

SZ16-ZN/EN-A05
Adventurer 3
User Guide
This guide is only applicable to FLASHFORGE Adventurer3 3D printer


Preface
Notice
Terms
Content
Chapter 1: About Adventurer 3
1.1 — Components Introduce
1.2 — Reference
Chapter 2: Operating
2.1 — Unpacking
2.2 — Accessories
2.3 — Interface
2.3.1 — Build
2.3.2 — Tools
2.3.2.1 — NetWork
2.3.2.2 — Preheat
2.3.2.3 — Setting
2.3.2.4 — About
2.3.3 — Filament
2.4 — Print
2.4.1 — Load Filament
2.4.2 — Model File Transfer
2.4.3 — Print
2.4.3.1 — FlashCloud Print
2.4.3.2 — PolarCloud Print
2.4.4 — Model Remove
2.4.5 — Replace Filament
2.5 — The Guide of Using Camera
2.5.1 — The Switching Can Be Controlled by the Lower Computer
2.5.2 — FlashCloud Camera Use
2.5.3 — PolarCloud Camera Use
2.5.4 — The Switching Can Be Controlled Through the Cloud
2.5.5 — Error Handling
06
06
07
08
08
10
11
11
13
13
16
19
20
21
22
22
24
29
29
31
35
36
37
37
38
40
42
44
Chapter 3: Q&A
Chapter 4: Supports and Service
01
37
40

Preface
Note: Each device must be tested before leaving factory. If there are some residues in
extruder or some tiny scratches on the build tape, it is normal and won’t affect
the printing quality.
On the completion of this User Guide, thanks all FlashForge engineers and the FlashForge
3D printer users for their unremitting efforts and sincere assistance.
The FlashForge Adventurer 3 User Guide is designed for the Adventurer 3 users to start their
printing journey with FlashForge Adventurer 3. Even if you are familiar with earlier FlashForge
machines or 3D printing technology, we still recommend that please read this guide, as there
is lots of important information about the Adventurer 3 for you to get a better 3D experience.
For a better and more successful printing experience, you can refer to the following materials:
Quick Start Guide:
Users will find the Quick Start Guide together with the printer accessories. The Quick Start Guide
will help you start your print journey as soon as possible.
Official FlashForge Website: www.flashforge.com
The official FlashForge website contains the up-to-date information concerning FlashForge
software, firmware, device maintenance and so on. Users are also able to get the contact
information from there.
02

Notice
Safety Notice: PLEASE READ AND STRICTLY FOLLOW ALL THE
SAFETY WARNINGS AND NOTICE BELOW.
Work Environment Safety
Keep your work place tidy.
Do not operate Adventurer 3 in the presence of flammable liquids, gases or dust.
Keep Adventurer 3 out of children and untrained people’s reach.
Electrical Safety
Always use the Adventurer 3 with a properly grounded outlet. Do not refit Adventurer 3 plug.
Do not use Adventurer 3 in damp or wet locations. Do not expose Adventurer 3 to burning sun.
In case of device damage, please use the power supply provided by FlashForge.
Avoid using the device during an thunderstorm.
In case of uncertain accident, please unplug the device if you do not use it for long.
Personal Safety
Do not touch the nozzle and build plate during printing.
Do not touch the nozzle after finishing printing.
Dress properly. Do not wear loose clothing or jewelry. Keep your hair, clothing and gloves
away from moving parts.
Do not operate the device while you are tired or under the influence of drugs, alcohol or
medication.
Cautions
Do not leave the device unattended for long.
Do not make any modifications to the device.
To lower the build plate before loading/unloading filament.
(The distance between the nozzle and build plate should be kept for at least 50mm)
Operate the device in a well-ventilated environment.
Never use the device for illegal activities.
Never use the device to make any food storage vessels.
Never use the device to make any electrical appliance.
Never put the model into your mouth.
Do not remove the models with force.
Wireless Communcations
Wi-Fi frequency: 2.4G
CPU (MT7688) frequency: 580MHZ
Frequency band(s) in which the radio equipment operates: 2.4-2.4835GHZ
The maximum radiated transmitter power: 14-18 DBM
Wi-Fi is for transfer printing model file and connect with FLASHPRINT software or print cloud.
03

The computer connects to the device via WIFI to download the printed model. Connect
to the cloud platform through wifi, you can check the printing status, transfer the printing
documents and control the printer.
Environment Requirements
Temperature: RT 15-30℃; Moisture: 20%-70%
Place Requirements
The device must be placed in a dry and ventilated environment.
The distances of the left, right and back side space should be at least 20cm, and
the distance of the front side space should be at least 35cm. Device storage
temperature: RT 0-40℃
Filament Requirements
Do not abuse the filament. Please make sure you use the FlashForge filament or
the filament from the brands accepted by FlashForge.
Nozzle clogging and damage may be caused by non-FlashForge filament due to
inappropriate material properties.
Filament Storage
All polymers degrade with time. Do not unpack filament until necessary. Filament
should be stored at clean and dry conditions.
Legal Notice
All the information in this document is subject to any amendment or change
without the official authorization from FlashForge.
FLASHFORGE CORPORATION MAKES NO WARRANTY OF ANY KIND WITH REGARD TO THIS
DOCUMENT, INCLUDING, BUT NOT LIMITED TO, THE IMPLIED WARRATIES OF MERCHANTABILITY
AND FITNESS FOR A PARTICULAR PURPOSE.
FCC Notice
This device complies with part 15 of the FCC Rules. Operation is subject to the following
two conditions: (1) This device may not cause harmful interference, and (2) this device
must accept any interference received, including interference that may cause undesired
operation.
FlashForge shall not be liable for errors contained herein for incidental consequential
damages in connection with furnishing, performance or use of this material.
This document contains proprietary information protected by copyright.
Copyright © 2017 FlashForge Corp. All Rights Reserved.
04

Terms
Build Plate
Build Tape
Build Volume
Extruder
Nozzle
Cooling Fan
Filament Cartridge
The surface on which the Adventurer 3 builds an object.
The black tape that covers Adventurer 3’s build plate so that
the object can stick to the build plate well.
The three dimensional amount of space that an object
will use once it is completed. The largest build volume
is 150*150*150mm.
The integral extruder device installed on X-Axis. Extruder
draws the filament from the spool, melts it and pushes it
through a nozzle into the build plate.
Also called “print head”, which located at the bottom
of the extruder where heated filament is squeezed out.
To cool the outer assembly of the extruder and gear motor.
A specific box for placing FlashForge filament, which is
located on the right of printer.
Filament Guide Tube
Filament Intake
Solid Glue Stick
A white plastic tube that guides the filament from the
filament box to the filament intake.
An opening located at the top of the extruder.
A solid adhesive used for making the model stick to the
build plate firmly.
05
Chapter 1: About Adventurer 3
1
2
3
4
5
10
11
12
13
14
6
7
8
9
21
20
19
18
17
16
15
25
23
22
24
26
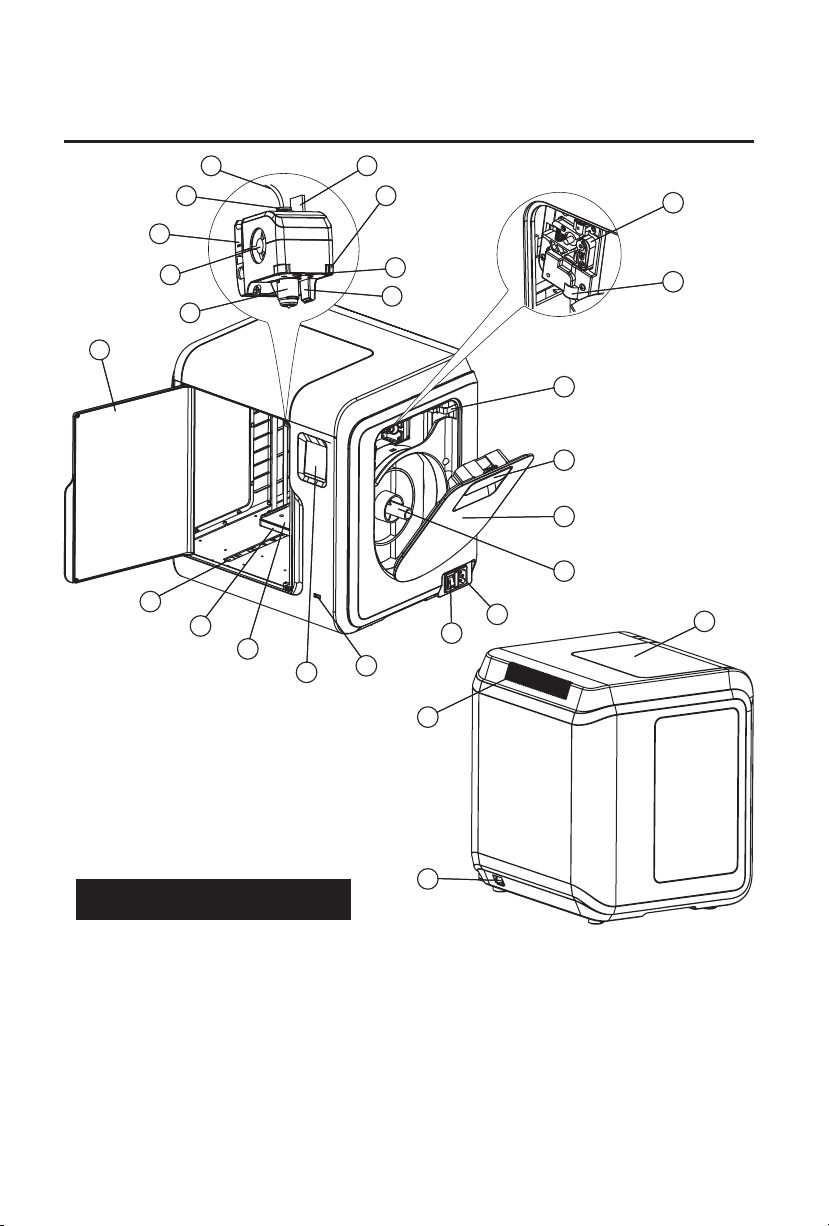
1.1 Components Introduce
1. Filament guide tube 2. Filament guide tube joint 3. Extruder base 4.Cooling Fan
5. Removable nozzle 6. Extruder cables 7. Clip 8. Led light
9. Air guide 10. Front door 11.Y-Axis sliding slot 12.Platform base
13. Removable build plate 14.Touch-screen 15.USB stick input 16.Power switch
17. Power input 18. Spool holder 19.Filament cover 20. Filament cover handle
21. Moto 22. Filament intake 23.Filament feeding wheel 24. Top cover
25. Air outlet 26. Ethernet input
06

1.2 Reference
Name
Number of Extruder
Print Technology
Screen Size
Build Volume
Layer Resolution
Build Accuracy
Positioning Accuracy
Filament Diameter
Nozzle Diameter
Build Speed
Software
Support Formats
Adventurer 3
1, Removable
Fused Filament Fabrication (FFF)
2.8″ color IPS Touch Screen
150×150×150mm
0.1-0.4mm
±0.2mm
Z axis 0.0025mm; XY axis 0.011mm
1.75mm (±0.07mm)
0.4mm
10~100 mm/s
FlashPrint
Input: 3mf/stl/obj/fpp/bmp/png/jpg/jpeg File
Output: gx/g File
Memory Size
OS
Device Power
Connectivity
Device Size
Net Weight
8G
Win xp/Vista/7/8/10, Mac OS, Linux
<120W
USB stick, WiFi, Ethernet
388×340×405mm
9 kg
07
Chapter 2: Operating
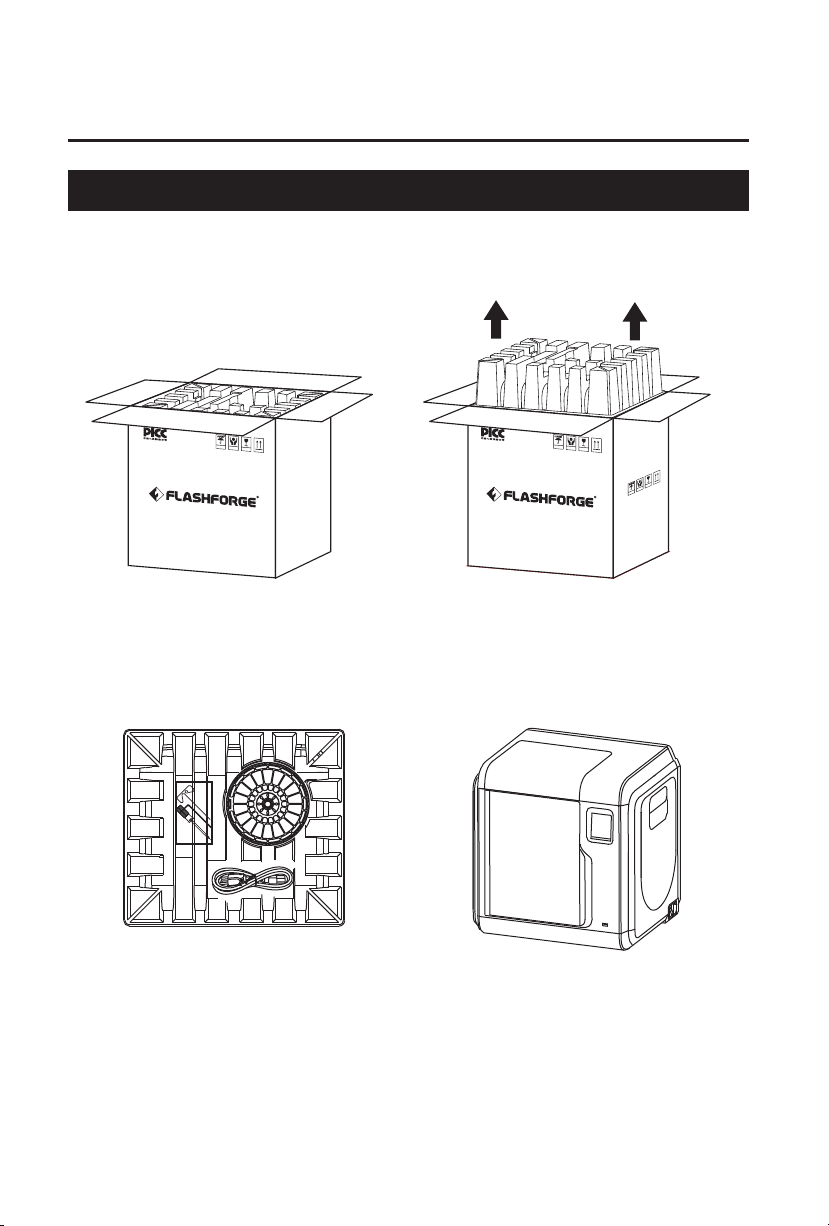
2.1 Unpacking
The People’s Insurance Company of China
KEEP DRY
HANDLE
WITH CARE
FRAGILE
1. Open the box.
3
. Be careful! Filament, build tape, solid
glue, scraper and power cable are all
placed inside the wrapping paper box.
The People’s Insurance Company of China
KEEP DRY
HANDLE
WITH CARE
FRAGILE
FRAGILE
HANDLE
WITH CARE
KEEP DRY
2. Take out the wrapping paper box
on the top.
4
. Take out the printer from the box.
08
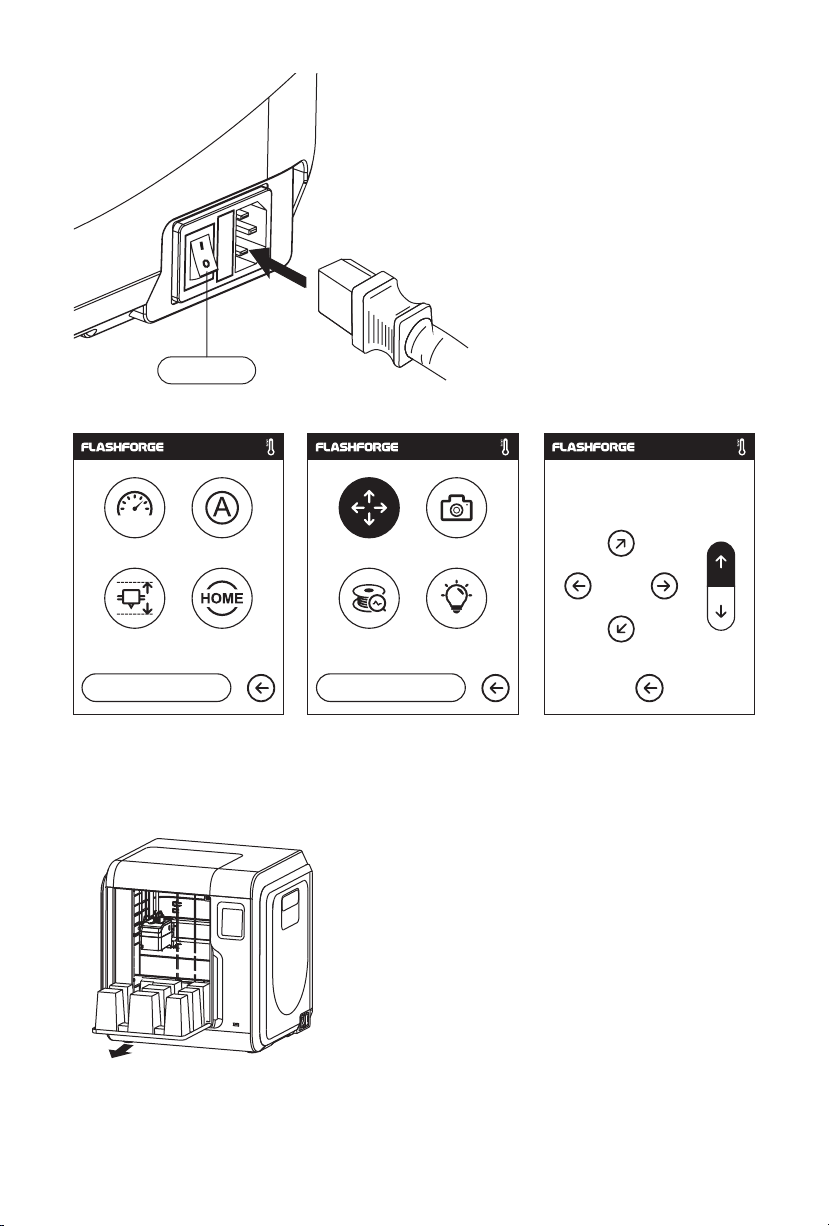
Power Switch
5. Plug the power cable into the input on the
back and turn on the power switch, the touch
screen is turned on.
X: 20.00 Y: 45.00 Z: 36.00
Y
1/3
Language
<<
Status
Calibration Home
<
6. Click [tools]-[setting] in turn to enter page like this, turn to page two, click [move].
Click the upper arrow in the moving page to make the extruder raises for removing the
paper box on the bottom easier.
Move Camera
FilamentCheck Led
2/3
<
7. Open the front door, take out the paper box inside
the printer, printer unpacking completed.
X
Z
09
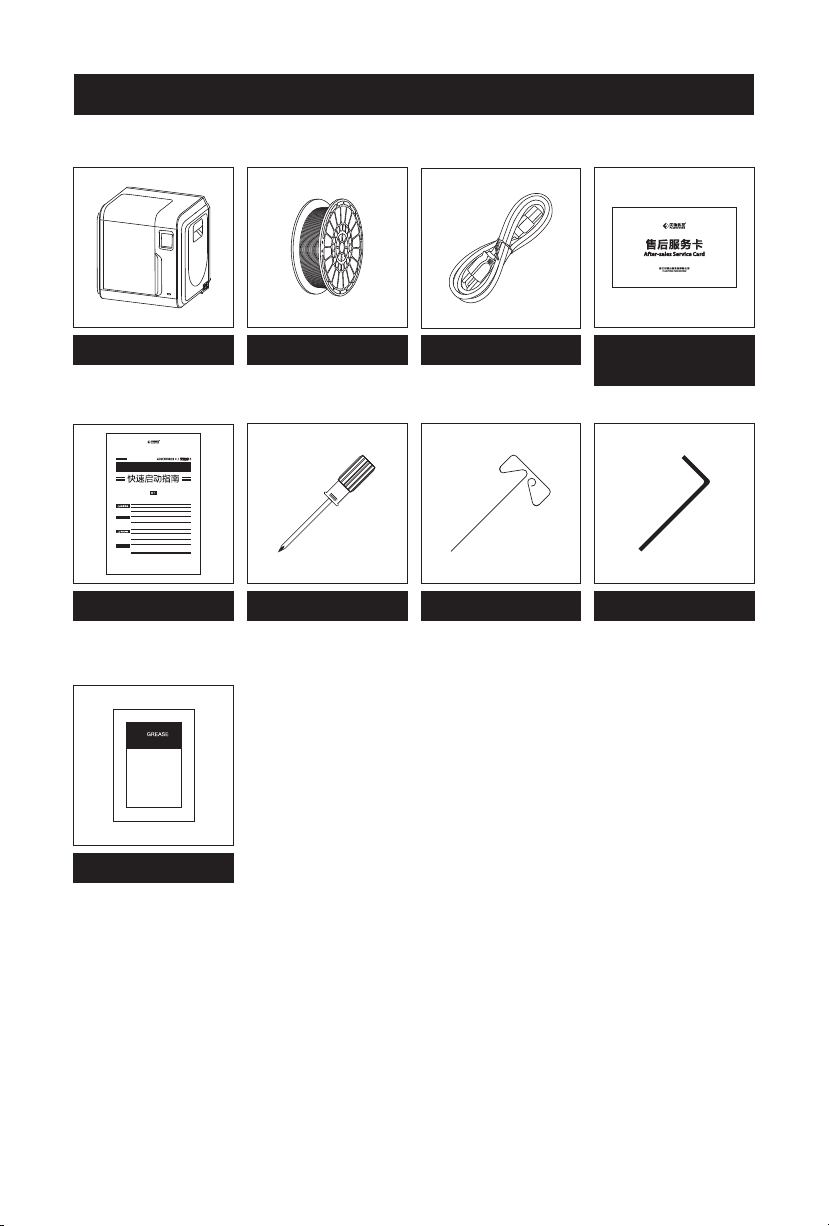
2.2 Accessories
3D Printer
SZ16-ZN/EN-A01
Quick Start Guide
9
1. 高温危险!打印机喷嘴和打印平台在工作时会被加热,请避免接触!
2. 可动部件可能造成卷入挤压和切割伤害。操作机器时请不要佩戴手套或缠绕物。
资料下载
前往闪铸科技官方网站 www.sz3dp.com ,可以在[ 技术支持 ] 页面下载用户使
用手册、切片软件等资料,或查看相关操作视频。
1. Hot! Avoid touching the heating nozzle and heating build plate in operation.
2. Moving parts in printer may cause injury. Do not wear gloves or other
sources of entanglement in operation.
Download
Please refer to FlashForge official website www.flashforge.com to download
the newest User’s Guide, Software and Instruction Videos.
(Support-Support Center-Select a Product)
本手册仅适用于闪铸科技 Adventurer3 3D打印机
This guide is only applicable to FLASHFORGE Adventurer3 3D printer
User Guide
Grease
Filament
Power Cable
After-sales
service card
Allen WrenchScrewdriver Unclogging Pin Tool
10
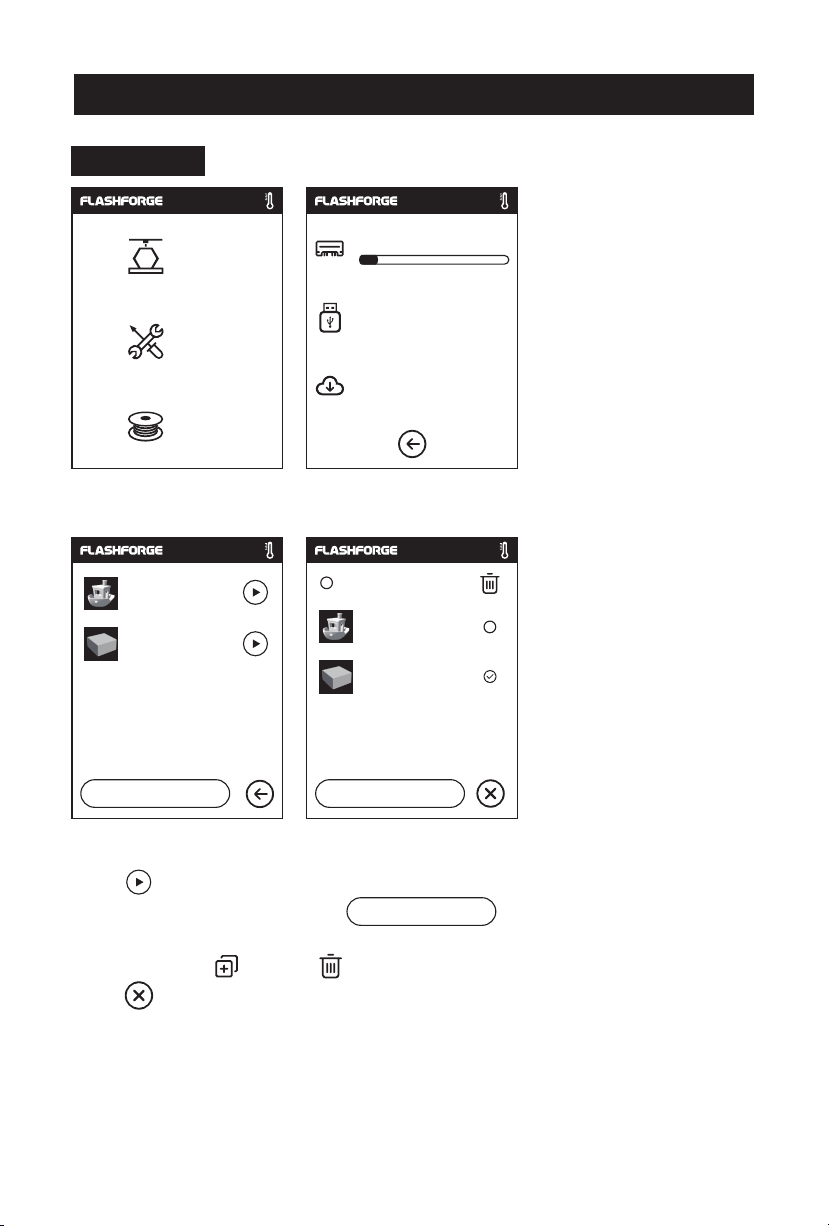
2.3.1 Build
2.3 Interface Menus Intrduction
Build
Tools
Filament
1. Tap [Print]. 2. Choose the read path of the print file File list.
Ship-PLA.gx
20mm_BoxPLA.gx
1/1
<
<
6.62GB
Not Available
No job
Select all
<
Ship-PLA.gx
20mm_BoxPLA.gx
1/1
<
Read the print file from:
The local memory card
The USB stick
The Cloud
Back: Back to upper interface
3. File list
Tap to begin printing; tap the picture of the selected file to enter file details.
Page-flip: Tap the left/right arrow.
Long press the file picture or file name, quit out multi-selected interface, you can
select all, copy ,delete .
Tap to quit out multi-selected interface.
<
1/3
11
<
20mm_Box-P…
0 10
h min
m
0.7
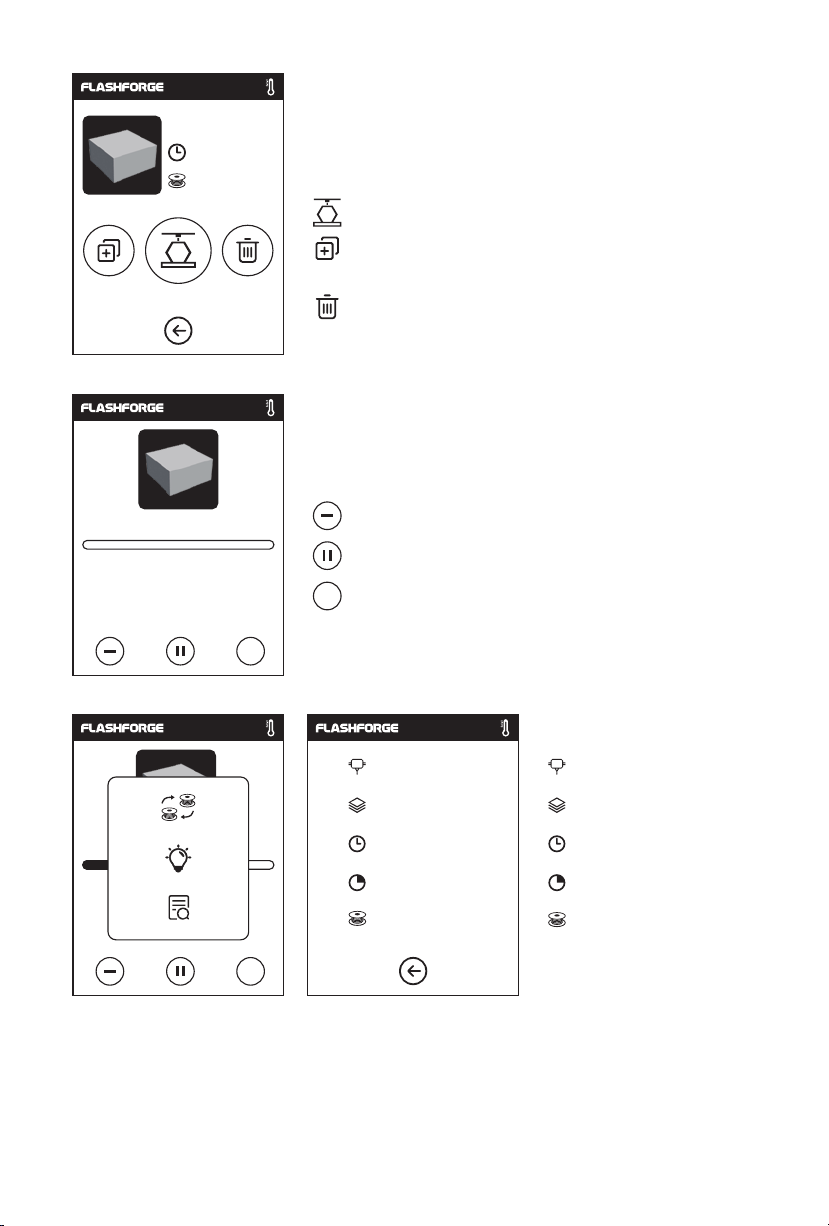
File details: Including file picture, time needed,
filament needed.
Build: To begin printing the file.
Copy: To copy the files to the local memory
card from the USB stick.
Delete: To delete the print file.
Print interface
20mm_Box-PLA.gx
0h10
Time Remaining
min
Cancel: To cancel the print job.
Pause/Resume: To suspend or resume the print job.
…
More: To check more settings and details information
during printing.
…
235
℃/235℃
100
℃/100℃
warrior.gx
2h18
min
剩余
0 1
h min
8
%
0.7
M
…
More
Replace: To change filament during printing progress.
Led Light: To turn on or turn off the led light.
Detail: To check more detail information.
Details
Extruder temperature
Build plate temperature
Used time
Printing progress
Whole filament needed
12
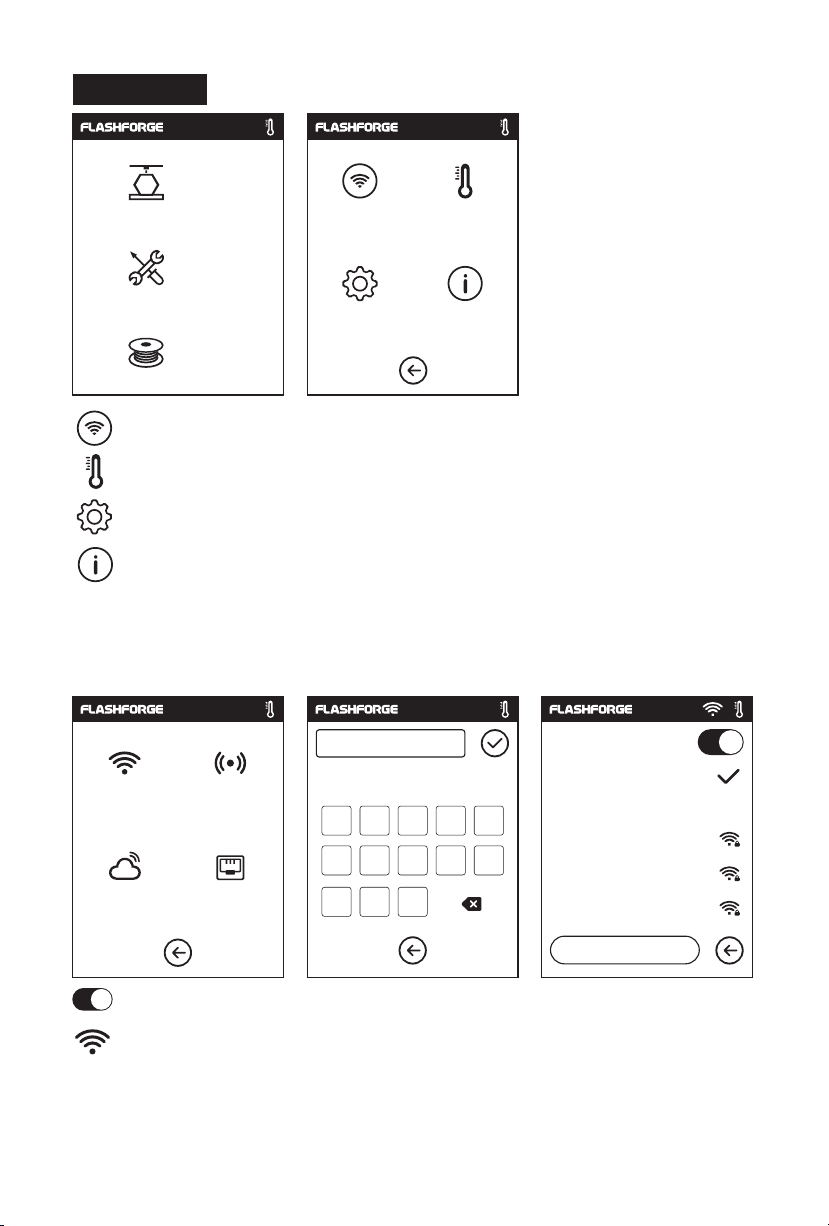
2.3.2 Tools
Build
Tools
Network
Preheat
Setting
Filament
Network: To connect printer to your PC or internet.
Preheat: To preheat the extruder and build plate.
Setting: To implement relevant function setups.
About: Information about the printer.
2.3.2.1 Network
WiFi
WiFi
Cloud
Hotspot
Ethernet
123
1 2 3 4 5
6 7 8 9
,
.
abc
About
WiFi
%#
0
_
Flashforge
Choose a network
ChinaNet-AnCr
TP-LINK_EDC2
QS_1234
1/3
<
ON/OFF: To turn on/off the WIFI connection.
WiFi connection: To connect your printer with your PC via a stable WIFI signal.
13
<
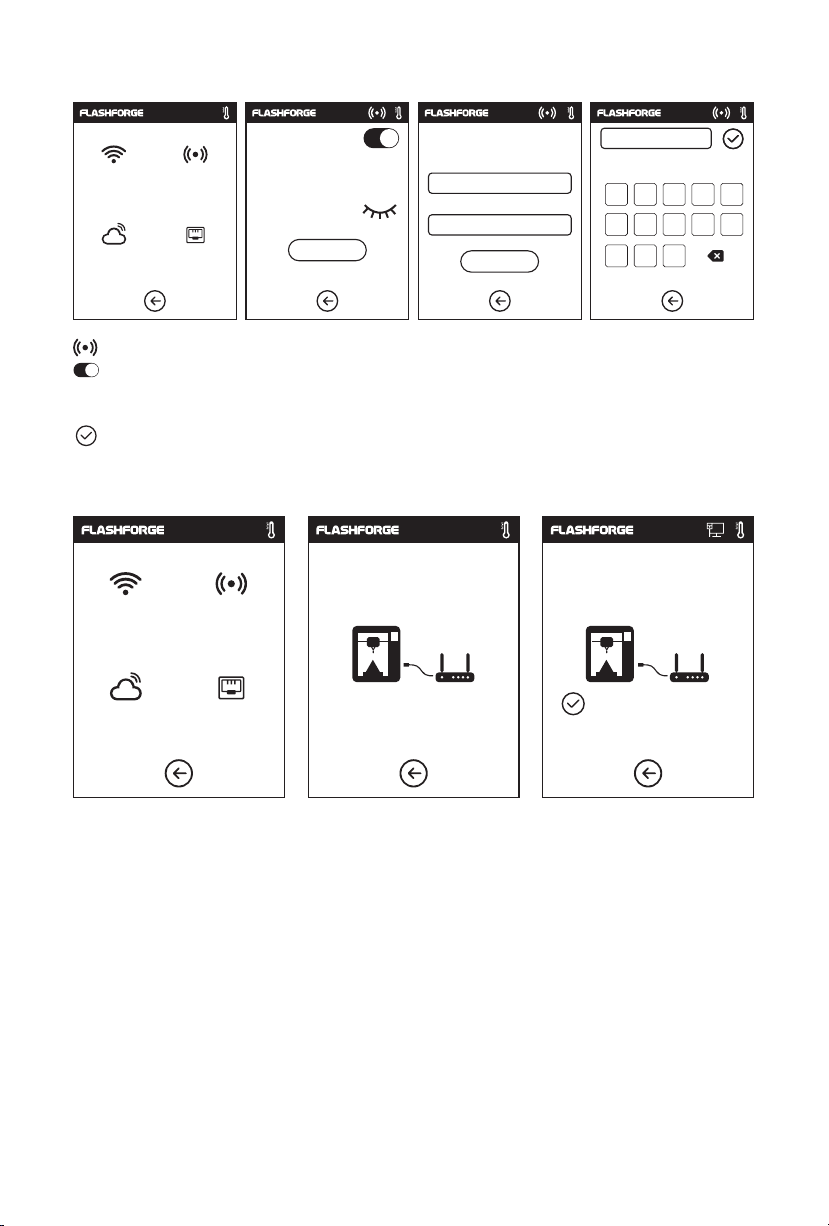
Hotspot
Setup WLan hotspot
SSID:
Password:
Save
123
1
6 7 8 9 0
,
WiFi
Cloud
Hotspot
Ethernet
WLan hotspot
SSID:
Password:
Setup hotspot
To set your printer as a WLAN hotspot.
Turn on/off the WLAN hotspot.
Hotspot setting: To set the hotspot name and password. Input hotspot name with
numbers, characters and symbols.
Tap to save the name and password.
Ethernet Connection
WiFi
Cloud
Hotspot
Ethernet
Please connect the cable Connected successful
%#
abc
5
3 4
2
_
.
To connect your printer with your PC via Ethernet cable.
14
Loading…
Flashforge Adventurer 3
EnglishSvenskaNorskSuomiDeutsch
3D Printer
Art.no Model
38-8870 ADVENTURER 3
Ver. 20200325
English 2
Svenska 16
Norsk 30
Suomi 44
Deutsch 58
View the manual for the Flashforge Adventurer 3 here, for free. This user manual comes under the category 3D printers and has been rated by 7 people with an average of a 8. This manual is available in the following languages: English. Do you have a question about the Flashforge Adventurer 3?
Ask your question here
Product Images (2)

Flashforge Adventurer 3 specifications
Below you will find the product specifications and the manual specifications of the Flashforge Adventurer 3.
The Flashforge Adventurer 3 is a 3D printer that allows users to create 3D prints with ease. It is designed to be a compact and affordable option for beginners, hobbyists, and students, with a user-friendly interface that makes it easy to use right out of the box. The printer has a build volume of 150 x 150 x 150 mm and features a removable, flexible build plate that makes it easy to remove finished prints. It uses FDM (Fused Deposition Modeling) technology and features a nozzle that can heat up to 220°C, allowing users to print with various filament types, including PLA, ABS, and more. Additionally, the printer comes with a built-in camera that allows users to monitor the printing process remotely and a filament run-out sensor that alerts them when the filament is running low. The Adventurer 3 is compatible with various software programs, including FlashPrint and various other open-source 3D printing software. It also includes a safety system that stops printing when the front door is opened, making it safe for children and pets. Overall, the Flashforge Adventurer 3 is a reliable and user-friendly 3D printer that provides a great opportunity for beginners and hobbyists to experiment with 3D printing.
General
| Brand | Flashforge |
| Model | Adventurer 3 | ADVENTURER3 |
| Product | 3D printer |
| Language | English |
| Filetype | User manual (PDF), Installation Guide (PDF) |
Frequently asked questions
Can’t find the answer to your question in the manual? You may find the answer to your question in the FAQs about the Flashforge Adventurer 3 below.
Is the manual of the Flashforge Adventurer 3 available in English?
Yes, the manual of the Flashforge Adventurer 3 is available in English .
Is your question not listed? Ask your question here
FLASHFORGE Adventurer 3 Pro 2 Expanding Boundaries

This guide is only applicable to FLASHFORGE Adventurer 3 Pro 2 3D printer.
Important Information
WARNING
1. Do not remove the wrapping around the nozzle.
2. Hot! Avoid touching the heating nozzle in operation.
3. Moving parts in the printer may cause injuries. Do not wear gloves or other sources of entanglement in operation.
Unpacking
- Open the box.

- Take out the wrapping paper box on the top.

- Be careful! Filament and power cable are all placed inside the wrapping paper box.

- Take out the printer from the box, and remove the bubble wrap around the printer. Tear off the fixing tapes and front door protective bag.

- Plug the power cable into the input on the right side, turn on the power switch, and the touch screen is turned on.

- Click [Toolsj-[Setting] in turn to enter page like this, turn to page two, and click (Move).


- Click the UP arrow in the page to raise the extruder for removing the bottom paper box easier.

- Open the front door, take out the paper box inside the printer, and printer unpacking is completed.


Kit Contents
- 3D Printer
- Filament
- Power Cable
- After- sales Service Card
- Quick Start Guide
- 0.6- 265 Nozzle
- Screwdriver
- Unclogging Pin Tool
- Allen Wrench
- Grease
- Leveling Card
- PEI Flexible Build Plate
- Glue Stick
Getting to know your Adventurer 3 Pro 2
- Filament guide tube
- Filament guide tube joint
- Extruder base
- Cooling fan
- Removable nozzle
- Extruder cables
- Clip
- Led light
- Air guide duct
- Front door
- Y- axis sliding slot
- 12. Platform base
- Build plate
- Touch screen
- U5B stick input
- Power switch
- Power input
- Spool holder
- Filament cover
- Filament cover handle
- Motor
- Filament intake
- Filament feeding wheel
- Top cover
- Air outlet
- Ethernet input


Install the PEI Build Plate
Note
Both sides are available. The gold PEI side can be used to print PLA/PLA-CF /PETG-CF High-Speed PLA. The other side can be used to print PETG/High-Speed PETG. Please choose according to the printing material.
- Manually pull the platform seat inside the machine outward slightly to a suitable position.

- Take out a PEI build plate from the accessories, and align the side with a groove inward with the two locating pins on the platform seat.

- When the locating pins just press against the groove of the platform plate, align the platform plate with the base along the outline of the platform seat, and lightly place the platform plate and attach it on the platform seat to complete the installation.


First Printing
Note
The equipment has been leveled and calibrated before leaving the factory, but the leveling plane may be damaged due to the vibration generated during transportation.
It is recommended to perform a calibration before first use.
Click [Tools] — [Setting] — [AutoCalibration] and operate following the on- screen prompts.

- Click (Start] and the machine starts pre- calibration. The first point is to calibrate the initial distance between the nozzle and the platform. Click the Up and Down arrows to adjust the Z-axis deviation value; Insert a leveling card between the nozzle and the platform. If it cannot be inserted, it means that the nozzle and the platform are too close. Click the Up arrow to make the nozzle away from the platform.
- Insert and slide the leveling card. If there is no frictional resistance, click the Down arrow to make the nozzle closer to the platform; When there is slight friction resistance, it means that the distance is appropriate.
- After calibrating the first point, please follow the on-screen prompts to continue the 9-polyaromatic Uog.
Scan the QR code to view the video
For specific operation, you can refer to the video. The link path is as follows:
Flashfire’s Official Website (www.flashforge.com) — Support- Video Center — select [Operation Videos] — [Adventurer 3 Pro2].


Filament Loading
- Open the filament cover, insert the filament into the filament intake, push the filament into the feeding wheel until some resistance is sensed.
Note: Please make sure the filament is inserted into the feeding wheels!
- Put the spool of filament on the spool hoLder and close the filament cover.
Mind the loading direction of filament. Make sure it is clockwise as the picture shows.
- Tap [Filament].

- Tap [Load) and the extruder starts heating.
- As shown on the right, loading starts when the extruder is heated to the target temperature.
Note: The extruder will be heated to the highest temperature by default during automatic filament feeding and withdrawing. Actually, the extruder heating temperature can be adjusted according to the used filament when in practical use.
- Loading is completed when there is filament coming out of the nozzle. Then tap [OK).


Model Printing
- Tap [Build].

- Choose the file path: Print from local memory card.

- Locate the model file in the model list, Tap on its right to start printing;
or tap the model file picture or file name to enter the model details page, and then tap to start printing.
- The extruder will heat up and the printer will start printing.

- After model printing finished, the printer will make a beep sound and pop up a prompt on the touch screen.


Model Removal
As shown in the picture, grasp the handles on both sides of the platform directly with both hands, and pull outwards to remove the build platform.

Notice
When printing completed, the extruder and build plate may still be hot. Please start operating after cooling down.
Please use the back side of the build plate when printing with PETG.
Please remove models after the platform has cooled down. If models are removed when the platform is not completely cooled down, bubbles will occur on the surface of the platform.
It is recommended to take the platform to the outside of the equipment for model removal, otherwise the model debris will remain in the equipment. Please keep the inside of the printer clean.

CUSTOMER SUPPORT
Zhejiang Flashforge 3D Technology Co., Ltd.
Address: No.518 XianYuan Road, Jinhua City, Zhejiang Province, China
Service Hotline: +86 579 82273989
[email protected]

Documents / Resources
tags: Adventurer 3 Pro 2 Expanding Boundaries, Boundaries, Expanding Boundaries, FLASHFORGE, Pro 2 Expanding the Boundaries,
Flashforge ADVENTURER 3 Quick start manual
- Flashforge
- 3D Printers
- Quick start manual for Flashforge ADVENTURER 3
- flashforge-adventurer-3-quick-start-manual-24_manual.pdf
- 24 |
Pages Preview:
Document Transcription:
See Details
Download