
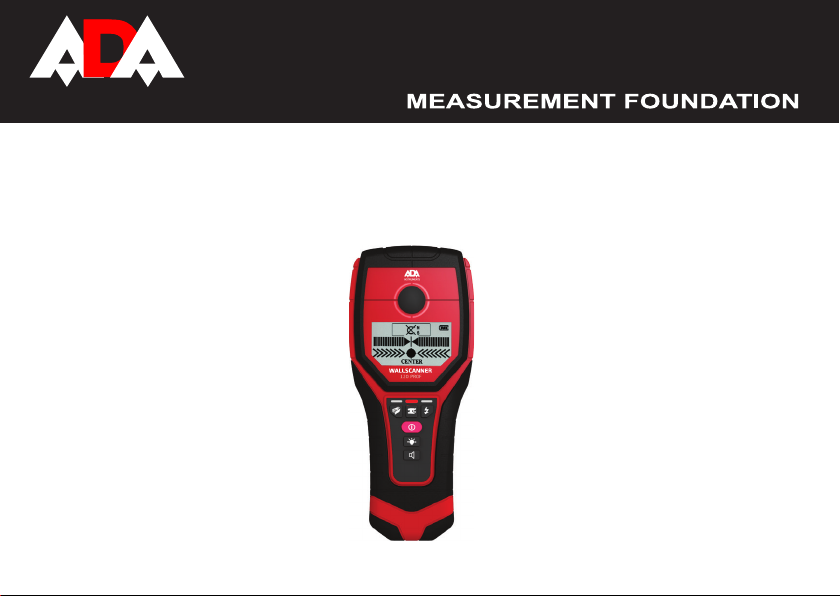
ADA Wall Scanner 120 PROF – это сканер для обнаружения скрытых металлических предметов, электрической проводки и деревянных элементов в стенах и строительных конструкциях. С его помощью легко найти место для безопасного сверления отверстия. Мощный излучающий элемент позволяет обнаруживать скрытые металлические детали на глубине до 12 см.
Преимущества модели:
- Глубина обнаружения магнитного металла до 12 см.
- Глубина обнаружения подключенной электропроводки до 5 см.
- Глубина обнаружения деревянных деталей до 3,8 см.
- ЖК экран
- Светодиодная индикация
- Индикатор положения
Прочный корпус
Сканер выдерживает неаккуратное обращение и падение с высоты человеческого роста. Резиновые накладки по бокам не дают ADA Wall Scanner 120 PRO выскользнуть из руки и играют роль демпфера.
Большой жидкокристаллический экран
Для отображения результатов сканирования используется ЖК-дисплей с отключаемой подсветкой. Благодаря ей поиск безопасных мест возможен даже в плохо освещенных местах. Подсветка отключается с помощью кнопки для экономии заряда батареи.
Механические кнопки
Выбор режимов работы и управление прибором осуществляется с помощью резиновых кнопок на передней панели. Их можно нажимать руками в перчатках, поэтому строитель может пользоваться прибором, не снимая их с рук.
Питание от батареи
Для работы ADA Wall Scanner 120 PROF используется съемная батарейка напряжением 9 В, поэтому заряжать аккумулятор для работы сканера не нужно. Время работы детектора от одного элемента питания – 6 часов. Остаток заряда в батарее отображается на экране.
Светодиодная индикация
При обнаружении скрытых в толще стены или строительной конструкции деревянных или металлических предметов, проводки из цветных металлов на корпусе загорается красный индикатор. При обнаружении безопасного места для сверления загорается зеленый светодиод. Поэтому использовать экран для быстрого сканирования не нужно.
Звуковой сигнал
Об обнаружении скрытых в стене элементов детектор металла, проводки и дерева оповещает с помощью звукового сигнала. При необходимости эта функция отключается.
Индикатор положения
На дисплее сканера имеется индикаторная шкала, которая упрощает поиск скрытых предметов в стене, полу или потолке. Она увеличивается или уменьшается по мере приближения к искомому предмету. Благодаря выбору разных режимов можно искать различные скрытые предметы в одной и той же стене.
Получить больше информации, ответов на интересующие вас вопросы, подробнее узнать об особенности модели и купить Детектор металла, проводки и дерева ADA Wall Scanner 120 PROF по выгодной цене вы можете в нашем розничном зале или интернет магазине Ada-Rus.ru
Характеристики
|
Производитель |
|
|
Поверка |
Нет |
|
Внесен в госреестр |
Нет |
|
Обнаруживаемые материалы |
черные металлы, цветные металлы, проводка, дерево |
|
Макс. глубина обнаружения древесины, мм |
38 |
|
Макс. глубина обнаружения проводки, мм |
50 |
|
Макс. глубина обнаружения цветных металлов, мм |
80 |
|
Макс. глубина обнаружения черных металлов, мм |
120 |
Детектор проводки Ada Wall Scanner 120 PROF А00485 и другие оригинальные товары в категории детекторы скрытой проводки доступны на сайте интернет-магазина Бигам в Москве по специальной цене 4990 рублей. Перед покупкой данной модели бренда Ada рекомендуем посмотреть особенности, технические параметры, документацию и сертификаты на продукцию. Также предлагаем сравнить товар детектор проводки Ada Wall Scanner 120 PROF А00485 с ассортиментом модификаций и аналогов из категории детекторы скрытой проводки Ada.
-
-
Инструкция Ada Wall Scanner 120 PROF
Инструкция.pdf 1.28 МБ
На странице представлена инструкция по эксплуатации и другие материалы производителя о товаре детектор проводки Ada Wall Scanner 120 PROF А00485, необходимые пользователю. Из руководства пользователя Ada (Ада) можно узнать устройство изделия, срок службы и комплект поставки. Детектор проводки Ada Wall Scanner 120 PROF А00485 и все товары серии требуют соблюдения правил использования, обслуживания, ухода и хранения.
-
Похожие товары
INSTRUMENTS
Operating manual
Wire, metal and wood detector
Model: Wall Scanner 120 Prof
Manufacturer: ADAINSTRUMENTS Address: WWW.ADAINSTRUMENTS.COM
WallScanner 120 Prof
Table of contents
1. Intended Use . . . . . . . . . . . . . . . . . . . . . . . . . . . . . . . . . . . . . . . . . . . . . . . . . 3
2. Product Features . . . . . . . . . . . . . . . . . . . . . . . . . . . . . . . . . . . . . . . . . . . . . . . . . . . . . 3
3. Technical data . . . . . . . . . . . . . . . . . . . . . . . . . . . . . . . . . . . . . . . . . . . . . . . . . . . . . . . 5
4. Operation . . . . . . . . . . . . . . . . . . . . . . . . . . . . . . . . . . . . . . . . . . . . . . . . . . . . . . . . . 6
5. Detection of objects . . . . . . . . . . . . . . . . . . . . . . . . . . . . . . . . . . . . . . . . . . . . 8
6. Operating Instructions . . . . . . . . . . . . . . . . . . . . . . . . . . . . . . . . . . . . . . . . . . . . . 9
7. Maintenance and service . . . . . . . . . . . . . . . . . . . . . . . . . . . . . . . . . . . . . . . . . . . . . . . . . 10
8. Warranty. . . . . . . . . . . . . . . . . . . . . . . . . . . . . . . . . . . . . . . . . . . . . . 11
9. Exceptions from responsibility . . . . . . . . . . . . . . . . . . . . . . . . . . . . . . . . . . . . . . . . . . . . . . . . . . . . . . . 11
Appendix 1. Warranty card
2
MEASUREMENT FOUNDATION
INSTRUMENTSINSTRUMENTS
Intended Use
The measuring tool is intended for the detection of metals (ferrous and non-ferrous metals,
e.g., rebar), joists and ‘live’ wires/conductors
in walls, ceilings and oors.
Product Features
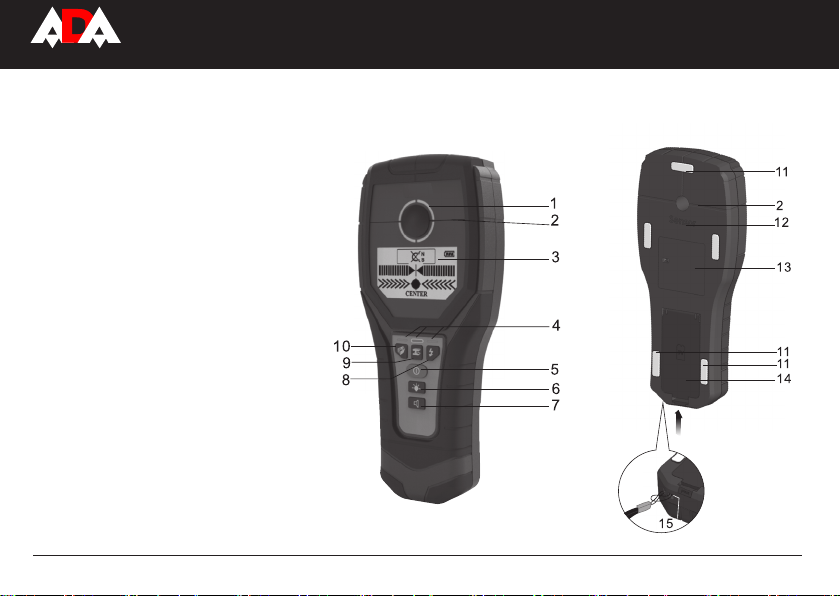
1. Illuminated ring
2. Marking line
3. Display
4. Operating — mode indication
5. ON/OFF button
6. Illumination button
7. Sound On/Off button
8. Charged wire mode
9. Metal mode
10. Multi-functional wall detector
mode
3
MEASUREMENT FOUNDATION
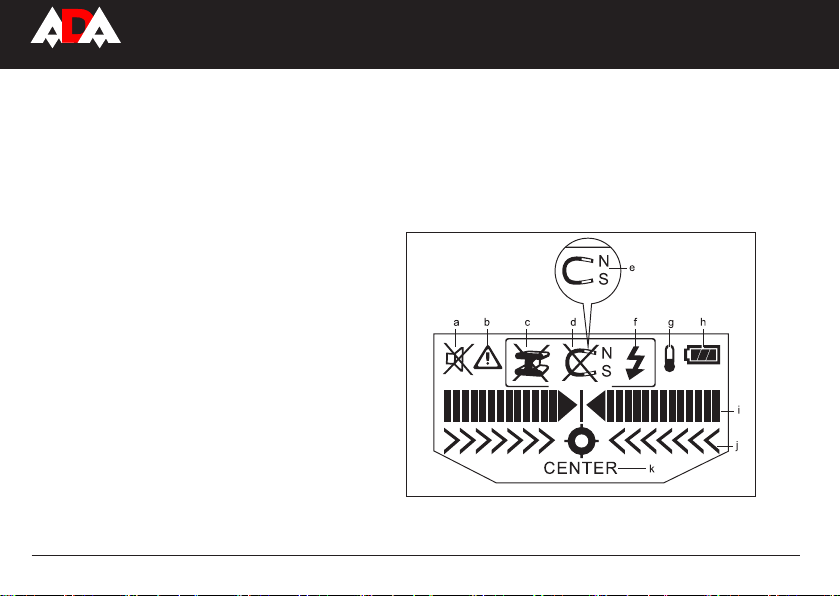
11. Contact pads
12. Sensor area
13. Type plate
14. Battery compartment lid
15. Hole for hand strip
DISPLAY ELEMENTS
a) Switch Off audio signal
b) Warning function
c) Non-metal object
d) Non-magnetic metal
e) Magnetic metal
f) Charged wire
g) Temperature control
h) Battery indication
i) Measuring indicator
j) Fine scale
k) Indication “CENTER”
WallScanner 120 Prof
4
MEASUREMENT FOUNDATION

INSTRUMENTSINSTRUMENTS
Technical data
Maximum scanning depth*:
Ferrous metals 120 mm
Non-ferrous metals (Copper) 80 mm
Copper conductors (live)** 50 mm
Wood 38 mm
Automatic switch off after approx. 5 min
Operating temperature -10 °C…+50°C
Storage temperature -20°C…+70°C
Battery 1×9 V
Operating lifetime approx. 5 h
Weight 270 g
*Depends on material and size of objects as material and condition of structure.
**Scanning depth will be smaller if wires/conductors are not “live”.
5
MEASUREMENT FOUNDATION
WallScanner 120 Prof
Operation
INSERTING/REPLACING THE BATTERY
Use only 9Vbattery. Insert the battery into the battery compartment (13) in accordance with the symbols in the battery compartment. Remove the batteries if the unit will not be used for a long period. The battery can be corroded or discharged over
long periods.
SWITCHING ON AND OFF
Protect the measuring tool against moisture and direct sun irradiation. Before switching the measuring tool on, make sure that
the sensor area 12 is dry. If required, wipe the measuring tool dry using a cloth.
If the measuring tool was subject to an extreme temperature change, allow it to the adjust to the ambient temperature before
switching on. Press ON/OFF button to switch on the instrument. After a short test the detector is ready for operation.
The measuring tool automatically enter the function mode of metal detection.
SCANNING
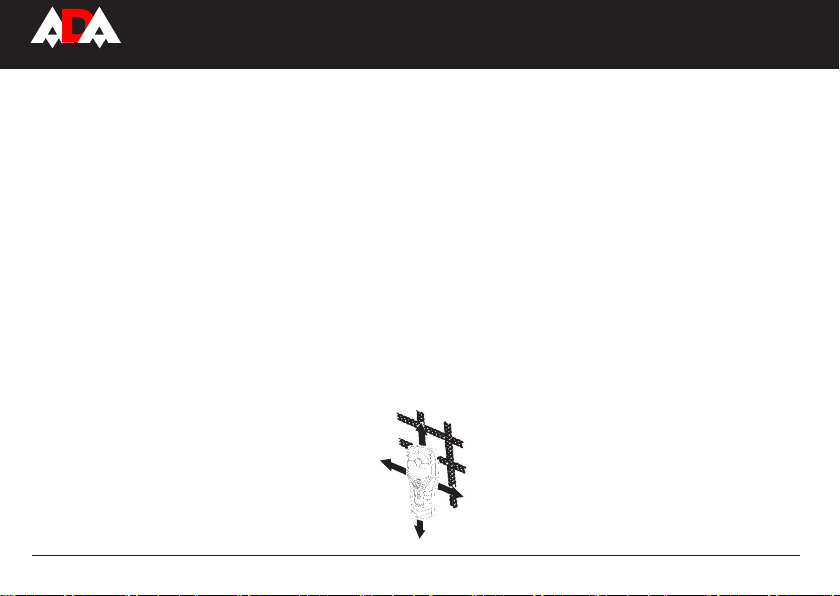
Put the tool on the surface of the object. Choose the correct operating mode and always move the tool in a straight line
(as shown on the picture).
6
MEASUREMENT FOUNDATION
INSTRUMENTSINSTRUMENTS
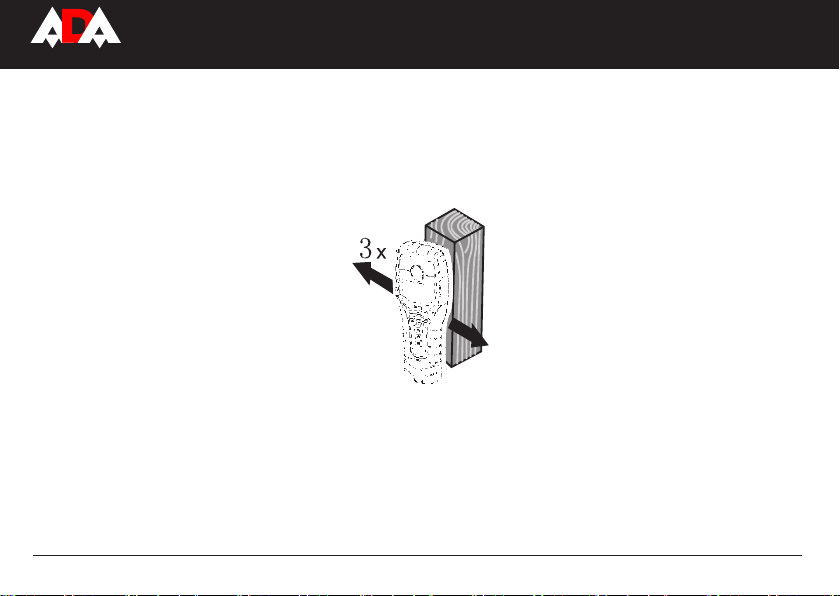
When the tool is on the surface of the object, the illuminated ring lights up green.
Measuring indicator i indicates maximum amplitude above the center of the object. Illuminated ring (1) lights up red and audio signal
sounds. For small and deeply embeded objects ring (1) can continue to light up yellow while there is no audio signal. To localize the
object more precise, move the measuring toolo repeatedly (3x) back and forth.
7
MEASUREMENT FOUNDATION
WallScanner 120 Prof
DETECTION OF OBJECTS
The detection of metal objects
Press button 9 to detect metal objects. Illuminated ring (1) and indication above the button (4) light up green. Symbol
(the metal detection indicator) or is indicated on the display.
Note: Scale “i” will show all scale for reinforcement steel mesh and steel in the examined base material. Illuminated ring lights
up green.
Place the measuring tool onto the surface to be scanned and move it sidewards, when the measuring tool comes close to a metal
object, the amplitude of the measuring indicator “j” increases. When it moves away from the object, the amplitude decreases,
at the position of maximum amplitude, the metal object is located below the center of the sensor. Indicator k is displayed on the
display.
Indicator “i” (detection depth value) is displayed on the display when scanning metal objects. The accuracy of depth value is a
relation of shape and position of scanning metal objects. Symbol e/d shows whether metal is magnetic or not. Illuminated ring
lights up yellow.
Note: If examined objects are small and deeply embedded, move the detector in horizontal and vertical direction. Pay
attention to the indication “i” and “j” for accurate detection.
Multi-functional wall detector mode
Choose this mode for operation. The detector can indicate following items in the wall (except wooden beam):
— magnetic metal
— non-metal, e.g. beam, plastic pipes that are full of water.
— charged object, e.g. electric wire.
Press button 10. Illuminated ring and indicator above the button light up green. The detector can detect wooden beam as metallic
object when scanning the metallic objects, nails, screws. In that case place the instrument on another place of the examined object
and restart the measuring procedure.
8
MEASUREMENT FOUNDATION
INSTRUMENTSINSTRUMENTS
In rear cases the detector can’t detect examined object, because the sensor area and type plate are solid and dirty. Just clean the
measuring tool with dry and soft cloth and restart the measuring procedure.
Scanning for “live” wires
This mode is suitable for detecting “live” conductors (110-230V). Press button 8 to activate Charged wire mode. Illuminated
ring and indicator above button 8 light up green. When a live conductor is detected, indication f appears on the display. Move
the detector above the measuring area several times to detect live wires. When the measuring tool is very close to the conductor,
the illuminated ring ashes red and audio signal beeps swiftly.
Under certain condition (such as below metal surfaces or behind suefaces with high water content) “live” conductors cannot
be securely detected.
Static electricity can lead to inaccurate indication of electric lines, e.g. over a large range. In that case place your free hand at
on the wall next to the measuring tool, in order to remove the static electricity.
Temperature control
The detector is equipped with a temperature control indicator . When the temperature control inducator lights up, the mea-
suring tool is out of the operating temperature range or there are signicant variations oin temperature. Switch the tool off and
allow it to adjust to the ambient temperature before switching it on again.
Operating Instructions
In accordance with the principles of tool operation, the measuring values can be impaired through certain ambient
conditions. These include, e.g. the proximity of other equipment that produce strong magnetic or electromagnetic elds,
9
MEASUREMENT FOUNDATION
Loading…
ManualsPro
ADA INSTRUMENTS
ADA INSTRUMENTS Wall Scanner 120 Prof Wire, metal and wood detector Instruction Manual
- June 3, 2024
- ADA INSTRUMENTS
Table of Contents
- ADA INSTRUMENTS Wall Scanner 120 Prof Wire, metal and wood detector
- Intended Use
- Product Features
- Technical data
- Operation
- DETECTION OF OBJECTS
- Operating Instructions
- WARRANTY
- References
- Read User Manual Online (PDF format)
- Download This Manual (PDF format)

ADA INSTRUMENTS Wall Scanner 120 Prof Wire, metal and wood detector
Intended Use
The measuring tool is intended for the detection of metals (ferrous and non-
ferrous metals, e.g., rebar), joists and ‘live’ wires/conductors in walls,
ceilings and floors.
Product Features
- Illuminated ring
- Marking line
- Display
- Operating – mode indication
- ON/OFF button
- Illumination button
- Sound On/Off button
- Charged wire mode
- Metal mode
- Multi-functional wall detector mode
- Contact pads
- Sensor area
- Type plate
- Battery compartment lid
- Hole for hand strip


DISPLAY ELEMENTS
- Switch Off audio signal
- Warning function
- Non-metal object
- Non-magnetic metal
- Magnetic metal
- Charged wire
- Temperature control
- Battery indication
- Measuring indicator
- Fine scale
- Indication “CENTER”
Technical data
- Maximum scanning depth*:
- Ferrous metals 120 mm
- Non-ferrous metals (Copper) 80 mm
- Copper conductors (live)** 50 mm
- Wood 38 mm
- Automatic switch off after approx. 5 min
- Operating temperature -10 °C…+50°C
- Storage temperature -20°C…+70°C
- Battery 1×9 V
- Operating lifetime approx. 5 h
- Weight 270 g
Depends on material and size of objects as material and condition of
structure. Scanning depth will be smaller if wires/conductors are not “live”.
Operation
INSERTING/REPLACING THE BATTERY
Use only 9Vbattery. Insert the battery into the battery compartment (13) in
accordance with the symbols in the battery compartment. Remove the batteries
if the unit will not be used for a long period. The battery can be corroded or
discharged over long periods.
SWITCHING ON AND OFF
Protect the measuring tool against moisture and direct sun irradiation. Before
switching the measuring tool on, make sure that the sensor area 12 is dry. If
required, wipe the measuring tool dry using a cloth. If the measuring tool was
subject to an extreme temperature change, allow it to the adjust to the
ambient temperature before switching on. Press ON/OFF button to switch on the
instrument. After a short test the detector is ready for operation. The
measuring tool automatically enter the function mode of metal detection.
SCANNING
Put the tool on the surface of the object. Choose the correct operating mode
and always move the tool in a straight line (as shown on the picture).
When the tool is on the surface of the object, the illuminated ring lights up
green. Measuring indicator i indicates maximum amplitude above the center of
the object. Illuminated ring (1) lights up red and audio signal sounds. For
small and deeply embeded objects ring (1) can continue to light up yellow
while there is no audio signal. To localize the object more precise, move the
measuring toolo repeatedly (3x) back and forth.
DETECTION OF OBJECTS
The detection of metal objects
Press button 9 to detect metal objects. Illuminated ring (1) and indication
above the button (4) light up green. Symbol (the metal detection indicator) or
is indicated on the display. Note: Scale “i” will show all scale for
reinforcement steel mesh and steel in the examined base material. Illuminated
ring lights up green. Place the measuring tool onto the surface to be scanned
and move it sidewards, when the measuring tool comes close to a metal object,
the amplitude of the measuring indicator “j” increases. When it moves away
from the object, the amplitude decreases, at the position of maximum
amplitude, the metal object is located below the center of the sensor.
Indicator k is displayed on the display. Indicator “i” (detection depth value)
is displayed on the display when scanning metal objects. The accuracy of depth
value is a relation of shape and position of scanning metal objects. Symbol
e/d shows whether metal is magnetic or not. Illuminated ring lights up yellow.
Note : If examined objects are small and deeply embedded, move the
detector in horizontal and vertical direction. Pay attention to the indication
“i” and “j” for accurate detection.
Multi-functional wall detector mode
Choose this mode for operation. The detector can indicate following items in
the wall (except wooden beam):
- magnetic metal
- non-metal, e.g. beam, plastic pipes that are full of water.
- charged object, e.g. electric wire.
Press button 10. Illuminated ring and indicator above the button light up
green. The detector can detect wooden beam as metallic object when scanning
the metallic objects, nails, screws. In that case place the instrument on
another place of the examined object and restart the measuring procedure In
rear cases the detector can’t detect examined object, because the sensor area
and type plate are solid and dirty. Just clean the measuring tool with dry and
soft cloth and restart the measuring procedure.
Scanning for “live” wires
This mode is suitable for detecting “live” conductors (110-230V). Press button
8 to activate Charged wire mode. Illuminated ring and indicator above button 8
light up green. When a live conductor is detected, indication f appears on the
display. Move the detector above the measuring area several times to detect
live wires. When the measuring tool is very close to the conductor, the
illuminated ring flashes red and audio signal beeps swiftly. Under certain
condition (such as below metal surfaces or behind suefaces with high water
content) “live” conductors cannot be securely detected. Static electricity can
lead to inaccurate indication of electric lines, e.g. over a large range. In
that case place your free hand flat on the wall next to the measuring tool, in
order to remove the static electricity.
Temperature control
The detector is equipped with a temperature control indicator . When the
temperature control inducator lights up, the measuring tool is out of the
operating temperature range or there are significant variations oin
temperature. Switch the tool off and allow it to adjust to the ambient
temperature before switching it on again.
Operating Instructions
In accordance with the principles of tool operation, the measuring values can
be impaired through certain ambient conditions. These include, e.g. the
proximity of other equipment that produce strong magnetic or electromagnetic
fields, moisture, metallic building materials. Foil-laminated insulation
materials or conductive wallpaper. Therefore, please also observe other
information sources (e.g. construction plans) before drilling, sawing or
routing into walls, ceilings or floors. Maintenance and service Wipe away
debris or contamination with a dry, soft cloth. Do not use cleaning agents or
solvents. In order not to affect the measuring function, decals/stickers or
name plates, especially metal ones, may not be attached in the sensor area on
the front or back side of the measuring tool. Do not remove contact pads (11)
on the back side of the measuring tool.
Disposal
Measuring tools, accessories and packaging should be sorted for environmental-
friendly recycling.
Only for EC countries:
Do not dispose of measuring tools into household waste! According the European
Guideline 2002/96/EC for Waste Electrical and Electronic Equipment and its
implementation into national right, measuring tools that are no longer usable
must be collected separately and disposed of in an environmentally correct
manner. Battery packs/batteries: Do not dispose of battery pack/ batteries
into household waste, fire or water. Battery packs/ batteries should be
collected, recycled or disposed of in an environmental-friendly manner.
Only for EC countries:
Defective or dead out battery packs/batteries must be recycled according the
guideline 91/157/EEC
WARRANTY
This product is warranted by the manufacturer to the original purchaser to be
free from defects in material and workmanship under normal use for a period of
two (2) years from the date of purchase. During the warranty period, and upon
proof of purchase, the product will be repaired or replaced (with the same or
similar model at manufactures option), without charge for either parts of
labour. In case of a defect please contact the dealer where you originally
purchased this product. The warranty will not apply to this product if it has
been misused, abused or altered. Withiut limiting the foregoing, leakage of
the battery, bending or dropping the unit are presumed to be defects resulting
from misuse or abuse.
EXCEPTIONS FROM RESPONSIBILITY
The user of this product is expected to follow the instructions given in
operators’ manual. Although all instruments left our warehouse in perfect
condition and adjustment the user is expected to carry out periodic checks of
the product’s accuracy and general performance. The manufacturer, or its
representatives, assumes no responsibility of results of a faulty or
intentional usage or misuse including any direct, indirect, consequential
damage, and loss of profits. The manufacturer, or its representatives, assumes
no responsibility for consequential damage, and loss of profits by any
disaster (earthquake, storm, flood …), fire, accident, or an act of a third
party and/or a usage in other than usual conditions. The manufacturer, or its
representatives, assumes no responsibility for any damage, and loss of profits
due to a change of data, loss of data and interruption of business etc.,
caused by using the product or an unusable product. The manufacturer, or its
representatives, assumes no responsibility for any damage, and loss of profits
caused by usage other thsn explained in the users’ manual. The manufacturer,
or its representatives, assumes no responsibility for damage caused by wrong
movement or action due to connecting with other products.
WARRANTY CARD
Warranty period for the instrument explotation is 24 months after the date of
original retail purchase. During this warranty period the owner of the product
has the right for free repair of his instrument in case of manufacturing
defects. Warranty is valid only with original warranty card, fully and clear
filled (stamp or mark of thr seller is obligatory). Technical examination of
instruments for fault identification which is under the warranty, is made only
in the authorized service center. In no event shall manufacturer be liable
before the client for direct or consewuential damages, loss of profit or any
other damage which occur in the result of the instrument outage. The product
is received in the state of operability, without any visible damages, in full
completeness. It is tested in my presence. I have no complaints to the product
quality. I am familiar with the conditions of qarranty service and I agree.
WARRANTY DOESN’T EXTEND TO FOLLOWING CASES:
- If the standard or serial product number will be changed, erased, removed or wil be unreadable.
- Periodic maintenance, repair or changing parts as a result of their normal runout.
- All adaptations and modifications with the purpose of improvement and expansion of normal sphere of product application, mentioned in the service instruction, without tentative written agreement of the expert provider.
- Service by anyone other than an authorized service center.
- Damage to products or parts caused by misuse, including, without limitation, misapplication or nrgligence of the terms of service instruction.
- Power supply units, chargers, accessories, wearing parts.
- Products, damaged from mishandling, faulty adjustment, maintenance with low-quality and non-standard materials, presence of any liquids and foreign objects inside the product.
- Acts of God and/or actions of third persons.
- In case of unwarranted repair till the end of warranty period because of damages during the operation of the product, it’s transportation and storing, warranty doesn’t resume.
References
- ADA Instruments
Read User Manual Online (PDF format)
Read User Manual Online (PDF format) >>
Download This Manual (PDF format)
Download this manual >>