
Инструкции
Peg Perego Aria Shopper Twin
Скачать
Peg Perego Book Plus / Plus S
Скачать
Peg Perego Booklet Classic / Lite
Скачать
Peg Perego Pliko Switch Compact
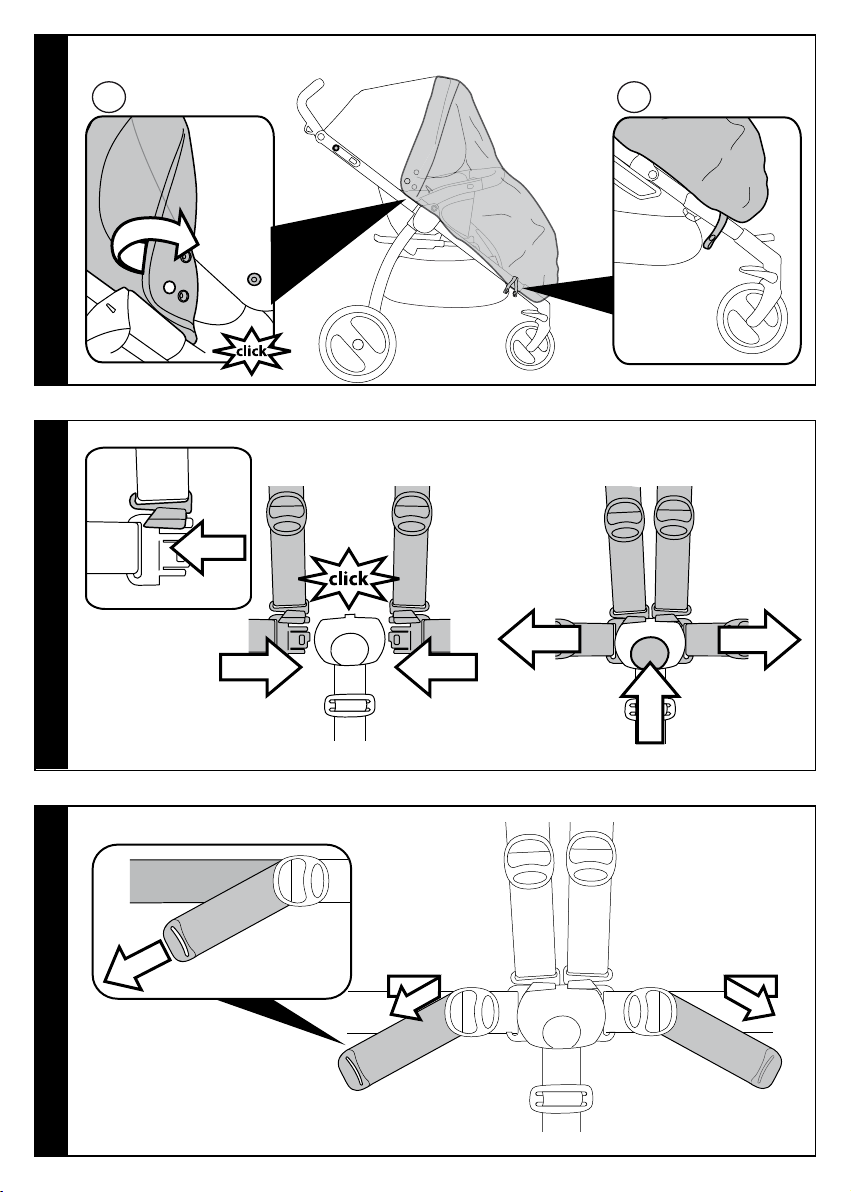
Скачать
Peg Perego Prima Pappa Diner
Скачать
Peg Perego Prima Pappa Duplo
Скачать
Peg Perego Prima Pappa Zero 3
Скачать
Peg Perego Primo Viaggio SL
Скачать
Peg Perego Primo Viaggio Switchable
Скачать
Peg Perego Sdraietta Melodia
Скачать
Peg Perego Sdraietta Mia Baby Seat
Скачать
Peg Perego Viaggio1 Duo Fix K
Скачать
Peg Perego Viaggio1 Duo Fix TT
Скачать
Peg Perego Viaggio 2-3 Surefix
Скачать
Peg Perego Walk n Play Jumper
Скачать
ENGLISH
PEG PEREGO®thanks you for choosing this product. For more than 60 years, PEG PEREGO have been taking children for an outing: first with its
famous baby carriages and strollers, later with its pedal and battery operated toy vehicles.
Discover our complete range of products, news and other information about the Peg Perego world on our web site www.pegperego.com
IMPORTANT INFORMATION
•Read this instruction manual carefully to learn the use of the vehicle and to teach your child safe and enjoyable
driving. Please keep this manual (with your original sales receipt) for use as a reference in the future.
•DO NOT RETURN YOUR VEHICLE TO THE STORE. This product cannot be returned for a refund
after it has been used. If you have ANY questions, need replacement parts or need assistance, call
us toll-free; U.S.A. , call 1-800-728-2108 / CANADA, call 1-800-661-5050
•This product meets and/or exceeds all ASTM (American Society for Testing and Materials) TOY SAFETY
STANDARDS, including F 963, Consumer Toy Safety Specifications as well as C.R.C, c.931, the Canadian
Hazardous Products (Toys) Regulations.
•Tools needed for assembly: Phillips screwdriver medium and small, pliers (not included)
•Your new vehicle is partially pre-assembled. It will require adult assembly. Please set aside at 45 minutes for
assembly.
•Before the vehicle is used for the first time, charge the battery for 18 hours to initiate it. Failure to do this can
result in permanent battery damage.
•Use only with the included Peg Perego 12 Volt lead-acid, rechargeable battery and a Peg Perego 12 Volt Charger
(both included).
•Year 3+
•Weight capacity 130 lbs
•Do not exceed the maximum total weight capacity of 130 lbs (59,1 kg).
Contents:
•1 Polaris RZR 900 CAMO riding vehicle — partially assembled
•1 Rechargeable 12V 12Ah sealed lead-acid battery
•1 Charger 12V
•two 230W motors — pre installed
•assembly hardware
•parts to be assembled
•decals
•Speed in 1st gear 2,5 MPH
•Speed in 2nd gear 5 MPH
•Speed in reverse gear 2,5 MPH
•To prevent damaging the motor and gears, teach your child to stop the vehicle before switching directions.
•Use this vehicle ONLY outdoors. Most interior flooring can be damaged by riding this vehicle indoors. Peg Perego
will not be responsible for damage to the floor if the vehicle is used indoors.
•Peg Perego reserves the right to modify or change its products. Price, literature, manufacturing processes or
locations or any combination of the above mentioned entities may change at any time for any reason without
notice with impunity.
CAUTION:
ELECTRIC VEHICLE NOT RECOMMENDED FOR CHILDREN UNDER 3 YEARS OF AGE. AS WITH ALL ELECTRIC
PRODUCTS, PRECAUTIONS SHOULD BE OBSERVED DURING HANDLING AND USE TO PREVENT ELECTRIC
SHOCK. RECHARGER INCLUDED. 120Vac 60Hz 16W INPUT — 12Vdc 12W OUTPUT
Manual
View the manual for the Peg Perego Book Plus here, for free. This user manual comes under the category strollers and has been rated by 10 people with an average of a 8.4. This manual is available in the following languages: English. Do you have a question about the Peg Perego Book Plus?
Ask your question here
Peg Perego Book Plus specifications
Below you will find the product specifications and the manual specifications of the Peg Perego Book Plus.
The Peg Perego Book Plus is a stroller designed for parents who value style, practicality, and comfort. It features an all-wheel suspension system that ensures a smooth ride for both the parent and the baby. The stroller is easy to maneuver due to its lightweight design and adjustable handlebar. The seat can be reclined to multiple positions, allowing the baby to sleep comfortably and sit up to look around during walks. It also comes with a five-point harness to ensure the safety of the baby.
The stroller is equipped with a large canopy that provides ample shade and protection from the sun and rain. It also has a peek-a-boo window that allows the parent to keep an eye on the baby while strolling. The Peg Perego Book Plus can be folded compactly with one hand, making it easy to store and transport. It also has a large storage basket that can hold all the essentials needed for a day out with the baby.
Overall, the Peg Perego Book Plus is a high-quality stroller that offers comfort, convenience, and safety for both the parent and the baby. Its practical features and sleek design make it a popular choice for parents who are looking for a stylish and reliable stroller.
General
| Brand | Peg Perego |
| Model | Book Plus | 208150656 |
| Product | stroller |
| Language | English |
| Filetype | Manual (PDF) |
Frequently asked questions
Can’t find the answer to your question in the manual? You may find the answer to your question in the FAQs about the Peg Perego Book Plus below.
Is it safe for a baby to sleep in a stroller?
No, the baby could suffocate. If a baby falls asleep in the stroller, the baby should be removed from the stroller and placed in a cradle. Once asleep, take the baby out and put it in its own cradle as soon as possible.
Which stroller is suitable for a newborn baby?
Most importantly, the baby should be able to lie flat. This helps it to breathe easily and supports the development of the lungs.
How long do I use a pram?
It is common to use a pram for up to 36 months.
Is the manual of the Peg Perego Book Plus available in English?
Yes, the manual of the Peg Perego Book Plus is available in English .
Is your question not listed? Ask your question here

IT Istruzioni d’uso
EN Instructions for use
FR Notice d’emploi
DE Gebrauchsanleitung
ES Instrucciones de uso
PT Instruções para uso
NL Gebruiksaanwijzing
DK Brugsanvisning
FI Käyttöohjeet
CZ Návod na použití
SK Návod na použitie
HU Használati útmutató
SL Navodila za uporabo
RU Инструкции по пользованию
TR Kullanım kılavuzu
EL Οδηγίες χρήσεως
book
1
B
2
A
1
2
C
D
3
3
FE
NO
OK
4
A
B
C
3
4
3
2
1
4
5
D
5
5
E
6
7
6
A
1
B
2
STOP
7
8
A
A
B
B
2
1
9
C
D
E
10
A
B
11
12
A
Book Completo
A
1
2
C
3 3
4
B
13
Book Completo
14
A
B
A
D D
B B
C
15
16
17
C
A
B
D
F
E
18
19
20
B
3
2
21
A
2
3
B
22
23
A
B
D
E
F
24
B
22
1 1
25
26
A
B
D
C
E
27
G
F
H
28
29
I
L
30
A
M
N
B
31
C
D
32
33
A
GM
Ganciomatic
System
B
C
1
D
2
3
2
1
34
35
Book
22
1
2
23
13
14
7
15
24
3
8
21
20
17
18
19
11
4
5
6
12
9
16
10
25
— 14 —
1dx) SPST7372D*
Book
1sx) SPST7372S*
2) SPST7302N
SPST7302KN
3) SPST7357NPEG
4) SPST6232*
5) SAPI7255*
6) SPST7255N
7) ARPI0635L32NGR
26
27
SPST7309N
9) MUCI5P26N
10) SAPI7297N
11) ITPABO00*
12) SPST7263N
13) SPST7261N
14) SAPI7303N
29
15) SAPI7251NN
16) MMST0087N
SPST7303N
MMRA0007
MMCA0007L30
17) SPST7323N
28
MMVI0526
18) SPST7351N
MMVA0260N
19) SPST7373N
20) MMVI0526
21) SPST7301*
22) ASPI0152L31
23) SAPI7087N
24) ERSHBK00-NY01RT01
25dx) MMEV0908DPEG
25sx) MMEV0908SPEG
26) IRBELV0007 (solo per versione Completo)
27) BCABOK00*
28) BCOBOK00* (solo per versione Completo)
IT• Ricamb i disponibili in piú colori d a specifica re nella richi esta.
EN• Spare parts available in different colours to be specified when ordering.
Pièces de rechange disponibles en plusieurs couleurs à spécifier dans la demande.
FR•
DE• Ersa tzteile in m ehr Farben vorha nden, die in d er Anfrage sp ezifizier t werden müsse n.
ES• Repuestos disponibles en otros colores que se especificarán en el pedido.
PT• Peças d e reposição di sponíveis em co res alternativ as a serem esp ecificadas no pedido.
NL• Reserve onderdelen v erkrijgbaar i n meerdere k leuren, bij b estelling te sp ecificeren.
DK• Reservedele kan leveres i flere farver som bør specificeres ved bestillingen.
FI• Varaos ia saatavana e ri värisinä: ilm oita väri til auksessa.
CZ• U náhrad ních dílů, k teré jsou k disp ozici ve více ba rvách, je nu tné na objedn ávce specifikov at příslušnou barvu.
SK• Pri náh radných dieloc h, ktoré sú k d ispozícii vo vi acerých farb ách, je potreb né pri objedn ávke špecifi kovať želanú fa rbu.
HU• A ta rtalék alk atrészek külö nböző színek ben elérhető k, melyeket rendeléskor ke ll kiválasz tani.
SL• Rezervni deli so na volj o v več barvah, ki jih je treba navesti pr i naročilu.
RU• Запчасти имеются различных цветов, необходимый указать в запросе.
TR• Sipa rişte belir tilen değişik r enklerdeki yedek parçala ri mevcuttur.
EL• Ανταλλα κτικά διαθέσ ιμα σε διάφορα χρώματα. Προ σδιορίστε ό ταν παραγγε ίλετε.
29) BSABOK00*
— 15 —

IT_Italiano
Grazie per aver acquistato un prodotto Peg-Pérego.
AVVERTENZA
IMPORTANTE: leggere attentamente queste
istruzioni e conservarle per un futuro utilizzo. La
sicurezza del bambino potrebbe essere messa a
rischio se non si eseguono queste istruzioni.
_ Questo articolo è stato progettato per il trasporto di 1
bambino nella seduta.
_ Non utilizzare questo articolo per un numero di
occupanti superiori a quanto previsto dal costruttore.
_ Questo articolo è omologato per bambini dalla nascita,
fino a 15 kg di peso nella seduta.
_ Questo articolo è stato progettato per essere usato in
combinazione con i prodotti Peg Perego Ganciomatic:
seggiolino auto «Primo Viaggio Tri-Fix» (gruppo 0+)
_ ATTENZIONE Prima dell’uso assicurarsi che i meccanismi
di aggancio del seggiolino o della seduta passeggino
o del seggiolino auto siano agganciati correttamente;
assicurarsi che i prodotti Peg Perego Ganciomatic siano
correttamente agganciati all’articolo.
_ Le operazioni di assemblaggio e di preparazione
dell’articolo devono essere effettuate solo da adulti.
_ Non utilizzate questo articolo se presenta parti
mancanti o rotture.
_ ATTENZIONE Utilizzare sempre il sistema di ritenuta.
Utilizzare sempre la cintura di sicurezza a cinque punti.
Agganciare sempre il cinturino girovita al cinturino
spartigambe.
ATTENZIONE non lasciare mai il vostro bambino incustodito.
_
_ Azionare sempre il freno quando si è fermi.
_ ATTENZIONE Prima dell’uso assicurarsi che
tutti i meccanismi di aggancio siano agganciati
correttamente.
_ ATTENZIONE Nelle operazioni di apertura e chiusura,
assicurarsi che il bambino sia a debita distanza per
evitare ferimenti.
_ ATTENZIONE Non consentire al bambino di giocare
con questo prodotto.
_ Evitare di introdurre le dita nei meccanismi.
_ Prestare attenzione alla presenza del bambino quando
si effettuano operazioni di regolazione dei meccanismi
(maniglione, schienale).
_ Ogni carico appeso al maniglione o alle maniglie può
rendere instabile l’articolo; seguire le indicazioni del
costruttore riguardo ai massimi carichi utilizzabili.
_ Il frontalino non è progettato per reggere il peso del
bambino; il frontalino non è disegnato per mantenere
il bambino nella seduta e non sostituisce il cinturino di
sicurezza.
_ Non introdurre nel cestello carichi per un peso
superiore a 5 kg. Non inserire nei portabibite pesi
superiori a quanto specificato nel portabibite stesso
e mai bevande calde. Non inserire nelle tasche delle
capotte (se presenti) pesi superiori a 0.2 Kg.
_ Non utilizzare l’articolo in vicinanza di scale o gradini;
non utilizzare vicino a fonti di calore, fiamme libere o
oggetti pericolosi a portata delle braccia del bambino.
_ Potrebbe essere pericoloso utilizzare accessori non
approvati dal costruttore.
_ Non utilizzare il parapioggia (se presente) in ambienti
chiusi e controllare sempre che il bambino non sia
accaldato; non collocare mai vicino a fonti di calore
e fare attenzione alle sigarette. Assicurarsi che il
parapioggia non interferisca con nessun meccanismo
in movimento del carrello o passeggino; togliere
sempre il parapioggia prima di chiudere il vostro
carrello o passeggino.
_ Non utilizzare le maniglie di sgancio per trasportare o
alzare il passeggino con dentro il bambino.
_ ATTENZIONE Questo articolo non è adatto per il
jogging o la corsa coi pattini.
_ Azionare sempre il freno durante le operazioni di
carico e scarico del bambino.
_ ATTENZIONE Non aggiungere alcun materassino.
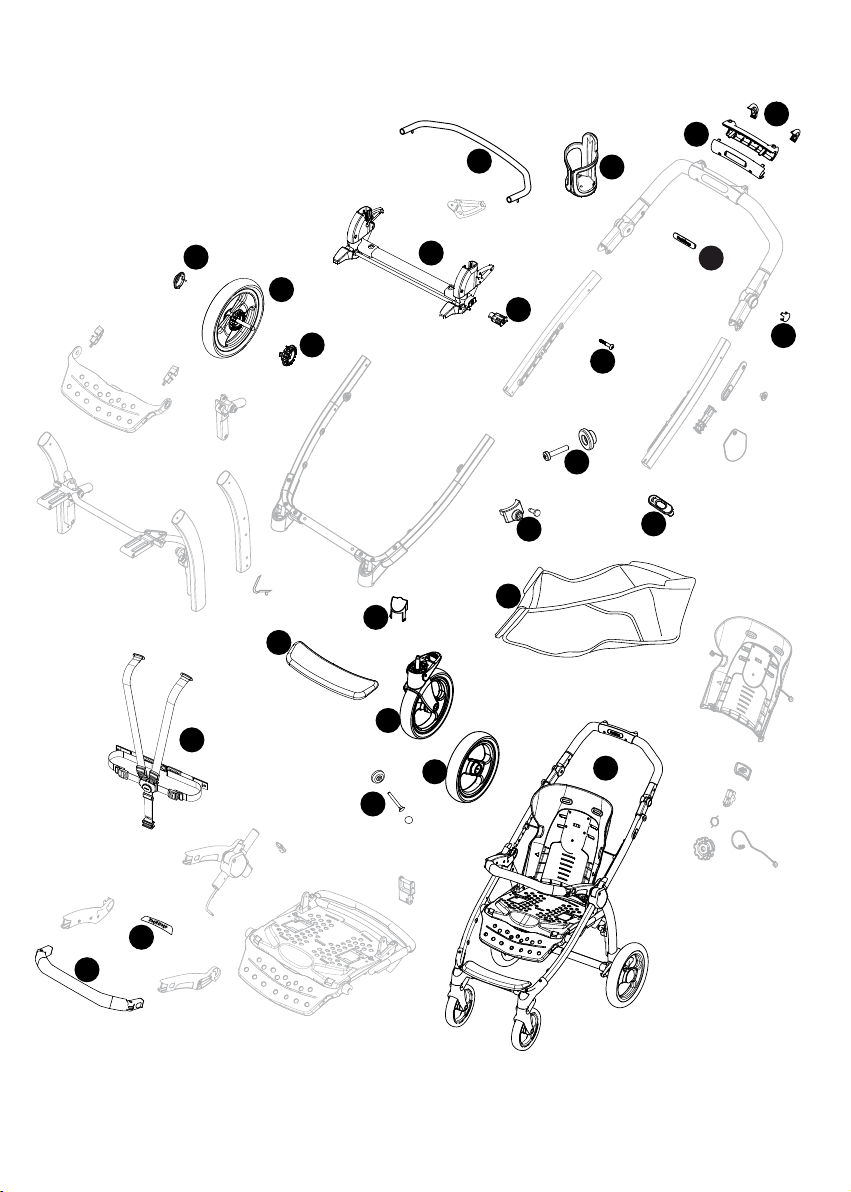
COMPONENTI DELL’ ARTICOLO
Verificare il contenuto presente nell’imballo e in caso
di reclamo prego contattare il Servizio Assistenza.
_ Passeggino BOOK CLASSICO è composto da:
telaio, 2 ruote posteriori, frontalino, cestello,
portabibite, capottina.
_ Passeggino BOOK COMPLETO è composto da:
telaio, 2 ruote posteriori, frontalino, cestello,
portabibite, capottina, copertina, parapioggia.
ISTRUZIONI D’USO
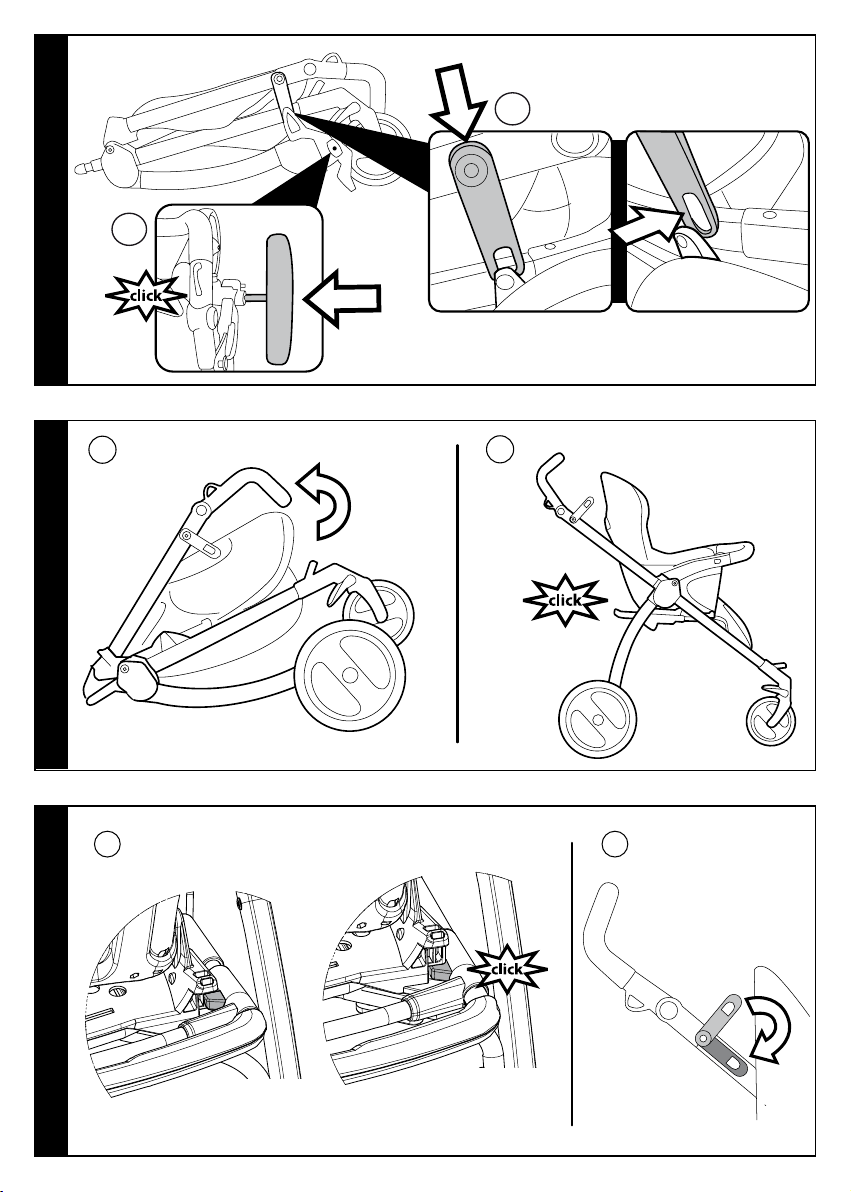
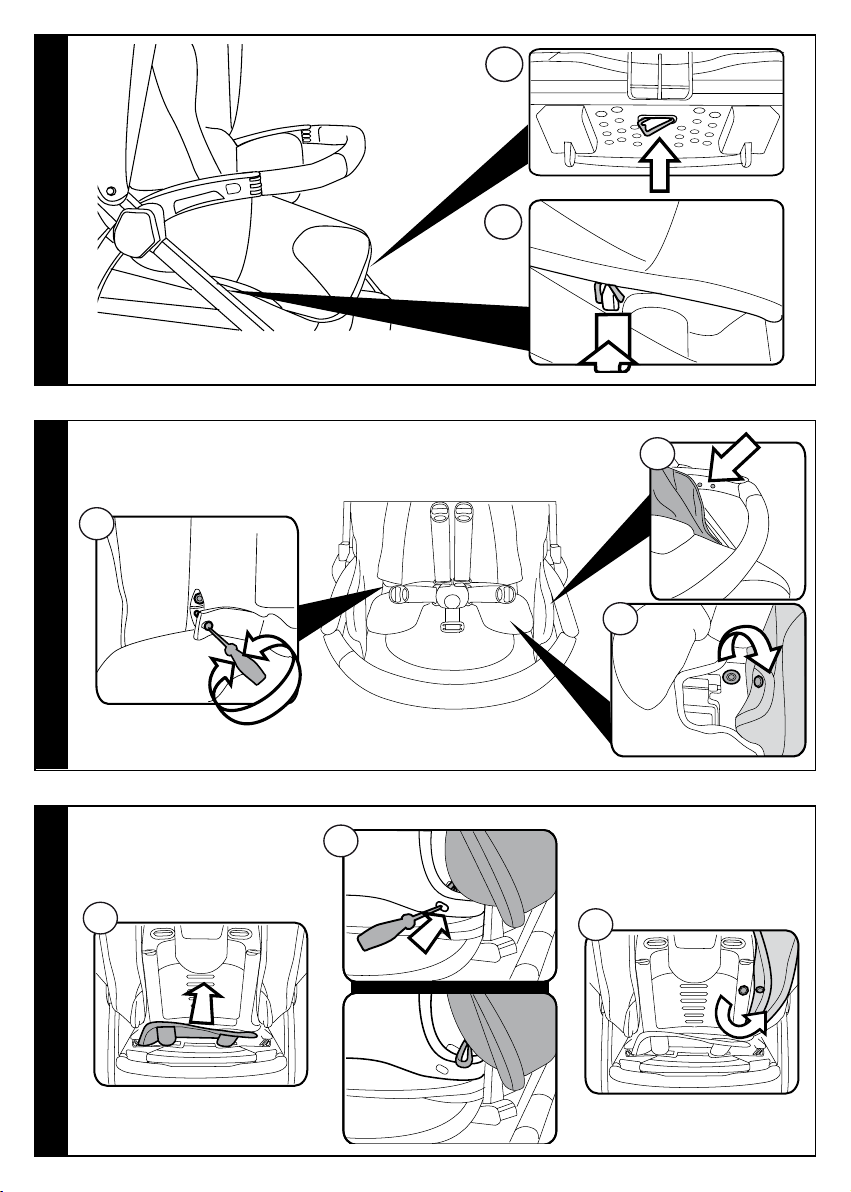
1• APERTURA: prima di aprire il passeggino, agganciare
le ruote posteriori fino al click (fig_a) e premendo sul
telaio sganciare, da entrambi i lati, i ganci di chiusura
(fig_b).
2• Impugnare il maniglione e ruotarlo per aprire il
passeggino (fig_c). Passeggino aperto (fig_d).
L’ apertura corretta è data dal click, corrispondente
all’aggangio della base.
3• Per sicurezza verificare il corretto aggancio della
seduta come in figura (fig_e).
Infine abbassare i ganci di chiusura (fig_f).
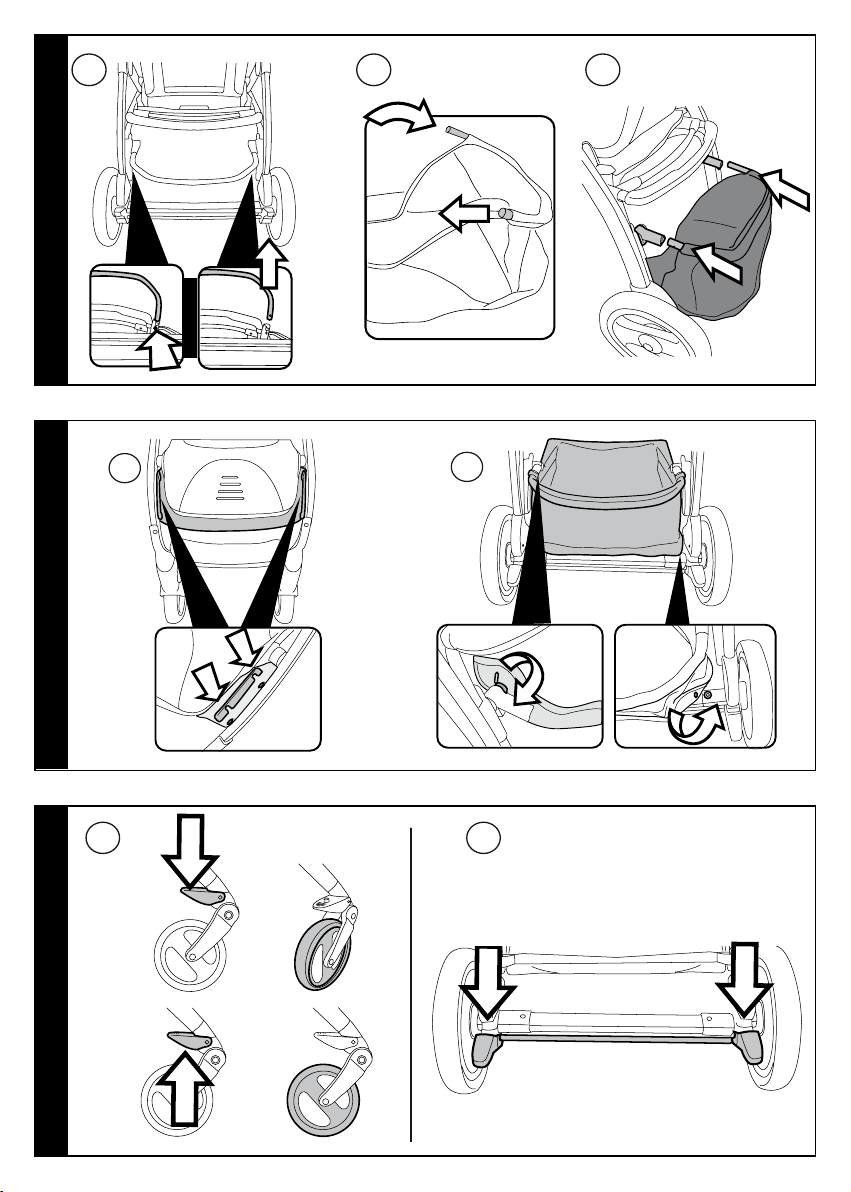
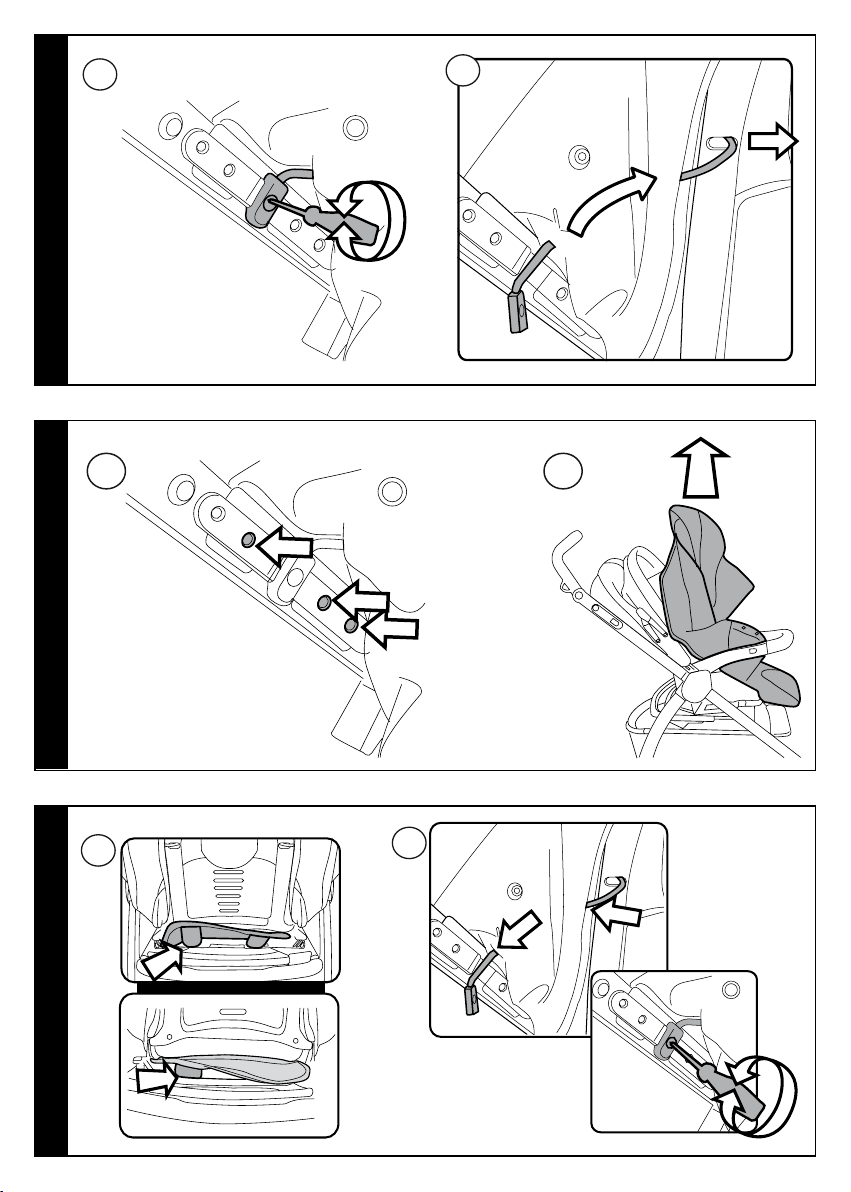
4• MONTAGGIO CESTELLO: Sganciare il tubo cestello
dai rispettivi supporti, premendo sulle molle al di
sotto di essi (Fig_a). Infilare il tubo cestello nella zona
posteriore del cestello facendo attenzione che le
molle siano rivolte verso il basso (Fig_b). Agganciare
il cestello ai montanti posteriori, infilando il tubo nei
rispettivi supporti (Fig_c).
5• Fissare lo shopper ai montanti anteriori
agganciandolo come indicato in figura (fig_d).
Infilare le asole del cestello ai ganci superiori e
inferiori (fig_e).
6 • RUOTE ANTERIORI FISSE O PIROETTANTI:
le ruote anteriori sono già agganciate al passeggino.
Per rendere le ruote anteriori piroettanti, occorre
abbassare la leva (freccia 1). Per renderle fisse, agire
sulla leva in senso contrario (freccia 2). Su terreni
difficili si consiglia l’uso di ruote fisse (fig_a).
FRENO: per frenare il passeggino, abbassare col piede
le leve posizionate sulle ruote posteriori (Fig.b).
Per sbloccare i freni, agire in senso contrario.
Da fermi, azionare sempre i freni.
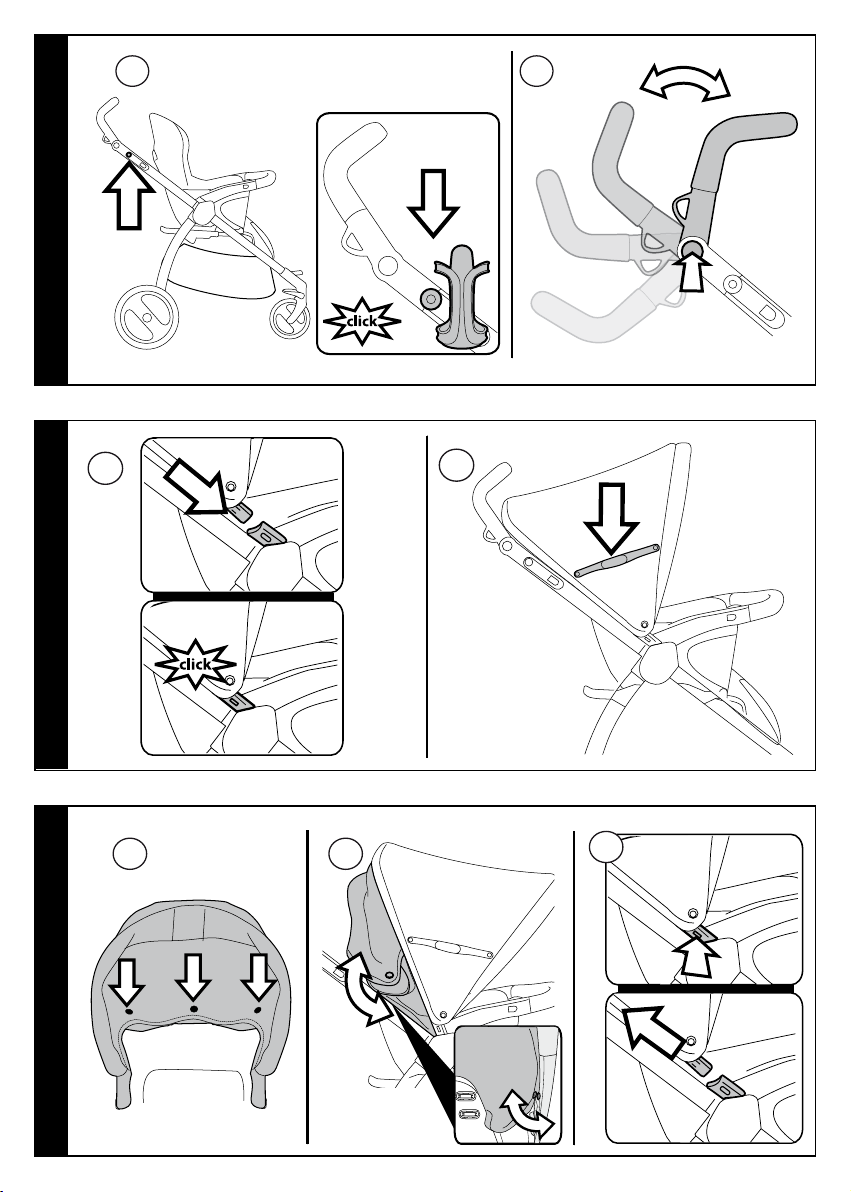
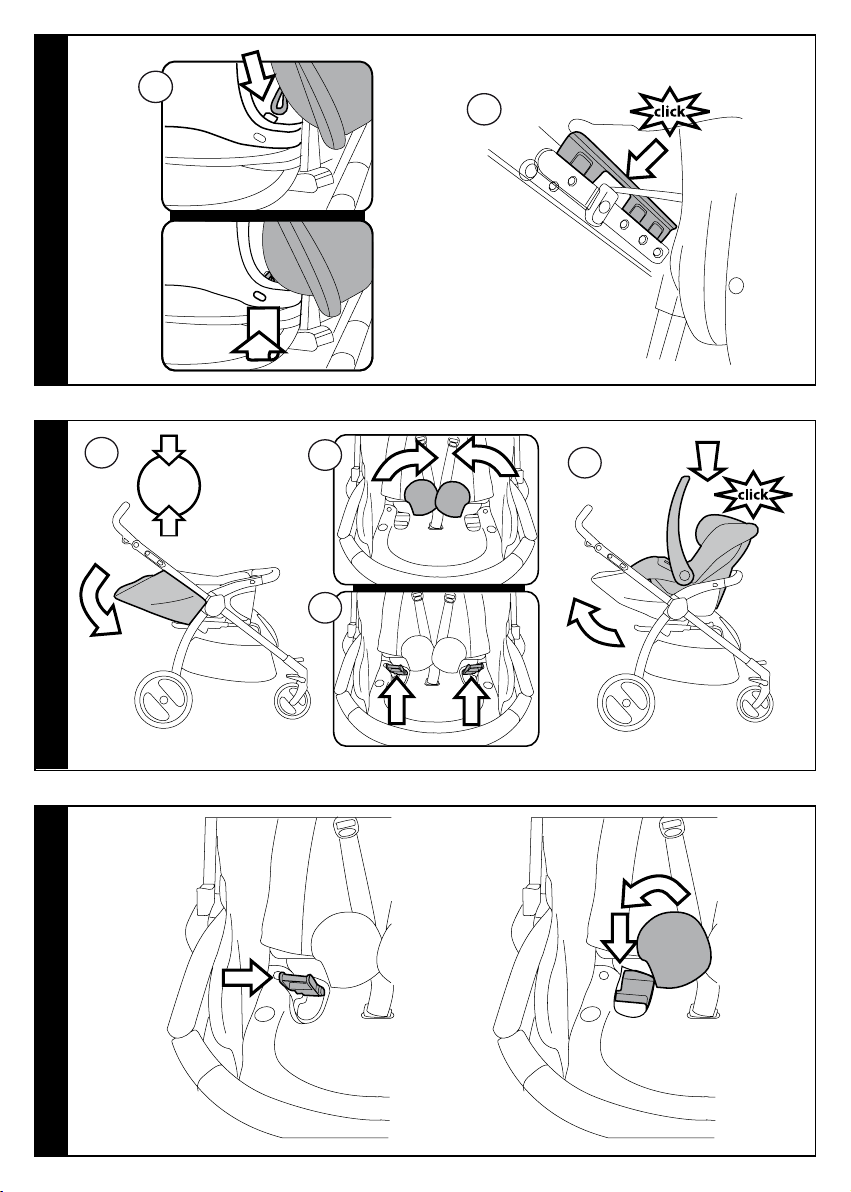
7• PORTABIBITE: é applicabile sul lato sinistro o destro del
passeggino, grazie al gancio già presente su ambedue
i lati del telaio. Per applicare il portabibite, agganciarlo
fino al click, (Fig.a).
REGOLAZIONE MANICI: i manici sono regolabili in
altezza in 4 posizioni. Per la posizione alta, premere
i pulsanti laterali e contemporaneamente alzare il
manico verso l’alto. Rilasciare i pulsanti.
Per abbassarlo agire in senso contrario (Fig.b).
— 16 —

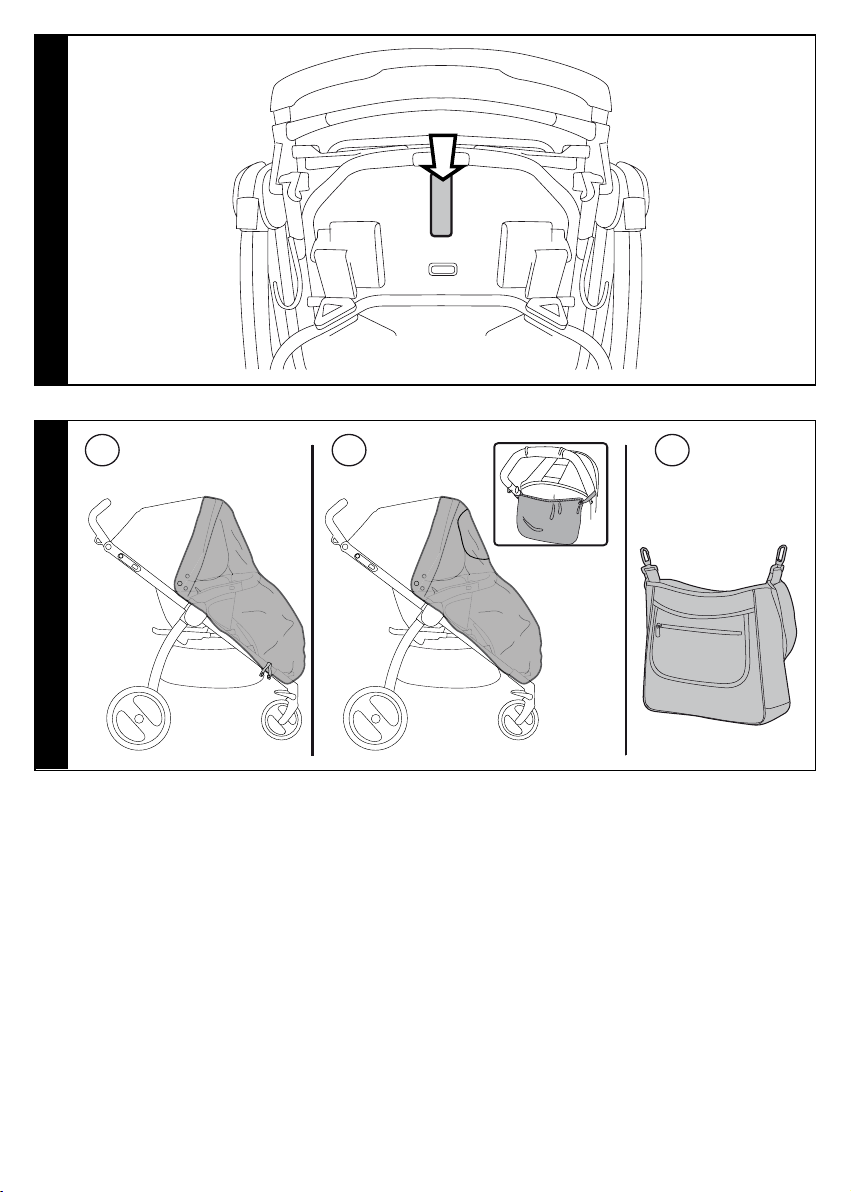
8• CAPOTTINA: per montarla, agganciare gli attacchi
laterali della capottina nelle sedi del telaio, fino al click
(Fig.a); tendere i compassi per tendere il tessuto (Fig.b).
9• Abbottonare la capottina sullo schienale del
passeggino (Fig.c) lateralmente da entrambi i lati ed
all’interno del maniglione (Fig.d).
Per togliere la capottina: sganciare gli attacchi
laterali della capottina dal telaio, premendo sul
bottone esterno come in figura (Fig.e) e sbottonarla
lateralmente, dallo schienale del passeggino e
dall’interno del maniglione.
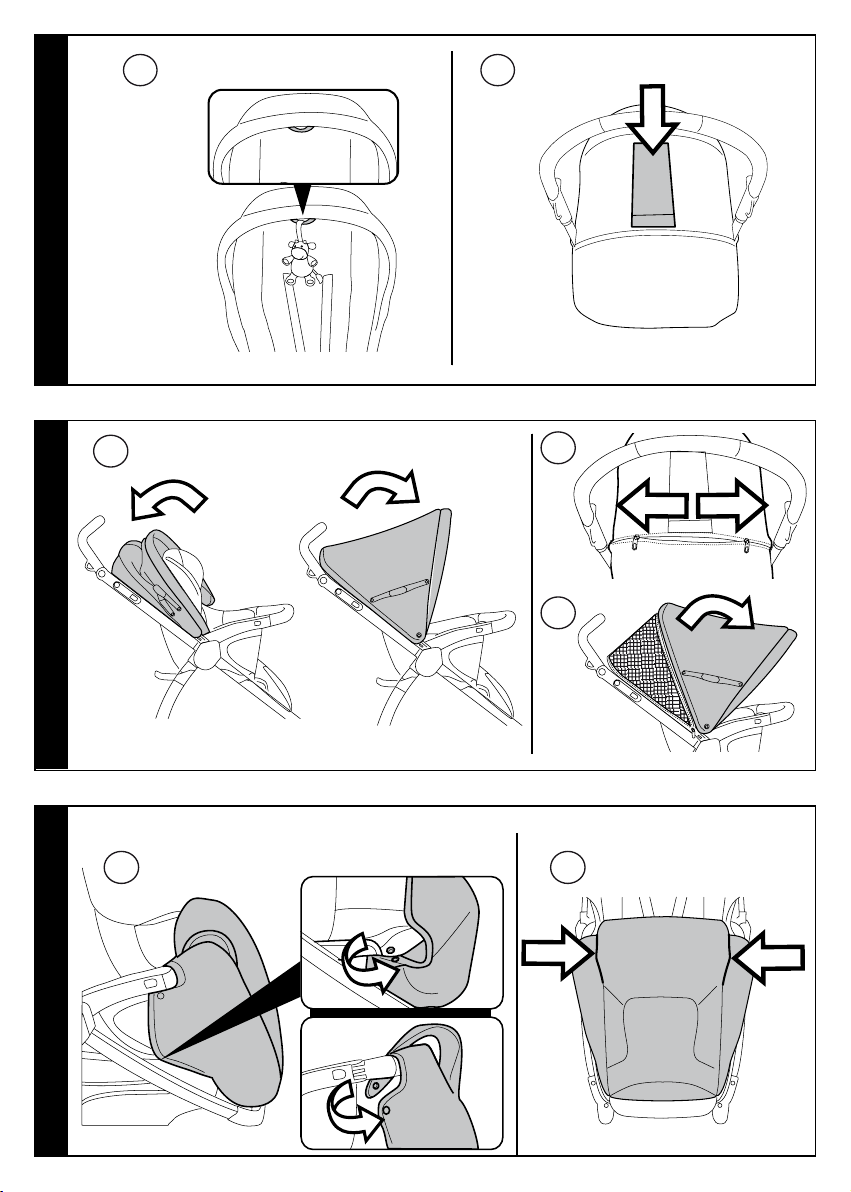
10• La capottina è dotata di:
— un laccetto, a cui è possibile agganciare dei giochini
(Fig.a).
— di una finestra con protezione ai raggi UV da cui è
possibile osservare il bambino (Fig.b).
11• La capottina è regolabile in due posizioni (Fig. a).
Slacciando la zip (Fig. b) e sollevando lo spicchio
di tessuto si scopre una retina che permette una
maggiore areazione e di osservare il bambino (Fig.c).
12• COPERTINA Book Completo: per montare la copertina
sul passeggino, abbottonarla sotto la pedanetta e
calzarla comprendendo il frontalino e abbottonarla
nuovamente (Fig.a).
Copertina montata correttamente.La copertina è
dotata di scaldamani per il bambino (Fig.b).
13• PARAPIOGGIA Book Completo: per montare il
parapioggia calzarlo sul passeggino, abbottonarlo alla
capottina su entrambi i lati, fino al click (Fig.a).
Agganciare gli elastici comprendendo il telaio nella
parte bassa del passeggino (Fig_b) .
• Non utilizzare il parapioggia in ambienti chiusi e
controllare sempre che il bambino non sia accaldato.
• Non collocare il parapioggia vicino a fonti di calore e
fare attenzione alle sigarette.
• Assicurarsi che il parapioggia non interferisca con
nessun meccanismo in movimento del passeggino.
• Togliere sempre il parapioggia prima di chiudere il
vostro passeggino.
• Lavare con una spugna e acqua saponata, senza
utilizzare detersivi.
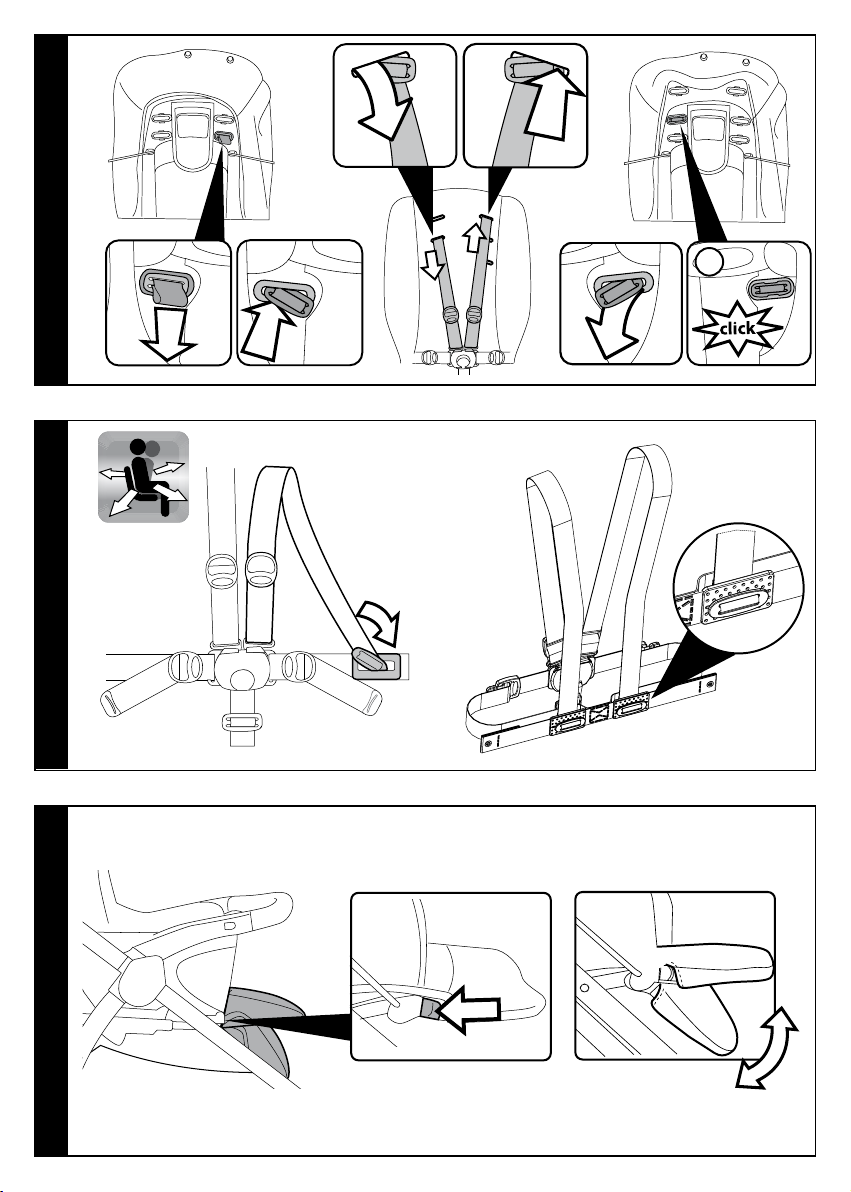
14• CINTURA DI SICUREZZA 5 PUNTI: per agganciarle,
inserire le due fibbie del cinturino girovita (con bretelle
agganciate freccia a) nel cinturino spartigambe fino
al click (freccia b). Per sganciarle premere il pulsante
posto centralmente alla fibbia (freccia c) e tirare verso
l’esterno il cinturino girovita (freccia d).
15• Per stringere il cinturino girovita tirare, da entrambi i
lati, nel senso della freccia, per allentarlo agire in senso
contrario.
Per regolare l’altezza delle cinture di sicurezza è necessario
16•
sganciare sul retro dello schienale le due fibbie.
Tirare verso di se le bretelle (freccia a) fino a sganciare
la fibbie e infilarle nelle asole dello schienale (freccia
b). Sfilare le bretelle dalla sacca (freccia c) e infilarle
nell’asola più idonea (freccia d), infine riagganciare
le due fibbie dietro lo schienale (freccia e). Il corretto
aggancio delle fibbie è determinato dal click (fig f).
ATTENZIONE: Per agganciare i cinturini nella terza
asola è necessario sollevare il tessuto perchè
nascoste dalla sacca.
17• LIBERTA’ DI MOVIMENTO: Dopo i 6 mesi e a
discrezione del genitore, è possibile agganciare i
cinturini diversamente per dare al bambino più libertà
di movimento sempre col massimo della sicurezza.
— Sganciare sul
spiegato nel punto 16).
retro dello schienale le due fibbie (come
—
sfilarle dal davanti le due fibbie;
— aggancire la fibbia come in figura in entrambi i lati del
cinturino ventrale.
18• REGOLAZIONE POGGIAGAMBE: il poggiagambe
é regolabile in 2 posizioni. Per abbassare il
poggiagambe, tirare le due levette laterali verso il
basso e contemporaneamente abbassarlo. Per alzare il
poggiagambe, spingerlo verso l’alto fino al click.
19• REGOLAZIONE SCHIENALE: lo schienale é reclinabile
in 8 posizioni. Per abbassare lo schienale, sollevare
la maniglia e contemporaneamente abbassare lo
schienale, bloccandolo nella posizione desiderata.
Per alzarlo, sollevare la maniglia e
contemporaneamente alzare lo schienale, bloccandolo
nella posizione desiderata.
20• FRONTALINO: per agganciare il frontalino è necessario
sganciare i tappi di protezione (Fig.a) e conservarli.
Tolti i tappi di protezione inserire le due estremità del
frontalino nei braccioli fino al click (Fig.b).
21• É possibile aprire il frontalino solo da un lato per
facilitare l’entrata e l’uscita del bambino quando é più
grande. Per aprirlo, premere il pulsante lateralmente e
tirare il frontalino verso l’esterno (Fig.a).
Per togliere il frontalino premere i due pulsanti
lateralmente e tirare il frontalino verso l’esterno (Fig.b).
Quando si toglie il frontalino inserire i tappi di protezione
dati in dotazione per chiudere i braccioli del telaio.
22• CHIUSURA: Per chiudere il passeggino è preferibile
rendere le ruote anteriori fisse, chiudere la capottina se
applicata e sganciare il seggiolino auto se agganciato.
— Allineare il maniglione al telaio del passeggino come
in figura (fig_a);
— alzare i ganci di chiusura posti sui due montanti
laterali (fig_b);
— tirare la maniglia interna posta dietro la seduta (fig_c)
e, mantenendo la stessa presa, sollevarla (fig_d)
23• e ruotare in avanti il maniglione fino alla completa
chiusura (fig_e). Assicurarsi che da entrambi i lati si
sia agganciato al gancio di chiusura. In caso contrario,
agganciare correttamente il gancio di chiusura, come
in figura (fig_f) .
Il passeggino chiuso rimane in piedi da solo.
24• E’ possibile, per una maggiore compattezza, estrarre
le ruote posteriori. Tirare verso l’esterno il perno ed
estrarre la ruota come in figura (fig_a).
TRASPORTO: si può trasportare comodamente,
tenendo le ruote anteriori fisse, impugnando la
maniglia centrale (fig_b).
25• SFODERABILITÀ: per sfoderare il passeggino:
— sfilare lo spartigambe del cinturino da sotto la seduta
(fig_a);
— sfilare lateralmente, da entrabi i lati, gli elastici (fig_b);
26• — svitare il cinturino, da entrambi i lati, tenendo il dito
sotto al dado (fig_c);
— sganciare gli attacchi della sacca dai braccioli in
sequenza come indicato (fig_d);
— sollevare alette sganciandole dal velcro per
sbottonare sacca da seduta (fig_e);
27• -sul retro del passeggino:
— sfilare sacca dalla seduta (fig_f);
— con l’aiuto del cacciavite sfilare elastico dalla sua
sede (fig_g);
— sganciare il bottone su entrambi i lati sullo schienale
(fig_h);
28• Svitare col cacciavite la vite all’interno del maniglione,
da entrambi i lati (fig_i).
— 17 —
— Togliere la vite e conser varla.
— Sfilare il cordino dalla sacca (fig_l)
29• Sganciare e sfilare gli spallacci dallo schienale come
indicato in figura 16_a / 16_b;
— premere nei fori e sfilare la sacca laterale, procedere
in entrambi i lati (fig_m);
— sfilare la sacca dall’alto (fig_n).
VESTIZIONE: per rivestire la sacca è necessario:
— calzare sacca sullo schienale
— calzare la sacca sulla pedanetta
— agganciare gli elastici laterali (25b)
— agganciare attacchi della sacca ai braccioli (26d)
— agganciare bottoni della sacca al telaio e abbassare i
velcri (26e)
Agganciare cinturino nella sua sede col cacciavite (26c)
—
— agganciare il cinturino spartigambe sotto la seduta una
parte deve rimanere sotto e una parte sopra (25a);
agganciare il cinturino all’altezza desiderata (punto 16)
—
30• sul retro del passeggino :
— inserire le due linguette rigide tra tubo e sedile (fig_a);
— Far passare il cordino nelle asole della sacca.Riavvitare
la vite al maniglione (fig_b).
ATTENZIONE: tendere il cordino per verif icare di
averlo stretto bene.
abbottonare la sacca allo schienale del passeggino (27h).
—
31• Inseriere l’elastico della sacca nella sua sede e tirarlo
dall’interno per agganciarlo (fig_c).
Inserire nelle rispettive sedi la linguetta rigida fino al
click. Verificare il corretto inserimento tirandola (fig_d).
Queste informazioni sono indispensabili in caso di reclamo.
ACCESSORI
35• PARAPIOGGIA: applicabile alla capottina (fig_a).
ZANZARIERA: applicabile alla capottina (fig_b).
BORSA: borsa con materassino per il cambio del bebè
(fig_c).
PULIZIA E MANUTENZIONE
MANUTENZIONE DELL’ARTICOLO: proteggere da agenti
atmosferici: acqua, pioggia o neve; l’esposizione continua
e prolungata al sole potrebbe causare cambiamenti di
colore in molti materiali; conservare questo articolo in
un posto asciutto. Eseguire controlli ed interventi di
manutenzione sulle parti principali ad intervalli regolari.
PULIZIA DEL TELAIO: periodicamente pulire le parti in
plastica con un panno umido senza utilizzare solventi
o altri prodotti simili; mantenere asciutte tutte le parti
in metallo per prevenire la ruggine; mantenere pulite
tutte le parti in movimento (meccanismi di regolazione,
meccanismi di aggancio, ruote…) da polvere o sabbia e
se occorre, lubrificarle con olio leggero.
PULIZIA DEL PARAPIOGGIA: lavare con una spugna e
dell’acqua saponata, senza utilizzare detersivi.
PULIZIA DELLE PARTI IN TESSUTO: spazzolare le parti
in tessuto per allontanare la polvere e lavare a mano
a una temperatura massima di 30° non torcere; non
candeggiare al cloro; non stirare; non lavare a secco;
non smacchiare con solventi e non asciugare a mezzo
di asciugabiancheria a tamburo rotativo.
GANCIOMATIC SYSTEM
Ganciomatic System é il sistema pratico e veloce che
ti permette di agganciare, il seggiolino auto Primo
Viaggio Tri-Fix, alla Base Ganciomatic del passeggino
con un solo gesto.
32• Prima di agganciare il seggiolino auto, è necessario:
— frenare il passeggino;
— reclinare completamente lo schienale (fig_a);
— sollevare le due alette sganciandole dai velcri e unirle
tra di loro (fig_b);
— alzare gli attacchi Ganciomatic dal telaio (fig_c);
— posizionare il seggiolino auto verso la mamma e
spingerlo verso il basso fino al click (fig_d);
— Verificare che l’elemento di trasporto del bambino sia
correttamente agganciato.
Sollevare lo schienale del passeggino all’altezza massima.
—
— E’ importante non rimuovere il frontalino dal
passeggino, quando si aggancia il seggiolino auto (per
l’aggancio del frontalino consultare il punto 20).
— Per sganciare il seggiolino auto dal passeggino
consultare il suo manuale d’uso.
33• Per abbassare gli attacchi Ganciomatic del passeggino,
spostarli verso l’ interno e ruotarli verso il basso.
NUMERI DI SERIE
34• BOOK, riporta sotto la seduta, informazioni relative:
nome del prodotto, data di produzione e numerazione
seriale dello stesso.
PEG-PÉREGO S.p.A.
Peg-Pérego S.p.A. è certificata ISO 9001.
La certificazione offre ai clienti e ai
consumatori la garanzia di una
trasparenza e fiducia nel modo di
lavorare dell’impresa. Peg Pérego potrà
modifiche ai modelli descritti in questa pubblicazione,
per ragioni di natura tecnica o commerciale. Peg
Pérego è a disposizione dei suoi Consumatori per
soddisfare al meglio ogni loro esigenza. Per questo,
conoscere il parere dei ns. Clienti, è per noi
estremamente importante e prezioso. Le saremo
quindi molto grati se, dopo aver utilizzato un ns.
prodotto, vorrà compilare il QUESTIONARIO
SODDISFAZIONE CONSUMATORE, segnalando
eventuali osservazioni o suggerimenti, che troverà nel
nostro sito internet: www.pegperego.com
apportare in qualunque momento
SERVIZIO ASSISTENZA PEG-PÉREGO
Se fortuitamente parti del modello vengono perse o
danneggiate, usare solo pezzi di ricambio originali Peg
Pérego. Per eventuali riparazioni, sostituzioni, informazioni
sui prodotti, vendita di ricambi originali e accessori,
contatta il Servizio Assistenza Peg Pérego indicando,
qualora fosse presente, il numero seriale del prodotto.
tel. 0039/039/60.88.213
numero verde: 800/147.414 (contattabile da rete fissa)
fax 0039/039/33.09.992
e-mail assistenza@pegperego.it
sito internet www.pegperego.com
— 18 —

EN_English
Thank you for choosing a Peg-Pérego product.
WARNING
IMPORTANT: read these instructions carefully and
keep them for future use. The child’s safety could be
at risk if these instructions are not followed.
_ This product was designed for the transport of 1 child
in the seat.
_ Do not use this product for a number of occupants
greater than that intended by the manufacturer.
_ This product is approved for children from birth up to
a weight of 15 kg in the seat.
_ This product was designed for use in combination
with the following Peg Perego Ganciomatic products:
the “Primo Viaggio Tri-Fix” car seat (Group 0+).
_ WARNING Check that the pram body or seat unit or
car seat attachment devices are correctly engaged
before use; check that the Peg Perego Ganciomatic
products are correctly fixed to the item.
_ The assembly and preparation of the product must be
carried out by an adult.
_ Do not use this product if there are parts missing or
signs of breakage.
_ WARNING Always use the restraint system; Always use
the five point harness; always use the harness crotch
strap in combination with the waist strap.
_ WARNING Never leave your child unattended.
_ Always apply the brake when stationary.
_ WARNING Ensure that all the locking devices are
engaged before use.
_ WARNING To avoid injury ensure that your child is
kept away when unfolding and folding this product.
_ WARNING Do not let your child play with this product.
_ Do not insert fingers into the mechanisms.
_ Be careful not to hurt the child when adjusting the
mechanisms (handlebar, backrest).
_ Any weights hanging on the handlebar or
handles could make the item unstable; follow the
manufacturer’s instructions as regards the maximum
loads transportable.
_ The front bar is not designed to support the child’s
weight. It is not designed to keep the child in the seat
and does not substitute for the waist belt.
_ Do not load the baskets over 5 kg. Do not put weight
in the cup holder in excess of those indicated on the
cup holders themselves and never hot drinks. Do not
put loads of more than 0.2 kg in the hood pockets (if
present).
_ Do not use the product near to stairs or steps, heat
sources, naked flames or dangerous objects within
reach of the child.
_ The use of accessories not approved by the
manufacturer could be dangerous.
_ Do not use the rain canopy (if present) indoors and
regularly check to ensure the child is not too warm;
do not park the stroller close to heat sources and keep
well away from lighted cigarettes. Ensure the rain
canopy is not interfering with any moving parts of the
carriage or stroller; always remove the rain canopy
before folding your carriage or stroller.
_ Do not use the release levers to move or lift the stroller
when the child is in it.
_ WARNING This product is not suitable for jogging or
skating.
_ Apply the brake when loading or unloading children.
_ WARNING do not add any matress.
ARTICLE COMPONENTS
Check the contents in the package. If you need to
make a complaint, please contact Customer Assistance.
_ The BOOK CLASSICO stroller includes: frame, 2 rear
wheels, front bar, basket, cup holder, canopy.
_ The BOOK COMPLETO stroller includes: frame, 2 rear
wheels, front bar, basket, cup holder, canopy, blanket,
rain cover.
INSTRUCTIONS FOR USE
1• OPENING THE STROLLER: before opening the stroller,
attach the back wheels until they click into place (fig_a).
Press on both sides of the chassis to release the closing
hooks.
2• Grasp the main handle and rotate it to open the stroller
(fig_c). Open stroller (fig_d).
The stroller is properly opened when you hear a click
(i.e. the base attaching).
3• For safety, check the seat is properly attached, as shown
in the picture (fig_e). Lastly, lower the closing hooks
(fig_f)
4• ASSEMBLING THE BASKET: Unfasten the basket tube
from its supports by pressing on the springs below
same (Fig_a). Insert the basket tube through the rear
of the basket, taking care that the springs are facing
downwards (Fig_b). Fasten the shopper bag to the rear
rods by sliding the tube into the respective supports
(Fig_c).
5• Fasten the shopper bag to the front rods as shown in
the figure (fig_d). Slip the basket loops over the upper
and lower hooks (fig_e).
6• LOCKABLE SWIVEL FRONT WHEELS:
The front wheels are already attached to the stroller.
For swivelling wheels, lower the lever (arrow 1). For
fixed wheels, move the lever in the opposite direction
(arrow 2). We recommend using fixed wheels on rough,
uneven surfaces (fig_a).
BRAKE: to set the brakes on the stroller, lower the
levers on the rear wheels with your foot (Fig.b). To
release the brakes, lift the lever.
Always set the brakes when the stroller is not
moving.
7• CUP HOLDER: The cup holder can be placed on left or
right side of the stroller through the hook fitted on both
sides of the chassis. To fit the cup holder, click it on
(Fig.a).
ADJUSTING THE HANDLES: the handles can be set into
4 different positions. For the highest position, push the
side buttons and lift the handle upwards at the same
time. Release the buttons. To lower the handles, do the
opposite (Fig.b).
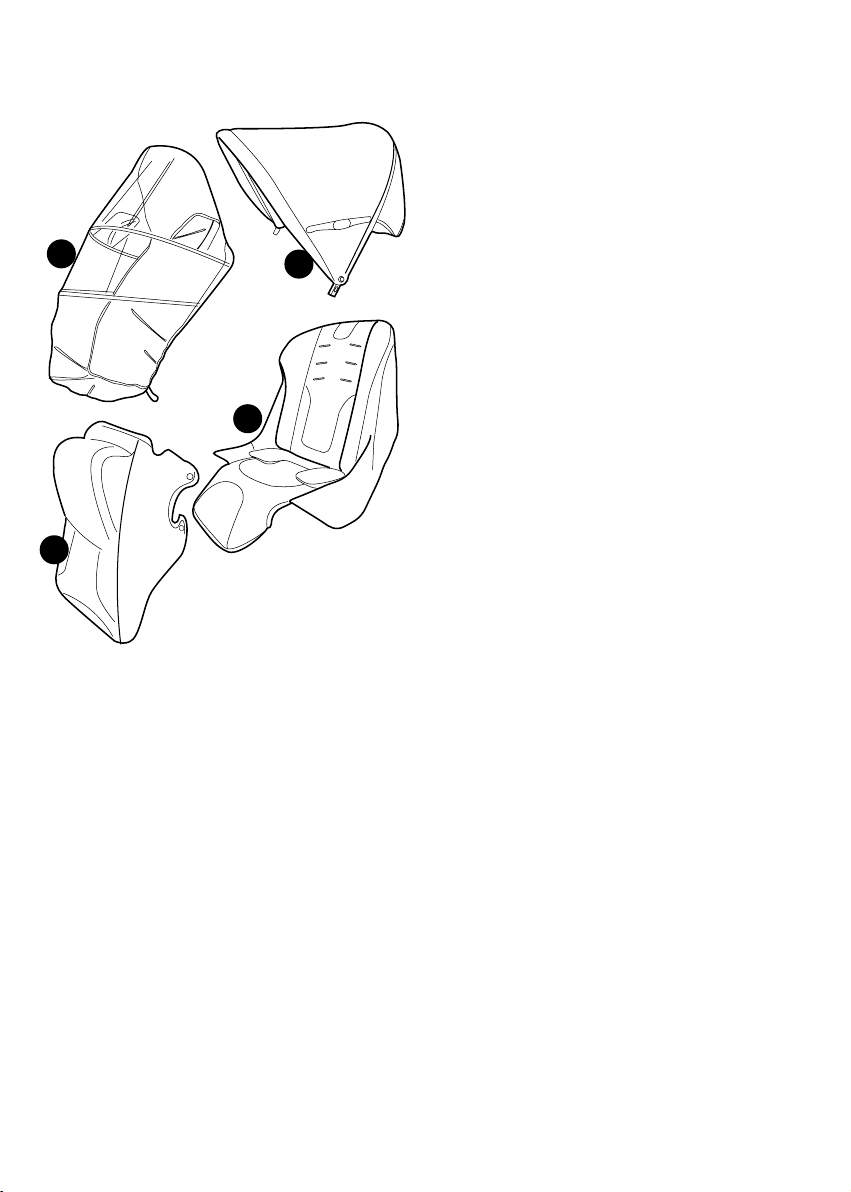
8• HOOD: to assemble the hood, fasten the hood’s side
attachments onto the sockets until they click (Fig.a);
expand the hood frame so that the fabric is fully
stretched (Fig.b).
9• Button the hood onto the stroller’s backrest (Fig.c), on
— 19 —

both sides and inside the handle (Fig.d).
To remove the hood: unfasten the hood’s side
attachments from the chassis by pressing the external
button (as shown in Fig.e) and unbutton it from the
backrest, the sides of the stroller and inside the handle.
10• The hood has:
— a fabric loop, for tying toys (Fig.a).
— a window with UV protection, to see the child (Fig.b).
11• The hood can be adjusted to two positions (Fig. a).
Undo the zip (Fig. b) and stretch the fabric flap to see
the child and to let more air under the hood (Fig. c).
12• MUFF for complete Book: to put the muff on the stroller,
button it up under the footrest and slide it upwards
over the bumper, then button it again (Fig.a). Properly
assembled muff. The muff has an extra little muff for the
child’s hands (Fig.b).
13• RAINCOVER for complete Book:
to fit the rain canopy, extend it over the stroller and
snap fit the buttons on both sides of the hood (Fig.a).
Fasten the elastic loops including the chassis in the
lower part of the stroller (Fig.b).
• Do not use the rain canopy indoors and always make
sure that the child is not too hot.
• Do not place the rain canopy near heat sources and
pay attention to cigarettes.
• Make sure that the rain canopy does not interfere with
any moving mechanism of the stroller.
• Always remove the rain canopy before folding up the
stroller.
• Wash with a sponge and soapy water. Do not use
detergents.
14• 5-POINT SAFETY HARNESS: to fasten, insert the two
buckles of the waist strap (with attached shoulder
straps, arrow a) into the leg divider strap until they
click into place (arrow b). To unfasten them, press the
button which is situated in the centre of the fastener
(arrow c) and pull the waist strap outwards (arrow d).
15• To tighten the waist strap, pull on both sides in the
direction of the arrow. To loosen it do the opposite.
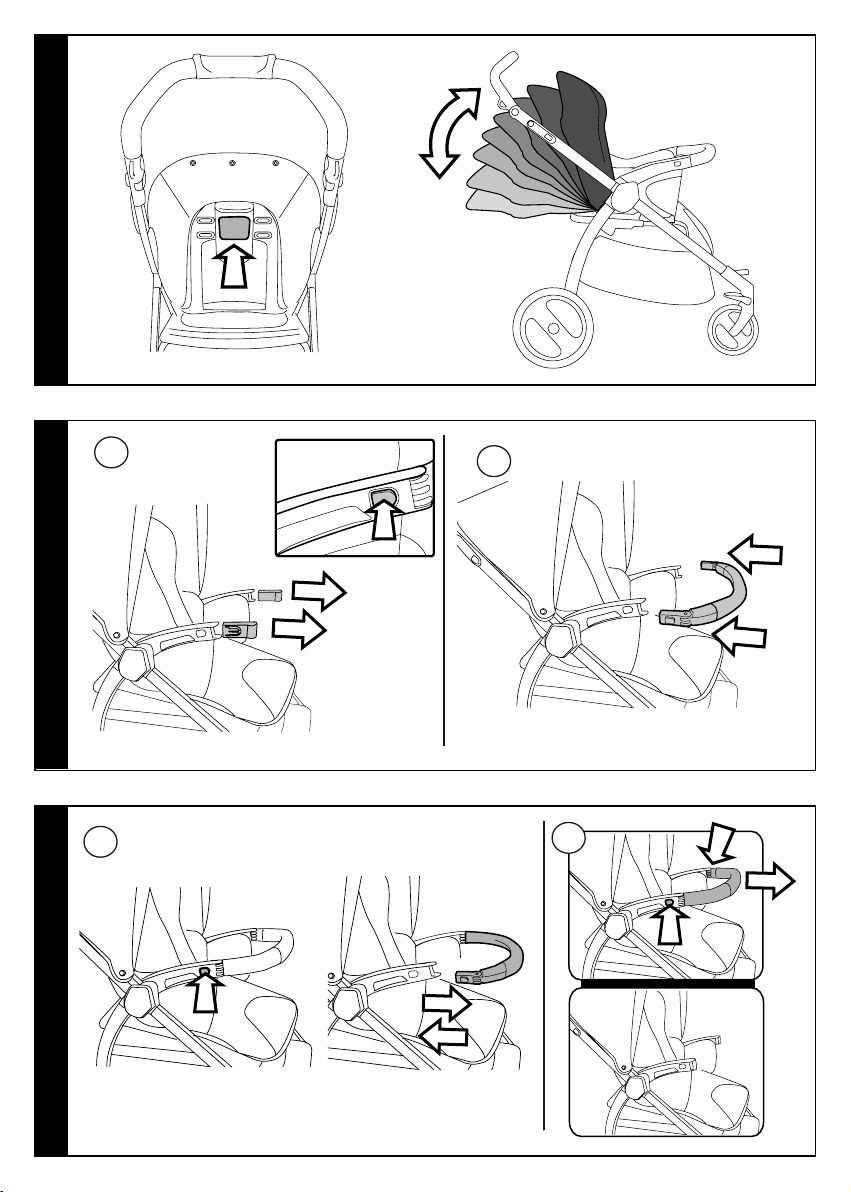
16• To adjust the height of the safety harnesses, release
the two buckles on the rear of the backrest.
Pull the shoulder straps towards you (arrow a) until the
buckles are released and insert them in the backrest
loops (arrow b). Remove the shoulder straps from the
sack (arrow c) and insert them in the most appropriate
buckle (arrow d), then reattach the two buckles
behind the backrest (arrow e). The buckles are securely
attached when a click is heard (fig f).
WARNING: To fasten the belts in the third eyelet, lift the
fabric, as they are hidden in the lining.
17• FREEDOM OF MOVEMENT: After 6 months, at the
discretion of the parents, the straps may be fastened
differently, to give your child more freedom of
movement, without jeopardising on safety.
— Detach the two buckles on the rear of the backrest (as
explained in paragraph 16).
— Slide the two buckles out from the front;
— Fasten the buckles, as shown in the figure, on both
sides of the waist strap.
18• ADJUSTING THE FOOTREST: the footrest can be adjusted
to 2 positions. To lower the footrest, push the two little
side levers downwards and lower the footrest at the
same time. To raise the footrest, push it upwards until it
clicks.
19• ADJUSTING THE BACKREST: the backrest can be reclined
into 8 positions. To lower the backrest, lift the handle
and lower the backrest at the same time. Block it in the
desired position. To raise the backrest, lift the handle
and raise the backrest at the same time. Block it in the
desired position.
20• FRONT BUMPER BAR: to attach the front bumper bar
remove the protection caps (Fig.a) and store them.
After removing the caps, insert the ends of the bumper
into the armrests until they click (Fig.b).
21• The bumper bar can be opened on one side so an older
child can climb on and off more easily. To open the
bumper bar, push the button on the side and pull the
bar outwards (Fig.a)
To remove the bumper bar, press the two buttons on
the sides and pull the bar outwards (Fig.b).
When the bumper bar is off, replace the protection
caps onto the chassis armrests to close them.
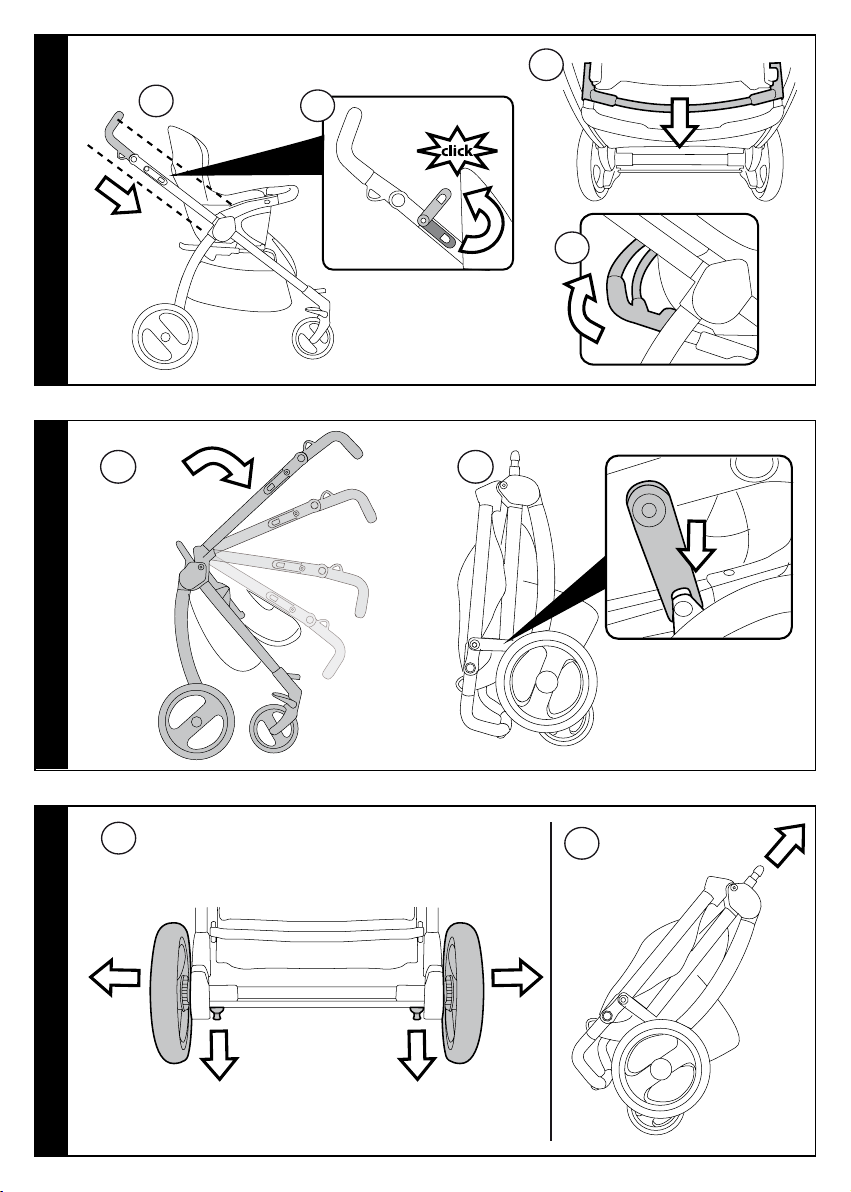
22• COLLAPSING THE STROLLER: to collapse the stroller,
put the front wheels into fixed position, close the hood
(if on the stroller) and remove the car seat (if on the
chassis).
— Align the handle with the stroller chassis as shown in
the picture (fig_a);
— lift the fastening hooks on the two sides of the chassis
(fig_b);
— Pull the interior handle placed behind the seat (fig_c)
and lift at the same time (fig_d).
23• Rotate the handle forward until completely closed
(fig_e).
Check that it has fastened to the closing hook on both
sides. If it has not, fasten the closing hook properly as
shown (fig_f).
The collapsed stroller is free standing.
24• To make the stroller smaller still, the back wheels can be
removed. Pull the pivot outwards and extract the wheel
as shown (fig_a).
TRANSPORT: the stroller can be carried comfortably
locking the front wheels and grasping the main handle
(fig_b).
25• REMOVING THE LINING: to remove the stroller’s lining:
— unthread the belt’s leg divider from under the seat
(fig_a);
— slip the elastics off their hooks on both sides (fig_b);
26• — unscrew the belt on both sides, keeping your finger
under the bolt (fig_c);
— unfasten the lining from the armrests as shown in the
picture (fig_d);
— lift the flaps and release them from the velcro fabric to
unbutton the seat’s lining (fig_e);
27• — on the back of the pushchair:
— remove the lining from the seat (fig_f);
— with the help of a screwdriver, remove the elastic from
its groove (fig_g);
— undo the buttons on both sides on the backrest (fig_h);
28• Use the screwdriver to remove the screw in the main
handle, on both sides (fig_i);
— Store the screw after removing it.
— Unthread the strap from the lining (fig_l);
29• Unfasten and remove the shoulder straps from the
backrest as shown in the figure 16_a / 16_b;
— push in the openings and pull off the side lining.
Do this on both sides (fig_m);
— remove the lining from above (fig_n).
— 20 —
REPLACING THE LINING: to put the lining back on:
— fit the lining onto the backrest
— fit the lining over the platform
— attach the side elastics (25b)
— fasten the lining’s hooks to the armrests (26d)
— fasten the lining’s buttons to the chassis and lower the
velcro straps (26e)
— fasten the belt in the right position with the screwdriver
(26c)
— attach the leg divider under the seat. One part must be
above the seat and one below (25a)
— attach the belt at the desired height (point 16)
30• on the back of the stroller:
— insert the two rigid flaps between the tube and the seat
(fig_a);
— thread the strap through the lining’s eyelet. Replace the
main handle’s screw (fig_b).
WARNING: stretch the strap to check it is securely
fastened.
— Button the lining onto the stroller’s backrest (27h).
31• Insert the lining’s elastic into the groove and stretch it
from inside to fasten it (fig_c).
Insert the rigid strap into its grooves until it clicks into
place. Check it is securely fastened by pulling it (fig_d).
GANCIOMATIC SYSTEM
The Ganciomatic System is the quick practical system
that enables you to attach the Primo Viaggio Tri-Fix car
seat to the stroller in just one step.
32• Before attaching the car seat, you must:
— insert the stroller’s break;
— put the backrest into the lowest position (flat, fig_a);
— lift the flaps, release them from the velcro fastening and
put the together (fig_b);
— lift the Ganciomatic attachments from the chassis
(fig_c);
— put the car seat in mum-facing position and push it
down until it clicks (fig_d);
— Check that the child transport system is properly
fastened.
— Lift the stroller backrest to the highest position.
— Important: do not remove the bumper bar from the
stroller when you attach the car seat (read point 20 to
see how to attach the bumper bar).
— To release the car seat, read the car seat’s instruction
manual.
33• To lower the stroller’s Ganciomatic fittings, move them
inwards and rotate them downwards.
SERIAL NUMBERS
34• The information on the BOOK stroller is under the seat
and includes: product name, production date and item
serial number.
This information is required if complaints are made.
BAG: diaper-changing bag with pad for changing baby’s
diaper (fig_c).
CLEANING AND MAINTENANCE
PRODUCT MAINTENANCE: protect from the weather:
water, rain, or snow; prolonged and continuous
exposure to bright sunlight may give rise to colour
changes of various different materials; store this product
in a dry place.The maintenance have to be regularly.
CLEANING THE CHASSIS: periodically clean all plastic parts
with a damp cloth. Do not use solvent or similar cleaning
products; keep all metal parts dry to prevent rusting; keep
moving parts clean (adjustment mechanisms, locking
mechanisms, wheels, …) and free of dust and sand and, if
necessary, lubricate with light machine oil.
CLEANING THE RAIN CANOPY: wash with a sponge and
soapy water; do not use detergents.
CLEANING FABRIC PARTS: brush fabric parts to remove
dust and wash by hand at a maximum temperature of
30°C; do not wring; do not use chlorine bleach, do not
iron; do not dry clean; do not apply solvent-based stain
removers and do not dry in a tumble dryer.
PEG-PÉREGO S.p.A.
Peg-Pérego S.p.A. is an ISO 9001 certified
company. This certification is a guarantee
for customers and consumers of the
transparency and trustworthiness of the
company’s procedures and working
at any time to the models described in this publication
for technical or commercial reasons. Peg Pérego is at
the disposal of its customers and consumers to ensure
that all their demands and queries are fully satisfied. It
is a key part of our policy to ensure we are always
aware of our customers’ views and requirements. We
would therefore be very grateful if, after using a Peg
Pérego product, you take the time to fill in our
CUSTOMER SATISFACTION QUESTIONNAIRE, making a
note of any comments or suggestions you might have.
You can find the questionnaire on the Peg Pérego
website: www.pegperego.com
methods. Peg Pérego can make changes
PEG-PÉREGO AFTER-SALES SERVICE
If any parts of the item get lost or damaged, only
use genuine Peg Pérego spare parts. For any repairs,
replacements, information on the products and sales
of genuine spare parts and accessories, contact the
Peg Pérego Assistance Service and state the serial
number of the product, if present.
tel. 0039/039/60.88.213
fax 0039/039/33.09.992
e-mail assistenza@pegperego.it
website www.pegperego.com
ACCESSORIES
35• RAIN CANOPY: can be fastened to the hood (fig_a).
MOSQUITO NETTING: can be fastened to the hood (fig_b).
— 21 —