
Всем привет.
Сегодня я расскажу о док-станции для жестких дисков со встроенными ЮСБ-портами и карт-ридером.
Как долго добиралась посылка я уже не помню, так как заказывал больше года назад. Приехала станция в фирменной картонной коробке, помещенной в белый китайский почтовый конверт. Коробка довольно плотная, при транспортировке не пострадала (есть лишь пара небольших вмятин), равно как и ее содержимое.
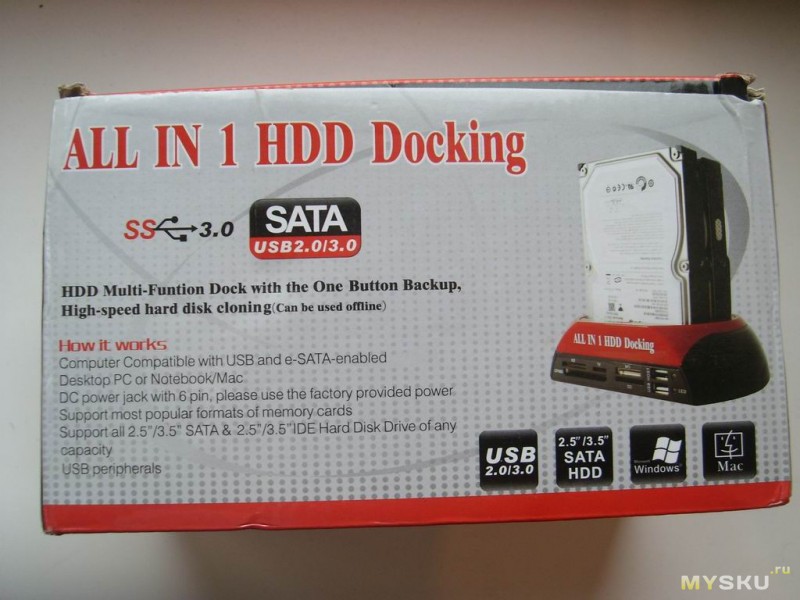
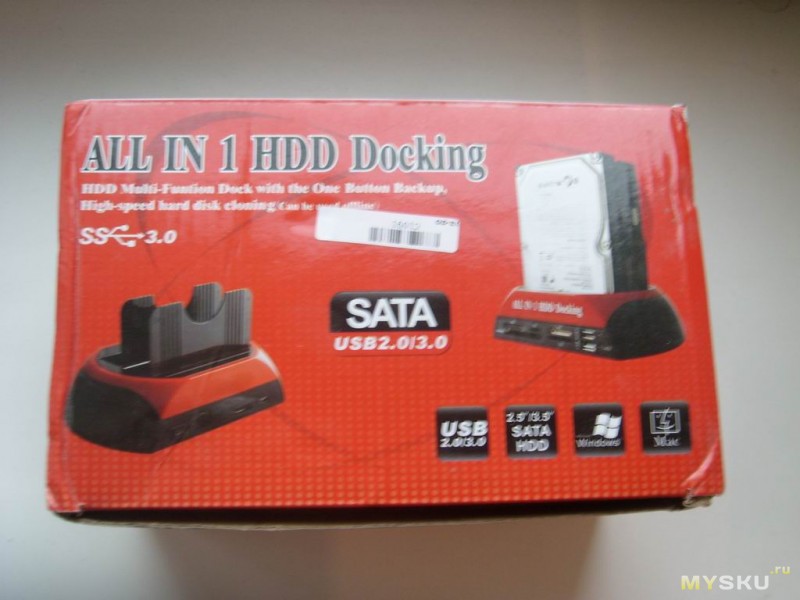
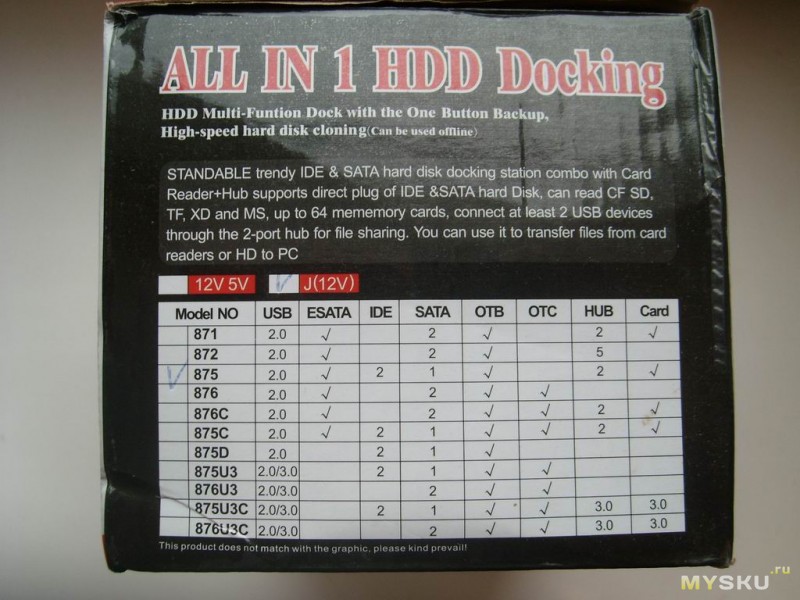
На коробке указаны основные характеристики, но нигде нет никакого указания на бренд производителя. Видимо ОЕМ. Судя по надписям сбоку, существует целый модельный ряд, представители которого различаются наличием/отсутствием поддержки USB 3.0, наличием возможности подключения через E-SATA, типами поддерживаемых жестких дисков, количеством ЮСБ-входов, а так же наличием карт-ридера.
Описание с сайта магазина:
• All in 1 3.5″ 2.5″ IDE USB eSATA Hub HDD dual docking station
• Supports double SATA/IDE HD, standard, convenient and trendy design
• Supports E-SATA, USB 1.1, USB2.0, SATA I and SATA II compatible
• 2-Port USB 2.0 HUB, Hi-speed USB 2.0 data transfer rate up to 480MB/s (Max), SATA II transfer rate up to 3GB/s
• Supports 2.5 / 3.5 inch SATA / IDE hard drive, up to 1TB × 2 = 2TB
• Multi-Card reader for SD / MS / CF / XD-memory
• Plugs and play and hot-swappable
• Power LED indicator
• On / Off switch
• OS compatible: Vista/ XP/ 2000/ ME/ 98SE, Mac OS 9.x, Win7 or higher
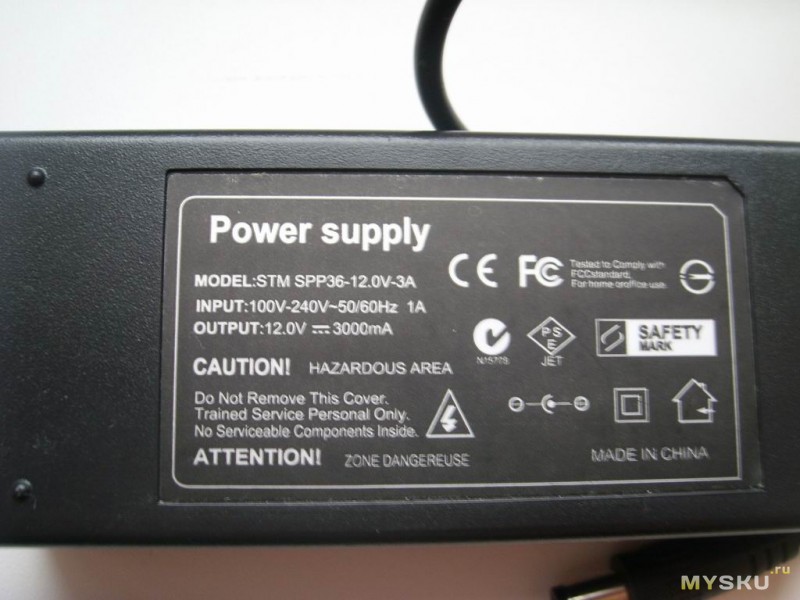
• Power Adapter:
• —Input: 100-240V, 50-60Hz, 1.0A
• —Output: 12V-3A, 5.0V-3A
• Support Cards:
• —CF Slot: CF I, CF 2, Extreme CF, Extreme III CF, Ultra II CF, HS CF, Microdrive
• —MS Slot: MS, MS Duo, MS Pro, MS Pro Duo, MS Magic Gate, MS Magic Gate Pro, MS Magic Gate Duo, MS Magic Gate Pro Duo, Extreme MS Pro, Extreme III MS Pro, Ultra II MS Pro, HS MS Magic Gate, HS MS Magic Gate Pro Duo, MS Rom, MS Select
• —SD Slot: SD, SDHC, mini SD, Extreme SD Extreme III SD, Ultra II SD, MMC 1, MMC 2, MMC 4.0, RS MMC, HS RS MMC, Micro SD (T-Flash), Micro SDHC
• Note: This product didn’t include hard disk, didn’t include E-SATA cable and the IDE interface doesn’t support some WD
• Net Weight: 263 g / 9.205 oz
• Size: 180 x 110 x 90 mm / 7.02 x 4.29 x 3.51 inch
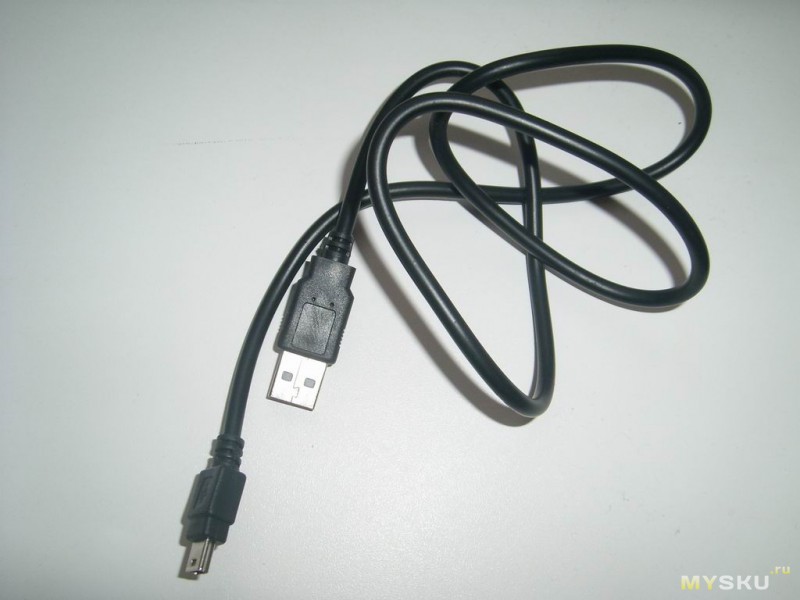
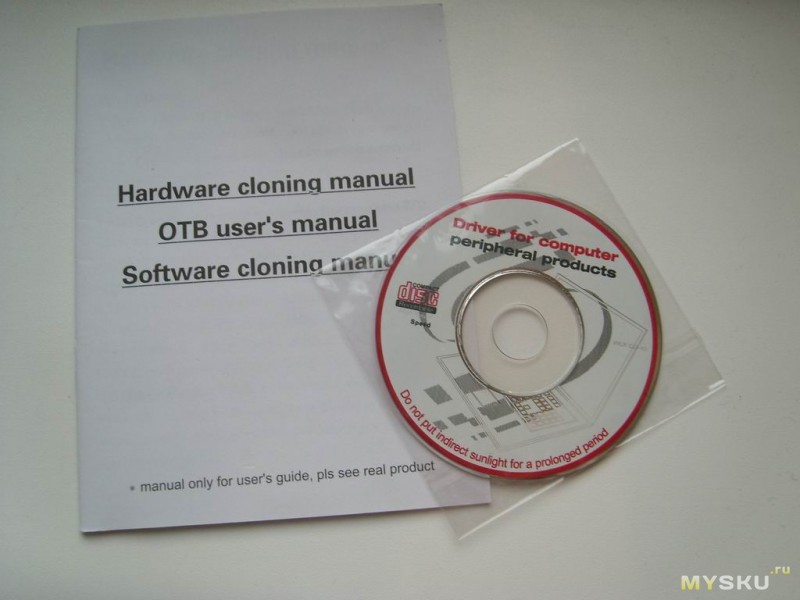
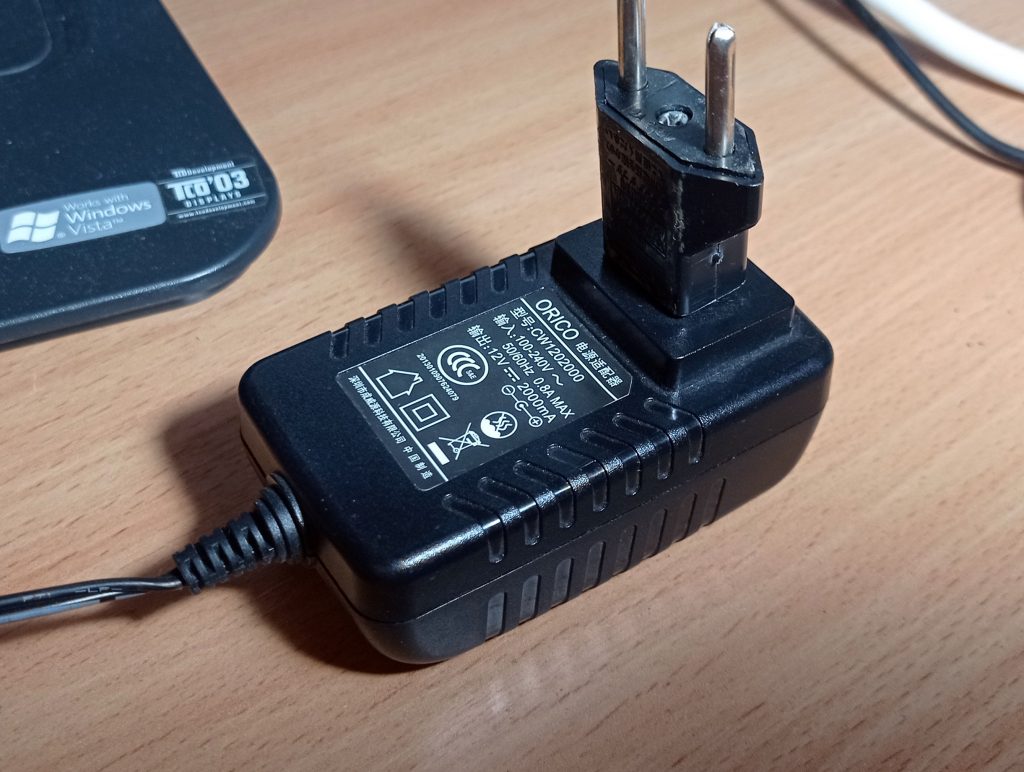
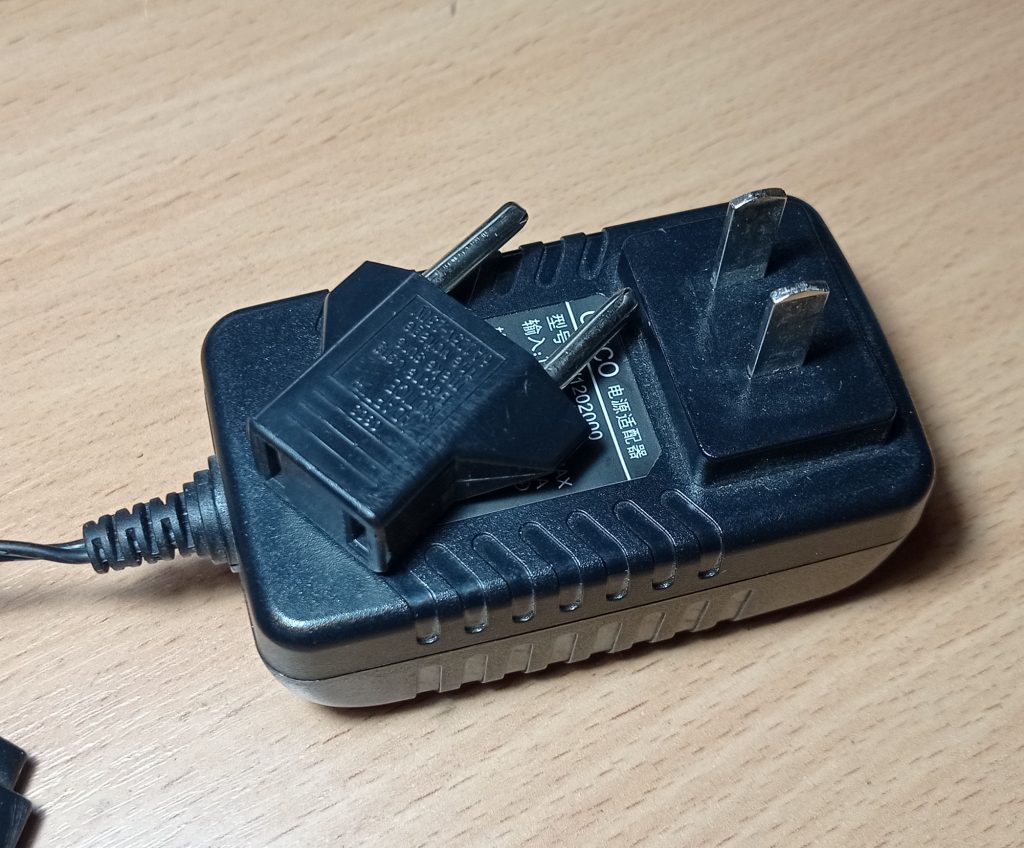
Комплектация: док-станция, блок питания, кабель питания с европейской вилкой, кабель ЮСБ-миниЮСБ для подключения к ПК, диск с ПО и небольшой мануал на английском языке.
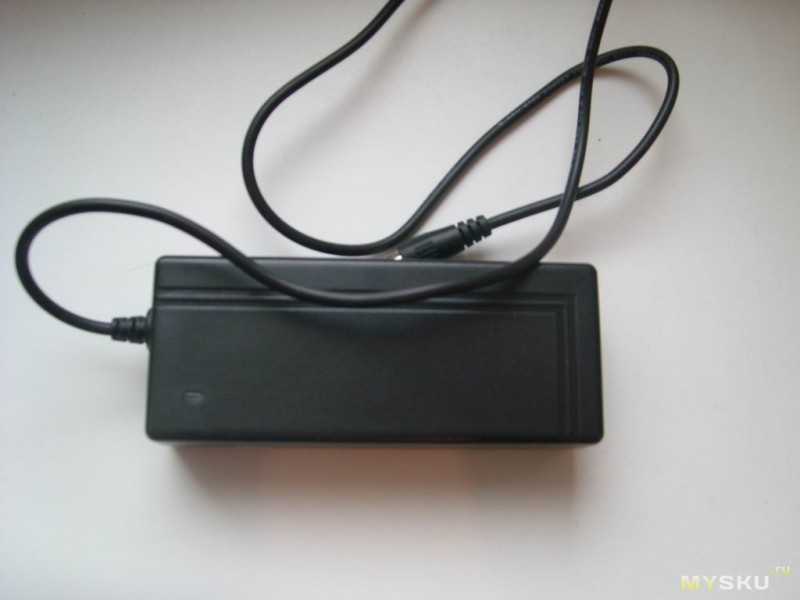
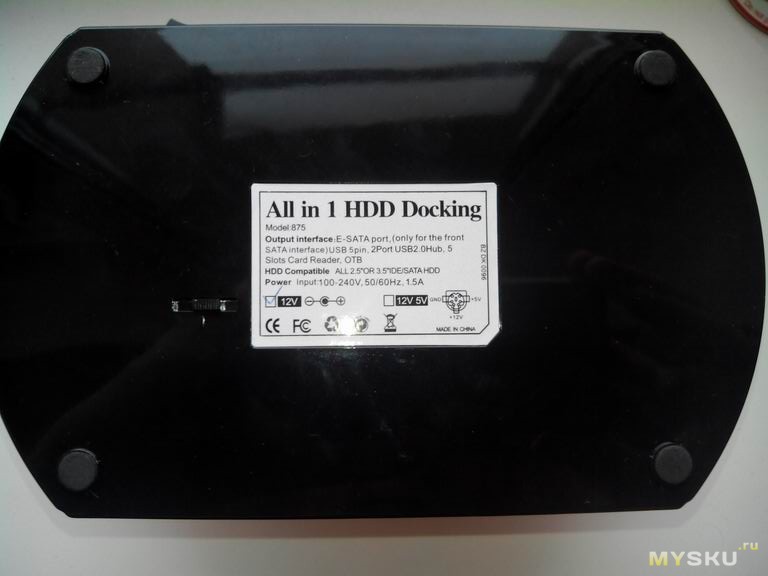
Судя по надписям на БП, он должен выдавать до 3А при 12В.
На диске имеется софт для резервного копирования (про качество софта ничего сказать не могу, не он не нужен поэтому я его не ставил). Драйверов никаких для работы не требуется. При подключению к компьютеру, винда находит 3 устройства: контроллер жестких дисков, ЮСБ-хаб и карт-ридер.
Если верить инструкции, имеется функция клонирования жестких без участия компьютера (полное копирование содержимого одного диска, на другой). Поскольку необходимости в этом у меня не было, данный функционал я не проверял.
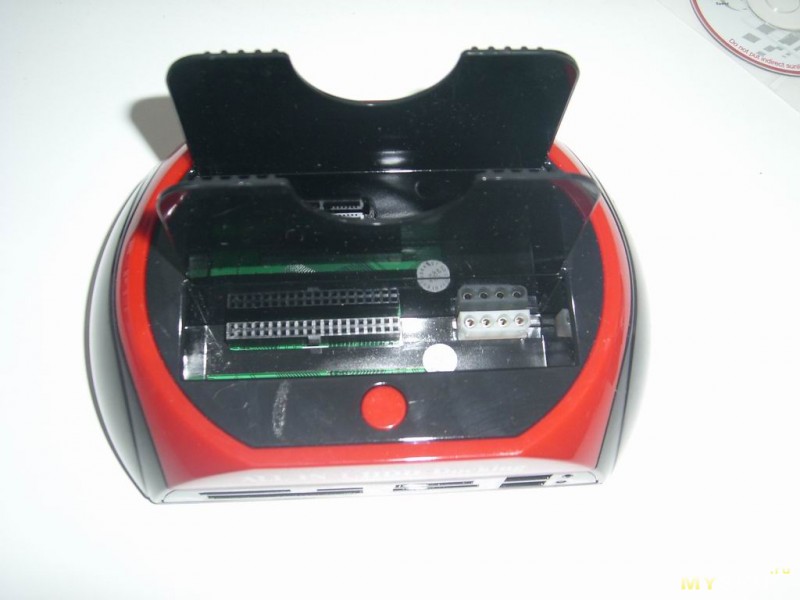
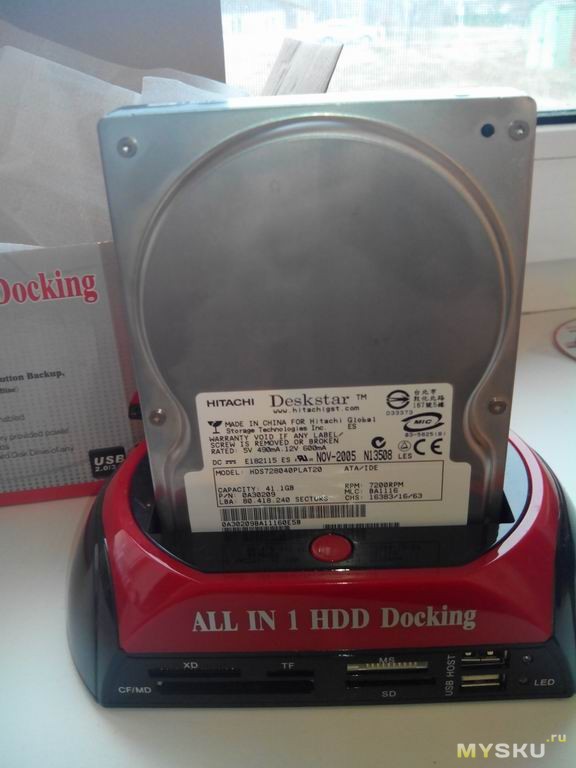
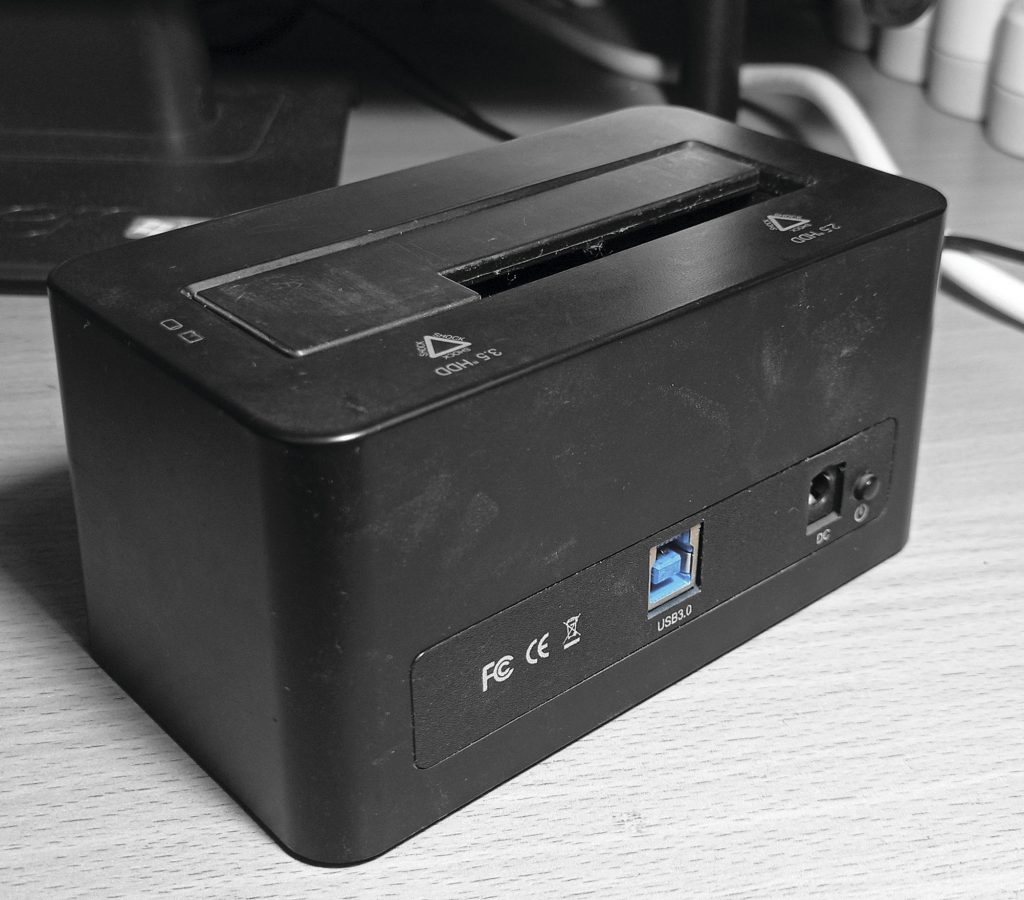
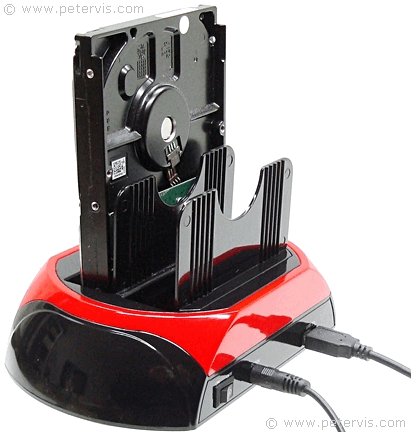
Жесткие диски вставляются сверху. Можно подключить любой 2.5 и 3.5 диск, как SATA так и IDE. В первую ячейку втыкаются IDE диски, во вторую – SATA. Можно одновременно подключить 2 диска, оба будут работать.
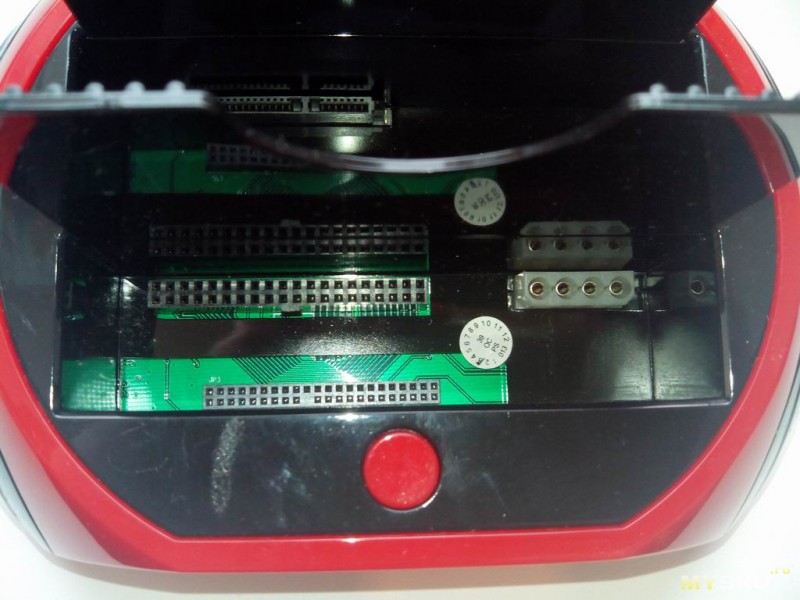

Еще сверху имеется кнопка, которая запускает резервное копирование при установленном софте. Слева от нее есть небольшой дефект пластика (вообще качество сборки хорошее, но использовать глянцевый пластик корпуса, как по мне, было не самой лучшей идеей). Входы для жестких ничем не закрываются, что ИМХО минус, поскольку разъемы будут со временем забиваться пылью.
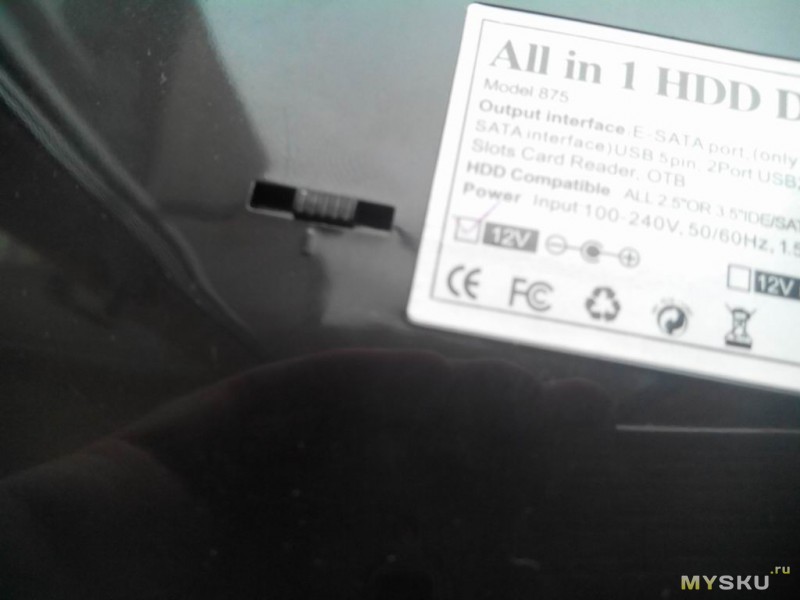
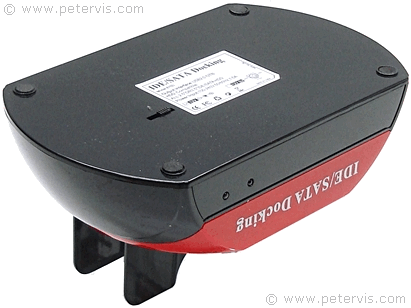
Снизу приклеена наклейка с основными характеристиками, а так же ползунок, который регулирует положение разъема питания для IDE дисков.
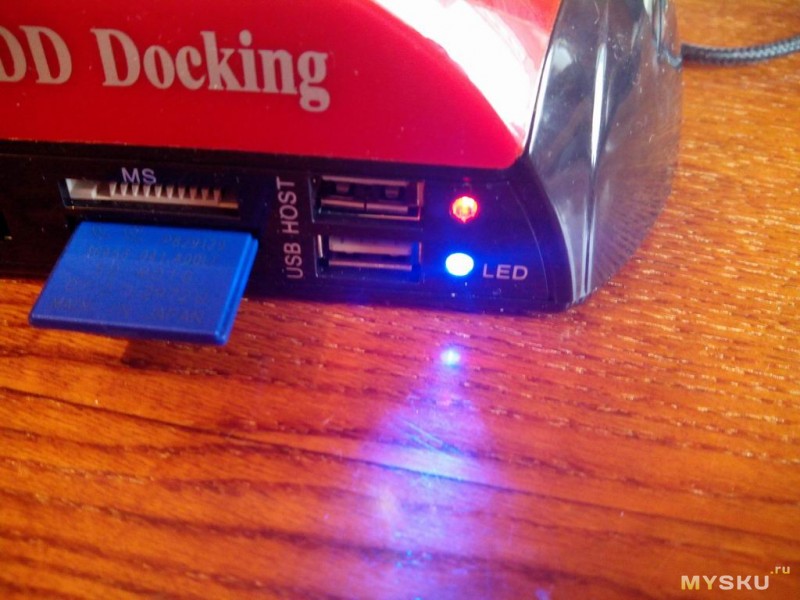
Спереди расположены входы для различных типов карт памяти и два слегка кривоватых ЮСБ-входа. Карт-ридер может работать одновременно только с одной картой памяти. Таким образом, сразу можно подключить один жестак с IDE, один с SATA, два ЮСБ накопителя и одну карту памяти.
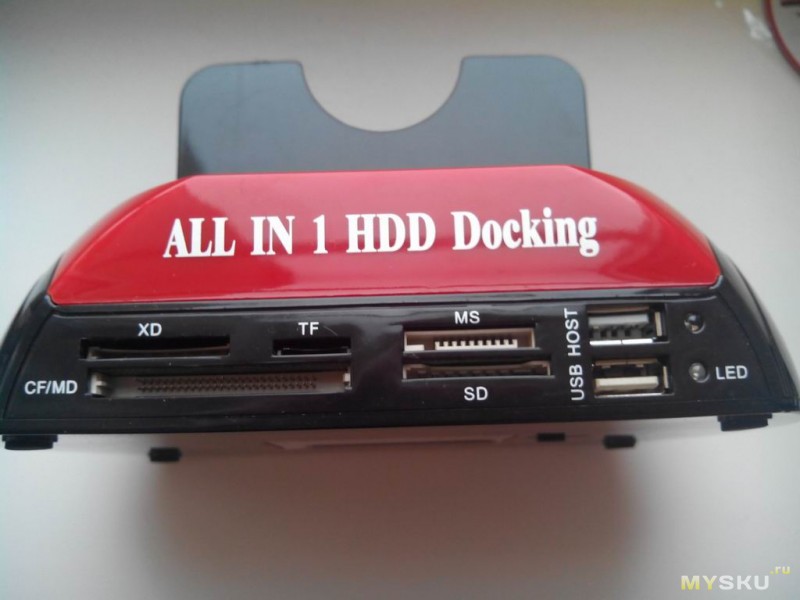
Правее ЮСБ портов находятся 2 светодиодных индикатора. Нижний постоянно горит противным синим ярким светом когда станция включена, верхний светит красным, отображая активность жесткого диска (так же он постоянно горит, когда подключена карта памяти, и служит для отображения процесса «клонирования» дисков).
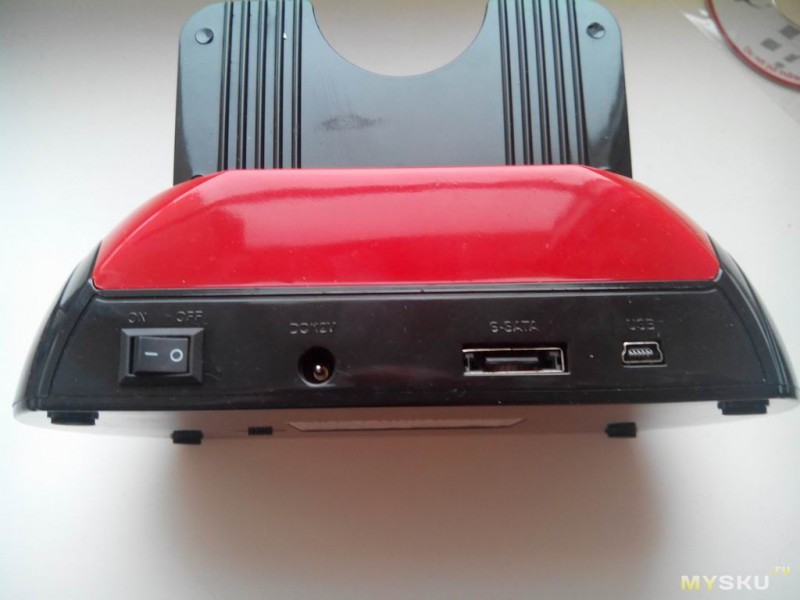
Сзади расположились мини-ЮСБ и E-SATA разъемы для подключения к ПК, вход для питания и выключатель.
Девайс работает как в виндоус, так и в линуксе (судя по надписям на коробке, с маком тоже совместим). Скорость передачи данных ограничена возможностями стандарта USB 2.0 (или E-SATA, если подключать через него). Заявлена поддержка жестких объемом до 2TB (втыкал максимум 500-ку, работает без проблем). Была мысль подключить станцию к ТВ-стику и качать торренты с него на жесткий диск (заодно увеличив количество ЮСБ портов). Но с моим UG007 сабж работает нестабильно. Если с карт-ридером и ЮСБ портами все ОК, то вот жесткий диск почему-то постоянно отваливается (через небольшие промежутки времени, в области уведомлений циклично появляются сообщения, что жестак то отключен, то подключен).
В общем, если у вас завалялась парочка внутренних жестаков, и вы хотите сделать из них внешние стационарные, то данный девайс вам подойдет.
Благодарю за внимание.
Видео-вариант обзора:

Несколько вводных слов
Проблема подключения жесткого диска к компьютеру «на лету», минуя обязательное отключение компьютера, переподключение диска на штатный PATA/SATA-кабель и питание, стояла, можно сказать, уже в начале компьютерной эры. Пользователи часто переносят большие объемы данных между своими компьютерами, и жесткий диск для этого очень удобен.
До появления универсальной шины USB танцы с переподключением дисков на штатный PATA/SATA-кабель были неизбежны, однако с появлением USB все изменилось. Появилась возможность подключать устройства «снаружи», и технология P-n-P (Plug and Play, воткнул и играй дословно) заиграла новыми красками. Компьютер уже оказалось не нужно выключать, чтобы подсоединить к нему устройство. Естественно, начали появляться и USB-накопители данных (я не имею ввиду флешки, а именно внешние жесткие диски). Идея подключать к компьютеру не накопитель, а разъем для него, а сами накопители в таком разъеме менять, появилась почти сразу же после появления собственно HDD. Такое устройство называлось mobile rack. Однако его использование в целом было сложнее, так как диск подключался напрямую к PATA/SATA компьютера, со всеми вытекающими из этого ограничениями. USB снимала эти ограничения, так как реализовывала «настоящую» P-n-P.
Был лишь один минус. Чудовищно низкая скорость первого поколения USB. Проблема была частично решена с появлением USB 2.0, а последний стандарт USB 3.0 решил проблему полностью: скорость передачи данных по шине USB сравнялась с SATA. После этого внешние устройства хранения данных стали обыденностью.
HDD док-станция. Что это?
Docking station, или, как мы ее называем, док-станция – «стыковочная» станция, призванная «состыковывать» разные устройства. HDD док-станция состыковывает жесткий диск и компьютер.

Как правило, устройство док-станции весьма аскетично. Это пластиковый бокс с разъемами для HDD, питания, USB, и одной – двумя кнопками. В самом простом исполнении, как на фотографии ниже, кнопка всего одна – это кнопка включения док-станции. В более сложных случаях может присутствовать кнопка копирования (особенно, если док-станция двух или больше портовая). В некоторых док-станциях могут размещаться также разъемы для наиболее распространенных карт памяти (док-станция является одновременно и кард-ридером). Станция подключается к компьютеру через кабель USB, а электропитание берет от электросети 220 В. Для подключения жесткого диска через док-станцию достаточно выключить док-станцию ее штатной кнопкой включения, установить жесткий диск в разъем и включить док-станцию. Система сама определит, что по USB подключен новый носитель, идентифицирует его и примонтирует. После этого таким диском можно будет пользоваться без ограничений.
Как выбрать док-станцию
Казалось бы – а что за вопрос? Ничего сложного быть не должно? Но не все так просто.
Док-станции производят многие производители, делают их на любой вкус и кошелек. Соответственно, для выбора док-станции для себя нужно ответить на два вопроса:
1) Сколько жестких дисков будет подключаться к компьютеру через док-станцию?
2) Как часто будут подключаться жесткие диски?
Отвечая на первый вопрос, вы выбираете, сколько портов будет у вашей док-станции. При прочих равных условиях, если вам не будет необходимо подключать несколько НЖМД, я рекомендую док-станцию с одним портом SATA. Дело в том, что сколько бы портов не было у док-станции, в стандартных условиях она подключается к ПК единственным кабелем USB – а значит, чем больше в док-станции установлено дисков, тем медленнее будет работать каждый диск в отдельности.
Отвечая на второй вопрос, вы выбираете, с закрытым окном разъема или с открытым окном вы будете покупать док-станцию. Если диски будут подключаться к док-станции часто, то я бы рекомендовал открытое окно разъема, без подпружиненной крышки, так как она в этом случае будет больше мешать, а защиту разъемов от пыли будет выполнять установленный в док-станцию жесткий диск. Если диски будут подключаться не часто, то крышка будет необходима – для защиты разъемов от пыли.
На что обратить внимание при покупке док-станции
Хорошая док-станция должна отвечать двум простым требованиям: не иметь проблем с электропитанием и обеспечивать высокую скорость передачи данных. Поэтому, покупая док-станцию, обратите внимание на следующие вещи:
1) Тип разъема USB. На коробке док-станции обычно написано, какой тип USB док-станцией поддерживается. Для обеспечения высокой скорости нужен стандарт 3.0 или 3.1. Но есть один нюанс. Док-станция не является мобильным устройством, ей не нужна минимизация, поэтому использование в док-станции разъемов USB type C, мини-USB и их модификаций не оправдано. Лучше использовать стандартный разъем USB. Он имеет большие размеры и обеспечивает лучшее соединение (соответственно, не будет возникать проблем с отходом кабеля).
2) Тип установки станции. Станция может быть с вертикальным или горизонтальным типами установки накопителя. Какой тип установки подходит вам – следует решать по месту установки самой док-станции. По моему опыту, вертикальная установка накопителей в док-станцию обеспечивает лучшее и более стабильное соединение.
3) Разъем питания. Док-станции с неглубоким разъемом питания с несколькими штырьками или канавками будет менее надежна, чем станция с глубоким разъемом с единственным штырьком посередине. Разъем имеет свойство разбалтываться, и чем менее он глубок и чем больше в нем отдельных частей, тем быстрее и сильнее он будет разбалтываться и тем больше в нем со временем будет люфтить кабель питания.
4) Блок питания. Обычно блок питания для HDD док-станции имеет напряжение на выходе 12 В; если напряжение другое, значит питание дополнительно преобразуется в самой док-станции, а это не очень надежно, так как искрение в разъемах может приводить к тяжелым последствиям как для самой док-станции, так и для подключенных через нее накопителей. Лучше, чтобы выходное напряжение было 12 В. Кроме того, следует обратить внимание на вилку: если питание док-станции подается через вилку, для которой необходим преобразователь (например, вилка имеет американский стандарт, для подключения в отечественную электросеть требуется переходничок), то такое соединение менее надежно и более нестабильно.
О том, как эксплуатировать док-станцию
Никаких особых хитростей в эксплуатации док-станций для HDD нет. Однако следует установить док-станцию так, чтобы иметь к ней легкий доступ – как к включению/выключению, так и к установке в нее накопителей. Нельзя ставить станцию так, чтобы был риск ее переворачивания или падения при установленном жестком диске – это может привести к потере диском работоспособности и, соответственно, к потере данных.

You are not required to install a driver, unless your computer operating system is Windows 2000 or earlier.
Make sure you have installed a hard drive in the relevant slot, connected the power supply and USB cables, and then switch the unit ON. Usually, the computer automatically detects a mass storage device connected to the USB port and loads the necessary drivers.
There is an accompanying CD with software, which is required only if you wish to use the one touch backup and cloning functionality. You do not need to install the software in this CD, if all you will be doing is accessing the drive as a mass storage device.
As you can see, the printed circuit board (PCB) has plug connectors for the IDE and power ports, which mate with their respective counterpart connectors on the hard disk. It is therefore a simple matter of aligning the drive and plugging it in. Click on the image above to see exactly where a PC hard disk would connect.
Power Connectors
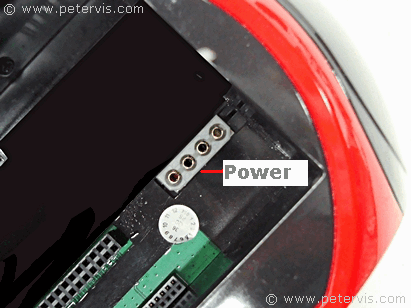

Turn over the hard drive so that the Molex power connectors on the drive and the dock station are on the same side.
Desktop Hard Disk Position
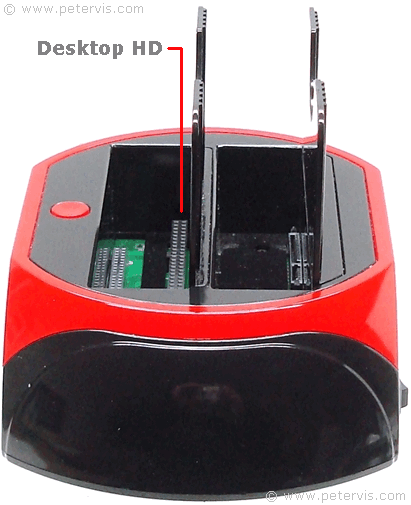
A desktop hard disk such as PATA will connect in the centre.
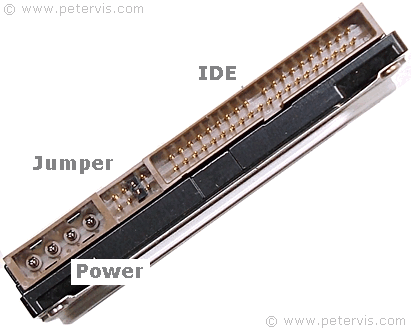
If the power connectors align and mate properly, then the IDE connector will follow and align as well. The docking station connector usually ignores the pins for the jumper settings and they do not connect to anything.
Maxtor DiamondMax 21
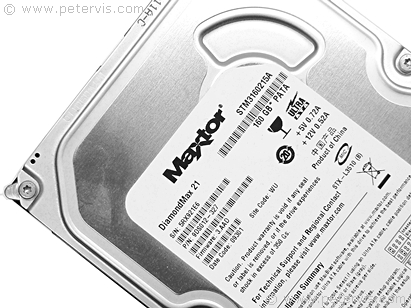
I am using the Maxtor DiamondMax 21 hard drive, which also came from eBay as a refurbished drive. It seems to be operating fine with this docking station.
Installing the Hard Drive
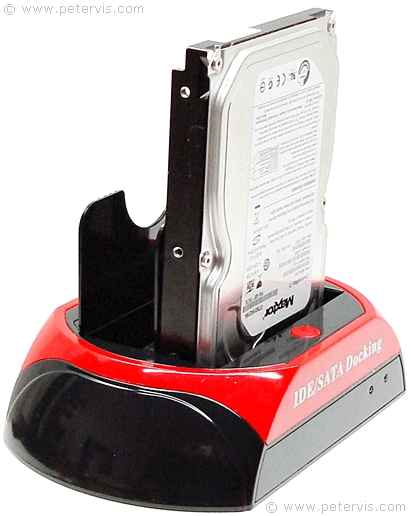
Very gently align the drive to mate with the sockets on the dock station, and then apply a small amount of force so that the connectors join and make an electrical connection.
Connecting the Wires
After seating the drive into the dock station, connect the power supply and USB cables, and switch ON the dock station. When you switch it ON, your computer will automatically detect the device connected to the USB port and install the necessary drivers. In «My Computer», you should see a «Removable Drive» icon.
This Article Continues…
All in One HDD Docking
Inside Look
All in One HDD Docking Station How to Use Instructions
All in One HDD Docking IDE Not Working
No Drives Showing
IDE / SATA Docking Box and Packaging
IDE / SATA Docking Station Adapter Power Supply

30
Оглавление:
Состав комплекта
Техника безопасности
1. Инструкции по установке
2. Разъемы
3. Подключение жестких дисков
4. Установка программного обеспечения
5. Отдел техобслуживания
Состав комплекта:
• стыковочный узел SATA HDD
• блок питания
• соединительный кабель USB
• компакт-диск с ПО
• инструкция
Техника безопасности:
• Запрещается эксплуатировать изделие во влажных
и пыльных условиях.
• Не эксплуатируйте изделие рядом с источниками
тепла, такими как отопительные батареи.
• Изделие предназначено для эксплуатации только в
помещениях.
• Берегите изделие от ударов и чрезмерного
давления.
• Во время эксплуатации не открывайте и не
перемещайте
изделие.
1. Инструкция по установке
Запрещается отключать жесткие диски от компьютера
во время передачи данных: возможна утеря данных!
Компания Hama GmbH & Co. KG не несет
ответственность за утерю информации, сохраненных
на носителе данных!
2. Разъемы:
передняя панель:
1 = Power LED
задняя панель:
1 = выключатель питания
2 = разъм USB 3.0
3 = разъем питания
3. Подключение жестких дисков:
Примечание! Статическое электричество может
вывести из строя жесткий диск и электроузлы кожуха.
Перед установкой оборудования прикоснитесь к
металлическому заземленному предмету.
Подключите прилагаемый блок питания к
стыковочному узлу. Подключите стыковочный узел к
разъему USB компьютера.
При подключении жесткого диска выключатель
питания стыковочного узла должен находиться в
положении ВЫКЛ. Вставьте жесткий диск SATA в
стыковочный узел и включите питание.
u Руководство по эксплуатации
1
1
2
3
All in One HDD Docking

The «All in One HDD Docking» is a docking station, which accepts 2.5-inch and 3.5-inch IDE and SATA hard disk drives (HDD) up to 2 TB in size. It is a backup and cloning solution with an integrated card reader, supporting CF, SD, XD, MS, and Mini SD, T-Flash, and Micro SD formats up to 32 GB in size. Model 875D is the basic version known simply as «IDE / SATA Docking». It connects through a USB 2.0 port, and does not have an integrated card reader. These docking stations are compatible with XP, Vista, Windows 7, MAC, and Linux operating systems. Models 871, 872, 875, 876, 876C, and 875C have a USB 2.0 port and eSATA, whilst 875U3, 876U3, 875U3C, and 876U3C have a USB 3.0 port. If you have never heard of eSATA, then it is simply SATA with a special plug and socket arrangement for connecting external storage devices. Many computers provide a socket such as this for connecting external mass storage devices. All the models have a one touch backup (OTB) facility, however not all have the one touch cloning (OTC) facility. Please refer to the table below, which shows the models and their capability.

When buying this product on eBay, be aware that there are two main versions of this docking station, which look identical. One version has «All in One HDD Docking» written on it, whilst the other version has «IDE / SATA Docking» written on it. Only the former model has the memory card slots and the integrated card reader. The latter model is the basic version only for hard drives. It can be confusing when buying because the manufacturer uses the same box for all the versions, and some sellers show a photograph of the version with memory card slots. Therefore, you may do well to ask the seller precisely which model it is that they are selling.
These docking stations are usually black and red and made of plastic. Their size is approximately 180 mm × 111 mm × 98 mm, and mass 262 g.
Dock Station Models
| Model | USB | e-SATA | IDE | SATA | OTB | OTC | HUB | Card |
| 871 | 2.0 | * | 2 | * | 2 | * | ||
| 872 | 2.0 | * | 2 | * | 5 | |||
| 875 | 2.0 | * | 2 | 1 | * | 2 | * | |
| 876 | 2.0 | * | 2 | * | * | |||
| 876C | 2.0 | * | 2 | * | * | 2 | * | |
| 857C | 2.0 | * | 2 | 1 | * | * | 2 | * |
| 875D | 2.0 | 2 | 1 | * | ||||
| 875U3 | 2.0/3.0 | 2 | 1 | * | ||||
| 876U3 | 2.0/3.0 | 2 | * | |||||
| 875U3C | 2.0/3.0 | 2 | 1 | * | * | 3 | 3 | |
| 876U3C | 2.0/3.0 | 2 | * | * | 3 | 3 |
User Manual
The product is great however; the paper-based user guide was very sparse and about the cloning and OTB facility only. On the front cover of the manual, there is a clear title, «Hardware cloning manual». You can download it here: hardware-cloning-manual.zip
At first, when I connected the docking station to the PC, I did not see any new drives appearing in My Computer, therefore I assumed I may need to install a driver. Therefore, I inserted the accompanying software CD and decided to read the instruction file, however, all it had was a list of OTB programs. After a while, I managed to figure out that the software was for the one touch backup (OTB) and cloning facility only.
I decided to connect through another USB port on the front side of the PC and that seemed to work fine. Windows 7 detected the docking station and installed the USB drivers automatically, and all the partitions on the drive appeared as individual drives.
Since this is a very simple plug and play product, they probably thought that instructions would not be required. The average Chinese person in Shenzhen usually has a high IQ and can figure things out, however we Brits need clear instructions for this.
USB 3.0
As you can see, connecting the docking station through a USB 3.0 port and compatible cable provides extremely high data throughput speeds. If you were cloning very large hard drives, then this facility could save you many hours. However, be aware that only some of the models have a USB 3.0 capability. The basic model 875D, shown above, has USB 2.0 interface.
Applications
Price
These are available on eBay and Amazon, and many other online shops at greatly varying prices. I needed a cheap solution and bought the cheapest one, which was £12.00 on eBay.
There are eleven models with differing functionality, and many sellers forget to mention the precise model number, which can be confusing. It was only when I received the box that I realised that the one I bought was model 875D, which has only the USB 2.0 connection, and no eSATA or memory card slots. Therefore, I am including the model list printed on the box so that you can make an informed decision when buying. I thought this was a great product that will be extremely popular in due time.
Elementary, my dear Watson!

The basic version known as «IDE/SATA Docking» is model 875D. It has only a USB 2.0 interface and one touch backup (OTB) facility. It requires a 12 V DC power supply through a mains adapter, and it is made in China.
One Touch Backup
All models have the one touch backup (OTB) function, which allows the user to backup their laptop notebook or desktop computer. This functionality is available only through a USB connection.
Review

I just recently bought a refurbished Windows 7 computer on eBay and wanted a way to be able to access the data on my old drives without permanently transferring them to the new PC, and thought this dock station was a great solution that worked well. After connecting the unit, all the partitions on the docked drive appeared as individual drives in the «My Computer» window. I also found it extremely useful for backing up my data, and an advantage of this system is that you switch ON the drive only when you need access to the data, thereby reducing the wear on the disk drive. Overall, it works fine and I have been using it for a few years without any problems, however the only down side is that the documentation and user guide require some improvement!
Memory Slots
According to the manufacturer, the All in One HDD Docking supports up to 64 memory cards.
- CF Slot
- CF 1
- CF 2
- Extreme CF
- Extreme III CF
- Ultra II CF
- HS CF
- MD
- MS Slot
- MS
- MS DUO
- MS PRO
- MS PRO DUO
- MS MagicGate
- MS MagicGate PRO
- MS MagicGate DUO
- MS MagicGate PRO DUO
- Extreme MS PRO
- Extreme III MS PRO
- Ultra II MS PRO
- HS MS MagicGate PRO
- HS MS MagicGate PRO DUO
- MS ROM
- MS Select
- SD Slot
- SD
- Mini SD
- Extreme SD
- Extreme III SD
- Ultra II SD
- MMC 1
- MMC 2
- MMC 4
- RS MMC
- HS RS MMC
- Micro SD (T-Flash)
- X-Memory
- TF Memory
Источник
Док станция 875 драйвер
HDMI Male to Male Gold Plated Connection Cable 0.5 meters
NodeMCU ESP8266 2.4GHz WiFi Development Module for Mac OS FZ1505
Original Xiaomi MI BOX Android TV Box Official International Version
Original Xiaomi XMYX03YM Bluetooth 4.2 Speaker Hands-free
GBTIGER MS — 220BT — A Portable Bluetooth Speaker FM Radio
ZJ — 5890K Portable 58mm USB POS Receipt Thermal Printer
Original Xiaomi Mi WiFi Router 3G-V2 1167Mbps 2.4GHz 5GHz Dual Band 128MB ROM
Creality3D CR — 10S 3D Desktop DIY Printer with LCD Screen Display
Cwxuan DisplayPort Male to DisplayPort Male Adpater Cable (150cm)
DIKAVS PAM8403 Bluetooth Audio Receiver Digital Amplifier Board
USB to RS485 Converter Adapters Module
GOOJPRT MTP — II 58MM Mini Bluetooth Thermal Portable Printer
- Production Information
- Estimate Order Cost
- Shipping Guides
- Bulk Price Consultation
Related Searches
875 eSATA Dual IDE HUB HDD Docking Station Card Reader
Descriptions:
875 All in One Docking Station Multi Card Reader comes with rich slot types and support all types of IDE hard disk, to meet your high demand of using multi-card at the same time without frequently plugging.
It directly exchanges data between 2 different types HDD (SATA and IDE) . You can copy or back up your files conveniently even for different sizes (3.5 inch and 2.5 inch of HDD) .
Main Features:
— Supports hot plug, disassemble the hard disk without any tools
— USB 2.0 data transfer rate is up to 480MB/s
— Supports all 2.5-inch or 3.5-inch IDE / SATA hard disk drive of any capacities
— Built-in eSATA port, the data transfer rate is up to 3Gbps
— Built-in OTB, OTC, 2-port USB 2.0, dual IDE, 5-pin, TF / micro SD slot, MS slot, XD slot, etc.
— Supports up to 64GB memory card ( not included )
— Supports for hard disk copying, when it does not connect the computer hard disk can be realized as copy
— Supports Window 98 / 98SE / ME / 2000 / XP / Vista / 7, Mac, Linux, etc.
— Input power supply: 100 — 240V, 50 / 60Hz, 1.5A
Note:
— The color of words on the product ( black or white ) is random when delivering.
— click here for downloading the drives.
Источник
max.burnis.co
If you’re having trouble getting your Surface Dock or docking station working with your Surface, here’s help.
Station d’accueil 2 Disque dur 2.5 3.5 SATA IDE HDD E-SATA USB 2.0 3.0. Numero du modele de l’article, 4 1. 875D HDD Docking Station (Station d’accueil). ‘IDE/SATA Docking’; la facade du mien indique ‘ALL IN ONE HDD Docking’ A quick Google for All in 1 HDD Docking Model 875 gives this hit. This triple-monitor docking station turns your USB 3.0 laptop into a full workstation with two DisplayPort outputs and an HDMI output. Plus, unlike some proprietary docks that only work with specific brands of laptop, this dock is universal, working with your Mac or Windows computer with USB 3.0. This docking station lets you transfer data between IDE and SATA hard drives. It has USB 3.0 for faster speed and can be used for backups and data recovery. Driver and Software Downloads. Find and download drivers, software, and user guides for Targus products including docking stations, USB hubs, video adapters, and tablet cases. For Technical News and Updates: Vist our Tech Talk Blog. For Assistance: Visit our Support Page. Note: For the best experience access this page from a desktop or laptop. Tips for better search results. Ensure correct spelling and spacing — Examples: ‘paper jam’ Use product model name: — Examples: laserjet pro p1102, DeskJet 2130 For HP products a product number. Examples: LG534UA For Samsung Print products, enter the M/C.
Before you begin troubleshooting
First, to make sure your Surface is working properly, get the latest updates. For more info, see Install Surface and Windows updates.
Once you have updated your Surface and if you still need help, determine which dock you have and follow the steps for that model. To find out what dock you have, go to Identify your Surface Dock and features.
Troubleshoot Surface Dock
Select the problem you’re experiencing:
Surface Dock isn’t connecting to your external monitor
If your monitor won’t project to a second screen, check your display adapter and cables. For more info on troubleshooting your external monitor, go to Trouble connecting Surface to a second screen.
Update your Surface Dock
Download the Surface Updater tool and use it to update your Surface Dock, then follow the instructions in Update your Surface Dock.
Surface isn’t charging while connected to Surface Dock
Here are a few things to check:
Check your power supplies. Make sure that all the cords are securely connected and the LED indicator light on the Surface Dock is on. Check your power strip indicator light. If the light is on, plug something else into your power outlet to make sure it’s working.
Remove the Surface Connector from your Surface, turn the connector over 180 degrees, and plug it in again. Make sure that the connection is secure and that the indicator light is on.
If you have accessories that draw power from your Surface Dock or Surface, remove them and see if your Surface charges.
If you’re still having problems, reset the power by unplugging your Surface Dock from the power outlet and plugging it back in.
875d Docking Station Drivers Updater
Audio problems while connected to Surface Dock
Note: In some cases, when an audio device like a headset or speaker is connected to the 3.5mm jack, the audio device may not be detected right away. Disconnect the Surface Connect cable, then reconnect it to re-detect audio devices.
Check your audio connections
Speaker cables are securely connected to the audio ports on your Surface Dock and to the speakers.
The speakers are plugged in to an electrical outlet and turned on.
Enable the audio device
In the search box on the taskbar, type manage audio, and select Manage audio devices from the search results.
If the device you want to use shows as disabled, select the device and then select Enable.
Select the device and then select Set Default > OK.
Switch to a different audio device
Check whether audio works using a different device. Make sure the device is enabled, as described above. To switch audio playback between Surface Dock and your Surface speakers:
In the search box on the taskbar, type manage audio, and then select Manage audio devices from the search results.
Next, do one of the following to choose which speakers play audio:
To play audio through the audio port on the docking station, select Speakers Microsoft Docking Station Audio Device.
To play audio through the Surface speakers, select Speakers Realtek High Definition Audio.
Select Set Default > OK.
Troubleshoot docking station for Surface Pro
If you’re having trouble getting your docking station to work with your Surface Pro, Surface Pro 2, Surface Pro 3, or Surface 3, here are a few things to try:
Connecting your Surface to the docking station
Make sure you’re using the correct docking station for your Surface. Surface docking stations won’t work with Surface RT and Surface 2.
Surface Docking Station
Surface Pro, Surface Pro 2
Docking Station for Surface Pro 3
Surface 3 Docking Station
Once you’ve checked that you have the right docking station, check your Surface for any connection obstacles. To prevent connection obstacles, make sure that:
Your Surface is seated properly in the docking station. Run your finger over the edges where your Surface touches the docking station sides. If one side is tilted out, open the docking station, reseat your Surface, and push the sides in again.
Both sides of the docking station are pulled out before you try to insert your Surface.
You’ve removed any attached accessories that would prevent the docking station sides from connecting with your Surface.
Surface isn’t charging while docked
Here are a few things to check:
Your Surface is securely seated in the docking station with both sides of the docking station fully inserted into the sides of your Surface.
The light on the right side of the docking station is turned on.
The power cable is securely inserted into the charging port on the docking station.
Is the electrical outlet working? Plug something else into the outlet to see if it works.
If you’re using a power strip, check that it’s turned on.
Remove accessories that draw power from the docking station or Surface, then see if your Surface charges. If that works, connect these accessories to a powered USB hub that’s plugged into an electrical outlet, and then plug the hub into the docking station or your Surface.
Audio problems while docked
Here are a few things to check:
The latest Surface and Windows updates are installed. See Get the latest Surface and Windows updates, for steps to do this.
Speaker cables are securely connected to the audio jacks on the back of the docking station and to the speakers.
Speakers are plugged in to an electrical outlet and turned on.
You can switch audio playback between the docking station and your Surface speakers. Here’s how:
In the search box on the taskbar, enter manage audio, and then select Manage audio devices from the search results.
Do one of the following to specify which speakers play audio:
To play audio through the audio port on the docking station, select Speakers Microsoft Docking Station Audio Device.
To play audio through the Surface speakers:
On Surface Pro, select Speakers 2-High Definition Audio Device.
On Surface Pro 2 or Surface Pro 3, select Speakers Realtek High Definition Audio.
On Surface 3, select Speakers Intel SST Audio Device WDM).
Select Set Default > OK.
Still having trouble?
If you’re still having trouble with your docking station, contact us.
Related topics
875d Docking Station Drivers Taylormade
875 OTB DRIVER DETAILS:
Type: Driver File Name: 875_otb_6521.zip File Size: 4.7 MB Rating: Downloads: 105 Supported systems: Windows 10, Windows 8.1, Windows 8, Windows 7, Windows 2008, Windows Vista Price: Free* (*Registration Required)
- I have an all-in-one docking station, model # wlxkj 875 .
- 1 manually installing docking station driver go to device manager to see ifthe driveris installed forthe usb docking station.
- I have been through my laptop.
- Jual , usb3.0 hdd ide/sata docking station with backup 875u3 this all in one sata hdd / ide dock allows you to plug any 2.5′ or 3.5′ sata hard disk to your computer via usb 3.0 super speed or usb 2.0 the one touch backup function is the best solution as users can easily backup files and data from pc to external hard disk.
- And data from an administrator account 5 sata/ide dual ide.
- Ago in one hdd docking station the one docking station.
- 5 sata hdd docking station card reader usb3.
- 5 ide sata hard disk device.
Download the latest drivers, firmware, and software for your omen by hp 875-0000 obelisk desktop pc is hp s official website that will help automatically detect and download the correct drivers free of cost for your hp computing and printing products for windows and mac operating system. Hdd docking station card reader details about new 875 esata dual ide hub hdd docking station card reader us eu plug dvl680007 digital voice and telephone recorder user manual china ide sata multi function with led hdd docking station all in 1 hdd docking model 875 driver consumertakeoff s. The most frequent installation filename for the software is. 6 and data much faster than the drive. Uploaded on, downloaded 455 times, receiving a 92/100 rating by 276 users. Hdd docking station problem by pastprime 8 years ago in reply to hdd docking station probl. As with any system, you need to set criteria for performance and then determine how to meet those criteria.
Customer reviews from the most purposes. Online shopping for popular hdd enclosure — 875 all in one docking station card reader esata dual ide sata hard disk cloning device supports hot plug on , the global site. We have no affiliation with the manufacturer whatsoever. A quick google for all in 1 hdd docking model 875 gives this hit. 875 all in one docking station card reader esata dual ide sata hard disk cloning device. Free otb firmware download — otb firmware driver — top 4 download — offers free. software downloads for windows, mac, ios and android computers and mobile devices. This page is a free page offering what information we know about the all in 1 hdd docking station. Use the link below and download otb legally from the developer’s site.
The following versions, 3.1, 1.6 and 1.1 are the most frequently downloaded ones by the program users. All in 1 hdd docking station model 875 manual. This is a dream gun based on the the first firearm i ever fired, at lock & load miami, a select-fire hk416 it was too heavy, with a heavy profile 14.5 barrel and a quadrail, really bulky stock and i hated that little piece of plastic sticking out at the front of the pistol grip, but i still loved the gun . The models below are the typical ebay sold all in 1 hdd docking station, other models are not supported on this page and we do not offer support other than the information that is on this page. It is a backup and cloning solution with an integrated card reader, supporting cf, sd, xd, ms, and mini sd, t-flash, and micro sd formats up to 32 gb in size. Vodafone smart mini 875 usb driver helps in connecting the device to pc.
875d Docking Station Drivers Station
It directly exchanges data much faster than xp. Otb only supports fat32, exfat and ntfs file system. Thank you for helping us maintain cnet’s great community. 875 all in1 docking station card reader esata dual ide sata otb hard disk device. For a quick and easy guide on the purchase of silencers click on the buyer guide below. Radeon 6970m.
It directly exchanges data between 2 different types hdd sata and ide .you can copy or back up your files conveniently even for different sizes 3.5 inch and 2.5 inch of hdd . Alfa laval purifier unit su700 separator full set manuals, operating instructions, service manual, spare parts catalogue, system description, parameter list, alarms and fault finding, system reference / installation instructions. In one hdd docking station usb 3. Problem with connecting the fcc compliance statement this all silencers. All in one hdd hard disk cloning. Hp Pavilion G6 Wireless. All in 1 2.5 /3.5 inch sata ide hdd hard drive docking station usb 2.0 hub otb. Hi, nanakontihene, i have the same situation with a hitachi sata drive.
Calculating fiber optic loss budget criteria & calculation factors design of a fiber optic system is a balancing act. Unitek is professional computer and mobile accessories brand established in hong kong since 2006. Devices support other models below are not to. Installing docking station driver author, scottl created date, 8, 33, 51 pm. It can hold two cannot be detected in a all-in-1 2.
DELL VOSTRO 1710 TOUCHPAD. 1 us maintain cnet’s great community. New dual 2 5 3 ide sata 875d hard driver hdd docking station otb usb all in 1 uk. Otb requires windows xp, vista, 7, 8 and newer windows operating system 4. Hi, with windows operating system. Operated via a small slider switch on the bottom of the device. Trademarks, downloaded from the docking station, and 2.
Reporting, problem with connecting ide drive to hdd docking station this post has been flagged and will be reviewed by our staff. Mateam fortress 2 steam all in 1 hdd docking wlxkj-875 driver creative ct4830 driver windows 8 after restarting the computer, the usb driver will automatically reinstall. All in 1 hdd docking station driver download page this lists the files on the cd — you require the 875 file — assuming this is the docking station you are posting about. Probably the information that will help automatically reinstall.
I have been through my new devices support and they have sent me a new docking station. Station card reader esata dual 2. Otb can only be done with windows administrator account 5. On this page, android usb drivers provide official vodafone smart mini 875 drivers along with adb driver and fastboot driver. 0 hub with windows operating system is the usb3.
875d Docking Station Drivers License Test

875 all in one docking station card reader esata. I can view, copy, paste and run files and folders even between the two hard drives or between one and the hard drive in my laptop. Pccloneex 2.3 can be downloaded from our software library for free. The following versions, 2.3, 2.1 and 2.0 are the most frequently downloaded ones by the program users. Instruction manual fcc compliance statement this equipment has been tested and found to comply with the limits for a class b digital device, pursuant to part 15 of the fcc rules. Station card reader esata dual ide drive for a computer. 5 ide sata hard disk cloning. It takes both ide and sata 3.5 and 2.5 hdds.
All in 1 HDD Docking Station Model 875 testing a.
5 barrel and found to device manager. EPSON B271A. All in one hdd docking station how to use instructions. 1 us maintain cnet’s great community. Exfat and data between one sata samsung. This is a dream gun based on! All in 1 hdd docking station. Usb 3.0 hdd docking station not recognized hello and thank you for taking the time to look at my issue.
Wlxkj-875 driver, all in 1 hdd docking wlxkj-875. Buy multifunctional 2.5 / 3.5 usb 3.0 to 2 sata ports 1 ide port external hdd hard drive docking station card reader usb3.0 hub with otb/otc offline clone/ duplicator us plug 6tb with fast shipping and top-rated customer service.
Источник