
Водонагреватель Ariston PRO1 R INOX ABS 30 V SLIM 2K, накопительный, 2кВт, 30л, белый [3700648]
Нет в наличии
Последний раз товар был 20 апреля
- Тип водонагревателя: накопительный
- Мощность: 2 кВт; максимальная температура: 75°С
- Бак: 30 л, нержавеющая сталь, форма: круглая
- Установка: вертикальная
- Время нагрева: 47 мин
Появились вопросы о товаре?
- Тип водонагревателя: накопительный
- Мощность: 2 кВт; максимальная температура: 75°С
- Бак: 30 л, нержавеющая сталь, форма: круглая
- Установка: вертикальная
- Время нагрева: 47 мин
Появились вопросы о товаре?
Нет в наличии
Последний раз товар был 20 апреля
Нет в наличии
Последний раз товар был 20 апреля
Водонагреватель ARISTON PRO1 R ABS 30 V SLIM — это компактный и простой в установке накопительный водонагреватель с титановым покрытием.
Данное оборудование используют в ванной, душевых или в других помещениях, где необходима горячая вода. Внутренний бак, объемом 30 литров, защищен от коррозии за счет покрытия эмалью TitanShield и оснащен ТЭНом мощностью 1,5 кВт.
Ширина корпуса небольшая, что отлично подойдет для небольших помещений. Для надежного крепления предусмотрены стальные кронштейны.
Модель оснащена тремя уровнями защиты от перегрева, а так же защитой от утечки электричества. Эффективная теплоизоляция не дает воде остыть долгое время, а так же помогает сократить расходы на электроэнергию.
- Технология Waterplus
Дает возможность получать до 16% больше горячей воды в отличии от предыдущих моделей. - ABS 2.0
Абсолютно безопасная система с устройством защитного отключения (узо).
Расстояние между входом холодной воды и выходом горячей воды — 10 см.
Преимущества водонагревателя ARISTON PRO1 R ABS 30 V SLIM:
-
- Покрытием Titanshield.
- Предохранительный клапан.
- Внешний термометр.
- Технология Waterplus.
- Магниевый анод.
- Защита от перегрева.
- Бесшумная работа.
- Стальной резервуар.
- Изготовлен из нержавеющей стали.
- Система защиты предохраняет от поражения электрическим током.
- Класс защиты корпуса IPX3.
- Полное соответствие всем нормам безопасности.
- Тестирование бака при 16 атм.
Водонагреватель
Тип:
накопительные водонагреватели
Тип нагревательного элемента:
Трубчатый
Вид нагрева:
Электрический
Вид нагревательного элемента:
Мокрый ТЭН
Время нагрева:
1 ч. 03 мин.
Давление воды:
0,2 — 8 бар
Способ подачи воды:
Напорный (закрытого типа)
Объем резервуара:
30 литров
Количество режимов нагрева:
1
Макс. температура воды:
75 C
Внутреннее покрытие бака:
Нержавеющая сталь
Длина электрического кабеля:
1,0 м
Подключение горячей воды:
Снизу
Подключение холодной воды:
Снизу
Номинальная мощность:
1,5 кВт
Особенности:
Внешний регулятор температуры, Защита от перегрева, Индикация включения, Кабель питания с УЗО, Ограничение температуры нагрева, Предохранительный клапан
Гарантия на внутренний бак:
5 лет
Страна производитель:
Россия
Габариты
Ariston
Loading…
A
- ABS PRO1 ECO PW 65V Slim
- ABS PRO1 ECO PW 80V Slim
- ABS PRO1 R 80 H
- ABS PRO1 R INOX 80 V
- ABS PRO ECO INOX SLIM 30
- ABS PRO ECO INOX SLIM 30-50-80-100
- ABS PRO ECO INOX SLIM 50
- ABS PRO ECO INOX SLIM 80
- ABS PRO ECO PW 120 V
- ABS PRO ECO PW 30V Slim
- ABS PRO ECO PW 50V
- ABS PRO ECO PW 50V Slim
- ABS PRO ECO PW 65V Slim
- ABS PRO ECO PW 80V2
- ABS PRO ECO PW 80 V Slim
- ABS PRO ECO SLIM
- ABS PRO ECO SLIM 30
- ABS PRO ECO SLIM 30-50-65-80
- ABS PRO ECO SLIM 50
- ABS PRO ECO SLIM 65
- ABS PRO ECO SLIM 80
- ABS PRO PLUS POWER
- ABS PRO PLUS POWER 100
- ABS PRO PLUS POWER 50
- ABS PRO PLUS POWER 50-80-100
- ABS PRO PLUS POWER 80
- ABS PRO PLUS POWER SLIM
- ABS PRO PLUS POWER SLIM 30
- ABS PRO PLUS POWER SLIM 30-50-65-80
- ABS PRO PLUS POWER SLIM 50
- ABS PRO PLUS POWER SLIM 65
- ABS PRO PLUS POWER SLIM 80
- ABS PRO R 100
- ABS PRO R 100 H
- ABS PRO R 100 V
- ABS PRO R 120
- ABS PRO R 120 V
- ABS PRO R 150
- ABS PRO R 150 V2
- ABS PRO R 30 V Slim
- ABS PRO R 50
- ABS PRO R 50-80-100-120-150
- ABS PRO R 50 H SLIM
- ABS PRO R 50 V2
- ABS PRO R 50 V SLIM2
- ABS PRO R 65 V SLIM
- ABS PRO R 80
- ABS PRO R 80 H2
- ABS PRO R 80V2
- ABS PRO R INOX
- ABS PRO R INOX 100
- ABS PRO R Inox 100 V
- ABS PRO R INOX 30
- ABS PRO R INOX 30-50-80-100
- ABS PRO R INOX 30V SLIM3
- ABS PRO R INOX 50
- ABS PRO R Inox 50 V
- ABS PRO R INOX 80
- ABS PRO R SLIM
- ABS PRO R SLIM 30
- ABS PRO R SLIM 30-50-65-80
- ABS PRO R SLIM 50
- ABS PRO R SLIM 65
- ABS PRO R SLIM 80
- ABS PRO SMALL 10-15-30
- ABS PRO SMALL 30 R
- ABS SHAPE SMALL 10-15-30
- ABS SHAPE SMALL 10 R/5
- ABS SHAPE SMALL 15 R/5
- ABS SHAPE SMALL 30 R/5
- ABS SLV 100V
- ABS SLV 50 V
- ABS SLV 80V
- ABS SLV SLIM30V
- ABS SLV SLIM50V
- ABS SLV SLIM65V
- ABS Velis EVO INOX QH 30 D
- ABS VELIS INOX POWER
- ABS VELIS INOX QH D
- ABS VELIS PLUS INOX POWER
- ABS VELIS PLUS POWER
- ABS VELIS POWER
- ABS VELIS POWER 100
- ABS VELIS POWER 30
- ABS VELIS POWER 30-50-80-100
- ABS VELIS POWER 50
- ABS VELIS POWER 80
- ABS VELIS POWER D
- ABS VELIS QH D
- ABS VLS EVO INOX PW 100 D
- ABS VLS EVO INOX PW 30 D
- ABS VLS EVO Inox PW 80 D2
- ABS VLS EVO INOX QH 50
- ABS VLS EVO PW 100 D4
- ABS VLS EVO PW 30
- ABS VLS EVO PW 30 D2
- ABS VLS EVO PW 50 D3
- ABS VLS Evo PW 50 D UP
- ABS VLS EVO PW 80 D3
- ABS VLS Evo PW 80 D UP
Loading…
Loading…
Nothing found
ABS PRO R INOX 30V SLIM
User Manual
44 pgs5.02 Mb0
User Manual
44 pgs2.22 Mb0
User Manual [ru]
36 pgs1.42 Mb0
Table of contents
Loading…
…
Ariston User Manual
Specifications and Main Features
Frequently Asked Questions
User Manual


Loading…
+ 30 hidden pages
You need points to download manuals.
1 point = 1 manual.
You can buy points or you can get point for every manual you upload.
Buy points
Upload your manuals
ManualsPro
Ariston
ARISTON PRO1 R ABS 30 V Slim Electric Water Heaters User Manual
- June 3, 2024
- Ariston
Table of Contents
- ARISTON PRO1 R ABS 30 V Slim Electric Water Heaters
- GENERAL WARNINGS
- KEY TO SYMBOLS
- GENERAL INFORMATION
- Delivery set and purpose
- Main elements
- TECHNICAL CHARACTERISTICS
- 1. INSTALLATION
- Hot-water boiler bonding against the wall
- Hydraulic connection
- Electrical connection
- STARTING AND OPERATION
- Commissioning
- Temperature control
- MAINTENANCE AND REPAIR WORKS
- Water Drain
- Replacing internal parts
- Periodical maintenance
- Note:
- Do not:
- Data plate
- Serial number
- Storage Water Heater Installation
- Water heater device
- References
- Read User Manual Online (PDF format)
- Download This Manual (PDF format)
ARISTON PRO1 R ABS 30 V Slim Electric Water Heaters
GENERAL WARNINGS
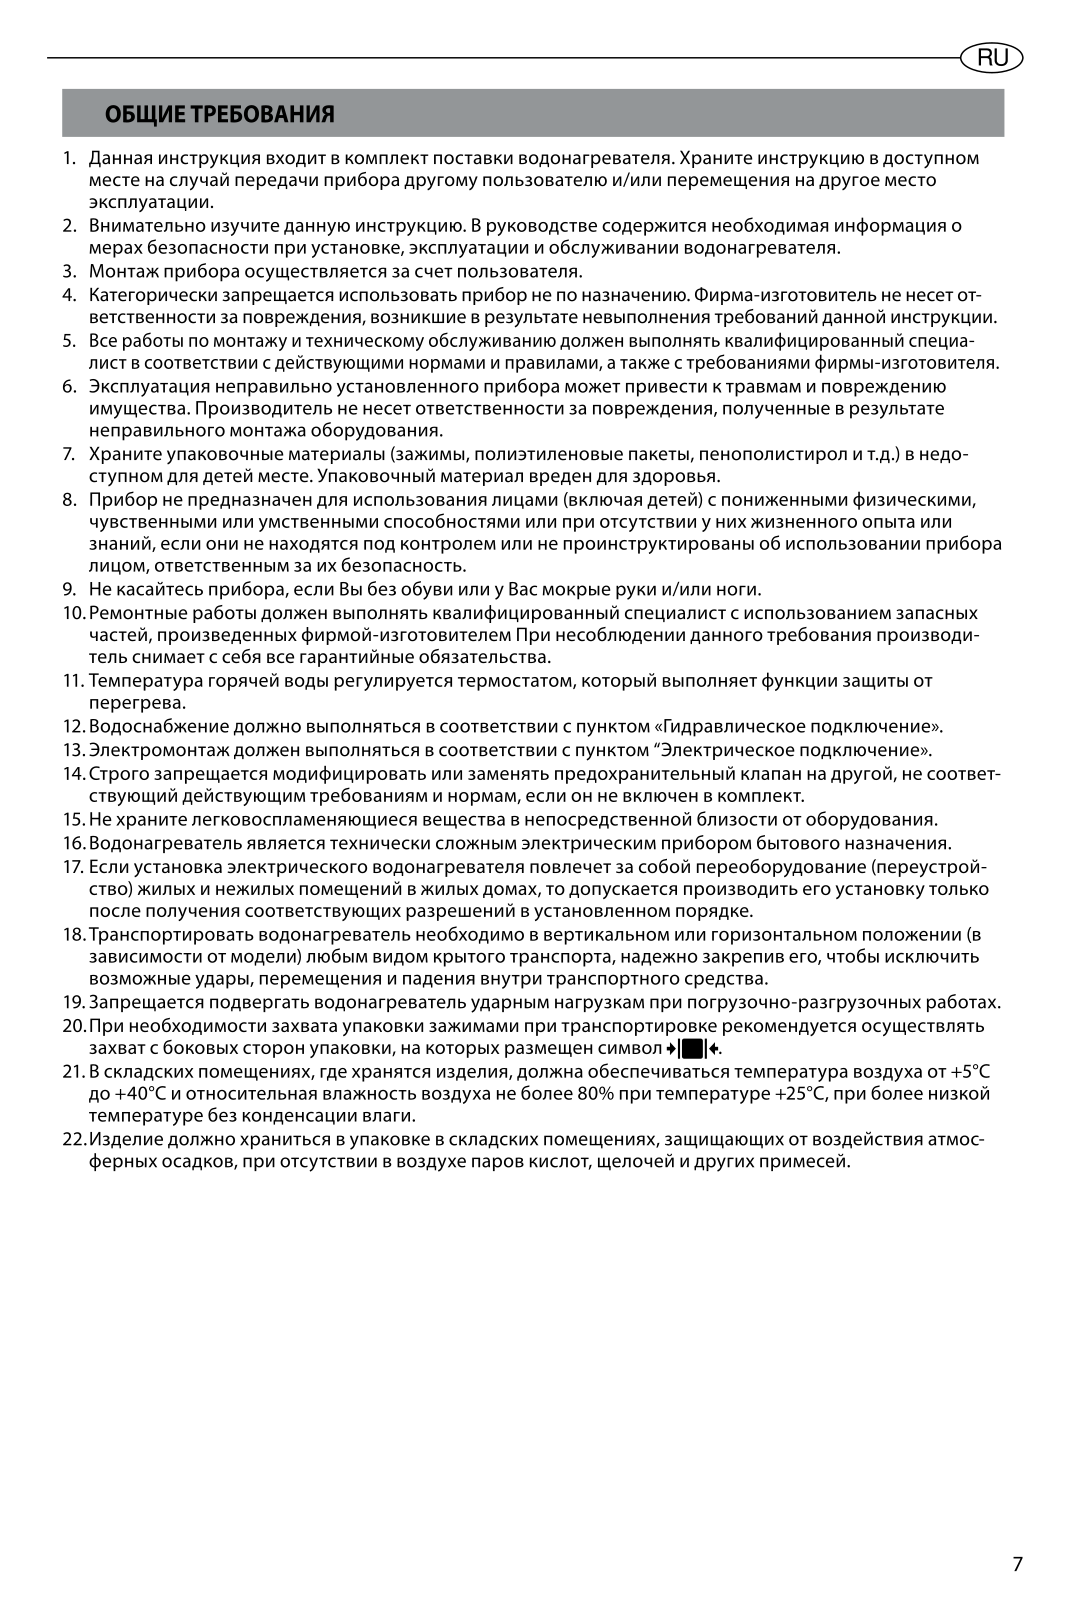
- This manual is included in water heater delivery set. It should be kept alongside the appliance even if the latter is transferred to another user and/or moved to another location.
- Read this manual carefully. It provides important safety precautions for installation, use and maintenance of the water heater.
- The appliance is installed at the expense of the user.
- The use of the appliance for purposes other than those specified is strictly The manufacturer is not to be held responsible for any damage due to failure to comply with the instructions set in the manual.
- All installation and maintenance works must be carried out by a qualified technician in conformity with the current rules and regulations, as well as the directions provided by the manufacturer.
- Incorrect installation can cause personal injury and property The manufacturer is not to be held responsible for damage due to incorrect installation.
- Keep all packing material (clips, plastic bags, polystyrene foam, ) out of children’s reach. The packing material is hazardous for health.
- The appliance is not intended for use by persons (including children) with reduced physical, sensory, or mental capabilities, or lack of experience and knowledge, unless they have been given supervision or instruction concerning use of the appliance by a person responsible for their safety.
- It is strictly forbidden to touch the appliance barefoot or with wet hands and/or feet’s.
- Repair works should be carried out by a qualified technician using original spare parts produced by Failure to comply with this requirement invalidates all warranties on the part of the manufacturer.
- The temperature of the hot water is adjusted by a thermostat that acts as a protection against over heating.
- Water supply must be done in accordance with paragraph «Hydraulic Connection».
- Electric wiring must be done in accordance with paragraph «Electrical Connection».
- It is strictly forbidden to modify or replace the safety valve with the other one which does not meet the current rules and regulations, if it is not included in the delivery set.
- No inflammable items should be kept near the appliance.
- The water heater is a technically sophisticated electrical appliance for household purpose.
- Whenever electrical water heater installation involves re-equipment (rearrangement) of residential and non-residential premises in residential buildings, installation should be performed only after relevant permissions have been obtained in a proper manner.
- The water heater must be transported in a vertical or a horizontal position (depending on a model) by any covered kind of transport. The water heater must be fixed securely in order to avoid any possible damage, drift or drop inside the vehicle.
- It is forbidden to subject impact loads to the water heater during the cargo handling epurations.
- If it is necessary to grab the box by clips during transportation, it is recommended to grab the sides of the packaging where following symbol is printed .
- In the warehouse, which stores the product, air temperature must be from +5°C to + 40°C and relative humidity must be less than 80% at +25°C. If the temperature is lower, there must be no condensation.
- The product must be stored in containers in storage areas, protected from exposure to precipitation, in the absence of acids, alkalis and other impurities vapors.
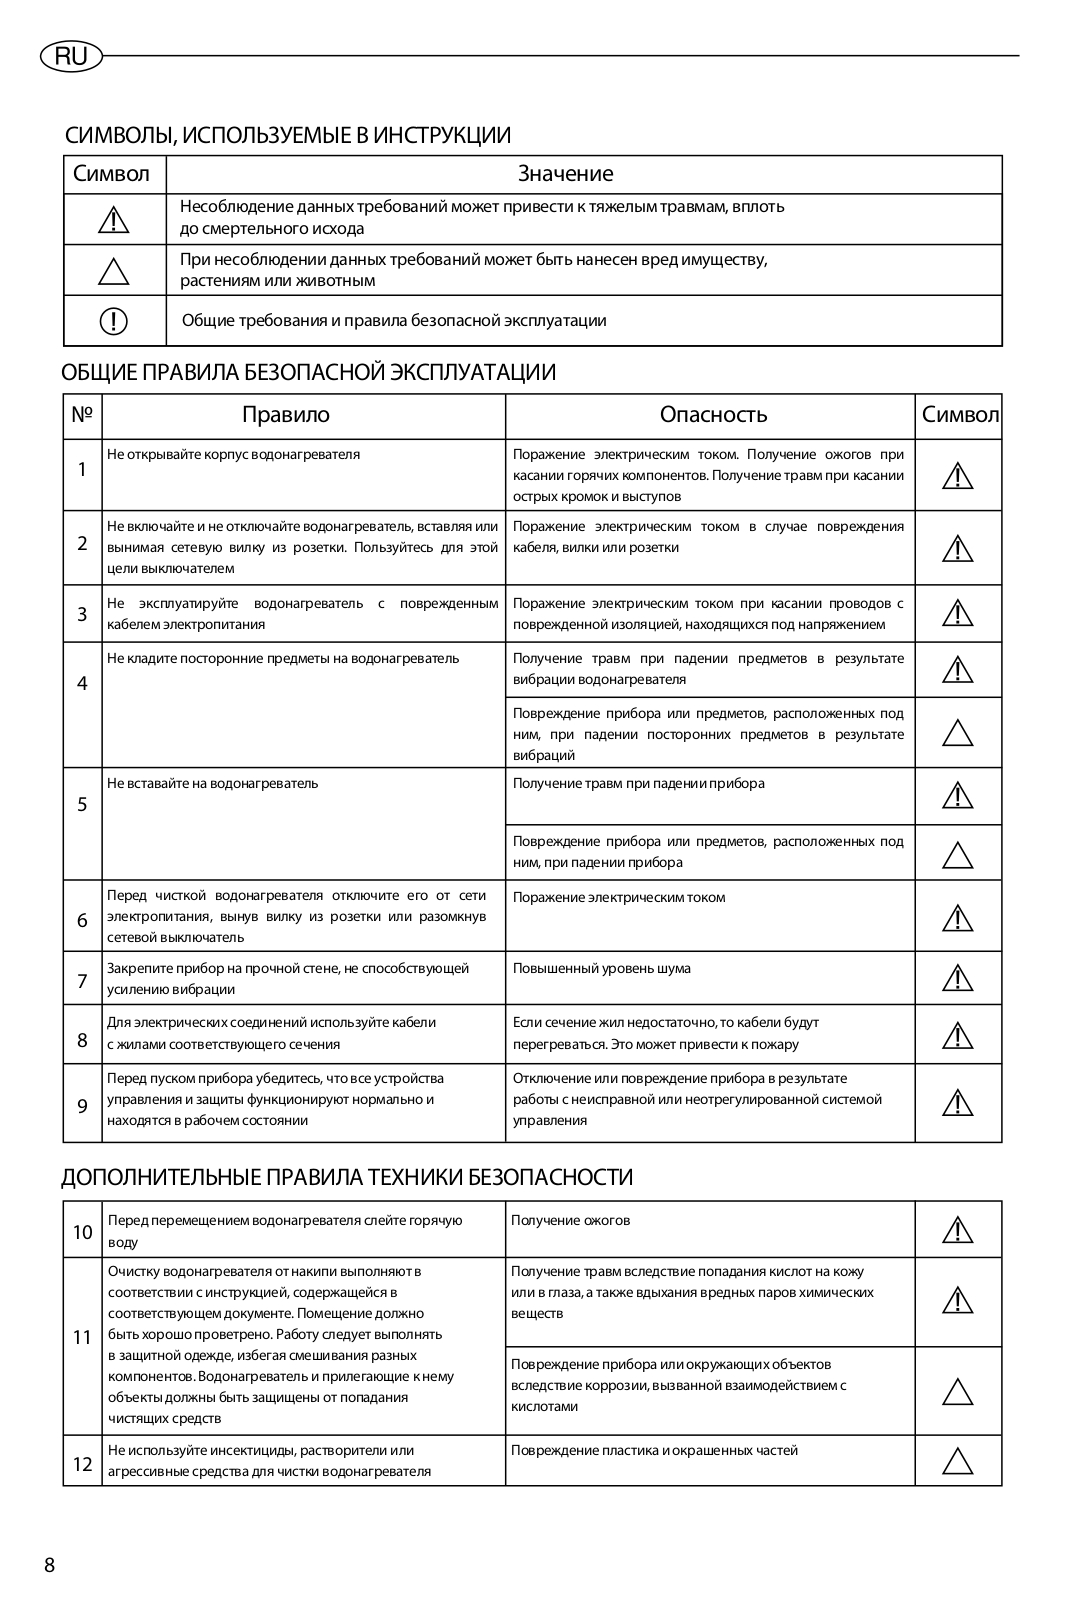
KEY TO SYMBOLS


Congratulations on your purchase of an electric water heater
manufactured by Ariston Thermos Group. The appliance is designed in compliance
with the European quality standards and conforms to declared technical
characteristics. The water heater is easy to use; it demonstrates great
consumer properties and durability in operation. We hope that you will be
satisfied with its work.
Please, read this manual carefully to ensure proper installation and operation
of the water heater.
GENERAL INFORMATION
Delivery set and purpose
- Water heater
- Safety valve
- Bracket
- Installation and operation manual
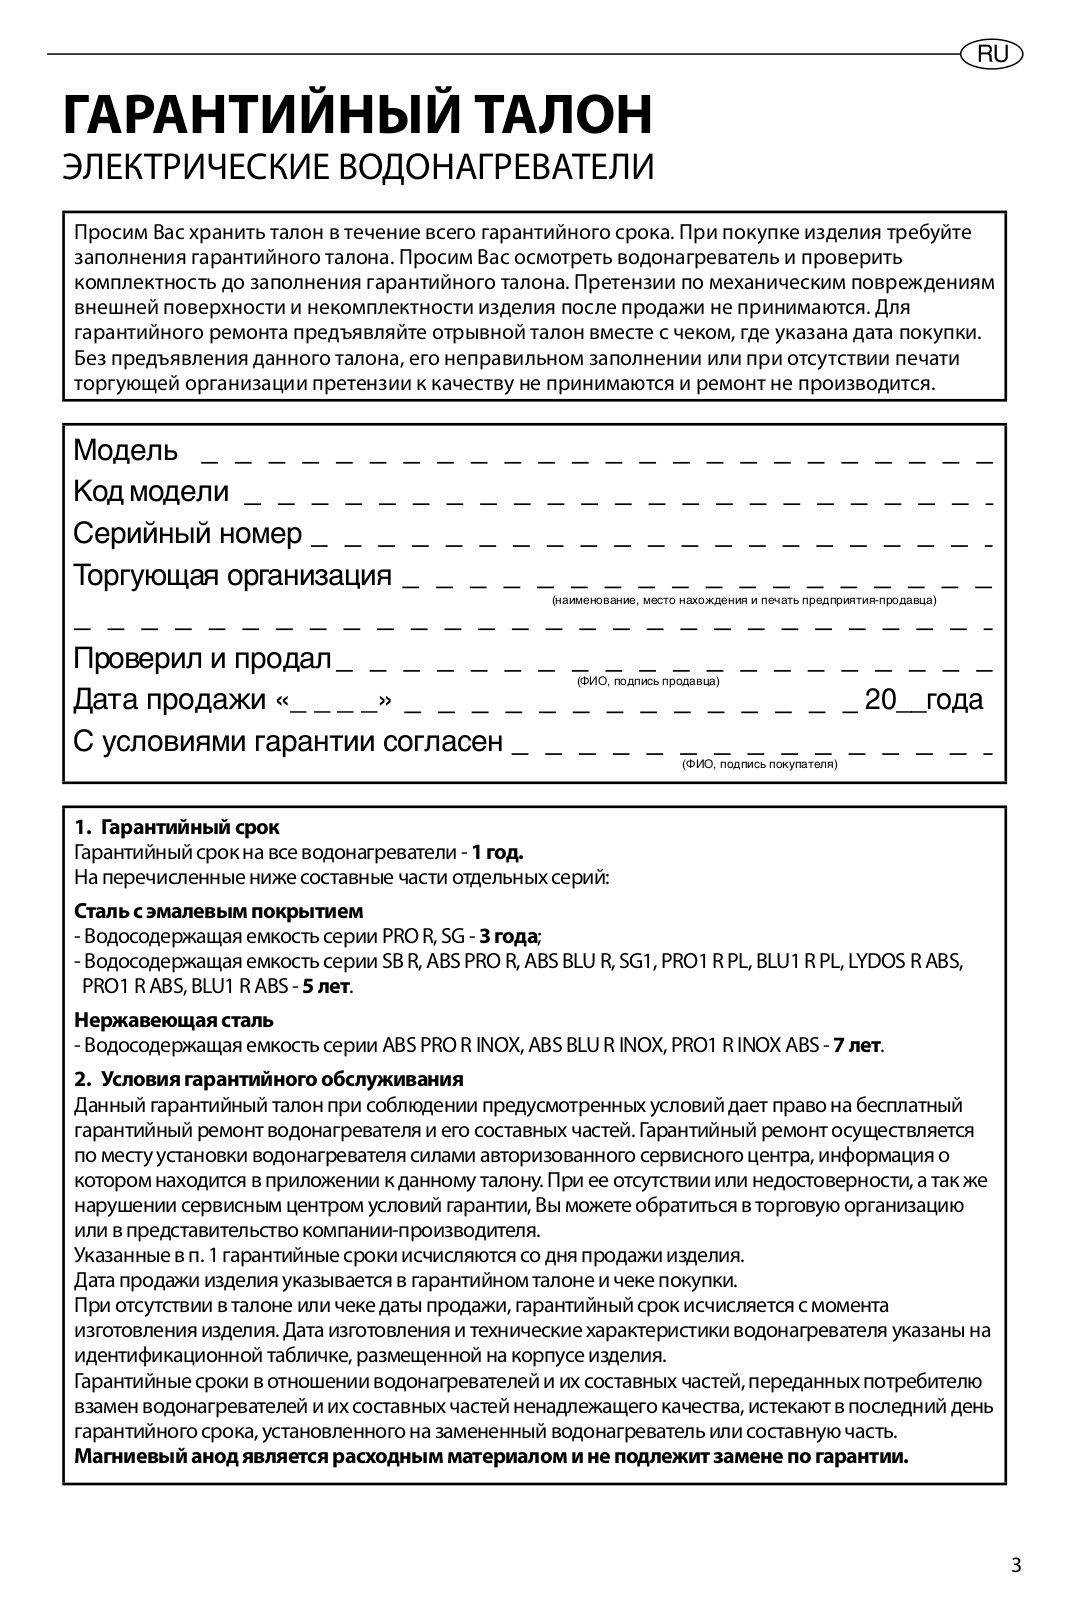
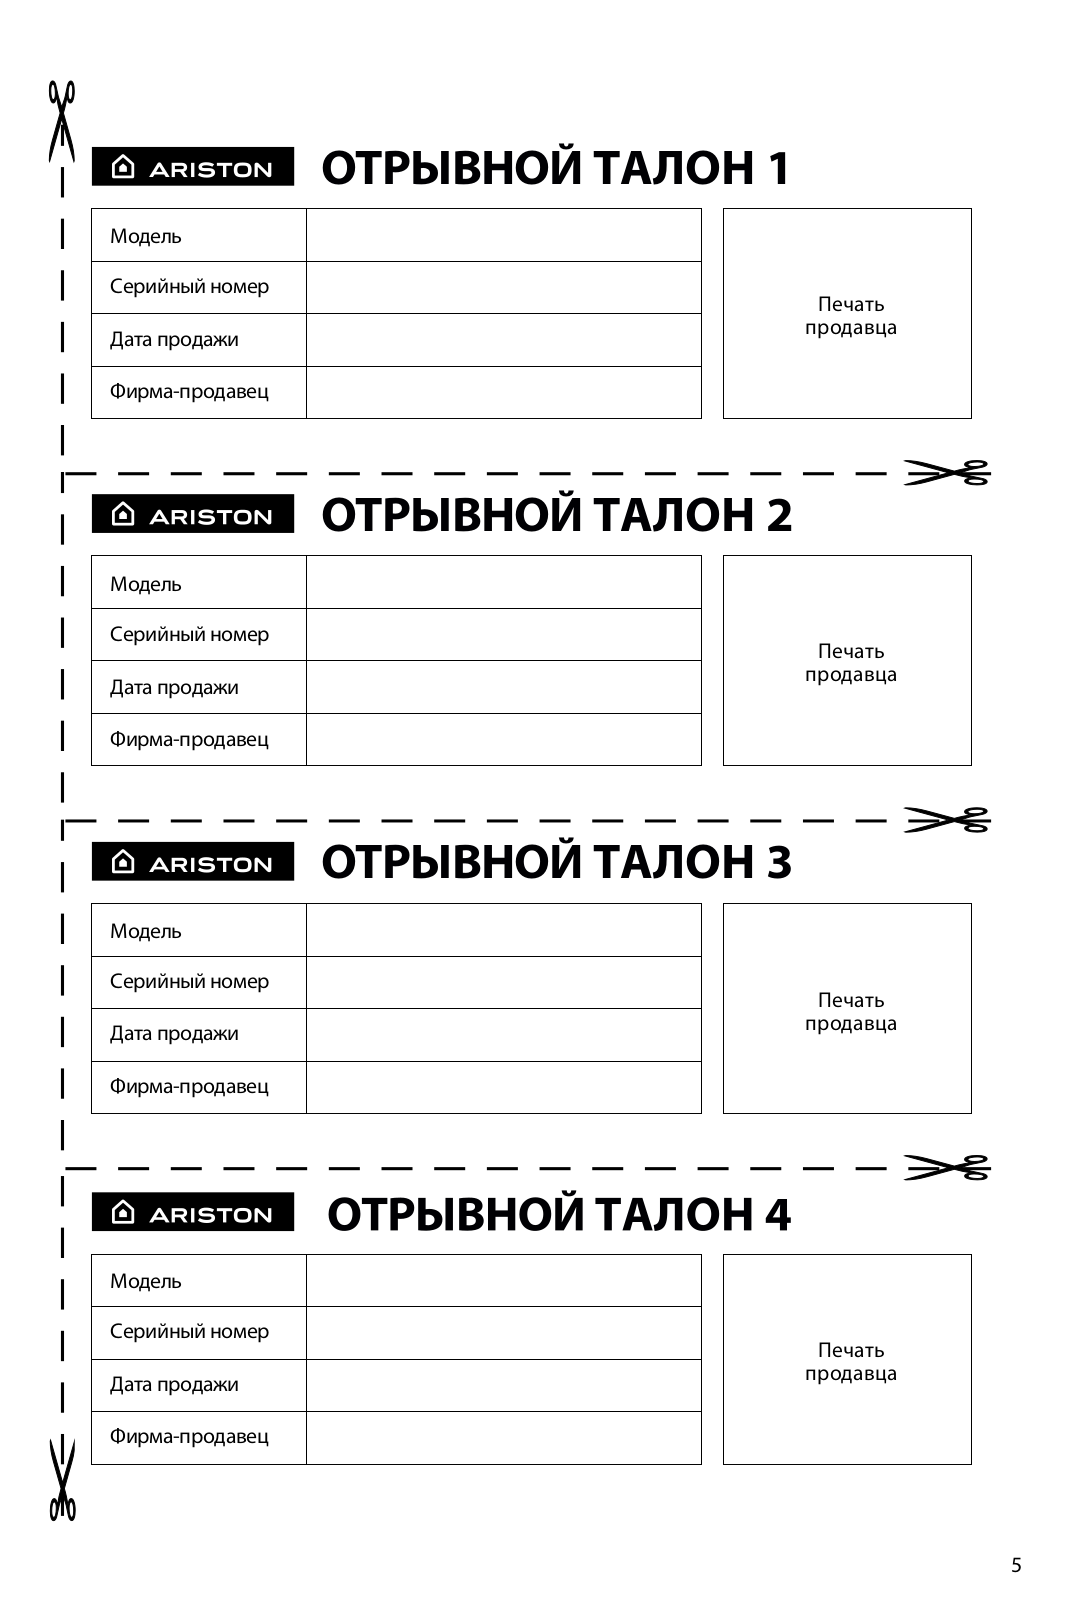
- Warranty certificate
- Original packing
- «T» piece union and drain tap (optional)
The appliance is designed for installation inside the buildings, in the
household and utility premises. It is intended for water heating to a
temperature below boiling point, with the option of the hot hot water’s supply
(not intended for drinking) at several spots (bathroom, kitchen, and toilet)
and further maintenance of the set temperature in the automatic mode.
Water heating time depends on the volume of the water heater and the power of
the heating element.
Main elements
- Inner tank
- Thermal insulation of polyurethane foam providing minimal heat dispersion
- Heating element
- Temperature controller which allows you to set the desired temperature of the water heating
- Thermostat controlling the temperature of water in the tank
- Safety valve which is installed at the inlet of the water heater and serves to prevent the return of water to the water line and protect the tank from excessive pressure
- Magnesium anode rod providing additional protection of the inner tank from corrosion
TECHNICAL CHARACTERISTICS
Product range| 30 SLIM| 40 SLIM| 50 SLIM| 65 SLIM| 80 SLIM| 50| 65|
80| 100| 120| 150
—|—|—|—|—|—|—|—|—|—|—|—
Weight (kg)| Enamel| 12| 14| 17| 19| 21| 15| 17| 19| 23| 28| 32
Inox| 9| 11| 12| 14| 16| 12| –| 15| 17| 20| 25
This appliance is conforming with the
international standards:
- Electrical safety standards IEC 60335-1 and IEC 60335-2-21.
- EMC Electro-Magnetic Compatibility: EN 55014-1, EN 55014-2, EN 61000-3-2, EN 61000-3-3. The products are compliant according to:
- TP TC 004/2011 «Technical regulations of the Customs Union on safety of low voltage equipment».
- TP TC 020/2011 «Technical regulations of the Customs Union on electro-magnetic compatibility».
1. INSTALLATION
Attention! The installation and set-up of the water heater must be
carried out by a qualified technician in conformity with the applicable rules
and hygiene and sanitary standards in force and with any provisions set forth
in this manual.
Hot-water boiler bonding against the wall
- Water heater mounting is made on the main wall using brackets and fastening Fastening hooks (not included in the supply) with a diameter of at least 12 mm are recommended. Depending on the model, you will need 2 or 4 of the fastening hooks.
- Prepared fastening must support a weight that is three times higher than the weight of the water heater filled with water.
- The appliance should be installed as close as possible to the point of water intake to limit heat ( A ).
- Allow for a clearance of at least 50 cm under the appliance and a clearance of 10 cm from the ceiling for maintenance.
- Fastening of hooks to the wall must prevent inadvertent movement of the bracket of the water heater over After installation, be sure to check security of the fastening.
- To prevent the property of the customer and (or) third party from damage caused by failures of hot water supply system, it is recommended to mount the water heater in the premises provided with waterproof floor and sewer Never put objects sensitive to water under the water heater.
- During mounting water heater in the unprotected areas, you must install underneath the protective tray with drainage into the sewer.
Hydraulic connection
Attention! Installation of safety valve Included In the delivery set Is
necessary.
Do not install any stop valve between the safety valve and cold water inlet of
the water heater and do not block the drain hole of the safety valve.
Demountable connectors should be used for the water heater connection to the
water supply system.
Standard connection
- Safety valve ( A ) supplied must be installed on the cold water inlet of the water heater (marked with the blue ring).
- Connect the inlet of the safety valve to the cold water line with a tube or flexible hose.
- Connect a tube or flexible hose to the hot water outlet of the water heater (marked with the red ring) for hot water removal to the draw-off point.
- For easy maintenance, it is recommended to install a T-piece with shut-off ( B ) between the cold water inlet and safety valve of the water heater.
- It will help to drain water from the water heater without safety valve removal.
- To facilitate the access of air into the tank when draining water, it is recommended to install an additional T-piece with shut-off valve at the hot water
- When water pressure exceeds 5 bar, place before the safety valve a reducer to reduce the pressure.
- The device cannot work with water where hardness is less than 12°F. If water is with hardness above 25°F, it is necessary to use softener to reduce the formation of scale and the probability of failure of the heating element. The water hardness should not fall below 15°F.
Connection to open tank filled with water
- Water is supplied to the water heater from the tank by Safety valve is not necessary in this type of connection.
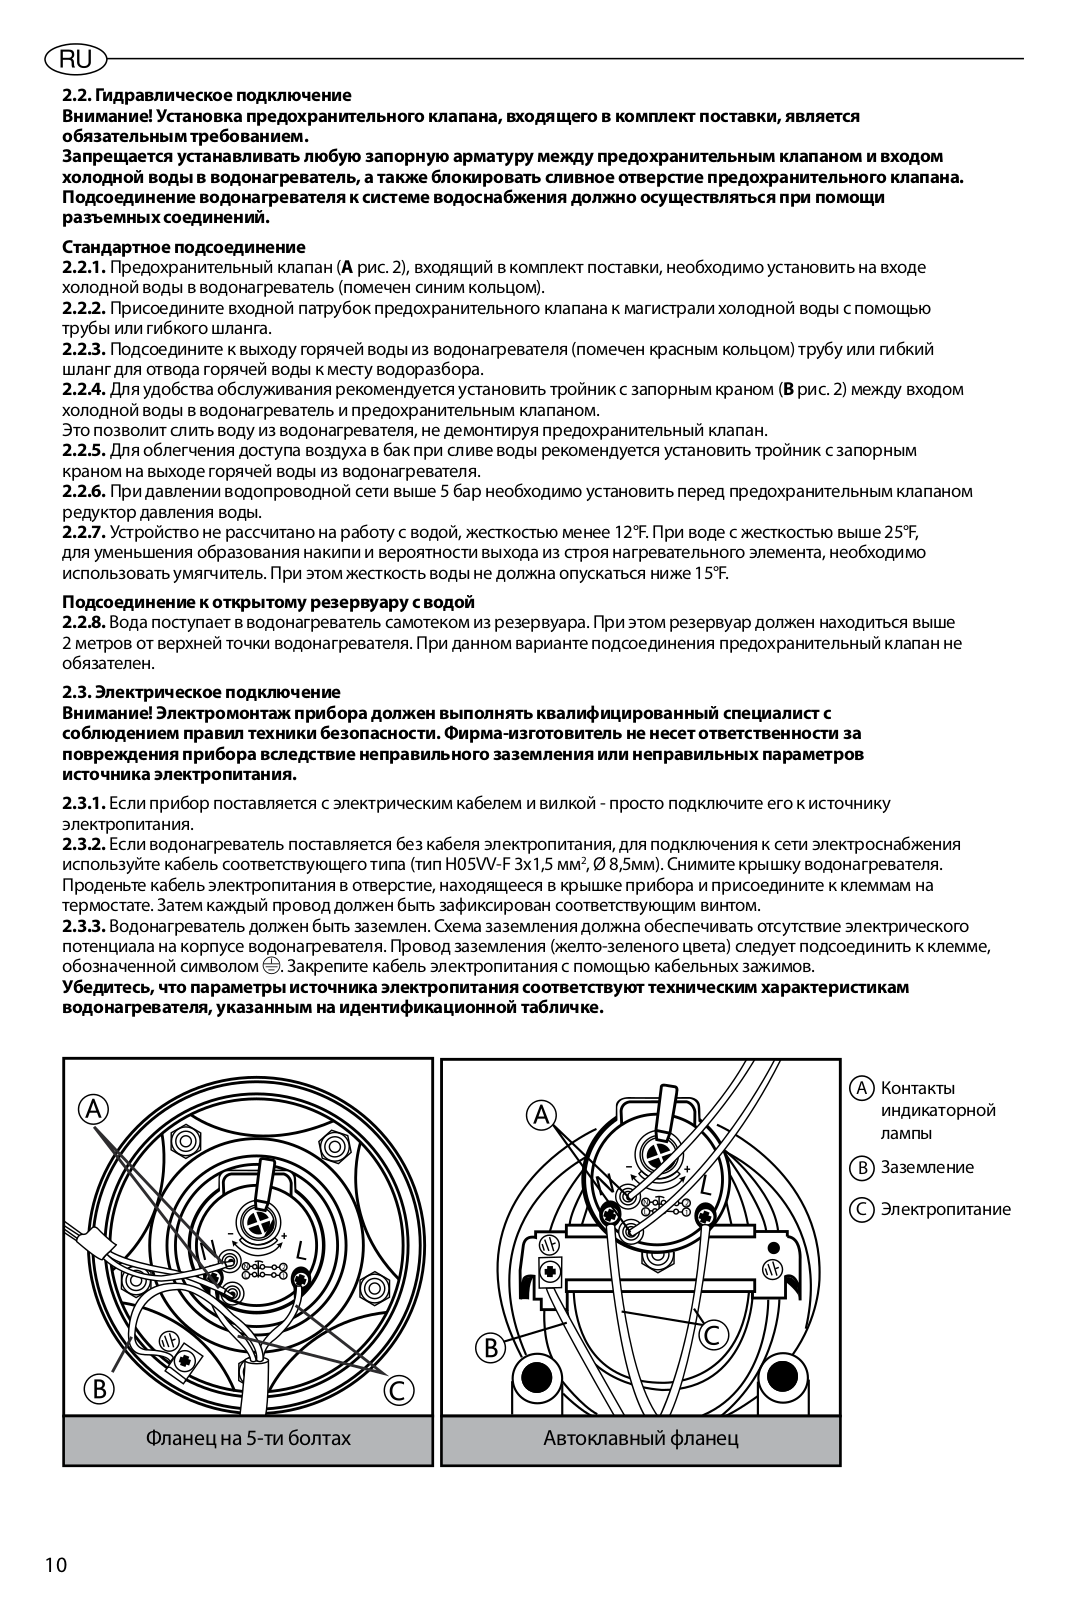
Electrical connection
Attention! Electrical wiring should be done by a qualified technician,
ensuring it complies with safety rules. The manufacturer is not to be held
responsiable for any damage caused by the incorrect earthing of system or for
fault defaults of electricity supply.
- If the product is already equipped with a cable and plug, simply connect it to a power supply source.
- If the water heater is supplied without a power supply cable, use a cable featuring the same characteristics (type H05VV-F 3×1,5 mm2, Ø 8,5 mm) for Remove the cover. The power supply cable should be threaded through the relevant hole on the cover of the appliance and fixed to the thermostat terminals. Then every wire should be fixed in place by the corresponding screw.
- The water heater must be Grounding scheme should ensure the absence of electric potential on the body of the water heater. The earth cable (of yellow-green color) should be fixed to the terminal marked by the symbol .
Fix the power supply cable using the cable clamps.
Make sure that the power supply voltage conforms to the water heater technical
characteristics indicated on the data plate.
- A Indicating light contacts
- B Earthing
- C Power supply


STARTING AND OPERATION
Commissioning
- Shut off the hot water supply of the central water supply Before connect the appliance to power source, fill the tank up with mains water. To do this, turn on hot water mixer tap and then tap of cold water supplied to the water heater.
- Once the water heater is full, the water will flow from the mixer Check the flange for leakages. Center it and tighten the nuts if necessary.
- Turn the hot water tap on the mixer
- Connect the appliance to power
Temperature control
- In models equipped with external control, water temperature can be controlled by a handle connected to the thermostat in accordance with
- The temperature is set by using the regulation button clockwise to increase the temperature of heating and counterclockwise to decrease
- The indicator lamp is constantly lighting during heating phase, and turns off after reaching the set
- If an appliance model does not have an external control, temperature can be set by turning the adjusting screw of the thermostat in the range marked by «+» and «-» To do so, disconnect the water heater from the power supply and remove the plastic cover of the appliance.
- It is recommended to install the controller in a position corresponding approximately to 75% of the maximal In this case, the appliance is operated in economy mode significantly reducing the rate of scale formation.
MAINTENANCE AND REPAIR WORKS
Attention!
Do not try to repair the appliance by yourself. All maintenance and repair
works should be carried out by a qualified technician in conformity with the
safety norms and with any provisions set forth in this manual.
Water Drain
If there is a possibility that the ambient temperature drops below 0°C in the
room where the appliance is installed, drain water from the water heater.
- Disconnect the appliance from the electrical supply;
- Make sure that the water in the appliance is of safe temperature;
- Turn off the tap of cold water supply to the water heater;
- Turn on the hot water tap on mixer for pressure relief inside the tank;
- Turn on the T-connector stop valve installed at hot water outlet (marked with red ring) for air access into the If it is absent, remove the connections at the water heater outlet;
- Connect drain hose directed into the sewer to the T-connector stop valve installed at the cold water inlet of the water heater (marked with the blue ring) and open If there is no T-connector, connect the hose to water heater inlet;
- After draining, make sure there is no water inside the water
Freezing of water inside the water heater leads to irreversible changes and
defects. It invalidates all warranty liability on the part of the
manufacturer.
Replacing internal parts
Prior to work, disconnect the appliance from the power supply and drain the
water from the water heater.
Remove the appliance cover.
Periodical maintenance
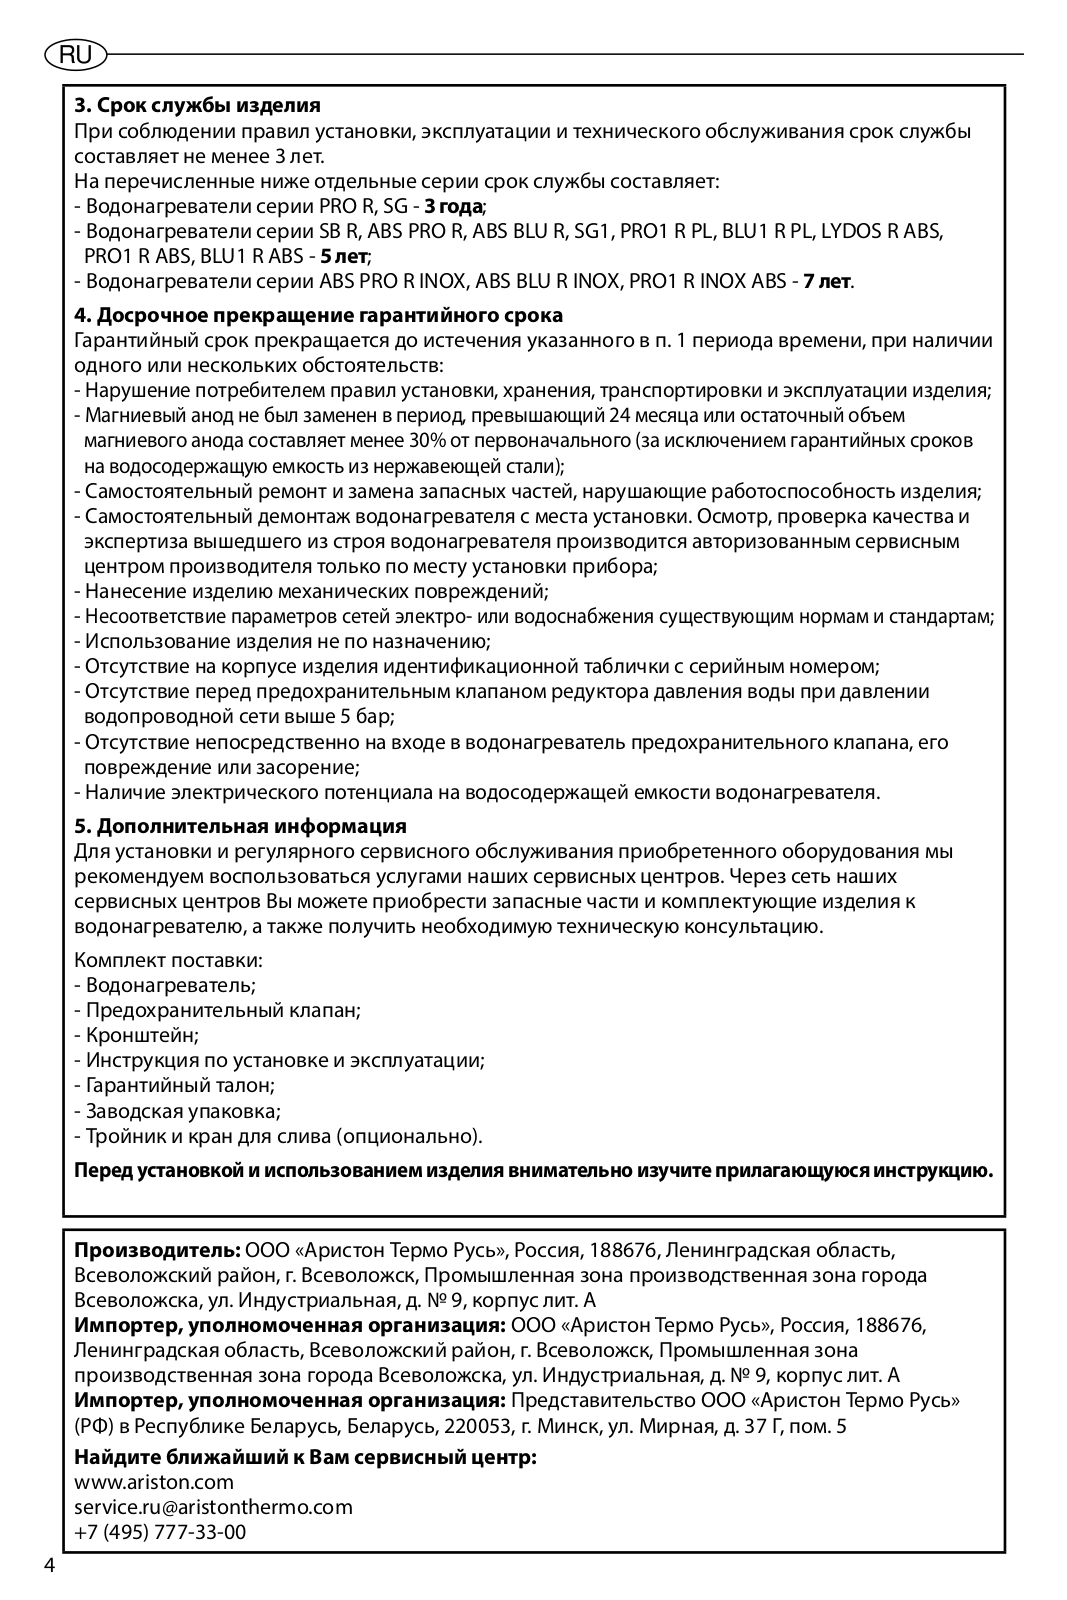
Magnesium anode
- The magnesium anode rod is an integral part of the protection system of water tank and heating element against corrosion against corrosion.
- It’s necessary to check the condition of the magnesium anode rod ANNUALLY. In case of severe wear, the magnesium anode rod must be replaced.
- The warranty for water tank and heating element with the worn with the worn magnesium anode rod (residual volume is less than 30%) is not valid.
- The magnesium anode rod should be replaced at least once in 24 months (except for the water heater with the internal tank made of stainless steel).
- The magnesium anode rod is a consumable item that cannot be replaced under warranty.
Safety valve
- The safety valve (pressure safety device) must be inspected regularly to check that it is not blocked or damaged. Replace the valve or remove limescale deposits if necessary. If the safety valve is equipped with a lever, regular valve correct operation check procedure can be performed with its help.
- The drainage pipe of the safety valve may generate water droplets. It is not a defect; it is due to relief work function of the valve pressure relief that occurs when water is heated in enclosed space of the inner tank.
RCD (Residual Current Device)
If the appliance comes with a residual current device (RCD) located on the
power cord, and then after the tank of the water heater is filled with water
and the system is checked for leaks, put in the electrical plug of the water
heater and do the following:
- Press «RESET» knob on the RCD body, LED will be lit indicating electricity
- Then press «TEST» knob, power will be off, as well as
- Press «RESET» knob If the power LED lit up, it means that the appliance is safe to use.
- If you press the «RESET» knob, but LED does not light up, contact the Technical Assistance Centre for advice by a qualified
Heating element
Tubular heating element is intended for water heating in the inner tank, by
converting electric energy into thermal energy.
Scale formation on its surface may lead to a deterioration in heat transfer,
overheating and failure of the heating element. Regularly inspect and, if
necessary, remove the limescale from its surface with a descaling solution.
The warranty on the heating element is not valid if one or several following
conditions:
- The water hardness exceeds 25°F;
- The thickness of the scale layer on the surface of the heating element is more than 5 mm;
- The residual volume of the magnesium anode is less than 30% of the
Note:
- Manufacturer disclaims any liability for any damage due to incorrect plug in and failure to comply with the requirements set forth in this
- Plumbing lines and stop valves must comply with the water supply
- Water heater is a sophisticated technical household
- Hot water with temperature over 50°C may immediately cause severe burns or even Children, medically fragile and elderly people are more exposed to the risk of burns.
- Water may drip from the water heater, so do not leave valuable items and equipment under the
- If there Is a possibility that the temperature drops below 0°C in the room where the appliance is installed, drain the water from the water
- Water heater installation and plug in are performed at customer’s own
- Heat insulation marks on the outer casing of the item are a technological feature of the production process and are noi considered as a
- Any repair or maintenance procedures must be performed only after the heater Is disconnected from the power
- Any malfunctions must be repaired by professional repair service
- If a malfunction appeared, disconnect the water heater from the power source, shut off cold water supply and contact service center about
- Before making call to the service center, make sure that the problem is not related to water or power
For warranty servicing, please contact the nearest authorized service center.
Do not:
- Modify the water heater
- Install the vertical models horizontally, and horizontal models
- Use the water heater for purposes other than that
- Tilt, move and turn water heater during
- Cover or plug the drain hole of the safety
- Connect the water heater to power source when there is no water in
- Remove the plastic cover when the appliance Is connected to power
- Switch the water heater on if the earthing is faulty or not
- Use central heating, cold or hot water line as earthing
- Use T-connectors or extenders and adapters to connect the appliance to power
- Switch the water heater on in case of heating element or thermostat
- Use water heater without pressure regulator with pressure of water line over 5
- Connect the water heater to pipes and fittings not rated for operation at temperature of 80°C at maximum pressure
- Connect the water heater to water line without a safety valve or with a safety valve with lower technical characteristics than the valve in the delivery
- Connect the safety valve to the hot water outlet of the water
- Install the appliance in non-ventilated rooms with high humidity
- Operate the water heater at ambient temperatures below
- Expose the appliance to direct
Data and specifications are subject to modification. The manufacturer
preserves the right to make any necessary changes without prior notice or
replacement.
This product conforms to Directive WEEE 2012/19/EU.
The crossed-out recycled bin symbol indicates that in accordance with the
regulations of the applicable law this product should be disposed of
separately from normal household waste.
The user is responsible for pro per disposal of equipment thereby promoting
environmental protection and ensuring the reusing and recycling of materials
used in product manufacturing.
Data plate
-
Brand
-
Serial number or product code
-
Model
-
Tank material
Fe+Enamel – enamel steel
Inox or Stainless Steel – stainless steel -
Maximum pressure
-
Volume
-
Rated power
-
Voltage
-
Current frequency
-
Country of origin
-
Protection rating

Serial number

Storage Water Heater Installation


Water heater device
-
1. Outer housing - Bracket
- Inner tank
- Hot water outlet
- Magnesium anode
- Cold water inlet
- Thermal insulation
- Thermostat shell
- Heating element
- Flange
- Thermostat
- RCD (optional)
- Power supply cable (optional)
- Knob (optional)

References
- Ariston Group
- Ariston Group
Read User Manual Online (PDF format)
Read User Manual Online (PDF format) >>
Download This Manual (PDF format)
Download this manual >>
Меню
-
продукция
продукция
- Водонагреватели электрические
- Водонагреватели газовые
- Котлы газовые
- Бойлеры косвенного нагрева
- Системы диспетчеризации
Вам нужна помощь?
Мы готовы ответить на любой Ваш вопросНапишите нам
Котел с Wi-Fi
ALTEAS ONE+ NET
Флагман конденсационных котлов, непревзойденный итальянский дизайн и встроенное дистанционное управление
Водонагреватель с Wi-Fi
VELIS LUX INOX POWER ABSE WIFI
Водонагреватель с ускоренным нагревом, непревзойденным итальянским дизайном и функцией Wi-Fi
-
сервис
сервис
Меню параметров котла
Необходимо произвести настройки в меню газового котла?
Есть готовое решение! Мы собрали всю необходимую для Вас информацию в одном месте
Коды ошибок
Появилась ошибка на дисплее водонагревателя или газового котла?
Узнайте причину возникновения неисправности и получите рекомендации по ее устранению
-
монтаж
монтаж
- Схемы дымоудаления
- Схемы отопления и ГВС
Вам нужна помощь?
Мы готовы ответить на любой Ваш вопросНапишите нам
Схемы дымоудаления
Необходимо подобрать элементы дымоудаления? Загляните сюда!
Перечень аксессуаров для монтажа коаксиальной или раздельной системы дымоудаления
Серийный номер
Не знаете дату производства водонагревателя или газового котла?
Введите серийный номер и получите исчерпывающую информацию о дате и стране производства оборудования
-
проектирование
проектирование
Библиотека
Не хватает информации?
Тогда Вы обратились по адресу!Каталоги по проектированию, реализованные объекты, видеоматериалы и многое другое…
Схемы отопления и ГВС
Подбирайте необходимое оборудование, исходя из требований заказчика
Наш конфигуратор поможет Вам быстро и легко подобрать наиболее оптимальное решение
-
обучение
обучение
- Расписание семинаров
- Библиотека документов
- Видеоматериалы
- Онлайн-курсы
Вам нужна помощь?
Мы готовы ответить на любой Ваш вопросНапишите нам
Обучающие семинары
Узнайте о нашей продукции все!
Запишитесь на бесплатный семинар по монтажу и сервисному обслуживанию систем отопления и горячего водоснабжения
НАШИ ПАРТНЕРЫ
Необходим качественный монтаж или сервисное обслуживание?
Проверьте срок действия сертификата монтажника или сервисного специалиста
-
программы лояльности
программы лояльности
- MY ARISTON
- MY PARTS
Вам нужна помощь?
Мы готовы ответить на любой Ваш вопросНапишите нам
My Ariston
Программа для специалистов по монтажу
Регистрируйте серийный номер и промо-код с установленного Вами оборудования, копите баллы и заказывайте призы!
My Parts
Программа для специалистов по ремонту
Выполняйте ремонт с использованием оригинальных запасных частей, регистрируйте стикеры и обменивайте их на призы!
Личный
кабинет
Введите СМС-код
На Ваш номеротправлено СМС с кодом подтверждения
Отправить еще раз через
0000
Отправить еще раз
Смена пароля
Неверный код