
Руководства пользователя
- Руководства пользователя
- Декларация соответствия
Версия E9378
9.77 MB
2015/08/28
Z97-A user’s manual (English)
Версия E10276
91.95 KB
2015/03/31
HDMI insert (English)
Версия R9141
1.27 MB
2014/09/04
Z97 Series Exclusion Feature Manual (Russian)
Версия S9060
5.76 MB
2014/08/25
Z97-A user’s manual(Spanish)
Версия E9060
5.48 MB
2014/07/21
Z97-A User’s Manual (English)
Версия F9060
6.7 MB
2014/06/11
Z97-A user’s manual(French)
Версия G9060
5.78 MB
2014/05/28
Z97-A user’s manual(German)
Версия J9060
6.08 MB
2014/05/27
Z97-A User’s Manual (Japanese)
Версия T9141
4.38 MB
2014/05/27
Z97 Series Exclusive Feature User’s Manual(Traditional Chinese)
Версия C9141
4.33 MB
2014/05/27
Z97 Series Exclusive Feature User’s Manual (Simplified Chinese)
Версия J9141
2.46 MB
2014/05/15
Z97 Series Exclusive Features User’s Manual (Japanese)
Версия G9141
2.75 MB
2014/05/15
Z97 Series Exclusive Features user’s manual(German)
Версия E9141
3.92 MB
2014/05/15
Z97 Series Exclusive Features User’s Manual (English)
Версия C9378
7.06 MB
2014/05/14
Z97-A User’s Manual (Simplified Chinese)
Версия T9060
7.06 MB
2014/04/28
Z97-A User’s Manual(Traditional Chinese)
Manuals.eu
- Manuals.eu
- ASUS
- Computers & Peripherals
- Motherboards
- LGA1150
- Z97-A
- Z97 Series Exclusion Feature Manual (Russian)
×
1
2
3
4
5
6
7
8
9
10
11
12
13
14
15
16
17
18
19
20
21
22
23
24
25
26
27
28
⟨
⟩
Copyright © Manuals.eu
Agreement
Privacy Policy
Contact us
-
Драйверы
31
-
Инструкции по эксплуатации
6
Языки:
ASUS Z97-A инструкция по эксплуатации
(28 страниц)
- Языки:Русский
-
Тип:
PDF -
Размер:
1.27 MB -
Описание:
Z97 Series Exclusion Feature Manual (Russian)
Z97 Series Exclusion Feature Manual (Russian)
Просмотр
ASUS Z97-A инструкция по эксплуатации
(28 страниц)
- Языки:Японский
-
Тип:
PDF -
Размер:
2.46 MB -
Описание:
Z97 Series Exclusive Features User’s Manual (Japanese)
Z97 Series Exclusive Features User’s Manual (Japanese)
Просмотр
ASUS Z97-A инструкция по эксплуатации
(28 страниц)
- Языки:Немецкий
-
Тип:
PDF -
Размер:
2.75 MB -
Описание:
Z97 Series Exclusive Features user’s manual(German)
Z97 Series Exclusive Features user’s manual(German)
Просмотр
ASUS Z97-A инструкция по эксплуатации
(121 страница)
- Языки:Французский
-
Тип:
PDF -
Размер:
6.7 MB -
Описание:
Z97-A user’s manual(French)
Z97-A user’s manual(French)
Просмотр
ASUS Z97-A инструкция по эксплуатации
(114 страниц)
- Языки:Немецкий
-
Тип:
PDF -
Размер:
5.78 MB -
Описание:
Z97-A user’s manual(German)
Z97-A user’s manual(German)
Просмотр
ASUS Z97-A инструкция по эксплуатации
(116 страниц)
- Языки:Японский
-
Тип:
PDF -
Размер:
6.08 MB -
Описание:
Z97-A User’s Manual (Japanese)
Z97-A User’s Manual (Japanese)
Просмотр
На NoDevice можно скачать инструкцию по эксплуатации для ASUS Z97-A. Руководство пользователя необходимо для ознакомления с правилами установки и эксплуатации ASUS Z97-A. Инструкции по использованию помогут правильно настроить ASUS Z97-A, исправить ошибки и выявить неполадки.

R9141
Первое издание
Апрель 2014
Copyright© 2014 ASUSTeK COMPUTER INC. Все права защищены.
Любая часть этого руководства, включая оборудование и программное обеспечение, описанные в нем, не может
быть дублирована, передана, преобразована, сохранена в системе поиска или переведена на другой язык в
любой форме или любыми средствами, кроме документации, хранящейся покупателем с целью резервирования,
без специального письменного разрешения ASUSTeK COMPUTER INC. (“ASUS”).
Гарантия прекращается, если: (1) изделие отремонтировано, модифицировано или изменено без письменного
разрешения ASUS; (2) серийный номер изделия поврежден, неразборчив либо отсутствует.
ASUS предоставляет данное руководство «как есть» без гарантии любого типа, явно выраженной
или подразумеваемой, включая неявные гарантии или условия получения коммерческой выгоды или
пригодности для конкретной цели, но не ограничиваясь этими гарантиями и условиями. НИ ПРИ КАКИХ
ОБСТОЯТЕЛЬСТВАХ ASUS, ЕЕ РУКОВОДСТВО, ДОЛЖНОСТНЫЕ ЛИЦА, СЛУЖАЩИЕ И ПОСРЕДНИКИ
НЕ НЕСУТ ОТВЕТСТВЕННОСТИ ЗА КАКОЙ-ЛИБО КОСВЕННЫЙ, СПЕЦИАЛЬНЫЙ, СЛУЧАЙНЫЙ
ИЛИ ЗАКОНОМЕРНЫЙ УЩЕРБ (ВКЛЮЧАЯ УЩЕРБ ОТ УПУЩЕННОЙ ВЫГОДЫ, НЕСОСТОЯВШЕЙСЯ
СДЕЛКИ, ПОТЕРИ ДАННЫХ ИЛИ НЕВОЗМОЖНОСТИ ИХ ИСПОЛЬЗОВАНИЯ, ПРЕРЫВАНИЯ
ДЕЯТЕЛЬНОСТИ И Т.П.), ДАЖЕ В ТОМ СЛУЧАЕ, ЕСЛИ ASUS БЫЛА УВЕДОМЛЕНА О ВОЗМОЖНОСТИ
ТАКОГО УЩЕРБА, КОТОРЫЙ МОГ ВОЗНИКНУТЬ В РЕЗУЛЬТАТЕ ДЕФЕКТА ИЛИ ОШИБКИ В ДАННОМ
РУКОВОДСТВЕ ЛИБО В ИЗДЕЛИИ.
ТЕХНИЧЕСКИЕ ХАРАКТЕРИСТИКИ И ИНФОРМАЦИЯ, СОДЕРЖАЩИЕСЯ В ДАННОМ РУКОВОДСТВЕ,
ПРИВОДЯТСЯ ТОЛЬКО В ЦЕЛЯХ ОЗНАКОМЛЕНИЯ. ОНИ МОГУТ БЫТЬ ИЗМЕНЕНЫ В ЛЮБОЕ ВРЕМЯ
БЕЗ УВЕДОМЛЕНИЯ И НЕ ДОЛЖНЫ РАССМАТРИВАТЬСЯ КАК ОБЯЗАТЕЛЬСТВО СО СТОРОНЫ ASUS.
ASUS НЕ НЕСЕТ КАКОЙ БЫ ТО НИ БЫЛО ОТВЕТСТВЕННОСТИ ЗА ОШИБКИ ИЛИ НЕТОЧНОСТИ,
КОТОРЫЕ МОГУТ СОДЕРЖАТЬСЯ В НАСТОЯЩЕМ РУКОВОДСТВЕ, В ТОМ ЧИСЛЕ ОТНОСЯЩИЕСЯ К
ОПИСАННЫМ В НЕМ ИЗДЕЛИЯМ И ПРОГРАММАМ.
Продукция и названия корпораций, имеющиеся в этом руководстве, могут являться зарегистрированными
торговыми знаками или быть защищенными авторскими правами соответствующих компаний и используются
только в целях идентификации.

Содержание
Dual Intelligent Processors 5 ……………………………………………………………………………………………..4
5-Way Optimization ……………………………………………………………………………………………..4
TPU (Turbo Processing Unit) ………………………………………………………………………………..4
EPU (Energy Processing Unit) ………………………………………………………………………………7
DIGI+ Power Control …………………………………………………………………………………………..8
FAN Xpert 3 …………………………………………………………………………………………………….. 10
Turbo App ………………………………………………………………………………………………………. 12
Карта Wi-Fi GO!…………………………………………………………………………………………………………… 13
Спецификация карты ASUS Wi-Fi GO! ……………………………………………………………. 13
Установка ………………………………………………………………………………………………………. 14
Wi-Fi Engine …………………………………………………………………………………………………………………. 15
Wi-Fi GO! и Remote GO! ……………………………………………………………………………………………… 17
Системные требования ……………………………………………………………………………………. 17
Вход в учетную запись ……………………………………………………………………………………. 17
Использование Wi-Fi GO! ……………………………………………………………………………….. 19
Cloud GO! ………………………………………………………………………………………………………. 22
Remote Desktop ……………………………………………………………………………………………….. 23
Передача файлов …………………………………………………………………………………………….. 25
Удаленная клавиатура и мышь ………………………………………………………………………… 26
ASUS Media Streamer …………………………………………………………………………………………………… 26
Системные требования ……………………………………………………………………………………. 26
Уведомления для РЧ оборудования …………………………………………………………………………….. 28

Обозначения, используемые в руководстве
В руководстве имеются примечания и предупреждения, с которыми Вам нужно ознакомиться для
успешного выполнения задач.
ОСТОРОЖНО: Информация о действиях, которые могут привести к
повреждению оборудования, потере данных и бытовым травмам.
ВНИМАНИЕ: Предупреждающая информация о возможности повреждения
компонентов при выполнении задач
ВАЖНО: Инструкции, которым Вы должны следовать при выполнении задач
ПРИМЕЧАНИЕ: Советы и полезная информация, которая поможет при
выполнении задач.
Dual Intelligent Processors 5
ASUS Dual Intelligent Processors 5 сочетает в себе функции TPU, EPU, DIGI+ Power Control, Fan
Xpert 3, и Turbo App, позволяющие увеличить производительность системы. Автоматический
баланс между производительностью, энергосбережением и настройками вентилятора через
дружественный интерфейс.
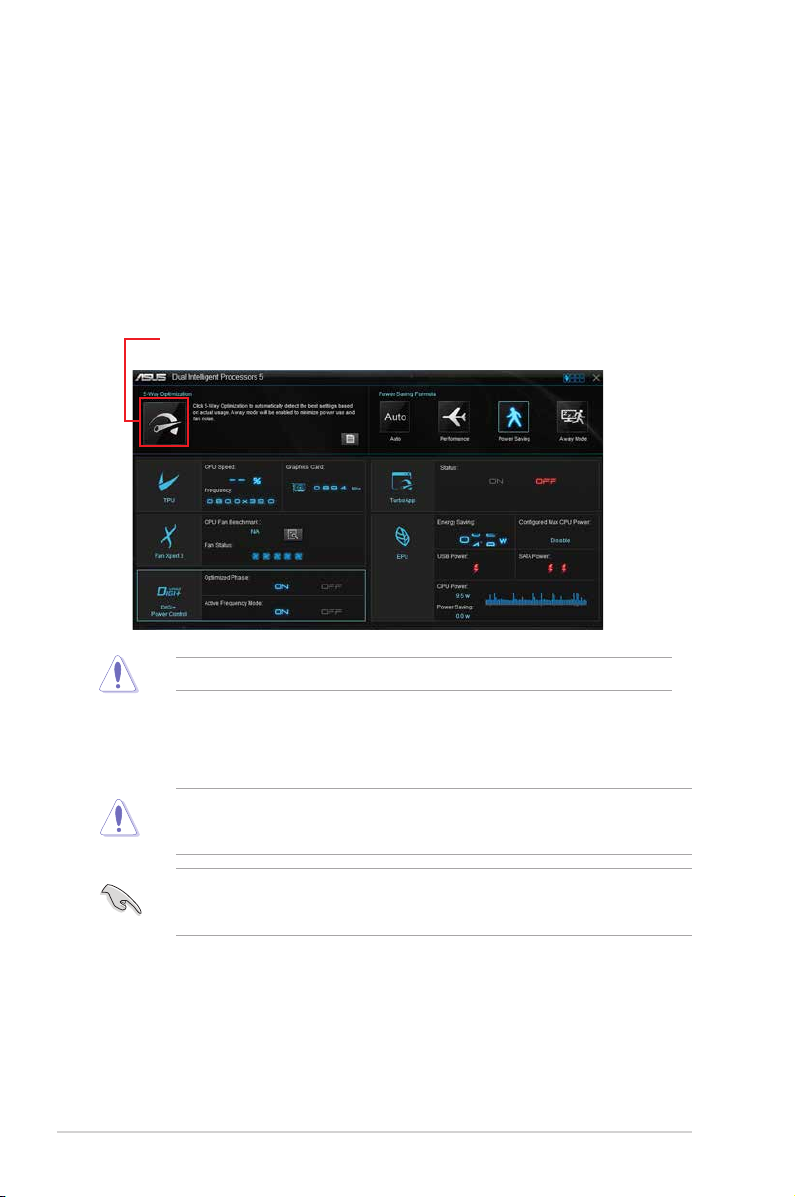
5-Way Optimization
Функция 5-Way Optimization динамически оптимизирует компьютер в режиме реального времени
для обеспечения наилучшего состояния.
Экран 5-Way Optimization
Нажмите кнопку 5-Way Optimization для автоматической оптимизации вашей системы
Не отключайте вентилятор во время процесса автонастройки.
TPU (Turbo Processing Unit)
TPU позволяет вручную настроить частоту и напряжение процессора и памяти для улучшения
стабильности и повышения производительности.
Перед изменением напряжения процессора ознакомьтесь с документацией на процессор.
Установка высокого напряжения может повредить процессор, а установка низкого напряжения
может привести к нестабильной работе системы.
Для обеспечения стабильной работы системы, все изменения, сделанные в TPU не сохраняются
в настройках BIOS и сбрасываются при перезагрузке. Сохраните настройки разгона в профиль и
вручную загрузите их после перезагрузки системы.
4
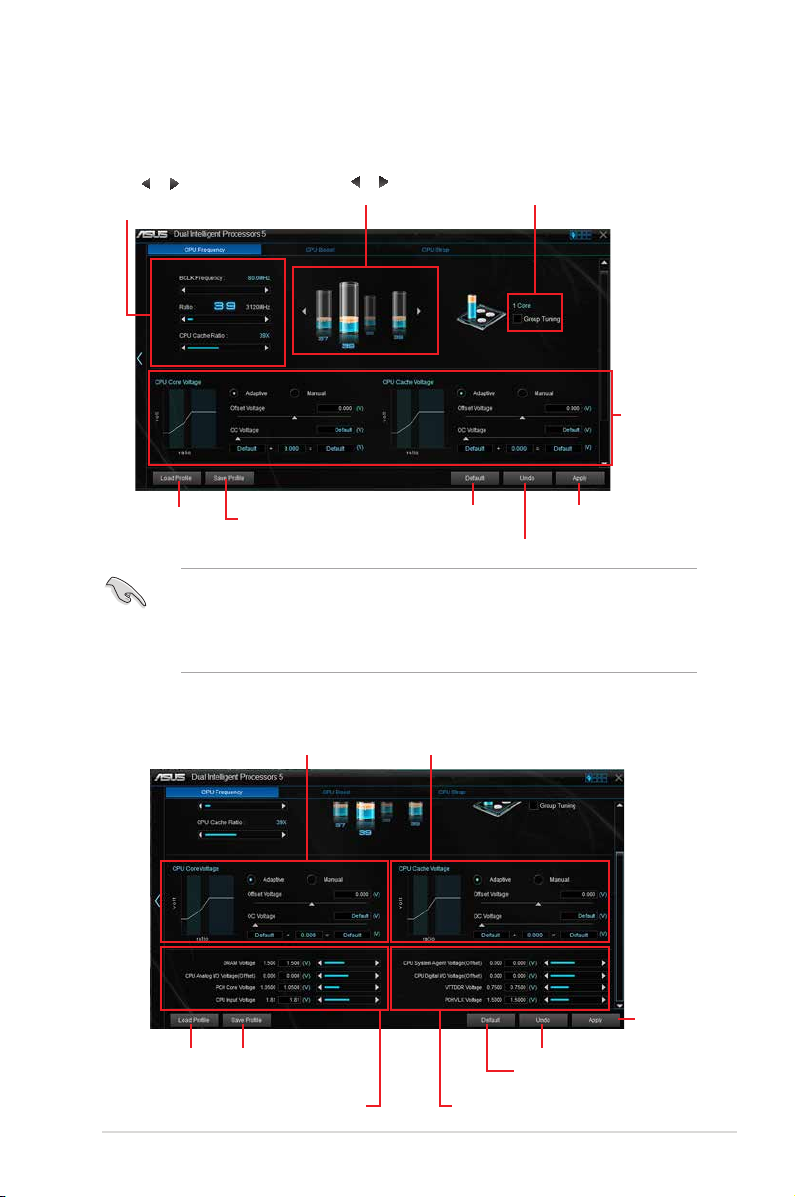
Использование TPU
Частота
процессора
Нажмите или для регулировки базовой
частоты, множителя процессора и множителя
процессорного кэша
Нажмите для загрузки
сохраненного профиля
Нажмите для сохранения
настроек в профиль
• Перед использованием функции TPU установите пункт Множитель ядра процессора в
BIOS в значение [Авто]. Подробную информацию смотрите в разделе Меню Ai Tweaker
руководства материнской платы.
• Полоски в CPU Ratio показывают состояние процессорных ядер. Их количество зависит
от Вашего процессора.
Напряжение
Настройка напряжения ядра CPU Настройка напряжения кэша процессора
Нажмите или для выбора
количества настраиваемых ядер
Щелкните для загрузки
настроек по умолчанию
Установите флажок для
включения групповой
настройки
Нажмите для применения
Нажмите для отмены настроек
настроек
Прокрутите вниз, затем
настройте напряжения
процессора и памяти
Нажмите для загрузки
сохраненного профиля
Переместите ползунок для регулировки напряжения DRAM,
CPU Analog I/O, PCH, and CPU Input
Нажмите для сохранения изменений
в профиль
Нажмите для
применения настроек
Нажмите для отмены настроек
Щелкните для загрузки настроек по умолчанию
Переместите ползунок для регулировки напряжения CPU System
Agent, CPU Digital I/O, VTTDDR и PCHVLX
5
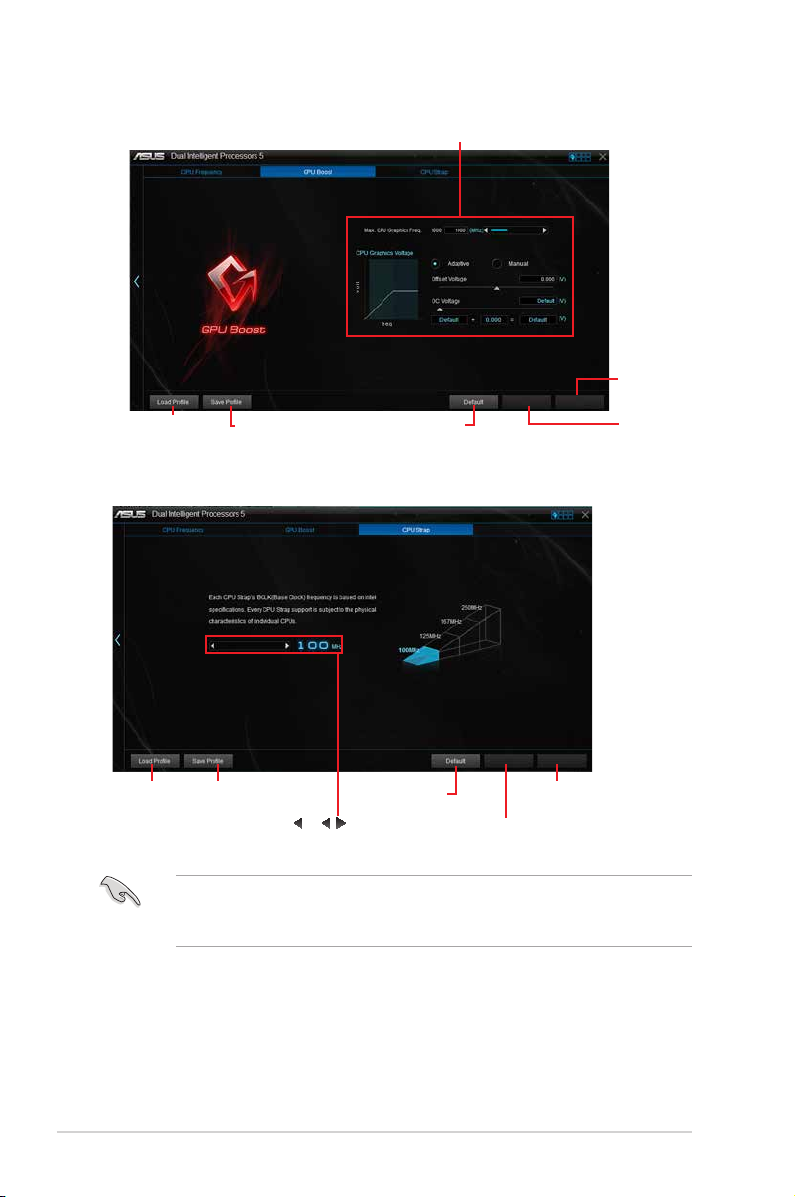
GPU Boost
Нажмите для загрузки
сохраненного профиля
CPU Strap
Нажмите для сохранения
изменений в профиль
Настройка напряжения iGPU
Нажмите для включения
настроек по умолчанию
Нажмите для
применения
настроек
Нажмите для
отмены настроек
Нажмите для загрузки
сохраненного профиля
6
Нажмите для сохранения
изменений в профиль
Нажмите или для настройки
базовой частоты процессора
Нажмите для включения
настроек по умолчанию
Нажмите для
применения настроек
Нажмите для отмены
настроек
• Результат разгона зависит от модели процессора и конфигурации системы.
• Для предотвращения повреждения материнской платы от перегрева, рекомендуется
использовать хорошее охлаждение.
EPU (Energy Processing Unit)
EPU (Energy Processing Unit) автоматически определяет текущую загрузку системы и управляет
энергопотреблением. Это обеспечивает полную оптимизацию энергопотребления, снижение шума
вентилятора и увеличение срока службы компонентов.
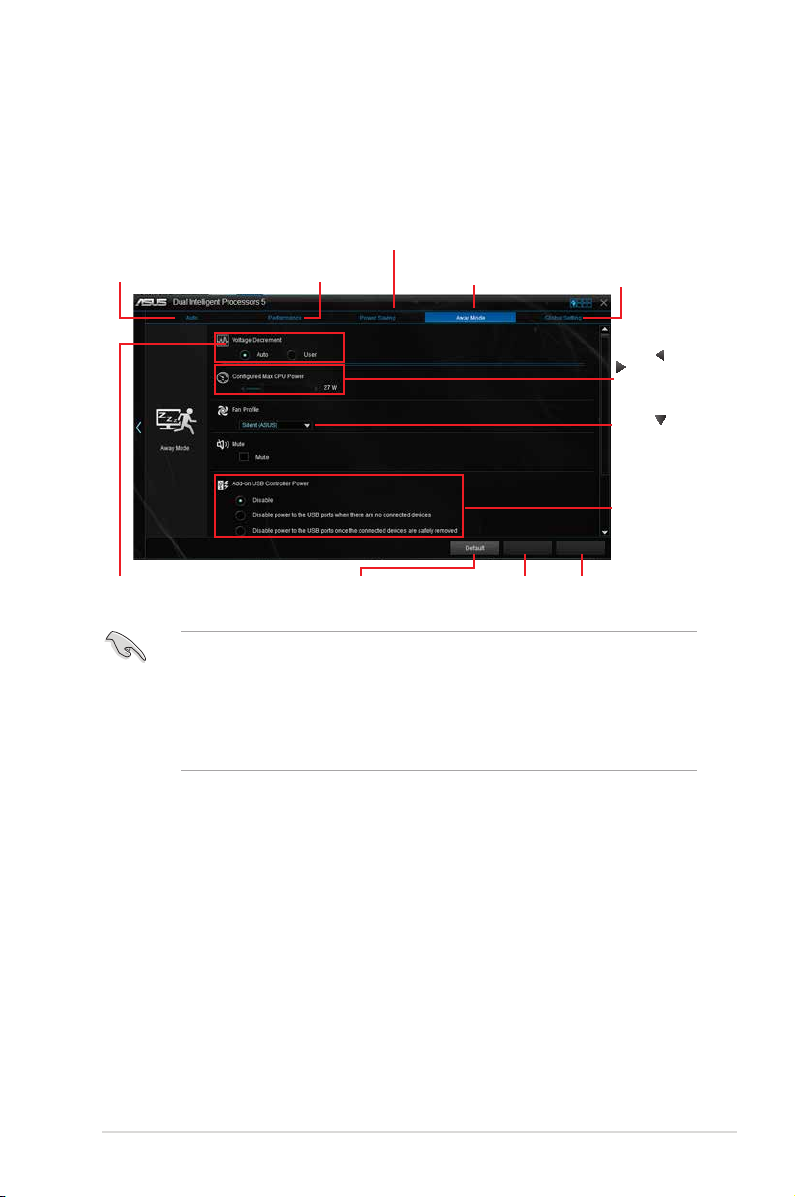
Использование EPU
Нажмите для конфигурации
параметров режима энергосбережения
Нажмите для конфигурации
параметров в автоматическом режиме
Нажмите для конфигурации
параметров режима высокой
производительности
Нажмите для конфигурации
параметров в режиме Отошел
Нажмите для конфигурации
глобальных настроек
Нажмите
для настройки
максимальной
мощности
процессора
Нажмите для
выбора профиля
Выберите
режим питания
контроллера USB
или
Выберите опцию для уменьшения
напряжения
• При включении функции энергосбережения процессора, частота процессора может
уменьшаться до 800 МГц. Однако фактическая частота процессора изменяется в
зависимости от установленной мощности. Мощность процессора можно отрегулировать
вручную.
• Функция энергосбережения процессора может уменьшить потребляемую мощность
процессора и повлиять на производительность процессора под нагрузкой. Для
восстановления системных настроек по умолчанию перезагрузите компьютер.
Нажмите для включения
настроек по умолчанию
Нажмите для отмены
настроек
Нажмите для применения
настроек
7
DIGI+ Power Control
Функции ASUS DIGI+ Power обеспечивают революционную и инновационную систему
управления VRM и DRAM. Управление обеспечивает сверхточную настройку напряжения и
памяти для стабильности и производительности системы.
Следующие инструкции предназначены только для справки. Конфигурируемые опции зависят
от модели материнской платы.
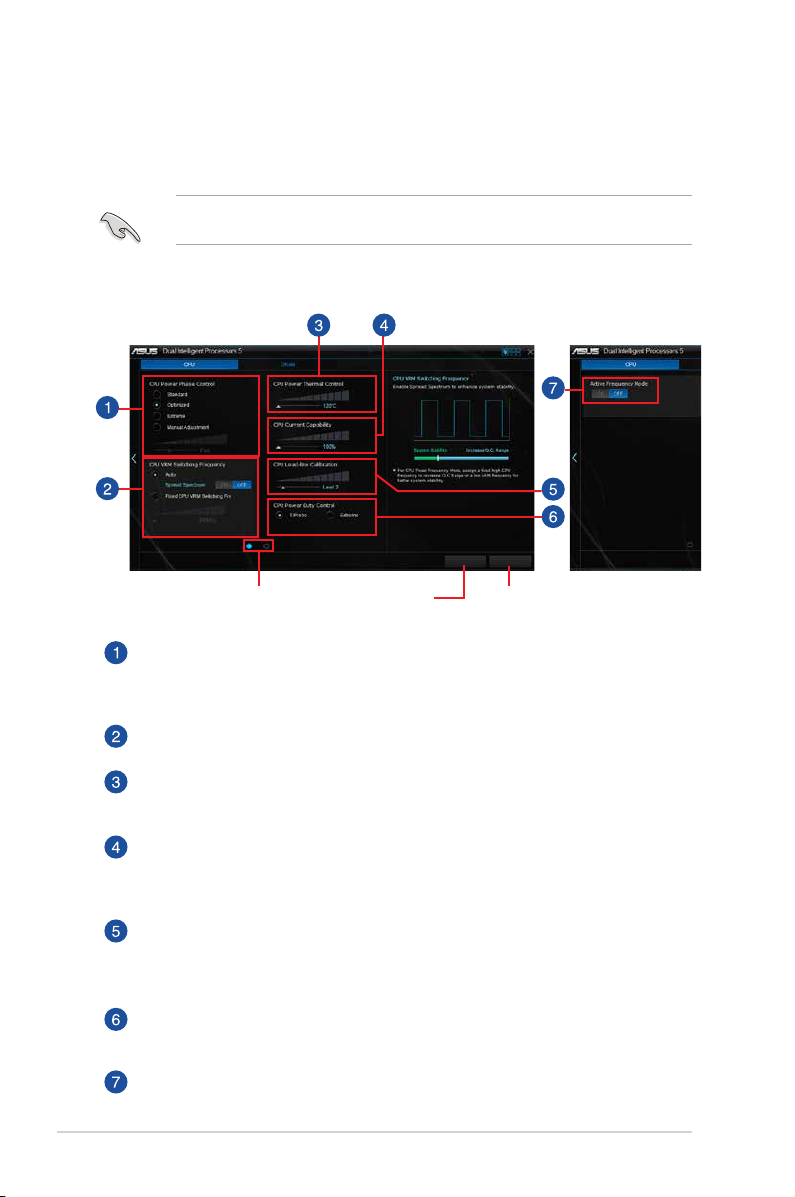
Настройка CPU Power
Нажмите для переключения между
экранами
Нажмите для отмены
изменений
Нажмите для
применения изменений
Управление фазами питания процессора
Увеличьте количество фаз при высокой нагрузке системы для получения быстрой
реакции на изменение нагрузки и лучшее охлаждение. Уменьшите количество фаз при
легкой нагрузке системы для увеличения эффективности VRM.
CPU VRM Switching Frequency
Включить Spread Spectrum для повышения стабильности системы.
CPU Power Thermal Control
Высокое значение обеспечивает широкий диапазон питания процессора и расширяет
частотный диапазон разгона.
CPU Current Capability
CPU Current Capability обеспечивает более широкий диапазон для разгона. Высокое
значение обеспечивает широкий диапазон питания и одновременно расширяет
частотный диапазон разгона.
CPU Load-line Calibration
Позволяет регулировать напряжение и контролировать температуру системы.
Установите высокое значение для высокой производительности системы или низкое
значение для энергосбережения.
CPU Power Duty Control
CPU Power Duty Control регулирует ток для каждой фазы VRM и температуру
компонентов каждой фазы.
Active Frequency Mode
Active Frequency Mode позволяет увеличить энергосбережение процессора. Выберите
ON для ускорения переходных характеристик и увеличения энергосбережения
8
процессора.
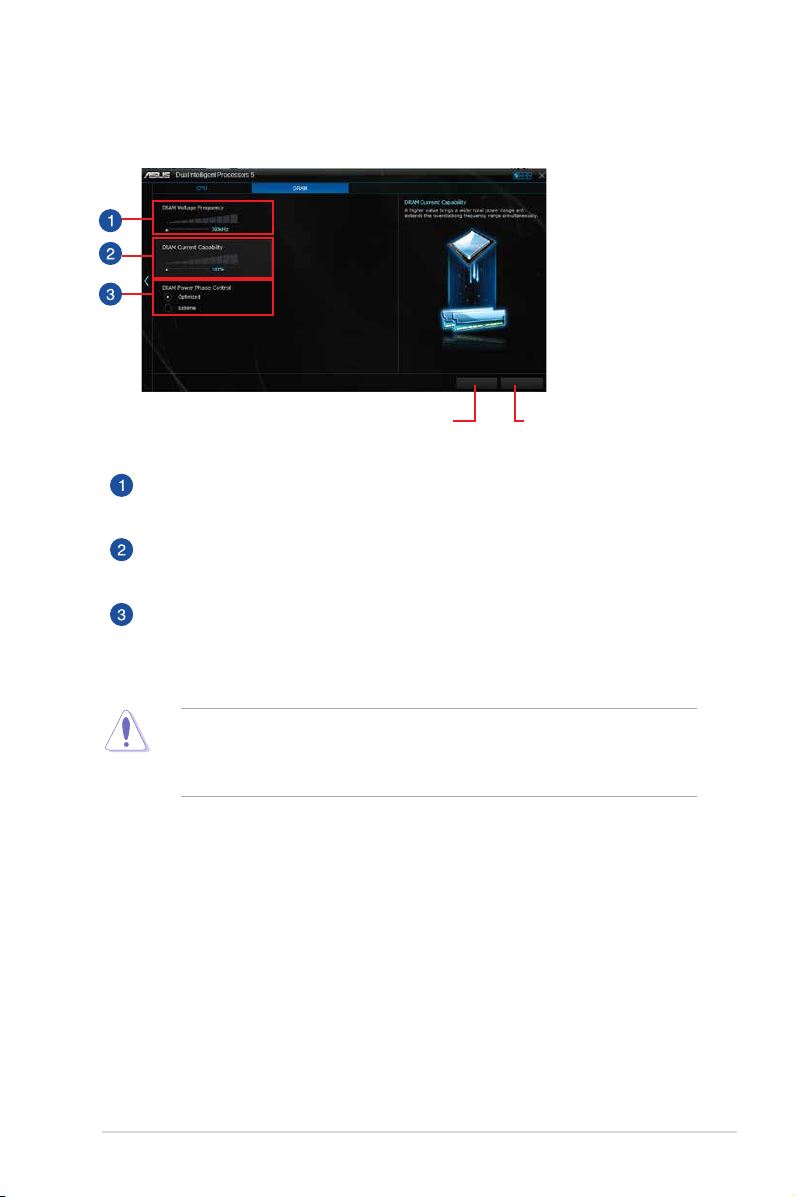
Настройка DRAM Power
Нажмите для отмены
изменений
Нажмите для
применения изменений
DRAM Voltage Frequency
Позволяет настроить частоту переключения DRAM для обеспечения стабильности
системы или увеличения разгонного потенциала.
DRAM Current Capability
Высокое значение обеспечивает широкий диапазон питания и одновременно расширяет
частотный диапазон разгона.
DRAM Power Phase Control
Выберите Extreme для увеличения производительности системы или выберите
Optimized для повышения эффективности питания DRAM.
• Фактический прирост производительности может варьироваться в зависимости от
спецификации процессора.
• Для контроля теплового режима убедитесь, что охлаждающие модули правильно
установлены на материнской плате.
9
Loading…
-
Страница 1
Motherboard Z97-A[…]
-
Страница 2
ii E9060 First Edition April 2014 Copyright © 2014 ASUSTeK COMPUTER INC. All Rights Reserved. No part of this manual, including the products and software described in it, may be reproduced, transmitted, transcribed, stored in a retrieval system, or translated into any language in any form or by any means, except documentation kept by the purchaser[…]
-
Страница 3
iii Contents Safety information ………………………………………………………………………………………… iv About this guide …………………………………………………………………………………………… iv Package contents ……………………………………………………………[…]
-
Страница 4
iv Safety information Electrical safety • To prevent electrical shock hazard, disconnect the power cable from the electrical outlet before relocating the system. • When adding or removing devices to or from the system, ensure that the power cables for the devices are unplugged before the signal cables are connected. If possible, disconnect all […]
-
Страница 5
v Where to find more information Refer to the following sources for additional information and for product and software updates. 1. ASUS websites The ASUS website provides updated information on ASUS hardware and software products. Refer to the ASUS contact information. 2. Optional documentation Your product package may include optional documentati[…]
-
Страница 6
vi Z97-A specifications summary (continued on the next page) Package contents Check your motherboard package for the following items: Motherboard ASUS Z97-A Motherboard Cables 3 x Serial ATA 6.0 Gb/s cables Accessories 1 x ASUS SLI bridge connector 2-in-1 Q-connector Application DVD Support DVD Documentation User Guide If any of the above items is […]
-
Страница 7
vii Z97-A specifications summary (continued on the next page) VGA — Supports Intel ® InTru™ 3D, Quick Sync Video, Intel ® Clear Video HD Technology, and Intel ® Insider™ — Maximum shared memory of 512 MB * DisplayPort 1.2 Multi-Stream Transport compliant, supports DP 1.2 monitor daisy-chain up to 3 displays. Multi-GPU Support Supports AMD ®[…]
-
Страница 8
viii Z97-A specifications summary ASUS Exclusive Features DIGI+ Power Control — CPU Power — Industry-leading digital 8-phase power design — ASUS CPU power utility TPU — Auto Tuning, TPU, GPU Boost, 2-level TPU switch EPU — EPU, EPU switch Fan Xpert 3 — Featuring Fan Auto Tuning function and multiple thermistors selection for optimized system coolin[…]
-
Страница 9
ix ASUS Exclusive Features Crystal Sound 2 — Feel the sound power with different usage scenarios Steam support — Compatible with the most fun gaming platform under Windows ® system EZ DIY Push Notice — Monitor your PC status with smart devices in real time UEFI BIOS EZ Mode featuring friendly graphics user interface — O.C. Tuner — CrashFree BIOS 3[…]
-
Страница 10
x Rear panel I/O ports 1 x VGA port 1 x Optical S/PDIF out port 1 x Intel ® LAN (RJ45) port 4 x USB 3.0/2.0 ports 2 x USB 2.0/1.1 ports 8-channel audio I/O ports Internal I/O connectors 1 x 19-pin USB 3.0/2.0 connector, supports additional 2 USB 3.0 / 2.0 ports 3 x USB 2.0/1.1 connectors, support additional 6 USB 2.0 / 1.1 ports 1 x M.2 Socket 3 ([…]
-
Страница 11
ASUS Z97-A 1-1 1.2 Motherboard overview Before you install the motherboard, study the conguration of your chassis to ensure that the motherboard ts. Unplug the power cord before installing or removing the motherboard. Failure to do so can cause you physical injury and damage to motherboard components. 1.2.1 Placement direction When installing[…]
-
Страница 12
1-2 Chapter 1: Product introduction Place this side towards the rear of the chassis 1.2.3 Motherboard layout[…]
-
Страница 13
ASUS Z97-A 1-3 1.2.4 Layout contents Connectors/Jumpers/Slots/LED Page 1. ATX power connectors (24-pin EATXPWR, 8-pin EATX12V) 1-29 2. Intel ® LGA1150 CPU socket 1-4 3. CPU and chassis fan connectors (4-pin CPU_FAN, 4-pin CPU_OPT; CHA_FAN1, CHA_FAN2, CHA_FAN3, CHA_FAN4) 1-28 4. DDR3 DIMM slots 1-7 5. CPU Over Voltage jumper (3-pin CPU_OV) 1-24 6. […]
-
Страница 14
1-4 Chapter 1: Product introduction 1.3 Central Processing Unit (CPU) The motherboard comes with a surface mount LGA1150 socket designed for the 4th Generation and New 4th Generation Intel ® Core™ i7 / Intel ® Core™ i5 / Intel ® Core™ i3, Pentium ® , and Celeron ® processors. • Ensure that all power cables are unplugged before installi[…]
-
Страница 15
ASUS Z97-A 1-5 1.3.1 Installing the CPU[…]
-
Страница 16
1-6 Chapter 1: Product introduction 1.3.2 CPU heatsink and fan assembly installation Apply the Thermal Interface Material to the CPU heatsink and CPU before you install the heatsink and fan, if necessary. To install the CPU heatsink and fan assembly[…]
-
Страница 17
ASUS Z97-A 1-7 To uninstall the CPU heatsink and fan assembly 1.4 System memory 1.4.1 Overview This motherboard comes with four Double Data Rate 3 (DDR3) Dual Inline Memory Module (DIMM) sockets. A DDR3 module is notched differently from a DDR or DDR2 module. DO NOT install a DDR or DDR2 memory module to the DDR3 slot. According to Intel ® CPU spe[…]
-
Страница 18
1-8 Chapter 1: Product introduction 1.4.2 Memory configurations You may install 1 GB, 2 GB, 4 GB, and 8 GB unbuffered non-ECC DDR3 DIMMs into the DIMM sockets. You can refer to the recommended memory population below. • You may install varying memory sizes in Channel A and Channel B. The system maps the total size of the lower-sized channel for t[…]
-
Страница 19
ASUS Z97-A 1-9 Z97-A Motherboard Qualified Vendors Lists (QVL) DDR3 3200 (O.C.) MHz capability Vendors Part No. Size SS/DS Chip Brand Chip NO. Timing Voltage DIMM socket support (Optional) 1 2 4 AVEXIR AVD3UH32001304G-4CI(XMP) 16GB (4x4GB) SS — — 13-15-15-35 1.65V • • • G.SKILL F3-3200C12Q-16GTXDG(XMP) 16GB (4x4GB) SS — — 12-15-15-35 1.65V ?[…]
-
Страница 20
1-10 Chapter 1: Product introduction DDR3 2800 (O.C.) MHz capability Vendors Part No. Size SS/DS Chip Brand Chip NO. Timing Voltage DIMM socket support (Optional) 1 2 4 AVEXIR AVD3UH28001208G- 4BZ1(XMP) 32GB (4x8GB) DS — — 12-14-14-35 1.65V • • • A_DATA AX3U2800W 4G12(XMP) 16GB (4x4GB) SS — — 12-14-14-36 1.65V • • • A_DATA AX3U2800W 8G1[…]
-
Страница 21
ASUS Z97-A 1-11 DDR3 2666 (O.C.) MHz capability Vendors Part No. Size SS/DS Chip Brand Chip NO. Timing Voltage DIMM socket support (Optional) 1 2 4 Apacer 78.BAGFF.AFC0C(XMP) 8GB (2x4GB) DS — — 12-13-13-35 — • • • Apacer 78.BAGFR.AFD0C(XMP) 8GB (2x4GB) DS — — 12-13-13-35 — • • • Apacer 78.CAGFF.AFD0C(XMP) 16GB (2x8GB) DS — — 12-13-13-35[…]
-
Страница 22
1-12 Chapter 1: Product introduction Vendors Part No. Size SS/DS Chip Brand Chip NO. Timing Voltage DIMM socket support (Optional) 1 2 4 G.SKILL F3-19200CL9Q- 16GBZMD(XMP) 16GB (4x4GB) DS — — 9-11-11-31 1.65 • • • G.SKILL F3-2400C11Q-32GXM(XMP) 32GB (4x8GB) DS — — 11-13-13-31 1.65 • • • GEIL GOC316GB24 00C10QC(XMP) 16GB (4x4GB) DS — — 1[…]
-
Страница 23
ASUS Z97-A 1-13 Vendors Part No. Size SS/DS Chip Brand Chip NO. Timing Voltage DIMM socket support (Optional) 1 2 4 CORSAIR CMY8GX3M2A2133C11R (Ver4.21)(XMP) 8GB (2x4GB) DS — — 11-11-11-27 1.5 • • • CORSAIR CMZ8GX3M2A2133C11R (Ver4.21)(XMP) 8GB (2x4GB) DS — — 11-11-11-27 1.5 • • • G.SKILL F3-17000CL11Q2- 64GBZLD(XMP) 64GB (8x8GB) DS — -[…]
-
Страница 24
1-14 Chapter 1: Product introduction DDR3 1866 (O.C.) MHz capability Vendors Part No. Size SS/DS Chip Brand Chip NO. Timing Voltage DIMM socket support (Optional) 1 2 4 CORSAIR CMT32GX3M4X1866C9(Ver3.23) (XMP) 32GB (4x8GB) DS — — 9-10-9-27 1.5 • • • CORSAIR CMY16GX3M2A1866C9 (Ver 4.21)(XMP) 16GB (2x8GB) DS — — 9-10-9-27 1.5 • • • CORSAI[…]
-
Страница 25
ASUS Z97-A 1-15 DDR3 1600 MHz capability Vendors Part No. Size SS/DS Chip Brand Chip NO. Timing Voltage DIMM socket support (Optional) 1 2 4 A-DATA AD3U1600W4G11 4GB SS A-DATA 3WCD-1211A 11-11-11-28 — • • • A-DATA AD3U1600W8G11 8GB DS A-DATA 3WCD-1211A 11-11-11-28 — • • • A-DATA ADDU1600W 4G11-B 4GB SS A-DATA DWND-1211A 9-9-9-24 — • ?[…]
-
Страница 26
1-16 Chapter 1: Product introduction Vendors Part No. Size SS/DS Chip Brand Chip NO. Timing Voltage DIMM socket support (Optional) 1 2 4 CORSAIR CMZ16GX3M2A1 600C10 (Ver.3.24) (XMP ) 16GB (2x8GB) DS — — 10-10- 10-27 1.5 • • • CORSAIR CMZ16GX3M 4A1600C9(XMP) 16GB (4x4GB) DS — — 9-9-9-24 1.5 • • • CORSAIR CMZ16GX3M4X1600C9 (Ver8.16)(XMP) […]
-
Страница 27
ASUS Z97-A 1-17 DDR3 1600 MHz capability Vendors Part No. Size SS/DS Chip Brand Chip NO. Timing Voltage DIMM socket support (Optional) 1 2 4 KINGSTON KHX16C10 B1K2/16X(XMP) 16GB (2x8GB) DS — — — 1.5 • • • KINGSTON KHX16C9K2/16 16GB (2x8GB) DS — — 1333-9-9-9-24 1.5 • • • KINGSTON KHX16C9P1K2/16 16GB (2x8GB) DS — — — 1.5 • • • KINGS[…]
-
Страница 28
1-18 Chapter 1: Product introduction DDR3 1333 MHz capability Vendors Part No. Size SS/DS Chip Brand Chip NO. Timing Voltage DIMM socket support (Optional) 1 2 4 AMD AE32G1339U1-U 2GB SS AMD 23EY4587 MB3H — 1.5 • • • AMD AE34G1339U2-U 4GB DS AMD 23EY4587 MB3H — 1.5 • • • Apacer 78.B1GDE.9L10C 4GB DS Apacer AM5D5908 CEHSBG 9 — • • ?[…]
-
Страница 29
ASUS Z97-A 1-19 Vendors Part No. Size SS/DS Chip Brand Chip NO. Timing Voltage DIMM socket support (Optional) 1 2 4 Mach Xtreme MXD3U133316GQ 16GB (4x4GB) DS — — — — • • • Mach Xtreme MXD3V13332GS 2GB SS Mach Xtreme C2S46D3 0-D313 — — • • • MICRON MT8JTF25664AZ-1G4M1 2GB SS MICRON D9PFJ — — • • • Patriot PSD32G13332 2GB DS Prtriot[…]
-
Страница 30
1-20 Chapter 1: Product introduction To remove a DIMM 1.5.1 Installing an expansion card To install an expansion card: 1. Before installing the expansion card, read the documentation that came with it and make the necessary hardware settings for the card. 2. Remove the system unit cover (if your motherboard is already installed in a chassis). 3. Re[…]
-
Страница 31
ASUS Z97-A 1-21 1.5.2 Configuring an expansion card After installing the expansion card, congure it by adjusting the software settings: 1. Turn on the system and change the necessary BIOS settings, if any. See Chapter 2 for information on BIOS setup. 2. Assign an IRQ to the card. 3. Install the software drivers for the expansion card. When using[…]
-
Страница 32
1-22 Chapter 1: Product introduction IRQ assignments for this motherboard A B C D E F G H I.G.D. Shared – – – – – – – HD Audio 1 Controller Shared – – – – – – HD Audio 2 Controller – – – – – Shared – EHCI 1 Controller – – – – – – – Shared EHCI 2 Controller Shared – – – – – – – XHCI C[…]
-
Страница 33
ASUS Z97-A 1-23 1.6 Jumpers 1. Clear RTC RAM (3-pin CLRTC) This jumper allows you to clear the Real Time Clock (RTC) RAM in CMOS. You can clear the CMOS memory of date, time, and system setup parameters by erasing the CMOS RTC RAM data. The onboard button cell battery powers the RAM data in CMOS, which include system setup information such as syste[…]
-
Страница 34
1-24 Chapter 1: Product introduction 2. CPU Over Voltage jumper (3-pin CPU_OV) The CPU Over Voltage jumper allows you to set a higher CPU voltage for a exible overclocking system, depending on the type of the installed CPU. To gain more CPU voltage setting, insert the jumper to pins 2-3. To go back to its default CPU voltage setting, insert the […]
-
Страница 35
ASUS Z97-A 1-25 1.7 Connectors 1.7.1 Rear panel connectors * and **: Refer to the tables on the next page for LAN port LEDs and audio port definitions. Rear panel connectors 1. DisplayPort 7. DVI-D port 2. VGA port 8. USB 3.0 ports 56 3. USB 2.0 ports 7-8 9. USB 3.0 ports 34 4. PS/2 keyboard/mouse port 10. Optical S/PDIF Out port 5. LAN port* 11. A[…]
-
Страница 36
1-26 Chapter 1: Product introduction • The plugged USB 3.0 device may run on xHCI or EHCI mode, depending on the operating system’s setting. • USB 3.0 devices can only be used for data storage. • We strongly recommend that you connect USB 3.0 devices to USB 3.0 ports for faster and better performance from your USB 3.0 devices. • Due to th[…]
-
Страница 37
ASUS Z97-A 1-27 1.7.2 Internal connectors 1. Serial port connector (10-1 pin COM) This connector is for a serial (COM) port. Connect the serial port module cable to this connector, then install the module to a slot opening at the back of the system chassis. The COM module is purchased separately. 2. Intel ® Z87 Serial ATA 6.0 Gb/s connectors (7-pi[…]
-
Страница 38
1-28 Chapter 1: Product introduction 3. CPU and chassis fan connectors (4-pin CPU_FAN, 4-pin CPU_OPT; CHA_FAN1, CHA_FAN2, CHA_FAN3, CHA_FAN4) Connect the fan cables to the fan connectors on the motherboard, ensuring that the black wire of each cable matches the ground pin of the connector. • DO NOT forget to connect the fan cables to the fan conn[…]
-
Страница 39
ASUS Z97-A 1-29 • For a fully congured system, we recommend that you use a power supply unit (PSU) that complies with ATX 12 V Specication 2.0 (or later version) and provides a minimum power of 350 W. • DO NOT forget to connect the 4-pin/8-pin ATX +12V power plug. Otherwise, the system will not boot up. • We recommend that you use a PSU[…]
-
Страница 40
1-30 Chapter 1: Product introduction 5. Front panel audio connector (10-1 pin AAFP) This connector is for a chassis-mounted front panel audio I/O module that supports either HD Audio or legacy AC`97 audio standard. Connect one end of the front panel audio I/O module cable to this connector. • We recommend that you connect a high-denition front[…]
-
Страница 41
ASUS Z97-A 1-31 7. DirectKey connector (2-pin DRCT) This connector is for the chassis-mounted button that supports the DirectKey function. Connect the button cable that supports DirectKey, from the chassis to this connector on the motherboard. Ensure that your chassis comes with the extra button cable that supports the DirectKey feature. Refer to t[…]
-
Страница 42
1-32 Chapter 1: Product introduction 9. USB 2.0 connectors (10-1 pin USB910, USB1112, USB1314) These connectors are for USB 2.0 ports. Connect the USB module cable to any of these connectors, then install the module to a slot opening at the back of the system chassis. These USB connectors comply with USB 2.0 specications and supports up to 480 M[…]
-
Страница 43
ASUS Z97-A 1-33 • SystempowerLED(2-pinPWR_LED) This 2-pin connector is for the system power LED. Connect the chassis power LED cable to this connector. The system power LED lights up when you turn on the system power, and blinks when the system is in sleep mode. • HarddiskdriveactivityLED(2-pinHDD_LED) This 2[…]
-
Страница 44
1-34 Chapter 1: Product introduction 12. USB 3.0 connector (20-1 pin USB3_12) This connector allows you to connect a USB 3.0 module for additional USB 3.0 front or rear panel ports. With an installed USB 3.0 module, you can enjoy all the benets of USB 3.0 including faster data transfer speeds of up to 5 Gb/s, faster charging time for USB-chargea[…]
-
Страница 45
ASUS Z97-A 1-35 13. Thunderbolt header (5-pin TB_HEADER) This connector is for the add-on Thunderbolt I/O card that supports Intel’s Thunderbolt Technology, allowing you to connect up to six Thunderbolt-enabled devices and a DisplayPort-enabled display in a daisy-chain conguration. The add-on Thunderbolt I/O card and Thunderbolt cables are pur[…]
-
Страница 46
1-36 Chapter 1: Product introduction 1.8 Onboard LEDs 1. Standby Power LED The motherboard comes with a standby power LED that lights up to indicate that the system is ON, in sleep mode, or in soft-off mode. This is a reminder that you should shut down the system and unplug the power cable before removing or plugging any motherboard components. The[…]
-
Страница 47
ASUS Z97-A 1-37 4. EPU LED (OLED2) The EPU LED lights up when the EPU switch is enabled. 3. TPU LED (TPU_LED) The TPU LED lights up when the TPU switch is enabled.[…]
-
Страница 48
1-38 Chapter 1: Product introduction 1.9 Onboard buttons and switches Onboard buttons and switches allow you to ne-tune performance when working on a bare or open-case system. This is ideal for overclockers and gamers who continually change settings to enhance system performance. 1. EPU switch Enable this switch to automatically detect the curre[…]
-
Страница 49
ASUS Z97-A 1-39 2. MemOK! button Installing DIMMs that are not compatible with the motherboard may cause system boot failure, and the DRAM_LED near the MemOK! button lights continuously. Press and hold the MemOK! button until the DRAM_LED starts blinking to begin automatic memory compatibility tuning for successful boot. • Refer to section 1.8 On[…]
-
Страница 50
1-40 Chapter 1: Product introduction 3. TPU switch With its two-level adjustment functions, the TPU allows you to automatically adjusts the CPU ratio and clock speed for an optimal system performance. • Enable this switch when the system is powered off. • When the TPU switch is set to Enabled (TPU_I: CPU Ratio Boost), the system automatically a[…]
-
Страница 51
ASUS Z97-A 1-41 4. Power-on button The motherboard comes with a power-on button that allows you to power up or wake up the system. The button also lights up when the system is plugged to a power source indicating that you should shut down the system and unplug the power cable before removing or installing any motherboard component. 5. EZ XMP switch[…]
-
Страница 52
1-42 Chapter 1: Product introduction 1.10 Software support 1.10.1 Installing an operating system This motherboard supports Windows ® 7 (32bit/64bit) and Windows ® 8 (32bit/64bit) Operating Systems (OS). Always install the latest OS version and corresponding updates to maximize the features of your hardware. Motherboard settings and hardware optio[…]
-
Страница 53
ASUS Z97-A 2-1 2.1 Managing and updating your BIOS The ASUS website publishes the latest BIOS versions to provide enhancements on system stability, compatibility,and performance. However, BIOS updating is potentially risky. If there is no problem using the current version of BIOS, DO NOT manually update the BIOS. Inappropriate BIOS updating may res[…]
-
Страница 54
2-2 Chapter 2: BIOS information EZ Update requires an Internet connection either through a network or an ISP (Internet Service Provider). 2.1.1 EZ Update EZ Update is a utility that allows you to automatically update your motherboard’s softwares, drivers, and the BIOS version easily. With this utlity, you can also manually update the saved BIOS a[…]
-
Страница 55
ASUS Z97-A 2-3 7. Reboot the system when the update process is done. • This function supports USB ash disks formatted using FAT32 or FAT16 on a single partition only. • Ensure to load the BIOS default settings to ensure system compatibility and stability. Select the Load Optimized Defaults item under the Exit menu. • DO NOT shut down or re[…]
-
Страница 56
2-4 Chapter 2: BIOS information 2.1.4 ASUS BIOS Updater ASUS BIOS Updater allows you to update the BIOS in DOS environment. The screen captures used in this section are for reference only and may not be exactly the same as actually shown on your computer screen. Before updating BIOS • Prepare the motherboard support DVD and a USB ash drive. ?[…]
-
Страница 57
ASUS Z97-A 2-5 Please select boot device: E1: ASUS DVD-E818A6T (4069MB) USB DISK 2.0 (3824MB) UEFI: (FAT) USB DISK 2.0 (3824MB) Enter Setup and to move selection ENTER to select boot device ESC to boot using defaults Booting the system in DOS environment To boot the system in DOS: 1. Insert the USB ash drive with the latest BIOS le an[…]
-
Страница 58
2-6 Chapter 2: BIOS information 2. On the BIOS Updater screen, press <Tab> to switch from Files panel to Drives panel then select D: . ASUSTeK BIOS Updater for DOS V1.30 [2014/01/01] Current ROM BOARD: Z97-A VER: 0210 (H :00 B :00) DATE: 02/12/2014 Update ROM BOARD: Unknown VER: Unknown DATE: Unknown PATH: C: C: D: FORMAN~1 <DIR> Z97-A[…]
-
Страница 59
ASUS Z97-A 2-7 2.2 BIOS setup program Use the BIOS Setup program to update the BIOS or congure its parameters. The BIOS screens include navigation keys and brief online help to guide you in using the BIOS Setup program. Entering BIOS Setup at startup To enter BIOS Setup at startup, press <Delete> during the Power-On Self Test (POST). If yo[…]
-
Страница 60
2-8 Chapter 2: BIOS information 2.2.1 EZ Mode By default, the EZ Mode screen appears when you enter the BIOS setup program. The EZ Mode provides you an overview of the basic system information, and allows you to select the display language, system performance mode and boot device priority. To access the Advanced Mode, click Exit/Advanced Mode , the[…]
-
Страница 61
ASUS Z97-A 2-9 Configuration fields Menu bar General help Sub-menu item Menu items Scroll bar Last modified settings Language EZ Tuning Wizard MyFavorite Quick Note Hot Keys Goes back to EZ Mode Displays the CPU/motherboard temperature, CPU and memory voltage output Q-Fan control 2.2.2 Advanced Mode The Advanced Mode provides advanced options for e[…]
-
Страница 62
2-10 Chapter 2: BIOS information Menu bar The menu bar on top of the screen has the following main items: My Favorites For saving the frequently-used system settings and conguration Main For changing the basic system conguration Ai T weaker For changing the overclocking settings Advanced For changing the advanced system settings Monitor For d[…]
-
Страница 63
ASUS Z97-A 2-11 EZ Tuning Wizard (F11) This button above the menu bar allows you to view and tweak the overclocking settings of your system. It also allows you to change the motherboard’s SATA mode from AHCI to RAID mode. Refer to section 2.2.4 EZ Tuning Wizard for more information. Quick Note (F9) This button above the menu bar allows you to key[…]
-
Страница 64
2-12 Chapter 2: BIOS information 2.2.3 QFan Control The QFan Control allows you to set a fan prole or manually congure the operating speed of your CPU and chassis fans. Configuring fans manually Select Manual from the list of proles to manually congure your fans’ operating speed. Speed points Click to select a fan to be configured Cli[…]
-
Страница 65
ASUS Z97-A 2-13 To congure your fans: 1. Select the fan that you want to congure and to view its current status. 2. Click and drag the speed points to adjust the fans’ operating speed. 3. Click Apply to save the changes then click Exit (ESC) . 2.2.4 EZ Tuning Wizard EZ Tuning Wizard allows you to overclock your CPU and DRAM, computer usage,[…]
-
Страница 66
2-14 Chapter 2: BIOS information Creating RAID To create RAID: 1. Press <F11> on your keyboard or click from the BIOS screen to open EZ Tuning Wizard screen. 2. Click RAID then click Next . • Ensure that your HDDs have no existing RAID volumes. • Ensure to connect your HDDs to Intel ® SATA connectors. 3. Select the type of storage for yo[…]
-
Страница 67
ASUS Z97-A 2-15 2.3 My Favorites MyFavorites is your personal space where you can easily save and access your favorite BIOS items. Adding items to My Favorites To add BIOS items: 1. Press <F3> on your keyboard or click from the BIOS screen to open Setup Tree Map screen. 2. On the Setup Tree Map screen, select the BIOS items that you want to s[…]
-
Страница 68
2-16 Chapter 2: BIOS information 3. Select an item from main menu panel, then click the submenu that you want to save as favorite from the submenu panel and click . You cannot add the following items to My Favorite items: • Items with submenu options • User-managed items such as language and boot order • Conguration items such as Memory SP[…]
-
Страница 69
ASUS Z97-A 2-17 Administrator Password If you have set an administrator password, we recommend that you enter the administrator password for accessing the system. Otherwise, you might be able to see or change only selected elds in the BIOS setup program. To set an administrator password: 1. Select the Administrator Password item and press <En[…]
-
Страница 70
2-18 Chapter 2: BIOS information 2.5 Ai T weaker menu The Ai Tweaker menu items allow you to congure overclocking-related items. Be cautious when changing the settings of the Ai Tweaker menu items. Incorrect eld values can cause the system to malfunction. The conguration options for this section vary depending on the CPU and DIMM model you[…]
-
Страница 71
ASUS Z97-A 2-19 The following item appears only when you set the Ai Overclocking Tuner to [Manual] . Filter PLL [Auto] Set this item to high BCLK (base clock) mode when using a very high BCLK to improve overclocking capability. Conguration options: [Auto] [Low BCLK mode] [High BCLK mode] BCLK Frequency [Auto] This item allows you to set the BCLK[…]
-
Страница 72
2-20 Chapter 2: BIOS information 2-Core Ratio Limit [Auto] Select [Auto] to apply the CPU default Turbo Ratio setting or manually assign a 2-Core Limit value that must be higher than or equal to the 3-Core Ratio Limit. If you assign a value for 2-Core Ratio Limit, do not set the 1-Core Ratio Limit to [Auto] . 3-Core Ratio Limit [Auto] Select [Auto][…]
-
Страница 73
ASUS Z97-A 2-21 2.5.9 DRAM Frequency [Auto] This item allows you to set the memory operating frequency. The congurable options vary with the BCLK (base clock) frequency setting. Select the auto mode to apply the optimized setting. Conguration options: [Auto] [DDR3-2400MHz] [DDR3-3199MHz] [DDR3-3999MHz] [DDR3-4200MHz] [DDR3-4800MHz] [DDR3-5400[…]
-
Страница 74
2-22 Chapter 2: BIOS information DRAM RAS# to CAS# Delay [Auto] Conguration options: [Auto] [1] – [31] DRAM RAS# PRE Time [Auto] Conguration options: [Auto] [1] – [31] DRAM RAS# ACT Time [Auto] Conguration options: [Auto] [1] – [63] DRAM Command Rate [Auto] Conguration options: [Auto] [1] – [2] Secondary Timings DRAM RAS# to RAS[…]
-
Страница 75
ASUS Z97-A 2-23 DRAM RTL (CHA_R0D0) [Auto] Conguration options: [Auto] [1] — [63] DRAM RTL (CHA_R0D1) [Auto] Conguration options: [Auto] [1] — [63] DRAM RTL (CHA_R1D0) [Auto] Conguration options: [Auto] [1] — [63] DRAM RTL (CHA_R1D1) [Auto] Conguration options: [Auto] [1] — [63] DRAM RTL (CHB_R0D0) [Auto] Conguration options: [Auto] […]
-
Страница 76
2-24 Chapter 2: BIOS information tRDRD_dr [Auto] Conguration options: [Auto] [1] — [15] tRDRD_dd [Auto] Conguration options: [Auto] [1] — [15] tWRRD [Auto] Conguration options: [Auto] [1] — [63] tWRRD_dr [Auto] Conguration options: [Auto] [1] — [15] tWRRD_dd [Auto] Conguration options: [Auto] [1] — [15] tWRWR [Auto] Conguration op[…]
-
Страница 77
ASUS Z97-A 2-25 Channel A/B DIMM Control [Enable Both DIMMs] This item allows you to enable or disable the DIMMs on channels A and B. Conguration options: [Enable Both DIMMS] [Disable DIMM0] [Disable DIMM1] [Disable Both DIMMS] Scrambler Setting [Optimized (ASUS)] This item allows you to set the optimized mode to enhance system stability. Con[…]
-
Страница 78
2-26 Chapter 2: BIOS information CPU VRM Switching Frequency [Auto] This item affects the VRM transient response speed and the component thermal production. Select [Manual] to congure a higher frequency for a quicker transient response speed. Conguration options: [Auto] [Manual] DO NOT remove the thermal module. The thermal conditions should […]
-
Страница 79
ASUS Z97-A 2-27 2.5.15 Internal CPU Power Management The subitems in this menu allow you to set the CPU ratio and their features. Enhanced Intel SpeedStep Technology [Enabled] This item allows the operating system to dynamically adjust the processor voltage and cores frequency, resulting to a decreased average power consumption and decreased averag[…]
-
Страница 80
2-28 Chapter 2: BIOS information CPU Internal Power Fault Control Thermal Feedback [Auto] This item allows your system to take precautionary actions to protect the CPU when the thermal condition of the external regulator exceeds the threshold. Conguration options: [Auto] [Disabled] [Enabled] CPU Integrated VR Fault Management [Auto] Disable this[…]
-
Страница 81
ASUS Z97-A 2-29 Power Fast Ramp Response [Auto] This item allows you to enhance the response of the CPU voltage regulator during the load transients. Use the <+> or <-> to adjust the value. The values range from 0.00 to 1.50. Conguration options: [Auto] [0.00] — [1.50] CPU Internal Power Saving Control Power Saving Level 1 Threshold […]
-
Страница 82
2-30 Chapter 2: BIOS information The following items appear only when you set the CPU Core Voltage to [Offset Mode] . Offset Mode Sign [+] [+] To offset the voltage by a positive value. [–] To offset the voltage by a negative value. CPU Core Voltage Offset Use the <+> or <-> keys to adjust the value. The values range from 0.001 V to 0[…]
-
Страница 83
ASUS Z97-A 2-31 The following item appears only when you set the CPU Core Voltage to [Manual] . CPU Graphics Voltage Override [Auto] This item allows you to set the CPU Graphics Voltage override. By default, this item takes the standard value of the installed CPU. You can use the <+> or <-> keys to adjust the value. The values range fro[…]
-
Страница 84
2-32 Chapter 2: BIOS information CPU Analog I/O Voltage Offset [Auto] This item allows you to set the amount of voltage fed to the analog portion of the I/O on the CPU. By default, this item takes the standard value of the installed CPU. Increase the amount of voltage to enhance the overclocking capability. You can use the <+> or <-> ke[…]
-
Страница 85
ASUS Z97-A 2-33 2.5.25 PCH Core Voltage [Auto] This item allows you to set the Core voltage for the PCH (Platform Controller Hub). You can use the <+> or <-> keys to adjust the value. The values range from 0.70 V to 1.5 V with a 0.0125 V interval. • The values of the CPU PLL Voltage, CPU Manual Voltage, CPU Offset Voltage, iGPU Manual[…]
-
Страница 86
2-34 Chapter 2: BIOS information 2.5.31 Clock Crossing Reset Voltage [Auto] This item allows you to increase the value of the clock crossing reset voltage when the rising edge of the BCLK DN is equal to the falling edge of the BCLK D+. You can use the <+> or <-> keys to adjust the value. The values range from 0.1 V to 1.9 V with a 0.006[…]
-
Страница 87
ASUS Z97-A 2-35 2.6.1 CPU Configuration The items in this menu show the CPU-related information that the BIOS automatically detects. The items shown in submenu may be different due to the CPU you installed. Intel Adaptive Thermal Monitor [Enabled] This item allows you to protect the CPU by decreasing its frequency as it reaches the thermal throttle[…]
-
Страница 88
2-36 Chapter 2: BIOS information Dynamic Storage Accelerator [Disabled] This item allows you to accelerate the performance of the SSDs (Solid-State Drives) by dynamically adjusting the power management during heavy multitasking. Conguration options: [Enabled] [Disabled] CPU Power Management Configuration This item allows you to manage and con[…]
-
Страница 89
ASUS Z97-A 2-37 C7 Latency [Long] This item allows you to set the duration of C7 latency for C7 state. Conguration options: [Short] [Long] Package C State Support [Auto] This item allows you to set the a C-state support for the CPU package. Conguration options: [Auto] [Enabled] [C0/C1] [C2] [C3] [C6] [CPU C7] [CPU C7s] 2.6.2 PCH Configuration[…]
-
Страница 90
2-38 Chapter 2: BIOS information Hybrid Hard Disk Support [Disabled] This item allows you to enable or disable the hybrid hard disk support for a faster resume time. Conguration options: [Enabled] [Disabled] Intel Smart Connect Technology This item allows the system to support Intel Smart Connect Technology, that periodically refreshes selected […]
-
Страница 91
ASUS Z97-A 2-39 Alternate ID [Disabled] This item allows you to report the alternate device ID. Conguration options: [Disabled] [Enabled] SATA6G (SATA6G_1 — SATA6G_6) These items allow you to assign a name of each SATA 6G connectors. Hot Plug [Disabled] (SATA6G_1 — SATA6G_6) These items allow you to enable/disable SATA Hot Plug Support. You can […]
-
Страница 92
2-40 Chapter 2: BIOS information DMI Configuration This item allows you to control various DMI (direct media interface) to run at PCI-E 2.0 speed. DMI Gen 2 [Auto] Set this item to [Enabled] to run DMI at PCI-E 2.0 speed. Conguration options: [Enabled] [Disabled] NB PCI-E Configuration This item allows you to congure the NB PCI Express settin[…]
-
Страница 93
ASUS Z97-A 2-41 EHCI Hand-off [Disabled] [Enabled] Enables the support for operating systems without an EHCI hand-off feature. [Disabled] Disables the EHCI Hand-off support. Mass Storage Devices [Auto] This item allows your system to detect the devices according to their media formats. Conguration options: [Auto] [Floppy] [Forced FDD] [Hard Disk[…]
-
Страница 94
2-42 Chapter 2: BIOS information ASPM Support [Disabled] This item allows you to select the ASPM state for energy-saving conditions. Conguration options: [Disabled] [L0s] [L1] [L0sL1] [Auto] SA — PCI Express options DMI Link ASPM Control [Disabled] This item allows you to control the Active State Power Management on both CPU and PCH (platform co[…]
-
Страница 95
ASUS Z97-A 2-43 Intel LAN Controller [Enabled] This item allows you to enable or disable the Intel LAN1/2 controllers. Conguration options: [Disabled] [Enabled] The following item appears only when you set the Intel LAN Controller to [Enabled] . Intel PXE OPROM [Disabled] This item allows you to enable or disable the PXE OptionRom of the Intel ?[…]
-
Страница 96
2-44 Chapter 2: BIOS information 2.6.9 Network Stack Configuration Network stack [Disable] This item allows you to disable or enable the UEFI network stack. Conguration options: [Disable] [Enable] The following item appears only when you set the Network Stack to [Enabled] . Ipv4/Ipv6 PXE Support [Enabled] This item allows you to enable or disabl[…]
-
Страница 97
ASUS Z97-A 2-45 2.7 Monitor menu The Monitor menu displays the system temperature/power status, and allows you to change the fan settings. Scroll down to display the other BIOS items. 2.7.1 Qfan Tuning Click this item to automatically detect the lowest speed and congure the minimum duty cycle for each fan. 2.7.2 CPU Temperature / MB Temperature […]
-
Страница 98
2-46 Chapter 2: BIOS information 2.7.4 CPU Core 0/3 Voltage, 3.3V Voltage, 5V Voltage, 12V Voltage The onboard hardware monitor automatically detects the voltage output through the onboard voltage regulators. Select [Ignore] if you do not want to detect this item. 2.7.5 CPU Q-Fan Control [Auto] This item allows you to set the CPU Q-Fan operating mo[…]
-
Страница 99
ASUS Z97-A 2-47 CPU Fan Middle Duty Cycle(%) [20] Use the <+> or <-> keys to adjust the CPU fan middle duty cycle. The values range from 20% to 100%. When the CPU temperature reaches the upper limit, the CPU fan operates at the maximum duty cycle. CPU Lower Temperature [20] Use the <+> or <-> keys to adjust the CPU fan’s l[…]
-
Страница 100
2-48 Chapter 2: BIOS information Chassis Fan 1/4 Max. Duty Cycle(%) [100] Use the <+> or <-> keys to adjust the maximum chassis fan duty cycle. The values range from 20% to 100%. When the chassis temperature reaches the upper limit, the chassis fan will operate at the maximum duty cycle. Chassis Fan 1/4 Middle Temperature [45] Use the &[…]
-
Страница 101
ASUS Z97-A 2-49 2.8 Boot menu The Boot menu items allow you to change the system boot options. 2.8.1 Fast Boot [Enabled] [Disabled] This item allows your system to go back to its normal boot speed. [Enabled] This item allows your system to accelerate the boot speed. The following items appear only when you set the Fast Boot to [Enabled] . SATA Supp[…]
-
Страница 102
2-50 Chapter 2: BIOS information PS/2 Keyboard and Mouse Support [Auto] Select any of these settings when PS/2 keyboard and mouse are installed. These settings only apply when fastboot is enabled. [Auto] For a faster POST time, PS/2 devices are only available when the system boots up or rebooted when the PS/2 devices are not reconnected or changed.[…]
-
Страница 103
ASUS Z97-A 2-51 The following items appear only when you set the Boot Logo Display to [Disabled] . Post Report [5 sec] This item allows you to select a desired POST report waiting time. Conguration options: [1 sec] — [10 sec] [Until Press ESC] 2.8.4 Bootup NumLock State [Enabled] This item allows you to enable or disable power-on state of the Nu[…]
-
Страница 104
2-52 Chapter 2: BIOS information The following items appear only when you set the Launch CSM to [Enabled] . Boot Devices Control [UEFI and Legacy OpROM] This item allows you to select the type of devices that you want to boot. Conguration options: [UEFI and Legacy OpROM] [Legacy OpROM only] [UEFI only] Boot from Network Devices [Legacy OpROM fir[…]
-
Страница 105
ASUS Z97-A 2-53 PK Management The Platform Key (PK) locks and secures the rmware from any permissible changes. The system veries the PK before your system enters the OS. Delete PK This item allows you to delete the PK from your system. Once the PK is deleted, all the system’s Secure Boot keys will not be active. Conguration options: [Yes[…]
-
Страница 106
2-54 Chapter 2: BIOS information DBX Management The dbx (Revoked Signature database) lists the forbidden images of db items that are no longer trusted and cannot be loaded. Delete the dbx This item allows you to delete the dbx le from your system. Load dbx from File This item allows you to load the downloaded dbx from a USB storage device. Con?[…]
-
Страница 107
ASUS Z97-A 2-55 2.9 Tool menu The Tool menu items allow you to congure options for special functions. Select an item then press <Enter> to display the submenu. 2.9.1 Setup Animator This item allows you to enable or disable the Setup animator. Conguration options: [Disabled] [Enabled] 2.9.2 ASUS EZ Flash 2 Utility This item allows you to[…]
-
Страница 108
2-56 Chapter 2: BIOS information 2.9.4 ASUS DRAM SPD Information This item allows you to view the DRAM SPD information. 2.10 Exit menu The Exit menu items allow you to load the optimal default values for the BIOS items, and save or discard your changes to the BIOS items. You can access the EZ Mode from the Exit menu.[…]
-
Страница 109
ASUS Z97-A A-1 Appendices Notices Federal Communications Commission Statement This device complies with Part 15 of the FCC Rules. Operation is subject to the following two conditions: • This device may not cause harmful interference. • This device must accept any interference received including interference that may cause undesired operat[…]
-
Страница 110
A-2 Appendices REACH Complying with the REACH (Registration, Evaluation, Authorisation, and Restriction of Chemicals) regulatory framework, we published the chemical substances in our products at ASUS REACH website at http://csr.asus.com/english/REACH.htm. DO NOT throw the motherboard in municipal waste. This product has been designed to enable pro[…]
-
Страница 111
ASUS Z97-A A-3 Google™ License Terms Copyright© 2014 Google Inc. All Rights Reserved. LicensedundertheApacheLicense,Version2.0(the“License”);youmaynotusethisle except in compliance with the License. You may obtain a copy of the License at: http://www.apache.org/licenses/LICENSE-2.0 Unless requi[…]
-
Страница 112
A-4 Appendices Manufacturer: ASUSTeK Computer Inc. Address: 4F, No. 150, LI-TE RD., PEITOU, TAIPEI 112, TAIWAN Authorised representative in Europe: ASUS Computer GmbH Address: HARKORT STR. 21-23, 40880 RATINGEN, GERMANY ASUS contact information ASUSTeK COMPUTER INC. Address 15 Li-Te Road, Peitou, Taipei, Taiwan 11259 Telephone +886-2-2894-3447 Fax […]
-
Страница 113
ASUS Z97-A A-5 EC Declaration of Confo rmity We, the undersigned, Manufacturer: ASUSTeK COMPUTER INC. Address, City: 4F, No. 150, LI-TE Rd., PEITOU, TAIPEI 112, TAI W AN Country: TAIWAN Author ized representative in Europe: ASUS COMPUTER GmbH Address, City: HARKORT STR. 21-23, 4088 0 RATINGEN Country: GERMANY declare the follo wing app aratus: Prod[…]
-
Страница 114
A-6 Appendices[…]