
Operator’s Manual
Model 120000
Quantum 600 Series
625 Series
650 Series
675 Series
BRIGGSandSTRATTON.com
Quick Start Guide
on page 4
ECopyright Briggs & Stratton Corporation
Milwaukee, Wisconsin 53201 U.S.A.
Form No. 277039-9/06
Printed in U.S.A.
Safety References
The safety alert symbol is used to identify safety
information about hazards that can result in personal
injury. A signal word (DANGER, WARNING, or
CAUTION) is used with the alert symbol to indicate the
likelihood and the potential severity of injury. In addition,
a hazard symbol may be used to represent the type of
hazard.
DANGER indicates a hazard which, if not
avoided, will result in death or serious
injury.
WARNING indicates a hazard which, if not
avoided, could result in death or serious
injury.
CAUTION indicates a hazard which, if not
avoided, might result in minor or moderate
injury.
CAUTION, when used without the alert
symbol, indicates a situation that could result
in damage to the engine.
This manual contains safety
information to make you aware of
the hazards and risks associated with engines.
Because Briggs & Stratton does not necessarily
know what equipment this engine will power, it is
important that you read the instructions and the
instructions for the equipment this engine powers.
SYMBOLS ASSOCIATED
WITH THIS ENGINE:
Read
Fire
Explosion
Kickback
Hot Surface
Toxic F u mes
Moving Parts
Shock
Hazardous
Chemical
Operating
Manual
Oil
Fuel
Fuel Shutoff
On Off
Run
Choke
Stop
Table of Contents
Safety 2. . . . . . . . . . . . . . . . . . . . . . . . . . .
Features 3. . . . . . . . . . . . . . . . . . . . . . . . . .
QuickStart 4. . . . . . . . . . . . . . . . . . . . . . . .
Troubleshooting 6. . . . . . . . . . . . . . . . . .
READYSTARTE 7. . . . . . . . . . . . . . . . . . .
Starting 8. . . . . . . . . . . . . . . . . . . . . . . . . .
Operating & Stopping 9. . . . . . . . . . . . .
Oil 10. . . . . . . . . . . . . . . . . . . . . . . . . . . . . .
Fuel 12. . . . . . . . . . . . . . . . . . . . . . . . . . . . .
Fresh StartE Fuel Cap 12. . . . . . . . . . . .
Specifications 13. . . . . . . . . . . . . . . . . . .
Maintenance 14. . . . . . . . . . . . . . . . . . . . .
Storage & Service 17. . . . . . . . . . . . . . . .
Warranty Information 18. . . . . . . . . . . . .
Slow Fast
WARNING
Briggs & Stratton does not approve or authorize
the use of these engines on 3-wheel All Terrain
Vehicles (ATVs), motor bikes, fun/recreational
go-karts, aircraft products or vehicles intended for
use in competitive events. Use of these engines in
such applications could result in property damage,
serious injury (including paralysis), or even death.
WARNING
The engine exhaust from this product contains
chemicals known to the State of California to cause
cancer, birth defects, or other reproductive harm.
CAUTION
This engine is shipped from Briggs & Stratton
without oil. If you start the engine without oil, the
engine will be damaged beyond repair and will
not be covered under warranty.
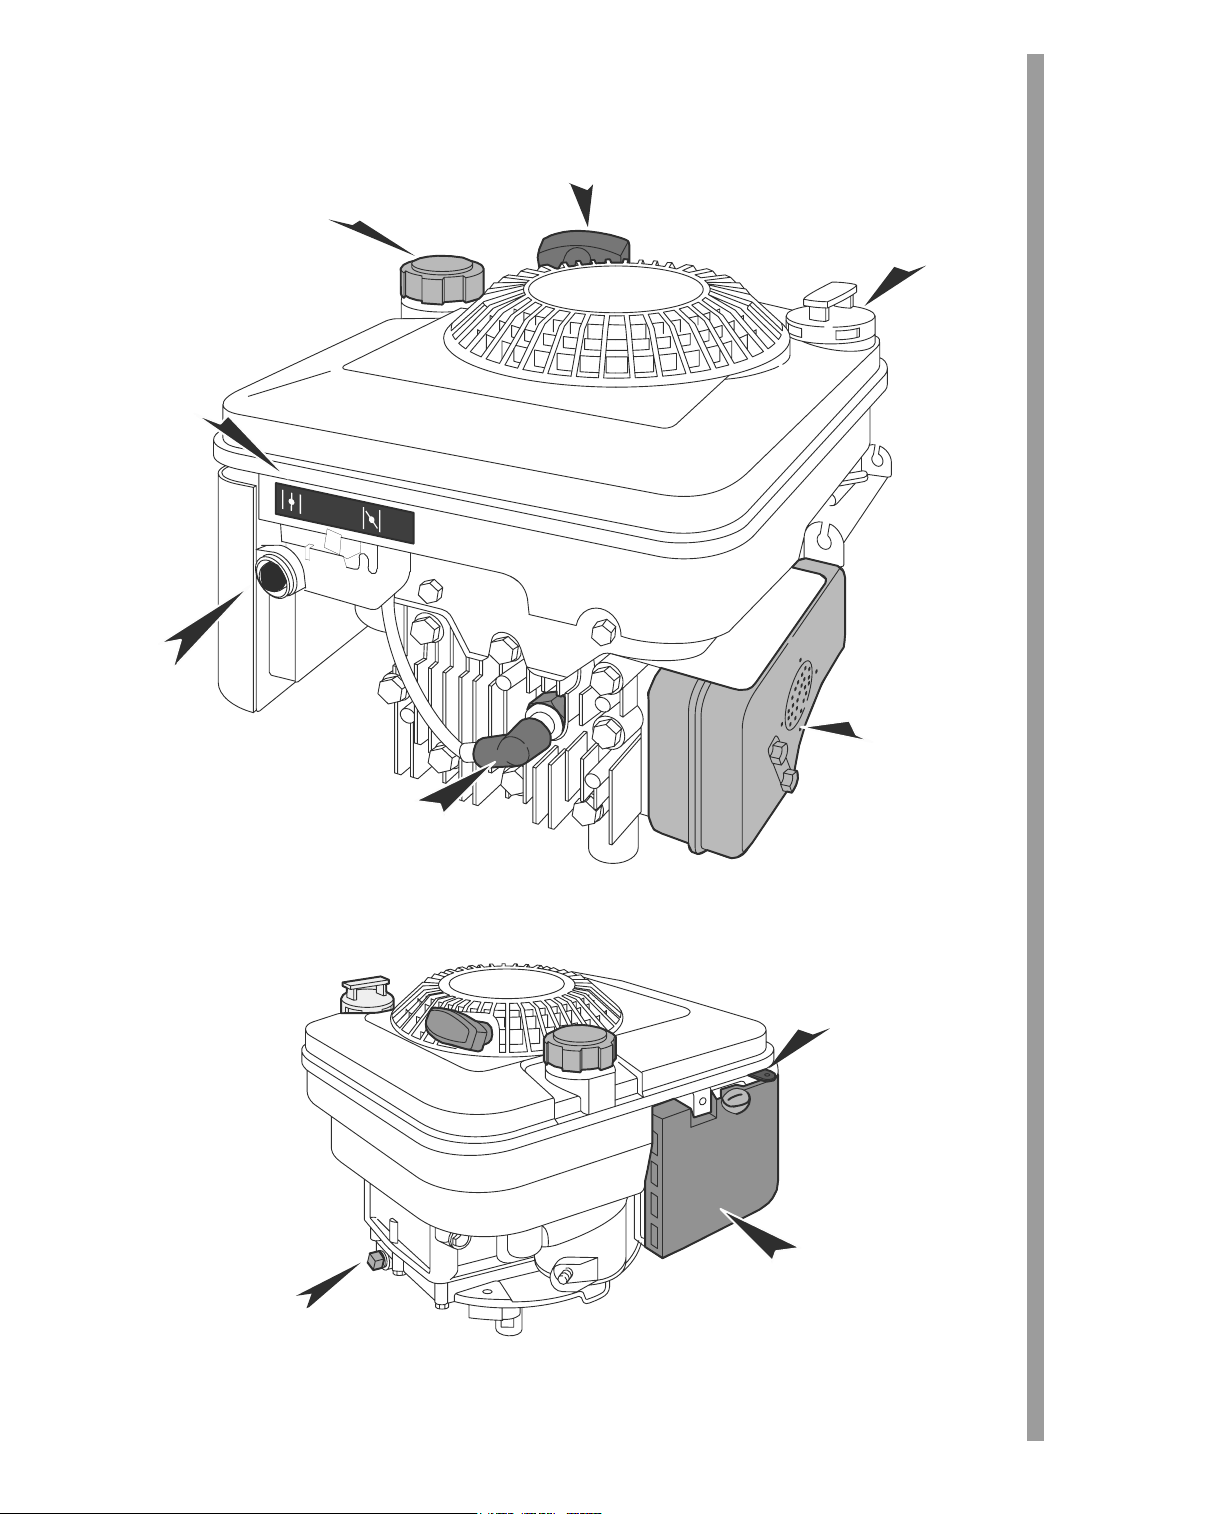
Know Your Engine
Fuel fill
Choke
(if equipped)
Primer
Rewind/Starter
handle
Oil cap &
Oil dipstick
Side oil drain plug
(if equipped)
Muffler
Spark plug
Front
view
Speed
control lever
Air cleaner
Back
view
3
This manual contains safety information to make you aware of the hazards and risks
associated with engines. Read the Operating Manual before starting your engine.
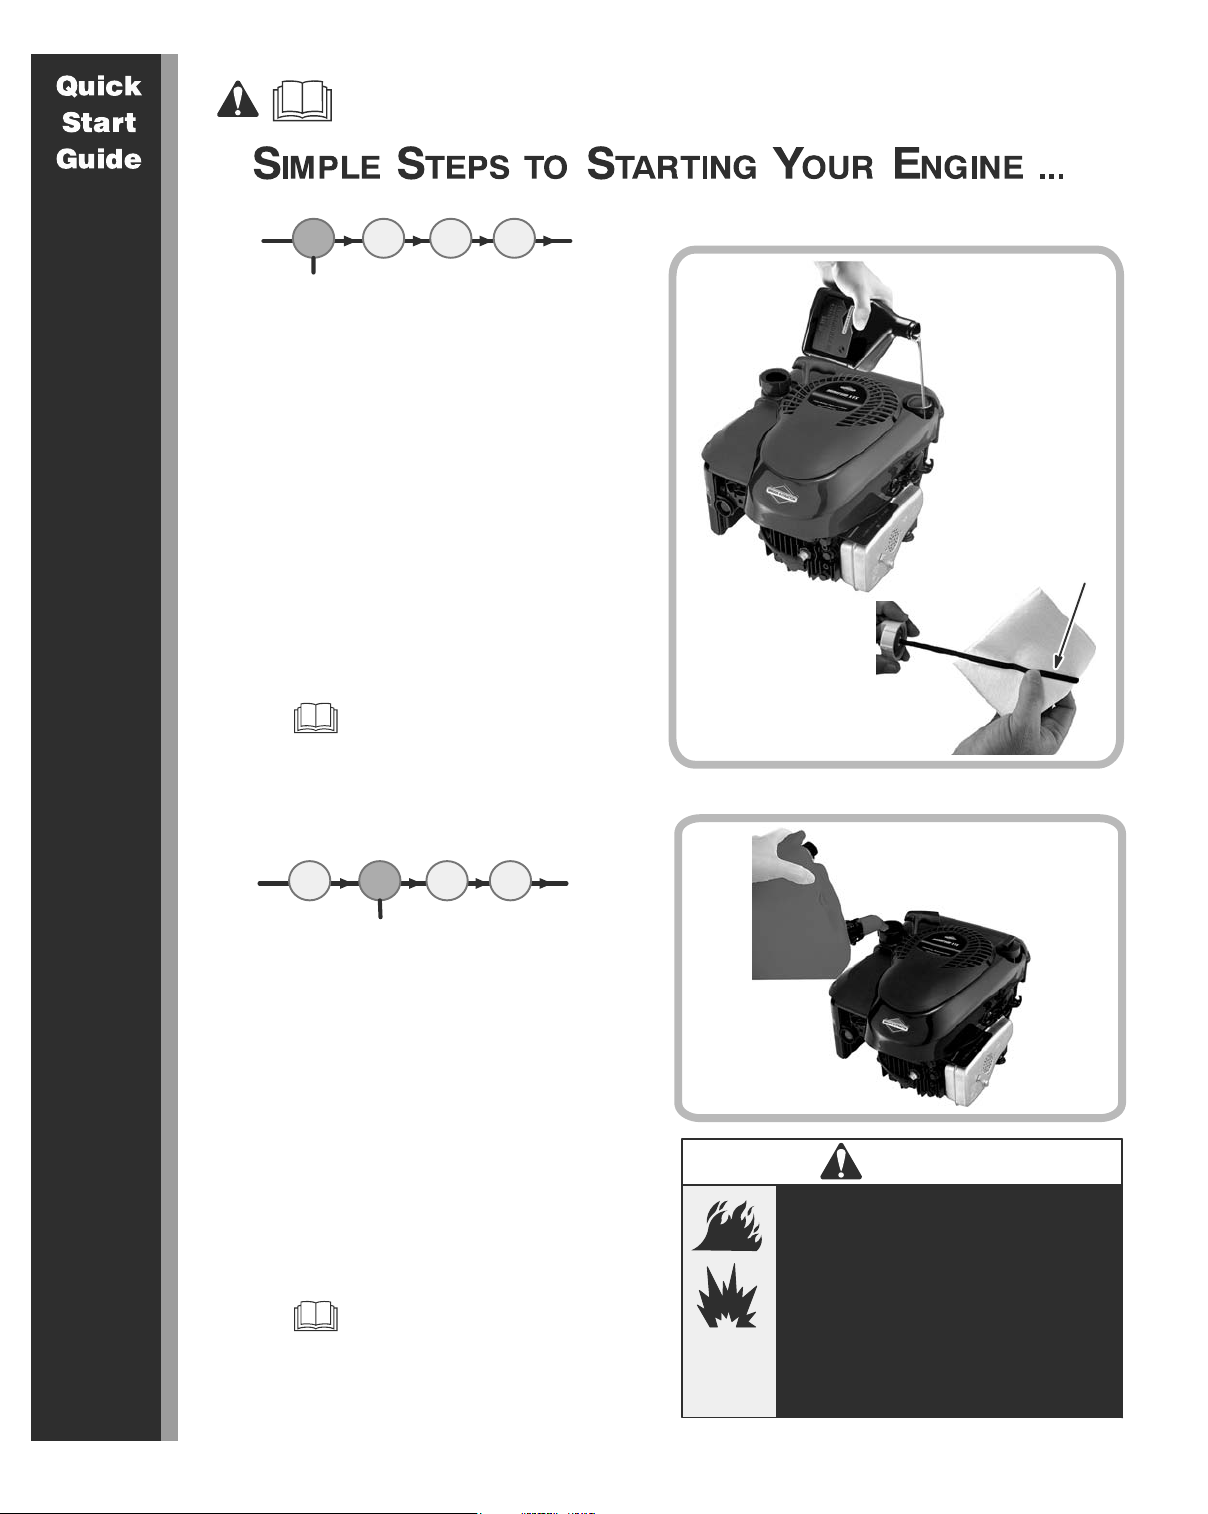
1
ADD OIL
WHAT KIND?
High quality SAE 30 motor oil.
HOW MUCH?
To FULL line on dipstick.
Engine holds about 20 oz. (0.61l).
HOW?
Unscrew and remove oil cap.
Pour in oil. Replace cap.
SPECIAL CONCERNS?
Do not overfill.
Do not tip engine.
See page 10 for details.
432
FULL
WIPE DIPSTICK.
REPLACE DIPSTICK
AND TIGHTEN CAP.
REMOVE DIPSTICK
TO READ LEVEL.
1
2 3 4
ADD GAS
WHAT KIND?
Unleaded, 85 octane or higher.
HOW MUCH?
Fill to one inch below top of fuel fill neck.
HOW?
Remove gas cap. Pour in gas. Replace cap.
SPECIAL CONCERNS?
Fuel equipment outdoors. If fuel spills, wait
until it evaporates before starting engine.
See page 12 for details.
WARNING
Starting engine creates sparking.
Gasoline and its vapors are
extremely flammable and
explosive. Fire or explosion can
cause severe burns or death.
If fuel spills, wait until it
evaporates before starting
engine.
DO NOT use pressurized starting
fluids.
4
If ReadyStart™ go to step 4.
1 2 3 4
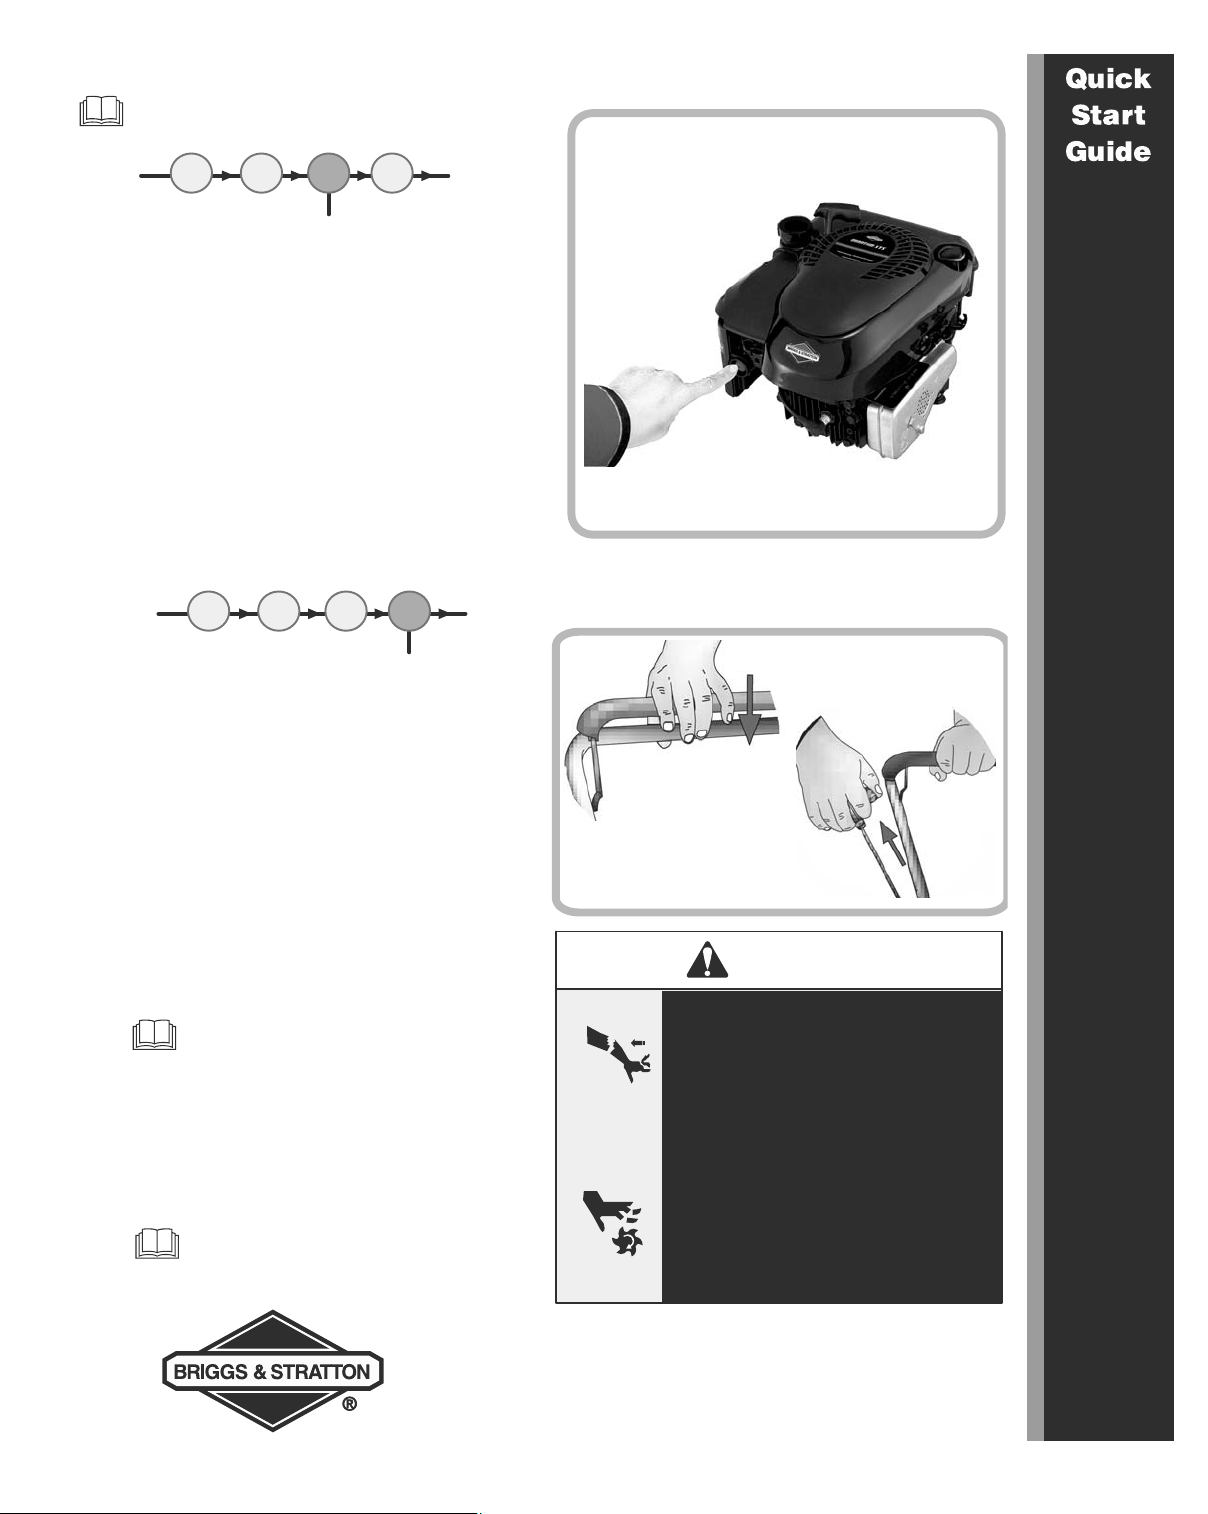
PUSH PRIMER
HOW MANY TIMES?
Press 5 times the FIRST TIME you start engine.
For all future starts, press
HOW?
Locate primer bulb. Press with finger. Wait two
seconds between each press.
SPECIAL CONCERNS?
Pressing primer too many times can flood
engine with gas. A flooded engine will not start.
See Troubleshooting section.
3 times.
1 4
2 3
PULL STARTER HANDLE
HOW?
Stand behind equipment.
Close bail, or operator control bar, on
equipment with this feature. If you do not keep
bail held against equipment handle, engine will
not start.
Slowly pull cord until you feel resistance, then
pull quickly.
SPECIAL CONCERNS?
If speed control equipped, start in FAST position.
Also, see warning at right.
If electric start equipped see page 8.
To Stop Engine −
Let go of bail, or operator control bar, which
activates brake and stops engine from running.
For complete starting instructions
see page 8.
WARNING
Rapid retraction of starter cord
(kickback) will pull hand and arm
toward engine faster than you can
let go. To avoid kickback, slowly
pull the cord until you feel
resistance, then pull rapidly.
Broken bones, fractures, bruises or
sprains could result.
Rotating parts can contact or
entangle hands, feet, hair, clothing,
or accessories.
Traumatic amputation or severe
laceration can result.
Need assistance? 1-800-233-3723
(USA and Canada ONLY, Pre-recorded message.)
www.briggsandstratton.com
5
Troubleshooting
Starter Handle will not pull.
r The bail, operator control bar, is not
engaged which releases the brake from
the flywheel allowing the engine to turn
over.
r Place equipment on flat level surface.
• Ensure all external equipment/engine loads are removed
before starting engine. Direct coupled equipment
components must be securely attached such as, but not
limited to, blades, impellors, pulleys, sprockets, etc.
WARNING
Engine will not start.
r Oil Level is OVER FULL
mark on dipstick.
• Drain excess oil from engine to bring level to
FULL mark on dipstick.
• Check air cleaner filter for oil saturation.
If saturated, clean or replace filter.
r Out of Fuel
• Add gasoline.
• Prime engine.
r Engine Flooded
• Set choke (if equipped) to OPEN/RUN
position, place throttle (if equipped) in FAST
and continue to pull starter handle.
r Spark Plug Fouling
• Remove spark plug. Clean, check gap,
replace. See Maintenance section.
CAUTION
DO NOT OVERFILL OIL.
Overfilling may cause
smoking, hard starting, spark
plug fouling or oil saturation of
air filter.
WARNING
• Ensure fuel cap, and air
cleaner are in place
before starting engine.
• Before refueling − turn
engine OFF and let
engine cool at least 2
minutes before
removing gas cap.
• Check fuel lines, tank,
cap, and fittings for
cracks or leaks.
Replace if necessary.
• Do not crank engine
with spark plug
removed.
Engine is Smoking or Running Rough.
r Engine may have been
tipped during transport.
• Check for fouled spark plug.
• Check air cleaner filter for oil saturation.
If saturated, clean or replace filter.
6
CAUTION
If engine is tipped to transport
equipment, to remove debris, to
drain oil, etc., keep the spark
plug side of engine up.
KEEP SPARK PLUG
UP
Loading…
Русский
- Bedienungsanleitung Briggs & Stratton 650 SERIES
- Briggs & Stratton 650 SERIES User Manual
- Manual Usuario Briggs & Stratton 650 SERIES
- Mode d’emploi Briggs & Stratton 650 SERIES
- Istruzioni Briggs & Stratton 650 SERIES
- инструкция Briggs & Stratton 650 SERIES
- Briggs & Stratton 650 SERIESの取扱説明書
- Handleiding Briggs & Stratton 650 SERIES
- Manual de uso Briggs & Stratton 650 SERIES
Вам нужна инструкция? Мы поможем Вам ее найти и сэкономить Ваше время.
- 20 stron
- 0.74 mb
Изделие Briggs & Stratton 650 SERIES, а также другие, которыми Вы пользуетесь ежедневно, наверняка вы получили в комплекте с инструкцией обслуживания. Из опыта наших пользователей мы знаем, что большинство из Вас не уделили этому особого внимания. Большая часть инструкций, сразу же после покупки попадает в корзину для мусора вместе с коробкой — это ошибка. Ознакомьтесь с информацией, касающейся инструкции Briggs & Stratton 650 SERIES, которая поможет Вам в будущем сэкономить нервы и избежать головной боли.
Важная подсказка — не забывайте хотя бы раз прочитать инструкцию Briggs & Stratton 650 SERIES
Если вы не хотите каждый раз читать информационные брошюры, касающиеся, тех или Briggs & Stratton 650 SERIES иных изделий, достаточно, прочитать их раз — сразу же после покупки устройства. Вы получите основное знания, касающиеся поддержания изделия Briggs & Stratton 650 SERIES в хорошем эксплуатационном состоянии, так, чтобы без проблем достигнуть его планируемого цикла работы. Затем инструкцию можно отложить на полку и вернуться к ней только в случае, если вы не уверены, правильно ли проводится техобслуживание изделия. Правильный уход является необходимым элементом Вашего удовольствия Briggs & Stratton 650 SERIES.
Раз в году пересмотрите шкафчик, в котором держите инструкции для всех устройств, — выбросите те, которыми вы уже не пользуетесься. Это поможет Вам сохранять порядок в своей домашней базе инструкций обслуживания.
Summary of Contents for Briggs & Stratton 650 SERIES
Что находится в инструкции Briggs & Stratton 650 SERIES? Почему стоит ее прочитать?
- Гарантия и подробности, касающиеся техобслуживания изделия
Хорошей идеей будет прикрепить чек к странице инструкции. Если что-то плохое случится во время использования Briggs & Stratton 650 SERIES, у вас будет комплект документов, необходимый для гарантийного ремонта. В этой части инструкции вы найдете информацию об авторизованных сервисных центрахBriggs & Stratton 650 SERIES а также, как самостоятельно правильно ухаживать за оборудованием — так, чтобы не потерять гарантийных прав. - Указания по монтажу и Setup
Не терять нервов и времени на самостоятельную попытку установки и первого запуска изделия. Воспользуйтесь рекомендациями производителя Briggs & Stratton 650 SERIES чтобы правильно запустить изделие, без лишнего риска повреждения оборудования. - Информация, касающаяся дополнительных запчастей (входящих в комплект а также являющихся опцией)
Пересматривая эту часть документа вы сможете проверить, доставлен ли ваш Briggs & Stratton 650 SERIES с полним комплектом аксессуаров. Вы также сможете узнать, какие дополнительные запчасти или аксессуары для Briggs & Stratton 650 SERIES Вы сможете найти и докупить к своему устройству. - Troubleshooting
Самые частые проблемы, касающиеся Briggs & Stratton 650 SERIES и методы их решения. Это очень полезная часть руководства по обслуживанию — она позволит Вам сэкономить много времени на поиск решений. 90% проблем с Briggs & Stratton 650 SERIES повторяется у многих пользователей. - Требования, касающиеся питания и энергетический класс
Информация, касающаяся количества потребляемой энергии, а также рекомендации, касающиеся установки и питания Briggs & Stratton 650 SERIES. Прочитайте, чтобы оптимально пользоваться Briggs & Stratton 650 SERIES и не использовать большего количества ресурсов, нежели это необходимо для правильной работы изделия. - Специальные функции Briggs & Stratton 650 SERIES
Здесь вы можешь узнать, как персонализировать изделие Briggs & Stratton 650 SERIES. Вы узнаете, какие дополнительные функции могут помочь Вам удобно использовать продукт Briggs & Stratton 650 SERIES а также, какие функции Вашего устройства оптимальны для выполнения конкретной деятельности.
Как видите в инструкции вы найдете информацию, которая реально поможет Вам в использовании Вашего изделия. Стоит с ней ознакомиться, чтобы избежать разочарований, возникающих из более короткого, нежели предусматривалось, периода исправности изделия Briggs & Stratton 650 SERIES. Если все же вы не хотите копить инструкции в своем доме, наш сайт поможет Вам в этом — вы должны найти у нас руководство по обслуживанию большинства из своих устройств, а также Briggs & Stratton 650 SERIES.
Комментарии (0)
В нашем интернет-магазине вы можете купить американский двигатель Briggs&Stratton 650 series, который является одним из наиболее продаваемых двигателей с вертикальным валом. Данным двигателям отдают преимущество благодаря беспрецедентным техническим характеристикам и высокому уровню надежности -сборка у данного двигателя США.
Двигатели 650E SERIES идеально подходят для установки на газонокосилки бытового класса.
Качественный глушитель Значительно снижает шум и обеспечивает исключительный тембр. Бумажный воздушный фильтр (плоский) Обеспечивает повышенную защиту от попадания в двигатель переносимых по воздуху загрязняющих частиц. Удлиненная горловина для залива масла обеспечивает простоту технического обслуживания.
Электронная система зажигания Magnetron® Гарантирует легкий запуск без необходимости совершения дополнительных действий. Механический регулятор частоты вращения Контролирует скорость двигателя, в результате чего вырабатывается больше полезной мощности при усиленной эксплуатации.
Система ReadyStart® обеспечивает легкий запуск без необходимости подкачки топлива.
Механизм газораспределения Одноцилиндровый, 4-тактный верхнеклапанный (OHV) двигатель с воздушным охлаждением
Номер модели 124T
Крутящий момент (Нм) 2’600 об/мин 8,8*
Рабочий объем (куб. см.) 190
Цилиндр Алюминий
Длина вала 80 мм, диаметр 22.2
Ход цилиндра (мм) 51,8
Емкость топливного бака (л) 1,0
Емкость масляного бака (л) 0,6
Сухой вес (кг) 10,9
Длина (мм) 351 Ширина (мм) 308 Высота (мм) 249
Just Check & Add™
Никогда не меняйте масло — просто проверяйте и доливайте
ReadyStart®
Обеспечивает простой и удобный запуск без необходимости подкачивать топливо в карбюратор двигателя.
Гарантия запуска S2
Наша персональная гарантия запуска. Если ваш двигатель не запускается c первых двух попыток, мы отремонтируем его бесплатно.
Поплавковый карбюратор
Оптимальная подача топлива для повышения надежности и превосходной производительности.
Смазывание разбрызгиванием
Обеспечивает достаточную смазку в картере при нормальных условиях эксплуатации.
Технология OHV
Оптимизированные рабочие характеристики, обеспечивающие продление срока службы двигателя и улучшенную топливную экономичность.
Бумажный воздушный фильтр (овальный)
Обеспечивает улучшенную защиту от частиц мусора, имеющихся в поступающем в двигатель воздухе
Маслозаливная горловина высокого профиля
Упрощает процесс обслуживания.
Топливопроводы с низкой проницаемостью
Более экологически чистый.
Механический регулятор
Регулирует частоту вращения двигателя, чтобы обеспечить максимальную мощность при интенсивном использовании.
Электронная система зажигания Magnetron®
Обеспечивает бесперебойный, удобный запуск.
6 BRIGGSandSTRATTON.COM
Features and Controls
Compare the illustration
1
with your engine to familiarize yourself with the location of
various features and controls.
A. Engine Identification
Model Type Code
B. Spark Plug
C. Fuel Tank and Cap
D. Air Cleaner
E. Starter Cord Handle
F. Dipstick
G. Muffler
Muffler Guard (optional)
Spark Arrester (optional)
H. Air Intake Grille
I. Throttle Control (Optional)
Operation
Oil capacity (see the
Specifications
section)
Oil Recommendations
We recommend the use of Briggs & Stratton Warranty Certified oils for best
performance. Other high‐quality detergent oils are acceptable if classified for service SF,
SG, SH, SJ or higher. Do not use special additives.
Outdoor temperatures determine the proper oil viscosity for the engine. Use the chart to
select the best viscosity for the outdoor temperature range expected.
SAE 30
10W‐30
Synthetic 5W‐30
5W‐30
°F °C
* Below 40°F(4°C) the use of SAE 30 will result in hard starting.
** Above 80°F(27°C) the use of 10W‐30 may cause increased oil consumption. Check
oil level more frequently.
How To Check /Add Oil ‐
Figure
2
Before adding or checking the oil
Place engine level.
Clean the oil fill area of any debris.
1. Remove the dipstick (A) and wipe with a clean cloth (Figure 2).
2. Insert and tighten the dipstick.
3. Remove the dipstick and check the oil level. It should be at the top of the full indicator
(B) on the dipstick.
4. If low, add oil slowly into the engine oil fill (C). Do not overfill. After adding oil, wait
one minute and then recheck the oil level.
5. Replace and tighten the dipstick.
Fuel Recommendations
Fuel must meet these requirements:
Clean, fresh, unleaded gasoline.
A minimum of 87 octane / 87 AKI (91 RON). High altitude use, see below.
Gasoline with up to 10% ethanol (gasohol) is acceptable.
NOTICE: Do not use unapproved gasolines, such as E15 and E85. Do not mix oil in
gasoline or modify the engine to run on alternate fuels. Use of unapproved fuels will
cause damage to engine components, which will not be covered under warranty.
To protect the fuel system from gum formation, mix a fuel stabilizer into the fuel. See
Storage.
All fuel is not the same. If starting or performance problems occur, change fuel
providers or change brands. This engine is certified to operate on gasoline. The
emissions control system for this engine is EM (Engine Modifications).
High Altitude
At altitudes over 5,000 feet (1524 meters), a minimum 85 octane / 85 AKI (89 RON)
gasoline is acceptable.
For carbureted engines, high altitude adjustment is required to remain emissions
compliant. Operation without this adjustment will cause decreased performance,
increased fuel consumption, and increased emissions. Contact a Briggs & Stratton
Authorized Service Dealer for high altitude adjustment information. Operation of the
engine at altitudes below 2,500 feet (762 meters) with the high altitude adjustment is not
recommended.
For Electronic Fuel Injection (EFI) engines, no high altitude adjustment is necessary.
How To Add Fuel ‐
Figure
3
WARNING
Fuel and its vapors are extremely flammable and explosive.
Fire or explosion can cause severe burns or death.
When Adding Fuel
Turn engine off and let engine cool at least 2 minutes before removing the fuel
cap.
Fill fuel tank outdoors or in well‐ventilated area.
Do not overfill fuel tank. To allow for expansion of the fuel, do not fill above the
bottom of the fuel tank neck.
Keep fuel away from sparks, open flames, pilot lights, heat, and other ignition
sources.
Check fuel lines, tank, cap, and fittings frequently for cracks or leaks. Replace if
necessary
If fuel spills, wait until it evaporates before starting engine.
1. Clean the fuel cap area of dirt and debris. Remove the fuel cap (A,Figure3).
2. Fill the fuel tank (B) with fuel. To allow for expansion of the fuel, do not fill above the
bottom of the fuel tank neck (C).
3. Reinstall the fuel cap.
How To Start The Engine
Rapid retraction of starter cord (kickback) will pull hand and arm toward
engine faster than you can let go.
Broken bones, fractures, bruises or sprains could result.
WARNING
When starting engine, pull the starter cord slowly until resistance is felt and then
pull rapidly to avoid kickback.
WARNING
Fuel and its vapors are extremely flammable and explosive.
Fire or explosion can cause severe burns or death.
When Starting Engine
Ensure that spark plug, muffler, fuel cap and air cleaner (if equipped) are in
place and secured.
Do not crank engine with spark plug removed.
If engine floods, set choke (if equipped) to OPEN / RUN position, move throttle
(if equipped) to FAST position and crank until engine starts.