


Pure Loop 240mm готов к работе с современными флагманскими процессорами, такими как Intel Core i9 или AMD Ryzen 9, с возможностью разгона.
Дополнительная информация.
PURE LOOP
240mm
Тихое и эффективное охлаждение
Pure Loop 240mm — это новая бесшумная и эффективная готовая система водяного охлаждения be quiet! для ориентированных на конкурентную цену пользователей умеренно разогнанных систем.
- Высокая производительность охлаждения
- Двойное изолирование помпы для минимальных вибраций
- Два вентилятора Pure Wings 2 120mm PWM сочетают тихую работу и высокое давление воздушного потока
- Белая LED подсветка и полностью черные поверхности обеспечивают стильный и узнаваемый внешний вид
- Возможность добавления жидкости для длительной эксплуатации
- Гибкие трубки в оплетке и легкость монтажа обеспечивают удобство использования
- Никелированная поверхность теплообменника позволяет использовать жидкий метал
- Три года гарантии от производителя
Функциональные Cookies не настроены..
Вы не можете продолжать без функциональных cookies. Пожалуйста, активируйте их..
Больше информации.
ВЫСОКАЯ ЭФФЕКТИВНОСТЬ ОХЛАЖДЕНИЯ
Надежное охлаждение для мощных систем
Pure Loop обеспечивает надежное охлаждение даже самых требовательных систем. Высокая мощность охлаждения обеспечивает низкие температуры даже при пиковой производительности процессора.
ДВОЙНОЕ ИЗОЛИРОВАНИЕ ПОМПЫ
Плавная и бесшумная работа
Эффективное демпфирование помпы предотвращает передачу вибраций и гарантирует легендарную тишину работы be quiet!
ВЕНТИЛЯТОРЫ PURE WINGS 2
Исключительная надежность и снижение турбулентности
Вентилятор Pure Wings 2 120mm обеспечивает очень тихую работу и высокую производительность охлаждения. Девять оптимизированных для воздушного потока лопастей делают Pure Wings 2 идеальным выбором для алюминиевого радиатора Pure Loop.
УДОБСТВО ИСПОЛЬЗОВАНИЯ
Простой процесс добавления жидкости и длительная эксплуатация
Удобное расположение заправочного отверстия упрощает процесс добавления жидкости. Комплектная емкость с хладагентом обеспечивает длительный срок эксплуатации системы.
ПОЛНОСТЬЮ ЧЕРНЫЙ ЦВЕТ И БЕЛАЯ LED ПОДСВЕТКА
Узнаваемый и стильный внешний вид
Полностью черный дизайн в сочетании с белой LED подсветкой придает устройству элегантный внешний вид. Стильная алюминиевая поверхность охлаждающего модуля для потрясающего внешнего вида Pure Loop в любом корпусе ПК.
“Нам всегда нравилась идея доступной AiO системы с очень тихой работой, которой славится be quiet!. Pure Loop -это результат наших размышлений, и мы уверены: мы полностью удовлетворяем высокие ожидания наших клиентов.”
Tim Carstensen, R&D Department BU Cooling
Краткий обзор всех моделей:
Серия продуктов
Общая информация
| Модель | Pure Loop 240mm |
| Варианты цвета | — |
| Размеры радиатора, включая вентилятор (Д x Ш x Г), (мм) | 277 x 120 x 52 |
| Dimensions cooling block (H x W x D), (mm) | 94.5 x 83 x 42 |
| Общий вес (кг) | 1.05 |
| Совместимость с сокетами Intel | 1700 / 1200 / 2066 / 1150 / 1151 / 1155 / 2011(-3) Square ILM |
| Совместимость с сокетами AMD | AM5 / AM4 |
| Уровень шума (дБ(A)) @ 50/75/100% (об/мин) | 20.1/ 29.6 / 36.5 |
| Number of fans | 2 |
| Разъем подсветки | 3-pin 12V |
| Длина трубок (мм) | 400 |
| Заправочный клапан | ✓ |
Инфографика
| Скорость помпы (об\мин) | 5500 |
| Управление помпой (rpm) | — |
| Разъем помпы | 3-pin |
| Размеры (Д x Ш x Г), (мм) | 120 x 277 x 27 |
| Материал радиатора / отделка | aluminum / black spray painted |
| Материал основания / отделка | copper / nickel plated |
| Модель вентилятора | 2x Pure Wings 2 120mm PWM high-speed |
| Размеры вентилятора (мм) | 120 x 120 x 25 |
| Скорость вентилятора @ 100% PWM (об/мин) | 2000 |
| Поток воздуха при 100% PWM / 12В (CFM / м3/ч) | — |
| Воздушное давление при 100% PWM / 12В (мм H2O) | — |
| Технология подшипника | Rifle |
| Технология моторчика | 4-pole fan motor |
| Номинальное напряжение постоянного тока (V) | 12 |
| Ток при номинальном напряжении ток (A) | — |
| Безопасный уровень тока (A) | 0.3 |
| Потребляемая мощность (W) | 3.6 |
| Разъем | 4-pin PWM |
| Длина кабеля (мм) | 420 |
| Время работы (ч / 25°C) | 80,000 |
| Thermal grease (Type) | Included |
| Набор креплений | Intel & AMD |
| Adapter cables | SATA-to-3-pin |
| Емкость с охлаждающей жидкостью (мл) | ✓ / 100 |
| ARGB controller with SATA cable | — |
| ARGB-PWM-Hub | — |
| Языки руководства пользователя | CN, DE, EN, ES, FR, JP, PL, RU, TW |
| Одобрено | CE, FCC, UKCA, UL |
| Гарантия (лет) | 3 |
| Международная горячая линия / Бесплатно | ✓ / DE, FR |
| Артикул | BW006 |
| Код EAN | 4260052187890 |
| Размеры, упаковка (Д х Ш х В), (мм) | 240 x 321 x 140 |
| Вес брутто, упаковка (кг) | 1.94 |
| Штук в упаковке | 8 |
| Размеры, упаковочная коробка (Д x Ш x В), (мм) | 658 x 296 x 508 |
| Вес брутто, упаковочная коробка (кг) | 17 |
| РРЦ ( € ) | 104.90 |
PURE LOOP | 240mm
Артикул: BW006
Сохранить в pdf:
Изображения
Видео
Свойства
Лучше всего сочетается с
Displayed below is the user manual for PURE LOOP 240mm by be quiet! which is a product in the Computer Cooling Systems category.
This manual has pages.
360mm
280mm
240mm
120mm

2
» Product information for this CPU cooler
» Produktinformationen zu diesem CPU-Kühler
» Informations produit pour ce système de refroidissement
» Información del producto para este refrigerador de CPU
» Informacje produktowe dla tego coolera CPU
» Engelstalige productinformatie voor deze processorkoeler
» Produktinformation för den här processorkylaren, på engelska
» Подробнаяинформацияоданномкулередляпроцессора
» 此CPU散熱器的產品資訊
» 此CPU散热器的产品信息
» 製品情報CPUクーラー
NL
SE
www.bequiet.com/BW005 www.bequiet.com/BW006
www.bequiet.com/BW007 www.bequiet.com/BW008
120mm 240mm
280mm 360mm

3
Einleitung: Vielen Dank, dass Sie sich für ein be quiet!
Produkt entschieden haben. Diese Anleitung wird Ihnen beim
Installationsprozess behilflich sein. Sollten bei der Installation
Schwierigkeiten auftreten, kontaktieren Sie bitte unseren
Kundenservice unter service@bequiet.com. be quiet! kann
keinerlei Haftung für durch Kompatibilitätsprobleme bedingte
Schäden übernehmen.
Garantie:
• 3 Jahre Herstellergarantie für Endkonsumenten (nur Erst-
erwerb vom autorisierten be quiet! Händler), ab Datum
des Kaufbelegs
• Eine Garantieabwicklung ist nur in Verbindung mit einer
beigefügten Kopie des Kaufbeleges eines autorisierten
be quiet! Händlers möglich
• Manipulationen und bauliche Veränderungen jeglicher
Art, sowie Beschädigungen durch äußere mechanische
Einwirkungen führen zum totalen Garantieverlust
• Es gelten unsere allgemeinen Garantiebestimmungen, die
Sie unter www.bequiet.com im Internet abrufen können
Listan GmbH . Wilhelm-Bergner-Straße 11c . 21509 Glinde
Germany
Für weitere Unterstützung erreichen Sie uns via E-Mail:
service@bequiet.com
Für die Montage des Kühlers empfehlen wir die Installation
außerhalb des Gehäuses.
!
Introduction: Thank you for deciding to purchase a be quiet!
product. The following instructions will guide you through the
installation process. If you do encounter installation problems,
please don’t hesitate to contact our customer services by
mailing service@bequiet.com. Please note that be quiet!
cannot accept liability for damage caused by compatibility
problems.
Warranty:
• 3-year manufacturer guarantee for consumers (original
purchase from authorized be quiet! dealers only)
• Guarantee work can only be processed with a copy
included of the purchase receipt from an authorized be
quiet! dealer
• Manipulation and structural changes of any kind, including
any damage caused by external mechanical force, will lead
to a complete voiding of the guarantee
• Our General Warranty Conditions apply, which can be
viewed on bequiet.com
Listan GmbH . Wilhelm-Bergner-Straße 11c . 21509 Glinde
Germany
For further information contact us via e-mail:
service@bequiet.com
We recommend preparatory mounting of the cooler
outside the PC case for subsequent installation.
!
4
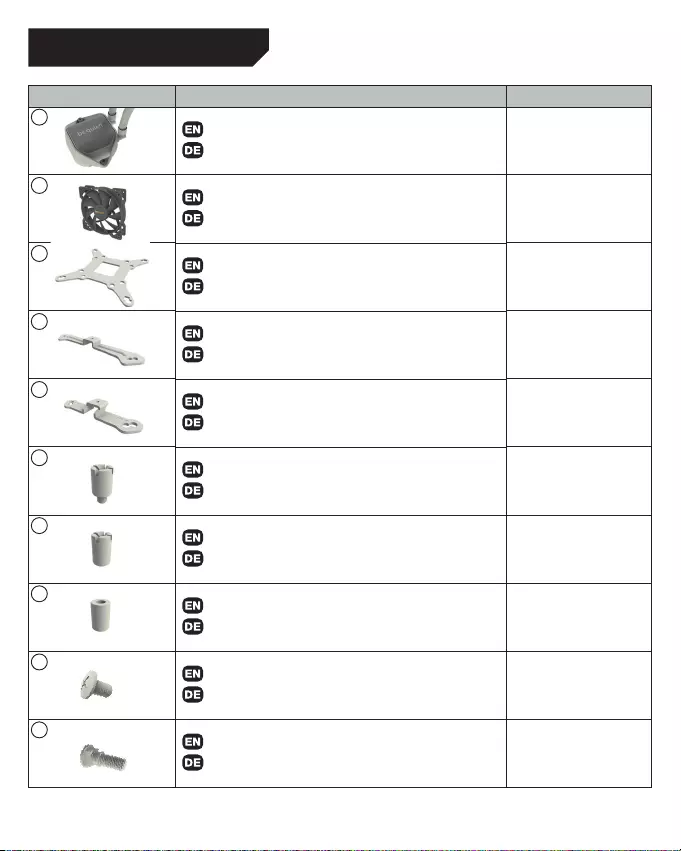
SCOPE OF DELIVERY / LIEFERUMFANG
Part name Quantity
be quiet! Pure Loop CPU cooler
be quiet! Pure Loop CPU Kühler 1
Fan
Lüfter
120: 1
240 / 280: 2
360: 3
Intel backplate
Intel Backplate 1
Intel mounting brackets
Intel Montagebrücken 2
Short AMD mounting brackets
Kurze AMD Montagebrücken 2
Intel spacer nut A
Intel Gewindebolzen A 4
Intel spacer nut B
Intel Gewindebolzen B 4
AMD Spacer nuts
AMD Abstandbolzen 4
Mounting bracket fastening screws
Befestigungsschrauben für die Montagebrücke 4
Intel backplate screws
Intel Backplate-Schrauben 4
1
2
3
4
5
6
7
8
9
10
5
11
12
13
14
15
16
17
18
19
20
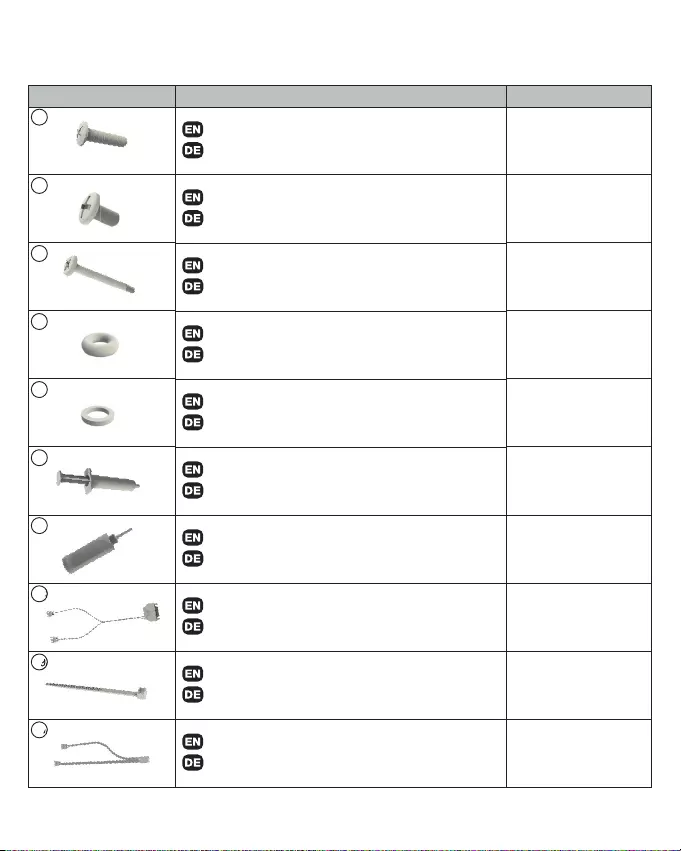
Part name Quantity
AMD backplate screws
AMD Backplate-Schrauben 4
Radiator mounting screws
Radiator Befestigungsschrauben
120: 4
240 / 280: 8
360: 12
Fan mounting screws
Lüfter Befestigungsschrauben
120: 4
240 / 280: 8
360: 12
O-Rings
O-Ringe 4
AM3 washers
AM3 Unterlegscheiben 4
Thermal paste
Wärmeleitpaste 1
Bottle of coolant
Flasche mit Kühlfl üssigkeit 1
SATA Adapter
SATA Adapter 1
Small Cable Tie
Kleiner Kabelbinder 3
Y-cable
Y-Kabel
120: 0
240 / 280: 1
360: 1
6
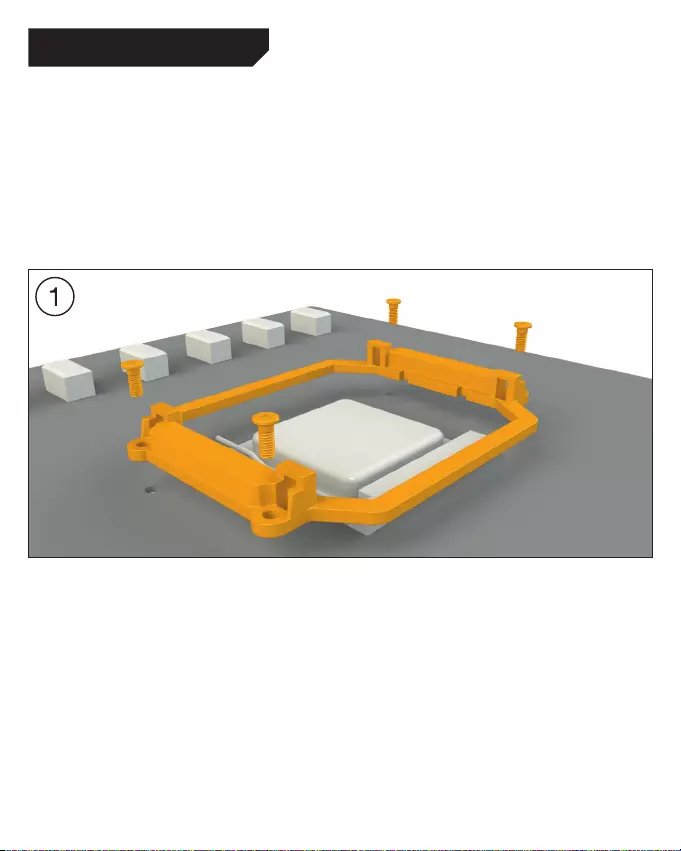
Assembly of the cooler mounting frame
Prior to mounting the cooler, please detach both
plastic holders of the AMD retention module. The
factory-mounted backplate on the rear side of the
motherboard is required for further installation of
the cooler.
Note: To install Pure Loop (1) onto an AM3
motherboard, please use the four AM3 washers
(15) and place these over the bolts of the factory-
mounted backplate on the front side of the
motherboard.
Aufbau des Kühlerbefestigungsrahmens
Bitte entfernen Sie zur Kühlermontage die
beiden Kunststoffhalterungen des AMD-
Retentionmoduls. Die werkseitig auf der
Mainboard-Rückseite befestigte Backplate wird
für die weitere Installation des Kühlers benötigt.
Hinweis: Zur Installation der Pure Loop (1) auf
einem AM3 Mainboard nutzen Sie bitte die vier
AM3 Unterlegscheiben (15) und legen diese auf
die Bolzen der werkseitig montierten Backplate
über die Mainboard Vorderseite.
The following parts are needed for this:
Pure Loop CPU cooler (1), fans (2), short AMD mounting brackets (5), AMD spacer nuts (8), AMD
backplate screws (11), radiator mounting screws (12), fan mounting screws (13), AM3 washers (15),
thermal paste (16), SATA Adapter (18), Y-Kabel (20)
Es werden folgende Bauteile benötigt:
Pure Loop CPU Kühler (1), Lüfter (2), kurze AMD Montagebrücken (5), AMD Abstandsbolzen (8),
AMD Backplate-Schrauben (11), Radiator Befestigungsschrauben (12), Lüfter Befestigungsschrauben
(13), AM3 Unterlegscheiben (15), Wärmeleitpaste (16), SATA Adapter (18), Y-Kabel (20)
AMD: AM4 / AM3(+)
7
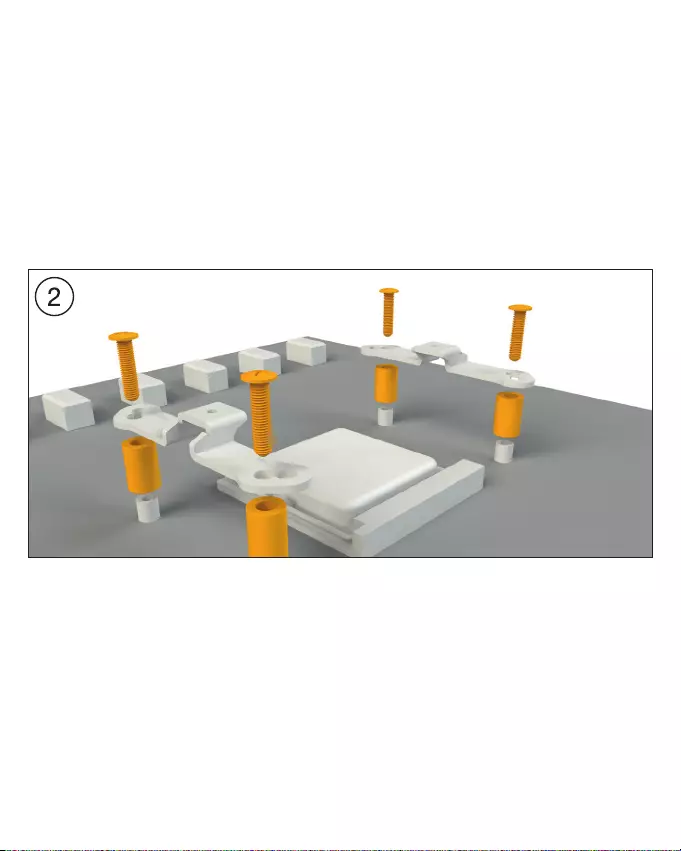
Place the four AMD spacer nuts (8) over the bolt
threads of the backplate on the front side and fix
both the AMD mounting brackets (5) using the
AMD backplate screws (11).
Platzieren Sie über die Vorderseite die vier
AMD Abstandsbolzen (8) über den Gewinden
der Backplate und fixieren die beiden kurzen
AMD Montagebrücken (5) mit Hilfe der AMD
Backplate-Schrauben (11).
8
AMD: AM4 / AM3(+)
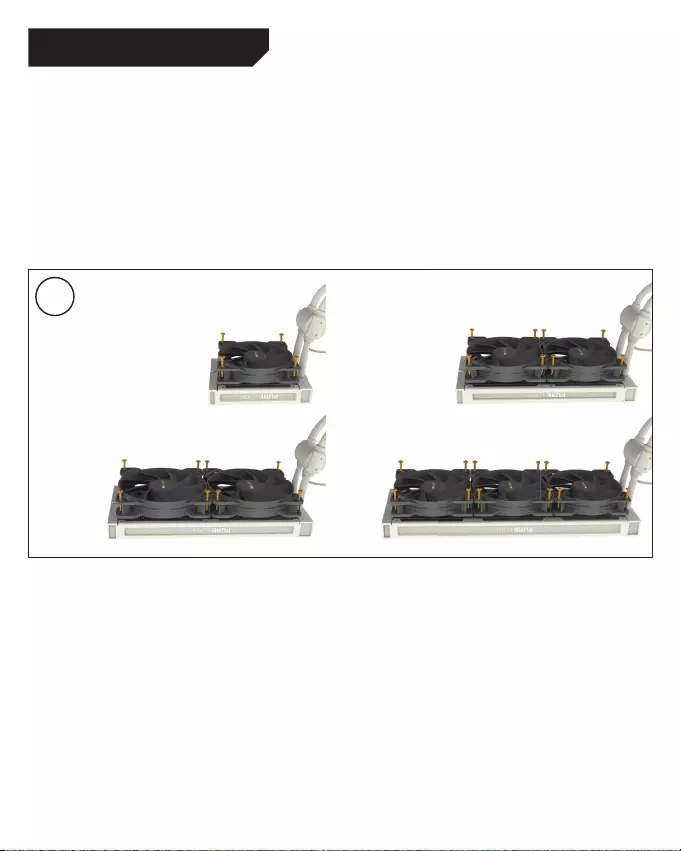
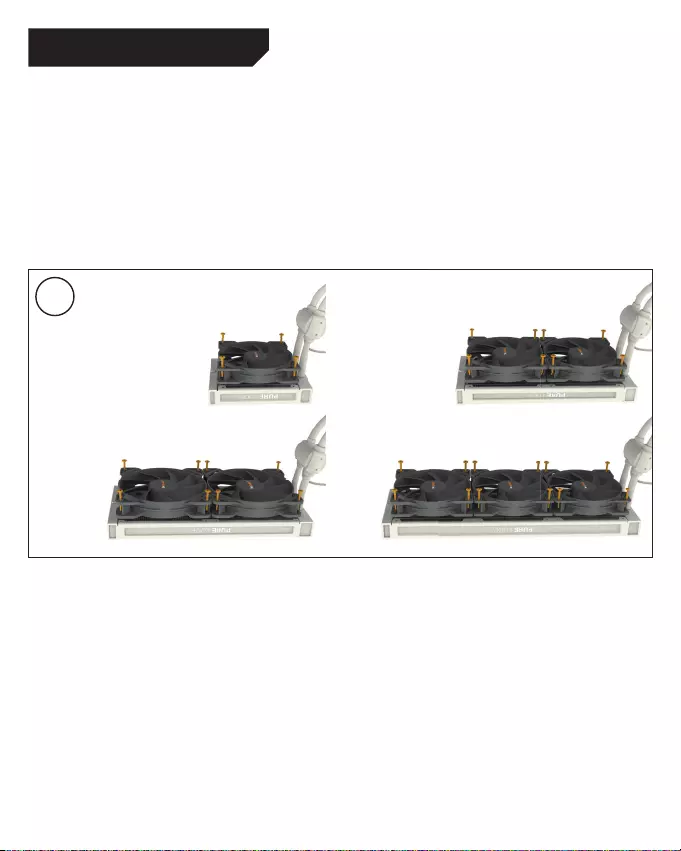
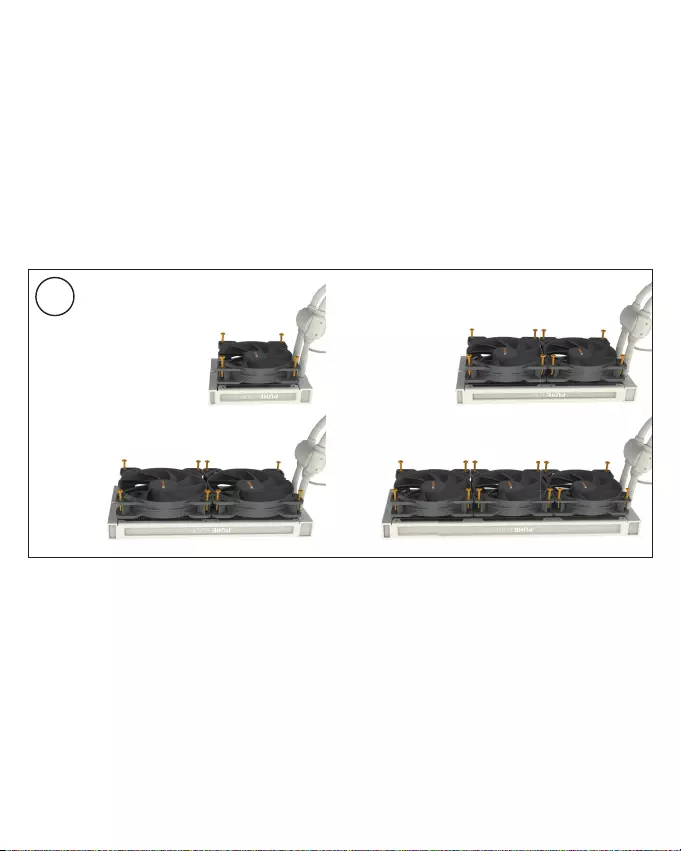
Mounting the fans on the radiator
Affi x the fan(s) (2) to the radiator with the fan
mounting screws (13). We recommend installation
in a push confi guration. With the fans facing
towards the model name on the radiator, mount
them on the hose side. Next connect the fans to
the CPU connection of the motherboard. You can
use the Y-cable (20) for this.
Befestigung der Lüfter am Radiator
Befestigen Sie die / den Lüfter (2) mit den
Lüfter Befestigungsschrauben (13) am Radiator.
Wir empfehlen die Installation in einer Push
Konfi guration. Den Lüfter / Die Lüfter, mit
der Modellbezeichnung auf den Radiator
gerichtet, montieren Sie auf der Schlauchseite.
Anschließend schließen Sie die beiden Lüfter an
den CPU-Anschluss des Mainboards an. Hierzu
können Sie das Y-Kabel nutzen (20).
3
9
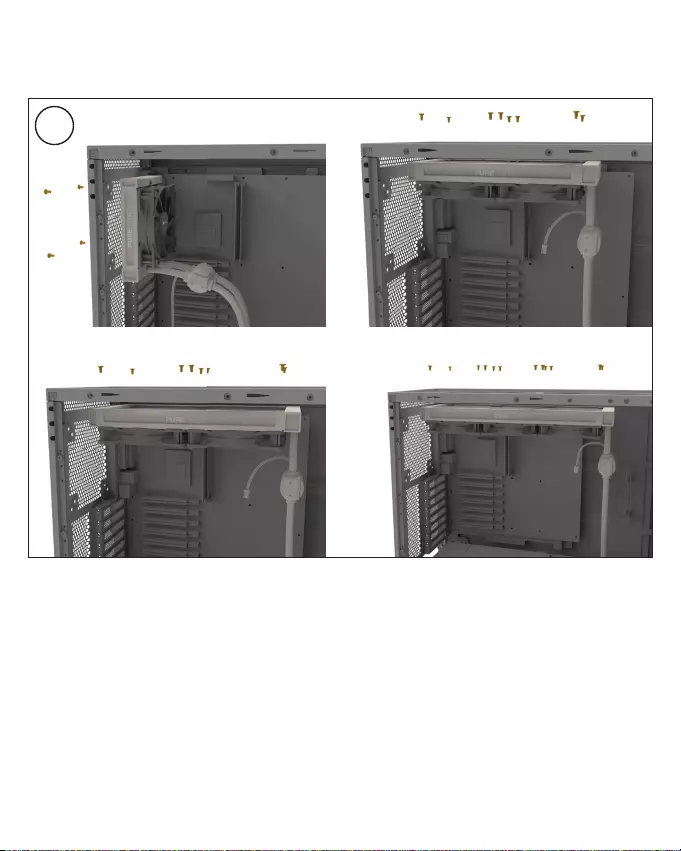
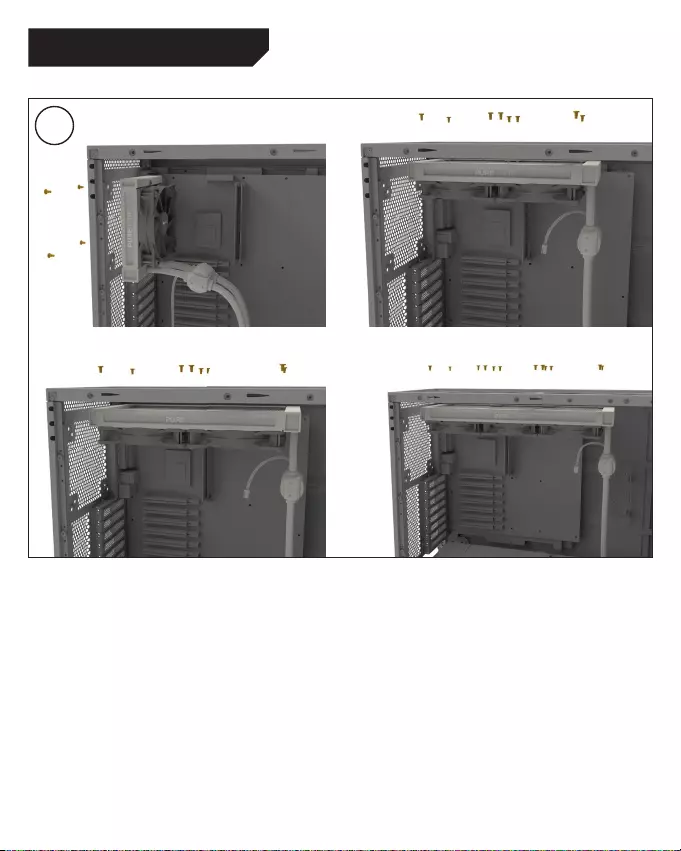
Affi xing the radiator to the case
Fix the radiator of Pure Loop (1) with the radiator
mounting screws (12) to the case. You can use a
normal crosshead screwdriver for this.
Befestigung des Radiators am Gehäuse
Befestigen Sie den Radiator der Pure Loop (1)
mit den Radiator Befestigungsschrauben (12)
am Gehäuse. Hierzu können Sie einen üblichen
Kreuz-Schraubendreher verwenden.
4
10
AMD: AM4 / AM3(+)
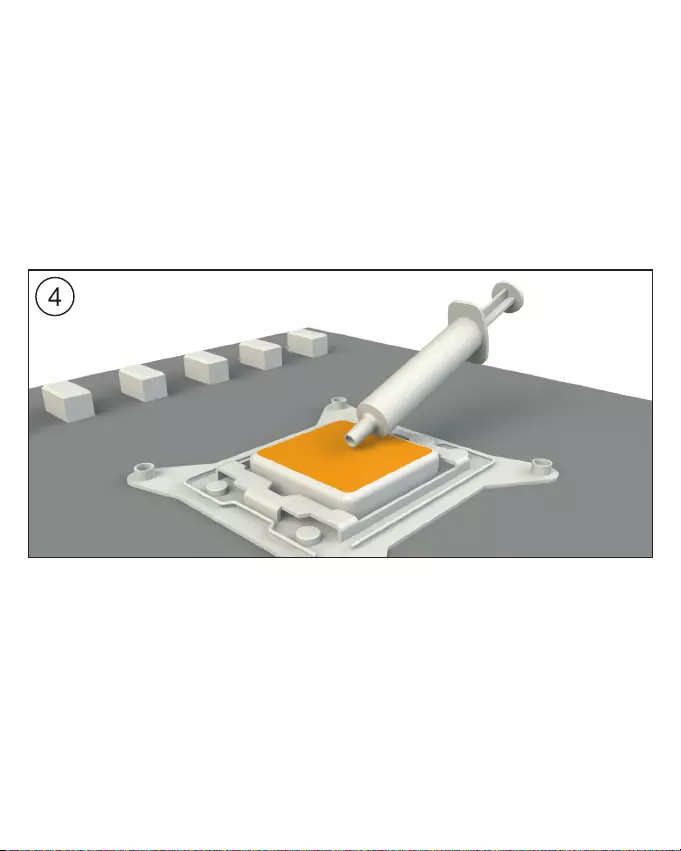
Mounting of the CPU block
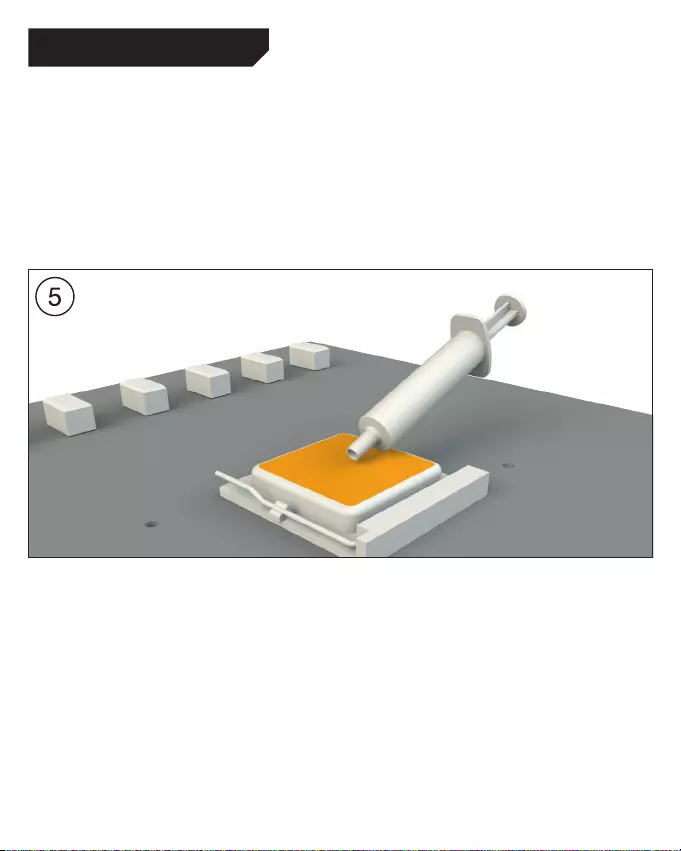
First peel off the protective film from the underside
of the cooler. Apply thermal paste (16) on the CPU
surface. The tube contains enough for about 1 or
2 applications.
Caution: The thermal paste supplied should not
be swallowed. If any is swallowed, drink lots of
water and urgently seek the advice of a doctor.
Store it beyond the reach of children. Avoid
contact with skin and eyes.
Montage des CPU-Blocks
Entfernen Sie zunächst die Schutzfolie von
der Unterseite des Kühlers. Tragen Sie die
Wärmeleitpaste (16) auf die CPU-Oberfläche
auf. Der Inhalt reicht für ca.1-2 Anwendungen.
Vorsicht: Die mitgelieferte Wärmeleitpaste
ist nicht zum Verzehr geeignet. Bei Verzehr
ausreichend Wasser trinken und umgehend
einen Arzt aufsuchen. Außerhalb der Reichweite
von Kindern aufbewahren. Vermeiden Sie Haut-
und Augenkontakt.
11
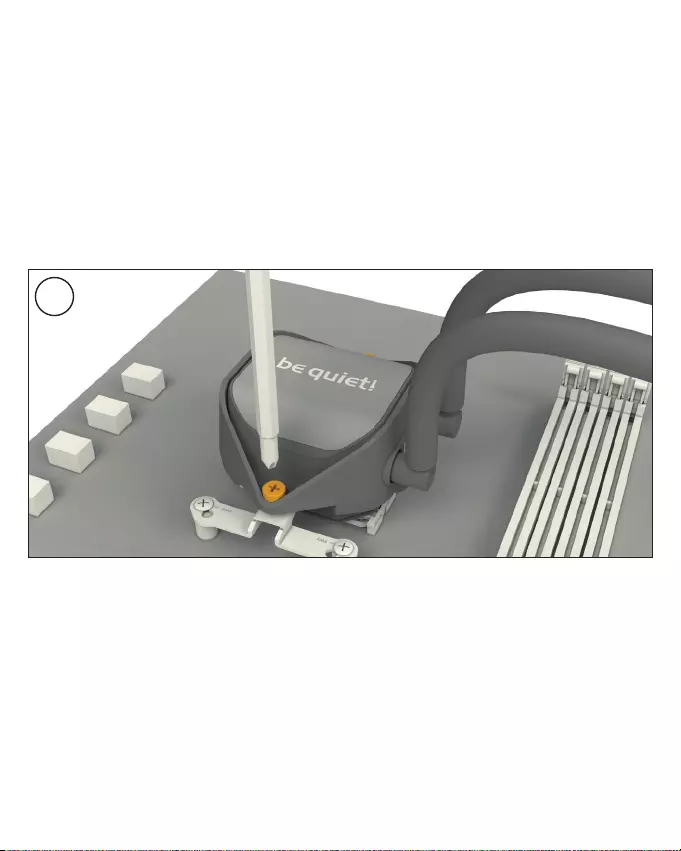
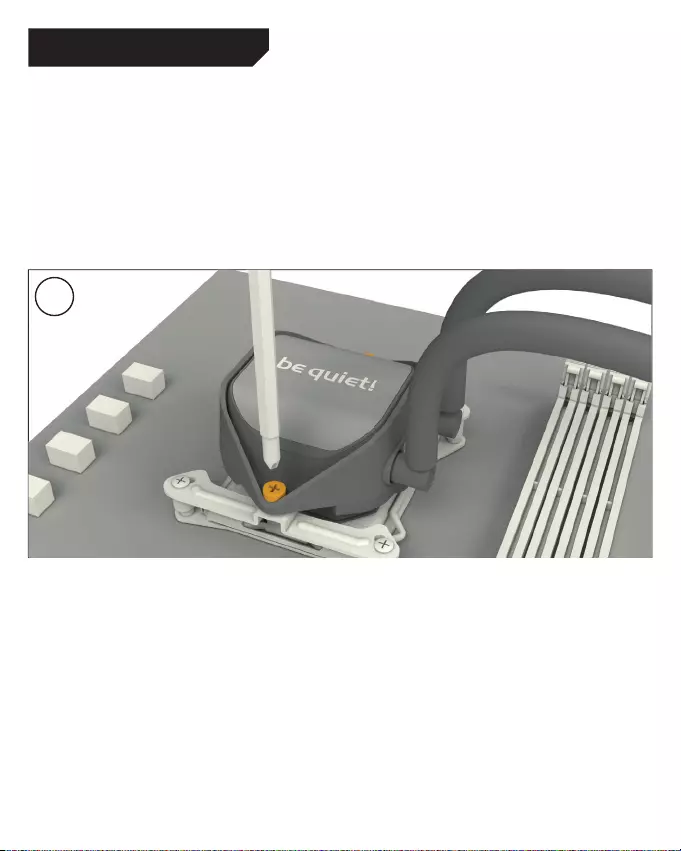
Place the CPU block centrally over the short
AMD mounting brackets (5), such that these
allow the CPU block to be screwed down.
For this you can use a normal crosshead
screwdriver. Next connect the pump and the
LED illumination to the SATA adapter (18).
Warning: The pump and illumination each
require 12V to operate properly. Lower voltages
can lead to loss of performance and faults.
Legen Sie den CPU-Block mittig auf die kurzen
AMD Montagebrücken (5), sodass sich der
CPU-Block mit selbigen verschrauben lässt.
Hierzu können Sie einen üblichen Kreuz-
Schraubendreher verwenden. Anschließend
schließen Sie die Pumpe sowie die LED-
Beleuchtung an den SATA Adapter (18) an.
Achtung: Pumpe und Beleuchtung müssen
jeweils mit 12V betrieben werden. Unter—
spannung kann zu Leistungsverlust und Defek-
ten führen.
6
12
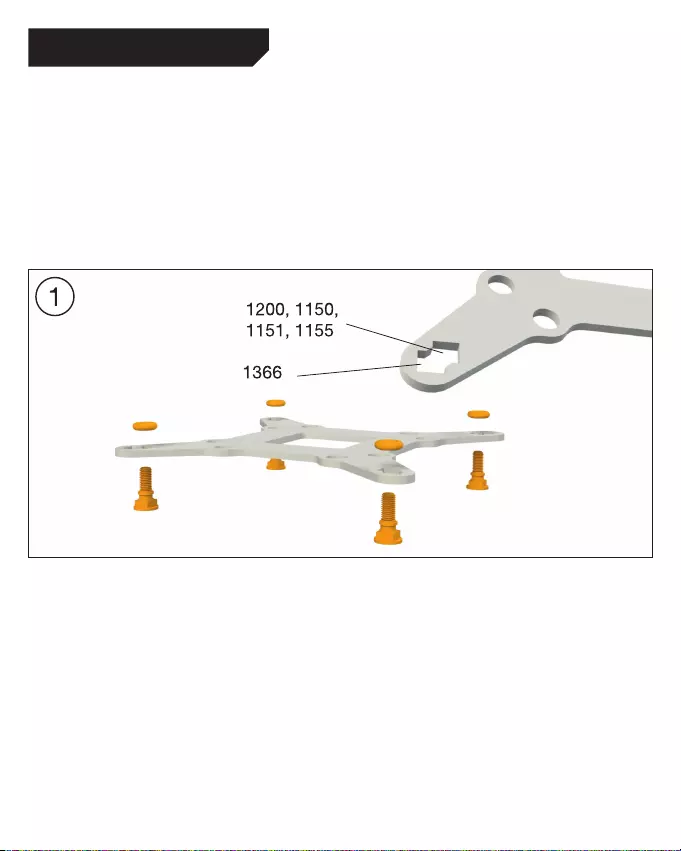
Affixing the backplate
Place the Intel backplate screws (10) in the
notches found on the rear of the Intel backplate
(3). Observe the drilled holes for the actual
CPU socket. Use the O-rings (14) to fasten the
backplate screws on the Intel backplate. Once
the Intel backplate is assembled for the actual
Intel socket, position it beneath the motherboard.
Make sure that the Intel backplate screws (10)
exactly match the positions of the motherboard
holes.
Befestigung der Backplate
Platzieren Sie die Intel Backplate Schrauben
(10) in die auf der Rückseite der Intel Backplate
(3) befindlichen Aussparungen. Beachten Sie
hierzu die Bohrlöcher für den jeweiligen Sockel.
Verwenden Sie zur Befestigung der Backplate-
Schrauben auf der Intel-Backplate die O-Ringe
(14). Sobald die Intel-Backplate für den jeweiligen
Intel-Sockel zusammengebaut ist, positionieren
Sie es unter dem Mainboard. Achten Sie dabei
darauf, dass die Intel Backplate-Schrauben (10)
genau in den Mainboardlöchern positioniert
sind.
The following parts are needed for this:
Pure Loop CPU cooler (1), 120mm fans (2), Intel Backplate (3), Intel mounting brackets (4), Intel
spacer nut B (7), fixing screws for the mounting bridges (9), Intel backplate screws (10), radiator
mounting screws (12), fan fixing screws (13), O-rings (14), thermal paste (16), SATA Adapter (18),
Y-Kabel (20)
Es werden folgende Bauteile benötigt:
Pure Loop CPU-Kühler (1), Lüfter (2), Intel Backplate (3), Intel Montagebrücken (4), Intel Gewindebolzen
B (7), Befestigungsschrauben für die Montagebrücke (9), Intel Backplate-Schrauben (10), Radiator
Befestigungsschrauben (12), Lüfter Befestigungsschrauben (13), O-Ringe (14), Wärmeleitpaste (16),
SATA Adapter (18), Y-Kabel (20)
Intel LGA 1200 / 1150 / 1151 / 1155
13
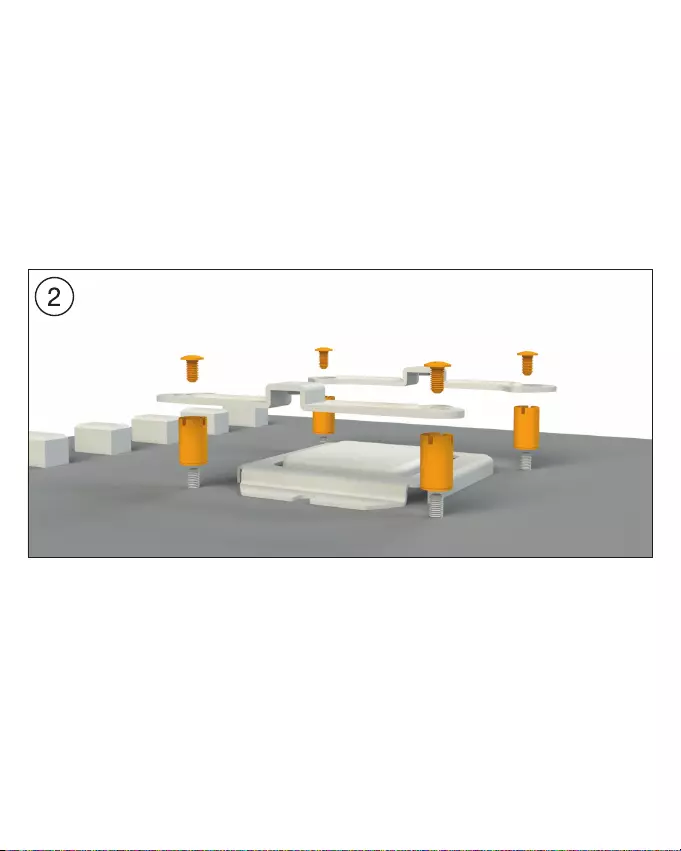
Installation of the mounting bridges
Screw the Intel spacer nuts B (7) onto the
previously located Intel backplate (3). Then
position the Intel mounting brackets (4) over
the Intel spacer nuts B (7), in order to affix them
with the fixing screws for the mounting brackets
fastening screws (9). For this you can use a
normal crosshead screwdriver.
Installation der Montagebrücken
Schrauben Sie die Intel Gewindebolzen B (7)
auf die zuvor platzierte Intel-Backplate (3). Dann
platzieren Sie die Intel Montagebrücken (4)
auf den Intel Gewindebolzen B (7), um sie
dann mit den Befestigungs-schrauben für die
Montagebrücke (9) zu fixieren. Hierfür können
Sie einen üblichen Kreuz-Schraubendreher ver-
wenden.
14
Intel LGA 1200 / 1150 / 1151 / 1155
Mounting the fans on the radiator
Affi x the fan(s) (2) to the radiator with the fan
mounting screws (13). We recommend installation
in a push confi guration. With the fans facing
towards the model name on the radiator, mount
them on the hose side. Next connect the fans to
the CPU connection of the motherboard. You can
use the Y-cable (20) for this.
Befestigung der Lüfter am Radiator
Befestigen Sie die / den Lüfter (2) mit den
Lüfter Befestigungsschrauben (13) am Radiator.
Wir empfehlen die Installation in einer Push
Konfi guration. Den Lüfter / Die Lüfter, mit der
Modellbezeichnung auf den Radiator gerichtet,
montieren Sie auf der Schlauchseite.
Anschließend schließen Sie die beiden Lüfter an
den CPU-Anschluss des Mainboards an. Hierzu
können Sie das Y-Kabel nutzen (20).
3
15
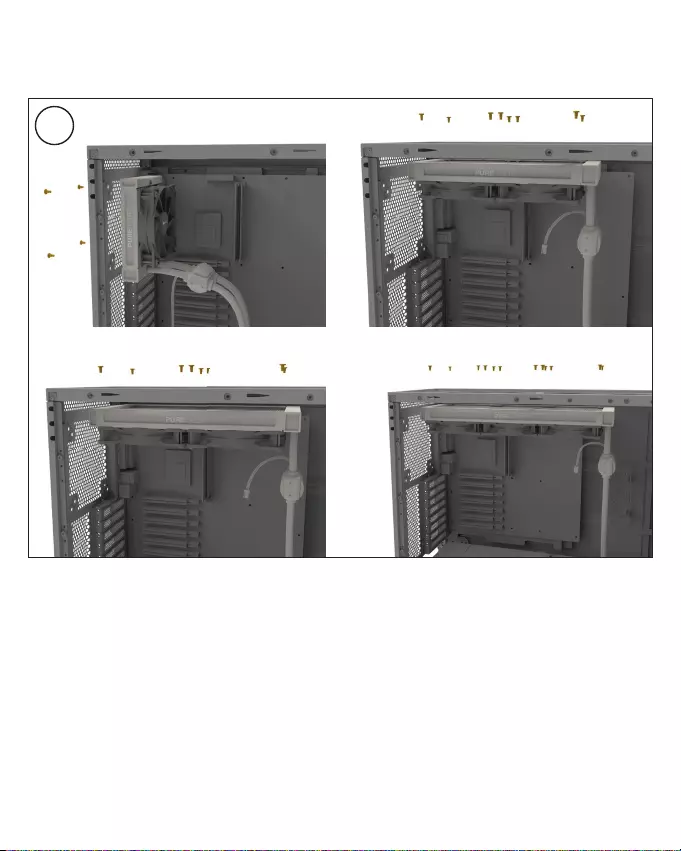
Affi xing the radiator to the case
Fix the radiator of Pure Loop (1) with the radiator
mounting screws (12) to the case. You can use a
normal crosshead screwdriver for this.
Befestigung des Radiators am Gehäuse
Befestigen Sie den Radiator der Pure Loop (1)
mit den Radiator Befestigungsschrauben (12)
am Gehäuse. Hierzu können Sie einen üblichen
Kreuz-Schraubendreher verwenden.
4
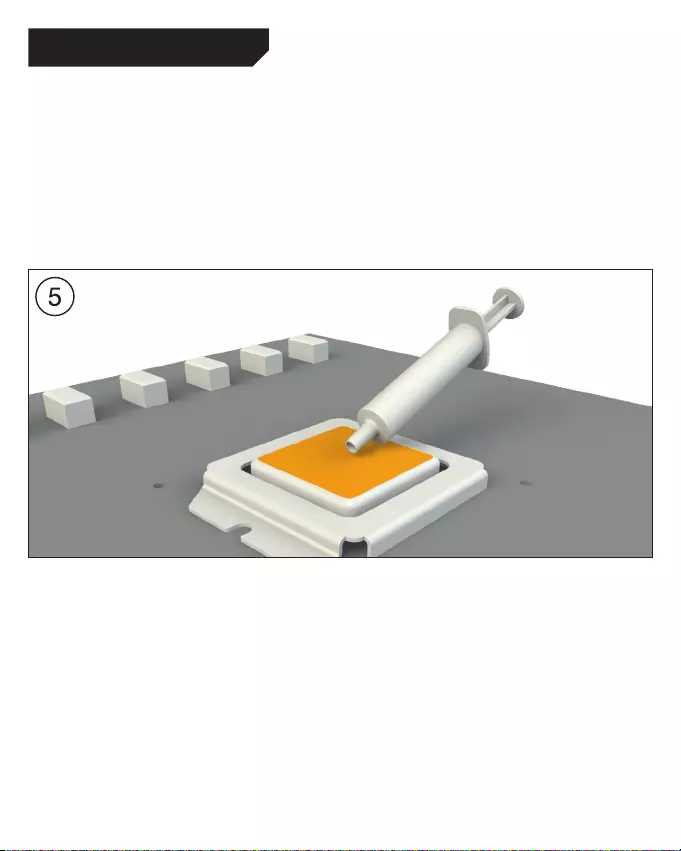
16
Intel LGA 1200 / 1150 / 1151 / 1155
Mounting of the CPU block
First peel off the protective film from the underside
of the cooler. Apply thermal paste (16) on the CPU
surface. The tube contains enough for about 1 or
2 applications.
Caution: The thermal paste supplied should not
be swallowed. If any is swallowed, drink lots of
water and urgently seek the advice of a doctor.
Store it beyond the reach of children. Avoid
contact with skin and eyes.
Montage des CPU-Blocks
Entfernen Sie zunächst die Schutzfolie von
der Unterseite des Kühlers. Tragen Sie die
Wärmeleitpaste (16) auf die CPU-Oberfläche
auf. Der Inhalt reicht für ca.1-2 Anwendungen.
Vorsicht: Die mitgelieferte Wärmeleitpaste
ist nicht zum Verzehr geeignet. Bei Verzehr
ausreichend Wasser trinken und umgehend
einen Arzt aufsuchen. Außerhalb der Reichweite
von Kindern aufbewahren. Vermeiden Sie Haut-
und Augenkontakt.
17
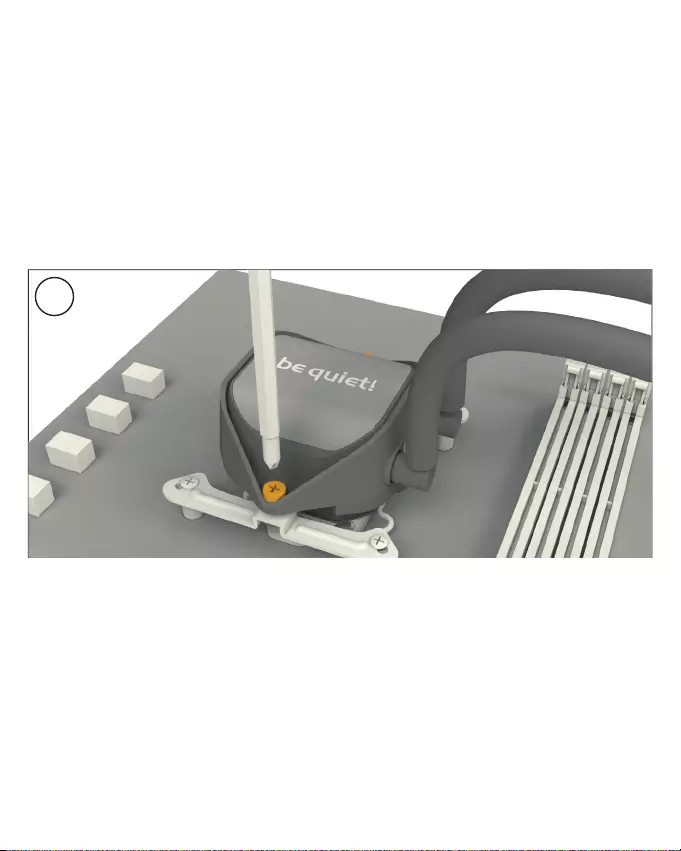
Place the CPU block centrally over the Intel
mounting brackets (4), such that these allow the
CPU block to be screwed down. For this you
can use a normal crosshead screwdriver. Next
connect the pump and the LED illumination to
the SATA adapter (18).
Warning: The pump and illumination each
require 12V to operate properly. Lower voltages
can lead to loss of performance and faults.
Legen Sie den CPU-Block mittig auf die Intel
Montagebrücken (4), sodass sich der CPU-Block
mit selbigen verschrauben lässt. Hierzu können
Sie einen üblichen Kreuz-Schraubendreher
verwenden. Anschließend schließen Sie die
Pumpe sowie die LED-Beleuchtung an den
SATA-Adapter (18) an.
Achtung: Pumpe und Beleuchtung müssen
jeweils mit 12V betrieben werden. Unter—
spannung kann zu Leistungsverlust und
Defekten führen.
6
18
Intel LGA 2011(-3) square ILM / LGA 2066
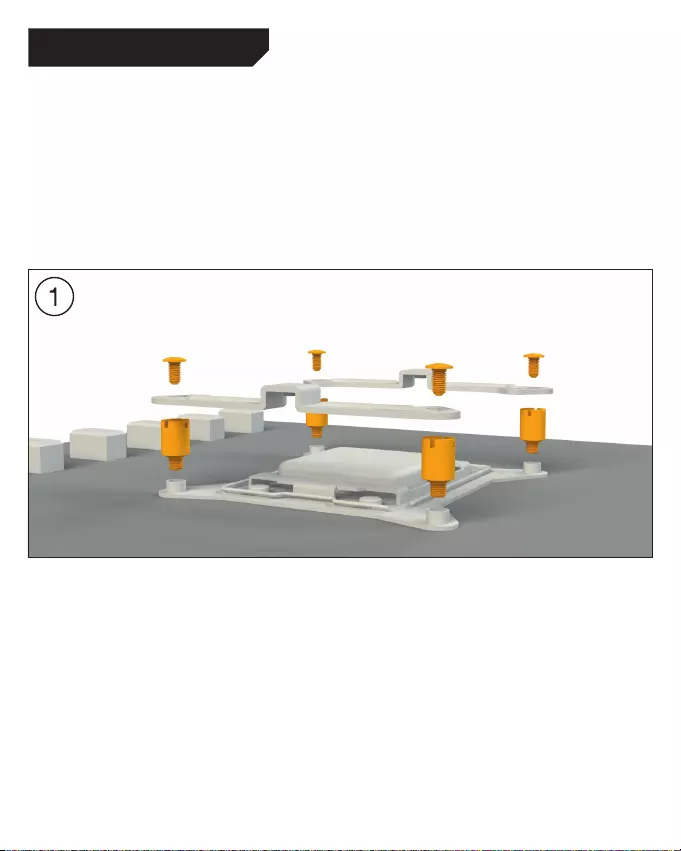
Assembly of the cooler mounting frame
First screw the Intel spacer nuts A (6) into the
threaded holes of the socket frame. Place both
the Intel mounting brackets (4) over the bolts
and affix these with the fixing screws for the
mounting bridges (9). To do this you can use a
normal crosshead screwdriver.
Aufbau des Kühlerbefestigungsrahmens
Schrauben Sie zuerst die Intel Gewindebolzen A
(6) in die Gewinde des Sockelrahmens. Platzieren
Sie die beiden Intel Montagebrücken (4) auf
den Intel Gewindebolzen und schrauben Sie
diese mit den Befestigungsschrauben für die
Montagebrücken (9) fest. Hierzu können Sie
einen üblichen Kreuz-Schraubendreher nutzen.
The following parts are needed for this:
Pure Loop (1), fans (2), Intel mounting brackets (4), Intel spacer nuts A (6), mounting bracket fastening
screws (9), radiator mounting screws (12), fan mounting screws (13), thermal paste (16), SATA Adapter
(18), Y-cable (20)
Es werden folgende Bauteile benötigt:
Pure Loop (1), Lüfter (2), Intel Montagebrücken (4), Intel Gewindebolzen A (6), Befestigungsschrauben
für die Montagebrücke (9), Radiator Befestigungsschrauben (12), Lüfter Befestigungsschrauben (13),
Wärmeleitpaste (16), SATA Adapter (18), Y-Kabel (20)
19
Befestigung der Lüfter am Radiator
Befestigen Sie die / den Lüfter (2) mit den
Lüfter Befestigungsschrauben (13) am Radiator.
Wir empfehlen die Installation in einer Push
Konfi guration. Den Lüfter / Die Lüfter, mit
der Modellbezeichnung auf den Radiator
gerichtet, montieren Sie auf der Schlauchseite.
Anschließend schließen Sie die beiden Lüfter an
den CPU-Anschluss des Mainboards an. Hierzu
können Sie das Y-Kabel nutzen (20).
Mounting the fans on the radiator
Affi x the fan(s) (2) to the radiator with the fan
mounting screws (13). We recommend instal-
lation in a push confi guration. With the fans
facing towards the model name on the radiator,
mount them on the hose side. Next connect
the fans to the CPU connection of the mother—
board. You can use the Y-cable (20) for this.
2
20
Intel LGA 2011(-3) square ILM / LGA 2066
Affi xing the radiator to the case
Fix the radiator of Pure Loop (1) with the radiator
mounting screws (12) to the case. You can use a
normal crosshead screwdriver for this.
Befestigung des Radiators am Gehäuse
Befestigen Sie den Radiator der Pure Loop (1)
mit den Radiator Befestigungsschrauben (12)
am Gehäuse. Hierzu können Sie einen üblichen
Kreuz-Schraubendreher verwenden.
3
21
Montage des CPU-Blocks
Entfernen Sie zunächst die Schutzfolie von
der Unterseite des Kühlers. Tragen Sie die
Wärmeleitpaste (16) auf die CPU-Oberfläche auf.
Der Inhalt reicht für ca. 1-2 Anwendungen.
Vorsicht: Die mitgelieferte Wärmeleitpaste
ist nicht zum Verzehr geeignet. Bei Verzehr
ausreichend Wasser trinken und umgehend einen
Arzt aufsuchen. Außerhalb der Reichweite von
Kindern aufbewahren. Vermeiden Sie Haut- und
Augenkontakt.
Mounting of the CPU block
First peel off the protective film from the
underside of the cooler. Apply thermal paste (16)
on the CPU surface. The tube contains enough
for about 1 or 2 applications.
Caution: The thermal paste supplied should
not be swallowed. If any is swallowed, drink
lots of water and urgently seek the advice of a
doctor. Store it beyond the reach of children.
Avoid contact with skin and eyes.
22
Place the CPU block centrally over the Intel
mounting brackets (4), such that these allow the
CPU block to be screwed down. For this you
can use a normal crosshead screwdriver. Next
connect the pump and the LED illumination to
the SATA adapter (18).
Warning: The pump and illumination each
require 12V to operate properly. Lower voltages
can lead to loss of performance and faults.
Legen Sie den CPU-Block mittig auf die Intel
Montagebrücken (4), sodass sich der CPU-Block
mit selbigen verschrauben lässt. Hierzu können
Sie einen üblichen Kreuz-Schraubendreher
verwenden. Anschließend schließen Sie die
Pumpe sowie die LED-Beleuchtung an den
SATA-Adapter (18) an.
Achtung: Pumpe und Beleuchtung müssen
jeweils mit 12V betrieben werden. Unterspannung
kann zu Leistungsverlust und Defekten führen.
5
Intel LGA 2011(-3) square ILM / LGA 2066
23
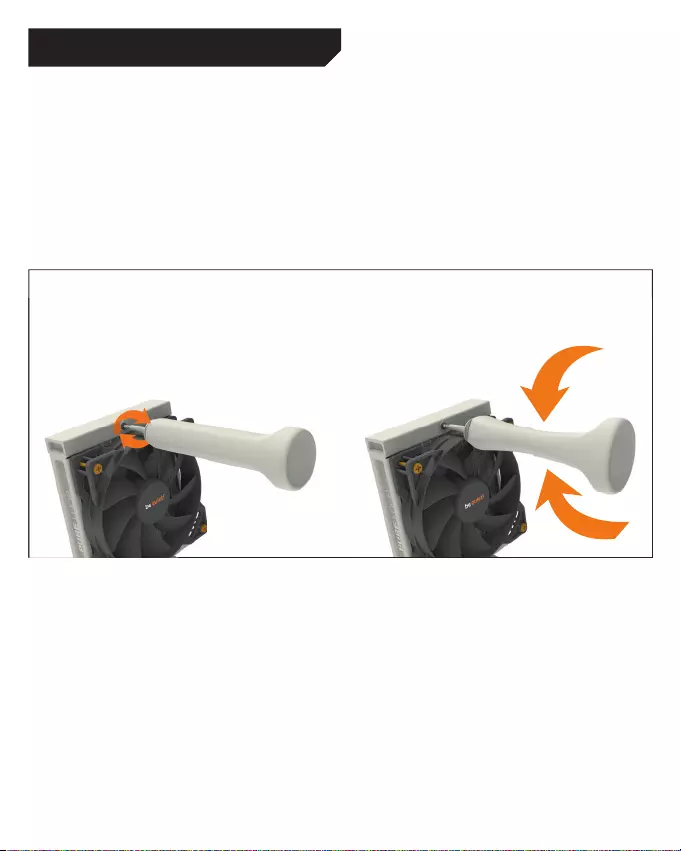
Refi lling the system
Topup the system after about two years of use.
In order to do this, fi rst detach the radiator from
the case. The fi lling port is on the opposite end
of the hoses. Open this as well as the bottle with
cooling fl uid (17). Rotate the bottle into the fi lling
port. Hold the radiator so that the fi lling port is at
the highest level with the bottle upended over it.
Then lightly squeeze the bottle. Repeat this until
no further air bubbles appear in the bottle.
Nachfüllen des Systems
Füllen Sie das System nach ca. zwei Jahren
Gebrauch nach. Zu diesem Zweck demontieren
Sie den Radiator vom Gehäuse. Der Nachfüll-
Port liegt auf der gegenüberliegenden Seite der
Schläuche. Öffnen Sie sowohl diesen als auch
die Flasche mit Kühlfl üssigkeit (17). Drehen Sie
diese in den Refi ll Port. Halten den Radiator
so, dass der Refi ll Port der höchste Punkt ist
und die Flasche kopfüber steht. Anschließend
drücken Sie die Flasche leicht. Wiederholen Sie
diesen Vorgang, bis keine Luftbläschen zurück
in die Flasche aufsteigen.
REFILLING THE SYSTEM / NACHFÜLLEN DES SYSTEMS
24
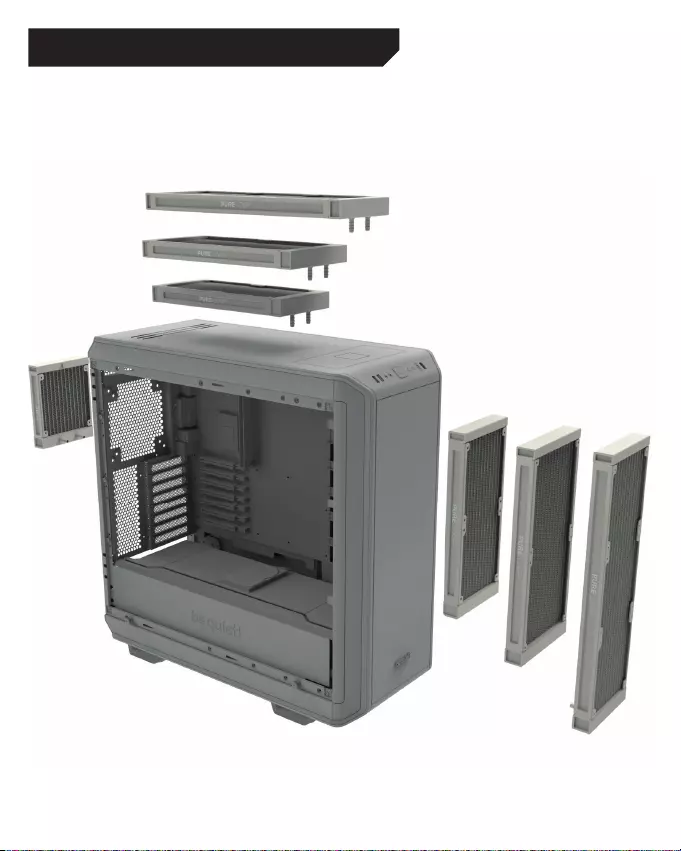
RECOMMENDED INSTALLATION / EMPFOHLENE EINBAUPOSITION

25
Insuffi cient cooling performance
■ Ensure the CPU block is mounted as described
in the instructions. Use only the mounting
equipment supplied with the unit.
■ Please operate the pump and lighting only with
12 volts. No voltage regulator should be used,
because this can damage the device.
■ Have you applied too much or too little thermal
paste? It is suffi cient when it thinly covers the
back of the CPU.
■ After a drop in coolant is apparent, it is
advisable to top up the coolant level to
maintain optimum cooling performance. For
the correct way to top up the coolant, refer to
the installation instructions.
■ Please ensure that the airfl ow of the fans is
not restricted, to guarantee their maximum
performance.
■ Check that suffi cient room is allocated to
the radiator, so it is able to draw in suffi cient
cooling air and expel the warmed air.
Produces more noise
■ Check the coolant level and if necessary top
it up. The right way to do this is described in
the installation instructions. When the coolant
level is too low, it leads to more noise and can
damage the device.
■ The radiator must be mounted in a suitable
position in the case to prevent vibration and
turbulence in the airfl ow. Please also note any
advice given by the manufacturer of the case.
■ Make sure that no tubes or cables come into
contact with fans in the case. Bubbles of air
may have become trapped in the pump’s
impeller during transportation. It may be
possible to free the impeller by repeated
switching on and/or loading cycles.
Painted surfaces of the radiator
■ The Pure Loop all-in-one water cooler uses an
aluminum radiator, which is originally silver in
color. The radiator is lightly tinted with black
paint, which from certain perspectives might
not be entirely opaque. This outer paint cover
does not affect the cooling performance in any
way.
■ The Pure Loop all-in-one water cooler is
a cooling unit intended for the cooling of
processors and made solely for that purpose.
If you plan to open up or modify its closed
system we are no longer able to guarantee
its functionality or cooling performance in
any way. Please only allow authorized service
technicians to undertake repairs. Opening
the device besides of the refi llport voids the
warranty.
■ Should you experience any other problems
with the water cooler, please get in touch
with our service department. You will fi nd
our contact details in the manufacturer’s
information section.
TROUBLESHOOTING

26
Unzureichende Kühlleistung
■ Bitte montieren Sie den CPU-Block wie im
Handbuch beschrieben. Nutzen Sie dazu
ausschließlich das beiliegende Montage-
material.
■ Kontrollieren Sie die Kabelverbindungen von
Pumpe und Lüftern. Bitte betreiben Sie die
Pumpe und Beleuchtung bei 12 Volt. Es darf
keine Spannungsregulierung zum Einsatz
kommen, da das Gerät sonst Schaden
nehmen kann.
■ Haben Sie zu viel – oder keine – Wärmeleitpaste
aufgetragen? Es genügt, wenn die CPU mit
einer dünnen Schicht leicht bedeckt ist.
■ Bei merklichem Flüssigkeitsverlust empfiehlt
es sich zum Aufrechterhalten der Kühlleistung
die Kühlflüssigkeit nachzufüllen. Die korrekte
Handhabung entnehmen Sie bitte der
Installationsanleitung.
■ Bitte überprüfen Sie, ob die Lüfter zu stark
gedrosselt sind. Beide Lüfter müssen
ungedrosselt betrieben werden, um die volle
Leistungsfähigkeit zu gewährleisten.
■ Bitte prüfen Sie, ob der Radiator ausreichend
Platz hat, um kühle Luft anzusaugen und die
erwärmte Luft abzugeben.
Stark erhöhte Lautstärke
■ Kontrollieren Sie den Flüssigkeitskreislauf
und füllen Sie ihn ggf. nach. Ein zu geringer
Flüssigkeitsstand kann zu einer erhöhten
Lautstärke und zum Defekt des Gerätes führen.
■ Der Radiator muss an einer geeigneten
Stelle montiert sein, um Schwingungen des
Gehäuses sowie starke Luftverwirbelungen
zu vermeiden. Bitte beachten Sie hierzu die
Angaben Ihres Gehäuseherstellers.
■ Bitte achten Sie darauf, dass Schläuche
und Kabel nicht in Berührung mit Lüftern im
Gehäuse kommen. Beim Transport könnten
sich Lüfterbläschen am Impeller der Pumpe
verfangen haben, durch mehrmalige Einschalt-
und/oder Lastzyklen könnte der Impeller frei
werden
Verfärbte Oberfläche des Radiators
■ Die Pure Loop All-In-One Wasserkühlung nutzt
einen Aluminiumradiator, der im Ursprung
einen Silber-Ton hat. Die Radiatoren wurden
oberflächlich mit schwarzer Farbe versehen,
die aus bestimmten Perspektiven nicht
blickdicht sein kann. Durch die äußerliche
Färbung wird die Kühlleistung in keinster
Weise beeinflusst.
■ Bei den Pure Loop All-In-One Wasserkühlungen
handelt es sich um Kühlungseinheiten, die
zur Kühlung von Prozessoren vorgesehen
und gefertigt wurden. Sollten Sie vorhaben
den Kühlkreislauf zu öffnen oder zu
modifizieren, können wir keinerlei Garantie
für die Funktionalität sowie die zu erwartende
Kühlleistung übernehmen. Bitte lassen
Sie Reparaturen nur von autorisiertem
Fachpersonal durchführen! Ein Öffnen des
Gerätes abseits vom Refill Port am Radiator
führt zum Garantieverlust.
■ Sollten Sie darüber hinaus Probleme mit Ihrer
Wasserkühlung haben wenden Sie sich bitte
an unseren Service. Die Kontaktinformationen
finden Sie im Abschnitt “Herstellerangaben”.
FEHLERBEHEBUNG

27
I. APPLICABILITY
This non-transferable warranty is applicable to
newly purchased, previously unopened be quiet!
products and is enforceable by only the original
consumer purchaser. Proof of purchase is required
for warranty service, so should be retained. be quiet!
does not provide warranty registration services.
II. WARRANTY PERIOD
For eligible products, parts and labor are warranted
for the applicable warranty period from the date of
purchase. The applicable warranty period varies
by product model, and is identified in your user
documentation, on the product package, or as
listed below. Should any of these warranty periods
differ, the longest specified warranty period will
apply. Replaced products will be warranted for the
remainder of the original warranty period or thirty
days, whichever is longer.
III. EXCLUSIONS
The following are not covered by the warranty:
1. Normal wear and tear.
2. Any product which has been modified without
permission from be quiet!, or on which the serial
number or warranty sticker has been defaced,
modified, or removed.
3. Damage, deterioration or malfunction resulting
from: Accident, abuse, misuse or improper use,
neglect, connection to an improper voltage
source, unauthorized product modification, or
failure to follow instructions included with the
product. Fire, water, lightning, or other acts of
nature. Repair or attempted repair by anyone not
authorized by be quiet!. Shipping or transport
damage (claims must be made with the carrier).
Any other cause which does not relate to a defect
in materials or manufacturing workmanship.
4. Cartons, cases, batteries, cabinets, tapes,
accessories or other consumables used with this
product.
5. be quiet!, Inc. does not warrant that this
product will meet your requirements. It is your
responsibility to determine the suitability of this
product for your purpose.
6. Removal or installation charges.
7. Shipping charges.
8. Any incidental charges.
IV. EXCLUSION OF DAMAGES
be quiet!‘s sole obligation and liability under this
warranty is limited to the repair or replacement of
a defective product at its option. be quiet! shall not,
in any event, be liable for any special, incidental,
indirect, or consequential damages whatsoever,
including but not limited to loss of profits, revenue,
or data (whether direct or indirect), damages
resulting from interruption of service and loss
of business, or for liability in tort relating to this
product or resulting from its use
or possession, even if be quiet! has been advised
previously of the possibility of such damages.
V. LIMITATIONS OF IMPLIED WARRANTIES
There are no other warranties, expressed or implied,
including but not limited to those of merchantability
or fitness for a particular purpose. The duration of
implied warranties is limited to the warranty length
specified in Paragraph II.
VI. LOCAL LAW AND YOUR WARRANTY
This warranty gives you specific legal rights. You
may also have other rights granted under local law.
These rights may vary.
VII. NO OTHER WARRANTY
No be quiet! employee, dealer, or other agent is
authorized to make any modification, extension, or
addition to this warranty.
VIII. TO OBTAIN TECHNICAL SUPPORT OR
WARRANTY SERVICE
Please see your product owner’s manual or visit the
Online Support section at www.bequiet.com
LIMITED WARRANTY

bequiet.com
be quiet! Pure Loop 240mm Data Sheet
Data Sheet
2 pages
en
28 pages
de
en
fr
ja
ru
sv
sp
zh
nl
pl
be quiet! Pure Loop 240mm Cooler Specification
The be quiet! Pure Loop 240mm Cooler is a high-performance liquid cooling system designed for efficient thermal management in gaming and high-performance computing systems. It features a sleek, double-fan radiator configuration that measures 240mm, optimized for compatibility with a wide range of cases. The Pure Loop employs a high-quality aluminum radiator that works in tandem with two Pure Wings 2 120mm PWM fans, which are engineered to operate quietly while delivering robust airflow. These fans have a maximum rotational speed of 2000 RPM, ensuring effective heat dissipation.
The cooling solution utilizes a double decoupled pump unit, positioned on the tubes to reduce vibration and noise, maintaining a quiet operation even under heavy loads. The pump is also equipped with a white LED illumination, adding a subtle aesthetic enhancement. To further ensure durability and longevity, the cooler comes with a convenient and easy-to-use refill port, allowing users to maintain the coolant levels over time.
The Pure Loop 240mm Cooler supports a wide array of current Intel and AMD sockets, including Intel LGA 1200, 115x, 2066, and 2011(-3) Square ILM, as well as AMD AM4 sockets, providing broad compatibility. It includes flexible sleeved tubes, designed to be kink-resistant, which facilitate straightforward installation and routing within the system. The cooler is backed by a three-year warranty, reflecting be quiet!’s commitment to quality and reliability. This cooling solution is ideal for users looking to achieve a balance between performance, aesthetics, and quiet operation in their system builds.
be quiet! Pure Loop 240mm Cooler F.A.Q.
Begin by mounting the radiator in your case. Then, attach the fans using the provided screws. Apply thermal paste to your CPU and secure the cooler’s pump unit using the appropriate mounting bracket for your CPU socket. Connect the pump and fan power cables to your motherboard.
Check fan and pump connections to ensure they are secure. Inspect for obstructions in the fan blades or radiator. If noise persists, consider adjusting the fan speed through BIOS or software to reduce RPM levels.
Locate the refill port on the radiator and remove the cap. Use the provided coolant bottle to slowly add liquid until the system is full. Replace the cap securely and check for leaks before powering on the system.
Regularly check for dust buildup on the radiator and fans, cleaning them with compressed air as needed. Periodically inspect for leaks and refill the coolant every 2 years or if levels are low.
Fan speed can be controlled via your motherboard’s BIOS settings or through fan control software. Ensure the fans are connected to a controllable fan header on the motherboard.
Yes, the cooler can be mounted in various orientations, such as top, front, or side, depending on your case layout. Ensure the pump is below the highest point of the loop to avoid air pockets.
The radiator dimensions are approximately 277mm x 120mm x 27mm, ensuring compatibility with most standard cases that support 240mm radiators.
Listen for a gentle humming sound from the pump when the system is powered on. Check motherboard BIOS or software for pump RPM readings to ensure it is functioning within normal parameters.
The cooler comes with two Pure Wings 2 120mm PWM fans, designed for quiet operation and efficient cooling performance.
Yes, the cooler is compatible with AM4 sockets and includes the necessary mounting hardware for installation on such motherboards.
View the manual for the Be Quiet! Pure Loop 2 240mm here, for free. This user manual comes under the category computer cooling components and has been rated by 1 people with an average of a 7.6. This manual is available in the following languages: English. Do you have a question about the Be Quiet! Pure Loop 2 240mm?
Ask your question here
Be Quiet! Pure Loop 2 240mm specifications
Below you will find the product specifications and the manual specifications of the Be Quiet! Pure Loop 2 240mm.
The Be Quiet! Pure Loop 2 240mm is a computer cooling component designed to efficiently cool your system. It features a 240mm radiator size, which allows for effective heat dissipation. The pump is powered by a 3-phase motor for smooth and quiet operation. The component is equipped with two Pure Wings 2 fans, which offer high airflow and low noise levels.
The Pure Loop 2 240mm is designed for easy installation, with a tool-free mounting system for convenience. It also includes refill ports to easily add or replace coolant. The component is made with high-quality materials to ensure durability and longevity.
In terms of compatibility, the Be Quiet! Pure Loop 2 240mm is suitable for a wide range of Intel and AMD sockets, making it versatile for various systems. The component is designed to provide reliable cooling performance to keep your system running smoothly.
General
Frequently asked questions
Can’t find the answer to your question in the manual? You may find the answer to your question in the FAQs about the Be Quiet! Pure Loop 2 240mm below.
Is the manual of the Be Quiet! Pure Loop 2 240mm available in English?
Yes, the manual of the Be Quiet! Pure Loop 2 240mm is available in English .
Is your question not listed? Ask your question here
Обзор и тестирование системы жидкостного охлаждения be quiet! Pure Loop 240mm (BW006)
Серия систем жидкостного охлаждения Pure Loop от be quiet! произвела впечатление на энтузиастов сразу с момента анонса — производитель привнёс сразу несколько значительных изменений, которые действительно привлекают внимание. Позиционируются эта серия как Essential, что означает, если адаптировать на русский, возможность охлаждения любых поддерживаемых процессоров, а некоторых из них — даже с небольшим разгоном. Новая линейка полностью идентична между собой с точки зрения дизайна. В её основе лежит алюминиевый радиатор, помпа вынесена за пределы корпуса водоблока, реализована скромная светодиодная подсветка белого цвета, а также присутствует возможность обслуживания, для чего в комплекте даже дополнительная жидкость есть.
Что касается стоимости, то изучаемую сегодня 240 мм модель в московской рознице (на момент публикации материала) можно найти примерно за 8000 рублей.
Содержание:
1. Обзор кулера
2. Установка на разные платформы
3. Тестирование и заключение
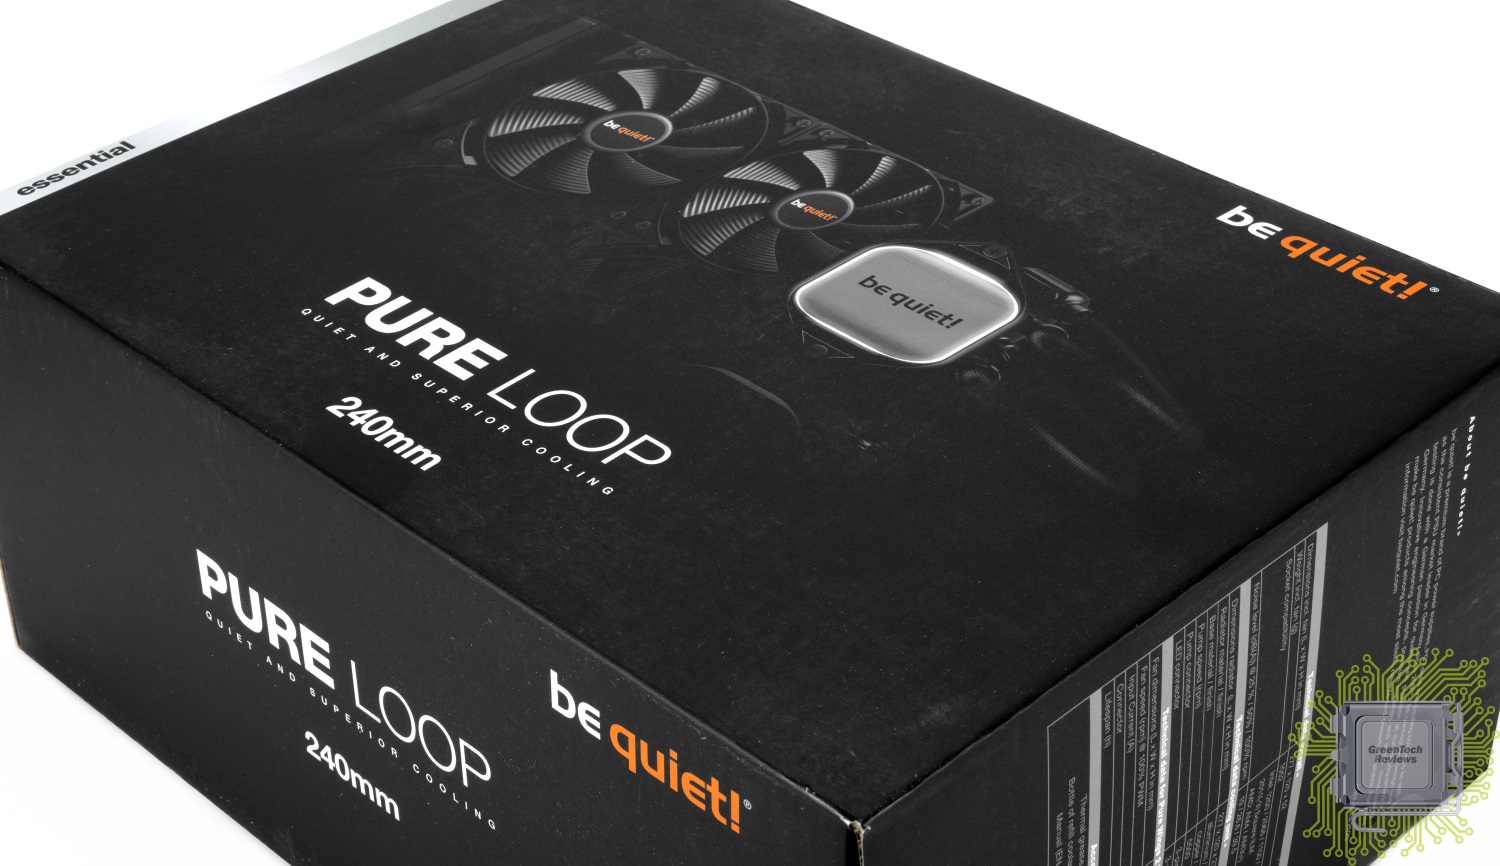
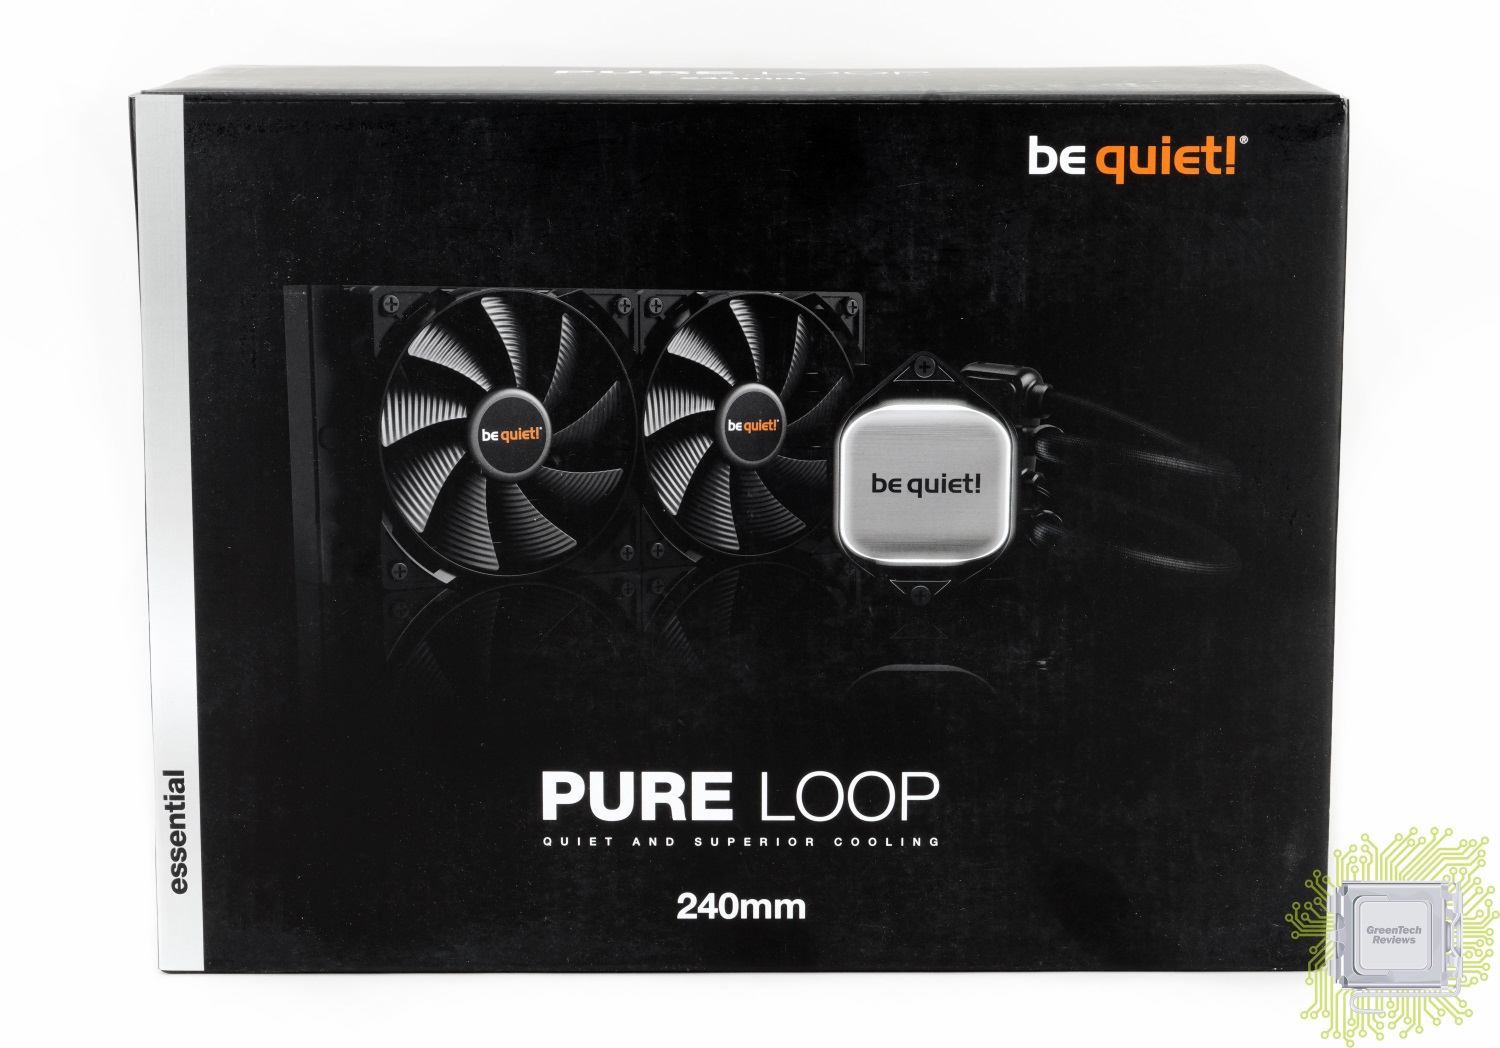
Дизайн упаковки всё также строг и узнаваем – коробка чёрного цвета с серебристой полосой Essential. На фронтальной стороне размещено изображение системы охлаждения, благодаря которому можно увидеть обновлённый дизайн водоблока, который теперь дополнен подсветкой.
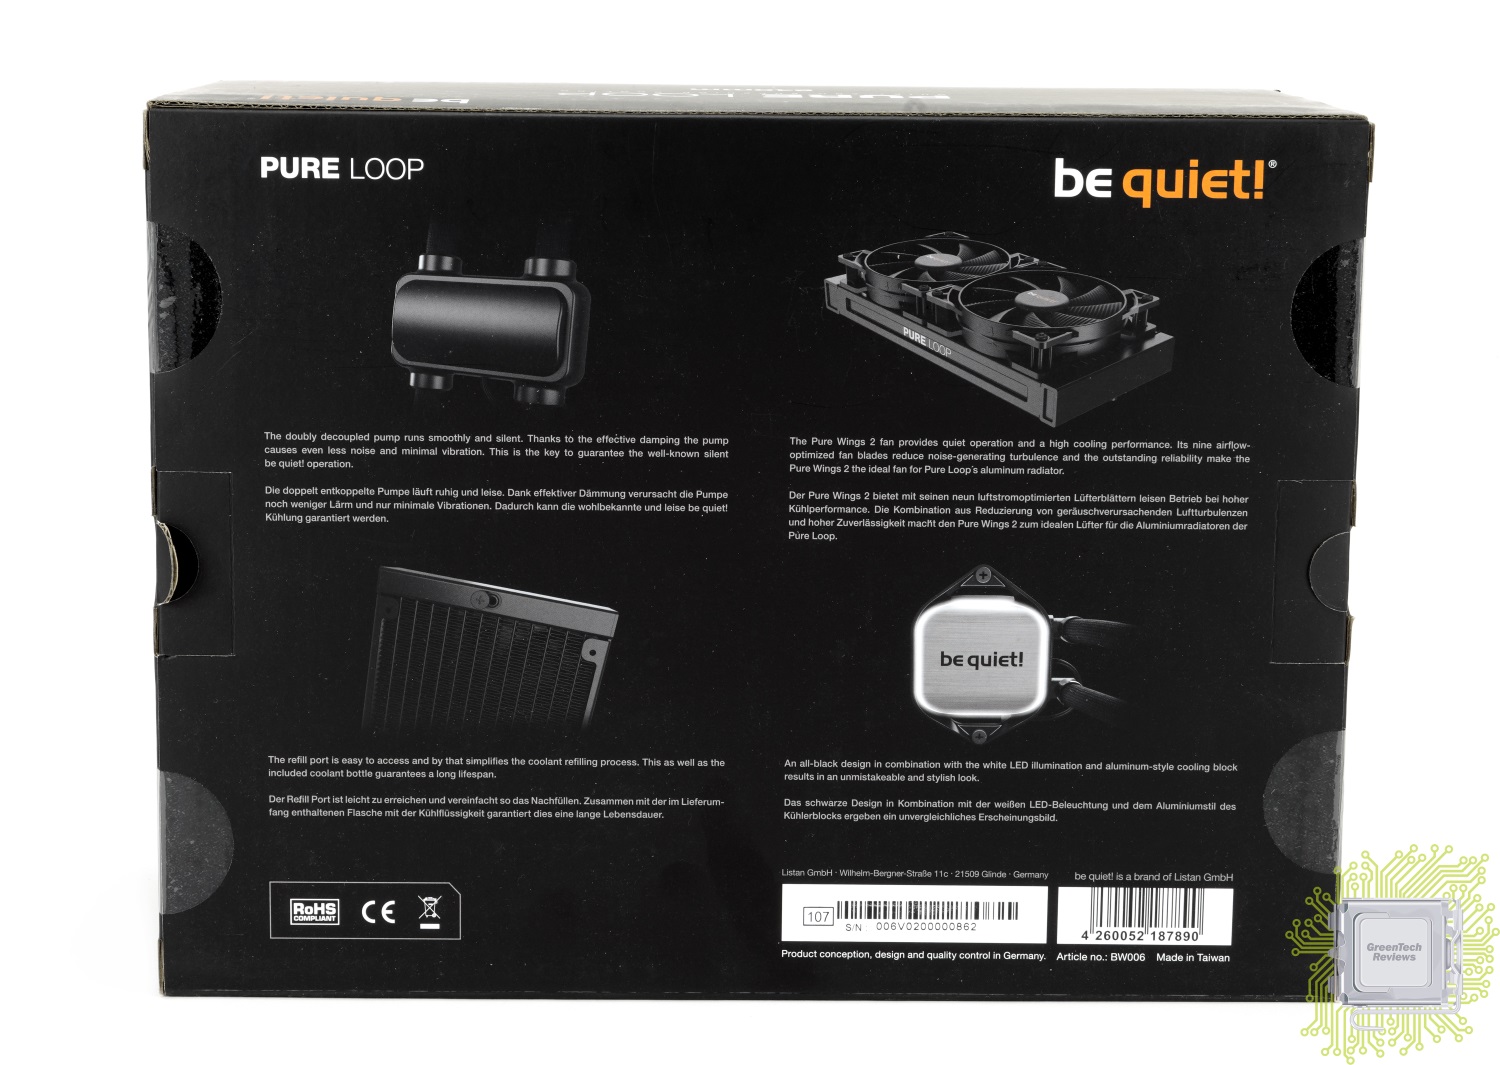
На боковых и обратной сторонах коробке размещена полезная информация о возможностях и технологических особенностях модели. В число самых значимых особенностей вошли:
— эффективное демпфирование помпы предотвращает передачу вибраций и гарантирует легендарную тишину работы be quiet!;
— вентилятор Pure Wings 2 120mm обеспечивает очень тихую работу и высокую производительность охлаждения. Девять оптимизированных для воздушного потока лопастей делают Pure Wings 2 идеальным выбором для алюминиевого радиатора Pure Loop;
— удобное расположение заправочного отверстия упрощает процесс добавления жидкости, а комплектная емкость с хладагентом обеспечивает длительный срок эксплуатации системы;
— полностью черный дизайн в сочетании с белой LED подсветкой придает устройству элегантный внешний вид. Стильная алюминиевая поверхность охлаждающего модуля для потрясающего внешнего вида Pure Loop в любом корпусе ПК.
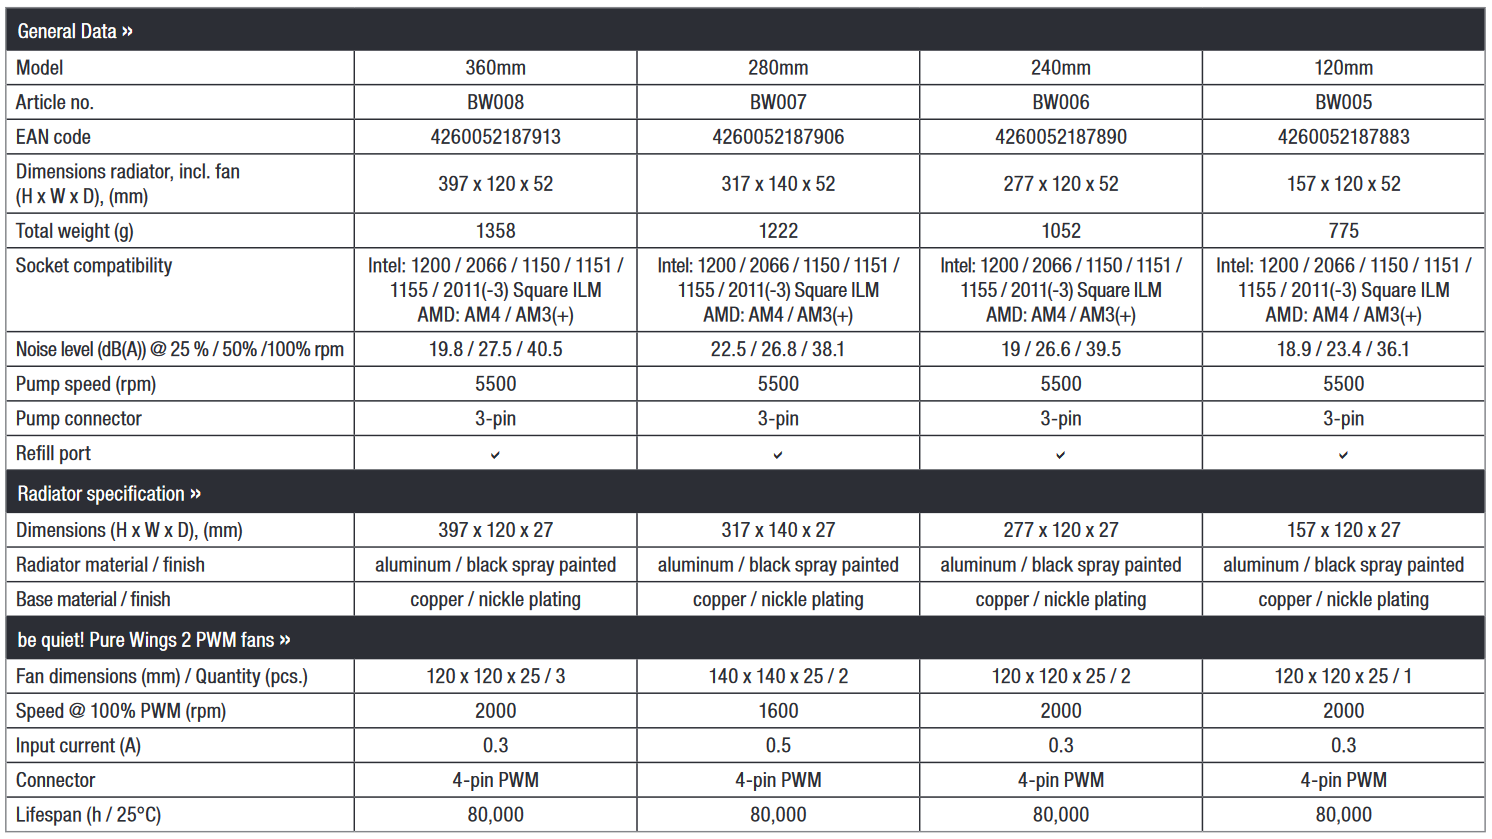
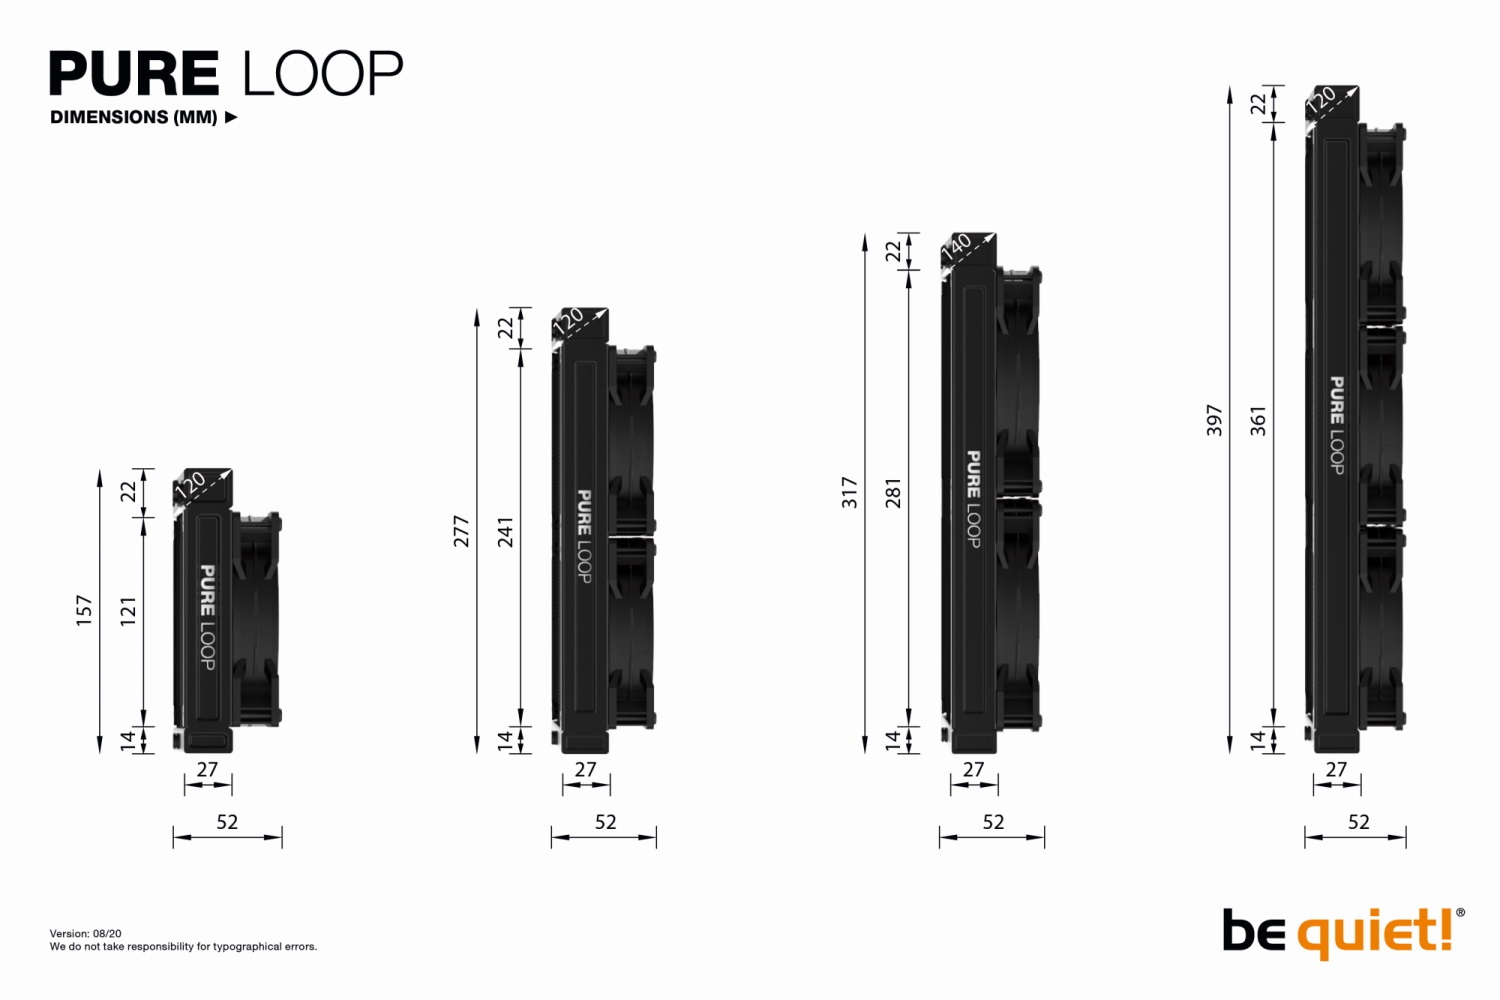
Основные технические характеристики для всех четырёх доступных моделей представлены на слайдах ниже, как и наглядное сравнение габаритов.
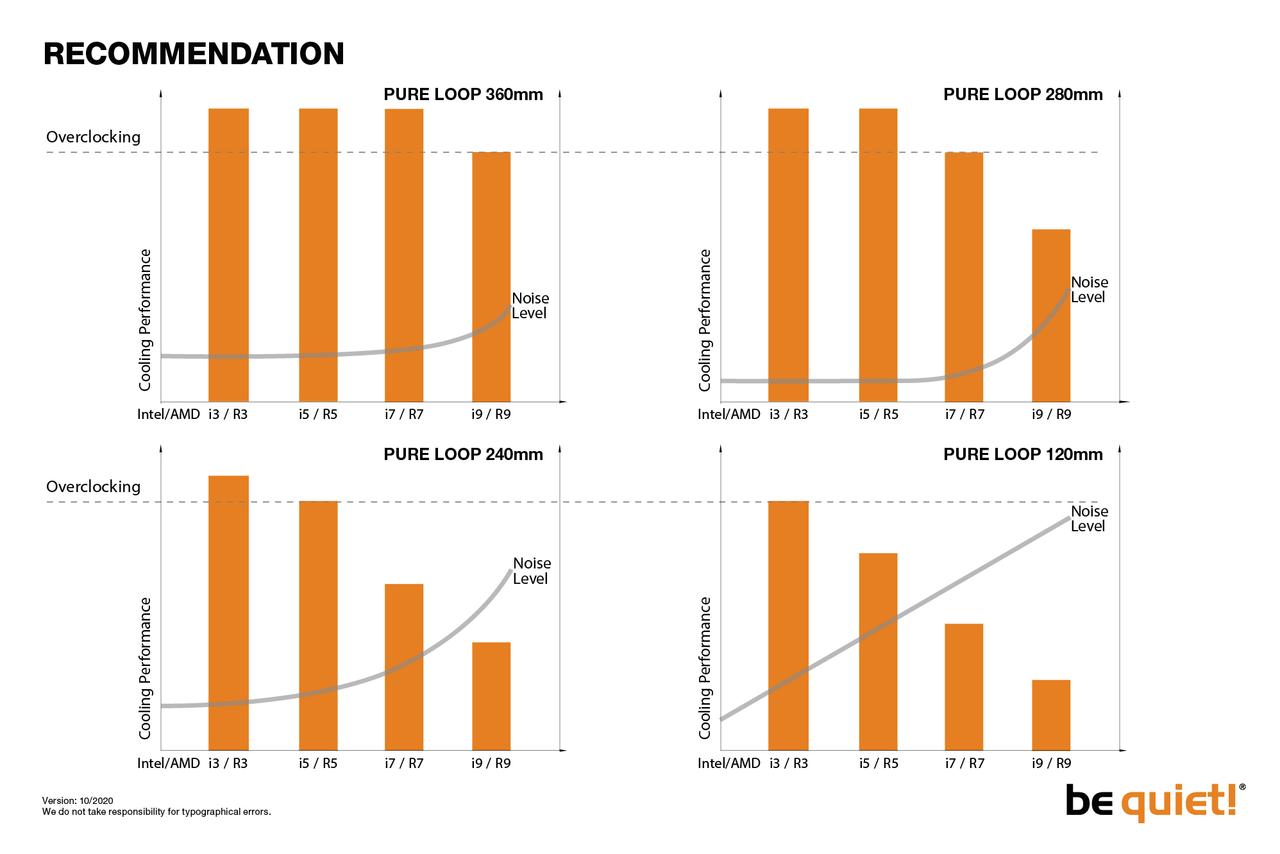
Для тех, кто ещё не смог определиться с выбором размера Pure Loop, производитель даёт некоторые рекомендации на эту тему:
Внутри основной чёрной коробки находится ещё одна, обладающая такой формой, чтобы система охлаждения и аксессуары были надёжно зафиксированы.
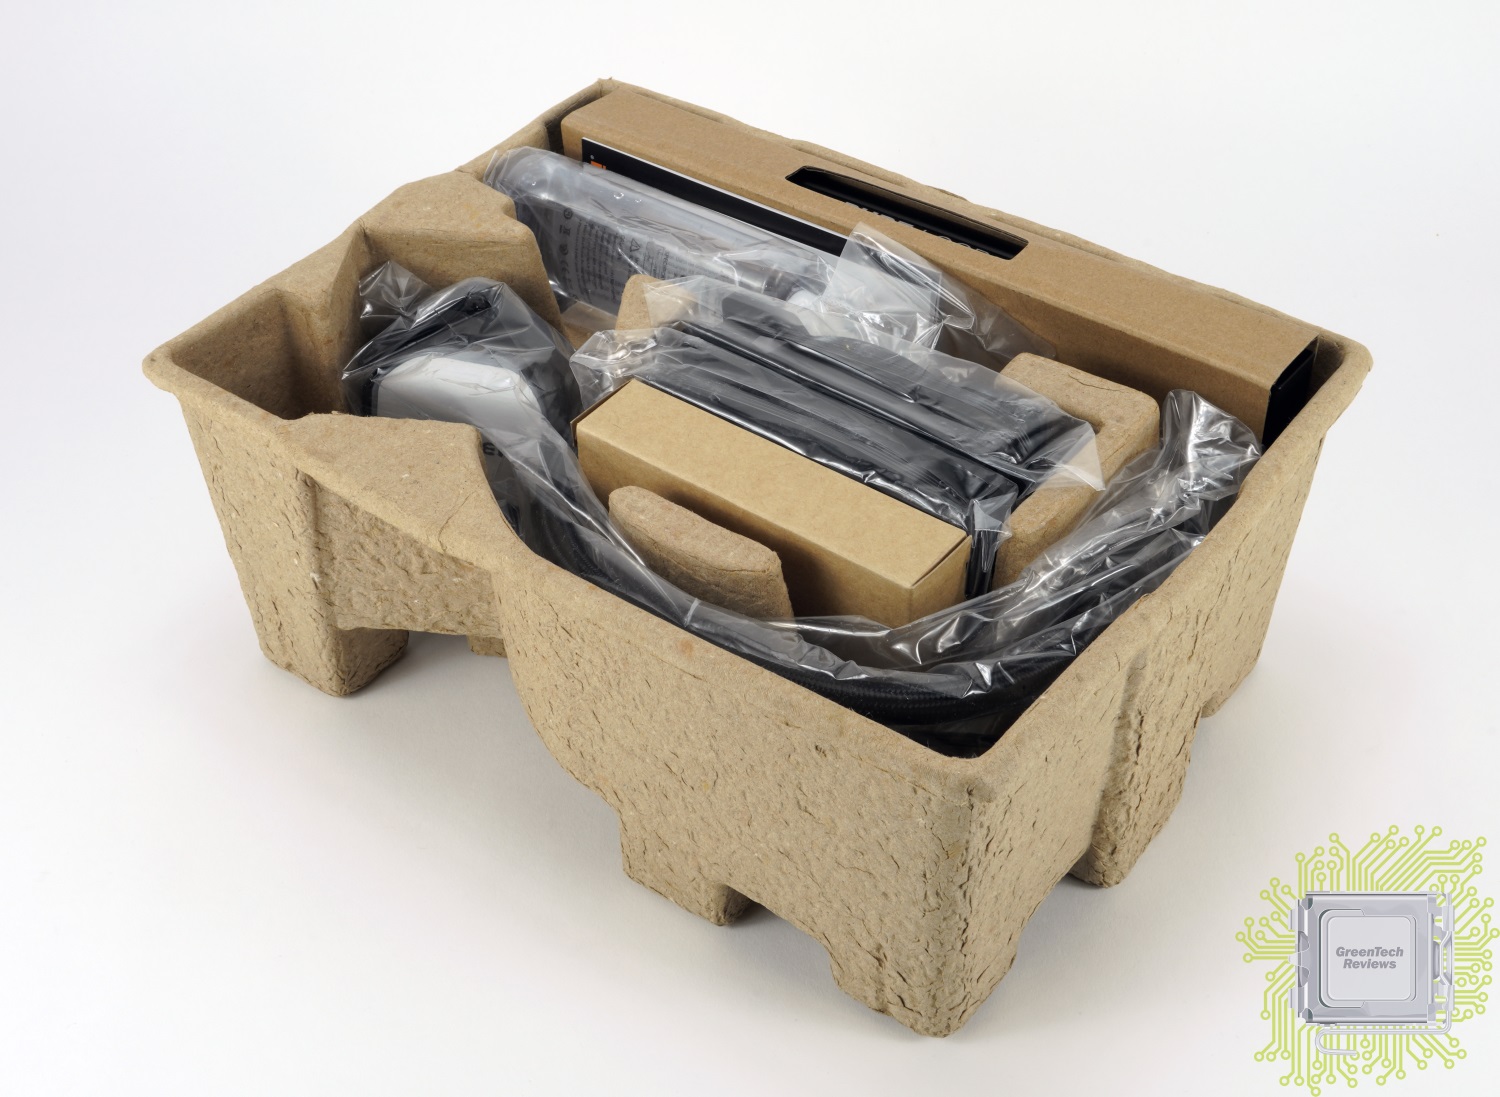
Комплект поставки отличается не только от предыдущей серии Silent Loop, но и вообще от других подобных решений на рынке. Отличительной особенностью является наличие ёмкости с дополнительной жидкостью (100 мл), которую, в соответствии с рекомендацией в руководстве пользователя, надо долить в систему охлаждения через 2 года после начала использования.
Тип креплений теперь полностью идентичен тому, что поставляется и с воздушными кулерами производителя. Всё целиком и полностью выполнено из металла.
Кроме минимума необходимых аксессуаров, в комплекте можно обнаружить три пластиковые стяжки для фиксации кабелей, Y-образный переходник питания подсветки и помпы на SATA коннектор, Y-образный переходник для подключения двух вентиляторов к одному 4-контактному разъёму на материнской плате.
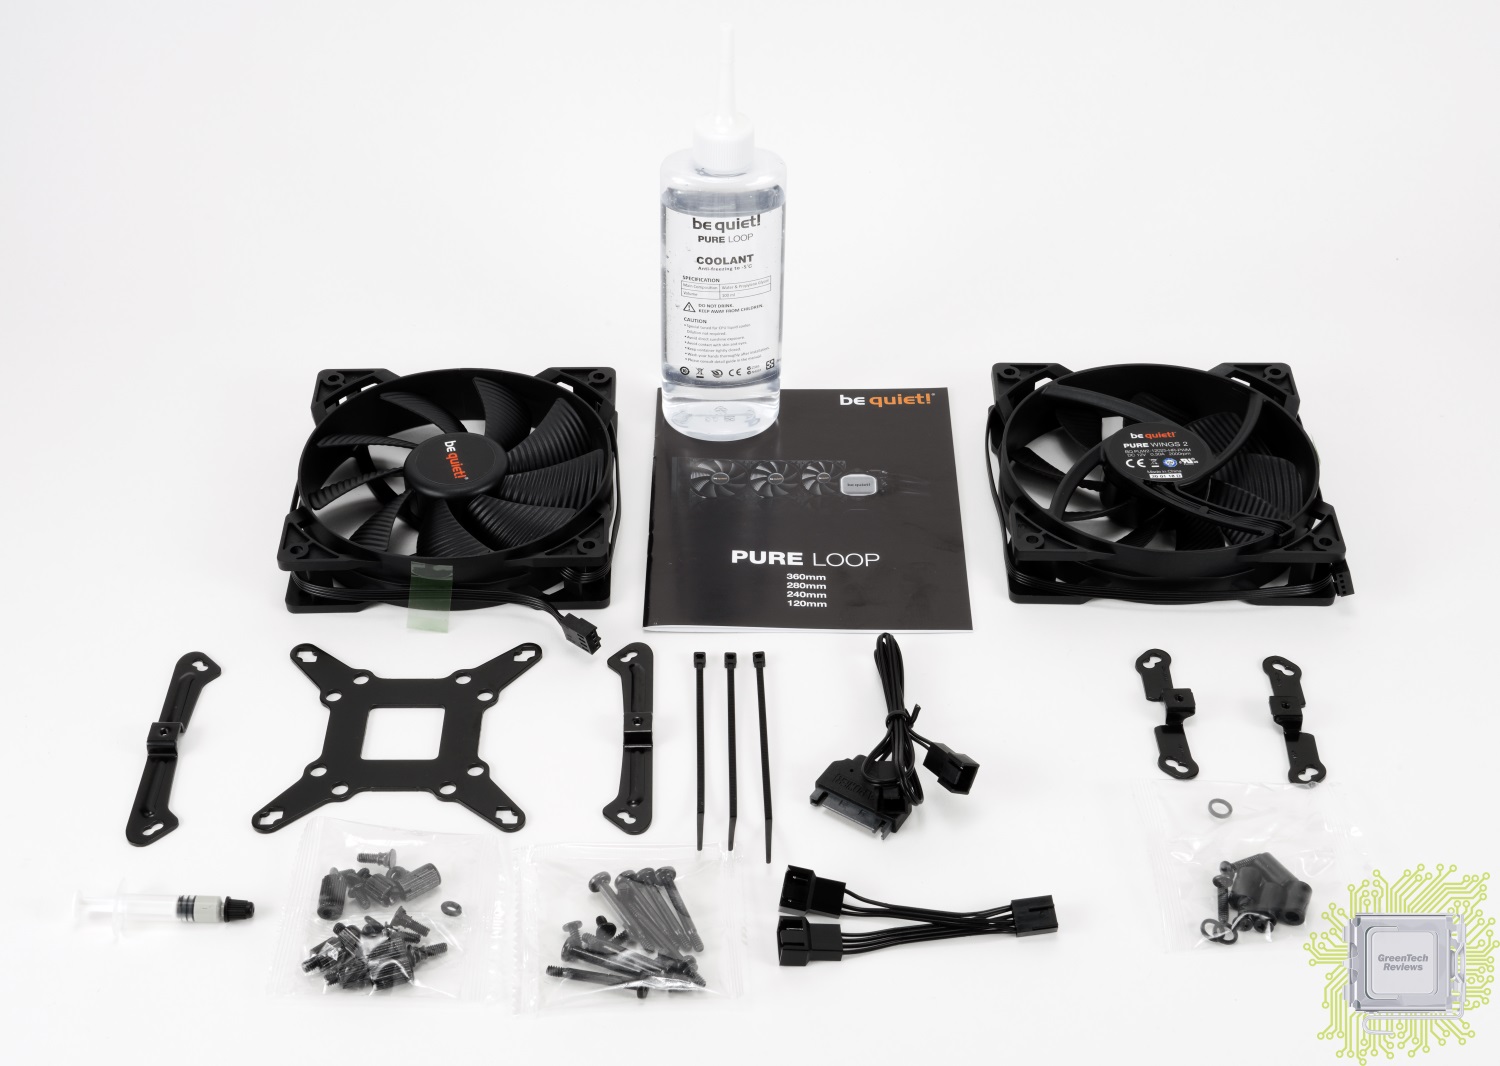
Пара 120 мм вентиляторов представлена моделями Pure Wings 2 и характерна скоростью работы до 2000 об/мин.

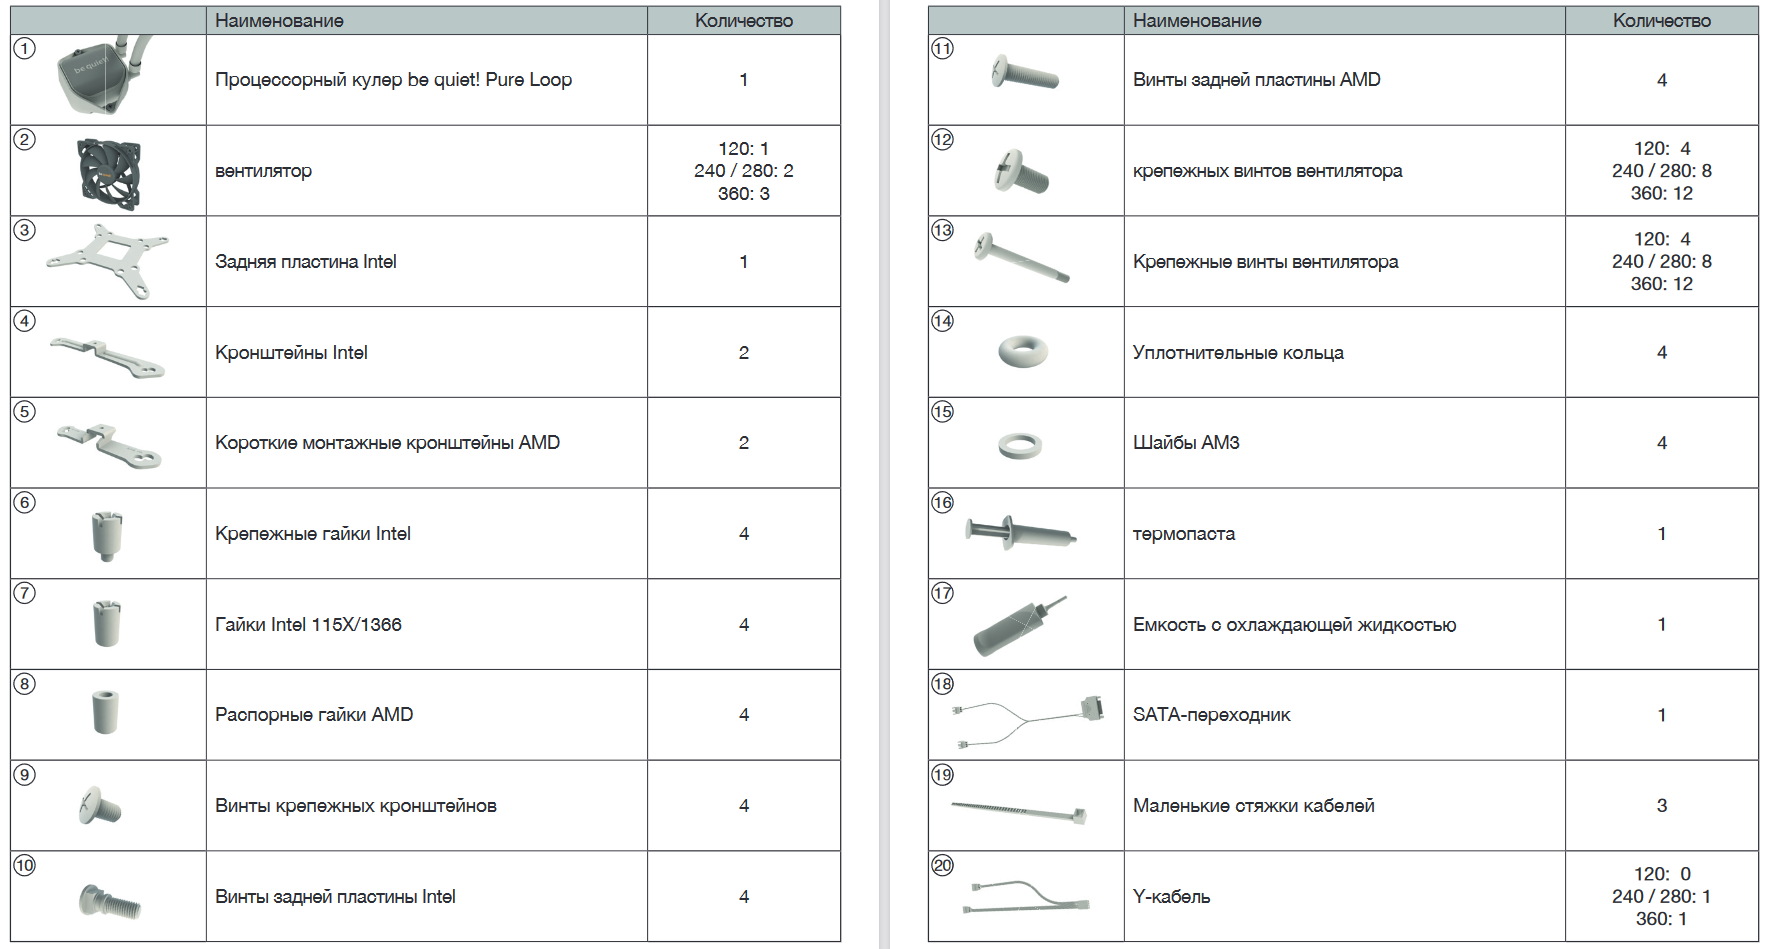
Для полного понимания состава комплекта с указанием всех элементов возьмём слайд из официального руководства пользователя:
Вот мы и добрались до самой системы охлаждения. От дизайна предшествующей серии не осталось совершенно ничего. Как внешне, так и технически — это совсем другой продукт. Цветовая схема насчитывает два основных цвета — чёрный и серебристый. При чём, второй представляет собой два вида материалов — алюминиевая верхняя панель корпуса водоблока и пластиковая часть по её периметру.
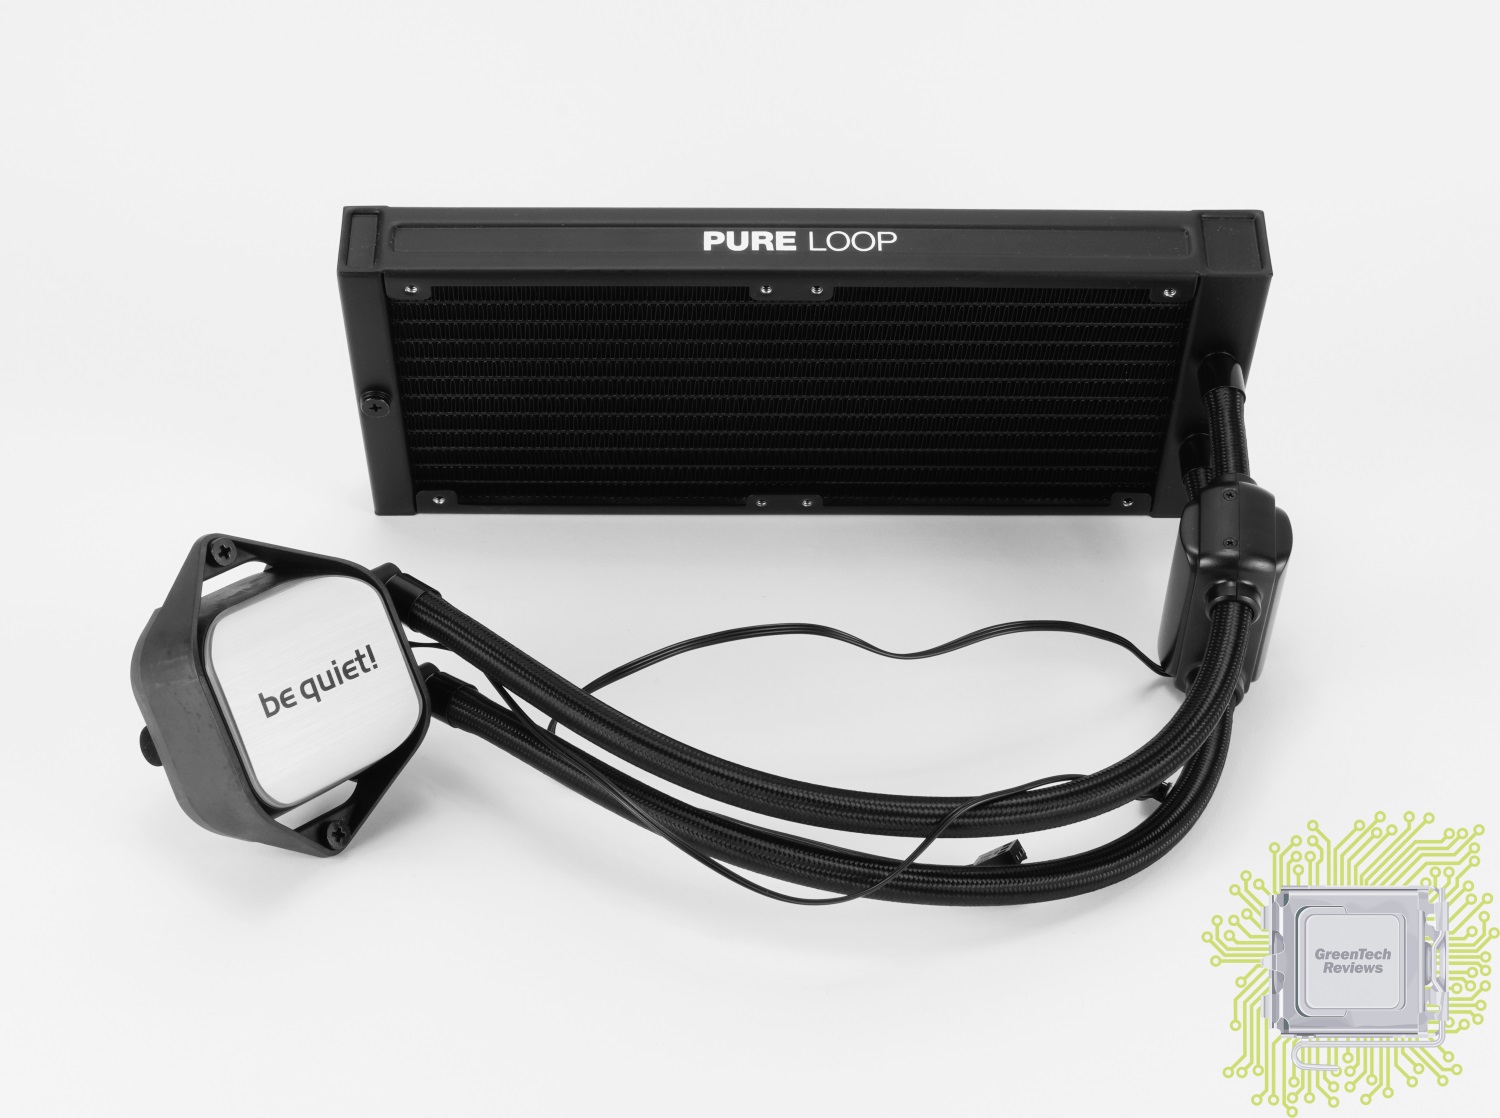
Конструкция водоблока претерпела значительные изменения — помпа теперь вынесена за его пределы. Это позволило заметно снизить вибрации и уровень шума. Кабель, который выодит из водоблока, необходим для питания подсветки.
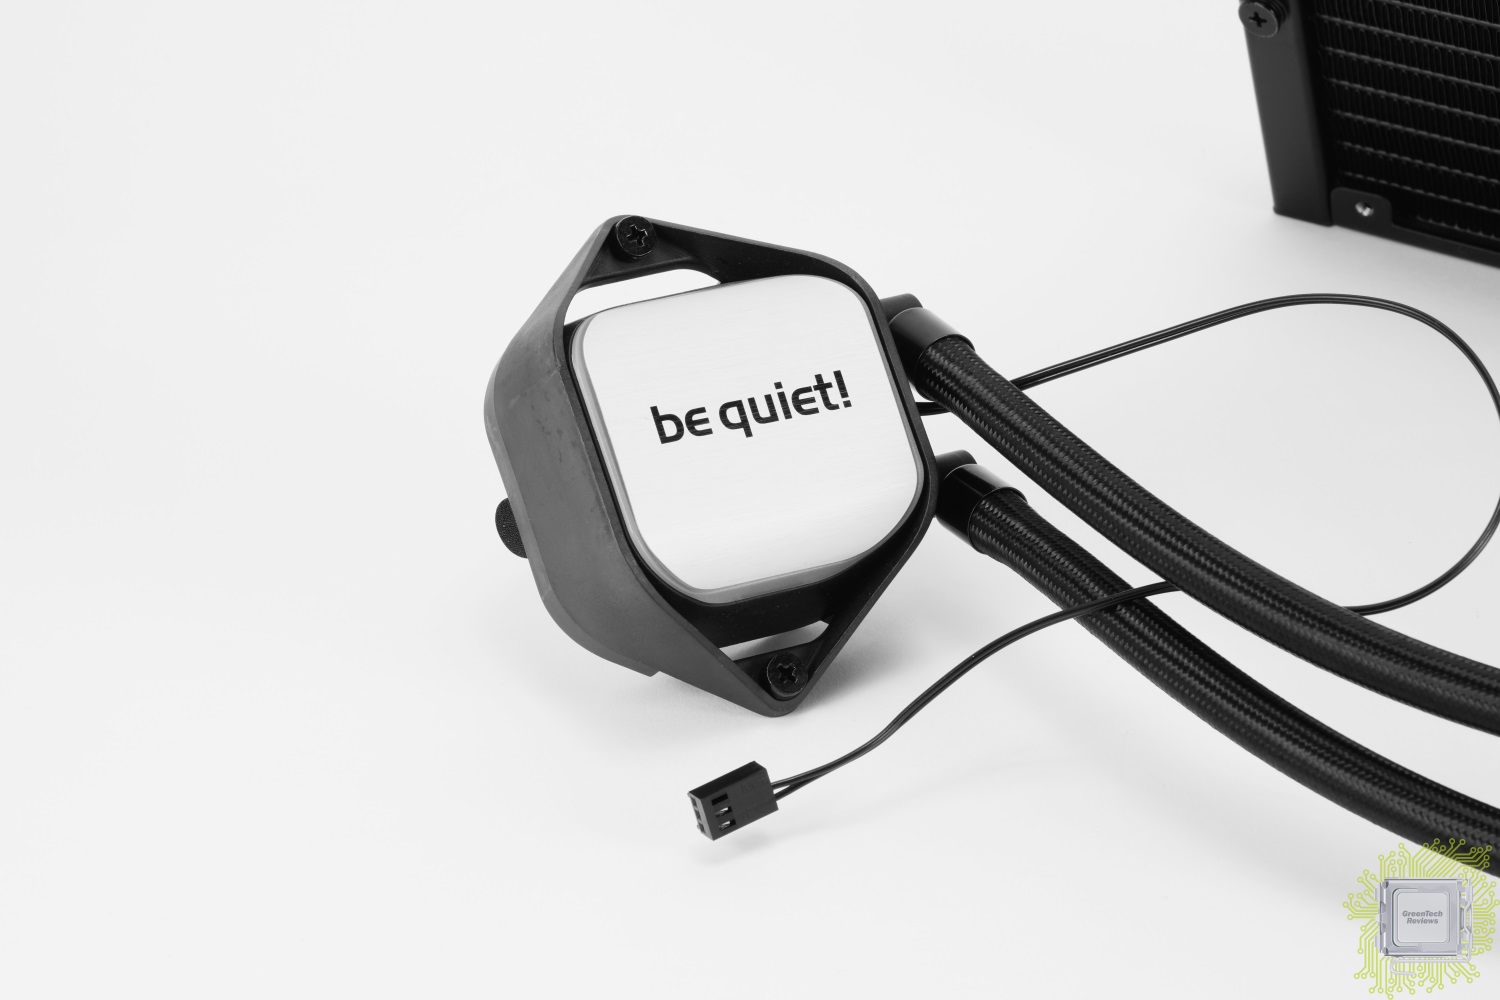
Впервые производитель реализовал подсветку в своей продукции. В случае с Pure Loop, это зона вокруг алюминиевой крышки водоблока. Цвет доступен только белый, а режим работы всего один — постоянное свечение.

Выглядит такая подсветка просто, но стильно и элегантно, что достигается мягкостью свечения.
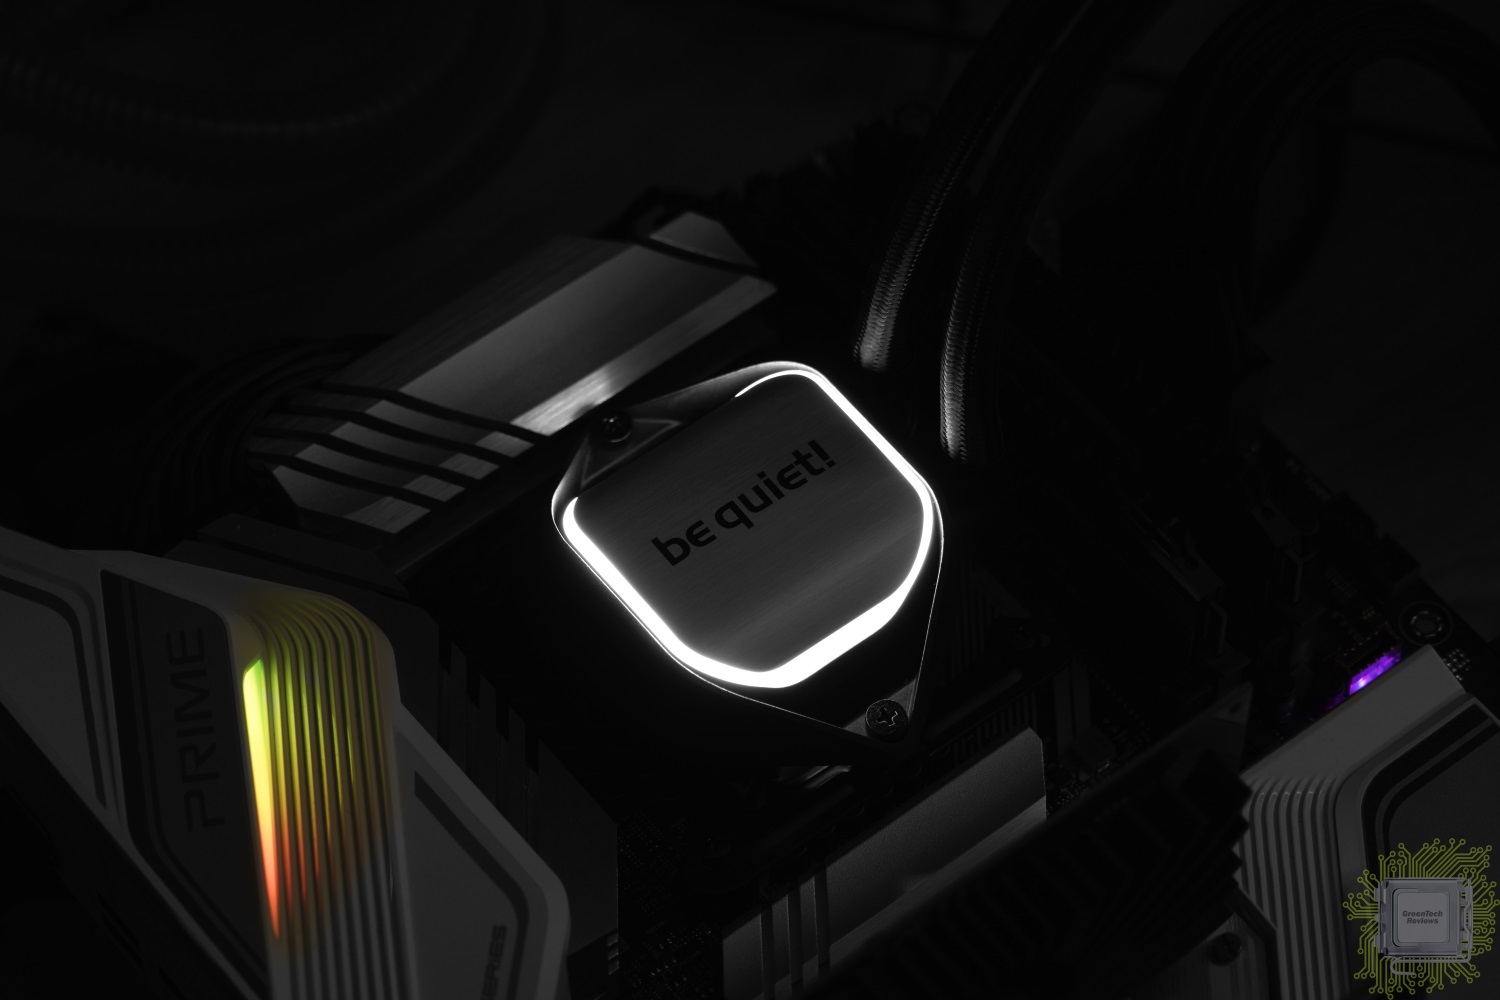
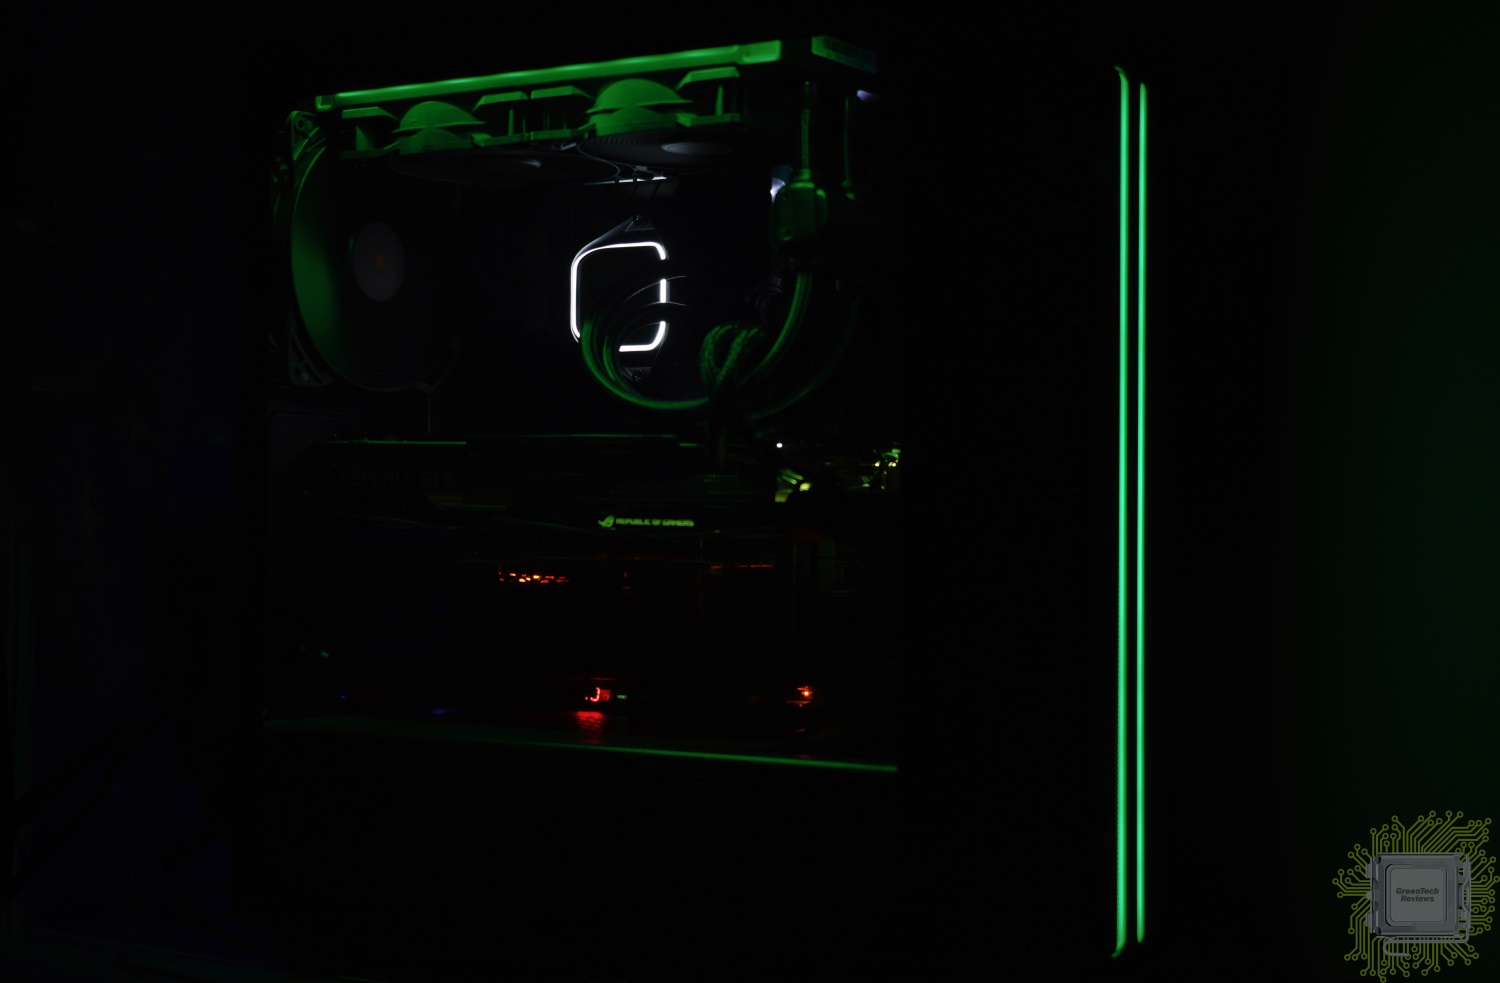
А вот таким образом выглядит Pure Loop, установленная в корпус (Pure Base 500DX).
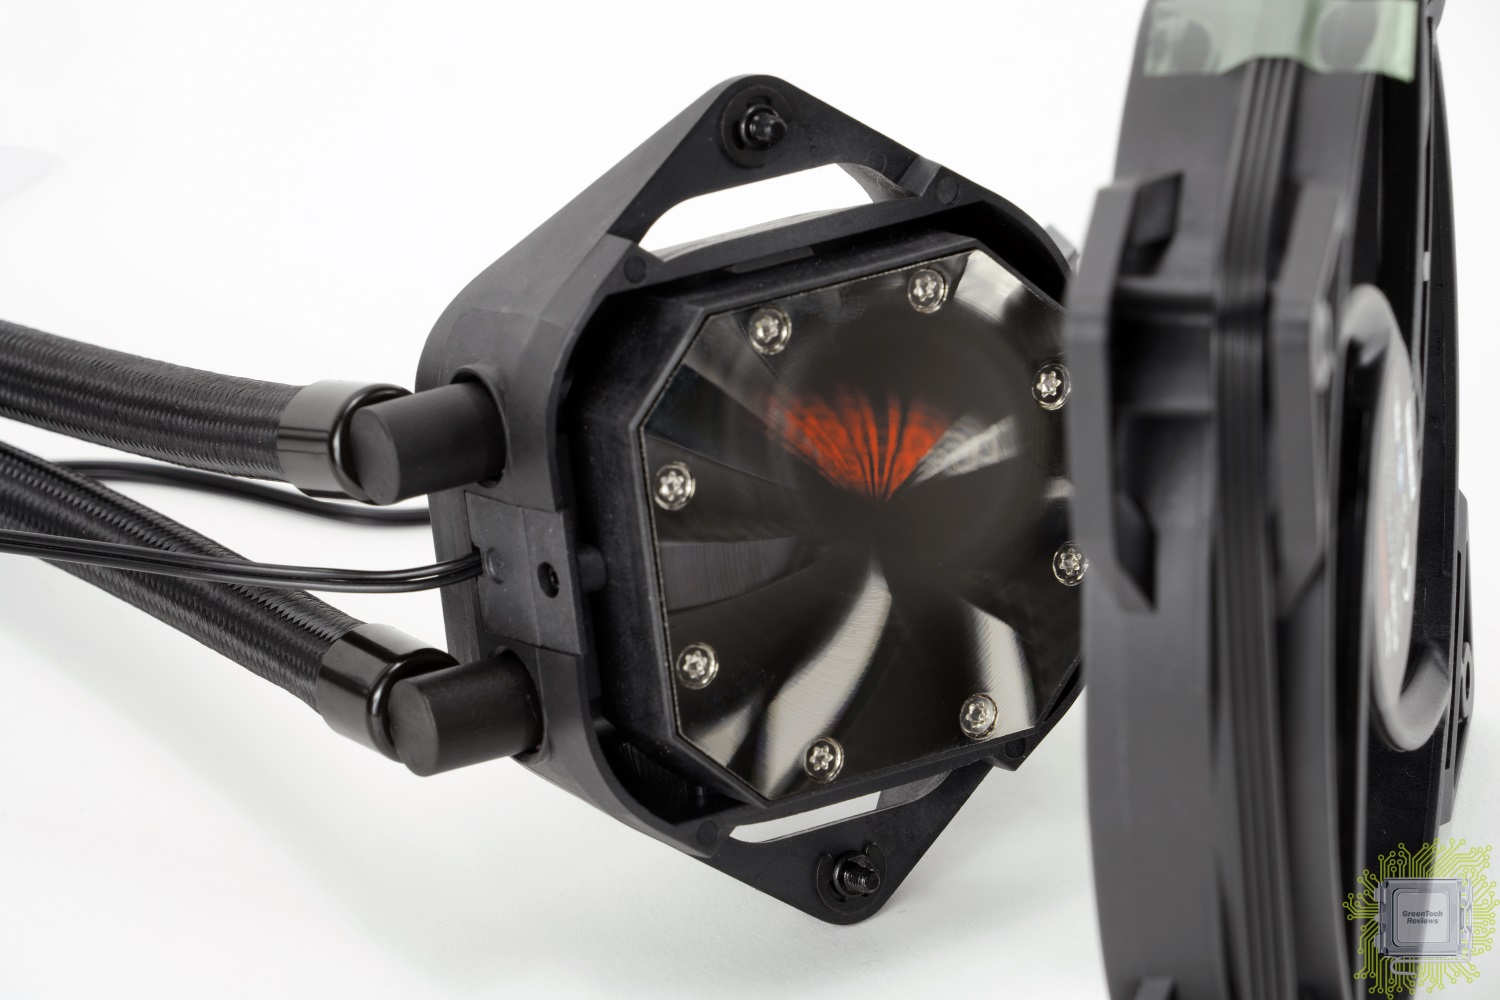
Основание водоблока никелированное, что позволяет использовать изучаемую систему охлаждения с термоинтерфейсом в виде жидкого металла.
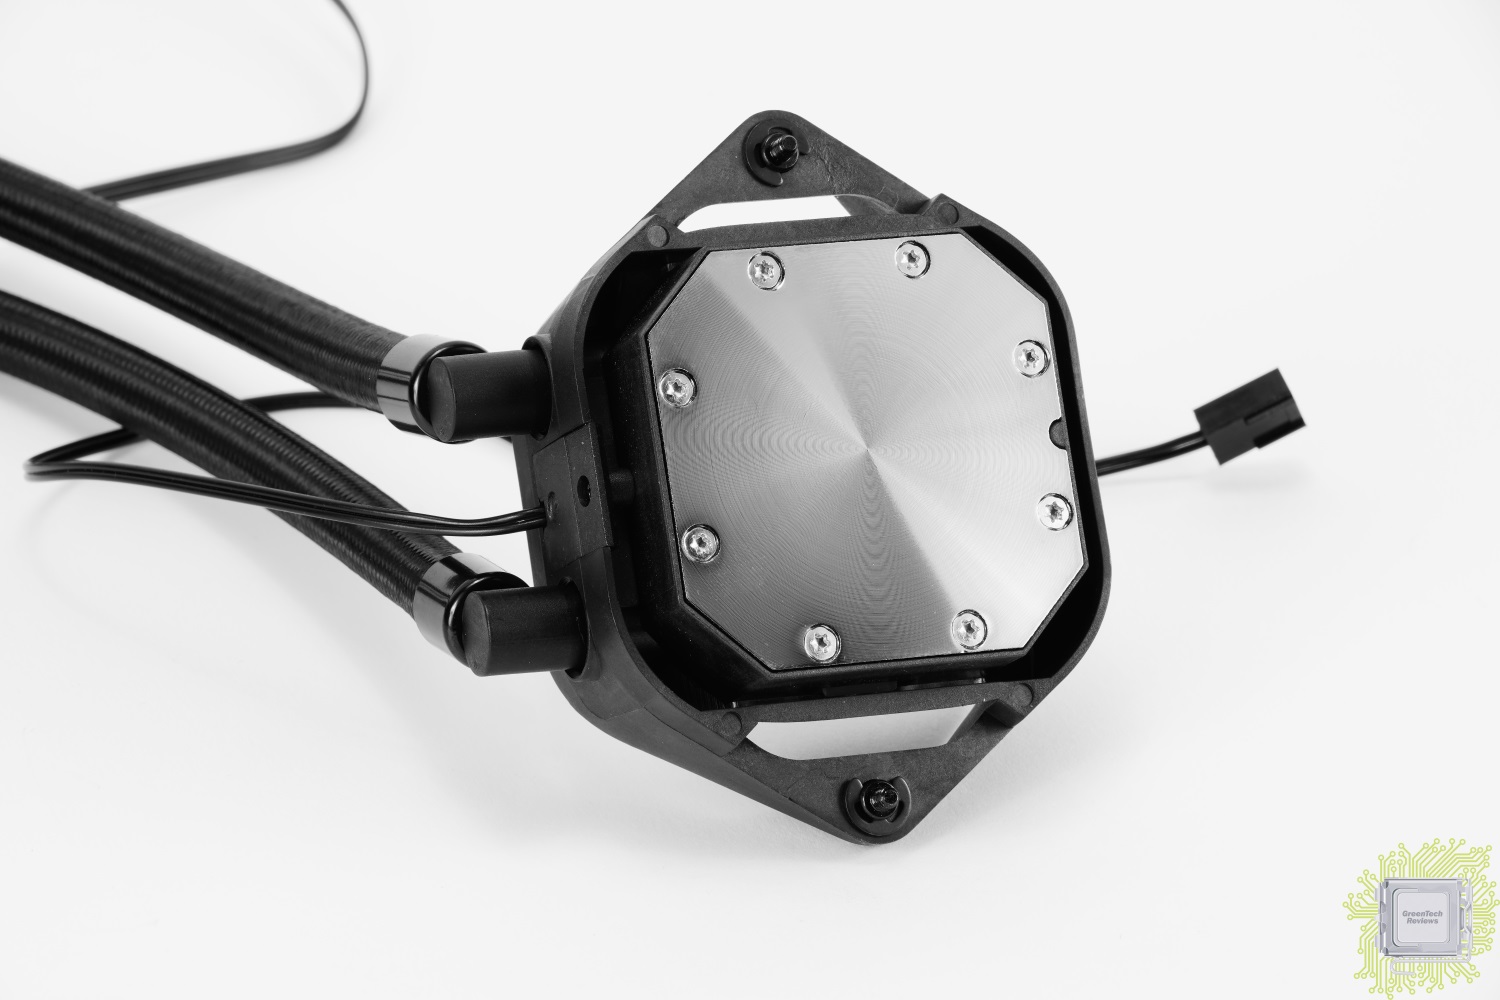
Поверхность основания до зеркала не отполирована, но разве это было когда-нибудь преградой для высокой эффективности?
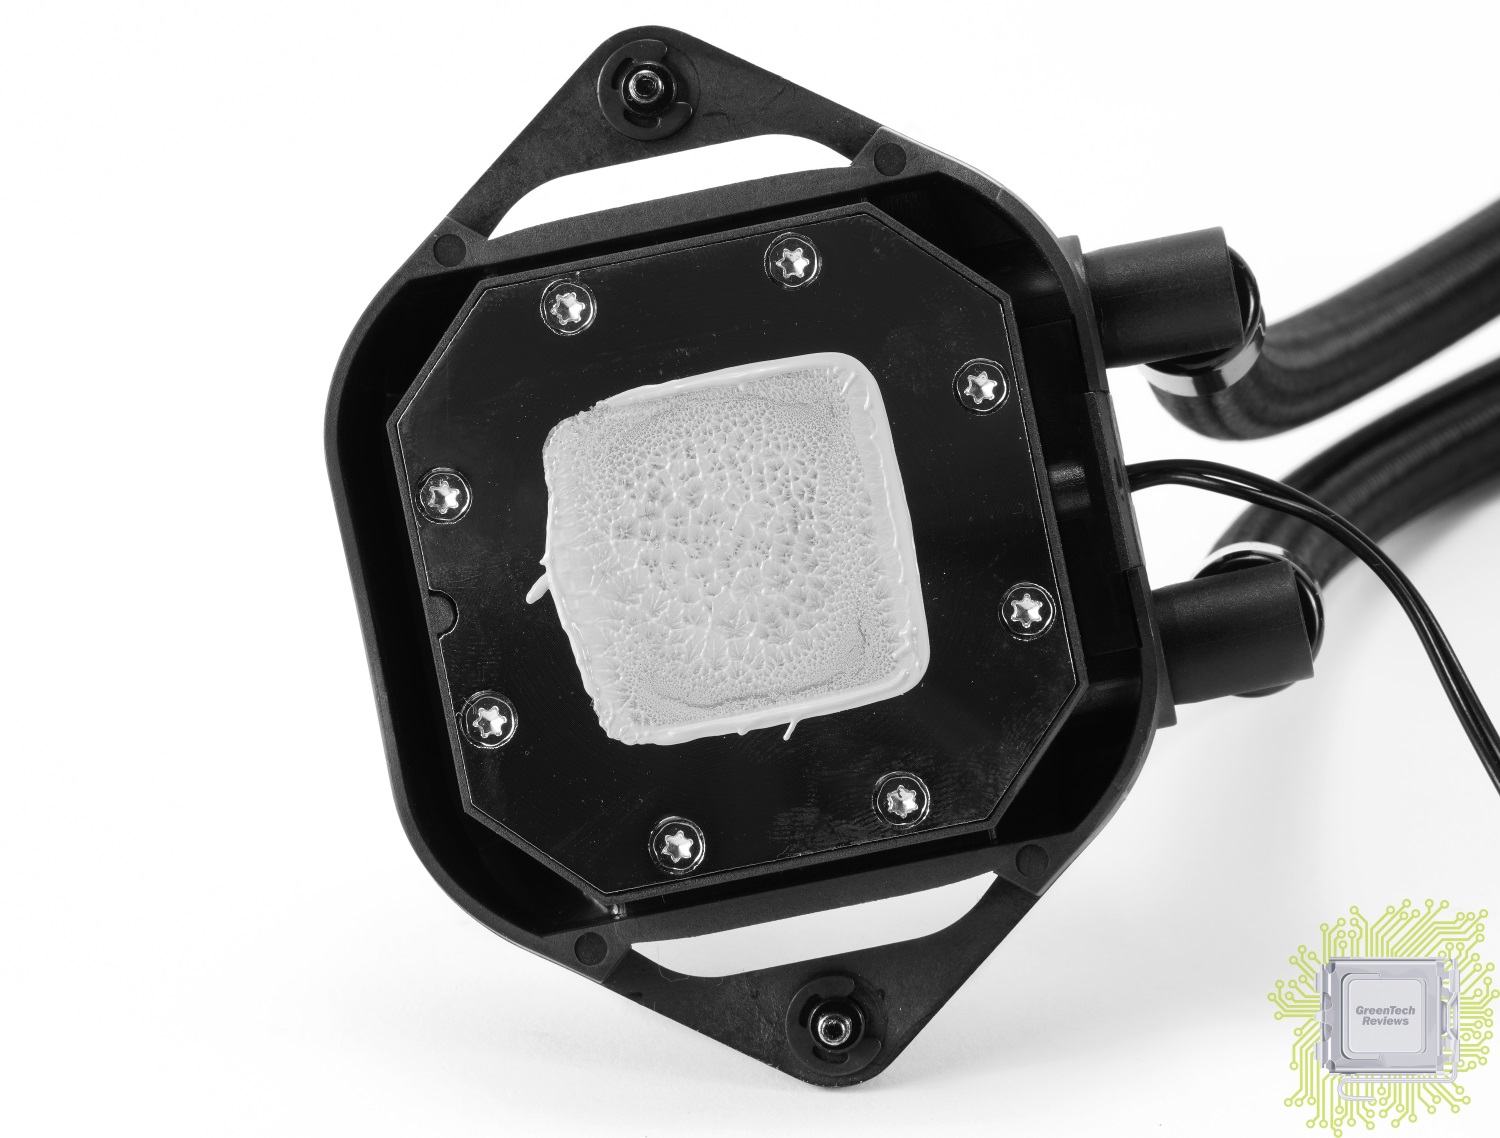
Тем более, что качество прижима на высоте. Конечно, ещё многое зависит от самой крышки процессора, но вся площадь крышки процессора в нашем случае полностью накрыта (слева вверху просто излишка термопасты нет).
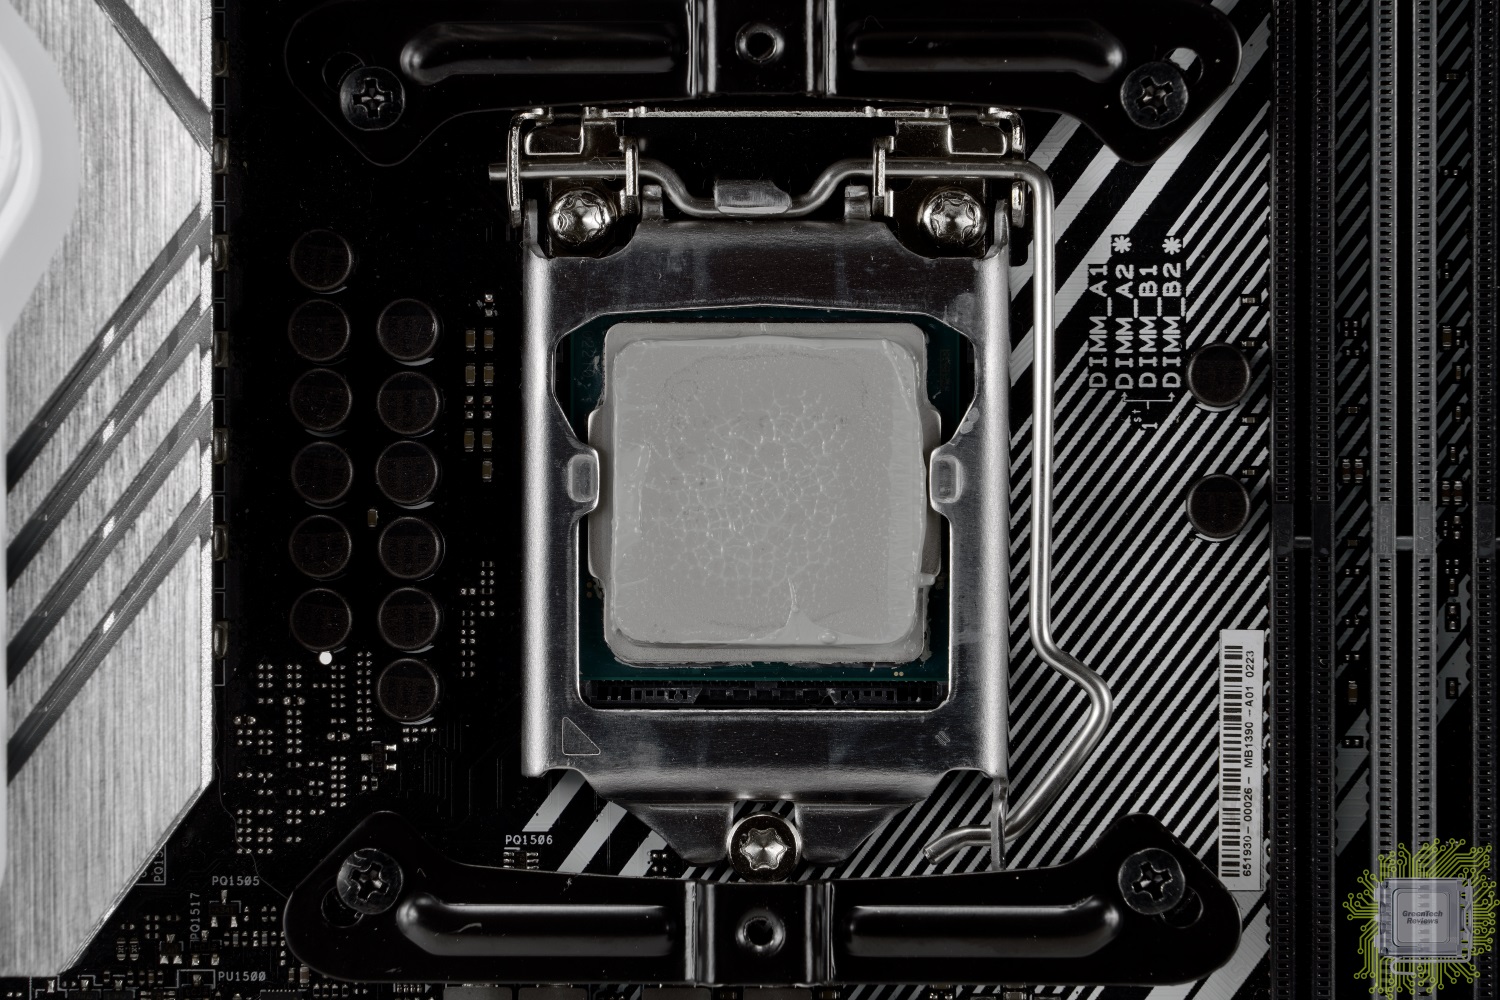
Тоже самое видно и по отпечатку на самом процессоре (с учётом небольшой погрешности при демонтаже).
Водоблок подключается к радиатору при помощи двух прочных шлангов, длина которых составляет 40 см.
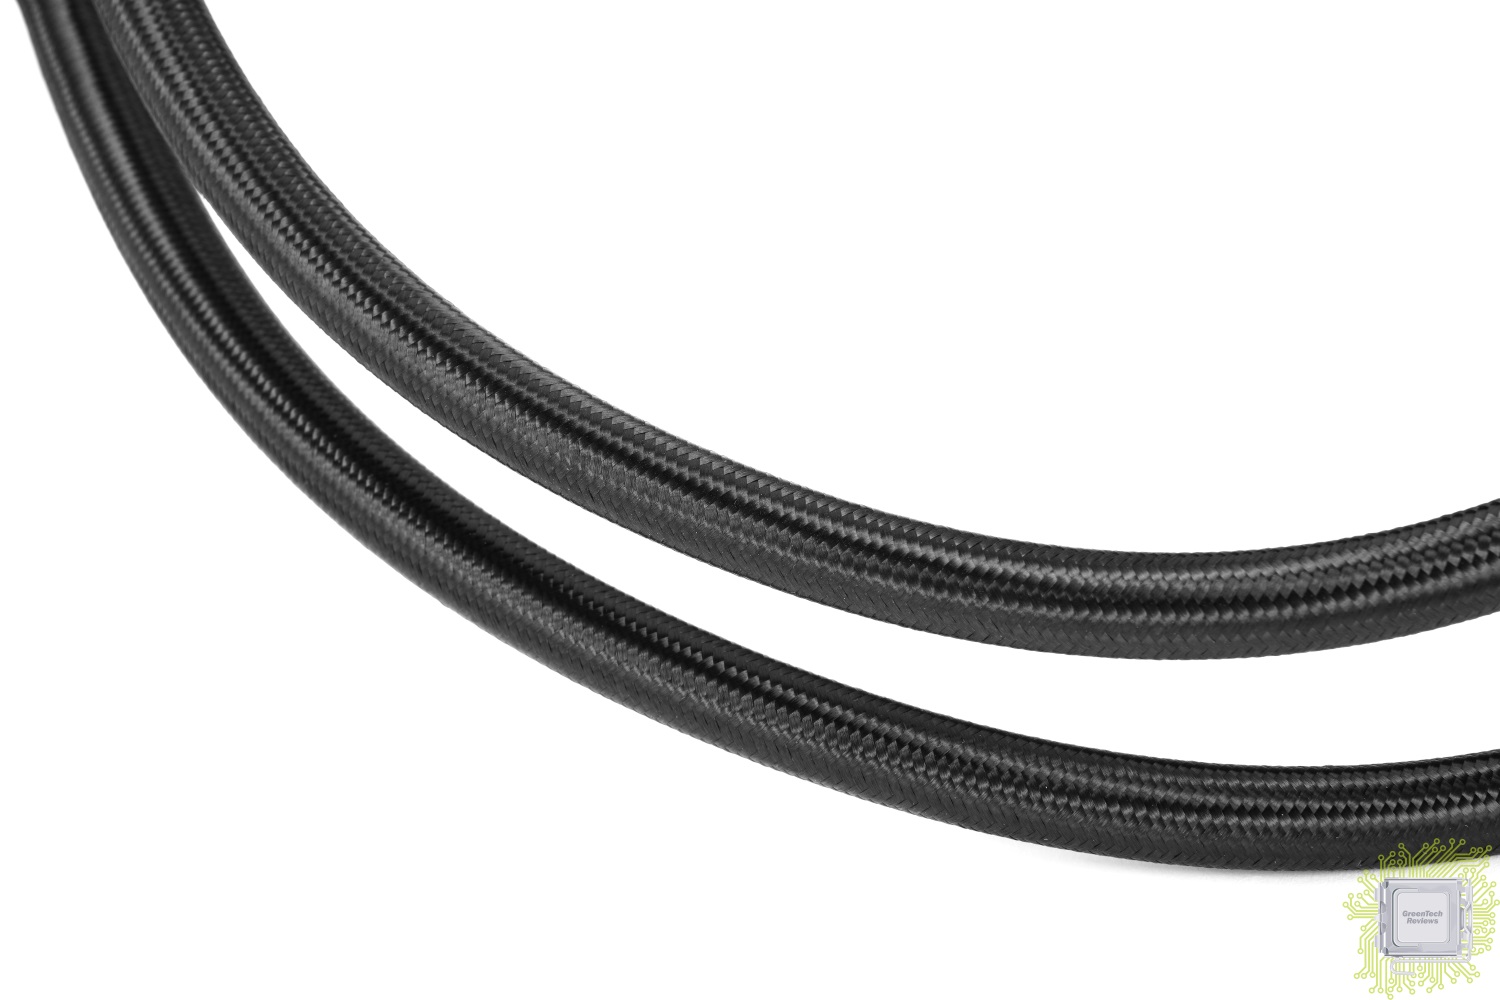
Для увеличения надёжности шланги дополнительно фиксируются металлическими элементами.
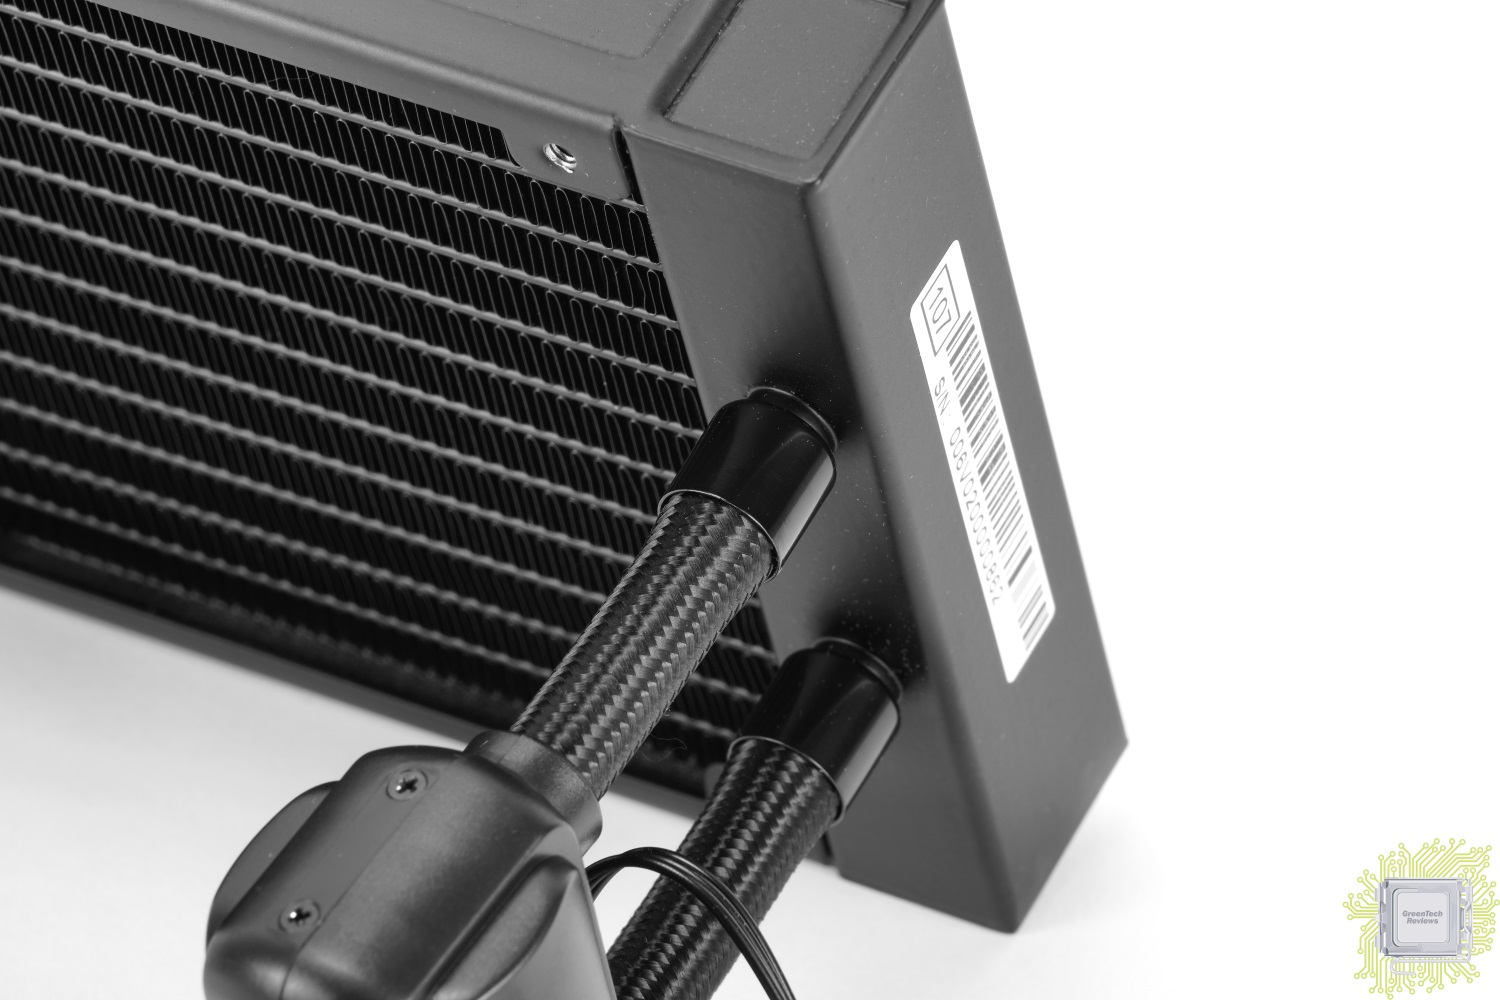
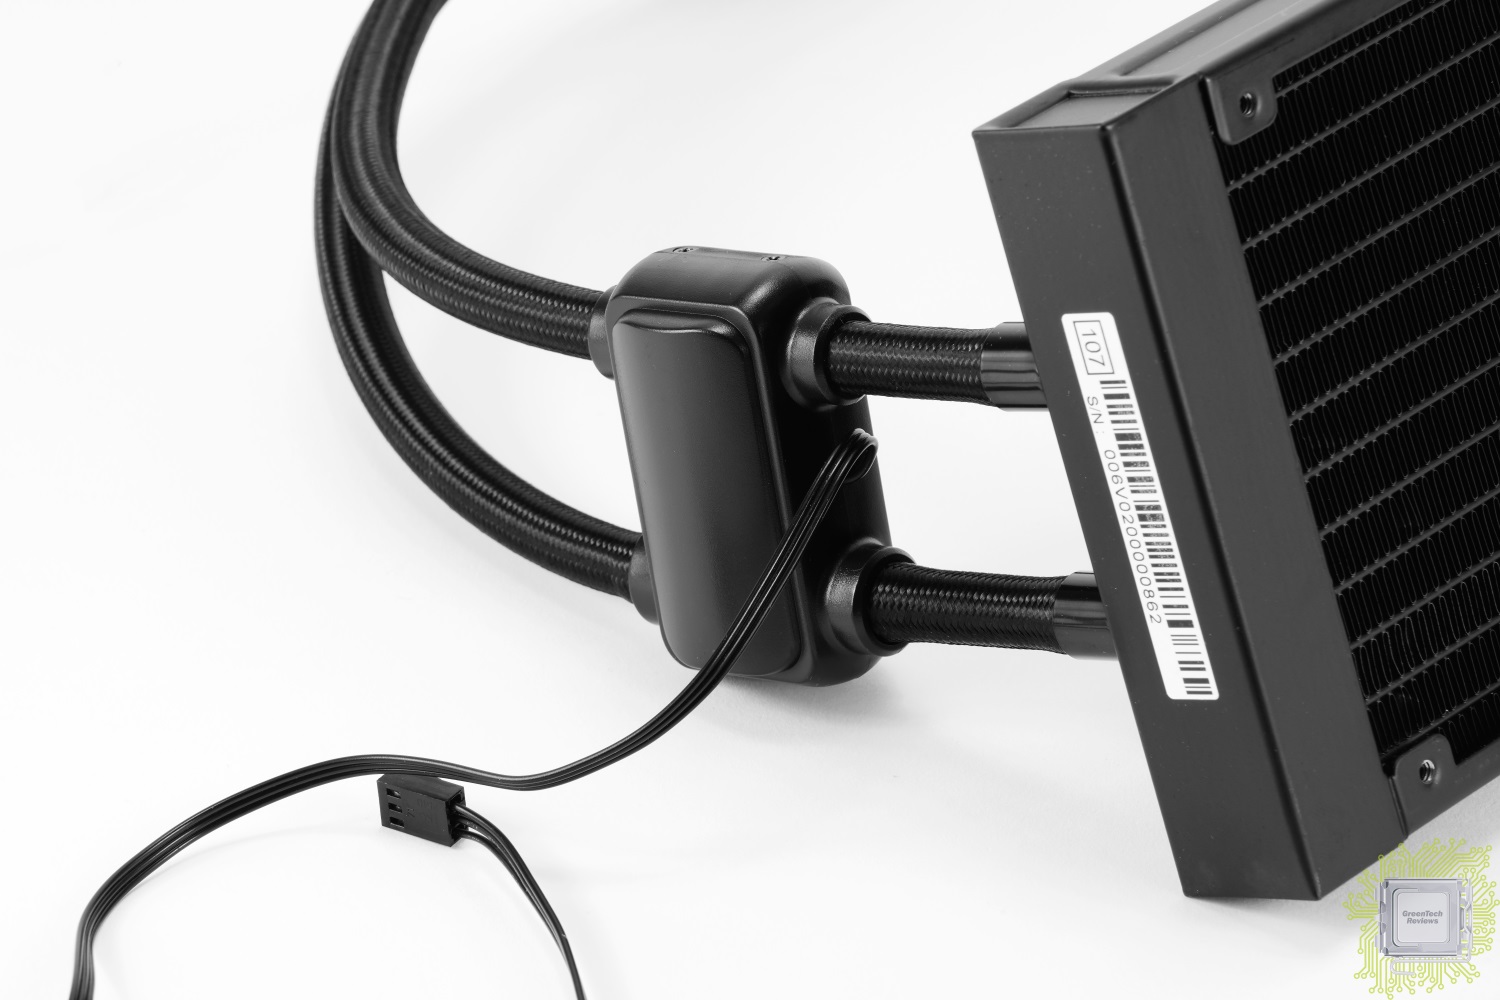
Помпа расположена именно на шлангах вблизи радиатора. Как мы уже говорили, это позволяет снизить уровень вибрации и шума, так как резиновые шланги отлично гасят эти паразитные эффекты при работе мотора. Производство попмы легло на плечи компании KD Industrial.
Подключается помпа 3-контактным кабелем питания с напряжением 12 В. Использование PWM управления в данном случае не допускается, что также указано в руководстве пользователя.
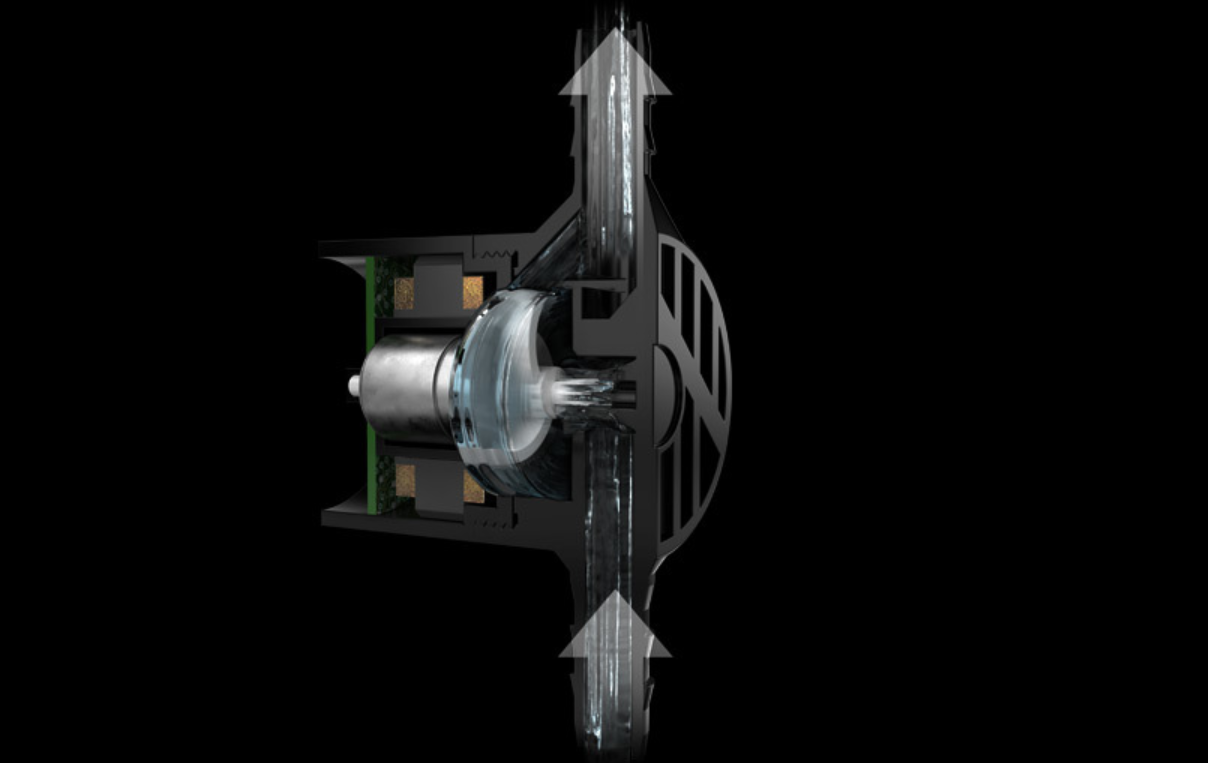
Конструкцию помпы внутри можно изучить при помощи официального слайда:
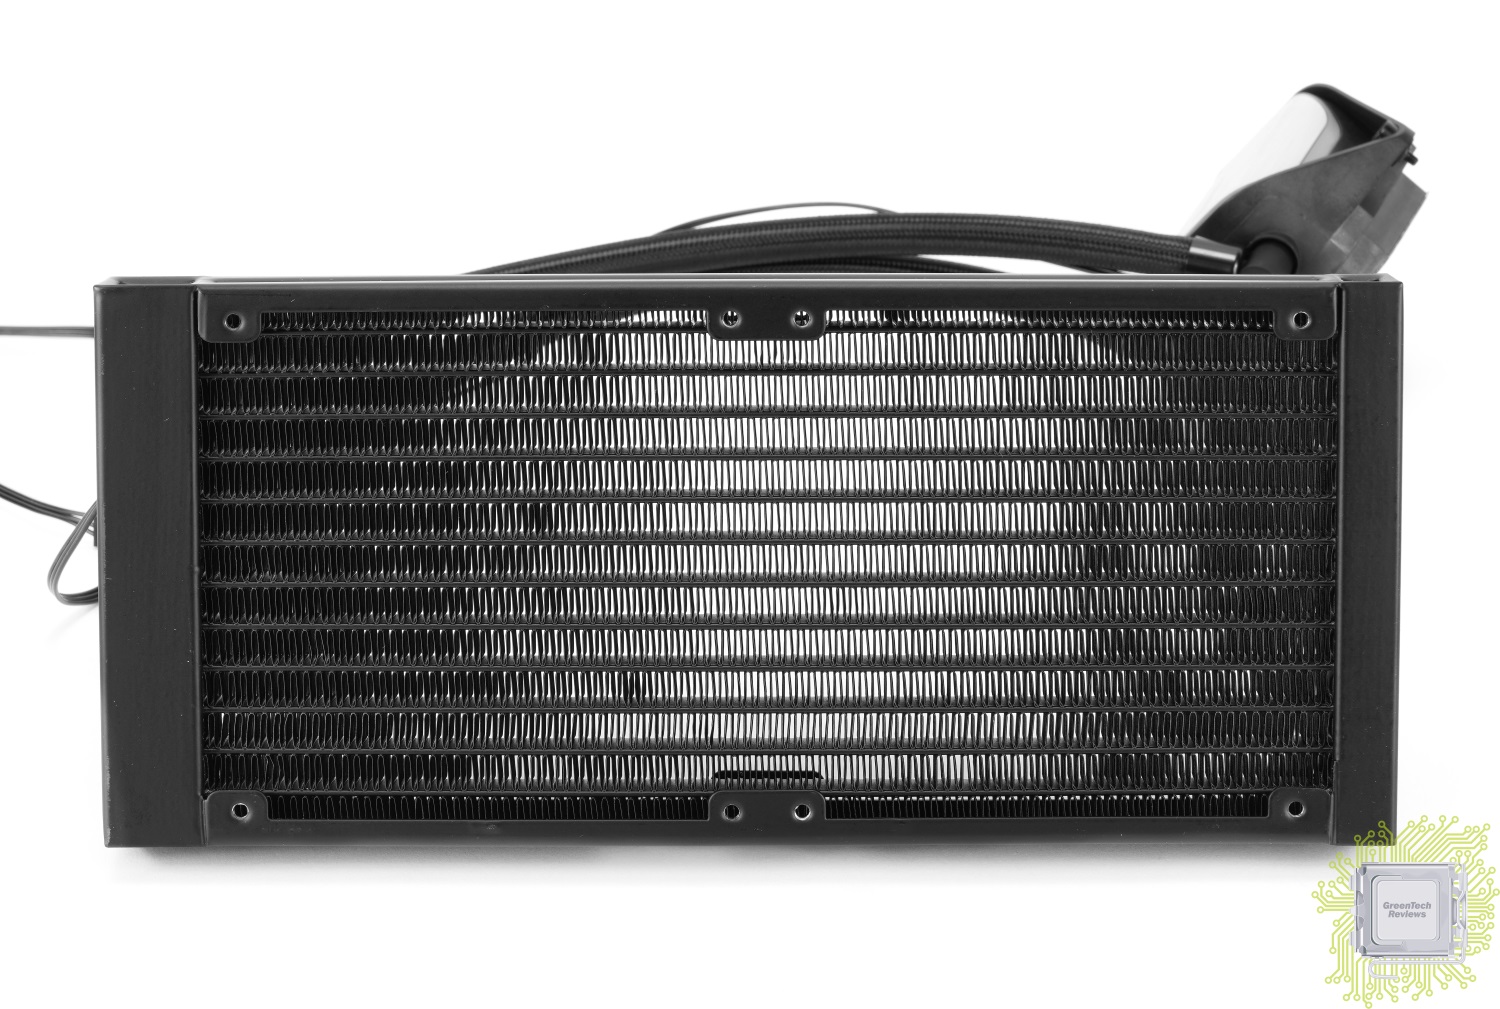
Радиатор полностью выполнен из металла, а в его дизайне преобладают прямые линии и углы. По центру одной из сторон его корпуса расположено отверстие, которое потребуется для долива жидкости спустя 2 года использования системы охлаждения.
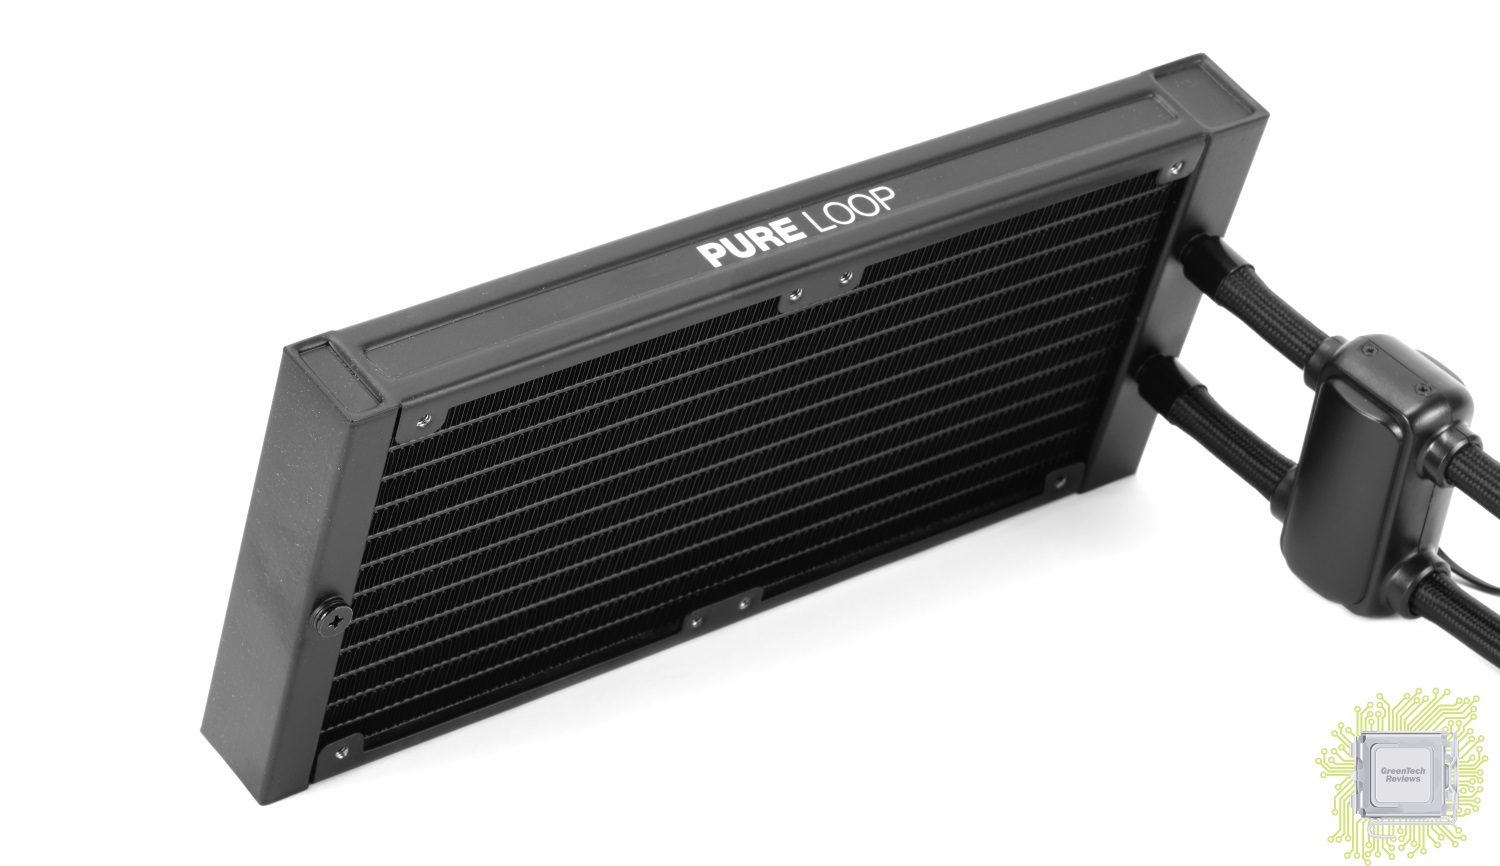
Качество изготовления радиатора на высочайшем уровне. Некоторые тени — кабели и коннекторы позади радиатора. Саму конструкцию можно назвать идеальной насколько это только возможно.
Читать далее: установка на разные платформы