
Bosch
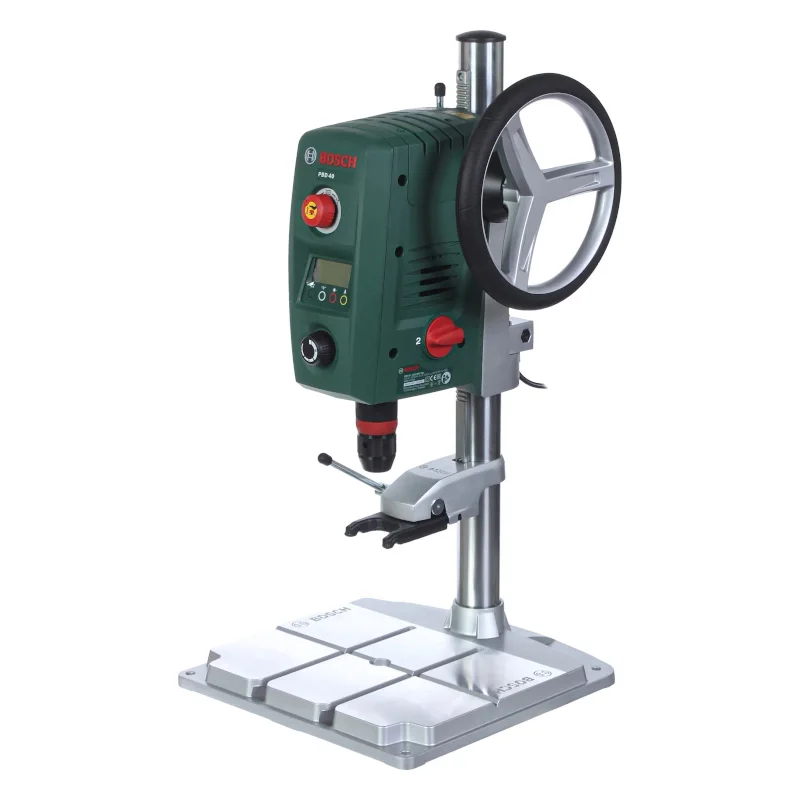
-
Артикул
0603B07000 -
Гарантия
1 год -
Класс товара
для дома -
Тип
сверлильный -
Двигатель
электрический -
Тип двигателя
щеточный -
Число скоростей
2 -
Мощность, Вт
710 -
Тип патрона
быстрозажимной -
Рабочая поверхность, мм
330×350
Все характеристики
Популярный отзыв
Для бытового станка — изумительная модель. Обладает неплохой мощностью, есть быстрозажимной патрон, лазерный указатель, подсветка. При этом станок дос…
Полный отзыв
Дополнительная скидка в корзине
Точная и аккуратная работа
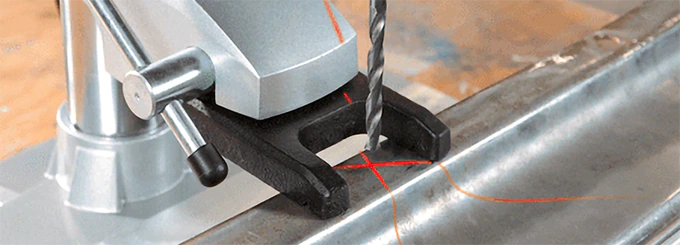
В Bosch PBD 40 все предусмотрено для получения ровных отверстий в нужных точках. Светодиодная подсветка рабочей зоны и лазерный прицел в виде перекрестия помогают верно выставить заготовку для получения идеального результата. Сверло надежно фиксируется блокировочным кольцом, что гарантирует высокую точность сверления.
Удобная настройка
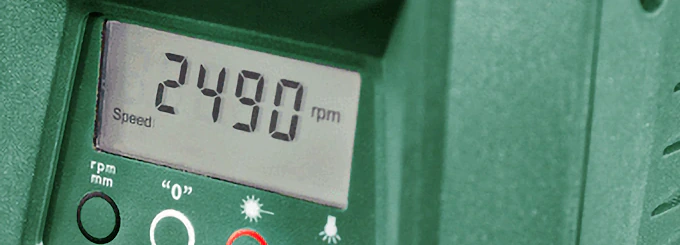
2-скоростной редуктор позволяет переключать передачи прямо во время работы – трудоемкое перенатягивание ремня больше не требуется. Частоту вращения можно плавно регулировать, отслеживая значение на цифровом экране. Это позволяет задать оптимальные настройки для работы с разными материалами. Система поддержания оборотов обеспечит постоянную частоту вращения даже при обработке особо твердых пород.
Надежность и безопасность
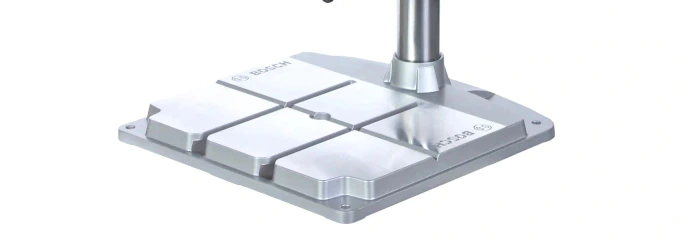
Станок надежно фиксируется на столе или верстаке с помощью отверстий в станине и саморезов. Быстроразъемный зажим позволяет прочно фиксировать даже круглые заготовки, что исключает их подвижность при работе и способствует высокому качеству сверления. На случай непредвиденных обстоятельств есть кнопка экстренной остановки двигателя – она имеет большой размер и легко доступна.
Описание
Сверлильный станок Bosch PBD 40 имеет мощность в 710 Вт и питается от обычной бытовой сети с напряжением 220 В. Инструмент может эффективно работать как с деревом, так и с более плотными материалами — например, со сталью или бетоном. А широкий диапазон регулировок позволит вам подобрать оптимальные настройки под каждую конкретную задачу.
Ключевые особенности:
- Предельная ширина оснастки для работы по дереву 40 мм.
- Предельная ширина оснастки для работы по металлу 13 мм.
- Лазерный прицел для точного указания места сверления.
- Быстрозажимной патрон с фиксатором для легкой смены оснастки.
- Изогнутая конструкция зажимного упора надежно фиксирует заготовки круглой формы.
Возможности Bosch PBD 40
Частота вращения шпинделя сверлильного станка регулируется в 2 передачах:
- 1 передача 200 –850 об/мин.
- 2 передача 600–2500 об/мин.
Конкретное значение можно настроить с помощью специального колеса-переключателя. Низкая скорость нужна для работы с оснасткой большого диаметра, а высокая — с малыми сверлами.
У инструмента есть возможность аварийной остановки. В случае внештатной ситуации просто нажмите на большую красную кнопку, и станок Bosch PBD 40 мгновенно остановится.
Лазерный прицел в виде перекрестия, позволяет видеть точное место сверления. Есть возможность настройки нулевой точки. Этот показатель отображается на ЖК-экране с подсветкой. Также дисплей показывает точное количество оборотов. Все данные хорошо читаются при любом освещении.
Продуманная конструкция
Станину вертикально-сверлильного станка можно прикрутить к столу — по углам есть специальные отверстия для крепления. Заготовка надежно фиксируется на месте при помощи двух упоров. Это повышает точность сверления.
За управление станком Bosch PBD 40 отвечает поворотное колесо вертикальной подачи шпинделя. Оно имеет резиновую накладку, что позволяет точно контролировать инструмент во время сверления.
У станка имеется яркая диодная подсветка рабочей зоны. Благодаря этому вы будете без затруднений работать даже в условиях недостаточной освещенности.
Сбоку на корпусе есть наклейка, на которой изображена диаграмма числа оборотов. Это поможет выставить нужные параметры, в зависимости от диаметра сверла и материалов, с которыми вы работаете.
Нашли ошибку в описании или в характеристиках?
Выделите текст и нажмите Ctrl+Enter
Характеристики
Смотреть все
Все
- Общие
-
Тип
сверлильный -
Число оборотов, об/мин
200-850/600-2500 -
Число скоростей
2 -
Тип патрона
быстрозажимной -
Рабочая поверхность, мм
330×350 -
Max число оборотов, об/мин
2500 -
Max диаметр сверления [дерево], мм
40 -
Max диаметр сверления [металл], мм
13 - Двигатель
-
Двигатель
электрический -
Тип двигателя
щеточный -
Мощность, Вт
710 -
Напряжение, В
220 -
Плавный пуск
нет - Функции и особенности
-
Возможность подключения к пылесосу
нет -
Адаптер для пылеудаления в комплекте
нет -
Наличие реверса
нет -
Наличие подсветки
нет -
Регулировка частоты вращения
да -
Для работы с металлом
да - Прочее
-
Класс товара
для дома
Видео
Комплектация
- Сверлильный станок Bosch PBD 40
- Торцевой ключ
- Быстроразъемный зажим
- Параллельный упор
- Руководство пользователя
- Коробка
Характеристики
Общие
-
array(39) {
  ["ID"]=>
  string(4) "6994"
  ["IBLOCK_ID"]=>
  string(1) "4"
  ["NAME"]=>
  string(6) "Тип"
  ["ACTIVE"]=>
  string(1) "Y"
  ["SORT"]=>
  string(3) "150"
  ["CODE"]=>
  string(6) "NB_TIP"
  ["DEFAULT_VALUE"]=>
  string(0) ""
  ["PROPERTY_TYPE"]=>
  string(1) "L"
  ["ROW_COUNT"]=>
  string(1) "1"
  ["COL_COUNT"]=>
  string(2) "30"
  ["LIST_TYPE"]=>
  string(1) "L"
  ["MULTIPLE"]=>
  string(1) "Y"
  ["XML_ID"]=>
  NULL
  ["FILE_TYPE"]=>
  string(0) ""
  ["MULTIPLE_CNT"]=>
  string(1) "0"
  ["LINK_IBLOCK_ID"]=>
  string(1) "0"
  ["WITH_DESCRIPTION"]=>
  string(1) "N"
  ["SEARCHABLE"]=>
  string(1) "N"
  ["FILTRABLE"]=>
  string(1) "N"
  ["IS_REQUIRED"]=>
  string(1) "N"
  ["VERSION"]=>
  string(1) "2"
  ["USER_TYPE"]=>
  string(0) ""
  ["USER_TYPE_SETTINGS"]=>
  string(0) ""
  ["HINT"]=>
  string(0) ""
  ["~NAME"]=>
  string(6) "Тип"
  ["~DEFAULT_VALUE"]=>
  string(0) ""
  ["VALUE_ENUM"]=>
  array(1) {
    [0]=>
    string(22) "сверлильный"
  }
  ["VALUE_XML_ID"]=>
  array(1) {
    [0]=>
    string(10) "sverlilnyy"
  }
  ["VALUE_SORT"]=>
  array(1) {
    [0]=>
    string(3) "500"
  }
  ["VALUE"]=>
  array(1) {
    [0]=>
    string(22) "сверлильный"
  }
  ["PROPERTY_VALUE_ID"]=>
  array(1) {
    [0]=>
    string(6) "734635"
  }
  ["VALUE_ENUM_ID"]=>
  array(1) {
    [0]=>
    string(5) "17293"
  }
  ["DESCRIPTION"]=>
  array(1) {
    [0]=>
    NULL
  }
  ["~VALUE"]=>
  array(1) {
    [0]=>
    string(22) "сверлильный"
  }
  ["~DESCRIPTION"]=>
  array(1) {
    [0]=>
    NULL
  }
  ["DISPLAY_VALUE"]=>
  string(22) "сверлильный"
  ["GROUP_ID"]=>
  string(3) "493"
  ["FILTER"]=>
  NULL
  ["NEW_URL"]=>
  string(0) ""
}
Тип
сверлильный -
array(38) {
  ["ID"]=>
  string(4) "6680"
  ["IBLOCK_ID"]=>
  string(1) "4"
  ["NAME"]=>
  string(40) "Число оборотов, об/мин"
  ["ACTIVE"]=>
  string(1) "Y"
  ["SORT"]=>
  string(3) "400"
  ["CODE"]=>
  string(24) "NB_CHISLO_OBOROTOV_OBMIN"
  ["DEFAULT_VALUE"]=>
  string(0) ""
  ["PROPERTY_TYPE"]=>
  string(1) "S"
  ["ROW_COUNT"]=>
  string(1) "1"
  ["COL_COUNT"]=>
  string(2) "30"
  ["LIST_TYPE"]=>
  string(1) "L"
  ["MULTIPLE"]=>
  string(1) "N"
  ["XML_ID"]=>
  NULL
  ["FILE_TYPE"]=>
  string(0) ""
  ["MULTIPLE_CNT"]=>
  string(1) "5"
  ["LINK_IBLOCK_ID"]=>
  string(1) "0"
  ["WITH_DESCRIPTION"]=>
  string(1) "N"
  ["SEARCHABLE"]=>
  string(1) "N"
  ["FILTRABLE"]=>
  string(1) "N"
  ["IS_REQUIRED"]=>
  string(1) "N"
  ["VERSION"]=>
  string(1) "2"
  ["USER_TYPE"]=>
  NULL
  ["USER_TYPE_SETTINGS"]=>
  array(0) {
  }
  ["HINT"]=>
  string(0) ""
  ["~NAME"]=>
  string(40) "Число оборотов, об/мин"
  ["~DEFAULT_VALUE"]=>
  string(0) ""
  ["VALUE_ENUM"]=>
  string(0) ""
  ["VALUE_XML_ID"]=>
  NULL
  ["VALUE_SORT"]=>
  NULL
  ["VALUE"]=>
  string(16) "200-850/600-2500"
  ["PROPERTY_VALUE_ID"]=>
  string(11) "128903:6680"
  ["DESCRIPTION"]=>
  NULL
  ["~VALUE"]=>
  string(16) "200-850/600-2500"
  ["~DESCRIPTION"]=>
  NULL
  ["DISPLAY_VALUE"]=>
  string(16) "200-850/600-2500"
  ["GROUP_ID"]=>
  string(3) "493"
  ["FILTER"]=>
  NULL
  ["NEW_URL"]=>
  string(0) ""
}
Число оборотов, об/мин
200-850/600-2500 -
array(39) {
  ["ID"]=>
  string(4) "6713"
  ["IBLOCK_ID"]=>
  string(1) "4"
  ["NAME"]=>
  string(43) "Рабочая поверхность, мм"
  ["ACTIVE"]=>
  string(1) "Y"
  ["SORT"]=>
  string(3) "400"
  ["CODE"]=>
  string(26) "NB_RABOCHAYA_POVERHNOST_MM"
  ["DEFAULT_VALUE"]=>
  string(0) ""
  ["PROPERTY_TYPE"]=>
  string(1) "L"
  ["ROW_COUNT"]=>
  string(1) "1"
  ["COL_COUNT"]=>
  string(2) "30"
  ["LIST_TYPE"]=>
  string(1) "L"
  ["MULTIPLE"]=>
  string(1) "Y"
  ["XML_ID"]=>
  NULL
  ["FILE_TYPE"]=>
  string(0) ""
  ["MULTIPLE_CNT"]=>
  string(1) "0"
  ["LINK_IBLOCK_ID"]=>
  string(1) "0"
  ["WITH_DESCRIPTION"]=>
  string(1) "N"
  ["SEARCHABLE"]=>
  string(1) "N"
  ["FILTRABLE"]=>
  string(1) "N"
  ["IS_REQUIRED"]=>
  string(1) "N"
  ["VERSION"]=>
  string(1) "2"
  ["USER_TYPE"]=>
  string(0) ""
  ["USER_TYPE_SETTINGS"]=>
  string(0) ""
  ["HINT"]=>
  string(0) ""
  ["~NAME"]=>
  string(43) "Рабочая поверхность, мм"
  ["~DEFAULT_VALUE"]=>
  string(0) ""
  ["VALUE_ENUM"]=>
  array(1) {
    [0]=>
    string(7) "330x350"
  }
  ["VALUE_XML_ID"]=>
  array(1) {
    [0]=>
    string(7) "330x350"
  }
  ["VALUE_SORT"]=>
  array(1) {
    [0]=>
    string(3) "500"
  }
  ["VALUE"]=>
  array(1) {
    [0]=>
    string(7) "330x350"
  }
  ["PROPERTY_VALUE_ID"]=>
  array(1) {
    [0]=>
    string(6) "734633"
  }
  ["VALUE_ENUM_ID"]=>
  array(1) {
    [0]=>
    string(5) "18090"
  }
  ["DESCRIPTION"]=>
  array(1) {
    [0]=>
    NULL
  }
  ["~VALUE"]=>
  array(1) {
    [0]=>
    string(7) "330x350"
  }
  ["~DESCRIPTION"]=>
  array(1) {
    [0]=>
    NULL
  }
  ["DISPLAY_VALUE"]=>
  string(7) "330x350"
  ["GROUP_ID"]=>
  string(3) "493"
  ["FILTER"]=>
  NULL
  ["NEW_URL"]=>
  string(0) ""
}
Рабочая поверхность, мм
330×350 -
array(39) {
  ["ID"]=>
  string(4) "6642"
  ["IBLOCK_ID"]=>
  string(1) "4"
  ["NAME"]=>
  string(29) "Число скоростей"
  ["ACTIVE"]=>
  string(1) "Y"
  ["SORT"]=>
  string(3) "400"
  ["CODE"]=>
  string(19) "NB_CHISLO_SKOROSTEJ"
  ["DEFAULT_VALUE"]=>
  string(0) ""
  ["PROPERTY_TYPE"]=>
  string(1) "L"
  ["ROW_COUNT"]=>
  string(1) "1"
  ["COL_COUNT"]=>
  string(2) "30"
  ["LIST_TYPE"]=>
  string(1) "L"
  ["MULTIPLE"]=>
  string(1) "N"
  ["XML_ID"]=>
  NULL
  ["FILE_TYPE"]=>
  string(0) ""
  ["MULTIPLE_CNT"]=>
  string(1) "5"
  ["LINK_IBLOCK_ID"]=>
  string(1) "0"
  ["WITH_DESCRIPTION"]=>
  string(1) "N"
  ["SEARCHABLE"]=>
  string(1) "N"
  ["FILTRABLE"]=>
  string(1) "N"
  ["IS_REQUIRED"]=>
  string(1) "N"
  ["VERSION"]=>
  string(1) "2"
  ["USER_TYPE"]=>
  NULL
  ["USER_TYPE_SETTINGS"]=>
  array(0) {
  }
  ["HINT"]=>
  string(0) ""
  ["~NAME"]=>
  string(29) "Число скоростей"
  ["~DEFAULT_VALUE"]=>
  string(0) ""
  ["VALUE_ENUM"]=>
  string(1) "2"
  ["VALUE_XML_ID"]=>
  string(1) "2"
  ["VALUE_SORT"]=>
  string(3) "500"
  ["VALUE"]=>
  string(1) "2"
  ["PROPERTY_VALUE_ID"]=>
  string(11) "128903:6642"
  ["VALUE_ENUM_ID"]=>
  string(5) "17422"
  ["DESCRIPTION"]=>
  NULL
  ["~VALUE"]=>
  string(1) "2"
  ["~DESCRIPTION"]=>
  NULL
  ["DISPLAY_VALUE"]=>
  string(1) "2"
  ["GROUP_ID"]=>
  string(3) "493"
  ["FILTER"]=>
  NULL
  ["NEW_URL"]=>
  string(0) ""
}
Число скоростей
2 -
array(38) {
  ["ID"]=>
  string(4) "6653"
  ["IBLOCK_ID"]=>
  string(1) "4"
  ["NAME"]=>
  string(44) "Max число оборотов, об/мин"
  ["ACTIVE"]=>
  string(1) "Y"
  ["SORT"]=>
  string(3) "400"
  ["CODE"]=>
  string(28) "NB_MAX_CHISLO_OBOROTOV_OBMIN"
  ["DEFAULT_VALUE"]=>
  string(0) ""
  ["PROPERTY_TYPE"]=>
  string(1) "N"
  ["ROW_COUNT"]=>
  string(1) "1"
  ["COL_COUNT"]=>
  string(2) "30"
  ["LIST_TYPE"]=>
  string(1) "L"
  ["MULTIPLE"]=>
  string(1) "Y"
  ["XML_ID"]=>
  NULL
  ["FILE_TYPE"]=>
  string(0) ""
  ["MULTIPLE_CNT"]=>
  string(1) "5"
  ["LINK_IBLOCK_ID"]=>
  string(1) "0"
  ["WITH_DESCRIPTION"]=>
  string(1) "N"
  ["SEARCHABLE"]=>
  string(1) "N"
  ["FILTRABLE"]=>
  string(1) "N"
  ["IS_REQUIRED"]=>
  string(1) "N"
  ["VERSION"]=>
  string(1) "2"
  ["USER_TYPE"]=>
  NULL
  ["USER_TYPE_SETTINGS"]=>
  string(0) ""
  ["HINT"]=>
  string(0) ""
  ["~NAME"]=>
  string(44) "Max число оборотов, об/мин"
  ["~DEFAULT_VALUE"]=>
  string(0) ""
  ["VALUE_ENUM"]=>
  NULL
  ["VALUE_XML_ID"]=>
  NULL
  ["VALUE_SORT"]=>
  NULL
  ["VALUE"]=>
  array(1) {
    [0]=>
    string(4) "2500"
  }
  ["PROPERTY_VALUE_ID"]=>
  array(1) {
    [0]=>
    string(6) "591267"
  }
  ["DESCRIPTION"]=>
  array(1) {
    [0]=>
    string(0) ""
  }
  ["~VALUE"]=>
  array(1) {
    [0]=>
    string(4) "2500"
  }
  ["~DESCRIPTION"]=>
  array(1) {
    [0]=>
    string(0) ""
  }
  ["DISPLAY_VALUE"]=>
  string(4) "2500"
  ["GROUP_ID"]=>
  string(3) "493"
  ["FILTER"]=>
  NULL
  ["NEW_URL"]=>
  string(0) ""
}
Max число оборотов, об/мин
2500 -
array(39) {
  ["ID"]=>
  string(4) "6973"
  ["IBLOCK_ID"]=>
  string(1) "4"
  ["NAME"]=>
  string(21) "Тип патрона"
  ["ACTIVE"]=>
  string(1) "Y"
  ["SORT"]=>
  string(3) "400"
  ["CODE"]=>
  string(14) "NB_TIP_PATRONA"
  ["DEFAULT_VALUE"]=>
  string(0) ""
  ["PROPERTY_TYPE"]=>
  string(1) "L"
  ["ROW_COUNT"]=>
  string(1) "1"
  ["COL_COUNT"]=>
  string(2) "30"
  ["LIST_TYPE"]=>
  string(1) "L"
  ["MULTIPLE"]=>
  string(1) "Y"
  ["XML_ID"]=>
  NULL
  ["FILE_TYPE"]=>
  string(0) ""
  ["MULTIPLE_CNT"]=>
  string(1) "5"
  ["LINK_IBLOCK_ID"]=>
  string(1) "0"
  ["WITH_DESCRIPTION"]=>
  string(1) "N"
  ["SEARCHABLE"]=>
  string(1) "N"
  ["FILTRABLE"]=>
  string(1) "N"
  ["IS_REQUIRED"]=>
  string(1) "N"
  ["VERSION"]=>
  string(1) "2"
  ["USER_TYPE"]=>
  NULL
  ["USER_TYPE_SETTINGS"]=>
  string(0) ""
  ["HINT"]=>
  string(0) ""
  ["~NAME"]=>
  string(21) "Тип патрона"
  ["~DEFAULT_VALUE"]=>
  string(0) ""
  ["VALUE_ENUM"]=>
  array(1) {
    [0]=>
    string(28) "быстрозажимной"
  }
  ["VALUE_XML_ID"]=>
  array(1) {
    [0]=>
    string(15) "bystrozazhimnoy"
  }
  ["VALUE_SORT"]=>
  array(1) {
    [0]=>
    string(3) "500"
  }
  ["VALUE"]=>
  array(1) {
    [0]=>
    string(28) "быстрозажимной"
  }
  ["PROPERTY_VALUE_ID"]=>
  array(1) {
    [0]=>
    string(6) "734634"
  }
  ["VALUE_ENUM_ID"]=>
  array(1) {
    [0]=>
    string(5) "16904"
  }
  ["DESCRIPTION"]=>
  array(1) {
    [0]=>
    NULL
  }
  ["~VALUE"]=>
  array(1) {
    [0]=>
    string(28) "быстрозажимной"
  }
  ["~DESCRIPTION"]=>
  array(1) {
    [0]=>
    NULL
  }
  ["DISPLAY_VALUE"]=>
  string(28) "быстрозажимной"
  ["GROUP_ID"]=>
  string(3) "493"
  ["FILTER"]=>
  NULL
  ["NEW_URL"]=>
  string(0) ""
}
Тип патрона
быстрозажимной -
array(38) {
  ["ID"]=>
  string(4) "6515"
  ["IBLOCK_ID"]=>
  string(1) "4"
  ["NAME"]=>
  string(58) "Max диаметр сверления [металл], мм"
  ["ACTIVE"]=>
  string(1) "Y"
  ["SORT"]=>
  string(3) "450"
  ["CODE"]=>
  string(35) "NB_MAX_DIAMETR_SVERLENIYA_METALL_MM"
  ["DEFAULT_VALUE"]=>
  string(0) ""
  ["PROPERTY_TYPE"]=>
  string(1) "N"
  ["ROW_COUNT"]=>
  string(1) "1"
  ["COL_COUNT"]=>
  string(2) "30"
  ["LIST_TYPE"]=>
  string(1) "L"
  ["MULTIPLE"]=>
  string(1) "N"
  ["XML_ID"]=>
  NULL
  ["FILE_TYPE"]=>
  string(0) ""
  ["MULTIPLE_CNT"]=>
  string(1) "5"
  ["LINK_IBLOCK_ID"]=>
  string(1) "0"
  ["WITH_DESCRIPTION"]=>
  string(1) "N"
  ["SEARCHABLE"]=>
  string(1) "N"
  ["FILTRABLE"]=>
  string(1) "N"
  ["IS_REQUIRED"]=>
  string(1) "N"
  ["VERSION"]=>
  string(1) "2"
  ["USER_TYPE"]=>
  NULL
  ["USER_TYPE_SETTINGS"]=>
  array(0) {
  }
  ["HINT"]=>
  string(0) ""
  ["~NAME"]=>
  string(58) "Max диаметр сверления [металл], мм"
  ["~DEFAULT_VALUE"]=>
  string(0) ""
  ["VALUE_ENUM"]=>
  string(0) ""
  ["VALUE_XML_ID"]=>
  NULL
  ["VALUE_SORT"]=>
  NULL
  ["VALUE"]=>
  string(2) "13"
  ["PROPERTY_VALUE_ID"]=>
  string(11) "128903:6515"
  ["DESCRIPTION"]=>
  NULL
  ["~VALUE"]=>
  string(2) "13"
  ["~DESCRIPTION"]=>
  NULL
  ["DISPLAY_VALUE"]=>
  string(2) "13"
  ["GROUP_ID"]=>
  string(3) "493"
  ["FILTER"]=>
  NULL
  ["NEW_URL"]=>
  string(0) ""
}
Max диаметр сверления [металл], мм
13 -
array(38) {
  ["ID"]=>
  string(4) "6521"
  ["IBLOCK_ID"]=>
  string(1) "4"
  ["NAME"]=>
  string(58) "Max диаметр сверления [дерево], мм"
  ["ACTIVE"]=>
  string(1) "Y"
  ["SORT"]=>
  string(3) "450"
  ["CODE"]=>
  string(35) "NB_MAX_DIAMETR_SVERLENIYA_DEREVO_MM"
  ["DEFAULT_VALUE"]=>
  string(0) ""
  ["PROPERTY_TYPE"]=>
  string(1) "N"
  ["ROW_COUNT"]=>
  string(1) "1"
  ["COL_COUNT"]=>
  string(2) "30"
  ["LIST_TYPE"]=>
  string(1) "L"
  ["MULTIPLE"]=>
  string(1) "N"
  ["XML_ID"]=>
  NULL
  ["FILE_TYPE"]=>
  string(0) ""
  ["MULTIPLE_CNT"]=>
  string(1) "5"
  ["LINK_IBLOCK_ID"]=>
  string(1) "0"
  ["WITH_DESCRIPTION"]=>
  string(1) "N"
  ["SEARCHABLE"]=>
  string(1) "N"
  ["FILTRABLE"]=>
  string(1) "N"
  ["IS_REQUIRED"]=>
  string(1) "N"
  ["VERSION"]=>
  string(1) "2"
  ["USER_TYPE"]=>
  NULL
  ["USER_TYPE_SETTINGS"]=>
  array(0) {
  }
  ["HINT"]=>
  string(0) ""
  ["~NAME"]=>
  string(58) "Max диаметр сверления [дерево], мм"
  ["~DEFAULT_VALUE"]=>
  string(0) ""
  ["VALUE_ENUM"]=>
  string(0) ""
  ["VALUE_XML_ID"]=>
  NULL
  ["VALUE_SORT"]=>
  NULL
  ["VALUE"]=>
  string(2) "40"
  ["PROPERTY_VALUE_ID"]=>
  string(11) "128903:6521"
  ["DESCRIPTION"]=>
  NULL
  ["~VALUE"]=>
  string(2) "40"
  ["~DESCRIPTION"]=>
  NULL
  ["DISPLAY_VALUE"]=>
  string(2) "40"
  ["GROUP_ID"]=>
  string(3) "493"
  ["FILTER"]=>
  NULL
  ["NEW_URL"]=>
  string(0) ""
}
Max диаметр сверления [дерево], мм
40 -
array(38) {
  ["ID"]=>
  string(4) "6996"
  ["IBLOCK_ID"]=>
  string(1) "4"
  ["NAME"]=>
  string(56) "Уровень звукового давления, дБ"
  ["ACTIVE"]=>
  string(1) "Y"
  ["SORT"]=>
  string(3) "700"
  ["CODE"]=>
  string(32) "NB_UROVEN_ZVUKOVOGO_DAVLENIYA_DB"
  ["DEFAULT_VALUE"]=>
  string(0) ""
  ["PROPERTY_TYPE"]=>
  string(1) "N"
  ["ROW_COUNT"]=>
  string(1) "1"
  ["COL_COUNT"]=>
  string(2) "30"
  ["LIST_TYPE"]=>
  string(1) "L"
  ["MULTIPLE"]=>
  string(1) "N"
  ["XML_ID"]=>
  NULL
  ["FILE_TYPE"]=>
  string(0) ""
  ["MULTIPLE_CNT"]=>
  string(1) "5"
  ["LINK_IBLOCK_ID"]=>
  string(1) "0"
  ["WITH_DESCRIPTION"]=>
  string(1) "N"
  ["SEARCHABLE"]=>
  string(1) "N"
  ["FILTRABLE"]=>
  string(1) "N"
  ["IS_REQUIRED"]=>
  string(1) "N"
  ["VERSION"]=>
  string(1) "2"
  ["USER_TYPE"]=>
  NULL
  ["USER_TYPE_SETTINGS"]=>
  array(0) {
  }
  ["HINT"]=>
  string(0) ""
  ["~NAME"]=>
  string(56) "Уровень звукового давления, дБ"
  ["~DEFAULT_VALUE"]=>
  string(0) ""
  ["VALUE_ENUM"]=>
  string(0) ""
  ["VALUE_XML_ID"]=>
  NULL
  ["VALUE_SORT"]=>
  NULL
  ["VALUE"]=>
  string(2) "73"
  ["PROPERTY_VALUE_ID"]=>
  string(11) "128903:6996"
  ["DESCRIPTION"]=>
  NULL
  ["~VALUE"]=>
  string(2) "73"
  ["~DESCRIPTION"]=>
  NULL
  ["DISPLAY_VALUE"]=>
  string(2) "73"
  ["GROUP_ID"]=>
  string(3) "493"
  ["FILTER"]=>
  NULL
  ["NEW_URL"]=>
  string(0) ""
}
Уровень звукового давления, дБ
73
Двигатель
-
array(39) {
  ["ID"]=>
  string(4) "6970"
  ["IBLOCK_ID"]=>
  string(1) "4"
  ["NAME"]=>
  string(18) "Двигатель"
  ["ACTIVE"]=>
  string(1) "Y"
  ["SORT"]=>
  string(3) "200"
  ["CODE"]=>
  string(11) "NB_DVIGATEL"
  ["DEFAULT_VALUE"]=>
  string(0) ""
  ["PROPERTY_TYPE"]=>
  string(1) "L"
  ["ROW_COUNT"]=>
  string(1) "1"
  ["COL_COUNT"]=>
  string(2) "30"
  ["LIST_TYPE"]=>
  string(1) "L"
  ["MULTIPLE"]=>
  string(1) "N"
  ["XML_ID"]=>
  NULL
  ["FILE_TYPE"]=>
  string(0) ""
  ["MULTIPLE_CNT"]=>
  string(1) "5"
  ["LINK_IBLOCK_ID"]=>
  string(1) "0"
  ["WITH_DESCRIPTION"]=>
  string(1) "N"
  ["SEARCHABLE"]=>
  string(1) "N"
  ["FILTRABLE"]=>
  string(1) "N"
  ["IS_REQUIRED"]=>
  string(1) "N"
  ["VERSION"]=>
  string(1) "2"
  ["USER_TYPE"]=>
  NULL
  ["USER_TYPE_SETTINGS"]=>
  array(0) {
  }
  ["HINT"]=>
  string(0) ""
  ["~NAME"]=>
  string(18) "Двигатель"
  ["~DEFAULT_VALUE"]=>
  string(0) ""
  ["VALUE_ENUM"]=>
  string(26) "электрический"
  ["VALUE_XML_ID"]=>
  string(14) "elektricheskiy"
  ["VALUE_SORT"]=>
  string(3) "500"
  ["VALUE"]=>
  string(26) "электрический"
  ["PROPERTY_VALUE_ID"]=>
  string(11) "128903:6970"
  ["VALUE_ENUM_ID"]=>
  string(5) "17505"
  ["DESCRIPTION"]=>
  NULL
  ["~VALUE"]=>
  string(26) "электрический"
  ["~DESCRIPTION"]=>
  NULL
  ["DISPLAY_VALUE"]=>
  string(26) "электрический"
  ["GROUP_ID"]=>
  string(4) "1513"
  ["FILTER"]=>
  NULL
  ["NEW_URL"]=>
  string(0) ""
}
Двигатель
электрический -
array(39) {
  ["ID"]=>
  string(4) "6548"
  ["IBLOCK_ID"]=>
  string(1) "4"
  ["NAME"]=>
  string(25) "Тип двигателя"
  ["ACTIVE"]=>
  string(1) "Y"
  ["SORT"]=>
  string(3) "250"
  ["CODE"]=>
  string(17) "NB_TIP_DVIGATELYA"
  ["DEFAULT_VALUE"]=>
  string(0) ""
  ["PROPERTY_TYPE"]=>
  string(1) "L"
  ["ROW_COUNT"]=>
  string(1) "1"
  ["COL_COUNT"]=>
  string(2) "30"
  ["LIST_TYPE"]=>
  string(1) "L"
  ["MULTIPLE"]=>
  string(1) "N"
  ["XML_ID"]=>
  NULL
  ["FILE_TYPE"]=>
  string(0) ""
  ["MULTIPLE_CNT"]=>
  string(1) "5"
  ["LINK_IBLOCK_ID"]=>
  string(1) "0"
  ["WITH_DESCRIPTION"]=>
  string(1) "N"
  ["SEARCHABLE"]=>
  string(1) "N"
  ["FILTRABLE"]=>
  string(1) "N"
  ["IS_REQUIRED"]=>
  string(1) "N"
  ["VERSION"]=>
  string(1) "2"
  ["USER_TYPE"]=>
  NULL
  ["USER_TYPE_SETTINGS"]=>
  array(0) {
  }
  ["HINT"]=>
  string(0) ""
  ["~NAME"]=>
  string(25) "Тип двигателя"
  ["~DEFAULT_VALUE"]=>
  string(0) ""
  ["VALUE_ENUM"]=>
  string(16) "щеточный"
  ["VALUE_XML_ID"]=>
  string(12) "shchetochnyy"
  ["VALUE_SORT"]=>
  string(3) "500"
  ["VALUE"]=>
  string(16) "щеточный"
  ["PROPERTY_VALUE_ID"]=>
  string(11) "128903:6548"
  ["VALUE_ENUM_ID"]=>
  string(5) "16814"
  ["DESCRIPTION"]=>
  NULL
  ["~VALUE"]=>
  string(16) "щеточный"
  ["~DESCRIPTION"]=>
  NULL
  ["DISPLAY_VALUE"]=>
  string(16) "щеточный"
  ["GROUP_ID"]=>
  string(4) "1513"
  ["FILTER"]=>
  NULL
  ["NEW_URL"]=>
  string(0) ""
}
Тип двигателя
щеточный -
array(39) {
  ["ID"]=>
  string(4) "6674"
  ["IBLOCK_ID"]=>
  string(1) "4"
  ["NAME"]=>
  string(24) "Напряжение, В"
  ["ACTIVE"]=>
  string(1) "Y"
  ["SORT"]=>
  string(3) "400"
  ["CODE"]=>
  string(17) "NB_NAPRYAZHENIE_V"
  ["DEFAULT_VALUE"]=>
  string(0) ""
  ["PROPERTY_TYPE"]=>
  string(1) "L"
  ["ROW_COUNT"]=>
  string(1) "1"
  ["COL_COUNT"]=>
  string(2) "30"
  ["LIST_TYPE"]=>
  string(1) "L"
  ["MULTIPLE"]=>
  string(1) "N"
  ["XML_ID"]=>
  NULL
  ["FILE_TYPE"]=>
  string(0) ""
  ["MULTIPLE_CNT"]=>
  string(1) "5"
  ["LINK_IBLOCK_ID"]=>
  string(1) "0"
  ["WITH_DESCRIPTION"]=>
  string(1) "N"
  ["SEARCHABLE"]=>
  string(1) "N"
  ["FILTRABLE"]=>
  string(1) "N"
  ["IS_REQUIRED"]=>
  string(1) "N"
  ["VERSION"]=>
  string(1) "2"
  ["USER_TYPE"]=>
  NULL
  ["USER_TYPE_SETTINGS"]=>
  array(0) {
  }
  ["HINT"]=>
  string(0) ""
  ["~NAME"]=>
  string(24) "Напряжение, В"
  ["~DEFAULT_VALUE"]=>
  string(0) ""
  ["VALUE_ENUM"]=>
  string(3) "220"
  ["VALUE_XML_ID"]=>
  string(3) "220"
  ["VALUE_SORT"]=>
  string(3) "500"
  ["VALUE"]=>
  string(3) "220"
  ["PROPERTY_VALUE_ID"]=>
  string(11) "128903:6674"
  ["VALUE_ENUM_ID"]=>
  string(5) "17502"
  ["DESCRIPTION"]=>
  NULL
  ["~VALUE"]=>
  string(3) "220"
  ["~DESCRIPTION"]=>
  NULL
  ["DISPLAY_VALUE"]=>
  string(3) "220"
  ["GROUP_ID"]=>
  string(4) "1513"
  ["FILTER"]=>
  NULL
  ["NEW_URL"]=>
  string(0) ""
}
Напряжение, В
220 -
array(38) {
  ["ID"]=>
  string(4) "6662"
  ["IBLOCK_ID"]=>
  string(1) "4"
  ["NAME"]=>
  string(22) "Мощность, Вт"
  ["ACTIVE"]=>
  string(1) "Y"
  ["SORT"]=>
  string(3) "350"
  ["CODE"]=>
  string(16) "NB_MOSHCHNOST_VT"
  ["DEFAULT_VALUE"]=>
  string(0) ""
  ["PROPERTY_TYPE"]=>
  string(1) "N"
  ["ROW_COUNT"]=>
  string(1) "1"
  ["COL_COUNT"]=>
  string(2) "30"
  ["LIST_TYPE"]=>
  string(1) "L"
  ["MULTIPLE"]=>
  string(1) "N"
  ["XML_ID"]=>
  NULL
  ["FILE_TYPE"]=>
  string(0) ""
  ["MULTIPLE_CNT"]=>
  string(1) "5"
  ["LINK_IBLOCK_ID"]=>
  string(1) "0"
  ["WITH_DESCRIPTION"]=>
  string(1) "N"
  ["SEARCHABLE"]=>
  string(1) "N"
  ["FILTRABLE"]=>
  string(1) "N"
  ["IS_REQUIRED"]=>
  string(1) "N"
  ["VERSION"]=>
  string(1) "2"
  ["USER_TYPE"]=>
  NULL
  ["USER_TYPE_SETTINGS"]=>
  array(0) {
  }
  ["HINT"]=>
  string(0) ""
  ["~NAME"]=>
  string(22) "Мощность, Вт"
  ["~DEFAULT_VALUE"]=>
  string(0) ""
  ["VALUE_ENUM"]=>
  string(0) ""
  ["VALUE_XML_ID"]=>
  NULL
  ["VALUE_SORT"]=>
  NULL
  ["VALUE"]=>
  string(3) "710"
  ["PROPERTY_VALUE_ID"]=>
  string(11) "128903:6662"
  ["DESCRIPTION"]=>
  NULL
  ["~VALUE"]=>
  string(3) "710"
  ["~DESCRIPTION"]=>
  NULL
  ["DISPLAY_VALUE"]=>
  string(3) "710"
  ["GROUP_ID"]=>
  string(4) "1513"
  ["FILTER"]=>
  NULL
  ["NEW_URL"]=>
  string(0) ""
}
Мощность, Вт
710 -
array(39) {
  ["ID"]=>
  string(4) "6691"
  ["IBLOCK_ID"]=>
  string(1) "4"
  ["NAME"]=>
  string(23) "Плавный пуск"
  ["ACTIVE"]=>
  string(1) "Y"
  ["SORT"]=>
  string(3) "500"
  ["CODE"]=>
  string(15) "NB_PLAVNYJ_PUSK"
  ["DEFAULT_VALUE"]=>
  string(0) ""
  ["PROPERTY_TYPE"]=>
  string(1) "L"
  ["ROW_COUNT"]=>
  string(1) "1"
  ["COL_COUNT"]=>
  string(2) "30"
  ["LIST_TYPE"]=>
  string(1) "L"
  ["MULTIPLE"]=>
  string(1) "N"
  ["XML_ID"]=>
  NULL
  ["FILE_TYPE"]=>
  string(0) ""
  ["MULTIPLE_CNT"]=>
  string(1) "5"
  ["LINK_IBLOCK_ID"]=>
  string(1) "0"
  ["WITH_DESCRIPTION"]=>
  string(1) "N"
  ["SEARCHABLE"]=>
  string(1) "N"
  ["FILTRABLE"]=>
  string(1) "N"
  ["IS_REQUIRED"]=>
  string(1) "N"
  ["VERSION"]=>
  string(1) "2"
  ["USER_TYPE"]=>
  NULL
  ["USER_TYPE_SETTINGS"]=>
  array(0) {
  }
  ["HINT"]=>
  string(0) ""
  ["~NAME"]=>
  string(23) "Плавный пуск"
  ["~DEFAULT_VALUE"]=>
  string(0) ""
  ["VALUE_ENUM"]=>
  string(6) "нет"
  ["VALUE_XML_ID"]=>
  string(3) "net"
  ["VALUE_SORT"]=>
  string(3) "500"
  ["VALUE"]=>
  string(6) "нет"
  ["PROPERTY_VALUE_ID"]=>
  string(11) "128903:6691"
  ["VALUE_ENUM_ID"]=>
  string(5) "16880"
  ["DESCRIPTION"]=>
  NULL
  ["~VALUE"]=>
  string(6) "нет"
  ["~DESCRIPTION"]=>
  NULL
  ["DISPLAY_VALUE"]=>
  string(6) "нет"
  ["GROUP_ID"]=>
  string(4) "1513"
  ["FILTER"]=>
  NULL
  ["NEW_URL"]=>
  string(0) ""
}
Плавный пуск
нет
Функции и особенности
-
array(39) {
  ["ID"]=>
  string(4) "6611"
  ["IBLOCK_ID"]=>
  string(1) "4"
  ["NAME"]=>
  string(39) "Для работы с металлом"
  ["ACTIVE"]=>
  string(1) "Y"
  ["SORT"]=>
  string(3) "500"
  ["CODE"]=>
  string(25) "NB_DLYA_RABOTY_S_METALLOM"
  ["DEFAULT_VALUE"]=>
  string(0) ""
  ["PROPERTY_TYPE"]=>
  string(1) "L"
  ["ROW_COUNT"]=>
  string(1) "1"
  ["COL_COUNT"]=>
  string(2) "30"
  ["LIST_TYPE"]=>
  string(1) "L"
  ["MULTIPLE"]=>
  string(1) "N"
  ["XML_ID"]=>
  NULL
  ["FILE_TYPE"]=>
  string(0) ""
  ["MULTIPLE_CNT"]=>
  string(1) "5"
  ["LINK_IBLOCK_ID"]=>
  string(1) "0"
  ["WITH_DESCRIPTION"]=>
  string(1) "N"
  ["SEARCHABLE"]=>
  string(1) "N"
  ["FILTRABLE"]=>
  string(1) "N"
  ["IS_REQUIRED"]=>
  string(1) "N"
  ["VERSION"]=>
  string(1) "2"
  ["USER_TYPE"]=>
  NULL
  ["USER_TYPE_SETTINGS"]=>
  array(0) {
  }
  ["HINT"]=>
  string(0) ""
  ["~NAME"]=>
  string(39) "Для работы с металлом"
  ["~DEFAULT_VALUE"]=>
  string(0) ""
  ["VALUE_ENUM"]=>
  string(4) "да"
  ["VALUE_XML_ID"]=>
  string(2) "da"
  ["VALUE_SORT"]=>
  string(3) "500"
  ["VALUE"]=>
  string(4) "да"
  ["PROPERTY_VALUE_ID"]=>
  string(11) "128903:6611"
  ["VALUE_ENUM_ID"]=>
  string(5) "18089"
  ["DESCRIPTION"]=>
  NULL
  ["~VALUE"]=>
  string(4) "да"
  ["~DESCRIPTION"]=>
  NULL
  ["DISPLAY_VALUE"]=>
  string(4) "да"
  ["GROUP_ID"]=>
  string(3) "494"
  ["FILTER"]=>
  NULL
  ["NEW_URL"]=>
  string(0) ""
}
Для работы с металлом
да -
array(39) {
  ["ID"]=>
  string(4) "6942"
  ["IBLOCK_ID"]=>
  string(1) "4"
  ["NAME"]=>
  string(54) "Регулировка частоты вращения"
  ["ACTIVE"]=>
  string(1) "Y"
  ["SORT"]=>
  string(3) "500"
  ["CODE"]=>
  string(36) "NB_REGULIROVKA_CHASTOTY_VRASHCHENIYA"
  ["DEFAULT_VALUE"]=>
  string(0) ""
  ["PROPERTY_TYPE"]=>
  string(1) "L"
  ["ROW_COUNT"]=>
  string(1) "1"
  ["COL_COUNT"]=>
  string(2) "30"
  ["LIST_TYPE"]=>
  string(1) "L"
  ["MULTIPLE"]=>
  string(1) "N"
  ["XML_ID"]=>
  NULL
  ["FILE_TYPE"]=>
  string(0) ""
  ["MULTIPLE_CNT"]=>
  string(1) "5"
  ["LINK_IBLOCK_ID"]=>
  string(1) "0"
  ["WITH_DESCRIPTION"]=>
  string(1) "N"
  ["SEARCHABLE"]=>
  string(1) "N"
  ["FILTRABLE"]=>
  string(1) "N"
  ["IS_REQUIRED"]=>
  string(1) "N"
  ["VERSION"]=>
  string(1) "2"
  ["USER_TYPE"]=>
  NULL
  ["USER_TYPE_SETTINGS"]=>
  array(0) {
  }
  ["HINT"]=>
  string(0) ""
  ["~NAME"]=>
  string(54) "Регулировка частоты вращения"
  ["~DEFAULT_VALUE"]=>
  string(0) ""
  ["VALUE_ENUM"]=>
  string(4) "да"
  ["VALUE_XML_ID"]=>
  string(2) "da"
  ["VALUE_SORT"]=>
  string(3) "500"
  ["VALUE"]=>
  string(4) "да"
  ["PROPERTY_VALUE_ID"]=>
  string(11) "128903:6942"
  ["VALUE_ENUM_ID"]=>
  string(5) "16853"
  ["DESCRIPTION"]=>
  NULL
  ["~VALUE"]=>
  string(4) "да"
  ["~DESCRIPTION"]=>
  NULL
  ["DISPLAY_VALUE"]=>
  string(4) "да"
  ["GROUP_ID"]=>
  string(3) "494"
  ["FILTER"]=>
  NULL
  ["NEW_URL"]=>
  string(0) ""
}
Регулировка частоты вращения
да -
array(39) {
  ["ID"]=>
  string(4) "6669"
  ["IBLOCK_ID"]=>
  string(1) "4"
  ["NAME"]=>
  string(27) "Наличие лазера"
  ["ACTIVE"]=>
  string(1) "Y"
  ["SORT"]=>
  string(3) "500"
  ["CODE"]=>
  string(18) "NB_NALICHIE_LAZERA"
  ["DEFAULT_VALUE"]=>
  string(0) ""
  ["PROPERTY_TYPE"]=>
  string(1) "L"
  ["ROW_COUNT"]=>
  string(1) "1"
  ["COL_COUNT"]=>
  string(2) "30"
  ["LIST_TYPE"]=>
  string(1) "L"
  ["MULTIPLE"]=>
  string(1) "N"
  ["XML_ID"]=>
  NULL
  ["FILE_TYPE"]=>
  string(0) ""
  ["MULTIPLE_CNT"]=>
  string(1) "5"
  ["LINK_IBLOCK_ID"]=>
  string(1) "0"
  ["WITH_DESCRIPTION"]=>
  string(1) "N"
  ["SEARCHABLE"]=>
  string(1) "N"
  ["FILTRABLE"]=>
  string(1) "N"
  ["IS_REQUIRED"]=>
  string(1) "N"
  ["VERSION"]=>
  string(1) "2"
  ["USER_TYPE"]=>
  NULL
  ["USER_TYPE_SETTINGS"]=>
  array(0) {
  }
  ["HINT"]=>
  string(0) ""
  ["~NAME"]=>
  string(27) "Наличие лазера"
  ["~DEFAULT_VALUE"]=>
  string(0) ""
  ["VALUE_ENUM"]=>
  string(4) "да"
  ["VALUE_XML_ID"]=>
  string(2) "da"
  ["VALUE_SORT"]=>
  string(3) "500"
  ["VALUE"]=>
  string(4) "да"
  ["PROPERTY_VALUE_ID"]=>
  string(11) "128903:6669"
  ["VALUE_ENUM_ID"]=>
  string(5) "16960"
  ["DESCRIPTION"]=>
  NULL
  ["~VALUE"]=>
  string(4) "да"
  ["~DESCRIPTION"]=>
  NULL
  ["DISPLAY_VALUE"]=>
  string(4) "да"
  ["GROUP_ID"]=>
  string(3) "494"
  ["FILTER"]=>
  NULL
  ["NEW_URL"]=>
  string(0) ""
}
Наличие лазера
да -
array(39) {
  ["ID"]=>
  string(4) "6695"
  ["IBLOCK_ID"]=>
  string(1) "4"
  ["NAME"]=>
  string(86) "Поддержание постоянных оборотов под нагрузкой"
  ["ACTIVE"]=>
  string(1) "Y"
  ["SORT"]=>
  string(3) "500"
  ["CODE"]=>
  string(50) "NB_PODDERZHANIE_POSTOYANNYH_OBOROTOV_POD_NAGRUZKOJ"
  ["DEFAULT_VALUE"]=>
  string(0) ""
  ["PROPERTY_TYPE"]=>
  string(1) "L"
  ["ROW_COUNT"]=>
  string(1) "1"
  ["COL_COUNT"]=>
  string(2) "30"
  ["LIST_TYPE"]=>
  string(1) "L"
  ["MULTIPLE"]=>
  string(1) "N"
  ["XML_ID"]=>
  NULL
  ["FILE_TYPE"]=>
  string(0) ""
  ["MULTIPLE_CNT"]=>
  string(1) "5"
  ["LINK_IBLOCK_ID"]=>
  string(1) "0"
  ["WITH_DESCRIPTION"]=>
  string(1) "N"
  ["SEARCHABLE"]=>
  string(1) "N"
  ["FILTRABLE"]=>
  string(1) "N"
  ["IS_REQUIRED"]=>
  string(1) "N"
  ["VERSION"]=>
  string(1) "2"
  ["USER_TYPE"]=>
  NULL
  ["USER_TYPE_SETTINGS"]=>
  array(0) {
  }
  ["HINT"]=>
  string(0) ""
  ["~NAME"]=>
  string(86) "Поддержание постоянных оборотов под нагрузкой"
  ["~DEFAULT_VALUE"]=>
  string(0) ""
  ["VALUE_ENUM"]=>
  string(4) "да"
  ["VALUE_XML_ID"]=>
  string(2) "da"
  ["VALUE_SORT"]=>
  string(3) "500"
  ["VALUE"]=>
  string(4) "да"
  ["PROPERTY_VALUE_ID"]=>
  string(11) "128903:6695"
  ["VALUE_ENUM_ID"]=>
  string(5) "17462"
  ["DESCRIPTION"]=>
  NULL
  ["~VALUE"]=>
  string(4) "да"
  ["~DESCRIPTION"]=>
  NULL
  ["DISPLAY_VALUE"]=>
  string(4) "да"
  ["GROUP_ID"]=>
  string(3) "494"
  ["FILTER"]=>
  NULL
  ["NEW_URL"]=>
  string(0) ""
}
Поддержание постоянных оборотов под нагрузкой
да -
array(39) {
  ["ID"]=>
  string(4) "6697"
  ["IBLOCK_ID"]=>
  string(1) "4"
  ["NAME"]=>
  string(33) "Наличие подсветки"
  ["ACTIVE"]=>
  string(1) "Y"
  ["SORT"]=>
  string(3) "500"
  ["CODE"]=>
  string(21) "NB_NALICHIE_PODSVETKI"
  ["DEFAULT_VALUE"]=>
  string(0) ""
  ["PROPERTY_TYPE"]=>
  string(1) "L"
  ["ROW_COUNT"]=>
  string(1) "1"
  ["COL_COUNT"]=>
  string(2) "30"
  ["LIST_TYPE"]=>
  string(1) "L"
  ["MULTIPLE"]=>
  string(1) "N"
  ["XML_ID"]=>
  NULL
  ["FILE_TYPE"]=>
  string(0) ""
  ["MULTIPLE_CNT"]=>
  string(1) "5"
  ["LINK_IBLOCK_ID"]=>
  string(1) "0"
  ["WITH_DESCRIPTION"]=>
  string(1) "N"
  ["SEARCHABLE"]=>
  string(1) "N"
  ["FILTRABLE"]=>
  string(1) "N"
  ["IS_REQUIRED"]=>
  string(1) "N"
  ["VERSION"]=>
  string(1) "2"
  ["USER_TYPE"]=>
  NULL
  ["USER_TYPE_SETTINGS"]=>
  array(0) {
  }
  ["HINT"]=>
  string(0) ""
  ["~NAME"]=>
  string(33) "Наличие подсветки"
  ["~DEFAULT_VALUE"]=>
  string(0) ""
  ["VALUE_ENUM"]=>
  string(6) "нет"
  ["VALUE_XML_ID"]=>
  string(3) "net"
  ["VALUE_SORT"]=>
  string(3) "500"
  ["VALUE"]=>
  string(6) "нет"
  ["PROPERTY_VALUE_ID"]=>
  string(11) "128903:6697"
  ["VALUE_ENUM_ID"]=>
  string(5) "16838"
  ["DESCRIPTION"]=>
  NULL
  ["~VALUE"]=>
  string(6) "нет"
  ["~DESCRIPTION"]=>
  NULL
  ["DISPLAY_VALUE"]=>
  string(6) "нет"
  ["GROUP_ID"]=>
  string(3) "494"
  ["FILTER"]=>
  NULL
  ["NEW_URL"]=>
  string(0) ""
}
Наличие подсветки
нет -
array(39) {
  ["ID"]=>
  string(4) "6550"
  ["IBLOCK_ID"]=>
  string(1) "4"
  ["NAME"]=>
  string(52) "Бесключевая замена оснастки"
  ["ACTIVE"]=>
  string(1) "Y"
  ["SORT"]=>
  string(3) "500"
  ["CODE"]=>
  string(33) "NB_BESKLYUCHEVAYA_ZAMENA_OSNASTKI"
  ["DEFAULT_VALUE"]=>
  string(0) ""
  ["PROPERTY_TYPE"]=>
  string(1) "L"
  ["ROW_COUNT"]=>
  string(1) "1"
  ["COL_COUNT"]=>
  string(2) "30"
  ["LIST_TYPE"]=>
  string(1) "L"
  ["MULTIPLE"]=>
  string(1) "N"
  ["XML_ID"]=>
  NULL
  ["FILE_TYPE"]=>
  string(0) ""
  ["MULTIPLE_CNT"]=>
  string(1) "5"
  ["LINK_IBLOCK_ID"]=>
  string(1) "0"
  ["WITH_DESCRIPTION"]=>
  string(1) "N"
  ["SEARCHABLE"]=>
  string(1) "N"
  ["FILTRABLE"]=>
  string(1) "N"
  ["IS_REQUIRED"]=>
  string(1) "N"
  ["VERSION"]=>
  string(1) "2"
  ["USER_TYPE"]=>
  NULL
  ["USER_TYPE_SETTINGS"]=>
  array(0) {
  }
  ["HINT"]=>
  string(0) ""
  ["~NAME"]=>
  string(52) "Бесключевая замена оснастки"
  ["~DEFAULT_VALUE"]=>
  string(0) ""
  ["VALUE_ENUM"]=>
  string(4) "да"
  ["VALUE_XML_ID"]=>
  string(2) "da"
  ["VALUE_SORT"]=>
  string(3) "500"
  ["VALUE"]=>
  string(4) "да"
  ["PROPERTY_VALUE_ID"]=>
  string(11) "128903:6550"
  ["VALUE_ENUM_ID"]=>
  string(5) "17461"
  ["DESCRIPTION"]=>
  NULL
  ["~VALUE"]=>
  string(4) "да"
  ["~DESCRIPTION"]=>
  NULL
  ["DISPLAY_VALUE"]=>
  string(4) "да"
  ["GROUP_ID"]=>
  string(3) "494"
  ["FILTER"]=>
  NULL
  ["NEW_URL"]=>
  string(0) ""
}
Бесключевая замена оснастки
да -
array(39) {
  ["ID"]=>
  string(4) "6930"
  ["IBLOCK_ID"]=>
  string(1) "4"
  ["NAME"]=>
  string(29) "Наличие реверса"
  ["ACTIVE"]=>
  string(1) "Y"
  ["SORT"]=>
  string(3) "500"
  ["CODE"]=>
  string(19) "NB_NALICHIE_REVERSA"
  ["DEFAULT_VALUE"]=>
  string(0) ""
  ["PROPERTY_TYPE"]=>
  string(1) "L"
  ["ROW_COUNT"]=>
  string(1) "1"
  ["COL_COUNT"]=>
  string(2) "30"
  ["LIST_TYPE"]=>
  string(1) "L"
  ["MULTIPLE"]=>
  string(1) "N"
  ["XML_ID"]=>
  NULL
  ["FILE_TYPE"]=>
  string(0) ""
  ["MULTIPLE_CNT"]=>
  string(1) "5"
  ["LINK_IBLOCK_ID"]=>
  string(1) "0"
  ["WITH_DESCRIPTION"]=>
  string(1) "N"
  ["SEARCHABLE"]=>
  string(1) "N"
  ["FILTRABLE"]=>
  string(1) "N"
  ["IS_REQUIRED"]=>
  string(1) "N"
  ["VERSION"]=>
  string(1) "2"
  ["USER_TYPE"]=>
  NULL
  ["USER_TYPE_SETTINGS"]=>
  array(0) {
  }
  ["HINT"]=>
  string(0) ""
  ["~NAME"]=>
  string(29) "Наличие реверса"
  ["~DEFAULT_VALUE"]=>
  string(0) ""
  ["VALUE_ENUM"]=>
  string(6) "нет"
  ["VALUE_XML_ID"]=>
  string(3) "net"
  ["VALUE_SORT"]=>
  string(3) "500"
  ["VALUE"]=>
  string(6) "нет"
  ["PROPERTY_VALUE_ID"]=>
  string(11) "128903:6930"
  ["VALUE_ENUM_ID"]=>
  string(5) "17548"
  ["DESCRIPTION"]=>
  NULL
  ["~VALUE"]=>
  string(6) "нет"
  ["~DESCRIPTION"]=>
  NULL
  ["DISPLAY_VALUE"]=>
  string(6) "нет"
  ["GROUP_ID"]=>
  string(3) "494"
  ["FILTER"]=>
  NULL
  ["NEW_URL"]=>
  string(0) ""
}
Наличие реверса
нет -
array(39) {
  ["ID"]=>
  string(4) "6670"
  ["IBLOCK_ID"]=>
  string(1) "4"
  ["NAME"]=>
  string(65) "Возможность подключения к пылесосу"
  ["ACTIVE"]=>
  string(1) "Y"
  ["SORT"]=>
  string(3) "500"
  ["CODE"]=>
  string(40) "NB_VOZMOZHNOST_PODKLYUCHENIYA_K_PYLESOSU"
  ["DEFAULT_VALUE"]=>
  string(0) ""
  ["PROPERTY_TYPE"]=>
  string(1) "L"
  ["ROW_COUNT"]=>
  string(1) "1"
  ["COL_COUNT"]=>
  string(2) "30"
  ["LIST_TYPE"]=>
  string(1) "L"
  ["MULTIPLE"]=>
  string(1) "N"
  ["XML_ID"]=>
  NULL
  ["FILE_TYPE"]=>
  string(0) ""
  ["MULTIPLE_CNT"]=>
  string(1) "5"
  ["LINK_IBLOCK_ID"]=>
  string(1) "0"
  ["WITH_DESCRIPTION"]=>
  string(1) "N"
  ["SEARCHABLE"]=>
  string(1) "N"
  ["FILTRABLE"]=>
  string(1) "N"
  ["IS_REQUIRED"]=>
  string(1) "N"
  ["VERSION"]=>
  string(1) "2"
  ["USER_TYPE"]=>
  NULL
  ["USER_TYPE_SETTINGS"]=>
  array(0) {
  }
  ["HINT"]=>
  string(0) ""
  ["~NAME"]=>
  string(65) "Возможность подключения к пылесосу"
  ["~DEFAULT_VALUE"]=>
  string(0) ""
  ["VALUE_ENUM"]=>
  string(6) "нет"
  ["VALUE_XML_ID"]=>
  string(3) "net"
  ["VALUE_SORT"]=>
  string(3) "500"
  ["VALUE"]=>
  string(6) "нет"
  ["PROPERTY_VALUE_ID"]=>
  string(11) "128903:6670"
  ["VALUE_ENUM_ID"]=>
  string(5) "16855"
  ["DESCRIPTION"]=>
  NULL
  ["~VALUE"]=>
  string(6) "нет"
  ["~DESCRIPTION"]=>
  NULL
  ["DISPLAY_VALUE"]=>
  string(6) "нет"
  ["GROUP_ID"]=>
  string(3) "494"
  ["FILTER"]=>
  NULL
  ["NEW_URL"]=>
  string(0) ""
}
Возможность подключения к пылесосу
нет -
array(39) {
  ["ID"]=>
  string(4) "6552"
  ["IBLOCK_ID"]=>
  string(1) "4"
  ["NAME"]=>
  string(37) "Блокировка шпинделя"
  ["ACTIVE"]=>
  string(1) "Y"
  ["SORT"]=>
  string(3) "500"
  ["CODE"]=>
  string(24) "NB_BLOKIROVKA_SHPINDELYA"
  ["DEFAULT_VALUE"]=>
  string(0) ""
  ["PROPERTY_TYPE"]=>
  string(1) "L"
  ["ROW_COUNT"]=>
  string(1) "1"
  ["COL_COUNT"]=>
  string(2) "30"
  ["LIST_TYPE"]=>
  string(1) "L"
  ["MULTIPLE"]=>
  string(1) "N"
  ["XML_ID"]=>
  NULL
  ["FILE_TYPE"]=>
  string(0) ""
  ["MULTIPLE_CNT"]=>
  string(1) "5"
  ["LINK_IBLOCK_ID"]=>
  string(1) "0"
  ["WITH_DESCRIPTION"]=>
  string(1) "N"
  ["SEARCHABLE"]=>
  string(1) "N"
  ["FILTRABLE"]=>
  string(1) "N"
  ["IS_REQUIRED"]=>
  string(1) "N"
  ["VERSION"]=>
  string(1) "2"
  ["USER_TYPE"]=>
  NULL
  ["USER_TYPE_SETTINGS"]=>
  array(0) {
  }
  ["HINT"]=>
  string(0) ""
  ["~NAME"]=>
  string(37) "Блокировка шпинделя"
  ["~DEFAULT_VALUE"]=>
  string(0) ""
  ["VALUE_ENUM"]=>
  string(4) "да"
  ["VALUE_XML_ID"]=>
  string(2) "da"
  ["VALUE_SORT"]=>
  string(3) "500"
  ["VALUE"]=>
  string(4) "да"
  ["PROPERTY_VALUE_ID"]=>
  string(11) "128903:6552"
  ["VALUE_ENUM_ID"]=>
  string(5) "17438"
  ["DESCRIPTION"]=>
  NULL
  ["~VALUE"]=>
  string(4) "да"
  ["~DESCRIPTION"]=>
  NULL
  ["DISPLAY_VALUE"]=>
  string(4) "да"
  ["GROUP_ID"]=>
  string(3) "494"
  ["FILTER"]=>
  NULL
  ["NEW_URL"]=>
  string(0) ""
}
Блокировка шпинделя
да -
array(39) {
  ["ID"]=>
  string(4) "6544"
  ["IBLOCK_ID"]=>
  string(1) "4"
  ["NAME"]=>
  string(68) "Адаптер для пылеудаления в комплекте"
  ["ACTIVE"]=>
  string(1) "Y"
  ["SORT"]=>
  string(3) "500"
  ["CODE"]=>
  string(41) "NB_ADAPTER_DLYA_PYLEUDALENIYA_V_KOMPLEKTE"
  ["DEFAULT_VALUE"]=>
  string(0) ""
  ["PROPERTY_TYPE"]=>
  string(1) "L"
  ["ROW_COUNT"]=>
  string(1) "1"
  ["COL_COUNT"]=>
  string(2) "30"
  ["LIST_TYPE"]=>
  string(1) "L"
  ["MULTIPLE"]=>
  string(1) "N"
  ["XML_ID"]=>
  NULL
  ["FILE_TYPE"]=>
  string(0) ""
  ["MULTIPLE_CNT"]=>
  string(1) "5"
  ["LINK_IBLOCK_ID"]=>
  string(1) "0"
  ["WITH_DESCRIPTION"]=>
  string(1) "N"
  ["SEARCHABLE"]=>
  string(1) "N"
  ["FILTRABLE"]=>
  string(1) "N"
  ["IS_REQUIRED"]=>
  string(1) "N"
  ["VERSION"]=>
  string(1) "2"
  ["USER_TYPE"]=>
  NULL
  ["USER_TYPE_SETTINGS"]=>
  array(0) {
  }
  ["HINT"]=>
  string(0) ""
  ["~NAME"]=>
  string(68) "Адаптер для пылеудаления в комплекте"
  ["~DEFAULT_VALUE"]=>
  string(0) ""
  ["VALUE_ENUM"]=>
  string(6) "нет"
  ["VALUE_XML_ID"]=>
  string(3) "net"
  ["VALUE_SORT"]=>
  string(3) "500"
  ["VALUE"]=>
  string(6) "нет"
  ["PROPERTY_VALUE_ID"]=>
  string(11) "128903:6544"
  ["VALUE_ENUM_ID"]=>
  string(5) "17584"
  ["DESCRIPTION"]=>
  NULL
  ["~VALUE"]=>
  string(6) "нет"
  ["~DESCRIPTION"]=>
  NULL
  ["DISPLAY_VALUE"]=>
  string(6) "нет"
  ["GROUP_ID"]=>
  string(3) "494"
  ["FILTER"]=>
  NULL
  ["NEW_URL"]=>
  string(0) ""
}
Адаптер для пылеудаления в комплекте
нет
Прочее
-
array(39) {
  ["ID"]=>
  string(4) "6501"
  ["IBLOCK_ID"]=>
  string(1) "4"
  ["NAME"]=>
  string(23) "Класс товара"
  ["ACTIVE"]=>
  string(1) "Y"
  ["SORT"]=>
  string(1) "2"
  ["CODE"]=>
  string(15) "NB_KLASS_TOVARA"
  ["DEFAULT_VALUE"]=>
  string(0) ""
  ["PROPERTY_TYPE"]=>
  string(1) "L"
  ["ROW_COUNT"]=>
  string(1) "1"
  ["COL_COUNT"]=>
  string(2) "30"
  ["LIST_TYPE"]=>
  string(1) "L"
  ["MULTIPLE"]=>
  string(1) "Y"
  ["XML_ID"]=>
  NULL
  ["FILE_TYPE"]=>
  string(0) ""
  ["MULTIPLE_CNT"]=>
  string(1) "5"
  ["LINK_IBLOCK_ID"]=>
  string(1) "0"
  ["WITH_DESCRIPTION"]=>
  string(1) "N"
  ["SEARCHABLE"]=>
  string(1) "N"
  ["FILTRABLE"]=>
  string(1) "N"
  ["IS_REQUIRED"]=>
  string(1) "N"
  ["VERSION"]=>
  string(1) "2"
  ["USER_TYPE"]=>
  NULL
  ["USER_TYPE_SETTINGS"]=>
  array(0) {
  }
  ["HINT"]=>
  string(0) ""
  ["~NAME"]=>
  string(23) "Класс товара"
  ["~DEFAULT_VALUE"]=>
  string(0) ""
  ["VALUE_ENUM"]=>
  array(1) {
    [0]=>
    string(15) "для дома"
  }
  ["VALUE_XML_ID"]=>
  array(1) {
    [0]=>
    string(9) "dlya-doma"
  }
  ["VALUE_SORT"]=>
  array(1) {
    [0]=>
    string(3) "500"
  }
  ["VALUE"]=>
  array(1) {
    [0]=>
    string(15) "для дома"
  }
  ["PROPERTY_VALUE_ID"]=>
  array(1) {
    [0]=>
    string(6) "734632"
  }
  ["VALUE_ENUM_ID"]=>
  array(1) {
    [0]=>
    string(5) "16777"
  }
  ["DESCRIPTION"]=>
  array(1) {
    [0]=>
    NULL
  }
  ["~VALUE"]=>
  array(1) {
    [0]=>
    string(15) "для дома"
  }
  ["~DESCRIPTION"]=>
  array(1) {
    [0]=>
    NULL
  }
  ["DISPLAY_VALUE"]=>
  string(15) "для дома"
  ["GROUP_ID"]=>
  string(3) "495"
  ["FILTER"]=>
  NULL
  ["NEW_URL"]=>
  string(0) ""
}
Класс товара
для дома -
array(38) {
  ["ID"]=>
  string(3) "255"
  ["IBLOCK_ID"]=>
  string(1) "4"
  ["NAME"]=>
  string(16) "Гарантия"
  ["ACTIVE"]=>
  string(1) "Y"
  ["SORT"]=>
  string(1) "1"
  ["CODE"]=>
  string(9) "GARANTIYA"
  ["DEFAULT_VALUE"]=>
  string(0) ""
  ["PROPERTY_TYPE"]=>
  string(1) "S"
  ["ROW_COUNT"]=>
  string(1) "1"
  ["COL_COUNT"]=>
  string(2) "30"
  ["LIST_TYPE"]=>
  string(1) "L"
  ["MULTIPLE"]=>
  string(1) "N"
  ["XML_ID"]=>
  string(3) "255"
  ["FILE_TYPE"]=>
  string(0) ""
  ["MULTIPLE_CNT"]=>
  string(1) "5"
  ["LINK_IBLOCK_ID"]=>
  string(1) "0"
  ["WITH_DESCRIPTION"]=>
  string(1) "N"
  ["SEARCHABLE"]=>
  string(1) "N"
  ["FILTRABLE"]=>
  string(1) "N"
  ["IS_REQUIRED"]=>
  string(1) "N"
  ["VERSION"]=>
  string(1) "2"
  ["USER_TYPE"]=>
  NULL
  ["USER_TYPE_SETTINGS"]=>
  array(0) {
  }
  ["HINT"]=>
  string(0) ""
  ["~NAME"]=>
  string(16) "Гарантия"
  ["~DEFAULT_VALUE"]=>
  string(0) ""
  ["VALUE_ENUM"]=>
  string(0) ""
  ["VALUE_XML_ID"]=>
  NULL
  ["VALUE_SORT"]=>
  NULL
  ["VALUE"]=>
  string(8) "1 год"
  ["PROPERTY_VALUE_ID"]=>
  string(10) "128903:255"
  ["DESCRIPTION"]=>
  NULL
  ["~VALUE"]=>
  string(8) "1 год"
  ["~DESCRIPTION"]=>
  NULL
  ["DISPLAY_VALUE"]=>
  string(8) "1 год"
  ["GROUP_ID"]=>
  string(3) "495"
  ["FILTER"]=>
  string(1) "Y"
  ["NEW_URL"]=>
  string(0) ""
}
Гарантия
1 год -
array(39) {
  ["ID"]=>
  string(3) "131"
  ["IBLOCK_ID"]=>
  string(1) "4"
  ["NAME"]=>
  string(10) "Бренд"
  ["ACTIVE"]=>
  string(1) "Y"
  ["SORT"]=>
  string(1) "1"
  ["CODE"]=>
  string(5) "BREND"
  ["DEFAULT_VALUE"]=>
  string(0) ""
  ["PROPERTY_TYPE"]=>
  string(1) "E"
  ["ROW_COUNT"]=>
  string(1) "1"
  ["COL_COUNT"]=>
  string(2) "30"
  ["LIST_TYPE"]=>
  string(1) "L"
  ["MULTIPLE"]=>
  string(1) "N"
  ["XML_ID"]=>
  string(3) "131"
  ["FILE_TYPE"]=>
  string(0) ""
  ["MULTIPLE_CNT"]=>
  string(1) "5"
  ["LINK_IBLOCK_ID"]=>
  string(1) "3"
  ["WITH_DESCRIPTION"]=>
  string(1) "N"
  ["SEARCHABLE"]=>
  string(1) "N"
  ["FILTRABLE"]=>
  string(1) "Y"
  ["IS_REQUIRED"]=>
  string(1) "N"
  ["VERSION"]=>
  string(1) "2"
  ["USER_TYPE"]=>
  NULL
  ["USER_TYPE_SETTINGS"]=>
  string(0) ""
  ["HINT"]=>
  string(0) ""
  ["~NAME"]=>
  string(10) "Бренд"
  ["~DEFAULT_VALUE"]=>
  string(0) ""
  ["VALUE_ENUM"]=>
  string(0) ""
  ["VALUE_XML_ID"]=>
  NULL
  ["VALUE_SORT"]=>
  NULL
  ["VALUE"]=>
  string(6) "120311"
  ["PROPERTY_VALUE_ID"]=>
  string(10) "128903:131"
  ["DESCRIPTION"]=>
  NULL
  ["~VALUE"]=>
  string(6) "120311"
  ["~DESCRIPTION"]=>
  NULL
  ["LINK_ELEMENT_VALUE"]=>
  array(1) {
    [120311]=>
    array(30) {
      ["ID"]=>
      string(6) "120311"
      ["~ID"]=>
      string(6) "120311"
      ["IBLOCK_ID"]=>
      string(1) "3"
      ["~IBLOCK_ID"]=>
      string(1) "3"
      ["NAME"]=>
      string(5) "Bosch"
      ["~NAME"]=>
      string(5) "Bosch"
      ["DETAIL_PAGE_URL"]=>
      string(19) "/info/brands/bosch/"
      ["~DETAIL_PAGE_URL"]=>
      string(19) "/info/brands/bosch/"
      ["PREVIEW_PICTURE"]=>
      string(6) "489924"
      ["~PREVIEW_PICTURE"]=>
      string(6) "489924"
      ["DETAIL_PICTURE"]=>
      string(6) "489925"
      ["~DETAIL_PICTURE"]=>
      string(6) "489925"
      ["SORT"]=>
      string(3) "140"
      ["~SORT"]=>
      string(3) "140"
      ["LANG_DIR"]=>
      string(1) "/"
      ["~LANG_DIR"]=>
      string(1) "/"
      ["CODE"]=>
      string(5) "bosch"
      ["~CODE"]=>
      string(5) "bosch"
      ["EXTERNAL_ID"]=>
      string(6) "120311"
      ["~EXTERNAL_ID"]=>
      string(6) "120311"
      ["IBLOCK_SECTION_ID"]=>
      NULL
      ["~IBLOCK_SECTION_ID"]=>
      NULL
      ["IBLOCK_TYPE_ID"]=>
      string(7) "content"
      ["~IBLOCK_TYPE_ID"]=>
      string(7) "content"
      ["IBLOCK_CODE"]=>
      string(17) "aspro_next_brands"
      ["~IBLOCK_CODE"]=>
      string(17) "aspro_next_brands"
      ["IBLOCK_EXTERNAL_ID"]=>
      string(20) "aspro_next_brands_s1"
      ["~IBLOCK_EXTERNAL_ID"]=>
      string(20) "aspro_next_brands_s1"
      ["LID"]=>
      string(2) "s1"
      ["~LID"]=>
      string(2) "s1"
    }
  }
  ["DISPLAY_VALUE"]=>
  string(42) "Bosch"
  ["GROUP_ID"]=>
  string(3) "495"
  ["FILTER"]=>
  string(1) "Y"
  ["NEW_URL"]=>
  string(0) ""
}
Бренд
Bosch
-
array(38) {
  ["ID"]=>
  string(4) "1086"
  ["IBLOCK_ID"]=>
  string(1) "4"
  ["NAME"]=>
  string(12) "Модель"
  ["ACTIVE"]=>
  string(1) "Y"
  ["SORT"]=>
  string(3) "500"
  ["CODE"]=>
  string(5) "MODEL"
  ["DEFAULT_VALUE"]=>
  string(0) ""
  ["PROPERTY_TYPE"]=>
  string(1) "S"
  ["ROW_COUNT"]=>
  string(1) "1"
  ["COL_COUNT"]=>
  string(2) "30"
  ["LIST_TYPE"]=>
  string(1) "L"
  ["MULTIPLE"]=>
  string(1) "N"
  ["XML_ID"]=>
  string(4) "1086"
  ["FILE_TYPE"]=>
  string(0) ""
  ["MULTIPLE_CNT"]=>
  string(1) "5"
  ["LINK_IBLOCK_ID"]=>
  string(1) "0"
  ["WITH_DESCRIPTION"]=>
  string(1) "N"
  ["SEARCHABLE"]=>
  string(1) "Y"
  ["FILTRABLE"]=>
  string(1) "Y"
  ["IS_REQUIRED"]=>
  string(1) "N"
  ["VERSION"]=>
  string(1) "2"
  ["USER_TYPE"]=>
  NULL
  ["USER_TYPE_SETTINGS"]=>
  array(0) {
  }
  ["HINT"]=>
  string(0) ""
  ["~NAME"]=>
  string(12) "Модель"
  ["~DEFAULT_VALUE"]=>
  string(0) ""
  ["VALUE_ENUM"]=>
  string(0) ""
  ["VALUE_XML_ID"]=>
  NULL
  ["VALUE_SORT"]=>
  NULL
  ["VALUE"]=>
  string(6) "PBD 40"
  ["PROPERTY_VALUE_ID"]=>
  string(11) "128903:1086"
  ["DESCRIPTION"]=>
  NULL
  ["~VALUE"]=>
  string(6) "PBD 40"
  ["~DESCRIPTION"]=>
  NULL
  ["DISPLAY_VALUE"]=>
  string(6) "PBD 40"
  ["GROUP_ID"]=>
  string(3) "495"
  ["FILTER"]=>
  string(1) "Y"
  ["NEW_URL"]=>
  string(0) ""
}
Модель
PBD 40 -
array(39) {
  ["ID"]=>
  string(4) "6961"
  ["IBLOCK_ID"]=>
  string(1) "4"
  ["NAME"]=>
  string(25) "Страна бренда"
  ["ACTIVE"]=>
  string(1) "Y"
  ["SORT"]=>
  string(3) "700"
  ["CODE"]=>
  string(16) "NB_STRANA_BRENDA"
  ["DEFAULT_VALUE"]=>
  string(0) ""
  ["PROPERTY_TYPE"]=>
  string(1) "L"
  ["ROW_COUNT"]=>
  string(1) "1"
  ["COL_COUNT"]=>
  string(2) "30"
  ["LIST_TYPE"]=>
  string(1) "L"
  ["MULTIPLE"]=>
  string(1) "N"
  ["XML_ID"]=>
  NULL
  ["FILE_TYPE"]=>
  string(0) ""
  ["MULTIPLE_CNT"]=>
  string(1) "5"
  ["LINK_IBLOCK_ID"]=>
  string(1) "0"
  ["WITH_DESCRIPTION"]=>
  string(1) "N"
  ["SEARCHABLE"]=>
  string(1) "N"
  ["FILTRABLE"]=>
  string(1) "N"
  ["IS_REQUIRED"]=>
  string(1) "N"
  ["VERSION"]=>
  string(1) "2"
  ["USER_TYPE"]=>
  NULL
  ["USER_TYPE_SETTINGS"]=>
  array(0) {
  }
  ["HINT"]=>
  string(0) ""
  ["~NAME"]=>
  string(25) "Страна бренда"
  ["~DEFAULT_VALUE"]=>
  string(0) ""
  ["VALUE_ENUM"]=>
  string(16) "Германия"
  ["VALUE_XML_ID"]=>
  string(9) "germaniya"
  ["VALUE_SORT"]=>
  string(3) "500"
  ["VALUE"]=>
  string(16) "Германия"
  ["PROPERTY_VALUE_ID"]=>
  string(11) "128903:6961"
  ["VALUE_ENUM_ID"]=>
  string(5) "17373"
  ["DESCRIPTION"]=>
  NULL
  ["~VALUE"]=>
  string(16) "Германия"
  ["~DESCRIPTION"]=>
  NULL
  ["DISPLAY_VALUE"]=>
  string(16) "Германия"
  ["GROUP_ID"]=>
  string(3) "495"
  ["FILTER"]=>
  NULL
  ["NEW_URL"]=>
  string(0) ""
}
Страна бренда
Германия -
array(39) {
  ["ID"]=>
  string(4) "6962"
  ["IBLOCK_ID"]=>
  string(1) "4"
  ["NAME"]=>
  string(37) "Страна производства"
  ["ACTIVE"]=>
  string(1) "Y"
  ["SORT"]=>
  string(3) "700"
  ["CODE"]=>
  string(22) "NB_STRANA_PROIZVODSTVA"
  ["DEFAULT_VALUE"]=>
  string(0) ""
  ["PROPERTY_TYPE"]=>
  string(1) "L"
  ["ROW_COUNT"]=>
  string(1) "1"
  ["COL_COUNT"]=>
  string(2) "30"
  ["LIST_TYPE"]=>
  string(1) "L"
  ["MULTIPLE"]=>
  string(1) "N"
  ["XML_ID"]=>
  NULL
  ["FILE_TYPE"]=>
  string(0) ""
  ["MULTIPLE_CNT"]=>
  string(1) "5"
  ["LINK_IBLOCK_ID"]=>
  string(1) "0"
  ["WITH_DESCRIPTION"]=>
  string(1) "N"
  ["SEARCHABLE"]=>
  string(1) "N"
  ["FILTRABLE"]=>
  string(1) "N"
  ["IS_REQUIRED"]=>
  string(1) "N"
  ["VERSION"]=>
  string(1) "2"
  ["USER_TYPE"]=>
  NULL
  ["USER_TYPE_SETTINGS"]=>
  array(0) {
  }
  ["HINT"]=>
  string(0) ""
  ["~NAME"]=>
  string(37) "Страна производства"
  ["~DEFAULT_VALUE"]=>
  string(0) ""
  ["VALUE_ENUM"]=>
  string(10) "Китай"
  ["VALUE_XML_ID"]=>
  string(5) "kitay"
  ["VALUE_SORT"]=>
  string(3) "500"
  ["VALUE"]=>
  string(10) "Китай"
  ["PROPERTY_VALUE_ID"]=>
  string(11) "128903:6962"
  ["VALUE_ENUM_ID"]=>
  string(5) "17391"
  ["DESCRIPTION"]=>
  NULL
  ["~VALUE"]=>
  string(10) "Китай"
  ["~DESCRIPTION"]=>
  NULL
  ["DISPLAY_VALUE"]=>
  string(10) "Китай"
  ["GROUP_ID"]=>
  string(3) "495"
  ["FILTER"]=>
  NULL
  ["NEW_URL"]=>
  string(0) ""
}
Страна производства
Китай
Габариты и вес
-
array(38) {
  ["ID"]=>
  string(4) "2515"
  ["IBLOCK_ID"]=>
  string(1) "4"
  ["NAME"]=>
  string(23) "Вес нетто, кг"
  ["ACTIVE"]=>
  string(1) "Y"
  ["SORT"]=>
  string(4) "1150"
  ["CODE"]=>
  string(12) "NB_VES_NETTO"
  ["DEFAULT_VALUE"]=>
  string(0) ""
  ["PROPERTY_TYPE"]=>
  string(1) "N"
  ["ROW_COUNT"]=>
  string(1) "1"
  ["COL_COUNT"]=>
  string(2) "30"
  ["LIST_TYPE"]=>
  string(1) "L"
  ["MULTIPLE"]=>
  string(1) "N"
  ["XML_ID"]=>
  string(4) "2515"
  ["FILE_TYPE"]=>
  string(0) ""
  ["MULTIPLE_CNT"]=>
  string(1) "5"
  ["LINK_IBLOCK_ID"]=>
  string(1) "0"
  ["WITH_DESCRIPTION"]=>
  string(1) "N"
  ["SEARCHABLE"]=>
  string(1) "N"
  ["FILTRABLE"]=>
  string(1) "N"
  ["IS_REQUIRED"]=>
  string(1) "N"
  ["VERSION"]=>
  string(1) "2"
  ["USER_TYPE"]=>
  NULL
  ["USER_TYPE_SETTINGS"]=>
  array(0) {
  }
  ["HINT"]=>
  string(0) ""
  ["~NAME"]=>
  string(23) "Вес нетто, кг"
  ["~DEFAULT_VALUE"]=>
  string(0) ""
  ["VALUE_ENUM"]=>
  string(0) ""
  ["VALUE_XML_ID"]=>
  NULL
  ["VALUE_SORT"]=>
  NULL
  ["VALUE"]=>
  string(2) "11"
  ["PROPERTY_VALUE_ID"]=>
  string(11) "128903:2515"
  ["DESCRIPTION"]=>
  NULL
  ["~VALUE"]=>
  string(2) "11"
  ["~DESCRIPTION"]=>
  NULL
  ["DISPLAY_VALUE"]=>
  string(2) "11"
  ["GROUP_ID"]=>
  string(4) "1435"
  ["FILTER"]=>
  string(1) "Y"
  ["NEW_URL"]=>
  string(0) ""
}
Вес нетто, кг
11 -
array(38) {
  ["ID"]=>
  string(4) "2530"
  ["IBLOCK_ID"]=>
  string(1) "4"
  ["NAME"]=>
  string(60) "Габариты упакованного товара, мм"
  ["ACTIVE"]=>
  string(1) "Y"
  ["SORT"]=>
  string(4) "1450"
  ["CODE"]=>
  string(34) "NB_GABARITY_UPAKOVANNOGO_TOVARA_MM"
  ["DEFAULT_VALUE"]=>
  string(0) ""
  ["PROPERTY_TYPE"]=>
  string(1) "S"
  ["ROW_COUNT"]=>
  string(1) "1"
  ["COL_COUNT"]=>
  string(3) "100"
  ["LIST_TYPE"]=>
  string(1) "L"
  ["MULTIPLE"]=>
  string(1) "N"
  ["XML_ID"]=>
  string(4) "2530"
  ["FILE_TYPE"]=>
  string(0) ""
  ["MULTIPLE_CNT"]=>
  string(1) "5"
  ["LINK_IBLOCK_ID"]=>
  string(1) "0"
  ["WITH_DESCRIPTION"]=>
  string(1) "N"
  ["SEARCHABLE"]=>
  string(1) "N"
  ["FILTRABLE"]=>
  string(1) "N"
  ["IS_REQUIRED"]=>
  string(1) "N"
  ["VERSION"]=>
  string(1) "2"
  ["USER_TYPE"]=>
  NULL
  ["USER_TYPE_SETTINGS"]=>
  array(0) {
  }
  ["HINT"]=>
  string(0) ""
  ["~NAME"]=>
  string(60) "Габариты упакованного товара, мм"
  ["~DEFAULT_VALUE"]=>
  string(0) ""
  ["VALUE_ENUM"]=>
  string(0) ""
  ["VALUE_XML_ID"]=>
  NULL
  ["VALUE_SORT"]=>
  NULL
  ["VALUE"]=>
  string(15) "750 x 378 x 273"
  ["PROPERTY_VALUE_ID"]=>
  string(11) "128903:2530"
  ["DESCRIPTION"]=>
  NULL
  ["~VALUE"]=>
  string(15) "750 x 378 x 273"
  ["~DESCRIPTION"]=>
  NULL
  ["DISPLAY_VALUE"]=>
  string(15) "750 x 378 x 273"
  ["GROUP_ID"]=>
  string(4) "1435"
  ["FILTER"]=>
  string(1) "Y"
  ["NEW_URL"]=>
  string(0) ""
}
Габариты упакованного товара, мм
750 x 378 x 273 -
array(38) {
  ["ID"]=>
  string(4) "2516"
  ["IBLOCK_ID"]=>
  string(1) "4"
  ["NAME"]=>
  string(50) "Вес упакованного товара, кг"
  ["ACTIVE"]=>
  string(1) "Y"
  ["SORT"]=>
  string(4) "1500"
  ["CODE"]=>
  string(29) "NB_VES_UPAKOVANNOGO_TOVARA_KG"
  ["DEFAULT_VALUE"]=>
  string(0) ""
  ["PROPERTY_TYPE"]=>
  string(1) "S"
  ["ROW_COUNT"]=>
  string(1) "1"
  ["COL_COUNT"]=>
  string(3) "100"
  ["LIST_TYPE"]=>
  string(1) "L"
  ["MULTIPLE"]=>
  string(1) "N"
  ["XML_ID"]=>
  string(4) "2516"
  ["FILE_TYPE"]=>
  string(0) ""
  ["MULTIPLE_CNT"]=>
  string(1) "5"
  ["LINK_IBLOCK_ID"]=>
  string(1) "0"
  ["WITH_DESCRIPTION"]=>
  string(1) "N"
  ["SEARCHABLE"]=>
  string(1) "N"
  ["FILTRABLE"]=>
  string(1) "N"
  ["IS_REQUIRED"]=>
  string(1) "N"
  ["VERSION"]=>
  string(1) "2"
  ["USER_TYPE"]=>
  NULL
  ["USER_TYPE_SETTINGS"]=>
  array(0) {
  }
  ["HINT"]=>
  string(0) ""
  ["~NAME"]=>
  string(50) "Вес упакованного товара, кг"
  ["~DEFAULT_VALUE"]=>
  string(0) ""
  ["VALUE_ENUM"]=>
  string(0) ""
  ["VALUE_XML_ID"]=>
  NULL
  ["VALUE_SORT"]=>
  NULL
  ["VALUE"]=>
  string(5) "13,77"
  ["PROPERTY_VALUE_ID"]=>
  string(11) "128903:2516"
  ["DESCRIPTION"]=>
  NULL
  ["~VALUE"]=>
  string(5) "13,77"
  ["~DESCRIPTION"]=>
  NULL
  ["DISPLAY_VALUE"]=>
  string(5) "13,77"
  ["GROUP_ID"]=>
  string(4) "1435"
  ["FILTER"]=>
  string(1) "Y"
  ["NEW_URL"]=>
  string(0) ""
}
Вес упакованного товара, кг
13,77
Файлы
Инструкция к Bosch PBD 40.pdf
25.59 МБ
Скачать
Отзывы
Самый полезный отзыв
Всего 9 отзывов
Всего 8 вопросов
OBJ_BUCH-1183-004.book Page 1 Monday, October 24, 2011 11:35 AM
Robert Bosch GmbH
Power Tools Division
70745 Leinfelden-Echterdingen
Germany
www.bosch-pt.com
PBD 40
1 619 929 J54 (2011.10) PS / 222 UNI
de Originalbetriebsanleitung
en Original instructions
fr Notice originale
es Manual original
pt Manual original
it Istruzioni originali
nl Oorspronkelijke
gebruiksaanwijzing
da Original brugsanvisning
sv Bruksanvisning i original
no Original driftsinstruks
fi Alkuperäiset ohjeet
el Рсщфьфхрп пдзгйюн чсЮузт
tr Orijinal işletme talimat
pl Instrukcja oryginalna
cs Původní návod k používání
sk Pôvodný návod na použitie
hu Eredeti használati utasítás
ru Оригинальное руководство по
эксплуатации
uk Ориг³нальна ³нструкц³я з
експлуатац³¿
ro Instrucţiuni originale
bg Оригинална инструкция
sr Originalno uputstvo za rad
sl Izvirna navodila
hr Originalne upute za rad
et Algupärane kasutusjuhend
lv Instrukcijas oriģinālvalodā
lt Originali instrukcija
OBJ_BUCH-1183-004.book Page 2 Monday, October 24, 2011 11:35 AM
2 |
Deutsch . . . . . . . . . . . . . . . . . . . . . . . . . . . . . . . . . . . . . . . . . Seite 9
English . . . . . . . . . . . . . . . . . . . . . . . . . . . . . . . . . . . . . . . . . . Page 17
Français . . . . . . . . . . . . . . . . . . . . . . . . . . . . . . . . . . . . . . . . . Page 25
Español . . . . . . . . . . . . . . . . . . . . . . . . . . . . . . . . . . . . . . . . Página 33
Português. . . . . . . . . . . . . . . . . . . . . . . . . . . . . . . . . . . . . . . Página 42
Italiano . . . . . . . . . . . . . . . . . . . . . . . . . . . . . . . . . . . . . . . . . Pagina 50
Nederlands . . . . . . . . . . . . . . . . . . . . . . . . . . . . . . . . . . . . . Pagina 58
Dansk . . . . . . . . . . . . . . . . . . . . . . . . . . . . . . . . . . . . . . . . . . . Side 66
Svenska . . . . . . . . . . . . . . . . . . . . . . . . . . . . . . . . . . . . . . . . . Sida 73
Norsk . . . . . . . . . . . . . . . . . . . . . . . . . . . . . . . . . . . . . . . . . . . Side 80
Suomi. . . . . . . . . . . . . . . . . . . . . . . . . . . . . . . . . . . . . . . . . . . . Sivu 87
ЕллзнйкЬ. . . . . . . . . . . . . . . . . . . . . . . . . . . . . . . . . . . . . . . . УелЯдб 94
Türkçe . . . . . . . . . . . . . . . . . . . . . . . . . . . . . . . . . . . . . . . . . Sayfa 103
Polski . . . . . . . . . . . . . . . . . . . . . . . . . . . . . . . . . . . . . . . . . . Strona 110
Česky . . . . . . . . . . . . . . . . . . . . . . . . . . . . . . . . . . . . . . . . . . Strana 119
Slovensky. . . . . . . . . . . . . . . . . . . . . . . . . . . . . . . . . . . . . . . Strana 126
Magyar . . . . . . . . . . . . . . . . . . . . . . . . . . . . . . . . . . . . . . . . . . Oldal 134
Русский . . . . . . . . . . . . . . . . . . . . . . . . . . . . . . . . . . . . . Страница 142
Укра¿нська. . . . . . . . . . . . . . . . . . . . . . . . . . . . . . . . . . . . Стор³нка 151
Română . . . . . . . . . . . . . . . . . . . . . . . . . . . . . . . . . . . . . . . . Pagina 159
Български . . . . . . . . . . . . . . . . . . . . . . . . . . . . . . . . . . . Страница 167
Srpski. . . . . . . . . . . . . . . . . . . . . . . . . . . . . . . . . . . . . . . . . . Strana 176
Slovensko . . . . . . . . . . . . . . . . . . . . . . . . . . . . . . . . . . . . . . . Stran 183
Hrvatski . . . . . . . . . . . . . . . . . . . . . . . . . . . . . . . . . . . . . . Stranica 191
Eesti . . . . . . . . . . . . . . . . . . . . . . . . . . . . . . . . . . . . . . . . . Lehekülg 199
Latviešu . . . . . . . . . . . . . . . . . . . . . . . . . . . . . . . . . . . . . . Lappuse 206
Lietuviškai . . . . . . . . . . . . . . . . . . . . . . . . . . . . . . . . . . . . Puslapis 214
1 619 929 J54 | (24.10.11) Bosch Power Tools
OBJ_BUCH-1183-004.book Page 3 Monday, October 24, 2011 11:35 AM
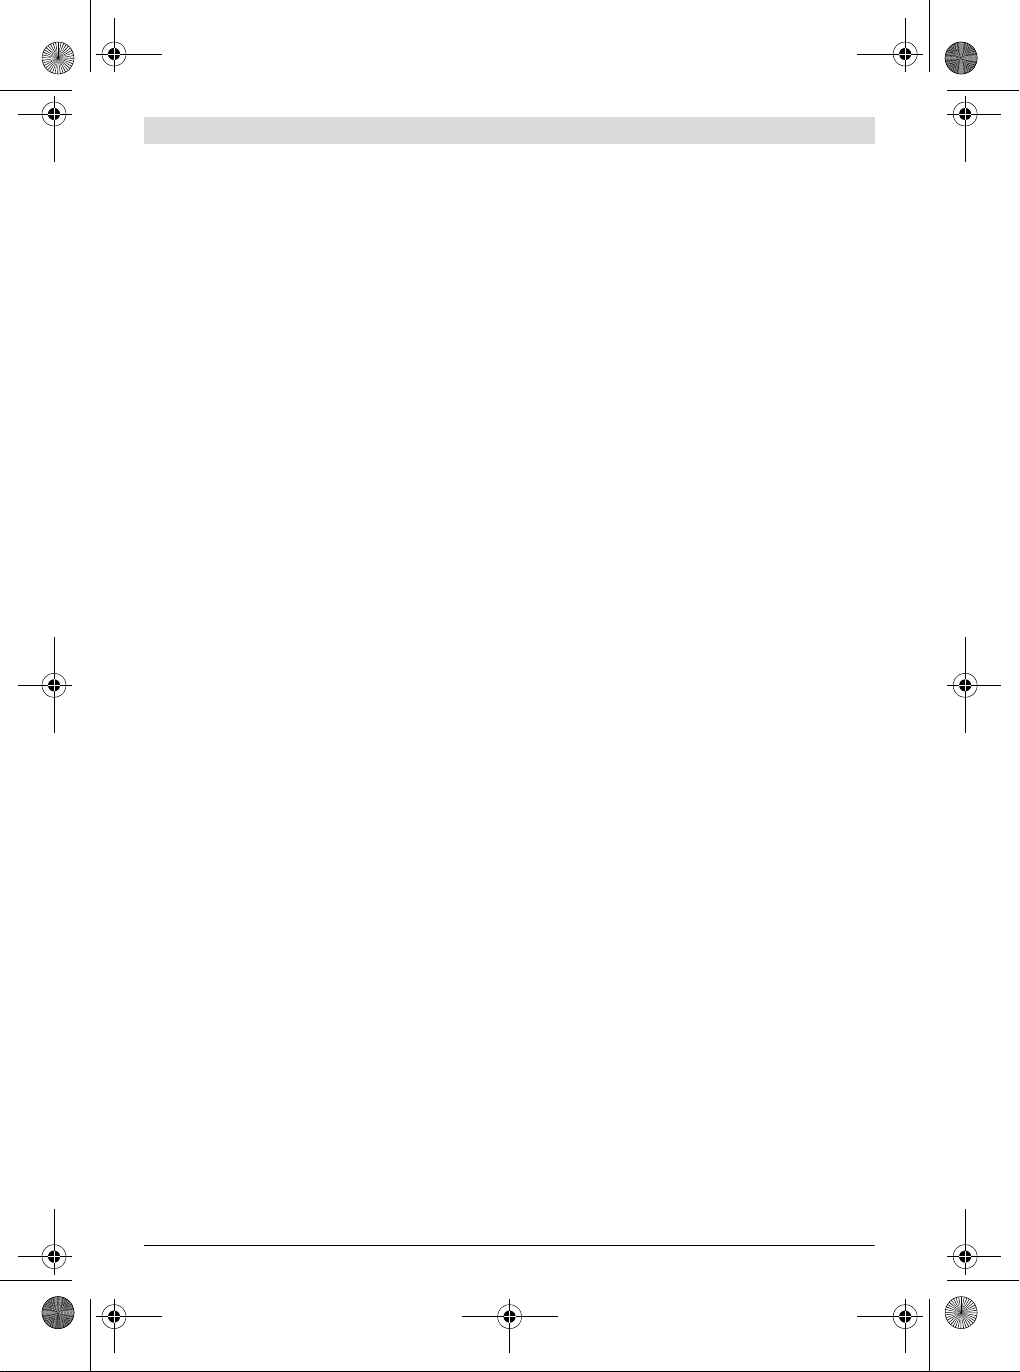
10
9
8
| 3
11
12
13
7
14
6
15
5
16
4
17
3
2
18
1
PBD 40
Bosch Power Tools 1 619 929 J54 | (24.10.11)
OBJ_BUCH-1183-004.book Page 4 Monday, October 24, 2011 11:35 AM
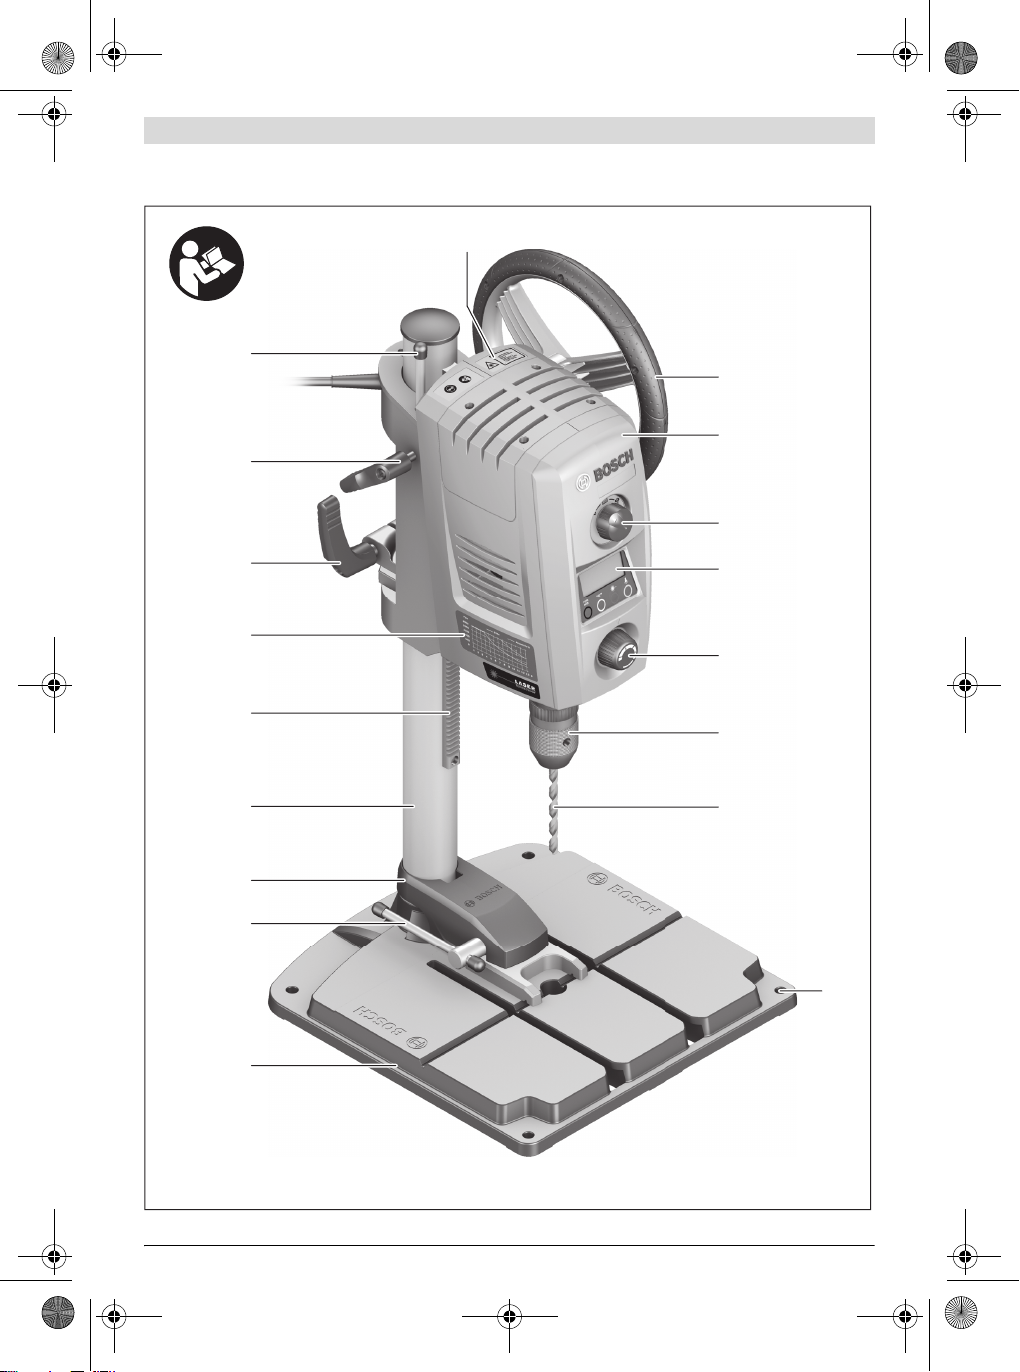
4 |
21
22
23
20
19
1 619 929 J54 | (24.10.11) Bosch Power Tools
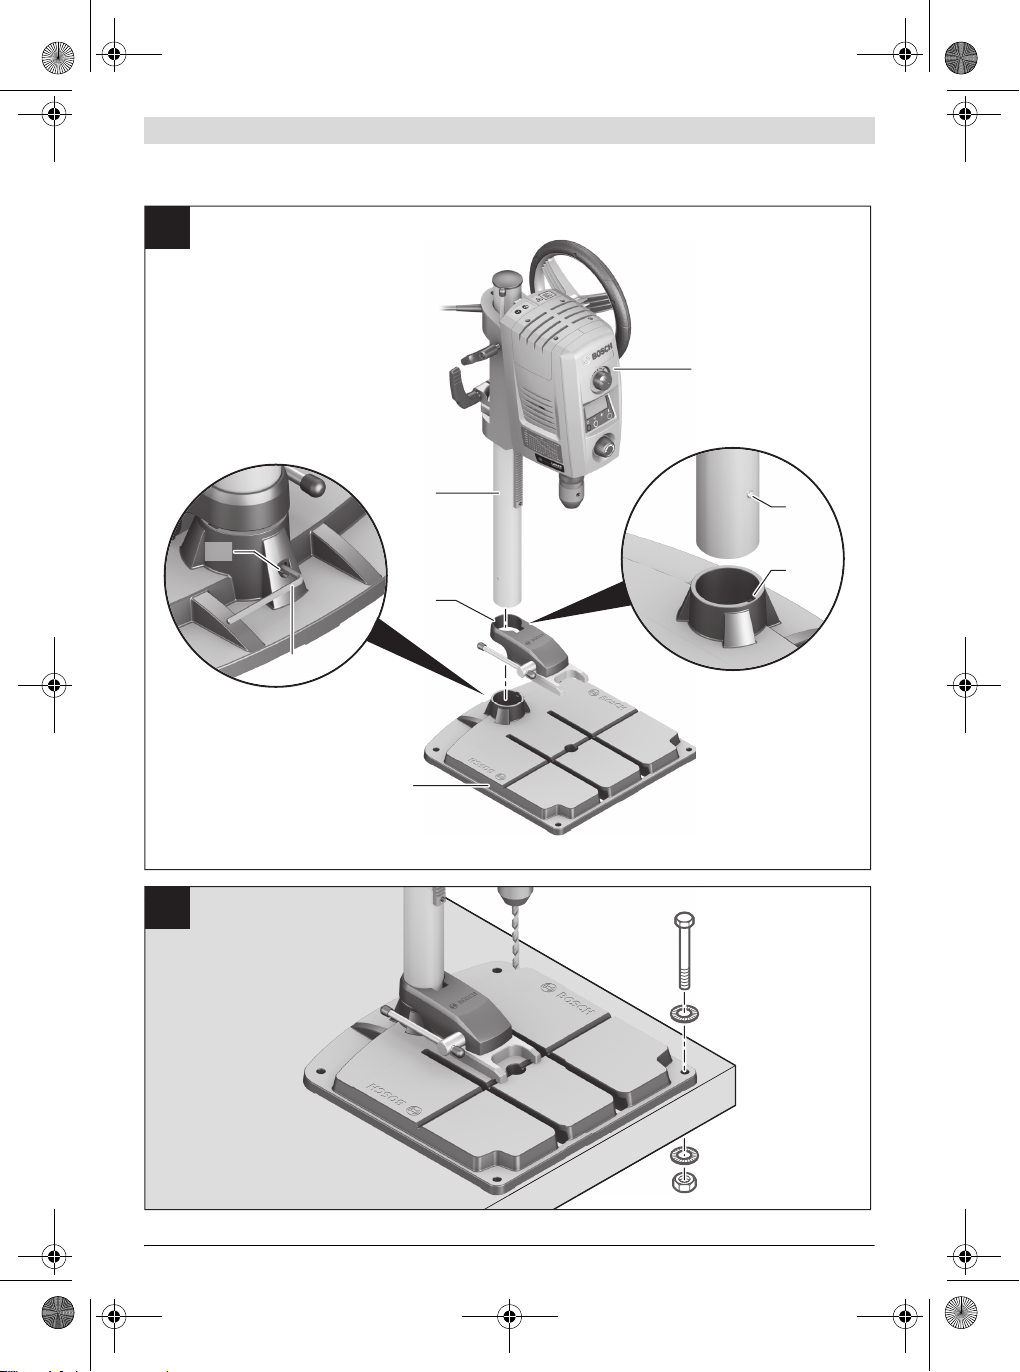
OBJ_BUCH-1183-004.book Page 5 Monday, October 24, 2011 11:35 AM
A
| 5
12
B
24
23
4
3
1
M8 (4x)
25
26
M8 (4x)
Bosch Power Tools 1 619 929 J54 | (24.10.11)
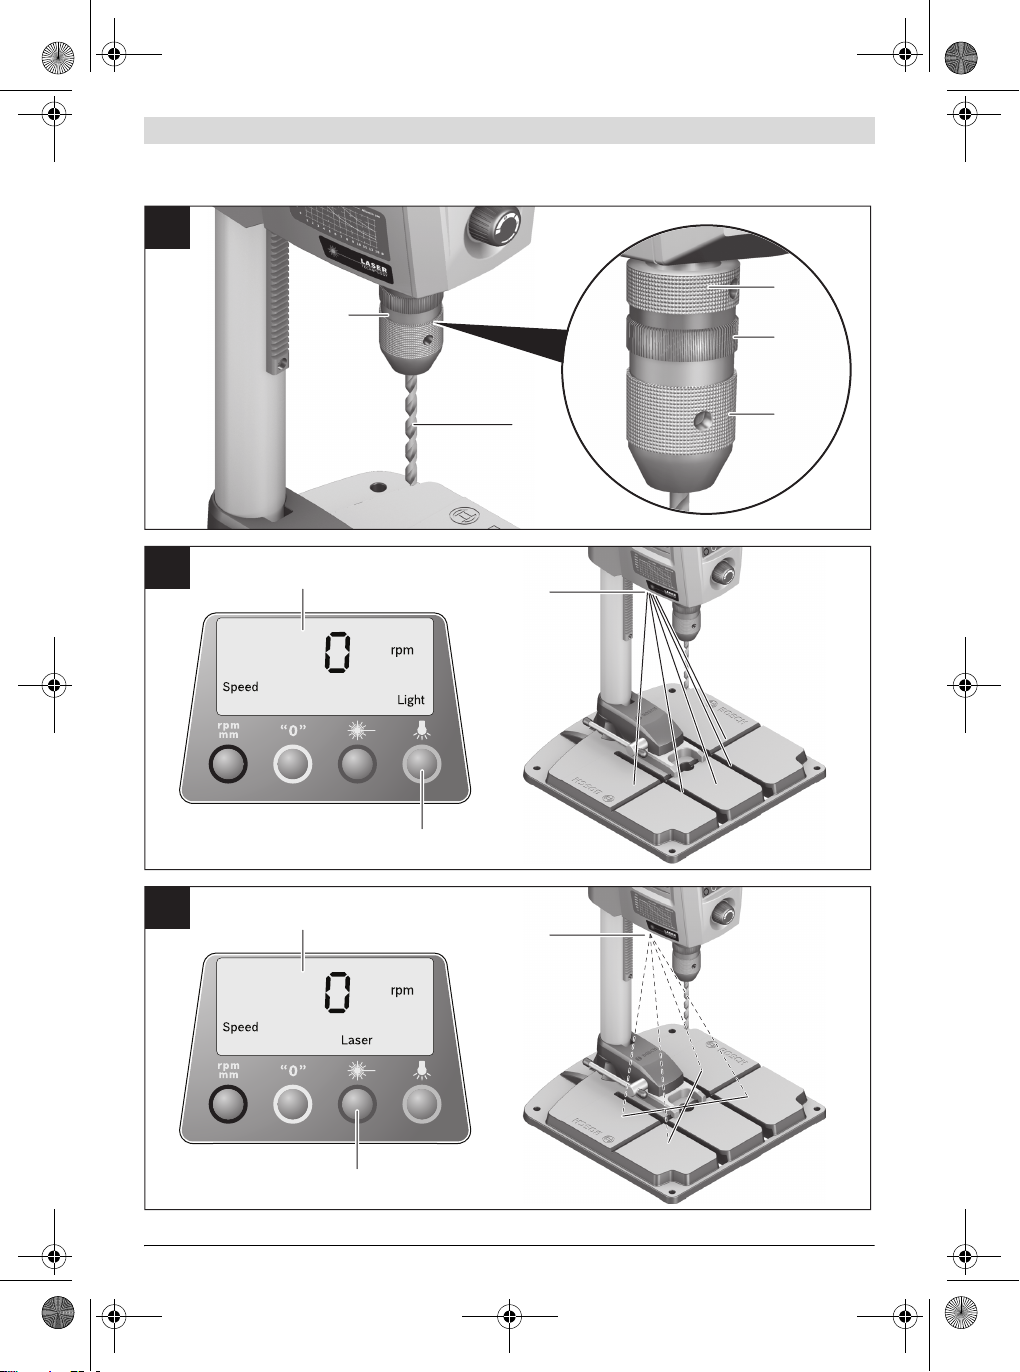
OBJ_BUCH-1183-004.book Page 6 Monday, October 24, 2011 11:35 AM
6 |
C
16
28
27
D
E
14
14
30
17
22
22
29
31
1 619 929 J54 | (24.10.11) Bosch Power Tools
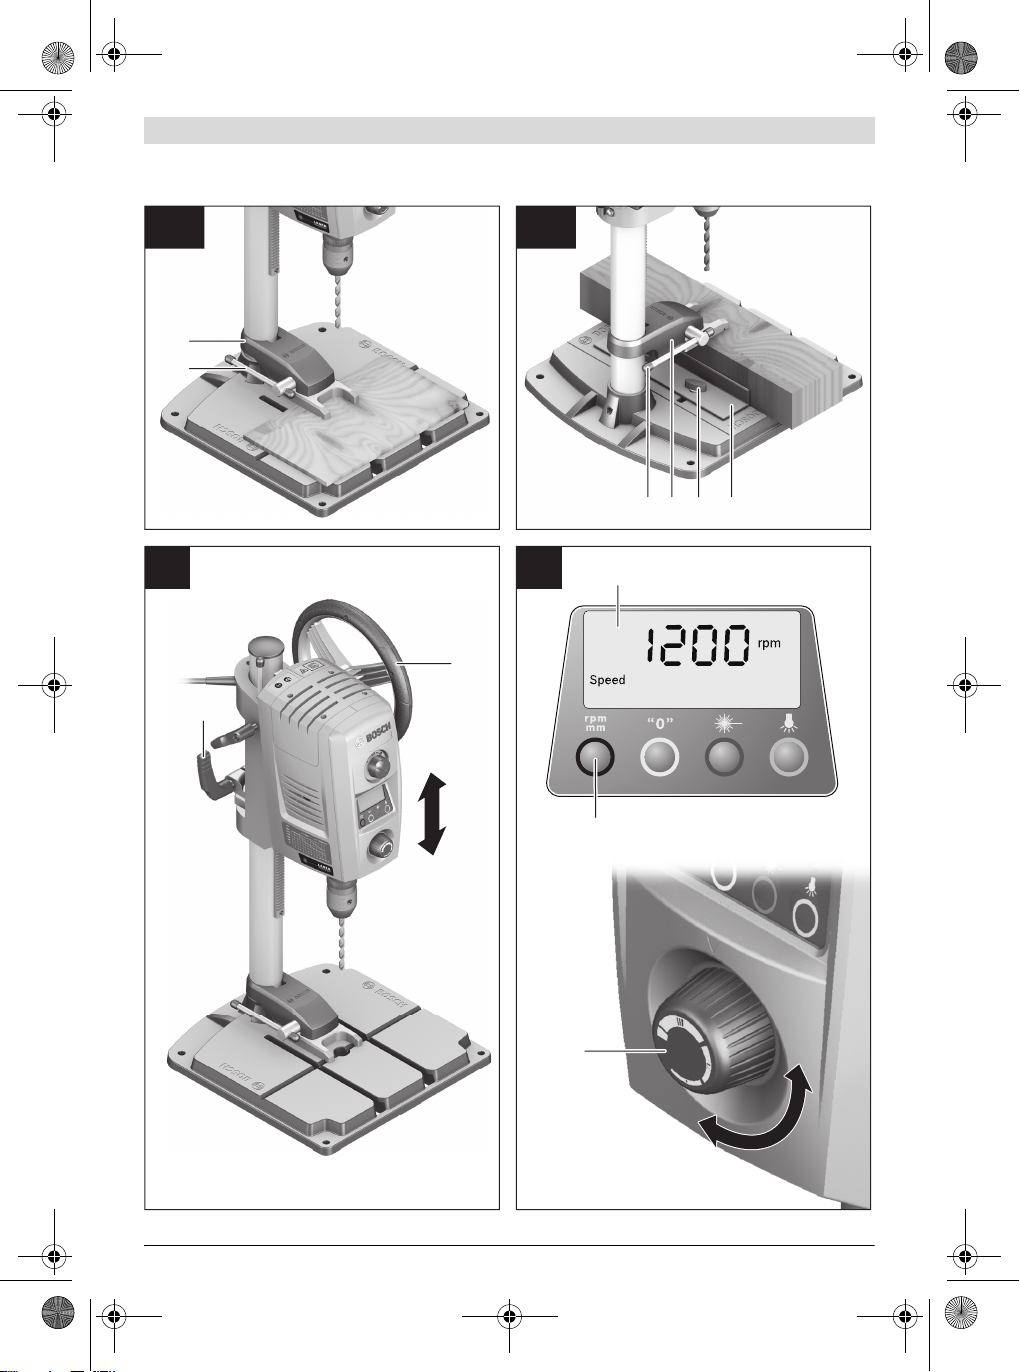
OBJ_BUCH-1183-004.book Page 7 Monday, October 24, 2011 11:35 AM
F2F1
3
2
| 7
32 1920
G
H
11
7
14
32
15
Bosch Power Tools 1 619 929 J54 | (24.10.11)
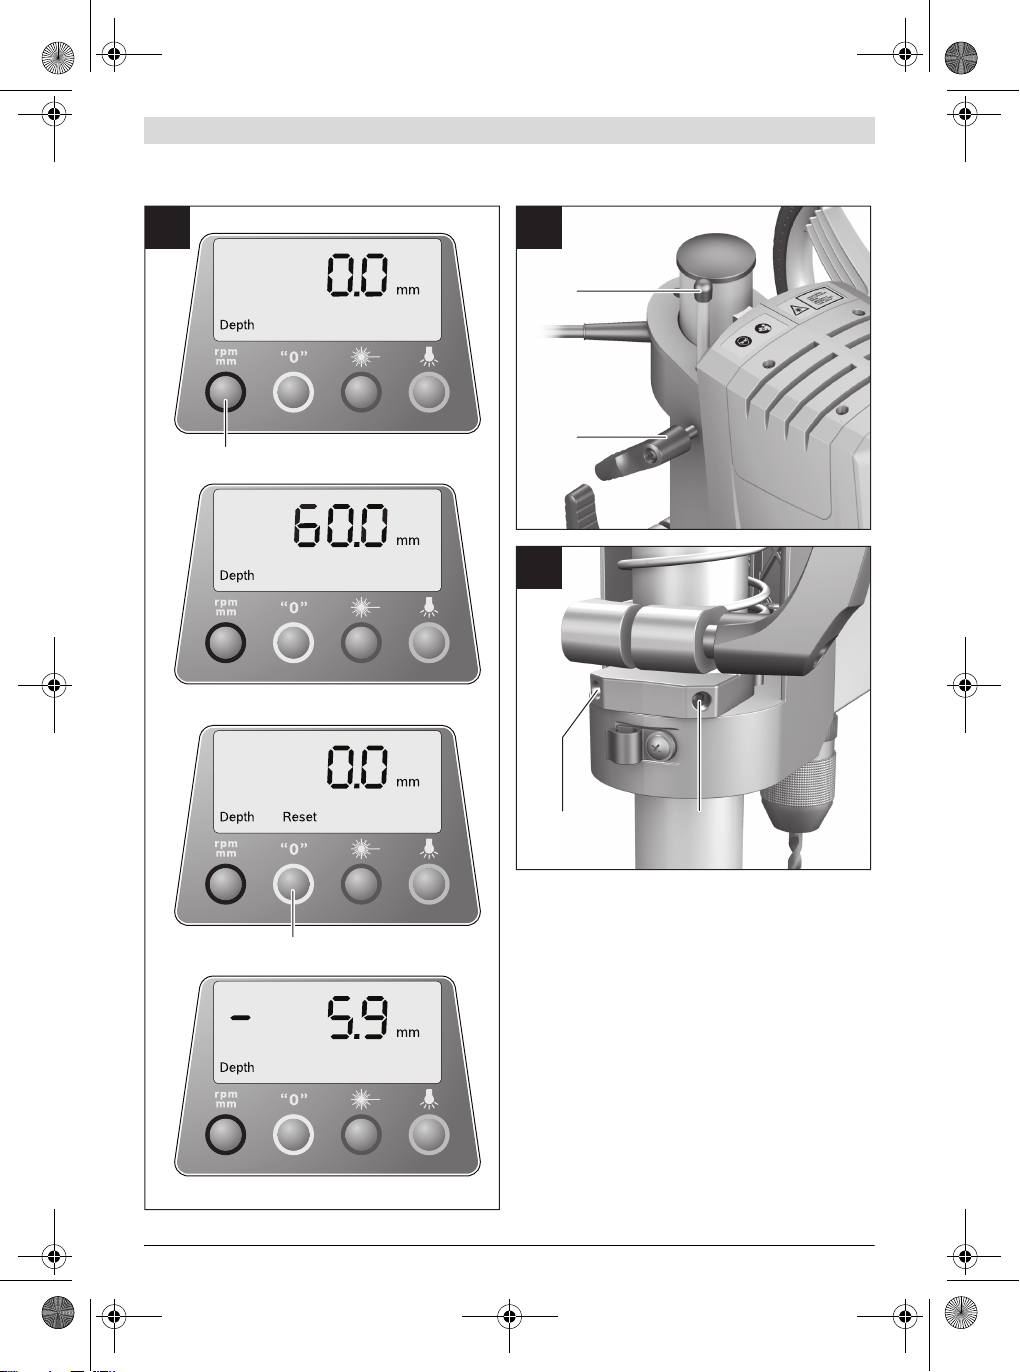
OBJ_BUCH-1183-004.book Page 8 Monday, October 24, 2011 11:35 AM
8 |
I
32
J
9
8
K
34
33
1 619 929 J54 | (24.10.11) Bosch Power Tools
34
OBJ_BUCH-1183-004.book Page 9 Monday, October 24, 2011 11:35 AM
Deutsch | 9
f Wenn der Betrieb des Elektrowerkzeuges in feuchter
Deutsch
Sicherheitshinweise
Allgemeine Sicherheitshinweise für Elektrowerkzeuge
ACHTUNG
Schlag, Verletzungs- und Brandgefahr folgende grundsätzliche Sicherheitsmaßnahmen zu beachten.
Lesen Sie alle diese Hinweise, bevor Sie dieses Elektrowerkzeug benutzen, und bewahren Sie die Sicherheitshinweise gut auf.
Der in den Sicherheitshinweisen verwendete Begriff „Elektrowerkzeug“ bezieht sich auf netzbetriebene Elektrowerkzeuge
(mit Netzkabel) und auf akkubetriebene Elektrowerkzeuge
(ohne Netzkabel).
Arbeitsplatzsicherheit
f Halten Sie Ihren Arbeitsbereich sauber und gut be-
leuchtet. Unordnung oder unbeleuchtete Arbeitsbereiche
können zu Unfällen führen.
f Arbeiten Sie mit dem Elektrowerkzeug nicht in explosi-
onsgefährdeter Umgebung, in der sich brennbare Flüssigkeiten, Gase oder Stäube befinden. Elektrowerkzeu-
ge erzeugen Funken, die den Staub oder die Dämpfe
entzünden können.
f Halten Sie Kinder und andere Personen während der
Benutzung des Elektrowerkzeugs fern. Bei Ablenkung
können Sie die Kontrolle über das Gerät verlieren.
Elektrische Sicherheit
f Der Anschlussstecker des Elektrowerkzeuges muss in
die Steckdose passen. Der Stecker darf in keiner Weise
verändert werden. Verwenden Sie keine Adapterstecker gemeinsam mit schutzgeerdeten Elektrowerkzeugen. Unveränderte Stecker und passende Steckdosen ver-
ringern das Risiko eines elektrischen Schlages.
f Vermeiden Sie Körperkontakt mit geerdeten Oberflä-
chen wie von Rohren, Heizungen, Herden und Kühlschränken. Es besteht ein erhöhtes Risiko durch elektri-
schen Schlag, wenn Ihr Körper geerdet ist.
f Halten Sie Elektrowerkzeuge von Regen oder Nässe
fern. Das Eindringen von Wasser in ein Elektrowerkzeug
erhöht das Risiko eines elektrischen Schlages.
f Zweckentfremden Sie das Kabel nicht, um das Elektro-
werkzeug zu tragen, aufzuhängen oder um den Stecker
aus der Steckdose zu ziehen. Halten Sie das Kabel fern
von Hitze, Öl, scharfen Kanten oder sich bewegenden
Geräteteilen. Beschädigte oder verwickelte Kabel erhö-
hen das Risiko eines elektrischen Schlages.
f Wenn Sie mit einem Elektrowerkzeug im Freien arbei-
ten, verwenden Sie nur Verlängerungskabel, die auch
für den Außenbereich geeignet sind. Die Anwendung ei-
nes für den Außenbereich geeigneten Verlängerungskabels verringert das Risiko eines elektrischen Schlages.
Bosch Power Tools 1 619 929 J54 | (24.10.11)
Beim Gebrauch von Elektrowerkzeugen
sind zum Schutz gegen elektrischen
Umgebung nicht vermeidbar ist, verwenden Sie einen
Fehlerstromschutzschalter. Der Einsatz eines Fehler-
stromschutzschalters vermindert das Risiko eines elektrischen Schlages.
Sicherheit von Personen
f Seien Sie aufmerksam, achten Sie darauf, was Sie tun,
und gehen Sie mit Vernunft an die Arbeit mit einem
Elektrowerkzeug. Benutzen Sie kein Elektrowerkzeug,
wenn Sie müde sind oder unter dem Einfluss von Drogen, Alkohol oder Medikamenten stehen. Ein Moment
der Unachtsamkeit beim Gebrauch des Elektrowerkzeuges
kann zu ernsthaften Verletzungen führen.
f Tragen Sie persönliche Schutzausrüstung und immer
eine Schutzbrille. Das Tragen persönlicher Schutzausrüs-
tung, wie Staubmaske, rutschfeste Sicherheitsschuhe,
Schutzhelm oder Gehörschutz, je nach Art und Einsatz des
Elektrowerkzeuges, verringert das Risiko von Verletzungen.
f Vermeiden Sie eine unbeabsichtigte Inbetriebnahme.
Vergewissern Sie sich, dass das Elektrowerkzeug ausgeschaltet ist, bevor Sie es an die Stromversorgung
und/oder den Akku anschließen, es aufnehmen oder
tragen. Wenn Sie beim Tragen des Elektrowerkzeuges den
Finger am Schalter haben oder das Gerät eingeschaltet an
die Stromversorgung anschließen, kann dies zu Unfällen
führen.
f Entfernen Sie Einstellwerkzeuge oder Schrauben-
schlüssel, bevor Sie das Elektrowerkzeug einschalten.
Ein Werkzeug oder Schlüssel, der sich in einem drehenden
Geräteteil befindet, kann zu Verletzungen führen.
f Vermeiden Sie eine abnormale Körperhaltung. Sorgen
Sie für einen sicheren Stand und halten Sie jederzeit
das Gleichgewicht. Dadurch können Sie das Elektrowerk-
zeug in unerwarteten Situationen besser kontrollieren.
f Tragen Sie geeignete Kleidung. Tragen Sie keine weite
Kleidung oder Schmuck. Halten Sie Haare, Kleidung
und Handschuhe fern von sich bewegenden Teilen. Lo-
ckere Kleidung, Schmuck oder lange Haare können von
sich bewegenden Teilen erfasst werden.
f Wenn Staubabsaug- und -auffangeinrichtungen mon-
tiert werden können, vergewissern Sie sich, dass diese
angeschlossen sind und richtig verwendet werden. Ver-
wendung einer Staubabsaugung kann Gefährdungen
durch Staub verringern.
Verwendung und Behandlung des Elektrowerkzeuges
f Überlasten Sie das Gerät nicht. Verwenden Sie für Ihre
Arbeit das dafür bestimmte Elektrowerkzeug. Mit dem
passenden Elektrowerkzeug arbeiten Sie besser und sicherer im angegebenen Leistungsbereich.
f Benutzen Sie kein Elektrowerkzeug, dessen Schalter
defekt ist. Ein Elektrowerkzeug, das sich nicht mehr ein-
oder ausschalten lässt, ist gefährlich und muss repariert
werden.
f Ziehen Sie den Stecker aus der Steckdose und/oder
entfernen Sie den Akku, bevor Sie Geräteeinstellungen
vornehmen, Zubehörteile wechseln oder das Gerät
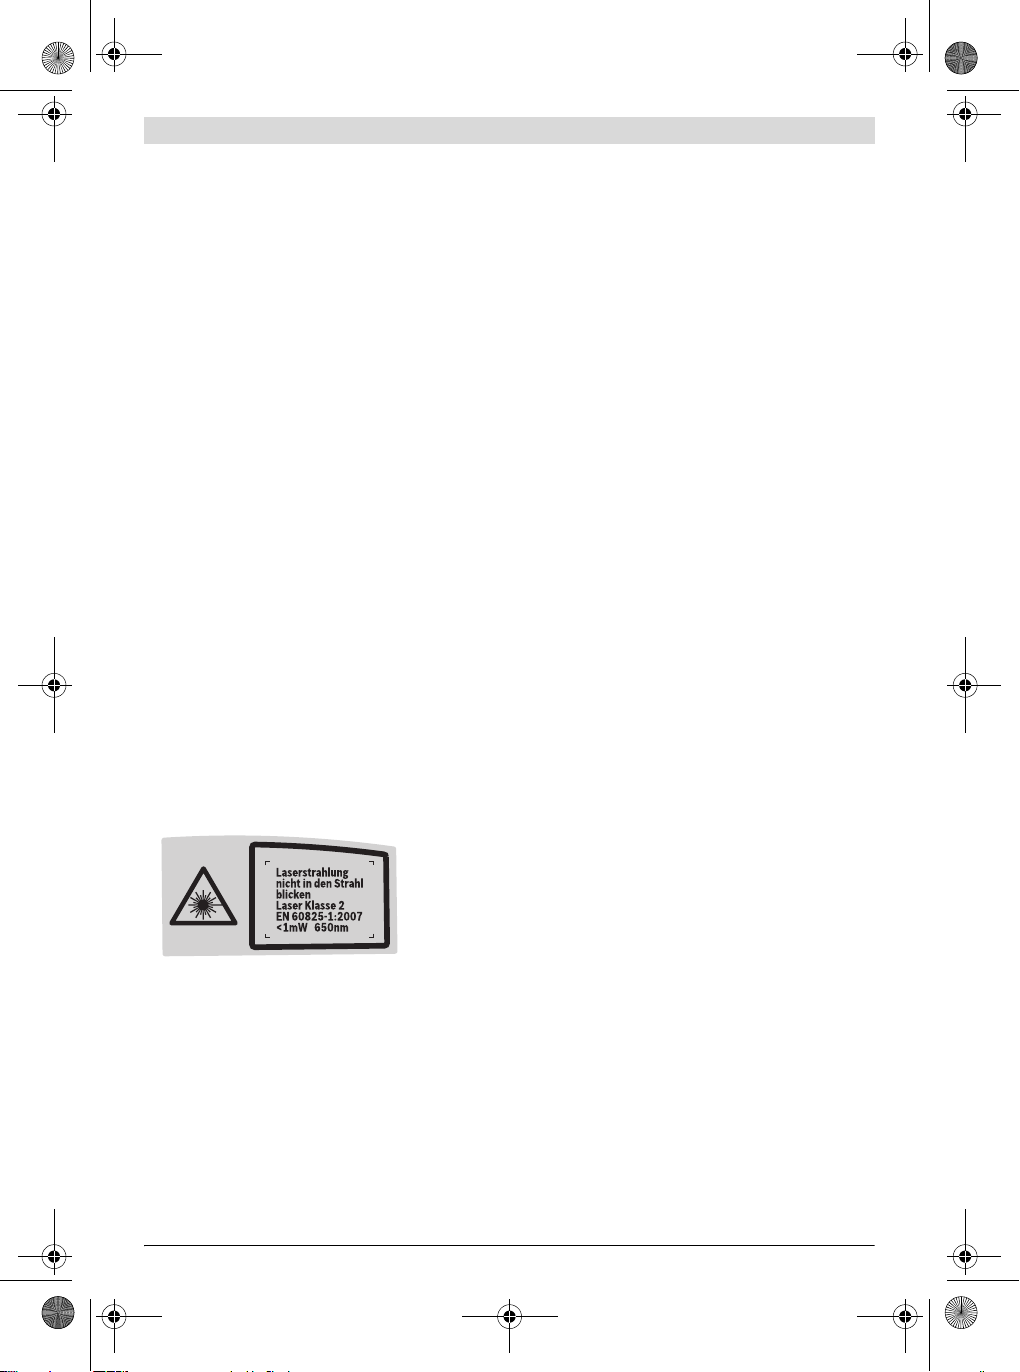
OBJ_BUCH-1183-004.book Page 10 Monday, October 24, 2011 11:35 AM
10 | Deutsch
weglegen. Diese Vorsichtsmaßnahme verhindert den un-
beabsichtigten Start des Elektrowerkzeuges.
f Bewahren Sie unbenutzte Elektrowerkzeuge außer-
halb der Reichweite von Kindern auf. Lassen Sie Personen das Gerät nicht benutzen, die mit diesem nicht vertraut sind oder diese Anweisungen nicht gelesen
haben. Elektrowerkzeuge sind gefährlich, wenn sie von
unerfahrenen Personen benutzt werden.
f Pflegen Sie Elektrowerkzeuge mit Sorgfalt. Kontrollie-
ren Sie, ob bewegliche Teile einwandfrei funktionieren
und nicht klemmen, ob Teile gebrochen oder so beschädigt sind, dass die Funktion des Elektrowerkzeuges beeinträchtigt ist. Lassen Sie beschädigte Teile vor
dem Einsatz des Gerätes reparieren. Viele Unfälle haben
ihre Ursache in schlecht gewarteten Elektrowerkzeugen.
f Halten Sie Schneidwerkzeuge scharf und sauber. Sorg-
fältig gepflegte Schneidwerkzeuge mit scharfen Schneidkanten verklemmen sich weniger und sind leichter zu führen.
f Verwenden Sie Elektrowerkzeug, Zubehör, Einsatz-
werkzeuge usw. entsprechend diesen Anweisungen.
Berücksichtigen Sie dabei die Arbeitsbedingungen und
die auszuführende Tätigkeit. Der Gebrauch von Elektro-
werkzeugen für andere als die vorgesehenen Anwendungen kann zu gefährlichen Situationen führen.
Service
f Lassen Sie Ihr Elektrowerkzeug nur von qualifiziertem
Fachpersonal und nur mit Original-Ersatzteilen reparieren. Damit wird sichergestellt, dass die Sicherheit des
Elektrowerkzeuges erhalten bleibt.
Sicherheitshinweise für Ständerbohrmaschinen
f Das Elektrowerkzeug wird mit einem Warnschild in
deutscher Sprache ausgeliefert (in der Darstellung des
Elektrowerkzeugs auf der Grafikseite mit Nummer 10
gekennzeichnet).
bohrenden Material angemessen sein. Bei einer falsch
eingestellten Drehzahl kann sich das Einsatzwerkzeug im
Werkstück verhaken.
f Führen Sie das Einsatzwerkzeug nur eingeschaltet ge-
gen das Werkstück. Es besteht sonst die Gefahr, dass
sich das Einsatzwerkzeug im Werkstück verhakt und das
Werkstück mitgenommen wird. Dies kann zu Verletzungen
führen.
f Kommen Sie mit Ihren Händen nicht in den Bohrbe-
reich, während das Elektrowerkzeug läuft. Beim Kon-
takt mit dem Einsatzwerkzeug besteht Verletzungsgefahr.
f Entfernen Sie niemals Bohrspäne aus dem Bohrbe-
reich, während das Elektrowerkzeug läuft. Führen Sie
die Antriebseinheit immer zuerst in die Ruheposition und
schalten Sie das Elektrowerkzeug aus.
f Entfernen Sie anfallende Bohrspäne nicht mit bloßen
Händen. Besonders durch heiße und scharfkantige Metall-
späne besteht Verletzungsgefahr.
f Brechen Sie lange Bohrspäne indem Sie den Bohrvor-
gang durch ein kurzes Zurückdrehen des Drehrads unterbrechen. Durch lange Bohrspäne besteht Verletzungs-
gefahr.
f Halten Sie Griffe trocken, sauber und frei von Öl und
Fett. Fettige, ölige Griffe sind rutschig und führen zum Ver-
lust der Kontrolle.
f Benutzen Sie Spannvorrichtungen, den Schnellspan-
ner oder einen Maschinenschraubstock (Zubehör), um
das Werkstück festzuspannen. Bearbeiten Sie keine
Werkstücke, die zu klein zum Festspannen sind. Wenn
Sie das Werkstück mit der Hand festhalten, können Sie es
nicht ausreichend gegen Verdrehen sichern und sich verletzen.
f Schalten Sie das Elektrowerkzeug sofort aus, wenn das
Einsatzwerkzeug blockiert. Das Einsatzwerkzeug blo-
ckiert, wenn:
– das Elektrowerkzeug überlastet wird oder
– es im zu bearbeitenden Werkstück verkantet.
f Fassen Sie das Einsatzwerkzeug nach dem Arbeiten
nicht an, bevor es abgekühlt ist. Das Einsatzwerkzeug
wird beim Arbeiten sehr heiß.
f Untersuchen Sie regelmäßig das Kabel und lassen Sie
ein beschädigtes Kabel nur von einer autorisierten
f Machen Sie Warnschilder am Elektrowerkzeug niemals
unkenntlich.
f Befestigen Sie das Elektrowerkzeug auf einer festen,
ebenen und waagerechten Fläche. Wenn das Elektro-
werkzeug verrutschen oder wackeln kann, kann das Einsatzwerkzeug nicht gleichmäßig und sicher geführt werden.
f Halten Sie die Arbeitsfläche bis auf das zu bearbeiten-
de Werkstück sauber. Scharfkantige Bohrspäne und Ge-
genstände können zu Verletzungen führen. Materialmischungen sind besonders gefährlich. Leichmetallstaub
kann brennen oder explodieren.
f Stellen Sie vor Arbeitsbeginn die richtige Drehzahl ein.
Die Drehzahl muss dem Bohrdurchmesser und dem zu
Kundendienststelle für Bosch-Elektrowerkzeuge reparieren. Ersetzen Sie beschädigte Verlängerungskabel.
Damit wird sichergestellt, dass die Sicherheit des Elektrowerkzeuges erhalten bleibt.
f Bewahren Sie das unbenutzte Elektrowerkzeug sicher
auf. Der Lagerplatz muss trocken und abschließbar
sein. Dies verhindert, dass das Elektrowerkzeug durch die
Lagerung beschädigt oder von unerfahrenen Personen bedient wird.
f Richten Sie den Laserstrahl nicht auf Personen oder
Tiere und blicken Sie nicht selbst in den Laserstrahl.
Dieses Elektrowerkzeug erzeugt Laserstrahlung der Laserklasse 2 gemäß EN 60825-1. Dadurch können Sie Personen blenden.
1 619 929 J54 | (24.10.11) Bosch Power Tools
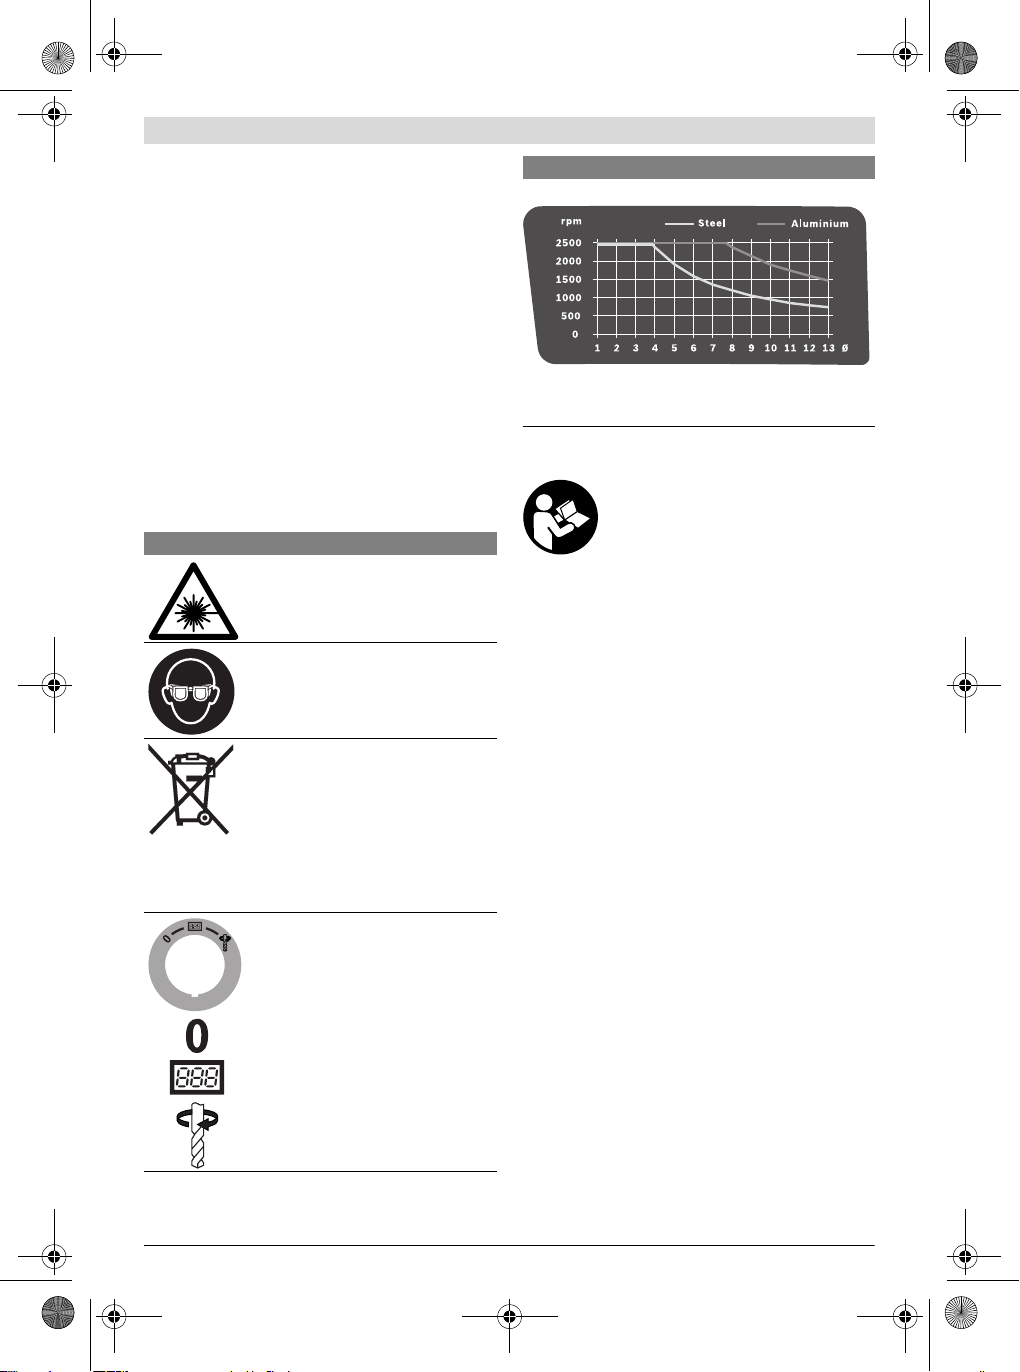
OBJ_BUCH-1183-004.book Page 11 Monday, October 24, 2011 11:35 AM
Deutsch | 11
f Tauschen Sie den eingebauten Laser nicht gegen einen
Laser anderen Typs aus. Von einem nicht zu diesem Elek-
trowerkzeug passenden Laser können Gefahren für Personen ausgehen.
f Verlassen Sie das Werkzeug nie, bevor es vollständig
zum Stillstand gekommen ist. Nachlaufende Einsatz-
werkzeuge können Verletzungen verursachen.
f Benutzen Sie das Elektrowerkzeug nicht mit beschä-
digtem Kabel. Berühren Sie das beschädigte Kabel
nicht und ziehen Sie den Netzstecker, wenn das Kabel
während des Arbeitens beschädigt wird. Beschädigte
Kabel erhöhen das Risiko eines elektrischen Schlages.
Symbole
Die nachfolgenden Symbole können für den Gebrauch Ihres
Elektrowerkzeugs von Bedeutung sein. Prägen Sie sich bitte
die Symbole und ihre Bedeutung ein. Die richtige Interpretation der Symbole hilft Ihnen, das Elektrowerkzeug besser und
sicherer zu gebrauchen.
Symbole und ihre Bedeutung
Laserstrahlung
nicht in den Strahl blicken
Laser Klasse 2
Tragen Sie eine Schutzbrille.
Symbole und ihre Bedeutung
Drehzahldiagramm
Das Diagramm zeigt die einzustellende Drehzahl (rpm) in
Abhängigkeit vom Bohrer-Durchmesser (Ø in mm) für die
Werkstoffe Stahl (Steel) und Aluminium (Aluminium).
Produkt- und Leistungsbeschreibung
Lesen Sie alle Sicherheitshinweise und Anweisungen. Versäumnisse bei der Einhaltung
der Sicherheitshinweise und Anweisungen
können elektrischen Schlag, Brand und/oder
schwere Verletzungen verursachen.
Bestimmungsgemäßer Gebrauch
Das Elektrowerkzeug ist zusammen mit den geeigneten Einsatzwerkzeugen bestimmt zum Bohren in Holz, Metall und
Kunststoff.
Abgebildete Komponenten
Die Nummerierung der abgebildeten Komponenten bezieht
sich auf die Darstellung des Elektrowerkzeuges auf den Gra-
Werfen Sie Elektrowerkzeuge nicht in den
Hausmüll!
Nur für EU-Länder:
Gemäß der Europäischen Richtlinie
2002/96/EG über Elektro- und ElektronikAltgeräte und ihrer Umsetzung in nationales Recht müssen
nicht mehr gebrauchsfähige Elektrowerkzeuge getrennt gesammelt und einer umweltgerechten Wiederverwertung zugeführt werden.
Ein-/Ausschalter
Ausschalten
Display in Betrieb nehmen
Bohren
Bosch Power Tools 1 619 929 J54 | (24.10.11)
fikseiten.
1 Grundplatte
2 Schnellspannhebel
3 Schnellspanner
4 Bohrsäule
5 Zahnstange
6 Drehzahldiagramm
7 Klemmhebel der Höheneinstellung
8 Klemmhebel des Tiefenanschlags
9 Tiefenanschlag
10 Laser-Warnschild
11 Drehrad
12 Antriebseinheit
13 Ein-/Ausschalter mit Quick-Stop-Funktion
14 Display
15 Drehzahlregler
16 Schnellspannbohrfutter
17 Einsatzwerkzeug*
18 Bohrungen für Montage
19 Parallelanschlag
20 Flügelschrauben des Parallelanschlags
21 Gangwahlschalter
22 Beleuchtungs- und Lasereinheit
23 Innensechskantschlüssel (4 mm)
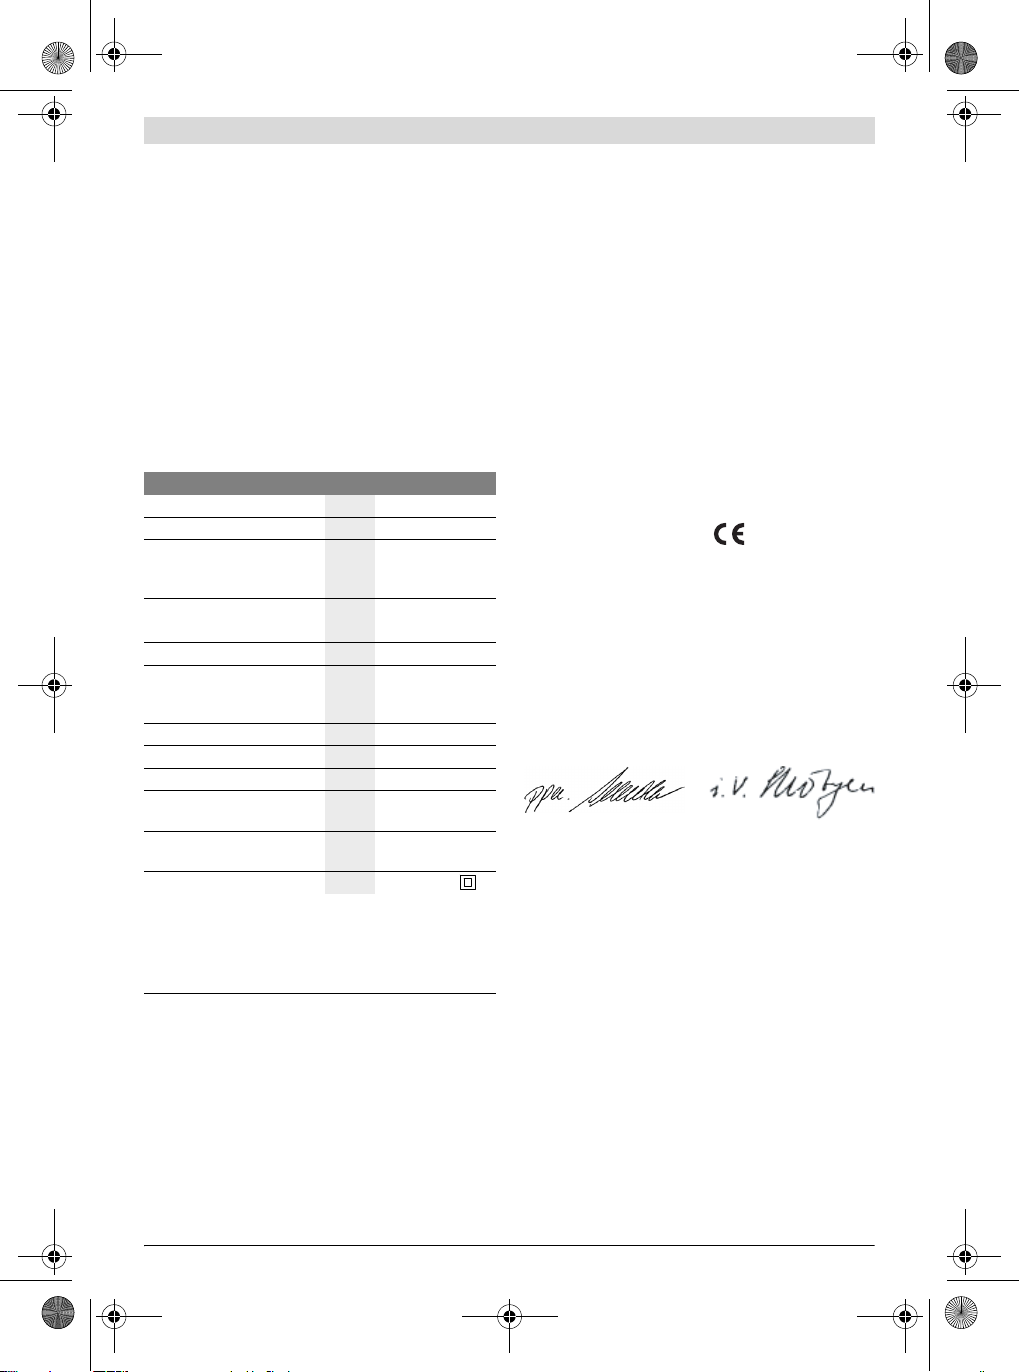
OBJ_BUCH-1183-004.book Page 12 Monday, October 24, 2011 11:35 AM
12 | Deutsch
24 Befestigungsschraube der Bohrsäule
25 Führungszapfen der Bohrsäule
26 Führungsnut der Grundplatte
27 Sicherungsring
28 Haltering
29 Spannhülse
30 Taste Beleuchtung
31 Taste Laserkreuz
32 Taste Drehzahlanzeige/Bohrtiefenanzeige
33 Taste Nullpunkt
34 Stellschrauben für die Klemmkraft der Bremse
*Abg ebildetes oder beschriebenes Zubehör gehört nicht zum
Standard-Lieferumfang. Das vollständige Zubehör finden Sie in
unserem Zubehörprogramm.
Technische Daten
Ständerbohrmaschine PBD 40
Sachnummer
Nennaufnahmeleistung
Leerlaufdrehzahl
– 1. Gang
– 2. Gang
Lasertyp
Laserklasse
max. Bohr-Ø
–Stahl
–Holz
Bohrfutterspannbereich
Bohrhub max.
Gesamthöhe
min
min
3 603 M07 0..
W 710
-1
-1
200– 850
600 –2500
nm
mW
mm
mm
mm 1,5–13
mm 90
mm 650
werkzeugen miteinander verwendet werden. Er eignet sich
auch für eine vorläufige Einschätzung der Schwingungsbelastung.
Der angegebene Schwingungspegel repräsentiert die hauptsächlichen Anwendungen des Elektrowerkzeugs. Wenn allerdings das Elektrowerkzeug für andere Anwendungen, mit abweichenden Einsatzwerkzeugen oder ungenügender Wartung
eingesetzt wird, kann der Schwingungspegel abweichen.
Dies kann die Schwingungsbelastung über den gesamten Arbeitszeitraum deutlich erhöhen.
Für eine genaue Abschätzung der Schwingungsbelastung sollten auch die Zeiten berücksichtigt werden, in denen das Gerät abgeschaltet ist oder zwar läuft, aber nicht tatsächlich im
Einsatz ist. Dies kann die Schwingungsbelastung über den gesamten Arbeitszeitraum deutlich reduzieren.
Legen Sie zusätzliche Sicherheitsmaßnahmen zum Schutz
des Bedieners vor der Wirkung von Schwingungen fest wie
zum Beispiel: Wartung von Elektrowerkzeug und Einsatzwerkzeugen, Warmhalten der Hände, Organisation der Arbeitsabläufe.
Konformitätserklärung
Wir erklären in alleiniger Verantwortung, dass das unter
„Technische Daten“ beschriebene Produkt mit den folgenden
Normen oder normativen Dokumenten übereinstimmt:
650
EN 61029, EN 60825-1 gemäß den Bestimmungen der
Richtlinien 2011/65/EU, 2004/108/EG, 2006/42/EG.
<1
Technische Unterlagen (2006/42/EG) bei:
2
Robert Bosch GmbH, PT/ETM9,
D-70745 Leinfelden-Echterdingen
13
Dr. Egbert Schneider
40
Senior Vice President
Engineering
Dr. Eckerhard Strötgen
Engineering Director
PT/ESI
Maße Grundplatte
(Breite x Tiefe x Höhe)
Gewicht entsprechend EPTAProcedure 01/2003
Schutzklasse
Die Angaben gelten für eine Nennspannung [U] von 230 V. Bei abweichenden Spannungen und in länderspez ifischen Ausführungen können
diese Angaben variieren.
Bitte beachten Sie die Sachnummer auf dem Typenschild Ihres Elektrowerkzeugs. Die Handelsbezeichnungen einzelner Elektrowerkzeuge
können variieren.
Geräusch-/Vibrationsinformation
Messwerte für Geräusch ermittelt entsprechend EN 61029.
Der A-bewertete Geräuschpegel des Elektrowerkzeugs be-
trägt typischerweise: Schalldruckpegel 77 dB(A); Schallleistungspegel 90 dB(A). Unsicherheit K=3 dB.
Gehörschutz tragen!
Schwingungsgesamtwerte a
gen) und Unsicherheit K ermittelt entsprechend EN 61029:
<2,5m/s2, K= 1,5 m/s2.
a
h
Der in diesen Anweisungen angegebene Schwingungspegel
ist entsprechend einem in EN 61029 genormten Messverfah-
mm 330 x 350 x 30
kg 11,2
(Vektorsumme dreier Richtun-
h
Robert Bosch GmbH, Power Tools Division
D-70745 Leinfelden-Echterdingen
Leinfelden, 24.10.2011
/II
Montage
f Vermeiden Sie ein unabsichtliches Starten des Elektro-
werkzeugs. Während der Montage und bei allen Arbeiten an dem Elektrowerkzeug darf der Netzstecker
nicht an die Stromversorgung angeschlossen sein.
Lieferumfang
Prüfen Sie vor der Erst-Inbetriebnahme des Elektrowerkzeugs, ob alle unten aufgeführten Teile mitgeliefert wurden:
– Antriebseinheit 12 mit Bohrsäule 4
– Grundplatte 1
– Schnellspanner 3
– Parallelanschlag 19
– Innensechskantschlüssel 23
Hinweis: Überprüfen Sie das Elektrowerkzeug auf eventuelle
Beschädigungen.
ren gemessen worden und kann für den Vergleich von Elektro-
1 619 929 J54 | (24.10.11) Bosch Power Tools
OBJ_BUCH-1183-004.book Page 13 Monday, October 24, 2011 11:35 AM
Vor dem weiterem Gebrauch des Elektrowerkzeugs müssen
Sie Schutzeinrichtungen oder leicht beschädigte Teile sorgfältig auf ihre einwandfreie und bestimmungsgemäße Funktion untersuchen. Überprüfen Sie, ob die beweglichen Teile
einwandfrei funktionieren und nicht klemmen, oder ob Teile
beschädigt sind. Sämtliche Teile müssen richtig montiert sein
und alle Bedingungen erfüllen, um den einwandfreien Betrieb
zu gewährleisten.
Beschädigte Schutzvorrichtungen und Teile müssen Sie sachgerecht durch eine anerkannte Fachwerkstatt reparieren
oder auswechseln lassen.
Montage von Einzelteilen (siehe Bild A)
Vor der ersten Inbetriebnahme müssen Sie das Elektrowerkzeug wie folgt zusammenbauen:
– Schieben Sie den Schnellspanner 3 über die Bohrsäule 4.
– Setzen Sie die Bohrsäule 4 so in die Grundplatte 1 ein,
dass der Führungszapfen 25 von der Führungsnut 26 aufgenommen wird.
– Ziehen Sie die Befestigungsschraube 24 mit dem In-
nensechskantschlüssel 23 fest an.
Montage auf einer Arbeitsfläche (siehe Bild B)
f Zur Gewährleistung einer sicheren Handhabung müs-
sen Sie das Elektrowerkzeug vor dem Gebrauch auf eine ebene und stabile Arbeitsfläche (z.B. Werkbank)
montieren.
– Befestigen Sie das Elektrowerkzeug mit einer geeigneten
Schraubverbindung auf der Arbeitsfläche. Dazu dienen die
Bohrungen 18.
Staub-/Späneabsaugung
Stäube von Materialien wie bleihaltigem Anstrich, einigen
Holzarten, Mineralien und Metall können gesundheitsschädlich sein. Berühren oder Einatmen der Stäube können allergische Reaktionen und/oder Atemwegserkrankungen des Benutzers oder in der Nähe befindlicher Personen hervorrufen.
Bestimmte Stäube wie Eichen- oder Buchenstaub gelten als
krebserzeugend, besonders in Verbindung mit Zusatzstoffe n
zur Holzbehandlung (Chromat, Holzschutzmittel). Asbesthaltiges Material darf nur von Fachleuten bearbeitet werden.
– Benutzen Sie möglichst eine für das Material geeignete
Staubabsaugung.
– Sorgen Sie für gute Belüftung des Arbeitsplatzes.
– Es wird empfohlen, eine Atemschutzmaske mit Filterklas-
se P2 zu tragen.
Beachten Sie in Ihrem Land gültige Vorschriften für die zu be-
arbeitenden Materialien.
f Vermeiden Sie Staubansammlungen am Arbeitsplatz.
Stäube können sich leicht entzünden.
Werkzeugwechsel (siehe Bild C)
Die Antriebseinheit 12 wird ab Werk mit einem zweihülsigen
Schnellspannbohrfutter 16 ausgeliefert.
Einsatzwerkzeug einsetzen
– Drehen Sie den Sicherungsring 27 in Richtung „UNLOCK“.
– Drehen Sie die Spannhülse 29 gegen den Uhrzeigersinn
bis das Einsatzwerkzeug 17 eingesetzt werden kann.
– Setzen Sie das Einsatzwerkzeug 17 ganz ein, halten Sie es
in der Werkzeugaufnahme und drehen Sie die Spannhülse
29 im Uhrzeigersinn von Hand kräftig zu.
Halten Sie dabei den Haltering 28 fest.
– Drehen Sie den Sicherungsring 27 in Richtung „LOCK“
Hinweis: Beim Einsetzen von kleinen Bohrern stellen Sie die
Werkzeugaufnahme vorher auf den ungefähren Bohrdurchmesser ein. Es besteht sonst die Gefahr, dass der Bohrer
nicht richtig zentriert eingesetzt wird.
Einsatzwerkzeug entnehmen
– Drehen Sie den Sicherungsring 27 in Richtung „UNLOCK“.
– Drehen Sie die Spannhülse 29 gegen den Uhrzeigersinn
bis das Einsatzwerkzeug 17 entnommen werden kann.
Betrieb
f Ziehen Sie vor allen Arbeiten am Elektrowerkzeug den
Netzstecker aus der Steckdose.
f Ziehen Sie nach jeder Verstellung am Elektrowerkzeug
Schrauben und Klemmhebel wieder fest.
Arbeitsvorbereitung
Arbeitsbereich beleuchten (siehe Bild D)
Sorgen Sie dafür, dass der unmittelbare Arbeitsbereich ausreichend beleuchtet ist.
– Drehen Sie zur Inbetriebnahme des Displays 14 den
Ein-/Ausschalter 13 in Position .
– Schalten Sie die Beleuchtungseinheit 22 mit der Taste 30
ein.
Im Display 14 wird die Anzeige „Light“ angezeigt.
Werkstück richtig positionieren (siehe Bild E)
Ein Laserkreuz zeigt Ihnen die exakte Bohrstelle an.
– Drehen Sie zur Inbetriebnahme des Displays 14 den
Ein-/Ausschalter 13 in Position .
– Schalten Sie die Lasereinheit 22 mit der Taste 31 ein.
Im Display 14 wird die Anzeige „Laser“ angezeigt.
– Richten Sie Ihre Markierung auf dem Werkstück am Laser-
kreuz aus.
Werkstück befestigen (siehe Bilder F1 –F2)
Zur Gewährleistung einer optimalen Arbeitssicherheit müssen Sie das Werkstück immer festspannen.
Bearbeiten Sie keine Werkstücke, die zu klein zum Festspannen sind.
– Positionieren Sie das Werkstück mit Hilfe des Laserkreu-
zes (siehe „Werkstück richtig positionieren“, Seite 13).
– Lösen Sie den Schnellspannhebel 2 am Schnellspanner 3.
– Lassen Sie den Schnellspanner auf dem Werkstück auflie-
gen. Drehen sie den Schnellspannhebel 2 in Uhrzeigerrich-
tung, bis das Werkstück fest verspannt ist.
– Lösen Sie nach dem Bohren den Schnellspannhebel 2 ent-
gegen dem Uhrzeigersinn.
– Drehen Sie den Schnellspanner 3 zur Seite und entneh-
men Sie das Werkstück.
Der Parallelanschlag 19 dient dazu, größere Werkstücke ge-
gen Verdrehen zu sichern.
Deutsch | 13
Bosch Power Tools 1 619 929 J54 | (24.10.11)
OBJ_BUCH-1183-004.book Page 14 Monday, October 24, 2011 11:35 AM
14 | Deutsch
– Lösen Sie die Flügelschrauben 20 am Parallelanschlag 19
und setzen Sie den Parallelanschlag in die Nuten der
Grundplatte 1 ein.
– Ziehen Sie die Flügelschrauben wieder fest.
– Befestigen Sie das Werkstück mit Hilfe des Schnellspan-
ners 3.
Hinweis: Verwenden Sie zum Festspannen von kleinen Werk-
stücken einen Maschinenschraubstock (z.B. Bosch MS 80).
Höhe der Antriebseinheit einstellen (siehe Bild G)
f Verstellen Sie die Höhe der Antriebseinheit nicht wäh-
rend des Betriebs. Betätigen Sie den Klemmhebel 7
nur, wenn das Drehrad in der Ausgangsposition ist. Die-
se Vorsichtsmaßnahme beugt möglichen Verletzungen
vor.
Die Höhe der Antriebseinheit 12 kann je nach Länge des Ein-
satzwerkzeugs und Größe des Werkstücks eingestellt werden.
Hinweis: Nach dem Einstellen der Höhe der Antriebseinheit
muss die Positionierung des Werkstücks mit Hilfe des Laserkreuzes erneut überprüft werden. Gegebenenfalls müssen
Sie das Werkstück neu ausrichten.
Eine Bremse verhindert, dass bei geöffnetem Klemmhebel 7
die Antriebseinheit 12 unbeabsichtigt absinkt. Überprüfen
Sie gelegentlich die Klemmkraft der Bremse und stellen Sie
sie gegebenenfalls nach (siehe „Bremse der Antriebseinheit
einstellen“, Seite 16).
– Stellen Sie sicher, dass das Drehrad 11 in der Ausgangs-
position ist.
– Fassen Sie mit einer Hand an das Drehrad 11 und lösen Sie
mit der anderen Hand den Klemmhebel 7 gegen den Uhr-
zeigersinn.
– Stellen Sie mit Hilfe des Drehrads die Höhe der Antriebs-
einheit 12 entsprechend des eingesetzten Einsatzwerk-
zeugs und der Werkstückhöhe ein.
– Ziehen Sie den Klemmhebel 7 im Uhrzeigersinn wieder
fest.
Hinweis: Der Klemmhebel 7 hat einen Freilauf, um ihn i n eine
ergonomisch günstige oder platzsparende Position drehen zu
können.
Ziehen Sie bei angezogenem Klemmhebel den Griff von der
Antriebseinheit weg, drehen Sie ihn in die gewünschte Position und lassen Sie ihn wieder einfedern.
Inbetriebnahme
f Beachten Sie die Netzspannung! Die Spannung der
Stromquelle muss mit den Angaben auf dem Typen-
schild des Elektrowerkzeuges übereinstimmen. Mit
230 V gekennzeichnete Elektrowerkzeuge können
auch an 220 V betrieben werden.
Einschalten
– Drehen Sie zur Inbetriebnahme des Displays 14 den
Ein-/Ausschalter 13 in Position .
– Drehen Sie zur Inbetriebnahme des Elektrowerkzeugs
den Ein-/Ausschalter 13 in Position .
Jetzt können Sie die Drehzahl einstellen (siehe „Drehzahl
einstellen“, Seite 14).
Ausschalten
– Drehen Sie zum Beenden des Bohrens den Ein-/Ausschal-
ter 13 in Position .
oder
– Drehen Sie zum kompletten Ausschalten des Elektro-
werkzeugs den Ein-/Ausschalter 13 in Position „0“.
Hinweis: Das Elektrowerkzeug ist jetzt stromlos. Alle aktuellen Einstellungen für Drehzahl und Bohrtiefe werden gelöscht.
Quick-Stop-Funktion
Das Elektrowerkzeug kann durch die Quick-Stop-Funktion
schnell ausgeschaltet werden, wenn sich z.B. das Einsatzwerkzeug im Werkstück verhakt hat.
– Drücken Sie kurz und schnell auf den Ein-/Ausschalter 13.
Das Elektrowerkzeug und das Display werden sofort ausgeschaltet.
Hinweis: Das Elektrowerkzeug ist jetzt stromlos. Alle aktuellen Einstellungen für Drehzahl und Bohrtiefe werden gelöscht.
– Um danach das Elektrowerkzeug wieder in Betrieb zu neh-
men, müssen Sie den Ein-/Ausschalter 13 in Position „0“
zurückdrehen.
Danach können Sie das Elektrowerkzeug wieder einschalten (Ein-/Ausschalter 13 in Position ).
Wiederanlaufschutz
Der Wiederanlaufschutz verhindert das unkontrollierte Anlaufen des Elektrowerkzeugs nach einem Stromausfall (z.B. Ziehen des Netzsteckers während des Betriebs).
– Um danach das Elektrowerkzeug wieder in Betrieb zu neh-
men, müssen Sie den Ein-/Ausschalter 13 in Position
zurückdrehen.
Danach können Sie das Elektrowerkzeug wieder einschalten (Ein-/Ausschalter 13 in Position ).
Temperaturabhängiger Überlastschutz
Bei bestimmungsgemäßen Gebrauch kann das Elektrowerkzeug nicht überlastet werden. Bei zu starker Belastung oder
Überschreitung der zulässigen Betriebstemperatur schaltet
die Elektronik das Elektrowerkzeug ab, bis dieses wieder im
optimalen Betriebstemperaturbereich ist.
– Um danach das Elektrowerkzeug wieder in Betrieb zu neh-
men, müssen Sie den Ein-/Ausschalter 13 in Position
zurückdrehen.
Danach können Sie das Elektrowerkzeug wieder einschalten (Ein-/Ausschalter 13 in Position ).
Drehzahl einstellen
f Stellen Sie vor Arbeitsbeginn die richtige Drehzahl ein.
Die Drehzahl muss dem Bohrdurchmesser und dem zu
bohrenden Material angemessen sein. Bei einer falsch
eingestellten Drehzahl kann sich das Einsatzwerkzeug im
Werkstück verhaken.
Orientieren Sie sich beim Einstellen der angemessenen Drehzahl an dem Drehzahldiagramm 6.
Es zeigt die einzustellende Drehzahl (rpm) in Abhängigkeit
vom Bohrer-Durchmesser (Ø in mm) für die Werkstoffe Stahl
(Steel) und Aluminium (Aluminium).
1 619 929 J54 | (24.10.11) Bosch Power Tools
OBJ_BUCH-1183-004.book Page 15 Monday, October 24, 2011 11:35 AM
Mechanische Gangwahl
Betätigen Sie den Gangwahlschalter 21 nur bei Stillstand
des Elektrowerkzeuges.
Mit dem Gangwahlschalter 21 können 2 Drehzahlbereiche
vorgewählt werden.
Gang 1:
Niedriger Drehzahlbereich; zum Arbeiten mit großen Bohrdurchmessern.
Gang 2:
Hoher Drehzahlbereich; zum Arbeiten mit kleinen Bohrdurchmessern.
– Drehen Sie den Gangwahlschalter 21 in die gewünschte
Position.
Hinweis: Lässt sich der Gangwahlschalter 21 nicht bis zum
Anschlag drehen, verdrehen Sie das Bohrfutter mit dem Bohrer etwas.
Elektronische Drehzahlregelung (siehe Bild H)
Mit Hilfe des Drehzahlreglers 15 können Sie die Drehzahl des
Elektrowerkzeugs stufenlos einstellen.
– Drehen Sie zur Inbetriebnahme des Elektrowerkzeugs
den Ein-/Ausschalter 13 in Position .
– Schalten Sie mit Hilfe der Taste 32 den Anzeigebereich
des Displays auf „Speed“.
– Verdrehen Sie den Drehzahlregler 15 solange, bis im Dis-
play 14 die gewünschte Drehzahl angezeigt wird.
Arbeitshinweise
Allgemeine Hinweise
Vergewissern Sie sich vor dem Bohren, dass der Schnellspanner 3, der Parallelanschlag 19 oder der Maschinenschraubstock (Zubehör) fest angezogen sind.
Beim Austritt des Bohrers aus dem Werkstück kann sich der
Bohrer im Werkstück verhaken und das Werkstück mitgenommen werden. Verlangsamen Sie daher am Ende der Bohrung
die Vorschubbewegung.
Falls das Einsatzwerkzeug blockiert, schalten Sie das Elektrowerkzeug aus. Lassen Sie das Einsatzwerkzeug und das Werkstück abkühlen. Entfernen Sie die Bohrspäne. Ermitteln Sie
die Ursache für das Verhaken des Einsatzwerkzeugs und beheben Sie diese.
Spezielle Hinweise zum Bohren in Metall
Körnen Sie Werkstücke aus Metall zum Bohren an.
Bohren Sie bei Bohrdurchmessern über 10 mm vor.
Verwenden Sie zum Kühlen der Bohrstelle Schneidöl (z.B.
Bosch Universalschneidöl), um besser arbeiten zu können.
Position des Bedieners
f Stellen Sie sich vor das Elektrowerkzeug. Damit haben
Sie immer eine gute Sicht auf die Bohrstelle.
– Halten Sie Hände und Finger vom rotierenden Einsatz-
werkzeug fern.
– Überkreuzen Sie Ihre Arme nicht vor der Antriebseinheit.
Bohren
– Legen Sie das Werkstück auf die Grundplatte 1.
– Stellen Sie die Höhe der Antriebseinheit ein (siehe „Höhe
der Antriebseinheit einstellen“, Seite 14).
– Richten Sie das Werkstück mit Hilfe des Laserkreuzes aus
(siehe „Werkstück richtig positionieren“, Seite 13).
– Spannen Sie das Werkstück fest (siehe „Werkstück befes-
tigen“, Seite 13).
– Stellen Sie eine angemessene Drehzahl ein (siehe „Dreh-
zahl einstellen“, Seite 14).
– Schalten Sie das Elektrowerkzeug ein.
– Drehen Sie zum Bohren das Drehrad 11 mit gleichmäßi-
gem Vorschub bis die gewünschte Bohrtiefe erreicht ist
(siehe „Bohrtiefe anzeigen“, Seite 15).
– Ist die gewünschte Bohrtiefe erreicht, führen Sie das
Drehrad 11 zurück bis die Antriebseinheit wieder in Aus-
gangposition ist.
– Schalten Sie das Elektrowerkzeug aus.
Bohrtiefe anzeigen (siehe Bild I)
Mit Hilfe des Displays 14 können Sie sich die aktuelle Bohrtiefe anzeigen lassen.
– Schalten Sie nach dem Einstellen der Drehzahl mit Hilfe
der Taste 32 den Anzeigebereich des Displays auf
„Depth“.
– Stellen Sie die Höhe der Antriebseinheit ein (siehe „Höhe
der Antriebseinheit einstellen“, Seite 14).
– Setzen Sie die Bohrerspitze leicht auf das Werkstück auf.
– Drücken Sie die Taste 33, um den Nullpunkt festzulegen.
Im Display 14 wird die Anzeige „Reset“ angezeigt.
– Bohren Sie mit gleichmäßigem Vorschub bis die ge-
wünschte Bohrtiefe im Display angezeigt wird.
Bohrtiefe einstellen (siehe Bild J)
Mit dem Tiefenanschlag 9 können Sie die Bohrtiefe t festle-
gen.
– Lösen Sie den Klemmhebel 8 gegen den Uhrzeigersinn.
– Führen Sie eine Probebohrung durch. Wird im Display 14
die gewünschte Bohrtiefe t
zeigen“, Seite 15), ziehen Sie den Klemmhebel 8 wieder
fest.
Für nachfolgende Bohrungen ist damit die Bohrtiefe auf
den Wert t begrenzt.
Transport
– Halten Sie zum Transportieren das Elektrowerkzeug an der
Grundplatte 1.
f Tragen Sie das Elektrowerkzeug immer zu zweit, um
Rückenverletzungen zu vermeiden.
Deutsch | 15
angezeigt (siehe „Bohrtiefe an-
Bosch Power Tools 1 619 929 J54 | (24.10.11)
OBJ_BUCH-1183-004.book Page 16 Monday, October 24, 2011 11:35 AM
16 | Deutsch
Wartung und Service
Wartung und Reinigung
f Ziehen Sie vor allen Arbeiten am Elektrowerkzeug den
Netzstecker aus der Steckdose.
f Halten Sie das Elektrowerkzeug und die Lüftungsschlit-
ze sauber, um gut und sicher zu arbeiten.
Reinigen Sie bei Bedarf die Bohrsäule 4 mit einem trockenen
Lappen und sprühen Sie sie leicht mit Bosch Universalschneidöl (Zubehör) ein.
Wenn ein Ersatz der Anschlussleitung erforderlich ist, dann
ist dies von Bosch oder einer autorisierten Kundendienststelle für Bosch-Elektrowerkzeuge auszuführen, um Sicherheitsgefährdungen zu vermeiden.
Sollte das Elektrowerkzeug trotz sorgfältiger Herstellungsund Prüfverfahren einmal ausfallen, ist die Reparatur von einer autorisierten Kundendienststelle für Bosch-Elektrowerkzeuge ausführen zu lassen.
Geben Sie bei allen Rückfragen und Ersatzteilbestellungen
bitte unbedingt die 10-stellige Sachnummer laut Typenschild
des Elektrowerkzeuges an.
Bremse der Antriebseinheit einstellen (siehe Bild K)
Die Klemmkraft der Bremse für die Antriebseinheit 12 kann
nachgestellt werden.
Überprüfen:
– Die Klemmkraft der Bremse muss die Antriebseinheit in je-
der Höhe sicher halten.
Einstellen:
– Drehen Sie die beiden Stellschrauben 34 mit dem In-
nensechskantschlüssel 23 gegen den Uhrzeigersinn, um
die Klemmkraft zu verringern oder drehen Sie sie im Uhrzeigersinn, um die Klemmkraft zu erhöhen.
Ziehen Sie die beiden Stellschrauben gleichmäßig an.
– Überprüfen Sie, ob die gewünschte Klemmkraft erreicht
wurde.
Deutschland
Robert Bosch GmbH
Servicezentrum Elektrowerkzeuge
Zur Luhne 2
37589 Kalefeld – Willershausen
Tel. Kundendienst: +49 (1805) 70 74 10*
Fax: +49 (1805) 70 74 11*
(*Festnetzpreis 14 ct/min, höchstens 42 ct/min aus Mobilfunknetzen)
E-Mail: Servicezentrum.Elektrowerkzeuge@de.bosch.com
Tel. Kundenberatung: +49 (1803) 33 57 99
(Festnetzpreis 9 ct/min, höchstens 42 ct/min aus Mobilfunknetzen)
Fax: +49 (711) 7 58 19 30
E-Mail: kundenberatung.ew@de.bosch.com
Österreich
Tel.: +43 (01) 7 97 22 20 10
Fax: +43 (01) 7 97 22 20 11
E-Mail: service.elektrowerkzeuge@at.bosch.com
Schweiz
Tel.: +41 (044) 8 47 15 11
Fax: +41 (044) 8 47 15 51
Luxemburg
Tel.: +32 2 588 0589
Fax: +32 2 588 0595
E-Mail: outillage.gereedschap@be.bosch.com
Entsorgung
Elektrowerkzeuge, Zubehör und Verpackungen sollen einer
umweltgerechten Wiederverwertung zugeführt werden.
Werfen Sie Elektrowerkzeuge nicht in den Hausmüll!
Nur für EU-Länder:
Kundendienst und Kundenberatung
Der Kundendienst beantwortet Ihre Fragen zu R eparatur und
Wartung Ihres Produkts sowie zu Ersatzteilen. Explosionszeichnungen und Informationen zu Ersatzteilen finden Sie
auch unter:
www.bosch-pt.com
Das Bosch-Kundenberater-Team hilft Ihnen gerne bei Fragen
zu Kauf, Anwendung und Einstellung von Produkten und Zubehören.
www.bosch-do-it.de, das Internetportal für Heimwerker und
Gartenfreunde.
www.dha.de, das komplette Service-Angebot der Deutschen
Heimwerker Akademie.
Änderungen vorbehalten.
Gemäß der Europäischen Richtlinie
2002/96/EG über Elektro- und ElektronikAltgeräte und ihrer Umsetzung in nationales
Recht müssen nicht mehr gebrauchsfähige
Elektrowerkzeuge getrennt gesa mmelt und
einer umweltgerechten Wiederverwertung
zugeführt werden.
1 619 929 J54 | (24.10.11) Bosch Power Tools
OBJ_BUCH-1183-004.book Page 17 Monday, October 24, 2011 11:35 AM
English | 17
used for appropriate conditions will reduce personal inju-
English
Safety Notes
General Power Tool Safety Warnings
W
ARNIN
to reduce the risk of fire, electric shock and personal injury including the following.
Read all these instructions before attempting to operate
this product and save these instructions.
The term “power tool” in the warnings refers to your mainsoperated (corded) power tool or battery-operated (cordless)
power tool.
Work area safety
f Keep work area clean and well lit. Cluttered or dark areas
invite accidents.
f Do not operate power tools in explosive atmospheres,
such as in the presence of flammable liquids, gases or
dust. Power tools create sparks which may ignite the dust
or fumes.
f Keep children and bystanders away while operating a
power tool. Distractions can cause you to lose control.
Electrical safety
f Power tool plugs must match the outlet. Never modify
the plug in any way. Do not use any adapter plugs with
earthed (grounded) power tools. Unmodified plugs and
matching outlets will reduce risk of electric shock.
f Avoid body contact with earthed or grounded surfaces,
such as pipes, radiators, ranges and refrigerators.
There is an increased risk of electric shock if your body is
earthed or grounded.
f Do not expose power tools to rain or wet conditions.
Water entering a power tool will increase the risk of elec tric
shock.
f Do not abuse the cord. Never use the cord for carrying,
pulling or unplugging the power tool. Keep cord away
from heat, oil, sharp edges and moving parts. Damaged
or entangled cords increase the risk of electric shock.
f When operating a power tool outdoors, use an exten-
sion cord suitable for outdoor use. Use of a cord suitable
for outdoor use reduces the risk of electric shock.
f If operating a power tool in a damp location is unavoid-
able, use a residual current device (RCD) protected
supply. Use of an RCD reduces the risk of electric shock.
Personal safety
f Stay alert, watch what you are doing and use common
sense when operating a power tool. Do not use a power
tool while you are tired or under the influence of drugs,
alcohol or medication. A moment of inattention while op-
erating power tools may result in serious personal injury.
f Use personal protective equipment. Always wear eye
protection. Protective equipment such as dust mask,
non-skid safety shoes, hard hat, or hearing protection
Bosch Power Tools 1 619 929 J54 | (24.10.11)
When using electric tools basic safety
G
precautions should always be followed
ries.
f Prevent unintentional starting. Ensure the switch is in
the off-position before connecting to power source
and/or battery pack, picking up or carrying the tool.
Carrying power tools with your finger on the switch or en-
ergising power tools that have the switch on invites acci-
dents.
f Remove any adjusting key or wrench before turning
the power tool on. A wrench or a key left attached to a ro-
tating part of the power tool may result in personal injury.
f Do not overreach. Keep proper footing and balance at
all times. This enables better control of the power tool in
unexpected situations.
f Dress properly. Do not wear loose clothing or jewel-
lery. Keep your hair, clothing and gloves away from
moving parts. Loose clothes, jewellery or long hair can be
caught in moving parts.
f If devices are provided for the connection of dust ex-
traction and collection facilities, ensure these are con-
nected and properly used. Use of dust collection can re-
duce dust-related hazards.
Power tool use and care
Do not force the power tool. Use the correct power tool
f
for your application. The correct power tool will do the
job better and safer at the rate for which it was designed.
f Do not use the power tool if the switch does not turn it
on and off. Any power tool that cannot be controlled with
the switch is dangerous and must be repaired.
f Disconnect the plug from the power source and/or the
battery pack from the power tool before making any
adjustments, changing accessories, or storing power
tools. Such preventive safety measures reduce the risk of
starting the power tool accidentally.
f Store idle power tools out of the reach of children and
do not allow persons unfamiliar with the power tool or
these instructions to operate the power tool. Power
tools are dangerous in the hands of untrained users.
f Maintain power tools. Check for misalignment or bind-
ing of moving parts, breakage of parts and any other
condition that may affect the power tool’s operation. If
damaged, have the power tool repaired before use.
Many accidents are caused by poorly maintained power
tools.
f Keep cutting tools sharp and clean. Properly maintained
cutting tools with sharp cutting edges are less likely to bind
and are easier to control.
f Use the power tool, accessories and tool bits etc. in ac-
cordance with these instructions, taking into account
the working conditions and the work to be performed.
Use of the power tool for operations different from those
intended could result in a hazardous situation.
Service
f Have your power tool serviced by a qualified repair per-
son using only identical replacement parts. This will en-
sure that the safety of the power tool is maintained.
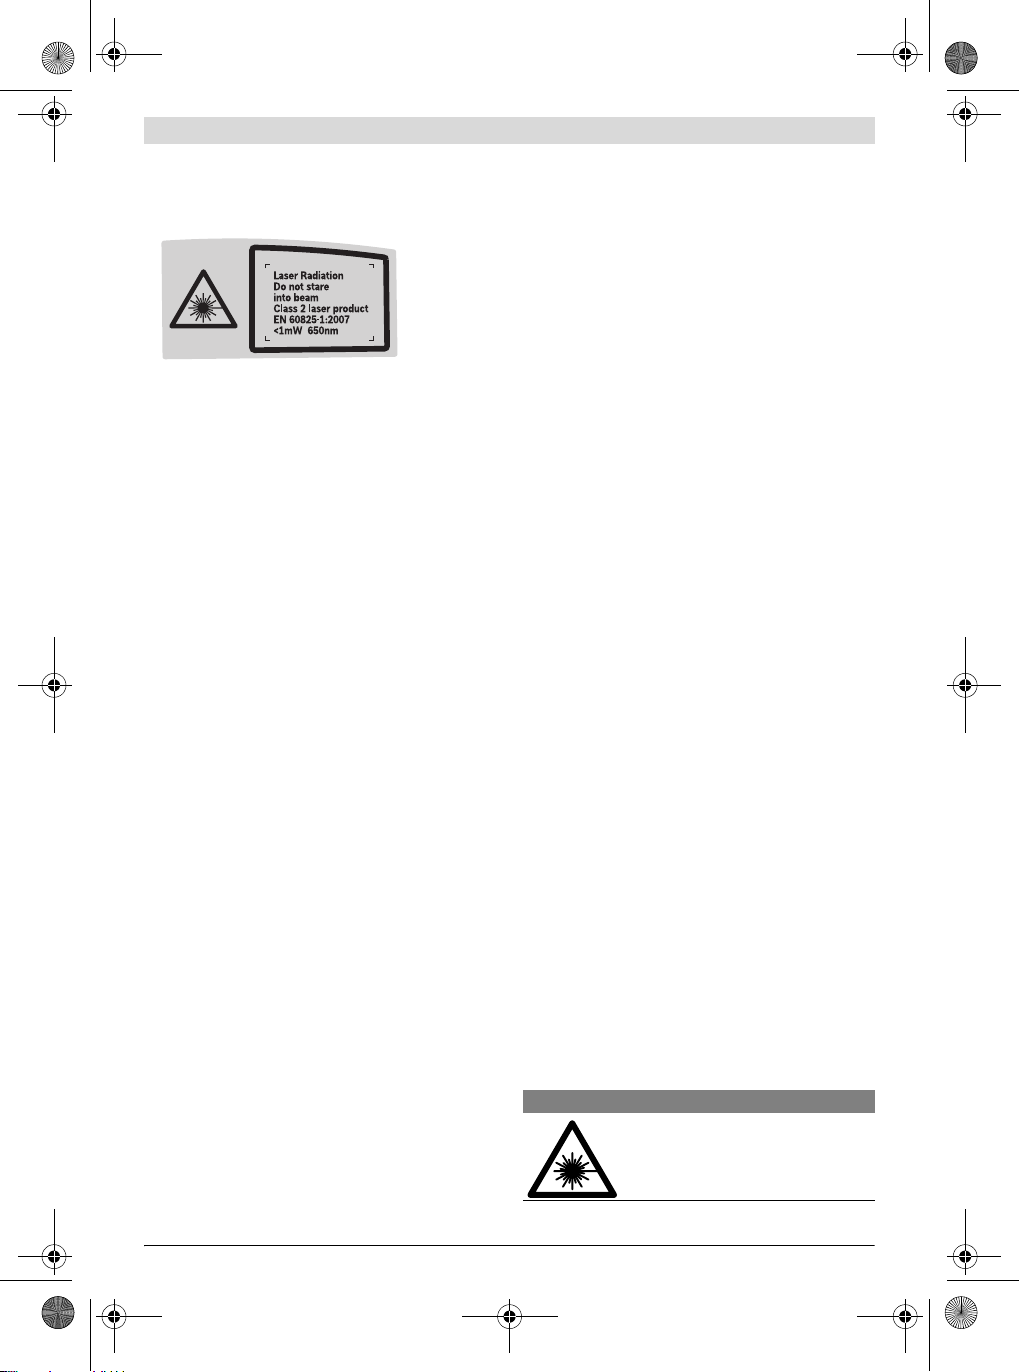
OBJ_BUCH-1183-004.book Page 18 Monday, October 24, 2011 11:35 AM
18 | English
Safety Warnings for Drill Presses
f The power tool is provided with a warning label in Ger-
man (marked with number 10 in the representation of
the power tool on the graphics page).
f Before putting into operation for the first time, attach
the supplied sticker in your national language over the
German text on the warning label.
f Never make warning signs on the machine unrecognis-
able.
f Fasten the machine on a firm, level and horizontal sur-
face. If the machine can slip off or wobbles, the application
tool cannot be uniformly and securely guided.
f Keep the working surface clean to the workpiece being
worked. Sharp-edged drilling chips/swarf and objects can
lead to injuries. Material mixtures are particularly dangerous. Light-alloy dust can burn or explode.
f Set the correct speed before beginning to work. The
speed must be appropriate for the drilling diameter
and the material being drilled. When the speed is set in-
correctly, the application tool can become caught or jam in
the workpiece.
f Guide the application tool toward the workpiece only
when switched on. Otherwise, there is danger of the ap-
plication tool becoming caught or jamming in the workpiece, and the workpiece being dragged along. This can
lead to injury.
f Keep your hands out of the drilling area while the ma-
chine is running. Danger of injury in case of contact with
the application tool.
f Never remove drilling chips/swarf from the drilling ar-
ea while the machine is running. Always guide the motor
unit to the idle position first, and then switch the machine
off.
f Do not remove forming drilling swarf/shavings with
your bear hands. Danger of injury in particular through hot
and sharp-edged metal swarf/shavings.
f Break off long drilling swarf/shavings by interrupting
the drilling procedure through brief reversing of the
handwheel. Dang er of injur y fro m long drill ing s warf /shav —
ings.
f Keep handles dry, clean, and free from oil and grease.
Greasy, oily handles are slippery causing loss of control.
f Use clamping devices, the quick-clamping device or a
machine vice (accessory) to clamp the workpiece. Do
not drill workpieces that are too small to clamp. When
holding the workpiece by hand, you cannot secure it sufficiently against being turned, and injure yourself.
f Switch the machine off immediately when the applica-
tion tool blocks. The application tool blocks when:
– the machine is subject to overload or
– when it jams or locks-up in the workpiece.
f Do not touch the application tool directly after the
working process until after it has cooled down. Applica-
tion tools become very hot while working.
f Check the cable regularly and have a damaged cable re-
paired only through an authorised customer service
agent for Bosch power tools. Replace damaged exten-
sion cables. This will ensure that the safety of the power
tool is maintained.
f Store the machine in a safe manner when not being
used. The storage location must be dry and lockable.
This prevents the machine from storage damage, and from
being operated by untrained persons.
f Do not direct the laser beam at persons or animals and
do not stare into the laser beam yourself, not even from
a distance. This power tool produces laser class 2 laser ra-
diation according to EN 60825-1. This can lea d to persons
being blinded.
f Do not replace the installed laser with another laser
type. A laser that does not fit to this power tool could pose
dangers for other persons.
f Never leave the machine before it has come to a com-
plete stop. Cutting tools that are still running can cause in-
juries.
f Never use the machine with a damaged cable. Do not
touch the damaged cable and pull the mains plug when
the cable is damaged while working. Damaged cables in-
crease the risk of an electric shock.
Products sold in GB only: Your product is fitted with an
BS 1363/A approved electric plug with internal fuse (ASTA
approved to BS 1362).
If the plug is not suitable for your socket outlets, it should be
cut off and an appropriate plug fitted in its place by an autho rised customer service agent. The replacement plug should
have the same fuse rating as the original plug.
The severed plug must be disposed of to avoid a possible
shock hazard and should never be inserted into a mains socket elsewhere.
Products sold in AUS and NZ only: Use a residual current device (RCD) with a rated residual current of 30 mA or less.
Symbols
The following symbols can be important for the operation of
your power tool. Please memorise the symbols and their
meanings. The correct interpretation of the symbols helps
you operate the power tool better and more secure.
Symbols and their meaning
Laser Radiation
Do not stare into beam
Class 2 laser product
1 619 929 J54 | (24.10.11) Bosch Power Tools
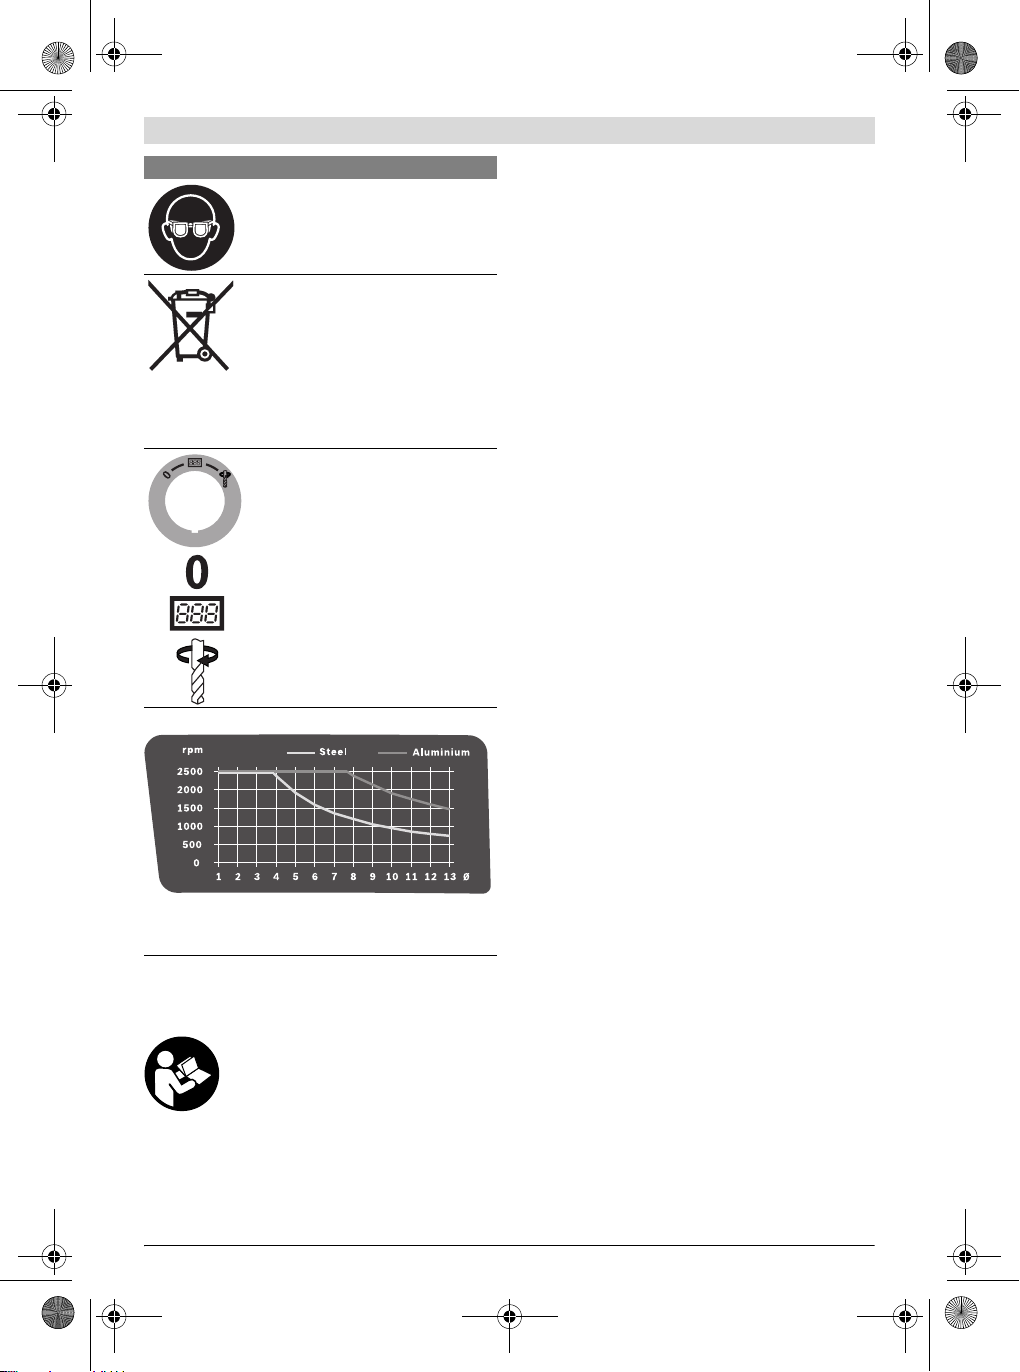
OBJ_BUCH-1183-004.book Page 19 Monday, October 24, 2011 11:35 AM
Symbols and their meaning
Wear safety goggles.
Do not dispose of power tools into household waste!
Only for EC countries:
According to the European Guideline
2002/96/EC for Waste Electrical and Electronic Equipment and its implementation into national right,
power tools that are no longer usable must be collected separately and disposed of in an environmentally correct manner.
On/Off switch
Switching Off
Starting the operation of the display
Drilling
Speed Diagram
The diagram provides the speed (rpm) to be set dependent
on the drill bit diameter (Ø in mm) for the materials Steel
and Aluminium.
Product Description and Specifications
Read all safety warnings and all instructions. Failure to follow the warnings and in-
structions may result in electric shock, fire
and/or serious injury.
Intended Use
In conjunction with the suitable application tools, the machine is intended for drilling in wood, metal, and plastic.
Product Features
The numbering of the components shown refers to the representation of the power tool on the graphic pages.
1 Base plate
2 Quick-clamping lever
3 Quick-clamping device
4 Drilling column
5 Rack
6 Speed diagram
7 Clamping lever of the height adjustment
8 Clamping lever of depth stop
9 Depth stop
10 Laser warning label
11 Handwheel
12 Motor unit
13 On/Off switch with Quick-Stop function
14 Display
15 Speed regulator
16 Keyless chuck
17 Tool bit*
18 Mounting holes
19 Parallel guide
20 Wing bolts of the parallel guide
21 Gear selector
22 Illumination and laser unit
23 Allen key (4 mm)
24 Fastening screw of the drilling column
25 Guide cog of the drilling column
26 Guide groove of the base plate
27 Securing ring
28 Holding ring
29 Clamping sleeve
30 Illumination button
31 Laser-cross button
32 Button for speed indication/drilling-depth indication
33 Zero-point button
34 Set screws for clamping force of the brake
*Accesso ries shown or described are not part of the standard delivery scope of the product. A complete overview of accessories
can be found in our accessories program.
Noise/Vibration Information
Measured sound values determined according to EN 61029.
Typically the A-weighted noise levels of the product are:
Sound pressure level 77 dB(A); Sound power level 90 dB(A).
Uncertainty K =3 dB.
Wear hearing protection!
Vibration total values a
determined according to EN 61029:
<2.5m/s2, K= 1.5 m/s2.
a
h
The vibration emission level given in this information sheet
has been measured in accordance with a standardised test
given in EN 61029 and may be used to compare one tool with
English | 19
(triax vector sum) and uncertainty K
h
Bosch Power Tools 1 619 929 J54 | (24.10.11)
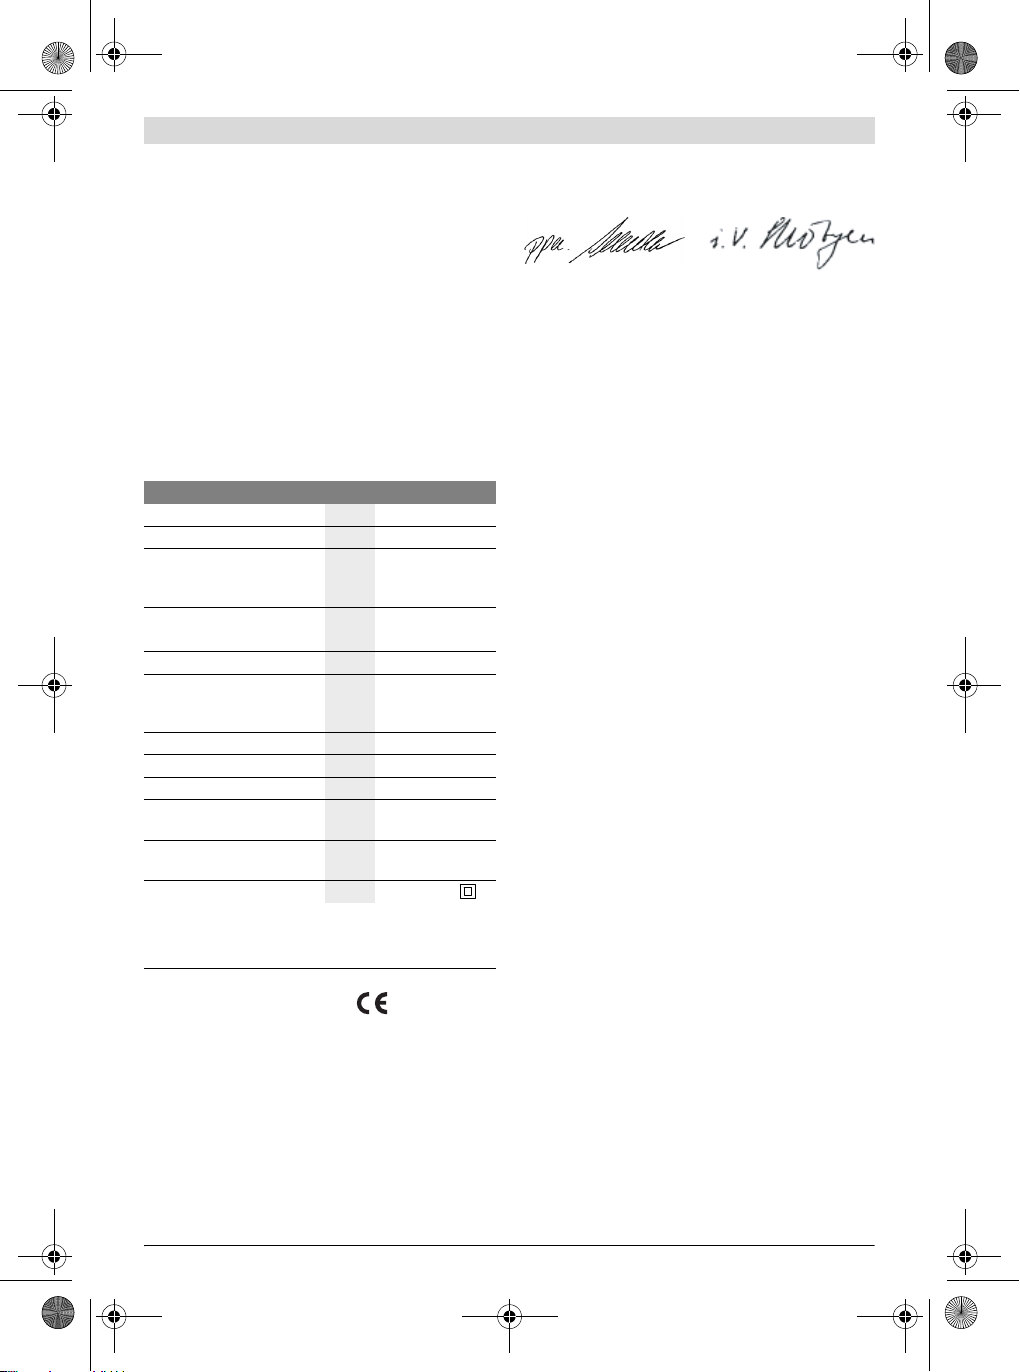
OBJ_BUCH-1183-004.book Page 20 Monday, October 24, 2011 11:35 AM
20 | English
another. It may be used for a preliminary assessment of exposure.
The declared vibration emission level represents the main ap-
Dr. Egbert Schneider
Senior Vice President
Engineering
plications of the tool. However if the tool is used for different
applications, with different accessories or poorly maintained,
the vibration emission may differ. This may significantly increase the exposure level over the total working period.
An estimation of the level of exposure to vibration should also
take into account the times when the tool is switched off or
when it is running but not actually doing the job. This may significantly reduce the exposure level over the total working period.
Identify additional safety measures to protect the operator
from the effects of vibration such as: maintain the tool and the
accessories, keep the hands warm, organisation of work patterns.
Technical Data
Drill Press PBD 40
Article number
Rated power input
No-load speed
–1st gear
– 2nd gear
Laser type
min
min
3 603 M07 0..
W 710
-1
-1
200– 850
600 –2500
nm
mW
Laser class
Max. drilling dia.
–Steel
– Wood
Chuck clamping range
Drill stroke, max.
Total height
mm
mm
mm 1.5–13
mm 90
mm 650
Size of base plate
(Width x depth x height)
mm 330 x 350 x 30
Weight according to
EPTA-Procedure 01/2003
kg 11.2
Protection class
The values given are valid for a nominal voltage [U] of 230 V. For different voltages and models for specific coun tries, these values can vary.
Please observe the article number on the type plate of your mac hine.
The trade names of the individual machines may vary.
Declaration of Conformity
We declare under our sole responsibility that the product described under “Technical Data” is in conformity with the following standards or standardization documents: EN 61029,
Robert Bosch GmbH, Power Tools Division
D-70745 Leinfelden-Echterdingen
Leinfelden, 24.10.2011
Assembly
f Avoid unintentional starting of the machine. During as-
sembly and for all work on the machine, the power plug
must not be connected to the mains supply.
Delivery Scope
Before starting the operation of the machine for the first time,
check if all parts listed below have been supplied:
– Motor unit 12 with drilling column 4
– Base plate 1
– Quick-clamping device 3
– Parallel guide 19
– Allen key 23
Note: Check the power tool for possible damage.
650
Before further use of the machine, check that all protective
<1
devices are fully functional. Any lightly damaged parts must
be carefully checked to ensure flawless operation of the tool.
2
All parts must be properly mounted and all conditions fulfilled
that ensure faultless operation.
13
Damaged protective devices and parts must be immediately
40
replaced by an authorised service centre.
Mounting Individual Components (see figure A)
Before putting into operation for the first time, the machine
must be assembled as follows:
– Slide the quick-clamping device 3 over the drilling column
4.
– Insert the drilling column 4 into the base plate 1 in such a
/II
manner that the guide cog 25 engages in the guide groove
26.
– Firmly tighten fastening screw 24 with Allen key 23.
Mounting to a Working Surface (see figure B)
f To ensure safe handling, the machine must be mounted
on a level and stable surface (e. g., workbench) prior to
using.
– Fasten the power tool with suitable screw fasteners to the
working surface. The mounting holes 18 serve for this
purpose.
EN 60825-1 according to the provisions of the directives
2011/65/EU, 2004/108/EC, 2006/42/EC.
Technical file (2006/42/EC) at:
Robert Bosch GmbH, PT/ETM9,
D-70745 Leinfelden-Echterdingen
Dr. Eckerhard Strötgen
Engineering Director
PT/ESI
1 619 929 J54 | (24.10.11) Bosch Power Tools
OBJ_BUCH-1183-004.book Page 21 Monday, October 24, 2011 11:35 AM
Dust/Chip Extraction
Dusts from materials such as lead-containing coatings, some
wood types, minerals and metal can be harmful to one’s
health. Touching or breathing-in the dusts can cause allergic
reactions and/or lead to respiratory infections of the user or
bystanders.
Certain dusts, such as oak or beech dust, are considered as
carcinogenic, especially in connection with wood-treatment
additives (chromate, wood preservative). Materials containing asbestos may only be worked by specialists.
– As far as possible, use a dust extraction system suitable for
the material.
– Provide for good ventilation of the working place.
– It is recommended to wear a P2 filter-class respirator.
Observe the relevant regulations in your country for the materials to be worked.
f Prevent dust accumulation at the workplace. Dusts can
easily ignite.
Changing the Tool (see figure C)
The motor unit 12 is provided ex works with a dual-sleeve keyless chuck 16.
Inserting
– Turn the securing ring 27 toward “UNLOCK”.
– Turn the clamping sleeve 29 in anticlockwise direction un-
til the application tool 17 can be inserted.
– Completely insert the application tool 17, hold it in the tool
holder and firmly turn clamping sleeve 29 by hand in clock-
wise direction.
Firmly hold the holding ring 28 when doing this.
– Turn the securing ring 27 toward “LOCK”
Note: When inserting drill bits with small diameters, set the
tool holder beforehand approximately to the drill bit diameter. Otherwise, it is possible that the drill bit is not inserted
centred.
Removing
– Turn the securing ring 27 toward “UNLOCK”.
– Turn clamping sleeve 29 in anticlockwise direction until
the application tool 17 can be removed.
Operation
f Before any work on the machine itself, pull the mains
plug.
f After each adjustment on the machine, retighten the
screws and clamping levers.
Preparing for Operation
Illuminating the Work Area (see figure D)
Provide for sufficient lighting of the direct working area.
–To activate the display 14, turn the On/Off switch 13 to
position .
– Switch on the illumination unit 22 with button 30.
The indication “Light” is shown on display 14.
Correctly positioning the workpiece (see figure E)
A laser cross indicates the exact drilling location.
–To activate the display 14, turn the On/Off switch 13 to
position .
– Switch on the laser unit 22 with button 31.
The indication “Laser” is shown on display 14.
– Align your mark on the workpiece with the laser cross.
Clamping the Workpiece (see figures F1 – F2)
To ensure optimum working safety, the workpiece must always be firmly clamped.
Do not saw workpieces that are too small to clamp.
– Position the workpiece with help of the laser cross (see
“Correctly positioning the workpiece”, page 21).
– Loosen the quick-clamping lever 2 on the quick-clamping
device 3.
– Allow the quick-clamping device to face against the work-
piece. Turn the quick-clamping lever 2 in clockwise direction until the workpiece is firmly clamped.
– After drilling, loosen quick-clamping lever 2 in anticlockwi-
se direction.
– Turn the quick-clamping device 3 aside and remove the
workpiece.
The parallel guide 19 is used for securing larger workpieces
against turning.
– Loosen the wing bolts 20 of parallel guide 19 and insert the
parallel guide into the grooves of base plate 1.
– Retighten the wing bolts again.
– Clamp the workpiece with the quick-clamping device 3.
Note: Use a machine vice (e.g. Bosch MS 80) to clamp smaller workpieces.
Adjusting the Height of the Motor Unit (see figure G)
f Do not adjust the height of the motor unit during opera-
tion. Actuate clamping lever 7 only when the hand-
wheel is in the starting position. This safety measure
prevents possible injury.
The height of the motor unit 12 can be adjusted dependent on
the length of the application tool and the size of the workpiece.
Note: After adjusting the height of the motor unit, the positioning of the workpiece must be checked again with the laser
cross. Realign the workpiece, if required.
When clamping lever 7 is open, a brake prevents the motor
unit 12 from accidental lowering. Occasionally check the
clamping force of the brake and readjust it as required (see
“Adjusting the Brake of the Motor Unit”, page 23).
– Make sure that the handwheel 11 is in the starting posi-
tion.
– Grasp the handwheel 11 with one hand and with the other
hand, loosen clamping lever 7 in anticlockwise direction.
– Adjust the height of motor unit 12 with the handwheel ac-
cording to the inserted application tool and height of the
workpiece.
– Tighten clamping lever 7 again in clockwise direction.
English | 21
Bosch Power Tools 1 619 929 J54 | (24.10.11)
OBJ_BUCH-1183-004.book Page 22 Monday, October 24, 2011 11:35 AM
22 | English
Note: Clamping lever 7 is indexed (adjustable), allowing it to
be set to an ergonomically favourable and space-saving position.
With the clamping lever tightened, pull its lever away from the
motor unit, turn it to the desired position and allow it to engage again.
Starting Operation
f Observe correct mains voltage! The voltage of the pow-
er source must agree with the voltage specified on the
nameplate of the machine. Power tools marked with
230 V can also be operated with 220 V.
Switching On
–To activate the display 14, turn the On/Off switch 13 to
position .
–To start the machine, turn the On/Off switch 13 to
position .
The speed can now be set (see “Adjusting the Speed”,
page 22).
Switching Off
–To end the drilling, turn the On/Off switch 13 to
position .
or
–To completely shut-off the machine, turn the On/Off
switch 13 to position “0”.
Note: The machine is now de-energized. All current settings for speed and drilling depth are deleted.
Quick-Stop Function
The Quick-Stop function enables swift switching off, e.g.,
when the application tool is jammed or locked-up in the workpiece.
– Briefly and quickly press the On/Off switch 13.
The machine and the display are switched off immediately.
Note: The machine is now de-energized. All current settings for speed and drilling depth are deleted.
– To restart the operation of the machine afterwards, the
On/Off switch 13 must be reset to position “0”.
Afterwards, the machine can be switched on again (On/Off
switch 13 in position ).
Restarting Protection
The restarting protection prevents uncontrolled starting of
the machine after a power failure (e.g., when the mains plug is
pulled during operation).
– To restart the operation of the machine afterwards, the
On/Off switch 13 must be reset to position .
Afterwards, the machine can be switched on again (On/Off
switch 13 in position ).
Temperature Dependent Overload Protection
When using the machine as intended for, it cannot be subject
to overload. In case of excessive loading or when exceeding
the allowable operating temperature, the electronics switch
the machine off until it is in the optimal operating-temperature range again.
– To restart the operation of the machine afterwards, the
On/Off switch 13 must be reset to position .
Afterwards, the machine can be switched on again (On/Off
switch 13 in position ).
Adjusting the Speed
f Set the correct speed before beginning to work. The
speed must be appropriate for the drilling diameter
and the material being drilled. When the speed is set in-
correctly, the application tool can become caught or jam in
the workpiece.
When adjusting the appropriate speed, please refer to the
speed diagram 6.
The diagram provides the speed (rpm) to be set dependent
on the drill bit diameter (Ø in mm) for the materials Steel and
Aluminium.
Gear Selection, Mechanical
Actuate the gear selector 21 only when the machine is at
a standstill.
Two speed ranges can be preselected with the gear selector
21.
1st gear:
Low speed range; for working with large drilling diameters.
2nd gear:
High speed range; For working with small drilling diameters.
– Set the gear selector 21 to the desired position.
Note: If the gear selector 21 cannot be turned to the stop,
turn the drill chuck a little.
Electronic Speed Control (see figure H)
With the speed regulator 15, the speed of the machine can be
variably adjusted.
–To start the machine, turn the On/Off switch 13 to
position .
– Press button 32 until “Speed” is indicated on the display.
– Turn the speed regulator 15 until the desired speed is indi-
cated on display 14.
Working Advice
General Information
Before drilling, make sure that the quick-clamping device 3,
the parallel guide 19 or the machine vice (accessory) are firmly clamped/tightened.
When the drill bit comes out of the workpiece, it can become
caught or jam in the workpiece, and drag the workpiece along.
Therefore, reduce the feed at the end of the drilling phase.
If the application tool should become blocked, switch the machine off. Allow the application tool and the workpiece to cool
down. Remove the drilling chips/swarf. Determine the cause
of the application tool’s jam and correct it.
Special Notes on Drilling in Metal
Centre-punch metal workpieces.
Pilot-drill when drilling diameters in excess of 10 mm.
To improve your work, use cutting oil (e.g. Bosch universal
cutting oil) to cool the drilling.
1 619 929 J54 | (24.10.11) Bosch Power Tools
OBJ_BUCH-1183-004.book Page 23 Monday, October 24, 2011 11:35 AM
Position of the Operator
f Position yourself in front of the machine. This ensures a
good view of the drilling location.
– Keep your hands and fingers away from the rotating appli-
cation tool.
– Do not stand in front of the motor unit with crossed arms.
Drilling
– Place the workpiece on base plate 1.
– Adjust the height of the motor unit (see “Adjusting the
Height of the Motor Unit”, page 21).
– Align the workpiece with help of the laser cross (see “Cor-
rectly positioning the workpiece”, page 21).
– Firmly clamp the workpiece (see “Clamping the Work-
piece”, page 21).
– Adjust the appropriate speed (see “Adjusting the Speed”,
page 22).
– Switch on the machine.
– For drilling, turn handwheel 11 with uniform feed until the
desired drilling depth is reached (see “Indicating the Drill-
ing Depth”, page 23).
– Once the desired drilling depth is reached, guide hand-
wheel 11 back until the motor unit is back in the starting
position.
– Switch the power tool off.
Indicating the Drilling Depth (see figure I)
The current drilling depth can be indicated on the display 14.
– After the speed has been set, press button 32 until
“Depth” is indicated on the display.
– Adjust the height of the motor unit (see “Adjusting the
Height of the Motor Unit”, page 21).
– Carefully allow the drill-bit tip to slightly touch the workpie-
ce.
– Press button 33 to set the zero point.
The indication “Reset” is shown on display 14.
– Drill with uniform feed until the desired drilling depth is in-
dicated on the display.
Adjusting the Drilling Depth (see figure J)
With the depth stop 9, the drilling depth t can be determined.
– Loosen clamping lever 8 in anticlockwise direction.
– Carry out a test drilling. When the desired drilling depth t is
indicated on display 14 (see “Indicating the Drilling
Depth”, page 23), retighten clamping lever 8 again.
For the following drillings, the drilling depth is limited to
the setting t.
Transport
– When transporting the machine, hold it by the base plate
1.
f The power tool should always be carried by two per-
sons in order to avoid back injuries.
Maintenance and Service
Maintenance and Cleaning
f Before any work on the machine itself, pull the mains
plug.
f For safe and proper working, always keep the machine
and ventilation slots clean.
If required, clean the drilling column 4 with a dry cloth and apply a light coat of Bosch universal cutting oil (accessory).
If the replacement of the supply cord is necessary, this has to
be done by Bosch or an authorized Bosch service agent in order to avoid a safety hazard.
If the machine should fail despite the care taken in manufacturing and testing procedures, repair should be carried out by
an after-sales service centre for Bosch power tools.
In all correspondence and spare parts order, please always include the 10-digit article number given on the type plate of
the machine.
Adjusting the Brake of the Motor Unit (see figure K)
The clamping force of the brake for the motor unit 12 can be
readjusted.
Checking:
– The clamping force of the brake must securely hold the mo-
tor unit in any position.
Adjusting:
– Turn both set screws 34 in anticlockwise direction with the
supplied Allen key 23 to reduce the clamping force, or increase the clamping force by turning in clockwise direction.
Tighten both set screws uniformly.
– Check if the desired clamping force has been reached.
After-sales Service and Customer Assistance
Our after-sales service responds to your questions concerning maintenance and repair of your product as well as spare
parts. Exploded views and information on spare parts can also be found under:
www.bosch-pt.com
Our customer service representatives can answer your questions concerning possible applications and adjustment of
products and accessories.
Great Britain
Robert Bosch Ltd. (B.S.C.)
P.O. Box 98
Broadwater Park
North Orbital Road
Denham
Uxbridge
UB 9 5HJ
Tel. Service: +44 (0844) 736 0109
Fax: +44 (0844) 736 0146
E-Mail: boschservicecentre@bosch.com
English | 23
Bosch Power Tools 1 619 929 J54 | (24.10.11)
OBJ_BUCH-1183-004.book Page 24 Monday, October 24, 2011 11:35 AM
24 | English
Ireland
Origo Ltd.
Unit 23 Magna Drive
Magna Business Park
City West
Dublin 24
Disposal
The machine, accessories and packaging should be sor ted for
environmental-friendly recycling.
Do not dispose of power tools into household waste!
Only for EC countries:
Tel. Service: +353 (01) 4 66 67 00
Fax: +353 (01) 4 66 68 88
Australia, New Zealand and Pacific Islands
Robert Bosch Australia Pty. Ltd.
Power Tools
Locked Bag 66
Clayton South VIC 3169
Customer Contact Center
Subject to change without notice.
Inside Australia:
Phone: +61 (01300) 307 044
Fax: +61 (01300) 307 045
Inside New Zealand:
Phone: +64 (0800) 543 353
Fax: +64 (0800) 428 570
Outside AU and NZ:
Phone: +61 (03) 9541 5555
www.bosch.com.au
Republic of South Africa
Customer service
Hotline: +27 (011) 6 51 96 00
Gauteng – BSC Service Centre
35 Roper Street, New Centre
Johannesburg
Tel.: +27 (011) 4 93 93 75
Fax: +27 (011) 4 93 01 26
E-Mail: bsctools@icon.co.za
KZN – BSC Service Centre
Unit E, Almar Centre
143 Crompton Street
Pinetown
Tel.: +27 (031) 7 01 21 20
Fax: +27 (031) 7 01 24 46
E-Mail: bsc.dur@za.bosch.com
Western Cape – BSC Service Centre
Democracy Way, Prosperity Park
Milnerton
Tel.: +27 (021) 5 51 25 77
Fax: +27 (021) 5 51 32 23
E-Mail: bsc@zsd.co.za
Bosch Headquarters
Midrand, Gauteng
Tel.: +27 (011) 6 51 96 00
Fax: +27 (011) 6 51 98 80
E-Mail: rbsa-hq.pts@za.bosch.com
According the European Guideline
2002/96/EC for Waste Electrical and Electronic Equipment and its implementation
into national right, power tools that are no
longer usable must be collected separately
and disposed of in an environmentally correct manner.
1 619 929 J54 | (24.10.11) Bosch Power Tools
OBJ_BUCH-1183-004.book Page 25 Monday, October 24, 2011 11:35 AM
dispositif à courant différentiel résiduel (RCD). L’usage
Français
Avertissements de sécurité
Avertissements de sécurité généraux pour l’outil
ATTENTION
curité fondamentales suivantes afin d’éviter les risques de
choc électrique, de blessures et d’incendie.
Lire toutes les consignes avant d’utiliser cet outil électroportatif et garder soigneusement les consignes de sécurité.
Le terme « outil » dans les consignes de sécurité fait référence
à votre outil électrique alimenté par le secteur (avec cordon
d’alimentation) ou votre outil fonctionnant sur batterie (sans
cordon d’alimentation).
Sécurité de la zone de travail
f Conserver la zone de travail propre et bien éclairée. Les
zones en désordre ou sombres sont propices aux acci-
dents.
f Ne pas faire fonctionner les outils électriques en at-
mosphère explosive, par exemple en présence de liqui-
des inflammables, de gaz ou de poussières. Les outils
électriques produisent des étincelles qui peuvent enflam-
mer les poussières ou les fumées.
f Maintenir les enfants et les personnes présentes à
l’écart pendant l’utilisation de l’outil. Les distractions
peuvent vous faire perdre le contrôle de l’outil.
Sécurité électrique
f Il faut que les fiches de l’outil électrique soient adap-
tées au socle. Ne jamais modifier la fiche de quelque fa-
çon que ce soit. Ne pas utiliser d’adaptateurs avec des
outils à branchement de terre. Des fiches non modifiées
et des socles adaptés réduiront le risque de choc électri-
que.
f Eviter tout contact du corps avec des surfaces reliées à
la terre telles que les tuyaux, les radiateurs, les cuisi-
nières et les réfrigérateurs. Il existe un risque accru de
choc électrique si votre corps est relié à la terre.
f Ne pas exposer les outils à la pluie ou à des conditions
humides. La pénétration d’eau à l’intérieur d’un outil aug-
mentera le risque de choc électrique.
f Ne pas maltraiter le cordon. Ne jamais utiliser le cordon
pour porter, tirer ou débrancher l’outil. Maintenir le
cordon à l’écart de la chaleur, du lubrifiant, des arêtes
ou des parties en mouvement. Les cordons endommagés
ou emmêlés augmentent le risque de choc électrique.
f Lorsqu’on utilise un outil à l’extérieur, utiliser un pro-
longateur adapté à l’utilisation extérieure. L’utilisation
d’un cordon adapté à l’utilisation extérieure réduit le risque
de choc électrique.
f Si l’usage d’un outil dans un emplacement humide est
inévitable, utiliser une alimentation protégée par un
Lors de l’utilisation d’outil électroportatifs, respecter les instructions de sé-
d’un RCD réduit le risque de choc électrique.
Sécurité des personnes
f Rester vigilant, regarder ce que vous êtes en train de
faire et faire preuve de bon sens dans l’utilisation de
l’outil. Ne pas utiliser un outil lorsque vous êtes fatigué
ou sous l’emprise de drogues, d’alcool ou de médicaments. Un moment d’inattention en cours d’utilisation
d’un outil peut entraîner des blessures graves des personnes.
f Utiliser un équipement de sécurité. Toujours porter
une protection pour les yeux. Les équipements de sécu-
rité tels que les masques contre les poussières, les chaussures de sécurité antidérapantes, les casques ou les protections acoustiques utilisés pour les conditions
appropriées réduiront les blessures des personnes.
f Eviter tout démarrage intempestif. S’assurer que l’in-
terrupteur est en position arrêt avant de brancher
l’outil au secteur et/ou au bloc de batteries, de le ramasser ou de le porter. Porter les outils en ayant le doigt
sur l’interrupteur ou brancher des outils dont l’interrupteur
est en position marche est source d’accidents.
f Retirer toute clé de réglage avant de mettre l’outil en
marche. Une clé laissée fixée sur une partie tournante de
l’outil peut donner lieu à des blessures de personnes.
f Ne pas se précipiter. Garder une position et un équili-
bre adaptés à tout moment. Cela permet un meilleur con-
trôle de l’outil dans des situations inattendues.
f S’habiller de manière adaptée. Ne pas porter de vête-
ments amples ou de bijoux. Garder les cheveux, les vêtements et les gants à distance des parties en mouvement. Des vêtements amples, des bijoux ou les cheveux
longs peuvent être pris dans des parties en mouvement.
f Si des dispositifs sont fournis pour le raccordement
d’équipements pour l’extraction et la récupération des
poussières, s’assurer qu’ils sont connectés et correctement utilisés. Utiliser des collecteurs de poussière peut
réduire les risques dus aux poussières.
Utilisation et entretien de l’outil
f Ne pas forcer l’outil. Utiliser l’outil adapté à votre appli-
cation. L’outil adapté réalisera mieux le travail et de maniè-
re plus sûre au régime pour lequel il a été construit.
f Ne pas utiliser l’outil si l’interrupteur ne permet pas de
passer de l’état de marche à arrêt et vice versa. Tout
outil qui ne peut pa s être commandé par l’interrupteur est
dangereux et il faut le faire réparer.
f Débrancher la fiche de la source d’alimentation en cou-
rant et/ou le bloc de batteries de l’outil avant tout réglage, changement d’accessoires ou avant de ranger
l’outil. De telles mesures de sécurité préventives rédui-
sent le risque de démarrage accidentel de l’outil.
f Conserver les outils à l’arrêt hors de la portée des en-
fants et ne pas permettre à des personnes ne connaissant pas l’outil ou les présentes instructions de le faire
fonctionner. Les outils sont dangereux entre les mains
d’utilisateurs novices.
Français | 25
Bosch Power Tools 1 619 929 J54 | (24.10.11)
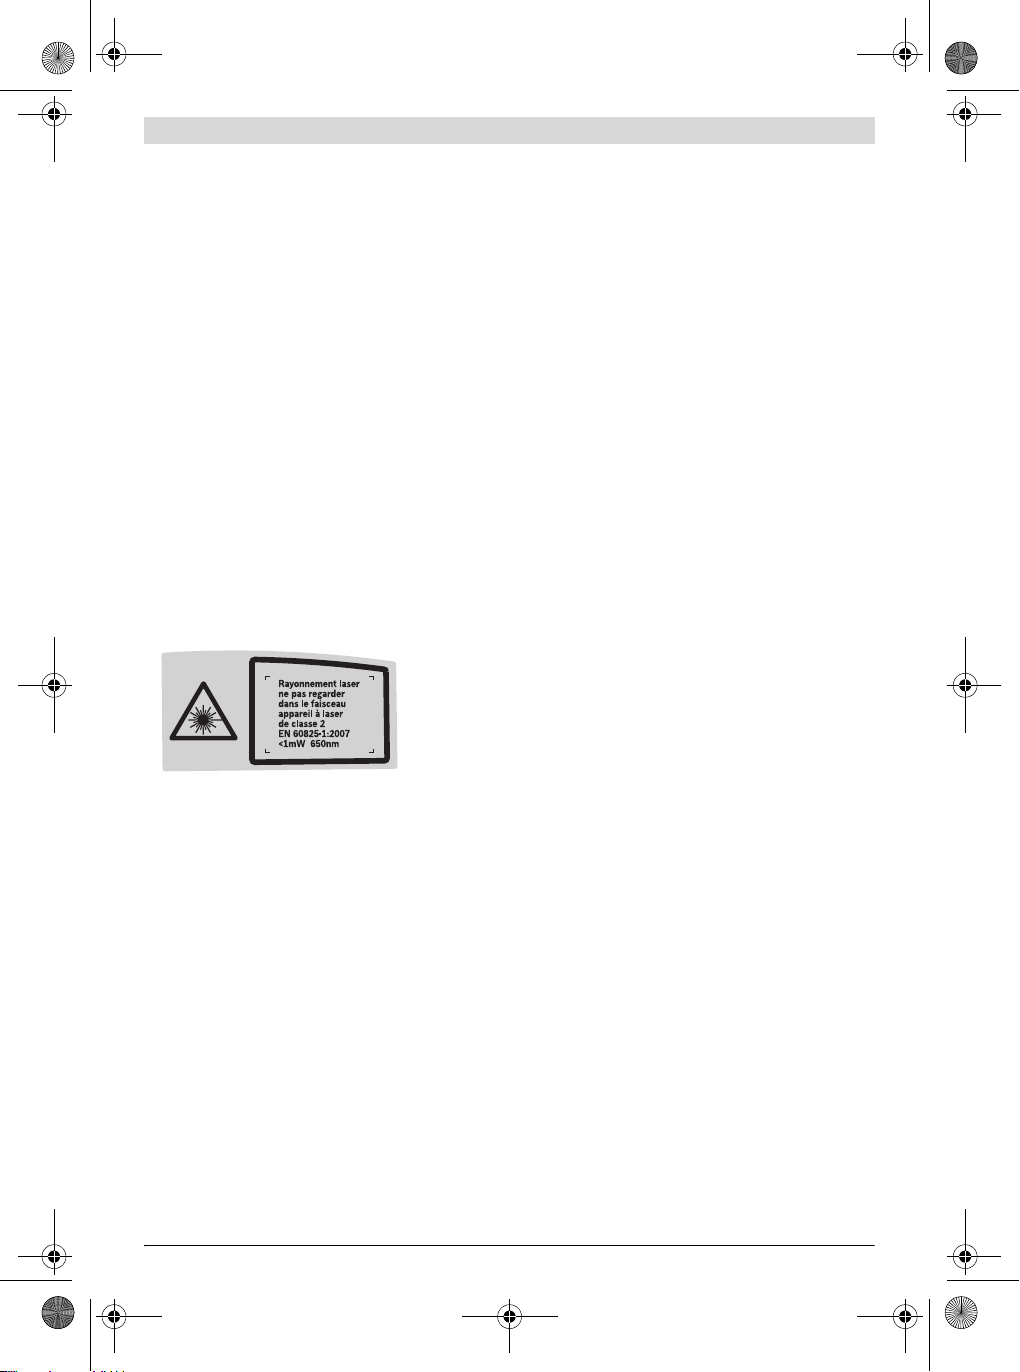
OBJ_BUCH-1183-004.book Page 26 Monday, October 24, 2011 11:35 AM
26 | Français
f Observer la maintenance de l’outil. Vérifier qu’il n’y a
pas de mauvais alignement ou de blocage des parties
mobiles, des pièces cassées ou toute autre condition
pouvant affecter le fonctionnement de l’outil. En cas de
dommages, faire réparer l’outil avant de l’utiliser. De
nombreux accidents sont dus à des outils mal entretenus.
f Garder affûtés et propres les outils permettant de cou-
per. Des outils destinés à couper correctement entretenus
avec des pièces coupantes tranchantes son t moins sus-
ceptibles de bloquer et sont plus faciles à contrôler.
f Utiliser l’outil, les accessoires et les lames etc., confor-
mément à ces instructions, en tenant compte des con-
ditions de travail et du travail à réaliser. L’utilisation de
l’outil pour des opérations différentes de celles prévues
pourrait donner lieu à des situations dangereuses.
Maintenance et entretien
f Faire entretenir l’outil par un réparateur qualifié utili-
sant uniquement des pièces de rechange identiques.
Cela assurera que la sécurité de l’outil est maintenue.
Avertissements de sécurité pour perceuses verticales
f Cet outil électroportatif est fourni avec une plaque
d’avertissement en langue allemande (dans la repré-
sentation de l’outil électroportatif se trouvant sur la pa-
ge des graphiques elle est marquée du numéro 10).
f Avant la première mise en service, recouvrir le texte al-
lemand de la plaque d’avertissement par l’autocollant
fourni dans votre langue.
f S’assurer que les panneaux d’avertissement se trou-
vant sur l’outil électroportatif soient toujours lisibles.
f Fixer l’outil électroportatif sur une surface stable, pla-
ne et horizontale. Si l’outil électroportatif peut glisser ou
vaciller, l’outil de travail ne peut pas être guidé de manière
régulière et sûre.
f Maintenir la surface de travail ainsi que la pièce à usi-
ner propres. Les copeaux ou autres objets tranchants
peuvent entraîner des blessures. Certains alliages de ma-
tériaux sont particulièrement dangereux. Les poussières
de métaux légers peuvent être explosives ou inflamma-
bles.
f Réglez la vitesse de rotation appropriée avant de com-
mencer le travail. La vitesse de rotation doit être adap-
tée au diamètre de perçage et au matériau à percer. Si
la vitesse de rotation est mal réglée, l’outil de travail peut
se coincer dans la pièce à usiner.
f Ne guider l’outil de travail contre la pièce à travailler
que lorsque l’appareil est en marche. Sinon, l’outil de
travail pourrait se coincer dans la pièce à usiner et empor-
ter celle-ci. Ceci peut entraîner des blessures.
f Maintenir les mains hors de la zone de perçage pendant
que l’outil électroportatif tourne. Lors d’un contact avec
l’outil de travail, il y a risque de blessures.
f Ne jamais enlever les copeaux de la zone de perçage
pendant le fonctionnement de l’outil électroportatif.
Toujours d’abord mettre l’unité d’entraînement en position
de repos puis éteindre l’outil électroportatif.
f Ne pas enlever les copeaux produits avec les mains
nues. Surtout les copeaux métalliques brûlants et aux
bords tranchants sont un risque de blessures.
f Interrompre le perçage pour briser les copeaux très
longs en faisant tourner brièvement la molette dans le
sens inverse. Les copeaux trop longs risquent de causer
des blessures.
f Garder les poignées sèches, propres et dépourvues
d’huile et de graisse. Des poignées grasses, huileuses
sont glissantes et provoquent ainsi une perte de contrôle.
f Utiliser des dispositifs de serrage, un tendeur rapide
ou un étau fixe (accessoire) pour bien maintenir la pièce à usiner. Ne pas travailler les pièces qui sont trop petites pour être serrées. Si vous essayez de tenir la pièce à
usiner seulement à la main, vous ne pourrez pas empêcher
qu’elle vous soit arrachée de la main, vous r isquez d’être
blessé.
f Arrêter immédiatement l’appareil électrique lorsque
l’outil de travail coince. L’outil se bloque lorsque :
– l’outil électroportatif est surchargé ou
– qu’il se coince dans la pièce à usiner.
f Ne pas toucher l’outil de travail après l’utilisation avant
qu’il ne soit refroidi. L’outil de travail chauffe énormé-
ment durant le travail.
f Contrôler le câble régulièrement et ne faire réparer un
câble endommagé que par un Service Après-Vente
autorisé pour outillage électroportatifs Bosch. Remplacer un câble de rallonge endommagé. Ceci est indis-
pensable pour assurer le bon fonctionnement en toute sécurité de l’outil électrique.
f En cas de non-utilisation, conservez l’outil électrique
dans un endroit sûr. L’emplacement de stockage doit
être sec et verrouillable. Ceci prévient l’endommage-
ment de l’outil électrique pendant le stockage ou son utilisation par des personnes non initiées.
f Ne pas diriger le faisceau laser vers des personnes ou
des animaux et ne jamais regarder soi-même dans le
faisceau laser. Cet outil électroportatif génère des rayon-
nements laser Classe laser 2 suivant EN 60825-1.
D’autres personnes peuvent être éblouies.
f Ne pas remplacer le laser incorporé contre un laser
d’un autre type. Un laser qui ne correspond pas à cet outil
électroportatif pourrait présenter des danger pour les personnes.
f Ne jamais quitter l’outil avant son arrêt total. Les outils
de travail qui ne sont pas encore en arrêt total peuvent causer des blessures.
1 619 929 J54 | (24.10.11) Bosch Power Tools
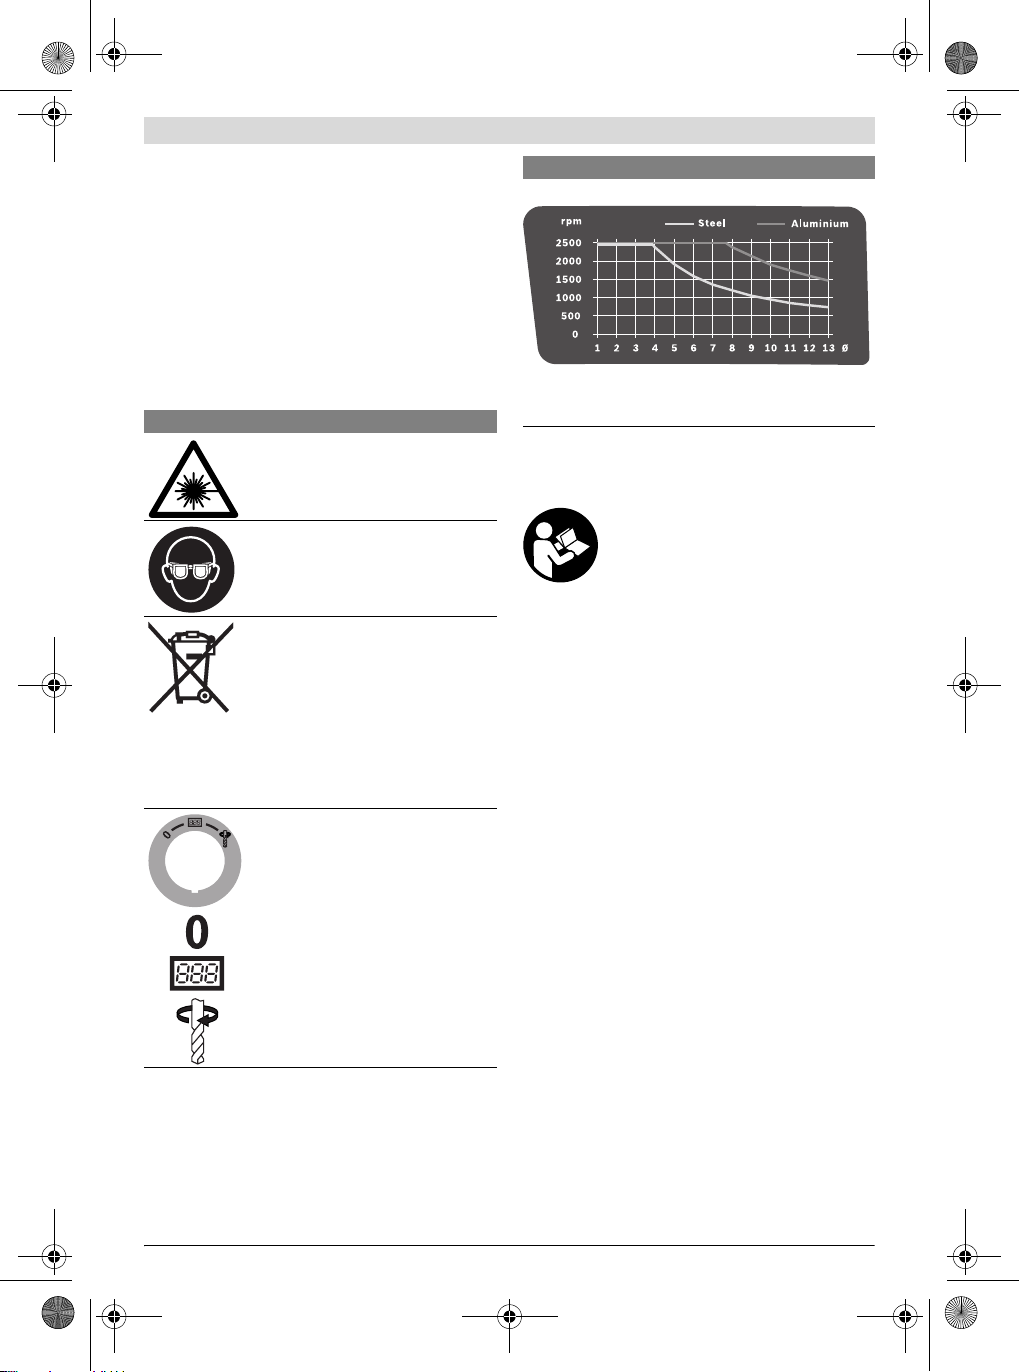
OBJ_BUCH-1183-004.book Page 27 Monday, October 24, 2011 11:35 AM
f Ne jamais utiliser un outil électroportatif dont le câble
est endommagé. Ne pas toucher à un câble endommagé
et retirer la fiche du câble d’alimentation de la prise de
courant, au cas où le câble aurait été endommagé lors
du travail. Un câble endommagé augmente le risque de
choc électrique.
Symboles et leur signification
Diagramme des vitesses
Symboles
Les symboles suivants peuvent être importants pour l’utilisation de votre outil électroportatif. Veuillez mémoriser les symboles et leur signification. L’interprétation correcte des symboles vous permettra de mieux utiliser votre outil
électroportatif et en toute sécurité.
Symboles et leur signification
Rayonnement laser
ne pas regarder dans le faisceau
appareil à laser de classe 2
Porter toujours des lunettes de protection.
Ne jetez pas les outils électroportatifs avec
les ordures ménagères !
Seulement pour les pays de l’Union
Européenne :
Conformément à la directive européenne
2002/96/CE relative aux déchets d’équipements électriques et électroniques et sa mise en vigueur conformément
aux législations nationales, les outils électroportatifs dont on
ne peut plus se servir doivent être isolés et suivre une voie de
recyclage appropriée.
Interrupteur Marche/Arrêt
Arrêt
Mettre l’écran en service
Perçage
Le diagramme indique les vitesses de rotation à régler (rpm)
suivant le diamètre du fore t (Ø en mm) pour les matériaux en
acier (Steel) et aluminium (Aluminium).
Description et performances du produit
Utilisation conforme
Cet outil électroportatif est con çu pour le perçage du bois, du
métal et des matières plastiques au moyen des outils de travail adaptés.
Eléments de l’appareil
La numérotation des éléments de l’appareil se réfère à la représentation de l’outil électroportatif sur les pages graphiques.
1 Plaque de base
2 Levier du tendeur rapide
3 Tendeur rapide
4 Colonne
5 Crémaillère
6 Diagramme des vitesses
7 Levier de blocage pour le réglage de la hauteur
8 Levier de blocage de la butée de profondeur
9 Butée de profondeur
10 Plaque signalétique du laser
11 Molette
12 Unité d’entraînement
13 Interrupteur Marche/Arrêt avec fonction Quick-Stop
14 Ecran
15 Régulateur de vitesse
16 Mandrin automatique
17 Outil*
18 Alésages pour le montage
19 Butée parallèle
20 Vis papillons de la butée parallèle
Français | 27
Il est impératif de lire toutes les consignes
de sécurité et toutes les instructions. Le
non-respect des avertissements et instructions indiqués ci-après peut conduire à une
électrocution, un incendie et/ou de graves
blessures.
Bosch Power Tools 1 619 929 J54 | (24.10.11)
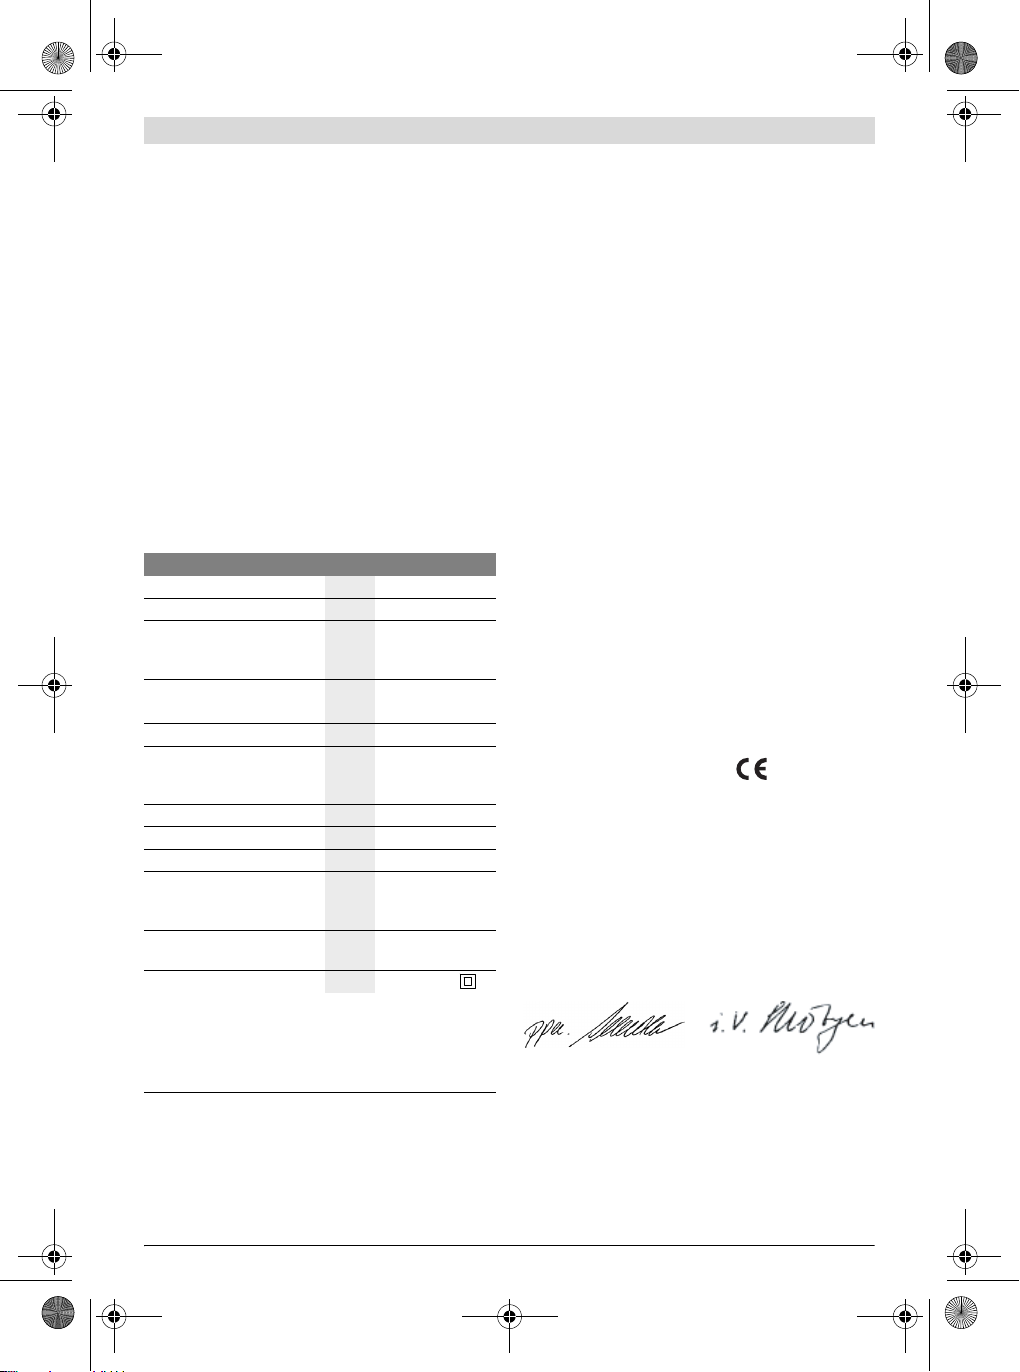
OBJ_BUCH-1183-004.book Page 28 Monday, October 24, 2011 11:35 AM
28 | Français
21 Commutateur de vitesse
22 Unité d’éclairage et laser
23 Clé mâle pour vis à six pans creux (4 mm)
24 Vis de fixation de la colonne
25 Tenon de guidage de la colonne
26 Gorge de guidage de la plaque de base
27 Anneau de retenue
28 Anneau de blocage
29 Douille de serrage
30 Touche pour l’éclairage
31 Touche croix laser
32 Touche affichage de la vitesse/de la profondeur de
perçage
33 Touche point zéro
34 Vis de réglage de la force de serrage du frein
*Les accesso ires décrits ou illustrés ne sont pas tous compris dans
la fourniture. Vous trouverez les accessoires complets dans notre
programme d’accessoires.
Caractéristiques techniques
Perceuse verticale PBD 40
N° d’article
Puissance nominale absorbée
Vitesse à vide
– 1ère vitesse
– 2ème vitesse
tr/min
tr/min
Type de laser
Classe laser
Ø perçage max.
– Acier
–Bois
Plage de serrage du mandrin
Course de perçage max.
Hauteur totale
Dimensions plaque de base
(Largeur x profondeur x hauteur)
Poids suivant EPTA-Procedure
01/2003
Classe de protection
Ces indications sont valables pou r une tension nominale de [U] 230 V.
Ces indications peuvent varier pour des tensions plus basses ainsi que
pour des versions spécifiques à certai ns pays.
Respectez impérativement le numéro d’article se trouvant sur la plaque
signalétique de l’outil électroportatif. Les désignations commerciales
des différents outils électroportatifs peuvent varier.
3 603 M07 0..
W 710
200– 850
600 –2500
nm
mW
mm
mm
mm 1,5–13
mm 90
mm 650
mm 330 x 350 x 30
kg 11,2
Niveau sonore et vibrations
Valeurs de mesure du niveau sonore déterminées conformément à la norme EN 61029.
Les mesures réelles (A) des niveaux sonores de l’appareil
sont : niveau de pression acoustique 77 dB(A) ; niveau d’intensité acoustique 90 dB(A). Incertitude K= 3 dB.
Porter une protection acoustique !
Valeurs totales des vibrations a
axes directionnels) et incertitude K relevées conformément à
la norme EN 61029 :
<2,5m/s2, K= 1,5 m/s2.
a
h
Le niveau d’oscillation indiqué dans ces instructions d’utilisation a été mesuré conformément à la norme EN 61029 et peut
être utilisé pour une comparaison d’outils électroportatifs. Il
est également approprié pour une estimation préliminaire de
la charge vibratoire.
Le niveau d’oscillation correspond aux utilisations principales
de l’outil électroportatif. Si l’outil électrique est cependant
utilisé pour d’autres applications, avec d’autres outils de travail ou avec un entretien non approprié, le niveau d’oscillation
peut être différent. Ceci peut augmenter considérablement la
charge vibratoire pendant toute la durée de travail.
Pour une estimation précise de la charge vibratoire, il est recommandé de prendre aussi en considération les périodes
pendant lesquelles l’appareil est éteint ou en fonctionnement,
mais pas vraiment utilisé. Ceci peut réduire considérablement la charge vibratoire pendant toute la durée de travail.
Déterminez des mesures de protection supplémentaires pour
protéger l’utilisateur des effets des vibrations, telles que par
650
exemple : Entretien de l’outil électrique et des outils de tra-
<1
vail, maintenir les mains chaudes, organisation des opéra-
2
tions de travail.
Déclaration de conformité
13
40
Nous déclarons sous notre propre responsabilité que le produit décrit sous « Caractéristiques techniques » est en conformité avec les normes ou documents normatifs suivants :
EN 61029, EN 60825-1 conformément aux termes des réglementations 2011/65/UE, 2004/108/CE, 2006/42/CE.
Dossier technique (2006/42/CE) auprès de :
Robert Bosch GmbH, PT/ETM9,
D-70745 Leinfelden-Echterdingen
Dr. Egbert Schneider
Senior Vice President
/II
Engineering
Robert Bosch GmbH, Power Tools Division
D-70745 Leinfelden-Echterdingen
Leinfelden, 24.10.2011
(somme vectorielle des trois
h
Dr. Eckerhard Strötgen
Engineering Director
PT/ESI
1 619 929 J54 | (24.10.11) Bosch Power Tools
OBJ_BUCH-1183-004.book Page 29 Monday, October 24, 2011 11:35 AM
Montage
f Évitez un démarrage accidentel de l’outil électroporta-
tif. Pendant le montage et lors de travaux sur l’outil
électroportatif, la fiche de secteur ne doit pas être connectée à l’alimentation en courant.
Accessoires fournis
Avant la première mise en service de l’outil électroportatif, vérifiez si toutes les pièces indiquées ci-dessous ont été
fournies :
– Unité d’entraînement 12 avec colonne 4
– Plaque de base 1
– Tendeur rapide 3
– Butée parallèle 19
– Clé mâle pour vis à six pans 23
Note : Contrôlez si l’outil électroportatif est endommagé.
Avant de réutiliser l’outil électroportatif, vérifiez soigneusement les dispositifs de protection ou les parties légèrement
endommagées afin de vous assurer qu’ils peuvent fonctionner correctement et remplir les conditions de fonctionnement. Contrôlez si les parties mobiles fonctionnent correctement et ne coincent pas, ou si des parties sont
endommagées. Toutes les parties doivent être correctement
montées et remplir toutes les conditions afin de garantir un
fonctionnement impeccable.
Faites réparer ou remplacer les dispositifs de protection et les
parties endommagés par un atelier agréé.
Montage de pièces individuelles (voir figure A)
Avant la première mise en service, il vous faut monter l’outil
électroportatif comme suit :
– Poussez le tendeur rapide 3 sur la colonne 4.
– Placez la colonne 4 dans la plaque de base 1 de manière à
ce que le tenon de guidage 25 s’enfile dans la gorge de guidage 26.
– Serrez fermement la vis de fixation 24 au moyen de la clé
mâle coudée pour vis à six pans creux 23.
Montage sur une surface de travail (voir figure B)
f Afin d’assurer un maniement en toute sécurité, l’outil
électroportatif doit être monté sur une surface de travail plane et stable (par ex. établi) avant son utilisation.
– A l’aide de vis appropriées, fixez l’outil électroportatif sur la
surface de travail. Faites cela à l’aide des alésages 18.
Aspiration de poussières/de copeaux
Les poussières de matériaux tels que peintures contenant du
plomb, certains bois, minéraux ou métaux, peuvent être nuisibles à la santé. Entrer en contact ou aspirer les poussières
peut entraîner des réactions allergiques et/ou des maladies
respiratoires auprès de l’utilisateur ou de personnes se trouvant à proximité.
Certaines poussières telles que les poussières de chêne ou de
hêtre sont considérées comme cancérigènes, surtout en association avec des additifs pour le traitement du bois (chromate, lazure). Les matériaux contenant de l’amiante ne doivent être travaillés que par des personnes qualifiées.
– Si possible, utilisez un dispositif d’aspiration des poussiè-
res approprié au matériau.
– Veillez à bien aérer la zone de travail.
– Il est recommandé de porter un masque respiratoire avec
un niveau de filtration de classe P2.
Respectez les règlements spécifiques aux matériaux à traiter
en vigueur dans votre pays.
f Evitez toute accumulation de poussières à l’emplace-
ment de travail. Les poussières peuvent facilement s’en-
flammer.
Changement d’outil (voir figure C)
L’unité d’entraînement 12 est fournie équipée en usine d’un
mandrin à serrage rapide 16 à deux douilles.
Montage des outils de travail
– Tournez l’anneau de retenue 27 vers « UNLOCK ».
– Tournez la douille de serrage 29 dans le sens inverse des
aiguilles d’une montre jusqu’à ce que l’outil de travail 17
puisse être monté.
– Insérez l’outil de travail 17 complètement, maintenez-le
dans le porte-outil et serrez fermement la douille de serra-
ge 29 dans le sens des aiguilles d’une montre.
Tenez fermement l’anneau de blocage 28.
– Tournez l’anneau de retenue 27 vers « LOCK ».
Note : Lors de l’utilisation de petits forets, réglez auparavant
le porte-outil sur à peu près le diamètre de perçage. Sinon,
vous risquez de ne pas pouvoir centre r correctement le foret.
Sortir l’outil de travail
– Tournez l’anneau de retenue 27 vers « UNLOCK ».
– Tournez la douille de serrage 29 dans le sens inverse des
aiguilles d’une montre jusqu’à ce que l’outil de travail 17
puisse être sorti.
Fonctionnement
f Avant d’effectuer des travaux sur l’outil électroporta-
tif, retirez la fiche de la prise de courant.
f Serrez à nouveau fermement les vis et levier de bloca-
ge après chaque modification du réglage de l’outil élec-
troportatif.
Préparation du travail
Eclairage de la zone de travail (voir figure D)
Veillez à ce que la zone de travail immédiate soit suffisamment
éclairée.
–Pour mettre l’écran en marche 14, tournez l’interrupteur
Marche/Arrêt 13 en position .
– Allumez l’unité d’éclairage 22 à l’aide de la touche 30.
« Light » est affiché sur l’écran 14.
Positionner correctement la pièce à usiner (voir figure E)
Une croix laser vous indique l’endroit de perçage exact.
–Pour mettre l’écran en marche 14, tournez l’interrupteur
Marche/Arrêt 13 en position .
– Allumez l’unité laser 22 à l’aide de la touche 31.
« Laser » est affiché sur l’écran 14.
– Orientez votre marquage sur la pièce d’après la croix laser.
Français | 29
Bosch Power Tools 1 619 929 J54 | (24.10.11)
OBJ_BUCH-1183-004.book Page 30 Monday, October 24, 2011 11:35 AM
30 | Français
Fixation de la pièce à travailler (voir figures F1 –F2)
La pièce à travailler doit toujours être bien serrée afin d’assurer un travail en toute sécurité.
Ne travaillez pas de pièces qui sont trop petites pour être serrées.
– Positionnez la pièce à usiner à l’aide de la croix laser (voir
« Positionner correctement la pièce à usiner », page 29).
– Desserrez le levier de serrage rapide 2 sur le tendeur rapi-
de 3.
– Posez le tendeur rapide sur la pièce à usiner. Tournez le
tendeur rapide 2 dans le sens des aiguilles d’une montre
jusqu’à ce que la pièce à usiner soit fermement serrée.
– Après le perçage, desserrez le tendeur rapide 2 dans le
sens inverse des aiguilles d’une montre.
– Tournez le tendeur rapide 3 vers le côté et enlevez la pièce
à usiner.
La butée parallèle 19 sert à empêcher les grosses pièces à usiner à être arrachées.
– Desserrez les vis papillon 20 de la butée parallèle 19 et
placez celle-ci dans les rainures de la plaque de base 1.
– Resserrez fermement les vis papillon.
– Fixez la pièce à usiner à l’aide du tendeur rapide 3.
Note : Utilisez un étau fixe (par ex. Bosch MS 80) pour fixer
des pièces à usiner de petite taille.
Réglez la hauteur de l’unité d’entraînement (voir figure G)
f Ne modifiez pas le réglable de hauteur de l’unité d’en-
traînement pendant l’utilisation de l’appareil. N’action-
nez le levier de blocage 7 que lorsque la molette est re-
venue dans sa position initiale. Cette mesures de
prudence permet de prévenir de possibles risques de bles-
sures.
La hauteur de l’unité d’entraînement 12 peut être réglée sui-
vant la longueur de l’outil de travail et la taille de la pièce à usiner.
Note : Une fois la hauteur de l’unité de perçage ajustée, la position de la pièce à usiner doit être vérifiée à nouveau à l’aide
de la croix laser. Le cas échéant, réajustez la pièce.
Un frein empêche que lorsque le levier de blocage 7 est
ouvert, l’unité d’entraînement 12 descende par inadvertance.
Vérifiez de temps en temps la force de serrage du frein et réajustez-la au besoin (voir « Réglez le frein de l’unité
d’entraînement », page 32).
– Assurez-vous que la mole tte 11 est bien dans la position
initiale.
– Tenez la molette 11 d’une main et desserrez de l’autre
main le levier de blocage 7 dans le sens contraire des
aiguilles d’une montre.
– Réglez à l’aide de la molette la hauteur de l’unité d’entraîne-
ment 12 selon l’outil de travail inséré et suivant la hauteur
de la pièce à usiner.
– Resserrez le levier de blocage 7 dans le sens des aiguilles
d’une montre.
Note : Le levier de blocage 7 dispose d’une certaine course libre qui permet de le tourner dans une position ergonomique
ou pour gagner de la place.
Lorsque le levier de blocage est serré, poussez la poignée
pour l’éloigner de l’unité d’entraînement, tournez-la dans la
position souhaitée et relâ chez-la.
Mise en service
f Tenez compte de la tension du réseau ! La tension de la
source de courant doit correspondre aux indications se
trouvant sur la plaque signalétique de l’outil électroportatif. Les outils électroportatifs marqués 230 V
peuvent également fonctionner sur 220 V.
Mise en marche
–Pour mettre l’écran en marche 14, tournez l’interrupteur
Marche/Arrêt 13 en position .
–Pour mettre l’outil électroportatif en marche , tournez
l’interrupteur Marche/Arrêt 13 en position .
Vous pouvez maintenant régler la vitesse de rotation (voir
« Réglage de la vitesse de rotation », page 31).
Arrêt
–Pour arrêter le perçage, tournez l’interrupteur Mar-
che/Arrêt 13 en position .
ou
–Pour arrêter complètement l’outil électroportatif, tour-
nez l’interrupteur Marche/Arrêt 13 en position « 0 ».
Note : L’outil électroportatif est maintenant hors tension.
Tous les réglages de vitesse de rotation ou de profondeur
de perçage sont alors effacés.
Fonction Quick-Stop
La fonction Quick-Stop permet d’éteindre rapidement l’outil
électroportatif au cas où, par exemple, l’outil de travail se
coincerait dans la pièce à usiner.
– Appuyez brièvement et rapidement sur l’interrupte ur Mar-
che/Arrêt 13.
L’outil électroportatif et l’écran seront immédiatement
éteints.
Note : L’outil électroportatif est maintenant hors tension.
Tous les réglages de vitesse de rotation ou de profondeur
de perçage sont alors effacés.
– Pour ensuite remettre l’outil électroportatif en marche, re-
mettez l’interrupteur Marche/Arrêt 13 sur la position « 0 ».
Vous pourrez ensuite à nouveau remettre en marche l’outil
électroportatif (interrupteur Marche/Arrêt 13 sur la position ).
Protection contre un démarrage intempestif
La protection contre un démarrage intempestif évite le démarrage incontrôlé de l’outil électroportatif après une interruption de l’alimentation en courant (par ex. un retrait de la fiche de secteur pendant le fonctionnement).
– Pour ensuite remettre l’outil électroportatif en marche, re-
mettez l’interrupteur Marche/Arrêt 13 sur la position .
Vous pourrez ensuite à nouveau remettre en marche l’outil
électroportatif (interrupteur Marche/Arrêt 13 sur la position ).
1 619 929 J54 | (24.10.11) Bosch Power Tools
Loading…
Bosch PBD 40 Instruction Manual
Bosch PBD 40 Drill Specification
The Bosch PBD 40 is a high-precision bench drill designed for both professional and DIY enthusiasts, offering a blend of performance and ease of use. It is powered by a 710-watt motor, providing robust and consistent performance across various applications. The drill features a digital display for precise speed settings, allowing users to adjust the speed electronically from 200 to 2500 revolutions per minute, ensuring optimal performance for different materials. The PBD 40 is equipped with a keyless precision chuck that can accommodate drill bits up to 13 mm, providing quick and easy bit changes without the need for additional tools. Its two-speed gearbox enhances versatility, allowing for both high-speed drilling and high-torque applications.
A standout feature is the integrated laser guide, which ensures accurate drilling by projecting a clear line onto the workpiece. This is complemented by the LED light that illuminates the drilling area, enhancing visibility in low-light conditions. The Bosch PBD 40 also includes a parallel guide and a large work plate, which supports larger workpieces and ensures stability. For added convenience, the drill has a maximum drilling depth of 90 mm, suitable for a wide range of drilling tasks. The adjustable depth stop allows for consistent drilling depths, essential for precise woodworking and metalworking projects.
The ergonomic design, combined with a clear control layout, ensures user-friendly operation, while the robust construction enhances durability. Overall, the Bosch PBD 40 Drill offers a balance of precision, power, and usability, making it a reliable choice for intricate drilling tasks.
Bosch PBD 40 Drill F.A.Q.
To set up the Bosch PBD 40, ensure that you have a stable work surface. Securely attach the drill press to the surface using the mounting holes. Ensure the drill bit is tightly secured in the chuck and adjust the table height as needed for your workpiece.
If the drill bit gets stuck, turn off the machine immediately. Carefully remove the bit by reversing the drilling process manually. Check for any debris or irregularities in the workpiece that may have caused the sticking.
To ensure accurate drilling, use the laser guide to align your workpiece correctly. Secure the material with clamps. Double-check the depth setting and ensure the drill bit is perpendicular to the work surface.
Regularly clean the drill press to remove dust and debris. Lubricate the moving parts according to the manual’s recommendations. Check the power cord for any damage and ensure all screws and bolts are tightened.
To change the drill bit, first unplug the machine for safety. Loosen the chuck by turning it counterclockwise, remove the existing bit, insert the new bit, and tighten the chuck securely by turning it clockwise.
Check if the drill press is properly plugged in and the power switch is on. Inspect the fuse and circuit breaker to ensure they are functional. If the issue persists, consult a professional technician.
The Bosch PBD 40 features an electronic speed control system. Use the speed adjustment knob to set the desired RPM based on your material and drill bit type. Refer to the manual for recommended settings.
Always wear safety goggles and hearing protection. Ensure clothing and hair are secured and keep hands away from the rotating bit. Use clamps to secure the workpiece and never leave the machine unattended while running.
Turn on the laser guide and perform a test drill on a scrap piece. Adjust the laser alignment screws until the laser line matches the drill bit’s entry point. Re-test until accurate alignment is achieved.
Ensure the drill press is mounted securely to a stable surface. Tighten all screws and bolts. Use appropriate speed settings and sharp drill bits, and ensure the workpiece is clamped down securely.
|
Код: 125807 Извините, товара сейчас нет в наличии
Бесплатная доставка Извините, товара сейчас нет в наличии Сравнить Новости интернет-магазина «Лаукар»:26.02.2025 17.02.2025 10.02.2025 Дополнительная информация в категории Станок сверлильный:Таблица Авторизованных сервисных центров по брендам. Описание Инструкция Отзывы (0) В интернет-магазине бытовой техники «Лаукар» Вы можете скачать инструкцию к товару Станок сверлильный Bosch PBD 40 0603B07000 совершенно бесплатно. Все инструкции, представленные на сайте интернет-магазина бытовой техники «Лаукар», предоставляются производителем товара. Для того чтобы скачать инструкцию, Вам необходимо нажать на ссылку «скачать инструкцию», расположенную ниже, а в случае, если ссылки нет, Скачать инструкцию Смотреть инструкцию 
Фирма-производитель оставляет за собой право на внесение изменений в конструкцию, дизайн и комплектацию товара: Станок сверлильный Bosch PBD 40 0603B07000. Пожалуйста, сверяйте информацию о товаре с информацией на |

Robert Bosch GmbH
Power Tools Division
70745 Leinfelden-Echterdingen
Germany
www.bosch-pt.com
1 619 929 J54 (2011.10) PS / 222 UNI
PBD 40
de Originalbetriebsanleitung
en Original instructions
fr Notice originale
es Manual original
pt Manual original
it Istruzioni originali
nl Oorspronkelijke
gebruiksaanwijzing
da Original brugsanvisning
sv Bruksanvisning i original
no Original driftsinstruks
fi Alkuperäiset ohjeet
el Рсщфьфхрп пдзгйюн чсЮузт
tr
Orijinal işletme talimat
pl
Instrukcja oryginalna
cs Původní návod k používání
sk Pôvodný návod na použitie
hu Eredeti használati utasítás
ru Оригинальное руководство по
эксплуатации
uk Ориг³нальна ³нструкц³я з
експлуатац³¿
ro Instrucţiuni originale
bg Оригинална инструкция
sr
Originalno uputstvo za rad
sl
Izvirna navodila
hr Originalne upute za rad
et Algupärane kasutusjuhend
lv
Instrukcijas oriģinālvalodā
lt
Originali instrukcija
OBJ_BUCH-1183-004.book Page 1 Monday, October 24, 2011 11:35 AM