
FĒNIX® 5/5S/5X PLUS
Owner’s Manual

© 2018 Garmin Ltd. or its subsidiaries
All rights reserved. Under the copyright laws, this manual may not be copied, in whole or in part, without the written consent of Garmin. Garmin reserves the right to change or improve its
products and to make changes in the content of this manual without obligation to notify any person or organization of such changes or improvements. Go to www.garmin.com for current updates
and supplemental information concerning the use of this product.
Garmin®, the Garmin logo, ANT+®, Auto Lap®, Auto Pause®, Edge®, fēnix®, TracBack®, VIRB®, and Virtual Partner® are trademarks of Garmin Ltd. or its subsidiaries, registered in the USA and other
countries. Connect IQ™, Garmin Connect™, Garmin Explore™, Garmin Express™, Garmin Golf™, Garmin Move IQ™ , Garmin Pay™, HRM-Run™, HRM-Swim™, HRM-Tri™, QuickFit™, tempe™,
TruSwing™, Varia™, Varia Vision™, Vector™, and Xero™ are trademarks of Garmin Ltd. or its subsidiaries. These trademarks may not be used without the express permission of Garmin.
American Heart Association® is a registered trademark of American Heart Association, Inc. Android™ is a trademark of Google Inc. Apple® and Mac® are trademarks of Apple Inc., registered in the
U.S. and other countries. The Bluetooth® word mark and logos are owned by the Bluetooth SIG, Inc. and any use of such marks by Garmin is under license. The Cooper Institute®, as well as any
related trademarks, are the property of The Cooper Institute. Di2™ is a trademark of Shimano, Inc. Shimano® is a registered trademark of Shimano, Inc. STRAVA and Strava™ are trademarks of
Strava, Inc. Advanced heartbeat analytics by Firstbeat. Training Stress Score™ (TSS), Intensity Factor™ (IF), and Normalized Power™ (NP) are trademarks of Peaksware, LLC. Wi‑Fi® is a
registered mark of Wi-Fi Alliance Corporation. Windows® is a registered trademark of Microsoft Corporation in the United States and other countries. Other trademarks and trade names are those
of their respective owners.
This product is ANT+® certified. Visit www.thisisant.com/directory for a list of compatible products and apps.

Table of Contents
Introduction……………………………………………………………1
Device Overview………………………………………………………………. 1
Viewing the Controls Menu……………………………………………. 1
Viewing Widgets………………………………………………………….. 1
Charging the Device…………………………………………………………. 1
Pairing Your Smartphone with Your Device…………………………. 1
Product Updates………………………………………………………………. 1
Setting Up Garmin Express…………………………………………… 2
Activities and Apps……………………………………………….. 2
Starting an Activity……………………………………………………………. 2
Tips for Recording Activities………………………………………….. 2
Stopping an Activity………………………………………………………….. 2
Adding or Removing a Favorite Activity……………………………….. 2
Creating a Custom Activity………………………………………………… 2
Indoor Activities……………………………………………………………….. 2
Recording a Strength Training Activity……………………………..2
Outdoor Activities………………………………………………………………3
Viewing Your Ski Runs…………………………………………………. 3
Using the Metronome…………………………………………………….3
Playing Audio Prompts During an Activity…………………………3
Jumpmaster………………………………………………………………… 3
Multisport………………………………………………………………………… 3
Creating a Multisport Activity…………………………………………. 3
Tips for Triathlon Training or Using Multisport Activities…….. 3
Swimming……………………………………………………………………….. 4
Swim Terminology……………………………………………………….. 4
Stroke Types……………………………………………………………….. 4
Tips for Swimming Activities………………………………………….. 4
Resting During Pool Swimming……………………………………… 4
Training with the Drill Log……………………………………………… 4
Golfing……………………………………………………………………………. 4
Playing Golf………………………………………………………………….4
Hole Information……………………………………………………………4
Moving the Flag…………………………………………………………… 4
Viewing Hazards………………………………………………………….. 5
Measuring a Shot…………………………………………………………. 5
Viewing Layup and Dogleg Distances…………………………….. 5
Keeping Score…………………………………………………………….. 5
Updating a Score…………………………………………………………. 5
TruSwing™…………………………………………………………………. 5
Using the Golf Odometer………………………………………………. 5
Tracking Statistics………………………………………………………… 5
Connected Features………………………………………………. 5
Enabling Bluetooth Notifications…………………………………………. 5
Viewing Notifications…………………………………………………….. 6
Receiving an Incoming Phone Call…………………………………. 6
Replying to a Text Message………………………………………….. 6
Managing Notifications…………………………………………………..6
Turning Off the Bluetooth Smartphone Connection……………….. 6
Turning On and Off Smartphone Connection Alerts………………. 6
Locating a Lost Mobile Device……………………………………………. 6
Garmin Connect………………………………………………………………..6
Updating the Software Using Garmin Connect Mobile………. 6
Updating the Software Using Garmin Express…………………. 7
Using Garmin Connect on Your Computer………………….. 7
Manually Syncing Data with Garmin Connect Mobile………… 7
Garmin Golf™ App………………………………………………………..7
Starting a GroupTrack Session……………………………………………7
Tips for GroupTrack Sessions……………………………………….. 7
Garmin Explore™…………………………………………………………….. 7
Wi‑Fi® Connected Features…………………………………… 7
Setting Up Wi‑Fi Connectivity…………………………………………….. 7
Connect IQ Features……………………………………………… 8
Downloading Connect IQ Features
Downloading Connect IQ Features Using Your Computer……… 8
…………………………………….. 8
Garmin Pay…………………………………………………………… 8
Setting Up Your Garmin Pay Wallet……………………………………. 8
Paying for a Purchase Using Your Watch……………………………. 8
Adding a Card to Your Garmin Pay Wallet…………………………… 8
Managing Your Garmin Pay Wallet………………………………….8
Changing Your Garmin Pay Passcode………………………………… 9
Music……………………………………………………………………. 9
Connecting to a Third-Party Provider………………………………….. 9
Downloading Audio Content from a Third-Party Provider…… 9
Disconnecting from a Third-Party Provider………………………. 9
Downloading Personal Audio Content…………………………………. 9
Listening to Downloaded Music………………………………………….. 9
Music Playback Controls…………………………………………………… 9
Connecting Headphones using Bluetooth Technology…………. 10
Heart Rate Features…………………………………………….. 10
Wrist-based Heart Rate…………………………………………………… 10
Wearing the Device……………………………………………………..10
Tips for Erratic Heart Rate Data…………………………………….10
Viewing the Heart Rate Widget…………………………………….. 10
Broadcasting Heart Rate Data to Garmin Devices………….. 10
Broadcasting Heart Rate Data During an Activity……….. 10
Turning Off the Wrist-based Heart Rate Monitor…………….. 10
Putting On the Heart Rate Monitor……………………………………. 11
Tips for Erratic Heart Rate Data…………………………………….11
Caring for the Heart Rate Monitor…………………………………. 11
Running Dynamics…………………………………………………………..11
Training with Running Dynamics………………………………….. 11
Color Gauges and Running Dynamics Data…………………… 12
Ground Contact Time Balance Data…………………………. 12
Vertical Oscillation and Vertical Ratio Data…………………12
Tips for Missing Running Dynamics Data………………………. 12
Performance Measurements……………………………………………. 12
Turning Off Performance Notifications…………………………… 13
Detecting Performance Measurements Automatically……… 13
Training Status…………………………………………………………… 13
Tips for Getting Your Training Status………………………… 13
About VO2 Max. Estimates………………………………………….. 13
Getting Your VO2 Max. Estimate for Running……………. 14
Getting Your VO2 Max. Estimate for Cycling……………… 14
Recovery Time…………………………………………………………… 14
Viewing Your Recovery Time…………………………………… 14
Recovery Heart Rate………………………………………………….. 14
Training Load…………………………………………………………….. 14
Viewing Your Predicted Race Times…………………………….. 14
About Training Effect………………………………………………….. 14
Heart Rate Variability and Stress Level…………………………. 15
Viewing Your Heart Rate Variability and Stress Level…. 15
Performance Condition……………………………………………….. 15
Viewing Your Performance Condition……………………….. 15
Lactate Threshold………………………………………………………. 15
Performing a Guided Test to Determine Your Lactate
Threshold……………………………………………………………… 15
Getting Your FTP Estimate………………………………………….. 16
Conducting an FTP Test…………………………………………. 16
Pulse Oximeter……………………………………………………. 16
Viewing the Pulse Oximeter Widget………………………………….. 16
Turning On All-Day Acclimation Mode……………………………….. 16
Turning On Manual Acclimation Mode………………………………. 16
Tips for Erratic Pulse Oximeter Data…………………………………. 16
Training………………………………………………………………. 17
Setting Up Your User Profile……………………………………………..17
Fitness Goals…………………………………………………………….. 17
Table of Contents i

About Heart Rate Zones……………………………………………… 17
Setting Your Heart Rate Zones………………………………… 17
Letting the Device Set Your Heart Rate Zones…………… 17
Heart Rate Zone Calculations………………………………….. 17
Setting Your Power Zones…………………………………………… 17
Activity Tracking………………………………………………………………18
Auto Goal………………………………………………………………….. 18
Using the Move Alert……………………………………………………18
Sleep Tracking…………………………………………………………… 18
Using Automated Sleep Tracking………………………………18
Using Do Not Disturb Mode…………………………………….. 18
Intensity Minutes………………………………………………………… 18
Earning Intensity Minutes………………………………………… 18
Garmin Move IQ™……………………………………………………… 18
Activity Tracking Settings…………………………………………….. 18
Turning Off Activity Tracking……………………………………. 18
Workouts………………………………………………………………………..18
Following a Workout From the Web……………………………….19
Starting a Workout……………………………………………………… 19
About the Training Calendar………………………………………… 19
Using Garmin Connect Training Plans………………………. 19
Interval Workouts……………………………………………………………. 19
Creating an Interval Workout……………………………………….. 19
Starting an Interval Workout………………………………………… 19
Stopping an Interval Workout………………………………………..19
Segments……………………………………………………………………….19
Strava™ Segments…………………………………………………….. 19
Viewing Segment Details…………………………………………….. 19
Racing a Segment……………………………………………………… 20
Setting a Segment to Adjust Automatically…………………….. 20
Using Virtual Partner®…………………………………………………….. 20
Setting a Training Target…………………………………………………. 20
Cancelling a Training Target………………………………………… 20
Racing a Previous Activity……………………………………………….. 20
Personal Records…………………………………………………………… 20
Viewing Your Personal Records…………………………………… 20
Restoring a Personal Record……………………………………….. 20
Clearing a Personal Record…………………………………………. 20
Clearing All Personal Records……………………………………… 21
Clock…………………………………………………………………… 21
Setting an Alarm…………………………………………………………….. 21
Deleting an Alarm………………………………………………………. 21
Starting the Countdown Timer………………………………………….. 21
Using the Stopwatch……………………………………………………….. 21
Adding Alternate Time Zones…………………………………………… 21
Setting Clock Alerts………………………………………………………… 21
Syncing the Time with GPS……………………………………………… 21
Navigation…………………………………………………………… 21
Saving Your Location……………………………………………………… 21
Editing Your Saved Locations………………………………………. 21
Projecting a Waypoint……………………………………………………… 21
Navigating to a Destination………………………………………………. 22
Navigating to a Point of Interest……………………………………….. 22
Points of Interest………………………………………………………… 22
Creating and Following a Course on Your Device……………….. 22
Creating a Round-Trip Course…………………………………………..22
Marking and Starting Navigation to a Man Overboard
Location………………………………………………………………………… 22
Navigating with Sight ‘N Go……………………………………………… 22
Navigating to Your Starting Point During an Activity……………. 22
Navigating to the Starting Point of Your Last Saved Activity…. 22
Stopping Navigation……………………………………………………….. 23
Map………………………………………………………………………………. 23
Viewing the Map………………………………………………………… 23
Saving or Navigating to a Location on the Map………………. 23
Navigating with the Around Me Feature………………………… 23
Compass
Altimeter and Barometer………………………………………………….. 23
………………………………………………………………………..23
History………………………………………………………………… 23
Using History…………………………………………………………………. 23
Multisport History……………………………………………………….. 24
Viewing Your Time in Each Heart Rate Zone…………………. 24
Viewing Data Totals………………………………………………………… 24
Using the Odometer…………………………………………………………24
Deleting History……………………………………………………………… 24
Customizing Your Device…………………………………….. 24
Activities and App Settings………………………………………………. 24
Customizing the Data Screens…………………………………….. 24
Adding a Map to an Activity…………………………………………. 25
Alerts………………………………………………………………………… 25
Setting an Alert……………………………………………………….25
Activity Map Settings……………………………………………………25
Routing Settings………………………………………………………….25
Auto Lap…………………………………………………………………….26
Marking Laps by Distance……………………………………….. 26
Enabling Auto Pause………………………………………………….. 26
Enabling Auto Climb…………………………………………………… 26
3D Speed and Distance………………………………………………. 26
Turning On and Off the Lap Key…………………………………… 26
Using Auto Scroll……………………………………………………….. 26
UltraTrac…………………………………………………………………… 26
Power Save Timeout Settings……………………………………….27
Changing the Order of an Activity in the Apps List………………. 27
Widgets…………………………………………………………………………. 27
Customizing the Widget Loop………………………………………. 27
VIRB Remote…………………………………………………………….. 27
Controlling a VIRB Action Camera……………………………. 27
Controlling a VIRB Action Camera During an Activity….. 27
Using the Stress Level Widget……………………………………… 28
Customizing the Controls Menu…………………………………………28
Watch Face Settings………………………………………………………..28
Customizing the Watch Face……………………………………….. 28
Sensors Settings……………………………………………………………..28
Compass Settings………………………………………………………. 28
Calibrating the Compass Manually…………………………… 28
Setting the North Reference……………………………………..29
Altimeter Settings……………………………………………………….. 29
Calibrating the Barometric Altimeter…………………………. 29
Barometer Settings…………………………………………………….. 29
Calibrating the Barometer……………………………………….. 29
Map Settings………………………………………………………………….. 29
Marine Map Settings…………………………………………………… 29
Showing and Hiding Map Data…………………………………….. 29
GroupTrack Settings……………………………………………………….. 29
Navigation Settings…………………………………………………………. 29
Customizing Map Features………………………………………….. 30
Setting Up a Heading Bug…………………………………………… 30
Setting Navigation Alerts………………………………………………30
System Settings……………………………………………………………… 30
Time Settings…………………………………………………………….. 30
Changing the Backlight Settings…………………………………… 30
Customizing the Hot Keys…………………………………………….30
Changing the Units of Measure……………………………………. 30
Viewing Device Information……………………………………………… 30
Viewing E-label Regulatory and Compliance Information…. 30
Wireless Sensors………………………………………………… 31
Pairing Your Wireless Sensors…………………………………………. 31
Using an Optional Bike Speed or Cadence Sensor……………… 31
Training with Power Meters……………………………………………… 31
Using Electronic Shifters…………………………………………………..31
Situational Awareness…………………………………………………….. 31
ii Table of Contents

Foot Pod……………………………………………………………………….. 31
Improving Foot Pod Calibration……………………………………. 31
Calibrating Your Foot Pod Manually……………………………… 31
Setting Foot Pod Speed and Distance…………………………… 31
tempe™………………………………………………………………………… 32
Device Information………………………………………………. 32
fēnix 5/5S/5X Plus Specifications……………………………………… 32
Battery Information………………………………………………………32
Data Management………………………………………………………….. 32
Disconnecting the USB Cable……………………………………….32
Deleting Files…………………………………………………………….. 32
Device Maintenance…………………………………………….. 32
Device Care…………………………………………………………………… 32
Cleaning the Device……………………………………………………. 32
Cleaning the Leather Bands………………………………………… 32
Changing the QuickFit™ Bands……………………………………….. 32
Metal Watch Band Adjustment…………………………………………. 33
Troubleshooting………………………………………………….. 33
My device is in the wrong language………………………………….. 33
Is my smartphone compatible with my device?…………………… 33
My phone will not connect to the device…………………………….. 33
Can I use my Bluetooth sensor with my watch?………………….. 33
My headphones will not connect to the device……………………. 33
My music cuts out or my headphones do not stay connected.. 33
Resetting Your Device…………………………………………………….. 33
Resetting All Default Settings…………………………………………… 33
Acquiring Satellite Signals……………………………………………….. 33
Improving GPS Satellite Reception………………………………..34
The temperature reading is not accurate……………………………. 34
Maximizing the Battery Life……………………………………………….34
Activity Tracking………………………………………………………………34
My daily step count does not appear…………………………….. 34
My step count does not seem accurate…………………………. 34
The step counts on my device and my Garmin Connect
account don’t match……………………………………………………. 34
The floors climbed amount does not seem accurate……….. 34
My intensity minutes are flashing………………………………….. 34
Getting More Information…………………………………………………. 34
Appendix…………………………………………………………….. 34
Data Fields……………………………………………………………………..34
VO2 Max. Standard Ratings…………………………………………….. 38
FTP Ratings…………………………………………………………………… 38
Wheel Size and Circumference………………………………………… 38
Symbol Definitions………………………………………………………….. 39
Index…………………………………………………………………… 40
Table of Contents iii

Introduction
WARNING
See the Important Safety and Product Information guide in the
product box for product warnings and other important
information.
Always consult your physician before you begin or modify any
exercise program.
• If you are recording an activity, select BACK to return to the
activity data pages.
Charging the Device
WARNING
This device contains a lithium-ion battery. See the Important
Safety and Product Information guide in the product box for
product warnings and other important information.
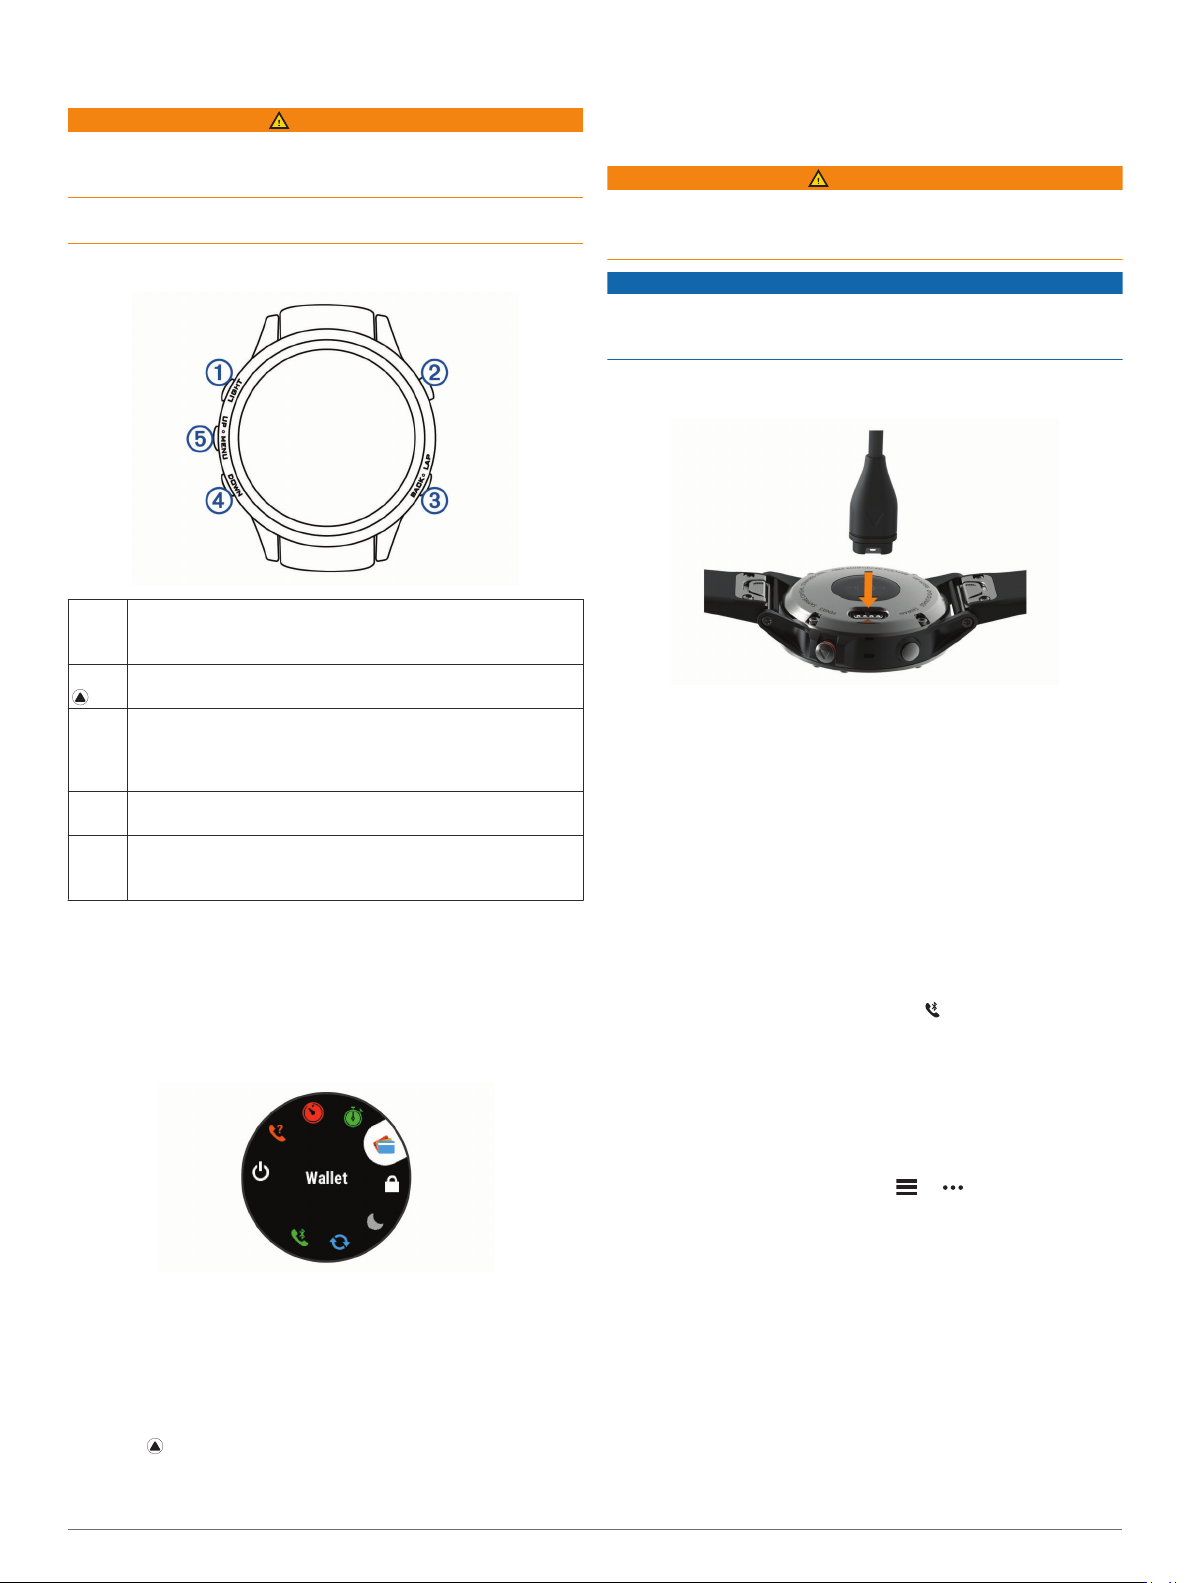
Device Overview
Select to turn the backlight on and off.
À
LIGHT
Hold to view the controls menu.
Hold to turn the device on.
Select to view the activity list and start or stop an activity.
Á
Select to choose an option in a menu.
Select to return to the previous screen.
Â
BACK
Select to record a lap, rest, or transition during a multisport
activity.
LAP
Hold to view the watch face from any screen.
Select to scroll through the widget loop and menus.
Ã
DOWN
Hold to view the music controls from any screen.
Select to scroll through the widget loop and menus.
Ä
UP
Hold to view the menu.
MENU
Viewing the Controls Menu
The controls menu contains options, such as turning on do not
disturb mode, locking the keys, and turning the device off. You
can also open the Garmin Pay™ wallet.
NOTE: You can add, reorder, and remove the options in the
controls menu (Customizing the Controls Menu, page 28).
From any screen, hold LIGHT.
1
NOTICE
To prevent corrosion, thoroughly clean and dry the contacts and
the surrounding area before charging or connecting to a
computer. Refer to the cleaning instructions in the appendix.
Plug the small end of the USB cable into the charging port on
1
your device.
Plug the large end of the USB cable into a USB port on your
2
computer.
Charge the device completely.
3
Pairing Your Smartphone with Your Device
To use the connected features of the fēnix device, it must be
paired directly through the Garmin Connect™ Mobile app,
instead of from the Bluetooth® settings on your smartphone.
From the app store on your smartphone, install and open the
1
Garmin Connect Mobile app.
Bring your smartphone within 10 m (33 ft.) of your device.
2
Select LIGHT to turn on the device.
3
The first time you turn on the device, it is in pairing mode.
TIP: You can hold LIGHT and select to manually enter
pairing mode.
Select an option to add your device to your Garmin Connect
4
account:
• If this is the first time you are pairing a device with the
Garmin Connect Mobile app, follow the on-screen
instructions.
• If you already paired another device with the Garmin
Connect Mobile app, from the or menu, select
Garmin Devices > Add Device, and follow the on-screen
instructions.
Select UP or DOWN to scroll through the options.
Product Updates
2
Viewing Widgets
Your device comes preloaded with several widgets, and more
are available when you pair your device with a smartphone.
• Select UP or DOWN.
The device scrolls through the widget loop.
• Select to view additional options and functions for a
widget.
• From any screen, hold BACK to return to the watch face.
Introduction 1
On your computer, install Garmin Express™ (www.garmin.com
/express). On your smartphone, install the Garmin Connect
Mobile app.
This provides easy access to these services for Garmin
devices:
• Software updates
• Map updates
• Data uploads to Garmin Connect
• Product registration
®

Setting Up Garmin Express
Connect the device to your computer using a USB cable.
1
Go to www.garmin.com/express.
2
Follow the on-screen instructions.
3
Activities and Apps
Your device can be used for indoor, outdoor, athletic, and fitness
activities. When you start an activity, the device displays and
records sensor data. You can save activities and share them
with the Garmin Connect community.
You can also add Connect IQ™ activities and apps to your
device using the Connect IQ Mobile app (Connect IQ Features,
page 8).
For more information about activity tracking and fitness metric
accuracy, go to garmin.com/ataccuracy.
Adding or Removing a Favorite Activity
The list of your favorite activities appears when you press
from the watch face, and it provides quick access to the
activities you use most. The first time you press to start an
activity, the device prompts you to select your favorite activities.
You can add or remove favorite activities at any time.
Hold MENU.
1
Select Settings > Activities & Apps.
2
Your favorite activities appear at the top of the list with a
white background. Other activities appear with a black
background.
Select an option:
3
• To add a favorite activity, select the activity, and select
Set as Favorite.
• To remove a favorite activity, select the activity, and select
Remove from Favorites.
Starting an Activity
When you start an activity, GPS turns on automatically (if
required). When you stop the activity, the device returns to
watch mode.
From the watch face, select .
1
Select an activity.
2
If necessary, follow the on-screen instructions to enter
3
additional information.
If necessary, wait while the device connects to your ANT+
4
sensors.
If the activity requires GPS, go outside, and wait while the
5
device locates satellites.
Select to start the timer.
6
NOTE: The device does not record your activity data until
you start the timer.
Tips for Recording Activities
• Charge the device before starting an activity (Charging the
Device, page 1).
• Select LAP to record laps.
• Select UP or DOWN to view additional data pages.
Stopping an Activity
Select .
1
Select an option:
2
• To resume your activity, select Resume.
• To save the activity and return to watch mode, select
Save.
• To suspend your activity and resume it at a later time,
select Resume Later.
• To mark a lap, select Lap.
• To navigate back to the starting point of your activity along
the path you traveled, select Back to Start > TracBack.
NOTE: This feature is available only for activities that use
GPS.
• To navigate back to the starting point of your activity by
the most direct path, select Back to Start > Route.
NOTE: This feature is available only for activities that use
GPS.
• To discard the activity and return to watch mode, select
Discard > Yes.
NOTE: After stopping the activity, the device saves it
automatically after 30 minutes.
Creating a Custom Activity
From the watch face, select > Add.
1
Select an option:
2
• Select Copy Activity to create your custom activity
starting from one of your saved activities.
• Select Other to create a new custom activity.
If necessary, select an activity type.
3
®
Select a name or enter a custom name.
4
Duplicate activity names include a number, for example:
Bike(2).
Select an option:
5
• Select an option to customize specific activity settings. For
example, you can select an accent color or customize the
data screens.
• Select Done to save and use the custom activity.
Select Yes to add the activity to your list of favorites.
6
Indoor Activities
The fēnix device can be used for training indoors, such as
running on an indoor track or using a stationary bike. GPS is
turned off for indoor activities.
When running or walking with GPS turned off, speed, distance,
and cadence are calculated using the accelerometer in the
device. The accelerometer is self-calibrating. The accuracy of
the speed, distance, and cadence data improves after a few
outdoor runs or walks using GPS.
TIP: Holding the handrails of the treadmill reduces accuracy.
You can use an optional foot pod to record pace, distance, and
cadence.
When cycling with GPS turned off, speed and distance are not
available unless you have an optional sensor that sends speed
and distance data to the device (such as a speed or cadence
sensor).
Recording a Strength Training Activity
You can record sets during a strength training activity. A set is
multiple repetitions (reps) of a single move.
From the watch face, select > Strength.
1
The first time you record a strength training activity, you will
select which wrist your watch is on.
Select to start the set timer.
2
Start your first set.
3
The device counts your reps. Your rep count appears when
you complete at least six reps.
2 Activities and Apps

TIP: The device can only count reps of a single move for
each set. When you want to change moves, you should finish
the set and start a new one.
Select LAP to finish the set.
4
The watch displays the total reps for the set. After several
seconds, the rest timer appears.
If necessary, hold MENU, select Edit Last Set, and edit the
5
number of reps.
TIP: You can also add the weight used for the set.
When you are done resting, select LAP to start your next set.
6
Repeat for each strength training set until your activity is
7
complete.
After your last set, select to stop the set timer.
8
Select Save.
9
Outdoor Activities
The fēnix device comes preloaded with outdoor activities, such
as running and cycling. GPS is turned on for outdoor activities.
You can add new activities based on default activities, such as
walking or rowing. You can also add custom activities to your
device (Creating a Custom Activity, page 2).
Viewing Your Ski Runs
Your device records the details of each downhill skiing or
snowboarding run using the auto run feature. This feature is
turned on by default for downhill skiing and snowboarding. It
automatically records new ski runs based on your movement.
The timer pauses when you stop moving downhill and when you
are on a chairlift. The timer remains paused during the chairlift
ride. You can start moving downhill to restart the timer. You can
view run details from the paused screen or while the timer is
running.
Start a skiing or snowboarding activity.
1
Hold MENU.
2
Select View Runs.
3
Select UP and DOWN to view details of your last run, your
4
current run, and your total runs.
The run screens include time, distance traveled, maximum
speed, average speed, and total descent.
Using the Metronome
The metronome feature plays tones at a steady rhythm to help
you improve your performance by training at a faster, slower, or
more consistent cadence.
NOTE: This feature is not available for all activities.
From the watch face, select .
1
Select an activity.
2
Hold MENU.
3
Select the activity settings.
4
Select Metronome > Status > On.
5
Select an option:
6
• Select Beats / Minute to enter a value based on the
cadence you want to maintain.
• Select Alert Frequency to customize the frequency of the
beats.
• Select Sounds to customize the metronome tone and
vibration.
If necessary, select Preview to listen to the metronome
7
feature before you run.
Go for a run (Starting an Activity, page 2).
8
The metronome starts automatically.
During your run, select UP or DOWN to view the metronome
9
screen.
If necessary, hold MENU to change the metronome settings.
10
Playing Audio Prompts During an Activity
You can enable your fēnix device to play motivational status
announcements during a run or other activity. Audio prompts
play on your connected headphones using Bluetooth
technology, if available. Otherwise, audio prompts play on your
smartphone paired through the Garmin Connect Mobile app.
During an audio prompt, the device or smartphone mutes the
primary audio to play the announcement.
NOTE: This feature is not available for all activities.
Hold MENU.
1
Select Settings > Audio Prompts.
2
Select an option:
3
• To hear a prompt for each lap, select Lap Alert.
NOTE: The Lap Alert audio prompt is enabled by default.
• To customize prompts with your pace and speed
information, select Pace/Speed Alert.
• To customize prompts with your heart rate information,
select Heart Rate Alert.
• To hear prompts when you start and stop the timer,
including the Auto Pause® feature, select Timer Events.
• To change the language or the dialect of the voice
prompts, select Dialect.
Jumpmaster
WARNING
The jumpmaster feature is for use by experienced skydivers
only. The jumpmaster feature should not be used as a primary
skydiving altimeter. Failure to input the appropriate jump related
information can lead to serious personal injury or death.
The jumpmaster feature follows military guidelines for
calculating the high altitude release point (HARP). The device
detects automatically when you have jumped to begin navigating
toward the desired impact point (DIP) using the barometer and
electronic compass.
Multisport
Triathletes, duathletes, and other multisport competitors can
take advantage of the multisport activities, such as Triathlon or
Swimrun. During a multisport activity, you can transition
between activities and continue to view your total time and
distance. For example, you can switch from biking to running
and view your total time and distance for biking and running
throughout the multisport activity.
You can customize a multisport activity, or you can use the
default triathlon activity set up for a standard triathlon.
Creating a Multisport Activity
From the watch face, select > Add > Multisport.
1
Select a multisport activity type, or enter a custom name.
2
Duplicate activity names include a number. For example,
Triathlon(2).
Select two or more activities.
3
Select an option:
4
• Select an option to customize specific activity settings. For
example, you can select whether to include transitions.
• Select Done to save and use the multisport activity.
Select Yes to add the activity to your list of favorites.
5
Tips for Triathlon Training or Using Multisport
Activities
• Select to start your first activity.
• Select LAP to transition to the next activity.
Activities and Apps 3
If transitions are turned on, the transition time is recorded
separately from the activity times.
• If necessary, select LAP to start the next activity.
• Select UP or DOWN to view additional data pages.
Swimming
NOTICE
The device is intended for surface swimming. Scuba diving with
the device may damage the product and will void the warranty.
NOTE: The device cannot record wrist heart rate data while
swimming.
Swim Terminology
Length: One trip down the pool.
Interval: One or more consecutive lengths. A new interval starts
after a rest.
Stroke: A stroke is counted every time your arm wearing the
device completes a full cycle.
Swolf: Your swolf score is the sum of the time for one pool
length and the number of strokes for that length. For
example, 30 seconds plus 15 strokes equals a swolf score of
45. For open water swimming, swolf is calculated over 25
meters. Swolf is a measurement of swimming efficiency and,
like golf, a lower score is better.
Stroke Types
Stroke type identification is available only for pool swimming.
Your stroke type is identified at the end of a length. Stroke types
appear when you are viewing interval history. You can also
select stroke type as a custom data field (Customizing the Data
Screens, page 24).
Free Freestyle
Back Backstroke
Breast Breaststroke
Fly Butterfly
Mixed More than one stroke type in an interval
Drill Used with drill logging (Training with the Drill Log, page 4)
swimming, or any type of swimming that is not one of the four
major strokes.
During your pool swim activity, select UP or DOWN to view
1
the drill log screen.
Select LAP to start the drill timer.
2
After you complete a drill interval, select LAP.
3
The drill timer stops, but the activity timer continues to record
the entire swim session.
Select a distance for the completed drill.
4
Distance increments are based on the pool size selected for
the activity profile.
Select an option:
5
• To start another drill interval, select LAP.
• To start a swim interval, select UP or DOWN to return to
the swim training screens.
Golfing
Playing Golf
Before you play golf, you should charge the device (Charging
the Device, page 1).
From the watch face, select > Golf.
1
Go outside, and wait while the device locates satellites.
2
Select a course from the list of available courses.
3
Select Yes to keep score.
4
Select UP or DOWN to scroll through the holes.
5
The device automatically transitions when you move to the
next hole.
After you complete your activity, select > End Round >
6
Yes.
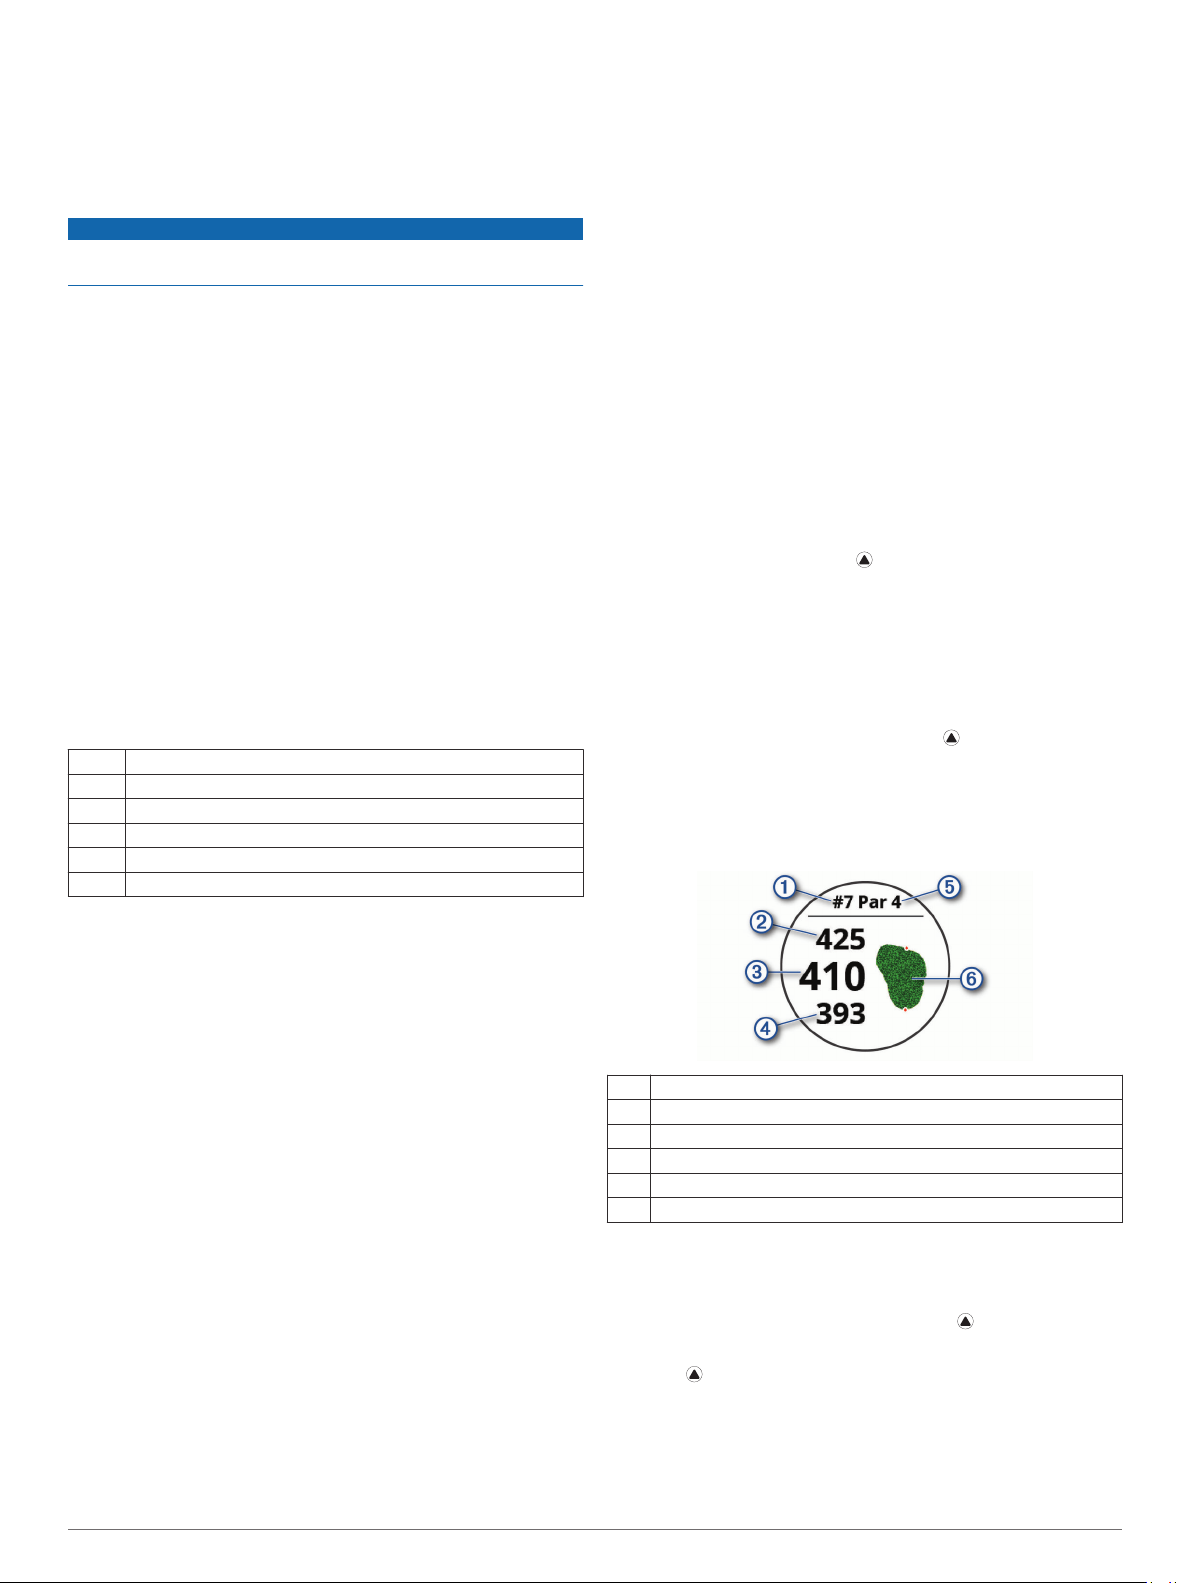
Hole Information
The device calculates the distance to the front and back of the
green, and to the selected pin location (Moving the Flag,
page 4).
Tips for Swimming Activities
• Before starting a pool swimming activity, follow the on-screen
instructions to select your pool size or enter a custom size.
The next time you start a pool swimming activity, the device
uses this pool size. You can hold MENU, select the activity
settings, and select Pool Size to change the size.
• Select LAP to record a rest during pool swimming.
The device automatically records swim intervals and lengths
for pool swimming.
• Select LAP to record an interval during open water
swimming.
Resting During Pool Swimming
The default rest screen displays two rest timers. It also displays
time and distance for the last completed interval.
NOTE: Swim data is not recorded during a rest.
During your swim activity, select LAP to start a rest.
1
The display reverses to white text on a black background,
and the rest screen appears.
During a rest, select UP or DOWN to view other data screens
2
(optional).
Select LAP, and continue swimming.
3
Repeat for additional rest intervals.
4
Training with the Drill Log
The drill log feature is available only for pool swimming. You can
use the drill log feature to manually record kick sets, one-arm
Current hole number
À
Distance to the back of the green
Á
Distance to the selected pin location
Â
Distance to the front of the green
Ã
Par for the hole
Ä
Map of the green
Å
Moving the Flag
You can take a closer look at the green and move the pin
location.
From the hole information screen, select > Move Flag.
1
Select UP or DOWN to move the pin position.
2
Select .
3
The distances on the hole information screen are updated to
show the new pin location. The pin location is saved for only
the current round.
4 Activities and Apps
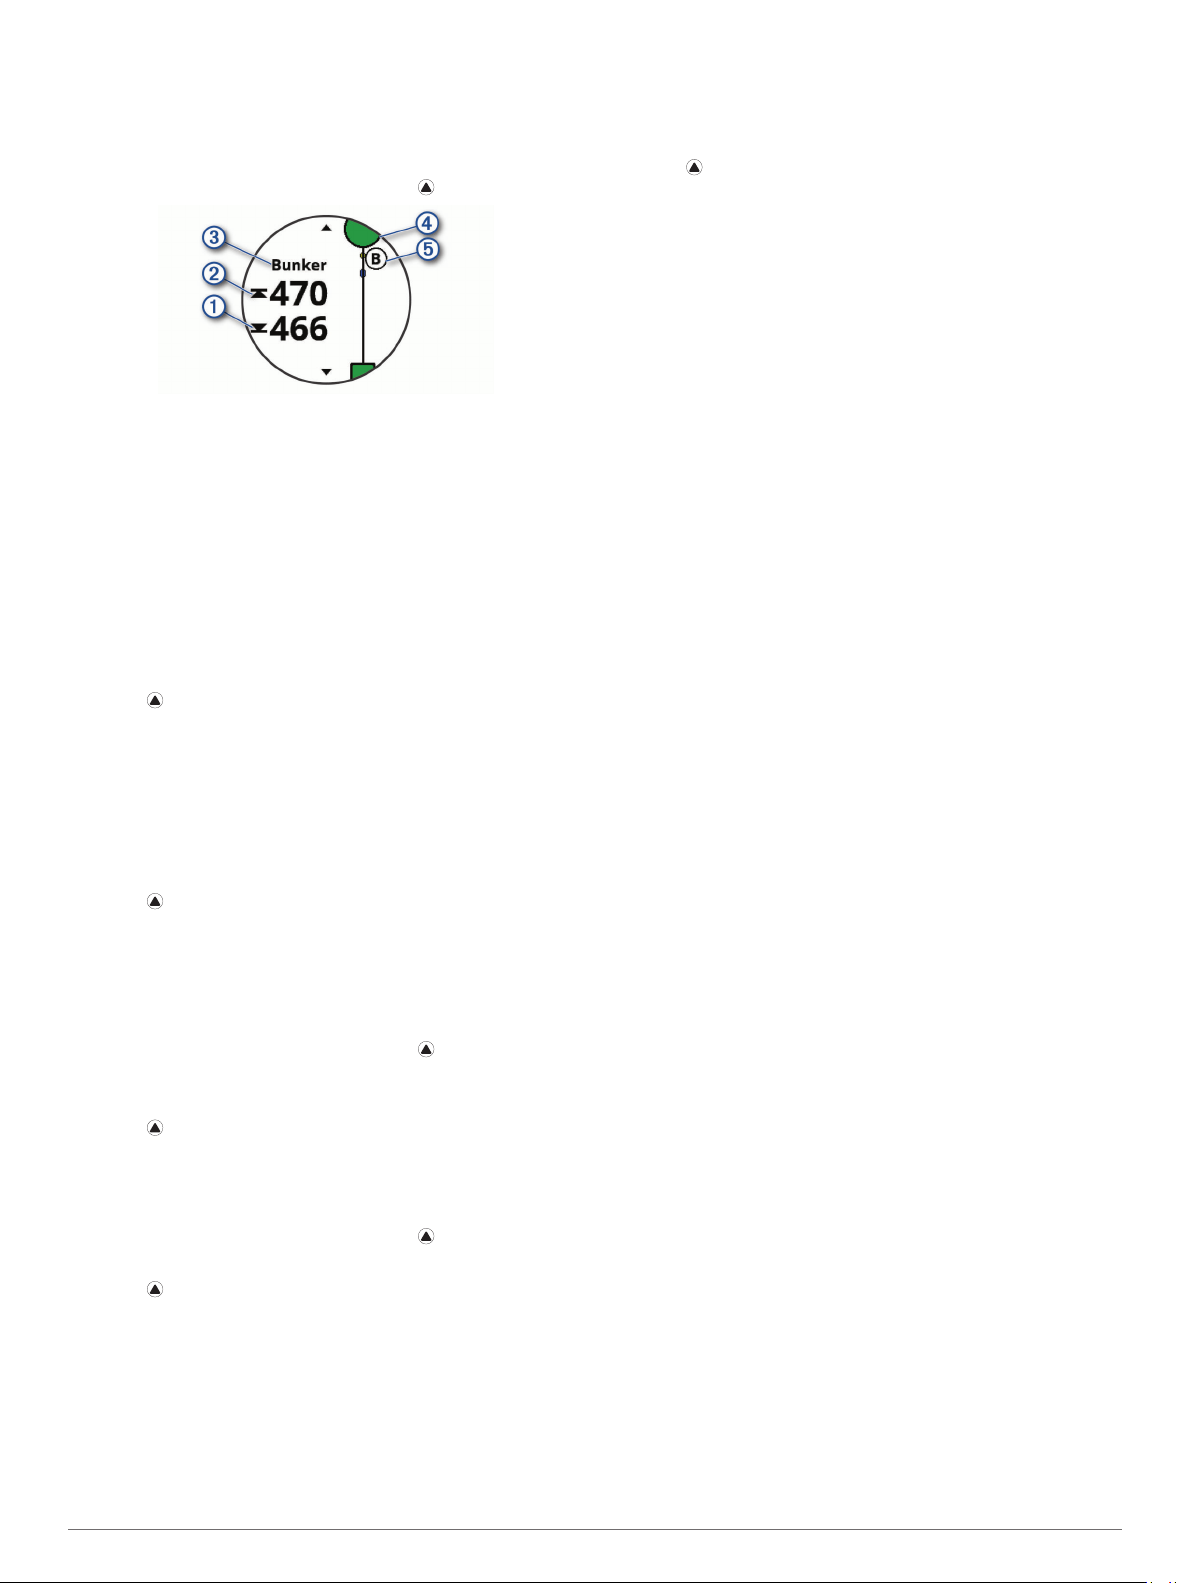
Viewing Hazards
You can view distances to hazards along the fairway for par 4
and 5 holes. Hazards that affect shot selection are displayed
individually or in groups to help you determine the distance to
layup or carry.
From the hole information screen, select > Hazards.
1
Using the Golf Odometer
You can use the odometer to record the time, distance, and
steps traveled. The odometer automatically starts and stops
when you start or end a round.
Select > Odometer.
1
If necessary, select Reset to reset the odometer to zero.
2
Tracking Statistics
The Stat Tracking feature enables detailed statistics tracking
while playing golf.
From the hole information screen, hold MENU.
1
Select the activity settings.
2
Select Stat Tracking to enable tracking statistics.
3
• The distances to the front À and back Á of the nearest
hazard appear on the screen.
• The hazard type  is listed at the top of the screen.
• The green is represented as a half circle à at the top of
the screen. The line below the green represents the center
of the fairway.
• Hazards Ä are shown below the green in approximate
locations relative to the fairway.
Select UP or DOWN to view other hazards for the current
2
hole.
Measuring a Shot
Take a shot, and watch where your ball lands.
1
Select > Measure Shot.
2
Walk or drive to your ball.
3
The distance automatically resets when you move to the next
hole.
If necessary, select Reset to reset the distance at any time.
4
Viewing Layup and Dogleg Distances
You can view a list of layup and dogleg distances for par 4 and 5
holes.
Select > Layups.
Each layup and the distance until you reach each layup
appear on the screen.
NOTE: Distances are removed from the list as you pass
them.
Keeping Score
From the hole information screen, select > Scorecard.
1
The scorecard appears when you are on the green.
Select UP or DOWN to scroll through the holes.
2
Select to select a hole.
3
Select UP or DOWN to set the score.
4
Your total score is updated.
Updating a Score
From the hole information screen, select > Scorecard.
1
Select UP or DOWN to scroll through the holes.
2
Select to select a hole.
3
Select UP or DOWN to change the score for that hole.
4
Your total score is updated.
TruSwing
The TruSwing feature allows you to view swing metrics recorded
from your TruSwing device. Go to www.garmin.com/golf to
purchase a TruSwing device.
™
Connected Features
Connected features are available for your fēnix device when you
connect the device to a compatible smartphone using Bluetooth
wireless technology. Some features require you to install the
Garmin Connect Mobile app on the connected smartphone. Go
to www.garmin.com/apps for more information. Some features
are also available when you connect your device to a wireless
network.
Phone notifications: Displays phone notifications and
messages on your fēnix device.
LiveTrack: Allows friends and family to follow your races and
training activities in real time. You can invite followers using
email or social media, allowing them to view your live data on
a Garmin Connect tracking page.
GroupTrack: Allows you to keep track of your connections
using LiveTrack directly on screen and in real time.
Activity uploads to Garmin Connect: Automatically sends
your activity to your Garmin Connect account as soon as you
finish recording the activity.
Connect IQ: Allows you to extend your device features with new
watch faces, widgets, apps, and data fields.
Software Updates: Allows you to update your device software.
Weather: Allows you to view current weather conditions and
weather forecasts.
Bluetooth sensors: Allows you to connect Bluetooth
compatible sensors, such as a heart rate monitor.
Find my phone: Locates your lost smartphone that is paired
with your fēnix device and currently within range.
Find my device: Locates your lost fēnix device that is paired
with your smarphone and currently within range.
Enabling Bluetooth Notifications
Before you can enable notifications, you must pair the fēnix
device with a compatible mobile device (Pairing Your
Smartphone with Your Device, page 1).
Hold MENU.
1
Select Settings > Phone > Smart Notifications > Status >
2
On.
Select During Activity.
3
Select a notification preference.
4
Select a sound preference.
5
Select Not During Activity.
6
Select a notification preference.
7
Select a sound preference.
8
Select Privacy.
9
Select a privacy preference.
10
Select Timeout.
11
Connected Features 5

Select the amount of time the alert for a new notification
12
appears on the screen.
Viewing Notifications
From the watch face, select UP to view the notifications
1
widget.
Select , and select a notification.
2
Select DOWN for more options.
3
Select BACK to return to the previous screen.
4
Receiving an Incoming Phone Call
When you receive a phone call on your connected smartphone,
the fēnix device displays the name or phone number of the
caller. You can accept or decline the call. If your device is
connected to a smartphone with Android™, you can also decline
with a text message by selecting from a list of messages on your
fēnix device.
• To accept the call, select Accept.
• To decline the call, select Decline.
• To decline the call and immediately send a text message
reply, select Reply, and select a message from the list.
Replying to a Text Message
NOTE: This feature is available only for smartphones with
Android.
When you receive a text message notification on your fēnix
device, you can send a quick reply by selecting from a list of
messages. You can customize messages in the Garmin
Connect Mobile app.
NOTE: This feature sends text messages using your phone.
Regular text message limits and charges from your carrier and
phone plan may apply. Contact your mobile carrier for more
information about text message charges or limits.
From the watch face, select UP to view the notifications
1
widget.
Select , and select a text message notification.
2
Select DOWN > Reply.
3
Select a message from the list.
4
Your phone sends the selected message as an SMS text
message.
Managing Notifications
You can use your compatible smartphone to manage
notifications that appear on your fēnix 5/5S/5X Plus device.
Select an option:
• If you are using an Apple® smartphone, use the
notifications settings on your smartphone to select the
items to show on the device.
• If you are using a smartphone with Android, from the
Garmin Connect Mobile app, select Settings > Smart
Notifications.
NOTE: Smartphone connection alerts are turned off by default.
Hold MENU.
1
Select Settings > Phone > Alerts.
2
Locating a Lost Mobile Device
You can use this feature to help locate a lost mobile device that
is paired using Bluetooth wireless technology and currently
within range.
Hold LIGHT to view the controls menu.
1
Select .
2
The fēnix device begins searching for your paired mobile
device. An audible alert sounds on your mobile device, and
the Bluetooth signal strength displays on the fēnix device
screen. The Bluetooth signal strength increases as you move
closer to your mobile device.
Select BACK to stop searching.
3
Garmin Connect
Your Garmin Connect account allows you to track your
performance and connect with your friends. It gives you the tools
to track, analyze, share, and encourage each other. You can
record the events of your active lifestyle, including runs, walks,
rides, swims, hikes, golf games, and more. It is also your online
statistics tracker, where you can analyze and share all your
rounds of golf.
You can create your free Garmin Connect account when you
pair your device with your phone using the Garmin Connect
Mobile app, or you can go to garminconnect.com.
Store your activities: After you complete and save a timed
activity with your device, you can upload that activity to your
Garmin Connect account and keep it as long as you want.
Analyze your data: You can view more detailed information
about your fitness and outdoor activities, including time,
distance, heart rate, calories burned, cadence, an overhead
map view, and pace and speed charts. You can view more
detailed information about your golf games, including
scorecards, statistics, and course information. You can also
view customizable reports.
NOTE: To view some data, you mus pair an optional wireless
sensor with your device (Pairing Your Wireless Sensors,
page 31).
Turning Off the Bluetooth Smartphone
Connection
Hold LIGHT to view the controls menu.
1
Select to turn off the Bluetooth smartphone connection on
2
your fēnix device.
Refer to the owner’s manual for your mobile device to turn off
Bluetooth wireless technology on your mobile device.
Turning On and Off Smartphone Connection
Alerts
You can set the fēnix 5/5S/5X Plus device to alert you when
your paired smartphone connects and disconnects using
Bluetooth wireless technology.
6 Connected Features
Track your progress: You can track your daily steps, join a
friendly competition with your connections, and meet your
goals.
Share your activities: You can connect with friends to follow
each other’s activities or post links to your activities on your
favorite social networking sites.
Manage your settings: You can customize your device and
user settings on your Garmin Connect account.
Updating the Software Using Garmin Connect Mobile
Before you can update your device software using the Garmin
Connect Mobile app, you must have a Garmin Connect account,

and you must pair the device with a compatible smartphone
(Pairing Your Smartphone with Your Device, page 1).
Synchronize your device with the Garmin Connect Mobile
app (Manually Syncing Data with Garmin Connect Mobile,
page 7).
When new software is available, the Garmin Connect Mobile
app automatically sends the update to your device.
Updating the Software Using Garmin Express
Before you can update your device software, you must
download and install the Garmin Express application and add
your device (Using Garmin Connect on Your Computer,
page 7).
Connect the device to your computer using the USB cable.
1
When new software is available, the Garmin Express
application sends it to your device.
After the Garmin Express application finishes sending the
2
update, disconnect the device from your computer.
Your device installs the update.
Using Garmin Connect on Your Computer
The Garmin Express application connects your device to your
Garmin Connect account using a computer. You can use the
Garmin Express application to upload your activity data to your
Garmin Connect account and to send data, such as workouts or
training plans, from Garmin Connect website to your device. You
can also install device software updates and manage your
Connect IQ apps.
Connect the device to your computer using the USB cable.
1
Go to www.garmin.com/express.
2
Download and install the Garmin Express application.
3
Open the Garmin Express application, and select Add
4
Device.
Follow the on-screen instructions.
5
Manually Syncing Data with Garmin Connect Mobile
Hold LIGHT to view the controls menu.
1
Select .
2
Garmin Golf™ App
The Garmin Golf app allows golfers to compete with each other
at different courses. More than 41,000 courses have a weekly
leaderboard that anyone can join. You can set up a tournament
event and invite players to compete. You can upload scorecards
from your compatible Garmin device to view detailed statistics
and shot analyses.
The Garmin Golf app syncs your data with your Garmin Connect
account. You can download the Garmin Golf app from the app
store on your smartphone.
Starting a GroupTrack Session
Before you can start a GroupTrack session, you must have a
Garmin Connect account, a compatible smartphone, and the
Garmin Connect Mobile app.
These instructions are for starting a GroupTrack session with
fēnix 5/5S/5X Plus devices. If your connections have other
compatible devices, you can see them on the map. The other
devices may not be able to display GroupTrack riders on the
map.
Go outside, and turn on the fēnix 5/5S/5X Plus device.
1
Pair your smartphone with the fēnix 5/5S/5X Plus device
2
(Pairing Your Smartphone with Your Device, page 1).
On the fēnix 5/5S/5X Plus device, hold MENU, and select
3
Settings > GroupTrack > Show on Map to enable viewing
connections on the map screen.
In the Garmin Connect Mobile app, from the settings menu,
4
select LiveTrack > GroupTrack.
If you have more than one compatible device, select a device
5
for the GroupTrack session.
Select Visible to > All Connections.
6
Select Start LiveTrack.
7
On the fēnix 5/5S/5X Plus device, start an activity.
8
Scroll to the map to view your connections.
9
TIP: From the map, you can hold MENU and select Nearby
Connections to view distance, direction, and pace or speed
information for other connections in the GroupTrack session.
Tips for GroupTrack Sessions
The GroupTrack feature allows you to keep track of other
connections in your group using LiveTrack directly on the
screen. All members of the group must be your connections in
your Garmin Connect account.
• Ride outside using GPS.
• Pair your fēnix 5/5S/5X Plus device with your smartphone
using Bluetooth technology.
• In the Garmin Connect Mobile app, from the settings menu,
select Connections to update the list of connections for your
GroupTrack session.
• Make sure all of your connections pair to their smartphones
and start a LiveTrack session in the Garmin Connect Mobile
app.
• Make sure all your connections are in range (40 km or
25 mi.).
• During a GroupTrack session, scroll to the map to view your
connections (Adding a Map to an Activity, page 25).
Garmin Explore
The Garmin Explore website and mobile app allow you to plan
trips and use cloud storage for your waypoints, routes, and
tracks. They offer advanced planning both online and offline,
allowing you to share and sync data with your compatible
Garmin device. You can use the mobile app to download maps
and navigate anywhere, without using your cellular service.
You can download the Garmin Explore app from the app store
on your smartphone, or you can go to explore.garmin.com.
™
Wi‑Fi® Connected Features
The fēnix 5/5S/5X Plus device has Wi‑Fi connected features.
The Garmin Connect Mobile app is not required for you to use
Wi‑Fi connectivity.
Activity uploads to your Garmin Connect account:
Automatically sends your activity to your Garmin Connect
account as soon as you finish recording the activity.
Workouts and training plans: Allows you to browse for and
select workouts and training plans on the Garmin Connect
site. The next time your device has a Wi‑Fi connection, the
files are wirelessly sent to your device.
Software updates: Your device downloads and installs the
latest software update automatically when a Wi‑Fi connection
is available.
Setting Up Wi‑Fi Connectivity
Select an option:
1
• Download the Garmin Connect Mobile app, and pair your
smartphone (Pairing Your Smartphone with Your Device,
page 1).
• Go to www.garmin.com/express, and download the
Garmin Express application.
Follow the on-screen instructions to set up Wi‑Fi connectivity.
2
Wi‑Fi® Connected Features 7

Connect IQ Features
You can add Connect IQ features to your watch from Garmin
and other providers using the Connect IQ Mobile app. You can
customize your device with watch faces, data fields, widgets,
and apps.
Watch Faces: Allow you to customize the appearance of the
clock.
Data Fields: Allow you to download new data fields that present
sensor, activity, and history data in new ways. You can add
Connect IQ data fields to built-in features and pages.
Widgets: Provide information at a glance, including sensor data
and notifications.
Apps: Add interactive features to your watch, such as new
outdoor and fitness activity types.
Downloading Connect IQ Features
Before you can download features from the Connect IQ Mobile
app, you must pair your fēnix 5/5S/5X Plus device with your
smartphone.
From the app store on your smartphone, install and open the
1
Connect IQ Mobile app.
If necessary, select your device.
2
Select a Connect IQ feature.
3
Follow the on-screen instructions.
4
Downloading Connect IQ Features Using
Your Computer
Connect the device to your computer using a USB cable.
1
Go to apps.garmin.com, and sign in.
2
Select a Connect IQ feature, and download it.
3
Follow the on-screen instructions.
4
Garmin Pay
The Garmin Pay feature allows you to use your watch to pay for
purchases in participating stores using credit or debit cards from
a participating financial institution.
Setting Up Your Garmin Pay Wallet
You can add one or more participating credit or debit cards to
your Garmin Pay wallet. Go to garmin.com/garminpay/banks to
find participating financial institutions.
From the Garmin Connect Mobile app, select or .
1
Select Garmin Devices, and select your device.
2
Select Garmin Pay > Create Your Wallet.
3
Follow the on-screen instructions.
4
Paying for a Purchase Using Your Watch
Before you can use your watch to pay for purchases, you must
set up at least one payment card.
You can use your watch to pay for purchases in a participating
store.
Hold LIGHT.
1
Select .
2
Enter your four-digit passcode.
3
NOTE: If you enter your passcode incorrectly three times,
your wallet locks, and you must reset your passcode in the
Garmin Connect Mobile app.
Your most recently used payment card appears.
If you have added multiple cards to your Garmin Pay wallet,
4
select DOWN to change to another card (optional).
Within 60 seconds, hold your watch near the payment reader,
5
with the watch facing the reader.
The watch vibrates and displays a check mark when it is
finished communicating with the reader.
If necessary, follow the instructions on the card reader to
6
complete the transaction.
TIP: After you successfully enter your passcode, you can make
payments without a passcode for 24 hours while you continue to
wear your watch. If you remove the watch from your wrist or
disable heart rate monitoring, you must enter the passcode
again before making a payment.
Adding a Card to Your Garmin Pay Wallet
You can add up to ten credit or debit cards to your Garmin Pay
wallet.
From the fēnix 5/5S/5X Plus device page in the Garmin
1
Connect Mobile app, select Garmin Pay > .
Follow the on-screen instructions to enter the card
2
information and add the card to your wallet.
After the card is added, you can select the card on your watch
when you make a payment.
Managing Your Garmin Pay Wallet
You can view detailed information about each of your payment
cards, and you can suspend, activate, or delete a card. You can
also suspend or delete your whole Garmin Pay wallet.
NOTE: In some countries, participating financial institutions may
restrict the wallet features.
From the fēnix 5/5S/5X Plus device page in the Garmin
1
Connect Mobile app, select Garmin Pay > Manage Your
Wallet.
Select an option:
2
• To suspend a specific card, select the card, and select
Suspend.
The card must be active to make purchases using your
fēnix 5/5S/5X Plus device.
• To temporarily suspend all cards in your wallet, select
Suspend Wallet.
You cannot pay using your fēnix 5/5S/5X Plus device until
you unsuspend at least one card using the app.
• To unsuspend your suspended wallet, select Unsuspend
Wallet.
• To delete a specific card, select the card, and select
Delete.
The card is completely deleted from your wallet. If you
want to add this card to your wallet in the future, you must
enter the card information again.
• To delete all cards in your wallet, select Delete Wallet.
Your Garmin Pay wallet and all the card information
associated with it are deleted. You cannot pay using your
fēnix 5/5S/5X Plus device until you create a new wallet
and add a card.
8 Connect IQ Features
Changing Your Garmin Pay Passcode
You must know your current passcode to change it. Your
passcode cannot be recovered. If you forget your passcode, you
must delete your wallet, create a new one, and reenter your card
information.
You can change the passcode required to access your
Garmin Pay wallet on your fēnix 5/5S/5X Plus device.
From the fēnix 5/5S/5X Plus device page in the Garmin
1
Connect Mobile app, select Garmin Pay > Reset Passcode.
Follow the on-screen instructions.
2
The next time you pay using your fēnix 5/5S/5X Plus device, you
must enter the new passcode.
Music
NOTE: This section is about three different music playback
options.
You can control music playback on your paired smartphone
using your fēnix 5/5S/5X Plus device.
On a fēnix, you can download audio content to your device from
your computer or from a third-party provider, so you can listen
when your smartphone is not nearby. To listen to audio content
stored on your device, you must connect headphones with
Bluetooth technology.
You can use the music controls to control music playback on
your smartphone or to play music stored on your device.
Connecting to a Third-Party Provider
Before you can download music or other audio files to your fēnix
from a supported third-party provider, you must connect to the
provider using the Garmin Connect Mobile app.
From the Garmin Connect Mobile app, select or .
1
Select Garmin Devices, and select your device.
2
Select Music.
3
Select an option:
4
• Select a third-party provider, and follow the on-screen
instructions.
• Select Get Music Apps, locate a provider, and follow the
on-screen instructions.
Downloading Audio Content from a Third-Party
Provider
Before you can download audio content from a third-party
provider, you must connect to a Wi‑Fi network (Setting Up Wi‑Fi
Connectivity, page 7).
Hold DOWN from any screen to open the music controls.
1
Select > Music Providers.
2
Select a connected provider.
3
Select a playlist or other item to download to the device.
4
Select BACK until you are prompted to sync with the service,
5
and select Yes.
The selected playlists and other items are downloaded to the
device.
Connect the device to an external power source.
6
Downloading audio content can drain the battery.
Disconnecting from a Third-Party Provider
From the Garmin Connect Mobile app, select or .
1
Select Garmin Devices, and select your device.
2
Select Music.
3
Select an installed third-party provider, and follow the on-
4
screen instructions to disconnect the third-party provider from
your device.
Downloading Personal Audio Content
Before you can send your personal music to your device, you
must install the Garmin Express application on your computer
(www.garmin.com/express).
You can load your personal audio files, such as .mp3 and .aac
files, to a fēnix device from your computer.
Connect the device to your computer using the included USB
1
cable.
On your computer, open the Garmin Express application,
2
select your device, and select Music.
TIP: For Windows® computers, you can select and browse
to the folder with your audio files. For Apple computers, the
Garmin Express application uses your iTunes® library.
In the My Music or iTunes Library list, select an audio file
3
category, such as songs or playlists.
Select the checkboxes for the audio files, and select Send to
4
Device.
If necessary, in the fēnix list, select a category, select the
5
checkboxes, and select Remove From Device to remove
audio files.
Listening to Downloaded Music
Hold DOWN from any screen to open the music controls.
1
Connect your headphones with Bluetooth technology
2
(Connecting Headphones using Bluetooth Technology,
page 10).
Select , and select an option:
3
• To listen to music downloaded to the watch from your
computer, select My Music.
• To listen to music from your smartphone, select Control
Music on Phone.
• To listen to music from a third-party provider, select the
name of the provider.
Select the music you want to play.
4
TIP: Select Play All Songs to start playing all the songs
downloaded to the device in shuffle mode.
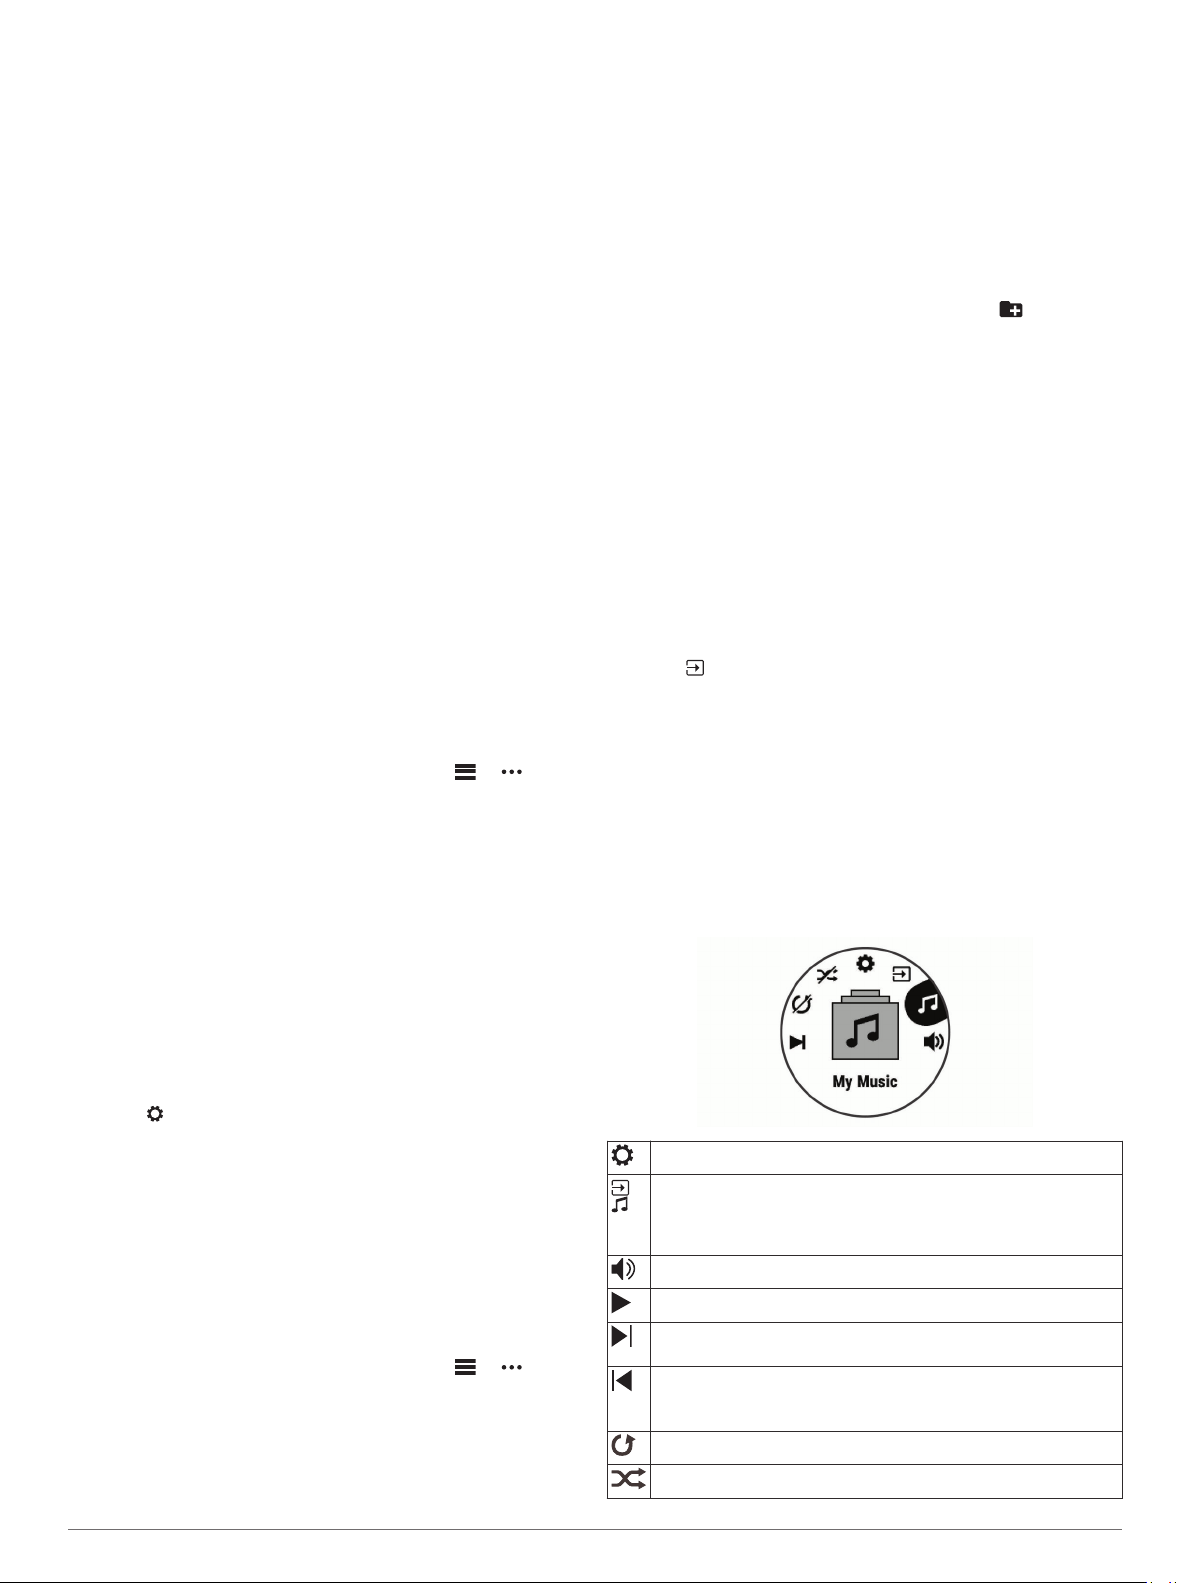
Music Playback Controls
Select to manage content from third-party providers.
Select to switch between playing audio from the device and
controlling music on a connected smartphone.
When playing audio from the device, select to browse the
available audio files and playlists in your library.
Select to adjust the volume.
Select to play and pause the current audio file.
Select to skip to the next audio file in the playlist.
Hold to fast forward through the current audio file.
Select to restart the current audio file.
Select twice to skip to the previous audio file in the playlist.
Hold to rewind through the current audio file.
Select to change the repeat mode.
Select to change the shuffle mode.
Music 9
Loading…
Изменено: Вт, 24 Янв, 2023 на 12:35 PM
Инструкции на русском языке для навигаторов Garmin представлены в таблице. Выберите название вашего устройства и скачайте инструкцию.
| Descent | https://garmin.ru/upload/download/manuals/Descent_OM_RU-RU.pdf | [3.84 Mb] |
| Descent Mk2 | https://www.garmin.ru/upload/download/manuals/Descent_Mk2_OM_RU-RU.pdf | [4.9 Mb] |
| Epix | https://garmin.ru/upload/download/manuals/epix.pdf | [5.17 Mb] |
| Enduro | https://garmin.ru/upload/download/manuals/Enduro_OM_RU-RU.pdf | [3.7 Mb] |
| Enduro 2 | https://www.garmin.ru/upload/download/manuals/Enduro_2_OM_RU-RU.pdf | [6.5 Mb] |
| Fenix | https://garmin.ru/upload/download/manuals/fenix.pdf | [1.75 Mb] |
| Fenix 2 | https://garmin.ru/upload/download/manuals/fenix2.pdf | [5.21 Mb] |
| Fenix 3 | https://garmin.ru/upload/download/manuals/fenix3_OM_RU.pdf | [3.23 Mb] |
| Fenix 5 | https://garmin.ru/upload/download/manuals/fenix5_OM_RU.pdf | [2.95 Mb] |
| Fenix 5x | https://garmin.ru/upload/download/manuals/fenix5x_OM_RU_01.pdf | [2.97 Mb] |
| Fenix 6 | https://www.garmin.ru/upload/download/manuals/fenix_6_6S_Sport_OM_RU-RU.pdf | [3.2 Mb] |
| Fenix 6x | https://www.garmin.ru/upload/download/manuals/fenix_6_6S_6X_Pro_OM_RU-RU.pdf | [3.6 Mb] |
| fenix 7 | https://www.garmin.ru/upload/download/manuals/fenix_7_Series_OM_RU-RU.pdf | [5.5 Mb] |
| Fenix 2 | https://garmin.ru/upload/download/manuals/fenix_2_OM_RU.pdf | [5.21 Mb] |
| Fenix 2 быстрый старт | https://garmin.ru/upload/download/manuals/fenix_2_QSM_RU.pdf | [1.21 Mb] |
| Fenix 5 Plus серия | https://garmin.ru/upload/download/manuals/fenix_5_Plus_Series_OM_RU.pdf | [3.61 Mb] |
| Fenix Chronos | https://garmin.ru/upload/download/manuals/fenix_Chronos_OM_RU.pdf | [3.07 Mb] |
| Forerunner735XT | https://garmin.ru/upload/download/manuals/Forerunner735XT.pdf | [5.83 Mb] |
| Forerunner 10 | https://garmin.ru/upload/download/manuals/Forerunner_10.pdf | [0.94 Mb] |
| Forerunner 110 | https://garmin.ru/upload/download/manuals/Forerunner_110.pdf | [0.66 Mb] |
| Forerunner 15 | https://garmin.ru/upload/download/manuals/Forerunner_15.pdf | [1.63 Mb] |
| Forerunner 205 305 | https://garmin.ru/upload/download/manuals/Forerunner_205_305.pdf | [1.04 Mb] |
| Forerunner 210 | https://garmin.ru/upload/download/manuals/Forerunner_210_om.pdf | [0.86 Mb] |
| Forerunner 220 | https://garmin.ru/upload/download/manuals/forerunner_220_web.pdf | [0.57 Mb] |
| Forerunner 225 | https://garmin.ru/upload/download/manuals/Forerunner_225.pdf | [1.55 Mb] |
| Forerunner 245 | https://www.garmin.ru/upload/download/manuals/FORERUNNER_245.pdf | [1.4 Mb] |
| Forerunner 25 | https://garmin.ru/upload/download/manuals/Forerunner_25_ru_www.pdf | [0.55 Mb] |
| Forerunner 301 | https://garmin.ru/upload/download/manuals/Forerunner_301.pdf | [2.06 Mb] |
| Forerunner 310 XT | https://garmin.ru/upload/download/manuals/Forerunner_310_XT.pdf | [0.44 Mb] |
| Forerunner 45 | https://www.garmin.ru/upload/download/manuals/FORERUNNER_45.pdf | [0.9 Mb] |
| Forerunner 405 | https://garmin.ru/upload/download/manuals/Forerunner_405.pdf | [0.81 Mb] |
| Forerunner 410 | https://garmin.ru/upload/download/manuals/Forerunner_410_om.pdf | [1.07 Mb] |
| Forerunner 50 | https://garmin.ru/upload/download/manuals/Forerunner_50.pdf | [1.04 Mb] |
| Forerunner 60 | https://garmin.ru/upload/download/manuals/Forerunner_60.pdf | [1.3 Mb] |
| Forerunner 610 | https://garmin.ru/upload/download/manuals/Forerunner_610_OM_russ.pdf | [0.84 Mb] |
| Forerunner 620 | https://garmin.ru/upload/download/manuals/Forerunner_620_web.pdf | [0.66 Mb] |
| Forerunner 630 | https://garmin.ru/upload/download/manuals/Forerunner_630.pdf | [1.06 Mb] |
| Forerunner 645 | https://garmin.ru/upload/download/manuals/Forerunner_645_OM_RU.pdf | [3.05 Mb] |
| Forerunner 70 | https://garmin.ru/upload/download/manuals/Forerunner_70.pdf | [0.93 Mb] |
| Forerunner 910XT | https://garmin.ru/upload/download/manuals/Forerunner_910XT.pdf | [0.74 Mb] |
| Forerunner 920XT | https://garmin.ru/upload/download/manuals/Forerunner_920XT_OM_RU-RU.pdf | [8.81 Mb] |
| Forerunner 920XT быстрый старт | https://garmin.ru/upload/download/manuals/Forerunner_920XT_QSM_RU_RU.pdf | [4.38 Mb] |
| Forerunner 35 | https://garmin.ru/upload/download/manuals/FR35OM_RUS.pdf | [0.65 Mb] |
| Forerunner 935 | https://garmin.ru/upload/download/manuals/FR935.pdf | [12.14 Mb] |
| Forerunner 945 | https://www.garmin.ru/upload/download/manuals/FORERUNNER_945.pdf | [2.1 Mb] |
| Forerunnner 955 | https://www.garmin.ru/upload/download/manuals/forerunner_955.pdf | [0.4 Mb] |
| Forerunner 25 | https://garmin.ru/upload/download/manuals/FR_25_OM_rus.pdf | [0.36 Mb] |
| Forerunner 735XT | https://garmin.ru/upload/download/manuals/FR_735XT_OM_RUS.pdf | [2.14 Mb] |
| Forerunner 745 | https://www.garmin.ru/upload/download/manuals/Forerunner_745_rus.pdf | [1.2 Mb] |
| Forerunner 230 | https://garmin.ru/upload/download/manuals/Garmin_Forerunner_230_OM_rus.pdf | [0.76 Mb] |
| Forerunner 630 | https://garmin.ru/upload/download/manuals/Garmin_Forerunner_630_OM_rus.pdf | [0.5 Mb] |
| Index Scale весы | https://garmin.ru/upload/download/manuals/Index_Scale_RUS.pdf | [4.02 Mb] |
| Instinct | https://www.garmin.ru/upload/download/manuals/Instinct_OM_RU.pdf | [3.8 Mb] |
| MARQ Athlete | https://www.garmin.ru/upload/download/manuals/MARQ_Athlete_OM_RU-RU.pdf | [6.8 Mb] |
| MARQ Expedition | https://www.garmin.ru/upload/download/manuals/MARQ_Expedition_OM_RU-RU.pdf | [6.7 Mb] |
| MARQ Driver | https://www.garmin.ru/upload/download/manuals/MARQ_Driver_OM_RU-RU.pdf | [6.9 Mb] |
| MARQ Captain | https://www.garmin.ru/upload/download/manuals/MARQ_Captain_OM_RU-RU.pdf | [7.0 Mb] |
| MARQ Aviator | https://www.garmin.ru/upload/download/manuals/MARQ_Aviator_OM_RU-RU.pdf | [8.0 Mb] |
| Swim | https://garmin.ru/upload/download/manuals/Swim.pdf | [2.37 Mb] |
| tactix Delta | https://www.garmin.ru/upload/download/manuals/tactix_Delta_OM_RU-RU.pdf | [5.6 Mb] |
| tactix 7 | https://www.garmin.ru/upload/download/manuals/tactix_7_OM_RU-RU.pdf | [8.0 Mb] |
| Vivoactive | https://garmin.ru/upload/download/manuals/vivoactive.pdf | [3.08 Mb] |
| Vivoactive 3 Music | https://garmin.ru/upload/download/manuals/Vivoactive_3_Music_OM_RU.pdf | [2.74 Mb] |
| Vivoactive 3 | https://garmin.ru/upload/download/manuals/vivoactive_3_OM_RU.pdf | [2.33 Mb] |
| Vivoactive 4 | https://www.garmin.ru/upload/download/manuals/Vivoactive_4_4S_OM_RU-RU.pdf | [2.8 Mb] |
| Vivoactive HR | https://garmin.ru/upload/download/manuals/vivoactiveHR_OM_RU.pdf | [2.4 Mb] |
| Vivofit | https://garmin.ru/upload/download/manuals/vivofit.pdf | [0.46 Mb] |
| Vivofit 2 | https://garmin.ru/upload/download/manuals/vivofit2.pdf | [10.23 Mb] |
| Vivofit 3 | https://garmin.ru/upload/download/manuals/vivofit3.pdf | [0.72 Mb] |
| Vivofit 4 | https://garmin.ru/upload/download/manuals/vivofit_4_OM_RU.pdf | [5.1 Mb] |
| Vivofit | https://garmin.ru/upload/download/manuals/vivofit_rus.pdf | [5.16 Mb] |
| Vivofit JR | https://garmin.ru/upload/download/manuals/vivofitJR_OM_RU.pdf | [1.8 Mb] |
| Vivomove HR | https://garmin.ru/upload/download/manuals/vivomoveHR_OM_RU.pdf | [1.84 Mb] |
| Vivosmart 3 | https://garmin.ru/upload/download/manuals/vivosmart3_OM_RU.pdf | [1.63 Mb] |
| Vivosmart 4 | https://www.garmin.ru/upload/download/manuals/vivosmart_4_OM_RU.pdf | [3.0 Mb] |
| Vivosmart HR | https://garmin.ru/upload/download/manuals/vivosmart_HR_OM_RU.pdf | [1.97 Mb] |
| Vivosmart | https://garmin.ru/upload/download/manuals/vivosmart_OM_RU_RU.pdf | [1.4 Mb] |
| Vivosport | https://garmin.ru/upload/download/manuals/vivosport_OM_RU.pdf | [1.74 Mb] |
Была ли эта статья полезной?
Да
Нет
Отправить отзыв
Извините, что не удалось помочь. У вас есть идеи, что можно улучшить в этой статье?
Garmin fēnix 5X Plus
FĒNIX
®
5/5S/5X PLUS
Owner’s Manual
View the manual for the Garmin fēnix 5X Plus here, for free. This manual comes under the category sport watches and has been rated by 3 people with an average of a 7.7.
This manual is available in the following languages: English. Do you have a question about the Garmin fēnix 5X Plus or do you need help?
Ask your question here
Index
- Table of Contents
- Introduction
- Activities and Apps
- Connected Features
- Safety and Tracking Features
- Wi‑Fi® Connected Features
- Connect IQ Features
- Garmin Pay
- Music
- Heart Rate Features
- Pulse Oximeter
- Training
- Clock
- Navigation
- History
- Customizing Your Device
- Wireless Sensors
- Device Information
- Device Maintenance
- Troubleshooting
- Appendix
- Index
Product Images (2)

Garmin fēnix 5X Plus specifications
Below you will find the product specifications and the manual specifications of the Garmin fēnix 5X Plus.
The Garmin fēnix 5X Plus is a sport watch that offers a variety of features for outdoor athletes and adventurers. With its rugged design, this watch is built to withstand tough conditions and is water-resistant up to 100 meters.
Equipped with advanced GPS and mapping capabilities, the fēnix 5X Plus allows users to navigate through unfamiliar terrain with confidence. It provides detailed mapping and routable cycling maps, helping users stay on track during their workouts or outdoor activities.
This watch also includes a heart rate monitor, which allows users to track their heart rate during exercise and monitor their fitness levels. Additionally, it offers advanced performance metrics, such as VO2 max, recovery time advisor, and training status, providing valuable insights into users’ training progress and performance.
The fēnix 5X Plus features a built-in music player, allowing users to listen to their favorite songs while on the go, without the need for their phone. It also offers smart notifications, so users can stay connected even while they’re on the move.
With a long battery life of up to 20 days in smartwatch mode, the fēnix 5X Plus ensures that users can rely on it during extended outdoor adventures without the need for frequent charging.
Overall, the Garmin fēnix 5X Plus is a reliable and durable sport watch that provides essential features for outdoor enthusiasts, helping them navigate, track their fitness, and stay connected while on the move.
General
| Brand | Garmin |
| Model | fēnix 5X Plus | 010-01989-03 |
| Product | sport watch |
| EAN | 0753759197681 |
| Language | English |
| Filetype | User manual (PDF), Safety instructions (PDF) |
Frequently Asked Questions
Can’t find the answer to your question in the manual? You may find the answer to your question in the FAQs about the Garmin fēnix 5X Plus below.
How do I activate the incident detection feature on my Garmin fēnix 5X Plus sport watch?
To activate the incident detection feature on your Garmin fēnix 5X Plus sport watch, follow these steps:
1. From the watch face, press and hold the MENU button.
2. Select «Settings» and then choose «Sensors & Accessories» from the menu.
3. Select «Add New» to add a new sensor or accessory.
4. You can either select «Search All» to search for all available sensors or choose your specific sensor type.
5. Follow the on-screen instructions to complete the setup process.
Please note that the incident detection feature is available only for outdoor walk, run, and bike activities. When an incident is detected by your fēnix 5X Plus watch with GPS enabled, the Garmin Connect app can send an automated text message and email with your name and GPS location to your emergency contacts. You can cancel the message before the countdown is complete if needed.
Remember to set up your emergency contacts before using the incident detection feature.
Why is the incident detection feature not working on my Garmin fēnix 5X Plus sport watch?
There could be several reasons why the incident detection feature is not working on your Garmin fēnix 5X Plus sport watch. Here are some troubleshooting steps you can try:
1. Ensure that the incident detection feature is enabled on your watch. To do this, go to the watch face, press and hold the MENU button, select «Settings,» then choose «Sensors & Accessories,» and make sure the incident detection feature is turned on.
2. Check if the GPS signal is strong and your watch is connected to satellites. The incident detection feature relies on GPS to accurately detect incidents. Make sure you are in an open area with a clear view of the sky.
3. Verify that your watch is within range of your smartphone. The incident detection feature uses your smartphone’s connectivity to send notifications to your emergency contacts. Ensure that your watch is paired and connected to your smartphone.
4. Make sure you have set up emergency contacts in the Garmin Connect app. Without emergency contacts, the incident detection feature will not be able to send notifications.
5. If the issue persists, try restarting your watch and smartphone. Sometimes a simple restart can resolve connectivity issues.
If none of these steps solve the problem, you may need to contact Garmin customer support for further assistance.
How do I add emergency contact phone numbers to my Garmin fēnix 5X Plus sport watch?
To add emergency contact phone numbers to your Garmin fēnix 5X Plus sport watch, follow these steps:
1. Open the Garmin Connect app on your smartphone.
2. Select the «Safety & Tracking» option.
3. Choose «Incident Detection & Assistance» and then select «Add Emergency Contact».
4. Follow the on-screen instructions to enter the emergency contact phone numbers.
5. Save the changes to complete the process.
By adding emergency contact phone numbers, you enable the incident detection and assistance features on your Garmin fēnix 5X Plus watch. These features allow the Garmin Connect app to send automated text messages and emails with your name and GPS location to your emergency contacts in case of an incident.
Please note that you need to be connected to the Garmin Connect app using Bluetooth technology for these features to work properly.
Why is the assistance feature not working on my Garmin fēnix 5X Plus sport watch?
The assistance feature on your Garmin fēnix 5X Plus sport watch may not be working due to the following reasons:
1. Ensure that your watch is connected to your smartphone via Bluetooth. The assistance feature relies on the connectivity between your watch and the Garmin Connect app on your smartphone.
2. Check if you have set up emergency contact phone numbers in the Garmin Connect app. Without emergency contacts, the assistance feature will not be able to send notifications.
3. Verify that your watch has a strong GPS signal. The assistance feature uses GPS to accurately track your location in case of an incident.
4. Make sure that the incident detection feature is enabled on your watch. The assistance feature works in conjunction with the incident detection feature to send notifications to your emergency contacts.
5. If the issue persists, try restarting your watch and smartphone. Sometimes, a simple restart can resolve connectivity issues.
If you have followed these steps and the assistance feature is still not working, you may need to contact Garmin customer support for further assistance.
How do I connect my Garmin fēnix 5X Plus sport watch to a Wi-Fi network?
To connect your Garmin fēnix 5X Plus sport watch to a Wi-Fi network, follow these steps:
1. From the watch face, press and hold the MENU button.
2. Select «Settings» and then choose «Wi-Fi» from the menu.
3. Select «My Networks» and then choose «Add Network».
4. The watch will display a list of nearby Wi-Fi networks. Select the desired network.
5. If prompted, enter the password for the network using the on-screen keyboard.
6. Once the password is entered, the watch will connect to the network and add it to the list of saved networks.
7. The watch will automatically reconnect to the network when it is within range.
Please note that before connecting to a Wi-Fi network, you need to ensure that your device is already connected to the Garmin Connect Mobile app on your smartphone or the Garmin Express application on your computer. Wi-Fi connectivity allows for features such as activity uploads to your Garmin Connect account, access to workouts and training plans, and software updates.
What is bluetooth?
Bluetooth is a way of exchanging data wirelessly between electronic devices via radio waves. The distance between the two devices that exchange data can in most cases be no more than ten metres.
Do I need to switch off my sport watch at night?
It is sensible for you to switch off your sport watch at night, this ensures longer battery life.
Do I need internet for GPS?
No, no internet is required to receive GPS.
What is GPS?
GPS is a system that can be used all over the globe to determine your location by means of satellites.
What does the abbreviation GPS stand for?
The abbreviation GPS stands for ‘Global Positioning System’.
What is an adult’s maximum heart rate?
As a rule of thumb for your maximum heart rate, you can use 220 minus your age.
How much should I exercise as an adult per week?
As an adult, it is recommended to do moderately intensive exercise for at least 2.5 hours per week. Preferably spread over several days.
How high is an adult’s heart rate at rest?
An adult’s resting heart rate is between 60 and 100 beats per minute.
Is the manual of the Garmin fēnix 5X Plus available in English?
Yes, the manual of the Garmin fēnix 5X Plus is available in English .
Is your question not listed? Ask your question here
The information herein is for personal use and informational purposes only. These documentations are only intended for a qualified person who is aware of the respective safety regulations and hazards. Manual-Hub.com cannot be held responsible for the accuracy or relevance of product information. Products names, logos, brands and other trademarks are the property of their respective trademark holders in the USA and other countries.
sitemap.xml | sitemap.txt
Disclaimer | Privacy Policy | Terms and Conditions
Copyright © 2011-2025 | Manual-Hub.com | All Rights Reserved.
Are you looking for the manual for Garmin Fenix 5X Plus? You are in the right place. Below the document viewer for Garmin Fenix 5X Plus manual in PDF format. To save your time, we say that the most common problems with Garmin Fenix 5X Plus can be found in the manual in the «Troubleshooting» section. Check the appropriate page number in the table of contents, and then enter it in the page number box on the right side of the document viewer for Garmin Fenix 5X Plus.
If you have questions about the Garmin Fenix 5X Plus device, use the form at the bottom of the page and ask our community a question.
Remember! Reading the Garmin Fenix 5X Plus user manual and adhering to the rules of using the device provided there, greatly help in its effective use. It is important to correctly configure Garmin Fenix 5X Plus, it will save resources needed to use it. In case of problems, you will also find recommended companies that can properly fix Garmin Fenix 5X Plus. One of the most important reasons why you should read the Garmin Fenix 5X Plus user manual is that to take advantage of the warranty provided on Garmin Fenix 5X Plus — the device must be used in accordance with the manufacturer’s recommendations presented in user manual.
If you want to download Garmin Fenix 5X Plus manual, use the «Download» button below. You can easily view the downloaded version and print selected manual pages Garmin Fenix 5X Plus. All manuals on our website are available in PDF format, which is the most universal format that is as easy to use as possible on all operating systems.