
Русский
- Bedienungsanleitung D-Link DNS-343
- D-Link DNS-343 User Manual
- Manual Usuario D-Link DNS-343
- Mode d’emploi D-Link DNS-343
- Istruzioni D-Link DNS-343
- инструкция D-Link DNS-343
- D-Link DNS-343の取扱説明書
- Handleiding D-Link DNS-343
- Manual de uso D-Link DNS-343
Вам нужна инструкция? Мы поможем Вам ее найти и сэкономить Ваше время.
- 2 stron
- 0.16 mb
Изделие D-Link DNS-343, а также другие, которыми Вы пользуетесь ежедневно, наверняка вы получили в комплекте с инструкцией обслуживания. Из опыта наших пользователей мы знаем, что большинство из Вас не уделили этому особого внимания. Большая часть инструкций, сразу же после покупки попадает в корзину для мусора вместе с коробкой — это ошибка. Ознакомьтесь с информацией, касающейся инструкции D-Link DNS-343, которая поможет Вам в будущем сэкономить нервы и избежать головной боли.
Важная подсказка — не забывайте хотя бы раз прочитать инструкцию D-Link DNS-343
Если вы не хотите каждый раз читать информационные брошюры, касающиеся, тех или D-Link DNS-343 иных изделий, достаточно, прочитать их раз — сразу же после покупки устройства. Вы получите основное знания, касающиеся поддержания изделия D-Link DNS-343 в хорошем эксплуатационном состоянии, так, чтобы без проблем достигнуть его планируемого цикла работы. Затем инструкцию можно отложить на полку и вернуться к ней только в случае, если вы не уверены, правильно ли проводится техобслуживание изделия. Правильный уход является необходимым элементом Вашего удовольствия D-Link DNS-343.
Раз в году пересмотрите шкафчик, в котором держите инструкции для всех устройств, — выбросите те, которыми вы уже не пользуетесься. Это поможет Вам сохранять порядок в своей домашней базе инструкций обслуживания.
Summary of Contents for D-Link DNS-343
Что находится в инструкции D-Link DNS-343? Почему стоит ее прочитать?
- Гарантия и подробности, касающиеся техобслуживания изделия
Хорошей идеей будет прикрепить чек к странице инструкции. Если что-то плохое случится во время использования D-Link DNS-343, у вас будет комплект документов, необходимый для гарантийного ремонта. В этой части инструкции вы найдете информацию об авторизованных сервисных центрахD-Link DNS-343 а также, как самостоятельно правильно ухаживать за оборудованием — так, чтобы не потерять гарантийных прав. - Указания по монтажу и Setup
Не терять нервов и времени на самостоятельную попытку установки и первого запуска изделия. Воспользуйтесь рекомендациями производителя D-Link DNS-343 чтобы правильно запустить изделие, без лишнего риска повреждения оборудования. - Информация, касающаяся дополнительных запчастей (входящих в комплект а также являющихся опцией)
Пересматривая эту часть документа вы сможете проверить, доставлен ли ваш D-Link DNS-343 с полним комплектом аксессуаров. Вы также сможете узнать, какие дополнительные запчасти или аксессуары для D-Link DNS-343 Вы сможете найти и докупить к своему устройству. - Troubleshooting
Самые частые проблемы, касающиеся D-Link DNS-343 и методы их решения. Это очень полезная часть руководства по обслуживанию — она позволит Вам сэкономить много времени на поиск решений. 90% проблем с D-Link DNS-343 повторяется у многих пользователей. - Требования, касающиеся питания и энергетический класс
Информация, касающаяся количества потребляемой энергии, а также рекомендации, касающиеся установки и питания D-Link DNS-343. Прочитайте, чтобы оптимально пользоваться D-Link DNS-343 и не использовать большего количества ресурсов, нежели это необходимо для правильной работы изделия. - Специальные функции D-Link DNS-343
Здесь вы можешь узнать, как персонализировать изделие D-Link DNS-343. Вы узнаете, какие дополнительные функции могут помочь Вам удобно использовать продукт D-Link DNS-343 а также, какие функции Вашего устройства оптимальны для выполнения конкретной деятельности.
Как видите в инструкции вы найдете информацию, которая реально поможет Вам в использовании Вашего изделия. Стоит с ней ознакомиться, чтобы избежать разочарований, возникающих из более короткого, нежели предусматривалось, периода исправности изделия D-Link DNS-343. Если все же вы не хотите копить инструкции в своем доме, наш сайт поможет Вам в этом — вы должны найти у нас руководство по обслуживанию большинства из своих устройств, а также D-Link DNS-343.
Комментарии (0)
Как работать с NAS D-Link DNS-343: как создать и настроить RAID массив, как настроить подключение по сети, добавить новую сетевую папку, и как восстанавливать данные с устройства?
Компания D-Link на сегодняшний день известна во всем мире своими маршрутизаторами и модемами, но помимо, производит устройства хранения для домашнего и офисного использования, такие как сетевое хранилище (NAS).
По большей части это оборудование соответствует стандарту и мало чем отличается от устройств от других производителей, и также, как и все NAS подвержено риску потери информации в случае повреждения или отказа оборудования.
Не зависимо от производителя все устройства NAS, как и жесткие диски, используемые с обычными компьютерами и ноутбуками, подвержены повреждению или отказу. И к сожалению, рано или поздно, это случается с каждым кто ежедневно пользуется компьютером.
Как и в случае с другими устройствами NAS, D-Link предоставляет возможность использовать множество томов, объединять несколько дисков в один, организовать сетевой доступ к хранилищу, обеспечивая при этом надежность хранения данных.
Сетевое хранилище объединяет накопители в RAID массивы, которые хоть и являются более безопасным хранилищем информации, но все же не исключают ее потери.
Восстановлении информации с NAS, используя различные программы для восстановления данных, не всегда бывает успешным. Некоторое программное обеспечение, может предоставить лишь частичный успех. А другие и вовсе повредить оставшуюся на дисках информацию. Чтобы этого избежать нужно правильно подобрать софт для восстановления.
Для начала давайте разберем как создать RAID на NAS устройстве от D-link. При первом запуске, система предложит его настроить. Одним из этапов настройки будет создание массива из подключенных накопителей.
Для создания RAID массива на этом этапе настройки выберите нужный тип, в моем случае это RAID 5 из трех дисков, и затем нажмите Далее.
В следующем окне будет предложено включить авторебилд, жмем Далее для продолжения.
Затем нужно выбрать файловую систему, здесь предложено на выбор только две файловых системы EXT2 и 3. Выбираем более стабильную EXT3 и жмем по кнопке Next (Далее).
После начнется процесс инициализации и форматирования дисков. Если на данных накопителях хранится важная информация не забудьте сделать ее копию, так как восстановить ее после форматирования будет не просто.
Закончив форматирование тома, система предложит перезагрузить устройство. RAID создан. Для того чтобы перенастроить, изменить уровень RAID или задать другой объём, кликните по кнопке реконфигурации.
Для изменения уровня RAID выберите его из списка и настройте по ранее представленной инструкции. Если нужно изменить его объём выберите расширенные настройки, затем тип массива, включить или выключить авторебилд, выбрать файловую систему, и на следующем этапе можно задать нужный объём – Далее.
Ждем окончания процесса инициализации. По завершению устройство будет готово к работе.
Теперь можно создать новую сетевую папку и настроить сетевой доступ. Для этого откройте вкладку Дополнительные (Advanced) – Сетевой доступ.
Выберите тип доступа к папке SMB или NFS, выберите пользователей данного каталога, можно выбрать всех.
Затем жмем по кнопке Browse, переходим по пути где надо создать новую папку, жмем по значку Создать новую, задаем имя – Ок.
Осталось добавить разрешение чтение и записи и сохранить настройки, после чего папка станет доступна по сети. Подключаемся к ней по FTP и записываем данные.
Существует множество обстоятельств, которые могут привести к потере данных. Человеческая ошибка, форматирование и перезапись информации, перегрев, сбои питания, аппаратные и программные сбои, механические неисправности, выход из строя одного накопителя является чрезмерной нагрузкой на другие диски, при несвоевременной замене может привести к потере данных.
Если вы не можете получить доступ к данным, хранящимся на вашем сетевом диске, то можно использовать специально ПО для восстановления данных. Большинство NAS устройств форматирует жесткие диски с использованием файловой системы Linux, при подключении их напрямую к ПК с операционной системой Windows их не удастся прочесть без сторонних приложений. Поскольку в сетевых устройствах (NAS), системы управления RAID основаны на двух технологиях Linux RAID: mdadm и LVM, то программа обязана поддерживает обе эти технологии. Лучше всего выбрать комплексное решение для восстановления с NAS. Которое поможет восстановить файлы при различных сценариях и поддерживает большинство популярных файловых систем, и типов RAID.
Достаньте диски из NAS и подключите их к ПК. После загрузки ПК, к которому вы подключаете диски, ОС может попросить вас инициализировать их или «форматировать», не делайте этого, так как в результате восстановить данные будет непросто.
В случае с RAID 5 данные можно вернуть с нерабочего NAS даже при поломке одного диска. Если на материнской плате ПК, к которому вы подключаете диски, недостаточно SATA или разъёмов питания, можно подключить на 1 диск меньше.
Полную версию статьи со всеми дополнительными видео уроками смотрите в источнике. А также зайдите на наш Youtube канал, там собраны более 400 обучающих видео.
Хорошее руководство по эксплуатации
Законодательство обязывает продавца передать покупателю, вместе с товаром, руководство по эксплуатации D-Link DNS-343. Отсутствие инструкции либо неправильная информация, переданная потребителю, составляют основание для рекламации в связи с несоответствием устройства с договором. В законодательстве допускается предоставлении руководства в другой, чем бумажная форме, что, в последнее время, часто используется, предоставляя графическую или электронную форму инструкции D-Link DNS-343 или обучающее видео для пользователей. Условием остается четкая и понятная форма.
Что такое руководство?
Слово происходит от латинского «instructio», тоесть привести в порядок. Следовательно в инструкции D-Link DNS-343 можно найти описание этапов поведения. Цель инструкции заключается в облегчении запуска, использования оборудования либо выполнения определенной деятельности. Инструкция является набором информации о предмете/услуге, подсказкой.
К сожалению немного пользователей находит время для чтения инструкций D-Link DNS-343, и хорошая инструкция позволяет не только узнать ряд дополнительных функций приобретенного устройства, но и позволяет избежать возникновения большинства поломок.
Из чего должно состоять идеальное руководство по эксплуатации?
Прежде всего в инструкции D-Link DNS-343 должна находится:
— информация относительно технических данных устройства D-Link DNS-343
— название производителя и год производства оборудования D-Link DNS-343
— правила обслуживания, настройки и ухода за оборудованием D-Link DNS-343
— знаки безопасности и сертификаты, подтверждающие соответствие стандартам
Почему мы не читаем инструкций?
Как правило из-за нехватки времени и уверенности в отдельных функциональностях приобретенных устройств. К сожалению само подсоединение и запуск D-Link DNS-343 это слишком мало. Инструкция заключает ряд отдельных указаний, касающихся функциональности, принципов безопасности, способов ухода (даже то, какие средства стоит использовать), возможных поломок D-Link DNS-343 и способов решения проблем, возникающих во время использования. И наконец то, в инструкции можно найти адресные данные сайта D-Link, в случае отсутствия эффективности предлагаемых решений. Сейчас очень большой популярностью пользуются инструкции в форме интересных анимаций или видео материалов, которое лучше, чем брошюра воспринимаются пользователем. Такой вид инструкции позволяет пользователю просмотреть весь фильм, не пропуская спецификацию и сложные технические описания D-Link DNS-343, как это часто бывает в случае бумажной версии.
Почему стоит читать инструкции?
Прежде всего здесь мы найдем ответы касательно конструкции, возможностей устройства D-Link DNS-343, использования отдельных аксессуаров и ряд информации, позволяющей вполне использовать все функции и упрощения.
После удачной покупки оборудования/устройства стоит посвятить несколько минут для ознакомления с каждой частью инструкции D-Link DNS-343. Сейчас их старательно готовят или переводят, чтобы они были не только понятными для пользователя, но и чтобы выполняли свою основную информационно-поддерживающую функцию.

Table of Contents
Table of Contents
Product Overview ………………………………………………..4
Package Contents…………………………………………….4
System Requirements ……………………………………… 4
Introduction ……………………………………………………..5
Features ………………………………………………………….6
Hardware Overview ………………………………………….7
Front View …………………………………………………. 7
Rear Panel (Connections) …………………………….8
Using the OLED ……………………………………………….9
Installation ………………………………………………………… 10
Hardware Setup ……………………………………………..10
Configuration …………………………………………………….13
Easy Search Utility………………………………………….13
Getting Started ………………………………………………14
Web UI ………………………………………………………….18
Setup ……………………………………………………………19
FTP Server ………………………………………………36
FTP Server Settings ………………………………. 36
FTP Server Status …………………………………. 37
FTP Server Behind a Router …………………… 38
UPnP AV Server ……………………………………….39
iTunes Server …………………………………………… 40
DHCP Server …………………………………………… 42
Maintenance …………………………………………………. 43
Change Admin Password ……………………………43
System ……………………………………………………. 44
Firmware ………………………………………………….45
E-Mail Alerts …………………………………………….46
E-Mail Alert Settings………………………………. 47
E-Mail Alert Types ………………………………….48
Power Management …………………………………..49
Dynamic DNS ………………………………………….. 50
LCD Display ……………………………………………..51
Wizard ……………………………………………………..19
LAN ………………………………………………………… 23
Time and Date …………………………………………. 24
Device Settings …………………………………………25
Advanced ………………………………………………………26
RAID ………………………………………………………. 26
Users and Groups ……………………………………..29
Quotas ……………………………………………………. 31
Configuring Quotas ……………………………….. 32
Network Access ……………………………………….. 34
Disk Utility ……………………………………………….. 52
Status……………………………………………………………53
Device Information …………………………………….53
Connecting a UPS to the DNS-343 ……………..54
Support ………………………………………………………… 55
Mapping a Drive ……………………………………………..56
Download Scheduling ……………………………………..59
Schedule Downloads ………………………………… 61
Scheduling Settings ………………………………….. 62
USB Print Server …………………………………………… 63
2D-Link DNS-343 User Manual

Table of Contents
Storing non-English Character Files ………………….. 71
Replacing or Adding a New Hard Drive ………………. 72
Contacting Technical Support ……………………………. 73
GNU/Linux GPL …………………………………………………. 74
GNU General Public License ……………………………75
Warranty ……………………………………………………………81
3D-Link DNS-343 User Manual
Section 1 — Product Overview
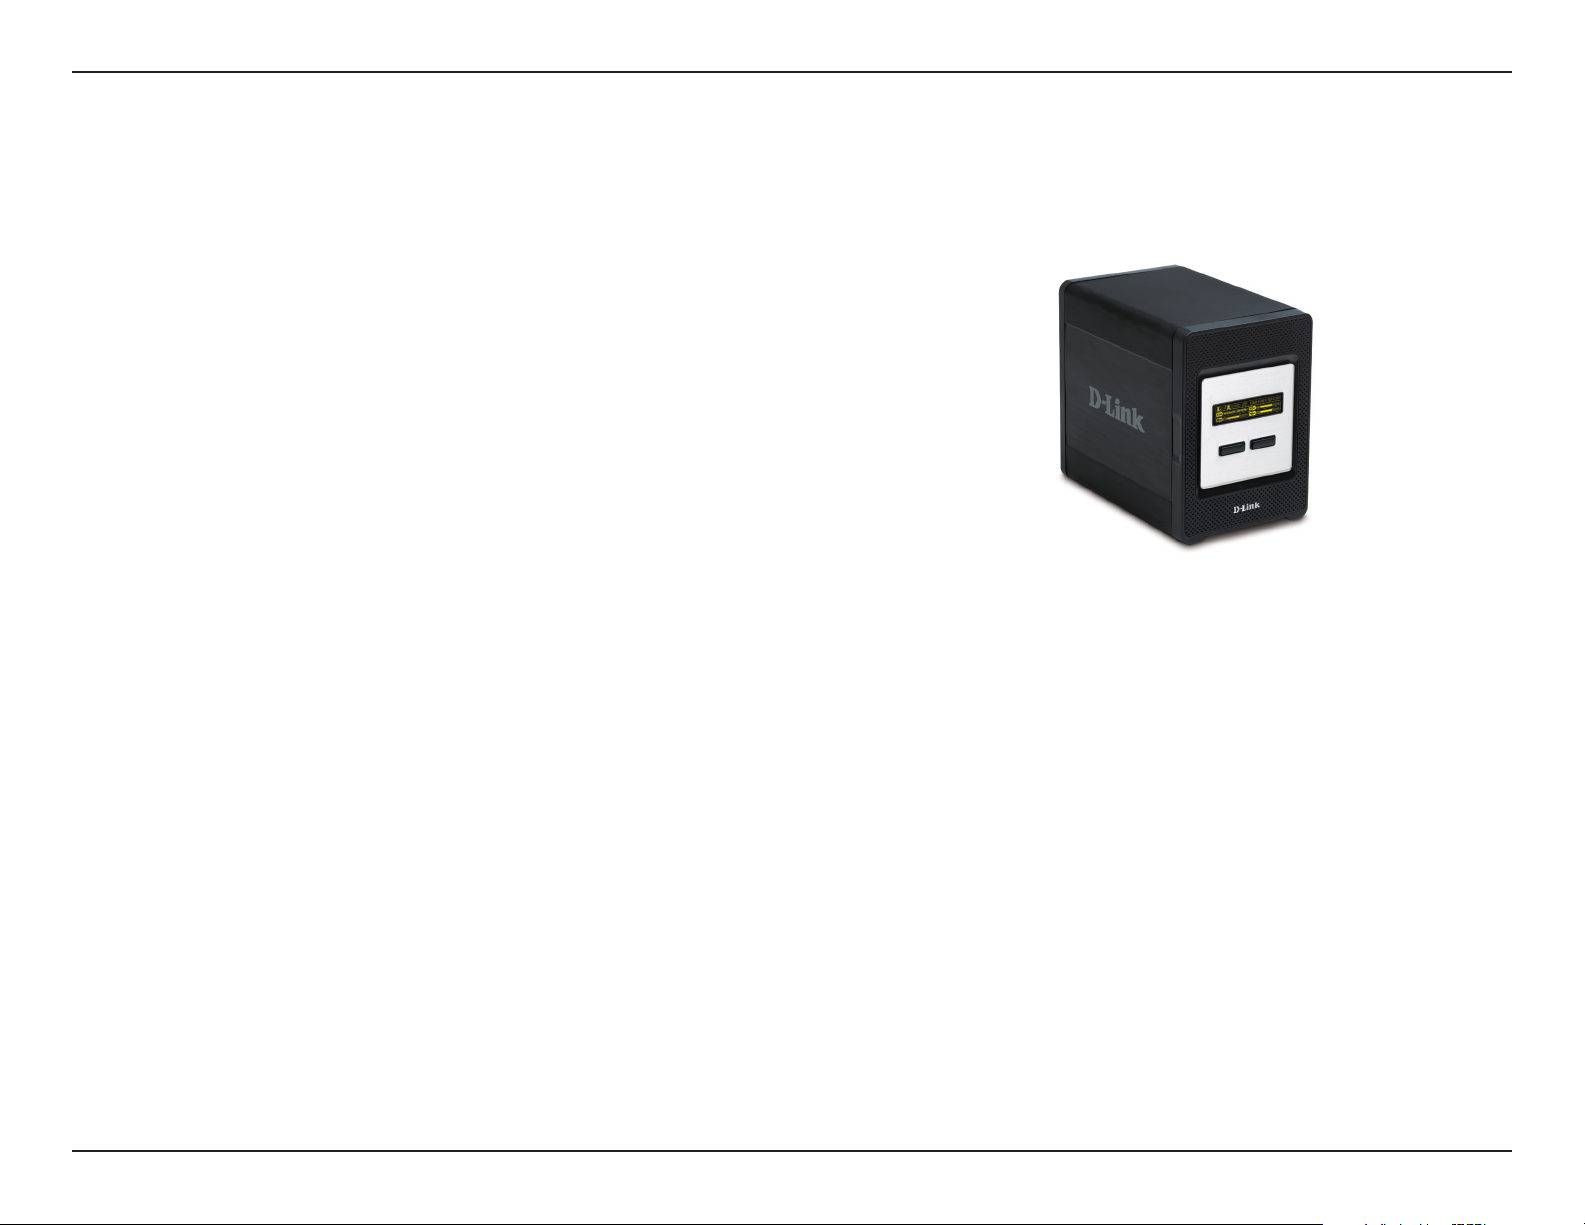
D-Link DNS-343 4-Bay Network Storage Enclosure
CD-ROM with Manual and Software
Quick Installation Guide
Power Adapter
Power Cable
CAT5 Ethernet Cable
Note: Using a power supply with a different voltage than the one included with the DNS-343 will cause damage and void
the warranty for this product.
Product Overview
Package Contents
If any of the above items are missing, please contact your reseller.
System Requirements
For best results, the following system requirements are recommended:
Computer with: 1GHz processor / 512 MB RAM / 200 MB available space / CD-ROM drive
Internet Explorer version 6.0 or Mozilla Firefox 1.0 and above
Windows
• The DNS-343 requires installation of a hard drive before it can be used. The hard disk must be a 3.5” SATA Hard Drive of any
capacity.
®
XP (with Service Pack 2) or Vista
™
4D-Link DNS-343 User Manual

Section 1 — Product Overview
Introduction
The D-Link DNS-343 4-Bay Network Storage Enclosure shares your documents, photos, music, and videos across
the network and on the Internet (via FTP server) so family members, friends, or employees can access them. This
enclosure, which can hold four 3.5” SATA hard drives of any capacity1, creates a central network point for backing up
valuable files. The built-in RAID 12 mirroring technology protects these files from drive failure. Other options such as
Standard, JBOD, RAID 0, and RAID 5 are also available.
The DNS-343 shares files over the Internet via the built-in FTP server3. Users and groups can be created and assigned
to folders with either read or read/write permissions. Quotas can be set per user or group to restrict space usage.
In addition, the DNS-343 can be used to stream photos, music, and videos to UPnP AV compatible network media
players4.
The included CD contains D-Link’s Easy Search Utility. This utility allows you to locate the DNS-343 on the network
and map drives to your computer. Backup software is also included on the CD. This software allows you to backup
your files from a computer to the DNS-343 manually, by a schedule, or in real-time. Real-time backups are a great way
to safeguard against unfortunate accidents that may result in the loss of important files.
Combining ease of use with practical, high performance features, the DNS-343 is an organized solution for any network.
Free up drive space on computers and centralize data on your network with the DNS-343 4-Bay Network Storage
Enclosure!
1 Hard Drive(s) not included.
2 RAID 1 mirroring requires the use of at least 2 internal SATA drives.
3 Note that use of an FTP Server to access files over the Internet does not provide for secure or encrypted transmissions.
4 D-Link cannot guarantee full compatibility or proper playback with all codecs. Playback capability depends on the codec support of the UPnP™ AV media player.
5D-Link DNS-343 User Manual

Section 1 — Product Overview
Features
• Equipped with one 10/100/1000 Mbps auto-MDIX Gigabit Ethernet LAN port
• Embedded SATA 3.5” HDD interface
• 128X64 OLED display screen
• 4-bay Serial ATA Hard Drive with RAID 0/1/5/JBoD support
• Supports 2 modes: Open mode and Account mode
• Supports Static and DHCP IP address assignment
• Supports Real time clock (RTC)
• Web-based administrative program is stored in flash ROM of the server.
• No setup necessary in open mode
• Supports Windows® XP and Vista™ Operating Systems
• Supports UPnP on Windows XP
• Supports PnP-X/LLTD
• Equipped with Ultra Cooler (aluminum housing + FAN speed control)
• Supports Thermal sensor
• E-mail Alert system to notify specified users of any device problems
• Supports HTTPS management function
• Supports iTunes Server
• Supports Schedule download
• Supports Easy Search
• Supports Downloader
• Supports Uni-code
• Supports User and Group management
• Supports Quotas for users and groups
• Supports group assignment for Network sharing and FTP server
• Can act as a DHCP Server
• Supports Configuration file save/load
• Tool-less Hard Drive installation
• Supports UPnP AV and DLNA compliant
• Supports DDNS
• Supports FTP Server
• USB port supports print server and UPS monitoring
• Jumbo frame support
6D-Link DNS-343 User Manual
Section 1 — Product Overview
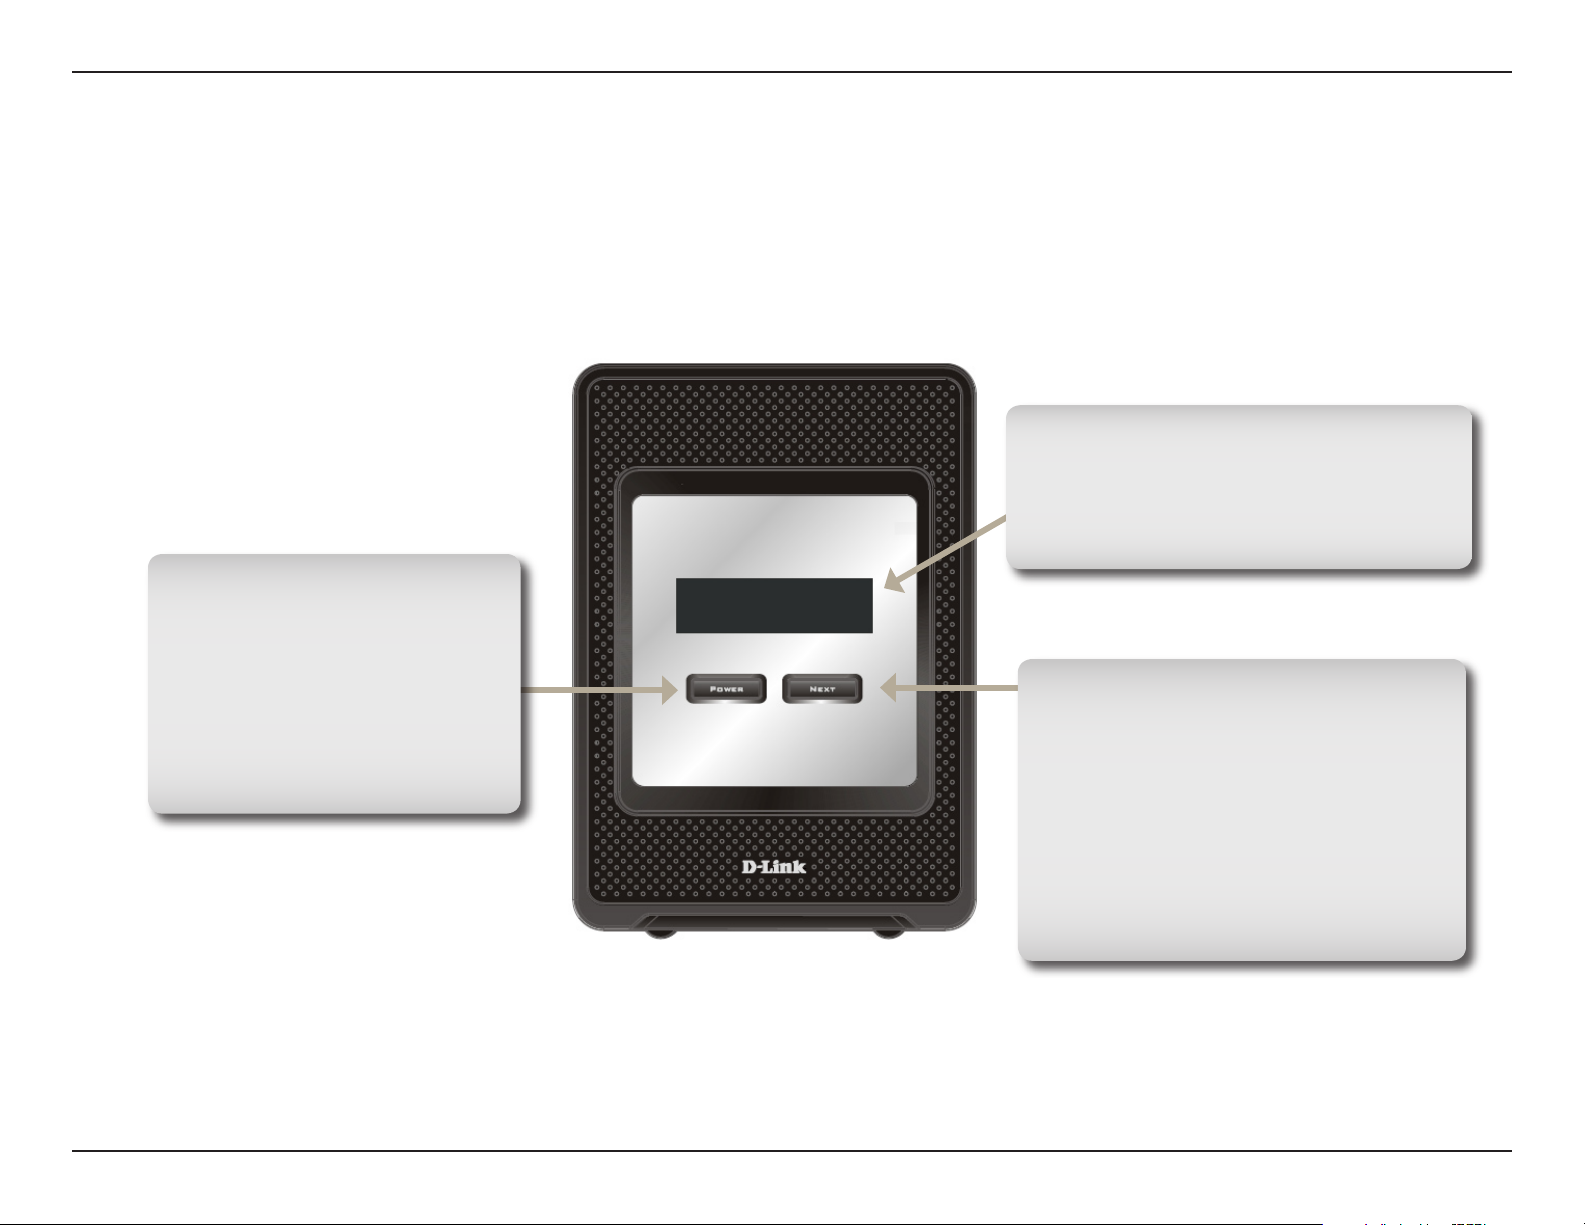
Power Button
Use this button to switch the
device on or off. To switch on
the device press the button
once. To switch off the device
hold the button down for 5
seconds.
Hardware Overview
Front View
OLED:
Thi s scre en dis pl ays Sys tem
Information, HD Status, and Server
Status.
Next Button
Use this button to display the
System Information (system state),
HD Status (hard drive state) and
Server Status (server status state)
on the OLED. Press the button
once to alternate between the
different Status screens
7D-Link DNS-343 User Manual
Section 1 — Product Overview
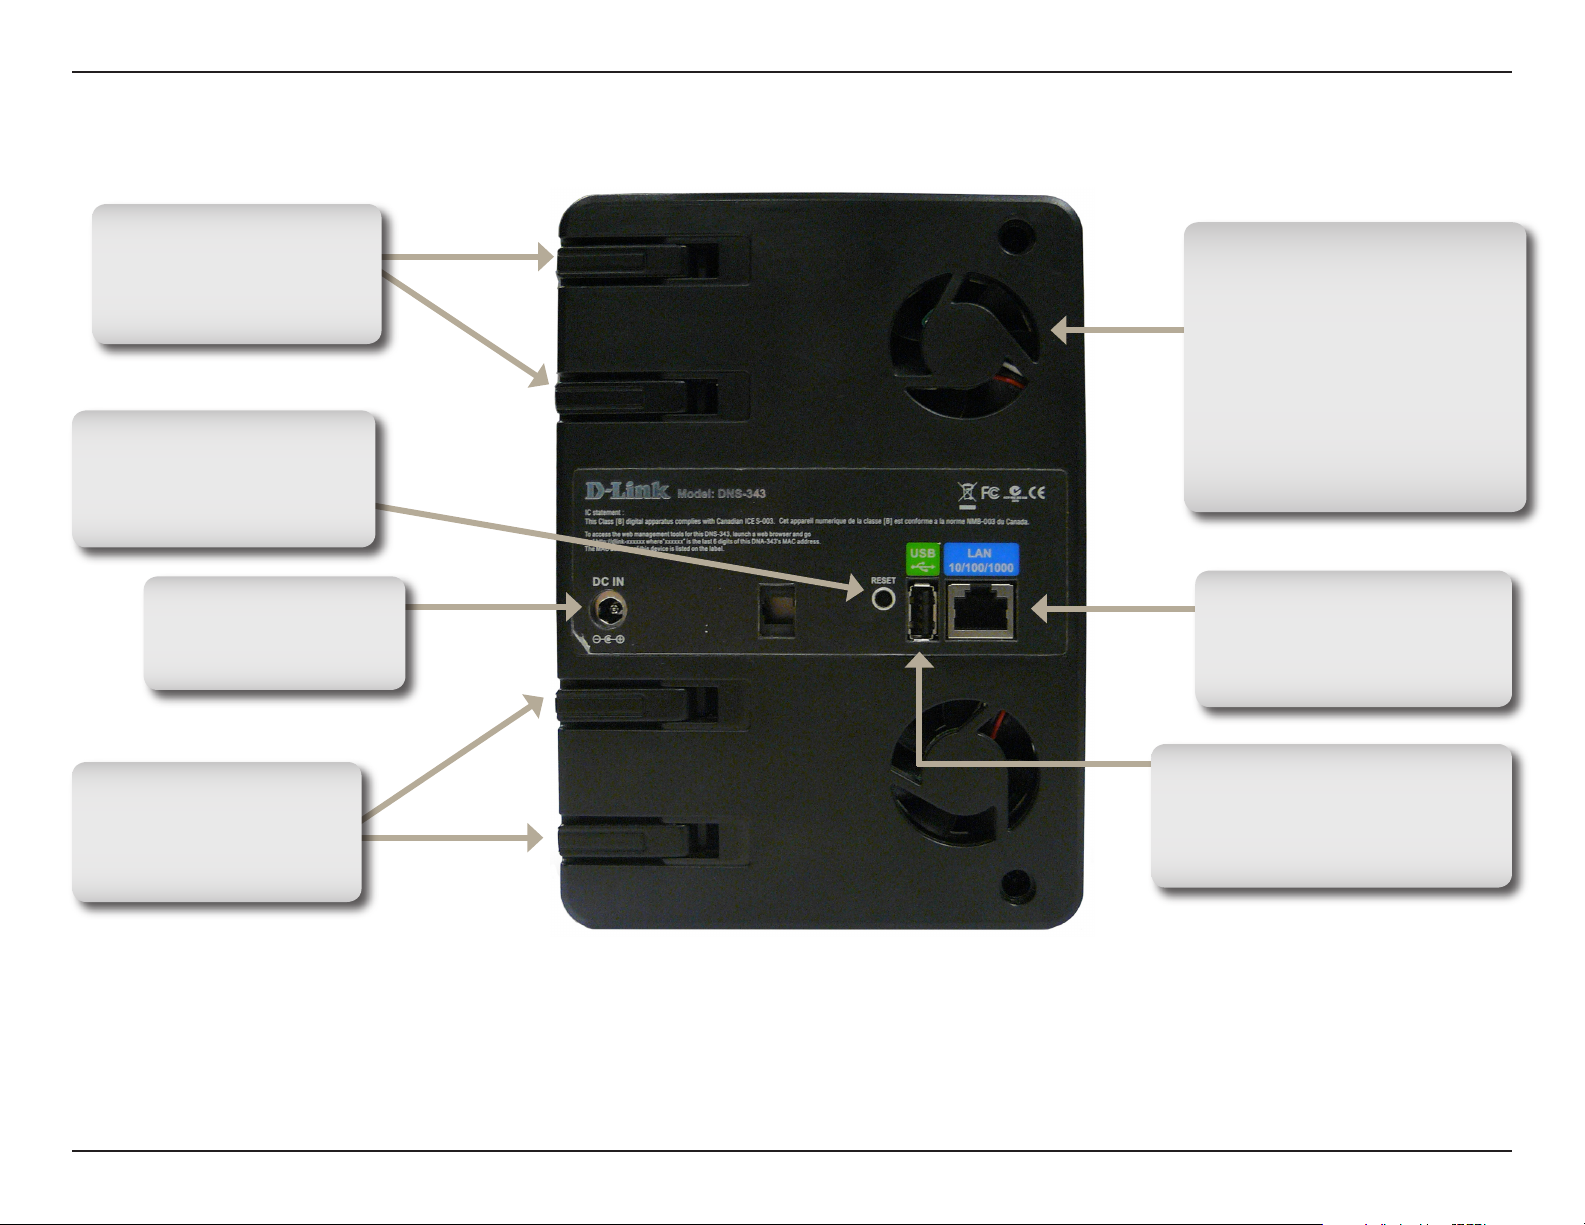
Rear Panel (Connections)
Drive Eject Levers
Use the provided lever
to eject the SATA hard
drives.
Reset Button
Press this button down for
over 5 seconds to reset the
unit to factory defaults.
Power Receptacle
Connect the supplied
power adapter.
Drive Eject Levers
Use the provided lever
to eject the SATA hard
drives.
Cooling Fan
The cooling fans are used
to cool the hard drives and
feature speed control. When
the unit is first powered on the
fans rotate at a low speed and
rotate at a high speed when
the temperature rises above
49 C.
Ethernet Port
Gigabit Ethernet port that
connects the DNS-343 to
the local network.
USB Connector
USB 2.0 (Type A) connector.
USB Host port for Print Server
or USB UPS monitoring.
8D-Link DNS-343 User Manual

Section 1 — Product Overview
Using the OLED
The DNS-343 network storage enclosure features an OLED that enables the administrator to easily view information
about the DNS-343. The OLED display screen displays information about the network connection, hard drive, and
server status. The OLED has three different screens:
System Information — This screen shows the following information:
• The hostname of the DNS-343
• The firmware version
• The IP address of the DNS-343
• The operating temperature
Hard Drive Status — This screen shows the following information:
• The percentage of space used on the hard drives
Server Status — This screen shows the following information:
• Whether a printer is connected to the server
• The status of the UPNP server
• The status of the iTunes server
• The status of the FTP Server
Press the Next button once to alternate between the different Status screens
9D-Link DNS-343 User Manual

Section 2 — Installation
Installation
Hardware Setup
This section provides unpacking and installation information for the DNS-343. Open the shipping carton for the
DNS-343 and carefully unpack its contents. If this is the first time using the DNS-343 or if a new hard disk is installed,
use the Easy Search utility located on the Installation CD and follow the instructions for setting up, configuring and
formatting the new drive.
To install the DNS-343 on your local network, refer to the steps below:
1. Access the drive bays by sliding the faceplate up until it
unlatches from the device.
2. Once the faceplate is unlatched, pull it off the device,
exposing the drive bay.
10D-Link DNS-343 User Manual
Section 2 — Installation
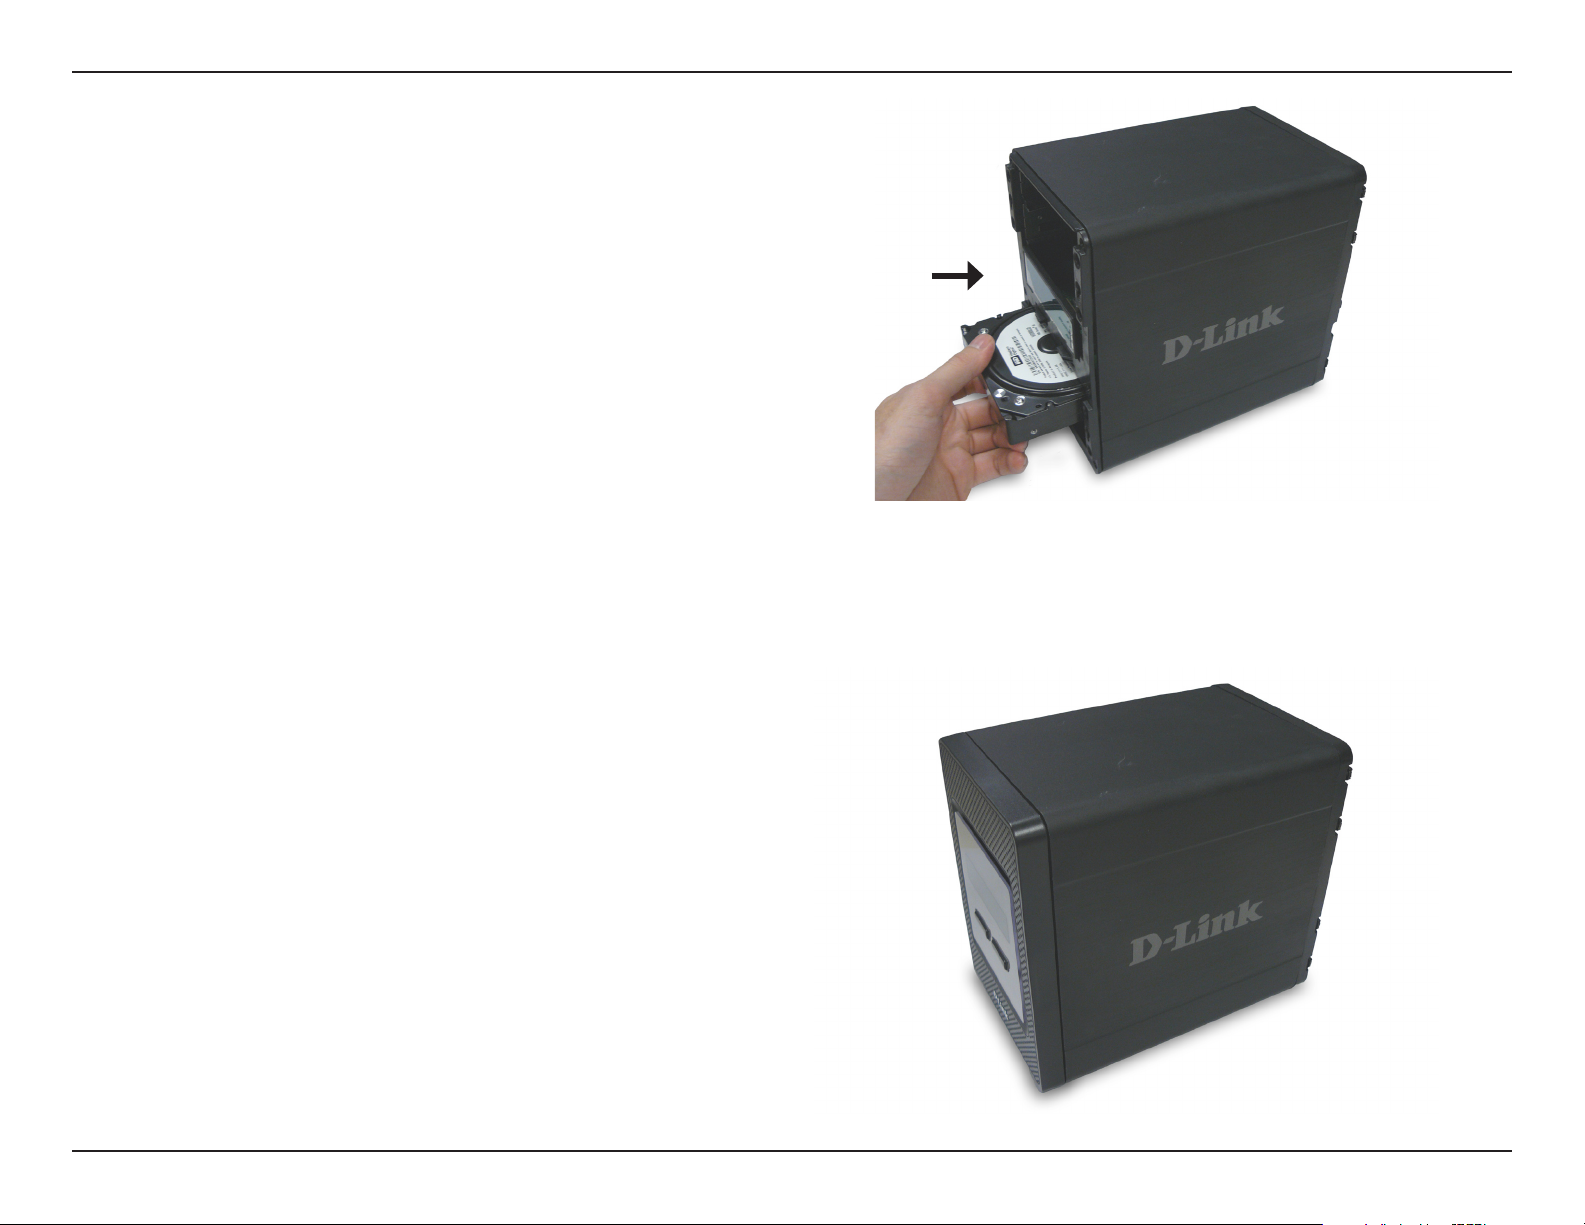
3. Insert a 3.5” SATA hard drive into an available drive
bay. Make sure to align the drive connector to the
SATA connector on the bottom edge inside the drive
bay of the DNS-343. Gently push the drive in until it
connects.
4. Attach the faceplate to the front of the device.
11D-Link DNS-343 User Manual
Section 2 — Installation
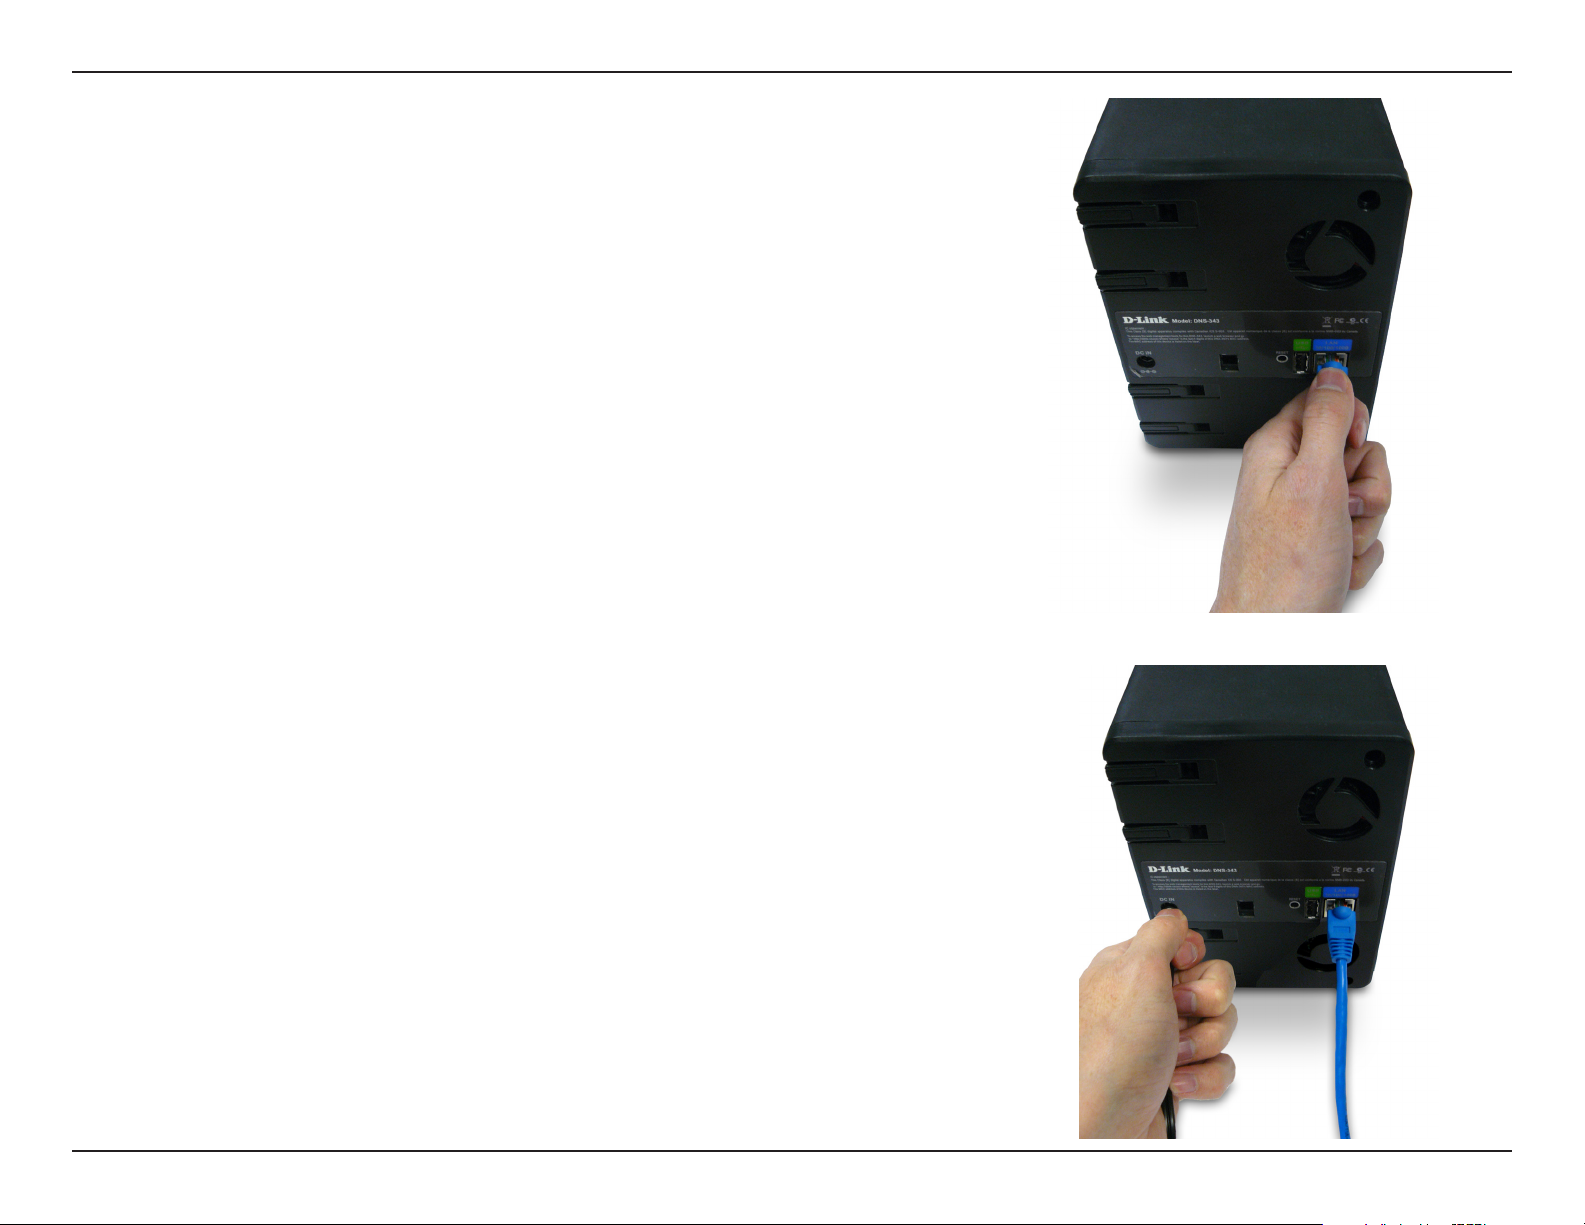
5. Connect an Ethernet cable to the available Ethernet port. This
cable should connect the DNS-343 to your local network via a
router or switch, or directly to a computer for configuration.
6. Connect the supplied power adapter to the power receptacle.
When a hard disk is installed, the hard disk must first be formatted in
the DNS-343 before it can be used. Insert the Installation CD into your
computer’s CD-ROM or DVD-ROM drive and follow the instructions
below to use the Easy Search Utility to establish a network link to the
DNS-343. Then use the web-based management software to format
the new hard disk.
12D-Link DNS-343 User Manual
Section 3 — Configuration
Configuration
Easy Search Utility
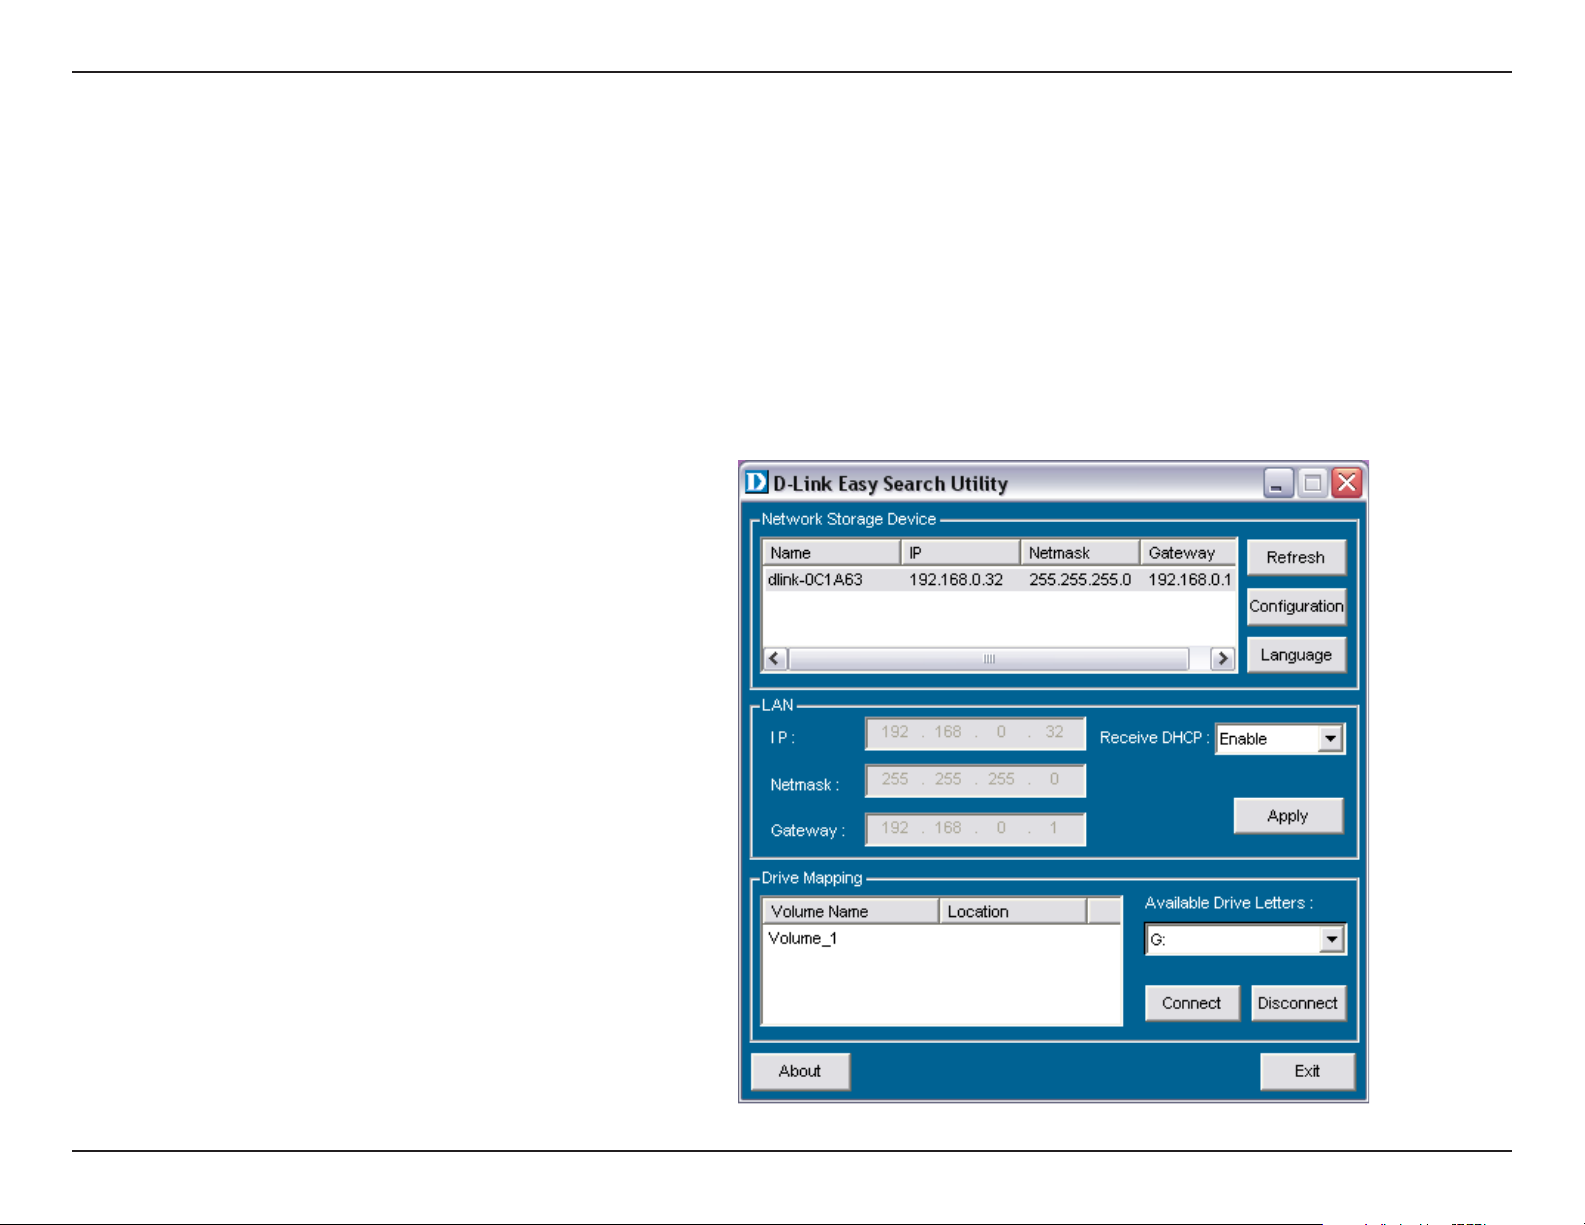
When first powered on, during the initial boot sequence, the DNS-343 will wait to be assigned an IP address via DHCP. If it does
not receive a DHCP assigned IP address, by default it will have a self-assigned IP address of 192.168.0.32. It is recommended
to use the included D-Link Easy Search Utility when accessing and configuring the DNS-343 for the first time. If you want to
change the IP address before logging in or are unable to connect to the DNS-343 IP address, you can use the Easy Search
Utility provided on the product CD to locate the device on your network and make any needed changes.
Network
Storage Device
Refresh
Configuration
LAN
Apply
Drive Mapping
Available
Drive Letters
The Easy Search Utility displays all
available DNS-343 devices within
the same network.
Refreshes the device list.
Click Configuration to access the
Web based configuration of the
DNS-343.
Configure the LAN Settings for the
DNS-343.
Click Apply to save changes to the
LAN Settings.
Volumes that are available for
mapping are displayed here.
Choose an available drive letter.
Click Connect to map the selected
vo l u m e. Click Di s connect to
disconnect the selected mapped
volume.
Exit
Click Exit to close the utility.
13D-Link DNS-343 User Manual
Section 3 — Configuration
Getting Started
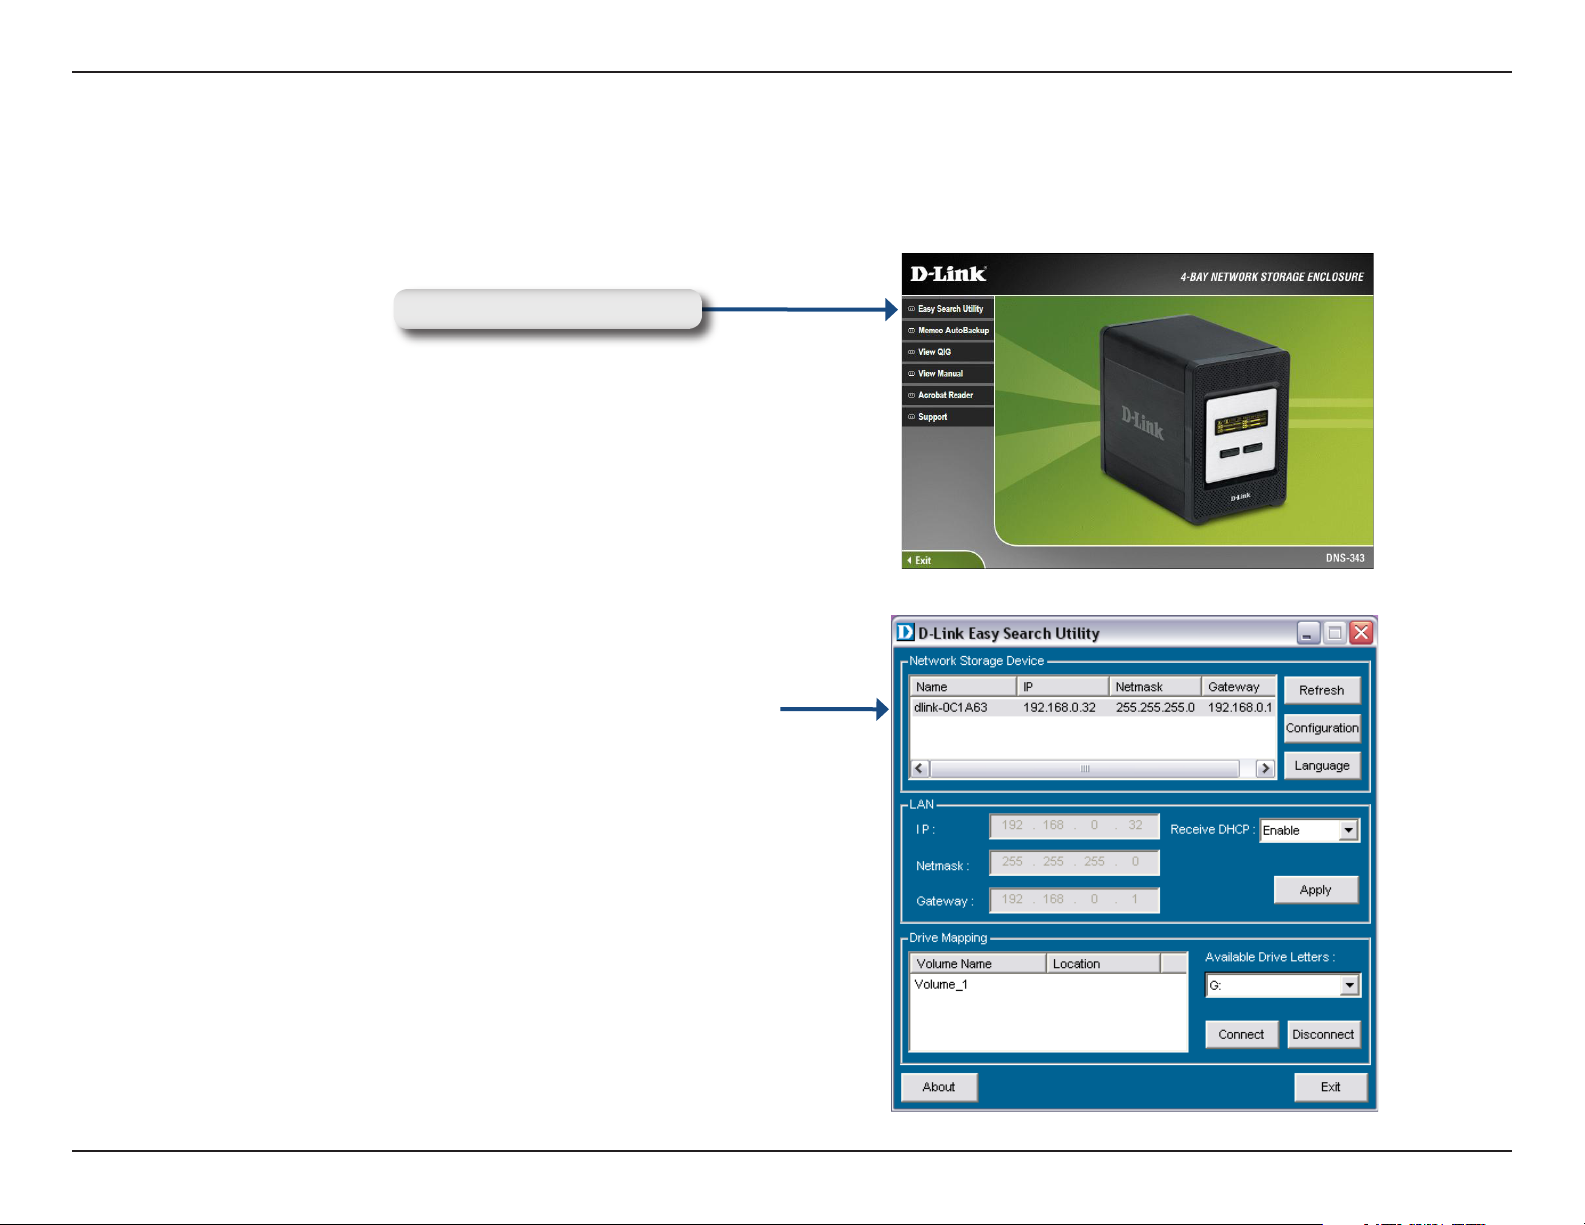
To run the Easy Search Utility, insert the DNS-343 CD into your CD-ROM drive:
Click Easy Search Utility.
Select the listed DNS-343 and click the Configuration button.
This will launch the computer’s default web browser and direct
it to the IP address listed for the device. Make sure the browser
is not configured to use a proxy server.
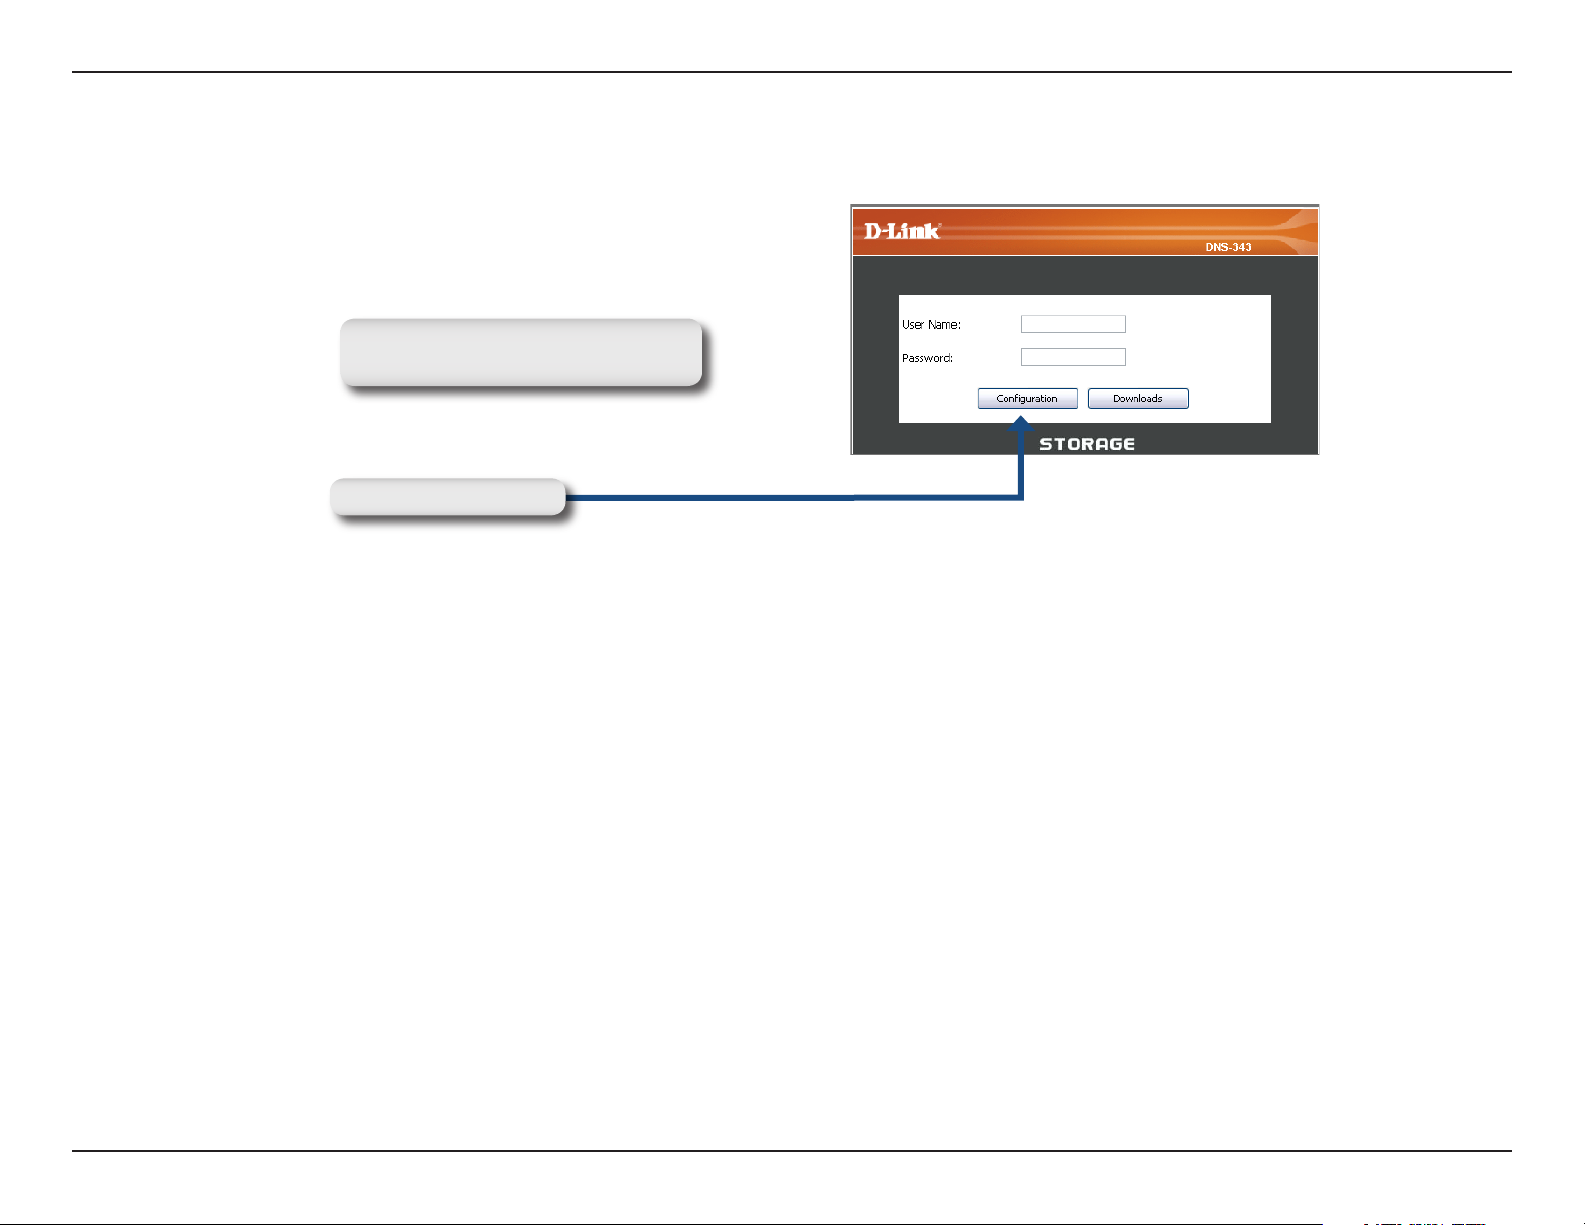
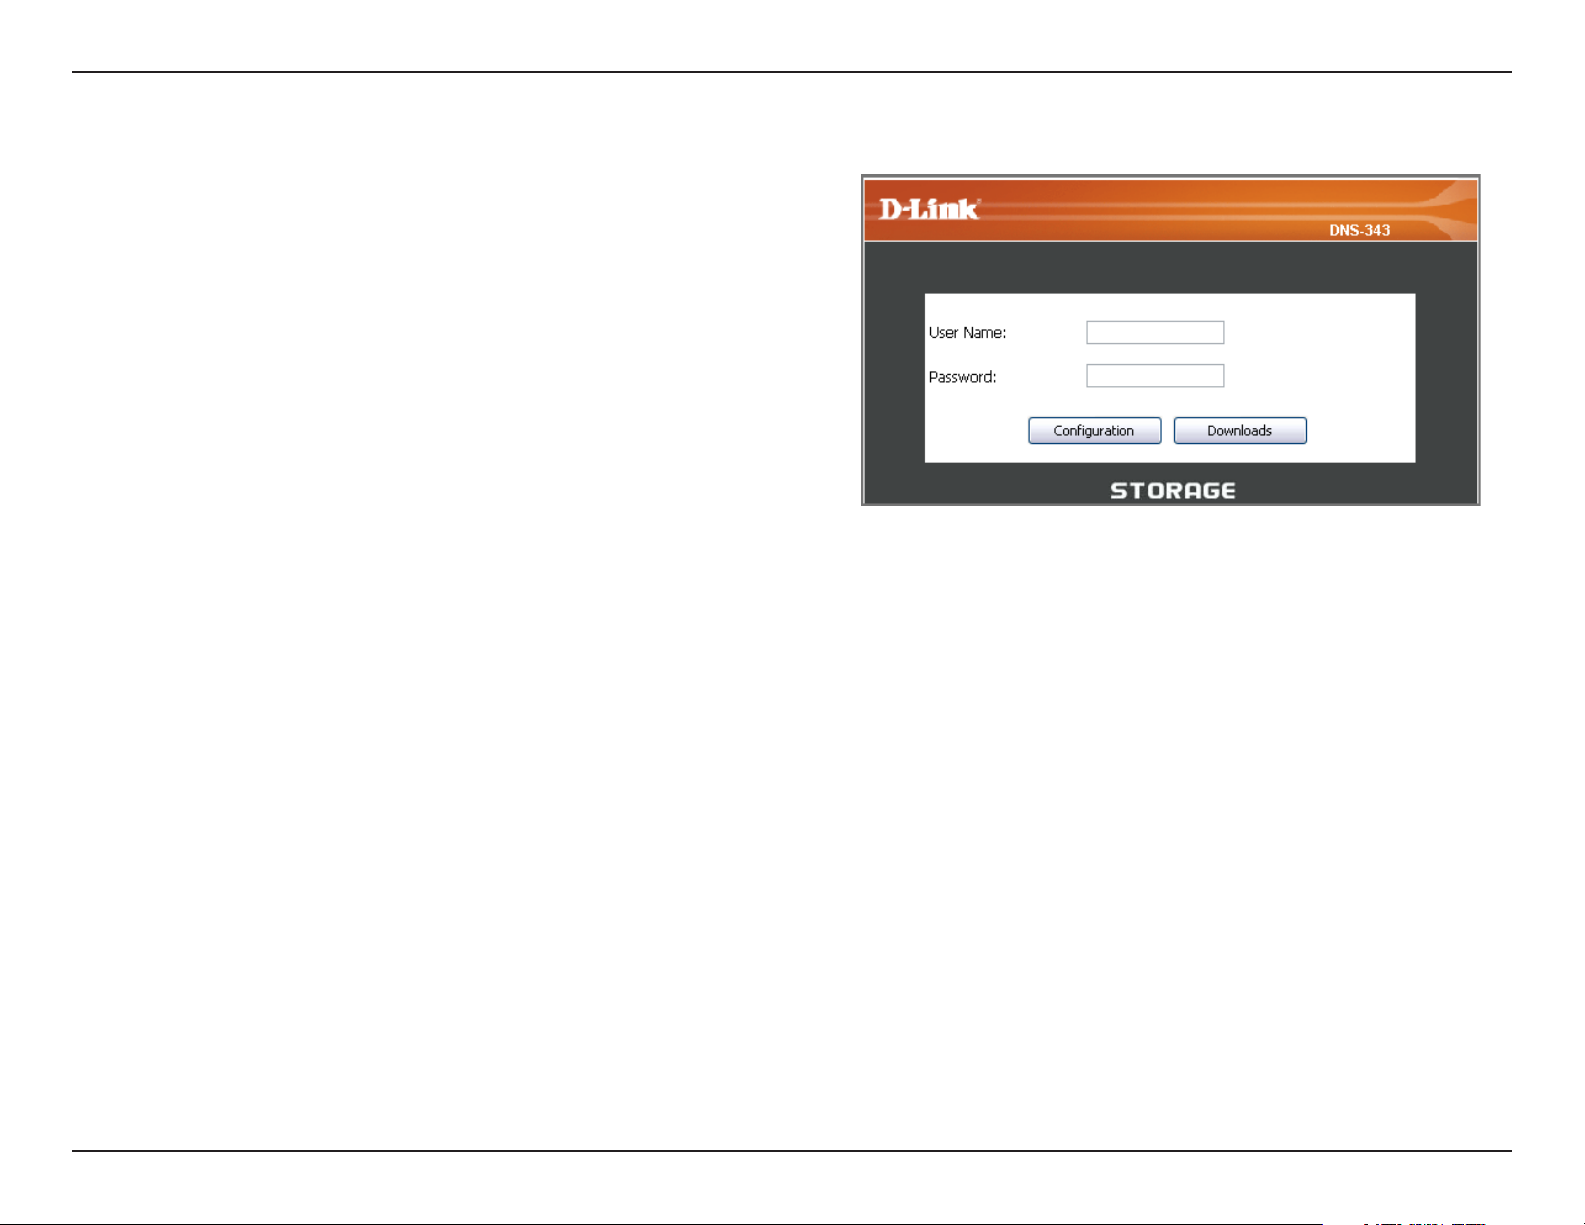
The first window that appears will require the user to login for
Configuration or Downloads menus. The Downloads menus
are described later in this guide in the section titled Downloads
on page 60.
Note: The computer used to access the DNS-343
web-based configuration manager must be on the same
subnet as the DNS-343. If your network is using a DHCP
server and the computer receives IP settings from DHCP,
the DNS-343 will automatically be in the same subnet.
14D-Link DNS-343 User Manual
Section 3 — Configuration
The Login screen will appear:
Type admin for the username and
leave the password field blank.
Click Configuration
Note: If the web browser is unable to connect to the web manager of the DNS-343, check to make sure your computer is on the same
subnet as the DNS-343. For example, if there is no DHCP server active, your computer will need an IP address in the 192.168.0.0 subnet.
Your computer should have an IP address of 192.168.0.x where x equals a number from 1 to 31, or 33 to 254.
When logging into the DNS-343 for the first time, you will be asked to choose a drive configuration (Basic or Custom)
and format the drives.
Basic Configuration offers four options: Standard, JBOD, RAID 1 and RAID 5. Standard configures each disk as a
separate volume, while JBOD combines all disks into a single volume. See page 26 for more details on using the RAID
configurations.
Custom Configuration offers 3 combination methods: RAID 0 + JBOD, RAID 1 + JBOD, and RAID 5 + JBOD. See
page 26 for more details on using the RAID configurations.
Note: All data will be erased during the format process.
15D-Link DNS-343 User Manual
Section 3 — Configuration
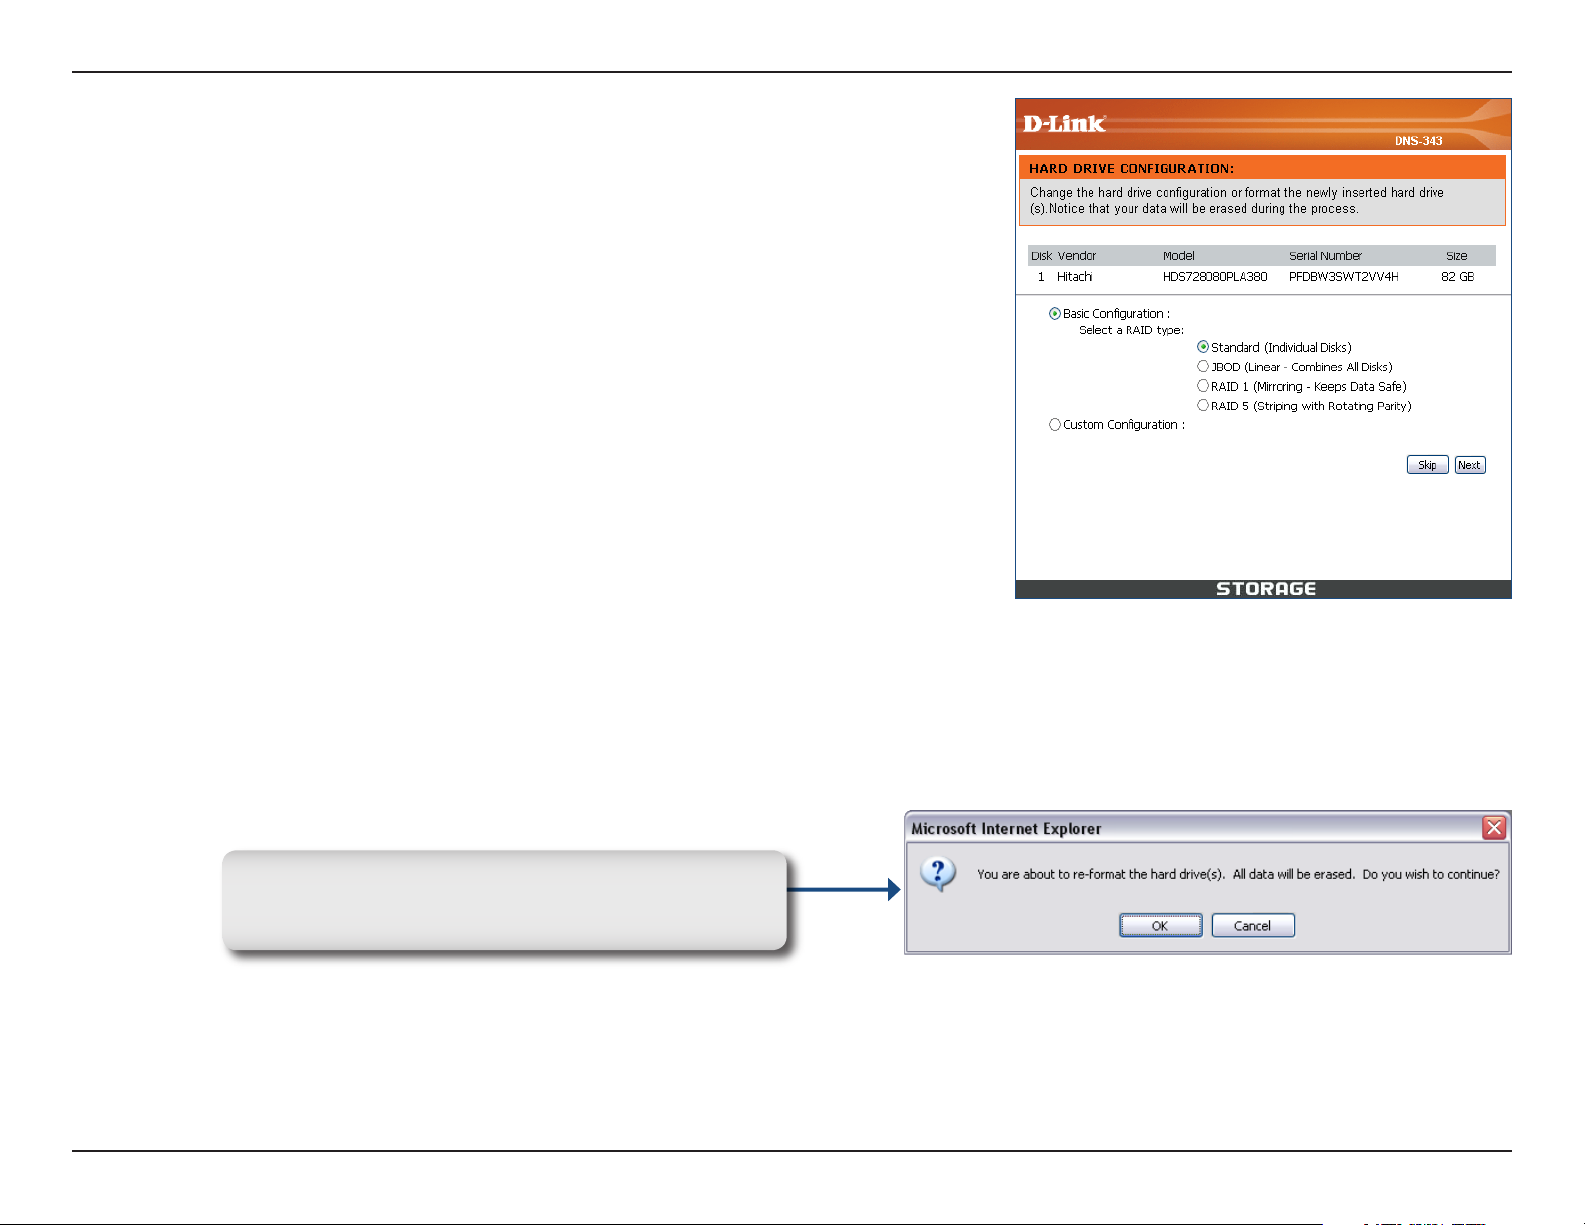
When prompted to configure the Hard Drive Settings:
Select from one of the basic types of hard drive configurations
below:
• Standard
• JBOD
• RAID 1
• RAID 5
Or select Custom Configuration and then click Next.
Note: All data will be erased off the hard drives installed in the
DNS-343 during the format process!
A warning message appears informing you that your
drives will be formatted and all data will be erased.
Click OK to continue.
16D-Link DNS-343 User Manual
Section 3 — Configuration
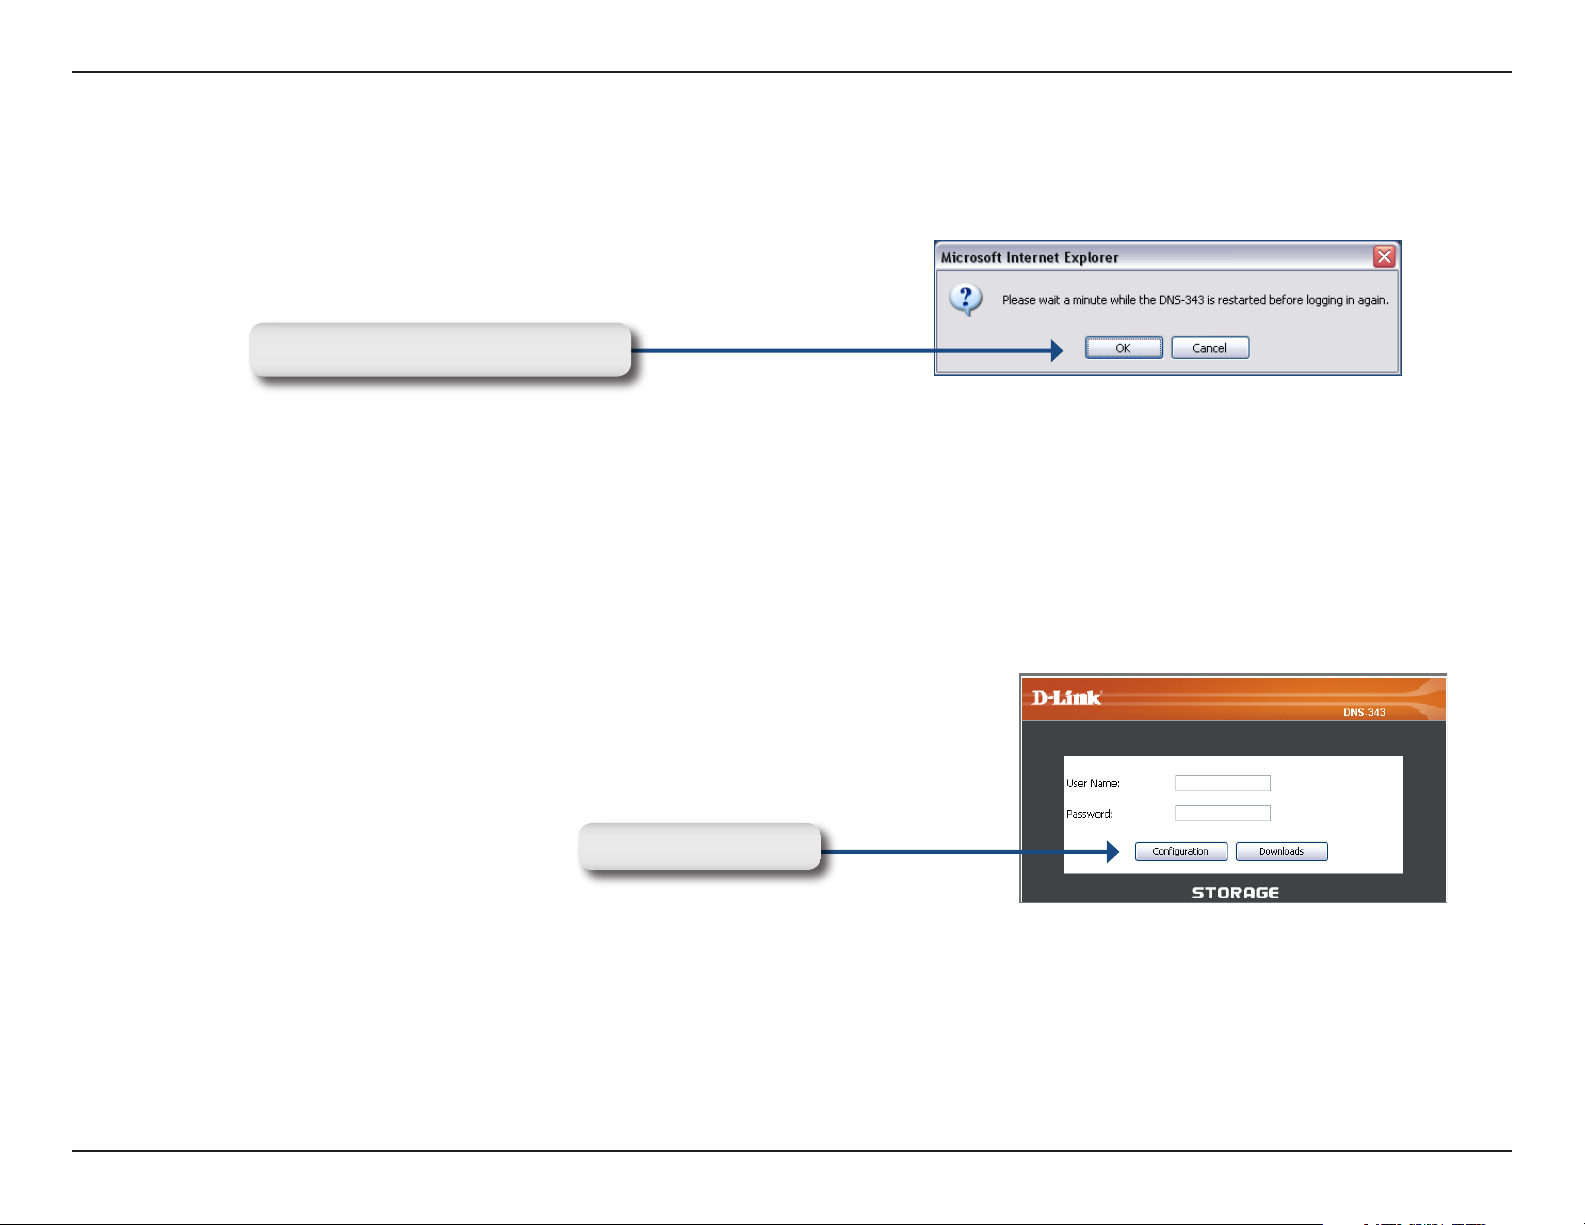
When the formatting completes, the Format Results screen will appear. Click Restart to finish the format procedure.
Then click OK to confirm and restart the DNS-343.
Press OK to restart the DNS-343.
When the system restarts you will be prompted to login to the DNS-343. Login to the DNS-343 with the username and
password you created previously
Click Configuration
17D-Link DNS-343 User Manual
Section 3 — Configuration
Web UI
After login, you will be redirected to the DNS-343 web UI:
The DNS-343 web UI defaults to the Setup page. The main categories for configuration are located in the menu tabs
at the top of the page. These categories include:
Setup — Contains the DNS-343 setup Wizard, LAN Setup, Time and Date settings and Device
settings.
Advanced — Allows the DNS-343 administrator to configure RAID options, Users, groups of users and
their storage quotas. The FTP Server, UPnP AV server, iTunes server, LLTD, and DHCP server settings
are also contained here as well.
Maintenance — Allows the DNS-343 administrator to reset the Admin Password, perform System
maintenance tasks, carry out Firmware Upgrades, configure e-mail alerts, configure Power Management
options, configure Dynamic DNS, change the LCD Display settings and get diagnostic information about
the installed Hard Disks.
Status — Shows current information about the LAN configuration, Device, Printer and Hard drives
installed.
Support — Contains help files for your DNS-343.
18D-Link DNS-343 User Manual
Section 3 — Configuration
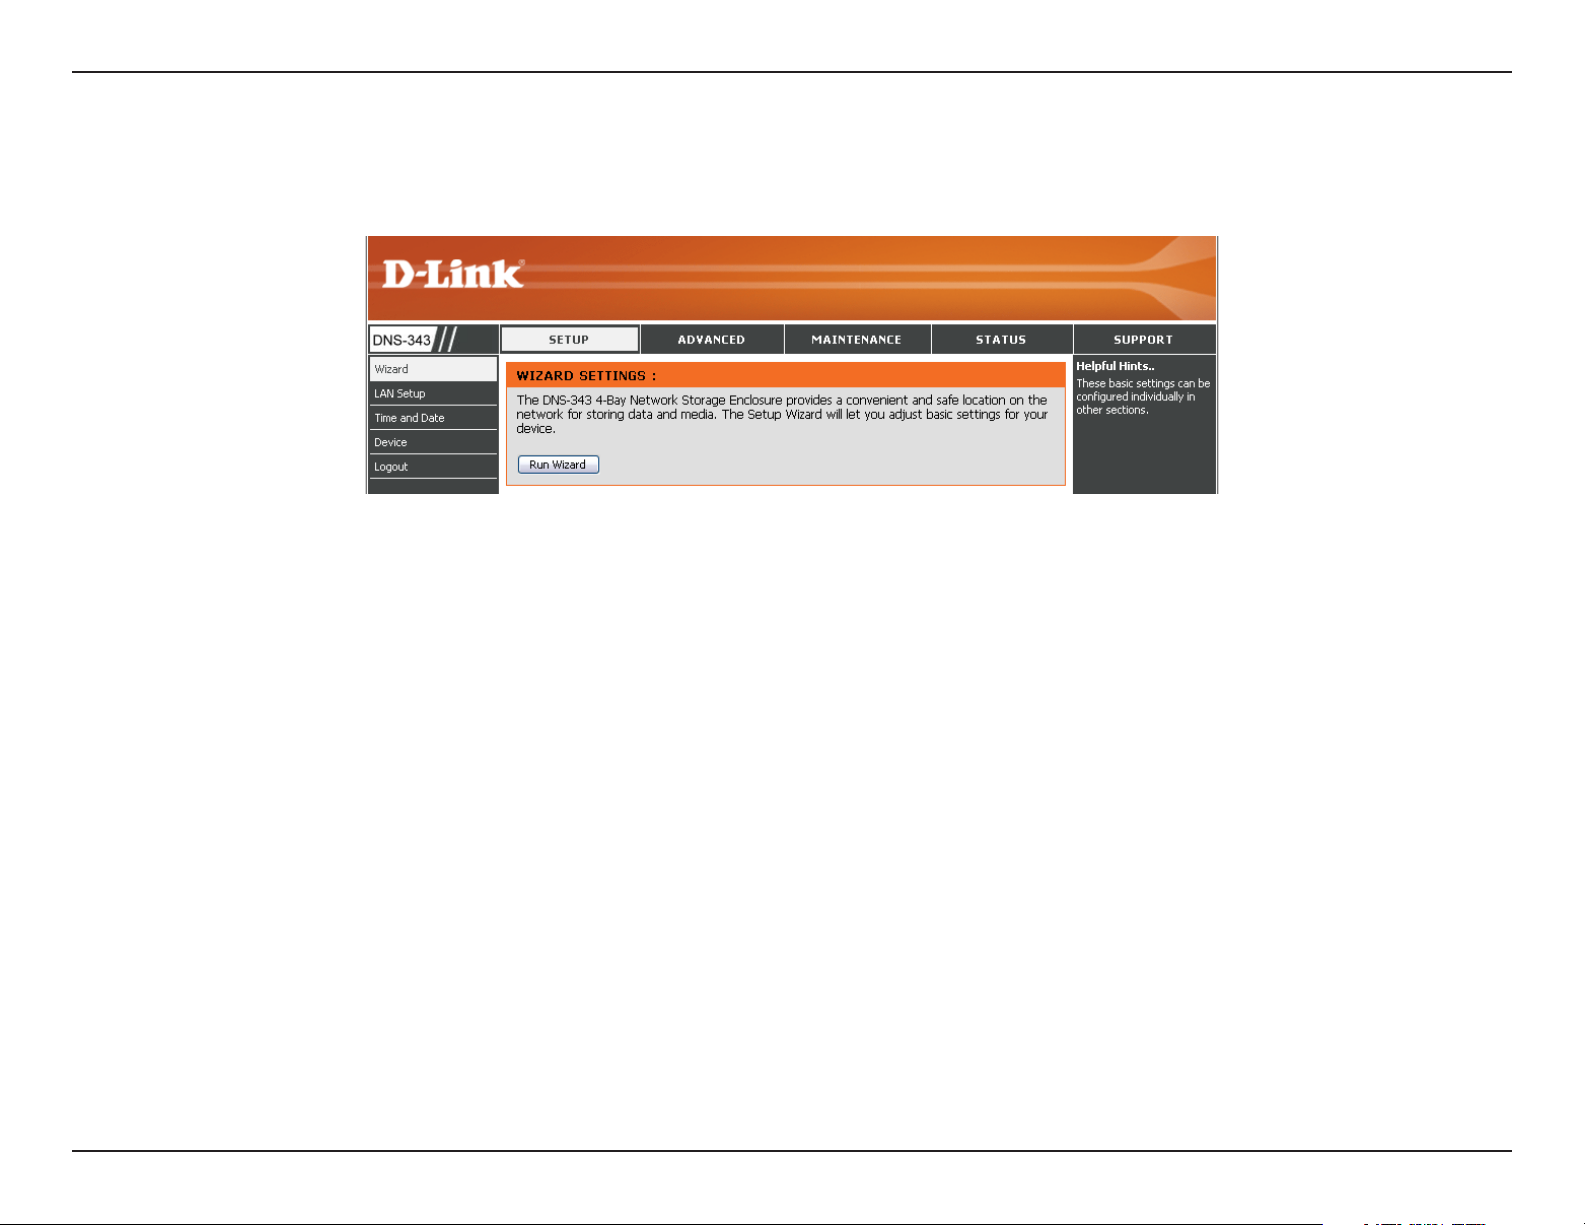
Setup
Wizard
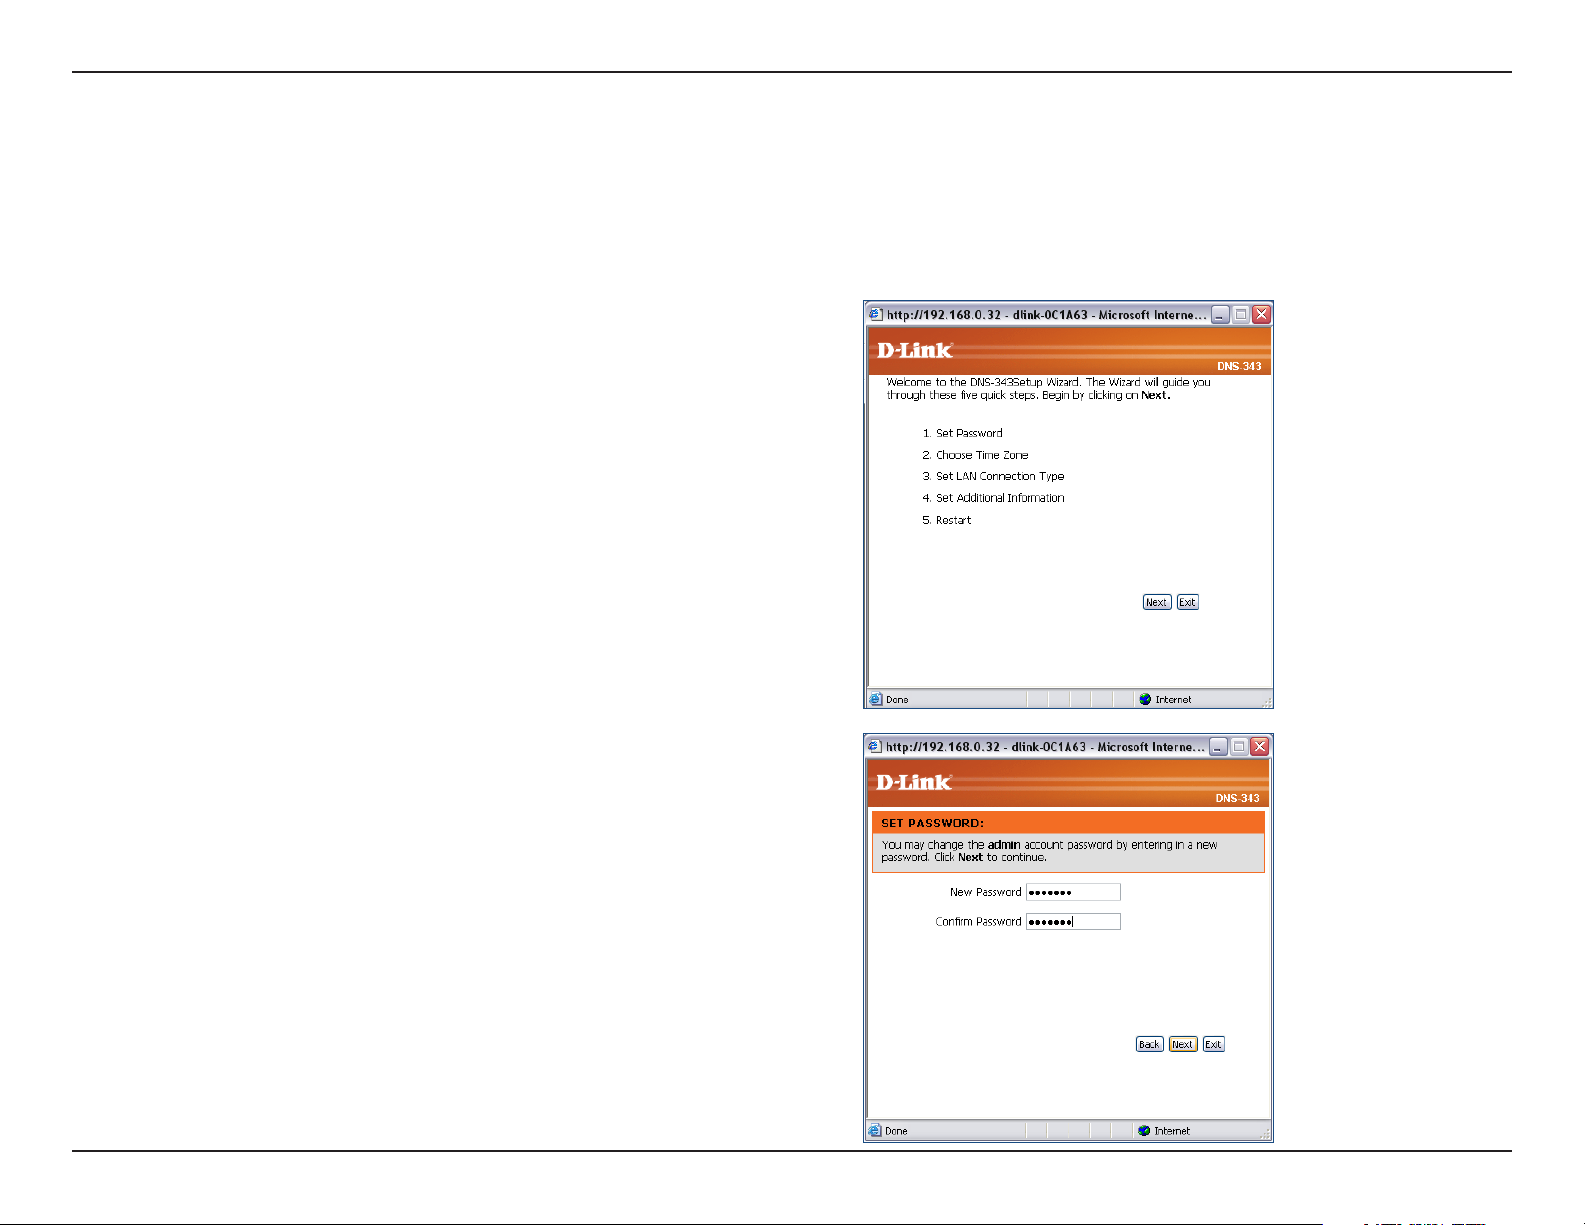
The DNS-343 has a setup Wizard that allows you to configure the basic settings for your device.
When running the DNS-343 setup wizard, the welcome screen
displays a summary of the five steps of the wizard. Click Next
to continue.
It is recommended that you set an admin password to access
the web manager. Type a New Password in the space provided
and type it again in the Confirm Password space. Click Next to
continue.
19D-Link DNS-343 User Manual

Section 3 — Configuration
Choose your Time Zone from the drop-down menu. Click Next
to continue.
Configure the IP settings for your device. If you are using a
DHCP server such as a router on your network, the DNS-343
will automatically obtain the IP settings.
If you prefer to assign a Static IP address, select Static IP
and enter the network setting for your device. Click Next to
continue.
20D-Link DNS-343 User Manual
Section 3 — Configuration
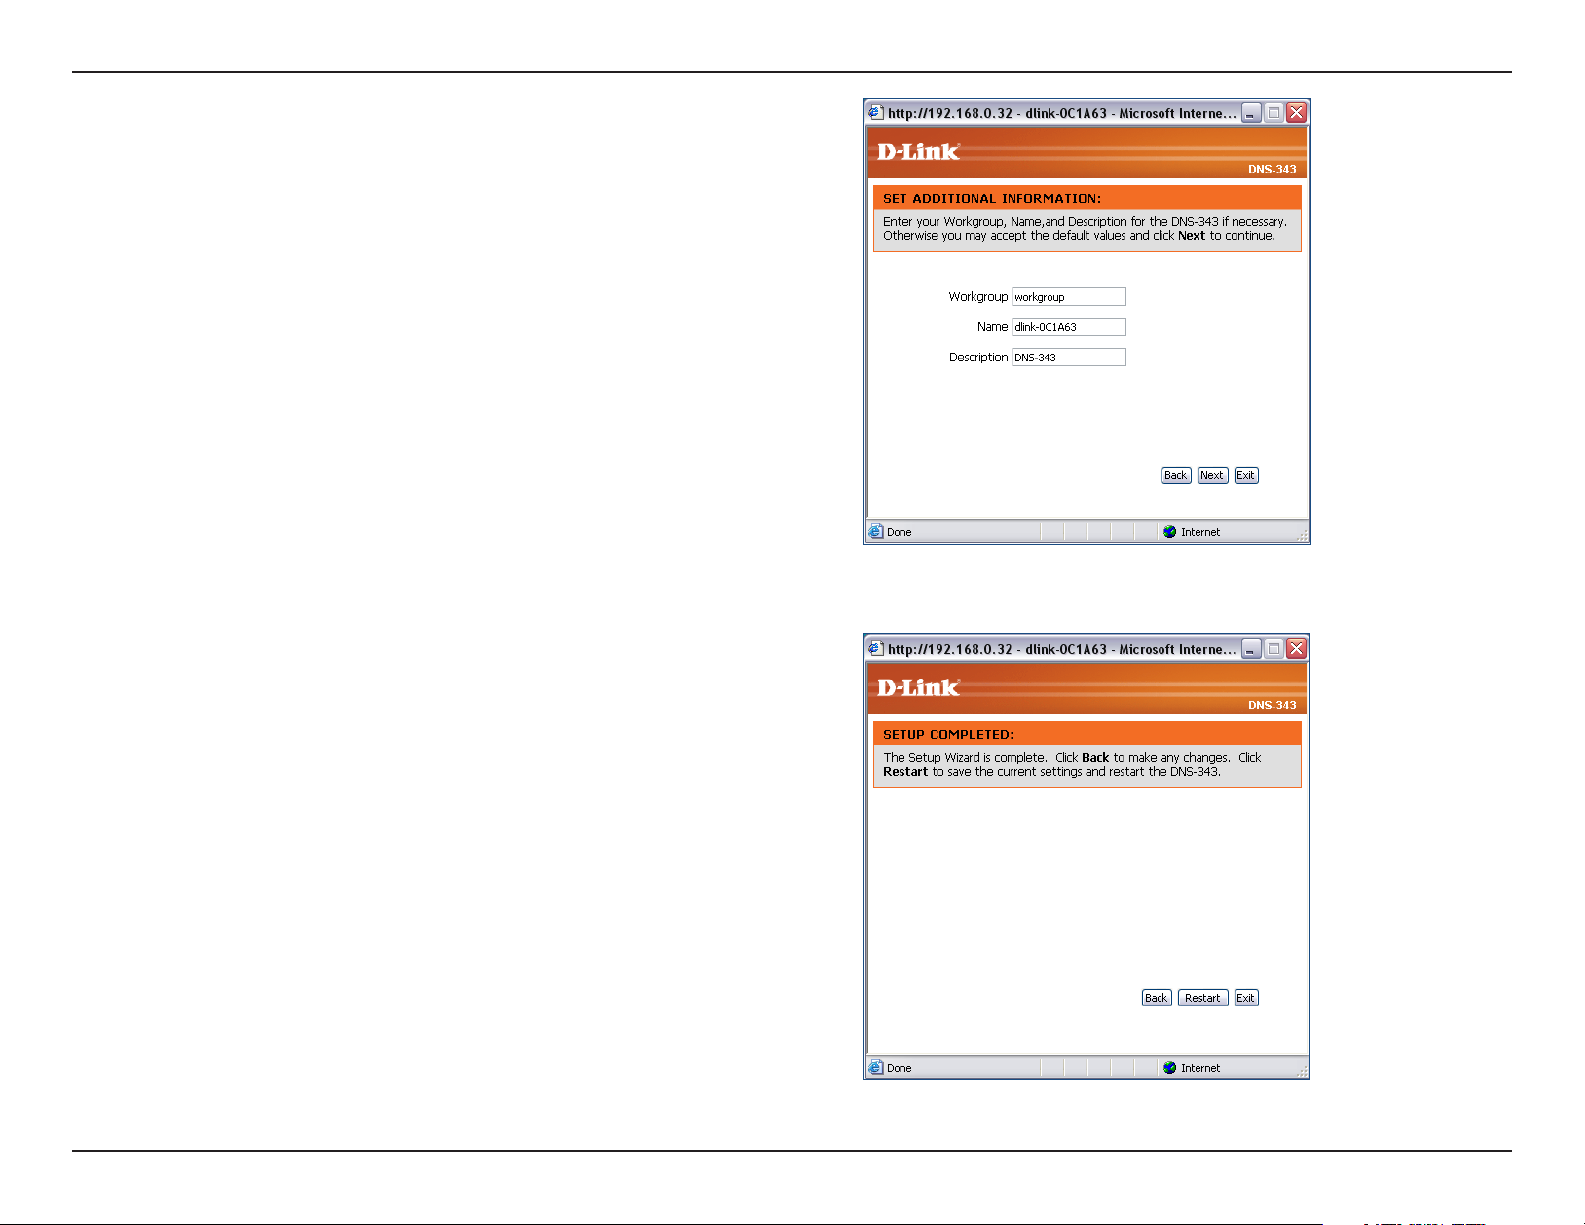
Enter the workgroup, name, and description for your DNS-343,
or leave the default values and click Next to continue.
Click Back to make changes or click Restart to save your settings
and reboot the DNS-343.
21D-Link DNS-343 User Manual
Section 3 — Configuration
When the login prompt appears, login using the new administrator
password. Then click Configuration to access the configuration
page of your DNS-343.
22D-Link DNS-343 User Manual
Section 3 — Configuration
LAN
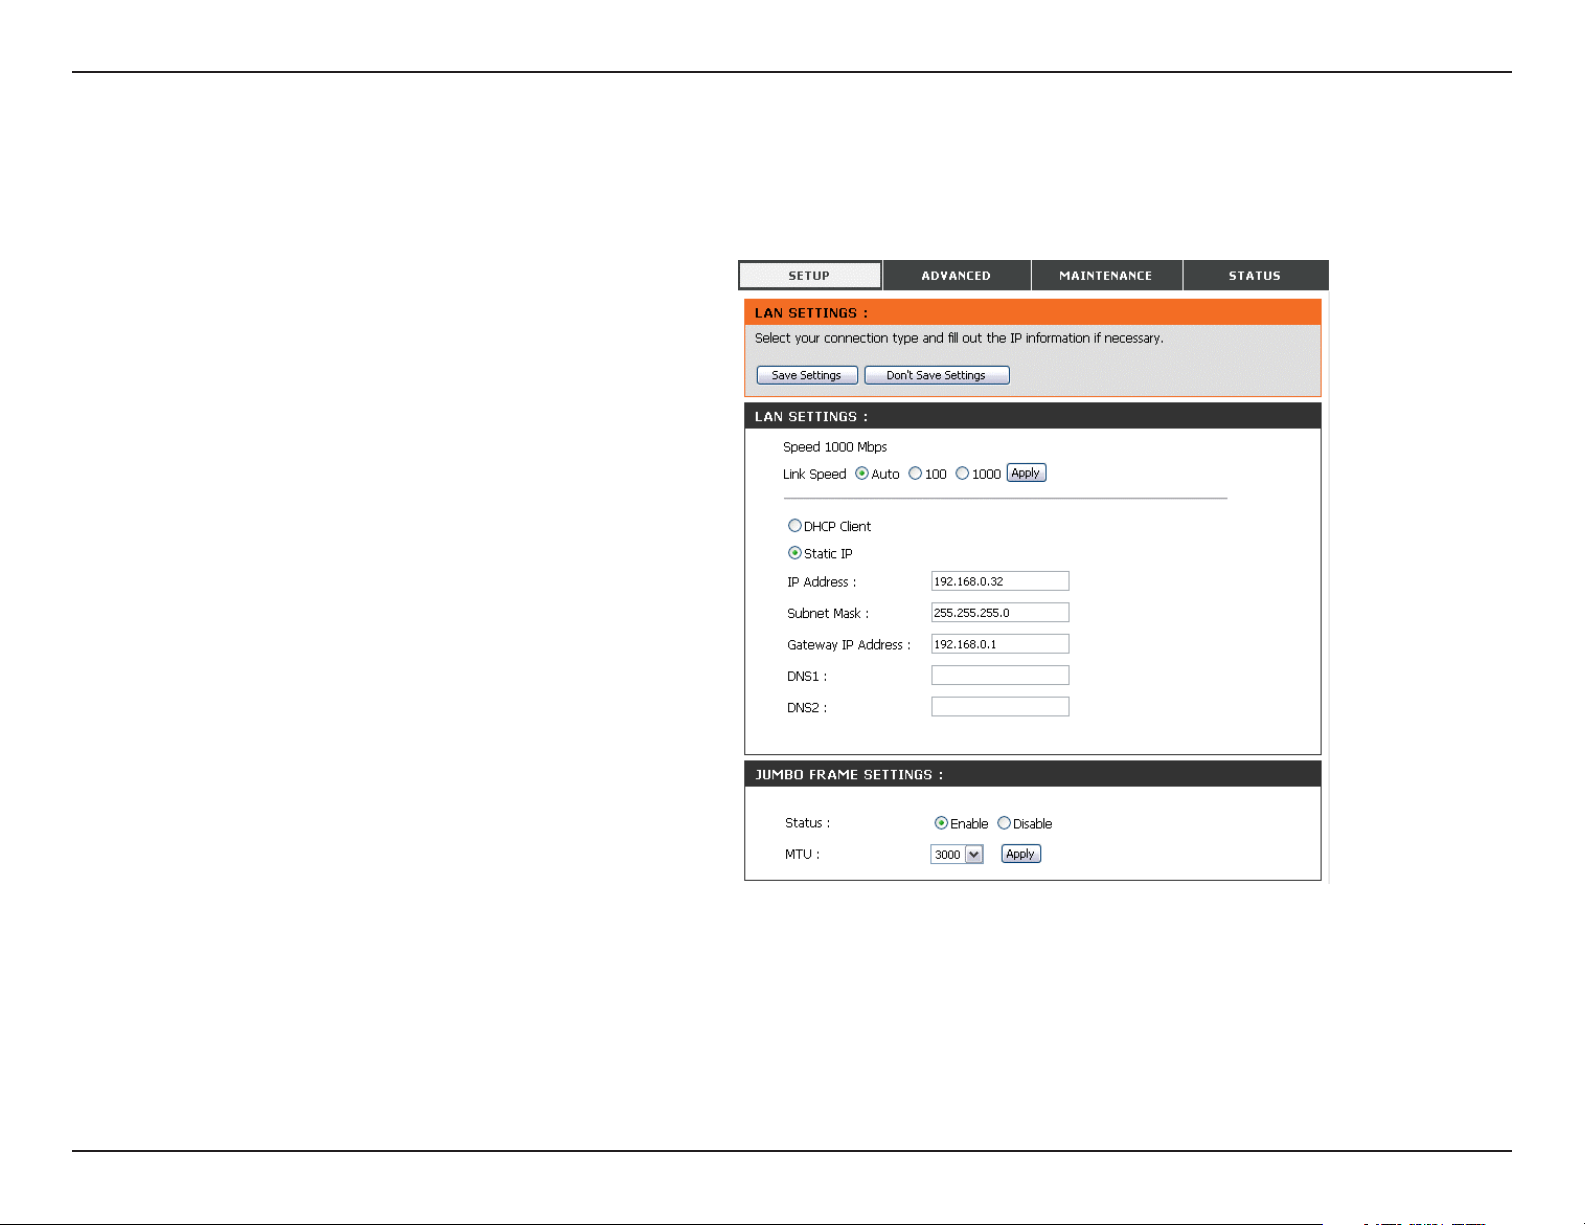
In this section, you can configure the LAN settings for your DNS-343.
Link Speed
DHCP Client
Static IP
Jumbo Frames
The LAN Link Speed is set to Auto by
default, but can be manually set to 100Mbps
or 1000Mbps.
Select DHCP Client to obtain an IP address
from your DHCP server.
Select Static IP to assign the IP information
for the DNS-343 manually.
The DNS-343 can support Jumbo Frames
that are between 3000 and 9000 bytes in
size. In order to enable Jumbo Frames on
the DNS-343, click the Enable radio button
and select an MTU size from the MTU
combo box.
Click on the Save Settings button to apply and save the new settings. If you have changed the IP address or selected
DHCP client, it will be necessary to log in again using the new IP address. If you do not know the new address (as
would likely be the case when changing from a static IP address to DHCP client), use the Easy Search Utility on the
Installation CD to obtain the IP address of your device.
23D-Link DNS-343 User Manual
Section 3 — Configuration
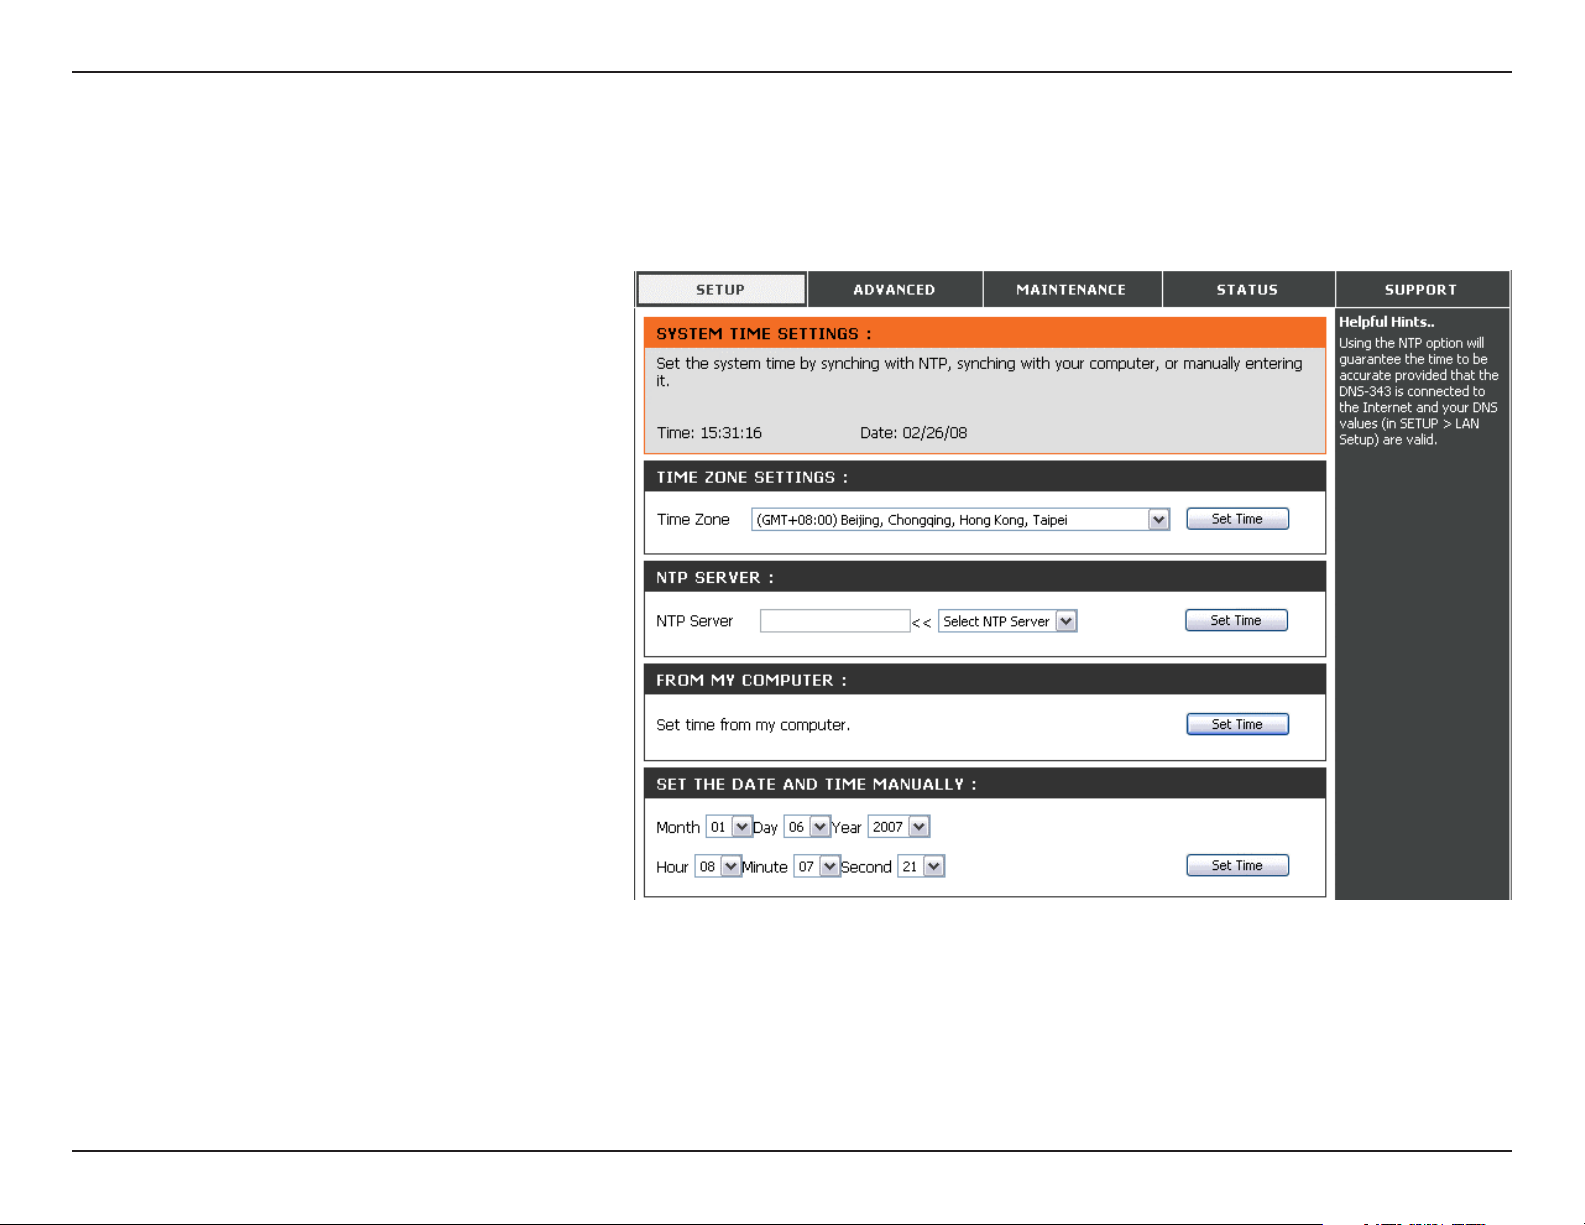
Time and Date
The system time and date can be set manually or configured from an NTP server.
Time Zone
NTP Server
From My
Computer
Set Date and
Time Manually
Select your time zone from the
drop-down menu.
Network Time Protocol (NTP)
synchronizes the DNS-343 with an
Internet time server.
D-Link provides two time servers
for your convenience. Choose the
one closest to your location.
This o p tio n will s y nchr o nize
the DNS-343 clock with yo u r
computer.
This option allows you to set the
time and date manually. Enter the
appropriate time and date and click
Set Time.
24D-Link DNS-343 User Manual

Section 3 — Configuration
Device Settings
This section allows you to assign a workgroup name, name, and a description to the DNS-343.
Workgroup
Name
Description
The Workgroup is used by Microsoft
Windows Network to organize available
network groups within the same network.
The unique Name appears for other network
services including shared libraries on
iTunes® and other media players.
The name can be used to access your device
from a web browser instead of using an IP
address, for example, http://dlink-xxxxxx.
This is useful when there is more then one
DNS-343 on the network.
By default the device name is d-link-xxxxxx,
where xxxxxx is the last six digits of the MAC
address.
Assigns a device de s c ription to th e
DNS-343.
®
25D-Link DNS-343 User Manual
Section 3 — Configuration
Advanced
RAID
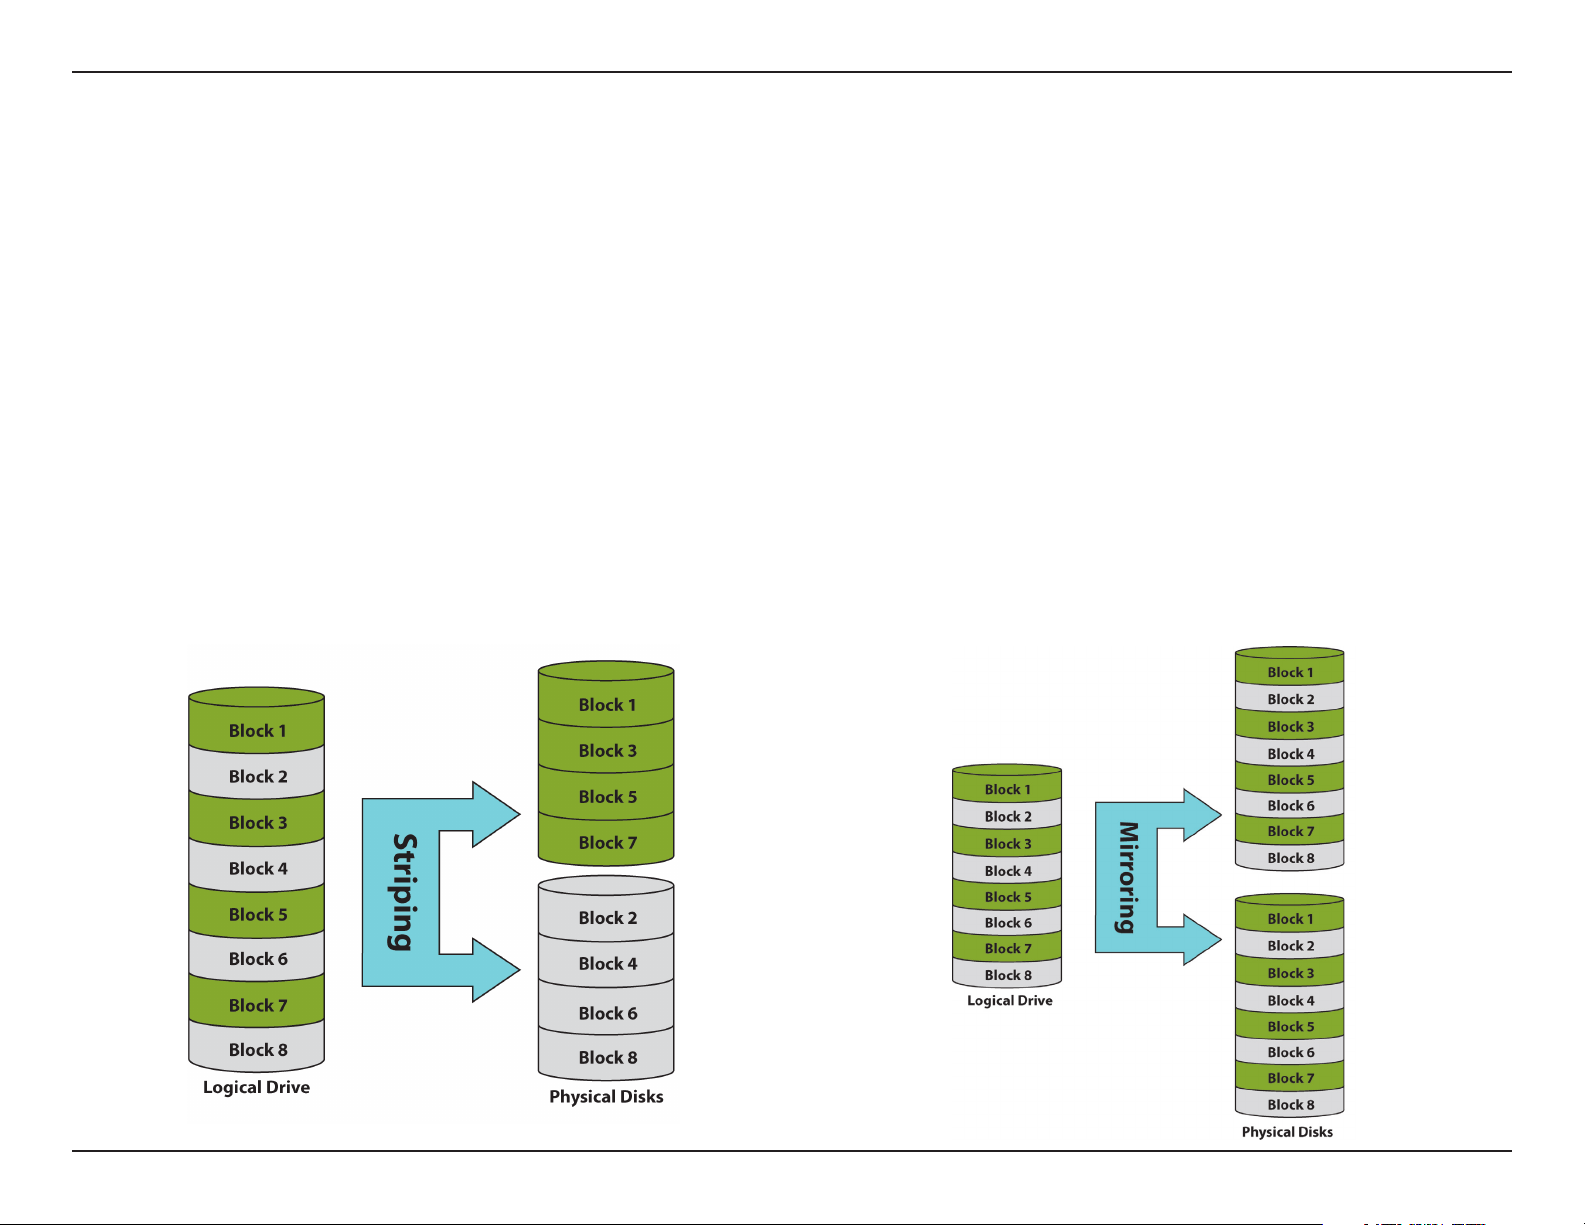
RAID, short for Redundant Array of Independent Disks, is a combination of two or more disks with the aim of providing
fault tolerance and improving performance. There are several different levels of RAID, with each one providing a different
method of sharing or distributing data among the drives.
RAID 0
RAID 0 provides data striping, which spreads
out blocks of data over all drives, but does not
provide data redundancy.
Although performance is improved, the lack
of fault tolerance means that if one drive fails,
all data in the array will be lost.
RAID 1
RAID 1 provides mirroring over multiple disks, with
the same read/write speed of a single disk. A RAID
1 array can only be as large as it’s smallest member
disk.
Because the data is stored on multiple disks,
RAID 1 provides fault tolerance and protection, in
addition to performance advantages.
26D-Link DNS-343 User Manual
Loading…