

- Безопасные способы оплаты
- Официальная гарантия
Товар снят с производства
Аналоги
Товар снят с производства!
DigiTech JamMan Stereo — педаль эффекта стерео лупер/фразовый сэмплер для электрогитары. Педаль может сохранять до 35 минут стерео звукового материала CD качества в 99 ячейках встроенной памяти. Использование опциональной SDHC карты, для которой предусмотрен специальный слот, увеличивает возможности педали до 16 часов записи и добавляет еще 99 ячеек памяти. Возможность стерео и реверсивного воспроизведения записей, а также наличие микрофонного входа делают педаль идеальной для проигрывания фонограмм и DJ использования.
JamMan Stereo оснащен USB портом, позволяющим подключить педаль к компьютеру и синхронизировать ее с бесплатной программой Jam Manager, что дает возможность сохранять лупы на компьютере, систематизировать их и создавать плэй-листы для выступлений. Педаль имеет 4 ножных кнопки: Loop Down, Loop Up, Rec/Play/Overdub и Tempo/Stop, обеспечивающие удобное и быстрое управление. Также предусмотрены отдельные регуляторы уровней для петель, ритма, микрофона и инструмента. JamMan Stereo позволяет изменять темп воспроизведения без изменения тональности. Вход Aux дает возможность импортировать музыку с CD или MP3 плеера.
Основные особенности JamMan Stereo:
- может сохранять до 35 минут стерео петель CD качества в 99 ячейках памяти;
- более 16 часов + 99 ячеек памяти с SDHC картой;
- реверсивное воспроизведение;
- дисплей;
- 4 ножные кнопки для удобства управления;
- микрофонный вход XLR;
- вход Aux;
- USB порт, синхронизация с Jam Manager;
- 3 Stop режима;
- автозапись;
- изменение скорости без изменения тональности;
- метроном;
- прочный корпус.
Программа Jam Manager:
- Скачать JamManager XT v2.3.5 (Windows)
- Скачать JamManager XT v2.3.5 (Mac OS X)
- DigiTech
- Гитары DigiTech
- Педали эффектов DigiTech
Файлы для скачивания
- Инструкция для DigiTech JamMan Stereo (English) (PDF 16 Мб 332 Кб)
Технические характеристики JamMan Stereo:
- тип: педаль эффекта стерео лупер;
- A/D/A конвертация: 24-бит;
- частота дискретизации: 44,1 кГц;
- формат файлов лупов: 44,1 кГц, 16-бит несжатый WAV;
- USB подключение: 2.0 High Speed (совместимое с USB 1.1);
- тип коннектора: 4-контактный Type B;
- максимальная длительность петли: 10 мин;
- емкость встроенной памяти: более 35 минут (всего 99 петель);
- опциональная внешняя память: SD/SDHC до 32 ГБ;
- емкость внешней памяти: до 16 часов (10,6 мегабайт/мин) с 16 ГБ картой, до 99 петель;
- микрофонный вход: XLR мама;
- импеданс микрофонного входа: 1 кОм, балансный;
- максимальный гейн микрофонного входа: 41 дБ (источник 150 Ом);
- EIN микрофонного входа: -125 дБ (максимальный гейн, источник 150 Ом);
- входные разъемы Left(mono)/Right: ¼” небалансные;
- входной импеданс Left(mono)/Right: 500 кОм моно, 1 МОм стерео;
- юнити гейн вход Left(mono)/Right/выход: ручка Inst Level на 12 часов;
- максимальный гейн входов Left(mono)/Right: 14,5 дБ;
- вход Aux: 1/8” стерео;
- импеданс входа Aux: 20 кОм;
- вход для футсвича: ¼” стерео, совместимый с опциональным DigiTech FS3X 3-кнопочным футсвичем;
- выходные разъемы Left(mono)/Right/Rythm: ¼” небалансные, балансные;
- импеданс выходов: 100 Ом балансный, 200 Ом небалансный;
- юнити гейн воспроизведения: ручка Loop Level на 12 часов;
- выход для наушников: 1/8” стерео;
- мощность выхода для наушников: 87.5 мВт на канал @ 50 Ом;
- динамический диапазон (линейные входы/выходы): 105 дБ А-взвешенный, юнити гейн;
- частотный отклик (линейные входы/выходы):: +0/-3 дБ 20 Гц – 20 кГц;
- потребляемая мощность: <9 Вт;
- потребляемый ток: <1 А;
- питание: 9.0 В DC 1.3 А;
- размеры (Д x Ш x В): 173,6 мм x 170,1 мм x 73,4 мм;
- вес: 1,01 кг;
В комплекте:
- педаль JamMan Stereo;
- блок питания.
ВАЖНАЯ ИНФОРМАЦИЯ О БЕЗОПАСНОСТИ
МЕРЫ
ПРЕДУПРЕЖДЕНИЕ
ПРЕДОСТОРОЖНОСТИ
РИСК ПОРАЖЕНИЯ ЭЛЕКТРИЧЕСКИМ ТОКОМ
НЕ ОТКРЫВАТЬ
ПРОЧТИТЕ СЛЕДУЮЩЕЕ:
ПРЕДУПРЕЖДЕНИЕ: ДЛЯ УМЕНЬШЕНИЯ РИСКА УДАРА
ЭЛЕКТРИЧЕСКИМ ТОКОМ НЕ ОСТАВЛЯЙТЕ УСТРОЙСТВО ПОД
ВОЗДЕЙСТВИЕМ ДОЖДЯ ИЛИ ВЛАГИ.  РУКОВОДСТВУЙТЕСЬ УКАЗАННЫМИ ИНСТРУКЦИЯМИ.
Представленные символы являются международными символами,
предупреждающими о существующей угрозе при использовании   УЧТИТЕ ВСЕ ПРЕДУПРЕЖДЕНИЯ.
электроустройств. Символ молнии со стрелкой в равностороннем
треугольнике призван предупредить пользователя о наличии   СЛЕДУЙТЕ ВСЕМ ИНСТРУКЦИЯМ.
опасного напряжения внутри устройства. Восклицательный знак в
равностороннем треугольнике означает необходимость вниматель-  УСТРОЙСТВО НЕ ДОЛЖНО НАХОДИТЬСЯ В МЕСТАХ ДОСТУ-
ного прочтения руководства пользователя.   ПА КАПЕЛЬ ИЛИ БРЫЗГ, А ТАКЖЕ НЕЛЬЗЯ УСТАНАВЛИВАТЬ
Данный символ предупреждает об отсутствии деталей, доступных   НА УСТРОЙСТВО СОСУДЫ С ЖИДКОСТЬЮ, НАПРИМЕР,
для обслуживания пользователем. Не открывайте корпус аппарата.   ВАЗЫ.
Не пытайтесь ремонтировать устройство самостоятельно. Сервис-
ное обслуживание устройства выполняется квалифицированным   ПРОТИРАЙТЕ КОРПУС ТОЛЬКО СУХОЙ ТКАНЬЮ.
персоналом. Открытие корпуса устройства по любой причине
приведет к отказу в гарантийном обслуживании. Не допускайте
попадания воды в устройство. Если жидкость все же попала внутрь,   НЕ БЛОКИРУЙТЕ ВЕНТИЛЯЦИОННЫЕ ОТВЕРСТИЯ. УСТА-
немедленно отключите питание устройства и предоставьте его для   НОВИТЕ УСТРОЙСТВО В СООТВЕТСТВИИ С ИНСТРУКЦИЯ-
выполнения сервисного ремонта. Во время грозы также необходимо   МИ ПРОИЗВОДИТЕЛЯ.
отключить питание устройства.
НЕ РАЗМЕЩАЙТЕ УСТРОЙСТВО РЯДОМ С ТАКИМИ ИС-
МЕРЫ ПРЕДОСТОРОЖНОСТИ   ТОЧНИКАМИ ТЕПЛА, КАК РАДИАТОРЫ, ПЕЧИ ИЛИ ДРУГИЕ
(ВКЛЮЧАЯ УСИЛИТЕЛИ), КОТОРЫЕ НАГРЕВАЮТСЯ ПРИ
ПРИМЕЧАНИЯ ДЛЯ ПОЛЬЗОВАТЕЛЕЙ, УСТРОЙСТВО КОТО-
РЫХ ОСНАЩЕНО КАБЕЛЕМ ПИТАНИЯ.   РАБОТЕ.
ПРЕДУПРЕЖДЕНИЕ: ДАННОЕ УСТРОЙСТВО ДОЛЖНО БЫТЬ   ИСПОЛЬЗУЙТЕ ТОЛЬКО РЕКОМЕНДУЕМЫЕ ПРОИЗВОДИТЕ-
ПОДКЛЮЧЕНО К РОЗЕТКЕ, ОСНАЩЕННОЙ ЗАЩИТНЫМ   ЛЕМ АКСЕССУАРЫ.
КОНТАКТОМ ЗАЗЕМЛЕНИЯ.
Контакты розетки окрашены в соответствии со следующим кодом:  ОТКЛЮЧАЙТЕ УСТРОЙСТВО ОТ СЕТИ ВО ВРЕМЯ ГРОЗЫ
Зеленый и желтый - земля        ИЛИ КОГДА ОНО НЕ ИСПОЛЬЗУЕТСЯ ДОЛГОЕ ВРЕМЯ.
Синий – нейтраль (без напряжения)
Не недооценивайте важности использования поляризованной или
Коричневый – под напряжением    заземленной вилки. Поляризованная вилка имеет два плоских кон-
Так как цвета проводов устройства могут не соответствовать цветам   такта, один из которых шире другого. Вилка с заземлением имеет
разъемов вашего кабеля, выполните следующее:   третий контакт для заземления. Широкий штырь или заземляю-
щий используются для обеспечения дополнительной безопасности.
•  Провод, окрашенный зеленым и желтым, должен быть подклю-
чен к разъему, отмеченному буквой Е или символом заземления,   Если прилагаемая вилка не подходит к вашей розетке, обратитесь к
или окрашенному зеленым цветом или зеленым с желтым.  электрику для замены на соответствующую.
•  Провод, окрашенный синим цветом, должен быть подключен к
разъему, отмеченному символом N или окрашенному в черный цвет.   Берегите кабель питания. Не наступайте на кабель и следите за
•  Провод, окрашенный коричневым цветом, должен быть подключен к   его целостностью, особенно у вилки и в месте, где он выходит из
разъему, отмеченному символом L или окрашенному в красный цвет.   устройства.
Для подключения данного устройства вам может потребоваться
отдельный двухжильный провод или штепсельная розетка, в   Сервисное обслуживание устройства выполняется квалифици-
зависимости от доступного источника питания в установке. Если   рованным персоналом. Сервисное обслуживание требуется, если
потребуется заменить штепсельную розетку, обратитесь к квалифи-  устройство повреждено, например, поврежден кабель или вилка
цированному электрику, необходимые данные для которого пред-  питания, пролита жидкость или внутрь пропали посторонние
ставлены в следующей таблице. Зеленый/желтый провод должен   предметы, устройство побывало под дождем или в условиях повы-
быть непосредственно подключен к корпусу устройства.
шенной влажности, устройство уронили, и оно не функционирует
Цвет провода
Проводник               нормально.
Обычный  Альтернативный
L  Под напряжением   Коричневый   Черный
N  Без напряжения  Синий  Белый  Отключение от сети: Сетевая розетка должна быть легко до-
E  Заземление/земля  Зеленый/ желтый  ЗЕЛЕНЫЙ
ступна. Для выполнения монтажа в рэк или при использовании в
ПРЕДУПРЕЖДЕНИЕ: Пренебрежительное отношение к заземле-  установке с недоступной розеткой необходимо встроить в электро-
нию может привести к сбою в работе данного устройства или всей   установку рэка многополюсный выключатель с делением не менее
системы, в которой устройство используется. При одновременном   3 мм на каждый полюс.
прикосновении к корпусу и точке заземления устройства вы можете
получить серьезные травмы, вплоть до летального исхода.
- Главная
-
Digi Tech
-
Музыкальные инструменты
-
JamMan Stereo
На этой странице вы найдёте полный список документов на Музыкальные инструменты Digi Tech JamMan Stereo.
Выберите необходимый PDF файл.
-
Музыкальные инструменты
Digi Tech JamMan Stereo Руководство по эксплуатацииТип файла
PDFРазмер
16.32 MbКол-во страниц
68Просмотров
13924Download / Read online
- 1
Другие Digi Tech Музыкальные инструменты
-
Digi Tech DigiTech Element XP Руководство пользователя
PDF файлов
2Просмотров
53715 -
Digi Tech JamMan Solo XT Руководство по эксплуатации
PDF файлов
1Просмотров
29523 -
Digi Tech JamMan Stereo Руководство по эксплуатации
PDF файлов
1Просмотров
16662 -
Digi Tech RP70 Руководство по эксплуатации
PDF файлов
1Просмотров
16050 -
Digi Tech RP1000 Руководство пользователя
PDF файлов
2Просмотров
14039 -
Digi Tech GSP1101 Руководство пользователя
PDF файлов
2Просмотров
13931
Другие устройства Digi Tech
-
Телефоны
Digi Tech DigiTech Telephone C0408 Инструкция по эксплуатацииPDF файлов
1Просмотров
22563 -
Педали музыкальных эффектов
Digi Tech RP250 Инструкция по эксплуатацииPDF файлов
1Просмотров
8118 -
Видеорегистраторы
Digi Tech MP 600-9000 DVI Инструкция по эксплуатацииPDF файлов
1Просмотров
6514 -
Мобильные телефоны
Digi Tech DigiTech Cell Phone CO408 Инструкция по эксплуатацииPDF файлов
1Просмотров
6165 -
Электроника разное
Digi Tech V-10 Руководство по эксплуатацииPDF файлов
1Просмотров
5400 -
Портативные динамики
Digi Tech RP300A Инструкция по эксплуатацииPDF файлов
1Просмотров
4779
Ранее вы смотрели
Производители
Axiom Audio
Bench
Certified International
D3Publisher
Havis-Shields
High Resolution Technologies
Hitachi
KidKraft
Promise Technology
Schippers
Типы устройств
Медицинские сигнализации
Дрели
Удлинители
Машинки для приготовления печенья
Бритвы
Аксессуары для вращательного оборудования
Аналитические рентгены (XRD)
Электроинструменты
Уличные
Устройства
Cisco Systems Catalyst 2900 SERIES XL
GE Profile PFDS455GL
Kicker 2014 KS Coaxial Speakers
LG DLGX3876V
Metra Electronics 99-7875
Mitsubishi Electronics WS-65713
Motorola HK211
Pottery Barn Camp Twin Bed
Renault Captur
Samsung DV220AE-02810B
freeuserguide.ru
About Us
Contacts
Disclamers
Privacy Policy
Эта страница полезна для вас? Поделитесь ссылкой:
Owner’s Manual
Professional Audio Equipment
IMPORTANT SAFETY INFORMATION
WarnInG for your
ProtectIon
reaD tHe foLLoWInG:
KEEP THESE INSTRUCTIONS
The symbols shown above are internationally accepted symbols that warn of
potential hazards with electrical products. The lightning flash with arrowpoint
in an equilateral triangle means that there are dangerous voltages present
within the unit. The exclamation point in an equilateral triangle indicates
that it is necessary for the user to refer to the owner’s manual.
These symbols warn that there are no user serviceable parts inside the unit.
Do not open the unit. Do not attempt to service the unit yourself. Refer all
servicing to qualified personnel. Opening the chassis for any reason will
void the manufacturer’s warranty. Do not get the unit wet. If liquid is spilled
on the unit, shut it off immediately and take it to a dealer for service.
Disconnect the unit during storms to prevent damage.
Safety InStructIonS
NOTICE FOR CUSTOMERS IF YOUR UNIT IS EQUIPPED WITH A POWER CORD.
WARNING: THIS APPLIANCE SHALL BE CONNECTED TO A MAINS SOCKET OUTLET WITH A
PROTECTIVE EARTHING CONNECTION.
The cores in the mains lead are coloured in accordance with the following code:
GREEN and YELLOW — Earth BLUE — Neutral BROWN — Live
As colours of the cores in the mains lead of this appliance may not correspond with the
coloured markings identifying the terminals in your plug, proceed as follows:
•
The core which is coloured green and yellow must be connected to the terminal in the plug
marked with the letter E, or with the earth symbol, or coloured green, or green and yellow.
•
The core which is coloured blue must be connected to the terminal marked N or coloured
black.
•
The core which is coloured brown must be connected to the terminal marked L or coloured
red.
This equipment may require the use of a different line cord, attachment plug, or both,
depending on the available power source at installation. If the attachment plug needs to be
changed, refer servicing to qualified service personnel who should refer to the table below.
The green/yellow wire shall be connected directly to the units chassis.
CONDUCTOR
L LIVE BROWN BLACK
N NEUTRAL BLUE WHITE
E EARTH GND
WARNING: If the ground is defeated, certain fault conditions in the unit or in the system to
which it is connected can result in full line voltage between chassis and earth ground. Severe
injury or death can then result if the chassis and earth ground are touched simultaneously.
WIRE COLOR
Normal Alt
GREEN/
YEL
GREEN
HEED ALL WARNINGS
FOLLOW ALL INSTRUCTIONS
THE APPARATUS SHALL NOT BE EXPOSED TO DRIPPING OR SPLASHING
LIQUID AND NO OBJECT FILLED WITH LIQUID, SUCH AS VASES, SHALL
BE PLACED ON THE APPARATUS
CLEAN ONLY WITH A DRY CLOTH.
DO NOT BLOCK ANY OF THE VENTILATION OPENINGS. INSTALL IN
ACCORDANCE WITH THE MANUFACTURER’S INSTRUCTIONS.
DO NOT INSTALL NEAR ANY HEAT SOURCES SUCH AS RADIATORS, HEAT
REGISTERS, STOVES, OR OTHER APPARATUS (INCLUDING AMPLIFIERS)
THAT PRODUCE HEAT.
ONLY USE ATTACHMENTS/ACCESSORIES SPECIFIED BY THE
MANUFACTURER.
UNPLUG THIS APPARATUS DURING LIGHTNING STORMS OR WHEN
UNUSED FOR LONG PERIODS OF TIME.
Do not defeat the safety purpose of the polarized or grounding-type plug. A
polarized plug has two blades with one wider than the other. A grounding
type plug has two blades and a third grounding prong. The wide blade or third
prong are provided for your safety. If the provided plug does not fit your outlet,
consult an electrician for replacement of the obsolete outlet.
Protect the power cord from being walked on or pinched particularly at plugs,
convenience receptacles, and the point where they exit from the apparatus.
Refer all servicing to qualified service personnel. Servicing is required when the
apparatus has been damaged in any way, such as power-supply cord or plug is
damaged, liquid has been spilled or objects have fallen into the apparatus, the
apparatus has been exposed to rain or moisture, does not operate normally,
or has been dropped.
MAINS DISCONNECT: The plug shall remain readily operable. For rack-mount
or installation where plug is not accessible, an all-pole mains switch with a
contact separation of at least 3 mm in each pole shall be incorporated into the
electrical installation of the rack or building.

If you wa nt to dispose this product, do not mix it with general household wa ste. There is a
separate collection system for used electronic products in accordance with legislation tha t
requires proper treatment, recovery and recycling.
Private household in the 25 member states of the EU, in Switzerland and Norway may return their used
electronic products free of charge to designated collection facilities or to a retailer (if you purchase a similar
new one).
For Countries not mentioned above, please contact your local authorities for a correct method of disposal.
By doing so you will ensure that your disposed product undergoes the necessary treatment, recovery and
recycling and thus prevent potential negative effects on the environment and human health.
IMPORTANT SAFETY INFORMATION
eLectroMaGnetIc
coMPatIBILIty
This device complies with part 15 of the FCC Rules and
the Product Specifications noted on the Declaration of
Conformity. Operation is subject to the following two
conditions:
• this device may not cause harmful
interference, and
• this device must accept any interference received, including
interference that may cause undesired operation.
Operation of this unit within significant
electromagnetic fields should be avoided.
• use only shielded interconnecting cables.
u.K. MaInS PLuG WarnInG
A molded mains plug that has been cut off from the cord is
unsafe. Discard the mains plug at a suitable disposal facility.
NEVER UNDER ANY CIRCUMSTANCES SHOULD
YOU INSERT A DAMAGED OR CUT MAINS
PLUG INTO A 13 AMP POWER SOCKET.
Do not use the mains plug without the fuse cover in place.
Replacement fuse covers can be obtained from your local
retailer. Replacement fuses are 13 amps and MUST be
ASTA approved to BS1362.
DecLaratIon of
conforMIty
Manufacturer’s Name: Harman Music Group
Manufacturer’s Address: 8760 S. Sandy Parkway
Sandy, Utah 84070, USA
declares that the product:
Product name: JamMan Stereo
Product option: all (requires Class II power adapter that conforms
to the requirements of EN60065, EN60742, or
equivalent.)
conforms to the following Product Specifications:
Safety: IEC 60065 -01+Amd 1
EMC: EN 55022:2006
EN 55024:1998
FCC Part 15
Supplementary Information:
The product herewith complies with the requirements of the:
Low Voltage Directive 2006/95/EC
EMC Directive 2004/108/EC.
RoHS Directive 2002/95/EC
WEEE Directive 2002/96/EC
EC Regulation 278/2009
With regard to Directive 2005/32/EC and EC Regulation
1275/2008 of 17 December 2008, this product is
designed, produced, and classified as Professional Audio
Equipment and thus is exempt from this Directive.
Director, Engineering
Signal Processing
8760 S. Sandy Parkway
Sandy, Utah 84070, USA
Date: April 28, 2011
European Contact: Your local DigiTech Sales and Service Office or
Harman Music Group
8760 South Sandy Parkway
Sandy, Utah
84070 USA
Ph: (801) 566-8800
Fax: (801) 568-7583

Warranty
We at DigiTech® are very proud of our products and back up each one we sell with the
following warranty:
1. The warranty registration card must be mailed within ten days after purchase date to
validate this warranty, or you can register via our website (www.digitech.com).
2. DigiTech warrants this product, when used solely within the U.S., to be free from defects
in materials and workmanship under normal use and service.
3. DigiTech liability under this warranty is limited to repairing or replacing defective
materials that show evidence of defect, provided the product is returned to DigiTech
WITH RETURN AUTHORIZATION, where all parts and labor will be covered up to a
period of one year (this warranty is extended to a period of six years when the product
has been properly registered by mail or through our website). A Return Authorization
number may be obtained from DigiTech by telephone. The company shall not be liable for
any consequential damage as a result of the product’s use in any circuit or assembly.
4. Proof-of-purchase is considered to be the burden of the consumer.
5. DigiTech reserves the right to make changes in design, or make additions to, or
improvements upon this product without incurring any obligation to install the same on
products previously manufactured.
6. The consumer forfeits the benefits of this warranty if the product’s main assembly is
opened and tampered with by anyone other than a certified DigiTech technician or, if the
product is used with AC voltages outside of the range suggested by the manufacturer.
7. The foregoing is in lieu of all other warranties, expressed or implied, and DigiTech neither
assumes nor authorizes any person to assume any obligation or liability in connection
with the sale of this product. In no event shall DigiTech or its dealers be liable for special
or consequential damages or from any delay in the performance of this warranty due to
causes beyond their control.
NOTE: The information contained in this manual is subject to change at any time without
notification. Some information contained in this manual may also be inaccurate due to
undocumented changes in the product or operating system since this version of the manual
was completed. The information contained in this version of the owner’s manual supersedes all
previous versions.

Table of Contents
Overview …………………………………………………………………………….. 3
Quick Start ………………………………………………………………………….4
Guided Tour — Front Panel …………………………………………………….10
Guided Tour — Rear Panel ……………………………………………………… 16
Making Connections …………………………………………………………….19
Selecting a Loop ………………………………………………………………….. 22
Recording a Loop — Inst/Mic Input …………………………………………24
Auto Record Mode ……………………………………………………………….26
Recording a Loop Using Auto Record ……………………………………28
Recording Overdubs …………………………………………………………….30
Undo, Redo, and Clear ………………………………………………………….32
Undo an Overdub …………………………………………………………………………….. 32
Redo an Overdub ……………………………………………………………………………..32
Clear Overdubs/Unstored Phrases ………………………………………………….32
Recording a Loop — Aux Input ………………………………………………..34
Stop Modes ………………………………………………………………………….36
Using Auto-Quantizing Looping ……………………………………………37
Storing/Copying Phrases ………………………………………………………38
Store Changes to a Loop …………………………………………………………………. 38
Copy a Loop to a Different Memory Location ……………………………….. 38
Time Signature …………………………………………………………………….40
Setting a Loop Tempo for Recording …………………………………….42
Time Stretching a Loop ……………………………………………………….44
Time Stretch a Loop that is Stopped ………………………………………………. 44
Time Stretch a Loop that is Playing ………………………………………………….44
1

Loop / Single Phrases …………………………………………………………… 46
Rhythm Type ………………………………………………………………………..48
Rhythm Out ………………………………………………………………………………………49
Deleting Individual Loop Phrases …………………………………………. 50
Erase All Loops — Internal Memory ……………………………………….52
Using Optional SD/SDHC Memory Cards …………………………….54
Formatting SD Cards ……………………………………………………………………….. 55
Unformatted Cards ………………………………………………………………………….. 55
Erase All Loops — Memory Card ……………………………………………56
Factory Restore ……………………………………………………………………58
Optional FS3X Footswitch ……………………………………………………59
JamManagerTM Librarian Software ………………………………………..60
Specifications ………………………………………………………………………. 61
2

Overview
Congratulations and special thanks from DigiTech
DigiTech JamMan® Stereo Looper/Phrase Sampler.
The JamMan Stereo Looper can store 35 minutes of CD-quality loops in 99
internal memories and has an SD memory card expansion slot so you can
store over 16 hours of material in an additional 99 slots. The JamMan Stereo
features true stereo looping, reverse playback, and a mic input making it
perfect for backing tracks or DJ applications.
The JamMan Stereo features USB connectivity and will sync to DigiTech’s
free JamManager™ software that organizes and saves your JamMan Stereo’s
loops to a PC or Mac. The JamManager also lets you quickly create custom
JamLists to take to your gig.
Features:
• Store over 35 minutes of stereo, CD-Quality loops in 99 internal
memories
• Optional SDHC card can store over 16 hours* of CD-quality audio in 99
additional memories (198 total memories)
• Reverse Playback
• Downloadable JamManager™ librarian for PC and Mac archives and
organizes your loops over USB.
• Auto Quantized looping
• Aux Input lets you import music from CD and MP3 players
• 3 Stop modes (Stop, Finish, and Fade)
• Time Stretching lets you slow down or speed up loops without changing pitch
• Balanced XLR mic input with dedicated gain control is perfect for
dynamic and self- powered microphones
• Metronome with multiple rhythm sounds and time signatures
• Automatic recording
• Optional footswitch adds additional Hands-Free™ functionality
* with optional 16GB or higher SDHC memory card
®
for choosing the
3
Quick Start
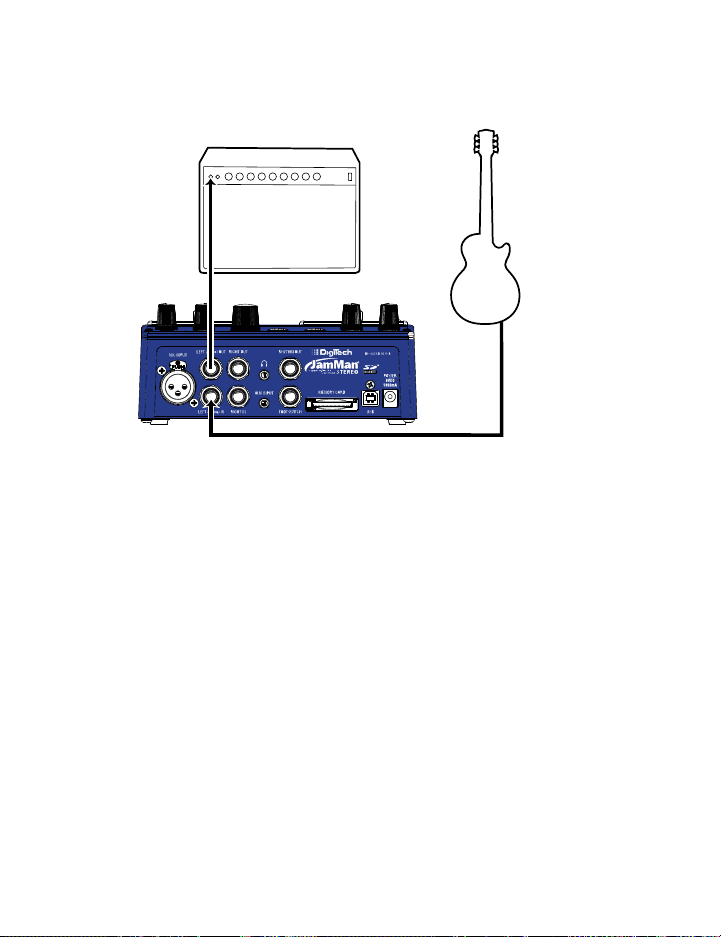
1. Get Connected
Before powering up your JamMan® Stereo:
a. Make Connections
1. Connect a guitar or bass to the LEFT (Mono) IN jack on the JamMan
Stereo’s rear panel.
2. Connect the JamMan Stereo’s LEFT (Mono) OUT to the input of an
amplifier or a channel of a mixer.
b. Connect the Power Supply
1. Start with your amplifier and the JamMan turned off or the mixer
faders at their minimum position.
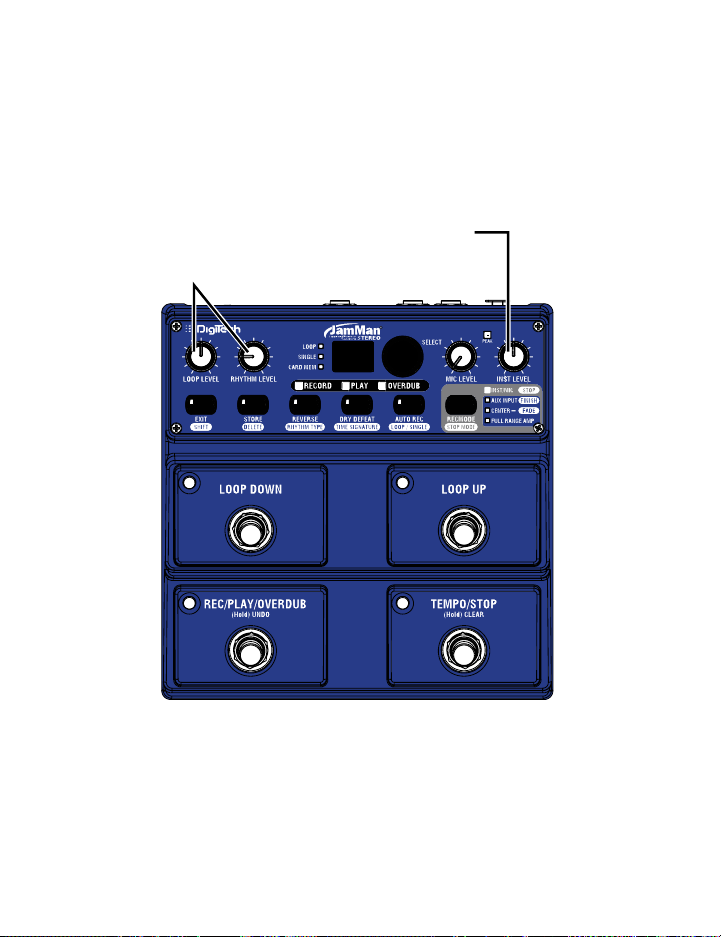
2. Turn the LOOP LEVEL, RHYTHM LEVEL, MIC LEVEL, and INST LEVEL knobs all
the way down on the JamMan Stereo.
3. Connect the power supply to the POWER jack on the JamMan Stereo.
4. Connect the other end of the power supply to an AC outlet.
5. Turn your amplifier on and turn up its volume to a normal playing
level or bring up the mixer’s faders to a nominal level.
4
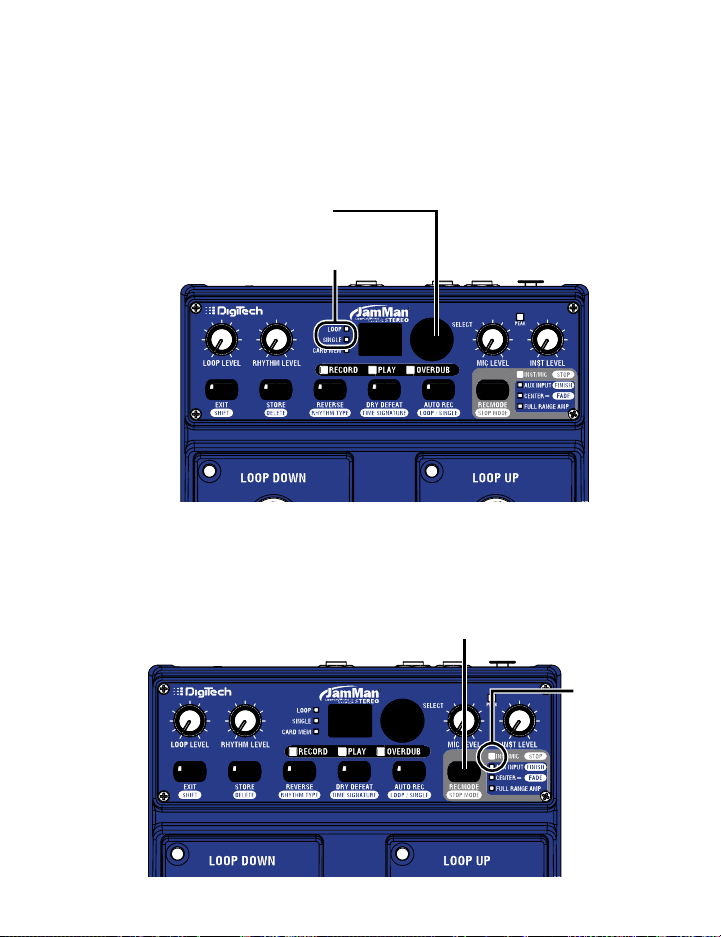
Press the RECORD MODE button…
Quick Start
2. Select an Empty Loop
Rotate the SELECT knob or use the LOOP UP/LOOP DOWN footswitches until the
LOOP LED and the SINGLE LED are off.
…until these LEDs
are off.
99
3. Select the Record Mode
Press the REC MODE button repeatedly until the INST/MIC LED lights.
99
…until the
INST/MIC
LED lights
5
Quick Start
4. Adjust the Recording Level
Set the INST LEVEL and LOOP LEVEL knobs to 12 o’clock. Set the RHYTHM LEVEL
knob to the 9 o’clock position.
Set the LOOP LEVEL to 12 o’clock
and the RHYTHM LEVEL knob
to 9 o’clock
Set the INST LEVEL
knob to 12 o’clock
99
6
Quick Start
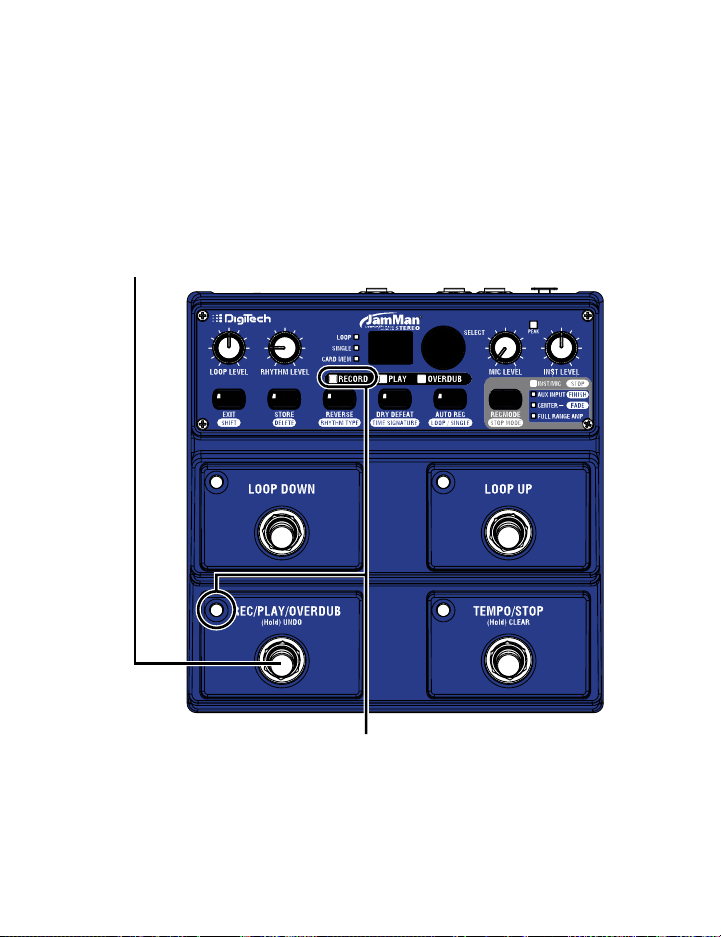
5. Start Recording
Press the REC/PLAY/OVERDUB (lower left) footswitch to start recording. While
recording, the REC/PLAY/OVERDUB footswitch and RECORD LEDs will light red.
Press the REC/PLAY/OVERDUB
(lower left) footswitch.
99
While recording, the
RECORD and REC/PLAY/OVERDUB
LEDs light solid red.
7
Quick Start
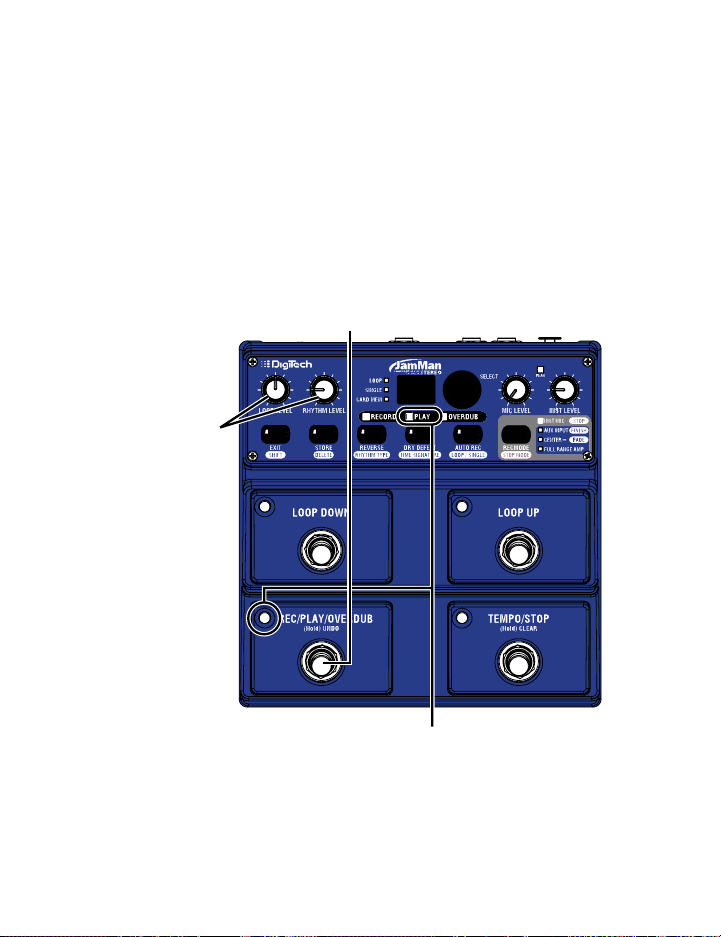
6. Start Loop Playback
Press the REC/PLAY/OVERDUB (lower left) footswitch while recording to set
the loop point and start playing back from the beginning. The REC/PLAY/
OVERDUB
RHYTHM LEVEL knobs as needed.
and RHYTHM LEVEL knobs
footswitch and PLAY LEDs light green. Adjust the LOOP LEVEL and
Press the REC/PLAY/OVERDUB
(lower left) footswitch while recording
to stop recording and start playback.
Adjust the LOOP LEVEL
as necessary.
During playback, the
PLAY and REC/PLAY/OVERDUB
LEDs light solid green.
8
Quick Start
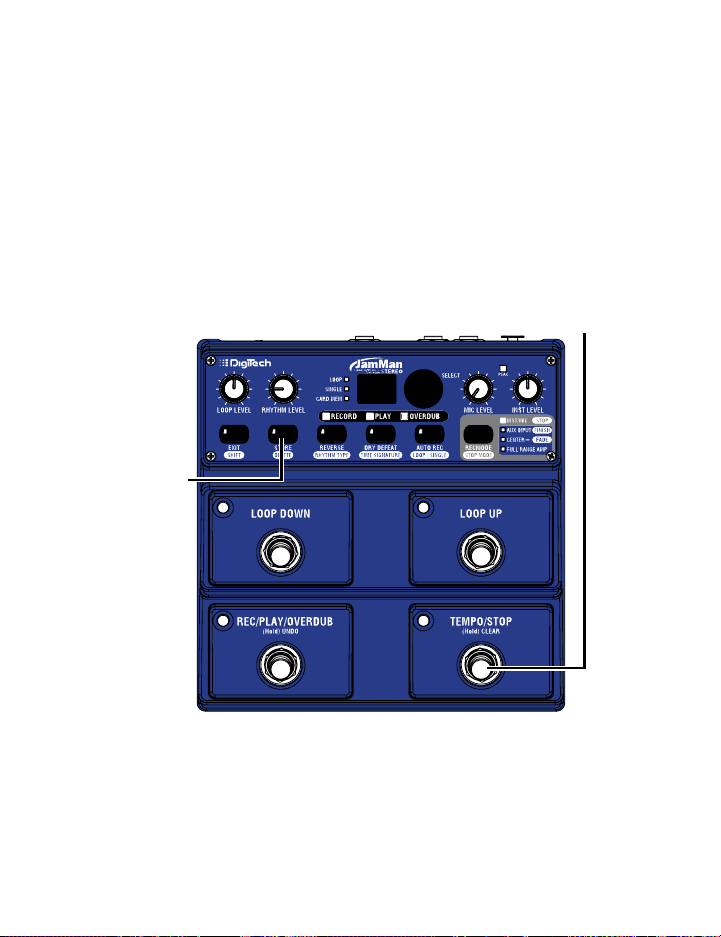
7. Stop Playback/Store the Loop
Press the TEMPO/STOP (lower right) footswitch to stop playback, then press
the STORE button twice to store the loop.
First press the TEMPO/STOP
(lower right) footswitch to
stop playback.
99
Then press the
STORE button twice
to store the loop.
9
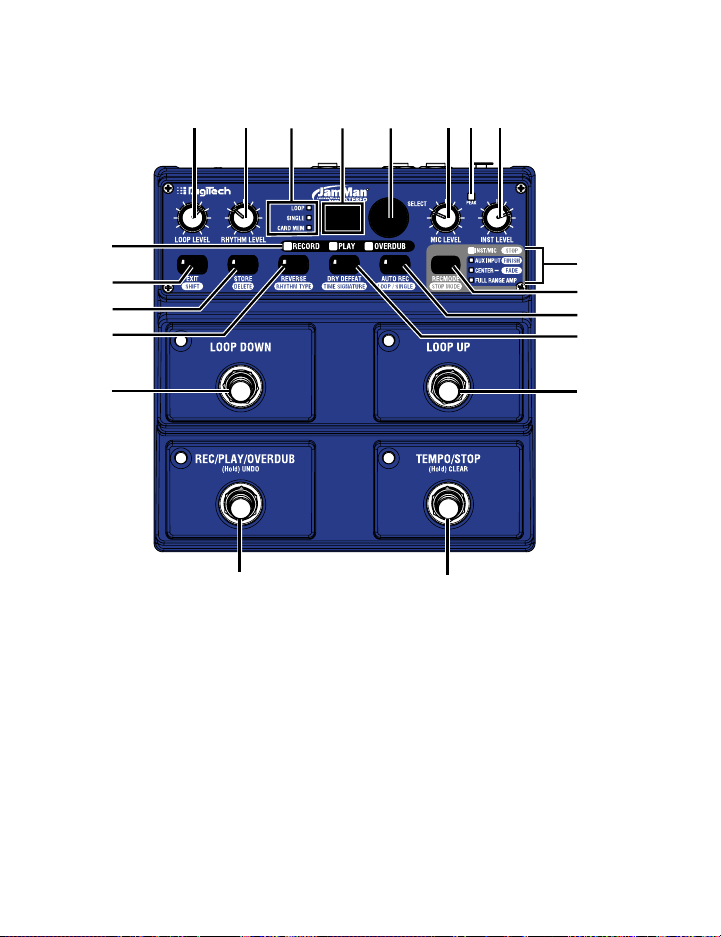
Guided Tour — Front Panel
1234567
20
19
18
17
16
15
1. Loop Level
Controls the playback level of the loop phrase.
2. Rhythm Level
Controls the level of the Rhythm guide track.
8
9
10
11
12
13
14
3. Loop/Single/Card Mem LEDs
Loop LED
This green LED indicates the current phrase memory is set to
playback continuously as a loop when play is initiated. Loop is the
default setting when a phrase is recorded meaning any audio that is
10

Guided Tour — Front Panel
recorded will be recorded as a loop phrase. Loop phrases can be
converted to Single phrases and vice versa. The Loop LED will also
flash during processes where the internal memory or optional SD
memory is being accessed (loading a loop, Time Stretching, or store/
copy procedure).
Single
This yellow LED indicates the current phrase memory is set to
playback only once when play is initiated. Single phrases can be
converted to Loop phrases and vice versa. The Single LED will also
flash during processes where the internal memory or optional SD
memory is being accessed (loading a loop, Time Stretching, or store/
copy procedure).
Card Mem
This red LED is lit when you are selecting loop memories on the
optional SD/SDHC memory card. When this LED is off, loops are
being selected from the JamMan® Stereo’s internal memory.
4. Display
The Display shows the currently selected loop memory location. It
also shows information during store/copy procedures, during Time
Signature and Rhythm Type setup, file deletion, and card formatting
procedures.
5. Select Knob
The Loop Select knob is used for selecting different loop memories
and making selections when in other modes (such as Time Signature
and Rhythm Type).
11

Guided Tour — Front Panel
6. Mic Level Knob
This knob controls the input signal level from the XLR Mic Input jack.
7. Peak LED
This LED lights when Instrument, Mic, or Aux Input signals are
detected by the JamMan® Stereo. This LED will light green when a
signal is present, yellow when approaching the A/D clipping point, and
red when clipping is present.
A good practice is to set the Inst Level and Loop Level controls
at the 12 o’clock position when using an electric guitar or bass.
This provides a unity gain signal through the JamMan Stereo when
connected to your amplifier.
For all other uses, set the Input Level controls so the green and
yellow LEDs light regularly but rarely lights the red LED. If the Aux
Input is being used, adjust the output level of the audio source to set
the input level appropriately.
8. Instrument Level Knob
This knob controls the input signal level from the Left (Mono) and
Right Input jacks.
9. Record Mode/Stop Mode LEDs
Inst/Mic (Stop) LED
This LED indicates the Instrument/Mic inputs are selected for
recording. When the Shift button is enabled, this LED will light when
the “Stop” stop mode is selected for the Loop (see page 36).
12

Guided Tour — Front Panel
Aux Input (Finish) LED
This LED indicates the Aux Input is selected for recording (see page
34). When the Shift button is enabled, this LED will light when the
“Finish” stop mode is selected for the Loop.
Center – (Fade) LED
This LED lights when the Aux Input is selected for recording with
the Center – (center minus) option applied (see page 34). When
the Shift button is enabled, this LED will light when the “Fade” stop
mode is selected for the Loop.
Full Range Amp LED
This LED lights when the Aux Input is selected for recording. The
program material will be recorded with an equalization curve so that
when it is played through a guitar amp it will more closely retain its
original frequency response (see page 34).
10. Record Mode (Stop Mode) Button
Press this button to select the inputs that are to be recorded: Inst/
Mic or Aux Input with options of “Center Minus” and/or Full Range
Amp (indicated by the LEDs next to the button).
Press this button while the Shift button is lit to select one of three
Stop Modes: Stop, Finish, or Fade, indicated by the LEDs next to the
button (see page 36).
11. Auto Record (Loop/Single) Button
Press this button to enable Auto Record for all empty loop
memories. When Auto Record is enabled, you can arm the JamMan®
Stereo to record but recording only starts when you begin playing
(see page 26).
13

Guided Tour — Front Panel
Press this button while the Shift button is lit to change the playback
status of a recorded phrase. When the Loop LED is lit the phrase
will play back in an endless loop. When the Single LED is lit, the
phrase will play once and stop.
12. Dry Defeat (Time Signature) Button
Press and hold this button to defeat dry signal through the JamMan®
Stereo. Dry Defeat should be used when connecting to parallel effects
loops of amps that have them or when the JamMan is used in an Aux
Send of a mixer.
Press this button while the Shift button is lit to change the Time
Signature (see page 40). Note that Time Signature can only be
changed for a memory location that has no phrase recorded in it.
13. Loop Up Footswitch
This footswitch selects the next higher loop memory. Press and hold
this footswitch to scroll quickly through internal and optional SD
card memories.
14. Tempo/Stop (Hold) Clear Footswitch
This footswitch Stops recording, playback and overdubbing of the
phrase. It is also used to set the tempo before recording a loop
or for changing the tempo of a stored loop. Press and hold this
footswitch for two seconds to clear any audio in a loop that has not
been stored. Pressing and holding this footswitch can also restore
the stored tempo if it has been changed.
15. Rec/Play/Overdub (Hold) Undo Footswitch
This footswitch is used for recording, playing, and overdubbing loops.
Pressing and holding this footswitch for two seconds will undo or
redo the last overdub.
14

Guided Tour — Front Panel
16. Loop Down Footswitch
This footswitch selects the next lower loop memory. Press and hold
this footswitch to scroll quickly through internal and optional SD
card memories.
17. Reverse (Rhythm Type) Button
Press this button to make the recorded loop phrase play back in
reverse.
Press this button while the Shift button is lit to change the Rhythm
Type. Turn the Loop Select knob to change the active rhythm guide
track. You can hear the different rhythm types as they are selected
only if Rhythm Level is turned up and a loop is playing or when a
tempo is being set in an empty phrase memory (see page 48).
18. Store (Delete) Button
Press to store/copy changes made to a memory location. This
button will light when a change has been made indicating the change
must be stored for later recall. Changes that are not stored will
be lost when a different loop is selected or the JamMan® Stereo is
turned off. Press this button while the Shift button is lit to delete the
contents of the current memory location (see page 50).
19. Exit (Shift) Button
Press this button to exit procedures like Store and Delete or to
to enable and disable the secondary Shift button functions. Shift is
active when this button is lit.
20. Record/Play/Overdub Status LEDs
Indicates which function is active during performance.
15
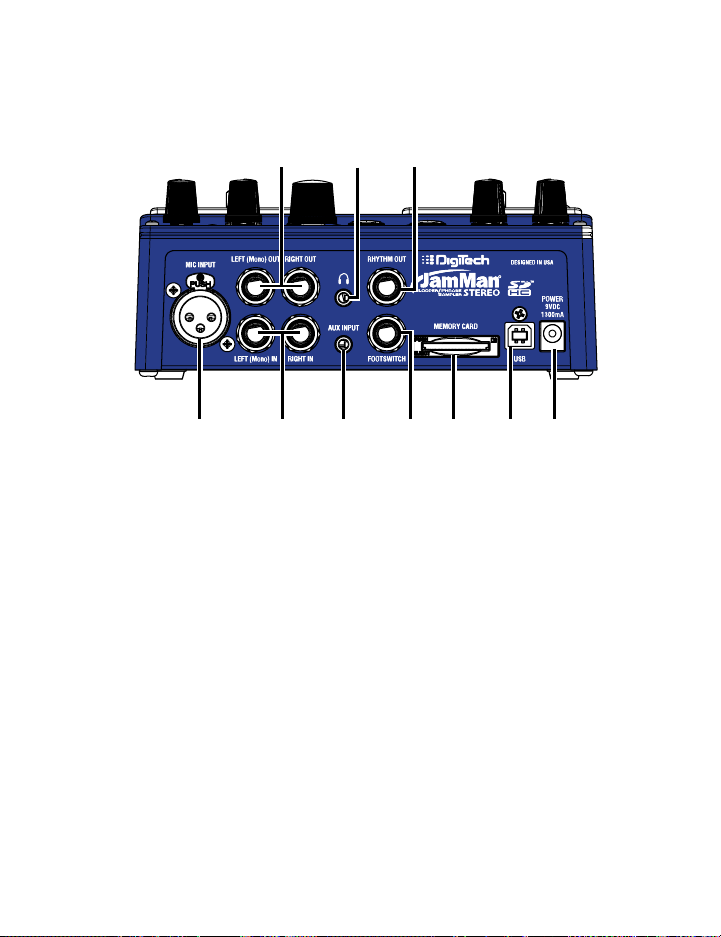
Guided Tour — Rear Panel
642
13578910
1. Mic Input
Connect a microphone here. The mic input accepts low impedance
dynamic or self-powered condenser microphones. The mic input is
recorded to both left and right channels of a loop recorded in the
JamMan® Stereo.
2. Left (Mono) and Right Outputs
Connect the Left (Mono) output to the input of a guitar amplifier,
mixer channel, another pedal’s input, or amp effects return.
Connect the Right output to the input of a second guitar amplifier
when a second amp is being used or to a second mixer channel.
3. Left (Mono) and Right Inputs
Connect your instrument, another pedal’s output, or an amp effects
send to the Left (Mono) input jack. Signals are heard at both outputs
when only the Left (Mono) jack is used.
16

Guided Tour — Rear Panel
Connect a second instrument or second output from a previous
pedal for stereo operation. Left and Right inputs are processed
separately through the looper and then fed to the Left and Right
outputs to keep true stereo separation between channels.
4. Headphone Output
This is a stereo headphone output that lets the JamMan® Stereo be
used without having to connect to an amp or mixer. This output uses
the same mix as presented at the 1/4” outputs, meaning if a single
cable is plugged into the Left (Mono) Output, the headphone output
will also be in mono.
5. Aux Input
Plug your portable MP3/CD player in here. When the Aux Input
Minus Center option is selected, any stereo source is summed to
mono when recorded (see page 34).
6. Rhythm Output Jack
Use this jack to isolate the Rhythm Output from the looped audio.
Plugging into this output will defeat the Rhythm guide track in the
left and right outputs (see page 49).
7. Footswitch Jack
Plug the optional FS3X Footswitch in here. FS3X footswitches select
Undo, Reverse, and Tempo (see page 59).
8. SD/SDHC Card Slot
The JamMan Stereo is compatible with optional SD/SDHC memory
cards up to 32GB in size for expanding the total amount of loop
storage time available. Adding an SD card also increases the number
of available loops from 99 to 198. New cards should be formatted
17
Loading…
Скачать файл PDF «Digi Tech JamMan Stereo Руководство по эксплуатации» (16.32 Mb)
Популярность:
13923 просмотры
Подсчет страниц:
68 страницы
Тип файла:
Размер файла:
16.32 Mb
Google Ads: