
Первый запуск
Посмотрите видеоинструкцию как собрать, зарядить и использовать новый беспроводной пылесос Dyson V15 Detect™.
Обратите внимание, что расцветка вашего пылесоса может отличаться от той, что показана в видео, но процесс его использования будет таким же.
Как установить док-станцию для беспроводного пылесоса.
Док-станция позволяет удобно хранить и заряжать устройство между уборками. На ней также можно хранить две дополнительные насадки.
Полностью зарядите аккумулятор перед первым использованием:
Это важный шаг, который поможет системе управления батареей правильно рассчитать оставшееся время работы.
Советы по использованию вашего аккумулятора
Заряжайте между уборками — полная зарядка аккумулятора может занять до 4,5 часов. Когда отображается зеленая галочка, зарядка завершена.
Чередуйте — если у вас есть дополнительный аккумулятор, рекомендуется полностью зарядить его и регулярно чередовать использование аккумулятора.
Хранение аккумуляторов — если вы не используете аккумулятор, рекомендуется хранить их с зарядом около 30%.
Позвольте устройству остыть — не устанавливайте аккумулятор сразу на зарядку после продолжительной непрерывной уборки (в случае нагрева).
Устраивайте перерыв — разряжайте батарею полностью хотя бы раз в месяц, чтобы продлить срок ее службы.
Температура важна — рекомендуем хранить ваш пылесос где температура варьируется между 18 и 28°C, избегая солнечного света и отопительных приборов.
Оптимальный режим — постоянное использование режима высокой мощности ускоряет износ батареи, рекомендуем производить повседневную уборку в режиме «Авто» или «Эко».
Советы по эксплуатации вашего устройства
Чтобы работать наилучшим образом, ваш беспроводной пылесос Dyson V15 Detect™ нуждается в простом регулярном обслуживании. В него входит очистка контейнера для пыли при достижении отметки Max, удаление мусора со щетки и ежемесячная промывка фильтра.
Как опустошить контейнер?
Следите за уровнем грязи в контейнере и опустошайте его, когда он достигает отметки MAX, не допуская переполнения.
Как помыть фильтр беспроводного пылесоса Dyson V15™?
При нормальном использовании блок фильтра следует промывать не реже одного раза в месяц. Как это сделать, смотрите на данном видео.
Рекомендуем регулярно ухаживать за насадками пылесоса.
Чистые насадки не будут забирать дополнительной энергии вашего аккумулятора, тем самым Вы сможете использовать пылесос долго и без потери мощности.
Как почистить универсальную насадку?
Насадку Digital Motorbar™ для пола и ковра можно протереть влажной тканью без ворса.
Устранение проблем
Устранение засоров
Если в воздушных путях вашей машины возникнет засор, на ЖК-экране появится предупреждение. На экране будет анимация, которая покажет, какие пути воздушного потока следует проверить.
Что делать, если на экране отображается сообщение «фильтр установлен не корректно»
Введение
Вертикальные пылесосы стали настоящим открытием для многих пользователей, стремящихся к быстрому и эффективному решению задач по уборке. Одним из наиболее продвинутых и функциональных вариантов на рынке является Dyson V15 Detect Absolute (серебристый). Этот аппарат сочетает в себе современные технологии, высокую мощность всасывания и удобную конструкцию, что делает его идеальным выбором для уборки самых разных помещений. В данной статье мы рассмотрим все аспекты использования вертикального пылесоса Dyson V15 Detect Absolute (серебристый), включая подготовку к работе, настройку, советы по эксплуатации, уход и обслуживание. Также мы разберем самые частые ошибки начинающих пользователей и способ их избежать, а в конце вы найдете реальные отзывы от владельцев пылесоса.
Независимо от того, являетесь ли вы опытным пользователем техники Dyson или только рассматриваете вариант покупки вертикального пылесоса, эта статья позволит вам разобраться во всех важных деталях и максимально эффективно использовать функционал данной модели. Именно благодаря лазерной технологии обнаружения пыли, удобному контейнеру для пыли и ряду интеллектуальных функций, Dyson V15 Detect Absolute становится не просто очередным гаджетом, а полноценным помощником в доме.
Зачем и когда стоит использовать вертикальные пылесосы
Вертикальные пылесосы призваны обеспечить мобильность, простоту и скорость уборки. Такие модели особенно актуальны в нескольких сценариях:
- Экономия времени. Если ваша жизнь полна дел и забот, то компактный и легкий вертикальный пылесос позволит быстро решить вопрос с удалением пыли и мусора.
- Многозадачность. Вертикальные пылесосы могут использоваться практически на любой поверхности: ковролин, ламинат, плитка, мебель и даже автомобильный салон.
- Отсутствие проводов. В большинстве случаев вертикальные пылесосы работают от аккумулятора, что устраняет необходимость находиться рядом с розеткой. Модель Dyson V15 Detect Absolute не исключение — она поставляется с аккумуляторной батареей и может работать до 60 минут без подзарядки.
- Чистота и гигиена. Благодаря технологии обнаружения невидимых частиц пыли с помощью лазера, у вас есть возможность не пропустить самые мелкие загрязнения.
Таким образом, если у вас ограниченное время на уборку, несколько разных поверхностей, а также вы цените компактность и функциональность, вертикальный пылесос Dyson V15 Detect Absolute (серебристый) будет отличным решением.
Краткий обзор основных характеристик
| Характеристика | Значение |
|---|---|
| Потребляемая мощность | 610 Вт (610 W) |
| Источник питания | Аккумулятор (baterie) |
| Цвет | Серебристый (argint) |
| Вес | 3,08 кг (3,08 kg) |
| Макс. уровень шума | 89 дБ (89 db) |
| Габариты (В x Ш x Г) | 126,4 см x 25 см x 25,2 см |
| Тип аккумулятора | Li-ion |
| Время работы | До 60 минут |
| Емкость аккумулятора | 3600 мАч (3600 mAh) |
| Тип пылесоса | Вертикальный пылесос (aspirator vertical) |
| Тип пылесборника | Контейнер (container), объем 0,76 л |
| Дополнительные функции | Обнаруживает невидимые частицы пыли при помощи лазерного луча |
| Возможности уборки | Сухая (uscat) |
| Регулировка мощности | На корпусе (pe corp) |
| Труба всасывания | Цельная (o singură bucată) |
| Место для хранения насадок | Есть |
| Щетка Ковер/Пол | В комплекте |
| Насадки пылесоса | Комбинированная, щелевая, мини-электрощетка |
| Мощность всасывания | 240 Вт (240 W) |
| Количество аккумуляторов | 1 |
| Время зарядки | Около 4 часов (4 ore) |
| Фильтр тонкой очистки | HEPA |
| Вертикальная парковка | Есть |
| Индикатор заполнения пылесборника | Есть |
Пошаговая инструкция по эксплуатации
1. Подготовка к работе
Прежде чем начать пользоваться Dyson V15 Detect Absolute, необходимо выполнить несколько простых шагов:
- Зарядите аккумулятор. Перед первым использованием полностью зарядите пылесос (около 4 часов). Убедитесь, что индикатор на блоке питания показывает завершение зарядки.
- Проверьте комплектность. Удостоверьтесь, что у вас есть все необходимые насадки: щелевая, комбинированная и мини-электрощетка, а также фильтр.
- Установите фильтр. Убедитесь, что HEPA-фильтр установлен плотно и корректно, чтобы обеспечить максимальную эффективность уборки.
- Проверьте контейнер. Контейнер для сбора пыли должен быть пустым и чистым, это повысит качество уборки и продлит срок службы пылесоса.
- Соберите конструкцию. Прикрепите трубку всасывания и насадку, подходящую для вашей задачи. Для очистки ковров лучше использовать щетку Ковер/Пол, для узких мест — щелевую насадку, а если вам нужно почистить мебель, то выберите комбинированную насадку.
2. Основные этапы эксплуатации
Когда все готово, можно приступать к уборке:
- Включение пылесоса. Нажмите кнопку питания на корпусе, чтобы запустить двигатель. Обратите внимание, что у Dyson V15 Detect Absolute нет проводов, поэтому вы можете свободно перемещаться по комнате.
- Выбор режима всасывания. Пылесос оснащен несколькими оборотами мотора и способностью автоматически подстраиваться под тип поверхности. Есть базовый режим и режим повышенной мощности. Рекомендуется использовать более мощный режим при сильных загрязнениях или при уборке ковровых покрытий.
- Наблюдение за лазером. Модель V15 Detect Absolute оборудована лазером, который подсвечивает мельчайшие частички пыли на поверхности, помогая вам не пропустить грязь в труднодоступных местах.
- Уборка разных зон. Для напольных покрытий используйте насадку Ковер/Пол. Для мебели и щелей переключайтесь на соотвествующие насадки. Пылесос совместим с прочими аксессуарами Dyson, что позволяет вам максимально адаптировать процесс уборки под ваши нужды.
- Проверка уровня заряда. Время работы пылесоса может достигать 60 минут, но оно зависит от выбранного режима всасывания. Следите за индикатором заряда, чтобы своевременно подзарядить аккумулятор.
3. Советы по правильному использованию
Чтобы получить максимальную отдачу от Dyson V15 Detect Absolute, примите во внимание следующие рекомендации:
- Регулярно очищайте фильтр. Засоренный фильтр снижает мощность всасывания и может перегружать двигатель.
- Используйте подходящие насадки. Назначение каждой насадки прописано в инструкции. Выбирайте ту, которая лучше всего подходит для конкретного типа поверхности или задачи.
- Контролируйте уровень заполнения контейнера. Чем меньше в нем пыли, тем эффективнее уборка. Опустошайте контейнер сразу после окончания уборки.
- Не допускайте полного разряда. Для сохранения емкости аккумулятора старайтесь не дожидаться полного разряда. Заряжайте пылесос при достижении критического уровня заряда.
4. Частые ошибки и как их избежать
При использовании вертикального пылесоса Dyson V15 Detect Absolute новички могут сталкиваться с типичными ошибками. Вот как их избежать:
- Неправильная установка фильтра. Если фильтр установлен неплотно, снижается герметичность системы, что влияет на качество уборки и срок службы мотора.
- Переполнение контейнера. Пользователи могут забывать вовремя опорожнять контейнер, из-за чего снижается мощность всасывания.
- Неправильный выбор насадки. Использование неподходящей насадки может оставить мусор на полу или задерживать его в сочленениях щетоки.
- Игнорирование регулярной чистки. Фильтры, щетки и насадки требуют как минимум базового ухода и очистки после каждого или нескольких циклов уборки.
Комплектация и аксессуары
В комплект Dyson V15 Detect Absolute (серебристый) обычно входят:
- Основной блок пылесоса с мотором, аккумулятором и контейнером для пыли.
- Труба всасывания (цельная), позволяющая достигать труднодоступных мест без лишних соединений.
- Насадки: комбинированная (для мебели и твердых поверхностей), щелевая (для узких пространств) и мини-электрощетка (для шерсти домашних животных и глубокой очистки ковровых ворсов).
- Адаптер питания для зарядки аккумулятора.
- Док-станция (опционально) для хранения пылесоса в вертикальном положении и подзарядки.
Дополнительно вы можете приобрести другие насадки, совместимые с Dyson V15, чтобы адаптировать пылесос к более специфическим задачам. Например, отдельная мягкая роликовая насадка, которая особенно хорошо справляется с мелкой пылью на твердых полах, или отдельная удлиненная щелевая насадка для очистки в самых труднодоступных уголках.
Обслуживание и уход
Для сохранения эффективности и продления срока службы Dyson V15 Detect Absolute следуйте регулярному плану обслуживания:
- Очистка контейнера. Освобождайте контейнер после каждой крупной уборки. Вытряхивайте мусор, при необходимости промывайте контейнер водой и тщательно просушивайте.
- Промывка и сушка фильтра. HEPA-фильтр рекомендуется промывать под струей холодной воды раз в месяц (в зависимости от интенсивности использования), затем дать ему полностью высохнуть.
- Проверка щеток. Волосы и шерсть животных могут наматываться на щетку. Регулярно проверяйте ее, удаляйте намотанные волокна и при необходимости промывайте.
- Зарядка и хранение. Следите за тем, чтобы аккумулятор был заряжен, особенно если вы планируете хранить пылесос длительное время. Храните пылесос в сухом месте, избегайте прямых солнечных лучей.
Реальные отзывы пользователей: плюсы и минусы
Плюсы (по мнению владельцев):
- Высокая мощность всасывания. Пользователи отмечают, что даже при базовом режиме пылесос справляется с труднодоступными загрязнениями.
- Лазерная технология. Большинство владельцев в восторге от того, как лазер подсвечивает пыль, которая обычно остается незамеченной.
- Удобство использования. Отсутствие проводов, небольшой вес и эргономичная ручка делают уборку менее утомительной.
- Длительное время работы. Для большинства бытовых задач 60 минут автономности вполне достаточно.
- Простота обслуживания. Контейнер легко снимается, фильтр промывается, а насадки можно хранить прямо на корпусе или в специальных держателях.
Минусы (по мнению владельцев):
- Стоимость. Модель Dyson V15 Detect Absolute не относится к бюджетным устройствам.
- Громкость работы. При максимальном режиме мощность всасывания сопровождается довольно громким шумом, что может создавать дискомфорт.
- Емкость контейнера. Хотя он и достаточно вместителен (0,76 л), при больших объемах уборки его приходится чаще опустошать.
Практические сценарии использования
Уборка в квартире с животными
Если у вас дома есть домашние животные, особенно длинношерстные, вам будет интересен режим повышенной мощности и мини-электрощетка. Она помогает собирать шерсть с ковров и мягкой мебели, а лазер обеспечивает обнаружение самой мелкой шерсти, которая обычно не видна невооруженным глазом.
Чистка труднодоступных мест
Если вам нужно очистить узкие уголки, автомобильный салон или высокие полки, то Dyson V15 Detect Absolute с щелевой насадкой и трубой всасывания станет незаменимым инструментом. Небольшой вес и отсутствие проводов позволяют свободно перемещаться, не боясь запутаться в шнуре.
Дом с разными напольными покрытиями
Переход между паркетом, плиткой и ковром часто вызывает вопросы, но Dyson V15 Detect Absolute легко справляется с такими задачами. Универсальная насадка регулирует высоту щеток, а мощность пылесоса автоматически подстраивается под материал пола, обеспечивая оптимальную глубину очистки.
Заключение
Вертикальный пылесос Dyson V15 Detect Absolute (серебристый) — это современное решение для тех, кто ценит высокоэффективную уборку, удобство и инновационность. Благодаря лазерной технологии, мощному двигателю и разнообразию насадок, этот пылесос отлично подходит как для ежедневной быстрой уборки, так и для генеральной очистки всей квартиры. Регулярное обслуживание, правильный выбор насадок и грамотное использование функций помогут вам наслаждаться чистотой и порядком без лишних усилий.
Выберите подходящую модель в нашем каталоге: Перейти по ссылке
Кроме того, следите за нашими обновлениями в соцсетях и блоге, чтобы узнавать больше о новых тенденциях и обзорах бытовой техники:
- Telegram
- OK
- X (Twitter)
- VK
- Блог Moll-Market
Удачных покупок и легкой уборки!

Dyson V15 detect
User manual
00.00.0 0 VERS ION NO.01
SV12 JN.00000 PN.000000-00-00
Top view of the Dyson V15 detect
machine, showing cleaner head,
wand, bin and main body.
Contents
In the box
Getting started
The LCD screen
Charging your machine
Changing your click-in battery
Caring for your floors
Emptying your bin
Cleaning your bin
Clearing blockages
Washing your filter
Washing your Laser Slim Fluffy™
brush bar
Clearing obstructions from your
High Torque cleaner head with
anti-tangle comb
Cleaning your tools
Clearing blockages from your
Hair screw tool
Looking after your machine

In the box
Vacuum cleaner with click-in
battery
Additional click-in battery
Additional click-in batteries included with V15 Detect Absolute
and V15 Detect Complete, or can be purchased separately
from www.dysoncanada.ca
Wand Charger
Some tools may not be included.
You can buy additional tools at www.dysoncanada.ca
Laser Slim Fluffy™ cleaner head
A precisely-angled laser makes
invisible dust visible on hard floors.
High torque cleaner head with anti-tangle comb
Dyson DLS™ technology monitors brush bar resistance
and adapts power across different floor types.
Polycarbonate teeth prevent tangling around the bristles.
Charges your vacuum with
or without a dock.
Wall dock
Your Dyson vacuum drops into the
wall-mounted charging dock, ready
for your next clean.
Combination tool
Two tools in one – wide
nozzle and brush,
for quick switching
between cleaning and
dusting tasks around
your home or car.
Stubborn dirt brush
Stiff nylon bristles
dislodge ground-in dir t
from coarse carpets,
high traffic areas and
car interiors.
Crevice tool
Engineered for precise
cleaning around tricky
edges and into hard-toreach narrow spaces.
Wand clip
Clips to your vacuum’s
wand to hold tools.
Hair screw tool
Anti-tangle conical
brush bar spirals hair
off and into the bin.
Motor-driven cleaning
for smaller spaces.
Light pipe crevice tool
Crevice tool with LED
lights lets you reach
into dark, narrow
spaces and see where
you’re cleaning.
Soft dusting brush
Enclosed in a skirt of soft
nylon bristles for gentle,
vacuum-assisted dusting
of delicate objects
and surfaces.

Getting started
Power modes
Your machine has three power modes for
different tasks. Change power modes quickly
using a single button.
Location of the Selection button
on the screen on the filter end
of the machine.
The screen showing the machine set to
Eco mode with a full batter y in green
to show that this will give the longest
battery life of the three modes.
Eco mode
Maximum run time for longer cleans all
around your home.
Two screens showing the machine
set to Auto mode and Med mode with
a blue battery showing that this will
give a medium length of battery life.
Auto and Med mode
The optimum balance of power and run time.
Attach your cleaner head or Hair screw tool to
activate Auto mode. Suction power automatically
adapts to dust levels.
The screen showing the machine set
to Boost mode with a red bat ter y to
show that this will give the shortest
battery life of the three modes.
Diagram showing the connection of
the wand onto the main body, with
the wand release button aligned
with the top of the main body.
Boost mode
Designed for intensive spot cleaning
of ground–in dirt
Arrow showing the end
of the wand connecting
to the cleaner head.
Turn your laser on and off
Turn your laser on or off with the slider
switch on your cleaner head.
Class 1 laser pro duct –
safe fo r pets and humans.
Avoid loo king directly into
the beam.
The screen, on the end of the
main body, showing a graph
of the sizing and counting
ofthe dust particles.
9,927,641
1.1M
450K
1.6K
10m 60 180 500
Measures microscopic dust particles
A piezo sensor continuously sizes
and counts dust particles at the inlet.
Attach your cleaner head or Hair
screw tool and use in Auto mode to
automatically increase suction power
when needed.

The LCD screen
Boost
Eco
Auto Med
100%
English
Espanol
English English
selected
4:50 Auto
Low
run time
Exit
Off
On
The LCD screen shows your particle count information and performance,
including the cleaning mode selected, remaining run time, filter maintenance
and blockage information.
Settings menu
Control the settings on your machine using the button.
Toentertheset tingsmenu, press and hold the button until the menu screen
appears. Tap to scroll through the options available.
Particle count and graph
Select to turn the measuring and counting of particles on and of f. Turn off
the measuring and counting of particles to stop your machine automatically
adjusting suction power and turn off the graph.
The Selection button
on the screen being
pressed.
Automatic adjustment between hard floors and carpets will continue, when
using the High Torque cleaner head.
Adjust reactive suction power sensitivity.
Use the selection button to change how sensitive the particle count is.
This will change how your machine automatically reacts to the dust particles.
For more information and support for your machine
goonline:www.dysoncanada.ca/support
Change language
To change the language on your screen, press the button and hold until the
language list appears. Release the button.
Tap the button to scroll through the language list to your preferred language.
Press and hold the button until the countdown ends.
A green tick will appear on the screen to show your language selection
is complete.
To cancel your selection, release the button during the countdown.
Canadien
français
Two screens, the first with
the language list and then
the tick screen to show that
the language has been
successfully changed.
Change alert settings
You can turn the alert motor pulse off. Your motor will no longer pulse but
run time alert information will continue to be displayed on the LCD screen
when your machine needs your attention.
Turning off alerts will not turn off the blockage alert pulsing. This is to ensure
you clear any blockages, preventing damage to your machine.
Tap to scroll through the settings menu. Select the ‘Aler ts’ option.
Scroll to select on or off. Hold the button until the countdown ends and a tick
appears on the screen. To cancel your selection, release the button during
the countdown
The screen with an amber
warning triangle to
demonstrate an alert.

Run time countdown
Boost
Eco
Auto Med
100%
4:50 Auto
Low
run time
Boost
Auto Med
English English
selected
4:50 Auto
Low
run time
Exit
Off
On
When the battery needs charging, your machine will pulse three times and
a low run time icon will appear on the screen.
When your battery is empty, a red warning icon will appear on the screen.
When Particle count and graph is turned on, low run time will be in amber
and red when in Boost mode.
Battery health
To get the best performance and life from your batter y, use Eco or Auto/Med mode.
The screen with
a battery time remaining
shown as a number and
as a half filled battery.
A red screen with an
icon with a plug being
connected to the power
supply. This demonstrates
the battery is empty and
needs charging.
Alerts
The aler ts you might see are:
Filter – the filter isn’t fitted correctly, or needs cleaning.
Blockage – your machine has a blockage that needs removing.
Alert icon with Fully
charge before first
use wording.
Alert icon with Filter
not sealed wording.
The battery health is
shown on the batteries
on the screen.
Alert icon with
Airways blocked
wording.
Alert icon with
Filter needs
cleaning wording.
Exit settings menu
Screen with Exit
menu wording and
return icon.
Loading…
Table of Contents
- In the box
- Getting started
- The LCD screen
- Charging your machine
- Changing your click-in battery
- Caring for your floors
- Emptying your bin
- Cleaning your bin
- Clearing blockages
- **** Washing your filter
- Washing your Laser Slim Fluffy™ brush bar
- Clearing obstructions from your High Torque cleaner head with an anti-
- Cleaning your tools
- Clearing blockages from your Hair screw tool
- Looking after your machine
- Documents / Resources
- Read User Manual Online (PDF format)
- Download This Manual (PDF format)
User manual
Dyson V15 detect
Top view of the Dyson V15 detect machine, showing the cleaner head, wand, bin,
and main body.
In the box
A vacuum cleaner with a click-in battery| Laser Slim Fluffy™ cleaner head
A precisely-angled laser makes invisible dust visible on hard floors.| High
torque cleaner head with an anti-tangle comb
Dyson DLS™ technology monitors brush bar resistance and adapt power across
different floor types.
Polycarbonate teeth prevent tangling around the bristles.
Additional click-in battery
Additional click-in batteries included with V15 Detect Absolute and V15 Detect
Complete or can be purchased separately from
www.dysoncanada.ca
Wand| Charger
Charges your vacuum with or without a dock.| Wall dock
Your Dyson vacuum drops into the wall-mounted charging dock, ready for your
next clean.
Some tools may not be included.
You can buy additional tools at
www.dysoncanada.ca
Combination tool
Two tools in one – wide nozzle and brush, for quick switching between cleaning
and dusting tasks around your home or car.| Crevice tool
Engineered for precise cleaning around tricky edges and into hard-to-reach
narrow spaces.| Hair screw tool
Anti-tangle conical brush bar spirals hair off and into the bin. Motor-
riven cleaning for smaller spaces.| Light pipe crevice tool with LED
lights lets you reach into dark, narrow spaces and see where you’re leaning.|
Soft dusting brush
Enclosed is a skirt of soft nylon bristles or gentle, a vacuum-assisted
dusting of delicate objects and surfaces.
Stubborn dirt brush
Stiff nylon bristles dislodge ground-in dirt from coarse carpets, high traffic
areas, and car interiors.| Wand clip
Clips to your vacuum wand to hold tools.
Getting started
Power modes
Your machine has three power modes for different tasks. Change power modes
quickly using a single button.
Eco-mode
The screen shows the machine set to Eco mode with a full battery in green to
show that this will give the longest battery life of the three modes.
Maximum run time for longer cleans all-around your home.
Auto and Med mode
Two screens show the machine set to Auto mode and Med mode with a blue battery
showing that this will give a medium length of battery life.
The optimum balance of power and run time.
Attach your cleaner head or Hair screw tool to activate the Auto mode. Suction
power automatically adapts to dust levels.
Boost mode
The screen shows the machine set to Boost mode with a red battery to show that
this will give the shortest battery life of the three modes.
Designed for intensive spot cleaning of ground–in dirt
Arrow showing the end of the wand connecting to the cleaner head.
Turn your laser on and off
Turn your laser on or off with the slider switch on your cleaner head.
Class 1 laser product – safe for pets and humans.
Avoid looking directly into the beam.
The screen, on the end of the main body, shows a graph of the sizing and
counting of the dust particles.
Measures microscopic dust particles
A piezo sensor continuously sizes and counts dust particles at the inlet.
Attach your cleaner head or Hair screw tool and use in Auto mode to
automatically increase suction power when needed.
The LCD screen
The LCD screen shows your particle count information and performance,
including the cleaning mode selected, remaining run time, filter maintenance,
and blockage information.
Settings menu
Control the settings on your machine using the button.
To enter the settings menu, press and hold the button until the menu screen
appears. Tap to scroll through the options available.
Particle count and graph
Select to turn the measuring and counting of particles on and off. Turn off
the measuring and counting of particles to stop your machine from
automatically adjusting suction power and turn off the graph.
Automatic adjustment between hard floors and carpets will continue when using
the High Torque cleaner head.
Adjust reactive suction power sensitivity.
Use the selection button to change how sensitive the particle count is.
This will change how your machine automatically reacts to the dust particles.
For more information and support for your machine go online:
www.dysoncanada.ca/support
Change language
To change the language on your screen, press the button and hold until the
language list appears. Release the button.
Tap the button to scroll through the language list to your preferred language.
Press and hold the button until the countdown ends.
A green tick will appear on the screen to show your language selection is
complete.
To cancel your selection, release the button during the countdown.
Change alert settings
You can turn the alert motor pulse off. Your motor will no longer pulse but
run time alert information will continue to be displayed on the LCD screen
when your machine needs your attention.
Turning off alerts will not turn off the blockage alert pulsing. This is to
ensure you clear any blockages, preventing damage to your machine.
Tap to scroll through the settings menu. Select the ‘Alerts’ option.
Scroll to select on or off. Hold the button until the countdown ends and a
tick appears on the screen. To cancel your selection, release the button
during the countdown
Run time countdown
When the battery needs charging, your machine will pulse three times and a low
run time icon will appear on the screen.
When your battery is empty, a red warning icon will appear on the screen.
When the Particle count and graph are turned on, the low run time will be in
amber and red when in Boost mode.
Battery health
To get the best performance and life from your battery, use Eco or Auto/Med
mode.
Alerts
The alerts you might see are:
Filter – the filter isn’t fitted correctly or needs cleaning.
Blockage – your machine has a blockage that needs removing.
Exit settings menu
Charging your machine
It’s important to fully charge your new machine before using it for the first
time and after every clean. This is because the battery and monitoring
system’s algorithm ‘learns’ over time, and fully charging your machine helps
it to more accurately calculate and display the remaining run time.
Connect to the charger either directly or in the dock.
The blue LEDs on either side of the battery will flash during charging.
When the battery is fully charged, both LEDs will light for 5 seconds.
Your battery is fully charged when the display shows 100%.
Your machine won’t operate or charge if the ambient temperature is below
5°C(41°F). This is designed to protect both the motor and battery.
Changing your click-in battery
If you have additional click-in batteries, we recommend that you alternate the
batteries to maintain even performance.
Additional click-in batteries included with V15 Detect Absolute and V15 Detect
Complete or can be purchased separately from
www.dysoncanada.ca
Removing your battery
Push the battery release button on the handle and slide the battery off your
machine.
Charge the battery.
Refitting your battery
Align your battery with the handle and slide it in. Push firmly until it
clicks into place.
Caring for your floors
Check that the underside of the cleaner head or tool is clean and free from
any objects that may cause damage.
Before vacuuming your flooring, rugs, and carpets, check the manufacturer’s
recommended cleaning instructions.
The brush bar on your machine can damage certain carpet types and floors.
Some carpets will fuzz if a rotating brush bar is used when vacuuming. If this
happens, we recommend vacuuming without the motorized floor tool and
consulting with your flooring manufacturer.
Emptying your bin
Empty as soon as the dirt reaches the MAX level – don’t overfill. Using your
machine, when the dirt is above the MAX line, may affect the performance and
require more frequent filter washing.
Overfilling your bin could result in inaccurate readings on the particle
graph.
Remove your wand
Press the red wand release button, on the top of the wand, and pull the wand
away from the bin.
Release the dirt
Hold the machine over the bin, pointing downwards.
Firmly push the red bin release button. The bin will slide down, cleaning the
shroud as it goes, and the bin base will open.
The bin base won’t open if the red bin release button isn’t pushed down all
the way.
Minimize dust contact
Cover your bin tightly in a dust-proof bag while you empty. Remove the bin
carefully, seal the bag tightly and dispose of.
Close your bin
Push the bin base upwards until the bin and bin base click into place.
Cleaning your bin
Remove your bin
If it is necessary to clean your bin, empty it as shown in the ‘Emptying your
bin’ section.
Press the red button located on the bin runner to release the bin and slide
your bin off the runner.
Only clean your bin with a damp cloth.
Make sure that the bin and seals are completely dry before replacing.
Refit your bin
Insert the spine onto the bin runner.
Close your bin by pushing the bin base upwards until the bin and bin base
click into place.
Your bin isn’t dishwasher safe and the use of detergents, polishes, or air
fresheners to clean your bin isn’t recommended, as it may damage your machine.
Clearing blockages
Disconnect your machine from the charger before looking for blockages.
Be careful not to touch the trigger and be aware of sharp objects.
Leave your machine to cool down before looking for blockages.
Don’t use your machine when looking for blockages as this could cause injury.
If your machine detects a blockage, the motor will pulse and you won’t be able
to use your machine until the blockage has been cleared.
If you try to use your machine when the motor is pulsing, it will
automatically cut out.
Check the main body
Remove the bin and check for blockages in the main body of your machine.
Make sure any blockages are completely cleared and all parts are fitted
before using your machine.
Check the wand and cleaner head
Check the wand for blockages.
Check your cleaner head for blockages, following the instructions to remove
the brush bar, where necessary.
Reassemble your machine
Refit all parts securely before using your machine.
Clearing blockages isn’t covered by your warranty.
**** Washing your filter
Wash your filter at least once a month to maintain optimum suction power.
For more information and support for your machine go online:
www.dysoncanada.ca/support
Important: your filter must be completely dry before you put it back into
the machine. Your machine could be damaged if used with a damp filter.
Twist off your filter
Twist your filter counter-clockwise and pull it away from your machine.
Tap your filter
Before washing your filter, tap it gently over a bin to remove any loose dust
and debris.
Wash your filter
Wash with warm, running tap water – gently rub your filter with your fingers
to remove the dirt.
Fill and shake
Place your hand over one end of your filter.
Fill the filter with warm tap water.
Place your hand over the open end of the filter and shake it firmly to remove
trapped dirt and debris.
Shake out the water
Empty the filter and shake firmly to remove excess water.
Shake with the filter in both an upward and downward position.
Keep shaking until there’s no water coming from the filter.
Dry your filter
Leave your filter to dry for at least 24 hours in a well-ventilated, warm
place.
Don’t dry your filter in a tumble dryer, microwave, or near a naked flame.
Important: your filter must be completely dry before you put it back into
the machine. Your machine could be damaged if used with a damp filter.
Washing your Laser Slim Fluffy™ brush bar
Your Laser Slim Fluffy™ cleaner head has a washable brush bar. To maintain
optimum performance, check and wash your brush bar regularly.
Make sure your machine is disconnected from the charger and take care not to
touch the trigger.
Remove your brush bar
Don’t put any part of your machine in a dishwasher or use detergents, polishes
or air fresheners.
Press the cleaner head release button on the end of the wand. Place the
cleaner head upside down.
Push the end cap up fully and pull the brush bar out of the cleaner head.
Wash and dry your brush bar
Hold your brush bar under running water and gently rub to remove any lint or
dirt.
Stand your brush bar upright as shown. Leave to dry completely for at least 24
hours.
Replace your brush bar
Before replacing, check that your brush bar is completely dry.
Reattach the end cap to your brush bar.
Slide your brush bar into the cleaner head. Push the end cap back down to the
closed position.
Cleaning your laser lens
To maintain optimum performance, keep your laser lens clean. Only clean the
lens when the cleaner head is not attached to your machine.
Use a soft, dry, lint-free cloth to wipe the lens.
Clearing obstructions from your High Torque cleaner head with an anti-
tangle comb
Your High Torque cleaner head with an anti-tangle comb doesn‘t have a washable
brush bar. To maintain optimum performance, check your brush bar regularly and
clear any obstructions.
Make sure your machine is disconnected from the charger and take care not to
touch the trigger.
Remove your brush bar
Don’t put any part of your machine in a dishwasher or use detergents, polishes
or air fresheners.
Press the cleaner head release button on the end of the wand. Place the
cleaner head upside down.
Use a coin to unlock the end cap.
Twist the end cap and remove it from your brush bar. Don’t wash the end cap.
Slide your brush bar out of the cleaner head.
Look for obstructions
Clear any debris from your brush bar.
Check inside the cleaner head and remove any debris or blockages.
Your High Torque cleaner head and brushbar aren’t washable. Wipe over with a
damp lint-free cloth.
Don’t put any part of your machine in a dishwasher or use detergents,
polishes, or air fresheners.
Replace your brush bar
Push the end cap back onto your brush bar and slide it back into the cleaner
head.
Turn the end cap into the locked position.
Your cleaner head isn’t washable and should only be wiped over with a damp
lint-free cloth.
Cleaning your tools
Don’t put any part of your machine in a dishwasher or use detergents, polishes
or air fresheners.
Wipe with a damp, lint-free cloth, without touching the connector end.
Make sure your tools are completely dry before using.
Clearing blockages from your Hair screw tool
Your Hair screw tool doesn’t have a washable brush bar. To maintain optimum
performance, check your brush bar regularly and clear any obstructions.
Make sure your machine is disconnected from the charger and take care not to
touch the trigger.
Remove the cover and brush bar
Remove the Hair screw tool from the wand or machine.
Push the base plate open. Press the red lever down to release the cleaner
headcover.
Pull the cleaner headcover off the main body of the tool.
Look for obstructions.
Pull your brush bar firmly to remove it from the main body.
Check and remove any obstructions from all three parts of your Hair screw
tool.
Your Hair screw tool isn’t washable. Wipe over with a damp lint-free cloth.
Don’t put any part of your machine in a dishwasher or use detergents, polishes
or air fresheners.
Reassemble Hair screw tool
Put your brush bar back into position and press firmly until it clicks back
into position.
Check the red locking lever is in the unlocked position. Align the cleaner
headcover with the guide on the main body. Push it down until it clicks into
position.
Push the red locking lever up until it clicks into position and push the base
plate back into place.
Looking after your machine
To always get the best performance from your machine, it’s important to clean
it regularly and check for blockages.
Look after your machine
If your machine is dusty, wipe with a damp lint-free cloth.
Check for blockages in the cleaner head, tools, and main body of your machine.
Wash your filter regularly and leave it to dry completely.
Don’t use detergents or polishes to clean your machine.
Look after your battery
To get the best performance and life from your battery, use Eco or Auto/Med
mode.
Your machine won’t operate or charge if the ambient temperature is below
5°C(41°F).
This is designed to protect both the motor and battery.
Your serial numbers
You can find your serial numbers on your machine, battery, and charger.
Use your serial number to register.
For more information and support for your machine go online:
www.dysoncanada.ca/support
SV12 JN.00000 PN.000000-00-0000.00.00 VERSION NO.01
Documents / Resources
|
dyson 85614750 V15 Detect Absolute Vacuum
Cleaner
[pdf] User Manual
85614750, V15 Detect Absolute Vacuum Cleaner
—|—
Read User Manual Online (PDF format)
Read User Manual Online (PDF format) >>
Download This Manual (PDF format)
Download this manual >>
The store will not work correctly in the case when cookies are disabled.
FAQs about the particle count graph
The bars and numbers in the particle count graph will slow down to show that less debris is being picked up, letting you know you’ve achieved a deep clean.
The particle count is a scientific measurement of the debris in your bin. Each bar represents a different size of dust particle. The bars rise faster when more debris of that size is vacuumed.
Reactive suction power works with all cleaner heads, including the Dyson Laser Slim Fluffy™, Digital Motorbar™ and Direct drive cleaner heads, and the Dyson Hair screw tool.
In Auto mode, the motor – which controls suction power – intelligently reacts to the amount of dust detected to provide a deeper clean, automatically. More dust, more power. Adjusting the motor sensitivity in the settings menu affects how responsive your machine is to the level of dust detected. Set to ‘High’, and your machine will react more often, and provide more suction power, when a smaller concentration of dust is detected. Set to ‘Low’, and suction power will react less often, and to larger amounts of dust. To change the motor sensitivity, hold the selection button beneath the LCD screen to enter the settings menu. Then tap the button to scroll through to the motor sensitivity settings. Hold to select, then choose your preferred setting.
Yes. The graph works independently of the attachments, and can be used with all cleaner heads, tools and accessories.
To reset the particle count, either charge your machine (the count will reset after 30 minutes of charging) or remove the click-in battery for 15 seconds before replacing. The vacuum can be purged of any residual dust in the cleaner head or wand by activating suction away from any surface for 10 seconds.
Dyson DLS™ (Dynamic Load Sensor) technology senses when the floor type changes, by monitoring brush bar resistance while using the Digital Motorbar™ cleaner head. The piezo sensor senses changes in dust levels, and works with any cleaner head.
While we can measure particles as small as 0.1 microns in the lab, it’s not yet possible to fit these measurement technologies into a vacuum cleaner. What we can’t yet detect with our piezo sensor, we can filter out. Our HEPA filter media can capture 99.97% of particles down to 0.1 microns in size.
Maintaining your machine
How to clean your vacuum
Cleaning removes dust build-up and helps optimise performance. The filter and brush bar in the Dyson Laser Slim Fluffy™ cleaner head can be washed, and the bin and tools wiped clean.
Removing blockages
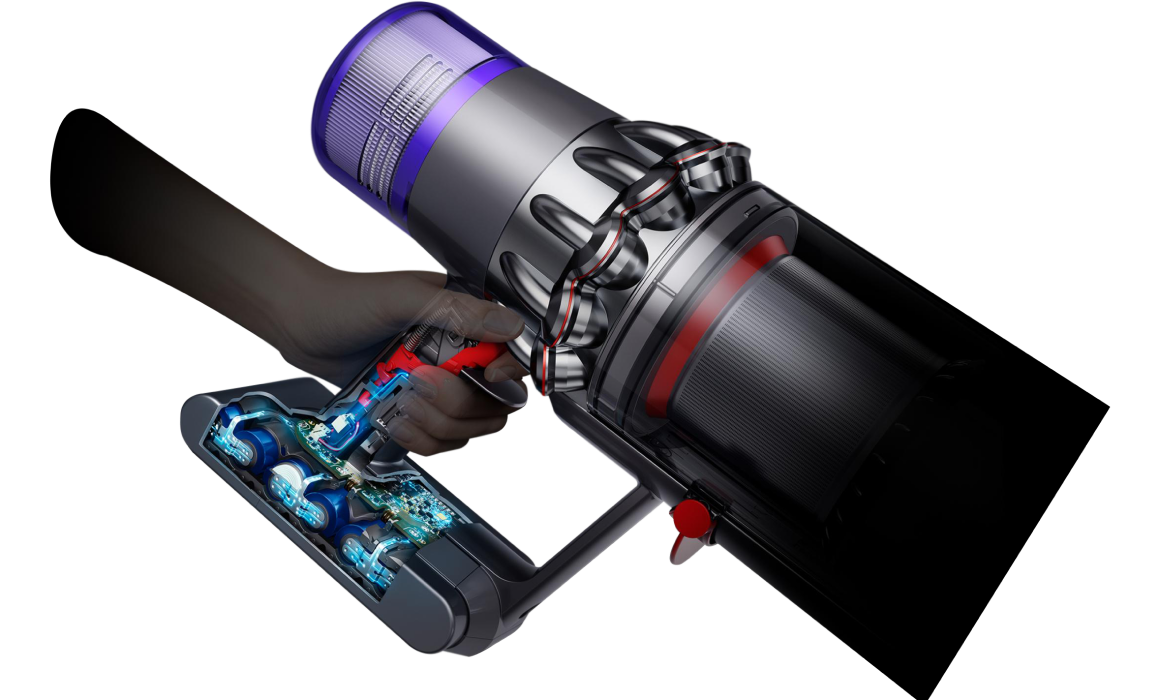
Your LCD screen will alert you if there’s a blockage in your machine’s airways. On-screen animation shows you which airflow pathways to check.
Maintaining the Digital Motorbar™ cleaner head
Your Digital Motorbar™ cleaner head with anti-tangle comb can be wiped clean with a damp, lint-free cloth.
FAQs about maintenance
Your machine will pulse seven times to alert you if there’s a blockage. You can follow the animated guide on your LCD screen to clear it.
The LCD screen on your machine will remind you when it’s time to clean your filter. This will usually be around once a month, but may be more frequent if you use your machine more heavily. After cleaning the filter, always leave it to dry for at least 24 hours. You must ensure it’s completely dry before refitting. We recommend following the cleaning instructions and cleaning by hand. The filter is not suitable for dishwasher use.
Your machine works independently and doesn’t currently connect to the Dyson Link app.