
3
X
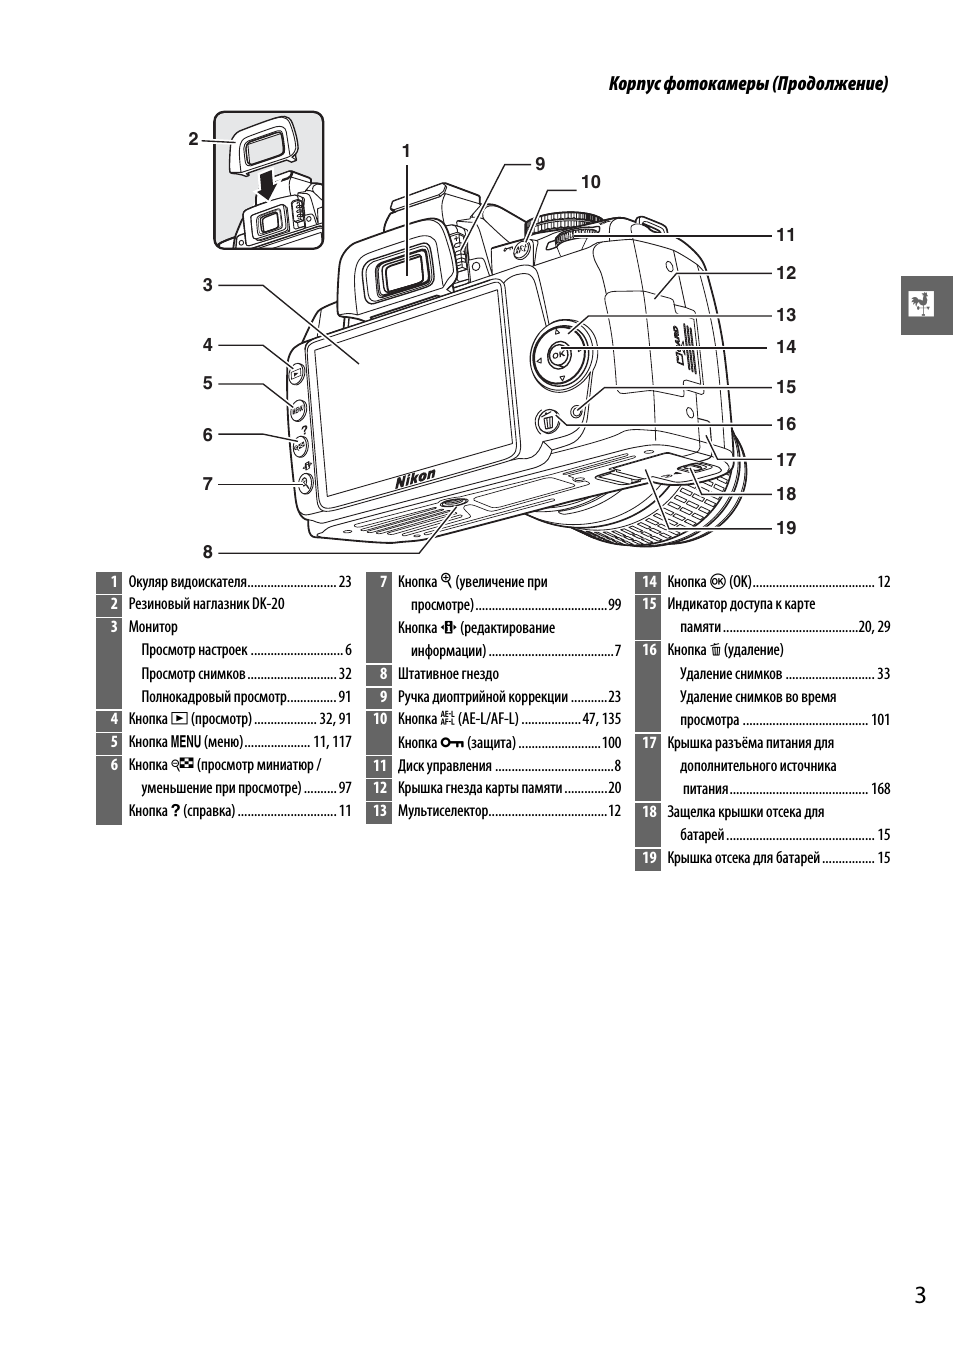
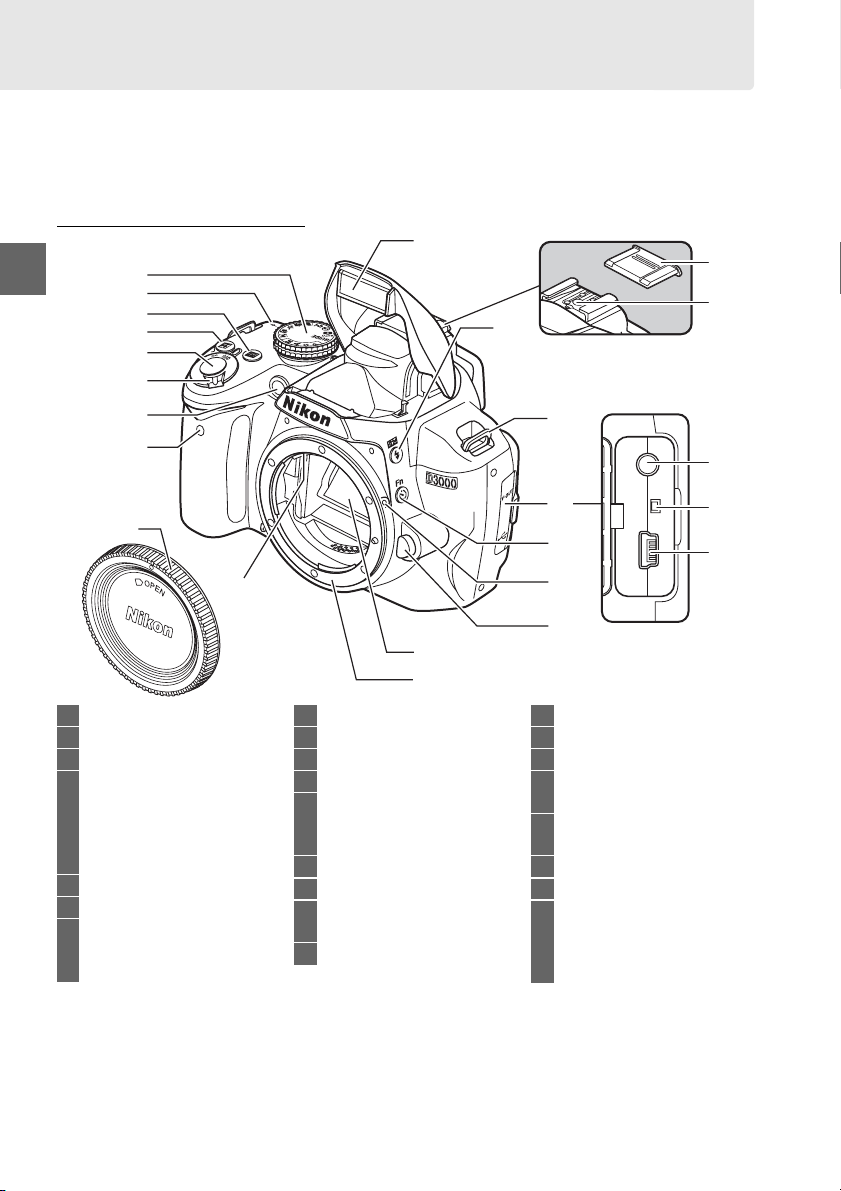
Корпус фотокамеры (Продолжение)
1
9
10
11
13
16
15
12
14
19
18
17
3
4
5
6
7
8
2
1
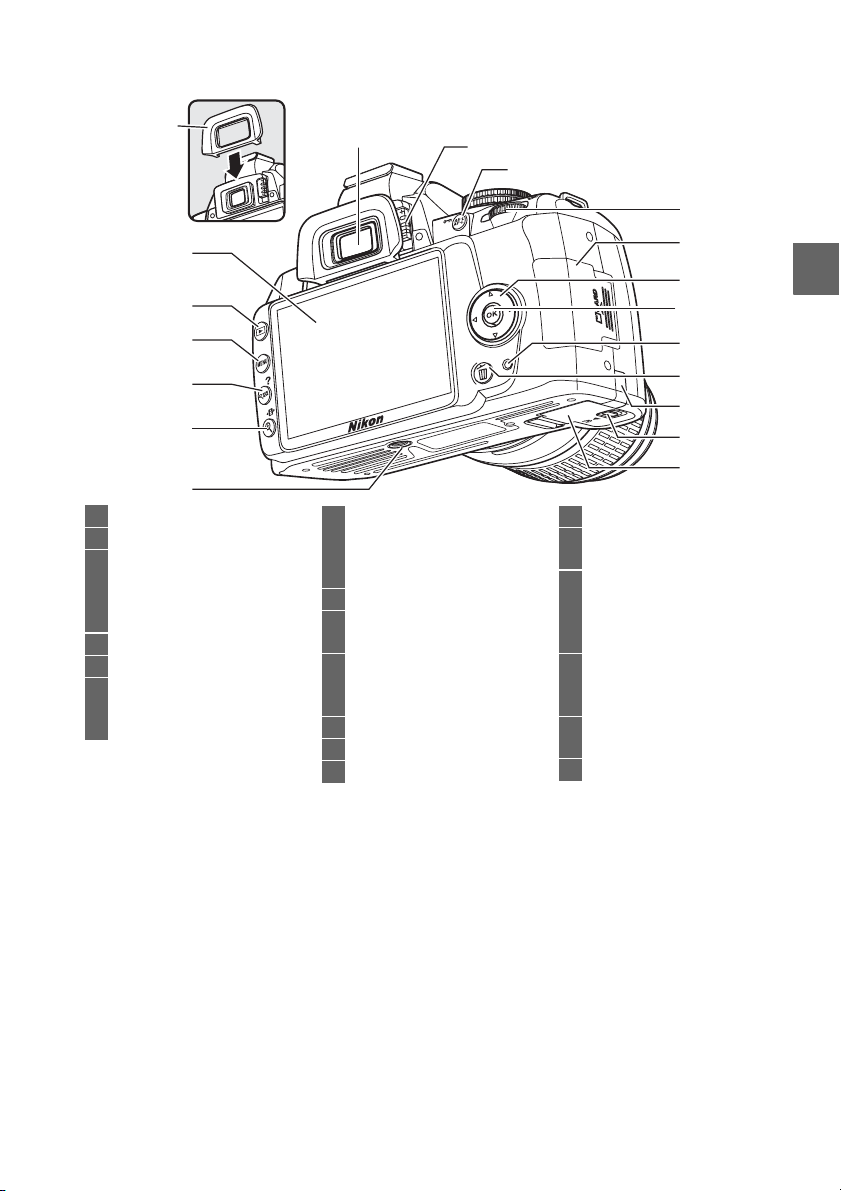
Окуляр видоискателя……………………… 23
2
Резиновый наглазник DK-20
3
Монитор
Просмотр настроек ………………………. 6
Просмотр снимков ……………………… 32
Полнокадровый просмотр…………… 91
4
Кнопка
K (просмотр)………………. 32, 91
5
Кнопка
G (меню)……………….. 11, 117
6
Кнопка
W (просмотр миниатюр /
уменьшение при просмотре) ………. 97
Кнопка
Q (справка) ………………………… 11
7
Кнопка
X (увеличение при
просмотре)………………………………….99
Кнопка
P (редактирование
информации) ………………………………..7
8
Штативное гнездо
9
Ручка диоптрийной коррекции ………..23
10
Кнопка
A (AE-L/AF-L) ………………47, 135
Кнопка
L (защита) …………………….100
11
Диск управления ………………………………8
12
Крышка гнезда карты памяти ………….20
13
Мультиселектор………………………………12
14
Кнопка
J (OK)………………………………. 12
15
Индикатор доступа к карте
памяти …………………………………..20, 29
16
Кнопка
O (удаление)
Удаление снимков ……………………… 33
Удаление снимков во время
просмотра ……………………………….. 101
17
Крышка разъёма питания для
дополнительного источника
питания…………………………………… 168
18
Защелка крышки отсека для
батарей ……………………………………… 15
19
Крышка отсека для батарей ……………. 15
X
4
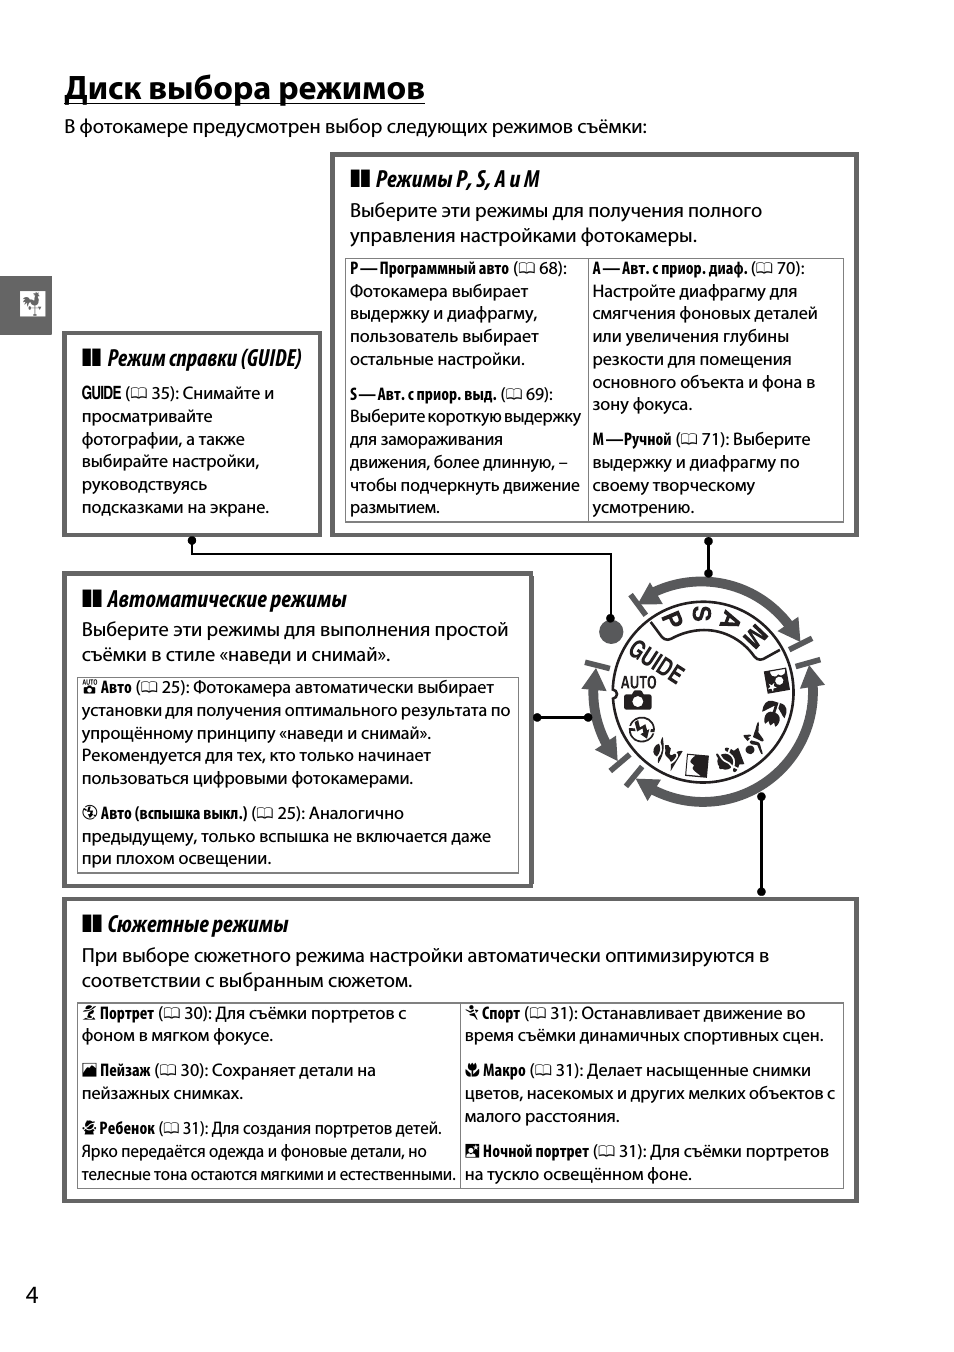
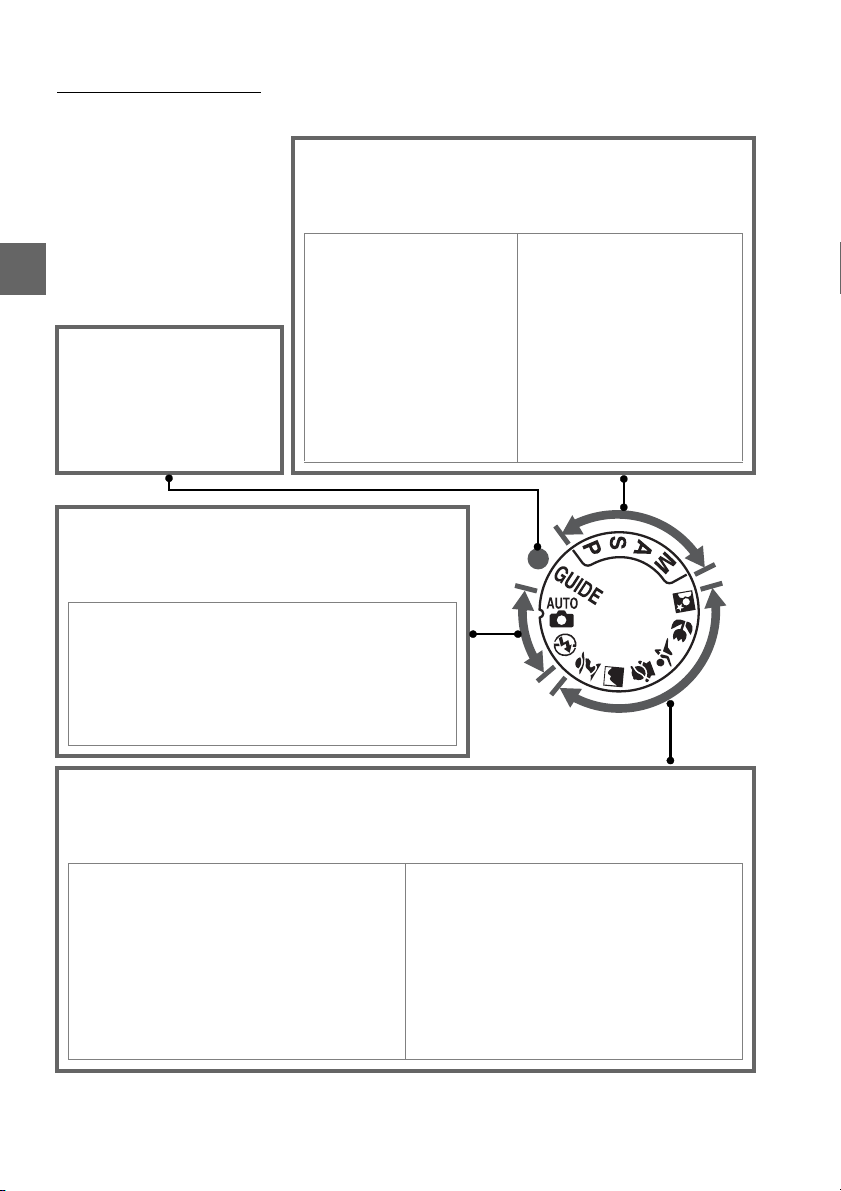
Диск выбора режимов
В фотокамере предусмотрен выбор следующих режимов съёмки:
❚❚ Режимы P, S, A и M
Выберите эти режимы для получения полного
управления настройками фотокамеры.
P—Программный авто
(
0 68):
Фотокамера выбирает
выдержку и диафрагму,
пользователь выбирает
остальные настройки.
S—Авт. с приор. выд.
(
0 69):
Выберите короткую выдержку
для замораживания
движения, более длинную, –
чтобы подчеркнуть движение
размытием.
A— Авт. с приор. диаф.
(
0 70):
Настройте диафрагму для
смягчения фоновых деталей
или увеличения глубины
резкости для помещения
основного объекта и фона в
зону фокуса.
M—Ручной
(
0 71): Выберите
выдержку и диафрагму по
своему творческому
усмотрению.
❚❚ Режим справки (GUIDE)
g (0 35): Снимайте и
просматривайте
фотографии, а также
выбирайте настройки,
руководствуясь
подсказками на экране.
❚❚ Автоматические режимы
Выберите эти режимы для выполнения простой
съёмки в стиле «наведи и снимай».
i Авто (0 25): Фотокамера автоматически выбирает
установки для получения оптимального результата по
упрощённому принципу «наведи и снимай».
Рекомендуется для тех, кто только начинает
пользоваться цифровыми фотокамерами.
j Авто (вспышка выкл.) (0 25): Аналогично
предыдущему, только вспышка не включается даже
при плохом освещении.
❚❚ Сюжетные режимы
При выборе сюжетного режима настройки автоматически оптимизируются в
соответствии с выбранным сюжетом.
k Портрет (0 30): Для съёмки портретов с
фоном в мягком фокусе.
l Пейзаж (0 30): Сохраняет детали на
пейзажных снимках.
p Ребенок (0 31): Для создания портретов детей.
Ярко передаётся одежда и фоновые детали, но
телесные тона остаются мягкими и естественными.
m Спорт (0 31): Останавливает движение во
время съёмки динамичных спортивных сцен.
n Макро (0 31): Делает насыщенные снимки
цветов, насекомых и других мелких объектов с
малого расстояния.
o Ночной портрет (0 31): Для съёмки портретов
на тускло освещённом фоне.
5
X
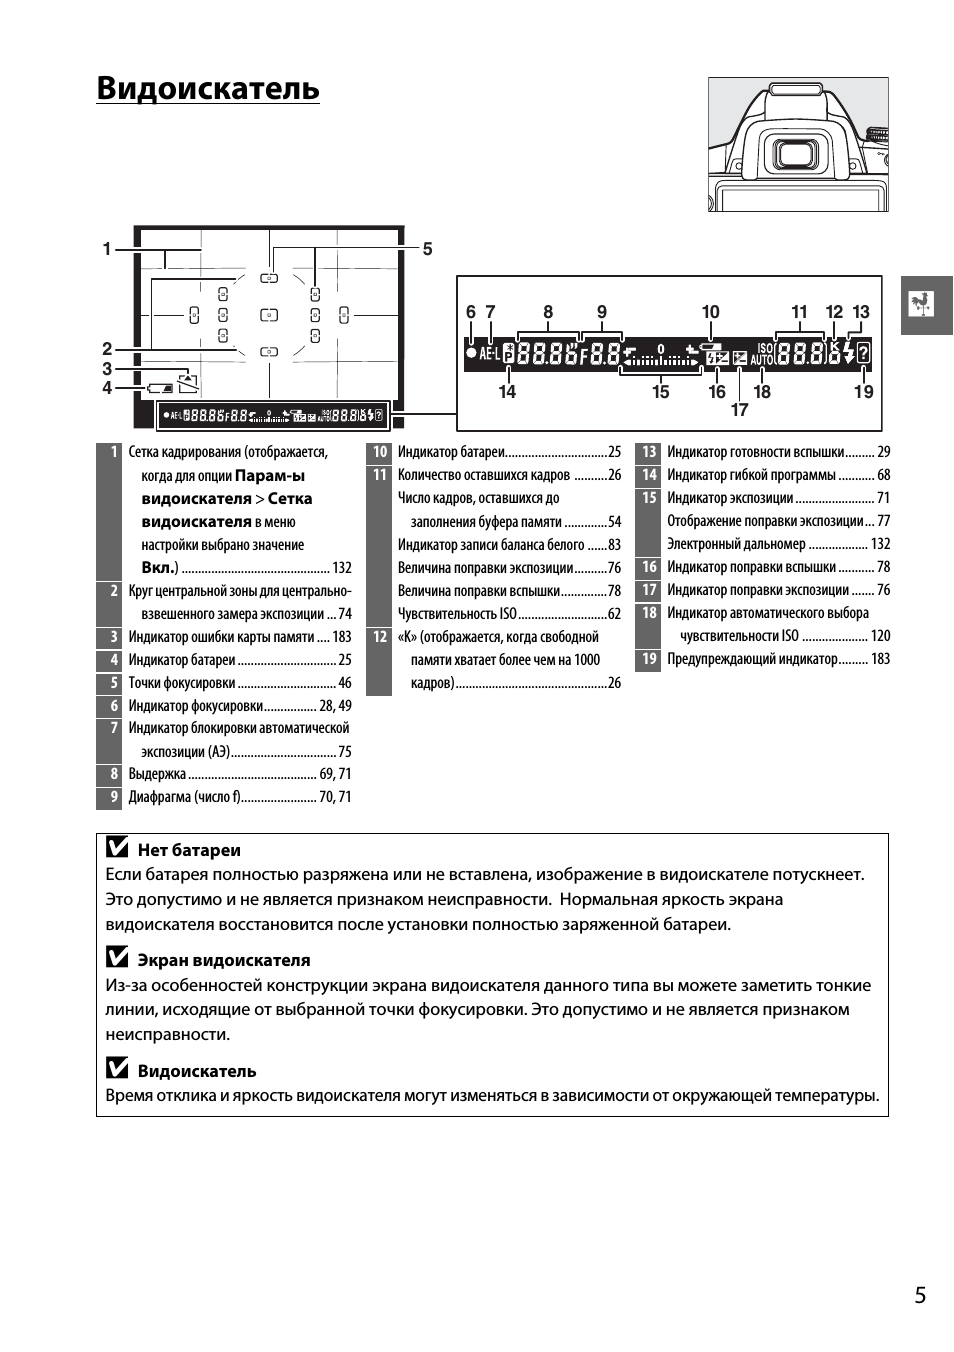
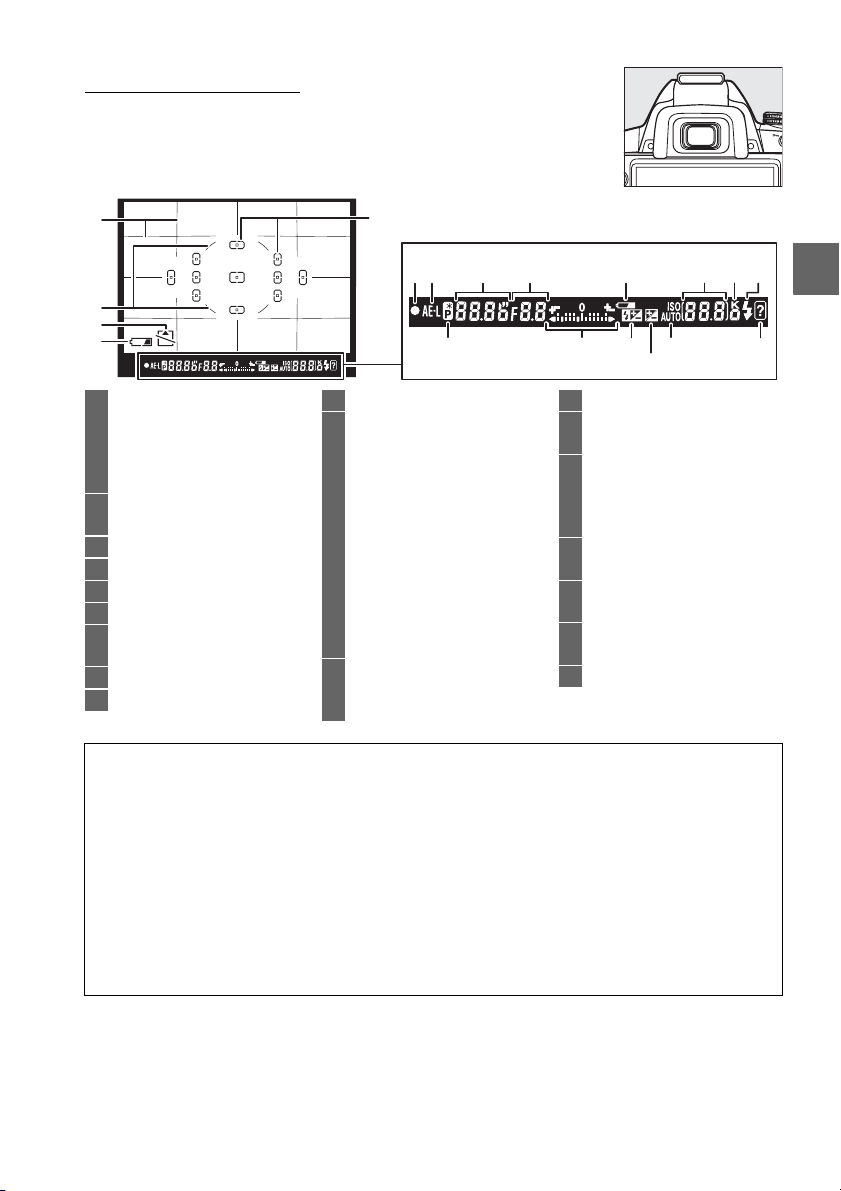
Видоискатель
1
5
2
3
4
6 7
16
14
17
19
18
10
12
8
15
9
13
11
1
Сетка кадрирования (отображается,
когда для опции
Парам-ы
видоискателя > Сетка
видоискателя в меню
настройки выбрано значение
Вкл.) ……………………………………… 132
2
Круг центральной зоны для центрально-
взвешенного замера экспозиции … 74
3
Индикатор ошибки карты памяти …. 183
4
Индикатор батареи ………………………… 25
5
Точки фокусировки ………………………… 46
6
Индикатор фокусировки……………. 28, 49
7
Индикатор блокировки автоматической
экспозиции (АЭ)………………………….. 75
8
Выдержка ………………………………… 69, 71
9
Диафрагма (число f)………………….. 70, 71
10
Индикатор батареи………………………….25
11
Количество оставшихся кадров ……….26
Число кадров, оставшихся до
заполнения буфера памяти ………….54
Индикатор записи баланса белого ……83
Величина поправки экспозиции……….76
Величина поправки вспышки…………..78
Чувствительность ISO………………………62
12
«K» (отображается, когда свободной
памяти хватает более чем на 1000
кадров)……………………………………….26
13
Индикатор готовности вспышки……… 29
14
Индикатор гибкой программы ……….. 68
15
Индикатор экспозиции …………………… 71
Отображение поправки экспозиции… 77
Электронный дальномер ……………… 132
16
Индикатор поправки вспышки ……….. 78
17
Индикатор поправки экспозиции ……. 76
18
Индикатор автоматического выбора
чувствительности ISO ……………….. 120
19
Предупреждающий индикатор……… 183
D
Нет батареи
Если батарея полностью разряжена или не вставлена, изображение в видоискателе потускнеет.
Это допустимо и не является признаком неисправности. Нормальная яркость экрана
видоискателя восстановится после установки полностью заряженной батареи.
D
Экран видоискателя
Из-за особенностей конструкции экрана видоискателя данного типа вы можете заметить тонкие
линии, исходящие от выбранной точки фокусировки. Это допустимо и не является признаком
неисправности.
D
Видоискатель
Время отклика и яркость видоискателя могут изменяться в зависимости от окружающей температуры.
X
6
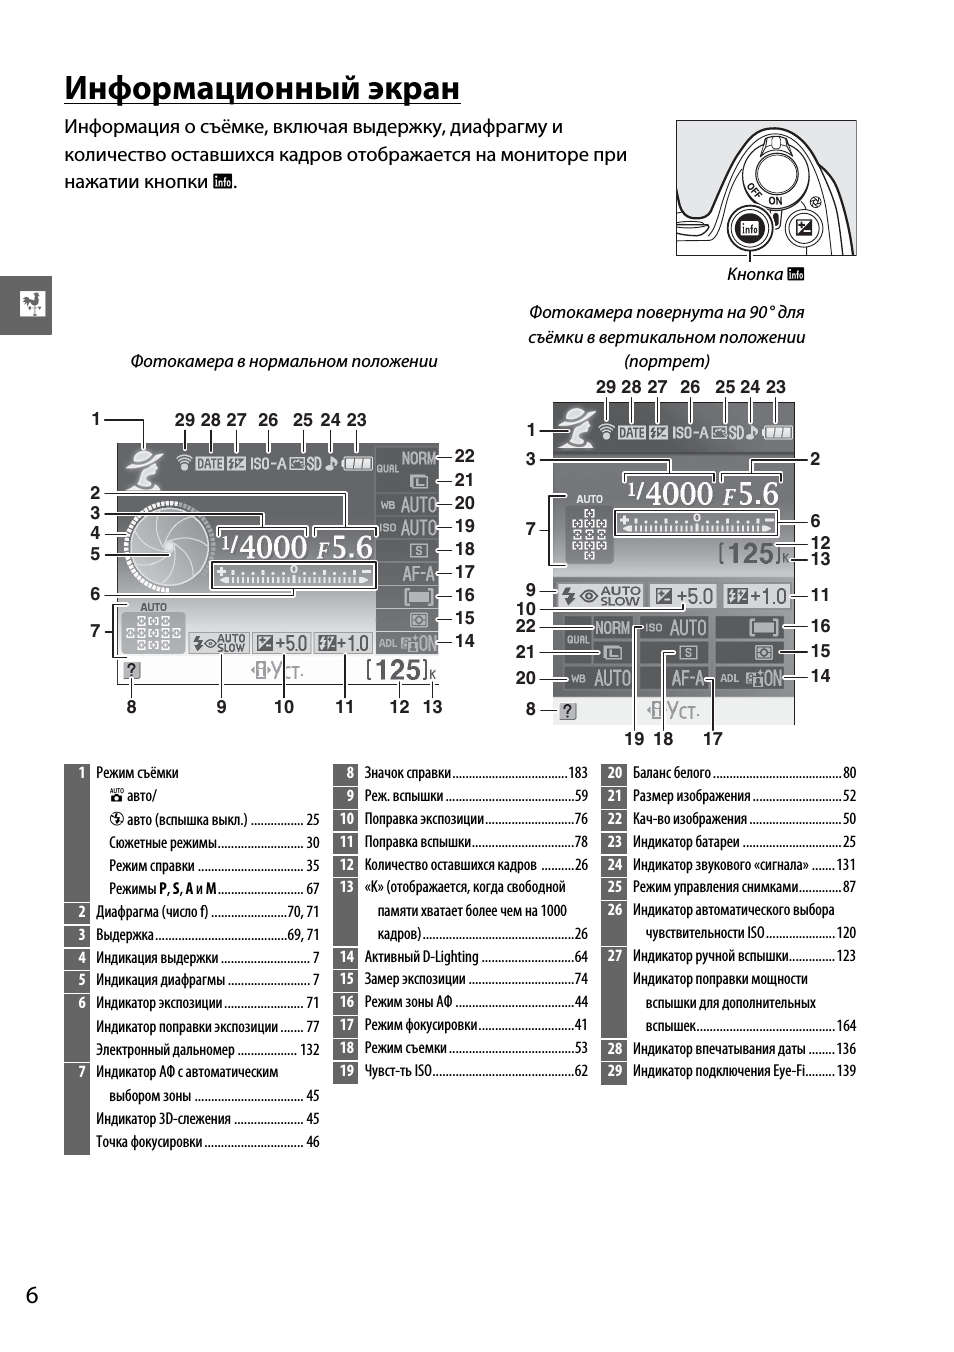
Информационный экран
Информация о съёмке, включая выдержку, диафрагму и
количество оставшихся кадров отображается на мониторе при
нажатии кнопки
R.
Фотокамера в нормальном положении
Фотокамера повернута на 90° для
съёмки в вертикальном положении
(портрет)
Кнопка
R
12
29 28 27 26 25 24 23
20
21
19
18
17
16
15
14
22
11
10
9
8
13
4
7
5
1
3
6
2
29 28 27 26 25 24 23
15
14
16
13
12
11
19
9
22
21
20
1
3
2
18
17
10
6
7
8
1
Режим съёмки
i авто/
j авто (вспышка выкл.) ……………. 25
Сюжетные режимы…………………….. 30
Режим справки ………………………….. 35
Режимы P, S, A и M…………………….. 67
2
Диафрагма (число f) …………………..70, 71
3
Выдержка………………………………….69, 71
4
Индикация выдержки ……………………… 7
5
Индикация диафрагмы ……………………. 7
6
Индикатор экспозиции …………………… 71
Индикатор поправки экспозиции ……. 77
Электронный дальномер ……………… 132
7
Индикатор АФ с автоматическим
выбором зоны …………………………… 45
Индикатор 3D-слежения ………………… 45
Точка фокусировки ………………………… 46
8
Значок справки……………………………..183
9
Реж. вспышки …………………………………59
10
Поправка экспозиции………………………76
11
Поправка вспышки………………………….78
12
Количество оставшихся кадров ……….26
13
«K» (отображается, когда свободной
памяти хватает более чем на 1000
кадров)……………………………………….26
14
Активный D-Lighting ……………………….64
15
Замер экспозиции …………………………..74
16
Режим зоны АФ ………………………………44
17
Режим фокусировки………………………..41
18
Режим съемки ………………………………..53
19
Чувст-ть ISO…………………………………….62
20
Баланс белого …………………………………80
21
Размер изображения ………………………52
22
Кач-во изображения ……………………….50
23
Индикатор батареи …………………………25
24
Индикатор звукового «сигнала» …….131
25
Режим управления снимками………….87
26
Индикатор автоматического выбора
чувствительности ISO…………………120
27
Индикатор ручной вспышки…………..123
Индикатор поправки мощности
вспышки для дополнительных
вспышек……………………………………164
28
Индикатор впечатывания даты ……..136
29
Индикатор подключения Eye-Fi………139
7
X
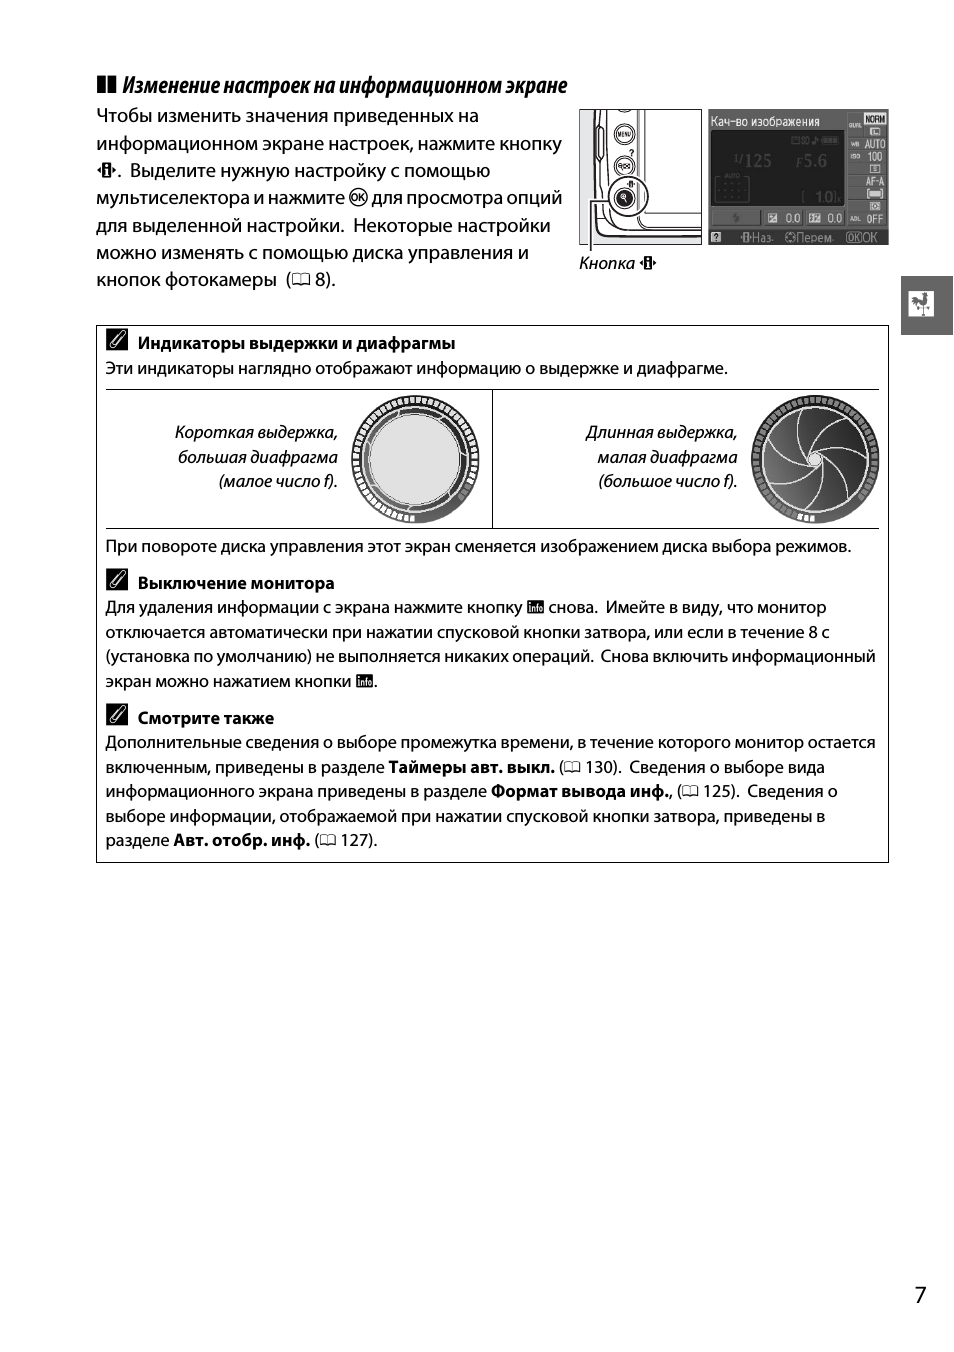
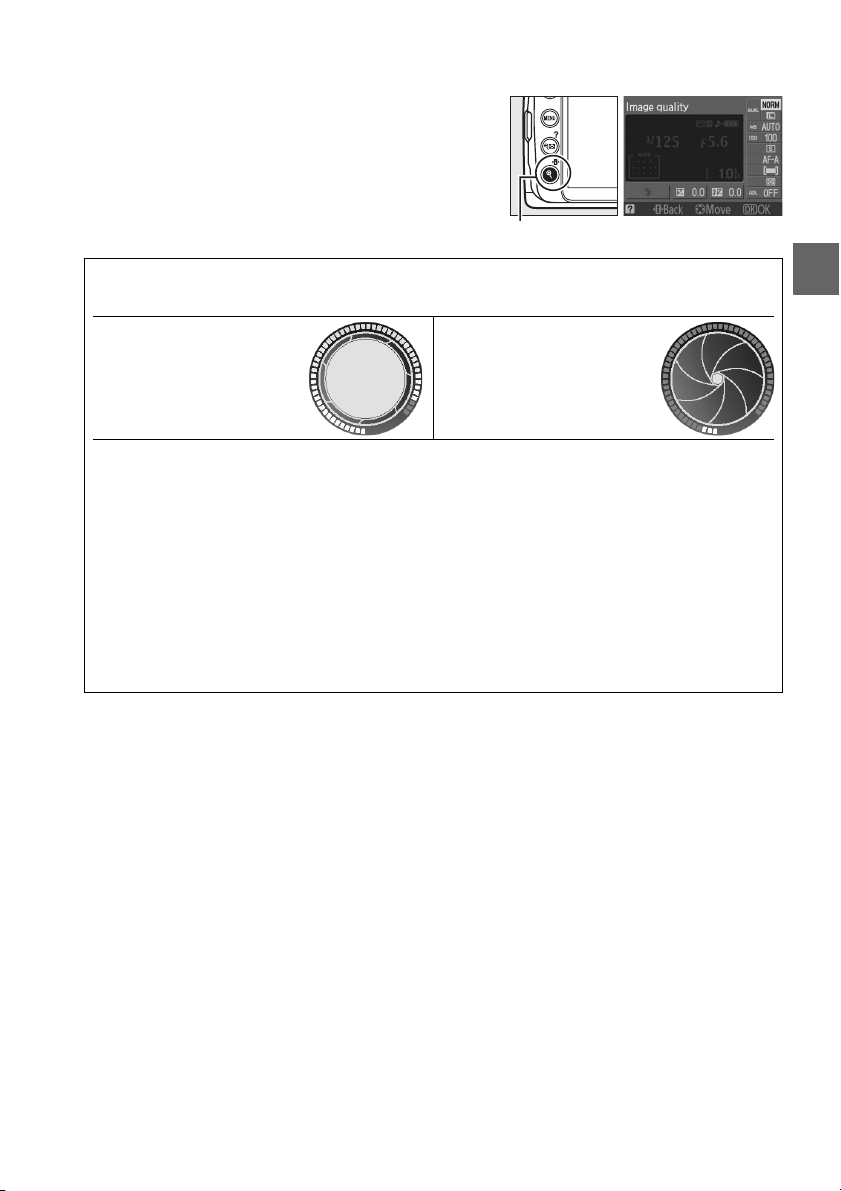
❚❚ Изменение настроек на информационном экране
Чтобы изменить значения приведенных на
информационном экране настроек, нажмите кнопку
P. Выделите нужную настройку с помощью
мультиселектора и нажмите
J для просмотра опций
для выделенной настройки. Некоторые настройки
можно изменять с помощью диска управления и
кнопок фотокамеры (
0 8).
A
Индикаторы выдержки и диафрагмы
Эти индикаторы наглядно отображают информацию о выдержке и диафрагме.
Короткая выдержка,
большая диафрагма
(малое число f).
Длинная выдержка,
малая диафрагма
(большое число f).
При повороте диска управления этот экран сменяется изображением диска выбора режимов.
A
Выключение монитора
Для удаления информации с экрана нажмите кнопку
R снова. Имейте в виду, что монитор
отключается автоматически при нажатии спусковой кнопки затвора, или если в течение 8 с
(установка по умолчанию) не выполняется никаких операций. Снова включить информационный
экран можно нажатием кнопки
R.
A
Смотрите также
Дополнительные сведения о выборе промежутка времени, в течение которого монитор остается
включенным, приведены в разделе Таймеры авт. выкл. (
0 130). Сведения о выборе вида
информационного экрана приведены в разделе Формат вывода инф., (
0 125). Сведения о
выборе информации, отображаемой при нажатии спусковой кнопки затвора, приведены в
разделе Авт. отобр. инф. (
0 127).
Кнопка
P
X
8
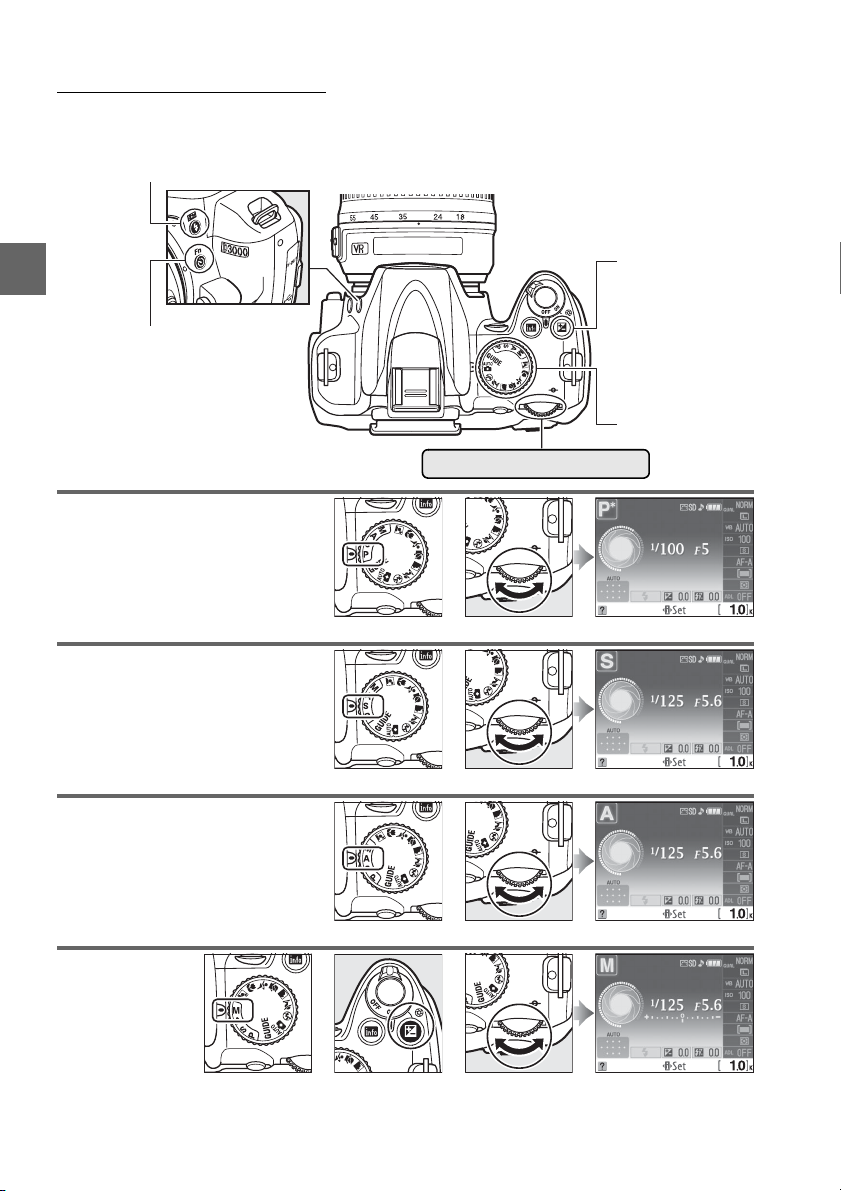
Диск управления
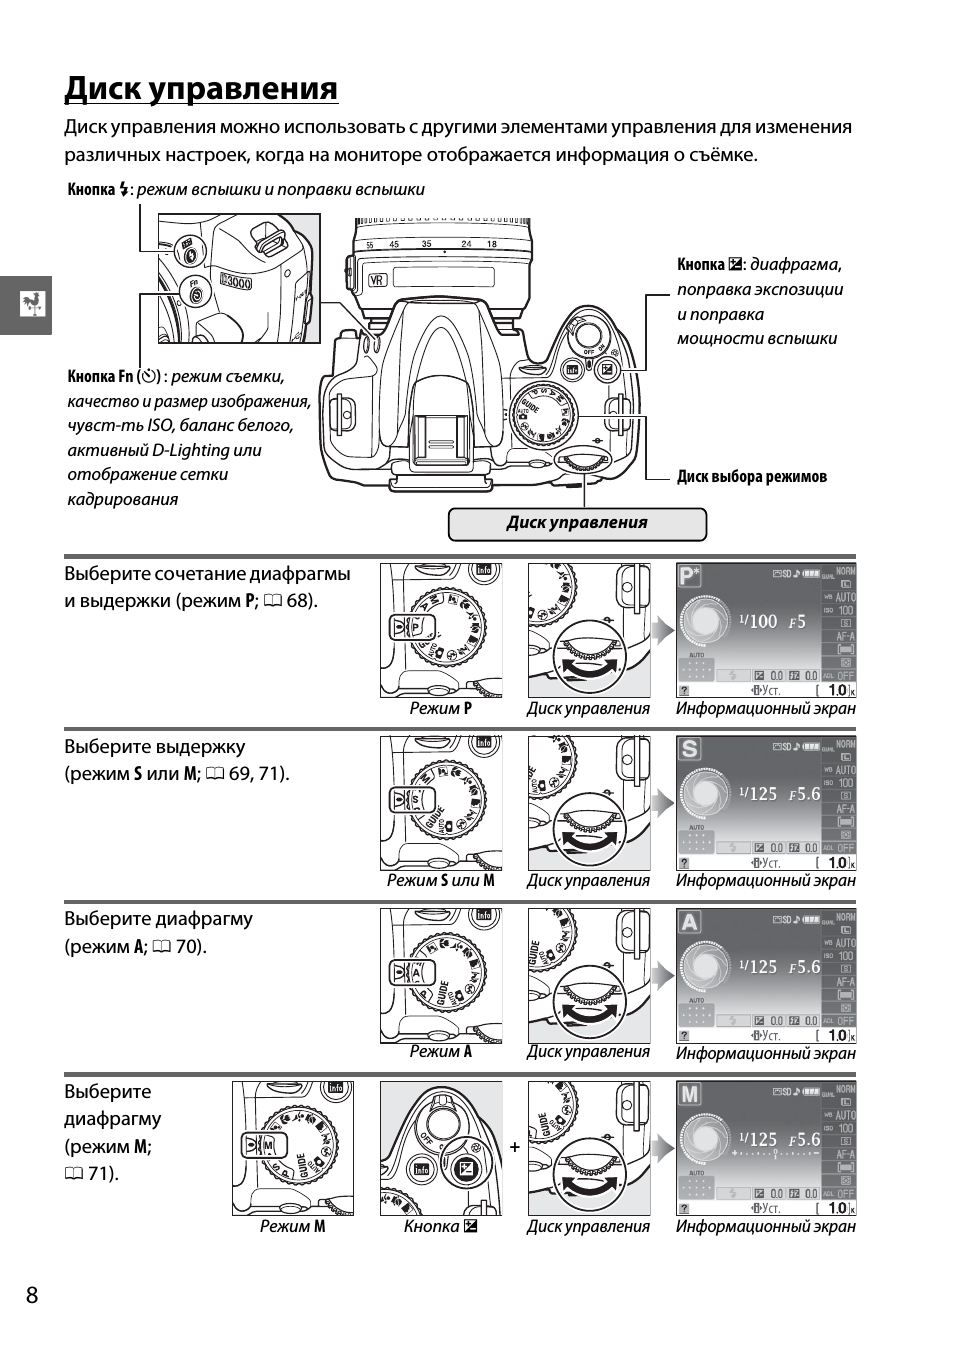
Диск управления можно использовать с другими элементами управления для изменения
различных настроек, когда на мониторе отображается информация о съёмке.
Выберите сочетание диафрагмы
и выдержки (режим P;
0 68).
Режим P
Диск управления
Информационный экран
Выберите выдержку
(режим S или M;
0 69, 71).
Режим S или M
Диск управления
Информационный экран
Выберите диафрагму
(режим A;
0 70).
Режим A
Диск управления
Информационный экран
Выберите
диафрагму
(режим M;
0 71).
+
Режим M
Кнопка
E
Диск управления
Информационный экран
Диск управления
Кнопка
M: режим вспышки и поправки вспышки
Кнопка Fn (
E) : режим съемки,
качество и размер изображения,
чувст-ть ISO, баланс белого,
активный D-Lighting или
отображение сетки
кадрирования
Диск выбора режимов
Кнопка
E: диафрагма,
поправка экспозиции
и поправка
мощности вспышки
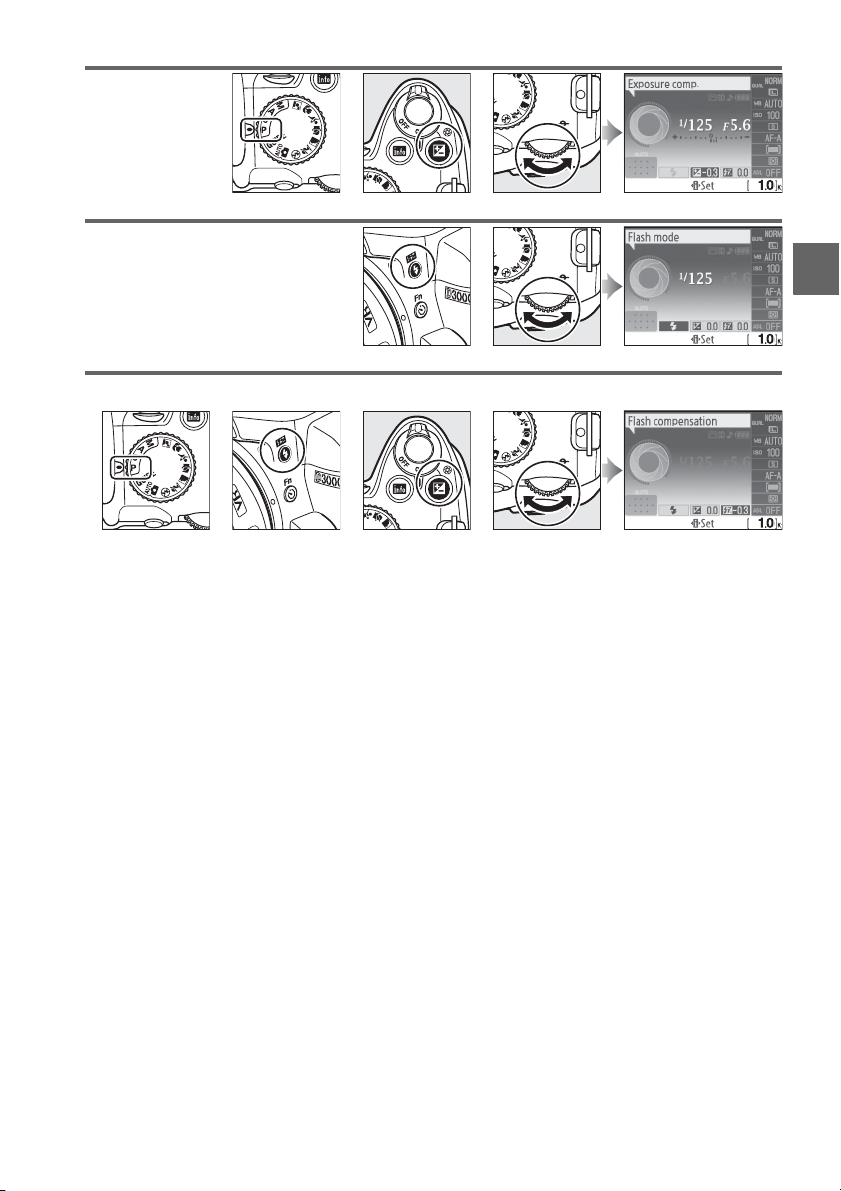
9
X
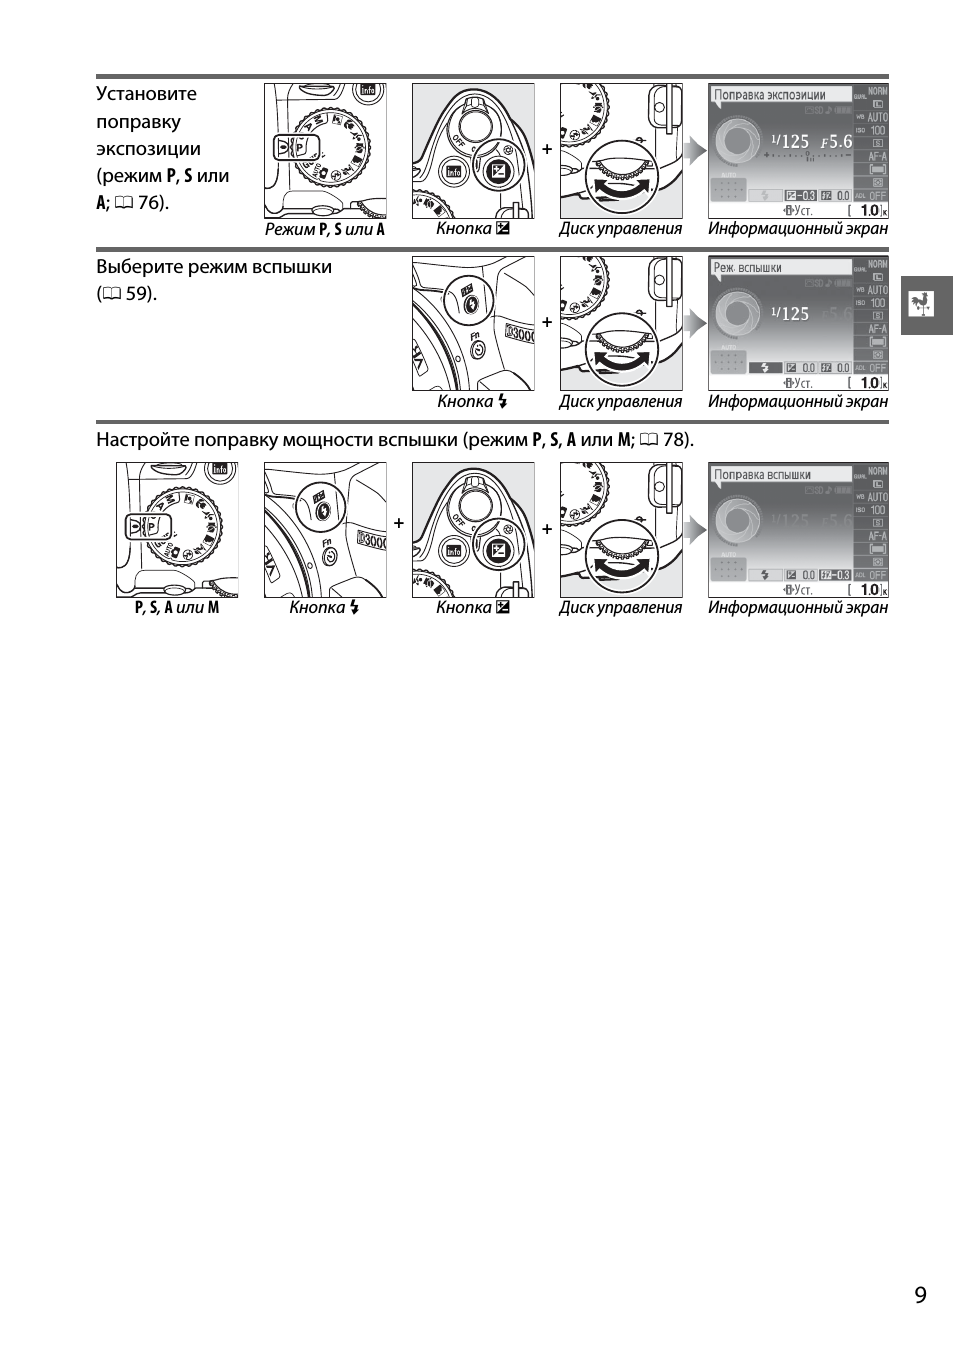
Установите
поправку
экспозиции
(режим P, S или
A
;
0 76).
+
Режим P, S или A
Кнопка
E
Диск управления
Информационный экран
Выберите режим вспышки
(
0 59).
+
Кнопка
M
Диск управления
Информационный экран
Настройте поправку мощности вспышки (режим P, S, A или M;
0 78).
+
+
P
, S, A или M
Кнопка
M
Кнопка
E
Диск управления
Информационный экран
X
10
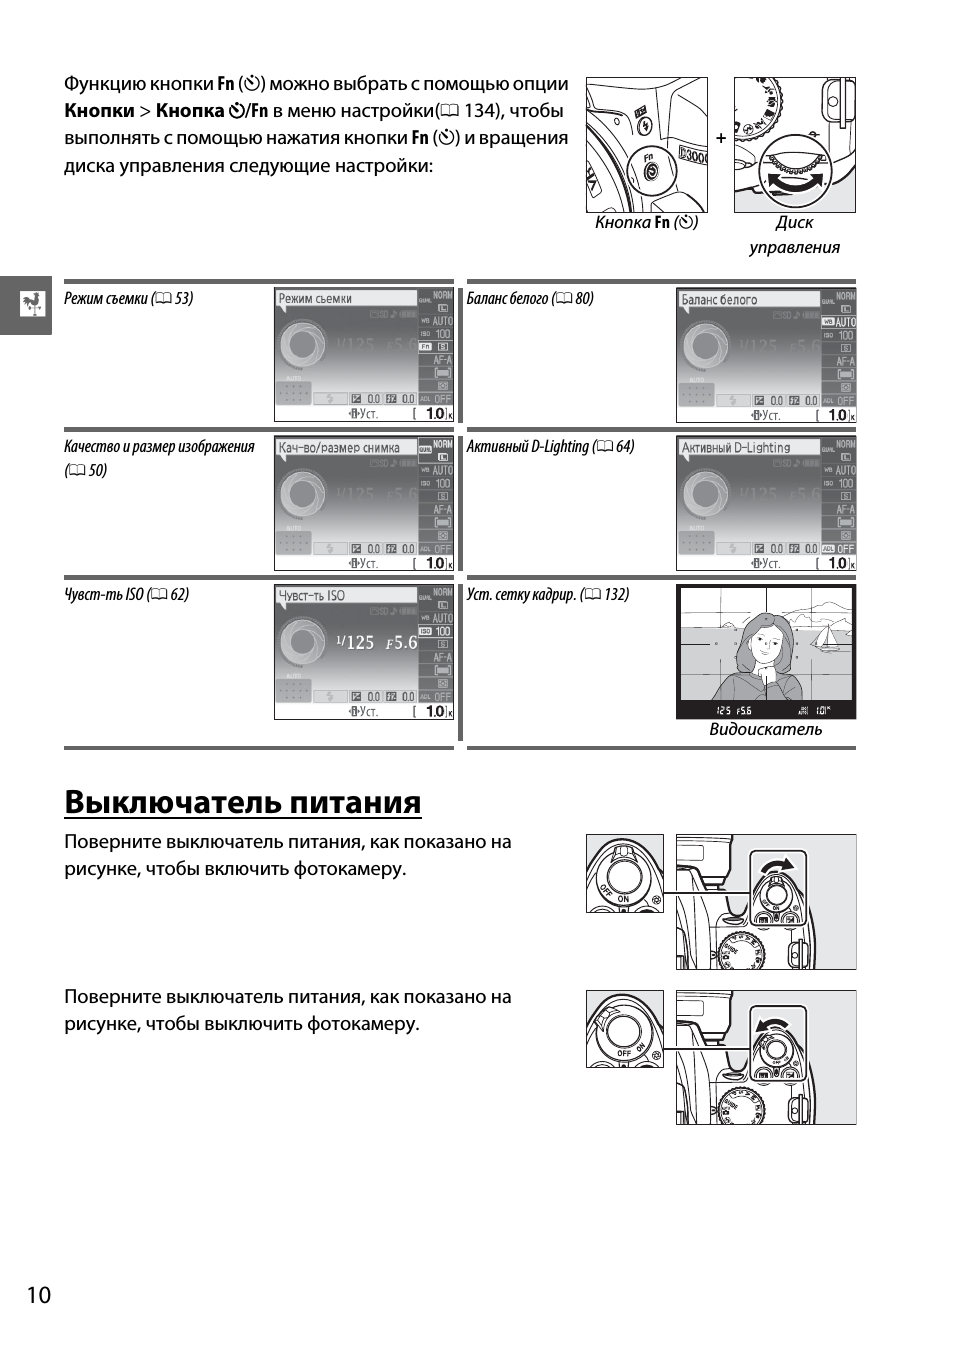
Выключатель питания
Поверните выключатель питания, как показано на
рисунке, чтобы включить фотокамеру.
Поверните выключатель питания, как показано на
рисунке, чтобы выключить фотокамеру.
Функцию кнопки Fn (
E) можно выбрать с помощью опции
Кнопки > Кнопка
E/Fn в меню настройки(0 134), чтобы
выполнять с помощью нажатия кнопки Fn (
E) и вращения
диска управления следующие настройки:
+
Кнопка Fn (
E)
Диск
управления
Режим съемки (
0 53)
Баланс белого (
0 80)
Качество и размер изображения
(
0 50)
Активный D-Lighting (
0 64)
Чувст-ть ISO (
0 62)
Уст. сетку кадрир. (
0 132)
Видоискатель
11
X
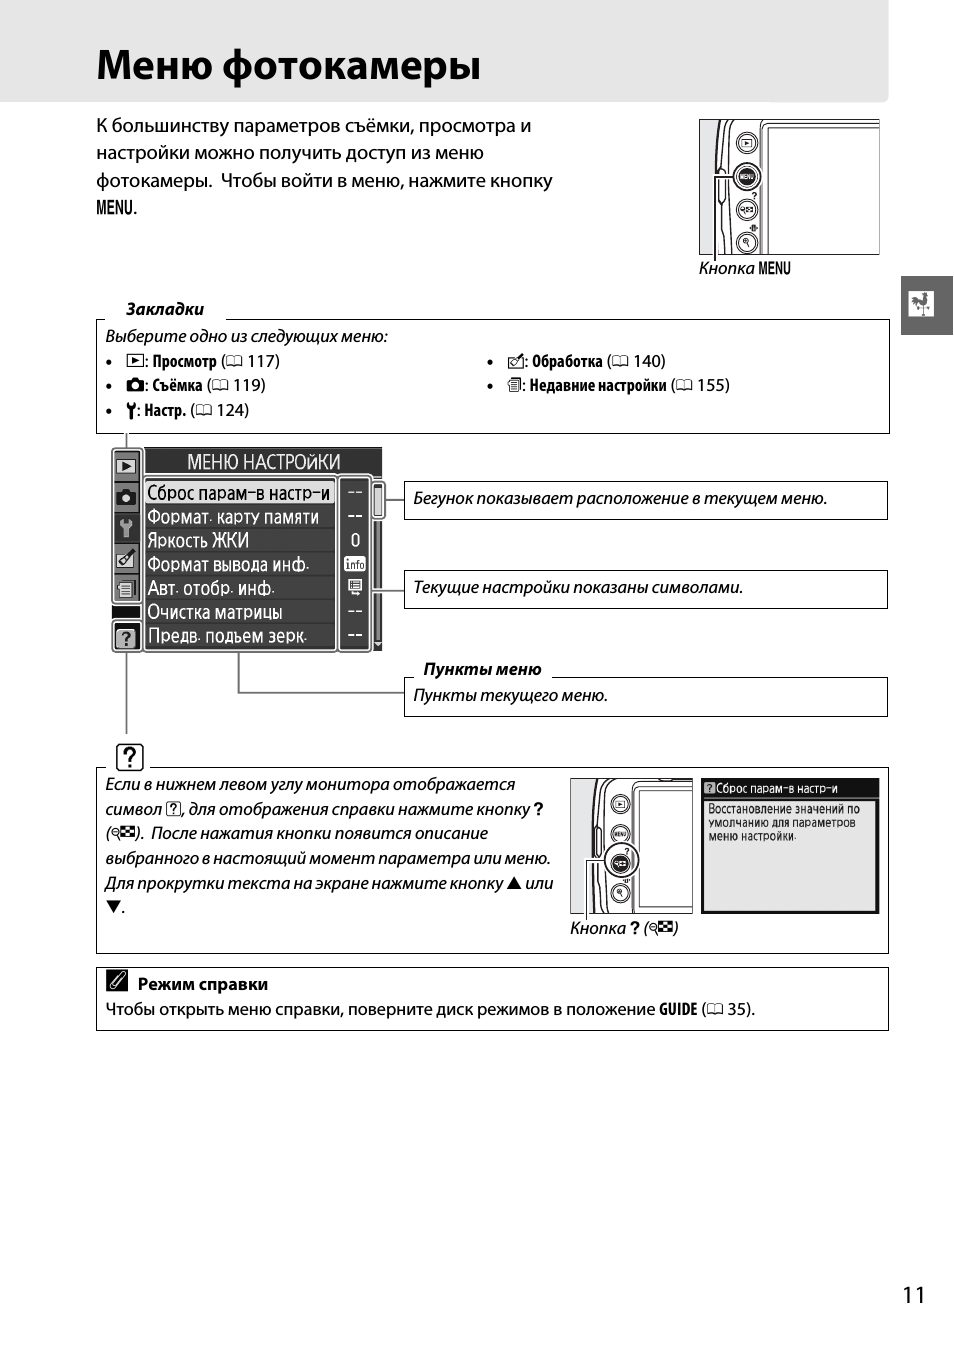
Меню фотокамеры
К большинству параметров съёмки, просмотра и
настройки можно получить доступ из меню
фотокамеры. Чтобы войти в меню, нажмите кнопку
G.
Закладки
Выберите одно из следующих меню:
•
D: Просмотр (0 117)
•
N: Обработка (0 140)
•
C: Съёмка (0 119)
•
m: Недавние настройки (0 155)
•
B: Настр. (0 124)
d
Если в нижнем левом углу монитора отображается
символ
d, для отображения справки нажмите кнопку Q
(
W). После нажатия кнопки появится описание
выбранного в настоящий момент параметра или меню.
Для прокрутки текста на экране нажмите кнопку
1 или
3.
A
Режим справки
Чтобы открыть меню справки, поверните диск режимов в положение GUIDE (
0 35).
Кнопка
G
Бегунок показывает расположение в текущем меню.
Текущие настройки показаны символами.
Пункты меню
Пункты текущего меню.
Кнопка
Q (W)
X
12
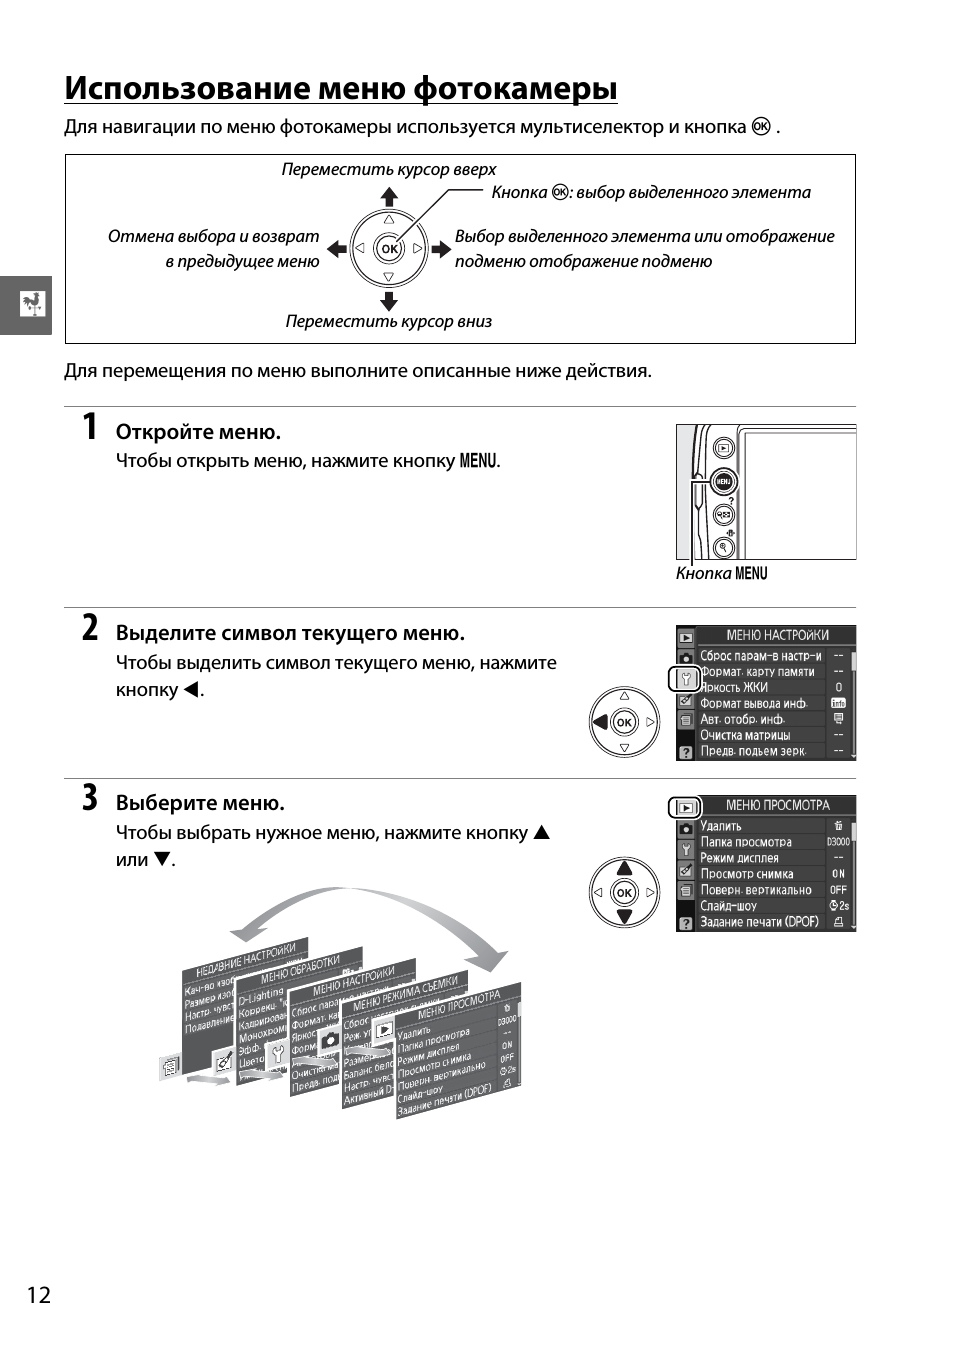
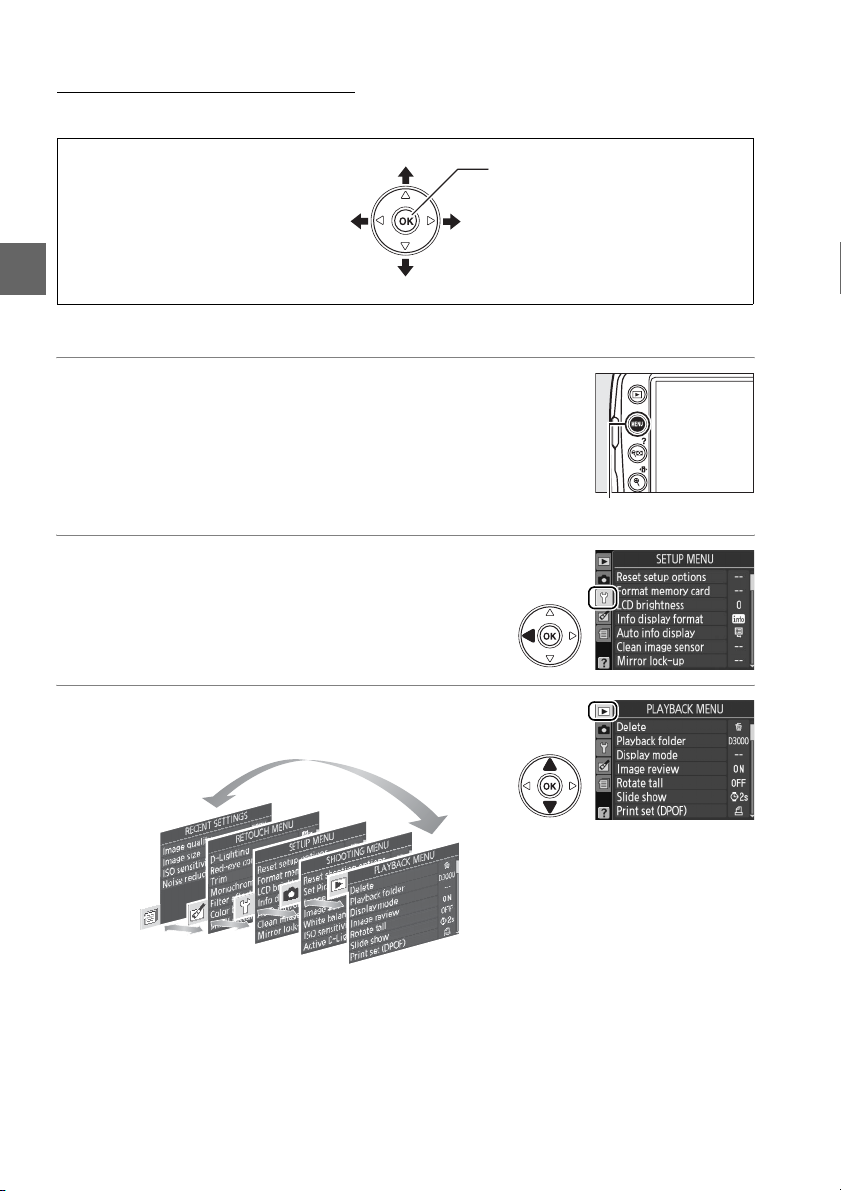
Использование меню фотокамеры
Для навигации по меню фотокамеры используется мультиселектор и кнопка
J .
Для перемещения по меню выполните описанные ниже действия.
1
Откройте меню.
Чтобы открыть меню, нажмите кнопку
G.
2
Выделите символ текущего меню.
Чтобы выделить символ текущего меню, нажмите
кнопку
4.
3
Выберите меню.
Чтобы выбрать нужное меню, нажмите кнопку
1
или
3.
Выбор выделенного элемента или отображение
подменю отображение подменю
Переместить курсор вверх
Переместить курсор вниз
Кнопка
J: выбор выделенного элемента
Отмена выбора и возврат
в предыдущее меню
Кнопка
G
13:51
Обзор Nikon D3000||Как настроить фотик (ISO, выдержка, диафрагма)
07:31
[ОБЗОР] Nikon D3100 — топ за свои деньги!
03:36
Видео обзор камеры Nikon D3000
03:56
Окрестности и природа Даугавпилса снятые на Nikon D3000
16:59
Nikon D3000 | Revisión en profundidad
Нажмите на кнопку для помощи
DIGITAL CAMERA
Reference Manual
En

Where to Find It
Find what you’re looking for from:
The Table of Contents
i
Find items by function or menu name.
The Q&A Index
i
Know what you want to do but don’t know the function name?
the “question and answer” index.
The Index
i
Search by key word.
Error Messages
i
If a warning is displayed in the viewfinder or monitor, find the solution here.
Troubleshooting
i
Camera behaving unexpectedly?
A For Your Safety
Before using the camera for the first time, read the safety instructions in “For Your Safety”
(0 xi–xvi).
Find the solution here.
➜
➜
➜
➜
➜
0 vi–x
0 ii–v
Find it from
0 194–196
0 183–185
0 179–182
Help
Use the camera’s on-board help feature for help on menu items and other topics. See page 11
for details.
Digitutor
“Digitutor”, a series of “watch and learn” manuals in movie form, is available from the following
website: http://www.nikondigitutor.com/index_eng.html
Q&A Index 0 ii
Table of Contents 0 vi
Introduction 0 1
X
Basic Photography and Playback 0 25
s
Guide Mode 0 35
!
More on Photography (All Modes) 0 41
z
P, S, A, and M Modes 0 67
t
More on Playback 0 91
I
Connections 0 105
Q
The Playback Menu 0 117
o
The Shooting Menu 0 119
i
The Setup Menu 0 124
g
The Retouch Menu 0 140
u
Recent Settings 0 155
w
Technical Notes 0 157
n
i
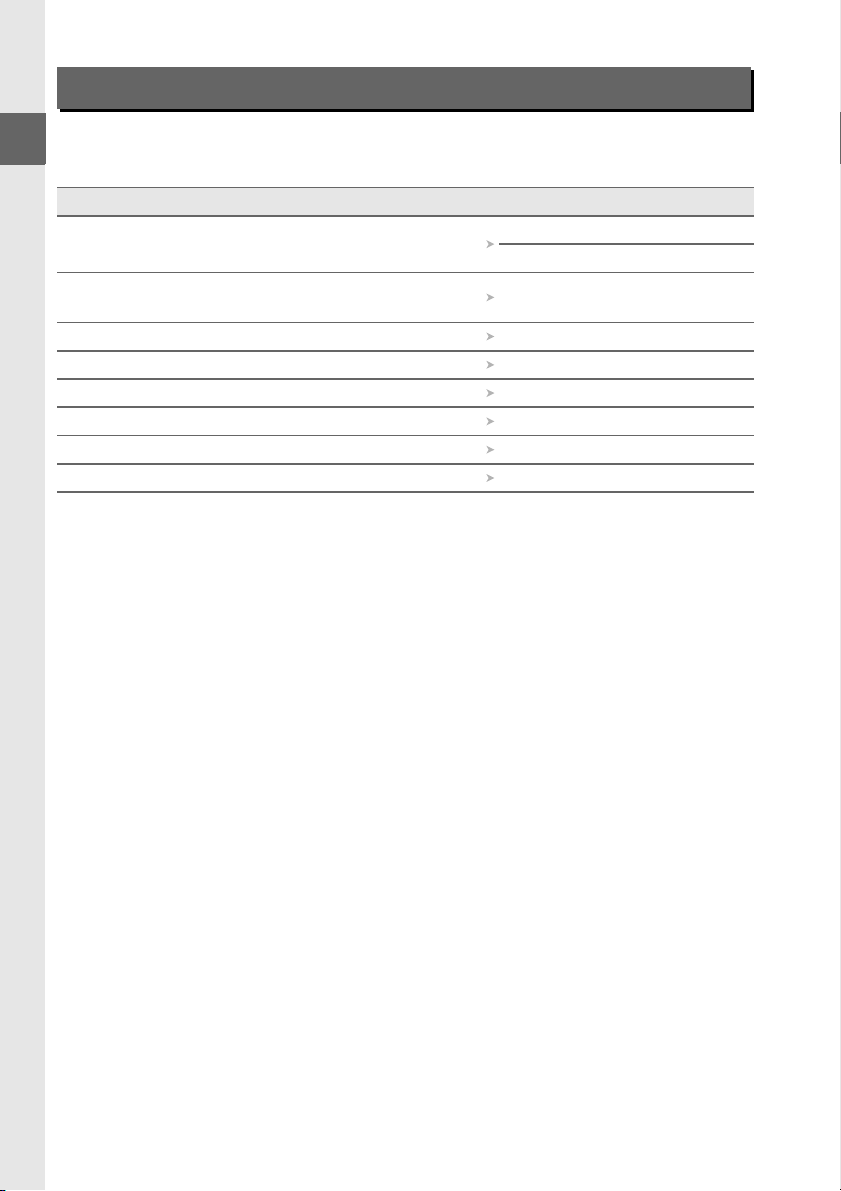
Q&A Index
Find what you’re looking for using this “question and answer” index.
❚❚ Camera Displays
Question Key phrase 0
What do these icons mean?
How many more shots can I take with this card?
How much charge does the battery have left? Battery level 25
How do I keep the displays from turning off? Auto off timers 130
How do I display the menus in another language? Language 127
How do I adjust monitor brightness? LCD brightness 125
Can I display a framing grid in the viewfinder? Framing grid 132
How do I view more information about a photo? Photo information 92–96
The information display 6
The viewfinder 5
Number of exposures
remaining
26
ii
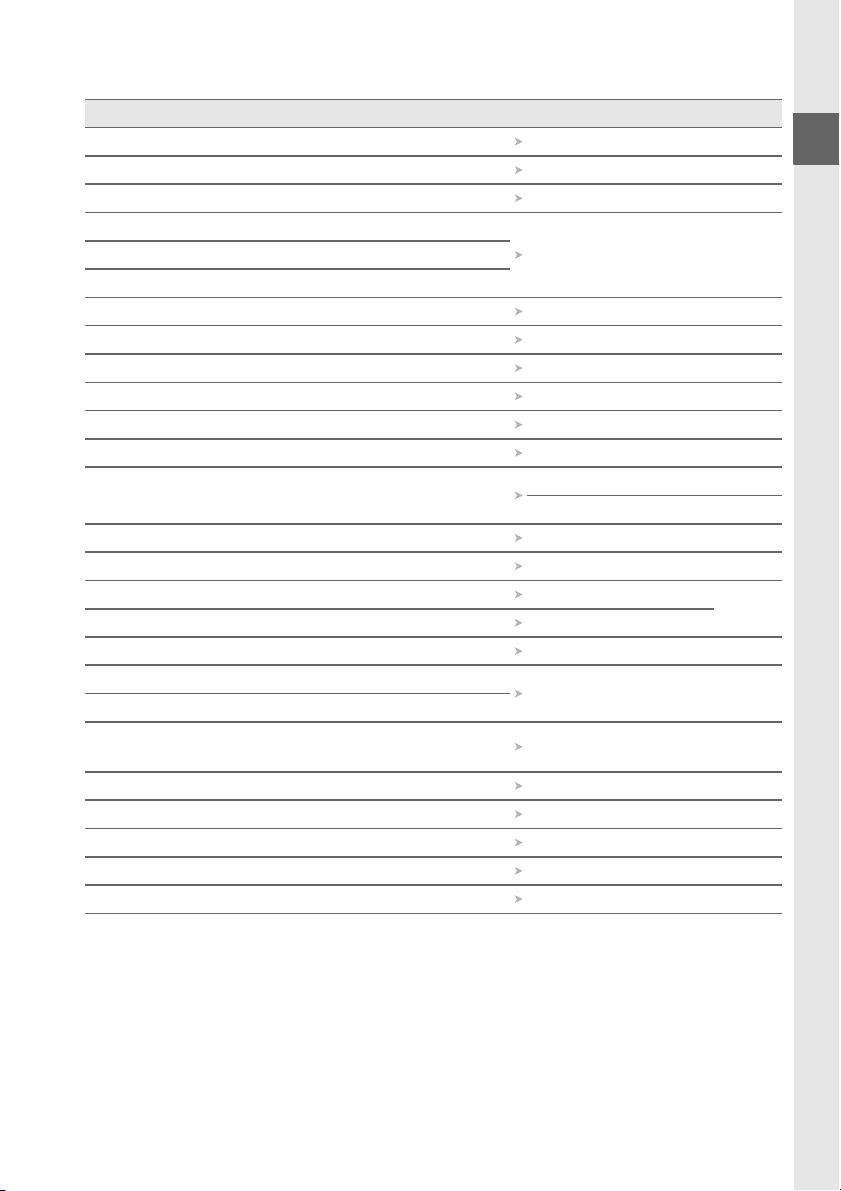
❚❚ Taking Photographs
Question Key phrase 0
Is there a quick and easy way to take snapshots? Auto modes 25–29
How do I use the GUIDE position on the mode dial? Guide mode 35–40
How do I quickly adjust settings for different scenes? Scene modes 30–31
How do I take pictures for printing at large sizes?
Image quality and size 50–52How can I get more pictures on the memory card?
Can I take pictures with a small file size for e-mail?
Can I choose how the camera focuses? Focus mode 41–43
Can I choose the focus point? Focus point 46
Can I change the composition without refocusing? 3D-tracking 45
How do I focus on a subject that is not in a focus point? Focus lock 46
Can I set the flash to fire automatically when needed? Auto flash 59–60
How do I avoid “red-eye”? Red-eye reduction 59–60
How do I keep the flash from firing?
How do I turn off the light on the front of the camera? AF-assist illuminator 122
How do I shoot a series of photos in quick succession? Release mode 53–54
How do I take pictures with the self-timer? Self-timer
How do I use the optional remote control? Remote control
What is exposure? Exposure 67
How do I “freeze” motion?
How do I suggest motion by blurring moving objects?
Can I blur the background to bring out a subject?
Can I make photos brighter or darker? Exposure compensation 76
How do I create “light trails” behind moving objects? Long time-exposures 72–73
How do I preserve details in shadows and highlights? Active D-Lighting 64–65
How do I focus the viewfinder? Viewfinder focus 23
How do I keep the camera from beeping? Beep 131
Auto (flash off) mode 27
Flash off 58–60
Mode S (shutter-priority
auto)
Mode A (aperture-
priority auto)
55–57
69
70
iii
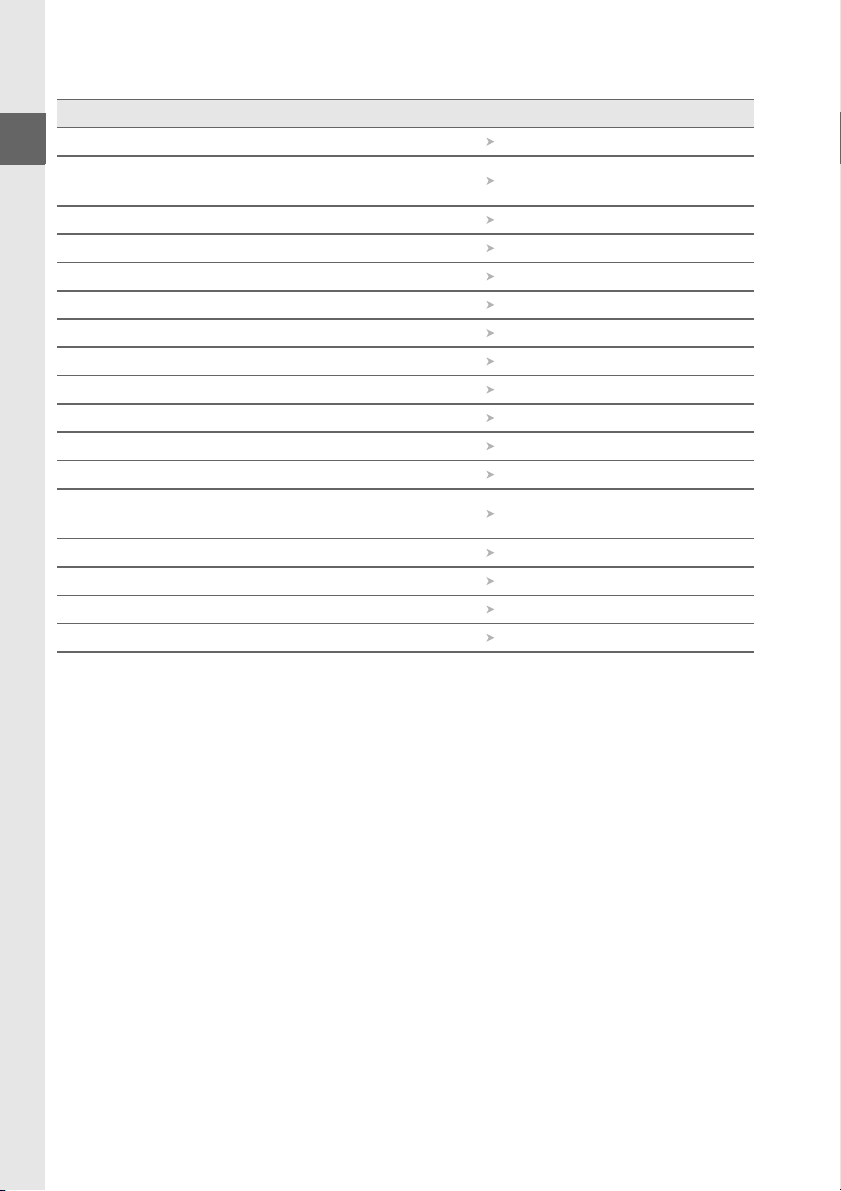
❚❚ Viewing, Retouching, and Printing Photographs
Question Key phrase 0
How do I view photographs on the camera? Playback 32, 91
How do I delete unwanted photos? Deleting photos
Can I zoom in on photos during playback? Playback zoom 99
Can I protect photos from accidental deletion? Protect 100
Can I view photos in an automatic slide show? Slide show 104
Can I view photos on a TV? Viewing on TV 116
How do I copy photos to a computer? Computer 105–106
How do I print photos? Printing 107–115
Can I print the date of recording on my photos? Time stamp 109, 112
How do I order professional prints? Print set (DPOF) 114
Can I create retouched copies of photos? Retouch 140–154
How do I remove “red-eye”? Red-eye correction 142
Can I overlay two NEF (RAW) photos to make a single
image?
How do I make JPEG copies of RAW (NEF) photos? NEF (RAW) processing 149
Can I copy a photo to use as a base for a painting? Color outline 150
Can I make copies that look like photos of miniatures? Miniature effect 150
Can I make stop-motion movies from my photos? Stop-motion movie 151–152
Image overlay 147–148
33,
101–103
iv
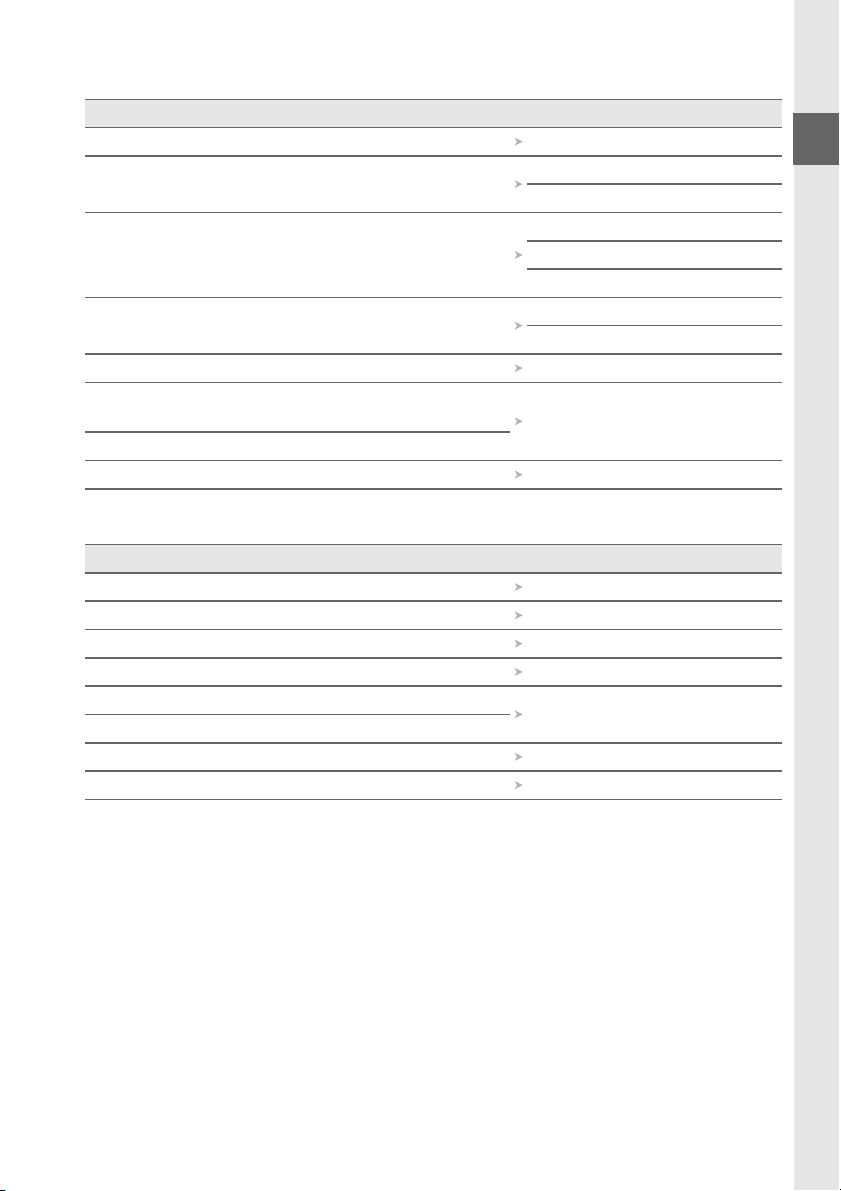
❚❚ Menus and Settings
Question Key phrase 0
How do I use the menus? Using the menus 11–13
How do I get help for a menu or message?
The information display 6, 7
How do I adjust settings?
How do I restore default settings?
How do I set the camera clock? Time zone and date 18, 127
How do I keep the file number from being reset when I
insert a new memory card?
How do I reset file numbering to 1?
Is there a quick way to access recently-used settings? Recent settings 155
Reset shooting options 119
File number sequence 133
Help 11
Error messages 183
The command dial 8–10
Menus 117–155
Reset setup options 125
❚❚ Miscellaneous
Question Key phrase 0
What do I do with the eyepiece cap? The DK-5 eyepiece cap 55
What memory cards can I use? Approved memory cards 167
What lenses can I use? Compatible lenses 157
What optional flash units (Speedlights) can I use? Optional flash units 162
What other accessories are available for my camera?
What software is available for my camera?
How do I clean the camera? Cleaning 169
Who do I go to for servicing and repairs? Servicing 169
Accessories 166
v

Table of Contents
Q&A Index …………………………………………………………………………………………………………………… ii
For Your Safety ………………………………………………………………………………………………………….. xi
Notices………………………………………………………………………………………………………………………. xiii
Introduction 1
Overview……………………………………………………………………………………………………………………… 1
Getting to Know the Camera……………………………………………………………………………………. 2
The Camera Body ……………………………………………………………………………………………………….2
The Mode Dial……………………………………………………………………………………………………………..4
The Viewfinder…………………………………………………………………………………………………………….5
The Information Display…………………………………………………………………………………………….6
The Command Dial …………………………………………………………………………………………………….8
The Power Switch……………………………………………………………………………………………………. 10
Camera Menus…………………………………………………………………………………………………………..11
Using Camera Menus ……………………………………………………………………………………………… 12
First Steps …………………………………………………………………………………………………………………..14
Charge the Battery ………………………………………………………………………………………………….. 14
Insert the Battery ……………………………………………………………………………………………………..15
Attach a Lens……………………………………………………………………………………………………………. 16
Basic Setup……………………………………………………………………………………………………………….. 18
Insert a Memory Card………………………………………………………………………………………………20
Format the Memory Card ……………………………………………………………………………………….21
Adjust Viewfinder Focus …………………………………………………………………………………………23
Basic Photography and Playback 25
“Point-and-Shoot” Photography (i and j Modes)……………………………………………25
Step 1: Turn the Camera On…………………………………………………………………………………… 25
Step 2: Select i or j Mode …………………………………………………………………………………..27
Step 3: Frame the Photograph ……………………………………………………………………………… 27
Step 4: Focus …………………………………………………………………………………………………………….28
Step 5: Shoot ……………………………………………………………………………………………………………. 29
Creative Photography (Scene Modes) ………………………………………………………………….. 30
k Portrait ………………………………………………………………………………………………………………30
l Landscape………………………………………………………………………………………………………… 30
p Child …………………………………………………………………………………………………………………. 31
m Sports ……………………………………………………………………………………………………………….. 31
n Close Up …………………………………………………………………………………………………………… 31
o Night Portrait……………………………………………………………………………………………………31
Basic Playback……………………………………………………………………………………………………………32
Deleting Unwanted Photographs …………………………………………………………………………33
vi

Guide Mode 35
The Guide Menu………………………………………………………………………………………………………..35
Shoot: Taking Pictures in Guide Mode …………………………………………………………………………………..37
View/Delete: Viewing and Deleting Pictures in Guide Mode …………………………………………………….39
Set up: Changing Camera Settings in Guide Mode ……………………………………………………………………40
More on Photography (All Modes) 41
Focus …………………………………………………………………………………………………………………………..41
Focus Mode……………………………………………………………………………………………………………….41
AF-Area Mode …………………………………………………………………………………………………………..44
Focus Point Selection ………………………………………………………………………………………………46
Focus Lock…………………………………………………………………………………………………………………46
Manual Focus ……………………………………………………………………………………………………………48
Image Quality and Size …………………………………………………………………………………………….50
Image Quality……………………………………………………………………………………………………………50
Image Size………………………………………………………………………………………………………………….52
Release Mode …………………………………………………………………………………………………………….53
Self-Timer and Remote Modes……………………………………………………………………………….55
Using the Built-in Flash…………………………………………………………………………………………….58
Flash Mode………………………………………………………………………………………………………………..59
ISO Sensitivity…………………………………………………………………………………………………………….62
Active D-Lighting………………………………………………………………………………………………………64
P, S, A, and M Modes 67
Shutter Speed and Aperture……………………………………………………………………………………67
Mode P (Programmed Auto) ………………………………………………………………………………….68
Mode S (Shutter-Priority Auto) ………………………………………………………………………………69
Mode A (Aperture-Priority Auto)……………………………………………………………………………70
Mode M (Manual)……………………………………………………………………………………………………..71
Exposure …………………………………………………………………………………………………………………….74
Metering……………………………………………………………………………………………………………………. 74
Autoexposure Lock ………………………………………………………………………………………………….75
Exposure Compensation…………………………………………………………………………………………76
Flash Compensation ………………………………………………………………………………………………..78
White Balance ……………………………………………………………………………………………………………80
Fine-Tuning White Balance …………………………………………………………………………………….82
Preset Manual……………………………………………………………………………………………………………83
vii

Picture Controls…………………………………………………………………………………………………………87
Selecting a Picture Control…………………………………………………………………………………….. 87
Modifying Picture Controls……………………………………………………………………………………. 88
More on Playback 91
Full-Frame Playback………………………………………………………………………………………………….91
Photo Information…………………………………………………………………………………………………… 92
Thumbnail Playback …………………………………………………………………………………………………97
Calendar Playback …………………………………………………………………………………………………….98
Taking a Closer Look: Playback Zoom……………………………………………………………………99
Protecting Photographs from Deletion……………………………………………………………… 100
Deleting Photographs ………………………………………………………………………………………….. 101
Full-Frame, Thumbnail, and Calendar Playback………………………………………………..101
The Playback Menu………………………………………………………………………………………………..102
Slide Shows…………………………………………………………………………………………………………….. 104
Connections 105
Connecting to a Computer ………………………………………………………………………………….. 105
Before Connecting the Camera……………………………………………………………………………105
Connecting the Camera………………………………………………………………………………………..106
Printing Photographs……………………………………………………………………………………………. 107
Connecting the Printer………………………………………………………………………………………….107
Printing Pictures One at a Time……………………………………………………………………………108
Printing Multiple Pictures……………………………………………………………………………………..110
Creating Index Prints……………………………………………………………………………………………..113
Creating a DPOF Print Order: Print Set ……………………………………………………………….114
Viewing Photographs on TV ………………………………………………………………………………… 116
Menu Guide 117
D The Playback Menu: Managing Images …………………………………………………………………. 117
Playback Folder…………………………………………………………………………………………………..117
Display Mode………………………………………………………………………………………………………118
Image Review ……………………………………………………………………………………………………..118
Rotate Tall……………………………………………………………………………………………………………118
C The Shooting Menu: Shooting Options …………………………………………………………………. 119
Reset Shooting Options…………………………………………………………………………………….119
ISO Sensitivity Settings ……………………………………………………………………………………..120
Color Space …………………………………………………………………………………………………………121
Noise Reduction …………………………………………………………………………………………………122
AF-Assist………………………………………………………………………………………………………………122
Built-in Flash ……………………………………………………………………………………………………….123
viii

B The Setup Menu: Camera Setup ……………………………………………………………………………… 124
Reset Setup Options…………………………………………………………………………………………. 125
LCD Brightness………………………………………………………………………………………………….. 125
Info Display Format ………………………………………………………………………………………….. 125
Auto Info Display………………………………………………………………………………………………. 127
Video Mode ……………………………………………………………………………………………………….. 127
Time Zone and Date…………………………………………………………………………………………. 127
Language …………………………………………………………………………………………………………… 127
Image Comment……………………………………………………………………………………………….. 128
Auto Image Rotation………………………………………………………………………………………… 128
Dust off Ref Photo …………………………………………………………………………………………….. 129
Auto off Timers………………………………………………………………………………………………….. 130
Self-Timer Delay………………………………………………………………………………………………… 131
Remote on Duration…………………………………………………………………………………………. 131
Beep ……………………………………………………………………………………………………………………. 131
Viewfinder Options…………………………………………………………………………………………… 132
File Number Sequence…………………………………………………………………………………….. 133
Buttons……………………………………………………………………………………………………………….. 134
No Memory Card? …………………………………………………………………………………………….. 136
Date Imprint ………………………………………………………………………………………………………. 136
Active Folder ………………………………………………………………………………………………………138
Eye-Fi Upload…………………………………………………………………………………………………….. 139
Firmware Version………………………………………………………………………………………………. 139
N The Retouch Menu: Creating Retouched Copies ……………………………………………………….. 140
Creating Retouched Copies …………………………………………………………………………………141
D-Lighting………………………………………………………………………………………………………….. 142
Red-Eye Correction …………………………………………………………………………………………… 142
Trim …………………………………………………………………………………………………………………….. 143
Monochrome ……………………………………………………………………………………………………..143
Filter Effects……………………………………………………………………………………………………….. 144
Color Balance …………………………………………………………………………………………………….. 145
Small Picture ……………………………………………………………………………………………………… 145
Image Overlay……………………………………………………………………………………………………. 147
NEF (RAW) Processing………………………………………………………………………………………. 149
Quick Retouch …………………………………………………………………………………………………… 150
Color Outline……………………………………………………………………………………………………… 150
Miniature Effect…………………………………………………………………………………………………. 150
Stop-Motion Movie…………………………………………………………………………………………… 151
Before and After………………………………………………………………………………………………… 154
m Recent Settings…………………………………………………………………………………………………..155
Technical Notes 157
Compatible Lenses…………………………………………………………………………………………………157
Compatible CPU Lenses ………………………………………………………………………………………. 157
Compatible Non-CPU Lenses ……………………………………………………………………………… 159
ix

Optional Flash Units (Speedlights)……………………………………………………………………… 162
The Nikon Creative Lighting System (CLS)…………………………………………………………162
Other Accessories ………………………………………………………………………………………………….. 166
Approved Memory Cards ……………………………………………………………………………………..167
Attaching a Power Connector and AC Adapter…………………………………………………168
Caring for the Camera…………………………………………………………………………………………… 169
Storage …………………………………………………………………………………………………………………….169
Cleaning…………………………………………………………………………………………………………………..169
The Low-Pass Filter ………………………………………………………………………………………………..170
Caring for the Camera and Battery: Cautions……………………………………………………. 174
Available Settings………………………………………………………………………………………………….. 176
Memory Card Capacity …………………………………………………………………………………………. 177
Exposure Program………………………………………………………………………………………………….178
Troubleshooting ……………………………………………………………………………………………………. 179
Display……………………………………………………………………………………………………………………..179
Shooting (All Modes)……………………………………………………………………………………………..180
Shooting (P, S, A, M)……………………………………………………………………………………………..181
Playback…………………………………………………………………………………………………………………..182
Miscellaneous …………………………………………………………………………………………………………182
Error Messages……………………………………………………………………………………………………….. 183
Specifications …………………………………………………………………………………………………………. 186
Battery Life ………………………………………………………………………………………………………………193
Index………………………………………………………………………………………………………………………… 194
x
For Your Safety
To prevent damage to your Nikon product or injury to yourself or to others, read the following
safety precautions in their entirety before using this equipment. Keep these safety instructions
where all those who use the product will read them.
The consequences that could result from failure to observe the precautions listed in this
section are indicated by the following symbol:
This icon marks warnings. To prevent possible injury, read all warnings before using
A
this Nikon product.
❚❚ WARNINGS
Keep the sun out of the frame
A
Keep the sun well out of the frame when
shooting backlit subjects. Sunlight
focused into the camera when the sun is
in or close to the frame could cause a fire.
Do not look at the sun through the viewfinder
A
Viewing the sun or other strong light
source through the viewfinder could
cause permanent visual impairment.
Using the viewfinder diopter control
A
When operating the viewfinder diopter
control with your eye to the viewfinder,
care should be taken not to put your
finger in your eye accidentally.
Turn off immediately in the event of malfunction
A
Should you notice smoke or an unusual
smell coming from the equipment or AC
adapter (available separately), unplug
the AC adapter and remove the battery
immediately, taking care to avoid burns.
Continued operation could result in
injury. After removing the battery, take
the equipment to a Nikon-authorized
service center for inspection.
Do not use in the presence of flammable gas
A
Do not use electronic equipment in the
presence of flammable gas, as this could
result in explosion or fire.
Keep out of reach of children
A
Failure to observe this precaution could
result in injury.
Do not disassemble
A
Touching the product’s internal parts
could result in injury. In the event of
malfunction, the product should be
repaired only by a qualified technician.
Should the product break open as the
result of a fall or other accident, remove
the battery and/or AC adapter and then
take the product to a Nikon-authorized
service center for inspection.
Do not place the strap around the neck of an
A
infant or child
Placing the camera strap around the neck
of an infant or child could result in
strangulation.
Observe caution when using the flash
A
• Using the camera with the flash in close
contact with the skin or other objects
could cause burns.
• Using the flash close to the subject’s
eyes could cause temporary visual
impairment. Particular care should be
observed when photographing infants,
when the flash should be no less than
one meter (39 in.) from the subject.
Avoid contact with liquid crystal
A
Should the monitor break, care should be
taken to avoid injury due to broken glass
and to prevent the liquid crystal from the
monitor touching the skin or entering
the eyes or mouth.
xi

Observe proper precautions when handling
A
batteries
Batteries may leak or explode if
improperly handled. Observe the
following precautions when handling
batteries for use in this product:
• Use only batteries approved for use in
this equipment.
• Do not short or disassemble the battery.
• Be sure the product is off before
replacing the battery. If you are using
an AC adapter, be sure it is unplugged.
• Do not attempt to insert the battery
upside down or backwards.
• Do not expose the battery to flame or to
excessive heat.
• Do not immerse in or expose to water.
• Replace the terminal cover when
transporting the battery. Do not
transport or store the battery with
metal objects such as necklaces or
hairpins.
• Batteries are prone to leakage when
fully discharged. To a void dama ge t o
the product, be sure to remove the
battery when no charge remains.
• When the battery is not in use, attach
the terminal cover and store in a cool,
dry place.
• The battery may be hot immediately
after use or when the product has been
used on battery power for an extended
period. Before removing the battery
turn the camera off and allow the
battery to cool.
• Discontinue use immediately should
you notice any changes in the battery,
such as discoloration or deformation.
Observe proper precautions when handling the
A
quick charger
• Keep dry. Failure to observe this
precaution could result in fire or electric
shock.
• Dust on or near the metal parts of the
plug should be removed with a dry
cloth. Continued use could result in fire.
• Do not handle the power cable or go
near the charger during thunderstorms.
Failure to observe this precaution could
result in electric shock.
• Do not damage, modify, or forcibly tug
or bend the power cable. Do not place
it under heavy objects or expose it to
heat or flame. Should the insulation be
damaged and the wires become
exposed, take the power cable to a
Nikon-authorized service
representative for inspection. Failure to
observe this precaution could result in
fire or electric shock.
• Do not handle the plug or charger with
wet hands. Failure to observe this
precaution could result in electric
shock.
• Do not use with travel converters or
adapters designed to convert from one
voltage to another or with DC-to-AC
inverters. Failure to observe this
precaution could damage the product
or cause overheating or fire.
Use appropriate cables
A
When connecting cables to the input and
output jacks, use only the cables
provided or sold by Nikon for the
purpose to maintain compliance with
product regulations.
CD-ROMs
A
CD-ROMs containing software or
manuals should not be played back on
audio CD equipment. Playing CD-ROMs
on an audio CD player could cause
hearing loss or damage the equipment.
xii
Notices
• No part of the manuals included with this
product may be reproduced, transmitted,
transcribed, stored in a retrieval system, or
translated into any language in any form,
by any means, without Nikon’s prior
written permission.
• Nikon reserves the right to change the
specifications of the hardware and
software described in these manuals at
any time and without prior notice.
Notices for Customers in the U.S.A.
Federal Communications Commission (FCC) Radio Frequency Interference Statement
This equipment has been tested and found
to comply with the limits for a Class B digital
device, pursuant to Part 15 of the FCC rules.
These limits are designed to provide
reasonable protection against harmful
interference in a residential installation. This
equipment generates, uses, and can radiate
radio frequency energy and, if not installed
and used in accordance with the instructions,
may cause harmful interference to radio
communications. However, there is no
guarantee that interference will not occur in
a particular installation. If this equipment
does cause harmful interference to radio or
television reception, which can be
determined by turning the equipment off
and on, the user is encouraged to try to
correct the interference by one or more of
the following measures:
• Reorient or relocate the receiving antenna.
• Increase the separation between the
equipment and receiver.
• Connect the equipment into an outlet on a
circuit different from that to which the
receiver is connected.
• Consult the dealer or an experienced
radio/television technician for help.
• Nikon will not be held liable for any
damages resulting from the use of this
product.
• While every effort has been made to
ensure that the information in these
manuals is accurate and complete, we
would appreciate it were you to bring any
errors or omissions to the attention of the
Nikon representative in your area (address
provided separately).
CAUTIONS
Modifications
The FCC requires the user be notified that any
changes or modifications made to this device
that are not expressly approved by Nikon
Corporation may void the user’s authority to
operate the equipment.
Interface Cables
Use the interface cables sold or provided by
Nikon for your equipment.
interface cables may exceed the limits of
Class B Part 15 of the FCC rules.
Notice for Customers in the State of California
WARNI NG: Handling the cord on this product
may expose you to lead, a chemical known to
the State of California to cause birth defects
or other reproductive harm. Wash hands
after handling.
Nikon Inc., 1300 Walt Whitman Road,
Melville, New York 11747-3064, U.S.A.
Tel.: 631-547-4200
D3000
Using other
xiii
Notices for Customers in Canada
CAUTION
This Class B digital apparatus complies with
Canadian ICES-003.
Notice for Customers in Europe
This symbol indicates that this
product is to be collected
separately.
The following apply only to users in
European countries:
• This product is designated for separate
collection at an appropriate collection
point. Do not dispose of as household
waste.
• For more information, contact the retailer
or the local authorities in charge of waste
management.
Disposing of Data Storage Devices
Please note that deleting images or formatting memory cards or other data storage devices
does not completely erase the original image data. Deleted files can sometimes be recovered
from discarded storage devices using commercially available software, potentially resulting in
the malicious use of personal image data. Ensuring the privacy of such data is the user’s
responsibility.
Before discarding a data storage device or transferring ownership to another person, erase all
data using commercial deletion software, or format the device and then completely refill it
with images containing no private information (for example, pictures of empty sky). Be sure to
also replace any pictures selected for preset manual white balance (0 83). Care should be
taken to avoid injury when physically destroying data storage devices.
Use Only Nikon Brand Electronic Accessories
Nikon cameras are designed to the highest standards and include complex electronic circuitry.
Only Nikon brand electronic accessories (including battery chargers, batteries, AC adapters,
and flash accessories) certified by Nikon specifically for use with this Nikon digital camera are
engineered and proven to operate within the operational and safety requirements of this
electronic circuitry.
The use of non-Nikon electronic accessories could damage the camera and may
void your Nikon warranty. The use of third-party rechargeable Li-ion batteries not
bearing the Nikon holographic seal shown at right could interfere with normal
operation of the camera or result in the batteries overheating, igniting, rupturing, or leaking.
For more information about Nikon brand accessories, contact a local authorized Nikon dealer.
ATT EN TI ON
Cet appareil numérique de la classe B est
conforme à la norme NMB-003 du Canada.
This symbol on the battery
indicates that the battery is to be
collected separately.
The following apply only to users in
European countries:
• All batteries, whether marked with this
symbol or not, are designated for separate
collection at an appropriate collection
point. Do not dispose of as household
waste.
• For more information, contact the retailer
or the local authorities in charge of waste
management.
xiv

Notice Concerning Prohibition of Copying or Reproduction
Note that simply being in possession of material that has been digitally copied or reproduced
by means of a scanner, digital camera, or other device may be punishable by law.
• Items prohibited by law from being copied or
reproduced
Do not copy or reproduce paper money,
coins, securities, government bonds, or
local government bonds, even if such
copies or reproductions are stamped
“Sample.”
The copying or reproduction of paper
money, coins, or securities which are
circulated in a foreign country is prohibited.
Unless the prior permission of the
government has been obtained, the
copying or reproduction of unused postage
stamps or post cards issued by the
government is prohibited.
The copying or reproduction of stamps
issued by the government and of certified
documents stipulated by law is prohibited.
• Cautions on certain copies and reproductions
The government has issued cautions on
copies or reproductions of securities issued
by private companies (shares, bills, checks,
gift certificates, etc.), commuter passes, or
coupon tickets, except when a minimum of
necessary copies are to be provided for
business use by a company. Also, do not
copy or reproduce passports issued by the
government, licenses issued by public
agencies and private groups, ID cards, and
tickets, such as passes and meal coupons.
• Comply with copyright notices
The copying or reproduction of copyrighted
creative works such as books, music,
paintings, woodcuts, prints, maps,
drawings, movies, and photographs is
governed by national and international
copyright laws. Do not use this product for
the purpose of making illegal copies or to
infringe copyright laws.
xv
A Before Taking Important Pictures
Before taking pictures on important occasions (such as at weddings or before taking the
camera on a trip), take a test shot to ensure that the camera is functioning normally. Nikon
will not be held liable for damages or lost profits that may result from product malfunction.
A Life-Long Learning
As part of Nikon’s “Life-Long Learning” commitment to ongoing product support and
education, continually-updated information is available on-line at the following sites:
• For users in the U.S.A.: http://www.nikonusa.com/
• For users in Europe and Africa: http://www.europe-nikon.com/support/
• For users in Asia, Oceania, and the Middle East: http://www.nikon-asia.com/
Visit these sites to keep up-to-date with the latest product information, tips, answers to
frequently-asked questions (FAQs), and general advice on digital imaging and photography.
Additional information may be available from the Nikon representative in your area. See the
following URL for contact information: http://imaging.nikon.com/
xvi
Introduction
X
Overview
Thank you for your purchase of a Nikon single-lens reflex (SLR) digital camera. To ge t
the most from your camera, please be sure to read all instructions thoroughly and
keep them where they will be read by all who use the product.
❚❚ Symbols and Conventions
To make it easier to find the information you need, the following symbols and
conventions are used:
This icon marks cautions; information that should be read before use to
D
prevent damage to the camera.
This icon marks notes; information that should be read before using the
A
camera.
This icon marks references to other pages in this manual.
0
D Use Only Nikon Brand Accessories
Only Nikon brand accessories certified by Nikon specifically for use with your Nikon digital
camera are engineered and proven to operate within its operational and safety
requirements. THE USE OF NON-NIKON ACCESSORIES COULD DAMAGE YOUR CAMERA AND MAY VOID YOUR
NIKON WARRANTY.
D Servicing the Camera and Accessories
The camera is a precision device and requires regular servicing. Nikon recommends that the
camera be inspected by the original retailer or a Nikon-authorized service representative
once every one to two years, and that it be serviced once every three to five years (note that
fees apply to these services). Frequent inspection and servicing are particularly
recommended if the camera is used professionally. Any accessories regularly used with the
camera, such as lenses or optional flash units, should be included when the camera is
inspected or serviced.
A Camera Settings
The explanations in this manual assume that default settings are used.
X
1
Getting to Know the Camera
Take a few moments to familiarize yourself with camera controls and displays. You
may find it helpful to bookmark this section and refer to it as you read through the
rest of the manual.
The Camera Body
11
X
1
2
3
4
5
6
12
20
21
7
8
9
10
1 Mode dial……………………………..4
2 Focal plane mark (E) ………. 49
3 R (information) button………6
4 E (exposure compensation)
button…………………………….. 77
N (aperture) button…………. 71
Flash compensation button
………………………………………… 79
5 Shutter-release button…….. 29
6 Power switch…………………….. 25
7 AF-assist illuminator…………. 43
Self-timer lamp…………………. 56
Red-eye reduction lamp ….. 60
18
19
8 Infrared receiver ………………..56
9 BF-1A body cap
10 CPU contacts
11 Built-in flash………………………. 58
12 M (flash mode) button ………58
Y (flash compensation)
button…………………………….. 79
13 Eyelet for camera strap
14 Connector cover
15 E (self-timer) button ………..57
Fn (function) button ………..134
16 Mounting index…………………16
13
22
14
15
16
17
17 Lens release button …………..17
18 Mirror………………………………..172
19 Lens mount………………………..49
20 BS-1 accessory shoe cover
……………………………………….162
21 Accessory shoe (for optional
flash unit) ………………………162
22 VIDEO-OUT connector……..116
23 Reset switch……………………..179
24 USB connector
Connecting to a
computer……………………….106
Connecting to a printer ..107
23
24
2
The Camera Body (Continued)
2
3
4
5
6
7
8
1 Viewfinder eyepiece…………..23
2 DK-20 rubber eyecup
3 Monitor
Viewing settings……………….6
Viewing pictures……………..32
Full-frame playback………..91
4 K (playback) button….. 32, 91
5 G (menu) button…..11, 117
6 W (thumbnail/playback
zoom out) button……………97
Q (help) button…………………..11
1
7 X (playback zoom in)
button…………………………….. 99
P (information edit)
button………………………………..7
8 Tripod s ocket
9 Diopter adjustment
control……………………………. 23
10 A (AE-L/AF-L)
button…………………….. 47, 135
L (protect) button ……….100
11 Command dial ……………………..8
12 Memory card slot cover……. 20
13 Multi selector ……………………. 12
9
10
11
12
13
14
15
16
17
18
19
14 J (OK) button………………….. 12
15 Memory card access lamp
………………………………….. 20, 29
16 O (delete) button
Deleting pictures…………….33
Deleting pictures during
playback………………………..101
17 Power connector cover for
optional power connector
……………………………………….168
18 Battery-chamber cover latch
…………………………………………15
19 Battery-chamber cover…….. 15
X
3
The Mode Dial
The camera offers a choice of the following modes:
❚❚ P, S, A, and M Modes
Select these modes for full control over camera
settings.
P— Programmed auto (0 68):
X
❚❚ GUIDE Mode
g (0 35): Take and
view pictures and adjust
settings with the help of
an on-screen guide.
❚❚ Auto Modes
Select these modes for simple, point-andshoot photography.
i Auto (0 25): Camera adjusts settings automati-
cally to produce optimal results with “point-andshoot” simplicity. Recommended for first-time
users of digital cameras.
j Auto (flash off ) (0 25): As above, except that the
flash will not fire even when lighting is poor.
Camera chooses shutter
speed and aperture, user
controls other settings.
S —Shutter-priority auto
(0 69): Choose fast shutter
speeds to freeze action,
slow shutter speeds to
suggest motion by blurring
moving objects.
A—Aperture-priority auto
(0 70): Adjust aperture to
soften background details or
increase depth-of-field to
bring both main subject and
background into focus.
M—Manual (0 71): Match
shutter speed and aperture
to your creative intent.
❚❚ Scene Modes
Selecting a scene mode automatically optimizes settings to suit the selected
scene.
k Port rait (0 30): Shoot portraits with back-
ground in soft focus.
l Landscape (0 30): Preserve details in
landscape shots.
p Child (0 31): Create portraits of children.
Clothing and background details are vividly
rendered while skin tones remain soft and
natural.
4
m Sports (0 31): Freeze motion for dynamic
sports shots.
n Close up (0 31): Take vivid close-ups of
flowers, insects, and other small objects.
o Night portrait (0 31): Shoot portraits
against a dimly-lit backdrop.
The Viewfinder
1
2
3
4
1 Framing grid (displayed when
On is selected for
Viewfinder options >
Viewfinder grid in the
setup menu) …………………132
2 Reference circle for center-
weighted metering…………74
3 Card warning indicator…… 183
4 Battery indicator………………..25
5 Focus points ……………………….46
6 Focus indicator …………….28, 49
7 Autoexposure (AE) lock
indicator…………………………..75
8 Shutter speed………………69, 71
9 Aperture (f-number)……70, 71
5
6 7
10 Battery indicator ………………. 25
11 Number of exposures
remaining ………………………26
Number of shots remaining
before memory buffer
fills ………………………………….. 54
White balance recording
indicator…………………………. 83
Exposure compensation value
…………………………………………76
Flash compensation
value ………………………………. 78
ISO sensitivity……………………. 62
12 “K” (appears when memory
remains for over 1000
exposures)……………………… 26
10 1281591311
1614
17
13 Flash-ready indicator………… 29
14 Flexible program
indicator………………………….68
15 Exposure indicator……………. 71
Exposure compensation
display……………………………..77
Electronic rangefinder …….132
16 Flash compensation
indicator………………………….78
17 Exposure compensation
indicator………………………….76
18 Auto ISO sensitivity
indicator………………………..120
19 Warning indicator ……………183
1918
D No Battery
When the battery is exhausted or no battery is inserted, the display in the viewfinder will
dim. This is normal and does not indicate a malfunction. The viewfinder display will return
to normal when a fully-charged battery is inserted.
D The Viewfinder Display
Owing to the characteristics of this type of viewfinder display, you may notice fine lines
radiating outward from the selected focus point. This is normal and does not indicate a
malfunction.
D The Viewfinder
The response time and brightness of the viewfinder display may vary with temperature.
X
5

The Information Display
Shooting information, including shutter speed, aperture, and
the number of exposures remaining, is displayed in the monitor
when the R button is pressed.
X
Camera in normal orientation
1
2
3
4
5
6
7
1 Shooting mode
2 Aperture (f-number) ……70, 71
3 Shutter speed ………………69, 71
4 Shutter-speed display………….7
5 Aperture display…………………..7
6 Exposure indicator……………. 71
Exposure compensation
Electronic rangefinder…….132
7 Auto-area AF indicator …….. 45
3D-tracking indicator……….. 45
Focus point……………………….. 46
29
i auto/
j auto (flash off) ………….. 25
Scene modes …………………. 30
Guide mode ……………………35
P, S, A, and M modes……….. 67
indicator…………………………. 77
28 27 26 25 24 23
111098 13
8 Help icon…………………………..183
9 Flash mode…………………………59
10 Exposure compensation ……76
11 Flash compensation…………..78
12 Number of exposures
13 “K” (appears when memory
14
15 Metering…………………………….74
16 AF-area mode…………………….44
17 Focus mode………………………..41
18 Release mode…………………….53
19 ISO sensitivity…………………….62
22
21
20
19
18
17
16
15
14
12
remaining ……………………….26
remains for over 1000
exposures)……………………….26
Active D-Lighting
Camera rotated 90° to shoot
1
3
7
9
10
22
21
20
8
……………….64
R button
in tall (portrait) orientation
29 28 27 26 25 24 23
19
18 17
20 White balance…………………… 80
21 Image size…………………………. 52
22 Image quality……………………. 50
23 Battery indicator……………….. 25
24 “Beep” indicator ………………131
25 Picture Control………………….. 87
26 Auto ISO sensitivity
indicator……………………….. 120
27 Manual flash indicator……. 123
Flash compensation indicator
for optional flash units …164
28 Date imprint indicator ……. 136
29 Eye-Fi connection
indicator……………………….. 139
2
6
12
13
11
16
15
14
6
❚❚ Changing Settings in the Information Display
To change settings for the items listed in the
information display, press the P button.
Highlight items using the multi selector and press
J to view options for the highlighted item.
items can also be adjusted using the command
dial and camera buttons (0 8).
Some
P button
A The Shutter-Speed and Aperture Displays
These displays provide visual indications of shutter speed and aperture.
Fast shutter speed, large
aperture (small f-number).
While the mode dial is rotated, this display is replaced by an image of the mode dial.
Slow shutter speed, small
aperture (large f-number).
A Turning the Monitor Off
To clear information from the display, press the R button again. Note that the monitor turns
off automatically while the shutter-release is pressed or if no operations are performed for
8 s (the default value). The information display can be restored by pressing the R button.
A See Also
For information on choosing how long the monitor stays on, see Auto off timers (0 130).
For information on choosing a design for the information display, see Info display format,
(0 125). For information on choosing whether information is displayed when the shutterrelease button is pressed; see Auto info display (0 127).
X
7
The Command Dial
The command dial can be used with other controls to adjust a variety of settings
when shooting information is displayed in the monitor.
M button: flash mode and flash compensation
E button:
aperture,
exposure
X
Fn (E) button: release mode,
image quality and size,
ISO sensitivity,
white balance,
ctive D-Lighting,
or framing grid display
Command dial
Choose a combination of
aperture and shutter speed
(mode P; 0 68).
Mode P Command dial Information display
Choose a shutter speed
(mode S or M; 0 69, 71).
compensation,
and flash
compensation
Mode dial
Choose an aperture
(mode A; 0 70).
Choose an
aperture
(mode M;
0 71).
8
Mode S or M Command dial Information display
Mode A Command dial
Information display
+
Mode M E button Command dial Information display
Set exposure
compensation
(mode P, S, or A;
0 76).
+
Mode P, S, or A
Choose a flash mode (0 59).
E button Command dial Information display
+
M button Command dial Information display
Adjust flash compensation (mode P, S, A, or M; 0 78).
+
P, S, A, or M M button E button Command dial Information display
+
X
9
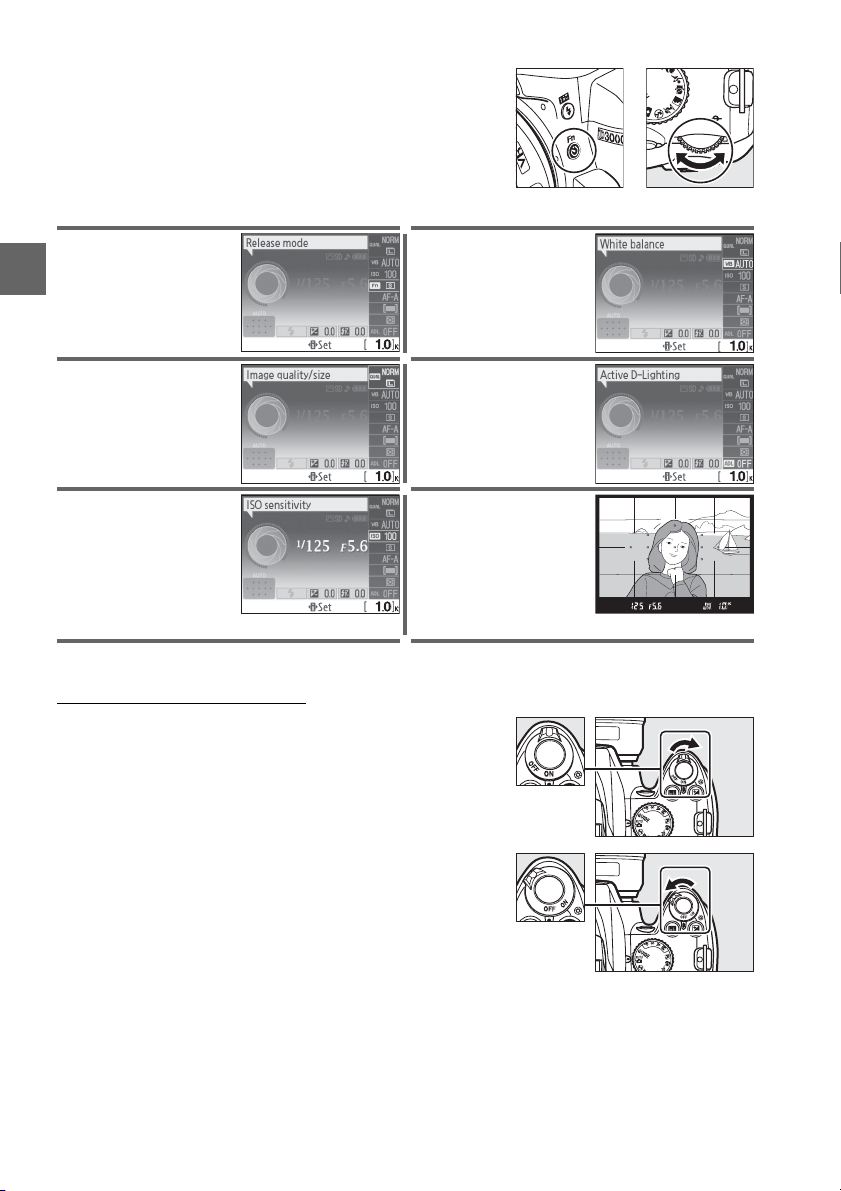
The role of the Fn (E) button can be selected using the
Buttons >
(0 134), allowing the following settings to be
adjusted by pressing the Fn (E) button and rotating
the command dial:
Release mode (0 53) White balance (0 80)
E/Fn button option in the setup menu
X
Image quality and size (0 50) Active D-Lighting (0 64)
ISO sensitivity (0 62) Set framing grid (0 132)
+
Fn (E) button Command dial
Viewfinder
The Power Switch
Rotate the power switch as shown to turn the camera
on.
Rotate the power switch as shown to turn the camera
off.
10

Camera Menus
Most shooting, playback, and setup options can
be accessed from the camera menus.
menus, press the G button.
To view the
G button
Ta bs
Choose from the following menus:
D: Playback (0 117) • N: Retouch (0 140)
•
• C: Shooting (0 119) • m: Recent settings (0 155)
• B: Setup (0 124)
Slider shows position in current menu.
Current settings are shown by icons.
Menu options
Options in current menu.
d
If a d icon is displayed at the bottom left corner of the
monitor, help can be displayed by pressing the Q (W)
button. A description of the currently selected option or
menu will be displayed while the button is pressed. Press
1 or 3 to scroll through the display.
Q (W) button
X
A Guide Mode
To display the guide menu, rotate the mode dial to GUIDE (0 35).
11
Using Camera Menus
The multi selector and J button are used to navigate the camera menus.
Move cursor up
J button: select highlighted item
Cancel and return to
previous menu
Select highlighted item or
display sub-menu
X
Follow the steps below to navigate the menus.
Move cursor down
1 Display the menus.
Press the G button to display the menus.
2 Highlight the icon for the current menu.
Press 4 to highlight the icon for the current
menu.
3 Select a menu.
Press 1 or 3 to select the desired menu.
G button
12
Loading…
-
Инструкции по эксплуатации
15
Языки:
Nikon D3000 инструкция по эксплуатации
(68 страниц)
- Языки:Русский
-
Тип:
PDF -
Размер:
6.62 MB
Просмотр
Nikon D3000 инструкция по эксплуатации
(216 страниц)
- Языки:Русский
-
Тип:
PDF -
Размер:
15.91 MB
Просмотр
Nikon D3000 инструкция по эксплуатации
(68 страниц)
- Языки:Словацкий
-
Тип:
PDF -
Размер:
6.39 MB
Просмотр
Nikon D3000 инструкция по эксплуатации
(68 страниц)
- Языки:Польский
-
Тип:
PDF -
Размер:
6.46 MB
Просмотр
Nikon D3000 инструкция по эксплуатации
(216 страниц)
- Языки:Нидерландский
-
Тип:
PDF -
Размер:
15.66 MB
Просмотр
Nikon D3000 инструкция по эксплуатации
(216 страниц)
- Языки:Исландский
-
Тип:
PDF -
Размер:
15.48 MB
Просмотр
Nikon D3000 инструкция по эксплуатации
(216 страниц)
- Языки:Венгерский
-
Тип:
PDF -
Размер:
15.59 MB
Просмотр
Nikon D3000 инструкция по эксплуатации
(216 страниц)
- Языки:Эстонский
-
Тип:
PDF -
Размер:
15.46 MB
Просмотр
Nikon D3000 инструкция по эксплуатации
(216 страниц)
- Языки:Португальский
-
Тип:
PDF -
Размер:
15.91 MB
Просмотр
Nikon D3000 инструкция по эксплуатации
(216 страниц)
- Языки:Итальянский
-
Тип:
PDF -
Размер:
15.81 MB
Просмотр
Nikon D3000 инструкция по эксплуатации
(68 страниц)
- Языки:Итальянский
-
Тип:
PDF -
Размер:
6.45 MB
Просмотр
Nikon D3000 инструкция по эксплуатации
(216 страниц)
- Языки:Немецкий
-
Тип:
PDF -
Размер:
15.71 MB
Просмотр
Nikon D3000 инструкция по эксплуатации
(216 страниц)
- Языки:Чешский
-
Тип:
PDF -
Размер:
15.52 MB
Просмотр
Nikon D3000 инструкция по эксплуатации
(68 страниц)
- Языки:Чешский
-
Тип:
PDF -
Размер:
6.4 MB
Просмотр
Nikon D3000 инструкция по эксплуатации
(216 страниц)
-
Тип:
PDF -
Размер:
15.59 MB
Просмотр
На NoDevice можно скачать инструкцию по эксплуатации для Nikon D3000. Руководство пользователя необходимо для ознакомления с правилами установки и эксплуатации Nikon D3000. Инструкции по использованию помогут правильно настроить Nikon D3000, исправить ошибки и выявить неполадки.
A semi-professional digital SLR Nikon D3000 camera has replaced the Nikon D60, popular among the beginners. The D3000 refers to a budget camera type, which is not bad, of course. A camera is a thing needed in any family. It is convenient and interesting. After all a professional can hardly catch a moment, when, for example, your beloved is sleeping with his mouth open, or your child put a pot on his head. And there is a share of intimacy in such family pictures, not for prying eyes. That’s it, for this category of photographers, namely for amateurs, the Nikon D3000 has been developed. But this does not mean that aside from home images, the Nikon D3000 is capable of nothing yet. So, for example, this camera can be a «great guide» into the world of professional images for novice photographers.
All the more so, photographers are not born. As a rule, the desire to become a professional turns up gradually. As far as you get a brand new camera, you start to randomly shooting all around. Having done in 2 weeks about two thousand shots, most of which should be deleted, the idea to expand the horizons in the knowledge of photography arises in your head. It means that finally the time comes to read the instruction manual. The Nikon D3000 is equipped with an interactive guide on the use of the camera, very convenient and accessible. So every owner of the Nikon D3000, having scrolled through the guide, will find a lot of interesting things.
The GUIDE mode in the D3000, the so-called interactive manual, is specially designed for beginners. Even if it is the first camera that you hold in your hands, there is no difficulty to understand everything. If you are a curious person, this mode is designed specifically for you. The GUIDE offers tips and descriptions during shooting, gives you the possibility to try some of the functions directly from the menu. In other words, if you noticed a letter “A”, for example, on the screen, and you do not know what can happen if you press it, the GUIDE explains, that it means the Aperture Priority mode. Then, if you are interested, you can try. Thus, the Nikon developers are trying to help their clients not to despair in case of loss of a paper user manual, as all the prompting base is now not only on paper but also in the camera.
As regards the D3000 functional features, then there is need to compare it with the Nikon D60. The speed and the sensor in the Nikon D3000 remained unchanged: the CCD sensor with the resolution of 10.2 megapixels, field of view crop factor is 1.5, light sensitivity is 100-1600 (expandable to 3200), with built-in dust removal due to move of a protective filter and air blowing.
Noise reduction is achieved through the improved processor. The number of focus points has increased to 11. The LCD monitor has reached 3 inches, while the resolution remained at the previous level, that is 230,000 pixels. However, graphical user interface has been improved, as, for example, when you turn the camera to view images, they automatically rotate.
The Nikon D3000 offers the following shooting modes: 2 types of Auto (with and without flash), Portrait, Landscape, Child, Sport, Macro, Night Portrait, Shutter-priority Auto («S”), Aperture-priority Auto («A»), Manual («M»), and Programmed Auto (“P”). As mentioned above the D3000 belongs to a budget class and is considered as a family camera, that’s why these modes are more than enough for you to get good and quality images.
The digital D3000 is able to save images in JPEG and RAW. Continuous shooting speed is 3 frames per second. Multiple digital effects, accumulated and multiplied in the previous models (the D60, the D90, and the D5000), has focused in the Nikon D3000. So, for example, the miniature effect, known as tilt-shift, is offered.
To summarize, it should be noted, that the Nikon D3000 is an interesting, convenient, and easy-to-use digital SLR camera. It features interesting functions, an attractive design, and an affordable price. Designed specifically for middle-class consumers, the Nikon D3000 can become the best friend of the family.