
Safety Warnings
No car seat can guarantee protection from injury in every situation, but proper use helps reduce the risk of serious injury or death. READ THIS MANUAL CAREFULLY.
- Review your vehicle owner’s manual for more information about airbags and car seat use.
- If your vehicle does not have a back seat, review your vehicle owner’s manual.
- The American Academy of Pediatrics (AAP) and the National Highway Traffic Safety Administration (NHTSA) recommend that children be rear-facing until age 2 or until they reach the maximum rear-facing height and weight rating for their seat.
- Choose the correct mode of use for the car seat depending on your child’s size. Infants less than 20 lbs. (9 kg) MUST use this car seat rear-facing.
- Select a suitable location for the car seat in your vehicle.
- Secure the car seat with a vehicle seat belt or LATCH that is properly routed as shown in this manual.
- The vehicle seat belt system MUST hold the car seat securely. Not all vehicle seat belts can be used with a car seat.
- If the vehicle seat belt does not hold the car seat securely, read “Vehicle Seat Belts” section 8-F and your vehicle owner’s manual.
- Always secure a car seat with LATCH or a vehicle seat belt, even when unoccupied. In a crash, an unsecured car seat can injure passengers.
- If the car seat is in a crash, it must be replaced. DO NOT use it again! A crash can cause unseen damage and using it again could result in serious injury or death.
- DO NOT use a car seat if it is damaged or missing parts.
- DO NOT use accessories or parts other than those provided by Graco. Their use could alter the performance of the car seat.
- DO NOT remove the LATCH system from the car seat. If using a vehicle seat belt to secure the car seat, LATCH connectors must be stored.
- Never leave a child unattended, even when sleeping. The child may become tangled in harness straps and suffocate or
strangle. - Rear-facing car seat must be properly leveled:
- Too reclined can result in injury or ejection.
- Being too upright can result in breathing difficulties.
- Never attach two LATCH connectors to one vehicle’s lower anchor point unless specifically allowed by the vehicle manufacturer.
- Do not use both the vehicle belt and LATCH belts at the same time when using the car seat rear or forward facing.
Right Mode of Use
Note: Preterm or low birth weight infants may be at special risk in a vehicle or aircraft. According to the AAP, these infants may suffer breathing issues if improperly reclined in a car seat. When rear-facing, use the corrected age for preemies. Graco advises that you have your physician or hospital staff evaluate your infant and recommend the proper car seat or car bed before you and your infant leave the hospital.
Install Cup Holders
Cup Holders
To attach the cup holders, match the right cup holder to the right side of the seat and the left to
the left. Align the tab on the cup holder with a slot in the seat and slide down. You will hear a “Click” when they are secured in place.
Car Seat Features
Rear-Facing
Rear-Facing: 4-40 lbs (1.8-18 kg)
Prepare to Install LATCH Rear-Facing
- Remove LATCH Strap from Storage Location Push in on the red buttons on the LATCH connectors and remove from storage position.
- Recline the Car Seat Place the car seat in 1st, 2nd or 3rd recline position.
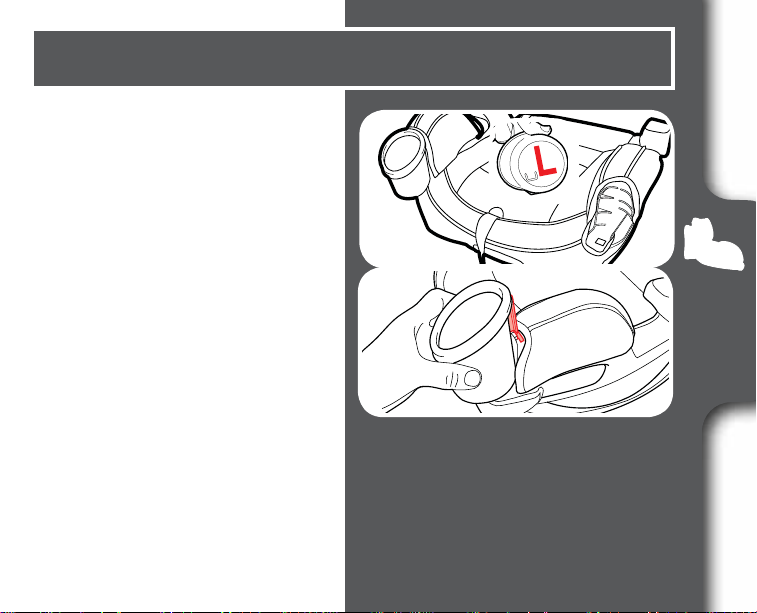
- Make Sure LATCH Strap is in the Rear-Facing Belt Path Marked With a Blue Label If correct, skip to section 3-C. Continue to next step if it is not.
- Loosen Harness Straps Lift up on the harness release lever while pulling out on the harness straps at the chest clip.
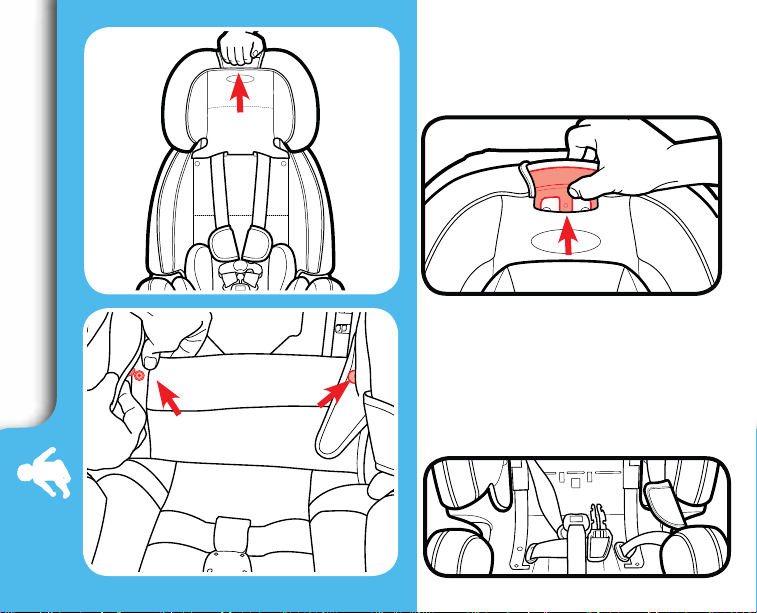
- Raise Headrest Squeeze the red handle and lift the headrest up.
- Unsnap Pad and Expose Seat Pan Undo the 2 snaps and pull the bottom of the seat pad to expose the plastic shell.
- Pull LATCH Connectors Out of Forward-Facing Belt Path
- Slide the Entire LATCH Strap Along the Bar to the Front of the Seat
- Push Each Connector Into the Rear-Facing Belt Path in Front of the Crotch Belt
- Replace the Seat Pad Move the headrest back to its proper position for your child.
Forward-Facing
Forward-Facing: 20-65 lbs (9-30 kg) 49 inches (125 cm) or less
Prepare to Install LATCH Forward-Facing
- Remove LATCH Strap from Storage Location Push in on the red buttons on the LATCH connectors and remove it from the storage position.
- Adjust the Car Seat Place the car seat in the 4th, 5th or 6th recline position.For Children 20-40 lbs
(9-18 kg) MUST use recline position 4. - Make Sure LATCH Strap is in the Forward-Facing Belt Path Marked with Orange Label If correct, skip to section 4-C. Continue to the next step if it is not.To Move LATCH Strap to Forward-Facing Belt Path
- Loosen Harness Straps Lift up on the harness release lever while pulling out on the harness straps at the chest clip.
- Raise Headrest Squeeze the red handle and lift the headrest up.
- Unsnap Pad and Expose Seat Pan Undo the 2 snaps and pull the bottom of the seat pad to expose the plastic shell.
- Pull LATCH Connectors Out of Rear-Facing Belt Path
- Slide the Entire LATCH Strap Up Along the Bar to the Top
- Push Each Connector Into the Forward-Facing Belt Path
- Replace the Seat Pad Move the headrest back to its proper position for your child.
Belt-Positioning Booster
Booster Use With Back: 30-100 lbs (14-45 kg) 38-57 in. (96-145 cm) at least 3 years old Booster Use Without Back: 40-120 lbs (18.1-54 kg) 40-57 in. (101-145 cm) at least 4 years old
Securing Child 5-point Harness
- Loosen Harness Straps Lift up on the harness release lever while pulling out on the harness straps at the chest clip. Unbuckle the chest clip and the crotch buckle. Place harness straps off to the sides.
- Place Your Child in the Seat Make sure their back is flat against the car seat back. Avoid bulky or heavy clothing. Doing so will prevent the harness straps from being tightened properly. Place a blanket over the child after you have secured the child.
- Place Harness Straps Over the Child’s Shoulders and Buckle You will hear a “click” when buckle tongues are securely attached. Pull up on each buckle’s tongue to make sure it is securely attached.
- Be sure the Harness Straps Are at the Proper Height Rear-Facing: Harness straps should be at or just below the child’s shoulders. The top of the head must be 1 in. below the headrest adjustment lever Forward-Facing: Harness straps should be at or just above the child’s shoulders. Top of child’s ears below the top of the headrest.
- To Raise or Lower Headrest/Harness Adjustment Lever Squeeze the adjustment lever and lift or lower the headrest for the proper harness height.
- Check the Crotch Buckle Position The correct slot is the one that is closest to your child without being underneath your child.
- To Adjust the Crotch Strap Recline the car seat and locate the metal retainer under the car seat shell.
- Rotate the Metal Retainer and Insert It Up Through the Shell and Pad From the top of the car seat, pull the crotch buckles out.
- Insert the Metal Retainer in the New Crotch Buckle Slot Reach underneath the car seat and pull the metal retainer through.
- Pull Up on Crotch Strap to Make Sure it is Secured
- Buckle the Chest Clip You will hear a “click” when the chest clip is securely buckled.
- Pull All the Slack Out From Around the Waist Pull up on the harness strap while pushing the chest clip down. Do this to both sides.
- Tighten the Harness by Pulling the Harness Adjustment Strap When you are not able to pinch any of the harness webbing at your child’s shoulder, the harness is tight enough. A snug harness should not allow any slack. It lies in a relatively straight line without sagging. It does not press on the child’s flesh or push the child’s body into an unnatural position.
- Raise the Chest Clip to Child’s Armpit Level
Choosing Vehicle Seat Location
Review your vehicle owner’s manual for seating locations.
The best seating location for this car seat is one that:
- Is recommended by your vehicle owner’s manual, and
- Results in a secure installation of this car seat
According to accident statistics, the safest place for your child in any vehicle is the back seat. The center of the back seat can be the safest during a possible side impact.
Some vehicles have specific requirements for where the car seat can be installed, so be sure to check your vehicle owner’s manual for available seating positions, if any. For example, sometimes the center rear seat has a lap belt only vehicle seat belt, which cannot be used when this car seat is in Booster mode.
In the event there is no available back seat and / or you have no other option than to place a child other than an infant in a rear-facing car seat in a front passenger seating position, the National Highway Traffic Safety Administration (NHTSA) recommends that you take the following steps:
- Ensure the child is properly restrained according to their age and size
- Move the seat as far back as possible
- Make sure the child is not leaning out of position, such as leaning forward into the deployment path of the air bag
- Set the air bag ON-OFF switch, if available, to the OFF position
- Move the seat as far back as possible
Unsafe Vehicle Seat Locations
Never install this car seat in any of the following vehicle seating locations:
What is LATCH?
This car seat can be installed using your vehicle’s LATCH system, if your vehicle is equipped with LATCH. All 2003 and newer model year vehicles are required to have a LATCH system, although some manufacturers began including LATCH earlier.
Some vehicle owner manuals use the term ISOFIX to identify the LATCH system. LATCH consists of lower anchors and top tether anchors, which are built-in to your vehicle, and connecting hooks that are built-in to your car seat. Lower anchors are used INSTEAD of the vehicle’s seat belt to secure the child seat to the vehicle. Top tethers are used IN ADDITION to the lower anchors OR the vehicle’s seat belt to secure a forward-facing car seat to the vehicle.
Review your vehicle’s owner manual for exact location and use.
Typical seat in a passenger vehicle. Other vehicle types may have different LATCH locations.
Choosing LATCH or Seat Belts
This car seat can be installed in your vehicle using either the vehicle seat belt OR the LATCH system. The LATCH system allows you to securely attach your safety seat in your car without using the vehicle seat belt and possibly to get a better fit. For more information on LATCH and how to determine if your vehicle is equipped with LATCH, see section
What is LATCH?.
For seating positions equipped with LATCH, experts recommend trying the LATCH installation first and only using the seat belt in that seating position if LATCH, for some reason, results in a looser fit. If you want to use the center rear seat and LATCH is not available in that position (check the vehicle owner’s manual), try the seat belt to be sure you can get a tight installation. If you cannot, try using LATCH in a different seating position.
Remember to only use LATCH in seating positions recommended by your vehicle manufacturer. Do not use the lower anchors of the child restraint anchorage system (LATCH system) to attach this child restraint when restraining a child weighing more than 42 lbs (19 kg) with the internal harnesses of the child restraint.
How to Remove LATCH and Tether
LATCH
To remove the LATCH from the lower anchors, push in on the red buttons and pull them off
Top Tether
To remove, lift up on the tether lock to release the tension. Press in on the hook’s spring. Push tether hook in, then lift up and pull away from tether anchor.
Vehicle Seat Belts
Review your vehicle owner’s manual for vehicle seat belt use
This car seat can be installed using a vehicle seat belt. To do this, you will need to change the seat belt to a locked mode for use with car seats. With some vehicle seat belts, this is done with the latchplate; with other vehicle seat belts, this is done with the retractor.
Vehicle Seat Belt Terms
Lap/Shoulder Belt Installation – Rear-Facing/Forward-Facing Modes
Always review your vehicle owner’s manual for specific information about your vehicle seat belts. There are three types of retractors: ELR (Emergency Locking Retractor), ALR (Automatic Locking Retractor) , and Switchable (ELR switch to ALR). To determine your type of retractor, follow these steps:
- Slowly pull the belt out about halfway and stop.
- Let the belt retract back several inches.
- Try to slowly pull the belt out more. If the belt cannot be pulled any further, it is ALR. If it can be pulled further, go to the next step.
- Slowly pull the belt all the way out, and then allow it to retract several inches.
- Try to pull the belt all the way out again. If it cannot be pulled out, it is Switchable. If it can still be pulled out freely, it is ELR.
Note: Most vehicles manufactured after 1996 will have Switchable retractors in the back seat. If you have any questions about your retractor type, consult your vehicle owner’s manual or call Graco for assistance.
How to Lock Your Lap and Shoulder Vehicle Seat Belt
Sliding Latch Plate and Switchable Retractor
A latchplate that slides freely on the belt webbing and cannot, by itself, hold the belt snug around a car seat. When installing the car seat, route the vehicle seat belt through the proper belt path and buckle it in. Slowly pull the shoulder belt all the way out to switch it to locking mode. Then, as you pull the vehicle seat belt tight, feed all the slack back into the retractor. Grab the sides of the seat at the belt path and slide the seat side-to-side and front-to-back. The seat should not move more than 1 inch (2.5 cm).
Note: With the vehicle seat belt in this locking mode, all the tension is upwards in the shoulder belt. This may start to tilt your car seat sideways. If this happens, use a locking clip instead of this switching the retractor. See Sliding Latch Plate and ELR Retractor.
For more manuals by Graco, visit ManualsLibraryy
Graco 4Ever All-in-one Car Seat-FAQs
When should I change my Graco 4Ever to a booster?
You should switch to a booster once your child reaches the maximum weight or height for the forward-facing mode. It’s also recommended to use a belt-positioning booster seat when your child is 4′ 9″ tall or under.
What are the rules for rear-facing with the Graco 4Ever?
1. 4-22 lb (1-8 kg), less than 1 year old: Must be rear-facing.
2. 22-40 lb (10-18 kg): Should remain rear-facing.
3. 22-40 lb (10-18 kg) and can sit unassisted: Can switch to forward-facing.
4. 40-65 lb (18-30 kg): Should be forward-facing.
When should I move to a backless booster?
Your child should be at least 38 inches tall and weigh at least 40 pounds before transitioning to a backless booster seat. It’s also recommended that your child is at least 4 years old for both physical and maturity reasons.
When can I remove the Graco 4Ever infant insert?
There is no specific age or weight limit for removing the infant insert. It should be removed when the child no longer needs the extra support.
When should I switch to forward-facing?
Your child can switch to forward-facing once they have outgrown the rear-facing car seat, and they are at least 2 years old. They should use a 5-point harness until they reach 40 lb (18 kg) and can sit properly without moving out of position.
Do Graco 4Ever car seats expire?
Yes, the Graco 4Ever car seat expires 10 years from the date of manufacture, which is indicated on the seat.
What is the correct car seat angle for the Graco 4Ever?
The recommended angle is between 40º and 45º, ensuring your child’s head does not fall forward and reducing strain on the neck and head.
What is the height limit for Graco 4Ever in rear-facing mode?
The height limit for rear-facing is 43 inches.
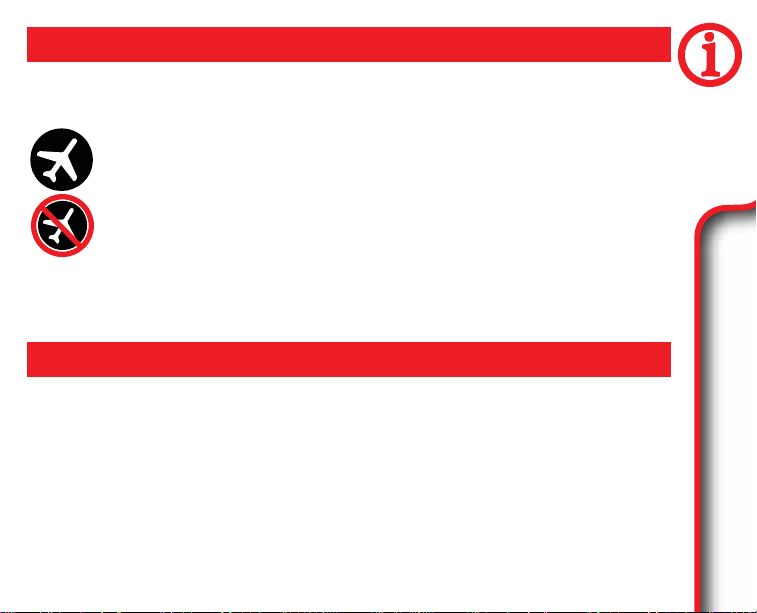
Can the Graco 4Ever DLX be used on an airplane?
Yes, the Graco 4Ever DLX is certified for use on airplanes. It should only be used in forward-facing aircraft seats.
When should I remove the infant insert?
The infant insert should be removed when your child weighs 11 lbs. Ensure that the shoulder harness straps are positioned at or below your child’s shoulders.
Is it safe to use the Graco car seat without the base?
Yes, you can use the Graco car seat without the base by installing it with the vehicle seat belt. You should not use both the seat belt and the base at the same time.
When should I switch to a booster seat with the Graco 4Ever?
Once your child outgrows the harnessed car seat, they should use a Belt-Positioning Booster Seat until the vehicle seat belt fits properly. Typically, this happens when the child reaches 4′ 9″ tall, usually around ages 8-12.
PD276106E 4/14
www.gracobaby.com
Do not install or use this
child restraint until you
read and understand
the instructions in this
manual.
FAILURE TO PROPERLY
USE THIS
CHILD RESTRAINT
INCREASES THE
RISK OF SERIOUS
INJURY OR DEATH IN
A SUDDEN STOP OR
CRASH.

Important Pages 6-16
1-A Safe Use Checklist
1-B Before You Begin
Register This Car Seat
If You Need Help
Certification
Car Seat’s Useful Life
Vehicle Seat Protection
Warm Weather Use
1-C Safety Warnings
1-D Right Mode of Use
Features Pages 17-23
2-A Car Seat Features
Rear-Facing Use Pages 24-38
3-A Rear-Facing Checklist
3-B Prepare to Install LATCH Rear-Facing
2

Rear-Facing Continued
3-C Installing With LATCH Straps
3-D Installing With Vehicle Seat Belt
Forward-Facing Use Pages 39-53
4-A Forward-Facing Checklist
4-B Prepare to Install LATCH Forward-Facing
4-C Installing Using the LATCH Strap
4-D Installing Using the Vehicle Seat Belts
Belt-Positioning Booster Use Pages 54-68
5-A Booster Seat Checklist
5-B Prepare for Backed Booster Use
5-C Install Backed Booster
5-D Prepare Backless Booster Use
5-E Install Backless Booster
3

Securing Child Pages 69-81
6-A Securing Child 5-Point Harness
6-B Securing Child Backed Booster
6-C Securing Child Backless Booster
6-D Securing With Belt-Positioning Clip
Care & Cleaning Pages 82-86
7-A Cleaning Seat Pad
7-B Cleaning Crotch Buckle
7-C Cleaning Harness and LATCH Straps
7-D Accessories
Additional Information Pages 87-99
8-A Choosing Vehicle Seat Location
8-B Unsafe Vehicle Seat Locations
8-C What is LATCH?
4

Additional Information Continued
8-D Choosing LATCH or Seat Belts
8-E How to Remove LATCH and Tether
8-F Vehicle Seat Belts
5
1-A Welcome to the Graco Family!
Your child’s safety depends on you. No car seat can guarantee protection from injury in
every situation, but proper use helps reduce the risk of serious injury or death.
Even if this car seat seems easy to figure out on your own, you must follow the detailed
instructions in this instruction manual to ensure the steps below are performed correctly.
SAFE USE CHECKLIST
Choose the correct mode of use for your
child, depending on their weight.
• Rear-Facing: 4-40 lbs. (1.8-18 kg)
• Forward-Facing: 20-65 (9-30 kg)
49 in. (125 cm) or less
• Booster Use: With back: 30-100 lbs.
(14-45 kg) 38-57 in. (96-145 cm)
Without back: 40-120 lbs. (18.1-54 kg)
40-57 in. (101-145 cm)
• Children less than 20 lbs (9 kg) MUST
use this car seat rear-facing.
6
For More Information…
Review section 1-D.

SAFE USE CHECKLIST
For More Information…
Choose a suitable location for this car seat
in your vehicle.
• Never place a child rear-facing in a
seating position with an active frontal
airbag.
• You MUST use a lap and shoulder
vehicle seat belt when using as a
booster seat.
Install this car seat tightly in your vehicle.
• Car seat should not move at the belt path
more
side, front to back when installed rear
facing or forward-facing.
• Use the top tether strap when using
forward-facing.
than 1 in. (2.5 cm) from side to
Review section 8-A.
Review sections:
Rear-Facing 3-C or 3-D.
Forward-Facing 4-C or 4-D.
Booster 5-C or 5-D
7
Important
SAFE USE CHECKLIST
Secure your child tightly in this car seat
• Rear-Facing: Harness strap height
MUST be at or just below top of child’s
shoulders. Top of head must be 1 in.
below the headrest adjustment lever.
• Forward-Facing: Harness strap height
MUST be at or just above top of child’s
shoulders. Top of child’s ears below top
of headrest.
• Harness strap snug enough you cannot
pinch the strap.
• Chest clip at armpit level.
• Booster Use: shoulder belt should lie
between child’s neck and edge of
shoulder and the lap belt should lay low
on the child’s hips.
.
8
For More Information…
Review section 6.

1-B Before You Begin
Register This Child Restraint
Please fill out the prepaid registration postcard attached to the harness
and mail it in today or register online at www.gracobaby.com/
carseatregistration.
Child restraints could be recalled for safety reasons. You must register
this restraint to be reached in a recall. Send your name, address, and the
restraint’s model number and manufacturing date to:
Graco Children’s Products, Inc.
Attn: Customer Service
3 Glenlake Parkway Atlanta, GA 30328
or call 1-800-345-4109
or register online at
www.gracobaby.com/carseatregistration
For recall information, call the U.S. Government’s Vehicle Safety Hotline at 1-888327-4236 (TTY: 1–800–424–9153), or go to http://www.NHTSA.gov.
Important
9
continue next page
For future reference or if you change addresses, record the model name,
model number, date of manufacture and purchase date of this car seat on the
below. You can find this information either on the registration card if you still
have it or on the date label located on the back of the car seat.
Model Name _________________________
Model Number _______________________
Date of Manufacture __________________
Date of Purchase _____________________
If You Need Help
In the U.S.A, please contact our Customer Service Department with any
questions you may have concerning parts, use, or maintenance. When you
contact us, please have your product’s model number and date of manufacture ready so that we may help you efficiently. These numbers can be found
on a sticker on the back side of your car seat.
For additional resources or to get your car seat checked by a child passenger
safety technician, please visit the following web sites:
www.nhtsa.gov • www.seatcheck.org • www.safekids.org • www.cpsc.gov
10
continue next page
Certification
This child restraint meets or exceeds all applicable requirements of Federal
Motor Vehicle Safety Standard 213 for use in motor vehicles.
This child restraint is certified for use in aircraft only when used
with the internal harness system.
This child restraint is NOT certified for use in aircraft when used as
a booster seat because aircrafts do not have shoulder belts.
Contact the airline for their specific polices.
Car Seat’s Useful Life
STOP using this car seat and throw it away 10 years after the date of manufacture. Look for this sticker on back of the car seat.
Graco Children’s Products Inc. advises against loaning or passing along
a car seat unless you know the complete history of the product. We also
advise against purchasing a car seat second hand.
11
Important

Vehicle Seat Protection
Protect vehicle seat. Use a car seat mat, towel, or thin blanket under and
behind car seat.
Warm Weather Use
Car seat parts can get very hot in the sun or warm weather. To avoid burns,
always check before putting child in car seat.
1-C Safety Warnings
No car seat can guarantee protection from injury
in every situation, but proper use helps reduce the
risk of serious injury or death. READ THIS MANUAL
CAREFULLY.
12
Failure to follow these instructions and child restraint’s labels
can result in child striking the vehicle’s interior during a sudden
stop or crash.
! NEVER PLACE THIS CHILD RESTRAINT REAR-FACING
IN A VEHICLE SEATING LOCATION THAT HAS AN
ACTIVE FRONT AIR BAG.
If an air bag inflates, it can hit the child and car seat with great
force and cause serious injury or death to your child.
! Review your vehicle owner’s manual for more information
about air bags and car seat use.
! If your vehicle does not have a back seat, review your
vehicle owner’s manual.
! The American Academy of Pediatrics (AAP) and National
Highway Traffic Safety Administration (NHTSA) recommends
that children be rear-facing until age 2 or until they reach the
maximum rear-facing height and weight rating for their seat.
13
continue next page
Important
! Choose the correct mode of use for the car seat depending
on your child’s size. Infants less than 20 lbs. (9 kg) MUST use
this car seat rear-facing.
! Select a suitable location for the car seat in your vehicle.
! Secure car seat with a vehicle seat belt or LATCH that is
properly routed as shown in this manual.
! Vehicle seat belt system MUST hold car seat securely. Not
all vehicle seat belts can be used with a car seat.
! If vehicle seat belt does not hold car seat securely, read
“Vehicle Seat Belts” section 8-F and your vehicle owner’s
manual.
! Always secure car seat with LATCH or a vehicle seat belt,
even when unoccupied. In a crash, an unsecured car seat can
injure passengers.
! If car seat is in a crash, it must be replaced. DO NOT use it
again! A crash can cause unseen damage and using it again
could result in serious injury or death.
! DO NOT use car seat if it is damaged or missing parts.
14
! DO NOT use accessories or parts other than those provided
by Graco. Their use could alter the performance of the car
seat.
! DO NOT remove LATCH system from car seat. If using vehicle
seat belt to secure car seat, LATCH connectors must be stored.
! Never leave child unattended, even when sleeping. Child
may become tangled in harness straps and suffocate or
strangle.
! Rear-facing car seat must be properly leveled:
• Too reclined can result in injury or ejection.
• Too upright can result in breathing difficulties.
! Never attach two LATCH connectors to one
vehicle lower anchor point unless specifically
allowed by the vehicle manufacturer.
! Do not use both the vehicle belt and LATCH belts
at the same time when using the car seat rear or forward
facing.
15
Important
1-D Right Mode of Use
4 lbs
(1.8 kg)
Important
Rear-Facing with 5-Point Harness
4-20 lbs (1.8-9 kg) less than 1
year old MUST be rear-facing.
20-40 lbs (9-18 kg) CAN be
rear-fcing.
Note: Preterm or low birth weight infants may be at special risk in a vehicle or aircraft.
According to the AAP, these infants may suffer breathing issues if improperly reclined in
a car seat. When rear-facing, use the corrected age for preemies. Graco advises that you
have your physician or hospital staff evaluate your infant and recommend the proper car
seat or car bed before you and your infant leave the hospital.
30 lbs
20 lbs
(14 kg)
(9 kg)
Forward-Facing with 5-Point Harness
20-40 lbs (9-18 kg) can sit upright
unassisted CAN be forward-facing.
40-65 lbs (18-30 kg) SHOULD be
forward-facing.
Booster Mode with Vehicle Lap/Shoulder Seat Belt
30-65 lbs (14-30 kg) CAN be in backed booster mode.
40-65 lbs (18.1-30 kg) CAN be in backless booster mode.
Over 65 lbs (30 kg) MUST be in booster mode.
40 lbs
(18 kg)
16
65 lbs
(30 kg)
120 lbs
(54 kg)
2-A Install Cup Holders
Cup Holders
To attach the cup holders, match
the right cup holder to the right
side of the seat and the left to
the left. Align the tab on the
cup holder with the slot in the
seat and slide down. You will
hear a “Click” when they are
secured in place.
Cup Holders
Installing
17
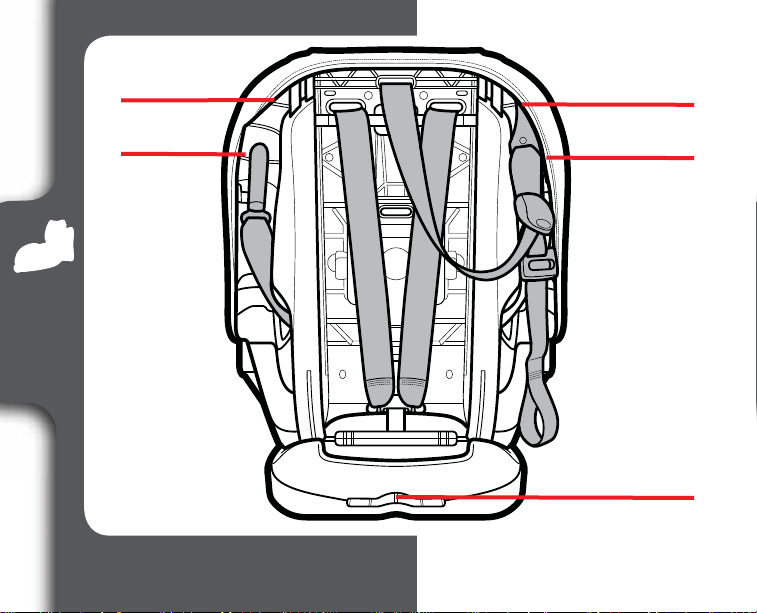
2-B Car Seat Features
A
B
D
C
E
H
I
Features
N
L
F
G
J
K
M
18

A Headrest/Harness
Adjustment Lever
B Headrest
C Booster Shoulder Belt
Guide
D Headrest Infant Pillow
E Infant Body Pillow
F Harness Covers
G Harness Straps
H Chest Clip
I Buckle
J Harness Release Lever
(under flap)
K Harness Adjustment Strap
L Recline Handle
M Seat Base
N Cup Holder
Features
19
A
D
Features
B
G
E
C
H
20
F

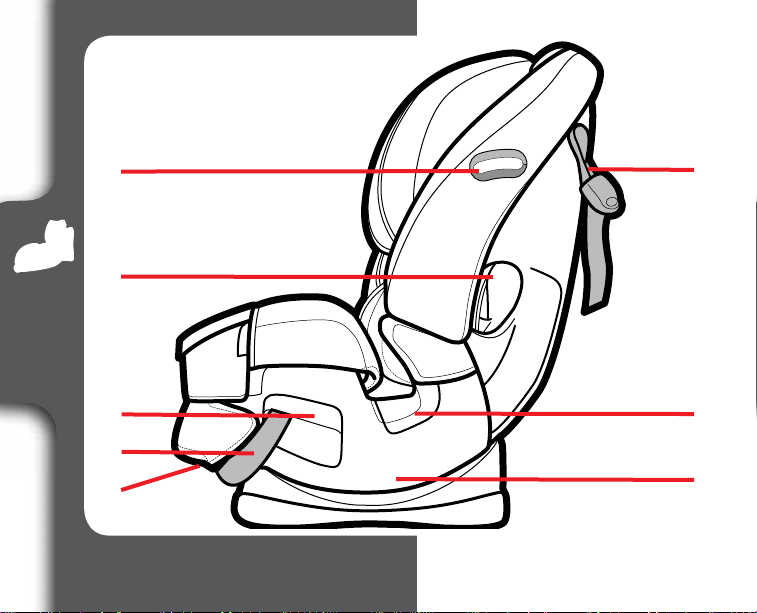
A Level Indicator
B Top Tether Strap
C LATCH Strap
D Forward-Facing Belt Path
E Booster Lap Belt Path
F Recline Position Indicator
G Rear-Facing Belt Path
H Rear-Facing LATCH Strap
Storage (under seat)
Features
21
A
A
B
Features
B
C
22

A Top Tether Strap Storage
B Forward-Facing LATCH
Strap Storage
C Instruction Manual Storage
Features
23
3-A Rear-Facing
LATCH Strap
Vehicle Seat Lap/Shoulder Belt
Rear
Facing
Rear-Facing:
4-40 lbs (1.8-18 kg)
• Place car seat rear-facing in the
vehicle back seat.
• Make sure LATCH strap or vehicle
seat belt is routed through the rearfacing belt path marked with a blue
label.
• Install this car seat tightly in your
vehicle. Car seat should not move
at the rear-facing belt path more
than 1 in. (2.5 cm) from side to
side, front to back.
• Check recline level making sure the
bubble is within the blue area.
• Harness straps need to be even
with or just below the top of
child’s shoulders and chest clip is
24
at armpit level.
• Infants who weigh less than
20 lbs (9 kg) MUST be rear-
facing.
• The American Academy of
Pediatrics (AAP) and NHTSA
recommend that children be rearfacing until the age of 2 or until
they reach the maximum rearfacing height and weight. This
car seat can remain rear-facing
up to 40 lbs.
NEVER place this
child restraint rearfacing in a vehicle
seating location
that has an active
front air bag.
25
Vehicle Seat Lap Belt
Facing
Rear
Rear
Facing
3-B Prepare to Install LATCH
Rear-Facing
1. Remove LATCH Strap from
Storage Location
Push in on the red buttons on the
LATCH connectors and remove
from storage position.
2. Recline the Car Seat
Place the car seat in 1st, 2nd or
3rd recline position.
26
3.
Make Sure LATCH Strap is
in the Rear-Facing Belt Path
Marked With a Blue Label
If correct, skip to section 3-C.
Continue to next step if it is not.
To Move LATCH Strap to Rear-Facing Belt Path
4.
Loosen Harness Straps
Lift up on the harness release
lever while pulling out on the
harness straps at the chest clip.
Facing
Rear
27
continue next page
Rear
Facing
5. Raise Headrest
Squeeze the red handle and lift
headrest up.
6. Unsnap Pad and Expose
Seat Pan
Undo the 2 snaps and pull
bottom of seat pad to expose the
plastic shell.
28
7.
Pull LATCH Connectors Out
of Forward-Facing Belt Path
8.
Slide Entire LATCH Strap
Along Bar to the Front of the
Seat
9.
Push Each Connector Into
the Rear-Facing Belt Path in
Front of Crotch Belt
Facing
Rear
29
continue next page
Rear
Facing
10. Replace Seat Pad
Move headrest back to its proper
position for your child.
30
Loading…
Description
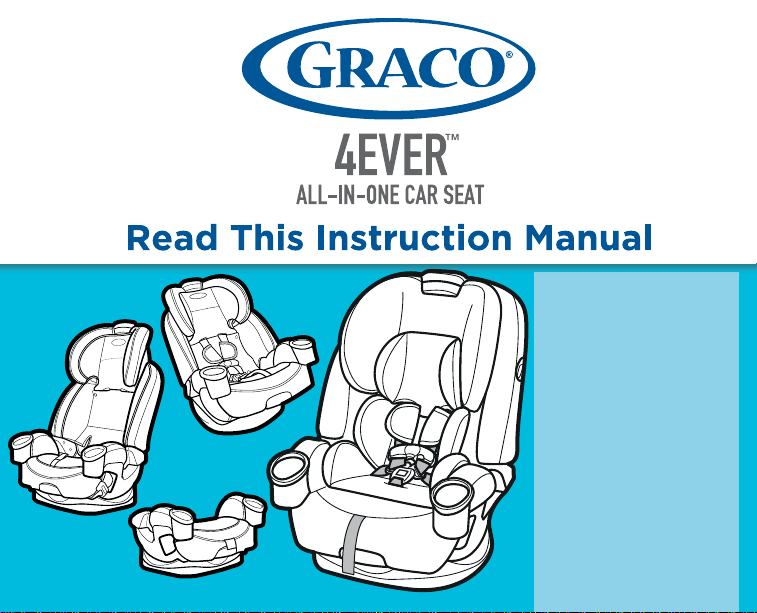
This PDF instruction manual is for the Graco 4Ever 4-in-1 Convertible car seat.
About the Item
Graco 4Ever 4-in-1 Convertible Car Seat (4-120 lb baby to booster seat)
The Graco 4Ever All-in-1 Convertible Car Seat gives you 10 years with one car seat. It’s comfortable for your child and convenient for you as it transitions from rear-facing infant car seat (4-40 lb) to forward-facing 5-point harness seat (22-65 lb) to high-back belt-positioning booster (40-100 lb) to backless belt-positioning booster (40-120 lb). For a proper fit, the Simply Safe Adjust Harness System and 10-position headrest lets you adjust the harness and headrest together, with no rethreading. The 6-position recline keeps your child comfortable, while the InRight LATCH system with one-second attachment makes installation easy. It’s the only seat that truly goes from baby to booster!
Read this Instruction manual (NWL0001110919A 12/20)
Do not install or use this child restraint until you read and understand the instructions in this manual.
Lea este manual de instrucciones (NWL0001110921A 12/20)
No instale ni use este sistema de seguridad para niños hasta que haya leído y entendido las instrucciones en este manual.
Document(s) available
(PDF) INSTRUCTION MANUAL / MANUAL DE INSTRUCCIONES
Available languages
ENGLISH (EN) | ESPAÑOL (ES)
SUMMARY OF CONTENTS
IMPORTANT
1-A Quick Guide to Your Manual
1-B Welcome to the Graco Family
1-C Right Mode of Use
1-D Before You Begin: Register This Car Seat, If You Need Help, Certification, Car Seat’s Useful Life, Vehicle Seat Protection, Warm Weather Use
1-E Safety Warnings
FEATURES
REAR-FACING
3-A Rear-Facing Use
3-B Install Rear-Facing with Lower Anchor Attachment
3-C Install Rear-Facing with Vehicle Seat Belt
FORWARD-FACING
4-A Forward-Facing Use
4-B Install Forward-Facing with LATCH
4-C Install Forward-Facing with the Vehicle Seat Belt
BOOSTER
5-A Booster Use
5-B Install Highback Booster
5-C Install Backless Booster
SECURING CHILD
6-A Securing Child 5-Point Harness
6-B Securing Child Highback Booster
6-C Securing Child Backless Booster
MOVING LOWER ANCHOR ATTACHMENT
ACCESSORIES
VEHICLE INFORMATION
CARE & CLEANING
10-A Cleaning Seat Pad
10-B Cleaning Buckle
10-C Cleaning Harness, Lower Anchor and Tether
INSTALLATION QUICK START GUIDE (NWL0000918916C 12/20)
Why download the Manual?
This instruction manual provides all the information from Graco Children’s Products about the 4Ever 4-in-1 Convertible Car Seat, as detailed in the table of contents. Reading it completely will address most questions you might have. You can download and save it for offline use, including viewing it on your device or printing it for your convenience if you prefer a paper version.
How to download the Manual?
Download it by clicking the button below
Helped you out?
Glad to hear that. It would be awesome if you could . . .
-
КиберДни
Условия возврата
Обменять или вернуть товар надлежащего качества можно в течение 14 дней с момента покупки.
Подробнее
О товаре
Характеристики
Группа: 1/2/3 (9-36 кг)
Крепление: система Latch
Установка: по ходу движения
| Код товара | 1000008647 |
|---|---|
| Артикул | 1906081 |
| Тип автокресла | кресло |
| Длина упаковки, см | 60 |
| Ширина упаковки, см | 60 |
| Высота упаковки, см | 50 |
| Вес упаковки, кг | 10 |
| Страна производства | Китай |
Инструкции и сертификаты
- Инструкция
-
- Общие впечатления
- Очень мягкое, удобное, вместительное автокресло! Единственное кресло, в котором мы смогли пристегнуть пухлого малыша в объемном комбинезоне и в положении лёжа! Пользуемся ещё 4ый год, очень удобное! Ребенок в нем спокойно ехал двое суток и ни устал. Советую всем!
- Достоинства
- Вместительное, много положений, длинные ремни, подлокотники, съёмные чехлы
- Недостатки
- Нет
-
- Общие впечатления
- Пользуемся автокреслом уже 2.5 года! Отличное кресло! Сначала тоже были в шоке от того, что кресло ходуном ходит, а когда установили все правильно — полный восторг! Сиденье очень удобное, дочь ехала на юг всю дорогу в нем и даже не просилась встать! Ткань на ощупь очень приятная, в магазине даже не нашли что-то похожее, остальные такие грубые были! Подстаканники — мегавещь! Доча хранит там все, кроме стаканов )))) когда покупали, показалось дороговато, но сейчас никаких денег на него не жалко! Теперь выбираем кресло для второго ребенка этой же фирмы!
- Достоинства
- Приятная ткань, хорошая и надёжная фиксация кресла, подстаканники
- Недостатки
- Нет
-
- Общие впечатления
- Самое лучшее кресло, которое мы смотрели, все снимается и стирается, ребёнку удобно сидеть, спать, 6 положений регулировки спинки, мягкое, приятное , надежное, ремни не жмут
-
- Общие впечатления
- Креслом пользуемся уже 3 года. Довольны. Качество не подкачало. Цена соответствует заявленному товару. Один раз заплатил и на долго. Вся ткань снимается и стирается в стиральной машинке. Весь пластик разбирается и протирается на ура. Проверено и одобрено.
- Достоинства
- Много функционально. Безопасно. Удобно.
- Недостатки
- Инструкция на английском. Что бы ребёнок с рождения чувствовал себя комфортно нужно докупить специальный матрасик.
-
- Общие впечатления
- Пользуемся второй год. В нем действительно короткие ремни, я это кресло разбирала и собирала полностью 3 раза, запаса длины нет!!! В зимнем комбезе или куртке все внатяг, ребенок ноет, что туго. ИНСТРУКЦИЮ ИЗУЧИЛА ОТ КОРКИ ДО КОРКИ!!! за такие деньги можно было на 10см ремень удлинить. Установка по ходу движения относительно лёгкая, но попасть с первого раза не всегда получается. Я не нашла ручку для переноски кресла! Подскажите где она!)))) Кресло нелегкое и таскать его черти как неудобно, за подголовник не вариант, можно оторвать.
- Достоинства
- Лежачее положение в любой момент легко и просто, съёмные чехлы для стирки
- Недостатки
- Со временем клинит одну сторону ремней, получается что один короче другого и решается это только если кресло снять и ремни закрепить заново! Короткие ремни!!! Нет ручки для переноски кресла!
-
- Общие впечатления
- После долгого подбирается цена и качество решили брать именно этот вариант. По книге устанавливать не вариант, но нашли видео на просторах интернета и с лёгкостью поставили. фиксация ребенка как в майке и шортах, так и в зимней одежде удобное. Не давит и держит. Не разочаровалась ни разу, для второго ребенка такой же будем брать.
- Достоинства
- Комфортность ребенку и удобства родителям если ребенок уснул, можно уложить.
- Недостатки
- По инструкции практически не установить. Лучше найти видео в интернете.
-
- Общие впечатления
- Шикарное автокресло.
- Достоинства
- Одни плюсы, тоже долго разбиралась с крепежом ) у нас розовое, теперь нужно серое )
- Недостатки
- Нет
-
- Общие впечатления
- Просто превосходное во всем, с ремнями все нормально, не обращайте внимания на негатив по этому поводу, обращайте внимание НА ИНСТРУКЦИЮ!!!

- Достоинства
- Отличное во всем!
- Недостатки
- По всей видимости, его сняли с производства
-
- Общие впечатления
- Купили по скидке, кресло супер удобное, сын ездит уже 2года. Пристёгивается легко. Все удобно и продуманно. Не пожалели не разу что купили))).
-
- Общие впечатления
- Читаю негативные отзывы и не понимаю почему проще написать негатив, чём разобраться с креслом. Нормальные ремни, крепко крепиться и мега удобное. Недавно ездили в далёкое путешествие, ребёнок кресло сильно замазал едой, все легко отстегнули и постирали, кресло как новое. Ребёнку нравится. Когда засыпает я меняю положение на лежачее, подстаканники тоже удобно. За 2 года эксплуатации только плюсы нашла. Не читайте негативные отзывы!
- Достоинства
- Мегаудобное
- Недостатки
- Нет

Все отзывы (25)
Вопросы покупателей
-
Здравствуйте! Можно такое кресло привезти под заказ? Здравствуйте. При оформлении заказа можно выбрать любой доступный Вам способ доставки.
Ещё товары
Часто задаваемые вопросы
Цена на Автокресло Graco 1/2/3 (9-36 кг) — 13999 ₽.
Да, можем доставить товар в любой регион России, в том числе в следующие города: Москва, Санкт-Петербург, Екатеринбург, Краснодар, Пермь, Самара, Нижний Новгород, Воронеж, Новосибирск, Казань.
Вам будет начислено 280 бонусов. Бонусами можно оплатить 100 % стоимости покупки: 1 бонус = 1 рубль.
Да, в нашем интернет-магазине возможно купить данный товар в рассрочку. Для этого выберите оплату Долями при оформлении заказа. Вы платите одну четверть от суммы заказа сразу, а остальные три будут списываться с карты через каждые две недели.
Да, у нас вы можете увидеть 20 фото под названием товара.
В нашем интернет-магазине действует много акций и скидок. Вы можете ознакомиться с ними в разделе акций из меню сайта.
Цены в интернет-магазине могут отличаться от розничных магазинов.
Категории
- Детское автокресло
- Аксессуары для автокресла
- База для автокресла
- Подушка для путешествий
- Аксессуары для автокресла
- Бустеры
- Автокресло britax romer
- Cybex автокресло
- Макси кози автокресло
- Дуна автокресло
- Recaro автокресло
- Автокресло happy baby
- Автокресло babyton
- Автокресло rant
- Автокресло siger
- Автокресло chicco
- Автокресло isofix
- Nania автокресло
- Автокресло peg perego
- Graco автокресло
- Автокресло joie
- Автокресло evenflo
- Автокресло inglesina
- Автокресло baby care
- Автокресло olsson
- Автокресло конкорд
Report abuse
Libble takes abuse of its services very seriously. We’re committed to dealing with such abuse according to the laws in your country of residence. When you submit a report, we’ll investigate it and take the appropriate action. We’ll get back to you only if we require additional details or have more information to share.
Product:
Get your user manual by e-mail
Enter your email address to receive the manual of Graco 4ever in the language / languages: English as an attachment in your email.
The manual is 12,2 mb in size.
You will receive the manual in your email within minutes. If you have not received an email, then probably have entered the wrong email address or your mailbox is too full. In addition, it may be that your ISP may have a maximum size for emails to receive.
The manual is sent by email. Check your email
If you have not received an email with the manual within fifteen minutes, it may be that you have a entered a wrong email address or that your ISP has set a maximum size to receive email that is smaller than the size of the manual.