
Computer- und Trainingsanleitung
für Ruder-Fitness-Trainer „COACH LS”, Art.-Nr. 7985-670
Der Umwelt zuliebe: Wir drucken auf 100% Altpapier!
D
GB
F
NL
E
I
PL

2
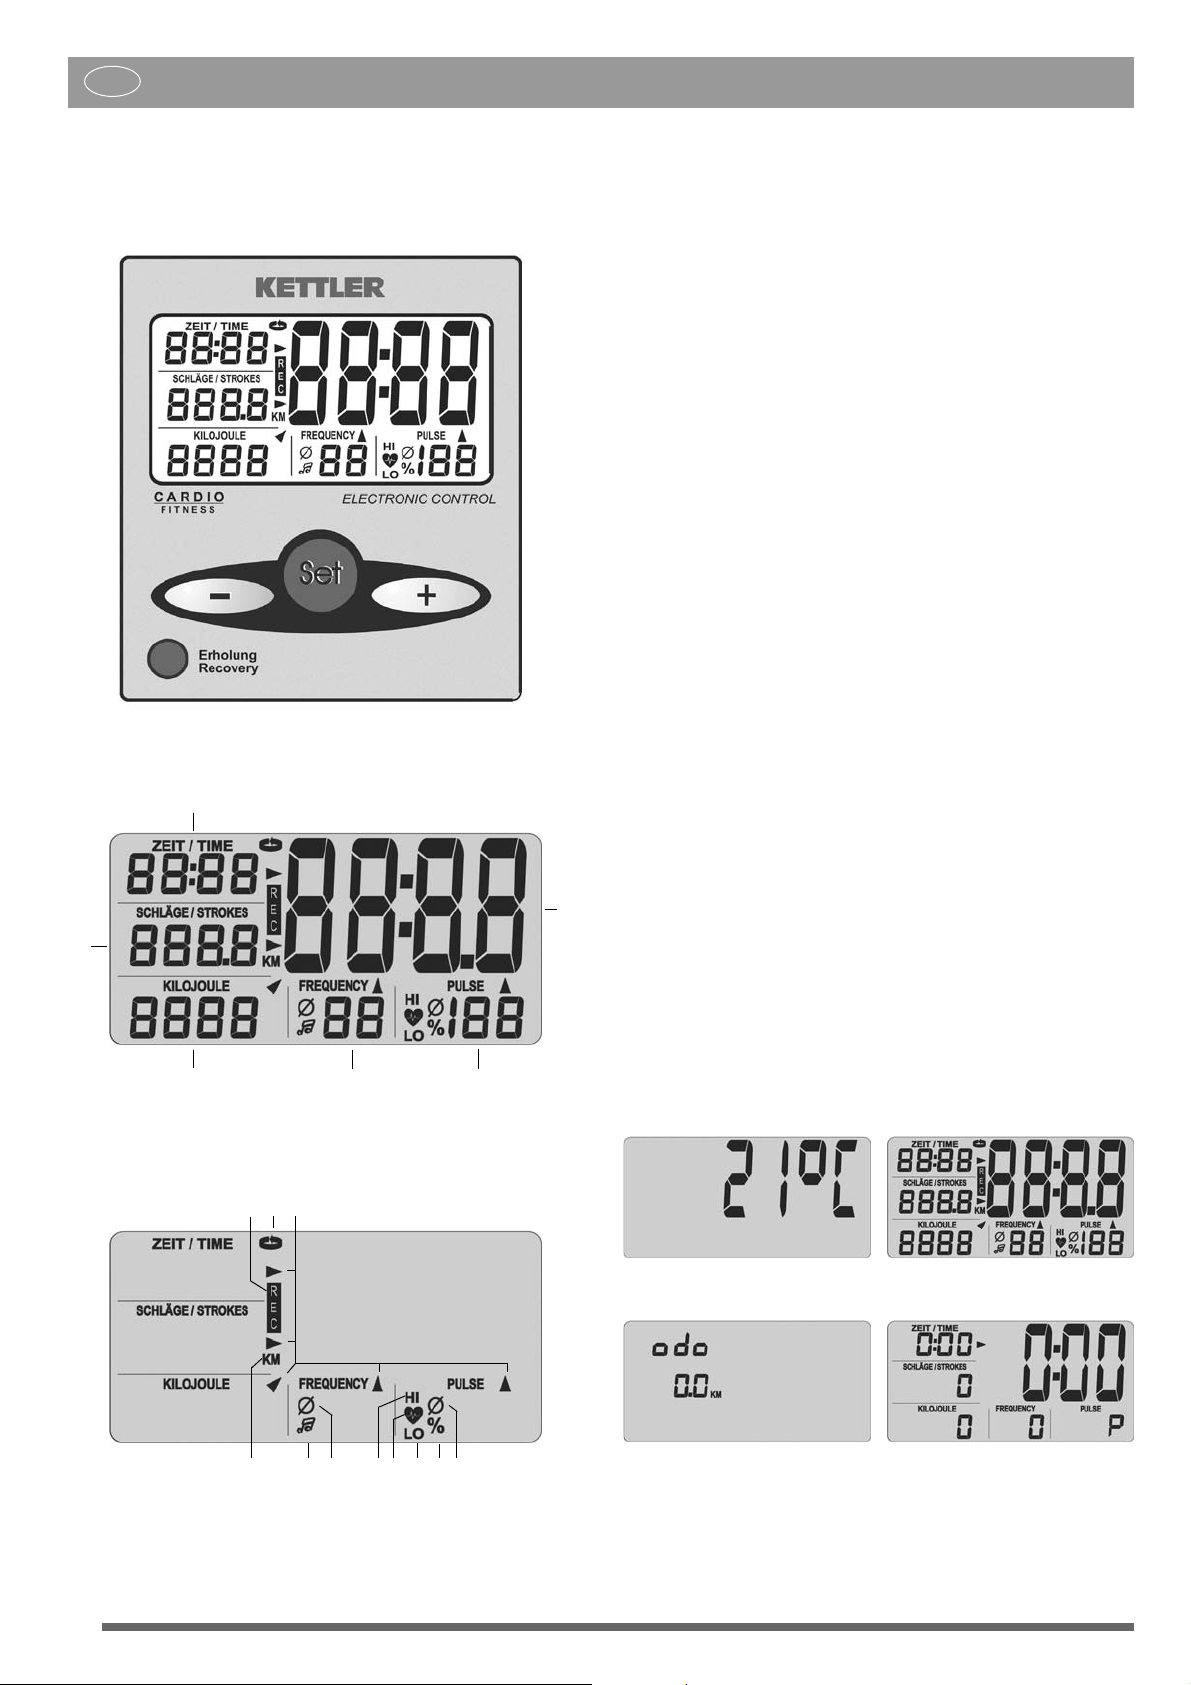
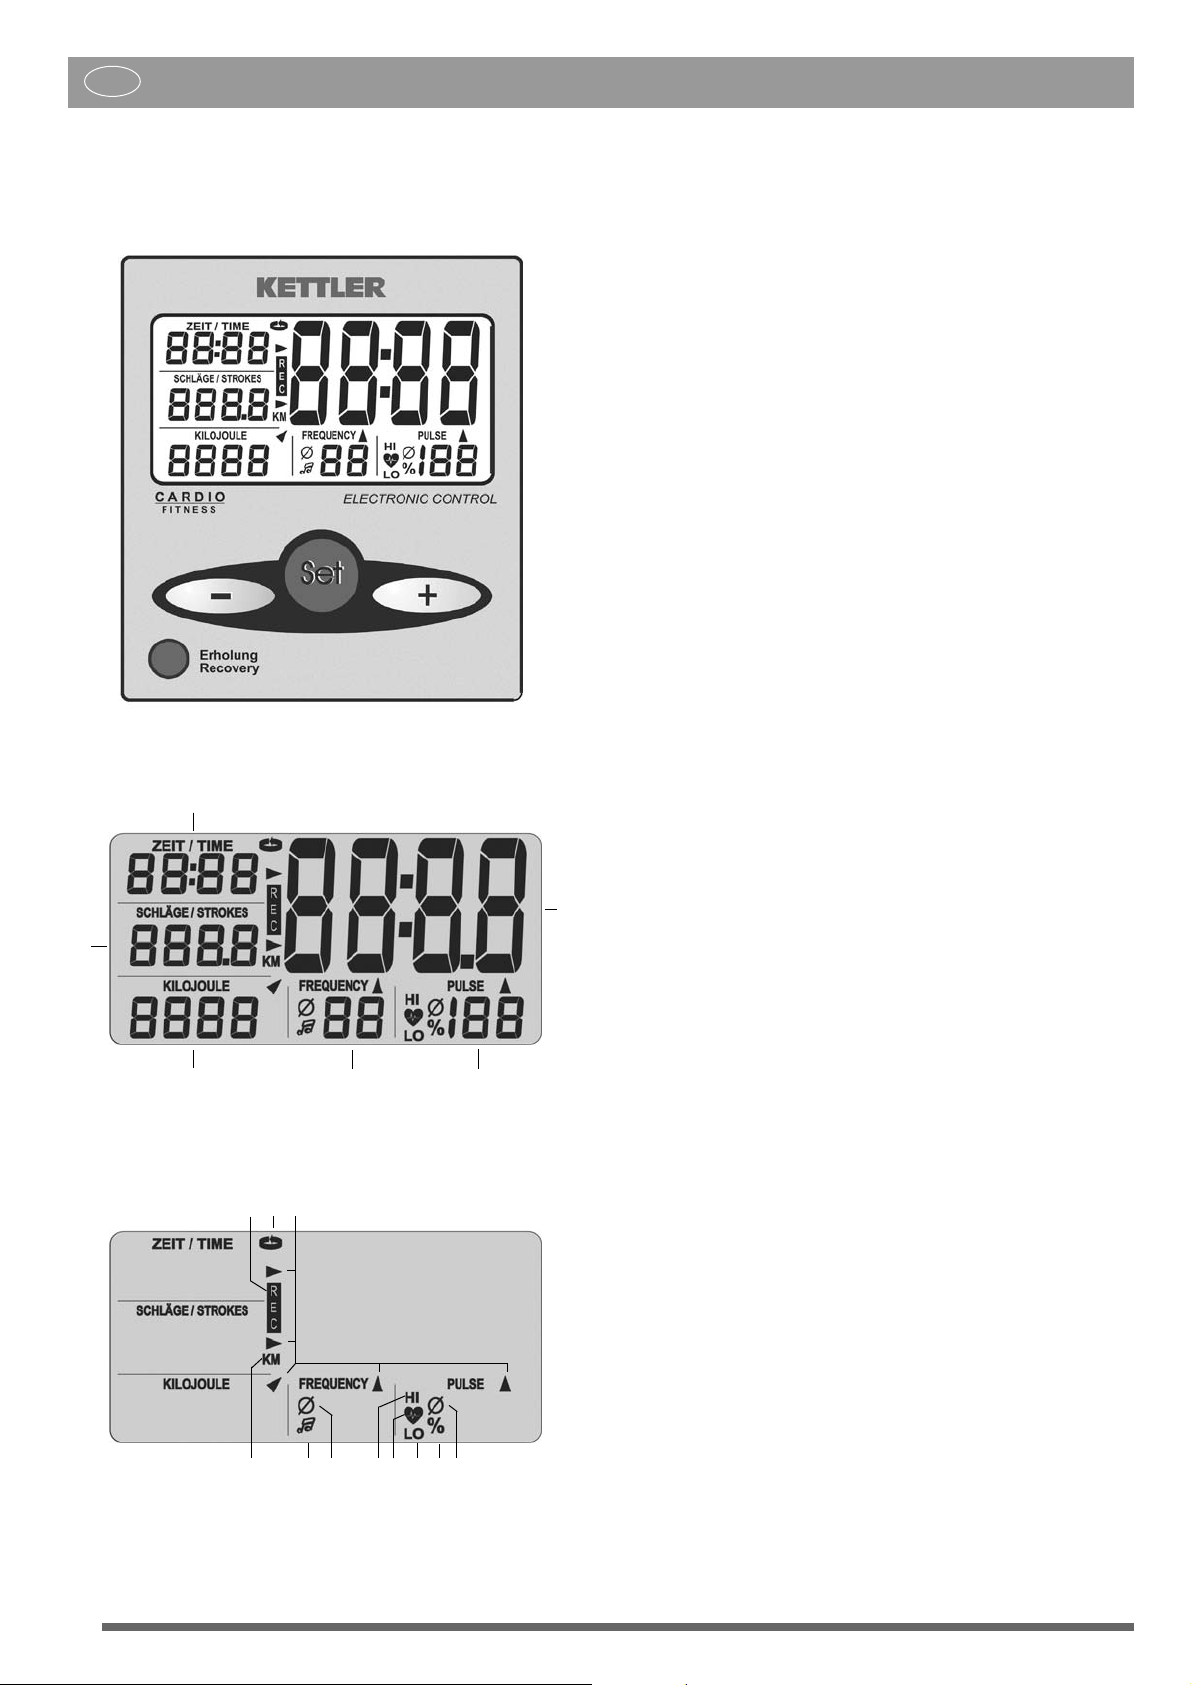
Bedienungsanleitung für den Trainingscomputer
mit Digitalanzeige ( ST2500- 4)
Ausstattung:
Werte:
1 Zeit
……………………………0:00 — 99:59 [min:sec]
2 Ruderschläge …………….0 — 9999
Gesamtkilometer
(Odometer) [0 — 999.9 km]
3 Energieverbrauch
……….0 — 9999 [KJ]
4 Schlagfrequenz ………….0 — 99 [Schläge/min]
5 Puls
…………………………..50 — 199 [Schläge/min]
6 Gross-Anzeige
………….. Raumtemperatur [0 — 40 °]
Fitnessnote [F1.0 — F6.0]
Symbole:
a REC
…………………………. Erholungspuls
b SCAN ……………………… automatischer Anzeigewechsel
c Pfeile
……………………….. aktueller Bereich in der Gross-Anzeige
d KM
…………………………..
Gesamtkilometer
e Note
……………………….. akustische Schlagfrequenzvorgabe aktiv
f Durchschnitt ……………… Schlagfrequenz + Puls
g HI
……………………………. Überschreitung des oberen Pulswertes
h Herz
………………………… blinkt im Takt des Pulsschlages
i LO …………………………… Unterschreitung des unteren Pulswertes
j Prozent
……………………. % von Maximalpuls-Vorgabe
Tasten:
Minus-Taste ……………………..Werte vermindern (Anzeigebereich zurück)
Set-Taste
…………………………. Funktionstaste [Vorgabe, Wechsel,
Rücksetzen (Reset) der Anzeige]
Plus-Taste
……………………….. Werte erhöhen (Anzeigebereich vor)
Recovery- Taste
……………….. Funktionstaste [Fitnessnotenermittlung]
Anschlüsse (hinten)
Buchse (2 polig)
………………. für den Geschwindigkeitsaufnehmer
Batteriefach
…………………….. 2 Batterien: Mignon1,5 Volt, LR6, AA,
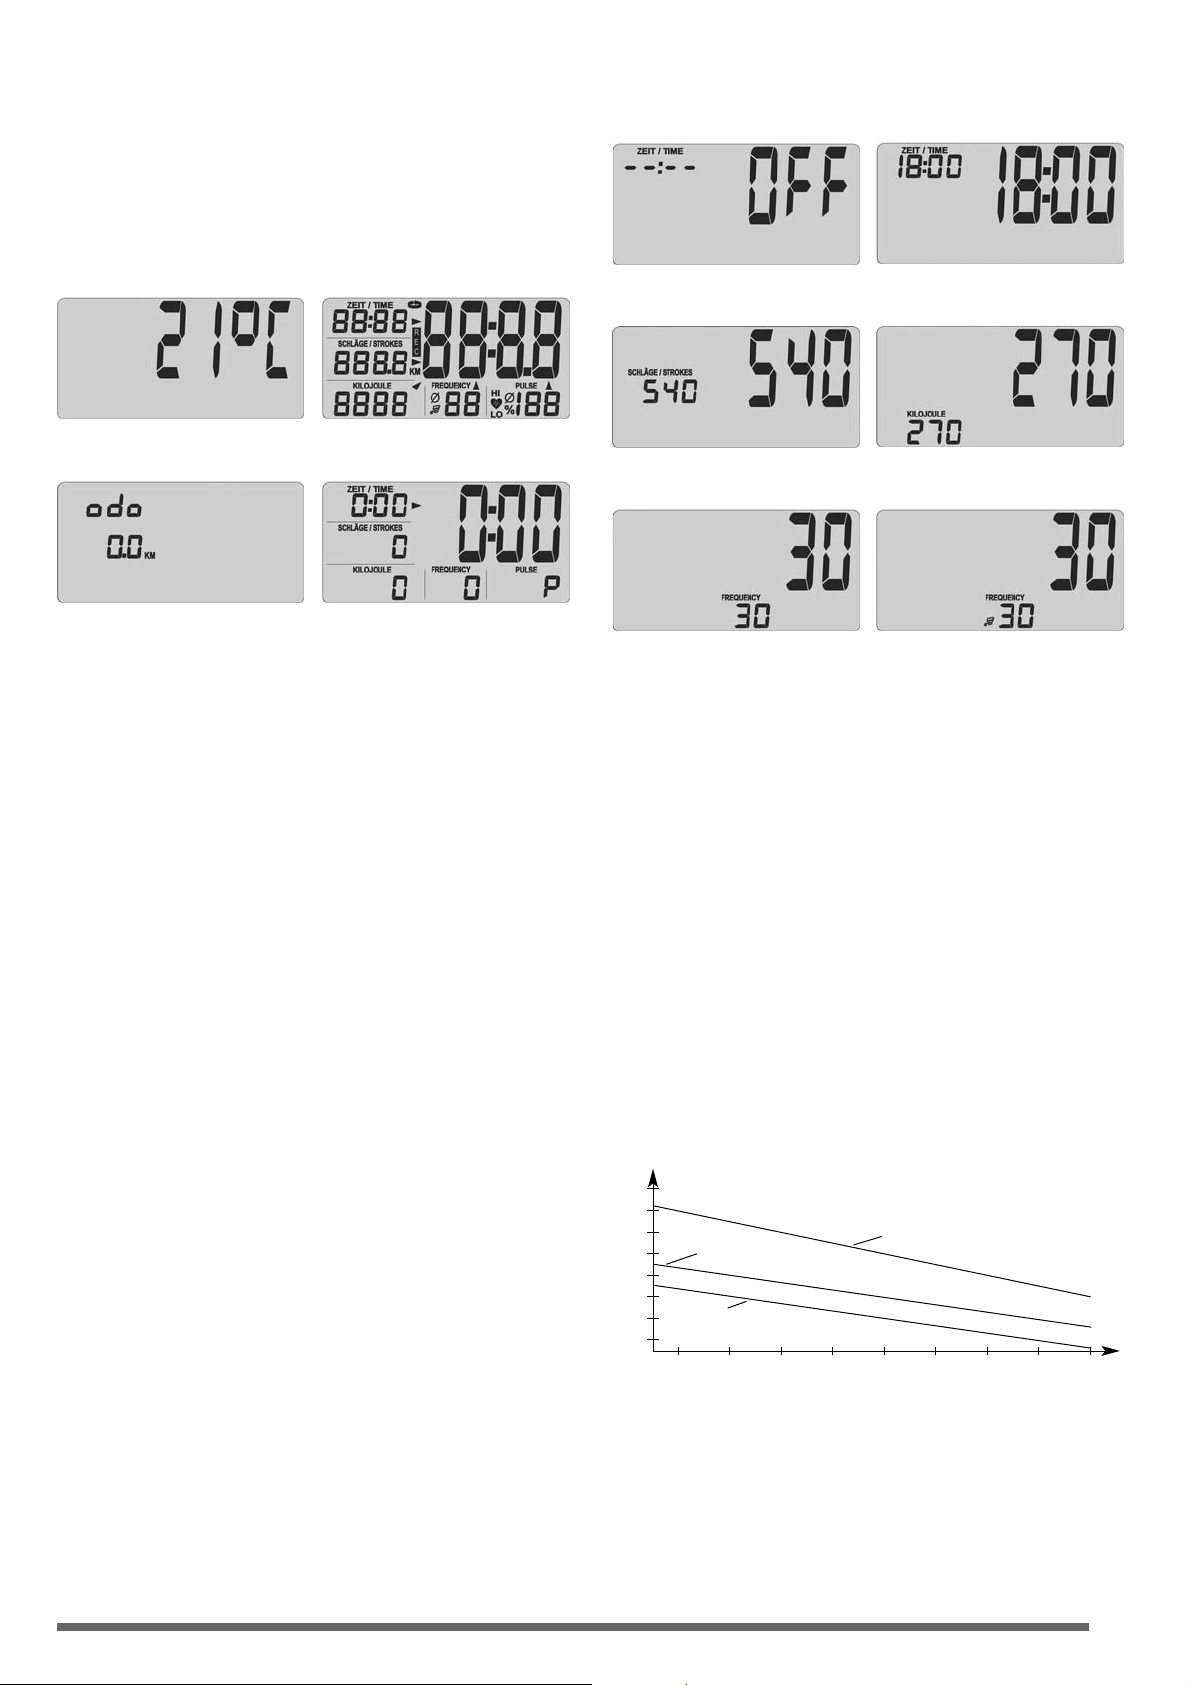
1.0 Anzeigen vor dem Training
1.Raumtemperatur …………… Bild 1 [vor und nach dem Training]
2.Vollanzeige
………………….. Bild 2 [nach Ruderbeginn oder Tasten-
druck, 1 sec]
3.Gesamtkilometer
…………… Bild 3 [Anzeigedauer:10 Sekunden oder
Taste]
4.Trainingsbereitschaft
……… Bild 4
Bild 1 Raumtemperatur
Bild 4 TrainingsbereitschaftBild 3 Gesamtkilometer
Bild 2 Vollanzeige
Trainingswerte in der Anzeige
3
1
2
4
5
6
Symbole in der Anzeige
a
bc
d
e
f
gh i j
f
Funktionen und Bedienung des Trainingscomputers
D
2.0 Pulserfassung
Dieser Trainingscomputer erfasst den Puls über das Cardio Puls Set. Der
Empfänger befindet sich auf der Platine der Anzeigeelektronik.
Pulserfassung mit dem Cardio Puls Set
Legen Sie den Brustgurt an. Beachten Sie die dazugehörige Anleitung.
Pulsanzeige
Sie haben die Startanzeige (Bild 4) eingestellt.
Das Herzsymbol (h) blinkt im Takt Ihres Pulsschlages.
Nach einigen Sekunden wird der Pulsschlag als Wert (5) angezeigt.
3.0 Training ohne Vorgabe von Trainingsdaten
Starten Sie das Training. Alle Werte zählen aufwärts.
4.0 Training mit Vorgaben von Trainingsdaten
Einstellen von Zeit (1),Ruderschlägen (2), Kilojoule (3), Schlagfrequenz (4)
Puls(5).
Sie haben die Startanzeige (Bild 4) eingestellt. Drücken Sie die Set-Taste,
kommen Sie in den Vorgabenmodus und mit der + oder — Taste stellen Sie
den gewünschtenWert ein.
Drücken Sie länger auf die +/- Taste erfolgt ein schneller Vor- oder Rücklauf
der Vorgabewerte.
Drücken Sie die +/- Tasten zusammen, springt der Wert auf “OFF” zurück.
Mit der Set-Taste erreichen Sie die nächsten Vorgaben.
Nach den Pulsvorgaben verlassen Sie mit der Set-Taste den Vorgabemodus
und sehen die Anzeige mit den eventuellen Eingaben(Bild 17/18).
Drücken Sie länger die Set-Taste, springt die Anzeige auf die Vollanzeige
(Resetfunktion) (Bild 2)
Bemerkung
Geben Sie innerhalb von 4 Minuten keine Vorgabewerte ein, springt die
Anzeige auf Raumtemperatur (Bild 1).
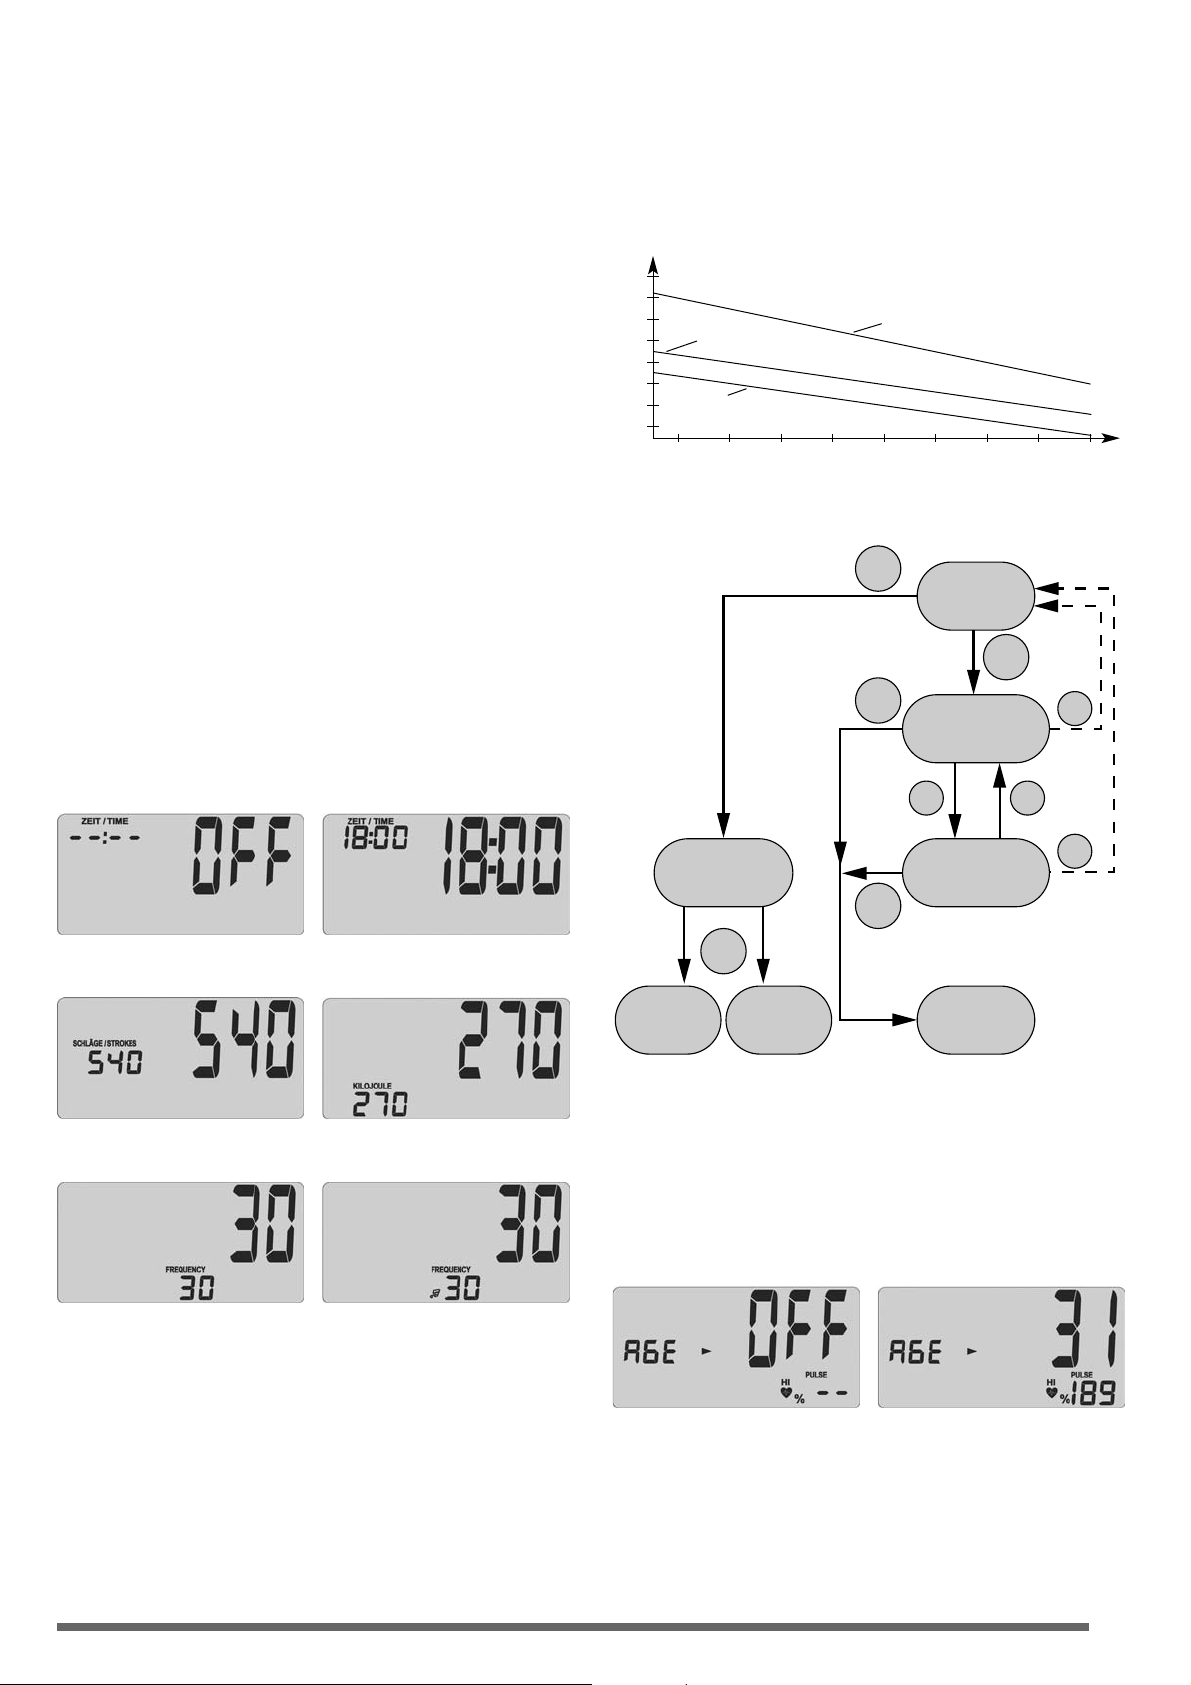
Bild 5: Zeit-Vorgabe beginnt mit “OFF”
Bild 6 Zeit-Vorgabe: z.B. 18 Minuten
Bild 7: Ruderschläge-Vorgabe : z.B. 540 Schläge
Bild 8: Energieverbrauch-Vorgabe: z.B. 270 Kilojoule
Bild 9: Frequenz-Vorgabe: z.B. 30 Schläge pro Minute
Bild 10: Piepsen aktiviert: bei 30 Schlägen piepst es alle 2 Sekunden
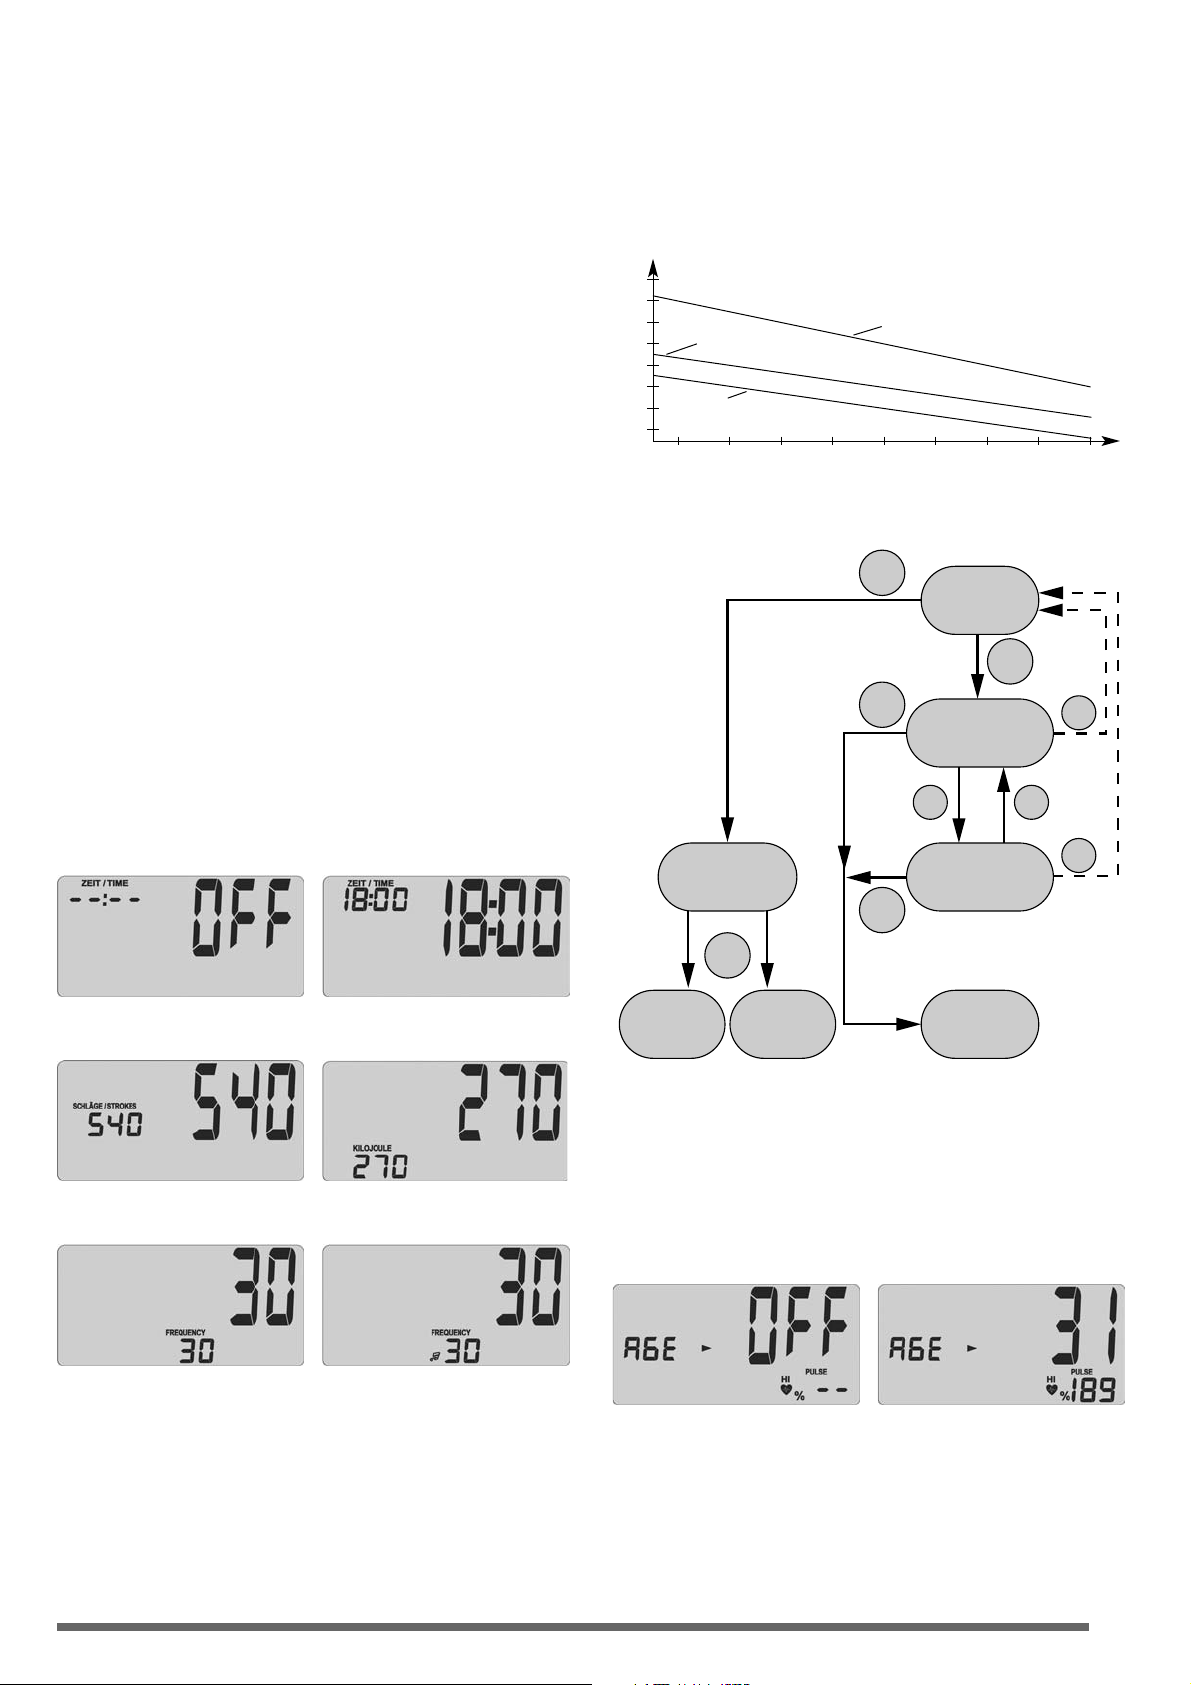
Der richtige Trainingspuls
Der Trainingspuls ist abhängig von Alter und Trainingsziel. Es gibt für jedes
Alter und Trainingsziel den “richtigen“ sogenannten aeroben Trainingsbereich,
der durch eine obere und eine untere Pulsgrenze (+/- 10 Schläge) gekennzeichnet ist. Der Trainingspuls sollte immer innerhalb der aeroben Zone liegen.
Die maximale Pulsfrequenz (220 minus Lebensalter) darf nicht überschritten
werden. Gesunde Personen orientieren sich an nachstehendem Diagramm
(vgl. auch 4.2).
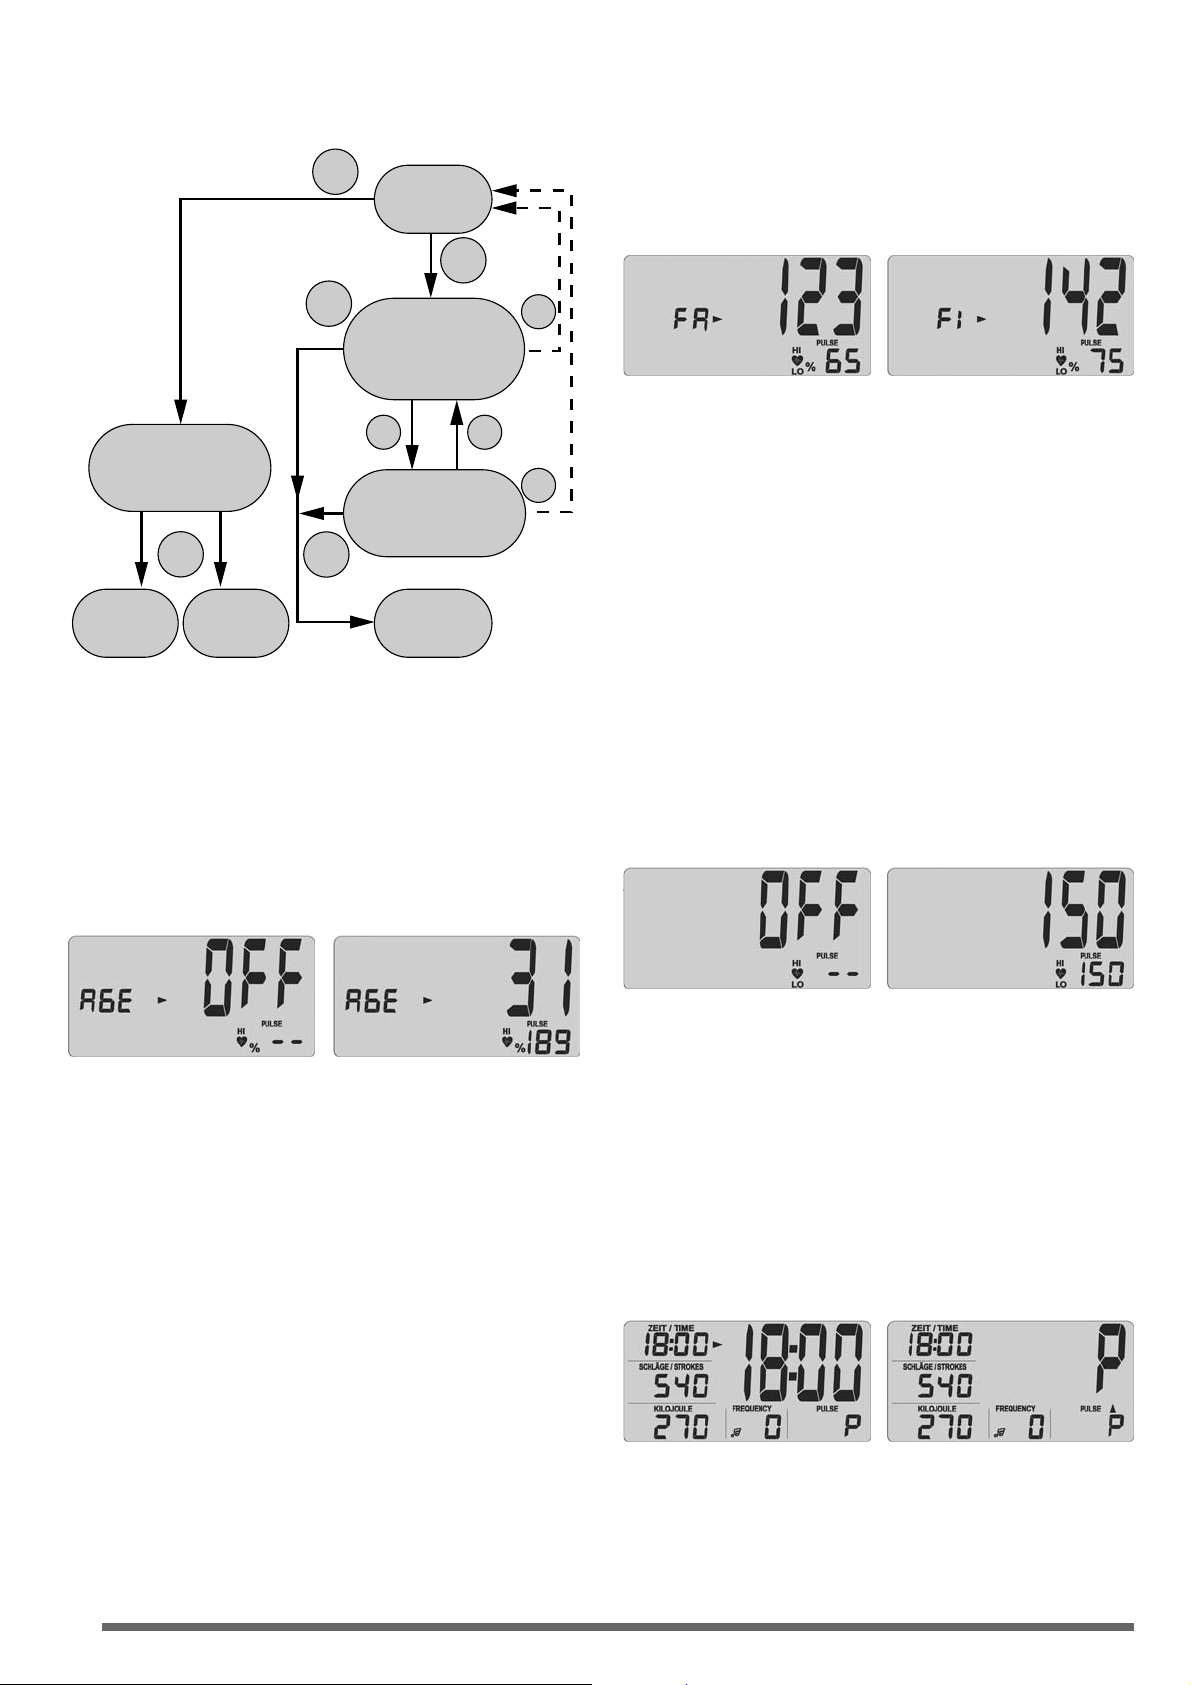
Puls-Vorgabemöglichkeiten
Das Schema zeigt den Ablauf bei der Pulsvorgabe
Im Einzelnen:
Vorgabe: Trainingspuls
Mit der Set-Taste rufen Sie nacheinander 2 Eingabebereiche auf:
1. Alter [Age] (Bild 11/12)
2. Pulszonen:Fettverbrennung [Fa 65%] (Bild 13)
Fitness [Fi 75%] (Bild 14)
4.1 Alterseingabe
Die Alterseingabe dient zur Berechnung Ihres Maximalpulses.
Geben Sie Ihr Alter ein, erscheint in der PULSE- Anzeige (5) der altersabhängige Maximalpuls (Formel: 220 — Alter) (Bild 12).Bei Eingaben bis
21Jahren kann nur 199 als Maximalpuls angezeigt werden, es wird aber
mit dem richtigen Wert gerechnet.
3
Bild 5 Bild 6
Bild 7 Bild 8
Bild 9 Bild 10
Puls / min.
220
200
180
160
140
120
100
20 30 40 50 60 70 80 90 100
Alter
220 minus Lebensalter
80
Bild 11
Keine Eingabe “OFF”
Bild 12
Alterseingabe z.B. 31 mit
Maximalpulsanzeige 189 und
HI Symbol
Fettverbrennung
Fitness
Start Pulsvorgabe
Set
Alterseingabe
OFF, 10-99
Eingabe
nein (OFF)
Set
mit +/- Taste
Eingabe
ja
Pulseingabe:
Set
–
Fettverbrennung 65%
(220-Alter) x 0,65
+ –
Pulswerteingabe:
OFF, 40-188
mit +/- Taste
Eingabe
nein (OFF)
Set
Training
ohne % und
ohne HI/LO
Eingabe
ja
Training
ohne %
mit HI/LO
Set
Pulseingabe:
Fitness 75%
(220-Alter) x 0,75
Training
mit %
und HI/LO
+
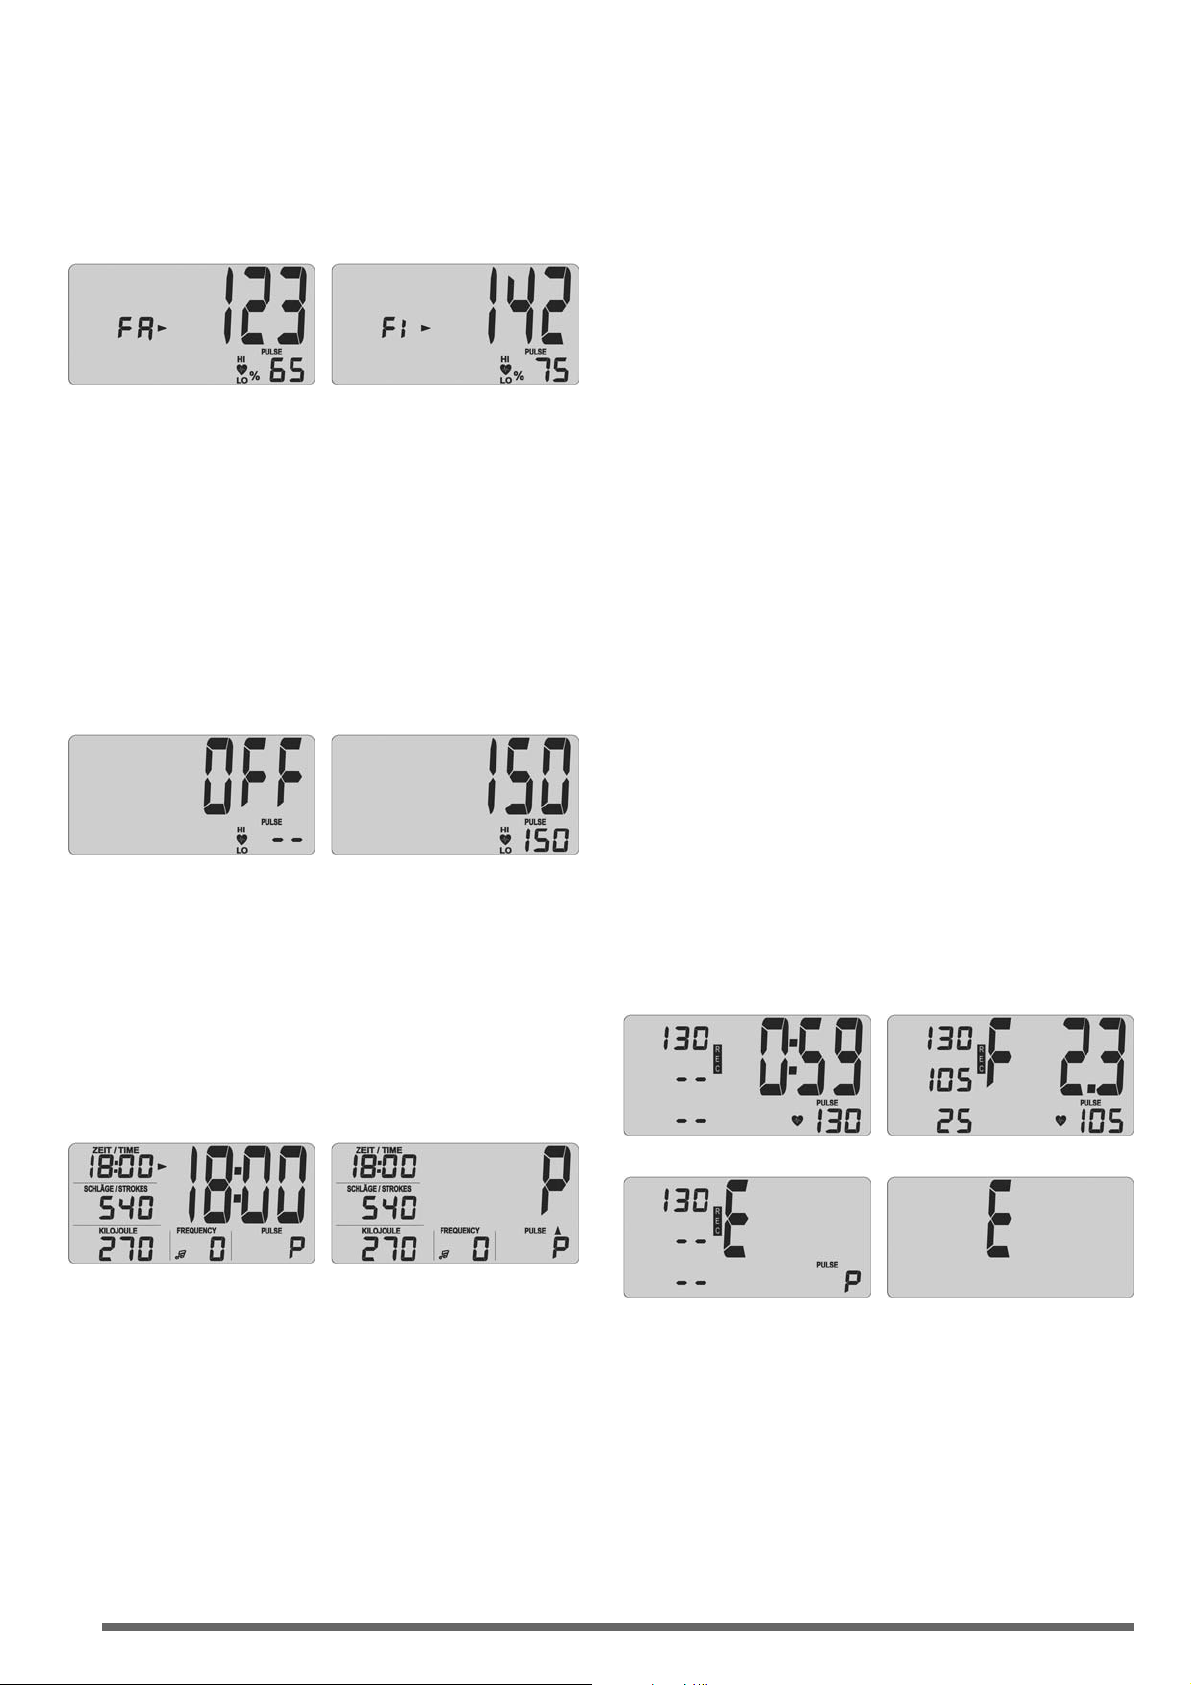
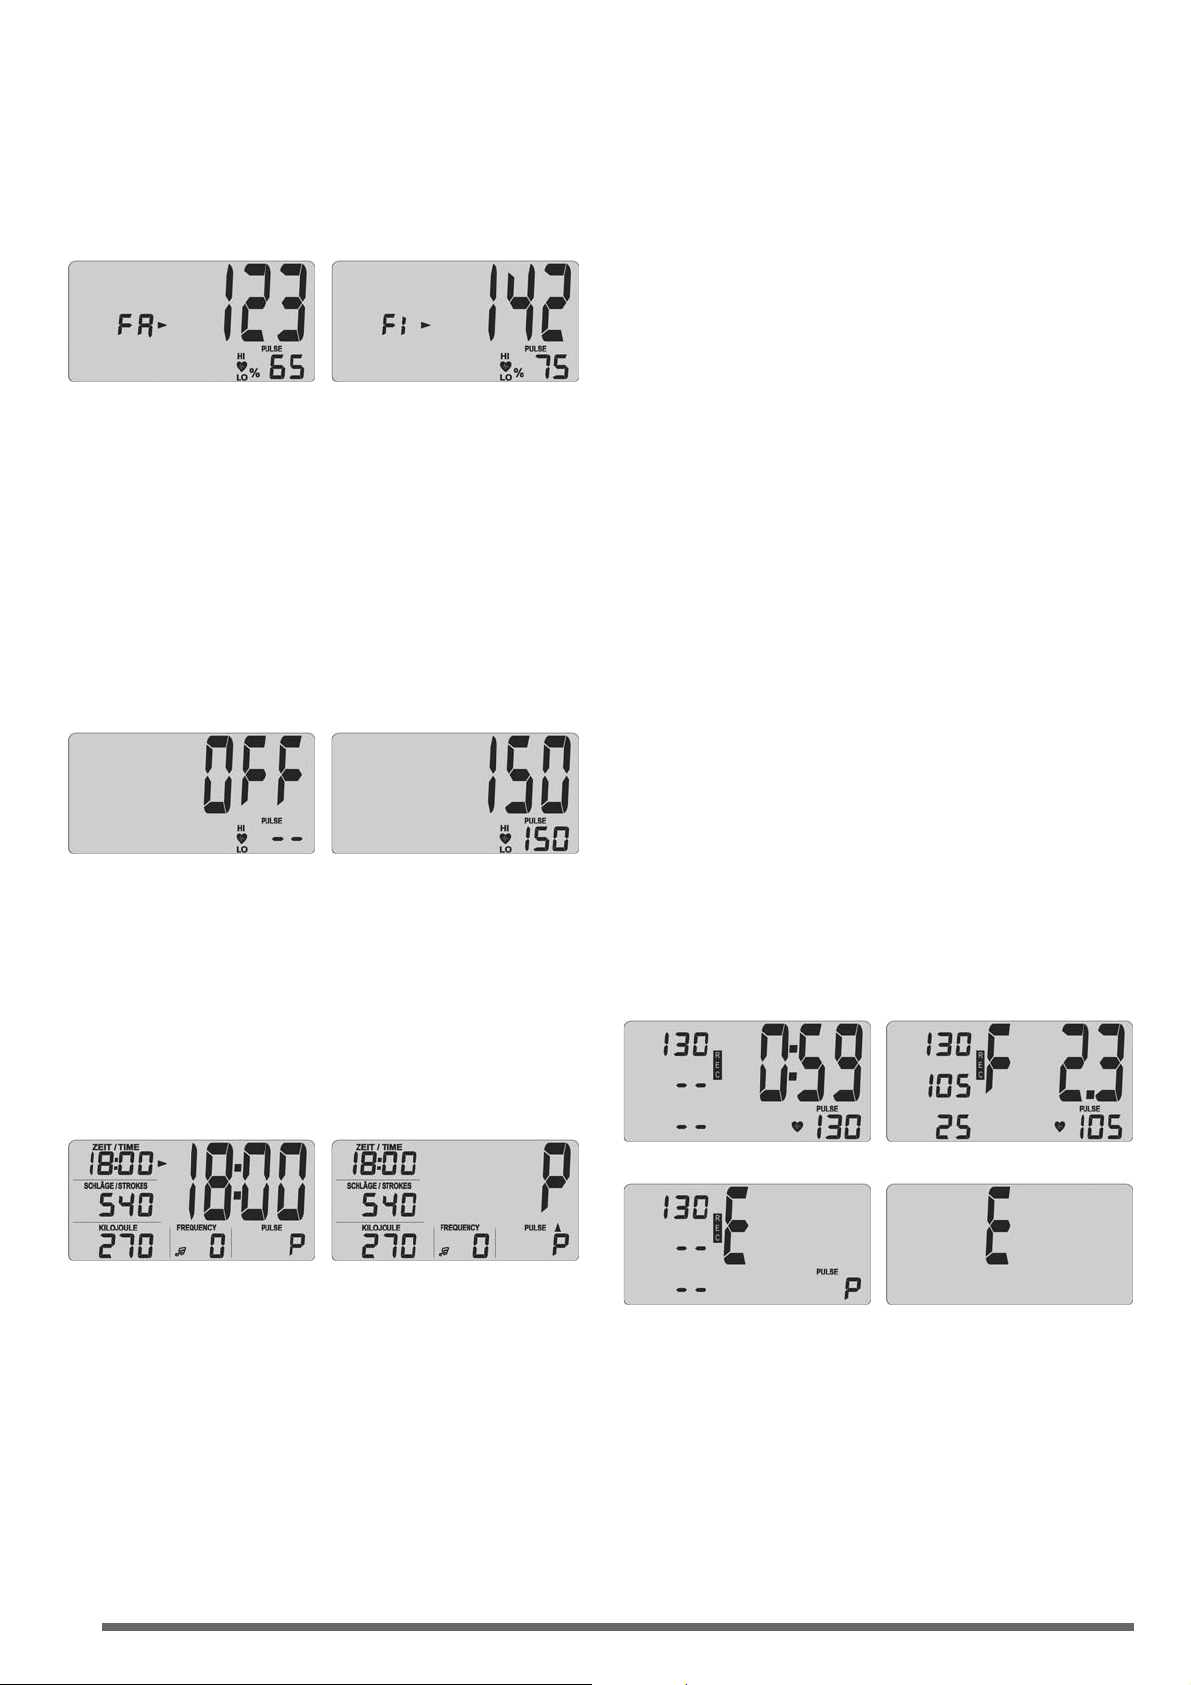
4.2 Pulszonen
mit den +/- Tasten wählen Sie 2 Zonen an. Die Alterseingabe dient zur
Berechnung dieser Pulszonen. Dieser wird in der PULSE- Anzeige (5)
sichtbar.
1. Fettverbrennung [Fa 65%] (Bild 13)
Formel: (220 — Alter) x 0,65
2. Fitness Zone [Fi 75%] (Bild 14)
Formel: (220 — Alter) x 0,75
Funktion
Durch die Pulszonen-Eingabe und des übernommenen Maximalpulses wird
eine Pulszonenüberwachung aktiviert. Ist der vorgegebene Trainingspuls um
11 Schläge unterschritten, so erscheint der Schriftzug «LO» , bei Überschreitung
um 11 Schläge «HI«. Die «LO» Überwachung ist aktiv, wenn erstmals der
vorgegebene Trainingspuls beim Rudern erreicht wird. Fällt die Schlagzahl
auf Null, wird die «LO«-Funktion wieder durch Erreichen des vorgegebenen
Trainingspuls aktiv. Die «HI» Überwachung ist immer aktiv.
Der Wert, der mit dem % — Symbol angezeigt wird, ist der Vergleich
zwischen aktuellem Pulswert und Maximalpulswert.
4.3 Pulswertüberwachung (altersunabhängig)
Diese Eingabe ist mit den +/- Tasten im Bereich von 40 — 188 möglich.
Funktion
Die “HI” und”LO” Anzeige funktioniert wie unter 4.2 beschrieben.
Die prozentuale Pulsanzeige ist nicht verfügbar.
4.4 Vorgabenabschluss
Drücken Sie nach der letzten Vorgabe die Set-Taste, werden alle Vorgabewerte
(ausser Pulsvorgaben und Frequenz) angezeigt (Bild 17).
Schalten Sie die Pulswertüberwachung aus: “OFF”— Anzeige, sind alle
Pulsüberwachungen deaktiviert und in der Gross-Anzeige steht “Zeit”
(Bild 18)
Funktion
Beginnen Sie mit dem Rudern. Alle Vorgabewerte (ausser Pulsgrenze)
zählen rückwärts, blinken bei Null ein paar Sekunden und zählen dann vom
Vorgabewert aufwärts weiter.
Steigt Ihr Pulsschlag über die eingegebene Pulsgrenze, blinkt zur Warnung
das HI — Symbol.
5.0 Anzeige im Training
Starten Sie mit dem Training, beginnt im 5 Sekundentakt ein automatischer
Anzeigewechsel SCAN (Symbol b in der Anzeige). Mit der Set -Taste können
Sie ihn ausschalten. Mit den +/- Tasten können Sie dann einen Anzeigebereich
vor- oder zurückspringen. Haben Sie die Schlagfrequenz-Vorgabe-Note (e)
in der Anzeige aktiviert, piepst es im eingestellten Takt, um Ihnen zu helfen,
die Schlagfrequenz einzuhalten.
6.0 Anzeige vor dem Training, bei Trainingsunterbrechung, — ende
Unterbrechen Sie das Rudern, erkennt die Elektronik Trainingsunterbrechung.
Der automatische Anzeigewechsel stoppt. Das Symbol SCAN verschwindet
. Unter Frequenz (4) und Puls (5) wird mit dem Durchschnitts-Symbol (f) der
Durchschnittswert angezeigt.
Setzen Sie das Training innerhalb 4 Minuten nicht fort, wechselt die Anzeige
auf Raumtemperatur (Bild 1). Dabei wird die Strecke auf die Gesamtkilometer
addiert. Alle anderen Werte werden nicht gespeichert.
Bemerkung
Mit den +/- Tasten können Sie einen Anzeigebereich vor- oder zurückspringen.
Mit der Set-Taste kommen Sie wieder in den Eingabemodus. Dabei werden
alle vorherigen Trainingsdaten gelöscht. Vorgaben bleiben erhalten.
7.0 Anzeige bei Trainingsfortsetzung
Starten Sie wieder mit dem Training. Die Werte zählen weiter.
8.0 Erholungspulsmessung
Der Trainingscomputer ist mit einer Erholungspuls-Funktion ausgestattet.
Diese ermöglicht es, bei Trainingsende Ihren Erholungspuls zu messen.
Drücken Sie bei Trainingsende die Erholungspulstaste. Der aktuelle Pulswert
wird unter Zeit (1) übernommen (Bild 19). Der Computer mißt 59 Sekunden
rücklaufend Ihren Puls (Bild 19). Danach wird der aktuelle Pulswert unter
Schläge (2) übernommen und unter Kilojoule (3) wird die Differenz der
Pulswerte innerhalb des Rücklaufs angegeben und eine Fitnessnote mit (F )
angezeigt (Bild 20). Die Berechnung wird unter 9.0 Allgemeines erklärt. Wird
die Pulsmessung unterbrochen, wird statt eines Wertes ( P ) angezeigt. Drücken
Sie die Recovery-Taste, erscheint wieder die aktuelle Trainingsanzeige.
Der aktuelle Puls wird immer unter Pulse (5) angezeigt.
Bild 19: Erholungspulsmessung mit Zeitrücklauf (0:59 — 0:00)
Bild 20: Fitnessnotenanzeige
Bild 21: Keine Pulserkennung ( E ) bei Erholungspulsmessung
Bemerkung: Wird kein Pulswert angezeigt, wird die Erholungspuls-Funktion
nicht ausgeführt.
Bild 22: Keine Erholungspulsfunktion ( E )
4
Bild 13
Pulszone: Fettverbrennung mit 65 %
Bild 14
Pulszone : Fitness mit 75 %
Bild 15
Keine Eingabe “OFF”
Bild 16
Pulswerteingabe z.B. 150 und HI
LO-Symbol
Bild 17
Keine Eingabe “OFF” (vgl. Bild 15)
Bild 18
Pulswerteingabe z.B. 150 und HI
LO-Symbol (vgl. Bild 16)
Bild 19
Bild 22Bild 21
Bild 20

5
9.0 Allgemeines
Gesamtkilometerberechung
1 Ruderschlag ergibt eine Strecke von 5 Metern.
Kilojouleberechnung
Aus sportmedizinischer Sicht ergibt sich beim Rudern folgender
Energieverbrauch: 1 Stunde Rudern verbraucht bei einer Schlagfrequenz von
40 Schlägen pro Minute 2930 kJ.
1 Kilometer ergeben 244 Kilojoule
Die Berechnung basiert auf mittlerer Belastungsstufe und ändert sich nur durch
Variation der Schlagfrequenz.
Fitnessnotenberechnung
Der Computer berechnet und bewertet die Differenz zwischen Belastungspuls
und Erholungspuls und Ihre hieraus resultierende «Fitnessnote» nach folgender
Formel:
10 x ( P1 — P2 )
2
Note ( F ) = 6 —
( P1 )
P1 = Belastungspuls
P2 = Erholungspuls
Note 1 = sehr gut Note 6 = ungenügend
Der Vergleich von Belastungs- und Erholungspuls ist eine einfache und
schnelle Möglichkeit, die körperliche Fitness zu kontrollieren. Die Fitnessnote
ist ein Orientierungswert für Ihre Erholungsfähigkeit nach körperlichen
Belastungen. Bevor Sie die Erholungspulstaste drücken und Ihre Fitnessnote
ermitteln, sollten Sie über einen längeren Zeitraum, d.h. mind. 10 Minuten,
in Ihrem Belastungsbereich trainieren. Bei regelmäßigem Herz-KreislaufTraining werden Sie feststellen, daß sich Ihre «Fitnessnote» verbessert.
Durchschnittswertberechnung
Für die Durchschnittswertberechnung von Schlagfrequenz und Puls werden
alle Trainingsintervalle berücksichtigt, bis die “Reset”-Funktion gemacht wurde
oder die „Temperatur“-Anzeige erscheint.
Hinweise zur Pulsmessung
Die Pulsberechnung beginnt, wenn das Herz in der Anzeige im Takt Ihres
Pulsschlages blinkt.
Cardio Puls Set
Beachten Sie die dazugehörige Anleitung.
Störungen in der Pulsanzeige
Überprüfen Sie die Batteriespannung der ELektronik und des Brustgurtes.
Störungen beim Trainingscomputer
Notieren Sie den Kilometerstand. Bei merkwürdigem Verhalten des
Trainigscomputers entnehmen Sie die Batterien, überprüfen die Batteriespannung und setzen die Batterien wieder ein. Die gespeicherten
Gesamtkilometer gehen beim Batteriewechsel verloren.
Trainingsanleitung für Ruder-Fitness-Trainer COACH LS
Mit dem KETTLER COACH LS können Sie alle Vorteile des Rudertrainings
nutzen, ohne das oft recht aufwendige “zu Wasser lassen” eines Bootes.
Durch das Rudertraining verbessern Sie sowohl die Leistungsfähigkeit
Ihres Herz-Kreislaufsystems als auch Ihre Kraftfähigkeit. Bevor Sie mit
dem Training beginnen, sollten Sie folgendes beachten:
Wichtiger Hinweis
Lassen Sie vor Aufnahme des Trainings durch Ihren Hausarzt abklären, ob
Sie für das Training mit dem KETTLER COACH LS geeignet sind. Der
ärztliche Befund sollte Grundlage für den Aufbau Ihres Trainingsprogramms
sein. Die folgenden Trainingshinweise empfehlen sich nur für gesunde
Personen.
Vorteile des Rudertrainings
Rudern steigert, wie oben bereits erwähnt, hervorragend die Leistungsfähigkeit des Herz-Kreislaufsystems. Ebenso wird die Sauerstoffaufnahmefähigkeit verbessert. Man kann ferner eine Fettreduktion erreichen, da
durch das Ausdauertraining vermehrt Fettsäuren zur Energiebereitstellung
herangezogen werden.
Ein weiterer Vorteil des Rudertrainings liegt darin, daß alle wichtigen
Muskelgruppen des Körpers gekräftigt werden. Als besonders wertvoll kann
aus orthopädischer Sicht die durch das Rudertraining hervorgerufene
Kräftigung der Rücken- und Schultermuskulatur genannt werden.
Gerade die Kräftigung der Rückenmuskulatur wirkt den heutzutage häufig
auftretenden orthopädischen Problemen in diesem Bereich entgegen.
Das Training mit dem KETTLER COACH LS stellt somit ein umfassendes
Fitnesstraining dar. Es steigert Ausdauer und Kraft und kann als gelenkschonendes Training angesehen werden.
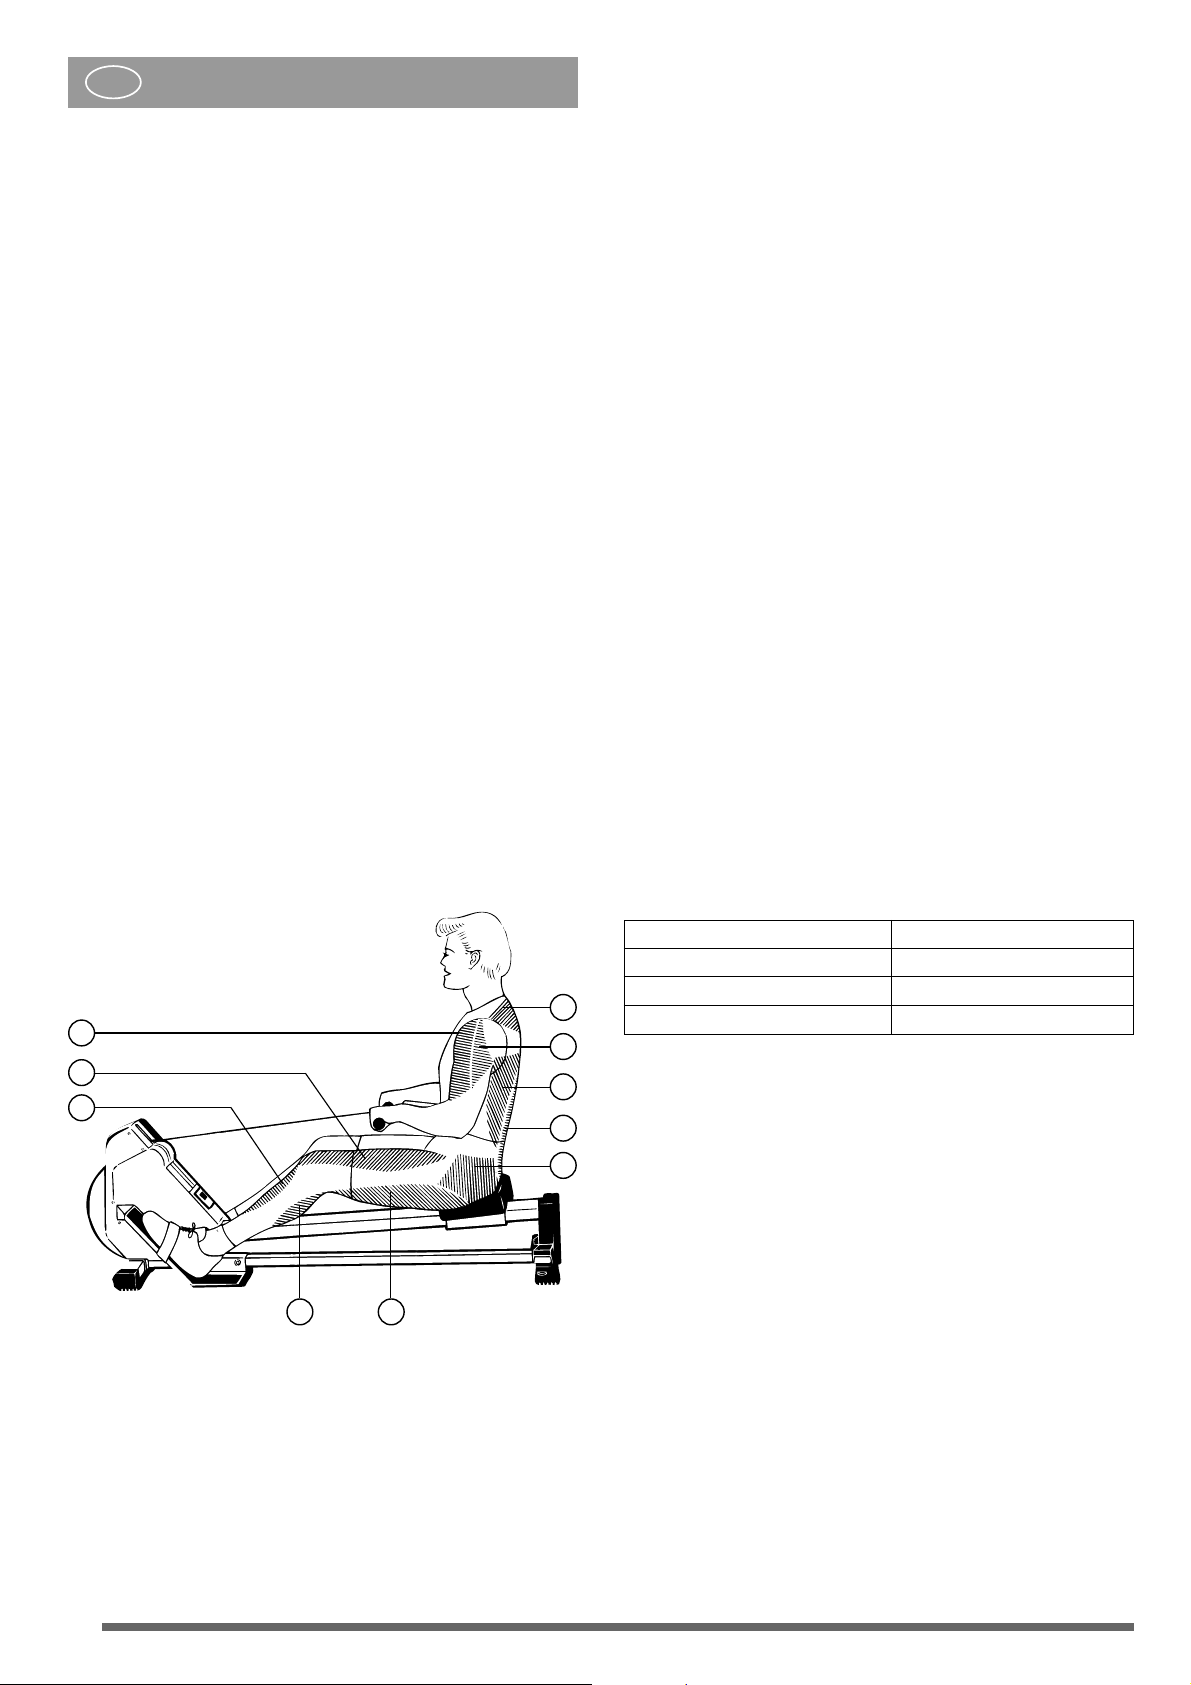
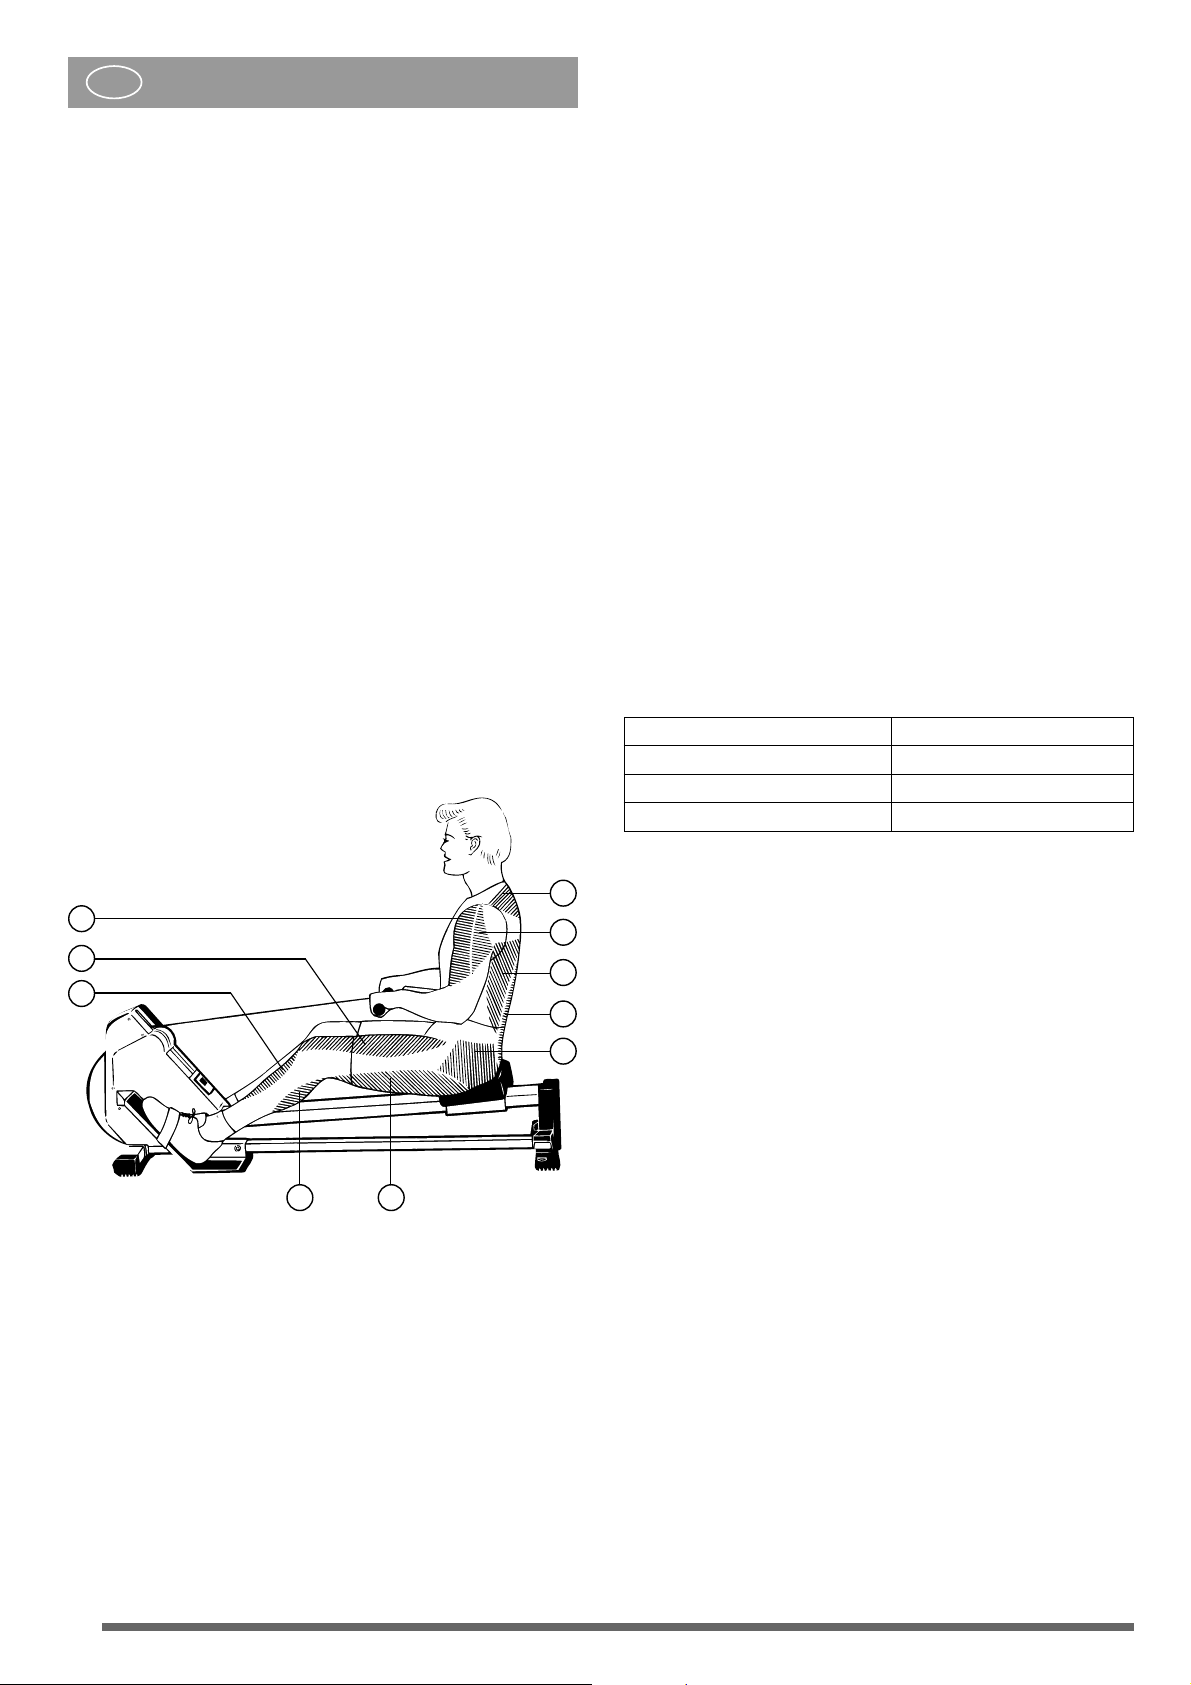
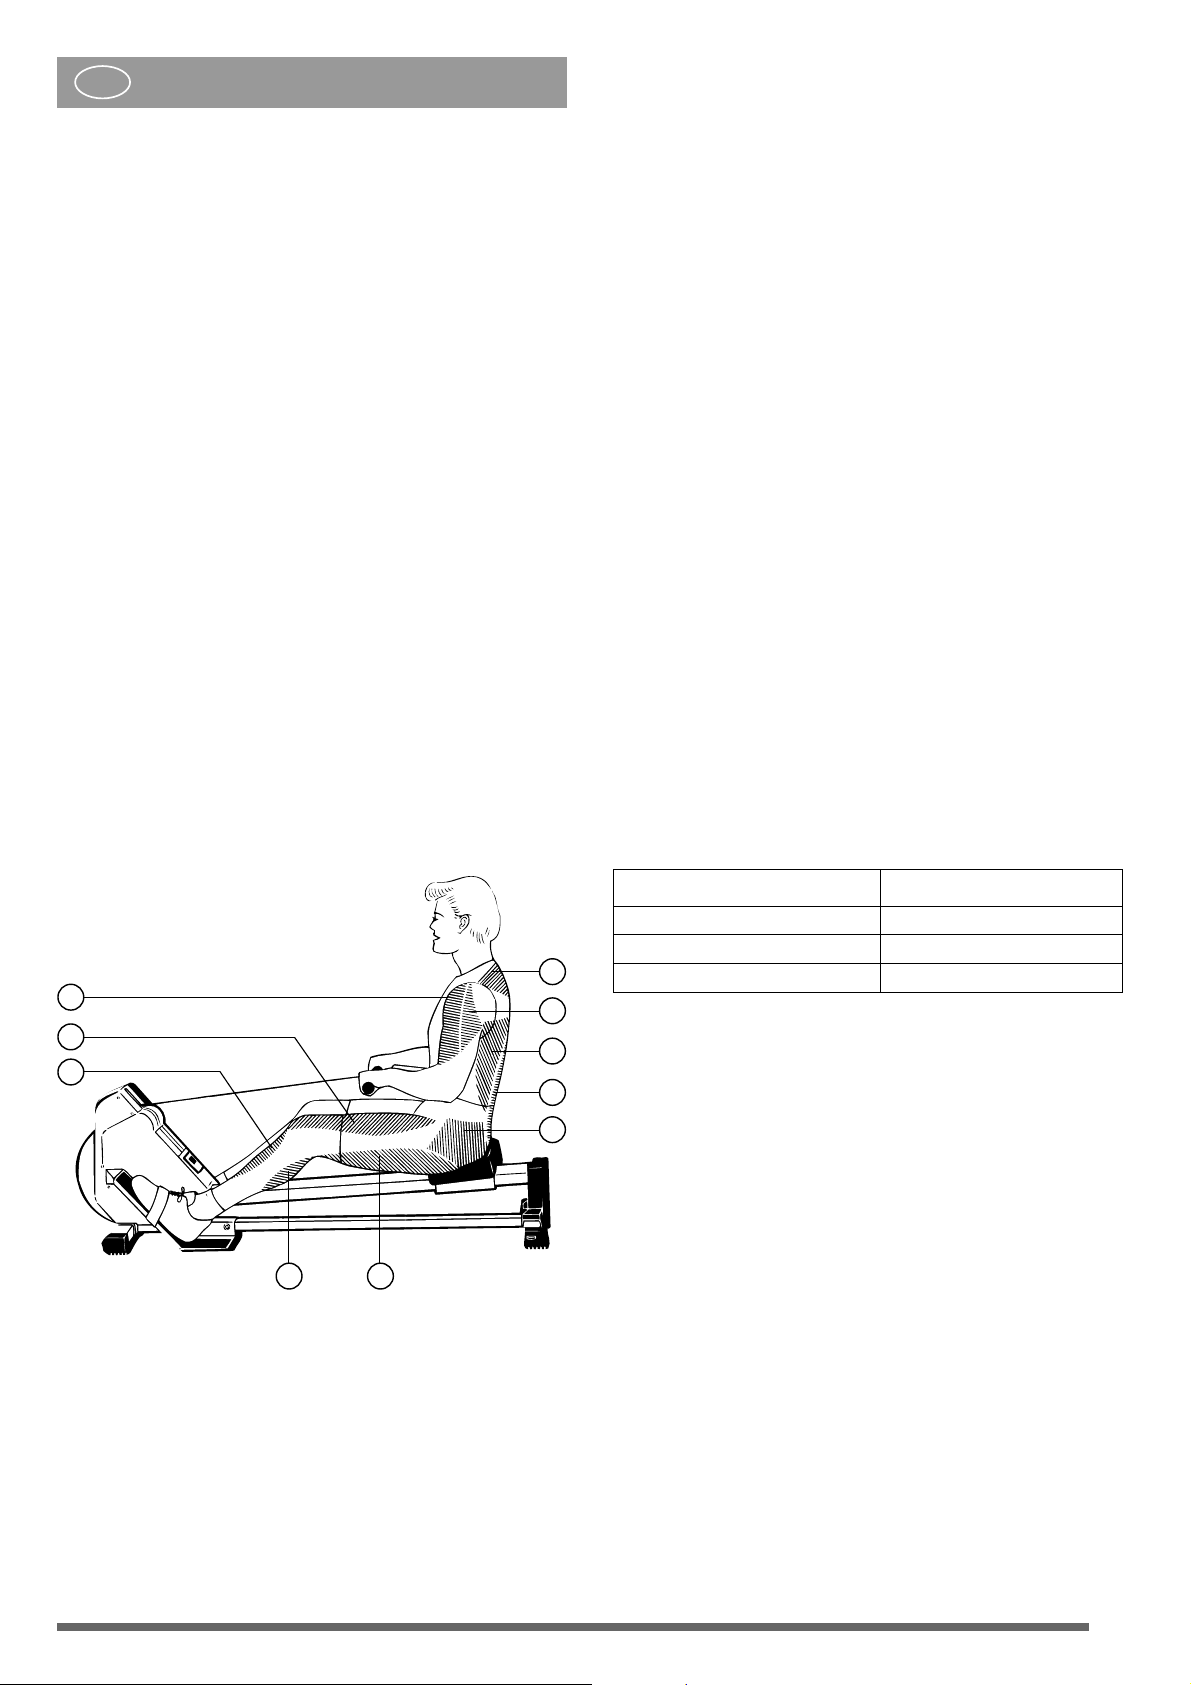
Welche Muskelgruppen werden beansprucht?
Die Ruderbewegung belastet die gesamte Muskulatur des Körpers. Einige
Muskelgruppen werden allerdings besonders trainiert. Sie sind in der
unteren Abbildung aufgeführt.
Wie die Abbildung zu erkennen gibt, werden beim Rudern Ober- und
Unterkörper aktiviert. Innerhalb der Beinmuskulatur beansprucht das Rudern
besonders den Beinstrecker (1), den Beinbeuger (2) sowie die Schienbeinund Wadenmuskulatur (5, 4). Durch die Hüftstreckbewegung wird beim Rudern
ebenfalls die Gesäßmuskulatur (3) belastet.
Im Bereich der Rumpfmuskulatur spricht das Rudern vornehmlich den breiten
Rückenmuskel (6) und den Rückenstrecker (8) an. Ferner trainiert man den
Trapezmuskel (7), den Deltamuskel (9) und den Armbeuger (10).
Durch spezielle Übungen können Sie mit dem KETTLER COACH LS noch
andere Muskelgruppen beanspruchen, die in einem weiteren Abschnitt
demonstriert werden.
Planung und Steuerung Ihres Rudertrainings
Die Grundlage für die Trainingsplanung ist Ihre aktuelle körperliche
Leistungsfähigkeit. Mit einem Belastungstest kann Ihr Hausarzt Ihre persönliche Leistungsfähigkeit diagnostizieren, die die Basis für Ihre Trainingsplanung
darstellt. Haben Sie keinen Belastungstest durchführen lassen, sind in jedem
Fall hohe Trainingsbelastungen zu vermeiden. Folgenden Grundsatz sollten
Sie sich für die Planung merken: Ausdauertraining wird sowohl über den
Belastungsumfang als auch über die Belastungshöhe/- intensität gesteuert.
Zur Trainingsintensität
Die Belastungsintensität kann beim Rudertraining über die Pulsfrequenz
Ihres Herzens kontrolliert werden. Die Intensität wird beim Training mit
dem Rudergerät einerseits über die Schlagzahl und andererseits über den
Widerstand der Zugeinrichtung geregelt. Mit steigender Schlagzahl erhöht
sich die Intensität des Trainings. Sie nimmt ebenfalls zu, wenn der
Widerstand durch die Zugeinrichtung vergrößert wird. Das Rudergerät
Coach LS verfügt über 10 Belastungsstufen.
Wählen Sie als Anfänger grundsätzlich eine geringe Intensität, d.h. die
Schlagfrequenz sollte unter 20 Schlägen pro Minute liegen und die Schaltung
der Zugeinrichtung in niedrigster Position.
Vermeiden Sie als Anfänger eine zu hohe Schlagzahl oder ein Training mit
zu großem Widerstand. Versuchen Sie, Ihre individuelle Schlagzahl und den
optimalen Widerstand der Zugeinrichtung mit Hilfe der empfohlenen Puls-
frequenz abzustimmen (vgl. 4.0 „Der richtige Trainingspuls” / 4.2 „Pulszonen”).
Kontrollieren Sie Ihre Pulsfrequenz während des Trainings an drei Zeitpunkten.
Vor dem Training wird der Ruhepuls festgestellt. Während des Trainings (ca.
10 Minuten nach Trainingsbeginn) überprüft man den Belastungspuls, der
bei richtiger Belastungsintensität in der Nähe der Trainingsempfehlung
liegt. Eine Minute nach Trainingsabschluß messen Sie den sogenannten
Erholungspuls.
Die drei Werte tragen Sie in die dafür vorgesehene Tabelle ein. Ein regelmäßiges Training führt zu einem Absinken des Ruhe- und Belastungspulses.
Hierin ist eine der zahlreichen positiven Auswirkungen des Ausdauertrainings
zu sehen. Da das Herz langsamer schlägt, steht mehr Zeit für die Füllung
der Herzkammern und die Durchblutung der Herz-muskulatur (durch die Herzkranzgefäße) zur Verfügung.
Zum Belastungsumfang
Unter dem Belastungsumfang versteht man die Dauer einer Trainingseinheit und deren Häufigkeit pro Woche. Als fitnesspositiv werden von seiten
der Sportmedizin folgende Belastungsfaktoren erachtet:
Trainingshäufigkeit Trainingsdauer
täglich ca. 10 Minuten
2-3 x wöchentlich 20 — 30 Minuten
1-2 x wöchentlich 30 — 60 Minuten
Trainingseinheiten von 20-30 Minuten/30-60 Minuten eignen sich nicht
für den Anfänger. Der Anfänger steigert den Belastungsumfang seines
Trainings nur allmählich. Gestalten Sie die ersten Trainingseinheiten relativ
kurz. Als eine günstige Variante des Anfängertrainings erachtet man das
Intervalltraining. Das Anfängertraining kann für die ersten 4 Wochen
folgendermaßen konzipiert sein:
1.-2. Woche Umfang einer Trainingseinheit
Trainingshäufigkeit 3x wöchentlich 3 Minuten rudern
1 Minute Pause
3 Minuten rudern
1 Minute Pause
3 Minuten rudern
3.-4. Woche Umfang einer Trainingseinheit
Trainingshäufigkeit 4x wöchentlich 5 Minuten rudern
1 Minute Pause
5 Minuten rudern
Im Anschluß an dieses vierwöchige Anfängertraining können Sie täglich
10 Minuten ohne Pause mit dem Rudergerät trainieren. Wenn Sie im späteren Verlauf das 3 x wöchentliche Training von 20 -30 Minuten bevorzugen,
sollte zwischen zwei Trainingstagen ein trainingsfreier Tag geplant werden.
1
5
10
4
2
7
9
6
8
3
D
6

7
Trainingsbegleitende Gymnastik
Eine optimale Ergänzung des Rudertrainings ist in der Gymnastik zu sehen.
Beginnen Sie das Training grundsätzlich mit einer Aufwärmphase. Aktivieren
Sie Ihren Kreislauf einige Minuten durch leichte Ruderübungen (10-15
Schläge pro Minute). Beginnen Sie dann mit Dehnübungen. Danach folgt
das eigentliche Rudertraining.
Beendet wird das Training ebenfalls durch leichte Ruderübungen.
Dehnübungen runden die Abwärmphase ab.
Hinweise für das Krafttraining mit dem KETTLER COACH LS
Neben dem Rudertraining eignet sich der COACH LS ebenfalIs für das kraftbetonte Fitnesstraining. Für ein gesundheitlich wertvolles Training sind allerdings einige Punkte unbedingt zu beachten, die wir Ihnen kurz darstellen
möchten:
1. Vermeiden Sie als Anfänger ein Training mit zu schweren Widerständen.
2. Trainieren Sie nur mit so schweren Widerständen, die Sie ohne Preßatmung bewältigen.
3. Führen Sie alle Bewegungen gleichmäßig, nicht ruckhaft und schnell durch.
4. Auf einen geraden Rücken ist bei allen Übungen zu achten, ein
Training mit Hohlkreuz oder Rundrücken sollte vermieden werden.
5. Bedenken Sie stets, daß Ihre Muskulatur und Ihre Kraft schneller zunehmen
als die Anpassungen Ihrer Bänder, Sehnen und Gelenke.
Fazit: den Widerstand im fortlaufenden Trainingsprozeß nur langsam
steigern.
Kurzdarstellung einiger Trainingsmethoden
Für das Fitnesstraining eignet sich die kraftausdauerorientierte Trainingsmethode. Dies bedeutet, daß Übungen mit leichtem Widerstand (ca. 4050% der individuellen «Maximalkraft*») 15-20 mal wiederholt werden.
*Maximalkraft wird hier als maximale persönliche Kraftfähigkeit verstanden, die aufgebracht werden kann, um ein schweres Gewicht einmal zu bewältigen.
Beispiel für die Trainingsplanung
*S = Satz oder Serie
*Wdh = Anzahl der Wiederholungen
Beginnen Sie Ihr Training stets mit Aufwärmübungen. Pausieren Sie während
des Trainings nach jedem Satz ca. 60 Sekunden und nutzen Sie die Pausen
zu Lockerungs — und Dehnungsübungen.
Trainieren Sie 2 — 3mal pro Woche mit Ihrem COACH LS und nutzen Sie
jede Gelegenheit, Ihr Training zu ergänzen, wie z.B. durch ausgedehnte
Spaziergänge, Radfahren, Schwimmen usw. Sie werden feststellen, daß ein
regelmäßiges Training Ihre Fitness und Ihr Wohlbefinden recht bald verbessert.
Warnhinweise!
Sie trainieren mit einem Gerät, das sicherheitstechnisch nach neuesten
Erkenntnissen konstruiert wurde. Mögliche Gefahrenstellen, die Verletzungen verursachen können, sind bei dem Gerät bestmöglich vermieden
und abgesichert. Das Gerät ist ausschließlich für die Benutzung von
Erwachsenen konzipiert.
Falsches oder übermäßiges Training kann zu Gesundheitsschäden führen.
Lassen Sie vor Aufnahme des Trainings durch Ihren Hausarzt abklären, ob
Sie gesundheitlich für das Training mit diesem Gerät geeignet sind. Der ärztliche Befund sollte Grundlage für den Aufbau Ihres Trainingsprogrammes
sein.
Das Gerät ist als Spielzeug auf keinen Fall geeignet. Bedenken Sie, daß
durch das natürliche Spielbedürfnis bzw. das Temperament von Kindern im
Umgang mit dem Gerät unvorhersehbare Situationen und Gefahren auftreten
können, die eine Verantwortung seitens des Herstellers ausschließen. Wenn
Sie Kinder dennoch an das Gerät lassen, sind diese auf die richtige
Benutzung des Gerätes hinzuweisen und zu beaufsichtigen.
Die Montage des Gerätes muß sorgfältig und von einer erwachsenen Person
vorgenommen werden. Stellen Sie sicher, daß der Trainingsbetrieb nicht vor
ordnungsgemäßem Abschluß der Montage aufgenommen wird.
Bei regelmäßigem Trainingsbetrieb empfehlen wir alle ein bis zwei Monate
eine Kontrolle aller Geräteteile sowie Befestigungselemente, insbesondere
der Schrauben und Bolzen. Damit das konstruktiv vorgegebene
Sicherheitsniveau des Gerätes erhalten bleibt, ist bei Verschleiß das Gerät
der Benutzung zu entziehen und die durch Verschleiß beschädigten Teile
sind sofort auszutauschen.
Übung 1.-2. Woche 3.- 4. Woche 5.- 6. Woche
S* Wdh* S* Wdh* S* Wdh*
1 1 — 2 individ. 2 individ. 3 individ.
4 1 — 2 12-15 2 15- 20 3 15-20
7 1 — 2 12-15 2 15- 20 3 15-20
9 1 — 2 12-15 2 15- 20 3 15-20
13 1 — 2 12-15 2 15- 20 3 15-20
14 1 — 2 12-15 2 15- 20 3 15-20
17 1 — 2 12-15 2 15- 20 3 15-20
8
Operating instructions for the training computer
with digital display (ST 2500-4)
Features:
Figures displayed:
1 Time
………………………….0.00 — 99.59 [min: sec]
2 Oar strokes ………………..0 — 9999
Total number of km
Odometer [0 — 999.9 km]
3 Energy consumptio
n…….0 — 9999 [KJ]
4 Stroke frequency …………0 — 99 [strokes per min.]
5 Pulse rate
……………………50 — 199 [strokes per min.]
6 General display
………….Room temperature [0 — 40°]
Fitness mark [F1.0 — F6.0]
Symbols:
a REC
…………………………..Recovery pulse
b SCAN………………………..Automatic display change
c Arrows
………………………Current part of general display
d KM
……………………………
Total km covered
e Mark
………………………….Audible oar-stroke rhythm activated
f Average …………………….Stroke frequency + pulse rate
g HI
……………………………..Max. pulse rate exceeded
h Heart
…………………………Flashes in time with pulse
i LO …………………………….Below min. pulse rate
j Percent
………………………% of max. pulse rate
Buttons:
Minus Button ……………………..Reduce values (display section back)
Set button
………………………….Function button [set value, change value,
reset value in display]
Plus button
………………………..Increase values (display section forward)
Recovery button
…………………Function button [calculate fitness mark]
Connections (rear)
Socket (2-pole)
…………………..for speed sensor
Battery compartment
…………..2 batteries: Mignon 1.5 V, LR6, AA
1.0 Display before starting exercising
1. Room temperature………….Fig. 1 [before and after exercising]
2. Full display
……………………Fig. 2 [after beginning rowing or push
button for 1 sec.]
3. Total no. of km.
……………..Fig. 3 [display duration: 10 sec. or push
button]
4. Ready for use
………………..Fig. 4
Functions and Operation of Training Computer
GB
Training figures in display
3
1
2
4
5
6
Symbols in display
a
bc
d
e
f
gh i j
f
Fig. 1 Room temperature
Fig. 4 Ready for useFig. 3 Total no. of km.
Fig. 2 Full display
9
2.0 Pulse-rate
This training computer records the pulse rate via the Cardio Puls Set. The
receiver is located on the main board of the display electronics.
Using the Cardio Puls Set
Strap on the chest belt. Follow the instructions for use.
Pulse-rate display
You have set the start display (fig. 4).
The heart symbol (h) flashes in time with your pulse
After a few seconds, the pulse rate is shown as a figure (5).
3.0 Exercising without setting target data
Start exercising. All the figures count upwards.
4.0 Exercising with target data set
Set time (1), oar strokes (2), kilojoules (3), oar frequency (4), pulse rate (5).
You have set the start display (fig. 4). Press the Set button. You are now in
the Set mode and you can set the desired target figures using the + or — buttons.
When you press the plus or minus button and hold it down, the set figures
scroll upwards and downwards more quickly.
When you press the plus and minus buttons together, the display returns to
«OFF».
To see the next set figures, press the Set button.
After setting the target pulse rate, press the Set button to quit the setting mode.
Any settings you have made are then shown in the display (figs. 17/18).
When you press the Set button and hold it down, the full display is shown
(reset function) (fig. 2).
Note
If you do not enter any settings for 4 minutes, the display returns to room
temperature (fig. 1).
Fig. 5: Time setting display starting with «OFF»
Fig. 6: Time setting: e.g. 18 minutes
Fig. 7: Oar-stroke setting, e.g. 540 strokes
Fig. 8: Energy-consumption setting, e.g. 270 kilojoules
Fig. 9: Frequency setting: e.g. 30 strokes per minute
Fig. 10: Bleep activated. At 30 strokes it bleeps every 2 sec.
The correct exercising pulse rate
The pulse rate during training depends on age and training objective. For
every age and objective there is a «correct» so-called aerobic training area
which is marked by an upper and a lower pulse-rate limit (+/- 10 strokes).
The pulse rate should always be within this aerobic zone. The maximum pulse
frequency (220 minus age in years) must not be exceeded. Healthy persons
should use the following diagrams (see 4.2 also).
Possible pulse settings
The diagram shows the sequence for setting the target pulse rate
In detail:
Setting: exercising pulse rate
By pressing the Set button, you display 2 areas for entering data:
1. Age [Age] (Fig. 11/12)
2. Pulse zone: Fat combustion [Fa 65%] (Fig. 13)
Fitness [Fi 75%] (Fig. 14)
4.1 Age input
The age input is for calculating your maximum pulse rate.
When you enter your age, the age-related maximum pulse rate (formula:
220 — age) appears in the PULSE display (5).
For entries up to 21 years, only 199 can be shown as maximum pulse rate.
It is calculated with the correct value.
Fig. 5 Fig. 6
Fig. 7 Fig. 8
Fig. 9 Fig. 10
Puls / min.
220
200
180
160
140
120
100
20 30 40 50 60 70 80 90 100
Age
220 minus age
80
Fig. 11
No input “OFF”
Fig. 12
Age input, e.g. 31 with maximum
pulse-rate 189 displayed with
HI symbol.
Fat combustion
Fitness
Start pulse-rate setting
Set
Input age
OFF, 10-99
Input
No (OFF)
Set
with +/- Button
Input
Yes
Set
Input pulse rate:
–
Fat combustion 65%
(220-age) x 0,65
+ –
Pulse-rate input:
OFF, 40-188
with +/- Button
Input
No (OFF)
Set
Exercising
without % and
without HI/LO
Input
Yes
Exercising
without % and
with HI/LO
Set
Puls-input:
Fitness 75%
(220-age) x 0,75
Exercising
with %
and HI/LO
+
10
4.2 Pulse-rate zones
Using the +/- buttons, you can select 2 zones. The age input serves for
calculating these zones. This is shown in the PULSE display (5).
1. Fat consumption [Fa 65%] (Fig. 13)
Formula: (220 — age) x 0,65
2. Fitness zone [Fi 75%] (Fig. 14)
Formula: (220 — age) x 0,75
Function
When the pulse zone is entered and the maximum pulse set, pulse-zone monitoring is activated. If the number of strokes is 11 less than the set exercising
pulse, the letters «LO» appear. When the set pulse is exceeded by 11
strokes, the symbol «HI» appears. The «LO» monitoring is activated when
the set pulse rate is reached for the first time during rowing. If the number
of strokes declines to zero, the «LO» function is again activated when the
set pulse rate is reached. «HI» monitoring is always active.
The figure which is shown with the % symbol is the relation of the current
pulse rate to the maximum pulse rate.
4.3 Pulse-rate monitoring (independent of age)
This can be set from 40 — 180 using the +/- buttons.
Function
The «HI» and «LO» display is described in 4.2.
The percentage pulse display is not available.
4.4 Concluding input
After entering the last setting, press the Set button. All the set figures
(apart from pulse-rate and frequency) are now displayed (fig. 17).
If you switch the pulse-rate monitoring off, the OFF display is shown and
all pulse-rate monitoring functions are deactivated and the general
display shows «Time» (fig. 18)
Function
Start rowing. All the settings (apart from pulse limit) count downwards. When
zero is reached, they flash for a few seconds and then start counting from
the set value upwards.
If your pulse rate rises above the specified limit, the HI symbole flashes as
a warning.
5.0 Display during exercising
When you start your exercising session, the automatic display change
SCAN starts at five-second intervals (symbol b in the display). You can switch
it off with the Set button. Using the +/- button, you can switch forward to
the next display section or back to the last one. If you have set the stroke
frequency (e) in the display, it bleeps at the set rhythm to help you to
maintain the right frequency.
6.0 Display before and after exercising and
during interruptions
The electronics are able to detect interruptions in rowing. The automatic display
change stops. The symbol SCAN disappears. Under Frequency (4) and Pulse
Rate (5) the average figure is indicated with the average symbol (f).
If you resume exercising within 4 minutes, the display changes to Room
Temperature (fig. 1). The distance is added to the total number of kilometres.
All other figures are not stored.
Note
Press the +/- button to move to the next or the previous display section.
Press the Set button to return to the Input mode. All previous exercising data
are deleted. Settings are not deleted.
7.0 Display on resumption of training
When you resume exercising, the figures continue to count.
8.0 Measurement of recovery pulse
The training computer features a recovery-pulse function. This allows you to
measure your pulse rate during the recovery period following exercising. When
you finish exercising, press the recovery-pulse button. The current pulse
figure is accepted under Time (1) (fig. 19). The computer then measures your
pulse rate for 59 seconds counting downwards (fig. 19). Following this, the
current pulse rate is accepted under Strokes (2). Under Kilojoules (3), the difference in the pulse figures during the downward count appears and a fitness
mark (F) is displayed (fig. 20). The calculation process is explained in section
9.0 General Notes. If the pulse measurement is interrupted, the letter (P) appears
instead of a figure. To return to the current training display, press the Recover
button. The current pulse is always displayed under Pulse (5).
Fig. 19: Measurement of recovery pulse counting downwards
(0.59 — 0.00)
Fig. 20: Display of fitness mark
Fig. 21: No pulse detected (E) during recovery measurement
Note: If no pulse figure is displayed, the recovery-pulse function is
not activated.
Fig. 22: No recovery function (E)
Fig. 13
Pulse zone: fat combustion with 65 %
Fig. 14
Pulse zone: fat combustion with 55 %
Fig. 15
No entry “OFF”
Fig. 16
Pulse rate entered, e.g. 150 and HI
an LO symbols
Fig. 17
No entry “OFF” (See fig. 15)
Fig. 18
Pulse rate entered, e.g. 150 and
HI an LO symbols. (See fig. 16)
Fig. 19
Fig. 22Fig. 21
Fig. 20

11
9.0 General notes
Calculation of overall number of kilometres
1 oar stroke is equivalent to a distance of 5 metres.
Calculation of kilojoules
Medically, the energy consumption produced by rowing is as follows: 1 hour
of rowing at a stroke frequency of 40 leads to a consumption of 2930 kJ
per minute.
1 kilometre results in 244 kilojoules.
The calculation is based on the medium-load setting and alters only on variation
of stroke frequency.
Calculation of fitness mark
The computer calculates and assesses the difference between the pulse rate
during exercising and during recovery and awards the fitness mark according
to the following formula:
10 x ( P1 — P2 )
2
Note ( F ) = 6 —
( P1 )
P1 = Exercising pulse rate
P2 = Recovery pulse rate
Mark 1 = very good Mark 6 = extremely poor
Comparing the pulse rates during exercising and subsequent recovery is a
fast and simple method of gauging physical fitness. The fitness mark is a
rough guideline for estimating your ability to recover from physical exertion.
Before pressing the Recovery-pulse button and checking your fitness, you
are advised to row within your «safe» range for at least 10 minutes, if
possible longer. Regular exercise will gradually improve your fitness mark.
Calculation of average figure
In order to calculate the average for stroke frequency and pulse rate, all the
training periods are taken into account until the «Reset» function is activated
or the «Temperature» display appears.
Notes on pulse-rate measurement
The pulse-rate measurement starts when the heart symbol in the display flashes
in time with your heartbeat.
Cardio Puls Set
Follow the instructions for using the Cardio Puls Set.
Interference in the pulse-rate display
Check the voltage of the batteries for the electronics and the chest belt.
Malfunction of training computer
Note the number of kilometres. If the computer behaves abnormally, remove
the batteries, check them, and replace them.
The total number of kilometres is cancelled when the batteries are changed.
12
Exercising with the KETTLER COACH LS
The KETTLER COACH LS rowing machine provides all of the advantages of
“real life” rowing without the trouble or expense of “taking to the water”.
Rowing is a sport that improves not only the performance of the cardio-vascular system, but also improves stamina and endurance. The
following
points should be observed before commencing a course of training:
Important
Before commencing a course of training, have your family doctor check that
you are fit enough to exercise with the COACH LS. The result of the medical
check-up should be used as a basis for planning the exercise programme.
The following directions are only to be recommended to healthy persons.
The advantages of rowing
As mentioned above, rowing is an excellent way to increase the efficiency
of the cardio-vascular system. It also improves the ability to absorb oxygen.
In addition, rowing is also suitable for “burning off” fat by calling up the
fat reserves (in the form of fatty acids) to be transformed into energy.
Another important advantage of rowing lies in the strengthening of all of
the body’s important muscle groups, whereby the strengthening of the back
and shoulder muscles can be considered especially beneficial from the orthopaedic point of view. The strengthening of the back muscles can help
prevent such orthopaedic problems as are encountered all too often
nowadays. Exercising with the KETTLER COACHLS is therefore a comprehensive way to exercise. It improves endurance and strength while at the
same time not putting the joints under stress.
Which muscles are called on
The movements in the rowing exercise call on all of the body’s muscle
groups. Although some are concentrated upon more than others. These groups
are shown in the lower illustration.
As can be seen in the illustration, rowing activates the upper and lower body
to the same extent. In the legs, rowing exercises the extensors (1), the
flexors (2) and the shin and calf muscles (5, 4). The movement of the hips
also calls on the seat (gluteus) muscles (3).
In the torso region, rowing calls primarily upon the latissimus (6) and the
erectors (8), but also on the trapezius (7), the deltoid (9) and the arm
extensor muscles (10).
The KETTLER COACH LS can also be used for other special exercises to
concentrate on further muscles groups. These are described in one of the
following sections.
Planning and controlling your rowing
The basis for planning your course of exercise should be your actual state
of fitness. Your family doctor can put you through an endurance test to
determine your physical performance. The results of the test should be
used to plan your exercise programme. If you do not go through an endurance test, you should avoid excessive exercising stresses at all costs. The
following principle should be follow in your planning; endurance training
can be controlled as much by the extent of effort as by the level of effort
and the intensity.
Exercise intensity
The effort intensity when rowing can be determined by checking the pulse.
The intensity of the rowing exercises can be varied on the one hand by altering
the number of strokes per minute, and on the other by altering the resistance
of the tension device. The intensity increases both when the stroke rate is
increased, and when the resistance in the tension device is increased.
Beginners should always start at a low intensity level, i.e. at a stroke rate
of less than 20 strokes/minute, and with the control of the tension device
at his lowest resistance setting.
Beginners should therefore avoid exercising at high stroke rates or at high
resistance levels. The optimum stroke rate and level of resistance should be
determined using the recommended pulse rate (see 4.0 «The correct exercising pulse rate» / 4.2 «Pulse-rate zones»), which should be checked three
times during each session. Before starting, check the resting pulse, about
10 minutes into the session check the effort pulse (which should be in the
region of the recommended level), and after finishing exercising, check the
recovery pulse.
These three values can be entered into the record sheet. Regular exercising
will soon show a reduction in both the rest and the effort pulse rates. This
can be taken as a sign for the positive effects of the endurance training. The
heart is beating more slowly and more time is available for the heart to take
in blood and for the blood to circulate through the heart’s own muscles.
Extent of exercise
By extent of exercise, we refer to the length of the exercise sessions and their
frequency per week. Experts consider the following extent of exercise to be
especially effective:
Sessions per week Length of session
Daily 10 minutes
two or three times a week 20 — 30 minutes
once or twice a week 30 — 60 minutes
Exercise sessions of 20 -30minutes/30 -60 minutes are not suitable for he
beginner. The beginner should increase his/her extent of exercising only
gradually, with the first blocks being kept relatively short. Block exercising
can be looked upon as a good variation at the beginning.
A typical beginner’s programme for the first 4 weeks could be something
like the following:
1st/2nd week Length of exercise blocks
Sessions per week three 3 minutes rowing
1 minute break
3 minutes rowing
1 minute break
3 minutes rowing
3rd/4th week Length of exercise blocks
Sessions per week four 5 minutes rowing
1 minute break
5 minutes rowing
Following these 4 weeks of beginner’s exercising, the blocks can be
extended to 10 minutes of continuous rowing without a break. If 3 weekly
sessions of 20 -30 minutes are preferred (at later stages), a free day should
be planned between each two days with exercise.
Accompanying gymnastic exercises
Gymnastik exercises are an ideal complement to rowing. Always do
warming-up exercises before starting rowing. Activate the circulation with
a few minutes of easy rowing (10 -15 strokes per minute). Stretching
exer-
cises should then be carried out before the real rowing exercise is started.
Easy
rowing should also be done at the end of the session, with further stretching
exercises during the cooling-down period.
GB
1
5
10
4
2
7
9
6
8
3

13
Instructions for exercising with the KETTLER COACH LS
Besides rowing, the COACH LS is also suitable for exercises designed to
increase general fitness, but with special emphasis on muscle-building. In
order to achieve maximum benefit from the COACH LS, the following
points should be noted:
1. beginners should avoid exercising with high resistances;
2. use only resistances which do not cause strained breathing;
3. carry out all movements smoothly and regularly — not in sudden jerks;
4. do not exercise with the back curved upwards or with rounded
shoulders;
5. always remember, that muscles and strength increase relatively quick
ly,
i.e. at a pace which tendons, ligaments and joints cannot al ways
follow.
In brief: Increase resistance only gradually in the course of regular training.
Some methods of exercising
For general fitness, a method of exercising which emphasizes both strength
and stamina is recommended. This means that exercises at low resistance
levels (approx. 40-50% of personal maximum strength»*) should be repeated
15-20 times.
(*Here, the term «maximum strength»*) means the maximum strength which a person
has to concentrate in order to raise a heavy weight once.
Example of a training schedule
S.* = Serie
Always warm up before exercising. Rest for approx. 60seconds after each
series of repeats, and use these intervals for loosening and stretching exercises.
Exercise 2-3 times per week with your COACH LS and make use of every
opportunity for alternative forms of exercise such as walking,
c
ycling, swimming etc. You will then find that regular exercising increases
your
physical fitness and your general sense ot wellbeing.
Caution!
You are using a machine that has been designed and built to the latest safety
standards. Any possible sources of danger that could lead to injury have
been extensively eliminated guarded against. Moreover, the machine is
intended only for the use of adults.
Wrong or excessive training can damage your health. Before commencing
a course of fitness training, arrange for a medical check-up to see if you
are in a state of health suited to training on the machine. The result of the
check-up should be used as a basis for your training programme.
The machine is never to be looked upon as a toy. Please remember that the
nature of children who are using the machine can lead to unforeseen situations and hazards for which the manufacturer cannot be held liable. If children
are allowed to use the machine, they should be instructed on its correct use
and dangerous situations explained to them.
The machine must be carfully assembled by an adult. It must be ensured that
the machine is not used until it has been fully assembled.
When used for regular training, we recommend checking all parts of the
Machine (especially screws, nuts and bolts) every 1 to 2 months. So that
the intended level of safety is maintened, the machine is to be taken out of
use if any parts are worn. The worn parts are to be exchanged immediately.
Exercise 1.-2. Week 3.- 4. Week 5.-6. Week
S* Repeat S* Repeat S* Repeat
1 1 — 2 individ. 2 individ. 3 individ.
4 1 — 2 12-15 2 15- 20 3 15-20
7 1 — 2 12-15 2 15- 20 3 15-20
9 1 — 2 12-15 2 15- 20 3 15-20
13 1 — 2 12-15 2 15- 20 3 15-20
14 1 — 2 12-15 2 15- 20 3 15-20
17 1 — 2 12-15 2 15- 20 3 15-20
14
Instructions d’utilisation pour l’ordinateur de
bord à affichage digital (ST2500-4)
Equipement
Valeurs:
1 Temps …………………………..0 : 00 – 99 : 59 (min : sec)
2 Mouvements de rame…………0 – 9999
Nombre total de kilomètres
Odomètre (0 – 999,9 km)
3 Consommation d’énergie ……0 – 9999 (KJ)
4 Fréquence des mouvements….0 – 99 (coups de rame / min)
5 Pulsations cardiaques…………50 – 199 (coups de rame / min)
6 Affichage ordinaire……………Température ambiante (0 – 40 °)
Note de condition physique
(F1.0 – F6.0)
Symbole:
a REC ………………………………Pulsations cardiaques au repos
b SCAN……………………………Changement d’affichage automatique
c Flèche ……………………………Zone actuelle dans l’affichage
ordinaire
d KM ……………………………….Kilométrage total
e Note ……………………………..Indication acoustique activée de la
fréquence des coups de rame
f Moyenne………………………..Fréquence des coups de rame + pul-
sations cardiaques
g HI…………………………………Dépassement de la valeur plafond des
pulsations cardiaques
h Cœur ……………………………Clignote en synchronisation avec les
pulsations cardiaques
i LO ………………………………..Dépassement de la valeur plancher
des pulsations cardiaques
j Pourcentage…………………….% de l’indication des pulsations
cardiaques maximales
Touches:
Touche moins (-) …………………….Touche moins (-) Réduire les valeurs
(reculer dans la zone d’affichage)
Touche de réglage (set)……………..Touche de fonction (indication, chan-
gement, réinitialisation (reset) de l’affi-
chage)
Touches des pulsations cardiaques.Augmenter les valeurs (avancer dans
la zone d’affichage)
Touche de récupération (recovery)..Touche de fonction (calcul de la note
de condition physique)
Raccordements (à l’arrière) :
Douille (bipolaire)……………………Pour le capteur de vitesse
Compartiment des piles:……………2 piles de type Mignon 1,5 Volts,
LR6, AA
Fonctions et utilisation du programme d’entraînement
F
Valeurs d’entraînement affichées
3
1
2
4
5
6
Symboles sur l’affichage
a
bc
d
e
f
gh i j
f
15
1.0 Affichage avant l’entraînement
1.Température ambiante……………..Illustration 1 (avant et après
l’entraînement)
2. Affichage global ……………………Illustration 2 (après le début des
coups de rame ou par pression de
touche, 1 sec)
3. Kilométrage total …………………..Illustration 3 (durée de l’affichage:
10 secondes ou touche)
4. Disponibilité pour l’entraînement..Illustration 4
2.0 La mesure des pulsations cardiaques
Ce programme d’entraînement mesure les pulsations cardiaques au moyen
du système Cardio Puls Set. Le récepteur se trouve sur la platine de l’affichage électronique.
Prise des pulsations cardiaques avec le Cardio Puls Set
Installez la sangle à la poitrine. Suivez les directives qui s’affichent.
Affichage des pulsations cardiaques
Réglez l’affichage de démarrage (illustration 4).
Le symbole du cœur (h) clignote en fonction de la fréquence des battements
du cœur.
Après quelques secondes, la mesure de vos pulsations cardiaques s’affiche.
3.0 S’entraîner sans indication de données
3.0 d’entraînement
Commencez l’entraînement. Toutes les valeurs vont en augmentant.
4.0 S’entraîner avec des indications de données
4.0 d’entraînement
Réglage du chronomètre (1), des coups de rame (2), des kilojoules (3), de
la fréquence des coups de rames (4) et des pulsations cardiaques (5).
Vous avez réglé l’affichage de démarrage (illustration 4). Appuyez sur la
touche Set, allez dans le menu des indications d’objectifs et sélectionnez
la valeur désirée à l’aide des touches + ou -.
Une pression prolongée sur la touche +/- permet de faire avancer ou
reculer plus rapidement les valeurs de l’indication d’objectif.
Appuyez en même temps sur la touche +/- pour que la valeur affichée revienne
à la position « OFF ».
Sélectionnez les indications sur les objectifs suivants à l’aide de la touche
Set.
Après les indications d’objectifs sur les pulsations cardiaques, quittez le mode
des indications d’objectifs au moyen de la touche Set pour voir s’afficher
les entrées éventuels (illustrations 17 / 18).
Effectuez une pression longue sur la touche Set pour qu’apparaisse l’affi-
chage global. (fonction de réinitialisation) (illustration 2).
Remarque
La température de la pièce s’affiche si aucune indication d’objectif n’est entrée
au bout de 4 minutes (illustration 1).
Illustration 5: l’indication de temps commence par « OFF »
Illustration 6: indication de temps, par exemple 18 minutes
Illustration 7: indication des coups de rame, par exemple 540 coups de
rame
Illustration 8: indication sur la consommation d’énergie, par exemple 270
kilojoules
Illustration 9: indication sur la fréquence, par exemple 30 coups de rame
par minute
Illustration 10: signal sonore activé: A 30 battements, l’appareil sonne
toutes les 2 secondes
Le pouls idéal à l’entraînement.
Le pouls d’entraînement dépend de l’âge et de l’objectif d’entraînement. Pour
chaque âge et pour chaque objectif, il y a ce qu’on appelle le domaine
d’entraînement aérobie « adéquat » qui est caractérisé par une limite de
pouls supérieure et inférieure de +/- 10 battements. Le pouls d’entraînement doit toujours être compris dans la zone aérobie. La fréquence de
pouls maximale (220 moins l’âge) ne doit pas être dépassée. Les personnes en bonne santé se réfèrent au diagramme ci-après (voir aussi 4.2).
Illustration 1: Température ambiante
Illustration 4: Disponibilité pour
l’entraînement
Illustration 3: Kilométrage total
Illustration 2: Affichage global
Illustration 5 Illustration 6
Illustration 7 Illustration 8
Illustration 9 Illustration 10
Pulsations / min
220
200
180
160
140
120
100
20 30 40 50 60 70 80 90 100
Age
220 moins l‘âge de la personne
80
Combustion des
graisses
Condition physique
16
Possibilités d’objectif en matière de pulsations cardiaques
Le schéma ci-dessous montre comment atteindre les objectifs des pulsations
cardiaques.
En détail :
Objectif: pulsations cardiaques à l’entraînement
Appelez consécutivement 2 plages d’entrée au moyen de la touche set:
1. Âge (Age) (Illustrations 11 / 12)
2. Zones des pulsations cardiaques :
Combustion des graisses (Fa 65 %) (Illustration 13)
Condition physique (Fi 75 %) (Illustrations 14)
4.1 Entrée de l’âge de la personne
L’entrée de l’âge de la personne sert à calculer vos pulsations cardiaques
maximales.
Entrez votre âge. Ensuite, les pulsations cardiaques maximales qui dépendent
de votre âge apparaissent dans l’affichage des pulsations (PULSE) (5)
(formule de base : 220 – l’âge de la personne) (illustration 12). Si vous entrez
21 ans, seul le chiffre 199 peut être affiché comme valeur maximale.
Cependant la valeur réelle correcte est calculée.
4.2 Zones des pulsations cardiaques
Les touches +/- permettent de sélectionner 2 zones. L’entrée de l’âge de la
personne sert à calculer ces zones de pulsations cardiaques. Ceci est
visible dans l’affichage PULSE (5).
1. Combustion des graisses [Fa 65%] (Illustration 13)
Formule de calcul : (220 – âge de la personne) x 0,65
2. Zone de la condition physique [Fi 75%] (Illustration 14)
Formule de calcul : (220 – âge de la personne) x 0,75
Fonction:
L’entrée des zones de pulsations cardiaques et des pulsations cardiaques
maximales prises en charge permet d’activer le contrôle des zones de pulsations cardiaques. Lorsque les pulsations cardiaques à l’entraînement sont
en deçà de 11 battements, l’affichage « LO » apparaît. Lorsque les pulsations cardiaques à l’entraînement sont au-delà de 11 battements, l’affichage « HI » apparaît. Le contrôle « HO » est actif lorsque la valeur prédéfinie pour le pouls d’entraînement est atteinte pendant le mouvement des
coups de rame. Si le nombre de battements descend à zéro, la fonction «
LO » est de nouveau activée lorsque la valeur prédéfinie pour le pouls d’entraînement est atteinte. Le contrôle « HI » est toujours actif.
La valeur qui est affichée avec le symbole « % » représente la comparaison
entre la valeur actuelle des pulsations cardiaques et la valeur maximale des
pulsations.
4.3 Contrôle de la valeur des pulsations cardiaques (dépend de l’âge de
la personne)
Cette entrée est possible au moyen des touches +/- dans une plage com-
prise entre 40 et 188.
Fonction
L’affichage « HI » et « LO » fonctionne comme indiqué au point 4.2. L’affichage en pourcentage des pulsations cardiaques n’est plus disponible.
4.4 Conclusion des indications d’objectif
Appuyez sur la touche Set après la dernière indication : toutes les valeurs
d’indication d’objectif seront alors affichées (en dehors des indications
des pulsations cardiaques et de la fréquence) (illustration 17).
Désactivez le contrôle de la valeur des pulsations cardiaques : affichage
« OFF » ; tous les contrôles des pulsations cardiaques sont désactivés et «
Zeit » (temps) apparaît dans l’affichage ordinaire (illustration 18).
Illustration 11
Aucune indication « OFF »
Illustration 12
Entrée de l’âge de la personne,
par exemple 31 avec affichage
des pulsations cardiaques maximales 189 et symbole HI
Illustration 17
Aucune entrée « OFF »
(cf. illustration 15)
Illustration 18
Entrée de la valeurs des pulsations
cardiaques, par exemple 150 et HI
Symbole LO (cf. illustration 16)
Illustration 13
zones de pulsations cardiaques:
combustion des graisses à 65 %
Illustration 14
zones de pulsations cardiaques:
condition physique avec 75 %
Illustration 15
Aucune entrée « OFF »
Illustration 16
Entrée des valeurs des pulsations
cardiaques, par exemple 150 et HI
Symbole LO
Pouls de départ par défaut
Set
Entrée l‘âge
OFF, 10-99 avec
Entrée
non (OFF)
la touche +/-
Entrée
oui
Set
Set
Entrée des
–
pulsations cardiaques:
Combustion des
graisses 65%
(220-âge) x 0,65
Entrée de la valeur
+ –
des pulsations cadiaques:
OFF, 40-188 Au moyen
de la touche +/-
Entrée des
pulsations cardiaques:
+
Condition physique 75%
Entrée
non (OFF)
Set
Entraînement
sans % et
sans HI/LO
Entrée
oui
Entraînement
sans % et
avec HI/LO
Set
(220-âge) x 0,65
Entraînement
avec %
avec HI/LO

17
Fonction:
Commencez avec les mouvements de rame. Toutes les valeurs prédéfinies
d’objectif, en dehors de la limite des pulsations cardiaques, comptent à
rebours, clignotent pendant quelques secondes lorsque zéro est atteint, puis
comptent de nouveau dans l’ordre chronologique à partir de la valeur prédéfinie d’objectif.
Si vos pulsations cardiaques dépassent la valeur limite entrée pour les pulsations cardiaques, le symbole HI clignote en avertissement.
5.0 Affichage pendant l’entraînement
Commencez l’entraînement. Un changement automatique de l’affichage SCAN
(symbole b sur l’affichage) se produit par rythme de 5 secondes. La touche
SET vous permet de le désactiver. La touche +/- vous permet de vous
déplacer en avant ou en arrière dans une zone d’affichage. Si la lettre (e)
d’indication d’objectif « fréquence des coups de rame » est activée, un signal
sonore est émis selon un rythme prédéfini afin de vous aider à maintenir la
fréquence des coups de rame.
6.0 Affichage avant l’entraînement, en cas
6.0 d’interruption de l’entraînement et à la fin de
l’entraînement
Lorsque vous interrompez l’entraînement, le système électronique reconnaît
l’interruption. Le changement automatique d’affichage s’arrête. Le symbole
SCAN disparaît. La valeur moyenne est alors affichée avec le symbole de
moyenne (f), au dessous de la fréquence (4) et des pulsations cardiaques
(5).
Si vous ne poursuivez pas l’entraînement dans les 4 minutes qui suivent, l’affichage passe automatiquement à la température ambiante (illustration 1).
Le parcours réalisé est alors additionné au kilométrage total. Aucune autre
valeur n’est enregistrée.
Remarque:
La touche +/- vous permet de vous déplacer en avant ou en arrière dans
une zone de l’affichage.
La touche SET vous permet de retourner dans le mode d’entrée. Toutes les
données précédentes d’entraînement sont alors effacées. Seules les indications
d’objectif sont conservées.
7.0 Affichage en cas de poursuite de
7.0 l’entraînement
Reprenez l’entraînement. les valeurs continuent alors de compter.
8.0 Mesure des pulsations cardiaques au repos
L’ordinateur de bord est équipé d’une fonction permettant de mesurer les
pulsations cardiaques au repos. Cette fonction permet de mesurer vos pulsations cardiaques au repos à la fin de l’entraînement. Pour ce faire, il convient
d’appuyer sur la touche des pulsations cardiaques au repos à la fin de l’entraînement. La valeur actuelle des pulsations cardiaques est prise en charge sous
le « temps » (1) (illustration 19). L’ordinateur de bord procède alors à un
compte à rebours en partant de 59 secondes et mesure vos pulsations cardiaques (illustration 19). La valeur actuelle des pulsations cardiaques est ensuite
prise en charge sous « coups de rame » (2), tandis que sous kilojoules (3),
la différence des valeurs des pulsations cardiaques pendant le compte à
rebours est indiquée et qu’une note de condition physique est affichée
avec (F) (illustration 20). Ce dernier calcul est expliqué au chapitre « 9.0
généralités ». Si la mesure des pulsations cardiaques est interrompue, une
valeur (P) est affichée à la place. Appuyer sur la touche de récupération «
recovery » pour obtenir de nouveau l’affichage actuel de l’entraînement.
Les pulsations cardiaques actuelles sont toujours affichées sous « Pulse » (5).
Illustration 19: mesure des pulsations cardiaques au repos avec compte à
rebours (0 : 59 – 0 : 00)
Illustration 20: affichage de la note de condition physique
Illustration 21: aucune identification du pouls (E) lors de la mesure des pul-
sations cardiaques au repos
Remarque: Lorsque aucune valeur n’est affichée pour le pouls, la
fonction de mesure des pulsations cardiaques au repos n’est
pas exécutée.
Illustration 22: aucune fonction de récupération (E).
9.0 Généralités
Calcul du kilométrage total
1 mouvement de rame représente une distance de 5 mètres.
Calcul des kilojoules
Considéré sous l’angle de la médecine du sport, le mouvement de rame représente la consommation d’énergie suivante : avec une fréquence de 40 mouvements de rame par minute, une heure passée à ramer équivaut à une
consommation de 2930 kj.
1 kilomètre correspond à une valeur de 244 kilojoules.
Le calcul est établi par rapport à un niveau moyen d’effort et varie seulement
quand la fréquence des mouvements de rame change.
Calcul de la note de la condition physique
L’ordinateur calcule et évalue la différence entre le pouls en activité et les
pulsations cardiaques au repos et établit votre « note de condition physique »
selon la formule suivante :
10 x ( P1 — P2 )
2
Note ( F ) = 6 —
( P1 )
P1 = pulsations cardiaques en activité
P2 = pulsations cardiaques au repos
Note 1 = très bien Note 6 = insuffisant
La comparaison entre les pulsations cardiaques en activité et les pulsations
cardiaques au repos est un moyen simple et efficace pour contrôler la condition
physique. La note de la condition physique est une valeur permettant
d’indiquer la capacité de récupération après un effort physique. Avant de
presser la touche des pulsations cardiaques au repos et de calculer votre
note de condition physique, vous devez vous entraîner dans votre niveau
d’effort pendant une période prolongée, c’est à dire pendant au moins 10
minutes. En entraînant régulièrement votre circulation cardiaque, vous
pourrez voir votre « note de condition physique » s’améliorer.
Calcul de la valeur moyenne
Pour calculer la moyenne de la fréquence des mouvements de rame et des pulsations cardiaques, tous les intervalles d’entraînement sont pris en considération jusqu’à ce que la fonction de réinitialisation « Reset » soit enclenchée
ou que l’affichage « Température » apparaisse.
Illustration 19
Illustration 22Illustration 21
Illustration 20

18
Remarques sur la mesure des pulsations cardiaques
Le calcul des pulsations cardiaques débute lorsque le cœur sur l’affichage
clignote au rythme des battements de votre pouls.
Avec le système Cardio Puls Set
Suivez attentivement les instructions correspondantes.
Dysfonctionnement de l’affichage des pulsations cardiaques
Vérifiez la tension de la pile de la partie électronique et de la sangle
entourant la cage thoracique.
Dysfonctionnement de l’ordinateur d’entraînement
Notez le nombre de kilomètres parcourus. Si l’ordinateur de bord ne fonctionne pas correctement, enlevez les piles, contrôlez leur tension, et replacez
les dans le compartiment. Lors du changement des piles, l’enregistrement
du kilométrage total est perdu.
Instructions relatives à l’entraînement avec la
machine à ramer KETTLER COACH LS
Avec la machine à ramer KETTLER COACH LS, on peut profiter de tous les
avantages de l’entraînement avec un aviron, sans avoir à mettre au préalable
le bateau à l’eau. L’entraînement avec un aviron permet d’améliorer aussi
bien l’efficience du système cardio-vasculaire que la capacité de force. Avant
de commencer l’entraînement, observer ce qui suit:
Remarque importante
Avant d’entreprendre un programme d’entraînement, consulter son médecoin
traitant afin d’établir si l’on est apte à travailler avec l’appareil
KETTLER COACH LS. La composition du programme d’entraînement
ci-après s’adressent uniquement aux personnes bien portantes.
Avantages de la pratique de l’aviron
Comme déjà mentionné plus haut, la pratique de l’aviron sert à améliorer
l’efficience du système cardio-vasculaire, ainsi que l’oxygénation. La pratique de l’aviron permet de réduire la graisse, l’entraînement en endurance
augmentant la quantité d’acides gras disponibles pour l’énergie.
Autre avantage de l’entraînement avec l’aviron, le renforcement de la musculature générale. Pour l’orthopédiste, l’entraînement avec l’aviron renforce les dorsaux et les muscles des épaules. Le renforcement des muscles
du dos peut prévenir les problèmes orthopédiques qui surviennent fréquemment de nos jours dans ce domaine.
L’entraînement avec la machine à ramer COACH LS représente donc un entraînement optimum pour la condition physique. Il augmente l’endurance et la
force et peut être considéré comme un entraînement qui ménage les articulations.
Quels sont les muscles mis en oeuvre?
L’aviron sollicite la musculature du corps. Certains groupes, représentés à
la fig. ci-dessous, sont tout particulièrement mis en oeuvre.
Comme le montre la fig., la pratique de l’aviron active dans une mesure
égale, le buste et la partie inférieure du corps. Dans les muscles des jambes,
il sollicite tout particulièrement les extenseurs (1), les fléchisseurs (2), de même
que les muscles du tibia et du mollet (5, 4). La détente des jambes sollicite
aussi la musculature des fesses (3).
En ce qui concerne la musculature du torse, la pratique de l’aviron sollicite
principalement le large dorsal (6) et l’extenseurs (8). On entraîne en outre
le muscle trapézoidal (7), le muscle delta (9) et le fléchisseur de bas (10).
Les exercices spéciaux effectués avec la machine à ramer KETTLER
COACH LS sollicitent d’autres groupes de muscles qui seront décrits dans
un autre chapitre.
Comment établir un programme d’entraînement et l’appliquer
Le programme d’entraînement sera basé sur l’efficience physique du moment.
Un test effectué en charge permettra au médecin traitant d’établir
l’efficience personnelle qui constituera la base du programme. Si l’on ne
s’est pas soumis audit test en charge, il convient tout cas d’éviter les charges
trop élevées. Principe à suivre pour l’établissement du programme: l’entraînement en endurance sera dicté aussi bien par l’importance de la charge
que par son intensité.
En ce qui concerne l’intensité de l’entraînement
Pendant l’entraînement avec le rameur, l’intensité de charge (résistance à
la traction) peut être contrôlée à l’aide de la fréquence cardiaque. Avec le
rameur, l’intensité est réglée, d’une part par le nombrede coups de rame
et, d’autre part, par la résistance à la traction. L’intensité de l’entraînement
augmente avec l’augmentation du nombre de coups de rame, de même que
lorsqu’on augmente la résistance à l’aide du dispositif de traction. Les
novices sélectionneront une intensité réduite, ce qui signifie que la fréqeuence
des coups de rame restera inférieure 20 coups/minute et la commande du
dispositif de traction dans la position la plus basse.
Eviter donc, comme débutant, de s’entraîner avec un nombre de coups de
rame trop élevé ou avec une résistance trop forte. Essayer d’harmoniser individuellement le nombre de coups de rame et la résistance optimale des rames.
Pendant l’entraînement, mesurer trois fois la fréquence du pouls. D’abord
le pouls au repos avant de commencer. Mesurer le pouls en charge au bout
de 10 minutes d’entraînement; celui-ci doit se situer dans les environs des
chiffres recommandés pour l’entraînement (voir 4.0 «Le pouls d’entraînement adéquat»/4.2 «Zones de pouls»). Une minute après la fin de
l’exercice, mesurer le soi-disant pouls de relaxation. nscrire ces trois chiffres
au tableau prévu à cet effet. L’entraînement régulier a pour conséquence
la diminution de la fréquence du pouls au repos et en charge. Il faut voir
là un des nombreux effets positifs de l’entraînement en endurance. Le coeur
battant plus lentement a davantage de temps à sa disposition pour le remplissage des ventricules et la nutrition du muscle cardiaque par les artères
coronaires.
En ce qui concerne l’ampleur de la charge
On entend par là, durée d’une séance d’entraînement et fréquence hebdomadaire des exercices. La médecine sportive considère efficiente pour
l’entraînement, l’ampleur de charge suivante:
Frèquence des séances Durée des séances
d’entraînement d’entraînement
Journellement 10 minutes
Deux ou trois fois par semaine 20 — 30 minutes
Une ou deux fois par semaine 30 — 60 minutes
Les séances d’entraînement de 20 à 30 minutes/30 à 60 minutes ne conviennent pas pour le débutant; celui-ci n’augmentera la charge que peu à
peu. Les premiers exercices resteront relativement courts. La méthode à intervalles constitue une solution de rechange favorable pour l’entraînement des
débutants.
Programme d’entraînement possible pour les quatre premières semaines:
1re et 2e semaines Ampleur de chaque séance
Fréquence des séances ramer 3 minutes
3 fois par semaine repos 1 minute
ramer 3 minutes
repos 1 minute
ramer 3 minutes
3e et 4e semaines Ampleur de chaque séance
Fréquence des séances ramer 5 minutes
4 fois par semaine repos 1 minute
ramer 5 minutes
Après ce programme de 4 semaines pour novices, on peut s’entraîner tous
les jours avec le rameur, pendant 10 minutes sans interruption. Si, plus tard,
on préfère s’entraîner 3 fois par semaine pendant 20 à 30 minutes, il y a
lieu d’entrecouper deux journées d’entraînement par une journée de repos.
Gymnastique d’accompagnement
La gymnastique constitue le complément optimal à l’entraînement sur la
machine à ramer.
Chaque séance d’entraînement devra comporter une phase d’échauffement.
Activer la circulation pendant quelques minutes par de légers mouvements
F
1
5
10
4
2
7
9
6
8
3
19

de canotage (10 à 15 coups/minute). Commencer par des exercices
d’assouplissement des muscles pour passer ensuite aux exercices d’endurance proprement dits. Passer ensuite à la réduction de l’effort par des mouvements de canotage faciles et terminer la séance par quelques exercices
d’assouplissement.
Remarques concernant l’entraînement de la force avec
KETTLER COACH LS
Outre le rameur, COACH LS convient fort bien pour pratiquer l’entraÎne
ment, en vue de développer la force.
Il y a lieu cependant de suivre quelques remarques indispensables à un entraînement de valeur pour la santé, que l’on trouvera exposées succinctement
ci-aprés:
1. Comme novice, éviter de s’entralner avec des résistances trop importantes.
2. Ne s’entraîner qu’avec des résistances qui permettent de respirer
sans aucune contrainte.
3. Exécuter régulièrement tous les mouvements, sans à-coups et rapidement.
4. Dans tous les exercices, garder le dos bien droit. Eviter de le creuser
ou de le bomber.
5. On ne doit jamais perdre de vue que sa musculature et sa force aug-
mentent plus rapidement que ne se fait l’adaptation des ligaments,
des nerfs et des articulations.
En un mot, on ne doit augmenter la résistance que lentement et au fur et à
mesure que l’entraînement avance.
Présentation succincte de quelques méthodes d’entraînement
La méthode d’entraînement orientée vers l’endurance et la force convient
pour la mise en forme. Cela signifie 15 à 20 répétitions des exercices peu
de résistance légers (40 à 50% environ de la «force individuelle maximale*»).
On entend là par force maximale, la force personelle maximale possible à développer
pour actionner une seule fois un poids lourd.
Exemple de programme d’entraînement
Toujours commencer l’entraînement par une phase d’échauffement. Pendant
l’entraînement, intercaler après chaque série, une pause de 60 secondes
environ et profiter de ces pauses pour faire des exercices d’assouplissement
et d’extension.
S’entraîner 2 ou 3 fois par semaine avec son COACH LS et profiter de toutes
les occasions pour compléter l’entraînement par de longues promenades à
pied ou à bicyclette, en pratiquant la natation, etc. On constate
ra que l’en-
traînement régulier améliore bientôt la condition et le bienêtre.
Avertissement!
Vous vous entraînez avec un appareil conçu et construit selon les exigences
et principes modernes de sécurité. Les points dangereux sources éventuelles
de blessures, ont été évités ou sécurisés le mieux possible. L’utilisation de
l’appareil est exclusivement réservée aux adultes.
L’entraînement excessif ou mal programmé peut nuire à la santé. Avant de
s’entraîner, il est vivement conseillé de consulter son médicin traitant afin
de s’assurer qu`iln’y a pas de contre-indications médicales. Les résultats de l’examen médical devraient servir de base pour établir son programme
d’entraînement.
Il ne peut, en aucun cas, servir de jouet. Il ne faut jamais perdre de vue que,
de par leur naturel et leur tempérament, les enfants aiment jouer et qu’avec
cet appareil, ils peuvent se trouver confrontés avec des situations, des
dangers imprévus, lesquels excluent toute responsabilité de la part du constructeur. Si vous autorisez cependant vos enfants à jouer avec l’appareil,
il y a lieu de leur en apprendre le mode d’emploi correct et de les surveiller.
Le montage de l’appareil doit être fait soigneusement par un adulte. Veiller
à ne pas commencer l’entraînement avant que le montage n’ait été effectué
dans toutes les règles de l’art.
En cas d’emploi régulier l’appareil, nous recommandons d’effectuer, tous
les mois ou tous les deux mois, un contrôle de toutes les pièces et des éléments de fixation tels que vis, boulons, axes de fixations de câbles. Pour
que soit maintenu le haut niveau de sécurité de l’appareil, il y a lieu d’en
interdire l’utilisation si des pièces sont usées et de remplacer ces dernières
immédiatement.
Exercises 1re-2re semaines 3re- 4re semaines 5re- 6re semaines
Série Répét Série Répét Série Répét
1 1 — 2 individ. 2 individ. 3 individ.
4 1 — 2 12-15 2 15-20 3 15-20
7 1 — 2 12-15 2 15-20 3 15-20
9 1 — 2 12-15 2 15-20 3 15-20
13 1 — 2 12-15 2 15-20 3 15-20
14 1 — 2 12-15 2 15-20 3 15-20
17 1 — 2 12-15 2 15-20 3 15-20
20
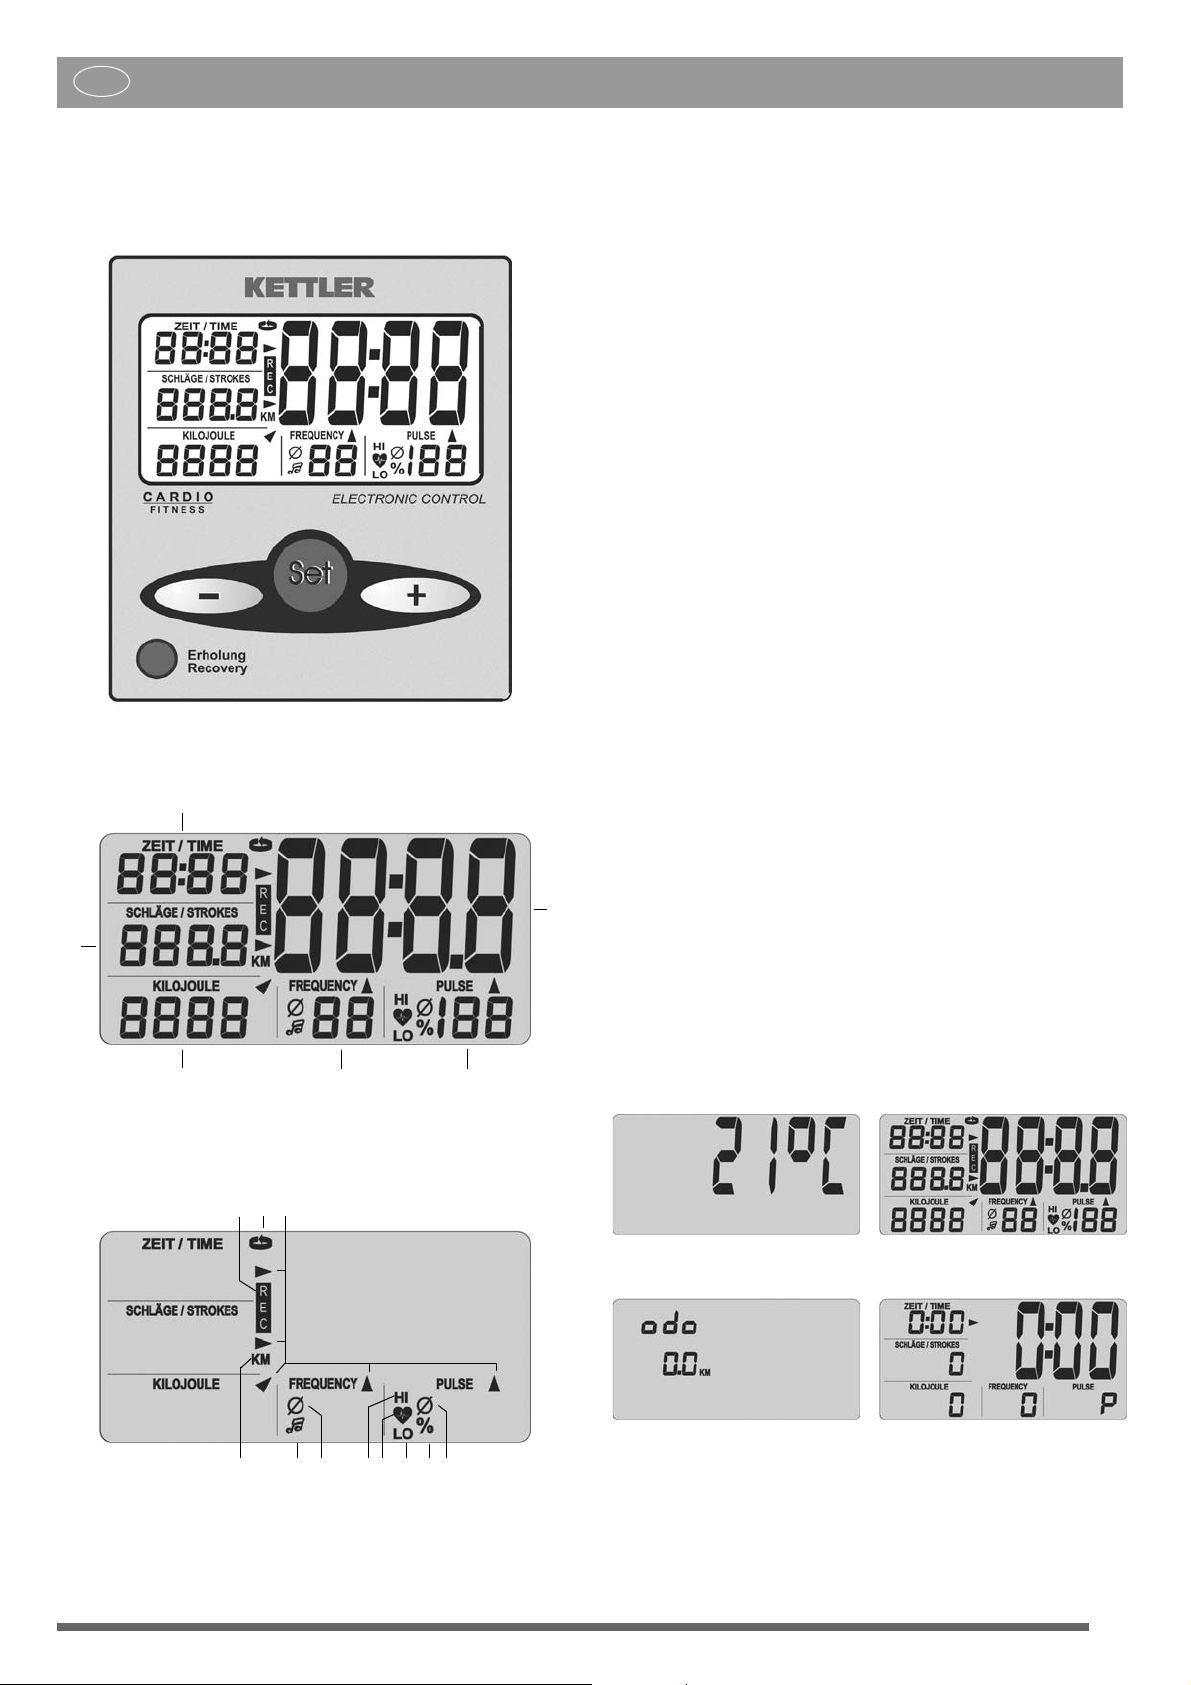
Bedieningshandleiding voor de trainingscomputer met digitaal display (ST2500-4)
Uitrusting:
Waardes:
1 Tijd ………………………..0:00 – 99:59 [min:sec]
2 Roeislagen……………….0 – 9999
Totaal aantal kilometers
odometer [0 – 999.9 km]
3 Calorieënverbruik………0 – 9999 [kJ]
4 Slagfrequentie…………..0 – 99 [slagen/min]
5 Polsslag…………………..50 – 199 [slagen/min]
6 Groot veld ……………….kamertemperatuur [0 — 40º]
conditiecijfer [F1.0 – F6.0]
Symbolen:
a REC……………………….Herstelpols
b SCAN…………………….Automatische wisseling van gegevens
c Pijl…………………………Actueel bereik in het grote veld
d KM ………………………..Totaal aantal kilometers
e Noot………………………Akoestische slagfrequentie weergave actief
f Doorsnede……………….Slagfrequentie + polsslag
g HI………………………….Overschrijding van de bovenste polsslag-
waarde
h Hart……………………….Knippert synchroon met de polsslag
i LO…………………………Onderschrijding van de onderste polsslag-
waarde
j Procent……………………% van maximale voorgeprogrammeerde
polsslag
Toetsen:
Min-toets …………………………..Waardes verminderen (weergaveveld terug)
Set-toets ………………………..Functietoets [voorprogrammeren, wisselen,
terugzetten (reset) van weergaveveld]
Plus-toets……………………….Waardes verhogen (weergaveveld vooruit)
Recovery-toets…………………Functietoets [opvragen conditiecijfer]
Aansluitingen (achter)
Bus (2-polig) …………………..voor de snelheidsmeter
Batterijvak ……………………..2 batterijen: Mignon 1,5 Volt, LR6, AA,
1.0 Weergaves voor de training
1. Kamertemperatuur…………Afbeelding 1 [voor en na de training]
2. Volledige weergave………Afbeelding 2 [na aanvang roeien of toets-
gebruik, 1 sec]
3. Totaal aantal kilometers …Afbeelding 3 [weergavetijd: 10 seconden
of toets]
4. Gereed voor training……..Afbeelding 4
Functies en bediening van de trainingscomputer
NL
Trainingswaardes op de display
3
1
2
4
5
6
Symbolen op de display
a
bc
d
e
f
gh i j
f
Afbeelding 1: Kamertemperatuur
Afbeelding 4: Gereed voor
training
Afbeelding 3: Totaal aantal
kilometers
Afbeelding 2: Volledige weergave
21
Loading…
Kettler Coach LS Fitness Equipment PDF User Guides and Manuals for Free Download: Found (4) Manuals for Kettler Coach LS Device Model (Assembly Instructions Manual, Manual )
The Kettler Coach LS is a remarkable piece of fitness equipment designed for both serious athletes and casual fitness enthusiasts looking to elevate their workout routine. With its sleek design and user-friendly features, the Coach LS stands out in the crowded market of indoor cycling bikes. This review will delve into its various attributes, ensuring potential buyers understand its strengths and weaknesses.
One of the most notable features of the Kettler Coach LS is its robust construction. Built with durable materials, it promises longevity and reliability. This bike can withstand the rigors of intense training sessions, making it an ideal choice for those who push their limits in pursuit of fitness goals. The frame is both stable and sturdy, providing a solid base during cycling workouts.
Another significant aspect of the Kettler Coach LS is its adjustable elements. Users can easily modify the seat height and position, ensuring a comfortable fit for individuals of various heights. The handlebars are also adjustable, allowing for customization based on user preference. This adaptability means that family members or friends can also use the same bike without sacrificing comfort.
The performance features of the Kettler Coach LS are impressive as well. It comes equipped with a high-precision flywheel that offers a smooth cycling experience. The adjustable resistance levels allow users to tailor their workouts, whether they are looking for a challenging session or a lighter ride for recovery. The transition between different resistance levels is seamless, which is a crucial factor for anyone engaged in interval training.
In addition to its physical attributes, the Kettler Coach LS includes a digital display that provides valuable feedback during workouts. Users can monitor their speed, distance, time, and calorie consumption, which helps track progress over time. This information is particularly beneficial for those who thrive on metrics and data as they pursue their fitness journeys.
Here are some of the key features of the Kettler Coach LS:
- High-precision flywheel for smooth cycling.
- Adjustable seat and handlebars for a perfect fit.
- Multiple resistance levels for customizable workouts.
- Digital display for tracking workout metrics.
- Sturdy construction ensuring long-term durability.
While the Kettler Coach LS excels in many areas, it is not without its shortcomings. Some users may find the absence of built-in workout programs a drawback, as many other bikes in this category come with pre-set routines. This could limit the variety of workouts available, requiring users to be more creative in structuring their sessions. Moreover, the price point might deter budget-conscious buyers, but the quality and features can justify the investment for serious users.
In conclusion, the Kettler Coach LS is a compelling option for anyone serious about indoor cycling. Its quality construction, adjustable features, and smooth performance make it a standout choice for fitness lovers. Although it may lack pre-set workout programs, the overall value it offers remains significant. If you are in the market for a robust and reliable exercise bike that can facilitate various training regimens, look no further than the Kettler Coach LS. Its exceptional build and thoughtful design meet the demands of diverse users, making it a worthwhile addition to any home gym.
FAQ: Types of Manuals and Their Contents
Kettler Coach LS Manuals come in various types, each serving a specific purpose to help users effectively operate and maintain their devices. Here are the common types of Kettler Coach LS User Guides and the information they typically include:
- User Manuals: Provide comprehensive instructions on how to use the device, including setup, features, and operation. They often include troubleshooting tips, safety information, and maintenance guidelines.
- Service Instructions: Designed for technicians and repair professionals, these manuals offer detailed information on diagnosing and repairing issues with the device. They include schematics, parts lists, and step-by-step repair procedures.
- Installation Guides: Focus on the installation process of the device, providing detailed instructions and diagrams for proper setup. They are essential for ensuring the device is installed correctly and safely.
- Maintenance Manuals: Provide guidance on routine maintenance tasks to keep the device in optimal condition. They cover cleaning procedures, part replacements, and regular servicing tips.
- Quick Start Guides: Offer a concise overview of the essential steps needed to get the device up and running quickly. They are ideal for users who need immediate assistance with basic setup and operation.
Each type of Kettler Coach LS instruction is designed to address specific needs, ensuring users have the necessary information to use, maintain, and repair their devices effectively.
Related Instructions for Kettler Coach LS:
1
MONTAGEANLEITUNG RACE 07938-180
16
81
17
2
TRACK-5
Manual TRACK-5 (Fitness Equipment ePDF User Guide, #14Y9M8)
18
116
24
3
Racer GT
Brochure Kettler Exercise Bike Brochure (File: kettler-racer-gt-brochure-1, 24.02.2025)
1
405
94
4
OSLO 07033-000
26
530
106
5
UNIX 10 EXT
Manual User Manual: Kettler UNIX 10 EXT (3TZ5YT, Upd.11th Sep 2024)
52
329
63
6
REGATTA 300
40
1455
291
7
FEEL 0104902
16
1406
211
Fitness Equipment Devices by Other Brands:
|
Cortex Omega ABE-10 Owner’s Manual Omega ABE-10 Owner’s manual — 486OW4 V.K007A20160812 11 Feb 2025 | 14 |
|
|
Precor C556 Service Manual C556 Service manual — I4C6VI C556 Elliptical Fitness Crosstrainerl 18 Mar 2025 | 81 |
|
|
ProGear 750 Owner’s Manual #XML67W: 750 Fitness Equipment Owner’s manual 750 Rower with Additional 20 Oct 2024 | 24 |
|
|
Performance Travel Trac 2000 Manual Travel Trac 2000 Manual — 1JYS33 Thank you for purchasing the Performance Travel Trac 2000™ portable trainer. 02 Feb 2025 | 4 |
Categories:
Burner
Crosstrainer
Trainer
Furniture
Lighting Equipment
Cross trainer
Report abuse
Libble takes abuse of its services very seriously. We’re committed to dealing with such abuse according to the laws in your country of residence. When you submit a report, we’ll investigate it and take the appropriate action. We’ll get back to you only if we require additional details or have more information to share.
Product:
Register
Register getting emails for Kettler COACH LS — 07985-640 at:
- new questions and answers
- new manuals
You will receive an email to register for one or both of the options.
Get your user manual by e-mail
Enter your email address to receive the manual of Kettler COACH LS — 07985-640 in the language / languages: English, German, Dutch, French, Italian, Polish, Spanish, Spanish as an attachment in your email.
The manual is 2,1 mb in size.
You will receive the manual in your email within minutes. If you have not received an email, then probably have entered the wrong email address or your mailbox is too full. In addition, it may be that your ISP may have a maximum size for emails to receive.
The manual is sent by email. Check your email
If you have not received an email with the manual within fifteen minutes, it may be that you have a entered a wrong email address or that your ISP has set a maximum size to receive email that is smaller than the size of the manual.
The email address you have provided is not correct.
Please check the email address and correct it.
Your question is posted on this page
Would you like to receive an email when new answers and questions are posted? Please enter your email address.
Хорошее руководство по эксплуатации
Законодательство обязывает продавца передать покупателю, вместе с товаром, руководство по эксплуатации Kettler COACH LS — 07985-640. Отсутствие инструкции либо неправильная информация, переданная потребителю, составляют основание для рекламации в связи с несоответствием устройства с договором. В законодательстве допускается предоставлении руководства в другой, чем бумажная форме, что, в последнее время, часто используется, предоставляя графическую или электронную форму инструкции Kettler COACH LS — 07985-640 или обучающее видео для пользователей. Условием остается четкая и понятная форма.
Что такое руководство?
Слово происходит от латинского «instructio», тоесть привести в порядок. Следовательно в инструкции Kettler COACH LS — 07985-640 можно найти описание этапов поведения. Цель инструкции заключается в облегчении запуска, использования оборудования либо выполнения определенной деятельности. Инструкция является набором информации о предмете/услуге, подсказкой.
К сожалению немного пользователей находит время для чтения инструкций Kettler COACH LS — 07985-640, и хорошая инструкция позволяет не только узнать ряд дополнительных функций приобретенного устройства, но и позволяет избежать возникновения большинства поломок.
Из чего должно состоять идеальное руководство по эксплуатации?
Прежде всего в инструкции Kettler COACH LS — 07985-640 должна находится:
— информация относительно технических данных устройства Kettler COACH LS — 07985-640
— название производителя и год производства оборудования Kettler COACH LS — 07985-640
— правила обслуживания, настройки и ухода за оборудованием Kettler COACH LS — 07985-640
— знаки безопасности и сертификаты, подтверждающие соответствие стандартам
Почему мы не читаем инструкций?
Как правило из-за нехватки времени и уверенности в отдельных функциональностях приобретенных устройств. К сожалению само подсоединение и запуск Kettler COACH LS — 07985-640 это слишком мало. Инструкция заключает ряд отдельных указаний, касающихся функциональности, принципов безопасности, способов ухода (даже то, какие средства стоит использовать), возможных поломок Kettler COACH LS — 07985-640 и способов решения проблем, возникающих во время использования. И наконец то, в инструкции можно найти адресные данные сайта Kettler, в случае отсутствия эффективности предлагаемых решений. Сейчас очень большой популярностью пользуются инструкции в форме интересных анимаций или видео материалов, которое лучше, чем брошюра воспринимаются пользователем. Такой вид инструкции позволяет пользователю просмотреть весь фильм, не пропуская спецификацию и сложные технические описания Kettler COACH LS — 07985-640, как это часто бывает в случае бумажной версии.
Почему стоит читать инструкции?
Прежде всего здесь мы найдем ответы касательно конструкции, возможностей устройства Kettler COACH LS — 07985-640, использования отдельных аксессуаров и ряд информации, позволяющей вполне использовать все функции и упрощения.
После удачной покупки оборудования/устройства стоит посвятить несколько минут для ознакомления с каждой частью инструкции Kettler COACH LS — 07985-640. Сейчас их старательно готовят или переводят, чтобы они были не только понятными для пользователя, но и чтобы выполняли свою основную информационно-поддерживающую функцию.