
Как пользоваться беспроводными наушниками: включать, настраивать и заряжать
Беспроводные наушники уже прочно вошли в моду. И это не удивительно, они компактные, долго держат заряд и подключаются почти к любому устройству, будь то плеер или телевизор. Рассказываем, как пользоваться беспроводными наушниками, чтобы процесс наслаждения музыкой был максимально прост и доступен.
Shutterstock
Приводим простую инструкцию по использованию этого гаджета.
Беспроводные наушники подключаются к мобильным устройствам через Bluetooth. Хранятся они в специальном чехле-зарядке. Сегодня мы расскажем, как настраивать беспроводные наушники разных брендов.
РЕКЛАМА – ПРОДОЛЖЕНИЕ НИЖЕ
Как работают беспроводные наушники?
На сегодняшний день беспроводные наушники — это выбор большинства пользователей. Такая гарнитура считается наиболее удобным способом прослушивания музыки, передачи голоса или просмотра видео со звуком. В первую очередь, за счет отсутствия лишних проводов и кнопок. Принцип работы подобных наушников заключается в получении сигнала «по воздуху». Технологически это работает следующим образом:
- передача через Bluetooth;
- передача по NFC;
- более устаревшие способы (передача через ИК-порт или радиосоединение).
Как включить беспроводные наушники
Чтобы включить наушники, зажми кнопку включения на несколько секунд. В некоторых моделях имеется всего одна кнопка, которая отвечает за все аспекты управления устройством. О том, как подключить беспроводные наушники к телефону, ты можешь в подробностях узнать из отдельной статьи.
РЕКЛАМА – ПРОДОЛЖЕНИЕ НИЖЕ
На беспроводных наушниках обычно имеется лишь одна кнопка, отвечающая за все аспекты управления
Как правильно настроить наушники
Беспроводные наушники можно подключать к любому виду мобильных устройств: смартфону, планшету, ноутбуку, персональному компьютеру. Каждый из них предполагает свой алгоритм подключения. Рассмотрим их особенности.
- Чтобы соединить наушники со смартфоном или планшетом, включи Bluetooth в настройках мобильного устройства, выполни поиск оборудования и выбери в списке свою модель наушников. В следующий раз наушники подсоединятся автоматически.
- Большинство современных ноутбуков имеет функцию Bluetooth – в этом случае алгоритм подключения наушников будет таким же, как в первом пункте.
- Для персонального компьютера следует купить модуль Bluetooth, подключить его в разъём USB и произвести настройку драйверов. Как правило, это происходит автоматически. После того, как Bluetooth устройство будет подключено. Нужно зайти в настройки, открыть вкладку «Устройства Bluetooth», произвести поиск нового оборудования и из выпавшего списка выбрать модель своих наушников.
РЕКЛАМА – ПРОДОЛЖЕНИЕ НИЖЕ
РЕКЛАМА – ПРОДОЛЖЕНИЕ НИЖЕ
Как настроить беспроводные наушники для использования с iPhone
Обычный алгоритм объединения в пару беспроводных наушников и iPhone выглядит так:
- Положи наушники рядом со смартфоном и разблокируй его.
- Нажми кнопку питания на кейсе или наушниках и удерживай, пока индикатор не изменит цвет.
- На экране смартфона должен появиться запрос на подключение.
- Далее следуй инструкциям смартфона.
Как настроить беспроводные наушники для использования с Android
При сопряжении гаджета с устройством, работающим на системе Андроид, выполни следующие шаги:
- Загрузи на смартфон специальное приложение, позволяющее подключить данную модель наушников.
- Нажми кнопку питания и удерживай несколько секунд (по инструкции).
- Когда индикатор начнёт мигать, наушники переключатся в режим соединения.
- В списке устройств на Android выбери наушники и нажми на значок «Подключить».
РЕКЛАМА – ПРОДОЛЖЕНИЕ НИЖЕ
Как настроить беспроводные наушники для использования с ноутбуком или другим устройством по Bluetooth
Беспроводные наушники можно синхронизировать не только со смартфоном, но и с другими устройствами
Если требуется создать пару с ноутбуком, персональным компьютером или другими устройствами, выполняется следующее:
- Нажми кнопку питания на наушниках и удерживайте её до изменения состояния индикатора.
- Открой меню настроек на твоем устройстве.
- Найди в настройках вкладку Bluetooth.
- Выбери в списке обнаруженных устройств свои наушники.
РЕКЛАМА – ПРОДОЛЖЕНИЕ НИЖЕ
РЕКЛАМА – ПРОДОЛЖЕНИЕ НИЖЕ
Возможные проблемы при подключении беспроводных наушников и их решение
Хотя подключение беспроводных наушников это довольно простая процедура, тем не менее могут возникать сложности при настройке и синхронизации устройств.
Нет подключения
Даже если пользователь сделал все по инструкции, гаджет может не появиться в разделе «доступные устройства» на телефоне. В таком случае нужно выполнить следующие действия:
- удостовериться в том, что наушники заряжены;
- заново включить Bluetooth;
- перезагрузить смартфон и гарнитуру
- проверить подключенные устройства и отключить ненужные;
- проверить, не подключились ли наушники к другому смартфону или компьютеру.
Не находит устройство
Причин тому, что телефон «не видит» гарнитуру, может быть несколько:
РЕКЛАМА – ПРОДОЛЖЕНИЕ НИЖЕ
- возможно устройства находятся слишком далеко друг от друга;
- смартфон или наушники почти или полностью разряжены.
- Чтобы установить соединение, нужно зарядить гаджет с наушниками, поднести гарнитуру к нему поближе и на всякий случай перезагрузить оба устройства.
Работает только один наушник
Такая проблема часто возникает, если наушники вынимали из бокса не одновременно и, как правило, решается следующими простыми действиями:
- переподключить девайс (убрать в зарядное устройство и снова одновременно достать);
- если проблема не решилась, попробовать работу гарнитуры на других устройствах. Не исключено, что дело кроется в поломке одного из наушников.
Пропал звук
Отсутствие звука может быть вызвано:
РЕКЛАМА – ПРОДОЛЖЕНИЕ НИЖЕ
- установкой новых программ на телефоне;
- разрядкой устройств;
- техническим сбоем.
Стоит убедиться, что выбран вариант получения аудиосигнала именно через наушники, удалить новые программы, которые возможно стали причиной проблем с передачей звука, и перезагрузить оба устройства. Если это не поможет, обратиться в службу поддержки пользователей или отправить гаджет на диагностику.
Как пользоваться беспроводными наушниками
После того, как ты подключила наушники к смартфону или ноутбуку, можно наслаждаться всеми прелестями их функционала, а таковых немало! Какие «плюшки» вы можете ожидать от беспроводных наушников?
Прежде всего, конечно, отсутствие путающихся проводов. Но это далеко не всё.
С помощью беспроводных наушников ты можешь управлять плейлистом без помощи смартфона. В руководстве пользователя сказано, как можно переключать трек, увеличивать или уменьшать громкость, а также переводить в наушники входящий звонок.
Ещё одно преимущество заключается в том, что у наушников предусмотрена функция автоподключения. Это значит, что подключать их к телефону нужно лишь один раз – при первом использовании (или после перезагрузки смартфона), а затем устройства будут соединяться друг с другом без участия пользователя. Главное – убедиться, что активирован Bluetooth.
Беспроводные наушники приостанавливают воспроизведение, когда хотя бы один из них извлекается из уха. Вернув наушник на место, ты сможешь слушать трек с того места, где он остановился.
В некоторых моделях есть функция шумоподавления, которая позволяет наслаждаться звуком даже в шумном метро. Также отличная «фича» – режим Multipoint, который позволяет подключаться сразу к двум устройствам.
Дополнительные функции активируются согласно инструкции. Обычно этот механизм предполагает определённые комбинация нажатия кнопки включения.
РЕКЛАМА – ПРОДОЛЖЕНИЕ НИЖЕ
РЕКЛАМА – ПРОДОЛЖЕНИЕ НИЖЕ
Какие правила безопасности важно соблюдать?
Эксплуатация беспроводных наушников дается намного легче, чем в случае с проводными, но и тут стоит придерживаться нескольких правил:
- если наушники используются в общественных местах и на улице — стоит выбирать модели с неполным шумоподавлением, чтобы слышать, что происходит вокруг. В случае с применением вакуумных устройств, которые обеспечивают высокую звукоизоляцию, рекомендуется прослушивать аудио на неполной громкости;
- наушники, как и смартфон, желательно регулярно обрабатывать антисептиком;
- во время прослушивания под дождем и снегопадом девайс стоит прятать под головным убором для того, чтобы избежать попадания влаги;
- как правило, при низких температурах воздуха батарея гарнитуры садится быстрее, поэтому зимой перед выходом на улицу стоит позаботиться о полном заряде;
- чтобы беспроводное устройство не выпало из ушей в самый неподходящий момент, рекомендуется правильно подбирать по размеру индивидуальные силиконовые накладки.
РЕКЛАМА – ПРОДОЛЖЕНИЕ НИЖЕ
Как заряжать беспроводные наушники
Если наушники работают от батареек, севшие элементы питания нужно просто заменить. Но большинство моделей требуют зарядки аккумулятора. Есть три основных способа, как заражать беспроводные наушники.
- Зарядка осуществляется через кабель. Чаще всего беспроводные наушники заряжаются с помощью кабеля с разъёмом мини-USB, USB Type-C, E-type и так далее, которые поставляются в комплекте.
- Наушники заряжаются через кейс. Сам процесс зарядки происходит аналогично первому способу, только заряжаешь ты не сами наушники напрямую, а чехол от них. Когда индикатор на корпусе чехла погаснет или изменит цвет, это означает, что гаджет полностью заряжен. О видах сигналов, которые подаёт световой индикатор, вы можете прочесть в руководстве по эксплуатации устройства. Технология заряда от специального футляра с аккумулятором используется в наушниках AirPods от компании Apple и их аналогах.
- С помощью беспроводного зарядного устройства. Процесс зарядки тоже может быть беспроводным! Сегодня в продаже можно найти зарядные устройства, которые не нужно подключать к сети. Такие аксессуары помогают заряжать не только наушники, но у другие гаджеты.
РЕКЛАМА – ПРОДОЛЖЕНИЕ НИЖЕ
РЕКЛАМА – ПРОДОЛЖЕНИЕ НИЖЕ
Главное в использовании беспроводных наушников — вовремя заряжать их
Как правильно заряжать беспроводные наушники: инструкция
- Если зарядка осуществляется через кабель, один его конец вставляем в специальный разъём на девайсе, другой – в зарядное устройство.
- Смотрим в руководстве пользователя, сколько нужно заряжать данную модель наушников. Оставляем гаджет заряжаться на необходимый период времени.
- По истечении указанного периода проверяем световой индикатор. Если он свидетельствует о полном заряде аккумулятора, отключаем наушники и пользуемся.
- Старайтесь всегда заряжать наушники до 100%.
- Не рекомендуется использовать наушники до того момента, когда они отключаются из-за полного «опустошения» батареи. Начните заряжать их чуть раньше.
- Нельзя трогать гаджет во время зарядки.
РЕКЛАМА – ПРОДОЛЖЕНИЕ НИЖЕ
Сколько заряжать наушники?
Период полного заряда беспроводных наушников может варьироваться от одного до четырёх часов, в зависимости от модели. Поэтому за такой информацией лучше обратиться к инструкции. Некоторые производители предусматривают для своего продукта режим быстрой зарядки, при котором после 10-15 минут соединения с блоком питания наушники могут проработать 2-3 часа беспрерывно. Для определения уровня заряда сверяйтесь со световым индикатором. Если ты используешь AirPods, степень заряда кейса и наушников можно посмотреть также на экране сопряжённого смартфона.
РЕКЛАМА – ПРОДОЛЖЕНИЕ НИЖЕ
Как заряжать беспроводные наушники JBL
Наушники от этого производителя могут заряжать как напрямую от зарядного устройства, так и от футляра. Для выбора оптимального способа зарядки изучи инструкцию. Одна из самых популярных моделей – JBL Tune 120 – снабжена световым индикатором на кейсе, состоящим из четырёх разноцветных светодиодов. Они загораются все разом, когда уровень заряда достигает 100%.
РЕКЛАМА – ПРОДОЛЖЕНИЕ НИЖЕ
Как заряжать беспроводные наушники Xiaomi
Очень популярный способ зарядки, который используется для беспроводных наушников — это зарядка с помощью футляра с аккумулятором
Любимая покупателями модель наушников Redmi Airdots от Xiaomi заряжается от футляра. Сперва убедитесь, что кейс заряжен, затем проверьте, нет ли внутри него защитных наклеек, которые могут препятствовать соприкосновению контактов. Если есть, удалите их. Вставьте наушники до конца в специальные углубления и оставьте заряжаться согласно инструкции.
РЕКЛАМА – ПРОДОЛЖЕНИЕ НИЖЕ
Как заряжать беспроводные наушники Apple AirPods
AirPods поставляются в комплекте с зарядным футляром, поэтому схема зарядки вполне стандартная: подключай футляр к сети с помощью кабеля и жди необходимое время. Чехол может заряжаться как с помещёнными в него наушниками, так и без них.
Как отключить беспроводные наушники
Для отключения наушников достаточно поместить их в футляр и закрыть крышку.
Если ты обнаружила какие-либо неполадки в работе наушников, часто требуется подключить их заново. Для этого открой список Bluetooth-устройств на вашем смартфоне или другом девайсе, выбери в нём наушники и нажмите «Забыть это устройство». Строчка с названием наушников исчезнет. После этого вновь соедини устройства в пару согласно инструкции.
РЕКЛАМА – ПРОДОЛЖЕНИЕ НИЖЕ
Чтобы произвести принудительное отключение Bluetooth-наушников, нужно в течение 10 секунд зажать одновременно кнопку питания и уменьшения громкости. Индикатор начнёт мигать. Это означает, что настройки наушников сброшены.
Полезное видео по настройке беспроводных наушников AirPods
Все способы:
- Подключение эндоскопа на Android
- Шаг 1: Аппаратное подключение
- Шаг 2: Приложения для эндоскопа
- Вопросы и ответы: 41
Эндоскоп является полезным инструментом, позволяющим при необходимости проникать и осматривать труднодоступные места. И хотя подобное приспособление изначально создано в медицинских целях, на сегодняшний день купить его можно без особых проблем для последующего использования совместно с ПК или смартфоном. Про второй вариант подключения нами будет рассказано далее по ходу статьи.
Подключение эндоскопа на Android
Процедуру соединения эндоскопа с телефоном можно поделить на два этапа, сводящихся к подключению кабеля и использованию одной из специальных программ. Для успешной установки соединения какие-то конкретные требования к Android-устройству и установленной версии ОС отсутствуют.
Шаг 1: Аппаратное подключение
В настоящее время существует два типа подключения внешней камеры, разделяющиеся на проводное и беспроводное соединение. Мы рассмотрим оба варианта.
Вариант 1: USB-эндоскоп
Чтобы подключить USB-девайс к телефону, воспользуйтесь идущим в комплекте кабелем и по необходимости переходником «USB — micro-USB». Чаще всего эндоскоп изначально оснащен штекером micro-USB, который следует подключить к соответствующему порту на телефоне.
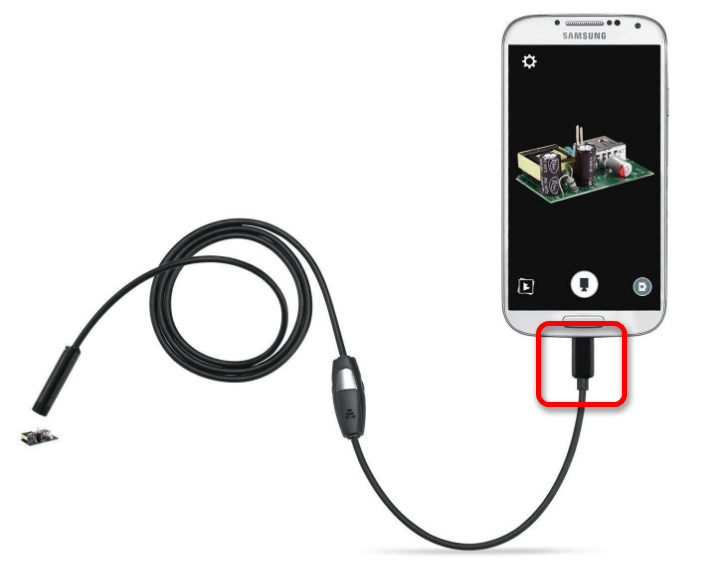
Стоит обратить внимание, что далеко не все смартфоны совместимы с USB-эндоскопами, так как некоторые модели более требовательны в плане потребления и потому не могут быть подключены к порту на телефоне из-за нехватки энергии для одновременной работы камеры и подсветки. Обойти подобные ограничения невозможно, так что учитывайте это заранее при выборе модели.
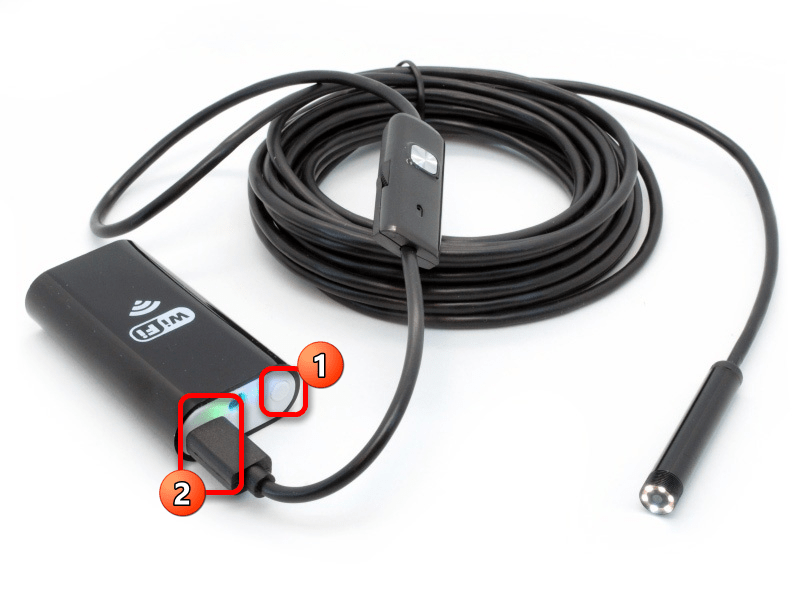
Вариант 2: Wi-Fi эндоскоп
- Некоторые более дорогие модели эндоскопа позволяют произвести подключение с помощью идущего в комплекте Wi-Fi модуля, совместимого как с телефонами, так и компьютерами. Прежде всего включите Вай-Фай, нажав отмеченную на скриншоте кнопку.

Подключите кабель micro-USB от девайса к порту, подсвеченному зеленым индикатором и значком Wi-Fi. За счет этого камера будет готова к передаче сигнала по беспроводной сети.
Примечание: Второй порт используется только для зарядки так как в отличие от проводного эндоскопа, данное устройство работает за счет встроенного аккумулятора.
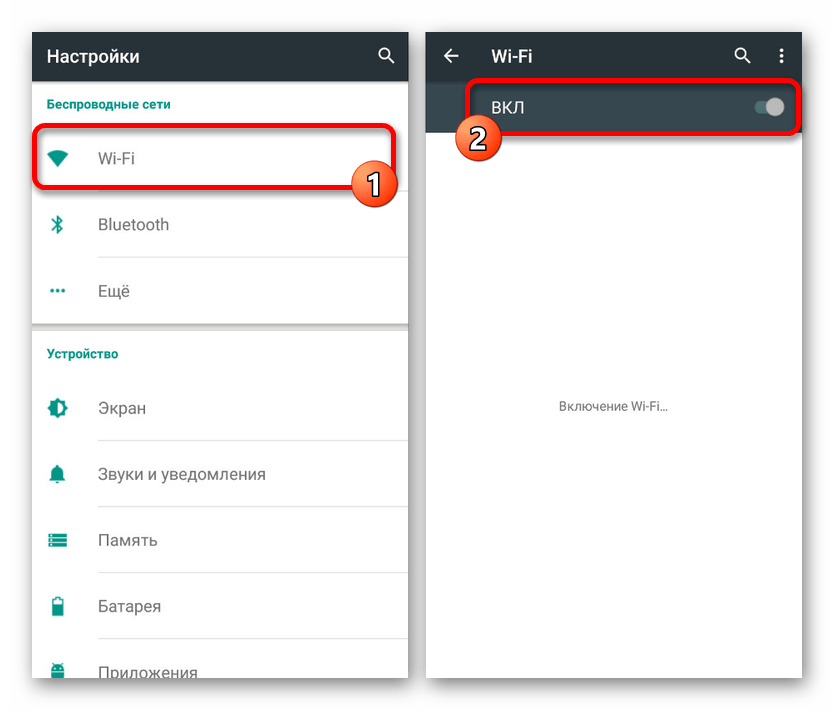
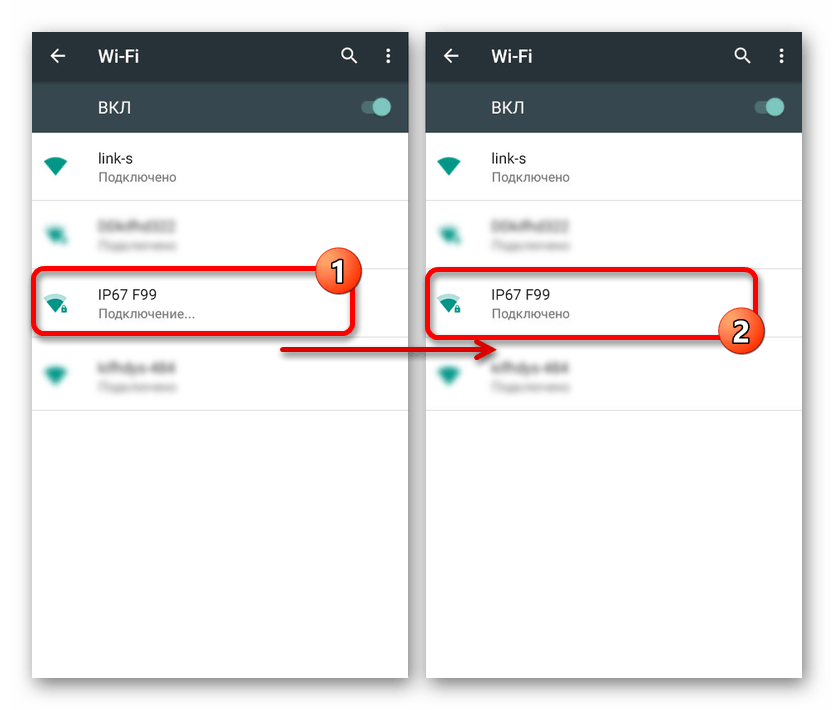
- На телефоне зайдите в «Настройки», перейдите в раздел «Wi-Fi» и воспользуйтесь ползунком включения беспроводной сети. После этого автоматически начнется поиск доступных устройств.
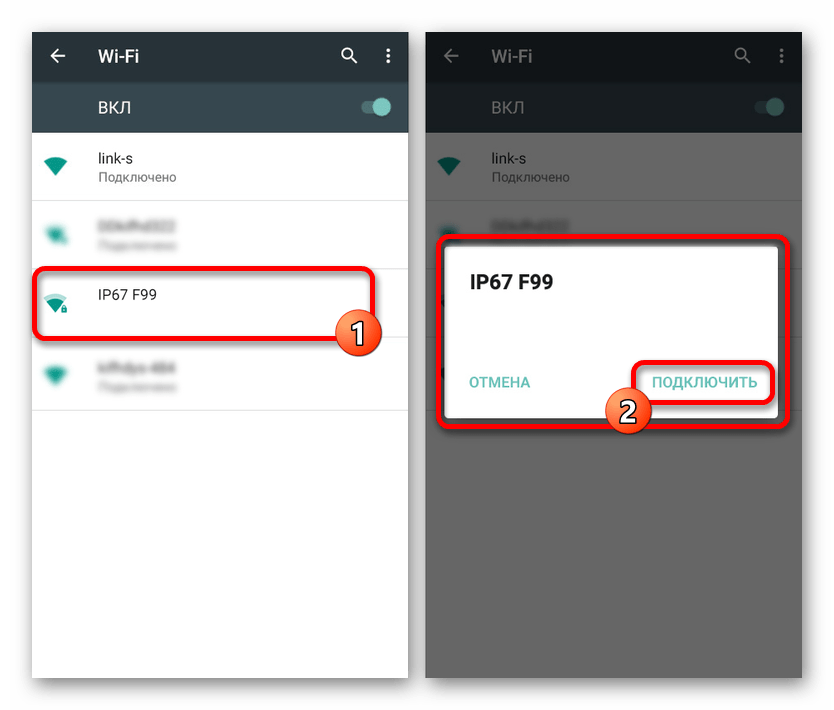
- В появившемся списке выберите нужное устройство, название которого должно соответствовать наименованию модели эндоскопа. Чтобы продолжить, в окне с названием сети нажмите кнопку «Подключить».
- Для успешной установки соединения также потребуется указать PIN-код, установленный производителем по умолчанию. Равно как и название сети, его желательно найти в инструкции из комплекта, так как комбинации могут отличаться на разных устройствах.
Для включения иногда требуется подтвердить соединение через специальное окно на экране телефона. В результате должно будет открыться стандартное приложение «Камера» или одна из специальных программ, рассмотренных нами далее. При этом в зависимости от модели смартфона какие-то действия будут отличаться.
Шаг 2: Приложения для эндоскопа
Некоторые модели эндоскопа при подключении к телефону могут использовать стандартные приложения для работы с камерой, так что специальное ПО требуется не всегда. Однако подобные варианты скорее являются исключениями, в то время как подавляющее большинство девайсов будут стабильно работать только при наличии одного из специальных приложений, доступных для загрузки в Google Play Маркете.
OTG View
Лучшей программой для Android, позволяющей получать изображение и управлять камерой, подключенной отдельно, можно смело назвать OTG View. Это приложение совместимо с большинством USB-эндоскопов и может исправно работать с устройствами, подключенными посредством Wi-Fi.
Скачать OTG View из Google Play Маркета
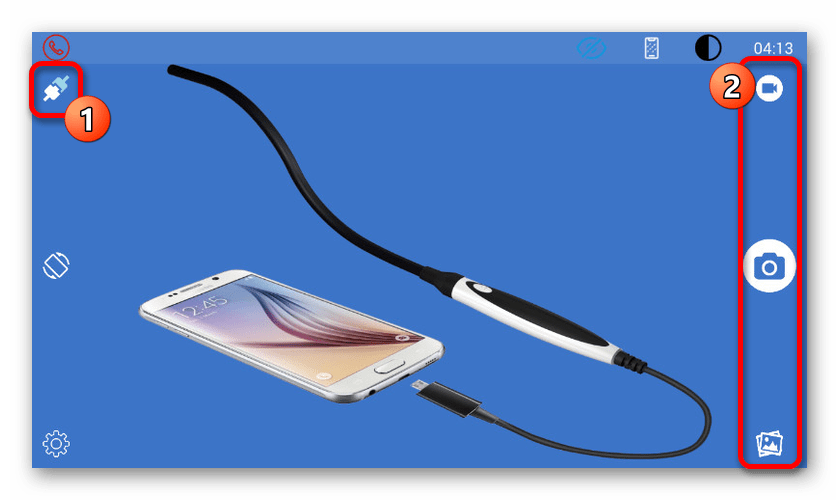
- После выполнения действий из первого раздела инструкции откройте OTG View. В результате на экране появится картинка или изображение с внешней камеры. Для обновления соединения можете воспользоваться значком в левой верхнем углу экрана.
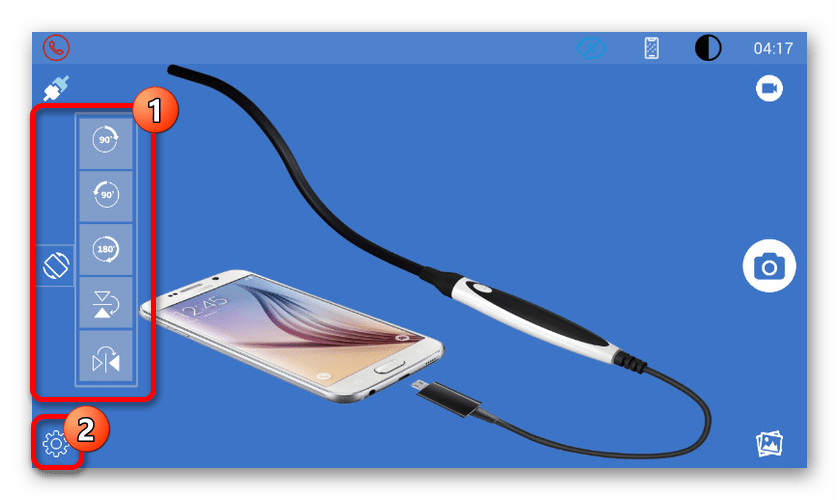
- С помощью приложения можно создавать видеозаписи или фотографии, что в сочетании с характеристиками многих эндоскопов гарантирует высокое качество. Кроме того, изображение можно отзеркалить или повернуть с помощью вспомогательного меню.
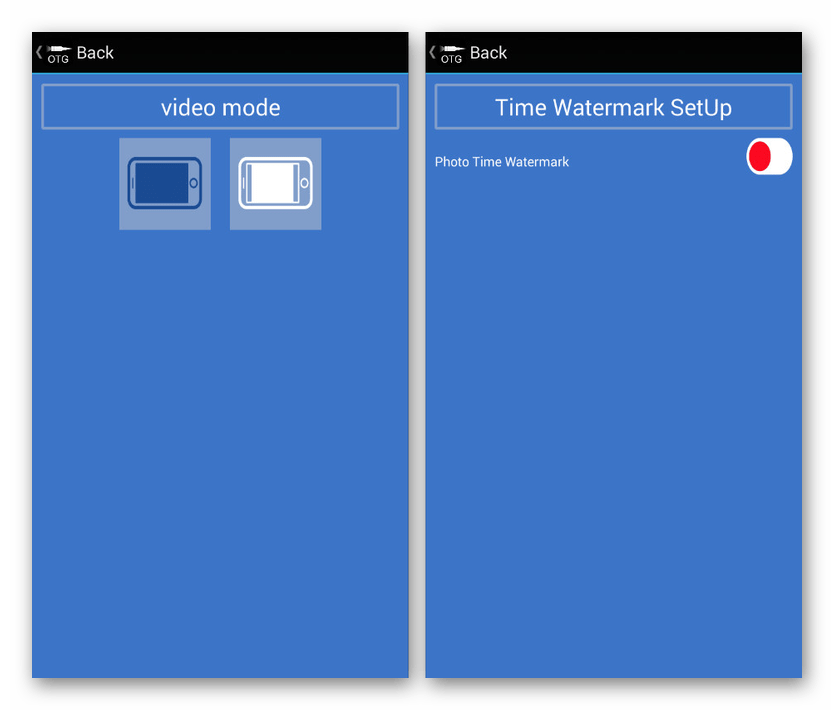
- Особенного внимания заслуживают встроенные настройки приложения, ограниченные несколькими параметрами вроде видеорежима и отображения водяных знаков. В зависимости от версии ОС приложение может меняться в лучшую или худшую сторону.
В связи с тем, что данное решение изначально предназначено для работы с эндоскопом и является лучшим, попробуйте использовать OTG View в первую очередь. Тут также заметьте, что о совместимости с ПО может быть указано на упаковке или в инструкции от девайса.
Представленной инструкции по аппаратному подключению и последующему использованию эндоскопа вполне достаточно для успешного соединения внешней камеры с телефоном. Чтобы избежать возможных проблем, соблюдайте порядок действий, сначала подключив камеру и только после этого тестируя приложения.
Наша группа в TelegramПолезные советы и помощь

AudioBox™ USB
Owner’s Manual
OverviewHookupConnecting
to a
Computer
Studio One Artist
TutorialsTechnical
English
Español
Deutsch
Information
and Warranty
Troubleshooting
®
www.presonus.com
Français

Important Safety Instructions
The exclamation point within an equilateral triangle is intended
to alert the user to the presence of important operating and
maintenance (servicing) instructions in this manual.
The lightning flash with arrowhead symbol within an equilateral
triangle is intended to alert the user to the presence of
uninsulated “dangerous” voltage within the product’s enclosure that may
be of sufficient magnitude to constitute a risk of electric shock to humans.
CAUTION: TO REDUCE THE RISK OF ELECTRIC SHOCK, DO NOT
REMOVE THE COVER. NO USER-SERVICEABLE PARTS INSIDE. REFER
SERVICING TO QUALIFIED PERSONNEL.
CAUTION: To reduce the risk of electric shock, do not expose this
appliance to rain and moisture. The apparatus shall not be
exposed to dripping or splashing liquids and no object filled with liquids,
such as vases, shall be placed on the apparatus.
CAUTION: These service instructions are for use by qualified
service personnel only. To reduce the risk of electric shock, do not
perform any servicing other than that contained in the operation
instructions. Repairs must be performed by qualified service personnel.
1. Read these instructions.
2. Keep these instructions.
3. Heed all warnings.
12. Use only with the cart, stand, tripod, bracket, or table
specified by the manufacturer or sold with
this apparatus. When a cart is used, use
caution when moving the cart/apparatus
combination to avoid injury from tip-over.
13. Unplug this apparatus during lightning storms or
when unused for long periods of time.
14. Servicing is required when the apparatus has been damaged in any
way, such as if a power-supply cord or plug is damaged; or liquid
has been spilled, or objects have fallen, into the apparatus; or if the
apparatus has been exposed to rain or moisture, does not operate
normally, or has been dropped. All PreSonus products in the USA
should be serviced at the PreSonus factory in Baton Rouge, Louisiana.
If your PreSonus product requires a repair, contact support@
presonus.com to arrange for a return-authorization number.
Customers outside the USA should contact their local distributor. Your
distributor’s contact information is available at www.presonus.com.
15. The apparatus shall be connected to a Mains power outlet
with a protective grounding/earthing connection.
16. Where the Mains plug or an appliance coupler
is used as the disconnect device, the disconnect
device shall remain readily operable.
4. Follow all instructions.
5. Do not use this apparatus near water.
6. Clean only with dry a cloth.
7. Do not block any ventilation openings. Install in
accordance with the manufacturer’s instructions.
8. Do not install near any heat sources, such as radiators, heat registers,
stoves, or other apparatus (including amplifiers) that produce heat.
9. Do not defeat the safety purpose of the polarized or grounding-type
plug. A polarized plug has two blades, with one wider than
the other. A grounding-type plug has two blades and a third
grounding prong. The wide blade and the third prong are provided
for your safety. If the provided plug does not fit into your outlet,
consult an electrician for replacement of the obsolete outlet.
10. Protect the power cord from being walked on or pinched,
particularly at plugs, convenience receptacles, and
the point where they exit from the apparatus.
11. Use only attachments/accessories specified by PreSonus.
EU Directives on the Protection of the
Environment and Other Euro Stuff
RoHS This product is compliant with the EU Directive 2002/95/EG for
the Restriction of the use of Certain Hazardous Substances in Electrical
and Electronic Equipment. No lead (Pb), cadmium (Cd), mercury (Hg),
hexavalent chromium (Cr+6), PBB or PBDE is intentionally added to
this device. Any traces of impurities of these substances contained
in the parts are below the RoHS specified threshold levels.
REACh This product is compliant with the European Union Directive
EC1907/206 for the Registration, Evaluation, Authorization, and
Restriction of chemicals (REACh) and contains none or less than 0.1% of
the chemicals listed as hazardous chemicals in the REACh regulation.
WEEE As with the disposal of all old electrical
and electronic equipment, this product is not to
be treated as regular household waste. Instead it
shall be handed over to the applicable collection
point for the recycling of electrical and electronic equipment.
CE This product complies with the European Union Council Directives
and Standards relating to electromagnetic compatibility EMC Directive
(2006/95/EC) and the Low Voltage Directive (2004/108/EC).

AudioBox™ USB
5.0 Tutorials — 30
1.0 Overview — 1
1.1 Introduction — 1
1.2 Summary of AudioBox USB
Hardware Features — 2
1.3 Summary of Studio One Artist
Software Features — 2
1.4 What is in the Box — 3
2.0 Hookup — 4
2.1 Front-Panel Connections — 4
2.2 Rear-Panel Connections — 6
2.3 Basic Hookup Diagram — 7
3.0 Connecting to a
Computer — 8
3.1 System Requirements — 8
3.2 Installation for Windows — 9
3.3 Installation for Mac OS X — 11
5.1 Microphone Types — 30
5.1.1 Condenser — 30
5.1.2 Dynamic — 30
5.1.3 USB Microphones and
Other Types — 30
5.1.4 Microphone Placement — 31
5.2 A Brief Tutorial on Dynamics
Processing — 34
5.2.1 Common Questions Regarding
Dynamics Processing — 34
5.2.2 Types of Dynamic
Processing — 35
5.2.3 Compression Settings:
Some Starting Points — 39
5.3 Equalizers — 42
5.3.1 What is an EQ? — 42
5.3.2 Equalization Settings:
How to Find the Best and
Leave the Rest — 44
5.3.3 General EQ Suggestions — 47
OverviewHookupConnecting
to a
Computer
Studio One Artist
TutorialsTechnical
Information
3.4 Using the AudioBox USB with Popular
Audio Applications — 11
3.5 Windows Control Panel — 13
4.0 Studio One Artist
Quick Start — 15
4.1 Installation and Authorization — 15
4.2 Enabling the Audio Driver — 20
4.3 Configuring MIDI Devices — 21
4.4 Creating a New Song — 25
4.5 Creating Audio Tracks — 26
4.6 Creating MIDI Tracks — 28
4.7 Adding Virtual Instruments and Plug-in
Effects to Your Song — 29
5.4 Digital Effects — 50
5.4.1 Reverb — 50
5.4.2 Delay — 51
5.4.3 Modulation Effects — 51
6.0 Technical Information — 52
6.1 AudioBox USB Specifications — 52
7.0 Troubleshooting and
Warranty — 54
7.1 Troubleshooting — 54
7.2 PreSonus AudioBox Limited
Warranty — 55
Index — 56
and Warranty
Troubleshooting

0 Current Section PreSonus AudioBox
™
USB
0.0 Current Sub Section
Overview Hookup Connecting
Computer
to a
Studio One Artist
Tutorials Technical
Information
Troubleshooting
and Warranty
iv

Owner’s Manual
1.0 Overview
1.1 Introduction
Overview 1
Introduction 1.1
Thank you for purchasing the PreSonus AudioBox™ USB. PreSonus Audio
Electronics has designed the AudioBox USB utilizing high-grade components
to ensure optimum performance that will last a lifetime. Loaded with 2 highheadroom, Class A, microphone preamplifiers; a built-in 2×2 USB 1.1 recording
and playback engine; MIDI I/O; and more, AudioBox USB breaks new boundaries
for music performance and production. All you need is a computer with a
USB connection, a few microphones and cables, powered speakers, and your
instruments, and you are ready to record in the studio or in front of a live audience!
OverviewHookupConnecting
Overview
to a
Computer
Studio One Artist
TutorialsTechnical
We encourage you to contact us with questions or comments regarding this
product. You can reach us by email at support@presonus.com or call us at 1-225216-7887 between 9 a.m. and 5 p.m. Central Time (GMT -06:00 CST). PreSonus
Audio Electronics is committed to constant product improvement, and we
value your suggestions highly. We believe the best way to achieve our goal of
constant product improvement is by listening to the real experts: our valued
customers. We appreciate the support you have shown us through the purchase
of this product and are confident that you will enjoy your AudioBox USB!
ABOUT THIS MANUAL: We suggest that you use this manual to familiarize yourself with the
features, applications, and correct connection procedures for your AudioBox before trying to
connect it to your computer. This will help you avoid problems during installation and setup.
Throughout this manual you will find Power User Tips that can quickly make you an
AudioBox USB expert. In addition to the Power User Tips, you will find an assortment
of audio tutorials at the back of this manual. These tutorials cover everything from
microphone placement to equalizer and compression-setting suggestions.
Information
and Warranty
Troubleshooting
1

1 Overview
1.2 Summary of AudioBox USB Hardware Features
Overview Hookup Connecting
Overview
Computer
to a
1.2 Summary of AudioBox USB Hardware Features
• 24-bit/48 kHz sampling rate
• 2 Class A microphone preamplifiers
• 2 Instrument inputs
• MIDI I/O
• 2×2 USB 1.1 audio interface
• Headphone output
• Analog monitor mixing with playback/input mix control
PreSonus AudioBox™ USB
Studio One Artist
Tutorials Technical
Information
Troubleshooting
and Warranty
• Rugged steel chassis
• Studio One™ Artist
• Compatible with Cubase, Digital Performer, Logic, Nuendo,
Pro Tools 9+, Sonar, Studio One, and others
• Mac OS X®- and Windows®-compatible
1.3 Summary of Studio One Artist Software Features
All PreSonus audio interfaces include PreSonus Studio One Artist recording
software, which comes with more than 6 GB of plug-ins, loops, and samples,
giving you everything you need for music recording and production. The Studio
One Artist Quick Start Guide is located in Section 4.1 of this manual. You will
find a complete user manual on the Studio One Artist installation DVD.
• Unlimited track count, inserts, and sends
• 20 high-quality native plug-ins: amp modeling (Ampire), delay (Analog Delay,
Beat Delay), distortion (Redlight Dist), dynamics processing (Channel Strip,
Compressor, Gate, Expander, Limiter, Tricomp), equalizer (Channel Strip, Pro EQ),
modulation (Autofilter, Chorus, Flange, Phaser, X-Trem), reverb (MixVerb, Room
Reverb), and utility (Binaural Pan, Mixtool, Phase Meter, Spectrum Meter, Tuner)
• More than 6 GB of loops, samples, and instruments, featuring: Presence
virtual sample player, Impact virtual drum machine, SampleOne virtual
sampler, Mojito virtual analog-modeled subtractive synthesizer
• Innovative and intuitive MIDI mapping
• Powerful drag-and-drop functionality for faster workflow
• Mac OS X®- and Windows®-compatible
2

Owner’s Manual
1.4 What is in the Box
Overview 1
What is in the Box 1.4
Your AudioBox USB package contains the following:
PreSonus AudioBox USB recording interface
6’ (1.8m) USB cable
Software library containing
• PreSonus Studio One Artist program DVD plus gigabytes of third-party content
• AudioBox driver and manual CD
OverviewHookupConnecting
Overview
to a
Computer
Studio One Artist
TutorialsTechnical
Information
and Warranty
Troubleshooting
3

2 Hookup
2.1 Front-Panel Connections
PreSonus AudioBox™ USB
Computer
Overview Hookup Connecting
Hookup
to a
Studio One Artist
Tutorials Technical
Information
2.0 Hookup
2.1 Front-Panel Connections
Microphone/Instrument Inputs. Both channels of the AudioBox USB have Mic/
Instrument combo jacks. This convenient connector accepts either a ¼-inch phone
plug or an XLR plug.
• Microphone Inputs. The XLR inputs on channels 1 and 2 are equipped with two
custom PreSonus microphone preamplifiers. These preamps work great with all
types of microphones including dynamic, ribbon, and condenser microphones.
Power User Tip: Dynamic microphones and ribbon microphones (which are a special type of
dynamic mic) are generally lower-output devices that, with few exceptions, require no external
power source. Sending phantom power to a ribbon mic that doesn’t require it can cause severe
damage to the mic – usually beyond repair. Condenser microphones are generally more sensitive
than dynamic and ribbon microphones and typically require external +48V phantom power. Always
review your microphone’s documentation and follow its recommended operating practices.
Troubleshooting
and Warranty
• Instrument Inputs. The ¼-inch TS connectors on channels 1 and 2
are for use with instruments (guitar, bass, etc.). When an instrument
is plugged into the instrument input, the mic preamp is bypassed,
and the AudioBox USB becomes an instrument preamplifier.
Power User Tip: Active instruments are those that have an internal preamp or a line-level output.
Active instruments should be plugged into a line input rather than into an instrument input.
Plugging a line-level source into the instrument inputs on the front of the AudioBox USB not only
risks damage to these inputs but also results in a very loud and often distorted audio signal.
Please note: As with any audio input device, plugging in a microphone or an instrument, or
turning phantom power on or off, will create a momentary spike in the audio output of your
AudioBox USB. Because of this, we highly recommend that you turn down the channel trim before
changing connections or turning phantom power on or off. This simple step will add years to life of
your audio equipment.
48-volt Phantom Power. The AudioBox USB provides 48V phantom power for the
microphone input on each channel. Press the 48V button to enable phantom power
for all microphone inputs.
WARNING: Phantom power is only required for condenser micro phones and
can severely damage some dynamic mics, especially ribbon mics. Therefore,
switch phantom power off for all channels where it is not required.
XLR connector wiring for phantom power:
Pin 1 = GND
Pin 2 = +48V
4
Pin 3 = +48V

Owner’s Manual
Hookup 2
Front-Panel Connections 2.1
Input Gain/Trim Control. These knobs provide the following gain structure:
• XLR Microphone Instrument inputs: 40 dB of variable gain (-10 to +30 dB)
• TS ¼-inch Instrument Level inputs: 60 dB of variable gain (0 dB to +60 dB)
Clip Indicator. All channels feature clip LEDs next to the trim controls. The red clip
indicator LED will illuminate when the channel’s input signal reaches 0 dBFS. At this
level, your mic preamp/line trim signal will exhibit signs of clipping (distortion).
Power User Tip: Never run your input levels higher than the channel inputs can handle. If you overdrive
the analog-to-digital converters, it will cause digital distortion (digital clipping), which sounds terrible.
Mixer. The Mixer knob allows you to blend your input signals with the playback
streams from your computer. This allows you to monitor your input signal with
zero latency. If the knob is positioned at 12 o’clock, the input signal and the
playback stream will be equally balanced. Turning the knob to the left will increase
the level of the input signal relative to the playback stream; turning to the right
will increase the level of the playback stream relative to the input signal.
Please note: When creating monitor mixes using Studio One or another DAW, it is important that
you turn the Mixer knob all the way to the Playback position. Monitoring both the input signal
and the playback stream will create a doubling effect that will make monitoring difficult.
Phones. The Phones knob controls the volume of the headphone output
on the rear of the unit. The headphone amplifier is quite powerful, and the
volume goes to 11, so use the maximum setting with extreme caution.
OverviewConnecting
Hookup
to a
Computer
Studio One Artist
TutorialsTechnical
Main. The Main knob controls the output level for the Main Outputs
on the back of the AudioBox, with a range of -80 dB to 10 dB.
Power LED. This LED will illuminate red when the AudioBox is
properly powered and synced to a USB connection.
Information
and Warranty
Troubleshooting
5

2 Hookup
2.2 Rear-Panel Connections
PreSonus AudioBox™ USB
Computer
Overview Hookup Connecting
Hookup
to a
Studio One Artist
Tutorials Technical
Information
2.2 Rear-Panel Connections
¼-inch Phones (headphone) Jack. This is where you connect headphones to your
AudioBox USB.
Main Out. These are the main outputs for the AudioBox USB. The output level of the
Main Outs is controlled by the Main volume knob on the front of the unit.
Power User Tip: You must connect speakers or headphones directly to your AudioBox USB in order
to monitor playback from your computer.
Troubleshooting
and Warranty
MIDI I/O. MIDI stands for “Musical Instrument Digital Interface.” MIDI inputs
and outputs allow connection to, and communication with, external MIDI
equipment. One function of these ports is MIDI sequencing but the MIDI
protocol can be used for much more than instruments and sequencing.
NOTE: MIDI is not audio but is frequently used to trigger or control
an audio source (such as a plug-in or synthesizer). It’s important
to ensure that your MIDI data is correctly sent and received by
the appropriate hardware or software devices. If the devices
generate audio, you may also need to return the audio to an
AudioBox USB input channel. Please consult the User’s Manuals
of your MIDI devices for help with MIDI setup and usage.
USB Port. This is where you connect the USB cable from your AudioBox USB to your
computer. The AudioBox USB is bus-powered via this connection and does not
require an external power supply.
Your AudioBox USB is compatible with all types of USB ports (1.1, 2.0, and 3.0).
6

Owner’s Manual
2.3 Basic Hookup Diagram
Hookup 2
Basic Hookup Diagram 2.3
OverviewConnecting
AUDIOBOX USB
1 2
Mic• Instrument
guitar
Designed by
PreSonus in
the USA.
Manufactured
in PRC.
vocal mic
IN OUT
48V
-10
0 60
-80 10
Power
Hookup
to a
Clip
0 60
-10
+30
Clip
+30
1 11
PLAYBACKINPUTS
Computer
Studio One Artist
headphones
L
R
TutorialsTechnical
Information
computer
USB
midi
MIDI
PHONESMAIN OUT
and Warranty
Troubleshooting
monitors
7

3 Connecting to a Computer
3.1 System Requirements
PreSonus AudioBox™ USB
Computer
Computer
Overview Hookup Connecting
Connecting
to a
to a
Studio One Artist
Tutorials Technical
3.0 Connecting to a Computer
Your AudioBox USB is a rugged USB 1.1 audio interface with zerolatency analog monitoring control and professional audio tools.
3.1 System Requirements
Below are the minimum computer-system requirements for
PreSonus Studio One Artist and AudioBox USB.*
Mac
• Operating Systems:
• Mac OS X 10.6 or higher
• Hardware:
• Minimum: Intel® Core™ Duo 1.5 GHz processor, 2 GB RAM
• Recommended: Intel Core 2 Duo or Intel iCore
processor or better, 4 GB or more RAM
Windows
Information
Troubleshooting
and Warranty
• Operating Systems (32- or 64-bit):
• Windows 7, Vista
• Hardware:
• Minimum: Intel Core Duo or AMD Athlon™ X2 processor, 2 GB RAM
• Recommended: Intel Core 2 Duo or AMD Athlon X4 or better, 4 GB or more RAM
NOTE: The speed of your processor, amount of RAM, and capacity, size, and speed of your hard
drives will greatly affect the overall performance of your recording system. A faster processor
and more RAM can reduce signal latency (delay) and improve overall performance.
*Subject to change. Check www.presonus.com for updates.
8

Owner’s Manual
3.2 Installation for Windows
Connecting to a Computer 3
Installation for Windows 3.2
The AudioBox installer requires that your AudioBox USB be connected to your
computer. Connect your AudioBox USB to an available USB port and insert the
Installation CD into your disc drive. The AudioBox installer will auto-launch and take
you through each step of the installation process. Please read each message carefully.
It is recommended that you quit all applications before you start the installation.
Windows Vista Users: If you see any Windows Security
alerts, click “Install this driver software anyway.”
1. The installer will open to the Welcome screen.
Click “Next.”
OverviewHookupConnecting
to a
to a
Computer
Computer
Connecting
Studio One Artist
TutorialsTechnical
Information
and Warranty
Troubleshooting
2. You will be asked if you would like the installer to
automatically create an icon on your desktop for the
AudioBox control panel.
This control panel allows you to adjust the
buffer size and sample rate of your AudioBox
USB. Creating a desktop icon will provide
you with quick access to these controls.
Click “Next.”
9

3 Connecting to a Computer
3.3 Installation for Mac OS X
PreSonus AudioBox™ USB
Computer
Computer
Overview Hookup Connecting
Connecting
to a
to a
Studio One Artist
Tutorials Technical
3. The installer will now scan your computer, you
will be prompted to begin the installation.
If your AudioBox is not detected by the
installer, you will prompted to connect it.
Click “Install Driver.”
4. Once the driver has been installed successfully, you will
be alerted.
Click “Next” to finish the installation.
Information
Troubleshooting
and Warranty
5. In order for the driver to operate properly, you must
restart your computer.
Click “Finish” to automatically reboot your computer.
6. Once your computer has restarted,
your AudioBox USB is now ready to use!
3.3 Installation for Mac OS X
Your AudioBox USB is a class-compliant Core Audio device. No
installation is necessary on Mac computers. Simply connect
your AudioBox USB to your Mac to begin using it.
10

Owner’s Manual
Connecting to a Computer 3
Using the AudioBox USB with Popular Audio Applications 3.4
3.4 Using the AudioBox USB with Popular Audio Applications
Apple Logic Pro/Express 7+:
Complete setup instructions for Studio One Artist and a brief tutorial
on its features can be found in Section 4 of this manual. However, you
can use your AudioBox USB with any audio-recording application that
supports Core Audio or ASIO. Please consult the documentation that came
with your audio application for specific instructions on how to select the
AudioBox USB driver as the audio-device driver for your software.
Below are basic driver-setup instructions for four popular audio applications.
1. Launch Logic Pro/Express.
2. Go to Logic | Preferences | Audio.
3. Click on the Devices Ta b.
4. On the Core Audio tab, check Enabled.
5. Select PreSonus AudioBox USB from the device menu.
6. You will be asked if you’d like to relaunch Logic. Click “try (re)launch.”
OverviewHookupConnecting
to a
to a
Computer
Computer
Connecting
Studio One Artist
TutorialsTechnical
Steinberg Cubase 4+
7. Your AudioBox USB features custom I/O labels for faster workflow.
To enable these labels for use in Logic, go to Options | Audio | I/O Labels.
8. The second column in the pop-up window will be named
“Provided by Driver.” Activate each of these labels for your Au-
dioBox USB. When you are done, close this window.
9. You are now ready to use your AudioBox USB.
1. Launch Cubase.
2. Go to Devices | Device Setup.
3. Select “VST Audio System” from the Devices column in the Device Setup.
4. Select PreSonus AudioBox USB from the ASIO Driver drop-down list.
5. Click “Switch” to begin using the AudioBox USB driver.
6. Once you have successfully changed the driver, go to Devices |
VST Connections to enable your input and output buses.
Information
and Warranty
Troubleshooting
11

3 Connecting to a Computer
3.4 Using the AudioBox USB with Popular Audio Applications
PreSonus AudioBox™ USB
Computer
Computer
Overview Hookup Connecting
Connecting
to a
to a
Studio One Artist
Tutorials Technical
Cakewalk Sonar 6+
1. Launch Sonar.
2. Go to Options | Audio… and click on the Advanced tab.
3. Change the Driver Mode to “ASIO.” (Using WDM, rather than
ASIO, for pro-audio applications is not recommended.)
4. Click the “OK” button.
5. Restart Sonar.
6. Go to Options | Audio… and click on the Drivers tab.
7. Highlight all input and output drivers beginning with “PreSonus AudioBox USB.”
8. Go to Options | Audio… and click on the General tab.
9. Set the Playback Timing Master to “PreSonus AudioBox USB… DAW Out 1.”
10. Set the Recording Timing Master to “PreSonus AudioBox USB… Mic/Inst 1.”
Information
Troubleshooting
and Warranty
Ableton Live 5+
1. Launch Ableton Live
2. Go to Options | Preferences | Audio
3. Choose Driver Type: Asio | Audio Device: ASIO PreSonus AudioBox USB
4. Go to Input Config: Enable and select the desired Input channels.
5. Go to Output Config: Enable and select the desired Output channels.
6. You may now select the AudioBox USB’s inputs
and outputs for each track created in Live.
12

Owner’s Manual
3.5 Windows Control Panel
Connecting to a Computer 3
Windows Control Panel 3.5
Your AudioBox USB features a control panel on Windows systems
that allows you to adjust the buffer size and sample rate.
On Mac systems, these functions are accessible
from within your DAW application.
Run at Startup Launches the AudioBox USB Control Panel Automatically on Startup.
When this is enabled, the AudioBox USB Control Panel will automatically
launch each time you boot your Windows.
Sample Rate Selector Changes Sample Rate.
Sets the sample rate to 44.1 or 48 kHz.
A higher sample rate will increase the fidelity of the
recording. It will also increase the file size and the amount
of system resources necessary to process the audio.
Changing the sample rate will produce a momentary popping noise.
Because of this, it is recommended that you turn the Main and Phones
volumes down on your AudioBox prior to changing the sample rate.
ASIO Buffer Size (Windows Only) Changes the Buffer Size.
OverviewHookupConnecting
to a
to a
Computer
Computer
Connecting
Studio One Artist
TutorialsTechnical
You can set the buffer size from 32 to 2,048 samples. The buffer size
determines the roundtrip time it takes audio data to be converted from
analog to digital and back to analog. As a general rule, the higher the
buffer size, the better the system performance, but the less playable
virtual instruments and the like become. In general, 512 samples (11 to 12
milliseconds) will provide you with a large enough buffer for optimum
system performance but small enough to be unobtrusive. You should set
your buffer size prior to launching your host application.
Information
and Warranty
Troubleshooting
13

4 Studio One Artist
4.1 Installation and Authorization
PreSonus AudioBox™ USB
Computer
Overview Hookup Connecting
4.0 Studio One Artist Quick Start
to a
Studio One Artist
Tutorials Technical
Information
Troubleshooting
and Warranty
Your AudioBox USB comes with Studio One Artist recording and
production software. Whether you are about to record your first
album or your fiftieth, Studio One Artist provides you with all of
the tools necessary to capture and mix a great performance. As
a valued PreSonus customer, you are also eligible for a discount
upgrade to Studio One Producer or Studio One Professional. For
more details on the Studio One upgrade program for PreSonus
customers, please visit http://studioone.presonus.com/.
4.1 Installation and Authorization
Once you have installed the AudioBox USB drivers and connected
your AudioBox USB to your computer, you can use the included
PreSonus Studio One Artist music-production software to begin
recording, mixing, and producing your music. To install Studio One
Artist, insert your installation disc into your computer’s DVD drive.
Follow the onscreen instructions to complete the installation process.
Running the Studio One Installer
To Install Studio One Artist, insert your Studio One Artist installation DVD
into your computer’s DVD drive.
14
• Windows Users: Launch the Studio One Artist
installer and follow the onscreen instructions.
• Mac Users: Drag the Studio One Artist application into
the Applications folder on your Macintosh hard drive.

Owner’s Manual
Creating a User Account
Studio One Artist 4
Installation and Authorization 4.1
1. After installing Studio One Artist, launch the program, and the Activate
Studio One menu will appear. Click on the Activate or Upgrade link to
begin.
2. If you are a new Studio One user, you will need to create a user account.
Click on the “Create New Account” link if your computer is connected to
the Internet.
• If your computer is not connected to the Internet,
skip to “Activating Studio One Artist Offline.”
• If you already have a PreSonus user account, you can
skip to “Activating Studio One Artist On Line.”
OverviewHookupConnecting
to a
Computer
Studio One Artist
TutorialsTechnical
3. Fill out the user registration form. You will be asked to create a
username and password. This information will be used to access your
PreSonus user account on the PreSonus Web site. With this account,
you can manage registration for all of your PreSonus hardware and
software products. You will be notified of, and will have access to,
important information and updates related to your PreSonus products,
ensuring you get the best performance possible from them.
Your username and password will also provide you with access to the
PreSonus user forums to chat with other PreSonus users as well as
PreSonus employees.
4. Once your user account has been successfully created, you will be
alerted that the activation email has been sent to the email address
that you provided.
Don’t forget to activate your PreSonus user account
the next time you check your email!
Information
and Warranty
Troubleshooting
15

4 Studio One Artist
4.1 Installation and Authorization
PreSonus AudioBox™ USB
Computer
Overview Hookup Connecting
to a
Studio One Artist
Tutorials Technical
Activating Studio One Artist Online
Now that you have created a user account, you can activate your
copy of Studio One Artist. Click on the Activate Online link and enter
your previously created account username, password, and the
product key you received with the Studio One Artist installation disc.
Your Studio One Product Key is located on
the Studio One Artist disc wallet.
Click on the Activate button to finish the activation process.
Activating Studio One Artist Offline
1. If your computer is not connected to the Internet, visit
http://www.presonus.com/registration/ on an Internetconnected computer to create your account.
Information
Troubleshooting
and Warranty
2. Once you have created your user account, log in and click on the
Software Registration link.
3. Enter the Product Key located on the Studio One Artist disc wallet.
Click “Submit.”
4. When product key is registered, you see a list of links to download
Studio One Artist and its bundled content. Click the Registration Home
link to go back to the main page.
Click on the “My Software” link.
16
Loading…
Manual
View the manual for the PreSonus Audiobox USB here, for free. This user manual comes under the category audio recorder and has been rated by 1 people with an average of a 8.5. This manual is available in the following languages: English. Do you have a question about the PreSonus Audiobox USB?
Ask your question here
Frequently asked questions
Can’t find the answer to your question in the manual? You may find the answer to your question in the FAQs about the PreSonus Audiobox USB below.
What is the weight of the PreSonus Audiobox USB?
The PreSonus Audiobox USB has a weight of 2300 g.
Is the manual of the PreSonus Audiobox USB available in English?
Yes, the manual of the PreSonus Audiobox USB is available in English .
Is your question not listed? Ask your question here

Технические параметры USB аудиоинтерфейса PreSonus Audiobox USB:
USB-интерфейс PreSonus Audiobox USB с питанием от шины, в котором есть микрофонные входы с фантомным питанием 48 В, а также два балансных TRS-выхода, MIDI-вход/выход, регулятор микса между записываемым и воспроизводимым сигналом.
USB-интерфейс поставляется вместе с фирменным ПО PRESONUS ProPak, а также секвенсором Steinberg Cubase LE 4. От сторонних производителей в комплекте — плагины, барабанные петли и семплы ударных.
— 24-бита/ 44.1, 48кГц USB звукозаписывающий интерфейс
— 2 микрофонных/ инструментальных предусилителя XMAX класса А
— фантомное питание 48В
— 2 балансных TRS выхода
— MIDI вход/выход
— питание по USB
— поддержка Windows XP, Vista, Windows 7, Windows 8 -10 , Mac OS X
Элитные предусилители
Компания PreSonus Audio выиграла множество наград за построение микрофонных предусилителей высочайшего класса во всех ценовых диапазонах. Преампы AudioBox USB без усилий превзойдут любой USB-интерфейс. Предусилители в AudioBox имеют высокий динамический диапазон, низкий шум и высокий выход, что даст вам чистый, полный и богатый звук.
Профессиональные 24-битные конвертеры
Большинство USB записывающих устройств работают с частотой дискретизации 16-бит и используют конвертеры с динамическим диапазоном менее 90 дБ. Это приводит к сжатому и относительно маленькому звуку. В AudioBox USB применены профессиональные АЦП с динамическим диапазоном 102дБ и частотой дискретизации 24-бита, поэтому цифровое преобразование проходит максимально качественно.
Питание по шине USB
AudioBox USB питается через шину USB, позволяя вам брать его куда угодно, где наступит вдохновение. Никаких нагромождений аппаратуры и кучи проводов – просто подключите AudioBox к USB-порту и можно начинать записывать.
Всегда готов к дороге
Здесь нет никакого пластика. AudioBox USB сделан в полностью металлическом корпусе с металлическими ручками и готов выдержать любые тяготы дороги. Можно просто кинуть его в сумку от ноутбука и что бы вы не захотели – записать выступление, набросать микс или написать песню в комнате отеля – AudioBox всегда будет под рукой.
Cubase LE 4 – программа для записи и сведения
Steinberg`s Cubase LE 4 – это 48-дорожечная цифровая станция, поставляется с AudioBox и дает вам полнофункциональную мощную систему звукозаписи. Cubase LE 4 включает: 48-аудиодорожек, 64 MIDI дорожек, MIDI & секвенсор, EQ на каждую дорожку, поддержка VST плагинов, поддержку Virtual instrument, Time stretching и pitch shifting , HALionOne Sample Player (60 инструментов, звуковая библиотека 400 MB), Compressor, DualFilter, Distortion, PingPong-Delay, Chorus, Flanger, Phaser, AutoPanner, Vibrato, Rotary, MonoToStereo и Roomworks SE, DaTube, MIDI Gate, StepFilter, Bitcrusher, Chopper, Metalizer, Ring Modulator, Tranceformer, Grungelizer, Drum Editor и многое другое.
Системные требования
Windows
Windows XP SP3, Vista x64/x32 SP2, Windows 7 x64/x32 SP, Windows 8 x64/x32
Intel Core Duo или AMD Athlon X2 процессор (Intel Core 2 Duo или AMD Athlon X4 или лучше, рекомендуется)
2 GB RAM (4 GB рекомендуется)
Mac
Mac OS X 10.6.8 или выше
Intel Core Duo процессор (Intel Core 2 Duo или Intel Core i3 или лучше, рекомендуется)
2 GB RAM (4 GB рекомендуется)
Microphone Preamp
Type XLR Female Balanced
Frequency Response (±3.0 dB) 20 Hz to 20 kHz
Input Impedance (Balanced) 1200Ω
THD+N (unwtd, 1 kHz @ +4 dBu Output, Unity Gain) < 0.008%
S/N Ratio (Unity Gain, Ref. = +4 dBu, 20 Hz to 22 kHz) > 95 dB
Common Mode Rejection Ratio (1 kHz, 55 dB Gain) > 45 dB
Gain Control Range (± 1 dB) 0 dB to 35 dB
Max Input Level (Unity Gain, 1 kHz @ 0.5% THD+N) -3 dBu
Phantom Power (±2 VDC) +48 VDC
Instrument Input
Type ¼»
TS Female Unbalanced Input Impedance 0.5 MΩ
Line Outputs
Type ¼»
Balanced Output Impedance 51Ω
Headphone Output
Type ¼» TRS Active Stereo
Maximum Output 60 mW/Ch @ 60Ω Load
Frequency Response (±1.0 dB) 20 Hz — 30 kHz
MIDI I/O
Type Dual 5-pin Female DIN
Digital Audio
ADC Dynamic Range (A-wtd, 48 kHz Sample Rate) 105 dB
DAC Dynamic Range (A-wtd, 48 kHz Sample Rate) 105 dB
Bit Depth 24
Reference Level for 0 dBFS +4 dBu
Internal Sample Frequency Selections (kHz) 44.1, 48
Power USB Bus-powered
Physical
Dimensions 1/3U (steel chassis)
Height 5.5” (139.7 mm)
Depth 1.75″ (44.45 mm)
Width 5.5” (139.7 mm)
Weight 5 lbs (2.27 kg)
Обзор №1
По моим субъективным ощущениям PreSonus Audiobox USB 2×2 как-то чуть чуть намыливает звук инструмента, подключенного в инструментальный вход. Вот сколько я не пробовал свою гитару вызвучивать, ну чего-то вроде как бы не хватает.. то ли яркости, то ли «сочности». Ну и конечно расстроило отсутствие линейных входов. На сколько я понимаю, там только инструментальные, или же я не увидел кнопки переключения между линейным и инструментальным.
НО! Меня порадовали действительно хорошие драйвера PreSonus Audiobox USB, я выставлял самую минимальную задержку какая была только возможна в драйвере, кубейс показывал общую задержку в сумме входа и выхода 5-6ms, и, черт побери, ни треска, ничего, просто превосходно стабильная работа !
На счет замыливания звука я могу быть не прав, все тестировалось на коленке