
Displayed below is the user manual for HIO 3C23 WF by Hotpoint which is a product in the Dishwashers category.
This manual has pages.
1
EN
DAILY REFERENCE
GUIDE
Before using the appliance carefully read Health and Safety guide.
PRODUCT DESCRIPTION
THANK YOU FOR BUYING A HOTPOINT ARISTON PRODUCT.
In order to receive a more complete assistance, please
register your appliance on: www.hotpoint.eu/register
You can download the Safety Instructions and the
Use and Care Guide, by visiting our website
docs.hotpoint.eu and following the Instructions on
the back of this booklet.
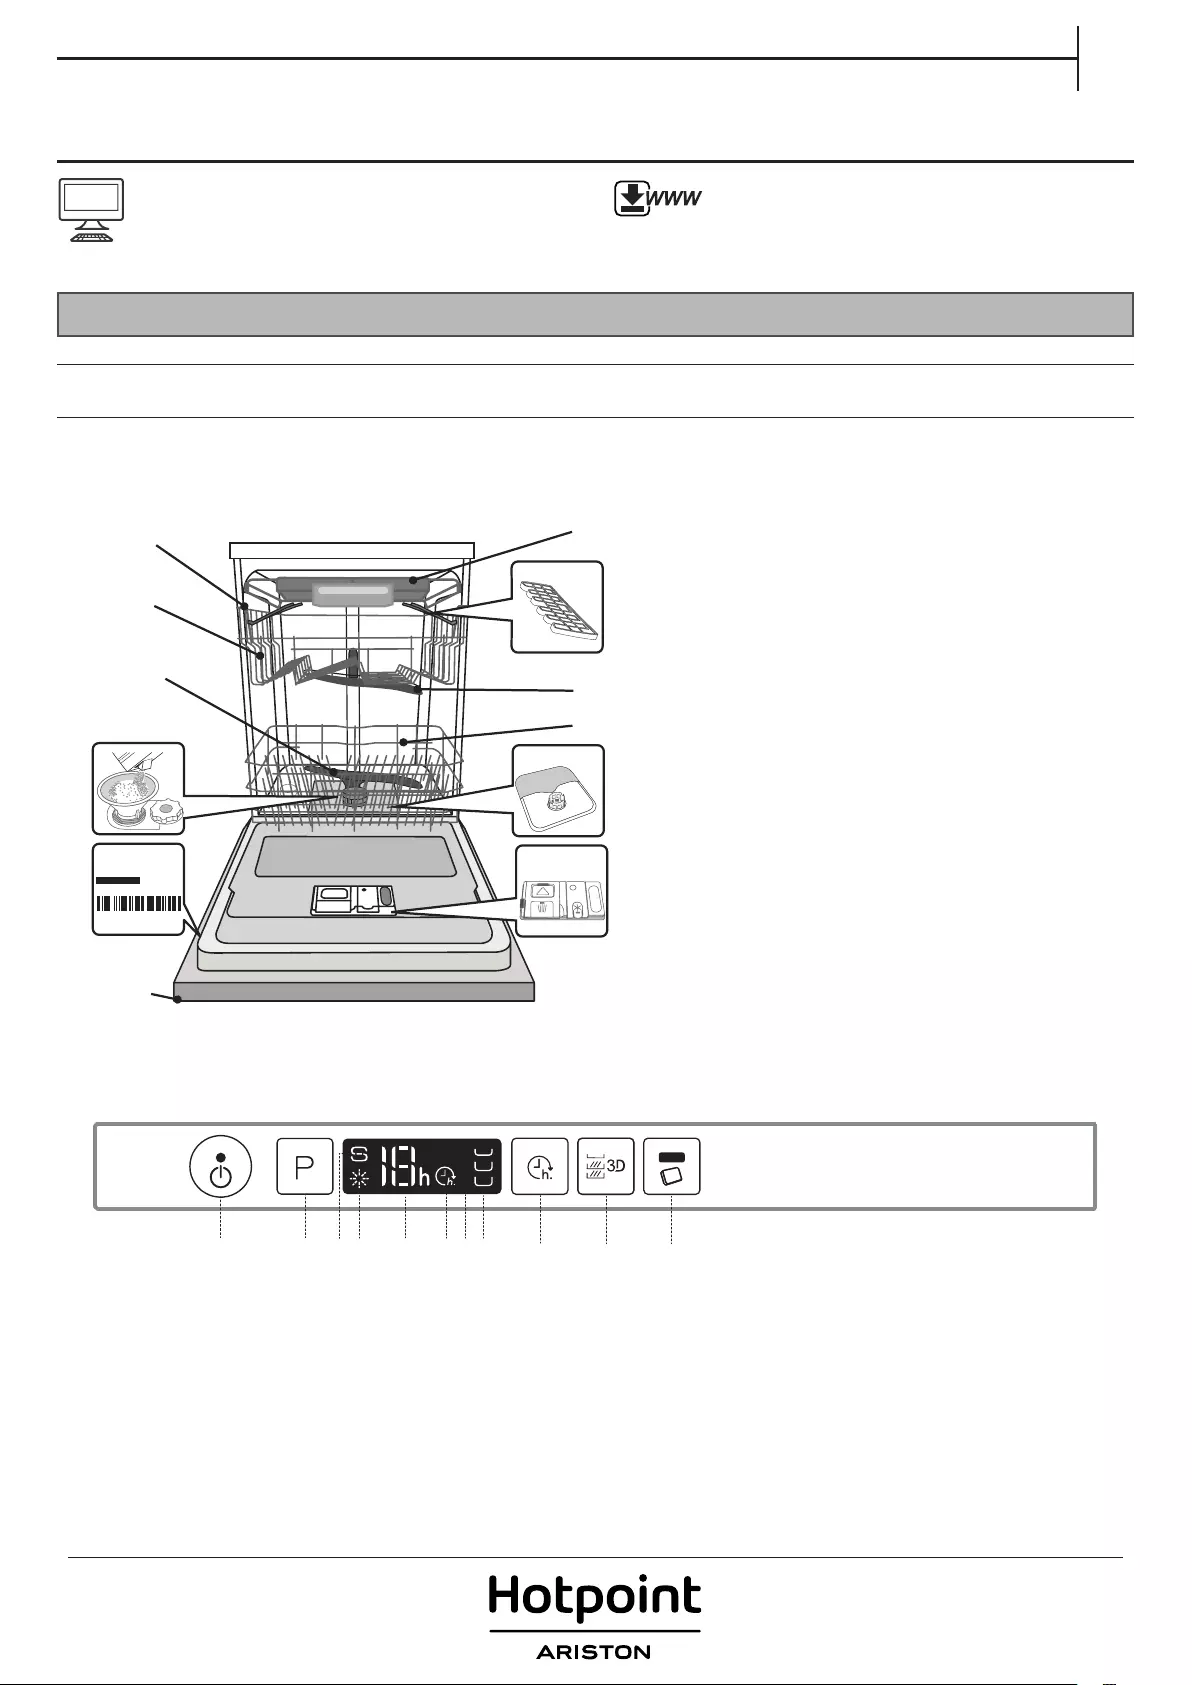
APPLIANCE
CONTROL PANEL
1. On-O/Reset button with indicator light
2. Program selection button
3. Salt rell indicator light
4. Rinse Aid rell indicator light
5. Program number and delay time indicator
6. Delay indicator light
7. Display
8. Zone Wash 3D indicator light
9. Delay button
10. Zone Wash 3D button
11. Tablet (Tab) button with indicator light
0000 000 00000
Service:
1
4
5
6
11
7
10
8
9
3
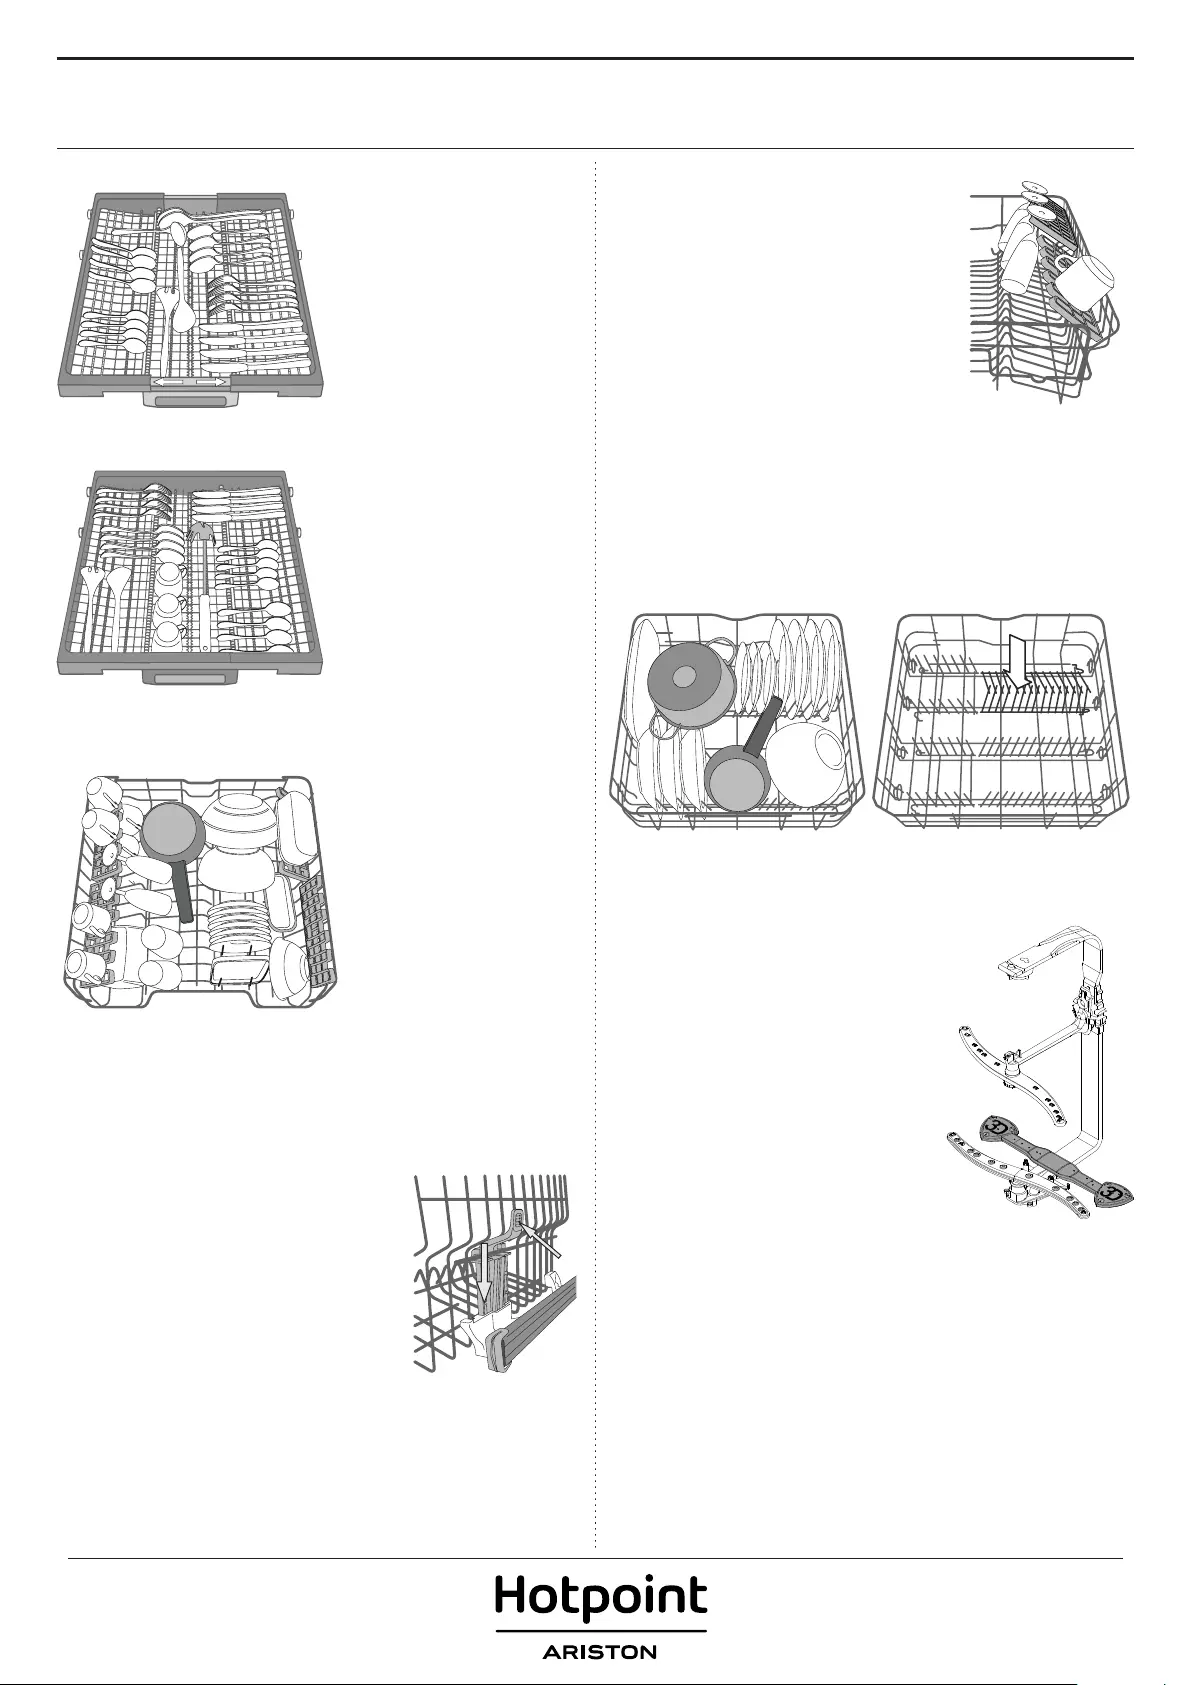
1. Upper rack
2. Cutlery rack
3. Foldable aps
4. Upper rack height adjuster
5. Upper spray arm
6. Lower rack
7. Lower spray arm
8. Filter Assembly
9. Salt reservoir
10. Detergent and Rinse Aid dispensers
11. Rating plate
12. Control panel
3 4 5 6 7 8 9 10 111 2
2
FIRST TIME USE
SALT, RINSE AID AND DETERGENT
ADVICE REGARDING THE FIRST TIME USE
After installation, remove the stoppers from the racks and the reta-
ining elastic elements from the upper rack.
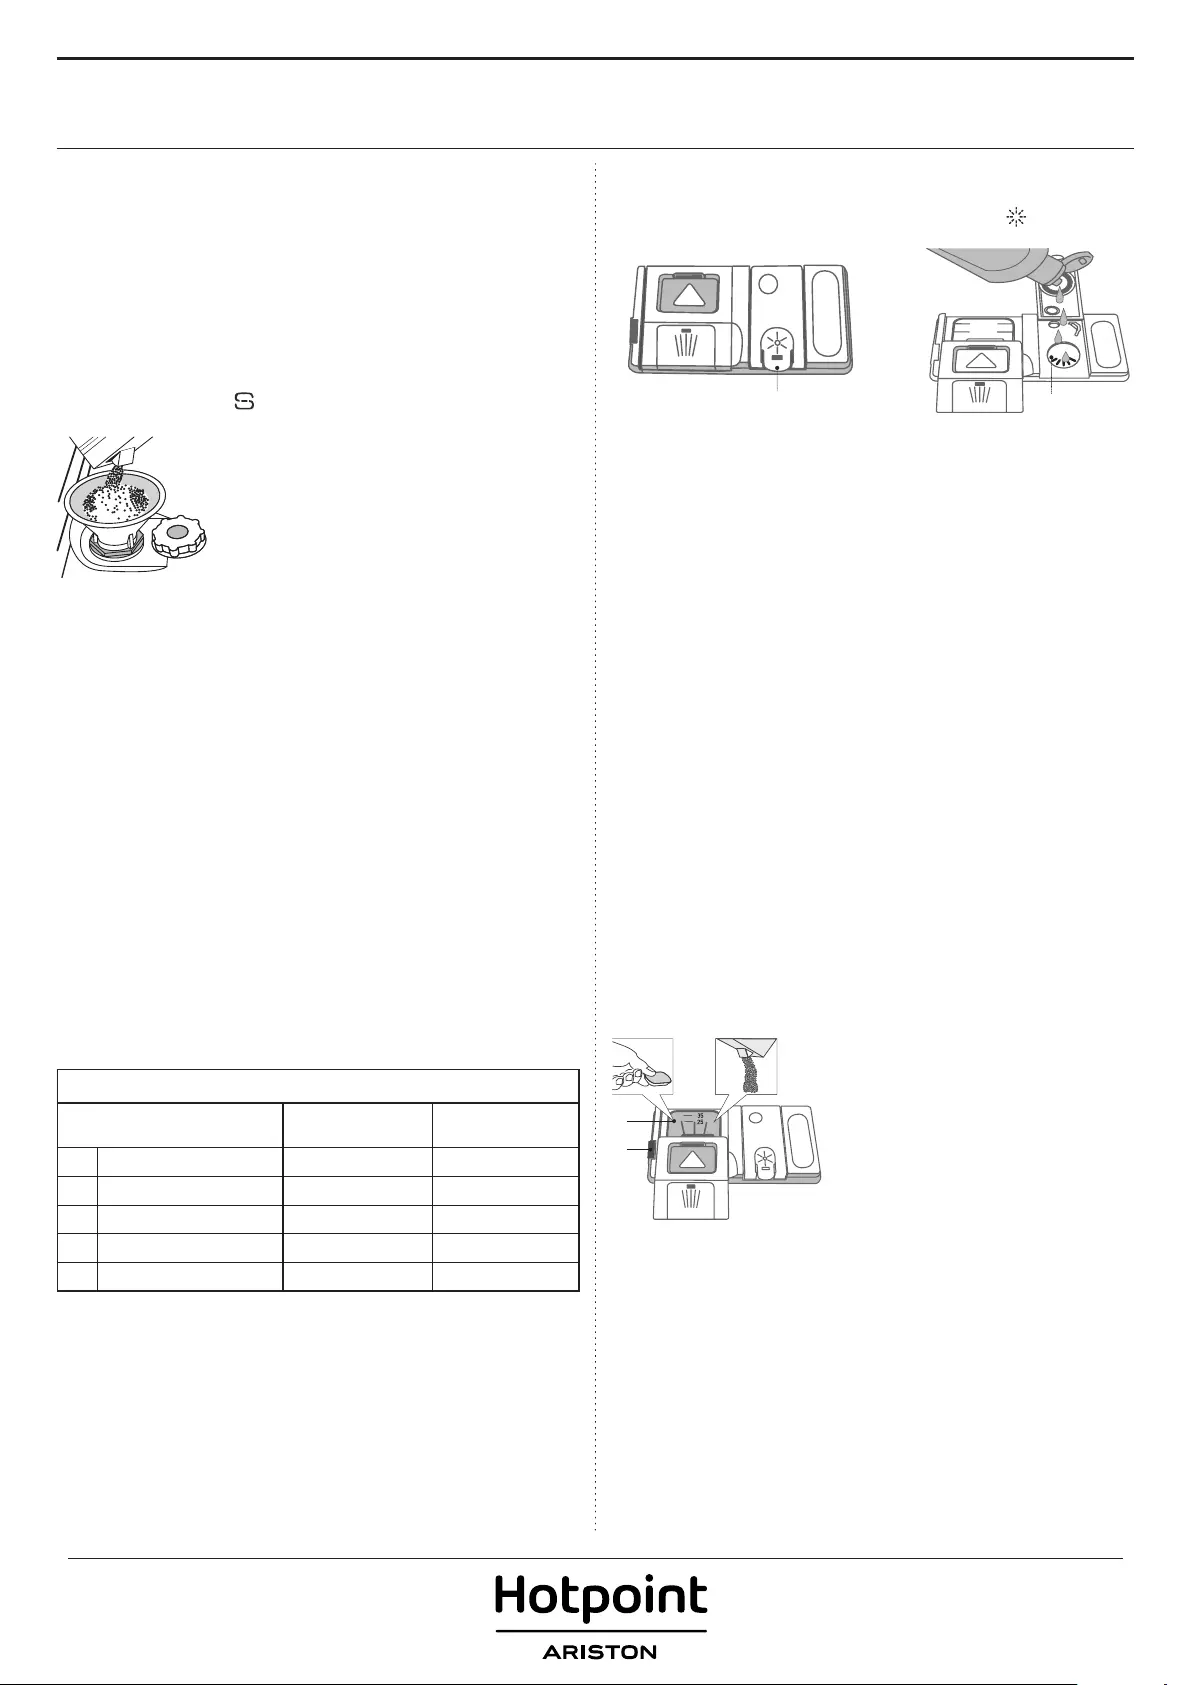
FILLING THE SALT RESERVOIR
The use of salt prevents the formation of LIMESCALE on the dishes and
on the machine’s functional components.
• It is important that the salt reservoir be never empty.
• It is important to set the water hardness.
The salt reservoir is located in the lower part of the dishwasher
(see PRODUCT DESCRIPTION) and should be lled when the SALT
REFILL indicator light in the control panel is lit .
1. Remove the lower rack and unscrew the
reservoir cap (anticlockwise).
2. Only the rst time you do this: ll the salt re-
servoir with water.
3. Position the funnel (see gure) and ll the salt
reservoir right up to its edge (approximately
1 kg); it is not unusual for a little water to leak
out.
4. Remove the funnel and wipe any salt residue
away from the opening.
Make sure the cap is screwed on tightly, so that no detergent can get
into the container during the wash program (this could damage the
water softener beyond repair).
Whenever you need to add salt, it is mandatory to complete the
procedure before the beginning of the washing cycle.
SETTING THE WATER HARDNESS
To allow the water softener to work in a perfect way, it is essential that
the water hardness setting is based on the actual water hardness in
your house. This information can be obtained from your local water
supplier.
The factory setting is for avarage (3) water hardness.
• Switch on the appliance by pressing the ON/OFF button.
• Switch o the appliance by pressing the ON/OFF button.
• Hold down button P for 5 seconds, until you hear a beep.
• Switch on the appliance by pressing the ON/OFF button.
• The current selection level number and the salt indicator light both
ash.
• Press button P to select the desired hardness level
(see WATER HARDNESS TABLE).
• Switch o the appliance by pressing the ON/OFF button.
Setting is complete!
As soon as this procedure is complete, run a program without loading.
Only use salt that has been specically designed for dishwashers.
After the salt has been poured into the machine, the SALT REFILL indi-
cator light switches o.
If the salt container is not lled, the water softener and the heating
element may be damaged as a result.
FILLING THE RINSE AID DISPENSER
Rinse aid makes dish DRYING easier. The rinse aid dispenser A should
be lled when the RINSE AID REFILL indicator light in the control
panel is lit.
1. Open the dispenser B by pressing and pulling up the tab on the lid.
2. Pour in the rinse aid (max.110 ml), making sure it does not overow
from the dispenser. If this happens, clean the spill immediately with a
dry cloth.
3. Press the lid down until you hear a click to close it.
NEVER pour the rinse aid directly into the appliance tub.
ADJUSTING THE DOSAGE OF RINSE AID
If you are not completely satised with the drying results, you can ad-
just the quantity of rinse aid used.
• Switch the dishwasher on using the ON/OFF button.
• Switch it o using the ON/OFF button.
• Press button P three times — a beep will be heard.
• Switch it on using the ON/OFF button.
• The current selection level number and rinse aid indicator light ash.
• Press button P to select the level of rinse aid quantity to be supplied.
• Switch it o using the ON/OFF button
Setting is complete!
If the rinse aid level is set to ZERO (ECO), no rinse aid will be supplied. The
LOW RINSE AID indicator light will not be lit if you run out of rinse aid.
A maximum of 5 levels can be set according to the dishwasher model. The
factory setting is specic to the model, please follow instruction above
to check this for your machine.
• If you see bluish streaks on the dishes, set a low number (1-2).
• If there are drops of water or limescale marks on the dishes, set
a mid-range number (3-4).
FILLING THE DETERGENT DISPENSER
To open the detergent dispenser
use the opening device A. Introduce
the detergent into the dry dispenser
B only. Place the amount of
detergent for pre-washing directly
inside the tub.
1. When measuring out the detergent re—
fer to the mentioned earlier information
to add the proper quantity. Inside the
dispenser B there are indications to help
the detergent dosing.
2. Remove detergent residues from the edges of the dispenser and
close the cover until it clicks.
3. Close the lid of the detergent dispenser by pulling it up until the
closing device is secured in place.
The detergent dispenser automatically opens up at the right time
according to the program.
If all-in-one detergents are used, we recommend using the TABLET
button, because it adjusts the program so that the best washing and
drying results are always achieved.
Water Hardness Table
Level °dH
German degrees
°fH
French degrees
1 Soft 0 — 6 0 — 10
2 Medium 7 — 11 11 — 20
3 Average 12 — 17 21 — 30
4 Hard 18 — 34 31 — 60
5 Very hard 35 — 50 61 — 90
M
A
X
35
25
EN
3
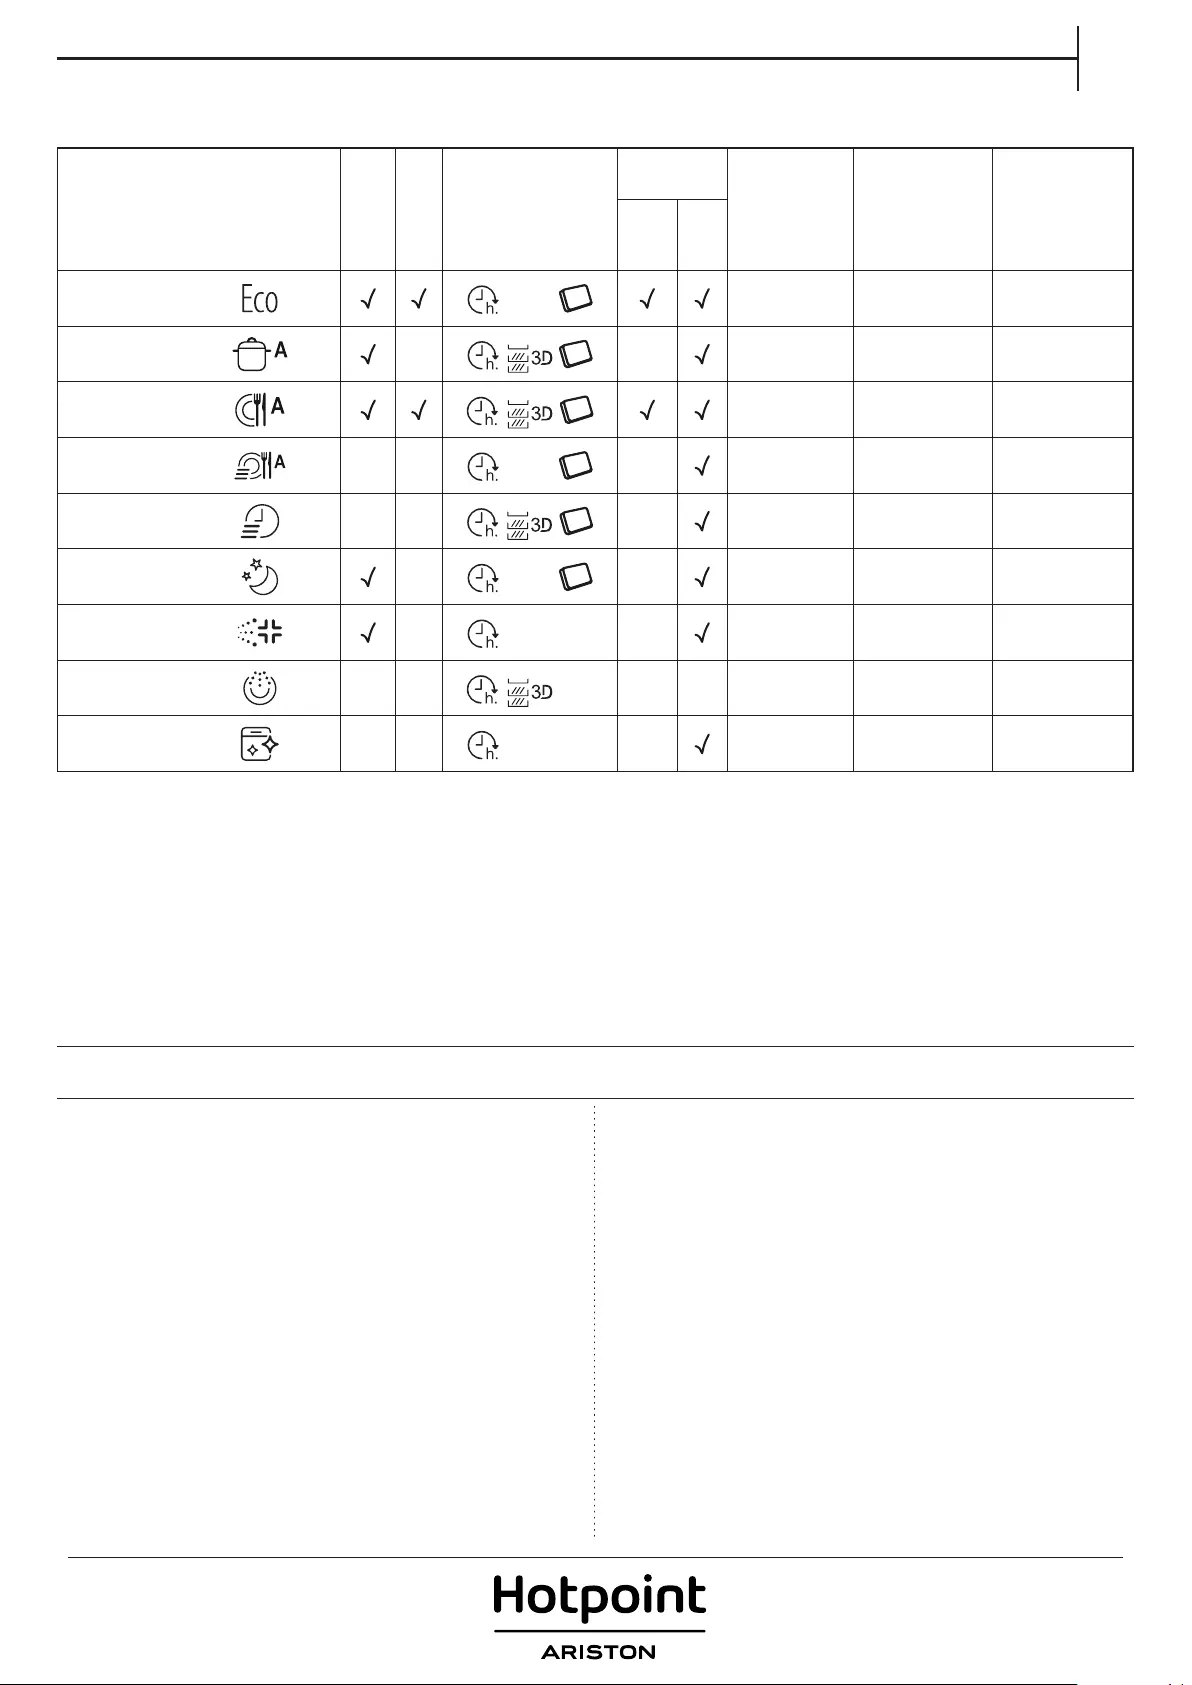
PROGRAMS TABLE
Instructions on wash cycle selection.
ECO
Normally soiled crockery. Standard program, the most ecient in
terms of its combined energy and water consumption.
AUTO INTENSIVE
Automatic program for heavily soiled dishes and pans (not to be used
for delicate items).
AUTO NORMAL
Automatic program for normally soiled pans and dishes.
AUTO FAST
Automatic program for limited quantity of normally soiled crockery.
Ensures optimal cleaning performance in shorter time.
EXPRESS 30’
Program to be used for lightly-soiled dishes with no dried food residues.
GOOD NIGHT
Suitable for night-time operation of the appliance. Ensures optimal
cleaning and drying performance with the lowest noise emission.
SANITIZING
Normally or heavily soiled crockery, with additional antibacterial wash.
Can be used to perform maintenance of the dishwasher.
SOAK
Use to refresh crockery planned to be washed later. No detergent to be
used with this program.
SELF-CLEAN
Program to be used to perform maintenance of the dishwasher.
It cleans the interior of the appliance using hot water.
Notes:
Please note that cycles like Express or Fast are most eective for lightly
soiled dishes.
To reduce consumption even further, only run the dishwasher when
it is full.
PROGRAMS DESCRIPTION
ECO program data is measured under laboratory conditions according to European Standard EN 50242. Note for Test Laboratories: For information on
comparative EN testing conditions, please send an email to the following address: assistenza_en_lvs@indesitcompany.com
Pre-treatment of the dishes is not needed before any of the programs.
*) Not all options can be used simultaneously.
**) The duration of the program shown on the display or in the booklet is an estimate calculated on standard conditions. The actual time may vary
depending on many factors such as temperature and pressure of the incoming water, room temperature, amount of detergent, quantity and type of load,
load balancing, additional selected options and sensor calibration. The sensor calibration can increase program duration up to 20 min.
Standby consumption: Left-on mode consumption: 6 W — O mode consumption: 0.5 W
Program
Drying
phase
ActivEco
Available
options *)
Detergent
container Duration
of wash
program
(h:min)**)
Water
consumption
(litres/
cycle)
Energy
consumption
(kWh/cycle)
Tub B
1. Eco 50° 3:10 9.5 0.93
2. Auto Intensive 65° — — 2:00 — 3:10 14.0 — 17.0 1.50 — 1.85
3. Auto Normal 55° 1:30 — 2:30 14.5 — 16.0 1.15 — 1.30
4. Auto Fast 50° — — — 0:55 — 1:20 13.0 — 14.5 1.15 — 1.25
5. Express 30’ 50° — — — 0:30 9.0 0.55
6. Good Night 50° — — 3:30 15.0 1.15
7. Sanitizing 65° — — 1:40 10.0 1.30
8. Soak — — — — — 0:12 4.5 0.01
9. Self- Clean 65° — — —0:50 8.0 0.85
4
OPTIONS AND FUNCTIONS
OPTIONS can be selected directly by pressing the corresponding button (see CONTROL PANEL).
If an option is not compatible with the selected program see PROGRAMS TABLE, the corresponding LED ashes rapidly 3 times
and beeps will sound. The option will not be enabled.
DELAY
The start time of the program may be delayed for a period of
time between 1 and 12 hours.
1. Press the DELAY button: the corresponding symbol appears
on the display; each time you press the button, the time
(1h, 2h, etc. up to max. 12h) from the start of the selected
wash cycle will be increased.
2. Select the wash program and close the door: the timer will
begin counting down;
3. Once this time has elapsed, the indicator light switches o
and the wash cycle begins.
To adjust the delay time and select a shorter period of
time, press the DELAY button. To cancel it, press the button
repeatedly until the selected delayed start indicator light
switches o.
The wash program will start automatically as soon as the door
is shut.
The Delay function cannot be set once a wash cycle has
been started.
ZONE WASH 3D
Option works with one rack at once. In particular, we
recommend to use it with Normal and Intensive cycles — thanks
to the additional 3D water jets placed on the bottom of the
cavity, ZONE WASH 3D option allows to save energy or to
increase the washing performance of the dishwasher:
• ZONE WASH 3D + NORMAL CYCLE: it allows to reduce
energy consumption up to 40%.
• ZONE WASH 3D + INTENSIVE CYCLE: it increases the
washing performances up to 40%. Ideal for very soiled
mixed loads, e.g. pans and saucepans, dishes with heavy
encrustation or dicult-to-clean crockery (grater, vegetable
mill, dirty cutlery).
How to activate the option:
1. Select a compatible cycle
2. By default the appliance washes dishes in all racks. To wash
only the specic rack, press this button repeatedly:
shown on the display (only lower rack)
shown on the display (only upper rack)
shown on the display (only cutlery rack)
shown on the display (option is OFF and the appliance will
wash dishes in all racks).
Remember to load the crockery in the selected rack only.
TABLET
This setting allows you to optimize the performance of
the program according to the type of detergent used.
Press the TABLET button (the indicator light will light up) if
you use combined detergents in tablet form (rinse aid, salt
and detergent in 1 dose).
If you use powder or liquid detergent, this option should
be o.
ActivEco
ActivEco is a convection drying system which automatically opens
the door during/after drying phase to ensure exceptional drying
performance every day. Door opens at the temperature that is safe to
your kitchen furniture, thus door will not be opened when the option
of POWER CLEAN or SHORT TIME are on.
As additional steam protection, special designed protection foil is added
together with the dishwasher. To see how to mount protection foil please
refer to (INSTALLATION GUIDE).
ActivEco functionality could be disabled by the user as follows:
1. Go to the Dishwasher software menu pressing and holding P but—
ton (6 sec).
2. You switched to ActivEco Control Menu, you could change status of
ActivEco functionality by pressing P button:
E – enabled d – disabled
To conrm the change and exit from the Control Menu please press
and hold P button (3 sec).
EN
5
DAILY USE
1. CHECK WATER CONNECTION
Check that the dishwasher is connected to the water supply and
that the tap is open.
2. SWITCH ON THE DISHWASHER
Open the door and press the ON/OFF button.
3. LOAD THE RACKS
(see LOADING THE RACKS).
4. FILLING THE DETERGENT DISPENSER
(see PROGRAMS TABLE).
5. CHOOSE THE PROGRAM AND CUSTOMISE THE CYCLE
Select the most appropriate program in accordance with the type
of crockery and its soiling level (see PROGRAMS
DESCRIPTION) by pressing the P button.
Select the desired options (see OPTIONS AND FUNCTIONS).
6. START
Start the wash cycle by closing the door. When the program starts
you hear a beep.
7. END OF WASH CYCLE
The end of the wash cycle is indicated by beeps and by the ash—
ing of the wash cycle number on the display. Open the door and
switch o the appliance by pressing the ON/OFF button.
Wait for a few minutes before removing the crockery — to avoid
burns.
Unload the racks, beginning with the lower one.
TIPS
Before loading the baskets, remove all food residues from the crockery and
empty the glasses. You do not need to rinse beforehand under running
water.
Arrange the crockery so that it is held in place rmly and does not tip over;
and arrange the containers with the openings facing downwards and the
concave/convex parts placed obliquely, thus allowing the water to reach
every surface and ow freely.
Warning: lids, handles, trays and frying pans do not prevent the sprayer
arms rom rotating. Place any small items in the cutlery basket. Very soiled
dishes and pans should be placed in the lower basket because in this sector
the water sprays are stronger and allow a higher washing performance.
After loading the appliance, make sure that the sprayer arms can rotate freely.
HYGIENE
To avoid odour and sediment which can be accumulated in the dishwa-
sher please run a high temperature program at least one a month. Use
a tea spoon of detergent and run it without the loading to clean your
appliance.
UNSUITABLE CROCKERY
• Wooden crockery and cutlery.
• Delicate decorated glasses, artistic handicraft and antique crockery.
Their decorations are not resistant.
• Parts in synthetic material which do not withstand high temperatures.
• Copper and tin crockery.
• Crockery soiled with ash, wax, lubricating grease or ink.
The colours of glass decorations and aluminium/silver pieces can change
and fade during the washing process. Some types of glass (e.g. crystal ob—
jects) can become opaque after a number of wash cycles too.
DAMAGE TO GLASS AND CROCKERY
• Only use glasses and porcelain guaranteed by the manufacturer as
dishwasher safe.
• Use a delicate detergent suitable for crockery.
• Collect glasses and cutlery from the dishwasher as soon as the wash
cycle is over.
The machine will switch o automatically during certain extended
periods of inactivity, in order to minimise electricity consumption.
If the crockery is only lightly soiled or if it has been rinsed with
water before being placed in the dishwasher, reduce the amount
of detergent used accordingly.
MODIFYING A RUNNING PROGRAM
If a wrong program was selected, it is possible to change it, provided that
it has only just begun: open the door, press and hold the ON/OFF button,
the machine will switch o.
Switch the machine back on using the ON/OFF button and select the new
wash cycle and any desired options; start the cycle by closing the door.
ADDING EXTRA CROCKERY
Without switching o the machine, open the door (be ware of HOT
steam!) and place the crockery inside the dishwasher. Close the door
and the cycle will begin from the point at which it was interrupted.
ACCIDENTAL INTERRUPTIONS
If the door is opened during the wash cycle, or if there is a power cut,
the cycle stops. It starts again from the point at which it was
interrupted once the door has been closed or the electricity supply is
restored.
For more information about the functions, you can request or download
from the WEB a Use & Care Guide by following the instructions on the last
page.
ADVICE AND TIPS
6
FOLDABLE FLAPS WITH ADJUSTABLE POSITION
The side foldable aps can be positioned at
three dierent heights to optimize the arran-
gement of crockery inside the rack. Wine glas-
ses can be placed safely in the foldable aps by
inserting the stem of each glass into the cor-
responding slots. For optimum drying results
incline the foldable aps more. To change the
inclination, pull up the foldable ap, slide it sli-
ghtly and position it as you wish.
LOWER RACK
For pots, lids, plates, salad bowls, cutlery etc. Large plates and lids
should ideally be placed at the sides to avoid interferences with the
spray arm. The lower rack has tip-up supports which can be used in a
vertical position when arranging plates or in a horizontal position
(lower) to load pans and salad bowls easily.
(loading example for the lower rack)
ZONE WASH 3D
Zone Wash 3D uses additional water jets
located both: in the lower and upper part of
the dishwasher (marked with orange color)
to wash more intensively heavily soiled items
by increasing water coverage on dishes.
Example: Load pots and casseroles facing
lower part of Zone Wash 3D components
and activate the 3D Zone Wash option
on the panel.
LOADING THE RACKS
CUTLERY RACK
The third rack was designed to
house the cutlery.
Arrange the cutlery as shown in
the gure.
A separate arrangement of the
cutlery makes collection easier
after washing and improves wa-
shing and drying performance.
Knives and other utensils with sharp edges must be positioned
with the blades facing downwards.
The geometry of the rack makes
it possible to place such small
items as coee cups in the area
in the middle.
UPPER RACK
Load delicate and light dishes:
glasses, cups, saucers, low sa-
lad bowls.
(loading example for the upper rack)
ADJUSTING THE HEIGHT OF THE UPPER RACK
The height of the upper rack can be adjusted: high position to place
bulky crockery in the lower basket and low position to make the most
of the tip-up supports by creating more space
upwards and avoid collision with the items
loaded into lower rack. The upper rack is
equipped with a Upper Rack height adjuster
(see gure), without pressing the levers, lift it up
by simply holding the rack sides, as soon as the
rack is stable in its upper position.
To restore to the lower position, press the levers
A at the sides of the rack and move the basket
downwards.
We strongly recommend that you do not
adjust the height of the rack when it is loaded.
NEVER raise or lower the basket on one side only.
A
EN
7
CARE AND MAINTENANCE
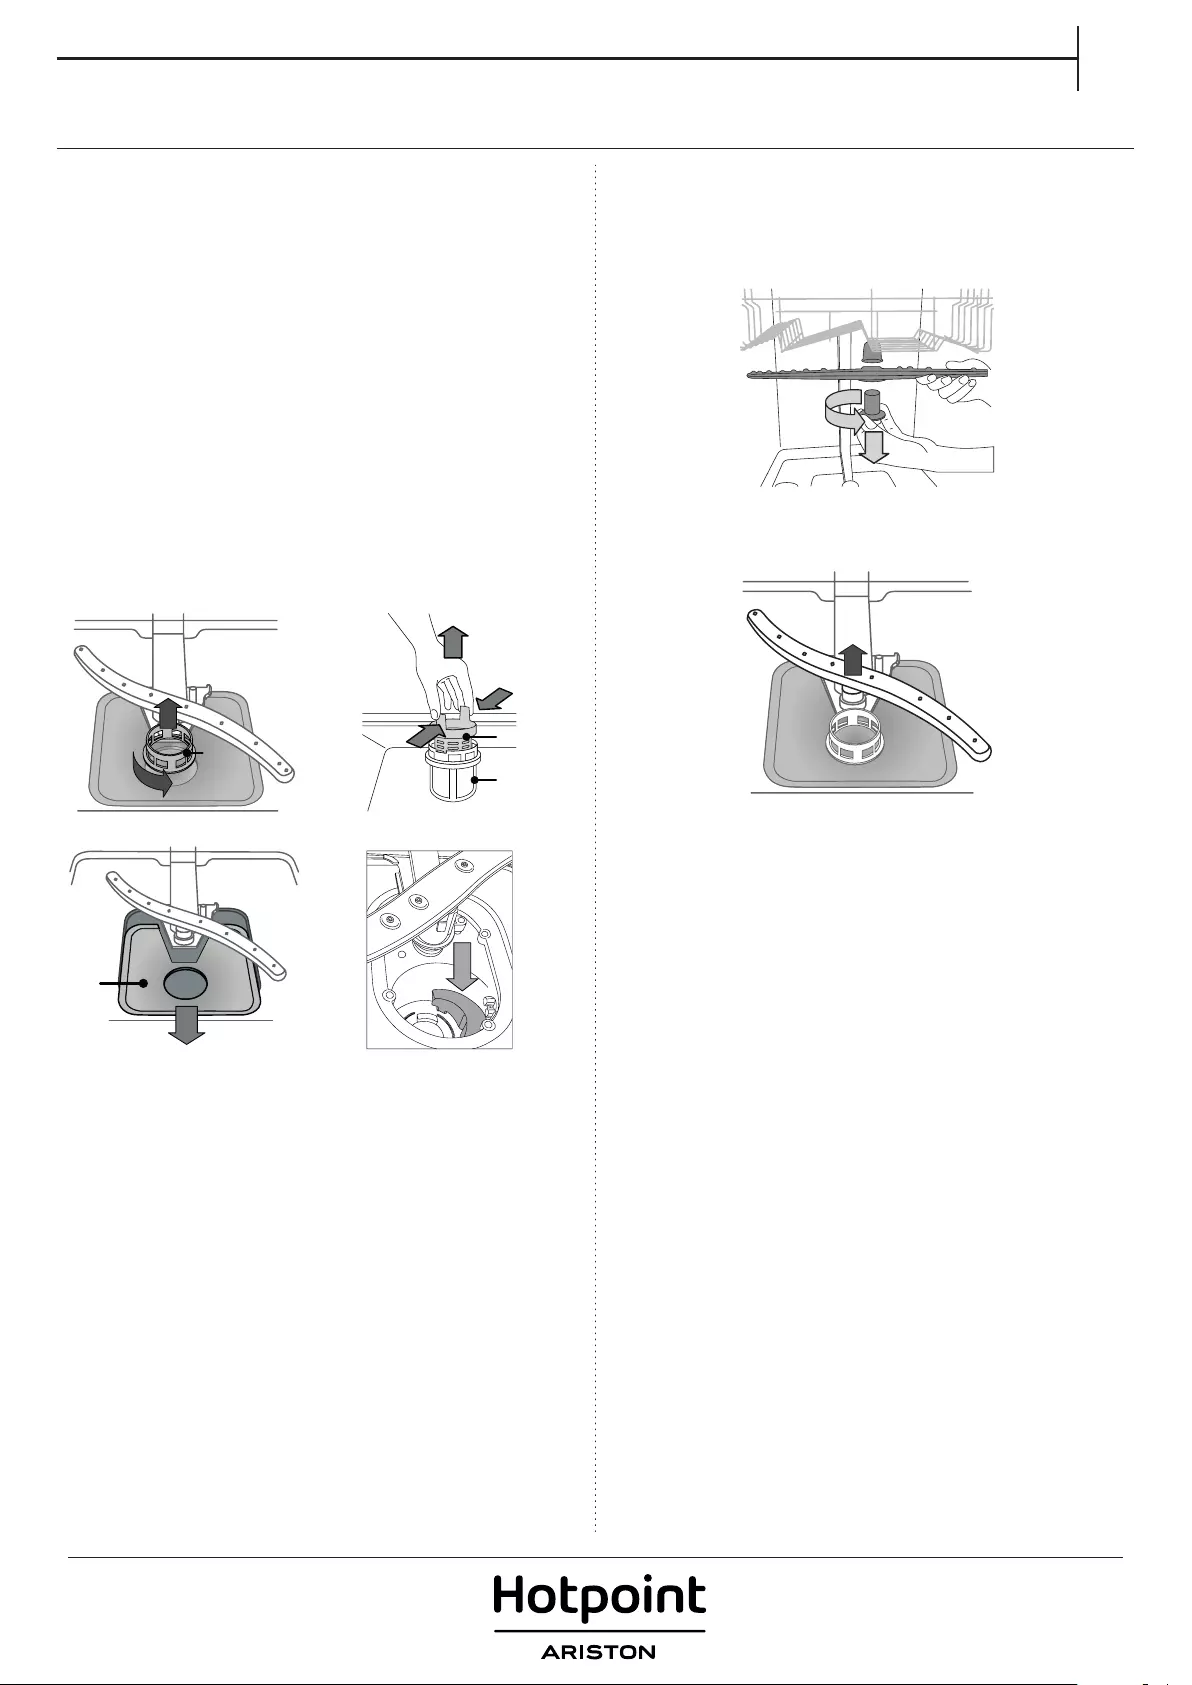
CLEANING THE FILTER ASSEMBLY
Regularly clean the lter assembly so that the lters do not clog and
that the waste water ows away correctly. The lter assembly consists
of three lters which remove food residues from the washing water
and then recirculate the water: to obtain the best washing results, you
need to keep them clean.
The dishwasher must not be used without lters or if the lter is
loose.
After several washes, check the lter assembly and if necessary clean it
thoroughly under running water, using a non-metallic brush and follo—
wing the instructions below:
1. Turn the cylindrical lter A in an anti-clockwise direction and pull it out
(Fig 1).
2. Remove the cup lter B by exerting a slight pressure on the side
aps (Fig 2).
3. Slide out the stainless-steel plate lter C (Fig 3).
4. Inspect the trap and remove any food residues. NEVER REMOVE
the wash-cycle pump protection (black detail) (Fig 4).
A
A
B
C
After cleaning the lters, re-place the lter assembly and x it in po-
sition correctly; this is essential for maintaining the ecient operation
of the dishwasher.
CLEANING THE SPRAY ARMS
On occasions, food residue may become encrusted onto the spray
arms and block the holes used to spray the water. It is therefore recom-
mended that you check the arms from time to time and clean them
with a small non-metallic brush.
To remove the upper spray arm, turn the plastic locking ring in an an-
ticlockwise direction. The upper spray arm should be replaced so that
the side with the greater number of holes is facing upwards.
The lower spray arm may be removed by pulling it upwards.
CLEANING THE WATER INLET HOSE
If the water hoses are new or have not been used for an extended
period of time, let the water run to make sure it is clear and free of
impurities before performing the necessary connections. If this
precaution is not taken, the water inlet could become blocked and
damage the dishwasher.
8
Your dishwasher may not work properly.
Before contacting the Service Centre check if the problem can be solved by going through the following list.
PROBLEMS POSSIBLE CAUSES SOLUTIONS
The dishwasher
won’t start
or does not
respond to
commands.
The appliance has not been plugged
in properly. Insert the plug into the socket.
Power outage. The dishwasher starts automatically when the power returns.
The dishwasher door is not closed. Vigorously push the door until you hear the “click”.
It does not respond to commands. Switch o the appliance by pressing the ON/OFF button, switch it back
on after approximately one minute and reset the program.
The dishwasher
won’t drain.
The wash cycle has not nished yet. Wait until the wash cycle nishes.
The drain hose is bent. Check that the drain hose is not bent (see INSTALATION INSTRUCTION).
The sink drain pipe is blocked. Clean the sink drain pipe.
The lter is clogged up with food
residues. Clean the lter (see CLEANING THE FILTER ASSEMBLY).
The dishwasher
makes
excessive
noise.
The dishes are rattling against each Position the crockery correctly (see LOADING THE RACKS).
An excessive amount of foam has
been produced.
The detergent has not been measured out correctly or it is not suita-
ble for use in dishwashers (see FILLING THE DETERGENT DISPENSER).
Reset dishwasher by pressing the DRAIN button (see OPTIONS AND
FUNCTIONS) and run new program without detergent.
The dishes are
not clean.
The crockery has not been arranged
properly. Arrange the crockery correctly (see LOADING THE RACKS).
The spray arms cannot rotate freely,
being hindered by the dishes. Arrange the crockery correctly (see LOADING THE RACKS).
The wash cycle is too gentle. Select an appropriate wash cycle (see PROGRAMS TABLE).
An excessive amount of foam has
been produced. The detergent has not been measured out correctly or it is not suitable
for use in dishwashers (see FILLING THE DETERGENT DISPENSER).
The cap on the rinse aid compartment
has not been shut correctly. Make sure the cap of the rinse aid dispenser is closed.
The lter is soiled or clogged. Clean the lter assembly (see CARE AND MAINTENANCE).
There is no salt. Fill the salt reservoir (see FILLING THE SALT RESERVOIR).
TROUBLESHOOTING
MAINTENANCE AND TROUBLESHOOTING GUIDE
For more information, maintenance procedures and troubleshooting,
see the Use and Care Guide
The Use and Care Guide can be obtained by:
• After-Sales Service; phone number see in warranty booklet.
• download from website: docs.hotpoint.eu
• use QR code
CONTACTING AFTER-SALES SERVICE
When you contact the After-Sales Service,
you must provide the codes shown on the
rating plate attached to the left or right side
inside the door of the dishwasher.
The phone number is listed in the warranty
booklet or on the website: www.hotpoint.eu
TECHNICAL DATASHEET
The technical data containing the energy consumption data can be
downloaded from the website: docs.hotpoint.eu
IEC 436
:
400011361877B
04/2019 ks — Xerox Fabriano
View the manual for the Hotpoint HIO 3C23 WF here, for free. This manual comes under the category dishwashers and has been rated by 1 people with an average of a 9.5.
This manual is available in the following languages: English. Do you have a question about the Hotpoint HIO 3C23 WF or do you need help?
Ask your question here
Hotpoint HIO 3C23 WF specifications
Below you will find the product specifications and the manual specifications of the Hotpoint HIO 3C23 WF.
The Hotpoint HIO 3C23 WF dishwasher features a control type of buttons for easy operation. It is equipped with a built-in LED display that allows users to monitor the status of the wash cycle. With a capacity of 14 place settings, this dishwasher is suitable for a large household.
Operating at a noise level of 43 dB, the Hotpoint HIO 3C23 WF dishwasher runs quietly in the background. It offers a total of 9 washing programs, including Eco, Intensive, and Soak, to cater to different cleaning needs. The drying class of this dishwasher is rated as A, ensuring that dishes come out dry and ready to be stored away.
The cycle time of the Hotpoint HIO 3C23 WF dishwasher is 220 minutes, providing thorough cleaning results. In addition, it has a salt indicator to alert users when it’s time to refill the dishwasher salt. With an energy efficiency class of A++, this dishwasher is designed to be energy-efficient, helping to reduce electricity consumption.
Overall, the Hotpoint HIO 3C23 WF dishwasher is a reliable and efficient appliance for keeping dishes clean and spotless.
Appliance placement
Fully built-in
Number of place settings
14 place settings
General
| Brand | Hotpoint |
| Model | HIO 3C23 WF | HIO 3C23 WF |
| Product | dishwasher |
| EAN | 8050147056400 |
| Language | English |
| Filetype | User manual (PDF) |
Design
| Appliance placement | Fully built-in |
| Door color | Not applicable |
| Control panel color | Stainless steel |
| Control type | Buttons |
| Built-in display | Yes |
| Display type | LED |
| Product size | Full size (60 cm) |
Performance
| Number of place settings | 14 place settings |
| Noise level | 43 dB |
| Number of washing programs | 9 |
| Cycle time | 220 min |
| Delayed start timer | — |
| Dishwashing programs | Eco, Intensive, Soak |
Other features
| Drying class | A |
| Annual energy consumption | 265 kWh |
| Annual water consumption | 2660 L |
| Washing class | A |
Ergonomics
Power
| A++ | |
| Energy consumption per cycle | 0.93 kWh |
| Water consumption per cycle | 9 L |
| Power consumption (off) | 0.5 W |
Weight & dimensions
| Weight | 35000 g |
| Width | — mm |
| Depth | — mm |
| Height | — mm |
show more
Frequently Asked Questions
Can’t find the answer to your question in the manual? You may find the answer to your question in the FAQs about the Hotpoint HIO 3C23 WF below.
Does Hotpoint HIO 3C23 WF have a built-in display?
Yes, Hotpoint HIO 3C23 WF has a built-in display, which provides the user with easy access to its various settings and options.
How many place settings does Hotpoint HIO 3C23 WF offer?
Hotpoint HIO 3C23 WF offers 14 place settings, making it suitable for larger households or dinner parties.
Is the energy efficiency class of Hotpoint HIO 3C23 WF rated as A++?
Yes, Hotpoint HIO 3C23 WF has an energy efficiency class of A++, meaning it is very energy efficient and will help save on electricity bills compared to other models.
What is the noise level of Hotpoint HIO 3C23 WF during operation?
The noise level of Hotpoint HIO 3C23 WF is 43 dB, which is considered quite low and will not disturb the user during its operation.
How many different washing programs does Hotpoint HIO 3C23 WF offer?
Hotpoint HIO 3C23 WF offers 9 different washing programs, providing the user with flexibility to choose the most suitable option for their dishes.
How can I adjust the delay time for the start of a wash cycle using the DELAY function?
To adjust the delay time for the start of a wash cycle using the DELAY function on the Hotpoint HIO 3C23 WF dishwasher, follow these steps:
1. Press the DELAY button to display the corresponding symbol on the screen.
2. Press the DELAY button repeatedly to increase the delay time from 1 hour up to a maximum of 12 hours.
3. Select the wash program and close the door to start the countdown timer.
4. Once the set delay time elapses, the indicator light will turn off, and the wash cycle will begin automatically.
5. To shorten the delay time, press the DELAY button. To cancel the delay, keep pressing the button until the indicator light turns off.
6. Remember, the Delay function cannot be set once a wash cycle has started. The wash program will start as soon as you close the door.
How do I activate the ZONE WASH 3D option and which cycles is it recommended to use with?
To activate the ZONE WASH 3D option on the Hotpoint HIO 3C23 WF dishwasher, follow these steps:
1. Select a compatible cycle, such as Normal or Intensive.
2. Press the button corresponding to the specific rack you want to wash (lower rack, upper rack, or cutlery rack).
3. Load the crockery in the selected rack only.
4. For the Normal cycle, ZONE WASH 3D reduces energy consumption by up to 40%.
5. For the Intensive cycle, ZONE WASH 3D increases washing performance by up to 40%.
6. This option is ideal for heavily soiled mixed loads, like pans, saucepans, and dishes with tough stains.
7. Activate the ZONE WASH 3D option by loading pots and casseroles facing the lower part of the dishwasher and selecting the 3D Zone Wash option on the control panel.
How can I set the delay time for the wash cycle using the DELAY function?
To set the delay time for the wash cycle using the DELAY function on the Hotpoint HIO 3C23 WF dishwasher, follow these steps:
1. Press the DELAY button to display the corresponding symbol on the screen.
2. Press the DELAY button repeatedly to increase the delay time from 1 hour up to a maximum of 12 hours.
3. Select the wash program and close the door to start the countdown timer.
4. Once the set delay time elapses, the indicator light will turn off, and the wash cycle will begin.
5. To adjust or cancel the delay time, press the DELAY button accordingly.
6. The wash program will start automatically when the door is closed.
7. Note that the Delay function cannot be set once a wash cycle has already started.
When should I press the TABLET button and what type of detergent should I be using for this option?
1. When using all-in-one detergents, it is recommended to press the TABLET button on the Hotpoint HIO 3C23 WF dishwasher. This button adjusts the program to ensure the best washing and drying results.
2. To fill the detergent dispenser, open it using the opening device and introduce the detergent into the dry dispenser only. Place the amount of detergent for pre-washing directly inside the tub.
3. Refer to the indications inside the dispenser for proper detergent dosing. Remove any detergent residues from the edges of the dispenser and close the cover until it clicks.
4. Close the lid of the detergent dispenser securely in place. The detergent dispenser will automatically open at the right time according to the program.
What is the weight of the Hotpoint HIO 3C23 WF?
The Hotpoint HIO 3C23 WF has a weight of 35000 g.
What is the height of the Hotpoint HIO 3C23 WF?
The Hotpoint HIO 3C23 WF has a height of — mm.
What is the width of the Hotpoint HIO 3C23 WF?
The Hotpoint HIO 3C23 WF has a width of — mm.
What is the depth of the Hotpoint HIO 3C23 WF?
The Hotpoint HIO 3C23 WF has a depth of — mm.
How do I add softening salt to my dishwasher?
Each dishwasher has a separate compartment for softening salt. It opens when you turn the knob on the compartment. The softening salt can then be poured into the compartment by means of a funnel.
What do I do about a smelly dishwasher?
In the case of a smelly dishwasher, you can take the following steps:
— Clean the filters
— Clean the spray arms
— Clean the door rubbers
— Run a hot wash program
— Run an empty machine with a dishwasher cleaner
Do you have to pre-rinse the dishes?
It is not recommended to rinse dirty dishes before placing them in the dishwasher.
For the life cycle of the machine, it is better to put everything dirty in the dishwasher.
The grease on the dirty dishes is the lubrication for the pump in the machine.
How much dishwashing detergent should I use?
The average amount used is about 25 grams of dishwashing detergent. It is recommended to follow the advice on the packaging.
Is the manual of the Hotpoint HIO 3C23 WF available in English?
Yes, the manual of the Hotpoint HIO 3C23 WF is available in English .
Is your question not listed? Ask your question here
7/0 с 9:00 до 21:00
вт-сб с 14:00 до 18:00
Бесплатная горячая линия
Ежедневно с 9:00 до 21:00
Бонус при заказе по телефону
Вы получите подарок, а менеджер сразу оформит и подтвердит Ваш заказ

Прямо сейчас 0 человек смотрят этот товар
Артикул:
71524
Габариты (ШxГxВ)
59.8×55.5×82 см
Тип установки
Встраиваемые
Все характеристики
Прямо сейчас 0 человек смотрят этот товар
Уточняйте наличие у менеджера
Наличие на данный момент — неизвестно. Требуется запрос
Выгода на услуги 11 427 ₽
Мы проанализировали цены на услуги в других интернет-магазинах и мы предлагаем наибольшую выгоду
Доставка по Москве: курьером
Для регионов: по тарифам ТК
Теги:
- Описание
-
Отзывы
(55)
-
Доставка и оплата
- Гарантия
Описание
Подробные характеристики
Общие характеристики
- Тип
- полноразмерная
- Установка
- встраиваемая полностью
- Вместимость
- 14 комплектов
- Класс энергопотребления
- A++
- Класс мойки
- A
- Класс сушки
- A
- Тип управления
- электронное
- Дисплей
- есть
Технические характеристики
- Расход воды
- 9.5 л
- Максимальная потребляемая мощность
- 1900 Вт
- Энергопотребление за цикл
- 0.93 кВтч
- Время мойки при обычной программе
- 220 мин
- Уровень шума при работе
- 43 дБ
Программы и режимы мойки
- Количество программ
- 9
- Количество температурных режимов
- 3
- Сушка посуды
- конденсационная
- Стандартные программы мойки
- экспресс-программа (быстрый цикл)
- Специальные программы
- экономичная программа для слабозагрязненной посуды, режим предварительного замачивания, автоматические программы
- Режим половинной загрузки
- есть
Другие функции и особенности
- Таймер отсрочки запуска
- есть, от 1 до 12 часов
- Защита от протечек
- есть, полная
- Использование средств 3 в 1
- есть
- Индикатор наличия соли / ополаскивателя
- есть / есть
- Особенности рабочей камеры
- внутренняя поверхность из нерж. стали, регулируемая по высоте корзина для посуды
- Дополнительные принадлежности
- лоток для столовых приборов, держатель для бокалов
- Размеры (ШхГхВ)
- 59.8×55.5×82 см
- Вес
- 35.5 кг
- Дополнительная информация
- ночная, самоочистка; гигиена
Производитель на свое усмотрение и без дополнительных уведомлений может менять комплектацию, внешний вид, страну производства и технические характеристики модели. Если вы заметили ошибку в описании, пожалуйста, сообщите нам по адресу info@vsestiralnie.com
Страна производства: Китай, Польша
Инструкция по эксплуатации Hotpoint-Ariston HIO 3C23 WF
Доставка и оплата

- Стандартная доставка
-
в пределах МКАД
600 ₽
-
за МКАД (до 50 км)
40 ₽ за 1 км.
- VIP доставка
-
по Москве
1200 ₽
-
за МКАД (до 50 км)
60 ₽ за 1 км.
Доставим как можно быстрее
Заказ, оформленный до 15:00 может быть доставлен
на следующий день.
Всегда на связи
Точная информация о дате и времени доставки доступна только после подтверждения заказа ВсеСтиральные.com
График доставки
по Москве и Московской области
10:00–18:00
18:00-23:00
ежедневно
Выбирайте время доставки!
При оформлении заказа вы всегда
сможете выбрать удобный для вас
интервал доставки.

Для вашего удобства в нашем интернет-магазине предусмотрено несколько вариантов оплаты:
Наличными
Курьер доставит вам товар по указанному адресу. Вы внимательно осматриваете комплектацию и внешний вид продукции, после чего оплачиваете ее стоимость, а также стоимость выбранных вами услуг. На привезенные изделия мы предоставим товарный чек и документацию.
Банковские карты при получении
Курьер доставит вам товар по указанному адресу. Вы внимательно осматриваете комплектацию и внешний вид продукции, после чего оплачиваете ее стоимость с помощью карт Visa / Mastercard / Maestro и МИР, а также стоимость выбранных вами услуг. На привезенные изделия мы предоставим товарный чек и документацию.
Банковские карты через сайт
Для удобной оплаты банковской картой используется система электронных платежей Яндекс.Денег. При оформлении заказа выберите способ оплаты с помощью карт Visa / Mastercard / Maestro и МИР, после чего вы перейдете на страницу безопасного платежа.
Банковский перевод
Для осуществления платежа банковским переводом менеджер выставит счет с выбранными товарами и вышлет на вашу электронную почту. Данный способ оплаты по банковским реквизитам компании предусмотрен как для физических, так и для юридических лиц.
Гарантия


- Если Вы не получили товар. Вы получите полное возмещение, если Ваш заказ не будет доставлен в течение срока, обещанного ВсеСтиральные.com после совершенной оплаты..
- При несоответствии описанию. Вы можете получить полный возврат, если товар значительно отличается от описания, указанного на сайте.
Гарантия юридической компетенции
Гарантия соответствия цены
- Все цены на сайте являются действительными.
- Цена для клиента остается без изменений после заказа.
- Цена на товар не может измениться после его оплаты.
Выезд мастера в день обращения
- При обращении до 12.00 дня (Доступно только для жителей Москвы и МО)
Гарантия профессиональной установки
- На все виды установок наша компания дает гарантию 1 год!
- Отзывы о нашей работе вы можете посмотреть «здесь«
- Похожие товары
Перейти к контенту
Посудомоечные машины Hotpoint-Ariston
- Размер инструкции: 4.34 Мб
- Формат файла: pdf
Если вы потеряли инструкцию от посудомоечной машины Hotpoint-Ariston HIO 3C23 WF, можете скачать файл для просмотра на компьютере или печати.
Инструкция для посудомоечной машины Hotpoint-Ariston HIO 3C23 WF на русском языке. В руководстве описаны возможности и полезные функции, а также правила эксплуатации. Перед использованием внимательно ознакомьтесь с инструкцией.
Чтобы не читать всю инструкцию вы можете выполнить поиск по содержимому внутри инструкции и быстро найти необходимую информацию. Рекомендации по использованию помогут увеличить срок службы посудомоечной машины Hotpoint-Ariston HIO 3C23 WF. Если у вас появилась проблема, то найдите раздел с описанием неисправностей и способами их решения. В нем указаны типичные поломки и способы их решения.
|
Код: 110600 Извините, товара сейчас нет в наличии
Бесплатная доставка Извините, товара сейчас нет в наличии Сравнить Услуги:Установка и подключение посудомоечной машины Новости интернет-магазина «Лаукар»:26.02.2025 17.02.2025 10.02.2025 Дополнительная информация в категории Встраиваемая посудомоечная машина:Встраиваемые посудомоечные машины — разбираемся в терминах Таблица Авторизованных сервисных центров по брендам. Описание Инструкция Отзывы (1) В интернет-магазине бытовой техники «Лаукар» Вы можете скачать инструкцию к товару Встраиваемая посудомоечная машина Hotpoint-Ariston HIO 3C23 WF совершенно бесплатно. Все инструкции, представленные на сайте интернет-магазина бытовой техники «Лаукар», предоставляются производителем товара. Для того чтобы скачать инструкцию, Вам необходимо нажать на ссылку «скачать инструкцию», расположенную ниже, а в случае, если ссылки нет, Скачать инструкцию Смотреть инструкцию 
Фирма-производитель оставляет за собой право на внесение изменений в конструкцию, дизайн и комплектацию товара: Встраиваемая посудомоечная машина Hotpoint-Ariston HIO 3C23 WF. Пожалуйста, сверяйте информацию о товаре с информацией на |