

LSTF 9H114
English
EN
Operating instructions
DISHWASHER — Contents
Operating instructions,1
Precautions and advice, 2-3
Product Data, 9
Assistance, 10
Installation, 11-12
Description of the appliance, 13
Refined salt and rinse aid, 14
Loading the racks, 15-16
Detergent and dishwasher use, 17
Wash cycles, 18
Special wash cycles and options, 19
Care and maintenance, 20
Troubleshooting, 21
Polski
PL
Instrukcja obsługi
ZMYWARKA — Spis treści
Instrukcja obsługi,1
Zalecenia i środki ostrożności, 3-4
Karta produktu, 9
Serwis Techniczny, 10
Instalacja, 22-23
Opis urządzenia, 24
Sól regeneracyjna i środek nabłyszczający, 25
Ładowanie koszy, 26-27
Środek myjący i obsługa zmywarki, 28
Programy, 29
Programy specjalne i opcje, 30
Konserwacja i obsługa, 31
Nieprawidłowe działanie i możliwe środki zaradcze, 32
Итальянский
RU
Руководство по эксплуатации
ПОСУДОМОЕЧНАЯ МАШИНА — Оглавление
Руководство по эксплуатации, 1
Меры предосторожности и рекомендации, 4-5
Установка, 33-34
Техническая спецификация изделия, 35
Описание изделия, 36
Регенерирующая соль и Ополаскиватель, 37
Загрузка корзин, 38-39
Моющее средство и использование посудомоечной
машины, 40
Программы, 41
Специальные программы и Дополнительные функции, 42
Техническое обслуживание и уход, 43
Неисправности и методы их устранения, 44
Сервисное обслуживание, 45
UA
Українська
Довідник користувача
ПОСУДОМИЙНА МАШИНА — Зміст
Довідник користувача,1
Запобіжні заходи та поради, 5-6-7
Допомога, 10
Встановлення, 46-47
Опис приладу, 48
Регенераційна сіль і ополіскувач, 49
Як завантажити короби, 50-51
Миючий засіб і використання посудомийної машини, 52
Програми, 53
Спеціальні програми й опції, 54
Догляд та очищення
Несправності та засоби їх усунення, 56
Қазақша
KZ
, 55
Пайдалану нұсқаулығы
ЫДЫС ЖУУ МАШИНАСЫ — Мазмұны
Пайдалану нұсқаулығы, 1
Сақтық шаралары мен кеңес, 7-8
Көмек, 10
Орнату, 57-58
Өнім парақшасы, 59
Құрылғы сипаттамасы, 60
Тазаланған тұз және шаюға көмекші зат, 61
Тартпаларға жүктеу, 62-63
Жуғыш зат пен ыдыс жуу машинасын қолдану, 64
Жуу циклдары, 65
Арнайы жуу циклдары мен опциялары, 66
Күтім және техникалық қызмет көрсету, 67
Ақаулықтарды жою, 68

EN
Precautions and advice
This appliance was designed and
manufactured in compliance with international
safety standards. The following information
has been provided for safety reasons and
should be read carefully.
Keep this instruction manual in a safe place
for future reference. If the appliance is sold,
given away or moved, make sure the manual
is kept with the machine.
Read the instructions carefully, as they
include important information on safe
installation, use and maintenance.
This appliance was designed for domestic
use or similar applications, for example:
— farmhouses;
— use by guests in hotels, motels and other
residential settings;
— bed & breakfasts.
Remove the appliance from all packaging
and make sure it was not damaged during
transportation. If it was damaged, contact
the retailer and do not proceed any further
with the installation process.
General safety
• This appliance should not be operated
by children younger than 8 years, people
with reduced physical, sensory or mental
capacities, or inexperienced people
who are not familiar with the product,
unless they are given close supervision
or instructions on how to use it safely and
are made aware by a responsible person
of the dangers its use might entail.
• Children must not play with the appliance.
• It is the user’s responsibility to clean and
maintain the appliance. Children should
never clean or maintain it unless they are
given supervision.
• The appliance was designed for domestic
use inside the home and is not intended
for commercial or industrial use.
• The appliance must be used to wash
domestic crockery in accordance with the
instructions in this manual.
• The appliance must not be installed
outdoors, even in covered areas. It is
extremely dangerous to leave the machine
exposed to rain and storms.
• Do not touch the appliance when barefoot.
• When unplugging the appliance always
pull the plug from the mains socket. Do
not pull on the cable.
• The water supply tap must be shut off
and the plug should be removed from
the electrical socket at the end of every
cycle and before cleaning the appliance
or carrying out any maintenance work.
• The maximum number of place settings is
shown in the product sheet.
• If the appliance breaks down, do not under
any circumstances touch the internal parts
in an attempt to perform the repair work
yourself.
• Do not lean or sit on the open door: this
may cause the appliance to overturn.
• The door should not be left open as it may
create a dangerous obstacle.
• Keep detergent and rinse aid out of reach
of children.
• The packaging material should not be
used as a toy.
• Knives and other utensils with sharp
edges must be placed either with the
points/blades facing downwards in the
cutlery basket or horizontally on the tip-up
compartments or in the tray/third basket,
if available.
Disposal
• To dispose of any packaging materials,
follow local legislation so that the
packagings may be reused.
• The European Directive 2012/19/EU
relating to Waste Electrical and Electronic
Equipment (WEEE) states that household
appliances should not be disposed of
using the normal solid urban waste cycle.
Exhausted appliances should be collected
separately in order to optimise the cost of
reusing and recycling the materials inside
the machine, while preventing potential
damage to the atmosphere and public
health. The crossed-out dustbin symbol
shown on all products reminds the owners
of their obligations regarding separated
waste collection.
For further information relating to the
correct disposal of household appliances,
owners may contact the relevant public
authority or the local appliance dealer.
Saving energy and respecting the
environment
Saving water and energy
• Only begin a wash cycle when the
dishwasher is full. While waiting for the
2

dishwasher to be filled, prevent unpleasant
odours with the Soak cycle
Wash Cycles).
(if available, see
• Select a wash cycle that is suited to the
type of crockery and to the soil level using
the Table of Wash Cycles:
— For dishes with a normal soil level, use
the Eco wash cycle, which guarantees low
energy and water consumption levels.
— If the load is smaller than usual activate
the Half Load option
and options, if available).
(see Special wash cycles
• If your electricity supply contract gives
details of electricity-saving time bands, run
the wash cycles when electricity prices are
lower. The Delayed Start option can help
you organise the wash cycles accordingly
(see Special wash cycles and options, if available).
PL
Zalecenia i środki ostrożności
Niniejsze urządzenie zostało
zaprojektowane i wyprodukowane zgodnie z
międzynarodowymi normami
bezpieczeństwa. Poniższe ostrzeżenia
podane zostały ze względów bezpieczeństwa
i należy je uważnie przeczytać.
Należy zachować niniejszą książeczkę
instrukcji dla przyszłych konsultacji. W
przypadku sprzedaży, odstąpienia lub
przeprowadzki należy dopilnować, aby
została przekazana wraz z urządzeniem
nowemu właścicielowi.
Uważnie przeczytać instrukcję: zawiera
ona ważne informacje dotyczące instalacji,
użytkowania i bezpieczeństwa.
To urządzenie zostało zaprojektowane
do użytku domowego lub podobnych
zastosowań, na przykład:
— w domach kolonijnych;
— do użytku przez klientów w hotelach, motelach
i innych obiektach typu mieszkaniowego;
— w pensjonatach bed and breakfast.
Rozpakować urządzenie i sprawdzić, czy nie
zostało uszkodzone podczas transportu. Jeśli
okazałoby się uszkodzone, nie podłączać go,
lecz skontaktować się ze sprzedawcą.
Bezpieczeństwo ogólne
• Niniejsze urządzenie może być używane
przez dzieci powyżej 8 roku życia oraz
osoby o ograniczonych zdolnościach
fizycznych, zmysłowych i umysłowych
lub nie posiadające jego odpowiedniej
znajomości lub doświadczenia, pod
warunkiem, że znajdują się one pod ścisłym
nadzorem odpowiedzialnej za nie osoby
bądź też otrzymały instrukcje dotyczące
bezpiecznego użytkowania urządzenia
oraz zrozumiały związane z nim zagrożenia.
• Dzieci nie powinny bawić się urządzeniem.
• Czyszczenie oraz konserwację urządzenia
musi przeprowadzać użytkownik. Nie mogą
być one przeprowadzane przez dzieci bez
nadzoru.
• Urządzenie jest przeznaczone do użytku
nieprofesjonalnego wewnątrz pomieszczeń
mieszkalnych.
• Urządzenie powinno być używane do mycia
naczyń w warunkach domowych zgodnie z
niniejszymi instrukcjami.
• Urządzenia nie należy instalować na
świeżym powietrzu, nawet w miejscu
zadaszonym, gdyż wystawienie go na
działanie deszczu i burz jest bardzo
niebezpieczne.
• Nie dotykać zmywarki, stojąc boso na
podłodze.
• Przy wyjmowaniu wtyczki z gniazdka nie
ciągnąć za kabel, lecz trzymać za wtyczkę.
• Po zakończeniu każdego cyklu i przed
przystąpieniem do czyszczenia i konserwacji
urządzenia należy zamknąć zawór wody i
wyjąć wtyczkę z gniazdka.
• Maksymalna ilość nakryć jest podana w
karcie produktu.
• W razie uszkodzenia w żadnym wypadku
nie ingerować w wewnętrzne mechanizmy
urządzenia i nie próbować go samodzielnie
naprawiać.
• Nie opierać się ani nie siadać na otwartych
drzwiach: urządzenie mogłoby się
przewrócić.
• Nie należy pozostawiać otwartych drzwi
zmywarki, gdyż można się o nie potknąć.
• Trzymać detergenty i płyn nabłyszczający
z dala od dzieci.
• Opakowania nie są zabawkami dla dzieci.
• Noże i przyrządy o ostrych krawędziach
należy wkładać do kosza na sztućce, tak
aby czubki/ostrza były skierowane do dołu,
lub układać w położeniu poziomym na
półeczkach lub na tacy/trzecim koszu w
modelach, w których są one zainstalowane.
Utylizacja
• Utylizacja materiałów opakowaniowych:
dostosować się do lokalnych przepisów;
3

w ten sposób opakowanie będzie mogło
zostać ponownie wykorzystane.
• Dyrektywa wspólnotowa 2012/19/EU w
sprawie zużytego sprzętu elektrycznego
i elektronicznego (WEEE) przewiduje,
że sprzęt gospodarstwa domowego nie
powinien być usuwany jako nieposortowane
odpady komunalne. Zużyte urządzenia
powinny podlegać selektywnej zbiórce w
celu uzyskania maksymalnego wskaźnika
odzysku i recyklingu ich materiałów
składowych oraz uniknięcia ewentualnych
zagrożeń dla zdrowia i środowiska. Symbol
przekreślonego kosza umieszczany
jest na wszystkich produktach w celu
przypominania o obowiązku segregacji
odpadów.
W celu uzyskania bliższych informacji na
temat prawidłowego złomowania urządzeń
gospodarstwa domowego ich właściciele
mogą się zwrócić do właściwych służb
publicznych lub do sprzedawców tych
urządzeń.
Oszczędność i ochrona środowiska
Oszczędność wody i energii
• Uruchamiać zmywarkę tylko z pełnym
ładunkiem. W oczekiwaniu na napełnienie
maszyny zapobiegać przykrym zapachom
przy pomocy cyklu namaczania
dostępny — zob. Programy).
(jeśli jest on
• Wybierać programy odpowiednie do rodzaju
naczyń i stopnia zabrudzenia, stosując się
do Tabeli programów:
— dla naczyń normalnie zabrudzonych
stosować program Eco, który zapewnia
niskie zużycie energii i wody.
— przy ograniczonym ładunku włączyć opcję
Połowa ładunku
Programy specjalne i opcje).
(
jeśli jest on dostępny — zob.
• Jeśli zawarta umowa na dostawę energii
elektrycznej przewiduje strefy czasowe
oszczędności energetycznej, uruchamiać
zmywarkę w godzinach obowiązywania
niższej taryfy. Opcja Opóźnienia startu
może pomoc w takiej organizacji zmywania
(jeśli jest ona dostępny — zob. Programy specjalne i
opcje).
Меры предосторожности
RU
и рекомендации
Изделие спроектировано и изготовлено
в соответствии с международными
нормативами по безопасности. Настоящие
инструкции составлены в целях вашей
безопасности и должны быть внимательно
прочитаны.
Важно сохранить данное руководство
для его последующих консультации. В
случае продажи, передачи или переезда
проверьте, чтобы данное техническое
руководство сопровождало изделие.
Необходимо внимательно прочитать
настоящие инструкции: в них содержатся
важные сведения об установке изделия,
его эксплуатации и безопасности.
Данное изделие предназначено для
бытового или другого аналогичного
использования, например:
— в агротуристических усадьбах;
— для использования проживающими в
гостинице, мотеле и в других временных
местах проживания;
— в гостиницах типа «номер с завтраком».
Снимите упаковку с изделия и проверьте,
чтобы на нем не было повреждений,
нанесенных при транспортировке.
При обнаружении повреждений не
подсоединяйте машину, а обратиться к
продавцу.
Общие требования к безопасности
• Данный бытовой электроприбор может
быть использован детьми не младше
8 лет и лицами с ограниченными
физическими сенсорными или
умственными способностями или не
обладающими достаточным опытом или
знанием о работе подобного прибора,
под наблюдением или после обучения
безопасному пользованию прибором и
усвоения связанных с ним опасностей.
• Не разрешайте детям играть с прибором.
• Чистка и уход за прибором должны
выполняться пользователем. Не поручать
чистку и уход детям без контроля.
• Данное изделие предназначается для
непрофессионального использования в
домашних условиях.
• Изделие предназначено для мытья
посуды в домашних условиях, может
быть использовано только в соответствии
с инструкциями, приведенными в данном
техническом руководстве.
• Запрещается устанавливать изделие
на улице, даже под навесом, так как
воздействие на него дождя и грозы
является чрезвычайно опасным.
• Не прикасайтесь к посудомоечной
4

машине с босыми ногами.
• Не тяните за сетевой кабель для
отсоединения вилки изделия из сетевой
розетки, возьмитесь за штепсельную
вилку рукой.
• Необходимо перекрыть водопроводный
кран и вынуть штепсельную вилку из
сетевой розетки в конце каждого цикла
и перед началом чистки и технического
обслуживания.
• Максимальное количество столовых
приборов указывается в технической
спецификации изделия.
• В случае неисправности категорически
запрещается открывать внутренние
механизмы изделия с целью их
самостоятельного ремонта.
• Не опирайтесь и не садитесь на
открытую дверцу машины: машина может
опрокинуться.
• Не держите дверцу открытой, так как об
нее можно случайно споткнуться.
• Храните моющие средства и
ополаскиватель вдали от детей.
• Не разрешайте детям играть с
упаковочными материалами.
• Ножи и кухонные принадлежность с
заостренными краями необходимо
укладывать острым концом/лезвием вниз
в корзине для столовых приборов или в
горизонтальном положении на откидных
полках или в лоток/третью корзину в
моделях, где предусмотрен.
Утилизация
• Утилизация упаковочных материалов:
соблюдайте местные нормативы по
утилизации упаковочных материалов.
• Согласно Европейской Директиве 2012/19/
СЕ касательно утилизации электронных и
электрических электроприборов (RAEE),
электроприборы не могут утилизироваться
вместе с обычным городским мусором.
Выведенные из строя приборы должны
собираться отдельно для оптимизации их
утилизации и рекуперации составляющих
их материалов, а также для безопасности
окружающей среды и здоровья человека.
Символ зачеркнутая мусорная корзинка,
имеющийся на всех приборах, служит
напоминанием об их отдельной
утилизации.
За более подробной информацией
о правильной утилизации бытовых
электроприборов пользователи
могут обратиться в специальную
государственную организацию или в
магазин.
Энергосбережение и охрана
окружающей среды
Экономия воды и электроэнергии
• Используйте посудомоечную машину
только с полной загрузкой. В ожидании
полного заполнения машины избежать
образования неприятных запахов можно
с помощью цикла Ополаскивание
доступен — см.Программы).
• Выбирайте программу мойки, подходящую
для данного типа посуды и степени
загрязнения в соответствии с Таблицей
программ:
— для нормально грязной посуды
используйте программу Есо,
обеспечивающую низкий расход
электроэнергии и воды.
— если машина загружена не полностью,
включите дополнительную функцию
Половина загрузки
Специальные программы и Дополнительные
функции).
(где доступна, см.
• Если ваш контракт с поставщиком
электроэнергии предусматривает
разные часовые тарифы для экономии
электроэнергии, пользуйтесь машиной
во время с льготным тарифом.
Дополнительная функция Запуск с
задержкой поможет оптимально
организовать мойку
см.Специальные программы и Дополнительные
функции).
UA
Запобіжні заходи та поради
(где доступна,
Посудомийна машина розроблена і
вироблена відповідно до міжнародних
стандартів безпеки. Це попередження
надаються задля вашої безпеки: уважно
ознайомтеся з ними.
Збережіть цю брошуру, щоб мати нагоду
звернутися до неї у будь-який момент.
У разі продажу, передачi iншiй особi або
переїзду переконайтеся в тому, що вона
залишається разом з виробом.
Уважно вивчіть інструкції: в них міститься
важлива інформація щодо встановлення,
використання та безпеки.
Цей прилад призначений для побутового
або аналогічного призначення, наприклад:
— у великих сільських будівлях;
(где
5

— використання з боку клієнтів у готелях,
мотелях і інших готельних структурах;
— у пансіонах зі сніданками.
Звільніть прилад від упаковки і
переконайтеся у відсутності пошкоджень
внаслідок перевезення. За наявностi
пошкоджень не виконуйте нiяких пiдключень
та негайно зверніться до постачальника.
Загальна безпека
• Цей електропобутовий прилад може
використовуватися дітьми віком
старше 8 років і особами з обмеженими
фізичними, сенсорними чи розумовими
можливостями або з браком досвіду та
необхідних знань, коли користування
відбувається під уважним наглядом
або за вказівками щодо безпечного
використання приладу від осіб,
відповідальних за їхню безпеку.
• Діти не повинні гратися з електропобутовим
приладом.
• Очищення і догляд за приладом
поглядається на користувача. Ці операції
не повинні виконуватися дітьми без
нагляду.
• Прилад призначений для непрофесійного
використання всередині житлових
приміщень.
• Прилад має використовуватися для
миття посуду та столових приборiв, згідно
інструкціям, вказаним у цій брошурі.
• Забороняється встановлювати прилад
поза приміщенням, навіть в захищених
мiсцях, тому що дуже небезпечно
піддавати його впливу дощу і грози.
• Не торкайтеся посудомийної машини
голими ногами.
• Не виймайте вилку з розетки, потягнувши
за кабель, тягніть тільки за саму вилку.
• Після кожного циклу і перш нiж розпочати
очищення або технiчне обслуговування,
закрийте водопровiдний кран та виймiть
штепсельну вилку з розетки.
• Максимальна кількість приборів вказана
у паспорті виробу.
• Якщо машина не працює через
несправностi, у жодному випадку не
робіть спроб самостійно виконати ремонт
внутрішніх механізмів.
• Не обпирайтеся і не сідайте на відкриті
дверцята: прилад може перекинутися.
• Не тримайте дверцята широко
вiдкритими, щоб не спiткнутися.
• Зберiгайте миючий засiб та ополiскувач
в недосяжних для дiтей мiсцях.
• Забороняйте дiтям гратися з упаковками.
• Ножі і прибори з гострими краями
необхідно розташовувати вістрями і
ріжучими кромками вниз у кошику для
столових приборів або покладати їх
горизонтально на відкідні елементи
або у піднос/третій кошик, якщо останні
передбачені у придбаній вами моделі.
Утилiзацiя
• Утилізація пакувальних матеріалів:
дотримуйтесь місцевих норм, так як
упаковка може використовуватися
повторно.
Європейська директива 2012/19/EU з
відходів від електричної й електронної
апаратури (WEEE), передбачає, що
побутові електроприлади не можуть
перероблятися у звичайному порядку
для твердих міських відходів. Зняті з
експлуатації побутові прилади мають
бути зібрані окремо для оптимізації
ступеню відновлення й повторного
використання матеріалів, що входять
до їхнього складу і з метою усунення
потенційної шкоди для здоров’я та
середовища. Символ закресленого бака,
зображеній на всіх виробах, нагадує про
необхідність окремої утилізації.
Для подальшої інформації щодо
правильної утилізації побутової техніки,
їхні власники можуть звернутися до
вiдповiдних мiських служб або до
постачальника.
Охорона і дбайливе відношення до
довкілля
Як заощадити воду та електроенергiю
• Запускайте посудомийну машину тiльки
при повному завантаженнi. Пiд час
очiкування повного заповнення машини
ви можете забезпечити уникнення
неприємних запахiв, завдяки циклу
Замочування
• Залежно від ступеню забруднення і типу
посуду виберiть придатну програму з
Таблицi програм:
— для миття звичайно забрудненого
начиння використовуйте програму Еко,
яка забезпечує низькi затрати енергiї та
води.
— при неповному завантаженнi
cкористуйтеся опцiєю Половинного
завантаження
Спеціальні програми й опції).
(де він передбачений- див. Програми).
(де вона передбачена — див.
6

• Якщо у вашому договорi на постачання
електричної енергiї передбаченi годиннi
пояси для заощадження енергії,
виконуйте цикли у перiоди за зниженими
тарифами. Опція Відстроченого пуску
може допомогти організувати миття в
разі таких вимог
Спеціальні програми й опції).
KZ
Сақтық шаралары мен кеңес
(е вона передбачена — див.
Бұл құрылғы халықаралық қауіпсіздік
стандарттарына сай өңделіп шығарылған.
Төмендегі ақпарат қауіпсіздік мақсатында
берілген, сондықтан оны мұқият оқып шығу
қажет.
Бұл нұсқаулықты кейін қарау үшін жоғалып
қалмайтындай бір жерге сақтап қойыңыз.
Құрылғы сатылса, тегін берілсе немесе
жылжытылса, нұсқаулық машинамен бірге
болатынын қамтамасыз етіңіз.
Нұсқауларды мұқият оқып шығыңыз, себебі
олардың ішінде қауіпсіз түрде орнату,
қолдану және техникалық қызмет көрсету
туралы маңызды ақпарат берілген.
Бұл құрылғы үйде немесе соған ұқсас
жағдайда қолдануға арналған, мысалы:
— фермадағы үйлер;
— қонақ үйлеріндегі, мотельдердегі және
басқа да қонақ күту орындарындағы
қонақтардың пайдалануы үшін;
— кіші қонақ үйлерінде.
Құрылғыны барлық орамасынан
босатыңыз және ол тасымалдау
кезінде зақымдалмағанын тексеріңіз.
Ол зақымдалған болса, сатушыға
хабарласыңыз және орнату үдерісін
тоқтатыңыз.
Жалпы қауіпсіздік
• Құрылғыны қауіпсіз түрде қолдану
бойынша жауапты адам нұсқау бермеген
не жақсылап бақыламаған я оған қатысты
қауіптер туралы хабарламаған жағдайда,
8 жасқа толмаған балалар, физикалық,
сезімталдық және психикалық қабілеттері
төмен адамдар немесе өнімнен хабары
жоқ тәжірибесіз адамдар құрылғыны
қолданбауы тиіс.
• Балаларға құрылғымен ойнауға
болмайды.
• Құрылғыны тазалау және оған күтім көрсету
пайдаланушының жауапкершілігіне
жатады. Балалар бақылаусыз құрылғыны
тазаламауы не оған күтім көрсетпеуі
керек.
• Құрылғы үйде қолдануға арналған, оны
коммерциялық немесе өндірістік тұрғыда
қолдануға болмайды.
• Құрылғы үйдегі ыдыс-аяқты осы
нұсқаулықтағы нұсқауларға сәйкес жуу
үшін қолданылуға арналған.
• Жабық жер болса да, құрылғыны сыртта
қолданбау қажет. Құрылғыны жауын мен
найзағай астында қалдыру өте қауіпті
• Жалаң аяқ болған кезде құрылғыға
тимеңіз.
• Құрылғыны токтан ажыратқан кезде,
розеткадан әрдайым айырынан ұстап
тартыңыз. Кабелінен ұстап тартпаңыз.
• Құрылғыны тазаламас немесе кез келген
қызмет көрсету жұмысын орындамас
бұрын және әр циклдан кейін су шүмегін
жабу және айырды розеткадан ағыту
керек.
• Орын параметрлерінің ең көп саны өнім
парағында көрсетілген.
• Құрылғы бұзылып қалса, ешбір жағдайда
өз бетіңізбен жөндеу мақсатында ішкі
бөліктерге тиюші болмаңыз.
• Ашық тұрған есікке сүйенбеңіз немесе
оған отырмаңыз: бұл құрылғыны аударып
түсуі мүмкін.
• Есікті ашық қалдырып кетуге болмайды,
себебі ол қауіпті кедергі болып табылады.
• Жуғыш зат пен шаюға көмекші затты
балалардан аулақ ұстаңыз.
• Орама материалын ойыншық ретінде
қолдануға болмайды.
• Өткір жиектері бар пышақтар мен басқа
құралдардың ұштарын/жүздерін төмен
қаратып ыдыс-аяқ себетіне салынуы
керек немесе көлденеңінен қайырмалы
бөліктерге, я болмаса тартпаға/үшінші
себетке (бар болса) қою керек.
Қоқысқа тастау
• Қаптау материалдарын тастағанда
оларды қайта пайдалану мүмкін болуы
үшін, жергілікті заңдарды сақтаңыз.
• Электр және электроникалық
7

құралдардың қалдықтарына (WEEE)
қатысты 2012/19/EU Еуропа заңнамасына
сәйкес үй құрылғылары қалыпты
толық қалалық қалдық айналымын
пайдаланып жойылмауы тиіс. Қоршаған
орта мен халық денсаулығына тиетін
зиянның алдын ала отырып, жарамсыз
құрылғылар қайта пайдалану мен
машина ішіндегі материалдарды өңдеу
құнын оңтайландыру мақсатында бөлек
жиналуы керек. Барлық өнімдердегі
сызылған қоқыс жәшігінің таңбасы өнім
иелерінің бөлектелген қоқыс жинауға
қатысты міндетін еске салады.
Үй құрылғыларын тиісті түрде қоқысқа
тастау туралы қосымша ақпарат алу
үшін ие адамдар тиісті мекемеге
немесе жергілікті құрылғы сатушысына
хабарласуы мүмкін.
Қуатты үнемдеу және қоршаған
ортаны құрметтеу
Су мен қуатты үнемдеу
• Ыдыс жуу машинасы толған кезде
ғана жуу циклын бастаңыз. Ыдыс жуу
машинасының толуын күтіп тұрғанда
жағымсыз иістердің алдын алыңыз
болса, «Жуу циклдары» бөлімін қараңыз)
.
(бар
• «Жуу циклдары» кестесін пайдалана
отырып, ыдыс-аяқ түріне және ластану
дәрежесіне қолайлы жуу циклын
таңдаңыз:
— Орташа ластанған ыдыстар үшін Эко
жуу циклын пайдаланыңыз, ол қуат пен
судың төмен деңгейі қолданылатынын
қамтамасыз етеді.
— Жүктеме әдеттегіден аз болса, Жартылай
жүктеу опциясын
опциялары» бөлімін қараңыз (бар болса)).
(«Арнайы жуу циклдары мен
• Егер ток жеткізу келісім-шартында токты
үнемдеуге арналған уақыт аралықтары
болса, төмен баға қолданылатын кезде
жуу циклдарын орындаңыз. КЕШІКТІРІП
БАСТАУ опциясы жуу циклдарын тиісті
түрде реттеуге көмектесе алады
жуу циклдары мен опциялары» бөлімін қараңыз (бар
болса)).
(
«Арнайы
8
EN
Product Data (product fiche)
Product Fiche
Brand
Model
Rated capacity in standard place settings (1)
Energy efciency class on a scale from A+++ (low consumption) to D (high consumption)
Energy consumption per year in kWh (2)
Energy consumption of the standard cleaning cycle in kWh
Power consumption of the off-mode in W
Power consumption of the left-on mode in W
Water consumption per year in litres (3)
Drying efcacy class on a scale from G (low efcacy) to A (high efcacy)
Programme time for standard cleaning cycle in minutes
The duration of the left-on mode in minutes
Noise in dB(A) Re 1pW
Built-in model
HOTPOINT ARISTON
LSTF 9H114
10
A+
237
0.83
0.5
5.0
2520
A
180
12
44
Yes
NOTES
1) The information on the label and che relates to the standard cleaning cycle, this programme is suitable to clean normally soiled
tableware and it is the most efcient programme in terms of combined energy and water consumption. The standard cleaning cycle
corresponds to the Eco cycle.
2) Based on 280 standard cleaning cycles using cold water ll and the consumption of the low power modes. Actual energy consumption
depends on how the appliance is used.
3) Based on 280 standard cleaning cycles. Actual water consumption depends on how the appliance is used.
PL
Karta produktu
Karta produktu
Marka
Nazwa modelu
Pojemność znamionowa, wyrażona liczbą standardowych kompletów naczyń (1)
Klasa efektywności energetycznej, skla od A+++ (niskie zużycie) do D (wysokie zużycie)
Zużycie energii w kWh rocznie (2)
Zużycie energii w standardowym cyklu zmywania w kWh
Zużycie energii w trybie wyłączenia i trybie czuwania w W
Zużycie energii w trybie włączenia i trybie czuwania w W
Roczne zużycie wody w litrach rocznie (3)
Klasa efektywności suszenia, skala od G (minimalna efektywność) do A (maksymalna efektywność)
Czas programu dla standardowego cyklu zmywania w minutach
Czas trwania trybu czuwania w minutach
Poziom emitowanego hałasu w dB(A) re1 pW
Model do zabudowy
Uwagi
1) Informacja, że cykl jest odpowiedni do zmywania normalnie zabrudzonych zastaw stołowych oraz że jest najbardziej efektywnym
programem pod względem łącznego zużycia energii i wody dla tego rodzaju zastawy stołowej; Standardowy cykl zmywania odpowiada
cyklowi Eco.
2) Na podstawie 280 standardowych cykli zmywania, przy użyciu zimnej wody, oraz w trybie niskiego zużycia energii. Rzeczywiste
zużycie energii zależy od sposobu użycia urządzenia.
3) Na podstawie 280 standardowych cykli zmywania. Rzeczywiste zużycie energii zależy od sposobu użycia urządzenia.
HOTPOINT ARISTON
LSTF 9H114
10
A+
237
0.83
0.5
5.0
2520
A
180
12
44
Tak
9

EN
Assistance
UA
Допомога
Before contacting Assistance:
• Check whether the problem can be resolved using the
Troubleshooting guide
• Restart the programme to check whether the problem
has ceased to exist.
• If the problem persists, contact the Authorised Technical
Assistance Service.
Never use the services of unauthorised technicians.
Please have the following information to hand:
• The type of malfunction.
• The appliance model (Mod.).
• The serial number (S/N).
This information can be found on the appliance data plate
(see Description of the appliance)
PL
Serwis Techniczny
Przed zwróceniem się do Serwisu Technicznego:
• Sprawdzić, czy problemu nie można rozwiązać
samodzielnie
sposoby ich usuwania).
• Ponownie uruchomić program, aby przekonać się, czy
usterka nie ustąpiła.
• W przeciwnym wypadku skontaktować się z
autoryzowanym Serwisem Technicznym.
Zwracać się wyłącznie do autoryzowanych
techników.
Podać:
• rodzaj nieprawidłowości;
• model urządzenia (Mod.);
• numer seryjny (S/N).
Informacje te znajdują się na tabliczce znamionowej
umieszczonej na urządzeniu
(patrz Nieprawidłowości w działaniu i
(see Troubleshooting).
.
(patrz Opis urządzenia).
Перш ніж звернутися у Сервісний центр:
• Перевірте, чи можна самостійно вирішити проблему
(див. “Несправності і засоби їх усунення”)
• Запустіть програму повторно, щоб перевірити чи
усунено несправність.
• У противному випадку зверніться до уповноваженого
сервісного центру.
Звертайтеся виключно до уповноважених
фахівців.
Cлiд повiдомити:
• тип несправності;
• Модель машини (Mod.);
• Серійний номер (S/N).
Ця інформація міститься на табличці з характеристиками,
прикріпленій до приладу.
(див. Опис приладу).
KZ
Көмек
Көмек қызметіне хабарласпас бұрын:
• Проблеманы Ақаулықтарды жою нұсқаулығын
қолдана отырып шешуге болатынын, не болмайтынын
тексеріңіз («Ақаулықтарды жою» бөлімін қараңыз).
• Бағдарламаны қайта іске қосыңыз да, проблема
кеткенін тексеріңіз.
• Проблема шешілмесе, Куәландырылған техникалық
көмек беру қызметіне хабарласыңыз.
Куәландырылмаған мамандарға қызмет
көрсеткізбеңіз.
Келесі мәліметтерді оңай жерде ұстаңыз:
• Проблеманың түрі
• Құрылғының моделі (Мод.).
• Сериялық нөмірі (С/н).
Бұл ақпаратты құрылғының деректер тілімшесінде
табуға болатын («Құрылғының сипаттамасы» бөлімін
қараңыз).
.
10
Installation
If the appliance must be moved at any time, keep it in an
upright position; if absolutely necessary, it may be tilted onto
its back.
Connecting the water supply
Adaptation of the water supply for installation should only
be performed by a qualified technician.
The water inlet and outlet hoses may be positioned towards
the right or the left in order to achieve the best possible
installation.
Make sure the dishwasher does not bend or squash the
hoses.
Connecting the water inlet hose
• To a 3/4” gas cold or hot water connection point (max.
60°C).
• Run the water until it is perfectly clear.
• Screw the inlet hose tightly into position and turn off the
tap.
If the inlet hose is not long enough, contact a specialist
store or an authorised technician
The water pressure must be within the values indicated
in the Technical Data table — otherwise the dishwasher may
be function properly.
Make sure the hose is not bent or compressed.
(see Assistance)
.
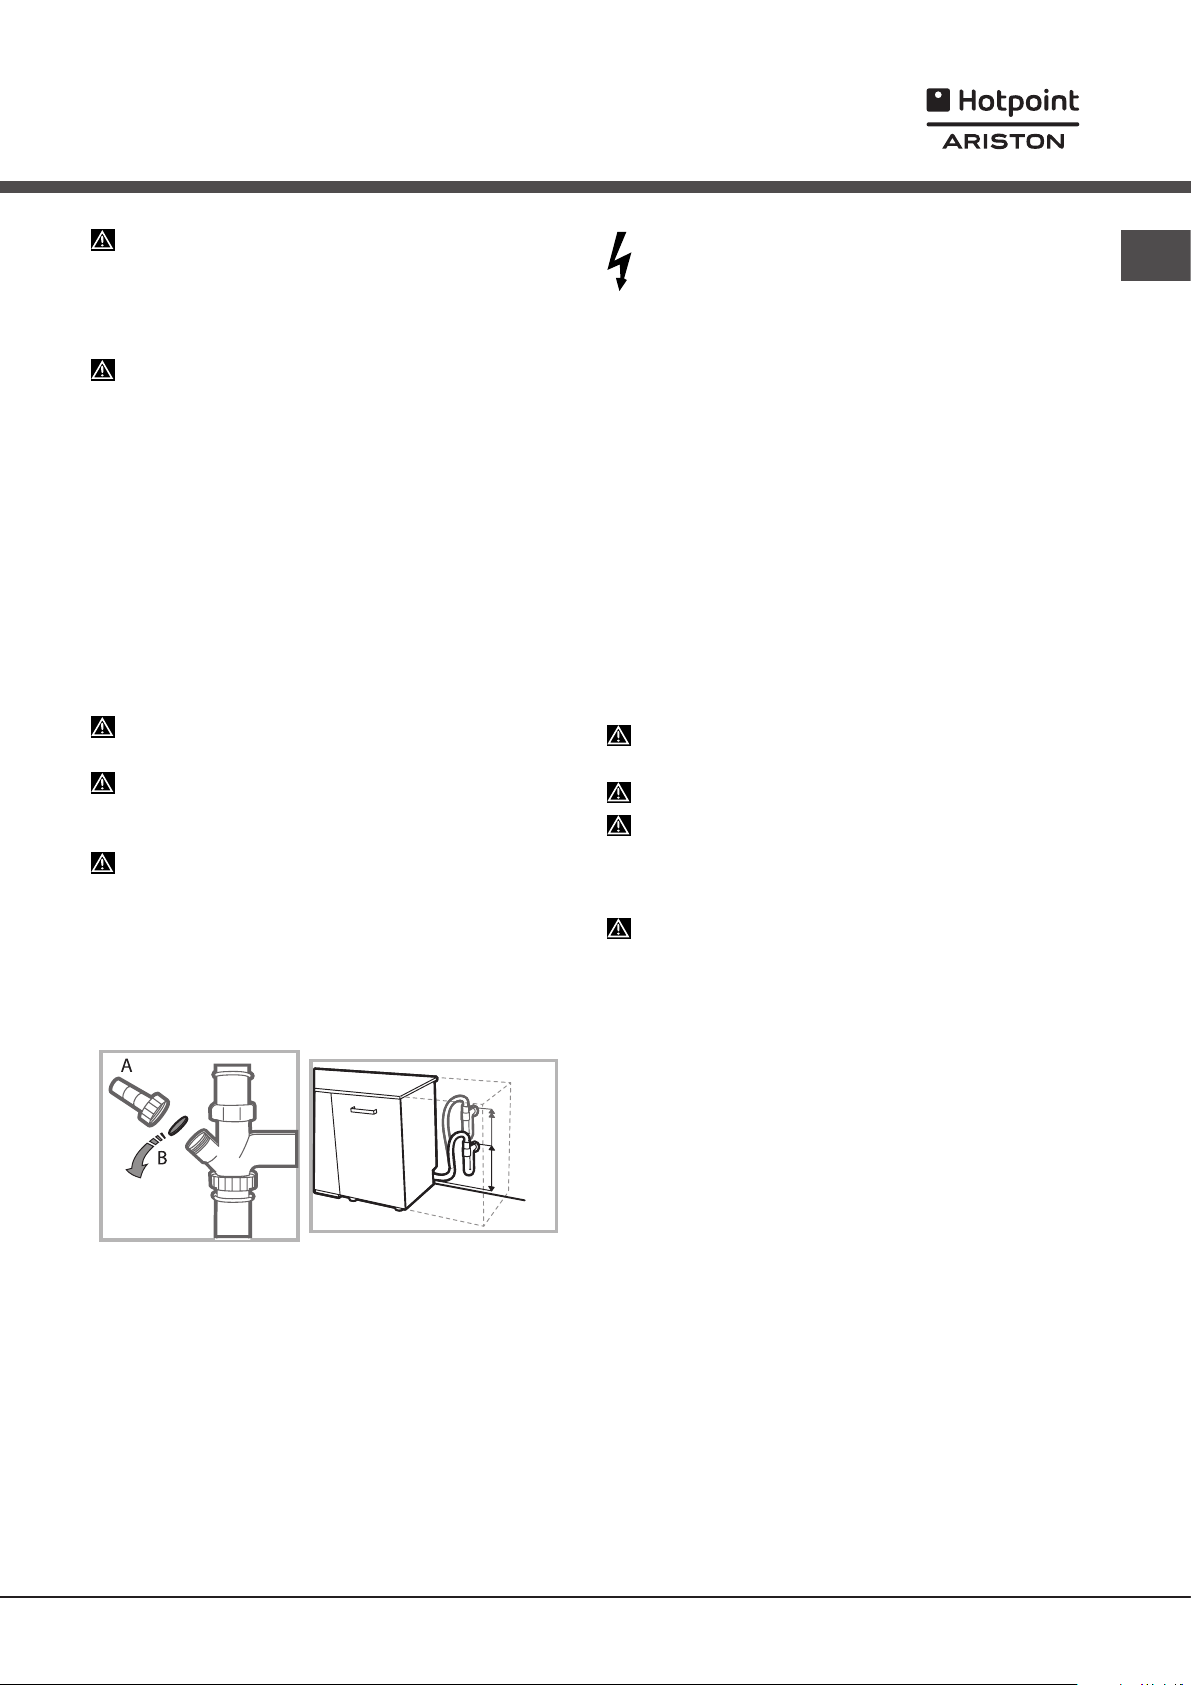
Connecting the water outlet hose
Connect the outlet hose to a drain duct with a minimum
diameter of 2 cm. (A)
The outlet hose connection must be at a height ranging from
40 to 80 cm from the floor or surface where the dishwasher
rests.
MAX 80 cm
MIN 40 cm
Before connecting the water outlet hose to the sink drain,
remove the plastic plug (B).
WARNING: HAZARDOUS VOLTAGE!
Under no circumstances should the water inlet hose be cut
as it contains live electrical parts.
Electrical connection
Before inserting the plug into the electrical socket, make
sure that:
• The socket is earthed and complies with current
regulations;
• the socket can withstand the maximum load of the
appliance as shown on the data plate located on the inside
of the door
(see chapter Description of the appliance);
• The power supply voltage falls within the values indicated
on the data plate on the inside of the door.
• The socket is compatible with the plug of the appliance. If
this is not the case, ask an authorised technician to replace
the plug (
multiple sockets.
Once the appliance has been installed, the power supply
cable and the electrical socket should be easily accessible.
The cable should not be bent or compressed.
If the power supply cable is damaged, have it replaced
by the manufacturer or its authorised Technical Assistance
Service in order to prevent all potential hazards.
see Assistance
). Do not use extension cables or
(See
Assistance)
The Company shall not be held responsible for any
incidents, if these regulations are not observed.
Positioning and levelling
1. Position the dishwasher on a level sturdy floor. If the floor is
uneven, the front feet of the appliance may be adjusted until
it reaches a horizontal position. If the appliance is levelled
correctly, it will be more stable and much less likely to move
or cause vibrations and noise while it is operating.
2. Before recessing the dishwasher, stick the adhesive
transparent strip* under the wooden shelf in order to protect
it from any condensation which may form.
3. Place the dishwasher so that its sides or back panel are in
contact with the adjacent cabinets or the wall. This appliance
can also be recessed under a single worktop*
Assembly instruction sheet)
.
(see the
EN
Anti-flooding protection
To ensure floods do not occur, the dishwasher:
— is provided with a special system which blocks the water
supply in the event of anomalies or leaks from inside the
appliance.
Some models are also equipped with the supplementary
safety device New Acqua Stop*, which guarantees antiflooding protection even in the event of a supply hose rupture.
4*. To adjust the height of the rear foot, turn the red hexagonal
bushing on the lower central part at the front of the dishwasher
using a hexagonal spanner with an opening of 8 mm. Turn the
spanner in a clockwise direction to increase the height and
in an anticlockwise direction to decrease it.
(see Building-in
instruction sheet attached to the documentation)
* Only available in selected models.
11
EN
Advice regarding the first wash cycle
After the installation, remove the stoppers from the racks and
the retaining elastic elements from the upper rack
(if any).
Water softener settings
Before starting the first wash cycle, set the hardness level of the water from the mains supply.
(see chapter Rinse
aid and refined salt).
First load the softener tank with water, then introduce about
1 kg of salt. It is perfectly normal for water to flow out.
As soon as this procedure is complete, run a wash cycle.
Only use salt that has been specifically designed for dishwashers.
After the salt has been poured into the machine, the LOW
SALT indicator light* switches off.
If the salt container is not filled, the water softener and
the heating element may be damaged as a result.
Technical data
width 44,5 cm
Dimensions
Capacity 10 standard place-settings
Water supply pressure
Power supply voltage See appliance data plate
height 82 cm
depth 55 cm
0,05 ÷ 1MPa (0.5 ÷ 10 bar)
7,25 psi – 145 psi
The machine has a buzzer/set of tones
dishwasher model
been implemented: power on, cycle end etc.
The symbols/indicator lights/LEDs on the control panel/
display may vary in colour and may have a flashing or fixed
light
(depending on the dishwasher model)
The display* provides useful information concerning the
type of wash cycle, drying/wash-cycle phase, remaining
time, temperature etc.
) to inform the user that a command has
(depending on the
.
Total absorbed power See appliance data plate
Fuse See appliance data plate
This dishwasher conforms to the
following European Community
Directives:
-2006/95/EC (Low Voltage)
-2004/108/EC (Electromagnetic
Compatibility)
-2009/125/EC (Comm. Reg.
1016/2010) (Ecodesign)
-97/17/EC (Labelling)
-2012/19/CE Waste Electrical
and Electronic Equipment (WEEE)
12
* Only available in selected models.
Description of the
appliance
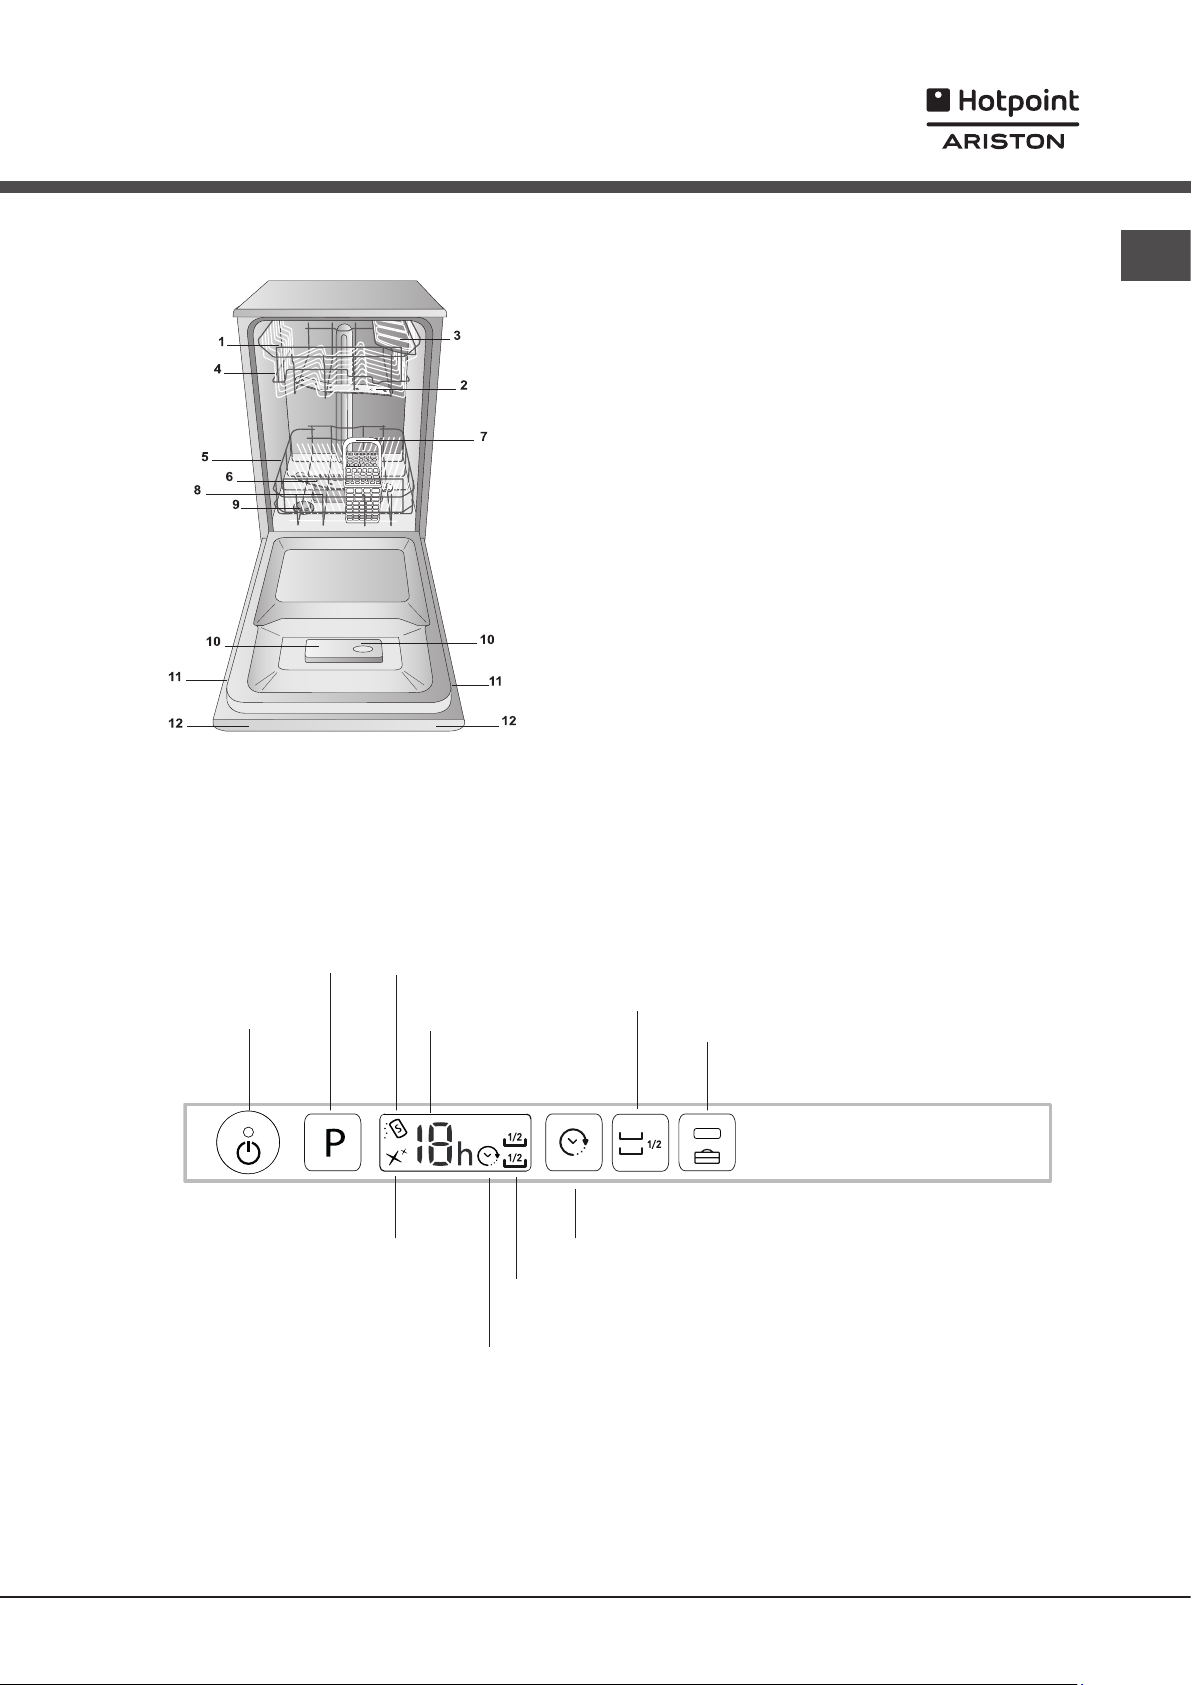
Overall view
EN
1. Upper rack
2. Upper spray arm
3. Tip-up compartments
4. Rack height adjuster
5. Lower rack
6. Lower spray arm
7. Cutlery basket
8. Washing filter
9. Salt dispenser
10. Detergent and rinse aid dispensers
11. Data plate
12. Control Panel***
Control panel
Select Wash
Cycle button
ON/OFF/RESET
button and
indicator light
Low Rinse Aid
indicator light
Low Salt
indicator light
Wash-Cycle number
and Remaining Time
indicator
Delayed Start Option
indicator light
Half Load Option button
Multi-functional Tablets Option
button and indicator light (Tabs)
Delayed Start
Option button
Half Load Option indicator lights
***Only in completely built-in models.
* Only available in selected models.
The number and type of wash cycles and options may vary depending on the dishwasher model.
13
Refined Salt and Rinse Aid
EN
Only use products which have been specifically designed
for dishwashers. Do not use table salt or industrial salt.
Follow the instructions given on the packaging.
If you are using a multi-function product, we recommend
that you add salt in any case, especially if the water is hard
or very hard.
If you do not add salt or rinse aid, the LOW SALT* and
LOW RINSE AID* indicator lights will remain lit.
(Follow the instructions given on the packaging.)
Measuring out the refined salt
The use of salt prevents the formation of LIMESCALE on the
dishes and on the machine’s functional components.
• It is important that the salt dispenser be never empty.
• It is important to set the water hardness.
The salt dispenser is located in the lower part of the dishwasher
(see Description)
• When the LOW RINSE AID indicator light in the control panel
is lit *;
• When the green float* on the cap of the salt dispenser is no
longer visible.
• See autonomy in the water hardness table.
(approximately 1 kg); it is not unusual for a little water to leak out.
4. Remove the funnel and wipe any salt residue away from the
opening; rinse the cap under running water and then screw it on.
It is advisable to perform this procedure every time you add salt
to the container.
Make sure the cap is screwed on tightly, so that no detergent can
get into the container during the wash cycle (this could damage
the water softener beyond repair).
Whenever you need to add salt, we recommend carrying out
the procedure before the washing cycle is started.
Setting the water hardness
For perfect water softener operation, it is essential that the
adjustment be based on the water hardness in your house. Ask
your local water supplier for this information. The factory setting
is for medium water hardness.
• Switch the dishwasher on using the On/Off button.
• Switch it off using the On/Off button
• Hold down button P for 5 seconds until you hear a beep.
• Switch it on using the On/Off button
• The current selection level number and salt indicator light flash.
• Press button P to select the desired hardness level
hardness table).
• Switch it off using the On/Off button
• Setting is complete!
and should be filled:
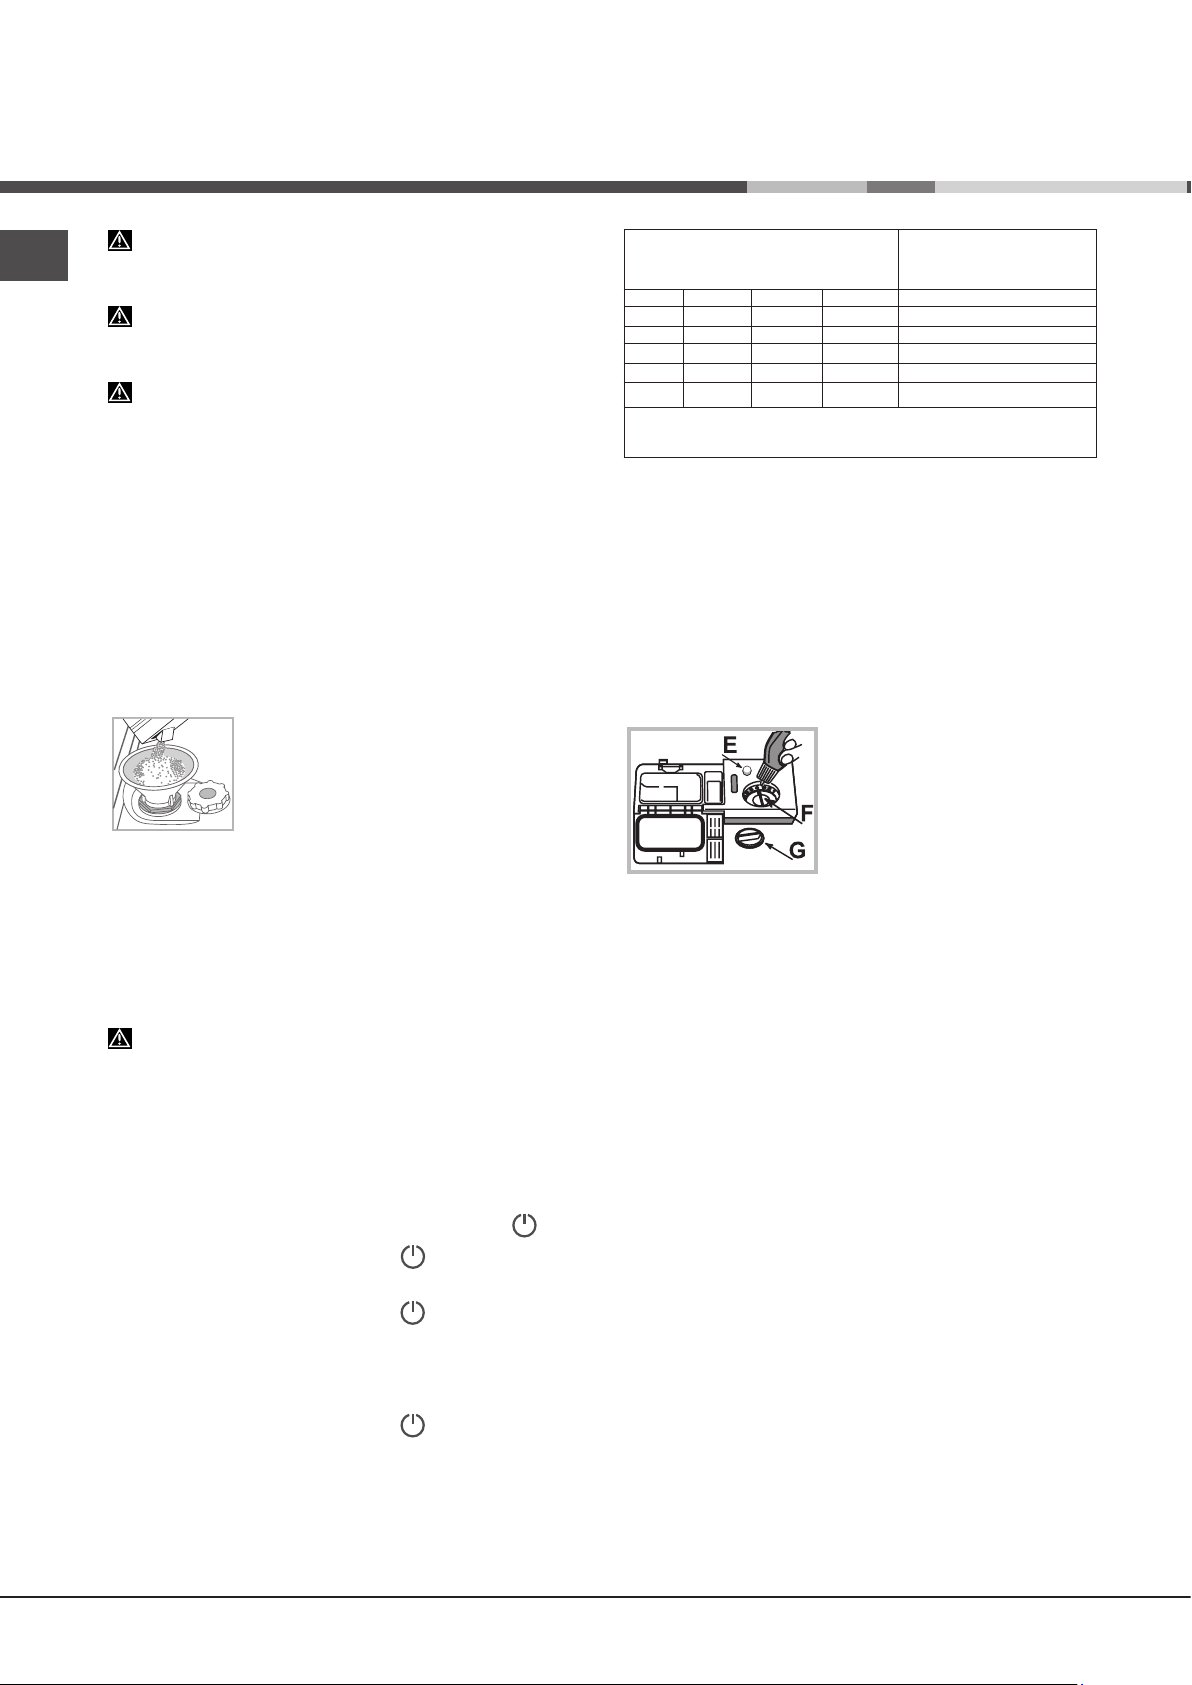
1. Remove the lower rack and unscrew the
container cap (anticlockwise).
2. Only the first time you do this: fill the water
dispenser up to the edge.
3. Position the funnel
fill the salt container right up to its edge
(see figure)
and
(see
Average autonomy
Water Hardness Table
level °dH °fH mmol/l months
1 0 — 6 0 — 10 0 — 1 7 months
2 6 — 11 11 — 20 1.1 — 2 5 months
3 12 — 17 21 — 30 2.1 — 3 3 months
4 17 — 34 31 — 60 3.1 — 6 2 months
34 — 50 61 — 90 6.1 — 9 2/3 weeks
5*
For values between 0°f and 10°f, we do not recommend the use
of salt. A setting of 5 may increase cycle duration.
(°dH = hardness measured in German degrees — °f = hardness
measured in French degrees – mmol/l = millimoles per litre)
salt dispenser with 1
wash cycle per day
Measuring out the rinse aid
Rinse aid makes dish DRYING easier. The rinse aid dispenser
should be filled:
• When the LOW RINSE AID indicator light on the panel/display
is lit *;
• When the dark optical indicator on the dispenser door “E”
becomes transparent.
1. Open the dispenser by turning
the cap «G» in an anticlockwise
direction.
2. Pour in the rinse aid, making
sure it does not overflow from the
dispenser. If this happens, clean
the spill immediately with a dry
cloth.
3. Screw the cap back on.
NEVER pour the rinse aid directly into the tub.
Adjusting the amount of rinse aid
If you are not completely satisfied with the drying results, you
can adjust the quantity of rinse aid used. Turn the adjuster “F”.
A maximum of 4 levels can be set according to the dishwasher
model. The factory setting is for a medium level.
• If you see bluish streaks on the dishes, set a low number (1-2).
• If there are drops of water or limescale marks on the dishes,
set a high number (3-4).
14
* Only available in selected models.
Loading the racks
Tips
Before loading the racks, remove all food residues from the
crockery and empty liquids from glasses and containers. No
preventive rinsing is needed under running water.
Arrange the crockery so that it is held in place firmly and does
not tip over; and arrange the containers with the openings facing
downwards and the concave/convex parts placed obliquely,
thus allowing the water to reach every surface and flow freely.
Make sure that the lids, handles, trays and frying pans do not
prevent the spray arms from rotating. Place any small items in
the cutlery basket.
Since plastic dishes and non-stick frying pans usually retain more
water drops, their drying will be not so good as that of ceramic
or stainless-steel dishes.
Lightweight items such as plastic containers should be placed
in the upper rack and arranged so that they cannot move.
After loading the appliance, make sure that the spray arms can
rotate freely.
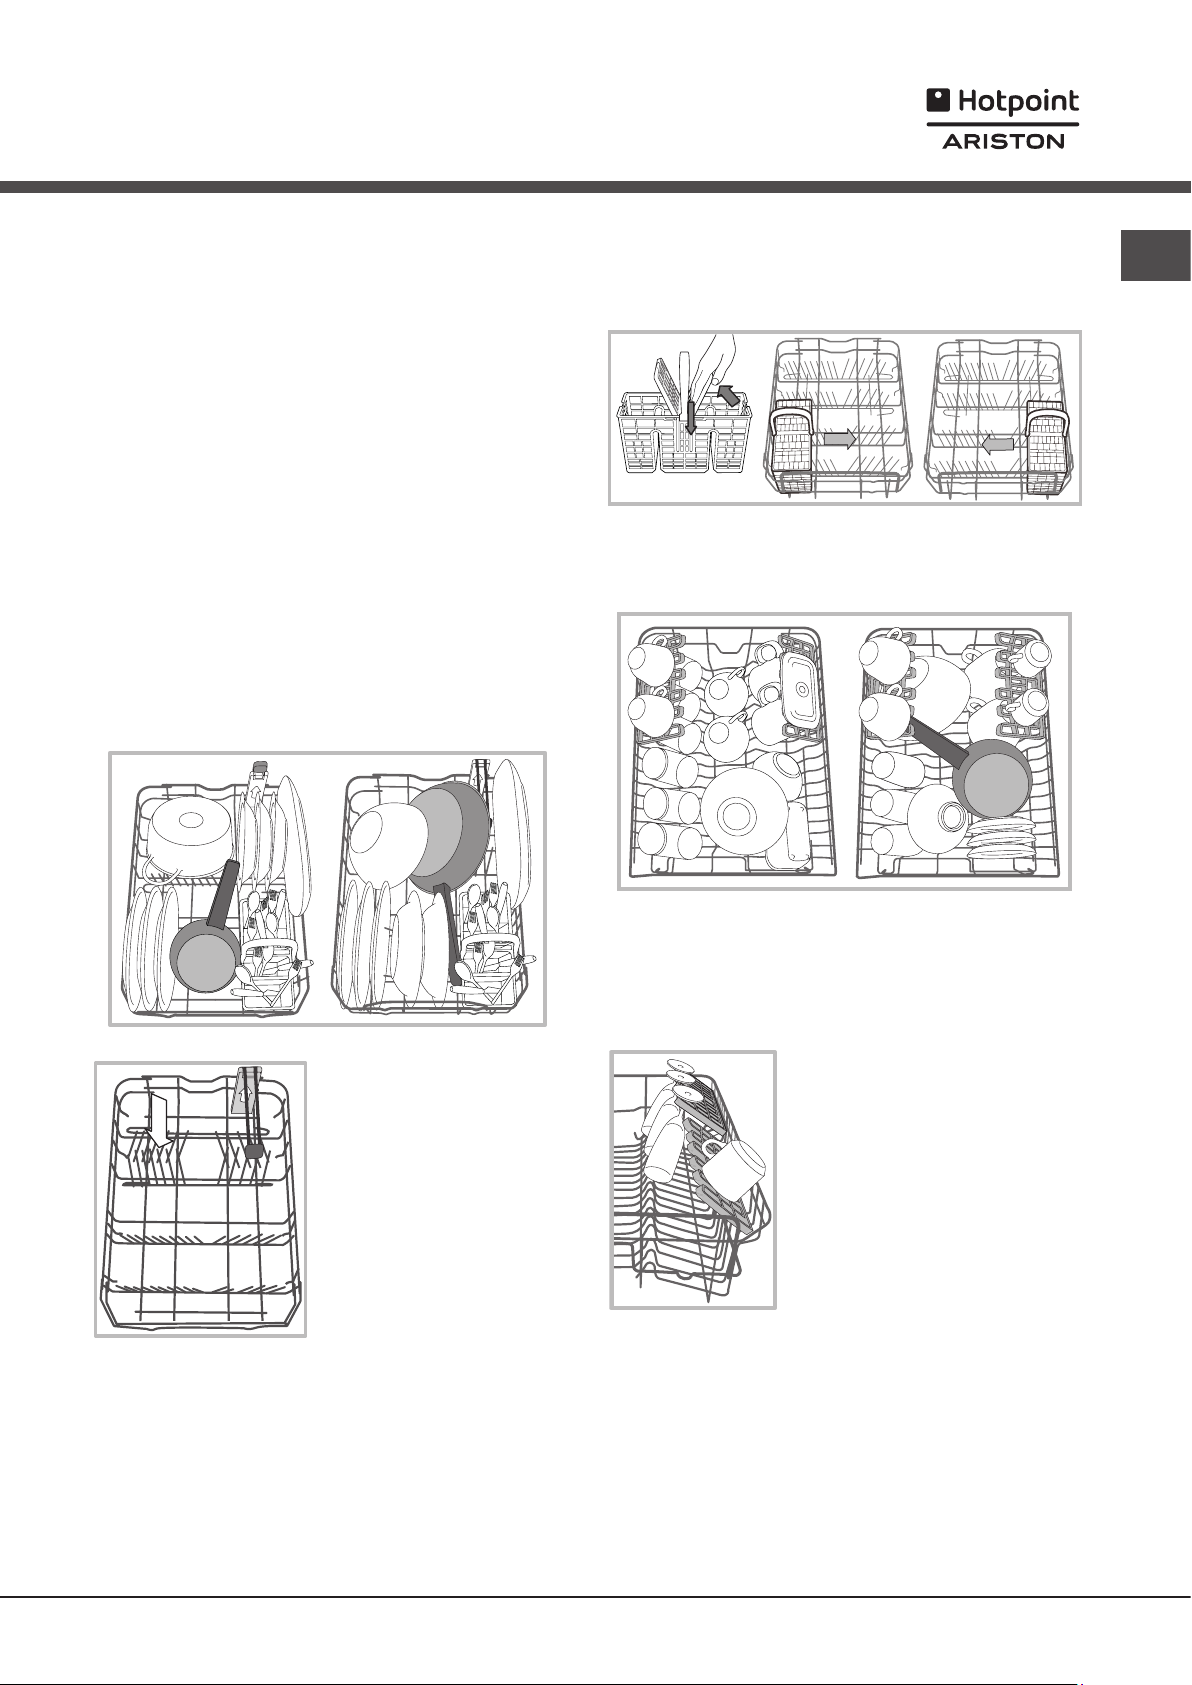
Lower rack
The lower rack can hold pans, lids, dishes, salad bowls, cutlery
etc. Large plates and lids should ideally be placed at the sides.
Cutlery basket
The basket is equipped with top grilles for improved cutlery
arrangement. The cutlery basket should be positioned only at
the front of the lower rack.
Upper rack
Load this rack with delicate and lightweight crockery such as
glasses, cups, saucers and shallow salad bowls.
EN
Several dishwasher models are
fitted with tip-up sectors*.
They can be used in a vertical
position when arranging dishes or
in a horizontal position (lower) to
load pans and salad bowls easily.
Some models are equipped with
Vertical Zone, special pull-out
supports*in the rear of the rack
that can be used to support frying
pans and baking pans in a more
vertical position, thus taking up
less space.
In order to use it, just get hold of the coloured grip and pull it
upwards while rotating it forward. The supports can slide right
and left to fit the size of the crockery.
Very soiled dishes and pans should be placed in the lower rack
because in this sector the water sprays are stronger and allow
a higher washing performance.
Adjustable position tip-up compartments*
The side tip-up compartments can be positioned at three
different heights to optimize the arrangement of the crockery
inside the rack.
Wine glasses can be placed safely in
the tip-up compartments by inserting
the stem of each glass into the
corresponding slot.
For optimum drying results incline
the tip-up compartments more. To
change the inclination, pull up the tipup compartment, slide it slightly and
position it as you wish.
*Only available in selected models with different numbers and
positions.
15
EN
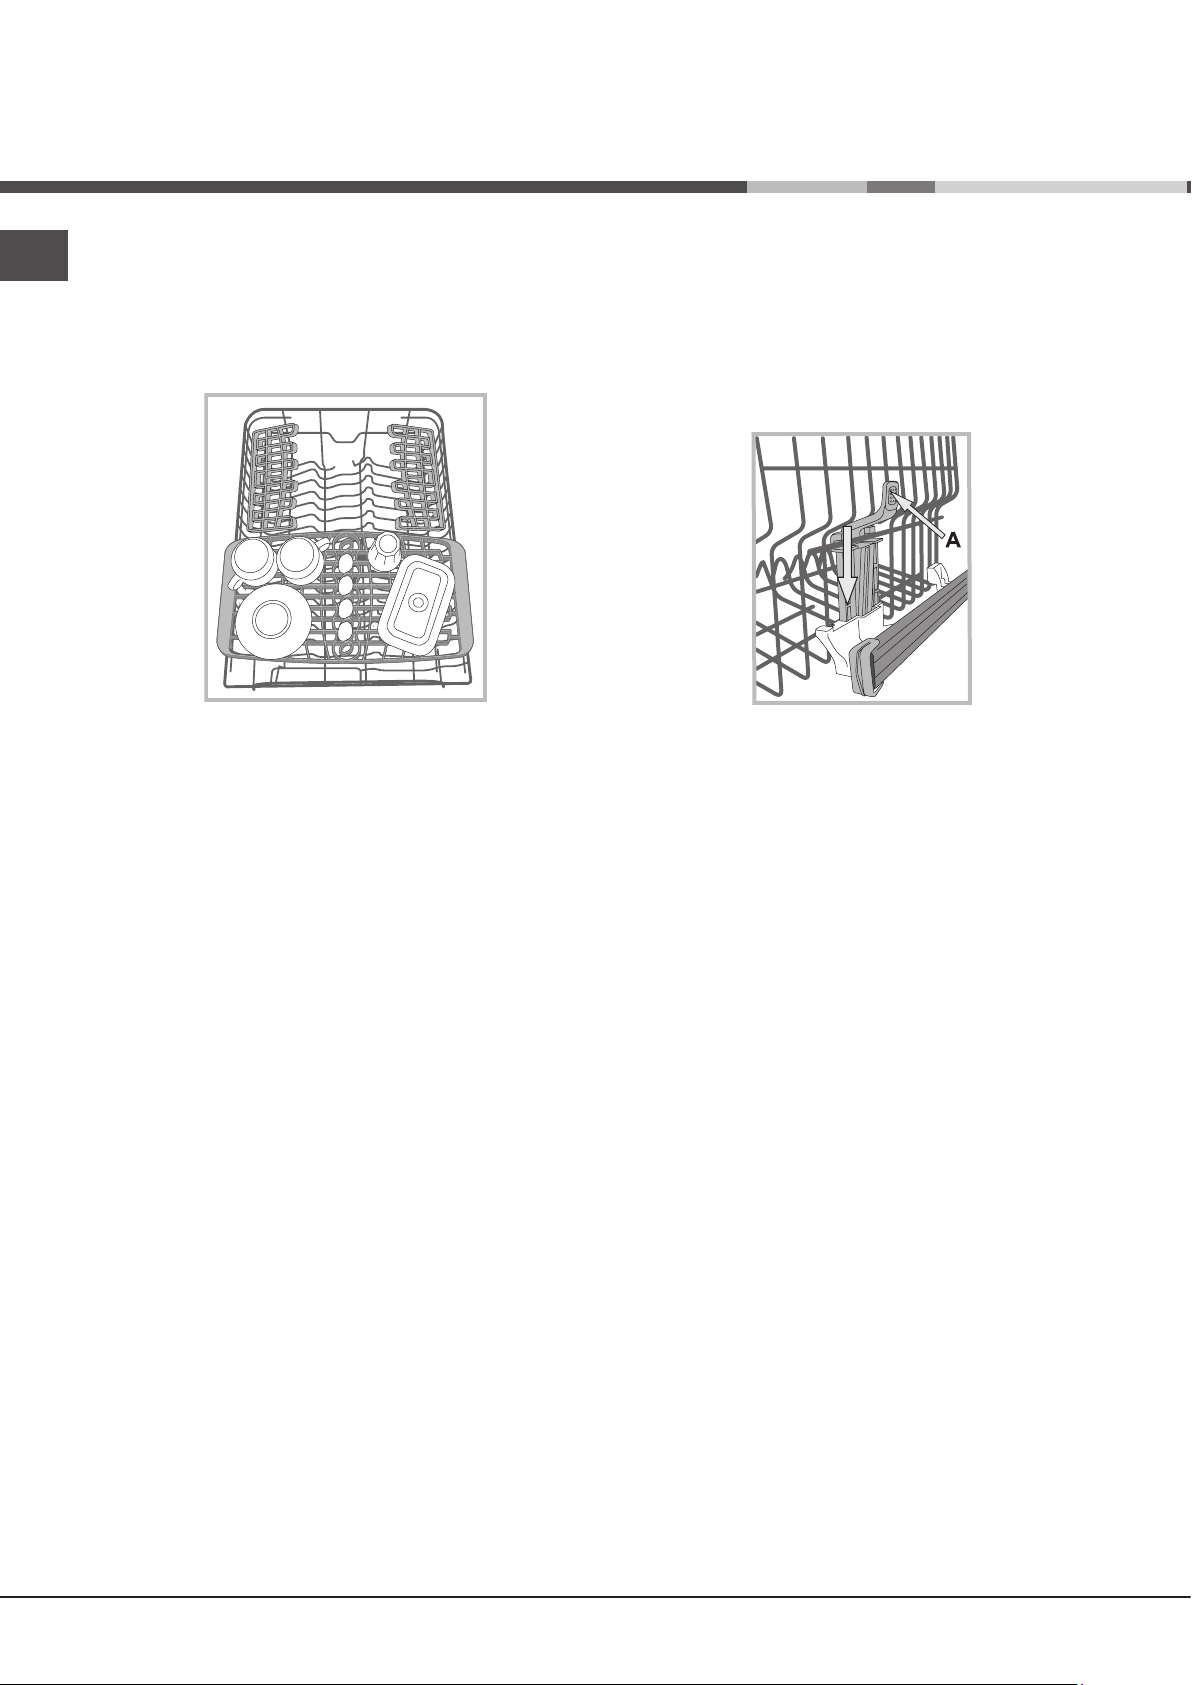
Tray*
Some dishwasher models are fitted with a sliding tray which
can be used to hold small crockery and cutlery.
For optimum washing performance, avoid positioning bulky
crockery directly below the tray. The cutlery tray can be
removed.
(see Figure.)
Adjusting the height of the upper rack
The height of the upper rack can be adjusted: high position
to place bulky crockery in the lower rack and low position to
make the most of the tip-up compartments by creating more
space upwards.
The height of the upper rack should be adjusted WHEN THE
RACK IS EMPTY.
NEVER raise or lower the rack on one side only.
If the rack is equipped with a Lift-Up device*
it up by holding its sides. To restore the lower position, press
the levers (A) at the sides of the rack and follow the rack down.
(see figure)
, lift
Unsuitable crockery
• Wooden crockery and cutlery.
• Delicate decorated glasses, artistic handicraft and antique
crockery. Their decorations are not resistant.
• Parts in synthetic material which do not withstand high
temperatures.
• Copper and tin crockery.
• Crockery soiled with ash, wax, lubricating grease or ink.
The colours of glass decorations and aluminium/silver pieces can
change and fade during the washing process. Some types of
glass (e.g. crystal objects) can become opaque after a number
of wash cycles too.
Damage to glass and crockery
Caused by:
• Type of glass and glass production process.
• Chemical composition of detergent.
• Water temperature of rinse cycle.
Tips:
• Only use glasses and porcelain guaranteed by the
manufacturer as dishwasher safe.
• Use a delicate detergent suitable for crockery.
• Collect glasses and cutlery from the dishwasher as soon as
the wash cycle is over.
* Only available in selected models.
16

Detergent and
dishwasher use
Measuring out the detergent
Good washing results also depend on the correct amount of
detergent being used. Exceeding the stated amount does not
result in a more effective wash and increases environmental
pollution.
The amount can be adjusted to the soil level.
In the case of normally soiled items, use approximately either
25g (powder detergent) or 25ml (liquid detergent). If tablets
are used, one tablet will be enough.
If the crockery is only lightly soiled or if it has been rinsed
with water before being placed in the dishwasher, reduce
the amount of detergent used accordingly.
For good washing results also follow the instructions shown
on the detergent box.
For further questions please ask the detergent producers.
Open the detergent dispenser using button D and measure out
the detergent according to the Table of wash cycles:
• powder or liquid: compartments
A (wash detergent) and B (pre-
wash detergent)
• tablets: when the cycle requires
1 tablet, place it in compartment
A and close cover C; when it
requires 2 tablets, place the
second tablet on the bottom of
the appliance.
Remove detergent residues from
the edges of the compartment and close cover C until it clicks.
The detergent dispenser automatically opens up at the right time
according to the wash cycle.
If all-in-one detergents are used, we recommend using the TABS
option, because it adjusts the cycle so that the best washing and
drying results are always achieved.
Only use detergent which has been specifically designed
for dishwashers.
DO NOT USE washing up liquid.
Using excessive detergent may result in foam residues
remaining in the machine after the cycle has ended.
To achieve the best washing and drying results, the combined
use of detergent, rinse aid liquid and refined salt is required.
We recommend using detergents that do not contain
phosphates or chlorine, as these products are harmful
to the environment.
Starting the dishwasher
1. Turn the water tap on.
2. Open the door and press ON-OFF button.
3. Measure out the detergent.
4. Load the racks
5. Select the wash cycle in accordance with the type of crockery
and its soil level
button.
6. Select the wash options*.
options)
7. Start the wash cycle by shutting the door.
8. The end of the wash cycle is indicated by beeps and by the
flashing of the wash cycle number on the display. Open the
door, switch off the appliance by pressing the ON/OFF button.
9. Wait for a few minutes before removing the crockery, in order
to avoid burns. Unload the racks, beginning with the lower level.
.
(see Loading the racks)
(see table of wash cycles)
— The machine will switch off automatically during
certain extended periods of inactivity, in order to
minimise electricity consumption.
AUTO WASH CYCLES*:some models of dishwashers are
equipped with a special sensor which can be used to assess
the level of soiling and automatically setting the most efficient
and economic wash cycle accordingly.
The duration of the Auto wash cycles may vary due to the
operation of the sensor.
If the crockery is only lightly soiled or if it has been rinsed
with water before being placed in the dishwasher, reduce the
amount of detergent used accordingly.
Modifying a wash cycle in progress
If a mistake was made during the wash cycle selection process,
it is possible to change the cycle, provided that it has only just
begun: open the door taking care to avoid the escaping steam,
by pressing and holding the ON/OFF button, the machine will
switch off. Switch the machine back on using the ON/OFF button
and select the new wash cycle and any options desired; start
the cycle by closing the door.
Adding extra crockery
Without switching off the machine, open the door, taking care
to avoid the escaping steam, and place the crockery inside the
dishwasher. Shut the door and the cycle will begin from the point
at which it was interrupted.
Accidental interruptions
If the door is opened during the wash cycle, or if there is a power
cut, the cycle stops. It starts again from the point at which it
was interrupted once the door has been shut or the electricity
supply is restored.
(see detergent information).
.
by pressing the P
(see Special wash cycles and
EN
* Only available in selected models.
17
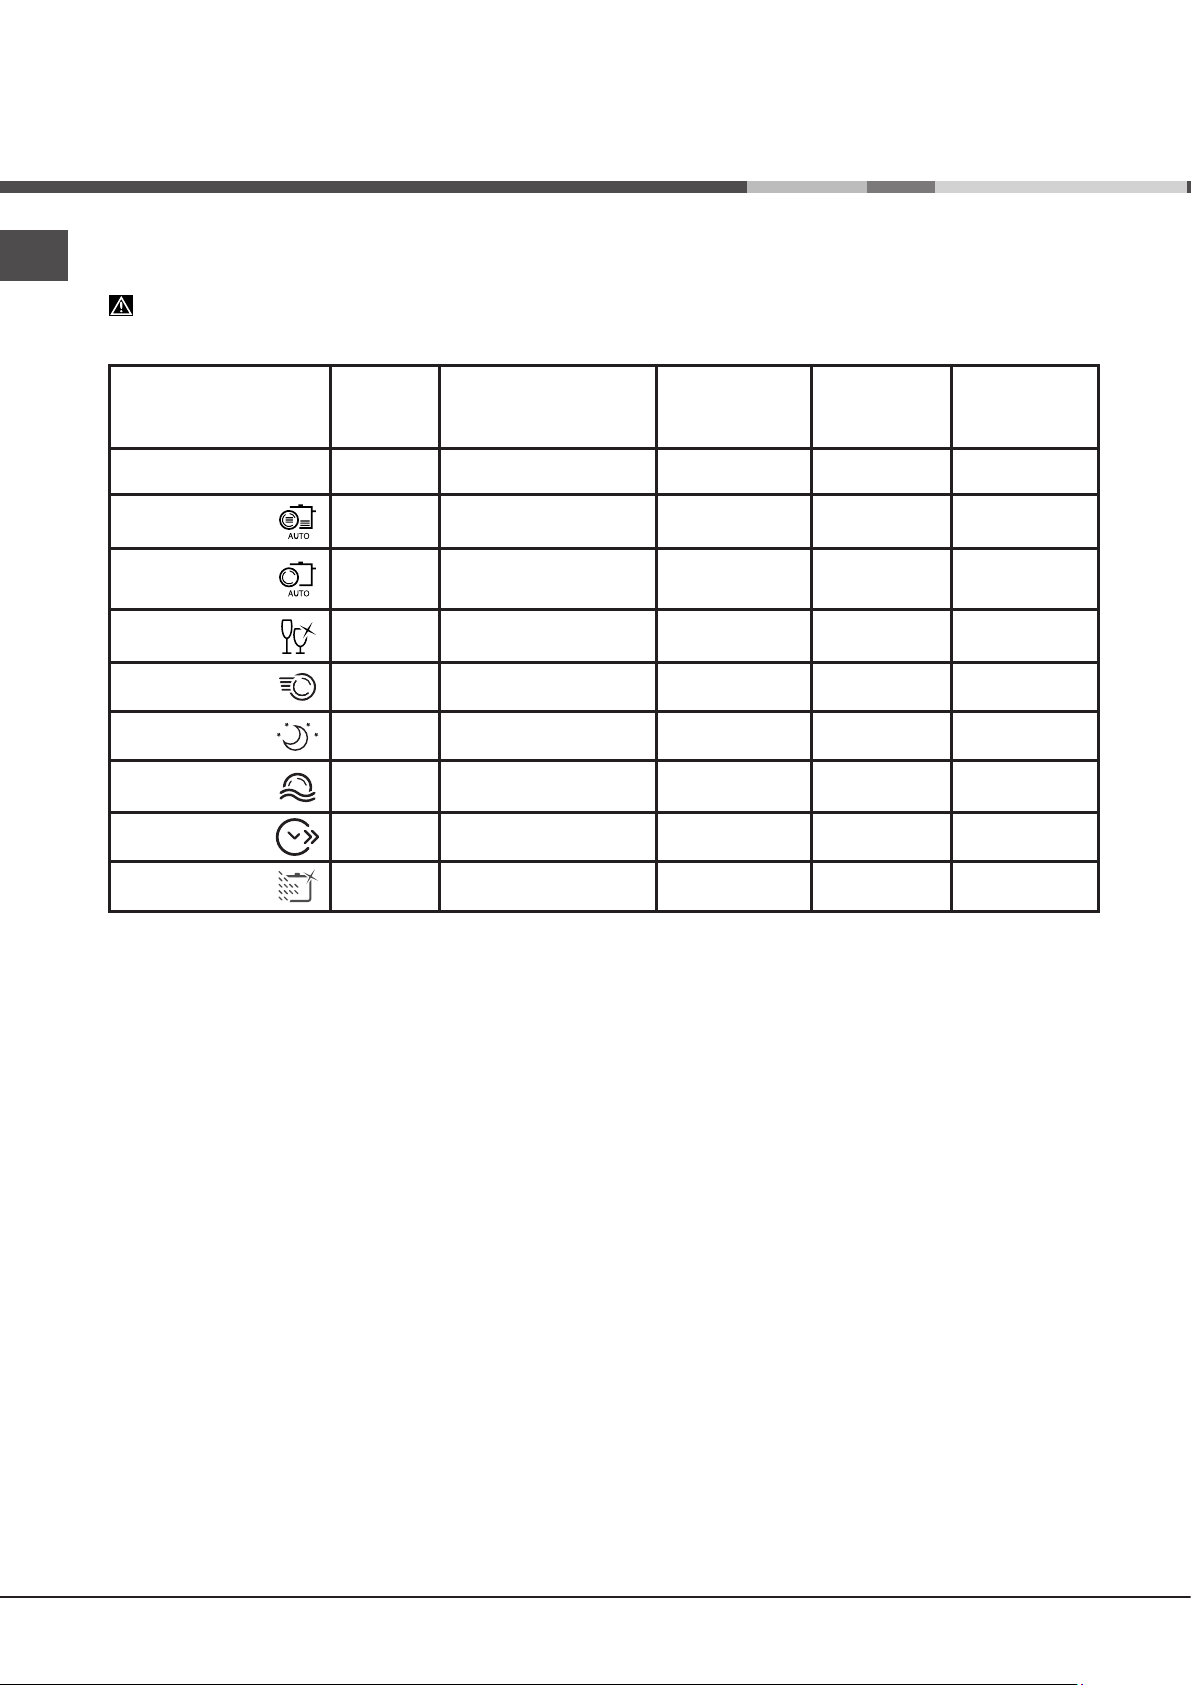
Wash cycles
EN
Wash-cycle data is measured under laboratory conditions according to European Standard EN 50242.
Based on the different conditions of use, the wash-cycle duration and data can change.
The number and type of wash cycles and options may vary depending on the dishwasher model.
Wash cycle
Wash cycle
1. Eco Yes
2. Auto Intensive Yes
3. Auto Normal Yes
4. Delicates Yes
5. Express No Delayed start – Tabs 00:25 8,0 0,45
6. Good Night Yes Delayed start – Tabs 03:30 13,0 0,85
7. Soak No
which
include
drying
Options
Delayed start –
Half Load — Tabs
Delayed start –
Half Load — Tabs
Delayed start –
Half Load — Tabs
Delayed start –
Half Load — Tabs
Delayed start –
Half Load
Approximate
duration of wash
cycles
h:min.
03:00 9,0 0,83
02:20 — 03:00 13,0 — 14,0 1,20 — 1,40
01:40 — 02:20 13,5 – 14,5 1,00 — 1,15
01:40 9,0 0,85
00:10 4,0 0,01
Water
consumption
(l/cycle)
Energy
consumption
(KWh/cycle)
8. Short Time Ye s Delayed start – Tabs 01:20 15,5 1,10
9. Ultra Intensive Yes
Instructions on wash-cycle selection and detergent dosage
1. The ECO wash cycle is the standard cycle to which the energy label data refers. It can be used to wash crockery with a normal
soil level and is the most efficient cycle in terms of energy and water consumption for this type of crockery.
4 gr/ml**+ 21 gr/ml – 1 Tab
2. Heavily soiled dishes and pans (not to be used for delicate items). 25 gr/ml – 1 Tab
3. Normally soiled pans and dishes. 4 gr/ml**+ 21 gr/ml – 1 Tab
4. Cycle for delicate items, which are more sensitive to high temperatures 25 gr/ml – 1 Tab
5. Fast cycle to be used for slightly dirty dishes (ideal for 2 place settings) 21 gr/ml – 1 Tab
6. Optimum performance ensured. Ideal for night-time operation. 25 gr/ml – 1 Tab
7. Pre-wash while awaiting completion of the load with the dishes from the next meal. No detergent.
8. Quick wash and dry cycle, suitable for crockery and pans with a normal soil level. 25 gr/ml – 1 Tab
9. Heavily soiled saucepans or pans with residual dried-on food. 4 gr/ml**+ 25 gr/ml – 1+1 Tab
Standby consumption: Left-on mode consumption: 5 W — Off mode consumption: 0.5 W.
(**Quantity of pre-washing detergent)
Delayed start –
Half Load — Tabs
02:50 17,0 1,45
18
Special wash cycles
and Options
Notes:
Optimum performance levels when using the “Express” cycles
can be achieved by respecting the specified number of place
settings.
To reduce consumption even further, only run the dishwasher
when it is full.
Note for Test Laboratories: for information on comparative EN
testing conditions, please send an email to the following address:
assistenza_en_lvs@indesitcompany.com
Wash options*
If an option is not compatible with the selected wash cycle
(see table of wash cycles), the corresponding LED flashes
rapidly 3 times and beeps will sound.
Delayed start Option
The start of the wash cycle may be delayed for a period
of time between 1 and 12 hours.
1. Press the DELAYED START button: the corresponding symbol
appears on the display; each time you press the button, the time
(1h, 2h, etc. up to max. 12h) from the start of the selected wash
cycle will be increased.
2. Select the cycle and close the door: the timer will begin
counting down;
3. Once this time has elapsed, the indicator light switches off
and the wash cycle begins.
To adjust the delay time and select a smaller period of time,
press the DELAYED START button. To cancel it, press the
button repeatedly until the selected delayed start indicator light
switches off. The wash cycle will start automatically as soon as
the door is shut.
Multi-functional tablets Option (Tabs)
This option optimises washing and drying results.
When using multi-functional tablets, press the MULTIFUNCTIONAL TABLETS button; the corresponding symbol
will light up. If the button is pressed again, the option will be
deselected.
The “Multi-functional tablets” option results in a
longer wash cycle.
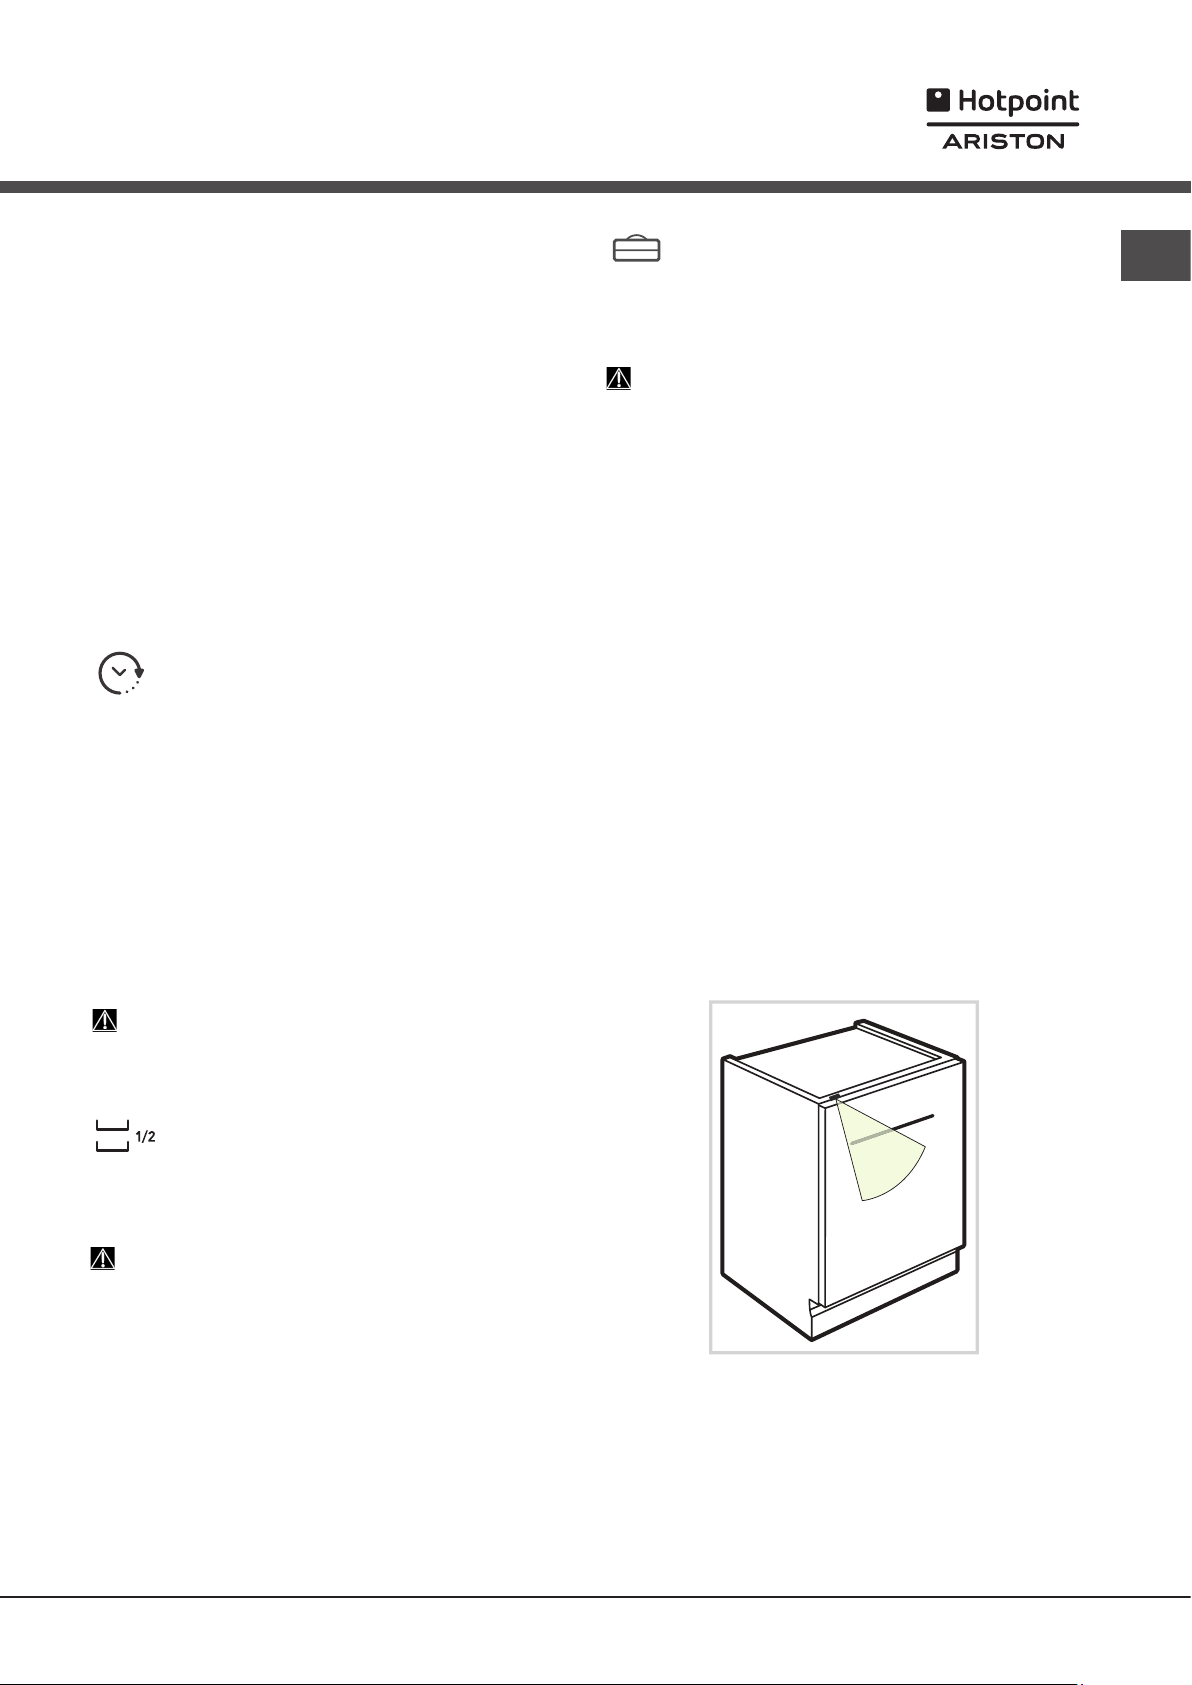
START 2END LIGHT*
Some dishwasher models are equipped with a green
indicator light in the gap between the door and kitchen
top providing information on the phase of the current
wash cycle. One of the following operating modes can be
selected:
a) Disabled function
b) When the cycle starts the light goes on for few seconds,
stays off during the cycle and flashes at the end of the cycle
(default mode)
c) The light stays on during the cycle and flashes at the end
of the cycle.
If the delayed start was set, the light goes on either for the
first few seconds or the entire duration of the countdown,
based on whether mode b) or c) was set.
The light goes off every time the door is opened.
To select the mode you prefer, switch on the machine, hold
down button P until one of the three letters (a, b or c) ap-
pears on the display, press button P until you reach the
desired letter (or mode), hold down button P to confirm the
selection.
EN
The Delayed Start function cannot be set once a wash
cycle has started.
Half load Option using the upper or lower rack
If there are not many dishes to be washed, a half load
cycle may be used in order to save water, electricity
and detergent. Select the wash cycle and then press the HALF
LOAD button: the indicator corresponding to the chosen rack
lights up and the wash cycle starts only in the upper or lower rack.
Remember to load the upper or lower rack only, and to
reduce the amount of detergent accordingly.
* Only available in selected models.
19
Care and maintenance
EN
Shutting off the water and electricity supplies
• Turn off the water tap after every wash cycle to avoid leaks.
• Always unplug the appliance when cleaning it and when
performing maintenance work.
Cleaning the dishwasher
• The external surfaces of the machine and the control panel
can be cleaned using a non-abrasive cloth which has been
dampened with water. Do not use solvents or abrasive
products.
• Any marks on the inside of the appliance may be removed
using a cloth dampened with water and a little vinegar.
Preventing unpleasant odours
• Always keep the door of the appliance ajar in order to avoid
moisture from forming and being trapped inside the machine.
• Clean the seals around the door and detergent dispensers
regularly using a damp sponge. This will avoid food becoming
trapped in the seals, which is the main cause behind the
formation of unpleasant odours.
Cleaning the spray arms
Food residue may become encrusted onto the spray arms
and block the holes used to spray the water. It is therefore
recommended that you check the arms from time to time and
clean them with a small non-metallic brush.
The two spray arms may both be removed.
To remove the upper spray arm,
turn the plastic locking ring in an
anti-clockwise direction. The upper
spray arm should be replaced so
that the side with the greater number
of holes is facing upwards.
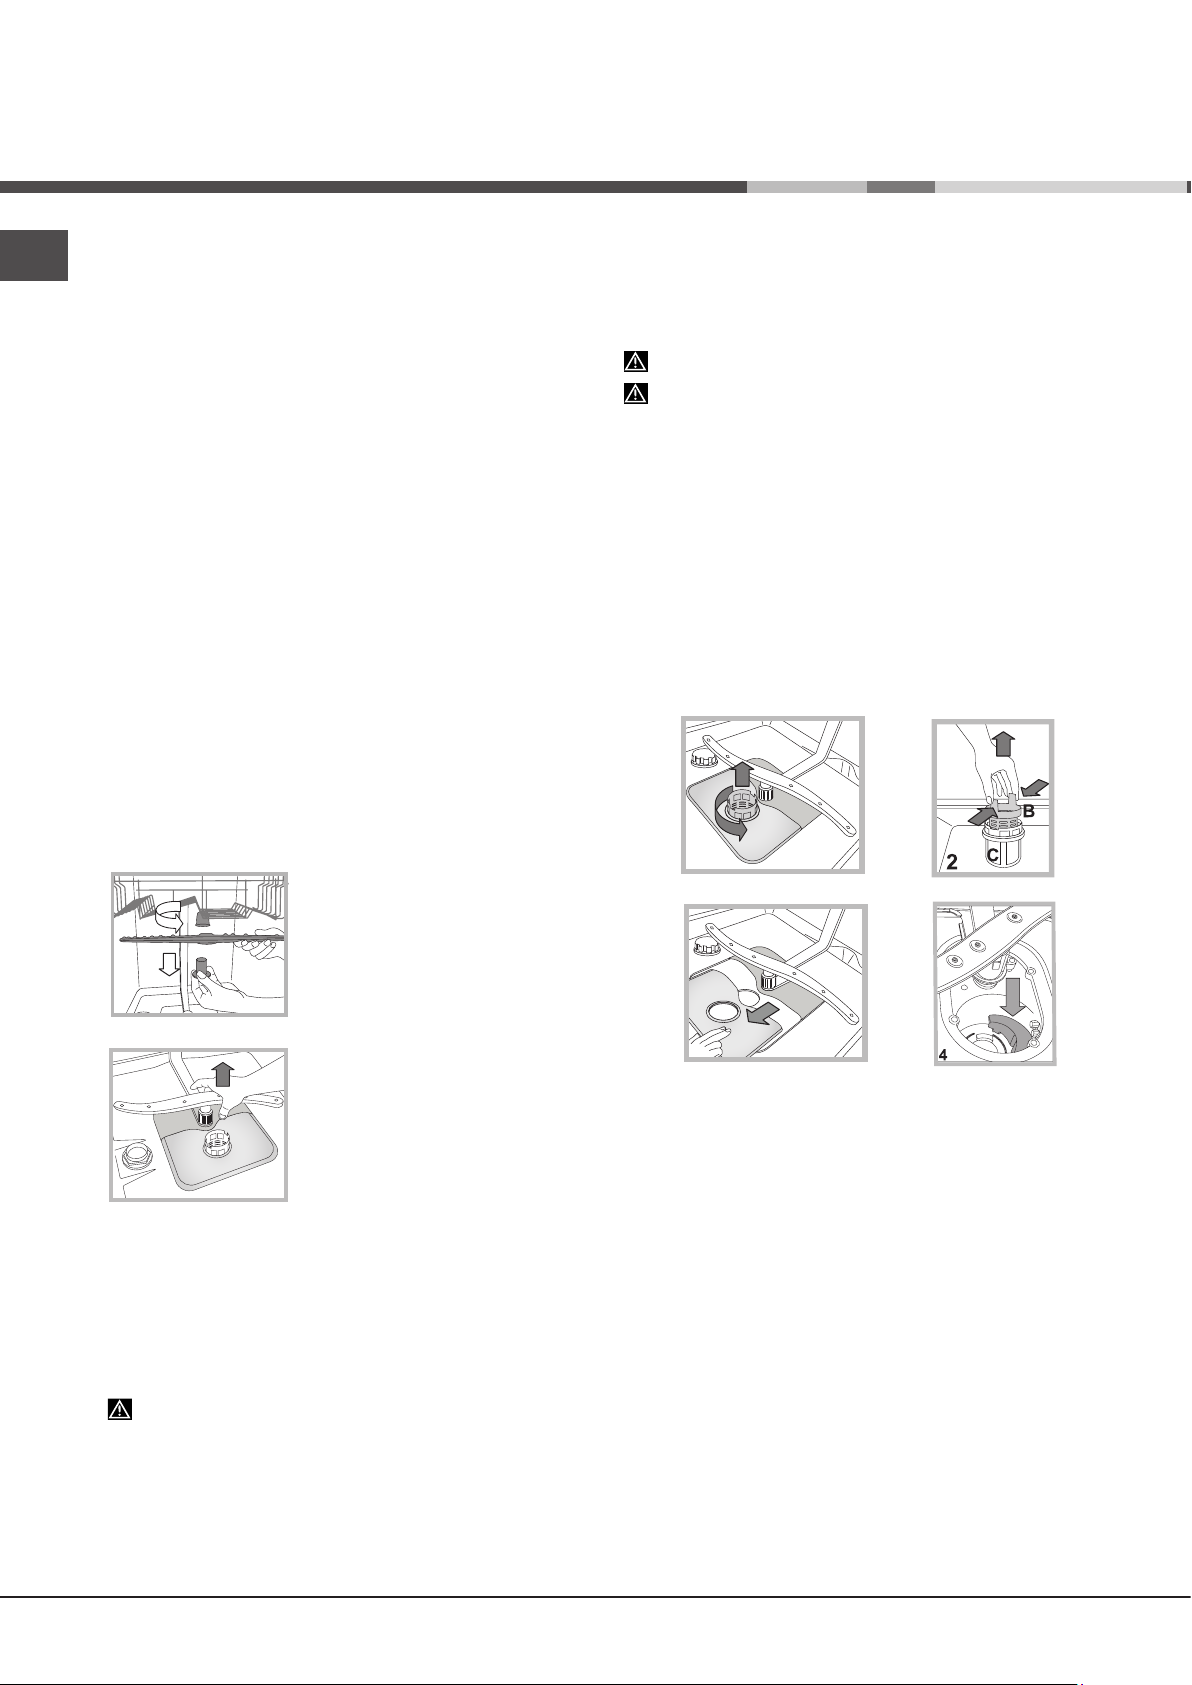
Cleaning the filters
The filter assembly consists of three filters which remove food
residues from the washing water and then recirculate the water.
They must be cleaned if you wish to achieve the best results in
every wash.
Clean the filters regularly.
The dishwasher must not be used without filters or if the filter
is loose.
• After several washes, check the filter assembly and if necessary
clean it thoroughly under running water, using a non-metallic
brush and following the instructions below:
1. Turn the cylindrical filter C in an anti-clockwise direction and
pull it out
2. Remove the cup filter B by exerting a slight pressure on the
side flaps
3. Slide out the stainless-steel plate filter A.
4. Inspect the trap and remove any food residues. NEVER
REMOVE the wash-cycle pump protection
(fig. 1).
(fig. 2);
(fig. 3).
(black detail) (fig.4).
C
1
A
The lower spray arm can be removed
by pressing on the side tabs and
pulling it upwards.
Cleaning the water inlet hose*
If the water hoses are new or have not been used for an extended
period of time, let the water run to make sure it is clear and free
of impurities before performing the necessary connections. If this
precaution is not taken, the water inlet could become blocked
and damage the dishwasher.
Clean the water inlet filter at the tap outlet regularly.
— Turn off the water tap.
— Unscrew the end of the water inlet hose, remove the filter and
clean it carefully under running water.
— Re-place the filter and screw the water hose back into position.
3
After cleaning the filters, re-place the filter assembly and fix it in
position correctly; this is essential for maintaining the efficient
operation of the dishwasher.
Leaving the machine unused for extended
periods
• Disconnect the appliance from the electricity supply and shut
off the water tap.
• Leave the door of the appliance ajar.
• When you return, run a wash cycle when the dishwasher is
empty.
* Only available in selected models.
20
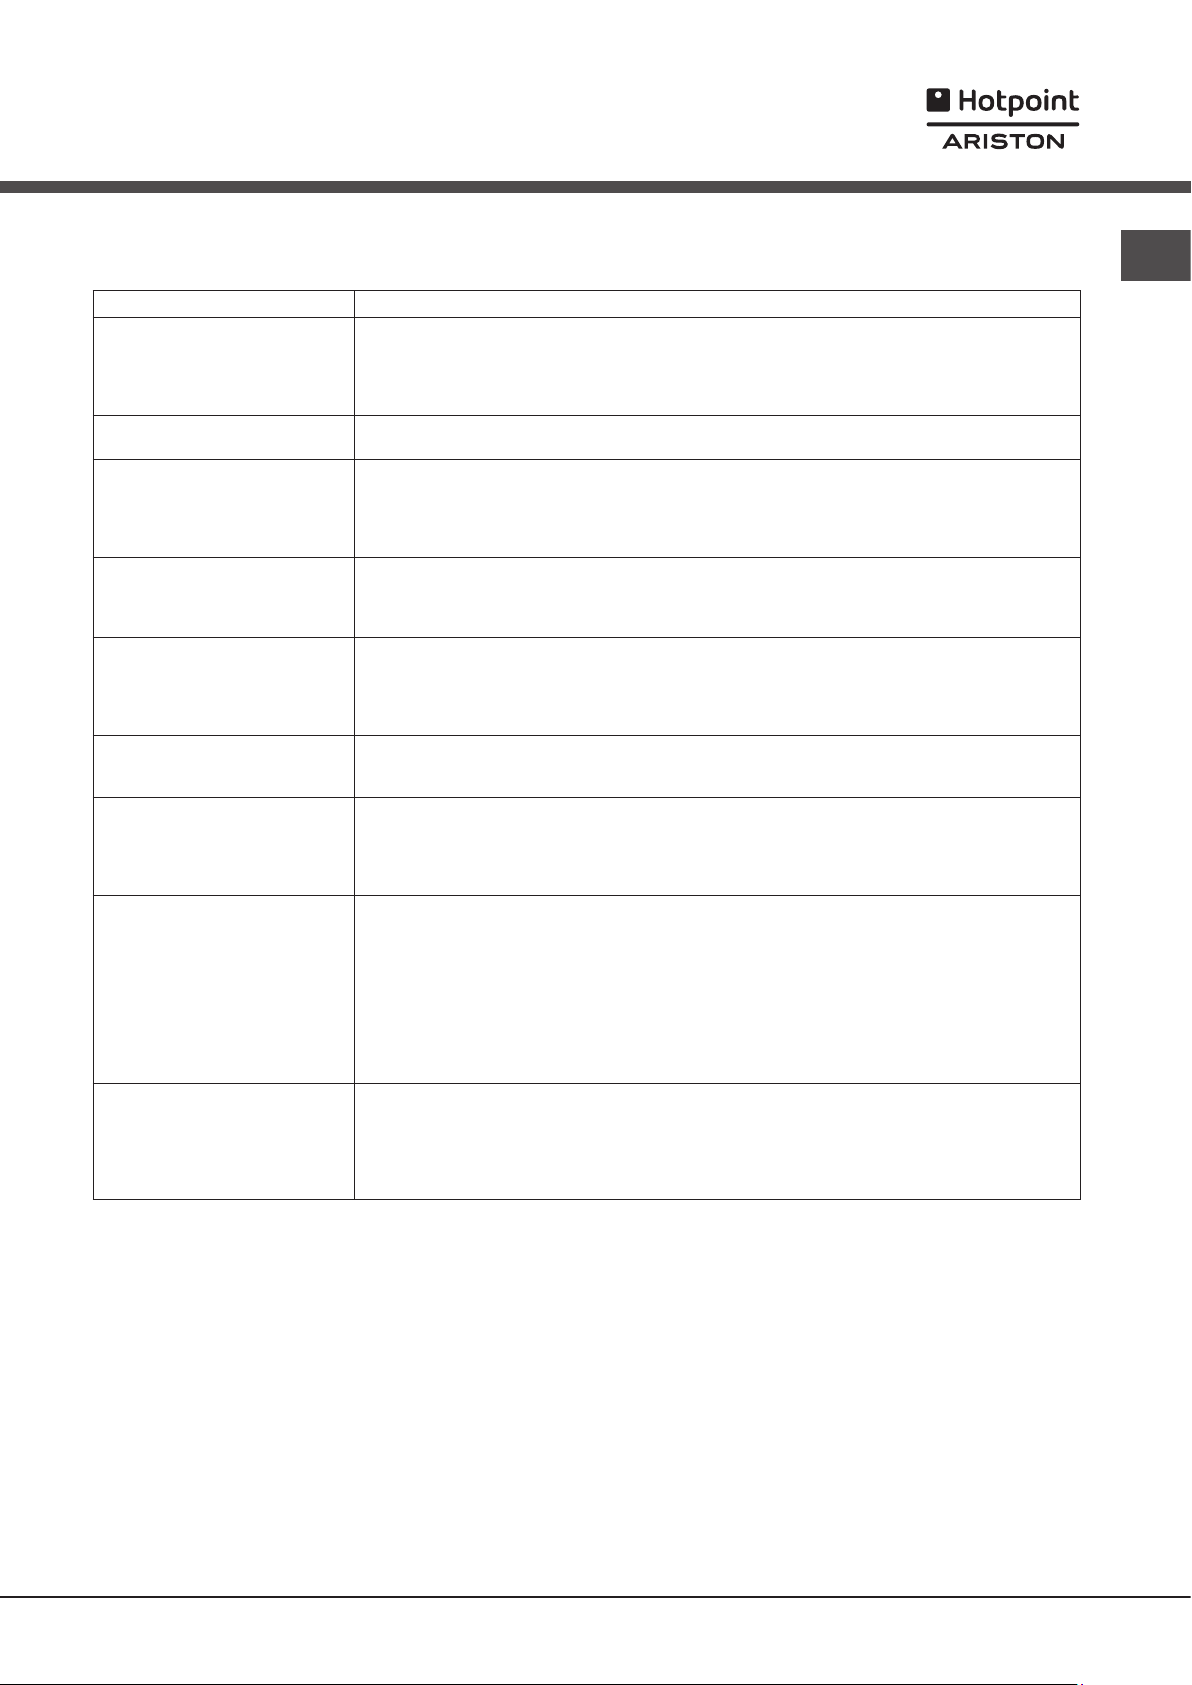
Troubleshooting
Whenever the appliance fails to work, check for a solution from the following list before calling for Assistance.
Problem: Possible causes / Solutions:
The dishwasher does not start
or cannot be controlled.
The door won’t close.
No water drain out of the
dishwasher.
The dishwasher makes
excessive noise.
The dishes and glasses are
covered in a white lm or
limescale deposits.
The dishes and glasses are
streaked or have a bluish
tinge.
The crockery has not been
dried properly.
The dishes are not clean. • The crockery has not been arranged properly.
The dishwasher won’t load
any water.
It is blocked with ashing lights.
• The water supply tap is not turned on.
• Switch off the appliance by pressing the ON/OFF button, switch it back on after approximately
one minute and reset the wash cycle.
• The appliance has not been plugged in properly or another electricity socket should be used.
• The dishwasher door has not been closed properly.
• Make sure that the racks were inserted all the way.
• The lock was released. Strongly push the door until a “clacking” noise is heard.
• The wash cycle has not nished yet.
• The water drain hose is bent
• The drain duct is clogged up.
• The lter is clogged up with food residues.
• Check the height of the drain hose.
• The dishes are rattling against each other or against the sprayer arms. Place the dishes
properly and make sure the sprayer arms can rotate freely.
• Too much foam: the detergent has not been measured out correctly or it is not suitable for use
in dishwashers.
• No rened salt.
• Water hardness adjustment is not suitable: increase the relevant values.
and Rinse Aid.)
• The salt and rinse-aid dispenser cap has not been closed properly.
• The rinse aid has been used up or the dosage is too low.
• The rinse aid dosage is too high.
• A wash cycle without a drying programme has been selected.
• The rinse aid has been used up.
• The rinse aid dispenser setting is not suitable.
• The crockery is made from non-stick material or plastic; the presence of water drops is
normal.
• The sprayer arms cannot rotate freely, being hindered by the dishes.
• The wash cycle is too gentle
• Too much foam: the detergent has not been measured out correctly or it is not suitable for use
in dishwashers.
• The lid on the rinse aid compartment has not been closed correctly.
• The lter is dirty or clogged up
• The rened salt level is low
• Make sure that the height of the dishes is compatible with the rack adjustment.
• The holes in the sprayer arms are clogged up.
• There is no water in the mains supply or the tap is shut off.
• The water inlet hose is bent
• The lters are clogged up: they need cleaning.
• The drain duct is clogged up: it needs cleaning.
• After checking and cleaning, switch the dishwasher on and off and start a new wash cycle.
• If the problem persists, turn off the water tap, remove the plug and call the Service Centre.
(See Detergent and dishwasher use.)
(See Detergent and dishwasher use.)
(see Installation).
Do not prewash the dishes by hand.
(See Rened Salt
(See Rened Salt and Rinse Aid.)
(see Wash Cycles).
(see Care and maintenance.)
(See Rened Salt and Rinse Aid.)
(See Care and maintenance.)
(see Installation).
(See Care and maintenance.)
EN
* Only available in selected models.
21
Loading…
LSTF 9H114
CL EU
EN
English
Operating instructions
DISHWASHER —
Contents
Operating instructions,1
Precautions and advice, 2-3
Product Data, 9
Assistance, 10
Installation, 11-12
Description of the appliance, 13
Refined salt and rinse aid, 14
Loading the racks, 15-16
Detergent and dishwasher use, 17
Wash cycles, 18
Special wash cycles and options, 19
Care and maintenance, 20
Troubleshooting, 21
Техническая спецификация изделия, 35
Описание изделия, 36
Регенерирующая соль и Ополаскиватель, 37
Загрузка корзин, 38-39
Моющее средство и использование посудомоечной
машины, 40
Программы, 41
Специальные программы и Дополнительные функции, 42
Техническое обслуживание и уход, 43
Неисправности и методы их устранения, 44
Сервисное обслуживание, 45
PL
Polski
Instrukcja obsługi
ZMYWARKA —
Spis treści
Instrukcja obsługi,1
Zalecenia i środki ostrożności, 3-4
Karta produktu, 9
Serwis Techniczny, 10
Instalacja, 22-23
Opis urządzenia, 24
Sól regeneracyjna i środek nabłyszczający, 25
Ładowanie koszy, 26-27
Środek myjący i obsługa zmywarki, 28
Programy, 29
Programy specjalne i opcje, 30
Konserwacja i obsługa, 31
Nieprawidłowe działanie i możliwe środki zaradcze,
32
RU
Итальянский
Руководство по эксплуатации
ПОСУДОМОЕЧНАЯ МАШИНА —
Оглавление
Руководство по эксплуатации, 1
Меры предосторожности и рекомендации, 4-5
Установка, 33-34
UA
Українська
Довідник користувача
ПОСУДОМИЙНА МАШИНА —
Зміст
Довідник користувача,1
Запобіжні заходи та поради, 5-6-7
Допомога, 10
Встановлення, 46-47
Опис приладу, 48
Регенераційна сіль і ополіскувач, 49
Як завантажити короби, 50-51
Миючий засіб і використання посудомийної машини, 52
Програми, 53
Спеціальні програми й опції, 54
Догляд та очищення, 55
Несправності та засоби їх усунення, 56
KZ
Қазақша
Пайдалану нұсқаулығы
ЫДЫС ЖУУ МАШИНАСЫ —
Мазмұны
Пайдалану нұсқаулығы, 1
Сақтық шаралары мен кеңес, 7-8
Көмек, 10
Орнату, 57-58
Өнім парақшасы, 59
Құрылғы сипаттамасы, 60
Тазаланған тұз және шаюға көмекші зат, 61
Тартпаларға жүктеу, 62-63
Жуғыш зат пен ыдыс жуу машинасын қолдану, 64
Жуу циклдары, 65
Арнайы жуу циклдары мен опциялары, 66
Күтім және техникалық қызмет көрсету, 67
Ақаулықтарды жою, 68
|
Код: 38851 Извините, товара сейчас нет в наличии
Бесплатная доставка Извините, товара сейчас нет в наличии Сравнить Услуги:Установка и подключение посудомоечной машины Новости интернет-магазина «Лаукар»:23.04.2025 26.02.2025 17.02.2025 Дополнительная информация в категории Встраиваемая посудомоечная машина:Встраиваемые посудомоечные машины — разбираемся в терминах Таблица Авторизованных сервисных центров по брендам. Описание Инструкция Отзывы (0) В интернет-магазине бытовой техники «Лаукар» Вы можете скачать инструкцию к товару Встраиваемая посудомоечная машина Hotpoint-Ariston LSTF 9H114 CL совершенно бесплатно. Все инструкции, представленные на сайте интернет-магазина бытовой техники «Лаукар», предоставляются производителем товара. Для того чтобы скачать инструкцию, Вам необходимо нажать на ссылку «скачать инструкцию», расположенную ниже, а в случае, если ссылки нет, Скачать инструкцию Смотреть инструкцию 
Фирма-производитель оставляет за собой право на внесение изменений в конструкцию, дизайн и комплектацию товара: Встраиваемая посудомоечная машина Hotpoint-Ariston LSTF 9H114 CL. Пожалуйста, сверяйте информацию о товаре с информацией на |
LSTF  9H114 CL EU
Техническая спецификация изделия, 35
EN   English                                       Описание изделия, 36
Регенерирующая соль и Ополаскиватель, 37
Operating instructions                              Загрузка корзин, 38-39
DISHWASHER - Contents                               Моющее средство и использование посудомоечной
машины, 40
Operating instructions,1                            Программы, 41
Precautions and advice, 2-3                         Специальные программы и Дополнительные функции, 42
Product Data, 9                                     Техническое обслуживание и уход, 43
Assistance, 10                                      Неисправности и методы их устранения, 44
Installation, 11-12                                 Сервисное обслуживание, 45
Description of the appliance, 13
Refined salt and rinse aid, 14
Loading the racks, 15-16
Detergent and dishwasher use, 17                     UA    Українська
Wash cycles, 18
Special wash cycles and options, 19                 Довідник користувача
Care and maintenance, 20
Troubleshooting, 21                                 ПОСУДОМИЙНА МАШИНА - Зміст
Довідник користувача,1
Запобіжні заходи та поради, 5-6-7
PL   Polski                                        Допомога, 10
Встановлення, 46-47
Instrukcja obslugi                                  Опис приладу, 48
Регенераційна сіль і ополіскувач, 49
ZMYWARKA - Spis tresci                              Як завантажити короби, 50-51
Instrukcja obslugi,1                                Миючий засіб і використання посудомийної машини, 52
Zalecenia i srodki ostroznosci, 3-4                 Програми, 53
Karta produktu, 9                                   Спеціальні програми й опції, 54
Serwis Techniczny, 10                               Догляд та очищення, 55
Instalacja, 22-23                                   Несправності та засоби їх усунення, 56
Opis urzadzenia, 24
Sol regeneracyjna i srodek nablyszczajacy, 25
Ladowanie koszy, 26-27
Srodek myjacy i obsluga zmywarki, 28
Programy, 29                                         KZ   ?аза?ша
Programy specjalne i opcje, 30
Konserwacja i obsluga, 31                           Пайдалану н?с?аулы?ы
Nieprawidlowe dzialanie i mozliwe srodki zaradcze, 32  ЫДЫС ЖУУ МАШИНАСЫ - Мазм?ны
Пайдалану н?с?аулы?ы, 1
Са?ты? шаралары мен ке?ес, 7-8
RU   Итальянский                                   К?мек, 10
Орнату, 57-58
Руководство по эксплуатации                         ?нім пара?шасы, 59
??рыл?ы сипаттамасы, 60
ПОСУДОМОЕЧНАЯ МАШИНА - Оглавление                   Тазалан?ан т?з ж?не шаю?а к?мекші зат, 61
Руководство по эксплуатации, 1                      Тартпалар?а ж?ктеу, 62-63
Меры предосторожности и рекомендации, 4-5           Жу?ыш зат пен ыдыс жуу машинасын ?олдану, 64
Установка, 33-34                                    Жуу циклдары, 65
Арнайы жуу циклдары мен опциялары, 66
К?тім ж?не техникалы? ?ызмет к?рсету, 67
А?аулы?тарды жою, 68
Установка
В случае переезда перевозите машину в вертикальном
положении. В случае крайней необходимости машина        ВНИМАНИЕ: ОПАСНОЕ НАПРЯЖЕНИЕ!                   RU
может укладываться задней стороной вниз.
Категорически запрещается обрезать шланг подачи воды,
Гидравлические соединения                           так как вдоль него проходят элементы под напряжением.
Адаптация  гидравлической  системы  для  монтажа
посудомоечной  машины  должна  выполняться  только   Электрическое подсоединение
квалифицированным техником.                         Перед подсоединением вилки машины к электрической
розетке необходимо проверить следующее:
Шланги подачи и слива воды могут быть направлены    •  сетевая  розетка  должна  быть  заземлена  и
вправо или влево для оптимальной установки машины.    соответствовать нормативам;
Трубы не должны заламываться или сдавливаться ма-   •  электрическая  розетка  должна быть рассчитана  на
шиной.                                                максимальную  потребляемую  мощность  изделия,
указанную на заводской табличке, расположенной с
Подсоединение шланга подачи воды                      внутренней стороны дверцы.
•  Подсоединение к водопроводному крану холодной или     (см. Описание посудомоечной машины);
горячей воды с резьбой 3/4” (макс. 60°C).         •  напряжение  сети  электропитания  должно
•  Дать воде стечь, пока она не станет прозрачной.    соответствовать  данным  на  паспортной  табличке,
•  Плотно закрутить шланг подачи и открыть кран.      расположенной с внутренней стороны дверцы машины;
•  сетевая  розетка  должна  быть  совместима  со
Если  длина  водопроводного  шланга  будет       штепсельной  вилкой  изделия.  В  противном  случае
недостаточной, следует обратиться в специализированный   поручите  замену  вилки  уполномоченному  технику
магазин  или  к  уполномоченному  сантехнику  (см.    (см.  Техническое  обслуживание);  не  используйте
Техническое обслуживание).                            удлинители и тройники.
Давление воды должно быть в пределах значений,      Изделие должно быть установлено таким образом,
указанных в таблице Технические данные; в противном   чтобы провод  электропитания и  электророзетка  были
случае  посудомоечная  машина  может  работать      легко доступны.
неправильно.
Сетевой кабель изделия не должен быть согнут или
Обратите внимание, чтобы водопроводный шланг не   сжат.
был заломлен или сжат.
Если  сетевой  кабель  поврежден,  во  избежание
Подсоединение сливного шланга                       опасности поручите его замену производителю изделия
или уполномоченному Центру технического обслуживания.
Подсоедините сливной шланг к сливному трубопроводу   (См. Техническое обслуживание)
с минимальным диаметром 2 см. (A)
Патрубок сливного шланга должен располагаться высоте   Производитель  не  несет  ответственности  за
от 40 до 80 см от пола или от опорной поверхности, на   последствия  несоблюдения  перечисленных  выше
которой установлена посудомоечная машина.           требований.
Расположение и нивелировка
1.  Установите  посудомоечную  машину  на  ровный  и
твердый  пол.  Выровняйте  машину,  отвинчивая  или
MAX 80 cm
завинчивай  передние  опорные  ножки  до  идеально
горизонтального положения машины. Точная нивелировка
MIN 40 cm
гарантирует стабильность и помогает избежать вибраций,
шумов и смещений машины.
2.  Перед  установкой  посудомоечной  машины  в  нишу
Перед подсоединением сливного шланга к сифону мойки   наклейте  прозрачную  самоклеящуюся  ленту  *  на
снимите пластиковую пробку (В).                     деревянную  плиту  для  ее  защиты  от  возможного
конденсата.
Защита против затопления
Во избежание затопления посудомоечная машина:
- оснащена системой, перекрывающей подачу воды в
случае аномалии или внутренних утечек.
Некоторые  модели  оснащены  также  дополнительным
защитным устройством New Acqua Stop*, предохраняющим
от затопления даже в случае разрыва водопроводного
шланга.                                             * Имеется только в некоторых моделях
33
3. Установите посудомоечную машину в нишу кухонного   Машина  оснащена  акустическими/звуковыми
RU      гарнитура, так чтобы сбоков или сзади она прилегала к   сигналами (в зависимости от модели посудомоечной
стене или к кухонным элементам. Изделие также может   машины),  которые  предупреждают  о  выполнении
быть  встроено  под  сплошной  столешницей  кухонного   команды: включение, конец цикла и т.п.
гарнитура* (см.схему Монтажа).
Символ/индикаторы на консоли управления/дисплее
4*.  Отрегулируйте  высоту  задней  опоры,  повернув   могут  иметь  разные  цвета,  мигать  или  гореть
шестигранную красную втулку, расположенную спереди,   постоянно. (в зависимости от модели посудомоечной
в центральной нижней части посудомоечной машины,    машины).
шестигранным разводным ключом с раскрытием 8 мм по
часовой стрелке для увеличения высоты и против часовой   На  дисплее  показываются  сведения  о  заданном
стрелки для ее уменьшения. (смотрите инструкции по   цикле,  этапе  мойки/сушки,  остаточном  времени,
температуре и т.п.
встроенному монтажу, прилагающиеся к документации)
Предупреждения  по  первому  использованию
машины
После  монтажа  вынуть  заглушки,  установленные  на
корзинах, и снять крепежные резинки с верхней корзины
(если имеются).
Настройка смягчителя воды
Перед запуском первой мойки задать степень жесткости
водопроводной воды. (см. раздел Ополаскиватель и Ре-
генерирующая соль)
При первой загрузке бачок смягчителя воды должен за-
полняться водой, а затем всыпать примерно 1 кг соли;
считается допустимым, если вода выходит из краев.
Немедленно запустить цикл мойки.
Используйте только специальную соль для посудомоеч-
ных машин.
После  загрузки  соли  индикатор  ОТСУТСТВИЕ  СОЛИ*
гаснет.
Если бачок не будет заполнен солью, смягчитель воды
и нагревательный элемент могут повредиться.
* Имеется только в некоторых моделях
34
-
Инструкции по эксплуатации
1
HOTPOINT-ARISTON LSTF 9H114 CL EU инструкция по эксплуатации
(14 страниц)
- Языки:Русский
-
Тип:
PDF -
Размер:
3.53 MB -
Описание:
Посудомоечная машина встраиваемая
Просмотр
На NoDevice можно скачать инструкцию по эксплуатации для HOTPOINT-ARISTON LSTF 9H114 CL EU. Руководство пользователя необходимо для ознакомления с правилами установки и эксплуатации HOTPOINT-ARISTON LSTF 9H114 CL EU. Инструкции по использованию помогут правильно настроить HOTPOINT-ARISTON LSTF 9H114 CL EU, исправить ошибки и выявить неполадки.