
Краткое руководство HP Designjet 500, 510, 800
Инструкция пользователя HP Designjet 500, 510, 800 — Скачать инструкцию (Русский язык)
Приемы работы — Содержание
Панель управления 4
Дисплей панели управления 4
Меню панели управления 6
Примеры использования панели
управления 17
Управление печатью 23
Прерывание печати
страницы 23
Прерывание процесса
высыхания 24
Управление не напечатанными
страницами (в очереди) 25
Изменение порядка заданий в
очереди (команда “Move to
front”) 27
Удаление заданий из очереди 27
Управление печатью (продолжение)
Печать нескольких копий задания,
находящегося в очереди 28
Экономия бумаги с помощью
функции группирования 29
Замена картриджей с чернилами
и печатающих головок 31
Замена картриджей 33
Замена печатающих головок 36
Загрузка листовой бумаги 47
Выгрузка листовой бумаги 54
Загрузка рулонной бумаги 55
Установка нового рулона 55
Загрузка рулонной бумаги 58
Выгрузка рулонной бумаги 64
Инструкция пользователя HP Designjet 500, 510, 800 — Скачать инструкцию (Русский язык)
?
how do I…
pocket guide
i
hp designjet 500 series printers
hp designjet 800 series printers
Contents—How Do I…
Navigate the Front Panel 4
The Front-Panel Display 4
Alphabetical List of Front-Panel
Menus 6
Examples of How to Use the Front
Panel 17
Manage Prints 25
Cancelling a Page that is Being
Printed 25
Cancelling the Drying Time for a
Printed Page 26
Managing Pages that have Not Yet
been Printed 27
Prioritizing a Job in the Queue
(“Move to Front”) 29
Deleting a Job from the Queue 29
Manage Prints (continued)
Making Copies of a Job in the
Queue 30
Avoiding Paper Waste by Nesting
Pages 31
Replace Ink Cartridges and
Printheads 33
Replacing Ink Cartridges 35
Replacing Printheads 38
Load a Sheet of Paper 47
Unloading a Sheet of Paper 54
Load a Roll of Paper 55
Installing a New Roll on the
Printer 55
Loading a Roll of Paper 58
Unloading a Roll of Paper 64

More
Information…
You can find more
about the following
topics in the User’s
Reference Guide, which
is on the Using Your Printer CD:
• Paper types; more about loading
• Ink supplies
• Page formatting
• Printer configuration
• Care of your printer
• Accessories
• More about solving problems
• General index; Glossary of terms.
Many of the procedures in the User’s
Reference Guide are animated.
You may also find other information
about HP Designjet printers, associated
software and support at this HP Web
site:
www.hp.com/go/designjet
See the other side of this Pocket Guide
for information about troubleshooting
problems.
© 2000, 2005 Hewlett-Packard
Company
Hewlett-Packard Company,
Inkjet Commercial Division,
Avda. Graells, 501,
08174 Sant Cugat del Vallès,
Barcelona, Spain
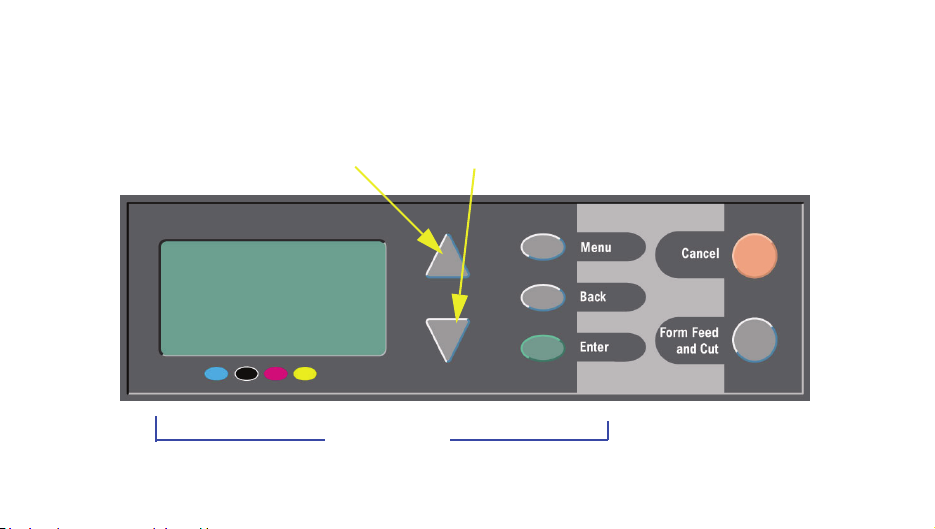
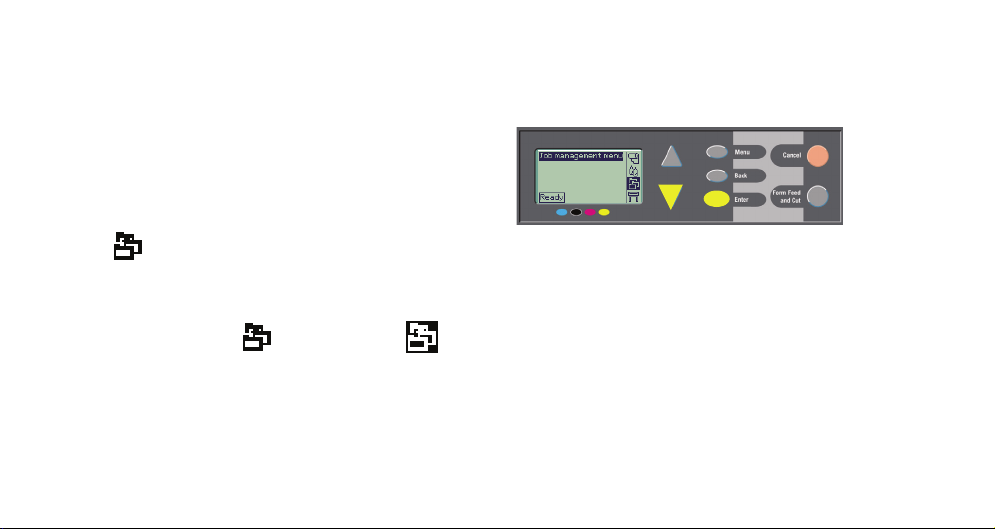
The Front-Panel Display
The panel on the front of your printer is the principal way of changing the printer’s
behavior, apart from controls provided by the software you use.
Up (Δ) and Down (∇) keys
Display area Action keys
4 The Front-Panel Display
Display-Area Keys
• Up (Δ) and Down (∇) let you navigate
through the items in a menu list. If there
are more options than can be shown on
the front panel, a vertical scroll bar
appears on the right side of the panel.
If further choices can be made for a menu
item, the symbol “ ” appears to its right. A
selected setting is shown by a tick (“√”).
• Menu takes you to the main screen. It
cancels
selected by pressing Enter.
• Back takes you to the previous screen,
also cancelling
selected with Enter.
• Enter selects the item in the menu list and
makes it current. If there are further
any choices that have not yet been
any choices not yet
The Front-Panel Display 5
selections to be made, Enter takes you to
them, shown by the arrows (
that starts on page 6.
→) in the table
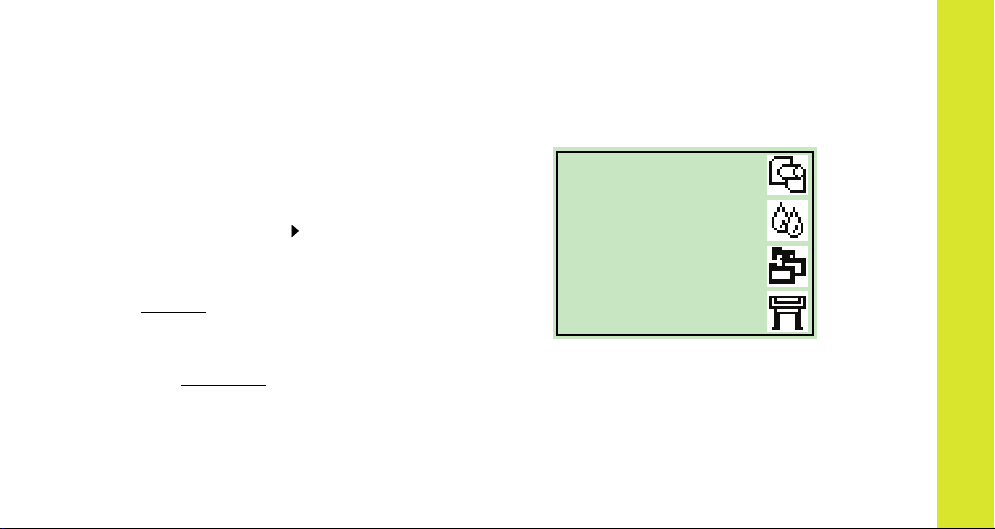
Display-Area Screen: Menu Icons
There are four main
front-panel menus,
each with a different
icon highlighted.
You can always reach
a main menu by
pressing Menu and
then scrolling (Δ or ∇).
Paper
Ink
Job man agement
Set-up
Action Keys
• Cancel cancels the current operation
(printing or preparing for printing).
• Form Feed and Cut causes a sheet to be
ejected or the roll to be advanced and cut.
navigate the front panel
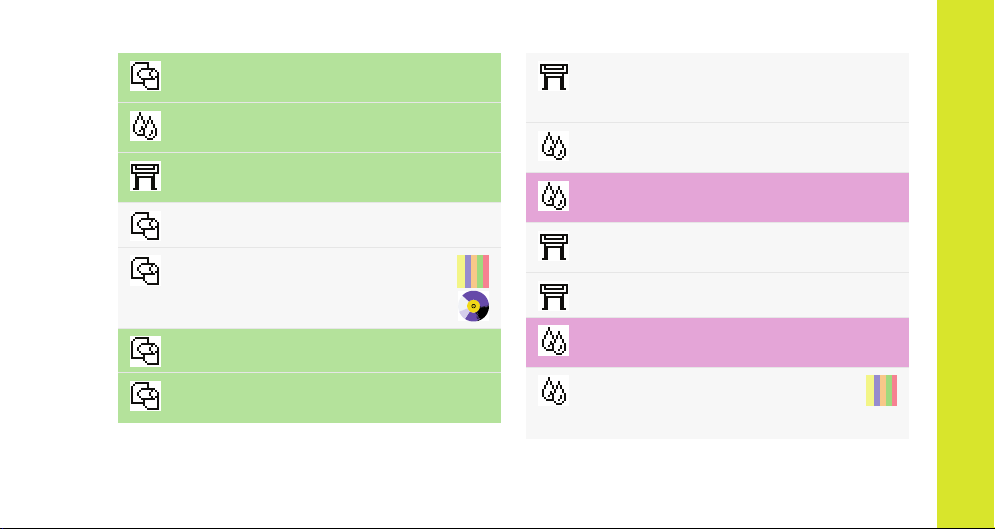
Alphabetical List of Front-Panel Menus
Key to the List of Front-Panel Menus
On pages 7 through 16 are the printer’s frontpanel menus, listed alphabetically. The key
to the list is on the right.
In the User’s Reference Guide (on the
Using Your Printer CD) they are listed
according to the structure of the menus.
For examples of how to use the menus, see
page 17.
Note: PostScript functions in the HP Designjet
500ps printer are available through the
supplied PostScript driver, and are not
available from the printer’s front panel.
6 Alphabetical List of Front-Panel Menus
There is more in this Pocket Guide on
23
the page indicated in black or in red if it
is on the reverse (“The Problem Is…”).
There is more in the User’s Reference
Guide, some sections with animations.
Only available when PostScript or HP-GL/2
is available on the printer
(HP Designjet 500 [with HP-GL/2 Accessory
card], 500 plus, 800 and 800ps).
Only available when PostScript is available
on the printer (HP Designjet 800ps).
Only available when HP-GL/2 is available on
the printer (HP Designjet 500 [with HP-GL/2
Accessory card], 500 plus, 800 and 800ps).
→ Advance
calibration
→ Align
printheads
→ Altitude
→ Page format→ Size→ ANSI sizes
22
44
→ Graphic language→ Automatic
[HP Designjet 800 series printers only]
→ Page format→ Size→ Automatic
→ PS settings→
Encoding→ Automatic
→ Print quality→ Best
→ I/O setup→ Appletalk
Card ID→ (depends on card)
→ Page format→ Size→ ARCH sizes
→ PS settings→
Encoding→ ASCII
→ Drying time→ Automatic
Alphabetical List of Front-Panel Menus 7
→ Advanced options→ Best quality
settings
→ PS settings→
Encoding→ Binary
→ Color settings→
Color/Monochrome→ True Black
→ Front Panel→ Buzzer (on/off)
navigate the front panel

→ Color calibration→ Calibrate now
→ Color calibration
→ Replace Ink
cartridges
→ Color settings→ CMYK
35
→ Calibration
(paper advance)
→ Graphic Language→ CALS/G4
[HP Designjet 800 series printers only]
→ Queue/copies→ Cancel
# Jobname→ (print in progress
or waiting) [HP Designjet 800 series printers only]
→ I/O setup→ Card ID
→ I/O setup→ Card setup
→ Information→ Ink cartridges
22
25
8 Alphabetical List of Front-Panel Menus
→ Color settings→ Color/
Monochrome
→ Color calibration
→ Color settings
(RGB, CMYK, etc.)
→ Color settings→
Rendering intent→ Colorimetric
→ Front Panel→ Contrast
→ Queue/copies→ Reprints/
# Jobname→ copies
[HP Designjet 800 series printers only]
30
→ Cutter (on/off)
→ Defects in
images (Troubleshooting)
→ HP-GL/2 settings→ Define palette
15
→ Drying time
(none, automatic, manual)
→ PS settings→ Encoding
(ASCII, Binary, Automatic)
→ Log→ Errors
17
→ Queue/copies→ Delete (print
# Jobname→ already printed)
[HP Designjet 800 series printers only]
→ Advanced options→
Best quality settings→Maximum detail
→ Color settings→
CMYK→ DIC
→ I/O setup→ DNS name
Card ID→ (depends on card)
→ Advanced options→
Optimize for→ Drawings/text
Alphabetical List of Front-Panel Menus 9
29
→ Color settings→
CMYK→ Euroscale
→ Page format→ Size→ Extra print sizes
→ Advance calibration Restore factory
settings
→ Print quality→ Fast
→ Advanced options→ Fast quality
settings
[HP Designjet 800 series printers only]
navigate the front panel
→ PS settings→
PS Scale→ Fit to page
→ Front Panel
(language, buzzer, contrast)
→ Graphic language
(PS, HP-GL/2, CALS/G4, Automatic)
[HP Designjet 800 series printers only]
→ Color settings→
Color/Monochrome→ Grayscale
→ Help
→ Graphic Language→ HP-GL/2
[HP Designjet 800 series printers only]
→ HP-GL/2 settings
→ I/O setup→ HW address
Card ID→ (depends on card)
10 Alphabetical List of Front-Panel Menus
→ I/O setup
→ I/O setup→ I/O timeout
→ Image quality
(Troubleshooting
→ Advanced options→
Optimize for→ Images
→ Information (ink
cartridges, printheads)
→ Printer
Information
→ Information→ Ink cartridges
Replace Ink
cartridges
)
15
35
Ink menu
→ Information→
Ink cartridges→ Ink levels
→ Page format→ Size→ Inked area
→ I/O setup→ IP address
Card ID→ (depends on card)
→ Page format→ Size→ ISO sizes
→ Page format→ Size→ JIS sizes
→ Graphic Language
[HP Designjet 800 series printers only]
→ Front Panel→ Language
→ Load roll
→ Load sheet
(national)
58
47
Job management
Queue/copies→ Job name (and
number of copies)
[printers with formatter card only]
Alphabetical List of Front-Panel Menus 11
→ Log
(printheads, errors)
→ Drying time→ Manual
→ Select paper
( Media) type
17
navigate the front panel
→ HP-GL/2 settings→ Merge (on/off)
→ Page format→ Mirroring
→ Color settings→ Color/
Monochrome
→ Queue/copies→ Move print to
# Jobname→ top
[HP Designjet 800 series printers only]
→ Color settings→
CMYK→ Native CMYK
→ Color settings→
RGB→ Native RGB
→ Nest settings→ Nest (on/off)
[HP Designjet 800 series only]
12 Alphabetical List of Front-Panel Menus
29
31
→ Nest settings→ Nest
wait time
[HP Designjet 800 series printers only]
→ Print quality→ Normal
→ Advanced options→ Optimize for
(drawings/text/images)
→ Page format→ Size→ Oversize prints
→ Page format
→ HP-GL/2 settings→ Palette
(define, select)
Paper (load, type)
→ Page format→ Paper size
31
→ Select paper type
→ Advance calibration→ Pattern
( create, measure)
→ HP-GL/2 settings→
Define palette→…→ Pen width, color
→ Color settings→
Rendering intent→ Perceptual
→ Graphic Language→ PostScript
[HP Designjet 800ps printers only]
→ Queue/copies→
# Jobname→ Print cancel
[HP Designjet 800 series printers only]
→ Page format→ Print (paper) size
22
25
Alphabetical List of Front-Panel Menus 13
→ Print quality
(best, normal, draft;
also Set-Up→Advanced Options)
→ Print quality
(poor) (Troubleshooting)
→ Page format→ Size→ Printed area
– see Inked area
→ Printer
information
→ Information→ Printheads
→ Printheads
(align,
replace)
→ PS settings→ PS scale
(PostScript)
15
38
navigate the front panel
→ Print Quality
(best, normal, draft)
→ Quality of
images (Troubleshooting)
→ Queue
(on/off)
[HP Designjet 800 series printers only]
→ Queue/
copies
[HP Designjet 800 series printers only]
→ Advanced options→
Fast quality settings→Reduced speed
[HP Designjet 800 series printers only]
→ Color settings→ Rendering intent
14 Alphabetical List of Front-Panel Menus
15
27
27
→ Replace ink
cartridges
→ Replace
printheads
→ Queue/copies→ Reprints/
# Jobname→ copies
→ I/O setup→ Card
setup→ Advanced→ Reset card
→ Color settings→ RGB
→ Roll
(load,
unload)
38
38
30
58
→ Page format→ Rotate (0°, 90°,
180°, 270°)
→ Color settings→
Rendering intent→ Saturation
→ PS settings→ PS Scale
(PostScript)
→ Select paper type
→ Sheet
(load,
unload)
→ Page format→ Size (of paper)
→ Page format→ Software
Size→ (Automatic)
47
Alphabetical List of Front-Panel Menus 15
→ Advanced options→
Fast quality settings→Reduced speed
[HP Designjet 800 series printers only]
→ Color settings→
RGB→ sRGB
→ Color settings→
CMYK→ SWOP
→ Advanced options→
Optimize for→ Drawings/Text
→ I/O setup→ I/O Timeout
→ Color settings→
CMYK→ TOYO
→ Troubleshoot-
ing
(image quality)
15
navigate the front panel

→ Select paper type
→ Unload roll
→ Unload
sheet
→ Nest settings→ Wait time
16 Alphabetical List of Front-Panel Menus
64
54
31
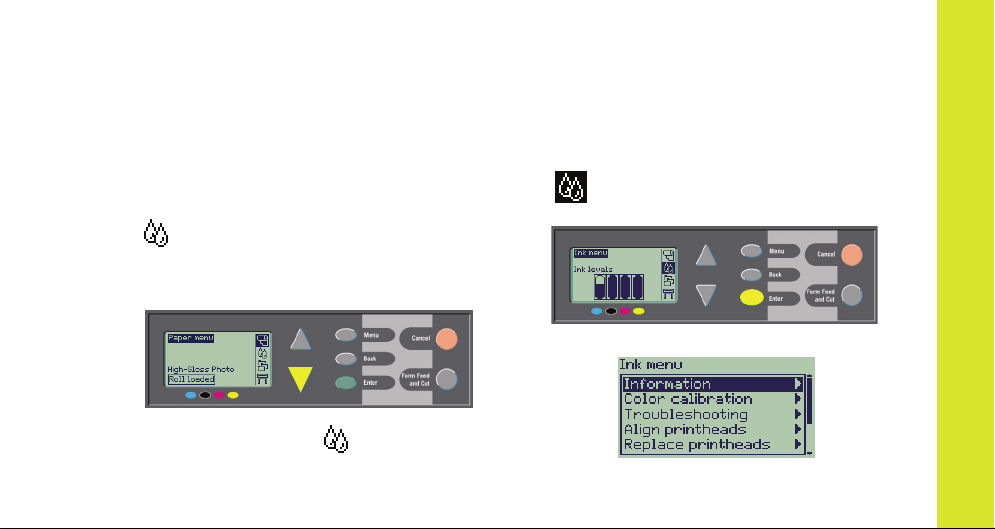
Examples of How to Use the Front Panel
The keys you should press on the front panel are highlighted here in yellow.
Setting the Ink-Drying Time to Two Minutes
1 From the table on page 9, the menu
structure is shown as:
→ Drying time
2 Starting from the main Paper menu, press
the Down key (∇) once…
…until the Ink menu ( ) is highlighted
Examples of How to Use the Front Panel 17
( ); then press the Enter key…
…to enter the Ink menu:
navigate the front panel
The scroll bar at the right indicates that the
list of available options is longer than can
be displayed at a time.
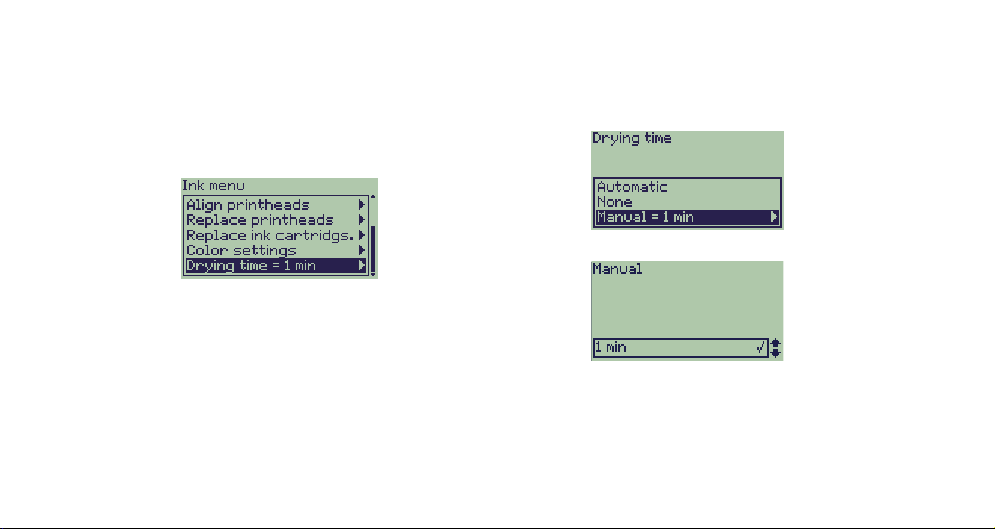
3 Press the Down key (∇) several times until
Drying time is highlighted.
The number of times you have to press the
Down key depends on:
• which model of printer–HP Designjet
500 or 800 series,
• whether you have an accessory card
installed on an HP Designjet 500 series
printer,
• which options were recently used.
18 Examples of How to Use the Front Panel
4 Then press Enter.
5 Press Down (∇) twice to highlight Manual,
and then press Enter again…
…to select Manual drying time:
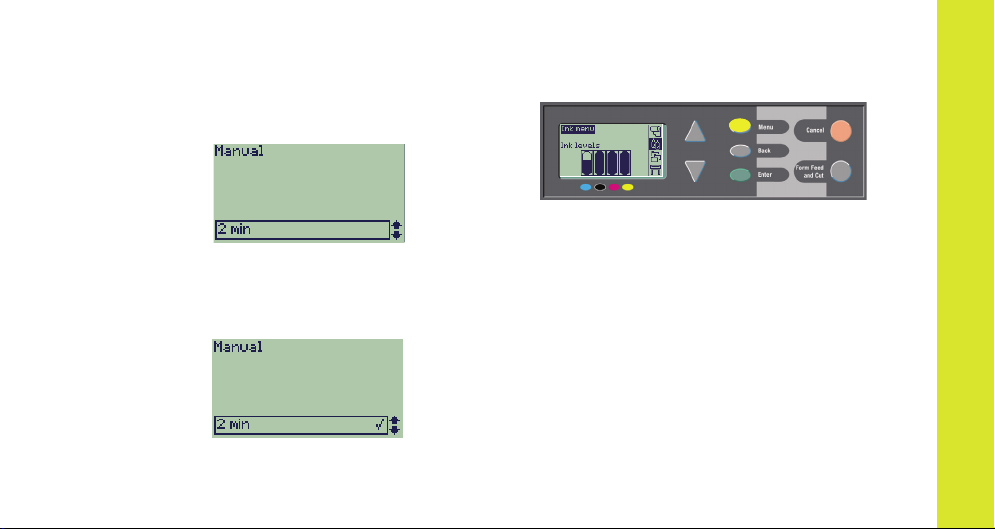
6 Press the Up key (Δ) to change the drying
time selection from 1 to 2 minutes. Then
press Enter to set the two-minute drying
time.
If the front-panel Buzzer is set On, there
will be a short ‘beep’ to confirm the
change. The value will be confirmed by a
tick mark at the right (“√”).
Examples of How to Use the Front Panel 19
7 Finally, press the Menu key to return to the
main menu.
navigate the front panel
Printing Three Additional Copies of a Job that has Already been Printed
This applies to HP Designjet 800 and 800ps
printers only; see page 23 for the HP
Designjet 500 plus, or 500 Series with an
Accessory card.
1 From the table on page 8, the menu
structure is shown as:
→ Queue/Copies
2 Starting from the main Paper menu, press
the Down key (∇) twice until Job
management ( ) is highlighted ( );
and then press Enter to enter the Job
management menu.
20 Examples of How to Use the Front Panel
Ensure that the highlighting is on Queue/
copies, by pressing the Up (Δ) or Down
key (∇) if necessary.
3 Press Enter to enter the Queue/copies
menu.
You will see a list of jobs that are in the
print queue. Jobs that have already been
printed have negative numbers; jobs that
are waiting to be printed have positive
Examples of How to Use the Front Panel 21
numbers.
Suppose the list of jobs are as shown in
the diagram. The job that is currently being
printed is number 0, whose job name is
“Job #7”.
4 Suppose that the job you want to print
again is number -2, “piston.gif”.
Press Up (Δ) or Down (∇) sufficient times
to highlight it; and then press Enter to
select this job.
navigate the front panel
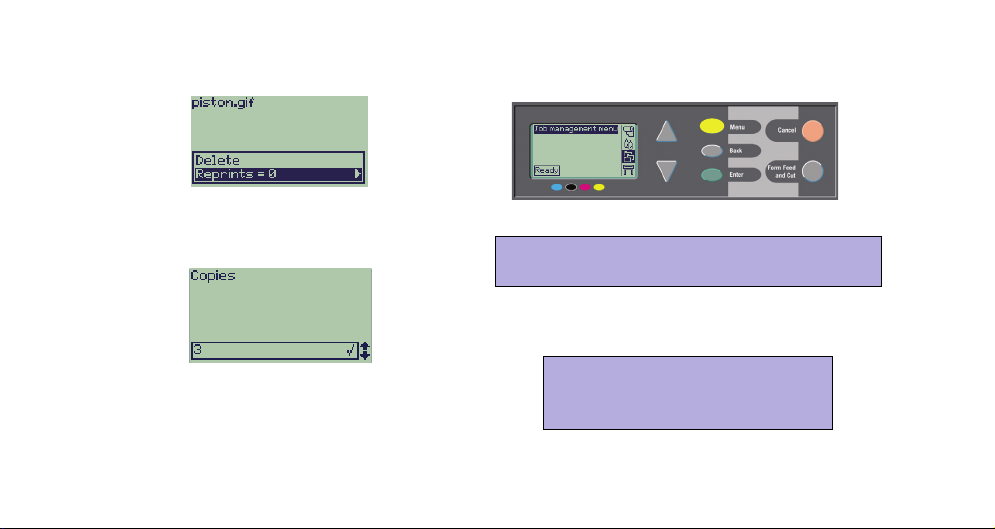
5 The options available for the job are listed;
select Reprints and press Enter again.
6 Press the Up key (Δ) to select three
reprints, and then press Enter to set the
number of reprints to 3;
7 Finally, press the Menu key to return to the
top-level menu.
See page 27 for more about Queueing
and Nesting prints.
the earlier screen is shown, with available
options.
The reprint is automatically moved to the
front of the queue.
22 Examples of How to Use the Front Panel
You can navigate to any of the
settings in the table that starts
on page 6 in a similar way.
Reprints with the HP Designjet 500
Series Printers
To obtain extra copies you must have an HP
Designjet 500 plus printer, or a 500 Series
with an accessory card. Proceed as follows:
1 With Job management highlighted ( ),
press Enter.
2 You will either see the message Queue is
empty, or the name of your job. In the
latter case, press Enter to see the options
available (including Reprints), and
continue as in Step 5 on page 22.
Examples of How to Use the Front Panel 23
navigate the front panel

24 Examples of How to Use the Front Panel
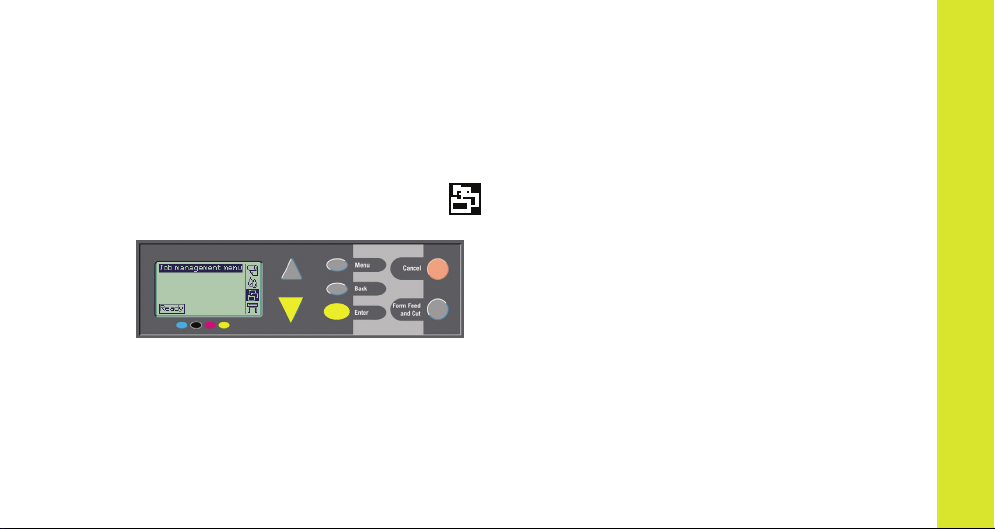
Cancelling a Page that is Being Printed
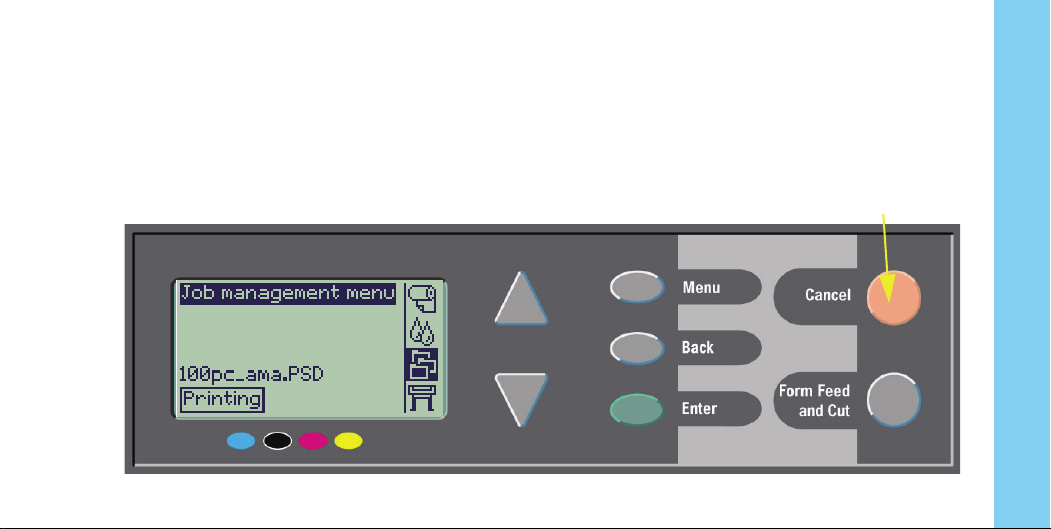
1 Press the Cancel key on the front panel.
The printer advances the paper as though the
print were finished.
Cancelling a Page that is Being Printed 25
A multi-page job or a big file may take longer
to stop printing than other files.
Cancel key
manage prints
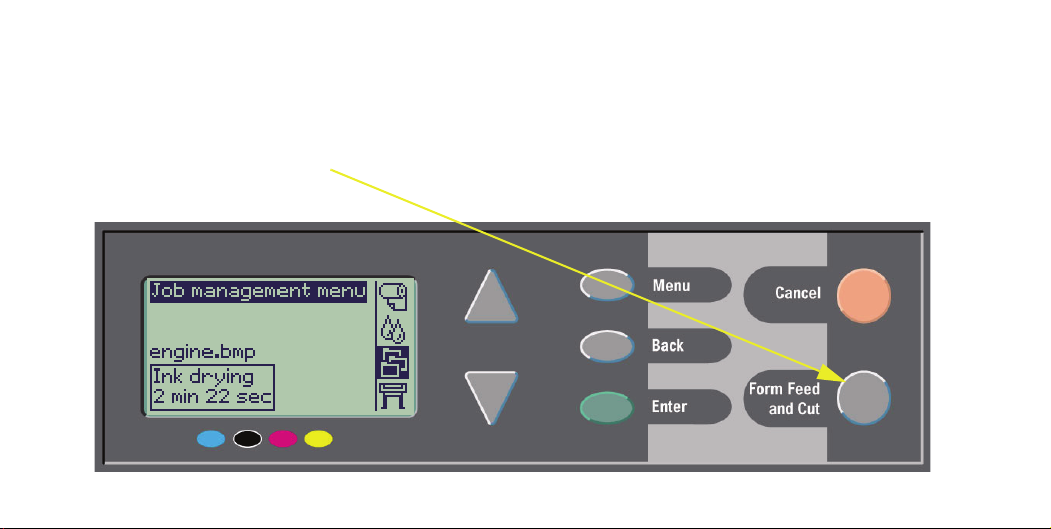
Cancelling the Drying Time for a Printed Page
Use caution when performing this procedure as an image which has had insufficient time to dry could
get damaged.
1 Press the Form Feed and Cut key on the
front panel.
26 Cancelling the Drying Time for a Printed Page
2 The printer will release the paper and it will
fall into the paper bin.

Managing Pages that have Not Yet been Printed
Queueing and nesting are only available on the
HP Designjet 800 Series. (You can obtain
reprints on the 500 plus, or on the 500 Series if
an accessory card is installed; see page 23).
Change the Queueing setting by selecting
Queue On or Off from the Job Management
( ) menu.
To change the Nesting setting, see page 32,
Turning Nesting On and Off.
If the printer is turned off with unprinted files in
the queue, the files are lost and must be resent.
With Queueing Turned ON
When Queueing is On and the printer receives
print files, the files are stored in the queue in the
Managing Pages that have Not Yet been Printed 27
order they are received. If Nesting is Off, the files
are printed as soon as possible, in the order they
are received. If Nesting is On, files are printed
when the time-out period expires or there are
enough files to fill a page width. You can reprint
files which have already been printed. See also
page 31, Avoiding Paper Waste by Nesting
Pages.
• You can send pages to the printer without
waiting for the current page to finish printing.
• Pages are stored in the queue in the order
they are received.
• You can manipulate the pages in the queue,
for example prioritizing them and reprinting
them.
• You can use nesting, the printer’s paper-
manage prints
saving feature (see page 31).
• While one page is printing, the printer will
accept and start processing the next file.
With Queueing Turned OFF
If Queueing is Off and the printer receives files,
they are printed as they are received, and are not
stored in the queue. Nesting settings have no
effect.
• Files are printed as they are received, and are
not stored in the queue.
• The printer will not accept another file sent
from the computer until the current page has
finished printing and the printer is ready.
• You cannot use nesting.
If you turn queueing off while pages are still in the
queue, they will be printed and (if nesting is on)
nested, until the queue is empty.
28 Managing Pages that have Not Yet been Printed
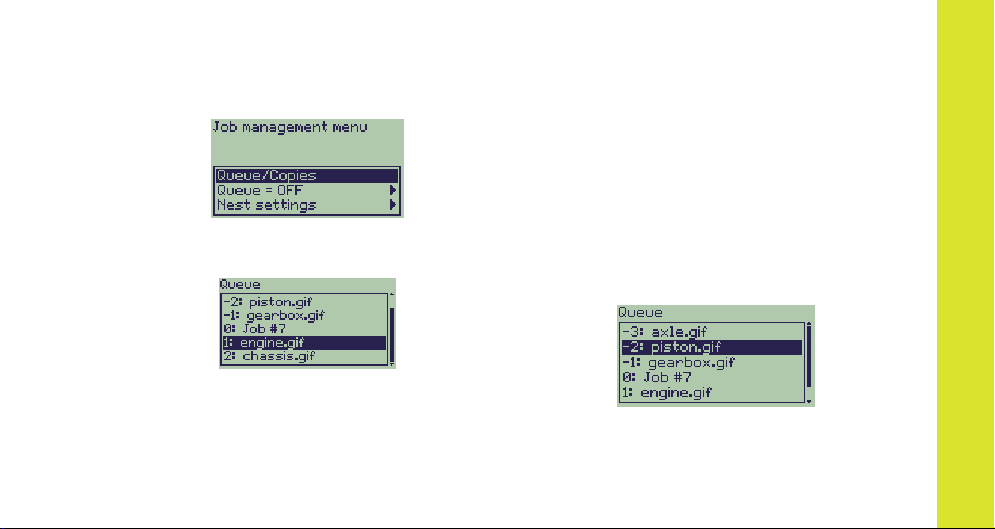
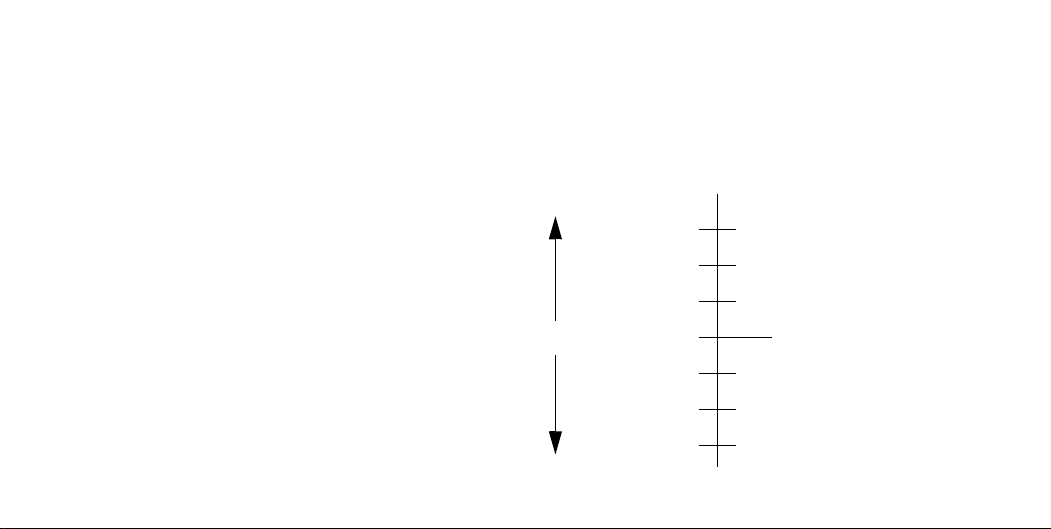
Position in Queue
The job currently being printed is in position 0.
The next job to be printed is in position 1, the one
after in position 2, and so on. The previous job
printed is in position –1, the one before that in
position –2, and so on.
up to 16 jobs
–3
–2
–1
0
1
2
3
jobs already printed
current job
jobs yet to be printed

Prioritizing a Job in the Queue
(“Move to Front”)
To make any job in the queue the next one to be
printed, select it and choose Move to front.
If nesting is turned on (see page 31, Avoiding
Paper Waste by Nesting Pages) the prioritized
job may still be nested with others. If you really
want this job to be printed next and on its own on
the roll, then first turn Nesting Off and then use
Move to front to move it to the top of the queue.
Managing Pages that have Not Yet been Printed 29
Deleting a Job from the Queue
Under normal circumstances, there is no need to
delete a job from the queue after printing it, as it
will just “fall off the end” of the queue as more
files are sent. However, if you have sent a file in
error and want to avoid any chance of it being
reprinted, you can delete it by selecting it and
choosing Cancel.
To remove a job that has not yet been printed,
simply identify it by its position in the queue (see
page 28, Position in Queue) and delete it, by
choosing Cancel and pressing the Enter key.
If the job is currently being printed (its queue
position is 0), and you want both to cancel the job
and to delete it from the queue, first press the
Cancel key and then cancel it from the queue.
manage prints
Making Copies of a Job in the Queue
Has the job already
been printed?
Yes
No
In all cases, the job must still be in the queue.
What to do
Use Reprints
(see right)
Use Copies
(see right)
30 Making Copies of a Job in the Queue
Copies and Reprints
Having selected the job and chosen Copies or
Reprints (from the Job Management (
menu), use the scrolling keys to specify the
number of copies required, and press Enter. The
number you enter is the actual number of pages
to be printed; for example, choosing 2 for a page
not yet printed means you will get the one original
and one additional; choosing 2 for a page already
printed once will result in a total of three (the
original one and two more). The maximum
number you can specify is 99.
• The setting you specify in this option overrides
any value set by your software.
• If Rotate was on when you sent the file, every
copy will be rotated also.
)
Loading…
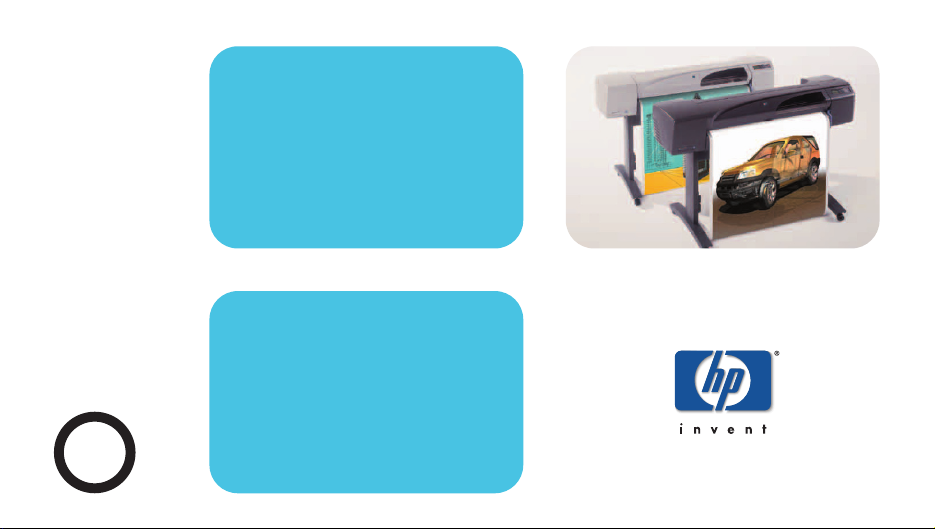
The HP Designjet 500 Plus Printer is a versatile large format printer at
a great price, delivering outstanding line drawings and photo quality
renders with smooth tone transitions. The printer now supports
seamless HP-GL/2 printing.
HP Designjet 500 Plus Printer series
Ideal for architects, interior designers and professionals in engineering, construction and mechanical design, working from home
or in small offices in workgroups of up to 3 people who need affordable, high quality, large format printing up to A0+ size.
Get outstanding line drawings and photo quality renders fast and at a great price.
• Reduce your click-to-print time with built-in HP-GL/2 card processing the vector data in the printer.
• Save yourself time: no need to trim the plots with a 5 mm margin on all sides of a page.
• See a difference in quality with lines as thin as 0.04 mm and an accuracy of ± 0.2%.
• Visualise your work with photo quality renders using HP Colour Layering Technology and up to 1200 dpi resolution.
Save yourself time with this fast and easy-to-use printer and cut the overall running costs.
• Print speeds of up to 90 seconds per A1 line drawing and 7.9 m2 of full colour images per hour.
• Three portrait A3+ images (330 x 483 mm) fit side by side
1
.
• Easy-to-install drivers are intuitive to use; the control panel is simple to navigate.
• Unattended printing is hassle-free with modular 69 cc ink cartridges, long-life printheads, 45.7 m long media rolls, automatic
cutting and stacking of prints in the media
2
.
• USB and parallel ports, optional network card.
Get your colours right with the EFI Designer Edition XL RIP for HP Designjet 500ps Plus Printer.
• The EFI Designer Edition XL RIP for HP Designjet 500ps Plus Printer allows you to process complex graphic files and perform
colour management simultaneously.
• Get accurate results even without colour expertise using several pre-set modes.
• Preview JPEG, TIFF, PDF or Adobe
®
PostScript
®
3™ files, check the layout and media orientation and avoid trial errors.
• Cut printing time and costs with a nesting feature positioning the printouts efficiently on media.
• Get full support for Mac OS X system.
1
The printer comes in two sizes, with a media path that is either 1067 mm (42-inch) or 610 mm (24-inch) wide. Three portrait A3+ images (330 x 483 mm)
fit side by side only available on 42-inch model.
2
Stand and media bin are optional on the 610 mm model.
HP Designjet 500 Plus
(24-inch) Printer
HP Designjet 500 Plus
(42-inch) Printer
EFI Designer Edition XL RIP
for HP Designjet 500ps Plus
Printer

Здравствуйте, хочу поделиться с Вами своим опытом в эксплуатации плоттеров HP DesignJet 100/100+/110/110+ series и HP Designjet 500 (plus), 800, 500PS, 800PS, 815, 820. Эти плоттеры используются уже более 10 лет в отделе печати с ежедневной нагрузкой от 100 цветных и ч/б чертежей формата А1 плотностью 200гр/м2.
Данные плоттеры уступают современным по скорости печати и по качеству, однако преимуществом данных моделей является большой ресурс, простота в обслуживании и огромный плюс – имеются в продаже недорогие (а это важно!) основные комплектующие и расходные материалы.
Вышеперечисленные плоттеры печатают головкой № 11. (C4810A C4811A C4812A C4813A)
- для каждого цвета предназначена своя головка;
- стоимость одной головки не превышает 40-50$;
- убитые головки можно легко восстановить (об этом я расскажу)
- легко подобрать совместимые чернила, которые будут обходиться гораздо дешевле, чем оригинальные картриджи на современные плоттеры т.к., новые головки очень чувствительны и легко выходят из строя. В большинстве случаев, головка идет цельная (средняя стоимость головки от 150 – 200$ (дорогой эксперимент).
Экономия на универсальных чернилах НР (совместимых) и расходных материалах дает нам огромный плюс – по цене одного оригинального картриджа можно купить 5 литров совместимых чернил.
В итоге мы получаем хорошую прибыль и конкурентные цены.
Как сделать СНПЧ на плоттеры НР DesignJet?
Есть ли возможность установить СНПЧ на плоттеры НР DesignJet?
Да, есть. Но лучше не покупать систему, а сделать её самостоятельно.
Почему? Потому что, заводские СНПЧ стоят дорого и при этом имеют маленькие ёмкости для чернил.
Чтобы сделать СНПЧ самостоятельно нам понадобиться:
- ПЗК (перезаправляемые картриджи);
- Система для переливания (крови);
- Пластиковый пакет (например, с физраствором), жидкость не важна.
Теперь поэтапно:
- Делаем отверстие сверху пакета и выливаем раствор
- Промываем пакет
- Сушим
- Отрываем защитную пломбу снизу пакета
- Подключаем систему переливания
- Наливаем чернила в пакеты
- Подключаем к пустым ПЗК в отверстие AIR
- Открываем пробку INK
- Затем открываем систему переливания, чтобы картридж полностью набрался чернилами (набираем не торопясь, не поднимая сильно давление!)
- После того, как картридж набрался закрываем отверстие INK
- Устанавливаем ПЗК в плоттер
- Вешаем пакеты ваше уровня ПЗК
Всю эту процедуру выполняем вне плоттера!!!
У данной СНПЧ крайне низкая стоимость. Я рекомендую менять ее раз в год в связи с тем, что фильтры постепенно забиваются. Хоть система и продолжает работать, возрастает риск попадания осадков в печатающую головку.

Как восстановить печатающую головку?
Если ваша печатающая головка начала полосить и качество печати вас не устраивает, не торопитесь её менять.
Головки № 11 (C4810A C4811A C4812A C4813A) достаточно простой конструкцией. Чтобы разобрать головку для диагностики и чистки достаточно одной плоской отвертки.

Чаще всего в печатающую головку попадает воздух, и головка перестает набирать чернила для того чтобы ее восстановить надо ее «протянуть».
Самый простой вариант в этой ситуации приобрести недорогое приспособление такое, как показано на картинке в Китае (стоимость в районе 6$).

Мой способ восстановления печатающей головки №11.
Для промывки головки я использую «Mr. Muscle» (именно такой как на фото). Он идеально подходит для этих целей.

Протягиваем головку тем самым удаляем весь воздух попутно промывая сопла. В итоге мы получаем полную головку, заполненную «Mr. Muscle»

Затем устанавливаем головку в плоттер и печатаем заполненный лист формата А1 цветом идентичным цвету головки (в параметрах устанавливаем «Text» и качество «Best»). При печати полностью заполненного листа, головка будет постепенно набираться и цвет вернется, но не сразу. Иногда приходится печатать несколько листов, чтобы вышел весь мускул и головка набралась краской. Запаситесь терпением.
Плоттер не видит головку.
Чаще всего проблема в верхней электронике. Ее можно легко переклеить от засохшей или старой головки. Верхняя электроника так же отвечает за определение цвета печатающей головки. Соответственно переклеив электронику, вы можете изменить цвет головки.