

HP Deskjet 2050 All-in-One series


Contents
1 How Do I?………………………………………………………………………………………………………………….3
2 Get to know the HP All-in-One
Printer parts………………………………………………………………………………………………………………..5
Control panel features………………………………………………………………………………………………….6
Status Lights……………………………………………………………………………………………………………….7
3Print
Print documents…………………………………………………………………………………………………………..9
Print photos………………………………………………………………………………………………………………10
Print envelopes………………………………………………………………………………………………………….11
Tips for print success………………………………………………………………………………………………….11
5 Copy and scan
Copy documents or photos………………………………………………………………………………………….23
Scan to a computer……………………………………………………………………………………………………24
Tips for copy and scan success…………………………………………………………………………………..26
6 Work with cartridges
Check the estimated ink levels…………………………………………………………………………………….27
Order ink supplies………………………………………………………………………………………………………28
Replace the cartridges………………………………………………………………………………………………..29
Use single-cartridge mode…………………………………………………………………………………………..31
Cartridge warranty information…………………………………………………………………………………….31
Contents
7 Solve a problem
Improve print quality…………………………………………………………………………………………………..33
Clear a paper jam………………………………………………………………………………………………………35
Unable to print…………………………………………………………………………………………………………..37
HP support………………………………………………………………………………………………………………..40
8 Technical information
Notice……………………………………………………………………………………………………………………….43
Specifications……………………………………………………………………………………………………………43
Environmental product stewardship program…………………………………………………………………45
Regulatory notices……………………………………………………………………………………………………..48
Index…………………………………………………………………………………………………………………………….51
1

Contents
2

1How Do I?
Learn how to use your HP All-in-One
Printer parts
•
Copy documents or photos
•
Load media
•
Replace the cartridges
•
Clear a paper jam
•
How Do I?
How Do I? 3

How Do I?
Chapter 1
4 How Do I?
2 Get to know the HP All-in-One
• Printer parts
Control panel features
•
Status Lights
•
Printer parts
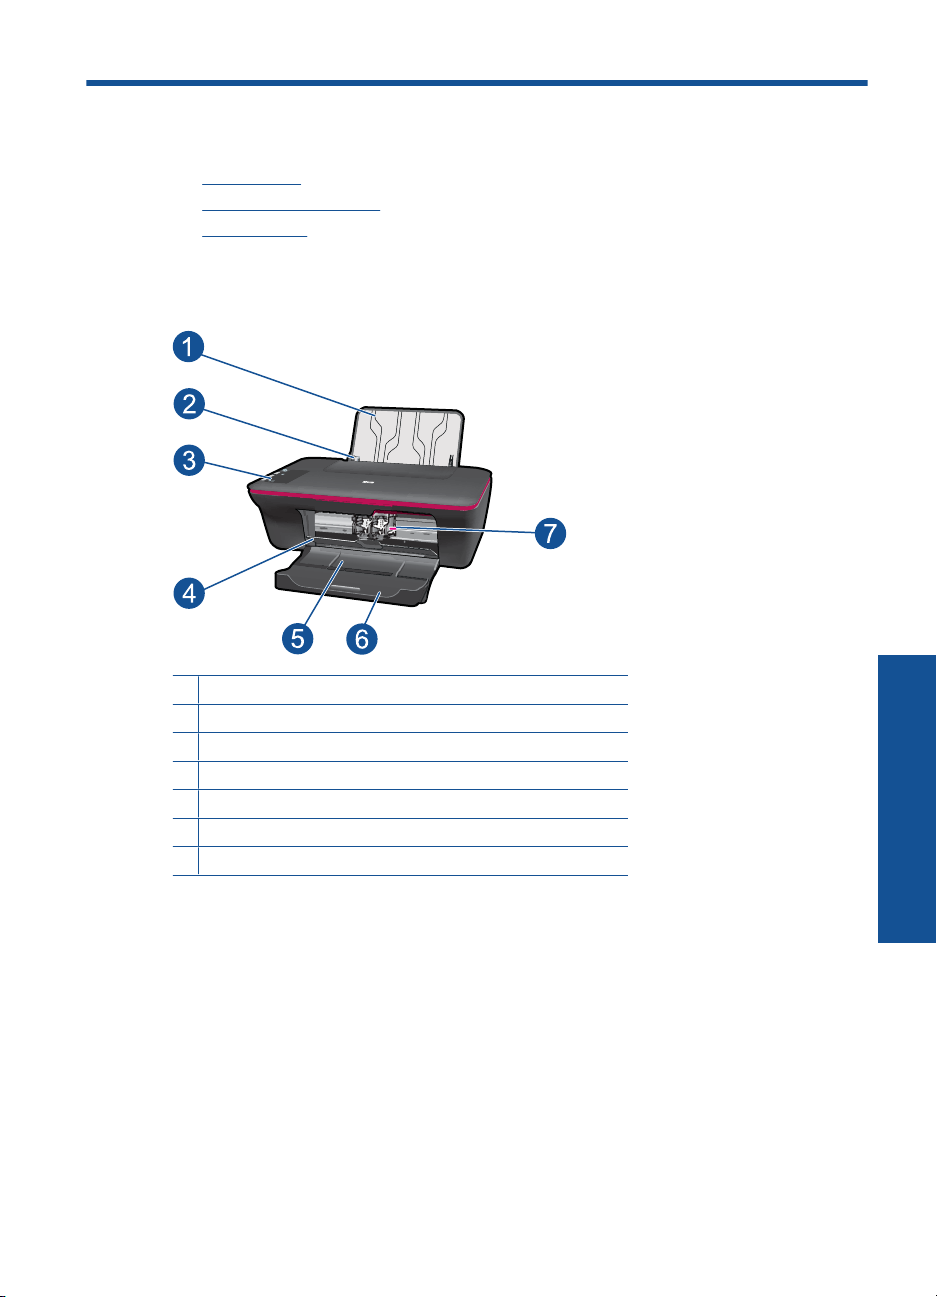
1 Input tray
2 Paper-width guide for the input tray
3 Control panel
4 Cartridge door
5 Output tray
6 Output tray extender (also referred to as the tray extender)
7 Cartridges
Printer parts 5
Get to know the HP All-in-One
Chapter 2
Control panel features
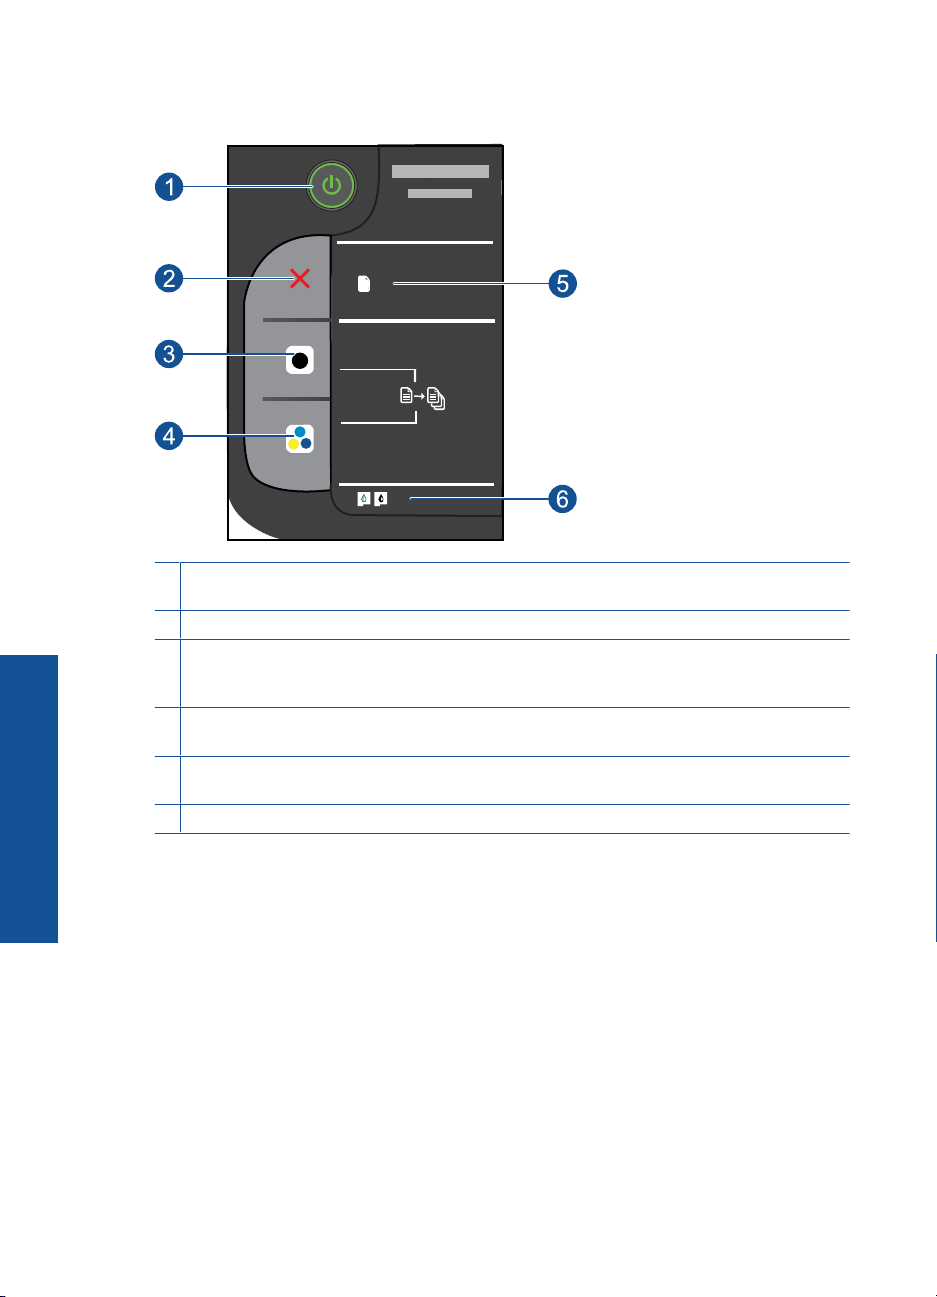
1 Power: Turns the product on or off. When the product is off, a minimal amount of power is still
used. To completely remove power, turn off the product, then unplug the power cord.
2 Cancel: Stops the current operation.
3 Start Copy Black: Starts a black-and-white copy job. Increase the number of copies (up to
10) by pressing the button multiple times. Acts as a resume button after resolving print
Get to know the HP All-in-One
problems.
4 Start Copy Color: Starts a color copy job. Increase the number of copies (up to 10) by pressing
the button multiple times. Acts as a resume button after resolving print problems.
5 Attention light: Indicates that there is a paper jam, the printer is out of paper, or some event
that requires your attention.
6 Cartridge light: Indicates low ink or a print cartridge problem.
!
6 Get to know the HP All-in-One
Status Lights
When the product is turned on, the on button light will be lit. When the product is
processing a job, the on light will be blinking. Additional blinking lights signal errors that
you can resolve. See below to learn about blinking lights and what to do.
Behavior Solution
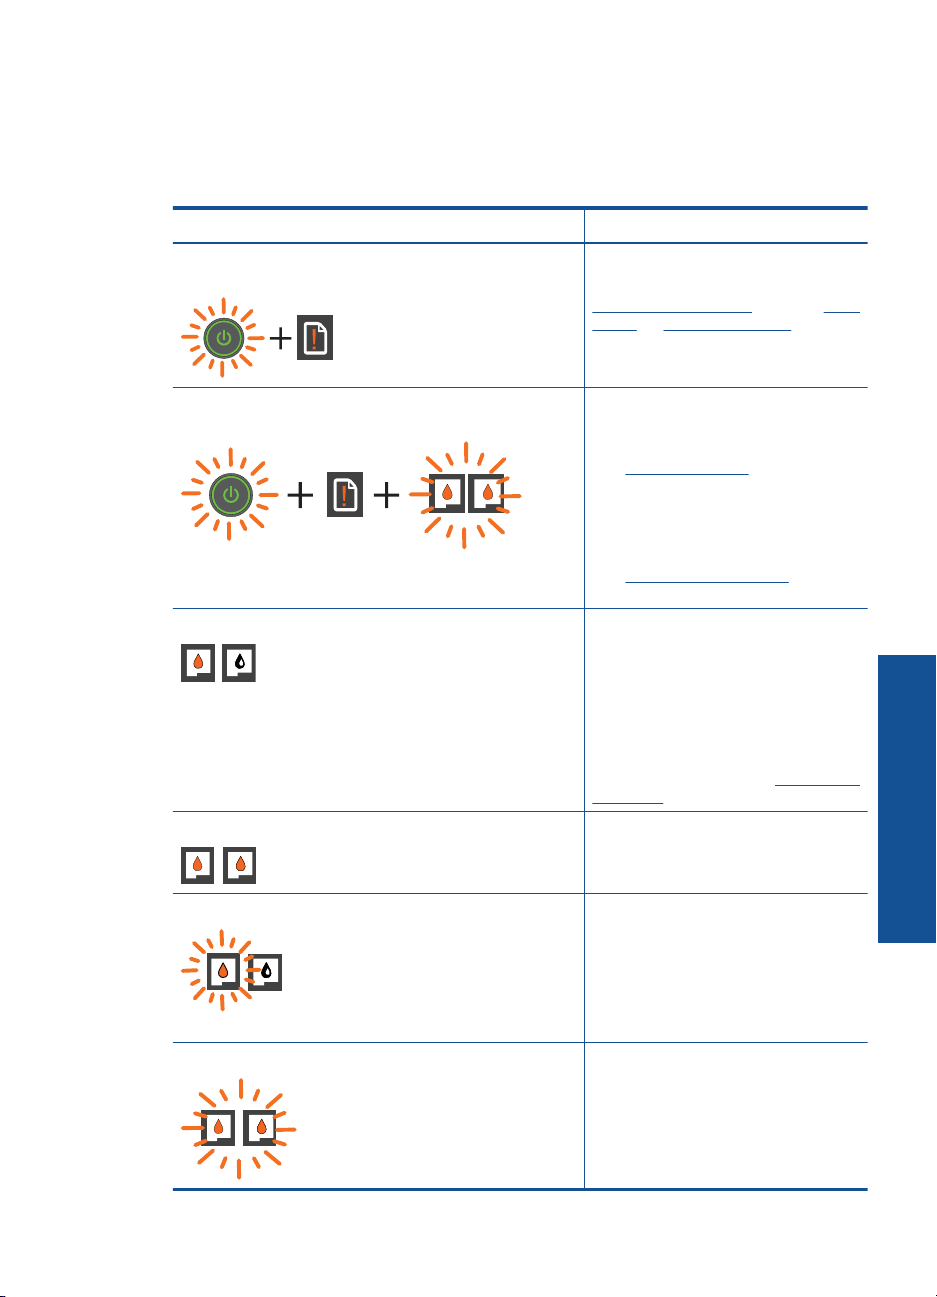
Power light is blinking and attention light is on (not
blinking)
Power light is blinking, both cartridge lights are blinking,
and the attention light is on (not blinking)
One cartridge light is on (not blinking) An “on” cartridge light indicates that
Both cartridge lights are on (not blinking) Both cartridges are low on ink.
The output tray is closed, there is no
paper, or there is a paper jam.
Replace the cartridges, correctly Load
media, or Clear a paper jam. Press
Start Copy Black or Start Copy
Color to resume.
The cartridge door is open, or the
carriage is obstructed.
If the cartridge door is open, close it.
Prepare the trays for more
See
information. If the carriage is
obstructed, open cartridge door and
move the carriage to the right to clear
the obstruction. Press Start Copy
Black or Start Copy color to resume.
See
Clear the print carriage for more
information.
the corresponding cartridge still has
the tape on, is not installed, or is low
on ink.
Remove the pink tape if it is still on the
cartridge, insert a cartridge if one is
missing, or replace the cartridge when
print quality is no longer acceptable.
For more information, see
cartridges.
Replace both cartridges when print
quality is no longer acceptable.
Replace the
One cartridge light is blinking A “blinking” cartridge light indicates
that the corresponding cartridge is not
installed correctly or is incompatible.
If the cartridge is not installed
correctly, reinsert the cartridge. If the
cartridge is incompatible, replace it
with a compatible cartridge.
Both cartridge lights are blinking Both cartridges may still have the tape
on, are missing, or are defective.
Remove the pink tape from both
cartridges if it is still on the cartridges,
install the missing cartridges or
replace the defective cartridges. See
Status Lights 7
Get to know the HP All-in-One
Chapter 2
(continued)
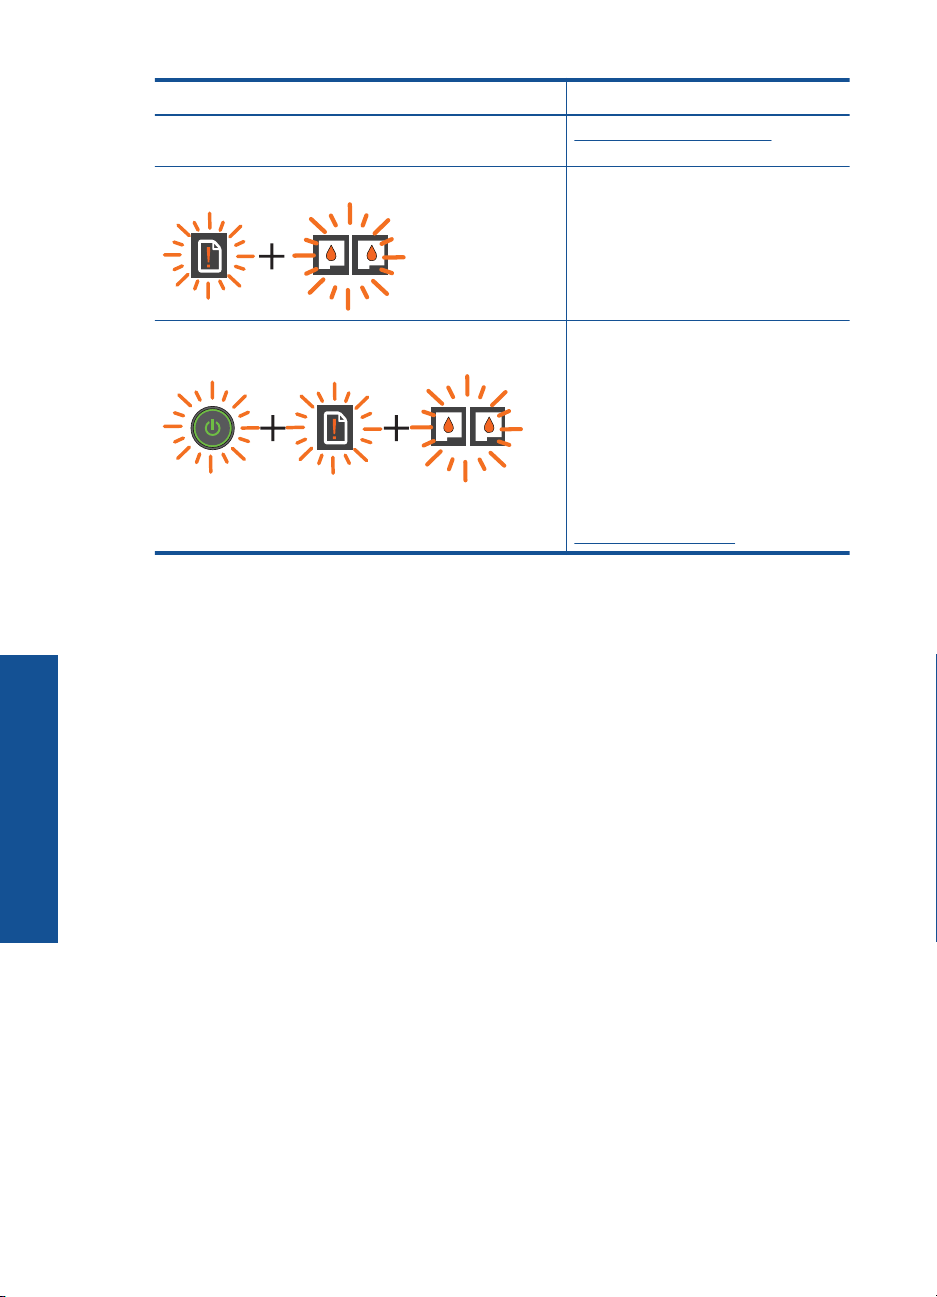
Behavior Solution
Identify a defective cartridge to identify
if only one cartridge is a defective.
Both cartridge lights and attention light are blinking The cartridge carriage inside the
printer has stalled.
Open cartridge door and make sure
the carriage is not obstructed, close
door, and then press the Start Copy
Black or Start Copy Color button to
resume.
Get to know the HP All-in-One
Power light, both cartridge lights, and attention light are
blinking
The printer is in an error state.
To exit the error state, reset the
product.
1. Turn off the product.
2. Unplug the power cord.
3. Wait a minute, then plug the
power cord back in.
4. Turn on the product.
If the problem persists, contact
Replace the cartridges.
8 Get to know the HP All-in-One
3Print
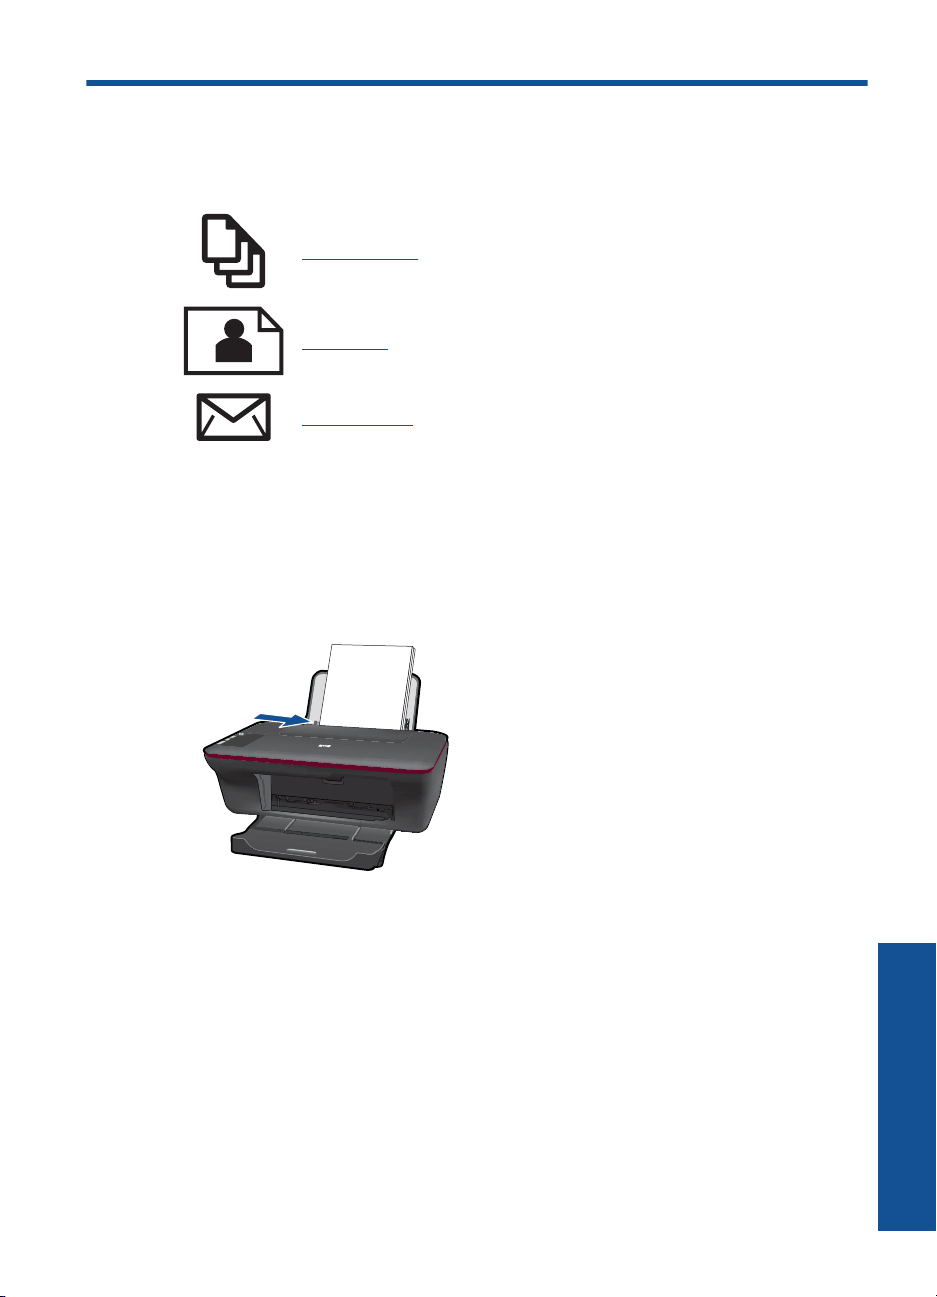
Choose a print job to continue.
Print documents
Print photos
Print envelopes
Print documents
To print from a software application
1. Make sure the output tray is open.
2. Make sure you have paper loaded in the input tray.
3. From your software application, click the Print button.
4. Make sure the product is the selected printer.
5. Click the button that opens the Properties dialog box.
Depending on your software application, this button might be called Properties,
Options, Printer Setup, Printer, or Preferences.
6. Select the appropriate options.
•On Layout tab select Portrait or Landscape orientation.
•On Paper/Quality tab select the appropriate paper type and print quality from the
Media drop-down list.
• Click Advanced to select the appropriate paper size from the Paper/Output list.
7. Click OK to close the Properties dialog box.
8. Click Print or OK to begin printing.
Print documents 9
Chapter 3
NOTE: You can print your document on both sides of the paper, instead of just one
side. Click on the Advanced button on the Paper/Quality or Layout tab. From the
Pages to Print drop-down menu select Print Odd Pages Only. Click OK to print.
After the odd numbered pages of the document have been printed, remove the
document from the output tray. Reload the paper in the input tray with the blank side
facing up. Return to the Pages to Print drop-down menu and then select Print Even
Pages Only. Click OK to print.
Print photos
To print a photo on photo paper
1. Make sure the output tray is open.
2. Remove all paper from the input tray, and then load the photo paper print side up.
NOTE: If the photo paper you are using has perforated tabs, load photo paper
so that tabs are on top.
10 Print
3. On the File menu in your software application, click Print.
4. Make sure the product is the selected printer.
5. Click the button that opens the Properties dialog box.
Depending on your software application, this button might be called Properties,
Options, Printer Setup, Printer, or Preferences.
6. Click the Paper/Quality tab.
7. Select the appropriate options.
•On Layout tab select Portrait or Landscape orientation.
•On Paper/Quality tab select the appropriate paper type and print quality from the
Media drop-down list.
• Click Advanced to select the appropriate paper size from the Paper/Output list.
NOTE: For maximum dpi resolution, go to the Paper/Quality tab and select
Photo Paper, Best Quality from the Media drop-down list. Make sure you are
printing in color. Then go to the Advanced tab and select Yes from the Print in
Max DPI drop-down list. For more information, see
dpi.
8. Click OK to return to the Properties dialog box.
9. Click OK, and then click Print or OK in the Print dialog box.
Print using the maximum
NOTE: Do not leave unused photo paper in the input tray. The paper might start to
curl, which could reduce the quality of your printout. Photo paper should be flat before
printing.
Print envelopes
You can load one or more envelopes into the input tray of the HP All-in-One. Do not use
shiny or embossed envelopes or envelopes that have clasps or windows.
NOTE: For specific details on how to format text for printing on envelopes, consult
the help files in your word processing software. For best results, consider using a label
for the return address on envelopes.
To print envelopes
1. Make sure the output tray is open.
2. Slide the paper guide all the way to the left.
3. Place the envelopes in the right side of the tray. The side to be printed on should face
up. The flap should be on the left side.
4. Push the envelopes into the printer until they stop.
5. Slide the paper guide firmly against the edge of the envelopes.
6. Click the button that opens the Properties dialog box.
Depending on your software application, this button might be called Properties,
Options, Printer Setup, Printer, or Preferences.
7. Select the appropriate options.
•On Paper/Quality tab select a Plain paper type.
• Click the Advanced button, and select the appropriate envelope size from the
Paper Size drop down menu.
8. Click OK, and then click Print or OK in the Print dialog box.
Tips for print success
To successfully print, the HP cartridges should be functioning properly with sufficient ink,
the paper should be loaded correctly, and the product should have the appropriate
settings.
Tips for print success 11

Chapter 3
Cartridge tips
• Use genuine HP ink cartridges.
• Install both the black and tri-color cartridges correctly.
For more information, see
Replace the cartridges.
• Check the estimated ink levels in the cartridges to make sure there is sufficient ink.
For more information, see
• For more information, see
Check the estimated ink levels.
Improve print quality.
Paper loading tips
• Load a stack of paper (not just one page). All of the paper in the stack should be the
same size and type to avoid a paper jam.
• Load paper with side to be printed on facing up.
• Ensure that paper loaded in the input tray lays flat and the edges are not bent or torn.
• Adjust the paper-width guide in the input tray to fit snugly against all paper. Make sure
the paper-width guide does not bend the paper in the input tray.
• For more information, see
Load media.
Printer settings tips
• On the Paper/Quality tab of the print driver, select the appropriate paper type and
quality from the Media drop down menu.
• Click the Advanced button, and select the appropriate Paper Size from the Paper/
Output drop-down menu.
• Click the HP All-in-One desktop icon to open the Printer Software.
12 Print
NOTE: You can also access the Printer Software by clicking Start > Programs
> HP > HP Deskjet 2050 J510 > HP Deskjet 2050 J510
Notes
• Genuine HP ink cartridges are designed and tested with HP printers and papers to
help you easily produce great results, time after time.
NOTE: HP cannot guarantee the quality or reliability of non-HP supplies. Product
service or repairs required as a result of using a non-HP supply will not be covered
under warranty.
If you believe you purchased genuine HP ink cartridges, go to:
www.hp.com/go/anticounterfeit
• Ink level warnings and indicators provide estimates for planning purposes only.
NOTE: When you receive a low-ink warning message, consider having a
replacement cartridge available to avoid possible printing delays. You do not need
to replace the cartridges until print quality becomes unacceptable.
• Software settings selected in the print driver only apply to printing, they do not apply
to copying or scanning.
• You can print your document on both sides of the paper, instead of just one side.
NOTE: Click the Advanced button on the Paper/Quality or Layout tab. From
the Pages to Print drop-down menu select Print Odd Pages Only. Click OK to
print. After the odd numbered pages of the document have been printed, remove
the document from the output tray. Reload the paper in the input tray with the
blank side facing up. Return to the Pages to Print drop-down menu and then
select Print Even Pages Only. Click OK to print.
• Print using black ink only
NOTE: If you want to print a black and white document using black ink only, click
the Advanced button. From the Print in Grayscale drop-down menu select
Black Ink Only, then click the OK button. If you see Black and White as an option
on the Paper/Quality tab or the Layout tab, select it.
Click here to go online for more information.
Print using the maximum dpi
Use maximum dots per inch (dpi) mode to print high-quality, sharp images on photo
paper.
See technical specifications for the print resolution of the maximum dpi mode.
Printing in maximum dpi takes longer than printing with other settings and requires a large
amount of disk space.
To print in Maximum dpi mode
1. Make sure you have photo paper loaded in the input tray.
2. On the File menu in your software application, click Print.
3. Make sure the product is the selected printer.
4. Click the button that opens the Properties dialog box.
Depending on your software application, this button might be called Properties,
Options, Printer Setup, Printer, or Preferences.
5. Click the Paper/Quality tab.
6. In the Media drop-down list, click Photo Paper, Best Quality.
NOTE: Photo Paper, Best Quality must be selected from the Media drop-down
list on the Paper/Quality tab to enable printing in maximum DPI.
7. Click the Advanced button.
8. In the Printer Features area, select Yes from the Print in Max DPI drop-down list.
9. Select Paper Size from Paper/Output drop-down menu.
10. Click OK to close the advanced options.
11. Confirm Orientation on Layout tab, then click OK to print.
Print using the maximum dpi 13

Chapter 3
14 Print

4 Paper basics
You can load many different types and sizes of paper in the HP All-in-One, including letter
or A4 paper, photo paper, transparencies, and envelopes.
This section contains the following topics:
Load media
Recommended papers for printing
If you want the best print quality, HP recommends using HP papers that are specifically
designed for the type of project you are printing.
Depending on your country/region, some of these papers might not be available.
ColorLok
HP recommends plain papers with the ColorLok logo for printing and copying of everyday
documents. All papers with the ColorLok logo are independently tested to meet high
standards of reliability and print quality, and produce documents with crisp, vivid color,
bolder blacks, and dry faster than ordinary plain papers. Look for papers with the ColorLok
logo in a variety of weights and sizes from major paper manufacturers.
HP Advanced Photo Paper
This thick photo paper features an instant-dry finish for easy handling without smudging.
It resists water, smears, fingerprints, and humidity. Your prints have a look and feel
comparable to a store-processed photo. It is available in several sizes, including A4, 8.5
x 11 inch, 10 x 15 cm (4 x 6 inch) (with or without tabs), 13 x 18 cm (5 x 7 inch), and two
finishes — glossy or soft gloss (satin matte). It is acid-free for longer lasting documents.
Paper basics
HP Everyday Photo Paper
Print colorful, everyday snapshots at a low cost, using paper designed for casual photo
printing. This affordable, photo paper dries quickly for easy handling. Get sharp, crisp
images when you use this paper with any inkjet printer. It is available in semi-gloss finish
in several sizes, including A4, 8.5 x 11 inch, and 10 x 15 cm (4 x 6 inch) (with or without
tabs). For longer-lasting photos, it is acid-free.
Recommended papers for printing 15
Loading…
Manuals.eu
- Manuals.eu
- HP
- Computers & Peripherals
- Printers
- Deskjet Printers
- Deskjet 2050 — J510c
- Руководство пользователя
×
1
2
3
4
5
6
7
8
9
10
11
12
13
14
15
16
17
18
19
20
21
22
23
24
25
26
27
28
29
30
31
32
33
34
35
36
37
38
39
40
41
42
43
44
45
46
47
48
49
50
51
52
53
54
55
56
57
58
⟨
⟩
Copyright © Manuals.eu
Agreement
Privacy Policy
Contact us
*CH350-90039*
*CH350-90039*
CH350-90039
© 2010 Hewlett-Packard Development Company, L.P.
Deskjet 2050 All-in-One J510 series
Black Cartridge
Tri-color Cartridge
122
122
Windows: Mac:
www.hp.com/support
Information
For setup information, see the setup poster. All other product information can be found in the electronic Help and Readme.
The electronic Help is automatically installed during printer software installation. Electronic Help includes instructions on
product features and troubleshooting. It also provides product specifications, legal notices, environmental, regulatory, and
support information. The Readme file contains HP support contact information, operating system requirements, and the most
recent updates to your product information. For computers without a CD/DVD drive, please go to www.hp.com/support to
download and install the printer software.
Install electronic Help
After software installation, click Start > All Programs >
HP > HP Deskjet 2050 J510 or HP Deskjet 1050 J410 >
Help.
Find Readme
Insert software CD. On software CD locate
ReadMe.chm. Click ReadMe.chm to open and then
select ReadMe in your language.
Find Readme
Insert the software CD, and then double-click the Read
Me folder located at the top-level of the software CD.
Find electronic Help
To install the electronic Help, insert the software CD in your computer and follow the on-screen instructions.
Find electronic Help
Mac OS X v10.5 and v10.6: From Finder Help, choose
Mac Help. In the Help Viewer, click and hold the Home
button, and then choose the Help for your device.
Register your HP Deskjet
Get quicker service and support alerts by registering at http://www.register.hp.com.
English
EN
ES
PT
Printed in [Spanish] Printed in [English]
Printed in [Portuguese]
-
Драйверы
4
-
Инструкции по эксплуатации
26
Языки:
HP DeskJet 2050 J510 инструкция по эксплуатации
(54 страницы)
- Языки:Английский
-
Тип:
PDF -
Размер:
12.87 MB
Просмотр
HP DeskJet 2050 J510 инструкция по эксплуатации
(12 страниц)
- Языки:Английский
-
Тип:
PDF -
Размер:
1.15 MB
Просмотр
HP DeskJet 2050 J510 инструкция по эксплуатации
(54 страницы)
- Языки:Турецкий
-
Тип:
PDF -
Размер:
6.73 MB
Просмотр
HP DeskJet 2050 J510 инструкция по эксплуатации
(56 страниц)
- Языки:Словенский
-
Тип:
PDF -
Размер:
6.65 MB
Просмотр
HP DeskJet 2050 J510 инструкция по эксплуатации
(56 страниц)
- Языки:Эстонский
-
Тип:
PDF -
Размер:
6.62 MB
Просмотр
HP DeskJet 2050 J510 инструкция по эксплуатации
(56 страниц)
- Языки:Испанский
-
Тип:
PDF -
Размер:
6.63 MB
Просмотр
HP DeskJet 2050 J510 инструкция по эксплуатации
(62 страницы)
- Языки:Тайский
-
Тип:
PDF -
Размер:
6.83 MB
Просмотр
HP DeskJet 2050 J510 инструкция по эксплуатации
(56 страниц)
- Языки:Португальский
-
Тип:
PDF -
Размер:
6.62 MB
Просмотр
HP DeskJet 2050 J510 инструкция по эксплуатации
(58 страниц)
- Языки:Индонезийский
-
Тип:
PDF -
Размер:
6.62 MB
Просмотр
HP DeskJet 2050 J510 инструкция по эксплуатации
(54 страницы)
- Языки:Арабский
-
Тип:
PDF -
Размер:
7.02 MB
Просмотр
HP DeskJet 2050 J510 инструкция по эксплуатации
(58 страниц)
- Языки:Латышский
-
Тип:
PDF -
Размер:
6.73 MB
Просмотр
HP DeskJet 2050 J510 инструкция по эксплуатации
(54 страницы)
- Языки:Шведский
-
Тип:
PDF -
Размер:
6.61 MB
Просмотр
HP DeskJet 2050 J510 инструкция по эксплуатации
(56 страниц)
- Языки:Французский
-
Тип:
PDF -
Размер:
6.64 MB
Просмотр
HP DeskJet 2050 J510 инструкция по эксплуатации
(58 страниц)
- Языки:Немецкий
-
Тип:
PDF -
Размер:
6.64 MB
Просмотр
HP DeskJet 2050 J510 инструкция по эксплуатации
(56 страниц)
- Языки:Венгерский
-
Тип:
PDF -
Размер:
6.66 MB
Просмотр
HP DeskJet 2050 J510 инструкция по эксплуатации
(58 страниц)
- Языки:Болгарский
-
Тип:
PDF -
Размер:
6.82 MB
Просмотр
HP DeskJet 2050 J510 инструкция по эксплуатации
(56 страниц)
- Языки:Итальянский
-
Тип:
PDF -
Размер:
6.63 MB
Просмотр
HP DeskJet 2050 J510 инструкция по эксплуатации
(56 страниц)
- Языки:Нидерландский
-
Тип:
PDF -
Размер:
6.62 MB
Просмотр
HP DeskJet 2050 J510 инструкция по эксплуатации
(54 страницы)
- Языки:Иврит
-
Тип:
PDF -
Размер:
6.88 MB
Просмотр
HP DeskJet 2050 J510 инструкция по эксплуатации
(54 страницы)
- Языки:Финский
-
Тип:
PDF -
Размер:
6.61 MB
Просмотр
HP DeskJet 2050 J510 инструкция по эксплуатации
(54 страницы)
- Языки:Датский
-
Тип:
PDF -
Размер:
6.61 MB
Просмотр
HP DeskJet 2050 J510 инструкция по эксплуатации
(58 страниц)
- Языки:Литовский
-
Тип:
PDF -
Размер:
6.7 MB
Просмотр
HP DeskJet 2050 J510 инструкция по эксплуатации
(56 страниц)
- Языки:Польский
-
Тип:
PDF -
Размер:
6.69 MB
Просмотр
HP DeskJet 2050 J510 инструкция по эксплуатации
(56 страниц)
- Языки:Корейский
-
Тип:
PDF -
Размер:
6.66 MB
Просмотр
HP DeskJet 2050 J510 инструкция по эксплуатации
(54 страницы)
- Языки:Хорватский
-
Тип:
PDF -
Размер:
6.66 MB
Просмотр
HP DeskJet 2050 J510 инструкция по эксплуатации
(16 страниц)
- Языки:Китайский
-
Тип:
PDF -
Размер:
2.77 MB
Просмотр
На NoDevice можно скачать инструкцию по эксплуатации для HP DeskJet 2050 J510. Руководство пользователя необходимо для ознакомления с правилами установки и эксплуатации HP DeskJet 2050 J510. Инструкции по использованию помогут правильно настроить HP DeskJet 2050 J510, исправить ошибки и выявить неполадки.
HP Deskjet 2050 All-in-One series
Contents
1 How Do I?………………………………………………………………………………………………………………….3
2 Get to know the HP All-in-One Printer parts………………………………………………………………………………………………………………..5 Control panel features………………………………………………………………………………………………….6 Status Lights……………………………………………………………………………………………………………….7
3 Print Print documents…………………………………………………………………………………………………………..9 Print photos………………………………………………………………………………………………………………10 Print envelopes………………………………………………………………………………………………………….11 Tips for print success………………………………………………………………………………………………….11
5 Copy and scan Copy documents or photos………………………………………………………………………………………….23 Scan to a computer……………………………………………………………………………………………………24 Tips for copy and scan success…………………………………………………………………………………..26
6 Work with cartridges Check the estimated ink levels…………………………………………………………………………………….27 Order ink supplies………………………………………………………………………………………………………28 Replace the cartridges………………………………………………………………………………………………..29 Use single-cartridge mode…………………………………………………………………………………………..31 Cartridge warranty information…………………………………………………………………………………….31
7 Solve a problem Improve print quality…………………………………………………………………………………………………..33 Clear a paper jam………………………………………………………………………………………………………35 Unable to print…………………………………………………………………………………………………………..37 HP support………………………………………………………………………………………………………………..40
8 Technical information Notice……………………………………………………………………………………………………………………….43 Specifications……………………………………………………………………………………………………………43 Environmental product stewardship program…………………………………………………………………45 Regulatory notices……………………………………………………………………………………………………..48
Index…………………………………………………………………………………………………………………………….51
1
C on
te nt
s
1 How Do I? Learn how to use your HP All-in-One
Printer parts Copy documents or photos Load media Replace the cartridges Clear a paper jam
How Do I? 3
H ow
D o
I?
Chapter 1
4 How Do I?
H ow
D o I?
2 Get to know the HP All-in-One Printer parts Control panel features Status Lights
Printer parts
1 Input tray
2 Paper-width guide for the input tray
3 Control panel
4 Cartridge door
5 Output tray
6 Output tray extender (also referred to as the tray extender)
7 Cartridges
Printer parts 5
G et
to k
no w
th e
H P
A ll-
in -O
ne
Control panel features
!
1 Power: Turns the product on or off. When the product is off, a minimal amount of power is still used. To completely remove power, turn off the product, then unplug the power cord.
2 Cancel: Stops the current operation.
3 Start Copy Black: Starts a black-and-white copy job. Increase the number of copies (up to 10) by pressing the button multiple times. Acts as a resume button after resolving print problems.
4 Start Copy Color: Starts a color copy job. Increase the number of copies (up to 10) by pressing the button multiple times. Acts as a resume button after resolving print problems.
5 Attention light: Indicates that there is a paper jam, the printer is out of paper, or some event that requires your attention.
6 Cartridge light: Indicates low ink or a print cartridge problem.
Chapter 2
6 Get to know the HP All-in-One
G et to know
the H P A
ll-in-O ne
Status Lights When the product is turned on, the on button light will be lit. When the product is processing a job, the on light will be blinking. Additional blinking lights signal errors that you can resolve. See below to learn about blinking lights and what to do.
Behavior Solution
Power light is blinking and attention light is on (not blinking)
The output tray is closed, there is no paper, or there is a paper jam. Replace the cartridges, correctly Load media, or Clear a paper jam. Press Start Copy Black or Start Copy Color to resume.
Power light is blinking, both cartridge lights are blinking, and the attention light is on (not blinking)
The cartridge door is open, or the carriage is obstructed. If the cartridge door is open, close it. See Prepare the trays for more information. If the carriage is obstructed, open cartridge door and move the carriage to the right to clear the obstruction. Press Start Copy Black or Start Copy color to resume. See Clear the print carriage for more information.
One cartridge light is on (not blinking) An on cartridge light indicates that the corresponding cartridge still has the tape on, is not installed, or is low on ink. Remove the pink tape if it is still on the cartridge, insert a cartridge if one is missing, or replace the cartridge when print quality is no longer acceptable. For more information, see Replace the cartridges.
Both cartridge lights are on (not blinking) Both cartridges are low on ink. Replace both cartridges when print quality is no longer acceptable.
One cartridge light is blinking A blinking cartridge light indicates that the corresponding cartridge is not installed correctly or is incompatible. If the cartridge is not installed correctly, reinsert the cartridge. If the cartridge is incompatible, replace it with a compatible cartridge.
Both cartridge lights are blinking Both cartridges may still have the tape on, are missing, or are defective. Remove the pink tape from both cartridges if it is still on the cartridges, install the missing cartridges or replace the defective cartridges. See
Status Lights 7
G et
to k
no w
th e
H P
A ll-
in -O
ne
Behavior Solution
Identify a defective cartridge to identify if only one cartridge is a defective.
Both cartridge lights and attention light are blinking The cartridge carriage inside the printer has stalled. Open cartridge door and make sure the carriage is not obstructed, close door, and then press the Start Copy Black or Start Copy Color button to resume.
Power light, both cartridge lights, and attention light are blinking
The printer is in an error state. To exit the error state, reset the product. 1. Turn off the product. 2. Unplug the power cord. 3. Wait a minute, then plug the
power cord back in. 4. Turn on the product. If the problem persists, contact Replace the cartridges.
Chapter 2 (continued)
8 Get to know the HP All-in-One
G et to know
the H P A
ll-in-O ne
3 Print Choose a print job to continue.
Print documents
Print photos
Print envelopes
Print documents
To print from a software application 1. Make sure the output tray is open. 2. Make sure you have paper loaded in the input tray.
3. From your software application, click the Print button. 4. Make sure the product is the selected printer. 5. Click the button that opens the Properties dialog box.
Depending on your software application, this button might be called Properties, Options, Printer Setup, Printer, or Preferences.
6. Select the appropriate options. On Layout tab select Portrait or Landscape orientation. On Paper/Quality tab select the appropriate paper type and print quality from the
Media drop-down list. Click Advanced to select the appropriate paper size from the Paper/Output list.
7. Click OK to close the Properties dialog box. 8. Click Print or OK to begin printing.
Print documents 9
Pr in
t
NOTE: You can print your document on both sides of the paper, instead of just one side. Click on the Advanced button on the Paper/Quality or Layout tab. From the Pages to Print drop-down menu select Print Odd Pages Only. Click OK to print. After the odd numbered pages of the document have been printed, remove the document from the output tray. Reload the paper in the input tray with the blank side facing up. Return to the Pages to Print drop-down menu and then select Print Even Pages Only. Click OK to print.
Print photos
To print a photo on photo paper 1. Make sure the output tray is open. 2. Remove all paper from the input tray, and then load the photo paper print side up.
NOTE: If the photo paper you are using has perforated tabs, load photo paper so that tabs are on top.
3. On the File menu in your software application, click Print. 4. Make sure the product is the selected printer. 5. Click the button that opens the Properties dialog box.
Depending on your software application, this button might be called Properties, Options, Printer Setup, Printer, or Preferences.
6. Click the Paper/Quality tab. 7. Select the appropriate options.
On Layout tab select Portrait or Landscape orientation. On Paper/Quality tab select the appropriate paper type and print quality from the
Media drop-down list. Click Advanced to select the appropriate paper size from the Paper/Output list.
NOTE: For maximum dpi resolution, go to the Paper/Quality tab and select Photo Paper, Best Quality from the Media drop-down list. Make sure you are printing in color. Then go to the Advanced tab and select Yes from the Print in Max DPI drop-down list. For more information, see Print using the maximum dpi.
8. Click OK to return to the Properties dialog box. 9. Click OK, and then click Print or OK in the Print dialog box.
Chapter 3
10 Print
NOTE: Do not leave unused photo paper in the input tray. The paper might start to curl, which could reduce the quality of your printout. Photo paper should be flat before printing.
Print envelopes You can load one or more envelopes into the input tray of the HP All-in-One. Do not use shiny or embossed envelopes or envelopes that have clasps or windows.
NOTE: For specific details on how to format text for printing on envelopes, consult the help files in your word processing software. For best results, consider using a label for the return address on envelopes.
To print envelopes 1. Make sure the output tray is open. 2. Slide the paper guide all the way to the left. 3. Place the envelopes in the right side of the tray. The side to be printed on should face
up. The flap should be on the left side. 4. Push the envelopes into the printer until they stop. 5. Slide the paper guide firmly against the edge of the envelopes.
6. Click the button that opens the Properties dialog box. Depending on your software application, this button might be called Properties, Options, Printer Setup, Printer, or Preferences.
7. Select the appropriate options. On Paper/Quality tab select a Plain paper type. Click the Advanced button, and select the appropriate envelope size from the
Paper Size drop down menu. 8. Click OK, and then click Print or OK in the Print dialog box.
Tips for print success To successfully print, the HP cartridges should be functioning properly with sufficient ink, the paper should be loaded correctly, and the product should have the appropriate settings.
Tips for print success 11
Pr in
t
Cartridge tips Use genuine HP ink cartridges. Install both the black and tri-color cartridges correctly.
For more information, see Replace the cartridges. Check the estimated ink levels in the cartridges to make sure there is sufficient ink.
For more information, see Check the estimated ink levels. For more information, see Improve print quality.
Paper loading tips Load a stack of paper (not just one page). All of the paper in the stack should be the
same size and type to avoid a paper jam. Load paper with side to be printed on facing up. Ensure that paper loaded in the input tray lays flat and the edges are not bent or torn. Adjust the paper-width guide in the input tray to fit snugly against all paper. Make sure
the paper-width guide does not bend the paper in the input tray. For more information, see Load media.
Printer settings tips On the Paper/Quality tab of the print driver, select the appropriate paper type and
quality from the Media drop down menu. Click the Advanced button, and select the appropriate Paper Size from the Paper/
Output drop-down menu. Click the HP All-in-One desktop icon to open the Printer Software.
NOTE: You can also access the Printer Software by clicking Start > Programs > HP > HP Deskjet 2050 J510 > HP Deskjet 2050 J510
Notes Genuine HP ink cartridges are designed and tested with HP printers and papers to
help you easily produce great results, time after time.
NOTE: HP cannot guarantee the quality or reliability of non-HP supplies. Product service or repairs required as a result of using a non-HP supply will not be covered under warranty.
If you believe you purchased genuine HP ink cartridges, go to:
www.hp.com/go/anticounterfeit
Ink level warnings and indicators provide estimates for planning purposes only.
NOTE: When you receive a low-ink warning message, consider having a replacement cartridge available to avoid possible printing delays. You do not need to replace the cartridges until print quality becomes unacceptable.
Software settings selected in the print driver only apply to printing, they do not apply to copying or scanning.
Chapter 3
12 Print
You can print your document on both sides of the paper, instead of just one side.
NOTE: Click the Advanced button on the Paper/Quality or Layout tab. From the Pages to Print drop-down menu select Print Odd Pages Only. Click OK to print. After the odd numbered pages of the document have been printed, remove the document from the output tray. Reload the paper in the input tray with the blank side facing up. Return to the Pages to Print drop-down menu and then select Print Even Pages Only. Click OK to print.
Print using black ink only
NOTE: If you want to print a black and white document using black ink only, click the Advanced button. From the Print in Grayscale drop-down menu select Black Ink Only, then click the OK button. If you see Black and White as an option on the Paper/Quality tab or the Layout tab, select it.
Click here to go online for more information.
Print using the maximum dpi Use maximum dots per inch (dpi) mode to print high-quality, sharp images on photo paper.
See technical specifications for the print resolution of the maximum dpi mode.
Printing in maximum dpi takes longer than printing with other settings and requires a large amount of disk space.
To print in Maximum dpi mode 1. Make sure you have photo paper loaded in the input tray. 2. On the File menu in your software application, click Print. 3. Make sure the product is the selected printer. 4. Click the button that opens the Properties dialog box.
Depending on your software application, this button might be called Properties, Options, Printer Setup, Printer, or Preferences.
5. Click the Paper/Quality tab. 6. In the Media drop-down list, click Photo Paper, Best Quality.
NOTE: Photo Paper, Best Quality must be selected from the Media drop-down list on the Paper/Quality tab to enable printing in maximum DPI.
7. Click the Advanced button. 8. In the Printer Features area, select Yes from the Print in Max DPI drop-down list. 9. Select Paper Size from Paper/Output drop-down menu. 10. Click OK to close the advanced options. 11. Confirm Orientation on Layout tab, then click OK to print.
Print using the maximum dpi 13
Pr in
t
4 Paper basics You can load many different types and sizes of paper in the HP All-in-One, including letter or A4 paper, photo paper, transparencies, and envelopes.
This section contains the following topics:
Load media
Recommended papers for printing If you want the best print quality, HP recommends using HP papers that are specifically designed for the type of project you are printing.
Depending on your country/region, some of these papers might not be available.
ColorLok HP recommends plain papers with the ColorLok logo for printing and copying of everyday documents. All papers with the ColorLok logo are independently tested to meet high standards of reliability and print quality, and produce documents with crisp, vivid color, bolder blacks, and dry faster than ordinary plain papers. Look for papers with the ColorLok logo in a variety of weights and sizes from major paper manufacturers.
HP Advanced Photo Paper This thick photo paper features an instant-dry finish for easy handling without smudging. It resists water, smears, fingerprints, and humidity. Your prints have a look and feel comparable to a store-processed photo. It is available in several sizes, including A4, 8.5 x 11 inch, 10 x 15 cm (4 x 6 inch) (with or without tabs), 13 x 18 cm (5 x 7 inch), and two finishes — glossy or soft gloss (satin matte). It is acid-free for longer lasting documents.
HP Everyday Photo Paper Print colorful, everyday snapshots at a low cost, using paper designed for casual photo printing. This affordable, photo paper dries quickly for easy handling. Get sharp, crisp images when you use this paper with any inkjet printer. It is available in semi-gloss finish in several sizes, including A4, 8.5 x 11 inch, and 10 x 15 cm (4 x 6 inch) (with or without tabs). For longer-lasting photos, it is acid-free.
Recommended papers for printing 15
Pa pe
r b as
ic s
HP Brochure Paper or HP Superior Inkjet Paper These papers are glossy-coated or matte-coated on both sides for two-sided use. They are the perfect choice for near-photographic reproductions and business graphics for report covers, special presentations, brochures, mailers, and calendars.
HP Premium Presentation Paper or HP Professional Paper These papers are heavy two-sided matte papers perfect for presentation, proposals, reports, and newsletters. They are heavyweight for an impressive look and feel.
HP Bright White Inkjet Paper HP Bright White Inkjet Paper delivers high-contrast colors and sharp text. It is opaque enough for two-sided color usage with no show-through, which makes it ideal for newsletters, reports, and flyers. It features ColorLok Technology for less smearing, bolder blacks, and vivid colors.
HP Printing Paper HP Printing Paper is a high-quality multifunction paper. It produces documents that look and feel more substantial than documents printed on standard multipurpose or copy paper. It features ColorLok Technology for less smearing, bolder blacks, and vivid colors. It is acid-free for longer lasting documents.
HP Office Paper HP Office Paper is a high-quality multifunction paper. It is suitable for copies, drafts, memos, and other everyday documents. It features ColorLok Technology for less smearing, bolder blacks, and vivid colors. It is acid-free for longer lasting documents.
HP Iron-On Transfers HP Iron-on Transfers (for color fabrics or for light or white fabrics) are the ideal solution for creating custom T-shirts from your digital photos.
HP Premium Inkjet Transparency Film HP Premium Inkjet Transparency Film make your color presentations vivid and even more impressive. This film is easy to use and handle and dries quickly without smudging.
HP Photo Value Pack HP Photo Value Packs conveniently package original HP cartridges and HP Advanced Photo Paper to save you time and take the guesswork out of printing affordable professional photos with your HP All-in-One. Original HP inks and HP Advanced Photo Paper have been designed to work together so your photos are long lasting and vivid, print after print. Great for printing out an entire vacations worth of photos or multiple prints to share.
NOTE: At this time, some portions of the HP Web site are available in English only.
To order HP papers and other supplies, go to www.hp.com/buy/supplies. If prompted, choose your country/region, follow the prompts to select your product, and then click one of the shopping links on the page.
Chapter 4
16 Paper basics
Paper basics
Load media Select a paper size to continue.
Load full-size paper a. Raise the input tray
Raise the input tray.
b. Lower the output tray Lower the output tray and pull out the tray extender.
Load media 17
Pa pe
r b as
ic s
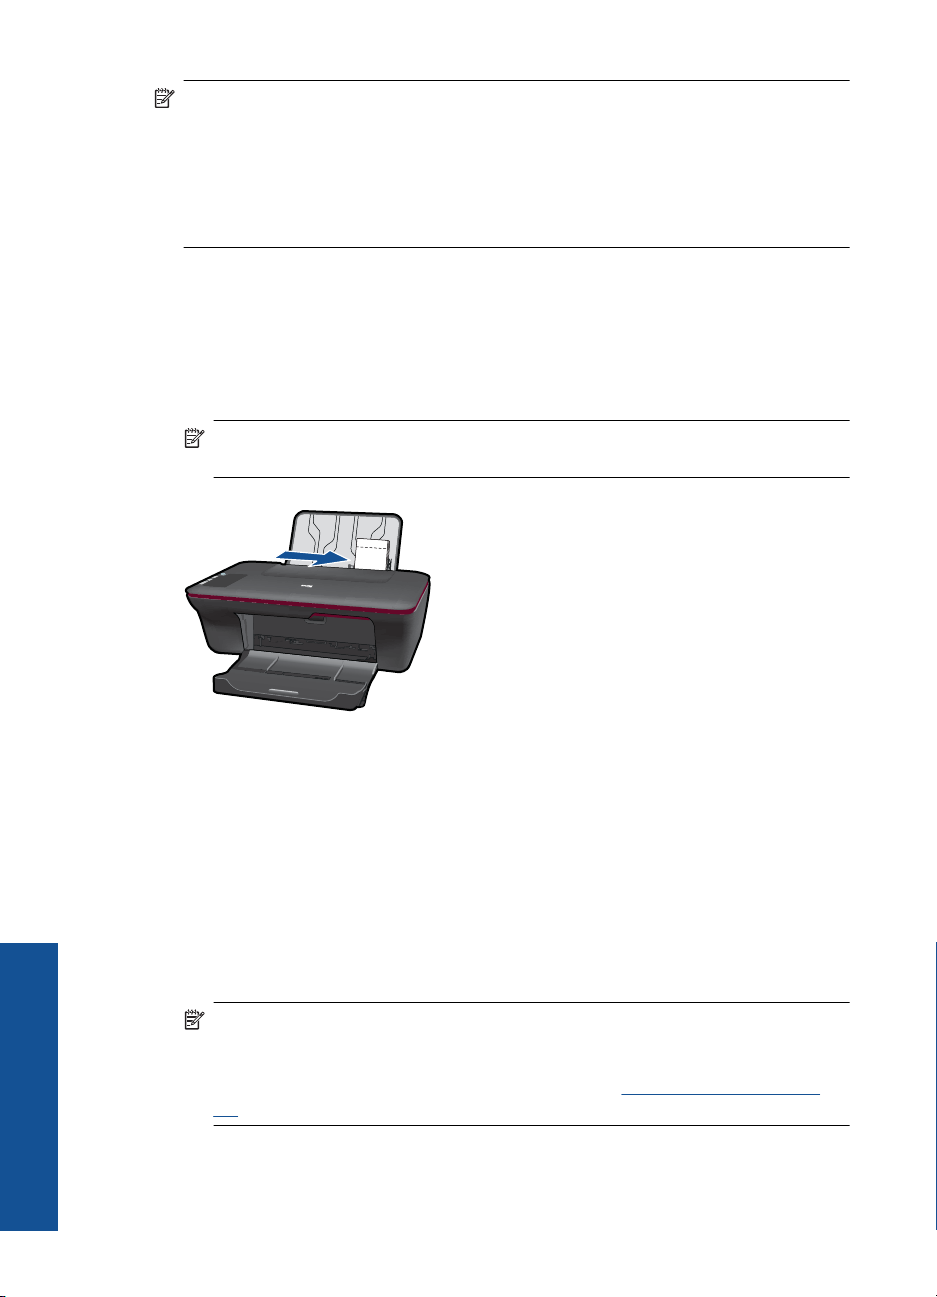
c. Slide paper-width guide to the left Slide paper-width guide to the left.
d. Load paper. Insert stack of paper into input tray with short edge forward and print side up.
Slide stack of paper down until it stops. Slide paper-width guide to the right until it stops at edge of paper.
Chapter 4
18 Paper basics
Paper basics
Load small-size paper a. Raise the input tray
Raise the input tray.
b. Lower the output tray Lower the output tray and pull out the tray extender.
Load media 19
Pa pe
r b as
ic s
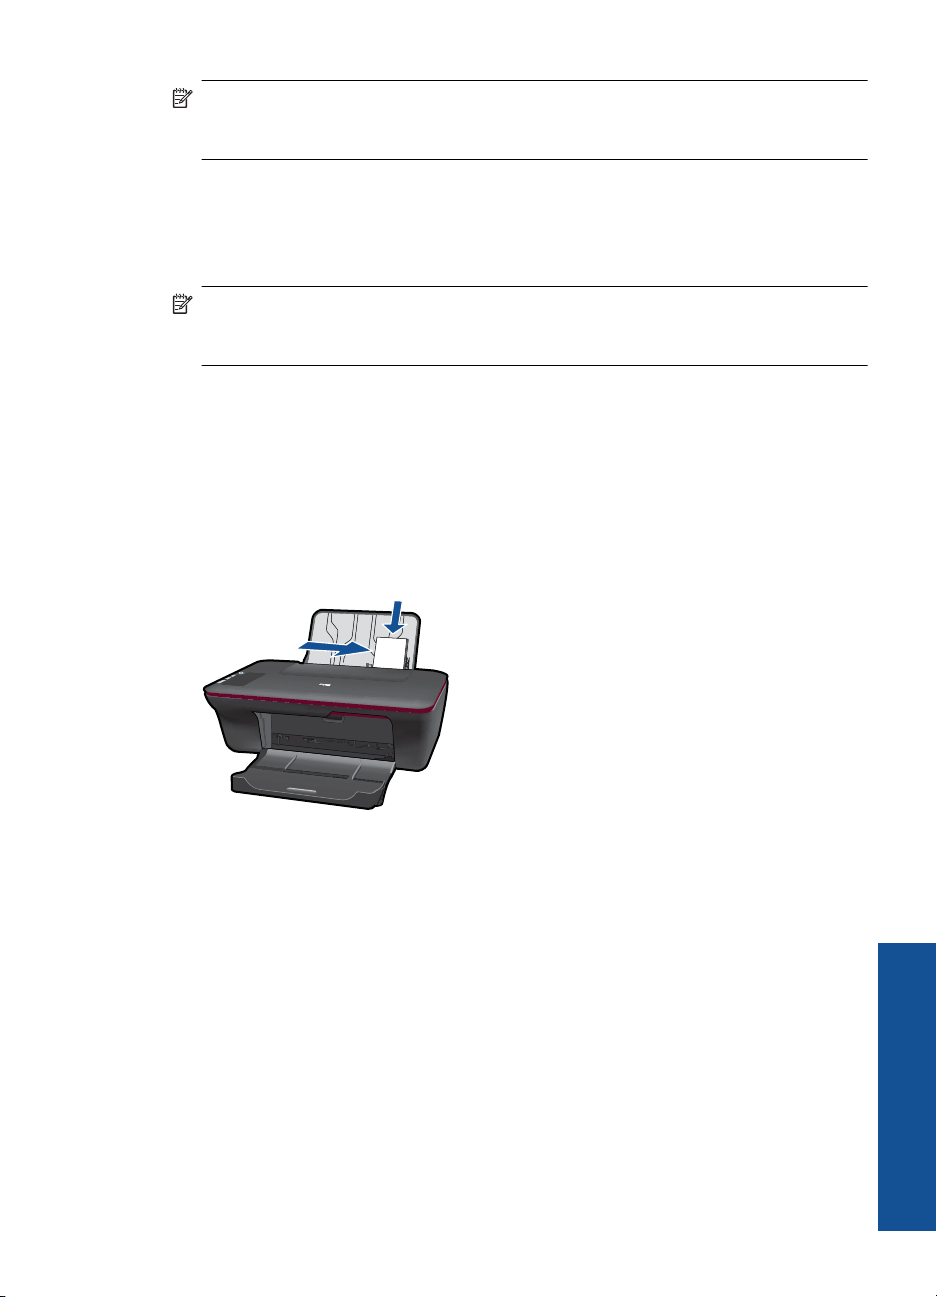
c. Slide paper-width guide to the left. Slide paper-width guide to the left.
d. Load paper. Insert stack of photo paper with short edge down and print side up. Slide stack of paper forward until it stops.
NOTE: If the photo paper you are using has perforated tabs, load photo paper so that tabs are on top.
Slide paper-width guide to the right until it stops at edge of paper.
Chapter 4
20 Paper basics
Paper basics
Load envelopes a. Raise the input tray
Raise the input tray.
b. Lower the output tray Lower the output tray and pull out the tray extender.
c. Slide paper-width guide to the left. Slide paper-width guide to the left.
Load media 21
Pa pe
r b as
ic s
Remove all paper from the main input tray. d. Load envelopes.
Insert one or more envelopes into far-right side of the input tray. The side to be printed on should face up. The flap should be on the left side and facing down.
Slide stack of envelopes down until it stops. Slide paper-width guide to the right against stack of envelopes until it stops.
Chapter 4
22 Paper basics
Paper basics
5 Copy and scan Copy documents or photos Scan to a computer Tips for copy and scan success
Copy documents or photos NOTE: All documents are copied in normal quality print mode. You cannot change the print mode quality when copying.
Do one of the following:
1-sided original to 1-sided copy a. Load paper.
Load either small photo paper or full-size paper in the input tray.
b. Load original. Lift lid on product.
Copy documents or photos 23
C op
y an
d sc
an
Load original print side down on right front corner of glass.
Close lid. c. Start copy.
Press either Start Copy Black or Start Copy Color. Increase the number of copies by pressing the button multiple times.
Scan to a computer NOTE: To scan to a computer, the HP All-in-One and computer must be connected and turned on.
Chapter 5
24 Copy and scan
C opy and scan
To scan to a computer:
Single page scan a. Load paper.
Load either small photo paper or full-size paper in the input tray.
b. Load original. Lift lid on product.
Load original print side down on right front corner of glass.
Scan to a computer 25
C op
y an
d sc
an
Close lid.
c. Start scan. Start the Scan job using the Printer Software. Click the HP All-in-One desktop
icon to open the Printer Software.
NOTE: You can also access the Printer Software by clicking Start > Programs > HP > HP Deskjet 2050 J510 > HP Deskjet 2050 J510
Select Scanner Actions. You will see scan options that you can select onscreen.
Tips for copy and scan success Load your original print side down on the right front corner of the glass.
Clean the scanner glass and make sure that there are no foreign materials adhering to it.
Click here to go online for more information.
Chapter 5
26 Copy and scan
C opy and scan
6 Work with cartridges Check the estimated ink levels Order ink supplies Replace the cartridges Use single-cartridge mode Cartridge warranty information
Check the estimated ink levels You can easily check the ink supply level to determine how soon you might need to replace a cartridge. The ink supply level shows an estimate of the amount of ink remaining in the cartridges.
To check the ink levels from the Printer Software 1. Click the HP All-in-One desktop icon to open the Printer Software.
NOTE: You can also access the Printer Software by clicking Start > Programs > HP > HP Deskjet 2050 J510 > HP Deskjet 2050 J510
2. In the Printer Software, click Printer Actions and then click Maintenance Tasks to access the Printer Toolbox.
3. Click the Estimated Ink Level tab.
NOTE: If you have installed a refilled or remanufactured cartridge, or a cartridge that has been used in another printer, the ink level indicator might be inaccurate or unavailable.
NOTE: Ink level warnings and indicators provide estimates for planning purposes only. When you receive a low-ink warning message, consider having a replacement cartridge available to avoid possible printing delays. You do not have to replace the cartridges until the print quality is unacceptable.
NOTE: Ink from the cartridges is used in the printing process in a number of different ways, including in the initialization process, which prepares the product and cartridges for printing, and in printhead servicing, which keeps print nozzles clear and ink flowing smoothly. In addition, some residual ink is left in the cartridge after it is used. For more information, see www.hp.com/go/inkusage.
Check the estimated ink levels 27
W or
k w
ith c
ar tr
id ge
s
Order ink supplies Before ordering cartridges, locate the correct cartridge number.
Locate the cartridge number on the printer The cartridge number is located inside the cartridge door.
Model No. xxxxx
HP Ink Cartridge
Product No.
xxxxxx xx
Locate the cartridge number in the Printer Software 1. Click the HP All-in-One desktop icon to open the Printer Software.
NOTE: You can also access the Printer Software by clicking Start > Programs > HP > HP Deskjet 2050 J510 > HP Deskjet 2050 J510
2. In the Printer Software, click Shop For Supplies Online. The correct cartridge number will be automatically displayed when you use this link.
To order genuine HP supplies for the HP All-in-One, go to www.hp.com/buy/supplies. If prompted, choose your country/region, follow the prompts to select your product, and then click one of the shopping links on the page.
NOTE: Ordering cartridges online is not supported in all countries/regions. If it is not available in your country/region, you may still view supplies information and print a list for reference when shopping at a local HP reseller.
Related topics Choose the right cartridges
Choose the right cartridges HP recommends that you use original HP cartridges. Original HP cartridges are designed and tested with HP printers to help you easily produce great results, time after time.
Related topics Order ink supplies
Chapter 6
28 Work with cartridges
W ork w
ith cartridges
Replace the cartridges
To replace the cartridges 1. Check power. 2. Load paper. 3. Remove cartridge.
a. Open cartridge door.
Wait for print carriage to move to center of the product. b. Press down to release cartridge, then remove it from slot.
Replace the cartridges 29
W or
k w
ith c
ar tr
id ge
s
4. Insert new cartridge. a. Remove cartridge from packaging.
b. Remove plastic tape using pink pull tab.
c. Slide cartridge into slot until it clicks into place.
Chapter 6
30 Work with cartridges
W ork w
ith cartridges
d. Close cartridge door.
5. Align cartridges.
Related topics Choose the right cartridges Order ink supplies
Use single-cartridge mode Use the single-cartridge mode to operate the HP All-in-One with only one print cartridge. The single-cartridge mode is initiated when a print cartridge is removed from the print cartridge carriage. During single-cartridge mode, the product can only print jobs from the computer.
NOTE: When the HP All-in-One operates in single-cartridge mode, a message is displayed on screen. If the message is displayed and two print cartridges are installed in the product, verify that the protective piece of plastic tape has been removed from each print cartridge. When plastic tape covers the print cartridge contacts, the product cannot detect that the print cartridge is installed.
Exit single-cartridge mode Install two print cartridges in the HP All-in-One to exit single-cartridge mode.
Related topics Replace the cartridges
Cartridge warranty information The HP cartridge warranty is applicable when the product is used in its designated HP printing device. This warranty does not cover HP ink products that have been refilled, remanufactured, refurbished, misused, or tampered with.
Cartridge warranty information 31
W or
k w
ith c
ar tr
id ge
s
During the warranty period the product is covered as long as the HP ink is not depleted and the end of warranty date has not been reached. The end of warranty date, in YYYY/ MM/DD format, may be found on the product as indicated:
For a copy of the HP Limited Warranty Statement, see the printed documentation that came with the product.
Chapter 6
32 Work with cartridges
W ork w
ith cartridges
7 Solve a problem This section contains the following topics:
Improve print quality Clear a paper jam Unable to print HP support
Click here to go online for more information.
Improve print quality 1. Make sure you are using genuine HP cartridges. 2. Check the Printer Software settings to make sure you have selected the appropriate
paper type and print quality from the Media drop-down list. 3. Check the estimated ink levels to determine if the cartridges are low on ink. For more
information, see Check the estimated ink levels. If the print cartridges are low on ink consider replacing them.
4. Align the printer cartridges
To align the cartridges from the Printer Software
NOTE: Aligning the cartridges ensures high-quality output. The HP All-in-One prompts you to align the cartridges every time you install a new cartridge. If you remove and reinstall the same print cartridge, the HP All-in-One will not prompt you to align the print cartridges. The HP All-in-One remembers the alignment values for that print cartridge, so you do not need to realign the print cartridges.
a. Load letter or A4 unused plain white paper into the input tray. b. In the Printer Software, click Printer Actions and then click Maintenence
Tasks to access the Printer Toolbox. c. The Printer Toolbox appears. d. Click the Device Services tab. e. Click Align Ink Cartridges tab. The product prints an alignment sheet. f. Load the cartridge alignment sheet print side down on the right front corner of the
glass. g. Press the Start Copy Black button. The product aligns the cartridges. Recycle
or discard the cartridge alignment sheet. 5. Print a diagnostics page if the cartridges are not low on ink.
To print a diagnostics page a. Load letter or A4 unused plain white paper into the input tray. b. In the Printer Software, click Printer Actions and then click Maintenence
Tasks to access the Printer Toolbox. c. Click Print Diagnostic Information to print a diagnostics page. Review the blue,
magenta, yellow, and black boxes on the diagnostics page. If you are seeing
Improve print quality 33
So lv
e a
pr ob
le m
streaks in the color and black boxes, or no ink in portions of the boxes, then automatically clean the cartridges
6. Clean the print cartridges automatically, if the diagnostic page shows steaks or missing portions of the color and black boxes.
To clean the cartridges automatically a. Load letter or A4 unused plain white paper into the input tray. b. In the Printer Software, click Printer Actions and then click Maintenence
Tasks to access the Printer Toolbox. c. Click Clean Ink Cartridges. Follow the onscreen instructions.
If the above solutions do not resolve the problem, click here for more online troubleshooting.
Chapter 7
34 Solve a problem
Solve a problem
Clear a paper jam Clear a paper jam.
To clear a paper jam 1. Press the cancel button to try to clear the jam automatically. If this does not work, the
paper jam will need to be cleared manually. 2. Locate the paper jam
Input tray If the paper jam is located near the back input tray, pull the paper gently out of the input tray.
Output tray If the paper jam is located near the front output tray, pull the paper gently out of
the output tray.
You may need to open the carriage door and slide the print carriage to the right to access the paper jam.
Clear a paper jam 35
So lv
e a
pr ob
le m
Inside of printer If the paper jam is located inside the printer, open the cleanout door located on
the bottom of the printer. Press tabs on both sides of the cleanout door.
Remove jammed paper.
Close the cleanout door. Gently push the door towards the printer until both latches snap into place.
3. Press the Start Copy Black or Start Copy Color button on the control panel to continue the current job.
If the above solutions do not resolve the problem, click here for more online troubleshooting.
Prevent paper jams Do not overfill the input tray. Remove printed papers from the output tray frequently. Ensure that paper loaded in the input tray lays flat and the edges are not bent or torn. Do not combine different paper types and paper sizes in the input tray; the entire stack
of paper in the input tray must be the same size and type. Adjust the paper-width guide in the input tray to fit snugly against all paper. Make sure
the paper-width guide does not bend the paper in the input tray. Do not force paper too far forward in the input tray.
Chapter 7
36 Solve a problem
Solve a problem
If the above solutions do not resolve the problem, click here for more online troubleshooting.
Unable to print Make sure that the printer is turned on and that there is paper in the tray. If you are still unable to print, try the following in order:
1. Check for error messages and resolve. 2. Disconnect and reconnect the USB cable. 3. Verify that the product is not paused or offline.
To verify that the product is not paused or offline
NOTE: HP provides a Printer Diagnostic Utility that can automatically fix this issue.
Click here to go online for more information. Otherwise, follow the steps below.
a. Depending upon your operating system, do one of the following: Windows 7: From the Windows Start menu, click Devices and Printers. Windows Vista: From the Windows Start menu, click Control Panel, and
then click Printers. Windows XP: From the Windows Start menu, click Control Panel, and then
click Printers and Faxes. b. Double-click the icon for your product to open the print queue. c. On the Printer menu, make sure there are no check marks next to Pause
Printing or Use Printer Offline. d. If you made any changes, try to print again.
4. Verify that the product is set as the default printer.
To verify that the product is set as the default printer
NOTE: HP provides a Printer Diagnostic Utility that can automatically fix this issue.
Click here to go online for more information. Otherwise, follow the steps below.
a. Depending upon your operating system, do one of the following: Windows 7: From the Windows Start menu, click Devices and Printers. Windows Vista: From the Windows Start menu, click Control Panel, and
then click Printers. Windows XP: From the Windows Start menu, click Control Panel, and then
click Printers and Faxes. b. Make sure the correct product is set as the default printer.
The default printer has a check mark in a black or green circle next to it.
Unable to print 37
So lv
e a
pr ob
le m
c. If the wrong product is set as the default printer, right-click the correct product and select Set as Default Printer.
d. Try using your product again. 5. Restart the print spooler.
To restart the print spooler
NOTE: HP provides a Printer Diagnostic Utility that can automatically fix this issue.
Click here to go online for more information. Otherwise, follow the steps below.
a. Depending upon your operating system, do one of the following:
Windows 7 From the Windows Start menu, click Control Panel, System and Security,
and then Administrative Tools.