
Перейти к контенту
Стиральные машины Zanussi
- Размер инструкции: 630.96 kB
- Формат файла: pdf
Если вы потеряли инструкцию от стиральной машины Zanussi FA 1023 (Aquacycle 1050), можете скачать файл для просмотра на компьютере или печати.
Инструкция для стиральной машины Zanussi FA 1023 (Aquacycle 1050) на русском языке. В руководстве описаны возможности и полезные функции, а также правила эксплуатации. Перед использованием внимательно ознакомьтесь с инструкцией.
Чтобы не читать всю инструкцию вы можете выполнить поиск по содержимому внутри инструкции и быстро найти необходимую информацию. Рекомендации по использованию помогут увеличить срок службы стиральной машины Zanussi FA 1023 (Aquacycle 1050). Если у вас появилась проблема, то найдите раздел с описанием неисправностей и способами их решения. В нем указаны типичные поломки и способы их решения.
-
Инструкции по эксплуатации
1
Zanussi FA 1023 (Aquacycle 1050) инструкция по эксплуатации
(42 страницы)
- Языки:Русский
-
Тип:
PDF -
Размер:
1.19 MB -
Описание:
Стиральная машина
Просмотр
На NoDevice можно скачать инструкцию по эксплуатации для Zanussi FA 1023 (Aquacycle 1050). Руководство пользователя необходимо для ознакомления с правилами установки и эксплуатации Zanussi FA 1023 (Aquacycle 1050). Инструкции по использованию помогут правильно настроить Zanussi FA 1023 (Aquacycle 1050), исправить ошибки и выявить неполадки.
INSTRUCTIONS BOOK
WASHING
MACHINES
TA 1050
TA 850
1. TECHNICAL CHARACTERISTICS
DIMENSIONS Height
Width
Depth
VOLTAGE / FREQUENCY
TOTAL POWER
WATER PRESSURE
Connection to the water network
Spin speed TA 1050
This washing machine complies with CEE directive 89-336 about the limitation of radioelectric disturbances and
directive CEE 73-23 for electrical safety.
Minimum
Maximum
TA 850
850 mm
400 mm
600 mm
230 V / 50 Hz
2300 W
0,05 MPa (0,5 bar)
0,8 MPa (8 bars)
Type 20×27
1000 rpm
850 rpm
2. WARNINGS
Keep this user’s manual with your washing machine. If you sell your washing machine or give it away, make sure that it is accompanied by its user’s manual. The new user can then be informed of how the washing machine operates and read relevant warnings.
These warnings have been written for your safety and for the safety of others. Please read these comments carefully before installing and using your washing machine. Thank you for your attention.
• When you receive your washing machine, unpack it or have it
unpacked immediately. Check its general appearance. Make
any reserves in writing on the delivery form and keep a copy.
• Your washing machine was designed for use by adults. Make
sure that children do not touch it or use it as a toy.
• Do not modify or attempt to modify the characteristics of this
washing machine. This could be dangerous for you.
• Your washing machine is intended for normal domestic use. Do
not use it for commercial or industrial purposes or for any
purpose other than that for which it was designed : to wash, to
rinse and to spin.
• Unplug the power suplly plug and close the water supply tap
every time after using your washing machine.
• Only wash articles that can resist machine washing. Refer to
the instructions on the label for each article.
• Do not wash underwear with bones, or any material without
hems, or torn materials in your washing machine.
• Remember to remove all coins, safety pins, boraches, screws,
etc., before each wash. They can cause serious damage if they
are left in your washing.
• Do not put articles in your washing machine if you have used a
solvent, alcohol, trichloroethylene, etc., to remove stains from
them. If you must use these stain removers, wait until the product has evaporated before putting the articles in the drum.
• Collect all small articles such as socks, belts, etc., in a small
cloth bag or pillow case.
• Use the quantity of detergent indicated in the «proportioning of
detergents» section.
• Always unplug the washing machine before cleaning it and
doing any maintenance.
• This washing machine is heavy. Take care when moving it.
• You must remove the packing on the washing machine before
use. Failure to remove all transport protection devices can
cause damage to the washing machine or nearby furniture.
The washing machine must be unplugged while packing is
being removed.
• Do not allow any one other than a qualified plumber to make
the hydraulic connections necessary to install your washing
machine.
• The washing machine must be plugged in to a power outlet with
a conform earth.
• Call a qualified electrician if the electrical installation in your
residence is such that you have to modify it before you can connect your washing machine.
• Please read the instructions in the «electrical connections»
chapter carefully before connecting your washing machine.
• After installing your washing machine, make sure that it is not
standing on its electrical power supply cable.
• When your machine is installed on a carpeted floor, make sure
that the carpet does not close off the ventilation openings near
the bottom of the machine.
• The power supply cable may be only replaced by the After
Sales Service.
• Your manufacturer cannot be held responsible for any damage
resulting from a nonconform installation.
• The symbol on the product or on its packaging indicates
that this product may not be treated as household waste. Instead it shall be handed over to the applicable collection point for
the recycling of electrical and electronic equipment. By ensuring this product is disposed of correctly, you will help prevent
potential negative consequences for the environment and
human health, which could otherwise be caused by inappropriate waste handling of this product. For more detailed information about recycling of this product, please contact your local
city office, your household waste disposal service or the shop
where you purchased the product.
146 8714 00 — 07/05
1
3. INSTALLATION
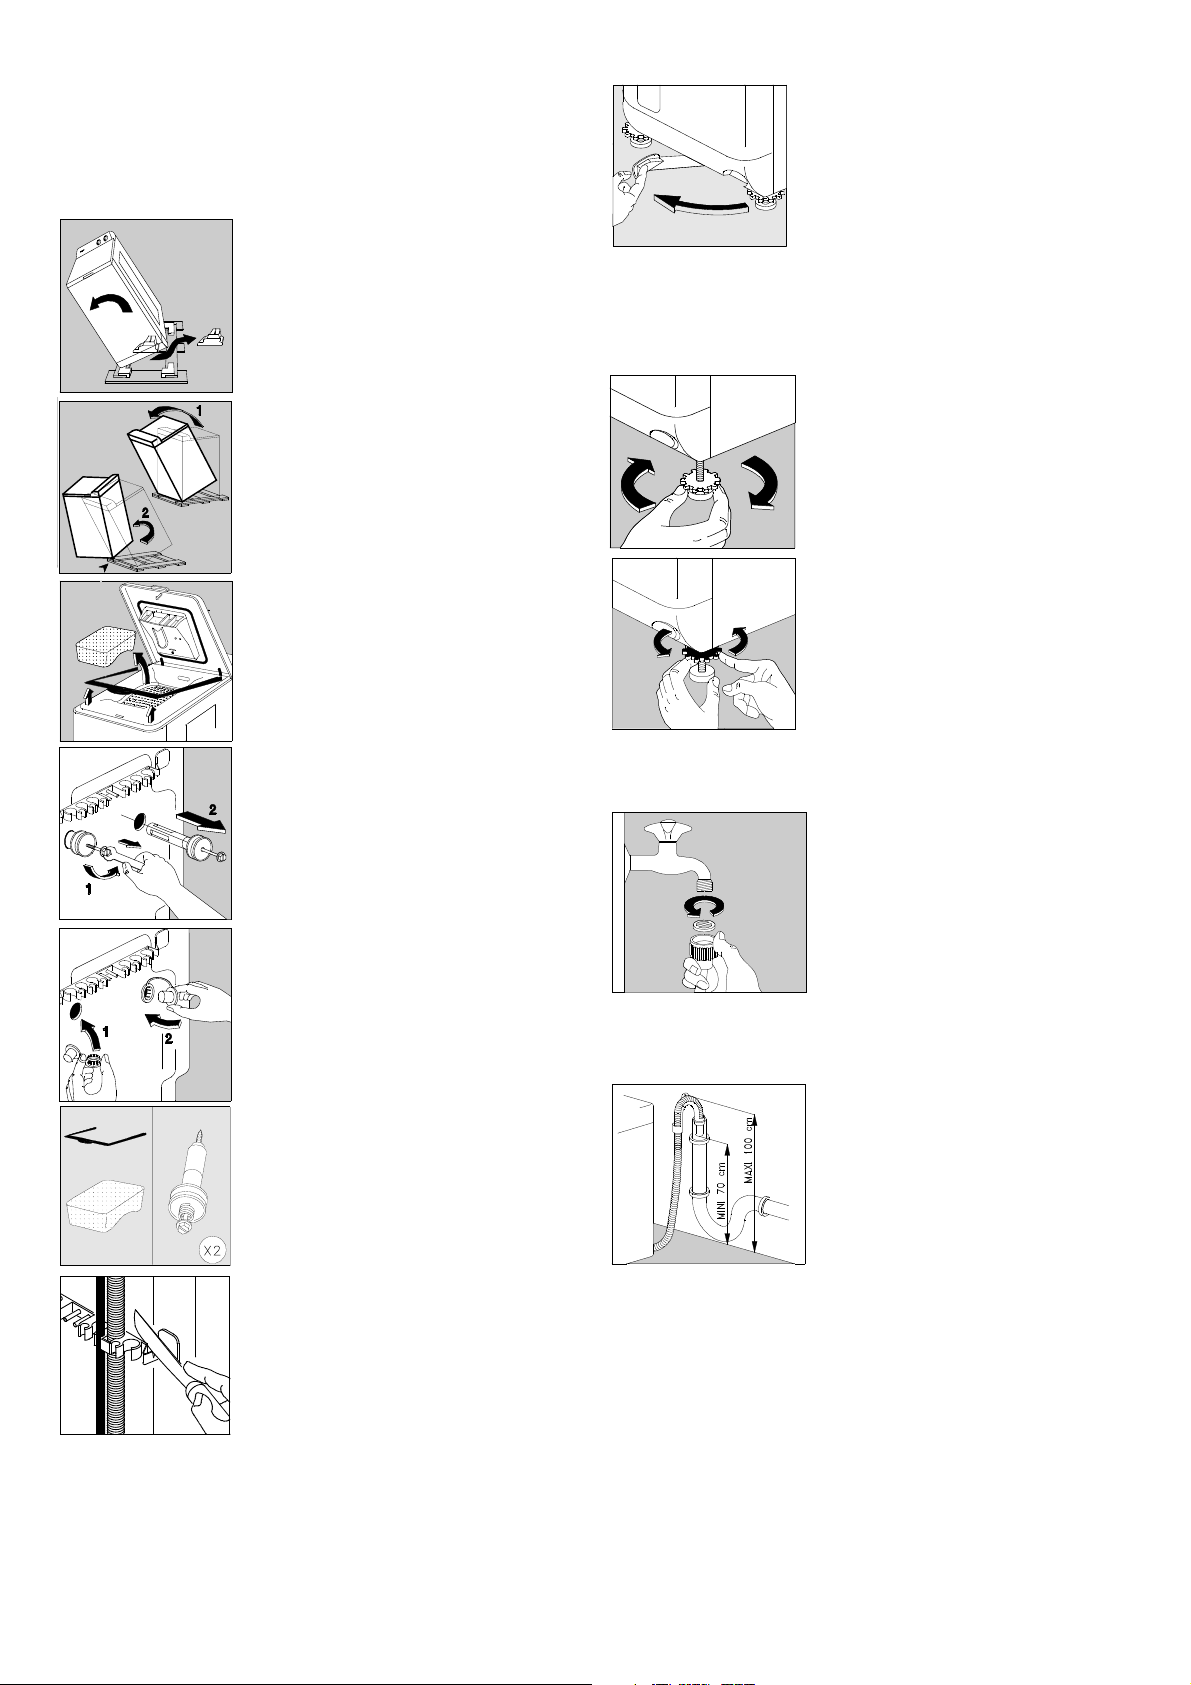
3.1. Unpacking
Packing used to protect internal parts of the washing
machine during transport must be removed before the
washing machine is put into service for the first time.
Remove all packing from the
washing machine. Tilt the washing
machine sideways and then remove
the packing under the motor, and
straighten the washing machine.
Tilt the washing machine backwards, rotate it by a quarter of a turn
on one of its corner to remove the
transport base.
Open the washing machine lid and
remove the immobilization packing
and plastic films.
Close the lid.
3.3. Moving your washing machine
If you want to move your washing
machine, lift it onto its rollers by pulling the lever at the bottom of the
washing machine all the way to the
left. When you have put your
washing machine into the required
location, put the lever back into its
initial position.
3.4. Leveling
Precise leveling will prevent vibrations, noise and movements of the washing machine during operation.
Make the washing machine level by
adjusting the leveling screw that is
too short.
Unscrew the stand and locking collar assembly (lift the washing machine if necessary).
When the washing machine is stable, maintain the stand on the
ground and turn the locking collar as
far as posible.
Use a 10 mm spanner to remove the
two screws and spacers at the back.
You can now see the openings that
must be closed with the caches in the
pack attached to the washing machine; do not forget to fold down the
central capsule.
Make sure that you have removed all
these parts from your washing machine and keep them so that you can
use them again if you need them for
future transport.
If you want to keep your washing machine aligned with the adjacent furniture, you can cut the pipe support
strip at the back of your washing machine. Leave the two side closers in
place.
3.2. Position
Put the washing machine on a flat hard floor in a well ventilated room.
Make sure that your washing machine does not touch the
wall or any other furniture in the room.
3.5. Water inlet
Screw the supply ppe connector
onto the water inlet tap (20×27
mm), remembering to use the
washer provided with the washing
machine.
Open the water inlet tap.
You cannot prolong the water inlet
pipe. If it is too short, buy a longer
pipe provided for this purpose.
3.6. Drain
The drain siphon must be placed
inside a drain pipe (or in a washbasin) at a height of between 70 and
100 cm. Make sure that it cannot
fall.
•Important: the drain pipe must
never be prolonged. If it is too
short, call a professional.
3.7. Electrical connection
You can only connect this washing machine to 230 V single
phase power supply.
Check rating of the fuse line: 10 A at 230V.
The washing machine must not be connected through an
extension cable or a power bar.
Check that the earthing connection is conform with the regulations in force.
2
4. USING
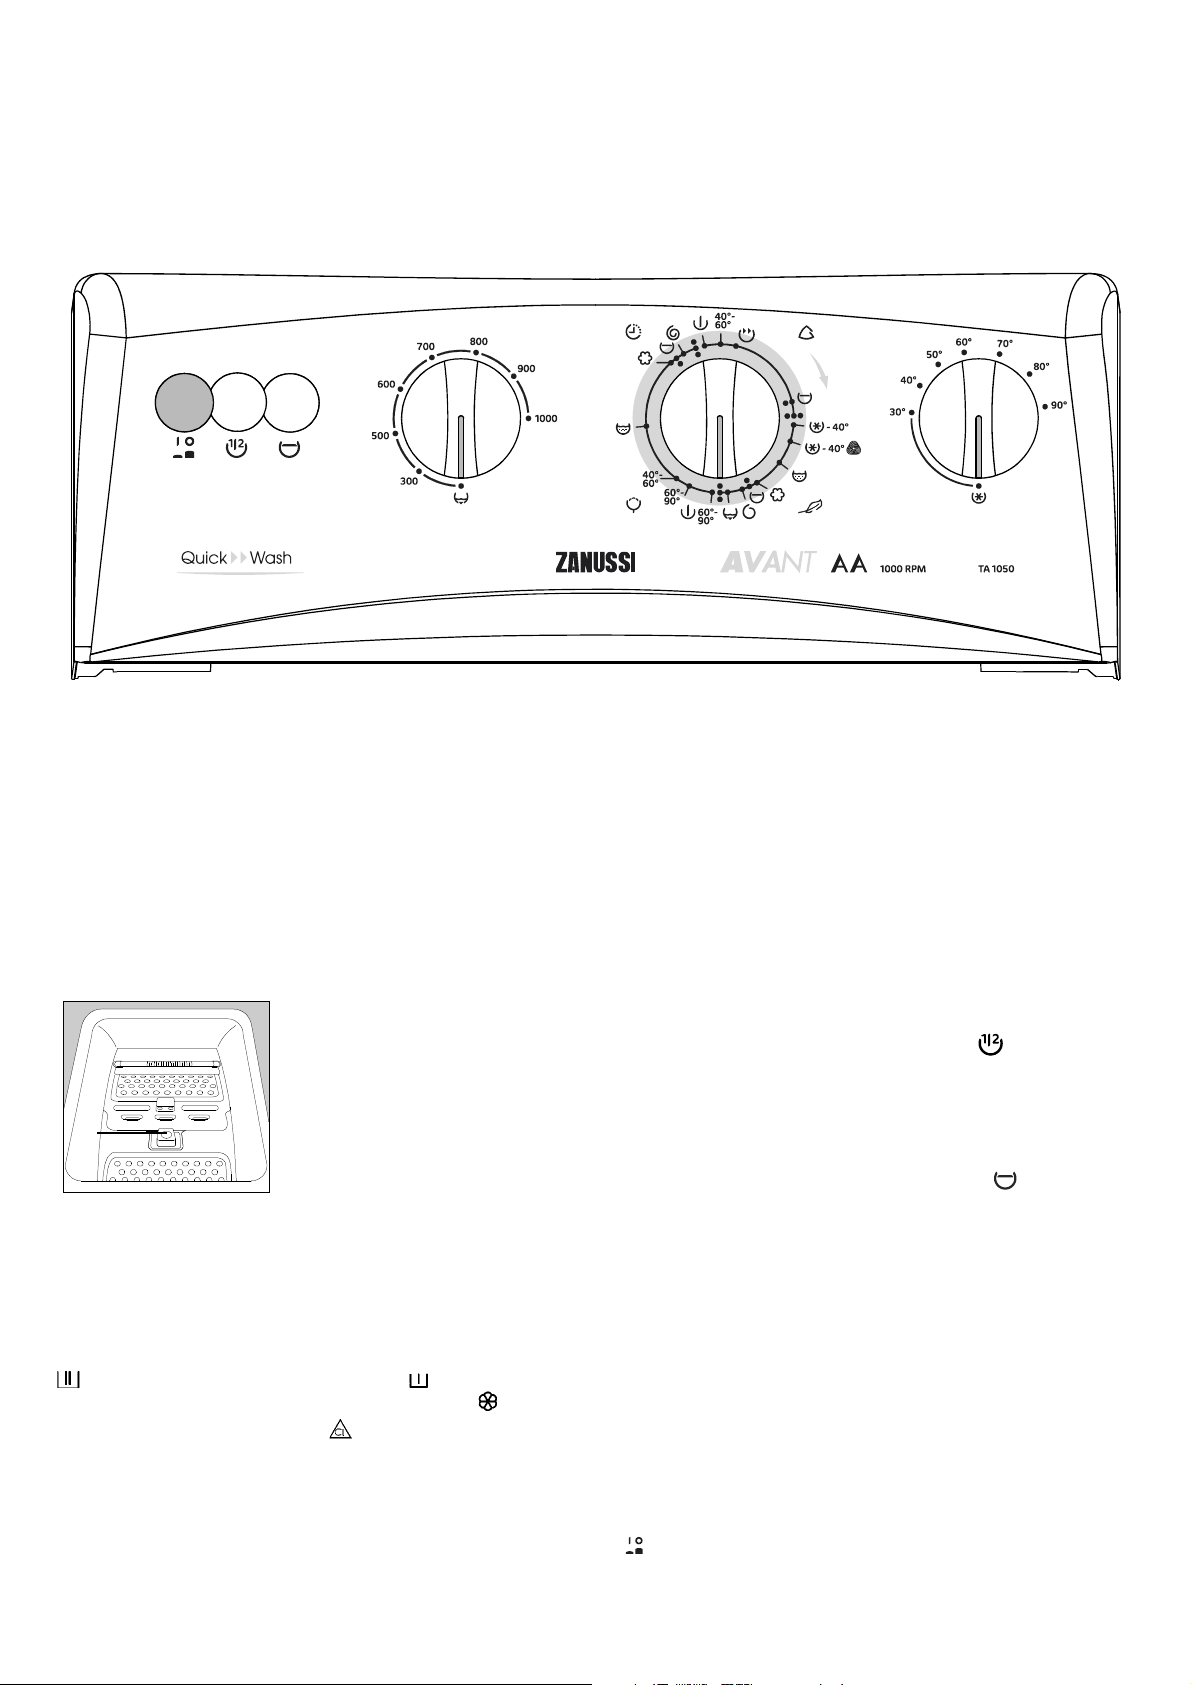
4.1. The control panel
1 — «On/Off» pushbutton 4 — Spinning speed variator
2 — «Half load» pushbutton 5 — Programme selector
3 — «Rinse hold» pushbutton 6 — Temperature selector
Presented model : TA 1050
1
2
3
4
4.2. How to do a wash ?
Before the first wash in your washing machine, we recommend that you should do a preliminary wash at 90°C with detergent but without any washing to clean the tub.
4.2.1. Loading the washing
• Lift the machine cover.
• Open the drum by pressing on the locking button A; the
two flaps automatically separate.
• Insert the washing, close the drum and the cover of your
washing machine.
Warning : before you close the
cover of your washing machine,
make sure that the drum door is
properly closed:
•the two flaps latched together,
A
•the locking button A extended.
5
The knob indicates the possible spinnings on the coton programmes. These spinnings are reduced for the synthetics,
wool and delicate cycles.
6
4.2.4. Choice of the temperature
Choose the wash temperature applicable for the selected
programme (using the information given in the programmes
table) and comply with the temperature shown on the care
label for each article to be washed (see the washing guide).
4.2.5. Choice of the pushbuttons
Press the chosen pushbuttons.
4.2.5.1. «Half load» pushbutton
This pushbutton allows to wash small quantity of linen not
much soiled (max. 2,5 kg) on cotton programmes only by reducing the water quantity during rinsings.
4.2.2. Proportioning of detergents
Your washing machine was designed to reduce water and
detergent consumption, therefore reduce the doses recommended by detergent manufacturers.
Pour the powder detergent dose into the wash compartment
and into the prewash compartment if you chose the
«prewash» option. Pour in the softener into the compartment and Javel water into the compartment if you wish.
If you are using a different type of detergent, refer to the «detergents and additives» section in the washing guide.
4.2.3. Choice of the spinning speed
Choose the spinning speed which corresponds to the nature
of your laundry and to the degree of humidity wished at the
end of the wash.
4.2.5.2. «Rinse hold» pushbutton
If you use this pushbutton, the tub remains full of water at the
end of the last rinse to prevent the washing from becoming
creased if it is not taken out of the drum as soon as the
washing machine is stopped.
4.2.6. Choice of the programme
Select the programme depending on the nature and the degree of soil of the laundry. Turn the programme selector
clockwise to select the chosen programme.
4.2.7. Starting the programme
After you choose the washing programme, press the On/Off
«» pushbutton to start the cycle.
3
WASHING MACHINE ЫЕШКФДЦТФÅ ЬФfiШТФ FA 1023 SINTETICOS 30°-60° J DELICADOS 30°-40° K LANA 30°-40° L SINTETICOS CON PRELAV. 30°-60° H ACLARADOS M SUAVIZANTES N DESCARGA P P B A C D L K J H G F 30° 90° 80° 70° 60° 50° 40 ° 35.292.722/0 N M 60°-90° B BLANCOS 40°-60° B COLORES RESISTENTES 30°-40° C
Dear customer, Please read these operating instructions carefully and pay particular attention to the safety notes indicated in the first pages. We recommend that you keep this instruction booklet for future reference and pass it on to any future owners. Transport damages When unpacking the
Warnings Disposal 4-5 Maintenance 5 Tips for environmental protection 5 Technical specifications Installation 6 7-8 Unpacking 7 Hydraulic connection 7 Levelling 8 Electrical connection 8 Your new washing machine 9 Description of the appliance 9 Detergent dispenser drawer Use 10 Control panel 10
Warnings The following warnings are provided in the interests of overall safety. You must read them carefully before installing or using the appliance. Installation • Leave the porthole door slightly ajar when the appliance is not in use. This preserves the door seal and prevents the formation of
• Keep all detergents in a safe place out of children’s reach. • Children are often not aware of how dangerous electrical appliances can be. When the machine is working, children should be carefully supervised and not be allowed to play with the appliance. • Make sure that children or pets do not
Technical specifications DIMENSIONS Height Width Depth 85 cm 60 cm 60 cm MAXIMUM LOAD Cotton Synthetics Delicates Woollens 4,5 kg 2 kg 2 kg 1 kg SPIN SPEED 1050 rpm max. POWER SUPPLY VOLTAGE/FREQUENCY TOTAL POWER ABSORBED MINIMUM FUSE PROTECTION 220-230 V/50 Hz 2000 W 10 A WATER PRESSURE 5 N/cm2 80
Transit security bars Hydraulic connection Before starting the machine up, the transport security bars must be removed as follows: You are advised to keep all the transport security bars in case the appliance has to be transported again. There should be a COLD WATER tap near the washing machine
90 cm. Max. 60 cm. Min. 1,5 m. Max. Electrical connections IMPORTANT: The distance from the floor to the highest part of the hose should be between 60 to 90 cm. (It is advised to be between 60 and 70 cm). The hose must not be bent nor twisted to avoid clogging. Should a prolongation of the
This new machine meets all modern requirements for effective treatment of laundry with low water, energy and detergent consumption. • The temperature selector dial will allow you to choose the most suitable temperature for your laundry. • The balance control device ensures the machine is stable
Use Control panel P B A N C M D L K 30° 90° 8 60° 50° 4 0° 5 70° 4 F 3 J H G 2 0° 1 6 7 1. Programme chart 6. Temperature selector It will help you to choose the most suitable washing programme for your laundry. This control allows you to select the temperature of the washing cycle in accordance
The following weights are indicative: bathrobe Sorting the laundry Follow the wash code symbols on each garment label and the manufacturer’s washing instructions. Sort the laundry as follows: whites, coloureds, synthetics, delicates, woollens. Temperatures 90° 60° for normally soiled white cottons
Quantity of detergent to be used Ink: depending on the type of ink, moisten the fabric first with acetone (*), then with acetic acid; treat any residual marks on white fabrics with bleach and then rinse thoroughly. The type and quantity of detergent will depend on the type of fabric, load size,
These symbols appear on fabric labels, in order to help you choose the best way to treat your laundry. Energetic wash 95 60 40 30 Max. wash temperature 95°C Max. wash temperature 60°C Max. wash temperature 40°C Max. wash temperature 30°C Hand wash Delicate wash 60 Bleaching Bleach in cold water 40
4. Select the temperature Operating sequence Turn the dial to the required setting. Before washing your first load of laundry, we recommend that you run a cotton cycle at 60°C, with the machine empty, in order to remove any manufacturing residue from the drum and tub. Pour half a measure of
ENGLISH 7. At the end of the programme The machine stops automatically. The mains on light goes out. If you have selected a programme which ends with the water of the last rinse left in the tub, drain the water before opening the door. Select programme “P” (drain) or “G” (spin). Wait one or two
Programme table Washing programmes for cotton and linen Load: 4,5 kg Additional functions Programme Temp. Fabrics A 60°-90° WHITES WITH PREWASH, for example work garments, sheets, household linen, underwear, towels B B C 60°-90° 40°-60° 30°-40° D Rinses COLD F Softeners COLD G Long spin WHITES
Washing programmes for synthetics, mixed fabrics, delicates and wool Load: 2 kg, wool 1 kg Addi-tional functions DESCRIPTION Programme Temp. Fabrics H 30°-60° SYNTHETICS WITH PREWASH, for example underwear, coloured items, shirts, blouses (*) Prewash at 30°C Wash at 30°-60°C 3 rinses Water drain J
Maintenance 1. Bodywork 3. Cleaning of the drainage area Clean the outside of the machine with warm water and a neutral, non-abrasive household detergent. Rinse with clean water and dry with a soft cloth. The drainage area must be cleaned if the pump has been blocked with objects such as buttons,
6. Frost precautions If it takes longer to fill up the washing machine it is time to check the water inlet hose filter it may be clogged. If the machine is installed in a place where the temperature could drop below 0°C, proceed as follows: Turn off the water tap. • disconnect the appliance;
Something not working? Problems which you can resolve yourself. Problem Possible cause • The machine does not start up: • The door is not firmly closed. • The machine is not plugged in or there is no power at the socket. • The main fuse has blown. • The programme selector is not positioned
If you are unable to identify or solve the problem, contact our service centre. Before telephoning, make a note of the model, serial number and purchase date of your machine: the Service Centre will require this information. Mod. ………. Prod. No. ……….. Mod. ………. Prod. No.
삇ʇeÏ˚È ÔÓÍÛÔ‡Úeθ! èÓÒËÏ ‚‡Ò ‚ÌËχÚeθÌÓ ËÁÛ˜ËÚ¸ ‰‡ÌÌÓe ÛÍÓ‚Ó‰ÒÚ‚Ó ÔÓ ˝ÍÒÔÎÛ‡Ú‡ˆËË Ë Ó·‡ÚËÚ¸ ÓÒÓ·eÌÌÓe ‚ÌËχÌËe ̇ ÔË‚e‰eÌÌ˚e ̇ Ôe‚˚ı ÒÚ‡Ìˈ‡ı Ò‚e‰eÌËfl ÔÓ ·eÁÓÔ‡ÒÌÓÒÚË. êeÍÓÏẻÛeÏ ‚‡Ï ÒÓı‡ÌËÚ¸ ˝ÚÓ ÛÍÓ‚Ó‰ÒÚ‚Ó ‰Îfl ÔÓθÁÓ‚‡ÌËfl ËÏ ‚ ·Û‰Û˘eÏ Ë Ôee‰‡Ú¸ e„Ó ‚ÓÁÏÓÊÌ˚Ï ·Û‰Û˘ËÏ ‚·‰eθˆ‡Ï.
ëÓ‰eʇÌËe ìÚËÎËÁ‡ˆËfl êeÍÓÏẻ‡ˆËË ÔÓ Á‡˘ËÚe ÓÍÛʇ˛˘eÈ Òe‰˚ ìıÓ‰ 24-25 25 25 íeıÌ˘eÒÍËe ı‡‡ÍÚeËÒÚËÍË 26 ìÒÚ‡Ìӂ͇ ê‡ÒÔ‡Íӂ͇ 27 èÓ‰Íβ˜eÌËe Í ‚Ó‰ÓÔÓ‚Ó‰Û Ë ÍaÌaÎËÁaˆËË 27 Ç˚‡‚ÌË‚‡ÌËe χ¯ËÌ˚ 28 ùÎeÍÚ˘eÒÍÓe ÔÓ‰Íβ˜eÌËe 28 LJ¯‡ ÌÓ‚‡fl ÒÚˇθ̇fl χ¯Ë̇ 29 éÔËÒ‡ÌËe ÔË·Ó‡ 29 ÑÓÁ‡ÚÓ ÏÓ˛˘e„Ó
LJÊÌ˚e Ò‚e‰eÌËfl ÔÓ ·eÁÓÔ‡ÒÌÓÒÚË ùÚË Ò‚e‰eÌËfl ÔË‚Ó‰flÚÒfl ‚ ËÌÚeeÒ‡ı ·eÁÓÔ‡ÒÌÓÒÚË. èee‰ ÛÒÚ‡ÌÓ‚ÍÓÈ ËÎË ˝ÍÒÔÎÛ‡Ú‡ˆËeÈ ÔË·Ó‡ Ëı ÌeÓ·ıÓ‰ËÏÓ Ú˘‡ÚeθÌÓ ËÁÛ˜ËÚ¸. • àÒÔÓθÁÛÈÚe Î˯¸ eÍÓÏẻÛeÏÓe ÍÓ΢eÒÚ‚Ó ÒÏfl„˜ËÚeÎfl ‰Îfl Ú͇ÌeÈ. Ö„Ó ˜eÁÏeÌÓe ÍÓ΢eÒÚ‚Ó ÏÓÊeÚ ÔÓ‚e‰ËÚ¸ ·eθe. • Ko„‰a ÔpË·op Ìe
ìÚËÎËÁ‡ˆËfl ìÔ‡ÍÓ‚Ó˜Ì˚e χÚeˇÎ˚ å‡ÚeˇÎ˚, ÔÓÏe˜eÌÌ˚e ÒËÏ‚ÓÎÓÏ Ôe‰Ì‡Á̇˜eÌ˚ ‰Îfl Ôee‡·ÓÚÍË. 凯Ë̇ ÑÎfl ÛÚËÎËÁ‡ˆËË ‚‡¯eÈ ÒÚ‡ÓÈ ÒÚˇθÌÓÈ Ï‡¯ËÌ˚ ËÒÔÓθÁÛÈÚe ÒÔeˆË‡Î¸ÌÓ Ôe‰Ì‡Á̇˜eÌÌ˚e Ò‚‡ÎÍË. ÇÌeÒËÚe Ò‚ÓÈ ‚Í·‰ ‚ ÔÓ‰‰eʇÌËe ˜ËÒÚÓÚ˚ ‚ ‚‡¯eÈ ÒÚ‡Ìe! , >êÖ< = ÔÓÎË˝ÚËÎeÌ >PS< = ÔÓÎËcÚËpoÎ >êê< =
íeıÌ˘eÒÍËe ı‡‡ÍÚeËÒÚËÍË êÄáåÖêõ Ç˚ÒÓÚ‡ òËË̇ ÉÎÛ·Ë̇ 85 ÒÏ 60 ÒÏ 60 ÒÏ åÄäëàåÄãúçÄü áÄÉêìáäÄ ëìïéÉé ÅÖãúü ïÎÓÔÓÍ ëËÌÚeÚË͇ íÓÌÍËe Ú͇ÌË òeÒÚ¸ 4,5 Í„ 2 Í„ 2 Í„ 1 Í„ ëäéêéëíú éíÜàåÄ å‡ÍÒËχθ̇fl 1050 Ó·/ÏËÌ èàíÄçàÖ çÄèêüÜÖçàÖ/óÄëíéíÄ éÅôÄü èéíêÖÅãüÖåÄü åéôçéëíú åàçàåÄãúçÄü åéôçéëíú
èÓ‰Íβ˜eÌËe Í ‚Ó‰ÓÔÓ‚Ó‰Û Ë ÍaÌaÎËÁaˆËË èee‰ ‚Íβ˜eÌËeÏ Ï‡¯ËÌ˚ ÌeÓ·ıÓ‰ËÏÓ Û‰‡ÎËÚ¸ ËÒÔÓθÁÓ‚‡ÌÌ˚e ‰Îfl Ôee‚ÓÁÍË ÍeÔeÊÌ˚e ¯Ú˚Ë ÒÎe‰Û˛˘ËÏ Ó·‡ÁÓÏ. êeÍÓÏẻÛeÚÒfl ÒÓı‡ÌËÚ¸ Ëı ̇ ÒÎÛ˜‡È Ôee‚ÓÁÍË Ï‡¯ËÌ˚ ‚ ·Û‰Û˘eÏ. ç‡ ÒÚeÌe fl‰ÓÏ ÒÓ ÒÚˇθÌÓÈ Ï‡¯ËÌÓÈ ‰ÓÎÊeÌ Ì‡ıÓ‰ËÚ¸Òfl Í‡Ì ïéãéÑçéâ ÇéÑõ Ò „‡ÁÓ‚ÓÈ
ÇÄÜçé: ê‡ÒÒÚÓflÌËe ÓÚ ÔÓ· ‰Ó ‚eıÌeÈ ˜‡ÒÚË ¯Î‡Ì„‡ ‰ÓÎÊÌÓ ÒÓÒÚ‡‚ÎflÚ¸ ÓÚ 60 ‰Ó 90 ÒÏ (êeÍÓÏẻÛeÚÒfl ‡ÒÒÚÓflÌËe ÓÚ 60 ‰Ó 70 ÒÏ). ò·̄ Ìe ‰ÓÎÊeÌ ÒÊËχڸÒfl ËÎË ÔeeÍۘ˂‡Ú¸Òfl, ˜ÚÓ·˚ Ìe Á‡ÚÛ‰ÌflÚ¸ ÔÓıÓʉeÌËe ‚Ó‰˚. èË ÌeÓ·ıÓ‰ËÏÓÒÚË ËÒÔÓθÁÓ‚‡ÌËfl Û‰ÎËÌËÚeÎfl ÒÎË‚ÌÓ„Ó ¯Î‡Ì„‡ e„Ó ‰ÎË̇ ÌË ‚ ÍÓeÏ ÒÎÛ˜‡e Ìe
ùÚ‡ ÌÓ‚‡fl ÒÚˇθ̇fl χ¯Ë̇ ÓÚ‚e˜‡eÚ ÒÓ‚eÏeÌÌ˚Ï Úe·Ó‚‡ÌËflÏ ÔÓ ˝ÙÙeÍÚË‚ÌÓÈ ÒÚËÍe ·eθfl Ò ÌËÁÍËÏ ÔÓÚe·ÎeÌËeÏ ‚Ó‰˚, ˝ÎeÍÚÓ˝Ìe„ËË Ë ÏÓ˛˘Ëı Òe‰ÒÚ‚. • ëeÎeÍÚÓ ÚeÏÔe‡ÚÛ˚ ÔÓÁ‚ÓÎËÚ ‚‡Ï ‚˚·‡Ú¸ ̇˷ÓÎee ÔÓ‰ıÓ‰fl˘Û˛ ÚeÏÔe‡ÚÛÛ ‰Îfl ÒÚËÍË ‚‡¯e„Ó ·eθfl. ENGLISH LJ¯‡ ÌÓ‚‡fl ÒÚˇθ̇fl χ¯Ë̇ êìëëäà •
ùÍÒÔÎÛ‡Ú‡ˆËfl è‡Ìeθ ÛÔ‡‚ÎeÌËfl P B A N C M D L K 30° 90° 8 60° 50° 4 0° 5 7 0° 4 F 3 J H G 2 0° 1 6 7 1. èÓ„‡ÏÏ̇fl ͇ÚӘ͇ 6. ëeÎeÍÚÓ ÚeÏÔe‡ÚÛ˚ é̇ ÔÓÁ‚ÓÎËÚ ‚‡Ï ‚˚·‡Ú¸ ̇˷ÓÎee ÔÓ‰xo‰fl˘Û˛ ÔÓ„‡ÏÏÛ ÒÚËÍË ‰Îfl ‚‡¯e„Ó ·eθfl. чÌÌ˚È Ó„‡Ì ÛÔ‡‚ÎeÌËfl ÔÓÁ‚ÓÎfleÚ ‚˚·Ë‡Ú¸ ÚeÏÔe‡ÚÛÛ ˆËÍ· ÒÚËÍË,
ëӷ≇ÈÚe Û͇Á‡ÌËfl ÒËÏ‚ÓÎÓ‚ ÚËÔ‡ ÒÚËÍË ‰Îfl ͇ʉÓÈ ÒÚˇeÏÓÈ ‚e˘Ë, ‡ Ú‡ÍÊe ËÌÒÚÛ͈ËË ËÁ„ÓÚÓ‚ËÚeÎfl ÔÓ ÒÚËÍe. ê‡ÒÒÓÚËÛÈÚe ·eθe ÒÎe‰Û˛˘ËÏ Ó·‡ÁÓÏ: ·eÎÓe ·eθe, ˆ‚eÚÌÓe, ÒËÌÚeÚË͇, ÚÓÌÍËe Ú͇ÌË, ¯eÒÚ¸. ÇeÒ ·eθfl èË‚e‰eÌÌ˚È ÌËÊe ‚eÒ fl‚ÎfleÚÒfl ÔË·ÎËÁËÚeθÌ˚Ï: ŇÌÌ˚È ı‡Î‡Ú ë‡ÎÙeÚ͇ èÓ‰Ó‰eflθÌËÍ
óeÌË· ¯‡ËÍÓ‚ÓÈ Û˜ÍË Ë ÍÎeÈ: ÒÏÓ˜ËÚe ‡ˆeÚÓÌÓÏ (*), ÔÓÎÓÊËÚe ‚e˘¸ ̇ Ïfl„ÍÛ˛ Ú̸͇ Ë ‡ÁÓÏÌËÚe ÔflÚÌÓ. ëÚˇθ̇fl χ¯Ë̇ Ó·ÓÛ‰Ó‚‡Ì‡ ÒËÒÚeÏÓÈ eˆËÍÛÎflˆËË, ÍÓÚÓ‡fl Ó·eÒÔe˜Ë‚‡eÚ ÓÔÚËχθÌÓe ËÒÔÓθÁÓ‚‡ÌËe ÍÓ̈eÌÚËÓ‚‡ÌÌÓ„Ó ÏÓ˛˘e„Ó Òe‰ÒÚ‚‡. èÓχ‰‡: ÒÏÓ˜ËÚe ‡ˆeÚÓÌÓÏ, Í‡Í ÓÔËÒ‡ÌÓ ‚˚¯e, Á‡ÚeÏ
ENGLISH O©enw ©asto na belwe estw ™tiketki s ukazaniåmi po stirke. NORMALWNAÅ STIRKA STIRKA 95 60 40 30 Stirka pri 95° Stirka pri 60° Stirka pri 40° Stirka pri 30° 60 BEREËNAÅ STIRKA OTBELIVANIE GLAËENIE HIMÂISTKA 40 40 Ru©naå stirka 30 MoΩno otbelivatw v holodnoj vode Ne otbelivatw Gladitw pri
4. Ç˚·eËÚe ÚeÏÔe‡ÚÛÛ èÓÒÎe‰Ó‚‡ÚeθÌÓÒÚ¸ ‡·ÓÚ˚ èÓ‚eÌËÚe ÒeÎeÍÚÓ Ì‡ ÌeÓ·ıÓ‰ËÏÓe Á̇˜eÌËe. èee‰ Ôe‚ÓÈ ÒÚËÍÓÈ ·eθfl eÍÓÏẻÛeÏ ‚‡Ï ‚˚ÔÓÎÌËÚ¸ ÔÓ„‡ÏÏÛ ÒÚËÍË ıÎÓÔ˜‡ÚÓ·ÛχÊÌÓ„Ó ·eθfl ÔË 60°ë Ò ÌeÁ‡„ÛÊeÌÌÓÈ Ï‡¯ËÌÓÈ, ˜ÚÓ·˚ Ó˜ËÒÚËÚ¸ ·‡‡·‡Ì Ë ·‡Í ÓÚ ‚Òeı ÔÓÏ˚¯ÎeÌÌ˚ı Áa„pflÁÌeÌËÈ. ç‡Ò˚Ô¸Úe
ENGLISH 7. Ç ÍÓ̈e ÔÓ„‡ÏÏ˚ 凯Ë̇ ‚˚Íβ˜ËÚÒfl ‡‚ÚÓχÚ˘eÒÍË. ã‡ÏÔ‡ ÒeÚË ÔÓ„‡ÒÌeÚ. êìëëäà ÖÒÎË ‚˚ ‚˚·‡ÎË ÔÓ„‡ÏÏÛ, Á‡Í‡Ì˜Ë‚‡˛˘Û˛Òfl ÓÚÍβ˜eÌËeÏ ÒÎË‚‡ ‚Ó‰˚ ÔÓÒÎe‰Ìe„Ó ÔÓÎÓÒ͇ÌËfl, ÒÎeÈÚe ‚Ó‰Û Ôee‰ ÓÚÍ˚ÚËeÏ Î˛Í‡. Ç˚·eËÚe ÔÓ„‡ÏÏÛ «ê» (ÒÎË‚) ËÎË «G» (ÓÚÊËÏ). èee‰ ÓÚÍ˚ÚËeÏ Î˛Í‡ ÔÓ‰ÓʉËÚe Ó‰ÌÛ —
퇷Îˈ‡ ÔÓ„‡ÏÏ èÓ„‡ÏÏ˚ ÒÚËÍË ‰Îfl ıÎÓÔ͇ Ë Î¸Ì‡ ᇄÛÁ͇: 4,5 Í„ ÑÓÔ. îÛÌ͈ËË èÓ„‡Ïχ íeÏÔ. í̸͇ A 60°-90° ÅÖãéÖ ÅÖãúÖ ë èêÖÑÇÄêàíÖãúçéâ ëíàêäéâ, ̇Ô. ‡·Ó˜‡fl Ó‰eʉ‡, ÔÓÒÚ˚ÌË, ‰Óχ¯Ìee θÌflÌÓe ·eθe, ÌËÊÌee ·eθe, ÔÓÎÓÚë‡ B B C 60°-90° 40°-60° 30°-40° ÅÖãéÖ ÅÖãúÖ ÅÖá èêÖÑÇÄêàíÖãúçéâ
Ë ¯eÒÚË á‡„ÛÁ͇: 2 Í„, ¯epcÚ¸ 1 Í„ ÑÓÔ. îÛÌ͈ËË íeÏÔ. H 30°-60° ëàçíÖíàäÄ ë èêÖÑÇÄêàíÖãúçéâ ëíàêäéâ, ̇Ô. ÌËÊÌee ·eθe, ˆ‚eÚÌ˚e Ú͇ÌË, Û·‡¯ÍË, ·ÎÛÁ˚ (*) èe‰‚‡ËÚeθ̇fl ÒÚË͇ ÔË 30°ë ëÚË͇ ÔË 30°-60° 3 ÔÓÎÓÒ͇ÌËfl ëÎË‚ ‚Ó‰˚ J 30°-60° ëàçíÖíàäÄ ÅÖá èêÖÑÇÄêàíÖãúçéâ ëíàêäà, ̇Ô. Û·‡¯ÍË,
ìıÓ‰ 1. ìıÓ‰ Á‡ ÍÓÔÛÒÓÏ 3. é˜ËÒÚ͇ ÒÎË‚ÌÓÈ ÁÓÌ˚ é˜Ë˘‡ÈÚe ̇ÛÊÌÛ˛ ˜‡ÒÚ¸ χ¯ËÌ˚ ÚeÔÎÓÈ ‚Ó‰ÓÈ Ë ÌeÈڇθÌ˚Ï, Ìe‡·‡ÁË‚Ì˚Ï ·˚ÚÓ‚˚Ï ÏÓ˛˘ËÏ Òe‰ÒÚ‚ÓÏ. èÓÚËÚe ˜ËÒÚÓÈ ‚Ó‰ÓÈ Ë ‚˚ÚËÚe ̇ÒÛıÓ. ëÎË‚ÌÛ˛ ÁÓÌÛ ÌeÓ·ıÓ‰ËÏÓ ÔÓ˜Ë˘‡Ú¸ ‚ ÚÓÏ ÒÎÛ˜‡e, eÒÎË Ì‡ÒÓÒ ·˚Î Á‡·ÎÓÍËÓ‚‡Ì Ú‡ÍËÏË Ôe‰ÏeÚ‡ÏË, Í‡Í Ôۄӂˈ˚,
ÖÒÎË ‰Îfl ̇ÔÓÎÌeÌËfl χ¯ËÌ˚ Úe·ÛeÚÒfl ·Óθ¯e ‚eÏeÌË, ÚÓ ÒÎe‰ÛeÚ ÔÓ‚eËÚ¸, Ìe Á‡ÒÓËÎÒfl ÎË ÙËÎ¸Ú Ì‡ÎË‚ÌÓ„Ó ¯Î‡Ì„‡. ÖÒÎË Ï‡¯Ë̇ ÛÒڇ̇‚ÎË‚‡eÚÒfl ‚ ÔÓÏe˘eÌËflı, „‰e ÚeÏÔe‡ÚÛ‡ ÏÓÊeÚ ÓÔÛÒÚËÚ¸Òfl ÌËÊe 0°ë, ‚˚ÔÓÎÌËÚe ÒÎe‰Û˛˘ee: á‡ÍÓÈÚe ‚Ó‰ÓÔÓ‚Ó‰Ì˚È Í‡Ì. • ÓÚÍβ˜ËÚe ÔË·Ó; éÚ‚eÌËÚe ÍeÔeÊÌÛ˛ „‡ÈÍÛ
óÚÓ-ÚÓ ÌeËÒÔ‡‚ÌÓ? èpo·ÎeÏ˚, ÍÓÚÓ˚e ‚˚ ÏÓÊeÚe e¯ËÚ¸ Ò‡ÏÓÒÚÓflÚeθÌÓ. çeËÒÔ‡‚ÌÓÒÚ¸ ÇÓÁÏÓÊÌ˚e Ô˘ËÌ˚ • ã˛Í ÔÎÓıÓ Á‡Í˚Ú. • 凯Ë̇ Ìe ‚Íβ˜‡eÚÒfl: • 凯Ë̇ Ìe ÔÓ‰Íβ˜ė Í ÓÁeÚÍe, ËÎË Êe ÓÁeÚ͇ Ó·eÒÚÓ˜ė. • èee„ÓeÎ ÒËÎÓ‚ÓÈ Ôe‰Óı‡ÌËÚeθ. • ëeÎeÍÚÓ ÔÓ„‡ÏÏ ÛÒÚ‡ÌÓ‚ÎeÌ ÌeÔ‡‚ËθÌÓ, ËÎË Êe
ÖÒÎË ‚‡Ï Ìe Û‰‡eÚÒfl ӷ̇ÛÊËÚ¸ ËÎË ÛÒÚ‡ÌËÚ¸ ÔÓ·ÎeÏÛ, Ó·‡˘‡ÈÚeÒ¸ ‚ ̇¯ ëe‚ËÒÌ˚È ˆeÌÚ. èee‰ Á‚ÓÌÍÓÏ Á‡Ô˯ËÚe ÏÓ‰eθ, Á‡‚Ó‰ÒÍÓÈ ÌÓÏe Ë ‰‡ÚÛ ÔÓÍÛÔÍË ‚‡¯eÈ Ï‡¯ËÌ˚, Ú‡Í Í‡Í ‚ ëe‚ËÒÌÓÏ ˆeÌÚe Û ‚‡Ò ÔÓÚe·Û˛Ú ˝ÚÛ ËÌÙÓχˆË˛. Mod. ………. Prod. No. ……….. Mod. ………. Prod. No.
EHPOESL/Z — 07/2001
Просмотр
Доступно к просмотру 42 страницы. Рекомендуем вам скачать файл инструкции, поскольку онлайн просмотр документа может сильно отличаться от оригинала.
-
WASHING MACHINE
ЫЕШКФДЦТФA ЬФ?ШТФ
FA 1023
BLANCOS  60°-90° B  SINTETICOS  30°-60° J
COLORES RESISTENTES  40°-60° B  DELICADOS  30°-40° K  B  P A  N
COLORES DELICADOS  30°-40° C  LANA  30°-40° L  C
BLANCOS CON PRELAV.  60°-90° A  SINTETICOS CON PRELAV. 30°-60° H  M
ACLARADOS  D  ACLARADOS  M  L
N
F
SUAVIZANTES           CENTRIFUGADO G  SUAVIZANTES                   DESCARGA P     90° 80° 70° 60° 50° 40° 30°  D  K
F
G  H  J
USER MANUAL
35.292.722/0        КГЛЩМЩВЫЕМЩ ЗЩ EЛЫЗДГФЕФСШШ
-
Dear customer,
Please read these operating instructions carefully
and pay particular attention to the safety notes
indicated in the first pages. We recommend that you
keep this instruction booklet for future reference and
pass it on to any future owners.
Transport damages
When unpacking the appliance, check that it is not
damaged. If in doubt, do not use it and contact the
Service Centre.
The symbols you will see on some paragraphs of this booklet have the following meaning:
The warning triangle and/or the key words (Warning!, Caution!) emphasize information that is particularly
important for your safety or correct functioning of the appliance.
The information marked with this symbol provides additional instructions and practical tips on the use of
the appliance.
Tips and information about economical and ecological use of the machine are marked with this symbol.
Our contribution to the protection of the
environment: we use recycled paper.
2
-
Contents
Warnings                                   4-5      Maintenance                                 18         ENGLISH
Bodywork                                   18
Disposal                                      5
Detergent dispenser drawer                 18
Cleaning of the drainage area              18
Tips for environmental protection 5
Water inlet filter                         19
Technical specifications                      6       Frost precautions                          19
Emergency emptying out                     19
Installation                               7-8
Something not working?                  20-21
Unpacking                                   7
Hydraulic connection                        7
Levelling                                   8
Electrical connection                       8
Your new washing machine                      9
Description of the appliance                  9
Detergent dispenser drawer                  9
Use                                         10
Control panel                              10
Controls                                   10
Washing hints                              11
Sorting the laundry                       11
Temperatures                              11
Before loading the laundry                11
Maximum loads                             11
Laundry weights                           11
Removing stains                           11
Detergents and additives                  12
International wash code symbols            13
Operating sequence                      14-15
Washing programmes                      16-17
3
- 1
- 2
- 3
- 4
- 42