
1
Operation Guide 3199
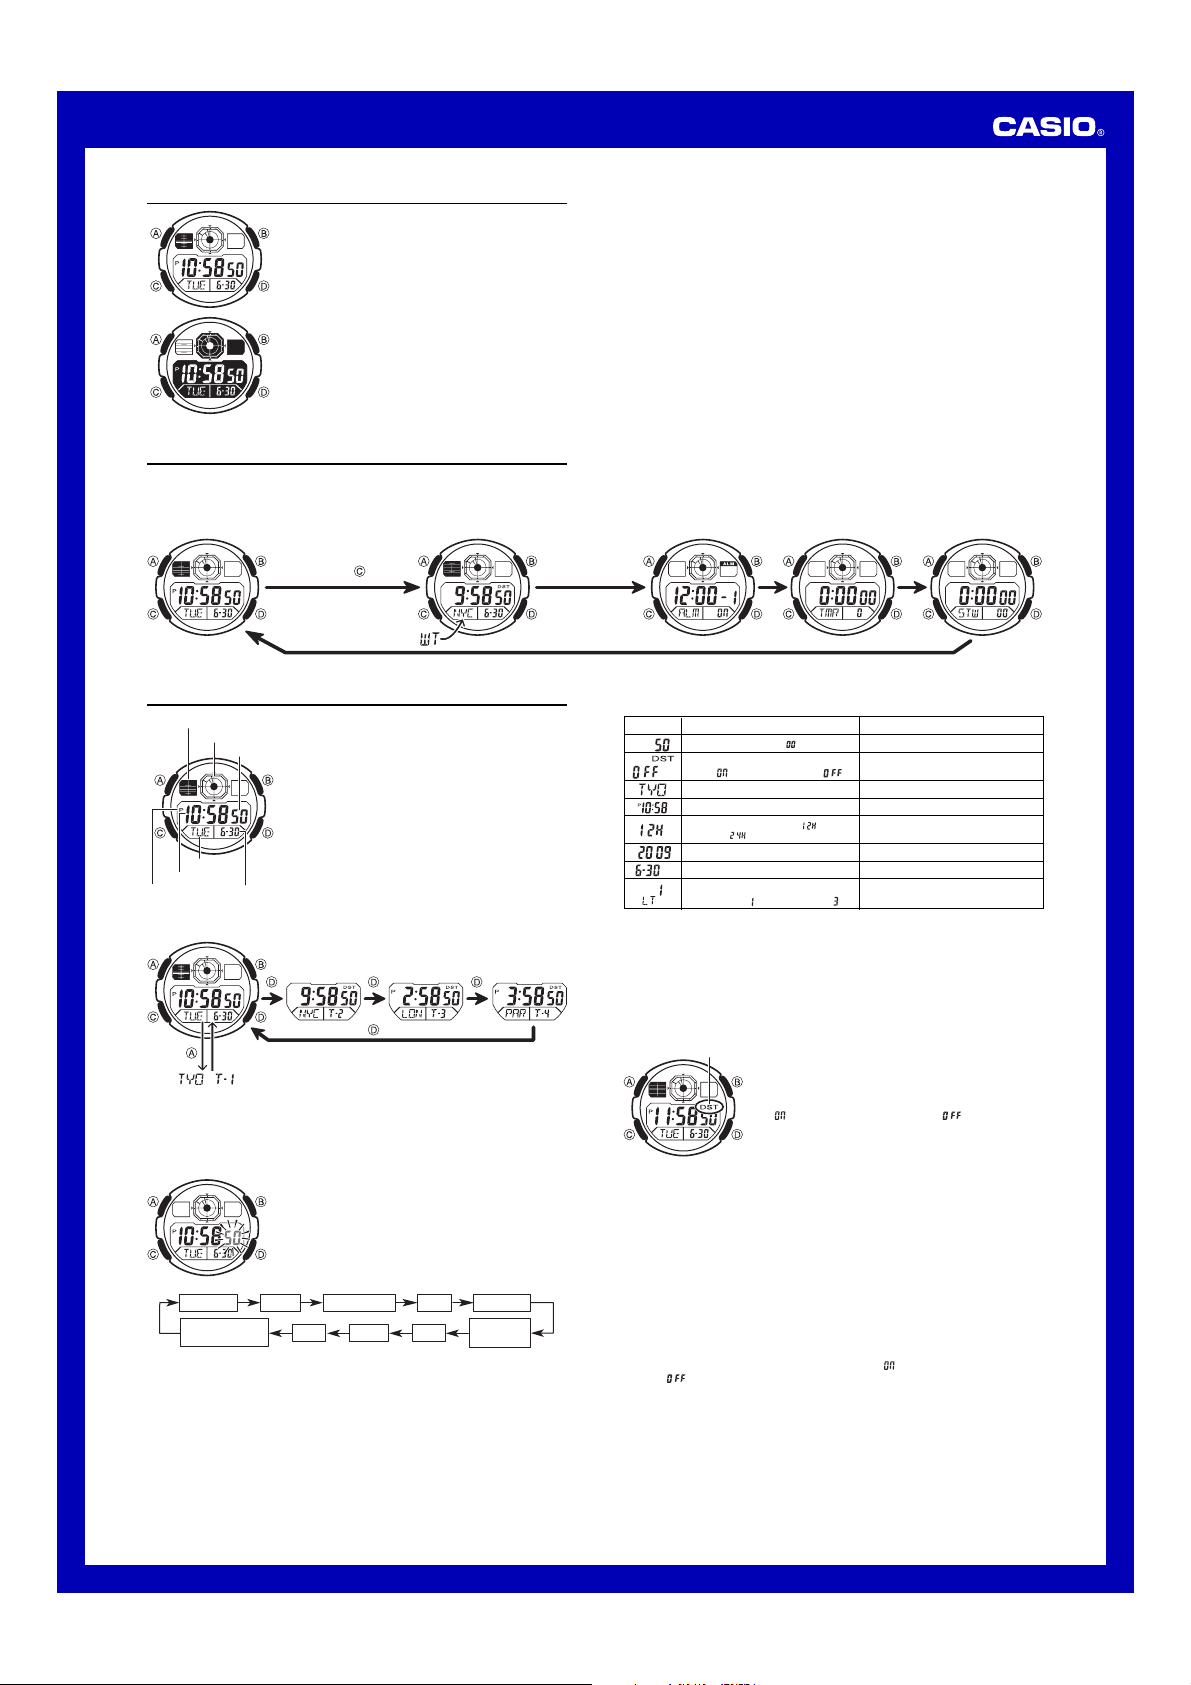
Timekeeping
The Timekeeping Mode’s Multi Time feature gives you
quick and easy access to the current time and date in four
different cities, numbered from T-1 (Time 1) through T-4
(Time 4). T-1 is your Home City Time, and T-2, T-3, and
T-4 are Local Times. Local Times are kept in
synchronization with your Home City Time (T-1).
• The graphic area B at the top of the screen indicates the
current Home City Time (T-1). For details on reading the
graphic areas, see “Graphic Areas”.
MA0909-EA
About This Manual
• Button operations are indicated using the letters shown
in the illustration.
• Each section of this manual provides you with the
information you need to perform operations in each
mode. Further details and technical information can be
found in the “Reference” section.
Timekeeping Mode World Time Mode Alarm Mode Countdown Timer
Mode
Stopwatch Mode
Press .
General Guide
• Press C to change from mode to mode.
• In any mode (except when a setting screen is on the display), press B to illuminate
the display.
Seconds
Day of week
Month – Day
Hour : Minutes
PM indicator
Graphic area A
Graphic area B
Switching Between Time Screens
Each press of D cycles the time screens in the sequence shown below.
Displayed for one second
• While the Home City Time (T-1) screen is displayed, pressing A will switch the day
of the week / month-day indication to the currently selected Home City code and the
T-1 indicator for about one second.
• You can change the current time setting for your Home City Time (T-1) only.
• For Local Times (T-2, T-3, T-4), you only can change the city code and DST setting.
Changing the Current Home City Time and Date Settings
1. Use D to display the current Home City Time (T-1)
screen.
2. Hold down A until the seconds start to flash, which
indicates the setting screen.
3. Press C to move the flashing in the sequence shown
below to select other settings.
Seconds City Code
Hour
Year
12/24-Hour
Format
Minutes
Illumination
Duration Setting
DST
Day Month
4. When the setting you want to change is flashing, use D and B to change it as
described below.
• See “Daylight Saving Time (DST)” for details about DST setting
.
5. Press A to exit the setting screen.
• The day of the week is displayed automatically in accordance with the date (year,
month, and day) settings.
Daylight Saving Time (DST)
Daylight Saving Time (summer time) advances the time setting by one hour from Standard
Time. Remember that not all countries or even local areas use Daylight Saving Time.
To toggle the Timekeeping Mode time between DST and Standard Time
1. Use D to display the current Home City Time (T-1)
screen.
2. Hold down A until the seconds start to flash, which
indicates the setting screen.
3. Press C to display the DST setting screen.
4. Press D to toggle between Daylight Saving Time
(
displayed) and Standard Time (
displayed).
5. Press A to exit the setting screen.
• The DST indicator appears on the Timekeeping screen
to indicate that Daylight Saving Time is turned on.
Screen
To do this:
Reset the seconds to .
Toggle between Daylight Saving
Time ( ) and Standard Time ( ).
Change the city code.
Change the hour or minutes.
Toggle between 12-hour ( ) and
24-hour ( ) timekeeping.
Change the year.
Change the month or day.
Toggle the setting between
1.5 seconds ( ) and 3 seconds ( ).
Do this:
Press D.
Press D.
Use D (east) and B (west).
Use D (+) and B (–).
Press D.
Use D (+) and B (–).
Use D (+) and B (–).
Press D.
DST indicator
12/24-Hour Format
• With the 12-hour format, the P (PM) indicator appears to the left of the hour digits for
times in the range of noon to 11:59 p.m. and no indicator appears to the left of the
hour digits for times in the range of midnight to 11:59 a.m.
• With the 24-hour format, times are displayed in the range of 0:00 to 23:59, without
any indicator.
• The 12-hour/24-hour timekeeping format you select in the Timekeeping Mode is
applied in all other modes.
Changing the City Setting of a Local Time
You can select any one of the city codes in the table at the back of this manual as a
Local Time city.
1. Display the Local Time whose city setting you want to change, and then hold down
A for about two seconds until the current city code starts fo flash.
2. Use D (east) and B (west) to select the city code you want.
3. Press C to display the DST setting screen.
4. Press D to toggle between Daylight Saving Time (
displayed) and Standard
Time (
displayed).
5. After the settings are the way you want, press A.
Руководство пользователя Прежде всего прочтите эту важную и…
Руководство пользователя Support chat
- Image
- Text
CASIO AE-2000 Модуль 3199
Руководство пользователя
Прежде всего прочтите эту важную информацию
Батарея
• При первых признаках недостаточности питания (нечеткость изображения или
отсутствие подсветки) необходимо заменить батарею у ближайшего дилера или
дистрибьютора фирмы «CASIO». В приобретенных вами часах, содержится батарея,
установленная изготовителем для тестовых испытаний, поэтому срок службы этой
батареи по сравнению со стандартным, вероятно, будет сокращен
Защита от воды
• Часы классифицируются по разрядам (с I по V разряд) в соответствии со степенью их
защищенности от воды. Уточните разряд ваших часов с помощью приведенной ниже
таблицы, чтобы определить правила их использования.
Маркировка
на корпусе
Брызги,
дождь и
т.п.
Плавание,
мытье
машины и
т.п.
Подводное
плавание,
ныряние и
т.п.
Ныряние с
аквалангом
I
—
Нет
Нет
Нет
Нет
II
WATER
RESISTANT
Да
Нет
Нет
Нет
III
50M WATER
RESISTANT
Да
Да
Нет
Нет
IV 100M WATER
RESISTANT
Да
Да
Да
Нет
V
200M WATER
RESISTANT
300M WATER
RESISTANT
Да
Да
Да
Да
Примечания для соответствующих разделов.
I. Часы не защищены от воды. Избегайте попадания любой влаги.
III. Если часы подверглись воздействию соленой воды, то тщательно промойте их и
вытрите насухо.
IV. Если часы подверглись воздействию соленой воды, то тщательно промойте их и
вытрите насухо.
V. Часы могут использоваться при погружении с аквалангом (за исключением
таких глубин, при которых требуется гелиево-кислородная смесь).
ВНИМАНИЕ!!!
Для всех категорий часов запрещается:
• нажимать кнопки под водой
• переводить стрелки под водой
• отвинчивать переводную головку под водой
ВАЖНО!!!
• Особенностью некоторых защищенных от воды часов является наличие
у них кожаных ремешков. Не надевайте эти часы во время плавания или
какой-либо другой деятельности, при которой ремешок погружается в
воду.
Уход за вашими часами
• Замена резиновой прокладки, защищающей часы от попадания воды и
пыли, должна осуществляться через каждые 2-3 года.
• Если внутрь часов попадет влага, то немедленно проверьте их у
ближайшего к вам дилера или дистрибьютора фирмы CASIO.
• Не подвергайте часы воздействию слишком высоких или низких
температур.
• Хотя часы рассчитаны на использование их в обычных условиях, тем не
менее, вы должны избегать грубого обращения с ними и не допускать их
падения.
• Не застегивайте ремешок слишком туго. Между вашим запястьем и
ремешком должен проходить палец.
• Для очистки часов и ремешка используйте сухую мягкую ткань, либо
мягкую ткань, смоченную в водном растворе мягкого нейтрального
моющего средства. Никогда не используйте легко испаряющимися
средствами (например, такими, как бензин, растворители, распыляющиеся
чистящие средства и т.п.).
• Когда вы не пользуетесь вашими часами, храните их в сухом месте.
• Избегайте попадания на часы бензина, чистящих растворителей, аэрозолей
из распылителей, клеящих веществ, краски и т.п. Химические реакции,
вызываемые этими материалами, приводят к повреждению прокладок,
корпуса и полировки часов.
• Особенностью некоторых моделей часов является наличие на их ремешке
изображений, выполненных шелкографией. Будьте осторожны при чистке
таких ремешков, чтобы не испортить эти рисунки.
Для часов с полимерными ремешками…
• Вы можете обнаружить белесое порошкообразное вещество на ремешке.
Это вещество не вредно для вашей кожи или одежды и может быть легко
удалено путем протирания мягкой тканью.
• Попадание на полимерный ремешок пота или влаги, а также хранение его
в условиях высокой влажности может привести к повреждению, разрыву
или растрескиванию ремешка. Для того чтобы обеспечить длительный
срок службы полимерного ремешка, как можно чаще протирайте его от
грязи и воды мягкой тканью.

Для часов с флуоресцентными корпусами и ремешками…
• Длительное облучение прямым солнечным светом может привести к постепенному
исчезновению флуоресцентной окраски.
• Длительный контакт с влагой может вызвать постепенное исчезновение
флуоресцентной окраски. В случае попадания на поверхность часов любой влаги, как
можно скорее удалите ее.
• Длительный контакт с влажной поверхностью может привести к обесцвечиванию
флуоресцентной окраски. Следите за отсутствием влаги на флуоресцентной
поверхности и избегайте ее контакта с другими поверхностями.
• Сильное трение поверхности, имеющей нанесенную флуоресцентную краску, о
другую поверхность может привести к переносу флуоресцентной краски на эту
поверхность.
Фирма «CASIO COMPUTER CO., LTD» не несет ответственности за какой бы то ни было
ущерб, который может возникнуть при использовании этих часов, и не принимает
никаких претензий со стороны третьих лиц.
ОБЩЕЕ ОПИСАНИЕ РЕЖИМОВ РАБОТЫ
На рисунке изображен общий вид часов в Режиме Текущего
Времени.
Последовательное нажатие кнопки “C” обеспечивает переход из
разряда в разряд в следующей последовательности: Режим
Текущего Времени – Режим Мирового Времени – Режим Звукового
Сигнала – Режим Таймера Обратного Отсчета Времени – Режим
Секундомера – Режим Текущего Времени.
• Для включения подсветки в любом режиме нажмите кнопку
“В”.
РЕЖИМ ТЕКУЩЕГО ВРЕМЕНИ
В Режиме Текущего Времени позволяет устанавливать значение
текущего времени Вашего родного города, а также просматривать
текущее значение времени в Вашем родном городе и местное время
в городах текущего местоположения.
Для просмотра значений времени нажимайте кнопку “D”.
Для просмотра дня недели, месяца и числа в Вашем родном городе нажимайте кнопку “А”.
Установка времени и даты
1.
В Режиме Текущего Времени нажмите кнопку “D” для изображения дисплея Вашего
родного города.
2.
Нажмите и удерживайте кнопку “А”. Изображение секунд начнет мигать,
что означает начало установок.
3.
Нажимайте кнопку “С” для перехода из разряда в разряд в следующей
последовательности: Секунды → Режим Летнего Времени (DST) Æ Код
города
→ Часы Æ Минуты Æ 12/24 часовой формат представления
времени
→ Год → Месяц → Число Æ Изменение продолжительности
подсветки
→ Секунды.
4.
Если вы выбрали для коррекции секунды (изображение секунд мигает),
нажмите кнопку “D” для сброса значения счетчика секунд в 00. Если вы
нажмете кнопку “D” при значении счетчика секунд между 30 и 59, то
значение счетчика установится в 00 и 1 прибавится к счетчику минут, если
значение счетчика секунд будет между 00 и 29, то изменение счетчика
минут не произойдет.
5.
Для изменения значений минут и т.д., используйте кнопку “D” для
увеличения и кнопку “В” для уменьшения значений.
6.
Для переключения 12/24 формата представления времени нажимайте
кнопку “D”. При выбранном 12-ти часовом формате представления
времени индикатор “Р” обозначает значение времени после полудня.
7.
Для включения (индикатор “DST”)/выключения летнего времени
нажимайте кнопку “D”.
8.
Для выбора кода необходимого Вам города нажимайте кнопки “B” и “D”.
9.
Для изменения продолжительности подсветки (1.5 секунды – 3 секунды)
нажимайте кнопку “В”.
•
Удерживание кнопки в нажатом состоянии позволяет изменять значения с
большей скоростью.
•
День недели устанавливается автоматически в соответствии с датой.
•
Вы можете установить значение времени в диапазоне от 2000г. до 2099г.
10.
По окончании установок нажмите кнопку “А” для возврата в Режим
Текущего Времени.
•
Если вы не будете нажимать кнопки в течение некоторого времени, то
часы автоматически перейдут в Режим Текущего Времени.
Изменение значения Вашего родного города
1.
В Режиме Текущего Времени нажимайте кнопку “D” для выбора значения
времени города, которое Вы хотите установить в качестве значения
Вашего родного города.
2.
Одновременно нажмите кнопки “А” и “В”.
Подсветка
•
В любом режиме нажмите кнопку “В” для включения подсветки.
•
Подсветка этих часов выполнена на светодиодных панелях (LED) панелях,
мощность которых падает после определенного срока использования.

•
Во время освещения дисплея часы испускают слышимый сигнал. Это происходит
потому, что элементы подсветки вибрируют, это не является показателем
неисправности часов.
•
Подсветку трудно разглядеть, если на часы падают прямые солнечные лучи.
•
Частое использование подсветки сокращает жизнь элемента питания.
РЕЖИМ МИРОВОГО ВРЕМЕНИ
В данном режиме вы можете просмотреть время в любом из 48 городов мира (31 часовых
поясов).
• Значение мирового времени синхронизировано с текущим, поэтому нет необходимости
устанавливать его самостоятельно.
• Для просмотра значений времени в других городах нажимайте кнопку “D”.
• Для включения летнего времени:
1. С помощью кнопки “D” выберите город, летнее время которого вы хотите установить.
2. Для включения (“DST”)/выключения летнего времени нажимайте кнопку “A”.
Установка значения Мирового Времени в качестве значения времени родного города
1.
В Режиме Текущего Времени нажимайте кнопку “D” для выбора значения времени
города, которое Вы хотите установить в качестве значения Вашего родного города.
2.
Одновременно нажмите кнопки “А” и “В”.
РЕЖИМ ЗВУКОВОГО СИГНАЛА
Вы можете установить до пяти различных звуковых сигналов. В установленное время
звуковой сигнал включится на 10 секунд.
•
Если включен режим индикации начала часа, короткий звуковой сигнал будет
подаваться в начале каждого часа.
Установка будильника
1.
В Режиме Звукового Сигнала нажимайте кнопку “D” для выбора типа сигнала: -1 →
-2 → -3 → -4 → -5 → :00 (индикация начала часа)
2.
Нажмите и удерживайте кнопку “А”. Цифровое значение в разряде часов начнет
мигать, так как оно выбрано для установки. В этот момент будильник автоматически
включается.
3.
Нажмите кнопку “С” для перехода из разряда в разряд в следующей
последовательности:
Часы – Минуты – Установка Звукового Сигнала (обычный звуковой
сигнал/ежедневно повторяющийся звуковой сигнал) – Часы.
4.
Нажимайте кнопку “D” для увеличения и кнопку “В” для уменьшения выбранного
значения. Удержание кнопки в нажатом состоянии позволяет изменять показания в
ускоренном режиме.
5.
Для переключения обычного звукового сигнала (1 – “ON”) и ежедневого звукового
сигнала (“ON”) наживайте кнопку “D”.
6.
По окончании установок нажмите кнопку “А”.
Проверка звучания будильника
В Режиме Звукового Сигнала нажмите кнопку “D” для проверки звучания
сигнала.
Включение/выключение звуковых сигналов
1.
В Режиме Звукового Сигнала используйте кнопку “D” для выбора типа
сигнала.
2.
Для выбора типа сигнала нажимайте кнопку “А”: Звуковой сигнал
выключен (“OFF”) – Включен обычный звуковой сигнал (“ALM 1 ON”) –
Включен ежедневный звуковой сигнал (“ALM ON”).
Включение/выключение индикации начала часа
1.
В Режиме Звукового Сигнала используйте кнопку “D” для выбора
индикации начала часа.
2.
Для ее включения/выключения нажимайте кнопку “А”.
РЕЖИМ ТАЙМЕРА ОБРАТНОГО ОТСЧЕТА
Таймер обратного отсчета может быть установлен в диапазоне от одной секунды
до 24 часов.
• Когда обратный отсчет времени достигает нуля, раздается длинный звуковой
сигнал.
Установка режимов таймера
1. В Режиме Таймера при изображении на дисплее часов значения стартового
времени нажмите и удерживайте кнопку “А”. Изображение стартового
времени начнет мигать, что означает начало установок.
2. Нажимайте кнопку “С” для перехода из разряда в разряд в следующей
последовательности: Часы – Минуты – Секунды – Часы.
3. Используйте кнопку “D” для увеличения выбранного значения, а кнопку “В”
– для уменьшения.
4. Если вы хотите установить значение 24-х часов в качестве времени
обратного отсчета, введите значение “0:00 00”.
5. По окончании установок нажмите кнопку “А”.
Использование таймера
1. Нажмите кнопку “D” в Режиме Таймера для запуска обратного отсчета
времени.
2. Нажмите кнопку “D” снова для остановки обратного отсчета времени.
• Вы можете продолжить обратный отсчет, нажав кнопку “D”.
3. После остановки обратного отсчета времени можно нажать кнопку “А” для
того, чтобы сбросить время обратного отсчета в стартовое значение.
РЕЖИМ СЕКУНДОМЕРА

Режим Секундомера позволяет регистрировать отдельные отрезки времени, время с
промежуточным результатом и время двойного финиша.
Рабочий Диапазон Общего Измеряемого Времени ограничен 23 часами 59 минутами, 59.99
секундами.
Измерение отдельных отрезков времени
D (Старт) – D (Стоп) – D (Повторный старт) – D (Стоп) – А (Сброс).
Измерение времени с промежуточным результатом
D (Старт) – А (Промежуточный результат. Индикатор SPL) – А (Повторный старт) – D
(Стоп) – А (Сброс).
Двойной финиш
D (Старт) – А (Разделение. Первый финиш. На дисплее результат первого финиша) – D
(Стоп. Второй финиш) – А (Отмена разделения. На дисплее результат второго финиша) – А
(Сброс).
Автодисплей
Для включения/выключения автодисплея нажимайте и удерживайте в течение трех секунд
кнопку “D” в Режиме Текущего Времени.
Включение/выключение звука кнопок
В любом режиме нажмите и удерживайте кнопку “С” в течение нескольких секунд для
включения (“MUTE”)/выключения звука кнопок.
Графические зоны
Графическая зона А – В Режимах Текущего и Мирового Времени сегменты показывают
текущее значение времени. карта дисплея часов показывает город, значение времени
которого представлено на цифровом дисплее. В Режимах Таймера Обратного Отсчета и
Секундомера сегменты показывают значение текущего измерения.
Графическая зона В – В любом режиме показывает значение времени Вашего родного
города (часы, минуты, секунды).
Код города
Город
Разница по
Гринвичу
(GMT)
Другие крупные
города данной
часовой зоны
PPG
-11.00
Паго-Паго
HNL
Гонолулу
-10.00
Папеэте
ANC
Анкара
-09.00
Ном
YVR
Ванкувер -08.00
Ванкувер
LAX
Лос Анджелес -08.00 Лас Вегас, Сиэтл,
Доусон Сити
YEA
Эдмонтон -07.00
DEN
Денвер
-07.00
Эль Пасо
MEX
Мехико -06.00
Мехико Сити
CHI
Чикаго
-06.00
Хьюстон, Даллас,
Новый Орлеан
NYC
Нью Йорк -05.00
Монреаль,
Детроит, Бостон,
Панама Сити,
Гавана, Лима,
Богота
SCL
Сантьяго -04.00
YHZ
Галифакс -04.00
YYT
Св.Джонс -03.50
RIO
Рио Де Жанейро -03.00
Сан Пауло, Буэнос
Айрес, Бразилиа,
Монтевидео
FEN
Фернандо де Норонья -02.00
RAI
Прая -01.00
Прая
UTC
LIS
Лиссабон +00.0
Дублин,
Касабланка,
Дакар, Абиджан
LON
Лондон +00.0
MAD
Мадрид +01.00
PAR
Париж +01.00
Амстердам, Алжир
ROM
Рим +01.00
BER
Берлин +01.00
STO
Стокгольм +01.00
ATH
Афины +02.00
CAI
Каир +02.00
JRS
Иерусалим +02.00
JED
Джидда +03.00
Кувейт, Эр-Рияд,
Аден, Аддис Абаба,
Найроби, Шираз

MOW
Москва +03.00
Москва
THR
Тегеран +03.05
DXB
Дубаи +04.00
Абу Даби, Мускат
KBL
Кабул +04.05
KHI
Карачи +05.00
DEL
Дели +05.50
Мумбаи, Кольката
KTM
Катманду +05.75
DAC
Дакка
+06.00
Коломбо
RGN
Янгон
+06.50
BKK
Бангкок +07.00
Ханой, Вьентьян
SIN
Сингапур +08.00
HKG
Гон Конг +08.00
Куала Лумпур,
Манила, Перт,
Улан Батор
BJS
Бейжинг +08.00
SEL
Сеул +09.00
Сеул
TYO
Токио +09.00
Пхеньян
ADL
Аделаида +09.05
Дарвин
GUM
Гуам +10.00
SYD
Сидней +10.00
Мельбурн,
Рабауль
NOU
Нумеа +11.00
Вила
WLG
Веллингтон
+12.00
Нади, Науру,
Крайстчерч
ТЕХНИЧЕСКИЕ ХАРАКТЕРИСТИКИ
Точность хода при нормальной температуре +-30сек. в месяц
Режим текущего времени
Часы, минуты, секунды, год, месяц, число, день
недели.
Календарная система
Автоматический календарь с 2000г. по 2099г.
Прочее
12/24 часовой формат представления времени.
Режим мирового времени
текущее время в городе другого часового пояса
Таймер обратного отсчета времени
Единица измерения
1 секунда
Диапазон измерений
1 секунда – 24 часа
Режим звукового сигнала
обычный звуковой сигнал, ежедневный звуковой
сигнал, индикация начала часа
Режим секундомера
Максимальный диапазон измерений 23 часов 59 мин 59,99 сек.
Режимы измерений
отдельные отрезки времени, измерение с
разделением, двойной финиш
Прочее
подсветка (светодиодные панели), изменение
продолжительности подсветки, автодисплей
Элемент питания
одна литиевая батарея типа CR2025
Срок годности
10 лет из расчета использования
звукового сигнала 10 секунд в день и
подсветки 1,5 секунды в день.
Информация о товаре
Наименование:
часы наручные электронные / электронно-механические кварцевые
(муж./жен.)
Торговая марка:
CASIO
Фирма изготовитель:
CASIO COMPUTER Co.,Ltd.
(КАСИО Компьютер Ко. Лимитед)
Адрес изготовителя:
6-2, Hon-machi 1-chome,
Shibuya-ku,Tokyo 151-8543, Japan
Импортер:
ООО «Касио», 127055, Москва, ул. Сущевская, д.27, стр. 1, Россия
Страна-изготовитель:
Гарантийный срок:
1 год
Адрес уполномоченной
организации для принятия
претензий:
указан в гарантийном талоне
Продукция соответствует ГОСТ 26270-98 (п.4.35)
Сертификат соответствия № РОСС JP. АЯ 46.Д00003

11:43
Casio AE 2000WD 1A .Мои впечатления и выводы после 11ти месяцев использования.
04:09
Часы Casio Illuminator AE-2000W-1A — Инструкция, как настроить от PresidentWatches.Ru
14:44
Casio AE 2000WD 1A .Мои впечатления плюсы и минусы после 3х месячного использования.
15:49
CASIO AE-2000W-1A FOR DIVING
02:35
CASIO STANDARD AE-2000W-1B — UNBOXING
10:49
Обзор Casio AE-2000W
04:25
Часы Casio Illuminator AE-2000W-1B — Инструкция, как настроить от PresidentWatches.Ru
03:58
Casio — AE-2000W-1AVEF Review
Press the button for help
MA0909-EA
Operation Guide 3199
About This Manual
• Button operations are indicated using the letters shown
in the illustration.
• Each section of this manual provides you with the
information you need to perform operations in each
mode. Further details and technical information can be
found in the “Reference” section.
General Guide
• Press C to change from mode to mode.
• In any mode (except when a setting screen is on the display), press B to illuminate
the display.
Timekeeping Mode World Time Mode Alarm Mode Countdown Timer
Press .
Timekeeping
Graphic area A
Graphic area B
Seconds
Day of week
Hour : Minutes
PM indicator
Switching Between Time Screens
Each press of D cycles the time screens in the sequence shown below.
• While the Home City Time (T-1) screen is displayed, pressing A will switch the day
of the week / month-day indication to the currently selected Home City code and the
T-1 indicator for about one second.
• You can change the current time setting for your Home City Time (T-1) only.
• For Local Times (T-2, T-3, T-4), you only can change the city code and DST setting.
Changing the Current Home City Time and Date Settings
Month – Day
Displayed for one second
Seconds City Code
Illumination
Duration Setting
The Timekeeping Mode’s Multi Time feature gives you
quick and easy access to the current time and date in four
different cities, numbered from T-1 (Time 1) through T-4
(Time 4). T-1 is your Home City Time, and T-2, T-3, and
T-4 are Local Times. Local Times are kept in
synchronization with your Home City Time (T-1).
• The graphic area B at the top of the screen indicates the
current Home City Time (T-1). For details on reading the
graphic areas, see “Graphic Areas”.
1. Use D to display the current Home City Time (T-1)
screen.
2. Hold down A until the seconds start to flash, which
indicates the setting screen.
3. Press C to move the flashing in the sequence shown
below to select other settings.
DST
Day Month
Hour
Year
Minutes
12/24-Hour
Format
4. When the setting you want to change is flashing, use D and B to change it as
described below.
Screen
To do this:
Reset the seconds to .
Toggle between Daylight Saving
Time ( ) and Standard Time ( ).
Change the city code.
Change the hour or minutes.
Toggle between 12-hour ( ) and
24-hour ( ) timekeeping.
Change the year.
Change the month or day.
Toggle the setting between
1.5 seconds ( ) and 3 seconds ( ).
• See “Daylight Saving Time (DST)” for details about DST setting
5. Press A to exit the setting screen.
• The day of the week is displayed automatically in accordance with the date (year,
month, and day) settings.
Daylight Saving Time (DST)
Daylight Saving Time (summer time) advances the time setting by one hour from Standard
Time. Remember that not all countries or even local areas use Daylight Saving Time.
To toggle the Timekeeping Mode time between DST and Standard Time
DST indicator
12/24-Hour Format
• With the 12-hour format, the P (PM) indicator appears to the left of the hour digits for
times in the range of noon to 11:59 p.m. and no indicator appears to the left of the
hour digits for times in the range of midnight to 11:59 a.m.
• With the 24-hour format, times are displayed in the range of 0:00 to 23:59, without
any indicator.
• The 12-hour/24-hour timekeeping format you select in the Timekeeping Mode is
applied in all other modes.
Changing the City Setting of a Local Time
You can select any one of the city codes in the table at the back of this manual as a
Local Time city.
1. Display the Local Time whose city setting you want to change, and then hold down
A for about two seconds until the current city code starts fo flash.
2. Use D (east) and B (west) to select the city code you want.
3. Press C to display the DST setting screen.
4. Press D to toggle between Daylight Saving Time (
Time (
5. After the settings are the way you want, press A.
displayed).
1. Use D to display the current Home City Time (T-1)
2. Hold down A until the seconds start to flash, which
3. Press C to display the DST setting screen.
4. Press D to toggle between Daylight Saving Time
5. Press A to exit the setting screen.
• The DST indicator appears on the Timekeeping screen
Mode
screen.
indicates the setting screen.
(
displayed) and Standard Time ( displayed).
to indicate that Daylight Saving Time is turned on.
Stopwatch Mode
Do this:
Press D.
Press D.
Use D (east) and B (west).
Use D (+) and B (–).
Press D.
Use D (+) and B (–).
Use D (+) and B (–).
Press D.
.
displayed) and Standard
1
Operation Guide 3199
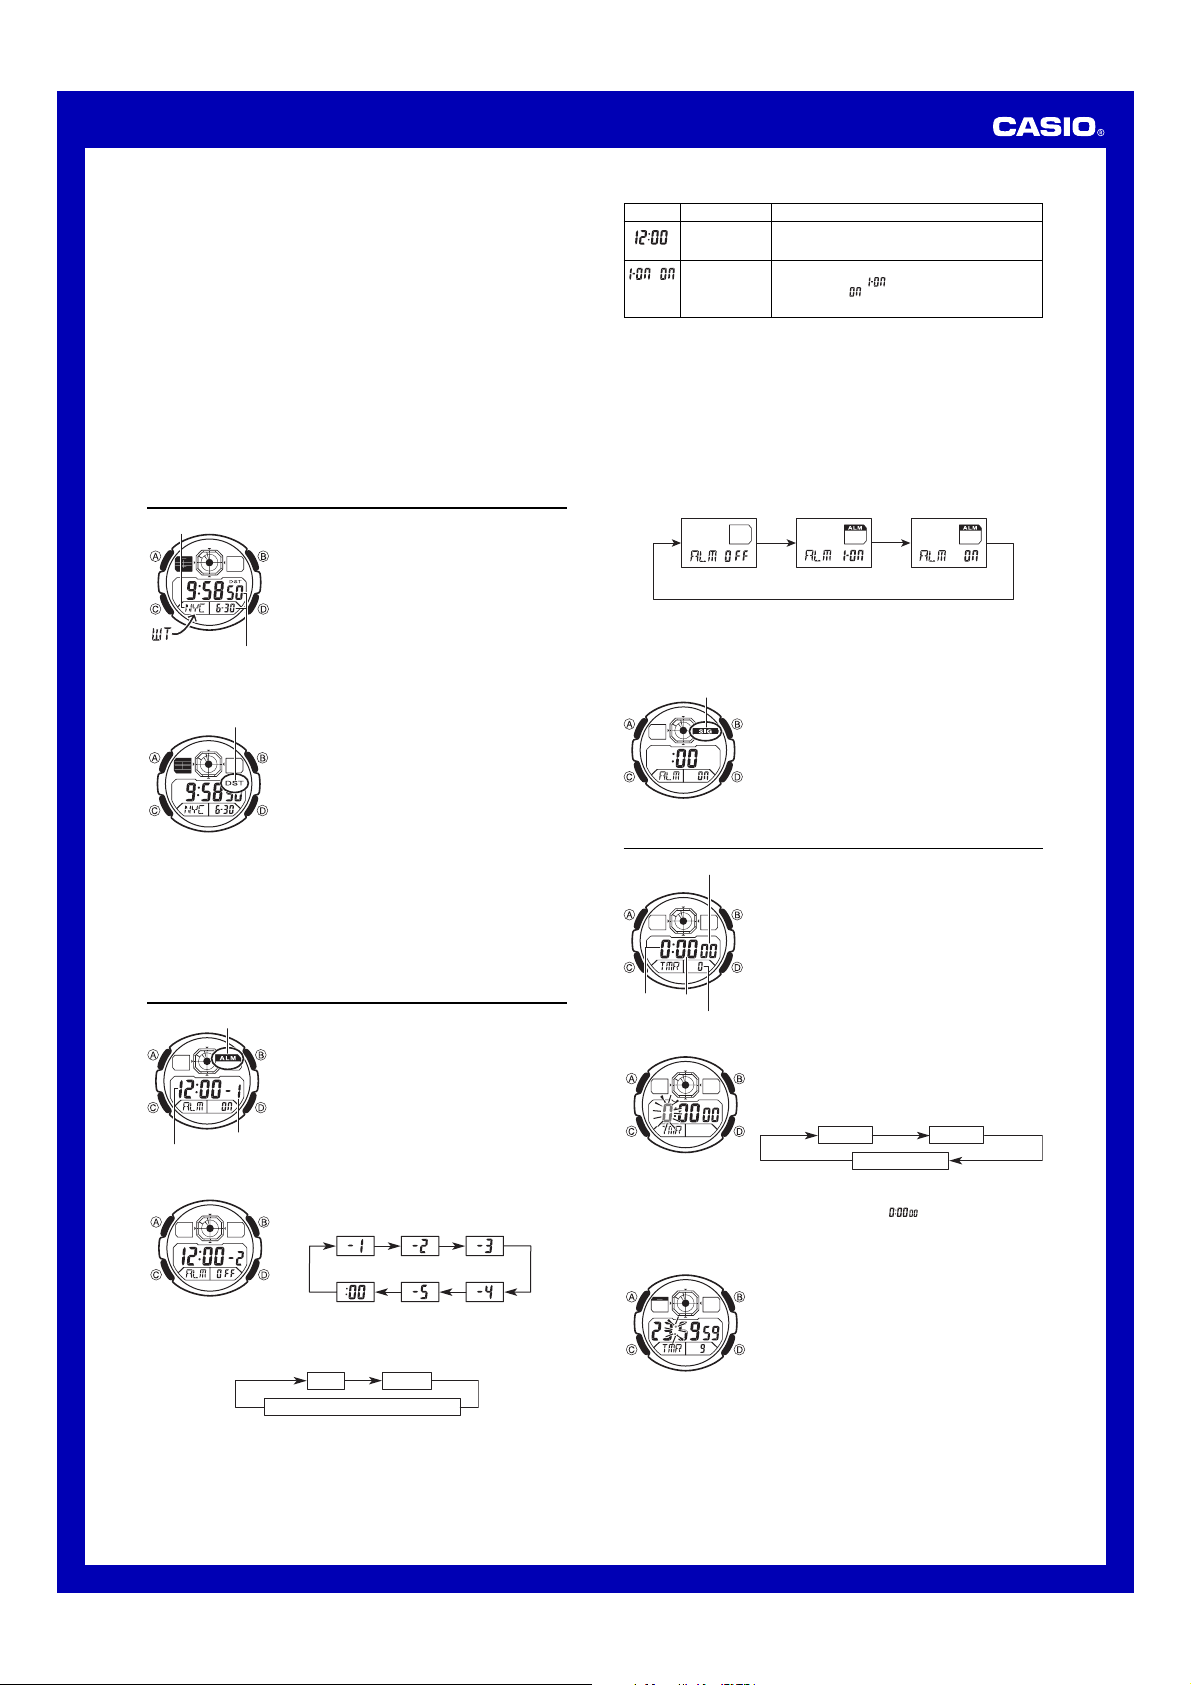
Changing Your Home City Time
Use the following procedure to change your current Home City Time to any one of the
three Local Times.
1. In the Timekeeping Mode, press D to display the Local Time which you want to
make your Home City Time.
2. Press A and B at the same time.
• This makes the Local Time you selected in step 1 your new Home City Time.
Illumination
An LED (light-emitting diode) illuminate the display for easy reading in the dark.
Illumination Precautions
• The illumination provided by the light may be hard to see when viewed under direct
sunlight.
• Illumination automatically turns off whenever an alarm sounds.
• Frequent use of illumination runs down the battery.
To turn on illumination
In any mode (except when a setting screen is on the display), press B to turn on
illumination.
• You can use the procedure above to select either 1.5 seconds or 3 seconds as the
illumination duration. When you press B, the illumination will remain on for about
1.5 seconds or 3 seconds, depending on the current illumination duration setting.
World Time
City code
Current time and date in
the zone of the selected
city code
To toggle a city code time between Standard Time and Daylight Saving Time
DST indicator
To change your Home Time city to the current World Time city
1. In the World Time Mode, use D to display the city you want to make your new
Home Time city.
2. Press A and B at the same time.
• This makes the World Time city you selected in step 1 your new Home Time city.
World Time shows the current time in 48 cities (31 time
zones) around the world.
• All of the operations in this section are performed in the
World Time Mode, which you enter by pressing C.
To view the time for another city code
In the World Time Mode, press D to scroll eastwardly
through city codes.
• For full information about city codes, see the “City Code
Table”.
• If the current time for a city is wrong, check your
Timekeeping Mode time and time zone settings and
make the necessary changes.
1. In the World Time Mode, use D (east) to display the
city code (time zone) whose Standard Time/Daylight
Saving Time setting you want to change.
2. Hold down A for about one second to toggle Daylight
Saving Time (DST displayed) and Standard Time (DST
not displayed).
• The DST indicator is on the display whenever you
display a city code for which Daylight Saving Time is
turned on.
• Note that the DST/Standard Time setting affects only the
currently displayed city code. Other city codes are not
affected.
• Note that you cannot switch between Standard Time
and Daylight Saving Time while UTC is selected as the
city code.
4. While a setting is flashing, use D and B to change it as described below.
Screen
To do this:
Change the hour
and minutes.
Toggle between
/
One-time Alarm
and Daily Alarm.
5. Press A to exit the setting screen.
Alarm Operation
The alarm tone sounds at the preset time for 10 seconds, regardless of the mode the
watch is in.
• Alarm and Hourly Time Signal operations are performed in accordance with the
Timekeeping Mode time.
• To stop the alarm tone after it starts to sound, press any button.
To test the alarm
In the Alarm Mode, hold down D to sound the alarm.
To turn an alarm on and off
1. In the Alarm Mode, use D to select an alarm.
2. Press A to cycle through the alarm settings as shown below.
Alarm Off
• In all modes, the alarm on indicator is shown for the alarm that is currently turned
on.
• The alarm on indicator flashes while the alarm is sounding.
To turn the Hourly Time Signal on and off
Hourly time signal
on indicator
Do this:
Use D (+) and B (–).
• With the 12-hour format, set the time correctly as a.m.
or p.m. (P indicator).
Press D.
One-time Alarm on:
Daily Alarm on:
One-Time Alarm
On
1. In the Alarm Mode, use D to select the Hourly Time
Signal.
2. Press A to toggle it on and off.
• The Hourly Time Signal on indicator is shown on the
display in all modes while this function is turned on.
Daily Alarm On
Countdown Timer
Seconds
The countdown timer can be set within a range of one
second to 24 hours. An alarm sounds when the
countdown reaches zero.
• All of the operations in this section are performed in the
Countdown Timer Mode, which you enter by pressing
C.
Alarms
Alarm on indicator
Alarm number
Alarm time
(Hour : Minutes)
To set an alarm time
2. After you select an alarm, hold down A until the hour setting of the alarm time
starts to flash, which indicates the setting screen.
• This operation turns on the One-time Alarm automatically.
3. Press C to move the flashing in the sequence shown below to select other settings.
Your watch has a total of five alarms, each of which you
can configure as a daily alarm or one-time alarm.
• Daily Alarm: Sounds at the preset time each day.
• One-time Alarm: Sounds once at the preset time and
then is disabled automatically.
You can also turn on an Hourly Time Signal that causes
the watch to beep twice every hour on the hour.
• All of the operations in this section are performed in the
Alarm Mode, which you enter by pressing C.
• Alarms operate in coordination with the current Home
City Time.
1. In the Alarm Mode, use D to scroll through the alarm
screens until the alarm number you want to set is
displayed.
Hour Minutes
One-time Alarm/Daily Alarm Selection
Hours
Minutes
1/10 second
To configure the countdown timer
3. When the setting you want to change is flashing, use D (+) and B (–) to change
the flashing item.
• To specify a countdown start time of 24 hours, set
4. Press A to exit the setting screen.
To use the countdown timer
1. While the countdown start time is on the display in the
Countdown Timer Mode, hold down A until the current
countdown start time starts to flash, which indicates the
setting screen.
2. Press C to move the flashing in the sequence shown
below to select other settings.
Hours Minutes
Seconds
.
Press D while in the Countdown Timer Mode to start the
countdown timer.
• When the end of the countdown is reached, the alarm
sounds for ten seconds or until you stop it by pressing
any button. The countdown time is reset to its starting
value automatically when the alarm sounds.
• Press D while a countdown operation is in progress to
pause it. Press D again to resume the countdown.
• To stop a countdown operation completely, first pause it
(by pressing D), and then press A. This returns the
countdown time to its starting value.
2
MA0909-EA
Operation Guide 3199
About This Manual
•Button operations are indicated using the letters shown
in the illustration.
• Each section of this manual provides you with the information you need to perform operations in each mode. Further details and technical information can be found in the “Reference” section.
General Guide
•Press C to change from mode to mode.
•In any mode (except when a setting screen is on the display), press B to illuminate the display.
Timekeeping Mode |
World Time Mode |
Press .
Timekeeping
Alarm Mode |
Countdown Timer |
Stopwatch Mode |
||||
Mode |
||||||
4.When the setting you want to change is flashing, use Dand Bto change it as described below.
Graphic area A Graphic area B
Seconds
Day of week
Hour : Minutes
PM indicator Month – Day
The Timekeeping Mode’s Multi Time feature gives you quick and easy access to the current time and date in four different cities, numbered from T-1 (Time 1) through T-4 (Time 4). T-1 is your Home City Time, and T-2, T-3, and T-4 are Local Times. Local Times are kept in synchronization with your Home City Time (T-1).
•The graphic area B at the top of the screen indicates the current Home City Time (T-1). For details on reading the graphic areas, see “Graphic Areas”.
Screen |
To do this: |
Do this: |
||||
Reset the seconds to . |
Press D. |
|||||
|
Toggle between Daylight Saving |
Press D. |
|||||
Time ( ) and Standard Time ( |
). |
|||||
Change the city code. |
Use D(east) and B(west). |
|||||
Change the hour or minutes. |
Use D(+) and B(–). |
|||||
|
Toggle between 12-hour ( ) and |
Press D. |
|||||
24-hour ( ) timekeeping. |
||||||
Change the year. |
Use D(+) and B(–). |
|||||
Change the month or day. |
Use D(+) and B(–). |
|||||
Toggle the setting between |
Press D. |
|||||
|
1.5 seconds ( |
) and 3 seconds ( |
). |
||||
Switching Between Time Screens
Each press of D cycles the time screens in the sequence shown below.
Displayed for one second
•While the Home City Time (T-1) screen is displayed, pressing Awill switch the day of the week / month-day indication to the currently selected Home City code and the T-1 indicator for about one second.
•You can change the current time setting for your Home City Time (T-1) only.
•For Local Times (T-2, T-3, T-4), you only can change the city code and DST setting.
Changing the Current Home City Time and Date Settings
1.Use D to display the current Home City Time (T-1) screen.
2. Hold down Auntil the seconds start to flash, which indicates the setting screen.
3. Press Cto move the flashing in the sequence shown below to select other settings.
Seconds DST City Code Hour Minutes
Illumination |
Day |
Month |
Year |
12/24-Hour |
||||||||
Duration Setting |
Format |
|||||||||||
• See “Daylight Saving Time (DST)” for details about DST setting.
5.Press Ato exit the setting screen.
•The day of the week is displayed automatically in accordance with the date (year, month, and day) settings.
Daylight Saving Time (DST)
Daylight Saving Time (summer time) advances the time setting by one hour from Standard Time. Remember that not all countries or even local areas use Daylight Saving Time.
To toggle the Timekeeping Mode time between DST and Standard Time
DST indicator |
1. Use D to display the current Home City Time (T-1) |
||
screen. |
|||
2. Hold down Auntil the seconds start to flash, which |
|||
indicates the setting screen. |
|||
3. Press Cto display the DST setting screen. |
|||
4. Press Dto toggle between Daylight Saving Time |
|||
( displayed) and Standard Time ( |
displayed). |
||
5. Press Ato exit the setting screen. |
|||
• The DST indicator appears on the Timekeeping screen |
to indicate that Daylight Saving Time is turned on.
12/24-Hour Format
•With the 12-hour format, the P (PM) indicator appears to the left of the hour digits for times in the range of noon to 11:59 p.m. and no indicator appears to the left of the hour digits for times in the range of midnight to 11:59 a.m.
•With the 24-hour format, times are displayed in the range of 0:00 to 23:59, without any indicator.
•The 12-hour/24-hour timekeeping format you select in the Timekeeping Mode is applied in all other modes.
Changing the City Setting of a Local Time
You can select any one of the city codes in the table at the back of this manual as a Local Time city.
1.Display the Local Time whose city setting you want to change, and then hold down Afor about two seconds until the current city code starts fo flash.
2.Use D (east) and B (west) to select the city code you want.
3.Press Cto display the DST setting screen.
4.Press Dto toggle between Daylight Saving Time ( displayed) and Standard
Time ( displayed).
5.After the settings are the way you want, press A.
1