
CEL-SH6VA200
© CANON INC. 2008
CANON INC.
30-2 Shimomaruko 3-chome, Ohta-ku, Tokyo 146-8501, Japan
Europ e, Africa & M iddle East
CANON EUROPA N.V.
PO Box 2262, 1180 EG Amstelveen, The Netherlands
WEB SELF-SERVICE: www.Support.Canon-Europe.com
.
,
,
Canon.
февраль 2008

2
Благодарим Вас за покупку изделия марки Canon.
Камера EOS 450D представляет собой высокоэффективную цифровую
однообъективную зеркальную камеру с датчиком высокого разрешения
12,20 млн. эффективных пикселов. Камера обеспечивает множество
таких функций, как стили Picture Styles, позволяющие расширить
возможности съемки, высокоточная высокоскоростная 9-точечная
автофокусировка для движущихся объектов и различные режимы
съемки, подходящие как новичкам, так и опытным фотографам.
В камере также установлены интегрированная система очистки EOS
для удаления следов пыли на изображении и блок самоочистки датчика
изображения для стряхивания пыли с датчика.
Для ознакомления с камерой сделайте несколько
пробных снимков
Цифровая камера позволяет сразу же просмотреть снятое изображение.
При чтении данной Инструкции сделайте несколько пробных снимков
и оцените результаты. Это поможет лучше изучить камеру.
Во избежание несчастных случаев, а также для получения
качественных снимков ознакомьтесь с разделами «Меры
предосторожности» (стр. 186, 187) и Правила обращения (стр. 12, 13).
Проверка камеры перед использованием и ограничение
ответственности
После съемки просмотрите снятое изображение и убедитесь, что
оно правильно записано. В случае если из-за неисправности камеры
или карты памяти невозможно записать изображения или передать
их на персональный компьютер, корпорация Canon не несет
ответственности за какие-либо убытки или причиненные неудобства.
Авторские права
Законодательство некоторых стран допускает использование
фотографий людей или некоторых объектов только для личных
целей. Следует также помнить, что на некоторых общественных
мероприятиях, выставках и т.п. фотосъемка может быть запрещена
даже для личных целей.
Данная камера совместима с картами памяти SD и SDHC. Далее в этом
руководстве эти карты памяти будут называться просто «карта».
* Карта памяти (для записи изображений) не входит в комплект
поставки камеры. Ее следует приобрести дополнительно.

3
В первую очередь убедитесь, что в комплект поставки камеры входят
все перечисленные ниже компоненты. При отсутствии каких-либо
компонентов обращайтесь к своему дилеру.
* Зарядное устройство LC-E5 или LC-E5E входит в комплект поставки.
(LC-E5E поставляется с кабелем питания.)
При покупке комплекта Lens Kit, проверьте наличие объектива.
В зависимости от типа комплекта Lens Kit в комплект поставки
может входить инструкция по эксплуатации объектива.
Не теряйте перечисленные выше компоненты.
Контрольный список комплекта поставки
Аккумулятор LP-E5
(включая защитную
крышку)
Зарядное устройство
LC-E5/LC-E5E*
Интерфейсный кабель
IFC-200U
Видеокабель
VC-100
EOS DIGITAL
Solution Disk
EOS DIGITAL
Software Instruction Manuals Disk
(1) Инструкция по эксплуатации
(данный документ)
(2) Карманный справочник
Краткое руководство по началу съемки
(3) Руководство по компакт-дискам
Руководство по прилагаемому программному
обеспечению (Компакт-диск EOS DIGITAL Solution Disk)
и Компакт-диск EOS DIGITAL Software Instruction Manuals
Disk с инструкциями к программному обеспечению.
Камера
(с наглазником
и крышкой корпуса)
Широкий ремень
EW-100DB III

4
Значки, используемые в настоящей Инструкции
<6>
: обозначает главный диск управления.
<V> <U> : обозначает клавиши перемещения <S>.
<0>
: обозначает кнопку установки.
0
, 9, 8 : обозначает, что данная функция остается активной
в течение, соответственно, 4, 6 или 16 с после того,
как отпущена кнопка.
* Значки и метки, используемые в настоящей Инструкции для обозначения
кнопок, дисков и установок камеры, соответствуют значкам и меткам на
камере и на ЖК-дисплее.
3
: обозначает функцию, которую можно изменить, нажав
кнопку <M> и изменив настройку.
M
: при отображении в правом верхнем углу страницы
означает, что данная функция доступна только в режимах
творческой зоны (стр. 20).
(стр.**) : За дополнительной информацией обращайтесь к указанным
страницам.
: Рекомендация или совет для более эффективной съемки.
: Совет по устранению неполадок.
: Предупреждение для предотвращения неполадок при съемке.
: Дополнительная информация.
Основные допущения
Во всех операциях, описываемых в данной Инструкции,
предполагается, что выключатель питания уже установлен
в положение <1>.
Предполагается, что для всех параметров меню и пользовательских
функций установлены значения по умолчанию.
Для иллюстрации в приводимых в Инструкции примерах камера
показана с установленным объективом EF-S 18-55mm f/3.5-5.6 IS.
Обозначения, используемые в настоящей Инструкции

5
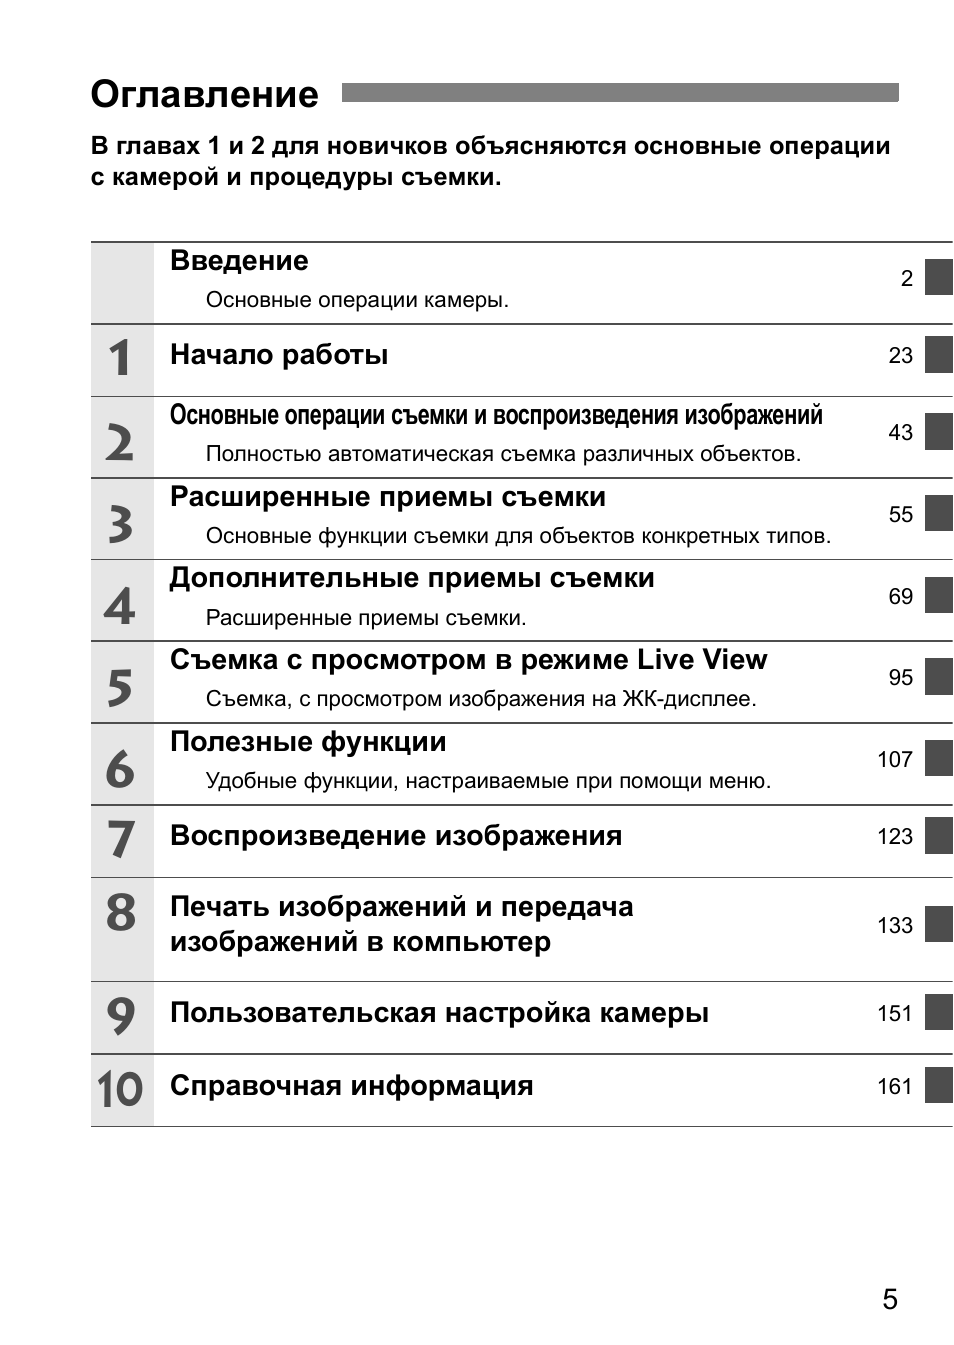
В главах 1 и 2 для новичков объясняются основные операции
с камерой и процедуры съемки.
Оглавление
Введение
Основные операции камеры.
2
Начало работы
23
Основные операции съемки и воспроизведения изображений
Полностью автоматическая съемка различных объектов.
43
Расширенные приемы съемки
Основные функции съемки для объектов конкретных типов.
55
Дополнительные приемы съемки
Расширенные приемы съемки.
69
Съемка с просмотром в режиме Live View
Съемка, с просмотром изображения на ЖК-дисплее.
95
Полезные функции
Удобные функции, настраиваемые при помощи меню.
107
Воспроизведение изображения
123
Печать изображений и передача
изображений в компьютер
133
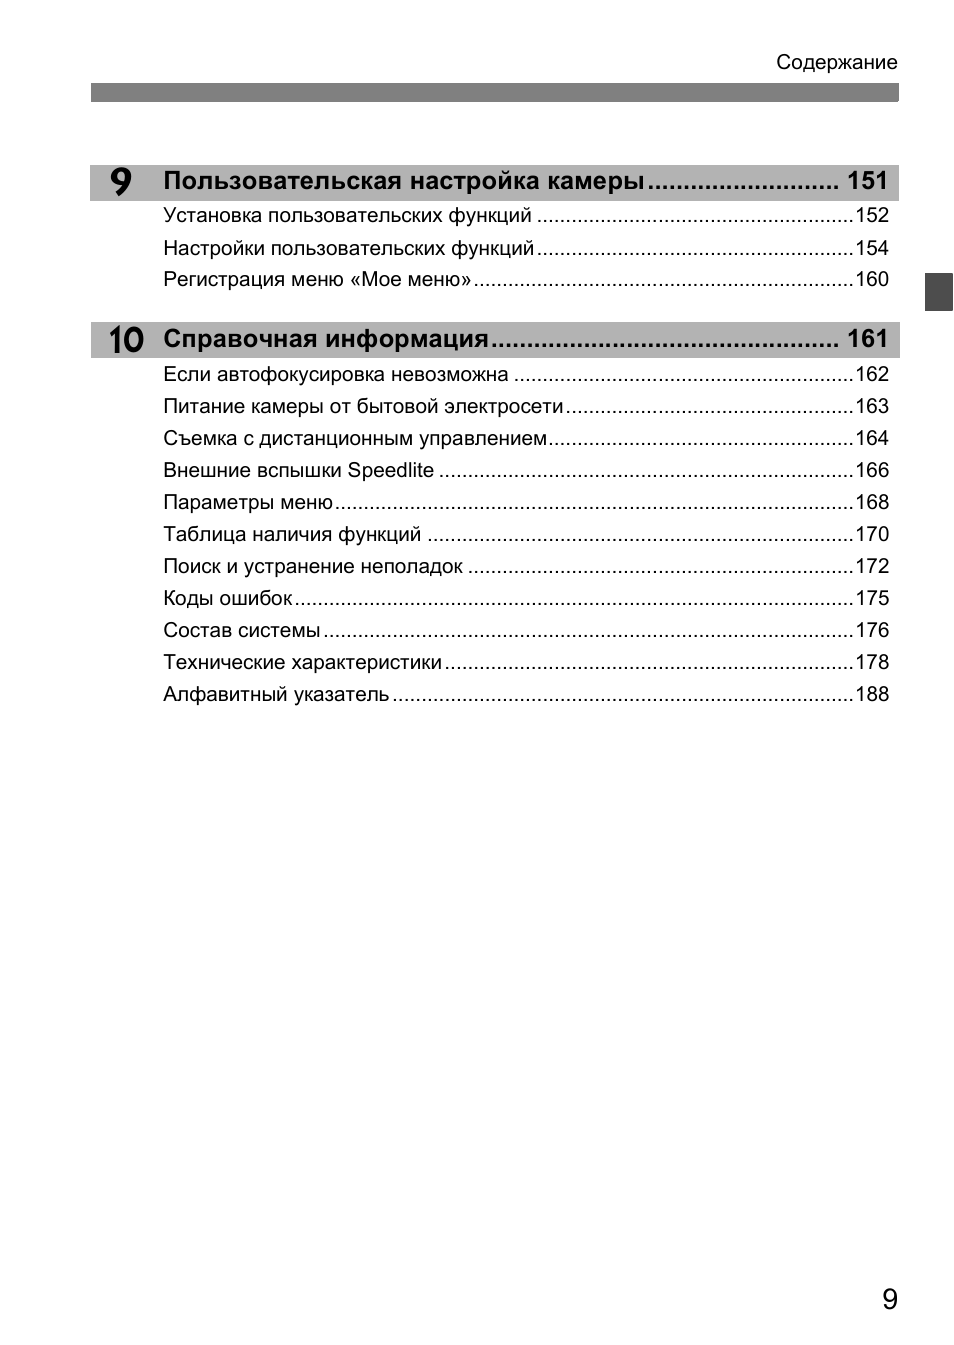
Пользовательская настройка камеры
151
Справочная информация
161
1
2
3
4
5
6
7
8
9
10
6
1
2
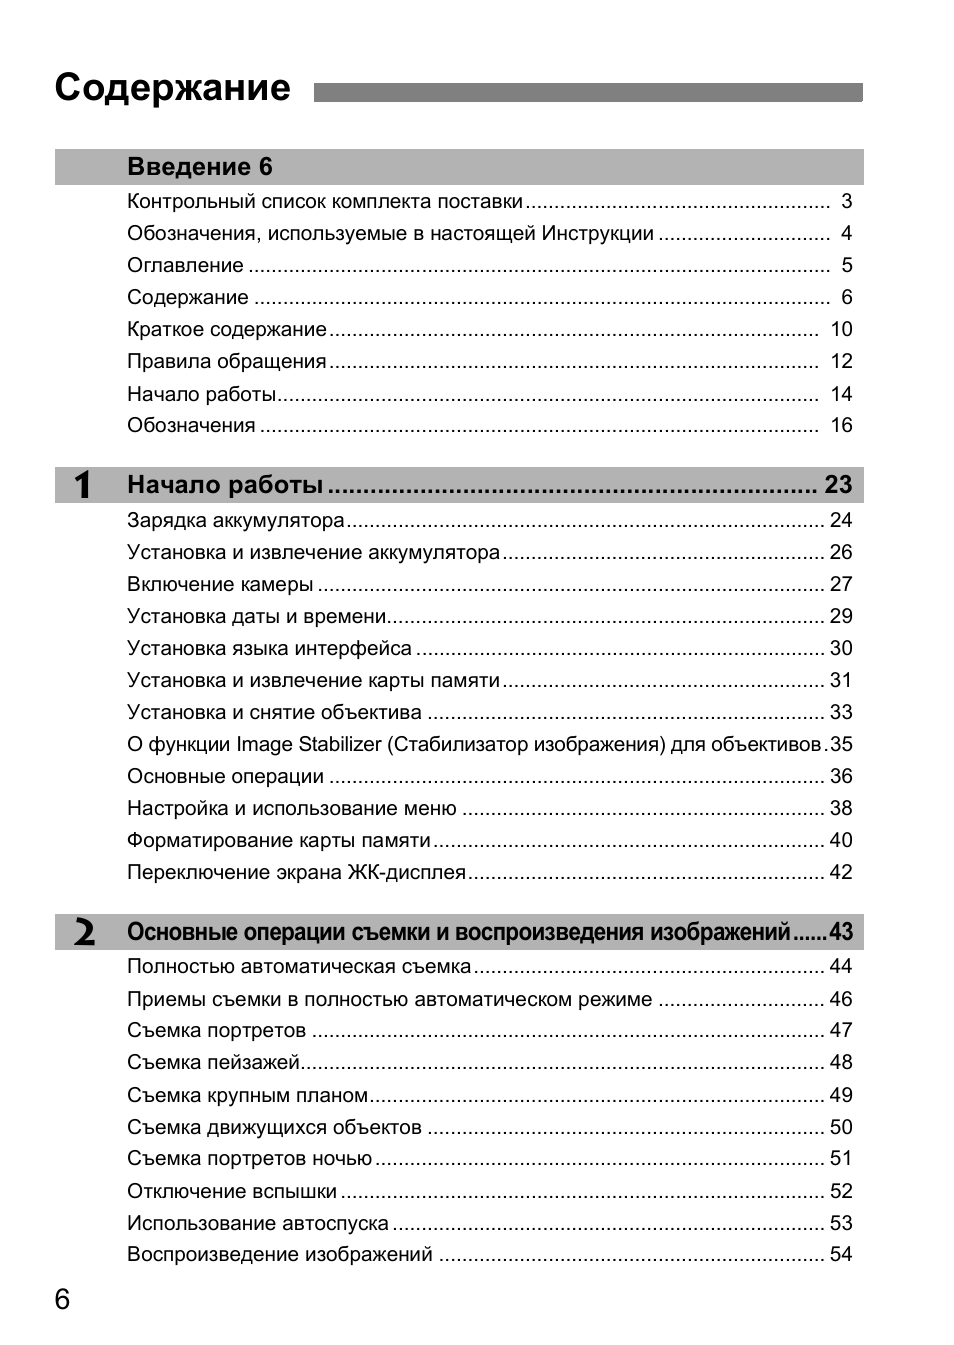
Введение 6
Контрольный список комплекта поставки…………………………………………….. 3
Обозначения, используемые в настоящей Инструкции ………………………… 4
Оглавление ……………………………………………………………………………………….. 5
Содержание ………………………………………………………………………………………. 6
Краткое содержание…………………………………………………………………………. 10
Правила обращения…………………………………………………………………………. 12
Начало работы…………………………………………………………………………………. 14
Обозначения ……………………………………………………………………………………. 16
Начало работы …………………………………………………………… 23
Зарядка аккумулятора……………………………………………………………………….. 24
Установка и извлечение аккумулятора……………………………………………….. 26
Включение камеры ……………………………………………………………………………. 27
Установка даты и времени…………………………………………………………………. 29
Установка языка интерфейса …………………………………………………………….. 30
Установка и извлечение карты памяти……………………………………………….. 31
Установка и снятие объектива …………………………………………………………… 33
О функции Image Stabilizer (Стабилизатор изображения) для объективов.35
Основные операции ………………………………………………………………………….. 36
Настройка и использование меню ……………………………………………………… 38
Форматирование карты памяти………………………………………………………….. 40
Переключение экрана ЖК-дисплея…………………………………………………….. 42
Основные операции съемки и воспроизведения изображений……43
Полностью автоматическая съемка……………………………………………………. 44
Приемы съемки в полностью автоматическом режиме ……………………….. 46
Съемка портретов …………………………………………………………………………….. 47
Съемка пейзажей………………………………………………………………………………. 48
Съемка крупным планом……………………………………………………………………. 49
Съемка движущихся объектов …………………………………………………………… 50
Съемка портретов ночью …………………………………………………………………… 51
Отключение вспышки ………………………………………………………………………… 52
Использование автоспуска ………………………………………………………………… 53
Воспроизведение изображений …………………………………………………………. 54
Содержание
7
Содержание
3
4
5
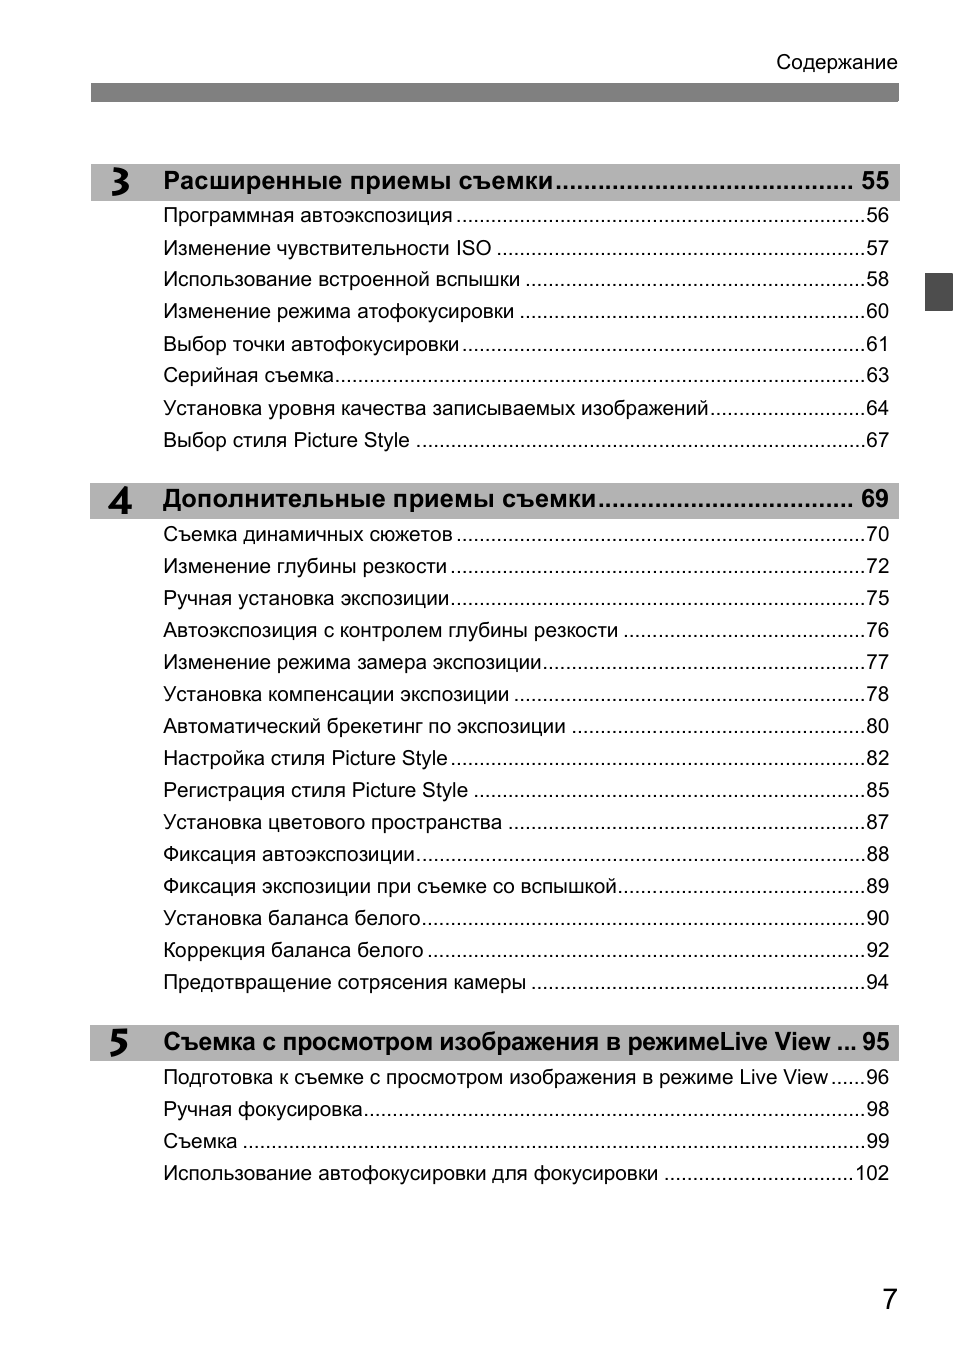
Расширенные приемы съемки…………………………………… 55
Программная автоэкспозиция ……………………………………………………………..56
Изменение чувствительности ISO ……………………………………………………….57
Использование встроенной вспышки …………………………………………………..58
Изменение режима атофокусировки ……………………………………………………60
Выбор точки автофокусировки …………………………………………………………….61
Серийная съемка………………………………………………………………………………..63
Установка уровня качества записываемых изображений………………………64
Выбор стиля Picture Style ……………………………………………………………………67
Дополнительные приемы съемки……………………………… 69
Съемка динамичных сюжетов ……………………………………………………………..70
Изменение глубины резкости ………………………………………………………………72
Ручная установка экспозиции………………………………………………………………75
Автоэкспозиция с контролем глубины резкости ……………………………………76
Изменение режима замера экспозиции………………………………………………..77
Установка компенсации экспозиции …………………………………………………….78
Автоматический брекетинг по экспозиции ……………………………………………80
Настройка стиля Picture Style………………………………………………………………82
Регистрация стиля Picture Style …………………………………………………………..85
Установка цветового пространства ……………………………………………………..87
Фиксация автоэкспозиции……………………………………………………………………88
Фиксация экспозиции при съемке со вспышкой…………………………………….89
Установка баланса белого…………………………………………………………………..90
Коррекция баланса белого ………………………………………………………………….92
Предотвращение сотрясения камеры ………………………………………………….94
Съемка с просмотром изображения в режимеLive View … 95
Подготовка к съемке с просмотром изображения в режиме Live View ……96
Ручная фокусировка……………………………………………………………………………98
Съемка ………………………………………………………………………………………………99
Использование автофокусировки для фокусировки ……………………………102
Содержание
8
6
8
7
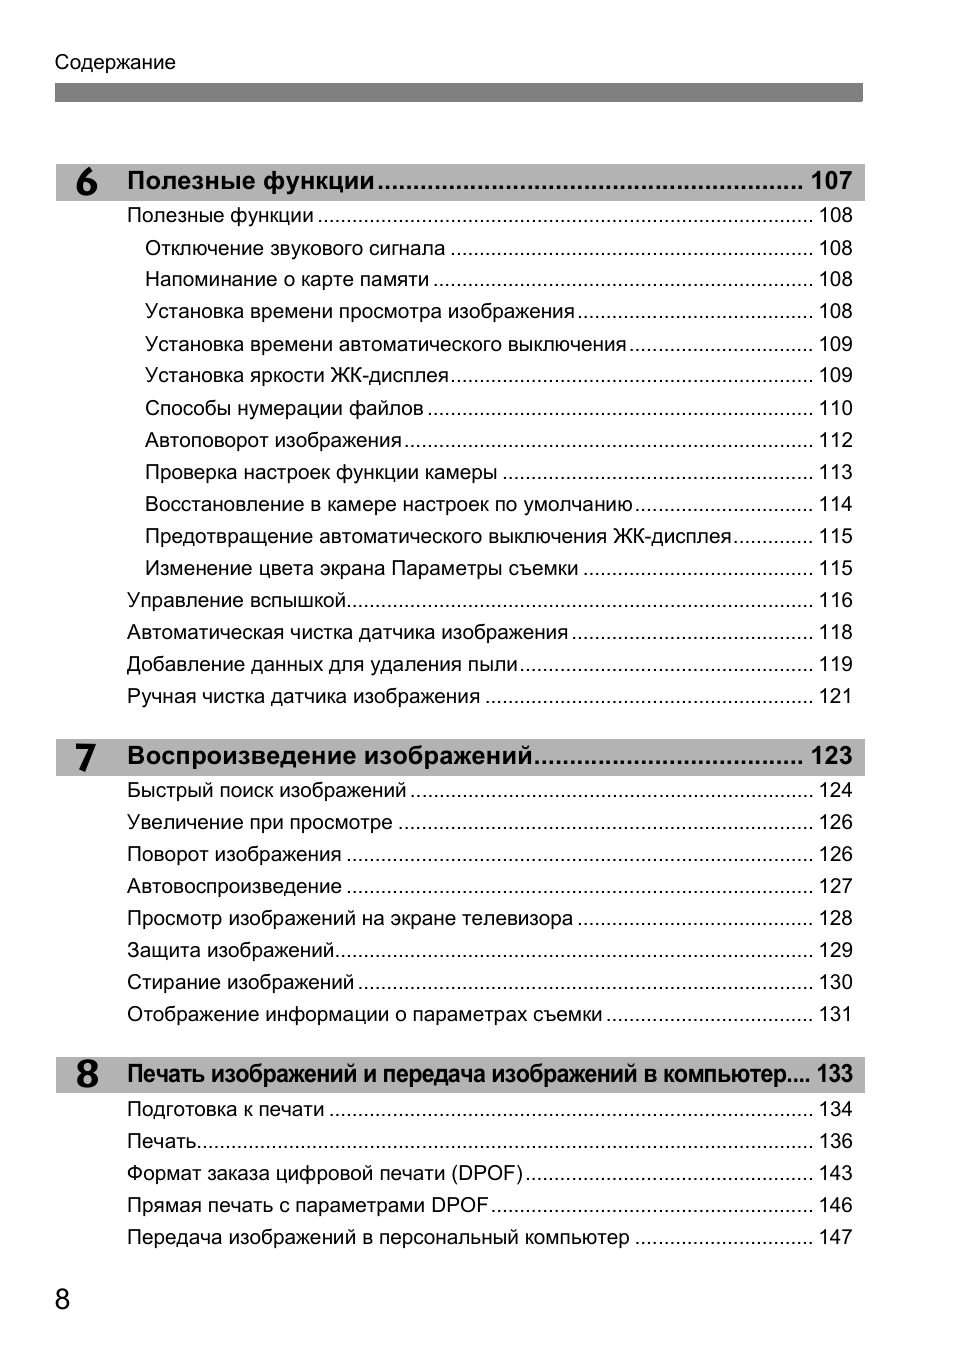
Полезные функции…………………………………………………… 107
Полезные функции ………………………………………………………………………….. 108
Отключение звукового сигнала ……………………………………………………… 108
Напоминание о карте памяти ………………………………………………………… 108
Установка времени просмотра изображения………………………………….. 108
Установка времени автоматического выключения………………………….. 109
Установка яркости ЖК-дисплея……………………………………………………… 109
Способы нумерации файлов …………………………………………………………. 110
Автоповорот изображения…………………………………………………………….. 112
Проверка настроек функции камеры ……………………………………………… 113
Восстановление в камере настроек по умолчанию…………………………. 114
Предотвращение автоматического выключения ЖК-дисплея………….. 115
Изменение цвета экрана Параметры съемки …………………………………. 115
Управление вспышкой……………………………………………………………………… 116
Автоматическая чистка датчика изображения …………………………………… 118
Добавление данных для удаления пыли…………………………………………… 119
Ручная чистка датчика изображения ………………………………………………… 121
Воспроизведение изображений……………………………….. 123
Быстрый поиск изображений ……………………………………………………………. 124
Увеличение при просмотре ……………………………………………………………… 126
Поворот изображения ……………………………………………………………………… 126
Автовоспроизведение ……………………………………………………………………… 127
Просмотр изображений на экране телевизора ………………………………….. 128
Защита изображений……………………………………………………………………….. 129
Стирание изображений ……………………………………………………………………. 130
Отображение информации о параметрах съемки ……………………………… 131
Печать изображений и передача изображений в компьютер…. 133
Подготовка к печати ………………………………………………………………………… 134
Печать…………………………………………………………………………………………….. 136
Формат заказа цифровой печати (DPOF)………………………………………….. 143
Прямая печать с параметрами DPOF……………………………………………….. 146
Передача изображений в персональный компьютер …………………………. 147
9
Содержание
9
10
Пользовательская настройка камеры……………………… 151
Установка пользовательских функций ……………………………………………….152
Настройки пользовательских функций……………………………………………….154
Регистрация меню «Мое меню»…………………………………………………………160
Справочная информация…………………………………………. 161
Если автофокусировка невозможна …………………………………………………..162
Питание камеры от бытовой электросети…………………………………………..163
Съемка с дистанционным управлением……………………………………………..164
Внешние вспышки Speedlite ………………………………………………………………166
Параметры меню………………………………………………………………………………168
Таблица наличия функций ………………………………………………………………..170
Поиск и устранение неполадок ………………………………………………………….172
Коды ошибок…………………………………………………………………………………….175
Состав системы ………………………………………………………………………………..176
Технические характеристики ……………………………………………………………..178
Алфавитный указатель ……………………………………………………………………..188
10
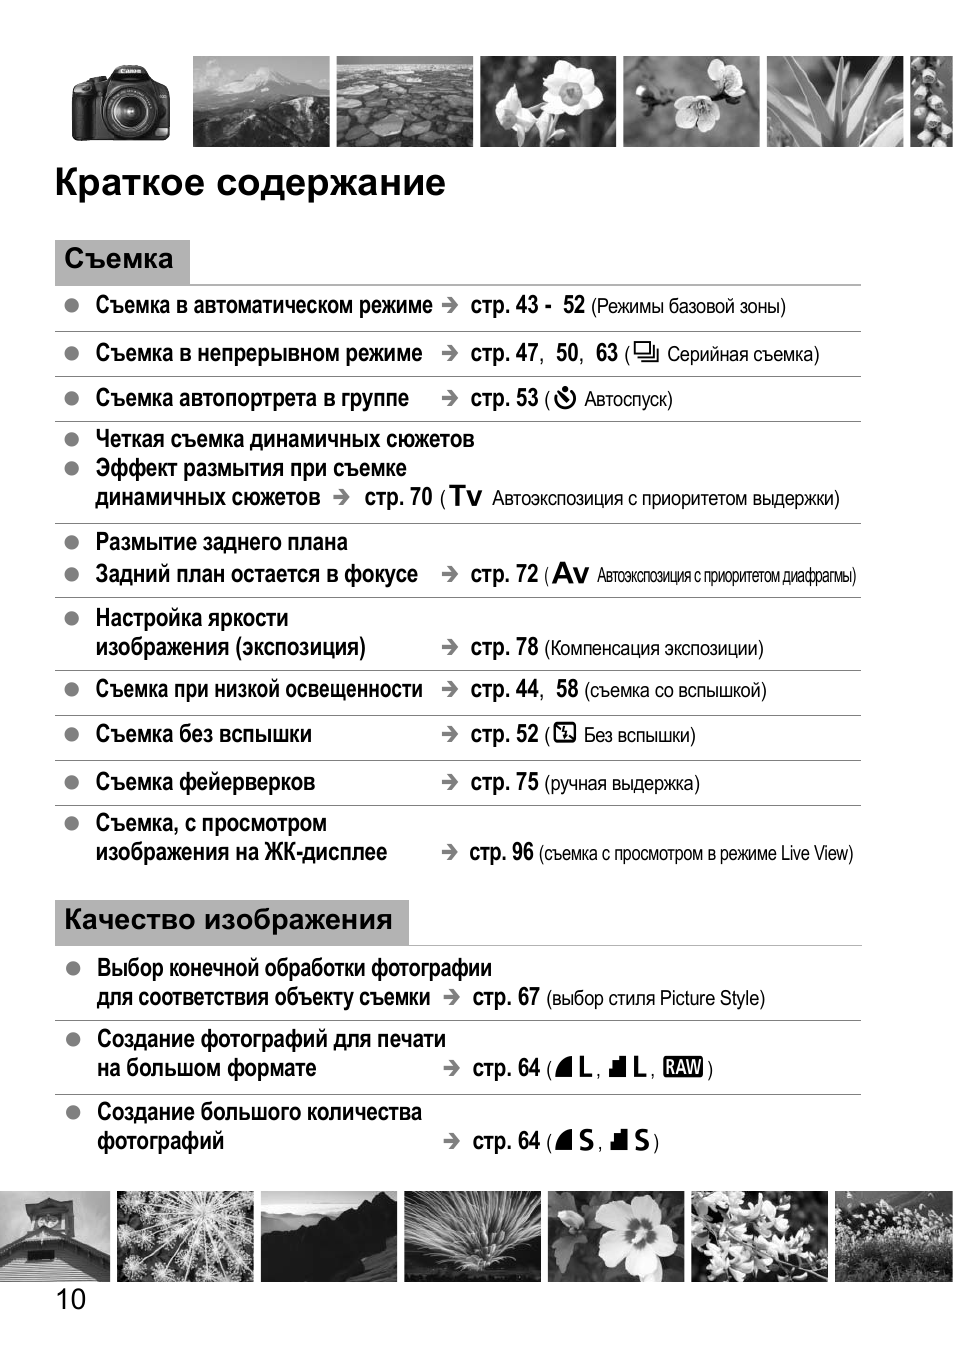
Краткое содержание
Съемка
Съемка в автоматическом режиме
Î
стр. 43 — 52
(Режимы базовой зоны)
Съемка в непрерывном режиме
Î
стр. 47, 50, 63
(
i
Серийная съемка)
Съемка автопортрета в группе
Î
стр. 53
(
j
Автоспуск)
Четкая съемка динамичных сюжетов
Эффект размытия при съемке
динамичных сюжетов
Î
стр. 70
(
s
Автоэкспозиция с приоритетом выдержки)
Размытие заднего плана
Задний план остается в фокусе
Î
стр. 72
(
f
Автоэкспозиция с приоритетом диафрагмы)
Настройка яркости
изображения (экспозиция)
Î
стр. 78
(Компенсация экспозиции)
Съемка при низкой освещенности
Î
стр. 44, 58
(съемка со вспышкой)
Съемка без вспышки
Î
стр. 52
(
7
Без вспышки)
Съемка фейерверков
Î
стр. 75
(ручная выдержка)
Съемка, с просмотром
изображения на ЖК-дисплее
Î
стр. 96
(съемка с просмотром в режиме Live View)
Качество изображения
Выбор конечной обработки фотографии
для соответствия объекту съемки
Î
стр. 67
(выбор стиля Picture Style)
Создание фотографий для печати
на большом формате
Î
стр. 64
(
73
,
83
,
1
)
Создание большого количества
фотографий
Î
стр. 64
(
76
,
86
)
06:14
Canon 400D с Avito за 2000рублей! Обзор-тест недорогой камеры из прошлого
13:57
Canon 450D как первая зеркалка
11:36
Canon 450D «Привет из прошлого»
03:29
Canon EOS 450D. Видеоприложение к тесту.
08:41
Снимаем видео на Canon 450D
10:13
Рассказ как я на Canon 450D фотал
11:02
«Беззеркалка» из Canon 450D ))
Нажмите на кнопку для помощи
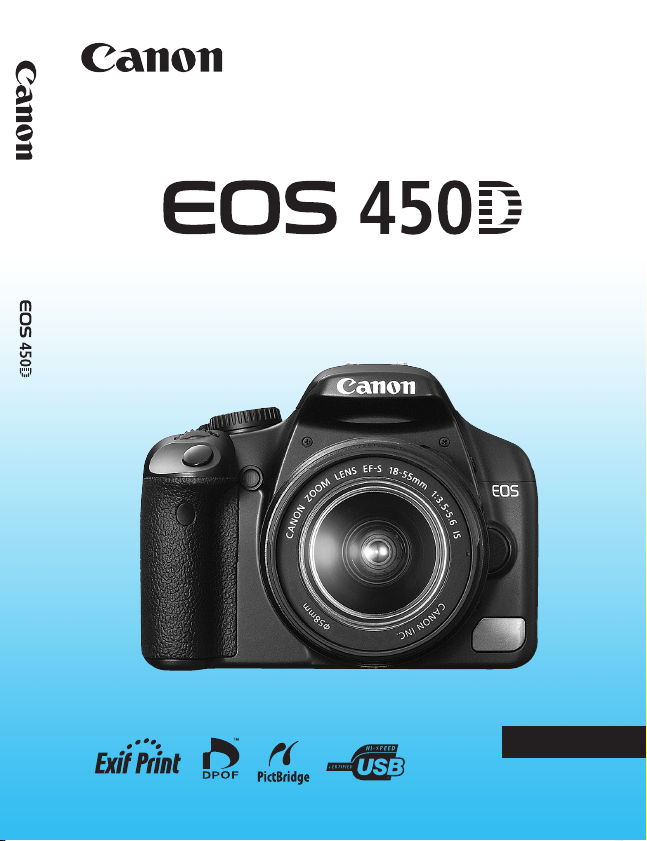
INSTRUCTION MANUAL
ENGLISH
INSTRUCTION
MANUAL

Thank you for purchasing a Canon product.
The EOS 450D is a high-performance, digital single-lens reflex camera
with a 12.20-megapixel image sensor. The camera provides many
features such as Picture Styles to expand your photographic
expression, fast and high-precision 9-point autofocus for moving
subjects, and diverse shooting modes for beginners as well as
advanced users.
It also incorporates the EOS Integrated Cleaning System to eliminate
dust spots on images and the Self Cleaning Sensor Unit to shake off
dust on the sensor.
Take a Few Test Shots to Familiarize Yourself with the
Camera
With a digital camera, you can immediately view the image you have
captured. While reading this manual, take a few test shots and see how
they come out. You can then better understand the camera.
To avoid botched pictures and accidents, read the Safety Warnings
(p.186,187) and Handling Precautions (p.12,13).
Test the Camera Before Using and Liability
After shooting, playback and check whether the image has been
properly recorded. If the camera or memory card is faulty and the
images cannot be recorded or downloaded to the personal computer,
Canon cannot be held liable for any loss or inconvenience caused.
Copyrights
Copyright laws in your country may prohibit the use of your recorded
images of people and certain subjects for anything but private
enjoyment. Also be aware that certain public performances, exhibitions,
etc., may prohibit photography even for private enjoyment.
This camera is compatible with SD memory cards and SDHC
memory cards. This manual will refer to all these cards as just “card.”
* The camera does not come with a card (for recording images).
Please purchase it separately.
2
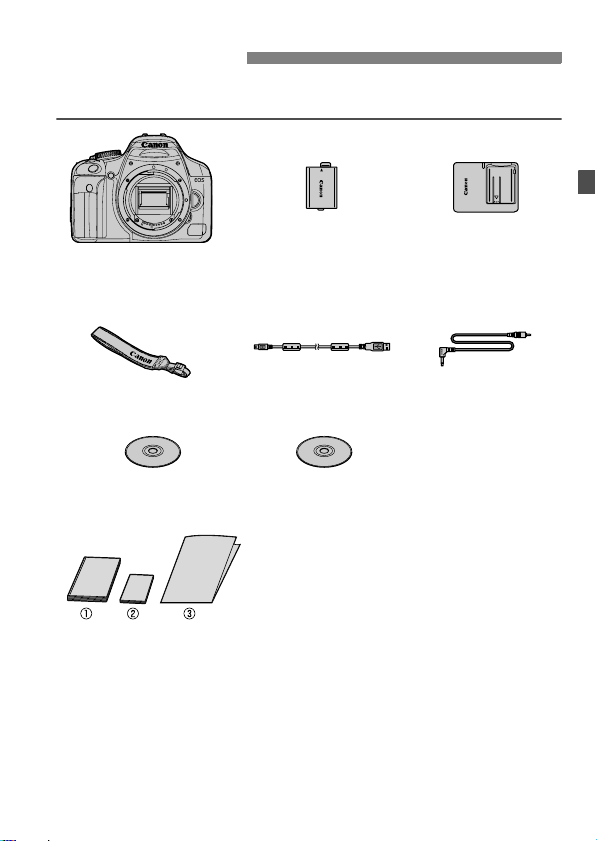
Item Check List
Before starting, check that all the following items have been included
with your camera. If anything is missing, contact your dealer.
Battery Pack LP-E5
Camera
(with eyecup and
body cap)
Wide Strap
EW-100DB III
EOS DIGITAL
Solution Disk
* Battery Charger LC-E5 or LC-E5E is provided. (The LC-E5E comes with a
power cord.)
(with protective cover)
Interface Cable
IFC-200U
EOS DIGITAL Software
Instruction Manuals Disk
(1) Instruction Manual (this booklet)
(2) Pocket Guide
Quick start guide to shooting.
(3) CD-ROM Guide
Guide to the bundled software (EOS DIGITAL
Solution Disk) and EOS DIGITAL Software Instruction
Manuals Disk.
Battery Charger
LC-E5/LC-E5E*
Video Cable
VC-100
If you purchased the Lens Kit, check that the lens is included.
Depending on the Lens Kit type, the lens instruction manual might
also be included.
Be careful not to lose any of the above items.
3

Conventions Used in this Manual
Icons in this Manual
<6> : Indicates the Main Dial.
<V> <U> : Indicate the <S> cross keys.
<0> : Indicates the setting button.
0, 9, 8 : Indicates that the respective function remains active
for 4 sec., 6 sec., or 16 sec. respectively after you let
go of the button.
* In this manual, the icons and markings indicating the camera’s buttons, dials,
and settings correspond to the icons and markings on the camera and on the
LCD monitor.
3 : Indicates a function which can be changed by pressing the
<M> button and changing the setting.
M : When shown on the upper right of the page, it indicates that the
function is available only in the Creative Zone modes (p.20).
(p.**) : Reference page numbers for more information.
: Tip or advice for better shooting.
: Problem-solving advice.
: Warning to prevent shooting problems.
: Supplemental information.
Basic Assumptions
All operations explained in this manual assume that the power switch
is already set to <1>.
It is assumed that all the menu settings and Custom Functions are
set to the default.
For explanatory purposes, the instructions show the camera attached
with an EF-S 18-55mm f/3.5-5.6 IS lens.
4
Chapters
For first-time users, chapters 1 and 2 explain the camera’s basic
operations and shooting procedures.
Introduction
Camera basics.
Getting Started
Basic Shooting and Image Playback
2
3
4
5
6
7
8
9
10
Fully automatic shooting for different subjects.
Advanced Shooting Techniques
Basic shooting features for specific types of subjects.
More Advanced Techniques
Advanced shooting techniques.
Live View Shooting
Shoot while viewing the LCD monitor.
Handy Features
Convenient menu-based functions.
Image Playback
Printing Images and Transferring Images to a Computer
Customizing the Camera
Reference
2
23
43
55
69
95
107
123
133
151
161
5

Contents
Introduction
Item Check List…………………………………………………………………………………….. 3
Conventions Used in this Manual ……………………………………………………………. 4
Chapters……………………………………………………………………………………………… 5
Contents at a Glance…………………………………………………………………………… 10
Handling Precautions ………………………………………………………………………….. 12
Quick Start Guide ……………………………………………………………………………….. 14
Nomenclature …………………………………………………………………………………….. 16
Getting Started 23
1
Recharging the Battery………………………………………………………………………… 24
Installing and Removing the Battery………………………………………………………. 26
Turning on the Power ………………………………………………………………………….. 27
Setting the Date and Time……………………………………………………………………. 29
Selecting the Interface Language………………………………………………………….. 30
Installing and Removing the Card …………………………………………………………. 31
Mounting and Detaching a Lens……………………………………………………………. 33
About the Lens Image Stabilizer……………………………………………………………. 35
Basic Operation………………………………………………………………………………….. 36
Menu Operations and Settings ……………………………………………………………… 38
Formatting the Card…………………………………………………………………………….. 40
Switching the LCD Monitor Screen………………………………………………………… 42
Basic Shooting and Image Playback 43
2
Fully Automatic Shooting……………………………………………………………………… 44
Full Auto Techniques…………………………………………………………………………… 46
Shooting Portraits ……………………………………………………………………………….. 47
Shooting Landscapes ………………………………………………………………………….. 48
Shooting Close-ups …………………………………………………………………………….. 49
Shooting Moving Subjects ……………………………………………………………………. 50
Shooting Portraits at Night……………………………………………………………………. 51
Disabling Flash…………………………………………………………………………………… 52
Using the Self-timer…………………………………………………………………………….. 53
Image Playback………………………………………………………………………………….. 54
6

Advanced Shooting Techniques 55
3
Program AE…………………………………………………………………………………………56
Changing the ISO Speed ………………………………………………………………………57
Using the Built-in Flash …………………………………………………………………………58
Changing the AF Mode …………………………………………………………………………60
Selecting the AF Point…………………………………………………………………………..61
Continuous Shooting…………………………………………………………………………….63
Setting the Image-recording Quality………………………………………………………..64
Selecting a Picture Style ……………………………………………………………………….67
More Advanced Techniques 69
4
Action Shots ………………………………………………………………………………………..70
Changing the Depth of Field ………………………………………………………………….72
Manual Exposure …………………………………………………………………………………75
Automatic Depth-of-Field AE………………………………………………………………….76
Changing the Metering Mode…………………………………………………………………77
Setting Exposure Compensation…………………………………………………………….78
Auto Exposure Bracketing……………………………………………………………………..80
Customizing the Picture Style ………………………………………………………………..82
Registering the Picture Style………………………………………………………………….85
Setting the Color Space ………………………………………………………………………..87
AE Lock………………………………………………………………………………………………88
FE Lock ………………………………………………………………………………………………89
Setting the White Balance……………………………………………………………………..90
White Balance Correction ……………………………………………………………………..92
Preventing Camera Shake …………………………………………………………………….94
Contents
Live View Shooting 95
5
Preparing for Live View Shooting……………………………………………………………96
Focusing Manually ……………………………………………………………………………….98
Shooting ……………………………………………………………………………………………..99
Using AF to Focus………………………………………………………………………………102
7

Contents
Handy Features 107
6
Handy Features………………………………………………………………………………… 108
Silencing the Beeper ………………………………………………………………………. 108
Card Reminder ………………………………………………………………………………. 108
Setting the Image Review Time ……………………………………………………….. 108
Setting the Auto Power-off Time……………………………………………………….. 109
Setting the LCD Monitor Brightness ………………………………………………….. 109
File Numbering Methods …………………………………………………………………..110
Auto Image Rotation…………………………………………………………………………112
Checking Camera Function Settings…………………………………………………..113
Reverting the Camera to the Default Settings………………………………………114
Preventing the LCD Monitor from Turning off Automatically …………………..115
Changing the Shooting Settings Screen Color……………………………………..115
Flash Control ……………………………………………………………………………………. 116
Automatic Sensor Cleaning ………………………………………………………………… 118
Appending Dust Delete Data ………………………………………………………………. 119
Manual Sensor Cleaning ……………………………………………………………………. 121
Image Playback 123
7
Searching for Images Quickly……………………………………………………………… 124
Magnified View …………………………………………………………………………………. 126
Rotating the Image ……………………………………………………………………………. 126
Auto Playback ………………………………………………………………………………….. 127
Viewing the Images on TV………………………………………………………………….. 128
Protecting Images …………………………………………………………………………….. 129
Erasing Images ………………………………………………………………………………… 130
Shooting Information Display………………………………………………………………. 131
Printing Images and Transferring Images to a Computer
8
Preparing to Print ……………………………………………………………………………… 134
Printing ……………………………………………………………………………………………. 136
Digital Print Order Format (DPOF) ………………………………………………………. 143
Direct Printing with DPOF…………………………………………………………………… 146
Transferring Images to a Personal Computer ……………………………………….. 147
8
133

Customizing the Camera 151
9
Setting Custom Functions ……………………………………………………………………152
Custom Function Settings ……………………………………………………………………154
Registering My Menu ………………………………………………………………………….160
Reference 161
10
When Autofocus Fails …………………………………………………………………………162
Using a Household Power Outlet ………………………………………………………….163
Remote Control Shooting…………………………………………………………………….164
External Speedlites …………………………………………………………………………….166
Menu Settings ……………………………………………………………………………………168
Function Availability Table …………………………………………………………………..170
Troubleshooting Guide………………………………………………………………………..172
Error Codes……………………………………………………………………………………….175
System Map ………………………………………………………………………………………176
Specifications …………………………………………………………………………………….178
Index ………………………………………………………………………………………………..189
Contents
9
Contents at a Glance
Shooting
Shoot automatically Î p.43 — 52 (Basic Zone modes)
Shoot continuously Î p.47, 50, 63 (i Continuous shooting)
Take a picture of myself in a group
Freeze the action
Take a blurred action shot
Blur the background
Keep the background in sharp focus
Adjust the image brightness (exposure)
Shoot under low light Î p.44, 58 (Flash photography)
Shoot without flash Î p.52 (7 Flash Off)
Photograph fireworks at night Î p.75 (Bulb exposure)
Shoot while viewing the LCD monitor
Image Quality
Select the photo finish to match the subject
Make a large size print of the picture
Î p.53 (j Self-timer)
Î p.70 (s Shutter-priority AE)
Î p.72 (f Aperture-priority AE)
Î p.78 (Exposure compensation)
Î p.96 (Live View shooting)
Î p.67 (
Î p.64 (73, 83, 1)
Selecting a Picture Style
)
Take many pictures Î p.64 (76, 86)
10
Focusing
Change the point of focus Î p.61 (S AF point selection)
Shoot a moving subject Î p.50, 60 (AI Servo AF)
Playback
View the images with the camera Î p.54 (x Playback)
Search for pictures quickly Î p.124 (H Index display)
Prevent important images
from accidental deletion
Delete unnecessary images Î p.130 (L Delete)
View the images on a TV set Î p.128 (Video OUT)
Set the LCD brightness Î p.109 (LCD Brightness)
Î p.129 (K Image protect)
Printing
Print pictures easily Î p.133 (Direct printing)
11

Handling Precautions
Camera Care
This camera is a precision instrument. Do not drop it or subject it to physical
shock.
The camera is not waterproof and cannot be used underwater. If you
accidentally drop the camera into water, promptly consult your nearest
Canon Service Center. Wipe off any water droplets with a dry cloth. If the
camera has been exposed to salty air, wipe with a well-wrung wet cloth.
Never leave the camera near anything having a strong magnetic field such
as a magnet or electric motor. Also avoid using or leaving the camera near
anything emitting strong radio waves such as a large antenna. Strong
magnetic fields can cause camera misoperation or destroy image data.
Do not leave the camera in excessive heat such as in a car in direct sunlight.
High temperatures can cause the camera to malfunction.
The camera contains precision electronic circuitry. Never attempt to
disassemble the camera yourself.
Use a blower to blow away dust on the lens, viewfinder, reflex mirror, and
focusing screen. Do not use cleaners that contain organic solvents to clean
the camera body or lens. For stubborn dirt, take the camera to the nearest
Canon Service Center.
Do not touch the camera’s electrical contacts with your fingers. This is to
prevent the contacts from corroding. Corroded contacts can cause camera
misoperation.
If the camera is suddenly brought in from the cold into a warm room,
condensation may form on the camera and internal parts. To prevent
condensation, first put the camera in a sealed plastic bag and let it adjust to
the warmer temperature before taking it out of the bag.
If condensation forms on the camera, do not use the camera. This is to avoid
damaging the camera. If there is condensation, remove the lens, card and
battery from the camera, and wait until the condensation has evaporated
before using the camera.
If the camera will not be used for an extended period, remove the battery
and store the camera in a cool, dry, well-ventilated location. Even while the
camera is in storage, press the shutter button a few times once in a while to
check that the camera is still working.
Avoid storing the camera where there are corrosive chemicals such as a
darkroom or chemical lab.
If the camera has not been used for an extended period, test all its functions
before using the camera. If you have not used the camera for some time or if
there is an important shoot coming up, have the camera checked by your
Canon dealer or check the camera yourself and make sure it is working
properly.
12
Handling Precautions
LCD Monitor
Although the LCD monitor is manufactured with very high precision
technology with over 99.99% effective pixels, there might be a few dead
pixels among the remaining 0.01% or less pixels. Dead pixels displaying
only black or red, etc., are not a malfunction. They do not affect the images
recorded.
If the LCD monitor is left on for a prolonged period, screen burn-in may occur
where you see remnants of what was displayed. However, this is only
temporarily and will disappear when the camera is left unused for a few
days.
Cards
Cards are precision devices. Do not drop the card or subject it to vibration.
Doing so could damage the images recorded on them.
Do not store or use the card near anything having a strong magnetic field
such as a TV set, speakers, or magnet. Also avoid places prone to having
static electricity. Otherwise, the images recorded on the card might be lost.
Do not leave the card in direct sunlight or near a heat source. Doing so can
warp the cards and make them unusable.
Do not spill any liquid onto the card.
Always store your cards in a case to protect the data stored on them.
Do not bend the card or subject it to any excessive force or physical shock.
Do not store the card in hot, dusty, or humid locations.
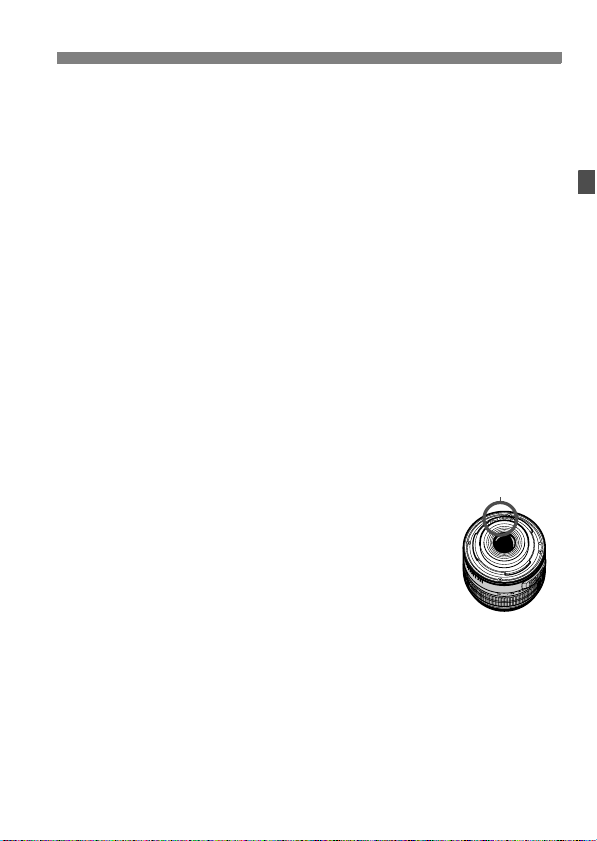
Lens Electrical Contacts
After detaching the lens from the camera, attach the lens
caps or put down the lens with the rear end up to avoid
scratching the lens surface and electrical contacts.
Contacts
Cautions During Prolonged Use
When you shoot continuously for a prolonged period or use Live View shooting
for a long period, the camera may become hot. Although this is not a
malfunction, holding the hot camera for a long period can cause slight skin
burns.
13
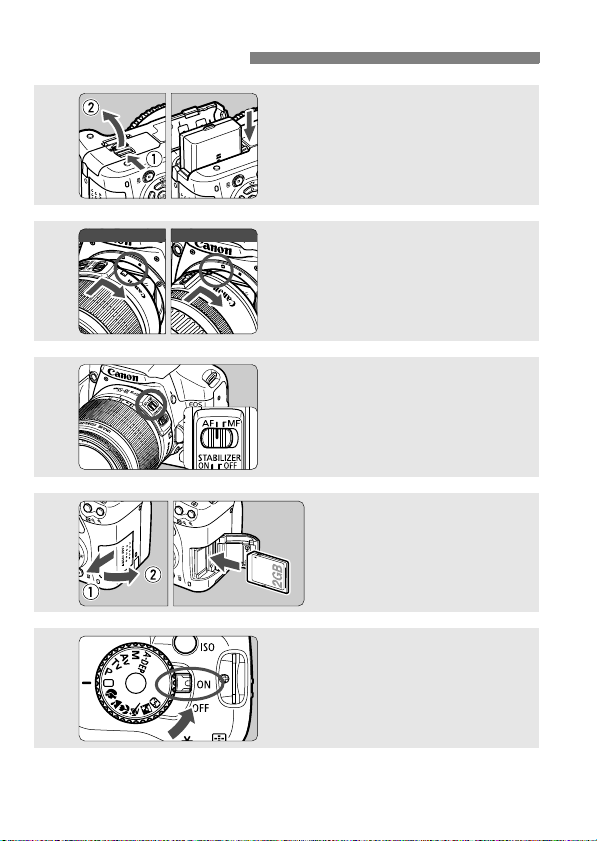
Quick Start Guide
1
2
3
4
Insert the battery. (p.26)
To recharge the battery, see page 24.
Attach the lens. (p.33)
When attaching an EF-S lens, align it
with the white index on the camera.
For other lenses, align it with the red
index.
Set the lens focus mode switch
to <AF>.
(p.33)
Open the slot cover and
insert a card.
With the card’s label facing you,
insert it into the slot.
(p.31)
5
14
Set the power switch to <1>.
(p.27)
When the LCD monitor displays the
Date/Time setting screen, see page
29.
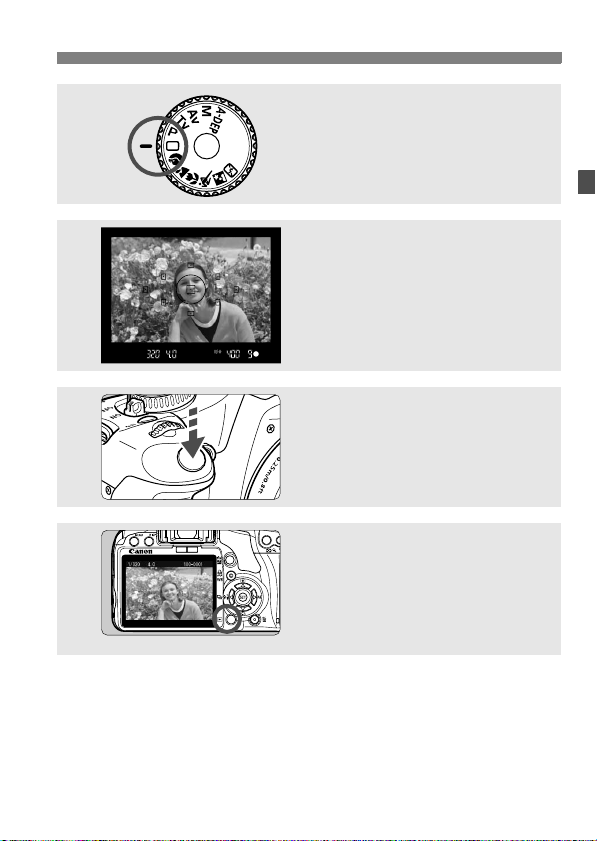
6
7
8
9
Quick Start Guide
Set the Mode Dial to <1> (Full
Auto). (p.44)
All the necessary camera settings will
be set automatically.
Focus the subject. (p.37)
Look through the viewfinder and aim
the viewfinder center over the subject.
Press the shutter button halfway, and
the camera will focus the subject.
Take the picture. (p.37)
Press the shutter button completely to
take the picture.
Review the picture. (p.108)
The captured image will be displayed
for about 2 sec. on the LCD monitor.
To display the image again, press the
<x> button. (p.54)
The shooting settings displayed on the LCD monitor will turn off
when your eye nears the viewfinder eyepiece.
To delete an image, see “Erasing Images” (p.130).
15
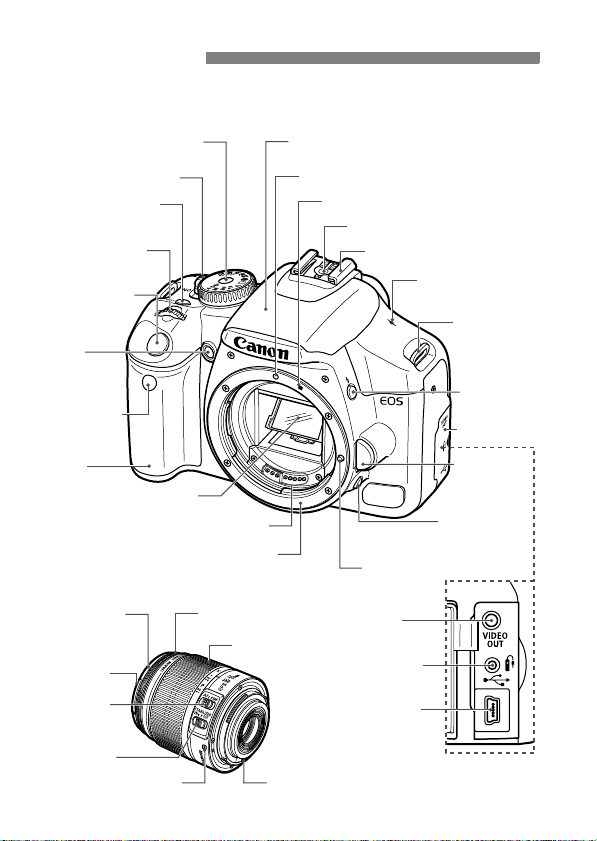
Nomenclature
The names in bold indicate the parts explained up until the “Basic
Shooting and Image Playback” section.
Mode Dial (p.20)
Power switch (p.27)
<Z> ISO speed
set button (p.57)
<6> Main Dial
(p.4)
Shutter button
(p.37)
Red-eye
reduction/
Self-timer lamp
(p.59/53)
Remote control
sensor
(p.94,164)
Grip
Mirror (p.94,121)
Contacts (p.13)
Lens mount
EF-S 18-55mm f/3.5-5.6 IS lens
Hood EW-60C
(sold separately)
mount
58 mm filter thread
(front of lens)
Focus mode
switch (p.33)
Image Stabilizer
switch (p.35)
Lens mount index (p.33)
Focusing ring
(p.62)
16
Built-in flash/AF-assist beam
(p.58/116)
EF Lens mount index (p.33)
Zoom ring (p.34)
Contacts (p.13)
EF-S Lens mount index (p.33)
Flash-sync contacts
Hot shoe (p.166)
<V> Focal plane
mark (p.49)
Strap mount
(p.22)
<D> Flash
button (p.58)
Terminal cover
Lens release
button (p.34)
Depth-of-field
preview button
Lens lock pin
Video OUT
terminal (p.128)
Remote control
terminal (p.164)
Digital terminal
(p.134,147)
(p.74)
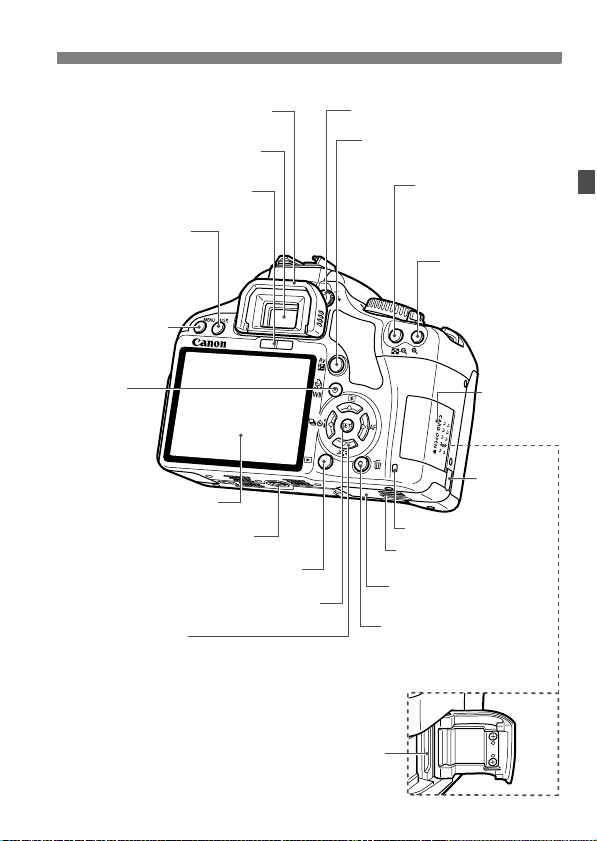
Nomenclature
Eyecup (p.165)
Viewfinder eyepiece
Display-off sensor (p.115)
<B> Shooting
settings display/
Trimming orientation
button (p.42,113/141)
<M> Menu
button (p.38)
<l/B>
Print/Share button/
White balance
selection button
(p.139,148/90)
LCD monitor (p.38,109)
Tripod socket
<x> Playback button (p.54)
<0> Setting button (p.38)
<S> Cross keys (p.38)
<Wq> Metering mode/Jump selection button (p.77/125)
<XA> Picture Style selection button (p.67)
<Yi/Q> Drive mode selection button (p.53,63)
<ZE> AF mode selection button (p.60)
Dioptric adjustment knob (p.36)
<O> Aperture/Exposure
compensation button (p.75/78)
<A/I> AE lock/
FE lock button/
Index/Reduce button
(p.88/89/124/126,141)
<S/u>
AF point selection/
Magnify button
(p.61/126,141)
Card slot
cover (p.31)
DC cord hole
(p.163)
Access lamp (p.32)
Battery compartment
cover release lever (p.26)
Battery compartment cover
(p.26)
<L> Erase button (p.130)
Card slot (p.31)
17
Nomenclature
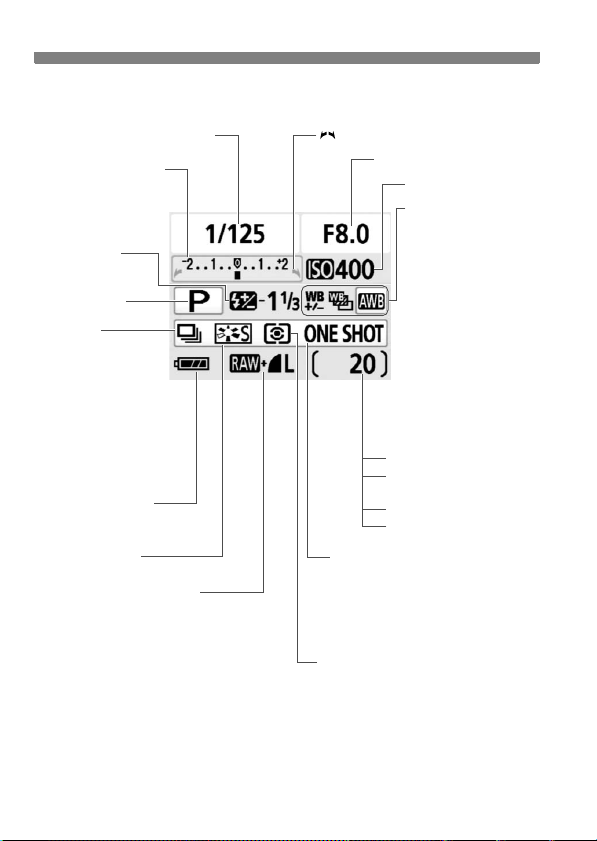
Shooting Settings Display
Shutter speed
Exposure level indicator
Exposure compensation
amount (p.78)
AEB range (p.80)
Flash exposure
compensation (p.79)
Shooting mode
Drive mode
(p.53,63)
u Single shooting
i Continuous
shooting
Q 10-sec. self-timer/
Remote control
l 2-sec. self-timer
q Continuous shots after
self-timer
Battery check (p.28)
zxcn
Picture Style (p.67)
Image-recording quality (p.64)
73 Large/Fine
83 Large/Normal
74 Medium/Fine
84 Medium/Normal
76 Small/Fine
86 Small/Normal
1 RAW
1+73 RAW+Large/Fine
Main Dial pointer (p.69)
Aperture
ISO speed (p.57)
White balance (p.90)
Q Auto
W Daylight
E Shade
R Cloudy
Y Tungsten light
U White fluorescent
light
I Flash
O Custom
2 White balance
correction (p.92)
B White balance
bracketing (p.93)
Shots remaining
Shots remaining during
WB bracketing
Self-timer countdown
Bulb exposure time
AF mode (p.60)
X One-Shot AF
9 AI Focus AF
Z AI Servo AF
g Manual Focusing
Metering mode (p.77)
q Evaluative metering
w Partial metering
r Spot metering
e Center-weighted average metering
The display will show only the settings currently applicable.
18
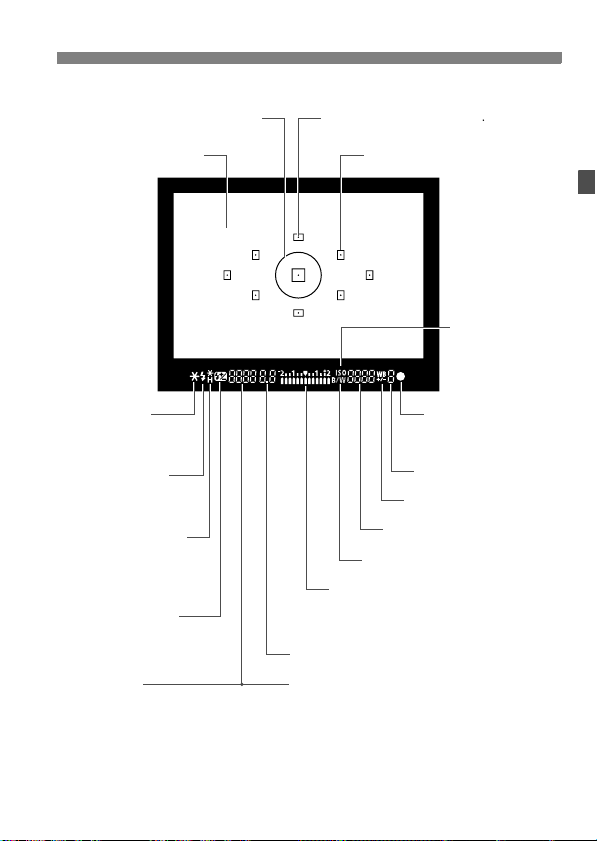
Viewfinder Information
Spot metering circle
Nomenclature
AF point display indicator < >
Focusing screen
<A> AE lock/
AEB in-progress
<D> Flash-ready
Improper FE lock
warning
<e> High-speed sync
(FP flash)
<d> FE lock/
FEB in-progress
<y> Flash exposure
compensation
Shutter speed
FE lock (FEL)
Busy (buSY)
Built-in flash recycling (D buSY)
AF points
<o> Focus
confirmation
light
Max. Burst
White balance correction
ISO speed
<0> Monochrome shooting
Exposure level indicator
Exposure compensation amount
AEB range
Red-eye reduction lamp-on indicator
Aperture
Card full warning (FuLL)
Card error warning (Err)
No card warning (Card)
<Z>
ISO speed
The display will show only the settings currently applicable.
19
Nomenclature
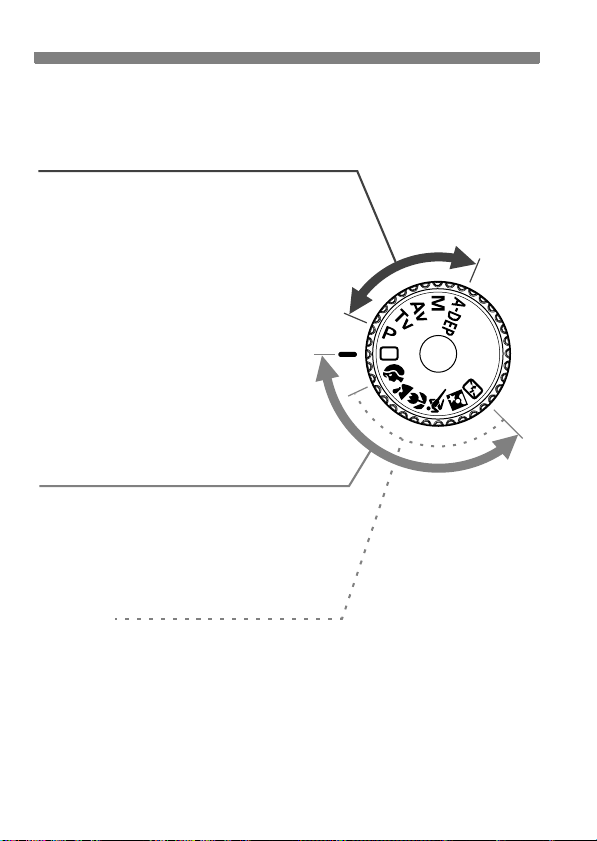
Mode Dial
The Mode Dial has the Basic Zone modes and Creative Zone modes.
Creative Zone
These modes give you more control
over the result.
d : Program AE (p.56)
s : Shutter-priority AE (p.70)
f : Aperture-priority AE (p.72)
a : Manual exposure (p.75)
8 : Automatic depth-of-field
AE (p.76)
Full Auto
Basic Zone
All you do is press the shutter button. Fully
automatic shooting for specific kinds of
subjects.
1: Full Auto (p.44)
Image Zone
2 : Portrait (p.47)
3: Landscape (p.48)
4 : Close-up (p.49)
5: Sports (p.50)
6 : Night Portrait (p.51)
7: Flash Off (p.52)
20

Battery Charger LC-E5
Battery Charger LC-E5E
Battery pack slot
Charge lamp
Nomenclature
Power plug
Charge lamp
Battery pack slot
Power cord
Power cord socket
21
Nomenclature
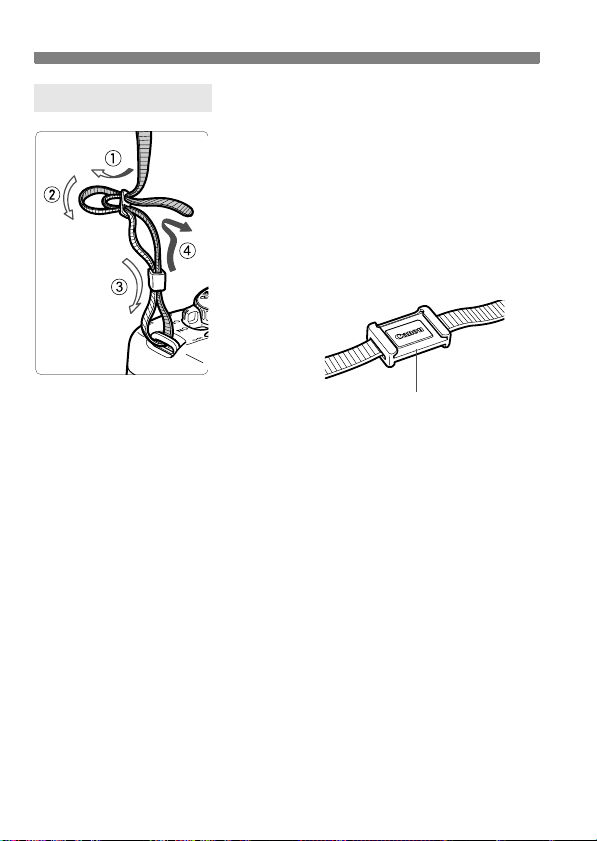
Attaching the Strap
Pass the end of the strap through the
camera’s strap mount eyelet from the
bottom. Then pass it through the strap’s
buckle as shown in the illustration. Pull the
strap to take up any slack and make sure the
strap will not loosen from the buckle.
The eyepiece cover is also attached to
the strap. (p.165)
Eyepiece cover
22

1
Getting Started
This chapter explains preliminary steps and basic
camera operations.
23
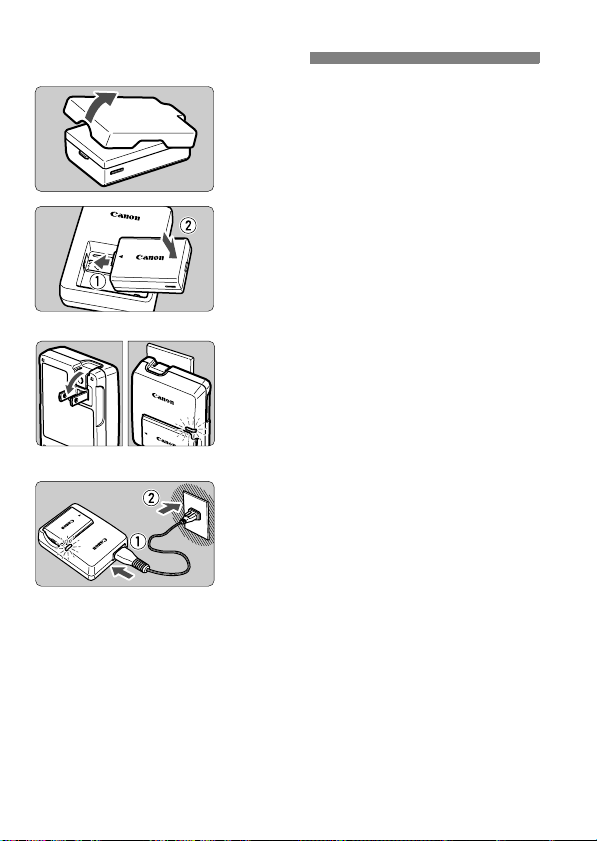
Recharging the Battery
Remove the protective cover.
1
Attach the battery.
2
As shown in the illustration, attach the
battery securely.
To detach the battery, follow the
above procedure in reverse.
LC-E5
LC-E5E
Recharge the battery.
3
For LC-E5
As shown by the arrow, flip out the
battery charger’s prongs and insert
the prongs into a power outlet.
For LC-E5E
Connect the power cord to the
charger and insert the plug into the
power outlet.
X Recharging starts automatically and
the charge lamp turns orange.
X When the battery is fully recharged,
the charge lamp will turn green.
It takes about 2 hours to fully
recharge a completely exhausted
battery.
The time required to recharge the
battery depends on the ambient
temperature and battery’s charge
level.
24

Recharging the Battery
Tips for Using the Battery and Charger
Recharge the battery on the day before or on the day it is to be
used.
Even during non-use or storage, a charged battery will gradually
discharge and lose its power.
After recharging the battery, detach it and unplug the charger
from the power outlet.
When not using the camera, remove the battery.
If the battery is left in the camera for a prolonged period, a small
amount of power current is released, resulting in excess discharge
and shorter battery life. Store the battery with the protective cover
attached. Storing the battery after it is fully charged can lower the
battery’s performance.
The battery charger can also be used in foreign countries.
The battery charger is compatible with a 100 V AC to 240 V AC 50/
60 Hz power source. If necessary, attach a commercially-available
plug adapter for the respective country. Do not attach any portable
voltage transformer to the battery charger. Doing so can damage the
battery charger.
If the battery becomes exhausted quickly even after being fully
charged, the battery has worn out.
Purchase a new battery.
Do not charge any battery other than Battery Pack LP-E5.
Battery Pack LP-E5 is dedicated to Canon products only. Using it with an
incompatible battery charger or product may result in malfunction or
accidents for which Canon cannot be held liable.
25
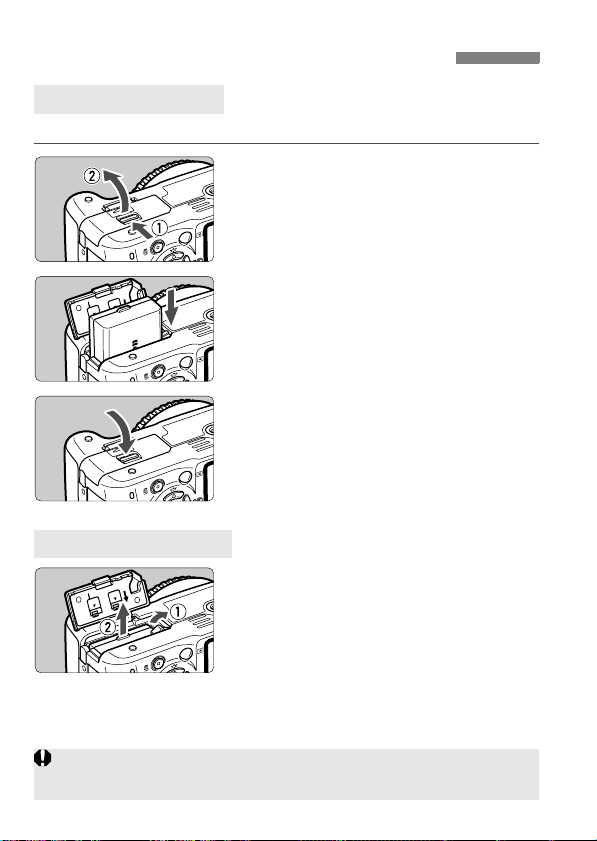
Installing and Removing the Battery
Installing the Battery
Load a fully charged Battery Pack LP-E5 into the camera.
Open the battery compartment
1
cover.
Slide the lever as shown by the arrow
and open the cover.
Insert the battery.
2
Insert the end with the battery
contacts.
Insert the battery until it locks in
place.
Close the cover.
3
Press the cover until it snaps shut.
Removing the Battery
Open the cover and remove the
battery.
Press the battery lock lever as shown
by the arrow and remove the battery.
To prevent shorting, be sure to attach
the protective cover to the battery.
Do not further push open the battery compartment cover when it is already
open. Doing so may damage its hinge.
26
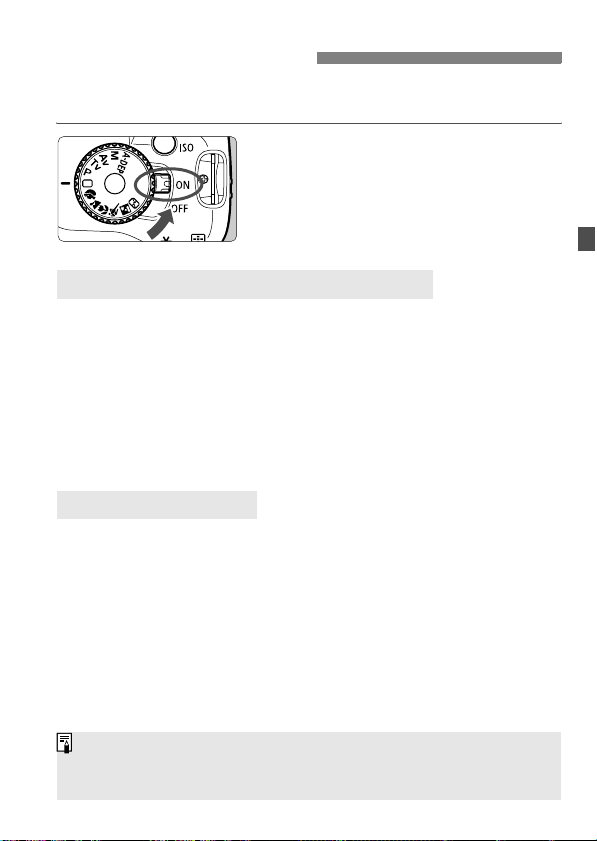
Turning on the Power
When you turn on the power switch and the date/time setting screen
appears, see page 29 to set the date/time.
<1> : The camera turns on.
<2> : The camera is turned off and
does not operate. Set to this
position when not using the
camera.
About the Automatic Self-Cleaning Sensor
Whenever you set the power switch to <1> or <2>, the sensor
cleaning will be executed automatically. During the sensor cleaning,
the LCD monitor will display <f>. Even during the sensor
cleaning, you can still shoot by pressing the shutter button halfway
(p.37) to stop the sensor cleaning and take a picture.
If you turn on/off the power switch <1>/<2> at a short interval,
the <f> icon might not be displayed. This is normal and not a
problem.
About Auto Power Off
To save battery power, the camera turns off automatically after about
30 seconds of non-operation. To turn on the camera again, just
press the shutter button.
You can change the auto power-off time with the menu’s [5 Auto
power off] setting. (p.109)
If you set the power switch to <2> while an image is being recorded to
the card, [Recording …] will be displayed and the power will turn off after
the card finishes recording the image.
27
Turning on the Power
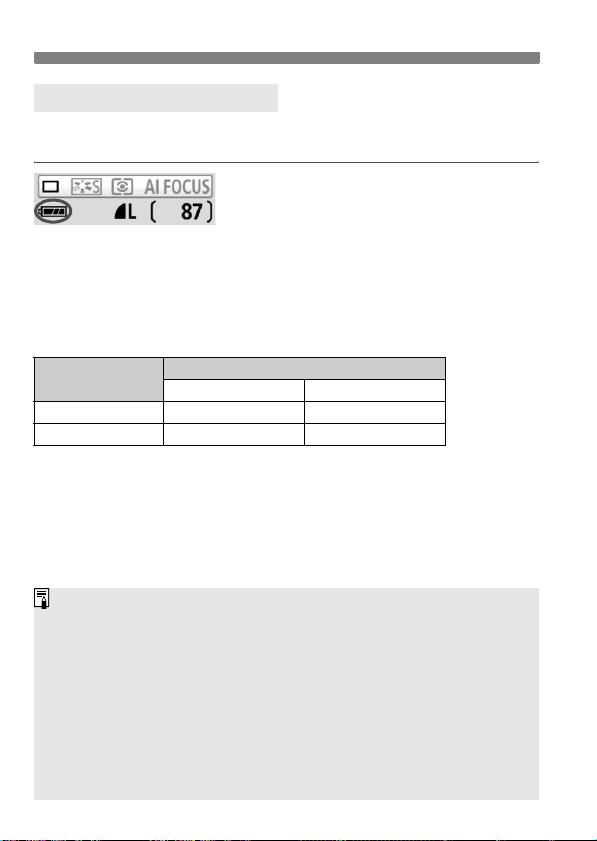
Checking the Battery Level
When the power switch is set to <1>, the battery level will be
indicated in one of four levels:
z : Battery level OK.
x : Battery level is slightly down,
but adequate power remains.
c : Battery will be exhausted soon.
n : Battery must be recharged.
Battery Life
Temperature
At 23°C / 73°F 600 500
At 0°C / 32°F 500 400
The figures above are based on a fully-charged LP-E5, no Live View shooting,
and CIPA (Camera & Imaging Products Association) testing standards.
The actual number of shots may be fewer than indicated above
depending on the shooting conditions.
Pressing the shutter button halfway for long periods or operating only the
autofocus can also reduce the number of possible shots.
The number of possible shots will decrease with more frequent use of
the LCD monitor.
The lens operation is powered by the camera’s battery. Using certain
lenses can reduce the number of possible shots.
Using the Image Stabilizer of the lens will decrease the number of
possible shots (shorter battery life).
For battery life with Live View shooting, see page 100.
No Flash 50% Flash Use
[Approx. number of shots]
Shooting Conditions
28
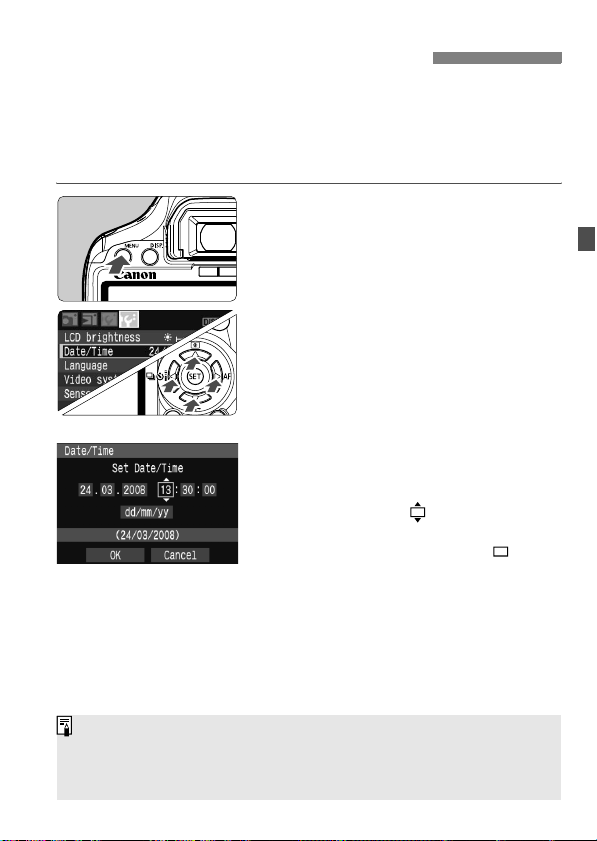
3 Setting the Date and Time
When you turn on the power for the first time or if the date/time has
been reset, the Date/Time setting screen will appear. Follow steps 3
and 4 to set the date/time. Note that the date/time appended to
recorded images will be based on this Date/Time setting. Be sure
to set the date/time.
Display the menu.
1
Press the <M> button to display
the menu.
Under the [6] tab, select [Date/
2
Time].
Press the <U> key to select the
[6] tab.
Press the <V> key to select [Date/
Time], then press <0>.
Set the date and time.
3
Press the <U> key to select the
date or time number.
Press <0> so is displayed.
Press the <V> key to set the number,
then press <
Exit the menu.
4
Press the <U> key to select [OK],
then press <0>.
X The date/time will be set.
Press the <M> button to return
to the shooting settings display.
0
>. (returns to .)
The date/time set will start from when you press <0> in step 4.
If you store the camera without the battery or if the camera’s battery
becomes exhausted, the date/time might be reset. If this happens, set
the date/time again.
29
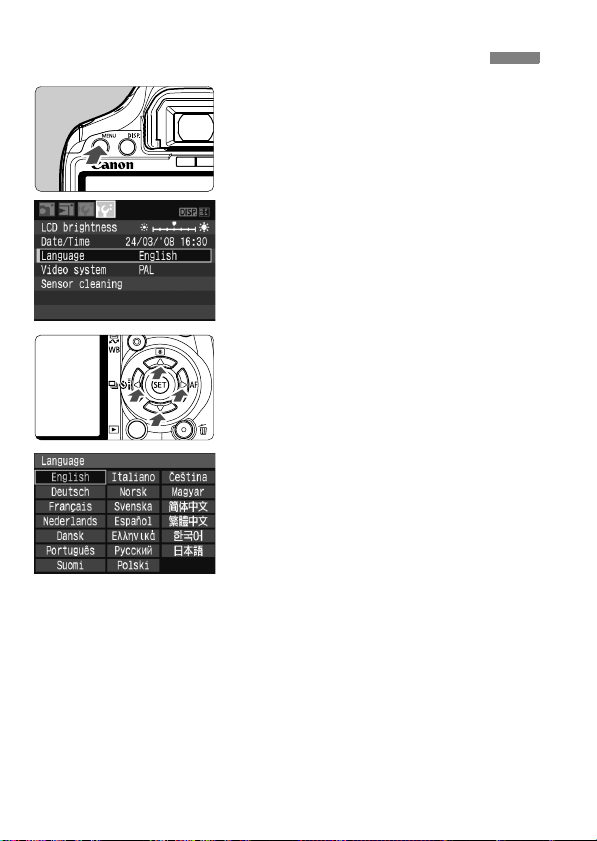
3 Selecting the Interface Language
Display the menu.
1
Press the <M> button to display
the menu.
Under the [6] tab, select
2
[Language].
Press the <U> key to select the
[6] tab.
Press the <V> key to select
[Language] (the third item from the
top), then press <0>.
Select the desired language.
3
Press the <S> key to select the
desired language, then press <0>.
X The menu language will change.
Press the <M> button to return
to the shooting settings display.
30
Loading…
Появились затруднения в использовании техники? Эта страница посвящена инструкции к фотоаппарату Canon EOS 450D, так же известному как EOS Digital Rebel XSi (вариант для США), EOS Kiss X2 (вариант для Японии). Перед использованием устройства советуем внимательно ознакомиться с руководством пользователя. В нём вы найдете основные характеристики, описание функций фотоаппарата EOS 450D, меры предосторожности и условия эксплуатации. Мы надеемся, что после прочтения содержимого файла, вы сможете в полном объеме использовать фотоаппарат и узнайте как делать красивые фотографии на Canon EOS 450D. Размер сенсора: 22.2 x 14.8 мм.
| Бренд: | Canon |
| Год выпуска: | 2008 |
| Тип сенсора фотоаппарата: | CMOS |
| Размер сенсора: | 22.2 x 14.8 мм |
| Тип файла: |
На нашем сайте предусмотрен просмотр инструкции к EOS 450D в режиме ОНЛАЙН. Для того, что бы воспользоваться этим удобством, подтвердите что вы не робот, сделав отметку в форме ниже, и нажмите кнопку «Посмотреть». После этого наш сайт запустит режим поиска файла и представит его вам. Так же вы можете скачать инструкцию для фотоаппарата.
Перейти к контенту
Цифровые фотоаппараты Canon
- Размер инструкции: 6.98 Мб
- Формат файла: pdf
Если вы потеряли инструкцию от цифрового фотоаппарата Canon EOS 450D, можете скачать файл для просмотра на компьютере или печати.
Инструкция для цифрового фотоаппарата Canon EOS 450D на русском языке. В руководстве описаны возможности и полезные функции, а также правила эксплуатации. Перед использованием внимательно ознакомьтесь с инструкцией.
Чтобы не читать всю инструкцию вы можете выполнить поиск по содержимому внутри инструкции и быстро найти необходимую информацию. Рекомендации по использованию помогут увеличить срок службы цифрового фотоаппарата Canon EOS 450D. Если у вас появилась проблема, то найдите раздел с описанием неисправностей и способами их решения. В нем указаны типичные поломки и способы их решения.