
4-420-752-61(1)
SLT-A37
Цифровой фотоаппарат
со сменным объективом
Цифровий фотоапарат зі
змінним об’єктивом
A-переходник
A-перехідник
Инструкция по эксплуатации RU
Посібник з експлуатації UA

RU
2
Для уменьшения опасности
возгорания или поражения
электрическим током не
подвергайте аппарат
воздействию дождя или
влаги.
СОХРАНИТЕ ЭТИ ИНСТРУКЦИИ
ОПАСНОСТЬ
ДЛЯ УМЕНЬШЕНИЯ ОПАСНОСТИ
ВОЗГОРАНИЯ ИЛИ ПОРАЖЕНИЯ
ЭЛЕКТРИЧЕСКИМ ТОКОМ
СТРОГО СОБЛЮДАЙТЕ ЭТИ
ИНСТРУКЦИИ
Если форма штепсельной вилки не
соответствует сетевой розетке,
используйте для сетевой розетки
переходник соответствующей
конфигурации.
Батарейный блок
Неправильное обращение с
батарейным блоком может стать
причиной его взрыва, возгорания, а
также химических ожогов.
Соблюдайте следующие меры
предосторожности.
• Не разбирайте блок.
• Не подвергайте батарейный блок
каким бы то ни было механическим
воздействиям: ударам, падениям
или попаданиям под тяжелые
предметы.
• Во избежание короткого
замыкания не допускайте контакта
металлических предметов с
контактами батарейного блока.
• Не допускайте нагрева батарейного
блока до температуры выше 60 °C:
избегайте воздействия на него
прямых солнечных лучей, а также
не оставляйте в припаркованном на
солнце автомобиле.
• Запрещается сжигать блок или
бросать его в огонь.
• Не следует использовать
поврежденные и протекшие литий-
ионные батареи.
Русский
ПРЕДУПРЕЖДЕНИЕ
ВАЖНЫЕ
ИНСТРУКЦИИ ПО
ТЕХНИКЕ
БЕЗОПАСНОСТИ
ПРЕДУПРЕЖДЕНИЕ

3
RU
• Для зарядки батарейного блока
используйте оригинальное зарядное
устройство Sony или другое
совместимое зарядное устройство.
• Храните батарейный блок в
недоступном для детей месте.
• Храните батарейный блок в сухом
месте.
• Замену следует выполнять только
на батарейный блок того же или
аналогичного типа,
рекомендованный Sony.
• Утилизация использованных
батарейных блоков должна
производиться надлежащим
образом в соответствии с
инструкциями.
Зарядное устройство
Даже если лампочка CHARGE не
горит, зарядное устройство не будет
отсоединено от источника питания
переменного тока до тех пор, пока
оно подсоединено к сетевой розетке.
Если при использовании зарядного
устройства возникнут какие-либо
проблемы, немедленно отключите
питание, отсоединив штепсельную
вилку от сетевой розетки.
Сетевой шнур (провод питания), если
он прилагается, предназначен
специально для использования
только с данным фотоаппаратом, и не
должен использоваться с другим
электрическим оборудованием.
Примечание для покупателей
в странах, где действуют
директивы ЕС
Производителем данного устройства
является корпорация Sony
Corporation, 1-7-1 Konan Minato-ku
Tokyo, 108-0075 Japan.
Уполномоченным представителем по
электромагнитной совместимости
(EMC) и безопасности изделия
является компания Sony Deutschland
GmbH, Hedelfinger Strasse 61, 70327
Stuttgart, Germany. По вопросам
обслуживания и гарантии
обращайтесь по адресам, указанным в
соответствующих документах.
Данное изделие прошло испытания и
соответствует ограничениям,
установленным в Директиве EMC в
отношении соединительных кабелей,
длина которых не превышает 3
метров.
Внимание
Электромагнитные поля
определенных частот могут влиять на
изображение и звук данного
аппарата.
Уведомление
Если статическое электричество или
электромагнитные силы приводят к
сбою в передаче данных,
перезапустите приложение или
отключите и снова подключите
коммуникационный кабель (USB и
т.д.).
Дата изготовления
изделия.
Вы можете узнать дату изготовления
изделия, взглянув на обозначение
“P/D:”, которое находится на
этикетке со штрих кодом картонной
коробки.
Для покупателей в
Европе
RU

RU
4
Знаки, указанные на этикетке со
штрих кодом картонной коробки.
P/D:XX XXXX
1. Месяц изготовления
2. Год изготовления
A-0, B-1, C-2, D-3, E-4, F-5, G-6,
H-7, I-8, J-9.
Дата изготовления литий-ионного
батарейного блока указаны на
боковой стороне или на поверхности
с наклейкой.
Утилизaция отслужившего
элeктpичecкого и
элeктpонного обоpyдовaния
(диpeктивa пpимeняeтcя в
cтpaнax Eвpоcоюзa и дpyгиx
eвpопeйcкиx cтpaнax, гдe
дeйcтвyют cиcтeмы
paздeльного cбоpa отxодов)
Дaнный знaк нa ycтpойcтвe или eго
yпaковкe обознaчaeт, что дaнноe
ycтpойcтво нeльзя yтилизиpовaть
вмecтe c пpочими бытовыми
отxодaми. Eго cлeдyeт cдaть в
cоотвeтcтвyющий пpиeмный пyнкт
пepepaботки элeктpичecкого и
элeктpонного обоpyдовaния.
Heпpaвильнaя yтилизaция дaнного
издeлия можeт пpивecти к
потeнциaльно нeгaтивномy влиянию
нa окpyжaющyю cpeдy и здоpовьe
людeй, поэтомy для пpeдотвpaщeния
подобныx поcлeдcтвий нeобxодимо
выполнять cпeциaльныe тpeбовaния
по yтилизaции этого издeлия.
Пepepaботкa дaнныx мaтepиaлов
поможeт cоxpaнить пpиpодныe
pecypcы. Для получения более
подробной информации о
переработке этого изделия
обратитесь в местные органы
городского управления, службу сбора
бытовых отходов или в магазин, где
было приобретено изделие.
1
2
5 буквенно-цифровых символов
7: 2007 г.
8: 2008 г.
9: 2009 г.
0: 2010 г.
. . .
A: Январь
B: Февраль
C: Март
D: Апрель
E: Май
F: Июнь
G: Июль
H: Август
I: Сентябрь
J: Октябрь
K: Ноябрь
L: Декабрь
XXXXX

5
RU
Утилизация использованных
элементов питания
(применяется в странах
Евросоюза и других
европейских странах, где
действуют системы
раздельного сбора отходов)
Данный знак на элементе питания
или упаковке означает, что элемент
питания, поставляемый с
устройством, нельзя утилизировать
вместе с прочими бытовыми
отходами.
На некоторых элементах питания
данный символ может
комбинироваться с символом
химического элемента. Символы
ртути (Hg) или свинца (Pb)
указываются, если содержание
данных металлов более 0,0005% (для
ртути) и 0,004% (для свинца)
соответственно.
Обеспечивая правильную
утилизацию использованных
элементов питания, вы
предотвращаете негативное влияние
на окружающую среду и здоровье
людей, возникающее при
неправильной утилизации. Вторичная
переработка материалов,
использованных при изготовлении
элементов питания, способствует
сохранению природных ресурсов.
При работе устройств, для которых в
целях безопасности, выполнения
каких-либо действий или сохранения
имеющихся в памяти устройств
данных необходима подача
постоянного питания от встроенного
элемента питания, замену такого
элемента питания следует
производить только в
специализированных сервисных
центрах.
Для правильной утилизации
использованных элементов питания,
после истечения срока службы,
сдавайте их в соответствующий пункт
по сбору электронного и
электрического оборудования.
Об использовании прочих элементов
питания, пожалуйста, узнайте в
разделе, в котором даны инструкции
по извлечению элементов питания из
устройства, соблюдая меры
безопасности. Сдавайте
использованные элементы питания в
соответствующие пункты по сбору и
переработке использованных
элементов питания.
Для получения более подробной
информации о вторичной
переработке данного изделия или
использованного элемента питания,
пожалуйста, обратитесь в местные
органы городского управления,
службу сбора бытовых отходов или в
магазин, где было приобретено
изделие.
Только для модели
предназначеных для
рынков России и стран
СНГ


RU
8
Примечания, относящиеся к
использованию фотоаппарата
Процедура съемки
• Данная камера имеет 2 режима
слежения за объектами: режим
ЖК-экрана, использующий
ЖК-экран, и режим видоискателя,
использующий видоискатель.
• Записанное изображение может
отличаться от изображения,
видимого перед съемкой.
Примечания, относящиеся к
функциям фотоаппарата
• Чтобы узнать, является ли ваш
фотоаппарат 1080 60i-совместимым
или 1080 50i-совместимым
устройством, посмотрите
маркировку на его нижней стороне.
1080 60i-совместимое устройство: 60i
1080 50i-совместимое устройство: 50i
• Во время просмотра записанных
фотоаппаратом 3D-изображений на
3D-совместимых мониторах могут
появиться неприятные симптомы,
такие как зрительное напряжение,
тошнота или чувство усталости.
При просмотре 3D-изображений
рекомендуется делать перерывы
для отдыха через определенные
интервалы времени. Необходимая
частота этих перерывов
индивидуальна, поэтому подберите
свой собственный режим. Если вы
чувствуете недомогание, прекратите
просмотр 3D-изображений и, при
необходимости, обратитесь к врачу.
Прочтите также инструкцию по
эксплуатации подключенного
устройства или программы,
используемой с фотоаппаратом.
Зрение детей всегда уязвимо
(особенно у детей младше 6 лет).
Прежде чем разрешать им
смотреть 3D-изображения,
проконсультируйтесь со
специалистом, таким как педиатр
или офтальмолог. Следите за тем,
чтобы дети соблюдали указанные
выше меры предосторожности.
Компенсации за потерю
содержимого записи не
предусмотрены
Компенсации за потерю содержимого
записи не предусмотрены, если запись
или воспроизведение не выполняются
из-за неисправности фотоаппарата
или носителя записи и т.п.
Рекомендация по выполнению
резервного копирования
данных
Для предотвращения потенциальной
опасности потери данных всегда
следует выполнять копирование
(резервное копирование) данных на
другой носитель.
Примечания, относящиеся к
ЖК-экрану, электронному
видоискателю, объективу и
датчику изображений
• ЖК-экран и электронный
видоискатель изготовлены
с использованием особо
высокоточной технологии, что
позволяет при эксплуатации
эффективно использовать свыше
99,99% пикселей. Вместе с тем, на
ЖК-экране и электронном
видоискателе могут постоянно
присутствовать несколько очень
мелких черных и (или) ярких точек
(белого, красного, синего или
зеленого цвета). Появление этих
точек связано с технологией
изготовления и никаким образом не
влияет на изображение.
• Не держите фотоаппарат за
ЖК-экран

Примечания, относящиеся к использованию фотоаппарата
9
RU
• Не подвергайте фотоаппарат
воздействию солнечного света, не
снимайте длительное время в
направлении солнца. Это может
повредить внутренний механизм
фотоаппарата. Если солнечный
свет будет сфокусирован на
близлежащий объект, это может
вызвать возгорание.
• При низкой температуре на экране
может появляться шлейф
изображения. Это не является
неисправностью. При включении
фотоаппарата в холодном месте
экран может временно потемнеть.
После того, как фотоаппарат
прогреется, экран будет
функционировать нормально.
Примечания, относящиеся
к длительной записи
• Длительная съемка приводит к
нагреванию камеры. Когда
температура достигает некоторого
уровня, на экране появляется
значок
и
фотоаппарат
автоматически выключается. Если
питание отключилось, подождите
10 минут или дольше, чтобы
температура внутри фотоаппарата
понизилась до безопасного уровня.
• В жаркую погоду температура
фотоаппарата повышается быстро.
• Если фотоаппарат нагрелся,
качество изображений может
ухудшиться. Рекомендуется
подождать, пока фотоаппарат
остынет, прежде чем продолжать
съемку.
• Поверхность камеры может
нагреться. Это не является
неисправностью.
Примечания по импорту
фильмов AVCHD на
компьютер.
При импорте фильмов AVCHD на
компьютер, для компьютеров
Windows используйте программное
обеспечение “PlayMemories Home”
на компакт-диске (прилагается).
Примечания, относящиеся к
воспроизведению видео на
других устройствах
• Данный фотоаппарат для записи в
формате AVCHD использует кодек
MPEG-4 AVC/H.264 High Profile.
Сделанные фотоаппаратом
видеозаписи в формате AVCHD
невозможно воспроизвести на
следующих устройствах.
– Устройства, совместимые с
AVCHD, которые не
поддерживают High Profile.
– Устройства, несовместимые с
форматом AVCHD.
Также фотоаппарат использует
кодек MPEG-4 AVC/H.264 Main
Profile для записи в формате MP4.
По этой причине видеозаписи,
сделанные данным фотоаппаратом
в формате MP4, невозможно
воспроизвести на других устройствах,
кроме тех, которые поддерживают
MPEG-4 AVC/H.264.
• Диски, записанные с качеством
изображения HD (высокая четкость),
можно воспроизвести только на
устройствах, совместимых с
форматом AVCHD.
DVD-проигрыватели и рекордеры
не могут воспроизводить диски HD,
так как эти устройства не совместимы
с форматом AVCHD. Кроме этого,
возможно, не удастся извлечь диски
HD из DVD-проигрывателей или
рекордеров.
Предупреждение об авторских
правах
На телевизионные программы,
фильмы, видеоленты и другие
материалы может распространяться
авторское право. Неправомочная
перезапись таких материалов может
противоречить положениям закона
об авторском праве.

Примечания, относящиеся к использованию фотоаппарата
RU
10
Изображения, используемые
в данном руководстве
Фотографии, использованные в
данном руководстве в качестве
примеров изображений, являются
репродуцированными
изображениями, а не настоящими
изображениями, снятыми с помощью
данного фотоаппарата.
О технических
характеристиках, указанных
в данном руководстве
Данные о работе камеры и ее
технические характеристики
определены в следующих условиях,
кроме случаев, указанных в настоящем
руководстве: температура окружающей
среды 25 °C, используется батарейный
блок, который заряжался
приблизительно в течение 1 часа
после того, как погас индикатор
CHARGE.
Название модели
Данное руководство относится к
нескольким моделям, поставляемым с
различными объективами.
Название модели зависит от
прилагаемого объектива. Доступные
модели варьируются в зависимости от
стран/регионов.
Название модели Объектив
SLT-A37
–
SLT-A37K
DT18-55 mm
SLT-A37M
DT18-135 mm
SLT-A37Y
DT18-55 mm и
DT55-200 mm

08:37
Sony SLT-A37 против Panasonic HC-V770 в съемке видео
08:28
Видеообзор Sony SLT-A37
08:16
Sony SLT-A37 для видео и возвращение к истокам
15:53
SONY A37-обзор+видео, фототест.
13:13
Фотоаппарат Sony Alpha SLT A37 Kit обзор, доступная камера для начинающего фотографа
31:01
Обзор и тест: Sony SLT-A57 (Sony α57) в декабре 2019, стоящий выбор?
08:00
Новое оборудование для видео. Sony alpha a37.
02:10
Тест Sony SLT A37 Kit / Test SLR the Sony SLT A37 Kit
Нажмите на кнопку для помощи
Характеристики, спецификации
Тип матрицы:
Exmor™ APS HD CMOS
Разрешение матрицы:
16.5 МПикс
Эффект. разрешение матрицы:
16.1 МПикс
Размер матрицы:
23.5 x 15.6 мм
Макс. разрешение:
4912×3264 Пикс
Оптический стабилизатор:
Да
Электронный видоискатель:
Да
Разрешение видоискателя:
1440000 Пикс
Разрешение ЖК дисплея:
230400 Пикс
ЖК-дисплей как видоискатель (LiveView):
Да
Поворот дисплея по вертикали:
на 180*
Тип карты памяти:
MS Pro-HG DUO, SDHC, SDXC
Макс. емкость карты памяти:
64 ГБ
Автоматическая фокусировка:
Да
Авт. регул. баланса белого:
Да
Ручная рег. баланса белого:
Да
Фикс. уст. баланса белого:
6
Диапазон выдержки:
30 — 1/4000 сек
Замер экспозиции:
авто/ручной
Серийная съемка:
7 кадр/сек
Поддержка ExifPrint 2.3:
Да
Дальность действия вспышки:
10 м
Сниж. эффекта красных глаз:
Да
Режим автоматич. вспышки:
Да
Регулир. интенсивности вспышки:
Да
Интеллектуальная площадка:
Да
Макс.разреш. видеозап.:
1920×1080 Пикс (FullHD)
Звук видеозаписи:
Dolby Digital 2.0
Запись в формате MPEG4:
Да
Запись звуков. комментария к фотоснимку:
Да
Авт. выбор чувствительности:
Да
Руч. выбор чувствительности:
Да
Чувствительность 100 ISO:
Да
Чувствительность 200 ISO:
Да
Чувствительность 400 ISO:
Да
Чувствительность 800 ISO:
Да
Чувствительность 1600 ISO:
Да
Чувствительность 3200 ISO:
Да
Чувствительность 6400 ISO:
Да
Чувствительность 12800 ISO:
Да
Чувствительность 16000 ISO:
Да
Время автономной работы:
до 500 кадров
Макс. кол-во снимков при полн.заряде аккум.:
500
Емкость аккумулятора:
1080 мАч
Наим. аккум. в комплекте:
NP-FW50
Время зарядки аккумулятора:
до 3 часов
Инд. времени работы аккум.:
Да
Интерфейс связи с ПК:
USB 2.0
Разъем для внешней вспышки:
Да
Наименование пульта ДУ:
RM-L1AM
Кабель для цифр.подкл. (HDMI):
доп.опция
Программное обеспечение:
в комплекте
Заряд. устр-во в комплекте:
Да
Работа под MS Windows:
XP, Vista, Windows 7
Работа под Mac OS:
X 10.5 и выше
Габаритные размеры (В*Ш*Г):
92*124*85 мм
Вес объектива в комплекте:
506 г
Инструкция к Фотоаппарату Цифровому Зеркальному Более 12 М Sony SLT-A37
4-420-746-11(1)
Цифровой
Подготовка
фотоаппарата
фотоаппарат со
Съемка и просмотр
сменным объективом
изображений
Съемка изображений в соответствии
со снимаемым объектом
Использование функций
α Руководство
съемки
Использование функций
A-переходник
воспроизведения
Список функций
Просмотр изображений
на компьютере
Прочее
Расширенные действия
Указатель
©2012 Sony Corporation
SLT-A37

Содержание
Основные
действия
……………..……………….…………………….……………. 9
В этом разделе приводится основная информация по эксплуатации
камеры.
Примечания, относящиеся к использованию
фотоаппарата ……..…..…….……..……..…….……..……. 10
Подготовка фотоаппарата
Проверка комплектации ……..……..…..…….……..……. 13
Элементы фотоаппарата ……………………………..…….. 15
Зарядка батарейного блока ………..…….…..……..……. 21
Установка батарейного блока/карты памяти
(продается отдельно) ………………….………………….. 23
Установка объектива …………..……..…….……..……..…. 26
Включение камеры и установка часов …………….... 29
Перед съемкой …..……..……..…….……..……..…….…….... 32
Регулирование видоискателя на остроту зрения
(диоптрийная коррекция) ……..…….……..……. 32
Как правильно держать камеру …………….…….... 32
Съемка и просмотр изображений
Съемка неподвижных изображений ……..……..….... 34
Запись видео ……………..……..…….……..……..…….…….... 36
Воспроизведение изображений …………..……………… 37
Удаление изображений (Удалить) …………….…….... 38
Съемка изображений в соответствии со снимаемым
объектом
Регулировка угла установки ЖК-экрана ………..…. 39
Съемка с различными режимами съемки .……..…. 40
Супер авторежим …….……..…..……..……..…. 41
Выбор сцены …..…….……..……..…….……..……. 42
Панорамный обзор/ Панорам. 3D-обзор
……..…….…..……..……..…….……..……..…….…….... 43
Непр. приор. АЭ с телеконв. ………….…….... 44
2

Использование функций съемки
Использование вспышки ….……..……..…….………….… 45
Настройка яркости изображения ……….……..…….… 47
Выбор режима протяжки ……..……..……..….. 49
Выбор вида экрана информации о режиме
съемки (DISP) …….….……….….………..….………50
Настройка размера изображения ……….……..…….… 51
Размер изобр. ….……..…….……..……..…….……..…….. 51
Панорама: размер ……………..…….……..……..…….… 51
Использование функций воспроизведения
Увеличение изображений ……….……..…..……..…….… 53
Переключение на отображение миниатюр
изображений ……….……..……..…….……..……..…….… 54
Просмотр изображений на экране телевизора …. 55
Список функций
Функции, которые могут использоваться при
помощи кнопок/переключателя.…………..……….. 56
Выбор функции с помощью кнопки Fn (Функция)
……..……..…..……..…….……..……..…….……..……..…….… 57
Функции, которые могут быть выбраны при
помощи кнопки Fn (Функция) ………….……..…..… 58
Функции, выбираемые кнопкой MENU ………..….. 60
Использование функции рекомендаций камеры …...68
Руководство в камере ……..…..……..…….……..…….. 68
Советы по съемке …………..……..…….……..……..….. 68
Просмотр изображений на компьютере
Использование компьютера …………….…..……..…….. 70
Использование программного обеспечения ……… 73
Выбор способа создания диска с фильмами …….… 77
Прочее
Список значков, появляющихся на экране ………... 80
Функции, доступные для каждого режима съемки ….83
Доступные режимы вспышки ………..…….……..…….. 84
3
Расширенные
действия
……………..……………….…………………….………….. 85
В этом разделе приводится дополнительная информация по
эксплуатации камеры.
Подготовка
Настройка камеры …………..…….……..……..…….…….... 86
Снятие наглазника ………..…..……..……..…….…….... 86
Экран, показываемый для режима съемки …….…. 87
Выбор режима экрана …….……..…….……..……..…. 87
Гистограмма …….……..…..…….……..……..…….…….... 88
Отображение объекта через объектив без
показываемых эффектов ……..……..……..…. 89
Список значков для режима видоискателя …… 90
Съемка четкого изображения без дрожания
камеры ……………………………………………..………..93
Индикатор предупреждения о дрожании
фотоаппарата …….………….………………………. 93
Использование функции SteadyShot …………..…. 94
Использование штатива .……..……..…….……..……. 94
Съемка
Выбор режима съемки ……………..……..…….……..……. 95
Интеллект. Авто/ Вспышка выкл …….…. 95
Супер авторежим ….……..……..…….……..….... 95
Выбор сцены …..…….……..……..…….……..….... 96
Панорамный обзор/ Панорам. 3D-обзор
……..…….…..……..……..…….……..……..…….…….... 99
Непр. приор. АЭ с телеконв. ………….…….. 101
Программное авто …….……..…..……..…….…….. 102
Приор. диафрагмы .……..……..…….……..…….... 103
Приор. выдержки ……………..……..…….……..….. 106
Ручной экспозиция ……………..…….……..…….... 107
BULB …………..…..……..…….……..……..…….…….. 109
Настройка записи фильма ……..……..……..…….…….. 112
Простая запись фильмов ………….……..…..…….... 112
Цифровое увеличение …….…..……..…….……..….. 113
Запись фильмов с отрегулированной
выдержкой и диафрагмой …………………114
4
Формат файла ………….……..……..…….……..……..… 115
Параметры записи …..……..……..…….……..……..… 116
Запись звука ….…….……..……..…….……..……..…..… 117
Настройка фокусировки ………..…….……..……..…….. 119
Автоматическая фокусировка …..…….……..…… 119
Блокировка фокуса ……..……..……..…..……..…….. 121
Режим АФ ……..…..…….……..……..…….……..……..… 122
Область AF …..…….……..…..……..…….……..……..… 123
Подсветка АФ …..…….……..……..…….……..……..… 124
Слежение за объект. ……………..…….……..……..… 124
Ручная фокусировка ……….……..…….……..……..… 126
Улучшение контуров ……..……..…….……..……..… 128
Фокусиров. лупа ..…….……..……..…….……..……..… 128
Распознавание лиц ……..…….……..……..…….……..…… 130
Распознаван. лиц ……….…………………..…………….. 130
Регистрация лиц …….…….……..……..…….……..…… 131
Авт. кадрир. портр. ……………..……..…….……..…… 132
Smile Shutter …………….……..……..…….……..……..… 133
Настройка яркости изображения ……….……..…….. 136
Блокировка АЭ ……….……..……..…….…..……..…… 136
Режим измер. ……………..……..…..…….……..……..… 137
Кор.эксп.вспыш. ….……..……..…….…..……..……..… 138
Управл.вспышкой .……..……..…….……..……..…….. 139
Вспышка …..……..……..…….……..…..……..…….……..…… 141
Беспроводная вспышка …….…….……..…..……..… 142
Настройка чувствительности ISO …………..……..… 144
Многокадровое шумоподавление ……………..… 145
Автоматическая коррекция яркости и
контрастности (Динамический диапазон) …… 146
Оптим.Д-диапаз. ….…..……..……..…….……..……..… 146
Авто HDR .……..……..…….……..……..…….……..…… 147
Настройка обработки изображения …….……..…… 149
Эффект рисунка …….…….……..……..…….……..…… 149
Творческ. стиль ……..…….……..……..…….……..…... 151
Настройка цветовых тонов (Баланс белого) ..…. 153
Экран точной настройки цвета …...…..……..…… 154
Цвет. темпер./Цвет. фильтр ……..…………………. 155
Пользовательский баланс белого ……………….. 156
5

Увеличение изображений с большей
кратностью, чем оптическое
масштабирование (ZOOM) ……..………..…… 158
Выбор режима протяжки …….…….……..….. 161
Покадровая съемка …………..……..……..…….…….. 161
Непрерыв. Съемка ……….……..……..…..…….…….. 161
Автоспуск .…..……..…….……..……..…….……..…….... 162
Брек.: Непрер./Покадр. брекетинг ……….…….. 163
Брекетинг WB ………….……..……..…….……..…….... 165
Воспроизведение
Экран, показываемый для режима
воспроизведения ………….……..………………….….. 166
Переключение экрана во время
воспроизведения ….……..………….………….. 166
Список значков на отображении
гистограммы……….…….……..……..…….…….. 166
Использование функций воспроизведения ………. 168
Поворот изображения …….…..……..…….……..….. 168
Режим просмотра ………..…….……..……..…….…….. 168
Слайд-шоу .…….……..……..…….……..……..…..…….... 169
Дисп.реж.воспр. ….…….……..……..…..…….……..….. 170
Прокрутка панорамных изображений ….…….. 170
Защита изображений (Защита) …………..…..…….... 171
Удаление изображений (Удалить) …………….…….. 172
Удаление (Неск. снимков) ……….…..……..…….... 172
Удаление всех изображений или фильмов в
одном и том же режиме просмотра ……... 173
О воспроизведении на телевизоре …….……..…….... 174
3D-просмотр …….…..……..…….……..……..…….…….. 174
Использование “BRAVIA” Sync ….……..…..….. 175
6

Настройка камеры
Настройка формата и качества изображения …. 176
Формат ..……..…..……..…….……..……..…….……..…… 176
Качество …….……..…….……..…..……..…….……..…… 176
Настройка других функций камеры …….……..…… 178
ШП длит. экспоз. .…….……..……..…….……..…..…… 178
ШП высокого ISO ….…….……..……..…….……..…… 178
Цвет. простран. ……..……………………………………… 179
Спуск б/объектива …..……..……..…….……..……..… 180
Сетка .……..……..…….……..……..…….……..…..……..… 180
Авто.просмотр …..…….…..……..……..…….……..…… 180
Функ. кнопки AEL …..……..…..……..…….……..…… 181
Кнопка предпросмотра ……….……..…….……..…… 182
Электронная передняя шторка затвора ………. 183
Яркость видоискат. ….……..……..…….……..……..… 183
Эко-режим …….…….……..……..…….……..……..…….. 184
Эконом. питания ………..……..…….……..……..…….. 184
Настр. FINDER/LCD ……..……..…….……..……..… 184
Компенсация объектива …..……..……..…….……..…... 185
Корр. об.: Периферич. затенение .……..……..… 185
Коррекция объектива: Хром. аберр. …………… 185
Коррекция объектива: Дисторсия ………..…….. 185
Настройка способа записи на карту памяти …….. 186
Форматировать ….…….……..……..…….……..……..… 186
Номер файла ……….……..……..…….……..……..…..… 186
Название папки ……….……..……..…….……..……..… 187
Выбор папк. записи ………..……..…….……..……..… 187
Создать папку ……..……..…..……..…….……..……..… 187
Восстан. БД изобр. ….……..……..…….……..……..… 188
Парам. Выгрузки ……….……..…..…….……..……..… 188
Возврат настроек к значениям по умолчанию ……..190
Информация о версии ПО фотоаппарата ……….. 194
7

Компьютер
Подключение фотоаппарата к компьютеру ……. 195
Настройка USB-соединения …….……..…….…….. 195
Подключение к компьютеру ………..…..……..….. 196
Импорт изображений в компьютер
(Windows) .……………………………………. 197
Импорт изображений в компьютер (Mac) ….. 198
Отмена USB-соединения ……..……..…….……..….. 199
Создание диска с фильмами ……..……..…..…….…….. 200
Создание диска с качеством изображения
стандартной четкости (AVCHD) ………… 200
Создание диска с качеством изображения
стандартной четкости (STD)……..……..….. 202
Типы дисков, которые можно использовать с
“PlayMemories Home” ……………..…….…….. 203
Печать
Определение данных DPOF ………..…….……..…….... 204
Печать даты ……….…….……..……..…….……..…….... 204
Чистка
Чистка камеры и объектива ..……..…….……..…….... 205
Чистка датчика изображения ……..…….……..…….... 206
Устранение неисправностей/Другие действия
Устранение неисправностей …….……..…….…..…….. 210
Предупреждающие сообщения …..…….……..…..….. 221
Меры предосторожности ……………..……..…….…….. 224
Использование камеры заграницей — источники
питания .…….……..……..…….……..……..…….……..….. 228
Формат AVCHD …..……..…….……..……..…….……..….. 229
Съемка 3D-изображений …..……..……..…….……..….. 230
Карта памяти ……..………….……..……..…….……..…….... 232
Батарейный блок/Зарядное устройство ………..… 235
Лицензия .……..…….……..……..…….……..……..…….…….. 237
Указатель …….……………….……….………….……………….………….. 239
8
Основные действия
В этом разделе приводится основная информация
по эксплуатации камеры. Для более эффективного
использования функций камеры см.
“Расширенные действия” (стр. 85).
9
Оглавление
Аннотации для Фотоаппарата Цифрового Зеркального Более 12 М Sony SLT-A37 в формате PDF
Топ 10 инструкций
Другие инструкции
4-420-752-41(1)
SLT-A37
A-mount
Interchangeable Lens Digital Camera/Instruction Manual GB
Appareil photo à objectif interchangeable/Mode d’emploi FR
Digitalkamera mit Wechselobjektiv/Gebrauchsanleitung DE
Cámara Digital de Lentes Intercambiables/Manual de instrucciones ES
Fotocamera digitale con obiettivo intercambiabile/Istruzioni per l’uso IT
Camara Digital de Objectivas intercambiáveis/Manual de instruções PT
Digitale camera met verwisselbare lens/Gebruiksaanwijzing NL
Aparat cyfrowy z wymiennymi obiektywami/Instrukcja obsługi PL
Digitalkamera med utbytbart objektiv/Handledning SE
Digitaalinen kamera vaihdettavalla objektiivilla/Käyttöopas FI
Digitalkamera med utskiftbart objektiv/Bruksanvisning NO
Digitalkamera med udskifteligt objektiv/Betjeningsvejledning DK
© 2012 Sony Corporation Printed in Thailand

English
A-mount
Owner’s Record
The model and serial numbers are located
on the bottom.
Record the serial number in the space
provided below.
Refer to these numbers whenever you call
upon your Sony dealer regarding this
product.
Model No. SLT-A37
Serial No. __________________________
WARNING
To reduce fire or shock hazard, do
not expose the unit to rain or
moisture.
GB
2
IMPORTANT SAFETY
INSTRUCTIONS
SAVE THESE
INSTRUCTIONS.
DANGER — TO
REDUCE THE RISK
OF FIRE OR
ELECTRIC SHOCK,
CAREFULLY
FOLLOW THESE
INSTRUCTIONS.
If the shape of the plug does not fit the
power outlet, use an attachment plug
adaptor of the proper configuration for the
power outlet.
Caution
Battery pack
If the battery pack is mishandled, the
battery pack can burst, cause a fire or even
chemical burns. Observe the following
cautions.
• Do not disassemble.
• Do not crush and do not expose the
battery pack to any shock or force such as
hammering, dropping or stepping on it.
• Do not short circuit and do not allow
metal objects to come into contact with
the battery terminals.
• Do not expose to high temperature above
60°C (140°F) such as in direct sunlight or
in a car parked in the sun.
• Do not incinerate or dispose of in fire.
• Do not handle damaged or leaking
lithium ion batteries.
• Be sure to charge the battery pack using a
genuine Sony battery charger or a device
that can charge the battery pack.
• Keep the battery pack out of the reach of
small children.
• Keep the battery pack dry.
• Replace only with the same or equivalent
type recommended by Sony.
• Dispose of used battery packs promptly
as described in the instructions.
Battery charger
Even if the CHARGE lamp is not lit, the
battery charger is not disconnected from the
AC power source (mains) as long as it is
connected to the wall outlet (wall socket).
If some trouble occurs while using the
battery charger, immediately shut off the
power by disconnecting the plug from the
wall outlet (wall socket).
The power cord (mains lead), if supplied, is
designed specifically for use with this
camera only, and should not be used with
other electrical equipment.
For Customers in the U.S.A.
and Canada
RECYCLING LITHIUM-ION
BATTERIES
Lithium-Ion batteries are
recyclable.
You can help preserve
our environment by
returning your used
rechargeable batteries to
the collection and
recycling location nearest you.
For more information regarding recycling
of rechargeable batteries, call toll free
1-800-822-8837, or visit http://
www.rbrc.org/
Caution: Do not handle damaged or
leaking Lithium-Ion batteries.
Battery Pack and lens
This device complies with Part 15 of the
FCC Rules, Operation is subject to the
following two conditions:
(1) This device may not cause harmful
interference, and (2) this device must
accept any interference received, including
interference that may cause undesired
operation.
This Class B digital apparatus complies
with Canadian ICES-003.
For Customers in the U.S.A.
UL is an internationally recognized safety
organization.
The UL Mark on the product means it has
been UL Listed.
If you have any questions about this
product, you may call:
Sony Customer Information Center
1-800-222-SONY (7669)
The number below is for the FCC related
matters only.
Regulatory Information
Declaration of Conformity
Trade Name: SONY
Model No.: SLT-A37
Responsible Party: Sony Electronics
Inc.
Address:16530 Via Esprillo,
San Diego, CA 92127 U.S.A.
Telephone No.: 858-942-2230
This device complies with Part 15 of the
FCC Rules. Operation is subject to the
following two conditions: (1) This
device may not cause harmful
interference, and (2) this device must
accept any interference received,
including interference that may cause
undesired operation.
CAUTION
You are cautioned that any changes or
modifications not expressly approved in
this manual could void your authority to
operate this equipment.
GB
GB
3
Note:
This equipment has been tested and found
to comply with the limits for a Class B
digital device, pursuant to Part 15 of the
FCC Rules.
These limits are designed to provide
reasonable protection against harmful
interference in a residential installation.
This equipment generates, uses, and can
radiate radio frequency energy and, if not
installed and used in accordance with the
instructions, may cause harmful
interference to radio communications.
However, there is no guarantee that
interference will not occur in a particular
installation. If this equipment does cause
harmful interference to radio or television
reception, which can be determined by
turning the equipment off and on, the user
is encouraged to try to correct the
interference by one or more of the
following measures:
– Reorient or relocate the receiving
antenna.
– Increase the separation between the
equipment and receiver.
– Connect the equipment into an outlet
on a circuit different from that to which
the receiver is connected.
– Consult the dealer or an experienced
radio/TV technician for help.
The supplied interface cable must be used
with the equipment in order to comply with
the limits for a digital device pursuant to
Subpart B of Part 15 of FCC Rules.
For Customers in Europe
Notice for the customers in the
countries applying EU Directives
The manufacturer of this product is Sony
Corporation, 1-7-1 Konan Minato-ku
Tokyo, 108-0075 Japan. The Authorized
Representative for EMC and product safety
is Sony Deutschland GmbH, Hedelfinger
Strasse 61, 70327 Stuttgart, Germany. For
any service or guarantee matters please
refer to the addresses given in separate
service or guarantee documents.
This product has been tested and found
compliant with the limits set out in the
EMC Directive for using connection cables
shorter than 3 meters (9.8 feet).
Attention
The electromagnetic fields at the specific
frequencies may influence the picture and
sound of this unit.
Notice
If static electricity or electromagnetism
causes data transfer to discontinue midway
(fail), restart the application or disconnect
and connect the communication cable
(USB, etc.) again.
Disposal of Old Electrical &
Electronic Equipment (Applicable in
the European Union and other
European countries with separate
collection systems)
This symbol on the product or on its
packaging indicates that this product shall
not be treated as household waste. Instead it
shall be handed over to the applicable
collection point for the recycling of
electrical and electronic equipment. By
ensuring this product is disposed of
correctly, you will help prevent potential
negative consequences for the environment
and human health, which could otherwise
be caused by inappropriate waste handling
of this product. The recycling of materials
will help to conserve natural resources. For
more detailed information about recycling
of this product, please contact your local
Civic Office, your household waste
disposal service or the shop where you
purchased the product.
GB
4

Disposal of waste batteries
(applicable in the European Union
and other European countries with
separate collection systems)
This symbol on the battery or on the
packaging indicates that the battery
provided with this product shall not be
treated as household waste.
On certain batteries this symbol might be
used in combination with a chemical
symbol. The chemical symbols for mercury
(Hg) or lead (Pb) are added if the battery
contains more than 0.0005% mercury or
0.004% lead.
By ensuring these batteries are disposed of
correctly, you will help prevent potentially
negative consequences for the environment
and human health which could otherwise be
caused by inappropriate waste handling of
the battery. The recycling of the materials
will help to conserve natural resources.
In case of products that for safety,
performance or data integrity reasons
require a permanent connection with an
incorporated battery, this battery should be
replaced by qualified service staff only.
To ensure that the battery will be treated
properly, hand over the product at end-oflife to the applicable collection point for the
recycling of electrical and electronic
equipment.
For all other batteries, please view the
section on how to remove the battery from
the product safely. Hand the battery over to
the applicable collection point for the
recycling of waste batteries.
For more detailed information about
recycling of this product or battery, please
contact your local Civic Office, your
household waste disposal service or the
shop where you purchased the product.
Notice for customers in the
United Kingdom
A moulded plug complying with BS 1363
is fitted to this equipment for your safety
and convenience.
Should the fuse in the plug supplied need to
be replaced, a fuse of the same rating as the
supplied one and approved by ASTA or
BSI to BS 1362, (i.e., marked with an or
mark) must be used.
If the plug supplied with this equipment has
a detachable fuse cover, be sure to attach
the fuse cover after you change the fuse.
Never use the plug without the fuse cover.
If you should lose the fuse cover, please
contact your nearest Sony service station.
GB
5

Notes on using your camera
Shooting procedure
• This camera has 2 modes for monitoring
subjects: the LCD screen mode using the
LCD screen, and the viewfinder mode
using the viewfinder.
• The recorded image may be different
from the image you monitored before
recording.
Notes on the functions available with
the camera
• To check whether it is a 1080 60icompatible device or 1080 50icompatible device, check for the
following marks on the bottom of the
camera.
1080 60i-compatible device:60i
1080 50i-compatible device:50i
• You may feel uncomfortable symptoms
such as eyestrain, nausea, or a tired
feeling while watching 3D-images
recorded with the camera on 3Dcompatible monitors. When you watch
3D-images, we recommend that you take
a break at regular time intervals. Since
the need for or frequency of break times
varies among individuals, please set your
own standards. If you feel sick, stop
watching 3D-images, and consult a
doctor as needed. Also, refer to the
operating instructions of the connected
device or the software used with the
camera. A child’s vision is always
vulnerable (especially for children under
6 years of age). Before allowing them to
watch 3D-images, please consult with an
expert, such as a pediatric or ophthalmic
doctor. Be sure to make sure your
children follow the precautions above.
No compensation for contents of the
recording
The contents of the recording cannot be
compensated for if recording or playback is
not possible due to a malfunction of your
camera or a memory card, etc.
Back up recommendation
To avoid the potential risk of data loss,
always copy (back up) data to other
medium.
Notes on the LCD screen, electronic
viewfinder, lens, and image sensor
• The LCD screen and electronic
viewfinder are manufactured using
extremely high-precision technology so
over 99.99% of the pixels are operational
for effective use. However, there may be
some tiny black points and/or bright
points (white, red, blue or green in color)
that constantly appear on the LCD screen
and electronic viewfinder. These points
are normal in the manufacturing process
and do not affect the images in any way.
• Do not hold the camera by taking hold of
the LCD screen.
• Do not expose the camera to sunlight or
shoot sunward for a long time. The
internal mechanism may be damaged. If
sunlight is focused on a nearby object, it
may cause a fire.
• Images may trail across on the screen in a
cold location. This is not a malfunction.
When turning on the camera in a cold
location, the screen may become
temporarily dark. When the camera
warms up, the screen will function
normally.
Notes on long-time recording
• When you continue to shoot for a long
time, the temperature of the camera rises.
If the temperature reaches above a certain
level, the mark is indicated on the
screen and the camera is turned off
automatically. If the power is turned off,
leave the camera for 10 minutes or longer
to allow the temperature inside the
camera to decrease to a safe level.
• Under high ambient temperatures, the
temperature of the camera rises quickly.
• When the temperature of the camera
rises, the image quality may deteriorate.
It is recommended that you wait until the
GB
6
temperature of the camera drops before
continuing to shoot.
• The surface of the camera may get warm.
This is not a malfunction.
Notes on importing AVCHD movies to
a computer
When importing AVCHD movies to a
computer, for Windows computers, use the
“PlayMemories Home” software on the
CD-ROM (supplied).
Notes when playing movies on other
devices
• This camera uses MPEG-4 AVC/H.264
High Profile for AVCHD format
recording. Movies recorded in AVCHD
format with this camera cannot be played
with the following devices.
– Other devices compatible with
AVCHD format that does not support
High Profile
– Devices incompatible with the
AVCHD format
This camera also uses MPEG-4 AVC/
H.264 Main Profile for MP4 format
recording. For this reason, movies
recorded in MP4 format with this camera
cannot be played on devices other than
those that support MPEG-4 AVC/H.264.
• Discs recorded with HD image quality
(high definition) can be played back only
on AVCHD format-compatible devices.
DVD-based players or recorders cannot
play back HD image quality discs, as
they are incompatible with the AVCHD
format. Also, DVD-based players or
recorders may fail to eject HD image
quality discs.
Warning on copyright
Television programs, films, videotapes, and
other materials may be copyrighted.
Unauthorized recording of such materials
may be contrary to the provisions of the
copyright laws.
The pictures used in this manual
The photographs used as examples of
pictures in this manual are reproduced
images, and are not actual images shot
using this camera.
Notes on using your camera
On the data specifications described
in this manual
The data on performance and specifications
is defined under the following conditions,
except as described in this manual: at an
ordinary ambient temperature of 25ºC
(77°F), and using a battery pack that is
charged for about 1 hour after the
CHARGE lamp goes out.
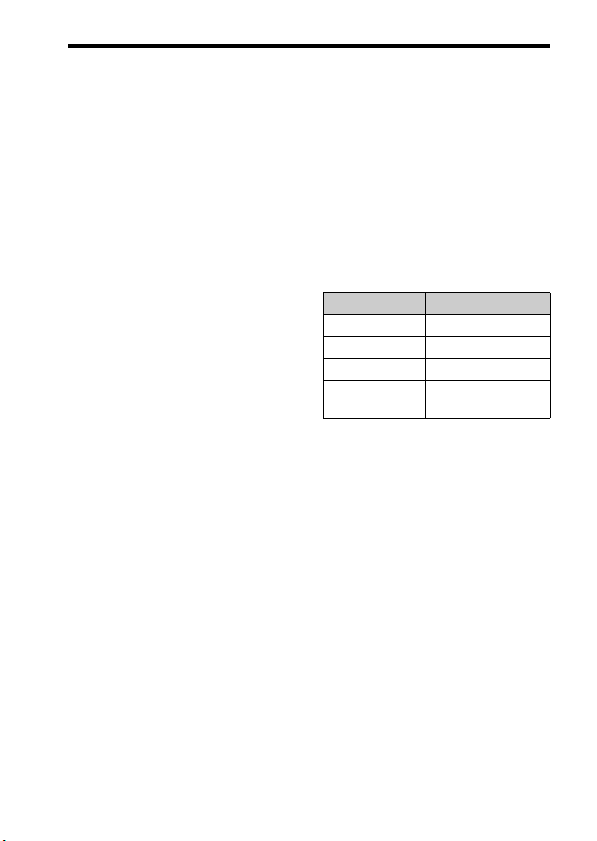
Model name
This manual covers several models
supplied with different lenses.
The model name varies depending on the
supplied lens. The available model varies
depending on the countries/regions.
Model name Lens
SLT-A37 –
SLT-A37K DT18-55mm
SLT-A37M DT18-135mm
SLT-A37Y DT18-55mm and
DT55-200mm
GB
7
Preparing the camera
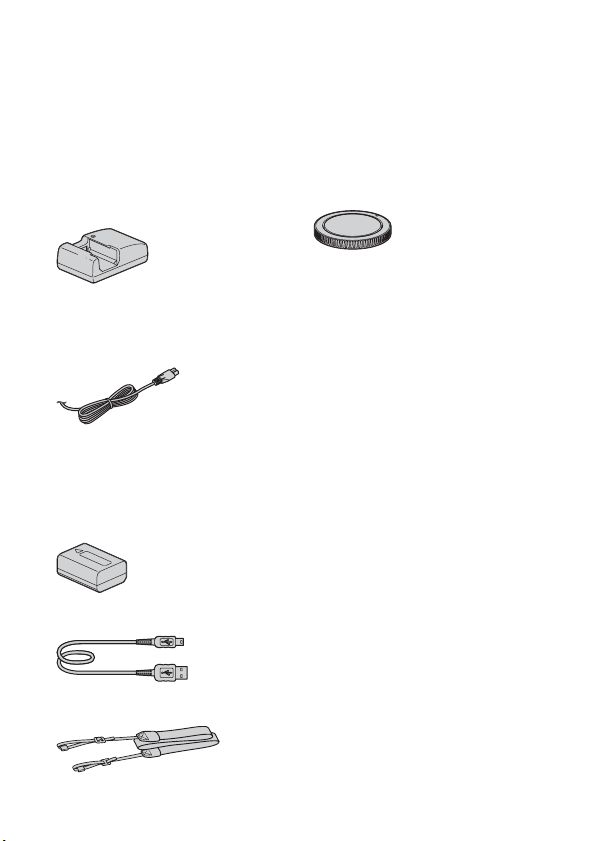
Checking the supplied items
First check the model name of your camera (page 7). The accessories
supplied differ depending on the model.
The number in parentheses indicates the number of pieces.
Common accessories
• Camera (1)
• BC-VW1 Battery charger (1)
• Power cord (mains lead) (1)* (not
supplied in the U.S.A. and
Canada)
* Multiple power cords may be supplied
with your camera. Use the appropriate
one that matches your country/region.
• Rechargeable battery pack NPFW50 (1)
• USB cable (1)
• Shoulder strap (1)
• Body cap (1) (Attached on the
camera)
• Eyecup (1) (Attached on the
camera)
•CD-ROM (1)
– Application Software for α
camera
– α Handbook
• Instruction Manual (1) (This
manual)
SLT-A37K
• DT18-55mm zoom lens (1)/Front
lens cap (1)/Packaging lid (1)
SLT-A37M
• DT18-135mm zoom lens (1)/
Front lens cap (1)/Rear lens cap
(1)/Lens hood (1)
SLT-A37Y
• DT18-55mm zoom lens (1)/Front
lens cap (1)/Packaging lid (1)
• DT55-200mm zoom lens (1)/
Front lens cap (1)/Rear lens cap
(1)/Lens hood (1)
GB
8

Identifying parts
See the pages in parentheses for details of operation.
Front side
Preparing the camera
A Shutter button (24)
B Power switch (22)
C Control dial
D Self-timer lamp
E Lens contacts*
F Mirror*
G Preview button
H Mount
I Built-in flash*
J Microphone**
K Mode dial (29)
L (Flash pop-up) button
M Mounting index (20)
N Lens release button
O Focus mode switch
* Do not directly touch these
parts.
** Do not cover this part
during movie recording.
Doing so may cause noise
or lower the volume.
GB
9

Rear side
Identifying parts
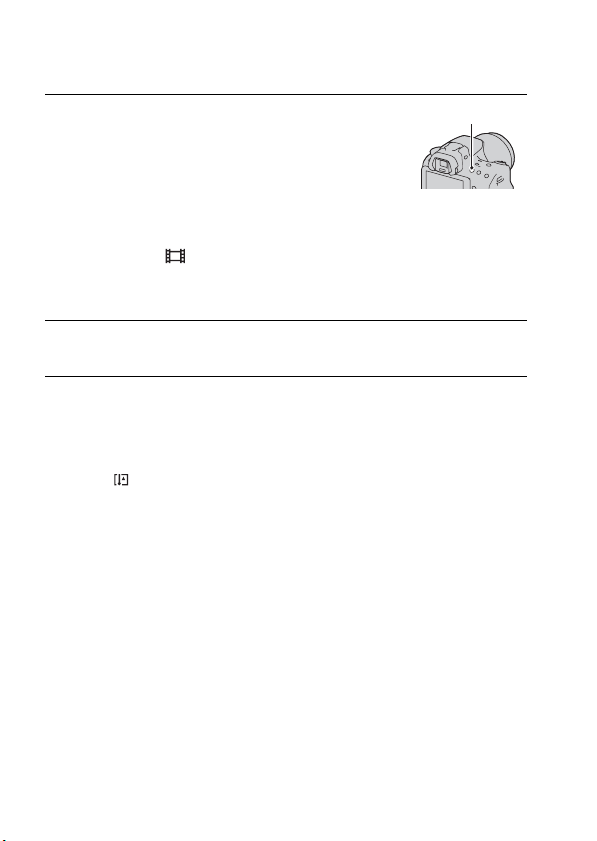
A Eyecup
B Viewfinder*
• When you look into the
viewfinder, the viewfinder
mode is activated, and when
you take your face away from
the viewfinder, the screen mode
returns to the LCD screen
mode.
C Eyepiece sensors
D Diopter-adjustment dial
E LCD screen (38)
F Access lamp (18)
G For shooting: Fn (Function)
button (30)
For viewing: (Image
rotation) button
GB
10
H Control button
v/V/b/B/DISP (Display)/WB
(White balance)/ (Drive)
/ISO
I Control button (Enter)/AF
button/Object Tracking button
(30)
J (In-Camera Guide) button
(32)
For viewing: (Delete) button
(28)
K (Playback) button (27)
* Do not directly touch this
part.
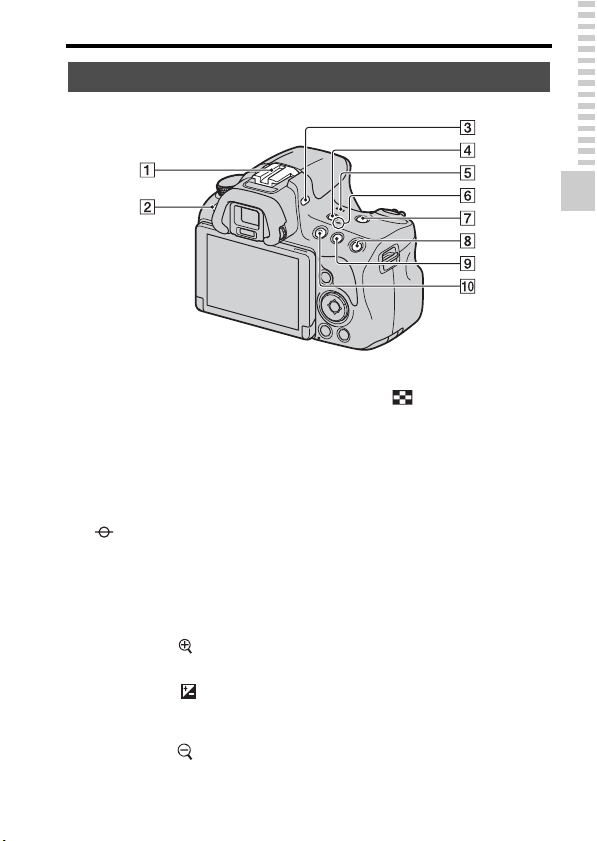
Top side
Identifying parts
Preparing the camera
A Auto-lock Accessory shoe
B MENU button (31)
C Microphone*
D FINDER/LCD button
E Speaker
F Image sensor position
mark
G ZOOM button
H For shooting: AEL (AE lock)
button
For viewing: (Zoom in)
button
I For shooting: (Exposure)
button/AV (Aperture value)
button
For viewing: (Zoom out)
button/ (Image index)
button
J MOVIE button (26)
* Do not cover this part
during movie recording.
Doing so may cause noise
or lower the volume.
11
GB
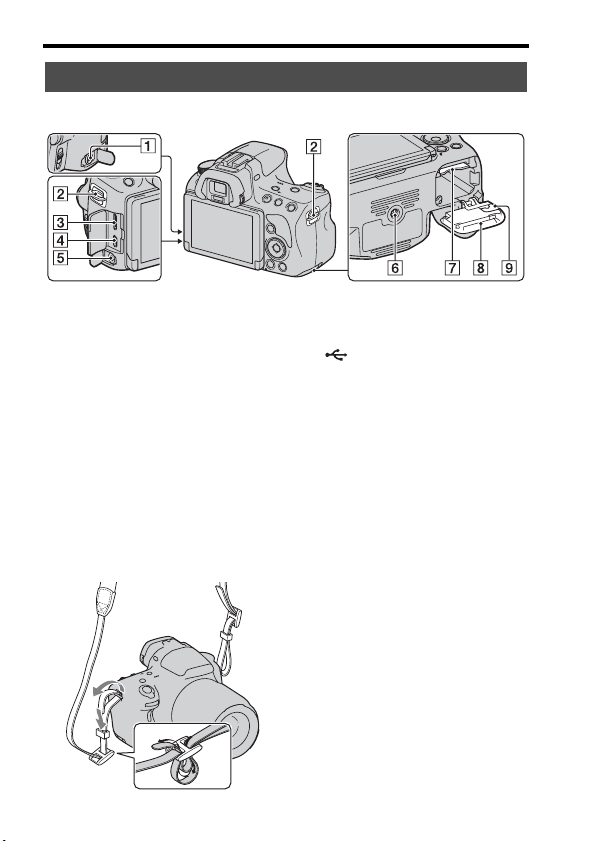
Sides/Bottom
Identifying parts
A REMOTE terminal
• When connecting the RML1AM Remote Commander
(sold separately) to the camera,
insert the plug of the Remote
Commander into the REMOTE
terminal, aligning the guide of
the plug with the guide of the
REMOTE terminal. Make sure
that the cord of the Remote
Commander faces forward.
B Hooks for shoulder strap
• Attach both ends of the strap
onto the camera.
GB
12
C HDMI mini terminal
D (USB) terminal
E Microphone jack
• When an external microphone
is connected, the internal
microphone is turned off
automatically. When the
external microphone is a plugin-power type, the power of the
microphone is supplied by the
camera.
F Tripod receptacle
• Use a tripod with a screw length
of less than 5.5 mm (7/32 inch).
You will be unable to firmly
secure the camera to tripods
with a screw length of 5.5 mm
(7/32 inch) or longer, and
attempting to do so may
damage the camera.
G Memory card insertion slot (17)
H Battery/memory card cover
(17)
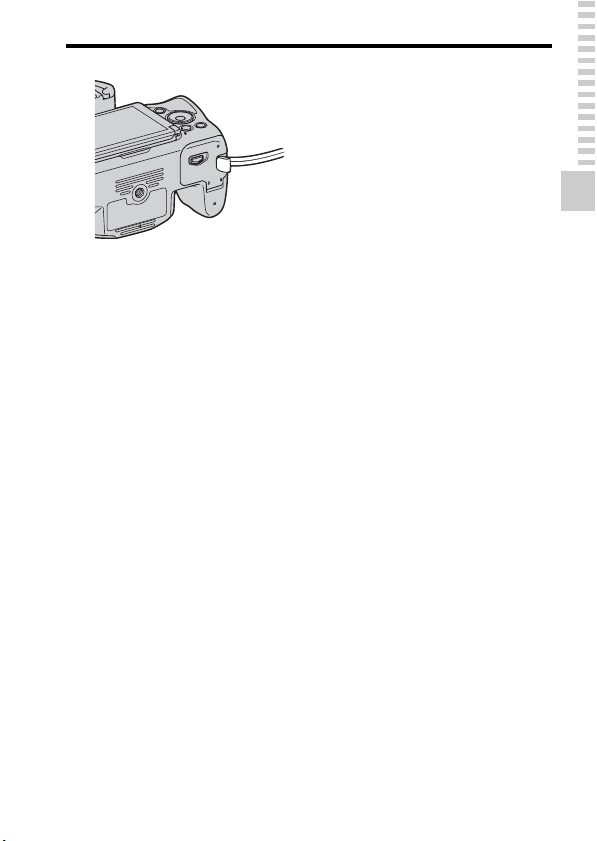
I Connection plate cover
• For using the AC-PW20 AC
Adaptor (sold separately)
Be careful not to catch the cord
of the AC Adaptor in the cover
when you close the cover.
Identifying parts
Preparing the camera
13
GB
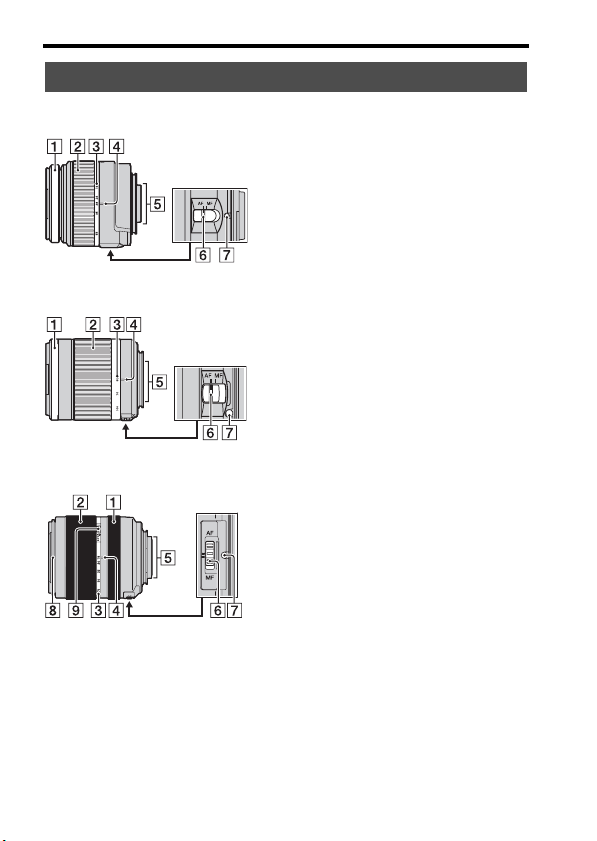
Lens
DT 18-55mm F3.5-5.6 SAM
(Supplied with the SLT-A37K/A37Y)
DT 55-200mm F4-5.6 SAM
(Supplied with the SLT-A37Y)
DT 18-135mm F3.5-5.6 SAM
(Supplied with the SLT-A37M)
Identifying parts
Focusing ring
A
B Zoom ring
C Focal-length scale
D Focal-length index
E Lens contacts
F Focusing mode switch
G Mounting index
H Lens hood index
I Zoom lock switch
• The DT 18-55mm F3.5-5.6
SAM/DT 55-200mm F4-5.6
SAM/DT 18-135mm F3.5-5.6
SAM are designed for Sony Amount cameras (models equipped
with an APS-C sized image
sensor). You cannot use these
lenses on 35mm-format cameras.
• For the lenses other than DT 1855mm F3.5-5.6 SAM/DT 55200mm F4-5.6 SAM/DT 18135mm F3.5-5.6 SAM, refer to
the operating instructions
supplied with the lens.
GB
14
Charging the battery pack
When using the camera for the first time, be sure to charge the NP-FW50
“InfoLITHIUM” battery pack (supplied).
The “InfoLITHIUM” battery pack can be charged even when it has not
been fully depleted.
It can also be used when it has not been fully charged.
The battery pack is discharged little by little, even when you do not use it.
To avoid missing an opportunity to shoot, check the remaining battery level
before you shoot. If the battery level is low, charge it again.
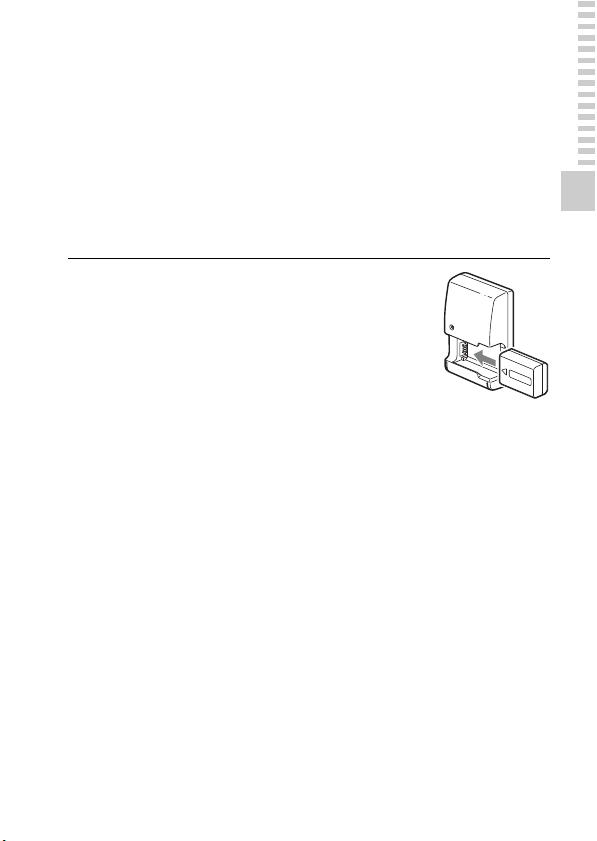
Insert the battery pack onto
1
the battery charger.
Push the battery pack until it clicks.
Preparing the camera
15
GB
Charging the battery pack
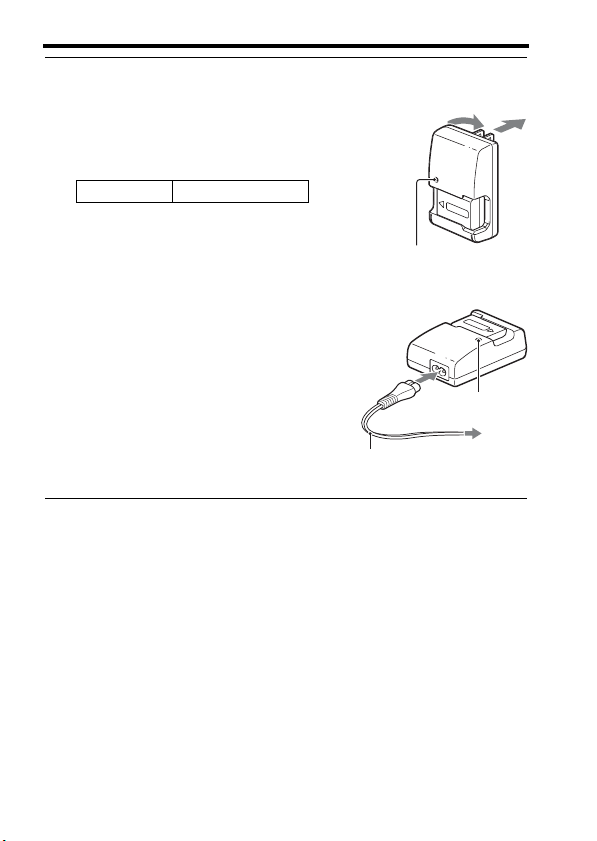
Connect the battery charger
2
to the wall outlet (wall
For the U.S.A and Canada
Plug
socket).
Light on: Charging
Light off: Charge completed
Charging time About 250 minutes
• When charging a fully depleted
battery pack at a temperature of 25°C
(77°F).
• The CHARGE lamp turns off when
charging is completed.
Notes
• The charging time differs depending on the remaining capacity of the battery pack or
charging conditions.
• We recommend charging the battery pack in an ambient temperature of between
10°C to 30°C (50°F to 86°F). You may not be able to efficiently charge the battery
pack outside of this temperature range.
• Connect the battery charger to the nearest wall outlet (wall socket).
For countries/regions other than the
U.S.A. and Canada
To a wall outlet
(wall socket)
CHARGE lamp
CHARGE lamp
GB
16
Inserting the battery pack/memory
card (sold separately)
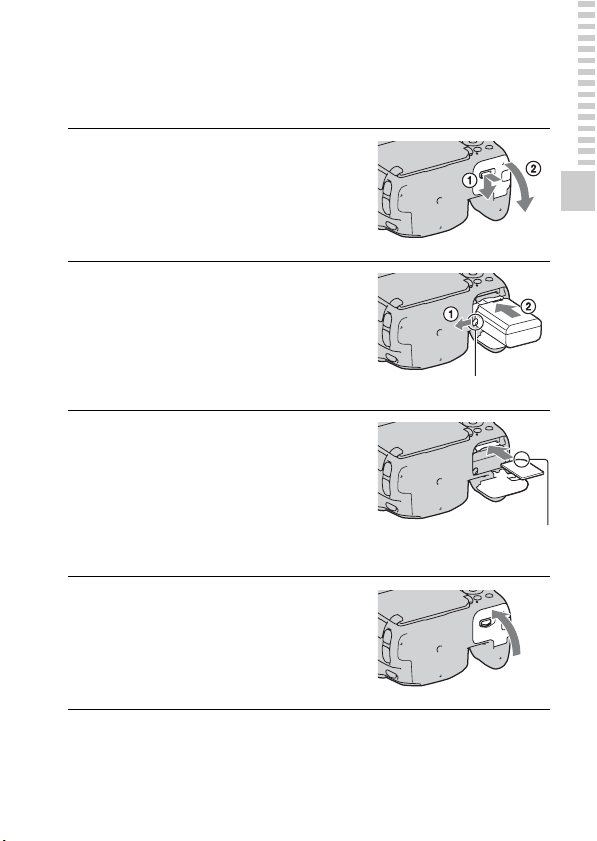
While sliding the cover open
1
lever, open the cover.
Firmly insert the battery pack
2
all the way while pressing
the lock lever with the tip of
the battery.
Lock lever
Insert a memory card.
3
• With the notched corner facing as
illustrated, insert the memory card
until it clicks into place.
Preparing the camera
Close the cover.
4
Ensure the notched corner faces
correctly.
17
GB
Inserting the battery pack/memory card (sold separately)
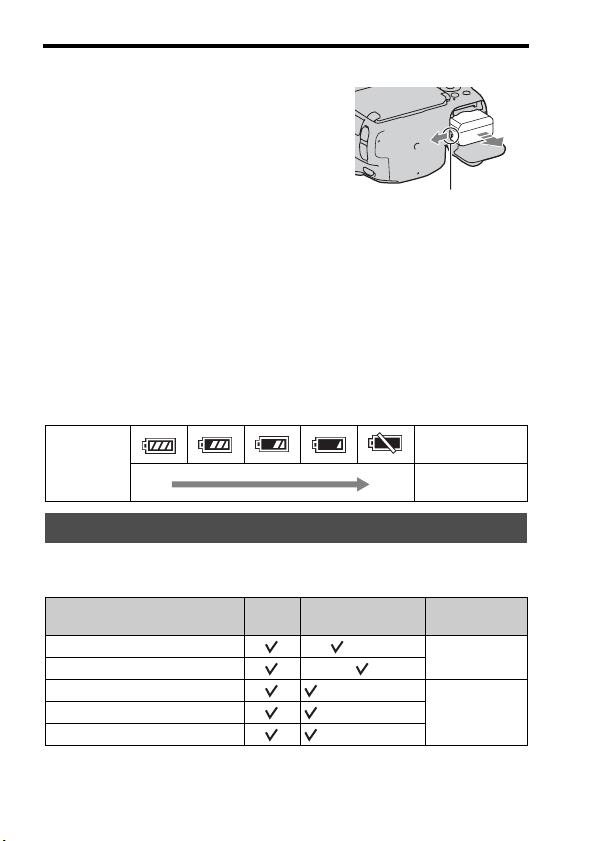
To remove the battery pack
Turn off the camera. Slide the lock lever
in the direction of the arrow 10 seconds
after turning off the camera, then remove
the battery pack. Be careful not to drop
the battery pack.
Lock lever
To remove the memory card
Check that the access lamp is not lit, then open the cover, and push the
memory card once.
To check the remaining battery level
The supplied battery pack is a lithium-ion battery pack that has functions
for exchanging information related to operating conditions with your
camera. The remaining battery time in percent figures is displayed
according to the operating conditions of your camera.
“Battery
Battery level
High Low
exhausted.”
You cannot shoot
any more pictures.
Available memory cards
The following memory cards are compatible with this camera. However, all
memory cards are not guaranteed to work with this camera.
Types of memory card
Memory Stick PRO Duo (Mark2)
Memory Stick PRO-HG Duo
SD memory card
SDHC memory card (Class 4 or faster)
SDXC memory card (Class 4 or faster)
• MultiMediaCard cannot be used.
Still
Movies In this manual
images
(Class 4 or faster)
Memory Stick
PRO Duo
SD card
GB
18

Inserting the battery pack/memory card (sold separately)
Note
• Images recorded on an SDXC memory card cannot be imported to or played on
computers or AV devices that are not compatible with exFAT. Make sure that the
device is compatible with exFAT before connecting it to the camera. If you connect
your camera to an incompatible device, you may be prompted to format the card.
Never format the card in response to this prompt, as doing so will erase all data on
the card. (exFAT is the file system used on SDXC memory cards.)
Preparing the camera
19
GB
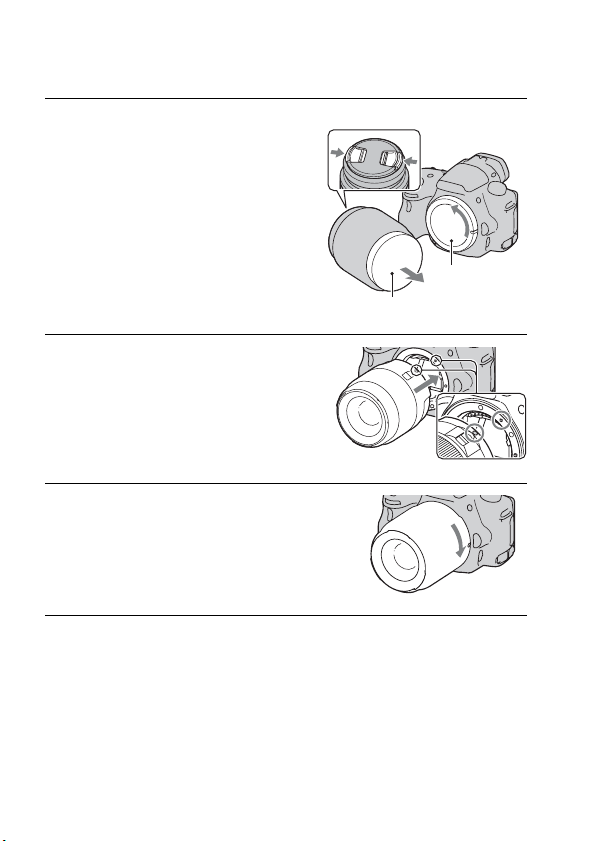
Attaching a lens
Remove the body cap from
1
Front lens cap
the camera and the
packaging lid from the rear
of the lens.
• When changing the lens, quickly
change the lens away from dusty
locations so as to keep dust or debris
from getting inside the camera.
• When shooting, remove the front lens
cap from the front of the lens.
Mount the lens by aligning
2
Packaging lid
Body cap
the orange index marks
(mounting indexes) on the
lens and camera.
Orange index marks
Turn the lens clockwise until
3
it clicks into the locked
position.
• Be sure to put the lens on straight.
Notes
• When attaching a lens, do not press the lens release button.
• Do not use force when attaching a lens.
• E-mount lenses are not compatible with this camera.
• When you use a lens for which a tripod socket is provided, attach the lens onto the
tripod using the tripod socket provided to help balance the weight of the lens.
• When carrying the camera with a lens attached, hold both the camera and the lens
firmly.
• Do not hold the part of the lens that is extended for the zoom or focus adjustment.
GB
20

Attaching a lens
To attach a lens hood
It is recommended that you use a lens
hood to reduce flare and ensure
maximum image quality.
Fit the hood into the mount on the end of
the lens barrel and rotate the hood
clockwise until it clicks.
Notes
• A lens hood is not included with the DT 18-55mm F3.5-5.6 SAM. You can use the
ALC-SH108 (sold separately).
• The lens hood may block the light of the flash. Remove the lens hood when using the
flash.
• When storing, turn over the lens hood and place it onto the lens backwards.
Note on changing the lens
When changing the lens, if dust or debris gets inside the camera and
adheres to the surface of the image sensor (the part that acts as the film), it
may appear as dark spots on the image, depending on the shooting
environment.
The camera is equipped with an anti-dust function to prevent dust from
landing on the image sensor. However, quickly change the lens away from
dusty locations when attaching/removing a lens.
Preparing the camera
21
GB
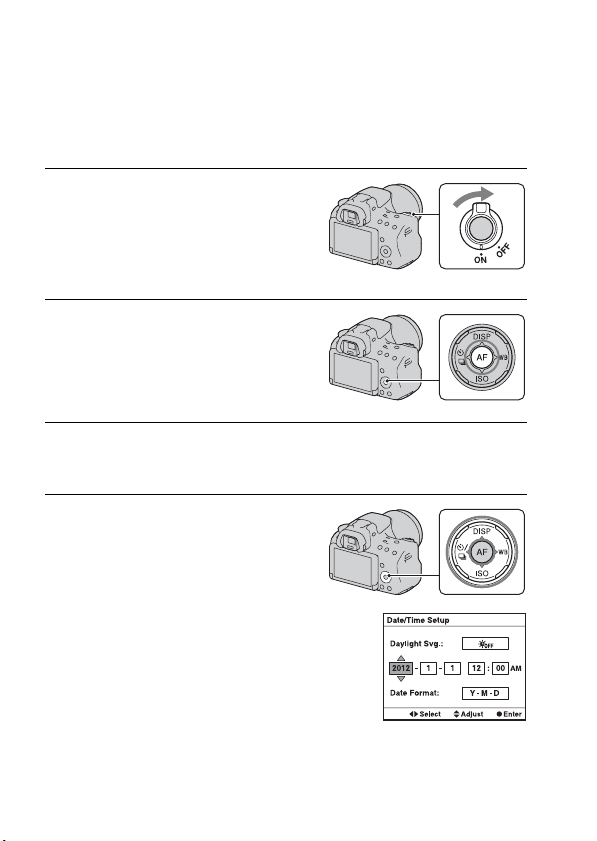
Turning the camera on and setting the
clock
When you turn the camera on for the first time, the date/time setup screen
appears.
Set the power switch to ON to
1
turn the camera on.
The screen used for setting date and
time appears.
• To turn the camera off, set it to OFF.
Verify that [Enter] is selected
2
on the LCD screen, then
press the center of the
control button.
Select your area with b/B on the control button, then
3
press the center of the control button.
Select each item with b/B
4
and set the numeric value
with v/V.
[Daylight Svg.:]: Turns on or off the
daylight saving time setting.
[Date Format:]: Selects the format to
display date.
• Midnight is indicated as 12:00 AM,
and noon as 12:00 PM.
GB
22

Turning the camera on and setting the clock
Repeat step 4 to set other items, then press the center
5
of the control button.
Verify that [Enter] is selected, then press the center of
6
the control button.
To cancel the date/time setting operation
Press the MENU button.
To set up the date/time again
When you turn the camera on for the first time, the date/time setup screen
appears automatically. The next time, set up the date and time from the
menu.
MENU button t 1 t [Date/Time Setup]
To set up the area again
You can set the area where you are using the camera. This allows you to set
the local area when you use the camera abroad.
MENU button t 1 t [Area Setting]
Maintaining the date and time setting
This camera has an internal rechargeable battery for maintaining the date
and time and other settings regardless of whether the power is on or off, or
the battery is installed or not.
Preparing the camera
23
GB
Shooting and viewing images
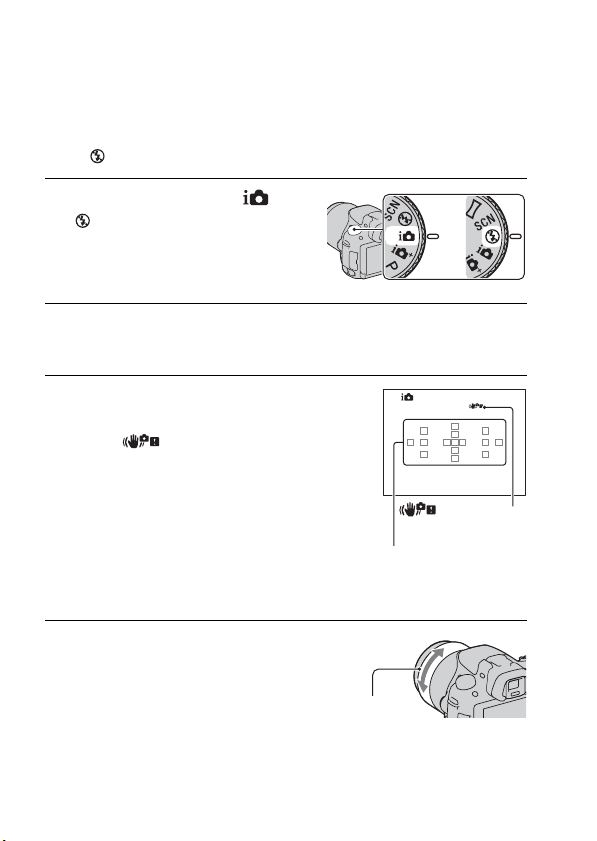
Shooting still images
The “Intelligent Auto” mode allows you to easily shoot any subject under
any conditions because the camera makes appropriate judgments on the
situation to adjust the settings.
Select when shooting in a location where the use of a flash is restricted.
Set the mode dial to or
1
(Flash Off).
Hold the camera, monitoring your shot with the LCD
2
screen or viewfinder.
Overlay the AF area on the
3
desired subject.
• If the (Camera shake
warning) indicator flashes, carefully
shoot the subject, holding the camera
steady, or by using a tripod.
• When the camera recognizes the
scene, the Scene Recognition icon
appears on the screen and suitable
settings for that scene will be put into
effect.
AF area
warning) indicator
or
(Camera shake
When using a zoom lens,
4
turn the zoom ring, then
decide on your shot.
GB
24
Zoom ring
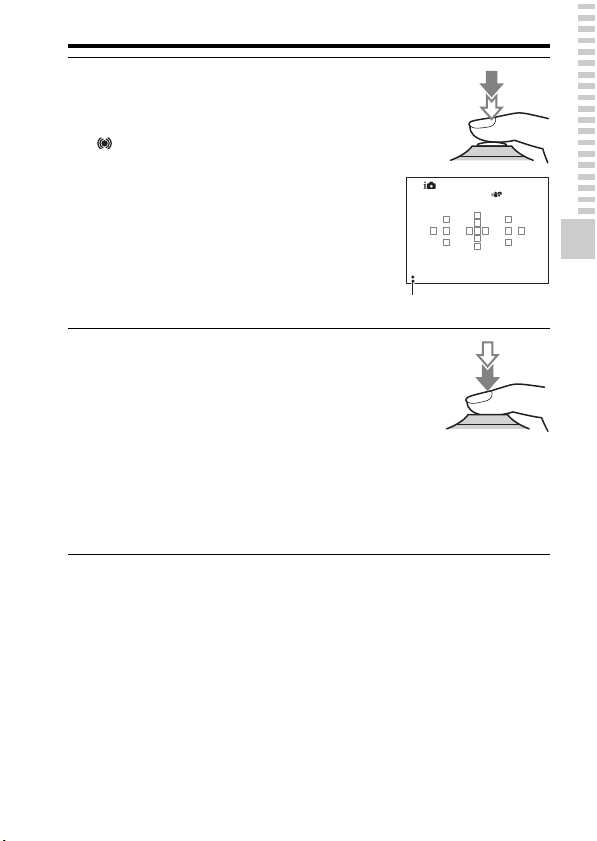
Press the shutter button
5
halfway down to focus.
When the focus is confirmed, z or
(Focus indicator) lights up.
Press the shutter button fully
6
down to shoot.
• When the camera detects and
shoots a face with [Auto Port.
Framing] set to [Auto], the
captured image is automatically
trimmed into a suitable
composition. Both the original and
the trimmed images are saved
(page 30).
Shooting still images
Shooting and viewing images
Focus indicator
25
GB
Recording movies
Press the MOVIE button to
1
MOVIE button
start recording.
• Movie recording can be started from
any exposure mode.
• The shutter speed and aperture are
adjusted automatically. If you want to
set them to particular values, set the
mode dial to (Movie) (page 29).
• The camera continues to adjust the
focus when it is in autofocus mode.
Press the MOVIE button again to stop recording.
2
Notes
• The sound of the camera and the lens in operation may be recorded while recording a
movie. You can disable sound recording by setting [Audio Recording] to [Off].
• The continuous recording time of a movie may be shorter, depending on the ambient
temperature or the status of the camera. See “Notes on continuous movie recording.”
• When the mark is indicated, the temperature of the camera is too high. Turn the
camera off and wait until the temperature of the camera drops.
GB
26
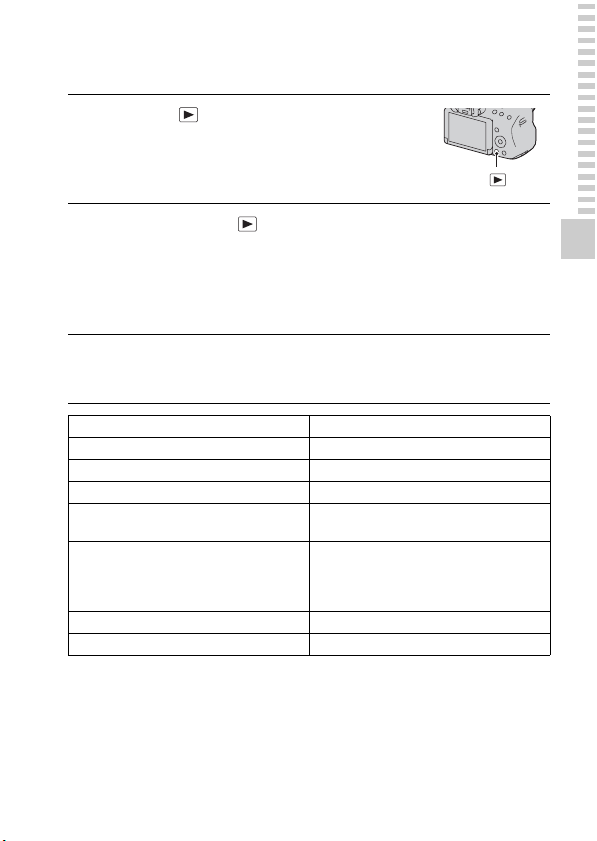
Playing back images
Press the button.
1
button
MENU button t 1 t [View Mode] t Select the
2
desired mode
• To play back still images, select [Folder View(Still)], and to play back
movies, select [Folder View(MP4)] or [AVCHD View] according to the
file format.
Select an image with b/B on the control button.
3
• To play back movies, press the center of the control button.
During movie playback Control button/control dial operation
To pause/resume z
To fast-forward B
To fast-rewind b
To slow-forward Rotate the control dial to the right during
To slow-reverse Rotate the control dial to the left during
To adjust sound volume V t v/V
To display the information v
Note
• Movies recorded with other devices may not be played back on this camera.
pause
pause
• The movie is played back frame-byframe.
Shooting and viewing images
27
GB
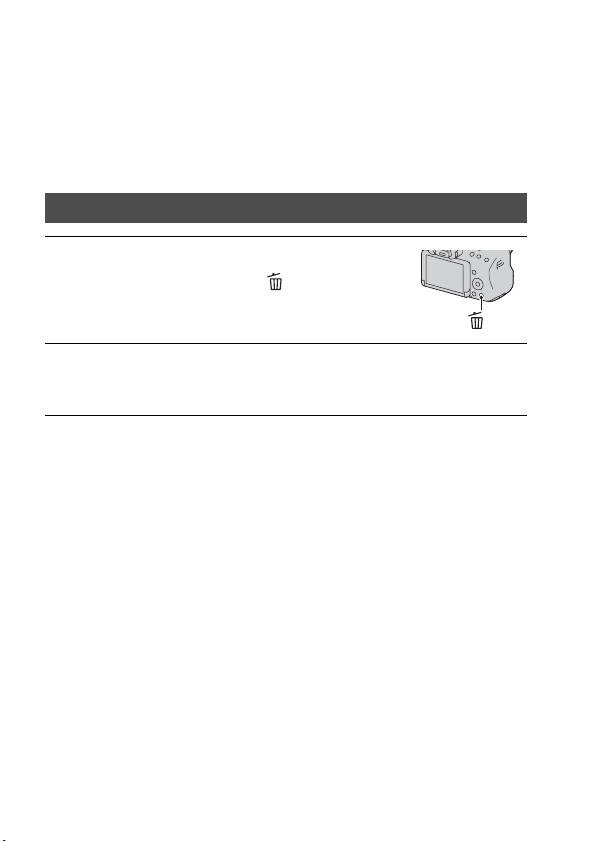
Deleting images (Delete)
Once you have deleted an image, you cannot restore it. Check whether to
delete the image or not beforehand.
Note
• Protected images cannot be deleted.
Deleting the image that is currently displayed
Display the image you want
1
to delete and press the
button.
Select [Delete] with v on the control button, then press
2
the center of the control button.
button
GB
28
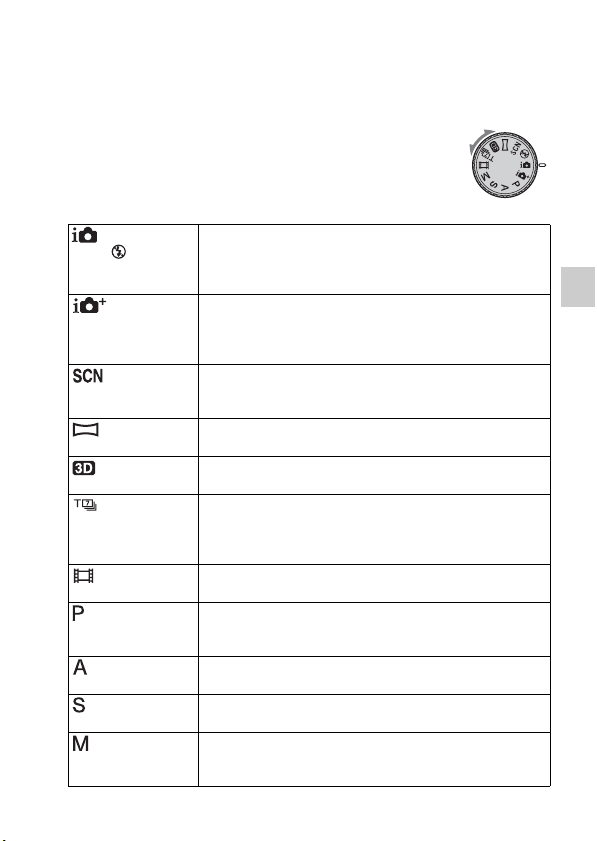
Shooting images to suit your subject
Shooting with the various shooting
modes
Set the mode dial to the desired
mode.
The following shooting modes are provided with the camera:
(Intelligent
Auto)/ (Flash Off)
(Superior
Auto)
(Scene
Selection)
(Sweep
Panorama)
(3D Sweep
Panorama)
(Tele-zoom
Cont. Priority AE)
(Movie) Allows you to shoot movies with the exposure adjusted
(Program Auto) Allows you to shoot with the exposure adjusted automatically
(Aperture
Priority)
(Shutter Priority) Allows you to shoot after adjusting the shutter speed
(Manual
Exposure)
The “Intelligent Auto” mode allows you to easily shoot any
subject under any conditions because the camera makes
appropriate judgments on the situation to adjust the settings.
Select “Flash Off” when you want to shoot without the flash.
The camera recognizes and evaluates the shooting condition,
and appropriate settings are set automatically. The camera
saves 1 appropriate image by combining or separating
images, as necessary.
Selecting an appropriate mode for the subject or the shooting
conditions allows you to shoot the image with a suitable
setting for the subject.
Allows you to shoot panoramic images.
Allows you to shoot 3D panoramic images for playback on a
3D compatible TV.
The camera continues to shoot while the shutter button is
pressed fully down. The center area on the screen is cropped
and the camera records the images continuously at a
maximum of about 7 images per second.
manually (both the shutter speed and the aperture value).
(both the shutter speed and the aperture value). The other
settings can be adjusted manually.
Allows you to shoot after adjusting the aperture value
manually using the control dial.
manually using the control dial.
Allows you to shoot after adjusting the exposure manually
(both the shutter speed and the aperture value) using the
control dial.
29
Shooting images to suit your subject
GB

Functions list
Functions that can be selected with
the Fn (Function) button
The functions that can be selected with the Fn button are as follows:
Scene Selection Selects an appropriate mode from among the Scene Selection
Movie Selects the exposure mode to suit your subject or your effect
Drive Mode Sets the drive mode such as continuous shooting.
Flash Mode Sets the flash mode.
Autofocus Mode Selects the method for focusing according to movement of
AF area Selects the area of focus.
Object Tracking Keeps the focus on a subject while tracking it.
Smile/Face Detect. Automatically captures people’s face(s) with the optimal
Auto Port. Framing Analyzes the scene when capturing face and automatically
ISO Sets the sensitivity to light. The larger the number, the faster
Metering Mode Selects the method for measuring brightness.
Flash Comp. Adjusts the intensity of flash output.
preset settings to suit shooting conditions.
(Portrait/Sports Action/Macro/Landscape/Sunset/Night
Scene/Hand-held Twilight/Night Portrait)
and records movies.
(P/A/S/M)
(Single Shooting/Cont. Shooting/Self-timer/Bracket: Cont./
Single Bracket/WB bracket)
(Flash Off/Autoflash/Fill-flash/Slow Sync./Rear Sync./
Wireless)
the subject.
(Single-shot AF/Automatic AF/Continuous AF)
(Wide/Zone/Spot/Local)
(On/Off)
focus and exposure./Shoots when a smile is detected.
(Face Detection Off/Face Detection On (Regist. Faces)/Face
Detection On/Smile Shutter)
saves another image with well-balanced composition.
(Auto/Off)
the shutter speed.
(Multi Frame Noise Reduct./ISO AUTO to 16000)
(Multi segment/Center weighted/Spot)
(+2.0EV to –2.0EV)
GB
30
Loading…
-
Инструкции по эксплуатации
2
Языки:
SONY SLT-A37 инструкция по эксплуатации
(243 страницы)
- Языки:Русский
-
Тип:
PDF -
Размер:
3.56 MB -
Описание:
Цифровая камера серии ? SLT A
Просмотр
SONY SLT-A37 инструкция по эксплуатации
(96 страниц)
- Языки:Английский
-
Тип:
PDF -
Размер:
7.45 MB
Просмотр
На NoDevice можно скачать инструкцию по эксплуатации для SONY SLT-A37. Руководство пользователя необходимо для ознакомления с правилами установки и эксплуатации SONY SLT-A37. Инструкции по использованию помогут правильно настроить SONY SLT-A37, исправить ошибки и выявить неполадки.