
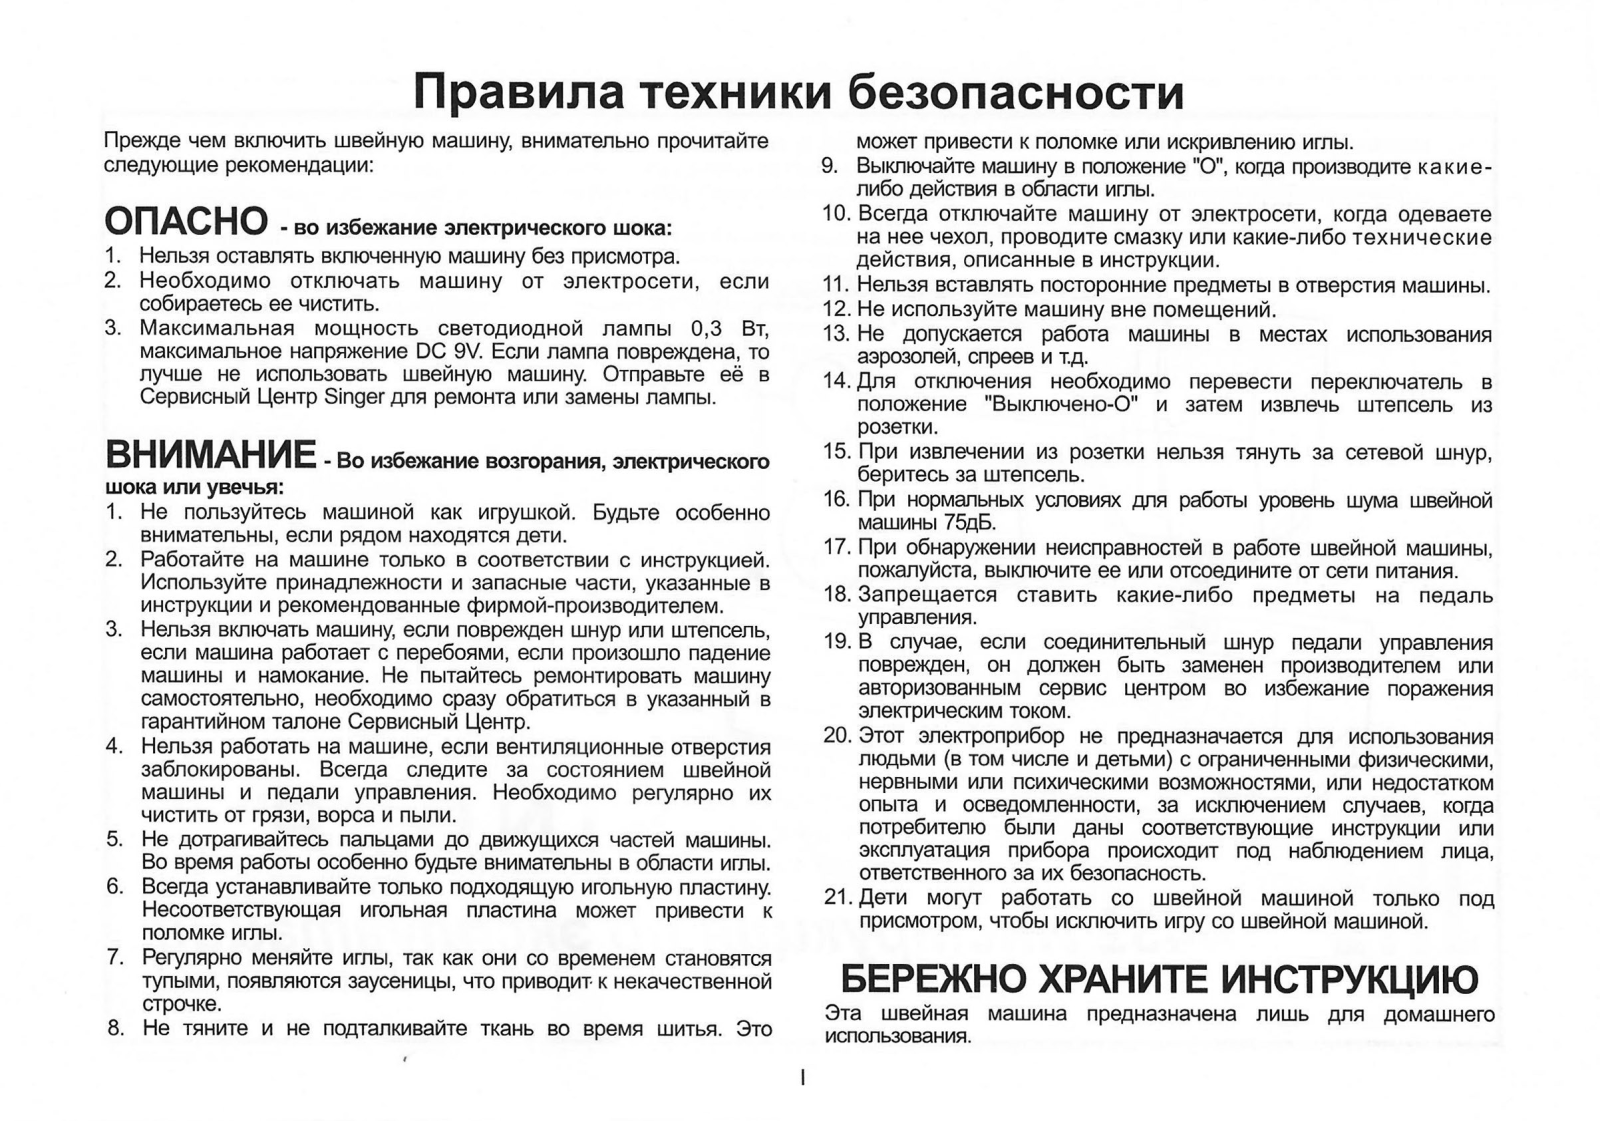
4423 Instruction Manual

When using an electrical appliance, basic safety should always be
followed, including the following:
Read all instructions before using this sewing machine.
1. An appliance should never be left unattended when plugged in.
2. Always unplug this appliance from the electric outlet immediately
after using and before cleaning.
3.
. Replace bulb with
same type rated 15 watts
1. Do not allow to be used as a toy. Close attention is necessary
when this appliance is used by or near children.
2. Use this appliance only for its intended use as described in this
manual. Use only attachments recommended by the
manufacturer as contained in this manual.
3. Never operate this appliance if it has a damaged cord or plug, if
it is not working properly, if it has been dropped or damaged, or
dropped into water. Return the appliance to the nearest
authorized dealer or service center for examination, repair,
electrical or mechanical adjustment.
4. Never operate the appliance with any air openings blocked. Keep
ventilation openings of the sewing machine and foot controller
free from accumulation of lint, dust, and loose cloth.
5. Keep fingers away from all moving parts. Special care is required
around the sewing machine needle.
6. Always use the proper needle plate. The wrong plate can cause
the needle to break.
7. Do not use bent needles.
8. Do not pull or push fabric while stitching. It may deflect the
needle causing it to break.
9. Switch the sewing machine off («O») when making any adjustments
in the needle area, such as threading needle, changing needle,
threading bobbin, or changing presser foot, and the like.
10. Always unplug sewing machine from the electrical outlet when
removing covers, lubricating, or when making any other user
servicing adjustments mentioned in the instruction manual.
11. Never drop or insert any object into any opening.
12. Do not use outdoors.
13. Do not operate where aerosol spray products are being used or
where oxygen is being administered.
14. To disconnect, turn all controls to the off («O») position, then
remove plug from outlet.
15. Do not unplug by pulling on cord. To unplug, grasp the plug, not
the cord.
This sewing machine is intended for household use only.
DANGER
SAVE THESE INSTRUCTIONS
—
To reduce the risk of electric shock:
(110-120V area / 220-240V area).
Please turn off the machine or unplug when the machine is not
operating properly.
18. Never place anything on the foot controller.
19. If the supply cord that is fixed with foot controller is damaged, it
must be replaced by the manufacturer or its service agent or a
similar qualified person in order to avoid a hazard.
20. This appliance is not intended for use by persons (including
children) with reduced physical, sensory or mental capabilities, or
lack of experience and knowledge, unless they have been given
supervision or instruction concerning use of the appliance by a
person responsible for their safety.
21. Children should be supervised to ensure that they do not play
with the appliance.
WARNING
—
To reduce the risk of burns, fire,
electric shock, or injury to persons:
Always unplug before changing the light bulb
16. The sound pressure level under normal operating conditions is
75dB(A).
17.
IMPORTANT SAFETY INSTRUCTIONS

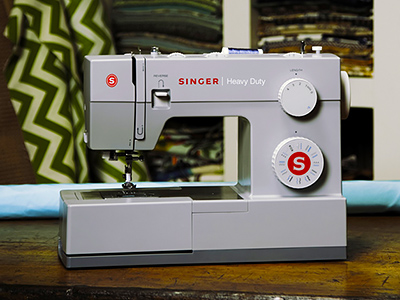
As the owner of a new Singer sewing machine, you are about to begin an exciting adventure in
creativity. From the moment you first use your machine, you will know you are sewing on one
of the easiest to use sewing machines ever made.
May we recommend that, before you start to use your sewing machine, you discover the many
features and the ease of operation by going through this instruction book, step by step, seated
at your machine.
To ensure that you are always provided with the most modern sewing capabilities, the
manufacturer reserves the right to change the appearance, design or accessories of this
sewing machine when considered necessary.
SINGER is a registered trademark of The Singer Company Limited or its affiliates.
© 2010 The Singer Company Limited or its affiliates. All rights reserved.
Congratulations

List of Contents
Machine Basics
Sewing
General Information
Maintenance and Troubleshooting
Principle Parts of the Machine ………………………………………………………………………………………………………………………………….2/3
Connecting Machine to Power Source………………………………………………………………………………………………………………………….4
Two Step Presser Foot Lifter/
………………………………………………………………………………………..5
Accessories………………………………………………………………………………………………………………………………………………………………6
Winding the Bobbin ……………………………………………………………………………………………………………………………………………………7
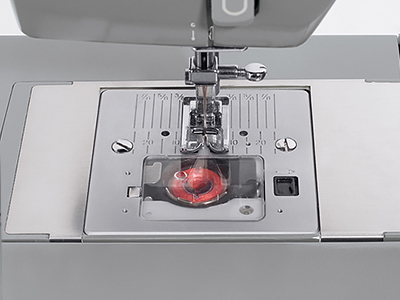
Inserting the Bobbin …………………………………………………………………………………………………………………………………………………..8
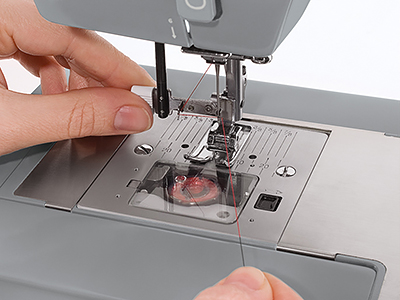
Threading the Upper Thread ……………………………………………………………………………………………………………………………………….9
Raising the Bobbin Thread ………………………………………………………………………………………………………………………………………..11
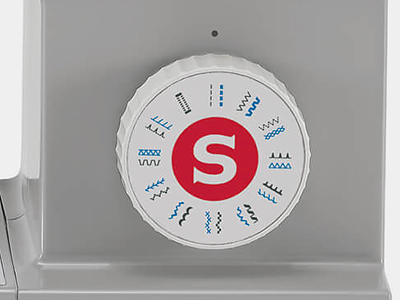
How to Choose Your Pattern……………………………………………………………………………………………………………………………………..13
Sewing Straight Stitch ………………………………………………………………………………………………………………………………………………16
Reverse Sewing/
………………………………………………………………………………………………17
Choosing Stretch Stitch Patterns ……………………………………………………………………………………………………………………………….18
Blind Hem……………………………………………………………………………………………………………………………………………………………….19
……………………………………………………………………………………………………………………………………………20
Sewing on Buttons …………………………………………………………………………………………………………………………………………………..22
Installing the Removable Extension Table …………………………………………………………………………………………………………………..23
Attaching the Presser Foot Shank ……………………………………………………………………………………………………………………………..24
Needle/Fabric/Thread Chart………………………………………………………………………………………………………………………………………25
…………………………………………………………………………………………………………………………………………….26
Inserting & Changing Needle …………………………………………………………………………………………………………………………………….27
Changing the Bulb……………………………………………………………………………………………………………………………………………………28
Troubleshooting Guide ……………………………………………………………………………………………………………………………………………..29
Adjusting Presser Foot Pressure
Automatic Needle Threader ………………………………………………………………………………………………………………………………………10
Thread Tension ……………………………………………………………………………………………………………………………………………………….12
Stitch Width Dial & Stitch Length Dial …………………………………………………………………………………………………………………………15
Removing the Work/Cutting the Thread
Sew 1-step Buttonholes
Threading the Machine
Three Needle Position Dial ……………………………………………………………………………………………………………………………………….14
Left and Right Side Balance for Buttonhole …………………………………………………………………………………………………………………21
How To Drop Feed Dog

2
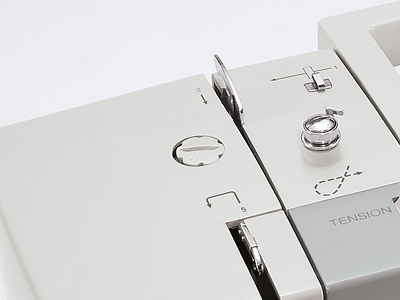
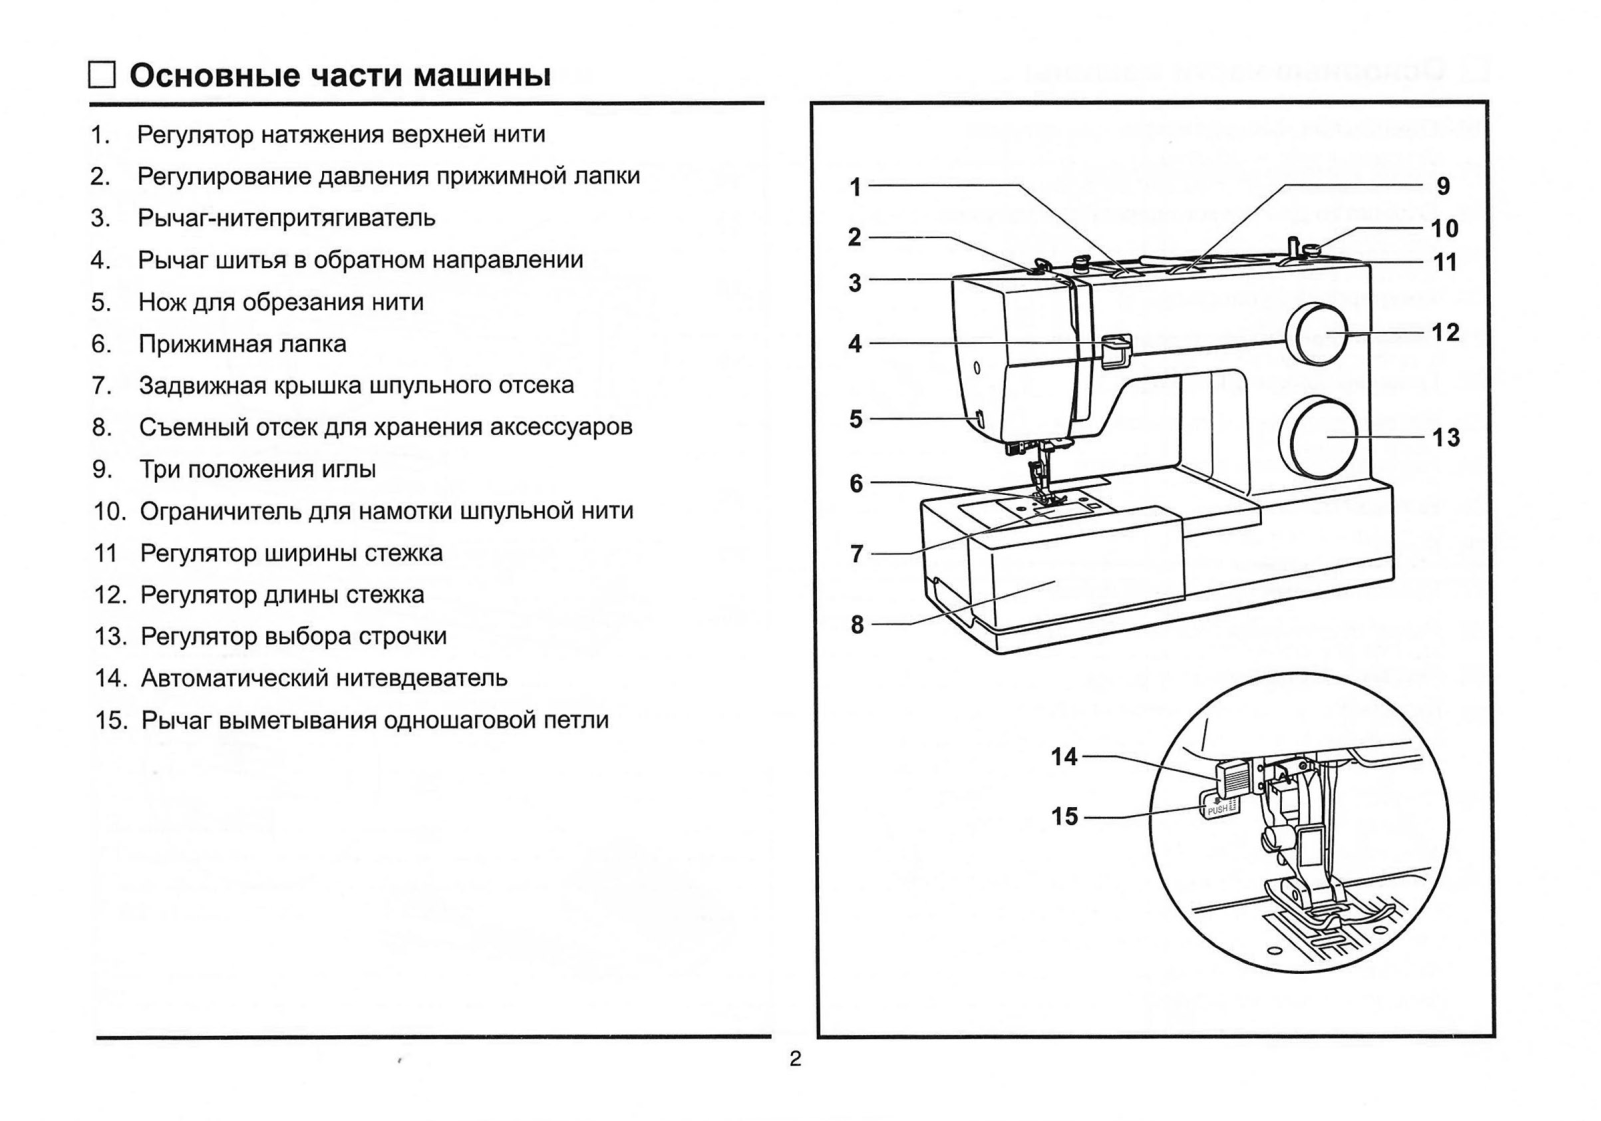
1. Thread tension dial
2. Presser foot pressure adjustment
3. Thread take-up lever
4. Reverse sewing lever
5. Thread cutter
6. Presser foot
7. Needle plate cover
8. Removable extension table/ accessory storage
9. Three needle position dial
10. Bobbin stopper
11. Stitch width dial
12. Stitch length dial
13. Pattern selector dial
14. Automatic threader
15. One step buttonhole lever
14
15
1
2
3
5
6
8
7
13
11
12
10
4
9
Principal Parts of the Machine

3
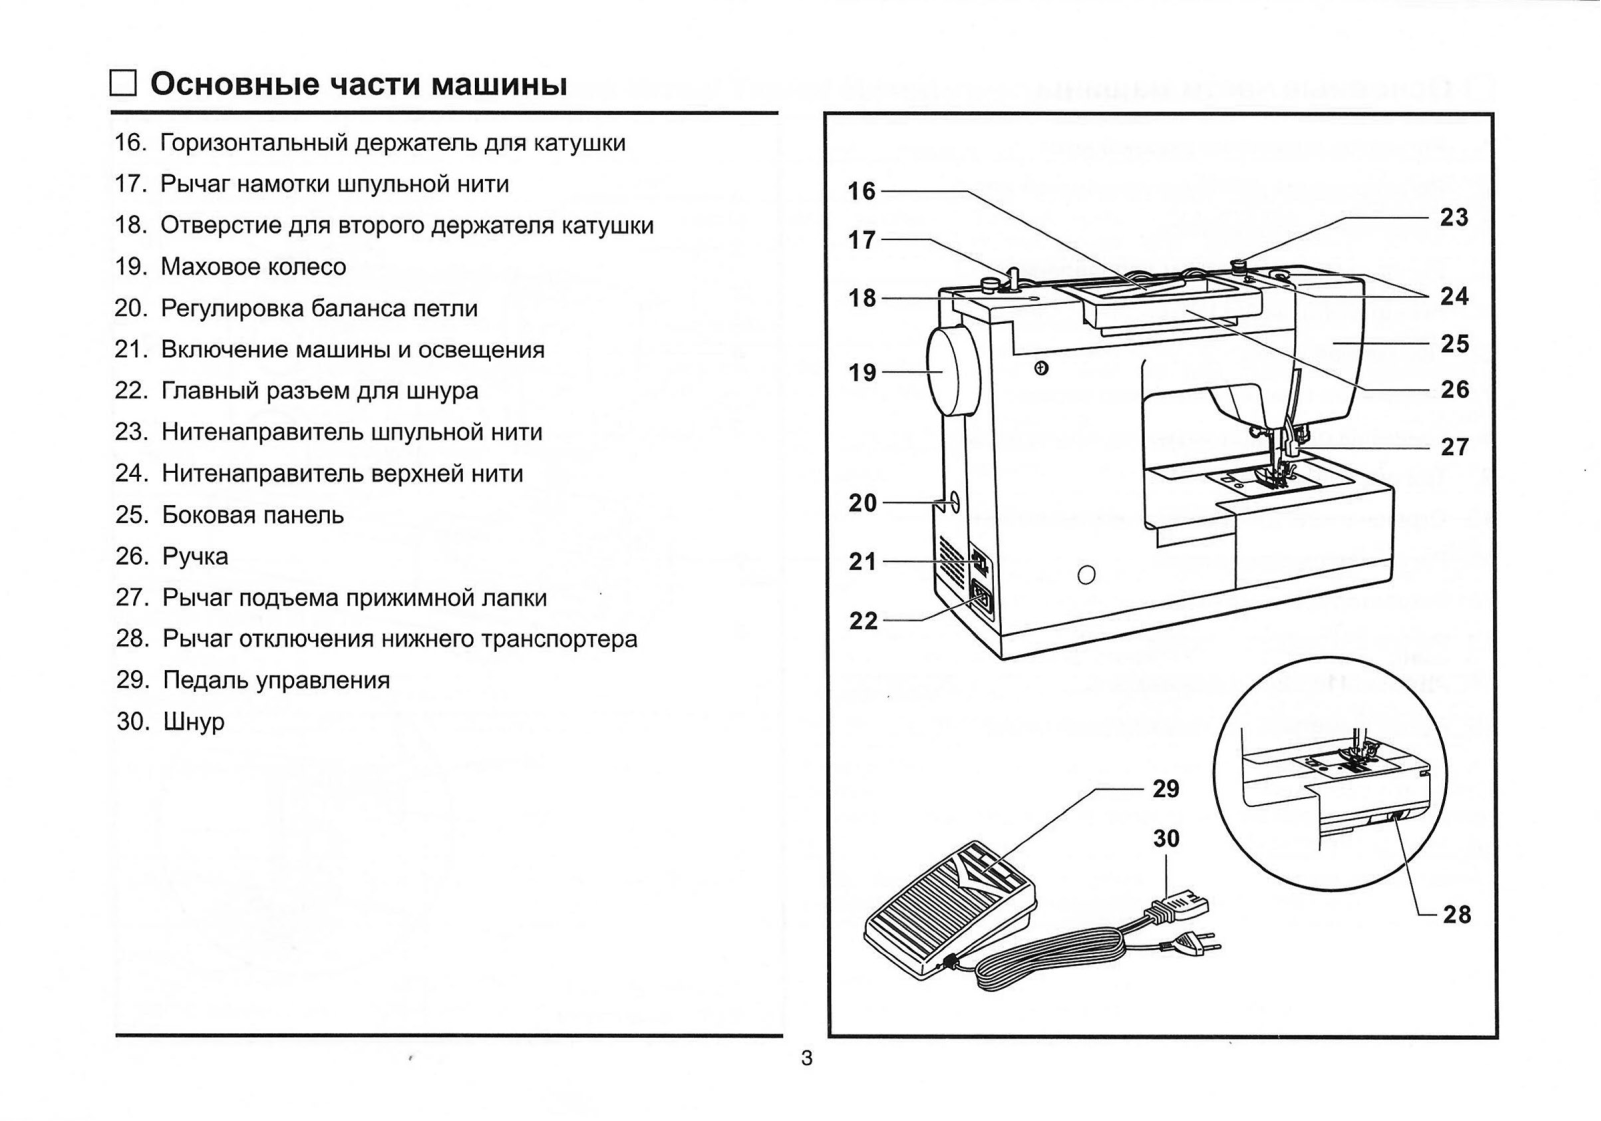
16. Horizontal spool pin
17. Bobbin winding spindle
18. Hole for second spool pin
19. Handwheel
20. Buttonhole stitch balance adjustment slot
21. Power and light switch
22. Main plug socket
23. Bobbin thread guide
24. Upper thread guide
25. Face plate
26. Handle
27. Presser foot lifter
28.
29. Foot speed control
30. Power cord
Drop feed control
29
30
25
26
28
23
24
27
20
21
22
16
17
19
18
Principal Parts of the Machine

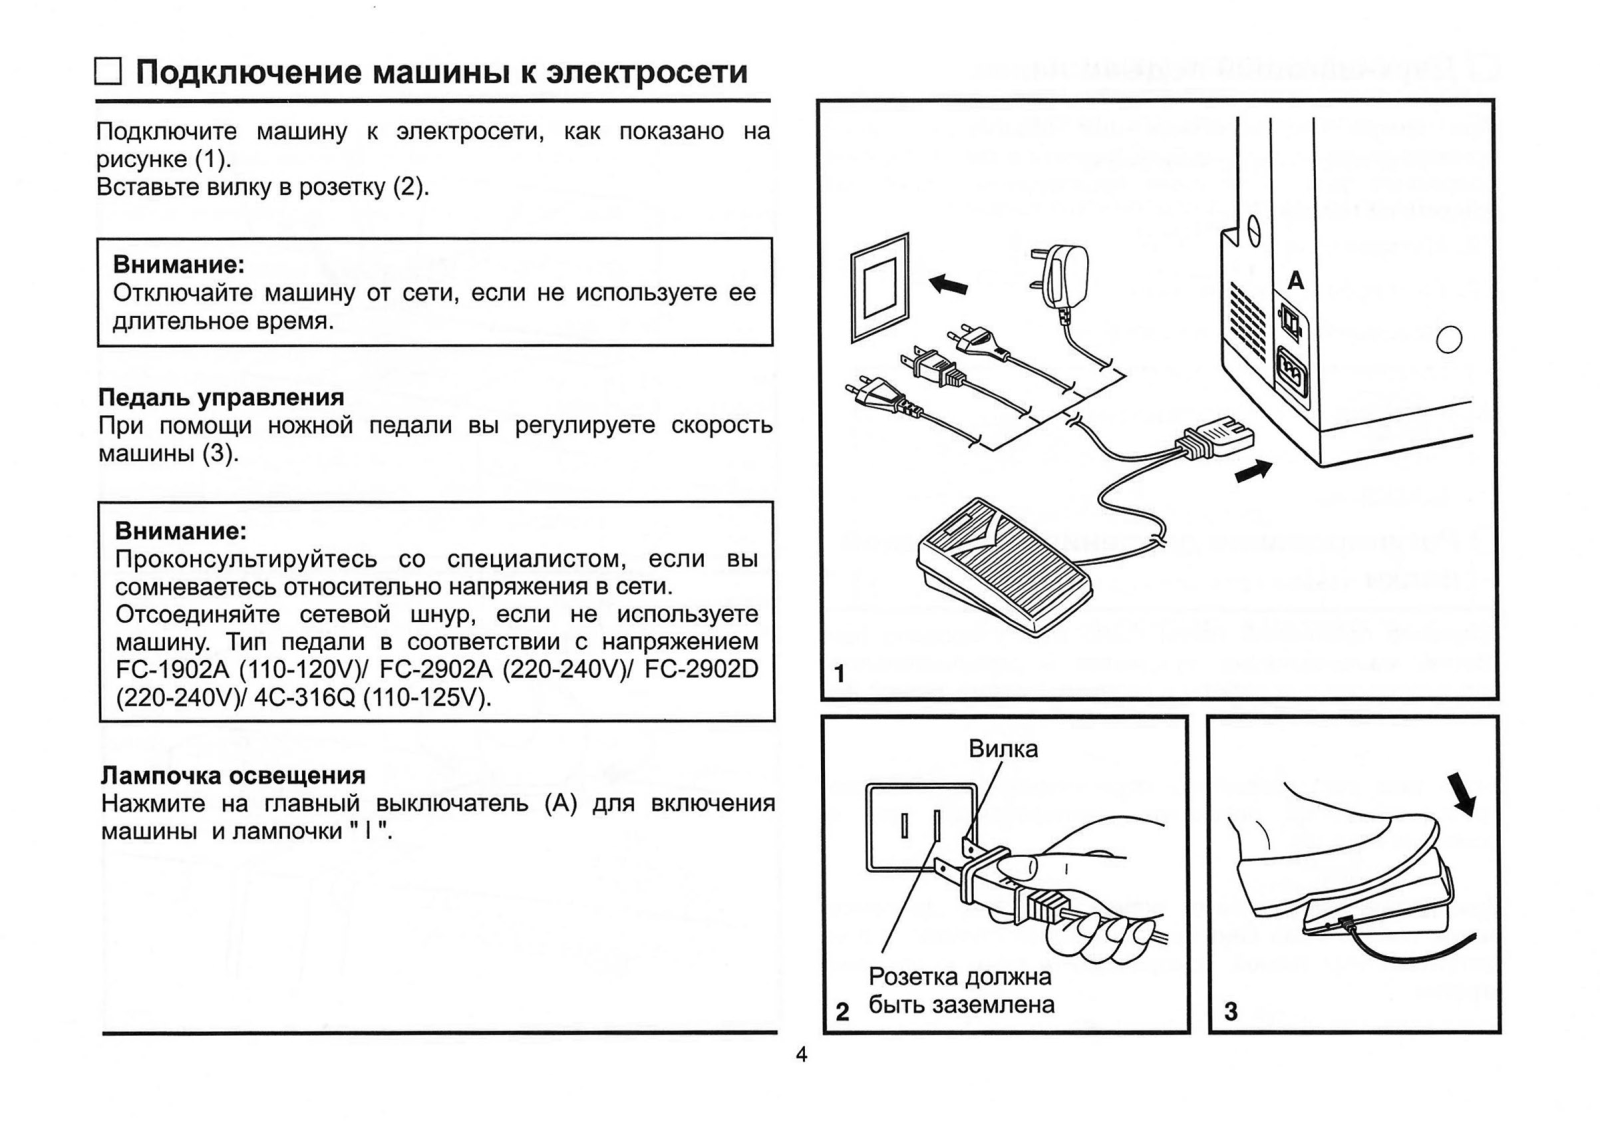
Connect the machine to a power source as illustrated. (1)
This appliance is equipped with a polarized plug which must be
used with the appropriate polarized outlet. (2)
Unplug power cord when machine is not in use.
The foot control pedal regulates the sewing speed. (3)
Consult a qualified electrician if in doubt of how to connect
machine to power source.
Unplug power cord when machine is not in use.
The foot control must be used with the appliance by KD-
1902 (110-120V area)/ KD-2902 (220-240V area)
manufactured by ZHEJIANG FOUNDER MOTOR
CORPORATION LTD. (China)
4C-316B (110-120V area)/ 4C-326G (230V area)
manufactured by Wakaho Electric Ind. Co., Ltd. (Vietnam)
Press main switch (A) to » l » for power and light.
For appliance with a polarized plug (one blade is wider than
the other). To reduce the risk of electric shock, this plug is
intended to fit in a polarized outlet only one way. If it does not
fit fully in the outlet, reverse the plug. If it still does not fit,
contact a qualified electrician to install the proper outlet. Do
not modify the plug in any way.
Attention:
Foot control
Attention:
Sewing light
IMPORTANT NOTICE
a. Polarized attachment plug
b. Conductor intended to be grounded
2
3
4
1
A
a
b
Connecting Machine to Power Source

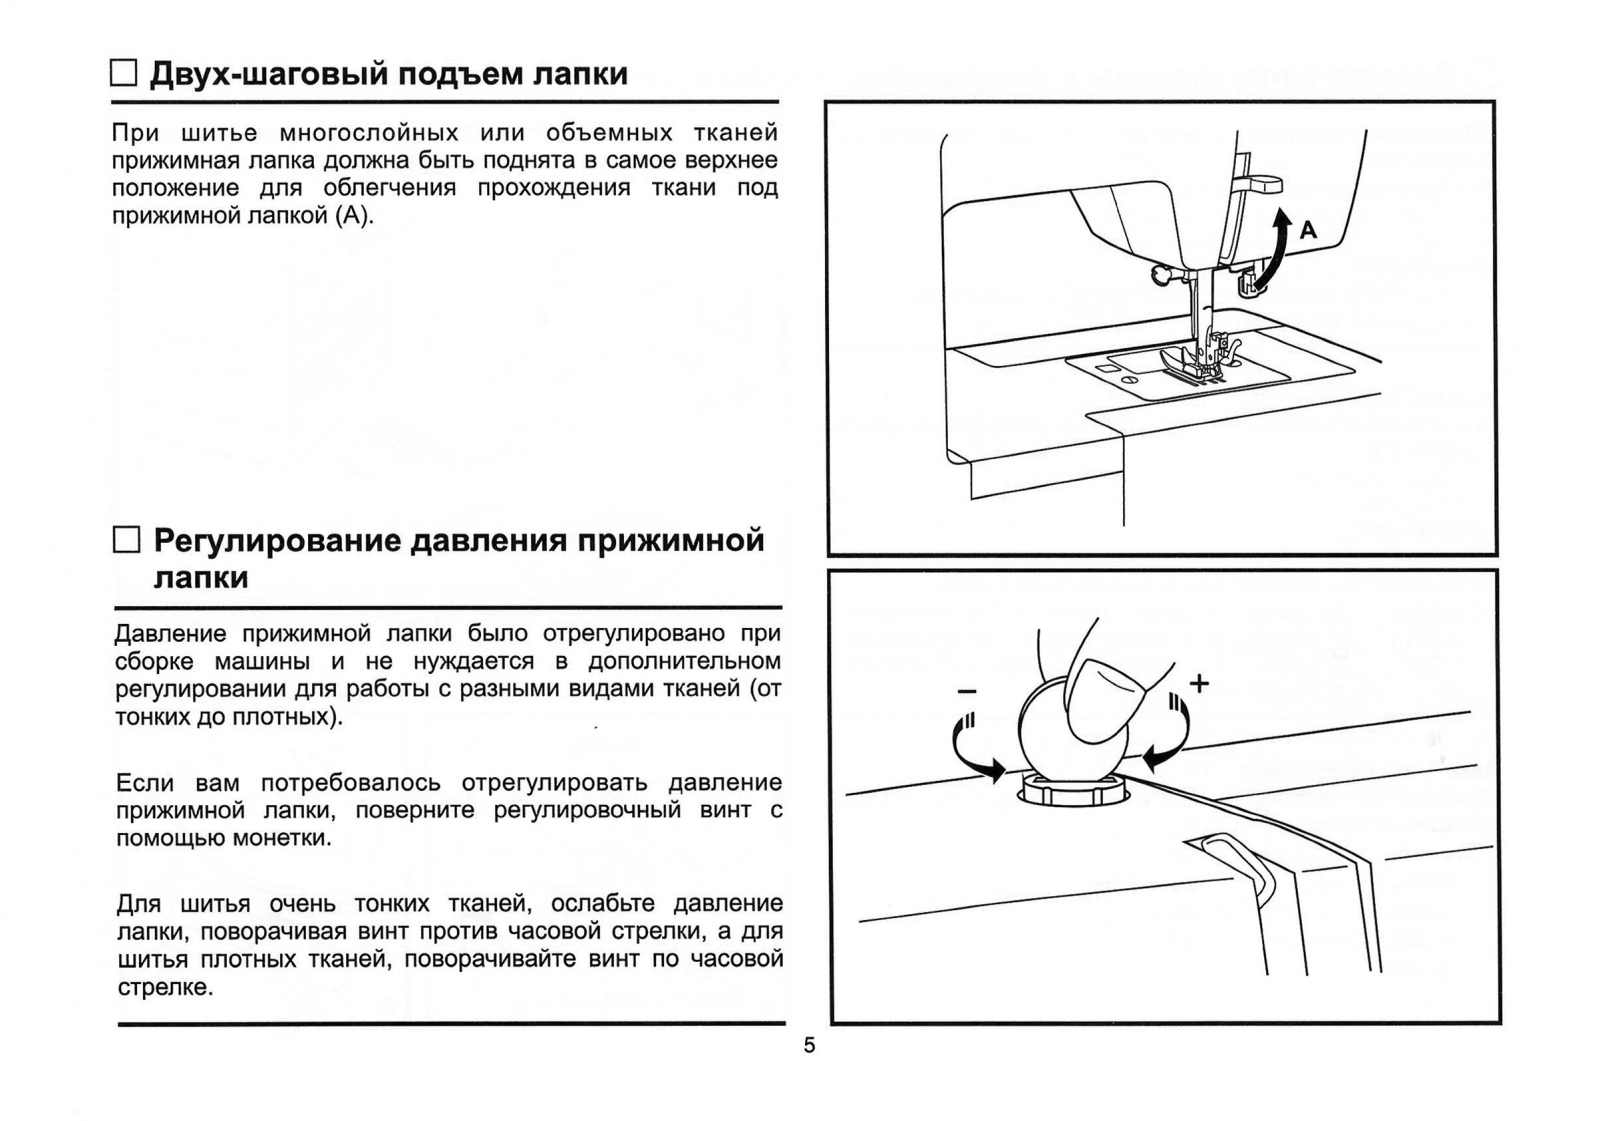
5
When sewing several layers or thick fabrics, the presser foot
can be raised
for easy positioning of the
work. (A)
to a higher position
A
The presser foot pressure of the machine has been pre-set
and requires no particular readjustment according to the type
of fabric (light-or-heavy weight).
However, if you need to adjust the presser foot pressure,
turn the presser adjusting screw with a coin.
For sewing very thin fabric, loosen the pressure by turning
the screw counter clockwise, and for heavy fabric, tighten by
turning it clockwise.
Two Step Presser Foot Lifter
Adjusting Presser Foot Pressure

1 Standard accessories
2 Optional accessories
Standard accessories (1)
Optional accessories (2)
a. All purpose foot
b. Zipper foot
c. Buttonhole foot
d. Button sewing foot
e. Seam ripper/ brush
f. Edge/ quilting guide
g. Pack of needles
h. Spool holders
i. Bobbin (3x)
j. L-screwdriver
k. Auxiliary Spool Pin
l. Spool pin felt
m. Soft cover
(These 10 accessories are not supplied with this machine;
they are, however, available for purchase from your authorized
retailer.)
n. Satin stitch foot
o. Overcasting foot
p. Hemmer foot
q. Cording foot
r. Blind hem foot
s. Quilting/ straight stitch foot
t. Gathering foot
u. Darning/ embroidery foot
v. Even Feed foot
w. Twin needle
o
n
p
q
r
s
t
u
v
w
006916008
006016008
006917008
0061850081
006904008
006172008
006907008
006900008
006813008
m
h
g
e
f
i
j
l
k
a
b
c
d
006806008
006905008
006914008
006Q6A0150
Accessories
6

1
2
4
7
8
9
5
6
3
10
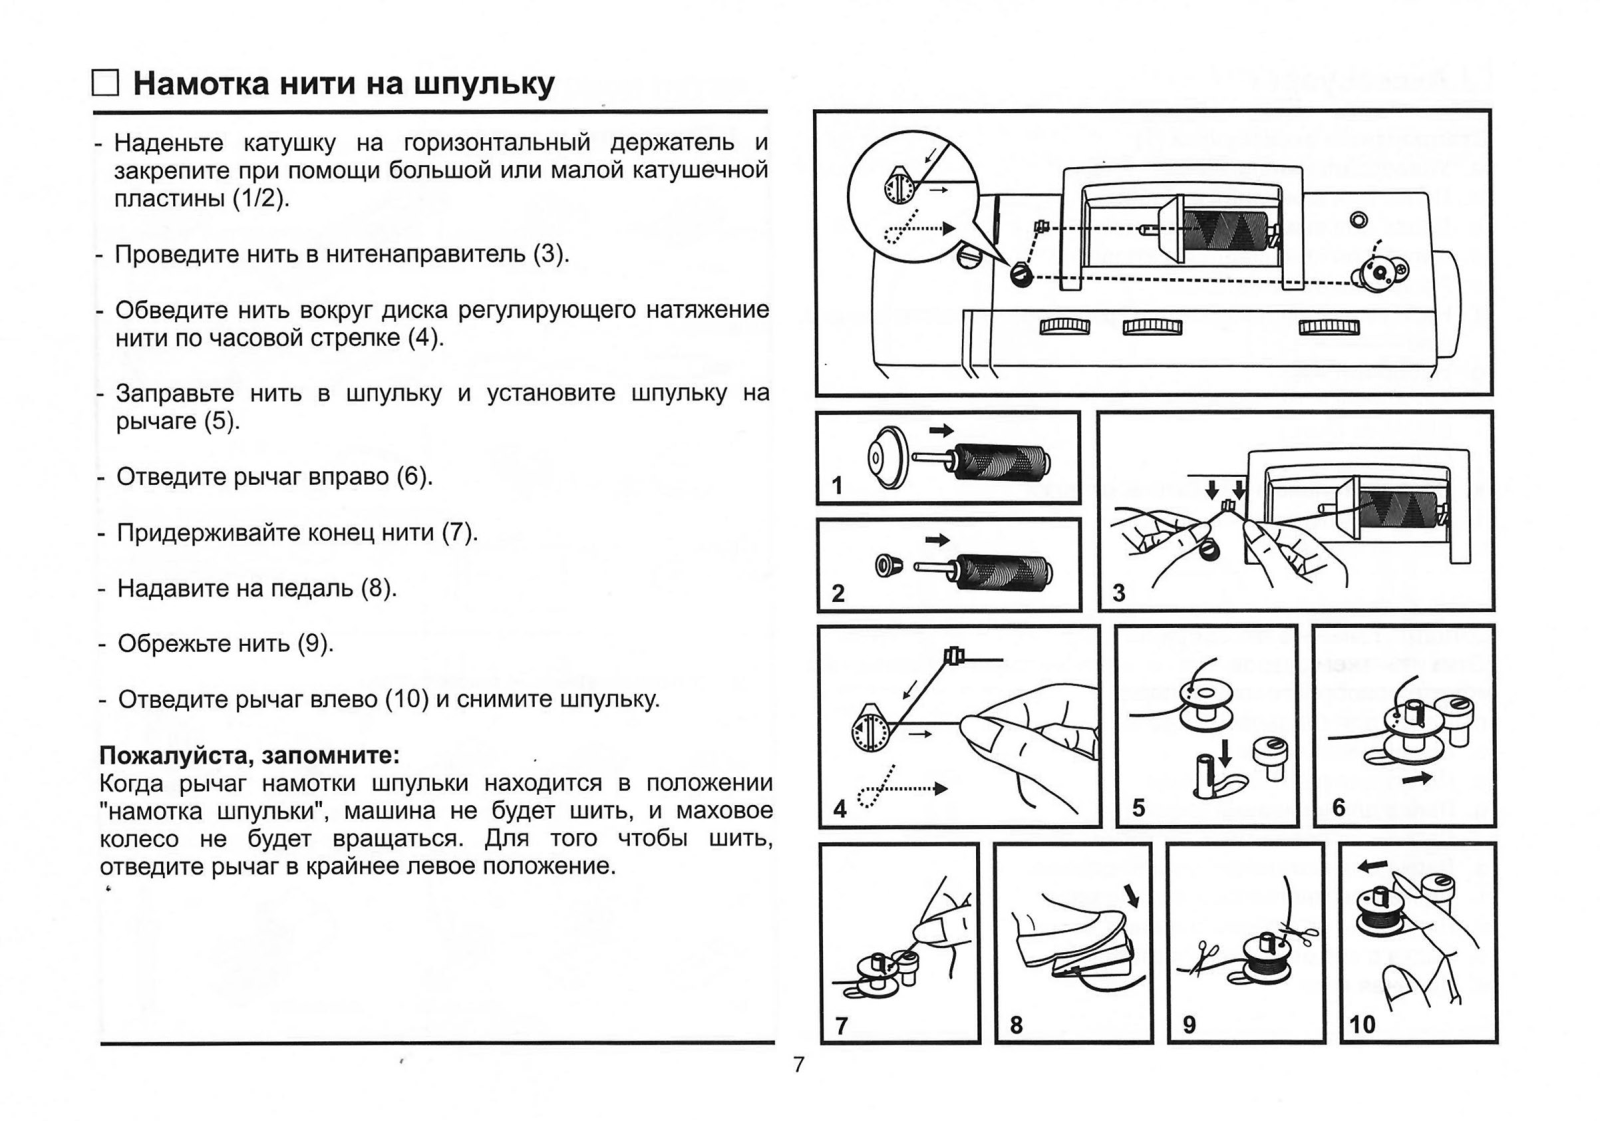
—
corresponding
. (1/2)
— Snap thread into thread guide. (3)
— Wind thread clockwise around bobbin winder tension discs. (4)
— Thread bobbin as illustrated and place on spindle. (5)
— Push bobbin spindle to right. (6)
— Hold thread end. (7)
— Step on foot control pedal. (8)
— Cut thread. (9)
— Push bobbin spindle to left (10) and remove.
When the bobbin winder spindle is in «bobbin winding»
position, the machine will not sew and the
.
To start sewing, push the bobbin winder spindle to the left
(sewing position).
Please Note:
Place thread and
spool holder on to spool
pin
handwheel turn
Winding the Bobbin
7

05:01
Singer 4423 Heavy Duty | Unboxing +Test
09:19
Singer Heavy Duty 4423 4 Threading & Winding a Bobbin
21:02
Model 4411 4423 Heavy Duty Instructional DVD
01:22
SINGER Heavy Duty series — ознакомительное видео
05:49
Singer HD 4423 — скорость работы
12:51
SINGER Heavy Duty 4423 — Erklärung und Test
Нажмите на кнопку для помощи
View the manual for the Singer Heavy Duty here, for free. This user manual comes under the category sewing machines and has been rated by 23 people with an average of a 8.5. This manual is available in the following languages: English. Do you have a question about the Singer Heavy Duty?
Ask your question here
Singer Heavy Duty specifications
Below you will find the product specifications and the manual specifications of the Singer Heavy Duty.
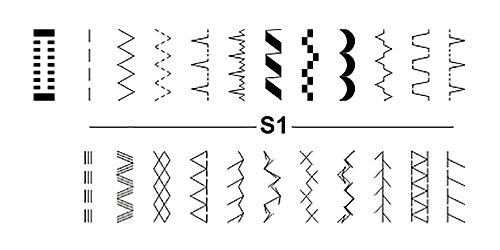
The Singer Heavy Duty sewing machine is an automatic sewing machine that is designed for sewing purposes. It features a 1-step buttonhole type and has a free arm, allowing for easy access to difficult-to-reach areas of fabric. The stitch length and width are both variable, providing flexibility in creating different types of stitches.
With a total of 23 stitch patterns to choose from, this sewing machine offers a wide range of options for various sewing projects. It also has 3 needle positions, allowing for precise stitching.
While the Singer Heavy Duty sewing machine does not have the capability to be connected to a computer, it does feature an automatic needle threader, which simplifies the threading process. Additionally, it does not have a display, making it a straightforward and easy-to-use machine.
Operating on electric power, this sewing machine ensures a reliable and consistent performance. It comes with one buttonhole option and is constructed with durable materials, ensuring its longevity.
Overall, the Singer Heavy Duty sewing machine provides a versatile sewing experience with its various stitch patterns and adjustable settings. It is designed to be user-friendly with features like an automatic needle threader, and its sturdy construction ensures reliable use over time.
Type
Automatic sewing machine
Power supply type
Electric
Sewing machine accessories included
Buttonhole foot, Cover
General
| Brand | Singer |
| Model | Heavy Duty | 4423.CL |
| Product | sewing machine |
| EAN | 168141620416, 37431883001, 37431883018, 374318847566, 0168141620416 |
| Language | English |
| Filetype | User manual (PDF) |
Features
| Type | Automatic sewing machine |
| Sewing machine functions | Sewing |
| Buttonhole type | 1 Step |
| Free arm | Yes |
| Number of programs | — |
| Stitch length | Variable |
| Number of stitch patterns | 23 |
| Number of needle positions | 3 |
| PC connected | No |
| Stitch width | Variable |
| Number of button holes | 1 |
| Automatic needle threader | Yes |
| Display | No |
| Product colour | Grey |
Power
| Power supply type | Electric |
Packaging content
| Sewing machine accessories included | Buttonhole foot, Cover |
show more
Frequently asked questions
Can’t find the answer to your question in the manual? You may find the answer to your question in the FAQs about the Singer Heavy Duty below.
How to Troubleshoot Thread Bunching on Singer Heavy Duty Sewing Machine
What size needle should I use?
Which size of needle you can best use depends on the thickness of the fabric you use. With a thick fabric you should use a thick needle. The packaging of your needle states for which substances your needle is suitable.
Why does the needle break while sewing?
There can be several causes for needle breakage:
— Not using the right needle for the right fabric
— The needle is set too low
— The fabric is not properly guided
— The bobbin case is not inserted correctly
How long does a sewing needle last?
Generally, a sewing needle lasts about 7 to 9 hours.
Is the manual of the Singer Heavy Duty available in English?
Yes, the manual of the Singer Heavy Duty is available in English .
Is your question not listed? Ask your question here
Производитель: Singer
4 обзора:
4.7 (Отличный товар)
Электромеханическая швейная машина Зингер Хеви Дьюти 4423
Швейная машина Singer Heavy Duty 4423 обладает увеличенным набором строчек, с помощью которых вы сможете не только шить изделия, но и украшать их декоративными швами. Наличие нитевдевателя и регуляторов длины и ширины строчки, а также давления лапки на ткань в процессе шитья выделяют эту модель среди подобных. Как и тот факт, что она обладает высокой скоростью шитья и более мощным мотором, за счет чего машина может справляться с плотными тяжелыми тканями, например, джинсой.
Особенности:
23 швейных операции
Эта модель имеет расширенный набор строчек, включая 12 декоративных, с возможностью регулировки как длины стежка до 4 мм, так и ширины до 6 мм. Выполняет петлю в автоматическом режиме за 1 шаг. 3 позиции положения иглы относительно центра отверстия игольной пластины можно изменить для вшивания молнии, шнура или отстрочки.
Давление лапки
Функция регулировки давления лапки на ткань позволяет добиваться оптимальных результатов при шитье как легких, так и тяжелых материалов.
Нитевдеватель
Встроенный заправщик нити облегчит вам трудоемкий процесс. Просто возьмитесь за кончик нити, а нитевдеватель сам протянет ее через ушко иглы.
Горизонтальный челнок
Этот вид челнока наиболее удобен для заправки шпульки, не требует смазки. Вы получите более качественную строчку и меньше вибрации машины за счет того, что челнок вращается, а не качается, как вертикальный.
Мощная и быстрая
Машина имеет более мощный двигатель, что позволяет шить на высокой скорости до 1100 ст/мин, а также она способна прошивать более тяжелые ткани.
Металлическая станина
Внутренний каркас швейной машины изготовлен из прочного металла, несет на себе все механизмы, очень хорошо подавляет вибрации и повышает общую прочность машины. Стальные детали в рабочей области помогают лучшему продвижению ткани за счет своей гладкой поверхности.
Инструкции для Singer Heavy Duty 4423:
Инструкция по эксплуатации Singer Heavy Duty 4423 (PDF, рус)
Характеристики Singer Heavy Duty 4423:
- Тип челнока
- Горизонтальный вращающийся челнок
- Максимальная ширина строчки
- 6 мм
- Максимальная длина стежка
- 4 мм
- Количество строчек
- 23
- Режим вымётывания петли
- Автоматическое выметывание прямой бельевой петли под размер пуговицы
- Верхний транспортёр
- нет
- Длина платформы
- 16 см
- Размеры рукавной платформы (длина/обхват)
- 6,5/27 см
- Ширина гребёнки транспортера
- 17 мм
- Высота подъема лапки (нормальная/максимальная)
- 6/10
- Электронный стабилизатор усилия прокола
- нет
- Регулятор (ограничитель) максимальной скорости
- нет
- Программируемая остановка иглы в верхнем/нижнем положении
- нет
- Нитевдеватель
- есть
- Горизонтальное расположение катушки
- есть
- Регулятор давления лапки
- есть
- Потребляемая мощность
- 90 Вт
- Тип освещения
- Светодиодное
- Органайзер
- нет
- Автостоп при намотке нитки на шпульку
- есть
- Линейка на корпусе
- нет
- Чехол
- Мягкий
- Швейный советник
- нет
- Стандарт игл
- 130/705H
- Страна разработки
- США
- Страна производства
- Китай
- Гарантия
- 1 год
- Максимальная скорость шитья
- 1100 ст/мин
- Вес без упаковки
- 6,5 кг
- Вес с упаковкой
- 7,7 кг
Строчки Singer Heavy Duty 4423:
Комплектация
- Педаль
- Мягкий чехол
- Лапка универсальная
- Лапка для вшивания молнии
- Лапка для выметывания петель
- Лапка для пришивания пуговиц
- Распарыватель
- Направитель для квилтинга
- Набор игл
- Шпульки
- Отвертка
- Дополнительный катушечный стержень
- Войлочная подкладка под катушку
Популярные аксессуары для Singer Heavy Duty 4423
Наличие:
есть
Наличие:
есть
Наличие:
есть
Наличие:
есть
Наличие:
есть
Наличие:
есть
Наличие:
есть
Наличие:
есть
Обратите внимание!
«Швейный Мир» является официальным дистрибьютором швейных машин фирмы Singer. Покупая Singer в наших магазинах, Вы получите качественную машину, обеспеченную гарантийным и сервисным обслуживанием.
Отзывы о товаре Singer Heavy Duty 4423
-
Капаева Татьяна Валерьевна
-
Отличный товар
Машинка для своих функций отличная! Комплектация маленькая, но поэтому и цена приемлемая.
Но !!! мне не повезло с менеджером, на вопросы отвечала размыто и не конкретно.
Про различия двух моделей Heavy duty 4423 и supera 5523 поступил ответ, что только цветом… почему цена такая разная я так и не услышала!
А на вопрос про дату производства вообще ответила: сейчас дату производства не ставят, это вам не хлеб….
Напишу тут для тех, кто тоже интересовался датой: в серийном номере первые три латинские буквы — наименование фабрики, а следующие две цифры год производства! Также там указывается день производства, производственная линия и бригада сборщиков.
Уважаемые менеджеры, будьте компетентны в своей работе!
В итоге машинку купила в другом магазине! -
Татьяна Медведева
-
Отличный товар
Машинка качественная, очень мощная. Идеальна для домашнего пользования.
Доставка быстрая, упаковка надежная. Никаких нареканий нет. -
Колганова Диана Александровна
-
Отличный товар
Singer Heavy Duty 4423 отличная бюджетная версия качество+цена и бонусом внешний вид. Есть весь необходимый функционал — количество операций для работы. Ход машины ровный и не шумный…. хотя если быстро шить…..немного шумит))). Шьет реально все…Совет — приобретите набор лапок на сайте…для удобства шитья различных видов тканей.
Отдельно спасибо за работу сотрудников, была приятно удивлена при работе с заказом # 80330. -
Лариса Г.
-
Хороший товар
Моя бабушка швея,потому с швейнымм машинами знакома с детства. Зингер приобрела меньше месяца назад, но пока могу отметить следующее: выглядит надежно, по работе нареканий нет. Шьет с легкостью как очень тонкие, так и плотные ткани; количество строчек более чем достаточное. Очень понравилось, что платформа изготовлена из металла, а не из пластика, как в большинстве современных машин.
Магазину отдельное спасибо! Работают быстро и качественно. По телефону ответили на все вопросы относительно особенностей работы данной модели. Приятный, вежливый персонал.
Отзывы о товаре могут оставлять только зарегистрированные покупатели.
Singer
Loading…
F
- FUTURA 4040
- Futura 900
- futura ce-100
- FUTURA CE 1506
- FUTURA CE-2002
- Futura CE-200E
- Futura CE-2504
- FUTURA CE 3504
- Futura II 920
- Futura Quartet
- Futura Quartet FQ-4
- FUTURA QUARTET SEQS-6000
- Futura Quintet 5
- Futura SES20002
- Futura top XL-5000
- Futura XL-4002
- Futura XL-5502
- Futurf II 920
- FW752
G
- G1152
- G1162
- G1172
- G300
- Garment Steamer,SteamWorks Pro
- Genie 353
- Genie 354
- Golden Touch & Sew 620
- Golden Touch & Sew 630
- Golden Touch & Sew 750
- GP
- Graduate 6705
- Graduate II 724
- Grill 3 in 1
- GX-M10
H
- H74
- HA-1
- HAL1200
- harmonie 1002
- HARMONIE 4633
- HARMONY 2662
- HD 1023
- HD 1053
- HD 1104
- HD1711
- HD205 FACILITA PRO
- HD 6335M2
- HE
- Heavy Duty 14HD854
- Heavy Duty 44114
- Heavy Duty 44235
- Heavy Duty 44322
- Heavy Duty 5554
- HG
- HM300
- HM-843
- HM-945
- Household Steam Iron2
I
- IDEA 3
- Imperial 7000
- Imperial 7005
- Improved Family
- Ingenuity 7436
- Inifinity
- Initiale
- Inspiration 4205
- Inspiration 4206
- Inspiration 4210
- Inspiration 4212
- INSPIRATION 4218
- Inspiration 42202
- INSPIRATION 4220 1
- INSPIRATION 42283
- INSPIRATION 4228 1
- IZEK 1500
J
- JUNIOR MISS 67B
K
- K15
- K17
- K18
- K194
- K332
- K38
- K38 Motor
- K42
- K492
- K532
- KB-6002L
- KB-6002LK
- KB-6015K
- KB6525PKRB
L
- L472
- L-5002
- LITTLE TOUCH & SEW 67A
- LOCKSTITCH
- LS2125
- LS-2720
- Luna 1120
M
- M100A
- M 16054
- M 24054
- M.C.P.K. 2504C
Loading…
Loading…
Nothing found
Heavy Duty 4432
operation manual
33 pgs798.6 Kb0
User manual
32 pgs11.58 Mb0
Table of contents
Loading…
…
Singer User manual
Specifications and Main Features
Frequently Asked Questions
User Manual


Loading…
+ 22 hidden pages
You need points to download manuals.
1 point = 1 manual.
You can buy points or you can get point for every manual you upload.
Buy points
Upload your manuals
Перейти к контенту
Русские электронные инструкции по эксплуатации
Постоянно обновляемый большой каталог документации по эксплуатации и использованию современных устройств и оборудования на русском языке. Бесплатное скачивание файлов.
Поиск:
Главная
♥ В закладки
Просмотр инструкции в pdf
Инструкция по эксплуатации швейной машины Singer Heavy Duty 4423.
Скачать инструкцию к швейной машине Singer Heavy Duty 4423 (1 006,51 КБ)
Инструкции по эксплуатации швейных машин Singer
« Инструкция к швейной машине Jaguar 594
» Инструкция к швейной машине Comfort 32
Вам также может быть интересно

Инструкция к швейной машине Singer M3305

Инструкция к швейной машине Singer Starlet 6680

Инструкция к швейной машине Singer Talent 3321

Инструкция к швейной машине Singer Starlet 6660

Инструкция к швейной машине Singer Confidence 7470

Инструкция к швейной машине Singer 2273

Инструкция к швейной машине Singer CONFIDENCE 7463

Инструкция к швейной машине Singer 1507
Добавить комментарий
Имя *
Email *
Сайт
Комментарий
Сохранить моё имя, email и адрес сайта в этом браузере для последующих моих комментариев.
- Добавить инструкцию
- Заказать инструкцию
- Политика конфиденциальности