
Центр безопасности данных
Информация о посещаемых вами сайтах сохраняется в браузере и может быть извлечена из него, в основном в виде файлов cookie. Это могут быть сведения о вас, ваших предпочтениях и устройстве, которые в основном необходимы для повышения удобства работы с сайтом. Такая информация обычно не служит непосредственно для идентификации пользователей, а лишь учитывает ваши интересы при использовании сетевых ресурсов.
Мы уважаем право на неприкосновенность частной жизни, поэтому вы можете установить запрет на использование некоторых типов файлов cookie.
Для получения дополнительных сведений и изменения настроек по умолчанию щёлкните по заголовку каждой категории.
Однако обратите внимание, что блокировка определённых типов файлов cookie может повлиять на удобство работы с сайтом и нашими сервисами, включая LiveChat.
Дополнительная информация
Управление настройками согласия
Обязательные файлы cookie
Всегда активно
Эти файлы cookie необходимы для работы веб-сайта и не могут быть деактивированы в наших системах. Как правило, они активируются только в ответ на ваши действия, аналогичные запросу услуг, такие как настройка уровня конфиденциальности, вход в систему или заполнение форм. Вы можете настроить браузер таким образом, чтобы он блокировал эти файлы cookie или предупреждал вас об их использовании, но в таком случае некоторые разделы веб-сайта не будут работать. Эти файлы cookie не хранят никакой личной информации.
Аналитические/рабочие файлы cookie
Всегда активно
Эти файлы cookie позволяют нам подсчитывать количество посетителей и источники трафика, чтобы оценивать и улучшать работу нашего веб-сайта. Они помогают нам узнавать, какие страницы являются наиболее и наименее популярными, а также отслеживать перемещение пользователей по сайту.
Все данные, собираемые с помощью файлов cookie данного типа, обобщаются и поэтому остаются анонимными. Если вы запретите эти файлы cookie, мы не узнаем, когда вы посещали наш сайт, и не сможем отслеживать его работу.
Информация об использовании содержимого, собранная с помощью файлов cookie, может быть объединена с собранной ранее информацией и использована для анализа, понимания и составления отчётов об общем использовании сайтов. Эти файлы cookie не используются для персонализации наших веб-сайтов и/или отображения контекстной рекламы для вас на других ресурсах.
Функциональные файлы cookie
Функциональные файлы cookie
Эти файлы cookie позволяют использовать дополнительные функции веб-сайта и настраивать его в соответствии со своими предпочтениями. Такие файлы могут размещаться нами или сторонними разработчиками, сервисы которых мы добавили на наши страницы.
Если вы запретите эти файлы cookie, то все сервисы или некоторые из них (например, LiveChat или рейтинги и обзоры) могут работать неправильно.
Рекламные и целевые файлы cookie
Рекламные и целевые файлы cookie
Эти файлы cookie настраиваются через веб-сайт нашими партнёрами по рекламе, которые могут использовать их для сбора данных о ваших интересах и отображения актуальной для вас рекламы на других сайтах.
Они не хранят личную информацию напрямую, а работают посредством уникальной идентификации браузера и устройства. Если вы запретите эти файлы cookie, вы не увидите адресную рекламу на различных сайтах.
Файлы cookie социальных сетей
Файлы cookie социальных сетей
Эти файлы cookie устанавливаются различными социальными сетями, функции которых добавлены на наш сайт. Они позволяют вам обмениваться информацией с друзьями и публиковать её на ваших страницах. Эти файлы cookie отслеживают посещаемые страницы в браузере и собирают информацию о ваших интересах. Это может отразиться на содержимом и сообщениях, отображаемых на других сайтах.
Если вы запретите эти файлы cookie, вы не сможете пользоваться этими функциями обмена данных.
Menu
Brother DCP-T420W Manuals
FAQs & Troubleshooting
Find frequently asked questions and troubleshooting information.
View FAQs
Find frequently asked questions and troubleshooting information.
View FAQs
Downloads
Download the latest drivers, utilities and firmware.
View Downloads

DCP-T220 / DCP-T225
DCP-T420W / DCP-T425W
Quick Setup Guide
Guía de configuración rápida
Guia de Configuração Rápida
Read the Product Safety Guide first, then read this guide for the correct installation procedure.
Keep this guide next to your machine for quick reference.
Primero, lea la Guía de seguridad del producto y, a continuación, lea esta guía para obtener
información sobre el procedimiento de instalación adecuado.
Conserve esta guía cerca de su equipo para consultas rápidas.
Primeiramente, leia o Guia de Segurança do Produto, depois leia este guia para conhecer o
procedimento de instalação correto.
Mantenha esse guia em um local próximo ao equipamento para agilizar possíveis consultas a ele.
D01H14001- 00
MEX/LTN/BRA
Version/Versión/ Versão 0
en es pt
Unpack the machine and check the components
1
Remove the protective tape
and the film covering the
machine.
Quite la cinta de protección
y la película que cubren el
equipo.
Remova a fita e o filme de
proteção que cobrem o
equipamento.
2
Desembale el equipo y revise los componentes
Desembale o equipamento e verifique os componentes
Fill the ink tanks with starter ink
Rellene los tanques de tinta con la tinta inicial
Encha os tanques de tinta com a tinta inicial
BTD60BK
BT5000CMY
BT5001CMY
BT5009CMY
BT6000BK
BT6001BK
BT6009BK
1
You must follow steps
Debe seguir los pasos
Você deve seguir os passos de
IMPO RTANT
Check the ink bottle model name on the label.
Using the incorrect ink may cause damage to the
machine.
IMPO RTANTE
Compruebe el nombre del modelo de la botella de
tinta en la etiqueta. Si utiliza una tinta incorrecta
podrían producirse daños en el equipo.
IMPO RTANTE
Verifique o nome do modelo do frasco de tinta no
rótulo. O uso de tinta incorreta pode causar danos
ao equipamento.
to 5 to complete the setup.
1
a 5 para completar la configuración.
1
a 5 para concluir a configuração.
Video setup instructions:
Instrucciones de
configuración en video:
Instruções de configuração em vídeo:
support.brother.com/videos
NOTE
• The components may differ depending on your country.
• Save all packing materials and the box in case you must ship your machine.
• We recommend using a USB 2.0 cable (Type A/B) that is no more than 6 feet
(2 meters) long (included in some countries).
NOTA
• Los componentes disponibles pueden diferir según cuál sea su país.
• Guarde el material del embalaje y la caja por si tiene que desplazar el equipo.
• Le recomendamos usar un cable USB 2.0 (Tipo A/B) que no supere los 6 pies
(2 metros) de longitud (incluido en algunos países).
OBSERVAÇÃO
• Os componentes podem variar de acordo com o país.
• Guarde todos os materiais de embalagem e a caixa para o caso de precisar
transportar o equipamento.
• Recomendamos usar um cabo USB 2.0 (tipo A/B) com até 2 metros de
comprimento (incluído com o equipamento em alguns países).
Open the ink tank cover a,
remove the cap b, and place
2
it on the back of the cover c.
Abra la cubierta del tanque
de tinta a, extraiga la tapa
b y colóquela en la parte
trasera de la cubierta c.
1
Abra a tampa do
compartimento do tanque de
tinta a, remova a tampa b,
3
e coloque-a sobre a parte
detrás da tampa c.
Remove the film and tighten the cap firmly.
Retire la película protectora y ajuste
firmemente la tapa.
Remova o filme e aperte a tampa com
firmeza.
When finished, remove the bottle,
pointing the nozzle upward so the ink
does not spill.
Remove the nozzle cap and insert the bottle nozzle firmly into the ink tank
so that the ink does not spill.
Extraiga la tapa de la boquilla e introduzca la boquilla de la botella con
firmeza en el tanque de tinta de modo que la tinta no se derrame.
Remova a tampa e insira o bico do frasco com firmeza no tanque de tinta
para que a tinta não derrame.
The bottle is self-standing and
the ink fills automatically until
the bottle is empty. To fill the
ink tank faster, squeeze the
bottle on both sides.
La botella puede permanecer
parada por sí sola. El
rellenado de tinta comenzará
automáticamente hasta que
la botella quede vacía. Para
rellenar los tanques de tinta
más rápido, apriete la botella
en ambos lados.
O frasco é independente e a
tinta enche automaticamente
até o frasco esvaziar. Para
encher o tanque de tinta mais
rapidamente, aperte ambos os
lados do frasco.
Replace the ink tank cap. Repeat
step
then close the ink tank cover.
for the other ink tanks, and
2
Cuando finalice, extraiga la botella
con la boquilla apuntando hacia
arriba para que la tinta no se
derrame.
Quando acabar, remova o frasco
apontando o bico para cima, de
modo que não derrame a tinta.
Reemplace la tapa del tanque de
tinta. Repita el paso
tanques de tinta y, a continuación,
cierre la cubierta del tanque de tinta.
Recoloque a tampa do tanque de
tinta. Repita o passo
outros tanques de tinta e, então,
feche a tampa do compartimento do
tanque de tinta.
en los otros
2
para os
2
3
4
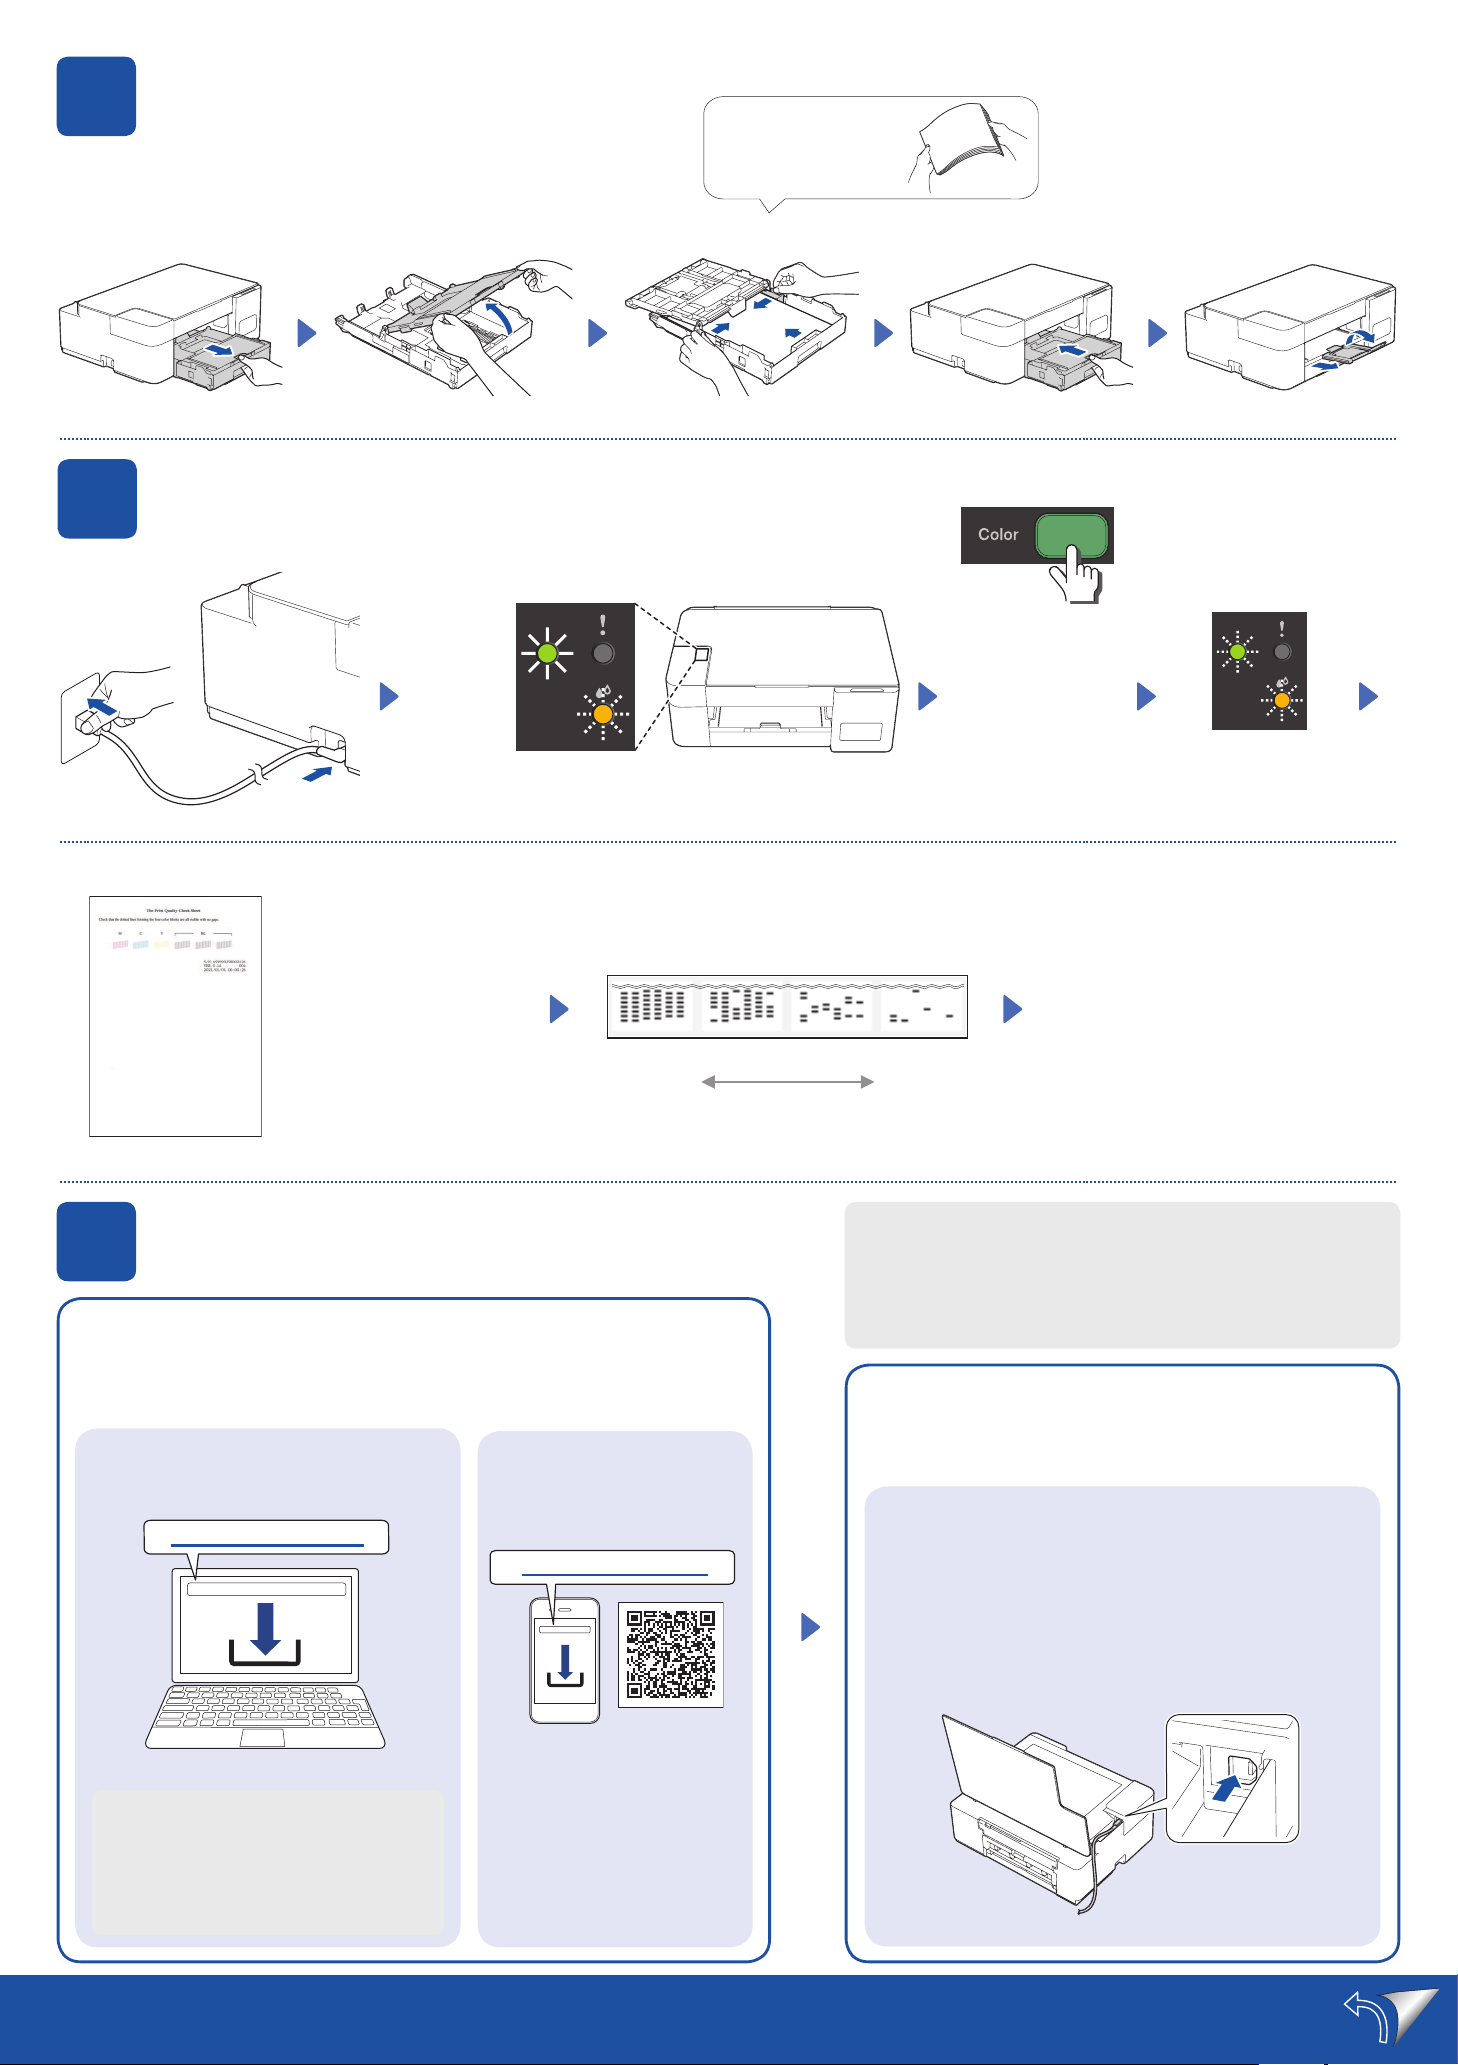
Load plain Letter paper in the paper tray
Cargue el papel tamaño carta en la
bandeja de papel
Coloque papel A4 comum na bandeja de
papel
Start the initial cleaning
Comience la limpieza inicial
Inicie a limpeza inicial
Lit
Encendido
Aceso
Blinking
Parpadea
Piscando
Fan the paper well.
Airee bien el papel.
Ventile bem o papel.
(Color)
(Color)
(Colorido)
Press and hold for
3 seconds
Mantenga
presionado durante
3 segundos
Mantenha
pressionado por
3 segundos
Blinking
Parpadea
Piscando
Initial cleaning begins
Comienza la limpieza
inicial
A limpeza inicial é iniciada
The machine prints the
Print Quality Check Sheet.
El equipo imprimirá la hoja
de comprobación de la
calidad de impresión.
O equipamento imprimirá
a folha de verificação de
qualidade de impressão.
Check the Print Quality Check Sheet.
Verifique la hoja de comprobación de la
calidad de impresión.
Examine a folha de verificação de
qualidade da impressão.
Good
Buena calidad
Boa qualidade
Connect your computer or mobile device
5
For Computers:
Para computadoras:
Para computadores:
Conecte su computadora o dispositivo móvil
Conecte o seu computador ou dispositivo móvel
Visit the websites to download and install Brother software.
Visite los sitios web para descargar e instalar el software Brother.
Visite os sites Web para fazer o download e a instalação do software da
Brother.
For Mobile Devices:
Para dispositivos móviles:
Para dispositivos móveis:
(DCP-T420W/DCP-T425W)
setup.brother.com
brother.com/apps
To improve the print quality, clean the print
head. See Improve Print Quality in this
guide.
Para mejorar la calidad de impresión,
limpie el cabezal de impresión. Consulte
Mejore la calidad de impresión en esta
guía.
Poor
Baja calidad
Baixa qualidade
Connect your Brother machine and computer/mobile device to the
same network.
Conecte su equipo Brother y su computadora/dispositivo móvil a
la misma red.
Conecte o seu equipamento Brother e o computador/dispositivo
móvel à mesma rede.
Follow the on-screen instructions.
Siga las instrucciones que irán apareciendo en la pantalla.
Siga as instruções na tela.
For USB Connection:
Use the USB port inside the machine, as shown.
Para la conexión USB:
Use el puerto USB dentro del equipo, como se muestra
en la imagen.
Para conexões USB:
Use a porta USB que está dentro do equipamento,
conforme a figura abaixo.
Para melhorar a qualidade de impressão,
limpe a cabeça de impressão. Leia
Melhorar a qualidade de impressão nesse
guia.
For Windows only, CD installation is also
available (for some countries).
Solo para Windows, también está disponible la
instalación desde CD (para algunos países).
Exclusivo para dispositivos Windows: CD de
instalação disponível (em alguns países).
Setup Complete / Configuración completada / Configuração concluída
Install the Brother iPrint&Scan
application.
Instale la aplicación Brother
iPrint&Scan.
Instale o aplicativo Brother
iPrint&Scan.
Код: 155089
Извините, товара сейчас нет в наличии
Бесплатная доставка
по Красноярску
Извините, товара сейчас нет в наличии
Новости интернет-магазина «Лаукар»:
Дополнительная информация в категории МФУ:
В интернет-магазине бытовой техники «Лаукар» Вы можете скачать инструкцию к товару МФУ Brother DCP-T420W совершенно бесплатно.
Все инструкции, представленные на сайте интернет-магазина бытовой техники «Лаукар», предоставляются производителем товара.
Перед началом использования товара рекомендуем Вам ознакомиться с инструкцией по применению.
Для того чтобы скачать инструкцию, Вам необходимо нажать на ссылку «скачать инструкцию», расположенную ниже, а в случае, если ссылки нет,
Вы можете попробовать обратиться к данной странице позднее,
возможно специалисты интернет-магазина бытовой техники «Лаукар» еще не успели загрузить для скачивания инструкцию к товару:
МФУ Brother DCP-T420W.

Фирма-производитель оставляет за собой право на внесение изменений в конструкцию, дизайн и комплектацию товара: МФУ Brother DCP-T420W. Пожалуйста, сверяйте информацию о товаре с информацией на
официальном сайте компании производителя.
FREE ENGLISH BROTHER DCP-T420W (01) PDF USER GUIDE
FREE ENGLISH BROTHER DCP-T420W (01) PDF USER MANUAL
FREE ENGLISH BROTHER DCP-T420W (01) PDF OWNER GUIDE
FREE ENGLISH BROTHER DCP-T420W (01) PDF OWNER MANUAL
FREE ENGLISH BROTHER DCP-T420W (01) PDF REFERENCE GUIDE
FREE ENGLISH BROTHER DCP-T420W (01) PDF INSTRUCTION GUIDE
FREE ENGLISH BROTHER DCP-T420W (01) PDF REFERENCE MANUAL
FREE ENGLISH BROTHER DCP-T420W (01) PDF INSTRUCTION MANUAL
FREE ENGLISH BROTHER DCP-T420W (01) PDF OPERATING INSTRUCTIONS
CLICK HERE TO DOWNLOAD BROTHER DCP-T420W (01) PDF MANUAL
If this is not the document you want for this product, click here to see if we have any other documents for this product.
How do I unpack the machine and check the components?
Unpack the machine and check the components. The components may differ depending on your country. Save all packing materials and the box in case you must ship your machine.
What type of USB cable is recommended?
We recommend using a USB 2.0 cable (Type A/B) that is no more than 6 feet (2 meters) long (included in some countries).
How do I fill the ink tanks with ink?
Check the ink bottle model name on the label. Using the incorrect ink may cause damage to the machine.
- Open the ink tank cover, remove the cap, and place it on the back of the cover.
- Remove the film and tighten the cap firmly.
- Remove the nozzle cap and insert the bottle nozzle firmly into the ink tank so that the ink does not spill. The bottle is self-standing and the ink fills automatically until the bottle is empty. To fill the ink tank faster, squeeze the bottle on both sides.
- When finished, remove the bottle, pointing the nozzle upward so the ink does not spill.
- Replace the ink tank cap. Repeat step 2 for the other ink tanks, and then close the ink tank cover.
How do I load letter-size paper in the paper tray?
Load letter-size paper in the paper tray.
How do I start the initial cleaning process?
Start the initial cleaning. The machine prints the Print Quality Check Sheet. Check the Print Quality Check Sheet.
To improve the print quality, clean the print head.
How do I connect my computer or mobile device?
Connect your Brother machine and computer/mobile device to the same network.
Where can I download and install Brother software?
Visit these websites to download and install Brother software:
- setup.brother.com
- brother.com/apps
How do I connect my computer?
For Windows only, CD installation is also available (for some countries).
How do I connect my mobile device?
Install the Brother iPrint&Scan application.
What are the LED indications?
| LED | Indication |
|---|---|
| Power LED | * Standby <br> * Busy (blinking) <br> * Sleep (blinking slowly and faintly) |
| Warning LED | * See Check Ink Volume in this guide. When finished, press Stop. <br> * Paper jam (blinking simultaneously): See Remove Jammed Paper in this guide. <br> * No paper loaded: Load paper in the tray, and then press Black Start or Color Start. <br> * Tray not detected: Slowly push the paper tray completely into the machine. <br> * Wrong paper size <br> * Out of memory <br> * Machine error |
| Ink LED | Blinking |
| Wi-Fi (DCP-T420W/DCP-T425W/DCP-T426W) | * Off <br> * Connecting <br> * Connected |
For solutions, see the Online User’s Guide: support.brother.com/manuals
What does the Control Panel look like?
The Control Panel contains the following:
- Power / Stop button
- Power LED
- Warning LED
- Ink LED
- Color Start button
- Black Start button
- Copy Shortcut button
- Wi-Fi button / LED (DCP-T420W/DCP-T425W/DCP-T426W)
How do I turn the machine on?
Press the Power/Stop button to turn the machine on.
How do I turn the machine off?
Press and hold the Power/Stop button to turn the machine off.
How do I make a copy?
- Load the paper in the paper tray.
- Place the document in the lower right corner of the scanner glass.
- Press Black Start or Color Start.
How do I make multiple copies?
In step 3 above, press Black Start or Color Start once for each additional copy.
How do I make a best quality copy?
In step 3 above, press and hold Black Start or Color Start for two seconds.
How can I make other types of copies?
Use the Brother iPrint&Scan application on a computer or mobile device.
How do I change the machine settings?
The machine’s settings are set from the application (Brother iPrint&Scan or Brother Utilities) on your computer or mobile device.
What is the default password to manage the machine settings?
The default password to manage this machine’s settings is located on the back of the machine and marked “Pwd”. We recommend immediately changing the default password to protect your machine from unauthorized access.
How do I check the ink volume?
Press and hold the Copy Shortcut button for 3 seconds.
How do I improve the print quality?
Clean the print head.
How do I clean the print head?
Press Black Start or Color Start while the Ink LED is blinking.
To clean black only, press Black Start.
To clean all colors, press Color Start.
After cleaning, the machine prints the Print Quality Check Sheet.
What should I do if the print quality does not improve with normal cleaning?
If the print quality does not improve with normal cleaning, try the Special cleaning (Note that this operation will consume a large amount of ink).
How do I perform the Special Cleaning?
- Make sure all ink tanks are at least half-full.
- Hold Black Start and Color Start simultaneously for five seconds while the Ink LED is blinking.
How do I remove jammed paper?
Press the Power/Stop button and the Copy Shortcut button simultaneously.
How do I set a specific copy function for the Copy Shortcut button?
You can set one specific copy function for the Copy Shortcut button. The default is 2 in 1 ID Copy.
What precautions should I take when filling the ink tanks?
- Do not fill the ink tank past the maximum fill mark.
- When the ink level reaches the lower line, refill the ink tank as soon as possible.
- Avoid getting ink on your hands.
CLICK HERE TO DOWNLOAD BROTHER DCP-T420W (01) PDF MANUAL