
BUYER’S MODEL NO. 2662 FACTORY MODEL ORIGINAL ISSUE MARCH, 2003 SECTION —-
CA97861
REFER TO IMPORTANT NOTICE BELO
PARTS LIST
FOR
Model 2662
IMPORTANT:
WHEN ORDERING THE PARTS
LWAYS CHECK THE SERIAL
NUMBER OF THE MACHINE.
FIRST DIGIT OF THE SERIAL
NUMBER MUST MATCH WITH
THE LAST DIGIT OF THE FACTOR
MODEL ABOVE.
FACTORY
MODEL
SERIAL
NO.
FIRST DIGIT
ЧЧЧЧЧЧЧ
P.NO.77327
BUYER’S MODEL NO. 2662 SECTION PAGE REVISION REMARKS PART NO. DESCRIPTION
BUYER’S MODEL NAM
FACTORY MODEL CA97861
ORIGINAL ISSU
March, 2003
SERIAL NO.
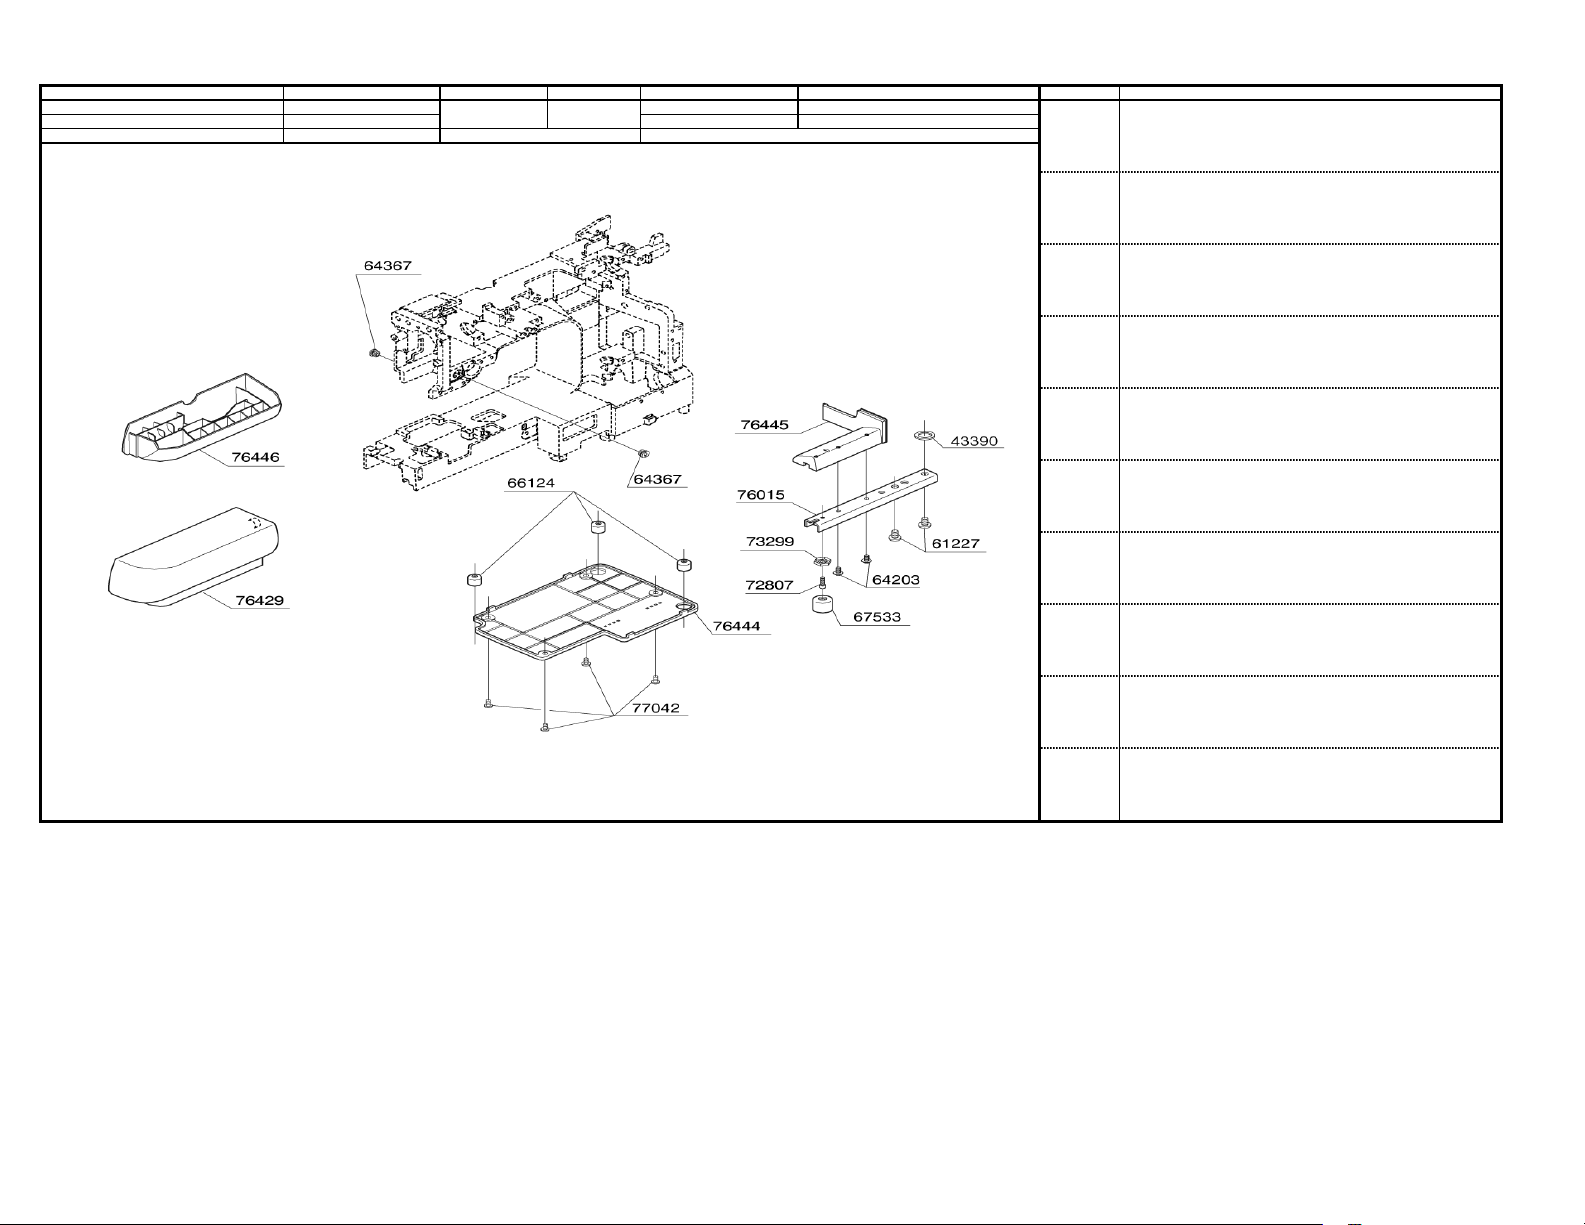
1
43390 THRUST WASHE
61227 E6 PHILLIPS SCRE
64203 TAPPING SCRE
64367 M8 SCRE
66124 RUBBER FOOT
67533 RUBBER CUSHION
72807 M4 STUD SCRE
73299 M4 TORQUE NUT
76015 LEG
76429 EXTENSION TABLE
76444 BOTTOM COVE
76445 LEG COVE
76446ACCESSORY BOX
77042 M4 PHILLIPS SCRE
BUYER’S MODEL NO. 2662 SECTION PAGE REVISION REMARKS PART NO. DESCRIPTION
BUYER’S MODEL NAM
FACTORY MODEL CA97861
ORIGINAL ISSU
March, 2003
SERIAL NO.
2
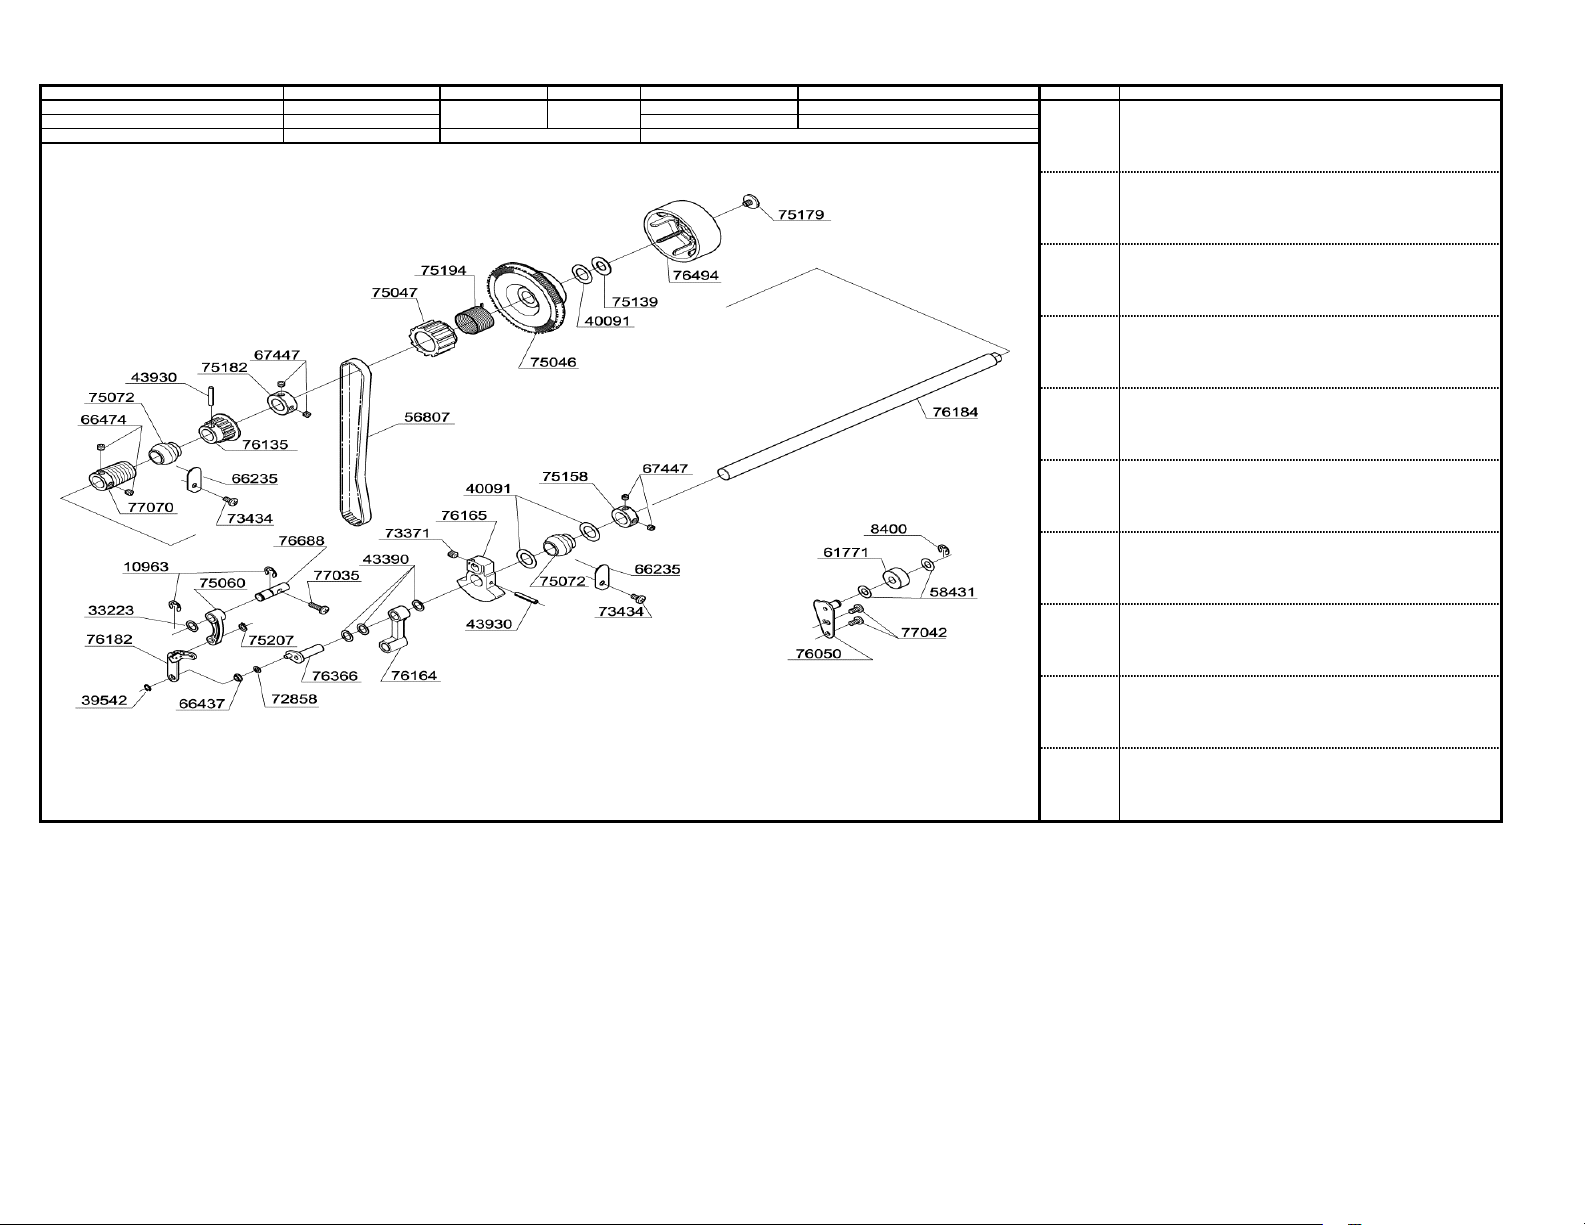
8400 E5 CLIP-ON-WASHE
10963 E6 CLIP-ON-WASHE
33223 WASHER
39542 CLIP-ON-WASHE
40091 THRUST WASHE
43390 THRUST WASHE
43930 SPRING PIN
56807 TIMING BELT
58431 FIBER WASHE
61771 TENSION ROLLE
66235 SECURING PLATE
66437 BUSH
66474 M5 SCRE
67447 M5 SCRE
72858 WASHER
73371 M6 SCRE
73434 M4 PHILLIPS SCRE
75046 BELT PULLE
75047 CLUTCH
75060 TAKE-UP LEVER CRAN
75072 BALL BUSHING
75139 WASHER
75158 COLLAR
75179 M5 SCRE
75182 COLLAR
75194 TORSION SPRING
75207 GRIP RING
76050 TENSIONING PULLEY BASE
76135 BELT PULLE
76164 NEEDLE BAR CRAN
76165 BALANCER
76182 TAKE-UP LEVE
76184 MAIN SHAFT
76366 CRANK SHAFT
76494 HAND WHEEL
76688 SHAFT
77035 M4 PHILLIPS SCRE
77042 M4 PHILLIPS SCRE
77070 SPRING GEA
BUYER’S MODEL NO. 2662 SECTION PAGE REVISION REMARKS PART NO. DESCRIPTION
BUYER’S MODEL NAM
FACTORY MODEL CA97861
ORIGINAL ISSU
March, 2003
SERIAL NO.
3
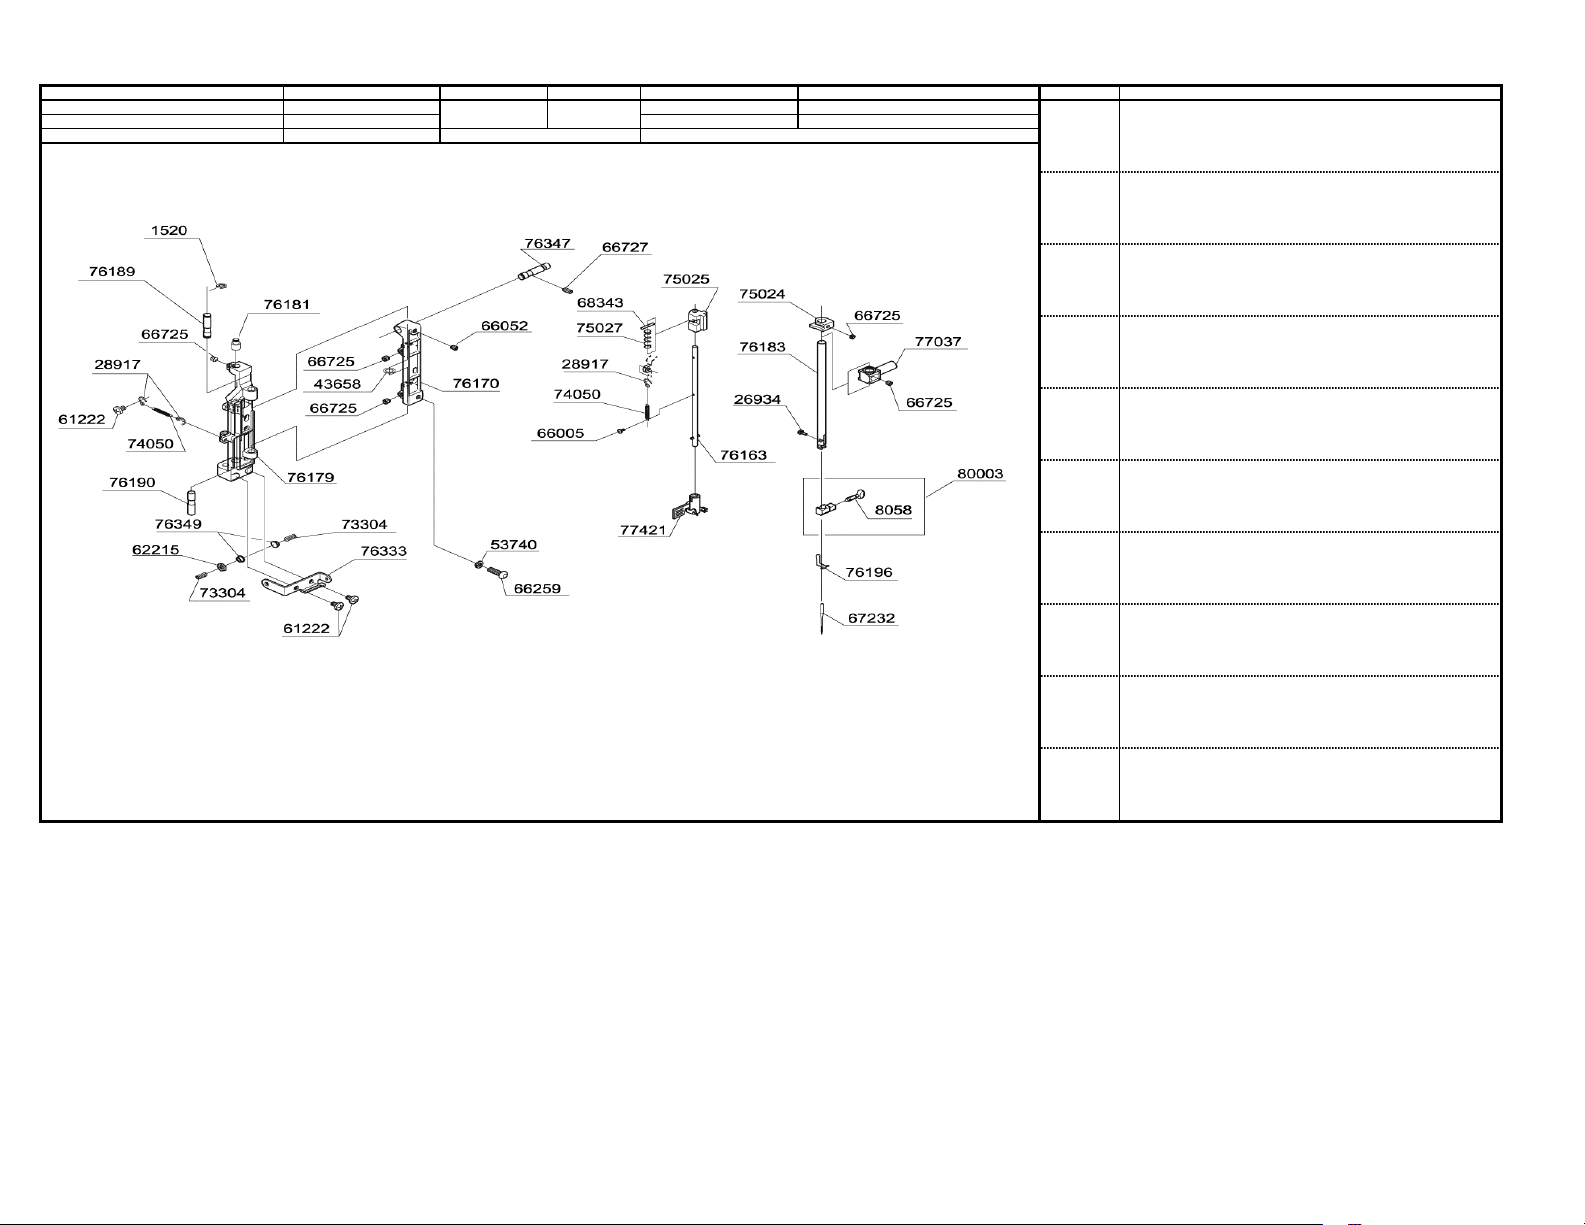
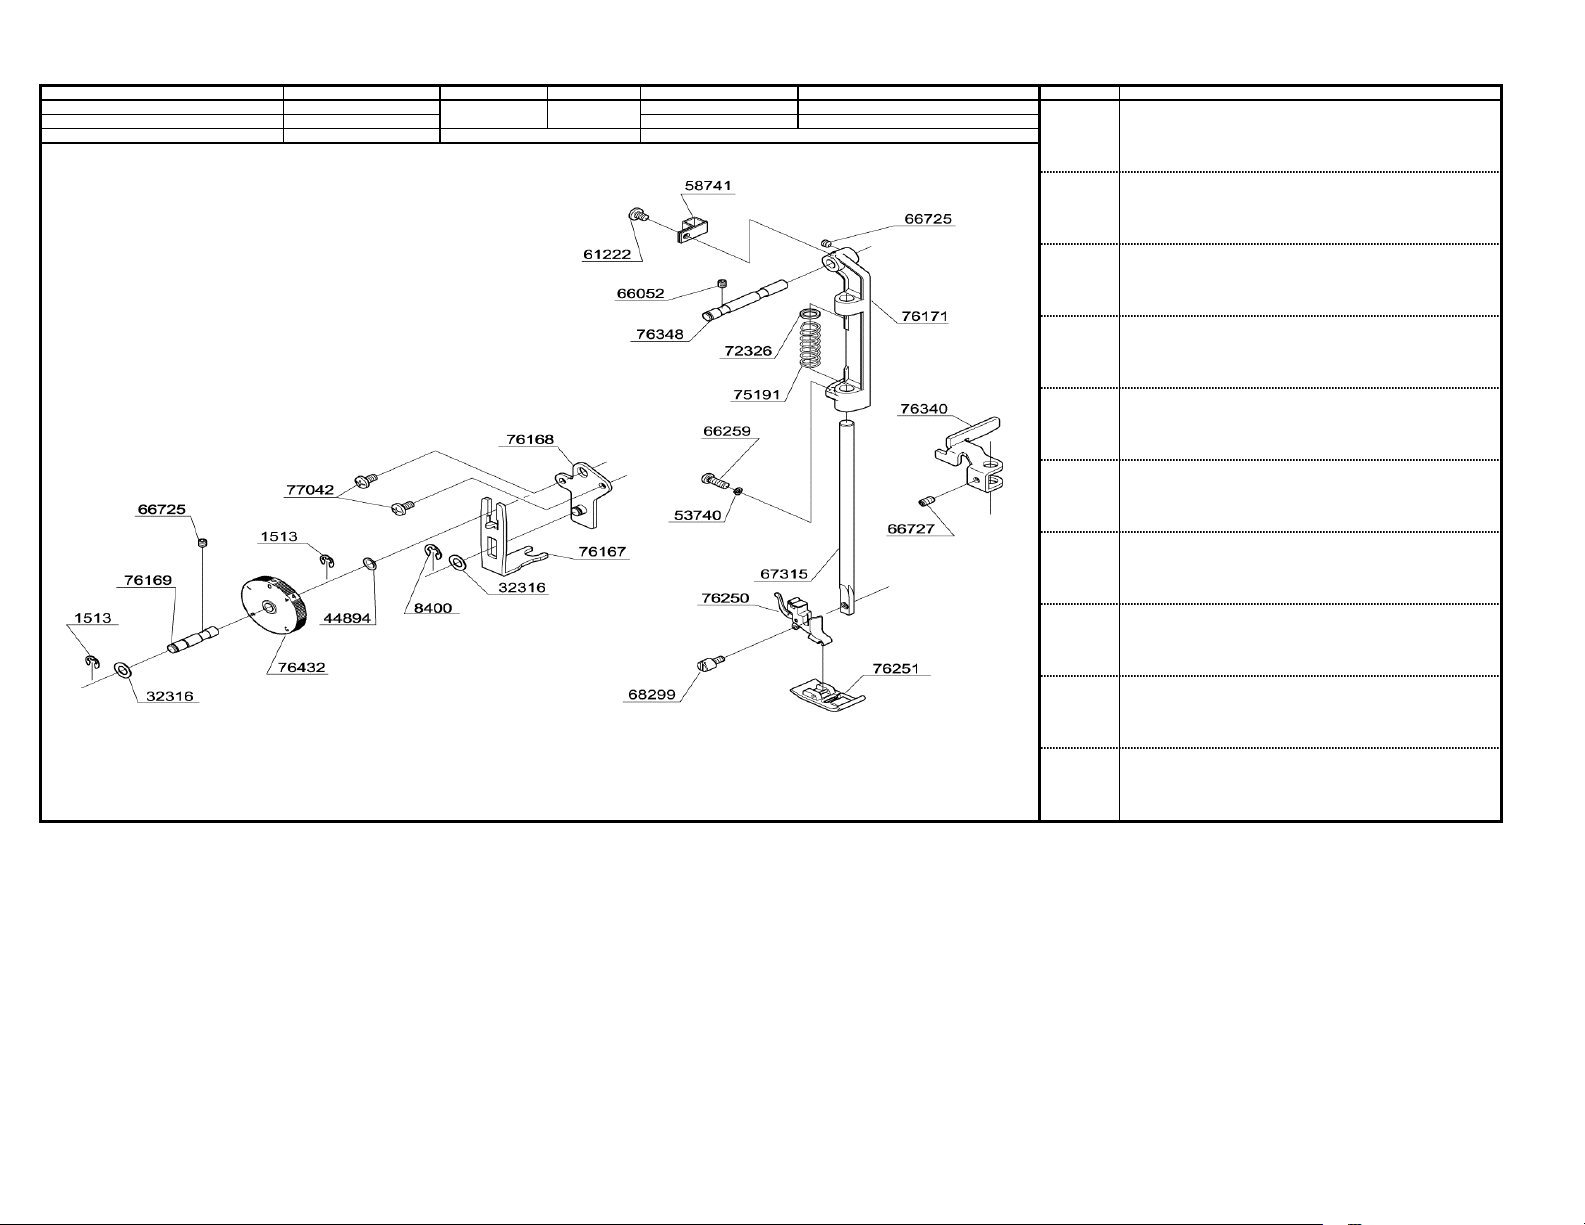
1520 E3 CLIP-ON-WASHE
8058 NEEDLE CLAMP SCRE
26934 #8 SCREW
28917 HOOK FOR SPRING
43658 THRUST WASHE
53740 SPRING WASHE
61222 M4 PHILLIPS SCRE
62215 M4 TORQUE NUT
66005 M2 PHILLIPS SCRE
66052 M4 SCRE
66259 M4 SCRE
66725 M4 SCRE
66727 M4 SCRE
67232 NEEDLE
68343 PIN
73304 M4 SCRE
74050 EXTENSION SPRING
75024 STOPPER
75025 GUIDE BLOC
75027 COMPRESSION SPRING
76163 THREADER SHAFT SE
76170 SUPPORT BRACKE
76179 NEEDLE BAR SUPPOR
76181 SUPPORT CENTER PIN
76183 NEEDLE BA
76189 SUPPORT PIN
76190 SUPPORT CENTER PIN
76196 THREAD GUIDE
76333 SUPPORT THREAD GUIDE
76347 SUPPORT BASE PIN
76349 CAP
77037 NEEDLE BAR CLAMP
77421 THREADER ASSEMBL
80003 NEEDLE CLAMP SE
BUYER’S MODEL NO. 2662 SECTION PAGE REVISION REMARKS PART NO. DESCRIPTION
BUYER’S MODEL NAM
FACTORY MODEL CA97861
ORIGINAL ISSU
March, 2003
SERIAL NO.
4
1513 E4 CLIP-ON-WASHE
8400 E5 CLIP-ON-WASHE
32316 WASHER
44894 WASHER
53740 SPRING WASHE
58741 CORD GUARD
61222 M4 PHILLIPS SCRE
66052 M4 SCRE
66259 M4 SCRE
66725 M4 SCRE
66727 M4 SCRE
67315 PRESSER BA
68299 #7 SCREW FOR SHAN
72326 WASHER
75191 COMPRESSION SPRING
76167 DARNING CONTROL PLATE
76168 DARNING CONTROL BASE
76169 STRAIGHT PIN
76171 PRESSER BAR BRACKE
76250 PRESSER FOOT HOLDE
76251 ZIGZAG PRESSER FOO
76340 PRESSER BAR BLOC
76348 STRAIGHT PIN
76432 PRESSER CONTROL DIAL
77042 M4 PHILLIPS SCRE
BUYER’S MODEL NO. 2662 SECTION PAGE REVISION REMARKS PART NO. DESCRIPTION
BUYER’S MODEL NAM
FACTORY MODEL CA97861
ORIGINAL ISSU
March, 2003
SERIAL NO.
5
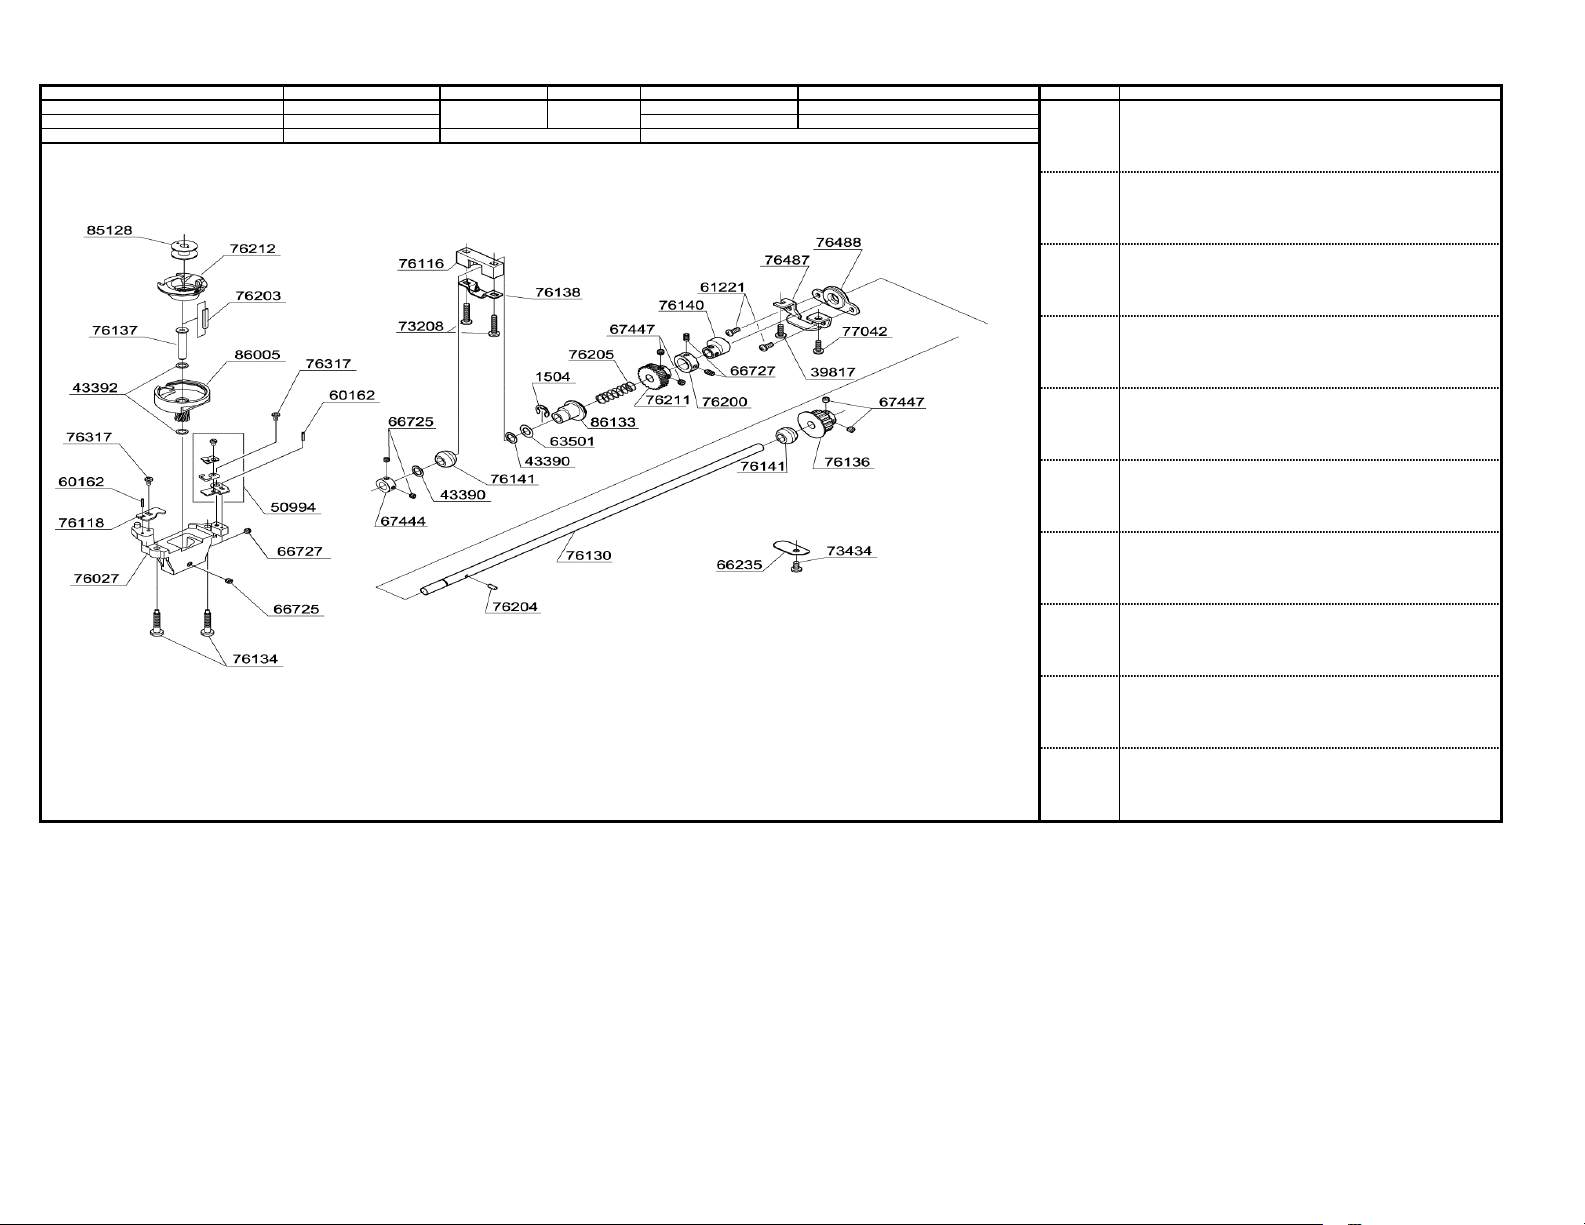
1504 E7 CLIP-ON-WASHE
39817 M4 PHILLIPS SCRE
43390 THRUST WASHE
43392 THRUST WASHE
50994 RETAINER SET
60162 KNOCK PIN
61221 M4 PHILLIPS SCRE
63501 WASHER
66235 SECURING PLATE
66725 M4 SCRE
66727 M4 SCRE
67444 COLLAR
67447 M5 SCRE
73208 M4 PHILLIPS SCRE
73434 M4 PHILLIPS SCRE
76027 SHUTTLE RACE BASE
76116 BALL METAL GUIDE
76118 BOBBIN CASE STOPPE
76130 LOWER SHAFT
76134 SCREW
76136 BELT METAL
76137 SHUTTLE RACE SHAF
76138 SECURING PLATE
76140 FEED REGULATING
76141 BALL METAL
76200 COLLAR
76203 OILING CORD
76204 PIN
76205 TORSION SPRING
76211 BEVEL GEA
76212 BOBBIN CASE
76317 M3 PHILLIPS SCRE
76487 LOWER SHAFT GUIDE BRACKE
76488 LOWER SHAFT GUIDE
77042 M4 PHILLIPS SCRE
85128 BOBBIN
86005 SHUTTLE RACE
86133 FEED LIFTING CAM
Loading…
Перейти к контенту
Швейные машинки Singer
- Размер инструкции: 1,016.64 kB
- Формат файла: pdf
Если вы потеряли инструкцию от швейной машинки Singer 2662, можете скачать файл для просмотра на компьютере или печати.
Инструкция для швейной машинки Singer 2662 на русском языке. В руководстве описаны возможности и полезные функции, а также правила эксплуатации. Перед использованием внимательно ознакомьтесь с инструкцией.
Чтобы не читать всю инструкцию вы можете выполнить поиск по содержимому внутри инструкции и быстро найти необходимую информацию. Рекомендации по использованию помогут увеличить срок службы швейной машинки Singer 2662. Если у вас появилась проблема, то найдите раздел с описанием неисправностей и способами их решения. В нем указаны типичные поломки и способы их решения.
- Инструкции и руководства
- Бренды
- SINGER
- 2662
- Справочник Пользователя
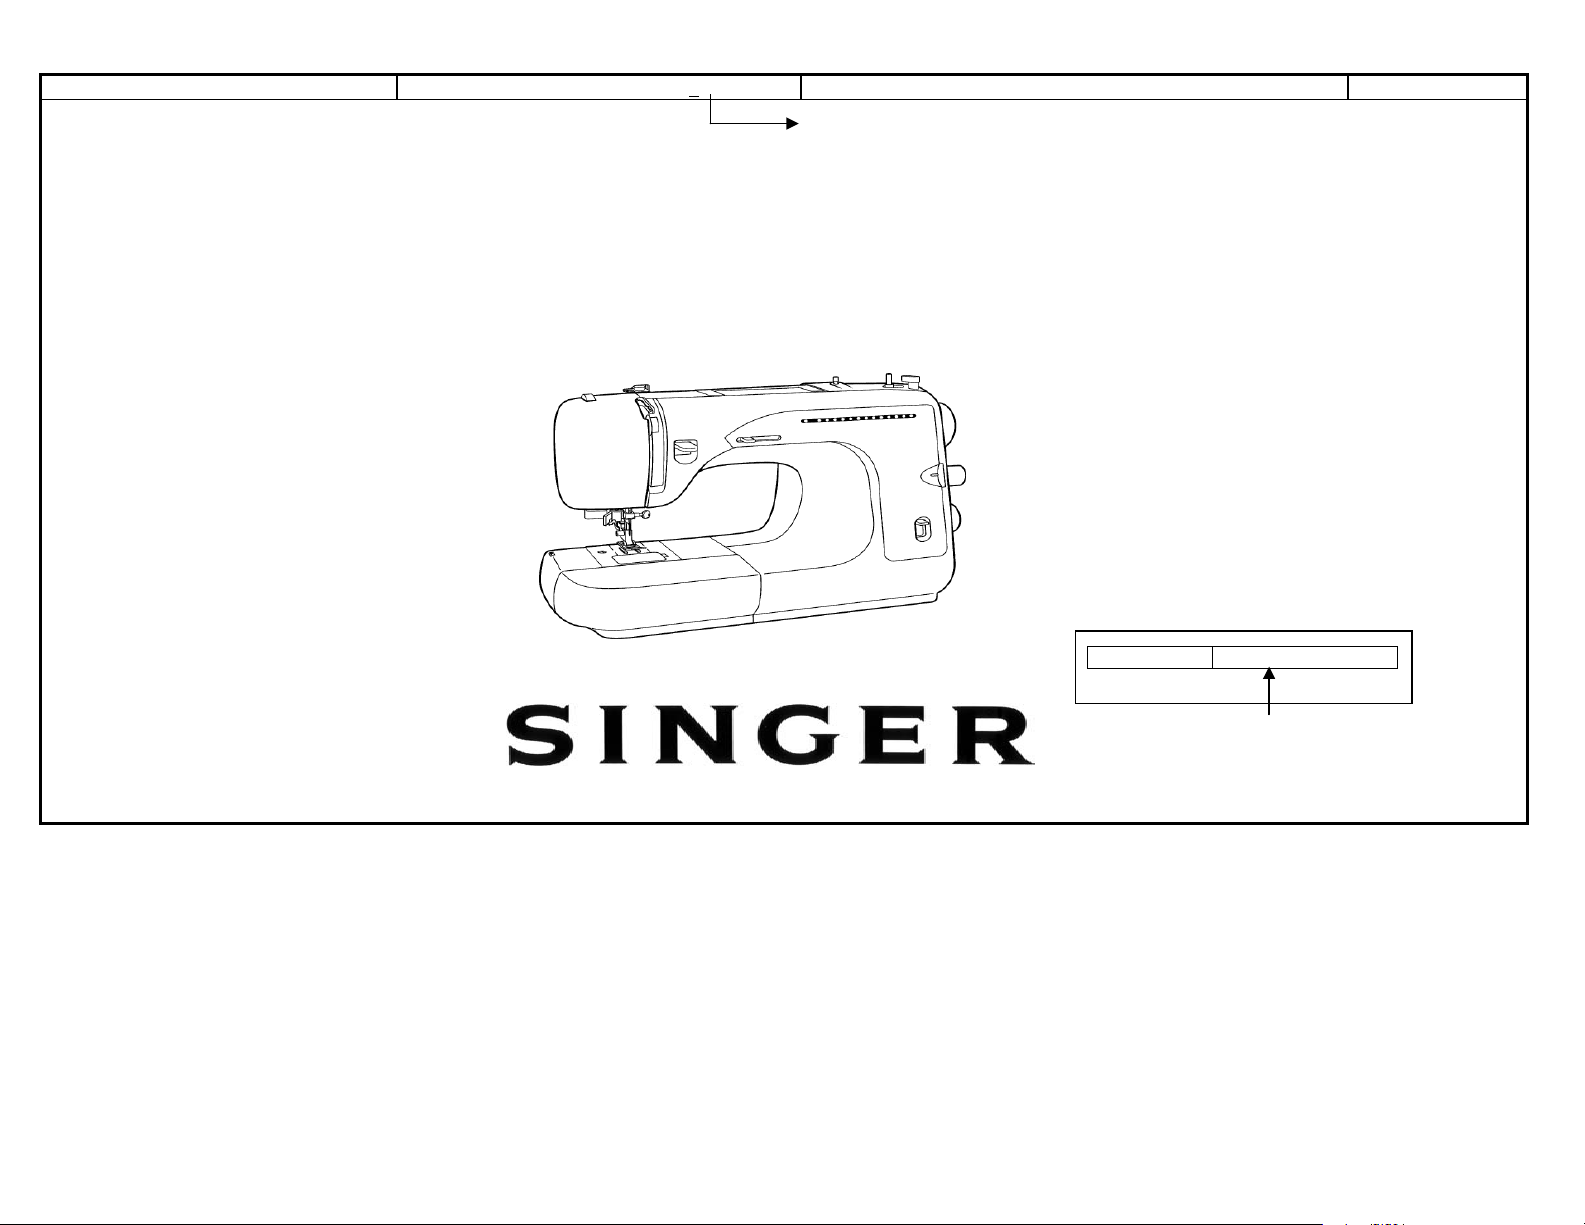
INSTRUCTION MANUAL
MANUAL DE INSTRUCCIONES
MODE D’EMPLOI
Model/Modelo/Modèle
2662
1
POLARIZED PLUGS CAUTION
This appliance has a polarized plug (one blade
wider than the other). To reduce the risk of electric
shock, this plug is intended to fit in a polarized
outlet only one way. If the plug does not fit fully in
the outlet, reverse the plug. If it still does not fit,
contact a qualified electrician to install the proper
outlet. Do not modify the plug in any way.
“When using an electrical appliance, basic safety precautions should always be followed, including the following.”
“Read all instructions before using this sewing machine.”
“DANGER
—
—
To reduce the risk of electric shock:”
“IMPORTANT SAFETY INSTRUCTIONS”
1. “This sewing machine should never be left unattended when plugged in. Always unplug this sewing machine from the electric
outlet immediately after using and before cleaning.”
2. “Always unplug before replacing light bulb. Replace bulb with same type rated 15 watts.”
“WARNING
—
To reduce the risk of burns, fire, electric shock, or injury to persons: ”
1. “Do not allow to be used as a toy. Close attention is necessary when this sewing machine is used by or near children.”
2. “Use this sewing machine only for its intended use as described in this manual. Use only attachments recommended by the
manufacturer as contained in this manual.”
3. “Never operate this sewing machine if it has a damaged cord or plug, if it is not working properly, if it has been dropped or
damaged, or dropped into water. Return the sewing machine to the nearest authorized dealer or service center for examination,
repair, electrical or mechanical adjustment.”
4. “Never operate the sewing machine with any air openings blocked. Keep ventilation openings of the sewing machine and foot
control free from the accumulation of lint, dust, and loose cloth.”
5. “Never drop or insert any object into any opening.”
6. “Do not use outdoors.”
7. “Do not operate where aerosol (spray) products are being used or where oxygen is being administered.”
8. “To disconnect, turn switch to the off (“0”) position, then remove plug from outlet.”
9. “Do not unplug by pulling on cord. To unplug, grasp the plug, not the cord.”
10. “Keep fingers away from all moving parts. Special care is required around the sewing machine needle.”
11. “Never sew with a damaged needle plate as this can cause needle to break.”
12. “Do not use bent needles.”
13. “Do not pull or push fabric while stitching. It may deflect the needle causing it to break.”
14. “Switch the sewing machine off (“0”) when making any adjustments in the needle area, such as threading needle, changing
needle, threading bobbin, or changing presser foot, etc.”
15. “Always unplug sewing machine from the electrical outlet when removing covers, lubricating, or when making any other user
servicing adjustments mentioned in the instruction manual.”
“SAVE THESE INSTRUCTIONS”
“This product is for household use, or equivalent.”
SINGER
®
is a Registered Trademark of The Singer Company Limited.
“CAUTION
—
—
Moving parts
—
To reduce risk of injury, switch off before servicing. Close cover before operating machine.”
FOOT CONTROL (USA only)
Use Matsushita Electric, Model 4C-316B with this
sewing machine.
ENGLISH
This appliance complies with EEC Directive 89/336/EEC covering the electromagnetic compatibility.
Singer 2662 Instruction Manual
Singer 2662 Specification
The Singer 2662 is a versatile sewing machine designed to cater to a wide range of sewing needs, from basic mending to more intricate projects. This model is equipped with 36 built-in stitches, offering users a variety of options including basic, stretch, and decorative stitches. It features a fully automatic 1-step buttonhole, simplifying the process of creating buttonholes by completing the task in a single step. The machine is built with an automatic needle threader, which significantly reduces eye strain and threading time by allowing for quick and easy threading of the needle. It also includes adjustable stitch length and width, providing greater precision and control over stitch customization for different fabric types and sewing techniques. The Singer 2662 is designed with a top drop-in bobbin system that is both convenient and user-friendly, ensuring easy setup and monitoring of thread supply. The free arm capability of the machine allows for effortless sewing of circular areas, such as cuffs and sleeves. Additional features include a built-in accessory storage, allowing users to keep essential sewing tools organized and within reach. The machine is engineered for durability and ease of use, making it suitable for both beginners and experienced sewists. Its robust construction is complemented by a sleek design that fits well in any sewing space. The Singer 2662 also offers variable needle positions, enhancing its versatility for different sewing applications, including quilting and topstitching. Overall, this model combines functionality with simplicity, making it an ideal choice for those seeking a reliable sewing machine with a wide range of features.
Singer 2662 F.A.Q.
To thread the Singer 2662, start by placing a spool of thread on the spool pin. Then, follow the threading path as indicated on the machine, which usually involves passing the thread through the thread guide, down to the tension discs, up to the take-up lever, and then down through the needle. Ensure the presser foot is up to properly engage the tension discs.
If the needle on your Singer 2662 keeps breaking, check for several issues: ensure you are using the correct needle size and type for the fabric, inspect the needle for bends or damage, and make sure it is properly inserted with the flat side facing the back. Also, verify that the machine is threaded correctly and that the tension settings are appropriate.
Regular maintenance for the Singer 2662 includes cleaning the bobbin area with a small brush to remove lint and debris, oiling the machine as per the manual’s instructions, and wiping the exterior with a soft cloth. Always unplug the machine before cleaning and use only the specified sewing machine oil.
Skipped stitches can be caused by using the wrong needle for the fabric type, a dull or bent needle, or incorrect threading. Ensure the needle is appropriate for the fabric and is in good condition. Re-thread the machine, ensuring the thread is seated properly in the tension discs and take-up lever.
To adjust the tension on the Singer 2662, start with the default setting, which is usually marked on the tension dial. If the stitches are too loose, increase the tension by turning the dial to a higher number. If they are too tight, decrease the tension by turning it to a lower number. Test the stitch on a scrap piece of fabric to achieve the desired result.
To change the presser foot on the Singer 2662, raise the presser foot lever to lift the presser foot. Press the lever located at the back of the presser foot holder to release the current foot. Align the new presser foot with the holder and lower the presser foot lever until it snaps into place.
If the fabric is not feeding properly, check that the feed dogs are raised and not lowered for free-motion sewing. Ensure the presser foot is down and the correct foot is used for the fabric type. Also, clean the feed dogs to remove any lint or debris obstructing their movement.
To wind the bobbin on a Singer 2662, place an empty bobbin on the bobbin winder spindle and push it to the right. Thread the machine as usual but loop the thread around the bobbin winder tension disc. Run the machine by pressing the foot pedal or start button to wind the bobbin until it is filled. Push the bobbin back to the left and remove it.
A loud noise could be due to a variety of issues: ensure the machine is properly oiled, check for any obstructions in the bobbin area, and inspect the needle for damage. Also, verify that all screws and attachments are secure. If the noise persists, it might be necessary to have the machine serviced by a professional.
To troubleshoot tension issues, first re-thread the machine, ensuring the thread is correctly seated in the tension discs. Test different tension settings on a scrap fabric. If the tension is still incorrect, check the bobbin to ensure it is wound evenly and inserted correctly. Clean the tension discs and the bobbin area to remove any lint buildup.