

Lenovo ideapad 320
ideapad 320-14IAP/ideapad 320-14AST/
ideapad 320-15IAP/ideapad 320-15AST/
ideapad 320-15ABR/
ideapad 320-15ABR Touch
Hardware
Maintenance
Manual

Notes:
• Before using this information and the product it supports, be sure to read the general information under
“Notices” on page 94.
•This manual applies to the following models: Lenovo ideapad 320-14IAP/ideapad 320-14AST/ideapad
320-15IAP/ideapad 320-15AST/ideapad 320-15ABR/ideapad 320-15ABR Touch. The illustrations used
in this manual are for Lenovo ideapad 320-15ABR unless otherwise stated.
First Edition (April 2017)
© Copyright Lenovo 2017. All rights reserved.
LIMITEDANDRESTRICTEDRIGHTSNOTICE:IfdataorsoftwareisdeliveredpursuantaGeneral
ServicesAdministration“GSA”contract,use,reproduction,ordisclosureissubjecttorestrictionsset
forthinContractNo.GS-35F-05925.
©2017Lenovo

iii
Contents
About this manual ………………………………… iv
Safety information …………………………………. 1
Generalsafety………………………………………… 2
Electricalsafety………………………………………. 3
Safety information …………………………………. 3
Safetyinspectionguide……………………………. 5
Handlingdevicesthataresensitiveto
electrostaticdischarge……………………………… 6
Groundingrequirements…………………………… 6
Safetynotices:multilingualtranslations………. 7
Lasercompliancestatement……………………. 14
Important service information ………………. 16
StrategyforreplacingFRUs……………………. 16
Strategyforreplacingaharddiskdrive…………17
Importantnoticeforreplacingasystem
board……………………………………………………….17
Importantinformationaboutreplacing
RoHScompliantFRUs…………………………… 18
General checkout ……………………………….. 19
Whattodorst……………………………………… 20
Powersystemcheckout………………………….. 21
CheckingtheACadapter……………………………21
Checkingoperationalcharging…………………….22
Checkingthebatterypack…………………………..22
Related service information …………………. 23
Restoringthefactorycontentsbyusing
OneKeyRecovery…………………………………. 23
Restoreoffactorydefault……………………………23
Passwords……………………………………………. 24
Power-onpassword……………………………………24
Hard-diskpassword……………………………………24
Administratorpassword………………………………24
Powermanagement………………………………. 25
Puttingthecomputertosleeporshuttingit
down………………………………………………………..25
Puttingyourcomputertosleep…………………….25
Shuttingdownthecomputer………………………..26
Lenovo ideapad 320-14IAP/ideapad 320-
14AST/ideapad 320-15IAP/ideapad 320-
15AST/ideapad 320-15ABR/ideapad 320-
15ABR Touch ………………………………………. 27
Specications……………………………………….. 27
Statusindicators……………………………………. 31
Hotkeys………………………………………………… 32
FRUreplacementnotices……………………….. 33
Screwnotices………………………………………….. 33
RemovingandreplacinganFRU…………….. 34
1010Opticaldrive………………………………………35
1020Basecover………………………………………..36
1030Batterypack………………………………………39
1040PCIExpressMiniCardforwireless
LAN………………………………………………………….41
1050DIMM……………………………………………….43
1060Harddiskdrive…………………………………..45
1070Speakers………………………………………….47
1080FanassemblyandHeatSink
assembly…………………………………………………..48
1090ODDtransferboard,backupbattery……..53
1100Uppercase………………………………………..55
1110
Systemboard…………………………………….. 60
1120LCDunit……………………………………………62
1130Integratedcameraandantenna
assembly…………………………………………………..66
Locations……………………………………………… 68
Frontviewandright-sideview……………………..68
BottomandLeft-sideview…………………………. 69
Partslist……………………………………………….. 70
Overall……………………………………………………..71
LCDFRUs………………………………………………..88
Miscellaneousparts……………………………………91
ACadapters………………………………………………91
Screws……………………………………………………..93
Notices………………………………………………… 94
Trademarks………………………………………….. 95

iv
About this manual
Thismanualcontainsserviceandreferenceinformation forthefollowing
Lenovoproduct:
Lenovo ideapad 320-14IAP/ideapad 320-14AST/ideapad 320-15IAP/
ideapad 320-15AST/ideapad 320-15ABR/ideapad 320-15ABR Touch
Usethismanualtotroubleshootproblems.
Themanualisdividedintothefollowingsections:
• Thecommonsectionsprovidegeneralinformation,guidelines,and safety
informationrequiredforservicingcomputers.
• Theproduct-specicsectionincludesservice,reference,andproduct-specic
partsinformation.
Important:
This manual is intended only for trained servicers who are familiar with Lenovo
products. Use this manual to troubleshoot problems effectively.
Before servicing a Lenovo product, make sure to read all the information under
“Safety information” on page 1 and “Important service information” on page 16.

1
Safety information
Safety information
Thischapterpresentsthefollowingsafetyinformation thatyouneedtoget
familiarwithbeforeyouservice aLenovoideapad320-14IAP/ideapad320-
14AST/ideapad320-15IAP/ideapad 320-15AST/ideapad320-15ABR/ideapad
320-15ABRTouchcomputer:
• “Generalsafety”onpage2
• “Electricalsafety”onpage3
• “Safetyinspectionguide”onpage5
• “Handlingdevicesthataresensitivetoelectrostaticdischarge”onpage6
• “Groundingrequirements”onpage6
• “Safetynotices:multilingualtranslations”onpage7
• “Lasercompliancestatement”onpage14

2
ideapad 320-14IAP/ideapad 320-14AST/ideapad 320-15IAP/ideapad 320-15AST/ideapad
320-15ABR/ideapad 320-15ABR Touch Hardware Maintenance Manual
General safety
Followtheserulesbelowtoensuregeneralsafety:
• Observeagoodhousekeepingintheareawherethemachinesareput
duringandafterthemaintenance.
• Whenliftinganyheavyobject:
1. Makesurethatyoucanstandsafelywithoutslipping.
2. Distributetheweightoftheobjectequallybetweenyourfeet.
3. Useaslowliftingforce.Nevermovesuddenlyortwistwhenyouattempt
toliftit.
4. Liftitbystandingorpushingupwithyourlegmuscles;thisactioncould
avoidthestrainfromthemusclesinyourback.Donotattempttoliftany
objectthatweighsmorethan16kg(35lb)orthatyouthinkistooheavy
foryou.
• Donotperformanyactionthatcauseshazardstothecustomer, orthat
makesthemachineunsafe.
• Beforeyou startthemachine,makesurethatotherservicerepresentatives
andthecustomerarenotinahazardousposition.
• Pleaseremovecoversandotherpartsinasafeplace,away fromall
personnel,whileyouareservicingthemachine.
• Keepyourtoolcaseawayfrom walkareassothatotherpeoplewill nottrip
overit.
• Donotwearlooseclothingthatcanbetrappedinthemovingpartsofthe
machine.Makesurethatyoursleevesarefastenedorrolledupaboveyour
elbows.Ifyourhairislong,fastenit.
• Inserttheendsofyour necktieorscarfinsideclothingorfastenitwiththe
nonconductiveclip,about8centimeters(3inches)fromtheend.
• Donotwearjewelry,chains,metal-frameeyeglasses,ormetalfastenersfor
yourclothing.
Attention:Metalobjectsaregoodelectricalconductors.
• Wearsafetyglasses whenyou arehammering, drilling,soldering, cutting
wire,attachingsprings,usingsolvents,orworking inanyotherconditions
thatmaybehazardoustoyoureyes.
• Afterservice, reinstallall safetyshields, guards,labels, andgroundwires.
Replaceanysafetydevicethatiswornordefective.
• Reinstallallcoverscorrectlybeforereturningthemachinetothecustomer.
• Fanlouversonthemachinehelptopreventthe overheatingof internal
components.Donotobstructfanlouversorcoverthem withlabels or
stickers.

3
Safety information
Electrical safety
Observethefollowingruleswhenworkingonelectricalequipments.
Important:
Use only approved tools and test equipments. Some hand tools have handles
covered with a soft material that does not insulate you when working with live
electrical currents.
Many customers have rubber floor mats near their machines that contain small
conductive bers to decrease electrostatic discharges. Do not use such kind of mat
to protect yourself from electrical shock.
• Findtheroomemergencypower-off(EPO)switch,disconnectingswitchor
electricaloutlet.Ifanelectricalaccidentoccurs,youcan thenoperate the
switchorunplugthepowercordquickly.
• Donotworkaloneunderhazardousconditionsorneartheequipmentthat
hashazardousvoltages.
• Disconnectallpowerbefore:
– Performingamechanicalinspection
– Workingnearpowersupplies
– Removingorinstallingmainunits
• Beforeyoustarttowork onthemachine,unplugthe powercord.Ifyou
cannotunplugit,askthe customertopower-offthewallboxthatsupplies
powertothemachine,andtolockthewallboxintheoffposition.
• Ifyouneedtoworkona machinethathasexposedelectricalcircuits,
observethefollowingprecautions:
– Ensurethatanotherperson,familiarwiththepower-offcontrols,isnear
you.
Attention:Anotherperson mustbe thereto switchoffthe power,if
necessary.
– Useonlyonehandwhenworkingwithpowered-onelectricalequipment;
keeptheotherhandinyourpocketorbehindyourback.
Attention:Anelectricalshockcanoccuronlywhenthereisacomplete
circuit.Byobservingtheaboverule,youmaypreventacurrentfrom
passingthroughyourbody.
– Whenusingtesters,setthecontrolscorrectlyandusetheapproved
probeleadsandaccessoriesforthattester.
– Standonsuitablerubbermats(obtainedlocally,ifnecessary)toinsulate
youfromgroundssuchasmetaloorstripsandmachineframes.
Observethespecialsafetyprecautionswhenyouworkwithveryhighvoltages;
instructionsfortheseprecautionsare inthesafetysectionsof maintenance
information.Beextremelycarefulwhenyoumeasurethehighvoltages.
• Regularlyinspectandmaintainyourelectricalhandtoolsforsafeoperational
condition.
• Donotusewornorbrokentoolsandtesters.
• Neverassumethatpowerhasbeendisconnectedfromacircuit.First,check
ittomakesurethatithasbeenpoweredoff.
Safety information

4
ideapad 320-14IAP/ideapad 320-14AST/ideapad 320-15IAP/ideapad 320-15AST/ideapad
320-15ABR/ideapad 320-15ABR Touch Hardware Maintenance Manual
• Alwayslookcarefullyforpossiblehazardsin yourworkarea.Examplesof
thesehazardsaremoistoors,nongroundedpowerextensioncables,power
surges,andmissingsafetygrounds.
• Donottouchliveelectricalcircuitswiththereflective surfaceof aplastic
dentalmirror.Thesurfaceisconductive;suchtouchingcan causepersonal
injuryandmachinedamage.
• Donotservicethefollowingpartswiththepoweronwhentheyareremoved
fromtheirnormaloperatingplacesinamachine:
– Powersupplyunits
– Pumps
– Blowersandfans
– Motorgenerators
andsimilarunits.(Thispracticeensurescorrectgroundingoftheunits.)
• Ifanelectricalaccidentoccurs:
– Caution:donotbecomeavictimyourself.
– Switchoffthepower.
– Sendthevictimtogetmedicalaid.

5
Safety information
Safety inspection guide
Thepurpose ofthisinspectionguideistoassistyouinidentifyingpotential
unsafeconditions.Aseachmachinewasdesignedandbuilt,required safety
itemswereinstalledtoprotectusersand servicepersonnel frominjury.This
guideaddressesonlythoseitems.You shouldusegoodjudgmenttoidentify
potentialsafetyhazardsaccordingtotheattachmentofnon-Lenovofeaturesor
optionsnotcoveredbythisinspectionguide.
Ifanyunsafeconditionsare present,youmustdeterminehow seriousthe
apparenthazardcouldbeandwhetheryoucancontinuewithoutrstcorrecting
theproblem.
Considertheseconditionsandthesafetyhazardstheypresent:
• Electricalhazards,especiallyprimarypower(primaryvoltageontheframe
cancauseseriousorfatalelectricalshock)
• Explosivehazards,suchasadamagedCRTfaceorabulgingcapacitor
• Mechanicalhazards,suchaslooseormissinghardware
Todeterminewhetherthereareanypotentialunsafeconditions,usethe
followingchecklistatthebeginningofeveryservicetask.Beginthecheckswith
thepoweroff,andthepowercorddisconnected.
Checklist:
1. Checkexteriorcoversfordamage(loose,broken,orsharpedges).
2. Turnoffthecomputer.Disconnectthepowercord.
3. Checkthepowercordfor:
a. Athird-wiregroundconnectoringoodcondition.Useametertomeasure
third-wiregroundcontinuityfor0.1ohmor lessbetweentheexternal
groundpinandtheframeground.
b. Thepowercordshouldbethetypespeciedinthepartslist.
c. Insulationmustnotbefrayedorworn.
4. Checkforcrackedorbulgingbatteries.
5. Removethecover.
6. Checkforanyobviousnon-Lenovoalterations.Usegoodjudgmentastothe
safetyofanynon-Lenovoalterations.
7. Checkinside theunitforanyobviousunsafeconditions, suchasmetal
filings,contamination,waterorotherliquids,or signsoffireorsmoke
damage.
8. Checkforworn,frayed,orpinchedcables.
9. Checkthatthepower-supplycoverfasteners(screwsorrivets)havenot
beenremovedortamperedwith.
6
ideapad 320-14IAP/ideapad 320-14AST/ideapad 320-15IAP/ideapad 320-15AST/ideapad
320-15ABR/ideapad 320-15ABR Touch Hardware Maintenance Manual
Handling devices that are sensitive to electrostatic discharge
Anycomputerpartcontainingtransistorsorintegrated circuits(ICs)shouldbe
consideredsensitivetoelectrostaticdischarge(ESD).ESDdamagecanoccur
whenthere isadifferenceincharge betweenobjects. Protectagainst ESD
damagebyequalizingthechargesothatthemachine,thepart,theworkmat,
andthepersonhandlingthepartareallatthesamecharge.
Notes:
1. Use product-specic ESD procedures when they exceed the requirements noted
here.
2. Make sure that the ESD protective devices you use have been certied (ISO
9000) as fully effective.
WhenhandlingESD-sensitiveparts:
• Keepthepartsinprotectivepackagesuntiltheyareinsertedintotheproduct.
• Avoidcontactwithotherpeople.
• Wearagroundedwriststrapagainst yourskintoeliminatestaticonyour
body.
• Preventthepartfromtouchingyourclothing.Mostclothingisinsulativeand
retainsachargeevenwhenyouarewearingawriststrap.
• Usetheblacksideofagroundedworkmattoprovidea static-freework
surface.ThematisespeciallyusefulwhenhandlingESD-sensitivedevices.
• Selectagroundingsystem,suchasthoselistedbelow,toprovideprotection
thatmeetsthespecicservicerequirement.
Note:
The use of a grounding system to guard against ESD damage is desirable but not
necessary.
– AttachtheESDgroundcliptoanyframeground,groundbraid,orgreen-
wireground.
– Whenworkingonadouble-insulatedorbattery-operatedsystem,usean
ESDcommongroundorreferencepoint.Youcanusecoaxorconnector-
outsideshellsonthesesystems.
– Usetheroundgroundprongoftheacplugonac-operatedcomputers.
Grounding requirements
Electricalgroundingofthecomputerisrequiredforoperatorsafetyandcorrect
systemfunction.Propergroundingoftheelectrical outletcanbeveriedbya
certiedelectrician.
7
Safety information
Safety notices: multilingual translations
ThesafetynoticesinthissectionareprovidedinEnglish,French,German,
Hebrew,Italian,Japanese,andSpanish.
Safety notice 1
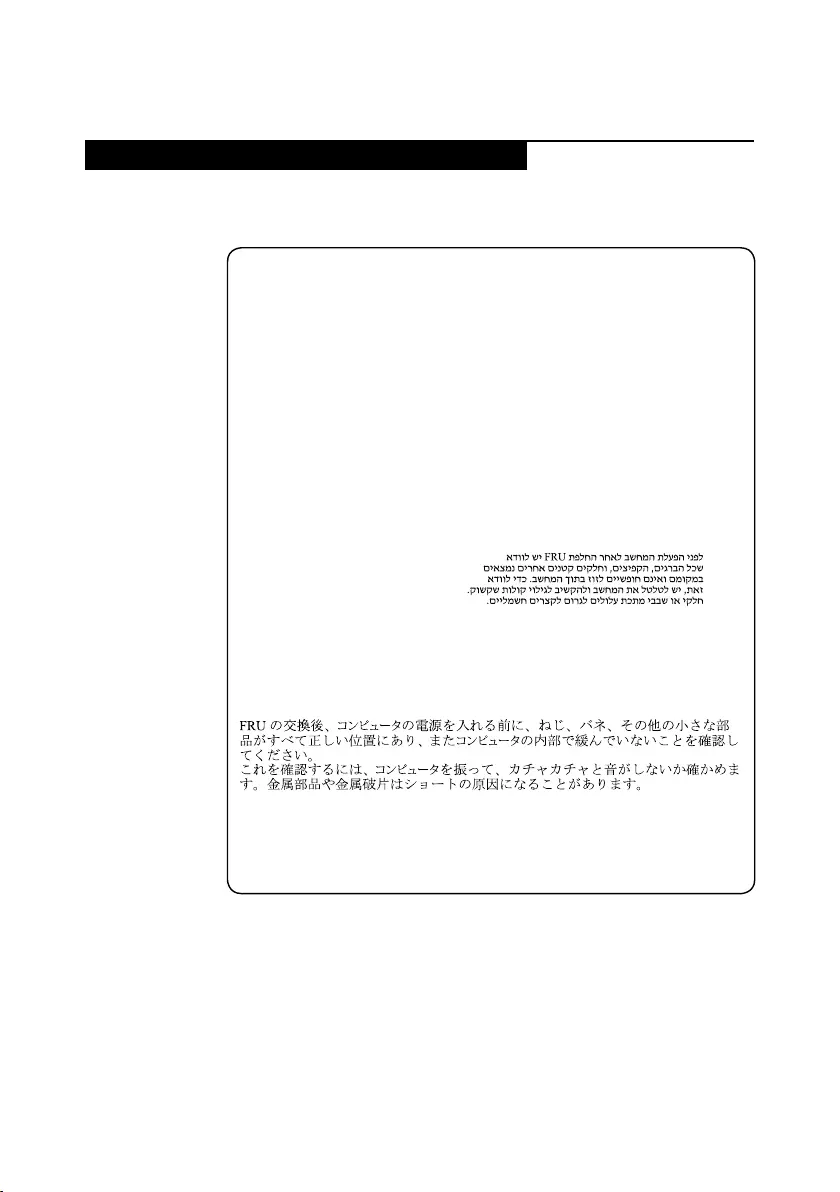
Before the computer is powered on after FRU replacement, make sure all screws,
springs, and other small parts are in place and are not left loose inside the computer.
Verify this by shaking the computer and listening for rattling sounds. Metallic parts
or metal akes can cause electrical shorts.
Avant de remettre l’ordinateur sous tension après remplacement d’une unité en
clientèle, vériez que tous les ressorts, vis et autres pièces sont bien en place et
bien xées. Pour ce faire, secouez l’unité et assurez-vous qu’aucun bruit suspect ne
se produit. Des pièces métalliques ou des copeaux de métal pourraient causer un
court-circuit.
Bevor nach einem FRU-Austausch der Computer wieder angeschlossen wird,
muß sichergestellt werden, daß keine Schrauben, Federn oder andere Kleinteile
fehlen oder im Gehäuse vergessen wurden. Der Computer muß geschüttelt und auf
Klappergeräusche geprüft werden. Metallteile oder-splitter können Kurzschlüsse
erzeugen.
Prima di accendere l’elaboratore dopo che é stata effettuata la sostituzione di una
FRU, accertarsi che tutte le viti, le molle e tutte le altri parti di piccole dimensioni
siano nella corretta posizione e non siano sparse all’interno dell’elaboratore.
Vericare ciò scuotendo l’elaboratore e prestando attenzione ad eventuali rumori;
eventuali parti o pezzetti metallici possono provocare cortocircuiti pericolosi.
Antes de encender el sistema despues de sustituir una FRU, compruebe que
todos los tornillos, muelles y demás piezas pequeñas se encuentran en su sitio
y no se encuentran sueltas dentro del sistema. Compruébelo agitando el sistema
y escuchando los posibles ruidos que provocarían. Las piezas metálicas pueden
causar cortocircuitos eléctricos.
8
ideapad 320-14IAP/ideapad 320-14AST/ideapad 320-15IAP/ideapad 320-15AST/ideapad
320-15ABR/ideapad 320-15ABR Touch Hardware Maintenance Manual
Safety notice 2
DANGER
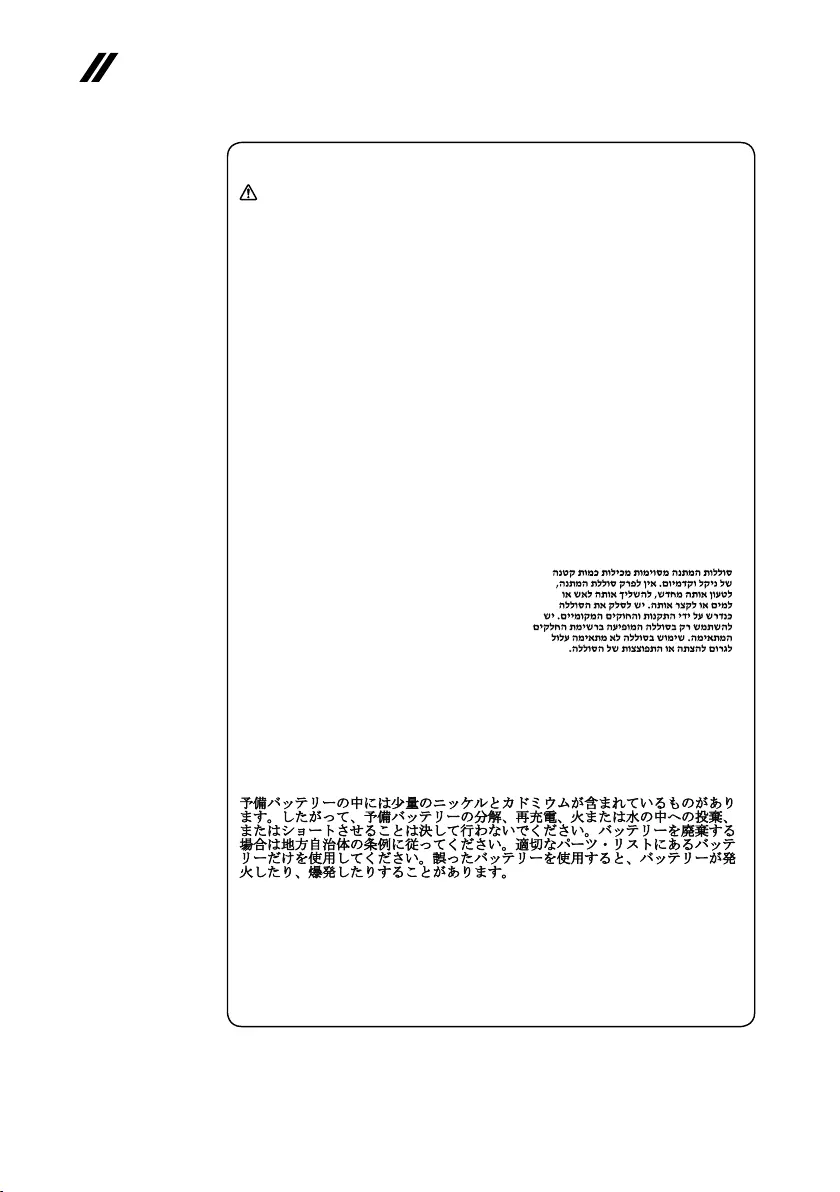
Some standby batteries contain a small amount of nickel and cadmium. Do not
disassemble a standby battery, recharge it, throw it into fire or water, or short-
circuit it. Dispose of the battery as required by local ordinances or regulations.
Use only the battery in the appropriate parts listing. Use of an incorrect battery can
result in ignition or explosion of the battery.
Certaines batteries de secours contiennent du nickel et du cadmium. Ne les
démontez pas, ne les rechargez pas, ne les exposez ni au feu ni à l’eau. Ne
les mettez pas en court-circuit. Pour les mettre au rebut, conformez-vous à la
réglementation en vigueur. Lorsque vous remplacez la pile de sauvegarde ou celle
de l’horloge temps réel, veillez à n’utiliser que les modèles cités dans la liste de
pièces détachées adéquate. Une batterie ou une pile inappropriée risque de prendre
feu ou d’exploser.
Die Bereitschaftsbatterie, die sich unter dem Diskettenlaufwerk befindet,
kann geringe Mengen Nickel und Cadmium enthalten. Sie darf nicht zerlegt,
wiederaufgeladen, kurzgeschlossen, oder Feuer oder Wasser ausgesetzt werden. Bei
der Entsorgung die örtlichen Bestimmungen für Sondermüll beachten. Beim Ersetzen
der Bereitschafts-oder Systembatterie nur Batterien des Typs verwenden, der in der
Ersatzteilliste aufgeführt ist. Der Einsatz falscher Batterien kann zu Entzündung oder
Explosion führen.
Alcune batterie di riserva contengono una piccola quantità di nichel e cadmio. Non
smontarle, ricaricarle, gettarle nel fuoco o nell’acqua né cortocircuitarle. Smaltirle
secondo la normativa in vigore (DPR 915/82, successive disposizioni e disposizioni
locali). Quando si sostituisce la batteria dell’RTC (real time clock) o la batteria di
supporto, utilizzare soltanto i tipi inseriti nell’appropriato Catalogo parti. L’impiego
di una batteria non adatta potrebbe determinare l’incendio o l’esplosione della
batteria stessa.
Algunas baterías de reserva contienen una pequeña cantidad de níquel y cadmio.
No las desmonte, ni recargue, ni las eche al fuego o al agua ni las cortocircuite.
Deséchelas tal como dispone la normativa local. Utilice sólo baterías que se
encuentren en la lista de piezas. La utilización de una batería no apropiada puede
provocar la ignición o explosión de la misma.
9
Safety information
Safety notice 3
DANGER
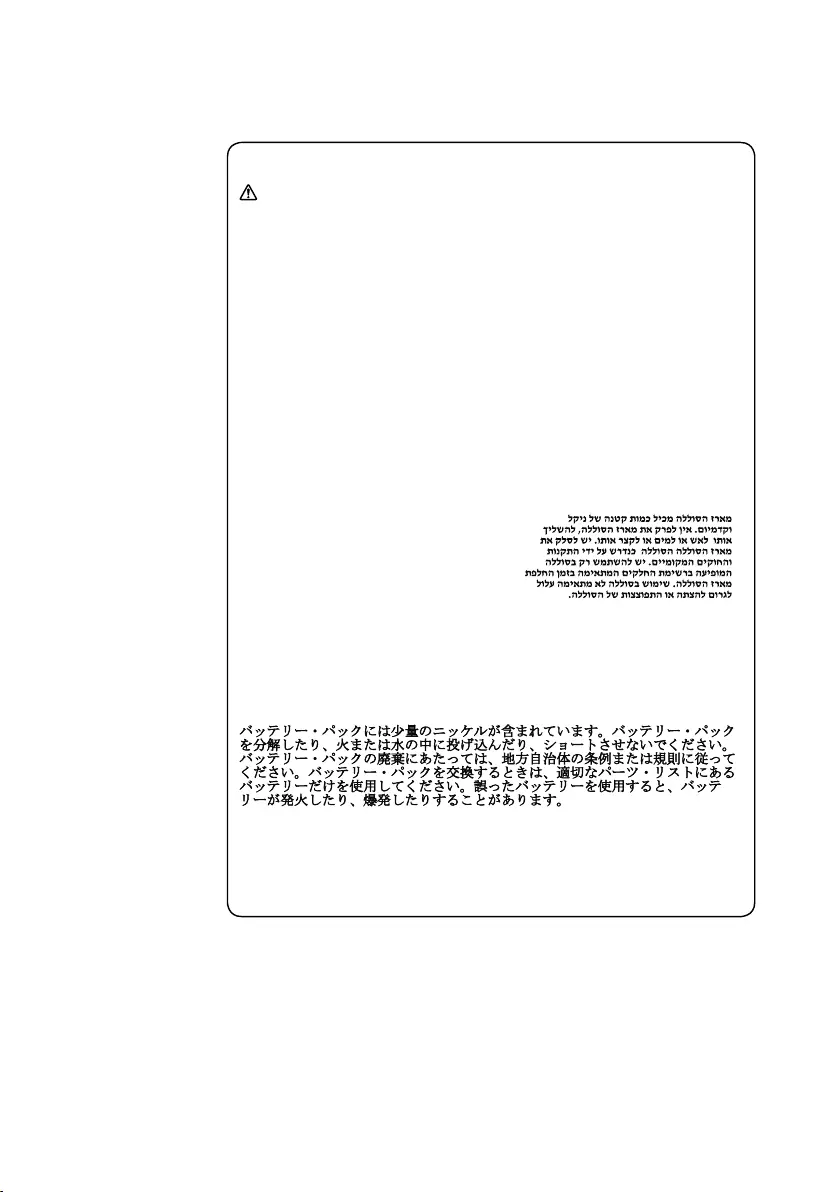
The battery pack contains small amounts of nickel. Do not disassemble it, throw
it into re or water, or short-circuit it. Dispose of the battery pack as required by
local ordinances or regulations. Use only the battery in the appropriate parts listing
when replacing the battery pack. Use of an incorrect battery can result in ignition
or explosion of the battery.
La batterie contient du nickel. Ne la démontez pas, ne l’exposez ni au feu ni à l’eau.
Ne la mettez pas en court-circuit. Pour la mettre au rebut, conformez-vous à la
réglementation en vigueur. Lorsque vous remplacez la batterie, veillez à n’utiliser
que les modèles cités dans la liste de pièces détachées adéquate. En effet, une
batterie inappropriée risque de prendre feu ou d’exploser.
Akkus enthalten geringe Mengen von Nickel. Sie dürfen nicht zerlegt,
wiederaufgeladen, kurzgeschlossen, oder Feuer oder Wasser ausgesetzt werden.
Bei der Entsorgung die örtlichen Bestimmungen für Sondermüll beachten. Beim
Ersetzen der Batterie nur Batterien des Typs verwenden, der in der Ersatzteilliste
aufgeführt ist. Der Einsatz falscher Batterien kann zu Entzündung oder Explosion
führen.
La batteria contiene piccole quantità di nichel. Non smontarla, gettarla nel fuoco
o nell’acqua né cortocircuitarla. Smaltirla secondo la normativa in vigore (DPR
915/82, successive disposizioni e disposizioni locali). Quando si sostituisce la
batteria, utilizzare soltanto i tipi inseriti nell’appropriato Catalogo parti. L’impiego
di una batteria non adatta potrebbe determinare l’incendio o l’esplosione della
batteria stessa.
Las baterías contienen pequeñas cantidades de níquel. No las desmonte, ni
recargue, ni las eche al fuego o al agua ni las cortocircuite. Deséchelas tal como
dispone la normativa local. Utilice sólo baterías que se encuentren en la lista de
piezas al sustituir la batería. La utilización de una batería no apropiada puede
provocar la ignición o explosión de la misma.
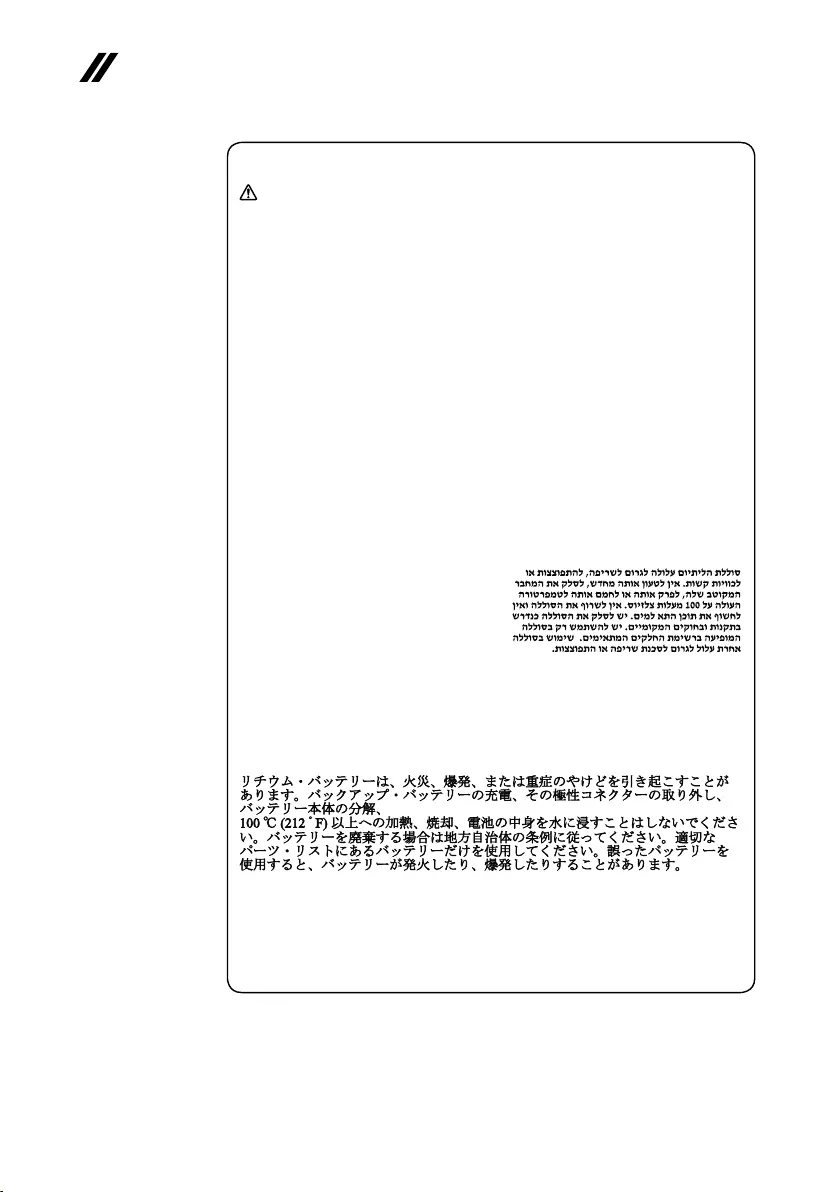
10
ideapad 320-14IAP/ideapad 320-14AST/ideapad 320-15IAP/ideapad 320-15AST/ideapad
320-15ABR/ideapad 320-15ABR Touch Hardware Maintenance Manual
Safety notice 4
DANGER
The lithium battery can cause a re, an explosion, or a severe burn. Do not recharge
it, remove its polarized connector, disassemble it, heat it above 100°C (212°F),
incinerate it, or expose its cell contents to water. Dispose of the battery as required
by local ordinances or regulations. Use only the battery in the appropriate parts
listing. Use of an incorrect battery can result in ignition or explosion of the battery.
La pile de sauvegarde contient du lithium. Elle présente des risques d’incendie,
d’explosion ou de brûlures graves. Ne la rechargez pas, ne retirez pas son
connecteur polarisé et ne la démontez pas. Ne l’exposez pas à une temperature
supérieure à 100°C, ne la faites pas brûler et n’en exposez pas le contenu à l’eau.
Mettez la pile au rebut conformément à la réglementation en vigueur. Une pile
inappropriée risque de prendre feu ou d’exploser.
Die Systembatterie ist eine Lithiumbatterie. Sie kann sich entzünden, explodieren
oder schwere Verbrennungen hervorrufen. Batterien dieses Typs dürfen nicht
aufgeladen, zerlegt, über 100 C erhitzt oder verbrannt werden. Auch darf ihr Inhalt
nicht mit Wasser in Verbindung gebracht oder der zur richtigen Polung angebrachte
Verbindungsstecker entfernt werden. Bei der Entsorgung die örtlichen Bestimmungen
für Sondermüll beachten. Beim Ersetzen der Batterie nur Batterien des Typs
verwenden, der in der Ersatzteilliste aufgeführt ist. Der Einsatz falscher Batterien
kann zu Entzündung oder Explosion führen.
La batteria di supporto e una batteria al litio e puo incendiarsi, esplodere o
procurare gravi ustioni. Evitare di ricaricarla, smontarne il connettore polarizzato,
smontarla, riscaldarla ad una temperatura superiore ai 100 gradi centigradi,
incendiarla o gettarla in acqua. Smaltirla secondo la normativa in vigore (DPR
915/82, successive disposizioni e disposizioni locali). L’impiego di una batteria
non adatta potrebbe determinare l’incendio o l’esplosione della batteria stessa.
La batería de repuesto es una batería de litio y puede provocar incendios,
explosiones o quemaduras graves. No la recargue, ni quite el conector polarizado,
ni la desmonte, ni caliente por encima de los 100°C (212°F), ni la incinere ni
exponga el contenido de sus celdas al agua. Deséchela tal como dispone la
normativa local.
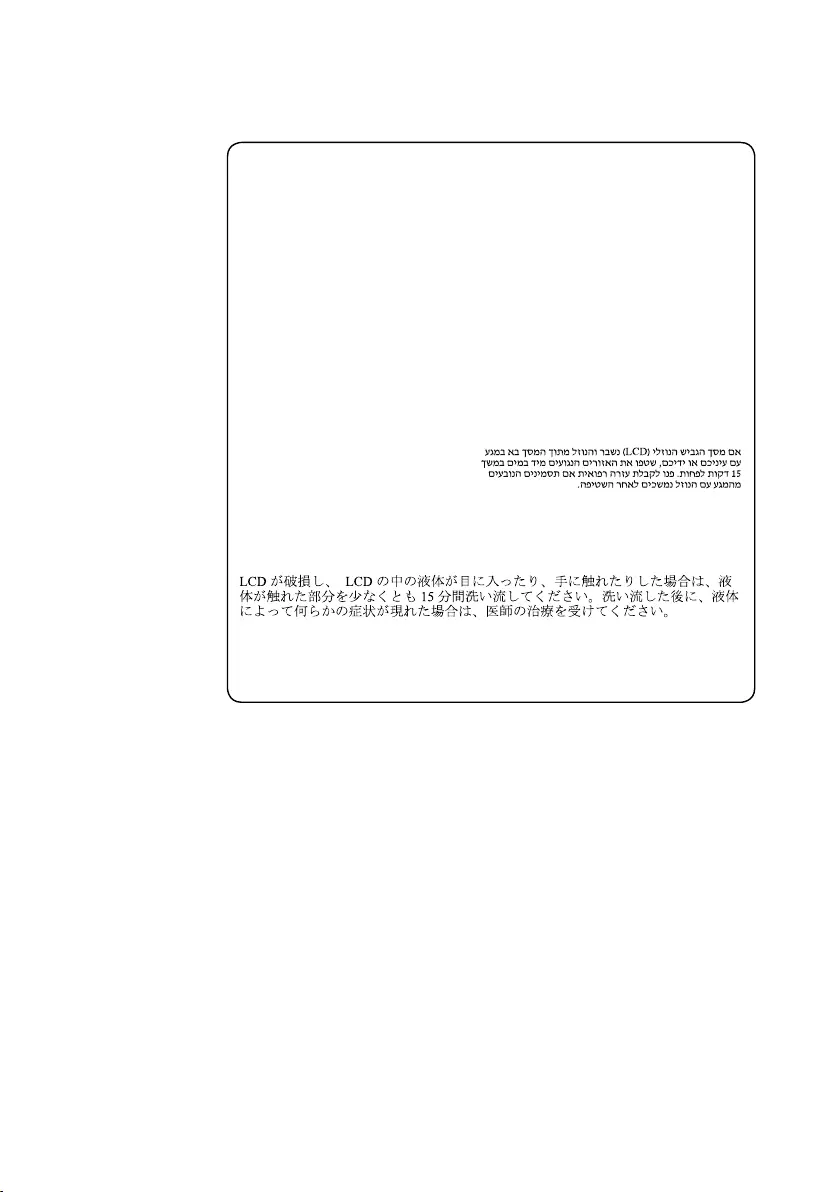
11
Safety information
Safety notice 5
If the LCD breaks and the uid from inside the LCD gets into your eyes or on your
hands, immediately wash the affected areas with water at least for 15 minutes. Seek
medical care if any symptoms caused by the uid are present after washing.
Si le panneau d’afchage à cristaux liquides se brise et que vous recevez dans les
yeux ou sur les mains une partie du fluide, rincez-les abondamment pendant au
moins quinze minutes. Consultez un médecin si des symptômes persistent après le
lavage.
Die Leuchtstoffröhre im LCD-Bildschirm enthält Quecksilber. Bei der Entsorgung
die örtlichen Bestimmungen für Sondermüll beachten. Der LCD-Bildschirm
besteht aus Glas und kann zerbrechen, wenn er unsachgemäß behandelt wird
oder der Computer auf den Boden fällt. Wenn der Bildschirm beschädigt ist und
die darin befindliche Flüssigkeit in Kontakt mit Haut und Augen gerät, sollten
die betroffenen Stellen mindestens 15 Minuten mit Wasser abgespült und bei
Beschwerden anschließend ein Arzt aufgesucht werden.
Nel caso che caso l’LCD si dovesse rompere ed il liquido in esso contenuto
entrasse in contatto con gli occhi o le mani, lavare immediatamente le parti
interessate con acqua corrente per almeno 15 minuti; poi consultare un medico se i
sintomi dovessero permanere.
Si la LCD se rompe y el uido de su interior entra en contacto con sus ojos o sus
manos, lave inmediatamente las áreas afectadas con agua durante 15 minutos como
mínimo. Obtenga atención medica si se presenta algún síntoma del uido despues
de lavarse.
12
ideapad 320-14IAP/ideapad 320-14AST/ideapad 320-15IAP/ideapad 320-15AST/ideapad
320-15ABR/ideapad 320-15ABR Touch Hardware Maintenance Manual
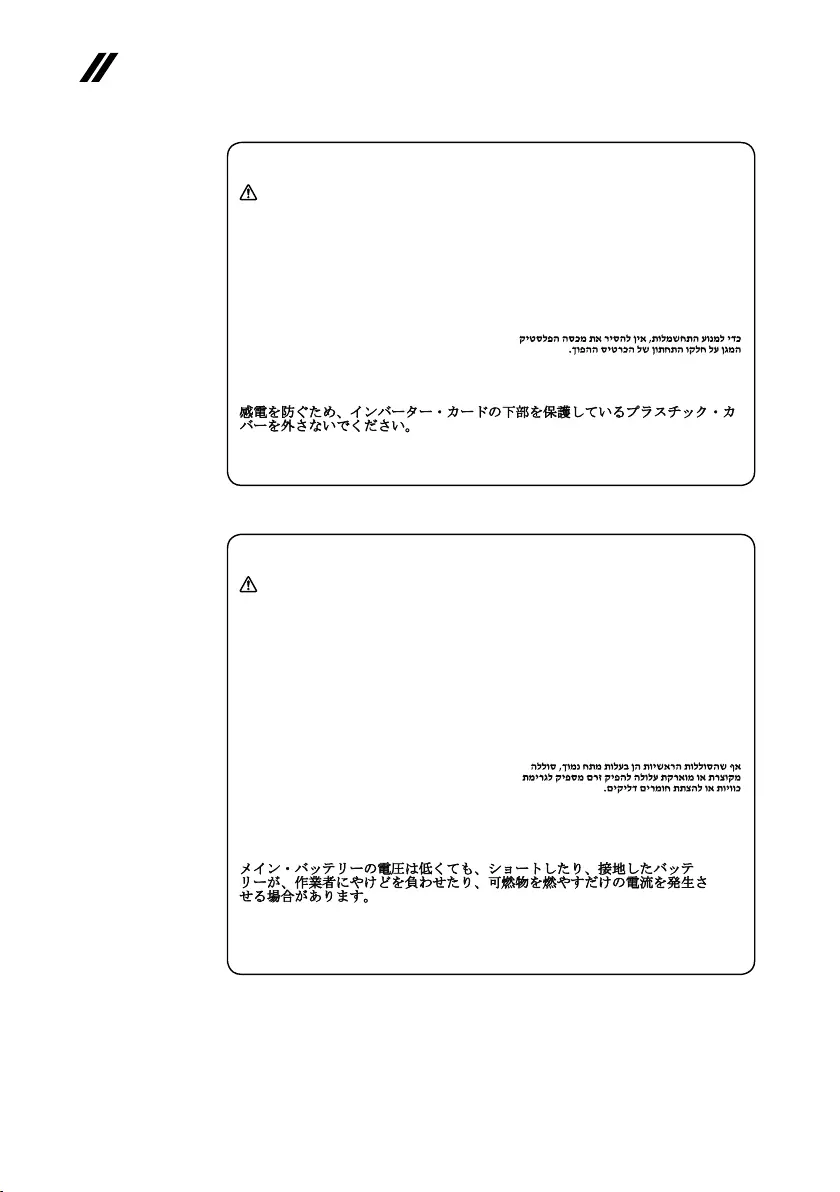
Safety notice 6
DANGER
To avoid shock, do not remove the plastic cover that protects the lower part of the
inverter card.
An d’éviter tout risque de choc électrique, ne retirez pas le cache en plastique
protégeant la partie inférieure de la carte d’alimentation.
Aus Sicherheitsgründen die Kunststoffabdeckung, die den unteren Teil der
Spannungswandlerplatine umgibt, nicht entfernen.
Per evitare scosse elettriche, non rimuovere la copertura in plastica che avvolge la
parte inferiore della scheda invertitore.
Para evitar descargas, no quite la cubierta de plástico que rodea la parte baja de la
tarjeta invertida.
Safety notice 7
DANGER
Though the main batteries have low voltage, a shorted or grounded battery can
produce enough current to burn personnel or combustible materials.
Bien que le voltage des batteries principales soit peu élevé, le court-circuit ou la
mise à la masse d’une batterie peut produire sufsamment de courant pour brûler
des matériaux combustibles ou causer des brûlures corporelles graves.
Obwohl Hauptbatterien eine niedrige Spannung haben, können sie doch bei
Kurzschluß oder Erdung genug Strom abgeben, um brennbare Materialien zu
entzünden oder Verletzungen bei Personen hervorzurufen.
Sebbene le batterie di alimentazione siano a basso voltaggio, una batteria in
corto circuito o a massa può fornire corrente sufficiente da bruciare materiali
combustibili o provocare ustioni ai tecnici di manutenzione.
Aunque las baterías principales tienen un voltaje bajo, una batería cortocircuitada
o con contacto a tierra puede producir la corriente suciente como para quemar
material combustible o provocar quemaduras en el personal.
13
Safety information
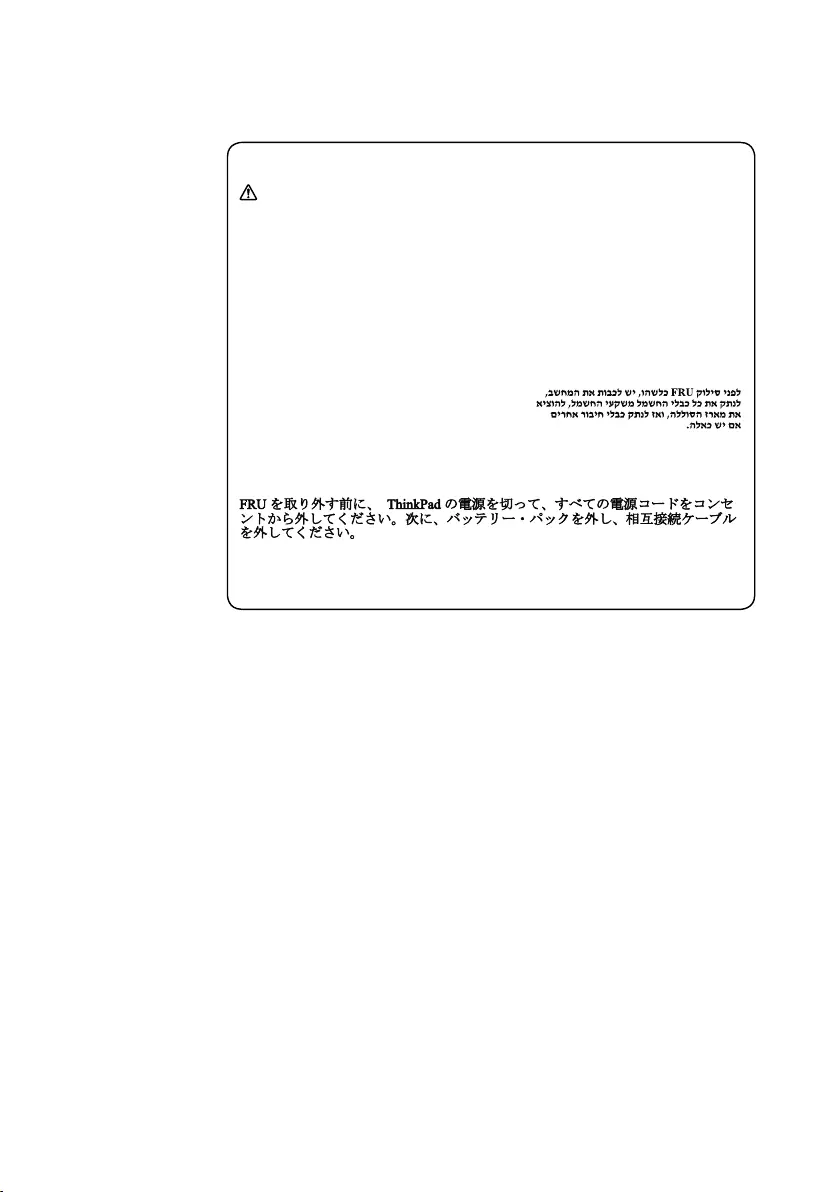
Safety notice 8
DANGER
Before removing any FRU, turn off the computer, unplug all power cords from
electrical outlets, remove the battery pack, and then disconnect any interconnecting
cables.
Avant de retirer une unité remplaçable en clientèle, mettez le système hors tension,
débranchez tous les cordons d’alimentation des socles de prise de courant, retirez la
batterie et déconnectez tous les cordons d’interface.
Die Stromzufuhr muß abgeschaltet, alle Stromkabel aus der Steckdose gezogen,
der Akku entfernt und alle Verbindungskabel abgenommen sein, bevor eine FRU
entfernt wird.
Prima di rimuovere qualsiasi FRU, spegnere il sistema, scollegare dalle prese
elettriche tutti i cavi di alimentazione, rimuovere la batteria e poi scollegare i cavi
di interconnessione.
Antes de quitar una FRU, apague el sistema, desenchufe todos los cables de las
tomas de corriente eléctrica, quite la batería y, a continuación, desconecte cualquier
cable de conexión entre dispositivos.
14
ideapad 320-14IAP/ideapad 320-14AST/ideapad 320-15IAP/ideapad 320-15AST/ideapad
320-15ABR/ideapad 320-15ABR Touch Hardware Maintenance Manual
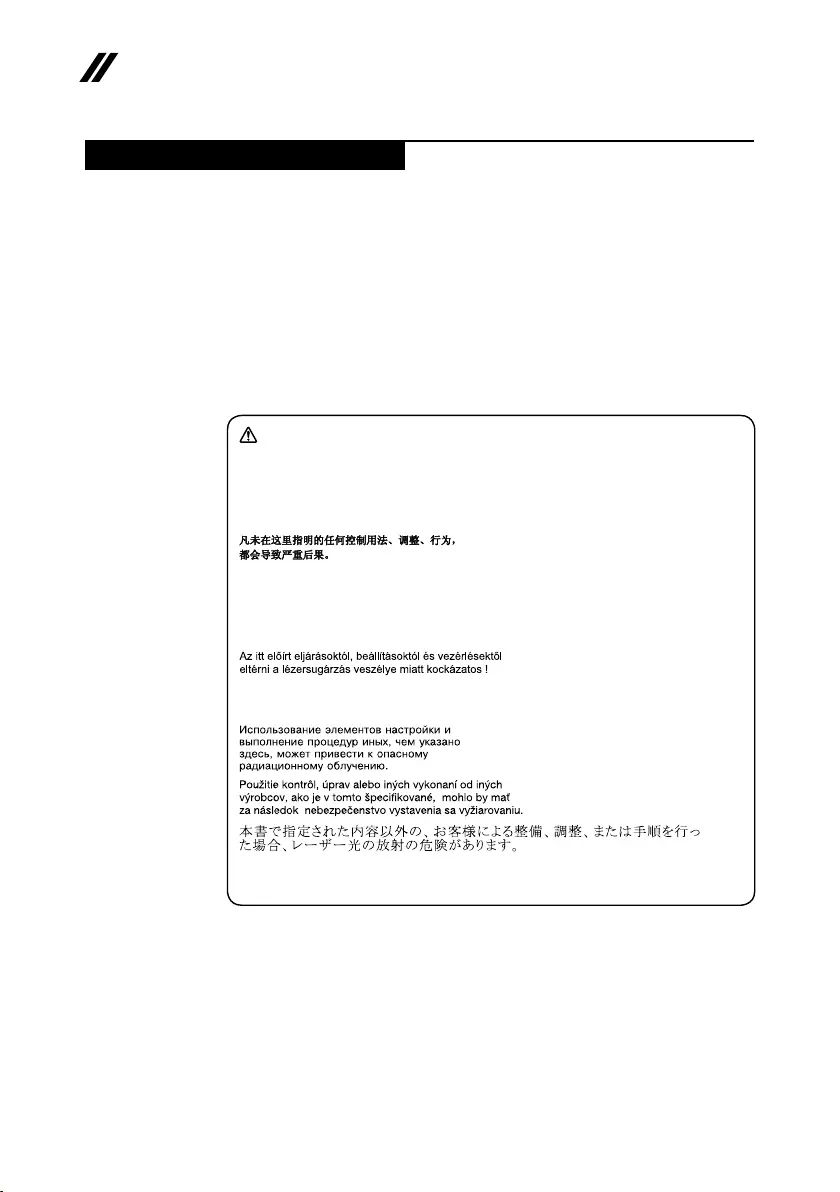
Laser compliance statement
SomemodelsofLenovocomputerareequippedfromthefactorywithan
opticalstorage devicesuch asa CD-ROMdrive oraDVD-ROMdrive.Such
devicesarealsosoldseparatelyasoptions.Ifoneofthesedrivesisinstalled,
itiscertiedinthe U.S.toconformtothe requirementsoftheDepartmentof
HealthandHumanServices21CodeofFederalRegulations(DHHS21CFR)
SubchapterJforClass1 laserproducts.Elsewhere,thedrive iscertifiedto
conformtotherequirementsoftheInternationalElectrotechnicalCommission
(IEC)825andCENELECEN60825forClass1laserproducts.
IfaCD-ROMdrive,aDVD-ROMdrive,oranotherlaserdeviceisinstalled,note
thefollowing:
CAUTION
Use of controls or adjustments or performance of procedures other than those
specied herein might result in hazardous radiation exposure.
O uso de controles, ajustes ou desempenho de procedimentos diferentes daqueles
aqui especicados pode resultar em perigosa exposição à radiação.
Pour éviter tout risque d’exposition au rayon laser, respectez les consignes de
réglage et d’utilisation des commandes, ainsi que les procédures décrites.
Werden Steuer- und Einstellelemente anders als hier festgesetzt verwendet, kann
gefährliche Laserstrahlung auftreten.
L’utilizzo di controlli, regolazioni o l’esecuzione di procedure diverse da quelle
specicate possono provocare l’esposizione a.
El uso de controles o ajustes o la ejecución de procedimientos distintos de los aquí
especicados puede provocar la exposición a radiaciones peligrosas.
OpeningtheCD-ROMdrive,theDVD-ROMdrive,oranyotheropticalstorage
devicecouldresultinexposuretohazardouslaserradiation.Thereareno
serviceablepartsinsidethosedrives.Do not open.
15
Safety information
ACD-ROMdrive,aDVD-ROMdrive,oranyotherstoragedeviceinstalledmay
containanembeddedClass3AorClass3Blaserdiode.Notethefollowing:
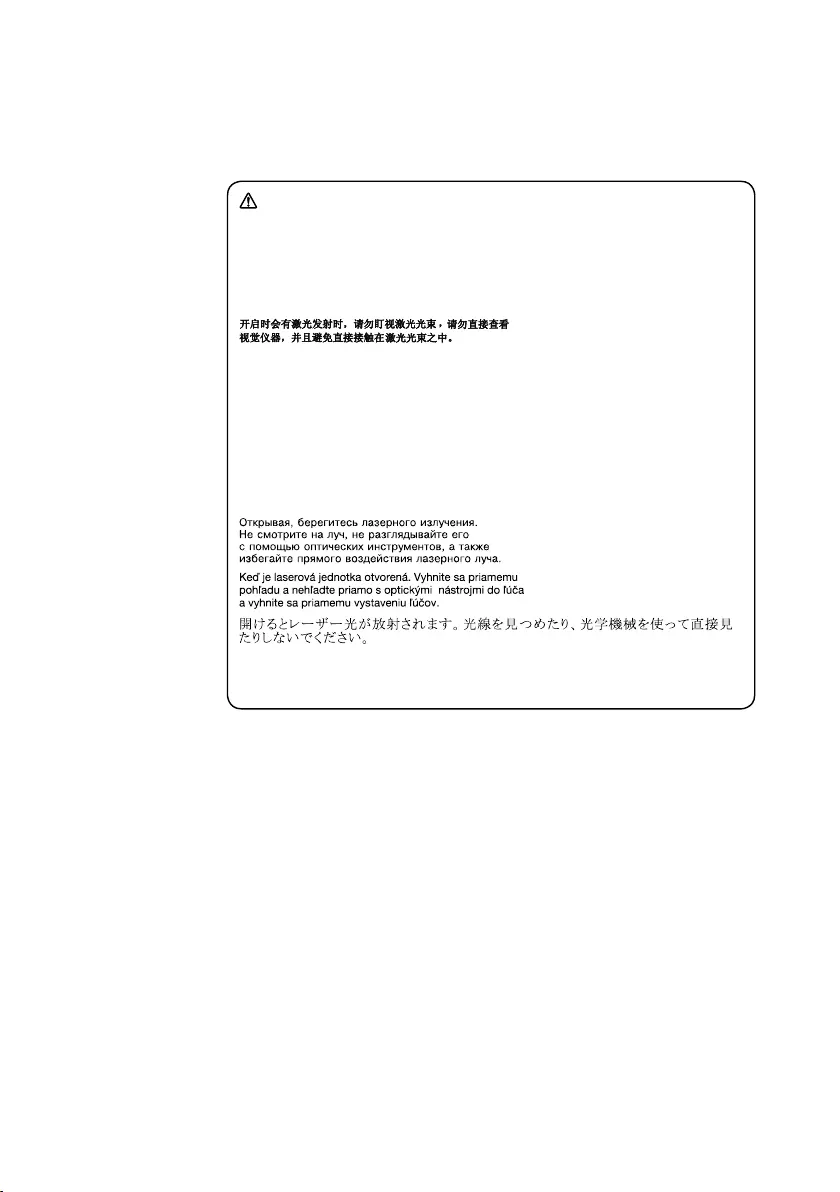
DANGER
Emits visible and invisible laser radiation when open. Do not stare into the beam,
do not view directly with optical instruments, and avoid direct exposure to the
beam.
Radiação por raio laser ao abrir. Não olhe xo no feixe de luz, não olhe diretamente
por meio de instrumentos óticos e evite exposição direta com o feixe de luz.
Rayonnement laser si carter ouvert. Évitez de fixer le faisceau, de le regarder
directement avec des instruments optiques, ou de vous exposer au rayon.
Laserstrahlung bei geöffnetem Gerät. Nicht direkt oder über optische Instrumente
in den Laserstrahl sehen und den Strahlungsbereich meiden.
Kinyitáskor lézersugár ! Ne nézzen bele se szabad szemmel, se optikai
eszközökkel. Kerülje a sugárnyalábbal való érintkezést!
Aprendo l’unità vengono emesse radiazioni laser. Non fissare il fascio, non
guardarlo direttamente con strumenti ottici e evitare l’esposizione diretta al fascio.
Radiación láser al abrir. No mire jamente ni examine con instrumental óptico el
haz de luz. Evite la exposición directa al haz.
16
ideapad 320-14IAP/ideapad 320-14AST/ideapad 320-15IAP/ideapad 320-15AST/ideapad
320-15ABR/ideapad 320-15ABR Touch Hardware Maintenance Manual
Important service information
Thischapterpresentsthefollowingimportantserviceinformation:
• “StrategyforreplacingFRUs”onpage16
– “Strategyforreplacingaharddiskdrive”onpage17
– “Importantnoticeforreplacingasystemboard”onpage17
• “ImportantinformationaboutreplacingRoHScompliantFRUs”onpage18
Important:
BIOS and device driver xes are customer-installable. The BIOS and device
drivers are posted on the customer support site:
http://support.lenovo.com.
Strategy for replacing FRUs
Before replacing parts:
Makesurethatallsoftwarexes,drivers,andBIOSdownloadsareinstalled
beforereplacinganyFRUslistedinthismanual.
Afterasystemboardisreplaced,ensurethatthelatestBIOSisloadedtothe
systemboardbeforecompletingtheserviceaction.
Todownloadsoftwarexes,drivers,andBIOS,followthestepsbelow:
1. Gotohttp://support.lenovo.com.
2. Enterthe serialnumberorselectaproductoruseLenovo smart
downloading.
3. SelecttheBIOS/Driver/Applicationsanddownload.
4. Followthedirectionsonthescreenandinstallthenecessarysoftware.

17
Important service information
Usethefollowingstrategytopreventunnecessary expenseforreplacingand
servicingFRUs:
• IfyouareinstructedtoreplaceanFRU,butthereplacementdoesnotsolve
theproblem,reinstalltheoriginalFRUbeforeyoucontinue.
• Somecomputers haveboth aprocessor boardand asystem board.If you
areinstructedtoreplaceeitherofthem,andreplacingoneofthemdoesnot
solvetheproblem,reinstallthatboard,andthenreplacetheotherone.
• IfanadapteroradeviceconsistsofmorethanoneFRU,anyoftheFRUs
maybethecauseoftheerror.Beforereplacingtheadapterordevice,
removetheFRUsonebyonetoseeifthesymptomschange.Replaceonly
theFRUthatchangedthesymptoms.
Attention:Thesetup configurationonthecomputeryouareservicingmay
havebeencustomized.RunningAutomatic Configurationmay alterthe
settings.Notethecurrentcongurationsettings(usingtheViewConguration
option);then,whenservicehasbeencompleted,verifythatthosesettings
remainineffect.
Strategy for replacing a hard disk drive
Alwaystrytorunalow-levelformatbeforereplacingaharddiskdrive.This
willcauseallcustomerdata ontheharddiskto belost.Makesurethatthe
customerhasacurrentbackupofthedatabeforeperformingthisaction.
Attention:Thedrivestartupsequenceinthecomputeryouareservicingmay
havebeenchanged.Beextremelycarefulduringwriteoperations suchas
copying,saving,orformatting.Ifyouselectanincorrectdrive,dataorprograms
canbeoverwritten.
Important notice for replacing a system board
Somecomponentsmountedonasystemboardarevery sensitive.Improper
handlingcancausedamagetothosecomponents, andmaycauseasystem
malfunction.
Attention:Whenhandlingasystemboard:
• Donotdropthesystemboardorapplyanyexcessiveforcetoit.
• Avoidroughhandlingofanykind.
• Avoidbendingthe systemboard andhard pushingtopreventcrackingat
eachBGA(BallGridArray)chipset.

18
ideapad 320-14IAP/ideapad 320-14AST/ideapad 320-15IAP/ideapad 320-15AST/ideapad
320-15ABR/ideapad 320-15ABR Touch Hardware Maintenance Manual
Important information about replacing RoHS compliant FRUs
RoHS, The Restriction of Hazardous Substances in Electrical and
Electronic Equipment Directive (2002/95/EC) is a European Union legal
requirement affecting the global electronics industry. RoHS requirements
must be implemented on Lenovo products placed on the market after
June 2006. Products on the market before June 2006 are not required to
have RoHS compliant parts. If the original FRU parts are non-compliant,
replacement parts can also be non-compliant. In all cases if the original
FRU parts are RoHS compliant, the replacement part must also be RoHS
compliant.
Note:RoHSandnon-RoHSFRUpartnumberswiththesametandfunction
areidentiedwithuniqueFRUpartnumbers.
Lenovoplans totransit toRoHScompliancewell beforethe implementation
dateandexpectsitssupplierstobereadytosupportLenovo’srequirements
andscheduleintheEU.Productssold in2005and2006willcontainsome
RoHScompliantFRUs.Thefollowingstatementpertainstotheseproductsand
anyproductLenovoproducescontainingRoHScompliantFRUs.
RoHScompliant FRUshave uniqueFRU partnumbers. Beforeor afterthe
RoHSimplementationdate,failedRoHScompliantparts mustalwaysbe
replacedwithRoHScompliantones,soonlytheFRUsidentiedascompliant
inthesystemHMMordirectsubstitutionsforthoseFRUsmaybeused.
Products marketed before June 2006 Products marketed after June 2006
Current or
original part
Replacement FRU Current or
original part
Replacement FRU
Non-RoHS CanbeNon-RoHS
MustbeRoHS MustbeRoHS
Non-RoHS CanbeRoHS
Non-RoHS CansubtoRoHS
RoHS MustbeRoHS
Note:Adirectsubstitutionisapartwith adifferentFRU partnumberthatis
automaticallyshippedbythedistributioncenteratthetimeoftheorder.

19
General checkout
General checkout
Thischapterpresentsthefollowinginformation:
• “Whattodorst”onpage20
• “Powersystemcheckout”onpage21
Beforeyougotothecheckout,makesuretoreadthefollowingimportantnotes:
Important notes:
• Onlycertiedtrainedpersonnelcanservicethecomputer.
• BeforereplacinganyFRU,readtheentirepageon removingandreplacing
FRUs.
• CarefullyremovescrewsforreusewhenreplacingFRUs.
• Beextremelycarefulduringsuch writeoperationsascopying,saving,or
formatting. Drives in the computer that you are servicing sequence might
have been altered. If you select an incorrect drive, data or programs might be
overwritten.
• ReplaceanFRUonlywithanotherFRU ofthecorrectmodel. When you
replace an FRU, make sure that the machine model and the FRU part number are
correct by referring to the FRU parts list.
• AnFRUshouldnotbereplacedjustbecauseofasingle,unreproduciblefailure.
Single failures can occur for a variety of reasons that have nothing to do with a
hardware defect, such as cosmic radiation, electrostatic discharge, or software
errors. Consider replacing an FRU only when a problem recurs. If you suspect that
an FRU is defective, clear the error logs and run the test again. If the error does
not recur, do not replace the FRU.
• BecarefulnottoreplaceanondefectiveFRU.

20
ideapad 320-14IAP/ideapad 320-14AST/ideapad 320-15IAP/ideapad 320-15AST/ideapad
320-15ABR/ideapad 320-15ABR Touch Hardware Maintenance Manual
What to do rst
WhenyoudoreturnanFRU,youmustincludethefollowinginformationinthe
partsexchangeformorpartsreturnformthatyouattachtoit:
1. Nameandphonenumberofservicer
2. Dateofservice
3. Dateonwhichthemachinefailed
4. Dateofpurchase
5. ProcedureindexandpagenumberinwhichthefailingFRUwasdetected
6. FailingFRUnameandpartnumber
7. Machinetype,modelnumber,andserialnumber
8. Customer’snameandaddress
Note for warranty:During thewarranty period,the customermay be
responsiblefor repaircostsifthecomputerdamagewascausedbymisuse,
accident,modification,unsuitablephysicaloroperatingenvironment, or
impropermaintenancebythecustomer.
Thefollowingisalistofsomecommonitemsthatare notcovered under
warrantyandsomesymptomsthatmightindicatethatthesystemwas
subjectedtostressbeyondnormaluse.
Beforecheckingproblemswiththecomputer,determinewhetherthedamageis
coveredunderthewarrantybyreferringtothefollowinglist:
The following are not covered under warranty:
• LCDpanelcrackedfromtheapplicationofexcessiveforce orfrombeing
dropped
• Scratched(cosmetic)parts
• Distortion,deformation,ordiscolorationofthecosmeticparts
• Plasticparts,latches,pins,orconnectorsthathavebeencrackedorbroken
byexcessiveforce
• Damagecausedbyliquidspilledintothesystem
• DamagecausedbytheimproperinsertionofaPCCardortheinstallationof
anincompatiblecard
• Improperdiskinsertionoruseofanopticaldrive
• Diskettedrivedamagecausedbypressureonthediskette drivecover,
foreignmaterialinthedrive,ortheinsertionofadiskettewithmultiplelabels
• Damagedorbentdisketteejectbutton
• Fusesblownbyattachmentofanonsupporteddevice
• Forgottencomputerpassword(makingthecomputerunusable)
• Stickykeyscausedbyspillingaliquidontothekeyboard
• UseofanincorrectACadapteronlaptopproducts
The following symptoms might indicate damage caused by nonwarranted
activities:
• Missingpartsmightbeasymptomofunauthorizedserviceormodication.
• Ifthespindleofaharddiskdrivebecomesnoisy,itmayhavebeensubjected
toexcessiveforce,ordropped.
21
General checkout
Power system checkout
Toverifyasymptom,followthestepsbelow:
1. Turnoffthecomputer.
2. Removethebatterypack.
3. ConnecttheACadapter.
4. Makesurethatpowerissuppliedwhenyouturnonthecomputer.
5. Turnoffthecomputer.
6. DisconnecttheACadapterandinstallthechargedbatterypack.
7. Makesurethatthebatterypacksupplies powerwhen youturnonthe
computer.
Ifyoususpectapowerproblem,seetheappropriateoneofthefollowingpower
supplycheckouts:
• “CheckingtheACadapter”onpage21
• “Checkingoperationalcharging”onpage22
• “Checkingthebatterypack”onpage22
Checking the AC adapter
YouareherebecausethecomputerfailsonlywhentheACadapterisused.
• Ifthepower-onindicatordoesnotturnon,checkthepowercordoftheAC
adapterforcorrectcontinuityandinstallation.
• Ifthecomputerdoesnotchargeduringoperation,goto“Checking
operationalcharging”.
TochecktheACadapter,followthestepsbelow:
1. UnplugtheACadaptercablefromthecomputer.
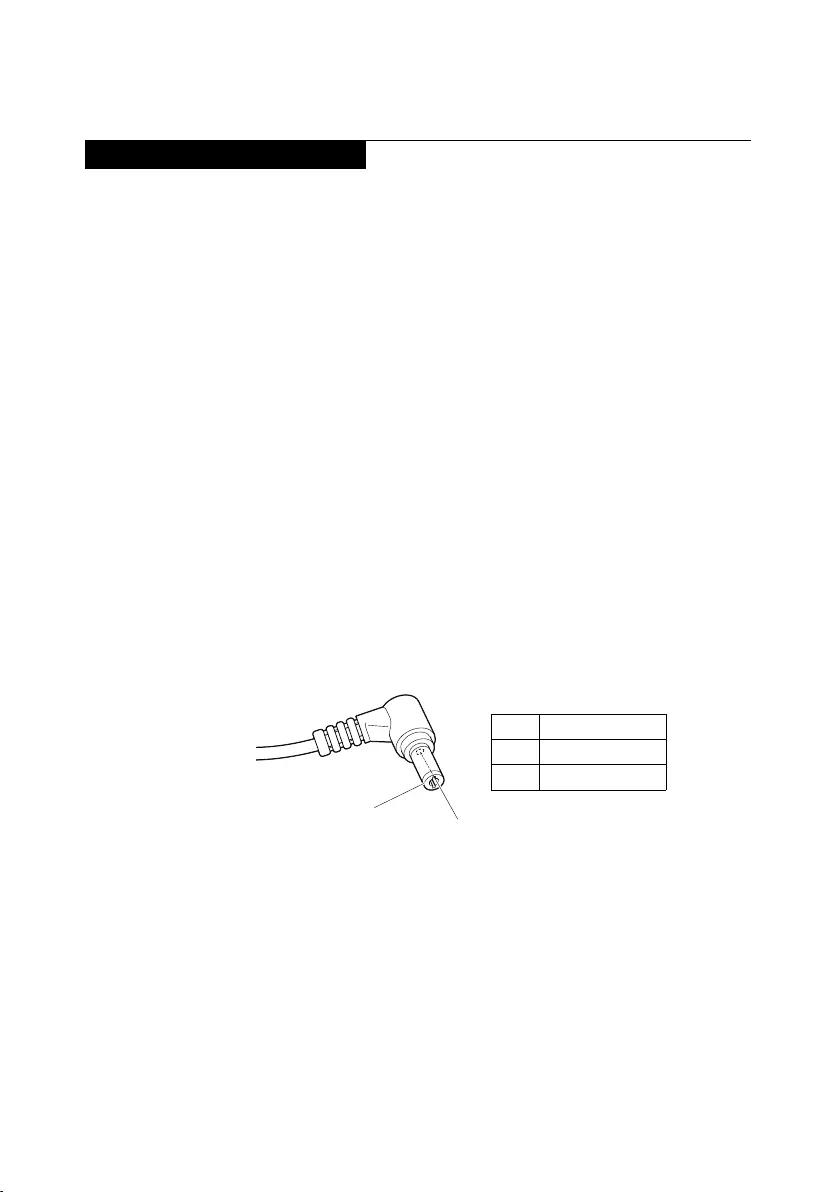
2. MeasuretheoutputvoltageattheplugoftheAC adaptercable.Seethe
followinggure:
2
1
Voltage (V DC)
+20
0
Pin
1
2
Note:OutputvoltagefortheACadapterpinNo.2maydifferfromtheoneyou
areservicing.
3. Ifthevoltageisnotcorrect,replacetheACadapter.
4. Ifthevoltageisacceptable,dothefollowing:
• Replacethesystemboard.
• Iftheproblempersists,goto“Lenovoideapad320-14IAP/ideapad320-
14AST/ideapad320-15IAP/ideapad320-15AST/ideapad320-15ABR/
ideapad320-15ABRTouch”onpage27.
Note:NoisefromtheACadapterdoesnotalwaysindicateadefect.

22
ideapad 320-14IAP/ideapad 320-14AST/ideapad 320-15IAP/ideapad 320-15AST/ideapad
320-15ABR/ideapad 320-15ABR Touch Hardware Maintenance Manual
Checking operational charging
Tocheckwhetherthebatterychargesproperlyduringoperation,usea
dischargedbattery packor abattery packthat hasless than50% ofthetotal
powerremainingwheninstalledinthecomputer.
Performoperationalcharging.Ifthe batterystatusindicatororicon doesnot
lighton,removethebatterypackandletitreturntoroomtemperature.Reinstall
thebatterypack.Ifthe chargeindicatororiconis stilloff,replacethebattery
pack.
Ifthechargeindicatorstilldoesnotlighton,replacethesystemboard.Then
reinstallthebatterypack.Ifitisstillnotcharged,gotothenextsection.
Checking the battery pack
BatterychargingdoesnotstartuntilthePowerMetershowsthatlessthan95%
ofthetotalpowerremains;underthisconditionthebatterypackcanchargeto
100%ofitscapacity.Thisprotectsthebatterypackfrombeingoverchargedor
fromhavingashortenedlife.
Tocheckyourbattery,move yourcursortothePower Metericonintheicon
trayoftheWindows®taskbarandwaitforamoment(butdonotclickit),andthe
percentageofbatterypowerremainingisdisplayed.Togetdetailedinformation
aboutthebattery,double-clickthePowerMetericon.
Note:Ifthebatterypack becomeshot,itmaynotbeable tobecharged.
Removeitfromthecomputerandleaveitatroomtemperatureforawhile.After
itcoolsdown,reinstallandrechargeit.

23
Related service information
Related service information
Thischapterpresentsthefollowinginformation:
• “RestoringthefactorycontentsbyusingOneKeyRecovery”onpage23
• “Passwords”onpage24
• “Powermanagement”onpage25
Restoring the factory contents by using OneKey Recovery
Restore of factory default
TheLenovoideapad320-14IAP/ideapad320-14AST/ideapad320-15IAP/
ideapad320-15AST/ideapad320-15ABR/ideapad320-15ABRTouchcomputers
comewithpre-installedOneKeyRecovery System.Inordertosave application
filesandtheinitialbackedupfilesofthe system,the harddiskinaLenovo
computerincludesahiddenpartition whenitisshipped.Ifyouneed torestore
thesystemtothepointofyourrstbootup,justenterLenovoOneKeyRecovery
SystemandrunSystem Recovery.FordetailsofOneKeyRecovery System,
seethe User Guide for Lenovo OneKey Recovery system.
Note: This will delete all the new data on the system partition (C drive), which
is not recoverable. Make sure to back up your critical data before you perform this
action.
Whenyouusetherecoverydiscstobootyourcomputer,thesystemwillenter
theuserinterfaceforsystemrecoveryautomatically.Pleasefollowtheprompt
toinsertthebackupdiscstocompletethewholerecoveryprocess.
Note:The recovery process might take up to 2 hours.

24
ideapad 320-14IAP/ideapad 320-14AST/ideapad 320-15IAP/ideapad 320-15AST/ideapad
320-15ABR/ideapad 320-15ABR Touch Hardware Maintenance Manual
Passwords
Asmany asthreepasswordsmaybeneededforanyLenovocomputer:
thepower-onpassword(POP),theharddiskpassword(HDP),andthe
administratorpassword.
Ifanyofthesepasswordshasbeenset,apromptforitappearsonthescreen
wheneverthecomputeristurnedon.Thecomputer doesnotstartuntilthe
passwordisentered.
Power-on password
Apower-onpassword(POP)protectsthesystemfrombeing poweredonby
anunauthorized person.Thepasswordmustbeenteredbeforeanoperating
systemcanbebooted.
Hard-disk password
Therearetwohard-diskpasswords(HDPs):
+UserHDP-fortheuser
+MasterHDP-forthesystemadministrator, whocan useit togetaccessto
theharddiskdriveeveniftheuserhaschangedtheuserHDP
Attention:IftheuserHDPhas beenforgotten,checkwhetheramasterHDP
hasbeenset.Ifithas,itcanbeusedforaccess totheharddiskdrive.If
nomasterHDPisavailable,neitherLenovonorLenovoauthorizedservice
techniciansprovideanyservicestoreseteithertheuserorthemasterHDP,or
torecoverdatafromthe harddiskdrive.Theharddiskdrivecanbereplaced
forascheduledfee.
Administrator password
Administratorpasswordcontrolstheaccess ofthewholesetuputility.Only
aftertheAdministratorpasswordhasbeensetcantheUserpasswordbeset.If
Administratorpasswordwascleared,theUserpasswordwasclearedtoo.

25
Related service information
Power management
Note:PowermanagementmodesarenotsupportedforAPMoperatingsystem.
Toreducepowerconsumption,thecomputer hastwopowermanagement
modes:sleep(standby),andhibernation.
Putting the computer to sleep or shutting it down
Whenyouhavenishedworkingwithyourcomputer,youcanputittosleepor
shutitdown.
Putting your computer to sleep
Ifyouwillbeawayfromyourcomputerforonlyashorttime,putthecomputer
tosleep.
Whenthecomputerisin sleepmode,youcanquicklywakeittoresumeuse,
bypassingthestartupprocess.
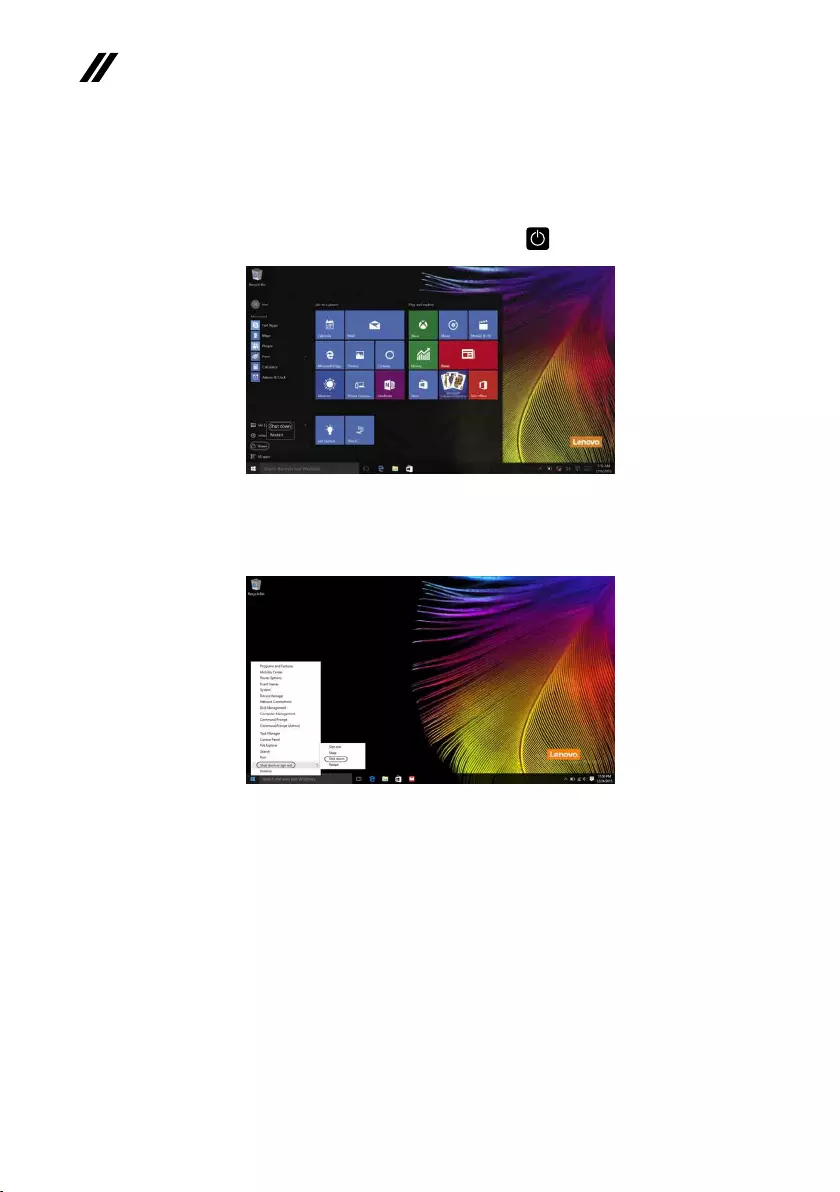
Toputthecomputertosleep,dooneofthefollowing:
• Closethedisplaylid.
• PressandholdthePowerkeyforabout1to5seconds.
• Movethe cursortothelower-leftcorner,and thenselect theStartbutton.
SelectPower → Sleep.
Note:Putyourcomputertosleepbeforeyoumoveit.Movingyourcomputer
whiletheharddiskdriveisspinningcandamagetheharddisk,causing
lossofdata.
Towakeupthecomputer,performthefollowing:
• Pressanykeyonthekeyboard.
26
ideapad 320-14IAP/ideapad 320-14AST/ideapad 320-15IAP/ideapad 320-15AST/ideapad
320-15ABR/ideapad 320-15ABR Touch Hardware Maintenance Manual
• Right-clickorpresstheStartbuttoninthelower-leftcornerandselectShut
down or sign out→Shut down.
Shutting down the computer
Ifyouarenotgoingtouseyourcomputerforalongtime,shutitdown.
Toshutdownyourcomputer,dooneofthefollowing:
• SelecttheStartbutton,thenselectPower → Shut down.

27
Lenovo ideapad 320-14IAP/ideapad 320-14AST/ideapad 320-15IAP/ideapad 320-
15AST/ideapad 320-15ABR/ideapad 320-15ABR Touch
Lenovo ideapad 320-14IAP/ideapad 320-14AST/ideapad
320-15IAP/ideapad 320-15AST/ideapad 320-15ABR/
ideapad 320-15ABR Touch
Thischapter presentsthe followingproduct-specific servicereferencesand
product-specicpartsinformation:
• “Specications”onpage27
• “Statusindicators”onpage31
• “Hotkeys”onpage32
• “FRUreplacementnotices”onpage33
• “RemovingandreplacinganFRU”onpage34
• “Locations”onpage68
• “Partslist”onpage70
Specications
Thefollowingtableliststhespecificationsof theLenovoideapad320-
14IAP/ideapad320-14AST/ideapad320-15IAP/ideapad320-15AST/
ideapad320-15ABR/ideapad320-15ABRTouch:
Table 1. Specications
Lenovo ideapad 320-14IAP Lenovo ideapad 320-14AST
Form Factor
Dimensions Appr.338.3mm×249.9mm×22.7mm
Weight Appr.2.1kgwithbattery
LCDsize 14.0-inch
Processor
Seethesystempropertiesofyourcomputer,youcandothisasfollows:
ClickControl Panel,thenclickHardware and Sound,clickDevice Manager
underDevices and PrintersanddoubleclickProcessors.
Memory
Typeandspeed DDR3L DDR4-2133MHz
Maximum
supported
capacity
8GB
SSD
Interface SATA3
Hard disk drive
Formfactor 2.5-inch,7mm
Capacity SSD+HDD
(onselectmodels)
Interface SATA2/SATA3
Optical Drive
Formfactor 9.0mm
Type Writer

28
ideapad 320-14IAP/ideapad 320-14AST/ideapad 320-15IAP/ideapad 320-15AST/ideapad
320-15ABR/ideapad 320-15ABR Touch Hardware Maintenance Manual
Table 1. Specications (continued)
Lenovo ideapad 320-14IAP Lenovo ideapad 320-14AST
Display
Display
resolution(LCD) 1366×768pixelsHD/1920×1080pixelsFHD
LCDbacklight LED
I/O Ports
USB USB3.0×1,USB2.0×1
Audio Comboaudiojack×1
Video/Audio HDMIslot×1
Ethernet RJ-45×1
Memorycard
slot 4in1slot×1(SD/SDHC/SDXC/MMC)
Battery pack
Type Polymer
Cells/Capacity 2cells,30Wh/35Wh
Note: Thecapacitygivenhereisthetypicaloraveragecapacityasmeasuredina
specictestenvironment.Capacitiesmeasuredinotherenvironmentsmay
differbutarenolowerthantheratedcapacity(seeproductlabel).
AC power adapter
Input 100-240VAC,50-60Hz
Outputvoltage 20VDC
Power DIS65W,UMA45W
Miscellaneous
Camera 0.3M/HD
Security Kensingtonslot×1

29
Lenovo ideapad 320-14IAP/ideapad 320-14AST/ideapad 320-15IAP/ideapad 320-
15AST/ideapad 320-15ABR/ideapad 320-15ABR Touch
Table 1. Specications (continued)
Lenovo ideapad
320-15IAP
Lenovo ideapad
320-15AST
Lenovo ideapad
320-15ABR/ideapad
320-15ABR Touch
Form Factor
Dimensions Appr.378mm×260mm×22.9mm
Weight Appr.2.2kgwithbattery
LCDsize 15.6-inch
Processor
Seethesystempropertiesofyourcomputer,youcandothisasfollows:
ClickControl Panel,thenclickHardware and Sound,clickDevice Manager
underDevices and PrintersanddoubleclickProcessors.
Memory
Typeand
speed DDR3L DDR4-2133MHz
DDR4-1600/
1866MHz
(onselectmodels)
Maximum
supported
capacity
8GB 16GB
SSD
Interface SATA3
Hard disk drive
Formfactor 2.5-inch,7mm
Capacity SSD+HDD
(onselectmodels)
Interface SATA2/SATA3
Optical Drive
Formfactor 9.0mm
Type Writer
Display
Display
resolution
(LCD)
1366×768pixelsHD/1920×1080pixelsFHD
LCD
backlight LED

30
ideapad 320-14IAP/ideapad 320-14AST/ideapad 320-15IAP/ideapad 320-15AST/ideapad
320-15ABR/ideapad 320-15ABR Touch Hardware Maintenance Manual
Lenovo ideapad
320-15IAP
Lenovo ideapad
320-15AST
Lenovo ideapad
320-15ABR/ideapad
320-15ABR Touch
I/O Ports
USB USB3.0×1,USB2.0×1
USB3.0×2,
Type-C×1
(supportUSB3.1
Gen1,Output5V
DC,0.9ADC)
Audio Comboaudiojack×1
Video/Audio HDMIslot×1
Ethernet RJ-45×1
Memory
cardslot 4in1slot×1(SD/SDHC/SDXC/MMC)
Battery pack
Type Polymer
Cells/
Capacity 2cells,30Wh/35Wh
Note: Thecapacitygivenhereisthetypicaloraveragecapacityasmeasuredina
specictestenvironment.Capacitiesmeasuredinotherenvironmentsmay
differbutarenolowerthantheratedcapacity(seeproductlabel).
AC power adapter
Input 100-240V,50-60HzAC
Output
voltage 20VDC
Power DIS65W,UMA45W
Miscellaneous
Camera 0.3M/HD
Security Kensingtonslot×1
Table 1. Specications (continued)
31
Lenovo ideapad 320-14IAP/ideapad 320-14AST/ideapad 320-15IAP/ideapad 320-
15AST/ideapad 320-15ABR/ideapad 320-15ABR Touch
Status indicators
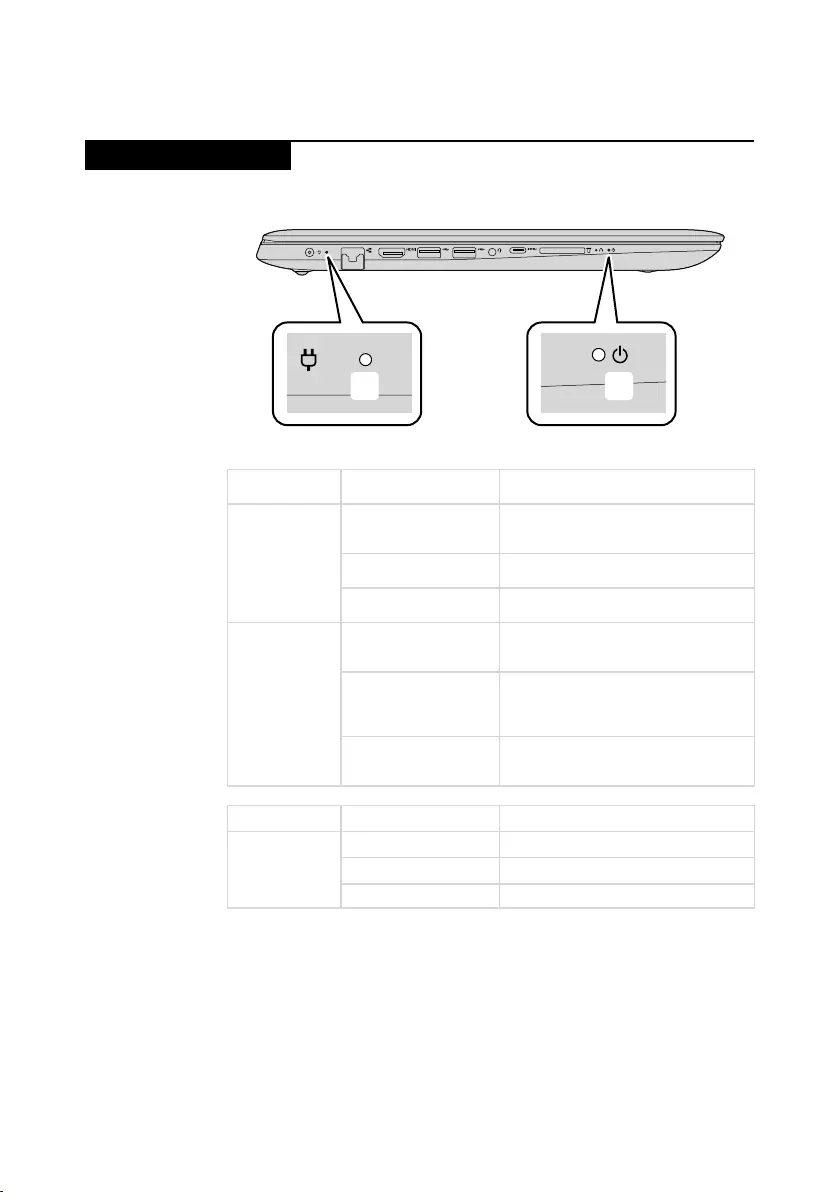
Thesystemstatusindicatorsbelowshowthecomputerstatus:
ba
Table 2. Status indicators
AC power
adapter status
Indicator status Meaning
Disconnected
Off
Thecomputerisinsleepmodeor
turnedoff;Thebatteryhasmorethan
20%charge.
Solidamber Thebatteryhasbetween5%and
20%charge.
Fastblinkingamber Thebatteryhasbetween0%and5%
charge.
Connected
Slowblinkingamber
Thebatteryisbeingcharged.When
batterychargereaches20%,the
blinkingcolorchangestowhite.
Slowblinkingwhite
Thebatteryhasbetween20%and
80%chargeandisstillcharging.
Whenthebatteryreaches80%
chargethelightwillstopblinking.
Solidwhite
Thebatteryhasmorethan80%
charge,chargingwillcontinueuntil
thebatteryisfullycharged.
Indicator Indicator status Meaning
Power status
indicator
On(solidwhite) Thecomputerispoweredon.
Blinking Thecomputerisinsleepmode.
Off Thecomputerispoweredoff.
32
ideapad 320-14IAP/ideapad 320-14AST/ideapad 320-15IAP/ideapad 320-15AST/ideapad
320-15ABR/ideapad 320-15ABR Touch Hardware Maintenance Manual
Hotkeys
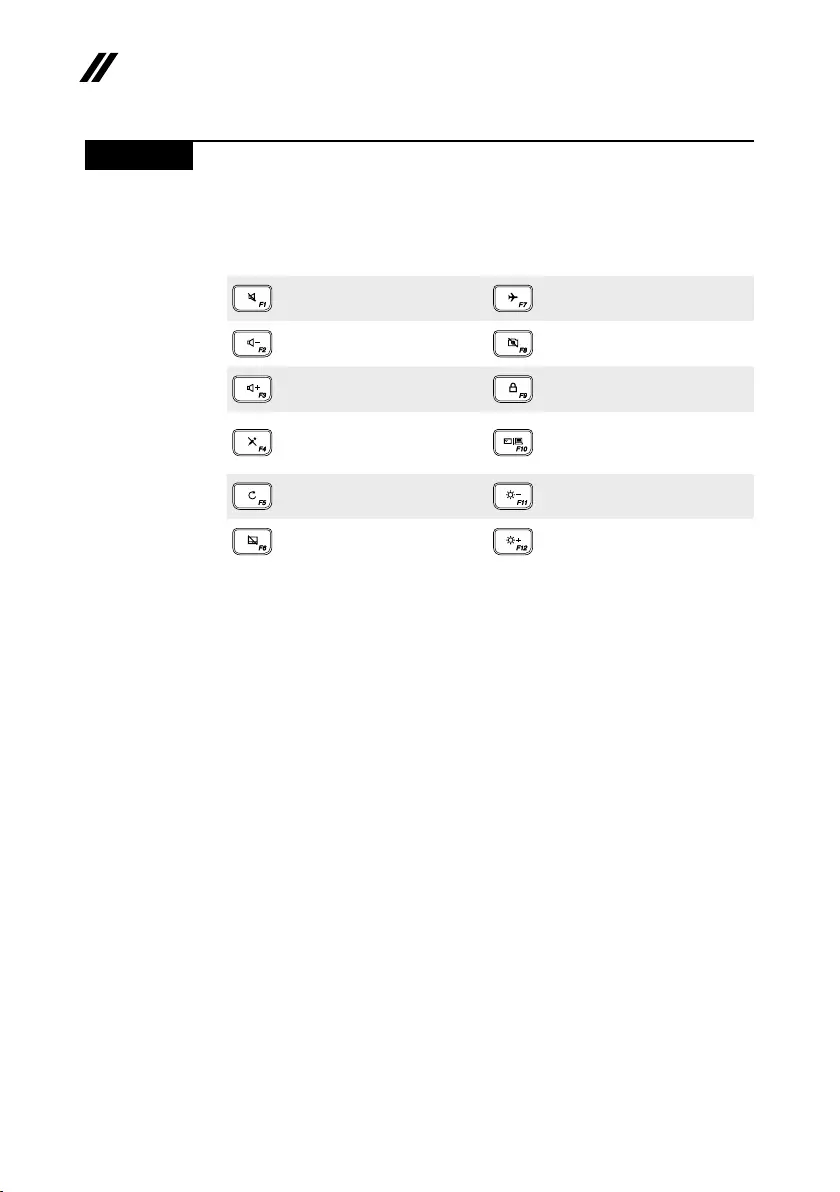
Youcanaccesscertainsystemsettingsquicklybypressingtheappropriate
hotkeys.
Table 3. Hotkeys
:
Mutes/unmutesthesound.
:Enables/disablesairplane
mode.
:
Decreasesthevolumelevel.
: Enables/disablescamera.
:
Increasesthevolumelevel.
:Locks/unlockstheLCD
screen.
:
Enables/disables
microphone.
:
Enablestheexternal
projectorordanglesthe
externaldisplay.
:
Refreshespage.
:Decreasesdisplay
brightness.
:
Enables/disablesthetouch
pad.
:Increasesdisplay
brightness.
33
Lenovo ideapad 320-14IAP/ideapad 320-14AST/ideapad 320-15IAP/ideapad 320-
15AST/ideapad 320-15ABR/ideapad 320-15ABR Touch
FRU replacement notices
Thissection presentsnotices relatedto removingand replacingparts. Read
thissectioncarefullybeforereplacinganyFRU.
Screw notices
Loosescrewscancauseareliabilityproblem.IntheLenovocomputer,this
problemisaddressedwithspecialnylon-coatedscrewsthathavethefollowing
characteristics:
• Theymaintaintightconnections.
• Theydonoteasilycomeloose,evenwithshockorvibration.
• Theyarehardertotighten.
• Eachoneshouldbeusedonlyonce.
Dothefollowingwhenyouservicethismachine:
• Keepthescrewkitinyourtoolbag.
• CarefullyremovescrewsforreusewhenreplacingFRUs.
• Useatorquescrewdriverifyouhaveone.
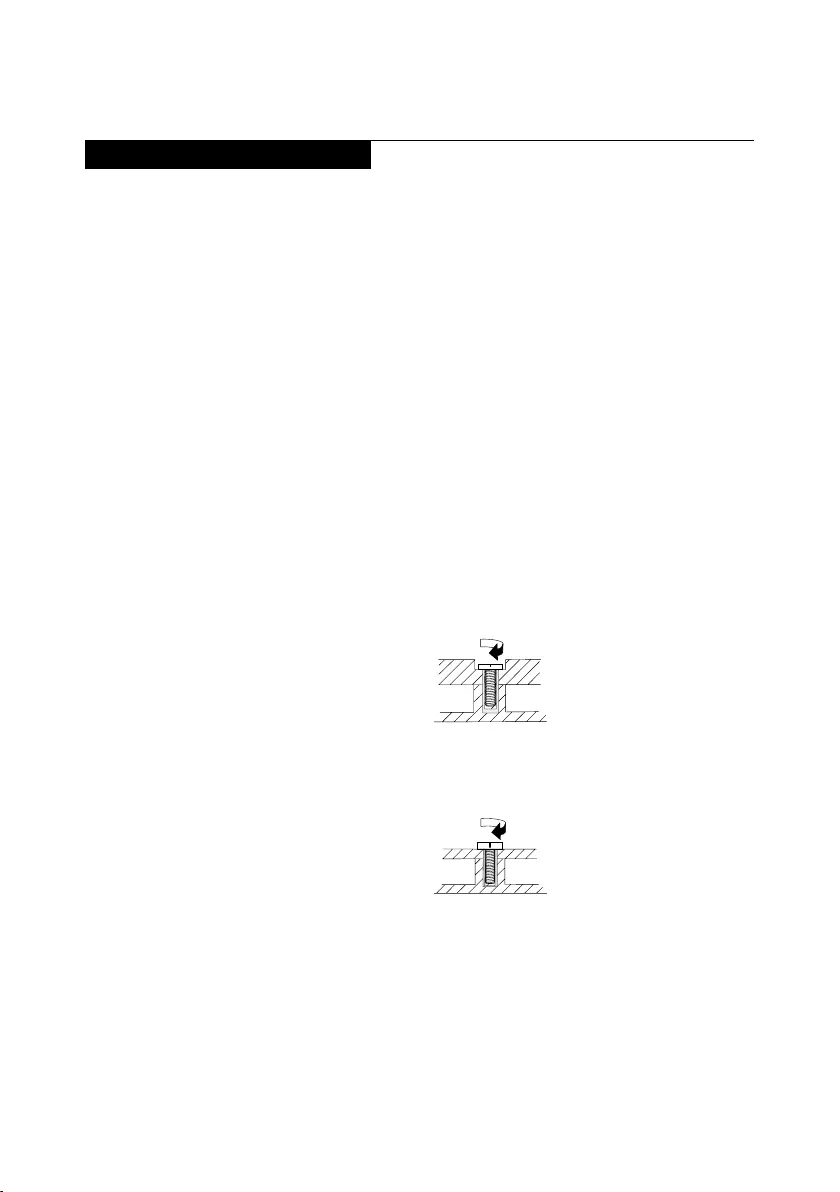
Tightenscrewsasfollows:
• Plastic to plastic
Turnanadditional90°afterthe screwhead touchesthesurfaceofthe
plasticpart:
(Cross-section)
• Logic card to plastic
Turnanadditional180° afterthescrewheadtouchesthesurfaceofthe
logiccard:
(Cross-section)
• Torque driver
Ifyouhaveatorquescrewdriver,refertothe“Torque”columnforeachstep.
• Makesurethatyouusethecorrectscrews.Ifyouhaveatorquescrewdriver,
tightenallscrewsrmlytothetorqueshowninthetable.Carefully remove
screws for reuse when replacing FRUs. Make sure that all screws are
tightened rmly.
• Ensuretorque screwdriversare calibratedcorrectly followingcountry
specications.
34
ideapad 320-14IAP/ideapad 320-14AST/ideapad 320-15IAP/ideapad 320-15AST/ideapad
320-15ABR/ideapad 320-15ABR Touch Hardware Maintenance Manual
Removing and replacing an FRU
Thissectionpresentsexplodedgureswiththeinstructions toindicatehowto
removeandreplacetheFRU.Makesuretoobservethefollowinggeneralrules:
1. Donotattempttoserviceanycomputerunlessyouhavebeentrainedand
certied.Anuntrainedpersonrunstheriskofdamagingparts.
2. BeforereplacinganyFRU,review“FRUreplacementnotices”onpage33.
3. Beginby removinganyFRUsthathavetobe removedbeforethefailing
FRU.AnyofsuchFRUsarelistedatthetopofthepage.Removethemin
theorderinwhichtheyarelisted.
4. FollowthecorrectsequenceinthestepstoremovetheFRU,asgiveninthe
guresbythenumbersinsquarecallouts.
5. WhenturningascrewtoreplaceanFRU,turnitinthedirectionasgivenby
thearrowinthegure.
6. WhenremovingtheFRU,moveitinthe directionasgivenbythearrowin
thegure.
7. ToputthenewFRUinplace,reversetheremovalproceduresandfollow
anyofthenotesthatpertaintoreplacement.For informationabout
connectingandarranginginternalcables,see“Locations”onpage68.
8. WhenreplacinganFRU,usethecorrectscrewasshownintheprocedures.
DANGER
Before removing any FRU, turn off the computer, unplug all power cords from
electrical outlets, remove the battery pack, and then disconnect any of the
interconnecting cables.
Attention:AfterreplacinganFRU,donotturnonthecomputeruntilyouhave
madesurethatallscrews,springs,andothersmallpartsareinplaceandnone
areloose insidethe computer.Verifythis byshaking thecomputer gentlyand
listeningforrattlingsounds.Metallicpartsormetal akescancauseelectrical
shortcircuits.
Attention:Thesystem boardis sensitiveto, andcan bedamaged by,
electrostaticdischarge. Beforetouching it,establish personalgrounding by
touchingagroundpointwithonehandorusinganelectrostaticdischarge(ESD)
strap(P/N6405959)toremovepotentialshockreasons.
35
Lenovo ideapad 320-14IAP/ideapad 320-14AST/ideapad 320-15IAP/ideapad 320-
15AST/ideapad 320-15ABR/ideapad 320-15ABR Touch
1010 Optical drive
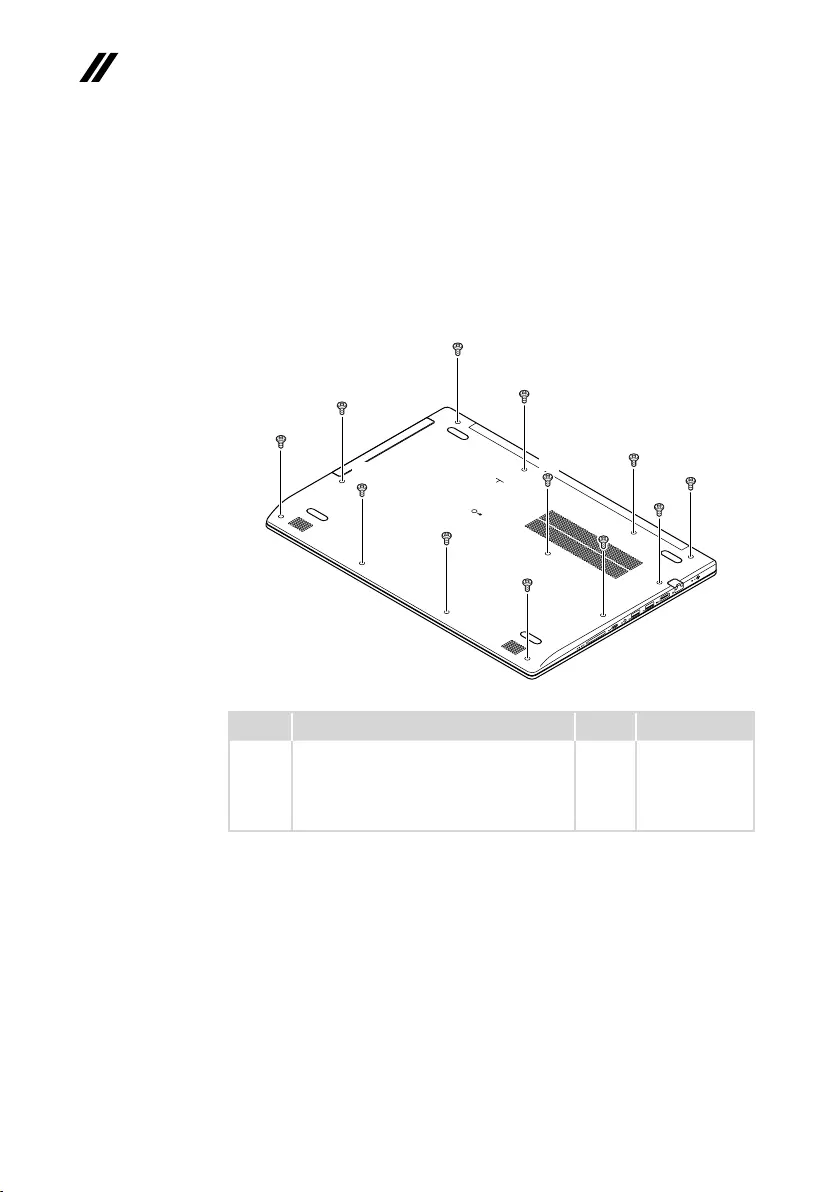
Figure 1. Removal steps of optical drive
Removethescrew1.Thenpulltheopticaldriveoutinthedirectionshownby
arrow2.
a
b
Step Screw (quantity) Color Torque
1M2.5×7mm,Phillipshead,nylok-coated(1)
LOWTOUPPER
Black/
Silver
3.0+/-0.3kgf/cm
Removethescrew3,thencarefullyremovetheopticaldrivebracketandbezel
inthedirectionsshownbyarrows4and5.
d
c
e
Step Screw (quantity) Color Torque
3M2×3mm,Phillipshead,nylok-coated(1)
ODDBRKTOODDMODULE
Silver 1.85+/-0.15kgf/cm
36
ideapad 320-14IAP/ideapad 320-14AST/ideapad 320-15IAP/ideapad 320-15AST/ideapad
320-15ABR/ideapad 320-15ABR Touch Hardware Maintenance Manual
1020 Base cover
Foraccess,removethisFRU:
• “1010Opticaldrive”onpage35
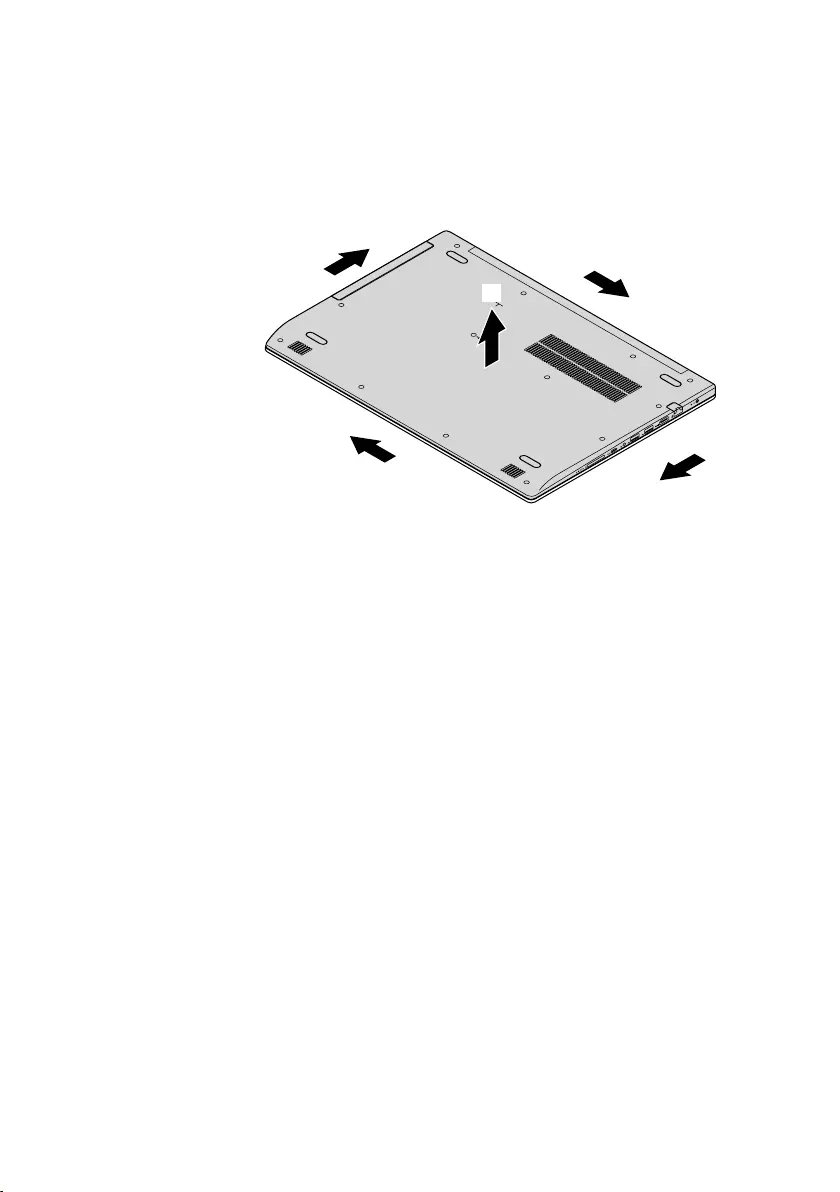
Figure 2. Removal steps of base cover
Removethescrews1.
a
a
a
a
a
a
a
a
a
a
a
a
Step Screw (quantity) Color Torque
1M2.5×7mm,Phillips-head,nylok-coated
(12)loglow—logup&loglow—ioboard—
logup&loglow—mb—logup&loglow—
rightsidehinge—logup&loglow—leftside
hinge—klockbracket—logup
Black/
Silver
3.0+/-0.3kgf/cm
37
Lenovo ideapad 320-14IAP/ideapad 320-14AST/ideapad 320-15IAP/ideapad 320-
15AST/ideapad 320-15ABR/ideapad 320-15ABR Touch
Figure 2. Removal steps of base cover (continued)
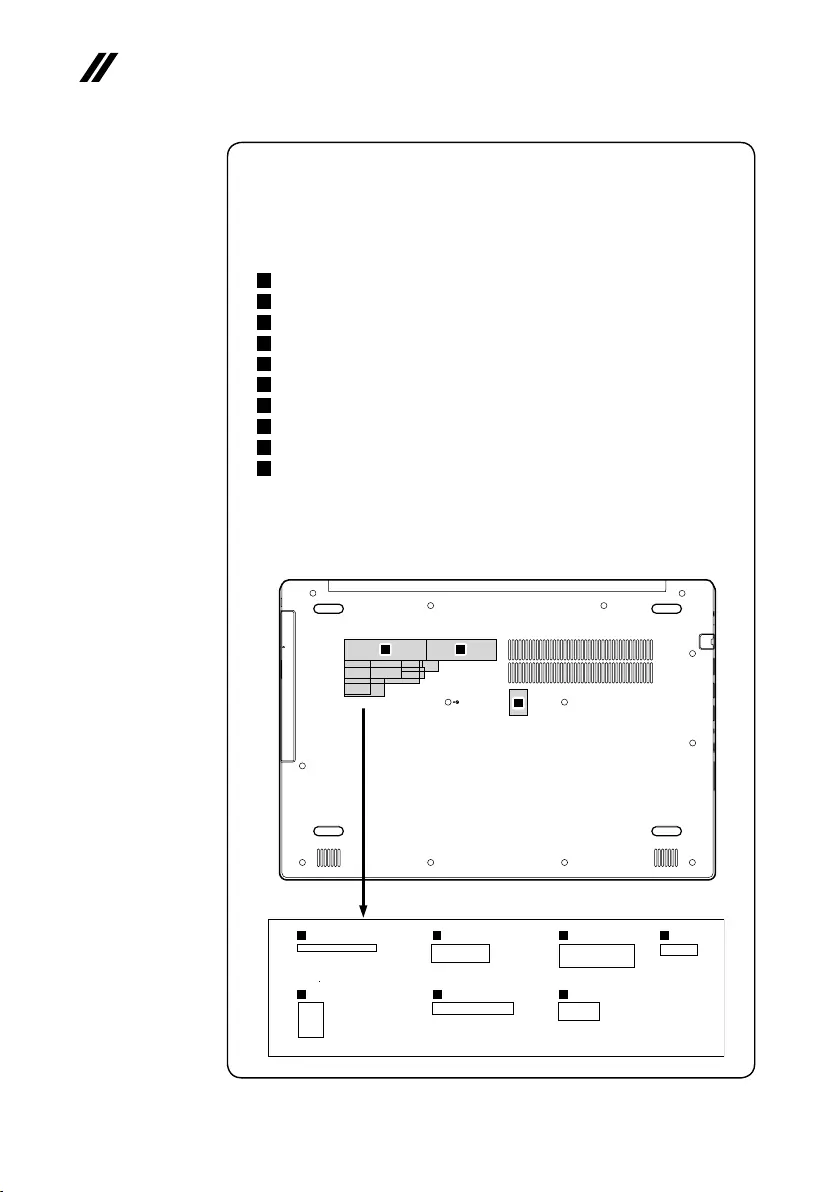
Removethebasecoverinthedirectionsshownbyarrows2and3.
b
b
b
b
c
38
ideapad 320-14IAP/ideapad 320-14AST/ideapad 320-15IAP/ideapad 320-15AST/ideapad
320-15ABR/ideapad 320-15ABR Touch Hardware Maintenance Manual
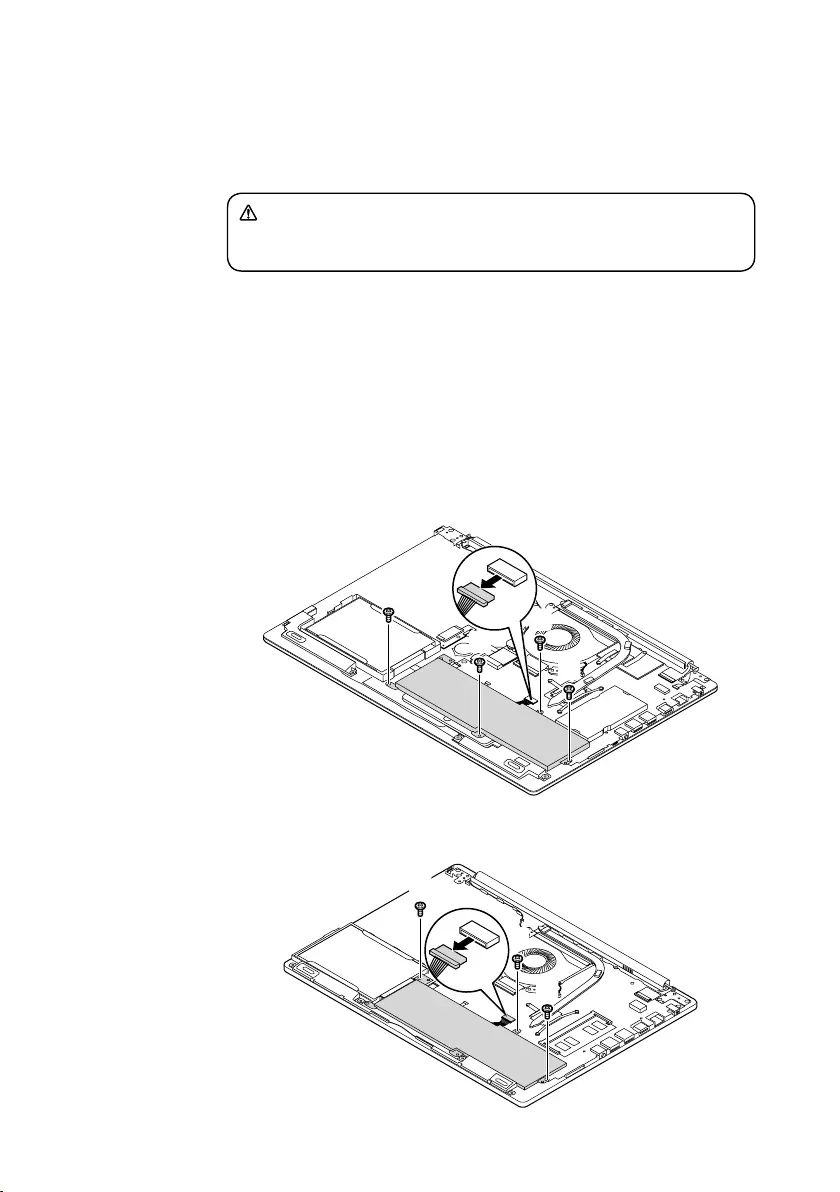
Note: Applying labels to the base cover
ThenewbasecoverFRUisshippedwitha kitcontaininglabelsofseveral
kinds.Whenyoureplacethebasecover,youneedtoapplythefollowing
labels:
Thefollowinglabelsneedtobepeeledofffromtheoldbasecoverandputon
thenewbasecover.
a Ratinglabel
b Ratinglabelforprint
c OSlabel
d Argentinalabel68×6mm
e KCClabel50×16mm
f Adapterlabel65×20mm
g Indonesialabel32×10mm
h BISlabel22×30mm
i TWlabel70×10mm
j WL/BTlabel35×15mm
Forsomemodels,youalsoneedtoapplyoneortwoFCClabels.Checkthe
oldbasecover;ifithasoneortwoFCClabels,ndduplicatesoftheminthe
labelkitandapplythemtothenewbasecover.
Forthelocationofeachlabel,refertothefollowinggures:
ab
c
efg
hij
d
39
Lenovo ideapad 320-14IAP/ideapad 320-14AST/ideapad 320-15IAP/ideapad 320-
15AST/ideapad 320-15ABR/ideapad 320-15ABR Touch
1030 Battery pack
DANGER
Only use the battery specied in the parts list for your computer. Any other battery
could ignite or explode.
Foraccess,removetheseFRUsinorder:
• “1010Opticaldrive”onpage35
• “1020Basecover”onpage36
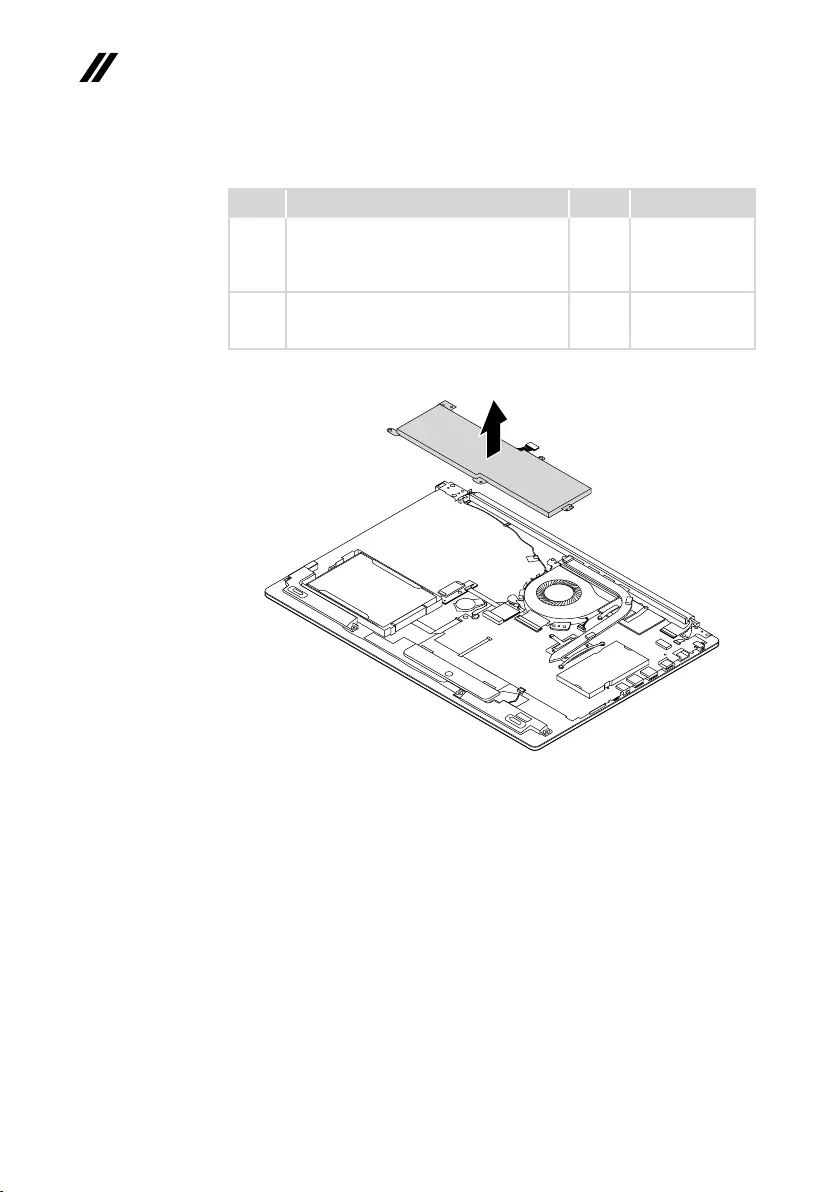
Figure 3. Removal steps of battery pack
Detachthebatterypackconnectorinthedirectionshownbyarrow1,remove
thescrews2.
ideapad 320-15IAP/ideapad 320-15AST/ideapad 320-15ABR/
ideapad 320-15ABR Touch
b
b
b
b
b
a
ideapad 320-14IAP/ideapad 320-14AST
b
b
b
b
a
40
ideapad 320-14IAP/ideapad 320-14AST/ideapad 320-15IAP/ideapad 320-15AST/ideapad
320-15ABR/ideapad 320-15ABR Touch Hardware Maintenance Manual
Figure 3. Removal steps of battery pack (continued)
Step Screw (quantity) Color Torque
2M2×6mm,Phillips-head,nylok-coated(4)
battery—logup(ideapad320-15IAP/
ideapad320-15AST/ideapad320-15ABR/
ideapad320-15ABRTouch)
Black 1.85+/-0.15kgf/cm
2M2×6mm,Phillips-head,nylok-coated(3)
battery—logup(ideapad320-14IAP/
ideapad320-14AST)
Black 1.85+/-0.15kgf/cm
Removethebatterypackinthedirectionshownbyarrow3.
c
41
Lenovo ideapad 320-14IAP/ideapad 320-14AST/ideapad 320-15IAP/ideapad 320-
15AST/ideapad 320-15ABR/ideapad 320-15ABR Touch
1040 PCI Express Mini Card for wireless LAN
Foraccess,removetheseFRUsinorder:
• “1010Opticaldrive”onpage35
• “1020Basecover”onpage36
• “1030Batterypack”onpage39
Important:
The preinstalled WLAN module may only be replaced with a Lenovo approved
module in order to comply with FCC and IC regulations. Refer to Table 4 “Parts
list—Overall” on page 73 for Lenovo part numbers for the approved modules.
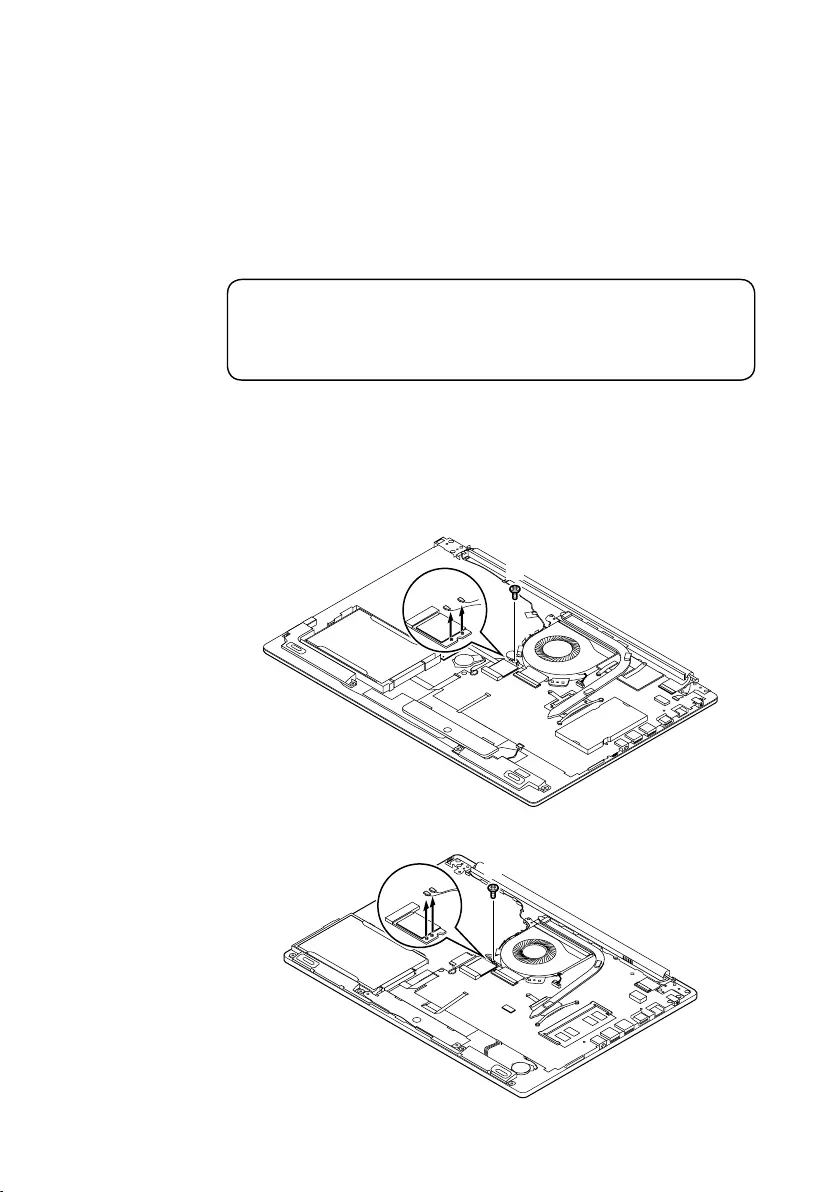
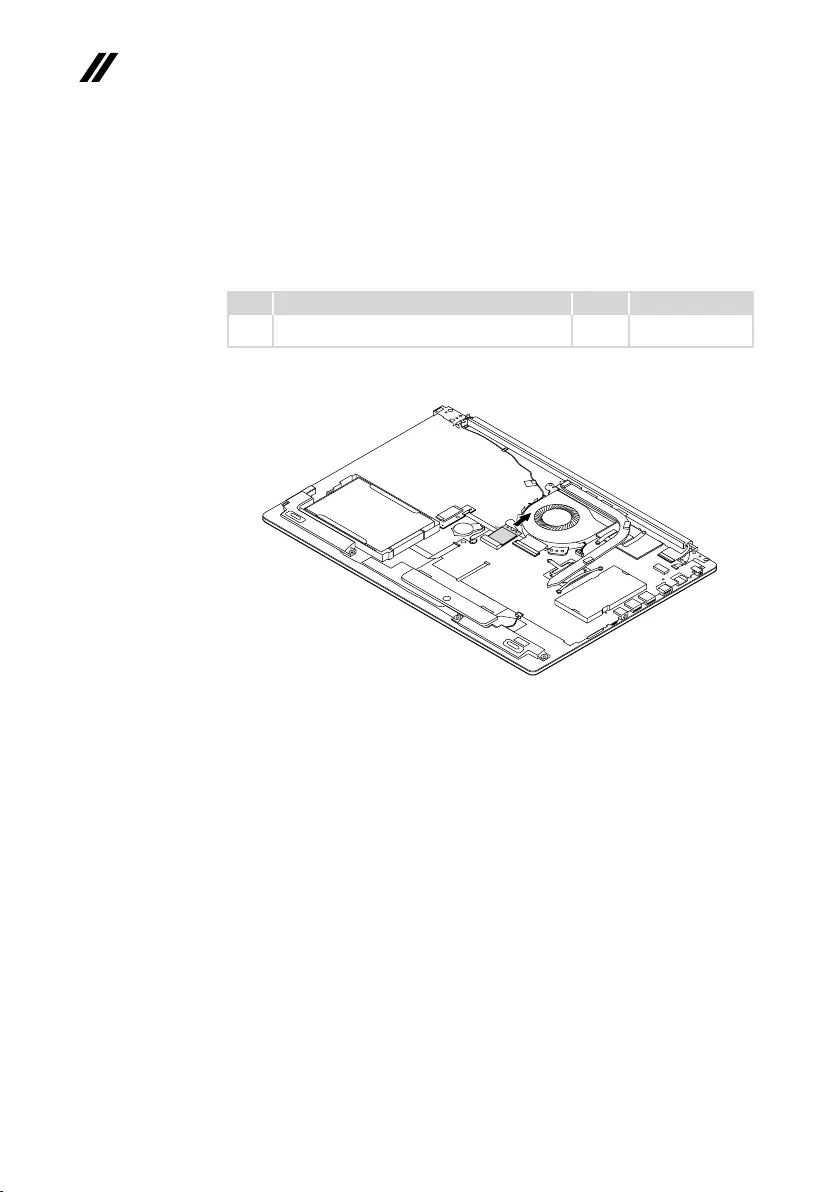
Figure 4. Removal steps of PCI Express Mini Card for wireless LAN
DisconnectthetwowirelessLANcables(black,gray)1,andthenremovethe
screw2.
ideapad 320-15IAP/ideapad 320-15AST/ideapad 320-15ABR/
ideapad 320-15ABR Touch
aa
b
ideapad 320-14IAP/ideapad 320-14AST
aa b
42
ideapad 320-14IAP/ideapad 320-14AST/ideapad 320-15IAP/ideapad 320-15AST/ideapad
320-15ABR/ideapad 320-15ABR Touch Hardware Maintenance Manual
Figure 4. Removal steps of PCI Express Mini Card for wireless LAN (continued)
Instep 1,unplugthejacksbyusingtheremovaltoolantennaRFconnector
(P/N:08K7159),orpickuptheconnectorswithyourngersandgentlyunplug
theminthedirectionshownbythearrows.
Notes:ThewirelessLANcardhas2cablesinstep1.
ThewirelessLANcardinsomemodelsmighthave3cablesinstep1.
Step Screw (quantity) Color Torque
2M2×3mm,Phillips-head,nylok-coated(1)
wirelesscard—logup
Silver 1.85+/-0.15kgf/cm
Removethecardinthedirectionshownbyarrow.
When installing:
• InmodelswithawirelessLANcardthathastwoantenna connectors,plug
theblackcable(1st)(MAIN)intothejacklabeledMAIN,andthegraycable
(2nd)(AUX)intothejacklabeledAUXonthecard.
• InmodelswithawirelessLANcardthathasthreeantennaconnectors,plug
theblackcable(1st)(MAIN)intothejacklabeled1,thegreycable(3rd)into
thejacklabeled3,andthewhitecable(2nd)(AUX)intothejacklabeled2on
thecard.
43
Lenovo ideapad 320-14IAP/ideapad 320-14AST/ideapad 320-15IAP/ideapad 320-
15AST/ideapad 320-15ABR/ideapad 320-15ABR Touch
1050 DIMM
Foraccess,removetheseFRUsinorder:
• “1010Opticaldrive”onpage35
• “1020Basecover”onpage36
• “1030Batterypack”onpage39
• “1040PCIExpressMiniCardforwirelessLAN”onpage41
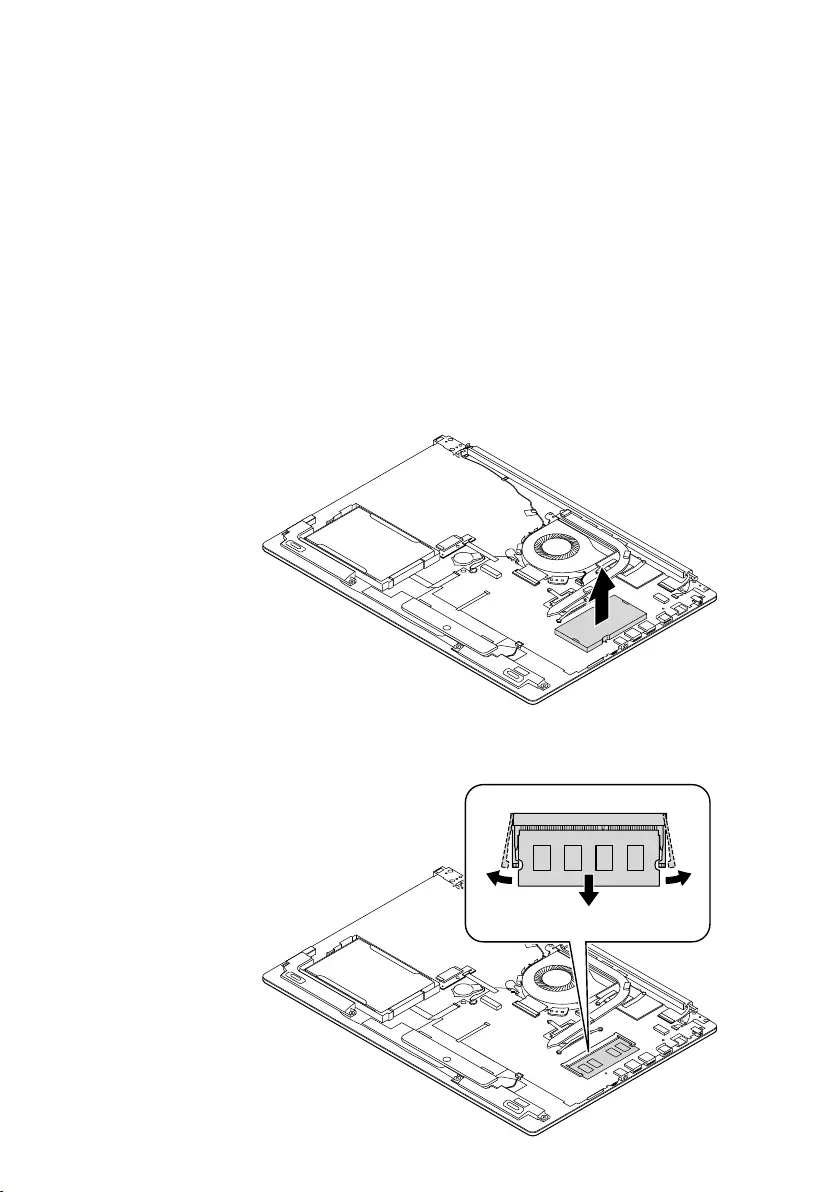
Figure 5. Removal steps of DIMM
ideapad 320-15IAP/ideapad 320-15AST/ideapad 320-15ABR/
ideapad 320-15ABR Touch
Insertaflatbladetoolintothememorymodulecover,andthenremovethe
memorymodulecovermanually.
Releasethe twolatches onbothedgesofthesocketatthesametimeinthe
directionsshownbyarrows1, andthenunplugtheDIMMinthedirection
shownbyarrow2.
a
a
b
44
ideapad 320-14IAP/ideapad 320-14AST/ideapad 320-15IAP/ideapad 320-15AST/ideapad
320-15ABR/ideapad 320-15ABR Touch Hardware Maintenance Manual
Figure 5. Removal steps of DIMM (continued)
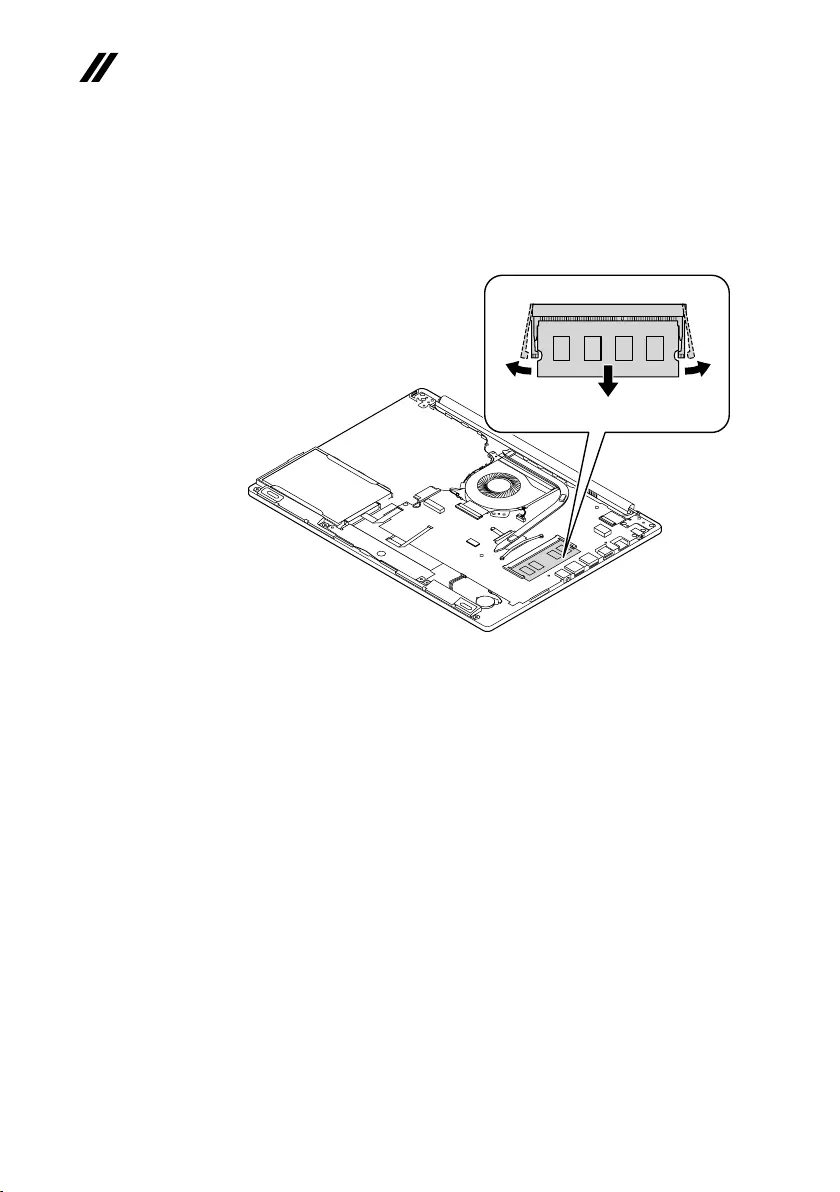
ideapad 320-14IAP/ideapad 320-14AST
Releasethe twolatches onbothedgesofthesocketatthesametimeinthe
directionsshownbyarrows1, andthenunplugtheDIMMinthedirection
shownbyarrow2.
a
a
b
45
Lenovo ideapad 320-14IAP/ideapad 320-14AST/ideapad 320-15IAP/ideapad 320-
15AST/ideapad 320-15ABR/ideapad 320-15ABR Touch
1060 Hard disk drive
Foraccess,removetheseFRUsinorder:
• “1010Opticaldrive”onpage35
• “1020Basecover”onpage36
• “1030Batterypack”onpage39
• “1040PCIExpressMiniCardforwirelessLAN”onpage41
• “1050DIMM”onpage43
Attention:
• Donotdroptheharddiskdriveorapplyanyphysicalshockto it. The hard
disk drive is sensitive to physical shock. Improper handling can cause damage and
permanent loss of data.
• Before removing the drive, suggest the customer to backup all the information on
it if possible.
• Never remove the drive while the system is operating or in suspend mode.
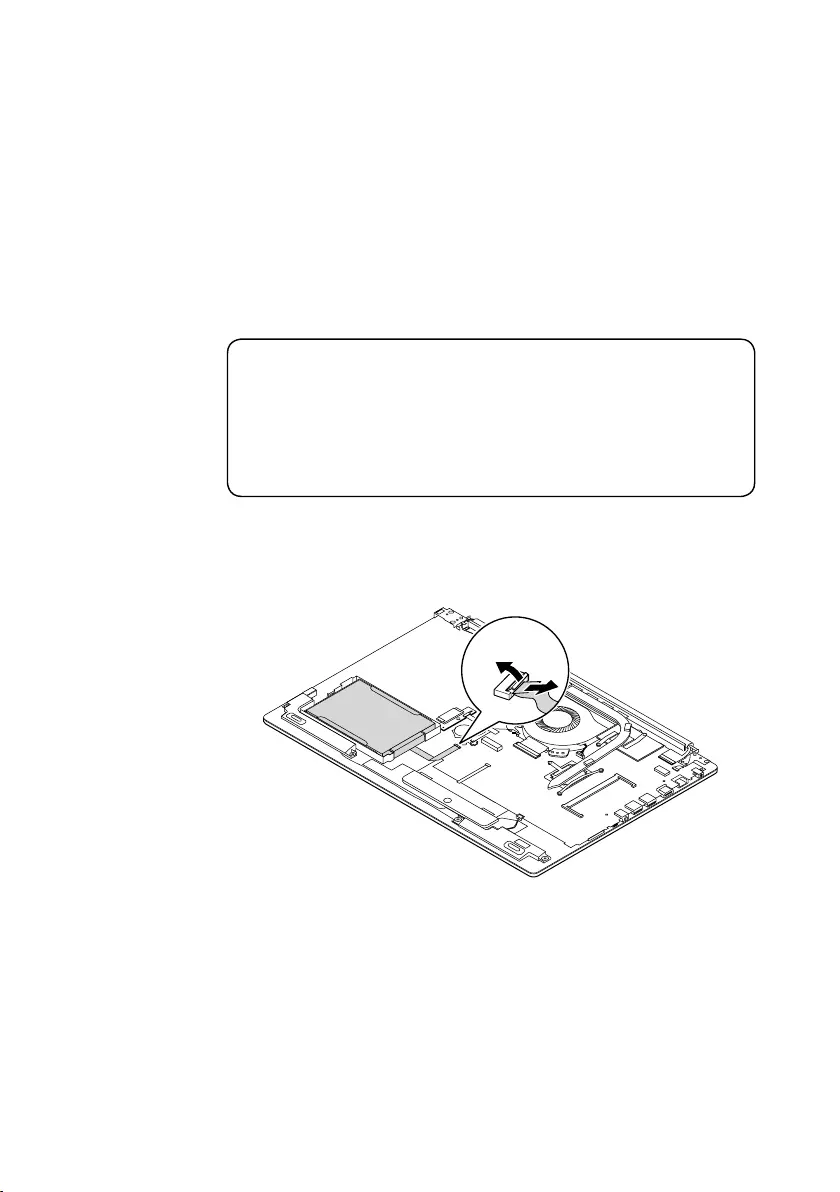
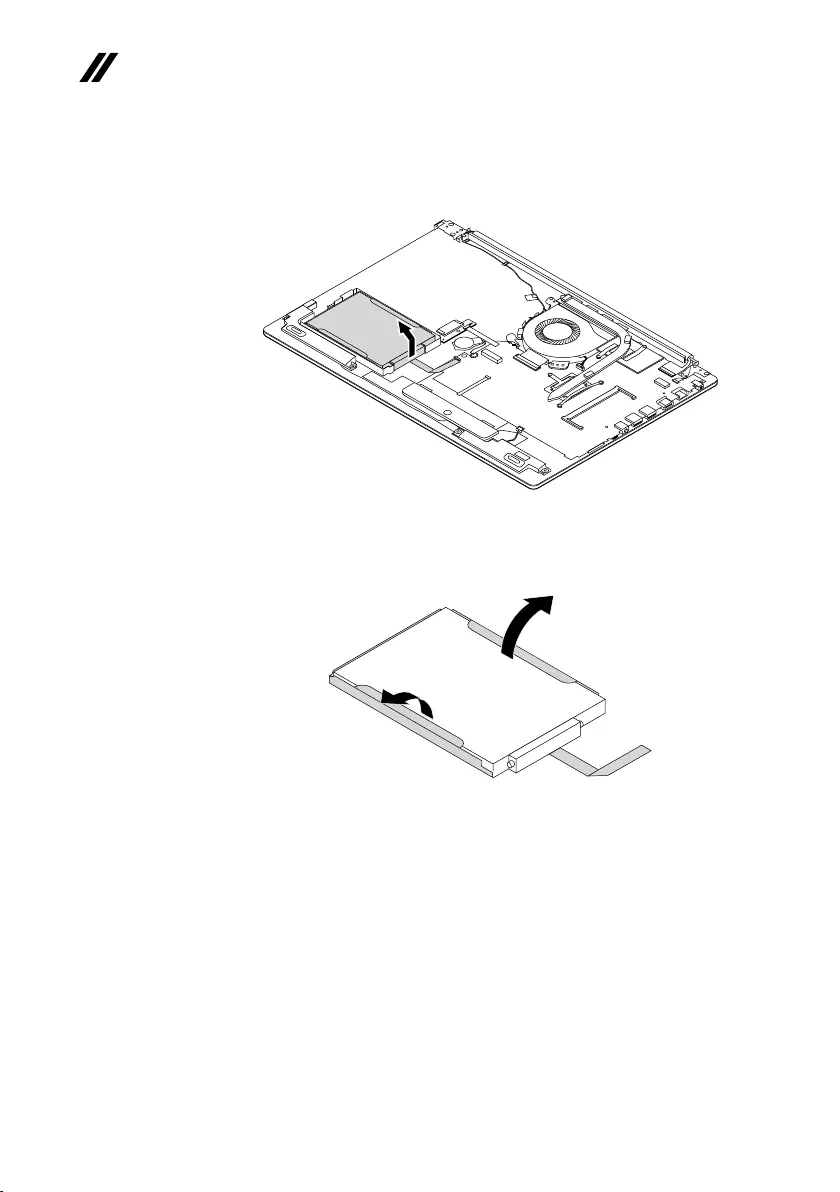
Figure 6. Removal steps of hard disk drive
DetachtheHDDboardconnectorinthedirectionshownbyarrows1and2.
RemovetheHDDboard.
b
a
When installing:MakesurethattheHDDboardconnectorisattachedrmly.
46
ideapad 320-14IAP/ideapad 320-14AST/ideapad 320-15IAP/ideapad 320-15AST/ideapad
320-15ABR/ideapad 320-15ABR Touch Hardware Maintenance Manual
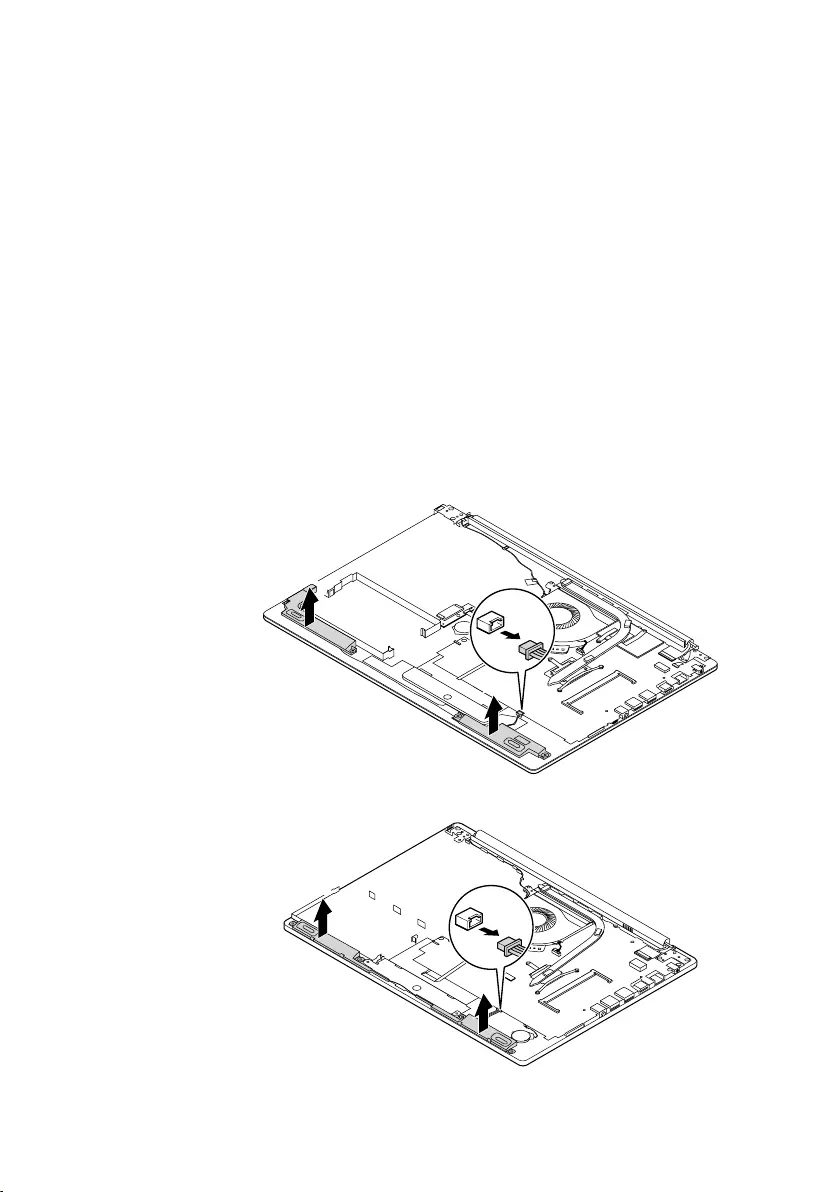
Figure 6. Removal steps of hard disk drive (continued)
Removetheharddiskdrivefromtheslotinthedirectionshownbyarrow3.
c
Detachthebracketfromtheharddiskdrive.
d
d
47
Lenovo ideapad 320-14IAP/ideapad 320-14AST/ideapad 320-15IAP/ideapad 320-
15AST/ideapad 320-15ABR/ideapad 320-15ABR Touch
1070 Speakers
Foraccess,removetheseFRUsinorder:
• “1010Opticaldrive”onpage35
• “1020Basecover”onpage36
• “1030Batterypack”onpage39
• “1040PCIExpressMiniCardforwirelessLAN”onpage41
• “1050DIMM”onpage43
• “1060Harddiskdrive”onpage45
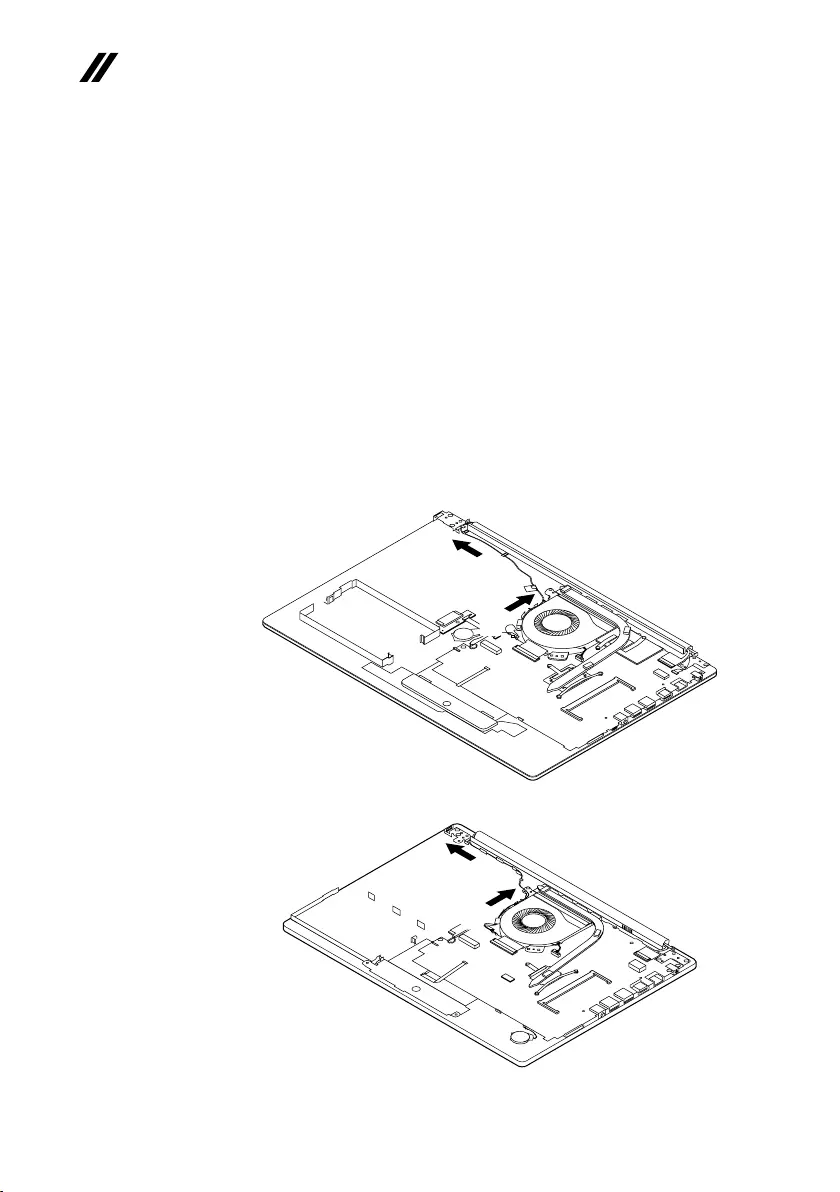
Figure 7. Removal steps of speakers
Unplugthespeakerconnector1.Thenremovethespeakers2.
ideapad 320-15IAP/ideapad 320-15AST/ideapad 320-15ABR/
ideapad 320-15ABR Touch
b
b
a
ideapad 320-14IAP/ideapad 320-14AST
b
b
a
When installing:Makesurethattheconnectorisattachedrmly.
48
ideapad 320-14IAP/ideapad 320-14AST/ideapad 320-15IAP/ideapad 320-15AST/ideapad
320-15ABR/ideapad 320-15ABR Touch Hardware Maintenance Manual
1080 Fan assembly and Heat Sink assembly
Foraccess,removetheseFRUsinorder:
• “1010Opticaldrive”onpage35
• “1020Basecover”onpage36
• “1030Batterypack”onpage39
• “1040PCIExpressMiniCardforwirelessLAN”onpage41
• “1050DIMM”onpage43
• “1060Harddiskdrive”onpage45
• “1070Speakers”onpage47
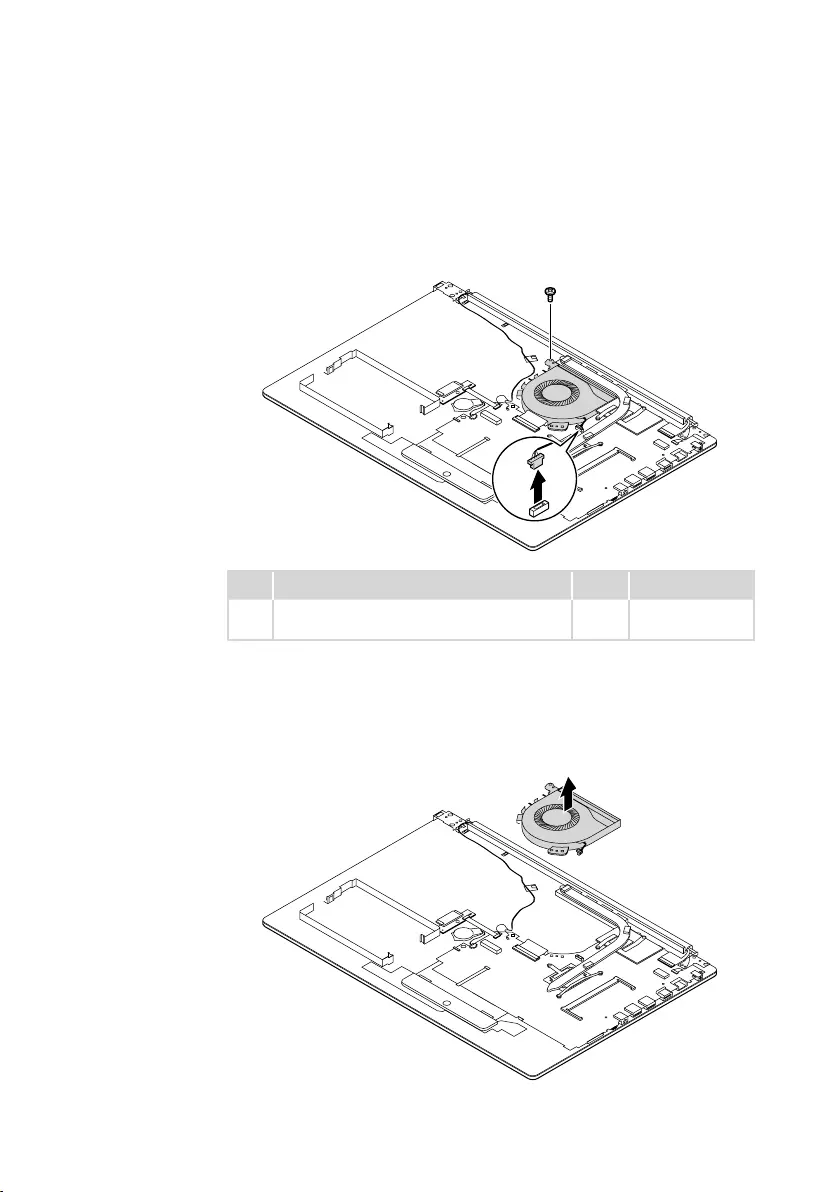
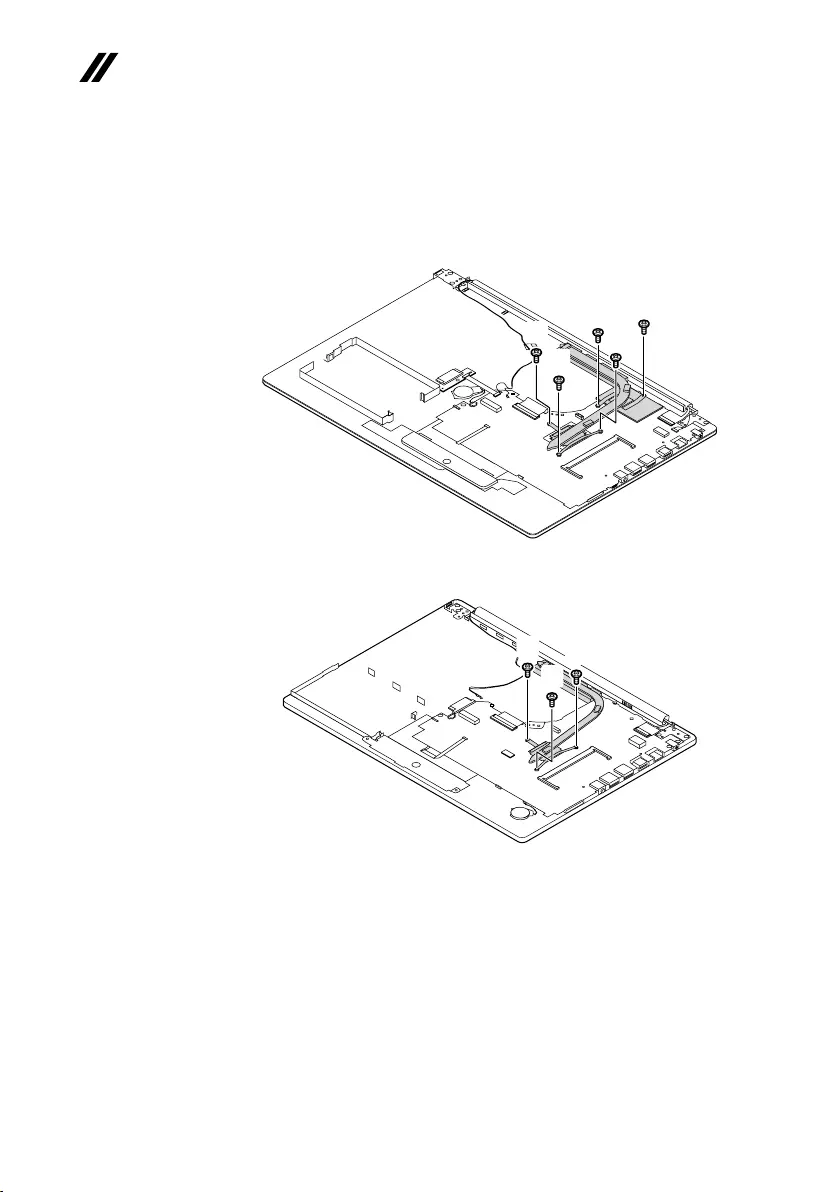
Figure 8. Removal steps of fan assembly and Heat Sink assembly
Releasethecablesfromthecableguidesinthedirectionshownbyarrows1.
ideapad 320-15IAP/ideapad 320-15AST/ideapad 320-15ABR/
ideapad 320-15ABR Touch
a
a
ideapad 320-14IAP/ideapad 320-14AST
a
a
When installing:Route theantenna cablesalong thecable guides.Asyou
routethecables,makesurethattheyarenotsubjectedtoanytension.Tension
couldcausethecablesto bedamagedbythecableguides,or awiretobe
broken.
49
Lenovo ideapad 320-14IAP/ideapad 320-14AST/ideapad 320-15IAP/ideapad 320-
15AST/ideapad 320-15ABR/ideapad 320-15ABR Touch
Figure 8. Removal steps of fan assembly and Heat Sink assembly (continued)
Unplugthefanconnectorinthedirection shownby arrow2.Removethe
screw3.
c
b
Step Screw (quantity) Color Torque
3M2×6mm,Phillipshead,nylok-coated(1)
fan—mb—logup&fan—logup
Black 1.85+/-0.15kgf/cm
When installing:Makesurethattheconnectorisattachedrmly.
Removethefaninthedirectionshownbyarrow4.Becarefulnottodamage
theconnector.
d
50
ideapad 320-14IAP/ideapad 320-14AST/ideapad 320-15IAP/ideapad 320-15AST/ideapad
320-15ABR/ideapad 320-15ABR Touch Hardware Maintenance Manual
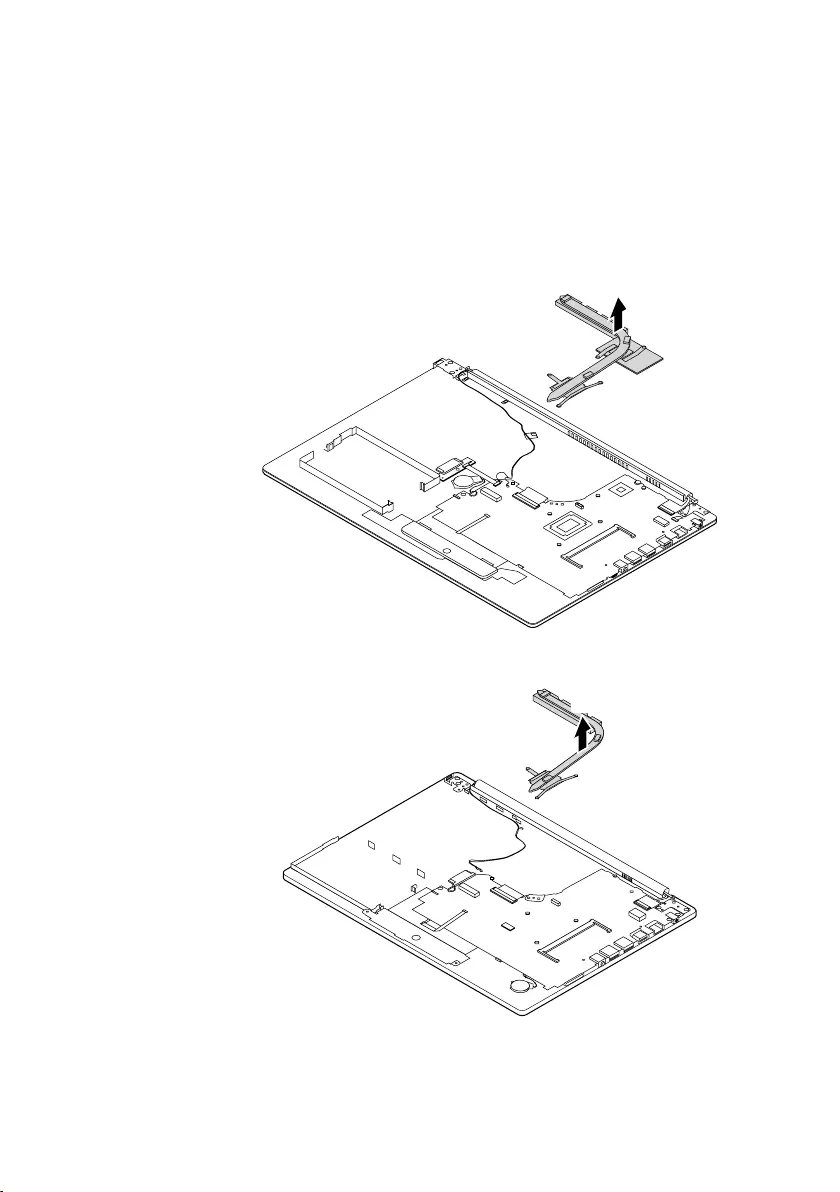
Figure 8. Removal steps of fan assembly and Heat Sink assembly (continued)
Removethescrews5.
ideapad 320-15IAP/ideapad 320-15AST/ideapad 320-15ABR/
ideapad 320-15ABR Touch
e
e
e
e
e
ideapad 320-14IAP/ideapad 320-14AST
e
e
e
51
Lenovo ideapad 320-14IAP/ideapad 320-14AST/ideapad 320-15IAP/ideapad 320-
15AST/ideapad 320-15ABR/ideapad 320-15ABR Touch
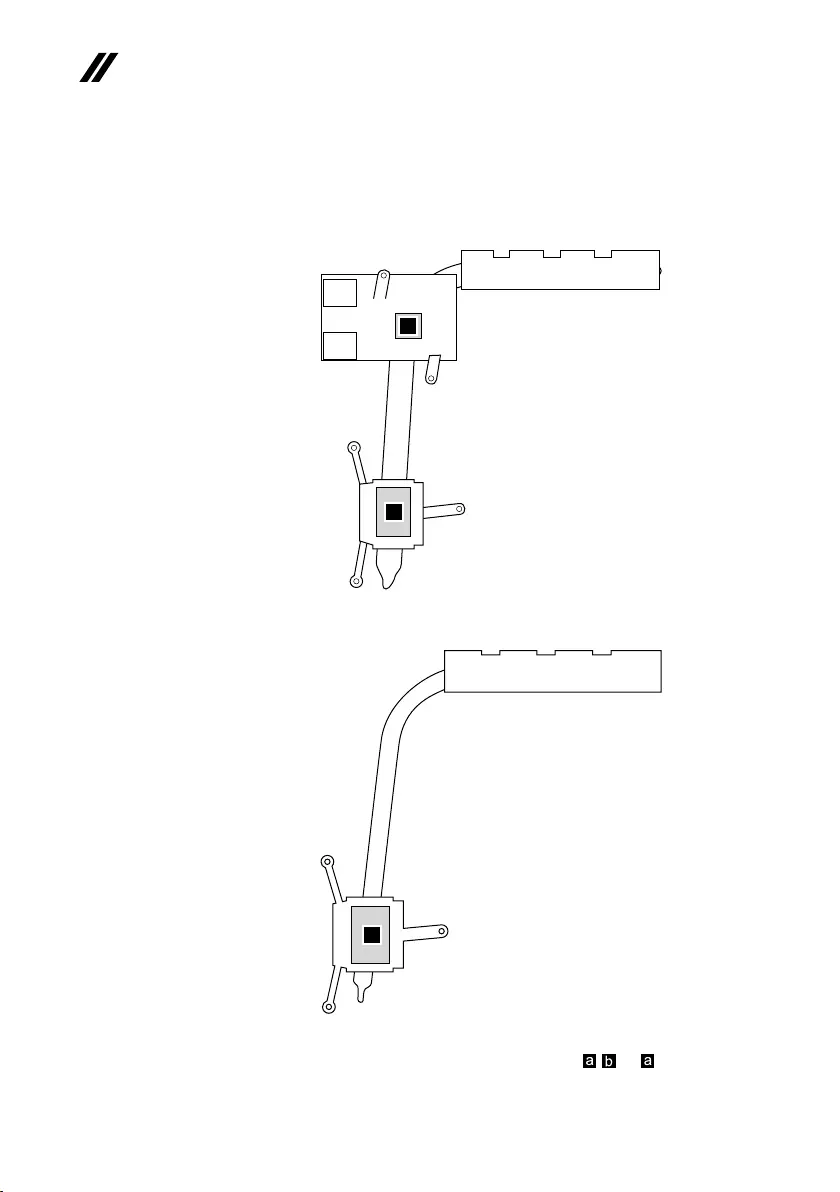
Figure 8. Removal steps of fan assembly and Heat Sink assembly (continued)
Lifttheheatsinkinthedirectionshownbyarrows6.
ideapad 320-15IAP/ideapad 320-15AST/ideapad 320-15ABR/
ideapad 320-15ABR Touch
f
ideapad 320-14IAP/ideapad 320-14AST
f
52
ideapad 320-14IAP/ideapad 320-14AST/ideapad 320-15IAP/ideapad 320-15AST/ideapad
320-15ABR/ideapad 320-15ABR Touch Hardware Maintenance Manual
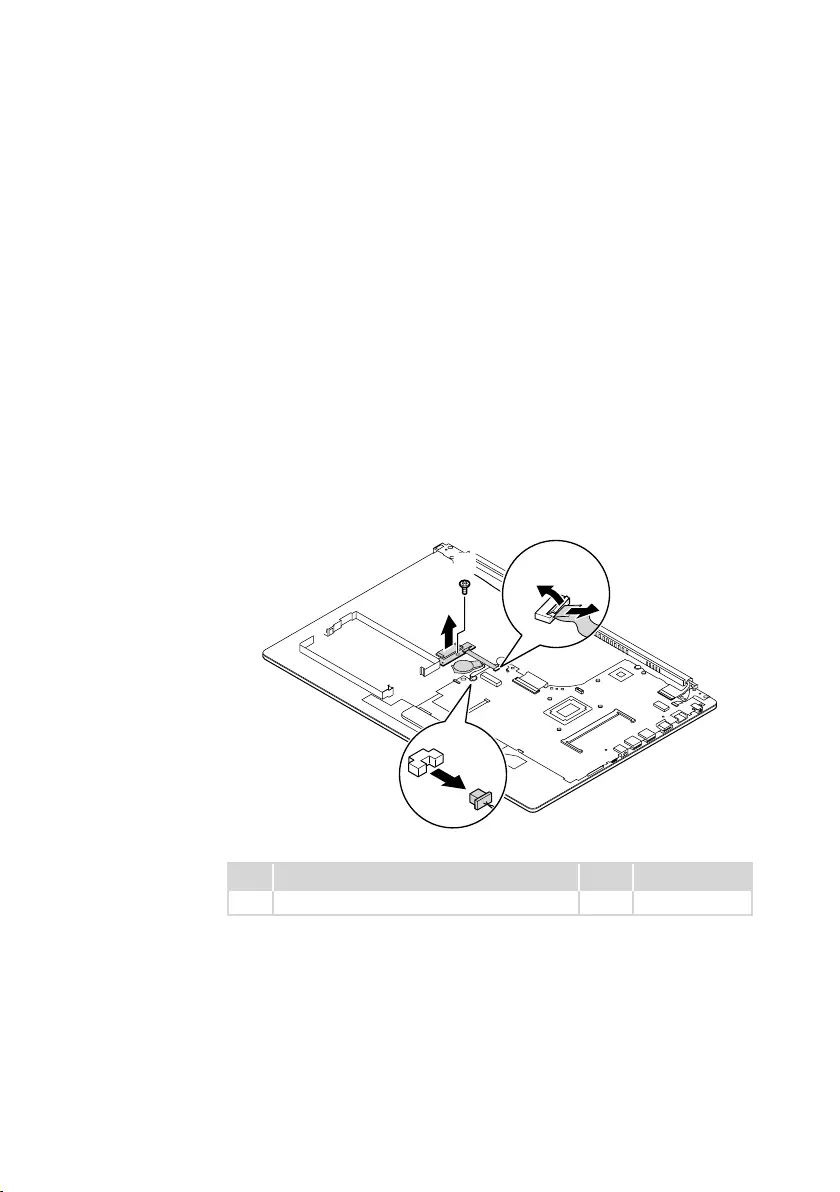
Figure 8. Removal steps of fan assembly and Heat Sink assembly (continued)
ideapad 320-15IAP/ideapad 320-15AST/ideapad 320-15ABR/
ideapad 320-15ABR Touch
a
b
ideapad 320-14IAP/ideapad 320-14AST
a
When installing:Beforeyouattachthefanassemblytothecomputer,apply
thermalgrease,atanamount of0.2grams,tothe or partshownin
thegure above.Eithertoomuchortoolittlegreaseapplicationcancausea
thermalproblemduetoimperfectcontactwithacomponent.
53
Lenovo ideapad 320-14IAP/ideapad 320-14AST/ideapad 320-15IAP/ideapad 320-
15AST/ideapad 320-15ABR/ideapad 320-15ABR Touch
1090 ODD transfer board, backup battery
Foraccess,removetheseFRUsinorder:
• “1010Opticaldrive”onpage35
• “1020Basecover”onpage36
• “1030Batterypack”onpage39
• “1040PCIExpressMiniCardforwirelessLAN”onpage41
• “1050DIMM”onpage43
• “1060Harddiskdrive”onpage45
• “1070Speakers”onpage47
• “1080FanassemblyandHeatSinkassembly”onpage48
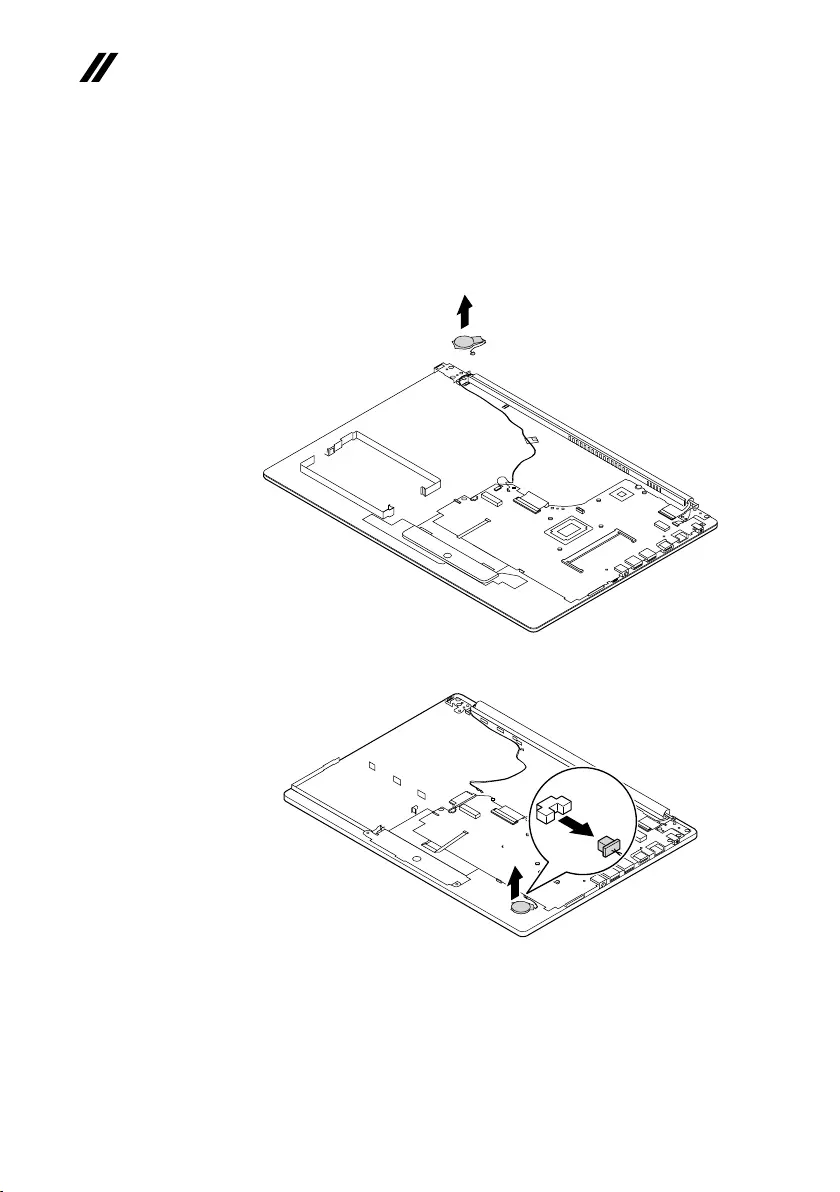
Figure 9. Removal steps of ODD transfer board, backup battery
Detachthesystemboardconnectorinthedirectionsshownbyarrows1and2.
Unplugthebackupbatteryconnectorinthedirectionshownbyarrow3.
Removethescrew4.RemovetheODDtransferboardinthedirectionshown
byarrow5.
e
d
b
a
c
Step Screw (quantity) Color Torque
4M2×3mm,Phillips-head,nylok-coated(1) Silver 1.85+/-0.15kgf/cm
When installing:Makesurethattheconnectorsareattachedrmly.
54
ideapad 320-14IAP/ideapad 320-14AST/ideapad 320-15IAP/ideapad 320-15AST/ideapad
320-15ABR/ideapad 320-15ABR Touch Hardware Maintenance Manual
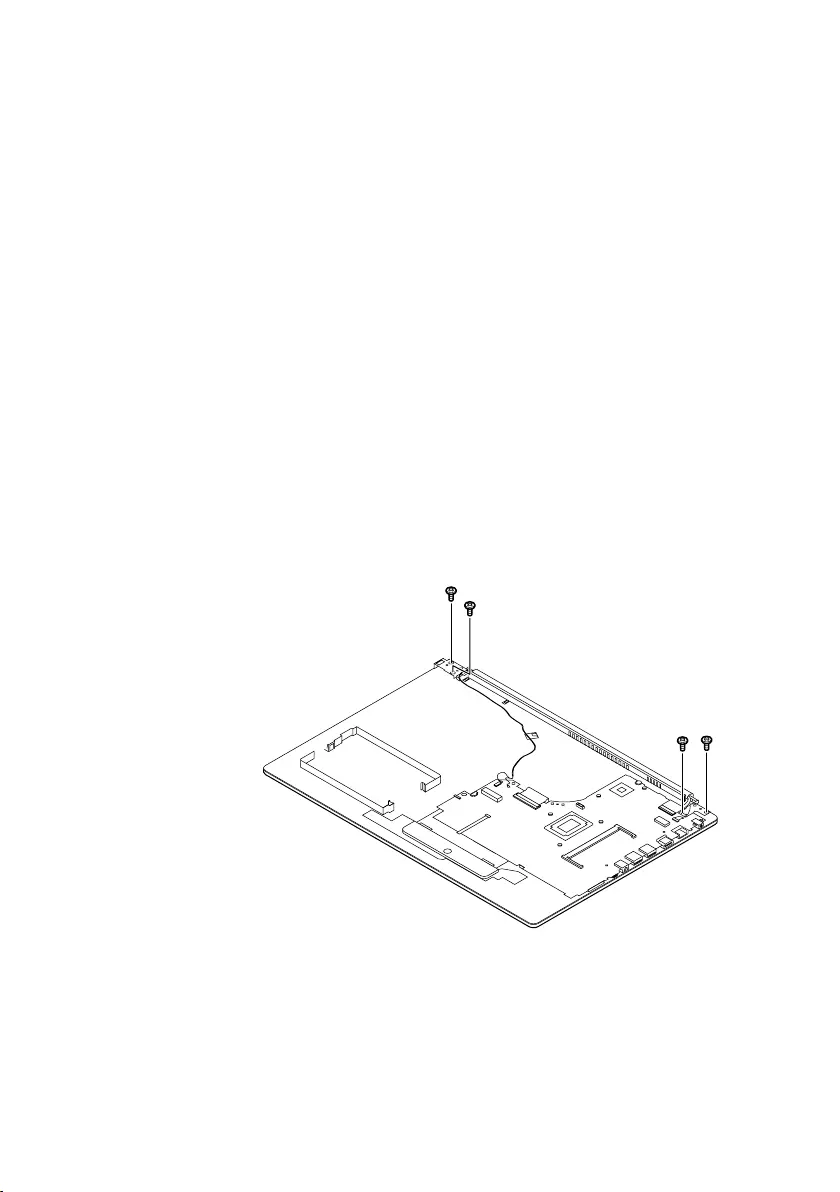
Figure 9. Removal steps of ODD transfer board, backup battery (continued)
Removethebackupbatteryinthedirectionshownbyarrow6.
ideapad 320-15IAP/ideapad 320-15AST/ideapad 320-15ABR/
ideapad 320-15ABR Touch
f
ideapad 320-14IAP/ideapad 320-14AST
f
c
When installing:Makesurethattheconnectorisattachedrmly.
55
Lenovo ideapad 320-14IAP/ideapad 320-14AST/ideapad 320-15IAP/ideapad 320-
15AST/ideapad 320-15ABR/ideapad 320-15ABR Touch
1100 Upper case
Foraccess,removetheseFRUsinorder:
• “1010Opticaldrive”onpage35
• “1020Basecover”onpage36
• “1030Batterypack”onpage39
• “1040PCIExpressMiniCardforwirelessLAN”onpage41
• “1050DIMM”onpage43
• “1060Harddiskdrive”onpage45
• “1070Speakers”onpage47
• “1080FanassemblyandHeatSinkassembly”onpage48
• “1090ODDtransferboard,backupbattery”onpage53
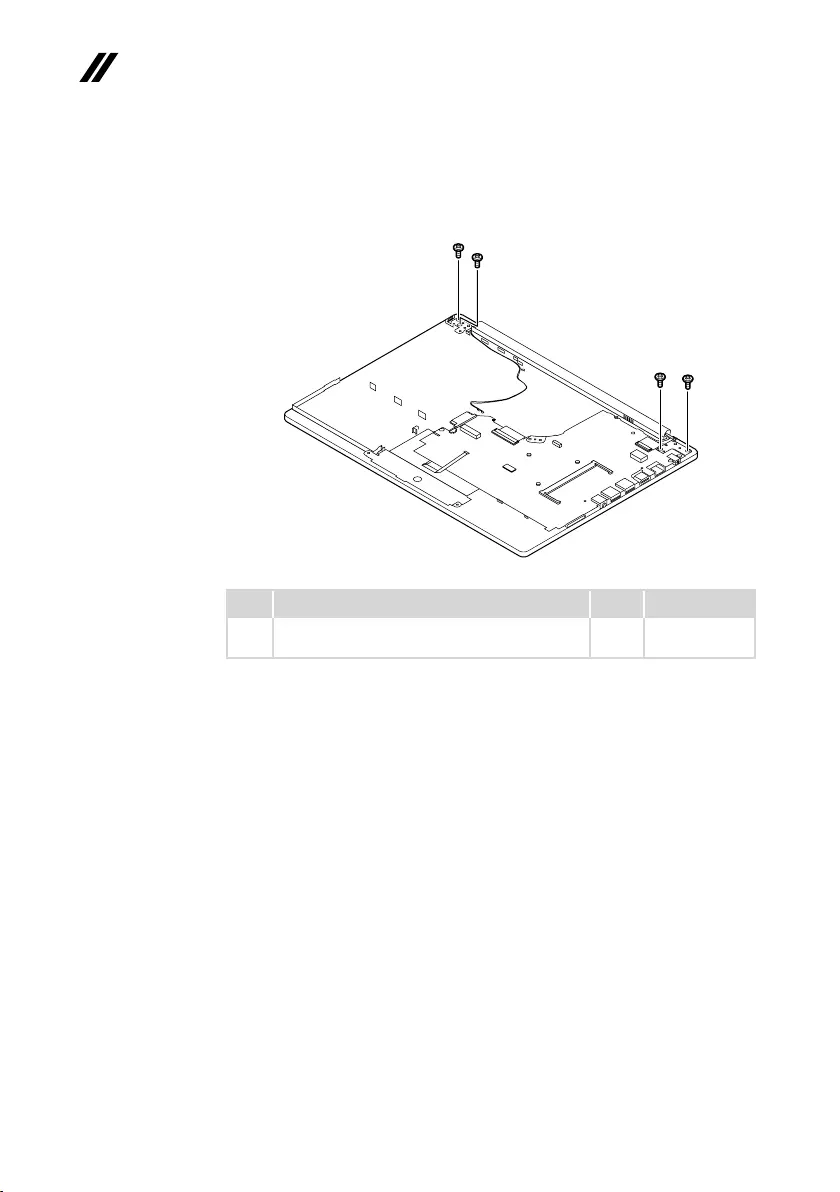
Figure 10. Removal steps of upper case
Removethescrews1.
ideapad 320-15IAP/ideapad 320-15AST/ideapad 320-15ABR/
ideapad 320-15ABR Touch
aa
a
a
56
ideapad 320-14IAP/ideapad 320-14AST/ideapad 320-15IAP/ideapad 320-15AST/ideapad
320-15ABR/ideapad 320-15ABR Touch Hardware Maintenance Manual
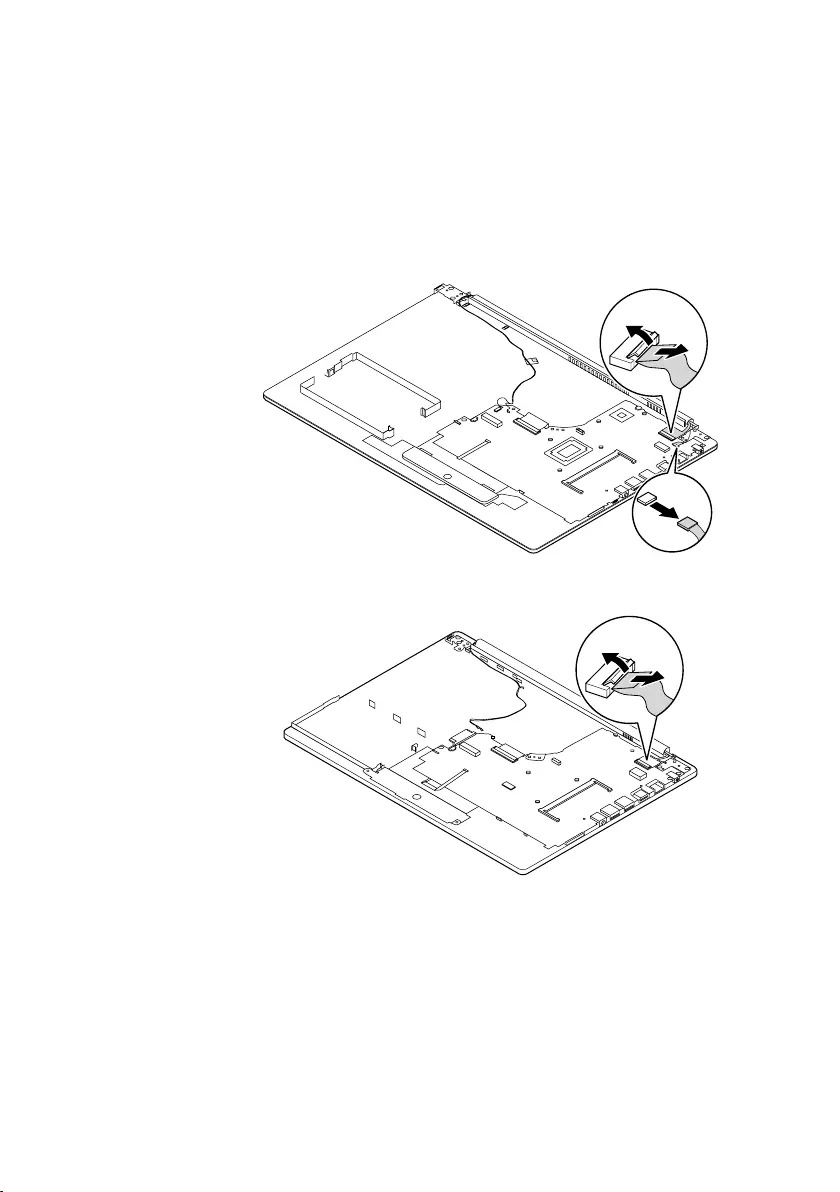
Figure 10. Removal steps of upper case (continued)
ideapad 320-14IAP/ideapad 320-14AST
aa
aa
Step Screw (quantity) Color Torque
1M2.5×5mm,Phillips-head,nylok-coated(4)
leftsidehinge—logup&rightsidehinge—logup Black 3+/-0.3kgf/cm
57
Lenovo ideapad 320-14IAP/ideapad 320-14AST/ideapad 320-15IAP/ideapad 320-
15AST/ideapad 320-15ABR/ideapad 320-15ABR Touch
Figure 10. Removal steps of upper case (continued)
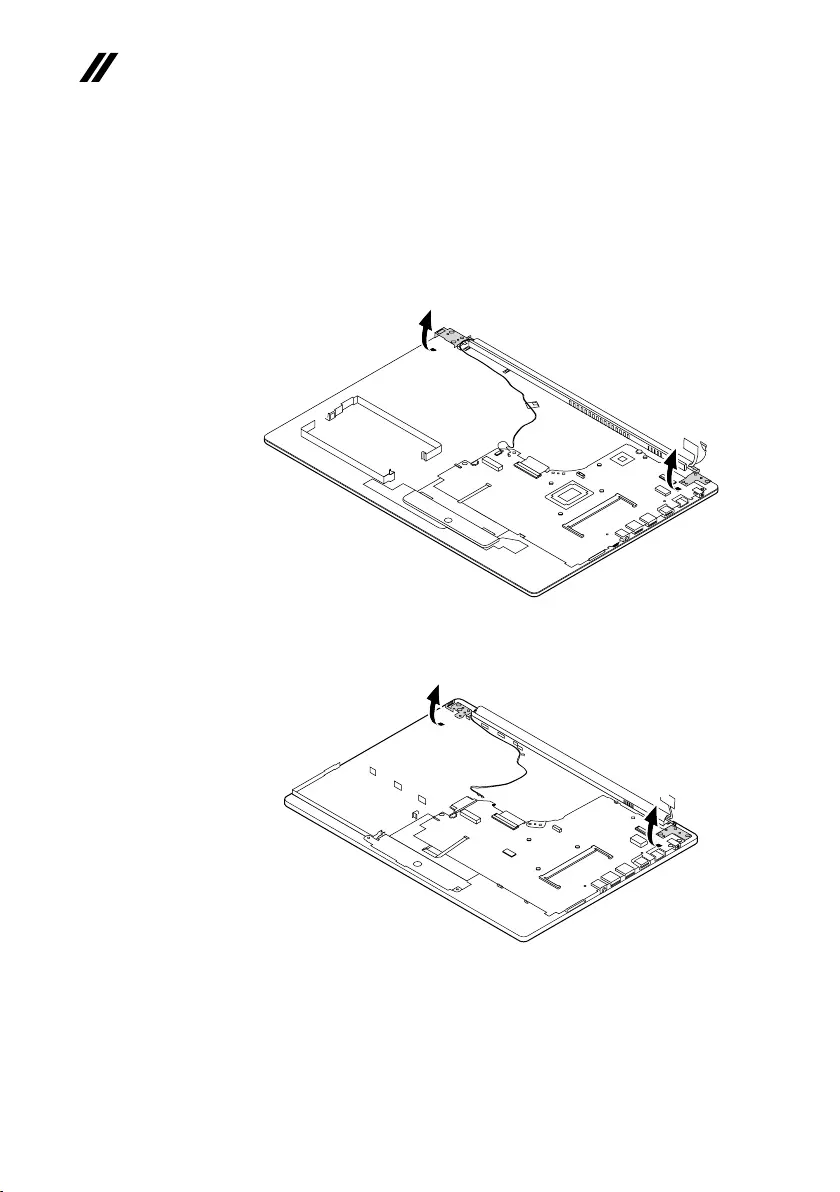
DetachtheLCDunitconnectorsinthedirectionsshownbyarrows2to4.
ideapad 320-15IAP/ideapad 320-15AST/ideapad 320-15ABR/
ideapad 320-15ABR Touch
c
b
d
ideapad 320-14IAP/ideapad 320-14AST
c
b
58
ideapad 320-14IAP/ideapad 320-14AST/ideapad 320-15IAP/ideapad 320-15AST/ideapad
320-15ABR/ideapad 320-15ABR Touch Hardware Maintenance Manual
Figure 10. Removal steps of upper case (continued)
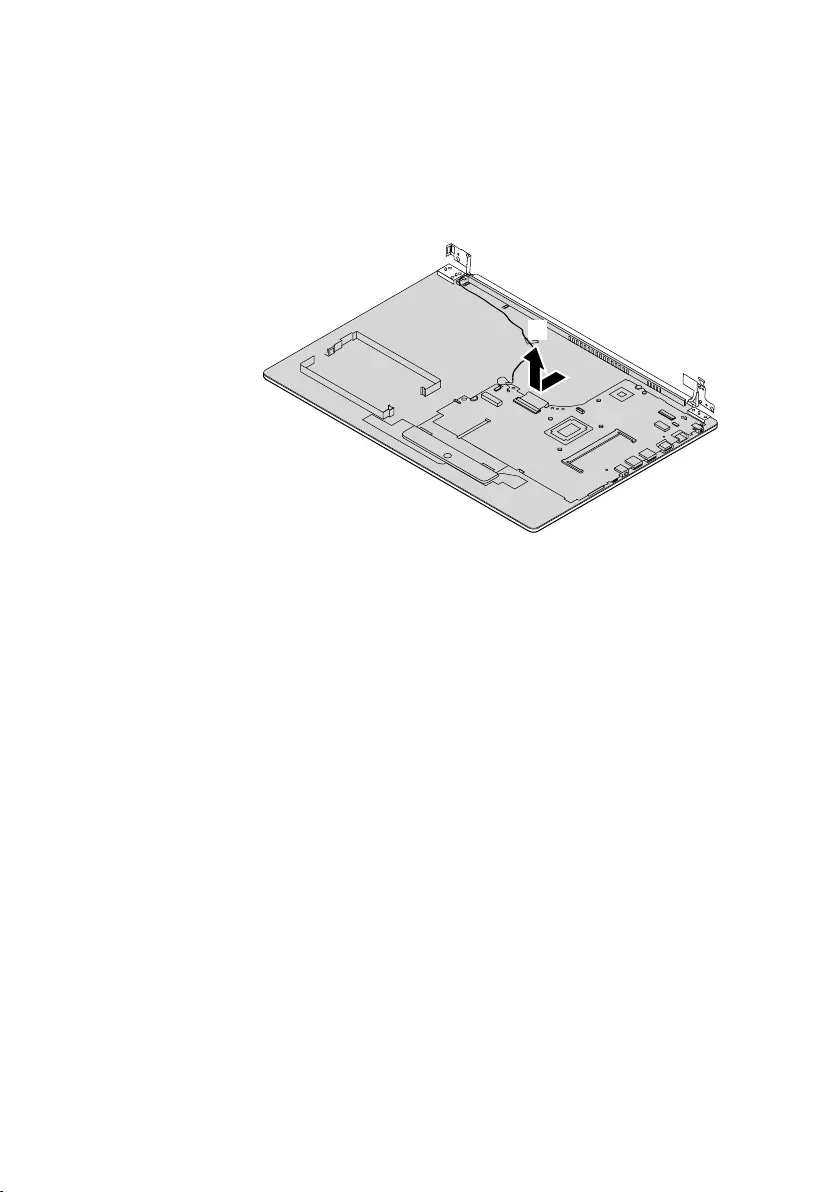
Openthehingeinthedirectionshownbyarrows5.
ideapad 320-15IAP/ideapad 320-15AST/ideapad 320-15ABR/
ideapad 320-15ABR Touch
e
e
ideapad 320-14IAP/ideapad 320-14AST
e
e
59
Lenovo ideapad 320-14IAP/ideapad 320-14AST/ideapad 320-15IAP/ideapad 320-
15AST/ideapad 320-15ABR/ideapad 320-15ABR Touch
Figure 10. Removal steps of upper case (continued)
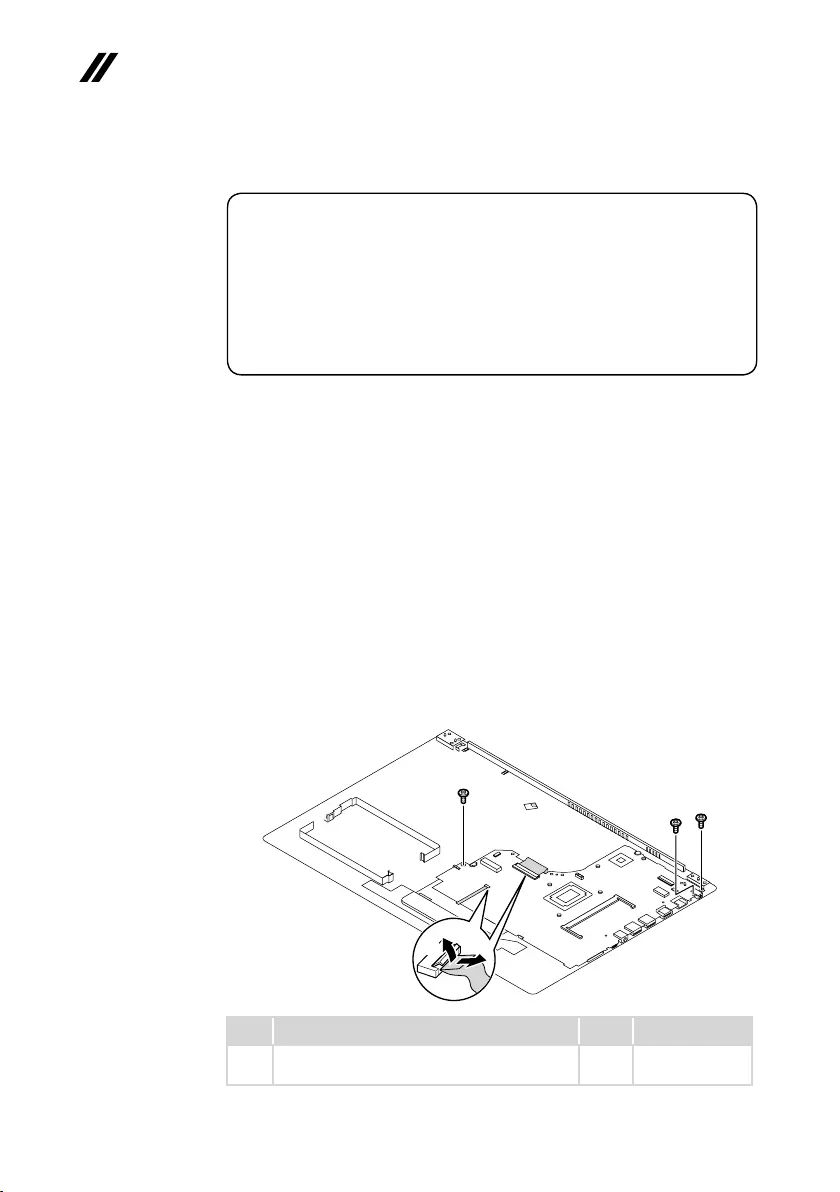
RemovetheuppercasefromtheLCD moduleinthedirectionsshownby
arrow6.
f
60
ideapad 320-14IAP/ideapad 320-14AST/ideapad 320-15IAP/ideapad 320-15AST/ideapad
320-15ABR/ideapad 320-15ABR Touch Hardware Maintenance Manual
1110
System board
Important notices for handling the system board:
When handling the system board, bear the following in mind.
• Be careful not to drop the system board on a bench top that has a hard surface,
such as metal, wood, or composite.
• Avoid rough handling of any kind.
• During the whole process, make sure not to drop or stack the system board.
• If you put a system board down, make sure to put it only on a padded surface such
as an ESD mat or conductive corrugated material.
Foraccess,removetheseFRUsinorder:
• “1010Opticaldrive”onpage35
• “1020Basecover”onpage36
• “1030Batterypack”onpage39
• “1040PCIExpressMiniCardforwirelessLAN”onpage41
• “1050DIMM”onpage43
• “1060Harddiskdrive”onpage45
• “1070Speakers”onpage47
• “1080FanassemblyandHeatSinkassembly”onpage48
• “1090ODDtransferboard,backupbattery”onpage53
• “1100Uppercase”onpage55
Figure 11. Removal steps of system board
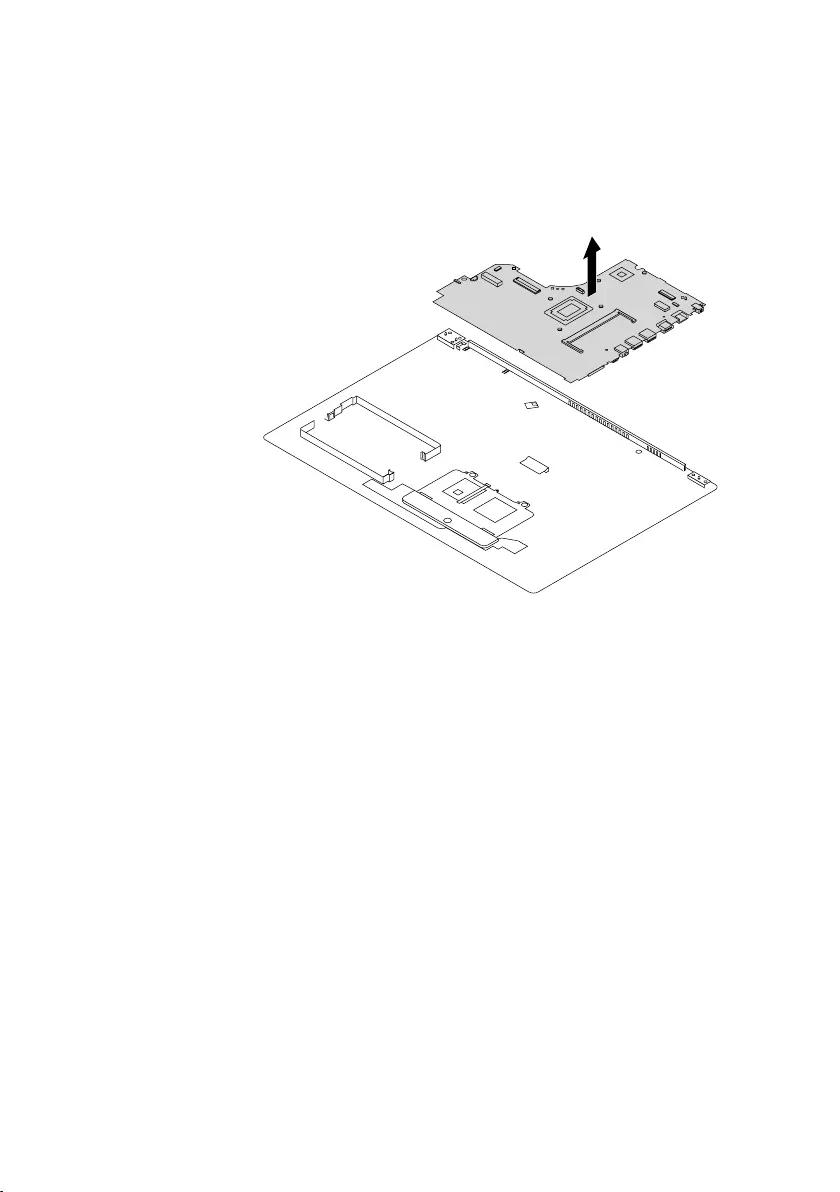
Disconnecttheconnectorsinthedirectionsshownbyarrows1and2.
Thenremovethescrews3.
b
c
c
c
a
Step Screw (quantity) Color Torque
3M2×3mm,Phillips-head,nylok-coated(3)
M/B—logup
Silver 1.85+/-0.15kgf/cm
61
Lenovo ideapad 320-14IAP/ideapad 320-14AST/ideapad 320-15IAP/ideapad 320-
15AST/ideapad 320-15ABR/ideapad 320-15ABR Touch
Figure 11. Removal steps of system board (continued)
Removethesystemboardinthedirectionshownbyarrow4.
d
62
ideapad 320-14IAP/ideapad 320-14AST/ideapad 320-15IAP/ideapad 320-15AST/ideapad
320-15ABR/ideapad 320-15ABR Touch Hardware Maintenance Manual
1120 LCD unit
Foraccess,removetheseFRUsinorder:
• “1010Opticaldrive”onpage35
• “1020Basecover”onpage36
• “1030Batterypack”onpage39
• “1040PCIExpressMiniCardforwirelessLAN”onpage41
• “1050DIMM”onpage43
• “1060Harddiskdrive”onpage45
• “1070Speakers”onpage47
• “1080FanassemblyandHeatSinkassembly”onpage48
• “1090ODDtransferboard,backupbattery”onpage53
• “1100Uppercase”onpage55
• “1110Systemboard”onpage60
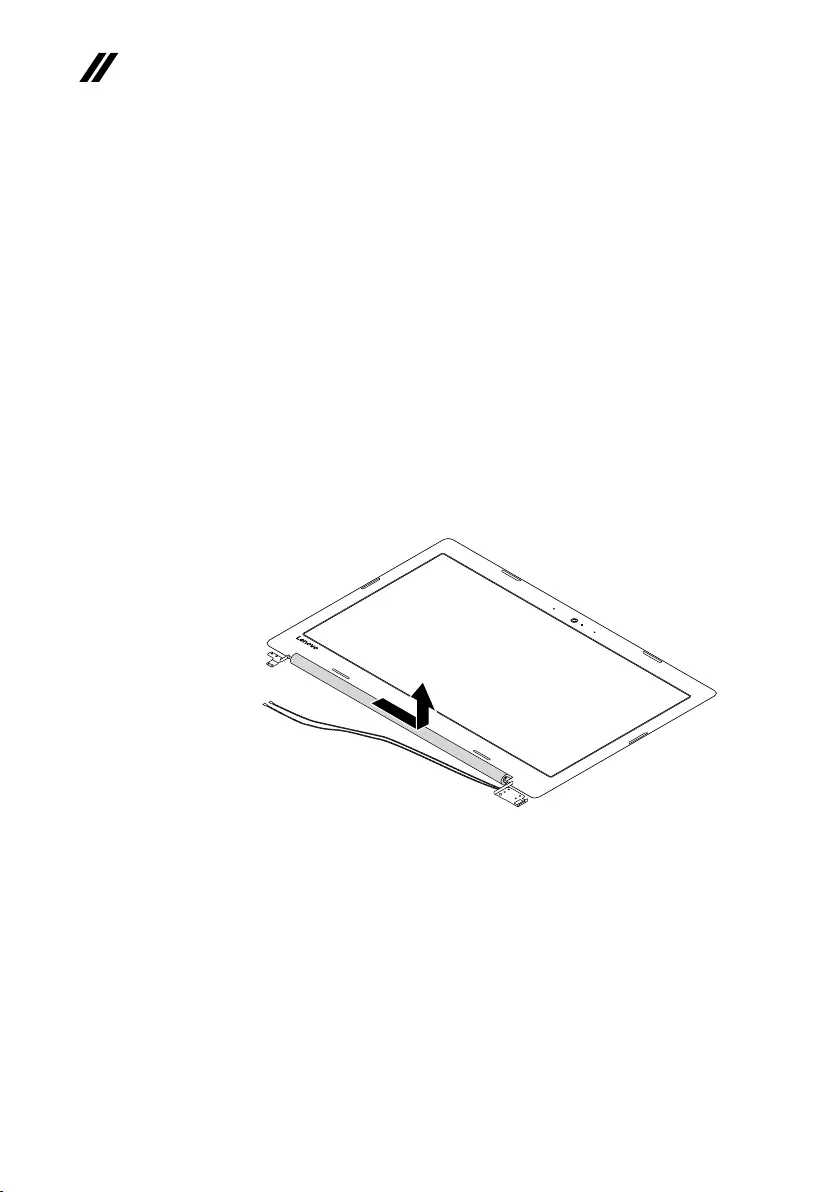
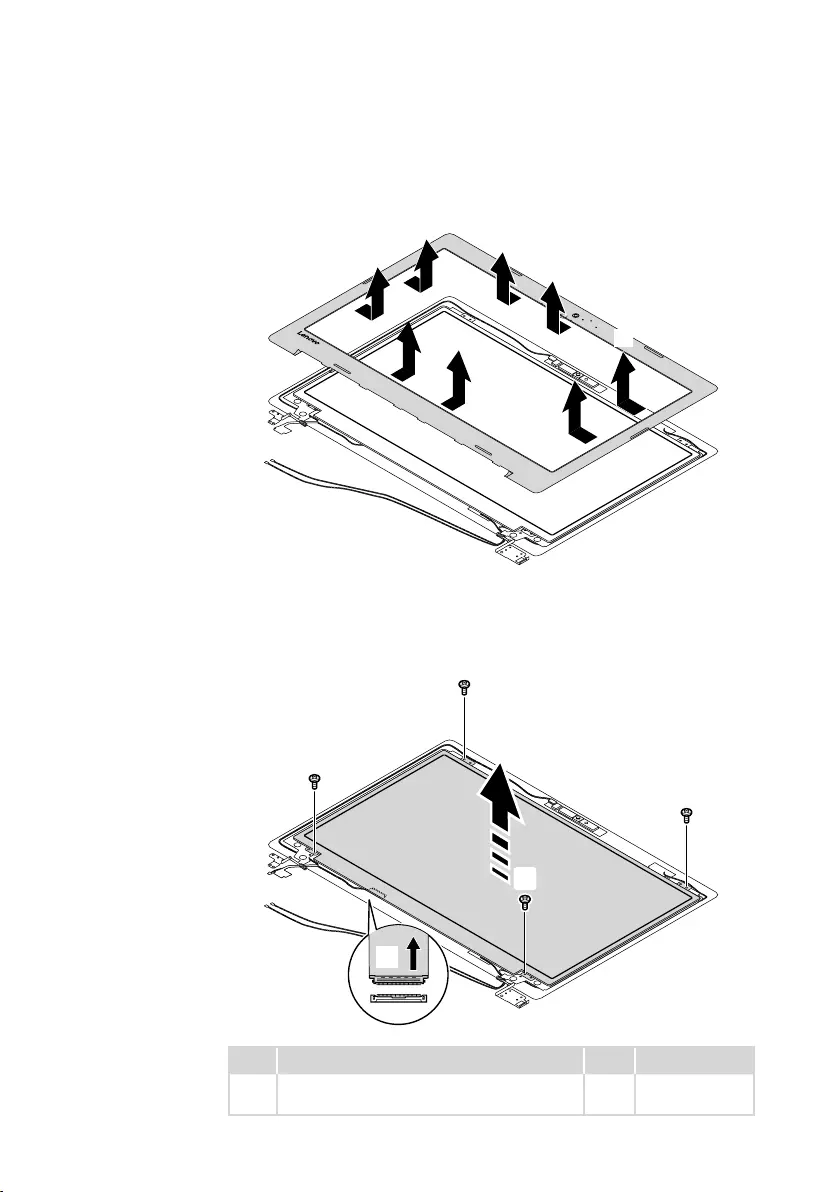
Figure 12. Removal steps of LCD unit
Pullthehingecaptotherightsidetoreleasethehooks.
63
Lenovo ideapad 320-14IAP/ideapad 320-14AST/ideapad 320-15IAP/ideapad 320-
15AST/ideapad 320-15ABR/ideapad 320-15ABR Touch
Figure 12. Removal steps of LCD unit (continued)
RemovetheLCDfrontbezelinthedirectionshownbyarrows1.
a
a
a
a
a
a
a
a
Removethescrews2.LifttheLCDmoduleslightly3.Disconnecttheconnectorin
thedirectionshownbyarrow4.ThenremovetheLCDmodule.
c
b
b
b
b
Step Screw (quantity) Color Torque
2M2×3mm,Phillips-head,nylok-coated(4)
lcdpanel—lcdcover
Silver 1.85+/-0.15kgf/cm
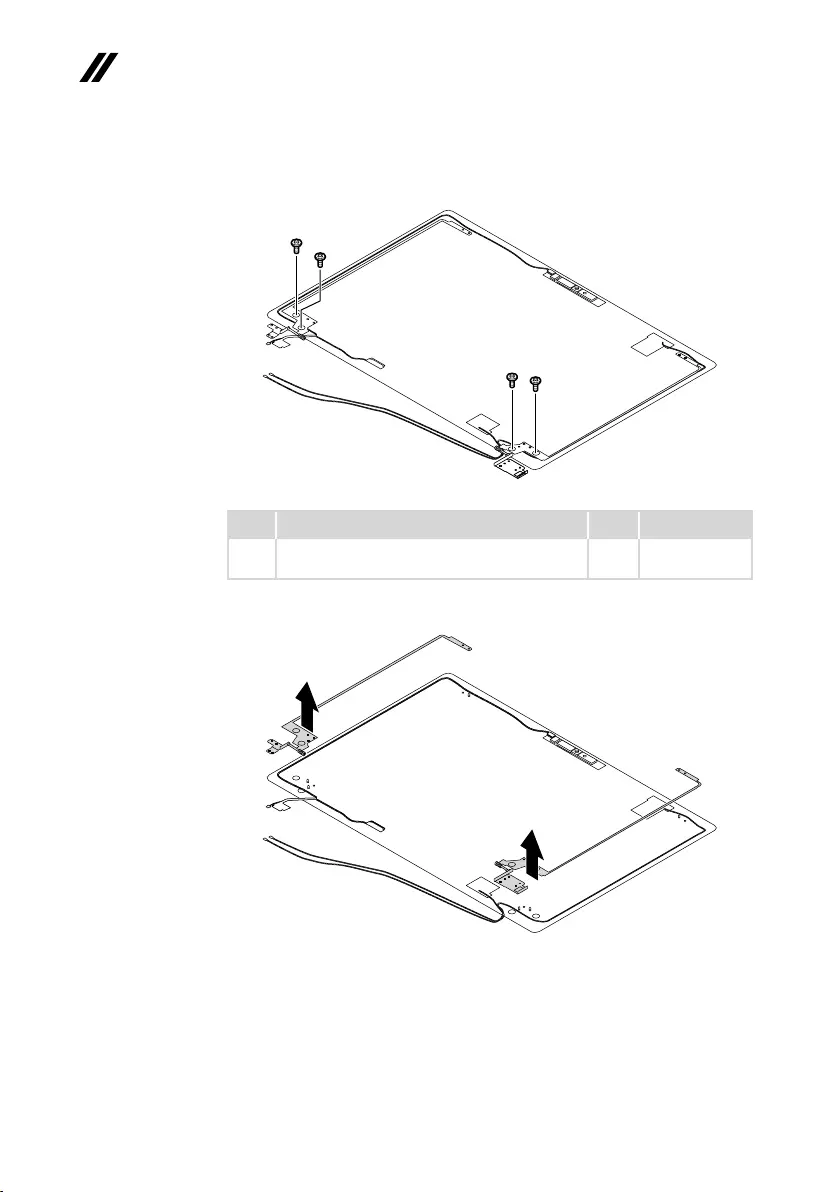
64
ideapad 320-14IAP/ideapad 320-14AST/ideapad 320-15IAP/ideapad 320-15AST/ideapad
320-15ABR/ideapad 320-15ABR Touch Hardware Maintenance Manual
Figure 12. Removal steps of LCD unit (continued)
Removethescrews5.
e
ee
e
Step Screw (quantity) Color Torque
5M2.5×2.5mm,Phillips-head,nylok-coated(4)
lcdbrk—lcdcover
Silver 3+/-0.3kgf/cm
RemovetheLCDhingesinthedirectionshownbyarrows6.
f
f
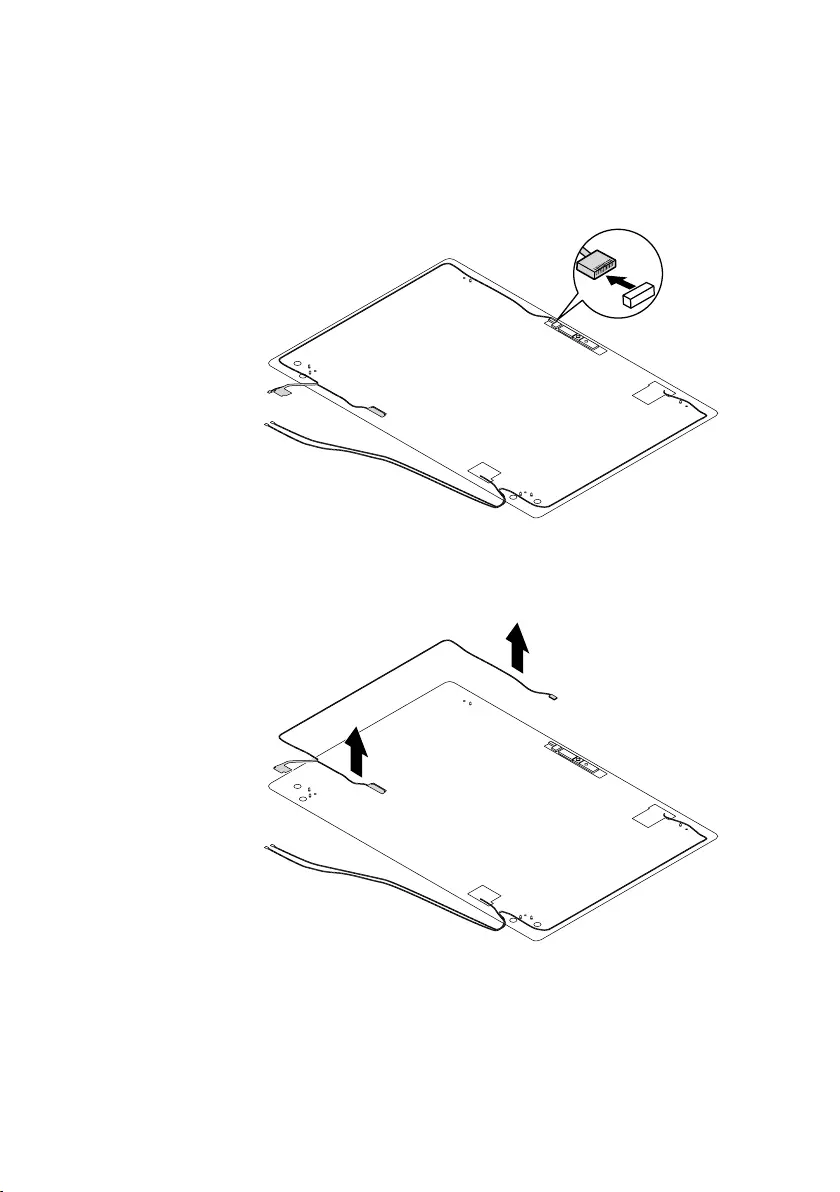
65
Lenovo ideapad 320-14IAP/ideapad 320-14AST/ideapad 320-15IAP/ideapad 320-
15AST/ideapad 320-15ABR/ideapad 320-15ABR Touch
Figure 12. Removal steps of LCD unit (continued)
Detachthecameraconnectorinthedirectionshownbyarrow1.
a
RemovetheLCDcableinthedirectionshownbyarrows2.
b
b
When installing:Makesurethattheconnectorisattachedrmlyandthatyou
donotpinchtheantennacableswhenyouattachtheLCDassembly.Routethe
LCDcablealongthecableguides.
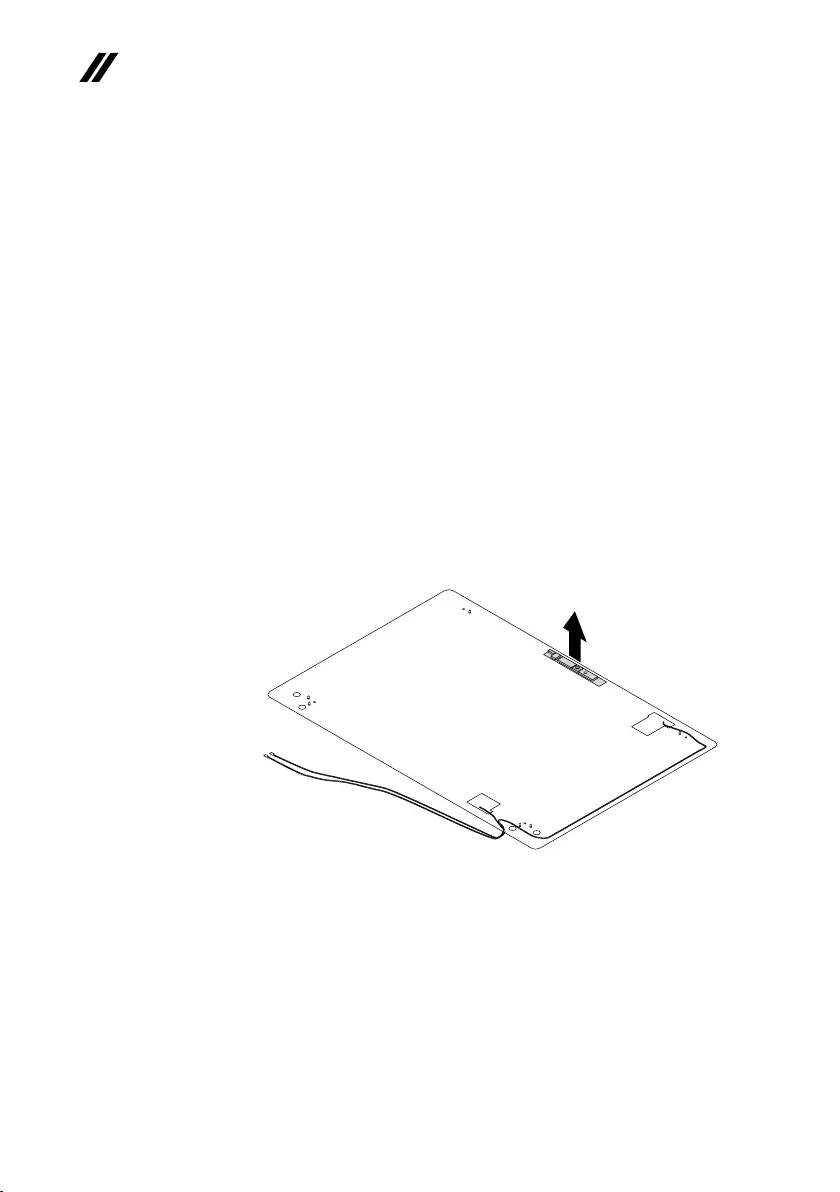
66
ideapad 320-14IAP/ideapad 320-14AST/ideapad 320-15IAP/ideapad 320-15AST/ideapad
320-15ABR/ideapad 320-15ABR Touch Hardware Maintenance Manual
1130 Integrated camera and antenna assembly
Foraccess,removetheseFRUsinorder:
• “1010Opticaldrive”onpage35
• “1020Basecover”onpage36
• “1030Batterypack”onpage39
• “1040PCIExpressMiniCardforwirelessLAN”onpage41
• “1050DIMM”onpage43
• “1060Harddiskdrive”onpage45
• “1070Speakers”onpage47
• “1080FanassemblyandHeatSinkassembly”onpage48
• “1090ODDtransferboard,backupbattery”onpage53
• “1100Uppercase”onpage55
• “1110Systemboard”onpage60
• “1120LCDunit”onpage62
Figure 13. Removal steps of integrated camera and antenna assembly
Note:TheintegratedcameraisstuckonthetopcenteroftheLCDcover.
Removetheintegratedcamerainthedirectionshownbyarrow1.
a
When installing:Sticktheintegratedcameratothe topcenteroftheLCD
coverandadjustitsplacementtomakesuretheconnectorisattachedrmly.
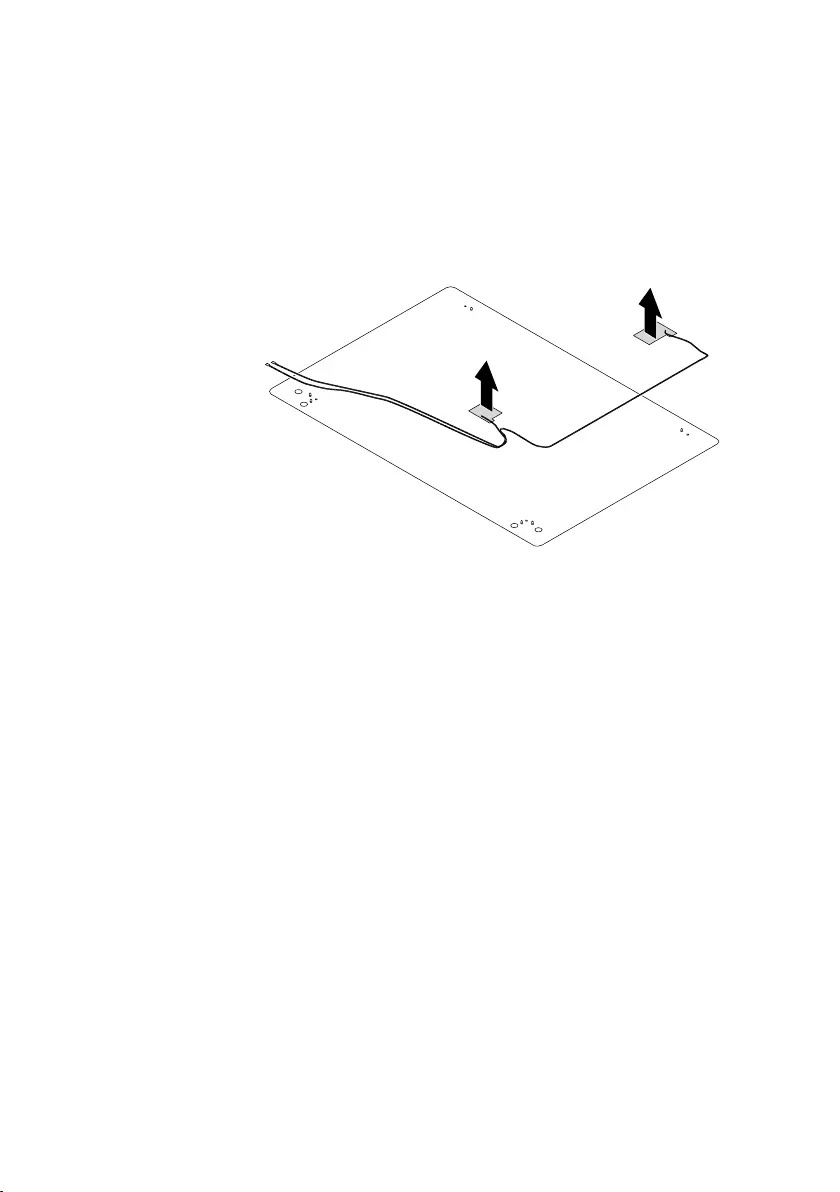
67
Lenovo ideapad 320-14IAP/ideapad 320-14AST/ideapad 320-15IAP/ideapad 320-
15AST/ideapad 320-15ABR/ideapad 320-15ABR Touch
Figure 13. Removal steps of integrated camera and antenna assembly
(continued)
Peeloffthe adhesivetapesecuringtheantennaboards,releasethecables
fromthecableguide,andthenremove theantennaassemblyinthedirection
shownbyarrows2.
b
b
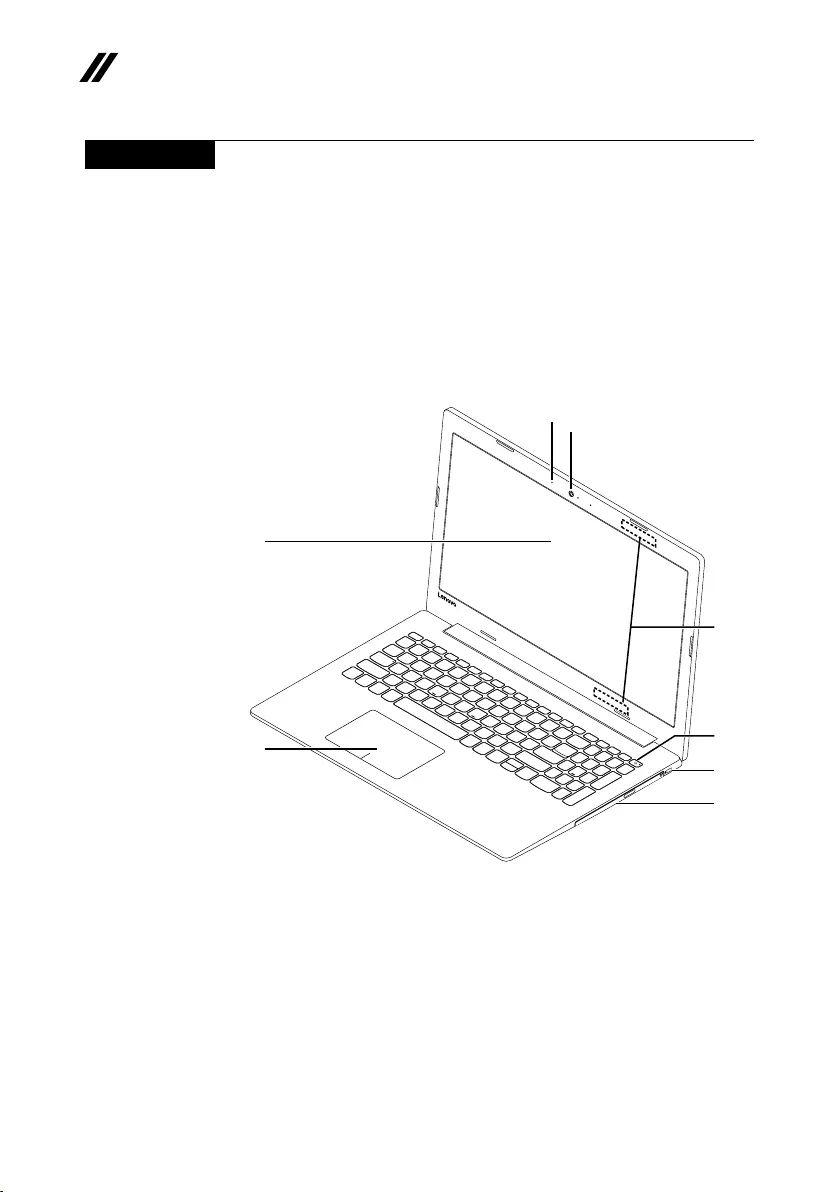
68
ideapad 320-14IAP/ideapad 320-14AST/ideapad 320-15IAP/ideapad 320-15AST/ideapad
320-15ABR/ideapad 320-15ABR Touch Hardware Maintenance Manual
Locations
Front view and right-side view
1 Integratedcamera
2 Built-inmicrophone
3 Computerdisplay
4 WirelessLANantennas
5 PowerKey
6 Touchpad
7 Opticaldiscdrive
8 KensingtonSecurityslot
f
c
e
h
g
d
a
b
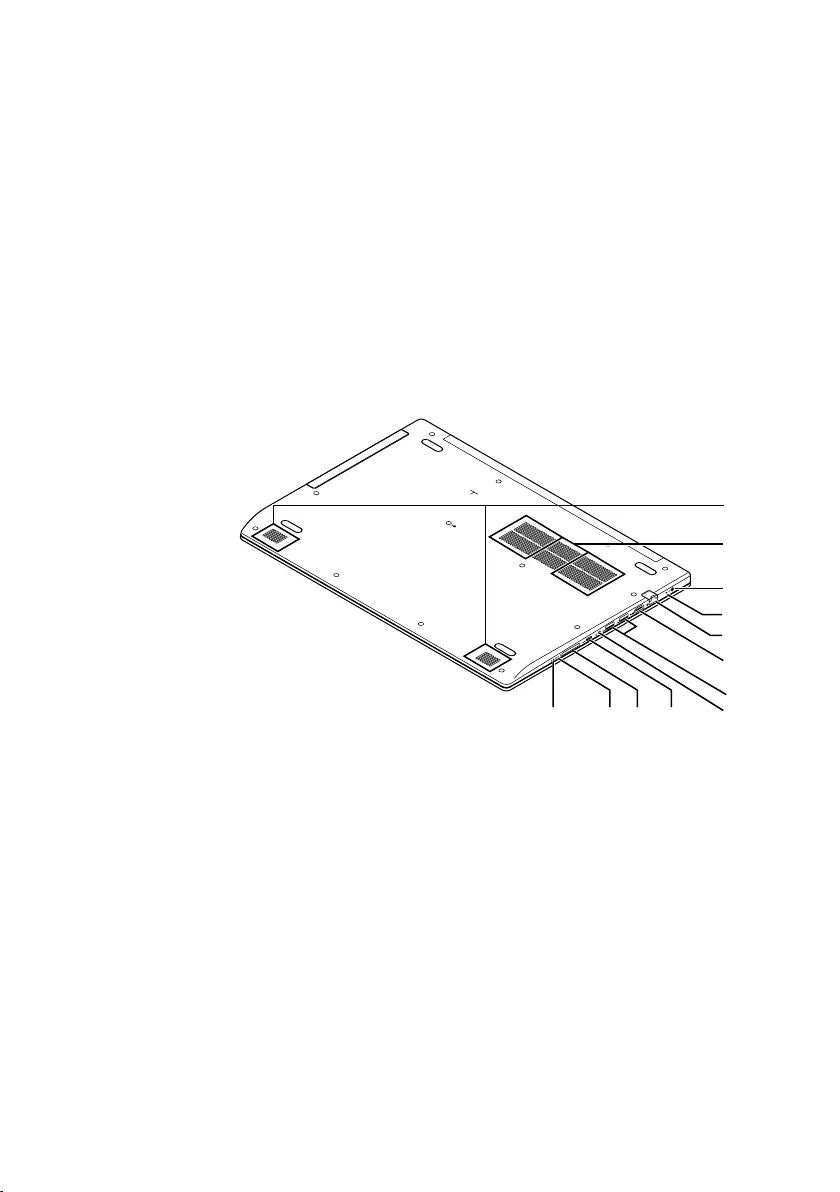
69
Lenovo ideapad 320-14IAP/ideapad 320-14AST/ideapad 320-15IAP/ideapad 320-
15AST/ideapad 320-15ABR/ideapad 320-15ABR Touch
Bottom and Left-side view
1 Speakers
2 Ventilationslots
3 ACpoweradapterjack
4 Battery/Chargingstatusindicator
5 RJ-45port
6 HDMIport
7 USBport
8 Comboaudiojack
9 Type-Cport(onlyonselectmodels)
J Memorycardslot
K Novobutton
L Powerstatusindicator
b
c
d
f
e
g
hi
a
jkl
70
ideapad 320-14IAP/ideapad 320-14AST/ideapad 320-15IAP/ideapad 320-15AST/ideapad
320-15ABR/ideapad 320-15ABR Touch Hardware Maintenance Manual
Parts list
Thissectionpresentsthefollowingserviceparts:
• “Overall”onpage71
• “LCDFRUs”onpage88
• “Miscellaneousparts”onpage91
• “ACadapters”onpage91
• “Screws”onpage93
Note:
Each FRU is available for all types or models, unless specic types or models are
specied.
Attention:
DonotattempttoreplaceanFRUonyourown.IfanFRUisdamaged,contact
aLenovoauthorizedserviceroramarketing representativeforreplacement
orrepair.Onlyqualiedtechnicianscaninspectorrepairthisproduct.
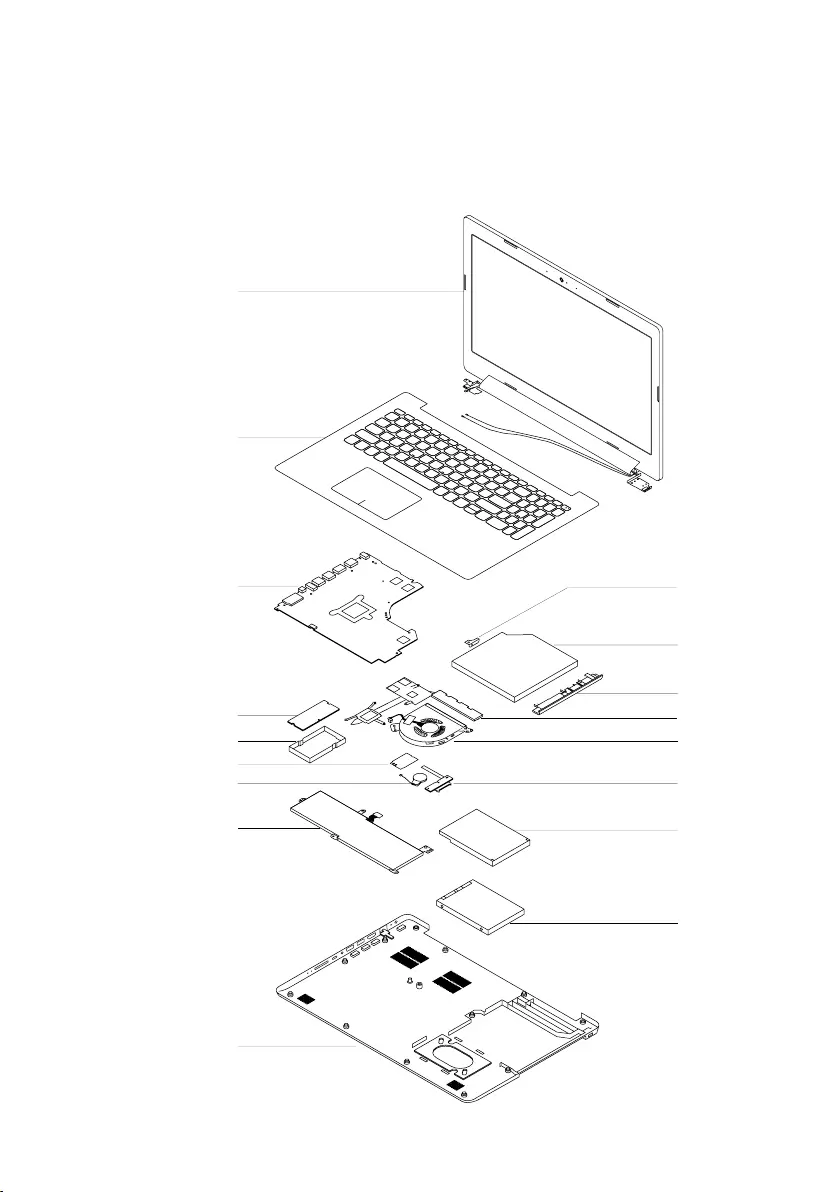
71
Lenovo ideapad 320-14IAP/ideapad 320-14AST/ideapad 320-15IAP/ideapad 320-
15AST/ideapad 320-15ABR/ideapad 320-15ABR Touch
Overall
ideapad 320-15IAP/ideapad 320-15AST/ideapad 320-15ABR/
ideapad 320-15ABR Touch
1
2
3
4
5
8
6
a
7
12
11
10
c
b
d
13
9
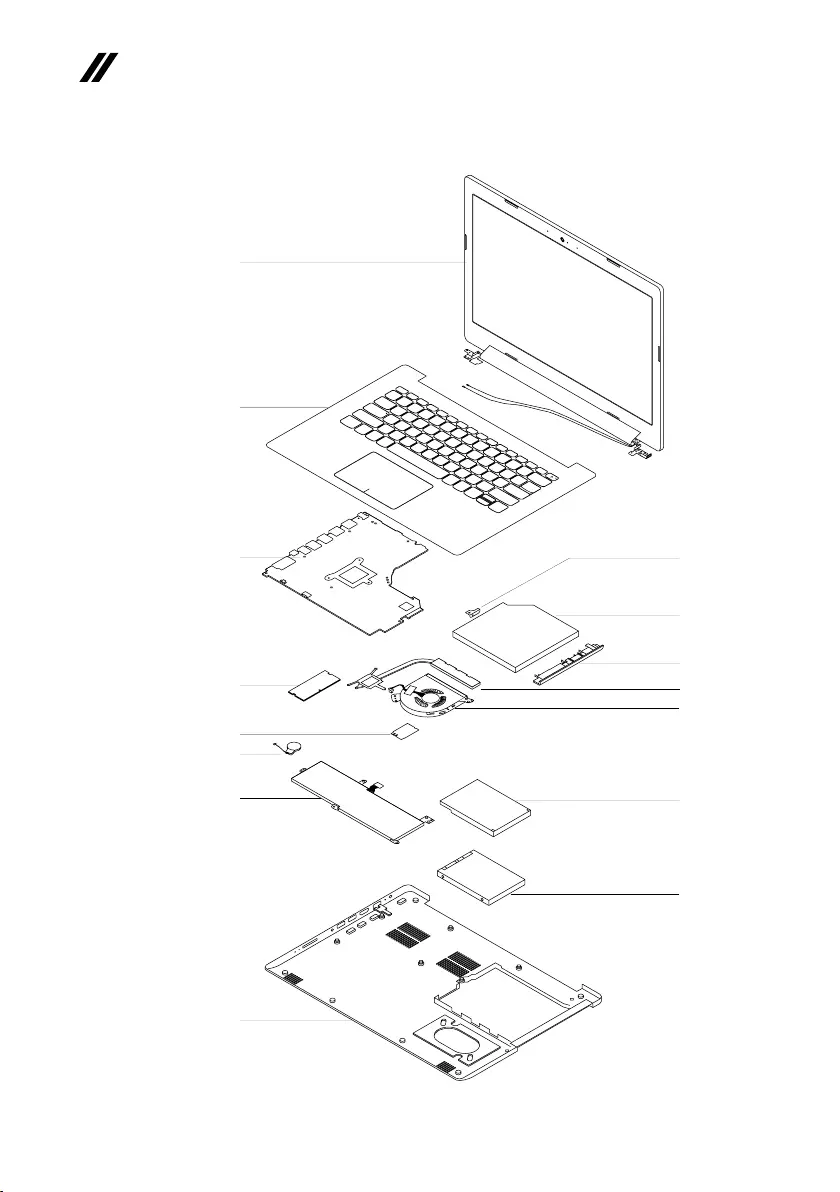
72
ideapad 320-14IAP/ideapad 320-14AST/ideapad 320-15IAP/ideapad 320-15AST/ideapad
320-15ABR/ideapad 320-15ABR Touch Hardware Maintenance Manual
ideapad 320-14IAP/ideapad 320-14AST
1
2
3
4
5
8
6
7
c
b
d
13
10
11
9

73
Lenovo ideapad 320-14IAP/ideapad 320-14AST/ideapad 320-15IAP/ideapad 320-
15AST/ideapad 320-15ABR/ideapad 320-15ABR Touch
Table 4. Parts list—Overall
No. FRU FRU no. CRU
ID.
a-d See“Miscellaneousparts”onpage91.
1 LCDunit(see“LCDFRUs”onpage88).
2 UPPERCASEASML80XKPGIMRUSKB 5CB0N82229
N
2 UPPERCASEASML80XKPGIMRUKKB 5CB0N82346
2 UPPERCASEASML80XKPGIMRITAKB 5CB0N82214
2 UPPERCASEASML80XKPGIMRSPAKB 5CB0N82297
2 UPPERCASEASML80XKPGIMRTURKB 5CB0N82249
2 UPPERCASEASML80XKPGIMRTHAKB 5CB0N82323
2 UPPERCASEASML80XKPGIMRPORKB 5CB0N82262
2 UPPERCASEASML80XKPGIMRLSPKB 5CB0N82327
2 UPPERCASEASML80XKPGIMRCFENKB 5CB0N82261
2 UPPERCASEASML80XKPGIMRKORKB 5CB0N82353
2 UPPERCASEASML80XKPGIMRTCKB 5CB0N82216
2 UPPERCASEASML80XKPGIMRRUKB 5CB0N82197
2 UPPERCASEASML80XKPGIMRFRKB 5CB0N82341
2 UPPERCASEASML80XKPGIMRGEKB 5CB0N82288
2 UPPERCASEASML80XKPGIMRARAKB 5CB0N82360
2 UPPERCASEASML80XKPGIMRBRAKB 5CB0N82300
2 UPPERCASEASML80XKPGIMRDUTCHKB 5CB0N82221
2 UPPERCASEASML80XKPGIMRGREKB 5CB0N82253
2 UPPERCASEASML80XKPGIMRHEBKB 5CB0N82271
2 UPPERCASEASML80XKPGIMRHUNKB 5CB0N82230
2 UPPERCASEASML80XKPGIMRNORDICKB 5CB0N82304
2 UPPERCASEASML80XKPGIMRBELKB 5CB0N82256
2 UPPERCASEASML80XKPGIMRILDKB 5CB0N82372
2 UPPERCASEASML80XKPGIMRSLEKB 5CB0N82281
2 UPPERCASEASML80XKPGIMRSWSKB 5CB0N82191
2 UPPERCASEASML80XKPGIMRUSINTKB 5CB0N82194
2 UPPERCASEASML80XKPGIMRCZHSLKKB 5CB0N82289
2 UPPERCASEASML80XKPGIMRBULKB 5CB0N82264
2 UPPERCASEASML80XKPGIMRINDIAKB 5CB0N82352
2 UPPERCASEASML80XKPGIMRFRARKB 5CB0N82348
2 UPPERCASEASML80XKPGIMRUKRKB 5CB0N82189
2 UPPERCASEASML80XKIGIMRUSKB 5CB0N82321
2 UPPERCASEASML80XKIGIMRUKKB 5CB0N82266
2 UPPERCASEASML80XKIGIMRITAKB 5CB0N82373
2 UPPERCASEASML80XKIGIMRSPAKB 5CB0N82251
2 UPPERCASEASML80XKIGIMRTURKB 5CB0N82285
2 UPPERCASEASML80XKIGIMRTHAKB 5CB0N82324
2 UPPERCASEASML80XKIGIMRPORKB 5CB0N82190
2 UPPERCASEASML80XKIGIMRLSPKB 5CB0N82318
2 UPPERCASEASML80XKIGIMRCFENKB 5CB0N82252
2 UPPERCASEASML80XKIGIMRKORKB 5CB0N82284
2 UPPERCASEASML80XKIGIMRTCKB 5CB0N82299
2 UPPERCASEASML80XKIGIMRRUKB 5CB0N82243
2 UPPERCASEASML80XKIGIMRFRKB 5CB0N82342
2 UPPERCASEASML80XKIGIMRGEKB 5CB0N82239

74
ideapad 320-14IAP/ideapad 320-14AST/ideapad 320-15IAP/ideapad 320-15AST/ideapad
320-15ABR/ideapad 320-15ABR Touch Hardware Maintenance Manual
Table 4. Parts list—Overall (continued)
No. FRU FRU no. CRU
ID.
2 UPPERCASEASML80XKIGIMRARAKB 5CB0N82211
N
2 UPPERCASEASML80XKIGIMRBRAKB 5CB0N82339
2 UPPERCASEASML80XKIGIMRDUTCHKB 5CB0N82340
2 UPPERCASEASML80XKIGIMRGREKB 5CB0N82347
2 UPPERCASEASML80XKIGIMRHEBKB 5CB0N82295
2 UPPERCASEASML80XKIGIMRHUNKB 5CB0N82226
2 UPPERCASEASML80XKIGIMRNORDICKB 5CB0N82200
2 UPPERCASEASML80XKIGIMRBELKB 5CB0N82245
2 UPPERCASEASML80XKIGIMRILDKB 5CB0N82267
2 UPPERCASEASML80XKIGIMRSLEKB 5CB0N82312
2 UPPERCASEASML80XKIGIMRSWSKB 5CB0N82259
2 UPPERCASEASML80XKIGIMRUSINTKB 5CB0N82273
2 UPPERCASEASML80XKIGIMRCZHSLKKB 5CB0N82199
2 UPPERCASEASML80XKIGIMRBULKB 5CB0N82332
2 UPPERCASEASML80XKIGIMRINDIAKB 5CB0N82336
2 UPPERCASEASML80XKIGIMRFRARKB 5CB0N82254
2 UPPERCASEASML80XKIGIMRUKRKB 5CB0N82224
2 UPPERCASEASML80XKWIMRUSKB 5CB0N82374
2 UPPERCASEASML80XKWIMRUKKB 5CB0N82368
2 UPPERCASEASML80XKWIMRITAKB 5CB0N82286
2 UPPERCASEASML80XKWIMRSPAKB 5CB0N82338
2 UPPERCASEASML80XKWIMRTURKB 5CB0N82343
2 UPPERCASEASML80XKWIMRTHAKB 5CB0N82246
2 UPPERCASEASML80XKWIMRPORKB 5CB0N82195
2 UPPERCASEASML80XKWIMRLSPKB 5CB0N82231
2 UPPERCASEASML80XKWIMRCFENKB 5CB0N82322
2 UPPERCASEASML80XKWIMRKORKB 5CB0N82277
2 UPPERCASEASML80XKWIMRTCKB 5CB0N82272
2 UPPERCASEASML80XKWIMRRUKB 5CB0N82260
2 UPPERCASEASML80XKWIMRFRKB 5CB0N82209
2 UPPERCASEASML80XKWIMRGEKB 5CB0N82361
2 UPPERCASEASML80XKWIMRARAKB 5CB0N82238
2 UPPERCASEASML80XKWIMRBRAKB 5CB0N82220
2 UPPERCASEASML80XKWIMRDUTCHKB 5CB0N82335
2 UPPERCASEASML80XKWIMRGREKB 5CB0N82222
2 UPPERCASEASML80XKWIMRHEBKB 5CB0N82247
2 UPPERCASEASML80XKWIMRHUNKB 5CB0N82307
2 UPPERCASEASML80XKWIMRNORDICKB 5CB0N82333
2 UPPERCASEASML80XKWIMRBELKB 5CB0N82210
2 UPPERCASEASML80XKWIMRILDKB 5CB0N82255
2 UPPERCASEASML80XKWIMRSLEKB 5CB0N82362
2 UPPERCASEASML80XKWIMRSWSKB 5CB0N82258
2 UPPERCASEASML80XKWIMRUSINTKB 5CB0N82365
2 UPPERCASEASML80XKWIMRCZHSLKKB 5CB0N82298
2 UPPERCASEASML80XKWIMRBULKB 5CB0N82337
2 UPPERCASEASML80XKWIMRINDIAKB 5CB0N82303
2 UPPERCASEASML80XKWIMRFRARKB 5CB0N82227

75
Lenovo ideapad 320-14IAP/ideapad 320-14AST/ideapad 320-15IAP/ideapad 320-
15AST/ideapad 320-15ABR/ideapad 320-15ABR Touch
No. FRU FRU no. CRU
ID.
2 UPPERCASEASML80XKWIMRUKRKB 5CB0N82370
N
2 UPPERCASEASML80XKIBIMRUSKB 5CB0N82279
2 UPPERCASEASML80XKIBIMRUKKB 5CB0N82201
2 UPPERCASEASML80XKIBIMRITAKB 5CB0N82363
2 UPPERCASEASML80XKIBIMRSPAKB 5CB0N82268
2 UPPERCASEASML80XKIBIMRTURKB 5CB0N82283
2 UPPERCASEASML80XKIBIMRTHAKB 5CB0N82274
2 UPPERCASEASML80XKIBIMRPORKB 5CB0N82350
2 UPPERCASEASML80XKIBIMRLSPKB 5CB0N82305
2 UPPERCASEASML80XKIBIMRCFENKB 5CB0N82263
2 UPPERCASEASML80XKIBIMRKORKB 5CB0N82236
2 UPPERCASEASML80XKIBIMRTCKB 5CB0N82359
2 UPPERCASEASML80XKIBIMRRUKB 5CB0N82356
2 UPPERCASEASML80XKIBIMRFRKB 5CB0N82235
2 UPPERCASEASML80XKIBIMRGEKB 5CB0N82233
2 UPPERCASEASML80XKIBIMRARAKB 5CB0N82217
2 UPPERCASEASML80XKIBIMRBRAKB 5CB0N82355
2 UPPERCASEASML80XKIBIMRDUTCHKB 5CB0N82250
2 UPPERCASEASML80XKIBIMRGREKB 5CB0N82329
2 UPPERCASEASML80XKIBIMRHEBKB 5CB0N82310
2 UPPERCASEASML80XKIBIMRHUNKB 5CB0N82208
2 UPPERCASEASML80XKIBIMRNORDICKB 5CB0N82294
2 UPPERCASEASML80XKIBIMRBELKB 5CB0N82276
2 UPPERCASEASML80XKIBIMRILDKB 5CB0N82320
2 UPPERCASEASML80XKIBIMRSLEKB 5CB0N82198
2 UPPERCASEASML80XKIBIMRSWSKB 5CB0N82203
2 UPPERCASEASML80XKIBIMRUSINTKB 5CB0N82204
2 UPPERCASEASML80XKIBIMRCZHSLKKB 5CB0N82290
2 UPPERCASEASML80XKIBIMRBULKB 5CB0N82218
2 UPPERCASEASML80XKIBIMRINDIAKB 5CB0N82278
2 UPPERCASEASML80XKIBIMRFRARKB 5CB0N82328
2 UPPERCASEASML80XKIBIMRUKRKB 5CB0N82207
2 UPPERCASEASML80XLPGIMRUSKB 5CB0N86311
2 UPPERCASEASML80XLPGIMRUKKB 5CB0N86475
2 UPPERCASEASML80XLPGIMRITAKB 5CB0N86435
2 UPPERCASEASML80XLPGIMRSPAKB 5CB0N86375
2 UPPERCASEASML80XLPGIMRTURKB 5CB0N86357
2 UPPERCASEASML80XLPGIMRTHAKB 5CB0N86447
2 UPPERCASEASML80XLPGIMRPORKB 5CB0N86476
2 UPPERCASEASML80XLPGIMRLSPKB 5CB0N86512
2 UPPERCASEASML80XLPGIMRCFENKB 5CB0N86428
2 UPPERCASEASML80XLPGIMRKORKB 5CB0N86532
2 UPPERCASEASML80XLPGIMRTCKB 5CB0N86438
2 UPPERCASEASML80XLPGIMRRUKB 5CB0N86294
2 UPPERCASEASML80XLPGIMRFRKB 5CB0N86629
2 UPPERCASEASML80XLPGIMRGEKB 5CB0N86432
2 UPPERCASEASML80XLPGIMRARAKB 5CB0N86317
Table 4. Parts list—Overall (continued)

76
ideapad 320-14IAP/ideapad 320-14AST/ideapad 320-15IAP/ideapad 320-15AST/ideapad
320-15ABR/ideapad 320-15ABR Touch Hardware Maintenance Manual
Table 4. Parts list—Overall (continued)
No. FRU FRU no. CRU
ID.
2 UPPERCASEASML80XLPGIMRJPKB 5CB0N86563
N
2 UPPERCASEASML80XLPGIMRBRAKB 5CB0N86439
2 UPPERCASEASML80XLPGIMRDUTCHKB 5CB0N86454
2 UPPERCASEASML80XLPGIMRGREKB 5CB0N86573
2 UPPERCASEASML80XLPGIMRHEBKB 5CB0N86269
2 UPPERCASEASML80XLPGIMRHUNKB 5CB0N86411
2 UPPERCASEASML80XLPGIMRNORDICKB 5CB0N86320
2 UPPERCASEASML80XLPGIMRBELKB 5CB0N86490
2 UPPERCASEASML80XLPGIMRILKB 5CB0N86266
2 UPPERCASEASML80XLPGIMRSLEKB 5CB0N86265
2 UPPERCASEASML80XLPGIMRSWSKB 5CB0N86605
2 UPPERCASEASML80XLPGIMRUSINTKB 5CB0N86407
2 UPPERCASEASML80XLPGIMRCZHSLKKB 5CB0N86517
2 UPPERCASEASML80XLPGIMRBULKB 5CB0N86382
2 UPPERCASEASML80XLPGIMRINDIAKB 5CB0N86292
2 UPPERCASEASML80XLPGIMRFRARKB 5CB0N86326
2 UPPERCASEASML80XLPGIMRUKRKB 5CB0N86389
2 UPPERCASEASML80XLIGIMRUSKB 5CB0N86581
2 UPPERCASEASML80XLIGIMRUKKB 5CB0N86316
2 UPPERCASEASML80XLIGIMRITAKB 5CB0N86464
2 UPPERCASEASML80XLIGIMRSPAKB 5CB0N86578
2 UPPERCASEASML80XLIGIMRTURKB 5CB0N86547
2 UPPERCASEASML80XLIGIMRTHAKB 5CB0N86287
2 UPPERCASEASML80XLIGIMRPORKB 5CB0N86277
2 UPPERCASEASML80XLIGIMRLSPKB 5CB0N86502
2 UPPERCASEASML80XLIGIMRCFENKB 5CB0N86588
2 UPPERCASEASML80XLIGIMRKORKB 5CB0N86522
2 UPPERCASEASML80XLIGIMRTCKB 5CB0N86291
2 UPPERCASEASML80XLIGIMRRUKB 5CB0N86582
2 UPPERCASEASML80XLIGIMRFRKB 5CB0N86307
2 UPPERCASEASML80XLIGIMRGEKB 5CB0N86425
2 UPPERCASEASML80XLIGIMRARAKB 5CB0N86262
2 UPPERCASEASML80XLIGIMRJPKB 5CB0N86456
2 UPPERCASEASML80XLIGIMRBRAKB 5CB0N86390
2 UPPERCASEASML80XLIGIMRDUTCHKB 5CB0N86308
2 UPPERCASEASML80XLIGIMRGREKB 5CB0N86488
2 UPPERCASEASML80XLIGIMRHEBKB 5CB0N86487
2 UPPERCASEASML80XLIGIMRHUNKB 5CB0N86587
2 UPPERCASEASML80XLIGIMRNORDICKB 5CB0N86484
2 UPPERCASEASML80XLIGIMRBELKB 5CB0N86574
2 UPPERCASEASML80XLIGIMRILKB 5CB0N86303
2 UPPERCASEASML80XLIGIMRSLEKB 5CB0N86608
2 UPPERCASEASML80XLIGIMRSWSKB 5CB0N86529
2 UPPERCASEASML80XLIGIMRUSINTKB 5CB0N86449
2 UPPERCASEASML80XLIGIMRCZHSLKKB 5CB0N86336
2 UPPERCASEASML80XLIGIMRBULKB 5CB0N86540
2 UPPERCASEASML80XLIGIMRINDIAKB 5CB0N86542

77
Lenovo ideapad 320-14IAP/ideapad 320-14AST/ideapad 320-15IAP/ideapad 320-
15AST/ideapad 320-15ABR/ideapad 320-15ABR Touch
Table 4. Parts list—Overall (continued)
No. FRU FRU no. CRU
ID.
2 UPPERCASEASML80XLIGIMRFRARKB 5CB0N86403
N
2 UPPERCASEASML80XLIGIMRUKRKB 5CB0N86282
2 UPPERCASEASML80XLWHIMRUSKB 5CB0N86409
2 UPPERCASEASML80XLWHIMRUKKB 5CB0N86306
2 UPPERCASEASML80XLWHIMRITAKB 5CB0N86346
2 UPPERCASEASML80XLWHIMRSPAKB 5CB0N86528
2 UPPERCASEASML80XLWHIMRTURKB 5CB0N86441
2 UPPERCASEASML80XLWHIMRTHAKB 5CB0N86401
2 UPPERCASEASML80XLWHIMRPORKB 5CB0N86554
2 UPPERCASEASML80XLWHIMRLSPKB 5CB0N86465
2 UPPERCASEASML80XLWHIMRCFENKB 5CB0N86351
2 UPPERCASEASML80XLWHIMRKORKB 5CB0N86619
2 UPPERCASEASML80XLWHIMRTCKB 5CB0N86543
2 UPPERCASEASML80XLWHIMRRUKB 5CB0N86584
2 UPPERCASEASML80XLWHIMRFRKB 5CB0N86387
2 UPPERCASEASML80XLWHIMRGEKB 5CB0N86288
2 UPPERCASEASML80XLWHIMRARAKB 5CB0N86480
2 UPPERCASEASML80XLWHIMRJPKB 5CB0N86458
2 UPPERCASEASML80XLWHIMRBRAKB 5CB0N86367
2 UPPERCASEASML80XLWHIMRDUTCHKB 5CB0N86398
2 UPPERCASEASML80XLWHIMRGREKB 5CB0N86420
2 UPPERCASEASML80XLWHIMRHEBKB 5CB0N86611
2 UPPERCASEASML80XLWHIMRHUNKB 5CB0N86527
2 UPPERCASEASML80XLWHIMRNORDICKB 5CB0N86575
2 UPPERCASEASML80XLWHIMRBELKB 5CB0N86275
2 UPPERCASEASML80XLWHIMRILKB 5CB0N86457
2 UPPERCASEASML80XLWHIMRSLEKB 5CB0N86585
2 UPPERCASEASML80XLWHIMRSWSKB 5CB0N86391
2 UPPERCASEASML80XLWHIMRUSINTKB 5CB0N86384
2 UPPERCASEASML80XLWHIMRCZHSLKKB 5CB0N86555
2 UPPERCASEASML80XLWHIMRBULKB 5CB0N86537
2 UPPERCASEASML80XLWHIMRINDIAKB 5CB0N86302
2 UPPERCASEASML80XLWHIMRFRARKB 5CB0N86483
2 UPPERCASEASML80XLWHIMRUKRKB 5CB0N86304
2 UPPERCASEASML80XLLLIMRUSKB 5CB0N86379
2 UPPERCASEASML80XLLLIMRUKKB 5CB0N86342
2 UPPERCASEASML80XLLLIMRITAKB 5CB0N86491
2 UPPERCASEASML80XLLLIMRSPAKB 5CB0N86519
2 UPPERCASEASML80XLLLIMRTURKB 5CB0N86576
2 UPPERCASEASML80XLLLIMRTHAKB 5CB0N86285
2 UPPERCASEASML80XLLLIMRPORKB 5CB0N86310
2 UPPERCASEASML80XLLLIMRLSPKB 5CB0N86348
2 UPPERCASEASML80XLLLIMRCFENKB 5CB0N86546
2 UPPERCASEASML80XLLLIMRKORKB 5CB0N86600
2 UPPERCASEASML80XLLLIMRTCKB 5CB0N86408
2 UPPERCASEASML80XLLLIMRRUKB 5CB0N86622
2 UPPERCASEASML80XLLLIMRFRKB 5CB0N86592

78
ideapad 320-14IAP/ideapad 320-14AST/ideapad 320-15IAP/ideapad 320-15AST/ideapad
320-15ABR/ideapad 320-15ABR Touch Hardware Maintenance Manual
Table 4. Parts list—Overall (continued)
No. FRU FRU no. CRU
ID.
2 UPPERCASEASML80XLLLIMRGEKB 5CB0N86365
N
2 UPPERCASEASML80XLLLIMRARAKB 5CB0N86590
2 UPPERCASEASML80XLLLIMRJPKB 5CB0N86296
2 UPPERCASEASML80XLLLIMRBRAKB 5CB0N86586
2 UPPERCASEASML80XLLLIMRDUTCHKB 5CB0N86539
2 UPPERCASEASML80XLLLIMRGREKB 5CB0N86631
2 UPPERCASEASML80XLLLIMRHEBKB 5CB0N86520
2 UPPERCASEASML80XLLLIMRHUNKB 5CB0N86501
2 UPPERCASEASML80XLLLIMRNORDICKB 5CB0N86616
2 UPPERCASEASML80XLLLIMRBELKB 5CB0N86440
2 UPPERCASEASML80XLLLIMRILKB 5CB0N86505
2 UPPERCASEASML80XLLLIMRSLEKB 5CB0N86572
2 UPPERCASEASML80XLLLIMRSWSKB 5CB0N86430
2 UPPERCASEASML80XLLLIMRUSINTKB 5CB0N86368
2 UPPERCASEASML80XLLLIMRCZHSLKKB 5CB0N86323
2 UPPERCASEASML80XLLLIMRBULKB 5CB0N86371
2 UPPERCASEASML80XLLLIMRINDIAKB 5CB0N86332
2 UPPERCASEASML80XLLLIMRFRARKB 5CB0N86536
2 UPPERCASEASML80XLLLIMRUKRKB 5CB0N86388
2 UPPERCASEASML80XLIBIMRUSKB 5CB0N86404
2 UPPERCASEASML80XLIBIMRUKKB 5CB0N86567
2 UPPERCASEASML80XLIBIMRITAKB 5CB0N86604
2 UPPERCASEASML80XLIBIMRSPAKB 5CB0N86609
2 UPPERCASEASML80XLIBIMRTURKB 5CB0N86615
2 UPPERCASEASML80XLIBIMRTHAKB 5CB0N86322
2 UPPERCASEASML80XLIBIMRPORKB 5CB0N86455
2 UPPERCASEASML80XLIBIMRLSPKB 5CB0N86354
2 UPPERCASEASML80XLIBIMRCFENKB 5CB0N86318
2 UPPERCASEASML80XLIBIMRKORKB 5CB0N86345
2 UPPERCASEASML80XLIBIMRTCKB 5CB0N86548
2 UPPERCASEASML80XLIBIMRRUKB 5CB0N86383
2 UPPERCASEASML80XLIBIMRFRKB 5CB0N86281
2 UPPERCASEASML80XLIBIMRGEKB 5CB0N86393
2 UPPERCASEASML80XLIBIMRARAKB 5CB0N86374
2 UPPERCASEASML80XLIBIMRJPKB 5CB0N86363
2 UPPERCASEASML80XLIBIMRBRAKB 5CB0N86497
2 UPPERCASEASML80XLIBIMRDUTCHKB 5CB0N86305
2 UPPERCASEASML80XLIBIMRGREKB 5CB0N86446
2 UPPERCASEASML80XLIBIMRHEBKB 5CB0N86448
2 UPPERCASEASML80XLIBIMRHUNKB 5CB0N86421
2 UPPERCASEASML80XLIBIMRNORDICKB 5CB0N86550
2 UPPERCASEASML80XLIBIMRBELKB 5CB0N86337
2 UPPERCASEASML80XLIBIMRILKB 5CB0N86506
2 UPPERCASEASML80XLIBIMRSLEKB 5CB0N86417
2 UPPERCASEASML80XLIBIMRSWSKB 5CB0N86499
2 UPPERCASEASML80XLIBIMRUSINTKB 5CB0N86309
2 UPPERCASEASML80XLIBIMRCZHSLKKB 5CB0N86312

79
Lenovo ideapad 320-14IAP/ideapad 320-14AST/ideapad 320-15IAP/ideapad 320-
15AST/ideapad 320-15ABR/ideapad 320-15ABR Touch
Table 4. Parts list—Overall (continued)
No. FRU FRU no. CRU
ID.
2 UPPERCASEASML80XLIBIMRBULKB 5CB0N86395
N
2 UPPERCASEASML80XLIBIMRINDIAKB 5CB0N86385
2 UPPERCASEASML80XLIBIMRFRARKB 5CB0N86511
2 UPPERCASEASML80XLIBIMRUKRKB 5CB0N86521
2 UPPERCASEASML80XLRDIMRUSKB 5CB0N86509
2 UPPERCASEASML80XLRDIMRUKKB 5CB0N86343
2 UPPERCASEASML80XLRDIMRITAKB 5CB0N86301
2 UPPERCASEASML80XLRDIMRSPAKB 5CB0N86333
2 UPPERCASEASML80XLRDIMRTURKB 5CB0N86315
2 UPPERCASEASML80XLRDIMRTHAKB 5CB0N86284
2 UPPERCASEASML80XLRDIMRPORKB 5CB0N86415
2 UPPERCASEASML80XLRDIMRLSPKB 5CB0N86556
2 UPPERCASEASML80XLRDIMRCFENKB 5CB0N86493
2 UPPERCASEASML80XLRDIMRKORKB 5CB0N86364
2 UPPERCASEASML80XLRDIMRTCKB 5CB0N86514
2 UPPERCASEASML80XLRDIMRRUKB 5CB0N86535
2 UPPERCASEASML80XLRDIMRFRKB 5CB0N86469
2 UPPERCASEASML80XLRDIMRGEKB 5CB0N86504
2 UPPERCASEASML80XLRDIMRARAKB 5CB0N86569
2 UPPERCASEASML80XLRDIMRJPKB 5CB0N86283
2 UPPERCASEASML80XLRDIMRBRAKB 5CB0N86353
2 UPPERCASEASML80XLRDIMRDUTCHKB 5CB0N86270
2 UPPERCASEASML80XLRDIMRGREKB 5CB0N86551
2 UPPERCASEASML80XLRDIMRHEBKB 5CB0N86579
2 UPPERCASEASML80XLRDIMRHUNKB 5CB0N86297
2 UPPERCASEASML80XLRDIMRNORDICKB 5CB0N86500
2 UPPERCASEASML80XLRDIMRBELKB 5CB0N86508
2 UPPERCASEASML80XLRDIMRILKB 5CB0N86356
2 UPPERCASEASML80XLRDIMRSLEKB 5CB0N86423
2 UPPERCASEASML80XLRDIMRSWSKB 5CB0N86340
2 UPPERCASEASML80XLRDIMRUSINTKB 5CB0N86626
2 UPPERCASEASML80XLRDIMRCZHSLKKB 5CB0N86482
2 UPPERCASEASML80XLRDIMRBULKB 5CB0N86596
2 UPPERCASEASML80XLRDIMRINDIAKB 5CB0N86328
2 UPPERCASEASML80XLRDIMRFRARKB 5CB0N86606
2 UPPERCASEASML80XLRDIMRUKRKB 5CB0N86538
2 UPCASEASML80XLPGIMRUSKBFP 5CB0N86595
2 UPCASEASML80XLPGIMRUKKBFP 5CB0N86321
2 UPCASEASML80XLPGIMRITAKBFP 5CB0N86594
2 UPCASEASML80XLPGIMRSPAKBFP 5CB0N86610
2 UPCASEASML80XLPGIMRTURKBFP 5CB0N86599
2 UPCASEASML80XLPGIMRTHAKBFP 5CB0N86445
2 UPCASEASML80XLPGIMRPORKBFP 5CB0N86381
2 UPCASEASML80XLPGIMRLSPKBFP 5CB0N86495
2 UPCASEASML80XLPGIMRCFENKBFP 5CB0N86477
2 UPCASEASML80XLPGIMRKORKBFP 5CB0N86295
2 UPCASEASML80XLPGIMRTCKBFP 5CB0N86279

80
ideapad 320-14IAP/ideapad 320-14AST/ideapad 320-15IAP/ideapad 320-15AST/ideapad
320-15ABR/ideapad 320-15ABR Touch Hardware Maintenance Manual
Table 4. Parts list—Overall (continued)
No. FRU FRU no. CRU
ID.
2 UPCASEASML80XLPGIMRRUKBFP 5CB0N86534
N
2 UPCASEASML80XLPGIMRFRKBFP 5CB0N86468
2 UPCASEASML80XLPGIMRGEKBFP 5CB0N86492
2 UPCASEASML80XLPGIMRARAKBFP 5CB0N86460
2 UPCASEASML80XLPGIMRBRAKBFP 5CB0N86338
2 UPCASEASML80XLPGIMRDUTCHKBFP 5CB0N86273
2 UPCASEASML80XLPGIMRGREKBFP 5CB0N86545
2 UPCASEASML80XLPGIMRHEBKBFP 5CB0N86331
2 UPCASEASML80XLPGIMRHUNKBFP 5CB0N86467
2 UPCASEASML80XLPGIMRNORDICKBFP 5CB0N86571
2 UPCASEASML80XLPGIMRBELKBFPKBFP 5CB0N86564
2 UPCASEASML80XLPGIMRILKBFP 5CB0N86289
2 UPCASEASML80XLPGIMRSLEKBFP 5CB0N86552
2 UPCASEASML80XLPGIMRSWSKBFP 5CB0N86392
2 UPCASEASML80XLPGIMRUSINTKBFP 5CB0N86410
2 UPCASEASML80XLPGIMRCZHSLKKBFP 5CB0N86378
2 UPCASEASML80XLPGIMRBULKBFP 5CB0N86557
2 UPCASEASML80XLPGIMRINDIAKBFP 5CB0N86396
2 UPCASEASML80XLPGIMRFRARKBFP 5CB0N86472
2 UPCASEASML80XLPGIMRUKRKBFP 5CB0N86466
2 UPCASEASML80XLIGIMRUSKBFP 5CB0N86330
2 UPCASEASML80XLIGIMRUKKBFP 5CB0N86405
2 UPCASEASML80XLIGIMRITAKBFP 5CB0N86268
2 UPCASEASML80XLIGIMRSPAKBFP 5CB0N86621
2 UPCASEASML80XLIGIMRTURKBFP 5CB0N86589
2 UPCASEASML80XLIGIMRTHAKBFP 5CB0N86280
2 UPCASEASML80XLIGIMRPORKBFP 5CB0N86429
2 UPCASEASML80XLIGIMRLSPKBFP 5CB0N86352
2 UPCASEASML80XLIGIMRCFENKBFP 5CB0N86612
2 UPCASEASML80XLIGIMRKORKBFP 5CB0N86524
2 UPCASEASML80XLIGIMRTCKBFP 5CB0N86300
2 UPCASEASML80XLIGIMRRUKBFP 5CB0N86481
2 UPCASEASML80XLIGIMRFRKBFP 5CB0N86630
2 UPCASEASML80XLIGIMRGEKBFP 5CB0N86261
2 UPCASEASML80XLIGIMRARAKBFP 5CB0N86290
2 UPCASEASML80XLIGIMRBRAKBFP 5CB0N86613
2 UPCASEASML80XLIGIMRDUTCHKBFP 5CB0N86373
2 UPCASEASML80XLIGIMRGREKBFP 5CB0N86355
2 UPCASEASML80XLIGIMRHEBKBFP 5CB0N86416
2 UPCASEASML80XLIGIMRHUNKBFP 5CB0N86452
2 UPCASEASML80XLIGIMRNORDICKBFP 5CB0N86329
2 UPCASEASML80XLIGIMRBELKBFP 5CB0N86451
2 UPCASEASML80XLIGIMRILKBFP 5CB0N86386
2 UPCASEASML80XLIGIMRSLEKBFP 5CB0N86559
2 UPCASEASML80XLIGIMRSWSKBFP 5CB0N86525
2 UPCASEASML80XLIGIMRUSINTKBFP 5CB0N86267
2 UPCASEASML80XLIGIMRCZHSLKKBFP 5CB0N86274

81
Lenovo ideapad 320-14IAP/ideapad 320-14AST/ideapad 320-15IAP/ideapad 320-
15AST/ideapad 320-15ABR/ideapad 320-15ABR Touch
No. FRU FRU no. CRU
ID.
2 UPCASEASML80XLIGIMRBULKBFP 5CB0N86541
N
2 UPCASEASML80XLIGIMRINDIAKBFP 5CB0N86324
2 UPCASEASML80XLIGIMRFRARKBFP 5CB0N86412
2 UPCASEASML80XLIGIMRUKRKBFP 5CB0N86278
3 MBL80XQN3450UMAWIN 5B20P19723
3 MBL80XQN3450UMANOK 5B20P19716
3 MBL80XQN3350UMAWIN 5B20P19713
3 MBL80XQN3350UMANOK 5B20P19722
3 MBL80XQN4200R17M_M1_2GWIN 5B20P19715
3 MBL80XQN4200R17M_M1_2GNOK 5B20P19714
3 MBL80XQN3450R17M_M1_2GWIN 5B20P19718
3 MBL80XQN3450R17M_M1_2GNOK 5B20P19721
3 MBL80XQN3350R17M_M1_2GWIN 5B20P19719
3 MBL80XQN3350R17M_M1_2GNOK 5B20P19717
3 MBL80XQN4200UMAWIN 5B20P19720
3 MBL80XQN4200UMANOK 5B20P19712
3 MBL80XRN4200UMAWIN 5B20P20643
3 MBL80XRN4200UMANOK 5B20P20647
3 MBL80XRN3350R17M_M1_2GWIN 5B20P20649
3 MBL80XRN3350R17M_M1_2GNOK 5B20P20638
3 MBL80XRN3450UMAWIN 5B20P20645
3 MBL80XRN3450UMANOK 5B20P20648
3 MBL80XRN3350UMAWIN 5B20P20644
3 MBL80XRN3350UMANOK 5B20P20642
3 MBL80XRN3450R17M_M1_2GWIN 5B20P20640
3 MBL80XRN3450R17M_M1_2GNOK 5B20P20641
3 MBL80XRN4200R17M_M1_2GWIN 5B20P20639
3 MBL80XRN4200R17M_M1_2GNOK 5B20P20646
3 MBL80XSA109620PR17MM_2G4GNFPWIN 5B20P11090
3 MBL80XSA109620PR17MM_2G4GNFPNOK 5B20P11080
3 MBL80XSA109620PUMA4GNFPWIN 5B20P11088
3 MBL80XSA109620PUMA4GNFPNOK 5B20P11079
3 MBL80XSA109620PR17MM_2GNFPWIN 5B20P11115
3 MBL80XSA109620PR17MM_2GNFPNOK 5B20P11125
3 MBL80XSA109620PUMANFPWIN 5B20P11120
3 MBL80XSA109620PUMANFPNOK 5B20P11111
3 MBL80XSA129720PR17MM_2G4GNFPWIN 5B20P11078
3 MBL80XSA129720PR17MM_2G4GNFPNOK 5B20P11126
3 MBL80XSA129720PR17MM_4G4GNFPWIN 5B20P11101
3 MBL80XSA129720PR17MM_4G4GNFPNOK 5B20P11076
3 MBL80XSA129720PUMA4GNFPWIN 5B20P11116
3 MBL80XSA129720PUMA4GNFPNOK 5B20P11113
3 MBL80XSA129720PR17MM_2GNFPWIN 5B20P11128
3 MBL80XSA129720PR17MM_2GNFPNOK 5B20P11123
3 MBL80XSA129720PR17MM_4GNFPWIN 5B20P11072
3 MBL80XSA129720PR17MM_4GNFPNOK 5B20P11127
3 MBL80XSA129720PUMANFPWIN 5B20P11077
Table 4. Parts list—Overall (continued)

82
ideapad 320-14IAP/ideapad 320-14AST/ideapad 320-15IAP/ideapad 320-15AST/ideapad
320-15ABR/ideapad 320-15ABR Touch Hardware Maintenance Manual
No. FRU FRU no. CRU
ID.
3 MBL80XSA129720PUMANFPNOK 5B20P11105
N
3 MBL80XSFX9800PR17MM_2G4GNFPWIN 5B20P11122
3 MBL80XSFX9800PR17MM_2G4GNFPNOK 5B20P11095
3 MBL80XSFX9800PR17MM_4G4GNFPWIN 5B20P11082
3 MBL80XSFX9800PR17MM_4G4GNFPNOK 5B20P11106
3 MBL80XSFX9800PUMA4GNFPWIN 5B20P11107
3 MBL80XSFX9800PUMA4GNFPNOK 5B20P11086
3 MBL80XSFX9800PR17MM_2GNFPWIN 5B20P11081
3 MBL80XSFX9800PR17MM_2GNFPNOK 5B20P11108
3 MBL80XSFX9800PR17MM_4GNFPWIN 5B20P11093
3 MBL80XSFX9800PR17MM_4GNFPNOK 5B20P11119
3 MBL80XSFX9800PUMANFPWIN 5B20P11132
3 MBL80XSFX9800PUMANFPNOK 5B20P11070
3 MBL80XSA109620PR17MM_2G4GFPWIN 5B20P11073
3 MBL80XSA109620PR17MM_2G4GFPNOK 5B20P11102
3 MBL80XSA109620PUMA4GFPWIN 5B20P11117
3 MBL80XSA109620PUMA4GFPNOK 5B20P11083
3 MBL80XSA109620PR17MM_2GFPWIN 5B20P11118
3 MBL80XSA109620PR17MM_2GFPNOK 5B20P11096
3 MBL80XSA109620PUMAFPWIN 5B20P11121
3 MBL80XSA109620PUMAFPNOK 5B20P11074
3 MBL80XSA129720PR17MM_2G4GFPWIN 5B20P11098
3 MBL80XSA129720PR17MM_2G4GFPNOK 5B20P11097
3 MBL80XSA129720PR17MM_4G4GFPWIN 5B20P11112
3 MBL80XSA129720PR17MM_4G4GFPNOK 5B20P11133
3 MBL80XSA129720PUMA4GFPWIN 5B20P11110
3 MBL80XSA129720PUMA4GFPNOK 5B20P11103
3 MBL80XSA129720PR17MM_2GFPWIN 5B20P11131
3 MBL80XSA129720PR17MM_2GFPNOK 5B20P11085
3 MBL80XSA129720PUMAFPWIN 5B20P11089
3 MBL80XSA129720PUMAFPNOK 5B20P11075
3 MBL80XSA129720PR17MM_4GFPWIN 5B20P11092
3 MBL80XSA129720PR17MM_4GFPNOK 5B20P11084
3 MBL80XSFX9800PR17MM_2G4GFPWIN 5B20P11124
3 MBL80XSFX9800PR17MM_2G4GFPNOK 5B20P11114
3 MBL80XSFX9800PR17MM_4G4GFPWIN 5B20P11129
3 MBL80XSFX9800PR17MM_4G4GFPNOK 5B20P11100
3 MBL80XSFX9800PUMA4GFPWIN 5B20P11094
3 MBL80XSFX9800PUMA4GFPNOK 5B20P11130
3 MBL80XSFX9800PR17MM_2GFPWIN 5B20P11109
3 MBL80XSFX9800PR17MM_2GFPNOK 5B20P11104
3 MBL80XSFX9800PR17MM_4GFPWIN 5B20P11071
3 MBL80XSFX9800PR17MM_4GFPNOK 5B20P11087
3 MBL80XSFX9800PUMAFPWIN 5B20P11099
3 MBL80XSFX9800PUMAFPNOK 5B20P11091
3 MBL80XTA109620PR17MM_2G4GNFPWIN 5B20P15508
3 MBL80XTA109620PR17MM_2G4GNFPNOK 5B20P15534
Table 4. Parts list—Overall (continued)

83
Lenovo ideapad 320-14IAP/ideapad 320-14AST/ideapad 320-15IAP/ideapad 320-
15AST/ideapad 320-15ABR/ideapad 320-15ABR Touch
No. FRU FRU no. CRU
ID.
3 MBL80XTA109620PUMA4GNFPWIN 5B20P15505
N
3 MBL80XTA109620PUMA4GNFPNOK 5B20P15511
3 MBL80XTA109620PR17MM_2GNFPWIN 5B20P15553
3 MBL80XTA109620PR17MM_2GNFPNOK 5B20P15559
3 MBL80XTA109620PUMANFPWIN 5B20P15552
3 MBL80XTA109620PUMANFPNOK 5B20P15556
3 MBL80XTA129720PR17MM_2G4GNFPWIN 5B20P15561
3 MBL80XTA129720PR17MM_2G4GNFPNOK 5B20P15542
3 MBL80XTA129720PR17MM_4G4GNFPWIN 5B20P15529
3 MBL80XTA129720PR17MM_4G4GNFPNOK 5B20P15560
3 MBL80XTA129720PUMA4GNFPWIN 5B20P15526
3 MBL80XTA129720PUMA4GNFPNOK 5B20P15540
3 MBL80XTA129720PR17MM_2GNFPWIN 5B20P15527
3 MBL80XTA129720PR17MM_2GNFPNOK 5B20P15537
3 MBL80XTA129720PR17MM_4GNFPWIN 5B20P15558
3 MBL80XTA129720PR17MM_4GNFPNOK 5B20P15544
3 MBL80XTA129720PUMANFPWIN 5B20P15555
3 MBL80XTA129720PUMANFPNOK 5B20P15518
3 MBL80XTFX9800PR17MM_2G4GNFPWIN 5B20P15550
3 MBL80XTFX9800PR17MM_2G4GNFPNOK 5B20P15539
3 MBL80XTFX9800PR17MM_4G4GNFPWIN 5B20P15554
3 MBL80XTFX9800PR17MM_4G4GNFPNOK 5B20P15541
3 MBL80XTFX9800PUMA4GNFPWIN 5B20P15515
3 MBL80XTFX9800PUMA4GNFPNOK 5B20P15549
3 MBL80XTFX9800PR17MM_2GNFPWIN 5B20P15522
3 MBL80XTFX9800PR17MM_2GNFPNOK 5B20P15543
3 MBL80XTFX9800PR17MM_4GNFPWIN 5B20P15503
3 MBL80XTFX9800PR17MM_4GNFPNOK 5B20P15545
3 MBL80XTFX9800PUMANFPWIN 5B20P15536
3 MBL80XTFX9800PUMANFPNOK 5B20P15514
3 MBL80XTA109620PR17MM_2G4GFPWIN 5B20P15516
3 MBL80XTA109620PR17MM_2G4GFPNOK 5B20P15504
3 MBL80XTA109620PUMA4GFPWIN 5B20P15532
3 MBL80XTA109620PUMA4GFPNOK 5B20P15501
3 MBL80XTA109620PR17MM_2GFPWIN 5B20P15523
3 MBL80XTA109620PR17MM_2GFPNOK 5B20P15519
3 MBL80XTA109620PUMAFPWIN 5B20P15530
3 MBL80XTA109620PUMAFPNOK 5B20P15535
3 MBL80XTA129720PR17MM_2G4GFPWIN 5B20P15520
3 MBL80XTA129720PR17MM_2G4GFPNOK 5B20P15512
3 MBL80XTA129720PR17MM_4G4GFPWIN 5B20P15521
3 MBL80XTA129720PR17MM_4G4GFPNOK 5B20P15528
3 MBL80XTA129720PUMA4GFPWIN 5B20P15513
3 MBL80XTA129720PUMA4GFPNOK 5B20P15500
3 MBL80XTA129720PR17MM_2GFPWIN 5B20P15506
3 MBL80XTA129720PR17MM_2GFPNOK 5B20P15524
3 MBL80XTA129720PUMAFPWIN 5B20P15546
Table 4. Parts list—Overall (continued)

84
ideapad 320-14IAP/ideapad 320-14AST/ideapad 320-15IAP/ideapad 320-15AST/ideapad
320-15ABR/ideapad 320-15ABR Touch Hardware Maintenance Manual
No. FRU FRU no. CRU
ID.
3 MBL80XTA129720PUMAFPNOK 5B20P15507
N
3 MBL80XTA129720PR17MM_4GFPWIN 5B20P15499
3 MBL80XTA129720PR17MM_4GFPNOK 5B20P15548
3 MBL80XTFX9800PR17MM_2G4GFPWIN 5B20P15547
3 MBL80XTFX9800PR17MM_2G4GFPNOK 5B20P15498
3 MBL80XTFX9800PR17MM_4G4GFPWIN 5B20P15525
3 MBL80XTFX9800PR17MM_4G4GFPNOK 5B20P15557
3 MBL80XTFX9800PUMA4GFPWIN 5B20P15502
3 MBL80XTFX9800PUMA4GFPNOK 5B20P15510
3 MBL80XTFX9800PR17MM_2GFPWIN 5B20P15538
3 MBL80XTFX9800PR17MM_2GFPNOK 5B20P15517
3 MBL80XTFX9800PR17MM_4GFPWIN 5B20P15533
3 MBL80XTFX9800PR17MM_4GFPNOK 5B20P15509
3 MBL80XTFX9800PUMAFPWIN 5B20P15531
3 MBL80XTFX9800PUMAFPNOK 5B20P15551
3 MBL80XUA49120R17MM12GWIN 5B20P19172
3 MBL80XUA49120R17MM12GNOK 5B20P19169
3 MBL80XUA49120UMAWIN 5B20P19167
3 MBL80XUA49120UMANOK 5B20P19179
3 MBL80XUA69220UMAWIN 5B20P19171
3 MBL80XUA69220UMANOK 5B20P19177
3 MBL80XUA69220R17MM12GWIN 5B20P19173
3 MBL80XUA69220R17MM12GNOK 5B20P19180
3 MBL80XUE29000R17MM12GWIN 5B20P19174
3 MBL80XUE29000R17MM12GNOK 5B20P19175
3 MBL80XUE29000UMAWIN 5B20P19178
3 MBL80XUE29000UMANOK 5B20P19170
3 MBL80XUA99420UMAWIN 5B20P19176
3 MBL80XUA99420UMANOK 5B20P19164
3 MBL80XUA99420R17MM12GWIN 5B20P19166
3 MBL80XUA99420R17MM12GNOK 5B20P19181
3 MBL80XVA49120R17MM12GWIN 5B20P19434
3 MBL80XVA49120R17MM12GNOK 5B20P19440
3 MBL80XVA49120UMAWIN 5B20P19431
3 MBL80XVA49120UMANOK 5B20P19439
3 MBL80XVA99420R17MM12GWIN 5B20P19429
3 MBL80XVA99420R17MM12GNOK 5B20P19444
3 MBL80XVE29000UMAWIN 5B20P19438
3 MBL80XVE29000UMANOK 5B20P19433
3 MBL80XVA69220R17MM12GWIN 5B20P19435
3 MBL80XVA69220R17MM12GNOK 5B20P19441
3 MBL80XVA69220UMAWIN 5B20P19442
3 MBL80XVA69220UMANOK 5B20P19428
3 MBL80XVA99420UMAWIN 5B20P19430
3 MBL80XVA99420UMANOK 5B20P19443
3 MBL80XVE29000R17MM12GWIN 5B20P19432
3 MBL80XVE29000R17MM12GNOK 5B20P19436
Table 4. Parts list—Overall (continued)

85
Lenovo ideapad 320-14IAP/ideapad 320-14AST/ideapad 320-15IAP/ideapad 320-
15AST/ideapad 320-15ABR/ideapad 320-15ABR Touch
No. FRU FRU no. CRU
ID.
4 WLAN,Wi1X1AC+BT4.1,CbtRTL8821AE1x1AC+BTPCIEM.2
WLAN
SW10A11648
N
4 WLAN,Wi1X1AC+BT4.1,LtnNFA435A1x1AC+BTPCIEM.2WLAN SW10K97461
5 DDR4Memroy,4GBDDR42400SoDIMM,M471A5244CB0-CRC SM30M49902
5 DDR4Memroy,4GBDDR42400SoDIMM,HMA851S6AFR6N-UH SM30G16505
5 DDR4Memroy,4GBDDR42400SoDIMM,MTA4ATF51264HZ-2G3B1 SM30G16506
5 DDR4Memroy,4GBDDR42400SoDIMM,RMSA3270MB86H9F-2400 SM30G16507
5 DDR4Memroy,8GBDDR42400SoDIMM,M471A1K43CB1-CRC SM30M49901
5 DDR4Memroy,8GBDDR42400SoDIMM,HMA81GS6AFR8N-UH SM30G16509
5 DDR4Memroy,8GBDDR42400SoDIMM,MTA8ATF1G64HZ-2G3B1 SM30G16510
5 DDR4Memroy,8GBDDR42400SoDIMM,RMSA3260MB78HAF-2400 SM30G16511
5 DDR4Memroy,2GBDDR42400SoDIMM,M471A5644EB0-CRC SM30G16500
5 DDR4Memroy,2GBDDR42400SoDIMM,HMA425S6AFR6N-UH SM30G16501
5 DDR4Memroy,2GBDDR42400SoDIMM,MTA4ATF25664HZ-2G3B1 SM30G16502
5 DDR4Memroy,2GBDDR42400SoDIMM,RMSA3270MB76H8F-2400 SM30G16503
5 DDR4Memroy,16GBDDR42400SoDIMM,M471A2K43CB1-CRC SM30M49903
5 DDR4Memroy,16GBDDR42400SoDIMM,HMA82GS6AFR8N-UH SM30G16513
5 DDR4Memroy,16GBDDR42400SoDIMM,MTA16ATF2G64H-2G3B1 SM30G16514
5DDR4Memroy,OnBoardDDR4Memory8Gb*16,K4A8G165WB-BCRC SM30L08874
5 DDR4Memroy,OnBoardDDR4Memory8Gb*16,K4A8G165WC-
BCRC(C/8Gb/18nm/SDP)
SM30N71798
5 DDR4Memroy,OnBoardDDR4Memory8Gb*16,H5AN8G6NAFR-
UHC
SM30L08875
5 DDR4Memroy,OnBoardDDR4Memory8Gb*16,MT40A512M16JY—
083E:B
SM30L08877
6RTCBATTERYL80XK 5B10N82213
7 Battery,Polymer30WNormal(15wh*2cell),320SP/AL16M2PB1
7.5V30Wh2cellbty
5B10M86148
7 Battery,Polymer30WNormal(15wh*2cell),320CP/CL16C2PB2
7.6V30Wh2cellbty
5B10M88058
7 Battery,Polymer30WNormal(15wh*2cell),320LGL16L2PB2
7.4V30Wh2cellbty
5B10M91442
7 Battery,Polymer30WNormal(15wh*2cell),320SP/AL16M2PB3
7.68V30Wh2cellbty
5B10M86147
7 Battery,Polymer30WNormal(15wh*2cell),320LGL16L2PB1
7.6V30Wh2cellbty
5B10M90492
7 Battery,Polymer35wNormal(17.5wh*2Cell),320SP/AL16M2PB2
7.5V35Wh2cellbty
5B10M86149
7 Battery,Polymer35wNormal(17.5wh*2Cell),320CP/CL16C2PB1
7.6V35Wh2cellbty
5B10M88059
7 Battery,Polymer35wNormal(17.5wh*2Cell),320SYL16S2PB1
7.6V35Wh2cellbty
5B10M90490
7 Battery,Polymer35wNormal(17.5wh*2Cell),320LGL16L2PB3
7.6V35Wh2cellbty
5B10M91443
8 LowerCaseL80XQTEXWHITE 5CB0P19728
8 LowerCaseL80XQTEXCOOLGREY 5CB0P19724
8 LowerCaseL80XQTEXICEBLUE 5CB0P19727
Table 4. Parts list—Overall (continued)

86
ideapad 320-14IAP/ideapad 320-14AST/ideapad 320-15IAP/ideapad 320-15AST/ideapad
320-15ABR/ideapad 320-15ABR Touch Hardware Maintenance Manual
No. FRU FRU no. CRU
ID.
8 LowerCaseL80XRLCRPT 5CB0P20651
N
8 LowerCaseL80XRICEBLUEPT 5CB0P20654
8 LowerCaseL80XRWHITETEX 5CB0P20656
8 LowerCaseL80XRLILACPT 5CB0P20650
8 LowerCaseL80XRCOOLGREYTEX 5CB0P20655
8 LOWERCASEL80XLTEXWH 5CB0N86419
8 LOWERCASEL80XLTEXCG 5CB0N86400
8 LOWERCASEL80XLTEXLL 5CB0N86625
8 LOWERCASEL80XLTEXIB 5CB0N86553
8 LOWERCASEL80XLTEXLCR 5CB0N86376
9 DUMMYODDWHL80XK 5M20N82196
*
9 DUMMYODDCGL80XK 5M20N82244
9 DUMMYODDIBL80XK 5M20N82269
9 DUMMYODDIBL80XLPT 5M20N86344
9 DUMMYODDLLL80XLPT 5M20N86533
9 DUMMYODDLCRL80XLPT 5M20N86399
9 DUMMYODDfor2ndHDDWHL80XK 5M20N82228
9 DUMMYODDfor2ndHDDCGL80XK 5M20N82345
9 DUMMYODDfor2ndHDDIBL80XL 5M20P16489
9 DUMMYODDL80XLfor2ndHDDLLPT 5M20N86530
9 DUMMYODDL80XLfor2ndHDDLCRPT 5M20N86558
9 ODD,9.0mmRamboODD,HLDSGUE0N9.0mmSlimTrayRambo
ODD
5DX0J46488
9 ODD,9.0mmRamboODD,PLDSDA-8AESH9.0mmSlimTrayRambo
ODD
5DX0L08424
10 THERMALMODULEDISL80XQ 5H40P19726
N
10 THERMALMODULEUMAL80XQ 5H40P19725
10 THERMALMODULEDISL80XS 5H40P11135
10 THERMALMODULEUMAL80XS 5H40P11134
10 THERMALMODULEDISL80XU 5H40P19165
10 THERMALMODULEUMAL80XU 5H40P19168
11 FANDC5VL80XK 5F10N82225
12 ODDBOARDW/FFCL80XV 5C50P19437
12 ODDBOARDNSB241L80XL 5C50N86565
13 HDD(7mm),500G5400rpm7mm,ST500LT0126G7mm5.4K500G
HDD
16200383
13 HDD(7mm),500G5400rpm7mm,MQ01ABF0506G7mm5.4K500G
HDD
5H20L34560
13 HDD(7mm),500G5400rpm7mm,WD5000LPCX-24VHAT07mm
5400rpm500GHDD
5H20J35762
13 HDD(7mm),1TB5400rpm7mm,SeagateST1000LM0351T2.5″7mm
5400rpmHDD
5H20L22184
13 HDD(7mm),1TB5400rpm7mm,WD10SPCX-24HWST16G7mm1T
HDD
16200554
13 HDD(7mm),1TB5400rpm7mm,TSBMQ02ABF1006G7mm5.4k
1TBHDD
5H20G09709
Table 4. Parts list—Overall (continued)

87
Lenovo ideapad 320-14IAP/ideapad 320-14AST/ideapad 320-15IAP/ideapad 320-
15AST/ideapad 320-15ABR/ideapad 320-15ABR Touch
No. FRU FRU no. CRU
ID.
13 HDD(7mm),2TB54rpm(7mm),STRosewood2D7mm2TBHDD 5H20M37521
N
13 SSD,128G,CV3 5SD0L02317
13 SSD,128G,MZYTY128HDHP-000L22.5»128G5mmSSD 5SD0L14645
13 SSD,128G,SC308-1282.5″5mm128GB6Gb/sSATAHFS128G3BTND-
N210ASSD
5SD0M38535
13 SSD,128G,5mm128GB2.5″SATA6Gb/sRTNRB128RFM2KWDLSSD 5SD0M61138
13 SSD,256G,CV3 5SD0L02316
13 SSD,256G,PM871A 5SD0K93729
13 SSD,256G,SC308-2562.5″5mm256GB6Gb/sSATA
HFS256G3BTND-N210ASSD
5SD0M38533
13 SSD,256G,5mm256GB2.5″SATA6Gb/sRTNRB128RFM2KWDL
SSD
5SD0M61139
Table 4. Parts list—Overall (continued)
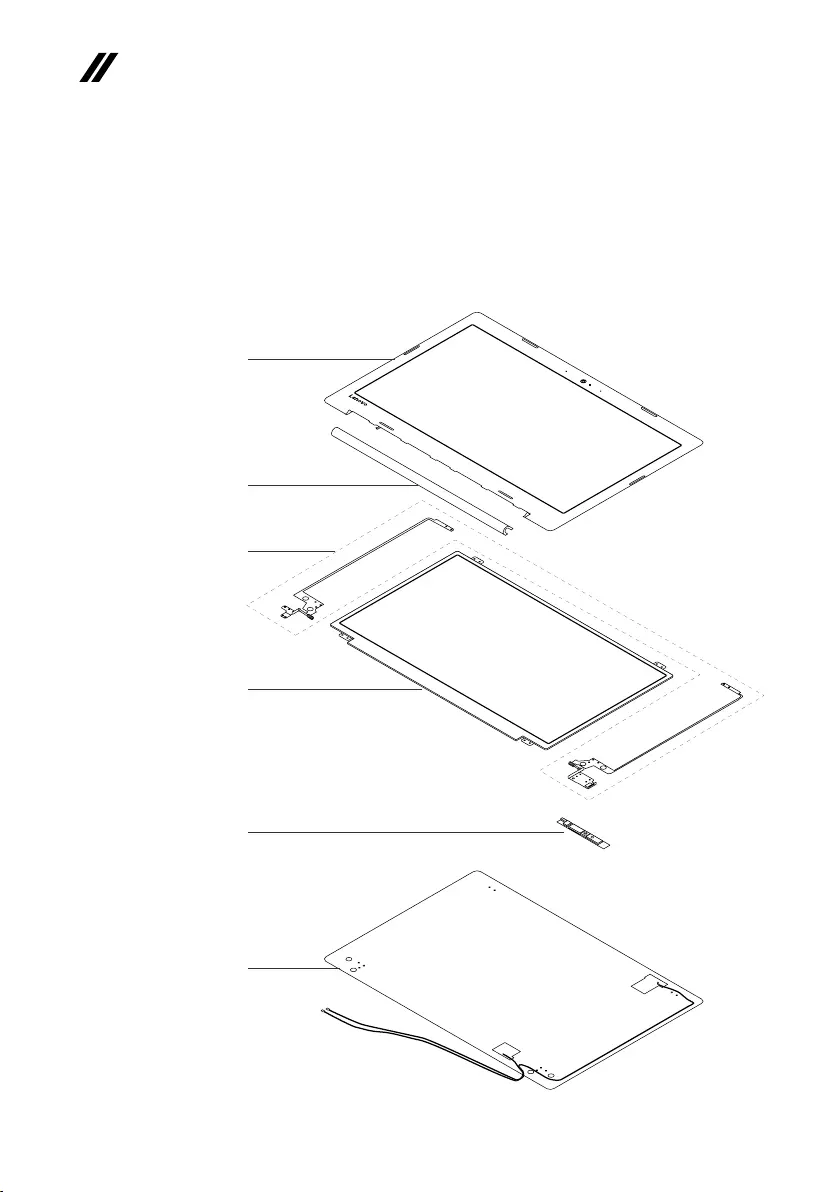
88
ideapad 320-14IAP/ideapad 320-14AST/ideapad 320-15IAP/ideapad 320-15AST/ideapad
320-15ABR/ideapad 320-15ABR Touch Hardware Maintenance Manual
LCD FRUs
InLenovoideapad320-14IAP/ideapad320-14AST/ideapad320-15IAP/
ideapad320-15AST/ideapad320-15ABR/ideapad320-15ABRTouch,thereare
followingtypesofLCD.
• “14-in.HDLED”
• “15-in.HDLED”
• “15.6-in.HDLED”
1
2
5
4
6
3

89
Lenovo ideapad 320-14IAP/ideapad 320-14AST/ideapad 320-15IAP/ideapad 320-
15AST/ideapad 320-15ABR/ideapad 320-15ABR Touch
Table 5. Parts list—LCD FRUs
No. FRU FRU no. CRU
ID.
1 LCDBUEZELL80XKTEX14TBKWCAMMYMAGNET 5B30N82311
N
2 HINGECAP14TL80XKOBPT 5CB0N82275
2 HINGECAP14TL80XKPGPT 5CB0N82240
2 HINGECAP14TL80XKWHPT 5CB0N82232
2 HINGECAP14TL80XKDBUPT 5CB0N82234
3 HINGELR14TL80XK 5H50N82309
4 14.0’Panel,HDTNSlimGL(3.0mm),AUOB140XTN02.D2AHDGS
NB
5D10H13021
4 14.0’Panel,HDTNSlimGL(3.0mm),INN140BGA-EB3HDTGSNB 5D10K85754
4 14.0’Panel,HDTNSlimGL(3.0mm),BONT140WHM-N31HDTGS
NB
5D10K81083
4 14.0’Panel,HDTNSlimGL(3.0mm),IVM140NWR6-R0HDTGSNB 5D10K81642
4 14.0’Panel,HDTNSlimAG(3.0mm),AUOB140XTN02.EHW0AHD
AGSNB
5D10G95364
4 14.0’Panel,HDTNSlimAG(3.0mm),INN140BGA-EA3HDTAGSNB 5D10K85755
4 14.0’Panel,HDTNSlimAG(3.0mm),BONT140WHM-N41HDTAGS
NB
5D10K81099
4 14.0’Panel,HDTNSlimAG(3.0mm),IVM140NWR6-R1HDTAGS
NB
5D10K81644
4 14.0’Panel,FHDTNSlimGL(3.0mm),INN140HGE-EBAC4FHDTG
SNB
5D10K93438
4 14.0’Panel,FHDTNSlimGL(3.0mm),BONT140FHM-N31FHDTGS
NB
5D10L01873
4 14.0’Panel,FHDTNSlimAG(3.0mm),AUB140HTN01.E2AFHDTAG
SNB
5D10L08701
4 14.0’Panel,FHDTNSlimAG(3.0mm),INN140HGE-EAAC4FHDT
AGSNB
5D10K93439
4 14.0’Panel,FHDTNSlimAG(3.0mm),BONT140FHM-N41FHDTAG
SNB
5D10L01874
4 15.6’Panel,15.6»HDTNSlimGL(3.2mm),AUB156XTN07.01AHDT
GSNB
5D10K90419
4 15.6’Panel,15.6»HDTNSlimGL(3.2mm),INXN156BGA-EB2HDTG
SNB
5D10K81084
4 15.6’Panel,15.6»HDTNSlimGL(3.2mm),BONT156WHM-N32V8
HDTGSNB
5D10K81087
4 15.6’Panel,15.6»FHDTNSlimGL(3.2mm),AUB156HTN03.90C
FHDTGSNB
5D10M82922
4 15.6’Panel,15.6»FHDTNSlimGL(3.2mm),INN156HGA-EBBFHDT
GSNB
5D10K93436
415.6’Panel,15.6»FHDTNSlimGL(3.2mm),BONT156FHM-N31FHDT
GSNB
5D10K93437
4 15.6’Panel,15.6»HDTNSlimAG(3.2mm),AUB156XTN07.13AHDT
AGSNB
5D10H52713
4 15.6’Panel,15.6»HDTNSlimAG(3.2mm),INXN156BGA-EA2HDT
AGSNB
5D10K81086
4 15.6’Panel,15.6»HDTNSlimAG(3.2mm),BONT156WHM-N42V8
HDTAGSNB
5D10K81097
4 15.6’Panel,15.6»FHDTNSlimAG(3.2mm),AUB156HTN03.80C
FHDTAGSNB
5D10L08702

90
ideapad 320-14IAP/ideapad 320-14AST/ideapad 320-15IAP/ideapad 320-15AST/ideapad
320-15ABR/ideapad 320-15ABR Touch Hardware Maintenance Manual
No. FRU FRU no. CRU
ID.
4 15.6’Panel,15.6»FHDTNSlimAG(3.2mm),INN156HGA-EABFHDT
AGSNB
5D10K93435
N
4 15.6’Panel,15.6»FHDTNSlimAG(3.2mm),BONT156FHM-N41
FHDTAGSNB
5D10K93434
4 15.6’TouchPanel,OnCellpanelfor320-15ABRTouch,AU
B156XTK01.05AHDTGSNB(T)
5D10M41896
4 15.6’TouchPanel,OnCellpanelfor320-15ABRTouch,IN
N156BGN-E41HDTGSNB(T))
5D10K81098
5 Camera,HDW/SingleMIC,BISBNCR1NKSKHDNBcamera SC20M52085
5 Camera,HDW/SingleMIC,CCYCNFGH41HDNBcamera SC20M52089
5 Camera,HDW/SingleMIC,LTN6SF111N2HDNBcamera SC20M52114
5 Camera,HDW/SingleMIC,AVCHAA-8F4A03HDNBcamera SC20M52087
5 Camera,0.3MW/SingleMIC,BISBNCRVTKTL0.3MNBcamera SC20M52088
5 Camera,0.3MW/SingleMIC,CCYCNFG0200.3MNBcamera SC20M52082
5 Camera,0.3MW/SingleMIC,AWAAM-6SF5A020.3MNBcamera SC20M52079
5 Camera,0.3MW/SingleMIC,AVCHAA-93C5010.3MNBcamera SC20M52080
5 CAMERAL80XK0.3MW1MIC 5C20N82280
5 CAMERAL80XKHDW1MIC 5C20N82351
6LCDCOVERL80XK14TOBPTANTEEDP 5CB0N82366
6LCDCOVERL80XK14TPGPTANTEEDP 5CB0N82367
6LCDCOVERL80XK14TBWPTANTEEDP 5CB0N82237
6LCDCOVERL80XK14TDBUPTANTEEDP 5CB0N82331
6LCDCOVERL80XL15TBWPTANTEEDP 5CB0N86561
6LCDCOVERL80XL15TPGPTANTEEDP 5CB0N86313
6LCDCOVERL80XL15TOBPTANTEEDP 5CB0N86327
6LCDCOVERL80XL15TPPLPTANTEEDP 5CB0N86349
6LCDCOVERL80XL15TDBUPTANTEEDP 5CB0N86413
6LCDCOVERL80XL15TCRPTANTEEDP 5CB0N86358
6LCDCOVERL80XNTOUCHOBPTANTEEDP 5CB0N86888
6LCDCOVERL80XNTOUCHPGPTANTEEDP 5CB0N86847
6LCDCOVERL80XNTOUCHBWPTANTEEDP 5CB0N86850
6LCDCOVERL80XNTOUCHPPLPTANTEEDP 5CB0N86872
6LCDCOVERL80XNTOUCHCRPTANTEEDP 5CB0N86866
6LCDCOVERL80XNTOUCHDBUPTANTEEDP 5CB0N86890
Table 5. Parts list—LCD FRUs (continued)

91
Lenovo ideapad 320-14IAP/ideapad 320-14AST/ideapad 320-15IAP/ideapad 320-
15AST/ideapad 320-15ABR/ideapad 320-15ABR Touch
Miscellaneous parts
Table 6. Parts list—Miscellaneous parts
FRU FRU no. CRU
ID.
Systemmiscellaneousparts:
N
• (a)RAMEMISHIELDINGASSYL80YL 5S60N98522
• (b)ODDBEZELL80XKIB 5B30N82326
• (b)ODDBEZELL80XLTEXWH 5B30N86406
• (b)ODDBEZELL80XLTEXCG 5B30N86570
• (c)ODDBRACKETL80SL 5B40L35764
• (d)HDDBRACKETL80XK 5B40N82219
Note:Italicized lettersinparenthesesarereferences totheexplodedviewin
“Overall”onpage71.
AC adapters
Table 7. Parts list—AC adapters
FRU P/N CRU
ID.
Adaptor,45W(New)wallmountwithroundplug(Lowcost45wAdaptor),Delta
ADP-45DWA20V2.25ACOO
SA10M42800
*
Adaptor,45W(New)wallmountwithroundplug(Lowcost45wAdaptor),Delta
ADP-45DWJ20V2.25ACOO
SA10M42721
Adaptor,45W(New)wallmountwithroundplug(Lowcost45wAdaptor),Delta
ADP-45DWB20V2.25ACOO
SA10M42785
Adaptor,45W(New)wallmountwithroundplug(Lowcost45wAdaptor),Delta
ADP-45DWD20V2.25ACOO
SA10M42696
Adaptor,45W(New)wallmountwithroundplug(Lowcost45wAdaptor),Delta
ADP-45DWH20V2.25ACOO
SA10M42699
Adaptor,45W(New)wallmountwithroundplug(Lowcost45wAdaptor),Delta
ADP-45DWG20V2.25ACOO
SA10M42774
Adaptor,45W(New)wallmountwithroundplug(Lowcost45wAdaptor),Delta
ADP-45DWE20V2.25ACOO
SA10M42748
Adaptor,45W(New)wallmountwithroundplug(Lowcost45wAdaptor),Delta
ADP-45DWC20V2.25ACOO
SA10M42700
Adaptor,45W(New)wallmountwithroundplug(Lowcost45wAdaptor),Delta
ADP-45DWK20V2.25ACOO
SA10M42804
Adaptor,45W(New)wallmountwithroundplug(Lowcost45wAdaptor),Liteon
PA-1450-55LN20V2.25ACOO
SA10M42711
Adaptor,45W(New)wallmountwithroundplug(Lowcost45wAdaptor),Liteon
PA-1450-55LG20V2.25ACOO
SA10M42709
Adaptor,45W(New)wallmountwithroundplug(Lowcost45wAdaptor),Liteon
PA-1450-55LL20V2.25ACOO
SA10M42742
Adaptor,45W(New)wallmountwithroundplug(Lowcost45wAdaptor),Liteon
PA-1450-55LK20V2.25ACOO
SA10M42530
Adaptor,45W(New)wallmountwithroundplug(Lowcost45wAdaptor),Liteon
PA-1450-55LI20V2.25ACOO
SA10M42734
Adaptor,45W(New)wallmountwithroundplug(Lowcost45wAdaptor),Liteon
PA-1450-55LR20V2.25ACOO
SA10M42701
Adaptor,45W(New)wallmountwithroundplug(Lowcost45wAdaptor),Liteon
PA-1450-55LS20V2.25ACOO
SA10M42736

92
ideapad 320-14IAP/ideapad 320-14AST/ideapad 320-15IAP/ideapad 320-15AST/ideapad
320-15ABR/ideapad 320-15ABR Touch Hardware Maintenance Manual
FRU P/N CRU
ID.
Adaptor,45W(New)wallmountwithroundplug(Lowcost45wAdaptor),Liteon
PA-1450-55LU20V2.25ACOO
SA10M42743
*
Adaptor,45W(New)wallmountwithroundplug(Lowcost45wAdaptor),Liteon
PA-1450-55LZ20V2.25ACOO
SA10M42752
Adaptor,45W(New)wallmountwithroundplug(Lowcost45wAdaptor),
ChiconyADL45WCA20V2.25ACOO
SA10M42726
Adaptor,45W(New)wallmountwithroundplug(Lowcost45wAdaptor),
ChiconyADL45WCB20V2.25ACOO
SA10M42737
Adaptor,45W(New)wallmountwithroundplug(Lowcost45wAdaptor),
ChiconyADL45WCC20V2.25ACOO
SA10M42697
Adaptor,45W(New)wallmountwithroundplug(Lowcost45wAdaptor),
ChiconyADL45WCD20V2.25ACOO
SA10M42790
Adaptor,45W(New)wallmountwithroundplug(Lowcost45wAdaptor),
ChiconyADL45WCK20V2.25ACOO
SA10M42768
Adaptor,45W(New)wallmountwithroundplug(Lowcost45wAdaptor),
ChiconyADL45WCE20V2.25ACOO
SA10M42706
Adaptor,45W(New)wallmountwithroundplug(Lowcost45wAdaptor),
ChiconyADL45WCF20V2.25ACOO
SA10M42746
Adaptor,45W(New)wallmountwithroundplug(Lowcost45wAdaptor),
ChiconyADL45WCG20V2.25ACOO
SA10M42792
Adaptor,45W(New)wallmountwithroundplug(Lowcost45wAdaptor),
ChiconyADL45WCH20V2.25ACOO
SA10M42786
Adaptor,65W(New)wallmountwithroundplug(Lowcost65WAdaptor),Delta
ADLX65CDGC2A20V3.25ACOO
SA10M42764
Adaptor,65W(New)wallmountwithroundplug(Lowcost65WAdaptor),Delta
ADLX65CDGG2A20V3.25ACOO
SA10M42758
Adaptor,65W(New)wallmountwithroundplug(Lowcost65WAdaptor),Delta
ADLX65CDGU2A20V3.25ACOO
SA10M42765
Adaptor,65W(New)wallmountwithroundplug(Lowcost65WAdaptor),Delta
ADLX65CDGK2A20V3.25ACOO
SA10M42745
Adaptor,65W(New)wallmountwithroundplug(Lowcost65WAdaptor),Delta
ADLX65CDGI2A20V3.25ACOO
SA10M42796
Adaptor,65W(New)wallmountwithroundplug(Lowcost65WAdaptor),Delta
ADLX65CDGR2A20V3.25ACOO
SA10M42775
Adaptor,65W(New)wallmountwithroundplug(Lowcost65WAdaptor),Delta
ADLX65CDGA2A20V3.25ACOO
SA10M42718
Adaptor,65W(New)wallmountwithroundplug(Lowcost65WAdaptor),Delta
ADLX65CDGE2A20V3.25ACOO
SA10M42794
Adaptor,65W(New)wallmountwithroundplug(Lowcost65WAdaptor),Delta
ADLX65CDGB2A20V3.25ACOO
SA10M42769
Adaptor,65W(New)wallmountwithroundplug(Lowcost65WAdaptor),Liteon
ADLX65CLGC2A20V3.25ACOO
SA10M42791
Adaptor,65W(New)wallmountwithroundplug(Lowcost65WAdaptor),Liteon
ADLX65CLGG2A20V3.25ACOO
SA10M42714
Adaptor,65W(New)wallmountwithroundplug(Lowcost65WAdaptor),Liteon
ADLX65CLGU2A20V3.25ACOO
SA10M42725
Adaptor,65W(New)wallmountwithroundplug(Lowcost65WAdaptor),Liteon
ADLX65CLGK2A20V3.25ACOO
SA10M42531
Adaptor,65W(New)wallmountwithroundplug(Lowcost65WAdaptor),Liteon
ADLX65CLGI2A20V3.25ACOO
SA10M42753
Table 7. Parts list—AC adapters (continued)

93
Lenovo ideapad 320-14IAP/ideapad 320-14AST/ideapad 320-15IAP/ideapad 320-
15AST/ideapad 320-15ABR/ideapad 320-15ABR Touch
FRU P/N CRU
ID.
Adaptor,65W(New)wallmountwithroundplug(Lowcost65WAdaptor),Liteon
ADLX65CLGR2A20V3.25ACOO
SA10M42738
*
Adaptor,65W(New)wallmountwithroundplug(Lowcost65WAdaptor),Liteon
ADLX65CLGA2A20V3.25ACOO
SA10M42793
Adaptor,65W(New)wallmountwithroundplug(Lowcost65WAdaptor),Liteon
ADLX65CLGE2A20V3.25ACOO
SA10M42740
Adaptor,65W(New)wallmountwithroundplug(Lowcost65WAdaptor),Liteon
ADLX65CLGB2A20V3.25ACOO
SA10M42817
Adaptor,65W(New)wallmountwithroundplug(Lowcost65WAdaptor),Chicony
ADLX65CCGC2A20V3.25ACOO
SA10M42805
Adaptor,65W(New)wallmountwithroundplug(Lowcost65WAdaptor),Chicony
ADLX65CCGG2A20V3.25ACOO
SA10M42815
Adaptor,65W(New)wallmountwithroundplug(Lowcost65WAdaptor),Chicony
ADLX65CCGU2A20V3.25ACOO
SA10M42762
Adaptor,65W(New)wallmountwithroundplug(Lowcost65WAdaptor),Chicony
ADLX65CCGK2A20V3.25ACOO
SA10M42735
Adaptor,65W(New)wallmountwithroundplug(Lowcost65WAdaptor),Chicony
ADLX65CCGI2A20V3.25ACOO
SA10M42751
Adaptor,65W(New)wallmountwithroundplug(Lowcost65WAdaptor),Chicony
ADLX65CCGR2A20V3.25ACOO
SA10M42704
Adaptor,65W(New)wallmountwithroundplug(Lowcost65WAdaptor),Chicony
ADLX65CCGA2A20V3.25ACOO
SA10M42766
Adaptor,65W(New)wallmountwithroundplug(Lowcost65WAdaptor),Chicony
ADLX65CCGE2A20V3.25ACOO
SA10M42760
Adaptor,65W(New)wallmountwithroundplug(Lowcost65WAdaptor),Chicony
ADLX65CCGB2A20V3.25ACOO
SA10M42707
Screws
Table 8. Parts list—screws
FRU P/N CRU
ID.
SCREWL80XKMM2.5D7.0LK4.5D0.8TZKNL 5S10N82242 N
SCREWL80XKMM2.5D7.0LK4.5D0.8TNINL 5S10N82325 N
SCREWLMM1.98D3LK4.5DNINL0.4T 5S10K25435 N
AILZAScrewMM22.0D2LK7D 90203987 N
SCREWL80T6MM2.5D2.5LK8.0DNI 5S10L45749 N
ScrewLY700-15ACZHingebase 5S10K26861 N
ACLU1ScrewD-C/D-KB/ODD-D-MB-KB/FAN 90205118 N
Table 7. Parts list—AC adapters (continued)

94
ideapad 320-14IAP/ideapad 320-14AST/ideapad 320-15IAP/ideapad 320-15AST/ideapad
320-15ABR/ideapad 320-15ABR Touch Hardware Maintenance Manual
Notices
Lenovomaynotoffertheproducts,services,or featuresdiscussedinthis
documentinallcountries.Consultyourlocal Lenovorepresentativefor
informationontheproductsandservicescurrentlyavailableinyourarea.Any
referencetoaLenovoproduct,program,orserviceisnotintendedtostateor
implythatonlythatLenovoproduct,program, orservicemaybeused.Any
functionallyequivalent product,program,orservicethatdoesnotinfringe
anyLenovo intellectualproperty rightmay beused instead.However,itisthe
user’sresponsibilitytoevaluateandverifytheoperationofanyotherproduct,
program,orservice.
Lenovomayhavepatentsorpendingpatentapplicationscoveringsubjectmatter
describedinthisdocument.Thefurnishingofthisdocumentdoesnotgiveyou
anylicensetothesepatents.
LENOVOGROUPLTD.PROVIDESTHIS PUBLICATION“ASIS”
WITHOUTWARRANTYOFANYKIND, EITHEREXPRESS ORIMPLIED,
INCLUDING,BUTNOTLIMITEDTO,THEIMPLIEDWARRANTIESOFNON-
INFRINGEMENT,MERCHANTABILITYORFITNESS FORAPARTICULAR
PURPOSE.Somejurisdictionsdonot allowdisclaimerofexpressorimplied
warrantiesincertaintransactions,therefore,thisstatementmaynotapplytoyou.
Thisinformation couldinclude technicalinaccuracies ortypographical errors.
Changesareperiodicallymadetotheinformationherein;thesechanges
willbeincorporatedinneweditionsofthepublication.Lenovomay make
improvementsand/or changesintheproduct(s)and/ortheprogram(s)
describedinthispublicationatanytimewithoutnotice.
Theproductsdescribedinthisdocumentarenotintendedforuse in
implantationorotherlifesupport applicationswheremalfunctionmayresult in
injuryordeathtopersons.Theinformationcontainedinthisdocumentdoesnot
affectorchange Lenovoproductspecicationsorwarranties.Nothinginthis
documentshalloperateasanexpressorimpliedlicenseorindemnityunderthe
intellectualpropertyrightsofLenovoorthirdparties.Allinformationcontained
inthisdocumentwasobtainedinspecicenvironmentsandispresentedasan
illustration.Theresultobtainedinotheroperatingenvironmentsmayvary.
Lenovomayuseordistributeanyof theinformationyousupplyinanyway it
believesappropriatewithoutincurringanyobligationtoyou.
Anyreferencesinthispublication tonon-LenovoWebsites areprovidedfor
convenienceonlyanddonotinanymannerserveasanendorsementofthose
Websites.Thematerials atthose Websitesare notpartofthematerialsfor
thisLenovoproduct,anduseofthoseWebsitesisatyourownrisk.

95
Notices
Anyperformance datacontained hereinwas determinedin acontrolled
environment.Therefore,theresultobtainedinotheroperatingenvironments
mayvarysignificantly.Somemeasurementsmayhavebeenmadeon
development-levelsystemsandthereisnoguaranteethatthesemeasurements
willbethesameongenerallyavailablesystems.Furthermore,some
measurementsmayhavebeenestimatedthroughextrapolation.Actualresults
mayvary.Users ofthisdocumentshouldverifytheapplicabledatafor their
specicenvironment.
Trademarks
ThefollowingtermsaretrademarksorregisteredtrademarksofLenovointhe
UnitedStates,othercountries,orboth.
Lenovo
OneKey
MicrosoftandWindowsaretrademarks ofMicrosoftCorporationintheUnited
States,othercountries,orboth.
Othercompany,products, orservice namesmaybetrademarksorservice
marksofothers.
Lenovo IdeaPad 320
ideapad 320-15ISK/ideapad 320H-15ISK/
ideapad 320L-15ISK/ideapad 320R-15ISK/
ideapad 320E-15ISK/ideapad 320-15IKB/
ideapad 320H-15IKB/ideapad 320L-15IKB/
ideapad 320R-15IKB/ideapad 320E-15IKB/
ideapad 320-15IKB Touch
Hardware
Maintenance
Manual
Manual
View the manual for the Lenovo IdeaPad 320 here, for free. This manual comes under the category laptops and has been rated by 3 people with an average of a 8.9.
This manual is available in the following languages: English. Do you have a question about the Lenovo IdeaPad 320 or do you need help?
Ask your question here
Index
- About this manual
- Safety information
- Safety information
- Important service information
- General checkout
- Related service information
- Lenovo ideapad 320-15ISK/ideapad 320H-15ISK/ideapad 320L-15ISK/ideapad 320R-15ISK/ideapad 320E-15ISK/ideapad 320-15IKB/ideapad 320H-15IKB/ideapad 320L-15IKB/ideapad 320R-15IKB/ideapad 320E-15IKB/ideapad 320-15IKB Touch
- Notices
Product Images (2)


Lenovo IdeaPad 320 specifications
Below you will find the product specifications and the manual specifications of the Lenovo IdeaPad 320.
The Lenovo IdeaPad 320 is a laptop model available in the United States. This laptop features a 15.6-inch high-definition display, which offers a clear and vibrant visual experience. It is powered by an Intel Core processor, providing fast and efficient performance for day-to-day computing tasks.
The IdeaPad 320 comes equipped with a range of storage options, allowing users to choose the capacity that best suits their needs. It also has ample memory for multitasking and running multiple applications simultaneously. The laptop features a built-in DVD drive, enabling users to play their favorite movies or install software easily.
For connectivity, the IdeaPad 320 offers multiple USB ports, including USB 3.0, allowing for fast data transfer speeds. It also has an HDMI port, enabling users to connect the laptop to an external display for a larger viewing experience. The laptop has built-in Wi-Fi and Bluetooth capabilities, ensuring easy and convenient wireless connectivity.
The IdeaPad 320 runs on the Windows operating system, providing users with a familiar and user-friendly interface. It also includes a range of built-in software and applications, such as antivirus protection and productivity tools.
Overall, the Lenovo IdeaPad 320 offers a reliable and durable laptop option with its quality construction and powerful performance. Its range of features and connectivity options make it a versatile choice for everyday computing tasks.
General
| Brand | Lenovo |
| Model | IdeaPad 320 | 80YB000JUK |
| Product | laptop |
| Language | English |
| Filetype | User manual (PDF) |
Frequently Asked Questions
Can’t find the answer to your question in the manual? You may find the answer to your question in the FAQs about the Lenovo IdeaPad 320 below.
How can I connect my Lenovo IdeaPad 320 to a Wi-Fi network?
To connect to a Wi-Fi network, click on the network icon located in the bottom-right corner of your screen. Then, select the appropriate Wi-Fi network from the list and enter the password, if required.
My laptop is running slow, how can I improve its performance?
To improve performance, consider closing unnecessary programs and browser tabs, deleting temporary files, and running a disk cleanup. You can do this by searching for «Disk Cleanup» in the Start menu and following the prompts.
How do I adjust the screen brightness on my laptop?
To adjust the screen brightness, locate the function keys at the top of your keyboard. Look for the icons that resemble a sun or a light bulb. Press the Function (Fn) key in combination with the corresponding brightness function key to increase or decrease the brightness.
How do I transfer files from a USB drive to my laptop?
Connect the USB drive to one of the available USB ports on your laptop. Open the File Explorer by pressing the Windows key and E simultaneously. Then, locate your USB drive under «This PC» or «Computer» and click on it to access its contents. You can now copy and paste or drag and drop the desired files to your laptop’s storage.
Is it possible to connect my laptop to an external monitor? If so, how?
Yes, you can connect your Lenovo IdeaPad 320 to an external monitor. Locate the HDMI or VGA port on the side or back of your laptop. Depending on the available ports, use an HDMI or VGA cable to connect the laptop to the external monitor. Once connected, ensure the monitor is powered on and select the appropriate input source on the monitor itself. Your laptop should automatically detect and display the extended desktop on the external monitor.
What is bluetooth?
Bluetooth is a way of exchanging data wirelessly between electronic devices via radio waves. The distance between the two devices that exchange data can in most cases be no more than ten metres.
What is HDMI?
HDMI stands for High-Definition Multimedia Interface. An HDMI cable is used to transport audio and video signals between devices.
What screen dimensions does my laptop have?
The size of your laptop is usually expressed in inches, 1 inch is 2.54 centimetres. The size is the diagonal size of your laptop, so you measure the screen from bottom left to top right.
How can I best clean my laptop?
A slightly damp cleaning cloth or soft, dust-free cloth works best to remove fingerprints. Dust in hard-to-reach places is best removed with compressed air.
What does the download speed on the internet depend on?
The download speed on the internet depends on the type of connection you have. If you have a 25 Mb/s connection this means that theoretically you should be able to download 25 MB per second.
How do I clean my keyboard?
Hold the keyboard upside down and use a can of compressed air to blow away the dirt. The keys can even be cleaned with a damp cloth.
Is the manual of the Lenovo IdeaPad 320 available in English?
Yes, the manual of the Lenovo IdeaPad 320 is available in English .
Is your question not listed? Ask your question here

Read the safety notices and important tips in the
included manuals before using your computer.
Lenovo ideapad 320
ideapad 320-15ISK / ideapad 320H-15ISK /
ideapad 320L-15ISK / ideapad 320R-15ISK /
ideapad 320E-15ISK / ideapad 320-15IKB /
ideapad 320H-15IKB / ideapad 320L-15IKB /
ideapad 320R-15IKB / ideapad 320E-15IKB /
ideapad 320-15IKB Touch
Uživatelská příručka
Než začnete používat počítač, přečtěte si bezpečnostní poznámky
a důležité rady, které naleznete v přiložených příručkách.

Poznámky
•Před používáním produktu si přečtěte dokument Příručka s bezpečnostními aobecnými
informacemi Lenovo .
teré pokyny v této příručce mohou předpokládat, že používáte systém Windows®
•Něk
10. Pokud používáte jiný operační systém Windows, některé postupy se mohou mírně
lišit. Pokud používáte jiný operační systém, některé postupy pro vás nemusí platit.
• Vlastnosti a funkce popsané v této příručce js
funkce nemusejí být dostupné na vašem počítači nebo váš počítač může obsahovat
funkce, které nejsou popsané v této uživatelské příručce.
• Ilustrace v této příručce
operačního systému jsou pouze orientační. Viz skutečný produkt.
Upozornění k předpisům
• Podrobnosti naleznete v části Guides & Manuals na webu http://support.lenovo.com.
se mohou lišit od skutečného produktu. Snímky obrazovky
ou společné většině modelů. Některé
První vydání (Únor 2017)
© Copyright Lenovo 2017.

Obsah
Kapitola 1. Seznámení s počítačem ……………………………………………..1
Pohled shora ………………………………………………………………………………………………….. 1
Pohled zleva ………………………………………………………………………………………………….. 5
Pohled zprava ………………………………………………………………………………………………… 8
Pohled zdola ………………………………………………………………………………………………… 10
Kapitola 2. Začínáme používat systém Windows 10 ……………………11
První konfigurace operačního systému ……………………………………………………………. 11
Rozhraní operačního systému ………………………………………………………………………… 11
Uvedení počítače do režimu spánku nebo jeho vypnutí …………………………………….. 15
Připojení k bezdrátové síti ……………………………………………………………………………… 17
Získání nápovědy v systému Windows ……………………………………………………………. 18
Kapitola 3. Systém pro obnovení ………………………………………………. 19
Push-button reset (Snadné obnovení do výchozího stavu) …………………………………. 19
Kapitola 4. Odstraňování potíží …………………………………………………. 21
Časté otázky ………………………………………………………………………………………………… 21
Odstraňování potíží ………………………………………………………………………………………. 23
Ochranné známky ……………………………………………………………………..26
i

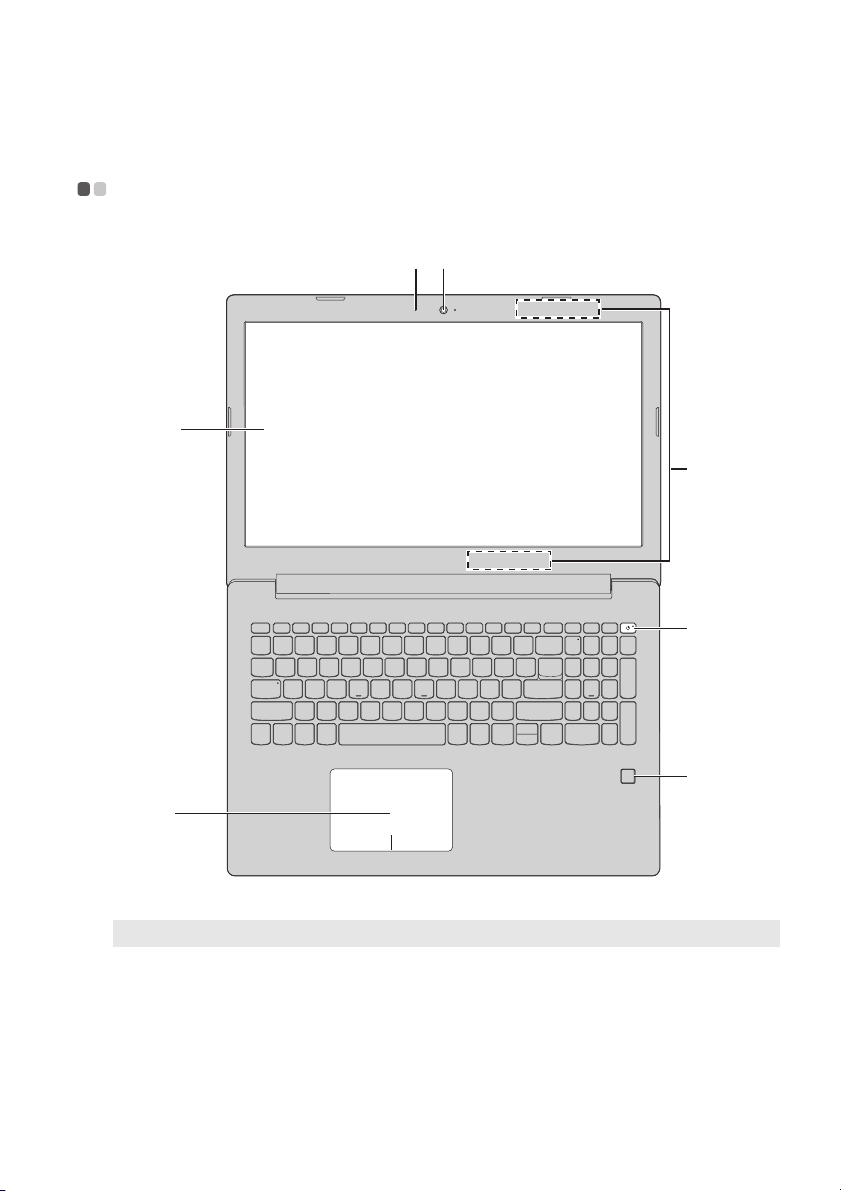
Kapitola 1. Seznámení s počítačem
Pohled shora — — — — — — — — — — — — — — — — — — — — — — — — — — — — — — — — — — — — — — — — — — — — — — — — — — — — — — — — — — — — — — — — —
Poznámka: Čárkované linky označují součástky, které nejsou zvnějšku vidět.
Pozor:
evírejte panel displeje o více než 170 stupňů. Při zavírání panelu displeje dávejte pozor, abyste
• Neot
mezi panelem a klávesnicí nenechali pera nebo jiné předměty. Jinak by mohlo dojít k poškození
panelu displeje.
1

Kapitola 1. Seznámení s počítačem
a Zabudovaný
mikrofon
b Integrovaná
kamera
c Displej
d Antény
bezdrátové sítě
LAN
e Tlačítko napájení
f Čtečka otisků
prstů (u
některých
modelů)
g Touchpad
Zachycuje zvuk, který lze použít pro videokonference, vyprávění
nebo záznam zvuku.
Kameru lze použít pro videokomunikaci.
LCD displej s LED podsvícením nabízí vynikající vizuální výstup.
Připojení k bezdrátovému adaptéru LAN k odesílání a příjmu
bezdrátových vln.
Stiskem tohoto tlačítka zapnete nebo vypnete počítač.
Když je počít
déle než 1 sekundu, počítač přejde do režimu spánku. Pokud
tlačítko stisknete a podržíte déle než 4 sekundy, počítač se
vypne.
Registruje otisky prstů, které lze použít jako hesla pro
zabezpečení počítače.
Touchpad plní úlohu běžné myši.
Touchpad: Chcete-li
prstem po touchpadu ve směru, kterým chcete, aby se ukazatel
pohyboval.
Tlačítka touc
pravému/levému tlačítku běžné myši.
ač zapnutý a vy toto tlačítko stisknete a podržíte
posunout ukazatel na obrazovce, posuňte
hpadu: Funkce na levé/pravé straně odpovídají
Poznámka: Touchpad můžete zapnout/vypnout stiskemtlačítka F6 ( ).
2
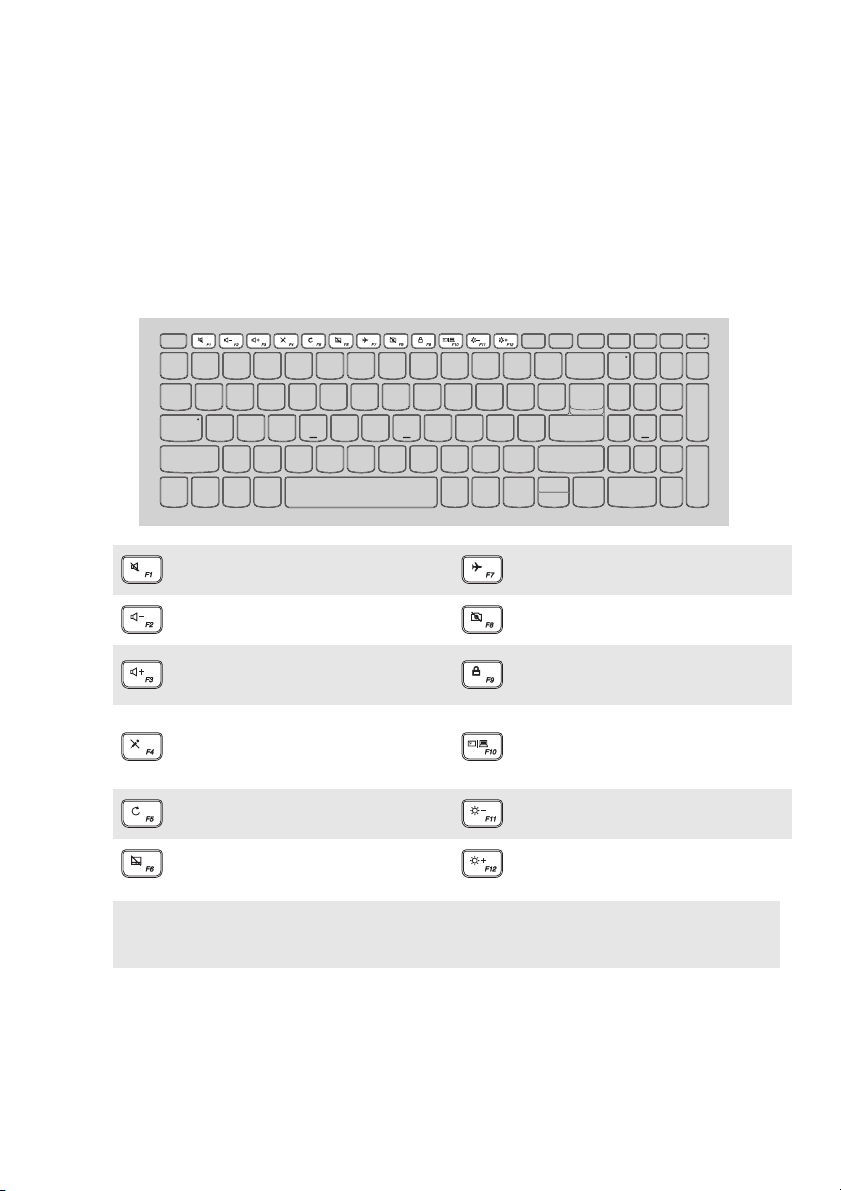
Kapitola 1. Seznámení s počítačem
Používání
klávesnice
Klávesové zkratky
Stisknutím příslušných klávesových zkratek lze rychle přistoupit k některým
nastavením systému.
Ztlumí/zapne zvuk. Zapne/vypne režim v letadle.
Sníží úroveň hlasitosti. Zapnutí/vypnutí kamery.
Zvýší úroveň hlasitosti.
Zamknutí/odemknutí LCD
obrazovky.
Zapnutí externího projektoru
Zapnutí/vypnutí mikrofonu.
nebo přepnutí externího
zobrazovacího zařízení.
Aktualizace stránky. Změnit jas displeje.
Zapne/vypne touchpad. Zvýší jas displeje.
Poznámka: Pokud v Nástroji pro nastavení systému BIOS přepnete položku Hotkey Mode (Režim
klávesových zkratek) z nastavení Enabled (Povoleno) na nastavení Disabled
(Zakázáno), bude nutné stisknout s příslušnou klávesovou zkratkou také klávesu Fn.
3
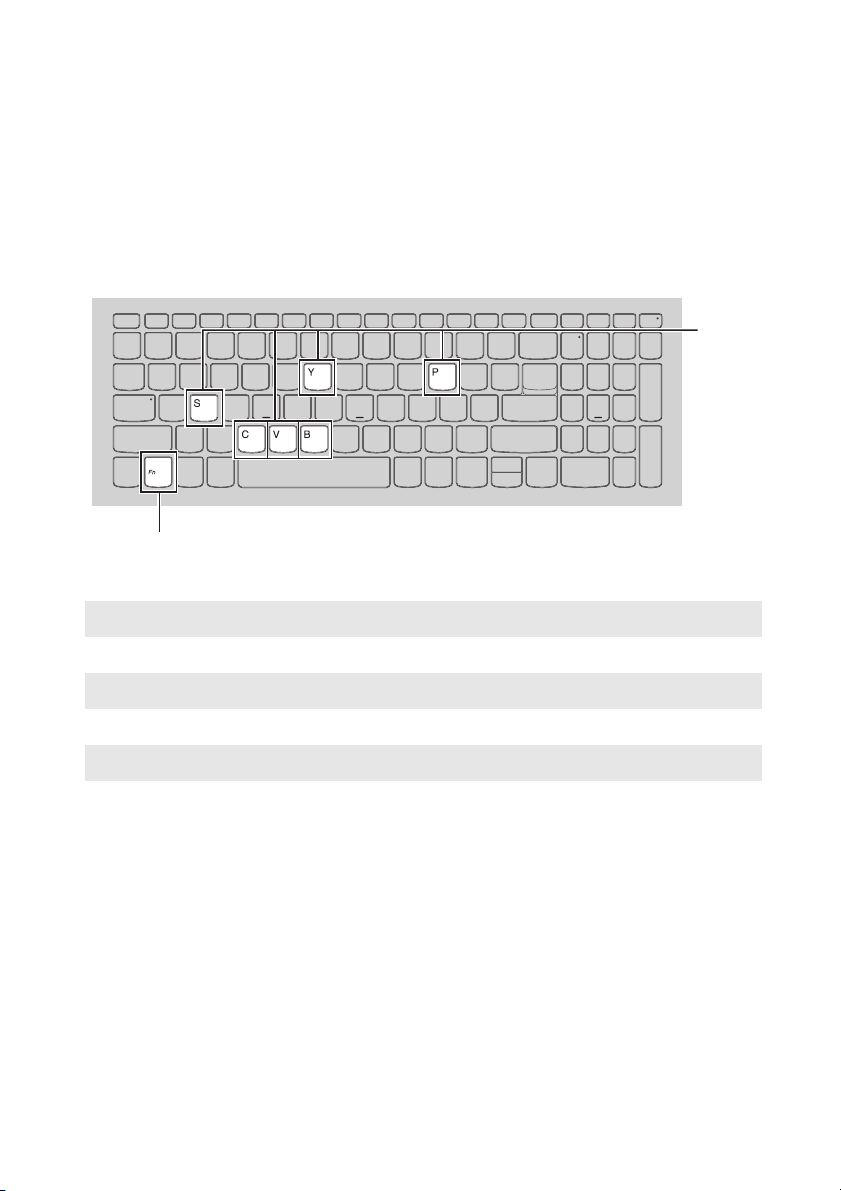
Kapitola 1. Seznámení s počítačem
Kombinace funkčních kláves
Pomocí funkčních kláves můžete okamžitě měnit provozní funkce. Chcete-li tuto
funkci použít, stiskněte a přidržte klávesu Fn a; pak stiskněte jednu z funkčních
kláves b.
Níže je uveden popis funkcí každé funkční klávesy.
Fn + B: Aktivace funkce přerušení.
Fn + P:
Fn + C: Zapnutí/vypnutí funkce scroll lock.
Fn + Y:
Fn + S + V: Nastavte přepravní režim baterie.
Aktivace funkce pauzy.
Aktivace systémového požadavku.
4
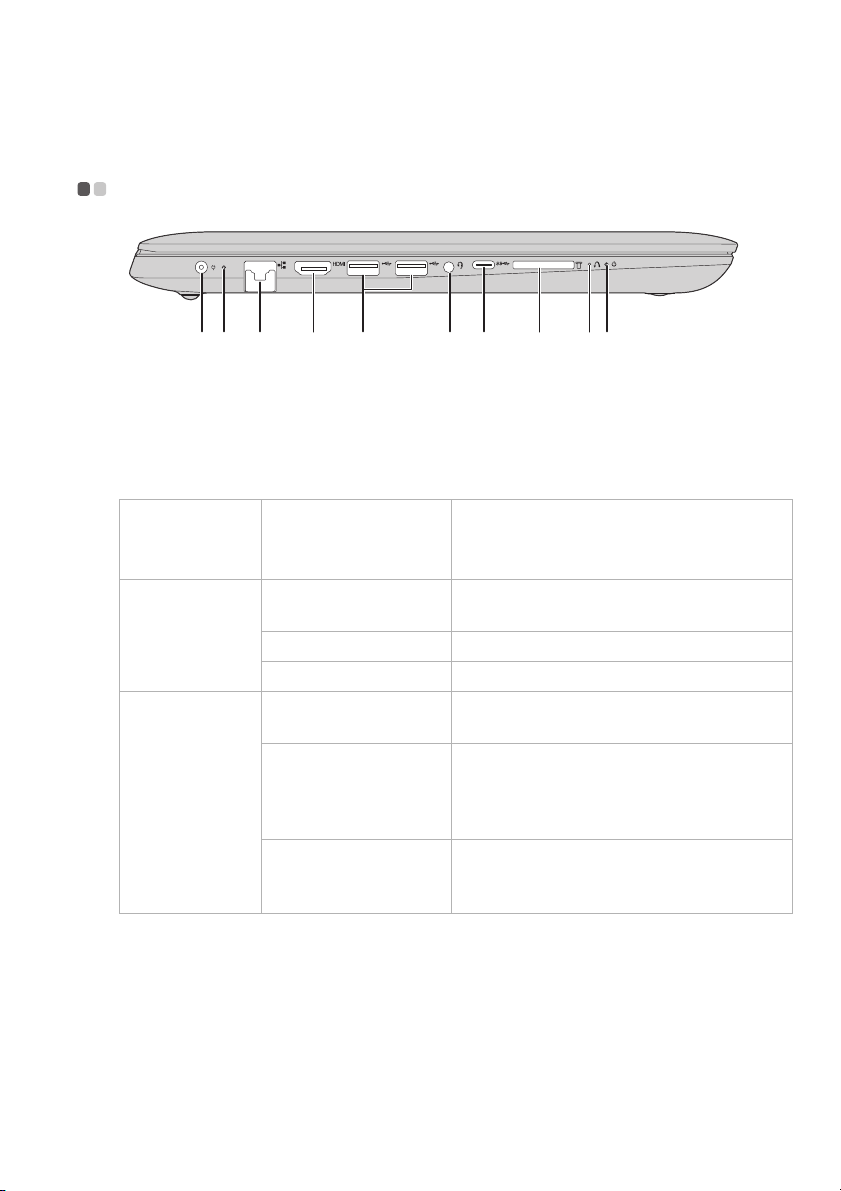
Kapitola 1. Seznámení s počítačem
Pohled zleva — — — — — — — — — — — — — — — — — — — — — — — — — — — — — — — — — — — — — — — — — — — — — — — — — — — — — — — — — — — — — — — — — —
a Konektor
napájecího
adaptéru
b Indikátor stavu
baterie/nabíjení
Stav
n
apájecího
adaptéru
Odpojeno
Připojeno
Slouží k připojení napájecího adaptéru.
Stav indikátoru Význam
Nesvítí Počítač je v režimu spánku nebo je vypnutý;
úroveň nabití baterie je větší než 20 %.
Stálé žluté světl
Rychle blikající žlutá Úroveň nabití
Pomalu blikající žlutá Baterie se nabíjí. Když úroveň nabití baterie
Pomalu blikající bílá Úroveň nabití
Stálé bílé světl
o Úroveň nabití baterie je mezi 5 % a 20 %.
baterie je mezi 1 % a 5 %.
dosáhne 20 %, indikátor začne blikat bíle.
baterie je mezi 20 % a 80 % a
baterie se stále nabíjí. Když úroveň nabití
baterie dosáhne 80 %, indikátor přestane
blikat.
o Úroveň nabití baterie je větší než 80 %,
nabíjení bude pokračovat až do úplného
nabití baterie.
5

Kapitola 1. Seznámení s počítačem
c Port RJ-45
d Port HDMI
e Port USB 3.0
Poznámka: Podrobnosti naleznete „Připojení zařízení USB“ na straně 7.
f Kombinovaný
Slouží k připojení počítače k ethernetové síti.
Slouží pro připojení k zařízením se vstupem HDMI, jako jsou
televize nebo monitor.
Připojení k USB zařízením.
Připojení ke sluchátkům.
zvukový konektor
• Kombinovaný zvukový konektor nepodporuje běžné mikrofony.
• Funkce nahrávání možná nebude podporována, pokud připojíte sluchátka nebo náhlavní sady
třetích stran z důvodu odlišnosti výrobních norem.
g Port typu C
h Zdířka pro
Port typu C podporuje:
• Podpora USB 3.1 gen 1, výstup 5 V DC, 0,9 A DC
Sem zasuňte paměťové karty (není součástí balení).
paměťovou kartu
Poznámka: Podrobnosti naleznete „Používání paměťové karty (není součástí balení)“ na straně 9.
i Tlačítko Novo
Když je počítač vypnutý, stisknutím tohoto tlačítka můžete
spustit System Recovery (Obnovení systému) nebo Nástroj pro
nastavení systému BIOS nebo otevřít nabídku spuštění počítače.
j Ukazatel stavu
napájení
Indikátor Stav indikátoru Význam
Ukazatel
st
avu
napájení
Svítí (stálé bílé světlo) Počítač je zapnutý.
Bliká Počít
Nesvítí Počít
ač je v režimu spánku.
ač je vypnutý.
6
Loading…
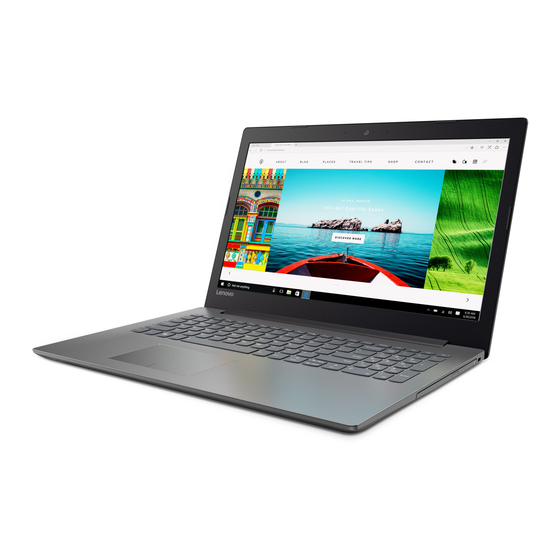
- Manuals
- Brands
- Lenovo Manuals
- Laptop
- ideapad 320
- Hardware maintenance manual
-
Contents
-
Table of Contents
-
Bookmarks
Lenovo ideapad 320
ideapad 320-14IAP/ideapad 320-14AST/
ideapad 320-15IAP/ideapad 320-15AST/
ideapad 320-15ABR/
ideapad 320-15ABR Touch
Hardware
Maintenance
Manual
Need help?
Do you have a question about the ideapad 320 and is the answer not in the manual?
Questions and answers
Related Manuals for Lenovo ideapad 320
Summary of Contents for Lenovo ideapad 320
-
Page 1
Lenovo ideapad 320 ideapad 320-14IAP/ideapad 320-14AST/ ideapad 320-15IAP/ideapad 320-15AST/ ideapad 320-15ABR/ ideapad 320-15ABR Touch Hardware Maintenance Manual… -
Page 2
• Before using this information and the product it supports, be sure to read the general information under “Notices” on page 94. • This manual applies to the following models: Lenovo ideapad 320-14IAP/ideapad 320-14AST/ideapad 320-15IAP/ideapad 320-15AST/ideapad 320-15ABR/ideapad 320-15ABR Touch. The illustrations used in this manual are for Lenovo ideapad 320-15ABR unless otherwise stated. -
Page 3: Table Of Contents
Power-on password ……….24 Hard-disk password ……….24 Administrator password ……..24 Power management ……..25 Putting the computer to sleep or shutting it down …………..25 Putting your computer to sleep ……25 Shutting down the computer ……26 Lenovo ideapad 320-14IAP/ideapad 320- 14AST/ideapad 320-15IAP/ideapad 320- 15AST/ideapad 320-15ABR/ideapad 320- 15ABR Touch ……….27 Specifications ……….27 Status indicators ……….. 31 Hotkeys…………32 FRU replacement notices ……33 Screw notices ……….33…
-
Page 4: About This Manual
• The product-specific section includes service, reference, and product-specific parts information. Important: This manual is intended only for trained servicers who are familiar with Lenovo products. Use this manual to troubleshoot problems effectively. Before servicing a Lenovo product, make sure to read all the information under “Safety information” on page 1 and “Important service information” on page 16.
-
Page 5: Safety Information
Safety information Safety information This chapter presents the following safety information that you need to get familiar with before you service a Lenovo ideapad 320-14IAP/ideapad 320- 14AST/ideapad 320-15IAP/ideapad 320-15AST/ideapad 320-15ABR/ideapad 320-15ABR Touch computer: • “General safety” on page 2 • “Electrical safety” on page 3 • “Safety inspection guide” on page 5 • “Handling devices that are sensitive to electrostatic discharge” on page 6 • “Grounding requirements” on page 6 • “Safety notices: multilingual translations” on page 7…
-
Page 6: General Safety
320-14IAP/ideapad 320-14AST/ideapad 320-15IAP/ideapad 320-15AST/ideapad 320-15ABR/ideapad 320-15ABR Touch Hardware Maintenance Manual General safety Follow these rules below to ensure general safety: • Observe a good housekeeping in the area where the machines are put during and after the maintenance. • When lifting any heavy object: 1. Make sure that you can stand safely without slipping. 2. Distribute the weight of the object equally between your feet. 3. Use a slow lifting force. Never move suddenly or twist when you attempt to lift it. 4. Lift it by standing or pushing up with your leg muscles; this action could avoid the strain from the muscles in your back. Do not attempt to lift any object that weighs more than 16 kg (35 lb) or that you think is too heavy for you.
-
Page 7: Electrical Safety
Safety information Safety information Electrical safety Observe the following rules when working on electrical equipments. Important: Use only approved tools and test equipments. Some hand tools have handles covered with a soft material that does not insulate you when working with live electrical currents. Many customers have rubber floor mats near their machines that contain small conductive fibers to decrease electrostatic discharges.
-
Page 8
320-14IAP/ideapad 320-14AST/ideapad 320-15IAP/ideapad 320-15AST/ideapad 320-15ABR/ideapad 320-15ABR Touch Hardware Maintenance Manual • Always look carefully for possible hazards in your work area. Examples of these hazards are moist floors, nongrounded power extension cables, power surges, and missing safety grounds. • Do not touch live electrical circuits with the reflective surface of a plastic dental mirror. The surface is conductive; such touching can cause personal injury and machine damage. • Do not service the following parts with the power on when they are removed from their normal operating places in a machine: – Power supply units – Pumps – Blowers and fans – Motor generators… -
Page 9: Safety Inspection Guide
The power cord should be the type specified in the parts list. c. Insulation must not be frayed or worn. 4. Check for cracked or bulging batteries. 5. Remove the cover. 6. Check for any obvious non-Lenovo alterations. Use good judgment as to the safety of any non-Lenovo alterations. 7. Check inside the unit for any obvious unsafe conditions, such as metal filings, contamination, water or other liquids, or signs of fire or smoke damage. 8. Check for worn, frayed, or pinched cables.
-
Page 10: Handling Devices That Are Sensitive To Electrostatic Discharge
320-14IAP/ideapad 320-14AST/ideapad 320-15IAP/ideapad 320-15AST/ideapad 320-15ABR/ideapad 320-15ABR Touch Hardware Maintenance Manual Handling devices that are sensitive to electrostatic discharge Any computer part containing transistors or integrated circuits (ICs) should be considered sensitive to electrostatic discharge (ESD). ESD damage can occur when there is a difference in charge between objects. Protect against ESD damage by equalizing the charge so that the machine, the part, the work mat, and the person handling the part are all at the same charge. Notes: 1. Use product-specific ESD procedures when they exceed the requirements noted here.
-
Page 11: Safety Notices: Multilingual Translations
Safety information Safety notices: multilingual translations The safety notices in this section are provided in English, French, German, Hebrew, Italian, Japanese, and Spanish. Safety notice 1 Before the computer is powered on after FRU replacement, make sure all screws, springs, and other small parts are in place and are not left loose inside the computer. Verify this by shaking the computer and listening for rattling sounds.
-
Page 12
320-14IAP/ideapad 320-14AST/ideapad 320-15IAP/ideapad 320-15AST/ideapad 320-15ABR/ideapad 320-15ABR Touch Hardware Maintenance Manual Safety notice 2 DANGER Some standby batteries contain a small amount of nickel and cadmium. Do not disassemble a standby battery, recharge it, throw it into fire or water, or short- circuit it. -
Page 13
Safety information Safety notice 3 DANGER The battery pack contains small amounts of nickel. Do not disassemble it, throw it into fire or water, or short-circuit it. Dispose of the battery pack as required by local ordinances or regulations. Use only the battery in the appropriate parts listing when replacing the battery pack. -
Page 14
320-14IAP/ideapad 320-14AST/ideapad 320-15IAP/ideapad 320-15AST/ideapad 320-15ABR/ideapad 320-15ABR Touch Hardware Maintenance Manual Safety notice 4 DANGER The lithium battery can cause a fire, an explosion, or a severe burn. Do not recharge it, remove its polarized connector, disassemble it, heat it above 100°C (212°F), incinerate it, or expose its cell contents to water. -
Page 15
Safety information Safety notice 5 If the LCD breaks and the fluid from inside the LCD gets into your eyes or on your hands, immediately wash the affected areas with water at least for 15 minutes. Seek medical care if any symptoms caused by the fluid are present after washing. Si le panneau d’affichage à… -
Page 16
320-14IAP/ideapad 320-14AST/ideapad 320-15IAP/ideapad 320-15AST/ideapad 320-15ABR/ideapad 320-15ABR Touch Hardware Maintenance Manual Safety notice 6 DANGER To avoid shock, do not remove the plastic cover that protects the lower part of the inverter card. Afin d’éviter tout risque de choc électrique, ne retirez pas le cache en plastique protégeant la partie inférieure de la carte d’alimentation. -
Page 17
Safety information Safety notice 8 DANGER Before removing any FRU, turn off the computer, unplug all power cords from electrical outlets, remove the battery pack, and then disconnect any interconnecting cables. Avant de retirer une unité remplaçable en clientèle, mettez le système hors tension, débranchez tous les cordons d’alimentation des socles de prise de courant, retirez la batterie et déconnectez tous les cordons d’interface. -
Page 18: Laser Compliance Statement
320-14IAP/ideapad 320-14AST/ideapad 320-15IAP/ideapad 320-15AST/ideapad 320-15ABR/ideapad 320-15ABR Touch Hardware Maintenance Manual Laser compliance statement Some models of Lenovo computer are equipped from the factory with an optical storage device such as a CD-ROM drive or a DVD-ROM drive. Such devices are also sold separately as options. If one of these drives is installed, it is certified in the U.S. to conform to the requirements of the Department of…
-
Page 19
Safety information A CD-ROM drive, a DVD-ROM drive, or any other storage device installed may contain an embedded Class 3A or Class 3B laser diode. Note the following: DANGER Emits visible and invisible laser radiation when open. Do not stare into the beam, do not view directly with optical instruments, and avoid direct exposure to the beam. Radiação por raio laser ao abrir. Não olhe fixo no feixe de luz, não olhe diretamente por meio de instrumentos óticos e evite exposição direta com o feixe de luz. -
Page 20: Important Service Information
Strategy for replacing FRUs Before replacing parts: Make sure that all software fixes, drivers, and BIOS downloads are installed before replacing any FRUs listed in this manual. After a system board is replaced, ensure that the latest BIOS is loaded to the system board before completing the service action. To download software fixes, drivers, and BIOS, follow the steps below: 1. Go to http://support.lenovo.com. 2. Enter the serial number or select a product or use Lenovo smart downloading. 3. Select the BIOS/Driver/Applications and download. 4. Follow the directions on the screen and install the necessary software.
-
Page 21: Strategy For Replacing A Hard Disk Drive
Important service information Use the following strategy to prevent unnecessary expense for replacing and servicing FRUs: • If you are instructed to replace an FRU, but the replacement does not solve the problem, reinstall the original FRU before you continue. • Some computers have both a processor board and a system board. If you are instructed to replace either of them, and replacing one of them does not solve the problem, reinstall that board, and then replace the other one. • If an adapter or a device consists of more than one FRU, any of the FRUs may be the cause of the error. Before replacing the adapter or device, remove the FRUs one by one to see if the symptoms change. Replace only the FRU that changed the symptoms. Attention: The setup configuration on the computer you are servicing may have been customized. Running Automatic Configuration may alter the settings. Note the current configuration settings (using the View Configuration option); then, when service has been completed, verify that those settings remain in effect.
-
Page 22: Important Information About Replacing Rohs Compliant Frus
Electronic Equipment Directive (2002/95/EC) is a European Union legal requirement affecting the global electronics industry. RoHS requirements must be implemented on Lenovo products placed on the market after June 2006. Products on the market before June 2006 are not required to have RoHS compliant parts.
-
Page 23: General Checkout
General checkout General checkout This chapter presents the following information: • “What to do first” on page 20 • “Power system checkout” on page 21 Before you go to the checkout, make sure to read the following important notes: Important notes: • Only certified trained personnel can service the computer. • Before replacing any FRU, read the entire page on removing and replacing FRUs. • Carefully remove screws for reuse when replacing FRUs. • Be extremely careful during such write operations as copying, saving, or formatting. Drives in the computer that you are servicing sequence might have been altered.
-
Page 24: What To Do First
320-14IAP/ideapad 320-14AST/ideapad 320-15IAP/ideapad 320-15AST/ideapad 320-15ABR/ideapad 320-15ABR Touch Hardware Maintenance Manual What to do first When you do return an FRU, you must include the following information in the parts exchange form or parts return form that you attach to it: 1. Name and phone number of servicer 2. Date of service 3. Date on which the machine failed 4. Date of purchase 5. Procedure index and page number in which the failing FRU was detected 6. Failing FRU name and part number 7. Machine type, model number, and serial number 8. Customer’s name and address Note for warranty: During the warranty period, the customer may be…
-
Page 25: Power System Checkout
Checking the AC adapter You are here because the computer fails only when the AC adapter is used. • If the power-on indicator does not turn on, check the power cord of the AC adapter for correct continuity and installation. • If the computer does not charge during operation, go to “Checking operational charging”. To check the AC adapter, follow the steps below: 1. Unplug the AC adapter cable from the computer. 2. Measure the output voltage at the plug of the AC adapter cable. See the following figure: Voltage (V DC) Note: Output voltage for the AC adapter pin No. 2 may differ from the one you are servicing. 3. If the voltage is not correct, replace the AC adapter. 4. If the voltage is acceptable, do the following: • Replace the system board. • If the problem persists, go to “Lenovo ideapad 320-14IAP/ideapad 320- 14AST/ideapad 320-15IAP/ideapad 320-15AST/ideapad 320-15ABR/ ideapad 320-15ABR Touch” on page 27. Note: Noise from the AC adapter does not always indicate a defect.
-
Page 26: Checking Operational Charging
320-14IAP/ideapad 320-14AST/ideapad 320-15IAP/ideapad 320-15AST/ideapad 320-15ABR/ideapad 320-15ABR Touch Hardware Maintenance Manual Checking operational charging To check whether the battery charges properly during operation, use a discharged battery pack or a battery pack that has less than 50% of the total power remaining when installed in the computer. Perform operational charging. If the battery status indicator or icon does not light on, remove the battery pack and let it return to room temperature. Reinstall the battery pack. If the charge indicator or icon is still off, replace the battery pack. If the charge indicator still does not light on, replace the system board. Then reinstall the battery pack. If it is still not charged, go to the next section.
-
Page 27: Related Service Information
Restore of factory default The Lenovo ideapad 320-14IAP/ideapad 320-14AST/ideapad 320-15IAP/ ideapad 320-15AST/ideapad 320-15ABR/ideapad 320-15ABR Touch computers come with pre-installed OneKey Recovery System. In order to save application files and the initial backed up files of the system, the hard disk in a Lenovo computer includes a hidden partition when it is shipped. If you need to restore the system to the point of your first boot up, just enter Lenovo OneKey Recovery System and run System Recovery. For details of OneKey Recovery System, see the User Guide for Lenovo OneKey Recovery system .
-
Page 28: Passwords
320-14IAP/ideapad 320-14AST/ideapad 320-15IAP/ideapad 320-15AST/ideapad 320-15ABR/ideapad 320-15ABR Touch Hardware Maintenance Manual Passwords As many as three passwords may be needed for any Lenovo computer: the power-on password (POP), the hard disk password (HDP), and the administrator password. If any of these passwords has been set, a prompt for it appears on the screen whenever the computer is turned on. The computer does not start until the password is entered.
-
Page 29: Power Management
Related service information Power management Note: Power management modes are not supported for APM operating system. To reduce power consumption, the computer has two power management modes: sleep (standby), and hibernation. Putting the computer to sleep or shutting it down When you have finished working with your computer, you can put it to sleep or shut it down. Putting your computer to sleep If you will be away from your computer for only a short time, put the computer to sleep. When the computer is in sleep mode, you can quickly wake it to resume use, bypassing the startup process. To put the computer to sleep, do one of the following: • Close the display lid. • Press and hold the Power key for about 1 to 5 seconds.
-
Page 30: Shutting Down The Computer
320-14IAP/ideapad 320-14AST/ideapad 320-15IAP/ideapad 320-15AST/ideapad 320-15ABR/ideapad 320-15ABR Touch Hardware Maintenance Manual Shutting down the computer If you are not going to use your computer for a long time, shut it down. To shut down your computer, do one of the following: • Select the Start button, then select Power → Shut down. • Right-click or press the Start button in the lower-left corner and select Shut down or sign out → Shut down.
-
Page 31: Lenovo Ideapad 320-14Iap/Ideapad 320-14Ast/Ideapad 320-15Iap/Ideapad 320-15Ast/Ideapad 320-15Abr/ Ideapad 320-15Abr Touch
• “Status indicators” on page 31 • “Hotkeys” on page 32 • “FRU replacement notices” on page 33 • “Removing and replacing an FRU” on page 34 • “Locations” on page 68 • “Parts list” on page 70 Specifications The following table lists the specifications of the Lenovo ideapad 320- 14IAP/ideapad 320-14AST/ideapad 320-15IAP/ideapad 320-15AST/ ideapad 320-15ABR/ideapad 320-15ABR Touch: Table 1. Specifications Lenovo ideapad 320-14IAP Lenovo ideapad 320-14AST Form Factor Dimensions Appr. 338.3 mm × 249.9 mm × 22.7 mm…
-
Page 32
320-14IAP/ideapad 320-14AST/ideapad 320-15IAP/ideapad 320-15AST/ideapad 320-15ABR/ideapad 320-15ABR Touch Hardware Maintenance Manual Table 1. Specifications (continued) Lenovo ideapad 320-14IAP Lenovo ideapad 320-14AST Display Display 1366 × 768 pixels HD/1920 × 1080 pixels FHD resolution (LCD) LCD backlight I/O Ports USB 3.0 × 1, USB 2.0 × 1 Audio Combo audio jack × 1 Video/Audio HDMI slot × 1 Ethernet RJ-45 × 1 Memory card 4 in 1 slot × 1 (SD/SDHC/SDXC/MMC) slot Battery pack… -
Page 33
Lenovo ideapad 320-14IAP/ideapad 320-14AST/ideapad 320-15IAP/ideapad 320- 15AST/ideapad 320-15ABR/ideapad 320-15ABR Touch Table 1. Specifications (continued) Lenovo ideapad Lenovo ideapad Lenovo ideapad 320-15ABR/ideapad 320-15IAP 320-15AST 320-15ABR Touch Form Factor Dimensions Appr. 378 mm × 260 mm × 22.9 mm Weight Appr. 2.2 kg with battery LCD size 15.6-inch Processor See the system properties of your computer, you can do this as follows: Click Control Panel, then click Hardware and Sound, click Device Manager under Devices and Printers and double click Processors. -
Page 34
320-14IAP/ideapad 320-14AST/ideapad 320-15IAP/ideapad 320-15AST/ideapad 320-15ABR/ideapad 320-15ABR Touch Hardware Maintenance Manual Table 1. Specifications (continued) Lenovo ideapad Lenovo ideapad Lenovo ideapad 320-15ABR/ideapad 320-15IAP 320-15AST 320-15ABR Touch I/O Ports USB 3.0 × 2, Type-C × 1 USB 3.0 × 1, USB 2.0 × 1 (support USB 3.1 Gen1, Output 5V DC, 0.9A DC) Audio Combo audio jack × 1 Video/Audio HDMI slot × 1 Ethernet RJ-45 × 1 Memory 4 in 1 slot × 1 (SD/SDHC/SDXC/MMC) -
Page 35: Status Indicators
Lenovo ideapad 320-14IAP/ideapad 320-14AST/ideapad 320-15IAP/ideapad 320- 15AST/ideapad 320-15ABR/ideapad 320-15ABR Touch Status indicators The system status indicators below show the computer status: Table 2. Status indicators AC power Indicator status Meaning adapter status The computer is in sleep mode or turned off; The battery has more than 20% charge. Disconnected The battery has between 5% and Solid amber 20% charge. The battery has between 0% and 5% Fast blinking amber charge. The battery is being charged. When Slow blinking amber battery charge reaches 20%, the blinking color changes to white. The battery has between 20% and 80% charge and is still charging.
-
Page 36: Hotkeys
320-14IAP/ideapad 320-14AST/ideapad 320-15IAP/ideapad 320-15AST/ideapad 320-15ABR/ideapad 320-15ABR Touch Hardware Maintenance Manual Hotkeys You can access certain system settings quickly by pressing the appropriate hotkeys. Table 3. Hotkeys Enables/disables airplane Mutes/unmutes the sound. mode. Decreases the volume level. Enables/disables camera. Locks/unlocks the LCD Increases the volume level. screen. Enables the external Enables/disables projector or dangles the microphone. external display. Decreases display Refreshes page. brightness. Enables/disables the touch Increases display pad. brightness.
-
Page 37: Fru Replacement Notices
15AST/ideapad 320-15ABR/ideapad 320-15ABR Touch FRU replacement notices This section presents notices related to removing and replacing parts. Read this section carefully before replacing any FRU. Screw notices Loose screws can cause a reliability problem. In the Lenovo computer, this problem is addressed with special nylon-coated screws that have the following characteristics: • They maintain tight connections. • They do not easily come loose, even with shock or vibration. • They are harder to tighten.
-
Page 38: Removing And Replacing An Fru
320-14IAP/ideapad 320-14AST/ideapad 320-15IAP/ideapad 320-15AST/ideapad 320-15ABR/ideapad 320-15ABR Touch Hardware Maintenance Manual Removing and replacing an FRU This section presents exploded figures with the instructions to indicate how to remove and replace the FRU. Make sure to observe the following general rules: 1. Do not attempt to service any computer unless you have been trained and certified. An untrained person runs the risk of damaging parts. 2. Before replacing any FRU, review “FRU replacement notices” on page 33. 3. Begin by removing any FRUs that have to be removed before the failing FRU. Any of such FRUs are listed at the top of the page. Remove them in the order in which they are listed. 4. Follow the correct sequence in the steps to remove the FRU, as given in the figures by the numbers in square callouts.
-
Page 39: 1010 Optical Drive
Lenovo ideapad 320-14IAP/ideapad 320-14AST/ideapad 320-15IAP/ideapad 320- 15AST/ideapad 320-15ABR/ideapad 320-15ABR Touch 1010 Optical drive Figure 1. Removal steps of optical drive Remove the screw 1.Then pull the optical drive out in the direction shown by arrow 2. Step Screw (quantity) Color Torque M2.5 × 7 mm, Phillips head, nylok-coated (1) Black/ 3.0+/-0.3 kgf/cm Silver LOW TO UPPER Remove the screw 3, then carefully remove the optical drive bracket and bezel in the directions shown by arrows 4 and 5. Step Screw (quantity) Color Torque M2 × 3 mm, Phillips head, nylok-coated (1) Silver 1.85+/-0.15 kgf/cm…
-
Page 40: 1020 Base Cover
320-14IAP/ideapad 320-14AST/ideapad 320-15IAP/ideapad 320-15AST/ideapad 320-15ABR/ideapad 320-15ABR Touch Hardware Maintenance Manual 1020 Base cover For access, remove this FRU: • “1010 Optical drive” on page 35 Figure 2. Removal steps of base cover Remove the screws 1. Step Screw (quantity) Color Torque M2.5 × 7 mm, Phillips-head, nylok-coated Black/ 3.0+/-0.3 kgf/cm (12) log low—log up & log low—io board— Silver log up & log low—mb—log up & log low— right side hinge—log up & log low—left side hinge—klock bracket—log up…
-
Page 41
Lenovo ideapad 320-14IAP/ideapad 320-14AST/ideapad 320-15IAP/ideapad 320- 15AST/ideapad 320-15ABR/ideapad 320-15ABR Touch Figure 2. Removal steps of base cover (continued) Remove the base cover in the directions shown by arrows 2 and 3. -
Page 42
320-14IAP/ideapad 320-14AST/ideapad 320-15IAP/ideapad 320-15AST/ideapad 320-15ABR/ideapad 320-15ABR Touch Hardware Maintenance Manual Note: Applying labels to the base cover The new base cover FRU is shipped with a kit containing labels of several kinds. When you replace the base cover, you need to apply the following labels: The following labels need to be peeled off from the old base cover and put on the new base cover. Rating label Rating label for print OS label Argentina label 68 × 6mm KCC label 50 × 16mm Adapter label 65 × 20mm… -
Page 43: 1030 Battery Pack
Lenovo ideapad 320-14IAP/ideapad 320-14AST/ideapad 320-15IAP/ideapad 320- 15AST/ideapad 320-15ABR/ideapad 320-15ABR Touch 1030 Battery pack DANGER Only use the battery specified in the parts list for your computer. Any other battery could ignite or explode. For access, remove these FRUs in order: • “1010 Optical drive” on page 35 • “1020 Base cover” on page 36 Figure 3. Removal steps of battery pack Detach the battery pack connector in the direction shown by arrow 1, remove the screws 2.
-
Page 44
320-14IAP/ideapad 320-14AST/ideapad 320-15IAP/ideapad 320-15AST/ideapad 320-15ABR/ideapad 320-15ABR Touch Hardware Maintenance Manual Figure 3. Removal steps of battery pack (continued) Step Screw (quantity) Color Torque M2 × 6 mm, Phillips-head, nylok-coated (4) Black 1.85+/-0.15 kgf/cm battery—log up (ideapad 320-15IAP/ ideapad 320-15AST/ideapad 320-15ABR/ ideapad 320-15ABR Touch) M2 × 6 mm, Phillips-head, nylok-coated (3) Black 1.85+/-0.15 kgf/cm battery—log up (ideapad 320-14IAP/ ideapad 320-14AST) Remove the battery pack in the direction shown by arrow 3. -
Page 45: 1040 Pci Express Mini Card For Wireless Lan
• “1030 Battery pack” on page 39 Important: The preinstalled WLAN module may only be replaced with a Lenovo approved module in order to comply with FCC and IC regulations. Refer to Table 4 “Parts list—Overall” on page 73 for Lenovo part numbers for the approved modules.
-
Page 46: Step Screw (Quantity) M2 × 6 Mm, Phillips-Head, Nylok-Coated
320-14IAP/ideapad 320-14AST/ideapad 320-15IAP/ideapad 320-15AST/ideapad 320-15ABR/ideapad 320-15ABR Touch Hardware Maintenance Manual Figure 4. Removal steps of PCI Express Mini Card for wireless LAN (continued) In step 1, unplug the jacks by using the removal tool antenna RF connector (P/N: 08K7159), or pick up the connectors with your fingers and gently unplug them in the direction shown by the arrows. Notes: The wireless LAN card has 2 cables in step 1. The wireless LAN card in some models might have 3 cables in step 1. Step Screw (quantity) Color Torque M2 × 3 mm, Phillips-head, nylok-coated (1) Silver 1.85+/-0.15 kgf/cm wireless card—log up Remove the card in the direction shown by arrow. When installing: • In models with a wireless LAN card that has two antenna connectors, plug…
-
Page 47: 1050 Dimm
Lenovo ideapad 320-14IAP/ideapad 320-14AST/ideapad 320-15IAP/ideapad 320- 15AST/ideapad 320-15ABR/ideapad 320-15ABR Touch 1050 DIMM For access, remove these FRUs in order: • “1010 Optical drive” on page 35 • “1020 Base cover” on page 36 • “1030 Battery pack” on page 39 • “1040 PCI Express Mini Card for wireless LAN” on page 41 Figure 5. Removal steps of DIMM ideapad 320-15IAP/ideapad 320-15AST/ideapad 320-15ABR/ ideapad 320-15ABR Touch Insert a flat blade tool into the memory module cover, and then remove the memory module cover manually.
-
Page 48
320-14IAP/ideapad 320-14AST/ideapad 320-15IAP/ideapad 320-15AST/ideapad 320-15ABR/ideapad 320-15ABR Touch Hardware Maintenance Manual Figure 5. Removal steps of DIMM (continued) ideapad 320-14IAP/ideapad 320-14AST Release the two latches on both edges of the socket at the same time in the directions shown by arrows 1, and then unplug the DIMM in the direction shown by arrow 2. -
Page 49: 1060 Hard Disk Drive
Lenovo ideapad 320-14IAP/ideapad 320-14AST/ideapad 320-15IAP/ideapad 320- 15AST/ideapad 320-15ABR/ideapad 320-15ABR Touch 1060 Hard disk drive For access, remove these FRUs in order: • “1010 Optical drive” on page 35 • “1020 Base cover” on page 36 • “1030 Battery pack” on page 39 • “1040 PCI Express Mini Card for wireless LAN” on page 41 • “1050 DIMM” on page 43 Attention: • Do not drop the hard disk drive or apply any physical shock to it. The hard disk drive is sensitive to physical shock. Improper handling can cause damage and permanent loss of data.
-
Page 50
320-14IAP/ideapad 320-14AST/ideapad 320-15IAP/ideapad 320-15AST/ideapad 320-15ABR/ideapad 320-15ABR Touch Hardware Maintenance Manual Figure 6. Removal steps of hard disk drive (continued) Remove the hard disk drive from the slot in the direction shown by arrow 3. Detach the bracket from the hard disk drive. -
Page 51: 1070 Speakers
Lenovo ideapad 320-14IAP/ideapad 320-14AST/ideapad 320-15IAP/ideapad 320- 15AST/ideapad 320-15ABR/ideapad 320-15ABR Touch 1070 Speakers For access, remove these FRUs in order: • “1010 Optical drive” on page 35 • “1020 Base cover” on page 36 • “1030 Battery pack” on page 39 • “1040 PCI Express Mini Card for wireless LAN” on page 41 • “1050 DIMM” on page 43 • “1060 Hard disk drive” on page 45 Figure 7. Removal steps of speakers Unplug the speaker connector 1. Then remove the speakers 2. ideapad 320-15IAP/ideapad 320-15AST/ideapad 320-15ABR/ ideapad 320-15ABR Touch ideapad 320-14IAP/ideapad 320-14AST…
-
Page 52: 1080 Fan Assembly And Heat Sink Assembly
320-14IAP/ideapad 320-14AST/ideapad 320-15IAP/ideapad 320-15AST/ideapad 320-15ABR/ideapad 320-15ABR Touch Hardware Maintenance Manual 1080 Fan assembly and Heat Sink assembly For access, remove these FRUs in order: • “1010 Optical drive” on page 35 • “1020 Base cover” on page 36 • “1030 Battery pack” on page 39 • “1040 PCI Express Mini Card for wireless LAN” on page 41 • “1050 DIMM” on page 43 • “1060 Hard disk drive” on page 45 • “1070 Speakers” on page 47 Figure 8. Removal steps of fan assembly and Heat Sink assembly Release the cables from the cable guides in the direction shown by arrows 1.
-
Page 53: M2 × 6 Mm, Phillips-Head, Nylok-Coated
Lenovo ideapad 320-14IAP/ideapad 320-14AST/ideapad 320-15IAP/ideapad 320- 15AST/ideapad 320-15ABR/ideapad 320-15ABR Touch Figure 8. Removal steps of fan assembly and Heat Sink assembly (continued) Unplug the fan connector in the direction shown by arrow 2. Remove the screw 3. Step Screw (quantity) Color Torque M2 × 6 mm, Phillips head, nylok-coated (1)
-
Page 54
320-14IAP/ideapad 320-14AST/ideapad 320-15IAP/ideapad 320-15AST/ideapad 320-15ABR/ideapad 320-15ABR Touch Hardware Maintenance Manual Figure 8. Removal steps of fan assembly and Heat Sink assembly (continued) Remove the screws 5. ideapad 320-15IAP/ideapad 320-15AST/ideapad 320-15ABR/ ideapad 320-15ABR Touch ideapad 320-14IAP/ideapad 320-14AST… -
Page 55
Lenovo ideapad 320-14IAP/ideapad 320-14AST/ideapad 320-15IAP/ideapad 320- 15AST/ideapad 320-15ABR/ideapad 320-15ABR Touch Figure 8. Removal steps of fan assembly and Heat Sink assembly (continued) Lift the heat sink in the direction shown by arrows 6. ideapad 320-15IAP/ideapad 320-15AST/ideapad 320-15ABR/ ideapad 320-15ABR Touch ideapad 320-14IAP/ideapad 320-14AST… -
Page 56
320-14IAP/ideapad 320-14AST/ideapad 320-15IAP/ideapad 320-15AST/ideapad 320-15ABR/ideapad 320-15ABR Touch Hardware Maintenance Manual Figure 8. Removal steps of fan assembly and Heat Sink assembly (continued) ideapad 320-15IAP/ideapad 320-15AST/ideapad 320-15ABR/ ideapad 320-15ABR Touch ideapad 320-14IAP/ideapad 320-14AST When installing: Before you attach the fan assembly to the computer, apply thermal grease, at an amount of 0.2 grams, to the or part shown in the figure above. Either too much or too little grease application can cause a… -
Page 57: 1090 Odd Transfer Board, Backup Battery
Lenovo ideapad 320-14IAP/ideapad 320-14AST/ideapad 320-15IAP/ideapad 320- 15AST/ideapad 320-15ABR/ideapad 320-15ABR Touch 1090 ODD transfer board, backup battery For access, remove these FRUs in order: • “1010 Optical drive” on page 35 • “1020 Base cover” on page 36 • “1030 Battery pack” on page 39 • “1040 PCI Express Mini Card for wireless LAN” on page 41 • “1050 DIMM” on page 43 • “1060 Hard disk drive” on page 45 • “1070 Speakers” on page 47 • “1080 Fan assembly and Heat Sink assembly” on page 48 Figure 9. Removal steps of ODD transfer board, backup battery Detach the system board connector in the directions shown by arrows 1 and 2.
-
Page 58
320-14IAP/ideapad 320-14AST/ideapad 320-15IAP/ideapad 320-15AST/ideapad 320-15ABR/ideapad 320-15ABR Touch Hardware Maintenance Manual Figure 9. Removal steps of ODD transfer board, backup battery (continued) Remove the backup battery in the direction shown by arrow 6. ideapad 320-15IAP/ideapad 320-15AST/ideapad 320-15ABR/ ideapad 320-15ABR Touch ideapad 320-14IAP/ideapad 320-14AST When installing: Make sure that the connector is attached firmly. -
Page 59: 1100 Upper Case
Lenovo ideapad 320-14IAP/ideapad 320-14AST/ideapad 320-15IAP/ideapad 320- 15AST/ideapad 320-15ABR/ideapad 320-15ABR Touch 1100 Upper case For access, remove these FRUs in order: • “1010 Optical drive” on page 35 • “1020 Base cover” on page 36 • “1030 Battery pack” on page 39 • “1040 PCI Express Mini Card for wireless LAN” on page 41 • “1050 DIMM” on page 43 • “1060 Hard disk drive” on page 45 • “1070 Speakers” on page 47 • “1080 Fan assembly and Heat Sink assembly” on page 48 • “1090 ODD transfer board, backup battery” on page 53 Figure 10. Removal steps of upper case Remove the screws 1.
-
Page 60
320-14IAP/ideapad 320-14AST/ideapad 320-15IAP/ideapad 320-15AST/ideapad 320-15ABR/ideapad 320-15ABR Touch Hardware Maintenance Manual Figure 10. Removal steps of upper case (continued) ideapad 320-14IAP/ideapad 320-14AST Step Screw (quantity) Color Torque M2.5 × 5 mm, Phillips-head, nylok-coated (4) 3 +/-0.3 kgf/cm Black left side hinge—log up & right side hinge—log up… -
Page 61
Lenovo ideapad 320-14IAP/ideapad 320-14AST/ideapad 320-15IAP/ideapad 320- 15AST/ideapad 320-15ABR/ideapad 320-15ABR Touch Figure 10. Removal steps of upper case (continued) Detach the LCD unit connectors in the directions shown by arrows 2 to 4. ideapad 320-15IAP/ideapad 320-15AST/ideapad 320-15ABR/ ideapad 320-15ABR Touch ideapad 320-14IAP/ideapad 320-14AST… -
Page 62
320-14IAP/ideapad 320-14AST/ideapad 320-15IAP/ideapad 320-15AST/ideapad 320-15ABR/ideapad 320-15ABR Touch Hardware Maintenance Manual Figure 10. Removal steps of upper case (continued) Open the hinge in the direction shown by arrows 5. ideapad 320-15IAP/ideapad 320-15AST/ideapad 320-15ABR/ ideapad 320-15ABR Touch ideapad 320-14IAP/ideapad 320-14AST… -
Page 63
Lenovo ideapad 320-14IAP/ideapad 320-14AST/ideapad 320-15IAP/ideapad 320- 15AST/ideapad 320-15ABR/ideapad 320-15ABR Touch Figure 10. Removal steps of upper case (continued) Remove the upper case from the LCD module in the directions shown by arrow 6. -
Page 64: 1110 System Board
320-14IAP/ideapad 320-14AST/ideapad 320-15IAP/ideapad 320-15AST/ideapad 320-15ABR/ideapad 320-15ABR Touch Hardware Maintenance Manual 1110 System board Important notices for handling the system board: When handling the system board, bear the following in mind. • Be careful not to drop the system board on a bench top that has a hard surface, such as metal, wood, or composite.
-
Page 65
Lenovo ideapad 320-14IAP/ideapad 320-14AST/ideapad 320-15IAP/ideapad 320- 15AST/ideapad 320-15ABR/ideapad 320-15ABR Touch Figure 11. Removal steps of system board (continued) Remove the system board in the direction shown by arrow 4. -
Page 66: 1120 Lcd Unit
320-14IAP/ideapad 320-14AST/ideapad 320-15IAP/ideapad 320-15AST/ideapad 320-15ABR/ideapad 320-15ABR Touch Hardware Maintenance Manual 1120 LCD unit For access, remove these FRUs in order: • “1010 Optical drive” on page 35 • “1020 Base cover” on page 36 • “1030 Battery pack” on page 39 • “1040 PCI Express Mini Card for wireless LAN” on page 41 • “1050 DIMM” on page 43 • “1060 Hard disk drive” on page 45 • “1070 Speakers” on page 47 • “1080 Fan assembly and Heat Sink assembly” on page 48 • “1090 ODD transfer board, backup battery” on page 53 • “1100 Upper case” on page 55 • “1110 System board” on page 60 Figure 12. Removal steps of LCD unit…
-
Page 67
Lenovo ideapad 320-14IAP/ideapad 320-14AST/ideapad 320-15IAP/ideapad 320- 15AST/ideapad 320-15ABR/ideapad 320-15ABR Touch Figure 12. Removal steps of LCD unit (continued) Remove the LCD front bezel in the direction shown by arrows 1. Remove the screws 2. Lift the LCD module slightly 3. Disconnect the connector in the direction shown by arrow 4. Then remove the LCD module. Step Screw (quantity) Color Torque M2 × 3 mm, Phillips-head, nylok-coated (4) Silver 1.85+/-0.15 kgf/cm lcd panel—lcd cover… -
Page 68
320-14IAP/ideapad 320-14AST/ideapad 320-15IAP/ideapad 320-15AST/ideapad 320-15ABR/ideapad 320-15ABR Touch Hardware Maintenance Manual Figure 12. Removal steps of LCD unit (continued) Remove the screws 5. Step Screw (quantity) Color Torque M2.5 × 2.5 mm, Phillips-head, nylok-coated (4) Silver 3+/-0.3 kgf/cm lcd brk—lcd cover Remove the LCD hinges in the direction shown by arrows 6. -
Page 69
Lenovo ideapad 320-14IAP/ideapad 320-14AST/ideapad 320-15IAP/ideapad 320- 15AST/ideapad 320-15ABR/ideapad 320-15ABR Touch Figure 12. Removal steps of LCD unit (continued) Detach the camera connector in the direction shown by arrow 1. Remove the LCD cable in the direction shown by arrows 2. When installing: Make sure that the connector is attached firmly and that you do not pinch the antenna cables when you attach the LCD assembly. Route the LCD cable along the cable guides. -
Page 70: 1130 Integrated Camera And Antenna Assembly
320-14IAP/ideapad 320-14AST/ideapad 320-15IAP/ideapad 320-15AST/ideapad 320-15ABR/ideapad 320-15ABR Touch Hardware Maintenance Manual 1130 Integrated camera and antenna assembly For access, remove these FRUs in order: • “1010 Optical drive” on page 35 • “1020 Base cover” on page 36 • “1030 Battery pack” on page 39 • “1040 PCI Express Mini Card for wireless LAN” on page 41 • “1050 DIMM” on page 43 • “1060 Hard disk drive” on page 45 • “1070 Speakers” on page 47 • “1080 Fan assembly and Heat Sink assembly” on page 48 • “1090 ODD transfer board, backup battery” on page 53 • “1100 Upper case” on page 55 • “1110 System board” on page 60 • “1120 LCD unit” on page 62…
-
Page 71
Lenovo ideapad 320-14IAP/ideapad 320-14AST/ideapad 320-15IAP/ideapad 320- 15AST/ideapad 320-15ABR/ideapad 320-15ABR Touch Figure 13. Removal steps of integrated camera and antenna assembly (continued) Peel off the adhesive tape securing the antenna boards, release the cables from the cable guide, and then remove the antenna assembly in the direction shown by arrows 2. -
Page 72: Locations
320-14IAP/ideapad 320-14AST/ideapad 320-15IAP/ideapad 320-15AST/ideapad 320-15ABR/ideapad 320-15ABR Touch Hardware Maintenance Manual Locations Front view and right-side view 1 Integrated camera 2 Built-in microphone 3 Computer display 4 Wireless LAN antennas 5 Power Key 6 Touch pad 7 Optical disc drive 8 Kensington Security slot…
-
Page 73: Bottom And Left-Side View
Lenovo ideapad 320-14IAP/ideapad 320-14AST/ideapad 320-15IAP/ideapad 320- 15AST/ideapad 320-15ABR/ideapad 320-15ABR Touch Bottom and Left-side view 1 Speakers 2 Ventilation slots 3 AC power adapter jack 4 Battery/Charging status indicator 5 RJ-45 port 6 HDMI port 7 USB port 8 Combo audio jack 9 Type-C port (only on select models) J Memory card slot K Novo button L Power status indicator…
-
Page 74: Parts List
320-14IAP/ideapad 320-14AST/ideapad 320-15IAP/ideapad 320-15AST/ideapad 320-15ABR/ideapad 320-15ABR Touch Hardware Maintenance Manual Parts list This section presents the following service parts: • “Overall” on page 71 • “LCD FRUs” on page 88 • “Miscellaneous parts” on page 91 • “AC adapters” on page 91 • “Screws” on page 93 Note: Each FRU is available for all types or models, unless specific types or models are specified.
-
Page 75: Overall
Lenovo ideapad 320-14IAP/ideapad 320-14AST/ideapad 320-15IAP/ideapad 320- 15AST/ideapad 320-15ABR/ideapad 320-15ABR Touch Overall ideapad 320-15IAP/ideapad 320-15AST/ideapad 320-15ABR/ ideapad 320-15ABR Touch…
-
Page 76
320-14IAP/ideapad 320-14AST/ideapad 320-15IAP/ideapad 320-15AST/ideapad 320-15ABR/ideapad 320-15ABR Touch Hardware Maintenance Manual ideapad 320-14IAP/ideapad 320-14AST… -
Page 77
Lenovo ideapad 320-14IAP/ideapad 320-14AST/ideapad 320-15IAP/ideapad 320- 15AST/ideapad 320-15ABR/ideapad 320-15ABR Touch Table 4. Parts list—Overall FRU no. See “Miscellaneous parts” on page 91. LCD unit (see “LCD FRUs” on page 88). UPPERCASEASML80XKPG IMR US KB 5CB0N82229 UPPERCASEASML80XKPG IMR UK KB 5CB0N82346 UPPERCASEASML80XKPG IMR ITA KB 5CB0N82214 UPPERCASEASML80XKPG IMR SPA KB 5CB0N82297 UPPERCASEASML80XKPG IMR TUR KB 5CB0N82249 UPPERCASEASML80XKPG IMR THA KB 5CB0N82323 UPPERCASEASML80XKPG IMR POR KB 5CB0N82262 UPPERCASEASML80XKPG IMR LSP KB 5CB0N82327 UPPERCASEASML80XKPG IMR CFEN KB 5CB0N82261 UPPERCASEASML80XKPG IMR KOR KB 5CB0N82353 UPPERCASEASML80XKPG IMR TC KB 5CB0N82216… -
Page 78
320-14IAP/ideapad 320-14AST/ideapad 320-15IAP/ideapad 320-15AST/ideapad 320-15ABR/ideapad 320-15ABR Touch Hardware Maintenance Manual Table 4. Parts list—Overall (continued) FRU no. UPPERCASEASML80XKIG IMR ARA KB 5CB0N82211 UPPERCASEASML80XKIG IMR BRA KB 5CB0N82339 UPPERCASEASML80XKIG IMR DUTCH KB 5CB0N82340 UPPERCASEASML80XKIG IMR GRE KB 5CB0N82347 UPPERCASEASML80XKIG IMR HEB KB 5CB0N82295 UPPERCASEASML80XKIG IMR HUN KB 5CB0N82226 UPPERCASEASML80XKIG IMR NORDIC KB 5CB0N82200 UPPERCASEASML80XKIG IMR BEL KB 5CB0N82245 UPPERCASEASML80XKIG IMR ILD KB 5CB0N82267 UPPERCASEASML80XKIG IMR SLE KB 5CB0N82312 UPPERCASEASML80XKIG IMR SWS KB 5CB0N82259… -
Page 79
Lenovo ideapad 320-14IAP/ideapad 320-14AST/ideapad 320-15IAP/ideapad 320- 15AST/ideapad 320-15ABR/ideapad 320-15ABR Touch Table 4. Parts list—Overall (continued) FRU no. UPPERCASEASML80XKW IMR UKR KB 5CB0N82370 UPPERCASEASML80XKIB IMR US KB 5CB0N82279 UPPERCASEASML80XKIB IMR UK KB 5CB0N82201 UPPERCASEASML80XKIB IMR ITA KB 5CB0N82363 UPPERCASEASML80XKIB IMR SPA KB 5CB0N82268 UPPERCASEASML80XKIB IMR TUR KB 5CB0N82283 UPPERCASEASML80XKIB IMR THA KB 5CB0N82274 UPPERCASEASML80XKIB IMR POR KB 5CB0N82350 UPPERCASEASML80XKIB IMR LSP KB 5CB0N82305 UPPERCASEASML80XKIB IMR CFEN KB 5CB0N82263 UPPERCASEASML80XKIB IMR KOR KB 5CB0N82236 UPPERCASEASML80XKIB IMR TC KB… -
Page 80
320-14IAP/ideapad 320-14AST/ideapad 320-15IAP/ideapad 320-15AST/ideapad 320-15ABR/ideapad 320-15ABR Touch Hardware Maintenance Manual Table 4. Parts list—Overall (continued) FRU no. UPPERCASEASML80XLPG IMR JP KB 5CB0N86563 UPPERCASEASML80XLPG IMR BRAKB 5CB0N86439 UPPERCASEASML80XLPG IMR DUTCH KB 5CB0N86454 UPPERCASEASML80XLPG IMR GRE KB 5CB0N86573 UPPERCASEASML80XLPG IMR HEB KB 5CB0N86269 UPPERCASEASML80XLPG IMR HUN KB 5CB0N86411 UPPERCASEASML80XLPG IMR NORDIC KB 5CB0N86320 UPPERCASEASML80XLPG IMR BEL KB 5CB0N86490 UPPERCASEASML80XLPG IMR IL KB 5CB0N86266 UPPERCASEASML80XLPG IMR SLE KB 5CB0N86265 UPPERCASEASML80XLPG IMR SWS KB 5CB0N86605… -
Page 81
Lenovo ideapad 320-14IAP/ideapad 320-14AST/ideapad 320-15IAP/ideapad 320- 15AST/ideapad 320-15ABR/ideapad 320-15ABR Touch Table 4. Parts list—Overall (continued) FRU no. UPPERCASEASML80XLIG IMR FRAR KB 5CB0N86403 UPPERCASEASML80XLIG IMR UKR KB 5CB0N86282 UPPERCASEASML80XLWH IMR US KB 5CB0N86409 UPPERCASEASML80XLWH IMR UK KB 5CB0N86306 UPPERCASEASML80XLWH IMR ITA KB 5CB0N86346 UPPERCASEASML80XLWH IMR SPA KB 5CB0N86528 UPPERCASEASML80XLWH IMR TUR KB 5CB0N86441 UPPERCASEASML80XLWH IMR THA KB 5CB0N86401 UPPERCASEASML80XLWH IMR POR KB 5CB0N86554 UPPERCASEASML80XLWH IMR LSP KB 5CB0N86465 UPPERCASEASML80XLWH IMR CFEN KB 5CB0N86351 UPPERCASEASML80XLWH IMR KOR KB… -
Page 82
320-14IAP/ideapad 320-14AST/ideapad 320-15IAP/ideapad 320-15AST/ideapad 320-15ABR/ideapad 320-15ABR Touch Hardware Maintenance Manual Table 4. Parts list—Overall (continued) FRU no. UPPERCASEASML80XLLL IMR GE KB 5CB0N86365 UPPERCASEASML80XLLL IMR ARA KB 5CB0N86590 UPPERCASEASML80XLLL IMR JP KB 5CB0N86296 UPPERCASEASML80XLLL IMR BRA KB 5CB0N86586 UPPERCASEASML80XLLL IMR DUTCH KB 5CB0N86539 UPPERCASEASML80XLLL IMR GRE KB 5CB0N86631 UPPERCASEASML80XLLL IMR HEB KB 5CB0N86520 UPPERCASEASML80XLLL IMR HUN KB 5CB0N86501 UPPERCASEASML80XLLL IMR NORDIC KB 5CB0N86616 UPPERCASEASML80XLLL IMR BEL KB 5CB0N86440 UPPERCASEASML80XLLL IMR IL KB 5CB0N86505… -
Page 83
Lenovo ideapad 320-14IAP/ideapad 320-14AST/ideapad 320-15IAP/ideapad 320- 15AST/ideapad 320-15ABR/ideapad 320-15ABR Touch Table 4. Parts list—Overall (continued) FRU no. UPPERCASEASML80XLIB IMR BUL KB 5CB0N86395 UPPERCASEASML80XLIB IMR INDIA KB 5CB0N86385 UPPERCASEASML80XLIB IMR FRAR KB 5CB0N86511 UPPERCASEASML80XLIB IMR UKR KB 5CB0N86521 UPPERCASEASML80XLRD IMR US KB 5CB0N86509 UPPERCASEASML80XLRD IMR UK KB 5CB0N86343 UPPERCASEASML80XLRD IMR ITA KB 5CB0N86301 UPPERCASEASML80XLRD IMR SPA KB 5CB0N86333 UPPERCASEASML80XLRD IMR TUR KB 5CB0N86315 UPPERCASEASML80XLRD IMR THA KB 5CB0N86284 UPPERCASEASML80XLRD IMR POR KB 5CB0N86415 UPPERCASEASML80XLRD IMR LSP KB… -
Page 84
320-14IAP/ideapad 320-14AST/ideapad 320-15IAP/ideapad 320-15AST/ideapad 320-15ABR/ideapad 320-15ABR Touch Hardware Maintenance Manual Table 4. Parts list—Overall (continued) FRU no. UPCASEASML80XLPGIMRRUKBFP 5CB0N86534 UPCASEASML80XLPGIMRFRKBFP 5CB0N86468 UPCASEASML80XLPGIMRGEKBFP 5CB0N86492 UPCASEASML80XLPGIMRARAKBFP 5CB0N86460 UPCASEASML80XLPGIMRBRAKBFP 5CB0N86338 UPCASEASML80XLPGIMRDUTCHKBFP 5CB0N86273 UPCASEASML80XLPGIMRGREKBFP 5CB0N86545 UPCASEASML80XLPGIMRHEBKBFP 5CB0N86331 UPCASEASML80XLPGIMRHUNKBFP 5CB0N86467 UPCASEASML80XLPGIMRNORDICKBFP 5CB0N86571 UPCASEASML80XLPGIMRBELKBFPKBFP 5CB0N86564… -
Page 85
Lenovo ideapad 320-14IAP/ideapad 320-14AST/ideapad 320-15IAP/ideapad 320- 15AST/ideapad 320-15ABR/ideapad 320-15ABR Touch Table 4. Parts list—Overall (continued) FRU no. UPCASEASML80XLIG IMR BUL KBFP 5CB0N86541 UPCASEASML80XLIG IMR INDIA KBFP 5CB0N86324 UPCASEASML80XLIG IMR FRAR KBFP 5CB0N86412 UPCASEASML80XLIG IMR UKR KBFP 5CB0N86278 MBL80XQN3450UMAWIN 5B20P19723 MBL80XQN3450UMANOK 5B20P19716 MBL80XQN3350UMAWIN 5B20P19713 MBL80XQN3350UMANOK 5B20P19722 MBL80XQN4200R17M_M1_2GWIN 5B20P19715 MBL80XQN4200R17M_M1_2GNOK 5B20P19714 MBL80XQN3450R17M_M1_2GWIN 5B20P19718 MBL80XQN3450R17M_M1_2GNOK… -
Page 86
320-14IAP/ideapad 320-14AST/ideapad 320-15IAP/ideapad 320-15AST/ideapad 320-15ABR/ideapad 320-15ABR Touch Hardware Maintenance Manual Table 4. Parts list—Overall (continued) FRU no. MBL80XSA129720PUMANFPNOK 5B20P11105 MBL80XSFX9800PR17MM_2G4GNFPWIN 5B20P11122 MBL80XSFX9800PR17MM_2G4GNFPNOK 5B20P11095 MBL80XSFX9800PR17MM_4G4GNFPWIN 5B20P11082 MBL80XSFX9800PR17MM_4G4GNFPNOK 5B20P11106 MBL80XSFX9800PUMA4GNFPWIN 5B20P11107 MBL80XSFX9800PUMA4GNFPNOK 5B20P11086 MBL80XSFX9800PR17MM_2GNFPWIN 5B20P11081 MBL80XSFX9800PR17MM_2GNFPNOK 5B20P11108 MBL80XSFX9800PR17MM_4GNFPWIN 5B20P11093 MBL80XSFX9800PR17MM_4GNFPNOK 5B20P11119… -
Page 87
Lenovo ideapad 320-14IAP/ideapad 320-14AST/ideapad 320-15IAP/ideapad 320- 15AST/ideapad 320-15ABR/ideapad 320-15ABR Touch Table 4. Parts list—Overall (continued) FRU no. MBL80XTA109620PUMA4GNFPWIN 5B20P15505 MBL80XTA109620PUMA4GNFPNOK 5B20P15511 MBL80XTA109620PR17MM_2GNFPWIN 5B20P15553 MBL80XTA109620PR17MM_2GNFPNOK 5B20P15559 MBL80XTA109620PUMANFPWIN 5B20P15552 MBL80XTA109620PUMANFPNOK 5B20P15556 MBL80XTA129720PR17MM_2G4GNFPWIN 5B20P15561 MBL80XTA129720PR17MM_2G4GNFPNOK 5B20P15542 MBL80XTA129720PR17MM_4G4GNFPWIN 5B20P15529 MBL80XTA129720PR17MM_4G4GNFPNOK 5B20P15560 MBL80XTA129720PUMA4GNFPWIN 5B20P15526 MBL80XTA129720PUMA4GNFPNOK… -
Page 88
320-14IAP/ideapad 320-14AST/ideapad 320-15IAP/ideapad 320-15AST/ideapad 320-15ABR/ideapad 320-15ABR Touch Hardware Maintenance Manual Table 4. Parts list—Overall (continued) FRU no. MBL80XTA129720PUMAFPNOK 5B20P15507 MBL80XTA129720PR17MM_4GFPWIN 5B20P15499 MBL80XTA129720PR17MM_4GFPNOK 5B20P15548 MBL80XTFX9800PR17MM_2G4GFPWIN 5B20P15547 MBL80XTFX9800PR17MM_2G4GFPNOK 5B20P15498 MBL80XTFX9800PR17MM_4G4GFPWIN 5B20P15525 MBL80XTFX9800PR17MM_4G4GFPNOK 5B20P15557 MBL80XTFX9800PUMA4GFPWIN 5B20P15502 MBL80XTFX9800PUMA4GFPNOK 5B20P15510 MBL80XTFX9800PR17MM_2GFPWIN 5B20P15538 MBL80XTFX9800PR17MM_2GFPNOK 5B20P15517… -
Page 89
Lenovo ideapad 320-14IAP/ideapad 320-14AST/ideapad 320-15IAP/ideapad 320- 15AST/ideapad 320-15ABR/ideapad 320-15ABR Touch Table 4. Parts list—Overall (continued) FRU no. WLAN, Wifi 1X1 AC+ BT 4.1, Cbt RTL8821AE 1x1AC+BT PCIE M.2 SW10A11648 WLAN WLAN, Wifi 1X1 AC+ BT 4.1, Ltn NFA435A 1x1AC+BT PCIE M.2 WLAN SW10K97461 DDR4 Memroy, 4GB DDR4 2400 SoDIMM, M471A5244CB0-CRC SM30M49902 DDR4 Memroy, 4GB DDR4 2400 SoDIMM, HMA851S6AFR6N-UH SM30G16505 DDR4 Memroy, 4GB DDR4 2400 SoDIMM, MTA4ATF51264HZ-2G3B1 SM30G16506 DDR4 Memroy, 4GB DDR4 2400 SoDIMM, RMSA3270MB86H9F-2400 SM30G16507 DDR4 Memroy, 8GB DDR4 2400 SoDIMM, M471A1K43CB1-CRC SM30M49901 DDR4 Memroy, 8GB DDR4 2400 SoDIMM, HMA81GS6AFR8N-UH SM30G16509 DDR4 Memroy, 8GB DDR4 2400 SoDIMM, MTA8ATF1G64HZ-2G3B1 SM30G16510 DDR4 Memroy, 8GB DDR4 2400 SoDIMM, RMSA3260MB78HAF-2400 SM30G16511 DDR4 Memroy, 2GB DDR4 2400 SoDIMM, M471A5644EB0-CRC SM30G16500… -
Page 90
320-14IAP/ideapad 320-14AST/ideapad 320-15IAP/ideapad 320-15AST/ideapad 320-15ABR/ideapad 320-15ABR Touch Hardware Maintenance Manual Table 4. Parts list—Overall (continued) FRU no. Lower Case L80XR LCR PT 5CB0P20651 Lower Case L80XR ICE BLUE PT 5CB0P20654 Lower Case L80XR WHITE TEX 5CB0P20656 Lower Case L80XR LILAC PT 5CB0P20650 Lower Case L80XR COOL GREY TEX 5CB0P20655 LOWERCASE L80XL TEX WH 5CB0N86419 LOWERCASE L80XL TEX CG 5CB0N86400 LOWERCASE L80XL TEX LL 5CB0N86625 LOWERCASE L80XL TEX IB 5CB0N86553 LOWERCASE L80XL TEX LCR 5CB0N86376 DUMMY ODD WH L80XK 5M20N82196… -
Page 91
Lenovo ideapad 320-14IAP/ideapad 320-14AST/ideapad 320-15IAP/ideapad 320- 15AST/ideapad 320-15ABR/ideapad 320-15ABR Touch Table 4. Parts list—Overall (continued) FRU no. HDD(7mm ), 2TB 54rpm (7mm), ST Rosewood2D 7mm 2TB HDD 5H20M37521 SSD,128G,CV3 5SD0L02317 SSD,128G,MZYTY128HDHP-000L2 2.5» 128G 5mm SSD 5SD0L14645 SSD,128G,SC308-128 2.5″ 5mm 128GB 6Gb/s SATA HFS128G3BTND- 5SD0M38535 N210A SSD SSD,128G,5mm 128GB 2.5″ SATA 6Gb/s RTNRB128RFM2KWDL SSD 5SD0M61138 SSD, 256G, CV3 5SD0L02316 SSD, 256G, PM871A 5SD0K93729 SSD, 256G, SC308-256 2.5″ 5mm 256GB 6Gb/s SATA 5SD0M38533 HFS256G3BTND-N210A SSD SSD, 256G, 5mm 256GB 2.5″ SATA 6Gb/s RTNRB128RFM2KWDL 5SD0M61139… -
Page 92: Lcd Frus
320-14IAP/ideapad 320-14AST/ideapad 320-15IAP/ideapad 320-15AST/ideapad 320-15ABR/ideapad 320-15ABR Touch Hardware Maintenance Manual LCD FRUs In Lenovo ideapad 320-14IAP/ideapad 320-14AST/ideapad 320-15IAP/ ideapad 320-15AST/ideapad 320-15ABR/ideapad 320-15ABR Touch, there are following types of LCD. • “14-in. HD LED” • “15-in. HD LED” • “15.6-in. HD LED”…
-
Page 93
Lenovo ideapad 320-14IAP/ideapad 320-14AST/ideapad 320-15IAP/ideapad 320- 15AST/ideapad 320-15ABR/ideapad 320-15ABR Touch Table 5. Parts list—LCD FRUs FRU no. LCDBUEZELL80XKTEX14TBKWCAMMYMAGNET 5B30N82311 HINGECAP14TL80XK OB PT 5CB0N82275 HINGECAP14TL80XK PG PT 5CB0N82240 HINGECAP14TL80XK WH PT 5CB0N82232 HINGECAP14TL80XK DBU PT 5CB0N82234 HINGE LR 14T L80XK 5H50N82309 14.0′ Panel, HD TN Slim GL (3.0mm), AUO B140XTN02.D 2A HD G S 5D10H13021 14.0′ Panel, HD TN Slim GL (3.0mm), IN N140BGA-EB3 HDT G S NB 5D10K85754 14.0′ Panel, HD TN Slim GL (3.0mm), BO NT140WHM-N31 HDT G S 5D10K81083 14.0′ Panel, HD TN Slim GL (3.0mm), IV M140NWR6-R0 HDT G S NB 5D10K81642 14.0′ Panel, HD TN Slim AG (3.0mm), AUO B140XTN02.E HW0A HD 5D10G95364 AG S NB 14.0′ Panel, HD TN Slim AG (3.0mm), IN N140BGA-EA3 HDT AG S NB… -
Page 94
320-14IAP/ideapad 320-14AST/ideapad 320-15IAP/ideapad 320-15AST/ideapad 320-15ABR/ideapad 320-15ABR Touch Hardware Maintenance Manual Table 5. Parts list—LCD FRUs (continued) FRU no. 15.6′ Panel, 15.6» FHD TN Slim AG (3.2mm), IN N156HGA-EAB FHDT 5D10K93435 AG S NB 15.6′ Panel, 15.6» FHD TN Slim AG (3.2mm), BO NT156FHM-N41 5D10K93434 FHDT AG S NB 15.6′ Touch Panel, On Cell panel for 320-15ABR Touch, AU 5D10M41896 B156XTK01.0 5A HDT G S NB(T) 15.6′ Touch Panel, On Cell panel for 320-15ABR Touch, IN 5D10K81098 N156BGN-E41 HDT G S NB(T)) Camera, HD W /Single MIC, BIS BNCR1NKSK HD NB camera SC20M52085 Camera, HD W /Single MIC, CCY CNFGH41 HD NB camera SC20M52089 Camera, HD W /Single MIC, LTN 6SF111N2 HD NB camera SC20M52114 Camera, HD W /Single MIC, AVC HAA-8F4A03 HD NB camera SC20M52087 Camera, 0.3M W/ Single MIC, BIS BNCRVTKTL 0.3M NB camera SC20M52088 Camera, 0.3M W/ Single MIC, CCY CNFG020 0.3M NB camera… -
Page 95: Miscellaneous Parts
Lenovo ideapad 320-14IAP/ideapad 320-14AST/ideapad 320-15IAP/ideapad 320- 15AST/ideapad 320-15ABR/ideapad 320-15ABR Touch Miscellaneous parts Table 6. Parts list—Miscellaneous parts FRU no. System miscellaneous parts: • (a) RAM EMI SHIELDING ASSYL80YL 5S60N98522 • (b) ODD BEZEL L80XK IB 5B30N82326 • (b) ODD BEZEL L80XL TEX WH 5B30N86406 • (b) ODD BEZEL L80XL TEX CG 5B30N86570 • (c) ODD BRACKET L80SL 5B40L35764 • (d) HDD BRACKET L80XK 5B40N82219 Note: Italicized letters in parentheses are references to the exploded view in “Overall” on page 71.
-
Page 96
320-14IAP/ideapad 320-14AST/ideapad 320-15IAP/ideapad 320-15AST/ideapad 320-15ABR/ideapad 320-15ABR Touch Hardware Maintenance Manual Table 7. Parts list—AC adapters (continued) Adaptor, 45W(New) wall mount with round plug ( Low cost 45w Adaptor), Liteon SA10M42743 PA-1450-55LU 20V2.25A COO Adaptor, 45W(New) wall mount with round plug ( Low cost 45w Adaptor), Liteon SA10M42752 PA-1450-55LZ 20V2.25A COO Adaptor, 45W(New) wall mount with round plug ( Low cost 45w Adaptor), SA10M42726 Chicony ADL45WCA 20V2.25A COO Adaptor, 45W(New) wall mount with round plug ( Low cost 45w Adaptor), SA10M42737 Chicony ADL45WCB 20V2.25A COO Adaptor, 45W(New) wall mount with round plug ( Low cost 45w Adaptor), SA10M42697 Chicony ADL45WCC 20V2.25A COO Adaptor, 45W(New) wall mount with round plug ( Low cost 45w Adaptor), SA10M42790 Chicony ADL45WCD 20V2.25A COO Adaptor, 45W(New) wall mount with round plug ( Low cost 45w Adaptor), SA10M42768 Chicony ADL45WCK 20V2.25A COO Adaptor, 45W(New) wall mount with round plug ( Low cost 45w Adaptor), SA10M42706 Chicony ADL45WCE 20V2.25A COO… -
Page 97: Screws
Lenovo ideapad 320-14IAP/ideapad 320-14AST/ideapad 320-15IAP/ideapad 320- 15AST/ideapad 320-15ABR/ideapad 320-15ABR Touch Table 7. Parts list—AC adapters (continued) Adaptor, 65W(New) wall mount with round plug (Low cost 65W Adaptor), Liteon SA10M42738 ADLX65CLGR2A 20V3.25A COO Adaptor, 65W(New) wall mount with round plug (Low cost 65W Adaptor), Liteon SA10M42793 ADLX65CLGA2A 20V3.25A COO Adaptor, 65W(New) wall mount with round plug (Low cost 65W Adaptor), Liteon SA10M42740 ADLX65CLGE2A 20V3.25A COO Adaptor, 65W(New) wall mount with round plug (Low cost 65W Adaptor), Liteon SA10M42817 ADLX65CLGB2A 20V3.25A COO Adaptor, 65W(New) wall mount with round plug (Low cost 65W Adaptor), Chicony SA10M42805 ADLX65CCGC2A 20V3.25A COO Adaptor, 65W(New) wall mount with round plug (Low cost 65W Adaptor), Chicony SA10M42815 ADLX65CCGG2A 20V3.25A COO Adaptor, 65W(New) wall mount with round plug (Low cost 65W Adaptor), Chicony SA10M42762 ADLX65CCGU2A 20V3.25A COO Adaptor, 65W(New) wall mount with round plug (Low cost 65W Adaptor), Chicony SA10M42735 ADLX65CCGK2A 20V3.25A COO…
-
Page 98: Notices
320-14IAP/ideapad 320-14AST/ideapad 320-15IAP/ideapad 320-15AST/ideapad 320-15ABR/ideapad 320-15ABR Touch Hardware Maintenance Manual Notices Lenovo may not offer the products, services, or features discussed in this document in all countries. Consult your local Lenovo representative for information on the products and services currently available in your area. Any reference to a Lenovo product, program, or service is not intended to state or imply that only that Lenovo product, program, or service may be used. Any functionally equivalent product, program, or service that does not infringe any Lenovo intellectual property right may be used instead. However, it is the…
-
Page 99: Trademarks
Furthermore, some measurements may have been estimated through extrapolation. Actual results may vary. Users of this document should verify the applicable data for their specific environment. Trademarks The following terms are trademarks or registered trademarks of Lenovo in the United States, other countries, or both. Lenovo OneKey Microsoft and Windows are trademarks of Microsoft Corporation in the United States, other countries, or both. Other company, products, or service names may be trademarks or service…

Read the safety notices and important tips in the
included manuals before using your computer.
Lenovo ideapad 320
ideapad 320-14IAP/ideapad 320-14AST
ideapad 320-15IAP/ideapad 320-15AST
ideapad 320-15ABR
ideapad 320-15ABR Touch
Руководство пользователя
Перед использованием компьютера ознакомьтесь
с указаниями по технике безопасности и важными
советами в прилагаемых руководствах.
Примечания
• Перед использованием изделия обязательно прочитайте Руководство по технике
безопасности и общей информации Lenovo информации Lenovo.
• Нек
оторые инструкции в настоящем руководстве подразумевают, что
используется система Windows
®
10. При использовании другой операционной
системы Windows некоторые операции могут немного отличаться. При
использовании других операционных систем некоторые операции, возможно, к
вам не относятся.
• Функции, опис
анные в настоящем руководстве, одинаковы для большинства
моделей. Некоторые функции могут быть недоступны на Вашем компьютере или
на Вашем компьютере могут присутствовать функции, не описанные в данном
руководстве пользователя.
• Ил
люстрации, используемые в данном руководстве, относятся к модели Lenovo
ideapad 320-15ABR, если не указано иное.
• Вид из
делия может отличаться от иллюстраций, приведенных в данном
документе. Снимки экранов операционной системы приведены исключительно в
качестве примера. См. описание для определенного продукта.
Нормативно—правовые положения
• Дополнительные сведения см. в разделе Guides & Manuals на сайте
http://support.lenovo.com.
Первое из
дание (Февраль 2017 г.)
© Lenovo, 2017 г.

i
Содержание
Глава 1. Общий обзор компьютера ………………………………………….. 1
Вид сверху …………..……………..……………..……………..…………….……………..……………. 1
Вид слева ………………….……………..……………..……………..……………..……………..………. 5
Вид справа ……..……………..……………..……………..……………..……………..……………..…. 9
Вид снизу …………………………………..……………..……………..……………..……………..….. 11
Глава 2. Начало использования Windows 10 …………………………..12
Первая настройка операционной системы …….……………..……………..…………….... 12
Использование интерфейсов системы ……..……………..……………..……………..…….. 12
Перевод в спящий режим или выключение
компьютера ………….……………..……. 16
Подключение к беспроводной сети ………………….……………..……………..……………. 18
Получение справки в Windows …………………..……………..……………..……………..….. 19
Глава 3. Система восстановления …………………………………………..20
Система Lenovo OneKey Recovery ………..……………..……………..……………..……….. 20
Push-button reset (Быстрый сброс параметров) ………………………..……………..…….. 22
Глава 4. Устранение неполадок ……………………………………………….25
Часто задаваемые вопросы ………………….……………..…………….……………..………….. 25
Устранение неполадок ………………………….……………..……………..……………..……….. 28
Приложение A. Инструкции по узлам CRU ……………………………… 31
Замена оптического привода ………………..……………..……………..……………..……….. 32
Товарные знаки ………….…………………………………………………………… 35


1
Глава 1. Общий обзор компьютера
Вид сверху — — — — — — — — — — — — — — — — — — — — — — — — — — — — — — — — — — — — — — — — — — — — — — — — — — — — — — — — — — — — — — — — — — — —
Примечание. Пунктирной линией обозначены компоненты, которые не видны снаружи.
Вн
имание!
• Не раскрыв
айте панель дисплея больше чем на 170 градусов. При закрытии панели дисплея
убедитесь, что между панелью дисплея и клавиатурой не осталось ручек или других
предметов. В противном случае панель дисплея может быть повреждена.

a Встроенная
камера
Камера предназначена для видеосвязи.
b Встроенный
микрофон
Используется для приема звука при проведении
видеоконференций, диктовке или записи звука.
c Дисплей
компьютера
ЖК—дисплей со светодиодной подсветкой обеспечивает
великолепное яркое изображение.
d Антенны
беспроводной
ЛВС
Подключите адаптер беспроводной ЛВС для отправки и
получения радиосигналов.
e Кнопка питания
Нажмите эту кнопку для включения/выключения
компьютера.
Когда ко
мпьютер включен, нажмите и удерживайте эту
кнопку дольше 1 секунды, чтобы перевести компьютер в
спящий режим, нажмите и удерживайте ее дольше 4 секунд,
чтобы выключить компьютер.
f Сенсорный
экран
Сенсорный экран работает как стандартная мышь.
Сенсорный эк
ран: Для перемещения указателя по экрану
компьютера проведите пальцем по сенсорному экрану в
нужном направлении.
Кнопки с
енсорного экрана: Левая и правая кнопки
сенсорного экрана работают так же, как левая и правая
кнопки стандартной мыши.
Примечание. Для включения и отключения сенсорнойпанели используйте клавишу F6 ( ).
Глава 1. Общий обзор компьютера
2

Глава 1. Общий обзор компьютера
3
И
спользование клавиатуры
“Горячие” клавиши
“Горячие” клавиши обеспечивают возможность быстрого доступа к
соответствующим настройкам системы.
Отключение/включение
звука.
Включение/выключение
режима полета.
Уменьшение уровня
громкости.
Включение/отключение
камеры.
Увеличение уровня
громкости.
Блокировка/разблокировка
ЖК—экрана.
Включение/отключение
микрофона.
Включение внешнего
проектора или
переключение на внешний
дисплей.
Обновление страницы.
Уменьшение яркости
дисплея.
Включение/отключение
сенсорного экрана.
Увеличение яркости
дисплея.
Примечание. При переключении параметра Hotkey Mode (Режим горячих клавиш) со
значения Enabled (Включен) на значение Disabled (Выключен) в программе
настройки BIOS потребуется нажать клавишу Fn в сочетании с
соответствующей горячей клавишей.

Глава 1. Общий обзор компьютера
4
Сочетания функциональных клавиш
С помощью функциональных клавиш можно мгновенно переключать рабочие
функции. Чтобы использовать эту функцию, нажмите и удерживайте клавишу
Fn a; затем нажмите одну из функциональных клавиш b.
Ниже описано назначение всех функциональных клавиш.
Fn + B: Активация функции прерывания.
Fn + P:
Активация функции паузы.
Fn + C: Включение/выключение функции scroll lock.
Fn + Y:
Активация системного запроса.
Fn + S + V:
перевод аккумулятора в режим
транспортировки.

Глава 1. Общий обзор компьютера
5
Вид слева — — — — — — — — — — — — — — — — — — — — — — — — — — — — — — — — — — — — — — — — — — — — — — — — — — — — — — — — — — — — — — — — — — — — — —
Lenovo ideapad 320-14IAP/ideapad 320-15IAP/ideapad 320-
14AST/ideapad 320-15AST
Lenovo ideapad 320-15ABR/ideapad 320-15ABR Touch
a Гнездо адаптера
питания
Позволяет подключить адаптер питания переменного тока.

b Индикатор
состояния
батареи/зарядки
Состояние
ада
птера
питания
Состояние
индикатора
Значение
Отключен
Не горит Компьютер находится в спящем режиме
или выключен; уровень заряда батареи
составляет более 20%.
Постоянно г
орит
желтым
Уровень заряда батареи составляет от 5%
до 20%.
Быстро ми
гает
желтым
Уровень заряда батареи составляет от 0%
до 5%.
Подключен
Медленно мигает
желтым
Батарея заряжается. Когда уровень заряда
достигнет 20%, индикатор прекратит
мигать и начнет светиться белым.
Медленно мигает
бе
лым
Уровень заряда батареи составляет от 20%
до 80%, и зарядка батареи продолжается.
Когда уровень заряда батареи достигнет
80%, индикатор перестанет мигать.
Горит бел
ым Уровень заряда батареи составляет более
80%, и зарядка продолжится до полного
заряда батареи.
c Порт RJ-45
Используется для подключения компьютера к сети Ethernet.
d Порт HDMI
Используется для подключения к устройствам с входом
HDMI, например телевизору или дисплею.
e Порт USB
Подключение USB-устройств.
• Для получения дополнительной информации см. «Подключение устройств USB» на стр. 8.
• По
рт черного цвета поддерживает USB 3.0.
Глава 1. Общий обзор компьютера
6

f Комбинированн
ое звуковое
гнездо
Позволяет подключить гарнитуру.
• Комбинированное звуковое гнездо не предназначено для подключения стандартных
микрофонов.
• Возможно, при подключении наушников или гарнитур сторонних производителей функция
записи не будет поддерживаться по причине использования разных промышленных
стандартов.
g Порт Type-C
(только Lenovo
ideapad 320-
15ABR/ideapad
320-15ABR
Touch)
Порт Type-C поддерживает:
• USB 3.1 (Gen 1, выходное напряжение 5 В постоянного
тока, 0,9 А постоянного тока)
h Разъем для
карты памяти
Предназначен для установки карт памяти (не прилагаются).
Примечание. Подробные сведения ищите «Использование карт памяти (не прилагаются)» на
странице 10.
i Кнопка Novo
Когда компьютер отключен, нажмите эту кнопку, чтобы
запустить System Recovery (Восстановление системы) или
утилиту программа настройки BIOS или войти в меню Boot
(Загрузка).
j Индикатор
уровня заряда
батареи
Индикатор Состояние
индикатора
Значение
Индикатор
у
ровня
заряда
батареи
Постоянно горит
белым
Питание компьютера включено.
Мигает Компьютер нах
одится в спящем режиме.
Не г
орит Питание компьютера выключено.
Глава 1. Общий обзор компьютера
7

Глава 1. Общий обзор компьютера
8
По
дключение устройств USB
Можно подсоединить устройство USB к компьютеру, вставив разъем USB (тип
A) в порт USB на компьютере.
При первом подключении устройства USB к одному из USB-портов
компьютера ОС Windows автоматически устанавливает драйвер для данного
устройства. После установки драйверов устройство можно подключать и
отключать без каких—либо дополнительных действий.
Примечание. Обычно ОС Windows определяет новое устройство после его подключения и
устанавливает драйвер автоматически. Однако для некоторых устройств перед
подключением может потребоваться установить драйвер вручную. Перед
подключением устройства прочтите предоставленную производителем
документацию.
Перед отключением запоминающего устройства USB убедитесь, что
компьютер завершил обмен данными с этим устройством. Щелкните значок
Безопасное извлечение устройств и дисков в области уведомлений Windows,
чтобы отключить устройство перед отсоединением.
Примечание. Если для питания устройства USB используется сетевой кабель, подключите
устройство к источнику питания до подключения к порту USB. В противном
случае устройство может быть не распознано компьютером.

Глава 1. Общий обзор компьютера
9
Вид справа — — — — — — — — — — — — — — — — — — — — — — — — — — — — — — — — — — — — — — — — — — — — — — — — — — — — — — — — — — — — — — — — — — —
a Привод
оптических
дисков
Считывание/запись оптических дисков.
Примечание. Некоторые модели оборудованы заглушками приводов оптических дисков.
b Гнездо для
замка
Kensington
Вставьте в него защитный замок (не входит в комплект),
чтобы защитить компьютер от кражи и
несанкционированного использования. На компьютер можно
установить защитный замок, чтобы компьютер нельзя было
унести без разрешения владельца. Дополнительную
информацию об установке защитного замка см. в
инструкциях, прилагаемых к приобретенному защитному
замку.
• Перед приобретением любого устройства защиты убедитесь, что оно подходит к петле
данного типа.
• Пользователь отвечает за оценку, выбор и применение запорных устройств и средств
защиты. Компания Lenovo не дает рекомендаций, оценок или гарантий относительно
функциональности, качества или эффективности запорных устройств и средств защиты.

Глава 1. Общий обзор компьютера
10
Испо
льзование карт памяти (не прилагаются)
Компьютер поддерживает карты памяти следующих типов.
• Ка
рты Secure Digital (SD)
• Secure Digital High Capacity (SDHC)
• SD eXtended Capacity (SDXC)
• MultiMediaCard (MMC)
• В разъем для карт памяти можно вставить одновременно только одну карту.
• Данное устройство чтения карт не поддерживает устройства SDIO (например, SDIO
Bluetooth и т. п.).
Установка карты памяти
Вставьте карту памяти в разъем до упора.
Извлечение карты памяти
Аккуратно извлеките карту памяти из разъема.
Примечание. Перед извлечением карты памяти отключите ее с помощью инструмента
Windows для безопасного извлечения устройств во избежание повреждения
данных.

Глава 1. Общий обзор компьютера
11
Вид снизу — — — — — — — — — — — — — — — — — — — — — — — — — — — — — — — — — — — — — — — — — — — — — — — — — — — — — — — — — — — — — — — — — — — — — —
aba
a Динамики
Обеспечивает вывод звука.
b Вентиляционны
е отверстия
Отвод тепла.
Примечание. Убедитесь, что вентиляционные отверстия не закрыты, иначе может произойти
перегрев компьютера.

12
Глава 2. Начало использования Windows 10
Первая настройка операционной системы — — — — — — —
При первом использовании операционной системы, возможно, потребуется
выполнить ее настройку. Процесс настройки может включать следующие
этапы.
• Приняти
е лицензионного соглашения с конечным пользователем.
• Наст
ройка подключения к Интернету.
• Р
егистрация операционной системы.
• Соз
дание учетной записи пользователя.
Использование интерфейсов системы — — — — — — — — — — — — — — —
Меню “Пуск”
В Windows 10 используется мощное и полезное меню “Пуск”. Чтобы открыть
меню “Пуск”, выполните одно из следующих действий.
• Наж
мите кнопку “Пуск” в левом нижнем углу, чтобы открыть меню “Пуск”.
• Наж
мите клавишу Windows на клавиатуре.

Глава 2. Начало использования Windows 10
13
Кнопка питания находится в меню “Пуск”. При ее нажатии можно выбрать
выключение или перезагрузку компьютера или перевести компьютер в спящий
режим.
В меню “Пуск” находятся установленные и часто используемые приложения.

Глава 2. Начало использования Windows 10
14
Панель центр уведомлений
Нажмите значок центр уведомлений на панели задач, чтобы открыть центр
уведомлений .
В области центр уведомленийможно просмотреть важные уведомления
операционной системы Windows и приложений. Кроме того, можно быстро
изменить общие настройки.
Task View (Представление задач) на панели задач
В Windows 10 можно добавлять новые рабочие столы и переключать их.
Чтобы добав
ить новый рабочий стол, выполните следующие действия:
• Щелкни
те значок Task View (Представление задач) на панели задач.

Глава 2. Начало использования Windows 10
15
• Щелкните Создать рабочий стол.
Для переключения рабочих столов щелкните значок Task View (Представление
задач)
, затем выберите необходимый рабочий стол.

Глава 2. Начало использования Windows 10
16
Перевод в спящий режим или выключение
компьютера — — — — — — — — — — — — — — — — — — — — — — — — — — — — — — — — — — — — — — — — — — — — — — — — — — — — — — — — — — — — — — — — — —
После завершения работы компьютер можно перевести в спящий режим или
выключить.
Перевод компьютера в спящий режим
Если компьютер не будет использоваться в течение небольшого периода
времени, переведите его в спящий режим.
Если ко
мпьютер находится в спящем режиме, можно быстро перевести его в
рабочий режим, минуя процесс запуска.
Чтобы переве
сти компьютер в спящий режим, выполните одно из следующих
действий.
• Закройте крышк
у дисплея.
• Наж
мите и удерживайте кнопку питания в течение 1-5 секунд.
• Пер
еместите курсор в нижний левый угол, а затем нажмите кнопку “Пуск”.
Выберите Питание Сон.
Примечание. Перед перемещением компьютера переведите его в спящий режим.
Перемещение компьютера во время вращения жесткого диска может привести к
его повреждению и потере данных.
Чтобы вывести компьютер из спящего режима, выполните следующие
действия:
• Наж
мите любую клавишу на клавиатуре.