

&
+15
Ткань и степень загрязнения
Прог-
ðàììa
Темпе-
ратура
Моющее средство Смягч-
итель
тбеливание
(Функция)/
Отбеливат-
ель
Длите-
льность
цикла,
мин
Описание цикла стирки
предв.
стирка
основная
стирка
Хлопок
сильным загрязнением
Очень сильно загрязненное
белое белье (простыни,
скатерти и т.д.)
1
90°C
155
Предварительная стирка, стирка
при высокой температуре,
полоскание, промежуточный и
окончательный отжим
Очень сильно загрязненное
белое белье (простыни,
скатерти и т.д.)
2
90°C
Деликат./
Обычный
147
Стирка при высокой температуре,
полоскание, промежуточный и
окончательный отжим
Сильно загрязненное белое и
прочно окрашенное цветное
белье
3
60°C
Деликат./
Обычный
157
Стирка при 60°C, полоскание,
промежуточный и окончательный
отжим
Слабо загрязненное белое и
линяющее цветное белье
(рубашки, маки и пр.)
4
40°C
Деликат./
Обычный
96
Стирка при 40°C, полоскание,
промежуточный и окончательный
отжим
Слабо загрязненное
линяющее цветное белье
5
30°C
Деликат./
Обычный
88
Стирка при 30°C, полоскание,
промежуточный и окончательный
отжим
Синтетика
Сильно загрязненная, прочно
окрашенная цветная (детская
одежда и пр.)
6
60°C
Деликатн.
97
Стирка при 60°C, полоскание,
остановка с водой или
деликатный отжим
Сильно загрязненная, прочно
окрашенная цветная (детская
одежда и пр.)
7
50°C
Деликатн.
93
Стирка при 50°C, полоскание,
остановка с водой или
деликатный отжим
Слабо загрязненная,
деликатная цветная (любая
одежда)
8
40°C
Деликатн.
83
Стирка при 40°C, полоскание,
остановка с водой или
деликатный отжим
Слабо загрязненная,
деликатная цветная (любая
одежда)
9
30°C
33
Стирка при 30°C, полоскание и
деликатный отжим
Деликатные ткани
Шерсть
10
40°C
Деликатн.
48
Стирка при 40°C, полоскание и
деликатный отжим
Особо деликатные ткани и
одежда (занавеси, шелк, вискоза
и пр.)
11
30°C
55
Стирка при 30°C, полоскание,
остановка с водой или слив
ЧАСТИЧНЫЕ ПРОГРАММЫ
Полоскание
Полоскание и отжим
Деликатное полоскание
Пполоскание, остановка с водой
или слив
Отжим
Слив и сильный отжим
Деликатный отжим
Слив и деликатный отжим
Слив
Слив
Запуск машины. Программы
Таблица программ
Примечание
«Остановка с водой»: см. дополнительную функцию «Легкая глажка» на с. 31. Данные в таблице, являются справочны-
ми и могут меняться в зависимости от конкретных условий стирки (объем стирки, температура воды в водопроводной
системе, температура в помещении и др.).
Специальная программа
Повседневная стирка 30′ мин (программа 9 для Синтетических тканей) предназначена для быстрой стирки слабозаг-
рязненного белья: цикл длится всего 30 минут, что позволяет сэкономить время и электроэнергию. Установив эту
программу (9 при температуре 30°С), Вы можете стирать различные виды тканей вместе (за исключением шерсти и
шелка) при максимальной загрузке белья 3 кг. Мы рекомендуем использовать жидкое моющее средство.
Краткие инструкции: Порядок запуска
программы
1. Включите стиральную машину, нажав на кнопку . Все
индикаторы загорятся на несколько секунд, затем
погаснут,
и
индиактор
ВКЛЮЧЕНИЕ/ЛЮК
ЗАБЛОКИРОВАН начнет мигать.
2. Загрузите белье в барабан, засыпьте стирал-
ьное вещество и добавки (смотрите стр. 20),
закройте крышки барабана и внешний люк.
3. Выбрать при помощи рукоятки выбора ПРОГРАММ
нужную программу.
4. Выбрать температуру стирки (см. стр. 19).
5. Выбрать скорость отжима (см. стр. 19).
6. Запустите программу, нажав кнопку ПУСК/СБРОС
(Start/Reset).
Для отмены запуска держите нажатой кнопку ПУСК/
СБРОС (Start/Reset) в течение 2-х секунд.
7. По завершении программы индикатор ВКЛЮЧЕНИЕ/
ЛЮК ЗАБЛОКИРОВАН замигает, сигнализируя, что
можно открыть люк. Вынуть белье и оставить люк
полуоткрытым для сушки барабана. Выключить
стиральную машину, нажав кнопку .

Instructions for use
WASHING MACHINE
GB
English, 1
HU
Magyar, 37
AVTL 104
ES
CIS
РУССКИЙ, 13
CZ
Èeský, 49
GR
ЕЛЛЗНЙКБ, 25
Contents
Installation, 2-3
Unpacking and levelling, 2
Electric and water connections, 2-3
The first wash cycle, 3
Technical details, 3
Washing machine description, 4-5
Control panel, 4
How to open and shut the drum, 5
Leds, 5
Starting and Programmes, 6
Briefly: how to start a programme, 6
Programme table, 6
Personalisations, 7
Setting the temperature, 7
Setting the spin cycle, 7
Functions, 7
Detergents and laundry, 8
Detergent dispenser, 8
Bleach cycle, 8
Preparing your laundry, 8
Special items, 8
Woolmark Platinum Care, 8
GB
GB
Precautions and advice, 9
General safety, 9
Disposal, 9
Saving energy and respecting the environment, 9
Care and maintenance, 10
Cutting off the water or electricity supply, 10
Cleaning your appliance, 10
Caring for your appliance door and drum, 10
Cleaning the pump, 10
Checking the water inlet hose, 10
Cleaning the detergent dispenser, 10
Troubleshooting, 11
Service, 12
Before calling for Assistance, 12
1
Installation
GB
Keep this instruction manual in a safe place for
future reference. Should the appliance be sold,
transferred or moved, make sure the instruction
manual accompanies the washing machine to inform
the new owner as to its operation and features.
Read these instructions carefully: they contain vital
information on installation, use and safety.
Unpacking and levelling
Unpacking
1. Unpack the washing
machine.
2. Check whether the
washing machine has
been damaged during
transport. If this is the
case, do not install it
and contact your
retailer.
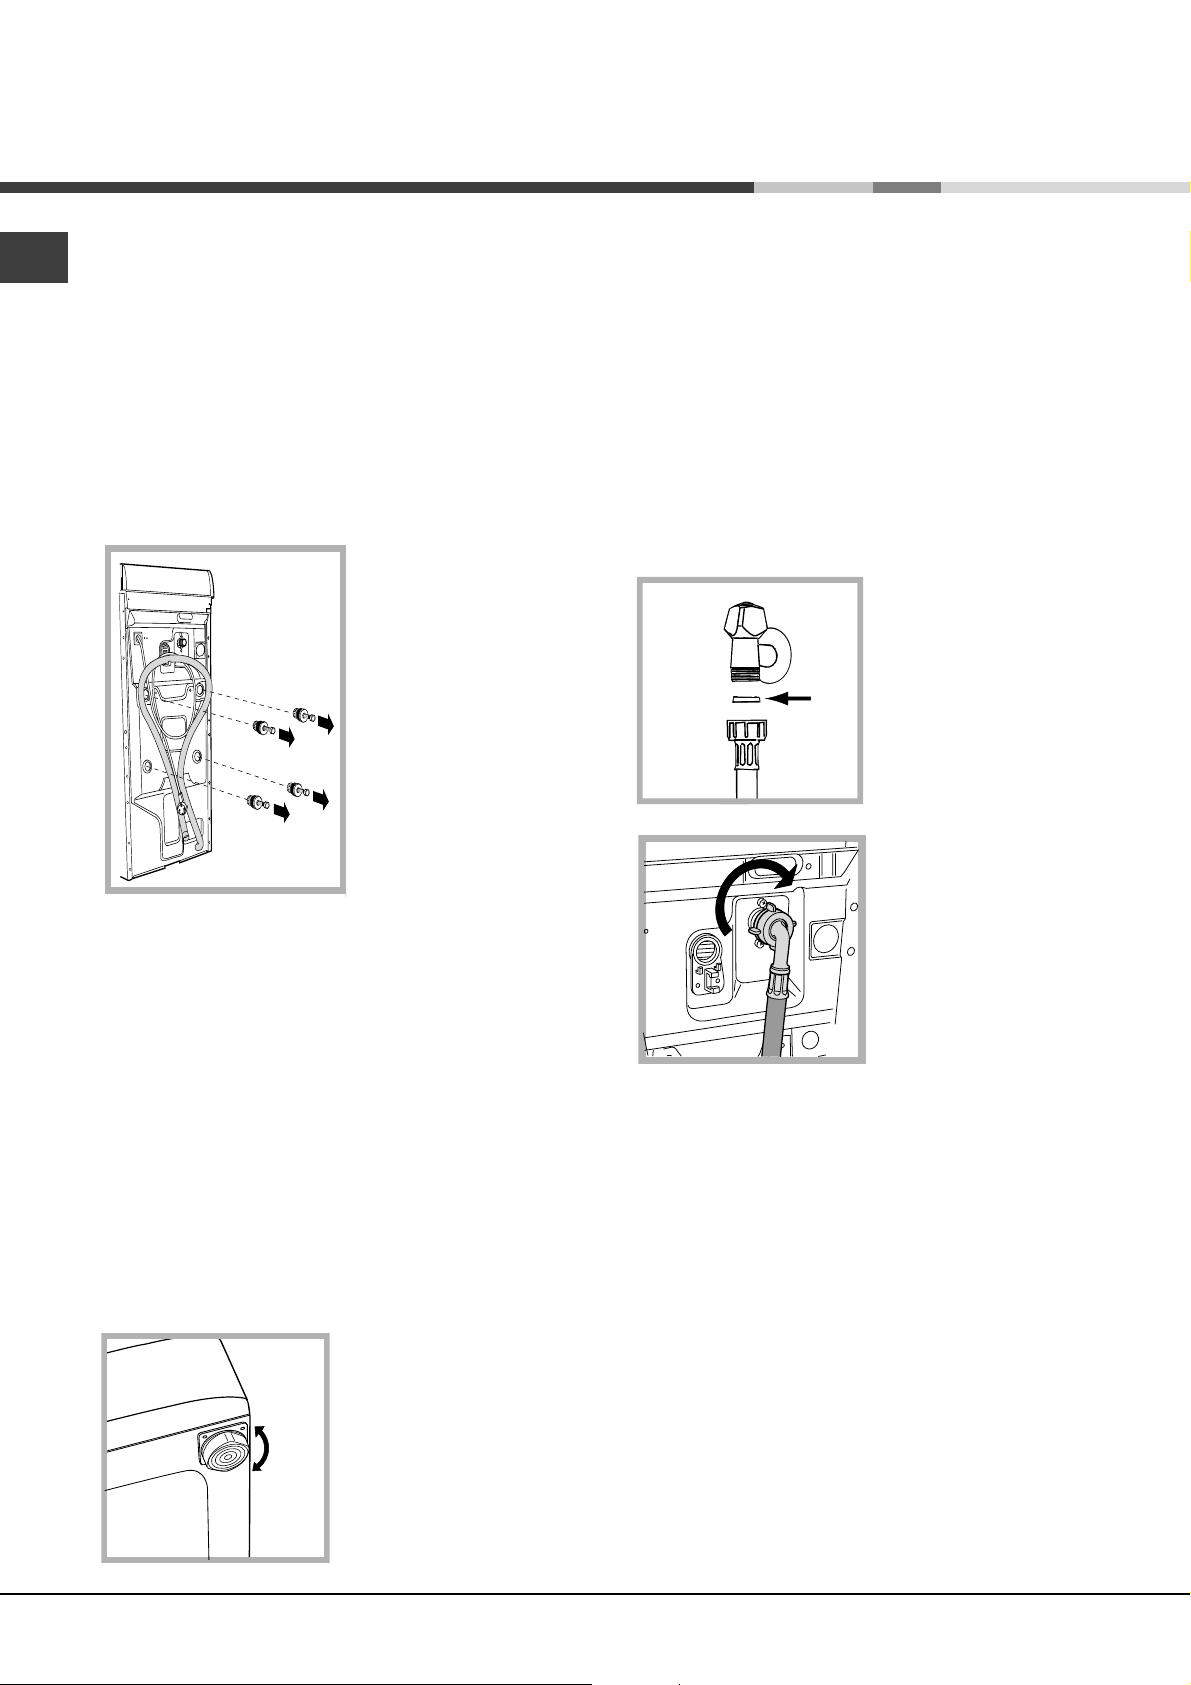
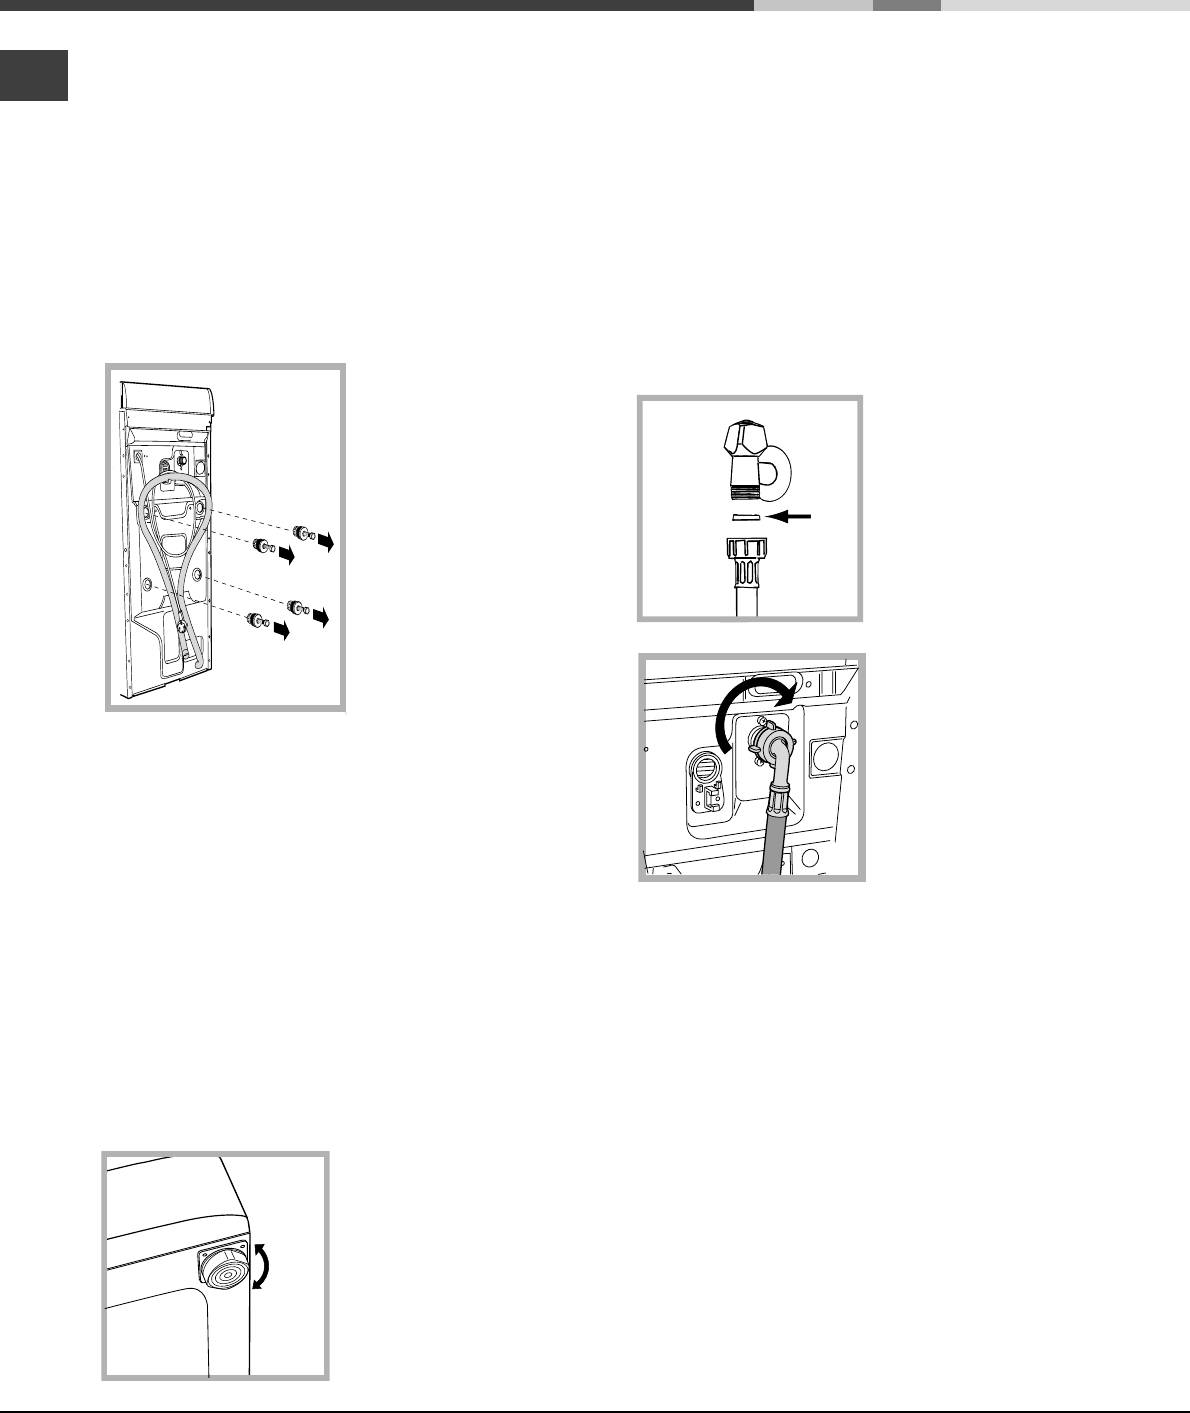
3. Remove the four
protective screws and
the rubber washer with
the respective spacer,
situated on the rear of
the appliance (see
figure).
4. Seal the gaps using the plastic plugs provided.
5. Keep all the parts: you will need them again if the
washing machine needs to be moved to another
location.
Levelling your appliance correctly will provide it with
stability and avoid any vibrations, noise and shifting
during operation. If it is placed on a fitted or loose
carpet, adjust the feet in such a way as to allow
enough room for ventilation beneath the washing
machine.
Electric and water connections
Connecting the water inlet hose
1. Insert seal A into the
end of the inlet hose and
screw the latter onto a
cold water tap with a 3/4
gas threaded mouth (see
A
figure).
Before making the
connection, allow the
water to run freely until it
is perfectly clear.
2. Connect the other end
of the water inlet hose to
the washing machine,
screwing it onto the
appliance’s cold water
inlet, situated on the top
right-hand side on the rear
of the appliance
(see figure).
Warning: should the screws be re-used, make sure
you fasten the shorter ones at the top.
Packaging materials are not children’s toys.
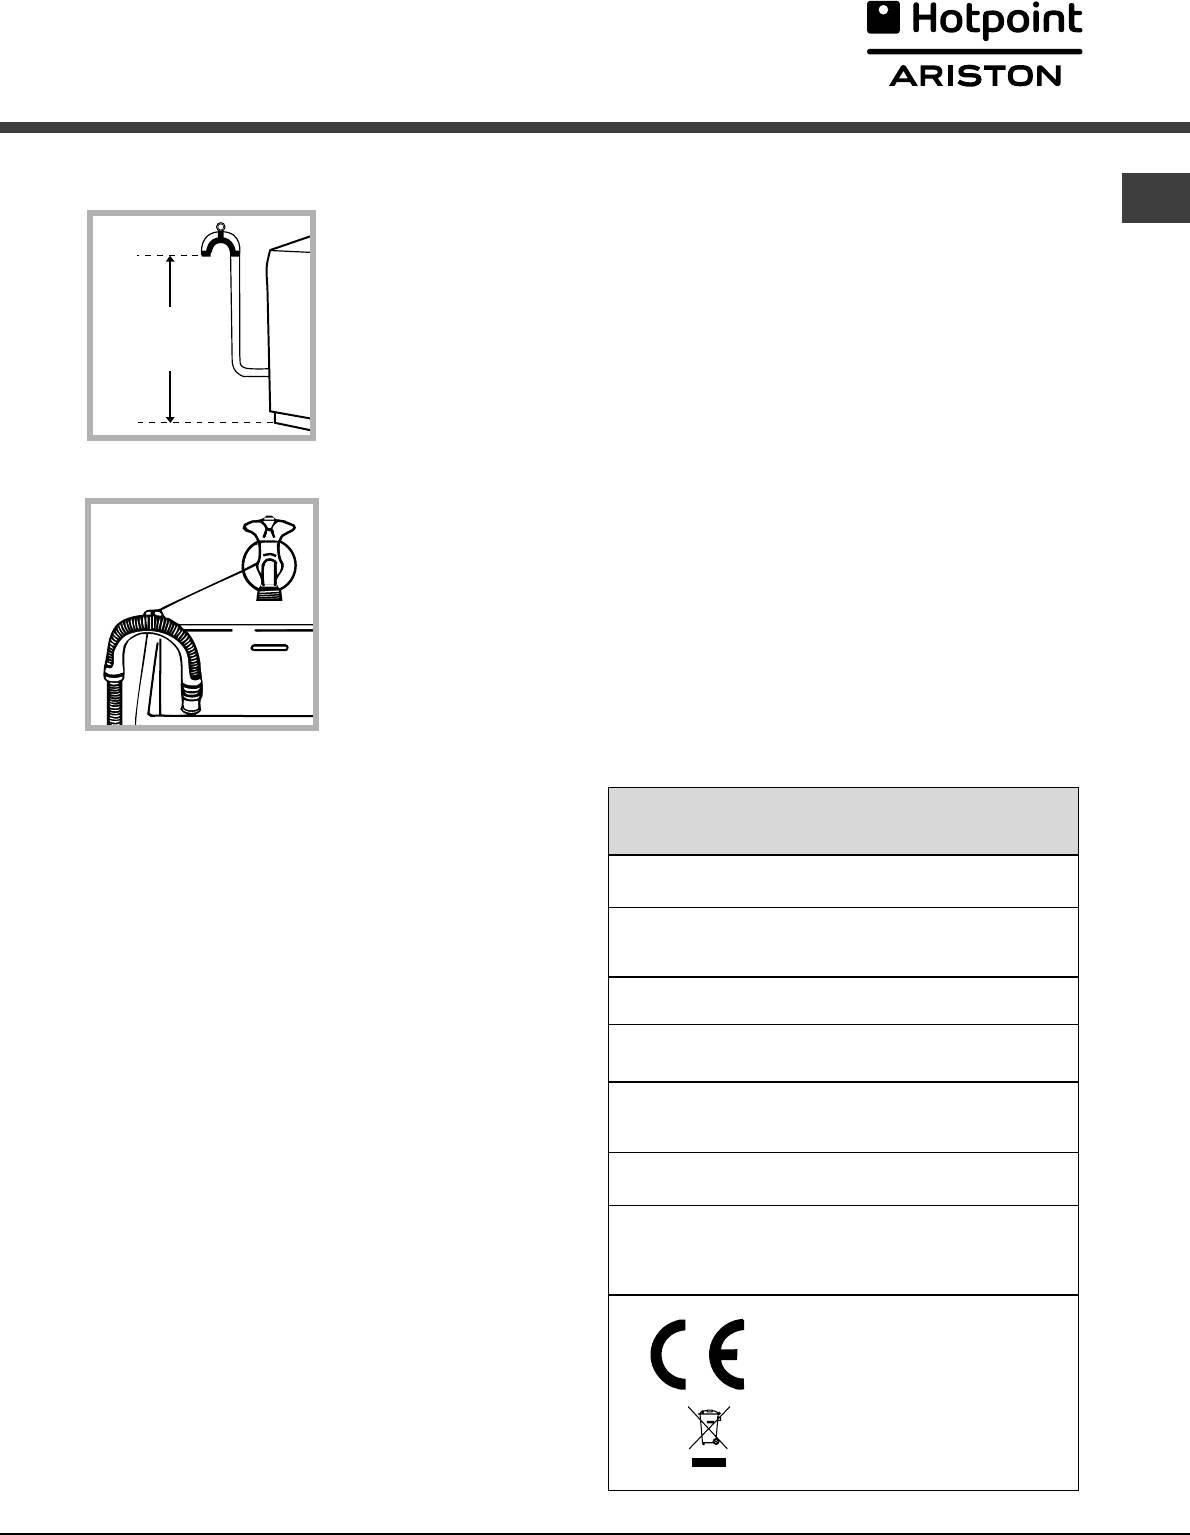
Levelling
1. Install the washing machine on a flat sturdy floor,
without resting it up against walls, furniture cabinets
or other.
2. If the floor is not
perfectly level, compensate for any unevenness
by tightening or
loosening the adjustable
front feet (see figure); the
angle of inclination,
measured according to
the worktop, must not
exceed 2°.
2
3. Make sure there are no kinks or bends in the
hose.
The water pressure at the tap must be within the
values indicated in the Technical details table
(on the next page).
If the water inlet hose is not long enough, contact
a specialist store or an authorised serviceman.
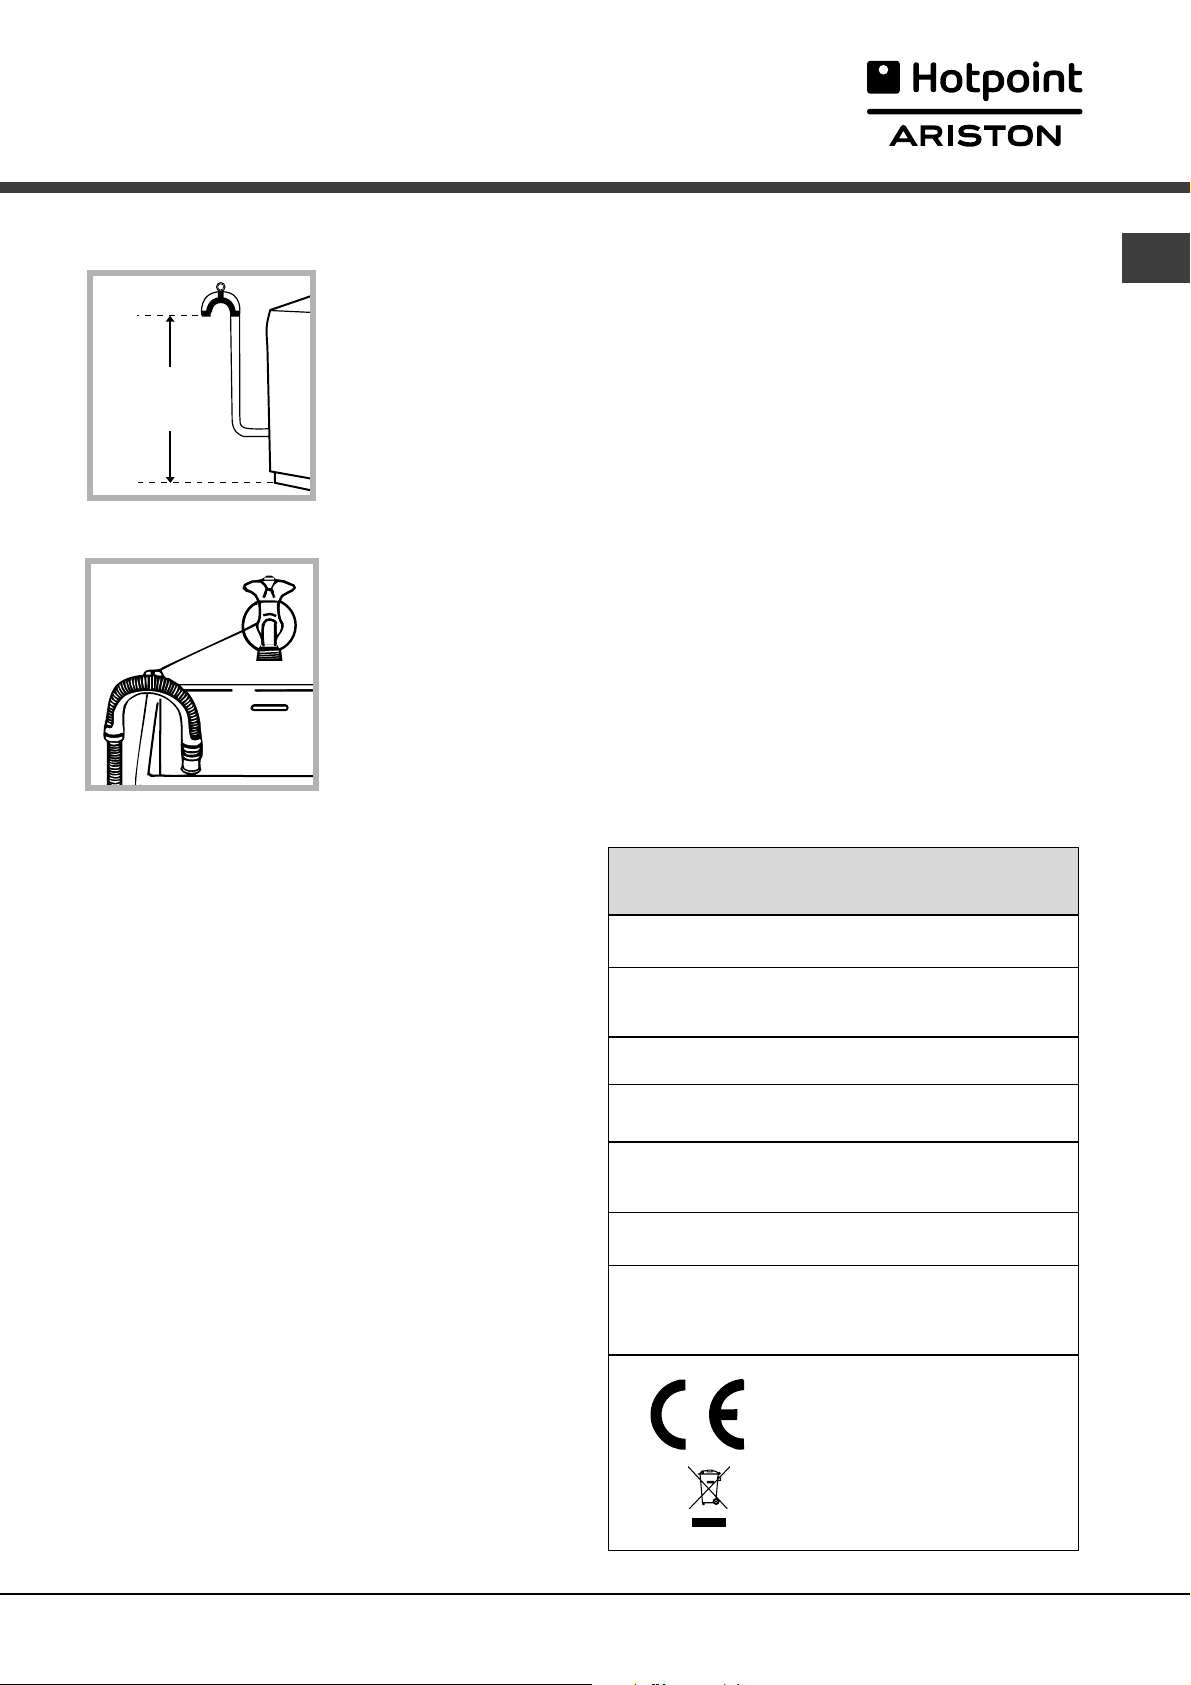
Connecting the drain hose
65 — 100 cm
Connect the drain hose,
without bending it, to a
draining duct or a wall
drain situated between
65 and 100 cm from the
floor;
alternatively, place it
over the edge of a
basin, sink or tub,
fastening the duct
supplied to the tap (see
figure). The free end of
the hose should not be
underwater.
GB
When the washing machine is installed, the main
socket must be within easy reach.
Do not use extensions or multiple sockets.
The power supply cable must never be bent or
dangerously compressed.
The power supply cable must only be replaced by
an authorised serviceman.
Warning! The company denies all liability if and when
these norms are not respected.
The first wash cycle
Once the appliance has been installed, and before
you use it for the first time, run a wash cycle with
detergent and no laundry, setting the 90°C
programme without a pre-wash cycle.
We advise against the use of hose extensions; in
case of absolute need, the extension must have the
same diameter as the original hose and must not
exceed 150 cm in length.
Electric connection
Before plugging the appliance into the mains socket,
make sure that:
the socket is earthed and in compliance with the
applicable law;
the socket is able to sustain the appliance’s
maximum power load indicated in the Technical
details table (on the right);
the supply voltage is included within the values i
ndicated on the Technical details table
(on the right);
the socket is compatible with the washing
machine’s plug. If this is not the case, replace the
socket or the plug.
The washing machine should not be installed in an
outdoor environment, not even when the area is
sheltered, because it may be very dangerous to
leave it exposed to rain and thunderstorms.
Technical details
Model
Dimensions
Capacity
Electric
connections
Water
connections
Spin speed
Control
programmes
according to EN
60456 directive
AVTL 104
40 cm wide
85 cm high
60 cm deep
from 1 to 5 kg
Please refer t o the technical d ata plat e
fixed to the machine.
maximum pressure 1 MPa (10 bar)
minimum pressure 0.05 MPa (0.5 bar)
drum capacity 42 litres
up to 1000 rpm
programme 3; temperature 60°C;
run with a load of 5 kg.
This appliance is compliant with the
following European Community
Directives:
— 89/336/CEE of 03/05/89
(Electromagnetic Compatibility) and
subsequent amendments
— 2006/95/CE (Low Voltage)
— 2002/96/CE
3
Washing machine description
GB
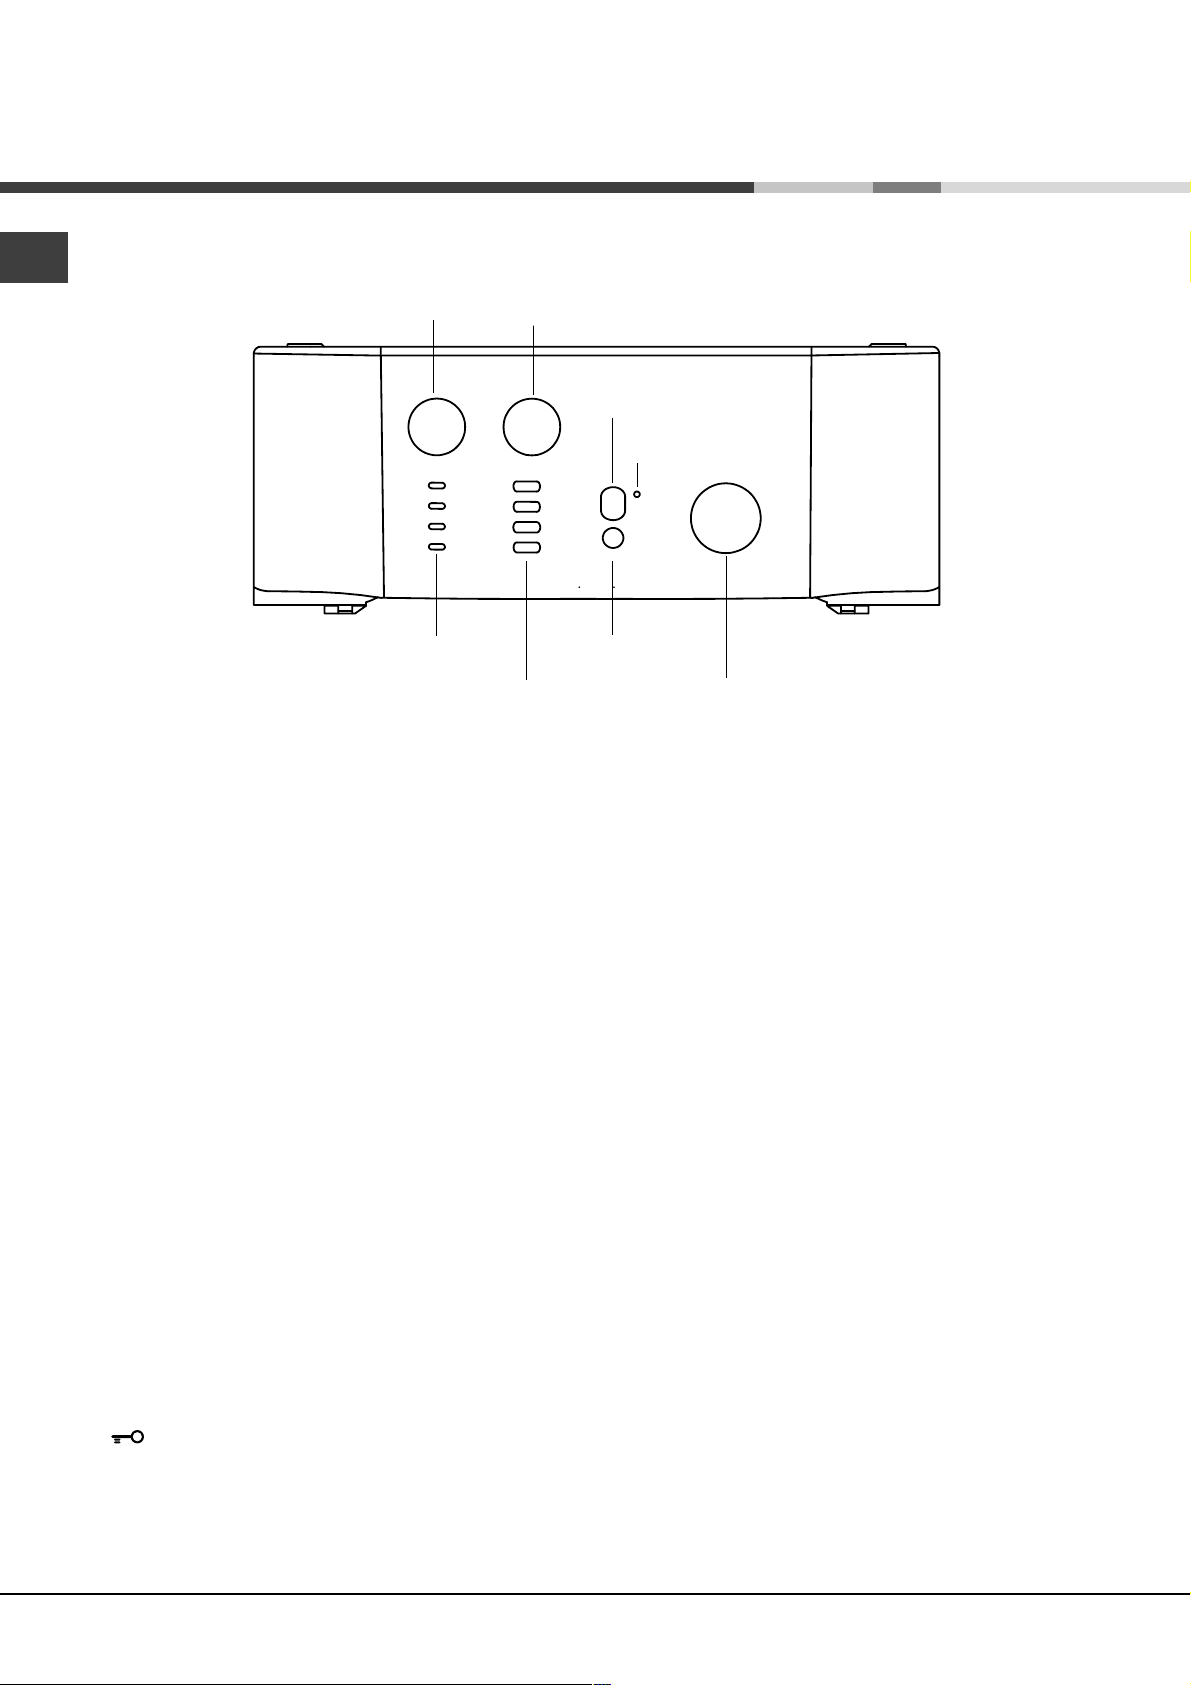
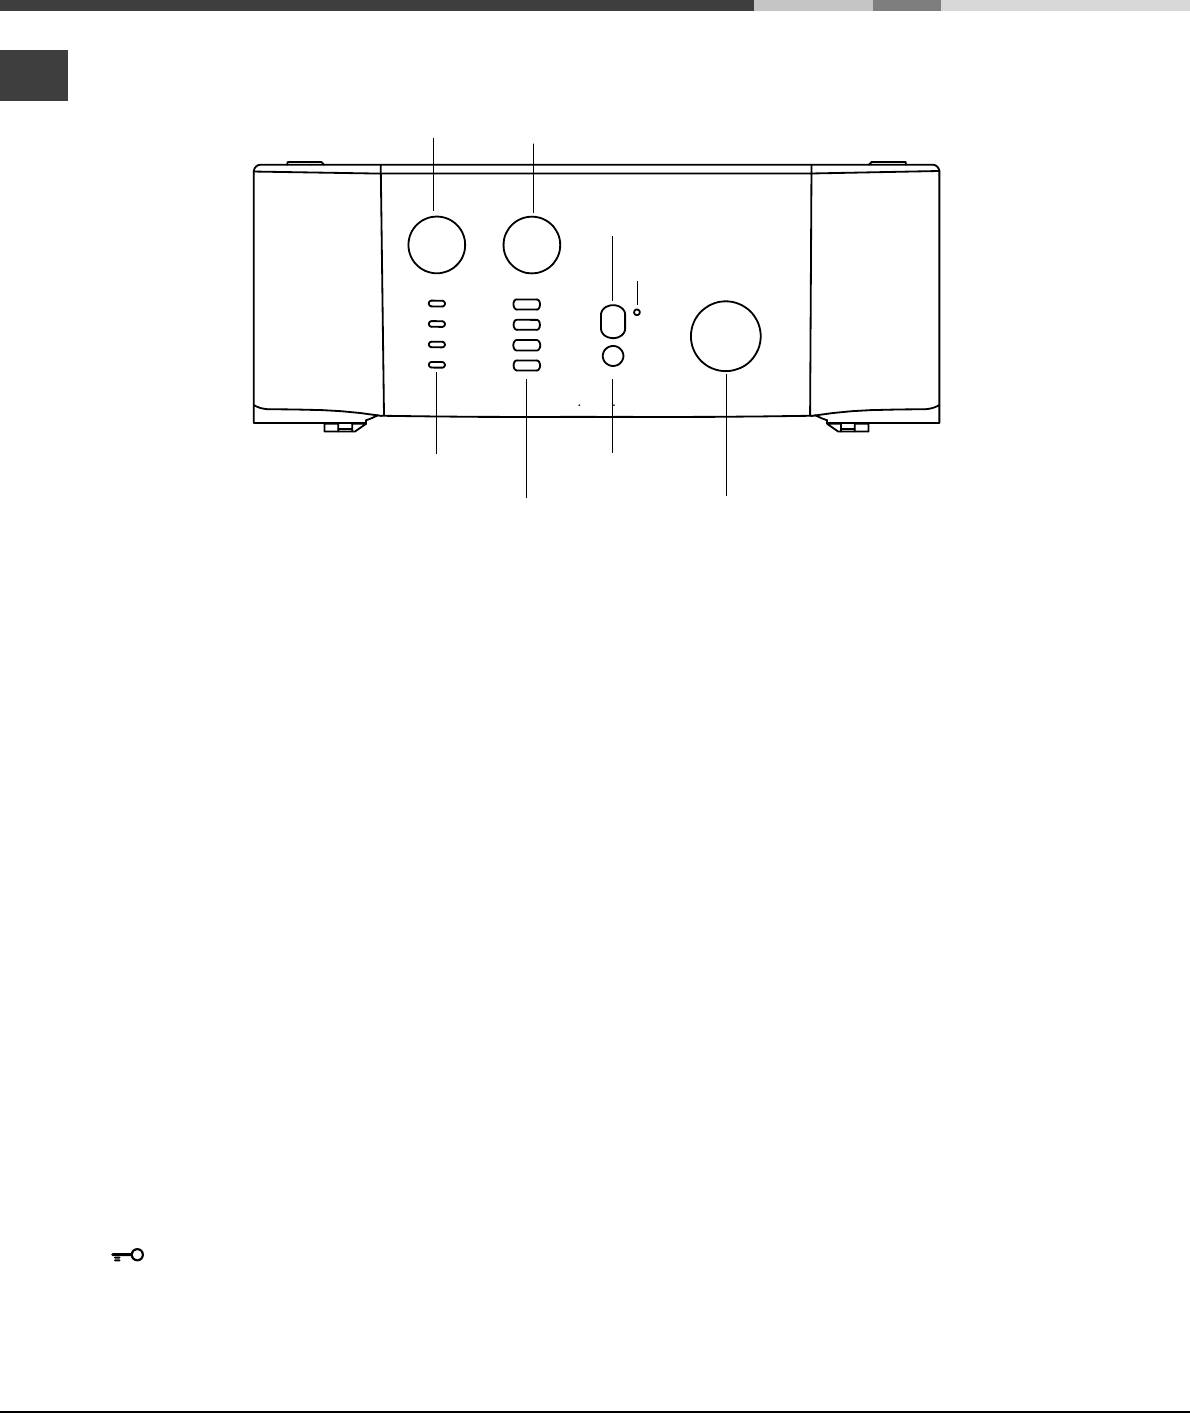
Control panel
SPIN SPEED
knob
LEDs
TEMPERATURE
knob
START/RESET
key
FUNCTION
keys
ON/OFF
key
LID LOCKED
LED
PROGRAMME
knob
Detergent dispenser to add detergent and fabric
softener (see page 8).
LEDs to find out which wash cycle phase is under way.
If the Delay Timer function has been set, the time left until
the programme starts will be indicated (see page 5).
SPIN SPEED knob to set the spin speed or exclude the
spin cycle completely (see page 7).
FUNCTION keys to select the functions available.
The button corresponding to the function selected will
remain on.
TEMPERATURE knob to set the temperature or the cold
wash cycle (see page 7).
ON/OFF key to turn the washing machine on and off.
START/RESET key to start the programmes or cancel
incorrect settings.
ON-OFF/LID LOCK led ,to find out whether the
washing machine is on (flashing) and if the lid may be
opened (see page 5).
PROGRAMME knob to set the programmes
(see page 6).
The knob stays still during the cycle.
ON-OFF/LID LOCK led:
If this LED is on, the appliance Lid is locked to prevent it from being opened accidentally; to avoid any damages,
you must wait for the lamp to flash before you open the Lid.
.
The rapid flashing of the ON-OFF/LID LOCK Led together with the flashing of at least one other LED indicates
there is an abnormality (see page 11).
4
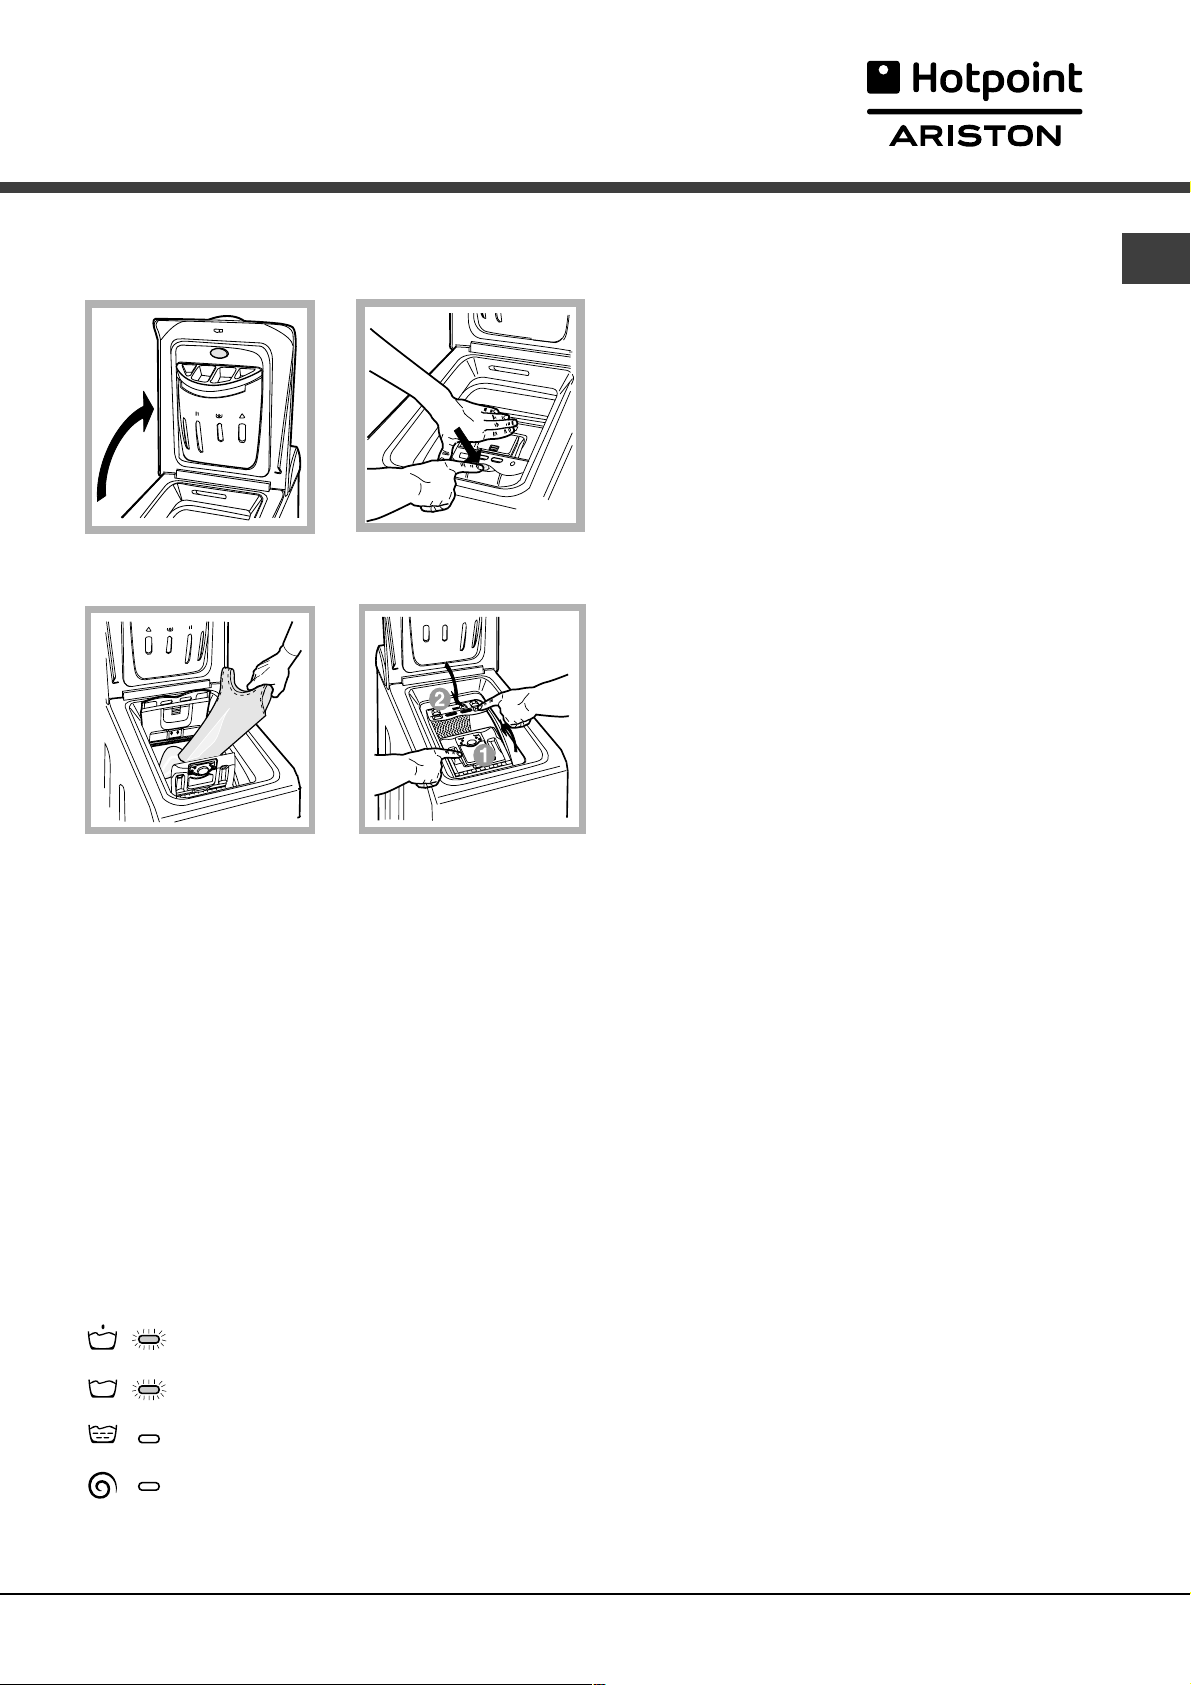
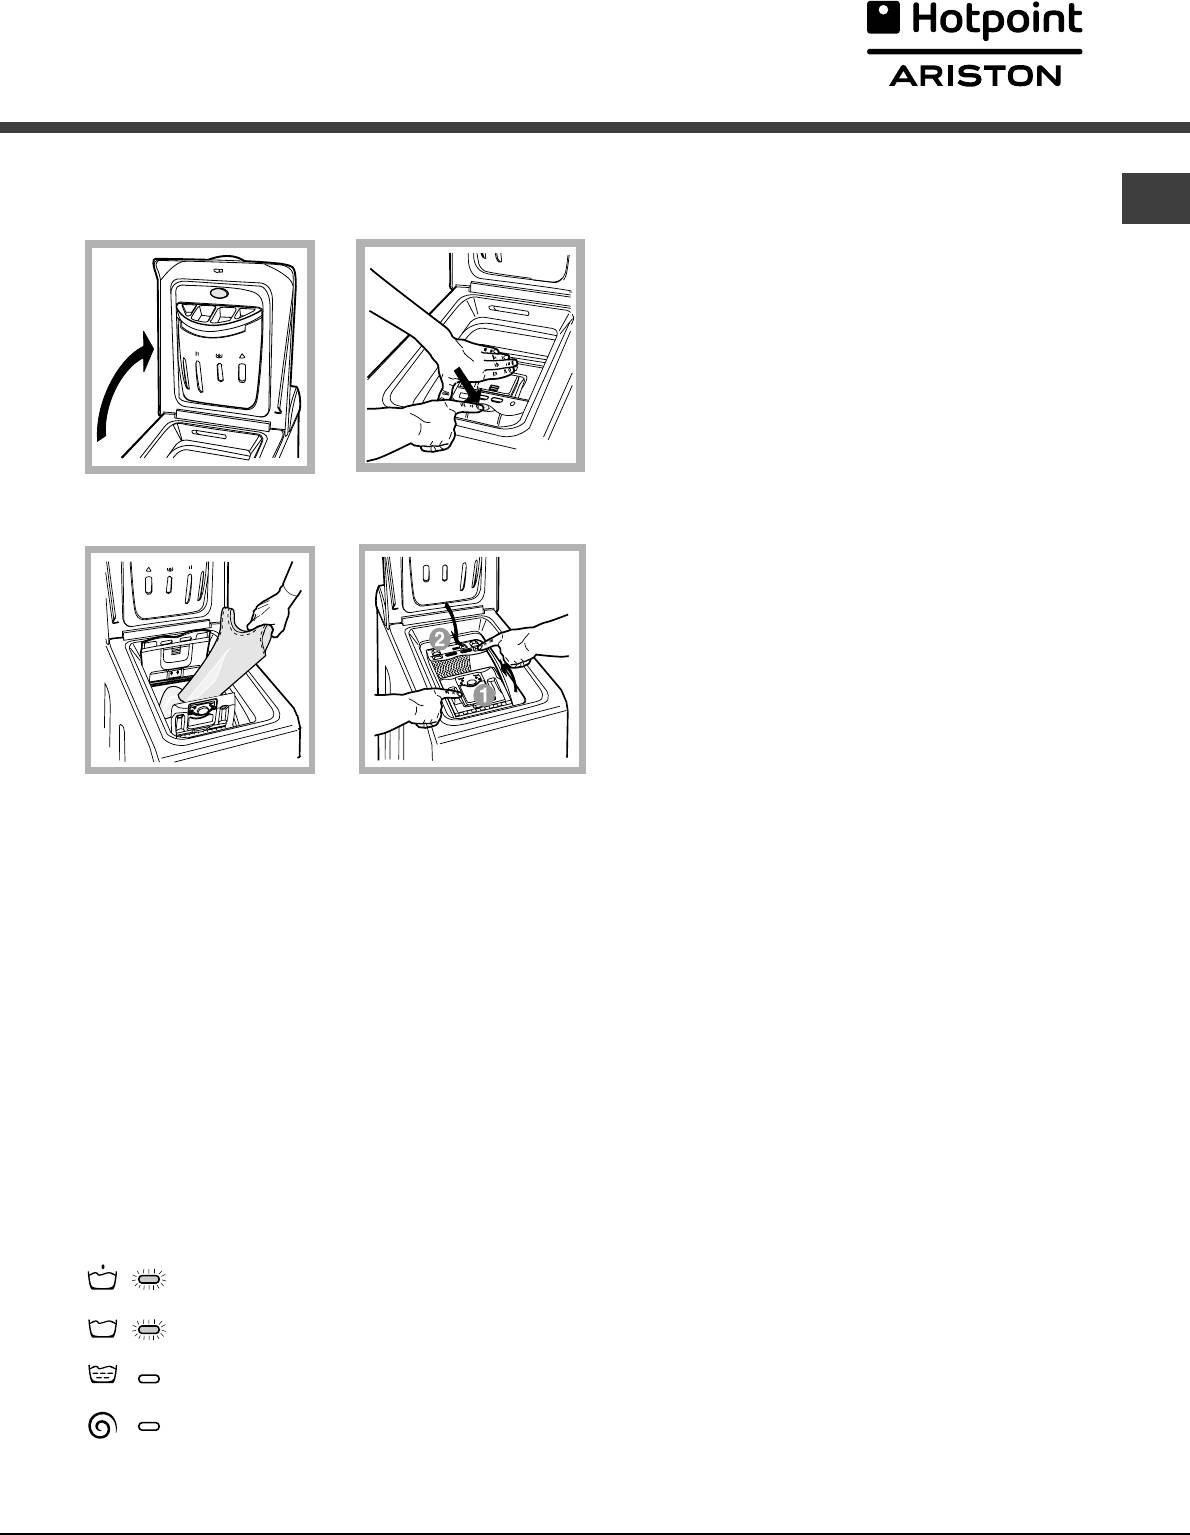
How to open and to close the drum
Fig. 1
Fig. 3
Fig. 2
Fig. 4
GB
A) Opening (Fig. 1).
Lift the external lid and open it completely.
B) Then open the drum using both hands as
shown in Fig. 2:
— press the button indicated by the arrow in Fig. 2
lightly downwards, with one hand firmly resting on
the doors to prevent them from suddenly opening
and hurting your fingers;
— therefore follow the appliance doors along as these
unhook and open easily.
C) Loading the washing machine. (Fig. 3).
D) Shutting (Fig. 4).
— close the drum fully by first shutting the front door
followed by the rear one;
— then ensure the hooks on the front door are perfectly
housed within the seat of the rear door;
— a f ter the hooks have clicked into position, press both
doors lightly downwards to make sure they do not
come loose;
— finally shut the external lid.
Leds
The LEDS provide important information.
This is what they can tell you:
Cycle phase under way:
During the wash cycle, the LEDs gradually illuminate
on to indicate the cycle phase under way:
Prewash
Wash
Rinse
Spin cycle
Note: during draining, the LED corresponding to the
Spin cycle phase will be turned on.
Function keys
The FUNCTION KEYS also act like LEDS.
When a function is selected, the corresponding button
is illuminated.
If the function selected is incompatible with the
programme set, the button will flash and the function
will not be enabled.
If you set a function that is incompatible with another
function you selected previously, only the last one
selected will be enabled.
5

Starting and Programmes
GB
Briefly: starting a programme
1. Switch the washing machine on by pressing button .
All the LEDS will light up for a few seconds and
the ON-OFF/DOOR LOCK Led will begin to flash.
2. Load your laundry into the washing machine, add
the detergent and any fabric softener (see page 
and shut the appliance door.
3. Set the PROGRAMME knob to the programme
required.
4. Set the wash temperature (see page 7).
5. Set the spin speed (see page 7).
6. Start he programme by pressing the START/RESET
button.
To cancel it, keep the START/RESET button pressed
for at least 2 seconds.
7. When the programme is finished, the ON-OFF/
DOOR LOCK Led will flash to indicate that the
appliance door can be opened. Take out your
laundry and leave the appliance door ajar to allow
the drum to dry thoroughly. Turn the washing
machine off by pressing button
.
Programme table
Type of fabric and degree
of soil
Programmes
Wash
temperature
Detergent
Pre-
Was h
wash
Fabric
softener
Cotton
Extremely s oiled whites
(sheet s, tablecloths, etc.)
Extremely s oiled whites
(sheet s, tablecloths, etc.)
Heavily s oiled whites and
fast colours
Heavily s oiled whites and
fast colours
Slightly soiled whites and
delicate colours (shirt s,
jumpers, etc.)
1
2
3
4
5
90°C
90°C
60°C
40°C
30°C
Synthetics
Heavily soiled fast colours
(baby linen, etc.)
Heavily soiled fast colours
(baby linen, etc.)
Delicate colours (all types
of slightly soiled
garments)
Delicate colours (all types
of slightly soiled
garments)
6
7
8
9
60°C
50°C
40°C
30°C 33
Delicate
Wool
Very del icate fabrics
(curtains, silk, viscose,
etc.)
PARTIAL PROGRAMMES
Rinse Rinse cycles and spin cycle
Delicate rinse cycle
Spin cycle
Delicat e s pin cycle
Draining Draining
10
11
40°C
30°C
Bleaching
/option
Bleach
Delicate/
Traditional
Delicate/
Traditional
Delicate/
Traditional
Delicate/
Traditional
Delicate
Delicate
Delicate
Delicate
Cycle
length
(minutes)
5
15
147
157
6
9
8
8
7
9
3
9
3
8
48
5
5
Description of wash cycle
Pre-wash, wash cycle, rinse
cycles, intermediate and final
spin cycles
Wash cycle, rinse cycles,
intermediate and final spin
cycles
Wash cycle, rinse cycles,
intermediate and final spin
cycles
Wash cycle, rinse cycles,
intermediate and final spin
cycles
Wash cycle, rinse cycles,
intermediate and final spin
cycles
Wash cycle, rinse cycles, anticrease or d elicate spin cycle
Wash cycle, rinse cycles, anticrease or d elicate spin cycle
Wash cycle, rinse cycles, anticrease or d elicate spin cycle
Wash cycle, rinse cycles and
delicate spin cycl
Wash cycle, rinse cycles and
delicate spin cycle
Wash cycle, rinse cycles, anticrease or draining cycle
Rins e cycles , anti-crease or
draining
Draining and heavy duty spin
cycle
Draining and d elicate spin
cycle
Notes
For the anti-crease function: see Easy iron, opposite page. The information contained in the table is purely indicative.
Special programme
Daily 30′ (programme 9 for Synthetics) is designed to wash lightly soiled garments in a short amount of time: it only
lasts 30 minutes and allows you to save on both time and energy. By setting this programme (9 at 30°C), you can
wash different fabrics together (except for woollen and silk items), with a maximum load of 3 kg.
We recommend the use of liquid detergent.
6
Personalisations
Setting the temperature
Turn the TEMPERATURE knob to set the wash temperature (see Programme table on page 6).
The temperature can be lowered, or even set to a cold wash (
).
Setting the spin speed
Turn the SPIN SPEED knob to set the spin speed for the programme selected.
The maximum spin speeds for each programme are as follows:
Programmes Maximum spin speed
Cottone 1000 rpm
Synthetics 800 rpm
Wool 600 rpm
Silk no
The spin speed can be lowered, or the spin cycle can be excluded altogether by selecting symbol
The washing machine will automatically prevent you from selecting a spin speed higher than the maximum speed for
each programme.
.
To avoid excessive vibrations, before every spin cycle the machine distributes the load in a uniform manner by
continuously rotating the drum at a speed which is slightly faster than the normal washing speed.
When, despite repeated attempts, the load is still not evenly distributed, the machine spins at a lower speed than
the set frequency.
If the load is excessively unbalanced, the machine attempts to distribute it instead of spinning.
The balancing attempts may extend the total duration of the cycle, up to a maximum of 10 minutes.
Functions
To enable a function:
1. press the button corresponding to the desired function, according to the table below;
2. the function is enabled when the corresponding button is illuminated.
Note: The rapid flashing of the button indicates that the corresponding function cannot be selected for the
programme set.
GB
Function Effect Comments Enabled with
programmes:
Su per
Was h
Ea s y i r on This option
Rap i d Cuts the
Ex tra
Rinse
Allows for an
impeccabl e
wash, visibly
whi t er t han a
standard
Class A wash.
reduces the
amount of
creasing on
fabrics,
making them
easier to iron.
duration of
the wash
cycle by 30%.
Increases the
eff iciency of
the rinse.
This function is incompatible with the RAPID function.
When this function is set, programmes 6, 7, 8, 11 and
Delicate rinse will end with the laundry left to soak
(Anti-crease) and the Rinse cycle phase LED will
flash.
— to conclude the cycle, press the START/RESET
button;
— to run the draining cycl e alone, set the knob t o the
relative symbol and press the START/RESET
button.
This function is incompatible with the SUPER WASH
function.
Recommended when the appliance has a full load or
with large quantities of detergent.
1, 2, 3, 4,
5, 6, 7, 8
All
programmes
except for
1, 2, 9, 10
and
Draining.
1, 2, 3, 4,
5, 6, 7, 8
Rinses
1, 2, 3, 4, 5,
6, 7, 8, and
Rinse
cycles.
7

Detergents and laundry
GB
Detergent dispenser
Good washing results also depend on the correct
dose of detergent: adding too much detergent won’t
necessarily make for a more efficient wash, and may
in fact cause build up
on the interior of your
appliance and even
pollute the
environment.
Open up the
detergent dispenser
and pour in the
detergent and fabric
softener, as follows.
compartment 1: Detergent for pre-wash
compartment 2: Detergent for the wash cycle
(powder or liquid)
It is recommended that you place liquid detergent
directly into the compartment using the appropriate
dosing cup.
compartment 3: Additives (softener, etc.)
When pouring the softener in compartment 3, avoid
exceeding the «max» level indicated.
The softener is added automatically into the machine
during the last wash. At the end of the wash
programme, some water will be left in compartment
3. This is used for the inlet of denser fabric softeners
into the machine, i.e. to dilute the more
concentrated softeners. Should more than a normal
amount of water remain in compartment 3, this
means the emptying device is blocked. For cleaning
instructions, see page 10.
Preparing your laundry
Divide your laundry according to:
— the type of fabric/the symbol on the label.
— the colours: separate coloured garments from
whites.
Empty all pockets and check for loose buttons.
Do not exceed the weight limits stated below,
which refer to the weight when dry:
Sturdy fabrics: max 5 kg
Synthetic fabrics: max 2.5 kg
Delicate fabrics: max 2 kg
Wool: max 1 kg
How much does your laundry weigh?
1 sheet 400-500 g
1 pillow case 150-200 g
1 tablecloth 400-500 g
1 bathrobe 900-1,200 g
1 towel 150-250 g
Special items
Curtains: fold curtains and place them in a pillow
case or mesh bag. Wash them separately without
exceeding half the appliance load. Use programme
11 which excludes the spin cycle automatically.
Quilted coats and windbreakers: if they are
padded with goose or duck down, they can be
machine-washed. Turn the garments inside out and
load a maximum of 2-3 kg, repeating the rinse cycle
once or twice and using the delicate spin cycle.
Trainers: remove any mud. They can be washed
together with jeans and other tough garments, but
not with whites.
Wool: for best results, use a specific detergent,
taking care not to exceed a load of 1 kg.
compartment 4: Bleach
Do not use hand wash detergent because it may
form too much foam.
Bleach cycle
Traditional bleach should be used on sturdy white
fabrics, and delicate bleach for coloured fabrics,
synthetics and for wool.
When pouring in the bleach, be careful not to exceed
the «max» level indicated on compartment 4 ..
To run the bleach cycle alone, pour the bleach into
compartment 4 and set the Rinse programme
cotton fabrics) or delicate Rinse
fabrics).
8
(for synthetic
(for
Woolmark Platinum Care
As gentle as a hand wash.
Hotpoint Ariston sets a new standard of
superior performance that has been
endorsed by The Woolmark Company with
the prestigious Woolmark Platinum Care brand. Look
for the Woolmark Platinum Care logo on the washing
machine to ensure you can safely and effectively
wash wool garments labelled as «hand wash»
(M.0303):
Set programme 10 for all «Hand wash»
using the appropriate detergent (max load 1 Kg).
garments,

Precautions and advice
The washing machine was designed and built in
compliance with the applicable international safety
regulations. The following information is provided for
your safety and should consequently be read carefully.
General safety
This appliance has been designed for nonprofessional, household use and its functions must
not be changed.
This washing machine should only be used by
adults and in accordance with the instructions
provided in this manual.
Never touch the washing machine when barefoot
or with wet or damp hands or feet.
Do not pull on the power supply cable to unplug
the appliance from the electricity socket. Pull the
plug out yourself.
Do not open the detergent dispenser while the
appliance is in operation.
Do not touch the drain water as it could reach
very high temperatures.
Never force the washing machine door: this could
damage the safety lock mechanism designed to
prevent any accidental openings.
In the event of a malfunction, do not under any
circumstances touch internal parts in order to
attempt repairs.
Always keep children well away from the
appliance while in operation.
The appliance door tends to get quite hot during
the wash cycle.
Should it have to be moved, proceed with the
help of two or three people and handle it with the
utmost care. Never try to do this alone, because
the appliance is very heavy.
Before loading your laundry into the washing
machine, make sure the drum is empty.
Disposal
Disposing of the packaging material: observe local
regulations, so the packaging can be re-used.
Disposal of old electrical appliances
The European Directive 2002/96/EC on Waste
Electrical and Electronic Equipment (WEEE), requires
that old household electrical appliances must not be
disposed of in the normal unsorted municipal waste
stream. Old appliances must be collected separately
in order to optimise the recovery and recycling of
the materials they contain and reduce the impact on
human health and the environment.
The crossed out «wheeled bin» symbol on the
product reminds you of your obligation, that when
you dispose of the appliance it must be separately
collected.
Consumers should contact their local authority or
retailer for information concerning the correct
disposal of their old appliance.
Disposing of an old washing machine:
before scrapping your appliance, cut the power
supply cable and remove the appliance door.
Saving energy and respecting the
environment
Environmentally-friendly technology
If you only see a little water through your appliance
door, this is because thanks to the latest technology,
your washing machine only needs less than half the
amount of water to get the best results: an objective
reached to respect the environment.
Saving on detergent, water,
energy and time
To avoid wasting resources, the washing machine
should be used with a full load. A full load instead
of two half loads allows you to save up to 50% on
energy.
The pre-wash cycle is only necessary on
extremely soiled garments. Avoiding it will save on
detergent, time, water and between 5 and 15%
energy.
Treating stains with a stain remover or leaving
them to soak before washing will cut down the
need to wash them at high temperatures. A
programme at 60°C instead of 90°C or one at
40°C instead of 60°C will save up to 50% on
energy.
Use the correct quantity of detergent depending
on the water hardness, how soiled the garments
are and the amount of laundry you have, to avoid
wastage and to protect the environment: despite
being biodegradable, detergents do contain
ingredients that alter the natural balance of the
environment. In addition, avoid using fabric
softener as much as possible.
If you use your washing machine from late in the
afternoon until the early hours of the morning, you
will help reduce the electricity board’s peak load.
If your laundry has to be dried in a tumble dryer,
select a high spin speed. Having the least water
possible in your laundry will save you time and
energy in the drying process.
GB
9
Care and maintenance
GB
Cutting off the water or electricity
supply
Turn off the water tap after every wash. This will
limit the wear of your appliance’s water system
and also prevent leaks.
Unplug your appliance when cleaning it and
during all maintenance operations.
Cleaning your appliance
The exterior and rubber parts of your appliance can
be cleaned with a soft cloth soaked in lukewarm
soapy water. Do not use solvents or abrasives.
Cleaning the detergent dispenser
Remove the dispenser by raising it and pulling it out
(see figure).
Wash it under running water; this operation should
be repeated
frequently.
Caring for your appliance door and
drum
Always leave the appliance door ajar to prevent
unpleasant odours from forming.
Cleaning the pump
The washing machine is fitted with a self-cleaning
pump that does not require any maintenance.
Sometimes, small items (such as coins or buttons)
may fall into the pre-chamber that protects the
pump, situated in the lower part of the same.
Make sure the wash cycle has ended and unplug
the appliance.
To recover any objects that have fallen into the prechamber:
1. remove the plinth at
the bottom on the
front side of the
washing machine by
pulling from the side
with your hands (see
diagram); (see figure);
2. unscrew the lid
rotating it anticlockwise (see figure): a
little water may trickle
out. This is perfectly
normal;
3. clean the interior
thoroughly;
4. screw the lid back
on;
5. reposition the panel,
making sure the hooks
are securely in place
before you push it onto
the appliance.
Checking the water inlet hose
Check the water inlet hose at least once a year. If
you see any cracks, replace it immediately: during
the wash cycles, water pressure is very strong and
a cracked hose could easily split open.
Never use hoses that have already been used.
Disassembly:
Press lightly on the large
button on the front of the
detergent dispenser and pull
it upwards (fig. 1).
Fig. 1 Fig. 2
10
How to clean the detergent dispenser
Cleaning:
Then clean the dispenser under a tap (fig. 3) using an old
toothbrush and, once the pair of siphons inserted in the
top of compartments 1 and 2 (fig. 4) have been pulled
out, check whether the same are not clogged and then
rinse them.
Fig. 3
Reassembly:
Do not forget to reinsert the
pair of siphons into the
special housings and then to
replace the dispenser into its
seat, clicking it into place
(fig. 4, 2 and 1).
Fig. 4

Troubleshooting
Your washing machine could fail to work. Before calling for Assistance (see page 12), make sure the problem
can’t easily be solved by consulting the following list.
Problem
The washing machine won’t
start.
The wash cycle won’t start.
The washing machine fails to
load water.
The washing machine
continuously loads and unloads
water.
Possible causes/Solution:
The appliance is not plugged into the socket, or not enough to
make contact.
There has been a power failure.
The appliance Lid is not shut properly. The Lid locked Led flashes.
The
The START/RESET button has not been pressed.
The water tap is not turned on.
The water inlet hose is not connected to the tap.
The hose is bent.
The water tap is not turned on.
There is a water shortage.
The water pressure is insufficient.
The START/RESET button has not been pressed.
The drain hose is not fitted between 65 and 100 cm from the floor
The free end of the hose is underwater (see page 3).
The wall drainage system doesn’t have a breather pipe.
If the problem persists even after these checks, turn off the water tap, switch
the appliance off and call for Assistance. If the dwelling is on one of the upper
floors of a building, there may be drain trap problems causing the washing
machine to load and unload water continuously. In order to avoid such an
inconvenience, special anti-drain trap valves are available in shops.
button has not been pressed.
(see page 3).
GB
The washing machine does not
drain or spin.
The washing machine vibrates
too much during the spin cycle.
The washing machine leaks.
The ON-OFF/DOOR LOCK Led
flashes rapidly at the same
time as at least one other LED.
There is too much foam.
The programme does not foresee the draining: some programmes
require enabling the draining manually (see page 6).
The Easy iron option is enabled: to complete the programme, press
the START/RESET button (see page 7).
The drain hose is bent (see page 3).
The drain duct is clogged.
The drum was not unblocked correctly during installation (see page 2).
The washing machine is not level (see page 2).
The washing machine is closed in between furniture cabinets and
the wall (see page 2).
The water inlet hose is not screwed on correctly (see page 2).
The detergent dispenser is obstructed (to clean it, see page 10).
The drain hose is not secured properly (see page 3).
Switch off the machine and unplug the appliance; wait for
approximately 1 minute then switch it on again.
If the problem persists, contact Assistance.
The detergent is not suitable for machine washing (it should bear
the definition «for washing machines» or «hand and machine wash»,
or the like).
You used too much detergent.
11

Service
GB
Before calling for Assistance:
Check whether you can solve the problem on your own (see page 11);
Restart the programme to check whether the problem has been solved;
If this is not the case, contact an authorised Technical Service Centre on the telephone number
provided on the guarantee certificate.
Always request the assistance of authorised servicemen.
Notify the operator of:
the type of problem;
the appliance model (Mod.);
the serial number (S/N);
This information can be found on the data plate situated on the rear of the washing machine.
12

Руководство по экпуатации
СТИРАЛЬНАЯ МАШИНА
Содержание
CIS
Установка, 26-27
РУССКИЙ
AVTL 104
Распаковка и выравнивание, 26
Подключение к водопроводной и электрической сети, 26-27
Пробный цикл стирки, 27
Технические характеристики, 27
Описание стиральной машины, 28-29
Панель управления, 28
Как открыть и закрыть барабан, 29
Индикаторы, 29
Запуск машины. Программы, 30
Краткие инструкции: Порядок запуска программы, 30
Таблица программ, 30
Персонализация стирки, 31
Выбор температуры, 31
Выбор скорости отжима, 31
Функции, 31
CIS
Моющие средства и белье, 32
Распределитель моющих средств, 32
Цикл отбеливания, 32
Подготовка белья, 32
Особенности стирки отдельных изделий, 32
Woolmark Platinum Care, 32
Предупреждения и рекомендации, 33
Общие правила безопасности, 33
Утилизация, 33
Экономия и охрана окружающей среды, 33
Обслуживание и уход, 34
Отключение воды и электричества, 34
Уход за стиральной машиной, 34
Уход за дверцей машины и барабаном, 34
Как чистить распределитель моющих средств, 34
Чистка насоса, 34
Проверка заливного шланга, 34
Устранение неисправностей, 35
Сервисное обслуживание, 36
!
Установка
+15
Сохраните данное руководство. Оно должно быть
в комплекте со стиральной машиной в случае продажи, передачи оборудования или при переезде
на новую квартиру, чтобы новый владелец оборудования мог ознакомиться с правилами его функционирования и обслуживания.
Внимательно прочитайте руководство: в нем со-
держатся важные сведения по установке и безопасной эксплуатации стиральной машины.
Распаковка и выравнивание
Распаковка
1. Распакуй те стиральную машину.
2. Убедитесь, что оборудование не было повреждено
во время транспортировки. При обнаружении по-
вреждений не подключайте машину свяжитесь с поставщиком
немедленно.
3. Удалите четыре
транспортировочных
винта и резиновые
пробки с прокладками,
расположенные в задней части стиральной
машины (ñì. ðèñ.).
4. Закройте отверстия
прилагающимися пластиковыми заглушками.
5. Сохраняйте все
детали: îíè Âàì
понадобятся при
последующей транспортировке стиральной
машины.
áолты, резиновые шайбы и большую металличес-
кую поперечную планку. Закройте образовавшиеся
отверстия пластмассовыми заглушками.
Не разрешайте детям играть с упаковочными
материалами.
После установки машины на место проверьте по уровню горизонтальность верхней крышки корпуса, отклонение горизонтали должно быть не более 2°.
Правильное выравнивание оборудования поможет избежать шума, вибраций и смещений во время
работы машины.
Если стиральная машина стоит на полу, покрытом
ковром, убедитесь, что ее основание возвышается над ковром. В противном случае вентиляция
будет затруднена или вовсе невозможна.
Подключение к водопроводной и
электрической сети
Подсоединение заливного шланга
1. Вставьте прокладку А
в конец заливного шланга и наверните его на
вывод водопровода
холодной воды с резьбо-
A
вым отверстием 3/4
дюйма (ñì. ðèñ.).
Перед подсоединением
откройте водопроводный
кран и дайте стечь
грязной воде.
2. Подсоедините заливной шланг к стиральной машине,
навинтив его на
водоприемник, расположенный в задней
верхней части справа
(ñì. ðèñ.).
3.Убедитесь, что
шланг не перекручен
и не пережат.
Выравнивание
1. Установите стиральную
машину на ровном и
прочном по лу, так чтобы
она не касалась стен,
мебели è прочих
предметов.
2. После установки машины на место отрегулируйте ее устойчивое
положение путем вращения передних ножек
(ñì. ðèñ.). Для этого
сначала ослабьте контргайку, после завершения
регулировки контргайку затяните.
»
Давление воды должно быть в пределах зна-
чений, указанных в таблице Технических характеристик (ñì. ñ. 3).
Если длина водопроводного шланга окажется
недостаточной, обратитесь в Авторизованный
Сервисный центр.

Подсоединение сливного шланга
Повесьте загнутый ко-
нец сливного шланга на
край раковины, ванны,
или поместите в
специальный вывод
65 — 100 cm
канализации. Шланг не
должен перегибаться.
Верхняя точка сливного шланга должна находиться на высоте 65100 см от пола. Распо-
ложение сливного
шланга должно обеспечивать разрыв струи
при сливе (конец шланга не должен быть
опущен в воду).
В случае крепления на
край ванной или раковины, шланг вешается
с помощью направляющей (входит в комплект поставки), которая
крепится к крану (ðèñ.).
Не рекомендуется применение удлинителей для
сливного шланга, при необходимости допускается его наращивание шлангом такого же диаметра
и длиной не более 150 см.
l розетка заземлена в соответствии с нормами безо-
пасности, описанными в данном разделе инструкции
допускается организация заземления рабочим ну-
лем, при условии, что защитная линия не имеет разрыва и подключена напрямую в обвод каких-либо
приборов (например, электрического счетчика).
Если вилка не подходит к розетке, ее следует заменить на новую, соответствующую розетке, или заменить
питающий кабель. Замена кабеля должна производиться только квалифицированным персоналом.
Запрещается использование переходников, двойных
и более розеток и удлинителей (они создают опасность
возгорания). Если Вы считаете их использование необходимым, применяйте один единственный удлинитель, удовлетворяющий требованиям безопасности.
Оборудование, подключенное с нарушением требований безопасности бытовых приборов большой
мощности, изложенных в данной инструкции, является потенциально опасным.
Производитель не несет ответственности за
ущерб здоровью и собственности, если он вызван
несоблюдением указанных норм установки.
Первый цикл стирки
По завершении установки, перед началом эксплуатации необходимо произвести один цикл стирки со стиральным порошком, но без белья, по программе 90°C без предварительной стирки.
CIS
Подсоединение к электросети
Внимание! Оборудование обязательно должно
быть заземлено!
1. Машина подключается к электрической сети при помощи двухполюсной розетки с заземляющим контактом (розетка не поставляется с машиной). Фазный
провод должен быть подключен через автомат защиты сети, рассчитанный на максимальный ток (ток срабатывания) 16 А, и имеющий время срабатывания не
более 0,1 с.
2. При наличии вблизи от предполагаемого места установки машины розетки с заземляющим контактом,
имеющей трехпроводную подводку кабеля с медными
жилами сечением не менее 1,5 кв. мм (или алюминиевыми жилами сечением не менее 2,5 кв. мм), доработка электросети не производится. При отсутствии
указанной розетки и проводки следует провести их монтаж.
3. Прокладка заземления отдельным проводом не
допускается.
4. Для доработки электрической сети рекомендуется
применять провод типа ППВ 3х1,5 380 ГОСТ 6223-79.
Допускается применение других марок кабеля, обеспечивающих пожаро- и электробезопасность при эксплуатации машины.
Перед включением машины в сеть убедитесь, что:
l розетка и проводка соответствуют требованиям, из-
ложенным в данном разделе инструкции;
l напряжение и частота тока сети соответствуют дан-
ным машины;
l розетка и вилка одного типа;
Технические характеристики
Модель
Ð àçìå ðû
Загрузка
Электрические
параметры
Гидравлические
параметры
Скорость отжима
Kонтрольные
программы
согласно
нормативу
EN 60456
AVTL 104
ширина 40 см
высота 85 см
глубина 60 см
1 — 5 êã
Смотрите паспортную табличку с
техническими характеристиками
на машине.
max давление 1 Мпа (10 бар)
min давл ение 0,05 Мпа (0,5 бар)
объем бар абана 42 л
äî 1000 îá/ìèí
программа 3; температура 60°С;
при загрузке до 5 кг.
Маш и н а соответствует след ующ и м
Ди рективам Ев ропейского
Экономи ческого сообщ ества:
— 89/336 /ЕЕС от 03.05.89 (электромагнитной совместимости) и
последующие модификации
— 2006/95/CE ( ни зкого нап ряжен ия)
#

+15
Описание стиральной машины
Панель управления
Рукоятка регуляции
скорости
ОТЖИМА
Рукоятка регуляции
ТЕМПЕРАТУРЫ
Кнопка
ВКЛЮЧЕНИЕ/
ВЫКЛЮЧЕНИЕ
Индикатор
ЗАБЛОКИРОВАН
ËÞÊ
Световые
индикаторы
Кнопки
ДОПОЛНИТЕЛЬНЫЕ
ФУНКЦИИ
Ячейка для стирального порошка, наполняе мая стиральным порошком и добавками
(смотреть стр. 20).
Световые индикаторы служат для контроля за
выполнением программы стирки.
Если была включена функция Таймер задержки,
индикаторы показывают время, остающееся до
запуска программы (смотреть стр. 17).
Рукоятка ОТЖИМ служит для регуляции скорости
отжима или для его исключения (смотреть стр.
31).
Кнопки ДОПОЛНИТЕЛЬНЫЕ ФУНКЦИИ служат
для подключения имеющихся дополнительных
функций. Кнопка выбранной функции останется
включенной.
Кнопка
ПУСК/ОТМЕНА
Рукоятка
выбора
ПРОГРАММ
Рукоятка ТЕМПЕРАТУРА служит для регуляции
температуры или для стирки в холодной воде
(смотреть стр. 19).
Кнопка ВКЛЮЧЕНИЕ/ВЫКЛЮЧЕНИЕ служит для
включения и выключения стиральной машины.
Кнопка ПУСК/ОТМЕНА служит для запуска
программ или для отмены ошибочного
программирования.
Индикатор ВКЛЮЧЕНИЕ/ЛЮК ЗАБЛОКИРОВАН
мигает, когда стиральная машина включена, и горит,
не мигая, если люк не заблокирован (смотреть
ñòð. 17).
Рукоятка выбора ПРОГРАММ служит для выбора
программ (смотреть стр. 18).
В процессе выполнения программы рукоятка
остается неподвижной.
Индикатор ВКЛЮЧЕНИЕ/ЛЮК ЗАБЛОКИРОВАН:
Горящий индикатор означает, что люк заблокирован во избежание его случайного открывания.
во избежание повреждений перед тем как открыть люк, необходимо дождаться, когда замигает индикатор.
! Частое мигание индикатора ВКЛЮЧЕНИЕ/ЛЮК ЗАБЛОКИРОВАН одновременно с любым другим
индикатором означает неисправность (смотреть стр. 23).
$
Как открыть и закрыть барабан
A) ОТКРЫВАНИЕ (рис. 1).
Поднимите внешнюю крышку и полностью ее откройте.
Б) Затем, используя обе руки, откройте барабан, как пока
зано на рис. 2:
— Нажмите кнопку, обозначенную стрелкой на рис. 2, слег
ка вниз,
другой рукой придерживая дверцы (так вы избежите
внезапного открывания дверок и защемления пальцев);
дверцы расцепятся и легко откроются.
CIS
Fig. 1
Fig. 2
Fig. 3 Fig. 4
Индикаторы
В) ЗАГРУЗКА СТИРАЛЬНОЙ МАШИНЫ (рис. 3).
Г) ЗАКРЫВАНИЕ (рис. 4).
— закройте полностью барабан, опуская сначала переднюю
дверцу, а затем заднюю;
— затем удостоверьтесь, что крюки передней дверцы точно
вошли в предназначенные места на задней дверце;
— после того, как крюки защелкнулись, нажмите обе дверцы
слегка вниз, чтобы убедиться они закрыты плотно;
— и, наконец, закройте внешнюю крышку.
Индикаторы сообщают пользователю важные
сведения.
Значение индикаторов:
Текущая фаза цикла:
В процессе цикла стирки индикаторы будут
загораться один за другим, показывая фазу
выполнения программы:
Предварительная стирка
Стирка
Полоскание
Отжим
Примечание: в процессе слива загорится
индикатор, соответствующий циклу Отжима.
Кнопки выбора функции
КНОПКИ ВЫБОРА ФУНКЦИИ также являются
индикаторами.
При выборе функции загорается соответствующая
кнопка.
Если выбранная функция является несовместимой с
заданной программой, кнопка будет мигать, и такая
функция не будет активирована.
Если будет выбрана функция, несовместимая с другой,
ранее выбранной функцией, останется включенной
только последняя выбранная функция.
%

Запуск машины. Программы
+15
Краткие инструкции: Порядок запуска
программы
1. Включите стиральную машину, нажав на кнопку . Все
индикаторы загорятся на несколько секунд, затем
погаснут, è индиактор ВКЛЮЧЕНИЕ/ЛЮК
ЗАБЛОКИРОВАН начнет мигать.
2. Загрузите белье в барабан, засыпьте стирал-
ьное вещество и добавки (смотрите стр. 20),
закройте крышки барабана и внешний люк.
3. Выбрать при помощи рукоятки выбора ПРОГРАММ
нужную программу.
4. Выбрать температуру стирки (ñì. ñòð. 19).
5. Выбрать скорость отжима (ñì. ñòð. 19).
6. Запустите программу, нажав кнопку ПУСК/СБРОС
(Start/Reset).
Для отмены запуска держите нажатой кнопку ПУСК/
СБРОС (Start/Reset) в течение 2-х секунд.
7. По завершении программы индикатор ВКЛЮЧЕНИЕ/
ЛЮК ЗАБЛОКИРОВАН замигает, сигнализируя, что
можно открыть люк. Вынуть белье и оставить люк
полуоткрытым для сушки барабана. Выключить
стиральную машину, нажав кнопку
.
Таблица программ
Ткань и степень загрязнения Ïðîã-
Хлопок
сил ьным загрязнением
Очень сильн о загр язненн ое
бел ое бел ье ( просты н и ,
скатерти и т.д.)
Очень сильн о загр язненн ое
бел ое бел ье ( просты н и ,
скатерти и т.д.)
Сильно загрязненное белое и
прочно окраш енное цветное
бел ье
Слабо загрязненн ое белое и
ли няющее цветное белье
(рубашки, маки и пр.)
Слабо загрязненное
ли няющее цветное белье
Синтетика
Силь но загрязнен ная, п рочно
окрашенная цветная (детская
одежда и пр.)
Силь но загрязнен ная, п рочно
окрашенная цветная (детская
одежда и пр.)
Слабо загрязненная,
делик атн ая цветн ая (л юбая
одежда)
Слабо загрязненная,
делик атн ая цветн ая (л юбая
одежда)
Деликатны е ткани
Шерсть 10 40°C
Особо деликатные ткани и
одежда (занавеси, шелк, вискоза
и пр.)
ЧАСТИЧНЫЕ ПРОГРАММЫ
Полоскание
Дел и ка тное полоск ан ие
Îòæ è ì Слив и сильный отжим
Деликатный отжим Слив и деликатный отжим
Ñëè â Ñëè â
ðàììa
Температура
1 90°C
2 90°C
3 60°C
4 40°C
5 30°C
6 60°C
7 50°C
8 40°C
9 30°C
11 30°C
Моющее средство
предв.
стирка
основная
стирка
Смягчитель
тбеливание
(Функция)/
Отбеливатель
Деликат./
Обычн ы й
Деликат./
Обычн ы й
Деликат./
Обычн ы й
Деликат./
Обычн ы й
Деликатн. 97
Деликатн. 93
Деликатн. 83
Деликатн. 48
Длите-
льность
цикла,
ìèí
155
147
157
96
88
33
55
Описание цикла стирки
Предв арительн ая сти рк а, сти рк а
при высокой температуре,
полоскание, промежуточный и
окончател ьный отжи м
Стирк а при высокой температуре,
полоскание, промежуточный и
окончател ьный отжи м
Стирка при 60°C, полоскание,
промежуточный и окончательный
отжи м
Стирка при 40°C, полоскан ие,
промежуточный и окончательный
отжи м
Стирка при 30°C, полоскание,
промежуточный и окончательный
отжи м
Стирка при 60°C, полоскание,
остановка с водой или
деликатный отжим
Стирка при 50°C, пол оскани е,
остановка с водой или
деликатный отжим
Стирка при 40°C, пол оскани е,
остановка с водой или
деликатный отжим
Сти рка при 30°C, п олоскан ие и
делик атный отжим
Стирка п ри 40°C, полоскание и
делик атный отжим
Сти рка при 30°C, п олоскан ие,
останов ка с водой или слив
Пол оскание и отжи м
Пп ол оскание, остан овка с водой
или слив
Примечание
«Остановка с водой»: см. дополнительную функцию «Легкая глажка» на с. 31. Данные в таблице, являются справочны-
ми и могут меняться в зависимости от конкретных условий стирки (объем стирки, температура воды в водопроводной
системе, температура в помещении и др.).
Специальная программа
Повседневная стирка 30′ мин (программа 9 для Синтетических тканей) предназначена для быстрой стирки слабозагрязненного белья: цикл длится всего 30 минут, что позволяет сэкономить время и электроэнергию. Установив эту
программу (9 при температуре 30°С), Вы можете стирать различные виды тканей вместе (за исключением шерсти и
шелка) при максимальной загрузке белья 3 кг. Мы рекомендуем использовать жидкое моющее средство.
&
Loading…
Перейти к контенту
Стиральные машины Ariston
- Размер инструкции: 1.91 Мб
- Формат файла: pdf
Если вы потеряли инструкцию от стиральной машины Ariston AVTL 104, можете скачать файл для просмотра на компьютере или печати.
Инструкция для стиральной машины Ariston AVTL 104 на русском языке. В руководстве описаны возможности и полезные функции, а также правила эксплуатации. Перед использованием внимательно ознакомьтесь с инструкцией.
Чтобы не читать всю инструкцию вы можете выполнить поиск по содержимому внутри инструкции и быстро найти необходимую информацию. Рекомендации по использованию помогут увеличить срок службы стиральной машины Ariston AVTL 104. Если у вас появилась проблема, то найдите раздел с описанием неисправностей и способами их решения. В нем указаны типичные поломки и способы их решения.
Раздел: Бытовая, кухонная техника, электроника и оборудование
Тип: Стиральная Машина
Характеристики, спецификации
Тип загрузки:
вертикальная
Максимальная загрузка белья:
5 кг
Расположение:
отдельностоящая
Размеры (ШxВxГ):
400x850x600 мм
Режимы стирки:
ручная стирка, шерсть, интенсивная
Максимальная скорость отжима:
1000 об/мин
Тип управления:
механическое
Класс электропотребления:
A
Материал изготовления бака:
пластик
Инструкция к Стиральной Машине Hotpoint-Ariston AVTL 104

Instructions for use
WASHING MACHINE
Contents
GB
GB
Installation, 2-3
GB
CIS
ES
GR
Unpacking and levelling, 2
Electric and water connections, 2-3
English, 1
ÐÓÑÑÊÈÉ, 13
ÅËËÇÍÉÊÁ, 25
The first wash cycle, 3
Technical details, 3
Washing machine description, 4-5
HU
CZ
Control panel, 4
How to open and shut the drum, 5
Magyar, 37
Èeský, 49
Leds, 5
Starting and Programmes, 6
Briefly: how to start a programme, 6
Programme table, 6
Personalisations, 7
Setting the temperature, 7
Setting the spin cycle, 7
Functions, 7
Detergents and laundry, 8
Detergent dispenser, 8
Bleach cycle, 8
Preparing your laundry, 8
AVTL 104
Special items, 8
Woolmark Platinum Care, 8
Precautions and advice, 9
General safety, 9
Disposal, 9
Saving energy and respecting the environment, 9
Care and maintenance, 10
Cutting off the water or electricity supply, 10
Cleaning your appliance, 10
Caring for your appliance door and drum, 10
Cleaning the pump, 10
Checking the water inlet hose, 10
Cleaning the detergent dispenser, 10
Troubleshooting, 11
Service, 12
Before calling for Assistance, 12
1
Installation
Keep this instruction manual in a safe place for
Levelling your appliance correctly will provide it with
GB
future reference. Should the appliance be sold,
stability and avoid any vibrations, noise and shifting
transferred or moved, make sure the instruction
during operation. If it is placed on a fitted or loose
manual accompanies the washing machine to inform
carpet, adjust the feet in such a way as to allow
the new owner as to its operation and features.
enough room for ventilation beneath the washing
machine.
Read these instructions carefully: they contain vital
information on installation, use and safety.
Unpacking and levelling
Electric and water connections
Unpacking
Connecting the water inlet hose
1. Unpack the washing
machine.
1. Insert seal A into the
2. Check whether the
end of the inlet hose and
washing machine has
screw the latter onto a
been damaged during
cold water tap with a 3/4
transport. If this is the
gas threaded mouth (see
case, do not install it
A
figure).
and contact your
Before making the
retailer.
connection, allow the
water to run freely until it
3. Remove the four
is perfectly clear.
protective screws and
the rubber washer with
2. Connect the other end
the respective spacer,
of the water inlet hose to
situated on the rear of
the washing machine,
the appliance (see
screwing it onto the
figure).
appliance’s cold water
4. Seal the gaps using the plastic plugs provided.
inlet, situated on the top
5. Keep all the parts: you will need them again if the
right-hand side on the rear
washing machine needs to be moved to another
of the appliance
location.
(see figure).
Warning: should the screws be re-used, make sure
3. Make sure there are no kinks or bends in the
you fasten the shorter ones at the top.
hose.
Packaging materials are not children’s toys.
The water pressure at the tap must be within the
values indicated in the Technical details table
Levelling
(on the next page).
1. Install the washing machine on a flat sturdy floor,
If the water inlet hose is not long enough, contact
without resting it up against walls, furniture cabinets
a specialist store or an authorised serviceman.
or other.
2. If the floor is not
perfectly level, compen-
sate for any unevenness
by tightening or
loosening the adjustable
front feet (see figure); the
angle of inclination,
measured according to
the worktop, must not
exceed 2°.
2
Connecting the drain hose
GB
Connect the drain hose,
When the washing machine is installed, the main
without bending it, to a
socket must be within easy reach.
draining duct or a wall
drain situated between
Do not use extensions or multiple sockets.
65 and 100 cm from the
65 — 100 cm
floor;
The power supply cable must never be bent or
dangerously compressed.
The power supply cable must only be replaced by
an authorised serviceman.
Warning! The company denies all liability if and when
alternatively, place it
these norms are not respected.
over the edge of a
basin, sink or tub,
The first wash cycle
fastening the duct
supplied to the tap (see
Once the appliance has been installed, and before
figure). The free end of
you use it for the first time, run a wash cycle with
the hose should not be
detergent and no laundry, setting the 90°C
underwater.
programme without a pre-wash cycle.
We advise against the use of hose extensions; in
case of absolute need, the extension must have the
same diameter as the original hose and must not
Technical details
exceed 150 cm in length.
Model
AVTL 104
40 cm wide
Electric connection
Dimensions
85 cm high
60 cm deep
Before plugging the appliance into the mains socket,
Capacity
from 1 to 5 kg
make sure that:
the socket is earthed and in compliance with the
Electric
Please refer to the technical data plate
applicable law;
connections
fixed to the machine.
maximum pressure 1 MPa (10 bar)
the socket is able to sustain the appliance’s
Water
minimum pressure 0.05 MPa (0.5 bar)
connections
maximum power load indicated in the Technical
drum capacity 42 litres
details table (on the right);
Spin speed
up to 1000 rpm
the supply voltage is included within the values i
Control
ndicated on the Technical details table
programmes
programme 3; temperature 60°C;
(on the right);
according to EN
run with a load of 5 kg.
60456 directive
the socket is compatible with the washing
machine’s plug. If this is not the case, replace the
This appliance is compliant with the
following European Community
socket or the plug.
Directives:
— 89/336/CEE of 03/05/89
The washing machine should not be installed in an
(Electromagnetic Compatibility) and
outdoor environment, not even when the area is
subsequent amendments
sheltered, because it may be very dangerous to
— 2006/95/CE (Low Voltage)
— 2002/96/CE
leave it exposed to rain and thunderstorms.
3
Washing machine description
Control panel
GB
SPIN SPEED
TEMPERATURE
knob
knob
ON/OFF
key
LID LOCKED
LED
LEDs
START/RESET
key
FUNCTION
PROGRAMME
keys
knob
Detergent dispenser to add detergent and fabric
ON/OFF key to turn the washing machine on and off.
softener (see page 8).
START/RESET key to start the programmes or cancel
LEDs to find out which wash cycle phase is under way.
incorrect settings.
If the Delay Timer function has been set, the time left until
the programme starts will be indicated (see page 5).
ON-OFF/LID LOCK led ,to find out whether the
washing machine is on (flashing) and if the lid may be
SPIN SPEED knob to set the spin speed or exclude the
opened (see page 5).
spin cycle completely (see page 7).
PROGRAMME knob to set the programmes
FUNCTION keys to select the functions available.
(see page 6).
The button corresponding to the function selected will
The knob stays still during the cycle.
remain on.
TEMPERATURE knob to set the temperature or the cold
wash cycle (see page 7).
ON-OFF/LID LOCK led:
If this LED is on, the appliance Lid is locked to prevent it from being opened accidentally; to avoid any damages,
you must wait for the lamp to flash before you open the Lid.
.
The rapid flashing of the ON-OFF/LID LOCK Led together with the flashing of at least one other LED indicates
there is an abnormality (see page 11).
4
How to open and to close the drum
GB
A) Opening (Fig. 1).
Lift the external lid and open it completely.
B) Then open the drum using both hands as
shown in Fig. 2:
— press the button indicated by the arrow in Fig. 2
lightly downwards, with one hand firmly resting on
the doors to prevent them from suddenly opening
and hurting your fingers;
— therefore follow the appliance doors along as these
unhook and open easily.
Fig. 1
Fig. 2
C) Loading the washing machine. (Fig. 3).
D) Shutting (Fig. 4).
— close the drum fully by first shutting the front door
followed by the rear one;
— then ensure the hooks on the front door are perfectly
housed within the seat of the rear door;
— after the hooks have clicked into position, press both
doors lightly downwards to make sure they do not
come loose;
— finally shut the external lid.
Fig. 3
Fig. 4
Leds
The LEDS provide important information.
Function keys
This is what they can tell you:
The FUNCTION KEYS also act like LEDS.
When a function is selected, the corresponding button
is illuminated.
Cycle phase under way:
If the function selected is incompatible with the
During the wash cycle, the LEDs gradually illuminate
programme set, the button will flash and the function
on to indicate the cycle phase under way:
will not be enabled.
If you set a function that is incompatible with another
Prewash
function you selected previously, only the last one
selected will be enabled.
Wash
Rinse
Spin cycle
Note: during draining, the LED corresponding to the
Spin cycle phase will be turned on.
5

Starting and Programmes
Briefly: starting a programme
5. Set the spin speed (see page 7).
GB
6. Start he programme by pressing the START/RESET
1. Switch the washing machine on by pressing button .
button.
All the LEDS will light up for a few seconds and
To cancel it, keep the START/RESET button pressed
the ON-OFF/DOOR LOCK Led will begin to flash.
for at least 2 seconds.
2. Load your laundry into the washing machine, add
7. When the programme is finished, the ON-OFF/
the detergent and any fabric softener (see page
DOOR LOCK Led will flash to indicate that the
and shut the appliance door.
appliance door can be opened. Take out your
3. Set the PROGRAMME knob to the programme
laundry and leave the appliance door ajar to allow
required.
the drum to dry thoroughly. Turn the washing
4. Set the wash temperature (see page 7).
machine off by pressing button
.
Programme table
Wash
Detergent
Bleaching
Cycle
Type of fabric and degree
Program-
Fabric
tempe-
/option
length
Description of wash cycle
of soil
mes
softener
rature
Pre-
Bleach
(minutes)
Wash
wash
Cotton
Pre-wash, wash cycle, rinse
Extremely soiled whites
1
90°C
15
5
cycles, intermediate and final
(sheets, tablecloths, etc.)
spin cycles
Wash cycle, rinse cycles,
Extremely soiled whites
Delicate/
2
90°C
1
4
7
intermediate and final spin
(sheets, tablecloths, etc.)
Traditional
cycles
Wash cycle, rinse cycles,
Heavily soiled whites and
Delicate/
3
60°C
1
5
7
intermediate and final spin
fast colours
Traditional
cycles
Wash cycle, rinse cycles,
Heavily soiled whites and
Delicate/
4
40°C
9
6
intermediate and final spin
fast colours
Traditional
cycles
Slightly soiled whites and
Wash cycle, rinse cycles,
Delicate/
delicate colours (shirts,
5
30°C
8
8
intermediate and final spin
Traditional
jumpers, etc.)
cycles
Synthetics
Heavily soiled fast colours
Wash cycle, rinse cycles, anti-
6
60°C
Delicate
9
7
(baby linen, etc.)
crease or delicate spin cycle
Heavily soiled fast colours
Wash cycle, rinse cycles, anti-
7
50°C
Delicate
9
3
(baby linen, etc.)
crease or delicate spin cycle
Delicate colours (all types
Wash cycle, rinse cycles, anti-
of slightly soiled
8
40°C
Delicate
8
3
crease or delicate spin cycle
garments)
Delicate colours (all types
Wash cycle, rinse cycles and
of slightly soiled
9
30°C 33
delicate spin cycl
garments)
Delicate
Wash cycle, rinse cycles and
Wool
10
40°C
Delicate
48
delicate spin cycle
Very delicate fabrics
Wash cycle, rinse cycles, anti-
(curtains, silk, viscose,
11
30°C
5
5
crease or draining cycle
etc.)
PARTIAL PROGRAMMES
Rinse Rinse cycles and spin cycle
Rinse cycles, anti-crease or
Delicate rinse cycle
draining
Draining and heavy duty spin
Spin cycle
cycle
Draining and delicate spin
Delicate spin cycle
cycle
Draining Draining
Notes
For the anti-crease function: see Easy iron, opposite page. The information contained in the table is purely indicative.
Special programme
Daily 30′ (programme 9 for Synthetics) is designed to wash lightly soiled garments in a short amount of time: it only
lasts 30 minutes and allows you to save on both time and energy. By setting this programme (9 at 30°C), you can
wash different fabrics together (except for woollen and silk items), with a maximum load of 3 kg.
We recommend the use of liquid detergent.
6
Personalisations
Setting the temperature
GB
Turn the TEMPERATURE knob to set the wash temperature (see Programme table on page 6).
The temperature can be lowered, or even set to a cold wash (
).
Setting the spin speed
Turn the SPIN SPEED knob to set the spin speed for the programme selected.
The maximum spin speeds for each programme are as follows:
Programmes Maximum spin speed
Cottone 1000 rpm
Synthetics 800 rpm
Wool 600 rpm
Silk no
The spin speed can be lowered, or the spin cycle can be excluded altogether by selecting symbol
.
The washing machine will automatically prevent you from selecting a spin speed higher than the maximum speed for
each programme.
To avoid excessive vibrations, before every spin cycle the machine distributes the load in a uniform manner by
continuously rotating the drum at a speed which is slightly faster than the normal washing speed.
When, despite repeated attempts, the load is still not evenly distributed, the machine spins at a lower speed than
the set frequency.
If the load is excessively unbalanced, the machine attempts to distribute it instead of spinning.
The balancing attempts may extend the total duration of the cycle, up to a maximum of 10 minutes.
Functions
To enable a function:
1. press the button corresponding to the desired function, according to the table below;
2. the function is enabled when the corresponding button is illuminated.
Note: The rapid flashing of the button indicates that the corresponding function cannot be selected for the
programme set.
Function Effect Comments Enabled with
programmes:
Super
Allows for an
Wash
impeccable
wash, visibly
1, 2, 3, 4,
This function is incompatible with the RAPID function.
whiter than a
5, 6, 7, 8
standard
Class A wash.
Easy i r on This option
When this function is set, programmes 6, 7, 8, 11 and
All
reduces the
Delicate rinse will end with the laundry left to soak
programmes
amount of
(Anti-crease) and the Rinse cycle phase LED will
except for
creasing on
flash.
1, 2, 9, 10
fabrics,
— to conclude the cycle, press the START/RESET
and
making them
button;
Draining.
easier to iron.
— to run the draining cycle alone, set the knob to the
relative symbol and press the START/RESET
button.
Rapid Cuts the
1, 2, 3, 4,
duration of
This function is incompatible with the SUPER WASH
5, 6, 7, 8
the wash
function.
Rinses
cycle by 30%.
Extra
Increases the
Recommended when the appliance has a full load or
1, 2, 3, 4, 5,
Rinse
efficiency of
with large quantities of detergent.
6, 7, 8, and
the rinse.
Rinse
cycles.
7
Detergents and laundry
Detergent dispenser
Preparing your laundry
GB
Good washing results also depend on the correct
Divide your laundry according to:
dose of detergent: adding too much detergent won’t
— the type of fabric/the symbol on the label.
necessarily make for a more efficient wash, and may
— the colours: separate coloured garments from
in fact cause build up
whites.
on the interior of your
Empty all pockets and check for loose buttons.
appliance and even
Do not exceed the weight limits stated below,
pollute the
which refer to the weight when dry:
environment.
Sturdy fabrics: max 5 kg
Synthetic fabrics: max 2.5 kg
Open up the
Delicate fabrics: max 2 kg
detergent dispenser
Wool: max 1 kg
and pour in the
detergent and fabric
How much does your laundry weigh?
softener, as follows.
1 sheet 400-500 g
1 pillow case 150-200 g
1 tablecloth 400-500 g
compartment 1: Detergent for pre-wash
1 bathrobe 900-1,200 g
1 towel 150-250 g
compartment 2: Detergent for the wash cycle
(powder or liquid)
Special items
It is recommended that you place liquid detergent
directly into the compartment using the appropriate
Curtains: fold curtains and place them in a pillow
dosing cup.
case or mesh bag. Wash them separately without
exceeding half the appliance load. Use programme
compartment 3: Additives (softener, etc.)
11 which excludes the spin cycle automatically.
When pouring the softener in compartment 3, avoid
Quilted coats and windbreakers: if they are
exceeding the «max» level indicated.
padded with goose or duck down, they can be
The softener is added automatically into the machine
machine-washed. Turn the garments inside out and
during the last wash. At the end of the wash
load a maximum of 2-3 kg, repeating the rinse cycle
programme, some water will be left in compartment
once or twice and using the delicate spin cycle.
3. This is used for the inlet of denser fabric softeners
Trainers: remove any mud. They can be washed
into the machine, i.e. to dilute the more
together with jeans and other tough garments, but
concentrated softeners. Should more than a normal
not with whites.
amount of water remain in compartment 3, this
Wool: for best results, use a specific detergent,
means the emptying device is blocked. For cleaning
taking care not to exceed a load of 1 kg.
instructions, see page 10.
compartment 4: Bleach
Do not use hand wash detergent because it may
Woolmark Platinum Care
form too much foam.
As gentle as a hand wash.
Bleach cycle
Hotpoint Ariston sets a new standard of
superior performance that has been
Traditional bleach should be used on sturdy white
endorsed by The Woolmark Company with
fabrics, and delicate bleach for coloured fabrics,
the prestigious Woolmark Platinum Care brand. Look
synthetics and for wool.
for the Woolmark Platinum Care logo on the washing
When pouring in the bleach, be careful not to exceed
machine to ensure you can safely and effectively
the «max» level indicated on compartment 4 ..
wash wool garments labelled as «hand wash»
To run the bleach cycle alone, pour the bleach into
(M.0303):
compartment 4 and set the Rinse programme
(for
Set programme 10 for all «Hand wash»
garments,
cotton fabrics) or delicate Rinse
(for synthetic
using the appropriate detergent (max load 1 Kg).
fabrics).
8

Precautions and advice
The washing machine was designed and built in
in order to optimise the recovery and recycling of
compliance with the applicable international safety
GB
the materials they contain and reduce the impact on
regulations. The following information is provided for
human health and the environment.
your safety and should consequently be read carefully.
The crossed out «wheeled bin» symbol on the
product reminds you of your obligation, that when
General safety
you dispose of the appliance it must be separately
collected.
This appliance has been designed for non-
Consumers should contact their local authority or
professional, household use and its functions must
retailer for information concerning the correct
not be changed.
disposal of their old appliance.
This washing machine should only be used by
Disposing of an old washing machine:
adults and in accordance with the instructions
before scrapping your appliance, cut the power
provided in this manual.
supply cable and remove the appliance door.
Never touch the washing machine when barefoot
Saving energy and respecting the
or with wet or damp hands or feet.
environment
Do not pull on the power supply cable to unplug
Environmentally-friendly technology
the appliance from the electricity socket. Pull the
If you only see a little water through your appliance
plug out yourself.
door, this is because thanks to the latest technology,
your washing machine only needs less than half the
Do not open the detergent dispenser while the
amount of water to get the best results: an objective
appliance is in operation.
reached to respect the environment.
Do not touch the drain water as it could reach
Saving on detergent, water,
very high temperatures.
energy and time
To avoid wasting resources, the washing machine
Never force the washing machine door: this could
should be used with a full load. A full load instead
damage the safety lock mechanism designed to
of two half loads allows you to save up to 50% on
prevent any accidental openings.
energy.
The pre-wash cycle is only necessary on
In the event of a malfunction, do not under any
extremely soiled garments. Avoiding it will save on
circumstances touch internal parts in order to
detergent, time, water and between 5 and 15%
attempt repairs.
energy.
Always keep children well away from the
Treating stains with a stain remover or leaving
appliance while in operation.
them to soak before washing will cut down the
need to wash them at high temperatures. A
The appliance door tends to get quite hot during
programme at 60°C instead of 90°C or one at
the wash cycle.
40°C instead of 60°C will save up to 50% on
energy.
Should it have to be moved, proceed with the
Use the correct quantity of detergent depending
help of two or three people and handle it with the
on the water hardness, how soiled the garments
utmost care. Never try to do this alone, because
are and the amount of laundry you have, to avoid
the appliance is very heavy.
wastage and to protect the environment: despite
being biodegradable, detergents do contain
Before loading your laundry into the washing
ingredients that alter the natural balance of the
machine, make sure the drum is empty.
environment. In addition, avoid using fabric
softener as much as possible.
Disposal
Disposing of the packaging material: observe local
If you use your washing machine from late in the
regulations, so the packaging can be re-used.
afternoon until the early hours of the morning, you
will help reduce the electricity board’s peak load.
Disposal of old electrical appliances
The European Directive 2002/96/EC on Waste
If your laundry has to be dried in a tumble dryer,
Electrical and Electronic Equipment (WEEE), requires
select a high spin speed. Having the least water
that old household electrical appliances must not be
possible in your laundry will save you time and
disposed of in the normal unsorted municipal waste
energy in the drying process.
stream. Old appliances must be collected separately
9
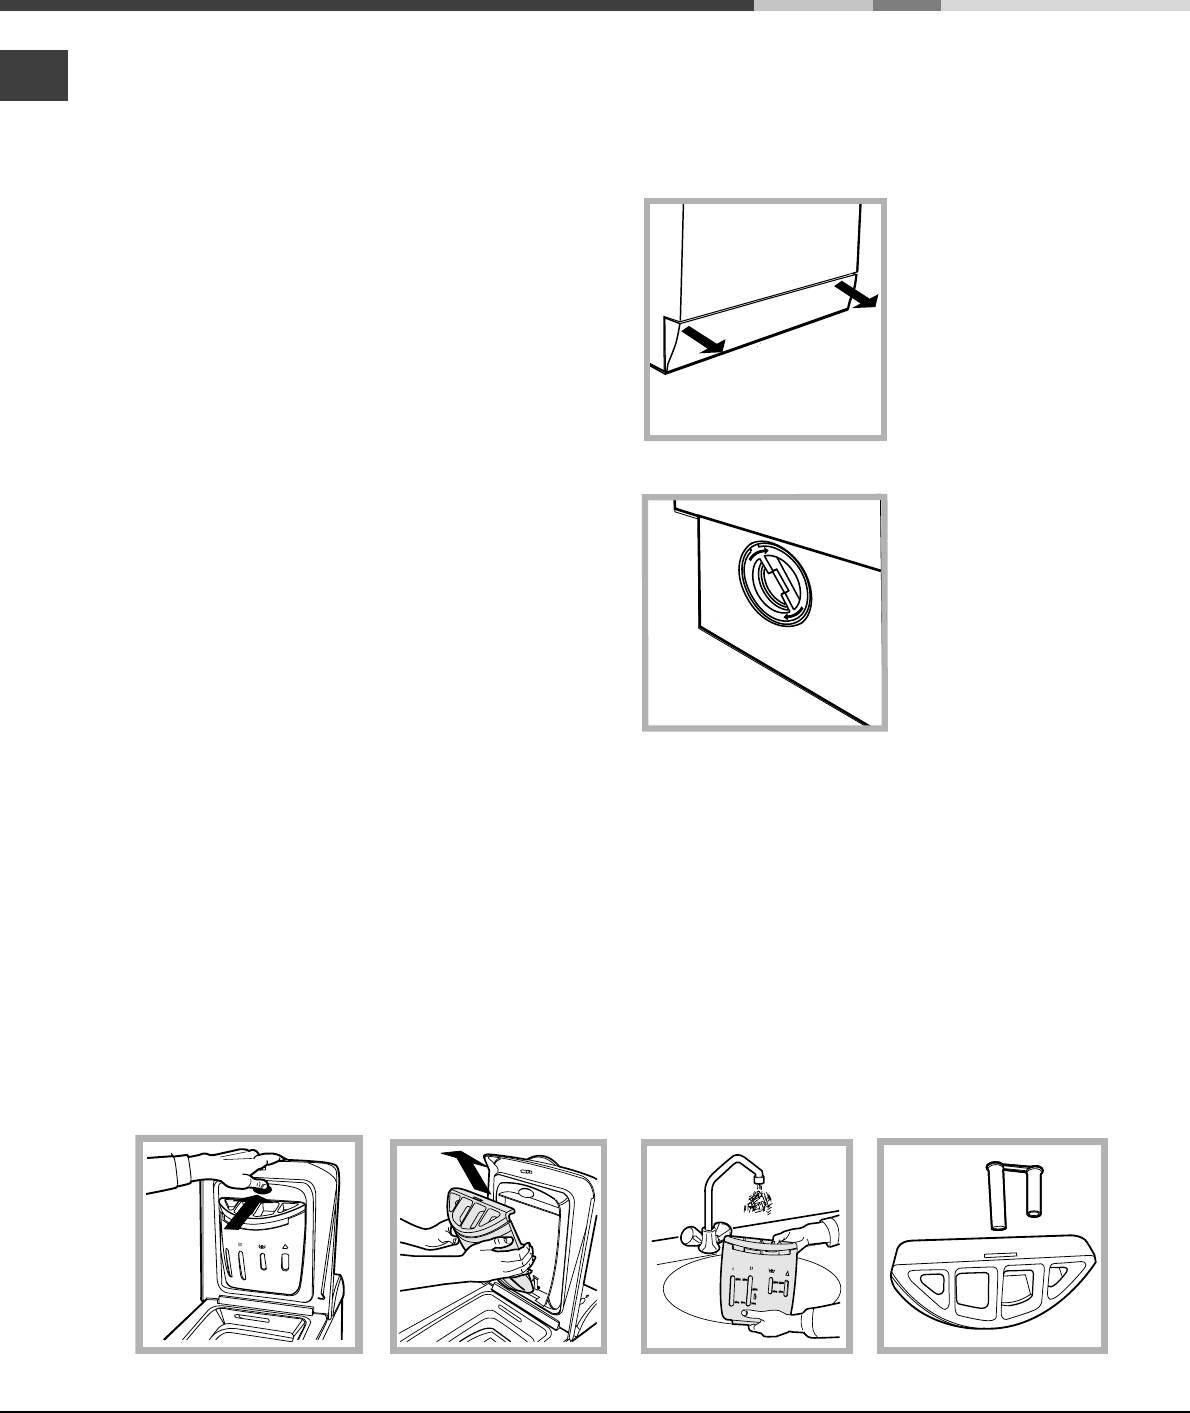
Care and maintenance
GB
Cutting off the water or electricity
Make sure the wash cycle has ended and unplug
supply
the appliance.
Turn off the water tap after every wash. This will
To recover any objects that have fallen into the pre-
limit the wear of your appliance’s water system
chamber:
and also prevent leaks.
Unplug your appliance when cleaning it and
1. remove the plinth at
during all maintenance operations.
the bottom on the
front side of the
Cleaning your appliance
washing machine by
The exterior and rubber parts of your appliance can
pulling from the side
be cleaned with a soft cloth soaked in lukewarm
with your hands (see
soapy water. Do not use solvents or abrasives.
diagram); (see figure);
2. unscrew the lid
Cleaning the detergent dispenser
rotating it anticlock-
wise (see figure): a
Remove the dispenser by raising it and pulling it out
little water may trickle
(see figure).
out. This is perfectly
Wash it under running water; this operation should
normal;
be repeated
3. clean the interior
frequently.
thoroughly;
4. screw the lid back
on;
Caring for your appliance door and
5. reposition the panel,
drum
making sure the hooks
Always leave the appliance door ajar to prevent
are securely in place
unpleasant odours from forming.
before you push it onto
the appliance.
Cleaning the pump
Checking the water inlet hose
The washing machine is fitted with a self-cleaning
Check the water inlet hose at least once a year. If
pump that does not require any maintenance.
you see any cracks, replace it immediately: during
Sometimes, small items (such as coins or buttons)
the wash cycles, water pressure is very strong and
may fall into the pre-chamber that protects the
a cracked hose could easily split open.
pump, situated in the lower part of the same.
Never use hoses that have already been used.
How to clean the detergent dispenser
Disassembly:
Cleaning:
Reassembly:
Press lightly on the large
Then clean the dispenser under a tap (fig. 3) using an old
Do not forget to reinsert the
button on the front of the
toothbrush and, once the pair of siphons inserted in the
pair of siphons into the
detergent dispenser and pull
top of compartments 1 and 2 (fig. 4) have been pulled
special housings and then to
replace the dispenser into its
it upwards (fig. 1).
out, check whether the same are not clogged and then
seat, clicking it into place
rinse them.
(fig. 4, 2 and 1).
Fig. 1 Fig. 2
Fig. 3
Fig. 4
10

Troubleshooting
Your washing machine could fail to work. Before calling for Assistance (see page 12), make sure the problem
GB
can’t easily be solved by consulting the following list.
Problem
Possible causes/Solution:
The washing machine won’t
The appliance is not plugged into the socket, or not enough to
start.
make contact.
There has been a power failure.
The wash cycle won’t start.
The appliance Lid is not shut properly. The Lid locked Led flashes.
The
button has not been pressed.
The START/RESET button has not been pressed.
The water tap is not turned on.
The washing machine fails to
The water inlet hose is not connected to the tap.
load water.
The hose is bent.
The water tap is not turned on.
There is a water shortage.
The water pressure is insufficient.
The START/RESET button has not been pressed.
The washing machine
The drain hose is not fitted between 65 and 100 cm from the floor
continuously loads and unloads
(see page 3).
water.
The free end of the hose is underwater (see page 3).
The wall drainage system doesn’t have a breather pipe.
If the problem persists even after these checks, turn off the water tap, switch
the appliance off and call for Assistance. If the dwelling is on one of the upper
floors of a building, there may be drain trap problems causing the washing
machine to load and unload water continuously. In order to avoid such an
inconvenience, special anti-drain trap valves are available in shops.
The programme does not foresee the draining: some programmes
The washing machine does not
require enabling the draining manually (see page 6).
drain or spin.
The Easy iron option is enabled: to complete the programme, press
the START/RESET button (see page 7).
The drain hose is bent (see page 3).
The drain duct is clogged.
The drum was not unblocked correctly during installation (see page 2).
The washing machine vibrates
The washing machine is not level (see page 2).
too much during the spin cycle.
The washing machine is closed in between furniture cabinets and
the wall (see page 2).
The water inlet hose is not screwed on correctly (see page 2).
The washing machine leaks.
The detergent dispenser is obstructed (to clean it, see page 10).
The drain hose is not secured properly (see page 3).
Switch off the machine and unplug the appliance; wait for
The ON-OFF/DOOR LOCK Led
approximately 1 minute then switch it on again.
flashes rapidly at the same
If the problem persists, contact Assistance.
time as at least one other LED.
The detergent is not suitable for machine washing (it should bear
There is too much foam.
the definition «for washing machines» or «hand and machine wash»,
or the like).
You used too much detergent.
11

Service
Before calling for Assistance:
GB
Check whether you can solve the problem on your own (see page 11);
Restart the programme to check whether the problem has been solved;
If this is not the case, contact an authorised Technical Service Centre on the telephone number
provided on the guarantee certificate.
Always request the assistance of authorised servicemen.
Notify the operator of:
the type of problem;
the appliance model (Mod.);
the serial number (S/N);
This information can be found on the data plate situated on the rear of the washing machine.
12

Ðóêîâîäñòâî ïî ýêïóàòàöèè
ÑÒÈÐÀËÜÍÀß ÌÀØÈÍÀ
CIS
Ñîäåðæàíèå
CIS
Óñòàíîâêà, 26-27
ÐÓÑÑÊÈÉ
Ðàñïàêîâêà è âûðàâíèâàíèå, 26
Ïîäêëþ÷åíèå ê âîäîïðîâîäíîé è ýëåêòðè÷åñêîé ñåòè, 26-27
Ïðîáíûé öèêë ñòèðêè, 27
Òåõíè÷åñêèå õàðàêòåðèñòèêè, 27
Îïèñàíèå ñòèðàëüíîé ìàøèíû, 28-29
Ïàíåëü óïðàâëåíèÿ, 28
Êàê îòêðûòü è çàêðûòü áàðàáàí, 29
Èíäèêàòîðû, 29
Çàïóñê ìàøèíû. Ïðîãðàììû, 30
Êðàòêèå èíñòðóêöèè: Ïîðÿäîê çàïóñêà ïðîãðàììû, 30
Òàáëèöà ïðîãðàìì, 30
Ïåðñîíàëèçàöèÿ ñòèðêè, 31
Âûáîð òåìïåðàòóðû, 31
AVTL 104
Âûáîð ñêîðîñòè îòæèìà, 31
Ôóíêöèè, 31
Ìîþùèå ñðåäñòâà è áåëüå, 32
Ðàñïðåäåëèòåëü ìîþùèõ ñðåäñòâ, 32
Öèêë îòáåëèâàíèÿ, 32
Ïîäãîòîâêà áåëüÿ, 32
Îñîáåííîñòè ñòèðêè îòäåëüíûõ èçäåëèé, 32
Woolmark Platinum Care, 32
Ïðåäóïðåæäåíèÿ è ðåêîìåíäàöèè, 33
Îáùèå ïðàâèëà áåçîïàñíîñòè, 33
Óòèëèçàöèÿ, 33
Ýêîíîìèÿ è îõðàíà îêðóæàþùåé ñðåäû, 33
Îáñëóæèâàíèå è óõîä, 34
Îòêëþ÷åíèå âîäû è ýëåêòðè÷åñòâà, 34
Óõîä çà ñòèðàëüíîé ìàøèíîé, 34
Óõîä çà äâåðöåé ìàøèíû è áàðàáàíîì, 34
Êàê ÷èñòèòü ðàñïðåäåëèòåëü ìîþùèõ ñðåäñòâ, 34
×èñòêà íàñîñà, 34
Ïðîâåðêà çàëèâíîãî øëàíãà, 34
Óñòðàíåíèå íåèñïðàâíîñòåé, 35
Ñåðâèñíîå îáñëóæèâàíèå, 36
!

Óñòàíîâêà
Ñîõðàíèòå äàííîå ðóêîâîäñòâî. Îíî äîëæíî áûòü
Ïîñëå óñòàíîâêè ìàøèíû íà ìåñòî ïðîâåðüòå ïî óðîâ-
+15
â êîìïëåêòå ñî ñòèðàëüíîé ìàøèíîé â ñëó÷àå ïðî-
íþ ãîðèçîíòàëüíîñòü âåðõíåé êðûøêè êîðïóñà, îòêëî-
äàæè, ïåðåäà÷è îáîðóäîâàíèÿ èëè ïðè ïåðååçäå
íåíèå ãîðèçîíòàëè äîëæíî áûòü íå áîëåå 2°.
íà íîâóþ êâàðòèðó, ÷òîáû íîâûé âëàäåëåö îáîðó-
Ïðàâèëüíîå âûðàâíèâàíèå îáîðóäîâàíèÿ ïîìî-
äîâàíèÿ ìîã îçíàêîìèòüñÿ ñ ïðàâèëàìè åãî ôóíê-
æåò èçáåæàòü øóìà, âèáðàöèé è ñìåùåíèé âî âðåìÿ
öèîíèðîâàíèÿ è îáñëóæèâàíèÿ.
ðàáîòû ìàøèíû.
Åñëè ñòèðàëüíàÿ ìàøèíà ñòîèò íà ïîëó, ïîêðûòîì
Âíèìàòåëüíî ïðî÷èòàéòå ðóêîâîäñòâî: â íåì ñî-
êîâðîì, óáåäèòåñü, ÷òî åå îñíîâàíèå âîçâûøà-
äåðæàòñÿ âàæíûå ñâåäåíèÿ ïî óñòàíîâêå è áåçî-
åòñÿ íàä êîâðîì.  ïðîòèâíîì ñëó÷àå âåíòèëÿöèÿ
ïàñíîé ýêñïëóàòàöèè ñòèðàëüíîé ìàøèíû.
áóäåò çàòðóäíåíà èëè âîâñå íåâîçìîæíà.
Ðàñïàêîâêà è âûðàâíèâàíèå
Ðàñïàêîâêà
1. Ðàñïàêóéòå ñòèðàëüíóþ ìàøèíó.
Ïîäêëþ÷åíèå ê âîäîïðîâîäíîé è
2. Óáåäèòåñü, ÷òî îáîðóäîâàíèå íå áûëî ïîâðåæäåíî
ýëåêòðè÷åñêîé ñåòè
âî âðåìÿ òðàíñïîðòèðîâêè. Ïðè îáíàðóæåíèè ïî-
âðåæäåíèé íå ïîäêëþ-
÷àéòå ìàøèíó ñâÿæè-
Ïîäñîåäèíåíèå çàëèâíîãî øëàíãà
òåñü ñ ïîñòàâùèêîì
1. Âñòàâüòå ïðîêëàäêó À
íåìåäëåííî.
â êîíåö çàëèâíîãî øëàí-
3. Óäàëèòå ÷åòûðå
ãà è íàâåðíèòå åãî íà
òðàíñïîðòèðîâî÷íûõ
âûâîä âîäîïðîâîäà
âèíòà è ðåçèíîâûå
õîëîäíîé âîäû ñ ðåçüáî-
ïðîáêè ñ ïðîêëàäêàìè,
A
âûì îòâåðñòèåì 3/4
ðàñïîëîæåííûå â çàä-
äþéìà (ñì. ðèñ.).
íåé ÷àñòè ñòèðàëüíîé
Ïåðåä ïîäñîåäèíåíèåì
ìàøèíû (ñì. ðèñ.).
îòêðîéòå âîäîïðîâîäíûé
êðàí è äàéòå ñòå÷ü
4. Çàêðîéòå îòâåðñòèÿ
ãðÿçíîé âîäå.
ïðèëàãàþùèìèñÿ ïëàñ-
òèêîâûìè çàãëóøêàìè.
2. Ïîäñîåäèíèòå çà-
5. Ñîõðàíÿéòå âñå
ëèâíîé øëàíã ê ñòè-
äåòàëè: îíè Âàì
ðàëüíîé ìàøèíå,
ïîíàäîáÿòñÿ ïðè
íàâèíòèâ åãî íà
ïîñëåäóþùåé òðàíñïîðòèðîâêå ñòèðàëüíîé
âîäîïðèåìíèê, ðàñïî-
ìàøèíû.
ëîæåííûé â çàäíåé
âåðõíåé ÷àñòè ñïðàâà
áîëòû, ðåçèíîâûå øàéáû è áîëüøóþ ìåòàëëè÷åñ-
(ñì. ðèñ.).
êóþ ïîïåðå÷íóþ ïëàíêó. Çàêðîéòå îáðàçîâàâøèåñÿ
îòâåðñòèÿ ïëàñòìàññîâûìè çàãëóøêàìè.
3.Óáåäèòåñü, ÷òî
Íå ðàçðåøàéòå äåòÿì èãðàòü ñ óïàêîâî÷íûìè
øëàíã íå ïåðåêðó÷åí
ìàòåðèàëàìè.
è íå ïåðåæàò.
Âûðàâíèâàíèå
Äàâëåíèå âîäû äîëæíî áûòü â ïðåäåëàõ çíà-
1. Óñòàíîâèòå ñòèðàëüíóþ
÷åíèé, óêàçàííûõ â òàáëèöå Òåõíè÷åñêèõ õàðàê-
ìàøèíó íà ðîâíîì è
òåðèñòèê (ñì. ñ. 3).
ïðî÷íîì ïîëó, òàê ÷òîáû
îíà íå êàñàëàñü ñòåí,
Åñëè äëèíà âîäîïðîâîäíîãî øëàíãà îêàæåòñÿ
ìåáåëè è ïðî÷èõ
íåäîñòàòî÷íîé, îáðàòèòåñü â Àâòîðèçîâàííûé
ïðåäìåòîâ.
Ñåðâèñíûé öåíòð.
2. Ïîñëå óñòàíîâêè ìà-
øèíû íà ìåñòî îòðåãó-
ëèðóéòå åå óñòîé÷èâîå
ïîëîæåíèå ïóòåì âðà-
ùåíèÿ ïåðåäíèõ íîæåê
(ñì. ðèñ.). Äëÿ ýòîãî
ñíà÷àëà îñëàáüòå êîíòðãàéêó, ïîñëå çàâåðøåíèÿ
ðåãóëèðîâêè êîíòðãàéêó çàòÿíèòå.
»

Ïîäñîåäèíåíèå ñëèâíîãî øëàíãà
l ðîçåòêà çàçåìëåíà â ñîîòâåòñòâèè ñ íîðìàìè áåçî-
ïàñíîñòè, îïèñàííûìè â äàííîì ðàçäåëå èíñòðóêöèè
CIS
Ïîâåñüòå çàãíóòûé êî-
äîïóñêàåòñÿ îðãàíèçàöèÿ çàçåìëåíèÿ ðàáî÷èì íó-
íåö ñëèâíîãî øëàíãà íà
ëåì, ïðè óñëîâèè, ÷òî çàùèòíàÿ ëèíèÿ íå èìååò ðàç-
êðàé ðàêîâèíû, âàííû,
ðûâà è ïîäêëþ÷åíà íàïðÿìóþ â îáâîä êàêèõ-ëèáî
èëè ïîìåñòèòå â
ïðèáîðîâ (íàïðèìåð, ýëåêòðè÷åñêîãî ñ÷åò÷èêà).
ñïåöèàëüíûé âûâîä
Åñëè âèëêà íå ïîäõîäèò ê ðîçåòêå, åå ñëåäóåò çàìå-
êàíàëèçàöèè. Øëàíã íå
65 — 100 cm
íèòü íà íîâóþ, ñîîòâåòñòâóþùóþ ðîçåòêå, èëè çàìåíèòü
äîëæåí ïåðåãèáàòüñÿ.
ïèòàþùèé êàáåëü. Çàìåíà êàáåëÿ äîëæíà ïðîèçâî-
Âåðõíÿÿ òî÷êà ñëèâíî-
äèòüñÿ òîëüêî êâàëèôèöèðîâàííûì ïåðñîíàëîì.
ãî øëàíãà äîëæíà íà-
Çàïðåùàåòñÿ èñïîëüçîâàíèå ïåðåõîäíèêîâ, äâîéíûõ
õîäèòüñÿ íà âûñîòå 65-
è áîëåå ðîçåòîê è óäëèíèòåëåé (îíè ñîçäàþò îïàñíîñòü
100 ñì îò ïîëà. Ðàñïî-
âîçãîðàíèÿ). Åñëè Âû ñ÷èòàåòå èõ èñïîëüçîâàíèå íå-
ëîæåíèå ñëèâíîãî
îáõîäèìûì, ïðèìåíÿéòå îäèí åäèíñòâåííûé óäëèíè-
øëàíãà äîëæíî îáåñ-
òåëü, óäîâëåòâîðÿþùèé òðåáîâàíèÿì áåçîïàñíîñòè.
ïå÷èâàòü ðàçðûâ ñòðóè
ïðè ñëèâå (êîíåö øëàí-
Îáîðóäîâàíèå, ïîäêëþ÷åííîå ñ íàðóøåíèåì òðåáî-
ãà íå äîëæåí áûòü
âàíèé áåçîïàñíîñòè áûòîâûõ ïðèáîðîâ áîëüøîé
ìîùíîñòè, èçëîæåííûõ â äàííîé èíñòðóêöèè, ÿâëÿ-
îïóùåí â âîäó).
åòñÿ ïîòåíöèàëüíî îïàñíûì.
 ñëó÷àå êðåïëåíèÿ íà
Ïðîèçâîäèòåëü íå íåñåò îòâåòñòâåííîñòè çà
êðàé âàííîé èëè ðàêî-
óùåðá çäîðîâüþ è ñîáñòâåííîñòè, åñëè îí âûçâàí
âèíû, øëàíã âåøàåòñÿ
íåñîáëþäåíèåì óêàçàííûõ íîðì óñòàíîâêè.
ñ ïîìîùüþ íàïðàâëÿ-
þùåé (âõîäèò â êîìï-
ëåêò ïîñòàâêè), êîòîðàÿ
Ïåðâûé öèêë ñòèðêè
êðåïèòñÿ ê êðàíó (ðèñ.).
Ïî çàâåðøåíèè óñòàíîâêè, ïåðåä íà÷àëîì ýêñï-
Íå ðåêîìåíäóåòñÿ ïðèìåíåíèå óäëèíèòåëåé äëÿ
ëóàòàöèè íåîáõîäèìî ïðîèçâåñòè îäèí öèêë ñòèð-
ñëèâíîãî øëàíãà, ïðè íåîáõîäèìîñòè äîïóñêàåò-
êè ñî ñòèðàëüíûì ïîðîøêîì, íî áåç áåëüÿ, ïî ïðî-
ñÿ åãî íàðàùèâàíèå øëàíãîì òàêîãî æå äèàìåòðà
ãðàììå 90°C áåç ïðåäâàðèòåëüíîé ñòèðêè.
è äëèíîé íå áîëåå 150 ñì.
Ïîäñîåäèíåíèå ê ýëåêòðîñåòè
Òåõíè÷åñêèå õàðàêòåðèñòèêè
Âíèìàíèå! Îáîðóäîâàíèå îáÿçàòåëüíî äîëæíî
áûòü çàçåìëåíî!
Ìîäåëü
AVTL 104
1. Ìàøèíà ïîäêëþ÷àåòñÿ ê ýëåêòðè÷åñêîé ñåòè ïðè ïî-
øèðèíà 40 ñì
ìîùè äâóõïîëþñíîé ðîçåòêè ñ çàçåìëÿþùèì êîíòàê-
Ð àçìåðû
âûñîòà 85 ñì
òîì (ðîçåòêà íå ïîñòàâëÿåòñÿ ñ ìàøèíîé). Ôàçíûé
ãëóáèíà 60 ñì
ïðîâîä äîëæåí áûòü ïîäêëþ÷åí ÷åðåç àâòîìàò çàùè-
òû ñåòè, ðàññ÷èòàííûé íà ìàêñèìàëüíûé òîê (òîê ñðà-
Çàãðóçêà
1 — 5 êã
áàòûâàíèÿ) 16 À, è èìåþùèé âðåìÿ ñðàáàòûâàíèÿ íå
áîëåå 0,1 ñ.
Ñìîòðèòå ïàñïîðòíóþ òàáëè÷êó ñ
Ýëåêòðè÷åñêèå
òåõíè÷åñêèìè õàðàêòåðèñòèêàìè
2. Ïðè íàëè÷èè âáëèçè îò ïðåäïîëàãàåìîãî ìåñòà óñòà-
ïàðàìåòðû
íà ìàøèíå.
íîâêè ìàøèíû ðîçåòêè ñ çàçåìëÿþùèì êîíòàêòîì,
èìåþùåé òðåõïðîâîäíóþ ïîäâîäêó êàáåëÿ ñ ìåäíûìè
max äàâëåíèå 1 Ìïà (10 áàð)
Ãèäðàâëè÷åñêèå
æèëàìè ñå÷åíèåì íå ìåíåå 1,5 êâ. ìì (èëè àëþìèíè-
min äàâëåíè å 0,05 Ìïà (0,5 áàð)
ïàðàìåòðû
îáúåì áàðàáàíà 42 ë
åâûìè æèëàìè ñå÷åíèåì íå ìåíåå 2,5 êâ. ìì), äîðà-
áîòêà ýëåêòðîñåòè íå ïðîèçâîäèòñÿ. Ïðè îòñóòñòâèè
Ñêîðîñòü îòæèìà
äî 1000 îá/ìèí
óêàçàííîé ðîçåòêè è ïðîâîäêè ñëåäóåò ïðîâåñòè èõ ìîí-
òàæ.
Kîíòðîëüíûå
3. Ïðîêëàäêà çàçåìëåíèÿ îòäåëüíûì ïðîâîäîì íå
ïðîãðàììû
ïðîãðàììà 3; òåìïåðàòóðà 60°Ñ;
äîïóñêàåòñÿ.
ñîãëàñíî
ïðè çàãðóçêå äî 5 êã.
4. Äëÿ äîðàáîòêè ýëåêòðè÷åñêîé ñåòè ðåêîìåíäóåòñÿ
íîðìàòèâó
EN 60456
ïðèìåíÿòü ïðîâîä òèïà ÏÏÂ 3õ1,5 380 ÃÎÑÒ 6223-79.
Äîïóñêàåòñÿ ïðèìåíåíèå äðóãèõ ìàðîê êàáåëÿ, îáåñ-
Ìàø è íà ñîîòâåòñòâóåò ñëåäóþù èì
ïå÷èâàþùèõ ïîæàðî- è ýëåêòðîáåçîïàñíîñòü ïðè ýêñ-
Äèðåêòèâàì Åâðîïåéñêîãî
ïëóàòàöèè ìàøèíû.
Ýêîíîìè÷åñêîãî ñîîáù åñòâà:
Ïåðåä âêëþ÷åíèåì ìàøèíû â ñåòü óáåäèòåñü, ÷òî:
— 89/336 /ÅÅÑ îò 03.05.89 (ýëåêòðî-
ìàãíèòíîé ñîâìåñòèìîñòè) è
l ðîçåòêà è ïðîâîäêà ñîîòâåòñòâóþò òðåáîâàíèÿì, èç-
ïîñëåäóþùèå ìîäèôèêàöèè
ëîæåííûì â äàííîì ðàçäåëå èíñòðóêöèè;
— 2006/95/CE (íèçêîãî íàïðÿæåíèÿ)
l íàïðÿæåíèå è ÷àñòîòà òîêà ñåòè ñîîòâåòñòâóþò äàí-
íûì ìàøèíû;
l ðîçåòêà è âèëêà îäíîãî òèïà;
#

Îïèñàíèå ñòèðàëüíîé ìàøèíû
Ïàíåëü óïðàâëåíèÿ
+15
Ðóêîÿòêà ðåãóëÿöèè
Ðóêîÿòêà ðåãóëÿöèè
ñêîðîñòè
ÎÒÆÈÌÀ
ÒÅÌÏÅÐÀÒÓÐÛ
Êíîïêà
ÂÊËÞ×ÅÍÈÅ/
ÂÛÊËÞ×ÅÍÈÅ
Èíäèêàòîð
ËÞÊ
ÇÀÁËÎÊÈÐÎÂÀÍ
Ñâåòîâûå
Êíîïêà
èíäèêàòîðû
ÏÓÑÊ/ÎÒÌÅÍÀ
Êíîïêè
Ðóêîÿòêà
ÄÎÏÎËÍÈÒÅËÜÍÛÅ
âûáîðà
ÔÓÍÊÖÈÈ
ÏÐÎÃÐÀÌÌ
ß÷åéêà äëÿ ñòèðàëüíîãî ïîðîøêà, íàïîëíÿå —
Ðóêîÿòêà ÒÅÌÏÅÐÀÒÓÐÀ ñëóæèò äëÿ ðåãóëÿöèè
ìàÿ ñòèðàëüíûì ïîðîøêîì è äîáàâêàìè
òåìïåðàòóðû èëè äëÿ ñòèðêè â õîëîäíîé âîäå
(ñìîòðåòü ñòð. 20).
(ñìîòðåòü ñòð. 19).
Êíîïêà ÂÊËÞ×ÅÍÈÅ/ÂÛÊËÞ×ÅÍÈÅ ñëóæèò äëÿ
Ñâåòîâûå èíäèêàòîðû ñëóæàò äëÿ êîíòðîëÿ çà
âêëþ÷åíèÿ è âûêëþ÷åíèÿ ñòèðàëüíîé ìàøèíû.
âûïîëíåíèåì ïðîãðàììû ñòèðêè.
Åñëè áûëà âêëþ÷åíà ôóíêöèÿ Òàéìåð çàäåðæêè,
Êíîïêà ÏÓÑÊ/ÎÒÌÅÍÀ ñëóæèò äëÿ çàïóñêà
èíäèêàòîðû ïîêàçûâàþò âðåìÿ, îñòàþùååñÿ äî
ïðîãðàìì èëè äëÿ îòìåíû îøèáî÷íîãî
çàïóñêà ïðîãðàììû (ñìîòðåòü ñòð. 17).
ïðîãðàììèðîâàíèÿ.
Ðóêîÿòêà ÎÒÆÈÌ ñëóæèò äëÿ ðåãóëÿöèè ñêîðîñòè
Èíäèêàòîð ÂÊËÞ×ÅÍÈÅ/ËÞÊ ÇÀÁËÎÊÈÐÎÂÀÍ
îòæèìà èëè äëÿ åãî èñêëþ÷åíèÿ (ñìîòðåòü ñòð.
ìèãàåò, êîãäà ñòèðàëüíàÿ ìàøèíà âêëþ÷åíà, è ãîðèò,
31).
íå ìèãàÿ, åñëè ëþê íå çàáëîêèðîâàí (ñìîòðåòü
ñòð. 17).
Êíîïêè ÄÎÏÎËÍÈÒÅËÜÍÛÅ ÔÓÍÊÖÈÈ ñëóæàò
äëÿ ïîäêëþ÷åíèÿ èìåþùèõñÿ äîïîëíèòåëüíûõ
Ðóêîÿòêà âûáîðà ÏÐÎÃÐÀÌÌ ñëóæèò äëÿ âûáîðà
ôóíêöèé. Êíîïêà âûáðàííîé ôóíêöèè îñòàíåòñÿ
ïðîãðàìì (ñìîòðåòü ñòð. 18).
âêëþ÷åííîé.
 ïðîöåññå âûïîëíåíèÿ ïðîãðàììû ðóêîÿòêà
îñòàåòñÿ íåïîäâèæíîé.
Èíäèêàòîð ÂÊËÞ×ÅÍÈÅ/ËÞÊ ÇÀÁËÎÊÈÐÎÂÀÍ:
Ãîðÿùèé èíäèêàòîð îçíà÷àåò, ÷òî ëþê çàáëîêèðîâàí âî èçáåæàíèå åãî ñëó÷àéíîãî îòêðûâàíèÿ.
âî èçáåæàíèå ïîâðåæäåíèé ïåðåä òåì êàê îòêðûòü ëþê, íåîáõîäèìî äîæäàòüñÿ, êîãäà çàìèãàåò èíäèêàòîð.
! ×àñòîå ìèãàíèå èíäèêàòîðà ÂÊËÞ×ÅÍÈÅ/ËÞÊ ÇÀÁËÎÊÈÐÎÂÀÍ îäíîâðåìåííî ñ ëþáûì äðóãèì
èíäèêàòîðîì îçíà÷àåò íåèñïðàâíîñòü (ñìîòðåòü ñòð. 23).
$
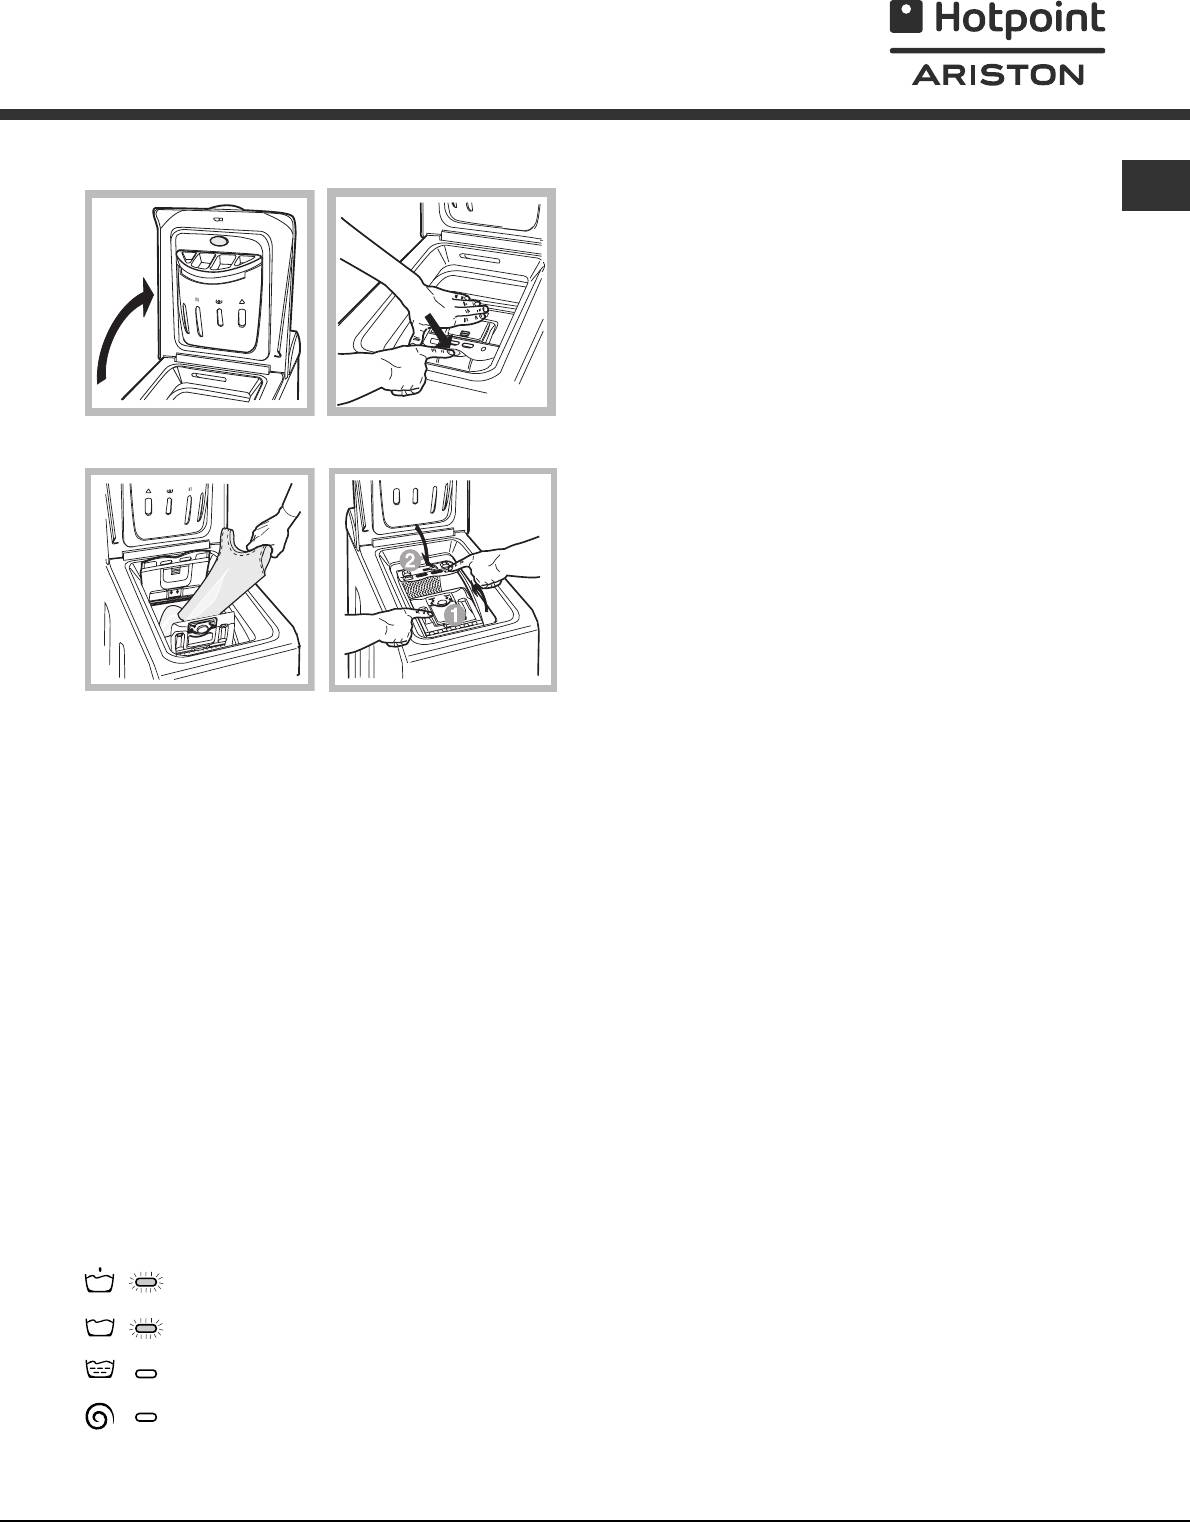
Êàê îòêðûòü è çàêðûòü áàðàáàí
CIS
A) ÎÒÊÐÛÂÀÍÈÅ (ðèñ. 1).
Ïîäíèìèòå âíåøíþþ êðûøêó è ïîëíîñòüþ åå îòêðîéòå.
Á) Çàòåì, èñïîëüçóÿ îáå ðóêè, îòêðîéòå áàðàáàí, êàê ïîêà
çàíî íà ðèñ. 2:
— Íàæìèòå êíîïêó, îáîçíà÷åííóþ ñòðåëêîé íà ðèñ. 2, ñëåã
êà âíèç,
äðóãîé ðóêîé ïðèäåðæèâàÿ äâåðöû (òàê âû èçáåæèòå
âíåçàïíîãî îòêðûâàíèÿ äâåðîê è çàùåìëåíèÿ ïàëüöåâ);
äâåðöû ðàñöåïÿòñÿ è ëåãêî îòêðîþòñÿ.
Fig. 1
Fig. 2
Â) ÇÀÃÐÓÇÊÀ ÑÒÈÐÀËÜÍÎÉ ÌÀØÈÍÛ (ðèñ. 3).
Ã) ÇÀÊÐÛÂÀÍÈÅ (ðèñ. 4).
— çàêðîéòå ïîëíîñòüþ áàðàáàí, îïóñêàÿ ñíà÷àëà ïåðåäíþþ
äâåðöó, à çàòåì çàäíþþ;
— çàòåì óäîñòîâåðüòåñü, ÷òî êðþêè ïåðåäíåé äâåðöû òî÷íî
âîøëè â ïðåäíàçíà÷åííûå ìåñòà íà çàäíåé äâåðöå;
— ïîñëå òîãî, êàê êðþêè çàùåëêíóëèñü, íàæìèòå îáå äâåðöû
ñëåãêà âíèç, ÷òîáû óáåäèòüñÿ îíè çàêðûòû ïëîòíî;
— è, íàêîíåö, çàêðîéòå âíåøíþþ êðûøêó.
Fig. 3 Fig. 4
Èíäèêàòîðû
Èíäèêàòîðû ñîîáùàþò ïîëüçîâàòåëþ âàæíûå
Êíîïêè âûáîðà ôóíêöèè
ñâåäåíèÿ.
ÊÍÎÏÊÈ ÂÛÁÎÐÀ ÔÓÍÊÖÈÈ òàêæå ÿâëÿþòñÿ
Çíà÷åíèå èíäèêàòîðîâ:
èíäèêàòîðàìè.
Ïðè âûáîðå ôóíêöèè çàãîðàåòñÿ ñîîòâåòñòâóþùàÿ
êíîïêà.
Òåêóùàÿ ôàçà öèêëà:
 ïðîöåññå öèêëà ñòèðêè èíäèêàòîðû áóäóò
Åñëè âûáðàííàÿ ôóíêöèÿ ÿâëÿåòñÿ íåñîâìåñòèìîé ñ
çàãîðàòüñÿ îäèí çà äðóãèì, ïîêàçûâàÿ ôàçó
çàäàííîé ïðîãðàììîé, êíîïêà áóäåò ìèãàòü, è òàêàÿ
âûïîëíåíèÿ ïðîãðàììû:
ôóíêöèÿ íå áóäåò àêòèâèðîâàíà.
Åñëè áóäåò âûáðàíà ôóíêöèÿ, íåñîâìåñòèìàÿ ñ äðóãîé,
Ïðåäâàðèòåëüíàÿ ñòèðêà
ðàíåå âûáðàííîé ôóíêöèåé, îñòàíåòñÿ âêëþ÷åííîé
òîëüêî ïîñëåäíÿÿ âûáðàííàÿ ôóíêöèÿ.
Ñòèðêà
Ïîëîñêàíèå
Îòæèì
Ïðèìå÷àíèå: â ïðîöåññå ñëèâà çàãîðèòñÿ
èíäèêàòîð, ñîîòâåòñòâóþùèé öèêëó Îòæèìà.
%
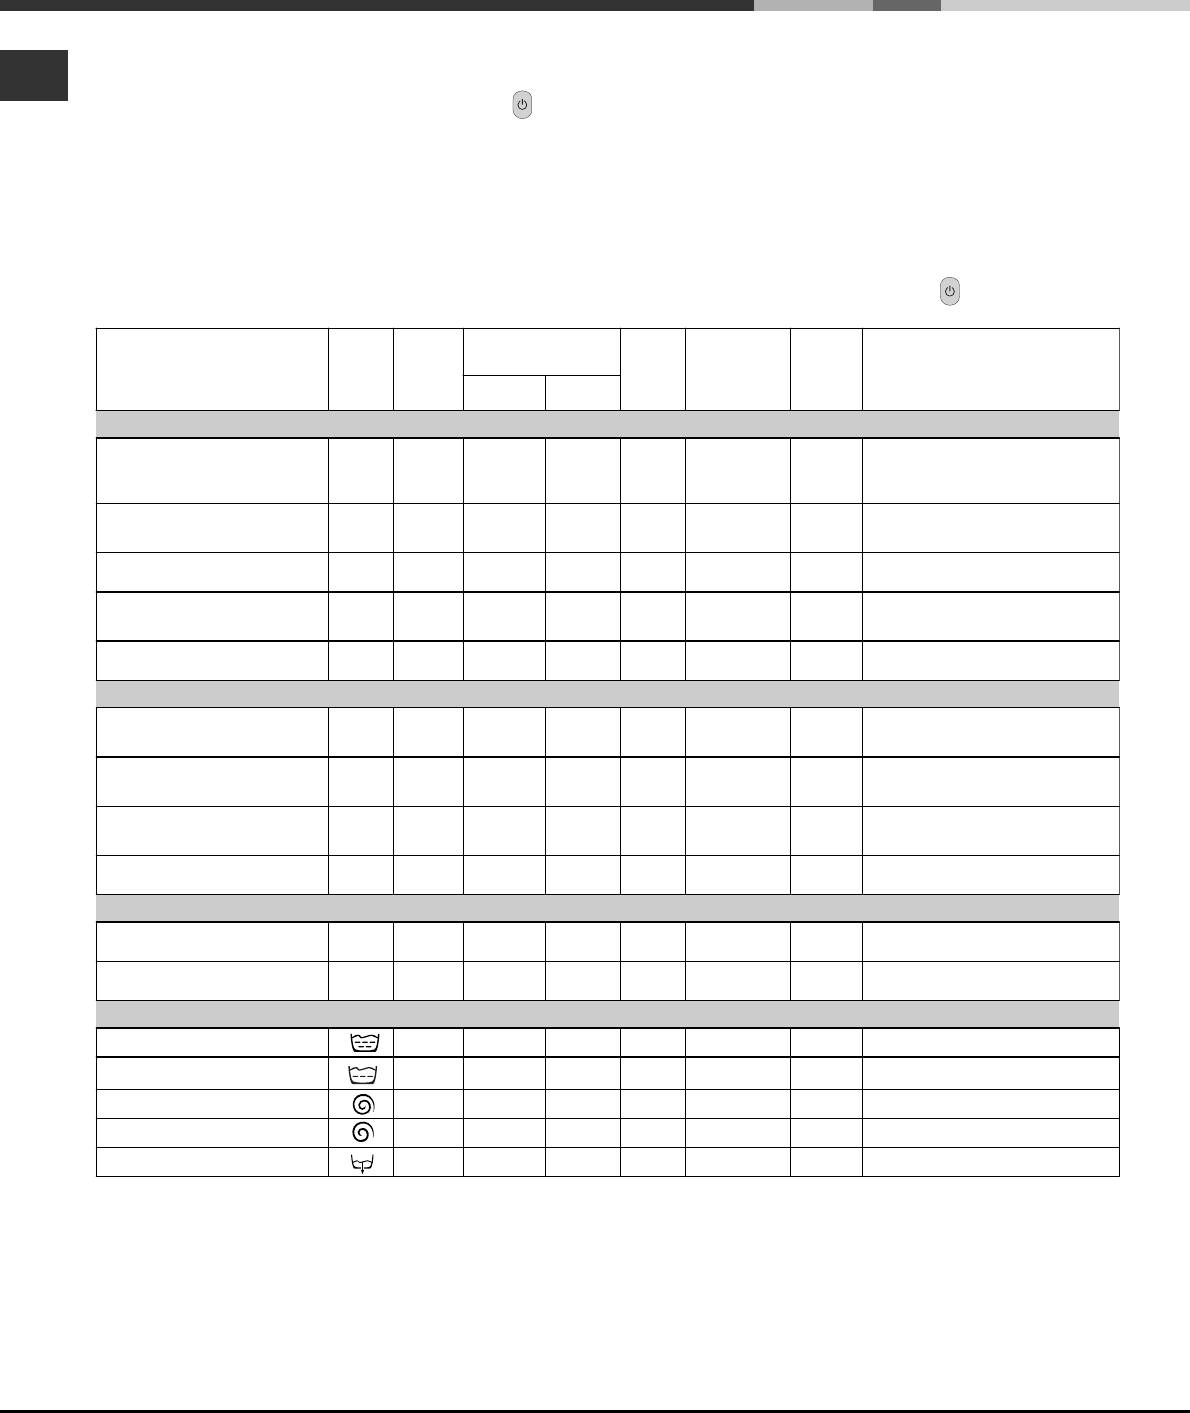
Çàïóñê ìàøèíû. Ïðîãðàììû
Êðàòêèå èíñòðóêöèè: Ïîðÿäîê çàïóñêà
íóæíóþ ïðîãðàììó.
4. Âûáðàòü òåìïåðàòóðó ñòèðêè (ñì. ñòð. 19).
+15
ïðîãðàììû
5. Âûáðàòü ñêîðîñòü îòæèìà (ñì. ñòð. 19).
1. Âêëþ÷èòå ñòèðàëüíóþ ìàøèíó, íàæàâ íà êíîïêó . Âñå
6. Çàïóñòèòå ïðîãðàììó, íàæàâ êíîïêó ÏÓÑÊ/ÑÁÐÎÑ
èíäèêàòîðû çàãîðÿòñÿ íà íåñêîëüêî ñåêóíä, çàòåì
(Start/Reset).
ïîãàñíóò, è èíäèàêòîð ÂÊËÞ×ÅÍÈÅ/ËÞÊ
Äëÿ îòìåíû çàïóñêà äåðæèòå íàæàòîé êíîïêó ÏÓÑÊ/
ÇÀÁËÎÊÈÐÎÂÀÍ íà÷íåò ìèãàòü.
ÑÁÐÎÑ (Start/Reset) â òå÷åíèå 2-õ ñåêóíä.
2. Çàãðóçèòå áåëüå â áàðàáàí, çàñûïüòå ñòèðàë-
7. Ïî çàâåðøåíèè ïðîãðàììû èíäèêàòîð ÂÊËÞ×ÅÍÈÅ/
üíîå âåùåñòâî è äîáàâêè (ñìîòðèòå ñòð. 20),
ËÞÊ ÇÀÁËÎÊÈÐÎÂÀÍ çàìèãàåò, ñèãíàëèçèðóÿ, ÷òî
çàêðîéòå êðûøêè áàðàáàíà è âíåøíèé ëþê.
ìîæíî îòêðûòü ëþê. Âûíóòü áåëüå è îñòàâèòü ëþê
3. Âûáðàòü ïðè ïîìîùè ðóêîÿòêè âûáîðà ÏÐÎÃÐÀÌÌ
ïîëóîòêðûòûì äëÿ ñóøêè áàðàáàíà. Âûêëþ÷èòü
ñòèðàëüíóþ ìàøèíó, íàæàâ êíîïêó
.
Òàáëèöà ïðîãðàìì
Äëèòå—
òáåëèâàíèå
Ìîþùåå ñðåäñòâî
ëüíîñòü
Òêàíü è ñòåïåíü çàãðÿçíåíèÿ Ïðîã—
Òåìïå-
Ñìÿã÷—
(Ôóíêöèÿ)/
öèêëà,
Îïèñàíèå öèêëà ñòèðêè
ðàììa
ðàòóðà
èòåëü
Îòáåëèâàò-
ïðåäâ.
îñíîâíàÿ
ìèí
åëü
ñòèðêà
ñòèðêà
Õëîïîê
ñèëüíûì çàãðÿçíåíèåì
Ïðåäâàðèòåëüíàÿ ñòèðêà, ñòèðêà
Î÷åíü ñèëüíî çàãðÿçíåííîå
ïðè âûñîêîé òåìïåðàòóðå,
1 90°C
áåëîå áåëüå ( ïðîñòûíè ,
155
ïîëîñêàíèå, ïðîìåæóòî÷íûé è
ñêàòåðòè è ò.ä.)
îêîí÷àòåëüíûé îòæèì
Î÷åíü ñèëüíî çàãðÿçíåííîå
Ñòèðêà ïðè âûñîêîé òåìïåðàòóðå,
Äåëèêàò./
áåëîå áåëüå ( ïðîñòûíè ,
2 90°C
147
ïîëîñêàíèå, ïðîìåæóòî÷íûé è
Îáû÷íû é
ñêàòåðòè è ò.ä.)
îêîí÷àòåëüíûé îòæèì
Ñèëüíî çàãðÿçíåííîå áåëîå è
Ñòèðêà ïðè 60°C, ïîëîñêàíèå,
Äåëèêàò./
ïðî÷íî îêðàøåííîå öâåòíîå
3 60°C
157
ïðîìåæóòî÷íûé è îêîí÷àòåëüíûé
Îáû÷íû é
áåëüå
îòæèì
Ñëàáî çàãðÿçíåííîå áåëîå è
Ñòèðêà ïðè 40°C, ïîëîñêàíèå,
Äåëèêàò./
ëèíÿþù åå öâåòíîå áåëüå
4 40°C
96
ïðîìåæóòî÷íûé è îêîí÷àòåëüíûé
Îáû÷íû é
(ðóáàøêè, ìàêè è ïð.)
îòæèì
Ñòèðêà ïðè 30°C, ïîëîñêàíèå,
Ñëàáî çàãðÿçíåííîå
Äåëèêàò./
5 30°C
ëèíÿþù åå öâåòíîå áåëüå
88
ïðîìåæóòî÷íûé è îêîí÷àòåëüíûé
Îáû÷íû é
îòæèì
Ñèíòåòèêà
Ñèëüíî çàãðÿçíåííàÿ, ïðî÷íî
Ñòèðêà ïðè 60°C, ïîëîñêàíèå,
îêðàøåííàÿ öâåòíàÿ (äåòñêàÿ
6 60°C
Äåëèêàòí. 97
îñòàíîâêà ñ âîäîé èëè
îäåæäà è ïð.)
äåëèêàòíûé îòæèì
Ñèëüíî çàãðÿçíåííàÿ, ïðî÷íî
Ñòèðêà ïðè 50°C, ïîëîñêàíèå,
îêðàøåííàÿ öâåòíàÿ (äåòñêàÿ
7 50°C
Äåëèêàòí. 93
îñòàíîâêà ñ âîäîé èëè
îäåæäà è ïð.)
äåëèêàòíûé îòæèì
Ñëàáî çàãðÿçíåííàÿ,
Ñòèðêà ïðè 40°C, ïîëîñêàíèå,
äåëèêàòíàÿ öâåòíàÿ (ëþáàÿ
8 40°C
Äåëèêàòí. 83
îñòàíîâêà ñ âîäîé èëè
îäåæäà)
äåëèêàòíûé îòæèì
Ñëàáî çàãðÿçíåííàÿ,
Ñòèðêà ïðè 30°C, ïîëîñêàíèå è
äåëèêàòíàÿ öâåòíàÿ (ëþáàÿ
9 30°C
33
äåëèêàòíûé îòæèì
îäåæäà)
Äåëèêàòíûå òêàíè
Ñòèðêà ïðè 40°C, ïîëîñêàíèå è
Øåðñòü 10 40°C
Äåëèêàòí. 48
äåëèêàòíûé îòæèì
Îñîáî äåëèêàòíûå òêàíè è
Ñòèðêà ïðè 30°C, ïîëîñêàíèå,
îäåæäà (çàíàâåñè, øåëê, âèñêîçà
11 30°C
55
îñòàíîâêà ñ âîäîé èëè ñëèâ
è ïð.)
×ÀÑÒÈ×ÍÛÅ ÏÐÎÃÐÀÌÌÛ
Ïîëîñêàíèå
Ïîëîñêàíèå è îòæèì
Ïïîëîñêàíèå, îñòàíîâêà ñ âîäîé
Äåëèêàòíîå ïîëîñêàíèå
èëè ñëèâ
Îòæè ì Ñëèâ è ñèëüíûé îòæèì
Äåëèêàòíûé îòæèì Ñëèâ è äåëèêàòíûé îòæèì
Ñëèâ Ñëèâ
Ïðèìå÷àíèå
«Îñòàíîâêà ñ âîäîé»: ñì. äîïîëíèòåëüíóþ ôóíêöèþ «Ëåãêàÿ ãëàæêà» íà ñ. 31. Äàííûå â òàáëèöå, ÿâëÿþòñÿ ñïðàâî÷íû-
ìè è ìîãóò ìåíÿòüñÿ â çàâèñèìîñòè îò êîíêðåòíûõ óñëîâèé ñòèðêè (îáúåì ñòèðêè, òåìïåðàòóðà âîäû â âîäîïðîâîäíîé
ñèñòåìå, òåìïåðàòóðà â ïîìåùåíèè è äð.).
Ñïåöèàëüíàÿ ïðîãðàììà
Ïîâñåäíåâíàÿ ñòèðêà 30′ ìèí (ïðîãðàììà 9 äëÿ Ñèíòåòè÷åñêèõ òêàíåé) ïðåäíàçíà÷åíà äëÿ áûñòðîé ñòèðêè ñëàáîçàã-
ðÿçíåííîãî áåëüÿ: öèêë äëèòñÿ âñåãî 30 ìèíóò, ÷òî ïîçâîëÿåò ñýêîíîìèòü âðåìÿ è ýëåêòðîýíåðãèþ. Óñòàíîâèâ ýòó
ïðîãðàììó (9 ïðè òåìïåðàòóðå 30°Ñ), Âû ìîæåòå ñòèðàòü ðàçëè÷íûå âèäû òêàíåé âìåñòå (çà èñêëþ÷åíèåì øåðñòè è
øåëêà) ïðè ìàêñèìàëüíîé çàãðóçêå áåëüÿ 3 êã. Ìû ðåêîìåíäóåì èñïîëüçîâàòü æèäêîå ìîþùåå ñðåäñòâî.
&
Ïåðñîíàëèçàöèÿ ñòèðêè
Âûáîð òåìïåðàòóðû
Âûáîð òåìïåðàòóðû ñòèðêè ïðîèçâîäèòñÿ ïðè ïîìîùè ðóêîÿòêè ÒÅÌÏÅÐÀÒÓÐÀ (ñì. Òàáëèöó ïðîãðàìì íà ñòð. 18).
CIS
Çíà÷åíèå òåìïåðàòóðû ìîæåò áûòü óìåíüøåíî âïëîòü äî ñòèðêè â õîëîäíîé âîäå (
).
Âûáîð ñêîðîñòè îòæèìà
Âûáîð ñêîðîñòè îòæèìà âûáðàííîé ïðîãðàììû ïðîèçâîäèòñÿ ïðè ïîìîùè ðóêîÿòêè ÎÒÆÈÌ.
Äëÿ ðàçíûõ ïðîãðàìì ïðåäóñìàòðèâàåòñÿ ðàçíàÿ ìàêñèìàëüíàÿ ñêîðîñòü îòæèìà:
ÏðîãðàììûÌàêñèìàëüíàÿ ñêîðîñòü îòæèìà
Õëîïîê 1000 îáîðîòîâ â ìèíóòó
Ñèíòåòèêà 800 îáîðîòîâ â ìèíóòó
Øåðñòü 600 îáîðîòîâ â ìèíóòó
Øåëê áåç îòæèìà
Ñêîðîñòü îòæèìà ìîæåò áûòü óìåíüøåíà èëè æå ìîæíî ñîâñåì èñêëþ÷èòü îòæèì, ïîâåðíóâ ðóêîÿòêó â ïîëîæåíèå
.
Ìàøèíà àâòîìàòè÷åñêè íå äîïóñêàåò óñòàíîâêó ñêîðîñòè îòæèìà, ïðåâûøàþùóþ ìàêñèìàëüíóþ ñêîðîñòü,
ïðåäóñìîòðåííóþ äëÿ êàæäîé ïðîðàììû.
Âî èçáåæàíèå ÷ðåçìåðíûõ âèáðàöèé ïåðåä êàæäûì îòæèìîì ìàøèíà ðàâíîìåðíî ðàñïðåäåëÿåò áåëüå â
áàðàáàíå. Ýòî ïðîèñõîäèò çà ñ÷åò íåïðåðûâíîãî âðàùåíèÿ áàðàáàíà ñî ñêîðîñòüþ, ñëåãêà ïðåâûøàþùåé
ñêîðîñòü ñòèðêè.
Åñëè ïîñëå íåñêîëüêèõ ïîïûòîê áåëüå íå ðàñïðåäåëÿåòñÿ ðàâíîìåðíî,
ìàøèíà ïðîèçâîäèò îòæèì ñ áîëåå íèçêîé ñêîðîñòüþ.
Ïðè íåâîçìîæíîñòè áàëàíñèðîêè ìàøèíà çàìåíÿåò îòæèì îïåðàöèåé áàëàíñèðîâêè.
Âîçìîæíûå ïîïûòêè áàëàíñèðîâêè ìîã
Ôóíêöèè Íàçíà÷åíèå Èñïîëüçîâàíèå Äîñòóïíà ñ
ïðîãðàììàìè:
Ïîçâîëÿåò
ïîëó÷èòü
Ñóïåð ñòèðêà
áåçóïðå÷íî
÷èñòîå áåëüå,
1, 2, 3, 4
çàìåòíî áîëåå
Îïöèÿ íå èñïîëüçóåòñÿ ñ ôóíêöèåé «ÁÛÑÒÐÀß ÑÒÈÐKÀ».
5, 6, 7, 8
áåëîå ïî
ñðàâíåíèþ ñî
ñòàíäàðòîì
Êë à ñ ñ à À .
Óìåíüøåíèå
Ïðè âûáîðå ýòîé ôóíêöèè ïðîãðàììû 6, 7,8, 11 ïðåðûâàþòñÿ
Âñå ïðîãðàììû
ñòåïåíè
áåç ñëèâà âîäû (îñòàíîâêà ñ âîäîé) è ñèãíàëüíàÿ ëàìïî÷êà
êðîìå
Ëåãêàÿ ãëàæêà
ñìèíàåìîñòè
ôàçû Îïîëàñêèâàíèÿ ìèãàåò:
1, 2, 9,10
òêàíåé,
×òîáû çàâåðøèòü öèêë, íàæìèòå êíîïêó ÏÓÑK/ÑÁÐÎÑ
Ñëèâ.
îáëåã÷åíèå
(Start/Resert).
ïîñëåäóþùåãî
×òîáû çàêîí÷èòü ïðîãðàììó ñëèâîì óñòàíîâèòå ðóêîÿòêó
ãëàæåíèÿ.
ïðîãðàììàòîðà íà ñîîòâåòñòâóþùèé ñèìâîë è
íàæìèòå êíîïêó
ÏÓÑK/ÑÁÐÎÑ (Start/Resert).
Áûñòðàÿ ñòèðêà Ñîêðàùàåò
ïðîäîëæèòåëüíî-
1, 2, 3, 4
ñòü öèêëà
Îïöèÿ íå èñïîëüçóåòñÿ ñ ôóíêöèåé «ÑÓÏÅÐ ÑÒÈÐKÀ».
5, 6, 7, 8
ñòèðêè
Ïîëîñêàíèå.
ïðèìåðíî íà
30%.
Ïîâûøàåò
Ïðèìåíåíèå ýòîé ôóíêöèè ðåêîìåíäóåòñÿ ïðè ïîëíîé
1, 2, 3, 4,
ýôôåêòèâíîñòü
çàãðóçêå ìàøèíû èëè ïðè èñïîëüçîâàíèè áîëüøîãî
5, 6, 7, 8,
Äîïîëíèòåëüíîå
ïîëîñêàíèÿ.
êîëè÷åñòâà ìîþùåãî ñðåäñòâà.
Ïîëîñêàíèå.
ïîëîñêàíèå
’
ó
ò ïðîäëèòü îáù
ó
þ ïðîäîëæèòåëüíîñòü öèêëà ìàêñ. íà 10 ìèí
ó
ò.
Ôóíêöèè
Ðàçëè÷íûå ôóíêöèè ñòèðêè ìàøèíû ïîçâîëÿþò äîñòè÷ü æåëàåìîé ÷èñòîòû è áåëèçíû âàøåãî áåëüÿ. Ïîðÿäîê
âûáîðà ôóíêöèé:
1. íàæàòü êíîïêó íóæíîé ôóíêöèè â ñîîòâåòñòâèè ñ ïðèâåäåííîé íèæå òàáëèöåé;
2. âêëþ÷åíèå ñîîòâåòñòâóþùåé êíîïêè îçíà÷àåò, ÷òî ôóíêöèÿ àêòèâèðîâàíà.
Ïðèìå÷àíèå: ×àñòîå ìèãàíèå êíîïêè îçíà÷àåò, ÷òî äàííàÿ ôóíêöèÿ íå ìîæåò áûòü àêòèâèðîâàíà äëÿ çàäàííîé ïðîãðàììû.

Ìîþùèå ñðåäñòâà è áåëüå
Ðàñïðåäåëèòåëü ìîþùèõ ñðåäñòâ
Ïîäãîòîâêà áåëüÿ
+15
Õîðîøèé ðåçóëüòàò ñòèðêè çàâèñèò òàêæå îò ïðàâèëü-
Ðàçáåðèòå áåëüå:
íîé äîçèðîâêè ìîþùåãî ñðåäñòâà: åãî èçáûòîê íå
— â ñîîòâåòñòâèè ñ òèïîì òêàíè / îáîçíà÷åíèÿ íà
ãàðàíòèðóåò áîëåå ýôôåêòèâíóþ ñòèðêó, íàïðîòèâ ìî-
ýòèêåòêå
æåò ïðèâåñòè ê îáðàçîâàíèþ íàëåòîâ âíóòðè ìàøè-
— ïî öâåòó: îòäåëèòå öâåòíîå áåëüå îò áåëîãî.
íû è çàãðÿçíåíèþ îêðó-
Âûíüòå èç êàðìàíîâ âñå ïðåäìåòû è ïðîâåðüòå
æàþùåé ñðåäû.
õîðîøî ëè äåðæàòñÿ ïóãîâèöû.
Íå ïðåâûøàéòå ìàêñèìàëüíîå íîðìû çàãðóçêè
áàðàáàíà, óêàçàííûå äëÿ ñóõîãî áåëüÿ:
Ïðî÷íûå òêàíè: ìàêñ. 5 êã
Âûäâèíüòå ðàñïðåäå-
Ñèíòåòè÷åñêèå òêàíè: ìàêñ. 2,5 êã
ëèòåëü è çàïîëíèòå åãî
Äåëèêàòíûå òêàíè: ìàêñ. 2 êã
îòäåëåíèÿ ìîþùèì
Øåðñòü: ìàêñ. 1 êã
ñðåäñòâîì è ñìÿã÷èòå-
ëåì:
Âåñ áåëüÿ
1 ïðîñòûíÿ 400 500 ã
1 íàâîëî÷êà 150 -200 ã
1 ñêàòåðòü 400 500 ã
1 õàëàò 900 1,200 ã
1 ïîëîòåíöå 150 -250 ã
Îòäåëåíèå 1: ìîþùåå ñðåäñòâî äëÿ ïðåäâà-
ðèòåëüíîé ñòèðêè (ïîðîøîê)
Îñîáåííîñòè ñòèðêè
ÿ÷åéêà 2: Ñòèðàëüíîå âåùåñòâî
îòäåëüíûõ èçäåëèé
(ïîðîøîê èëè æèäêîñòü)
Çàíàâåñêè: ñâåðíèòå è ïîëîæèòå â íàâîëî÷êó èëè â ñåò-
Æèäêîå ñòèðàëüíîå âåùåñòâî ñëåäóåò ïîìåùàòü
÷àòûé ìåøî÷åê. Ñòèðàéòå îòäåëüíî, íå ïðåâûøàÿ ïî-
íåïîñðåäñòâåííî â áàðàáàí â ñïåöèàëüíîì
ëîâèíû çàãðóçêè áàðàáàíà. Âûáåðèòå ïðîãðàììó 11, àâ-
êðóãëîì ïëàñòìàññîâîì äîçàòîðå.
òîìàòè÷åñêè èñêëþ÷àþùóþ îòæèì.
ÿ÷åéêà 3: Äîáàâêè (îïîëàñêèâàòåëü è ò.ä.)
Ñòåãàííûå êóðòêè è ïóõîâèêè: åñëè ïóõîâèê íà óòèíîì
Êîãäà âû íàëèâàåòå îïîëàñêèâàòåëü â ÿ÷åéêó 3,
èëè ãóñèíîì ïóõó, åãî ìîæíî ñòèðàòü â ñòèðàëüíîé
îáðàùàéòå âíèìàíèå, ÷òîáû íå ïðåâûñèòü
ìàøèíå. Âûâåðíèòå êóðòêó íàèçíàíêó, çàãðóçèòå â áàðà-
ìàêñèìàëüíûé óðîâåíü, óêàçàííûé îòìåòêîé
áàí íå áîëåå 2-3 êã èçäåëèé. Ïîâòîðèòå ïîëîñêàíèå 1-2
«max».
ðàçà, èñïîëüçóéòå äåëèêàòíûé îòæèì.
Îïîëàñêèâàòåëü àâòîìàòè÷åñêè ïîäàåòñÿ â
áàðàáàí â ïðîöåññå ïîñëåäíåãî îïîëàñêèâàíèÿ.
Ïàðóñèíîâûå òóôëè: Ïàðóñèíîâûå òóôëè
Ïî çàâåðøåíèè ïðîãðàììû ñòèðêè â ÿ÷åéêå 3
ïðåäâàðèòåëüíî î÷èñòèòå îò ãðÿçè è ñòèðàéòå ñ ïðî÷íûìè
îñòàåòñÿ âîäà. Îíà íåîáõîäèìà äëÿ ïîäà÷è â
òêàíÿìè èëè äæèíñàìè, åñëè ïîçâîëÿåò öâåò. Íå ñòèðàéòå
áàðàáàí î÷åíü ãóñòûõ îïîëàñêèâàòåëåé, ò.å. äëÿ
ñ áåëûìè âåùàìè.
ðàçáàâëåíèÿ êîíöåíòðèðîâàííûõ îïîëàñêèâàòåëåé.
Øåðñòü: Äëÿ äîñòèæåíèÿ íàèëó÷øèõ ðåçóëüòàòîâ
Åñëè â ÿ÷åéêå 3 îñòàíåòñÿ âîäû áîëüøå
ñòèðêè çàãðóæàéòå íå áîëåå 1 êã áåëüÿ è èñïîëü-
íîðìàëüíîãî, ýòî çíà÷èò, ÷òî êàíàë ñëèâà
çóéòå ñïåöèàëüíûå æèäêèå ñðåäñòâà, ïðåäíàçíà-
îïîëàñêèâàòåëÿ â áàðàáàí çàñîðèëñÿ. Ñìîòðèòå
÷åííûå äëÿ ñòèðêè øåðñòÿííûõ èçäåëèé.
îïèñàíèå ÷èñòêè ÿ÷ååê íà ñòð. 34.
ÿ÷åéêà 4:
Öèêë îòáåëèâàíèÿ
Îáû÷íûé îòáåëèâàòåëü èñïîëüçóåòñÿ äëÿ
ïðî÷íûõ áåëûõ òêàíåé, äåëèêàòíûé — äëÿ
Woolmark Platinum Care
öâåòíûõ, ñèíòåòè÷åñêèõ òêàíåé è äëÿ øåðñòè.
Íå çàëèâàéòå îòáåëèâàòåëü â ÿ÷åéêó-äîçàòîð 4
Hotpoint Ariston óñòàíîâèë íîâûé ñòàíäàðò âû—
âûøå îòìåòêè «ìàêñ.» (ñìîòðèòå ðèñóíîê).
ñîêîýôôåêòèâàíîé ñòèðêè, ïðèçíàííûé Êîìïà-
Äëÿ îñóùåñòâëåíèÿ òîëüêî îòáåëèâàíèÿ íàëåéòå
íèåé Woolmark ñ ïðåñòèæíîé ìàðêîé Woolmark
îòáåëèâàòåëü â ÿ÷åéêó 4 è âûáåðèòå ïðîãðàììó
Platinum Care. Åñëè íà âàøåé ñòèðàëüíîé ìàøè-
Îïîëàñêèâàíèå
(äëÿ õ/á òêàíåé) èëè Äåëèêàòíîå
íå èìååòñÿ ëîãîòèï Woolmark Platinum Care, â íåé ìîæíî
îïîëàñêèâàíèå
(äëÿ ñèíòåòè÷åñêèõ òêàíåé).
ñòèðàòü ñ îòëè÷íûì ðåçóëüòàòîì øåðñòÿíûå èçäåëèÿ íà
ýòèêåòêå êîòîðûõ íàïèñàíî «òîëüêî ðó÷íàÿ ñòèðêà» (M.0303).
Íå èñïîëüçóéòå ìîþùèå ñðåäñòâà, ïðåäíàçíà÷åí-
Âûáåðèòå ïðîãðàììó 10 äëÿ âñåõ èçäåëèé ñ ýòèêåòêîé «Ðó÷-
íûå äëÿ ðó÷íîé ñòèðêè îáðàçóþùàÿñÿ îáèëüíàÿ
íàÿ ñòèðêà»(
) è èñïîëüçóéòå ñïåöèàëüíûå ñðåäñòâà
ïåíà óõóäøàåò ðåçóëüòàò ñòèðêè è ìîæåò âûâåñòè
äëÿ ñòèðêè øåðñòè (max 1 êã) .
èç ñòðîÿ ñòèðàëüíóþ ìàøèíó.
Оглавление
Аннотации для Стиральной Машиной Hotpoint-Ariston AVTL 104 в формате PDF
Топ 10 инструкций
Другие инструкции
· инструкция (руководство, документация) для стиральной машины Hotpoint-Ariston AVTL 104
·
8 декабря 2018 эмякечет
Файл: man1926-53809.pdf
Размер: 1.64 Мб
Открыть файл
792 просмотра
добавить комментарий