
Вопросы и ответы
Результаты, отвечающие критериям поиска, не найдены.
Советы по поиску и устранению неисправностей не найдены.
Введите минимум два символа.
Результаты, отвечающие критериям поиска, не найдены.
Не можете найти нужную информацию? Читайте раздел Вопросы и ответы.
User Guide

Contents
Exciting Features
New Device
Featured Usage Tips 1
Camera Tips 2
Manage Your Phone 7
New Device
Conguration 12
Gestures and Operations
Smart Recognition
Record Exciting Moments on Your Screen 16
Home Screen
Navigation Bar
Use Shortcut Switches to Quickly Enable Frequently Used Features 20
Notication Panel and Status Bar 20
Screen Lock and Unlock 23
Home Screen Management 24
Contacts
Managing Business Cards
Managing Contacts 29
Merging Third-party App Contacts 31
15
19
28
Dialling
Message
Camera
Basic Calling Functions
VoLTE 34
Use VoWi-Fi for a New Calling Experience 35
Basic Messaging Functions
Basic Camera Functions
AI camera disabled., Intelligent Photo Scene Identication 41
Use Portrait Mode to Take Stunning Portraits 42
Use AR lens to Shoot Interesting Photos 42
Use Wide Aperture Mode to Highlight Your Shooting Subjects 42
Panorama 43
Use 3D Panorama to Take 360-degree Photos 44
Pro Mode 44
33
36
38
Light Painting Mode 47
More Capture Modes 51
i

Gallery
Optimiser
Contents
Customise Highlights Albums 53
Photo Management 53
Use Optimise 57
Manage Mobile Data Usage 57
Calendar
Clock
Enable Smart Power-Saving Management to Optimise Power
Consumption
Add Email Accounts
Manage Email Accounts 59
Manage VIP Email Contacts 60
Create Smart Groups 60
Import Important Events to Calendar 60
Set Auto Response for Exchange Email 60
Navigate the Calendar
Import To-Dos to Keep Your Work Organised 61
View Global Holidays 61
Use the Clock
57
59
61
63
Notepad
Manage Your Notes to Keep Your Records in Order
Utilities
Use Recorder to Make Audio Notes
HUAWEI ID and Multiple Users
Set and Use Multiple Users
Device Connection
Connect Your Phone to Bluetooth Devices
NFC 70
Connecting USB Device 74
Huawei Share 75
Security and Privacy
Enrol Your Facial Information and Enable Face Unlock
Fingerprint 80
65
66
67
69
80
Enable or Disable Location Services 83
PrivateSpace 83
ii

Enable App Lock 87
Backup and Restoration
Data Backup: Prevent the Loss of Your Data 88
Reset Your Phone 88
Contents
Data Backup by Shared Folders to Your Computer or Home NAS
Devices
Wi-Fi and Network
Wi-Fi 90
Connecting to the Internet 92
Share Your Mobile Network with Other Devices 93
Apps and
Notications
App Twin: Log in to Two Social Media Accounts at Once
Sound and Display
Set Up Do Not Disturb Mode
Congure Your Sound Settings 96
Enable Eye Comfort Mode to Prevent Eye Strain 97
More Display Settings 97
Smart Assistance
89
95
96
Access Device Functions from Anywhere with Navigation Dock
System
Change the Input Method
Accessibility 100
General Settings 102
System Update
Performing an Online Update
Legal Notice
Legal Notice
Personal Information and Data Security 108
Obtaining help 108
99
100
105
106
iii
Exciting Features
Featured Usage Tips
HiVision: Start Scanning to Learn More
Want to stick to a healthy diet and keep t? Wish you could understand foreign logos, road signs, and
restaurant menus while travelling abroad? Want to quickly get product information for comparisons
and to make purchases faster? Use HiVision to get all these done fast and easily.
HiVision can provide you with the following features:
l Identify objects: Scan to identify road signs or famous paintings. A card with relevant information
about the geographical locations or the painting will be generated for you.
l Shop: Scan the objects you like to get purchase recommendations.
l Translate: Scan words or phrases in a foreign language for a quick online translation, making your
trip abroad a breeze.
l Scan codes: Scan QR codes or barcodes to add contacts or acquire product information.
This feature is only supported in some countries and regions.
Enrol Your Facial Information and Enable Face Unlock
Face unlock allows you to unlock your device quickly and securely, without the need of a password.
l Face unlock can only be used when the owner account is logged in. It is not supported by
PrivateSpace.
l Face unlock is not available if the lock screen password has not been entered for three or more
days in a row, or if your device has been remotely locked or restarted.
l When using Face unlock, keep your eyes open, and face your device straight on from a
distance of 20–50 cm (about 8–20 in.). In order to scan your face accurately, avoid using this
feature when you are in a dark environment or facing direct light.
l Currently, only one face can be enroled. Delete the current facial data to enrol again.
1 Open Settings. Go to Security & privacy > Face recognition and enter your lock screen
password.
If you haven’t set up a lock screen password, set one
rst. Besides the 6-digit PIN, you can set
up other types of passwords: Pattern, 4-digit PIN, Custom PIN, or Password.
2 Selecting Enable pick up to wake will allow the screen to turn on and unlock when you pick up
your device and hold it to your face. If you do not need this feature, leave it deselected. Touch Get
started, and enrol your face.
3 Face unlock modes:
l Direct unlock: Turn on your screen. Your device
your screen.
identies your facial features and unlocks
1
View all shortcuts
Touch to enable
this feature
Touch and hold to
enter Settings
Organize shortcuts
Exciting Features
l Slide to unlock: Turn on your screen. After your device identies your facial features, slide the
lock screen to unlock.
l Smart display of lock screen notications: Enable Slide to unlock and Smart lock screen
notications. On the lock screen, your device hides notication details and displays them only
after recognizing the owner’s face.
l Access App lock: Enable Access App lock to access App lock and locked apps using Face
unlock.
Access Device Functions from Anywhere with Navigation Dock
In order to close an app or return to the home screen, you must use the navigation bar at the bottom
of your device. You can enable the Navigation dock feature on your device to avoid using navigation
buttons and to comfortably operate your device with one hand.
Open Settings. Go to System > System navigation > Navigation dock and enable
Navigation dock. The Navigation dock will appear on the screen. You can then drag it to your
preferred location. The Navigation dock can perform the following actions:
l Back: Touch the Navigation dock once to go back one step, or touch it twice to go back two steps.
l Home: Touch and hold the Navigation dock and then release it to go to the home screen.
l View background apps: Touch and hold the Navigation dock and then swipe left or right to view
any apps that are running in the background.
Use Shortcut Switches to Quickly Enable Frequently Used Features
Want to quickly enable or disable mobile data or hotspot? You can enable frequently used features by
using shortcut switches.
Camera Tips
AI camera disabled., Intelligent Photo Scene Identication
AI camera disabled. can automatically identify your current photography scene and intelligently
adjust the colour and brightness of the photo, so you don’t need to repeatedly adjust your camera for
the perfect shot.
2

Exciting Features
AI camera disabled. is a preset camera feature on your device that intelligently identies your
current photography scene and automatically adjusts the colour and brightness of your photo to help
you achieve better effects.
AI camera disabled. provides you with the following features:
l Intelligently identies photographing scenes and improves photo effects: AI camera
disabled. supports multiple scenes, such as the stage, beach, blue sky, greenery, and text scenes.
After smart identication, AI camera disabled. automatically adjusts the colour and brightness of
the camera and recommends an optimal mode (such as the portrait, greenery, or text mode) to
improve photo effects.
l Enables automatically with various preset camera settings ready: When you turn on your
camera and enter Standard camera mode, AI camera disabled. will be enabled automatically with
camera settings readily congured according to the photography scene, which saves you the trouble
of repeated manual adjustments.
l AI camera disabled. is only available when you take photos using the rear camera.
l Master AI is automatically disabled when you switch to Portrait mode, Wide aperture mode,
or Moving picture mode.
Use Portrait Mode to Take Stunning Portraits
Make your
make every photo beautiful and memorable.
Go to Camera > Portrait, select one of the effects, then touch to take a portrait.
l Blurred effect: Touch the icon in the viewnder and select a blurred effect.
l Stage lighting: Touch the icon in the viewnder and select a stage lighting effect.
seles and group shots even more beautiful. Portrait mode provides you with options to
A light source (such as neon light or street light) in a relatively well-lit background will
contribute to a better blurred effect.
Taking a photo from afar will reduce the stage lighting effect.
Use 3D Panorama to Take 360-degree Photos
Try the 3D panorama function to capture a 360-degree view of a scene or person.
There are two shooting modes for the 3D panorama function:
l Shooting objects: Go to
Camera > More > 3D panorama. Touch and hold , then follow
the onscreen prompts to slowly move your Phone around your subject in one direction. Release
to stop shooting. After shooting, touch the camera thumbnail, and then touch
above the
photo to generate a 3D panoramic photo.
l Shooting scenery: Go to Camera > More > 3D panorama. Touch and hold , then follow
the onscreen prompts to slowly move your Phone around your subject in one direction. Release
3
Exciting Features
to stop shooting. After shooting, touch the camera thumbnail, and then touch
photo to generate a 3D panoramic photo.
After a 3D panorama has been generated, you can tilt your Phone or drag the photo to view the 3D
effect.
above the
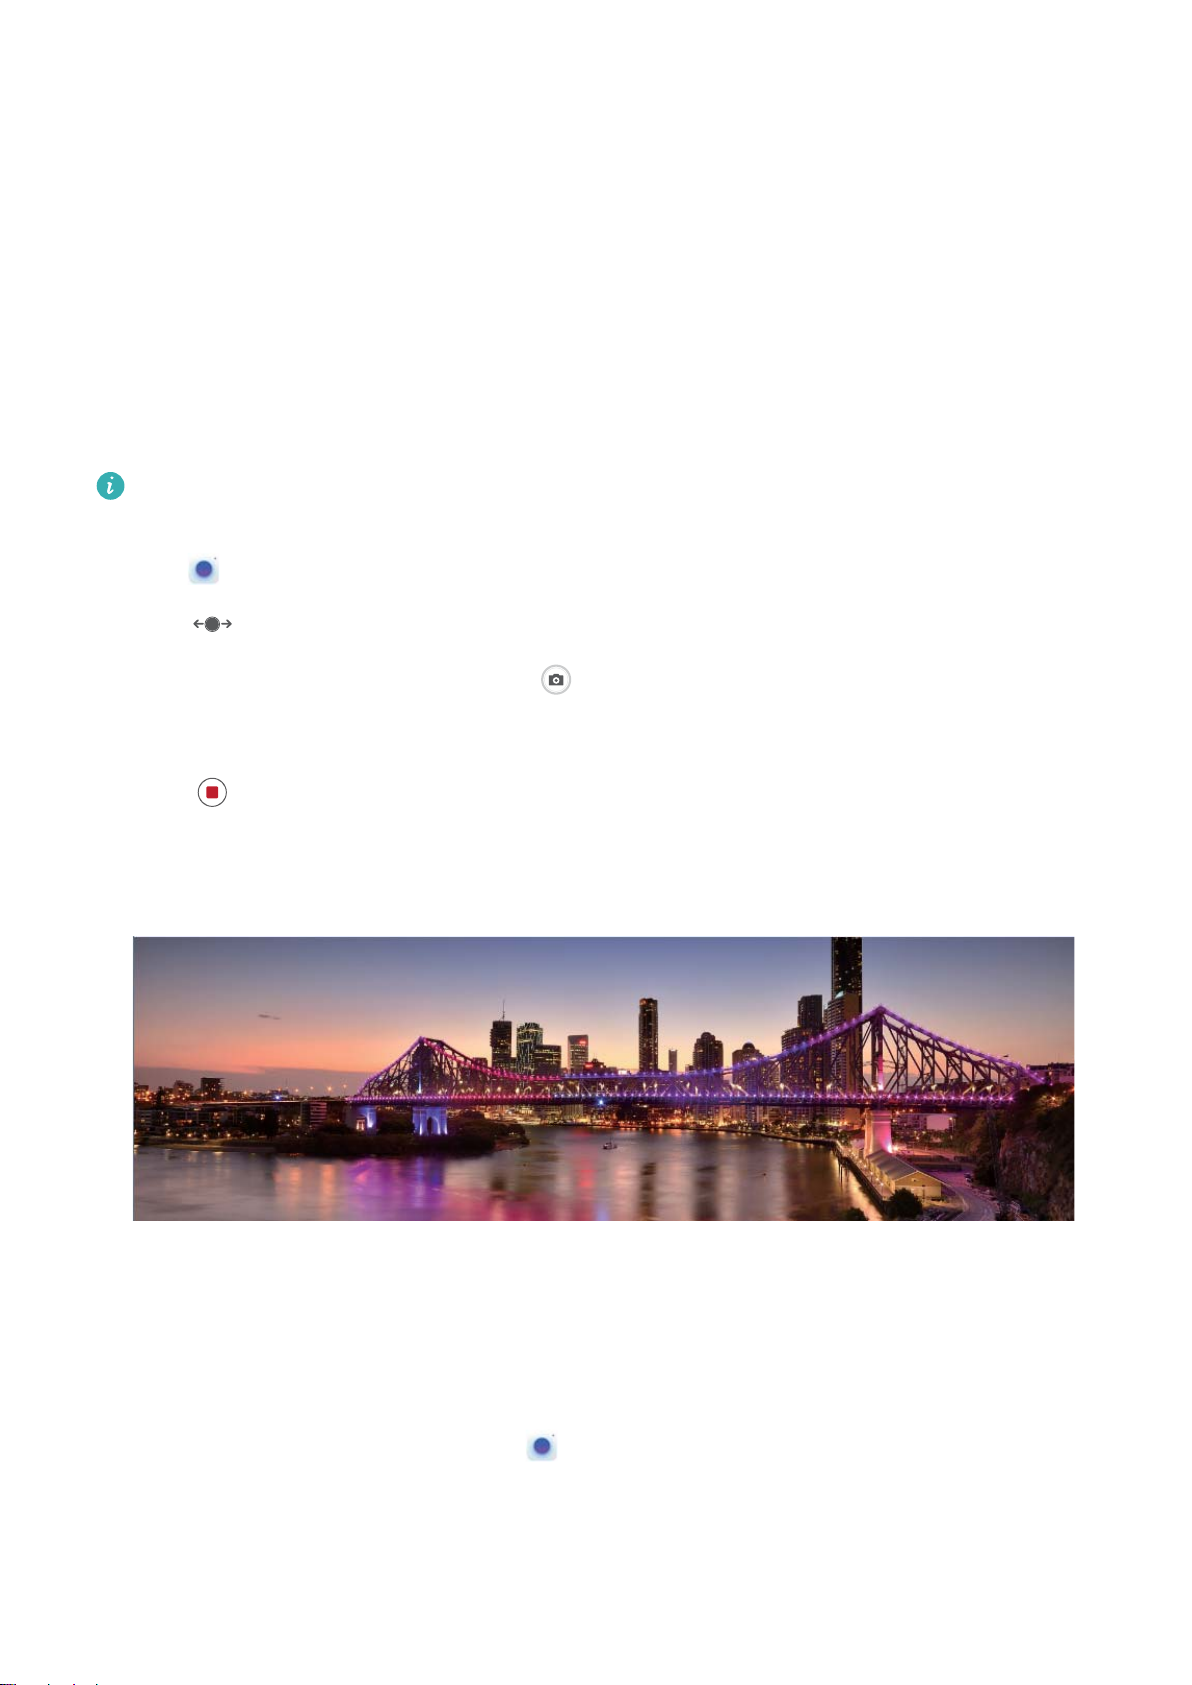
Use Panorama Mode to Take Panoramic Photos
Panoramas provide a wider viewing angle than ordinary photos, letting you take sweeping landscape
shots.
To capture a panorama shot, the camera takes multiple photos of objects within our visual eld and
stitches them together into a single photo.
When taking a panorama,
and try to avoid backgrounds that are all in one colour.
nd a wide, open space that is some distance away from the subject
1 Go to Camera > More > Panorama.
2 Touch at the bottom of the screen to congure the shooting direction.
3 Hold your Phone steady, and then touch to start shooting. Slowly move the Phone in the
direction indicated, holding the device steady and ensuring that the arrow stays level with the
centre line.
4 Touch when you are nished. The camera will automatically stitch the photos together to
create a panorama.
Custom Shooting Modes
Want to discover new ways of using your camera besides the preset functions? You can download or
delete shooting modes based on your needs.
Download more shooting modes: Open Camera > More > Download. Select the shooting
modes to download, and touch ADD.
Update shooting modes: To update shooting modes, go to the More screen. The shooting modes
with available updates will have red dots next to them. You can follow the onscreen prompts to
update them.
4
Exciting Features
Delete shooting modes: Go to More > , and touch to delete unneeded shooting modes.
To ensure that Camera works normally, preset shooting modes cannot be deleted.
Use AR lens to Shoot Interesting Photos
Use AR lens to make your photos fun and stand out.
Go to Camera > AR lens.
There are several effects to choose from to make your photos stand out:
l 3D Qmoji: Touch 3D Qmoji, and select an animated Qmoji. The Qmoji will then mimic and act out
your facial expressions and actions accordingly. Touch to record, or touch
, then touch and
hold to create your own personalised Qmoji.
l Add makeup effects to a photo or video: Touch Effects to select your desired dynamic sticker.
Then touch to take a photo or touch to shoot a video with the sticker. Some animated
stickers have sound effects that will be automatically added to the video.
Use Pro Mode to Take Scenic Photos
Want to make your scenic photos more vibrant and interesting? Use Pro mode to take unique and
personalised scenic photos.
Go to Camera > More > Pro to enter Pro mode.
Select a metering mode based on the shooting subject: Touch , and select a metering mode.
Metering Mode
Matrix Broad landscapes and seas
Centre The subject is in the centre of the picture, and
Application Scenario
stands out from the background.
Spot The subject to be highlighted in the picture is
relatively small, such as a ower or a tree.
Adjust brightness based on the shooting environment:
l Adjust ISO: Touch
, and drag the ISO slider to adjust its value.
To avoid excessive noise, the recommended ISO is below 400. The recommended ISO for the
daytime is between 100 and 200 and around 400 for night scenes.
l Adjust the shutter speed: Touch (shutter speed), and drag the shutter speed slider to your
desired speed.
The recommended shutter speed for static scenes (such as mountains) is between 1/80 and
1/125, and faster for moving subjects (such as waves). For best results, use a tripod when
shooting a moving subject.
5
Exciting Features
l Adjust exposure compensation: Touch
Adjust AWB: Touch
l When shooting under sunlight, you can select . In a weak light environment, you can select
, and drag the AWB slider to your desired value.
, and drag the EV slider to your desired value.
.
l Touch
to adjust the colour temperature. If you want to give your photo a cosy, nostalgic
tone, increase the K value. For a cold, calm or futuristic tone, lower the K value.
Adjust AF based on the shooting subject: Touch
Focusing Mode
Application Scenario
, and drag the AF slider to your desired value.
AF-S mode Static scenes (such as mountains)
AF-C mode Moving scenes (such as owing water and waves)
MF mode Protruding objects (such as a close-up of a ower)
Hold your device steady when shooting: Touch and enable Horizontal level. After this
feature is enabled, two horizontal guiding lines will appear on the viewnder. When the dotted line
overlaps with the solid line, the camera is horizontally aligned.
l Some options in Pro mode may change after you modify settings.
l The aforementioned recommended settings are for reference only. You may adjust them based
on the actual usage conditions to achieve your desired effect.
Use Pro Mode to Take Portraits
Want to take more professional portraits? Pro mode allows you to adjust your camera settings to
shoot professional-level portraits.
Go to Camera > More > Pro to enable Pro mode.
Select a Metering mode: or is recommended for taking portraits. Line up your subjects
(their faces for example) so they are in the centre of the
desired Metering mode.
viewnder. Then touch to select your
Adjust brightness based on the ambient light
l Adjust ISO: To avoid excessive noises, it is recommended that you use a lower ISO when taking
portraits. You should also adjust the ISO based on the actual lighting conditions. To do this, touch
, and slide it left or right to adjust the value.
Good for
Recommended ISO
Outdoors Between 100 and 200
Indoors Around 400
6
Exciting Features
Good for Recommended ISO
Night scenes Between 400 and 800
l Adjust shutter speed: Choose a slower shutter speed if the ambient light is low and a faster one
when it’s stronger. The recommended shutter speed for static portraits is between 1/80 and 1/125.
To shoot moving subjects, select a shutter speed of 1/125 or above. Touch (shutter speed),
slide until your desired speed is in the centre.
l Adjust EV compensation: Increase the EV compensation if the subjects or background is in dim
light, and decrease the EV compensation if the light is strong. Touch
, and slide until the desired
value is in the centre.
Adjust AWB: Select AWB depending on the lighting conditions. When shooting in sunlight, you can
select , and for gloomy days, select . Touch
, and slide until the desired value is in the
centre.
Adjust focus: To make your subject stand out, it is recommended that you use manual focus (MF)
when shooting portraits. When taking a close-up shot, touch the focus on the shot in the viewnder
to adjust the focus accordingly.
l Some parameters in Pro mode affect each other, so adjusting one may cause some unwanted
changes. Keep this in mind when setting up for your perfect shot.
l The recommended settings above are for reference only. You should adjust them based on the
actual scene for best shot.
Manage Your Phone
Use Password Vault
Password vault saves and lls in your passwords, allowing you to log in to apps on your device more
conveniently and securely.
Enable or disable Password vault: Password vault is enabled by default. After you update your
device, enable Password vault by performing the following operations:
1 Enter the lock screen password to access the Password vault settings. Open
Settings, and go
to Security & privacy > Password vault.
2 Enter your lock screen password to access the Password vault screen.
3 Enable Password vault. When you log in to an app for the rst time or after logging out, select
SAVE, and your username and password will be saved. Next time you log in, use the method you
picked, for example Face unlock, to automatically ll in your username and password to log in to
the app.
4 Enable or disable
you can use your face, ngerprint, or lock screen password to ll in the password when you log in.
If this feature is disabled, your username and password must be entered manually.
Autoll settings for individual apps. If the autoll feature is enabled for an app,
7
Exciting Features
Enable App Lock
App lock allows you to set a password for your important apps. Once you restart your device or
unlock the screen, you will be asked to enter your App lock password when opening these apps. App
lock adds an extra layer of protection for your private information and prevents unauthorised access
to important apps on your device.
Enable App lock: Open Settings. Go to Security & privacy > App lock. When you enable App
lock for the rst time, set the password and password protection question then enter App lock. On
the App lock screen, enable App lock for the apps you want to protect. When accessing a locked app
for the rst time, you need to enter your password. If you forget your password, touch Forgot
password, enter the answer to the password protection question, and reset your password. If you
have not set up password protection, the Forgot password option is not available.
If you have set up a
lock for the rst time, follow the onscreen instructions to link your ngerprint and face with App
lock for easier app unlocking.
Modify your App lock password and password protection: Touch on the App lock screen,
then touch Change password or Change password protection to modify your App lock password
or password protection.
If you enter the wrong password
remain locked for one minute. Try again after one minute. If you enter the wrong password
another three times in a row, you will need to wait 10 minutes to try unlocking again.
ngerprint and facial recognition to unlock your device and are opening App
ve times in a row while logging in to App lock, your device will
Enable PrivateSpace
Do you worry that potentially embarrassing information might be seen by your friends and co-workers
when you are showing them photos and other things on your Phone? PrivateSpace lets you store
private information in a hidden space within your device that can only be accessed with your
ngerprint or password.
You can add up to three users to Phone and PrivateSpace on your Users. If you have already
added three users under Settings > Users & accounts > Users > Add user, you cannot add
more users to PrivateSpace.
Enable PrivateSpace: If you are using PrivateSpace for the rst time, open Settings, go to
Security & privacy > PrivateSpace > Enable, and follow the onscreen instructions to create your
PrivateSpace.
You can only create one PrivateSpace.
Quickly switch between MainSpace and PrivateSpace: From the lock screen, you can quickly
switch between spaces using your ngerprint or password. After you restart your Phone, you are
required to rst enter the MainSpace using your password. You can then switch between spaces from
your lock screen.
8

Exciting Features
Enter PrivateSpace: You can enter your PrivateSpace directly from the lock screen using your
ngerprint or password. Alternatively, open Settings in MainSpace, and go to Security &
privacy > PrivateSpace > Log in to enter your PrivateSpace.
Exit PrivateSpace: When you exit your PrivateSpace, all system memory used by the PrivateSpace
will be freed. You can still switch back to your PrivateSpace whenever you need it. To exit
PrivateSpace, open Settings, and go to Security & privacy > PrivateSpace > Exit.
Delete PrivateSpace: Deleting your PrivateSpace will permanently delete all apps and data stored
within your PrivateSpace and this data will be unable to be restored. You can delete your PrivateSpace
in the following ways:
l
From the MainSpace, open
touch
l From the PrivateSpace, open Settings, then go to Security & privacy > PrivateSpace >
> Delete PrivateSpace.
Settings, then go to Security & privacy > PrivateSpace and
Delete.
Set Your Home Screen Wallpaper
Tired of default wallpapers? Set a photo you like as your home screen wallpaper to personalise your
home screen.
Open Settings, and then go to Home screen & wallpaper > Wallpaper. You can:
Set a picture as your home screen wallpaper: Touch Gallery or select a preset wallpaper in your
device, and follow the onscreen instructions to select Lock screen, Home screen or Both.
Set a photo as your wallpaper from Gallery: Have a great photo you want to set as your
wallpaper? In Gallery, open the photo that you like, go to > Set as > Wallpaper, and follow
the onscreen instructions to set the photo as your home screen wallpaper.
Manage Your Home Screen Widgets
Want to quickly manage widgets on your home screen? You can add, move or delete home screen
widgets to tidy up your home screen and make it easier to use.
Add widgets: Touch and hold an empty area on the home screen to enter home screen editing
mode. Touch Widgets, touch and hold a widget and drag it to an empty area on the home screen, or
touch the widget you want.
9
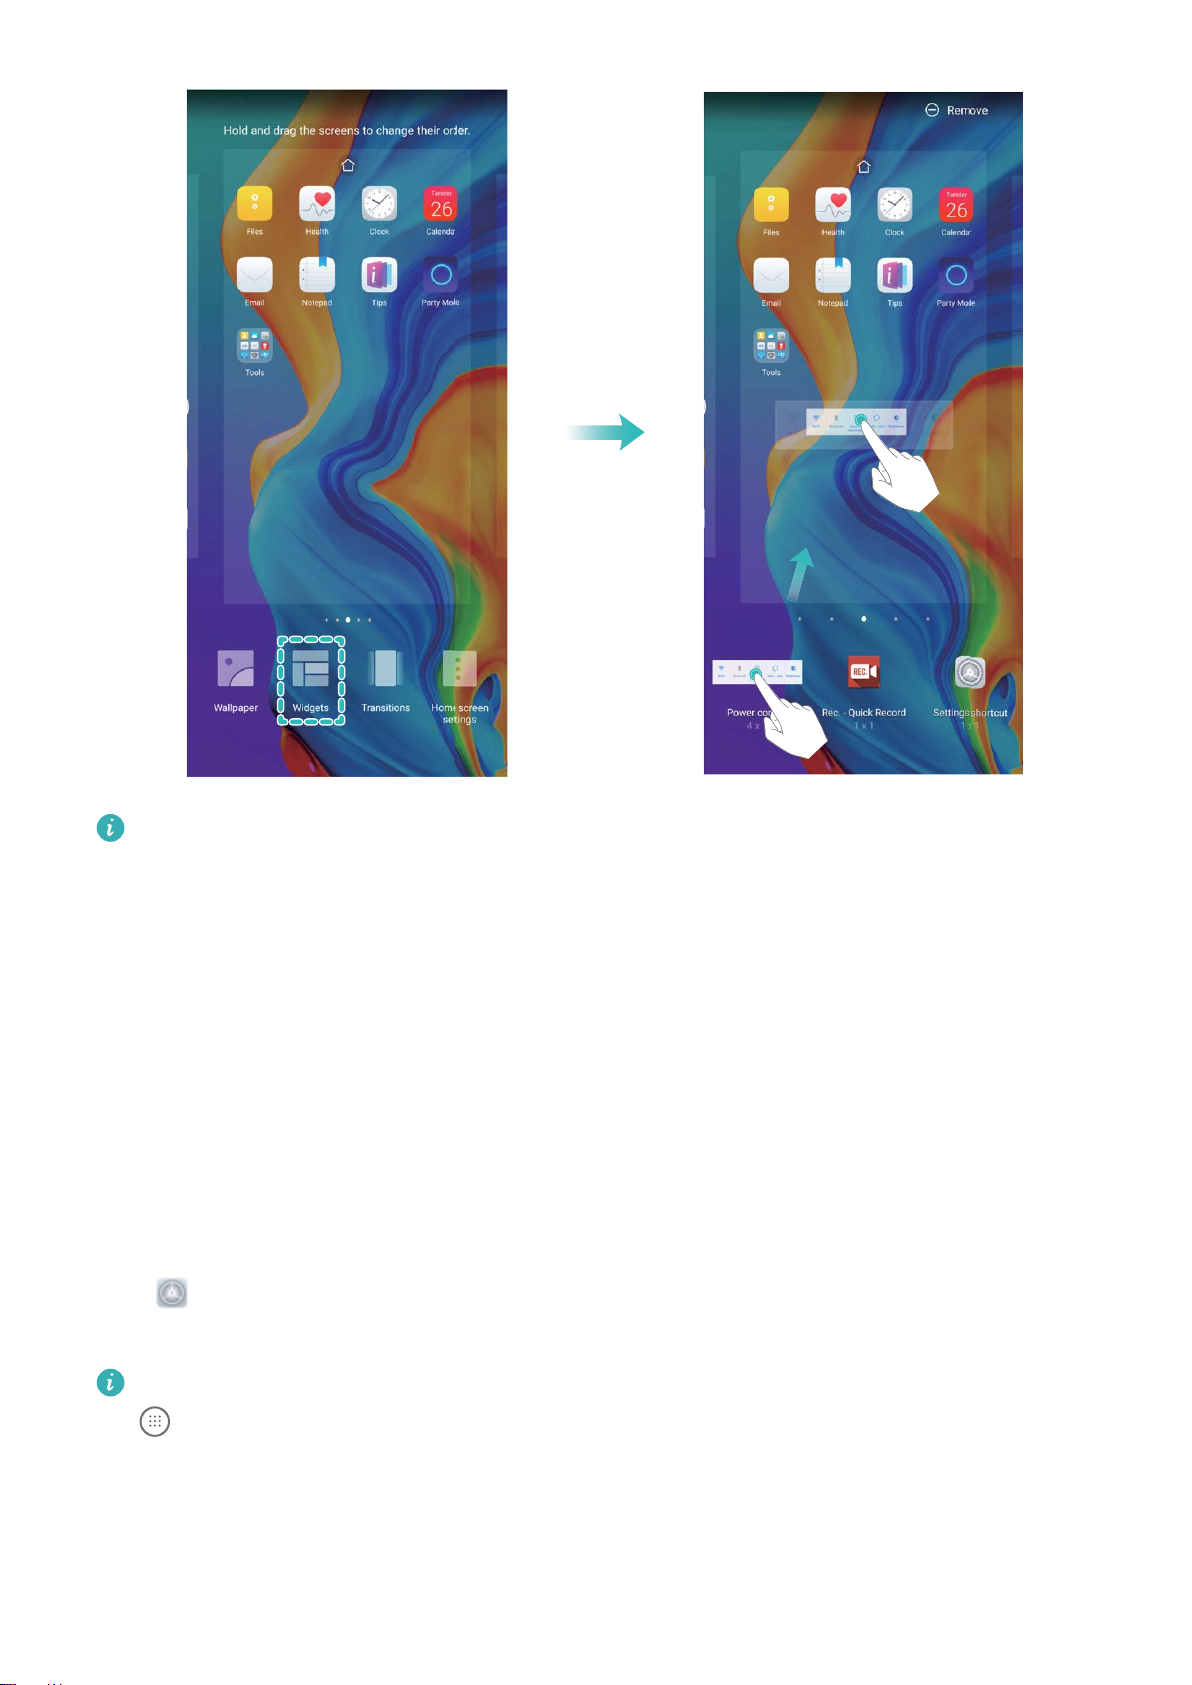
Exciting Features
Check that there are enough empty spaces on the home screen for the widget. If there is not
enough space, add an empty screen page or free up some space on the current home screen
page.
Delete widgets: Touch and hold a widget on the home screen until your Phone vibrates, and then
select Remove.
Move widgets: Touch and hold a widget on the home screen until your Phone vibrates. Drag the
widget to any position on the screen.
Use App Drawer to Store Apps
Want to store your apps in one location on your home screen to make your home screen look
cleaner? You can enable app drawer on your home screen to store all your apps and free up space on
your home screen.
Open Settings, go to Home screen & wallpaper > Home screen style, and select Drawer. If
you want to switch back to a standard home screen, select Standard.
Add an app icon from app drawer to the home screen
: After you enable app drawer, touch
on the home screen to enter the app list. From the app list, touch and hold the app icon that
you want to add until your Phone vibrates, and then drag it to the desired position on the home
screen.
10

Exciting Features
Enable TalkBack to Have Onscreen Content Read Aloud
Your device reads aloud content on the screen that you touch, select, or activate, helping you interact
with your device when you can’t read content on your screen clearly.
1 Open Settings and go to Smart assistance > Accessibility > TalkBack > to enter the
TalkBack settings screen.
2 Enable TalkBack and touch OK. Your device will launch a tutorial when you enable TalkBack for
the
rst time. If you need to listen to the tutorial again, touch to enter the TalkBack settings
screen, and launch the tutorial.
Touch and enable Explore by touch. Your device will read aloud content that you touch.
3
You may have enabled TalkBack by accident. To disable TalkBack, press and hold the Power button
until your device vibrates, then touch the screen with two
ngers for at least three seconds.
11
New Device
New Device Conguration
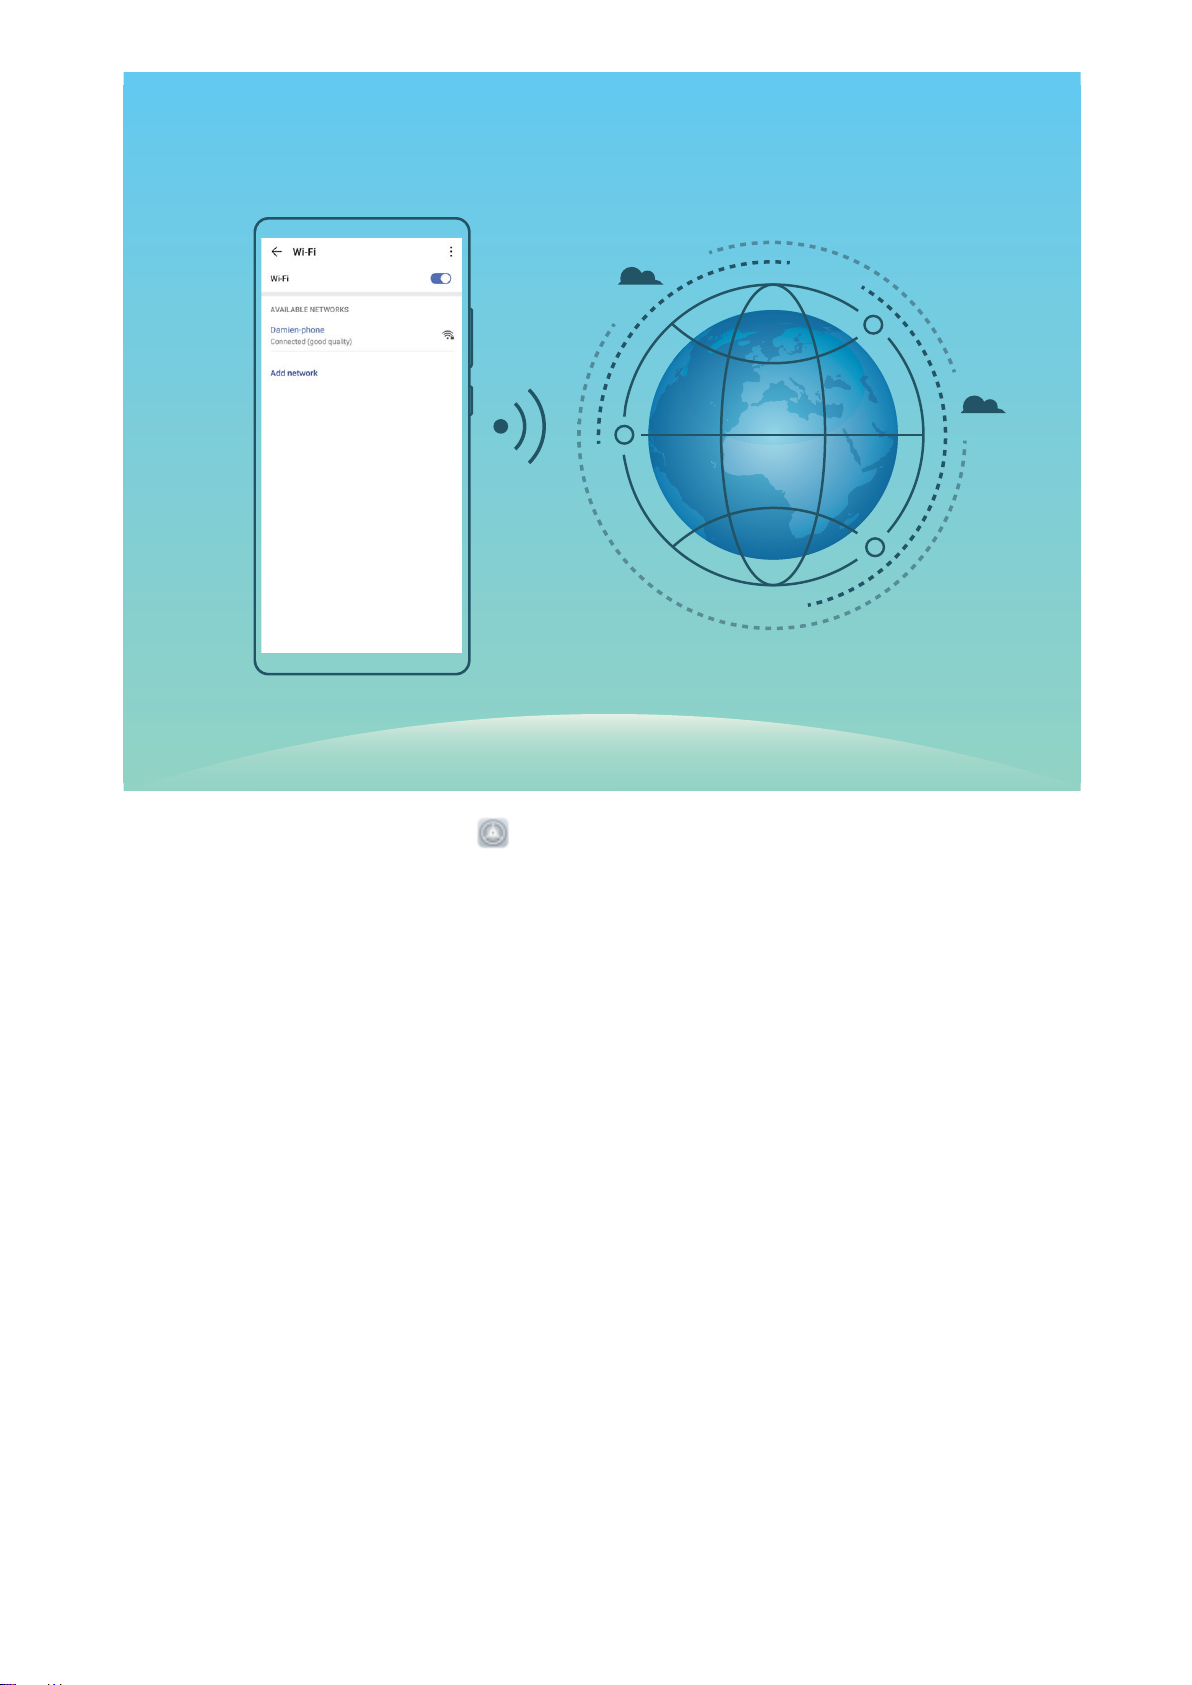
Connecting to the Internet
Connect to Wi-Fi networks effortlessly with your device.
Connecting to a Wi-Fi network
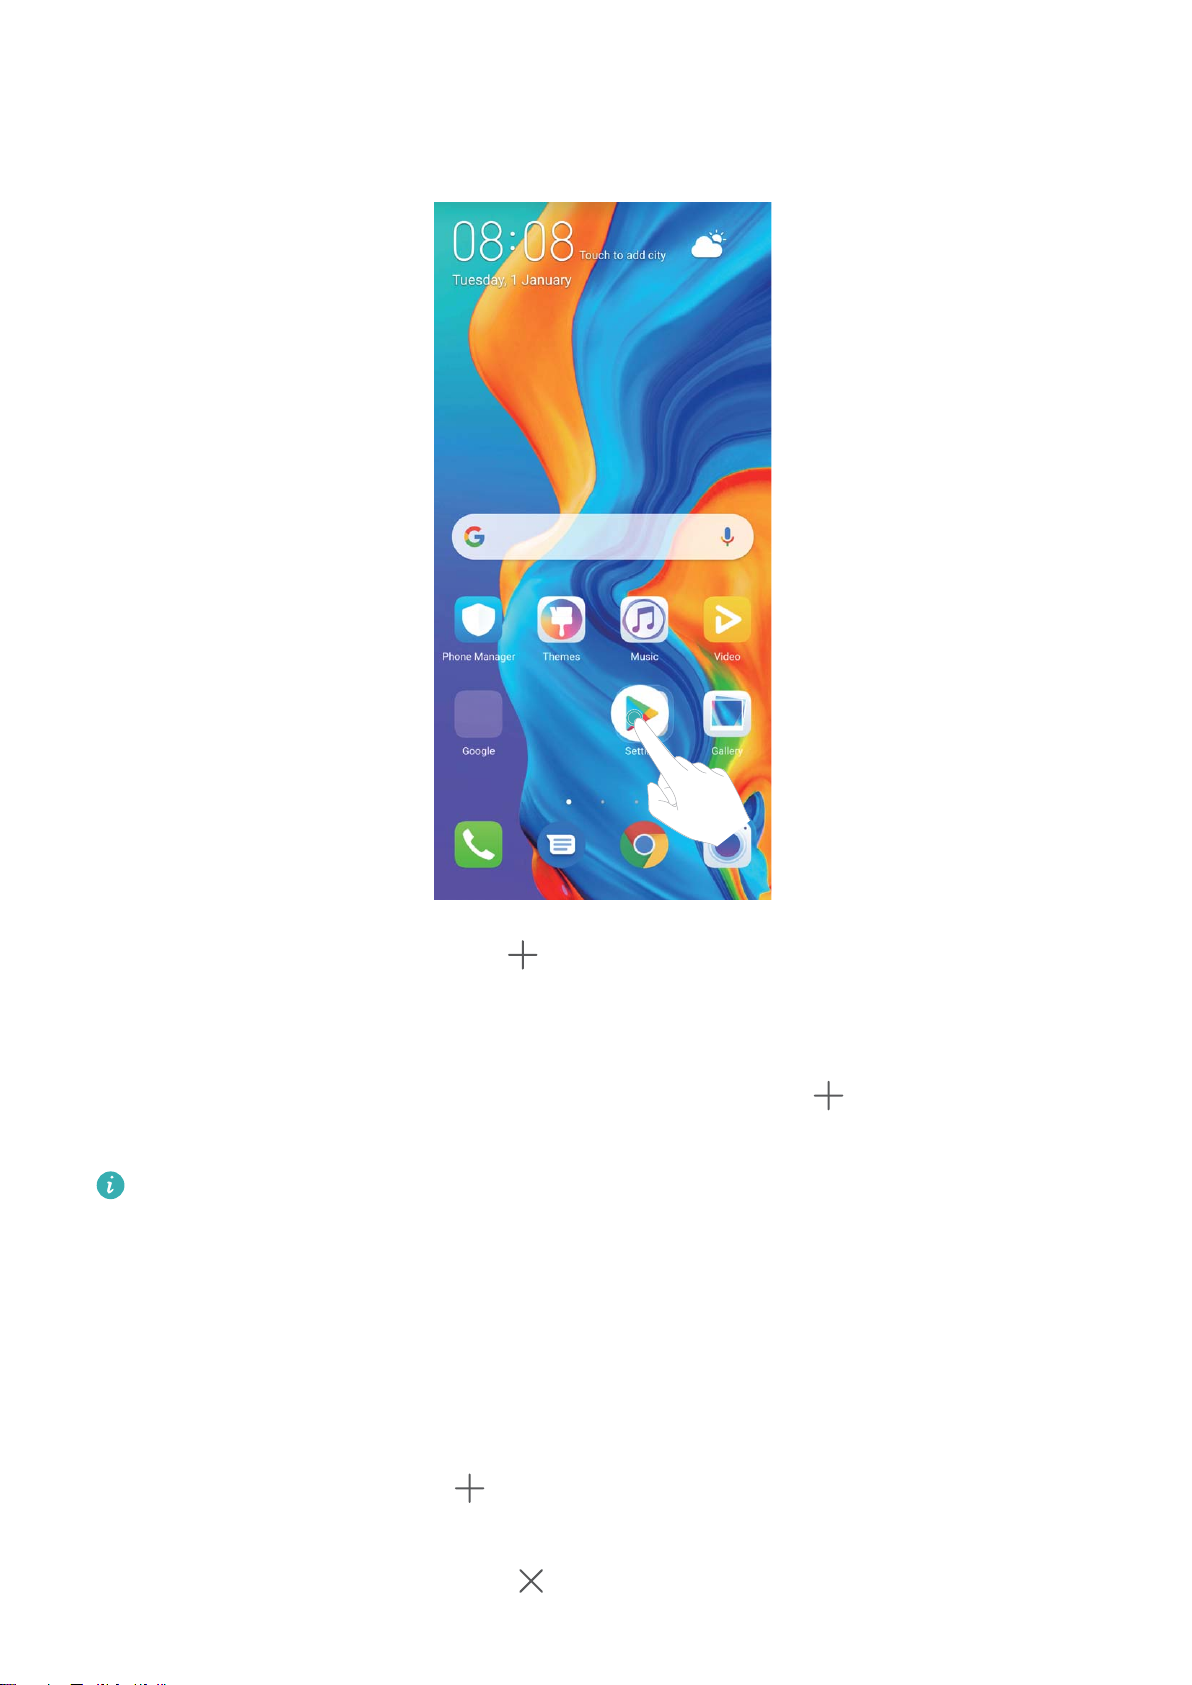
1 Swipe down from the status bar to open the notication panel.
2 Touch and hold to open the Wi-Fi settings screen.
3 Switch on Wi-Fi. Your device will list all available Wi-Fi networks at your location.
4 Select the Wi-Fi network you want to connect to. If you select an encrypted network, you will also
need to enter the Wi-Fi password.
Connecting using mobile data
Before using mobile data, ensure that you have a data plan with your network provider to avoid
incurring excessive data charges.
1 Swipe down from the status bar to open the notication panel.
2 Touch to enable mobile data.
To save battery power and reduce data usage, disable your mobile data connection when you
don’t need it.
Enrol Your Facial Information and Enable Face Unlock
Face unlock allows you to unlock your device quickly and securely, without the need of a password.
l Face unlock can only be used when the owner account is logged in. It is not supported by
PrivateSpace.
l Face unlock is not available if the lock screen password has not been entered for three or more
days in a row, or if your device has been remotely locked or restarted.
l When using Face unlock, keep your eyes open, and face your device straight on from a
distance of 20–50 cm (about 8–20 in.). In order to scan your face accurately, avoid using this
feature when you are in a dark environment or facing direct light.
l Currently, only one face can be enroled. Delete the current facial data to enrol again.
1 Open Settings. Go to Security & privacy > Face recognition and enter your lock screen
password.
If you haven’t set up a lock screen password, set one
up other types of passwords: Pattern, 4-digit PIN, Custom PIN, or Password.
rst. Besides the 6-digit PIN, you can set
12

New Device
2 Selecting Enable pick up to wake will allow the screen to turn on and unlock when you pick up
your device and hold it to your face. If you do not need this feature, leave it deselected. Touch Get
started, and enrol your face.
3 Face unlock modes:
l Direct unlock: Turn on your screen. Your device identies your facial features and unlocks
your screen.
l Slide to unlock: Turn on your screen. After your device
lock screen to unlock.
l Smart display of lock screen notications: Enable Slide to unlock and Smart lock screen
notications. On the lock screen, your device hides notication details and displays them only
after recognizing the owner’s face.
l Access App lock: Enable Access App lock to access App lock and locked apps using Face
unlock.
identies your facial features, slide the
Enrol a Fingerprint
You can enrol a ngerprint on your Phone and then use your ngerprint to unlock your screen or
access your Safe or App Lock without a password.
l Fingerprint unlocking is only available when your unlock method is set to Pattern, PIN or
Password. You will be required to unlock your Phone using the screen unlock password after
the device is restarted or if your
l Before enrolling a ngerprint, make sure your nger is clean and dry.
ngerprint is not recognised.
1 Open Settings.
2 Go to Security & privacy > Fingerprint ID > Fingerprint management > Change unlock
method, select Pattern, 4-digit PIN, Custom PIN or Password, and then follow the onscreen
instructions to set an unlock password.
3 Once you have set an unlock password, touch New ngerprint to enrol a ngerprint.
4 Place your ngertip on the ngerprint sensor. Press down lightly on the sensor until your device
vibrates. Repeat this step using different parts of your ngertip.
5 After enrolment is complete, touch OK.
To unlock the screen, simply place your
Connect to Wi-Fi
By connecting your device to a Wi-Fi network, you can effectively save mobile data.
To avoid potential security risks (such as unauthorised access to your personal data and
information), please exercise caution when connecting to a public Wi-Fi network.
ngertip on the ngerprint sensor.
nancial
13
New Device
Connect to a Wi-Fi Network: Open Settings, go to Wireless & networks > Wi-Fi, and enable
Wi-Fi. Touch a Wi-Fi network to access it, and enter the network password or complete the
authentication if required. Alternatively, you can scroll to the bottom of the menu, touch Add
network, and follow the onscreen instructions to add a network hotspot by entering its name and
password.
14
Gestures and Operations
Smart Recognition
HiVision: Start Scanning to Learn More
Want to stick to a healthy diet and keep t? Wish you could understand foreign logos, road signs, and
restaurant menus while travelling abroad? Want to quickly get product information for comparisons
and to make purchases faster? Use HiVision to get all these done fast and easily.
HiVision can provide you with the following features:
l Identify objects: Scan to identify road signs or famous paintings. A card with relevant information
about the geographical locations or the painting will be generated for you.
l Shop: Scan the objects you like to get purchase recommendations.
l Translate: Scan words or phrases in a foreign language for a quick online translation, making your
trip abroad a breeze.
l Scan codes: Scan QR codes or barcodes to add contacts or acquire product information.
This feature is only supported in some countries and regions.
Scan QR Codes and Barcodes
Scan QR codes and barcodes to compare prices, obtain information, add contacts, and more.
This feature requires an Internet connection. Connect to a Wi-Fi network to avoid incurring
unnecessary data charges.
Scan QR codes or barcodes: Once your device is unlocked, swipe down on the home screen, and
touch to open HiVision. On the HiVision screen, touch and place the QR code or barcode
within the scan frame to acquire information. From the results screen, you can:
l Touch to copy the information to the clipboard.
l If the QR code contains contact information, touch to add the information to your Contacts.
Scan to Translate Effortlessly
HiVision can help you quickly translate foreign text.
l
This feature requires an Internet connection. Connect to a Wi-Fi network to avoid incurring
unnecessary data charges.
l This translation feature currently supports Chinese, English, Japanese, Korean, French, Russian,
Spanish, Italian, German, and Portuguese.
1 Once your device is unlocked, swipe down from the centre of the home screen and touch to
open HiVision.
2 On the HiVision screen, touch , select the source and target languages, frame the text in the
viewnder, and wait for it to be translated.
15
Gestures and Operations
Scan Products
When you encounter an unknown item, you want to buy but can’t nd it. After scanning goods, you
can get the purchase recommendations of similar items, which is convenient for you to buy favourite
things.
This feature requires an Internet connection. Connect to a Wi-Fi network to avoid incurring
unnecessary data charges.
1 Once your device is unlocked, swipe down from the centre of the home screen, and touch to
open HiVision.
2 On the HiVision screen, touch to align your device with the item you want to purchase. The
system will automatically scan and recommend similar items.
Scan to Instantly Recognise Objects
Ever just start wondering about key landmarks during a journey and favourite paintings in an
exhibition? Scan a picture or an object in question using HiVision to nd out more.
This feature requires an Internet connection. Connect to a Wi-Fi network to avoid incurring
unnecessary data charges.
HiVision opens your world to limitless information and fun. Using painting scanning as an example,
perform the following to try it out:
1 Once your device is unlocked, swipe down from the middle part of the home screen, and touch
to open HiVision.
2 On the HiVision screen, touch , and make sure the painting is centred in the frame. HiVision
will automatically identify the painting and generate detailed information cards containing painting
name and the author.
Record Exciting Moments on Your Screen
The screen recording feature comes in handy when you are making tutorial videos or if you want to
record your gaming exploits to share with your friends using your Phone.
l
Screen recording will end if you make or answer a call.
l If you are using the sound recording function of your Phone before screen recording, Enable
microphone is disabled by default.
l If you have enabled Enable microphone, your device will record all ambient sounds in the
recording. It is recommended that you record your screen in a quiet environment.
Use shortcut to start recording: Swipe down from the status bar to open the notication panel,
and then touch > to start recording the screen. You can enable or disable Enable
microphone based on your needs. To end the recording, touch in the upper left corner of the
screen.
16
Gestures and Operations
Use key combination to start recording: Simultaneously press and hold the Power button and the
Volume up button to begin recording. You can enable or disable Enable microphone based on your
needs. To end the recording, simultaneously press and hold the Power button and the Volume up
button again.
17

You can view your screen recordings in Gallery.
Gestures and Operations
18

Home Screen
Navigation Bar
Congure Your Navigation Bar Layout
Using the navigation bar, you can conveniently access the home screen, return to the previous page,
exit an app, or view recent apps used.
To congure your navigation bar layout, open Settings, then go to System > System
navigation > Three-key navigation > Settings, and select the navigation key combination and
enable or disable Hide navigation keys based on your usage habits.
l Back key: Touch to return to the previous page or exit an app. Touch to close the onscreen
keyboard when inputting text.
l
l Recent key: Touch to open a list of recently used apps. Touch and hold to enable split screen
l Downward swipe notication key: Touch to open the notication panel.
Home key: Touch to return to the home screen. Touch and hold to display the Google Assistant
icon and swipe upwards on the icon to enable Google Assistant.
mode.
Use the Recent Key to Manage Background Apps
If you want to quickly switch to a recently used app, you might try using the Recent key. The Recent
key can help you quickly switch between several recently used apps. You can also use it to close your
background apps to increase your Phone’s operating speed.
Touch
l View recently used apps: Recently used apps will be displayed on the screen and you can check
. You can view, switch to, close, or lock recently used background apps:
them by swiping left or right.
19
View all shortcuts
Touch to enable
this feature
Touch and hold to
enter Settings
Organize shortcuts
Home Screen
l Switch to a recently used app: Swipe left or right on the screen to nd the app you want to use,
and touch the app tab.
l Close an app: Swipe up on an app tab to close the corresponding app.
l Close all apps: Touch to close all apps.
Navigate with Gestures
Navigate with gestures to quickly go back to the previous screen, return to the home screen, or view
recent tasks.
Open Settings, go to System > System navigation, and select Gestures. From here you can:
l Go back to the previous screen: Swipe inward from one side of the screen.
l Return to the home screen: Swipe upwards from the bottom of the screen.
l View recent tasks: Swipe upwards from the bottom of the screen and hold. Swipe up on an app’s
preview to close the app, or touch to close all apps.
l Enable Google Assistant: Touch Settings, and enable Google Assistant. Swipe upwards from
either bottom corner of the screen to enable Google Assistant.
Use Shortcut Switches to Quickly Enable Frequently
Used Features
Want to quickly enable or disable mobile data or hotspot? You can enable frequently used features by
using shortcut switches.
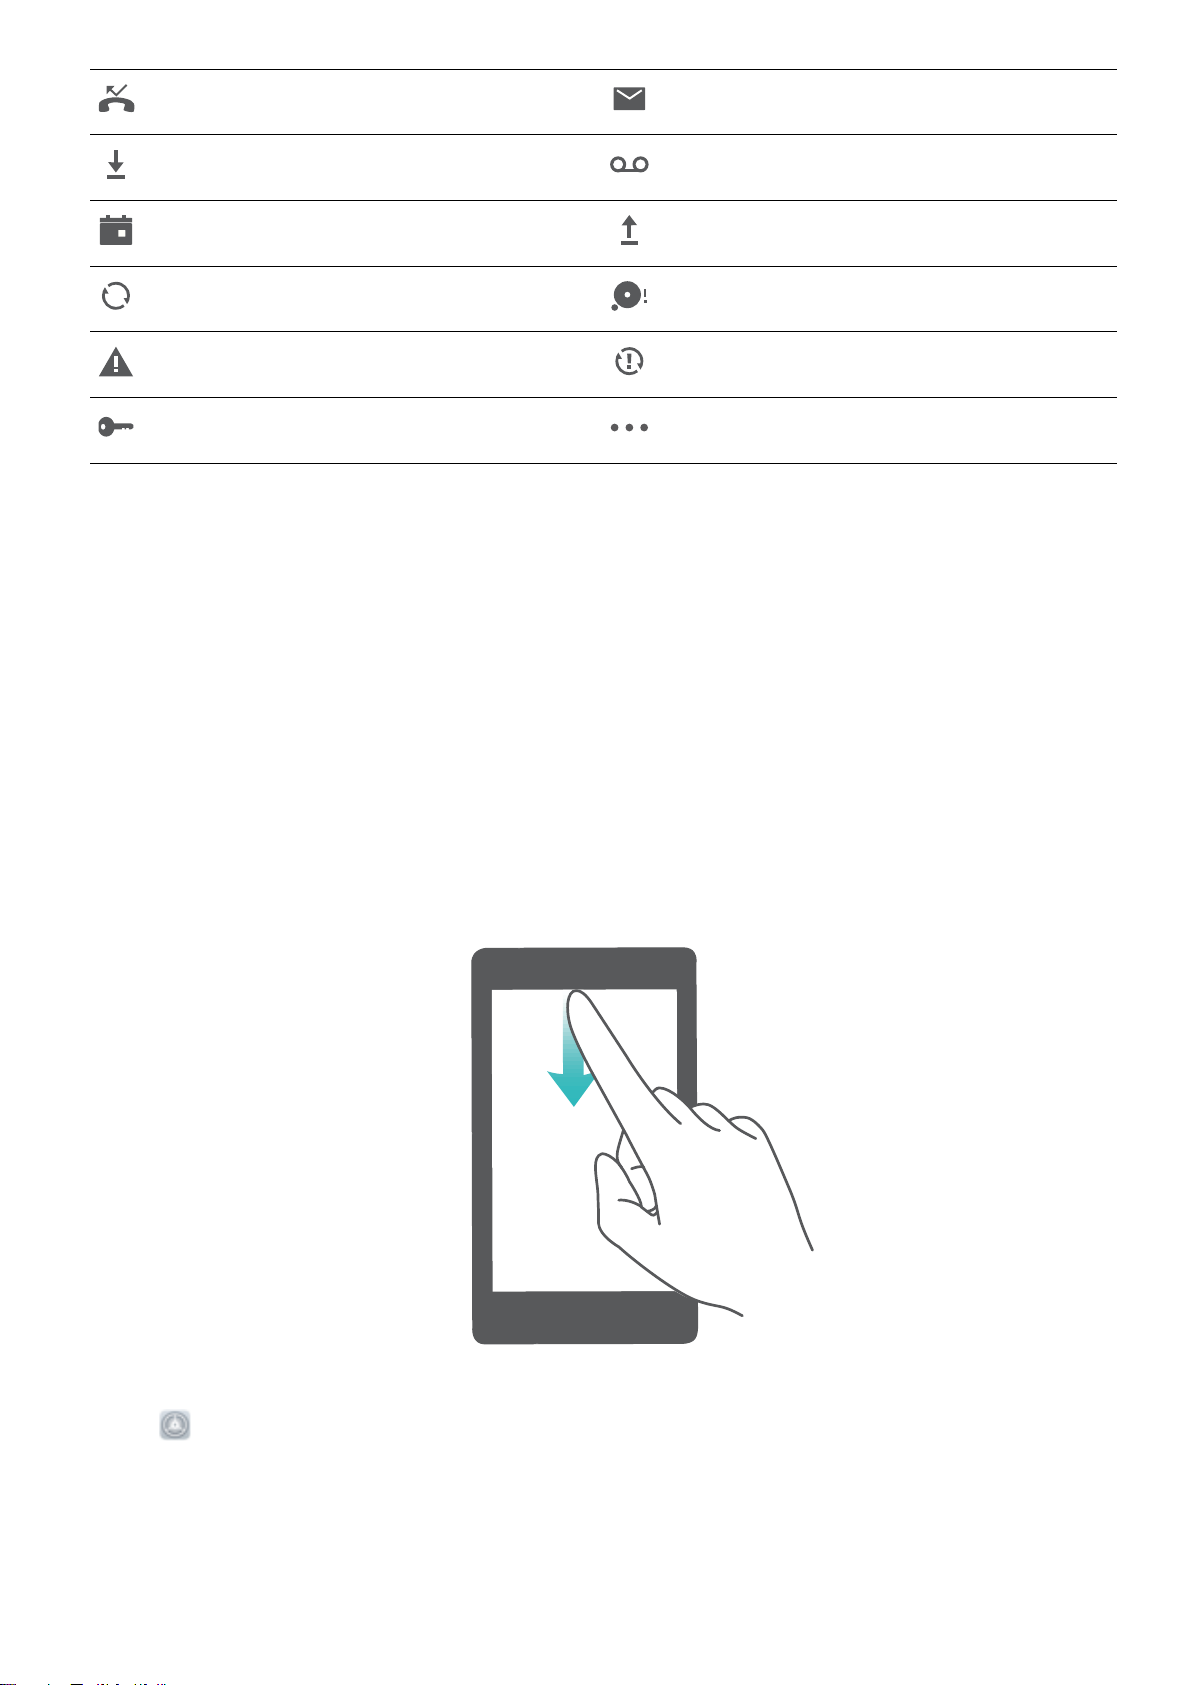
Notication Panel and Status Bar
Notication and Status Icons and Descriptions
The icons on the status bar give you a quick overview of the general status of your device, including
its network connection, battery level, and any new messages received when your device is in Silent
mode.
Status icons: By glancing at the status icons, you can quickly learn the status of your device, such as
its network connection, signal strength, battery level, time, and more.
20
The network status icons may vary by regions and service providers.
Signal strength No signal
4G+ network connected 3G network connected
4G network connected HSPA network connected
Home Screen
2G network connected
LTE network connected
LTE+ network connected NFC enabled
HSPA+ network connected Airplane mode enabled
VoLTE available Wi-Fi network connected
Roaming Receiving location data from GPS
Bluetooth enabled Silent mode enabled
Wi-Fi network available Charging
Vibration mode enabled Battery level low
Alarms enabled No SIM card detected
Battery fully charged Headset plugged in
Power saving mode enabled Performance mode enabled
Wired or wireless projection in use Super charging
Quick charging Eye comfort mode enabled
Do not disturb mode enabled USB cable connected
Data saving mode enabled Bluetooth power
Hotspot enabled Optimiser reminder
Can’t connect a call on current
Unstable signal
network
Select-to-speak enabled Screen time management enabled
Notication icons: When there is a new message, notication or reminder on your device, the
relevant icon will be displayed in the status bar.
21
Home Screen
Missed calls New emails
Downloading data New voicemails
Events reminder Uploading data
Synchronising data Memory full
Sign-in or synchronisation problem Synchronisation failed
VPN connected More notications
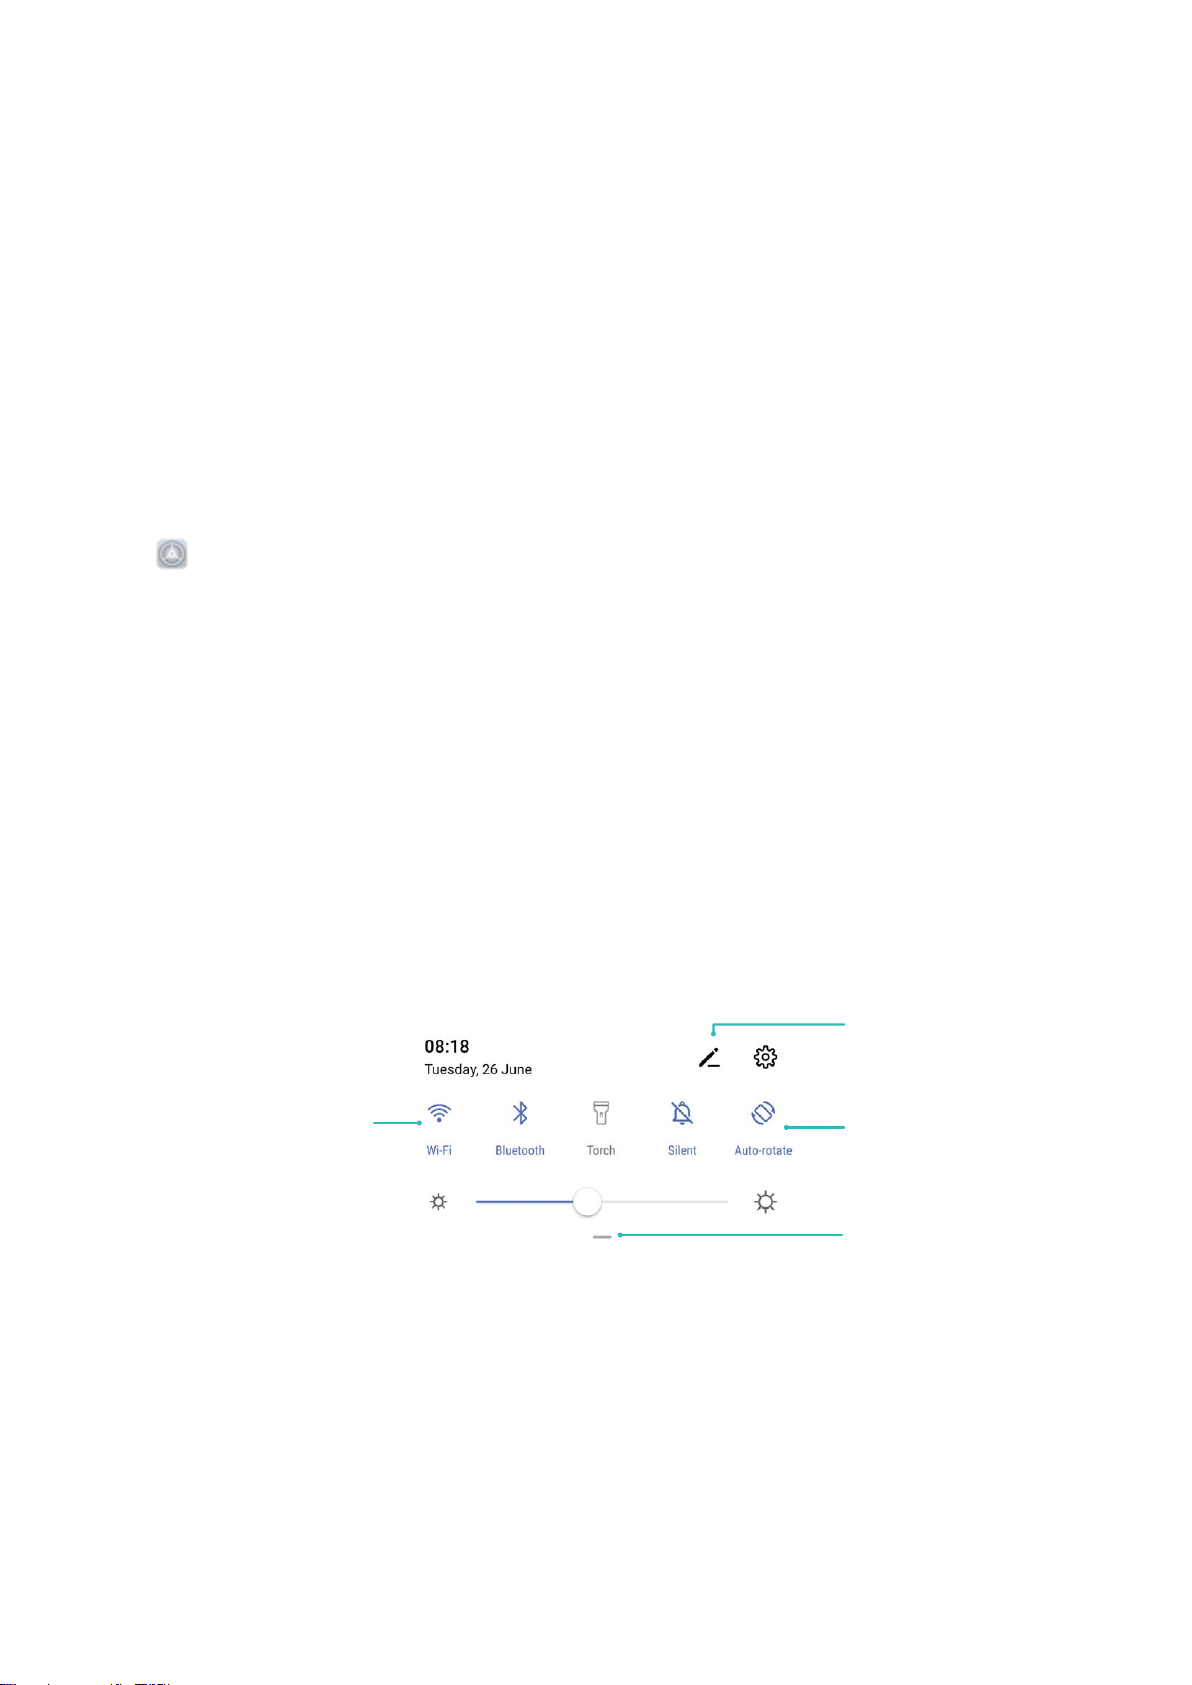
Open the Notication Panel to Get Important Information
Check the notications and the operating status of your device on the status bar.
When there is a notication reminder, you can turn on the screen and swipe down from the status bar
to view the notication.
Access notication panel when the screen is unlocked: Swipe down from the status bar to open
the notication panel. You can turn on or off shortcut switches, or touch notications to view the
details.
If you want to display the number of notications or no reminder on the notication and status bar,
touch Settings, and go to Notications > More notication settings > Notication method.
Then select Numbers or None.
Disable App Notications
Is it annoying to receive a variety of application push notications? You can set and disable the
specied notication.
22

Home Screen
Open Settings, and touch Notications. From here you can:
l Block notications from an app: Select the app, then disable Allow notications.
l Block notications from all apps: Select Batch management, then disable All.
Customise Notication Settings
Customise the notication settings to use your device the way you want.
Open Settings, then go to Notications > More notication settings. From here you can:
l Enable Notications turn on screen: Enable Notications turn on screen to set the screen to
turn on when notications are received.
l Enable notication light: Enable Pulse notication light to show a blinking indicator light when
notications are received.
l Set the notication style: Touch Notication method, then select Icons, Numbers, or None.
Screen Lock and Unlock
Set a Lock Screen Password to Protect Your Privacy
Your Phone stores a lot of sensitive information, such as personal photos, contact information,
banking apps (for example, Alipay). Set a lock screen password so that a password is required each
time you unlock your Phone. A lock screen password helps to protect your private information if your
Phone is lost or accessed by an unauthorised user.
Set a lock screen password: Open
password, and set the type of lock screen password you prefer.
l Set a PIN: A PIN number is a sequence of digits. Entering a PIN to unlock your Phone is quick and
simple. For better security, use a long sequence of random numbers as your PIN. Go to Set lock
screen password, follow the prompts to set up a PIN. Alternatively, touch Change unlock
method, and set 4-digit PIN or Custom PIN.
l Set a pattern: Unlock your Phone by drawing a preset pattern on the screen. For better security,
use a pattern that includes overlapping line segments. Go to Set lock screen password > Change
Settings, go to Security & privacy > Lock screen
unlock method > Pattern and draw the same pattern twice. The pattern must connect at least 4
dots.
l Set a password: A password made up of numbers, letters, and special characters is more secure
than a PIN or pattern. For better security, use a password with 8 or more characters that includes
numbers, letters, and special characters. Be sure to memorize the password so that you don’t get
locked out of your Phone if you forget it. Go to Set lock screen password > Change unlock
method > Password, follow the prompts to set up a password.
l Unlock your device using a smart band: If your device supports unlocking with a smart band,
the screen will automatically light up when the band comes within 80 cm of your device. Swiping
on the screen of your Phone will instantly unlock the device. Touch Smart unlock, and follow the
onscreen prompts to complete the setup.
23

Home Screen
l Unlock your device using a ngerprint: If your device supports ngerprint unlock, this is the
recommended unlock method. Using a ngerprint is a secure and quick way to unlock the
device. After setting a lock screen password, touch Add in the dialog box that pops up and
follow the onscreen prompts to enrol your ngerprints.
l For security reasons, please do not disable the lock screen password: A lock screen
password prevents unauthorised access to your device. For the security of your device, do not
select Disable lock screen password as the screen lock method.
l Regular password prompts help you to remember your password: If you have not
entered your screen lock password for 3 days, the system will require that you enter the
password to unlock your device.
Lock the Screen to Quickly Secure Your Phone
If you don’t use your Phone for a set period of time, the screen will turn off and lock. As long as the
screen stays on, you can use your Phone without needing to unlock the screen. Lock your screen
when you are not using your Phone to protect your privacy and prevent mistaken inputs.
Set a lock screen password to help protect your privacy. You can lock your device in the following
ways:
Lock the screen instantly with the Power button: Press the Power button to lock the screen at
any time.
Lock the screen with one-touch screen lock: Pinch two ngers together on the home screen to
enter the editing screen. Touch Widgets > Screen Lock and add the Screen Lock widget to your
home screen. This helps reduce wear and tear on your power button. After leaving the home screen
editing mode, touch the Screen Lock widget to instantly lock your screen. To lock your screen this
way, rst switch to the home screen page where the Screen Lock widget is located.
Home Screen Management
Manage Home Screen Icons
Move and delete app icons from the home screen, or rearrange them in folders so that your home
screen is organised the way you like it.
Move an app icon or folder: On the home screen, touch and hold an app or folder icon until your
device vibrates, then drag it to any position on the home screen.
Delete an app icon: On the home screen, touch and hold the icon of the app you want to uninstall
until your device vibrates, then touch Uninstall to delete the app.
To ensure that the system runs normally, some pre-installed system apps cannot be uninstalled.
Lock the home screen layout: Open Settings, go to Home screen & wallpaper > Home
screen settings, and enable Lock layout.
24
Home Screen
Create a folder: On the home screen, touch and hold an app icon until your device vibrates, then
drag it on top of another app icon. The two icons will be placed in a new folder.
Delete a folder: Open the folder, touch , deselect all the apps, then touch OK. The folder will be
deleted and all app icons in the folder will be moved to your home screen.
Rename a folder: Open the folder and touch the folder name to enter a new name.
Add or remove app icons from a folder: Open the folder and touch . Select the apps you wish
to add to the folder, deselect those you wish to remove, and then touch OK.
Another way to remove an app icon from a folder is to touch and hold the icon in the folder until
your device vibrates, then drag it to an empty space on the home screen.
Manage Your Home Screen
Too many icons on your home screen? You can add a new page to your home screen and customise it
to your liking.
Touch and hold an empty area on the home screen to enter home screen editing mode. You can do
the following:
l Add a new screen page: Touch
page.
at the left or right side of the screen to add a new screen
l Delete an empty screen page: Touch to delete the page.
25

Home Screen
Screen pages with app icons or widgets on them cannot be deleted.
l Modify screen page order: Touch and hold the screen page you want to move, then drag it to the
desired position.
l Set a default home screen page: Touch in the upper part of the home screen to set the
selected screen page as your default home screen page.
Set Your Home Screen Wallpaper
Tired of default wallpapers? Set a photo you like as your home screen wallpaper to personalise your
home screen.
Open Settings, and then go to Home screen & wallpaper > Wallpaper. You can:
Set a picture as your home screen wallpaper: Touch Gallery or select a preset wallpaper in your
device, and follow the onscreen instructions to select Lock screen, Home screen or Both.
Set a photo as your wallpaper from Gallery: Have a great photo you want to set as your
wallpaper? In
Gallery, open the photo that you like, go to > Set as > Wallpaper, and follow
the onscreen instructions to set the photo as your home screen wallpaper.
Manage Your Home Screen Widgets
Want to quickly manage widgets on your home screen? You can add, move or delete home screen
widgets to tidy up your home screen and make it easier to use.
Add widgets: Touch and hold an empty area on the home screen to enter home screen editing
mode. Touch Widgets, touch and hold a widget and drag it to an empty area on the home screen, or
touch the widget you want.
26
Loading…
Здесь размещена инструкция модели смартфона HUAWEI P30 lite. Представленное руководство по эксплуатации можно скачать бесплатно и затем изучить его со своего компьютера.
Huawei P30 Lite – младшая модель в серии смартфонов- флагманов китайского производителя. Девайс занимает место в среднем сегменте, в нем установлена задняя панель, реализованная из 3D-стекла. Презентовали устройство 26 марта 2019 в Париже.
Huawei P30 Lite является добротным смартфоном средней ценовой категории, который унаследовал ряд «фишек» более дорогих флагманов линейки. Гаджет обладает интересными цветовыми решениями, тройной основной камерой и отличным фронтальным модулем. Комплектуется телефон кабелем USB Type-C, наушниками, зарядным устройством, скрепкой для извлечения карт и документацией.
Что хорошо:
• Строенная камера с искусственным интеллектом.
• Корпус с эффектным дизайном из стекла.
• Расцветки в традиции лучших оригинальных дизайнерских решений.
• Технологичный объектив фронтальной камеры.
• Есть разъем USB Type-C и функция NFC.
Что не очень:
• В случае длительных нагрузок аппарат ощутимо нагревается.
• Экран не наибольшей яркости.
• Нет влаго- и пылезащиты.
Руководство по эксплуатации HUAWEI P30 lite
|
тип файла: |
размер файла: |
формат файла: |
скачать: |
|
руководство пользователя |
1.70 мегабайт |
|
Скачать инструкцию |
Перейти к контенту
Русские электронные инструкции по эксплуатации
Постоянно обновляемый большой каталог документации по эксплуатации и использованию современных устройств и оборудования на русском языке. Бесплатное скачивание файлов.
Поиск:
Главная
♥ В закладки
Просмотр инструкции в pdf
Инструкция по эксплуатации смартфона Huawei P30 Lite Midnight Black (MAR-LX1M).
Скачать инструкцию к смартфону Huawei P30 Lite Midnight Black (MAR-LX1M) (1,76 МБ)
Инструкции по эксплуатации смартфонов Huawei
« Инструкция к смартфону Huawei P30 Breathing Crystal (ELE-L29)
» Инструкция к смартфону Huawei Y6p Phantom Purple (MED-LX9N)
Вам также может быть интересно
%20Midnight%20Black.jpg)
Инструкция к смартфону Huawei Y6 2019 (MRD-LX1F) Midnight Black
Инструкция к смартфону Huawei Nova 2 64Gb Blue
.jpg)
Инструкция к беспроводным наушникам Huawei Freebuds Studio Gold (M0001)

Инструкция к фитнес-браслетам Huawei Band 2 Pro Black
.jpg)
Инструкция к смартфону Huawei Nova 3 Black (PAR-LX1)
.jpg)
Инструкция к смартфону Huawei P10 32Gb LTE Gold (VTR-L29)
.jpg)
Инструкция к смартфону Huawei Y5 Lite Amber Brown (DRA-LX5)

Инструкция к смартфону HUAWEI nova Y61 4+64GB Black
Добавить комментарий
Имя *
Email *
Сайт
Комментарий
Сохранить моё имя, email и адрес сайта в этом браузере для последующих моих комментариев.
- Добавить инструкцию
- Заказать инструкцию
- Политика конфиденциальности
Краткое руководство пользователя
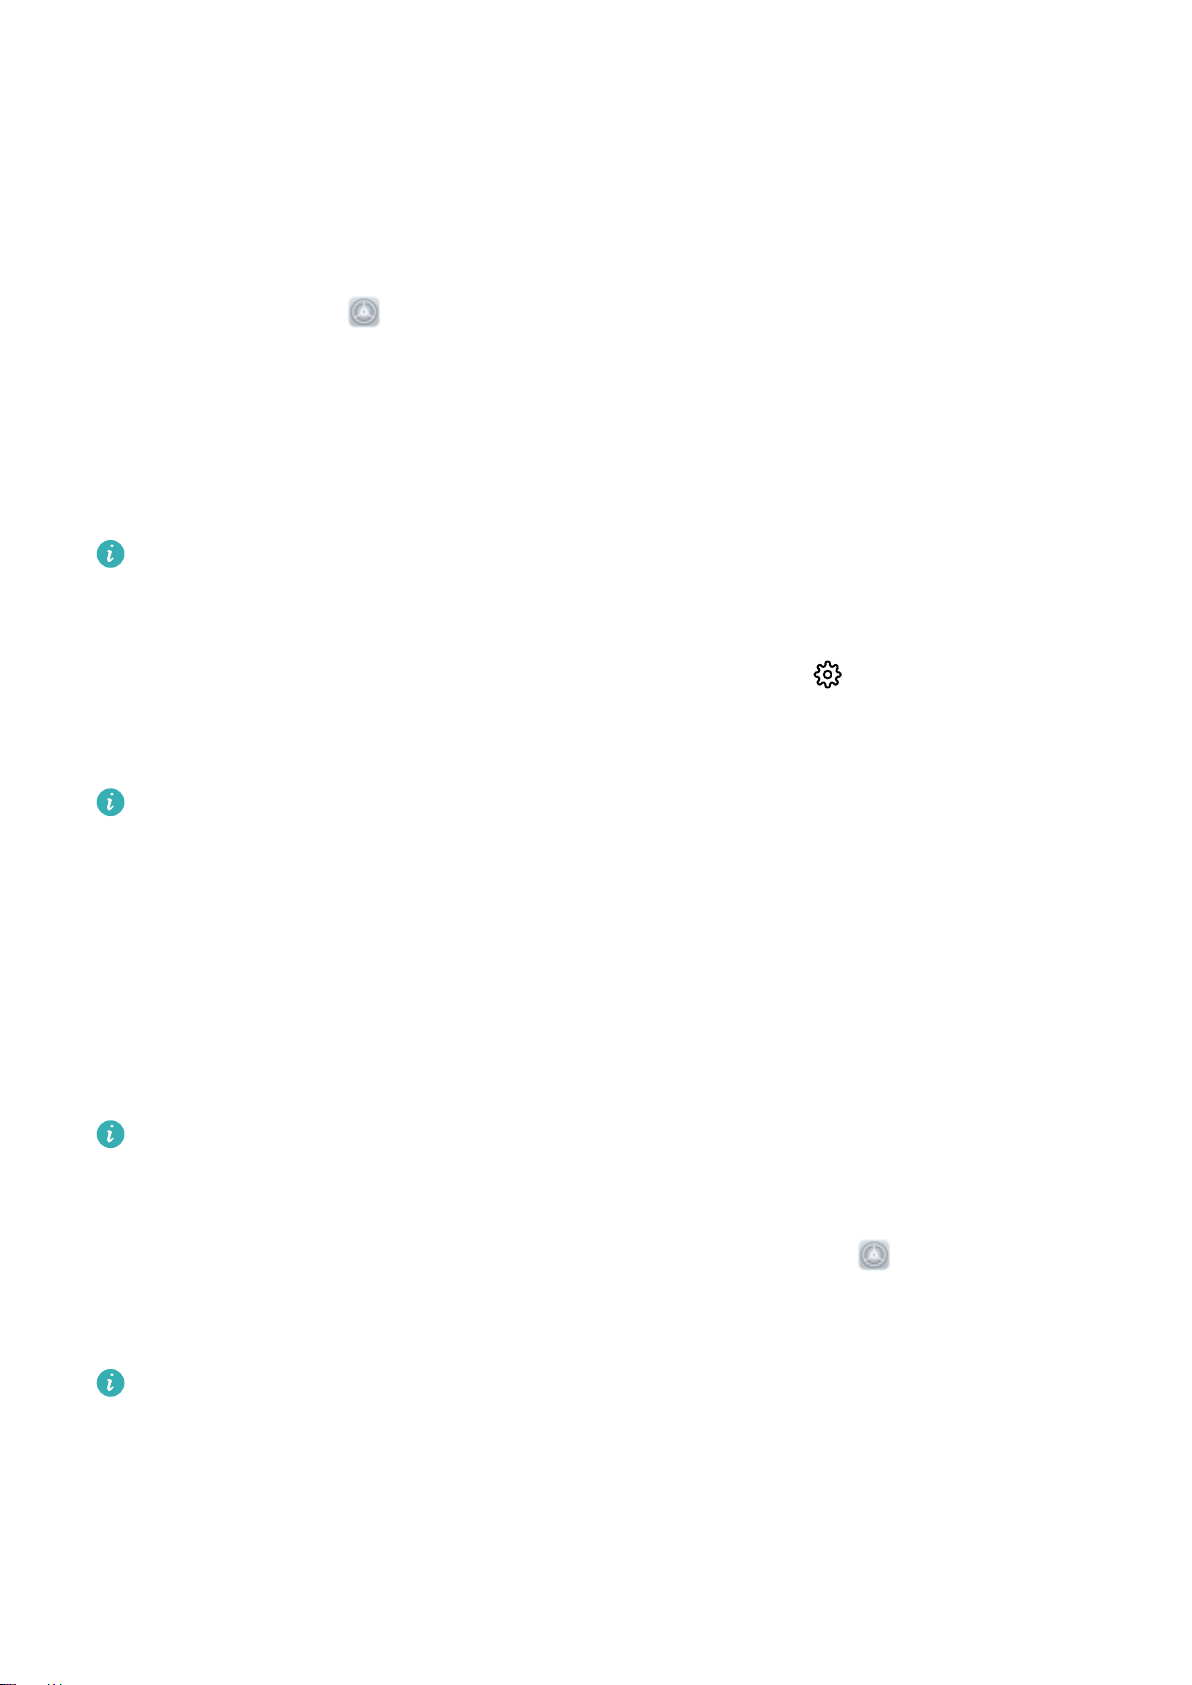
МАР-LX2
Знай свое устройство
Перед использованием устройства ознакомьтесь с его основными функциями.

| 1 | Кнопка громкости | 2 | Сканер отпечатков пальцев |
| 3 | Порт типа C | 4 | Разъем для гарнитуры |
| 5 | Кнопка питания | 6 | Советы Приложение |
| 7 | Слот для карты |
• Проверьте предустановленное приложение «Советы» и освоите все замечательные функции своего устройства.
Начиная
• Не вставляйте и не извлекайте SIM-карту, когда ваше устройство включено.
• Убедитесь, что карта правильно выровнена и лоток для карт выровнен, когда вы вставляете ее в устройство.
• Будьте осторожны, чтобы не поцарапать устройство и не пораниться при использовании штифта для извлечения.
• Храните выталкивающий стержень в недоступном для детей месте, чтобы предотвратить случайное проглатывание или травму.
• Не используйте в устройстве обрезанные или модифицированные SIM-карты или карты microSD, так как они могут быть не распознаны и могут повредить лоток (слот) для карт.
• Если ваша SIM-карта не соответствует вашему устройству, обратитесь к оператору связи.
Следуйте инструкциям на следующих рисунках, чтобы настроить устройство. Используйте прилагаемый штифт для извлечения.

Двойная карта, двойной режим ожидания, один проход (только для устройств с двумя SIM-картами)
Ваше устройство поддерживает только функцию Dual Standby Single Pass для двух SIM-карт, что означает, что вы не можете одновременно использовать обе SIM-карты для звонков или передачи данных.
• Когда вы разговариваете с использованием SIM-карты 1, SIM-карту 2 нельзя использовать для совершения звонков или ответа на них. Если кто-то звонит на сим карту
2, вызывающий абонент услышит голосовое сообщение типа «Набранный вами абонент находится вне зоны обслуживания» или «Набранный вами абонент в данный момент не может быть подключен»,
Пожалуйста, повторите попытку позже.» Фактическое сообщение зависит от поставщика услуг.
• Когда вы используете службу передачи данных SIM-карты 1, служба передачи данных SIM-карты 2 будет отключена.
Однопроходная функция вашего устройства помогает снизить энергопотребление и увеличить время работы устройства в режиме ожидания. Это не связано с условиями сети вашего поставщика услуг.
• Вы можете включить переадресацию вызовов между SIM-картами на устройстве, чтобы избежать пропущенных вызовов.
Для получения дополнительной информации
Если у вас возникнут какие-либо проблемы при использовании вашего устройства, вы можете получить помощь из следующих ресурсов:
- Посещать http://consumer.huawei.com/en к view информация об устройстве, часто задаваемые вопросы и другая информация.
- Посещать http://consumer.huawei.com/en/support для получения самой актуальной контактной информации для вашей страны или региона.
- Вы можете найти горячие линии обслуживания, адреса розничных продавцов, политику обслуживания и дополнительную информацию для вашего местного региона в HiCare.
Перейти к Настройки и прикоснуться Система> О телефоне> Юридическая информация к view юридическая информация о вашем продукте.
Перейти к Настройки и прикоснуться Система> О телефоне> Юридическая информация> Информация о безопасности для view информацию о безопасности вашего продукта.
Перейти к Настройки и прикоснуться Система> О телефоне> Информация для аутентификации view нормативная информация для вашего продукта.
Перейти к Настройки и прикоснуться Система> Сертификация логотипы для view дополнительная информация о логотипах сертификации для вашего продукта.
Все изображения и иллюстрации в этом руководстве, включая, помимо прочего, цвет устройства, размер и отображаемое содержимое, предназначены только для справки. Фактическое устройство может отличаться.
Ничто в этом руководстве не является явной или подразумеваемой гарантией.
Информация по безопасности
Перед использованием устройства внимательно прочтите всю информацию по технике безопасности, чтобы обеспечить его безопасную и правильную работу, а также узнать, как правильно утилизировать устройство.
Эксплуатация и безопасность
- Чтобы предотвратить возможное повреждение слуха, не слушайте музыку на высокой громкости в течение длительного времени.
- Использование несертифицированного или несовместимого адаптера питания, зарядного устройства или аккумулятора может повредить ваше устройство, сократить срок его службы или стать причиной пожара, взрыва или других опасностей.
- Идеальная рабочая температура от 0 °C до 35 °C. Идеальная температура хранения от -20 °C до +45 °C.
- Производители кардиостимуляторов рекомендуют соблюдать минимальное расстояние в 15 см между устройством и кардиостимулятором, чтобы предотвратить возможные помехи в работе кардиостимулятора. При использовании кардиостимулятора держите устройство с противоположной от кардиостимулятора стороны и не носите его в переднем кармане.
- Держите устройство и аккумулятор вдали от чрезмерного тепла и прямых солнечных лучей. Не кладите их на или в нагревательные приборы, такие как микроволновые печи, плиты или радиаторы.
- Соблюдайте местные законы и правила при использовании устройства. Чтобы снизить риск несчастных случаев, не используйте беспроводное устройство во время вождения.
- Во время полета в самолете или непосредственно перед посадкой используйте устройство только в соответствии с предоставленными инструкциями. Использование беспроводного устройства в самолете может нарушить работу беспроводных сетей, создать опасность для эксплуатации самолета или быть незаконным.
- Чтобы предотвратить повреждение деталей или внутренних цепей вашего устройства, не используйте его в пыльных, задымленных,amp, или в загрязненной среде или вблизи магнитных полей.
- При зарядке устройства убедитесь, что адаптер питания подключен к розетке рядом с устройством и легко доступен.
- Отключайте зарядное устройство от электросети и устройства, когда оно не используется.
- Не используйте, не храните и не транспортируйте устройство в местах хранения легковоспламеняющихся или взрывчатых веществ (например, на заправочной станции, нефтебазе или химическом заводе).ampле). Использование вашего устройства в этих
окружающая среда увеличивает риск взрыва или пожара. - Утилизируйте это устройство, аккумулятор и аксессуары в соответствии с местными правилами. Их нельзя выбрасывать вместе с обычными бытовыми отходами. Неправильное использование батареи может
привести к возгоранию, взрыву или другим опасностям. - Это устройство содержит встроенную батарею. Не пытайтесь заменить батарею самостоятельно. В противном случае устройство может работать некорректно или может повредить батарею. Для вашей личной безопасности и для обеспечения корректной работы устройства вам настоятельно рекомендуется обратиться в авторизованный сервисный центр Huawei для замены.
Информация об утилизации и переработке
Символ перечеркнутого мусорного бака на вашем продукте, батарее, литературе или упаковке напоминает вам, что все электронные продукты и батареи по окончании срока службы необходимо сдать в отдельные пункты сбора отходов; их нельзя выбрасывать вместе с обычным мусором вместе с бытовым мусором. Пользователь несет ответственность за утилизацию оборудования в специально отведенных пунктах сбора или в службе для раздельной переработки отработанного электрического и электронного оборудования (WEEE) и батарей в соответствии с местным законодательством.
Правильный сбор и переработка вашего оборудования помогают обеспечить переработку отходов электрического и электронного оборудования (EEE) таким образом, чтобы сохранить ценные материалы и защитить здоровье человека и окружающую среду от неправильного обращения, случайной поломки, повреждения и / или неправильной переработки в конце его жизни может быть вредным для здоровья и окружающей среды. Для получения дополнительной информации о том, где и как сдавать отходы EEE, обратитесь к местным властям, продавцу, в службу утилизации бытовых отходов или посетите webсайт http://consumer.huawei.com/en/.
Сокращение выбросов опасных веществ
Это устройство и его электрические аксессуары соответствуют местным применимым правилам по ограничению использования определенных опасных веществ в электрическом и электронном оборудовании, таким как регламенты ЕС REACH, RoHS и аккумуляторы (если включены). Чтобы ознакомиться с декларациями о соответствии REACH и RoHS, посетите наш webсайт http://consumer.huawei.com/ сертификация.
Соответствие нормативным требованиям ЕС
Операция на теле
Устройство соответствует спецификациям радиочастот при использовании вблизи уха или на расстоянии 0.50 см от тела. Убедитесь, что аксессуары устройства, такие как чехол и кобура для устройства, не состоят из металлических компонентов. Держите устройство подальше от тела, чтобы соблюсти требование по расстоянию.
Наибольшее значение SAR, зарегистрированное для этого типа устройства при испытании около уха, составляет
И при правильном ношении на теле
Заявление
Настоящим Huawei Technologies Co., Ltd. заявляет, что это устройство MAR-LX2 соответствует основным требованиям и другим соответствующим положениям Директивы 2014/53 / EU.
Самую последнюю и действительную версию DoC (Декларации соответствия) можно найти viewред. в http://consumer.huawei.com/ сертификация.
Данное устройство может эксплуатироваться во всех государствах-членах ЕС.
Соблюдайте национальные и местные правила в месте использования устройства.
Использование этого устройства может быть ограничено в зависимости от локальной сети.
Ограничения в диапазоне 2.4 ГГц:
Норвегия: Этот подраздел не распространяется на географическую зону в радиусе 20 км от центра Ню-Олесунн.
Ограничения в диапазоне 5 ГГц:
Согласно Статье 10 (10) Директивы 2014/53 / EU, упаковка показывает, что это радиооборудование будет подвергаться некоторым ограничениям при размещении на рынке в Бельгии (BE), Болгарии (BG), Чешской Республике (CZ). , Дания (DK), Германия (DE), Эстония (EE), Ирландия (IE), Греция (EL), Испания (ES), Франция (FR), Хорватия (HR), Италия (IT), Кипр (CY) , Латвия (LV), Литва (LT), Люксембург (LU), Венгрия (HU), Мальта (MT), Нидерланды (NL), Австрия (AT), Польша (PL), Португалия (PT), Румыния (RO) , Словения (SI), Словакия (SK), Финляндия (FI), Швеция (SE), Великобритания (UK), Турция (TR), Норвегия (NO), Швейцария (CH), Исландия (IS) и Лихтенштейн (LI).
Функция WLAN для данного устройства ограничена использованием только внутри помещений при работе в диапазоне частот от 5150 до 5350 МГц.
Правовое уведомление
Торговые марки и разрешения
и являются товарными знаками или зарегистрированными товарными знаками Huawei Technologies Co., Ltd.
Android™ является товарным знаком Google Inc.
LTE является торговой маркой ETSI.
Словесный знак и логотипы Bluetooth® являются зарегистрированными товарными знаками, принадлежащими Bluetooth SIG, Inc., и любое использование таких знаков компанией Huawei Technologies Co., Ltd. осуществляется по лицензии.
Wi-Fi®, логотип Wi-Fi CERTIFIED и логотип Wi-Fi являются товарными знаками Wi-Fi Alliance.
политика конфиденциальности
Чтобы лучше понять, как мы защищаем вашу личную информацию, ознакомьтесь с политикой конфиденциальности по адресу http://consumer.huawei.com/privacy-policy.
Авторские права © Huawei Technologies Co., Ltd.
2019. Все права защищены.
ДАННЫЙ ДОКУМЕНТ ПРЕДНАЗНАЧЕН ТОЛЬКО ДЛЯ ИНФОРМАЦИОННЫХ ЦЕЛЕЙ И НЕ СОДЕРЖИТ НИКАКИХ ГАРАНТИЙ.
31500АТУ_01