
Ultra Easy on You / Ultrafacile, Ultrarapide, Ultradoux
Owner’s Booklet
Guide d’utilisation
OneTouch®Customer Care Line / Ligne InfoSoins OneTouch®:
Canada 1 800 663-5521
U.S.A./É.-U. 1 800 227-8862
Monday–Friday 9am–8pm Eastern Time 6am–5pm Pacific time
Du lundi au vendredi 9 h à 20 h (heure de l’Est) 6 h à 17 h (heure du Pacifique)
www.OneTouch.ca
Distributed by / Distribué par :
LifeScan Canada Ltd./ Produits médicaux LifeScan Canada ltée
Burnaby, B.C./C.-B. V5C 6C6
Manufactured for / Fabriqué pour :
LifeScan Inc.
Milpitas, CA 95035 U.S.A./É.-U.
©LifeScan, Inc. 2003 Milpitas, CA 95035 02/2004
The system described herein is covered by one or more of the following U.S. patents / le système
décrit aux présentes est protégé par un ou plusieurs des brevets américains suivants : D428, 150,
5,708,247, 6,045,567, 6,156,051, 6,197,040, 6,241,862 and/et 6,284,125
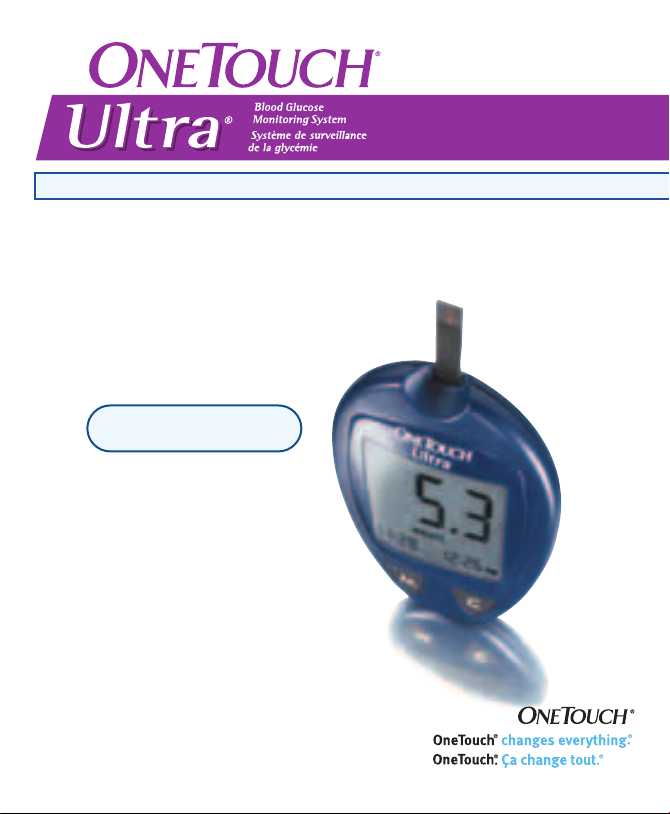
DIABETES BLOOD GLUCOSE MONITORING SYSTEM
Ultra
System Owner’s Booklet
Dear OneTouch®Ultra®System Owner:
You have chosen one of the best blood glucose monitoring
systems available. This booklet has important information you
must know about the OneTouch
carefully.
Blood glucose monitoring plays an important role in diabetes
control. A long-term study showed that keeping blood glucose
levels close to normal can reduce the risk of diabetes
complications by up to 60%.* The results you get with OneTouch
Ultra®System can help you and your healthcare professional
monitor and adjust your treatment plan to gain better control of
your diabetes.
A warranty registration card is included with your OneTouch
Ultra®System. Please complete it and mail it to us; if you prefer
to fill it out online, please visit www.OneTouch.ca
*American Diabetes Association position statement on the Diabetes Control and Complications Trial (1993).
®
Ultra®System. Please read it
®
®
ii
Table of Contents
ABOUT YOUR NEW SYSTEM . . . . . . . . .iv
The Complete OneTouch
®
Ultra®Blood Glucose
Monitoring System . . . . . . . . . . . . . .5
OneTouch®Ultra®Blood
Glucose Meter . . . . . . . . . . . . . . . . . .6
OneTouch®Ultra
®
Test Strips . . . . . . . . . . . . . . . . . . . .10
BEFORE TESTING . . . . . . . . . . . . . . . . .12
Checking the Display . . . . . . . . . . .12
Coding the Meter . . . . . . . . . . . . . . .12
Checking the System . . . . . . . . . . . .15
TESTING . . . . . . . . . . . . . . . . . . . . . . . . .21
Preparing the OneTouch
®
UltraSoft™Adjustable
Blood Sampler . . . . . . . . . . . . . . . .22
Fingertip Blood Sampling . . . . . . .25
Forearm Blood Sampling . . . . . . . .26
Step-by-Step Test
Procedure . . . . . . . . . . . . . . . . . . . . .30
Used Lancet and
Test Strip Disposal . . . . . . . . . . . . .32
Special Messages . . . . . . . . . . . . . .33
USING THE METER MEMORY . . . . . . . 34
DOWNLOADING TEST RESULTS
TO A PERSONAL COMPUTER . . . . . . . .36
COMPARING METER
AND LABORATORY RESULTS . . . . . . . .38
SETTING THE METER . . . . . . . . . . . . . .40
CARING FOR YOUR OneTouch
®
Ultra®SYSTEM . . . . . . . . . . . . . . . . . . .44
Meter . . . . . . . . . . . . . . . . . . . . . . .44
OneTouch®UltraSoft
™
Sampler . . . . . . . . . . . . . . . . . . . . .44
Battery . . . . . . . . . . . . . . . . . . . . . .45
DISPLAY MESSAGES AND
PROBLEM-SOLVING GUIDE . . . . . . . . .48
SPECIFICATIONS . . . . . . . . . . . . . . . . . .58
GUARANTEE . . . . . . . . . . . . . . . . . . . . . .59
INDEX . . . . . . . . . . . . . . . . . . . . . . . . . . .60
iii
About Your New System
The OneTouch®Ultra®System uses the latest blood glucose
monitoring technology. It measures the glucose content of a
blood sample by means of an electrical current produced in the
test strip and sent to the meter for measurement.
Test results are “plasma-calibrated.” This
makes it easier for you and your diabetescare team to compare your meter results
with laboratory tests.
iv
Your OneTouch®Ultra®Blood Glucose Monitoring System consists
of three main products: the OneTouch
Meter, OneTouch
OneTouch
®
®
Ultra®Test Strips (sold separately), and
Ultra®Control Solution. These products have been
®
Ultra®Blood Glucose
designed, tested, and proven to work together to produce accurate
blood glucose results. Use no other test strips or control solution
with your meter.
1

The OneTouch®Ultra®System is intended for use outside the body
(in vitro diagnostic use). It should be used only for testing fresh
capillary whole blood samples for glucose (sugar). It should not
be used for the diagnosis of diabetes or for testing newborns.
CAUTION: Before using any product to test your blood glucose,
read all instructions and practice the test. Do all quality control
checks as directed and consult with a diabetes healthcare
professional. These recommendations apply to all blood glucose
monitoring systems and are supported by the Diabetes Educator
Section of the Canadian Diabetes Association.
2
Important Information
• Severe dehydration resulting from excessive water loss may
cause false low results. If you believe you are suffering from
severe dehydration, consult a healthcare professional
immediately.
• Test results below 3.3 mmol/L (60 mg/dL) mean low blood
glucose (hypoglycemia). Test results greater than 10.0 mmol/L
(180 mg/dL) mean high blood glucose (hyperglycemia). If you
get results below 3.3 mmol/L (60 mg/dL) or above 10.0 mmol/L
(180 mg/dL), and do not have symptoms, first repeat the test. If
you have symptoms or continue to get results that fall below
3.3 mmol/L (60 mg/dL) or above 10.0 mmol/L (180 mg/dL),
follow the treatment advice of your healthcare professional.
• If you are experiencing symptoms that are not consistent with
your blood glucose test results AND you have followed all
instructions described in the OneTouch
call your healthcare professional.
• A red blood cell count (hematocrit) that is either very high
(above 55%) or very low (below 30%) can cause false results.
®
Ultra®Owner’s Booklet,
3
4

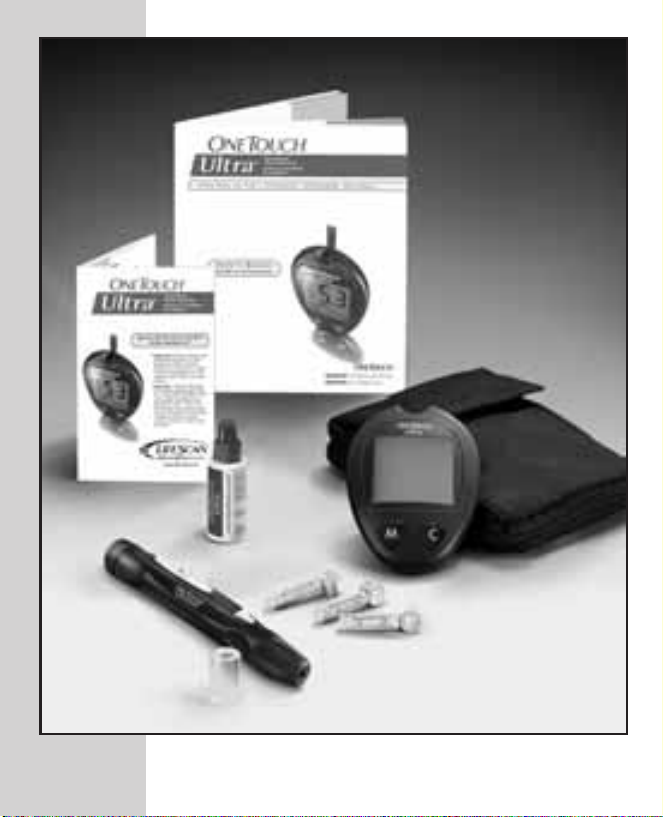
®
The Complete OneTouch
Ultra®Blood Glucose
Monitoring System
• OneTouch®Ultra®Meter
• Owner’s Booklet
• Quick Reference Guide
®
• OneTouch
UltraSoft™Adjustable
Blood Sampler
• Optional OneTouch
®
• OneTouch
• OneTouch
• OneTouch
UltraSoft™ Sterile Lancets
®
Ultra®Control Solution
®
Ultra®Test Strips
®
UltraClear™Cap
(Sold Separately)
• Carrying Case
• Warranty Registration Card
• Logbook
• One 3.0 V Lithium Battery (Installed)
5
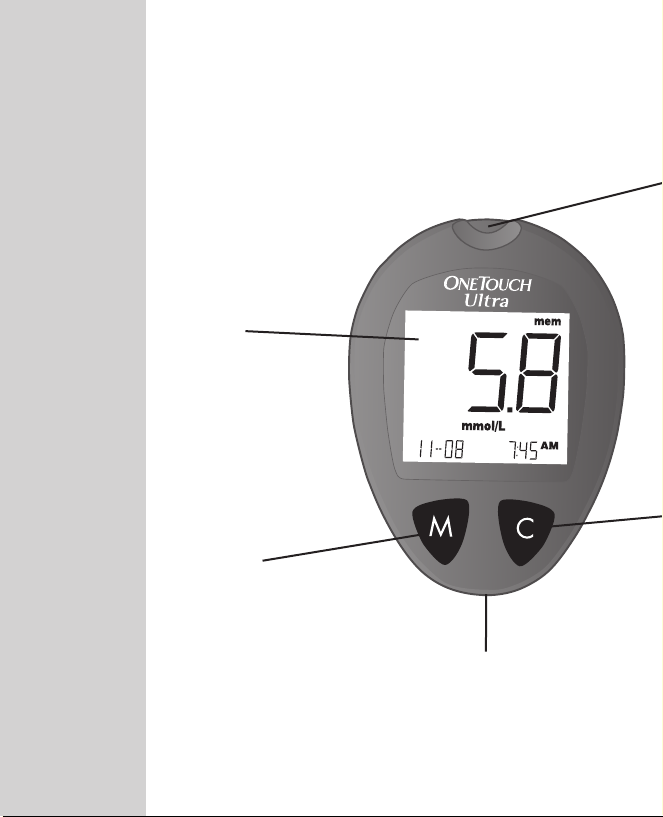
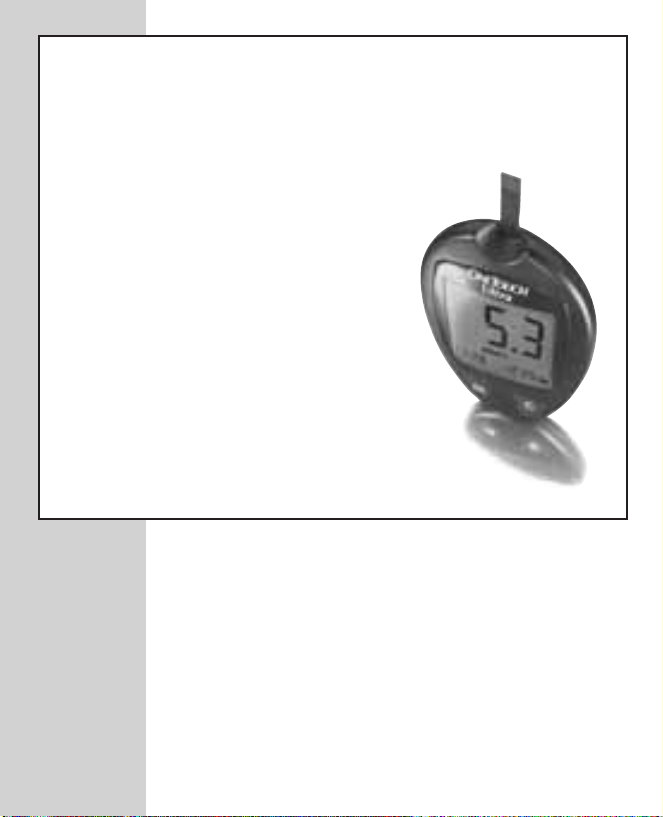
OneTouch®Ultra®Blood Glucose Meter
DISPLAY
Symbols, simple
messages, and test
results appear
here.
M BUTTON
Used to turn meter
on to enter:
◗ setting mode
◗ memory mode
DATA PORT
Used to
download your
test results to a
6
computer.
TEST PORT
Insert the OneTouch
®
Ultra
®
Test Strip here.
C BUTTON
Used to:
◗ change date, time and code number
◗ indicate control solution tests
◗ review test results in memory
7
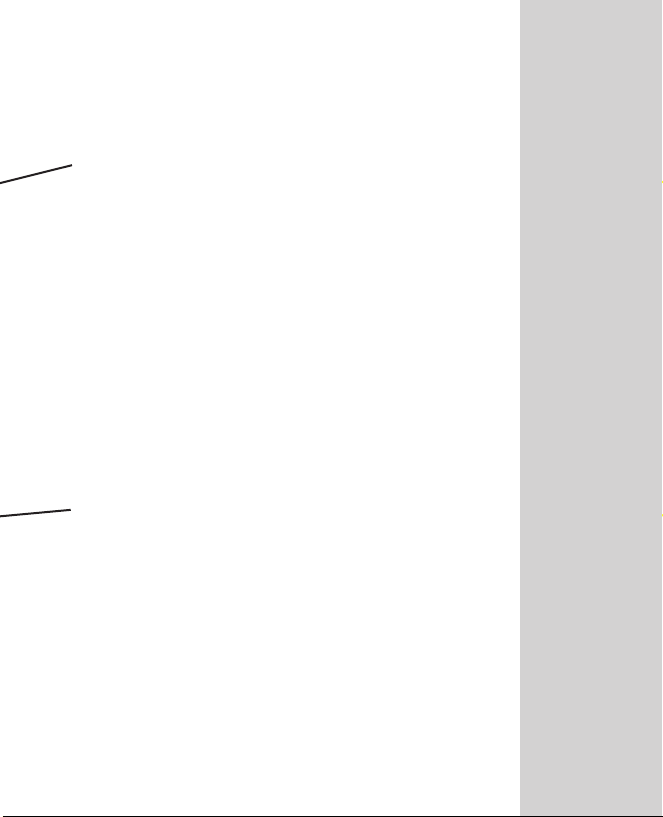
OneTouch®Ultra®Meter Display
CTL
Indicates a control
solution test result.
CODE
Appears with the code
number of the test strips.
BLOOD DROP SYMBOL
Tells you when to apply
the sample.
DECIMAL POINT
Appears in test results
only when unit of measure
is set to mmol/L.
BATTERY SYMBOL
Warns when the battery is
low or must be replaced.
8
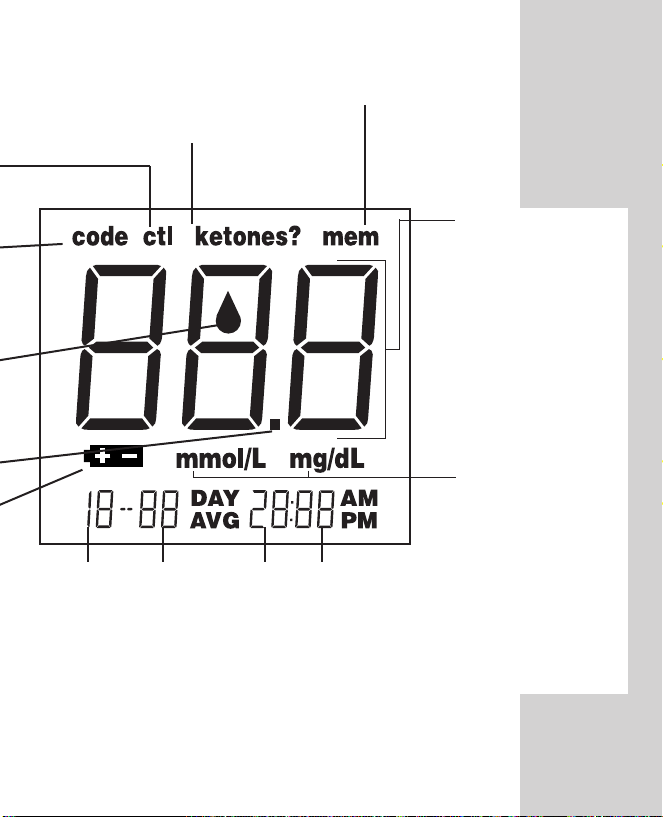
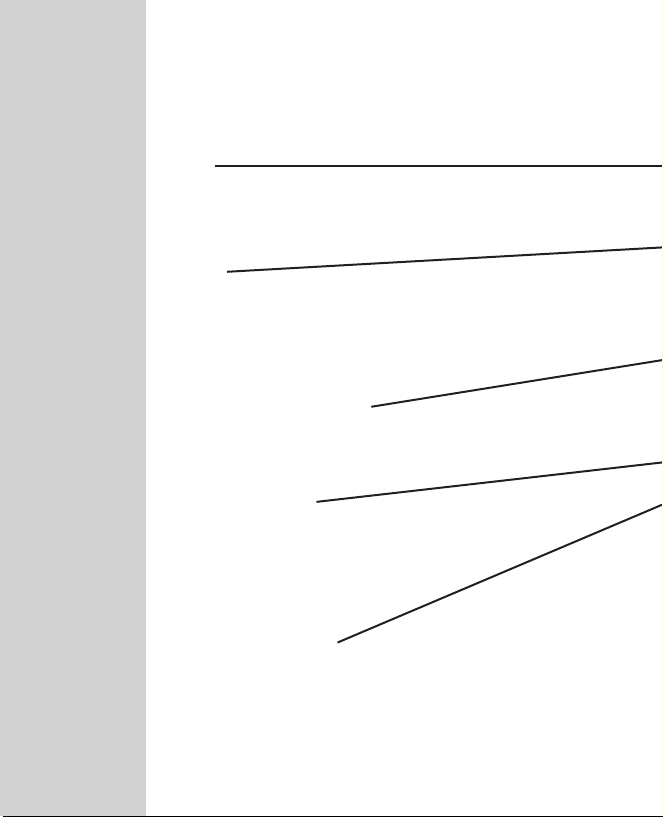
KETONES?
Appears when a test result
is above 13.3 mmol/L
(240 mg/dL) to suggest
ketone testing.
MONTH
DAY HOUR
MEM
Indicates a test result
stored in memory.
MINUTES
TEST RESULT
AREA
Test results are
displayed here.
MMOL/L
Unit of measure.
Millimoles per
litre (mmol/L) is
the standard unit
in Canada.
MG/DL
Unit of measure
used in other
parts of the
world.
9
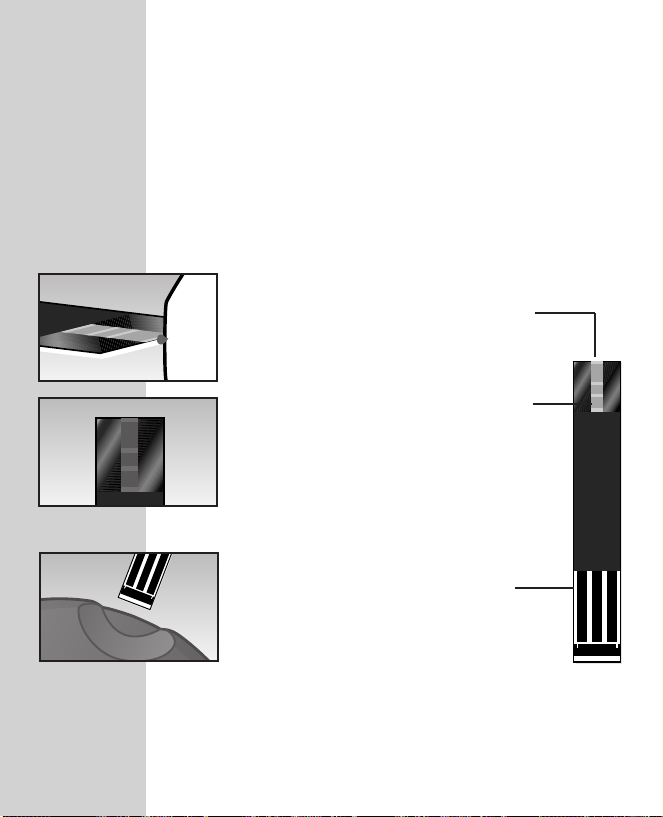
OneTouch®Ultra®Test Strips
(Sold Separately)
The OneTouch
of glucose in whole blood. Blood is applied to the
TOP EDGE of the OneTouch
®
Ultra®System measures the amount
®
Ultra®Test Strip and is
automatically drawn into the reaction cell where the
reaction takes place.
Top Edge
Apply a drop of blood to the
narrow channel here in the top
edge of the test strip.
Confirmation Window
Check here to confirm if enough
blood has been applied.
Contact Bars
Insert this end of the test strip,
contact bars facing up, into the
meter. Push it all the way in until
it will go no further.
10

Important Test Strip Information
• Store test strip vials in a cool, dry place below 30°C (86°F).
Keep away from direct sunlight and heat. Do not refrigerate.
• Store your test strips in their original vial only. To avoid
damage or contamination, do not transfer test strips to any
other place.
• Do not use test strips beyond the expiration date printed on
the package since they may cause inaccurate results.
• After removing a test strip from the vial, replace the vial cap
immediately and close it tightly.
• With clean, dry hands, you may touch the test strip anywhere
on its surface.
• Use each test strip immediately after removing it from the vial.
• Count three months from the date you first open a new vial of
test strips and write this date on the vial label. Throw test
strips and vial away after this discard date.
• Apply only OneTouch
sample to the test strip.
• Do not bend, cut, or modify test strips in any way.
• OneTouch
®
Ultra®Test Strips are for single use only. Never
reuse a test strip that has had either blood or control solution
applied to it.
• Refer to additional information in the OneTouch®Ultra
Test Strip package. (Sold separately.)
®
Ultra®Control Solution or a blood
®
WARNING: Keep the test strip vial away from children; the cap is a
choking hazard. Also, the cap may contain drying agents that are harmful
if inhaled or swallowed and may cause skin or eye irritation.
11
BEFORE TESTING
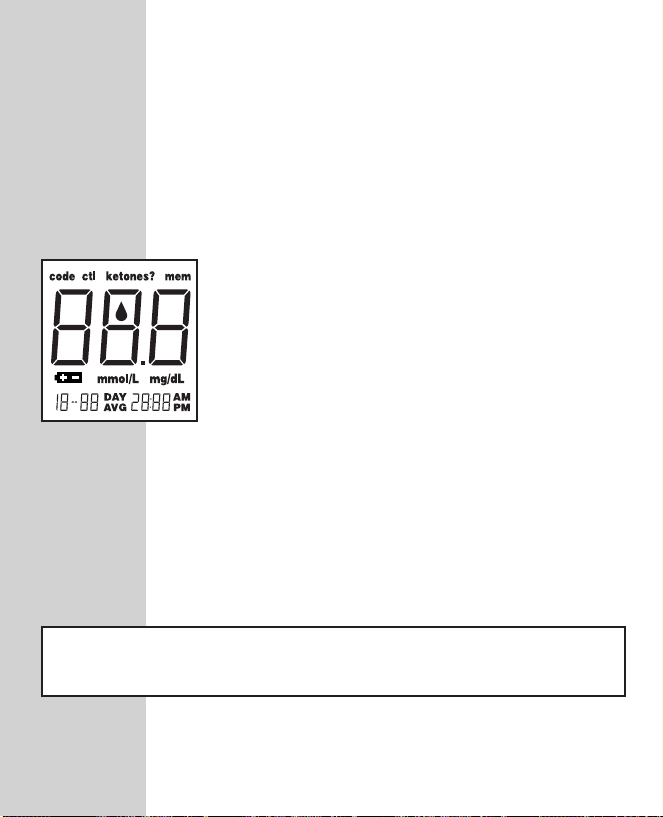
Checking the Display
Each time you turn on the OneTouch
Ultra®Meter either by inserting a test
strip or pressing the M button, all
segments of the display will appear
briefly. This tells you that the system is
performing several self-checks to confirm
that the meter is working properly. To
check that all display segments are
working, hold the C button down.
Coding the Meter
Code numbers are used to calibrate the
OneTouch
Ultra®Test Strips for accurate results. You
must code the meter before using it for the
first time and then every time you change
to another vial of test strips. Each time you
test, check to be sure that the code
number on the meter display matches the
code number on the test strip vial.
®
Ultra®Meter with OneTouch
®
®
CAUTION: Failure to code the meter correctly will cause
inaccurate test results.
12
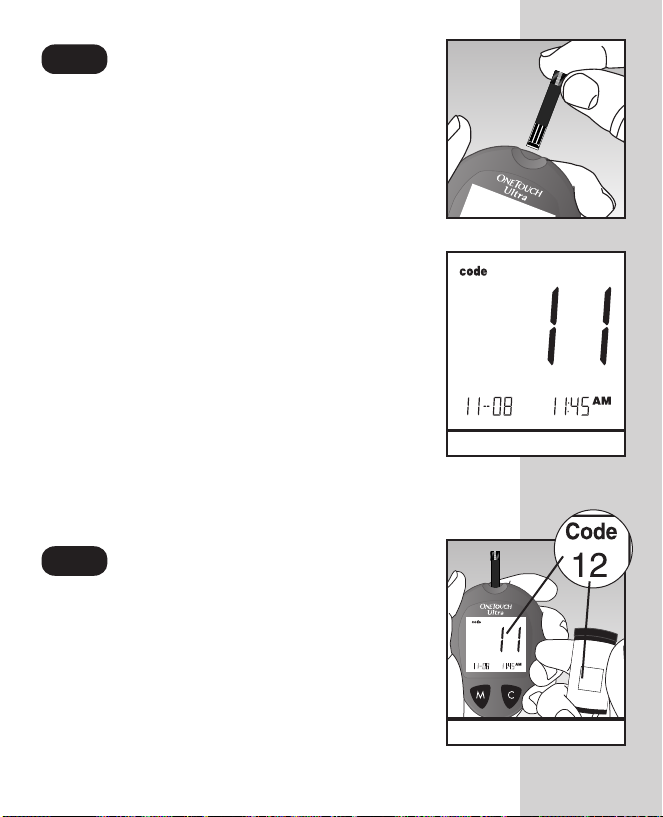
Enter the Code Mode.
Insert a test strip to turn on the meter.
Push it all the way in until it will go no
further. Avoid bending the test strip. The
display check will appear. Then the code
number is displayed for three seconds.
(The first time you use the meter, three
dashes Q will appear, meaning that
there is no code stored in the memory.) If
three dashes appear any other time, see
page 48 of “Display Messages and
Problem-Solving Guide.”
Match the Code Numbers.
Compare the code number on the meter
display with the code number on the test
strip vial. If the two code numbers
match, you may begin testing. If they do
not match, follow Step 3.
(Example)
D
o
n
o
t
s
t
o
r
e
t
e
s
t
s
t
r
i
p
s
o
u
t
si
d
e
t
h
e
v
i
a
l
.
N
e
p
a
s
c
o
n
s
e
r
v
e
r
l
e
s
b
a
n
d
e
l
e
t
t
e
s
d
e
t
e
s
t
h
o
r
s
d
e
l
e
u
r
f
l
a
c
o
n
.
Code
A
W
0
6
0
8
9
1
0
3
M
A
a
n
u
f
a
c
t
u
r
e
r
/
F
a
b
r
ic
a
n
t
:
L
i
f
e
S
c
a
n
,
I
n
c
.
M
il
p
it
a
s
,
C
A
9
5
0
3
5
U
.S
.
A
.
/
É
.U
.
(Example)
13
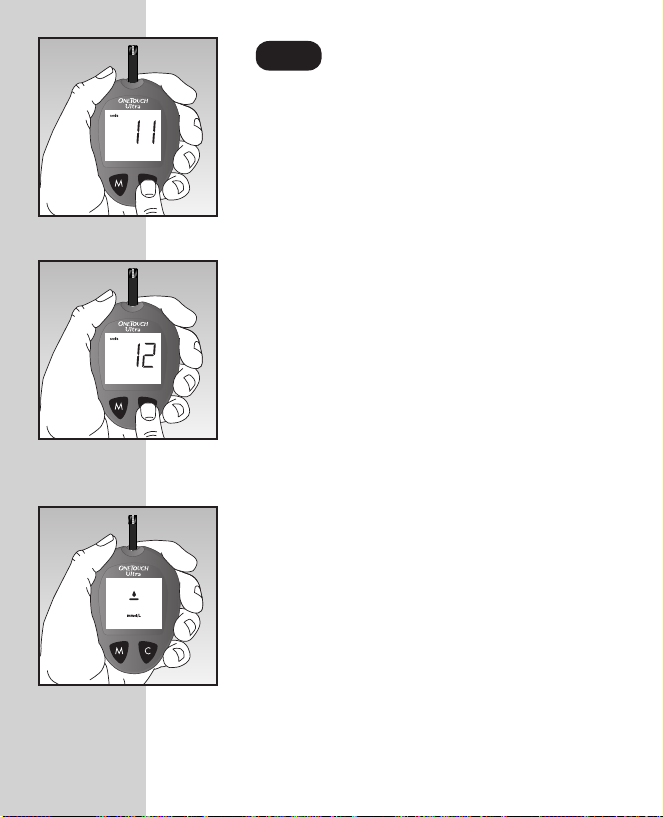
Code the Meter.
Press the C button to select the correct
code. Each time you press and release
the C button, the number will increase by
one. To move more quickly, press and
hold the C button.
After selecting the correct code number,
it will flash for three seconds and then
appear solid for three seconds.
Then the R symbol will appear with the
unit of measure, indicating that the
OneTouch
®
Ultra®System is ready
for testing.
14
Checking the System
NOTE: Refer to additional information in the OneTouch®Ultra
Control Solution package.
OneTouch®Ultra®Control Solution is used to check
that the meter and the test strips are working
together as a system and that you are performing
the test correctly.
OneTouch
contains a measured amount of
glucose that reacts with OneTouch
®
Ultra®Control Solution
®
Ultra®Test Strips. Compare your
control solution test results with the
range printed on the test strip vial
label. It is very important that you do
this simple check routinely to make
sure you get an accurate result.
®
Before you use the OneTouch
Ultra
®
Meter to test your blood for the first
time, practice the procedure using
control solution. When you can do
three tests in a row that are within the
range, you are ready to test your blood.
®
15

Important Control Solution Test Information
• Use only OneTouch®Ultra®Control Solution.
• Check the expiration date on the control solution vial. Record
the discard date (date opened plus three months) on the vial
label. Do not use after expiration or discard date, whichever
comes first.
• Control solution, meter, and test strips should be at room
temperature (20–25°C/ 68–77°F) before testing.
• Shake the vial, discard the first drop of control solution, and wipe
off the tip to ensure a good sample and an accurate result.
• Store control solution tightly closed at temperatures below 30°C
(86°F). Do not refrigerate.
16
CAUTION: The control solution range printed on the test strip vial
is for OneTouch
®
Ultra®Control Solution only. It is not a
recommended range for your blood glucose level.
When to do a control solution test:
• Once a week.
• When you open a new vial of test strips.
• Whenever you suspect that the meter or test
strips are not working properly.
• If your blood glucose test results are not
consistent with how you feel.
• After dropping the meter.
17
How to do a control solution test:
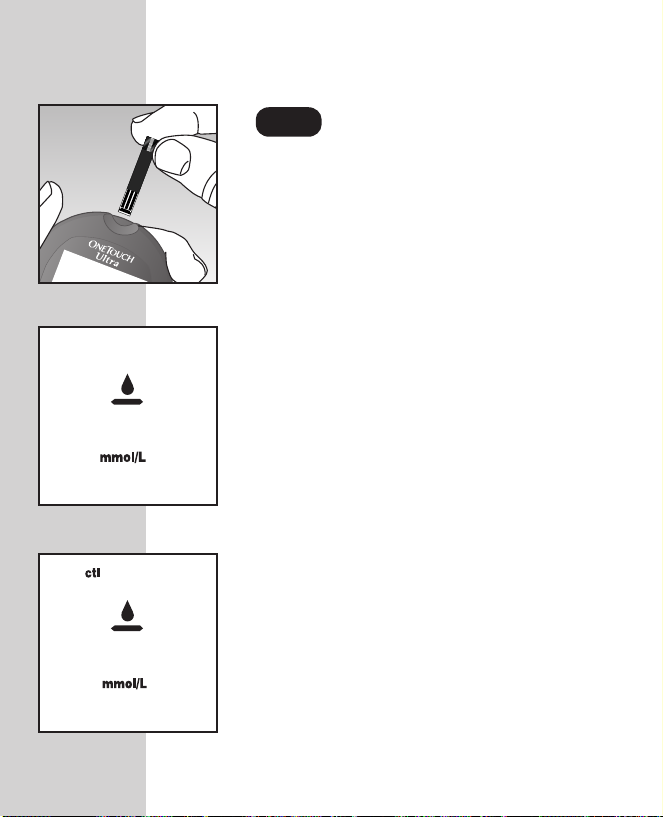
Insert Test Strip.
Insert a test strip, contact bars end first
and facing up, into the test port. Push it
all the way in until it will go no further.
The meter will turn on and the display
check will appear briefly.
Then the code number will appear,
followed by the
R
symbol and unit of
measure. Check that the unit of measure
is set correctly. Be sure the meter and
test strip codes match. If they do not,
code the meter correctly.
Press the C button to mark the test as a
control solution test in the meter
memory.
Ë
will appear on the display. If
you decide not to do a control solution
test, press the C button again to remove
Ë
from the display.
18
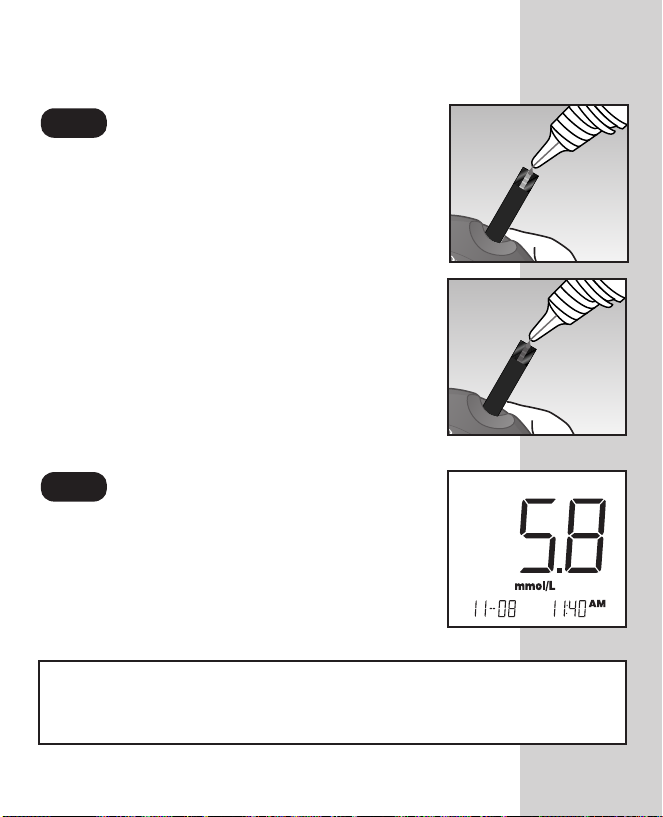
Apply Control Solution.
To ensure an accurate result:
• Shake the vial well
• Discard the first drop
• Wipe the dispenser tip
Hold the drop to the narrow channel in the
top edge of the test strip. When the
confirmation window is full, the meter will
begin to count down from N to A second.
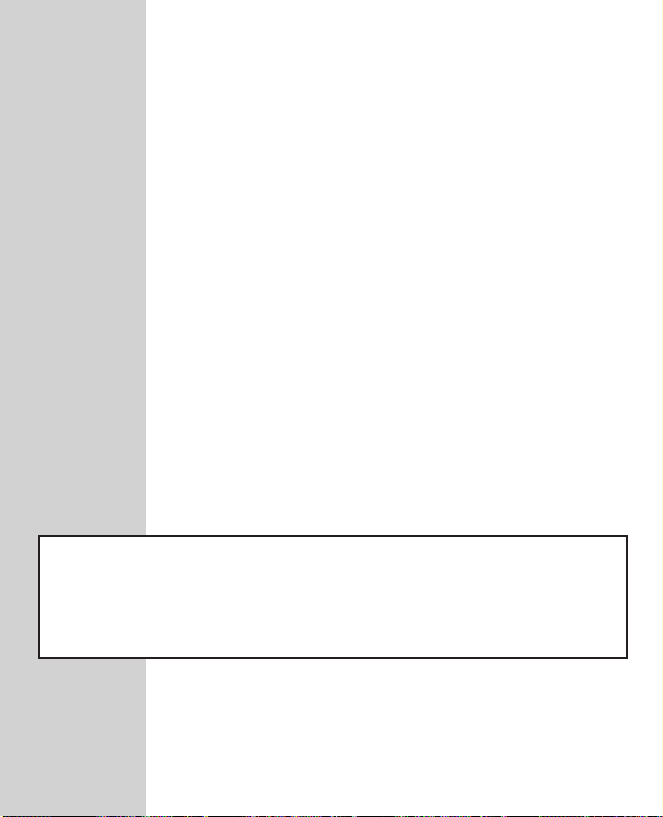
Result Appears in 5 Seconds.
Compare the control solution test result
with the range printed on the test strip
vial. The result should fall within this
range.
NOTE: Mark all control solution tests with Ëto distinguish
them from blood glucose tests in the meter memory. Marked
control solution tests will not be included in your averages.
19
Comparing control solution results
If test results fall outside the range printed on
the test strip vial, repeat the test. Out-of-range
results may be caused by one or more of
the following:
• Error in performing the test.
• Failure to shake the control solution
vial well.
• Expired or contaminated control solution.
• The meter, test strips, or control solution are
too warm or too cold.
• Failure to discard the first drop of control
solution and wipe the dispenser tip clean.
• Improper meter coding.
• Test strip deterioration.
• Meter malfunction.
CAUTION: If you continue to get control solution test results
that fall outside of the range printed on the vial, the system
may not be working properly. Do not use the meter. Call the
OneTouch
®
Customer Care Line at 1 800 663-5521.
20

TESTING YOUR BLOOD
Read this section and the test strip package insert
carefully before testing. Make sure you have all
items needed to test.
• Meter
• Test Strips
• Sampler
• Optional OneTouch
(for forearm sampling)
• Sterile Lancet
®
UltraClear™Cap
21
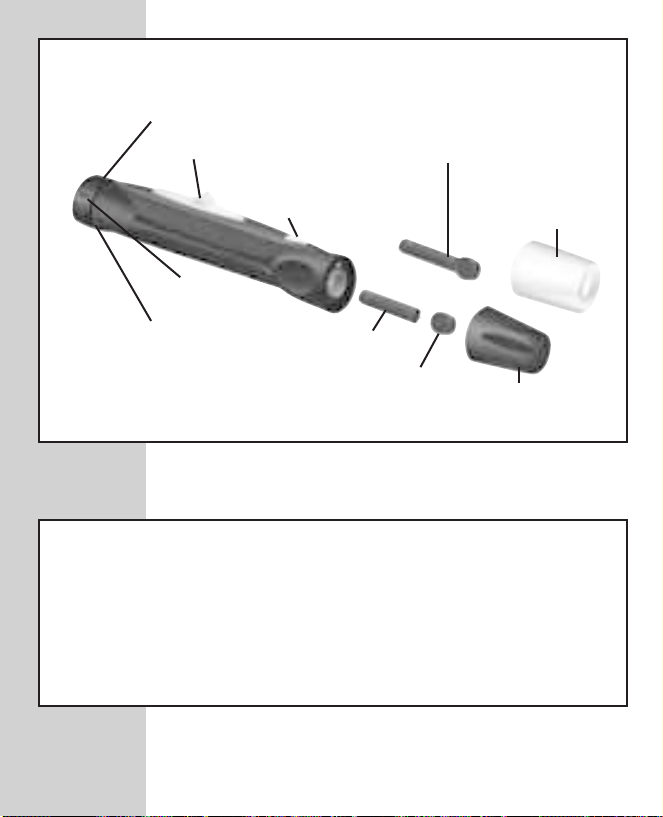
Preparing the OneTouch®UltraSoft™Sampler
Depth Adjustment Knob
Ejection/Cocking Control
Release Button
Depth
Indicator
Puncture Settings
Lancet Point
Lancet with
Protective Disk
Protective
Disk
OneTouch
UltraClearTMCap for
Forearm Sampling
Cap
CAUTION: To reduce the chance of infection:
®
• Never share a lancet or the OneTouch
UltraSoft™Sampler
with anyone.
• Always use a new, sterile lancet. Lancets are for single
use only.
®
• Keep the OneTouch
UltraSoft™Sampler clean.
®
22
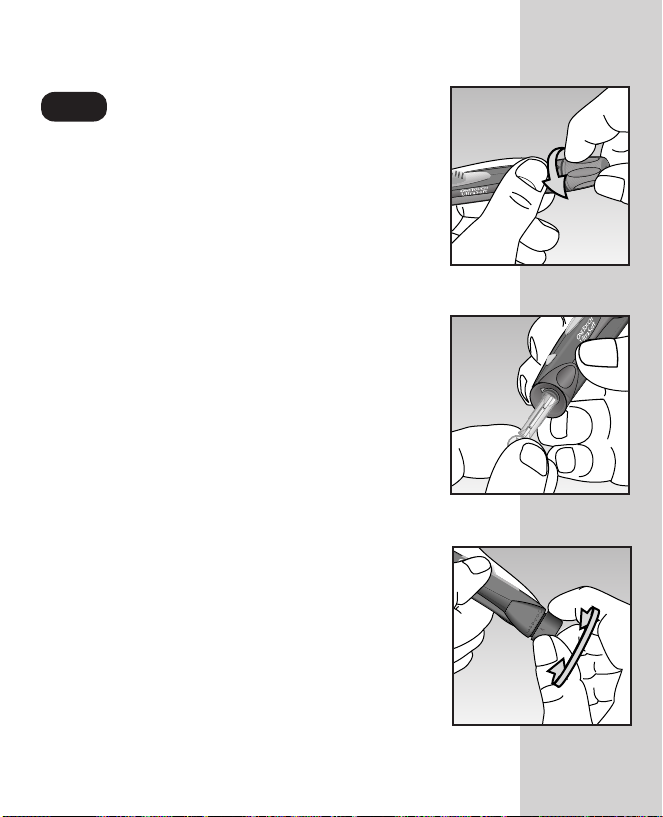
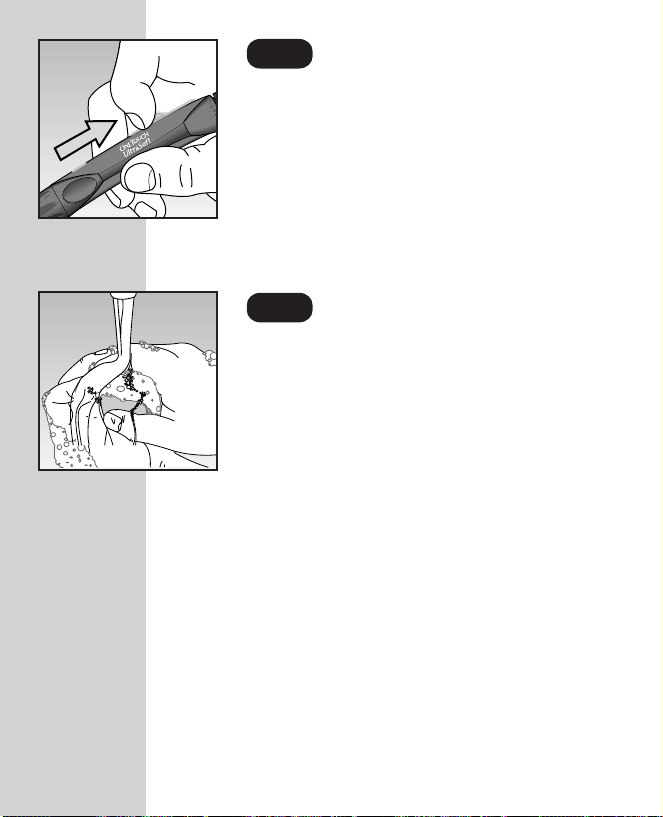
Insert a Lancet.
Turn the cap counterclockwise to remove it.
Insert the lancet into the lancet holder and
push down firmly until it is fully seated. Do
not twist the lancet. Twist the protective
disk until it separates from the lancet.
Replace the OneTouch
®
UltraSoft™Cap.
Turn it clockwise until it is snug.
Adjust the puncture depth setting if
necessary. Twist the depth adjustment knob
toward the smaller bumps for a shallower
puncture or toward the larger bumps for a
deeper puncture.
23
Cock the Sampler.
Slide the ejection/cocking control back until
it clicks. If it does not click, the sampler may
have been cocked when the lancet was
inserted. The sampler is now ready for use.
Wash Your Hands and
the Puncture Site.
Use warm, soapy water. Rinse and dry
thoroughly.
24
Loading…
Скачать
Ultra
Ultra
Ultra
Blood Glucose
Monitoring System
Owner’s
Booklet
DCO_06405104B_OTU_Uni_OBC_US 3/8/06 12:48 PM Page 2
Скачать файл PDF «Lifescan OneTouch Ultra Инструкция по эксплуатации» (2.79 Mb)
Популярность:
25477 просмотры
Подсчет страниц:
138 страницы
Тип файла:
Размер файла:
2.79 Mb
Google Ads:
- Главная
-
Lifescan
-
Глюкометры
-
OneTouch Ultra
На этой странице вы найдёте полный список документов на Глюкометры Lifescan OneTouch Ultra.
Выберите необходимый PDF файл.
-
Глюкометры
Lifescan OneTouch Ultra Инструкция по эксплуатацииТип файла
PDFРазмер
2.79 MbКол-во страниц
138Просмотров
25477Download / Read online
- 1
Другие Lifescan Глюкометры
-
Lifescan OneTouch Ultra Инструкция по эксплуатации
PDF файлов
1Просмотров
27792 -
Lifescan OneTouch Diabetes Management Software v2.3.1 Инструкция по эксплуатации
PDF файлов
1Просмотров
15767 -
Lifescan SPD2410BD Инструкция по эксплуатации
PDF файлов
1Просмотров
14155 -
Lifescan OneTouch Инструкция по эксплуатации
PDF файлов
1Просмотров
12351 -
Lifescan UltraSmart Инструкция по эксплуатации
PDF файлов
1Просмотров
11884 -
Lifescan SureStep Pro Инструкция по эксплуатации
PDF файлов
1Просмотров
10446
Другие устройства Lifescan
-
Телефоны
Lifescan 300 Инструкция по эксплуатацииPDF файлов
1Просмотров
7156 -
Телефоны
Lifescan 301 Инструкция по эксплуатацииPDF файлов
1Просмотров
7116 -
Телефоны
Lifescan 302 Инструкция по эксплуатацииPDF файлов
1Просмотров
6734 -
Телефоны
Lifescan 303 Инструкция по эксплуатацииPDF файлов
1Просмотров
6543 -
Беговые дорожки
Lifescan Pro Series Инструкция по эксплуатацииPDF файлов
1Просмотров
2422
Ранее вы смотрели
Производители
Aetrex
American Acoustic Development
Datel
Hudson Sales & Engineering
MicroBoards Technology
PayPal
Psiber Data Systems
Spirit
Turbo Chef Technologies
Volvo
Типы устройств
Динамики
Кассетные видеомагнитофоны
Стульчики для кормления
Копиры imageCLASS
Ящики
Комбинированные кофеварки
Перколяторы
Источники освещения RVI
Система управления видео
Портативные индукционные плиты
Устройства
Aiwa NSX-MTD9
ASUS PRO ADVANCED B23E E6713
Atlas Sound WR-5AT
Cypress enCoRe CY7C602xx
LG 640T
Porter-Cable 893PK
Sony STR-DE535
Sub-Zero & Wolf BI-48S Side-by-Side
freeuserguide.ru
About Us
Contacts
Disclamers
Privacy Policy
Эта страница полезна для вас? Поделитесь ссылкой:
Портативная система контроля уровня глюкозы в крови с элементом питания, модель OneTouch Ultra, OneTouch UltraEasy с принадлежностями (см. Приложение на 1 листе)I. Портативные системы контроля уровня глюкозы в крови с элементом питания OneTouch Ultra:
1. Тест-полоски OneTouch Ultra- возможна комплектация 1-3 флаконами,
2. Автоматическая ручка для прокалывания OneTouch UltraSoft — 1шт,
3. Ланцеты OneTouch UltraSoft — 1 упаковка,
4. Колпачок OneTouch AST — 1 шт,
5. Футляр — 1шт.
II. Портативная система контроля уровня глюкозы в крови с элементом питания OneTouch UltraEasy :
1. Тест-полоски OneTouch Ultra- возможна комплектация 1-3 флаконами,
2. Автоматическая ручка для прокалывания OneTouch- 1шт,
3. Ланцеты OneTouch UltraSoft — 1 упаковка,
4. Колпачок OneTouch AST — 1 шт,
5. Футляр — 1шт.
III.Принадлежности к портативным системам контроля уровня глюкозы в крови с элементом питания, модели: OneTouch Ultra, OneTouch UltraEasy:
1. Контрольный раствор глюкозы OneTouch Ultra — 1 флакон.
IV. Заводы-производители:
«ЛайфСкэн Скотланд Лтд.», Великобритания, LifeScan Scotland Ltd., Beechwood Park North Centre, Inverness IV2 3ED, United Kingdom.
«Асахи Полислайдер Ко. Лтд.», Япония, Asahi Polyslider Co. Ltd., 3-4, 4-chome, Nishiawaji Higashiyodogawa-Ku Osaka, Japan.
«Флекстроникс Индастриал Лтд. (Шеньчжень) Ко. Лтд.», Китай, Flextronics Industrial Ltd. (ShenZhen) Co. Ltd., Block C9, 2nd Industrial Zone, Xixiang, ShenZhen, China.