
Godox TT685S
迅丽TTL机顶闪光灯
Thinklite TTL Camera Flash
INSTRUCTION MANUAL
说 明 手 册
中英文双语 / Chinese English Bilingual
在使用本产品之前:
请先仔细阅读本手册,以确保您能安全使用。请保存好本手册以备将
来查询参考。
For Sony
Before using this product:
Please read this user manual carefully in order to ensure your safety
and the proper operation of this product. Keep for future reference.
705-TT685S-00
地址/Add: 深圳市宝安区福永镇福洲大道西新和村华发工业园A4栋
Building A4, Xinhe Huafa Industrial Zone, Fuzhou RD West, Fuyong
Town, Baoan District, Shenzhen 518103, China
电话/Tel: +86-755-29609320(8062) 传真/Fax: +86-755-25723423
邮箱/E-mail: godox@godox.com
http://www.godox.com
深圳市神牛摄影器材有限公司
GODOX Photo Equipment Co., Ltd.
Made In China
View the manual for the Godox TT685S here, for free. This user manual comes under the category flash units and has been rated by 4 people with an average of a 8.7. This manual is available in the following languages: English. Do you have a question about the Godox TT685S?
Ask your question here
Index
- 页 1
- 页 2
- 页 3
- 页 4
- 页 5
- 页 6
- 页 7
- 页 8
- 页 9
- 页 10
- 页 11
- 页 12
- 页 13
- 页 14
- 页 15
- 神牛
Product Images (4)

Godox TT685S specifications
Below you will find the product specifications and the manual specifications of the Godox TT685S.
The Godox TT685S is a slave flash unit with a color temperature of 5600 K, providing consistent lighting for photography purposes. It has an approximate recycling time of 2.6 seconds, allowing for quick consecutive shots without delays. With a shooting distance of up to 100 meters, it offers a wide range of coverage for capturing subjects at a distance.
The flash unit has a horizontal lighting angle of 360°, ensuring that the light is evenly spread across the frame. Its vertical lighting angle is 97°, providing flexibility in adjusting the position and direction of the light.
Equipped with a built-in display, the Godox TT685S allows users to easily access and navigate through its settings. The display type is LCD, offering clear visibility of the information displayed.
In terms of dimensions, the flash unit has a width of 64 millimeters, a depth of 76 millimeters, and a height of 190 millimeters. It weighs 530 grams, making it relatively lightweight for easy handling and portability.
For power source, the Godox TT685S supports four AA batteries. This battery type is widely available, providing convenience for users to easily replace or recharge the batteries.
Overall, the Godox TT685S is a versatile and user-friendly slave flash unit, offering reliable and consistent lighting for photography. Its wide shooting distance, adjustable lighting angles, and quick recycling time make it a suitable tool for various shooting situations. With its compact size and lightweight design, it is easy to carry and use on the go.
Number of batteries supported
4
General
| Brand | Godox |
| Model | TT685S | TT685S |
| Product | flash unit |
| EAN | 0602938090438, 0606825397129, 0611864739151, 0662578904571, 0711811934520, 0714757580370, 0714757580806, 0756910784522 |
| Language | English |
| Filetype | User manual (PDF) |
Features
| Type | Slave flash |
| Product colour | Black |
| Colour temperature | 5600 K |
| Approximate recycling time | 2.6 s |
| Shooting distance | 100 m |
| Lighting angle (horizontal) | 360 ° |
| Lighting angle (vertical) | 97 ° |
| Built-in display | Yes |
| Display type | LCD |
| Flash guide number | 60 m |
| Channels quantity | 32 channels |
| Wireless connection | Yes |
| Camera brands compatibility | Sony |
| Brand specific flash systems | TTL |
| Flash coverage | 20 — 200 mm |
Weight & dimensions
| Width | 64 mm |
| Depth | 76 mm |
| Height | 190 mm |
| Weight | 530 g |
Power
| Number of batteries supported | 4 |
| Battery type | AA |
show more
Frequently asked questions
Can’t find the answer to your question in the manual? You may find the answer to your question in the FAQs about the Godox TT685S below.
What is the weight of the Godox TT685S?
The Godox TT685S has a weight of 530 g.
What is the height of the Godox TT685S?
The Godox TT685S has a height of 190 mm.
What is the width of the Godox TT685S?
The Godox TT685S has a width of 64 mm.
What is the depth of the Godox TT685S?
The Godox TT685S has a depth of 76 mm.
Is the manual of the Godox TT685S available in English?
Yes, the manual of the Godox TT685S is available in English .
Is your question not listed? Ask your question here
Инструкция по эксплуатации для
фотовспышек NW880s и TT685s
1

Содержание
Описание вспышки
Корпус………………………………………………………………………………………………………………………………….2
контрольная панель ……………………………………………………………………………………………………………2
LCD экран …………………………………………………………………………………………………………………………….3
Содержание упаковки…………………………………………………………………………………………………………4
Аксессуары…………………………………………………………………………………………………………………………..5
Крепление вспышки на камере……………………………………………………………………………………………………………5
Управление энергопотреблением……………………………………………………………………………………………………….6
Режимы вспышки:
FEC (Коррекция экспозиции)………………………………………………………………………………………………7
синхронизация по задней шторке…………………………………………………………………………….………..8
Беспроводное управление вспышкой:
Оптическое управление……………………………………..……………………..……………………..…………………………….……11
Настройка беспроводного управления……………………………………………………………………..……….12
Настройка режима «Мастер» ……………………………………………………………….…………………………….12
Настройка канала связи……………………………………………………………….………………………………………13
Радио 2,4 GHz синхронизация
Другие настройки:
Беспроводные функции управления…………………………………………………………………………………..18
Вспышка с отклонением луча……………………………………………………………….……………………………..19
Зуммирование: настройка зоны освещения и использование панели дистанции………….20
Индикатор разряда батареи……………………………………………………………….……………………………….20
C.Fn: Установка пользовательских настроек………………………………………………………………………………………21
Функции защиты……………………………………………………………….…………………………………………………………………..22
Технические данные……………………………………………………………….…………………………………………………………….23
TTL: автоматический……………………………………………………………………………………………………………6
режим работы вспышки с высокоскоростной синхронизацией………………………………………7
М: ручной режим вспышки…………………….…………………………………………………………………………..8
Multi: режим стробоскопический……………………………………………………………….………………………9
Настройка беспроводного управления……………………………………………………………………………….14
Настройка режима «Мастер» ……………………………………………………………….…………………………….14
Настройка канала связи……………………………………………………………….………………………………………15
TTL: полностью автоматический режим вспышки……………………………………………………………..16
М: беспроводное управление в ручном режиме вспышки……………………………………………….17
Multi: беспроводное управление стробоскопическом режиме………………………………………..18
2
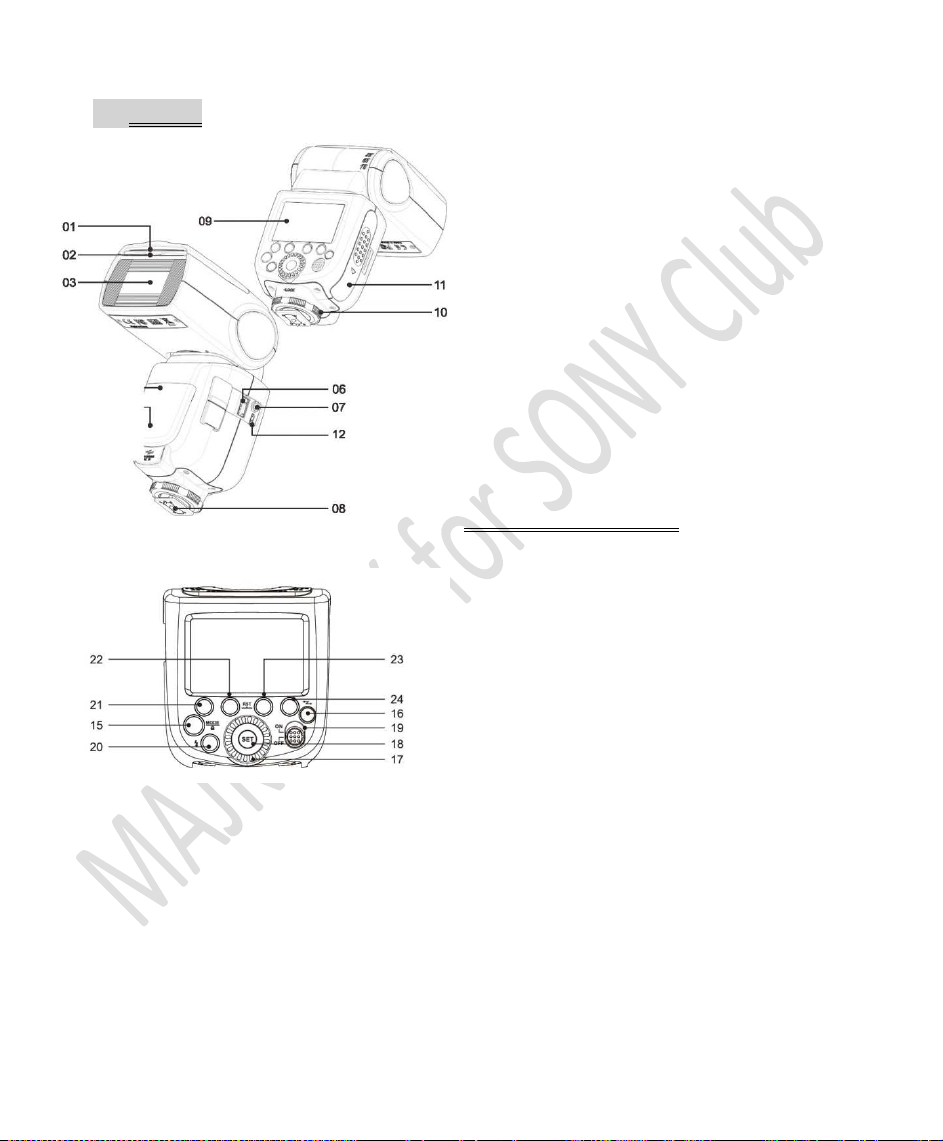
Корпус
1. Отражатель
2. Доп. рассеиватель
3. Голова вспышки
4. Оптический сенсор
5. Подсветка автофокуса
6. Разъем дистанц. управления
7. Контакт синхронизации
8. Горячий башмак
9. LCD-Дисплей
10. Кольцо фиксации
11. Батарейный блок
12. USB Порт
13. Индикатор готовности ведомой вспышки
14. Разъём внешнего источника питания
15. «MODE» выбор режима, кнопка блокировки
16. Выбор беспроводного режима
Контрольная панель
15. «MODE» выбор режима, кнопка блокировки
16. Выбор беспроводного режима
17. Выбор ступени
18. Кнопка «Установить»
19. ВКЛ/ВЫКЛ
20. Тест вспышки
21. Функциональная кнопка 1
22. Функциональная кнопка 2
23. Функциональная кнопка 3
25. Функциональная кнопка 4
3
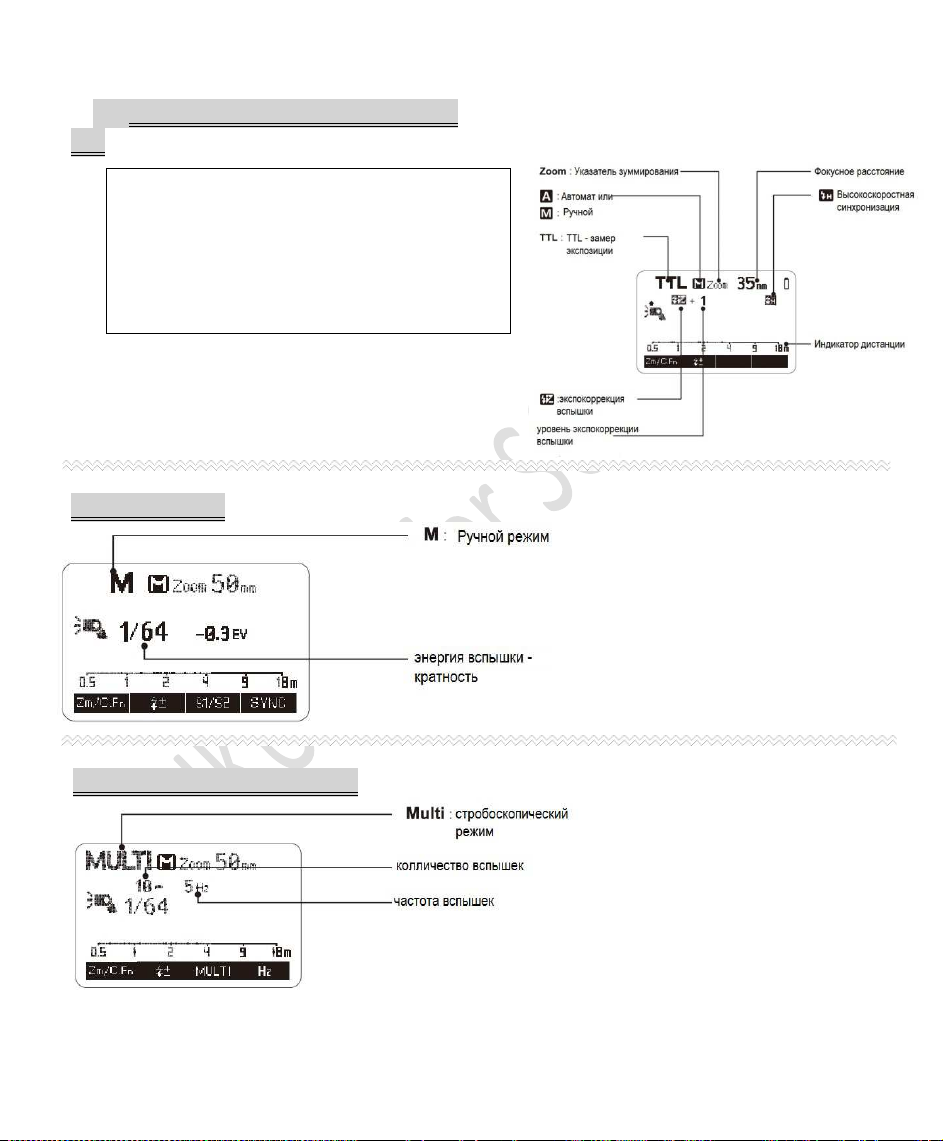
На дисплее отобразятся только те настройки,
ЖК—дисплей в разных режимах
TTL
которые были применены в настоящее время.
• ЖК-дисплей загорается при нажатии кнопки
или диска
Ручной режим
4
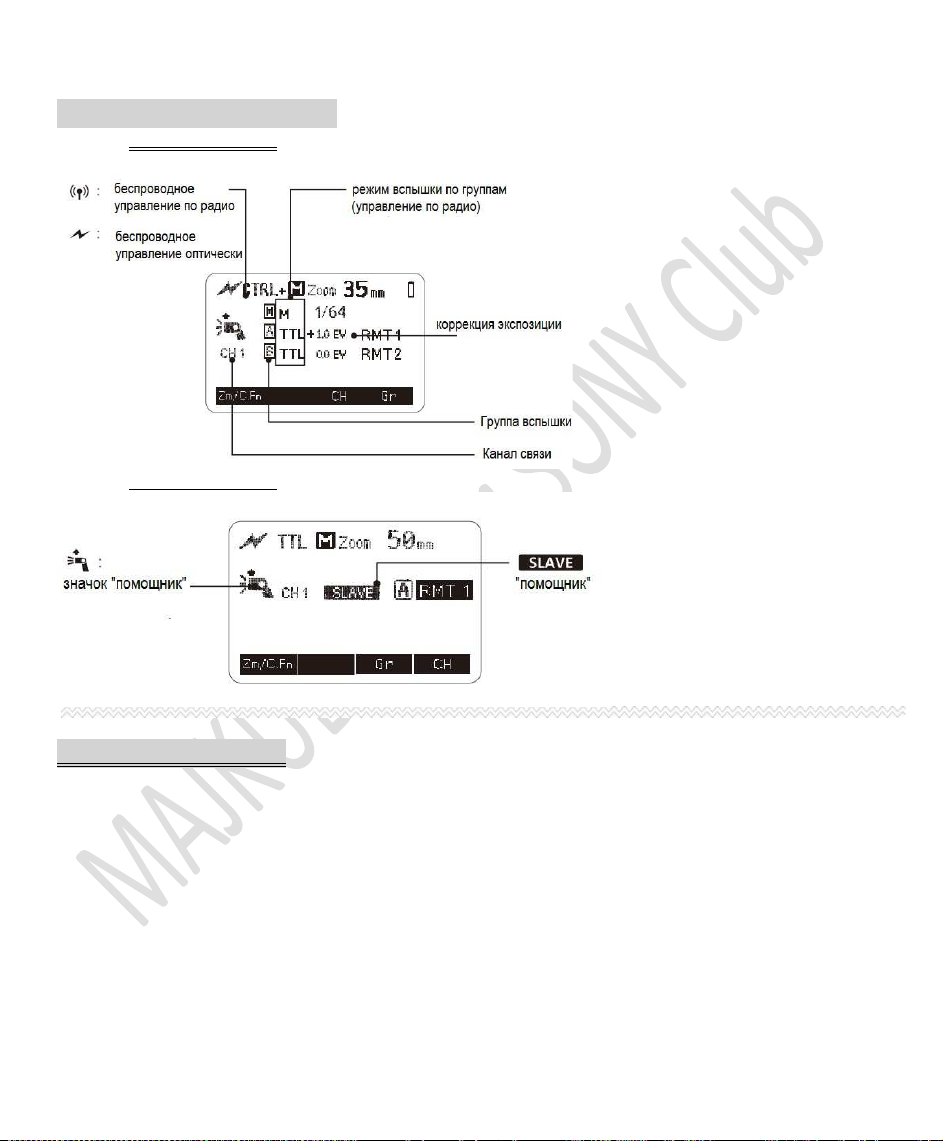
Беспроводное управление
• Режим «Ведущая»
• Режим «Ведомая»
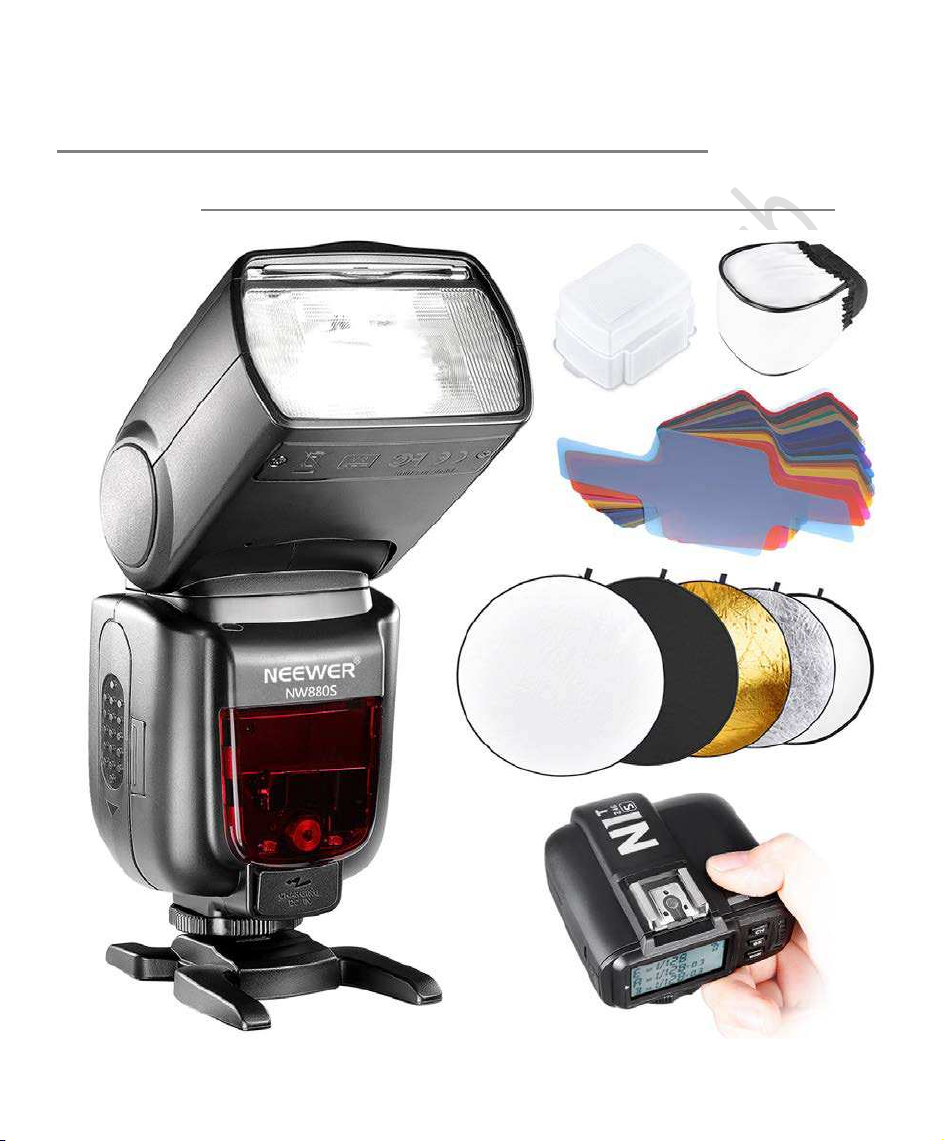
Содержание упаковки
1. Фотовспышка
2. Миниподставка
3. Защитный футляр
4. Инструкция
5
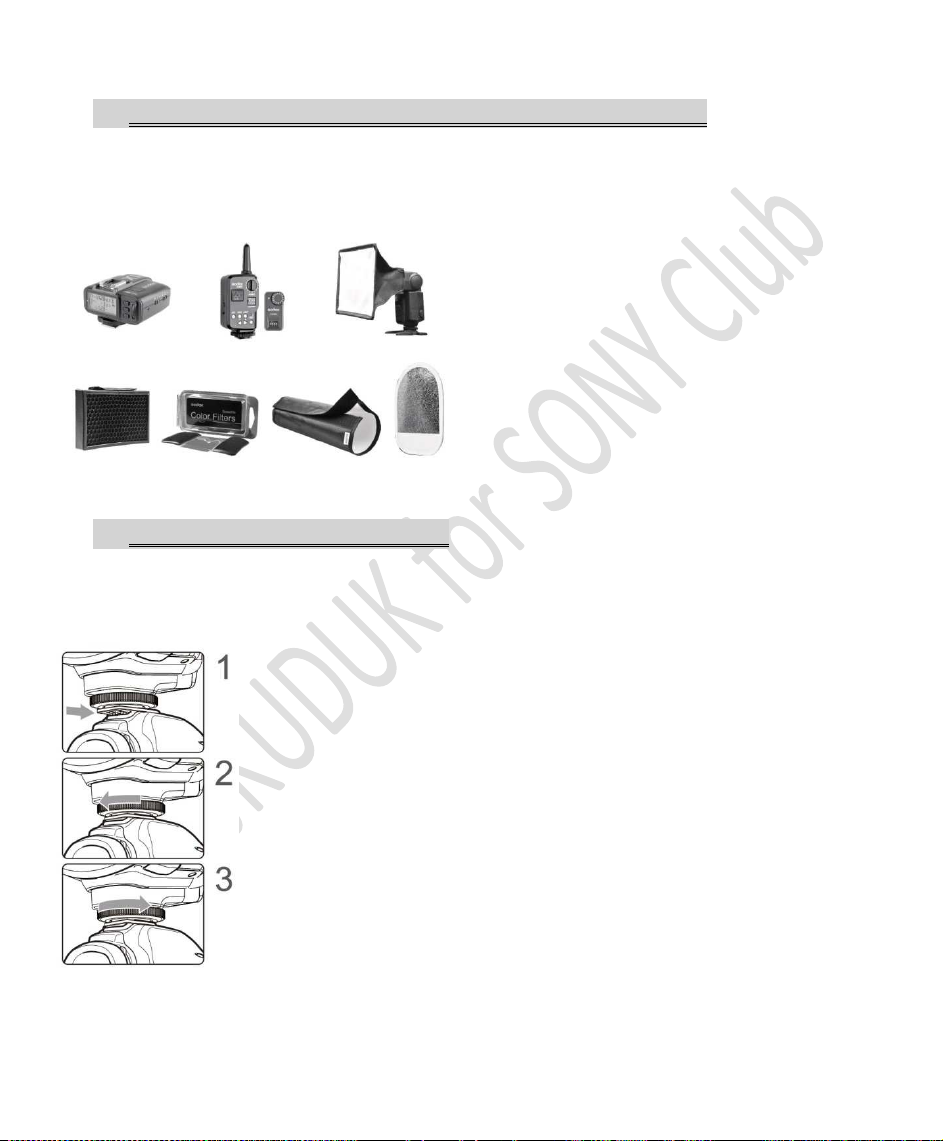
Дополнительные аксессуары, не входящие в комплект
Мы не берем на себя ответственность за неполадки или
повреждения вспышки, вызванные использованием
аксессуаров других производителей.
NEEWER N1T-S TTL — Устройство для беспроводного
управления несколькими фотовспышками; Минисофтбокс, FT-16S Управление питанием и пуском; набор
рефлекторов: белый, серебристый и золотистый; цветные
светофильтры и др.
Установка вспышки на камеру
Выключите вспышку и камеру перед установкой или
снятием.
Полностью продвиньте основание вспышки в «горячий башмак» для
установки аксессуаров
Поверните накатную гайку по направлению к корпусу камеры
до упора, так чтобы вспышка была прочно закреплена на месте
Снятие вспышки с камеры
Выключите вспышку и камеру
• Поверните накатную гайку по направлению к корпусу
вспышки до упора.
• Снимите вспышку с «горячего башмака» камеры для установки аксессуаров.
6

Управление энергопитанием
Используйте переключатель питания ON / OFF для включения или выключения вспышки. Выключите, если она не
будет использоваться в течение длительного периода времени. Установка в качестве мастер-вспышки отключит
питание автоматически в течение определенного периода (около 90 секунд) бездействия. Нажатие на кнопку
Затвора наполовину или нажатием любой кнопки вспышки, разбудит вспышку. Установка в качестве ведомой
вспышки, она переходит в спящий режим, (регулируемый, по умолчанию 60 минут) бездействия. Нажатие любой
кнопки вспышки разбудит ее.
Рекомендуется отключить функцию автоматического отключения питания если вспышка
используется вне камеры. (
По умолчанию для таймера отключения ведомого устройства установлено значение 60 минут.
Есть еще один вариант «30 минут»
C.Fn-APO, Cтр. 23)
Режимы вспышки:
Эта вспышка имеет три режима вспышки: TTL, ручной (M) и мульти (стробоскопический).
***** Нажимайте кнопку MODE> SELECTLON и все три режима поочередно будут переключаться, это вы увидите на
ЖК—экране.
TTL-Автоматика
Режим работы вспышки через объектив (TTL) предлагает очень простой способ получения превосходных
снимков, сделанных со вспышкой. В этом режиме, данные выдержки считываются встроенным в камеру
датчиком, замеряющим объем света, проходящего через объектив камеры (Through The Lens‖).Электронная
схема управления в камере передаст сигнал остановки на вспышку, как только будет получено достаточно
света, что приведет к мгновенному прерыванию вспышки. Преимущество этого режима вспышки заключается в
том, что все факторы, влияющие на правильность выдержки (фильтры, изменения диафрагмы и фокусного
расстояния на зум-объективе, насадки для съемки крупным планом и т.д.) учитываются автоматически.
В этом режиме доступны несколько функций TTL: FEC, HSS, вторая шторная синхронизация, модемная вспышка и т.д.
Нажмите кнопку выбора режима <MODE>, чтобы войти в режим TTL. ЖК-дисплей отобразит <TTL>.
• Нажмите наполовину кнопку затвора фотокамеры, чтобы сфокусироваться. Диапазон диафрагмы и уровень
эффективной вспышки будет отображаться в режиме реального времени.
• Когда кнопка спуска затвора полностью нажата, перед основной вспышкой сработает едва заметная
предварительная. Камера оценит уровень отраженного предварительного освещения таким образом, чтобы
7
последующая вспышка оптимально адаптировалась под преобладающее освещение во время съемки
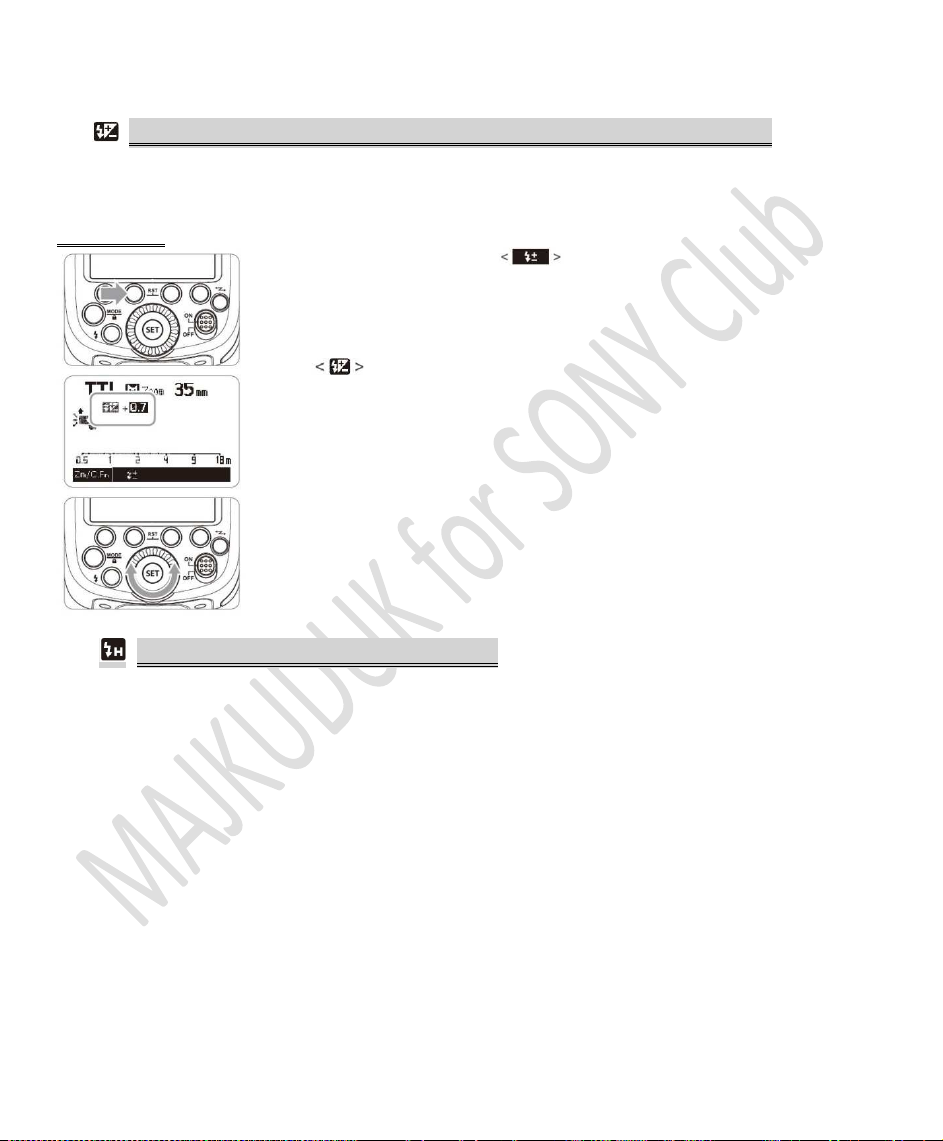
FEC: Flash Exposure Compensation – Экспокоррекция вспышки
Ручная экспокоррекция вспышки (экспозиционного числа, EV) может помочь устранить сильные различия
контраста между объекта съемки и фона. Коррекция с -3 до +3 шагов диафрагмы (экспозиционное число)
может быть сделана с интервалами 1/3 шага.
Настройка FEC:
Нажать функциональную кнопку 2 .
Значок и величина компенсации экспозиции при съемке со вспышкой будут
выделены на ЖК-экране.
Установите значение компенсации экспозиции при съемке со вспышкой.
• Поверните колесо переключателя на нужное положение
• «0,3» означает 1/3 шага
• «0,7» означает 2/3 шага
• Чтобы обнулить компенсацию экспозиции вспышки, установите +0
• Необходимо нажать < SET > чтобы применить настройки
Высокоскоростная синхронизация
Разные камеры поддерживают функцию автоматической высокоскоростной синхронизации (HSS) (см.
руководство пользователя вашей камеры). В данном режиме вспышки становится возможным использовать
вспышку даже, когда скорость срабатывания выше скорости синхронизации вспышки. В этом режиме можно
достичь впечатляющих результатов, например, когда широко открытая диафрагма (например, F 2.0)
используется для ограничения глубины резкости. Вспышка поддерживает функцию высокоскоростной
синхронизации в режимах TTL (TTL HSS) и ручном M (M HSS). Однако, по физическим причинам, высокоскоростная
синхронизация (HSS) значительно уменьшает значение ведущего числа и максимальный диапазон действия
вспышки. Поэтому учитывайте отображение максимального диапазона действия вспышки на ЖК-дисплее
вспышки. Высокоскоростная синхронизация (HSS) активируется автоматически, если скорость срабатывания
затвора, настроенная на камере (или вручную или автоматически через программу экспонирования) выше, чем
скорость синхронизации вспышки.
При использовании высокоскоростной синхронизации чем быстрее выдержка затвора, тем
короче эффективный диапазон вспышки.
• Режим вспышки «Мульти» не может быть установлен в режиме синхронизации с высокой
скоростью.
8
Loading…
- June 9, 2024
- Godox
Table of Contents
- Godox TT685II-S Camera Flash
- Foreword
- Name of Parts
- LCD Panel
- Radio Transmission Shooting
- **
- LCD Panel in Three Modes
- What’s in the Box of TT685IIS Kit?
- Power Management
- Maximum Stroboscopic Flashes
- Wireless Settings
- Setting the Communication Channel
- Other Applications
- Protection Function
- Technical Data
- Troubleshooting
- Firmware Upgrade
- Maintenance
- Warranty Conditions
- References
- Read User Manual Online (PDF format)
- Download This Manual (PDF format)
Godox TT685II-S Camera Flash

Dear customer,
Thank you for purchasing our product. Please read the following instructions
carefully before first use and keep this user manual for future reference. Pay
particular attention to the safety instructions. If you have any questions or
comments about the device, please contact the customer line.
- ✉ www.alza.co.uk/kontakt
- ✆ +44 (0)203 514 4411
- Importer Alza.cz a.s., Jankovcova 1522/53, Holešovice, 170 00 Prague 7, www.alza.cz
Foreword
Thank you for purchasing this product.
This TT685IIS camera flash applies to Sony series cameras and is compatible
with TTL autoflash. With this TTL compatible flash, your shooting will become
simpler. You can easily achieve a correct flash exposure even in complex
light-changing environments. This camera flash features:
- Approx. GN60 (ISO 100, @200mm), 81 steps from 1/1 to 1/256.
- Fully support Sony TTL camera flash. Workable as Transmitter or Receiver unit in a wireless flash group.
- Use dot-matrix LCD panel to make clear and convenient operations.
- With built-in 2.4GHz wireless remote system to support transmitting and receiving.
- Provided multiple functions, include HSS (up to 1/8000s) FEC, FEB, etc.
- Stable consistency and color temperature with good even lighting.
- Support with firmware upgrade.
Warning
-
Always keep this product dry. Do not use in rain or in damp conditions.
-
Do not disassemble. Should repairs become necessary, this product must be sent to an authorized maintenance center.
-
Keep out of reach of children.
Stop using this product if it breaks open due to extrusion, falling or strong
hit. Otherwise, electric shock may occur if you touch the electronic parts
inside it. -
Do not fire the flash directly into the eyes (especially those of babies) within short distances. Otherwise, visual impairment may occur.
-
Do not use the flash unit in the presence of flammable gases, chemicals, and other similar material. In certain circumstance, these materials may be sensitive to the strong light emitting from this flash unit and fire or electromagnetic interference may result.
-
Do not leave or store the flash unit if the ambient temperature reads over 50°C. Otherwise the electronic parts may be damaged.
-
Turn off the flash unit immediately in the event of malfunction.
Name of Parts

-
Flash Head
-
Built-in Wide Panel
-
Wireless Sensor
-
Focus Assist Beam
-
Sync Cord Jack
-
Type-C USB Port
-
Battery Cover
-
Hotshoe
-
LCD Panel
-
Hotshoe Fixing Buckle
-
External Charging Port
Control Panel
- Flash Menu Button
-
Wireless Selection Button
-
Select Dial
-
Set Button
-
ON/OFF Power Switch
-
Test Button/Flash Ready Indicator
- Focus Length Setting
- Mode Selection Button
-
Lock Setting
-
<+/->Power Output
-
Function Button 1
-
Function Button 2
-
Function Button 3
-
Function Button 4

LCD Panel
TTL Autoflash Zoom: zoom display

- The display will only show the settings currently applied.
- The functions displayed above function button 1 to 4, such as SYNC and <M/A/B/C>, change according to settings status.
- The LCD panel will lighten on when buttons and dials are operated.
M Manual Flash

Multi Flash

Radio Transmission Shooting
Transmitter Unit (TX)
**

**
Receiver Unit (RX)

LCD Panel in Three Modes
Attached to the Camera
2.4G Radio Transmission: As a Transmitter Unit
2.4G Radio Transmission: As a Receiver Unit
What’s in the Box of TT685IIS Kit?

Separately Sold Accessories
The product can be used in combination with the following accessories sold
separately, so as to achieve best photography effects: XProC, X2T-C & X1C TTL
wireless flash trigger, etc.

Loading and Unloading the Battery

To unload the battery hold down the battery press compartment and push the
battery downwardly to take it out.
Put 4 batteries in with the correct polarity after opening the battery
compartment, then close and push it to the top.
Tips : When collocated with the optional Godox Flash Power Box PB960,
TT685IIS will have more flash times, shorter recycle time and longer duration.
Attaching to a Camera

- Attach the Camera Flash Rotate the hotshoe fixing buckle to the left and insert the camera flash into the camera’s hotshoe.
- Secure the Camera Flash Rotate the hotshoe fixing buckle to the right until it locks up.
- Detach the Camera Flash Press the button and rotate the hotshoe fixing buckle to the left until it is loosened.
Power Management
Use ON/OFF Power Switch to power the flash unit on or off. Turn off it will
not be used for an extended period of time. Setting as transmitter flash, it
will turn the power off automatically after a certain period (approx. 90
seconds) od idle use. Pressing the camera shutter halfway or pressing any
flash button will wake up the flash unit. Setting as a receiver flash, it will
enter sleep mode after a certain period (adjustable, 60 minutes by default) od
idle use. Pressing any flash button will wake it up.
- Disabling Auto Power Off function is recommended when the flash is used off camera. (C.Fn-STBY)
- Receiver Auto Power Off Timer is set to 60 minutes by default. Another option “30 minutes” is available (C.Fn-RX STBY)
Flash Mode—TTL Autoflash
- This flash has three flash modes: E-TTL, Manual (M) and Multi (Stroboscopic). In E-TTL mode, the camera and the flash will work together to calculate the correct exposure for the subject and the background. In this mode, multiple TTL function are available: FEC, HSS, second curtain sync, control with Sony camera’s menu screen.
Press Mode Selection Button and three flash modes will display on the
LCD panel one by one with each pressing.
ETTL Mode
Press Mode Selection Button to enter E-TTL mode. The LCD panel will
display.
- Press the camera release button halfway to focus. The aperture and effective flash range will be displayed in the viewfinder.
- When the shutter button is fully pressed, the flash will fire pre-flash that the camera will use to calculate exposure and flash output the instant before the photo is taken.
FEC: Flash Exposure Compensation
With FEC function, this flash can adjust from -3 to +3 in 1/3 stops. It is
useful in situations where minor adjusting of the TTL system is needed based
on the environment.

- Press the <+/-> button. The flash exposure compensation amount will be highlighted on the LCD panel.
- Set the flash exposure compensation amount.
- Turn the Select Dial to set the amount.
- “0.3” means 1/3 step, “0.7” means 2/3 step.
- To cancel the flash exposure compensation, set the amount to “+0”.
- Press Set Button again to confirm the setting.
High-Speed Sync
High Speed Sync (FP flash) enables the flash to synchronize with all camera
shutter speeds. This is convenient when you want to use aperture priority for
fill-flash portraits.

- Press Function Button 2
- SYNC so that < > is displayed.
- Press MENU or Fn button on SONY camera to enter Flas Mode and choose Fill-flash, then set the camera hutter.
- If you set a shutter speed that is the same as or slower than the camera’s maximum flash sync speed < > will not be displayed in the viewfinder.
- With high-speed sync, the faster the shutter speed, the shorter the effecitve flash range.
- To return to normal flash press < > button again. Then < > will disappear.
- Multi flash mode cannot be set in high-speed sync mode.
- Over-temperature protection may be activated after 15 consecutive high-speed sync flashes.
Second-Curtain Sync
With a slow shutter speed, you can create a light train following the subject.
The flash fires right before the shutter closes.
Choose REAR flash mode in the settings of Sony camera.
M: Manual Flash
The flash output is adjustable from 1/1 full power to 1/256th power in 1/10th
stop increments. To obtain a correct flash exposure, use a hand-held flash
meter to determine the required flash output.

- Press button so that is displayed.
- Press <+/-> to choose power, then turn the Select Dial to choose a desired flash output amount.
- Press Set button again to confirm the setting.
Optic S1 Secondary Unit Setting
In M manual flash mode, press <S1/S2> button so that this flash can function
as an optic S1 secondary flash with optic sensor. With this function, the
flash will fire synchronously when the main flash fires, the same effect as
that by the use of radio triggers. This helps create multiple lighting
effects.
Optic S2 Secondary Unit Setting
Press <S1/S2> button so that this flash can also function as an optic S2
secondary flash with optic sensor in M manual flash mode. This is useful when
cameras have pre-flash function. With this function the flash will ignore a
single “preflash” from the main flash and will only fire in response to the
second, actual flash from the main unit.
- S1 and S2 optic triggering is only available in M manual
Multi: Stroboscopic Flash
With stroboscopic flash, a rapid series of flashes is fired. It can be used to
capture multiple images of a moving subject in single photograph.
You can set the firing frequency (number of flashes per sec. expressed as Hz),
the number of flashes, and the flash output.
Press button so that is displayed.
Set the flash frequency and flash times.
- Press the Function Button 2 to select the flash times. Turn the Select Dial to set the number.
- Press the Function Button 3 to select the flash frequency. Turn the Select Dial to set the number.
- Turn the Select Dial to choose desired flash output. After you finish the setting, press Set Button and all the settings will be displayed.

Calculating the Shutter Sped
During stroboscopic flash, the shutter remains open until the firing stops.
Use formula below to calculate the shutter speed and set it with the camera.
Number of Flashes / Flash Frequency = Shutter Speed
For example, if the number of flashes is 10 and the firing frequency is 5 Hz,
the shutter speed should be at least 2 seconds.
WARNING
To avoid overheating and deteriorating the flash head, do not use stroboscopic
flash more than 10 times in succession. After 10 times, allow the camera flash
to rest for at least 15 minutes. If you try to use stroboscopic flash more
than 10 times in succession, the firing might stop automatically to protect
the flash head. If this camera happens, allow at least 15 minutes rest for the
camera flash.
- Stroboscopic flash is most effective with a highly reflective subject against a dark background.
- Using a tripod and remote control is recommended.
- A flash output of 1/1 and 1/2 cannot be set for stroboscopic flash.
- Stroboscopic flash can be used with bulb
- If the number of flashes is displayed as, the firing will continue until the shutter closes or the battery is exhausted. The number of flashes will be limited ah shown by the following table:
Maximum Stroboscopic Flashes
Flash Output / Hz

Flash Output / Hz

Wireless Flash Shooting: Radio (2.4G) Transmission
- The TT685IIS attach to the camera is called the transmitter unit, and a TT685IIS that is wirelessly controlled is called the receiver unit.
- You can also wirelessly control the TT685IIS set as the receiver unit with the transmitter X1T-C (sold separately). For details on setting the transmitter unit functions, see the transmitter’s intrucstions.
Using a flash (transmitter/receiver) with a radio transmission wireless
shooting function make It easy to shoot with advanced wireless multiple flash
lighting, in the same ways as TTL autoflash shooting.
The basic relative position and operation range are as shown in the picture.
You can then perform wireless TTL autoflash shooting just by setting the
transmitter unit to
.
Positioning and Operation Range (Example of wireless flash shooting)
- Autoflash Shooting with One Receiver Unit
- Use the supplied mini stand to position the Receiver unit.
- Before shooting, perform a test flash and test shooting.
- The transmission distance might be shorter depending on the conditions such as positioning of Receiver units, the surrounding environment and whether conditions.

Wireless Multiple Flash Shooting
You can divide the Receiver units, into two or three groups and perform TTL
autoflash while changing the flash ratio (factor). In addition, you can set
and shoot with a different flash mode for each firing group, for up to 4
groups.
Auto Shooting with Two Receiver Groups

Auto Shooting with Three Receiver Groups

Wireless Settings
You can switch between normal flash and wireless flash. For normal flash
shooting, be sure to set the wireless setting to OFF.
Transmitter Unit Setting

Press < > button so that < > is displayed on the LCD panel.
Receiver Unit Setting

- Press < > button so that < > or < RX > displayed on the LCD panel.
Setting the Communication Channel
If there are other wireless flash systems nearby, you can change the channel
IDs to prevent signal interference. The channel IDs of the Transmitter unit
and the Receiver unit(s) must be set to the same.

- Press Buton to enter C.Fn CH setting.
- In C.Fn CH, turn the Select Dial to choose channel ID from 1 to 32.
- Press the Set Button to confirm.
Wireless ID Settings
Change the wireless channels and wireless ID to avoid interference for it can
only be triggered after the wireless IDs and channels of the Transmitter unit
and the Receiver unit are set to the same. Press the
button to enter
C.Fn ID. Press the Set Button to choose OFF channel expansion shutdown, and
choose any figure from 01 to 99.
Scan the Spare Channel
To avoid the interference of using the same channel by others, this function
can be used: enter the C.Fn settings and find the SCAN option. When setting it
to START, it will scan from 1% to 100%. And 8 spare channels will be displayed
after the scan is completed.

Using Automatic Wireless Flash with a Single Receiver Unit Transmitter Unit
Setting

- Attach a TT685IIS camera flash on the camera and set it as the Transmitter unit.
- M/A/B/C can be set as TTL respectively.
Receiver Unit Setting
- Set wireless controlled TT685IIS as the wireless Receiver Unit.
- You can choose A/B/C/D/E

Check the communication channel.
- If the Transmitter unit Receiver unit(s) are set to a different channel, set them to the same channel.
Position the camera and flashes
- Position the camera and flashes as the picture shows
Check that the flash is ready
- Check that the Transmitter flash ready indicator is lightened.
Check the flash operation.
- Press the Transmitter unit’s Test Button <>
- Then, the Receiver unit will fire. If not, adjust the Receiver unit’s angle toward the Transmitter unit and distance from the Transmitter unit.
Using Automatic Wireless Flash with Multiple Receiver Units
When stronger flash output or more convenient lighting operation is needed,
increase the number of Receiver units and set it as a single Receiver unit. To
add Receiver units, use the same steps as setting “automatic wireless flash
with a single Receiver unit”. Any flash group can be set (A/B/C/D/E). When the
number of Receiver units is increased and the Transmitter unit flash firing is
ON, automatic control is implemented to make all groups of flashes fire the
same flash output and ensure the total flash output up is to standard exposure
.

- If the Receiver unit’s auto power off function is workable, press the Transmitter unit’s test button to power it on. Please note that test firing is unavailable during the camera’s regular metering time.
- The effective time of Receiver auto power off is changeable.
- By making some settings, the auto AF-assist transmitter will not blink after the Receiver unit’s flash ready indicator is lightened.
Using Fully Automatic Wireless Flash
The FEC and other setting that set on the Transmitter unit will also be
appeared on the Receiver unit automatically. The Receiver unit does not need
any operation. Use the following settings to make wireless flashes according
to the same methods with normal flash shooting.
- Flash Exposure Compensation
About the Transmitter Unit
Use two or more Transmitter units. By preparing several cameras that with
Transmitter units flash attached, cameras can be changed in shooting while
keeping the same lighting source. (Receiver unit).
M: Wireless Flash Shooting with Manual Flash
This describes wireless (multiple shooting) using manual flash. You can shoot
with a different flash output setting for each Receiver unit (firing) group.
Set all parameters on the Transmitter unit.

- Setting the flash mode to
- Setting flash output.
- Press Function Button 1/2/3/4<M/A/B/C>. Turn the Select Dial to set the flash output of the groups. Press Set Button to confirm.
- Taking the picture.
- Each group fires at the set flash ratio.
Setting Flash Mode
You can directly operate the Receiver unit to manually set the manual flash or
stroboscopic flash.

- Setting the Receiver unit.
- Setting flash mode to
- Press button so that is displayed.
- Set the manual flash output
Multi: Wireless Flash Shooting with Manual Flash

- Setting Stroboscopic flash
- Press button so that is displayed.
- Setting the stroboscopic flash
The Reason & Solution of Not Triggering in Godox 2.4G Wireless
- Disturbed by the 2.4G signal in outer environment (e.g. wireless base station, 2.4G wifi router, Bluetooth, etc.)
- To adjust the channel CH setting on the flash trigger (add 10+ channels) and use the channel which is not disturbed. Or turn off the other 2.4G equipment in working.
- Please make sure that whether the flash has finished its recycle or caught up with the continuous shooting speed or not (the flash ready indicator is lighten) and the flash is not under the state of over-heat protection or other abnormal situation.
- Please downgrade the flash power output. If the flash is in TTL mode, please try to change it to M mode (a preflash is needed in TTL mode).
- Whether the distance between the flash trigger and the flash is too close or not (<0.5m)
- Please turn on the “close distance wireless mode” on the flash trigger
- X2 & X1 series: press the test button and hold on, then turning it on until the flash ready indicator blinks for 2 times.
- XPro series: Set the C.Fn-DIST to 0-30m.
- Whether the flash trigger and the receiver end equipment are in the low battery states or not.
- Please replace the battery (the flash trigger is recommended to use 1.5V disposable alkaline battery).
Other Applications
Sync Triggering
The Sync Cord Jack is a Φ2.5mm plug. Insert a trigger plug here and the flash
will be fired synchronously with the camera shutter.
Auto Focus Assist Beam
In poorly-lit or low contrast shooting environments, the built-in auto focus
assist beam will automatically light on to make it easier for autofocus. The
beam will light up only when autofocus is difficult and get out as soon as the
autofocus becomes correct.
If you want to turn off the auto focus assist beam, set the “AF” to “OFF” on
the C.Fn settings.
- If you find the auto focus assist beam does not light up, this is because the camera has got a correct autofocus
Position| Effective Range
—|—
Center| 0.6~10m / 2.0~32.8 feet
Periphery| 0.6~5m / 2.0~16.4 feet
Bounce Flash
By pointing the flash head toward a wall or ceiling, the flash will bounce off
the surface before illuminating the subject. This can soften shadows behind
the subject for more natural-looking shot. This is called bounce flash To set
the bounce direction, hold the flash head and turn it to a satisfying angle
.

- If the wall or ceiling is too far away, the bounced flash might be too weak and result in underexposure.
- The wall or ceiling should be a plain, white color for high reflectance. If the bounce surface is not white, a color cast may appear in the picture
Creating a Catchlight
With the catchlight panel, you can create a catchlight in the subject’s eyes
to add life to the facial expression.
- Point the flash head upward by 90°
- Pull out the wide panel. The catchlight panel will come out at the same time.
- Push the wide panel back in.
- Push in only the wide panel.
- Follow the same procedures as for bounce flash.

Notes
- Point the flash head straight ahead and then upward by 90° The catchlight will not appear if the swing the flash head left or right.
- For maximum catchlight effect, stay 1.5m/4.9ft away from the subject.
ZOOM: Setting the Flash Coverage
The flash coverage can be set automatically or manually. It can be set to
match the lens focal length from 20mm to 200mm.
In Manual Zoom mode, press the button.
- Turn the Select Dial to change the flash coverage.
- If < > is displayed, the flash coverage will be set automatically
If you set the flash coverage manually, make sure it covers the lens focal
length so that the picture will not have a dark periphery.
Low Battery Warning
If the battery power is low <> will appear and blink on the LCD panel. Please
replace the battery immediately

Fn: Setting Custom Functions
The following table lists the available and unavailable custom functions of
this flash.
Custom Function
Signs
| Function| Setting No.| Setting &
Description
—|—|—|—
m/ft| Distance indicator| m| m
Ft| Feet
AF| AF-assist beam RX| ON| ON
OFF| OFF
STBY| Auto sleep setting| ON| ON
OFF| OFF
RX STBY| Receiver auto
power off timer
| 60min| 60min
30min| 30min
SCAN| Scan the spare channel| OFF| OFF
START| Start to find the
spare channels
CH| Channel setting| 01~32| Choose channels
from 01-32
ID| Wireless ID| OFF| OFF
01-99| Choose any figure
from 01-99
BEEP| Beeper| ON| ON
OFF| OFF
LIGHT| Backlighting time| 12sec| Off in 12 sec
OFF| Always off
ON| Always lighting
LCD| LCD contras ratio| -3~+3| 7 levels
TX DIST| Firing distance| 1-100m
0-30m
| 1-100m firing
0-30m firing
- Press Button until C.Fn menu is displayed. The “Ver x.x” in the top right corner refers to the software version.
- Select the custom function No.
- Turn the Select Dial to select the Custom Function No.
- Change the Setting.
- Press Set Button and Setting No. Blinks.
- Turn the Select Dial to set the desired number. Pressing Set Button will confirm the settings.
- After you set the Custom Function and press button, the camera will be ready to shoot.
- In the C.Fn states, long press the “Clear” button for 2 seconds until “OK” is displayed on the panel, which means the values in C.Fn can be reset
Protection Function
Over-Temperature Protection
- To avoid overheating and deteriorating the flash head, do not fire more than 40 continuous flashes in fast succession 1/1 full power. After 40 continuous flashes, allow a rest time of at least 10 minutes.
- If you fire more than 40 continuous flashes and the fire more flashes in short intervals, the inner over-temperature protection function may be activated. If this occurs, allow a rest time of about 10 minutes, and the flash unit will then return to normal.
- When the over-temperature protection is started is shown on the LCD display.
Number of flashes that will activate over-temperature protection:
Power Output Level / Number of Flashes / ZOOM (mm)

Number of flashes what will activate over-temperature protection in high-
speed sync triggering mode:
Power Output Level / Number of Flashes / ZOOM (mm)

Other Protections
The system provides real-time protection to secure the device and your safety.
The following lists prompts for your reference
Prompts on
LCD Panel
| Meaning
—|—
E1| A failure occurs on the recycling system so that the flash cannot fire.
Please restart the flash unit. If the problem still exists, please send
this product to a maintenance centre.
E2| The system gets excessive heat. Please allow a rest time of 10
minutes.
E3| The voltage on two outlets of the flash tube is too high. Please send
this product to a maintenance centre.
E9| There are some errors occurred during the upgrading process.
Please using the correct firmware upgrade method.
Technical Data
| Model | TT685IIS |
|---|---|
| Guide No. (1/1 output, 200mm) | GN 60 (m ISO100, in meters) |
| Flash Coverage | 20 to 200mm |
| Auto zoom (Flash coverage set automatically to match the lens focal |
length image size)
| Manual Zoom
· Swinging/tilting flash head (bounce flash): 0 to 330° horizontally
and –
7° to 120° vertically
Flash Duration| 1/300 to 1/20000 seconds
Exposure Control
| Exposure control system | TTL autoflash and manual flash |
|---|---|
| Flash exposure compensation (FEC) | Manual. FEB±3 stops in 1/3 stop |
increments
(Manual FEC and FEB can be combined)
Sync mode| High-speed sync (up to 1/8000 seconds
first-curtain sync, and second-curtain sync
Multi flash| Provided (up to 90 times, 100Hz)
Wireless Flash (2.4G Radio Transmission)
| Wireless flash function | Transmitter, Receiver, Off |
|---|---|
| Transmitter groups | M,A,B,C |
| Controllable Receiver groups | A,B,C,D,E (E group can be controlled by X |
series flash trigger)
Transmission range (approx.)| 100m
Channels| 32 (1~32)
ID| 01~99
Auto Focus Assist Beam
| Effective range (approx.) | Center: 0.6~10m |
|---|---|
| Periphery: 0.6~5m |
Power Supply
Power source| NI-MH battery (recommended) or LR6
alkaline battery*4
—|—
Recycle time| 0.1-2.6s (Rechargeable Ni-MH Battery)
Full power flashes| About 290 times
Power saving| Power off automatically after approx. 90 seconds of idle
operation. (60 minutes if
set as Receiver)
Sync Triggering Mode
| Sync Triggering Mode | Hotshoe, 2.5mm sync line |
|---|---|
| Working temperature | -10°C -50°C |
Dimensions
| W x H x D | 6476190mm |
|---|---|
| Weight without battery | 405g |
| Weight with battery | 489g |
| 2.4G Frequency Range | 2413.0MHz-2465.0MHz |
| Max. Transmitting Power | 5dbm |
Troubleshooting
If there is a problem, refer to this Troubleshooting Guide.
-
The Camera Flash does not fire.
The camera flash is not attached securely to the camera.-
Attach the camera’s mounting foot securely to the camera.
The electrical contacts of the Camera Flash and camera are dirty. -
Clean the contacts.
-
-
The power turns off by itself.
After 90 minutes of idle operation, auto power took effect if the flash is set
as Transmitter.-
Press the shutter button halfway or press any flash button to wake up.
After 60 minutes (or 30 minutes) of idle operation, the flash unit will enter
sleep mode if it is set as Receiver. -
Press any flash button to wake up.
-
-
Auto zoom does not work.
The camera flash is not attached securely to the camera.- Attach the camera flash’s mounting foot the camera.
-
The flash exposure is underexposed or overexposed.
You used high-speed sync.-
With high-speed sync, the effective flash range will be shorter. Make sure the subject is within the effective flash range displayed.
You used Manual Flash Mode. -
Set the flash mode to TTL or modify the flash output.
-
-
Photos have dark corners or only parts of the target subject are illuminated.
The local length of lens exceeds the flash coverage.- Check the flash coverage you set. This flash unit has the flash coverage between 20 and 200mm, which fits medium-format cameras.
Firmware Upgrade
- The USB port is a Type-C USB socket. Type-C USB connection line is applicable.
- As the firmware upgrade needs the support of Godox G3 software, please download and install the “Godox G3 firmware upgrade software” before upgrading. Then choose the related firmware file.
- As the product needs to do firmware upgrade, please refer to instruction manual of the newest electric version as final.
Compatible Cameras Models
This flash unit can be used in the following Sony series camera models
:

This table only lists the tested camera models, not all Sony EOS series
cameras. For the compatibility of other camera models, a self-test is
recommended. Rights to modify this table retained
Maintenance
- Shut down the device immediately should abnormal operation be detected.
- Avoid sudden impacts and the product should be dedusted regularly.
- It is normal for the flash tube to be warm when in use. Avoid continuous flashes if unnecessary.
- Maintenance of the flash must be performed by our authorized maintenance department which can provide original accessories.
- Unauthorized service will void the warranty.
- If the product had failures or was wetter, do not use it until it is repaired by professionals.
- Change made to the specifications or design may not be reflected in this manual.
Warranty Conditions
A new product purchased in the Alza.cz sales network is guaranteed for 2
years. If you need repair or other services during the warranty period,
contact the product seller directly, you must provide the original proof of
purchase with the date of purchase.
The following are considered to be a conflict with the warranty conditions,
for which the claimed claim may not be recognized:
- Using the product for any purpose other than that for which the product is intended or failing to follow the instructions for maintenance, operation, and service of the product.
- Damage to the product by a natural disaster, the intervention of an unauthorized person or mechanically through the fault of the buyer (e.g., during transport, cleaning by inappropriate means, etc.).
- Natural wear and aging of consumables or components during use (such as batteries, etc.).
- Exposure to adverse external influences, such as sunlight and other radiation or electromagnetic fields, fluid intrusion, object intrusion, mains overvoltage, electrostatic discharge voltage (including lightning), faulty supply or input voltage and inappropriate polarity of this voltage, chemical processes such as used power supplies, etc.
- If anyone has made modifications, modifications, alterations to the design or adaptation to change or extend the functions of the product compared to the purchased design or use of non-original components
EU Declaration of Conformity
Identification data of the manufacturer’s / importer’s authorized
representative:
Importer : Alza.cz a.s.
Registered office : Jankovcova 1522/53, Holešovice, 170 00 Prague 7
CIN : 27082440
Subject of the declaration:
Title: External Flash
Model / Type : TT685II-S
The above product has been tested in accordance with the standard(s) used to
demonstrate compliance with the essential requirements laid down in the
Directive(s):
Directive No. 2014/53/EU
Directive No. 2011/65/EU as amended 2015/863/EU
WEEE
This product must not be disposed of as normal household waste in accordance
with the EU Directive on Waste Electrical and Electronic Equipment (WEEE –
2012/19 / EU). Instead, it shall be returned to the place of purchase or
handed over to a public collection point for the recyclable waste. By ensuring
this product is disposed of correctly, you will help prevent potential
negative consequences for the environment and human health, which could
otherwise be caused by inappropriate waste handling of this product. Contact
your local authority or the nearest collection point for further details.
Improper disposal of this type of waste may result in fines in accordance with
national regulations
References
- Alza.cz – rychlý a pohodlný nákup odkudkoliv | Alza.cz
- Alza.sk – rýchly a pohodlný nákup odkiaľkoľvek | alza.sk
- alza.at
- Alza | Alza.co.uk
- Alza.cz – rychlý a pohodlný nákup odkudkoliv | Alza.cz
- Alza.cz – rychlý a pohodlný nákup odkudkoliv | Alza.cz
- Alza.cz
- alza.de
- alza.hu
- alza.sk
Read User Manual Online (PDF format)
Read User Manual Online (PDF format) >>
Download This Manual (PDF format)
Download this manual >>
Хорошее руководство по эксплуатации
Законодательство обязывает продавца передать покупателю, вместе с товаром, руководство по эксплуатации Godox TT685S. Отсутствие инструкции либо неправильная информация, переданная потребителю, составляют основание для рекламации в связи с несоответствием устройства с договором. В законодательстве допускается предоставлении руководства в другой, чем бумажная форме, что, в последнее время, часто используется, предоставляя графическую или электронную форму инструкции Godox TT685S или обучающее видео для пользователей. Условием остается четкая и понятная форма.
Что такое руководство?
Слово происходит от латинского «instructio», тоесть привести в порядок. Следовательно в инструкции Godox TT685S можно найти описание этапов поведения. Цель инструкции заключается в облегчении запуска, использования оборудования либо выполнения определенной деятельности. Инструкция является набором информации о предмете/услуге, подсказкой.
К сожалению немного пользователей находит время для чтения инструкций Godox TT685S, и хорошая инструкция позволяет не только узнать ряд дополнительных функций приобретенного устройства, но и позволяет избежать возникновения большинства поломок.
Из чего должно состоять идеальное руководство по эксплуатации?
Прежде всего в инструкции Godox TT685S должна находится:
— информация относительно технических данных устройства Godox TT685S
— название производителя и год производства оборудования Godox TT685S
— правила обслуживания, настройки и ухода за оборудованием Godox TT685S
— знаки безопасности и сертификаты, подтверждающие соответствие стандартам
Почему мы не читаем инструкций?
Как правило из-за нехватки времени и уверенности в отдельных функциональностях приобретенных устройств. К сожалению само подсоединение и запуск Godox TT685S это слишком мало. Инструкция заключает ряд отдельных указаний, касающихся функциональности, принципов безопасности, способов ухода (даже то, какие средства стоит использовать), возможных поломок Godox TT685S и способов решения проблем, возникающих во время использования. И наконец то, в инструкции можно найти адресные данные сайта Godox, в случае отсутствия эффективности предлагаемых решений. Сейчас очень большой популярностью пользуются инструкции в форме интересных анимаций или видео материалов, которое лучше, чем брошюра воспринимаются пользователем. Такой вид инструкции позволяет пользователю просмотреть весь фильм, не пропуская спецификацию и сложные технические описания Godox TT685S, как это часто бывает в случае бумажной версии.
Почему стоит читать инструкции?
Прежде всего здесь мы найдем ответы касательно конструкции, возможностей устройства Godox TT685S, использования отдельных аксессуаров и ряд информации, позволяющей вполне использовать все функции и упрощения.
После удачной покупки оборудования/устройства стоит посвятить несколько минут для ознакомления с каждой частью инструкции Godox TT685S. Сейчас их старательно готовят или переводят, чтобы они были не только понятными для пользователя, но и чтобы выполняли свою основную информационно-поддерживающую функцию.
Are you looking for the manual for Godox TT685S? You are in the right place. Below the document viewer for Godox TT685S manual in PDF format. To save your time, we say that the most common problems with Godox TT685S can be found in the manual in the «Troubleshooting» section. Check the appropriate page number in the table of contents, and then enter it in the page number box on the right side of the document viewer for Godox TT685S.
If you have questions about the Godox TT685S device, use the form at the bottom of the page and ask our community a question.
Remember! Reading the Godox TT685S user manual and adhering to the rules of using the device provided there, greatly help in its effective use. It is important to correctly configure Godox TT685S, it will save resources needed to use it. In case of problems, you will also find recommended companies that can properly fix Godox TT685S. One of the most important reasons why you should read the Godox TT685S user manual is that to take advantage of the warranty provided on Godox TT685S — the device must be used in accordance with the manufacturer’s recommendations presented in user manual.
If you want to download Godox TT685S manual, use the «Download» button below. You can easily view the downloaded version and print selected manual pages Godox TT685S. All manuals on our website are available in PDF format, which is the most universal format that is as easy to use as possible on all operating systems.