
- June 12, 2024
- WiFi
Table of Contents
- Introduction :
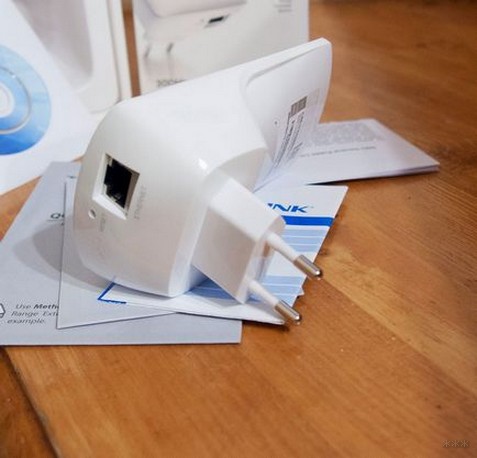
- Package Contents
- Getting Started
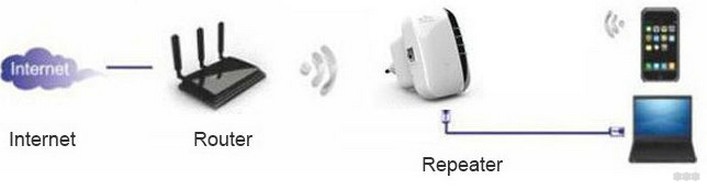
- Wireless Repeater Mode
- Wireless-N Wifi Repeater
- Configuring via Web Browser
- Firmware Upgrade
- Factory Default and Settings Backup, Restore
- Read User Manual Online (PDF format)
- Download This Manual (PDF format)
WiFi-Repeater
User Manual
**Quick Installation Guide(Q.1.G.)
REV.32.1**
Open Source Code
This product includes software codes developed by third parties. These sofware
codes are sutject to either the GNU General Public License (GPL), Version 2,
June 1991 or the GNU Lesser General Public License (LGPL), Version 2.1,
February 1999. You can copy, distritute, and/or modify in accordance with the
terms and conditions of GPL or LGPL.
The source code should be complete, if you think our need to provide any
additional source code files under GNU General Public License (GPL), please
contact us. We are committed to meeting the requirements of the GNU General
Public License (GPI.). You are welcome to contac us local ofice to get the
orresponding software and licenses. Please inform us your conact detals and
the product code. Ve will send you a CD with the software and license for
free.
Please refer to the GNU GPL Web site for further information.
http://ww.gnu.org/licens/licenses.en.html.
Introduction :
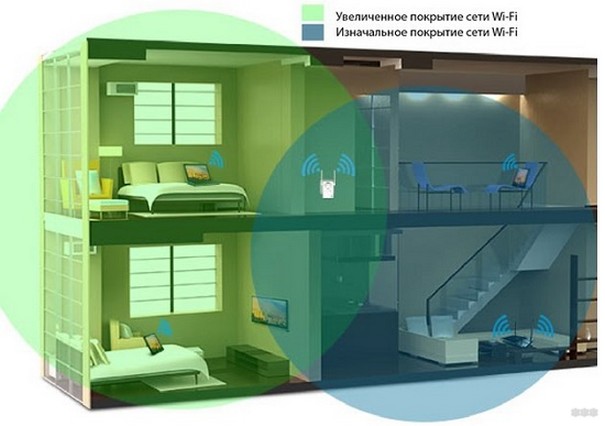
The WiFi Repeater is a combined wired/wireless network connection device
designed specifically for small business, ofice, and home office networking
requirements. It allows a wireless network to be expanded using multiple
access points without the need for a wired backbone to link them. It also
works well with other 11b/g and lln protocol wireless products.

NOTE : If you need to ‘the Wi-Fi Repeater, you need press and hold the
reset button inside the tiny hole for’ seconds.
Package Contents
Before you starting to use this router, please check if I there’s anything
missing in the package, and contact your dealer of purchasa to claim for
missing items:
1 x Wireless-N Repeater
1 x RJ-45 Networking Cable
1 x Quick installation Guide
Getting Started
Setting up a Wireless Infrastructure Network
For a typical wireless setup at home (as shown below), please do the Mowing:
Wireless Repeater Mode
You will need WiFi AP/Router Internet access
Wireless AP Mode
You will need broedband Router Internet access
Conrect the WiFi-Repeater to your Routor/Swtch with RJ-45 Cable

How to configure the WI-FI Repeater
You can configure the Wi-Fi Repealer by connecting it with your computer/aptop
with enclosed RJ45 cable cr wirelessly.
A. Configure the Wi-Fi Repeater wirelessly.
Al. Plug the Wi-Fi Repeater to a wall socket.
A2. Click on the network icon( ) on the right bottom of your desktop. You will
find the signal from the WI-Fl Repeater. Click on ‘Connect’ and wall for a few
seconds. A3. Open web browser and type https://192.168.10.1 in the browser’s
address box. This number is the detault IP address for this device. Note:
Please check whether the WiFi-Repeater accord with factory default settings
once you can’t download http://192.168.10.1. If you are still not sure what
reasons, you can reset the WiFi-Repeater, just need to press the reset button
for 10 seconds, then try again.
A4. The login screen telow will appear. Enter the “User Name’ and “Password”
then click “or to lbgin. The default User name is “admin” and Password is
sadmIn”. A5. After logging in, you will see the web page below: Click on
‘Repeater’ to continue.
Wireless-N Wifi Repeater
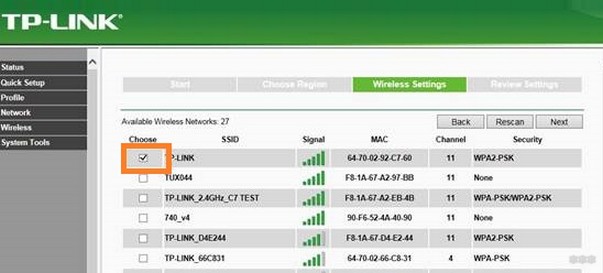
A6.Select your Wireless SSID to continue. A7. When you see below, please do
not change any setting but only insert the key of votir network.
Click on ‘Apply’ button, The Repeater will restart. Wait for a few seconds
your Wi-Fi Repeater is ready for use.
- The default wireless SSID and Security key of Wi-Fi Repeater is same as your AP/router.
B. Configure the WI-Fl Repeater with RJ45 Cable.
- Plug the Wi-Fi Repeater to a wall socket. Connect your computer 1 laptop with the Wi-Fi Repeater with enclosed RJ45 Cable.
- Follow process A3 to A7 to configure your Wi-Fi Repeater.
C. Configure the Wireless AP Mode.
- Plug the Wi-Fi Repeater into a wall socket.
- Follow process A2 to A4.
- Click on ‘AP to continue.
- The following massage will be displaygd on your web browser:


| SSID | the “SSID” of your wireless network. |
|---|---|
| Channel | Auto (recommend) |
| Securty typo | Setup the wireless security and encryption to prevent from |
unauthorized access and monitoring.
Supports 64/128-bit WEP, WPA, WPA2, WPAWPA2 encryption methods.
Securty key| the “Password” of your wireless network.
Click on ‘Apply’ button, The Repealer will restart. Walt a few seconds your
Wi-Fi Repeater is ready for use.
How to connect your computer/laptop with the Wi-FI Repeater
Adding a Wireless computers to the WIFi-Repeater
- Log on to the computer.
- Open Connect to a Network by right-clicking the network icon ( ) in the otification area.
- Choose the wireless network from the list that appears, and then click Connect.
- Type the network security key or passphrase if you are asked to do so, and then click OK. You’ll see a confirmation message when you are connected to the network.
- To confirm that you added the computer, do the following: Open Network by clicking the Start button , and then clicking Control Panel. In the search box, type network, and then, under Network and Sharing Center, click View network computers and devices. You should see icons for the computer you added and for the other computers and devices that are part of the network.
Note : If you don’t see icons dill in the Network folder, then network
discovery and file sharing might be turned off.
Adding a Wireless computers to the WIFI-Repeater with WPS Button
- Log on to the computer.
- Press the WPS button of the VViFi Repeater directly for 2.3 seconds.
- Press the WPS button of the Wireless Adapter directly for 2- 3 seconds. Click Finish to complete the WPS configuration. (Please check your Wireless adapter Manual with WPS configuration)
- You should see icons for the computer you added and for the other computers and devices that are part of the network.
Adding a wired (Ethernet) computer to the WIFI-Repeater
- Plug the W-Fi Repeater to a wall socket. Connect your computer I laptop with the Wi-Fi Repeater with enclosed RJ45 Cable.
- To confirm that you added the computer, do the Mowing: Open Network by clicking the Start button , and then clicking Control Panel. In the search box, type network, and then, under Network and Sharing Center, click View network computers and devices. You should see icons for the computer you added and for the other computers and devices that are part of the network.
For more information:
https://windows. microsoft. conven-US/windows
7/Add-a-device—onr—computer—to-a—network
https://windows.microsof.com/en-US/windowsvVetting—up-a-—vireiess-
network
https://windows.microsoft.com/en~US/windows—vista/settirg—up—a—wireless—network
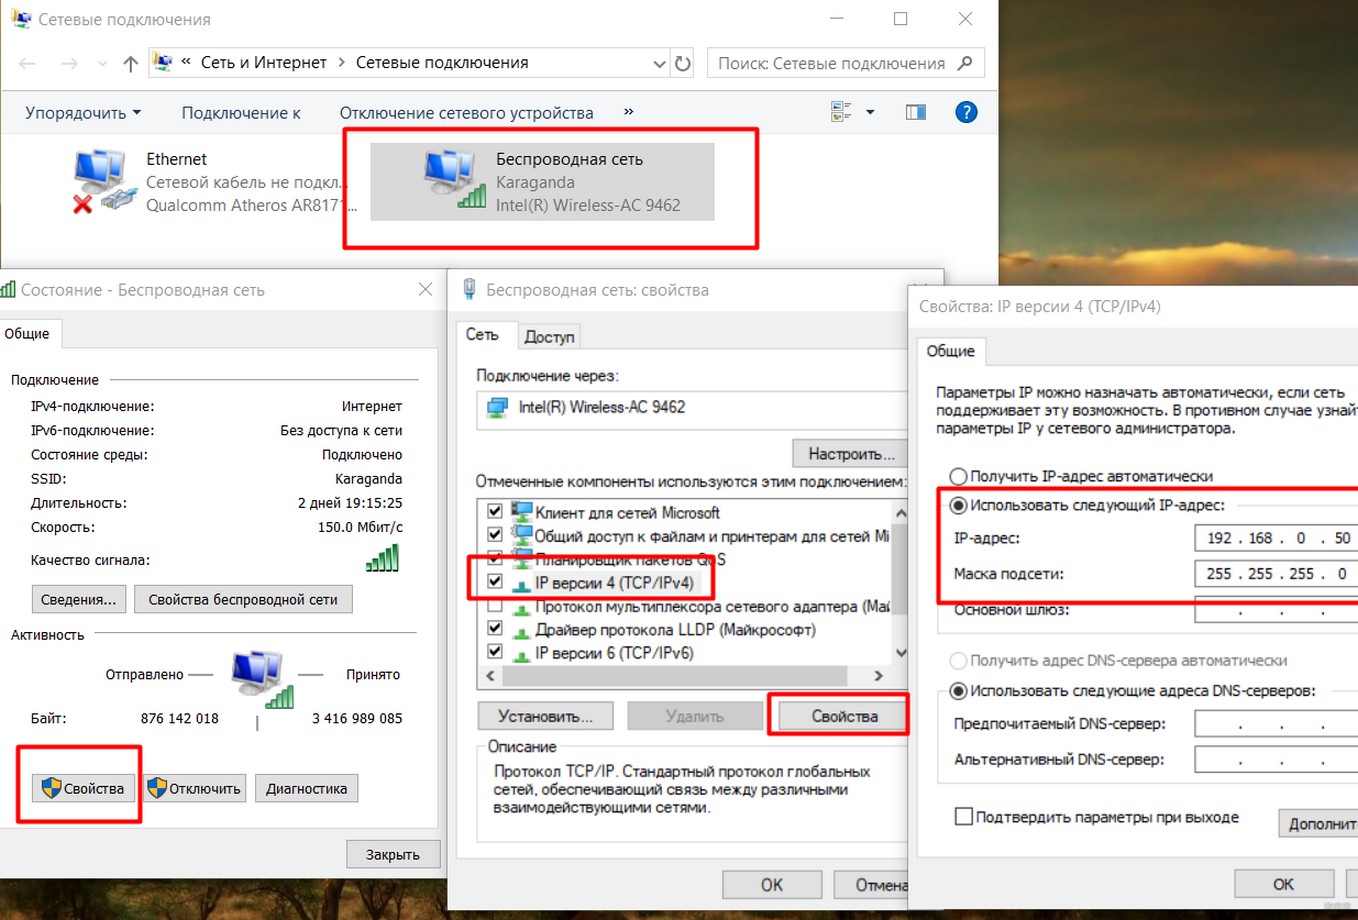
How to configure your computer/laptop with the Network IP Address
- Log on to the computer.
- Click the “Start” button (it should be located at the lower-left comer of your screen), then click ‘Control Panel’. Click “View Network Status and Tasks”, and then click “Manage Network Connections”. Right-click “Local Area Network”, then select “Properties”. When the “Local Area Connection Properties” window appears, select “Internet Protocol Version 4 (TCPIIPv4)” and then click “Properties”.
- Setting IP address manually: Type IP adress is 102.168.10.x (x is from 2 to 254), and Subnet mask is 255.255.255.0. Type the Routers LAN IP address (the default IP is 192.168.10.1) into the Default gateway field.
Configuring via Web Browser
Wireless Base Configuration – AP Mode
In AP mode and click “Wireless -> Basic Settings” located at the web
management interface, the following message will be displayed on your web
browser:
You could configure he minimum number of Wireless settings for communication,
such as Network Name (SSID) and Channel. The Access Point car be set simply
with only the minimum setting items.
| Wireless Enable | Wireless On/Off |
|---|---|
| SSID | the “SSID’ of your wireless network. |
| Channel | Auto (recommend) |
| Security type | Setup the wireless security and encryption to prevent from |
unauthorized access and monitoring. Supports 64/128-bit WEP, WPA, WPA2,
WPAWPA2 encryption methods.
Security key| the “Password’ of your wireless network.
Click ‘Apply’ button, The WiFi Repeater will restart.
Wireless Base Configuration – Repeater Mode
In Repeater mode and click ‘Wireless-> Basic Settings’ located at the web
management interface, the followirg message will be displayed on your web
browser:
| Wireless Enable | Wireless On/Off |
|---|---|
| Delete | Remove the repeater connection profile |
| Repeater ssid | the aSSID” of your repeater wireless network. |
| Security type | Setup the repeater ssid secunity type. |
| Security key | the “Password’ of your repeater wireless network. |
Click ‘Apply’button, The WiFi Repeater will restart.
Change Management password
Default password of Wireless Router is eadmin% and it’s displayed on the login
prompt when accessed from web browser.
There’s a security risk if you don’t change ‘he default password, since
everyone can see it.
This is very important when you ! wireless function enabled.
change password, please follow the following instructions:
Please click ‘Management -> Password’ menu on the web management interface.
the following message will be displayer on your web browser:
If you want to keep original password unchanged. click ‘Cancel’.
Click ‘Apply’ button, The WiFi Repeater will log off.
Firmware Upgrade
The system software used by this router is called as ‘firmware’, just like any
applications on your computer, when you replace the old application with a new
one, your computer will be equipped with new function. You can also use this
firmware upgrade function to add new functions to your router, even fix the
bugs of this router.
Please click ‘Management-> Upgrade Firmware’ located at the web management
interface, and then the following message will be displayed on your web
browser: Click ‘Browse…’or ‘Choose File’ button first; youll ba prompted to
provide the filename of fimmware upgrade file. Please download the latast
firmware file from our website, and use it to upgrade your router.
After a firmware upgrade file is selected, click ‘Upload’ button, and the
router will start firmware upgrade procedure automatically.
The procedure may take several minutes, please be patient.
NOTE: Never interrupt the upgrade procedure by closing the web browser or
physically disconnect your computer from router. If the firmware you uploaded
is corrupt, the firmware upgrade will fail, and you may have to retum this
router to the dealer of purchase to ask for help. (Warranty voids if you
interrupted the upgrade prccedure).
Factory Default and Settings Backup, Restore
You can backup all Setting of this router to a file, so you can make several
copied of router configuration for security reason.
To backup or restore router setting, please follow the following instructions:
Please click ‘Save/Reload setting’ located at the web management interface,
then the following message will be displayed on your web browser.
Save Settings| Press ‘Save…’ button, you can please save it as another
filename for different versions, and keep it in a safe place.
—|—
Load Settings| Press ‘Browse..’ to pick a previously-saved configuration file
from your computer, and then click ‘Upload…’ . After the. configuration is
uploaded, the router’s configuration will be replaced by the file you just
uploaded.
Reset Settings| Click this ‘Load default button to remove all settings
WEEE Directive & Product Disposal
At the and of is serviceable life, this product should not be treated as
household or general waste. It should be handed over to the applicable
collector point for the recycling of electrical and electronic equipment, or
returned to the supplier `or disposal.
Read User Manual Online (PDF format)
Read User Manual Online (PDF format) >>
Download This Manual (PDF format)
Download this manual >>
The Wireless-N Repeater Setup is a easy process. The DN-70181 is a WIFI Repeater with a wired/wireless network connection that is meant for small business, office, and home office networking. It enables the expansion of a wireless network by deploying several access points. There’s no need for a connected backbone to connect them. It also works with other 11b/g devices. Wireless gadgets that use the 11n protocol are also available.
HOW TO CONFIGURE THE WIFI REPEATER
After connecting it to your computer or laptop using the provided RJ45 cable or wirelessly, you can configure the Wi-Fi Repeater.
Follow the steps given below to configure the WIFI repeater wirelessly.
- At first, connect the Wi-Fi Repeater to a power outlet.
- On the right bottom of your desktop, click the network symbol or the signal from the “Wireless Repeater” can be found here. Wait for a few seconds after clicking ‘Connect.’
- In the address field of your web browser, put http://192.168.10.1 or Http://myrepeater.net. This device’s IP address is set to this number by default.
NOTE
If you are unable to download http://192.168.10.1 please verify whether the WIFI-Repeater is set to factory defaults. If you’re still not sure what’s causing the problem, you can reset the WIFI-Repeater by pressing the reset button for 10 seconds and then trying again.
- The login screen will display as seen below. To login, enter your “User Name” and “Password,” then click “OK.” And “admin” is the default user name, while “admin” is the default password.
- You will see the web page below after checking in and clicking “Setup Wizard”. To continue, choose “Wireless Repeater Mode (Station)” and then click “Next.”
- To proceed, select your Wireless SSID.
- Please do not modify any settings when you visit the site below; instead, just enter your network’s key.
The Repeater will restart once you press the ‘Save and Reboot’ button. Wait a few seconds before using your Wi-Fi Repeater. Wi-Fi Repeater uses the same SSID and KEY as your AP/router.
FOLLOW THE STEPS GIVEN BELLOW TO CONFIGURE THE WIFI REPEATER WITH RJ45 CABLE
- Firstly, connect the Wi-Fi Repeater to an outlet. With the included RJ45 cable, connect your computer or laptop to the Wi-Fi Repeater.
- In the address field of your web browser, put http://192.168.10.1.This device’s IP address is set to this number by default.
NOTE
If you are unable to download http://192.168.10.1 please verify whether the WIFI-Repeater is set to factory defaults. If you’re still not sure what’s causing the problem, you can reset the WIFI-Repeater by pressing the reset button for 10 seconds and then trying again.
- Now, the login screen will display as seen below.
To login, enter your “User Name” and “Password,” then click “OK.”And “admin” is the default user name, while “admin” is the default password.
- Then, you will see the web page below after checking in and clicking “Setup Wizard”. To proceed, choose “Wireless Repeater Mode (Station)” and then click “Next.”
- To proceed, select your Wireless SSID.
- Please do not modify any settings when you visit the site below; instead, just enter your network’s key. The Repeater will restart once you press the ‘Save and Reboot’ button. Wait a few seconds before using your Wi-Fi Repeater.
Wi-Fi Repeater uses the same SSID and KEY as your AP/router.
FOLLOW THE STEPS GIVEN BELOW TO CONFIGURE THE WIFI REPEATER WITH WPS BUTTON
1. Insert the Wi-Fi Repeater into a power outlet.
2. Confirm that WIFI-Repeater is set to “Wireless Repeater Mode (Station)” mode.
Step 1: For 3 seconds, press the WPS button on the AP/Router immediately. (For WPS configuration, please consult your AP/manual Router).
Step 2: Press and hold the WIFI Repeater’s WPS button for 7 to 10 seconds.
Step 3: After a few moments, your Wi-Fi Repeater will be ready to use.
The Wi-Fi Repeater’s Wireless SSID and KEY are the same as your AP/ router’s.
FOLLOW THE STEPS GIVEN BELOW TO CONFIGURE THE WIRELESS AP MODE
- Firstly, connect the Wi-Fi Repeater to a power source.
- Then, carry out steps A3–A4 in reverse order.
- To continue, select “Standard Wireless AP Mode” and then click “Next.”
- In your web browser, the following message will appear:
- SSID stands for “Secure Service Set Identifier.” It’s your wireless network’s “name.”Number of channels: Auto (recommend)
- ENCRYPTION: Set up wireless security and encryption to protect against illegal access and surveillance.
- The Repeater will restart when you click the ‘Save and Reboot’ button.
- Wait a few moments, your Wi-Fi Repeater will be ready.
FIRMWARE UPGRADE for Wirless N Repeater-
This router’s system software is known as “firmware,” and just like any other application on your computer, when you replace an old programme with a new one, your computer will gain new capabilities. This firmware update mechanism can also be used to add additional functionality to your router or to remedy faults.
Please go to the web administration interface and click on ‘Management-> Upgrade Firmware,’ which will display the following notice on your browser:
After clicking the ‘Browse…’ option, you will be requested to enter the filename of the firmware update file. Please visit our website to obtain the most recent firmware file and use it to upgrade your router.
After selecting a firmware update file, click the “Upload” button, and the router will immediately begin the firmware upgrading process. Please bear with us as the operation takes a few minutes.
NOTE:
Close your web browser or physically separate your computer from the router before starting the upgrading procedure. If the firmware you uploaded is corrupt, the firmware upgrade will fail, and you’ll have to return the router to the retailer where you bought it to get assistance. (If you interrupt the upgrading process, your warranty will be voided).
HOW TO RESET WIRELESS N REPEATER?
If you are facing any problem with wireless N repeater so don’t worry because you can reset it and is very easy to do. For that follow the steps given below.
- To clear all settings, click the ‘Reset’ button.
- The WIFI Repeater will restart when you click the ‘Upload ‘button.
Wireless-N WiFi Repeater беспроводный усилитель WiFi. Производитель: BLUELANS, Китай.
Как работает беспроводной усилитель WiFi сигнала Wireless-N WiFi Repeater
Wireless-N WiFi Repeater принимает сигнал от роутера и ретранслирует его дальше, таким образом увеличивая радиус действия сети Wifi. Можно использовать в Wifi диапазоне без провода, либо соединить репитер wifi с роутером проводом витая пара UTP и установить на значительно бОльшем расстоянии, чем зона Wifi роутера.
Технические характеристики Wi-Fi ретранслятора Wireless-N WiFi Repeater
- Модель: Wireless-N WiFi Repeater 300mbps беспроводной повторитель;
- Интерфейс: 10/100м LAN;
- Диапазон частот: 2.4 ГГц-2.4835 ГГц;
- Скорость: до 300 Мбит/с;
- Индикация сверху вниз: Сеть 220В; Индикация беспроводной сети; WPS индикатор; LAN индикатор;
- Питание: AC 100В-240В;
- IP адрес по умолчанию: 192.168.10.1;
- Имя и пароль по умолчанию: admin / admin;
- Кнопки: Кнопка WPS, Кнопка сброса Reset.
Как настроить усилитель WiFi Wireless-N Repeater инструкция на русском
Заходим через браузер на беспроводный повторитель. Для этого набираем в адресной строке IP адрес 192.168.10.1, вводим в открывшемся окне имя и пароль admin / admin. В случае, если используем репитер как ретранслятор без провода, то в программе нажимаем кнопку Repeater, далее выбираем сеть Wifi к которой подключится наш повторитель, вводим пароль сети, теперь устройство готово к работе. Если же репитер подключаем через провод, то в интерфейсе нажимаем кнопку AP, далее вбиваем настройки Wifi сети и пароль нашего вайфая. Дополнительно в комплекте идет инструкция с картинками. На нашем гаджете в WiFi подключениях находим и выбираем наш усилитель.
Привет! Эта статья будет посвящена повторителям Wi-Fi. Мы уже рассматривали много конкретных моделей на страницах нашего мегакрутого портала WiFiGid, но универсальной статьи еще не было. Итак, настройка репитера со всех сторон – от распаковки до конечного использования простыми словами от Ботана. Начинаем!
Внимание! Эта статья универсальная и подходит для всех репитеров, но чтобы возникало меньше вопросов при настройке, рекомендую через поиск на нашем сайте найти готовую инструкцию под свою конкретную модель, а если такой не окажется – добро пожаловать в комментарии!
Содержание
- Введение
- Установка
- Включение
- Настройка – через WPS
- Настройка – через интерфейс
- Проблемы
- Китайские репитеры
- Задать вопрос автору статьи
Введение
Итак, вам дома где-то не хватает сигнала Wi-Fi? Конечно же вы пошли искать варианты и наткнулись на возможность покупки репитера. Что может быть проще – подключить к розетке в нужном месте, сопрягли его с основным роутером, а сеть расширилась и стала готова к использованию уже на новом месте.
Честно, сам пользуюсь и очень рад (у меня 850RE, но это не имеет никакого отношения к статье – можете использовать хоть китайские Xiaomi или ноунеймы по типу Wall Powered Wireless Signal Repeater). На практике особой разницы при использовании дома брендовой модели и репитера из Китая замечено не было – если будете сомневаться в выборе.
На первый взгляд все просто, но есть небольшие нюансы, которые сильно облегчат вашу жизнь при настройке. Если у вас возникла какая-то проблема, пробежитесь по этой статье глазами, скорее всего найдете решение своей проблемы. А если нет – готовы обсудить.
Еще раз закрепим как может работать репитер:
- В режиме точки доступа (AP Mode) – подключаем к маршрутизатору по проводу и раздаем Wi-Fi. Неосновное предназначение, применяется редко. В основном используют, когда головной маршрутизатор просто не имеет беспроводного модуля. В идеале в этой ситуации лучше заменить роутер.
- В режиме репитера (Repeater Mode, Range Extender, Wireless Repeater) – репитер подключается к основному маршрутизатору через Wi-Fi и просто дублирует его сеть. Схема работы:
Некоторые маршрутизаторы сами способны работать в режиме повторителя – на случай, если у вас завалялся ненужный роутер с Wi-Fi. Но это уже другая история…
Пока не перешли к настройке, рекомендую продумать подключение устройств. Конечно, большую часть стоит зацепить именно по «воздуху», но многие модели оборудованы и LAN портом под обычный сетевой кабель – отсюда тоже можно получать интернет:
Репитеры работают по-разному – некоторые полностью дублируют сеть с тем же именем и паролем, некоторые создают свою. Первые встречаются чаще. Но если что-то вдруг не работает, проверьте, а не появилась ли сеть с другим именем – возможно это она. Правильнее все же репитеры полностью дублируют сеть, а точки доступа создают мост с головным роутером (возможно даже по Wi-Fi) и раздают уже свою сеть. Но на практике были случаи, когда эти два понятия смешивались.
Установка
Теперь обсудим установку репитера. Из прошлого раздела мы поняли, что нужно его поставить так, чтобы он мог принимать сигнал от основной точки доступа – если расположить далеко, дублировать будет просто нечего, а если расположить на краю – скорость заметно снизиться. Итого нужно выбрать место репитеру в зоне уверенного приема Wi-Fi от маршрутизатора. Благо некоторые устройства имеют индикацию уровня сигнала, ну а если нет – замеряйте прием телефоном.
Включение
Современный репитер идет со встроенным блоком питания – включили в розетку и сразу же работает. Бонусом – должна появиться любая индикация. На практике не встречал повторителей с отдельной кнопкой питания, но если уж она у вас есть – нажмите.

Настройка – через WPS
Все подключено и горит? Предлагаю тогда уже настроить репитер. Проще всего продублировать сеть как раз через WPS, благо современные репитеры поголовно поддерживают такое подключение.
И все же настоятельно рекомендую ознакомиться с бумажной инструкцией к своей модели или найти правильную статью под себя на нашем сайте. В вашей модели может что-то отличаться, а вы потеряете зря время!
Если такая кнопка есть (а некоторые репитеры просто имеют одну большую кнопку с тем же функционалом, но без надписи), делаем так:
- Подносим репитер как можно ближе к роутеру и включаем в розетку (для лучшего сигнала).
- Нажимаем кнопку WPS на репитере.
- Нажимаем кнопку WPS на роутере.
- Ждем время до подключения репитера – индикация подскажет.
Все! Сеть продублирована. Это самый простой способ, который рекомендуется попробовать в начале. Если вдруг на репитере или роутере нет кнопки WPS, или же все равно не подключается по какой-то неведомой причине – пробуем сделать настройку через веб-интерфейс.
Настройка – через интерфейс
Если почему-то первый способ вам не подошел, самое время зайти в настройки репитера и вручную показать кузькину мать… ну в смысле к какой сети подключаться. Здесь может быть много различий между репитерами – так что лучше найти мануал под свое устройство. Но принцип будет одинаковым для всех. Вот пример посмотрите на видео:
Краткий план:
- Подключаемся к репитеру – мне проще это сделать по проводу, некоторые репитеры позволяют подключаться к ним сразу по Wi-Fi. Если же ранее вайфай сеть была изменена – обычно на усилителях идет кнопка сброса настроек на заводские, в крайнем случае обнулитесь. Главное – правильно подключиться. Читайте свою инструкцию.
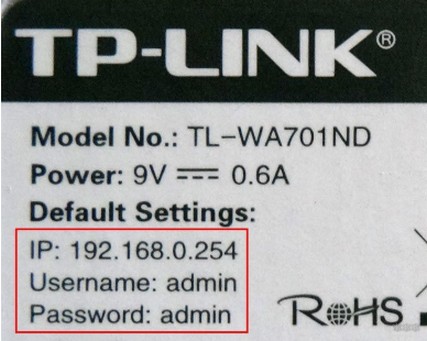
- Заходим в веб-конфигуратор. Для этого нужно ввести адрес в браузере. Пример подключения был в видео выше. Адреса для репитеров имеют формат 192.168.0.254, 192.168.1.254, tplinkrepeater.net – их действительно много вариантов. Так что или посмотрите инструкцию, или же загляните на наклейку на самом репитере – там обычно указываются и адрес подключения, и логин, и пароль для доступа (пригодятся).
- В результате вы должны попасть в главное меню настройщика:

- Далее обычно через мастера настройки вас проведут по шагам и подключат к сети: нужно будет выбрать ваш домашний Wi-Fi в списке доступных сетей и ввести от него пароль:
Как итог уже при ручном вводе все должно точно работать, проверьте это сразу не отходя от роутера, а уже далее относите усилитель в другую комнату. Дополнительно работу одновременно двух беспроводных сетей с одинаковым SSID (которые обычно не видно при подключении на устройствах) можно посмотреть через разные анализаторы Wi-Fi, например, Wi-Fi Analyzer на Android.
Проблемы
Для продвинутых пользователей. Возможная проблема с подключением – неправильно получены сетевые настройки. В идеале они должны быть выставлены в режим автоматического подключения, а репитер через свой DHCP сервер уже выдаст вам верный IP, маску, шлюз. В противном случае подстройтесь вручную под ваш репитер. Например, так:
После настройки не забудьте снова все выставить в режим «Получить автоматически».
Еще одна нередкая проблема – «Без доступа к интернету» при подключении через репитер. Как правило беда кроется в неверном получении настроек через DHCP. На скриншоте выше в поле Шлюз должен быть вписан (или получен автоматически) адрес центрального роутера (например, 192.168.0.1). Если возник какой-то глюк или DHCP через репитер отработал неверно – вписываем его вручную. Но еще проще – попробуйте все перезагрузить (и роутер, и усилитель, и подключаемы компьютер, ноутбук, телефон). Нередко помогает.
Китайские репитеры
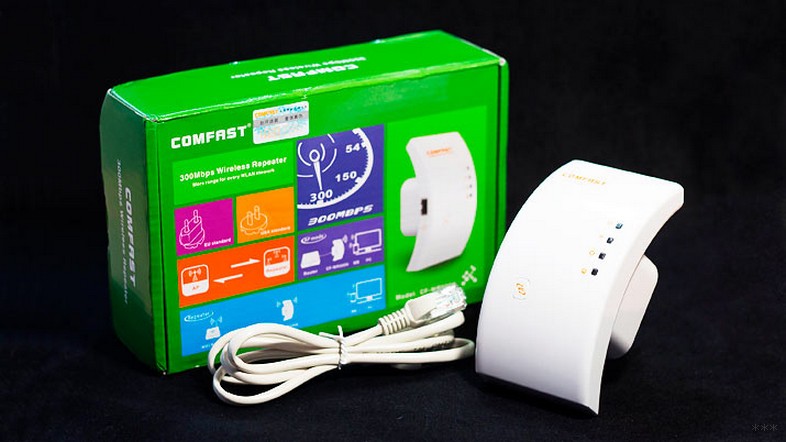
Некоторые модели Xiaomi имеют свои уникальные механики подключения к головному роутеру – вроде настройки через USB порт, или же через мобильное приложение, но в среднем все позволяют делать то же самое через веб-интерфейс. Вот пример на Comfast (очень типичный представитель).
Адреса подключений здесь обычно нестандартные. На этой модели – 192.168.10.1. Но логин и пароль те же – admin/admin:

Единственная возможная трудность на китайцах – отсутствие русского языка, а в самом худшем – присутствие только китайского. Но все лечится через переводчик Google Chrome.
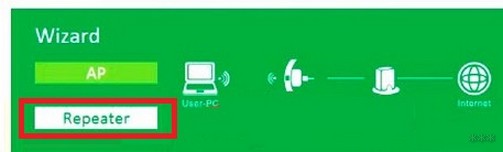
Другое отличие их сетевых устройств – красочные интерфейсы настройки. И тут главное не потеряться. Вот, например, модель предлагает по умолчанию режим точки доступа, а надо бы не забыть переключиться в ретранслятор:
Далее все то же самое – поиск сети, ввод к ней пароля и спокойная работа на долгие коды. Вот еще одна видеоинструкция на Wireless N WiFi Repeater:
Инструкция универсальная и немного водяная, поэтому буду заканчивать на этом. Если остались вопросы – пишите в комментарии. Но лучше всего, если вы уточните свой запрос до конкретной модели и там увидите конкретную инструкцию к своему репитеру на русском языке. Удачной настройки! Ваш Ботан из WiFiGid.ru.
Having issues with your wifi connection? Try new wifi repeater which extends your signals to your workshop, swimming pool, garage, etc. Now you don’t have to worry about losing connection when you step outside your room with your laptop or cell phone. Let’s learn the wireless n Wi-Fi repeater setup via 192.168.10.1 and WPS in this article.
Its small size makes it fit in any wall socket taking the least space possible. Wireless N repeater comes with a quick setup guide, one ethernet cable and the unit itself. Lets begin-
Configure wireless N repeater via web GUI
- Once you plug in the extender to an electrical outlet, the power light will turn green and the wifi light will blink.
- The next step requires you to connect the repeater to your computer or cell phone either through wifi or via ethernet cable.
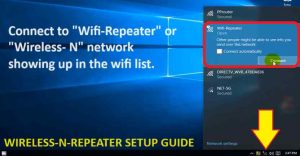
- For wifi, you need to go to wifi list on your laptop or cell phone and look for the “Wireless N” network name and connect to it.
- Ethernet connection can be established by connecting ethernet cable from extender to your computer/laptop.
- So, after the Extender is connected with your either or computer/laptop/cell phone you can go for a web-based setup.
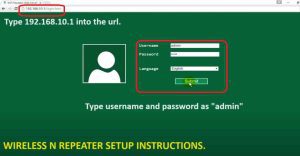
- Open any browser on your respective devices and in the address bar type 192.168.10.1.
- It will open the login page for you, the default username and password for wireless N Wifi repeater is “admin”.
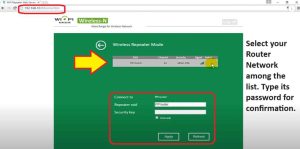
- Hit submit, On the next screen under wizard option, you will have to select among Ap mode or repeater mode.
- It will now scan and show you the list of wifi network names available, select your router wifi name.
- Enter the password for the same to complete wireless N Wifi repeater setup.
- Hit apply, it takes around 60 seconds to apply the settings. Later connect your devices with _EXT network showing in your wifi list.
Setup Wireless N Repeater via WPS
- For this setup, you have to make sure both extender and router are within the same room or in the range of 5-10 feet.
- Plugin the extender to the wall outlet and wait till power light gets stable.
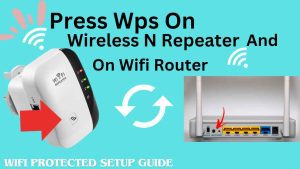
- Push the WPS button on your router. Depending on the model it can be on the back or on the front.
- Within two minutes push the WPS button on the extender as well, wps on both the devices will be blinking.
- Usually, it takes just 15-20 seconds to configure the wireless n repeater via WPS.
- Once successful WPS LED on extender will turn solid and you will see a new network name in your wifi list.
- You can choose to keep the same Wi-Fi name as your router or customize it as per your choice. The password is also same for the extender as your router.
- Click here to download Wireless N wifi repeater manual.
What if I forget user name for wireless-n wifi repeater?
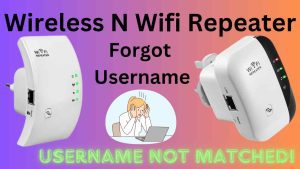
The default user name and password for this Wi-fi booster is “admin”. Now when you try that make sure you type it all in lowercase. Moreover, have a look at the back side of the repeater. If it has a sticker pasted with username/password then you can try that too. In case you are already trying it and it does not work then you will have to try the one that you set during wireless n Wi-Fi repeater setup.
Now if you can’t recall it then the only way to go ahead is to reset the extender. Now, be cautious while doing so. As it will erase all the data and previously saved settings. So, you will need to setup the repeater again after this. You can do that through the browser or WPS function.
First you need to understand if there is actually a need to login into the repeater’s user interface. For example, if you would like to change repeater’s SSDI, Password, Channels, etc.
Below mentioned are some steps to cope up with this issue.
Follow the below mentioned steps in case you forgot username of Internet Booster
1. Reset the username if u forgot it for wireless-n Wifi repeater
One of the best ways to fix the issue is by resetting the repeater. Lets learn how you can do that. Now there are two ways to reset the username. First is hard reseting the repeater which reset it to the factory default settings. And second is if by chance you are logged in to the web management page of the repeater then resetting its username. Lets learn both-
- To reset it, first, you have to move on to its wireless repeater’s admin page.
- So, let’s access the wireless-n repeater admin page using http://192.168.10.1. Before you type it into the url make sure your phone or computer is connected to “Wireless-N” network.
- After this, on the login page we assume the username and password in the browser admin credentials field are already prefilled. This is only possible when we allow google to save our passwords during setup. Now, if this IP address is not working for you then check here how to find your repeaters IP address. Once you have that type it into the url of the browser.
- Now, you have to be able to access its admin page.
- Moreover, in case if it gives you an option to “forget username” then you can click on that too. Otherwise follow the next step.
- Next, goto the settings>>administration>>username>>change.
- Enter the new username that you wish to set as your wireless-n repeater admin name.
- Lastly, you will need to hit on save, and you can use it to access your device’s admin page.
2. Second method
In this method you will be able to recover/reset the username of the wireless n repeater.
- First of all, plug the repeater into an electrical outlet.
- Next, wait until its power LED gets stable. It usually takes around 60 seconds.
- Now, in case your repeater has reset hole then press it with paper clip for around 10-15 seconds while the repeater is plugged in to the wall.
- Otherwise, you repeater might be provided with a reset Button. So using your thumb or finger, press and hold that button for around 10-15 seconds in order to reset wireless n repeater.
- If you don’t have both then you will find one “WPS” button on it. You need to press and hold that button for around 15 seconds to reset the repeater.
- Finally, after this you will need to setup wireless n wifi repeater from scratch. As you do that, you will ne able to set new username for your repeater.
How to login into wireless n repeater with my username and password
In order to login into your wireless n repeater with username and password, it is important that you know its IP address. Now, the default IP address 192.168.10.1 might not work if your device is already setup. As in case if DHCP is enabled then the router assigns new IP to the repeater. So, we will need to find it first, although we recommend you to try the default IP address first.
Lets find wireless n repeater IP Address
For this you will simply need to login into your router. Once you are logged in go to “Connected devices” or “DHCP List” or “Client List” tab. This is where you router will list all the devices connected to the router. There you will find your wireless n repeater too. Note down its IP address.
Now, you simply need to type this IP into the URL of the browser in order to access the admin page of wireless n repeater. In case you don’t know how to login into router, then check here.

Second method is by connecting your windows or mac system to wireless n repeater network name. Next, on your windows system press “Windows +R”. Then in the run box type “CMD” and hit enter. This will open up a black screen for you.
There you will need to type “Ipconfig” and press enter. This command will open a network configuration for you. You will find an IP address beside default gateway. So, note it down. This is the IP address of your repeater. Simply type it into the URL to access its login page.
On your MAC system, you will need to click on the “Apple icon” on the top left hand side of the screen. Then go to “System preferences” then click on “Networks’. There it will show you your router’s IP address. Once you are logged in into it, go to device list to check for the IP address of wireless n repeater.
How to add a wireless-n repeater to Linksys 2500?
If you would like to add the wireless-n repeater to Linksys 2500 then, you will first need to configure your main router first. Later, you can use the wireless range extender to boost the signal range of your router. So, let’s start the process as per the manual instructions-
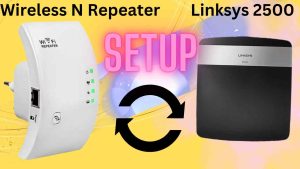
Steps to setup wireless n repeater to Linksys 2500
- Firstly, you will have to plug it closer to your existing Linksys 2500 router.
- After this, connect your extender into electrical socket or outlet.
- Make sure the power LED turns stable on it. Check it through its signal light.
- You can add the wireless-n repeater through the WPS button.
- Press and Hold it on router and extender for around 2 seconds to make a successful connection.
- Apart from this, you can add it through the browser setup too. Simply connect to repeater’s network and type 193.168.10.1 into the address bar.
- Just, use the wireless bridge mode on the login page and you can pair it with your router.
- At last, choose your router’s network name that you want to extend and get its Wi-Fi extended.
how do I reset my netvip wireless n wifi repeater to factory default?
Here are the following steps for resetting your netvip wireless n wifi repeater to factory default.
- Login into its admin panel by going to 192.168.10.1 IP Address.
- Go to the administration settings and click on the factory setting option.
- click on “Apply” to begin the reset process. It usually takes around 2-3 mins for the repeater to reset.
- If by any chances you are not able to login into the wireless-n then try the second method.
- Use a paper clip or pin to hold the netvip repeater factory reset button.
- Press and hold this reset button for 10 to 15 seconds.
- A blinking light on it means that it is resetting now.
- After this, wait for another 60 seconds as the repeater reboots. Then start the wireless n wifi repeater setup setup again from scratch.
How to reset wireless n repeater?
There are three ways to reset wireless n Wifi repeater. It depends which model you are using. Below we have mentioned all the three steps-
- In case you have a reset hole on the extender. Then using a paperclip, pin, pencil or anything pointed hold the reset hole for around 10-15 seconds while the repeater is still plugged in to the wall. After 15 seconds take the pin out and let the repeater reboot.
- Second method can be followed if you have a reset button instead of a hole. In this scenario you don’t require any pin. You simply can hold the button down using your thumb or finger for around 15 seconds as we did in the first step.
- If you can’t find a reset hole or a reset button on the repeater. Then it is very likely possible that you can reset it via wps button. So, here you simply need to press and hold the wps button on it for around 10-15 seconds.
After successful reset you will find your device showing up in your wifi list. You simply need to connect to it and begin the wireless n wifi repeater setup.
How to update the firmware of wireless n repeater?
Following steps to update the firmware of wireless n repeater.
- First of all, search in the browser field ap.setup.
- On this screen you will get user credential page asking for username and password. Type the required details.
- Once logged in. after this, move on to the wireless-n repeater administration settings.
- Then, you have to choose from its settings section the firmware update option.
- Choose the support option.
- After this, enter your wireless n repeater name and model number to get its latest version.
- Then, update its firmware by emulating the on-screen instructions.
- Finally, update the wireless-n wifi repeater firmware.
how to set up wireless n repeater with the wire or ethernet?
Following are the steps to set up a wireless n repeater with the wire or ethernet.
- First, you will have to plug the Wireless-N repeater into an electrical outlet.
- Make sure your repeater is placed in an location close to your router.
- Afterwards, connect the wireless repeater LAN port with your computer’s LAN port.
- Now, on your computer open a browser and in the URl or address bar type 192.168.10.1 and hit enter.
- Meanwhile, you do this the light on the repeater starts blinking.
- On the browser follow the on-screen instructions to complete wireless n wifi repeater setup.
- Finally, you will see wireless n repeater network name in your Wi-Fi list. You can connect your smart tv, cameras, ring, etc to it.
How to log in to the wireless-n repeater after setup?
You can log in to the wireless-n wifi repeater after the setup with its IP Address. Now, the default IP Address i.e. 192.168.10.1 can work for you. In case it doesn’t then use the below given steps to find its ip address. Now, make sure your repeater is plugged in to a wall outlet and is already setup.
- First and foremost you will need to download netgear genie on your system.
- After you have downloaded and installed the software open it.
- Then go to “Connected devices” or “Network map” tab. There you will see list of all the devices currently connected with your router.
- One of them will be your wireless n repeater.
- So, note down each IP Address and try it into the URL of the browser one by one.
- Once you get the IP of the repeater, you will be able to login into it in the future too using that IP.
Why my wireless n repeater not working?
Once in a while, we all face such issues with wifi repeaters. Where they stop working due to misconfiguration or power surge. So, let’s learn how to tackle this issue.
- First, you will need to reset the repeater and then set it up again.
- You can also try to update its firmware.
- Trying moving the repeater closer to the router.
- Try changing the wireless channels of the repeater through its admin page.
how to change the network key on a wireless-n repeater?
These are the following instructions to change the network key on a wireless-n repeater?
- If you wish to modify the password then you will go on the wireless repeater administration settings menu.
- Choose the advanced settings.
- Afterwards, to modify the network key, kindly click on the change password option.
- Then, change its password and confirm it again.
- Finally try connecting your devices to the repeater again with new Wi-Fi password.
- You can read above points if you don’t know how to login into the repeater.
how to change default password on wireless n repeater?
Here are the following steps to change the default password on wireless n repeater-
- You can change the default password of the wireless-N repeater through the browser.
- So first login into the repeater using its default IP Address. You can read the above mentioned steps if you want to learn how to find its IP or how to login into it.
- After this, click on the wireless settings and set your new password to change the default password.
- Type a new password and hit on save.
- After this, use this password to login into the repeater’s web management page.