
Skip to content
We have previously published about how you can upgrade the firmware of your router to the open source DD-WRT through its web interface. But some of the routers also allow the upgrading of the firmware through the TFTP (trivial file transfer protocol) interface. Upgrade of router firmware over TFTP is much more easier than the web interface method and takes much less time. Since TFTP does not support any username or password credentials, you can use the TFTP method of upgrading the firmware even if you have forgotten the router access credentials.
Windows comes with a simple command line TFTP client of its own, but not everyone likes to work with the command line interface. So if you want a simple GUI interface, then you can use the free Tftpd32 server/client for all your TFTP requirements.
In order to upgrade your firmware, first of all you have to download the upgraded version of the firmware file from the website of your router manufacturer. Be very careful when download the firmware and check thoroughly whether it is suitable for your version and model of the router. You can also use the open source router firmware like OpenWRT or DD-WRT.
The Tftpd32 program can act both as a TFTP server and client. We need to use this program only in the client mode. So launch the Tftpd32 tool and switch to the Tftp Client tab. Enter the web-interface IP address for your router (typically 192.168.1.1 or 192.168.0.1) as Host. Enter 69 as the port number as this is the default port for TFTP protocol. Choose the firmware file in the Local File section. And finally click on the Put button to transfer the file to your router.

The file transfer does not take much time. In most of the cases, the firmware file is very small and all it takes is 5-6 seconds to transfer it over TFTP to your router’s flash memory. You would receive a message when the file transfer is complete.
Now you can restart your router, it should use the new version of the firmware. You can also reset the router before starting to work with the new firmware to wipe out any of the obsolete settings.
Conclusion: It is easy to upgrade the firmware of routers over the TFTP protocol. It is as simple as copying a file in Windows from one folder to another because the TFTP protocol does not require any username or password to perform any of the copying actions.
You can download the Tftpd32 program from http://tftpd32.jounin.net/.
We use cookies on our website to give you the most relevant experience by remembering your preferences and repeat visits. By clicking “Accept”, you consent to the use of ALL the cookies.
Проблема
На досуге ради интереса и большого потенциала, решил прошить свой роутер на открытую прошивку OpenWrt. Прошиться было очень просто — в админке роутера, в разделе Firmware просто выбрать бинарник с прошивкой, и дождаться загрузки роутера. После наката OpenWrt с досадой обнаружил, что для подключения к интернету на моем провайдере используется VPN-протокол L2TP. Однако в прошивке OpenWrt для роутера Archer C6 по-умолчанию не были предустановлены пакеты для работы по этому протоколу. Для того, чтобы установить их, нужен интернет, а чтобы подключиться к интернету нужен L2TP. Замкнутый круг. Помимо установки зависимостей из репозиториев есть возможность установить все пакеты вручную с помощью ssh, scp, но мне показалось это муторным, и я просто решил вернуть старую прошивку.
Для начала, я попробовал сделать также, как и при прошивке OpenWrt — через веб интерфейс выбрать файл и прошиться на сток. Несмотря на то, что админка предоставила такую возможность, роутер после сего действа просто умер. После загрузки загорался индикатор питания, но ничего не происходило.
Что же, я знал на что иду, но попытка не пытка. Так я пришел к необходимости восстановления роутера посредством TFTP-сервера из recovery mode’a TPLink Archer C6.
Ниже приведу пошаговую инструкцию по настройке TFTP-сервера и прошивки роутера.
TFTP?
До того как встретился с необходимостью прошивки роутера я ничего не знал про этот протокол, в том числе и про его существование. Но пришлось познакомиться.
TFTP (Trivial File Transfer Protocol) — как видно из названия это элементарнейший протокол обмена файлами. Из интересных команд у него всего get — получить файл и put — отправить файл. Однако из-за своего минимализма и простоты реализации он идеально подходит для встраиваемых систем с ограниченым объемом памяти.
Решение
Что будем делать
Для восстановления роутера с помощью recovery mode’a необходимо предоставить возможность роутеру в recovery mode загрузить файл прошивки с tftp-сервера. tftp-сервер должен находиться на определенном IP и порту. Итого, если кратко:
- на ПК вручную прописать адрес 192.168.0.66 (ip по которому ходит роутер на tftp-сервер)
- подключить роутер к ПК по ethernet кабелю
- установить и запустить tftp сервер на порту 69
- дождаться пока роутер сам себя прошьет
Пререквизиты
Я использую Manjaro Linux с KDE, однако с небольшими изменениями инструкция должна подходить для любого дистрибутива Linux, и скорее всего MacOS. Итого, что нужно:
- ПК/Ноут на (Arch-based) Linux
- пачкорд
- роутер
- терпение
Установка и настройка TFTP-сервера
В качестве реализации сервера я выбрал tftp-hpa как рекомендует ArchWiki.
- Установить tftp-сервер
- Скорректировать конфиг tftp-hpa по пути /etc/conf.d/tftpd, чтобы он содержал следующее:
TFTPD_ARGS="--secure /srv/tftp/ --create --verbosity 5 --address 0.0.0.0:69 --username=tftp"
где:
/srv/tftp/- путь то директории где будет лежать наша прошивка
--create— запустить сервер с возможностью создавать файлы--verbosity 5— писать DEBUG логи в syslog--adress— хост и порт на котором будет запущен сервер. Порт ставим по-умолчанию — 69
- Запустить systemd демон tftp-сервера:
sudo systemctl start tftpd
- Чтобы не заморачиваться с пользователями, правами, группами – разрешить полный доступ к директории /srv/tftp/
sudo chmod -R 777 /srv/tftp
- Загрузить прошивкув соответствии с ревизией из поста https://4pda.to/forum/index.php?showtopic=976692&view=findpost&p=121017717
Для начала попробуйте самую старую, для ревизии 2, например, это ArcherC6(RU)_V2_20190115.zip. Если не получилось — поочередно поднимайте версию до тех пор, пока не получится. Мне потребовалось 2 попытки, таким образом, рабочим образом для моего роутера былаArcher C6(RU)_V2_200508.zip - Проверить, что сервер может отдавать файлы
Пункт необходим из-за очень скудных логов сервера tftp.
- запустить tftp клиент
- после успешного подключения появится приглашение командной строки. Выполнить команду загрузки файла ниже, и нажать enter:
get ArcherC6v2_tp_recovery.bin
- в случае успеха вы не получите никакого соощбения, но в директории в которой была запущена команда появится наш файл
ArcherC6v2_tp_recovery.bin - если произошла ошибка permission denied, выполнить
sudo chmod 777 ArcherC6v2_tp_recovery.bin
- повторно выполнить команду
get ArcherC6v2_tp_recovery.bin - если появилась ошибка file not found, то либо вы забыли исправить конфиг (см п.2), либо выполняете на отличном от arch-based дистрибутиве (конфиг должен лежать в другом месте)
Настройка проводного подключения
Как было упомянуто выше, необходимо сделать так, чтобы TFTP-сервер был в сети роутера по определенному IP и на определенном порту. Для этого настроим проводное подключение.
-
Подключить включенный роутер к ПК с помощью ethernet кабеля. В роутер воткнуть в любой порт КРОМЕ WAN. Если в настройках сети у вас отсутствует проводное соединение, по после подключения оно должно автоматически создасться. Желательно, чтобы на момент прошивки к ПК был подключен только один ethernet кабель для предупреждения возможных коллизий.
-
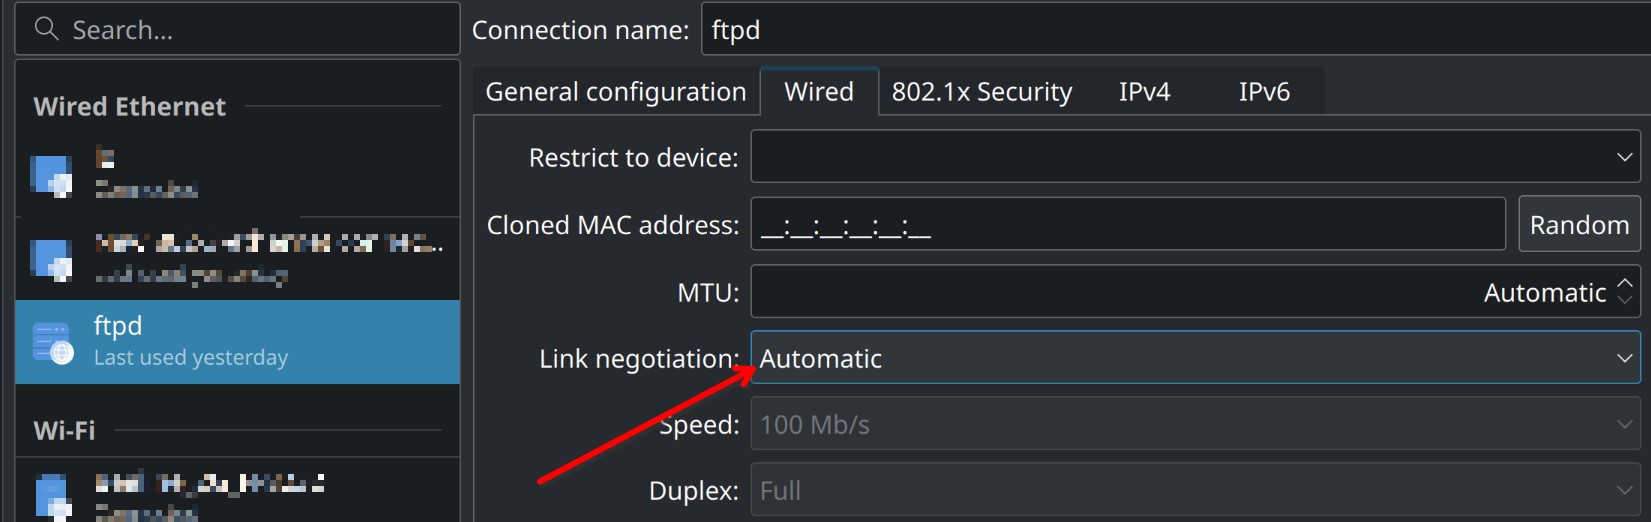
Открыть настройки проводного соединения (которое отвечает за подключение к роутеру). Я использую KDE, скриншоты будут оттуда. Выполнить следующие настройки:
- на вкладке Wired установить значение поля Link negotiation в Automatic
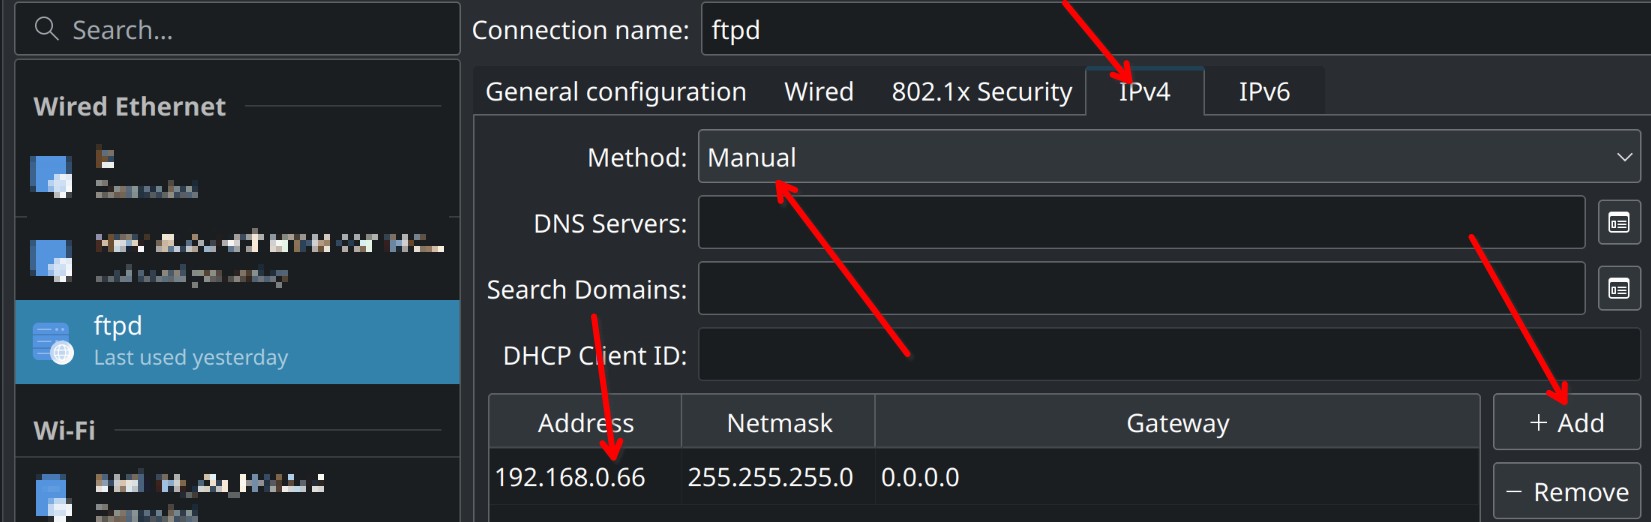
- на кладке ipv4:
- Method: Manual
- Нажать кнопку добавить в таблице. Добавить адресс 192.168.0.66, маска 255.255.255.0
Сохранить. Подключиться.
Если всё сделано правильно, то соединение должно пройти корректно.
Скриншоты
Прошивка
Для того, чтобы мы могли понять, пробует ли роутер подключиться к TFTP-серверу, необходимо подключиться к DEBUG логам TFTP-сервера с помощью journalctl. Как смотреть DEBUG логи по отдельному юниту я разбираться не стал, поэтому просто подключимся к стриму и будем ждать сообщений помеченных как in.tftpd. Для этого в терминале выполнить:
И прошиваем.
- Выключить роутер. Соединение пропадет. В окне с логами будет много логов от network manager’a.
- Зажать кнопку reset на роутере, одновременно включить роутер. Держать reset до тех пор, пока не загорится индикатор замка.
- Наблюдать за логами journalctl. Если все сделано правильно, должно появиться сообщение вроде такого:
дек 31 20:17:20 username-pc in.tftpd[14732]: *RRQ from 192.168.0.86 filename ArcherC6v2_tp_recovery.bin*
Если сообщение появилось — радуйтесь. Роутер перезагрузится. Не трогайте его 5-7 минут. Если по прошествии этого времени остался гореть только самый левый индикатор, выберите другую версию прошивки и повторите п11.
Время на прочтение6 мин
Количество просмотров133K
Привет хаб!
Существуют множество альтернативных прошивок для маршрутизаторов Dlink. После перехода на них могут возникнуть проблемы, а именно: дивайс не эффективно начнет работать или просто умрет. Если все таки прошили его не удачно. Это инструкция для вас и только для тех dir-620, которые не до конца сдохли. То есть он загружается, сетевая плата ПК не может с ним связаться по Ethernet интерфейсу.
Ну что ж приступим!
По мима софта и полуживого дивайса, нам понадобиться USB-UART (кстати очень нужная вещь в хозяйстве). Заходим на easyelectronics и делаем. Можно было конечно и купить, но у моего друга лежала без дела.
Незабываем что нужно вывести COM на самом роуторе.

(сразу предупреждаю нет возможности сфотографировать свой)
Прошивку переименуем в habr.bin (можно назвать хоть тюльпаном, главное чтоб были английские буквы и не превышала 127 символов )
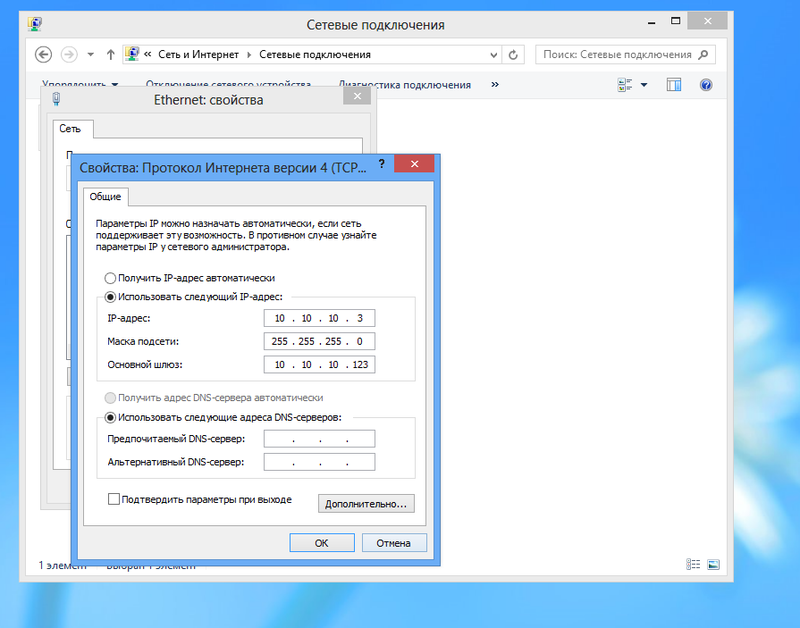
прописываем адреса на сеттевой
- адрес 10.10.10.3.
- маска 255.255.255.0
- шлюз 10.10.10.123
И так рассмотрим два варианта.
Вариант 1
Этот вариант очень распространённ им многие пользуются.
Сожалению я как не старался так не смог с помощью его восстановить dir-620.
для этого качаем putty, tftpd32. Что касается tftpd32, то я качал tftpd64 (битность системы не забываем).
Шаг 1
Кидаем прошивку в папку tftpd64.
Запускаем tftpd64, вкладка Tftp Server, нажимаем Browes выбираем папку где лежит программа.

Шаг 2
запускаем putty, заходим в Serial. Тут COM3 (у вас может быть другой, в диспетчере устройств посмотрите), Speed 57600, Flow control: None
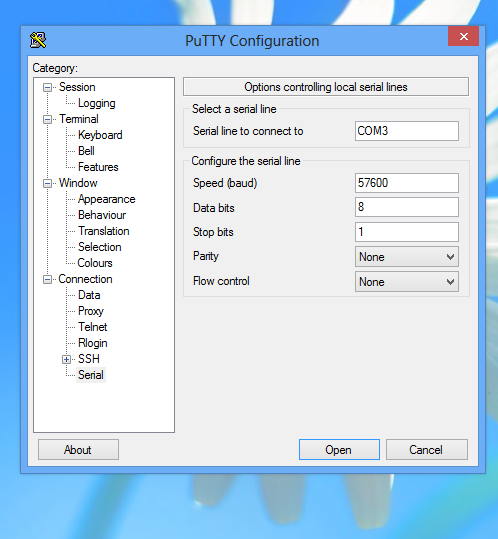
Переходим в Session, жмем open.
Шаг 3
Подключаем USB-UART к COM на самом роуторе. Хочу предупредить после включения у вас есть 5 секунд что бы выбрать нужный пункт, вам нужно нажать 2.
и включаем роутер.
Лог
U-Boot 1.1.3 (Feb 9 2010 — 10:44:20)
Board: Ralink APSoC DRAM: 32 MB
relocate_code Pointer at: 81fb0000
flash_protect ON: from 0xBF000000 to 0xBF01D3F3
flash_protect ON: from 0xBF030000 to 0xBF030FFF
============================================
Ralink UBoot Version: 3.3
— ASIC 3052_MP2 (Port5<->None)
DRAM component: 128 Mbits SDR
DRAM bus: 32 bit
Total memory: 32 MBytes
Flash component: NOR Flash
Date:Feb 9 2010 Time:10:44:20
============================================
icache: sets:256, ways:4, linesz:32 ,total:32768
dcache: sets:128, ways:4, linesz:32 ,total:16384
##### The CPU freq = 384 MHZ ####
SDRAM bus set to 32 bit
SDRAM size =32 Mbytes
Please choose the operation:
1: Load system code to SDRAM via TFTP.
2: Load system code then write to Flash via TFTP.
3: Boot system code via Flash (default).
4: Entr boot command line interface.
9: Load Boot Loader code then write to Flash via TFTP.
после выбора 2: Load system code then write to Flash via TFTP появится:
2: System Load Linux Kernel then write to Flash via TFTP.
Warning!!! Erase Linux in Flash then burn new one. Are you sure?(Y/N)
пишем Y жмем ENTER
Please Input new ones /or Ctrl-C to discard
Input device IP (10.10.10.123) ==:10.10.10.123
жмем ENTER
Input server IP (10.10.10.3) ==:10.10.10.3
жмем ENTER
Input Linux Kernel filename () ==:
пишем habr.bin — имя файла и жмем ENTER
после чего должна качаться прошивка, дивайс перезагрузится уже в рабочем состоянии.
но что делать если putty просто напросто отказывается заходить на ком, и tftpd32 не работает.
Вариант 2
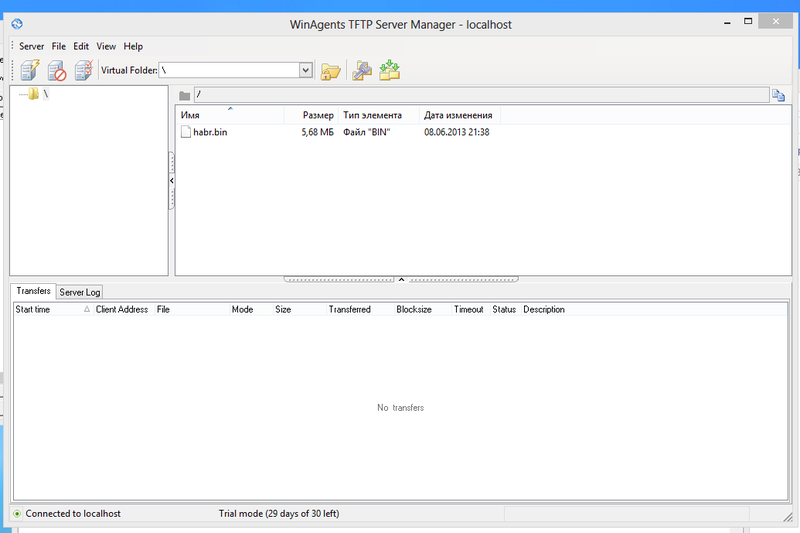
на понадобится Terminal v1.9b by Bray и WinAgents TFTP Server Manager(с офф сайта 30 дней триалка нам хватит этого срока)
Шаг 1
кидаем прошивку C:\ProgramData\WinAgents\TFTP Server 4\TFTPRoot. Видем появился файл на сервере.
Шаг 2
настраиваем Terminal v1.9b by Bray (port:COM3, Baud rate: 57600) жмем конект. Включаем роутер и видем Terminal v1.9b by Bray. НЕЗАБЫВАЕМ ЧТО ЕСТЬ 5 СЕКУНД ЧТОБЫ НАЖАТЬ ЦИФРУ ДВА(2)

Лог
U-Boot 1.1.3 (Feb 9 2010 — 10:44:20)
Board: Ralink APSoC DRAM: 32 MB
relocate_code Pointer at: 81fb0000
flash_protect ON: from 0xBF000000 to 0xBF01D3F3
flash_protect ON: from 0xBF030000 to 0xBF030FFF
============================================
Ralink UBoot Version: 3.3
— ASIC 3052_MP2 (Port5<->None)
DRAM component: 128 Mbits SDR
DRAM bus: 32 bit
Total memory: 32 MBytes
Flash component: NOR Flash
Date:Feb 9 2010 Time:10:44:20
============================================
icache: sets:256, ways:4, linesz:32 ,total:32768
dcache: sets:128, ways:4, linesz:32 ,total:16384
##### The CPU freq = 384 MHZ ####
SDRAM bus set to 32 bit
SDRAM size =32 Mbytes
Please choose the operation:
1: Load system code to SDRAM via TFTP.
2: Load system code then write to Flash via TFTP.
3: Boot system code via Flash (default).
4: Entr boot command line interface.
9: Load Boot Loader code then write to Flash via TFTP.
после выбора 2: Load system code then write to Flash via TFTP появиться:
2: System Load Linux Kernel then write to Flash via TFTP.
Warning!!! Erase Linux in Flash then burn new one. Are you sure?(Y/N)
пишем Y жмем ENTER
Please Input new ones /or Ctrl-C to discard
Input device IP (10.10.10.123) ==:10.10.10.123
жмем ENTER
Input server IP (10.10.10.3) ==:10.10.10.3
жмем ENTER
Input Linux Kernel filename () ==:
пишем habr.bin — имя файла и жмем ENTER
netboot_common, argc= 3
NetTxPacket = 0x81FE5600
KSEG1ADDR(NetTxPacket) = 0xA1FE5600
NetLoop,call eth_halt!
NetLoop,call eth_init!
Trying Eth0 (10/100-M)
Waitting for RX_DMA_BUSY status Start… done
Header Payload scatter function is Disable!!!
ETH_STATE_ACTIVE!!!
Using Eth0 (10/100-M) device
TFTP from server 10.10.10.3; our IP address is 10.10.10.123
Filename ‘habr.bin’.
TIMEOUT_COUNT=10,Load address: 0x80100000
Loading: Got ARP REPLY, set server/gtwy eth addr (1c:6f:65:eb:c1:51)
Got it
T #
first block received
################################################################
#################################################################
#################################################################
#################################################################
#################################################################
#################################################################
#################################################################
#################################################################
#################################################################
#################################################################
#################################################################
#################################################################
#################################################################
#################################################################
#################################################################
#################################################################
#################################################################
############################################################
done
Bytes transferred = 5959680 (5af000 hex)
NetBootFileXferSize= 005af000
Erase linux kernel block!!!
From 0xBF050000 To 0xBF5FFFFF
b_end =BF7FFFFF
Erase Flash from 0xbf050000 to 0xbf5fffff in Bank # 1
erase sector = 12
sect = 12,s_last = 102,erase poll = 1008817
erase sector = 13
sect = 13,s_last = 102,erase poll = 984201
erase sector = 14
*sect = 14,s_last = 102,erase poll = 1007174
erase sector = 15
sect = 15,s_last = 102,erase poll = 998828
erase sector = 16
бла бла бла
он ребут
бла бла бла
start urlfilter
init wans
Intialize wan…
[17179582.684000] eth2.5: Setting MAC address to 00 0c 43 30 52 89.
Set mac 00:0C:43:30:52:89 on iface eth2.5 — OK
Set mtu 1500 on iface eth2.5 — OK
start_wan_link_on_l2 — Up iface eth2.5
start_ip: dhcp ipv4
start_wan_link_on_l2 — Iface eth2.5 is up
start_wan_link_on_l2 — Up iface br0
start_wan_link_on_l2 — iface br0 is not wan, pass it
start ddns
info, udhcp client (v0.9.8) started (iface: eth2.5, connect: 1)
udhcp client (v0.9.8) started (iface: eth2.5, connect: 1)
debug, interface eth2.5 index 9
debug, interface eth2.5 hwaddr 00:0c:43:30:52:89
debug, interface eth2.5 mtu is 1500
debug, execle’ing /tmp/udhcpc with name deconfig
start services
start_telnet…
start_printserver…
init_sysusers…
debug, Opening raw socket on ifindex 9
Out init_device
init_device: pid_status(WEXITSTATUS) = 0
Done.
Welcome to
_______ ___ __ ____ _ _ ___
| ___ \ | | |__|| \ | || | / /
| | | || ___ | |__ __ | \| || |/ /
| |___| || |___| | || || |\ || \
|_______/ |______||__||_| \____||_|\___\
= Building Networks for People =
info, Sending discover…
[17179583.076000] dwc_otg: version 2.72a 24-JUN-2008
[17179583.080000] DWC_otg: Core Release: 2.66a
[17179583.284000] DWC_otg: Periodic Transfer Interrupt Enhancement — disabled
[17179583.288000] DWC_otg: Multiprocessor Interrupt Enhancement — disabled
[17179583.292000] DWC_otg: Using DMA mode
[17179583.296000] DWC_otg: Device using Buffer DMA mode
[17179583.300000] dwc_otg lm0: DWC OTG Controller
[17179583.304000] dwc_otg lm0: new USB bus registered, assigned bus number 1
[17179583.308000] dwc_otg lm0: irq 18, io mem 0x00000000
[17179583.312000] DWC_otg: Init: Port Power? op_state=1
[17179583.316000] DWC_otg: Init: Power Port (0)
[17179583.320000] usb usb1: Product: DWC OTG Controller
[17179583.324000] usb usb1: Manufacturer: Linux 2.6.21 dwc_otg_hcd
[17179583.328000] usb usb1: SerialNumber: lm0
[17179583.336000] usb usb1: configuration #1 chosen from 1 choice
[17179583.340000] hub 1-0:1.0: USB hub found
[17179583.344000] hub 1-0:1.0: 1 port detected
D-link init done
info, Sending discover…
info, Sending discover…
[17179597.196000] br0: topology change detected, propagating
[17179597.200000] br0: port 5(ra0) entering forwarding state
[17179597.204000] br0: topology change detected, propagating
[17179597.208000] br0: port 4(eth2.1) entering forwarding state
[17179597.212000] br0: topology change detected, propagating
[17179597.216000] br0: port 3(eth2.2) entering forwarding state
[17179597.220000] br0: topology change detected, propagating
[17179597.224000] br0: port 2(eth2.3) entering forwarding state
[17179597.228000] br0: topology change detected, propagating
[17179597.232000] br0: port 1(eth2.4) entering forwarding state
info, Sending discover…
info, Sending discover…
info, Sending discover…
Шаг 3
меняем адреса на сетевой, наслаждаемся роутером)
- при заливки файла на роутер вы уведите не только на терминале но и сервер вам скажет что файл уходил.
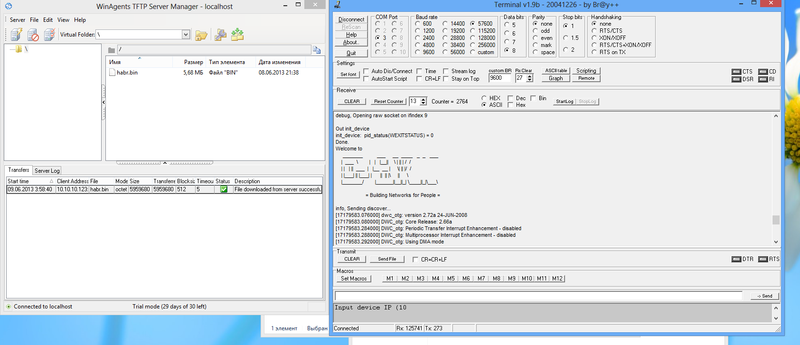
- Что касается Terminal v1.9b by Bray, вводим в серое поля (по символьный ввод).

Ну вот и все, всем удачи! 
Go back to generic.flashing
TFTP is a very simple protocol; simple enough to be implemented in small boot loaders. The basic idea is as follows:
-
Router is powered on
-
Bootloader prepares startup of firmware code
-
For a few seconds it initializes the wired lan ports
-
It then either:
-
Behavior thereafter varies by boot loader
You must determine whether your hardware’s bootloader has a TFTP client or server to understand which section below applies to your device.
Consult your specific model’s OpenWrt Wiki devicepage for details on necessary settings, IP addresses to use, and the TFTP type offered if any.
If your device is of the type that has a boot loader with a TFTP client that tries to download an image in recovery mode, then you must run a TFTP server to host the new firmware.
Detailed instructions are given on the Setting up a TFTP server for TFTP Recovery/Install wiki page.
Move this section showing how to configure a TFTP server to tftpserver
RouterBoards have a TFTP and DHCP clients running in their RouterBoot bootloader.
See : Common Procedures for Mikrotik RouterBoard for details.
Bash script to set static IP address, run DHCP server and run TFTP server (exemple for Mikrotik).
Note: Don’t forget to change USER, NETDEV, IP/DHCP IP-range and file name/folder path for your needs.
#/bin/bash
USER=user
NETDEV=enp1s0
ip address flush dev $NETDEV
ip address add 10.1.1.10/24 dev $NETDEV
dnsmasq -i $NETDEV --dhcp-range=10.1.1.50,10.1.1.100 \
--dhcp-boot=openwrt-ar71xx-mikrotik-vmlinux-initramfs.elf \
--enable-tftp --tftp-root=/home/$USER/openwrt -d -u $USER -p0 -K --log-dhcp --bootp-dynamic
Move this section showing how to configure a TFTP server to tftpserver
For example the bootloader implementation of the DIR-300 redboot contains a TFTP client. Two steps:
-
first you install and start a TFTP server (or daemon) on your host and place the image(s) to be flashed in the <root directory> of this software (you may be required to do this as root).
Possible directories can be
Example:
sudo apt-get install tftpd-hpa tftp
sudo cp ~/uboot/arch/arm/boot/uboot.img /var/lib/tftpboot
-
Test the server:
  tftp localhost
tftp> get uboot.img
tftp> quit
  cmp /var/lib/tftpboot/uboot.img uboot.img
  # no output other then a prompt means it worked correctly
-
connect to the bootloader, and tell it to get the images on your harddisk via its TFTP client (in case of the DIR-300 you obtain a connection via telnet on the non-default port 9000). Example:
telnet 192.168.20.81 9000
Redboot> load uboot.img
go
-
after successful installation of OpenWrt, do not forget to deactivate the TFTP server again!
Move this section showing how to configure a TFTP server to tftpserver
In case of the xxx Step 3 from Example 1 above is not applicable. There is no console to login to, the bootloader will automatically try to get a firmware over TFTP from a pre-configured IP address at every boot.
Move this section showing how to configure a TFTP server to tftpserver
Note: TftpServer.app places a pleasing GUI on top of the native OSX tftpd. There’s a writeup of using TftpServer.app at tftpserver. If you prefer to use the command-line, read on…
OS X Lion comes with a tftpd but its disabled by default. Like most services in OS X, tftpd is controlled by launchctl.
The configuration with which the daemon is lauched is in /System/Library/LaunchDaemons/tftp.plist and the the identifier is com.apple.tftpd
before you make changes to the config run:
sudo launchctl unload -F /System/Library/LaunchDaemons/tftp.plist
then:
sudo launchctl load -F /System/Library/LaunchDaemons/tftp.plist
to stop tftpd run:
sudo launchctl stop com.apple.tftpd
to start tftpd run:
sudo launchctl start com.apple.tftpd
Here is an example config file that will work:
<?xml version="1.0" encoding="UTF-8"?>
<!DOCTYPE plist PUBLIC "-//Apple Computer//DTD PLIST 1.0//EN" "http://www.apple.com/DTDs/PropertyList-1.0.dtd">
<plist version="1.0">
<dict>
	<key>Label</key>
	<string>com.apple.tftpd</string>
	<key>ProgramArguments</key>
	<array>
		<string>/usr/libexec/tftpd</string>
		<string>-l</string>
		<string>-s</string>
		<string>/private/tftpboot</string>
	</array>
	<key>inetdCompatibility</key>
	<dict>
		<key>Wait</key>
		<true/>
	</dict>
	<key>InitGroups</key>
	<true/>
	<key>Sockets</key>
	<dict>
		<key>Listeners</key>
		<dict>
			<key>SockServiceName</key>
			<string>tftp</string>
			<key>SockType</key>
			<string>dgram</string>
		</dict>
	</dict>
</dict>
</plist>
Differences from the default include removing this, to enable the service:
<key>Disabled</key>
<true/>
Add this to the ProgramArguments array to make it log to /var/log/syslog.log
<string>-l</string>
Place the openwrt image file you want to serve in:
/private/tftpboot
Notice that even after running launchctl start com.apple.tftpd you will not see tftpd running when executing ps aux | grep tftpd because of the way launchctl works. tftpd is in fact not running but launchctl will launch it as soon as it is required.
In some cases, when the output on the serial console is grabbled you can still act on faith and executer the following commands, which will work in most cases:
setenv ipaddr 192.168.1.1
setenv serverip 192.168.1.100
tftpboot 0x80000000 openwrt-xxx-generic-xxx-squashfs-factory.bin
erase 0x9f020000 +0x332004
cp.b 0x80000000 0x9f020000 0x332004
boot.m 0x9f020000
tftpd on MacOS 10.4 «Tiger»
Move this section showing how to configure a TFTP server to tftpserver
tftpd works out-of-the-box also on the old 10.4. Maybe the tftp dir is not yet created but this is just a mkdir. Get a root shell and issue these commands:
bash-4.2$ sudo bash
Password:
bash-4.2# mkdir -p /private/tftpboot/
bash-4.2# cp /path/to/openwrt-image /private/tftpboot/
bash-4.2# launchctl load -F /System/Library/LaunchDaemons/tftp.plist
bash-4.2# ps axu|grep ftp
root     23494   0.0  0.0    27696    152  ??  Ss    4:34PM   0:00.00 launchctl load -F /System/Library/LaunchDaemons/tftp.plist
root     23496   0.0  0.0    38604      4  p3  R+    4:34PM   0:00.00 grep ftp
bash-4.2# launchctl start com.apple.tftpd
bash-4.2# ps axu|grep ftp
root     23494   0.0  0.0    27696    152  ??  Ss    4:34PM   0:00.00 launchctl load -F /System/Library/LaunchDaemons/tftp.plist
root     23498   0.0  0.0    27244    464  ??  Ss    4:34PM   0:00.01 /usr/libexec/launchproxy /usr/libexec/tftpd -i /private/tftpboot
root     23500   0.0  0.0    38604      4  p3  R+    4:34PM   0:00.00 grep ftp
bash-4.2# tftp 192.168.100.72   ### just testing
tftp> get openwrt-ar71xx-generic-hornet-ub-squashfs-sysupgrade.bin
Received 7270950 bytes in 2.7 seconds
tftp>
The basic procedure of using a tftp client to upload a new firmware to your router:
-
Unplug the power to your router
-
Plug the Ethernet connection from your computer (acting as tftp client) into a LAN port on your model. See your model’s OpenWrt wiki devicepage for details on which port to use
-
Start your tftp client on your computer
-
Give it the router’s address (specific to model and bootloader, see your model’s wiki page)
-
Set mode to octet/binary
-
Tell the client to resend the file until it succeeds
-
“put” the file
-
Plug-in your router while having the tftp client running and constantly probing for a connection
-
The tftp client will receive an ack from the bootloader and starts sending the firmware
The TFTP commands vary across different implementations. Here are some examples:
The network link must be up and established during power up. One way to ensure this happens is to use a switch or hub in-between your computer and the device you are flashing as this will leave the link established when you power off the device.
Another option is to disable network manager in Linux (or use a distro/LiveCD that doesn’t have it). Some commands that may disable it (depends on the distribution of Linux used):
Preparation Steps
-
Configure a static IP to match your *bootloaders* network
-
Preconfigure an ARP entry to increase your changes of catching the TFTP window
Using atftp
Using netkit’s tftp
Using curl
using tftpd-hpa
On Mac OS X, you should be able to flash the router with the command line tftp client, which behaves identically to netkit’s tftp above.
Some people have had problems with the command line tftp client, however, and recommend using MacTFTP Client instead:
Many Macs will disable the Ethernet card when the router is powered off and will take too long to re-enable the card, causing the TFTP transfer to fail with an “Invalid Password” error. Many people have had success if they manually configure their network card (in the “Ethernet” tab of “Built-in Ethernet” in System Preferences’ Network panel) to:
Alternatively, you can connect the router to the Mac via a hub or switch; see the troubleshooting section for more information.
There are multiple tftp clients that you can choose from.
TFTP command line client short Instructions
Note that some bootloaders do not respond to ICMP ping.
GUI TFTP clients
Don’t forget about your firewall settings, if you use one. It is best to run the “put” command and then immediately apply power to the router, since the upload window is extremely short and very early in boot.
| TFTP Error | Reason |
|---|---|
| Code pattern is incorrect | The firmware image you’re uploading was intended for a different model. |
| Invalid Password | The firmware has booted and you’re connected to a password protected tftp server contained in the firmware, not the bootloader’s tftp server. |
| Timeout | Ping to verify the router is online Try a different tftp client (some are known not to work properly) |
| Timeout | Ping to the router works NetworkManager (Linux) may still be running causing autosense. Try again with manual configuration. |
Some machines will disable the ethernet when the router is powered off and not enable it until after the router has been powered on for a few seconds. If you’re consistantly getting “Invalid Password” failures try connecting your computer and the router to a hub or switch. Doing so will keep the link up and prevent the computer from disabling its interface while the router is off.
Before you go searching for a hub to keep your link live, try setting your TCP/IP setting to a static IP (192.168.1.10; 255.255.255.0; 192.168.1.1 [gateway]) method instead of DHCP.
If you can flash your router and after that it says “Boot program checksum is invalid” or “Invalid boot block on disk” on serial console try a different tftp client — atftp works well. This occurs with some netkit tftp packages and big firmwares.
Example
would this be better to just exist in specific model’s wiki pages?
should we create a page to list models with tftp support, noting which ones need the reset button trick?
On many routers, including the Asus WL-500g Premium v1 that I use, you flash an image by disconnecting power, press and hold down the reset button, and connect the power again. Wait a few seconds and the PWR LED will start to blink. Release the reset button. The device will now have a TFTP server running on 192.168.1.1.
Note that many TP-Link models are reported to support the same trick, including the TL-WR740Nv4, TL-WDR4300v1, TL-WDR3600v1, TL-WR842NDv1, TL-WR841NDv8, TL-WR841Nv11, TL-WR841Nv12, TL-MR3020v1, TL-MR3220v2, TL-MR3420v2, TL-WR940Nv2, TL-WR941NDv5, TL-WR1042NDv1 and possibly any other TP-Link model that has a recent firmware upgrade from the manufacturer. For a summary and ongoing experiments, see: http://bkil.blogspot.com/2014/12/hidden-tftp-of-tp-link-routers.html
You’ll have to use a Ethernet cable at this point. Connect it to LAN1-LAN4, not WAN. Configure your local machine on the 192.168.1.x/24 network, for example as 192.168.1.42. The router will use 192.168.1.1.
$ tftp 192.168.1.1
tftp> trace
Packet tracing on.
tftp> binary
tftp> put openwrt-brcm-2.4-squashfs.trx
sent WRQ <file=openwrt-brcm-2.4-squashfs.trx, mode=octet>
received ACK <block=0>
sent DATA <block=1, 512 bytes>
received ACK <block=1>
sent DATA <block=2, 512 bytes>
received ACK <block=2>
sent DATA <block=3, 512 bytes>
received ACK <block=3>
sent DATA <block=4, 512 bytes>
...
received ACK <block=4742>
sent DATA <block=4743, 512 bytes>
received ACK <block=4743>
sent DATA <block=4744, 512 bytes>
received ACK <block=4744>
sent DATA <block=4745, 0 bytes>
received ACK <block=4745>
Sent 2428928 bytes in 6.2 seconds
tftp> quit
$
Wait one minute and restart the box by disconnecting and reconnecting power. Some documentations claim that the device should restart by itself but I have never seen this happen, no matter how long I wait.
Check if your TFTP Server has sufficient access rights to files or directories.
U-Boots TFTP Client / tftpboot can complain with:
## Error: 'Access violation' (2), starting again!
TL;DR: Установить не сложно, но говорят, что 5 GHz Wi-Fi работает медленнее, чем на стоковой прошивке. Делайте на свой страх и риск.
Категорически приветствую всех в своём блоге. Никого не удивлю если скажу, что я любитель ставить всякие разные прошивки на свои устройства. В этот раз таким устройством оказался мой старенький роутер — TP-Link Archer A6 v2 (RU). А в качестве прошивки я решил поставить OpenWrt.
Предыстория
Прошивка роутера на OpenWrt для меня не нова. Я уже прошивал свой древнющий TP-Link WR841ND много лет тому назад. Сначала на DD-WRT, а потом неудачно на OpenWrt. Почему неудачно? Потому что роутер окирпичился, и пришлось проделывать какие-то махинации с подпайкой к плате и загрузкой прошивки через COM. Тем не менее, по итогу я всё-таки поставил на него OpenWrt, и был доволен 🙂
В 2020 году я приобрел себе роутер TP-Link Archer A6. Никакой информации о поддержке на OpenWrt в тот момент на него я не нашёл, и долгое время сидел на стоковой прошивке. Причём стоковая прошивка была какой-то совсем плохой. Роутер после выключения и включения мог минуту «думать» и не подключаться к сети. Плюс иногда пропадал интернет и роутер почему-то в эти моменты зависал и не давал мне зайти в админку. Возможно это какой-то брак конкретно моего устройства, но, тем не менее, я пинял именно на прошивку.
Но не так давно мне понадобилось подключить компьютер к уже существующей Wi-Fi сети с интернетом. Доступа по Ethernet кабелю к этой сети нет, и Wi-Fi адаптера на компьютере тоже нет.
Казалось бы, есть Wi-Fi роутер, есть Ethernet-кабель. Сразу приходит в голову мысль построить сеть, при которой компьютер подключается посредством кабеля к роутеру, а роутер посредством Wi-Fi подключается к уже существующей точке, откуда собственно и берет «интернет» для подключенных к нему кабелем устройств.
Как вы думаете, нашел ли я такую возможность в стоковой прошивке своего TP-Link’а? Конечно же, нет. Он может быть подключен через WAN к другому роутеру, чтобы раздать интернет, но не может подключаться к другому роутеру через Wi-Fi.
При этом я помнил, что на OpenWrt такое есть из коробки. Это и побудило меня опять полезть в недра интернета, и изучить можно ли перепрошить мой роутер на эту прошивку. Спойлер — можно.
Предостережения
Всё описанное ниже проверено только на роутере TP-Link Archer A6 v2 (RU). Перепроверьте надписи на дне роутера, чтобы узнать конкретную модель. Если у вас другая версия (не v2), то инструкция вам не подойдет, так как файлы прошивок не совместимы между версиями. Если ваш роутер для другого региона (EN/US), то скорее всего тоже не подойдет, и не стоит рисковать.
Также советую сначала прочитать всю инструкцию, скачать необходимые файлы, и лишь потом начинать процесс. Иначе можете оказаться без нужных файлов и без интернета.
Для удобства, я собрал все необходимые файлы в один архив. Там установщик WinSCP, изначальная прошивка для TFTP (уже переименованная), прошивка для загрузки через WinSCP, и настроенный Tftpd64. Но если не доверяете, то в инструкции оставлены оригинальные ссылки, откуда можно скачать то же самое.
Выполняйте перепрошивку на свой страх и риск! Если в этом процессе что-то пойдет не так, то можно остаться без рабочего роутера, и тогда придется как-то восстанавливать его.
А ещё важно помнить, что с текущей прошивкой OpenWrt под этот роутер есть проблема с 5 GHz Wi-Fi. На форумах пишут, что скорость сильно падает. В моём случае это не критично, но если вы рассчитываете на скорость выше 150 мбит по 5 Ghz Wi-Fi, то возможно вы её не получите. Если для вас это важно, то не прошивайтесь.
Инструкция
В основном, я использовал информацию отсюда, но в некоторых моментах у меня возникали проблемы, поэтому я чуть дополнил инструкцию. Инструкция составлена для Windows (на Mac OS у меня не получилось заставить роутер видеть мой TFTP сервер).
Прошивка будет происходить в несколько этапов:
- Сброс текущих настроек роутера на заводские.
- Подготовка сетевого адаптера.
- Загрузка прошивки с «голым» OpenWrt через TFTP.
- Загрузка более актуальной прошивки с OpenWrt с LuCi через SSH.
Сброс текущих настроек
Включаем роутер, зажимаем кнопку Reset, и держим секунд 10. Таким образом мы сбросим текущие настройки до заводских, чтобы точно не возникло проблем. Отключаем роутер.
Подготовка сетевого адаптера
Идём в настройки нашего сетевого адаптера, который будет подключаться к роутеру. В настройках скорости мы должны поставить «100 мбит полный дуплекс», иначе роутер может не подключиться к нашему TFTP серверу на компьютере.
Также в настройках сетевого адаптера нам нужно убрать автоматическое назначение IP адреса, и выставить конкретный — 192.168.0.66. Именно по этому IP адресу роутер будет«стучаться» в поисках TFTP сервера.
Если у вас включен Windows Defender (Брандмауэр Windows), либо любой другой firewall, то отключаем его на время, иначе он может заблокировать входящие запросы от роутера к TFTP.
Настройка и запуск TFTP сервера
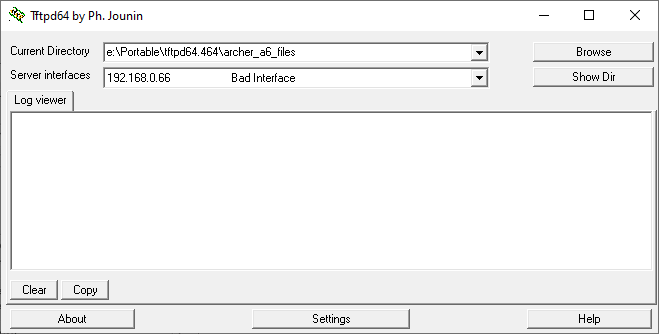
Скачиваем TFTP сервер tftpd64 отсюда. Распаковываем куда-нибудь, но на всякий случай без киррилических символов в пути.
Затем берём прошивку с OpenWrt. Я использовал вот эту, так как именно её упоминали в оригинальной инструкции. Если я правильно понял, в ней модифицирован один файл, чтобы прошивка считала наш роутер поддерживаемым. Этот bin файл нужно закинуть в ту же папку, куда распаковали tftpd64. Также необходимо переименовать файл в ArcherC6v2_tp_recovery.bin.
Запускаем tftpd64. Заходим в настройки и на вкладке GLOBAL отключаем всё кроме TFTP сервер.
На вкладке TFTP ставим TFTP Security на None, а в дополнительных настройках оставляем галочки только на Show Progress bar, Translate Unix file names, Bind TFTP to this address (здесь нужно будет выбрать IP 192.168.0.66).
Перезапускаем Tftpd64, в Server interfaces выставляем 192.168.0.66. Оставляем его включенным.
Первая прошивка через TFTP
Подключаем компьютер к роутеру напрямую в разъем LAN1 (в WAN работать не будет), если еще не подключили. Отключаем роутер (через кнопку сзади), на всякий случай вытаскиваем кабель питания на несколько секунд, и затем возвращаем обратно.
Затем зажимаем кнопку Reset и одновременно с этим включаем роутер. Далее кнопку включения можно отпустить, но Reset держим пока не загорится индикатор с WPS (обычно это секунды 3-4). После этого отпускаем Reset.
Если в Tftpd64 в этот момент появился лог, что был передан файл ArcherC6v2_tp_recovery.bin, то значит всё прошло успешно. Если нет, то пробуем повторять снова выключение и включение роутера с кнопкой Reset.
После того, как файл передан, ждем минуты 2, чтобы роутер закончил все процессы. В этот момент идем в настройки сетевого адаптера и возвращаем автоматическое назначение IP адреса.
Спустя пару минут идем в сведения о сетевом подключении, и смотрим IP адрес основного шлюза. У меня это был 192.168.1.1, но у вас может быть 192.168.0.1. Запоминаем адрес.
На данном этапе в роутере уже будет установлена OpenWrt, но так как по умолчанию в ней нету веб-интерфейса, вы не сможете зайти в админку, как делали это на стоковой прошивке. Перед этим нужно установить поверх еще одну прошивку с OpenWrt, где установлен веб-интерфейс LuCi.
Вторая прошивка через WinSCP
Скачиваем WinSCP отсюда. Он нужен для того, чтобы закинуть файл с прошивкой сразу в файловую систему роутера, и оттуда же запустить процесс установки прошивки.
Устанавливаем WinSCP, запускаем, и подключаемся к 192.168.1.1 (или к другому, если у вас основной шлюз отличался). В качестве логина и пароля будет root. File protocol указываем SCP.
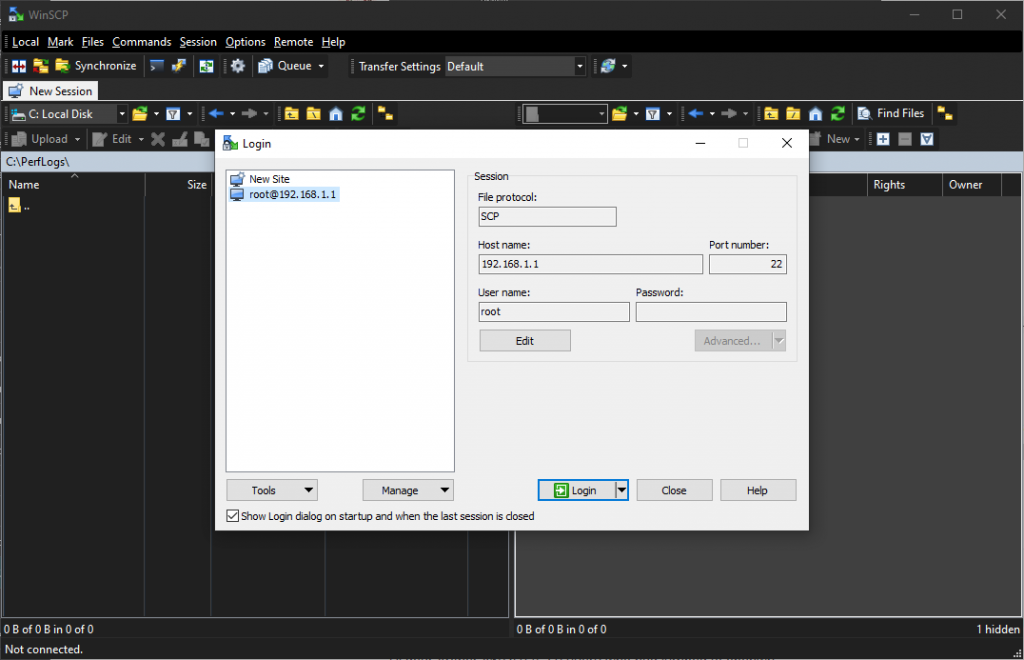
Когда подключились, выходим в корень файловой системы, и заходим в папку /tmp. Перекидываем туда файл с полной прошивкой, который можно взять здесь (из архива берем только файл openwrt-ath79-generic-tplink_archer-c6-v2-squashfs-sysupgrade.bin, его и кидаем на роутер).
Когда файл будет загружен, нам нужно открыть терминал в WinSCP через Commands -> Open Terminal, и выполнить в нём следующую команду:
mtd -r write /tmp/openwrt-ath79-generic-tplink_archer-c6-v2-squashfs-sysupgrade.bin firmwareПосле выполнения команды ждем минуты 2-3, и пробуем зайти в веб-интерфейс по адресу http://192.168.1.1 (опять же, подставить другой IP, если отличается). Если всё получилось, то вас встретит веб-интерфейс Luci.
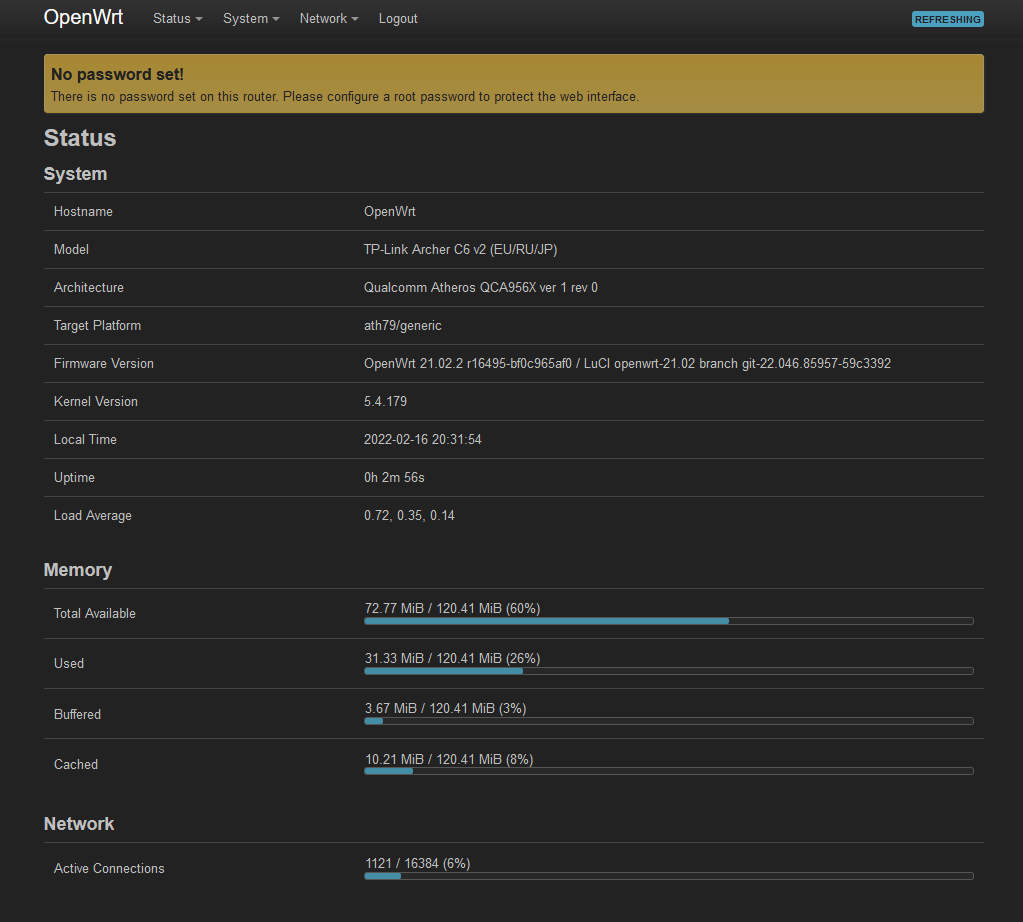
Вместо заключения
Готово, вы восхитительны!
С OpenWrt у роутера появляется гораздо больше функционала (установка блокировщика рекламы, VPN, ретрансляция и прочие крутые штуки). Но нужно быть аккуратным, так как OpenWrt не защитит вас от кривых настроек, и вполне можно что-то сломать вплоть до потери доступа к админке.
А если кто-то еще помнит с чего я начал запись, мне нужно было подключить роутер по Wi-Fi к уже существующей сети, и «раздать» с неё интернет по Ethernet кабелю. Собственно, с OpenWrt я смог решить данную задачу. Для тех, кому интересно, делал по этой инструкции.