
PFAFF
Hobby 350 • 382 • 422
Руководство по эксплуатации
Указания по технике безопасности при работе на бытовых швейных машинах согласно рекомендации МЭЕ 335-2-28
а) При работающей машине вследствие непрерывного движения иглы следует соблюдать особые меры предосторожности и постоянно следить за местом шитья
б) При оставлении машины без присмотра, при ремонте, при замене механических частей или принадлежностей следует отсоединять машину от сети путем извлечения сетевой вилки из розетки.
в) Максимально допустимая мощность осветительной лампы 15 Вт.
г) Регулировка натяжения приводного ремня может производиться только механиком фирмы „ПФАФФ».
Органы управления и основные узлы швейной машины

| 1 Нитепритягиватель | 15 Рычаг прижима ткани |
| 2 Нитенаправитель | 16 Регулятор натяжения моталки |
| 3 Ручка для переноса машины | 17 Установочное окошко образца стежков |
| 4 Моталка | 18 Кольцо выбора образца стежков |
| 5 Маховое колесо | 19 Штифт для насаживания катушки с нитками |
| 6 Расцепитель махового колеса | 20 Регулятор ширины зигзага с установочным окошком (модель 422) |
| 7 Клавиша шитья назад | 21 Крышка, за которой находится механизм челнока |
| 8 Главный выключатель | 22 Держатель лапки с лапкой |
| 9 Съемная часть платформы машины с коробкой для принадлежностей | 23 Крепежный винт держателя лапки |
| 10 Двигатель ткани | 24 Иглодержатель с крепежным винтом |
| 11 Игольная пластинка | 25 Стержень прижима ткани |
| 12 Нитеобрезатель | 26 Таблица образцов стежков |
| 13 Прорезь для проводки нитки | 27 Регулятор длины стежка |
| 14 Регулятор натяжения верхней нитки |
Приступая к работе
| Снять крышку чемодана-футляра, потянув ее вверх. | |
| Взявшись за ручку машины перенести ее на рабочее место. Повернуть вниз ручку для переноски машины. |
|
|
Электрическое присоединение: Установить ножной пускатель на пол. |
Подготовка шпульной нити.
| Подготовка шпульного колпачка: Для доступа к отсеку челночного устройства, захватить рукой снизу платформу швейной машины 9 и отвести влево ее съемную часть. |
|
|
Поворотом вниз (на себя) открыть крышку 21. |
|
|
Отвести в сторону защелку S и извлечь шпульный колпачок. Внимание. Пока защелка находится в отжатом состоянии шпулька не выпадет из шпульного колпачка. |
|
| Отпустить защелку S и вынуть шпульку из шпульного колпачка. | |
|
Насадить шпульку на шпиндель нитенамотчика (моталки). На шпинделе есть специальная пружина, которая должна попасть в прорезь на шпуле (шпульке). |
|
|
Для того, чтобы механизм намотки встал в рабочее положение, отжать шпульку вправо к упору S. |
|
|
Отключение швейного механизма или переключение машины на холостой ход: |
|
| Раздвинуть (поднять) катушкодержатель 19 и насадить на него катушку с нитками. |
Наматывание нитки на шпульку:

Нитку с катушки завести в регулятор натяжения моталки 16, провести к шпульке, пропустить через отверстие в стенке шпульки и удерживать кончик нитки в руке. Нажать на педаль ножного пускателя, после чего начнет вращаться шпиндель моталки. После намотки нескольких витков можно отпустить кончик нитки. Полностью намотанную шпульку отжать влево, снять со шпинделя и обрезать нитку.
|
Включение швейного механизма: |
|
|
Заправка шпульного колпачка: |
|
| Проверка натяжения нижней нитки: Рывками приподнимать шпульный колпачок за кончик нитки. При каждом рывке колпачок должен чуть — чуть опускаться. (При поворачивании винта S влево (против часовой стрелки) натяжение нитки уменьшается, при поворачивании вправо — увеличивается. |
|
| Установка шпульного колпачка: Отвести защелку Т и насадить колпачок на шпиндель U. Палец колпачка V должен зайти в вырез W. Внимание. Вставлять шпульный колпачок до щелчка. На шпинделе челнока есть проточка и защелка должна обязательно встать в эту проточку. |
Заправка верхней нити.
|
Заправка верхней нитки: |
|
|
Продеть кончик верхней нитки с передней стороны через ушко иглы. |
|
|
Придерживая верхнюю нитку, вращают маховое колесо на себя до тех пор, пока игла не выполнит один ход вниз и снова вверх. |
|
| Верхнюю и нижнюю нитки укладывают вправо (или влево) под лапку. | |
| Закрыть крышку 21. | |
| Машина имеет свободный рукав для обработки трубчатых (узких) швейных изделий. | |
| Надвинуть съемную часть платформы 9 (направляющие штифты должны войти в соответствующие отверстия). |
Начинаем шить.
|
Уложить материал под швейной лапкой. |
|
|
Опустить рычаг подъема швейной лапки 15. |
|
|
Запускаем машину в работу, нажав ногой на педаль пускателя. |
|
|
Завод — изготовитель выпускает машину с отрегулированным регулятором натяжения верхней нити. |
Важно знать!
Для получения при шитье хороших результатов необходимо:
1. Применять только исправные иглы.
2. Работать при правильно отрегулированном натяжении верхней и нижней ниток.
3. Соответствие игла — нить — материал обязательно.
Натяжение нижней нитки правильно отрегулировано на заводе-изготовителе. Если в результате проверки натяжения нижней нитки потребуется корректировка, то при ее выполнении разрешается поворачивать установочный (регулировочный) винт лишь на минимальную величину.
Проверка натяжения верхней нитки:
Нормальная установка регулятора соответствует диапазону 4-6.
Чем больше число, тем сильнее натяжение. Проверка натяжения производится при шитье широкой зигзагообразной строчкой. Переплетение ниток должно происходить в месте соприкасания сшиваемых тканей.
|
Удаление материала из под лапки. |
|
|
Нитеобрезатель 12. Вкладывают нитки в нитеобрезатель и тянут их вперед. Так же можно обрезать нить ножницами. |
|
|
Шитье назад: |
Управление машиной
Регулятор длины стежка 27:
| Требуемая длина стежка устанавливается в пределах от 0 до 4 мм по маркировочным отметкам. Диапазон, отмеченный значком между числами 0 и 1, применяется при обметывании пуговичных петель |


Установка образца строчки
Образец строчки выбирают из таблицы 26. Соответствующую ему букву (A-R) путем вращения кольца установки образца строчки 18 перевести в окошко 17 под меткой S. Относящиеся к этому образцу установки машины приводятся в окошке над буквой.
= образец строчки
= установка регулятора длины стежка
= установка регулятора зигзагообразной строчки
= швейная лапка
Таблица рабочих стежков.
| Символ | Строчка (стежок) | 350 | 382 | 422 | |
| A | Символы пуговичных петель | * | * | * | |
| B | Прямая строчка Среднее положение иглы |
* | * | * | |
| BC | Прямая строчка Левое положение иглы |
* | * | * | |
| D | Диапазон зигзагообразных строчек | * | * | * | |
| E | Эластичный шов | * | * | * | |
| F | Эластичный потайной стежок | * | * | * | |
| G | Узкий потайной стежок | * | * | * | |
| H | Фестончатый краеобметочный стежок | * | * | * | |
| J | Стачной стежок | * | * | * | |
| K | Эластичный декоративный стежок | * | |||
| N | Фасонный стежок | * | |||
| O | Фасонный стежок | * | |||
| P | Фасонный стежок | * | |||
| R | Фасонный стежок | * |
Шитье прямой строчкой
Модели 350 и 382:
Ручкой выбора образца строчки 18 перевести букву В или С под отметку S.
Длину стежка устанавливают ручкой регулятора длины стежка 27.
Модель 422:
Отметку В на ручке выбора образца строчки 18 переводят под метку S. После этого регулятором зигзагообразной строчки 20 переводят под установочную метку цифру „0″ для левого положения иглы или „5″ — для среднего положения иглы.
Растягивающаяся строчка (модели 382 и 422)
Для шитья изображенных в цвете растягивающихся строчек необходимо повернуть ручку регулятора длины стежка 27 таким образом, чтобы слово „Stretch» установилось под отметкой Т. В зависимости от вида ткани длину стежков растягивающейся строчки можно увеличить поворотом ручки в сторону „+» или уменьшить поворотом в сторону „-«.
Таблица растягивающихся строчек.
| Символ | Строчка (стежок) | 382 | 422 | |
| B | Прямая 3-кратная растягивающаяся строчка со средним положением иглы | * | * | |
| BС | Прямая 3-кратная растягивающаяся строчка с левым положением иглы | * | * | |
| D | Зигзагообразная 3-кратная растягивающаяся строчка | * | * | |
| E | Сотовый стежок | * | * | |
| F | Кромочная окантовочная строчка, широкая | * | * | |
| G | Кромочная окантовочная строчка, узкая | * | * | |
| H | Оверлочная строчка | * | * | |
| J | Пуловерная строчка | * | * | |
| K | Перообразный стежок | * | ||
| N | Эластичный декоративный стежок | * | ||
| O | Эластичный декоративный стежок | * | ||
| P | Эластичный декоративный стежок | * | ||
| R | Эластичный декоративный стежок | * |
Обслуживание машины.
|
Замена иглы (Система 130/705 Н): |
|
|
Перекрытие двигателя ткани: |
|
|
Замена швейной лапки: |
|
|
Установка швейной лапки: |
|
|
Лапкодержатель — устройство. |
Швейные лапки (стандартный комплект)
|
А нормальная лапка |
|
|
Ящик для принадлежностей: Открыть крышку платформы машины 9. Под ней находятся гнезда для размещения принадлежностей. |
Шитье зигзагообразной строчкой
|
Модели 350 и 382 (рис. U): |
|
|
Модель 422 (рис. V): |
Выстегивание
Швейная лапка: нормальная лапка А или прозрачная лапка В и направляющая линейка (специальные принадлежности)
Стежок: прямая строчка В
Направляющую линейку S можно использовать почти со всеми лапками.
Крепление линейки (специальные принадлежности):
Линейку S вставить в отверстие Т и закрепить винтом U. В зависимости от целей применения линейку можно устанавливать на требуемом расстоянии от лапки.
Использование направляющей линейки облегчает прокладывание параллельных или окантовочных простегивающих строчек. При этом линейку направляют вдоль кромки материала (рис. V) или ранее проложенной строчки (рис. W). Благодаря этому швы получаются равномерными и аккуратными.
Эластичный потайной стежок:
Швейная лапка: лапка потайного стежка G
Натяжение ниток: натяжение верхней нитки несколько ослабляют
Нитки: обычные швейные нитки
Стежок: эластичный потайной стежок F
Длина стежка: 3-4
Игла: № 70 или 80
Регулировка места прокалывания иглой ткани
Подготовленную кромку материала уложить под лапку потайного стежка таким образом, чтобы место изгиба верхнего слоя прилегало к упору Т лапки потайного стежка. Установочным винтом S сместить упор Т влево настолько, чтобы игла при левом проколе захватывала верхний слой только одной ниткой (рис. U и V). Выполните вначале пробный шов на остаточном куске ткани.
Выметывание петель
Швейная лапка: прозрачная лапка В
Натяжение ниток: слегка ослабить натяжение верхней нитки
Нитки: тонкие нитки для машинной вышивки
Длина стежка: регулятор установить в диапазоне стежков для выметывания петель
Игла: №70-80
1. Кольцо выбора образца стежка 18 установить на отметку А1 и выметать первый бок петли. Перевести иглу в верхнее положение.
2. Кольцо выбора образца стежка 18 установить на отметку 2А4 и прошить 4-6 закрепочных стежков. Перевести иглу в верхнее положение.
3. Кольцо выбора образца стежка 18 установить на отметку A3 и выметать второй бок петли с такой же длиной, как и первый.
Перевести иглу в верхнее положение.
4. Кольцо выбора образца стежка 18 установить на отметку 2А4 и прошить 4-6 закрепочных стежков. Перевести иглу в верхнее положение.
5. Кольцо выбора образца стежка 18 в моделях 350, 382 установить на отметку С, а в модели 422 на отметку В.
В модели 422 дополнительно установить ручку регулятора зигзагообразной строчки 20 на отметку 0. Затем выполнить несколько закрепляющих стежков.
6. Выметанную петлю осторожно прорезать ножом-вспарывателем (специальные принадлежности).
Пришивание пуговиц
Швейная лапка: без лапки или прозрачная лапка В
Образец стежка: С в моделях 350 и 382 D в модели 422
Двигатель ткани: перекрыт вышивальной пластинкой
Нитки: тонкие швейные нитки
Уложить пуговицу на заранее отмеченное место, передвинуть ее под лапко-держатель и опустить его в моделях 350 и 382 кольцо выбора образца стежков 18 устанавливают на отметку „С», а в модели 422 — на отметку „D». В модели 422 дополнительно перестанавливают регулятор зигзагообразной строчки 20 на отметку „0″. После этого опускают иглу в левое отверстие пуговицы, поднимают иглу в верхнее положение и снова опускают (не до конца). Затем в моделях 350/382 с помощью кольца выбора образца стежков 18, а в модели 422 с помощью регулятора зигзагообразной строчки 20 перемещают иглу до тех пор, пока она не станет входить в правое отверстие пуговицы. Теперь выполняют 6-8 перекрывающих и несколько строчечных стежков в левом отверстии пуговицы (рис. S).
Пришивание пуговиц со стойкой (для крупных пуговиц и толстой ткани). Опустить иглу в левое отверстие пуговицы. Подложить под лапку спичку посредине пуговицы. Опустить лапку (рис Т). Прошить несколько перекрывающих стежков и оставить кончики ниток длиной около 15 см. Продеть верхнюю и нижнюю нитки через отверстие пуговицы (рис. U). Обмотать нитки вокруг стойки и завязать их узлом (рис. V).
Вшивание застежки молния
Швейная лапка: лапка для вшивания молнии Е
Длина стежка: 2-3
Стежок: прямая строчка, среднее положение стежка
Нитки: швейные нитки
Закрепление лапки для вшивания молнии: Лапку навесить задним поперечным стерженьком на хвостовик держателя W и отжать салазки лапку вверх, чтобы произошла фиксация переднего стерженька X. Лапку можно перемещать в поперечном направлении в правое, левое (рис. S) или среднее положение.
Потайное вшивание молнии:
Приметать молнию. Лапку сместить до отказа влево. Раскрытую молнию уложить под лапку таким образом, чтобы зубчики застежки могли перемещаться вдоль правого направляющего выступа салазок лапки (рис. Т). Проложить отстрачивающую строчку на желаемой ширине примерно до половины длины застежки. Оставив иглу в ткани, поднять лапку и закрыть застежку (рис. U). Опустить лапку, продолжить шов до конца застежки и прострочить поперечный шов. Вторую половину застежки пристрочить параллельной строчкой на том же расстоянии. На небольшом расстоянии от конца застежки оставить иглу в ткани, поднять лапку и раскрыть молнию (рис. V).
Опустить лапку и прошить шов до конца.
Втачивание молнии в шов
Застежку молния подготавливают и укладывают следующим образом: Отутюживают края разреза. Левый отворот отгибают наружу (рис. S). Накладывают левую часть раскрытой застежки (рис. Т). Зубчики молнии должны немного выступать за линию отутюженного сгиба. Строчечный стежок прокладывают по отутюженному отвороту края ткани. Швейную лапку сдвигают в среднее положение, так чтобы игла входила в среднее отверстие лапки. Зубчики молнии должны проходить по левой направляющей канавке салазок лапки (рис. U). Перед началом шитья следует выровнять зубчики молнии для их беспрепятственного прохождения по направляющей канавке. Прокладывают строчку до конца застежки и закрепляют. Застегивают молнию. Вторую сторону застежки закрепляют булавкой в начале шва (рис. V) и раскрывают молнию. Вынув скрепляющую булавку, отгибают наружу правый отворот разреза вместе с лентой застежки и, как показано на рис. W, закрепить ее булавкой. Зубчики молнии должны теперь проходить по правой направляющей канавке лапки (рис. X). Пришивают вторую половину застежки. Затем прострачивают ленту молнии, отступив на ширину лапки. Зубчики молнии теперь проходят вдоль направляющего выступа лапки (рис. Y).
Вшивание молнии в дамские брюки
Лапку для вшивания молнии сдвинуть до отказа влево.
Отутюжить края разреза. Застегнутую молнию прикрепить булавками под правым отутюженным краем разреза таким образом, чтобы были еще видны зубчики. Приметать подготовленную планку откоса V и прошивать ее вместе с лентой молнии. Зубчики молнии должны проходить вдоль правого направляющего выступа лапки (рис S). Не доведя строчку до конца, оставить иглу в ткани, поднять лапку и раскрыть молнию. Опустить лапку и закончить строчку. Застегнуть молнию. Выступающий край разреза приметать по линии шва. Левую сторону молнии прикрепить булавками (рис. Т). Расстегнуть молнию. Закрепить направляющую линейку и установить ширину отстрачивания таким образом, чтобы направляющая часть линейки проходила по кромке материала (рис. U). Не доведя строчку до конца, оставить иглу в ткани, поднять лапку и застегнуть молнию.
Опустить лапку и закончить строчку. Конец шва закрепить несколькими закрепочными стежками.
Штопка
Подготовка машины:
Швейная лапка: штопальная лапка (специальные принадлежности)
Стежок: прямая строчка среднее положение иглы
Натяжение верхней нитки: несколько ослаблено
Нитки: тонкие нитки для машинного шитья
Игла: № 70
Двигатель ткани: перекрыт штопальной пластинкой
Закрепление штопальной лапки на машине: Снять держатель швейной лапки, винтом закрепить штопальную лапку. При этом следует обратить внимание на то, что хомутик Т, должен опираться на держатель винта S. Вытянуть вверх нижнюю нитку. Начиная штопку, нужно удерживать обе нитки. Вначале делают несколько стежков на здоровой ткани. Натяните обе нитки и проштопайте поврежденное место (см. рис. V). В конце каждой строчки выполняйте закругление (рис. V). Как только поврежденное место будет полностью покрыто, материал поворачивают на 90° и начинают шить поперечные строчки, пока не будет покрыто все поврежденное место (рис. W). При штопке Вы сами определяете длину стежка, перемещая материал вперед и назад.
Чистка и смазка
Извлеките сетевую вилку из розетки. Переведите иглу и лапку в верхнее положение. Выверните оба крепежных винта и снимите игольную пластинку. Щеткой-кисточкой прочистите детали двигателя ткани. Отведите в сторону оба фиксатора челнока S. Извлеките гнездо механизма челнока Т и сам челнок U. Прочистите желобок подшипника челнока. Время от времени подавайте в желобок подшипника по капле масла.
Осторожно! Нельзя ронять челнок на пол.
Замена осветительной лампы
|
Извлеките сетевую вилку из розетки. Отожмите лампу вверх, поверните ее в направлении S и выньте из патрона. Новую лампу вставьте таким образом, чтобы направляющие штырьки вошли в прорези U. Лампу отожмите вверх и поверните в сторону Т. |
Таблицу игл, применяемых на этой машине можно посмотреть здесь.
Неполадки и их устранение
|
Причины: |
Устранение: |
|
1. Распускается строчка |
|
|
Неправильно установлена игла. |
Игла должна быть вставлена в иглодержатель до упора. Лыска на стержне иглы должна быть направлена назад. |
|
Неправильно выбрана игла. |
Следует применять иглы системы 130/705 Н |
|
Игла изогнута или затуплена. |
Вставить новую иглу. |
|
Машина неправильно заправлена нитками. |
Проверить пути проводки ниток. |
|
Игла слишком тонкая для данной ткани. |
Применить более толстую иглу. |
|
2. Обрыв верхней нитки |
|
|
По указанным выше причинам. |
См. п. 1. |
|
При слишком сильном натяжении нитки. |
Отрегулировать натяжение нитки. |
|
При использовании низкокачественных или узловатых ниток или ниток, которые из-за длительного хранения стали излишне сухими. |
Применять только хорошие нитки. |
|
3. Поломка иглы |
|
|
Игла вставлена в иглодержатель не до упора. |
См. п. 1. |
|
Игла изогнута. |
Установить новую иглу. |
|
Игла слишком тонкая или слишком толстая. |
Руководствоваться „Таблицей игл». |
|
При подтягивании или подталкивании ткани игла изгибается и попадает в отверстие игольной пластинки. |
Ткань должна перемещаться машиной. Руками можно лишь слегка направлять движение ткани. |
|
4. Неравномерный шов |
|
|
Несоответствующее натяжение ниток. |
Проверить натяжение верхней и нижней ниток. |
|
Слишком толстая, узловатая или жесткая нитка. |
Применять только нитки надлежащего качества. |
|
Неравномерная намотка нитки на шпульку. |
При наматывании нитки на шпульку пользоваться регулятором натяжения моталки. |
|
Вязка стежка происходит на нижней или на верхней поверхности сшиваемых тканей. |
Правильно заправить нитками машину. Проверить натяжение ниток. |
|
5. Двигатель ткани не перемещает ее или перемещает неравномерно |
|
|
Между зубчатыми рейками двигателя ткани запрессовалась волокнистая пыль. |
Снять игольную пластинку и щеткой — кисточкой прочистить двигатель ткани |
|
6. Тяжелый ход машины |
|
|
В желобке подшипника челнока находятся обрезки ниток. |
Удалить нитки и капнуть одну каплю масла |
|
7. Важные указания |
|
|
Заправленную нитками машину не пускать в ход без подложенной ткани. При оставлении машины без присмотра, даже на короткое время, вынимать сетевую вилку из розетки. Это особенно важно, если поблизости находятся дети. |
Дополнительные принадлежности.
|
Принадлежности |
Номер заказа |
Назначение |
|
Лапка для аппликаций |
93-035920-91 |
Для нашивки аппликаций |
|
Устройство для обтачивания тесьмой (при снятом держателе лапки) |
98-053484-91 |
Для обтачивания кромок тесьмой |
|
Лапка для выпушки, 5-желобковая (сдвоенные иглы с промежутком 1,8-2,5 мм) |
93-035 950-91 |
Для вшивания выпушки (номер иглы 80), |
|
Лапка для выпушки, 7-желобковая (сдвоенные иглы с промежутком 1,4-1,8 мм) |
93-035 953-91 |
для тонкой выпушки (номер иглы 70) |
|
Лапка для бахромы |
93-035 943-91 |
Для выполнения бахромы и копировальных стежков |
|
Линейка-направитель |
98-802422-00 |
Для прокладки простегивающих строчек |
|
Лапка запошиватель, 4,5 мм |
93-035 946-91 |
Для запошивочных швов |
|
Лапка запошиватель, 6,5 мм |
93-035948-91 |
|
|
Лапка для петель |
98-694411-00 |
Для выметывания петель |
|
Лапка для собирания сборок |
93-035998-91 |
Для отделки воланов и т.п. |
|
Лапка для шнура |
93-035915-91 |
Для швов с вкладным шнуром |
|
Оверлочная лапка |
98-620404-00 |
Для обметывания обрезных краев и для одновременного сшивания и обметывания краев эластичных тканей |
|
Лапка полевого краеобметочного шва, 2 мм |
98-694804-00 |
Для обметывания краев зигзагообразной строчкой |
|
Подрубочная лапка, 3 мм |
98-694401-00 |
Для подрубки краев |
|
Штопальная лапка (при снятом держателе лапки) |
93-106103-91 |
Для штопки и штопки шерстью |
|
Тефлоновая лапка |
98-694 801-00 |
Для сшивания синтетических тканей |
|
Лапка для декоративных строчек |
98-694879-00 |
Для выполнения декоративных строчек |
Owner’s manual
Manuel d’utilisation
Gebrauchsanleitung
Manuale d’istruzioni
Handleiding
hobby™ 350 p
punching machine


English ……………………………………………………………….. 2-11
French ………………………………………………………………..12-21
German ……………………………………………………………..22-31
Italian …………………………………………………………………32-41
Dutch …………………………………………………………………42-51

This household sewing machine is designed to comply with IEC/EN 60335-2-28 and UL1594
IMPOR TANT SAFETY INSTRUCTIONS
When using an electrical appliance, basic safety precautions should always be followed, including
the following:
Read all instructions before using this household sewing machine.
DANGER — To reduce the risk of electric
shock:
• A sewing machine should never be left unattended when plugged in. Always unplug this
sewing machine from the electric outlet immediately after using and before cleaning.
• Always unplug before relamping. Replace bulb with same type rated 15 Watt.
WARNING — To reduce the risk of burns,
fi re, electric shock, or injury to persons:
• Do not allow to be used as a toy. Close attention is necessary when this sewing machine is
used by or near children and infi rm persons.
• Use this sewing machine only for its intended use as described in this manual. Use only
attachments recommended by the manufacturer as contained in this manual.
• Never operate this sewing machine if it has a damaged cord or plug, if it is not working
properly, if it has been dropped or damaged, or dropped into water. Return the sewing
machine to the nearest authorized dealer or service center for examination, repair, electrical or
mechanical adjustment.
• Never operate the sewing machine with any air openings blocked. Keep ventilation openings
of the sewing machine and foot controller free from the accumulation of lint, dust, and loose
cloth.
• Keep fi ngers away from all moving parts. Special care is required around the sewing machine
needle.
• Always use the proper needle plate. The wrong plate can cause the needle to break.
• Do not use bent needles.
• Do not pull or push fabric while stitching. It may defl ect the needle causing it to break.
• Switch the sewing machine off (“0”) when making any adjustment in the needle area, such as
threading needle, changing needle, threading bobbin, or changing presser foot, etc.
• Always unplug sewing machine from the electrical outlet when removing covers, lubricating,
or when making any other user servicing adjustments mentioned in the instruction manual.
• Never drop or insert any object into any opening.
• Do not use outdoors.
• Do not operate where aerosol (spray) products are being used or where oxygen is being
administrated.
• To disconnect, turn all controls to the off (“0”) position, then remove plug from outlet.
• Do not unplug by pulling on cord. To unplug, grasp the plug, not the cord.
• The sound pressure level under normal operating conditions is 70dB(A).
SAVE THESE INSTRUCTIONS
2
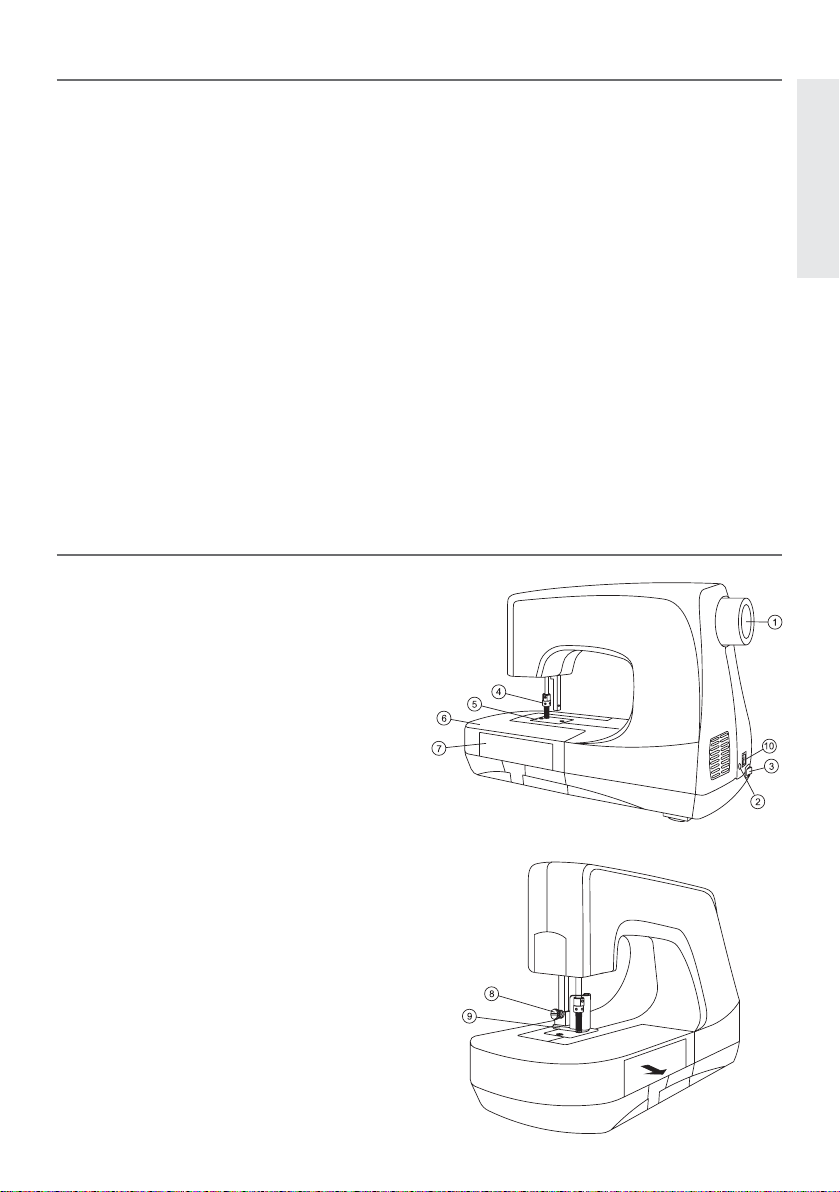
Table of Contents
Table of Contents ……………………………………3
Overview of the machine ………………………..3
Accessories ………………………………………………4
Setting Up ………………………………………………..4
Attaching the power cord and foot control 4
Machine speed ………………………………………..4
For the USA and Canada …………………………4
Cloth Presser ……………………………………………5
Getting Started ………………………………………..6
Fabric and trims that can be used …………….6
Laundering embellished projects ……………..6
Overview of the machine
1. Handwheel
2. Socket for foot control
3. Power switch
4. Needle clamp holder
5. Needle plate
6. Flat Bed Extension
7. Accessory storage
8. Cloth presser height adjusting screw
9. Clear fabric cover with needle guard
Connection socket
10.
NOTE: Laundering rules of
“pre-washing”: …………………………………………6
Start Embellishing ……………………………………7
Flat Bed Extension / Free Arm……………….8
Accessory Storage ……………………………………8
Maintenance …………………………………………….9
Changing the needle(s) ……………………………9
Replacing the light bulb………………………….10
Cleaning the lint box ………………………………10
Trouble Shooting …………………………………..11
Needle bent or Needle breakage …………..11
Specifi cations …………………………………………11
English
3
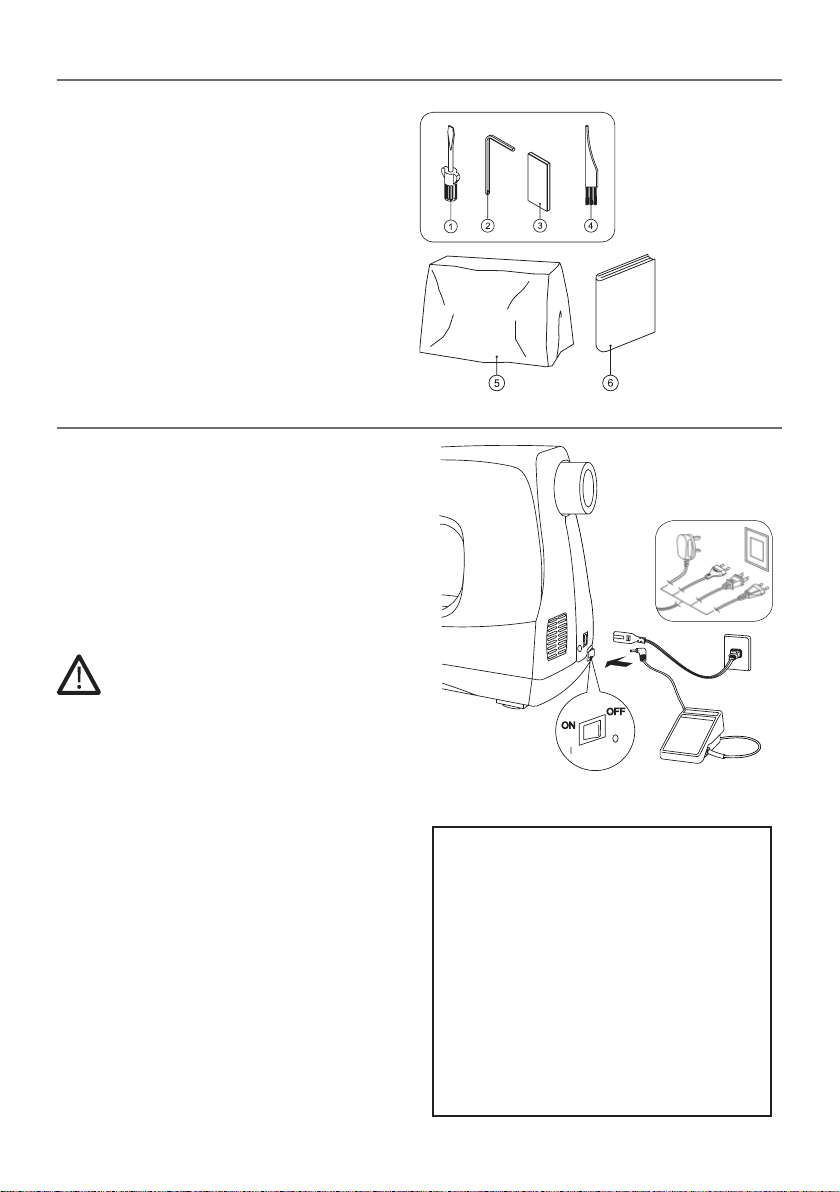
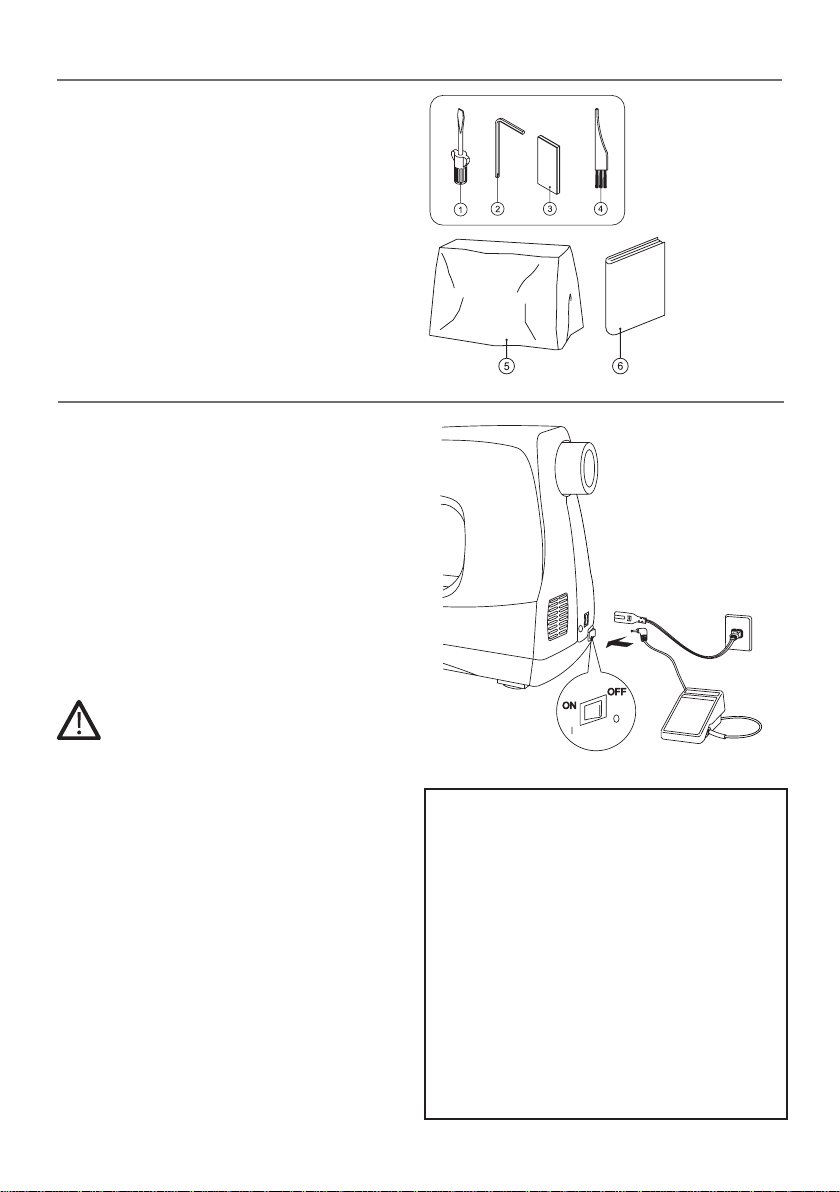
Accessories
1. Screwdriver
2. 1,5 mm Allen wrench
3. Needles
4. Cleaning brush
5. Machine cover
6. Instruction book
Setting Up
Attaching the power cord and
foot control
Plug the power cord into machine socket,
then into a wall outlet. Always make sure the
power is OFF and remove the plug from the
wall outlet when the machine is not in use,
or when making any adjustments such as
changing needles or light bulb.
Note: Before plugging in, check to ensure that
the foot control is of type “4C-337G” or
“C-9000”.
Machine speed
The machine speed is adjusted by increasing
or decreasing the pressure on the foot
control.
When not in use, do not place anything on
the foot control to prevent damage to the
foot control or motor.
4
For the USA and Canada
This sewing machine has a polarized
plug (one blade wider than the other).
To reduce the risk of electric shock,
this plug is intended to fi t in a polarized
outlet only one way. If the plug does not
fi t fully in the outlet, reverse the plug.
If it still does not fi t, contact a qualifi ed
electrician to install the proper outlet.
Do not modify the plug in any way.
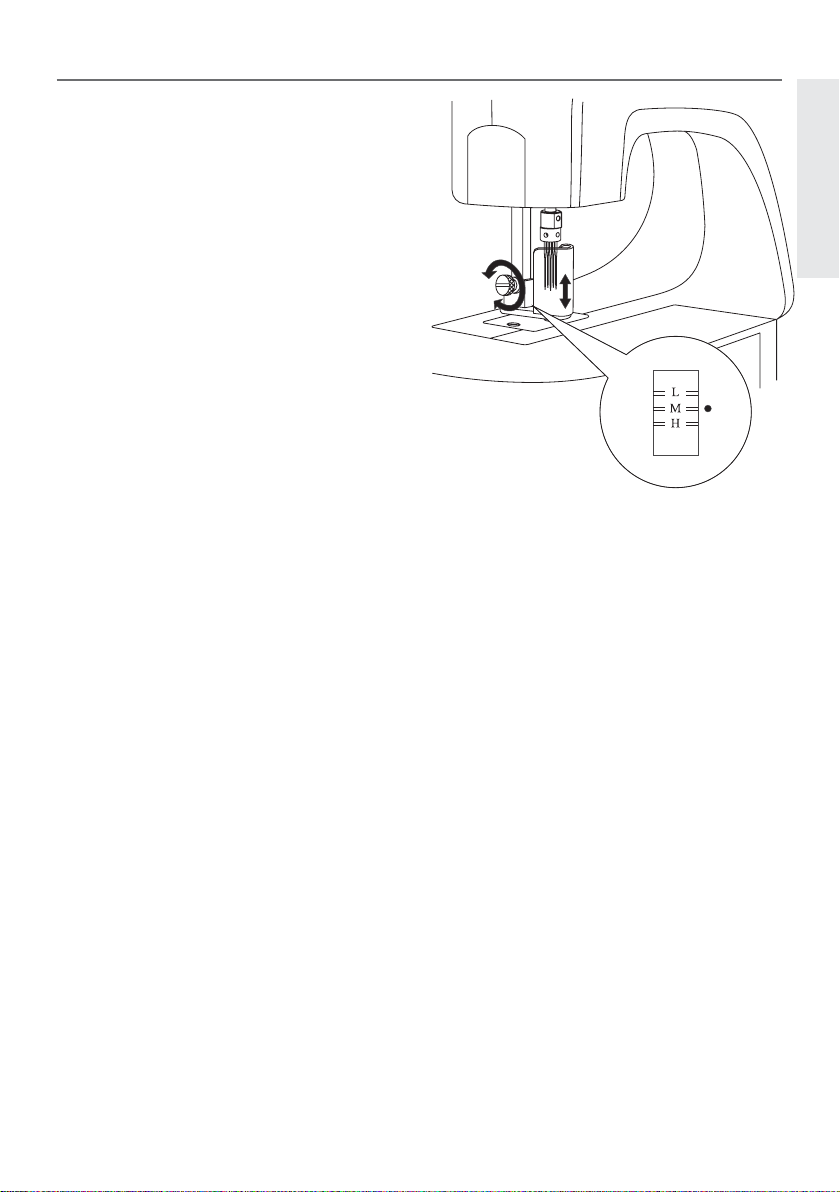
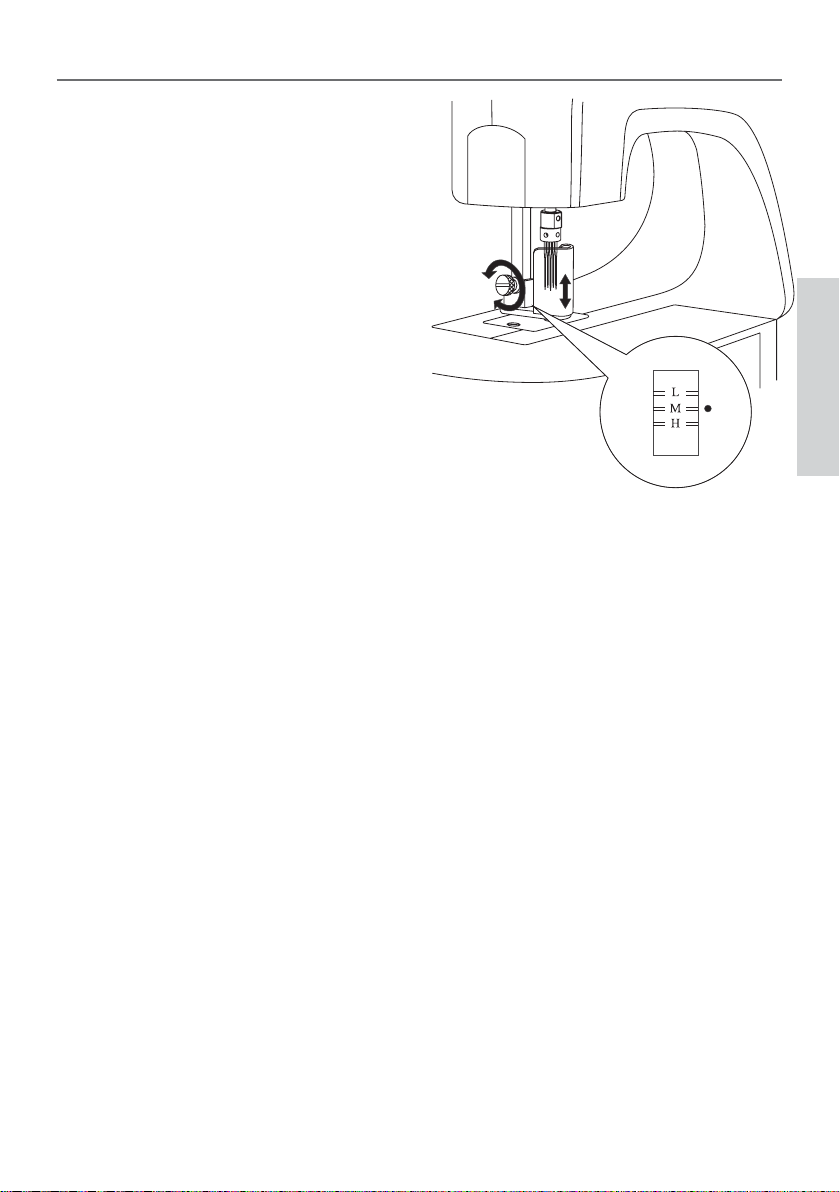
Cloth Presser
The cloth presser is to prevent cloth/fabric/
materials from lifting during the felting
process.
1. Place the cloth/fabric/materials on the
needle plate and under the cloth presser.
2. Loosen the cloth presser height adjusting
screw to adjust the height of the cloth
presser.
3. Move the clear fabric cover with needle
guard up or down until the red indicator
on the presser bar aligns with the correct
height for the thickness of your fabric
and felting material.
L= low position for thin or medium fabrics.
M= medium position for medium weight
fabrics.
H= high position for heavy or thick fabrics.
4. Tighten the clear fabric cover height
adjusting screw.
Note: The fabric and felting material must move
freely under the clear fabric cover with needle guard
without any restrictions.
English
5

Getting Started
Let your creativity soar with this needle felting machine! Now you can make your projects
even more creative. Let your imagination soar to create beautiful felted embellishment on
your garments, arts and crafts, home decorating, quilting, sewing, scrap booking and much
more.
Fabric and trims that can be used
Just about any fabric can be felted with the needle felting machine, however, some fabrics
tend to have more favorable results when embellishing or laundering afterward.
The recommended fabrics and trims are those made from natural fi bers, such as linen, wool,
wool roving, and wool, silk or cotton yarns. The best characteristic for fabrics is a napped or
textured surface.
A napped surface will adhere to a natural fi ber/napped surface/or mixed fi ber base.
Avoid synthetics with “wash and wear” type of weaves and fi nishes that have a smooth
surface.
Laundering embellished projects
To determine if your embellished project is washable, it is recommended that you do a test
sample fi rst from the fabrics you intend to use. Wash the fi nished sample the same way you
will wash it after the project is completed.
For example, if you plan on washing the completed project with a load of jeans and then put
it into the dryer, then do so with the sample. Do not “pamper” unless you plan on pampering
the fi nished project.
NOTE: Laundering rules of “pre-washing”:
Pre-washing all fabrics before sewing does not apply. With the needle felting machine, you
want thefi nished project to “shrink” so the felted fi bers will stay meshed. With this in mind,
be sure to make the project a little large, since the main fabric is a natural fi ber, to allow for
shrinkage.
Because of not pre-washing fi bers before embellishing, color fading can occur when working
with bright and contrasting colors. Be sure to make a test sample and wash it for best results.
6
Start Embellishing
Layer the project fabric with the material
that will be felted together to create the
embellishment. Make sure that the smaller
piece to be felted is on the correct side of
the project (right or wrong side).
The embellishing fabric can be put on either
the right or the wrong side of the project.
Experiment fi rst on scraps to see which look
you like best for your project.
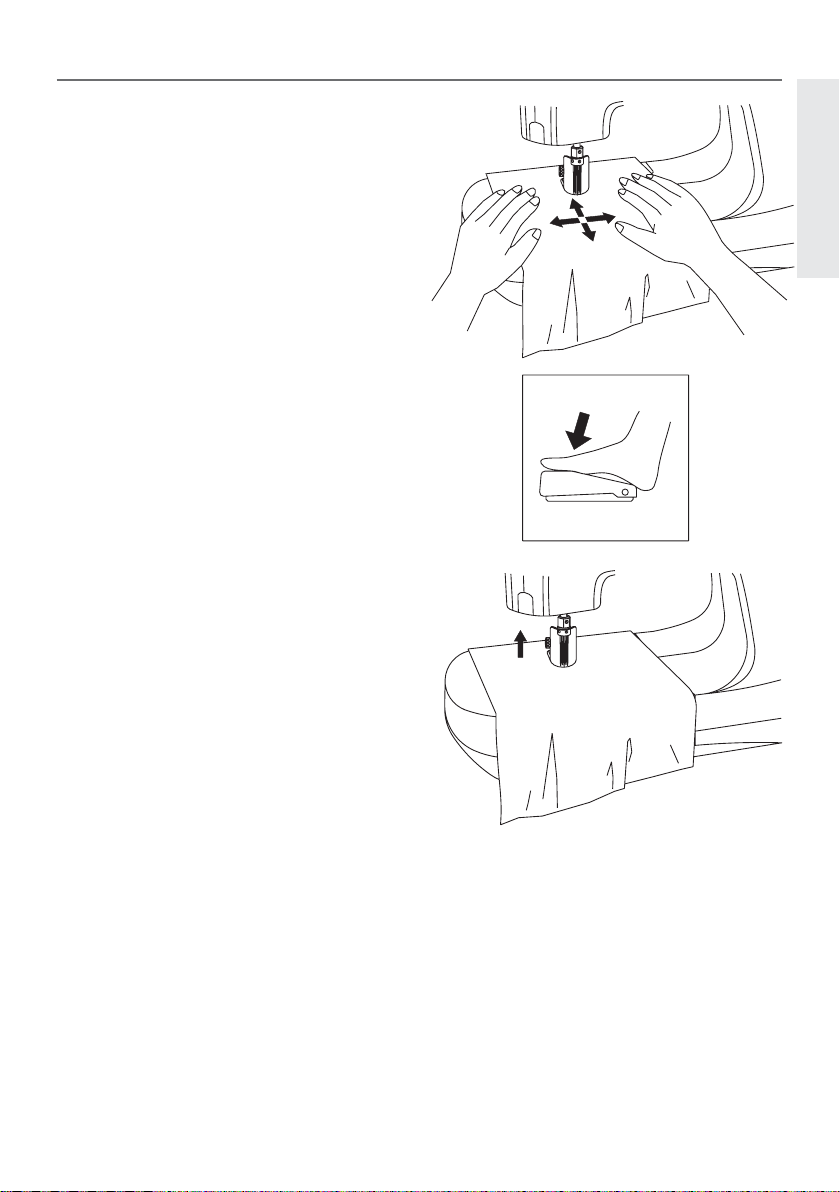
Place the layers to be felted together under
the clear fabric cover with needle guard.
Adjust the height if you need to at this time
so the project can move freely under the
clear fabric cover with needle guard
(see page 3).
Move the fabric in any direction so the
needles can mesh the layers together.
When you have fi nished embellishing the
needle stop position will automatically be up
and out of the project. Because the needles
always stop in the highest up position, your
projects are very easy to place into the felting
area and very easy to remove. You will never
break needles placing or removing your
project.
English
7
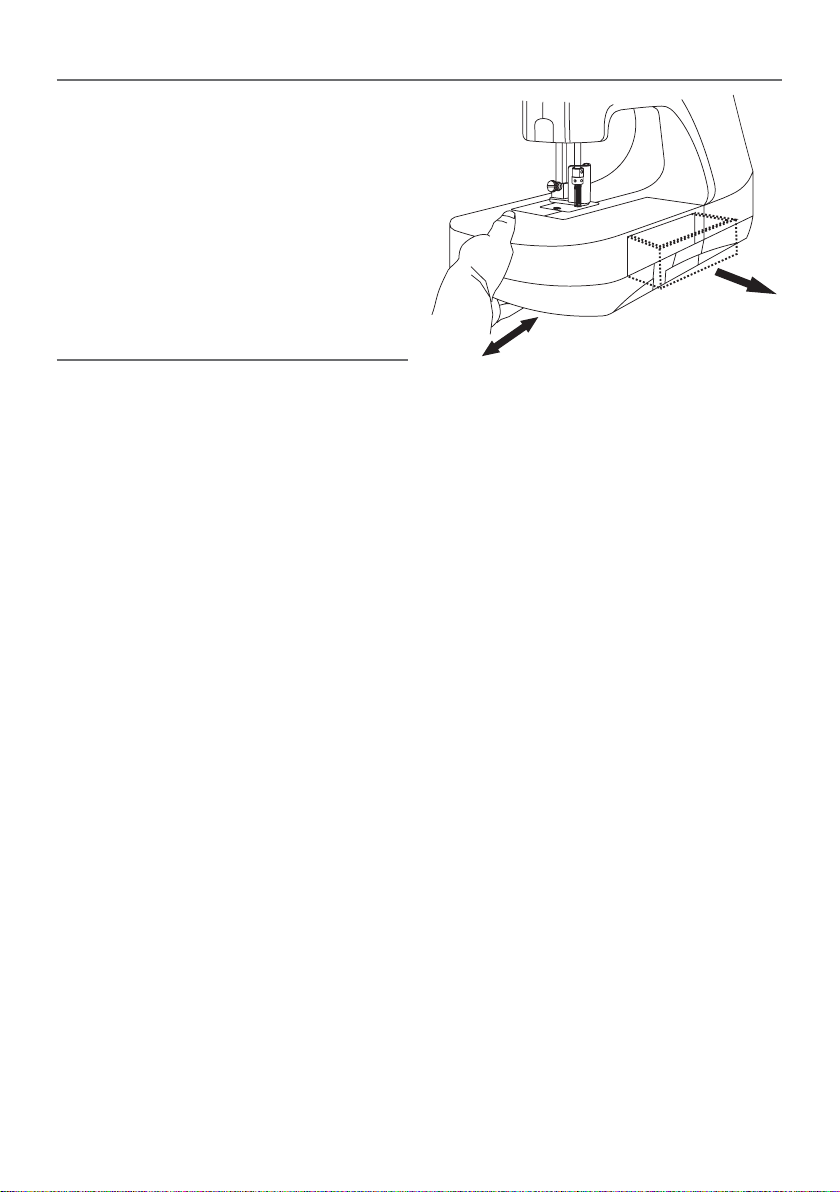
Flat Bed Extension / Free Arm
Remove the fl at bed extension by sliding it
to the left and the machine will convert to
a free arm. This will allow you to embellish
sleeves, pant legs, and small areas that are
sewn in the round. This will also give you
access to the free arm door to clean out the
lint that has accumulated from felting.
Accessory Storage
Open the accessory storage compartment by
pulling the drawer forward.
8
Maintenance
Changing the needle(s)
Use #S1037 needles for the needle felting
machine. Do not use any other type of
needles.
Note: #S1037 needle is a very special needle and
is exclusive for the needle felting machine. Purchase
these needles at the same authorized dealer where you
purchased your machine.
When you change needle(s), unplug the
power cord from the wall outlet.
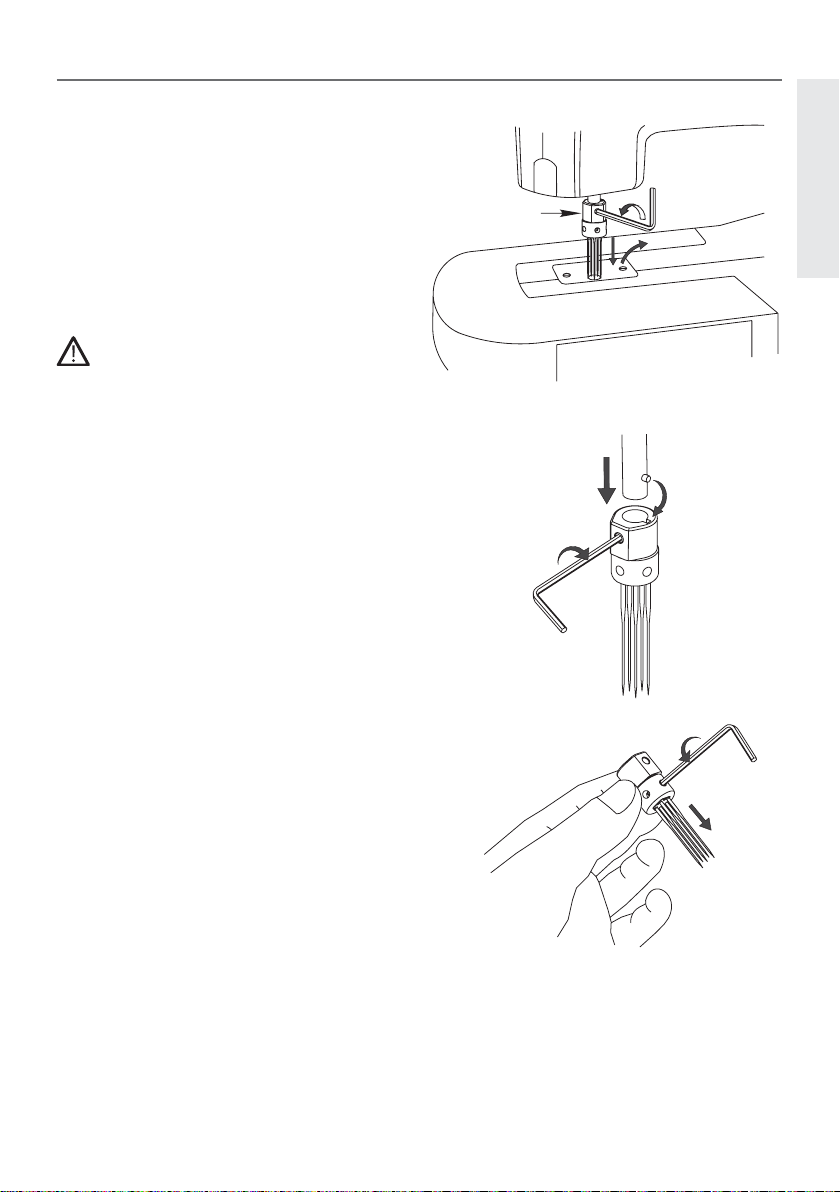
1. Turn the handwheel until the needle bar
is at the highest position.
2. Remove the presser height adjusting
screw and carefully remove the clear
fabric cover with needle guard, from the
machine.
3. Loosen the front needle clamp holder
fi xing screw by turning the 1.5mm Allen
wrench counter-clockwise.
4. Hold the needle clamp, lower it slowly
and remove it from the needle bar.
5. To remove the individual outer needles,
loosen the needle fi xing screw on the
needle clamp by turning the 1.5mm Allen
wrench counter-clockwise and remove
the needle(s). Insert the new needle(s)
until the top of the needle touches the
top of the needle hole. Tighten the
needle fi xing screw with 1.5mm hexagon
wrench by turning the Allen wrench
clockwise.
Note: #S1037 needles do not have a front or back,
therefore, you can insert the needle in any direction.
English
9
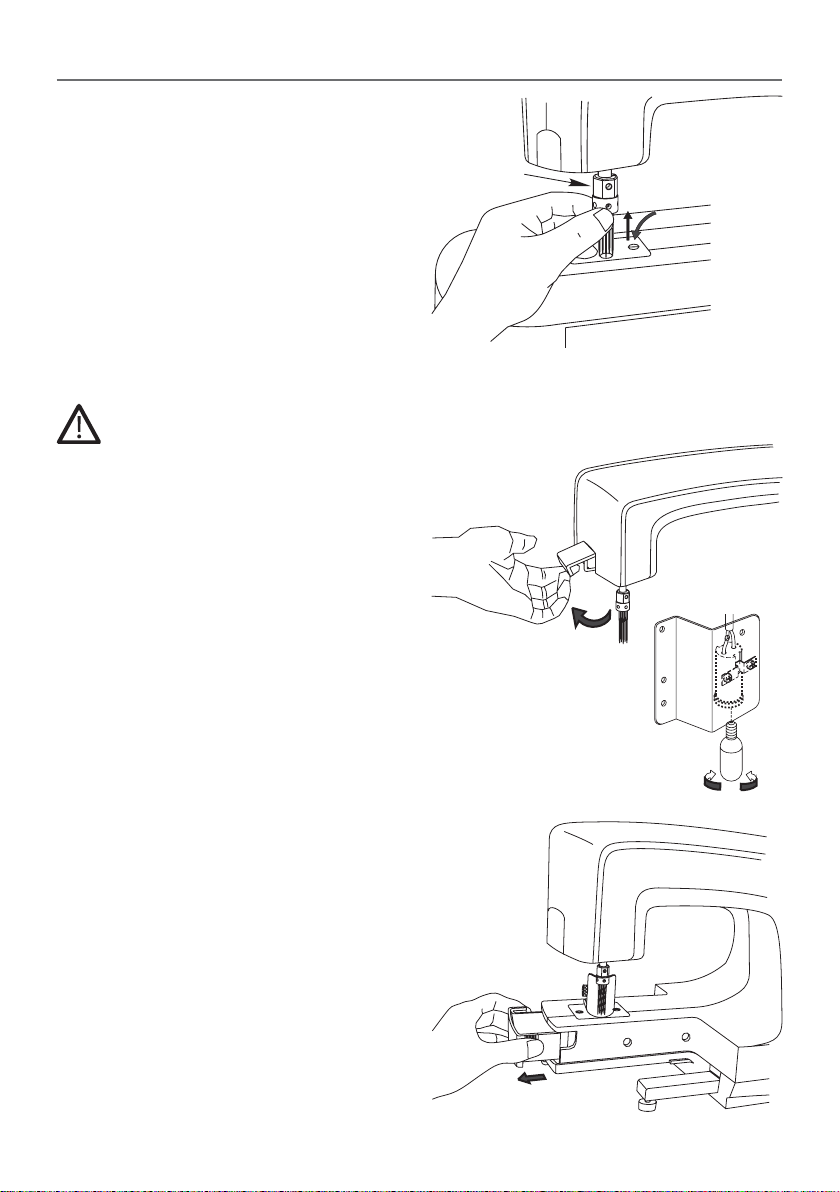
6. When replacing the needle clamp, make
sure the needle bar is in its highest
position. Insert the needle clamp into
the needlebar, rotate and lightly push
upward till the pin seats into the needle
bar. Tighten the needle clamp screw
clockwise with 1.5mm Allen wrench.
Note: Replace the clear fabric cover with needle guard
and presser height adjusting screw before continuing
to use the machine.
Replacing the light bulb
For safety reasons, unplug main power
cord prior to replacing light bulb.
1. Make sure that the light bulb is
completely cool before removing it from
the machine.
2. Open lamp cover.
3. Remove the light bulb and replace new
one with the same type rated, MAX 15W.
Groove
(inside
holder)
Cleaning the lint box
Slide the fl atbed extension to the left to
remove it from the machine. Grasp the lint
box by the ridged fi nger grips in the front
and back and pull to the left to slide the lint
box off the machine.
Clean the lint out after each project.
An accumulation of lint in the box or under
the stitch plate may cause needle breakage.
Slide the lint box back into the machine.
10

Trouble Shooting
Needle bent or Needle breakage
1. Are you moving the materials too quickly?
2. Are the needles touching the cloth presser or needle plate?
3. Is there dust or lint around the edge of the needles, cloth presser,or in the holes of the
needle plate?
4. Does the lint box area need to be cleaned?
For problems other than bent needles or needle breakage, please contact your retailer.
Specifi cations
Needle: #S1037
Number of needles: 5
Needle Clamp: Round type
Feeding: Manual
Light bulb: MAX 15 W
Measurement: 435mm x 189mm x 292mm
Weight: 5.6 kg
English
We reserve the right to change the machine equipment and the ass ort ment of accessories
without prior notice, or make modifi cations to the performance or design.
Such modifi cations, however, will always be to the benefi t of the user and the product.
Non-original Parts and Accessories
The warranty does not cover any defect or damage caused by use of non-original
accessories or parts.
Please note that on disposal, this product must be safely recycled
in accordance with relevant National legislation relating to
electrical/electronic products. If in doubt please contact your
retailer for guidance.
11

Cette machine à coudre à usage familial est conçue pour répondre aux normes EC/EN 60335-2-28 et
UL1594
CONSIGNES DE SÉCURITÉ
IMPORTANTES
Lors de l’utilisation d’un appareil électrique, les précautions de sécurité essentielles doivent toujours être
respectées, y compris les suivantes :
Lisez attentivement toutes les instructions avant d’utiliser cette machine à coudre à usage domestique.
DANGER — Pour éviter tout risque d’électrocution :
• Une machine à coudre branchée ne doit jamais être laissée sans surveillance. Débranchez toujours la
machine du réseau électrique immédiatement après usage et avant de la nettoyer.
• Débranchez-la toujours avant de changer une ampoule. R emplacez l’ampoule par une ampoule de
même type et de même puissance (15 W atts).
DANGER — Pour éviter tout risque de brûlure,
d’incendie, d’électrocution ou de blessure :
• Ne laissez pas les enfants jouer avec la machine. Il est fortement recommandé de redoubler
d’attention lorsque la machine est située à proximité d’enfants ou de personnes handicapées .
• N’utilisez cette machine à coudre que pour l’usage prévu, comme décrit dans ce manuel. N’utilisez
que les accessoires recommandés par le fabricant, conformément à nos indications.
• Ne faites jamais fonctionner la machine à coudre si la prise ou le cordon d’alimentation sont
endommagés, si elle ne fonctionne pas correctement ou si elle est tombée par terre, ou a été au
contact de l’eau. Retournez la machine au revendeur ou au centre de service technique le plus proche
de chez vous pour toute révision, réparation ou réglage mécanique ou électrique.
• Ne faites jamais fonctionner la machine à coudre si le système de ventilation est obstrué. Évitez toute
présence de peluche, poussières, c hutes de tissus dans la ventilation ou dans la pédale de commande.
• N’approchez pas les doigts des parties mobiles, en particulier au niveau de la zone située autour de
l’aiguille de la machine.
• Utilisez toujours la plaque à aiguille appropriée. L’aiguille risque de se casser avec une plaque non
adaptée.
• N’utilisez jamais d’aiguilles courbes.
• Ne tirez pas sur le tissu et ne le poussez pas pendant la couture. V ous éviterez ainsi de désaxer
l’aiguille puis de la casser.
• Éteignez la machine (position ”0”) lors des réglages au niveau de l’aiguille, par exemple : enfi lage de
l’aiguille, changement d’aiguille, bobinage de la canette, changement de pied presseur, etc .
• Débranchez toujours la machine à coudre pour retirer les couvercles, pour le graissage, ou pour tout
autre réglage de service par l’utilisateur, mentionné dans le manuel d’instructions.
• Ne faites jamais tomber ou ne glissez aucun objet dans les ouvertures.
• N’utilisez pas la machine à l’extérieur.
• N’utilisez pas votre machine à proximité de bombes aérosols ou de vaporisateurs ou lorsque de
l’oxygène est administré.
• Pour débrancher, commencez toujours par éteindre v otre machine (interrupteur en position 0).
• Ne débranchez pas la machine en tirant sur le cordon. Pour débrancher, saisir la prise, et non le
cordon.
• Tenez la prise quand vous enroulez le cordon dans l’enrouleur. Ne la faites pas ”claquer” contre
l’enrouleur.
• Le niveau de bruit dans des conditions de fonctionnement normal est de 70 dB(A).
CONSERVEZ CES INSTRUCTIONS
12
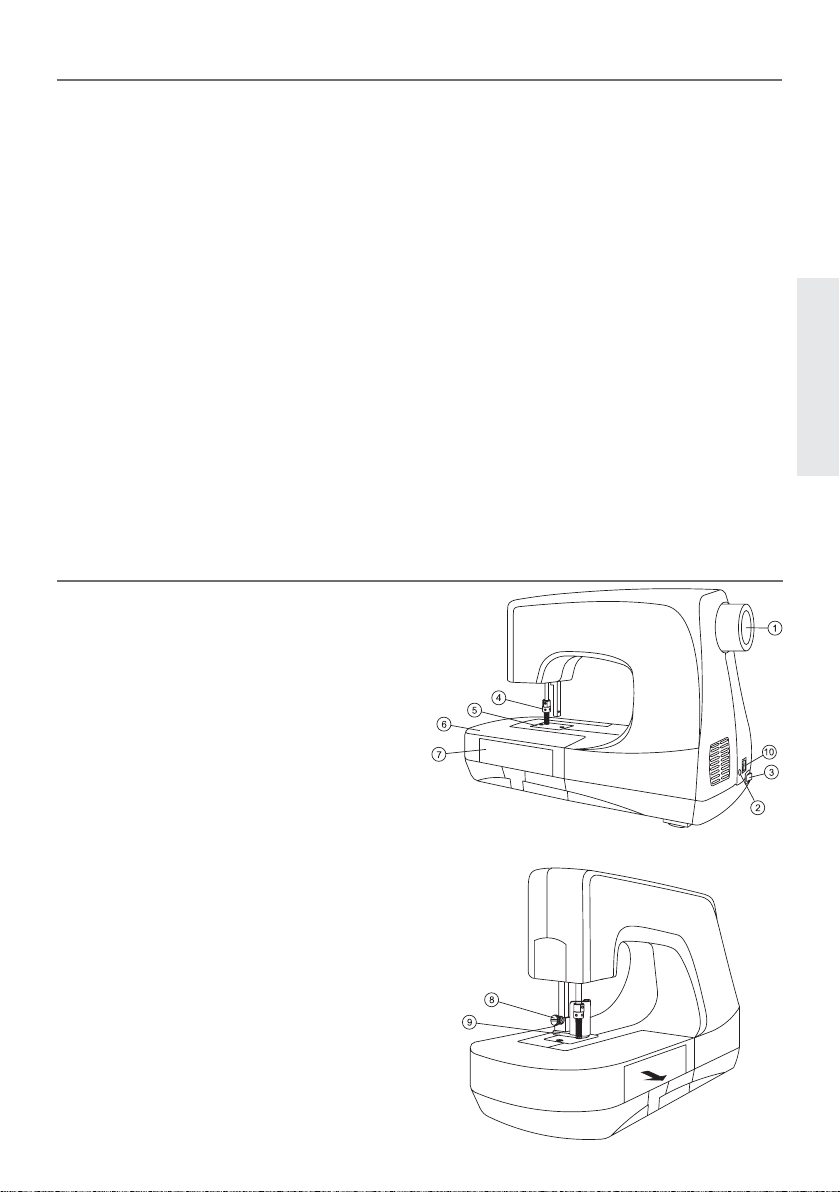
Table des matières
Vue d’ensemble de la machine ……………….13
Accessoires …………………………………………….14
Réglage …………………………………………………..14
Branchement de la pédale de commande .14
Vitesse de la machine ……………………………14
Pied-de-biche ………………………………………..15
Démarrage ……………………………………………..16
Tissus et fi ls utilisables ………………………….. 16
Lavage des ouvrages décorés ………………….16
Commencer à coudre …………………………….17
Extension à plateau étendu / bras libre ….18
Rangement des accessoires …………………….18
Entretien ………………………………………………..19
Changement d’aiguille …………………………..19
Remplacement de l’ampoule ………………….20
Nettoyage du compartiment à peluches …20
Dépannage …………………………………………….21
L’aiguille est pliée ou se casse. ……………….21
Caractéristiques techniques …………………….21
Vue d’ensemble de la machine
1 Volant à main
2. Prise de la pédale de commande
3. Interrupteur d’alimentation
4. Pince-aiguille
5. Plaque à aiguille
6. Extension à plateau étendu
7. Rangement des accessoires
8. Vis de réglage en hauteur du pied-debiche
9. Protège-tissu transparent avec protègeaiguille
Prise
10.
FrenchFrench
13
Accessoires
1. Tournevis
2. Clé Allen 1,5 mm
3. Aiguilles
4. Brosse de nettoyage
5. Housse de la machine
6. Manuel d’utilisation
Réglage
Branchement de la pédale de
commande
Branchez le cordon d’alimentation de
la pédale de commande dans la prise de
la machine, puis dans une prise murale.
Assurez-vous toujours que l’alimentation se
trouve sur OFF et sortez la fi che de la prise
murale lorsque vous n’utilisez pas la machine,
ou lorsque vous effectuez des opérations
telles que le changement d’aiguille ou le
remplacement de l’ampoule.
Remarque : Avant de brancher, vérifi ez que
la pédale est de type « 4C-337G » ou « C-9000 ».
Vitesse de la machine
La vitesse de la machine est régulée par
l’augmentation ou la diminution de la
pression sur la pédale de commande.
Lorsque vous n’utilisez pas la machine,
ne placez rien sur la pédale de commande
afi n d’éviter tout dommage de la pédale de
commande ou du moteur.
14
Pour les Etats Unis et le Canada
Cette machine à coudre est équipée d’une
prise polarisée (une fi che est plus large que
l’autre).
Afi n de réduire le risque d’électrocution,
cette prise est destinée à être adaptée dans
une prise polarisée à sens unique. Si la
fi che ne s’adapte pas totalement dans la
prise, retournez la fi che. Si elle ne s’adapte
toujours pas, contactez un électricien qualifi é
afi n d’installer une prise correcte. N’essayez
en aucun cas de modifi er la fi ch e.
Pied-de-biche
Le pied-de-biche sert à empêcher le
vêtement / tissu / matériau de se soulever
pendant le processus de feutrage.
1. Placez le vêtement / tissu / matériau sur
la plaque à aiguille et sous le pied-debiche.
2. Desserrez la vis de réglage en hauteur du
pied-de-biche pour ajuster la hauteur du
pied-de-biche.
3. Déplacez le protège-tissu transparent
avec protège-aiguilles vers le haut ou vers
le bas jusqu’à ce que le repère rouge sur
la barre du pied-de-biche s’aligne avec la
bonne hauteur pour l’épaisseur de votre
tissu et du matériau de feutrage.
L = position basse pour les tissus fi ns ou
moyens.
M = position moyenne pour les tissus
d’épaisseur moyenne.
H = position haute pour les tissus épais
ou très épais.
4. Serrez la vis de réglage en hauteur du
protège-tissu transparent.
Note : Le tissu et le matériau de feutrage doivent bouger
librement sous le protège-tissu transparent avec
protège-aiguille sans aucune entrave.
French
15
Loading…
Page doesn’t exist.
Instruction/ maintenance manual of the product hobby 350 Pfaff
- File size: N/A
- Number of pages: 70
Summary of contents each page of manual
Read the Pfaff hobby 350 manual — avoid problems
An important point after buying a device Pfaff hobby 350 (or even before the purchase) is to read its user manual. We should do this for several simple reasons:
- to know how to properly use the device
- to know how to perform maintenance/ periodic checks of correct operation of the product Pfaff hobby 350
- to know what to do in case of failure Pfaff hobby 350
If you have not bought Pfaff hobby 350 yet, this is a good time to familiarize yourself with the basic data on the product. First of all view first pages of the manual, you can find above. You should find there the most important technical data Pfaff hobby 350 — thus you can check whether the hardware meets your expectations. When delving into next pages of the user manual, Pfaff hobby 350 you will learn all the available features of the product, as well as information on its operation. The information that you get Pfaff hobby 350 will certainly help you make a decision on the purchase.
If you already are a holder of Pfaff hobby 350, but have not read the manual yet, you should do it for the reasons described above. You will learn then if you properly used the available features, and whether you have not made any mistakes, which can shorten the lifetime Pfaff hobby 350.
However, one of the most important roles played by the user manual is to help in solving problems with Pfaff hobby 350. Almost always you will find there Troubleshooting, which are the most frequently occurring failures and malfunctions of the device Pfaff hobby 350 along with tips on how to solve them. Even if you fail to solve the problem, the manual will show you a further procedure – contact to the customer service center or the nearest service center
-
Страница 1
PFAFF hobby 350 382422 Bed len u n gsa n we is u n g Instruction Book Mode d’emploi Gebruiksaanwijzing[…]
-
Страница 2
[…]
-
Страница 3
4 4 Bedienungsteile der Nähmaschine 1 Fadenhebel 2 Fadenführung 3 Tragegriff 4 Spuler 5 Handrad 6 Auslösescheibe 7 Rückwärtstaste 8 Hauptschalter 9 Verwandlungsnähfläche mit Zubehärfach 10 Transporteur 11 Stichplatte 12 Fadenabschneider 1 3 Einfädelschlitze 14 Oberfadenspannung 15 Stoffdrückerhebel 16 Spuler-Vorspannung 17 Stichmuster-Ein[…]
-
Страница 4
Safety rules valid for United Kingdom only The wires in the mains lead are coloured according to the following code: Blue: Neutral Brown: Live As the colours of the wires in the mains lead of this appliance may not corres pond with the colour coding of the terminals in your plug, proceed as follows: the wire coloured blue must be connected to the t[…]
-
Страница 5
IMPORTANT SAFETY INSTRUCTIONS This sewing machine is designed and manufactured for HOUSEHOLD use only. When using an electric appliance, basic safety precautions should always be followed, including the following: Read all instructions before using this sewing machine. DANGER To reduce the risk of electric schock: 1. The sewing machine should never[…]
-
Страница 6
t Kofferhaube abheben. Lift off the case. Enlever Ia valisette. Het kofferhuis optillen. N } 4 N Tragegriff umklappen. Fold down the carrying handle. Basculer Ia poignée vers l’arrière. Handgreep van u af, kantelen. Elektrischer Anschlul?: Den Anlasser auf den Boden stellen. Stecker S in die Maschine, und Stecker T in die Wand steckdose stecken[…]
-
Страница 7
5 Spulen vorbereiten: Unter die Näh fläche 9 greifen und diese nach links herausziehen, Bobbin winding preparations: Reach under work support 9 and pull it out towards the left. Preparer le bobinage: Passer Ia main sous Ia bolte de rangement 9 et retirer celle-ci vers Ia gauche. Spoelen: Met de linkerhand de werkbox verwijderen. 4 VerschluRklappe[…]
-
Страница 8
4 Nähwerk ausschalten: Handrad 5 fest halten und Scheibe 6 nach vorn drehen. Disengaging the sewing mechanism: Hold hand wheel 5 firmly and turn knob 6 towards you. Déhrayer le mécanisme de couture: Retenir le volant 5 et tourner le disque 6 vers ‘avant. Naaimechanisme uitschakelen: Het handwiel 5 vasthouden en koppel schroef 6 in het handwiel[…]
-
Страница 9
N Spulen: Den Faden von der Garnrolle in die Spulervorspannung 16 ziehen, zur Spule führen, durch em Loch der Spule fädeln und festhalten. Den FuRanlasser betätigen und aufspulen. Dabei den Faden nach einigen Umdrehungen los lassen. Die voile Spule nach links drücken, abnehmen und den Faden abschneiden. 4 N Bobbin winding: Pull the thread from […]
-
Страница 10
4 Nähwerk einschalten: Das Handrad 5 festhalten und die Scheibe 6 nach hin ten drehen. Engaging the sewing mechanism: Hold balance wheel 5 firmly and turn knob 6 away from you. Embrayage du mécanisme: Retenir le volant 5 et tourner le disque 6 vers l’arrière. Koppelschroef vastzetten: Om na het spoelen de machine weer in werking te stellen: sc[…]
-
Страница 11
Unterfadenspannung prufen: Kapsel leicht ruckartig aufwartsbewegen. Sie muB stufenweise niedersinken. (Einstell schraube S nach links drehen = schwa cher, nach rechts drehen = fester>. Checking the bobbin thread tension: With a brief sharp upward movement of your hand, the bobbin must gradually slip downwards. (Turn screw S to the left for a wea[…]
-
Страница 12
4 Oberfaden einlegen: Nadel und Faden hebel müssen oben stehen. Nähfuf anheben. Den Faden in die Fuhrung 2, den Schlitz S, nach oben in den Schlitz T, in den Fadenhebel 1, zurück durch den Schlitz T und in die rechte Führung U am Nadelhalter ziehen. Upper threading: The needle and the take-up lever must be raised. Pull the thread into guide 2, […]
-
Страница 13
7- Oberfaden festhalten. Handrad riach vorn drehen und einen Stich nähen. Nadel und Fadenhebel müssen oben stehen. Mit dem Oberfaden den Unter faden nach oben ziehen. Hold the needle thread taut. Turn the hand wheel towards you and sew a stitch until both needle and take-up lever are up. Pull out the bobbin thread by pulling the needle thread. Re[…]
-
Страница 14
Die Maschinen haben elnen Freiarm für rohrenförmiges Nahgut. The machines have a free arm for sewing tubular shaped articles. Les machines possèdent un bras libre pour Ia mise en cuvre d’articles tubu aires. De machines hebben een vrije arm voor rondvormige kledingstukken. Ndhfläche 9 an die Maschine schieben (Führungsstifte in die Bohrungen[…]
-
Страница 15
I N Wichtig! Urn em gutes Nähergebnis zu erreichen 1st foigendes zu beachten: 1. Eine einwandfreie Nadel 2. Richtige Oberfaden- bzw. Unter fadenspannung Die Unterfadenspannung 1st vom Her steiler richtig eingestellt. 1st nach Prufung der Unterfadenspan nung Is. Seite 9) eine Korrektur erfor derlich, darf die Einsteilschraube nur minimal gedreht we[…]
-
Страница 16
4 N4 Important: Veillez a ceci pour obtenir une bonne couture. 1. Utiliser une aiguille impeccable et 2. Des tensions de fils bien reglees. La tension inférieure est correctement réglee a l’usine. Si, après contrôle, Ia tension inférieure (voir pag. 9) doit être rajustée, ne tour ner que très peu Ia vis de reglage. Contrâle de Ia tension[…]
-
Страница 17
N RUckwärtsnähen: Die Taste 7 nieder drücken. Solange die Taste gedrückt wird, näht die Maschine rückwârts. Reverse sewing: Press down control 7. The machine sews backwards as long as the control key is held down. Couture en arrière: Abaisser Ia touche 7. La machine coud en arrière aussi longtemps que cette touche est tenue abaissée. Afhe[…]
-
Страница 18
dem Buchstaben im Fenster angegeben. = NähfuB = Zickzack Einstellknopf 20 (Modell 422) Stichlangen Einstellknopf 27 (———/STRsTi) = _____ = Stichmuster Stretchstiche der Modelle 382 und 422 Zum Nähen der farbig abgebildeten Stretchstiche muI ,,Stretch” auf dem Stichlängen-Einstellknopf 27 unter die Einstellmarkierung T gedreht werden. Je n[…]
-
Страница 19
Reglage des motifs de point Choisir le motif de point dans le tableau 26. Par rotation de Ia bague de réglage 18 des motifs, dans Ia fenêtre de réglage 1 7, faire encliqueter les lettres correspondantes (A—RI en dessous du repere S. Quant au réglage proprement dit de a machine, compte tenu du motif sélectionné, celui-ci est indique en dessu[…]
-
Страница 20
Sy,nbol/Symbole Simboli/Symbool Nutzstich-Tabelle Utility stitches Points utilitaires Stich Stitch Point [ 1 A Knopflochsymbole Buttonhole symbols Symboles de boutonniere Geradstich Straight stitch, Point droit, B Stichlage Mitte middle needle position deport median I B Geradstich Straight stitch, Point droit, C Stichlage links left needle position[…]
-
Страница 21
Nt Geradstich nähen Modelle 350 und 382: Mit dem Stich muster-Einstellknopf 1 8 B oder C unter die Markierung S drehen. Die Stichlãnge mit dem Stichlängen-Einstellknopf 27 wählen. Modell 422: Mit dem Einstellknopf 18, B unter die Markierung S stellen. Danach mit dem Zickzack-Einstellknopf 20 für die Stichlage links 0 und für die Stichlage Mit[…]
-
Страница 22
Symbol/Symbole Simboli/Symbool Stretchstich-Tabelle Stretch stitches Points stretch Stich Stitch Point Stretch3fach- Straight triple stretch Triple point stretch B Geradstich Mitte stitch, middle droit median iii B Stretch-3-fach- Straight triple stretch Triple point stretch c Geradstich links stitch, left droit a gauche Stretch-3fach- Zigzag tripl[…]
-
Страница 23
Stretchsteken-tab& Steek Modelle/ModelS 382 422 Stretch-3voudige rechte steek, midden Stretch-3voudige- rechte steek, links Stretch-3voudige- zigzagsteek Wafelsteek • a Boordsteek, breed • • Boordsteek, smal ) Overlocksteek • • Pulloversteek • • Veerstjeessteek Elastische siersteek Elastische siersteek Elastische siersteek N J ‘[…]
-
Страница 24
Nadel auswechseln (System 130/705 H): Netzstecker ziehen. Schraube S lösen. Nadel herausnehmen. Neue Nadel (flache Kolbenseite nach hinten) ganz nach oben schieben. Schraube fest drehen. Changing the needle (System 130/705 H): Pull out the mains plug. Loosen screw S. Take out the needle. Push the needle in as far as it will go (with its flat side […]
-
Страница 25
4 23 Nähful, auswechseln: Netzstecker zie hen. Roten Knopf S drücken. Der Fu rastet aus. Changing the sewing foot: Pull out the mains plug. To release the sewing foot, push the red button S. Changement de Ia semelle du pied: Débrancher Ia machine du secteur. Enfoncer le bouton rouge S; Ia semelle est libérée. Naaivoet wisselen: Schakel eerst d[…]
-
Страница 26
4 4 NähfüIe (Normalzubehör) A NormaInähfu1 B KIarsichtfu( G Blindstichfu(? E ReiRverschluBfu9, S Stick- und Stopfplatte Sewing feet (standard accessories) A Ordinary sewing foot B Clear-view foot G Blindstitch foot E Zipper foot S Embroidering/darning plate Pieds presseurs (accessoires standard) A Semelle normale B Semelle transparente G Semell[…]
-
Страница 27
25 N Zickzacknähen Modelle 350 und 382 lAbb. U>: Die gewunschte Zickzackbreite mit dem Stichmuster-Einstellring 18 im Bereich W, unter die Einstellmarkierung S dre hen. D ist der breiteste Zickzackstich. Zigzag sewing Models 350 and 382 (III. U>: Turn stitch pattern selector ring 18 until the required stitch width in range W is posi tioned b[…]
-
Страница 28
Befestigung des Uneals (Sonderzubehör): Lineal S durch die Bohrung T schieben und mit der Schraube U festdrehen. Je nach Verwendungszweck läBt sich das Lineal auf den gewünschten Abstand einstellen Parallel verlaufende Stepp linien oder Abstepparbeiten an Kanten näht man mühelos mit dem Führungs lineal. Dabei läuft die Stoffkante (Abb. V), o[…]
-
Страница 29
pied presseur normal A ou pied a semelle en plexiglas B et guide-droit (accessoire special) Point: B point droit Le guide-droit S convient a presque tous es pieds presseurs. Fixation du guide-droit (accessoire special): Glisser le guide S par le trou T et serrer a vis U. Suivant ‘application, regler le guide sur l’écartement désiré. Le guide[…]
-
Страница 30
28 So wird der Einstich der Nadel reguliert Den vorbereiteten Saum unter den BlindstichfuR legen. Der Stoffbruch des Oberstoffes Iàuft dabei am Anschlag T des Blindstichful,es entlang. Mit der Stellschraube S den Anschlag T soweit nach links drehen, daR die Nadel beim linken Einstich in den Oberstoff nur einen Faden erfaRt (Abb. U u. VI. Nähen Si[…]
-
Страница 31
29 ) -5 Point invisible elastique Pied presseur: Pied a points invisibles G Tension: Fit d’aiguilte moms tendu Fit: Fit a coudre Point: Point invisible é(astique F Longueur de point: Aiguille: 3à4 Grosseur 70 ou 80 Réglage de Ia jetée du point Poser t’ourtet préparé sous le pied a points invisib(es. La cassure du tissu extérieur longe (a[…]
-
Страница 32
loser Garn: feines Maschinenstickgarn Stichlange: Knopflochbereich Nadel: 70—80 1. Stichmusterring 18 auf Al stellen und die erste Raupe nähen. Die Nadel hochstellen. 2. Stichmusterring 18 auf 2A4 stellen und 4—6 Riegelstiche nähen. Die Nadel hochstellen. 3. Stichmusterrring 18 auf A3 stellen und die zweite Raupe so lang wie die erste nähen.[…]
-
Страница 33
Pied a semelle trans parente B Fil d’aiguille un peu moms tendu Fil a broder fin plage boutonniere 70 a 80 1. Tourner a bague 18 des motifs sur Al et coudre a premiere lèvre. Rele ver l’aiguille. 2. Tourner Ta bague 18 sur 2A4 et coudre 4 a 6 points d’arrêt. Arréter ‘aiguille en haut. 3. Tourner Ia bague 18 sur A3 et coudre Ta deuxième […]
-
Страница 34
Knopf annähen NähfuB: Den Knopf auf die zuvor markierte Stelle legen, unter den Nähfu6halter schieben und diesen senken. Beim Model! 350 oder 382 mit dem Stich musterring 1 8 C und beim Model! 422 D einstellen. Beim Model! 422 zusätzlich mit dem Zickzackknopf 0 einste!len. Dann die Nadel in die linke Knopf bohrung stechen (assen, die Nadel hoch[…]
-
Страница 35
4 Point: Griffe: Poser le bouton sur ‘emplacement mar- qué auparavant, en dessous du support de pied presseur. Faire descendre le support de pied sur le bouton. Par Ia bague de reglage 18 du motif de points, regler C sur les modèles 350 et 382 et D sur un modèle 422. Sur ce dernier modèle, regler en plus le bouton de reglage du point zigzag s[…]
-
Страница 36
Geradstich Stichiage Mitte Nhgarn So wird der Rei!verschluMuB eingera stet: FuR mit dem hinteren Steg in die hintere Nute W einhangen und die Sohle nach oben drücken, bis der vordere Steg X einrastet. Der FuR kann in die Positionen rechts, links (Abb. SI oder Mitte geschoben werden. Beidseitig verdeckt eingenähter ReiBver schiuR: ReiRverschluR ei[…]
-
Страница 37
D Insertion de fermetures a glissiere Pied presseur: Pied a fermeture a glissièro E Longueur do point: Point: 2 a 3 mm Point droit en position médiane Fil: Fil a coudre Mise en place du pied a fermeture a glissiere: Accrocher le pied avec sa tige arrière dans Ia rainure arrière W et faire remonter a semolle jusqu’à ce que a tige avant X s’[…]
-
Страница 38
Nahtrei1?,verschIu1 Maschinen-Einstellung siehe Seite 34. So wird der ReiRverschluI vorbereitet und angelegt: Die Schlitzkanten bügeln. Linke Nahtbreite nach auLen drehen (Abb. SI. Linke geöffnete ReiBver schluRseite, wie Abb. T zeigt, auflegen. Die ReiRverschluRzähne stehen etwas über die gebügelte Kante. Die Steppnaht verläuft in der gebuge[…]
-
Страница 39
Fermeture a glissiere invisible Reglage de Ia machine voir page 34. Voici comment procéder pour insérer (a fermeture a glissiére: Repasser es bords de Ia fente. Replier le relarge gauche du tissu vers (‘extérleur (fig. SI. Ouvrir a fermeture a glissiere et mettre Ia bande gauche en place, comme le montre (a figure T, es dents dépassant quelq[…]
-
Страница 40
V HosenreiRverschluB (Damen) Maschinen-Einsteflung siehe Seite 34. Den ReiltverschluRfuB nach inks bis zum Anschlag schieben. Die Schlitz kanten bugeln. Den geschlossenen ReiB verschlul?, so unter den rechten gebugel ten Schlitzrand heften, daB die ReiBver schluBähne noch sichtbar sind. Vorbereitete Untertrittsleiste V anstecken und beim Aufsteppe[…]
-
Страница 41
Fermeture A glissière pour pantalons pour femmes Reglage de (a machine voir page 34. Glisser le pied fermeture a g(issière vers Ia gauche jusqu’à a butée. Repasser es bords de Ia fente. BAtir Ia fermeture a glissiere fermée sous le bord droit de a fente de manière que es dents de (a fermeture soient encore visibles. Epingler Ia sous-patte V[…]
-
Страница 42
etwas leichter feines Maschinen stickgarn Stärke 70 abdecken mit Stopfplatte So bringen Sie den Stopffu an die Maschine: FüE,chenhalter entfernen, mit der Schraube S den StopffuB befesti gen. Dabei ist zu beachten, daR der Bugel T auf dem Schraubenhalter U auf iiegt. Zunächst den Unterfaden nach oben holen. Beide Fäden bei Nähbeginn festhalten[…]
-
Страница 43
— -, —- —, —1—-I-I-4- j- — — . L_ w Travaux de reprisage Preparation de Ia machine: Pied presseur: Pied a repriser (contre supplement) Point: Point droit median Tension du fil d’aiguille: moms forte Fil: Fil a broder fin Aiguille: Grosseur 70 Griffe: monter Ia plaque a repriser Mise en place du pied a repriser: Enlever le support d[…]
-
Страница 44
Cleaning and oiling Pull out the mains plug. Raise the needle and the sewing foot. Remove the two needle plate screws and take off the needle plate. Clean the feed dog with the brush. Push catches S of the sewing hook outwards. Take out ring T and sewing hook U. Clean the hook raceway. Apply a drop of oil to the hook raceway occasionally. Caution: […]
-
Страница 45
4 GlUhlampe auswechseln Netzstecker ziehen. Die Glühlampe hochdrücken, nach S drehen und herausnehmen. Die neue Lampe so em setzen, daR die Fuhrungen in den Schlit zen U gleiten. Die Gluhlampe hoch drücken und nach T drehen. Die maxi mal zulãssige Leistung der Lampe betragt 1 5 Watt. Changing the bulb Pull out the mains plug. Push the bulb upwa[…]
-
Страница 46
Nadel-Tabelle Die WahI der richtigen Nadel garantiert elne bessere Verarbeitung des NahmaterialS Stoffqualität Stotfqualität Stoffqualität Ieicht mittel schwer Nadel Nadel Nadel 60 70 75 80 90 100 110 120 Nadelspitzefl Bezeichnung Prof d Nadelspitze und Geeignet fur Nadelohr 130/705 H kleine Universalnadel für feinmaschige Synthe Nadelstärke: […]
-
Страница 47
Nadel-Tabefle Bezeichnung Stichlange Stichbreite Nadel- Geeignet für entfernung jj 130/705 H-ZWI 2,5 mm — 1,6 mm normale Biesen Stärke: 80 2,5 mm — 2,0 mm normale Biesen 130/705 I-t-ZWI I Stärke. 80 2,5 mm — 2,5 mm breite Biesen Stärke: 90 2,5 mm — 3,0 mm extra breite ! Stärke: 100 3,0 mm — 4,0 mm Biesen 45[…]
-
Страница 48
Needle chart Use of the correct needle ensures better processing of the material. Fabric weight: Fabric weight: Fabric weight: light medium heavy Needle size: Needle size: Needle size: 60 7Ô 75 80 90 100 110 ‘120 Needle points System & No. Profile Point & eye Suitable for 130/705 H Light ball point Universal needle for fine-meshed 70, 80[…]
-
Страница 49
Needle chart System & No. Stitch length Stitch width Needle Suitable for spacing 130/705 H-ZWI 2.5mm — 1.6mm Medium-wide 80 2.5 mm — 2.0 mm cording 130/705 H-ZWI 80 2.5 mm — 2.5 mm Wide cording 90 2.5 mm — 3.0 mm Extra wide cording 100 3.0 mm — 4.0 mm Extra wide cording L i 47[…]
-
Страница 50
Tableau des aiguilles Le choix de a pointe d’aiguille adequate est très important et garantit de meilleurs resultats. Matières: Matières: I Matières: legeres moyennes lourdes AiguiHes: Aiguilles: AiguiHes: 60 70 75 80 90 100 110 120 Pointes d’aiguille Designation Forme Pointe et chas Utilisations de pointe de l’aiguille 130/705 H pointe A[…]
-
Страница 51
Tabteau des aiguilles Designation Longueur de Largeur de Espacement Utilisations point point des aiguilles 130/705 H-ZWI 2,5 mm — 1,6 mm nervures Grosseur: 80 2,5 mm — 2,0 mm normales 130/705 H-ZWI Grosseur: 80 2,5 mm — 2,5 mm nervures arges Grosseur: 90 2,5 mm — 3,0 mm nervures Grosseur: 100 3,0 mm — 4,0 mm extra-larges 49[…]
-
Страница 52
Naaldentabel Het gebruik van de juiste naald, garandeert een betere verwerking van de stof Stofkwaliteit Stofkwaliteit Stofkwaliteit dun middel dik naald naald naald 60 70 75 80 90 100 110 120 Vorm van de Naaldpunt Benaming Profiel Naaldpunt en Geschikt voor: naaldoog 130/705 H kleine bol- Universele naald voor fijnmazige naalddikte: vormige punt s[…]
-
Страница 53
Naaldentabel Benaming Steeklengte Steekbreecite Naald- Geschikt voor: fi 130/705 H-ZWI 2,5 mm — 1,6 mm normale biezen jj naalddikte: 80 2,5 mm — 2,0 mm normale biezen 130/705 H-ZWI naa)ddikte: 80 2,5 mm — 2,5 mm brede biezen ) naalddikte: 90 2,5 mm — 3,0 mm brede biezen naalddikte: 100 3,0 mm — j 4,0 mm extra brede biezen — J__________ […]
-
Страница 54
Nahstörungen und ihre Beseitigung Ursache: 1. Die Maschine Iäft Stiche aus Die Nadel ist nicht richtig eingesetzt. Es ist eine falsche Nadel eingesetzt. Die Nadel ist verbogen oder stump!. Die Maschine ist nicht richtig eingefä deft. Die Nadel ist für das Garn zu fein. 2. Der Oberfaden reiGt Aus vorgenannten Gründen. Gel zu starker Fadensparin[…]
-
Страница 55
Ursache: Beseitigung: 5. Die Maschine transportiert nicht oder nur unregeImäig Zwischen den Transporteur-Zahnreihen Stichplatte abnehmen, Nähstaub mit hat sich Nähstaub festgepreRt. Pinsel entfernen. 6. Die Masehine geht schwer Fadenreste befinden sich in der Fadenreste entfernen und nur einen Greiferbahn. Tropfen DI in die Greiferbahn geben. 7.[…]
-
Страница 56
I Faults and how to remedy them Cause: Remedy: 54 1. Machine skips stitches Needle not inserted correctly. Wrong needle used. Needle bent or blunt. Machine threaded incorrectly. Needle too thin for thread used. 2. Needle thread breaks For any of the above reasons. Thread tension too strong. Poor-quality or knotty thread used, or thread that has bec[…]
-
Страница 57
Cause: Remedy: 5. Machine feeds irregularly or not at all Lint has accumulated between tooth Remove needle plate and clean out lint. rows of feed dog. 6. Machine runs with difficulty Thread ends in hook raceway. Remove thread ends and put a drop of oil into hook raceway. 7. Important notes: Never run a threaded machine unless there is a piece of fa[…]
-
Страница 58
Causes de derangements et remèdes Causes: Remèdes: 1. Points manques L aiguille n est pas placee selon es Engager I aiguille a fond le meplat du prescriptions talon vers arriere L’aiguille n’est pas du système prescrit. N’utiliser que des aiguilles du système 1 30/705 H. L’aiguille est déformèe ou épointee. Utiliser une aiguille neuv[…]
-
Страница 59
Causes: Remèdes 5. La machine n’entraine pas ou irregulierement Bourres agglomerèes entre es dents de Enlever Ia plaque a aiguille, ôter les Ia griffe. bourres au pinceau. 6. Marche dure de Ia machine Des bribes de fil se sont prises dans Ia Enlever es bribes de fil et mettre une coursière du crochet. goutte d’huile dans Is coursière. 7. R[…]
-
Страница 60
Opheffen van kleine storingen Oorza a k: 1. De machine slaat steken over De naald is niet goed ingezet. U gebruikt een verkeerd systeem naald. De naald is krom of stomp. De machine is niet goed ingeregen. De naald is te dun voor het garen. 2. De bovendraad breekt Door dezelfde oorzaken als boven. Bij een te zware bovenspanning. Bij slechte kwalitei[…]
-
Страница 61
Oorzaak: Opheffen: 5. De machine transporteert niet of onregelmatig Tussen de tandjes van de transporteur Steekplaat wegnemen, stof met het zit stof geperst. stofkwastje weghalen. 6. De machine ioopt zwaar Draadresten in de grijperbaan. Draadresten verwijderen en een druppel olie in de grijperbaan doen. 7. Belangrijke aanwijzingen Laat de ingeregen[…]
-
Страница 62
Sonderzubehör Das Sonderzubehör ist für spezielle Näharbeiten. Es ist bei ihrem Handler gegen Berechnung erhältlich. Bestell-Nr. Näharbeit 98-694 879-00 ‘behör ApplikatonsfuB 93-035 920-91 zum Applizieren Bandeinfasser (NähfuRhalter entternen) 98-053484-91 zum Einfassen von Kanten mit Band 93-035 950-91 zum Biesennähen BiesenfuB 5 Rillen[…]
-
Страница 63
Inhaltsverzeichnis Abstepparbeiten 26, 27 Anlasser 13 Elastischer Blindstich 28, 29 Elektrischer AnschIuI 4 Fadenabschneider 14 Geradstichnähen 1 9 Giühiampe auswechseln 43 HosenreiBverschlu8, (Damen) 38, 39 Knopfannähen 32, 33 Knopflochnähen 30, 31 Koffer abheben 4 Nade) auswechseln 22 Nadeltabelle 44, 45 NahtreiRverschIu) 36, 37 Nähfü8,e 24[…]
-
Страница 64
Special accessories The special accessories listed below are intendend for special sewing jobs. They can be obtained from your dealer at an extra charge. /ssory Part No. Sewing Operation Appliqué foot 93-035 920-91 For appliqué work Binder (remove sewing foot holderl 98-053484-91 For binding edges with tape Cording foot, 5 grooves 93-035 950-91 F[…]
-
Страница 65
Contents Accessory box 24 Bobbin winding 7 Bobbin winding preparations 5 Changing the bulb 43 Changing the needle 22 Changing the sewing foot 23 Checking the bobbin thread tension 9 Checking the needle thread tension 1 3 Cleaning and oiling 42 Covering the feed dog 22 Darning 40 Disengaging and engaging the sewing mechanism 6, 8 Drawing up to bobbi[…]
-
Страница 66
Accessoires spedaux Ces accessoires pour des travaux particuliers sont en vente chez votre dépositaire Pfaff contr facturation. Pied pose franges Guide-droit Pied pour point droit Rabatteur 4,5 mm Rabatteur 6,5 mm Pied a boutonnières Pied fronceur Pied guide-cordonnet Pied overlock Ourleur )bord roulé) 2 mm Ourleur 3 mm Pied a repriser Pied a se[…]
-
Страница 67
Table des matieres Accessoires spéclaux Aiguilles, tableau Bobinage Bobinage, preparation Bolte a canette, mise en place Boite de rangement Boutonnières Branchement électrique Canette, mise en place Changement de l’ampoule Contrôle de Ia tension du fil daiguille Coupe-fil Couture aux points zigzags Couture en marche arrière Points stretch, t[…]
-
Страница 68
Extra accessoires De accessoires zijn voor bijzoridere werzaamheden. Ze zijn verkrijgbaar bij de officiële Pfaff dealer. Biaisbandvoet naaivoethouder afnemen Stopvoet (Naaivoethouder atnemen) Qrduurvoet 98-053484-91 93-106 103-91 Stoppen en wolstoppen 98-694 879-00 borduren en sierste Applikatievoet 93-035 920-91 Omboren van kanten met band 1 ’[…]
-
Страница 69
I Inhoud Zigzag naaien 25 67 Aansluiten van de machine . 4 Accessoiresvakje 24 Afhechten, achterwaarts stikken 1 5 Blindzomen 28, 29 Bovendraad inrijgen 10 Bovendraadspanning kontroleren 1 3, 14 Draadafsnijder 14 Knopen aanzetten 32, 33 Knoopsgaten 30, 31 Koffer afnemen 4 Lampje wisselen 43 Naaimechanisme uit- en inschakelen 6, 8 Naaivoetjes 24 Naa[…]
-
Страница 70
PFAFF G. M. PFAFF Aktiengeselischaft Werk KarIsruheDuriach Gritznerstra5e 11 7500 Kadsruhe 41 Technische Arrderungen vorbehalten. Gedruckt in Deutschlancl. Subject to alterations in design. Printed in Germany. Sous toute reserve be modifications techniques. Imprimé en R.F.A. Technische wijzingen voorbehouden. Gedrskt in Dunsland. hr. 29829 998S8 0[…]
PFAFF
hobby 350 382422
Bed len u n gsa nwe is u n g Instruction Book Mode demploi Gebruiksaanwijzing
4 4Bedienungsteile der Nhmaschine
1 Fadenhebel 2 Fadenfhrung 3 Tragegriff 4 Spuler 5 Handrad 6 Auslsescheibe 7 Rckwrtstaste 8 Hauptschalter 9 Verwandlungsnhflche mit
Zubehrfach 10 Transporteur 11 Stichplatte 12 Fadenabschneider 1 3 Einfdelschlitze 14 Oberfadenspannung 15 Stoffdrckerhebel 16 Spuler-Vorspannung 17 Stichmuster-Einstellfenster 18 Stichmuster-Einstellring 1 9 Garnrollenstifte 20 Zickzack-EinsteHknopf mit Einstell
fenster (Model! 422) 21 VerschluRklappe, dahinter Greifer 22 NhfuRhalter mit NhfuB 23 Befestigungsschraube fr den
NhfuBhalter 24 Nadelhalter mit Halteschraube 25 Stoffdrckerstange 26 Stichmustertabelle 27 Stich(ngen-Einstellknopf
Parts of the sewing machine
1 Take-up lever 2 Thread guide 3 Carrying handle 4 Bobbin winder 5 Hand wheel 6 Disengaging knob 7 Reverse-feed control 8 Master switch 9 Detachable work support with
accessories box 10 Machine feed 11 Needle plate 1 2 Thread cutter 13 Threading slots 14 Needle thread tension 1 5 Presser bar lifter 1 6 Bobbin winder thread tension 1 7 Stitch pattern display window 1 8 Stitch pattern selector ring 19 Spool pins 20 Zigzag regulator knob with display
window (Modell 422) 21 Free-arm cover, enclosing sewing
hook 22 Sewing foot holder with sewing
foot 23 Retaining screw for sewing foot
holder 24 Needle holder with retaining screw 25 Presser bar 26 Stitch patterns 27 Stitch length regulator
Safety rules valid for United Kingdom only
The wires in the mains lead are coloured according to the following code: Blue: Neutral Brown: Live As the colours of the wires in the mains lead of this appliance may not corres pond with the colour coding of the terminals in your plug, proceed as follows: the wire coloured blue must be connected to the terminal marked with the letter N or coloured black. The wire coloured brown must be con nected to the terminal marked with the letter L or coloured red.
Please note: When a 13-ampere plug is used, a 3-ampere fuse has to be fitted.
2
IMPORTANT SAFETY INSTRUCTIONS This sewing machine is designed and manufactured for HOUSEHOLD use only. When using an electric appliance, basic safety precautions should always be followed, including the following: Read all instructions before using this sewing machine.
DANGER To reduce the risk of electric schock: 1. The sewing machine should never be left unattended when plugged in. Always
unplug this appliance from the electric outlet immediately after using and before cleaning.
2. Always unplug before relamping. Replace bulb with same type rated 15 Watts. 3. Do not reach for a sewing machine that has fallen into water. Unplug immediately. 4. Do not place or store sewing machine where it can fall or be pulled into a tub or
sink. Do not place in or drop into water or other liquid.
WARNING To reduce the risk of burns, fire, electric schock, or injury to persons:
1. Do not allow to be used as a toy. Close attention is necessary when this sewing machine is used by or near children.
2. Use this sewing machine only for its intended use as described in this manual. Use only attachments recommended by the manufacturer as contained in this manual.
3. Never operate this sewing machine if it has a damaged cord or plug, if it is not working properly, if it has been dropped or damaged, or dropped into water. Return the appliance to the nearest authorized dealer or service center for exami nation, repair, electrical or mechanical adjustment.
4. Never operate the sewing machine with any air openings blocked. Keep ventilation openings of the sewing machine and foot controller free from the accumulation of lint, dust, and loose cloth.
5. Never drop or insert any object into any opening. 6. Do not use outdoors. 7. Do not operate where aerosol (spray) products are being used or where oxygen is
being administered. 8. To disconnect, turn all controls to off (0) position, then remove plug from outlet. 9. Never operate on a soft surface such as a bed or couch where the air openings
may be blocked. 10. Do not unplug by pulling on cord. To unplug, grasp the plug, not the cord. 11. Keep fingers away from all moving parts. Special care is required around the
sewing machine needle. 12. Always use the proper needle plate. The wrong plate can cause the needle to break. 13. Do not use bent or blunt needles. Use needles recommended by the manufacturer
only. 14. Do not pull or push fabric while stitching. It may deflect the needle causing it to break. 15. Switch the sewing machine off (0) when making any adjustments in the needle
area, such as threading needle, changing needle, threading bobbin, or changing presser foot, etc.
16. Always unplug sewing machine from the electrical outlet when removing covers, lubricating, or when making any other user servicing adjustments mentioned in the instruction manual.
17. Hold plug when rewinding into cord reel. Do not allow plug to whip when rewinding. SAVE THESE INSTRUCTIONS
t Kofferhaube abheben.
Lift off the case.
Enlever Ia valisette.
Het kofferhuis optillen.
N
}
4 N Tragegriff umklappen.
Fold down the carrying handle.
Basculer Ia poigne vers larrire.
Handgreep van u af, kantelen.
Elektrischer Anschlul?: Den Anlasser auf den Boden stellen. Stecker S in die Maschine, und Stecker T in die Wand steckdose stecken. Danach den Haupt schalter 8 einschalten.
Electrical connection: Set the foot control on the floor. Insert plug S in the machine and plug T in the wall socket. Then actuate master switch 8.
Branchement electrique: Placer le rheostat a pedale sur Ia sol. Brancher Ia fiche S dans Ia machine et Ia fiche T dans Ia prise murale. Placer ensuite linterrupteur general sur MARCHE.
Electrische aansluiting: Zet de voet weerstand op een gemakkelijk bereik bare plaats op de vloer. Eerst stekker S in-de machine steken, daarna stekker T in hat stopcontact. Daarna de hoofd schakelear 8 inschakelen.
4
5
Spulen vorbereiten: Unter die Nh flche 9 greifen und diese nach links herausziehen,
Bobbin winding preparations: Reach under work support 9 and pull it out towards the left.
Preparer le bobinage: Passer Ia main sous Ia bolte de rangement 9 et retirer celle-ci vers Ia gauche.
Spoelen: Met de linkerhand de werkbox verwijderen.
4 VerschluRklappe 21 nach unten ffnen.
Fold free-arm cover 21 downwards.
Duvrir le capot 21 vers le bas.
Afsluitkapje 21 naar onder openen.
4 Klappe S anheben und die Spulenkapsel herausziehen.
Raise latch S and pull out the bobbin case.
Lever le loquet S et retirer Ia bolte a canette.
Spoelhuls aan klepje S wegtrekken.
4Klappe S loslassen und die Spule herausnehmen.
Release latch S and take out the bob
bin.
Lcher le loquet S et retirer Ia canette.
Klepje S loslaten, dan valt de spoel eruit.
4
Nhwerk ausschalten: Handrad 5 fest
halten und Scheibe 6 nach vorn drehen.
Disengaging the sewing mechanism:
Hold hand wheel 5 firmly and turn knob
6 towards you. Dhrayer le mcanisme de couture:
Retenir le volant 5 et tourner le disque
6 vers avant. Naaimechanisme uitschakelen: Het
handwiel 5 vasthouden en koppel
schroef 6 in het handwiel naar voren
draaien.
Garnrollenhalter 1 9 hochziehen und die
Garnrolle aufschieben.
Pull up thread reel pin 19 and place a
spool on it.
lirer les broches 1 9 vers le haut et
mettre une bobine de fil en place.
Garenpen 19 omhoog trekkerc, klosje
garen op de pen steken.
Spule auf die Spulerspindel 4 stecken.
Place the bobbin on winder spindle 4.
Placer Ia canette sur Ia broche 4 du dvidoir.
Het spoeltje op de as van de spoel winder 4 plaatsen.
Spule nach rechts gegen den Anschlag S drcken.
Push the bobbin to the right against stop S.
Pousser Ia canette vers Ia droite, contre Ia bute S.
Spoel naar rechts tegen de spoelwinder S drukken.
4
r
6
N Spulen: Den Faden von der Garnrolle in die Spulervorspannung 16 ziehen, zur Spule fhren, durch em Loch der Spule fdeln und festhalten. Den FuRanlasser bettigen und aufspulen. Dabei den Faden nach einigen Umdrehungen los lassen. Die voile Spule nach links drcken, abnehmen und den Faden abschneiden.
4 N Bobbin winding: Pull the thread from the spool into tensioner 16, to the bob bin, through one hole of the bobbin, then hold it there. Press the foot control to wind the bobbin. After a few turns, let go of the thread again. Push the filled bobbin to the left, remove it and cut the thread.
I
Bobinage: Faire passer le fil de a bobine dans Ia tension 16 et vers a canette. Enfiler le fil de lintrieur vers lextrieur et le maintenir. Appuyer sur le rheostat et bobiner. Lcher le fil apres quelques tours. Pousser Ia canette garnie vers Ia gauche, Ia retirer et couper le fil.
4 N Spoelen: De draad van de garenklos in de voorspanning (16) trekken, naar de spoel leiden, door een gaatje steken en vasthouden. Voetweerstand indrukken en opspoelen na een aantal omwentelin gen van de spoel de draad loslaten. De voile spoel naar links drukken, afnemen en draad afknippen.
7
4 Nhwerk einschalten: Das Handrad 5 festhalten und die Scheibe 6 nach hin ten drehen.
Engaging the sewing mechanism: Hold balance wheel 5 firmly and turn knob 6 away from you.
Embrayage du mcanisme: Retenir le volant 5 et tourner le disque 6 vers larrire.
Koppelschroef vastzetten: Om na het spoelen de machine weer in werking te stellen: schroef 6 vastzetten met hand wiel 5.
Spule einlegen S (Faden nach hinten). Den Faden in den Schlitz T und unter der Feder hindurch in die Offnung U ziehen,
Inserting the bobbin: With thread hanging down at back (SI, pull it into slot T, under the spring and out of spring U.
Mise en place de Ia canette (SI, le fil se droulant vers larriere. Tirer le fil par Ia fente T et, sous le ressort, jusqu (ouverture U.
Spoel inleggen 5: Draad van u af leggen. Spoel in de spoelhuls duwen: dan de draad via gleuf T onder veer U doortrekken.
8
Unterfadenspannung prufen: Kapsel leicht ruckartig aufwartsbewegen. Sie muB stufenweise niedersinken. (Einstell schraube S nach links drehen = schwa cher, nach rechts drehen = fester>.
Checking the bobbin thread tension: With a brief sharp upward movement of your hand, the bobbin must gradually slip downwards. (Turn screw S to the left for a weaker tension and to the right for a tighter tension.>
Tension du fil de canette: Laisser pendre Ia canette garnie au fil de Ia canette. Elle dolt descendre graduelle ment quand on imprime a Ia main de legeres saccades ascendantes. Rotation de Ia vis S vers Ia gauche: reduction de Ia tension; rotation vers Ia droite: renforcement.
Spoelspanning kontroleren: Bij goede spanning moet de spoelhuls blijven zweven; door een rukje aan de draad te geven moet de spoel steeds een stukje zakken. Stelschroefje S naar rechts is vaster; naar links is lossere spanning.
4 Spulenkapsel einsetzen: Klappe T anheben und die Kapsel bis zum Anschlag auf Stift U schieben. Der Kapselfinger V muB dabei in den Aus schnitt W eingreifen.
Inserting the bobbin case: Open latch T and push the bobbin case onto pin U until it snaps in place. Bobbin case finger V must fit into cutout W.
Mise en place de Ia bolte a canette: Lever le loquet T et engager Ia bolte a canette a fond sur Ia broche U. Le doigt V dolt sengager dans lencoche W.
Spoelhuls inzetten: KIep T opnenen en de spoelhuls op stift U schuiven de hulsvinger V moet in de uitholling W vallen.
I 9
4 Oberfaden einlegen: Nadel und Faden hebel mssen oben stehen. Nhfuf anheben. Den Faden in die Fuhrung 2, den Schlitz S, nach oben in den Schlitz T, in den Fadenhebel 1, zurck durch den Schlitz T und in die rechte Fhrung U am Nadelhalter ziehen.
Upper threading: The needle and the take-up lever must be raised. Pull the thread into guide 2, slot 5, upwards into slot T, into take-up lever 1, back through slot T and into the right guide U of the needle holder.
Passage du fil daiguille: Aiguille et releveur de fil en position haute. Lever le pied presseur. Tirer le fil dans le guide 2, dans Ia fente 5, vers le haut dans Ia fente T, dans le releveur de fit 1, revenir dans Ia fente T et dans le guide-fil droit U au pince-aiguille.
Bovendraad inrijgen: Naald en draad hevel in de hoogste stand. Naaivoetje omhoog. De draad via geleiding 2, door gleuf S naar beneden, naar boven door gleuf T, in de draadhevel 1, naar bene den terug in gleuf T door het rechter draadhaakje U van het naaldslot trek- ken.
Den Oberfaden von vorn nach hinten durch das Nadelhr fdeln.
Thread the needle from the front.
Enfiler le fil daiguille de avant en arrire par le chas daiguille.
Steek de draad van voor naar achter door het oog van de naald.
4
10
7- Oberfaden festhalten. Handrad riach vorn drehen und einen Stich nhen. Nadel und Fadenhebel mssen oben stehen. Mit dem Oberfaden den Unter faden nach oben ziehen.
Hold the needle thread taut. Turn the hand wheel towards you and sew a stitch until both needle and take-up lever are up. Pull out the bobbin thread by pulling the needle thread.
Retenir le fit daiguille. Tourner le volant vers soi et coudre un point. Arrter aiguille et le releveur de fil en haut.
Tjrer te fil de canette vers le haut a aide du fit daiguille.
Bovendraad vasthouden. Handwiet met de hand naar u toe draaien en n steek maken. Naald en draadhevel in de hoog ste stand. Dan met de bovendraad de spoeldraad naar boven halen.
\
Ober- und Unterfaden nach rechts unter
den NhfuL legen.
Place both threads towards the right
under the sewing foot.
Coucher les deux fits vers larrire a droite sous te pied presseur.
Boven- en onderdraad onder de naaivoet
door naar links leggen.
4 VerschluBklappe 21 schtieBen.
Close free-arm cover 21
Fermer le capot 21.
Afsluitkapje 21 sluiten.
11
Die Maschinen haben elnen Freiarm fr rohrenfrmiges Nahgut.
The machines have a free arm for sewing tubular shaped articles.
Les machines possdent un bras libre pour Ia mise en cuvre darticles tubu aires.
De machines hebben een vrije arm voor rondvormige kledingstukken.
Ndhflche 9 an die Maschine schieben (Fhrungsstifte in die Bohrungen).
Push detachable work support 9 onto the machine (guide pins into holes).
Mettre le plan de travail 9 en place (les broches doivent sengager dans les trous correspondants).
Workbox 9 tegen de machine schuiven (stiften in openingen).
\
Stoff unter den NhfuR legen.
Place fabric under the sewing foot.
Placer du tissu sous le pied presseur.
Werkstuk onder de naaivoet leggen.
Stoffdrckerhebel 1 5 senken.
Lower presser bar lifter 1 5.
Descendre le levier 1 5.
Stofdrukker 1 5 omlaag.
/
12
I N
Wichtig! Urn em gutes Nhergebnis zu erreichen
1st foigendes zu beachten: 1. Eine einwandfreie Nadel
2. Richtige Oberfaden- bzw. Unter fadenspannung
Die Unterfadenspannung 1st vom Her
steiler richtig eingestellt. 1st nach Prufung der Unterfadenspan
nung Is. Seite 9) eine Korrektur erfor
derlich, darf die Einsteilschraube nur minimal gedreht werden.
Oberfadenspannung uberprfen:
Die normale Emnsteiiung hegt im Bereich
von 4 bis 6. Je hher die Zahi, desto fester die Spannung. Uberprft wird mit einem breiten Zickzackstich. Eine kurze Naht nhen, Die Fadenverknotung soil in der Mitte der beiden Stoffiagen hegen.
Anlasser niedertreten: Je tiefer man drckt, urn so schneiler nht die Hobby.
Operating the foot control: The farther
you press the pedal down the faster the
machine runs. Abaisser Ia pdale du rheostat: Pius Ia pddale sera abaisse, pius Ia ((HObby coudra vite. Snelheidspedaal intrappen: De voetdruk
op het pedaal regeit de snelheid van de
machine.
Oberfadenspannung 14 S = Einsteflmarkierung.
N
Needle thread tension 1 4 S = Setting mark.
Tension du fil daiguille 14 S = repre de rglage.
Bovendraadspanning 14 S: Zichtbare cijferindikatie.
4N N Important! The following is essential for obtaining
good sewing results: 1 The needle must be in order. 2. The needle and bobbin thread
tensions must be right. The bobbin thread tension has been
correctly set at the works. if after
checking the bobbin thread tensions
(see p. 91 a correction is necessary, the
adjusting screw must only be turned
minimally.
Checking the needle thread tension: Normal setting is between 4 and 6. The
higher the number, the tighter the ten
sion. To check the tension, set a wide zigzag stitch. Sew a short seam. The
threads must interlock in the middle of
the material.
13
4 N4 Important: Veillez a ceci pour obtenir une bonne couture. 1. Utiliser une aiguille impeccable et 2. Des tensions de fils bien reglees. La tension infrieure est correctement rglee a lusine. Si, aprs contrle, Ia tension infrieure (voir pag. 9) doit tre rajuste, ne tour ner que trs peu Ia vis de reglage.
Contrle de Ia tension du fil daiguille: Position normale dans Ia plage entre 4 et 6. Tension dautant plus forte que le chiffre est lev. ContrOler avec le point zigzag le plus large. Coudre quelques points. Les fils doivent se nouer dans lepaisseur des deux pus.
Belangrijk: Het verkrijgen van een goed stiksel is van onderstaande punten afhankelijk: 1. een onbeschadigde naald. 2. De juiste bovendraad- en
onderdraadspanning. De onderdraadspanning is in de fabriek op de juiste wijze ingesteld. Is na het kontroleren van de onder draadspanning (zie bladz. 9) korrektie nodig, dan het instelschroefje op de spoelhuls altijd minimaal verdraaien.
De gebruikelijke draadspanning ligt in de zone tussen 4 en 6. Hoe hoger het cijfer hoe zwaarder de spanning. Kontroleer de spanning altijd met een brede zigzagsteek. Een kort stukje proefnaaien. Verknoping van boven en onderdraad moet tussen de stoff plaats hebben.
Stoffdrckerhebel 1 5 hochstellen. Stoff nach hinten herausnehmen.
Raise presser bar lifter 1 5. Remove the fabric by pulling it towards the back.
Relever le levier 1 5. Degager le tissu vers larrire.
Stofdrukker 15 omhoog duwen. Stof onder de voet wegtrekken.
Fadenabschneider 12: Fden einlegen und nach vorne ziehen.
Thread cutter 12: Draw the threads into the slot and pull them toward the front.
Coupe-fil 12: Coucher les fils dans Ia fente et les tirer vers le bas.
Draadafsnijder 12: de draden in de gleuf leggen en naar beneden trekken.
\ / 4
4
14
N RUckwrtsnhen: Die Taste 7 nieder
drcken. Solange die Taste gedrckt wird, nht die Maschine rckwrts.
Reverse sewing: Press down control 7. The machine sews backwards as long as the control key is held down.
Couture en arrire: Abaisser Ia touche 7. La machine coud en arrire aussi longtemps que cette touche est tenue abaisse.
Afhechten: Toets 7 indrukken en de machine stikt achteruit. Zolang men de toets ingedrukt houdt blijft de machine
achterwaarts stikken.
Stichlngen-Einsteflung 27: Die gewnschte Stichlnge zwischen 0 und
4 mm unter die Einstellmarkierung S stellen. Der Bereich cc, zwischen 0
und 1 ist zum Knopflochnhen.
Setting the stitch length 27: Set the
desired stitch length between 0 and
4 mm below mark S. Range cz
between 0 and 1 is for sewing button
holes.
Regle-point 27: Regler lalongueur de
point dsire, entre 0 et 4 mm, au-des
sous du repre S. La plage cz entre 0
et 1 sert au reglage des boutonnires.
Steeklengte-instelling 27: De gewenste
steeklengte tussen 0 en 4 mm onder indikatie S draaien. De zone cZ tussen
0 en 1 is voor knoopsgaten maken.
15
7
dem Buchstaben im Fenster angegeben.
= NhfuB
= Zickzack Einstellknopf 20 (Modell 422)
Stichlangen Einstellknopf 27
(—/STRsTi) =
_____
= Stichmuster
Stretchstiche der Modelle 382 und 422
Zum Nhen der farbig abgebildeten
Stretchstiche muI ,,Stretch auf dem
Stichlngen-Einstellknopf 27 unter die
Einstellmarkierung T gedreht werden. Je
nach Stoffart kann der Stretchstich
durch Drehen nach + verlangert oder
durch Drehen nach verkrzt werden.
Nutzstichtabelle: Seite 18/19
Stretchstichtabelle: Seite 20/2 1
16
= Sewing foot
1] = Zigzag regulator knob 20
(___/STREfii) = Stitch length regulator 27
______
= Stitch pattern
Stretch stitches of Models 382 and 422
For sewing the coloured stretch stit
ches, turn stitch length regulator 27
until the word ,,Stretch on the regula
tor knob is positioned below mark T.
Depending on the material used, stretch
stitches can be lengthened byeturning
the kob toward +, or shorten d by
turing it toward .
Utility-stitch table: pages 18/19 Stretch-stitch table: pages 20/2 1
I-
Stichmuster-Einstellung Das Stichmuster in der Tabelle 26 aus
whlen. Den dazugehrenden Buch
staben (AB) durch Drehen des Stich
muster-Einstellringes 18 im Einstell
fenster 1 7 unter der Markierung S einrasten. Die zum Stichmuster geho
rende Maschineneinstellung ist ber
Selecting the stitch pattern Select the stitch pattern in table 26. Turn stitch pattern selector ring 18 until
the corresponding latter (AR) snaps in
place below mark S in display window
1 7. The machine setting for sewing the
stitch pattern chosen is indicated in the
window above this letter,
Reglage des motifs de point
Choisir le motif de point dans le tableau
26. Par rotation de Ia bague de rglage
18 des motifs, dans Ia fentre de
rglage 1 7, faire encliqueter les lettres
correspondantes (ARI en dessous du
repere S. Quant au rglage proprement
dit de a machine, compte tenu du motif
slectionn, celui-ci est indique en
dessus de Ia lettre dans Ia fentre,
= regulateur 20 du
point zigzag
F/STRETCFi) = regulateur 27 de Ia
longueur de point
_____
= motif de point
Points stretch des modles 382 et 422
Pour permettre Ia couture de points
stretch, reprsents en couleurs, placer
le mot (
) sur le regle-point 27
sous le repre T. Selon Ia nature du
tissu, le point stretch peut tre allong
par rotation vers ou raccourci par
rotation vers .
Tableau des points utilitaires
en pages 18/19
Tableau des points stretch
en pages 20/2 1
= Naaivoet
= Zigzag-instelknop
E- /STRETCH} steeklengte instelknop
______
= Steekmotieven
Stretchsteken. modellen 382 en 422
Voor hat naaien van de gekleurd
afgebeelde stretchsteken moet symbool
,,Stretch van de steeklengteknop 27
onder instelmarkering T gedraaid wor
den. Naar gelang de stofsoort kan de
steek door draaien naar . langer of
door draaien naar korter ingesteld
worde n.
Nuttige stekentabel: bldz. 18/19
Stretchstekentabel: bldz. 20/21
17
N 4 Steken instehen
Het steekmotief in tabel 26 uitkiezen.
De corresponderende letter (ARI boven
het motief, met steekkeuzering 18 in
instelvenster 17 onder markering S
draaien. In hat instelvenster is onder de
letter de bij de steek behorende
machine-installing aangegeven.
= pied presseur
Sy,nbol/Symbole Simboli/Symbool Nutzstich-Tabelle Utility stitches Points utilitaires
Stich Stitch Point
[ 1 A Knopflochsymbole Buttonhole symbols Symboles de boutonniere
Geradstich Straight stitch, Point droit, B Stichlage Mitte middle needle position deport median
I B Geradstich Straight stitch, Point droit,
C Stichlage links left needle position deport a gauche
V\JJ D Zickzackbereich Zigzag stitch range Point zigzag
\ Al / E Elastiknaht Elastic seam Point zigzag piqu
V V
Point invisible F Elastischer Blindstich Elastic blindstitch lastique
G Blindstich schmal Blindstitch, narrow Point invisible troit
\[[ H Muschelkantenstich Shell-edging stitch Point cocotte
\Jf J Verbindungsstich Joining stitch Point en crneau
K Zierelastikstich Elastic decorative Point zigzag stitch fantaisie
11111 N Zierstich Fancy stitch Point fantaisie
ItlIllIlpI Q Zierstich Fancy stitch Point fantaisie
P Zierstich Fancy stitch Point fantaisie
R Zierstich Fancy stitch Point fantaisie
18
Nt Geradstich nhen Modelle 350 und 382: Mit dem Stich muster-Einstellknopf 1 8 B oder C unter die Markierung S drehen. Die Stichlnge mit dem Stichlngen-Einstellknopf 27 whlen. Modell 422: Mit dem Einstellknopf 18, B unter die Markierung S stellen. Danach mit dem Zickzack-Einstellknopf 20 fr die Stichlage links 0 und fr die Stichlage Mitte 5 unter die Einstell markierung drehen. Stichlnge whlen.
Straight stitching Models 350 and 382: Turn stitch pat tern selector ring 18 until B or C is posi tioned below mark S. Set the stitch length by turning stitch length regulator 27. Model 422: Turn stitch pattern selector ring 18 until B is positioned below mark S. Then turn zigzag regulator knob 20 until 0 or S is positioned below the set ting mark, depending on whether you wish to sew with the needle in its left or middle position, respectively.
Points droits Modles 350 et 382: par le bouton a slectionner les motifs de point 1 8, amener lune des lettres B ou C en dessous du repre S. Regler Ia longueur de point par le regle-point 27. Modle 422: par le bouton a selection ner les motifs de point 1 8, amener Ia lettre B en dessous du repere S. Au moyen du bouton 20 a regler es points zigzags, amener ensuite le deport a gauche des points sur 0> et le deport au milieu <5 en dessous du repere de rglage. Regler finalement encore Ia longueur de point.
Rechte steek naaien Modellen 350 en 382: Met de steekkeu zering 18 B of C onder markering S draaien. De steeklengte kiezen met instelknop 27. Model 422: Met de steekkeuzering 18, B onder markering S zetten. Daarna me zigzag-instelknop 20 voor naaldstand links, 0 en voor naaldstand links, 5 onder de instelmarkering draaien. De steeklengte kiezen.
Nuttige-steken-tabel Modelle/Models
Steek 350 382 422
Knoopsgaten . , ,symbolen
Rechte steek . . .naaldstand midden
Rechte steek S S S
naaldstand links
Zigzagzone S 5
Gestikte zigzag
Rektbare blindsteek
Blindsteek, smal
Schulpsteek S 5
Verbindungssteek S S
Elastische siersteek S
Siersteek S
Siersteek 5
Siersteek
Siersteek
19
Symbol/Symbole Simboli/Symbool Stretchstich-Tabelle Stretch stitches Points stretch
Stich Stitch Point
Stretch3fach- Straight triple stretch Triple point stretchB Geradstich Mitte stitch, middle droit median
iii B Stretch-3-fach- Straight triple stretch Triple point stretch
c Geradstich links stitch, left droit a gauche
Stretch-3fach- Zigzag triple stretch Triple point stretch D Zickzackstich stitch zigzag
E Wabenstich Honeycomb stitch Point nid dabeille
F Kanten-EinfaBstich Overedgestitch, Point de bordage breit wide large
G Kanten-EinfaEstich Overedgestitch, Point de bordage schmal narrow troit
77/7 H Overlockstich Overlock stitch Point overiock
J Pulloverstich Pullover stitch Point tricot
/ K Federstich Feather stitch Point dpi\
Elastic decorative Point zigzagN Zierelastikstich stitch fantaisie
Elastic decorative Point zigzag//%2 0 Zierelastikstich stitch fantaisie
t$ P Zierelastikstich Elastic decorative Point zigzag stitch fantaisie
Elastic decorative Point zigzagR Zierelastikstich stitch fantaisie
20
Stretchsteken-tab&
Steek
Modelle/ModelS
382 422
Stretch-3voudige rechte steek, midden
Stretch-3voudige- rechte steek, links
Stretch-3voudige- zigzagsteek
Wafelsteek a
Boordsteek, breed
Boordsteek, smal )
Overlocksteek
Pulloversteek
Veerstjeessteek
Elastische siersteek
Elastische siersteek
Elastische siersteek
N
J 21
Elastische siersteek
Nadel auswechseln (System 130/705 H):
Netzstecker ziehen. Schraube S lsen.
Nadel herausnehmen. Neue Nadel
(flache Kolbenseite nach hinten) ganz
nach oben schieben. Schraube fest
drehen.
Changing the needle (System 130/705 H):
Pull out the mains plug. Loosen
screw S. Take out the needle. Push the
needle in as far as it will go (with its
flat side facing towards the back).
Tighten the screw.
Remplacement de laiguille (systme
130/705 H): Dbrancher a machine du
secteur. Desserrer (a vis S et retirer
laiguille. Engager laiguille neuve (le
mplat du talon vers larrire) jusqua Ia
bute et serrer Ia vis.
Naald wisselen: Schakel eerst de stroom
uit. Schroef Iosdraaien. Naald eruit
halen. Nieuwe naald (130/705 H) met
de platte kant naar de achterzijde, zo
hoog mogelijk in de houder schuiven.
Schroef S vastdraaien.
Transporteur abdecken: Die Stick- und
Stopfplatte auf die Stichplatte schieben
und eindrcken. Die 3 Zapfen mssen
dabei in die Bohrungen T, U und V em
rasten.
Covering the feed dog: Push the
embroidering/darning plate onto the
needle plate and lock in place. In doing
so, make sure the three pins engage in
holes T, U, and V.
Recouvrement de Ia griffe: Glisser Ia
plaque a repriser et broder sur Ia
plaque a aiguille et appuyer de manire
que es trois tenons semboItent dans
es trous T, U et V.
Transporteur afdekken: Het stopplaatje
over de tandjes schuiven en aandruk
ken. De drie pennetjes van het plaatje
moeten daarbij in de gaatjes T, U en V
van de steekplaat klikken.
4
22
4
23
Nhful, auswechseln: Netzstecker zie
hen. Roten Knopf S drcken. Der Fu
rastet aus. Changing the sewing foot: Pull out the
mains plug. To release the sewing foot,
push the red button S. Changement de Ia semelle du pied:
Dbrancher Ia machine du secteur.
Enfoncer le bouton rouge S; Ia semelle
est libre. Naaivoet wisselen: Schakel eerst de
stroom uit. Druk op rode knop S. De
naaivoet is los.
4 Nhful anbringen: Stoffdrckerhebel
senken und den Fu dabel so schieben,
daR der Steg T in die Nuten U einrastet.
Attaching the sewing foot: Lower the
presser bar lifter and at the same time
reposition the sewing foot so that stud
T fits in slots U.
Mise en place de Ia semelle: Abaisser le
levier du pied presseur et deplacer Ia
semelle de manire que ltrier T
sembolte dans les rainures U.
Naaivoet inklemmen: Naaivoet zo onder
de klem U leggen, dat de stofdrukker
precies met uitsparing U over as T klikt.
4V und W sind zum Befestigen des
Lineals. X ist die NhfuRhalterschraube.
Hole W and screw V are used for
attaching an edge guide. Screw X is the
sewing foot holder screw.
V at W servent a fixer ltrier guide
bord. La vis X fixe Ia support de
semelle.
Linea&klem: Lineaal in W steken en met
V vastzetten. X is de voethouder
schroef.
4 4 NhfIe (Normalzubehr) A NormaInhfu1 B KIarsichtfu( G Blindstichfu(? E ReiRverschluBfu9, S Stick- und Stopfplatte
Sewing feet (standard accessories) A Ordinary sewing foot B Clear-view foot G Blindstitch foot E Zipper foot S Embroidering/darning plate
Pieds presseurs (accessoires standard) A Semelle normale B Semelle transparente G Semelle a point invisible E Semelle pour poser Ia fermeture a
glissire S Plaque a repriser et a broder
Naaivoeten (standaard accessoires) A Gewone naaivoet B Borduurvoet G Blindzoomvoet E Treksluitingvoet S Stopp(aatje
Zubehrfach: Den Deckel der Nh flche 9 ffnen. Darunter ist Platz fr Nhzubehr.
Accessory box: To open the accessory compartment, open the lid of work support 9.
Boito de rangement: Ouvrir le couvercie formant plan de travail. La boite sert au rangement des accessoires de couture.
Accessoiresbakje: De deksel van werk box 9 openen. In het bakje is plaats vbor de machineaccessoires.
A 98-694 563-10
B 98-694414-011
G 98-694407-011
D 98-694404-018
I
24
25
N Zickzacknhen Modelle 350 und 382 lAbb. U>: Die
gewunschte Zickzackbreite mit dem
Stichmuster-Einstellring 18 im Bereich
W, unter die Einstellmarkierung S dre
hen. D ist der breiteste Zickzackstich.
Zigzag sewing Models 350 and 382 (III. U>: Turn
stitch pattern selector ring 18 until the
required stitch width in range W is posi
tioned below mark S. D stands for the
widest zigzag stitch.
Modell 422 (Abb. VI: Der Buchstabe 0
wird unter die Markierung S gestellt und
die Breite mit dem Zickzack-Einstell
knopf 20 unter die Markierung T
gedreht. 5 ist der breiteste Zickzack.
J
Model 422 (Ill. VI: Set letter 0 below
mark S. and turn zigzag regulator knob
20 until the desired stitch width is
below mark T. % indicates the widest
zigzag stitch.
Coutures au point zigzag
Modeles 350 et 382 (fig. U): amener Ia
largeur voulue du point zigzag par Ia
bague de reglage 18 des motifs de
point dans Ia plage de reglage W en
dessous du repere S. D correspond au
point zigzag le plus large.
Modle 422 (fig. VI: amener a lettre 0
sous le repre S et Ia largeur de point
souhaite par le bouton de reglage 20
des points zigzags sous le repere T. 5
correspond au point zigzag le plus large.
4 Zigzagnaaien Modellen 350 en 382 (afb. U>: De
gewenste zigzagbreedte met de steek
keuzering 1 8 in zone W, onder instel
markering S draaien. 0 is de breedste
zigzag steek.
Model 422 (afb. VI: Letter 0 wordt
onder markering S gezet en de breedte
wordt met zigzagknop 20 onder
markering T gedraaid. S is de breedste
zigzag.
Befestigung des Uneals (Sonderzubehr): Lineal S durch die Bohrung T schieben und mit der Schraube U festdrehen. Je nach Verwendungszweck lBt sich das Lineal auf den gewnschten Abstand einstellen Parallel verlaufende Stepp linien oder Abstepparbeiten an Kanten nht man mhelos mit dem Fhrungs lineal. Dabei luft die Stoffkante (Abb. V), oder bei parallel verlaufenden Stepplinien die zuvor genhte Stepplinie am Fuhrungslineal entlang lAbb. WI. Der Nahtverlauf wird immer ordentlich und korrekt aussehen,
Ordinary sewing foot A o clear-view foot B and edge guide (special accessory) B, straight stitch
S can be used with nearly
Fitting the edge guide (Special accessory): Push edge guide S through hole T and secure it in position with screw U. The guide can be adjusted to the desired stitching margin for various applica tions. With the edge guide attached, it is easy to sew parallel lines of stitches or to stitch parallel to the edge. The guide either follows an edge (Fig. VI or when making parallel lines of stitches runs along the preceding line of stitches (Fig. W). The seam thus made looks neat and accurate.
4 4 Abstepparbeiten NhfuB: Normal-Nhful A oder
Klarsichtful B und Fuhrungs lineal (Sonderzubehr)
Stich: B Geradstich Das Fuhrungslineal S kann bei fast allen NhfBen zum Einsatz kommen.
Top-stitching Sewing foot:
Stitch: Edge guide all sewing feet.
-I 26
pied presseur normal A
ou pied a semelle en plexiglas B et guide-droit (accessoire special)
Point: B point droit
Le guide-droit S convient a presque tous
es pieds presseurs.
Fixation du guide-droit
(accessoire special): Glisser le guide S par le trou T et serrer
a vis U. Suivant application, regler le
guide sur lcartement dsir. Le guide
droit facilite considrablement es surpi
qres parallles et le surpiquage des
bords. Ce faisant, le bord du tissu
(fig. VI ou bien a piqCre prcdente suit
le guide-droit (fig. WI. La couture sera
toujours nette et rgulire.
Watteren Naaivoetje: Normale-naaivoet A of
borduurvoet 8 en Iineaal
(extra accessoires)
Steek: B Rechte steek
De lineaa( S kan bij nagenoeg aWe naai
voetjes worden gebruikt.
Bevestigen van de Iineaal
(extra accessoires): De Iineaal S door boring T schuiven en
met schroef U vastdraaien. De Iineaal
kan op iedere gewenste breedte
afgesteld worden. Parallel lopende
stiksels of sierstiksels langs kragen,
zomen e.d. kan men moeiteloos maken
met behulp van de l(neaai. Tijdens het
doorstikken van kragen, zomen ed.
loopt de lineaa(-op de gewenste
afstand-Iangs de stofkant (afb V(. Bij
watteerwerk loopt de lineaal steeds
over het voorgaande stikse( (afb. WI.
Op daze manier komen de stiksels
correct in de stof te liggen.
Surpiquage Pied presseur:
4
28
So wird der Einstich der Nadel
reguliert Den vorbereiteten Saum unter den
BlindstichfuR legen. Der Stoffbruch des
Oberstoffes Iuft dabei am Anschlag T
des Blindstichful,es entlang. Mit der
Stellschraube S den Anschlag T soweit
nach links drehen, daR die Nadel beim
linken Einstich in den Oberstoff nur
einen Faden erfaRt (Abb. U u. VI.
Nhen Sie zunchst eine Probenaht auf
einem Stoffrest.
Thread: Stitch: Stitch length: 34 Needle: size 70 or 80
How to regulate the needle
penetration Place the prepared hem under the blind-
stitch sewing foot. The crease line of
the outer fabric runs along edge guide T
of the blindstitch sewing foot. Turn
screw S to adjust edge guide T so far
to the left that the needle picks up only
one thread of the outer fabric when
penetrating on the left side (Figs. U and
VI. First make a sewing test using a
piece of waste material.
Elastiseher Blindstich NhfuR: BlindstichfuR G Spannung: Oberfaden etwas leichter
Garn: Nhgarn Stich: F Elastischer Blindstich
Stichlnge: 34 Nadel: Strke 70 oder 80
Elastic blind stitch Sewing foot: blindstitch foot G
Tension: needle thread tension a little slack ordinary sewing thread F elastic blind stitch
29
) -5
Point invisible elastique
Pied presseur: Pied a points invisibles G
Tension: Fit daiguilte moms tendu
Fit: Fit a coudre
Point: Point invisible (astique F
Longueur de point: Aiguille:
34 Grosseur 70 ou 80
Rglage de Ia jete du point
Poser tourtet prpar sous le pied a points invisib(es. La cassure du tissu
extrieur longe (a bute T du pied a points invisibtes. A (aide de (a vis de
reglage S, dptacer a bute T vers (a
gauche de sorte que (aiguitte, au point
gauche, ne saisisse quun fit du tissu
extrieur (fig. U et V(. Raliser tout
dabord une couture dessai sur une
chute de tissu.
N Elastische blindzoom
Naaivoet: btindzoomvoet G
Spanning: bovenspanning iets
tosser
Garen: normaal naaigaren
Steek: rekbare btindsteek
Steek(engte: 34 Naatd: dikte 70 of 80
Zo wordt de insteek van de naald
geregeld De stof onder de voet teggen, met
zoom aan de onderkant. De omgestagen
rand tangs de geteiding T van de voet
taten (open. Met instelschroef S,
ptaatje T zover naar links draaien tot de
naatd met de tinkerinsteek een
dread van de bovenstof pakt, afb. U en
V. Maakt U eerst een proefnaad op een
restje stof!
I
loser Garn: feines Maschinenstickgarn Stichlange: Knopflochbereich Nadel: 7080
1. Stichmusterring 18 auf Al stellen und die erste Raupe nhen. Die Nadel hochstellen.
2. Stichmusterring 18 auf 2A4 stellen und 46 Riegelstiche nhen. Die Nadel hochstellen.
3. Stichmusterrring 18 auf A3 stellen und die zweite Raupe so lang wie die erste nhen. Die Nadel hoch stellen.
4. Stichmusterring 1 8 auf 2A4 stellen und 46 Riegelstiche nhen. Die Nadel hochstellen.
5. Stichmusterring 18 bel den Modellen 350, 382 auf C und beim Modell 422 auf B stellen. Zustzlich beim Modell 422 den Zickzackknopf 20 auf 0 stellen. Dann einige Vernh stiche nhen.
6. Das Knopfloch mit dem Pfeiltrenner (Sonderzubehr) aufschneiden.
30
Sewing buttonholes Sewing foot: clear-view foot B Tension: needle thread tension a
little slack Thread: fine machine embroidery
thread Stitch length: buttonhole range czz, Needle: sizes 70 to 80
1. Turn stitch pattern selector ring 18 to A and sew the first buttonhole seam.
2. Turn stitch pattern selector ring 18 to 2A4 and sew 4 to 6 tacking stit ches. Raise the needle.
3. Turn stitch pattern selector ring 1 8 to A3 and sew the second button hole seam as long as the first one. Raise the needle.
4. Turn stitch pattern selector ring 18 to 2A4 and sew 4 to 6 tacking stitches. Raise the needle.
5. Turn stitch pattern selector ring 18 to C on models 350 and 382, and to B on model 422. Also set zigzag regulator knob 20 on model 422 at 0. Then sew a few tie-off stitches.
6. Cut the buttonhole open with the slitting knife lspecial accessoryl.
4 Knopflcher NhfuB: KlarsichtfuS B Spannung: Oberfadenspannung etwas
Pied a semelle trans
parente B Fil daiguille un peu
moms tendu Fil a broder fin
plage boutonniere
70 a 80
1. Tourner a bague 18 des motifs sur
Al et coudre a premiere lvre. Rele
ver laiguille.
2. Tourner Ta bague 18 sur 2A4 et
coudre 4 a 6 points darrt. Arrter
aiguille en haut.
3. Tourner Ia bague 18 sur A3 et
coudre Ta deuxime lvre aussi
Tongue que Ta premiere. Arrter
laiguille en haut.
4. Tourner Ta bague 18 sur 2A4 et
coudre 4 a 6 points darrt. Arrter
Taiguille en haut.
5. Avec un modle 350 ou 382, tour
ner Ta bague 18 sur C et avec un
modle 422 sur B. Placer en plus sur
Te modle 422, le rgulateur du point
zigzag 20 sur 0. Coudre quelques
points de nouage.
6. Ouvrir Ia boutonniere au Dcouvit
len supplement).
Garen: Steeklengte: Naald:
1. Steekkeuzering 18 op Al draaien en
de eerste rups naaien. De naald
omhoog brengen.
2. Steekkeuzering 18 op 2A4 draaien
en 46 trenssteken maken. De naald
omhoog brengen.
3. Steekkeuzering 18 op A3 draaien en
de tweede rups net zo lang als de
eerste maken. De naald weer
omhoog. 4. Steekkeuzering 18 op 2A4 brengen
en met 46 trenssteken het
knoopsgat afsluiten. De naald
omhoog brengen.
5. Steekkeuzering 18 bij de modellen
350, 382 op C en bi) model 422 op
B zetten. Bovendien bij model 422
de zigzagknop op 0 zetten. Dan
enige afhechtsteken naaien.
6. Het knoopsgat mef een tornmesje
lextra a