
31
Таблица программ
Программа / Тип белья
Загрузка Возможные
дополнительные
функции
Хлопок : белое или цветное белье, например, рабочая
одежда обычной степени загрязнения, постельное белье,
столовое белье, нательное белье, салфетки.
5,5 кг
Предварительная стирка
Быстрая стирка**
Полоскание плюс
Остановка с водой в баке
Задержка пуска
Эко* : белое или цветное белье, например, рабочая
одежда обычной степени загрязнения, постельное белье,
столовое белье, нательное белье, салфетки.
5,5 кг
Синтетика : синтетические ткани, нательное белье,
цветные ткани, рубашки, не требующие глаженья, блузки.
2,5 кг
Деликатные ткани : для непрочных тканей, например,
занавесок.
2,5 кг
Легкое глаженье : меньшее сминание белья, которое
поэтому легче гладить.
1,0 кг
Предварительная стирка
Полоскание плюс
Остановка с водой в баке
Задержка пуска
Ручная стирка : тонкое белье, требующее бережной
стирки, с указанием на этикетке “ручная стирка”.
1,0 кг
Остановка с водой в баке
Задержка пуска
Шерсть : Шерсть, допускающая машинную стирку, с
указаниями на этикетке “чистая натуральная шерсть,
машинная стирка, не садится”.
1,0 кг
Остановка с водой в баке
Задержка пуска
Джинсы : стирка одежды из джинсовой ткани.
Включается функция “Полоскание плюс”.
3,0 кг
Предварительная стирка
Остановка с водой в баке
Задержка пуска
Спорт : Для очень грязной верхней спортивной одежды.
Активирована опция Предварительная стирка.
2,5 кг
Полоскание плюс
Остановка с водой в баке
Задержка пуска
Замачивание : замачивание в случае очень грязного
белья с остановкой с водой в баке.
5,5 кг
Задержка пуска
Полоскание : белье, постиранное вручную, можно
прополоскать, используя эту программу.
5,5 кг
Полоскание плюс
Остановка с водой в баке
Задержка пуска
Слив : слив после остановки с водой в баке.
5,5 кг
Отжим : отжим при скорости от 500 до 850 об/мин после
остановки с водой в боке.
5,5 кг
Задержка пуска
* Контрольная программы для испытаний согласно норме CEI 456 (программа Эко 60°).
** Несовместимо с программой Эко.

32
Как стирать ?
Первое пользование прибором
ВАЖНО !
• Проверьте, чтобы все подключения к
электросети и к сети водоснабжения
соответствовали
инструкциям
по
установке.
• Снимите полистироловую прокладку и
все другие детали в барабане.
• Выполните предварительную стирку
при 90°C, без белья, но с добавлением
моющего средства для того, чтобы
промыть бак.
Каждодневное пользование
Загрузка белья
• Откройте крышку машины.
• Откройте
барабан,
нажав
на
запирающую кнопку А: произойдет
автоматическое
открывание
двух
створок.
• Загрузите белье, закройте барабан и
крышку машины.
ВНИМАНИЕ !
Прежде чем закрывать крышку машины,
убедитесь в том, что барабан закрыт
правильно :
• створки зацеплены друг за друга,
• запирающая кнопка А освобождена.
Дозировка моющих средств
Стиральная машина сконструирована
таким
образом,
чтобы
сделать
возможным снижение потребления воды
и моющих средств, поэтому уменьшите
дозы,
рекомендованные
производителями моющих средств.
Насыпьте нужное количество моющего
средства в отсеки стирки
и
предварительной стирки ,
если выбран
режим “Предварительная стирка”. Если
нужно, добавьте кондиционер для ткани в
отсек .
В случае использования моющего
средства другого типа, обратитесь к
разделу “Моющие средства и добавки”
инструкций по стирке.
Выбор нужной программы
Описание программ для разных типов
белья приведено в таблице программ
(см. раздел с таблицей программ).
Установите переключатель программ на
нужную программу. Индикатор кнопки
“Старт/Пауза”
начинает мигать
зеленым цветом.
A

33
ВНИМАНИЕ !
При установке переключателя программ
на другую программу в процессе
выполнения цикла машина игнорирует
новую выбранную программу. кнопка
“Старт/Пауза”
начинает мигать
красным цветом.
Выбор скорости отжима
Нажимайте
последовательно
кнопку
“Отжим” ,
чтобы повысить
или
понизить
скорость
отжима в случае, если
необходимо
выполнить
отжим белья на скорости,
отличной от той, которая
была выбрана стиральной
машиной.
Можно
также
выбрать один из следующих
вариантов : “Без отжима”
*
,
“Остановка с водой в баке”
* или “Ночной режим плюс”*.
Предусмотренные
максимальные
скорости :
для программ Хлопок, Синтетика, Ручная
стирка, Шерсть, Джинсы, Спорт и Легкое
глаженье : 850 об/мин,
для программы Деликатные ткани : 700
об/мин.
По завершении программы, в случае
если выбрана функция “Остановка с
водой в баке”
или “Ночной режим
плюс”,
необходимо
для
полного
завершения цикла выбрать программу
Отжим
или Слив
.
“Остановка с водой в баке”
Слив воды после последнего полоскания
не производится, таким образом, белье
не сминается.
Выбор дополнительной функции
Дополнительные
функции
выбираются после
выбора программы,
но
до
нажатия
кнопки “Старт/Пауза”
(см.
таблицу
программ).
Нажмите нужную(ые) кнопку(и); зажгутся
соответствующие
индикаторы.
При
повторном нажатии индикаторы гаснут.
Если одна из этих опций несовместима с
выбранной программой, кнопка “Старт/
Пауза”
мигает красным светом.
Функция “Предварительная стирка”
Предварительная стирка выполняется
при температуре не более 30°C. Стадия
предварительной стирки завершается
быстрым отжимом в случае программ
для стирки хлопка и синтетики и сливом в
случае программ стирки деликатных
тканей.
Опция “Быстрая стирка”
Время стирки будет сокращено в
зависимости от выбранной программы.
Функция “Полоскание плюс”
В процессе выполнения цикла будет
добавлено
одно
или
несколько
полосканий.
Эту
функцию
удобно
использовать в случае стирки белья лиц с
чувствительной кожей и в районах с
очень мягкой водой.
Однократный выбор :
Нажмите кнопку “Полоскание плюс” .
Функция окажется включенной только
для выбранной программы.
*в зависимости от модели

34
Постоянное включение :
Нажимайте в течение нескольких секунд
кнопки “Опции”
и “Полоскание плюс”
. Функция окажется включенной
постоянно, даже при отключении прибора
от электросети.
Для отключения функции повторите ту же
процедуру.
“Задержка пуска”
Данная функция обеспечивает задержку
пуска программы стирки на 3, 6 или 9
часа; выбор времени выполняется
последовательным нажатием кнопки
“Задержка пуска” .
Можно в любой момент изменить время
задержки или отменить этот режим
совсем, для этого перед нажатием кнопки
“Старт/Пауза”
следует нажать снова
кнопку “Задержка пуска”
(отсутствие
включенного индикатора указывает на
немедленный пуск).
Если же кнопка “Старт/Пауза”
уже
была нажата и необходимо изменить
время задержки или отменить задержку
совсем, выполните описанные ниже
действия :
• Для отмены задержки и немедленного
пуска цикла нажмите кнопку “Старт/
Пауза” ,
а затем кнопку “Задержка
пуска” .
Нажмите кнопку “Старт/
Пауза” для пуска цикла.
• Для изменения времени задержки
следует перейти в положение “Выкл”
и выполнить перенастройку цикла.
ВНИМАНИЕ !
В течение периода задержки крышка
будет блокирована. Если ее необходимо
открыть, следует перевести стиральную
машину в режим паузы, нажав кнопку
“Старт/Пауза” .
Закрыв крышку,
нажмите кнопку “Старт/Пауза” .
Пуск программы
Для пуска программы
нажмите кнопку “Старт/
Пауза”
;
соответствующий
индикатор
загорится
зеленым цветом.
Считается нормальным явлением тот
факт, что переключатель программ не
поворачивается во время выполнения
цикла.
Индикатор стадии стирки,
выполняемой в данной
момент, будет включен.
: Предварительная стирка +
стирка
: Полоскание + отжим
: Конец цикла
Вмешательство в ход выполнения
программы
Добавление белья в первые 10 минут
Нажмите кнопку “Старт/Пауза”
: во
время паузы соответствующий индикатор
мигает зеленым цветом. Крышка может
быть открыта только по прошествии
примерно 2 минут после остановки
стиральной машины. Нажмите снова на
эту
кнопку
для
возобновления
выполнения программы.
Изменение выполняемой программы
Прежде чем выполнять какие-либо
изменения в выполняемой программе,
необходимо
перевести
стиральную
35
машину в режим паузы, нажав кнопку
“Старт/Пауза” .
Если выбранное
изменение невозможно осуществить,
кнопка “Старт/Пауза”
мигает красным
цветом в течение нескольких секунд.
Если все же необходимо изменить
программу,
следует
отменить
выполнение текущей программы (см.
ниже).
Отмена программы
Если необходимо отменить программу,
следует повернуть ручку переключателя
программ в положение “Выкл” .
Конец программы
Стиральная машина останавливается
автоматически; кнопка “Старт/Пауза”
гаснет, и включается индикатор
.
Крышка может быть открыта только по
прошествии примерно 2 минут после
остановки стиральной машины.
Установите
ручку
переключателя
программ в положение “Выкл” .
Выньте
белье.
Отключите
подачу
напряжения на розетку и закройте кран
подачи воды.
ВНИМАНИЕ !
Рекомендуется
оставлять
после
использования
крышку
и
барабан
открытыми с целью проветривания бака.
Режим ожидания
Если на приборе, на который подается
напряжение, не выполнялось никаких
действий в течение 10 минут перед
пуском цикла или после окончания цикла,
включается
режим
ожидания.
Все
индикаторы погаснут, а кнопка “Старт/
Пауза”
начнет медленно мигать.
Для прекращения режима ожидания
достаточно нажать какую-либо кнопку
или повернуть ручку переключателя.
36
Руководство по стирке
ВАЖНО !
Сортировка и подготовка белья
• Рассортируйте белье по типу и символу
обработки
(см.
ниже
раздел
“Международные символы”): обычная
стирка подходит для прочного белья,
которое допускает интенсивные стирку
и отжим; стирка в щадящем режиме
подходит для тонкого белья из
деликатных тканей, которое должно
обрабатываться с осторожностью. В
случае смешанной загрузки, загрузки
изделий из разного типа тканей
выбирайте программу и температуру,
соответствующую самым непрочным
волокнам.
• Цветное и белое белье стирайте
отдельно. В противном случае белое
белье
может
окраситься
или
приобрести сероватый оттенок.
• Новые цветные изделия могут иметь
избыток краски. Поэтому в первый раз
их
следует
стирать
отдельно.
Соблюдайте
указания
“Стирать
отдельно” и “Стирать неоднократно
отдельно”.
• Освободите карманы и разверните
белье.
• Удалите слабозакрепленные пуговицы,
булавки, пряжки и т.п. Застегните
застежки на молнии, свяжите шнурки и
ремешки.
• Выверните наизнанку многослойную
одежду из разных видов ткани
(спальные мешки, анораки и т.п.),
цветные трикотажные изделия, а также
изделия из шерсти и тканей с
декоративными вставками.
• Мелкие непрочные изделия (носки,
колготки, бюстгальтеры и т.п.) следует
стирать в мешке-сетке для белья.
• Занавеси следует стирать с особой
осторожностью. Снимите зажимы и
положите занавески в сетку или мешок.
Загрузка белья с учетом типа
волокон
Количества загружаемого в барабан
белья
не
должно
превышать
максимальную вместимость стиральной
машины. Эта вместимость зависит от от
типа тканей. Необходимо уменьшить
загрузку в случае махровых изделий или
слишком грязного белья.
Разные
ткани
различаются
по
занимаемому ими объему и способности
удерживать воду. Поэтому, в общем
случае, барабан заполняется следующим
образом :
• полностью, но без уплотнения, в случае
белья из хлопка, льна, смешанных
волокон,
• наполовину в случае изделий из
обработанного хлопка и синтетических
волокон,
• примерно на треть своего объема в
случае очень непрочных изделий,
например, занавесок и шерстяной/
вязаной одежды.
В случае загрузки белья разного типа
заполняйте барабан с учетом самых
непрочных тканей.
Моющие средства и добавки
Пользуйтесь только теми моющими
средствами и добавками, которые
предназначены для стиральных машин.
Следуйте инструкциям производителя с
учетом указаний, содержащихся в
разделах “Отделение для моющих
37
средств” и “Дозировка моющих средств”.
Не
рекомендуется
пользоваться
одновременно
разными
моющими
средствами, так как это может привести к
порче белья.
Количество используемого моющего
средства зависит от загрузки белья,
жесткости воды и степени загрязнения
белья.
Если вода мягкая, следует немного
уменьшить дозу моющего средства. Если
вода
жесткая
(рекомендуется
пользоваться средствами для удаления
известкового налета) или если белье
очень грязное или на нем много пятен,
немного увеличьте дозу.
Сведения о жесткости воды можно
получить,
обратившись
в
службу
водоснабжения
или
в
другую
компетентную организацию.
Cтиральные
порошки
могут
использоваться без ограничений.
В случае выбора предварительной
стирки нельзя использовать жидкие
моющие средства. При остальных циклах
без предварительной стирки такие
средства могут заливаться в шарик-
дозатор, помещаемый непосредственно
в барабан, или в отделение для моющих
средств. В обоих случаях необходимо
сразу же включать цикл стирки.
Моющие средства в таблетках или в
отдельных дозах загружаются только в
отсек основной стирки отделения для
моющих средств стиральной машины.
При обработке пятен перед стиркой
следуйте дозам и рекомендациям,
данным
изготовителем.
Если
для
обработки пятен используется моющее
средство, необходимо сразу же включить
цикл стирки.
38
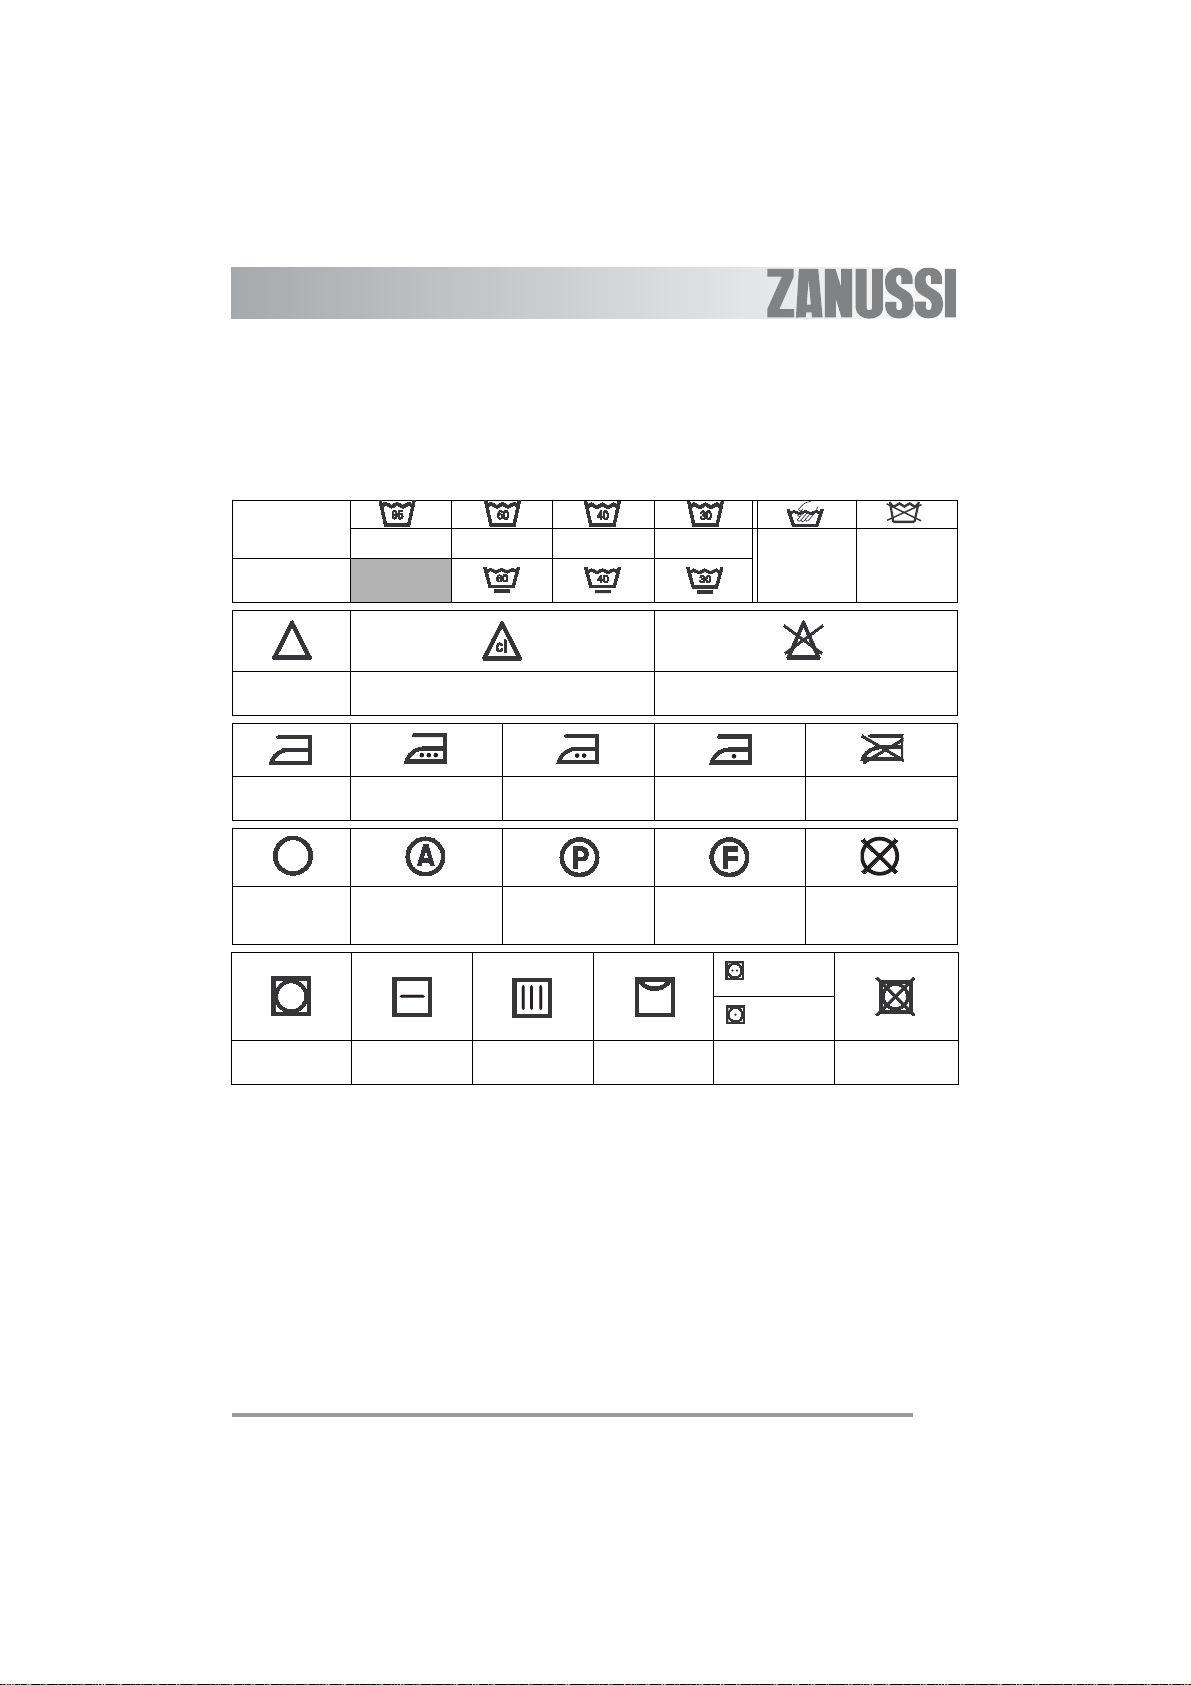
Международные символы
ОБЫЧНАЯ
СТИРКА
Стирка при
95°C
Стирка при
60°C
Стирка при
40°C
Стирка при
30°C
Щадящая
ручная стирка
Не стирать
ЩАДЯЩАЯ
СТИРКА
ОБРАБОТКА
ЖАВЕЛЕМ
Разрешено отбеливание хлором (жавелем),
только в холодной воде и разбавленным
раствором
Запрещено отбеливание хлором (жавелем)
ГЛАЖЕНЬЕ
Высокие температуры
(макс. 200°C)
Средние температуры
(макс. 150°C)
Низкие температуры
(макс. 100°C)
Не гладить
ХИМИЧЕСКАЯ
ЧИСТКА
Химическая чистка
(все обычные
растворители)
Химическая чистка
(все обычные
растворители, кроме
трихлорэтилена)
Химическая чистка
(только
углеводородными
растворителями и
R113)
Химическая чистка
запрещена
Haute
tempйrature
Tempйrature
moyenne
СУШКА
Сушить на
горизонтальной
поверхности
Сушить в
подвешенном
состоянии
Сушить на
плечиках
Разрешена сушка
в барабанной
сушилке
Запрещена сушка
в барабанной
сушилке
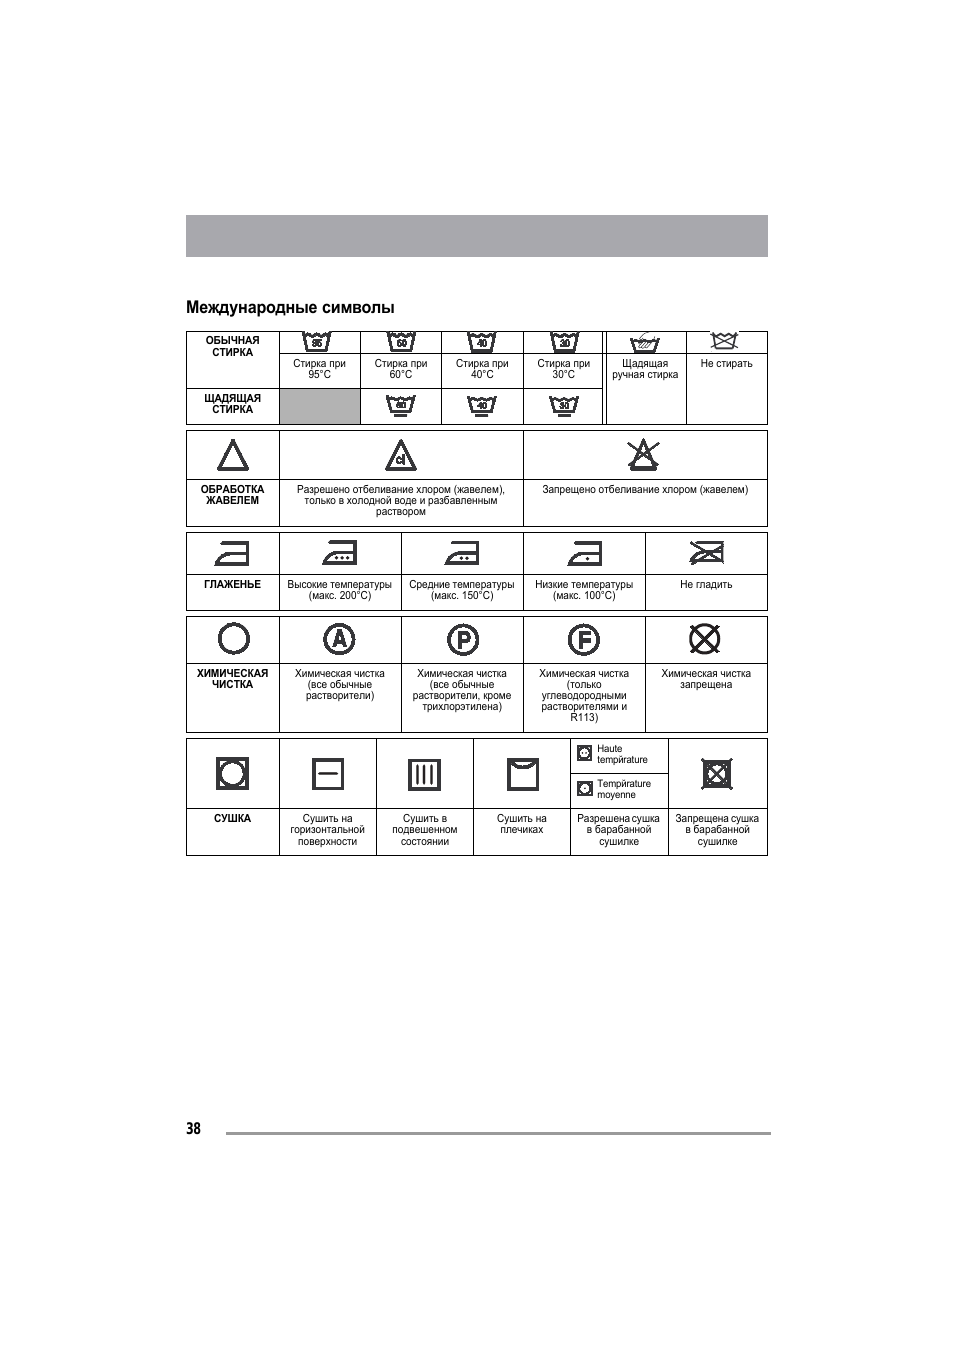
39
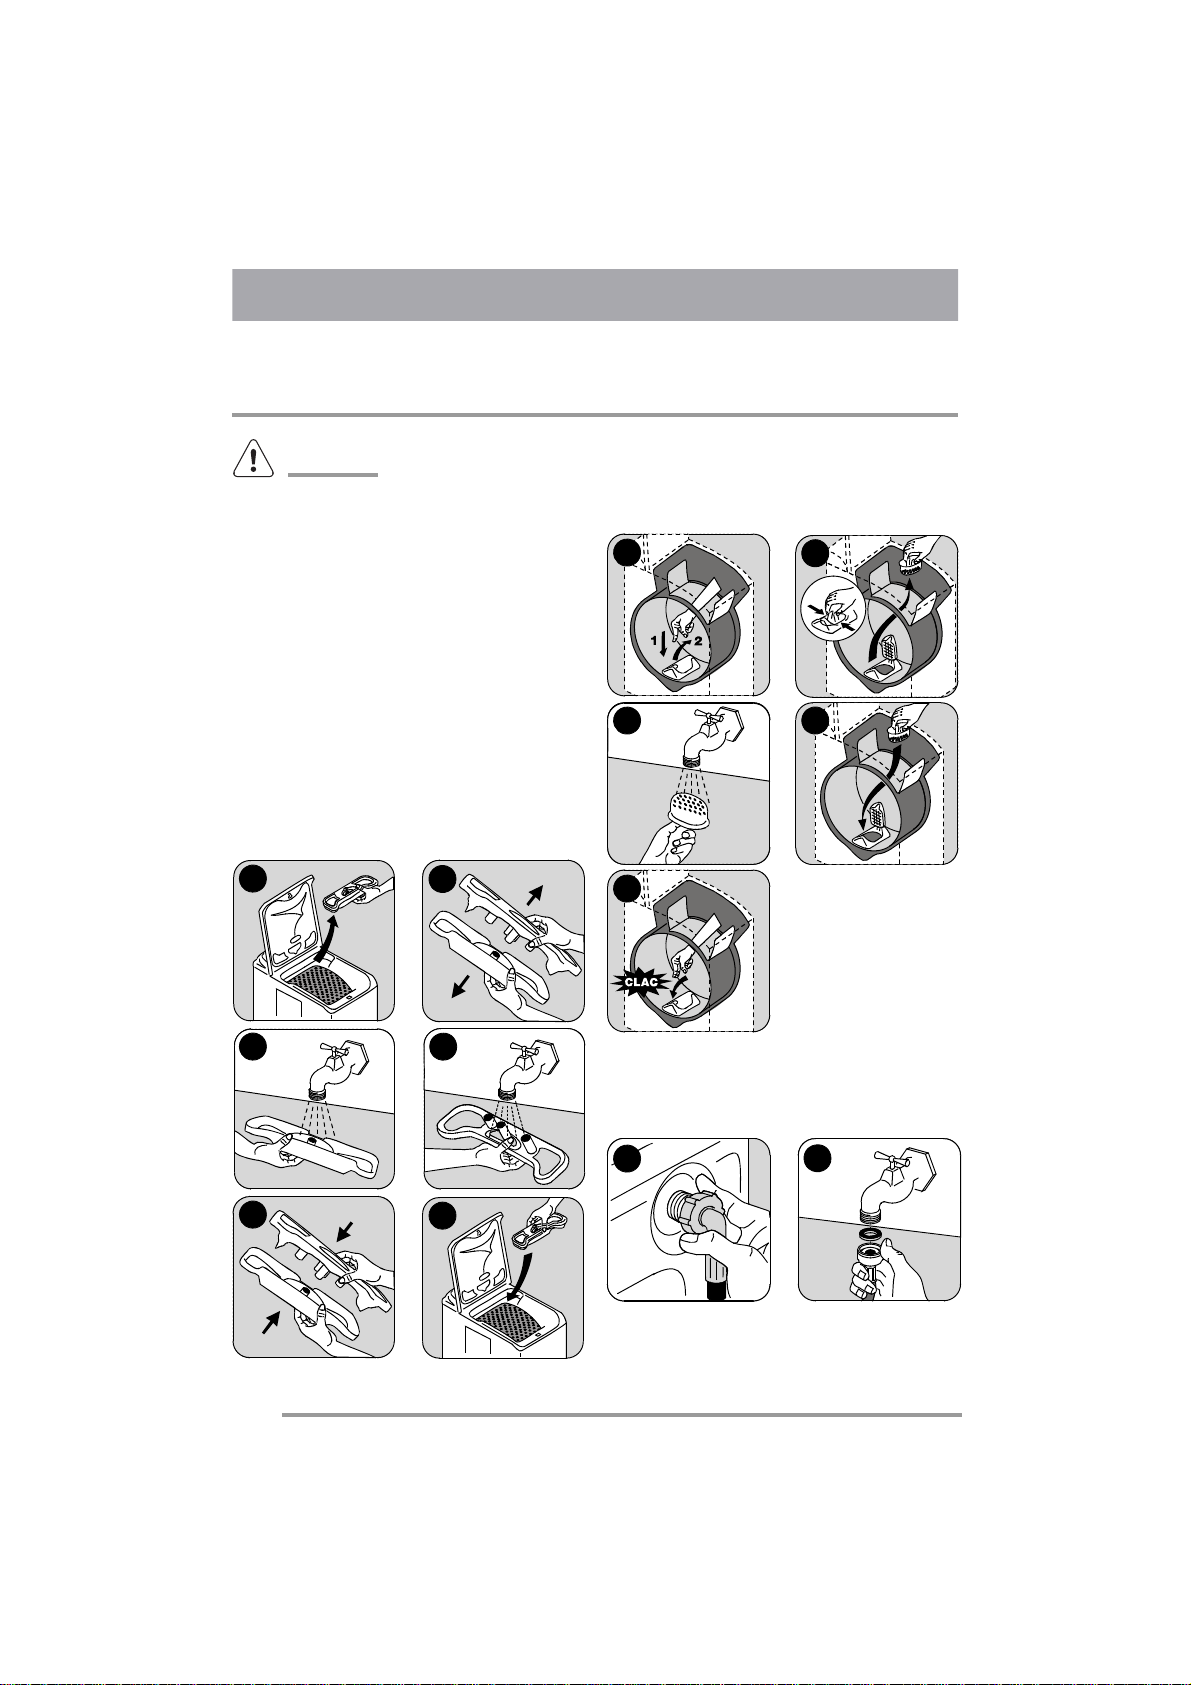
Уход и чистка
ВНИМАНИЕ !
Перед чисткой всегда отключайте прибор
от электросети.
Удаление
известковых
отложений в приборе
Для удаления известковых отложений
используйте
специальные,
не
вызывающие
коррозии
средства,
предназначенные
для
стиральных
машин. Соблюдайте приведенные на
упаковке указания по дозировке и
частоте пользования.
Корпус
Чистите корпус стиральной машины,
используя теплую воду с мягким моющим
средством.
Нельзя
пользоваться
спиртом,
растворителями
или
аналогичными средствами.
Отделение для моющих средств
Для чистки этого отделения выполните
действия, показанные ниже :
Бачок для сбора предмето
Выполняйте регулярную очистку бачка
для сбора предметов, расположенный в
нижней части барабана :
1
2
3
4
5
6
1
2
3
4
5
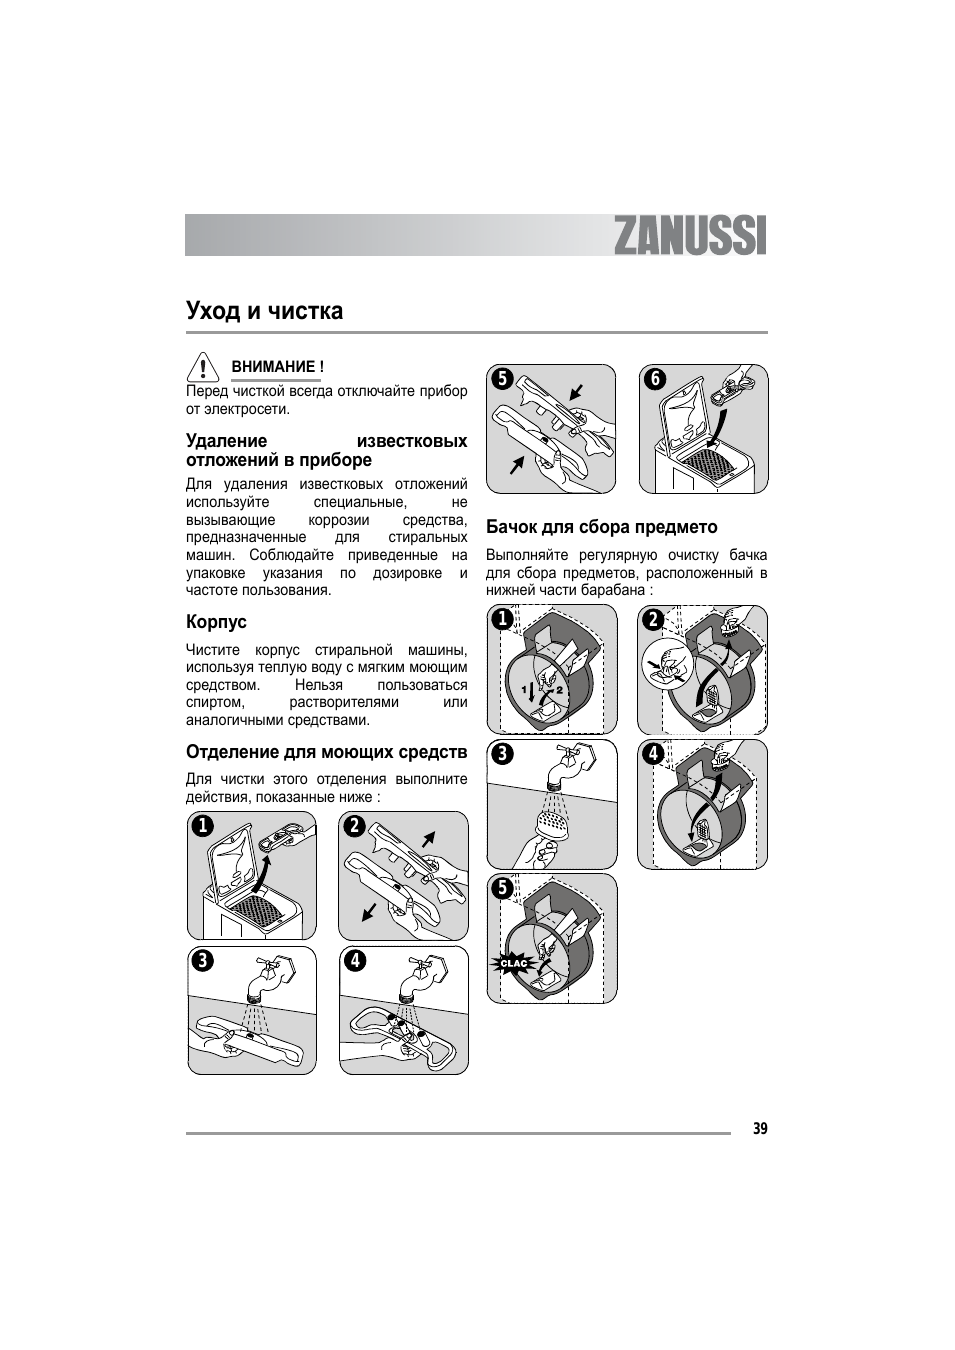
40
Фильтры на линии подачи воды
Для чистки этих фильтров выполните
действия, показанные ниже :
1
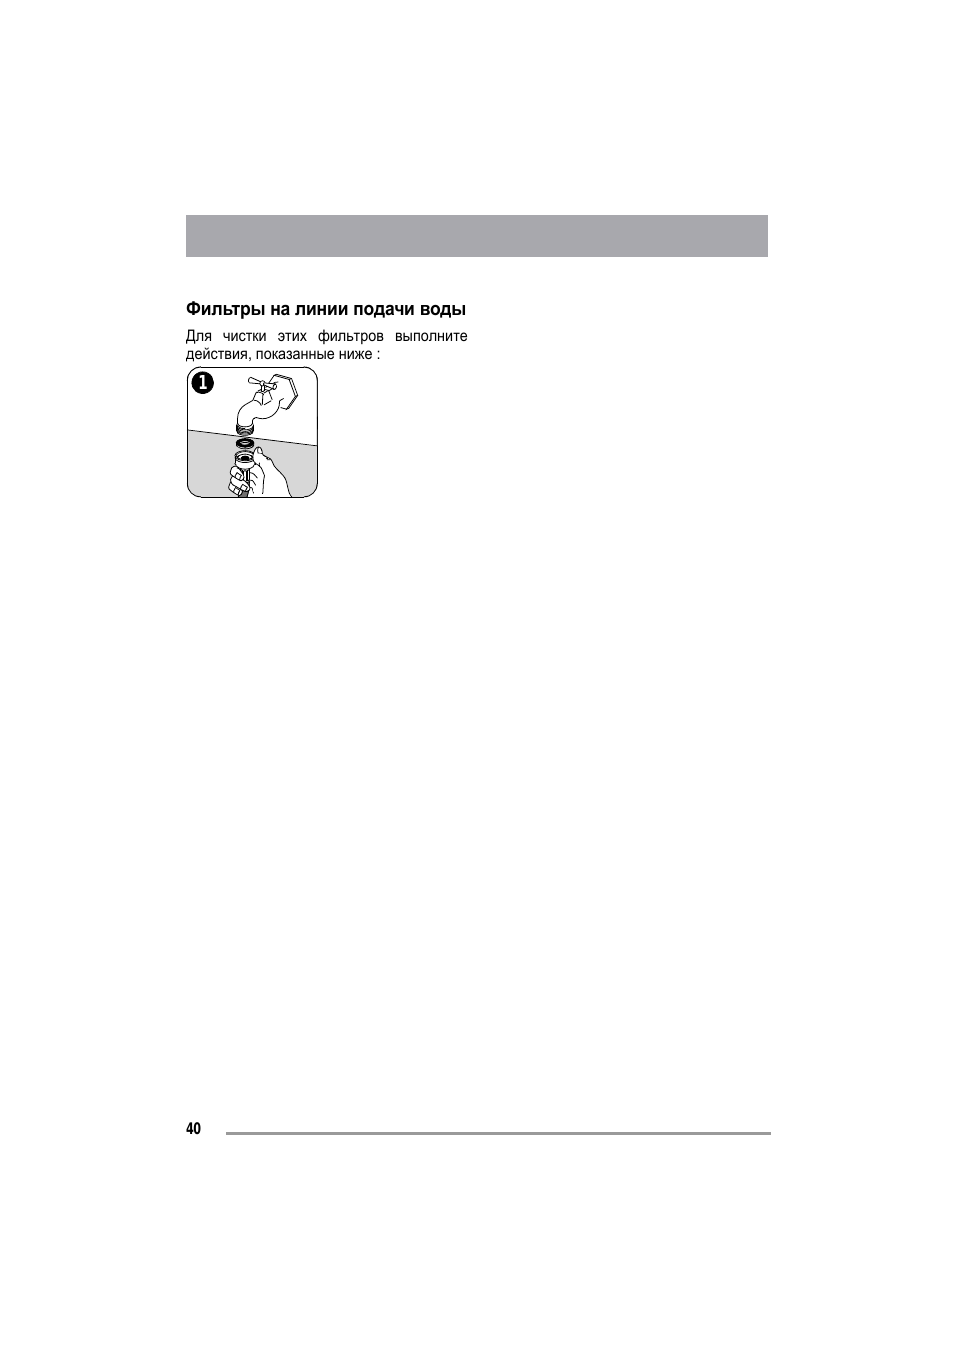
24:31
Диагностика стиральной машины Electrolux Zanussi. Коды ошибок в стиральных машинах
15:07
Замена помпы в стиральной машине
10:00
Сброс, стирание, просмотр ошибок ZANUSSI ZWY 180 (1100) и подобных
05:34
Стираем по таймеру — как включить стиральную машину в нужное для нас время
08:46
Замена подшипника в стиральной машине Zanussi / Electrolux
01:26
Очистка фильтра насоса стиральной машины Zanussi с вертикальной загрузкой
53:10
Ремонт фланца подшипников в стиральной машине
05:37
Стиралка не сливает. Решение!!
Нажмите на кнопку для помощи
Manuals.eu
- Manuals.eu
- Zanussi
- Home & Kitchen
- Washing machines
- ZWP580
- Manual
×
1
2
3
4
5
6
7
8
9
10
11
12
13
14
15
16
17
18
19
20
21
22
23
24
25
26
27
28
29
30
31
32
33
34
35
36
37
38
39
40
41
42
43
44
45
46
47
48
49
50
51
52
53
54
55
56
57
58
59
60
61
62
63
64
65
66
67
68
69
70
⟨
⟩
Copyright © Manuals.eu
Agreement
Privacy Policy
Contact us

Dakujeme vám, že ste si vybrali náš spotrebic
Prajeme vám, aby vám váš nový spotrebic
prinášal radost, a dúfame, že pri výbere
dalších spotrebicov opät uprednostníte našu
znacku.
Prosím, precítajte si pozorne návod na
používanie a uschovajte ho po celú dobu
životnosti spotrebica, aby ste si v nom v prí-
pade potreby mohli vyhladat užitocné infor-
mácie. Návod na používanie odovzdajte
prípadnému novému majitelovi spotrebica.
Спасибо, что Вы выбрали наш электробытовой
прибор
Мы желаем Вам получить массу
удовольствия от Вашего нового прибора
и надеемся, что в следующий раз Вы
вновь выберете наше изделие.
Пожалуйста, внимательно прочтите это
руководство, и во время эксплуатации
прибора используйте его в качестве
справочного документа. Руководство
пользователя должно передаваться
каждому будущему владельцу изделия.
2

Obsah
Upozornenia………………..…………..………..4
Popis zariadenia……………….…………..……6
Tabuľka programov ………..…………………..8
Ako prat’ ?…………………..…………..………..9
Návod na pranie………………….………..….13
Údržba a čistenie ……………..………………15
V prípade chybného fungovania …………17
Technické vlastnosti ………….………………19
Spotreba……………..………..…………………20
Životné prostredie……………………..………21
Inštalácia……………….………..………………22
Záruka/Servisná služba………………….….25
3
User manual
Használati
útmutató
Инструкцияѝ
поѝ
эксплуатации
Washing
machine
Automata
mosógép
Стиральнаяѝ
машина
ZWP 580

Thank you for selecting our appliance
We wish you lots of enjoyment with your new
appliance and we hope that you will consider our
brand again when purchasing household
appliances.
Please read this user manual carefully and keep
it throughout the product life cycle as a reference
document. The user manual should be passed
on to any future owner of the appliance.
Köszönjük, hogy a mi készülékünket választotta!
Kívánjuk, hogy sokszor lelje örömét új
készülékében, és reméljük, hogy ismét a mi
márkánkat keresi majd, amikor háztartási
készülékeket vásárol.
Kérjük, hogy figyelmesen tanulmányozza át
ezt a felhasználói kézikönyvet, és őrizze
meg a termék teljes életciklusa során, hogy
később is a rendelkezésére álljon. A felhasználói kézikönyvet adja át a készülék
esetleges jövőbeli tulajdonosának
Спасибо, что Вы выбрали наш электробытовой
прибор
Мы желаем Вам получить массу
удовольствия от Вашего нового прибора
и надеемся, что в следующий раз Вы
вновь выберете наше изделие.
Пожалуйста, внимательно прочтите это
руководство, и во время эксплуатации
прибора используйте его в качестве
справочного документа. Руководство
пользователя должно передаваться
каждому будущему владельцу изделия.
2

Contents
Warnings…………………………………………………4
Description of the appliance……………………….6
Programmes table…………………………………….8
How to run a wash cycle……………………………9
Washing guide ………………………………………12
Care and cleaning…………………………………..14
Operating problems ………………………………..15
Technical specifications…………………………..17
Consumption………………………………………….18
Environment…………………………………………..19
Installation……………………………………………..20
3

Warnings
WARNING !
These warnings are for the safety of you and
others around you.
Please read these points carefully before installing and using your appliance. Thank you
for your attention.
Keep this user manual with your appliance. If
the appliance is sold or given to another person, please make sure this user manual is
included. This way, the new user will have
the relevant operating instructions and warnings.
General safety
• Do not modify or attempt to modify this
appliance. This would put yourself in danger.
• Ensure that all coins, safety pins, brooches,
screws etc have been removed before starting
a washing programme. If left in washing, they
can seriously damage the appliance.
• Use the amount of detergent recommended in
the paragraph “Using the right amount of
detergent”.
• Put small items together (socks, belts etc.) in
a small linen bag or pillow case.
• Unplug and close inlet hose tap after using
appliance.
• Always disconnect the power supply from the
appliance before cleaning or maintenance.
• Do not machine wash clothes with ribbing,
unfinished or torn material.
Installation
• Unpack or ask for the appliance to be unpacked immediately upon arrival. Check the outside of the appliance is not damaged in any
way. Put any complaints you may have in writing on your copy of the delivery receipt.
• The appliance must be untied before connec-
ting to power supply or using. If all transit packaging is not completely removed, the
appliance or surrounding furniture could be
damaged.
• Connection to the water supply must be carried out by a qualified plumber.
• If your domestic electrical circuit needs adapting to allow the appliance to be plugged in,
use a qualified electrician.
• Ensure that, after installation, the power cable
is not trapped under the appliance.
• If the appliance is installed on carpeted floor,
ensure that the carpet does not obstruct any
ventilation ducts located at the base of the
appliance.
• The appliance must be equipped with an earthed power plug which conforms to regulations.
• Before connecting your appliance to the
power supply, carefully read the instructions in
the chapter entitled “Electrical connection”.
• Replacing the power cable should only be carried out by the After Sales Service.
• The manufacturer cannot be held responsible
for any damage resulting from incorrect installation.
Precautions to be taken against frost
If your appliance is exposed to temperatures
below 0°C, the following precautions must be
taken :
• Close the tap and disconnect the inlet hose.
• Place the end of this hose and the drain hose
in a basin on the floor.
• Select the Drain programme let it run until the
end of the cycle.
• Disconnect the appliance from the power supply by turning the program selector to “Stop”.
• Unplug the appliance.
• Screw the inlet hose back on and replace the
4

drain hose.
This way, the water remaining in the hoses will
be drained away, avoiding any ice formation
which would damage your appliance.
Before turning your appliance on again, ensure
that it is installed in an area where the temperature will not fall below freezing.
Use
• Your appliance is intended for normal domes-
tic use. Do not use the appliance for commer-
cial or industrial purposes or for any purpose
other than the one it was designed for :
washing, rinsing and spinning.
• Only wash items suitable for this treatment.
Refer to the instructions on the label of each
item.
• Do not put items into the washing machine
which have had stains removed with petrol,
alcohol, trichlorethylen etc. If such stain remo-
vers have been used, wait until the product
has evaporated before putting these items into
the drum.
• Your appliance has been designed for use by
adults. Ensure children do not touch the
appliance or use it as a toy.
5
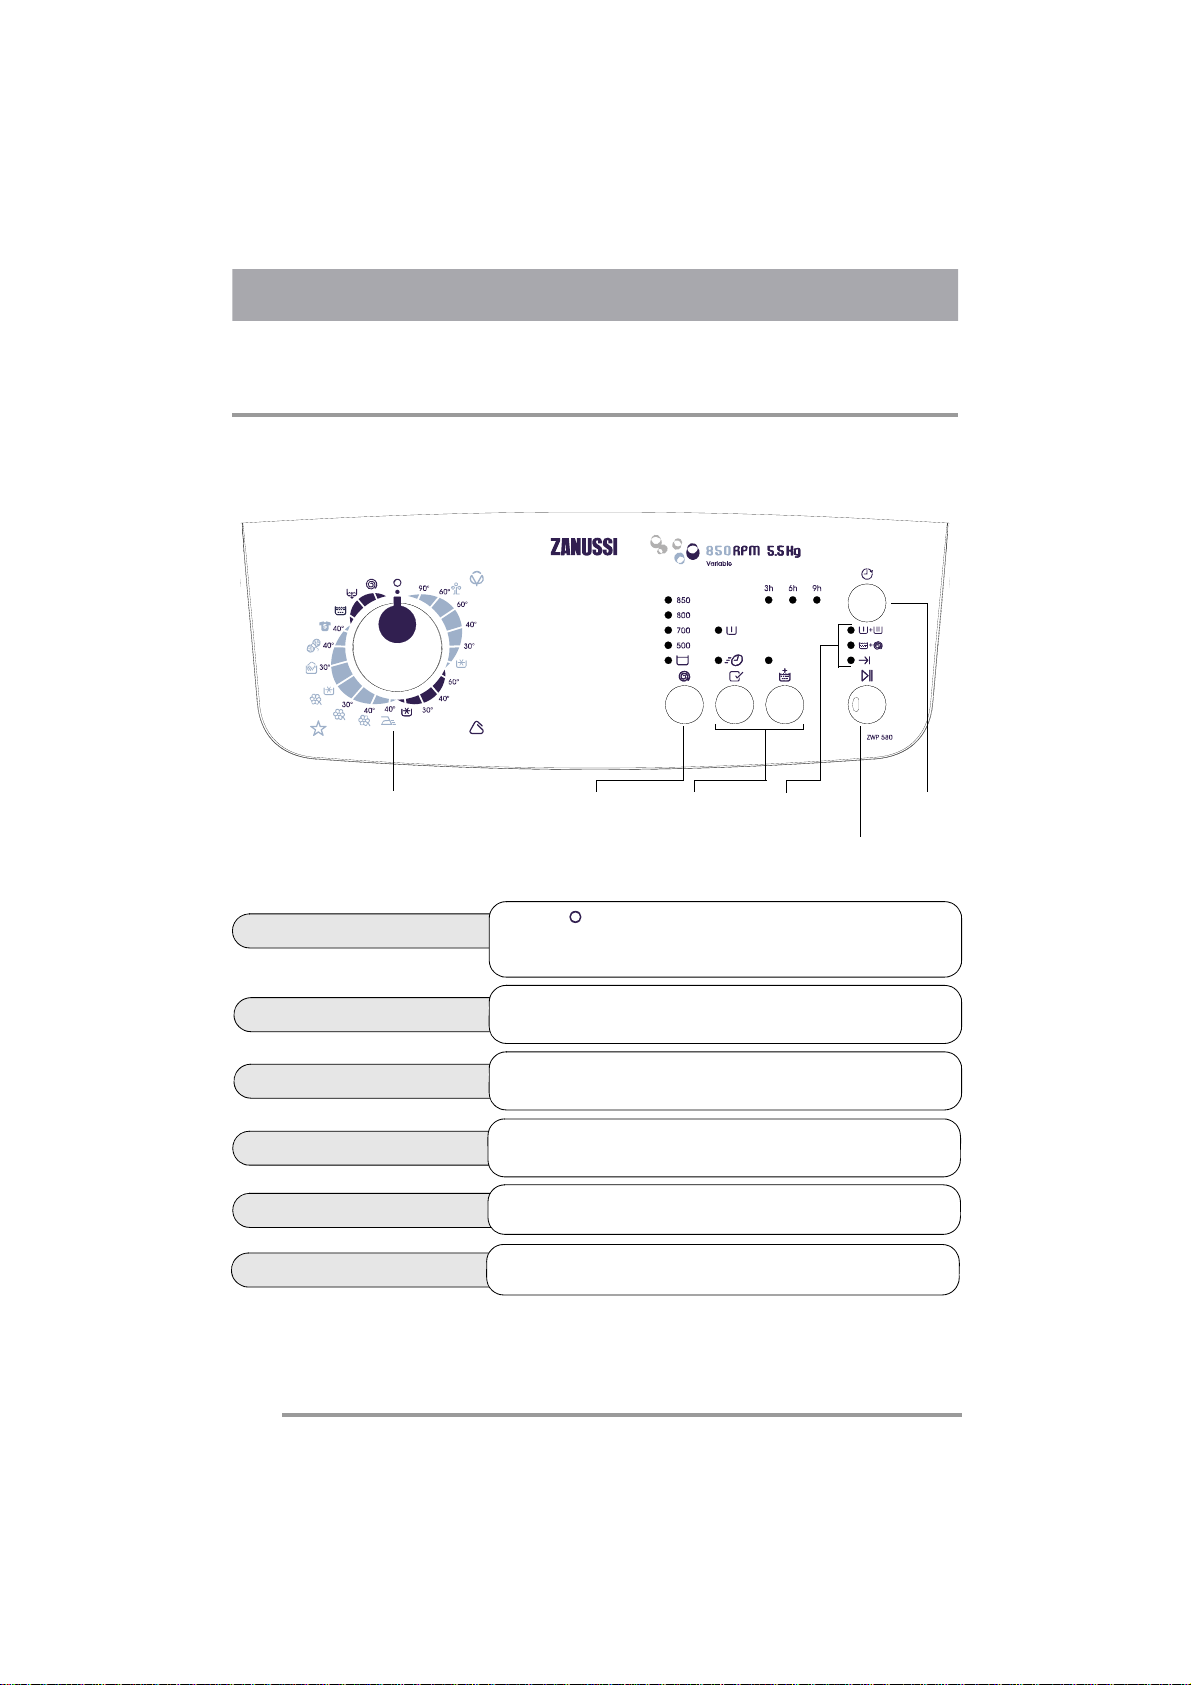
Description of the appliance
The control panel
Programme selector
Programme selector
Spin pushbutton
Options pushbutton
Lights of cycle progress
Start/Pause pushbutton
Delay start pushbutton
Spin
pushbutton
• On the position, the appliance is switched off.
•
On another position, the appliance is switched on and a programme is selected.
•
Choice of the desired spin speed or Rinse hold option by pressing
the pushbutton.
•
Choice of the options by pressing the pushbuttons.
•
Indicate the phase in progress.
•
To start the programme ou pause the programme.
•
Choice of a delay start by pressing the pushbutton.
Options
pushbuttons
Lights of cycle
progress
Delay start
pushbutton
Start/Pause
pushbutton
6
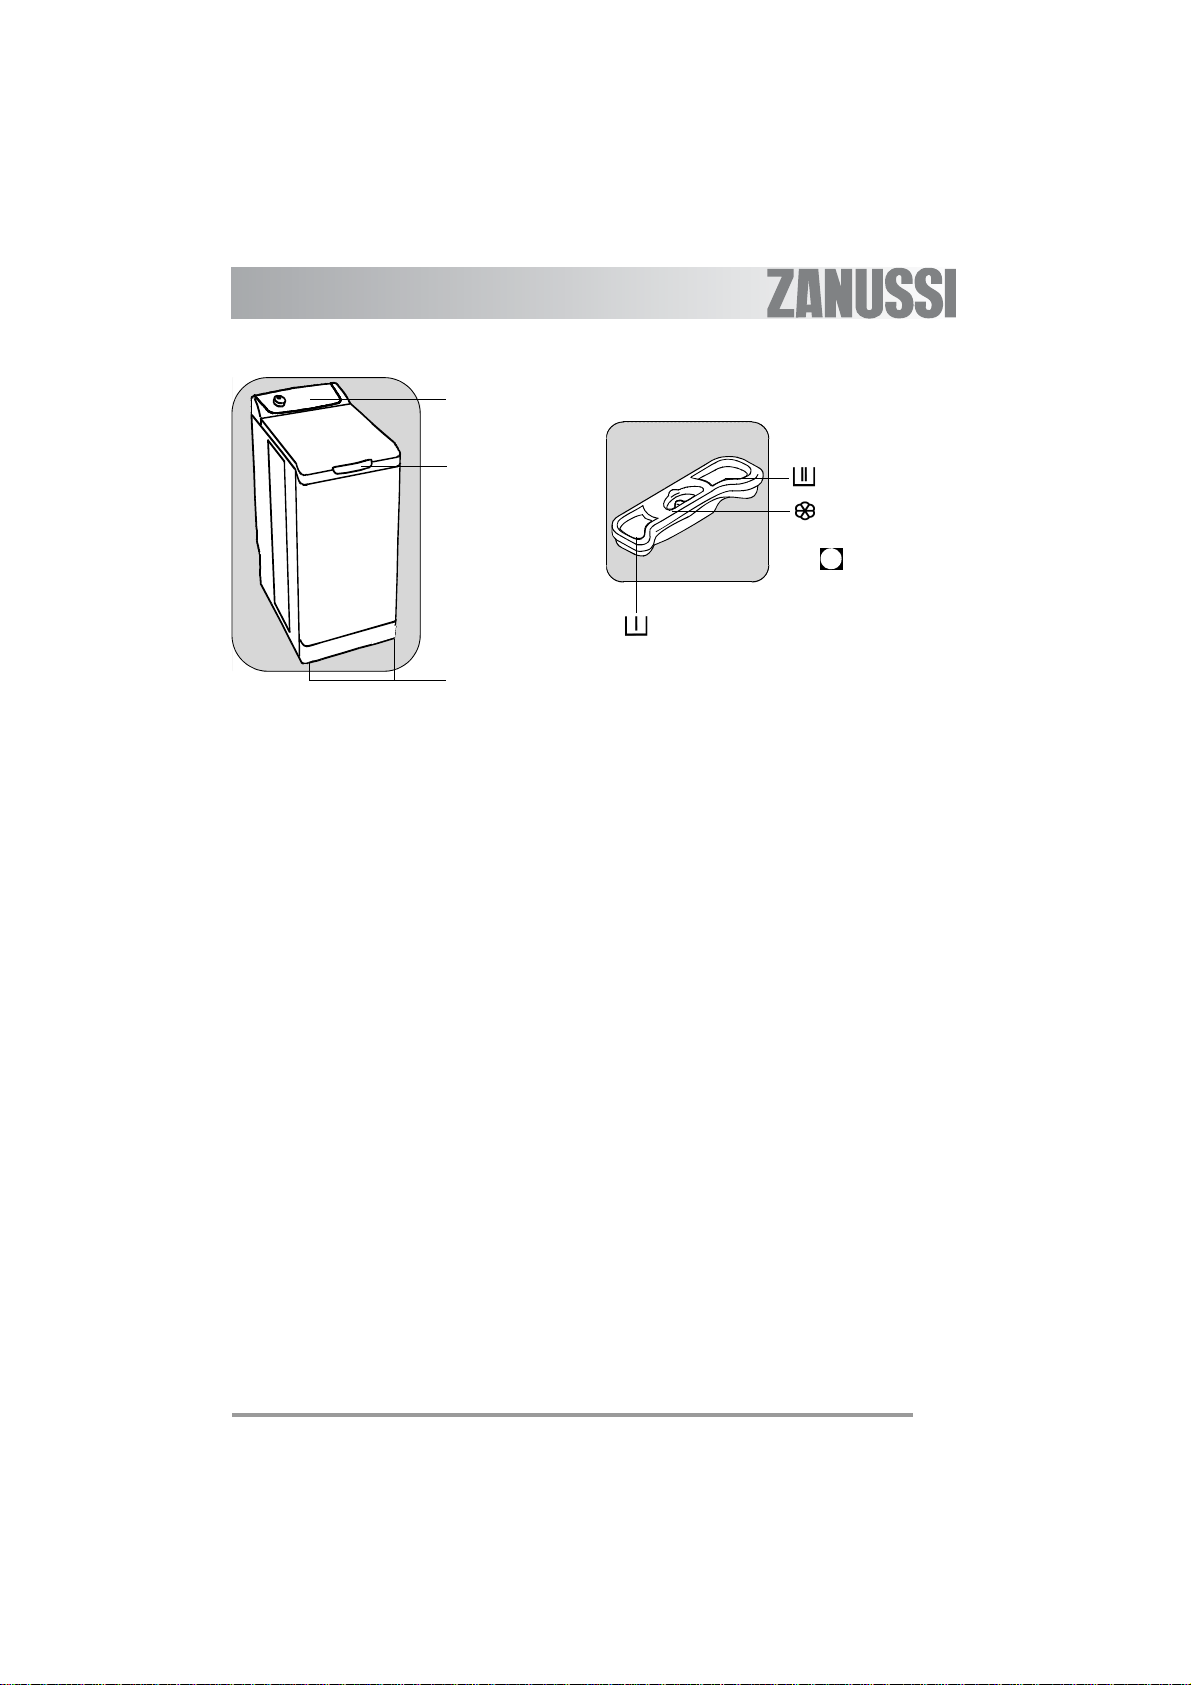
The control panel
Dispenser box
Lid handle
Adjustable levelling feet
Prewash
Wash
Softener (do not fill
above the MAX sym-
M
bol
)
7

Programmes table
Programme / Type of washing Load Possible options
Cottons : White or colour, e.g., normally soiled work clothes, bed
linen, table linen, body linen, towels.
Eco* : White or colour, e.g., normally soiled work clothes, bed linen,
table linen, body linen, towels.
Synthetics : Synthetic fabrics, body linen, coloured fabric s, non-iron
shirts, blouses.
5,5 kg Prewash
5,5 kg
2,5 kg
Quick
**
Rinse plus
Rinse hold
Delay start
Delicates : For all delicate materials, for example, curtains.
Easy iron : Reduces creasing and makes ironing easier.
Handwash : Very delicate items carrying the “wash by hand” label.
Wool : Machine washable wool carrying the labels “p ure new wool,
machine washable, does not shrink”.
Sport : For very dirty outdoor sports clothes. The Prewash option i s
activated.
Rinses : Hand washed items can be rinsed in this program. 5,5 kg Rinse plus
Drain : Runs an empty cycle after a Rinse hold or (Night Silence Plus). 5,5 kg
Spin : A spin cycle from 500 to 850 rpm after a Rinse hold (or Night
silence plus.
*
Reference programme for test conforming to CEI 456 standard (Eco 60° C).
**
Not available with Eco programme.
2,5 kg
1,0 kg Prewash
Rinse plus
Rinse hold
Delay start
1,0 kg Rinse hold
Delay start
1,0 kg Rinse hold
Delay start
2,5 kg Rinse plus
Rinse hold
Delay start
Rinse hold
Delay start
5,5 kg Delay start
8
How to run a wash cycle ?
Using for the first time
IMPORTANT !
• Ensure the electrical and water connections
comply with the installation instructions.
• Remove the polystyrene insert and all other
items inside the drum.
•
Run an initial wash cycle at 90°C, without any
washing but with detergent to clean the water
tank.
Daily use
Loading washing
• Open the lid of the appliance.
• Open the drum by depressing the locking but-
ton A : The two shutters unlock automatically.
•
Load the washing, close the drum and the lid
of your washing machine.
A
WARNING !
Before closing the lid of your appliance, ensure
that the drum is properly closed :
• When the two shutters are closed,
•
locking button A released.
Proportioning of detergents
mended by detergent manufacturers.
Pour the amount of washing powder into the
washing and prewash compartments if
you have selected the “prewash” option. Pour
fabric softener into the compartment if neces-
sary .
If you use another detergent type, refer to the
section “detergents and additives” in the
washing guide.
Selection of desired programme
You can find the right programme for different
types of washing in the programme table (see
“Programme table”).
Turn the programme selector to the required
programme. The “Start/Pause” pushbutton
flashes green.
WARNING !
If you turn the programme selector to another
programme while a cycle is in progress, the
appliance will ignore the new selected pro-
gramme. The “Start/Pause” pushbutton
flashes red for a few seconds.
Your washing machine has been designed to
reduce your water and detergent consumption.
You can therefore reduce the amounts recom-
9
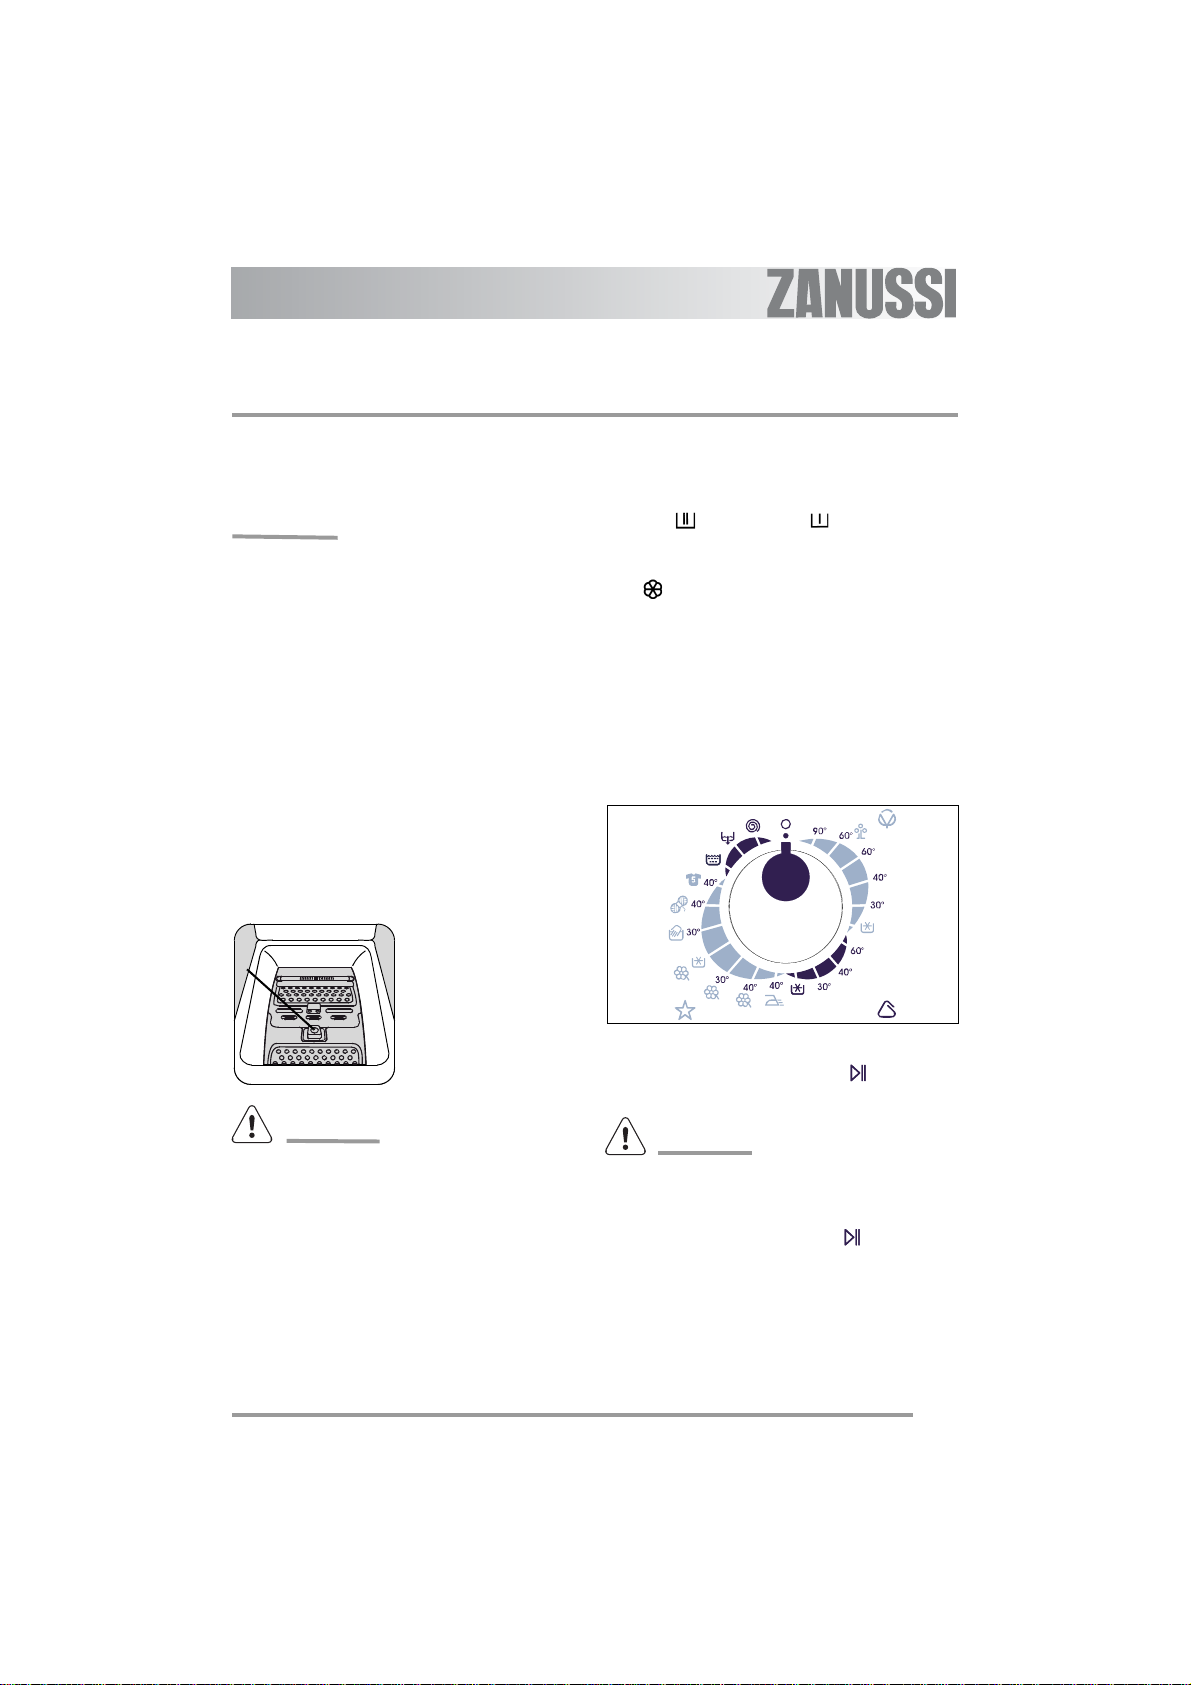
Selecting the spin speed
Press the “Spin”
to change the spin speed, if you
want your washing to be spun at
a different speed to the one
selected by the appliance. You
can also select “No spin”
hold”
*
plus”
*.
The maximum speeds are :
Cottons, Eco, Synthetics, Easy
iron, Handwash, Wool, Sport :
850 rpm,
Delicates : 700 rpm.
At the end of the programme, if you have selected “Rinse hold” or “Night silence plus”, you
then need to select a “Spin” or “Drain”
programme to finish the cycle.
“Rinse hold”
The washing machine will not drain the water
from the last rinse, so will not crease the laundry.
pushbutton
*
,
“Rinse
or “Night silence
Selecting options
You must select the different options after
selecting the programme and before
pressing the “Start/
Pause”
pushbutton
(see “Programme
table”).
Press the desired button(s) ; the corresponding
lights come on. If pressed again, the lights go
out. If one of the options is not compatible with
the selected programme, the “Start/Pause”
pushbutton flashes red..
*
depending on model
“Prewash” option
The appliance runs a prewash at 30°C max. The
prewash finishes with a short spin cycle for cotton or synthetic programmes, and with an empty
cycle for delicates programmes.
“Quick” option
The washing time will be reduced depending of
the selected programme.
“Rinse plus” option
The washing machine will add one or more rinses during the cycle.
This option is recommended for people with sensitive skin and in soft water areas.
Temporary :
Press the “Rinse plus” pushbutton. The
option is only active for the selected programme.
Permanent :
Hold down the “Option” and “Rinse plus”
pushbuttons for a few seconds. The option is
permanently activated, even if the appliance is
switched off..
To deactivate it, repeat the process.
“Delay start”
This option allows you to delay the start of a
wash programme by 3, 6 or 9 hours by pressing
the “Delay start” pushbutton.
You can change or cancel the delayed start time
at any time before you press the “Start/Pause”
pushbutton, by pressing the “Delay start”
pushbutton again (when all indicators are off, the
wash programme will start immediately).
If you have already pressed the “Start/Pause”
pushbutton and you want to change or cancel the delayed start, proceed as follows :
10
• To cancel the delayed start and start the cycle
immediately, press “Start/Pause” and then
“Delay start” . Press “Start/Pause” to
start the cycle.
• To change the timer delay period, you must go
through the “Off” position and reprogram
your cycle.
WARNING !
The lid will be locked during the delayed start
time. If you need to open it, you must first pause
the appliance by pressing the “Start/Pause”
pushbutton. After closing the lid again, press the
“Start/Pause” pushbutton.
Start of the programme
Press the “Start/Pause”
pushbutton to start the cycle ;
the corresponding light will
come on green.
It is normal for the programme
selector to remain stationary during the cycle.
The light corresponding to the
current cycle is illuminated.
Modifying the programme in progress
Before making any changes to the current programme, you need to pause the washing
machine by pressing the “Start/Pause” pushbutton. If the modification is not possible, the
“Start/Pause” pushbutton flashes red for a
few seconds. If you still decide to change the
programme, you must cancel the current programme (see below).
Cancelling the programme
If you want to cancel the programme, turn the
programme selector to the “Off” position.
End of the programme
The washing machine stops automatically ; the
“Start/Pause” pushbutton goes out and the
light comes on. The lid can only be opened
around 2 minutes after the washing machine has
come to a stop.
Turn the programme selector to the “Off” position.
Remove washing.
Unplug and close water inlet tap.
:
Prewash + Wash
:
Rinse + Spin
:
End of cycle
Interrupting a programme
Adding washing during the first 10 minutes
Press the “Start/Pause” pushbutton : the corresponding light will flash green while the
appliance is paused. The lid can only be opened
around 2 minutes after the washing machine has
come to a stop. Press the “Start/Pause” pus-
hbutton again to continue the programme.
WARNING !
We recommend leaving the lid and drum open
after use to ventilate the water tank.
Standby mode
If the appliance is on but no commands are
selected for 10 min before or after a cycle, it
goes into standby mode. All the lights go out and
“Start/Pause” flashes slowly.
T o exit stan dby mode, simply press any pushbutton or turn the programme selector.
11

Washing guide
IMPORTANT !
Sorting and preparing the washing
• Sort washing by type and care label (refer to
International symbols section below) : normal
wash for tough fabrics which can withstand
intense washing and spinning cycles ; delicate
wash for delicate fabrics which need to be
treated with care. For mixed loads, loads with
items of different types of material, choose a
programme and a temperature suitable for the
most fragile material.
• Wash whites and colours separately : Otherwise, whites will be coloured or will turn grey.
• New coloured clothes often contain excess
dye. It is recommended to wash such items
separately the first time. Follow care instructions “wash separately” and “wash separately
several times”.
• Empty pockets and unfold items.
• Remove loose buttons, pins and fasteners.
Close zip fasteners, tie ups laces and straps.
• Turn multilayered fabrics (sleeping bags, anoraks, etc.), coloured headwear, wool and
material with printed designs inside out.
• Wash small fragile items (socks, tights, bras,
etc) in a net bag.
• Take special care with curtains. Remove
hooks and place net curtains in a net or bag.
Wash loads depending on type of
materials
The amount of washing placed in the drum must
not exceed the maximum capacity of the
washing machine. This capacity can vary depending on the type of materials. Reduce the quantity if washing is heavily soiled or made of
absorbant material.
Not all textiles have the same volume in the
drum or the same water absorption levels. In
general, the drum must therefore be filled :
• to full capacity but avoiding excessive pressure on cotton, linen and cotton/linen mixtures,
• to half capacity for processed cottons and
synthetic fibres,
• to a third of its capacity for very fragile items
such as net curtains and woollens.
For mixed loads, fill drum depending on most
fragile materials.
Detergents and additives
Only use detergents and additives designed for
use in a washing machine. Refer to manufacturer’s recommendations and also Dispenser box
and Using the right amount of detergent sections.
We do not recommend mixing different types of
detergents. This may spoil the washing.
The amount of detergent to be used depends on
the size of the load, the hardness of the water
and how heavily soiled the washing is.
If the water is soft, reduce the amount slightly. If
the water contains lime scale (a descaler is
recommended) or if the washing is heavily soiled
or stained, increase the amount slightly.
You can obtain information on the hardness
level of water in your area by contacting your
water company or other competent source.
There are no restrictions on the use of powder
detergents.
Liquid detergents must not be used when a
prewash has been selected. For cycles without
prewash, they can be added either via means of
a dosing ball, or in the detergent compartment.
In either case, the wash cycle must be started
immediately.
Detergent tablets or doses must be placed in the
detergent compartment of your appliance’s dispenser box.
12
For stain removal before a wash cycle, please
refer to manufacturer’s recommended amounts
and instructions. If you use a detergent to
International symbols
NORMAL
WASH
DELICATE
WASH
Wash at 95°C Wash at 60°C Wash at 40°C Wash at 30°C Hand wash Do not wash
remove stains, the wash cycle must be started
immediately.
BLEACHING Whitewashing (bleach) allowed (cold only and in diluted
IRONING High temperature
DRY
CLEANING
DRYING Dry flat Hang dry Dry on clothes
(max 200°C)
Dry cleaning
(all common solvents)
solution)
Mid temperature
(all common solvents
except trichlorethylene
(max 150°C)
Dry cleaning
hanger
No whitewashing (bleach)
Low temperature
(max 100°C)
Dry cleaning
(only oil-based solvents
and R113)
High
temperature
Mid
temperature
Tumble drying per-
mitted
Do not iron
Do not dry clean
Do not tumble dry
13
Care and cleaning
WARNING !
Unplug the appliance before cleaning.
Descaling the appliance
To descale the appliance, use an appropriate
non-corrosive product designed for washing
machines. Read product label for recommended
amounts and how often descaling should be carried out.
The exterior
Use warm soapy water to clean the exterior of
the appliance. Never use alcohol, solvents or
similar products.
Dispenser box
To clean, proceed as follows :
1
2
Object trap
Regularly clean out the object trap which is located at the bottom of the drum :
1
3
2
4
5
14
3
4
Water inlet filters
To clean the 2 filters, proceed as follows :
1
5
6
2

Operating problems
Numerous checks were carried out on your
appliance before it left the factory. However,
should you notice a malfunction, please refer to
Problems Causes
The washing machine doesn’t start
or doesn’t fill :
The appliance fills but empties
straight away :
The washing machine doesn’t rinse
or doesn’t empty :
You have found water around the
washing machine :
•the appliance isn’t plugged in correctly, the electrical installation
isn’t working,
•the lid of your appliance and the drum shutters aren’t closed firmly,
•the programme start command hasn’t been properly selected,
•there is a power failure,
•the water supply has been cut off,
•the water inlet tap is closed,
•the water inlet filters are dirty,
•a red tab appears on the water inlet hose.
•the drainage U-piece is fixed too low (see installation section).
•the drain hose is blocked or bent,
•the drainage filter is obstructed,
•the out of balance detector has been activated : washing is unevenly distributed in the drum,
•the “Drain” programme or “Night Silence Plus” or “Rinse hold”
options have been selected,
•the height of the drainage U-piece is unsuitable.
•too much detergent has caused foam to overflow,
•the detergent is unsuitable for machine washing,
•the drainage U-piece isn’t attached correctly,
•the water inlet hose is leaking.
the sections below before contacting the aftersales service.
Wash is unsatisfactory : •the detergent is unsuitable for machine washing,
•there is too much washing in the drum,
•the wash cycle is unsuitable,
•there isn’t enough detergent.
The appliance vibrates, is noisy : •the appliance hasn’t been untied properly (see untying section),
•the appliance isn’t level and is unbalanced,
•the appliance is too close to the wall or furniture,
•washing is unevenly distributed in the drum,
•the load is too small.
15

Problems Causes
the wash cycle is much too long : •the water inlet filters are dirty,
•the power or water supply has been cut off,
•the motor overheating detector has been activated,
•the water inlet temperature is lower than usual,
•the foam detection security system has bee n activated (too much
detergent) and the washing machine has begun draining the foam,
•the out of balance detector has been activated : an extra phase has
been added to distribute washing more evenly in the drum.
The washing machine stops during
a wash cycle :
•the water or electricity supply is defective
•a Rinse hold has been selected,
•the drum shutters are open.
The lid doesn’t open at the end of
the cycle :
•the “immediate opening”* light is not lit,
•the temperature inside the drum is too high,
•the lid unlocks 1 — 2 minutes after the end of the cycle*.
**
The “Start/Pause” pushbutton
flashes red
***
:
The “Start/Pause” pushbutton**
flashes red*** :
•the lid isn’t closed properly.
•the drainage filter is obstructed,
•the drain hose is blocked or bent,
•the drain hose is fixed too high (see “Installation” section).
•the drainage pump is blocked,
•the standpipe is blocked.
The “Start/Pause” pushbutton**
flashes red*** :
Softener runs directly into the drum
•the water inlet tap is closed,
•the water supply has been cut off.
•you have gone past the MAX indicator.
when filling the dispenser box :
* Depending on model.
**On some models, the audible signals can sound.
*** After solving any problems, press the ‘Start/Pause’ pushbutton to restart the interrupted programme.
16

Technical specifications
DIMENSIONS Height
LINE VOLTAGE / FREQUENCY
POWER CONSUMPTION
WATER PRESSURE
Connection to water supply
This appliance conforms to the CEE 89-336 directive concerning the limiting of radio-electric interference and the 2006/95/CE directive concerning electrical safety.
Width
Depth
Minimum
Maximum
850 mm
400 mm
600 mm
230 V / 50 Hz
2300 W
0,05 MPa (0,5 bar)
0,8 MPa (8 bar)
Type 20×27
17

Consumption
Programme / Washing type
Cottons 90 67 2,20 140-150
Eco* 60 49 1,04 135-145
Cottons 60 62 1,30 120-130
Cottons 40 62 0,75 115-125
Cottons 30 62 0,55 110-120
Cottons
Synthetics 60 48 0,85 90-100
Synthetics 40 48 0,65 75-85
Synthetics 30 48 0,55 70-80
Synthetics
Easy iron 40 51 0,55 95-105
Delicates 40 53 0,55 60-70
Delicates 30 53 0,30 55-65
Delicates
Handwash 30 48 0,40 50-60
Wool 40 48 0,45 55-65
Temperatures
°C Litres kWh Time
cold
cold
cold
Average consumption**
62 0,45 95-105
48 0,20 70-80
53 0,15 50-60
Sport 40 50 0,70 95-105
Rinses — 32 0,05 50-60
Drain — — 0,002 0-10
Spin — — 0,015 10-20
* Reference programme for test conforming to CEI 456 standard (Eco 60° C) : 49 L / 1,04 kWh / 140 min
** Average figures which can vary depending on conditions of use.
Consumptions shown refer to the maximum temperature for each programme.
18

Environment
Disposing of the appliance
All materials carrying the symbol are recyclable. Dispose of them at a waste collection site
(enquire at your local council) for collection and
recycling.
When disposing of your appliance, remove all
parts which could be dangerous to others: cut off
the power supply cable at the base of the
appliance.
The symbol on the product or on its packaging indicates that this product may not be treated as household waste. Instead it shall be
handed over to the applicable collection point for
the recycling of electrical and electronic equipment. By ensuring this product is disposed of
correctly, you will help prevent potential negative
consequences for the environment and human
health, which could otherwise be caused by
inappropriate waste handling of this product. For
more detailed information about recycling of this
product, please contact your local city office,
your household waste disposal service or the
shop where you purchased the product.
Protecting the environment
To save water and energy and therefore help
protect the environment, we recommend the following :
• Whenever possible, use the appliance at full
capacity and avoid partial loads.
• Only use the prewash and soak programmes
for heavily soiled items.
• Use an appropriate amount of detergent for
the hardness of the water (cf. section “Using
the right amount of detergent”), the size of the
load and how soiled the washing is.
19
Installation
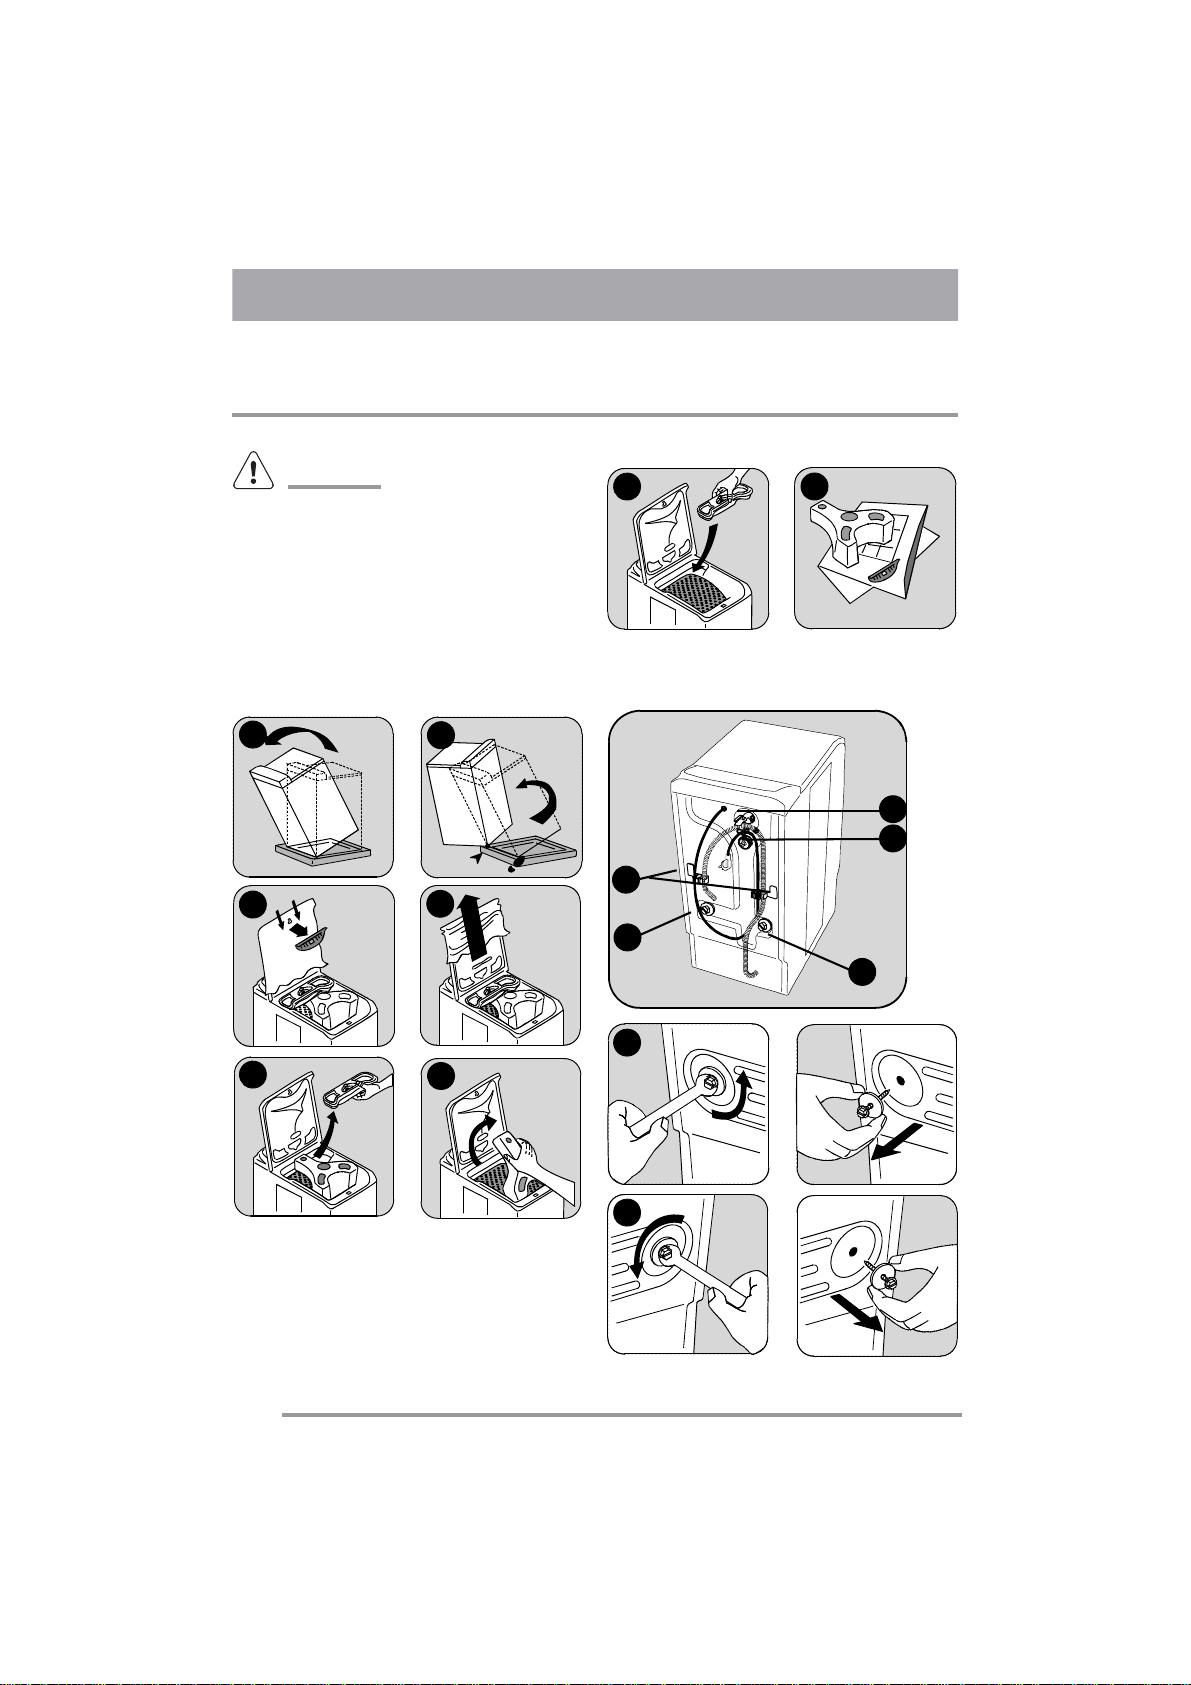
WARNING !
Remove all protective packaging for transit
before using for the first time. Keep in case needed for future transit : Transporting a non-secured appliance may damage internal components
and cause leakages and malfunctions. The
appliance can also be damaged through physical contact.
Unpacking
1
3
5
2
4
6
7 8
Untying
4
3
5
1
2
1
20
2
3
1 2
3 4
4
To install your washing machine at the same
level as surrounding furniture, proceed as follows :
5
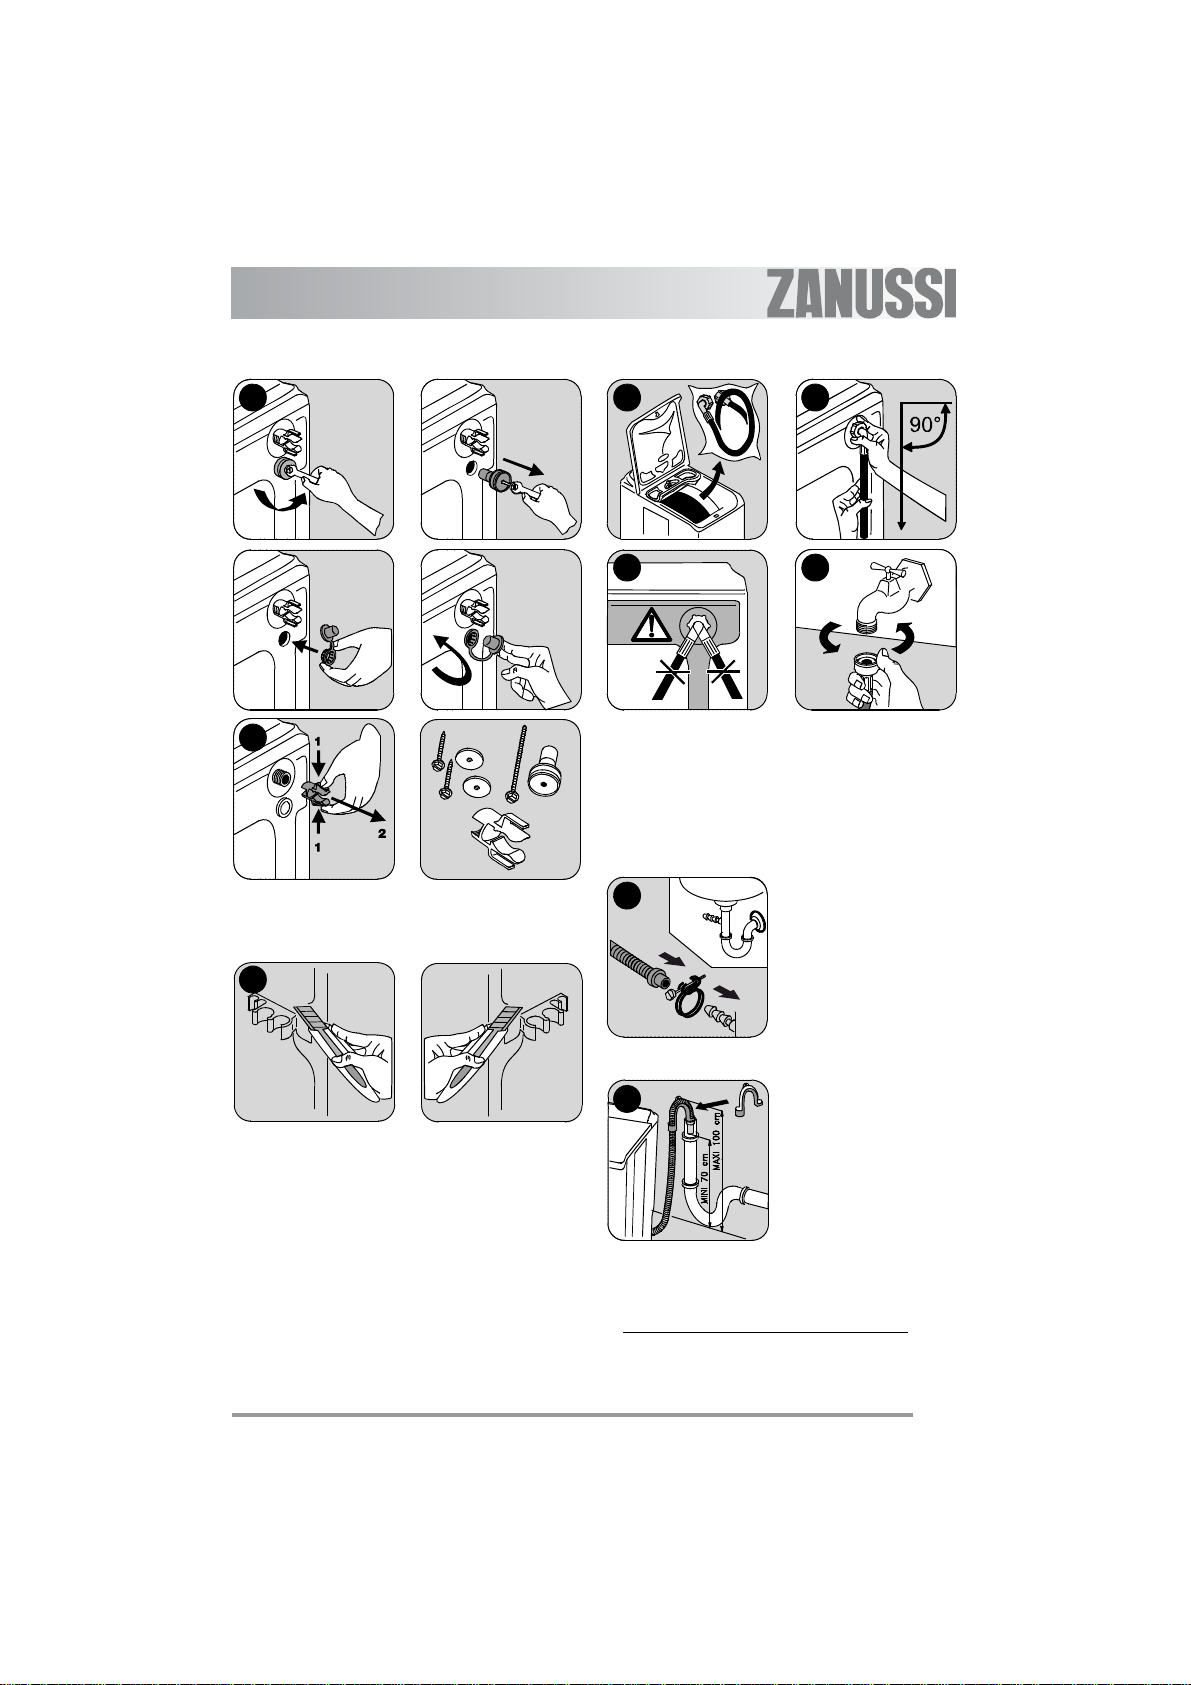
Water supply
Install the supplied water inlet hose at the rear of
your washing machine by proceeding as follows
(Do not reuse an old hose) :
Open the water inlet tap.
Check there are no leaks.
The water inlet hose can not be extended. If it is
too short, please contact the after-sales service.
Drainage
1
with the appliance
2
be able to enter the end of the hose, to avoid any
risk of siphoning.
— The connector at the
end of the flexible hose
can be attached to all
common types of standpipe.
Attach the connector to
the standpipe with the
hose clamp supplied
*
.
— Fit the U-piece on the
drainage hose.
Place everything in a
drainage point (or in a
sink) at a height of
between 70 and 100
cm. Ensure it is positioned securely. Air must
*depending on model
21
Loading…
Перейти к контенту
Стиральные машины Zanussi
- Размер инструкции: 2.72 Мб
- Формат файла: pdf
Если вы потеряли инструкцию от стиральной машины Zanussi ZWP 580, можете скачать файл для просмотра на компьютере или печати.
Инструкция для стиральной машины Zanussi ZWP 580 на русском языке. В руководстве описаны возможности и полезные функции, а также правила эксплуатации. Перед использованием внимательно ознакомьтесь с инструкцией.
Чтобы не читать всю инструкцию вы можете выполнить поиск по содержимому внутри инструкции и быстро найти необходимую информацию. Рекомендации по использованию помогут увеличить срок службы стиральной машины Zanussi ZWP 580. Если у вас появилась проблема, то найдите раздел с описанием неисправностей и способами их решения. В нем указаны типичные поломки и способы их решения.