
First of all, carefully mix one litre of milk at room temperature with one whole milk yoghurt at room temperature. Then divide the mixture between the pots and put them in the yoghurt maker. Put the lid on the yoghurt maker, then plug it in.
The markers on the lid (from 1 to 12) show the time at which the yoghurt will be ready. Make the graduation coincide with the mark located on the body of the appliance: if it is midday and you select a preparation time of 8 hours, set the graduation to number 8. Then, press the switch to start the preparation process. The light indicator will come on. Once the preparation time has ended, it is up to you to unplug the appliance and store the yoghurts in the refrigerator.
For your yoghurt maker to work correctly, you should not move it while it is in operation, you should avoid putting it in places subject to vibrations or exposed to draughts. You must never put the appliance in or on the refrigerator.
The milk is transformed into yoghurt through fermentation at an ideal temperature and for a specific time; these functions are carried out by the yoghurt maker.
Milk is a fermenting agent that constitutes a natural «catalyst» which is essential for this transformation.
Max 5 times, after 5 sets, the ferment should be renewed because after a while it becomes weaker and provides for a less solid consistency.
Yes it is, but you need to use the same cooking time.
One individual pot (150 gr) of natural plain fresh yoghurt found in the shops (preferably made from whole milk), with the longest best before date possible.
OR
Lyophilised dry ferment or dried yoghurt culture (bought in supermarkets, pharmacies and certain health food shops). Use the activation time and quantity of ferment/starter recommended in the manufacturers instructions.
OR
One pot of plain yoghurt you have already made in your yoghurt maker.
WARNING: when you have made your first set of yoghurts, you simply need to keep one jar aside in order to serve as the ferment for the others. After 5 sets, the ferment should be renewed because after a while it becomes weaker and provides for a less solid consistency.
Once plugged in, don’t move the yoghurt maker.
Don’t use your yoghurt maker on a surface that vibrates (e.g. refrigerator, dishwasher or washing machine).
The yoghurt maker does not need monitoring and automatically stops at the end of the programme. It can also operate at night.
No, transplanting is impossible unlike yoghurt.
You have to add lemon juice.
No. The lids are added after cooking, before putting the yoghurts in your refrigerator for at least 4 hours.
Before cleaning the appliance, unplug it. You should never put the body of the appliance in water. Clean it with a damp cloth, warm water and soap. Rinse and dry it. You can put the yoghurt pots, pot lids and yoghurt maker lid in the dishwasher.
Yes, the jars and lids are dishwasher safe.
Make sure to rinse the jars well after washing to remove any remaining washing liquid that could alter the firmness of the yoghurts.
After following the instructions in the user manual for starting the appliance, make sure that your electrical socket is working by plugging another appliance. If it still does not work, do not try to dismantle or repair the appliance yourself, instead, take it to an approved repair centre
Do not use your appliance. To avoid any danger, have it replaced by an approved repair centre.
Yes, that’s normal. These are noises caused by the dilation of parts.
This phenomenon happens and will fade after a while.
It takes 8 to 15 hours to obtain good yoghurt. The preparation time impacts the yoghurt consistency and taste. With longer time, the yoghurts will have more bitter flavour and firm consistency; with shorter time, they will have sweeter flavour and more liquid consistency.
Yes, you can add fruit as long as it has been boiled beforehand, food concentrates to give flavour, or jam, right from the start of preparation.
Several possible causes:
• Use of semi-skimmed or skimmed milk without adding milk powder (the milk used on its own is not rich enough in proteins).
⇨ Add 1 yoghurt jar of milk powder (2 with skimmed milk) or use whole milk and a half a jar of whole milk powder.
• The yoghurt maker was moved, bumped or vibrated during fermentation.
⇨ Do not move the yoghurt maker while it is working (do not place it on a refrigerator).
• The ferment is no longer active.
⇨ Change ferment or brand of yoghurt. Check the use-by-date of your ferment or your yoghurt.
• The yoghurt maker was opened during its fermentation cycle.
⇨ Do not remove the jars or open the yoghurt maker before the programme is finished (around 8 hours). Keep the yoghurt maker out of draughts while it is operating.
• Fermentation time too short.
⇨ Start a second cycle at the end of the first.
• The pots haven’t been properly cleaned/rinsed.
⇨ Before pouring your preparation into the pots, check that there are no traces of washing-up liquid, household cleaner or dirt on the inside of the pots.
• Fruit added to the yoghurt.
⇨ Try cooking fruits, or preferably use commercial stewed fruits or jams (at room temperature). Raw fruits will release acidic substances which prevent the yoghurt from forming correctly.
• Use the milk and ferment at room temperature or slightly warm (heat to 37°C or 40°C and measure using a thermometer). Do not use milk straight out of the refrigerator.
Plain yoghurts can be kept in the refrigerator for a maximum of 7 days, depending on the freshness of the milk. The best before date for natural yoghurts will be the date the yoghurts were made plus 7 days.
For good results and ease of preparation, use whole or semi-skimmed UHT milk or reconstituted milk powder. Fresh milk (untreated) or pasteurised milk needs to be boiled and then cooled and sieved in order to remove the skin.
No, it is necessary to have lactose for making yoghurt.
You could use other animal milk (goats, ewes, mares) or plant-based milk (soya). These types of milk will give less consistency yoghurt than cow’s milk.
Yoghurts should not be made with rice milk, hazelnut milk or chestnut milk due to lack of consistency.
Fermentation time too long, reduce the fermentation time next time you use the yoghurt maker.
Too much fermentation, reduce the fermentation time and/or add some powdered milk.
Fruit has been added to the yoghurt, try cooking fruits, or preferably use commercial stewed fruits or jams (at room temperature). Raw fruits will release acidic substances which prevent the yoghurt from forming correctly.
Clean the jars, the lid and the body with care.
Yoghurts should be kept for a maximum of 10 days.
Yoghurts of your own should only be used as ferment a maximum of 5 times.
Make sure to rinse the jars well after washing to remove any remaining washing liquid that could alter the firmness of the yoghurts.
The best temperature is between 40 and 50°C.
Yes, it’s condensation. At the end of the cycle, and in order to avoid the water going on the yoghurts, open up the cover and empty it into your sink.
This is an element that causes lactic fermentation, turning milk into yoghurt through the action of heat.
You can buy and use yoghurts which naturally contain lactic ferments, or buy powdered ferments at the pharmacist or in a natural products store; in this case, we advise you to refer to the ferment manufacturer’s instructions, which often recommend a long fermentation time.
You can then use one of your home-made yoghurts for your future preparations, but you will have to renew the ferment after 5 to 6 transplantations for a better result and a consistency that remains firm.
No, put them in the refigerator and wait around 4 hours before eating them.
After 48 hours, they will have had time to set.
Milk, preferably whole, and a lactic ferment which can be natural yogurt or powdered ferment available in supermarkets or at pharmacists; in this case, we advise you to refer to the ferment manufacturer’s instructions, which often recommend a long fermentation time.
Either just before tasting, or during preparation, mixing the sugar in with the milk and ferment.
You can also use a sugar substitute.
Yes. Cook the fruits beforehand so the acidity doesn’t prevent fermentation and then divide them in the pots.
• The longer the cooking time, the thicker and more acidic the yoghurt will be.
• The shorter the cooking time, the softer and more liquid the yoghurt will be.
You need to find the ideal cooking time in accordance with your tastes.
No. They are not designed for such use.
Your appliance contains valuable materials which can be recovered or recycled. Leave it at a local civic waste collection point.
Please go to the “Accessories” section of the website to easily find whatever you need for your product.
Find more detailed information in the Guarantee section of this website.
If you believe that one part is missing, please call Consumer Services Center and we will help you find a suitable solution.

JPM & Associés • marketing-design-communication • 10 /2011
Ref. 2653249
www.tefal.com
MULTI DELICES
EN
NL
11c
1
9
3
10
4
13
6
5
8
7
2
2
15
14
1211a 11b
11
11c
1
9
3
10
4
13
6
5
7
8
2
2
15
14
1211a 11b
11

Environment protection first!
i
Your appliance contains valuable materials which can be recovered or recycled.
‹
Leave it at a local civic waste collection point.
2
SAFETY RECOMMENDATIONS
Always read the instructions carefully before using your appliance for the first time and
keep them for future use: any use that does not conform to the instructions will release
Tefal from all responsibility.
• This appliance conforms to all relevant safety legislation, including low voltage directives,
regulations on electro-magnetic compatibility and materials in contact with foodstuffs, and
environmental legislation.
• This appliance is not intended to be used by persons (including children) with reduced physical,
sensory or mental capacities or lack of experience and knowledge, unless they have been given
supervision or instruction concerning use of the appliance by a person responsible for their safety.
• Children should be supervised to ensure they do not play with the appliance.
• Check that the power voltage of your appliance corresponds to that of your mains installation.
The warranty will be deemed void in the event of an electrical connection error.
• The appliance is designed for domestic use only. Any commercial use, inappropriate use or failure to
comply with the instructions, the manufactuer accepts no responsibility and the guarantee will not
apply.
• It is not intended to be used in the following cases, which are not covered by the guarantee:
— In kitchen corners reserved for staff in shops, offices and other professional environments.
— On farms.
— By hotel or motel clients, or on other residential premises.
— In bed and breakfast accommodation and other similar environments.
• Unplug your appliance as soon as you have finished using it or when cleaning it.
• Do not use your appliance if it is not working properly or if it has been damaged. Should this be the
case, contact a Tefal approved service centre (see after-sales list).
• Do not place the appliance near a heat source or in a hot oven, as this will cause serious damage.
• Any intervention other than cleaning and normal maintenance by the client should be performed by
a Tefal approved service centre.
• Never place the appliance, the power cord or the plug in water or any other liquid.
• Do not allow children to reach the power cord.
• Connect the appliance to a socket that has been grounded. If you wish to use an extension lead,
check that the socket has an earthed conductor.
• The power cord should never be placed close to or in contact with the hot parts of your appliance,
near a heat source or on a sharp angle.
• Do not use your appliance if the power cord or the plug is damaged. To avoid all possible danger,
have them replaced at a Tefal approved service centre (see list in the service booklet).
• For your own safety, only use Tefal accessories and spare parts which are suitable for your appliance.
• All appliances are subject to stringent quality control procedures. Practical tests are performed at
random on appliances, which may explain any signs of use.
3
EN
NL
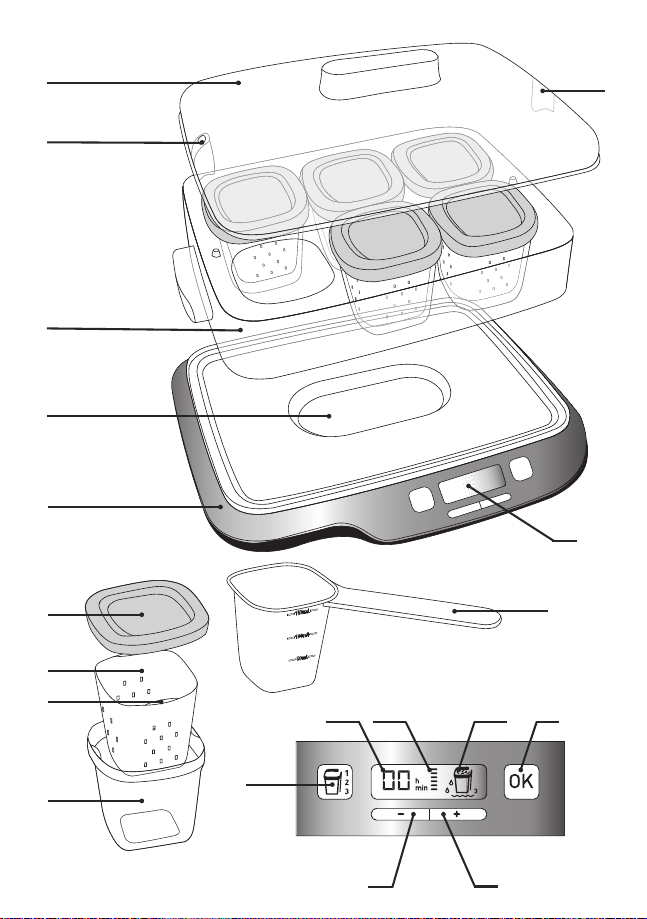
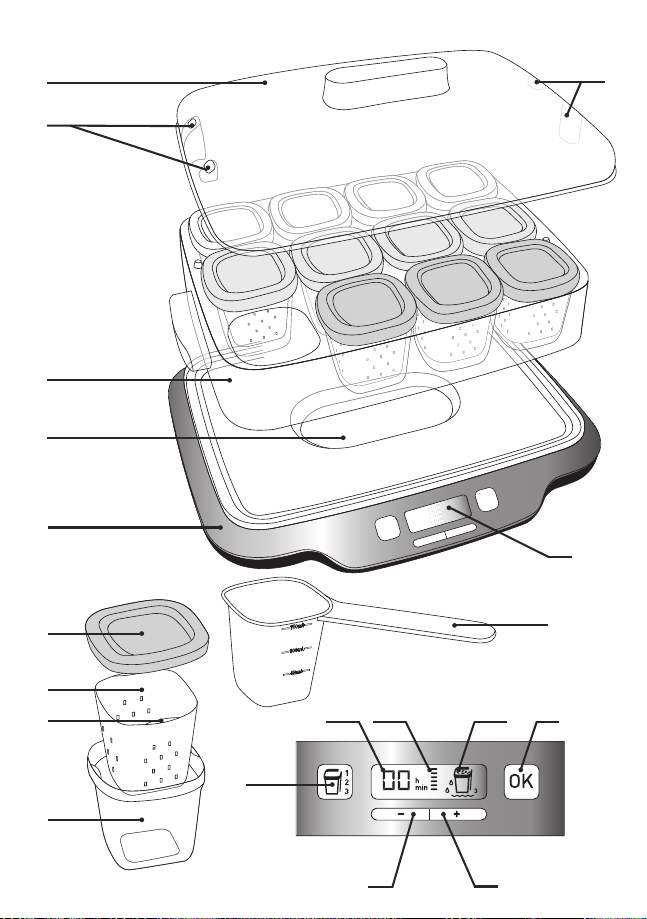
1 Appliance lid
2 Steam outlet holes
3 Lids for glass pots
1 or 3 colours depending on the model
4 Yoghurt cheese filters
5 Strainer lip
6 Glass pots
7 Pot container
8 Water tank for milk desserts
9 Base
10 Ladle / Measuring cup
Control panel
11
LCD screen
a Time remaining display
b Cycle in progress displ
c
1
yoghurt programme display or
2
fromage frais programme or
3
milk dessert programme display
12 «OK» button
13 Menu button
14 Set time — – key
15 Set time — + key
Description
Recommendations
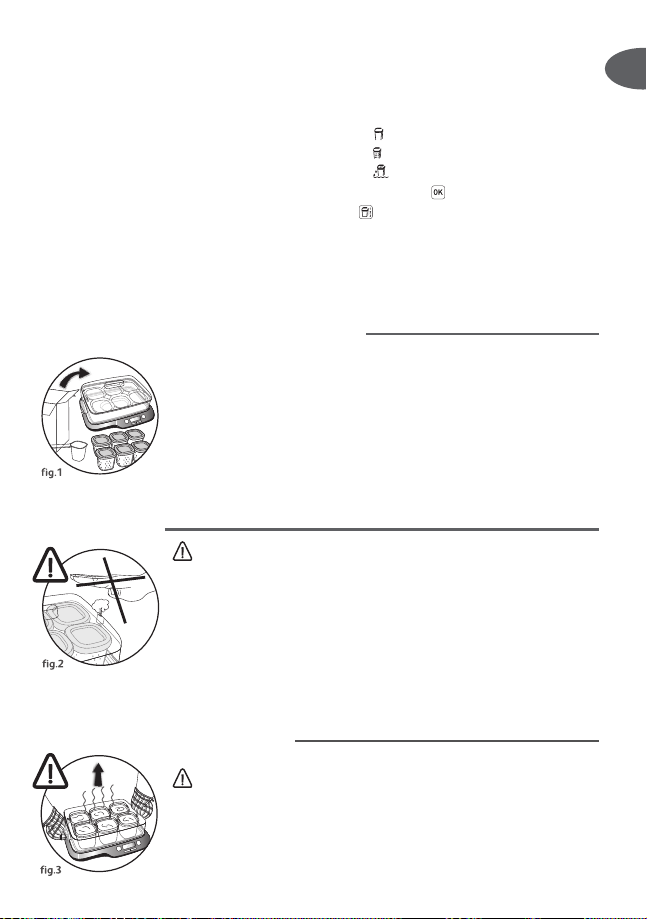
Before using for the first time
• Remove all packaging, stickers or accessories from the inside and outside
of the appliance
— fig.1.
• Clean the pots, the lids, the drip pans, the support, the lid and the ladle with
warm soapy water. You only need to wipe with a sponge to clean the inside
of the pot – but make sure you don’t use the abrasive side of the sponge
as this might damage the appliance. Never use abrasive cleaning products.
Never dip the body of the appliance in water.
During use
• The lid has steam release holes. In order to avoid risk of burning
yourself when the appliance is set to «dessert» mode, never place
your hands over these holes
— fig.2.
• Do not move the appliance during use, in particular, do not open the lid.
Do not place the appliance in places where there are vibrations (e.g. on
a refrigerator) or exposed to air currents. Respecting these
recommendations will ensure the success of your preparations.
At the end of the cycle
• After using the dessert function:
To avoid all risks of burns, turn off the appliance and wait before opening
the lid or moving the support. To move the support with the pots, use an
ovenglove or a towel
— fig.3
. Do not remove or touch the pots with your
bare hands at the end of cooking.

• At the end of cooking, condensation may form on the lid. If this
happens, remove the lid horizontally and place it in the sink to prevent
water from dripping into your preparations
— fig.4a-b
.
• Never put the glass pots in the freezer. Never put them in a micro-wave.
Never use a blowtorch.
• Never pour any very hot liquids into the glass pots.
• When the base has cooled down you can remove any remaining water
with a sponge.
4
To ensure success for all your preparations here are a few rules to follow.

5
EN
NL
Choice of ingredients
Milk
What milk should you use?
All our recipes (unless otherwise stipulated) are prepared using cow’s milk.
You can use plant milk such as soya milk for example as well as sheep or
goat’s milk but, in this case, the firmness of the yoghurt may vary
depending on the milk used. Raw milk or long-life milks and all the milks
described below are suitable for your appliance:
• Long-life sterilised milk: UHT whole milk results in firmer yoghurts.
Using semi-skimmed milk will result in less firm yoghurts. However, you
can use semi-skimmed milk and add one or two pots of powdered milk.
• Pasteurised milk: this milk gives a more creamy yoghurt with a little bit
of skin on the top.
• Raw milk (farm milk): this must be boiled. It is also recommended to
let it boil for a long time. It would be dangerous to use this milk without
boiling it. You must then leave it to cool before using it in your appliance.
Culturing using yoghurts prepared with raw milk is not recommended.
• Powdered milk: using powdered milk will result in very creamy yoghurts.
Follow the instructions on the manufacturer’s box.
Semi-skimmed
milk
Whole
milk
Raw
milk
Fluid Firm
Choose a whole
milk, preferably
long-life UHT.
Raw (fresh) or
pasteurised milk
must be boiled
then cooled and
needs the skin
removing.
yoghurts (programme 1)
and fromages frais (programme 2)
Low heat and long fermentation, that’s the secret!
The mixture is transformed into yogurt or fromage frais by being incubated at the right
temperature for a certain period.

The ferment
a) For yoghurts
This is made either from:
— One shop-bought natural yoghurt with the longest expiry date possible;
your yoghurt will therefore contain more active ferment for a firmer
yoghurt.
— From a freeze-dried ferment. In this case, follow the activation time
specified on the ferment instructions. You can find these ferments in
supermarkets, pharmacies and in certain health product stores.
— From one of your recently prepared yoghurts – this must be natural and
recently prepared. This is called culturing. After five culturing processes,
the used yoghurt loses active ferments and therefore risks giving a less
firm consistency. You then need to start again using a shopbought yoghurt
or freeze-dried ferment.
b) For other cheese preparations: fromage frais and petits Délices
• Starter: always use fromage frais to start the process.
• Rennet: to make cheese preparations, you need to add a few drops of
rennet (available from the pharmacy or specialist health food shops).
Tip: you can replace the rennet with one soup spoon of lemon juice.
When to sweeten?
For yoghurts and your fromage frais:
You can sweeten your yoghurts either when eating them or before
preparing them; this can be done by adding sugar to the milk at the same
time as the ferments and mixing well with a fork until it melts.
6
Too high a heat
may destroy the
properties of your
ferment.
If you have boiled
the milk, wait
until it has
reached room
temperature
before adding the
ferment.
Preparing the yoghurts
Preparing the mixture
• You need preferably full-cream milk and a ferment (ref choice of
ingredients).
• If you have chosen a yoghurt as a ferment: To obtain a good mixture,
delicately beat the yoghurt using a fork or whisk with a bit of milk to
transform the mixture into a smooth paste. Then add the rest of the
milk, while continuing to mix.
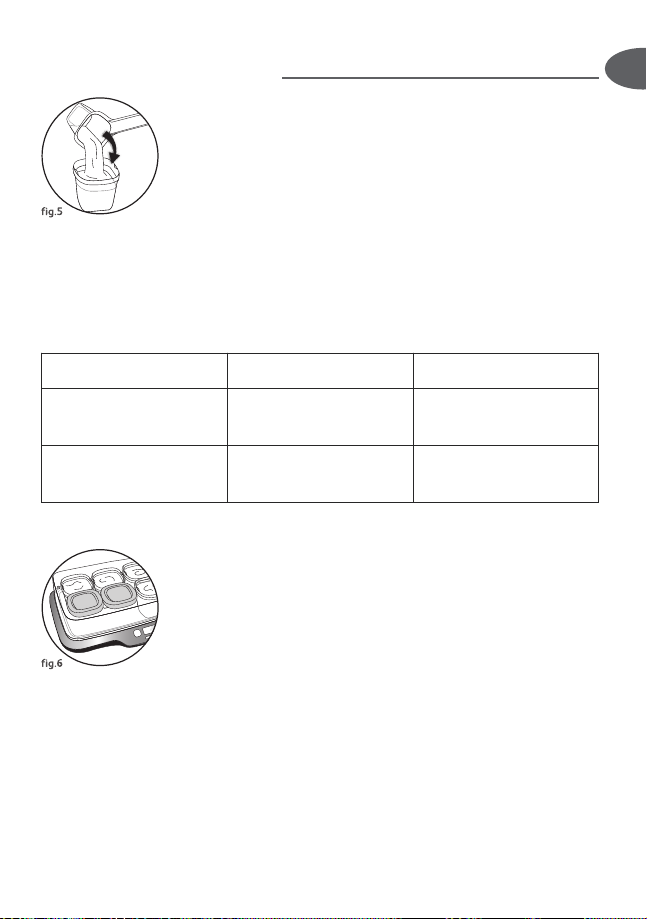
• Share the preparation among pots using the ladle supplied with the
appliance
— fig.5.
For 6 pots: 750 ml of milk, ferment of your choice.
For 12 pots: 1.5 L of milk, ferment of your choice.
Please note:
If you don’t want to use all the pots every time you must block the
unused holes with an empty pot for the 6 pot version or the pot lids
— fig.6 for the 12 pot version.
This will not affect the yoghurt fermentation time.
7
EN
NL
Number of pots Quantity of milk Ferment
6 750 ml
1 pot of yoghurt
or 1 sachet of freeze-dried
ferments
12 1.5 l
1 pot of yoghurt
or 1 sachet of freeze-dried
ferments
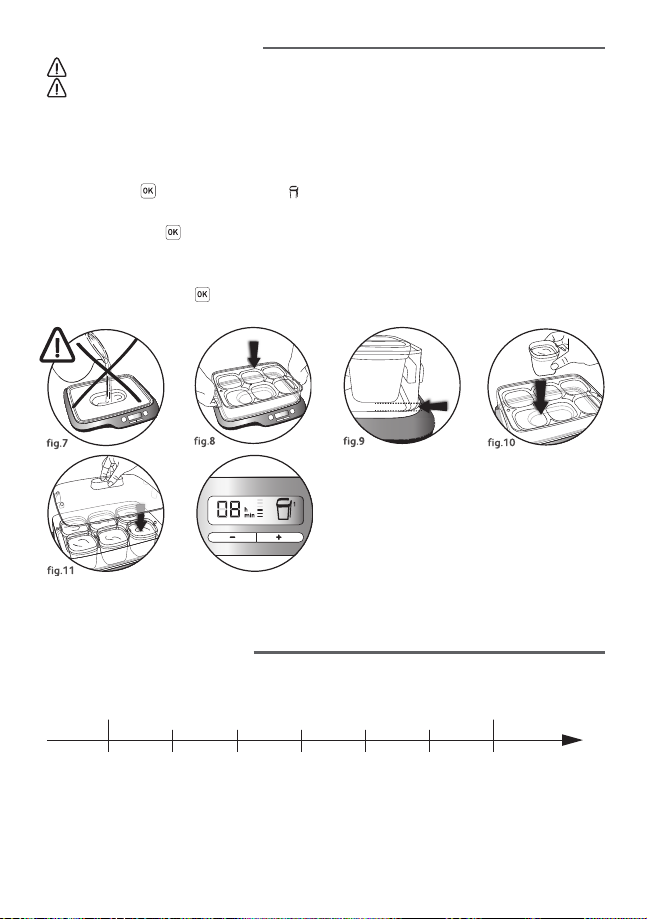
Start the appliance
• Do not put water in the base
— fig.7.
• Place the support on the base of the appliance
— fig.8.
The pots must be suspended
— fig.9.
• Suspend the filled pots without their lids in the spaces of the support
— fig.10.
• Close the lid over the product
— fig.11.
• Plug in the appliance.
• Press once on to select the «yoghurt
1
» program 1.
• Adjust the time using the + and – keys.
• Confirm using the key.
• The cycle starts
— fig.12.
• At any time, you can interrupt the cooking process and return to the program selection by
pressing continuously on .
Fermentation time
• Your yoghurt will need between 6 and 12 hours of fermentation,
depending on the basic ingredients and the result you are after.
6h 7h 8h 9h 10h 11h 12h
Fluid Firm
Sweet Acidic

End of cycle and cooling
• A beep indicates the end of cycle. Press to stop the beeping. Holding
down the key will allow you to return to the menu. It is possible to add
time by pressing the + or – key and confirming with the key.
• At the end of the cycle, put the lids on to the pots
— fig.13
and place the
yoghurts in the refrigerator for at least 4 hours so that they are nice and
firm.
Preservation
• Plain yoghurts may be kept in the fridge for up to 7 days maximum. The other types of
yoghurts need to be eaten more quickly.
Number
of pots
Quantity
of milk
Quantity of chilled
fromage frais
Rennet or lemon juice
6 750 ml 100 g 4 drops 1 soup spoon
12 1.5 l 100 g 6 drops 1 soup spoon
Making fromages frais or petits Délices
Preparing the mixture
This base mixture can be used for the two types of cheese
preparations.
• You need preferably full-cream milk and some chilled fromage frais.
• To get a good mixture, gently beat the fromage frais using a fork or a
whisk with a little milk in order to turn it into a very smooth paste. Then
add the rest of the milk, whilst continuing to mix.
• Add the rennet or the lemon juice.
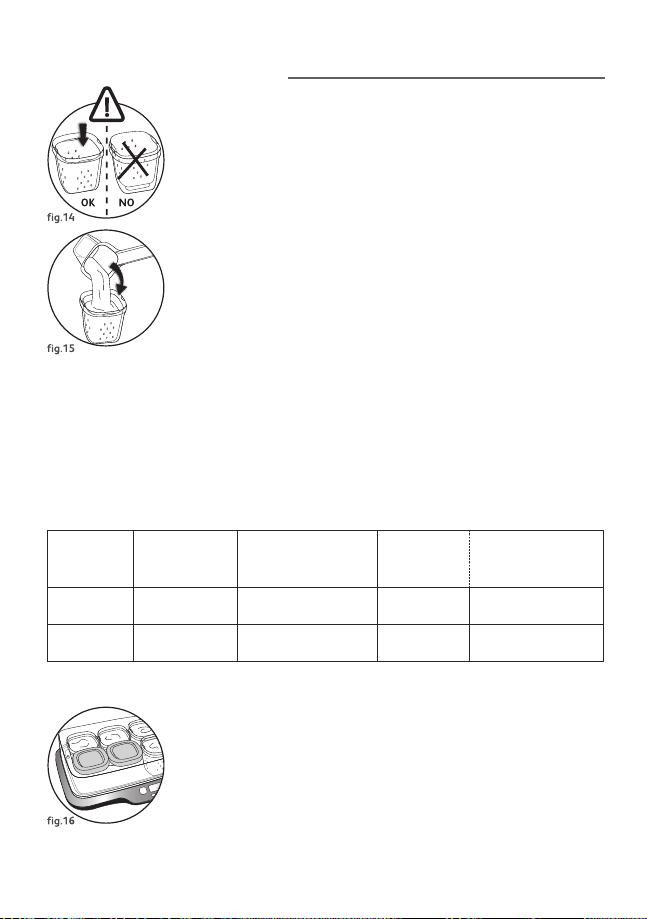
• Place the strainers in the pots and check that they are resting on the
bottom
— fig.14.
• Fill the pots using the ladle provided
— fig.15,
do not fill them above the
level of the lip on the strainer (you need to be able to lift it out to strain
the preparation).
For 6 pots: 750 ml of milk, 100 g of chilled fromage frais, 4 drops of
rennet or a soup spoon of lemon juice.
For 12 pots: 1.5 L of milk, 100 g of chilled fromage frais, 6 drops of rennet
or a soup spoon of lemon juice.
Please note:
If you don’t want to use all the pots every time, you must block the
unused holes with an empty pot for the 6 pot version or the pot lids
— fig.16 for the 12 pot version.
This will not affect the fromage frais fermentation time.
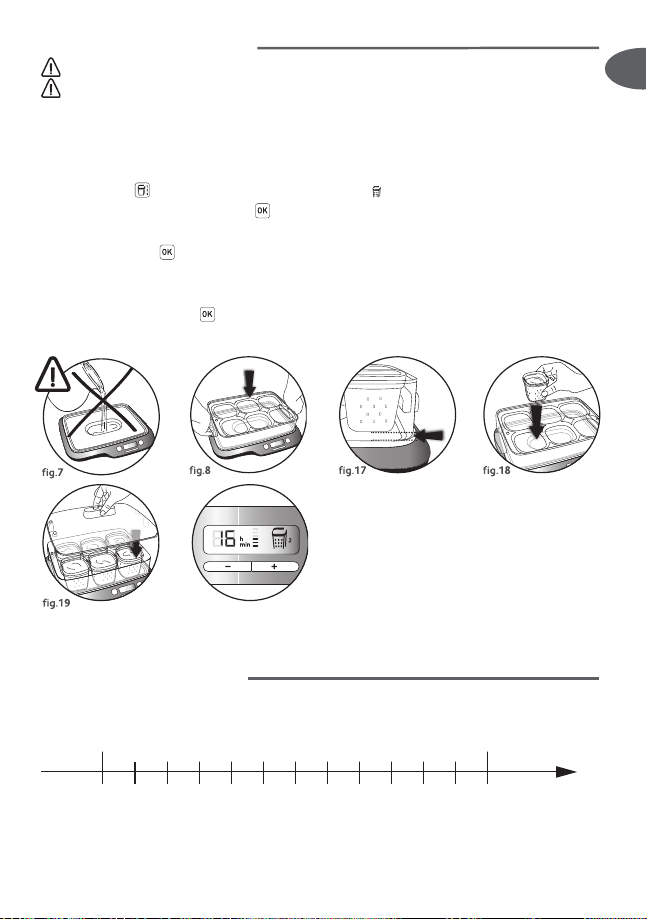
Start the appliance
• Do not put water in the base
— fig.7.
• Place the support on the base of the appliance
— fig.8.
The pots must be suspended
— fig.17.
• Suspend the filled pots without their lids in the spaces of the support
— fig.18.
• Close the lid over the product
— fig.19.
• Plug in the appliance.
• Press once on to select the «fromage frais» program
2
.
• Confirm the programme using the key.
• Adjust the time using the + and – keys.
• Confirm using the key.
• The cycle starts
— fig.20.
• At any time, you can interrupt the cooking process and return to the program selection by
pressing continuously on .
Fermentation time
• Depending on what you’ve made (fromages blancs or petits Délice) and
the recipe chosen, the fermentation time will range from 12 to 24hours.
Fluid Firm
Sweet Acidic
12h 13h 15h
16h
17h 18h 19h 20h 21h 22h 23h14h
24h
Loading…
-
Инструкции по эксплуатации
1
TEFAL YG654882 инструкция по эксплуатации
(11 страниц)
- Языки:Русский
-
Тип:
PDF -
Размер:
5.01 MB -
Описание:
Йогуртница
Просмотр
На NoDevice можно скачать инструкцию по эксплуатации для TEFAL YG654882. Руководство пользователя необходимо для ознакомления с правилами установки и эксплуатации TEFAL YG654882. Инструкции по использованию помогут правильно настроить TEFAL YG654882, исправить ошибки и выявить неполадки.
On this page, you can access 5 manuals for TEFAL in the Yogurt Maker category. These guides provide practical insights and solutions for 4 different models, ensuring thorough understanding and efficient use. These manuals offer clear and detailed instructions to troubleshoot any issues, ensuring optimized device performance.
Yogurt Maker User Guides by Other Brands
| Brand | Device Model | Type of Document | Category | Pages | Size | Views | Downloads | Updated |
|---|---|---|---|---|---|---|---|---|
| Cuisinart |
YM400E |
Cuisinart YM400E Instructions manual |
Cuisinart Yogurt Maker |
42 | 1241 | 249 | 21-09-2024 | |
| Yolife |
YL-210 |
Yolife YL-210 Operation manual |
Yolife Yogurt Maker |
12 | 445 | 98 | 27-11-2024 | |
| SKG |
TNA-01A |
SKG TNA-01A Operation & user’s manual |
SKG Yogurt Maker |
10 | 1226 | 233 | 24-09-2024 | |
| T-Fal |
Balanced Living YG2328US |
T-Fal Balanced Living YG2328US Manual |
T-Fal Yogurt Maker |
24 | 144 | 26 | 17-02-2025 | |
| Silvercrest |
SJB 15 B1 |
Silvercrest SJB 15 B1 Operating instructions manual |
Silvercrest Yogurt Maker |
50 | 1238 | 248 | 20-11-2024 |
TEFAL
YG654838 Мануал
Популярность:
2821 просмотры
Подсчет страниц:
46 страницы
Тип файла:
Размер файла:
6.45 Mb