
РУCCKИЙ
13
ОПЕРАЦИИ
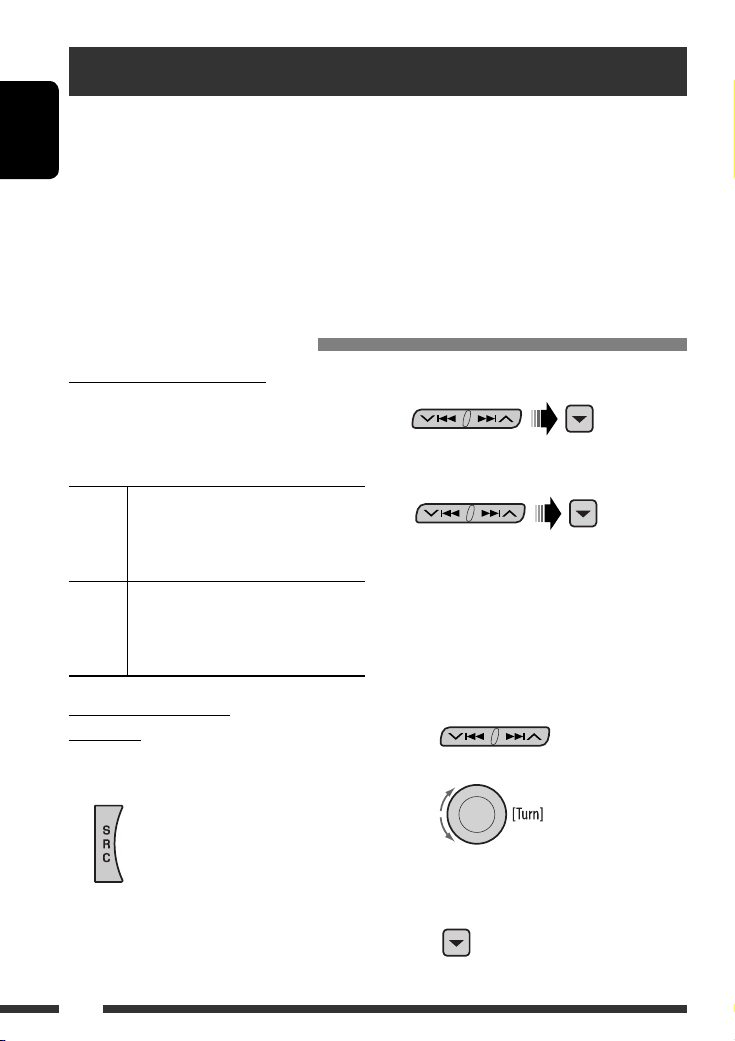
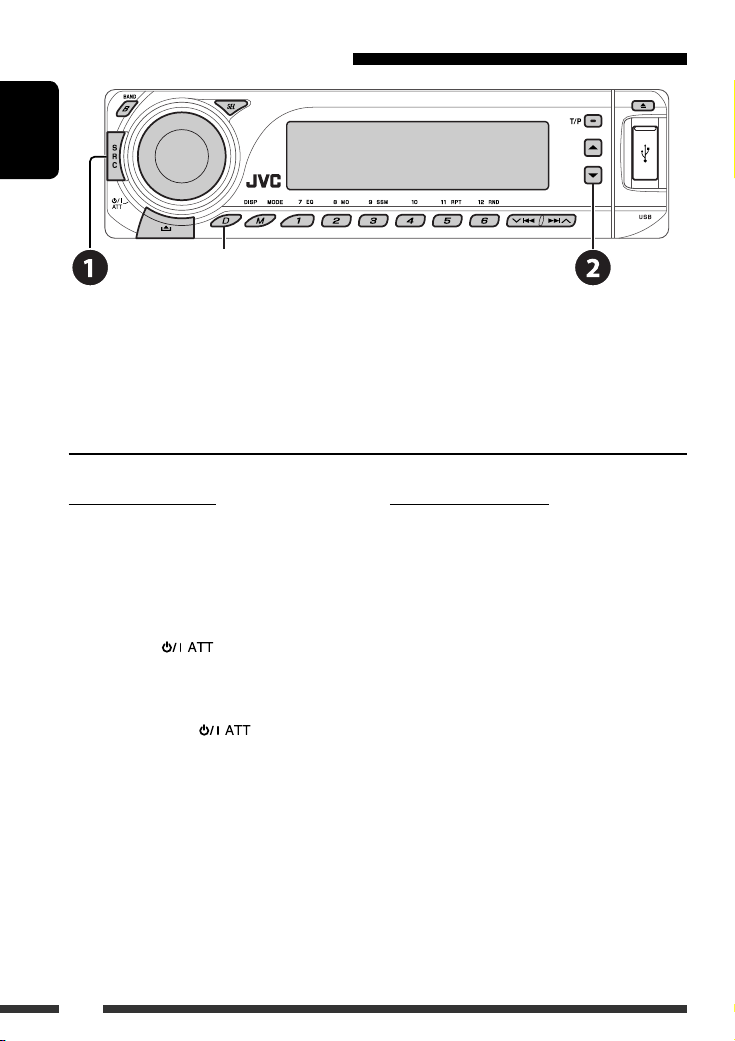
Останов воспроизведения и отключение устройства USB
Выньте его из устройства.
• Нажмите кнопку SRC для прослушивания другого источника воспроизведения.
Внимание:
• Не используйте устройство USB, если это может помешать безопасному вождению.
• Не отключайте и не подключайте повторно устройство USB, когда на дисплее мигает надпись “CHECK”.
• Не запускайте двигатель автомобиля, если подключено устройство USB.
• Перед отключением устройства USB необходимо остановить воспроизведение.
• Способность приемника воспроизводить файлы зависит от типа устройства USB.
• Вам не удастся соединить компьютер со входным USB-разъемом устройства.
• Во избежание потери данных убедитесь в том, что создана резервная копия всех важных данных.
• Во избежание повреждения не оставляйте устройство USB в автомобиле, не подвергайте его
воздействию прямых солнечных лучей или высокой температуры.
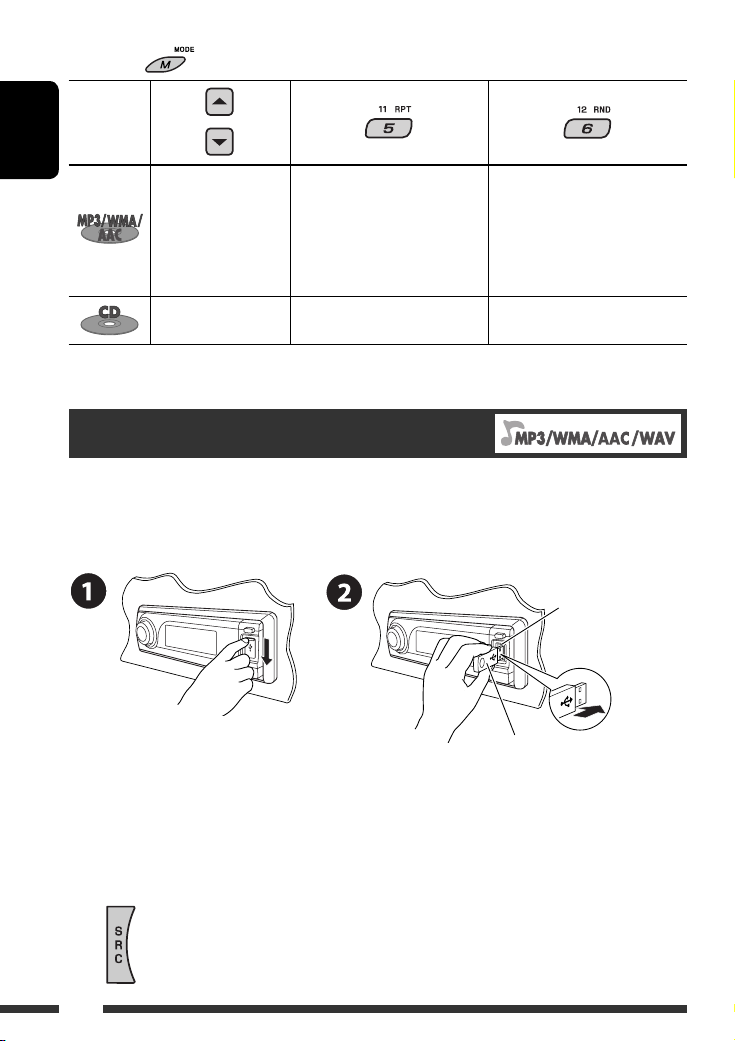
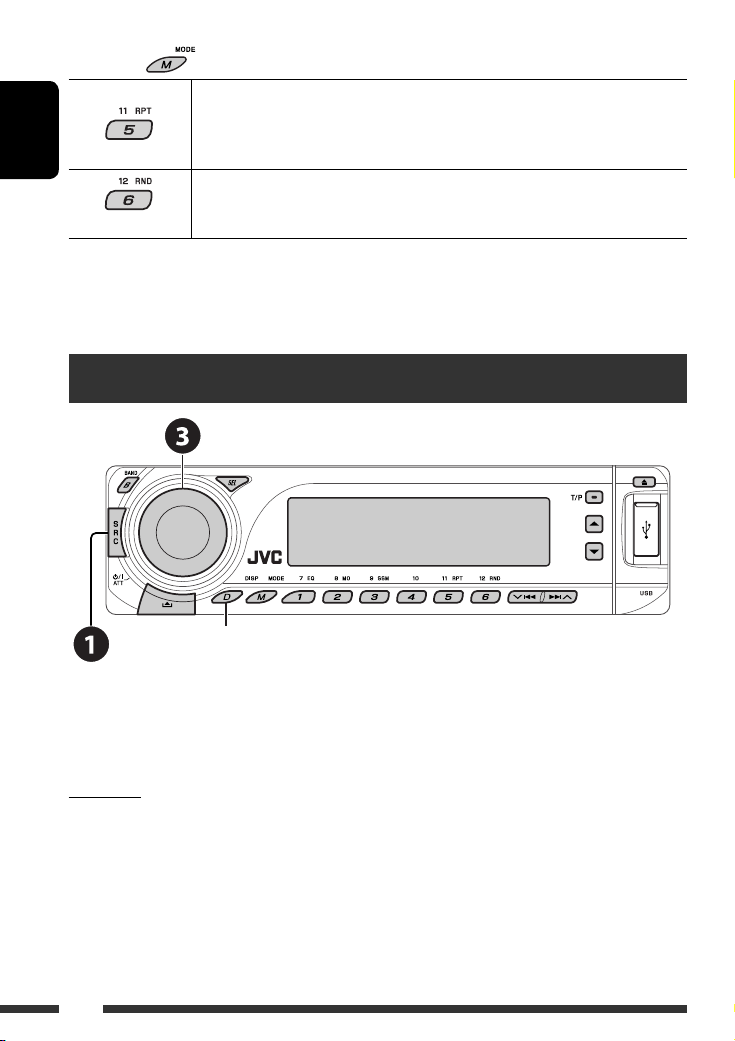
Нажатие (или удерживание нажатыми) следующих кнопок позволяет выполнять следующие операции…
Нажать:
Выберите дорожку
Удерживать: Перемотка дорожки назад или вперед
Выберите папку
(Нумерованные кнопки)
Непосредственный поиск
определенной папки
• См. также
*
4
и
*
5
на стр. 11.
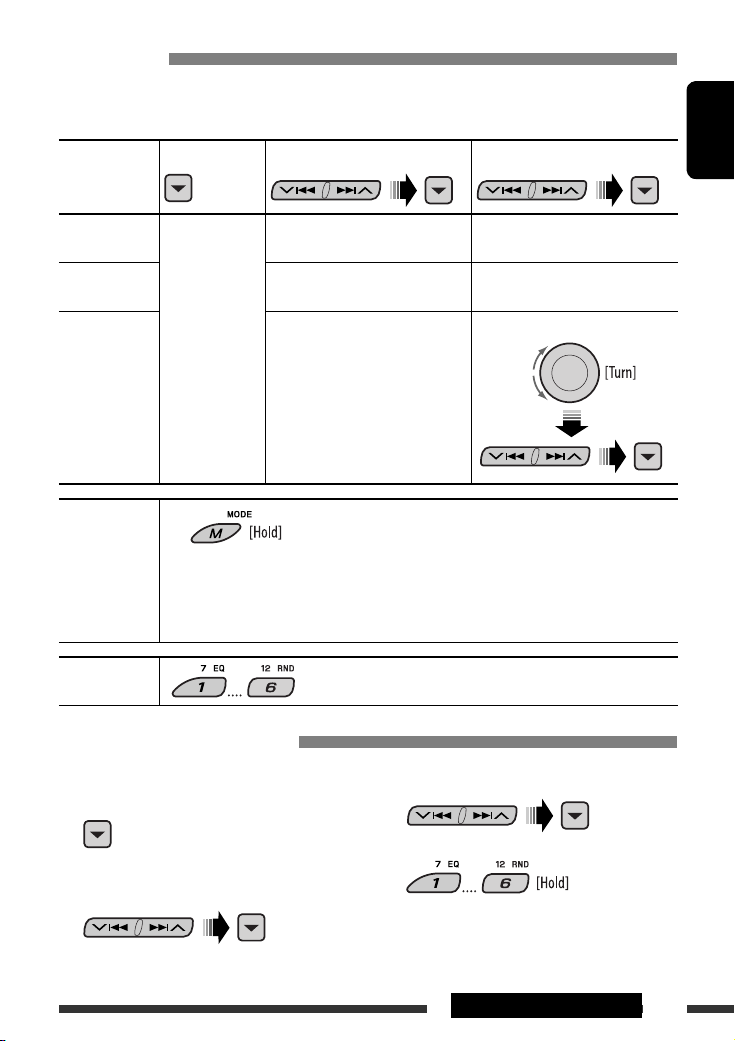
После нажатия
нажмите следующие кнопки для выполнения следующих операций…
Пропуск 10 дорожек (внутри одной папки)
TRK RPT:
Повтор текущей дорожки
FLDR RPT: Повтор всех дорожек из текущей папки
FLDR RND: Произвольное воспроизведение всех дорожек текущей папки, а затем
дорожек других папок
DISC RND: Произвольное воспроизведение всех дорожек
• Чтобы отключить повторное или произвольное воспроизведение, выберите “RPT OFF” или “RND OFF”.
Изменение отображаемой информации
* Если файл не содержит информацию
тегов или для настройки “TAG DISP”
установлено значение “TAG OFF” (см.
стр. 27), появляется имя папки и имя
файла. Индикатор TAG не загорится.
RU06-13_KD-G737[EE]1.indd 13
RU06-13_KD-G737[EE]1.indd 13
12/26/06 5:00:39 PM
12/26/06 5:00:39 PM

РУCCKИЙ
14
Использование устройств Bluetooth®
Для работы с устройствами Bluetooth необходимо подключить адаптер Bluetooth (KS-BTA200) к разъему
устройства автоматической смены компакт-дисков, расположенному на задней панели устройства. См.
также стр. 23.
• См. также инструкции, прилагаемые к адаптеру Bluetooth и устройству Bluetooth.
• См. список стран (входит в комплект поставки), в которых возможно использование функции Bluetooth®.
При первом использовании устройства Bluetooth с помощью данного устройства (режимы “BT-PHONE” и
“BT-AUDIO”) необходимо установить беспроводное соединение Bluetooth между этими устройствами.
• После установления соединения оно регистрируется в приемнике, даже если выполняется сброс
приемника. Всего можно зарегистрировать до пяти устройств.
• Для каждого источника (“BT-PHONE” и “BT-AUDIO”) можно одновременно подключить только одно устройство.
Регистрация устройства Bluetooth
2
Выберите “NEW”.
3
Выберите “OPEN”.
4
Введите PIN-код (Personal
Identification Number – личный
идентификационный номер) на
приемнике.
• Можно ввести любой номер (от 1 до 16 цифр).
[По умолчанию: 0000]
* Некоторые устройства имеют собственный
PIN-код. Введите указанный PIN-код в
приемник.
1
Перейдите к положению следующей
(предыдущей) цифры.
2
Выберите цифру или пробел.
3
Повторяйте действия
1
и
2
до тех
пор, пока не завершите ввод PIN-кода.
4
Подтвердите ввод.
На дисплее мигает надпись
“OPEN…”.
Методы регистрации (сопряжения)
Для регистрации и установления соединения с
устройством используйте один из приведенных
ниже пунктов меню “Bluetooth”.
• Для работы с меню “Bluetooth” выберите
“BT-PHONE” или “BT-AUDIO” в качестве источника.
OPEN
Подготовьте приемник к установлению
нового соединения Bluetooth.
Соединение устанавливается с
устройства Bluetooth.
SEARCH
Подготовьте приемник к установлению
нового соединения Bluetooth.
Соединение устанавливается с
приемника.
Регистрация с помощью функции “OPEN”
Подготовка
Включите функцию Bluetooth на устройстве.
1
Выберите “BT-PHONE” или “BT-AUDIO”.
RU14-21_KD-G737[EE]1.indd 14
RU14-21_KD-G737[EE]1.indd 14
12/26/06 5:02:35 PM
12/26/06 5:02:35 PM

РУCCKИЙ
15
ВНЕШНИЕ УСТРОЙСТВА
2
Выберите устройство для установления
соединения.
3
Для подключения используйте функции
“OPEN” или “SEARCH”.
Подключение и отключение
зарегистрированного устройства
1
Выберите “BT-PHONE” или “BT-AUDIO”.
2
Выберите зарегистрированное устройство,
которое необходимо подключить или
отключить.
3
Для подключения или отключения
выбранного устройства выберите
“CONNECT” или “DISCNNCT”.
Можно настроить автоматическое подключение
устройства Bluetooth при включении питания
приемника. (См. раздел “AUTO CNT” на стр. 28.)
Удаление зарегистрированного устройства
1
Выберите “BT-PHONE” или “BT-AUDIO”.
2
Выберите зарегистрированное устройство,
которое необходимо удалить.
3
Для удаления выбранного устройства
выберите “DELETE”, затем “YES”.
5
Используйте устройство Bluetooth для
поиска и установления соединения.
На подключенном устройстве введите тот же
PIN-код, который был введен для приемника. На
дисплее мигает надпись “CONNECT”.
Соединение установлено, теперь можно
использовать устройство с помощью приемника.
Устройство остается зарегистрированным
даже после его отключения. Для следующего
подключения этого же устройства выберите
“CONNECT” (или включите функцию “AUTO CNT”).
(См. правую колонку и стр. 28.)
Поиск доступных устройств
Выполните действия 1 и 2 на стр. 14, затем…
1
Выберите “SEARCH”.
Приемник осуществляет поиск списка
доступных устройств и их отображение.
• Если доступные устройства не обнаружены,
отображается сообщение “UNFOUND”.
2
Выберите устройство для установления
соединения.
3
Введите на приемнике PIN-код данного
устройства.
• Информацию о PIN-коде см. в инструкциях,
поставляемых с устройством.
4
Используйте устройство Bluetooth для
установления соединения.
Соединение установлено, теперь можно
использовать устройство с помощью
приемника.
Установление соединения со специальным
устройством
Выполните действия 1 и 2 на стр. 14, затем…
1
Выберите “SPECIAL”.
На дисплее приемника отображается список
запрограммированных устройств.
RU14-21_KD-G737[EE]1.indd 15
RU14-21_KD-G737[EE]1.indd 15
12/26/06 5:02:38 PM
12/26/06 5:02:38 PM

РУCCKИЙ
16
При входящем вызове….
Источник автоматически меняется на “BT-PHONE”.
При включенной функции “AUTO ANS” (ответ)….
Приемник автоматически отвечает на входящие
вызовы, см. стр. 28.
• При отключенной функции “AUTO ANS” (ответ)
ответ на входящий вызов осуществляется
нажатием любой клавиши (кроме
/диска
управления).
Завершение вызова
Удерживайте любую кнопку (за исключением
или диска управления).
• Можно настроить уровень громкости микрофона
(см. стр. 28).
При получении сообщения SMS….
Если сотовый телефон поддерживает функцию
работы с SMS-сообщениями (Short Message Service
– служба коротких сообщений) и настройка “MSG-
INFO” (информация о сообщении) имеет значение
“AUTO” (см. стр. 28), при получении сообщения
звучит сигнал, а на дисплее появляется надпись
“RCV MSG” (прием сообщения).
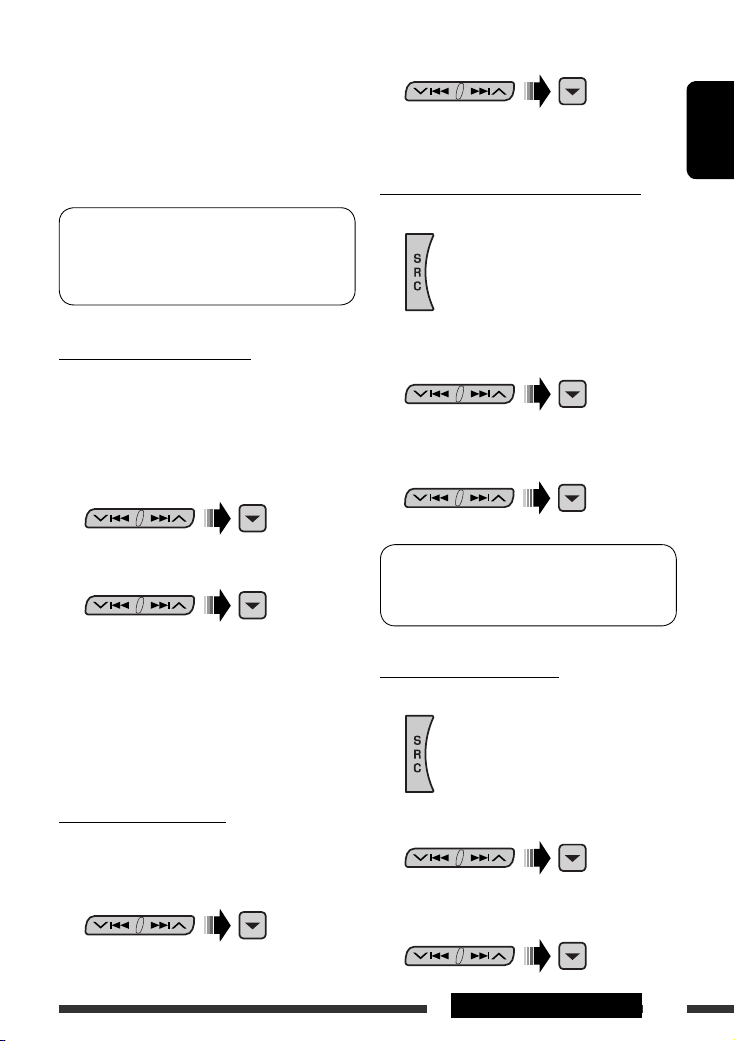
Использование сотового телефона Bluetooth
~
Выберите “BT-PHONE”.
Ÿ
Выберите меню “Bluetooth”.
!
Выполните вызов или настройку с помощью меню “Bluetooth”. (См. стр. 17 и 28.)
Изменение отображаемой информации
RU14-21_KD-G737[EE]1.indd 16
RU14-21_KD-G737[EE]1.indd 16
12/26/06 5:02:39 PM
12/26/06 5:02:39 PM

РУCCKИЙ
17
ВНЕШНИЕ УСТРОЙСТВА
Можно запрограммировать до шести номеров
телефонов.
1
Откройте меню набора.
2
Выберите необходимую настройку:
“PH BOOK”, “MISSED” или “RECEIVED”.
3
Выберите номер телефона.
4
Выполнение вызова
Для выполнения вызова можно использовать следующие способы.
Для выполнения вызова выберите “BT-PHONE”, затем выполните следующие действия:
1
2
3
(если не указано другое)
Журнал вызовов
Откройте
меню
набора.
Выберите журнал вызовов:
REDIAL, RECEIVED, MISSED
Выберите имя (если получено)
или номер телефона.
Телефонная книга
Выберите “PH BOOK”.
Отображается список номеров
телефонов.
Выберите имя из списка.
Набор номера
Выберите “NUMBER”.
Введите номер телефона.
Голосовая команда
1
На дисплее появляется надпись “SAY NAME”.
2
Произнесите имя вызываемого абонента.
• Можно также использовать голосовую команду из меню набора. Выберите
“VOICE” из меню набора.
• Если сотовый телефон не поддерживает функцию распознавания голоса,
появляется надпись “ERROR”.
Запрограммированный
номер телефона
Информацию о настройках см. далее.
Программирование номера телефона
RU14-21_KD-G737[EE]1.indd 17
RU14-21_KD-G737[EE]1.indd 17
12/26/06 5:02:39 PM
12/26/06 5:02:39 PM

РУCCKИЙ
18
Использование аудиопроигрывателя Bluetooth
~
Выберите “BT-AUDIO”.
Если воспроизведение не начинается автоматически, активируйте его с помощью элементов
управления аудиопроигрывателя Bluetooth.
• Информацию о подключении, отключении и удалении зарегистрированного устройства см. на стр. 15.
Информация о Bluetooth:
Дополнительные сведения о функциях Bluetooth можно найти на веб-узле JVC.
Прослушивание с устройства
автоматической смены компакт-дисков
Для подключения к данному приемнику рекомендуется использовать устройство автоматической смены
компакт-дисков компании JVC, совместимое с MP3. Можно подключить устройство автоматической смены
компакт-дисков к разъему устройства автоматической смены компакт-дисков на задней панели приемника.
См. также стр. 23.
• Можно воспроизводить только обычный компакт-диск (включая CD-текст) и диски MP3.
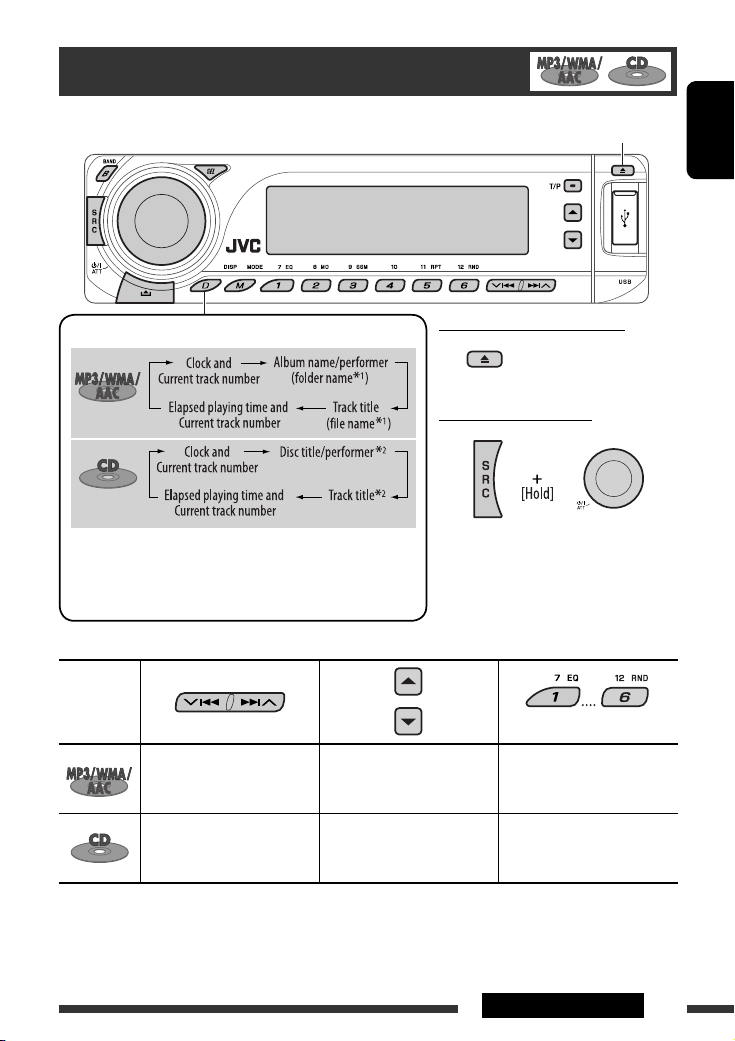
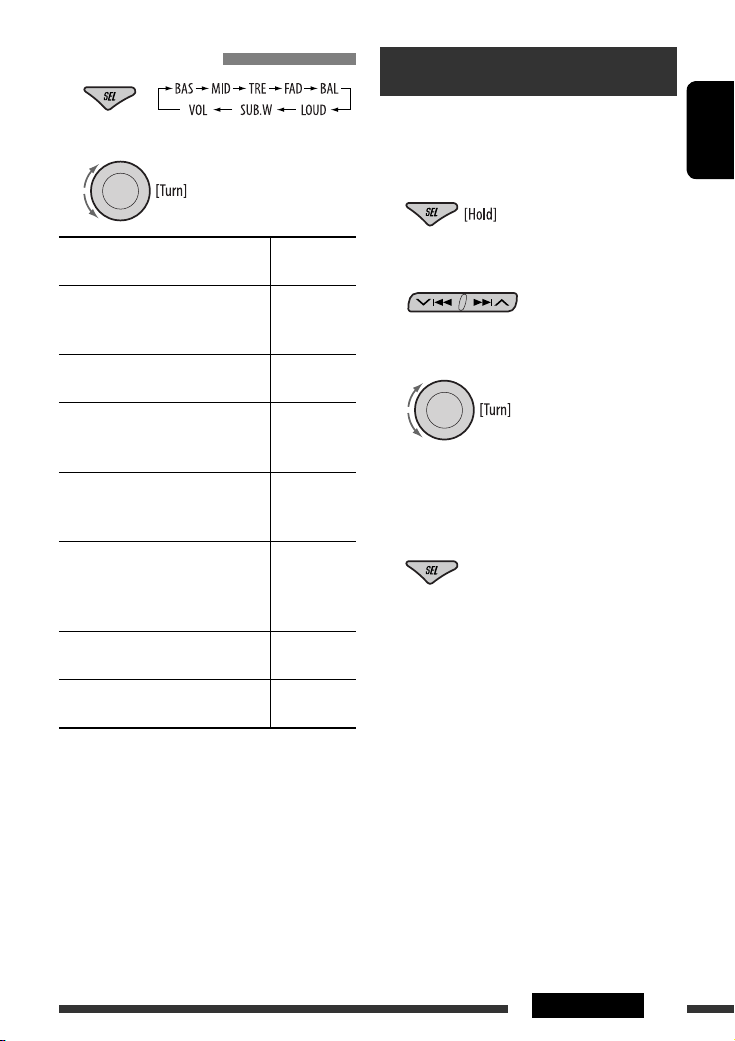
Изменение отображаемой информации
(см. стр. 11)
Прокрутка назад/прокрутка вперед
Приостанов или запуск воспроизведения
Меню ввода настроек
(список устройств)
Изменение отображаемой информации
RU14-21_KD-G737[EE]1.indd 18
RU14-21_KD-G737[EE]1.indd 18
12/26/06 5:02:40 PM
12/26/06 5:02:40 PM

РУCCKИЙ
19
ВНЕШНИЕ УСТРОЙСТВА
Подготовка
Убедитесь в том, что для настройки внешнего входа выбрано значение “CHANGER” (см. стр. 27).
~
Выберите “CD-CH”.
Ÿ
Выберите диск для воспроизведения.
Нажать:
Выбор диска с номером от 1 до 6.
Удерживать: Выбор диска с номером от 7 до 12.
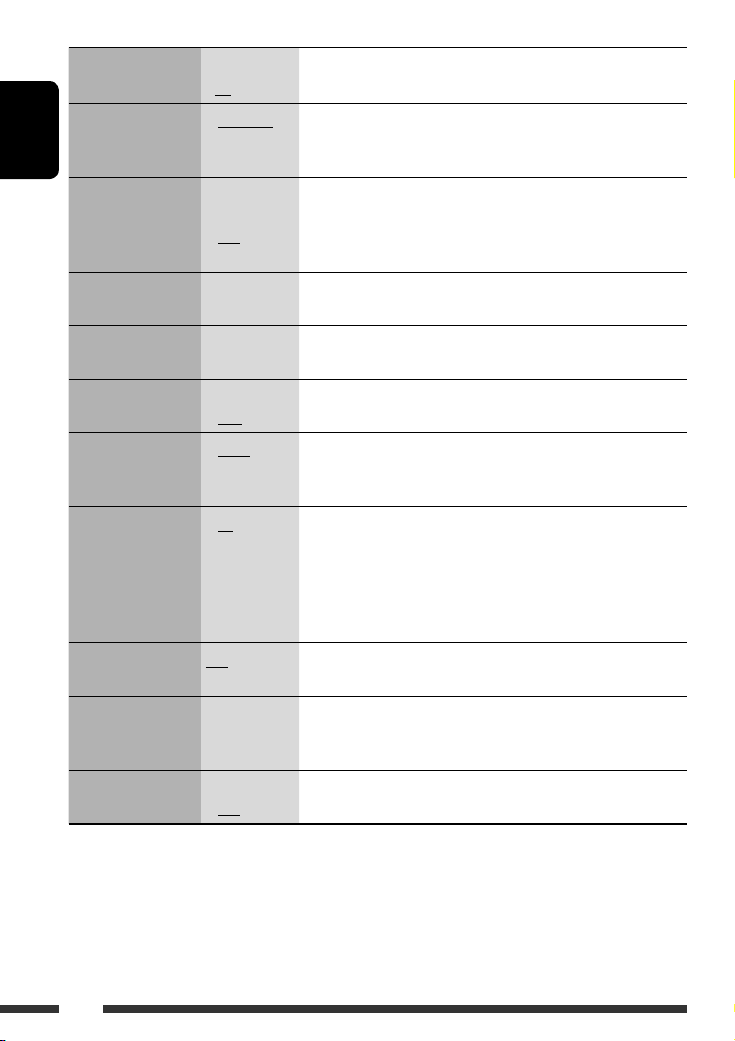
Нажатие (или удерживание нажатыми) следующих кнопок позволяет выполнять следующие операции…
Тип диска
Нажать:
Выберите дорожку
Удерживать: Перемотка дорожки назад или
вперед
Выберите папку
Нажать:
Выберите дорожку
Удерживать: Перемотка дорожки назад или
вперед
—
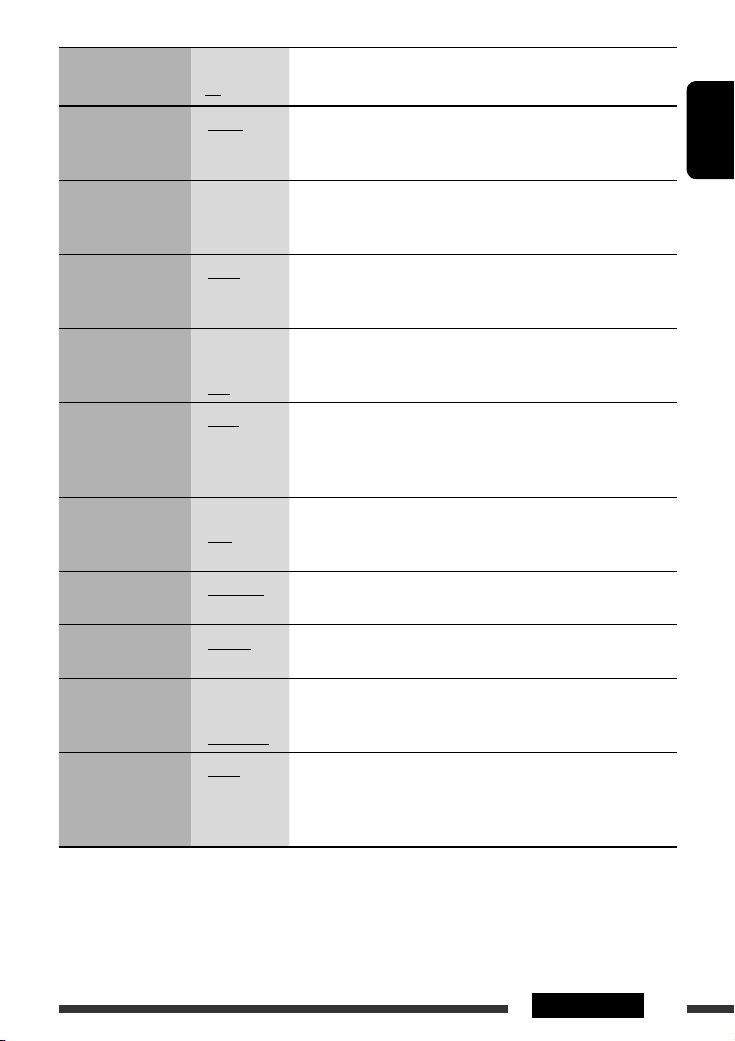
После нажатия
нажмите следующие кнопки для выполнения следующих операций…
Тип диска
Пропуск 10 дорожек
(внутри одной папки)
TRK RPT:
Повтор текущей дорожки
FLDR RPT:
Повтор всех дорожек из
текущей папки
DISC RPT:
Повтор всех дорожек
текущего диска
FLDR RND:
Произвольное воспроизведение
всех дорожек текущей папки, а
затем дорожек других папок
DISC RND:
Произвольное воспроизведение
всех дорожек текущего диска
MAG RND:
Произвольное воспроизведение
всех дорожек вставленных дисков
Пропуск 10 дорожек
TRK RPT:
Повтор текущей дорожки
DISC RPT:
Повтор всех дорожек
текущего диска
DISC RND:
Произвольное воспроизведение
всех дорожек текущего диска
MAG RND:
Произвольное воспроизведение
всех дорожек вставленных дисков
• Чтобы отключить повторное или произвольное воспроизведение, выберите “RPT OFF” или “RND OFF”.
RU14-21_KD-G737[EE]1.indd 19
RU14-21_KD-G737[EE]1.indd 19
12/26/06 5:02:40 PM
12/26/06 5:02:40 PM

РУCCKИЙ
20
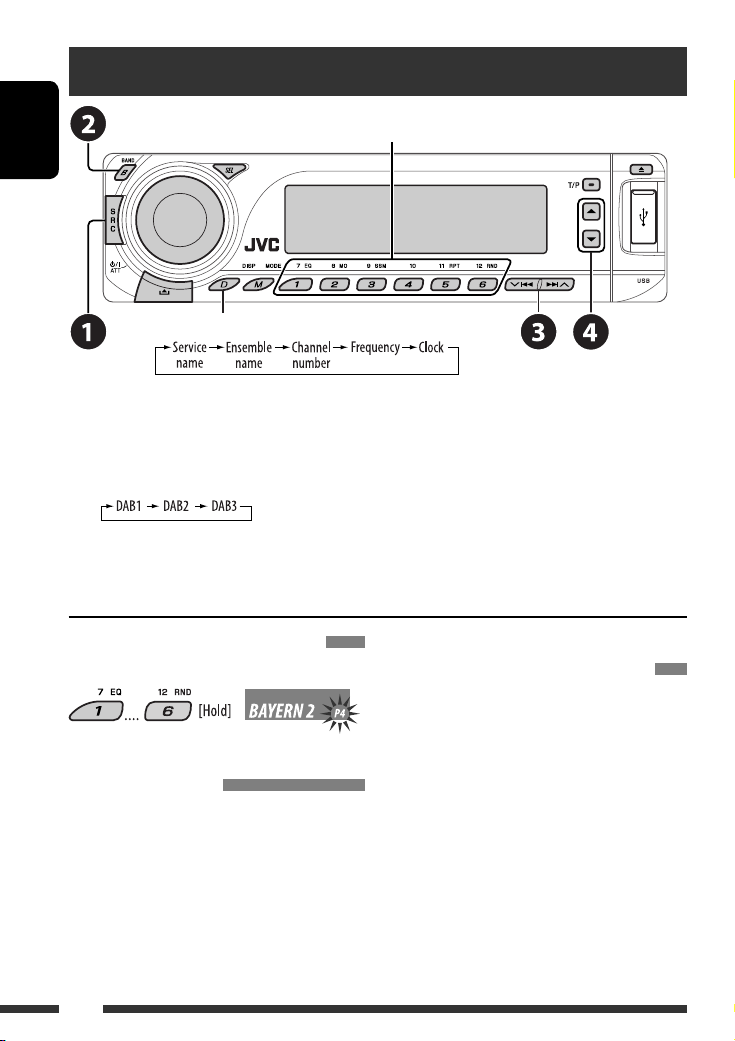
Прослушивание тюнера DAB
Изменение отображаемой информации
Выбор запрограммированной службы.
К разъему устройства автоматической смены компакт-дисков, расположенному на задней панели
устройства, можно подключить тюнер DAB компании JVC. См. также стр. 23.
~
Выберите “DAB”.
Ÿ
Выберите диапазон частот.
!
Поиск блока трансляции.
Поиск вручную: Удерживайте нажатой одну из кнопок, пока на дисплее не замигает индикатор “MANU”,
а затем неоднократно нажмите кнопку.
⁄
Выберите службу (основную или дополнительную) для прослушивания.
Сохранение служб DAB в памяти
При прослушивании службы DAB…
Включение или выключение
функции резервного приема
сообщений о движении на дорогах
(TA) или PTY
• Операции в точности соответствуют описанию для
радиостанций FM RDS на стр.10.
• Невозможно сохранять коды PTY отдельно для
тюнера DAB и для тюнера FM.
Отслеживание той же
программы—Поиск
альтернативной частоты
• Во время приема службы DAB:
Если автомобиль находится в регионе, где прием
службы невозможен, приемник автоматически
настраивается на другой блок трансляции или
радиостанцию FM RDS, транслирующую ту же
программу.
• Во время приема радиостанции FM RDS:
При поездке по региону, где служба DAB
транслирует ту же программу, что и радиостанция
FM RDS, приемник автоматически настраивается
на службу DAB.
Информацию о деактивации приема на
альтернативных частотах см. на стр. 27.
RU14-21_KD-G737[EE]1.indd 20
RU14-21_KD-G737[EE]1.indd 20
12/26/06 5:02:41 PM
12/26/06 5:02:41 PM

РУCCKИЙ
21
ВНЕШНИЕ УСТРОЙСТВА
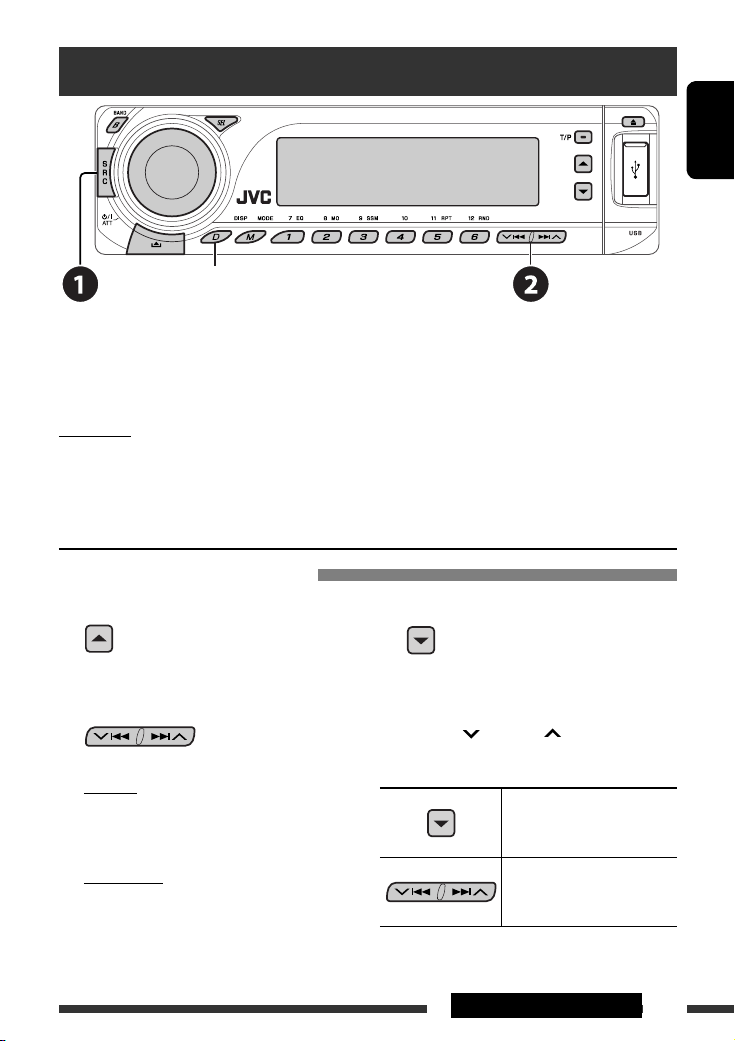
Прослушивание с проигрывателя iPod или D.
Изменение отображаемой информации
1
Перейдите главное меню.
Данный режим отключается, если
в течение 5 секунд не выполнено
ни одного действия.
2
Выберите необходимое меню.
Для iPod:
PLAYLIST
Ô
ARTISTS
Ô
ALBUMS
Ô
SONGS
Ô
GENRES
Ô
COMPOSER
Ô
(возврат на
начало)
Для проигрывателя D.:
PLAYLIST
Ô
ARTIST
Ô
ALBUM
Ô
GENRE
Ô
TRACK
Ô
(возврат на начало)
3
Подтвердите выбор.
• Для возврата в предыдущее меню нажмите
5
.
• Если выбрана дорожка, воспроизведение
начинается автоматически.
• Удерживая
4
/
¢
, можно
пропустить сразу 10 элементов.
Пауза или останов
воспроизведения
• Повторное нажатие
кнопки возобновляет
воспроизведение.
Нажать:
Выбор дорожек
Удерживать: Перемотка
дорожки назад
или вперед
Перед использованием подключите один из следующих адаптеров (приобретаются отдельно) к разъему
устройства автоматической смены компакт-дисков, расположенному на задней панели устройства. См.
также стр. 23.
• Интерфейсного адаптера для iPod—KS-PD100 для управления iPod.
• Интерфейсного адаптера для проигрывателя D.—KS-PD500 для управления проигрывателем D.
Подготовка
Убедитесь в том, что для настройки внешнего входа выбрано значение “CHANGER” (см. стр. 27).
~
Выберите “IPOD” или “D. PLAYER”.
Ÿ
Выберите песню для воспроизведения.
Выбор дорожки из меню
Продолжение не следующей странице
RU14-21_KD-G737[EE]1.indd 21
RU14-21_KD-G737[EE]1.indd 21
12/26/06 5:02:42 PM
12/26/06 5:02:42 PM

РУCCKИЙ
22
Прослушивание с других внешних устройств
Внешнее устройство можно подключить к разъему устройства автоматической смены компакт-дисков,
расположенному на задней панели приемника, с помощью следующих адаптеров (приобретаются отдельно).
См. также стр. 23.
• Адаптер линейного входа—KS-U57
• Адаптер дополнительного входа (AUX)—KS-U58
Подготовка
Убедитесь в том, что для настройки внешнего входа выбрано значение “EXT IN” (см. стр. 27).
~
Выберите “EXT IN”.
Ÿ
Включите подключенное устройство и начните воспроизведение звука с его
помощью.
!
Настройте громкость.
⁄
Настройка необходимого звука (См. страницы 24 и 25).
Изменение отображаемой информации
После нажатия
нажмите следующие кнопки для выполнения следующих операций…
ONE RPT:
Функции, аналогичные функциям “Repeat One” проигрывателя
iPod или “Режим повтора
=
Один трек” проигрывателя D.
ALL RPT:
Функции, аналогичные функциям “Repeat All” проигрывателя
iPod или “Режим повтора
=
Все” проигрывателя D.
ALBM RND*:
Функции, аналогичные функции “Shuffle Albums” проигрывателя
iPod.
SONG RND/RND ON: Функции, аналогичные функциям “Shuffle Songs” проигрывателя
iPod или “Произв. Воспроизв.
=
Включить” проигрывателя D.
• Чтобы отключить повторное или произвольное воспроизведение, выберите “RPT OFF” или “RND OFF”.
* iPod: Работает только при выборе значения “ALL” в элементе “ALBUMS” главного меню “MENU”.
RU22-29_KD-G737[EE]1.indd 22
RU22-29_KD-G737[EE]1.indd 22
12/26/06 5:05:50 PM
12/26/06 5:05:50 PM

04:22
Процессорная автомагнитола от JVC.
10:20
Bluetooth в магнитолу JVC KD-R307
10:47
Автомагнитола JVC KD-R331 не работают кнопки
06:42
Автомагнитола JVC (мелкий ремонт)
Нажмите на кнопку для помощи
ENGLISHРУCCKИЙУКРАЇНА
CD RECEIVER
РЕСИВЕР С ПРОИГРЫВАТЕЛЕМ КОМПАКТ-ДИСКОВ
ПРИЙМАЧ З ПРОГРАВАЧЕМ КОМПАКТ-ДИСКІВ
KD-G737
В соответствии с Законом Российской Федерации “О защите прав потре бителей” срок службы (годности) данного
товара “по истечении которого он может представлять опасность для жизни, здоровья потребителя, причинять вред
его имуществу или окружающей среде” составляет семь (7) лет со дня производства. Этот срок является временем,
в течение которого потребитель данного товара может безопасно им пользоваться при условии соблюдения
ин струк ции по эксплуатации данного товара, проводя необходимое обслуживание, включающее замену расходных
материалов и/или соответствующее ремонтное обеспечение в специализированном сервисном центре.
Дополнительные косметические материалы к данному товару, поставляе мые вместе с ним, могут храниться в
течение двух (2) лет со дня его производства.
Срок службы (годности), кроме срока хранения дополнительных космети ческих материалов, упомянутых
в предыдущих двух пунктах, не затрагивает никаких других прав потребителя, в частности, гарантийного
свидетельства JVC, которое он может получить в соответствии с законом о правах потребителя или других законов,
связанных с ним.
For canceling the display demonstration, see page 4.
Информацию об отмене демонстрации функций дисплея см. на стр. 4.
Інформацію щодо відміни демонстрації функцій дисплею див. на стор. 4.
For installation and connections, refer to the separate manual.
Указания по установке и выполнению соединений приводятся в отдельной инструкции.
Вказівки по встановленню та виконанню підключень наведені у окремій інструкції.
INSTRUCTIONS
ИНСТРУКЦИИ ПО ЭКСПЛУАТАЦИИ
ІНСТРУКЦІЇ
GET0432-001A
[EE]
Cover_KD—G737_001A_pre.indd 1Cover_KD-G737_001A_pre.indd 1 12/14/06 2:55:30 PM12/14/06 2:55:30 PM
Thank you for purchasing a JVC product.
Please read all instructions carefully before operation, to ensure your complete understanding and to obtain the best
possible performance from the unit.
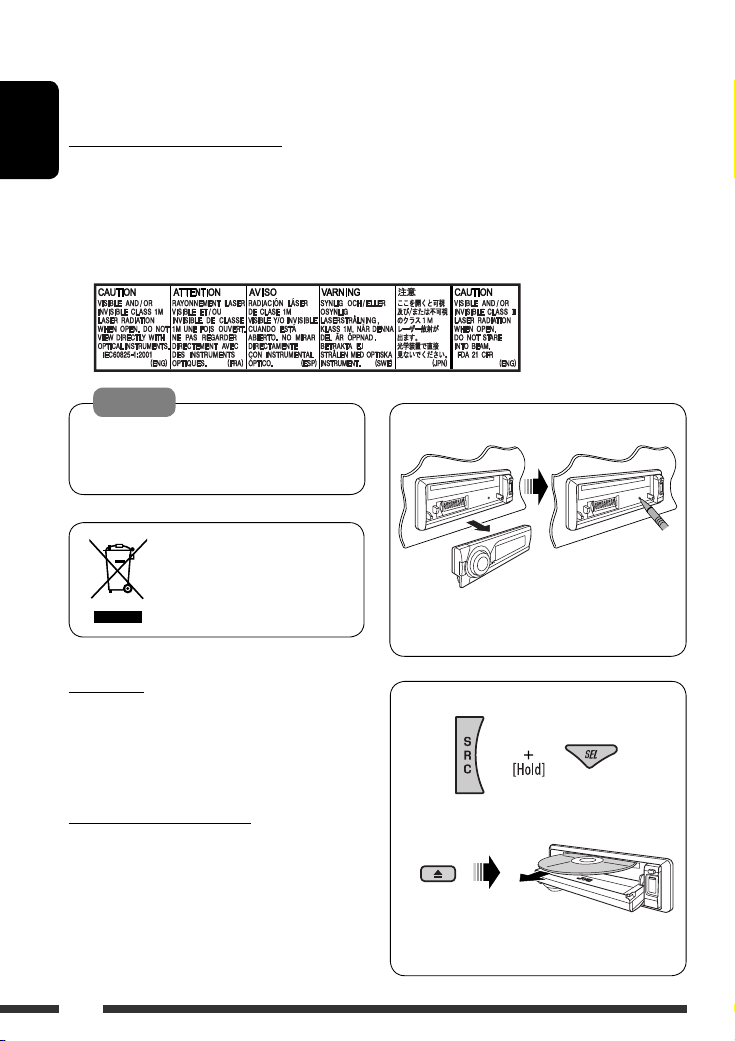
IMPORTANT FOR LASER PRODUCTS
ENGLISH
1. CLASS 1 LASER PRODUCT
2. CAUTION: Do not open the top cover. There are no user serviceable parts inside the unit; leave all servicing to
qualified service personnel.
3. CAUTION: Visible and/or invisible class 1M laser radiation when open. Do not view directly with optical
instruments.
4. REPRODUCTION OF LABEL: CAUTION LABEL, PLACED OUTSIDE THE UNIT.
Warning:
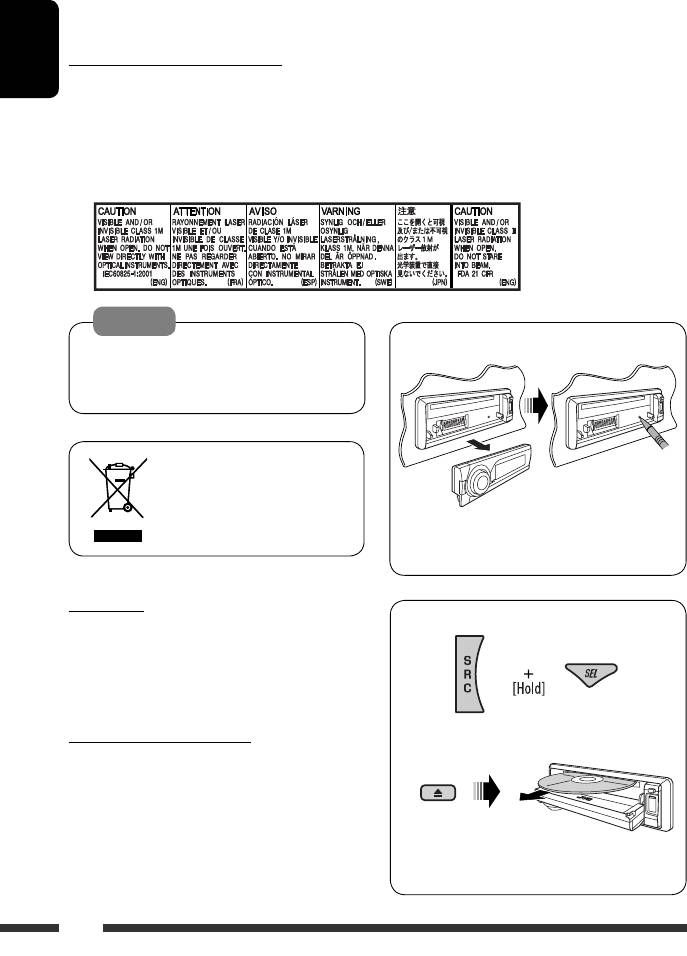
How to reset your unit
If you need to operate the unit while driving, be
sure to look around carefully or you may be involved
in a traffic accident.
[European Union only]
• Your preset adjustments will also be erased (except
the registered Bluetooth device, see page 14).
For safety…
How to forcibly eject a disc
• Do not raise the volume level too much, as this will
block outside sounds, making driving dangerous.
• Stop the car before performing any complicated
operations.
“PLEASE” and “EJECT” appear alternately on the
Temperature inside the car…
display.
If you have parked the car for a long time in hot or cold
weather, wait until the temperature in the car becomes
normal before operating the unit.
• Be careful not to drop the disc when it ejects.
• If this does not work, reset your unit.
2
EN02—05_KD—G737_001A_pre.indd 2EN02-05_KD-G737_001A_pre.indd 2 12/14/06 2:56:22 PM12/14/06 2:56:22 PM
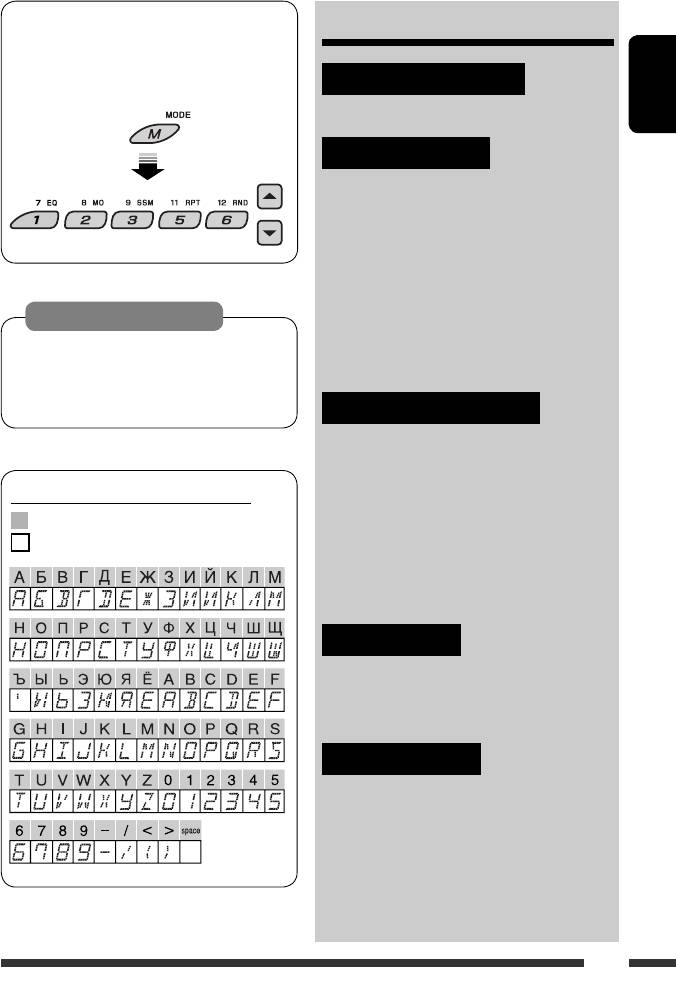
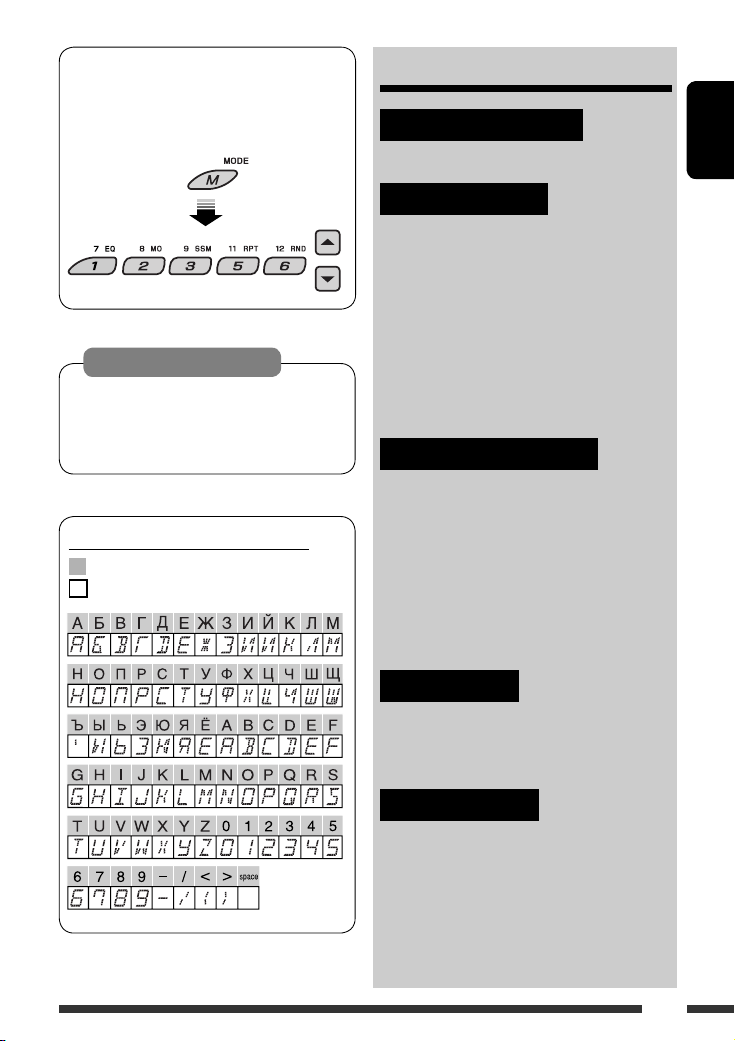
How to use functions mode
CONTENTS
If you press M MODE, the unit goes into functions
mode, then the number buttons (except “4”) and
INTRODUCTIONS
5/∞ buttons work as different function buttons.
Preparation …………………………………….. 4
ENGLISH
OPERATIONS
[Within 5 seconds…]
Basic operations ……………………………….. 5
• Using the control panel ………………….. 5
• Using the remote controller
(RM-RK50) ………………………………….. 6
Listening to the radio …………………………. 8
Searching for FM RDS programme
Caution on volume setting:
— PTY Search ………………………………… 9
Discs and connected USB devices produce very
Disc operations …………………………………. 11
little noise compared with other sources. Lower
Listening to the USB device ………………….. 12
the volume before playing to avoid damaging the
speakers by the sudden increase of the output level.
EXTERNAL DEVICES
Using the Bluetooth® devices ……………….. 14
• Using the Bluetooth cellular phone ….. 16
• Using the Bluetooth audio player …….. 18
Available characters on the display
Listening to the CD changer …………………. 18
Available characters
Listening to the DAB tuner …………………… 20
Display indications
Listening to the iPod / D. player …………….. 21
Listening to the other external
components ………………………………….. 22
SETTINGS
Selecting a preset sound mode ……………… 24
General settings — PSM ……………………… 25
Bluetooth settings …………………………….. 28
REFERENCES
Maintenance ……………………………………. 29
More about this unit ………………………….. 30
Troubleshooting ……………………………….. 34
Specifications …………………………………… 38
3
EN02—05_KD—G737_001A_pre.indd 3EN02-05_KD-G737_001A_pre.indd 3 12/14/06 2:56:25 PM12/14/06 2:56:25 PM
Preparation
Cancel the display demonstration and set the clock
• See also page 26.
ENGLISH
When the power is turned off: Check the current clock time
When the power is turned on: Change the display information
~ Turn on the power.
Ÿ Enter the PSM settings.
! ] ⁄ Cancel the display demonstrations
Select “DEMO,” then “DEMO OFF.”
Set the clock
Select “CLOCK H” (hour), then adjust the hour.
Select “CLOCK M” (minute), then adjust the minute.
Select “24H/12H,” then “24H” (hour) or “12H” (hour).
@ Finish the procedure.
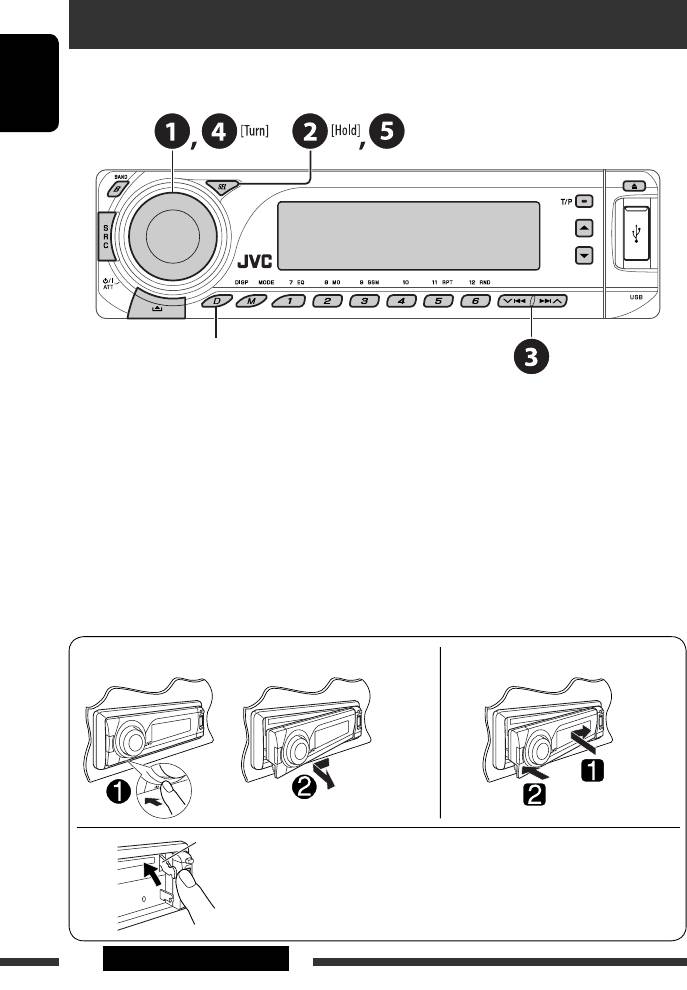
Detaching the control panel Attaching the control panel
Lever
CAUTION:
The lever comes out if you pressed the 0 button while the panel
is detached. If this happens, push the lever back into lock position
before attaching the panel.
4 INTRODUCTIONS
EN02—05_KD—G737_001A_pre.indd 4EN02-05_KD-G737_001A_pre.indd 4 1/5/07 9:13:15 AM1/5/07 9:13:15 AM

CD RECEIVER
РЕСИВЕР С ПРОИГРЫВАТЕЛЕМ КОМПАКТ-ДИСКОВ
ПРИЙМАЧ З ПРОГРАВАЧЕМ КОМПАКТ-ДИСКІВ
KD-G737
В соответствии с Законом Российской Федерации “О защите прав потре бителей” срок службы (годности) данного
товара “по истечении которого он может представлять опасность для жизни, здоровья потребителя, причинять вред
его имуществу или окружающей среде” составляет семь (7) лет со дня производства. Этот срок является временем,
в течение которого потребитель данного товара может безопасно им пользоваться при условии соблюдения
ин струк ции по эксплуатации данного товара, проводя необходимое обслуживание, включающее замену расходных
материалов и/или соответствующее ремонтное обеспечение в специализированном сервисном центре.
Дополнительные косметические материалы к данному товару, поставляе мые вместе с ним, могут храниться в
течение двух (2) лет со дня его производства.
Срок службы (годности), кроме срока хранения дополнительных космети ческих материалов, упомянутых
в предыдущих двух пунктах, не затрагивает никаких других прав потребителя, в частности, гарантийного
свидетельства JVC, которое он может получить в соответствии с законом о правах потребителя или других законов,
связанных с ним.
For canceling the display demonstration, see page 4.
Информацию об отмене демонстрации функций дисплея см. на стр. 4.
Інформацію щодо відміни демонстрації функцій дисплею див. на стор. 4.
For installation and connections, refer to the separate manual.
Указания по установке и выполнению соединений приводятся в отдельной инструкции.
Вказівки по встановленню та виконанню підключень наведені у окремій інструкції.
ENGLISHРУCCKИЙУКРАЇНА
INSTRUCTIONS
ИНСТРУКЦИИ ПО ЭКСПЛУАТАЦИИ
ІНСТРУКЦІЇ
GET0432-001A
[EE]
Thank you for purchasing a JVC product.
Please read all instructions carefully before operation, to ensure your complete understanding and to obtain the best
possible performance from the unit.
IMPORTANT FOR LASER PRODUCTS
ENGLISH
1. CLASS 1 LASER PRODUCT
2. CAUTION: Do not open the top cover. There are no user serviceable parts inside the unit; leave all servicing to
qualified service personnel.
3. CAUTION: Visible and/or invisible class 1M laser radiation when open. Do not view directly with optical
instruments.
4. REPRODUCTION OF LABEL: CAUTION LABEL, PLACED OUTSIDE THE UNIT.
Warning:
If you need to operate the unit while driving, be
sure to look around carefully or you may be involved
in a traffic accident.
[European Union only]
For safety…
• Do not raise the volume level too much, as this will
block outside sounds, making driving dangerous.
• Stop the car before performing any complicated
operations.
Temperature inside the car…
If you have parked the car for a long time in hot or cold
weather, wait until the temperature in the car becomes
normal before operating the unit.
How to reset your unit
• Your preset adjustments will also be erased (except
the registered Bluetooth device, see page 14).
How to forcibly eject a disc
“PLEASE” and “EJECT” appear alternately on the
display.
• Be careful not to drop the disc when it ejects.
• If this does not work, reset your unit.
2
How to use functions mode
If you press M MODE, the unit goes into functions
mode, then the number buttons (except “4”) and
5/∞ buttons work as different function buttons.
CONTENTS
INTRODUCTIONS
Preparation …………………………………….. 4
ENGLISH
[Within 5 seconds…]
Caution on volume setting:
Discs and connected USB devices produce very
little noise compared with other sources. Lower
the volume before playing to avoid damaging the
speakers by the sudden increase of the output level.
Available characters on the display
Available characters
Display indications
OPERATIONS
Basic operations ……………………………….. 5
• Using the control panel ………………….. 5
• Using the remote controller
(RM-RK50) ………………………………….. 6
Listening to the radio …………………………. 8
Searching for FM RDS programme
— PTY Search ………………………………… 9
Disc operations …………………………………. 11
Listening to the USB device ………………….. 12
EXTERNAL DEVICES
Using the Bluetooth® devices ……………….. 14
• Using the Bluetooth cellular phone ….. 16
• Using the Bluetooth audio player …….. 18
Listening to the CD changer …………………. 18
Listening to the DAB tuner …………………… 20
Listening to the iPod / D. player …………….. 21
Listening to the other external
components ………………………………….. 22
SETTINGS
Selecting a preset sound mode ……………… 24
General settings — PSM ……………………… 25
Bluetooth settings …………………………….. 28
REFERENCES
Maintenance ……………………………………. 29
More about this unit ………………………….. 30
Troubleshooting ……………………………….. 34
Specifications …………………………………… 38
3
Preparation
Cancel the display demonstration and set the clock
• See also page 26.
ENGLISH
When the power is turned off: Check the current clock time
When the power is turned on: Change the display information
~ Turn on the power.
Ÿ Enter the PSM settings.
! ] ⁄ Cancel the display demonstrations
Select “DEMO,” then “DEMO OFF.”
Set the clock
Select “CLOCK H” (hour), then adjust the hour.
Select “CLOCK M” (minute), then adjust the minute.
Select “24H/12H,” then “24H” (hour) or “12H” (hour).
@ Finish the procedure.
Detaching the control panel Attaching the control panel
Lever
CAUTION:
The lever comes out if you pressed the 0 button while the panel
is detached. If this happens, push the lever back into lock position
before attaching the panel.
4 INTRODUCTIONS
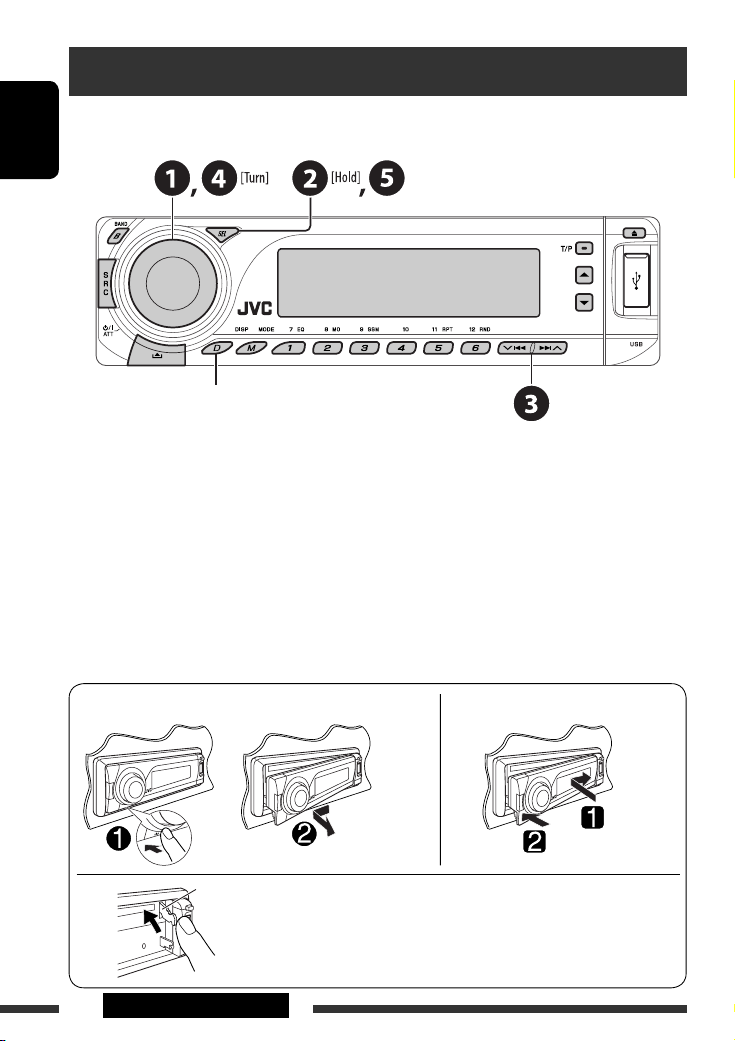
Basic operations
Using the control panel
ENGLISH
1 Select the source.
FM/AM = DAB * = CD * = USB * = CD-CH */
IPOD */D.PLAYER * (or EXT IN) = BT-PHONE
(Bluetooth Phone)* = BT-AUDIO (Bluetooth
Audio)* = (back to the beginning)
* You cannot select these sources if they are not
ready or not connected.
2 Select the bands.
3 • Turn on the power.
• Turn off the power [Hold].
• Attenuate the sound (if the power is on).
• Volume control [Turn].
4 • Adjust the sound mode.
• Enter the PSM settings [Hold].
5 Display window
6 • Activate/deactivate TA Standby Reception.
• Enter RDS programme search [Hold].
7 Eject disc.
8 USB (Universal Serial Bus) input terminal
9 Detach the panel.
p Change the display information.
q Enter functions mode.
Press M MODE, then one of the following buttons
(within 5 seconds)…
EQ : Select the sound mode.
MO : Turn on/off monaural reception.
SSM : Automatic station presetting [Hold].
RPT : Select repeat play.
RND : Select random play.
5 / ∞ : Skip 10 tracks.
w • FM/AM/DAB: Select preset station/DAB service.
• CD/USB: Select folder/track/disc (for CD
changer).
• BT-PHONE: Select preset phone number.
e • FM/AM/DAB: Search for station/DAB ensemble.
• CD/USB: Select track.
• IPOD/D.PLAYER: Select track.
• BT-PHONE/BT-AUDIO: Select setting item/
Select a registered device.
r • DAB: Select DAB service.
• CD/USB: Select folder.
• IPOD/D.PLAYER: Enter the main menu/Pause or
stop playback/Confirm selection.
• BT-PHONE/BT-AUDIO: Enter setting menu/
Confirm selection.
5OPERATIONS
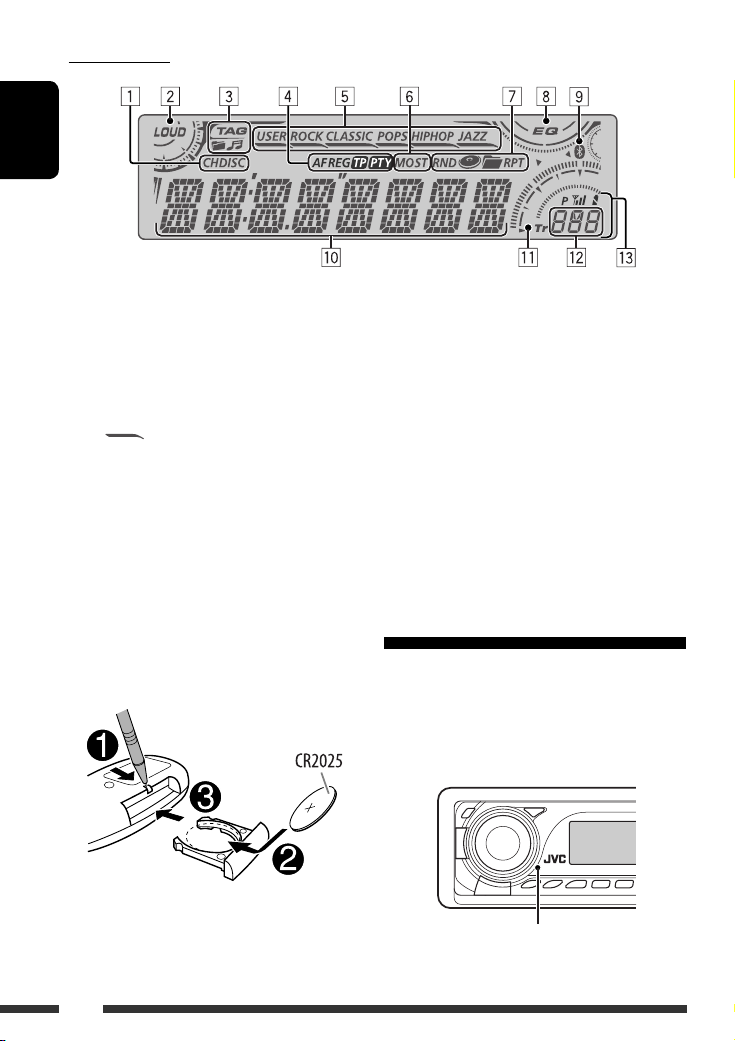
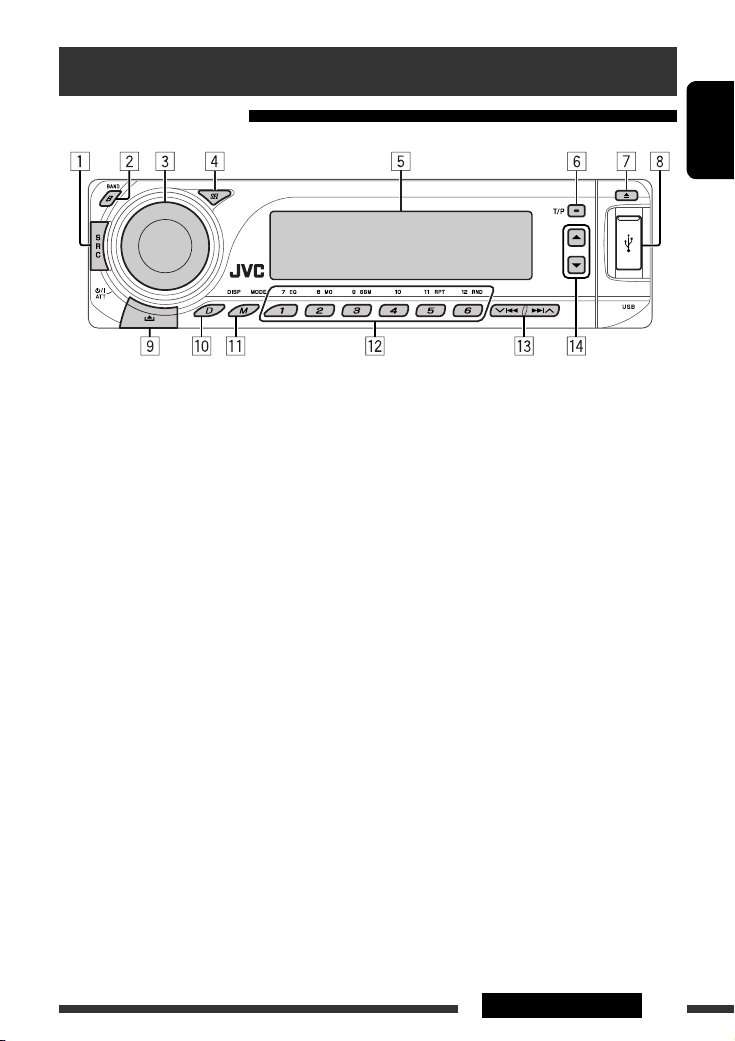
Display window
ENGLISH
1 Playback source indicators
2 Loudness indicator
3 Track information indicators
4 RDS indicators
5 Sound mode indicators
• lights up for the selected item.
6 Tuner reception indicators
7 Playback mode/item indicators
(Random/Repeat)
8 Equalizer indicator
Using the remote controller (RM-RK50)
Installing the lithium coin battery (CR2025)
9 Bluetooth indicator
p Main display
(Time, menu, playback information)
q Track indicator
w Source display/Preset No./Track No./Folder No./
Disc No.
e Status of Bluetooth device
(Device number, [1 – 5]; signal strength, [0 – 3]*;
battery reminder, [0 – 3]*)
* As the number increases, the signal/battery
strength becomes stronger.
Before using the remote controller:
• Aim the remote controller directly at the remote
sensor on the unit.
• DO NOT expose the remote sensor to bright light
(direct sunlight or artificial lighting).
Remote sensor
6

Warning:
To prevent accidents and damage
• Do not install any battery other than CR2025 or
its equivalent.
• Do not leave the remote controller in a place
(such as dashboards) exposed to direct sunlight
for a long time.
• Store the battery in a place where children
cannot reach.
• Do not recharge, short, disassemble, heat the
battery, or dispose of it in a fire.
• Do not leave the battery with other metallic
materials.
• Do not poke the battery with tweezers or similar
tools.
• Wrap the battery with tape and insulate when
throwing away or saving it.
• While playing an MP3 disc on an
MP3-compatible CD changer:
– Changes the disc if pressed briefly.
– Changes the folder if pressed and held.
• While listening to an Apple iPod or a JVC
D. player:
– Pauses/stops or resumes playback with D
∞.
– Enters the main menu with 5 U.
(Now 5 U/D ∞/2 R/F 3 work as the menu
selecting buttons.)*
3 Adjusts the volume level.
4 Selects the sound mode (iEQ: intelligent equalizer).
5 Selects the source.
6 For Bluetooth cellular phone:
– Answers calls if pressed briefly.
– Rejects calls if pressed and held.
7 • Searches for stations (or DAB services) if pressed
briefly.
• Searches for DAB ensembles if pressed and held.
• Fast-forwards or reverses the track if pressed and
held.
• Changes the tracks if pressed briefly.
• While listening to an iPod or a D. player (in menu
selecting mode):
– Selects an item if pressed briefly. (Then, press
D ∞ to confirm the selection.)
– Skips 10 items at a time if pressed and held.
• Reverse skip/forward skip for Bluetooth audio.
ENGLISH
1 • Turns the power on if pressed briefly or
attenuates the sound when the power is on.
• Turns the power off if pressed and held.
2 • Changes the FM/AM/DAB bands with 5 U.
• Changes the preset stations (or DAB services)
with D ∞.
• Changes the folder of the MP3/WMA/AAC/WAV.
* 5 U : Returns to the previous menu.
D ∞ : Confirms the selection.
7OPERATIONS
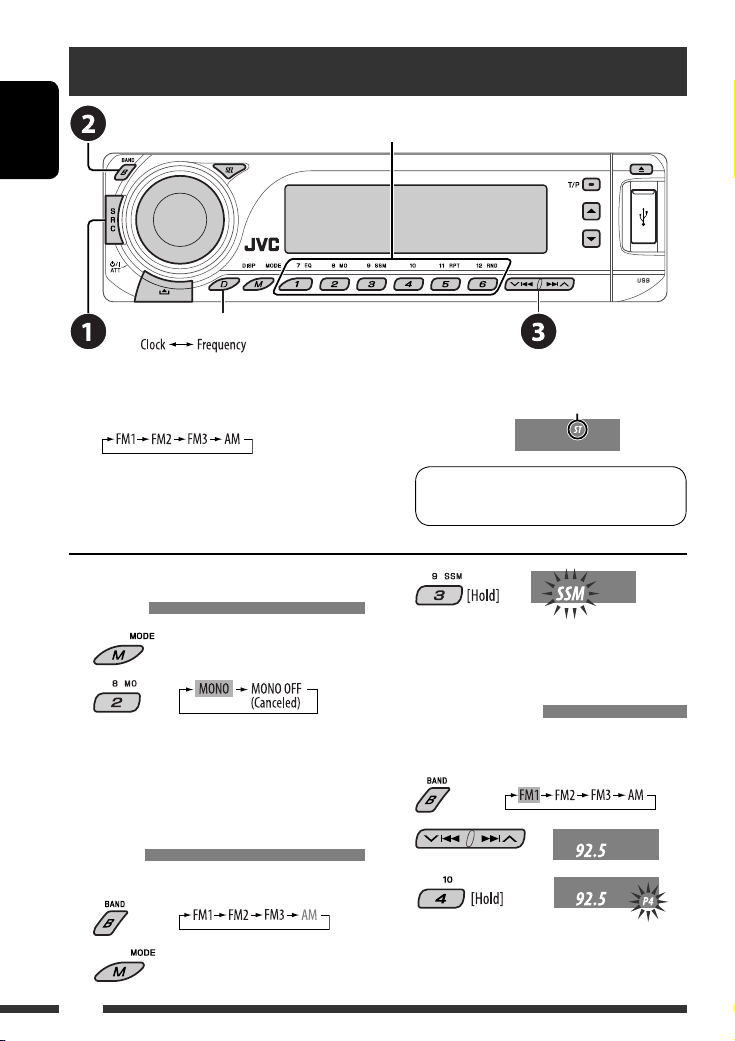
Listening to the radio
ENGLISH
Change the display information
Select preset station.
~ Select “FM/AM.”
Ÿ Select the bands.
! Search for a station to listen—Auto Search.
Manual Search: Hold either one of the buttons until “M”
flashes on the display, then press it repeatedly.
When an FM stereo broadcast is hard
to receive
1
2
Reception improves, but stereo effect will be lost.
• MO indicator lights up.
FM station automatic presetting —
SSM (Strong-station Sequential
Memory)
You can preset up to six stations for each band.
1
2
Lights up when receiving an FM stereo
broadcast with sufficient signal strength.
Note: FM1 and FM2: 87.5 MHz – 108.0 MHz
FM3: 65.00 MHz – 74.00 MHz
3
Local FM stations with the strongest signals are
searched and stored automatically in the FM band.
Manual presetting
Ex.: Storing FM station of 92.5 MHz into preset number
4 of the FM1 band.
1
2
3
8
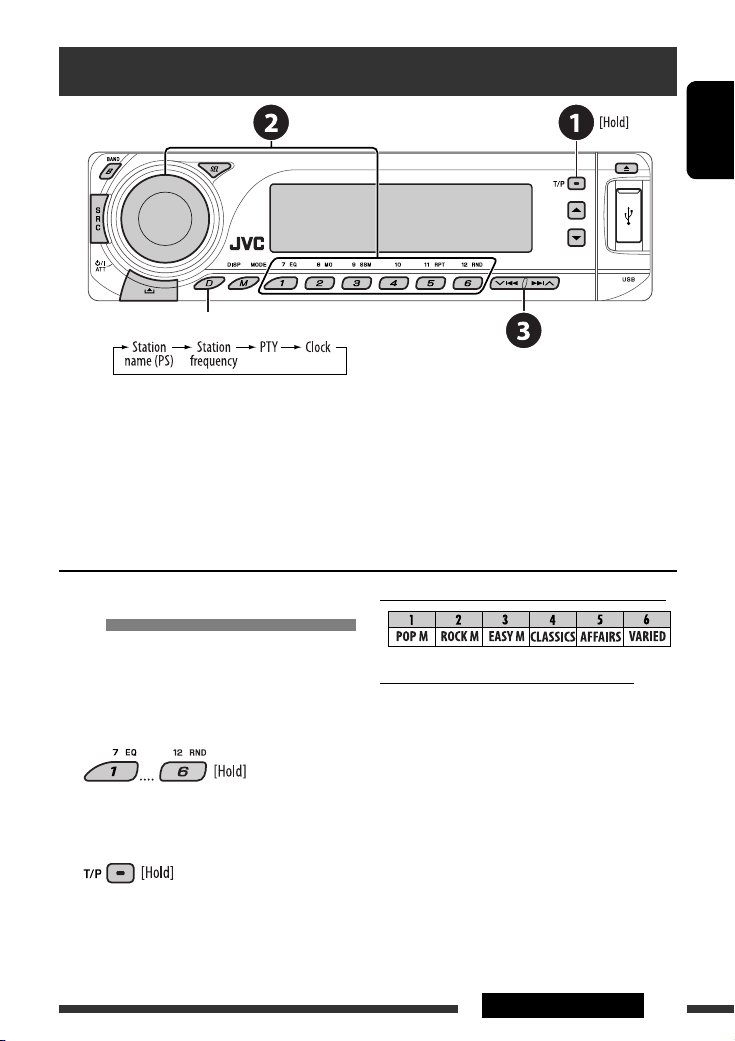
Searching for FM RDS programme — PTY Search
Change the display information
~ Activate PTY Search.
Ÿ Select one of the PTY codes (programme types).
See the following for details.
! Start searching.
If there is a station broadcasting a programme of the same PTY code as you have selected, that station is tuned
in.
ENGLISH
Storing your favorite programme
types
You can store your favorite PTY codes into the number
buttons.
1 Select a PTY code (see right column).
2 Select a preset number.
3 Repeat steps 1 and 2 for storing other
PTY codes.
4
Preset PTY codes in the number buttons (1 to 6):
PTY codes (available with the control dial):
NEWS, AFFAIRS, INFO, SPORT, EDUCATE, DRAMA,
CULTURE, SCIENCE, VARIED, POP M (music), ROCK M
(music), EASY M (music), LIGHT M (music), CLASSICS,
OTHER M (music), WEATHER, FINANCE, CHILDREN,
SOCIAL, RELIGION, PHONE IN, TRAVEL, LEISURE, JAZZ,
COUNTRY, NATION M (music), OLDIES, FOLK M (music),
DOCUMENT
9OPERATIONS
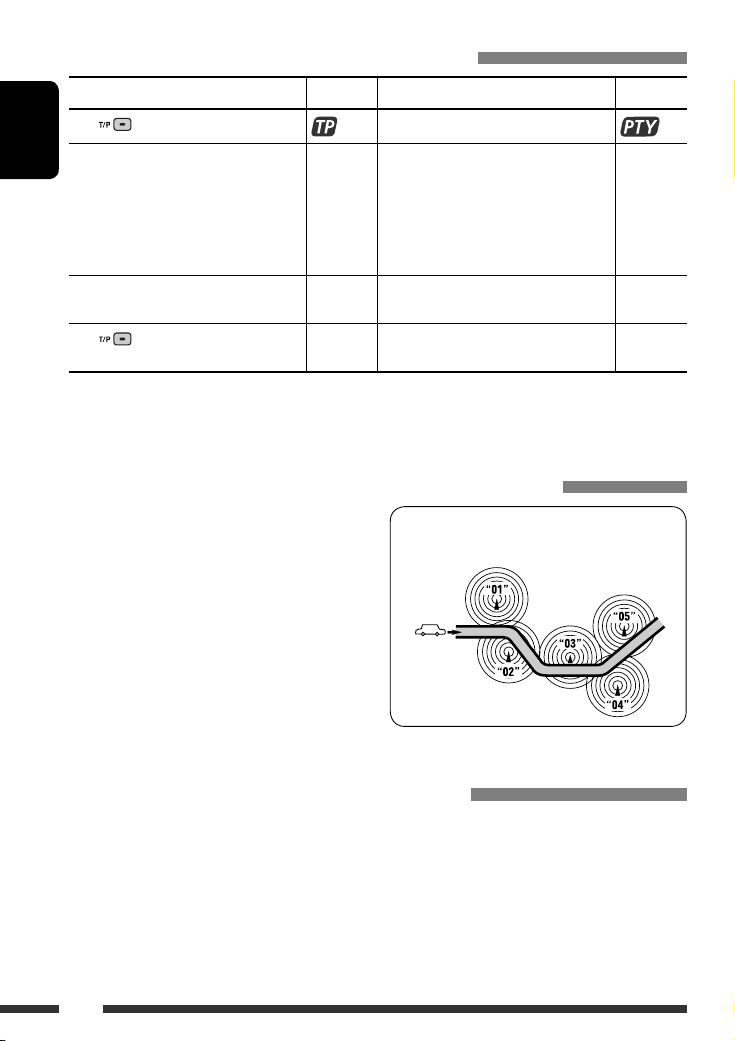
Activating/deactivating TA/PTY Standby Reception
TA Standby Reception Indicator PTY Standby Reception Indicator
Press
to activate. See page 26.
The unit temporarily will switch to Traffic
ENGLISH
Announcement (TA), if available, from any
source other than AM and FM3*.
The volume changes to the preset TA
volume level if the current level is lower
than the preset level (see page 26).
Not yet activated. Tune in to another
station providing the RDS signals.
Press
• When a DAB tuner is connected, TA/PTY Standby Reception also searches for services. (See also pages 20 and 26.)
* The unit will not switch to Traffic Announcement or PTY programme when a call connection is established through the
to deactivate. Goes off Select “OFF” for the PTY code (see page 26)
“BT-PHONE.”
Lights up The unit temporarily will switch to your
favorite PTY programme from any source
other than AM and FM3*.
Flashes Not yet activated. Tune in to another
station providing the RDS signals.
to deactivate.
Lights up
Flashes
Goes off
Tracing the same programme—Network-Tracking Reception
When driving in an area where FM reception is not
sufficient enough, this unit automatically tunes in to
another FM RDS station of the same network, possibly
broadcasting the same programme with stronger
signals (see the illustration on the right).
To change the Network-Tracking Reception
setting, see “AF-REG” on page 26.
• When the DAB tuner is connected, refer to “Tracing
the same programme—Alternative Frequency
Reception” on page 20.
Programme A broadcasting on different frequency
areas (01 – 05)
Automatic station selection—Programme Search
Usually when you press the number buttons, the preset station is tuned in.
If the signals from the FM RDS preset station are not sufficient for good reception, this unit, using the AF data, tunes
in to another frequency broadcasting the same programme as the original preset station is broadcasting.
• The unit takes some time to tune in to another station using programme search.
• See also page 26.
10
Disc operations
Open the control panel and insert the disc.
Playback starts automatically.
ENGLISH
Change the display information
To stop play and eject the disc
• Press SRC to listen to
another playback source.
Prohibiting disc ejection
1
If the file does not have Tag information or “TAG DISP” is set to
*
“TAG OFF” (see page 27), folder name and file name appear.
To cancel the prohibition, repeat the
same procedure.
TAG indicator will not light up.
2
*
“NO NAME” appears for an audio CD.
Pressing (or holding) the following buttons allows you to…
Disc type*
3
Press: Select track
Hold: Reverse/fast-forward
(Number buttons) *
Select folder Locate particular folder
5
directly *
4
track
Press: Select track
Hold: Reverse/fast-forward
—
Locate particular track directly
track
3
*
This unit can playback AAC files encoded using iTunes.
*4 Press to select number 1 to 6; hold to select number 7 to 12.
*5 It is required that folders be assigned with 2-digit numbers at the beginning of their folder names—01, 02, 03, and
so on.
Continued on the next page
11OPERATIONS
After pressing , press the following buttons to…
Disc type
ENGLISH
Skip 10 tracks (within
the same folder)
Skip 10 tracks TRK RPT:
• To cancel repeat play or random play, select “RPT OFF” or “RND OFF.”
TRK RPT:
Repeat current track
FLDR RPT:
Repeat current folder
Repeat current track
FLDR RND:
Randomly play all tracks of
current folder, then tracks of
next folders
DISC RND:
Randomly play all tracks
DISC RND:
Randomly play all tracks
Listening to the USB device
You can connect a USB mass storage class device such as a USB memory, Digital Audio Player *1, portable HDD, etc. to
the unit.
*1 You can connect both MTP (Media Transfer Protocol) devices and USB mass storage class devices.
Attaching a USB memory
USB input terminal
USB memory
This unit can play MP3/WMA/WMA-DRM10 *1/AAC*2/WAV tracks stored in a USB device.
*1 See page 32.
*2 This unit can play back AAC files encoded using iTunes. This unit cannot play back AAC files purchased from iTunes
Store.
If a USB device has been attached…
Playback starts from where it has been stopped previously.
• If a different USB device is currently attached, playback starts from the beginning.
12

To stop play and detach the USB device
Straightly pull it out from the unit.
• Press SRC to listen to another playback source.
Cautions:
• Avoid using the USB device if it might hinder your safety driving.
• Do not pull out and attach the USB device repeatedly while “CHECK” is flashing on the display.
• Do not start the car engine if a USB device is connected.
• Stop play back before disconnecting a USB device.
• This unit may not be able to play the files depending on the type of USB device.
• You cannot connect a computer to the USB input terminal of the unit.
• Make sure all important data has been backed up to avoid losing the data.
• Do not leave a USB device in the car, expose to direct sunlight, or high temperature to avoid deformation or
cause damages to the device.
Pressing (or holding) the following buttons allows you to…
Press: Select track
Hold: Reverse/fast-forward track
Select folder
(Number buttons)
After pressing
• To cancel repeat play or random play, select “RPT OFF” or “RND OFF.”
, press the following buttons to…
Skip 10 tracks (within the same folder)
TRK RPT: Repeat current track
FLDR RPT: Repeat all tracks of current folder
FLDR RND: Randomly play all tracks of current folder, then tracks of next folders
DISC RND: Randomly play all tracks
Locate particular folder directly
• See also *
4
and *5 on page 11.
ENGLISH
Change the display information
* If the file does not have Tag information
or “TAG DISP” is set to “TAG OFF” (see
page 27), folder name and file name
appear. TAG indicator will not light up.
13OPERATIONS
Using the Bluetooth® devices
For Bluetooth operations, it is required to connect the Bluetooth Adapter (KS-BTA200) to the CD changer jack on
the rear of this unit. See also page 23.
• Refer also to the instructions supplied with the Bluetooth adapter and the Bluetooth device.
ENGLISH
• Refer to the list (included in the box) to see the countries where you may use the Bluetooth® function.
To use a Bluetooth device through the unit (“BT-PHONE” and “BT-AUDIO”) for the first time, you need to establish
Bluetooth wireless connection between the unit and the device.
• Once the connection is established, it is registered in the unit even if you reset your unit. Up to five devices can be
registered in total.
• Only one device can be connected at a time for each source (“BT-PHONE” and “BT-AUDIO”).
Registering a Bluetooth device
Registration (Pairing) methods
Use either of the following items in the Bluetooth menu
to register and establish the connection with a device.
• Select “BT-PHONE” or “BT-AUDIO” as the source to
operate the Bluetooth menu.
OPEN Make the unit ready to establish a new
Bluetooth connection.
Connection is established by operating the
Bluetooth device.
SEARCH Make the unit ready to establish a new
Bluetooth connection.
Connection is established by operating
the unit.
Registering using “OPEN”
Preparation
Operate the device to turn on its Bluetooth function.
1 Select “BT-PHONE” or “BT-AUDIO.”
2 Select “NEW.”
3 Select “OPEN.”
4 Enter a PIN (Personal Identification
Number) code to the unit.
• You can enter any number you like (1-digit to
16-digit number). [Initial: 0000]
* Some devices have their own PIN code. Enter the
specified PIN code to the unit.
1 Move to the next (or previous) number
position.
2 Select a number or blank space.
14
3 Repeat steps 1 and 2 until you finish
entering a PIN code.
4 Confirm the entry.
“OPEN…” flashes on the display.
5 Use the Bluetooth device to search and
connect.
On the device to be connected, enter the same PIN
code you have just entered for this unit. “CONNECT”
flashes on the display.
Now connection is established and you can use the
device through the unit.
The device remains registered even after you
disconnect the device. Use “CONNECT“ (or activate
“AUTO CNT”) to connect the same device from next
time. (See the right column and page 28.)
2 Select a device you want to connect.
3 Use “OPEN’ or “SEARCH’ to connect.
ENGLISH
To connect/disconnect a registered device
1 Select “BT-PHONE” or “BT-AUDIO.”
To search for available devices
Perform steps 1 and 2 on page 14, then…
1 Select “SEARCH.”
The unit searches and displays the list of the
available devices.
• If no available device is detected, “UNFOUND”
appears.
2 Select a device you want to connect.
3 Enter the specific PIN code of the device to
the unit.
• Refer to the instructions supplied with the device
to check the PIN code.
4 Use the Bluetooth device to connect.
Now connection is established and you can use the
device through the unit.
To connect a special device
Perform steps 1 and 2 on page 14, then…
1 Select “SPECIAL.”
The unit displays the list of the preset devices.
2 Select a registered device you want to
connect/disconnect.
3 Select “CONNECT” or “DISCNNCT” to connect/
disconnect the selected device.
You can set the unit to connect a Bluetooth device
automatically when the unit is turned on. (See
“AUTO CNT” on page 28.)
To delete a registered device
1 Select “BT-PHONE” or “BT-AUDIO.”
2 Select a registered device you want to delete.
3 Select “DELETE,” then “YES” to delete the
selected device.
15EXTERNAL DEVICES
Using the Bluetooth cellular phone
ENGLISH
Change the display information
Select “BT-PHONE.”
~
Ÿ Enter Bluetooth menu.
! Make a call or settings using the Bluetooth menu. (See pages 17 and 28.)
When a call comes in….
The source is automatically changed to “BT-PHONE.”
When “AUTO ANS” (answer) is activated….
The unit answers the incoming calls automatically, see
page 28.
• When “AUTO ANS” (answer) is deactivated, press any
button (except /control dial) to answer the
incoming call.
To end the call
Hold any button (except /control dial).
• You can adjust the microphone volume level (see
page 28).
16
When an SMS comes in….
If the cellular phone is compatible with SMS (Short
Message Service) and “MSG-INFO” (message info) is set
to “AUTO” (see page 28), the unit rings and “RCV MSG”
(receiving message) appears on the display to inform
you the arrival of the message.
Making a call
You can make a call using the following methods.
Select “BT-PHONE,” then follow the following steps to make a call:
1 2
3 (unless mentioned otherwise)
ENGLISH
Call history Display the Dial
Menu.
Phone book Select “PH BOOK.”
Direct dialing Select “NUMBER.” Enter the phone number.
Voice command
1 “SAY NAME” appears on the display.
Select a call history.
REDIAL, RECEIVED, MISSED
The list of phone number appears.
Select a name (if it is acquired) or
phone number.
Select a name from the list.
2 Speak the name you want to call.
• You can also use voice command from the Dial Menu. Select “VOICE” from the Dial Menu.
• If your cellular phone does not support the voice recognition system, “ERROR” appears on the
display.
Preset phone
number
See the following for settings.
Presetting the phone number
You can preset up to six phone numbers.
3 Select a phone number.
1 Display the Dial Menu.
2 Select “PH BOOK,“ “MISSED,” or
“RECEIVED” whichever you want to use.
4
17EXTERNAL DEVICES

Using the Bluetooth audio player
ENGLISH
Pause/start play back
Enter setting menu
(Device list)
Change the display information
Reverse skip/forward skip
~ Select “BT-AUDIO.”
If playback did not start automatically, operate the Bluetooth audio player to start playback.
• Refer also to page 15 for connecting/disconnecting/deleting a registered device.
Bluetooth Information:
If you wish to receive more information about Bluetooth, visit our JVC web site.
Listening to the CD changer
Change the display information
(see page 11)
It is recommended to use a JVC MP3-compatible CD changer with your unit. You can connect a CD changer to the CD
changer jack on the rear of the unit. See also page 23.
• You can only play conventional CDs (including CD Text) and MP3 discs.
18

Preparation
Make sure “CHANGER” is selected for the external input setting, see page 27.
~ Select “CD-CH.”
Ÿ Select a disc to start playing.
Press: For selecting disc number 1 – 6.
Hold: For selecting disc number 7 – 12.
Pressing (or holding) the following buttons allows you to…
Disc type
ENGLISH
Press: Select track
Hold: Reverse/fast-forward track
Press: Select track
Hold: Reverse/fast-forward track
After pressing
Disc type
• To cancel repeat play or random play, select “RPT OFF” or “RND OFF.”
, press the following buttons to…
Skip 10 tracks (within
the same folder)
Skip 10 tracks TRK RPT:
TRK RPT:
Repeat current track
FLDR RPT:
Repeat all tracks of current folder
DISC RPT:
Repeat all tracks of the current
disc
Repeat current track
DISC RPT:
Repeat all tracks of the current
disc
Select folder
—
FLDR RND:
Randomly play all tracks of
current folder, then tracks of
next folders
DISC RND:
Randomly play all tracks of
current disc
MAG RND:
Randomly play all tracks of the
inserted discs
DISC RND:
Randomly play all tracks of
current disc
MAG RND:
Randomly play all tracks of the
inserted discs
19EXTERNAL DEVICES
Listening to the DAB tuner
Select preset service.
ENGLISH
Change the display information
You can connect a JVC DAB tuner to the CD changer jack on the rear of the unit. See also page 23.
~ Select “DAB.”
Ÿ Select the bands.
! Searching for an ensemble.
Manual Search: Hold either one of the buttons until “MANU” flashes on the display, then press it repeatedly.
⁄ Select a service (either primary or secondary) to listen to.
Storing DAB services in memory
While listening to a DAB service…
Activating/deactivating TA/PTY
Standby Reception
• Operations are exactly the same as explained on page
10 for FM RDS stations.
• You cannot store PTY codes separately for the DAB
tuner and for the FM tuner.
20
Tracing the same programme—
Alternative Frequency Reception
• While receiving a DAB service:
When driving in an area where a service cannot be
received, this unit automatically tunes in to another
ensemble or FM RDS station, broadcasting the same
programme.
• While receiving an FM RDS station:
When driving in an area where a DAB service is
broadcasting the same programme as the FM RDS
station is broadcasting, this unit automatically tunes
in to the DAB service.
To deactivate the Alternative Frequency
Reception, see page 27.
Listening to the iPod / D. player
Change the display information
Before operating, connect either one of the following (separately purchased) to the CD changer jack on the rear of
the unit. See also page 23.
• Interface adapter for iPod—KS-PD100 for controlling an iPod.
• D. player interface adapter—KS-PD500 for controlling a D. player.
Preparation
Make sure “CHANGER” is selected for the external input setting, see page 27.
~ Select “IPOD” or “D. PLAYER.”
Ÿ Select a song to start playing.
Selecting a track from the menu
1 Enter the main menu.
This mode will be canceled if no
operations are done for about
5 seconds.
2 Select the desired menu.
For iPod:
PLAYLIST Ô ARTISTS Ô ALBUMS Ô SONGS
Ô GENRES Ô COMPOSER Ô (back to the
beginning)
For D. player:
PLAYLIST Ô ARTIST Ô ALBUM Ô GENRE
Ô TRACK Ô (back to the beginning)
3 Confirm the selection.
• To move back to the previous menu, press 5.
• If a track is selected, playback starts
automatically.
• Holding 4/¢ can skip 10 items at
a time.
Pause/stop playback
• To resume playback, press
the button again.
Press: Select tracks
Hold: Reverse/fast-forward
track
ENGLISH
Continued on the next page
21EXTERNAL DEVICES
After pressing
ENGLISH
• To cancel repeat play or random play, select “RPT OFF” or “RND OFF.”
* iPod: Functions only if you select “ALL” in “ALBUMS” of the main “MENU.”
, press the following buttons to…
ONE RPT: Functions the same as “Repeat One” of the iPod or “Repeat Mode =
One” of the D. player.
ALL RPT: Functions the same as “Repeat All” of the iPod or “Repeat Mode
All” of the D. player.
ALBM RND*: Functions the same as “Shuffle Albums” of the iPod.
SONG RND/RND ON: Functions the same as “Shuffle Songs” of the iPod or “Random Play
= On” of the D. player.
Listening to the other external components
Change the display information
=
You can connect an external component using the following adapters (separately purchased) to the CD changer jack
on the rear of the unit. See also page 23.
• Line Input Adapter—KS-U57
• AUX Input Adapter—KS-U58
Preparation
Make sure “EXT IN” is selected for the external input setting, see page 27.
~ Select “EXT IN.”
Ÿ Turn on the connected component and start playing the source.
! Adjust the volume.
⁄ Adjust the sound as you want (see pages 24 and 25).
22

Concept diagram of the external device connection
For connection, see Installation/Connection manual (separate volume).
• Connection 1 (integrated connection)
Unit
CD changer jack
(see pages 14 – 18)
or
(see page 27 of the
”EXT IN” setting)
ENGLISH
JVC CD changer, [18]
Apple iPod, [21]
JVC D. player, [21]
JVC DAB tuner, [20]
(see page 27 of the
”EXT IN” setting)
• Connection 2 (alternative connection)
Unit
CD changer jack
(see page 27 of the
”EXT IN” setting)
(see page 27 of the
”EXT IN” setting)
: Adapter (separately purchased)
MD player, etc., [22]
MD player, etc., [22]
(see pages 14 – 18)
JVC DAB tuner, [20]
JVC CD changer, [18]
Apple iPod, [21]
JVC D. player, [21]
MD player, etc., [22]
MD player, etc., [22]
23EXTERNAL DEVICES

Selecting a preset sound mode
ENGLISH
Preset values
Indication (For)
USER (Flat sound) 00 00 00 OFF
ROCK (Rock or disco music) +03 00 +02 ON
CLASSIC (Classical music) +01 00 +03 OFF
POPS (Light music) +02 +01 +02 OFF
HIP HOP (Funk or rap music) +04 –02 +01 ON
JAZZ (Jazz music) +03 00 +03 OFF
BAS
(bass)
MID
(mid-range)
TRE
(treble)
LOUD
(loudness)
24
Adjusting the sound
1
2 Adjust the level.
General settings — PSM
You can change PSM (Preferred Setting Mode) items
listed in the table on pages 26 and 27.
ENGLISH
1 Enter the PSM settings.
BAS *1 (bass)
Adjust the bass.
1
MID *
(mid-range)
Adjust the mid-range frequencies
sound level.
1
(treble)
TRE *
Adjust the treble.
2
FAD *
(fader)
Adjust the front and rear speaker
balance.
3
(balance)
BAL *
Adjust the left and right speaker
balance.
1
LOUD *
(loudness)
Boost low and high frequencies to
produce a well-balanced sound at low
volume level.
SUB.W (subwoofer)
Adjust the subwoofer output level.
VOL (volume)
Adjust the volume.
*1 When you adjust the bass, mid-range, treble, or
loudness, the adjustment you have made is stored
for the currently selected sound mode (iEQ) including
“USER.”
*2 If you are using a two-speaker system, set the fader
level to “00.”
*3 The adjustment will not affect the subwoofer output.
*4 Depending on the amplifier gain control setting. (See
page 27 for details.)
–06 to +06
–06 to +06
–06 to +06
R06 to F06
L06 to R06
LOUD ON or
LOUD OFF
00 to 08,
initial: 04
00 to 30
4
(or 50) *
2 Select a PSM item.
3 Select or adjust the selected PSM item.
4 Repeat steps 2 and 3 to adjust other PSM
items if necessary.
5 Finish the procedure.
Continued on the next page
25SETTINGS
Indication Item
Setting, [reference page]
( : Initial)
DEMO
Display demonstration
ENGLISH
CLK DISP *
Clock display
1
• DEMO ON
• DEMO OFF
• ON
• OFF
: Display demonstration will be activated automatically if no
operation is done for about 20 seconds, [4].
: Cancels.
: Clock time is shown on the display at all times when the power is
turned off.
: Cancels; pressing D DISP will show the clock time for about 5 seconds
when the power is turned off, [4].
CLOCK H
0 – 23 (1 – 12) : Initial: 0 (0:00), [4].
Hour adjustment
CLOCK M
00 – 59 : Initial: 00 (0:00), [4].
Minute adjustment
24H/12H
Time display mode
CLK ADJ
Clock adjustment
2
AF-REG *
Alternative frequency/
regionalization
reception
• 12H
• 24H
• AUTO
• OFF
• AF
• AF REG
: See also page 4 for setting.
: The built-in clock is automatically adjusted using the CT (clock time)
data in the RDS signal.
: Cancels.
: When the currently received signals become weak, the unit switches
to another station or service (the programme may differ from the
one currently received), [10].
: When the currently received signals become weak, the unit switches
to another station broadcasting the same programme.
PTY-STBY
PTY standby
TA VOL
Traffic announcement
• OFF
OFF, PTY codes
(see page 9)
VOL 00 —
VOL 30 or 50 *
: Cancels (not selectable when “DAB AF” is set to “AF ON”).
: Activates PTY Standby Reception with one of the PTY codes, [9, 10].
: Initial: VOL 15, [10].
3
volume
P-SEARCH *
Programme search
1
*
If the power supply is not interrupted by turning off the ignition key of your car, it is recommended to select “OFF” to
2
• ON
• OFF
: Activates Programme Search, [10].
: Cancels.
save the car’s battery.
*2 Only for RDS FM stations.
3
Depending on the “AMP GAIN” setting.
*
26
Indication Item
Setting, [reference page]
( : Initial)
4
DAB AF *
Alternative frequency
reception
4
DAB VOL *
DAB volume
• AF ON
• AF OFF
VOL –12
— VOL +12
: Traces the programme among DAB services and FM RDS stations,
[20].
: Cancels.
: Initial: VOL 00; You can adjust the volume level of DAB tuner to
match the FM sound level and store it in memory.
adjustment
DIMMER
Dimmer
TEL
Telephone muting
5
SCROLL *
Scroll
• AUTO
• ON
• OFF
• MUTING 1/
MUTING 2
• OFF
• ONCE
• AUTO
• OFF
: Dims the display when you turn on the headlights.
: Dims the display illumination.
: Cancels.
: Select either one which mutes the sounds while using a cellular
phone.
: Cancels.
: Scrolls the track information once.
: Repeats scrolling (at 5-second intervals).
: Cancels. (Holding D DISP can scroll the display regardless of the
setting.)
WOOFER
Subwoofer cutoff
frequency
6
EXT IN *
External input
TAG DISP
Tag display
AMP GAIN
Amplifier gain control
IF BAND
Intermediate
frequency band
• LOW
• MID
• HIGH
• CHANGER
• EXT IN
• TAG ON
• TAG OFF
• LOW PWR
• HIGH PWR
• AUTO
• WIDE
: Frequencies lower than 90 Hz are sent to the subwoofer.
: Frequencies lower than 135 Hz are sent to the subwoofer.
: Frequencies lower than 180 Hz are sent to the subwoofer.
: To use a JVC CD changer, [18], or an Apple iPod/a JVC D. player, [21].
: To use any other external component, [22].
: Shows the tag while playing MP3/WMA/AAC/WAV tracks.
: Cancels.
: VOL 00 – VOL 30 (Select if the maximum power of each speaker is
less than 50 W to prevent damaging the speaker.)
: VOL 00 – VOL 50
: Increases the tuner selectivity to reduce interference noises between
adjacent stations. (Stereo effect may be lost.)
: Subject to interference noises from adjacent stations, but sound
quality will not be degraded and the stereo effect will remain.
4
*
Displayed only when DAB tuner is connected.
*5 Some characters or symbols will not be shown correctly (or will be blanked) on the display.
*6 Displayed only when one of the following sources is selected—FM, AM, DAB, CD, USB, or Bluetooth.
ENGLISH
27SETTINGS

Bluetooth settings
You can change the settings listed on the right column
according to your preference.
ENGLISH
1 Select “BT-PHONE” or “BT-AUDIO.”
2 Enter the Bluetooth menu.
3 Select “SETTING.”
4 Select a setting item.
5 Change the setting accordingly.
Setting menu ( : Initial)
AUTO CNT (connect)
When the unit is turned on, the connection is
established automatically with….
OFF: No Bluetooth device.
LAST: The last connected Bluetooth device.
ORDER: The available registered Bluetooth device
found at first.
AUTO ANS (answer)
Only for the device being connected for “BT-PHONE.”
ON: The unit answers the incoming calls
automatically.
OFF: The unit does not answer the calls
automatically. Answer the calls manually.
REJECT: The unit rejects all incoming calls.
MSG-INFO (message info)
Only for the device being connected for “BT-PHONE.”
AUTO: The unit informs you of the arrival of
a message by ringing and displaying
“RCV MSG” (receiving message).
MANUAL: The unit does not inform you of the arrival of
a message.
MIC SET (microphone setting)
Only for the device being connected for “BT-PHONE.”
Adjust microphone volume connected to the Bluetooth
adapter, [LEVEL 01/02/03].
28 SETTINGS
VERSION
The Bluetooth software and hardware versions are
shown.
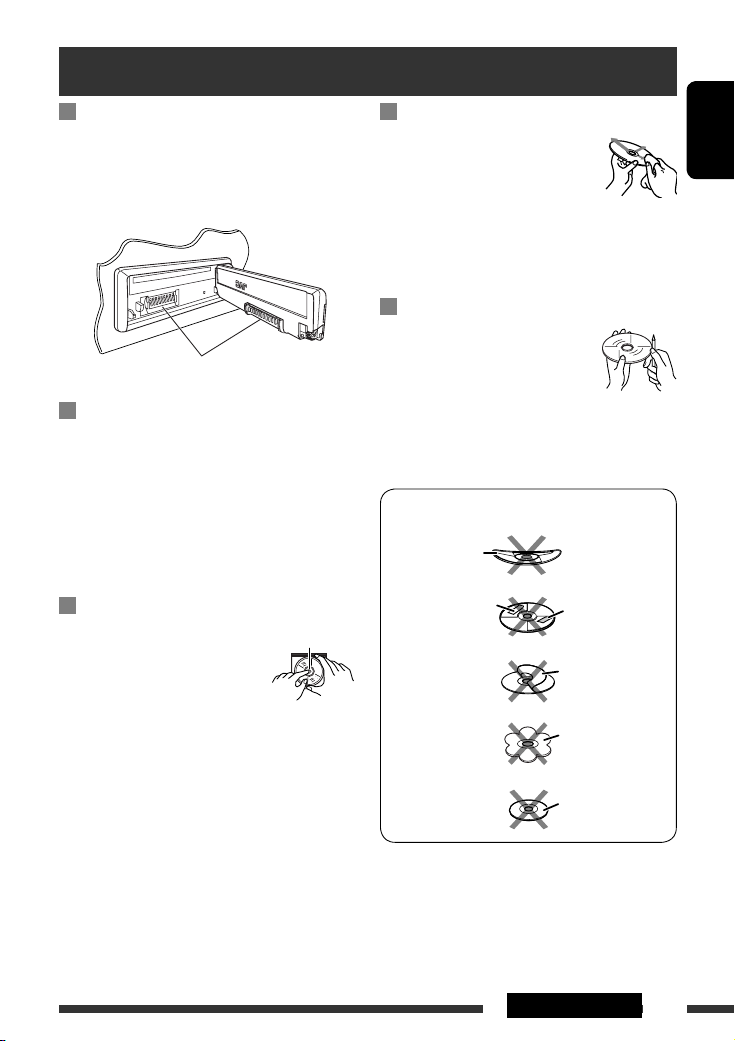
Maintenance
How to clean the connectors
Frequent detachment will deteriorate the connectors.
To minimize this possibility, periodically wipe the
connectors with a cotton swab or cloth moistened with
alcohol, being careful not to damage the connectors.
Connector
Moisture condensation
Moisture may condense on the lens inside the unit in
the following cases:
• After starting the heater in the car.
• If it becomes very humid inside the car.
Should this occur, the unit may malfunction. In this
case, eject the disc and leave the unit turned on for a
few hours until the moisture evaporates.
How to handle discs
When removing a disc from its
case, press down the center holder
of the case and lift the disc out,
holding it by the edges.
• Always hold the disc by the edges. Do not touch its
recording surface.
When storing a disc into its case, gently insert the
disc around the center holder (with the printed surface
facing up).
• Make sure to store discs into the cases after use.
Center holder
To keep discs clean
A dirty disc may not play correctly.
If a disc does become dirty, wipe it with
a soft cloth in a straight line from center
to edge.
• Do not use any solvent (for example, conventional
record cleaner, spray, thinner, benzine, etc.) to clean
discs.
To play new discs
New discs may have some rough spots
around the inner and outer edges. If
such a disc is used, this unit may reject
the disc.
To remove these rough spots, rub the edges with a
pencil or ball-point pen, etc.
Do not use the following discs:
Warped disc
Sticker
Sticker residue
Stick-on label
Unusual shape
Single CD (8 cm disc)
ENGLISH
29REFERENCES

More about this unit
General
Turning on the power
ENGLISH
• By pressing SRC on the unit, you can also turn on the
power. If the source is ready, playback also starts.
Turning off the power
• If you turn off the power while listening to a disc, disc
play will start from where playback has been stopped
previously, next time you turn on the power.
FM/AM/RDS
Storing stations in memory
• During SSM search…
– Received stations are preset in No. 1 (lowest
frequency) to No. 6 (highest frequency).
– When SSM is over, the station stored in No. 1 will
be automatically tuned in.
• When storing stations, the previously preset stations
are erased and stations are stored newly.
FM RDS operations
• Network-Tracking Reception requires two types of
RDS signals—PI (Programme Identification) and AF
(Alternative Frequency) to work correctly. Without
receiving these data correctly, Network-Tracking
Reception will not operate correctly.
• If a Traffic Announcement is received by TA Standby
Reception, the volume level automatically changes to
the preset level (TA VOL) if the current level is lower
than the preset level.
• When Alternative Frequency Reception is activated
(with AF selected), Network-Tracking Reception is
also activated automatically. On the other hand,
Network-Tracking Reception cannot be deactivated
without deactivating Alternative Frequency
Reception. (See pages 26 and 27.)
• If you want to know more about RDS, visit
<http://www.rds.org.uk>.
Disc
Caution for DualDisc playback
• The Non-DVD side of a “DualDisc” does not comply
with the “Compact Disc Digital Audio” standard.
Therefore, the use of Non-DVD side of a DualDisc on
this product may not be recommended.
General
• This unit has been designed to reproduce CDs/CD
Texts, and CD-Rs (Recordable)/CD-RWs (Rewritable)
in audio CD (CD-DA), MP3/WMA/AAC formats.
• When a disc is inserted upside down, “PLEASE” and
“EJECT” appear alternately on the display. Press 0 to
eject the disc.
• While fast-forwarding or reversing on an MP3/WMA/
AAC disc, you can only hear intermittent sounds.
Ejecting a disc
• If the ejected disc is not removed within 15 seconds,
the disc is automatically inserted again into the
loading slot to protect it from dust. Playback starts
automatically.
• After ejecting a disc, “NO DISC” appears and you
cannot operate some of the buttons. Insert another
disc or press SRC to select another playback source.
Playing a CD-R or CD-RW
• Use only “finalized” CD-Rs or CD-RWs.
• This unit can play back only files of the same type
which are first detected if a disc includes both audio
CD (CD-DA) files and MP3/WMA/AAC files.
• This unit can play back multi-session discs; however,
unclosed sessions will be skipped while playing.
• Some CD-Rs or CD-RWs may not play back on this
unit because of their disc characteristics, or for the
following reasons:
30
Loading…
-
Page 1: JVC KD-G737
ENGLISH РУCCKИЙ УКРАЇНА CD RECEIVER РЕСИВЕР С ПРОИГРЫВАТЕЛЕМ КОМПАКТ-ДИСКОВ ПРИЙМАЧ З ПРОГРАВАЧЕМ КОМПАКТ-ДИСКІВ KD-G737 For installation and connections, refer to the separate manual. Указания по установке и выполнению соединений ?[…]
-
Page 2: JVC KD-G737
ENGLISH 2 How to reset your unit • Your preset adjustments will also be erased (except the registered Bluetooth device, see page 14). How to forcibly eject a disc “PLEASE” and “EJECT” appear alternately on the display. • Be careful not to drop the disc when it ejects. • If this does not work, reset your unit. Thank you for purchasing […]
-
Page 3: JVC KD-G737
ENGLISH 3 How to use functions mode If you press M MODE, the unit goes into functions mode, then the number buttons (except “4”) and 5 / ∞ buttons work as different function buttons. Caution on volume setting: Discs and connected USB devices produce very little noise compared with other sources. Lower the volume before playing to avoid damagi[…]
-
Page 4: JVC KD-G737
ENGLISH 4 INTRODUCTIONS Preparation Cancel the display demonstration and set the clock • See also page 26. ~ Turn on the power. Ÿ Enter the PSM settings. ! ] ⁄ Cancel the display demonstrations Select “DEMO,” then “DEMO OFF.” Set the clock Select “CLOCK H” (hour), then adjust the hour. Select “CLOCK M” (minute), then adjust the[…]
-
Page 5: JVC KD-G737
ENGLISH 5 OPERATIONS Basic operations Using the control panel 1 Select the source. FM/AM = DAB * = CD * = USB * = CD-CH * / IPOD * /D.PLAYER * (or EXT IN ) = BT-PHONE (Bluetooth Phone) * = BT-AUDIO (Bluetooth Audio) * = (back to the beginning) * You cannot select these sources if they are not ready or not connected. 2 Select the bands. 3 • Turn o[…]
-
Page 6: JVC KD-G737
ENGLISH 6 Before using the remote controller: • Aim the remote controller directly at the remote sensor on the unit. • DO NOT expose the remote sensor to bright light (direct sunlight or artificial lighting). Display window Using the remote controller (RM-RK50) Installing the lithium coin battery (CR2025) Remote sensor 1 Playback source indicat[…]
-
Page 7: JVC KD-G737
ENGLISH 7 OPERATIONS Warning: To prevent accidents and damage • Do not install any battery other than CR2025 or its equivalent. • Do not leave the remote controller in a place (such as dashboards) exposed to direct sunlight for a long time. • Store the battery in a place where children cannot reach. • Do not recharge, short, disassemble, he[…]
-
Page 8: JVC KD-G737
ENGLISH 8 When an FM stereo broadcast is hard to receive 1 2 Reception improves, but stereo effect will be lost. • MO indicator lights up. FM station automatic presetting — SSM (Strong-station Sequential Memory) You can preset up to six stations for each band. 1 2 Listening to the radio Change the display information ~ Select “FM/AM.” Ÿ Se[…]
-
Page 9: JVC KD-G737
ENGLISH 9 OPERATIONS Storing your favorite programme types You can store your favorite PTY codes into the number buttons. 1 Select a PTY code (see right column). 2 Select a preset number. 3 Repeat steps 1 and 2 for storing other PTY codes. 4 Searching for FM RDS programme — PTY Search Change the display information Preset PTY codes in the number […]
-
Page 10: JVC KD-G737
ENGLISH 10 Activating/deactivating TA/PTY Standby Reception TA Standby Reception Indicator PTY Standby Reception Indicator Press to activate. See page 26. The unit temporarily will switch to Traffic Announcement (TA), if available, from any source other than AM and FM3 * . The volume changes to the preset TA volume level if the current level is low[…]
-
Page 11: JVC KD-G737
ENGLISH 11 OPERATIONS Disc operations Open the control panel and insert the disc. Playback starts automatically. To stop play and eject the disc • Press SRC to listen to another playback source. Prohibiting disc ejection To cancel the prohibition, repeat the same procedure. Change the display information * 1 If the file does not have Tag informat[…]
-
Page 12: JVC KD-G737
ENGLISH 12 After pressing , press the following buttons to… Disc type Skip 10 tracks (within the same folder) TRK RPT : Repeat current track FLDR RPT : Repeat current folder FLDR RND : Randomly play all tracks of current folder, then tracks of next folders DISC RND : Randomly play all tracks Skip 10 tracks TRK RPT : Repeat current track DISC RND […]
-
Page 13: JVC KD-G737
ENGLISH 13 OPERATIONS To stop play and detach the USB device Straightly pull it out from the unit. • Press SRC to listen to another playback source. Cautions: • Avoid using the USB device if it might hinder your safety driving. • Do not pull out and attach the USB device repeatedly while “CHECK” is flashing on the display. • Do not star[…]
-
Page 14: JVC KD-G737
ENGLISH 14 Using the Bluetooth® devices For Bluetooth operations, it is required to connect the Bluetooth Adapter (KS-BTA200) to the CD changer jack on the rear of this unit. See also page 23. • Refer also to the instructions supplied with the Bluetooth adapter and the Bluetooth device. • Refer to the list (included in the box) to see the coun[…]
-
Page 15: JVC KD-G737
ENGLISH 15 EXTERNAL DEVICES 2 Select a device you want to connect. 3 Use “OPEN’ or “SEARCH’ to connect. To connect/disconnect a registered device 1 Select “BT-PHONE” or “BT-AUDIO.” 2 Select a registered device you want to connect/disconnect. 3 Select “CONNECT” or “DISCNNCT” to connect/ disconnect the selected device. You can[…]
-
Page 16: JVC KD-G737
ENGLISH 16 When a call comes in…. The source is automatically changed to “BT-PHONE.” When “AUTO ANS” (answer) is activated…. The unit answers the incoming calls automatically, see page 28. • When “AUTO ANS” (answer) is deactivated, press any button (except /control dial) to answer the incoming call. To end the call Hold any button[…]
-
Page 17: JVC KD-G737
ENGLISH 17 EXTERNAL DEVICES You can preset up to six phone numbers. 1 Display the Dial Menu. 2 Select “PH BOOK,“ “MISSED,” or “RECEIVED” whichever you want to use. 3 Select a phone number. 4 Making a call You can make a call using the following methods. Select “BT-PHONE,” then follow the following steps to make a call: 1 2 3 (unless[…]
-
Page 18: JVC KD-G737
ENGLISH 18 Using the Bluetooth audio player ~ Select “BT-AUDIO.” If playback did not start automatically, operate the Bluetooth audio player to start playback. • Refer also to page 15 for connecting/disconnecting/deleting a registered device. Bluetooth Information: If you wish to receive more information about Bluetooth, visit our JVC web sit[…]
-
Page 19: JVC KD-G737
ENGLISH 19 EXTERNAL DEVICES Preparation Make sure “CHANGER” is selected for the external input setting, see page 27. ~ Select “CD-CH.” Ÿ Select a disc to start playing. Press: For selecting disc number 1 – 6. Hold: For selecting disc number 7 – 12. Pressing (or holding) the following buttons allows you to… Disc type Press: Select tra[…]
-
Page 20: JVC KD-G737
ENGLISH 20 Listening to the DAB tuner Change the display information Select preset service. You can connect a JVC DAB tuner to the CD changer jack on the rear of the unit. See also page 23. ~ Select “DAB.” Ÿ Select the bands. ! Searching for an ensemble. Manual Search: Hold either one of the buttons until “MANU” flashes on the display, the[…]
-
Page 21: JVC KD-G737
ENGLISH 21 EXTERNAL DEVICES Listening to the iPod / D. player Change the display information 1 Enter the main menu. This mode will be canceled if no operations are done for about 5 seconds. 2 Select the desired menu. For iPod: PLAYLIST Ô ARTISTS Ô ALBUMS Ô SONGS Ô GENRES Ô COMPOSER Ô (back to the beginning) For D. player: PLAYLIST Ô ARTIST ?[…]
-
Page 22: JVC KD-G737
ENGLISH 22 Listening to the other external components You can connect an external component using the following adapters (separately purchased) to the CD changer jack on the rear of the unit. See also page 23. • Line Input Adapter —KS-U57 • AUX Input Adapter —KS-U58 Preparation Make sure “EXT IN” is selected for the external input setti[…]
-
Page 23: JVC KD-G737
ENGLISH 23 EXTERNAL DEVICES Concept diagram of the external device connection For connection, see Installation/Connection manual (separate volume). • Connection 1 (integrated connection) JVC CD changer, [18] Apple iPod, [21] JVC D. player, [21] Unit CD changer jack (see page 27 of the ”EXT IN” setting) (see page 27 of the ”EXT IN” setting[…]
-
Page 24: JVC KD-G737
ENGLISH 24 Selecting a preset sound mode Indication (For) BAS (bass) MID (mid-range) TRE (treble) LOUD (loudness) USER (Flat sound) 00 00 00 OFF ROCK (Rock or disco music) +03 00 +02 ON CLASSIC (Classical music) +01 00 +03 OFF POPS (Light music) +02 +01 +02 OFF HIP HOP (Funk or rap music) +04 –02 +01 ON JAZZ (Jazz music) +03 00 +03 OFF Preset val[…]
-
Page 25: JVC KD-G737
ENGLISH 25 SETTINGS Continued on the next page General settings — PSM You can change PSM (Preferred Setting Mode) items listed in the table on pages 26 and 27. 1 Enter the PSM settings. 2 Select a PSM item. 3 Select or adjust the selected PSM item. 4 Repeat steps 2 and 3 to adjust other PSM items if necessary. 5 Finish the procedure. Adjusting th[…]
-
Page 26: JVC KD-G737
ENGLISH 26 Indication Item ( : Initial) Setting, [reference page] DEMO Display demonstration • DEMO ON • DEMO OFF : Display demonstration will be activated automatically if no operation is done for about 20 seconds, [4]. : Cancels. CLK DISP * 1 Clock display • ON • OFF : Clock time is shown on the display at all times when the power is turn[…]
-
Page 27: JVC KD-G737
ENGLISH 27 SETTINGS Indication Item ( : Initial) Setting, [reference page] DAB AF * 4 Alternative frequency reception • AF ON • AF OFF : Traces the programme among DAB services and FM RDS stations, [20]. : Cancels. DAB VOL * 4 DAB volume adjustment VOL –12 — VOL +12 : Initial: VOL 00; You can adjust the volume level of DAB tuner to match th[…]
-
Page 28: JVC KD-G737
ENGLISH 28 SETTINGS Setting menu ( : Initial) AUTO CNT (connect) When the unit is turned on, the connection is established automatically with…. OFF : No Bluetooth device. LAST : The last connected Bluetooth device. ORDER : The available registered Bluetooth device found at first. AUTO ANS (answer) Only for the device being connected for “BT-PHO[…]
-
Page 29: JVC KD-G737
ENGLISH 29 REFERENCES How to clean the connectors Frequent detachment will deteriorate the connectors. To minimize this possibility, periodically wipe the connectors with a cotton swab or cloth moistened with alcohol, being careful not to damage the connectors. Moisture condensation Moisture may condense on the lens inside the unit in the following[…]
-
Page 30: JVC KD-G737
ENGLISH 30 General Turning on the power • By pressing SRC on the unit, you can also turn on the power. If the source is ready, playback also starts. Turning off the power • If you turn off the power while listening to a disc, disc play will start from where playback has been stopped previously, next time you turn on the power. FM/AM/RDS Storing[…]
-
Page 31: JVC KD-G737
ENGLISH 31 REFERENCES – Discs are dirty or scratched. – Moisture condensation occurs on the lens inside the unit. – The pickup lens inside the unit is dirty. – CD-R/CD-RW on which the files are written with “Packet Write” method. – There are improper recording conditions (missing data, etc.) or media conditions (stained, scratched, wa[…]
-
Page 32: JVC KD-G737
ENGLISH 32 Playing MP3/WMA/AAC/WAV tracks from a USB device • Connecting a USB device automatically changes the source to “USB.” • While playing from a USB device, the playback order may differ from other players. • This unit may be unable to play back some USB devices or some files due to their characteristics or recording conditions. ?[…]
-
Page 33: JVC KD-G737
ENGLISH 33 REFERENCES Detaching a USB device • After removing a USB device, “NO USB“ appears and you cannot operate some of the buttons. Reattach a USB device or press SRC to select another playback source. Bluetooth operations General • While driving, do not perform complicated operation such as dialing the numbers, using phone book, etc. […]
-
Page 34: JVC KD-G737
ENGLISH 34 Troubleshooting What appears to be trouble is not always serious. Check the following points before calling a service center. Symptom Remedy/Cause General • Sound cannot be heard from the speakers. • Adjust the volume to the optimum level. • Check the cords and connections. • The unit does not work at all. Reset the unit (see pag[…]
-
Page 35: JVC KD-G737
ENGLISH 35 REFERENCES Symptom Remedy/Cause MP3/WMA/AAC • Tracks do not play back in the order you have intended them to play. Playback order is determined when files are recorded. • Elapsed playing time is not correct. This sometimes occurs during play. This is caused by how the tracks are recorded on the disc. • “PLEASE” and “EJECT” […]
-
Page 36: JVC KD-G737
ENGLISH 36 Symptom Remedy/Cause Bluetooth * • Bluetooth device does not detect the unit. The unit can be connected with one Bluetooth cellular phone and one Bluetooth audio device at a time. While connecting a device, this unit cannot be detected from another device. Disconnect currently connected device and search again. • The unit does not de[…]
-
Page 37: JVC KD-G737
ENGLISH 37 REFERENCES Symptom Remedy/Cause DAB • “noSIGNAL” appears on the display. Move to an area with stronger signals. • “RESET 08” appears on the display. Connect this unit and the DAB tuner correctly and reset the unit (see page 2). • The DAB tuner does not work at all. Reconnect this unit and the DAB tuner correctly. Then, rese[…]
-
Page 38: JVC KD-G737
ENGLISH 38 Specifications AUDIO AMPLIFIER SECTION Maximum Power Output: Front and rear: 50 W per channel Continuous Power Output (RMS): Front and rear: 19 W per channel into 4 Ω, 40 Hz to 20 000 Hz at no more than 0.8% total harmonic distortion. Load Impedance: 4 Ω (4 Ω to 8 Ω allowance) Tone Control Range: Bass: ±12 dB at 60 Hz Mid-range:[…]
-
Page 39: JVC KD-G737
ENGLISH 39 REFERENCES CD PLAYER SECTION Type: Compact disc player Signal Detection System: Non-contact optical pickup (semiconductor laser) Number of Channels: 2 channels (stereo) Frequency Response: 5 Hz to 20 000 Hz Dynamic Range: 96 dB Signal-to-Noise Ratio 98 dB Wow and Flutter: Less than measurable limit MP3 Decoding Format: (MPEG1/2 Audio Lay[…]
-
Page 40: JVC KD-G737
РУCCKИЙ 2 Как перенастроить Ваше устройство • Запрограммированные настройки будут также удалены (за исключением зарегистрированного устройства Bluetooth, см. стр. 14). Принудительное извлечение ди[…]
-
Page 41: JVC KD-G737
РУCCKИЙ 3 Использование режима настройки функций При нажатии кнопки M MODE приемник переходит в режим функций, после чего нумерованные кнопки (за исключением кнопок “4”) и кнопки 5 / ∞ работают ка[…]
-
Page 42: JVC KD-G737
РУCCKИЙ 4 ВВЕДЕНИЕ Подготовка Отмена демонстрации функций дисплея и настройка часов • См. также стр. 26. ~ Включение питания. Ÿ Войдите в настройки PSM. ! ] ⁄ Отмена демонстрации функций дисплея Выб[…]
-
Page 43: JVC KD-G737
РУCCKИЙ 5 ОПЕРАЦИИ Основные операции Использование панели управления 1 Осуществляет выбор источника звука. FM/AM = DAB * = CD * = USB * = CD-CH * / IPOD * /D.PLAYER * (или EXT IN ) = BT-PHONE (Телефон Bluetooth) * = BT-AUDIO (Bluetooth аудио) * = […]
-
Page 44: JVC KD-G737
РУCCKИЙ 6 Перед использованием пульта дистанционного управления выполните следующие действия: • Направьте пульт дистанционного управления непосредственно на телеметрический датчик приемн?[…]
-
Page 45: JVC KD-G737
РУCCKИЙ 7 ОПЕРАЦИИ Предупреждение: Предотвращение несчастных случаев и повреждений • Устанавливайте только аккумуляторную батарею CR2025 или эквивалентную ей. • Не оставляйте пульт дистанцион[…]
-
Page 46: JVC KD-G737
РУCCKИЙ 8 При слабом стереофоническом радиовещании на частоте FM 1 2 Прием улучшается, но стереоэффект будет потерян. • Загорается индикатор MO. Автоматическое программирование FM-радиостанций—S[…]
-
Page 47: JVC KD-G737
РУCCKИЙ 9 ОПЕРАЦИИ Сохранение любимых программ Предпочитаемые коды PTY можно назначить нумерованным кнопкам. 1 Выберите код PTY (см. столбец справа). 2 Выберите запрограммированный номер. 3 Повтори[…]
-
Page 48: JVC KD-G737
РУCCKИЙ 10 Включение или выключение функции резервного приема сообщений о движении на дорогах (TA) или PTY Резервный прием TA Индикатор Резервный прием PTY Индикатор Индикатор для включения. См. стр.[…]
-
Page 49: JVC KD-G737
РУCCKИЙ 11 ОПЕРАЦИИ Операции с дисками Откройте панель управления и вставьте диск. Воспроизведение начинается автоматически. Останов воспроизведения и извлечение диска • Нажмите кнопку SRC дл?[…]
-
Page 50: JVC KD-G737
РУCCKИЙ 12 После нажатия нажмите следующие кнопки для выполнения следующих операций… Тип диска Пропуск 10 дорожек (внутри одной папки) TRK RPT : Повтор текущей дорожки FLDR RPT : Повтор текущей папки FLDR[…]
-
Page 51: JVC KD-G737
РУCCKИЙ 13 ОПЕРАЦИИ Останов воспроизведения и отключение устройства USB Выньте его из устройства. • Нажмите кнопку SRC для прослушивания другого источника воспроизведения. Внимание: • Не исполь?[…]
-
Page 52: JVC KD-G737
РУCCKИЙ 14 Использование устройств Bluetooth® Для работы с устройствами Bluetooth необходимо подключить адаптер Bluetooth (KS-BTA200) к разъему устройства автоматической смены компакт-дисков, расположенному н?[…]
-
Page 53: JVC KD-G737
РУCCKИЙ 15 ВНЕШНИЕ УСТРОЙСТВА 2 Выберите устройство для установления соединения. 3 Для подключения используйте функции “OPEN” или “SEARCH”. Подключение и отключение зарегистрированного устройст?[…]
-
Page 54: JVC KD-G737
РУCCKИЙ 16 При входящем вызове…. Источник автоматически меняется на “BT-PHONE”. При включенной функции “AUTO ANS” (ответ)…. Приемник автоматически отвечает на входящие вызовы, см. стр. 28. • При отклю?[…]
-
Page 55: JVC KD-G737
РУCCKИЙ 17 ВНЕШНИЕ УСТРОЙСТВА Можно запрограммировать до шести номеров телефонов. 1 Откройте меню набора. 2 Выберите необходимую настройку: “PH BOOK”, “MISSED” или “RECEIVED”. 3 Выберите номер телефона.[…]
-
Page 56: JVC KD-G737
РУCCKИЙ 18 Использование аудиопроигрывателя Bluetooth ~ Выберите “BT-AUDIO”. Если воспроизведение не начинается автоматически, активируйте его с помощью элементов управления аудиопроигрывателя Bluetoo[…]
-
Page 57: JVC KD-G737
РУCCKИЙ 19 ВНЕШНИЕ УСТРОЙСТВА Подготовка Убедитесь в том, что для настройки внешнего входа выбрано значение “CHANGER” (см. стр. 27). ~ Выберите “CD-CH”. Ÿ Выберите диск для воспроизведения. Нажать: Выб?[…]
-
Page 58: JVC KD-G737
РУCCKИЙ 20 Прослушивание тюнера DAB Изменение отображаемой информации Выбор запрограммированной службы. К разъему устройства автоматической смены компакт-дисков, расположенному на задней пан?[…]
-
Page 59: JVC KD-G737
РУCCKИЙ 21 ВНЕШНИЕ УСТРОЙСТВА Прослушивание с проигрывателя iPod или D. Изменение отображаемой информации 1 Перейдите главное меню. Данный режим отключается, если в течение 5 секунд не выполнено н[…]
-
Page 60: JVC KD-G737
РУCCKИЙ 22 Прослушивание с других внешних устройств Внешнее устройство можно подключить к разъему устройства автоматической смены компакт-дисков, расположенному на задней панели приемника, с[…]
-
Page 61: JVC KD-G737
РУCCKИЙ 23 ВНЕШНИЕ УСТРОЙСТВА Концептуальная схема подключения внешних устройств Информацию о подключении см. в Руководство по установке/подключению (в отдельном издании). • Соединение 1 (инте[…]
-
Page 62: JVC KD-G737
РУCCKИЙ 24 Выбор запрограммированного режима звучания Индикатор (Для) BAS (низкие частоты) MID (средний диапазон частот) TRE (верхние частоты) LOUD (громкость) USER (Бемольный звук) 00 00 00 OFF ROCK (Музыка в стил[…]
-
Page 63: JVC KD-G737
РУCCKИЙ 25 НАСТРОЙКИ Продолжение не следующей странице Общие настройки—PSM Можно изменять параметры PSM (предпочитаемый режим настройки), которые перечислены в таблице на стр. 26 и 27. 1 Войдите в на[…]
-
Page 64: JVC KD-G737
РУCCKИЙ 26 Индикатор Элемент ( : По умолчанию) Настройки, [страница для справки] DEMO Демонстрация функций дисплея • DEMO ON • DEMO OFF : Если в течение 20 секунд не будет выполнено операций, начнется демон?[…]
-
Page 65: JVC KD-G737
РУCCKИЙ 27 НАСТРОЙКИ Индикатор Элемент ( : По умолчанию) Настройки, [страница для справки] DAB AF * 4 Поиск альтернативной частоты • AF ON • AF OFF : Oтслеживание программы среди служб DAB и радиостанций FM RDS[…]
-
Page 66: JVC KD-G737
РУCCKИЙ 28 НАСТРОЙКИ Меню настроек ( : По умолчанию) AUTO CNT (подключение) При включении устройства автоматически устанавливается соединение с…. OFF : Ни с одним из устройств Bluetooth. LAST : устройством Blue[…]
-
Page 67: JVC KD-G737
РУCCKИЙ 29 СПРАВОЧНАЯ ИНФОРМАЦИЯ Очистка разъемов При частом отсоединении разъемы загрязняются. Чтобы снизить уровень загрязнения, периодически проводите очистку разъемов с помощью ватных в?[…]
-
Page 68: JVC KD-G737
РУCCKИЙ 30 Общие сведения Включение питания • Для включения питания приемника также можно использовать кнопку SRC. Если источник готов, воспроизведение также начинается. Выключение питания • Е[…]
-
Page 69: JVC KD-G737
РУCCKИЙ 31 СПРАВОЧНАЯ ИНФОРМАЦИЯ – Диски загрязнены или поцарапаны; – На линзе внутри приемника присутствует конденсат влаги; – Линза звукоснимателя загрязнена; – При записи файлов на компак[…]
-
Page 70: JVC KD-G737
РУCCKИЙ 32 Воспроизведение дорожек MP3, WMA, AAC или WAV с устройства USB • При подключении устройства USB источник автоматически меняется на “USB”. • Порядок воспроизведения с устройства USB может отлич?[…]
-
Page 71: JVC KD-G737
РУCCKИЙ 33 СПРАВОЧНАЯ ИНФОРМАЦИЯ Отсоединение устройства USB • После удаления устройства USB появляется надпись “NO USB”, и становится невозможным использование некоторых кнопок. Снова подключит[…]
-
Page 72: JVC KD-G737
РУCCKИЙ 34 Устранение проблем Не всякое нарушение в работе устройства является результатом его неисправности. Перед обращением в сервисный центр проверьте следующее. Симптомы Способы устране[…]
-
Page 73: JVC KD-G737
РУCCKИЙ 35 СПРАВОЧНАЯ ИНФОРМАЦИЯ Симптомы Способы устранения/Причины MP3/WMA/AAC • Порядок воспроизведения дорожек отличается от заданного. Порядок воспроизведения определяется при записи файло?[…]
-
Page 74: JVC KD-G737
РУCCKИЙ 36 Симптомы Способы устранения/Причины Bluetooth * • Устройство Bluetooth не обнаруживает приемник. Приемник может быть подключен в определенный момент времени только к одному сотовому телефон[…]
-
Page 75: JVC KD-G737
РУCCKИЙ 37 СПРАВОЧНАЯ ИНФОРМАЦИЯ Симптомы Способы устранения/Причины DAB • На дисплее появляется надпись “noSIGNAL”. Перейдите в область с более сильным сигналом. • На дисплее появляется надпись ?[…]
-
Page 76: JVC KD-G737
РУCCKИЙ 38 Технические характеристики БЛОК УСИЛИТЕЛЕЙ ЗВУКА Максимальная выходная мощность: Передние и задние: 50 Вт на каждый канал Длительная выходная мощность (RMS): Передние и задние: 19 Вт на к[…]
-
Page 77: JVC KD-G737
РУCCKИЙ 39 СПРАВОЧНАЯ ИНФОРМАЦИЯ БЛОК ПРОИГРЫВАТЕЛЯ КОМПАКТ-ДИСКОВ Тип: проигрыватель компакт-дисков Система обнаружение сигнала: бесконтактное оптическое считывание (полупроводниковый лаз?[…]
-
Page 78: JVC KD-G737
2 УКРАЇНА Як повторно налаштувати пристрій • Всі зроблені вами налаштування будуть також стерті (за виключенням зареєстрованих Bluetooth-пристроїв, див. стор. 14). Примусове виймання диску На дисп?[…]
-
Page 79: JVC KD-G737
3 УКРАЇНА Користування режимом функцій При натисканні кнопки M MODE пристрій переходить у функціональний режим, в якому цифрові кнопки (за виключенням кнопки “4”) та кнопки 5 / ∞ працюватимуть в[…]
-
Page 80: JVC KD-G737
4 ПЕРЕДМОВА УКРАЇНА Підготовка Відміна демонстрації функцій дисплею та встановлення часу на годиннику • Див. також стор. 26. ~ Вмикання живлення. Ÿ Увійдіть у режим налаштування PSM. ! ] ⁄ Відміні[…]
-
Page 81: JVC KD-G737
5 РОБОТА УКРАЇНА Основні функції Використання панелі керування 1 Вибір джерела. FM/AM = DAB * = CD * = USB * = CD-CH * /IPOD * /D.PLAYER * (або EXT IN ) = BT-PHONE (Телефон Bluetooth) * = BT-AUDIO (Аудіопристрій Bluetooth) * = (назад до початку) *[…]
-
Page 82: JVC KD-G737
6 УКРАЇНА Перед використанням пульту дистанційного керування: • Націльте пульт прямо на дистанційний датчик пристрою. • НЕ ЗАЛИШАЙТЕ дистанційний датчик при сильному освітленні (під прямим[…]
-
Page 83: JVC KD-G737
7 РОБОТА УКРАЇНА Обережно: Щоб запобігти нещасним випадкам та пошкодженням, • Не встановлюйте ніякі інші батареї, окрім CR2025 або її еквіваленту. • Не залишайте пульт дистанційного керування у[…]
-
Page 84: JVC KD-G737
8 УКРАЇНА Коли прийом радіостанції FM- стерео утруднений 1 2 Прийом покращується, але стереоефект буде втрачено. • Загорається індикатор МО. Автоматичне запам’ятання FM-станцій — SSM (Послідовна[…]
-
Page 85: JVC KD-G737
9 РОБОТА УКРАЇНА Занесення у пам’ять улюблених типів програм Коди ваших улюблених PTY програм можна зберігати на цифрових кнопках. 1 Виберіть код PTY (дивіться стовпець праворуч). 2 Виберіть цифр[…]
-
Page 86: JVC KD-G737
10 УКРАЇНА Активація/деактивація прийому вибраних програм/повідомлень про стан дорожнього руху у режимі очікування Прийом повідомлень про стан дорожнього руху у режимі очікування Індикатор[…]
-
Page 87: JVC KD-G737
11 РОБОТА УКРАЇНА Робота з дисками Відкрийте панель керування та вставте диск. Відтворення почнеться автоматично. Щоби припинити програвання та висунути диск • Натисніть “SRC”, щоб змінити д?[…]
-
Page 88: JVC KD-G737
12 УКРАЇНА Після натиснення , натисніть наступні кнопки, щоби… Тип диску Пропустити 10 доріжок (в межах однієї папки) TRK RPT : Повторити відтворення поточної доріжки FLDR RPT : Повторити відтворення п[…]
-
Page 89: JVC KD-G737
13 РОБОТА УКРАЇНА Щоб припинити відтворення та від’єднати USB-пристрій Витягніть його з гнізда головного блоку. • Натисніть “SRC”, щоб змінити джерело прослуховування. Застереження: • Не вико?[…]
-
Page 90: JVC KD-G737
14 УКРАЇНА Використання Bluetooth®-пристроїв Для роботи з Bluetooth необхідно приєднати Bluetooth-адаптер (модель KS-BTA200) до гнізда пристрою зміни CD-дисків на тильному боці цього пристрою. Див. також стор. 23. […]
-
Page 91: JVC KD-G737
15 ЗОВНІШНІ ПРИСТРОЇ УКРАЇНА 2 Вибір пристрою, який потрібно підключити. 3 Для встановлення з’єднання скористайтесь пунктами “OPEN’ або “SEARCH’. Для підключення/від’єднання зареєстрованого пр[…]
-
Page 92: JVC KD-G737
16 УКРАЇНА При надходженні виклику…. Джерело автоматично змінюється на “BT-PHONE”. Коли функція “AUTO ANS” (Автоматична відповідь) є активною…. Пристрій автоматично відповідає на вхідні виклики, ?[…]
-
Page 93: JVC KD-G737
17 ЗОВНІШНІ ПРИСТРОЇ УКРАЇНА Ви можете занести в пам’ять не більше шести номерів телефонів. 1 Виведіть на екран меню набору номеру. 2 Виберіть одну з категорій “PH BOOK“, “MISSED” або “RECEIVED”, до як?[…]
-
Page 94: JVC KD-G737
18 УКРАЇНА Використання Bluetooth-аудіопрогравача ~ Виберіть пункт “BT-AUDIO”. Якщо відтворення не розпочинається автоматично, запустіть його безпосередньо з Bluetooth- аудіопрогравача. • Інформацію що[…]
-
Page 95: JVC KD-G737
19 ЗОВНІШНІ ПРИСТРОЇ УКРАЇНА Підготовка Переконайтесь, що обрано функцію “CHANGER” (пристрій зміни CD-дисків) для зовнішнього вхідного сигналу, дивись сторінку 27. ~ Виберіть пункт “CD-CH”. Ÿ Оберіт?[…]
-
Page 96: JVC KD-G737
20 УКРАЇНА Прослуховування тюнера DAB (цифрового радіомовлення) Зміна інформації, що відображає тьс я на дисплеї Вибір сервісу, який було занесено у пам’ять. До гнізда пристрою зміни CD-дисків, я[…]
-
Page 97: JVC KD-G737
21 ЗОВНІШНІ ПРИСТРОЇ УКРАЇНА Прослуховування програвачів iPod/D. player Зміна інформації, що відображається на дисплеї 1 Увійдіть у головне меню. Система вийде з даного режиму, якщо з боку користува[…]
-
Page 98: JVC KD-G737
22 УКРАЇНА Прослуховування інших зовнішніх компонентів За допомогою наступних адаптерів (які потрібно придбати окремо) до гнізда пристрою зміни CD-дисків на тильному боці головного блоку мож?[…]
-
Page 99: JVC KD-G737
23 ЗОВНІШНІ ПРИСТРОЇ УКРАЇНА Враховуйте схему з’єднання зовнішніх пристроїв Для з’єднання, дивіться “Керівництво зі встановлення та з’єднання” (окрема книга). • З’єднання 1 (інтегроване з[…]
-
Page 100: JVC KD-G737
24 УКРАЇНА Вибір запрограмованих режимів звучання Індикація (для) BAS (низькі частоти) MID (середній діапазон) TRE (високі частоти) LOUD (гучність) USER (приглушений звук) 00 00 00 OFF ROCK (музика рок або диско) +[…]
-
Page 101: JVC KD-G737
25 НАЛАШТУВАННЯ УКРАЇНА Продовження на наступній сторінці Загальні параметри — PSM Можна змінювати режими PSM (режим преференційних налаштувань), що наведені у таблиці на сторінках 26 і 27. 1 Увійд[…]
-
Page 102: JVC KD-G737
26 УКРАЇНА Індикація Режим ( : Первісна) Налаштування, [посилання на сторінку] DEMO Демонстрація функцій дисплею • DEMO ON • DEMO OFF : Демонстраційний режим буде активізовано автоматично при відсутнос[…]
-
Page 103: JVC KD-G737
27 НАЛАШТУВАННЯ УКРАЇНА Індикація Режим ( : Первісна) Налаштування, [посилання на сторінку] DAB AF * 4 Прийом інших частот • AF ON • AF OFF : Виконує простеження програми між сервісіми DAB та станціями FM RDS[…]
-
Page 104: JVC KD-G737
28 НАЛАШТУВАННЯ УКРАЇНА Налаштування параметрів меню ( : Первісна) AUTO CNT (підключення) При ввімкненні головного блоку автоматично проводиться спроба встановлення з’єднання з…. OFF : Ні з яким Blue[…]
-
Page 105: JVC KD-G737
29 ДОВІДКОВА ІНФОРМАЦІЯ УКРАЇНА Як чистити з’єднувачі Часте від’єднання з’єднувачів погіршує їх стан. Для зменшення ризику виведення з ладу періодично обережно протирайте з’єднувачі ватн[…]
-
Page 106: JVC KD-G737
30 УКРАЇНА Загальні несправності Включення живлення • Живлення можна також включити натиском на кнопку SRC в системі. Якщо джерело програвання готове, також почнеться й його програвання. Відк?[…]
-
Page 107: JVC KD-G737
31 ДОВІДКОВА ІНФОРМАЦІЯ УКРАЇНА – Диски забруднені або подряпані. – Волога сконденсувалась на лінзі всередині системи. – Звукознімальна лінза всередині системи забруднена. – Диски CD-R/CD-RW, н?[…]
-
Page 108: JVC KD-G737
32 УКРАЇНА Відтворення доріжок MP3/WMA/AAC/WAV, які знаходяться на USB-пристрої • При підключенні USB-пристрою джерело сигналу автоматично змінюється на “USB”. • При відтворенні доріжок з USB-пристрою п?[…]
-
Page 109: JVC KD-G737
33 ДОВІДКОВА ІНФОРМАЦІЯ УКРАЇНА Від’єднання USB-пристрою • Після від’єднання USB-пристрою на дисплеї з’являється напис “NO USB”, і використання деяких кнопок унеможливлюється. Підключіть USB-пр?[…]
-
Page 110: JVC KD-G737
34 УКРАЇНА Пошук та усунення несправностей Те, що здається проблемою, не завжди виявляється серйозним. Перш ніж телефонувати до сервісного центру, спробуйте наступне. Симптом Засоби виправле?[…]
-
Page 111: JVC KD-G737
35 ДОВІДКОВА ІНФОРМАЦІЯ УКРАЇНА Симптом Засоби виправлення/Причини MP3/WMA/AAC • Доріжки програються не в тому порядку, у якому ви передбачали їхнє програвання. Порядок програвання визначається ?[…]
-
Page 112: JVC KD-G737
36 УКРАЇНА Симптом Засоби виправлення/Причини Bluetooth * • Bluetooth-пристрій не може знайти головний блок. Пристрій не дозволяє одночасне підключення мобільного телефону і аудіопристрою з протокол?[…]
-
Page 113: JVC KD-G737
37 ДОВІДКОВА ІНФОРМАЦІЯ УКРАЇНА Симптом Засоби виправлення/Причини DAB • На дисплеї з’являється “noSIGNAL”. Перемістіться на територію з більш потужними сигналами. • На дисплеї з’являється “RES[…]
-
Page 114: JVC KD-G737
38 УКРАЇНА Характеристики АУДІО ПІДСИЛЮВАЧ Максимальна вихідна потужність: Передні та задні колонки: 50 Вт на канал Тривала вихідна потужність (ефективна): Передні та задні колонки: 19 Вт на кан?[…]
-
Page 115: JVC KD-G737
39 ДОВІДКОВА ІНФОРМАЦІЯ УКРАЇНА ПРОГРАВАЧ КОМПАКТ ДИСКІВ Тип: Програвач компакт-дисків Система виявлення сигналу: Безконтактне оптичне знімання (напівпровідниковим лазером) Кількість канал[…]
-
Page 116: JVC KD-G737
EN, RU, UK 0107DTSMDTJEIN Having TROUBLE with operation? Please reset your unit Refer to page of How to reset your unit Затруднения при эксплуатации? Пожалуйста, перезагрузите Ваше устройство Для получения информации о перезагрузке Вашего уст?[…]
-
Page 117: JVC KD-G737
Instructions CD RECEIVER KD-G737[…]
Просмотр
Доступно к просмотру 117 страниц. Рекомендуем вам скачать файл инструкции, поскольку онлайн просмотр документа может сильно отличаться от оригинала.
-
ENGLISH
CD RECEIVER
РЕСИВЕР С ПРОИГРЫВАТЕЛЕМ КОМПАКТ-ДИСКОВ
ПРИЙМАЧ З ПРОГРАВАЧЕМ КОМПАКТ-ДИСКІВ
KD-G737                                                          РУCCKИЙ
УКРАЇНА
В соответствии с Законом Российской Федерации “О защите прав потре бителей” срок службы (годности) данного
товара “по истечении которого он может представлять опасность для жизни, здоровья потребителя, причинять вред
его имуществу или окружающей среде” составляет семь (7) лет со дня производства. Этот срок является временем,
в течение которого потребитель данного товара может безопасно им пользоваться при условии соблюдения
ин струк ции по эксплуатации данного товара, проводя необходимое обслуживание, включающее замену расходных
материалов и/или соответствующее ремонтное обеспечение в специализированном сервисном центре.
Дополнительные косметические материалы к данному товару, поставляе мые вместе с ним, могут храниться в
течение двух (2) лет со дня его производства.
Срок службы (годности), кроме срока хранения дополнительных космети ческих материалов, упомянутых
в предыдущих двух пунктах, не затрагивает никаких других прав потребителя, в частности, гарантийного
свидетельства JVC, которое он может получить в соответствии с законом о правах потребителя или других законов,
связанных с ним.
For canceling the display demonstration, see page 4.
Информацию об отмене демонстрации функций дисплея см. на стр. 4.
Інформацію щодо відміни демонстрації функцій дисплею див. на стор. 4.
For installation and connections, refer to the separate manual.
Указания по установке и выполнению соединений приводятся в отдельной инструкции.
Вказівки по встановленню та виконанню підключень наведені у окремій інструкції.
INSTRUCTIONS
ИНСТРУКЦИИ ПО ЭКСПЛУАТАЦИИ
ІНСТРУКЦІЇ
GET0432-001A
[EE]
Cover_KD-G737_001A_pre.indd   1                           12/14/06   2:55:30 PM
Cover_KD-G737_001A_pre.indd   1
12/14/06   2:55:30 PM
-
Thank you for purchasing a JVC product.
Please read all instructions carefully before operation, to ensure your complete understanding and to obtain the best
possible performance from the unit.
ENGLISH  IMPORTANT FOR LASER PRODUCTS
1.  CLASS 1 LASER PRODUCT
2.  CAUTION: Do not open the top cover. There are no user serviceable parts inside the unit; leave all servicing to
qualified service personnel.
3.  CAUTION: Visible and/or invisible class 1M laser radiation when open. Do not view directly with optical
instruments.
4.  REPRODUCTION OF LABEL: CAUTION LABEL, PLACED OUTSIDE THE UNIT.
Warning:
How to reset your unit
If you need to operate the unit while driving, be
sure to look around carefully or you may be involved
in a traffic accident.
[European Union only]
•  Your preset adjustments will also be erased (except
the registered Bluetooth device, see page 14).
For safety...
How to forcibly eject a disc
•  Do not raise the volume level too much, as this will
block outside sounds, making driving dangerous.
•  Stop the car before performing any complicated
operations.
Temperature inside the car...    “PLEASE” and “EJECT” appear alternately on the
display.
If you have parked the car for a long time in hot or cold
weather, wait until the temperature in the car becomes
normal before operating the unit.
•  Be careful not to drop the disc when it ejects.
•  If this does not work, reset your unit.
2
12/14/06   2:56:22 PM
EN02-05_KD-G737_001A_pre.indd   2
EN02-05_KD-G737_001A_pre.indd   2                         12/14/06   2:56:22 PM
-
How to use functions mode      CONTENTS
If you press M MODE, the unit goes into functions
mode, then the number buttons (except “4”) and
INTRODUCTIONS
5/? buttons work as different function buttons.                 ENGLISH
Preparation ............................................  4
OPERATIONS
[Within 5 seconds...]
Basic operations ......................................  5
• Using the control panel .......................  5
• Using the remote controller
(RM-RK50) .........................................  6
Listening to the radio ...............................  8
Searching for FM RDS programme
Caution on volume setting:    — PTY Search .......................................  9
Discs and connected USB devices produce very   Disc operations ........................................ 11
little noise compared with other sources. Lower   Listening to the USB device ....................... 12
the volume before playing to avoid damaging the
speakers by the sudden increase of the output level.     EXTERNAL DEVICES
Using the Bluetooth® devices .................... 14
• Using the Bluetooth cellular phone ..... 16
• Using the Bluetooth audio player ........ 18
Available characters on the display
Listening to the CD changer ...................... 18
Available characters
Listening to the DAB tuner ........................ 20
Display indications
Listening to the iPod / D. player ................. 21
Listening to the other external
components ......................................... 22
SETTINGS
Selecting a preset sound mode .................. 24
General settings — PSM ........................... 25
Bluetooth settings ................................... 28
REFERENCES
Maintenance ........................................... 29
More about this unit ................................ 30
Troubleshooting ...................................... 34
Specifications .......................................... 38
3
12/14/06   2:56:25 PM
EN02-05_KD-G737_001A_pre.indd   3
EN02-05_KD-G737_001A_pre.indd   3                         12/14/06   2:56:25 PM
- 1
- 2
- 3
- 4
- 117