
Enabling AVX support in Windows 10 lets your computer handle more advanced processing tasks, like running certain applications or games that require these instructions. To enable AVX, you’ll need to check if your CPU supports it and then ensure it’s enabled in your BIOS/UEFI settings.
In this tutorial, you’ll learn how to check if your processor supports AVX and how to enable it if it’s not already enabled. These steps are straightforward and don’t require any advanced technical skills.
Step 1: Check CPU Compatibility
First, check if your CPU supports AVX instructions.
Open the Command Prompt and type “wmic cpu get caption, deviceid, name, numberofcores, maxclockspeed, status”. This command will display details about your CPU. Look for the model and search online to verify if it supports AVX.
Step 2: Access BIOS/UEFI Settings
Restart your computer and enter the BIOS/UEFI settings.
To enter your BIOS/UEFI, you usually press a key like F2, F10, DEL, or ESC during the startup process. The exact key depends on your motherboard manufacturer.
Step 3: Locate the CPU or Advanced Settings
Navigate to the CPU or Advanced settings tab in BIOS/UEFI.
In most BIOS/UEFI interfaces, you will find the CPU settings under an “Advanced” tab. Look for a section that mentions CPU features.
Step 4: Enable AVX Support
Find the AVX option and enable it.
Look for an option labeled “AVX” or “Advanced Vector Extensions”. If it’s set to “Disabled”, change it to “Enabled”.
Step 5: Save and Exit BIOS/UEFI
Save your settings and exit the BIOS/UEFI.
Usually, pressing F10 will save your changes and restart your computer. Your BIOS/UEFI interface will likely confirm that you want to save and exit.
After completing these steps, your computer should now have AVX support enabled. This will allow you to run applications and games that require these instructions.
Tips for How to Enable AVX Support in Windows 10
- Check CPU documentation: Always check your CPU documentation or manufacturer’s website for AVX support details.
- Perform a BIOS update: If you can’t find the AVX setting, consider updating your BIOS.
- Backup settings: Before making changes in BIOS, note down the current settings as a backup.
- Avoid overclocking conflicts: Overclocking can sometimes disable AVX, so ensure there’s no conflict between settings.
- Use system information tools: Tools like CPU-Z can also help verify if your CPU supports AVX.
Frequently Asked Questions
What is AVX?
AVX stands for Advanced Vector Extensions. It’s a set of instructions for doing complex mathematical calculations, primarily used in applications like scientific simulations, 3D modeling, and gaming.
How do I know if my CPU supports AVX?
You can check your CPU’s specifications on the manufacturer’s website or use command-line tools like WMIC in Windows.
Can enabling AVX cause issues?
Typically, enabling AVX won’t cause issues, but incorrect BIOS/UEFI settings can. Always ensure you change settings carefully.
Why isn’t AVX enabled by default?
Some BIOS/UEFI versions might have AVX disabled to maintain compatibility with older software or hardware. Enabling it can sometimes resolve issues with newer applications.
Is it safe to update BIOS/UEFI?
Yes, but follow the manufacturer’s instructions carefully. Incorrect updates can potentially harm your system.
Summary
- Check CPU compatibility.
- Access BIOS/UEFI settings.
- Locate the CPU or Advanced Settings.
- Enable AVX support.
- Save and exit BIOS/UEFI.
Conclusion
Enabling AVX support in Windows 10 is a simple process, but it’s essential to ensure your CPU supports these instructions before making any changes. By following the steps outlined, you can unlock the full potential of your processor, allowing it to handle more advanced tasks efficiently.
Whether you’re a gamer, a developer, or someone who uses heavy applications, enabling AVX can provide a noticeable boost in performance. Always double-check your settings, back up your configurations, and consult your CPU documentation if you’re unsure.
Should you encounter any issues, the tips and FAQs provided will help you troubleshoot common problems. Now that you know how to enable AVX support, take the plunge and optimize your system for better performance!
Matt Jacobs has been working as an IT consultant for small businesses since receiving his Master’s degree in 2003. While he still does some consulting work, his primary focus now is on creating technology support content for SupportYourTech.com.
His work can be found on many websites and focuses on topics such as Microsoft Office, Apple devices, Android devices, Photoshop, and more.
This guide applies to:
    SPR-M
    SPR-X
    3100-SM+
    3100-SX+
Currently we are shipping with AVX disabled by default, and we always recommend customers reach out to us about any AVX workloads they want to run, as this is a much more complex instruction set and requires more fine tuning on a per customer basis. It generates more heat and consumes more power, which can introduce instability.
You can enable AVX and test your workload to see how this performs. You will need to monitor the following items and report back to us your findings to ensure the system is operating within acceptable ranges.
- Package power draw (can be measured via ‘turbostat’)
- PSU power draw (can be measured per module in the ‘sensor’ tab of IPMI)
- CPU package / core temps
- If possible, can you let us know a before-and-after for these stats also
You can enable AVX in the BIOS:
- Enter the BIOS by pressing «F2» during boot
- Navigate to «Ai Tweaker -> AVX Related Controls»
- Enable «AVX», «AVX512» as needed
- For light workloads, you will be able to leave the «Ratio Offset to per-core Ratio Limit» on «auto»
- For heavier workloads you may need to specify an offset. The values in the screenshot below are a good starting point.

Please note that Sapphire Rapids handles AVX workloads slightly differently to previous generations and instead splits AVX, AVX2, AVX512 workloads into light, medium, and heavy variations of each instruction set. See the table below for comparison. This means that a heavy AVX2 load may have the AVX512 offset applied for example.

Was this article helpful?
That’s Great!
Thank you for your feedback
Sorry! We couldn’t be helpful
Thank you for your feedback
Feedback sent
We appreciate your effort and will try to fix the article
Are you looking to optimize your Windows 10 system for better performance? One effective way to do so is by installing AVX2, the Advanced Vector Extensions 2 instruction set, which can enhance the capabilities of your processor and improve the performance of applications that support it. Let’s explore how to install AVX2 on your Windows 10 device.
To install AVX2 on your Windows 10 machine, you need to check if your processor supports this instruction set. AVX2 was introduced by Intel in 2013, and it is supported by most modern processors. However, it’s essential to confirm whether your processor is AVX2 compatible before proceeding. You can check this information by examining the specifications of your CPU or by using online tools provided by Intel or AMD. Once you have confirmed compatibility, you can enable AVX2 in your Windows 10 system by updating your BIOS, as AVX2 is typically disabled by default. Updating the BIOS will activate AVX2 and allow your processor to take advantage of its enhanced capabilities, leading to improved performance and faster processing speeds for AVX2-supported applications.
To enable AVX2 in Windows 10, follow these steps:
- Ensure your CPU supports AVX2 instruction set.
- Update your Windows 10 version to the latest one.
- Open the BIOS settings on your computer.
- Look for the Advanced tab and find the «CPU Configuration» or «CPU Features» option.
- Locate «AVX2» or «Advanced Vector Extensions 2» in the settings.
- Enable AVX2 by selecting the appropriate option and save the changes.
- Restart your computer for the changes to take effect.
You have successfully installed AVX2 on your Windows 10 system.

Exploring AVX2 Installation in Windows 10
When it comes to optimizing performance on Windows 10, installing AVX2 (Advanced Vector Extensions 2) can be a game-changer. AVX2 is an extension of the x86 instruction set architecture that allows for enhanced parallel processing capabilities. By following a few simple steps, you can ensure that AVX2 is properly installed on your Windows 10 system, enabling your processor to take full advantage of its capabilities. In this article, we will guide you through the process of installing AVX2 in Windows 10, helping you unlock the potential of your hardware.
Checking AVX2 Compatibility
Before proceeding with the installation, it is essential to verify whether your system is AVX2 compatible. AVX2 is supported by certain processors, so it is crucial to determine if your CPU is capable of running AVX2 instructions.
One way to check AVX2 compatibility is by using third-party system information tools. CPU-Z is a popular utility that provides detailed information about your processor. Download and install CPU-Z from the official website, run the program, and navigate to the «Instructions» tab. Here, you will find the «AVX2» entry, indicating whether your CPU supports AVX2 or not.
Another method is to check your processor’s specifications provided by the manufacturer. Look for AVX2 support in the official documentation or the CPU’s product page on the manufacturer’s website. If AVX2 is listed as a supported instruction set, your processor is compatible.
System Requirements for AVX2
To ensure that AVX2 works seamlessly on your Windows 10 system, it is crucial to meet the minimum requirements:
- Windows 10 operating system
- AVX2 compatible CPU
- Updated BIOS
Enabling AVX2 in Windows 10
Once you have confirmed AVX2 compatibility, it’s time to enable it in Windows 10. By default, Windows 10 should already have AVX2 enabled, but it’s always a good practice to check and ensure that it’s activated on your system.
To check AVX2 status in Windows 10, you can use the Task Manager:
- Right-click on the taskbar and select «Task Manager» from the context menu. Alternatively, press «Ctrl + Shift + Esc» to open Task Manager directly.
- In the Task Manager window, click on the «Performance» tab.
- Under «CPU,» check the «Instructions» section. If AVX2 is listed, it means that AVX2 is enabled and active on your Windows 10 system.
If AVX2 is not listed, it means that it’s not currently enabled. In this case, you may need to update your system’s BIOS or enable AVX2 through the BIOS settings. Consult your hardware manufacturer’s documentation or support resources for detailed instructions on updating the BIOS and enabling AVX2.
Verifying AVX2 Functionality
After enabling AVX2, it’s essential to verify its functionality. Benchmarks can be useful tools to evaluate the performance improvement brought by AVX2 instructions. There are various benchmarking software available that stress your CPU and measure its performance.
Popular benchmarking applications like Cinebench, Geekbench, and PassMark can provide insights into the performance gain achieved through AVX2. Download and run these benchmarking tools, and compare the results with and without AVX2 enabled. If you notice a significant improvement in performance, it means that AVX2 is functioning correctly.
Additionally, you can monitor CPU usage while running resource-intensive tasks or applications that utilize AVX2 instructions. If the CPU usage is higher and the tasks are completed faster, it indicates that AVX2 is effectively improving the performance of your system.
Note on Software Compatibility
It is important to note that not all applications or software are optimized to take full advantage of AVX2. While AVX2 can enhance the performance of tasks that support it, applications that do not utilize AVX2 instructions may not see a noticeable improvement. Therefore, it’s essential to ensure that the software you use is AVX2 optimized.
Exploring Another Dimension of AVX2 Installation in Windows 10
In addition to the initial guide on AVX2 installation, Windows 10 provides an alternative method to enable AVX2 through the PowerShell command line. This method offers flexibility and control for advanced users who prefer command-line interfaces.
Enabling AVX2 via PowerShell
To enable AVX2 using PowerShell, follow these steps:
- Open the Start menu and search for «PowerShell.»
- Right-click on Windows PowerShell and select «Run as administrator.»
- In the PowerShell window, type the following command and press Enter:
Set-ItemProperty -Path "HKLM:\SYSTEM\CurrentControlSet\Control\Session Manager\kernel" -Name "FeatureSettingsOverride" -Value 8192 - Restart your computer to apply the changes.
After restarting your computer, AVX2 should be enabled on your Windows 10 system. You can verify its activation by following the aforementioned steps to check AVX2 status in Windows 10.
Disabling AVX2 via PowerShell
If, for any reason, you need to disable AVX2 through PowerShell, you can do so by following these steps:
- Open the Start menu and search for «PowerShell.»
- Right-click on Windows PowerShell and select «Run as administrator.»
- In the PowerShell window, type the following command and press Enter:
Remove-ItemProperty -Path "HKLM:\SYSTEM\CurrentControlSet\Control\Session Manager\kernel" -Name "FeatureSettingsOverride" - Restart your computer to apply the changes.
After the restart, AVX2 will be disabled on your Windows 10 system.
Cautionary Note
It is vital to exercise caution when modifying system settings, especially using PowerShell commands. Incorrect usage or modification of system settings can lead to instability or unintended consequences. Make sure you understand the implications and consequences of enabling or disabling AVX2 on your system before proceeding.
Seeking Professional Assistance
If you are unsure about modifying system settings or encounter any issues during the installation or modification process, it is recommended to seek professional assistance. Contact your hardware manufacturer’s support team or consult with an IT professional for guidance specific to your system configuration.
In conclusion, installing AVX2 in Windows 10 can significantly enhance your system’s performance by unlocking advanced vector processing capabilities. By following the steps outlined in this guide, you can ensure that AVX2 is properly installed and enabled on your Windows 10 system. Remember to verify AVX2 compatibility, check its status in Windows 10, and evaluate its functionality through benchmarks and CPU monitoring. Additionally, the PowerShell method provides an alternative means to enable or disable AVX2 for advanced users. However, exercise caution and seek professional assistance if needed. With AVX2 properly installed, your Windows 10 system can maximize its processing potential.

Installing AVX2 in Windows 10
AVX2 (Advanced Vector Extensions 2) is an instruction set extension for processors, providing improved performance for certain applications that can take advantage of vector processing. To install AVX2 in Windows 10, follow these steps:
Check Processor Compatibility
First, check if your processor supports AVX2 instructions. Open «Task Manager» by right-clicking on the taskbar and selecting it from the context menu. Go to the «Performance» tab and under «CPU», look for «Instruction Set» to see if AVX2 is listed.
Update Operating System
Make sure your Windows 10 operating system is up to date. Open «Settings» by clicking on the Start menu > «Settings» cog icon. Go to «Update & Security» and click on «Check for updates». Install any available updates.
Install AVX2-Supported Application
Download and install an application that utilizes AVX2 instructions. Popular choices include video editors, 3D rendering programs, and scientific computation software. Ensure the application version you download explicitly mentions AVX2 support.
Verify AVX2 Support
Open the AVX2-supported application and check if it’s running smoothly. If no errors occur and the software performs optimally, it indicates that AVX2 instructions are successfully installed on your Windows 10 system.
Key Takeaways: How to Install AVX2 in Windows 10
- AVX2, or Advanced Vector Extensions 2, is a set of instructions designed to enhance performance for applications that rely heavily on floating-point operations.
- Check if your processor supports AVX2 by using CPU-Z or a similar tool to view the instructions supported by your CPU.
- To enable AVX2 in Windows 10, you need to make sure that your processor supports it and that it is enabled in the BIOS settings of your computer.
- If your processor supports AVX2 but it is not enabled, you can enable it by accessing the BIOS settings and finding the option to enable AVX2 or similar.
- It is important to note that enabling AVX2 may increase power consumption and heat output, so make sure your computer’s cooling system
Frequently Asked Questions
Installing AVX2 in Windows 10 is a common requirement for users who need to run applications that utilize Advanced Vector Extensions 2 instructions. To help you understand the process better, here are some frequently asked questions about installing AVX2 in Windows 10:
1. What is AVX2 and why is it important to install it?
AVX2, short for Advanced Vector Extensions 2, is an instruction set extension for x86 processors. It provides a wider vector processing capability, allowing faster and more efficient execution of certain applications, especially those that involve heavy computational tasks like image and video processing, scientific modeling, and simulations.
By installing AVX2 on your Windows 10 system, you enable your processor to take advantage of these advanced instructions, which can significantly enhance the performance of compatible software and improve overall system efficiency.
2. How do I check if my Windows 10 system supports AVX2?
To check if your Windows 10 system supports AVX2, you can follow these steps:
1. Open the Task Manager by right-clicking on the taskbar and selecting «Task Manager.»
2. Go to the «Performance» tab.
3. Look for «Performance Monitor» and select it.
4. In the Performance Monitor window, expand «CPU» and look for the «Instructions» section.
5. If you see «AVX2» listed under the «Instructions» section, it means your system supports AVX2.
3. Can I install AVX2 on any Windows 10 system?
No, not all Windows 10 systems support AVX2. AVX2 requires a compatible processor that supports the instruction set extension. If your processor does not have AVX2 support, you will not be able to install it on your system.
You can check for AVX2 support by following the steps mentioned in the previous question.
4. How do I install AVX2 on my Windows 10 system?
Installing AVX2 on your Windows 10 system does not require a separate installation process. It is dependent on your processor’s hardware capabilities. If your processor supports AVX2, it will be automatically enabled when you run applications that utilize AVX2 instructions.
Make sure you have the latest drivers and updates installed for your processor, as these can sometimes include optimizations for AVX2 performance.
5. Can I enable AVX2 on an older Windows 10 system?
If your Windows 10 system meets the hardware requirements for AVX2 support, it should be enabled automatically when required. However, if you’re experiencing issues or want to ensure AVX2 is fully utilized, you can check for BIOS updates for your motherboard and install them, as they might include optimizations or bug fixes related to AVX2.
Remember to always follow the instructions provided by the hardware manufacturer and consult their support documentation if needed.
In summary, installing AVX2 in Windows 10 is a straightforward process that can greatly enhance the performance of your computer. By following the steps outlined in this guide, you can ensure that your system supports AVX2 and take advantage of its advanced instructions for faster and more efficient processing.
Remember to check that your CPU supports AVX2 before attempting the installation. Once you confirm compatibility, download and install the necessary Windows updates or software packages to enable AVX2. With AVX2 installed, you can enjoy improved performance in a wide range of applications, such as image and video editing, gaming, and scientific simulations.
По всей видимости, в скором будущем процессоры Intel Alder Lake полностью лишатся поддержки инструкций AVX-512. Это не такая серьёзная потеря для простых пользователей, как может показаться на первый взгляд, но сам факт отключения поддержки немного огорчает.
Это заметил и подтвердил ресурс Hardwareluxx. По его словам, производители материнских плат медленно, но уверенно выпускают обновления микрокода BIOS своих материнских плат, которые отключают поддержку AVX-512. В качестве примера были использованы материнские платы ASUS ROG MAXIMUS Z690 HERO и MSI MEG Z690 UNIFY.
На первой материнской плате изначально был BIOS версии 0702 с поддержкой AVX-512. Для их активации требуется выключить энергоэффективные ядра, после чего инструкции включались автоматически. После обновления BIOS до версии 0811 ситуация не изменилась.
На второй материнской плате для включения AVX-512 необходимо выключить E-ядра и включить поддержку инструкций в BIOS. Если на версии BIOS 1.13 всё работало нормально, то на 1.21 уже ничего не работает и активировать инструкции попросту невозможно.
Также ресурс подтверждает, что на материнской плате MSI MAG B660M MORTAR WIFI DDR4 изначально отсутствует поддержка инструкций AVX-512. Возможно, всё дело в предустановленной версии BIOS, однако если в случае Z690 остался бесполезный переключатель для включения поддержки инструкций, то на B660 он отсутствует вовсе.
Недавно мы опубликовали новость о том, что Intel отключила поддержку набора инструкций AVX-512 на процессорах Alder Lake с новыми версиями BIOS. Ранее мы не могли проверить функцию в лаборатории, но теперь мы подтвердили ее на практике.
Официально настольные процессоры Alder Lake набор инструкций AVX-512 не поддерживают, что объясняется отсутствием валидации Intel. Но функциональные блоки в производительных ядрах есть, и отключение в BIOS эффективных ядер приводило к активации AVX-512. Мы проверили эту возможность в наших тестах новых процессоров. Ходит много слухов по поводу того, почему набор команд AVX-512 официально не поддерживается. Но, по крайней мере, его можно было активировать указанным способом.
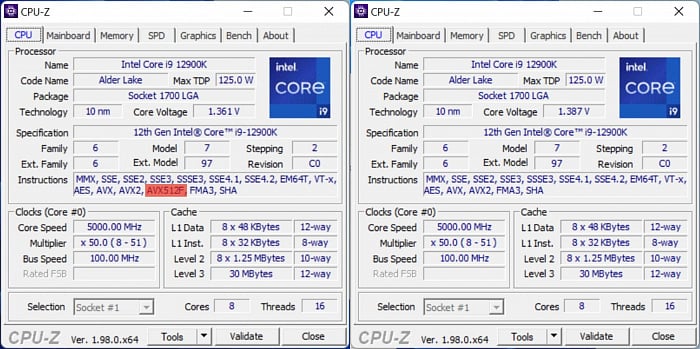
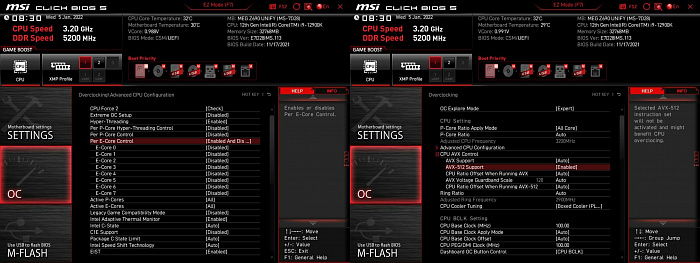
Факт заключается в том, что до сегодняшнего дня набор инструкций AVX-512 можно было активировать. Мы использовали в тестах процессоров Alder Lake материнскую плату ASUS ROG Maximus Z690 Hero с версией BIOS 0702. После отключения в BIOS эффективных ядер, производительные ядра начинали поддерживать AVX-512. И в некоторых тестах Core i9-12900K показывал преимущества от поддержки AVX-512. Мы также проверили материнскую плату MSI Z690 Unify, на которой с версией BIOS 1.13 тоже получилось включить AVX-512. Для этого в пункте «Advanced CPU Configuration» следовало выключить через «Per E-Core Control» все эффективные ядра. Затем в опциях разгона нужно было включить опцию «AVX-512 Support».
CPU-Z показывает наличие поддержки набора инструкций AVX-512:
Мы подготавливали платформу к тесту Core i5-12400, который получили сегодня, поэтому установили самую свежую версию BIOS 1.21, которая содержит те же самые функции. Мы отключили эффективные ядра и включили опцию AVX-512, но после загрузки поддержка набора инструкций AVX-512 исчезла:
Обновление BIOS содержит новую версию микрокода 18 вместо старой 15. Похоже, через микрокод Intel заблокировала активацию AVX-512. На материнской плате ASUS ROG Maximus Z690 способ активации AVX-512 оставался даже с последней версией BIOS 0811. Причем, как указывает ASUS, версия BIOS 0811 совместима со свей линейкой процессоров Alder Lake.
Мы поинтересовались у Intel, почему поддержка AVX-512 была отключена «задним числом». Однако пока не получили никакой официальной информации. На практике набор инструкций AVX-512 обычным пользователям вряд ли требуется, поскольку его поддерживают только профессиональные приложения. Но все равно несколько странно, зачем Intel потребовалось вносить подобную блокировку, тем более процессоры Alder Lake работали с AVX-512 вполне успешно.
Новый BIOS также заблокировал множитель на планке x51 при использовании AVX2. Процессор просто не выставляет более высокие тактовые частоты. И обойти блокировку через BIOS невозможно.
Подписывайтесь на группы Hardwareluxx ВКонтакте и Facebook, а также на наш канал в Telegram (@hardwareluxxrussia).
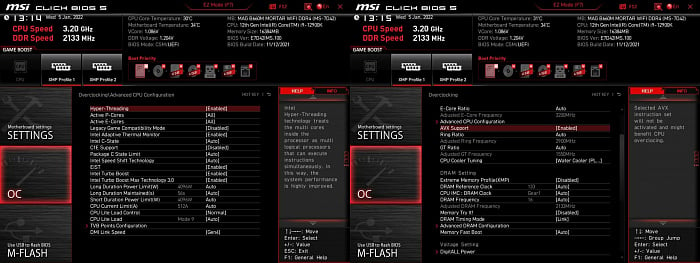
Включить AVX-512 на B660 невозможно вообще
В ходе тестирования материнской платы MSI MAG B660M MORTAR WIFI DDR4 мы попытались активировать AVX-512. Однако опций в BIOS для отключения эффективных ядер и активации AVX-512 просто не было. Можно было отключать одиночные ядра, но одно всегда оставалось активным. То есть включить поддержку AVX-512 не представляется возможным, по крайней мере, для ранее вышедших процессоров Alder Lake с эффективными ядрами. Будет интересно посмотреть, как все изменится ситуация в случае процессоров без ядер E.
Обновление: ASUS со следующим обновлением тоже уберет поддержку
Мы получили ответ от ASUS, на чьих материнских платах мы как раз успешно активировали AVX-512. Соответственно, версия BIOS 0811 все еще поддерживает AVX-512. Но следующие версии BIOS лишатся поддержки AVX-512 из-за нового микрокода процессоров Core 12-го поколения. Материнские платы на чипсетах H670, B660 и H610 изначально поставляются без поддержки AVX-512.
Обновление: ASUS отключает, MSI возвращает AVX-512
Через несколько недель мы вновь возвращаемся к теме AVX-512. Как мы и опасались, ASUS с версии BIOS 1003 установила новый микрокод Intel, поэтому активация функции AVX-512 в BIOS и отключение эффективных ядер не помогает. Набор инструкций AVX-512 больше на нашей материнской плате ASUS ROG Maximus Z690 Hero не работает.
Но MSI схитрила и добавила в версию BIOS A22 новый переключатель, который был протестирован на MEG Z690 Unify-X. Переключатель «AVX-512 Trial» активирует старый микрокод, инструкции AVX-512 вновь работают.
Производители материнских плат, а именно MSI в данном случае, продолжают искать способы обойти блокировку AVX-512. Пока неизвестно, будет ли похожая реализация от ASUS. По поводу материнских плат других производителей информации у нас нет.
Еще одна «фича», которую Intel вряд ли хотела получить в таком виде, касается разгона процессоров не-К поколения Alder Lake через базовую частоту. Мы успешно разогнали Core i5-12400 на материнской плате Z690, а также на модели B660 (тоже от ASUS), затем мы разогнали Core i3-12100F.