
Мы благодарим Вас за доверие, которое Вы оказываете нашим изделиям. Вы только
что приобрели последнюю новинку среди кофеварок Эспрессо. Ваша кофеварка оснащена
держателем фильтра, который снабжен двумя эксклюзивными системами: одна для выброса
кофейной гущи, другая для уплотнения помола при установке держателя фильтра.
Держатель фильтра — съемный, что позволяет с помощью частых чисток поддерживать
его в прекрасном рабочем состоянии. Для Вашей безопасности держатель фильтра снабжен
системой блокировки, которая позволяет ему оставаться на месте в то время, как в
кофеварке поднимается давление.
1. Описание прибора
Рис. 1
A.
Съемный резервуар
B.
Крышка резервуара
C.
Панель управления
D.
Входная рампа держателя фильтра
E.
Держатель фильтра
F.
Съёмная решётка восстановительного бака
G.
Восстановительный бак
H.
Шнур питания
I.
Врщающийся паровой патрубок
J.
Устройство «Капуччино»
К.
Дозировочная ложка
Рис. 2 и 2 bis
С. Панель управления
С1. Регулятор управления:
a)
положение «подача кофе»
b)
положение «О» (выключатель прибора)
c)
положение «паровой нагрев»
d)
положение «пар»
С2. Клавиша эспрессо -1 чашка
СЗ. Клавиша эспрессо — 2 чашки
С4. Регулятор автоматической дозировки воды
С5. Сигнальная лампочка работы прибора
Сб. Сигнальная лампочка температуры
Рис. 3
Е. Держатель фильтра с системой выброса кофейной гущи
Е1. Фильтр для одной или двух чашек
Е2. Кнопка выброса гущи и блокировки
2. Технические характеристики
•
Электромагнитный насос: 15 бар
•
Держатель фильтра с системой выброса гущи
•
или 2 чашки
•
Действие пара
•
Съемный резервуар (емкость — 0.8 л)
•
Шнур питания: 1 м
•
Мощность: 1060 Вт
•
Напряжение: 220-240 В. 50 Гц
•
Устройство защиты от перегрева и от избыточного давления
•
Размеры: высота — 300 мм, ширина — 275 мм, глубина — 250 мм.
•
Вес 3.3 кг
Важно:
Рабочее напряжение: этот прибор рассчитан на функционирование только при
переменном токе с напряжением 220-240 В.
Вид применения: этот прибор предназначен исключительно для домашнего
использования.
3. Меры предосторожности
•
Перед первым использованием ознакомьтесь с правилами rл.V
«Первое включение».
•
Убедитесь, что напряжение в Вашей сети соответствует напряжению, указанному на
приборе (220-240 В). Любое неправильное подключение может привести к непоправимым
повреждениям, на которые гарантия не распространяется.
•
Кофеварка должна включаться в сеть с заземляющим контактом. Если Вы используете
удлинитель, убедитесь, чтобы он был двухполюсного типа с заземляющим приводом 10А и в
хорошем состоянии.
•
Внимание: во время работы прибор находится под давлением, поэтому его не следует
оставлять без присмотра.
•
Следуйте рекомендациям по использованию функции «Пар» во избежание случайного
выброса пара.
•
Не рекомендуется ставить прибор на горячие поверхности (например, на плитку) или
вблизи огня во избежание повреждения корпуса прибора.
•
Во время работы некоторые части прибора (например: паровой патрубок, держатель
фильтра) могут сильно нагреваться, что может вызвать ожоги. Поэтому рекомендуется
пользоваться изолирующей ручкой держателя фильтра и предупредить об этом остальных
пользователей.
•
Не используйте и не храните прибор в местах, доступных детям.
•
Не включайте прибор если в нем нет воды.
•
Отключая прибор, не тяните за шнур.
•
Не погружайте прибор в воду.
•
Не нагревайте воспламеняющиеся жидкости паром.
•
Отключайте прибор от сети:
— перед снятием резервуара (для его заполнения, опустошения или чистки),
-перед любой операцией по уходу или чистке,
-после использования, если Вы больше не будете пользоваться кофеваркой,
-если она неправильно функционирует.
•
Не следует пользоваться кофеваркой если:

— шнур питания или прибор явно повреждены,
— уронили кофеварку или она дает течь.
•
Для очистки от накипи рекомендуется использовать чистый уксус, а не винный уксус.
•
Прибор может быть отремонтирован только при помощи специальных инструментов. В
случае повреждения шнура или в случае возникновения других проблем, обращайтесь к
Вашему дилеру или в сервис-центр (см. вкладыш).
4. Практические советы
Прежде чем снять держатель фильтра, разблокируйте его, слегка нажав на клавишу
«EJECT» (рис.9).
• Для приготовления кофе-эспрессо с сильным ароматом, рекомендуется использовать
специальный кофе эспрессо свежего помола, подходящий для изысканного приготовления
такого сорта кофе.
• Для сохранения ароматических свойств, храните молотый кофе в холодильнике.
• Не переполняйте держатель фильтра молотым кофе, пользуйтесь дозировочной ложкой
(1 ложка на 1 чашку, 2 ложки на 2 чашки). Удаляйте излишки.
• Если Вы не пользовались кофеваркой в течение боле 5 дней, то вылейте воду из
резервуара и промойте его.
• Перед тем как снять резервуар для его заполнения или опустошения, убедитесь, что
прибор отключён.
Важно:
Перед первым использованием, после длительных простоев или после очистки от накипи с
прибором следует обращаться как указано в гл. «Первое включение»
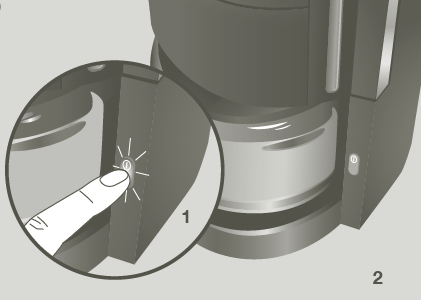
5. Первое включение
Промывка прибора перед первым использованием.
• Заполните резервуар водой.
• Установите на место держатель фильтра (без кофе) : поверните его слева направо до
• упора (рис.4).
• Поставьте под держатель фильтра емкость вместимостью более 1/2 литра. Поверните
регулятор С1 в положение (подача кофе) (рис.5).
• Наладьте прибор для приготовления кофе-эспрессо, поворачивая вправо регулятор
крепости кофе (С4) (рис.6).
• Нажмите на клавишу (СЗ) — 2 чашки кофе (рис.7).
• Затем выключите прибор (положение «О»).
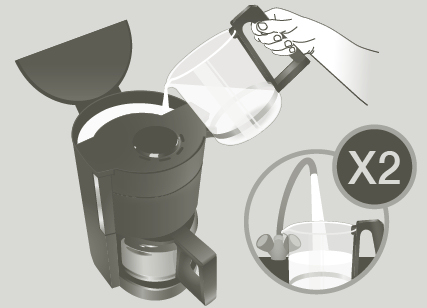
• Снимите резервуар, вылейте из него воду, тщательно прополоскайте его и установите
на место (рис.8).

6. Приготовление кофе-эспрессо
Важно: Если Вы используете Ваш прибор для приготовления кофе-эспрессо, то следует
промыть прибор как описано в гл. «Первое включение».
• Заполните резервуар водой.
• Включите прибор.
• Снимите держатель фильтра(, слегка нажав на клавишу «EJECT» и поворачивая его
влево (рис.9). С помощью дозировочной ложки положите молотый кофе в держатель
фильтра:
— на одну чашку: 1 дозировочная ложка (полная до краёв),
— на две чашки: 2 дозировочные ложки (полные до краёв).
• Наладьте прибор для приготовления кофе-эспрессо, поворачивая вправо регулятор
крепости кофе (С4) (рис.6).
• Нажмите на клавишу (СЗ) — 2 чашки кофе (рис.7).
• Затем выключите прибор (положение «О»).
• Снимите резервуар, вылейте из него воду, тщательно прополоскайте его и установите на
место (рис.8).
• Снимите излишек помола, который может остаться на окружности держателя
фильтра
(рис.10).
• Вставьте держатель фильтра в рампу прибора, поворачивая его слева направо (рис.4). В
зависимости от того, какой кофе Вы хотите приготовить: чем сильнее спрессован
молотый кофе (поворачивайте держатель фильтра вправо), тем крепче будет кофе. Если
Вы хотите приготовить только одну чашку кофе-эспрессо, то регулятор дозировки
должен находиться в крайнем правом положении, если Вы хотите приготовить две
чашки кофе-эспрессо, то регулятор дозировки должен находиться посередине (рис.11).
• Поставьте одну или две чашки на решетку восстановительного бака под держателем
фильтра (рис.12).
• Поверните регулятор С1 в положение («подача кофе») (рис.5).
• Зажгутся сигнальные лампочки работы прибора и температуры (рис. 13).
• Выберете сколько кофе Вы хотите налить в каждую чашку, поворачивая
регулятор дозировки воды (С4) влево для приготовления кофе-эспрессо быстрого
приготовления, и вправо для приготовления кофе-эспрессо длительного
приготовления.
• Нажмите на клавишу «1 чашка» (С2) или на клавишу «2 чашки» (СЗ) в зависимости от
того, сколько чашек кофе вы хотите приготовить (рис.7).
• Сигнальная лампочка клавиш С2 или СЗ будет гореть во время подачи кофе-эспрессо.
• Когда вода нагреется до необходимой температуры, сигнальная лампочка
температуры погаснет.
• Кофе-эспрессо начнет стекать в чашку (чашки) через некоторое время, а затем
автоматически остановится.
• Когда чашки наполнятся, выключите прибор, переводя регулятор С1 в положение 0.
• Снимите чашки с решетки.
• Снимите держатель фильтра, слегка нажимая на клавишу «EJECT» и поворачивая
его влево, затем необходимо вынуть держатель фильтра из гнезда. Извлеките гущу с
помощью системы выброса, нажав до упора на клавишу выброса «EJECT» на

рукоятке держателя фильтра (рис.3). Промойте держатель фильтра под проточной
водой, нажимая на клавишу «EJECT» для удаления остатков гущи (см. гл.YIII.В/ для
более глубокой чистки).
• Для того чтобы снова приготовить кофе-эспрессо, поверните регулятор С1 в
положение (подача кофе) (рис.5) и повторите все вышеописанные операции.
• Чтобы добавить в чашку (чашки) еще кофе, необходимо сразу же после прекращения
стекания кофе, и пока не погасли сигнальные лампочки клавиш С2 или СЗ:
— нажать на клавишу, которую Вы выбрали (1 или 2 чашки), чтобы получить
необходимое количество кофе,
— перевести регулятор С1 в положение 0.
Естественным явлением считается то, что каждое возвращение регулятора С1 в
положение «О» или «паровой нагрев» сопровождается легким шумом производимым
циркуляцией воды или пара, благодаря специальному устройству, с помощью которого
поднимается давление в каналах циркуляции.
Когда Вы оставляете выключатель в положении «подача кофе», сигнальная лампочка
температуры регулярно загорается и гаснет, что является нормальным явлением.
7. Использование пара
Пар служит для вспенивания молока (например, для капуччино и горячего шоколада), а
также для подогрева воды (для чая и горячих напитков).
• Поверните переключатель в положение (паровой нагрев) (рис.14)
• (для получения более густого пара, используйте повышенные температуры по
сравнению с теми, что рекомендованы для приготовления кофе).
• Загорятся сигнальные лампочки работы прибора и температуры воды (рис.13).
• Залейте жидкость, которая должна быть разогрета, в сосуд. Для достижения
наилучшего результата, рекомендуется заливать жидкость для разогрева или
вспенивания в сосуд с маленьким отверстием (например, в маленький кувшинчик).
• Погрузите паровой патрубок в жидкость.
• Когда сигнальная лампочка температуры погаснет, поверните регулятор С1 в
положение (подача пара) (рис.15): пар будет выходить в жидкость.
• Чтобы как следует вспенить молоко, совершайте сосудом круговые движения и
движения сверху вниз (рис.16). Насос работает с перерывами, что является
нормальным режимом работы.
• Во время работы прибора сигнальная лампочка температуры то загорается, то гаснет,
что является нормальным явлением.
• Когда жидкость нагреется и/или вспенится, выключите прибор (положение 0).
Важно:
Сразу же после прекращения подачи пара необходимо тщательно протереть паровой
патрубок с помощью влажной губки (чтобы удалить остатки кофе) и выпустить пар для
того, чтобы прочистить паровой патрубок изнутри.
Внимание:
Паровой патрубок сильно нагревается! Берегитесь ожогов!
Прибор снова готов для приготовления кофе-эспрессо. После использования пара
необходимо дать прибору остыть в течение 5 минут, иначе Ваш кофе-эспрессо будет иметь
«жженый вкус».

8. Чистка и уход
А. Прибор.
• Перед тем как чистить прибор, отключите его от сети и дайте ему остыть.
• Время от времени протирайте корпус прибора влажной губкой. Регулярно
промывайте
резервуар прибора, восстановительный бак и решетку, после чего протрите их насухо.
• Регулярно промывайте резервуар изнутри.
• Не рекомендуется использовать очищающие средства на алкогольной основе.
• После того как Вы отключили прибор, протрите влажной губкой решетку
стекания горячей воды (рис.17).
В. Держатель фильтра.
Вы только что приобрели прибор, который оснащен съемным держателем фильтра, что
позволяет Вам поддерживать его в прекрасном рабочем состоянии. Рекомендуется
прочищать держатель фильтра после каждого использования кофеварки. Установка и
съемка держателя фильтра должны осуществляться, когда фильтр уже остыл.
1. Снятие держателя фильтра.
• Извлеките держатель фильтра из паза прибора.
• Удалите кофейную гущу, нажимая на клавишу выброса гущи.
• Промойте его в чистой воде.
• Возьмите дно держателя фильтра большим и указательным пальцами
(рис.19) и потяните его вниз.
2. Чистка и промывание держателя фильтра.
Держатель фильтра можно чистить с помощью средства для мытья посуды и специальной
щетки, но затем необходимо промыть его в чистой воде.
Для достижения наилучшего результата, рекомендуется несколько раз нажать на клавишу
выброса гущи в то время, как Вы промываете держатель фильтра.
Для удаления воды рекомендуется тщательно просушить держатель фильтра
3. Установка держателя фильтра.
Сначала необходимо вставить нижнюю часть держателя фильтра в паз, специально для
этого предназначенный (А), вставьте его до упора, Вы услышите щелчок, гарантирующий
блокировку механизма (рис.20).
9. Удаление накипи
• Рекомендуется регулярно очищать Вашу эспрессо-кофеварку от накипи.
• Частота операций по удалению накипи безусловно зависит от того, какое количество
кофе-эспрессо Вы готовите, но также и от того, воду какой жесткости Вы
используете.
Чтобы узнать среднюю степень жесткости воды в Вашем регионе, обратитесь на
местную станцию водоснабжения. При жесткой воде и частом пользовании
кофеваркой рекомендуется регулярно удалять накипь. При мягкой воде -1 раз в год, если
вода средней жесткости или жесткая -1 раз в полгода.
• На ремонт в связи с образованием и удалением накипи гарантия не распространяется.

А. Удаление накипи
• Отключите прибор.
• Установите держатель фильтра (без помола) в паз прибора и заблокируйте держатель
фильтра, поворачивая его слева направо до упора.
• Установите емкость объемом более 1 /2 литра под держатель фильтра.
• Убедитесь, что регулятор С1 находится в положении «О».
• Вылейте воду из резервуара и установите его на место.
• Залейте 1/2 литра чистого уксуса (не винного уксуса) в резервуар.
• Включите прибор и поверните регулятор в положение (подача кофе) (рис. 5).
• Загорятся сигнальные лампочки работы прибора и температуры (рис.13).
• Сигнальные лампочки выбора количества чашек начнут мигать.
• Установите регулятор в положение для кофе-эспрессо длительного приготовления,
поворачивая регулятор крепости кофе вправо (С4) (рис.6).
• Нажмите на кнопку «2 чашки» (СЗ) (рис.7).
• Затем выключите прибор (положение «О»), подождите 10 минут и повторите операцию
до окончательного вытекания уксуса.
В. Промывание.
Важно!
После удаления накипи, прополощите 2-3 раза в чистой воде (без помола), как описано в
гл. «Первое включение».
Прибор очищен от накипи и снова готов к дальнейшему использованию.
10. Гарантия
Ваш прибор имеет гарантию на один год, но всякая ошибка в подключении прибора,
манипулировании и использовании по назначению, не указанному в инструкции, снимают
гарантию.
Ваш прибор рассчитан на использование исключительно в домашних хозяйственных целях,
всякое другое использование снимает гарантию.
Никакой ремонт по причине образования накипи не покрывается гарантией.
По всем проблемам, связанным с послепродажным обслуживанием, и проблемам,
связанным с отдельными деталями, обращайтесь к Вашему дилеру или в
специализированный сервисный центр.

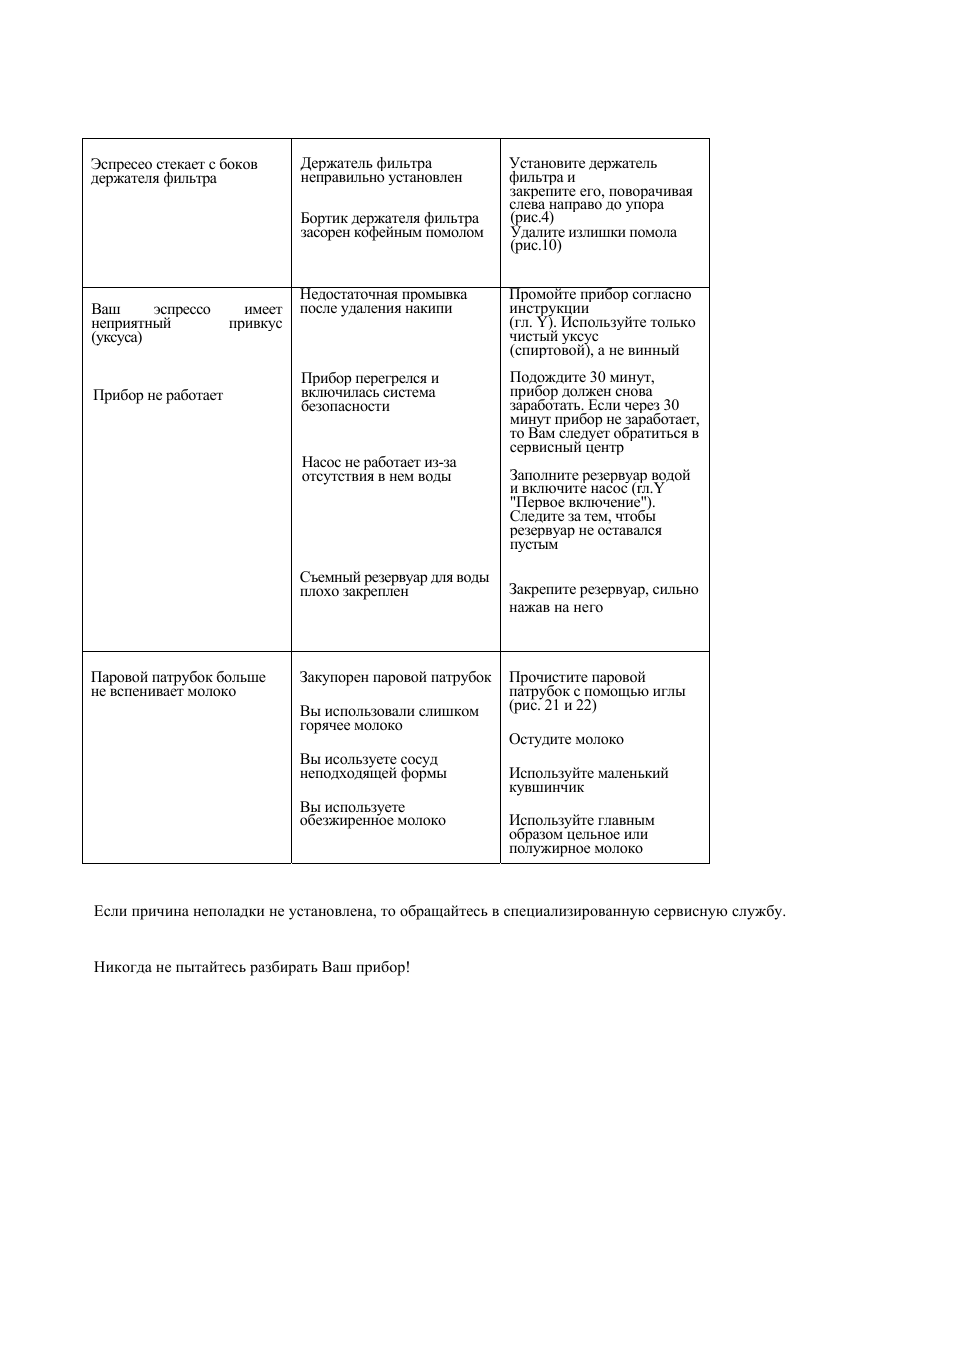
11. Решение возможных проблем
ПРОБЛЕМЫ
Держатель фильтра не
вынимается
ВОЗМОЖНЫЕ ПРИЧИНЫ
Вы забыли разблокировать
держатель фильтра
УСТРАНЕНИЕ
Нажмите слегка на клавишу
EJECT, поворачивая
держатель фильтра влево
(рис.9).
Кофейная гуща не
высушена после
стекания кофе
Вы недостаточно плотно
установили держатель
фильтра
Установите плотнее
держатель фильтра
Кофе-эспрессо стекает
слишком медленно
Вы слишком плотно зажали
держатель фильтра Помол
слишком мелкий, жирный,
мучнистый Загрязнена решетка
стекания воды
Ослабьте зажим
Выберете помол покрупнее
Когда прибор остынет,
протрите решетку стекания
воды влажной губкой (рис.17)
Вода вытекает из
держателя фильтра,
после приготовления
кофе
Регулятор работы прибора не
был установлен в положение
остановки прибора «0»
Преждевременное образование
накипи, так как вода с
высоким содержанием извести
Отключите прибор, переводя
регулятор работы в положение
«0» (рис.2 С1) Удалите накипь в
соответствии с указаниями
инструкции (см. гл. IX)
Излишки гущи в чашке Загрязнен держатель фильтра
Слишком мелкий помол
Несвежий помол
Промойте держатель фильтра в
горячей воде. Нажмите на
клавишу «EJECT», чтобы
удалить остатки гущи.
Просушите, чтобы удалить воду
(см. также гл. YIII.B). Выберете
помол покрупнее. Используйте
свежемолотый кофе
Кофе недостаточно
пенистый
Данный вид помола не
подходит цля приготовления
эспрессо В держателе фильтра
недостаточно молотого кофе
Используйте более мелкий помол
Добавьте еще молотого кофе
Зода капает из
эеэервуара во время
переноски
Засорился или заблокирован
клапан в днище резервуара
Промойте резервуар водой и
нажмите пальцем на клапан
внутри резервуара
Вода подтекает из-под
прибора
Внутренняя течь
Паровой патрубок
закупорен
Больше не пользуйтесь прибором,
обращайтесь в
специализированный сервисный
центр
Пар выходит из
отверстия,
расположенного
справ на паровом
патрубке (система
защиты от
повышенного
давления)
Отсутствие воды в резервуаре
Прочистите паровой патрубок
с помощью иглы (рис.21 и 22)
При работе насоса
раздается
ненормальный шум
Засорился держатель фильтра
Заполните резервуар водой и
включите насос (см.гл.Y).
Чашки заполняются
неравномерно
Прочистите держатель фильтра —
см. гл. YIII.B

Эспресео стекает с боков
держателя фильтра
Держатель фильтра
неправильно установлен
Бортик держателя фильтра
засорен кофейным помолом
Установите держатель
фильтра и
закрепите его, поворачивая
слева направо до упора
(рис.4)
Удалите излишки помола
(рис.10)
Ваш
эспрессо
имеет
неприятный
привкус
(уксуса)
Прибор не работает
Недостаточная промывка
после удаления накипи
Прибор перегрелся и
включилась система
безопасности
Насос не работает из-за
отсутствия в нем воды
Съемный резервуар для воды
плохо закреплен
Промойте прибор согласно
инструкции
(гл. Y). Используйте только
чистый уксус
(спиртовой), а не винный
Подождите 30 минут,
прибор должен снова
заработать. Если через 30
минут прибор не заработает,
то Вам следует обратиться в
сервисный центр
Заполните резервуар водой
и включите насос (rл.Y
«Первое включение»).
Следите за тем, чтобы
резервуар не оставался
пустым
Закрепите резервуар, сильно
нажав на него
Паровой патрубок больше
не вспенивает молоко
Закупорен паровой патрубок
Вы использовали слишком
горячее молоко
Вы исользуете сосуд
неподходящей формы
Вы используете
обезжиренное молоко
Прочистите паровой
патрубок с помощью иглы
(рис. 21 и 22)
Остудите молоко
Используйте маленький
кувшинчик
Используйте главным
образом цельное или
полужирное молоко
Если причина неполадки не установлена, то обращайтесь в специализированную сервисную службу.
Никогда не пытайтесь разбирать Ваш прибор!
06:48
Кофеварка слабо подает воду и пар. Ремонт Rowenta в Юмедиа Сервис
03:02
Обзор кофе машины roventa adagio
25:42
Ремонт кофеварки Rowenta Allegro ES 050
05:51
Кофеварка ROWENTA не фиксируется рожок
10:23
Ремонт уплотнителя в кофеварке Rowenta
18:33
Ремонт кофеварки Rowenta ES 050
07:25
Rowenta Prelude es 5100 готовим эспрессо
Нажмите на кнопку для помощи
Manual
View the manual for the Rowenta Adagio ES 180 here, for free. This user manual comes under the category coffee makers and has been rated by 7 people with an average of a 8.3. This manual is available in the following languages: English. Do you have a question about the Rowenta Adagio ES 180?
Ask your question here
Frequently asked questions
Can’t find the answer to your question in the manual? You may find the answer to your question in the FAQs about the Rowenta Adagio ES 180 below.
What is the best way to descale my coffee maker?
To descale the coffee maker, it is recommended to use a liquid descaling agent which is labelled as suitable for coffee machines.
How often should I descale my coffee maker?
How often a coffee machine needs to be descaled depends on how often it is used and the hardness of the water.
If hard water is used it is recommended to descale once a month, if soft water is used once a quarter is sufficient.
What does the grind say about the taste of the coffee?
How the coffee beans are ground strongly influences the taste of the coffee. If the coffee beans are very finely ground you will have a stronger taste and if the grind is coarser you will have a milder taste.
What is espresso?
Espresso is a small amount of concentrated coffee.
How long can I keep coffee beans?
The best-before date can be found on the packaging of the coffee beans. This best-before date applies as long as the bag is closed.
What is the best way to store coffee?
It is recommended to store coffee in an airtight and clean container.
Is the manual of the Rowenta Adagio ES 180 available in English?
Yes, the manual of the Rowenta Adagio ES 180 is available in English .
Is your question not listed? Ask your question here
-
Homepage
>
-
Instructions for use
>
-
Beverages
>
-
Filter
>
User manual and frequently asked questions ADAGIO
ADAGIO Filter Coffee Maker
An elegant coffee maker for your kitchen
This stylish coffee maker with glass jug and automatic switch-off prepares 1.25 L of coffee, for 10-15 cups.
Référence : CG380810
Voir les documents liés
Documentation
Voir les questions les plus fréquentes
FAQ
Never put your jug or insulated pot in the microwave oven, dishwasher or on a hotplate.
You can use a paper filter or permanent filter (nylon or metal). These two types of filter are sold in stores.
Operate your filter coffee maker for the first time without any coffee and with the equivalent of one jug of water to rinse it.
The hotplate is used to keep the coffee at the required temperature while leaving the coffee maker switched on. This function is available only with coffee makers that come with a glass pot.
Depending your appliance model, you can buy it from an after sales service or from the «Accessories» section of the website.
Scale deposits naturally form in your coffee maker. Regular descaling helps protect your coffee maker and ensures it a longer life. It will also help maintain a quality of coffee that remains constant over time.
Use the descaling kit or some white vinegar:
• Use some descaling solution diluted in half a litre of water or use 25cl of white vinegar in half a litre of water.
• Pour the solution into the water tank (without coffee),
• Start the cycle (without any coffee). After 2 minutes, stop the cycle manually. Leave the coffee maker for an hour,

• Restart the coffee maker to finish the cycle,
• To rinse the machine, run 2 cycles with water but without coffee.
Repeat the complete descaling operation, if necessary.
How often you descale your coffee maker depends on the hardness of the water and on how often you use your coffee maker. The following are tell-tell signs of scaling: the coffee making cycle takes longer, the appliance produces lots of steam, makes much more noise at the end of the cycle or stops during the cycle, this means that scale has built up in your coffee maker. You should descale your coffee maker between every 20 to 40 cycles or once a month depending on the hardness of the water.
Insulated carafes should never be put into the dishwasher!
A plastic insulated carafe should be rinsed under hot water immediately after use.
Never clean the carafe with a dishwashing brush or any other object as this may create hairline cracks that can cause the glass to implode. A brushed steel insulated carafe can easily be cleaned with a dishwashing brush or similar object, even inside.
The glass coffee pot and the filter receptacle must be washed in the upper rack of the dishwasher.
• The quantity of ground coffee is too large. We recommend using one measure of coffee (7 grams) per mug.
• The ground coffee is too fine (‘Espresso’ type ground coffee).
• If you use a permanent filter, do not use a paper filter as well.
• Certain types of paper filter (to make full-bodied coffees) can prolong the time in which it takes for the water to pass through the filter and ultimately cause the water to overflow.
The coffee maker is lined with scale. You should descale it.
In the event of a power cut, it may be necessary to press the On/Off button again.
On models with a timer, the clock must be programmed.
Clean the anti-drip valve of the filter holder under running water, activating it manually.
After following the instructions in the user manual for starting the appliance, make sure that your electrical socket is working by plugging another appliance. If it still does not work, do not try to dismantle or repair the appliance yourself, instead, take it to an approved repair centre
Do not use your appliance. To avoid any danger, have it replaced by an approved repair centre.
This is entirely dependent on taste: you can buy pre-ground coffee for filter machines from supermarkets in a variety of strengths and flavours, you can grind your own coffee beans or you can buy beans at a coffee shop and ask for them to be ground to filter consistency.
Always keep ground coffee in an airtight container or seal the pack with a bag clip. Keep the container in the fridge to prolong freshness.
Medium to fine ground (but not too fine). You can also ask for «Espresso ground».
The inner circuits scale up, water doesn’t flow through properly, and flows much slower.
The warranty excludes failures due to a lack of regular descaling.
Your appliance contains valuable materials which can be recovered or recycled. Leave it at a local civic waste collection point.
If you believe that one part is missing, please call Consumer Services Center and we will help you find a suitable solution.
Please go to the “Accessories” section of the website to easily find whatever you need for your product.
Find more detailed information in the Guarantee section of this website.
Consumerservices
- June 5, 2024
- Rowenta
Table of Contents
- DESCRIPTION
- SAFETY INSTRUCTIONS
- USING FOR THE FIRST TIME
- MAKING COFFEE
- CLEANING AND MAINTENANCE
- DESCALING
- TROUBLESHOOTING GUIDE
- END-OF-LIFE ELECTRICAL OR ELECTRONIC PRODUCTS
- References
- Read User Manual Online (PDF format)
- Download This Manual (PDF format)
CG301500 Adagio Coffee Maker
Instruction Manualwww.rowenta.com
|
—|—
DESCRIPTION
| A Water tank lid | G Warming plate |
|---|
B Removable filter holder with an
anti-drip system| H Cord storage (at the back)
C Measuring spoon| I On/off illuminated switch
D Swivel filter-holder| J Water level indicator
E Jug lid| K Adjustment knob for coffee measuring guide (depending on model)
F Jug with measuring marks: number of cups/quantity of water| L Water tank
SAFETY INSTRUCTIONS
-
Check that the supply voltage corresponds to that shown on the appliance’s rating plate.
-
This appliance is not intended for use by persons (including children) with reduced physical, sensory or mental capabilities, or lack of experience and knowledge unless they have been given supervision or instruction concerning the use of the appliance by a person responsible for their safety.
-
Children should not be allowed to play with the appliance.
-
A household appliance must not be used if the power supply cord of the appliance shows visible signs of damage, if the appliance has fallen or if it leaks. In this case, send the coffee-maker to an authorized Rowenta Service Centre (see list of addresses enclosed).
-
Do not let the supply cord rest on or hang down over corners, sharp edges, or hot objects. Use cord storage.
-
Disconnect the appliance if problems occur during filtering, before each cleaning or servicing, and after use.
-
Do not pour hot water or other liquids into the water tank.
-
Never open the filter-holder while the coffee is flowing.
-
Do not place or use the appliance on or near hot surfaces.
-
Reheat your coffee in the jug only in a microwave oven.
-
Do not immerse the appliance in water.
-
Entrust the repair of household appliances only to specialists. It is dangerous to try to repair an appliance yourself and will invalidate the guarantee.
-
A defective power supply cord should be replaced only by an authorized Rowenta Service Centre.
-
Rowenta accepts no liability for damage caused by improper use or operation of the appliance.
-
When the appliance has reached the end of its useful life it must be disposed of in an appropriate manner.
-
For your safety, this appliance complies with applicable standards and regulations:
– Low Voltage Directive
– Electromagnetic Compatibility
– Environment
– Materials in contact with food -
Your appliance has been designed for domestic indoor use only. It is not designed to be used in the following cases, which are not covered by the guarantee:
– In staff kitchenettes, shops, offices, and other professional environments
– In farms
– By customers in hotels, motels and other residential environments
– In environments such as bed and breakfast. -
After starting your coffee maker, never put your hand on the warming plate when you remove the jug from the coffee maker.
During operation, this plate is very hot and can cause burns. -
This product has been designed for domestic use only. Any commercial use, inappropriate use or failure to comply with the instructions, the manufacturer accepts no responsibility and the guarantee will not apply.
USING FOR THE FIRST TIME
- Run the coffee maker twice by adding as much water as possible, without ground coffee. Wait about 5 minutes between each operation.
- Spare Rowenta jugs are available from a service center for all models.
MAKING COFFEE
Follow the illustrations 1 to 6.
-
A model with a coffee measuring guide: you can get just the right amount of ground coffee to suit your taste (weak or strong coffee). Turn the adjustment knob: the quantity of coffee corresponds to the water level.
Pour the number of measuring spoonfuls of coffee into the filter. -
Model without coffee measuring guide: see drawing (illustration 3).
-
As soon as the coffee is made, press the switch: the light will go off.
CLEANING AND MAINTENANCE
Caution!
Do not put hard objects, like metallic or ceramic tea infusers, in the jug as
they could damage the inside.
- Disconnect the coffee maker and leave it to cool.
Follow the illustrations 8 to 11.
- Clean the coffee maker with a soft, moist cloth.
- Clean the inside of the jug only with a soft brush and rinse with fresh water.
- You can remove the inner filter-holder (illustration 8a, 8b depending on the model).
This filter holder is dishwasher safe.
- Do not immerse the coffee maker in water.
DESCALING
-
Descaling frequency depends on the hardness of your water and how often you use your coffee maker.
If you notice the brew cycle has slowed it is generally time to descale the
machine.
Depending on the water hardness, you must descale after every 40 to 120
cycles, i.e. once a month to once every 3 months. -
If you use descaling powder or liquid, follow the instructions provided by the manufacturer on the packet.
-
If you use white vinegar (available from hardware stores):
– Mix 2 cupfuls of vinegar with 2 cupfuls of water.
– Pour the cold descaling solution into the tank; do not forget to place the
jug and start the coffee maker.
– Stop the appliance once half the solution has run through and leave for
about an hour. Start the coffee maker again and let the rest of the solution
run through.
– After descaling, the appliance must be operated at least 2 or 3 times with
fresh water to rinse.
The guarantee does not cover coffeemakers with excessive scale build-up.
TROUBLESHOOTING GUIDE
| Problem | Possible cause | Solution |
|---|---|---|
| – The on/off light fails to come on. | – Appliance is not correctly plugged | |
| in. | – Plugin properly. |
– The coffee takes a long time to brew.
– Increased noise when brewing| – Coffee-maker lined with scale.| – Descale
the coffee-maker.
Subject to modification
END-OF-LIFE ELECTRICAL OR ELECTRONIC PRODUCTS
Think of the environment!
Your appliance contains valuable materials which can be recovered or recycled.
Leave it a local civic waste collection point.
If you have any problems or queries please contact our Customer Relations
Team for expert help and advice:
Helpline:
0845 602 1454 – UK
(01) 677 4003 – ROI
or consult our website:www.rowenta.co.uk
References
- rowenta.co.uk
- Rowenta USA | Garment Steamers, Steam Irons & Humidifiers
Read User Manual Online (PDF format)
Read User Manual Online (PDF format) >>
Download This Manual (PDF format)
Download this manual >>
View the manual for the Rowenta CT3818 Adagio II here, for free. This manual comes under the category coffee makers and has been rated by 2 people with an average of a 8.8.
This manual is available in the following languages: English. Do you have a question about the Rowenta CT3818 Adagio II or do you need help?
Ask your question here
Frequently Asked Questions
Can’t find the answer to your question in the manual? You may find the answer to your question in the FAQs about the Rowenta CT3818 Adagio II below.
How do I ensure the coffee maker is safely connected to the power supply?
To ensure the Rowenta CT3818 Adagio II coffee maker is safely connected to the power supply, follow these steps:
1. Before using the coffee maker for the first time, check that the mains supply voltage matches the voltage indicated on the appliance’s data plate. This information can usually be found on the bottom or back of the coffee maker.
2. Avoid using an extension lead if possible. If you need to use one, make sure it is in good condition, has a plug with an earth connection, and is suitable for the power rating of the coffee maker.
3. Never disconnect the plug by pulling on the power cord. Always grasp the plug itself to disconnect it from the power supply.
4. Ensure that the power cord is not in contact with hot parts of the coffee maker, close to a source of heat, or resting on sharp edges.
5. Place the coffee maker in a safe location, away from walls, wall cupboards, and easily inflammable objects like curtains.
6. Never leave the coffee maker unattended while it is connected to the power supply, especially if there are children present.
By following these steps, you can safely connect the Rowenta CT3818 Adagio II coffee maker to the power supply.
Why is the coffee not brewing properly?
If the coffee is not brewing properly in the Rowenta CT3818 Adagio II coffee maker, you can try the following steps to troubleshoot the issue:
1. Check the amount of ground coffee used: Ensure that you are using the correct amount of ground coffee per large cup. Use one measuring spoon of ground coffee for each cup.
2. Allow time between brewing: Wait a few minutes before making a second pot of coffee. This allows the coffee maker to reset and prepare for the next brewing cycle.
3. Check the thermal pot lid: Make sure the lid of the thermal pot is closed tightly all the way to the right. This ensures proper brewing and keeps the coffee warm.
4. Clean the coffee maker: Regularly clean the coffee maker to remove any buildup or residue that may affect the brewing process. Use a cloth or wet sponge to clean the appliance, ensuring it is unplugged and cooled down before cleaning.
5. Descaling the coffee maker: If the issue persists, it may be necessary to descale the coffee maker. Descaling removes mineral deposits that can affect the performance of the machine. Follow the instructions in the manual to descale the coffee maker using a descaling agent or white vinegar.
By following these steps, you can troubleshoot and resolve issues with the coffee not brewing properly in the Rowenta CT3818 Adagio II coffee maker.
How do I properly close the lid of the thermal pot?
To properly close the lid of the thermal pot on the Rowenta CT3818 Adagio II coffee maker, follow these steps:
1. After brewing the coffee, ensure that the thermal pot is placed on a stable surface.
2. Hold the thermal pot handle firmly with one hand.
3. With your other hand, grasp the lid of the thermal pot.
4. Align the lid with the opening on the top of the thermal pot.
5. Gently press down on the lid while turning it clockwise.
6. Continue turning the lid until it is closed tightly.
7. Make sure the lid is securely closed to prevent any leakage or heat loss.
By following these steps, you can properly close the lid of the thermal pot on the Rowenta CT3818 Adagio II coffee maker. This ensures that the coffee remains hot and ready to serve.
How do I adjust the intensity of the coffee using the aroma selector?
To adjust the intensity of the coffee using the aroma selector on the Rowenta CT3818 Adagio II coffee maker, follow these steps:
1. After adding the desired amount of ground coffee and water to the coffee maker, locate the aroma selector.
2. The aroma selector is usually located on the front or side of the coffee maker, near the control panel.
3. Turn the aroma selector knob to the desired intensity level. Most coffee makers have multiple settings, such as mild, medium, and strong.
4. As you turn the aroma selector, you will notice that the intensity of the coffee aroma and flavor will change accordingly.
5. Select the intensity level that suits your preference. If you prefer a stronger coffee, turn the aroma selector towards the strong setting. For a milder coffee, turn it towards the mild setting.
6. Once you have adjusted the aroma selector to your desired intensity, the coffee maker will brew the coffee accordingly.
By following these steps, you can easily adjust the intensity of the coffee using the aroma selector on the Rowenta CT3818 Adagio II coffee maker. Enjoy your customized cup of coffee!
How do I clean and descale the coffee maker?
To clean and descale the Rowenta CT3818 Adagio II coffee maker, follow these steps:
1. Cleaning:
— Unplug the coffee maker and let it cool down.
— Use a cloth or wet sponge to clean the exterior of the coffee maker.
— Remove the filter paper or permanent filter and dispose of the used coffee grounds.
— The removable filter holder can be cleaned in the dishwasher.
— Clean the glass jug with warm soapy water and rinse thoroughly. Do not put the jug in the dishwasher if it has a metal band.
— For the thermal pot, rinse it with hot water before use to improve heat retention. Do not clean it with abrasive cleaning products or put your hand inside to clean.
— Wipe the coffee maker with a dry cloth before using it again.
2. Descaling:
— Descaling should be done every 40 uses.
— You can use a descaling agent diluted in water or commercially available white vinegar.
— Pour the descaling solution into the water tank and turn on the coffee maker without coffee.
— Allow the equivalent of one cup of the solution to flow into the jug or thermal pot, then stop.
— Let the descaling solution act for one hour.
— Restart the coffee maker to stop the flow and run it two or three times with the equivalent of one jug of water to rinse.
By following these steps, you can effectively clean and descale the Rowenta CT3818 Adagio II coffee maker, ensuring optimal performance and longevity of the appliance.
How do I ensure the coffee maker is safely operated?
To ensure the safe operation of the Rowenta CT3818 Adagio II coffee maker, follow these steps:
1. Read the instructions for use carefully before using the coffee maker for the first time. It is important to comply with the instructions provided.
2. Keep the coffee maker and its cord away from children under 8 years old. The appliance should not be used by children unless they are at least 8 years old and supervised by an adult.
3. Check that the coffee maker operates correctly and is not damaged before use. If there is any damage or malfunction, do not use the appliance and have it repaired by an Approved Service Centre.
4. Avoid using the coffee maker with wet hands or on a damp surface to prevent the risk of electric shock. Never immerse the appliance, power cord, or plug in water or any other liquid.
5. Do not use the coffee maker in professional environments, such as kitchens reserved for staff use in shops or offices, hotels, motels, bed and breakfast accommodations, or similar environments.
6. Switch off and disconnect the coffee maker from the power supply before cleaning, performing maintenance, or when not in use.
7. Never leave the coffee maker unattended while connected to the power supply, especially when children are present.
8. Always allow the coffee maker to cool down completely before cleaning and storing it.
By following these safety precautions, you can ensure the safe operation of the Rowenta CT3818 Adagio II coffee maker.
Why is the coffee not brewing properly?
If the coffee is not brewing properly in the Rowenta CT3818 Adagio II coffee maker, you can try the following steps to troubleshoot the issue:
1. Check the amount of ground coffee used. Ensure that you are using one measuring spoon of ground coffee per large cup. Using too little or too much coffee can affect the brewing process.
2. Wait a few minutes before making a second pot of coffee. This allows the coffee maker to reset and prepare for the next brewing cycle.
3. Make sure the thermal pot lid is closed tightly all the way to the right. The lid must be properly closed to ensure the coffee is brewed and kept warm.
4. Clean the coffee maker regularly. Remove the filter paper or permanent filter and dispose of the used coffee grounds. Clean the appliance with a cloth or wet sponge, ensuring it is unplugged and cooled down before cleaning.
5. Descaling the coffee maker every 40 uses can help remove any mineral deposits that may affect the brewing process. You can use a descaling agent diluted in water or commercially available white vinegar. Follow the instructions provided in the manual for the descaling process.
By following these steps, you can troubleshoot and resolve issues with the coffee not brewing properly in the Rowenta CT3818 Adagio II coffee maker.
How do I clean the thermal pot?
To clean the thermal pot of the Rowenta CT3818 Adagio II coffee maker, follow these steps:
1. Ensure that the coffee maker is unplugged and cooled down before cleaning.
2. Remove the thermal pot from the coffee maker.
3. Rinse the thermal pot with hot water to remove any remaining coffee residue.
4. If the thermal pot is stained by coffee, fill it with lukewarm water and add a dishwasher detergent tablet. Let it soak for a while, then rinse thoroughly.
5. Do not use abrasive cleaning products on the thermal pot, as they may damage the surface.
6. After cleaning, make sure to dry the thermal pot thoroughly before placing it back in the coffee maker.
7. Do not put the thermal pot in the microwave or dishwasher.
By following these steps, you can effectively clean the thermal pot of the Rowenta CT3818 Adagio II coffee maker and ensure its proper maintenance.
How do I adjust the intensity of the coffee using the aroma selector?
To adjust the intensity of the coffee using the aroma selector on the Rowenta CT3818 Adagio II coffee maker, follow these steps:
1. Start by brewing a pot of coffee using your preferred coffee grounds and water ratio.
2. Once the coffee is brewed, locate the aroma selector on the coffee maker. It is usually located near the control panel or on the front of the machine.
3. The aroma selector is typically a dial or a switch that allows you to adjust the intensity of the coffee. Turn the dial or switch to the desired setting.
4. If you prefer a stronger coffee, turn the aroma selector towards the «strong» or «bold» setting. This will increase the extraction time and result in a more intense flavor.
5. If you prefer a milder coffee, turn the aroma selector towards the «mild» or «light» setting. This will decrease the extraction time and result in a lighter flavor.
6. After adjusting the aroma selector, brew another pot of coffee to taste the difference in intensity. Repeat the process until you find the desired strength.
By following these steps, you can easily adjust the intensity of the coffee using the aroma selector on the Rowenta CT3818 Adagio II coffee maker to suit your personal preference.
How do I descale the coffee maker?
To descale the Rowenta CT3818 Adagio II coffee maker, follow these steps:
1. Prepare a descaling solution by diluting a descaling agent in 2 large cups of water or by using 2 large cups of white wine vinegar.
2. Pour the descaling solution into the water tank of the coffee maker.
3. Start the coffee maker without adding any coffee grounds.
4. Allow the descaling solution to flow through the coffee maker and into the carafe or thermal pot until approximately one cup of liquid has passed through.
5. Stop the coffee maker and let the descaling solution sit in the coffee maker for about an hour to effectively remove any mineral deposits.
6. After an hour, restart the coffee maker to complete the descaling process. Allow the remaining descaling solution to flow through the coffee maker and into the carafe or thermal pot.
7. Once the descaling process is complete, rinse the coffee maker thoroughly by running two or three cycles with clean water.
8. Make sure to discard the descaling solution and rinse the carafe or thermal pot with clean water.
By following these steps, you can effectively descale the Rowenta CT3818 Adagio II coffee maker and maintain its performance and longevity.
How do I ensure the coffee maker is safely operated?
To ensure the safe operation of the Rowenta CT3818 Adagio II coffee maker, follow these steps:
1. Read the instructions for use carefully before using the coffee maker for the first time. It is important to comply with the instructions provided.
2. Keep the coffee maker and its cord away from children under 8 years old. The appliance should not be used by children unless they are at least 8 years old and supervised by an adult.
3. Check that the coffee maker operates correctly and is not damaged before use. If there is any damage or malfunction, do not use the appliance and have it repaired by an Approved Service Centre.
4. Avoid using the coffee maker with wet hands or on a damp surface to prevent the risk of electric shock. Never immerse the appliance, power cord, or plug in water or any other liquid.
5. Do not use the coffee maker in professional environments, such as kitchens reserved for staff use in shops or offices, hotels, motels, bed and breakfast accommodations, or similar environments.
6. Switch off and disconnect the coffee maker from the power supply before cleaning, performing maintenance, or when not in use.
7. Never leave the coffee maker unattended while connected to the power supply, especially when children are present.
8. Always allow the coffee maker to cool down completely before cleaning and storing it.
By following these safety precautions, you can ensure the safe operation of the Rowenta CT3818 Adagio II coffee maker.
Why is the coffee not brewing properly?
If the coffee is not brewing properly in the Rowenta CT3818 Adagio II coffee maker, you can try the following steps to troubleshoot the issue:
1. Check the amount of ground coffee used. Ensure that you are using one measuring spoon of ground coffee per large cup. Using too little or too much coffee can affect the brewing process.
2. Wait a few minutes before making a second pot of coffee. This allows the coffee maker to reset and prepare for the next brewing cycle.
3. Make sure the thermal pot lid is closed tightly all the way to the right. The lid must be properly closed to ensure the coffee is brewed and kept warm.
4. Clean the coffee maker regularly. Remove the filter paper or permanent filter and dispose of the used coffee grounds. Clean the appliance with a cloth or wet sponge, ensuring it is not hot when cleaning.
5. Descaling the coffee maker every 40 uses can help improve the brewing performance. You can use a descaling agent diluted in water or commercially available white vinegar. Follow the instructions provided in the manual for the descaling process.
By following these steps, you can troubleshoot and resolve issues with the coffee not brewing properly in the Rowenta CT3818 Adagio II coffee maker.
How do I clean the thermal pot?
To clean the thermal pot of the Rowenta CT3818 Adagio II coffee maker, follow these steps:
1. Ensure that the coffee maker is unplugged and cooled down before cleaning.
2. Remove the thermal pot from the coffee maker.
3. Rinse the thermal pot with hot water to remove any remaining coffee residue.
4. If the thermal pot is stained by coffee, fill it with lukewarm water and add a dishwasher detergent tablet. Let it soak for a while, then rinse thoroughly.
5. Do not use abrasive cleaning products on the thermal pot, as they may damage the surface.
6. After cleaning, make sure to dry the thermal pot completely before placing it back in the coffee maker.
7. Do not put the thermal pot in the microwave or dishwasher.
By following these steps, you can effectively clean the thermal pot of the Rowenta CT3818 Adagio II coffee maker and ensure its proper maintenance.
How do I adjust the intensity of the coffee using the aroma selector?
To adjust the intensity of the coffee using the aroma selector on the Rowenta CT3818 Adagio II coffee maker, follow these steps:
1. Start by brewing a pot of coffee using your preferred coffee grounds and water ratio.
2. Once the coffee is brewed, locate the aroma selector on the coffee maker. It is usually located near the control panel or on the front of the machine.
3. The aroma selector is designed to adjust the intensity of the coffee flavor. Turn the aroma selector knob to the desired setting. Typically, there are multiple settings ranging from mild to strong.
4. As you turn the aroma selector, you will notice that the brewing time may vary. A stronger coffee flavor may require a longer brewing time, while a milder flavor may require a shorter brewing time.
5. Experiment with different aroma selector settings to find the intensity of coffee that suits your taste preferences.
By following these steps, you can easily adjust the intensity of the coffee using the aroma selector on the Rowenta CT3818 Adagio II coffee maker and enjoy a customized coffee experience.
How do I descale the coffee maker?
To descale the Rowenta CT3818 Adagio II coffee maker, follow these steps:
1. Prepare a descaling solution by diluting a descaling agent in 2 large cups of water or by using 2 large cups of white wine vinegar.
2. Empty the water reservoir of the coffee maker and pour the descaling solution into the reservoir.
3. Place an empty container, such as a carafe or a cup, under the coffee outlet to collect the descaling solution.
4. Turn on the coffee maker and let the descaling solution flow through the machine. Allow the solution to fill the container.
5. Once the descaling solution has completely flowed through the coffee maker, turn off the machine and let it sit for about an hour to allow the solution to work on removing the limescale deposits.
6. After the hour has passed, turn on the coffee maker again to complete the descaling process. Allow the remaining descaling solution to flow through the machine and into the container.
7. Once the descaling process is complete, empty the container and rinse it thoroughly.
8. Fill the water reservoir with clean water and run a brewing cycle without coffee to rinse out any remaining descaling solution.
By following these steps, you can effectively descale the Rowenta CT3818 Adagio II coffee maker and maintain its performance over time.
What is the best way to descale my coffee maker?
To descale the coffee maker, it is recommended to use a liquid descaling agent which is labelled as suitable for coffee machines.
How often should I descale my coffee maker?
How often a coffee machine needs to be descaled depends on how often it is used and the hardness of the water.
If hard water is used it is recommended to descale once a month, if soft water is used once a quarter is sufficient.
What does the grind say about the taste of the coffee?
How the coffee beans are ground strongly influences the taste of the coffee. If the coffee beans are very finely ground you will have a stronger taste and if the grind is coarser you will have a milder taste.
What is espresso?
Espresso is a small amount of concentrated coffee.
How long can I keep coffee beans?
The best-before date can be found on the packaging of the coffee beans. This best-before date applies as long as the bag is closed.
What is the best way to store coffee?
It is recommended to store coffee in an airtight and clean container.
Is the manual of the Rowenta CT3818 Adagio II available in English?
Yes, the manual of the Rowenta CT3818 Adagio II is available in English .
Is your question not listed? Ask your question here