

Введение
Данное руководство показывает, насколько просто настроить процессор эффектов/контроллер
Korg KaossPAD3
(KP3) для работы с программой Native Instruments Traktor©. После того как все будет корректно сконфигурировано, пользователь сможет выбирать эффекты Traktor и управлять ими с помощью тач-пэда KP3 и других назначаемых MIDI-контроллеров. Такой подход к управлению эффектами является интуитивным, быстрым и открывает широкие возможности для творчества.
Сама процедура исключительно проста и не отнимет много времени. Приведенное ниже описание предполагает, что вы уже инсталлировали драйвер KORG USB MIDI на ваш компьютер. Для проверки корректности коммутации KP3 и компьютера запустите программу KP3editor и убедитесь, что обмен данными доступен в обоих направлениях.
Начало работы
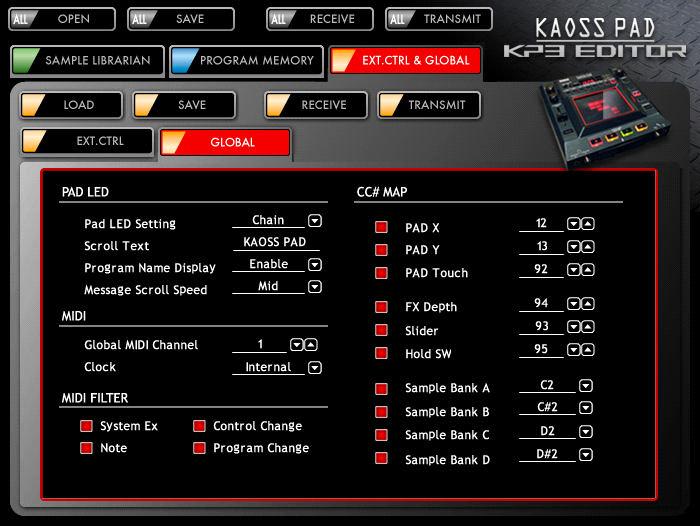
Карта функций в файле .tsi основана на фабричных настройках KP3. Пожалуйста, посмотрите Руководство Пользователя KP3 и рисунок ниже.
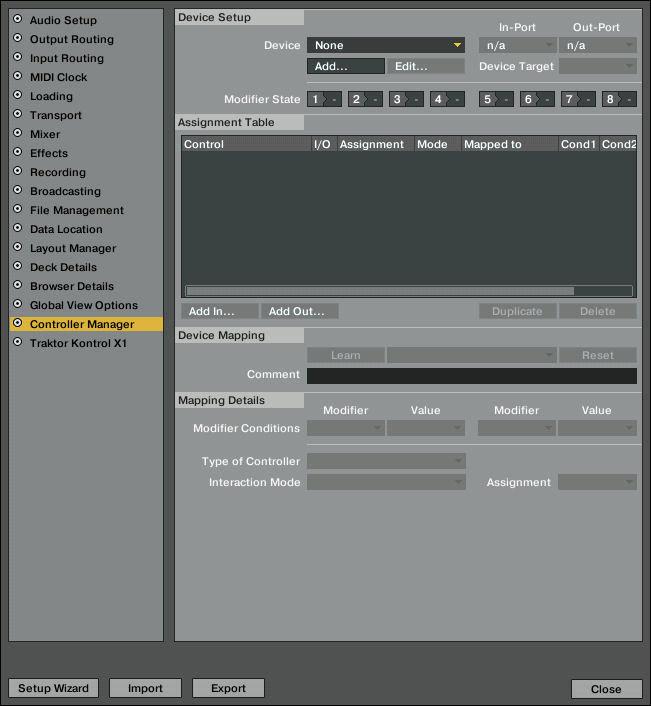
Откройте программу Traktor и выберите в меню File команду “Controller Manager”. На экран выведется следующее изображение:
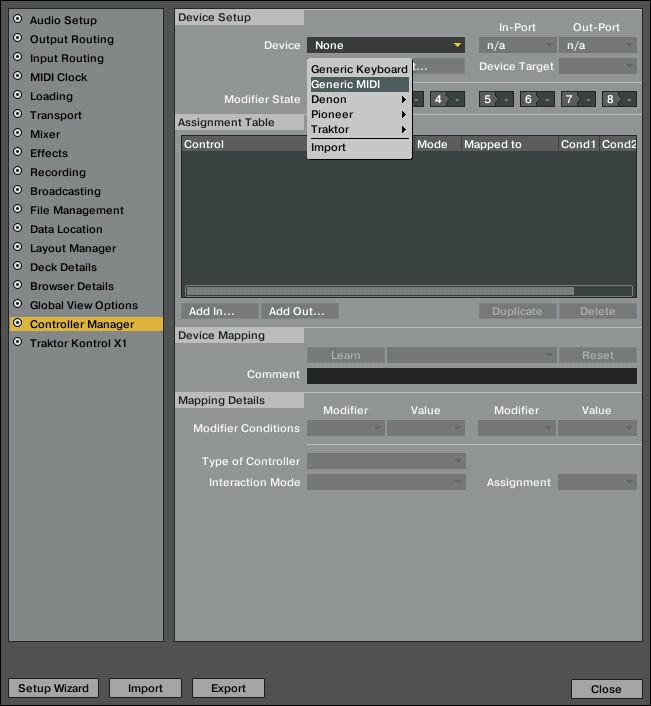
В секции Devie Setup щелкните по кнопке “ADD” и из раскрывшегося списка выберите опцию “Generic MIDI”.
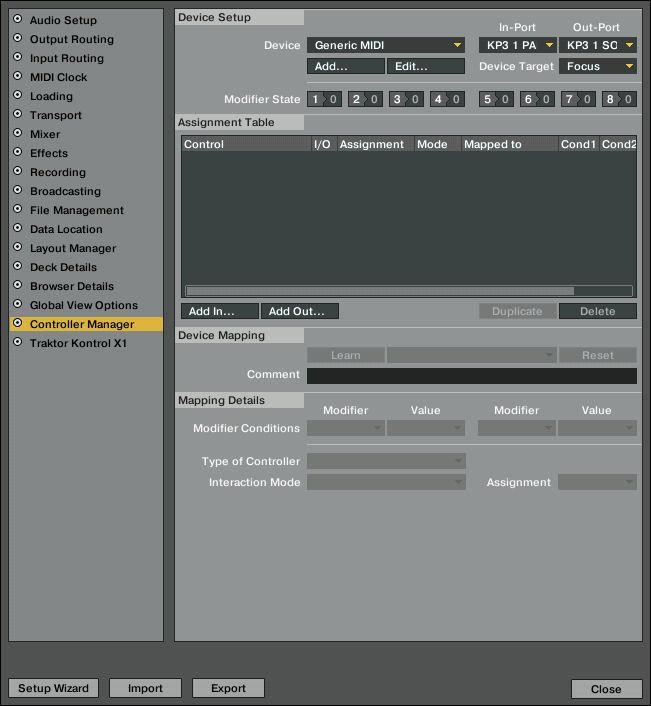
Выберите устройство KP3 с помощью параметров “In-Port” и “Out-Port”. После этого окно будет выглядеть приблизительно так:
Щелкните по расположенной внизу кнопке “IMPORT”, и в ответ на запрос укажите файл .tsi из данного архива. Щелкните по “OK”. Экран будет выглядеть примерно так:
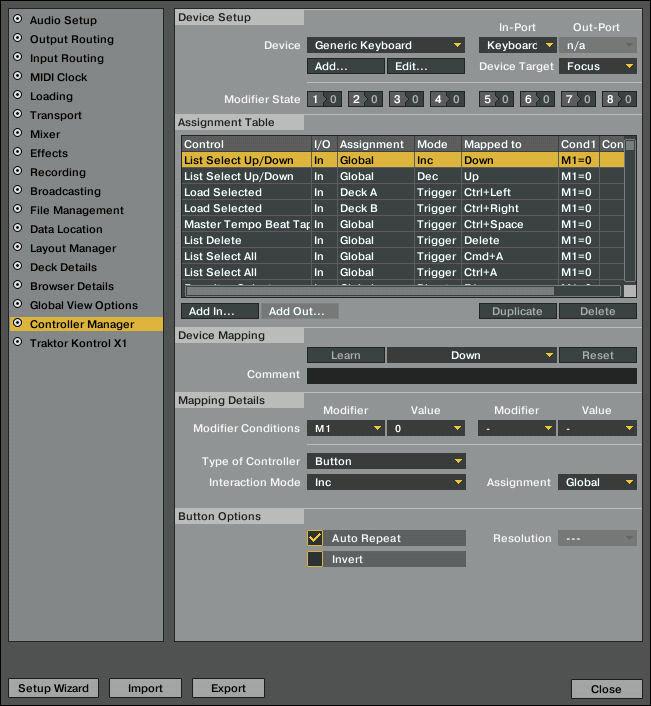
Закройте окно Preferences, инсталляция завершена.
На рисунке ниже показано, как функции KP3 связаны с проигрывателем Traktor DECK A и модулем FX 1. Кнопки банков сэмплов KP3 C и D назначены на функции DECK B Loop IN/SET CUE и Deck B Loop OUT.
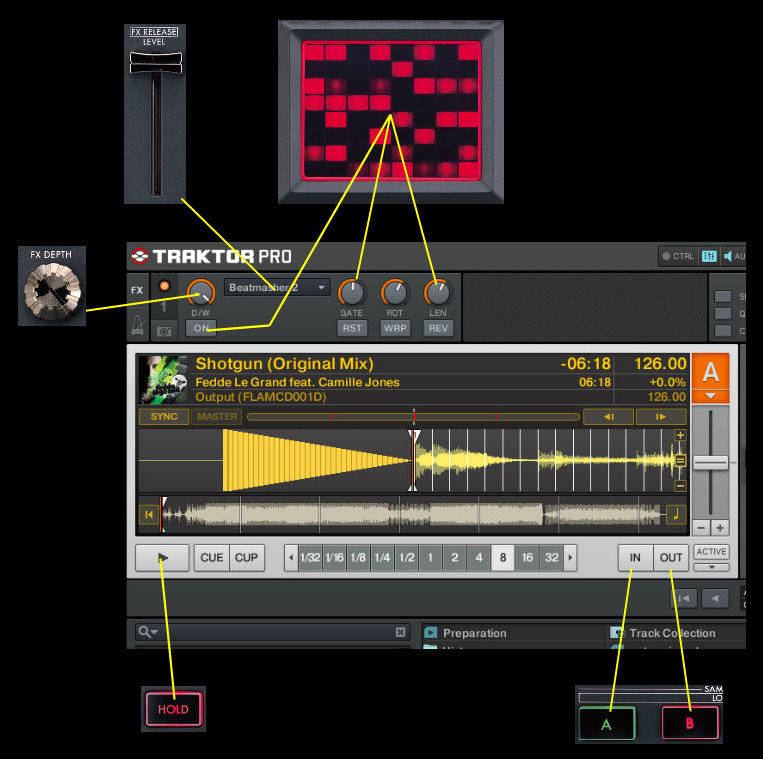
Кнопки KP3 SAMPLE BANK не генерируют никаких MIDI-данных нот до тех пор, пока в банк не загружен сэмпл. Подробнее см. Руководство Пользователя KP3.
Предыдущая
Следующая
Korg KAOSS PAD KP3 Руководство пользователя
Динамический процессор эффектов/сэмплер
Официальный и эксклюзивный дистрибьютор компании Korg на территории России, стран Балтии и СНГ — компания A&T Trade.
Данное руководство предоставляется бесплатно. Если вы приобрели данный прибор не у официального дистрибьютора фирмы Korg или авторизованного дилера компании A&T Trade, компания A&T Trade не несет ответственности за предоставление бесплатного перевода на русский язык руководства пользователя, а также за осуществление гарантийного сервисного обслуживания.
© ® A&T Trade, Inc.
Гарантийное обслуживание
По всем вопросам, связанным с ремонтом или сервисным обслуживанием динамического процессора эффектов/сэмплера KAOSS PAD KP3, обращайтесь к представителям фирмы Korg — компании A&T Trade. Телефон для справок (495) 796-9262; e-mail: synth@attrade.ru
|
Korg KAOSS PAD KP3. Руководство пользователя |
1 |

Правила безопасности
Размещение
Эксплуатация прибора в описанных ниже условиях может привести к выходу его из строя.
•Прямое попадание солнечных лучей
•Повышенные температура или влажность
•Загрязненное, пыльное помещение
•Интенсивная вибрация
•Близость магнитных полей
Питание
Подключайте прибор к сети с указанным на его блоке питания напряжением. Не перегружайте одну розетку подключением к ней большого количества приборов.
Интерференция с другим электронным оборудованием
Во избежание электромагнитных наводок располагайте прибор на возможно большем расстоянии от теле- и радиоприемников.
Эксплуатация
Не прикладывайте чрезмерных усилий при манипуляциях с регуляторами. Это может привести к выходу их из строя.
Уход
Пыль с внешних поверхностей прибора следует удалять чистой сухой тряпочкой. Использование жидких моющих средств, таких как бензин или растворитель, а также горючих полиролей запрещается.
Руководство пользователя
После прочтения, сохраняйте данное руководство для дальнейшего использования.
Попадание инородных тел внутрь прибора
Не ставьте на прибор или не располагайте рядом с ним емкости с жидкостью. Попадание жидкости внутрь корпуса прибора может привести к его поломке, возгоранию или поражению пользователя электрическим током. Не допускайте попадания внутрь корпуса прибора посторонних металлических предметов.
Электромагнитное излучение
Оборудование прошло тестовые испытания и соответствует требованиям, накладываемым на цифровые приборы класса “B” согласно части 15 правил FCC. Эти ограничения разработаны для обеспечения надежной защиты от интерференции при стационарных инсталляциях. Прибор генерирует, использует и способен излучать электромагнитные волны и, если установлен и эксплуатируется без соблюдения приведенных рекомендаций, может вызвать помехи в работе радио систем. Полной гарантии, что в отдельных инсталляциях прибор не будет генерировать радиочастотные помехи, нет. Если он влияет на работу радио или телевизионных систем (это проверяется включением и отключением прибора), то рекомендуется предпринять следующие меры:
•Переориентируйте или расположите в другом месте принимающую антенну.
•Разнесите на возможно большее расстояние прибор и приемник.
•Включите прибор в розетку, которая находится в другом контуре нежели розетка приемника.
•Проконсультируйтесь с дилером или квалифицированным телевизионным мастером.
Внесение в схему прибора несанкционированных изменений и модификаций может привести к потере права эксплуатации соответствующего оборудования.
Декларация соответствия европейским стандартам CE
Маркировка CE на приборах компании Korg, работающих от сети и выпущенных до 31 декабря 1996 года означает, что они удовлетворяют требованиям стандартов EMC Directive (89/336/EEC) и CE mark Directive (93/68/EEC). Приборы с этой маркировкой, выпущенные после 1 января 1997 года, кроме перечисленных стандартов удовлетворяют еще и требованиям стандарта Low Voltage Directive (73/23/EEC).
|
2 |
Korg KAOSS PAD KP3. Руководство пользователя |

Маркировка CE на приборах компании Korg, работающих от батареек, означает, что они удовлетворяют требованиям стандартов EMC Directive (89/336/EEC) и CE mark Directive (93/68/EEC).
Важное замечание
Изделия KORG разработана согласно точным спецификациям и требованиям по напряжению для каждой страны. Эти изделия имеют гарантию дистрибьютера KORG только в стране покупки. Все изделия KORG, не имеющие гарантийной квитанции или серийного номера, освобождаются от гарантийных обязательств и технического обслуживания со стороны производителя / дистрибьютера. Это требование необходимо для защиты прав потребителя и его безопасности.
* Все названия компаний, продукции, форматов, торговые марки или зарегистрированные торговые марки являются собственностью соответствующих компаний.
Содержание
Введение . . . . . . . . . . . . . . . . . . . . . . . . . . . . . . . . . . . 4
Обзор . . . . . . . . . . . . . . . . . . . . . . . . . . . . . . . . . . . . . . . . . . . . . . . . . . . . . . . . . . . . . . . 4 Внешний вид прибора . . . . . . . . . . . . . . . . . . . . . . . . . . . . . . . . . . . . . . . . . . . . . . . . . . 4
Коммутация . . . . . . . . . . . . . . . . . . . . . . . . . . . . . . . . . 5
Основная коммутация . . . . . . . . . . . . . . . . . . . . . . . . . . . . . . . . . . . . . . . . . . . . . . . . . . 5 Коммутация DJ2микшера . . . . . . . . . . . . . . . . . . . . . . . . . . . . . . . . . . . . . . . . . . . . . . . . 6
Работа с прибором . . . . . . . . . . . . . . . . . . . . . . . . . . . . 6
Включение питания . . . . . . . . . . . . . . . . . . . . . . . . . . . . . . . . . . . . . . . . . . . . . . . . . . . . 6 Подача аудиосигналов. . . . . . . . . . . . . . . . . . . . . . . . . . . . . . . . . . . . . . . . . . . . . . . . . . 6 Установка громкости . . . . . . . . . . . . . . . . . . . . . . . . . . . . . . . . . . . . . . . . . . . . . . . . . . . 6 Выбор программы . . . . . . . . . . . . . . . . . . . . . . . . . . . . . . . . . . . . . . . . . . . . . . . . . . . . . 6 Установка глубины эффекта . . . . . . . . . . . . . . . . . . . . . . . . . . . . . . . . . . . . . . . . . . . . . 7 Hold . . . . . . . . . . . . . . . . . . . . . . . . . . . . . . . . . . . . . . . . . . . . . . . . . . . . . . . . . . . . . . . . 7 Функция Mute . . . . . . . . . . . . . . . . . . . . . . . . . . . . . . . . . . . . . . . . . . . . . . . . . . . . . . . . 7 FX RELEASE . . . . . . . . . . . . . . . . . . . . . . . . . . . . . . . . . . . . . . . . . . . . . . . . . . . . . . . . . . 7 Pad Motion . . . . . . . . . . . . . . . . . . . . . . . . . . . . . . . . . . . . . . . . . . . . . . . . . . . . . . . . . . . 8 Работа с BPM . . . . . . . . . . . . . . . . . . . . . . . . . . . . . . . . . . . . . . . . . . . . . . . . . . . . . . . . . 8 Сохранение установок на кнопки Program Memory . . . . . . . . . . . . . . . . . . . . . . . . . . . 9 Сэмплирование . . . . . . . . . . . . . . . . . . . . . . . . . . . . . . . . . . . . . . . . . . . . . . . . . . . . . . 10
Набор функций. . . . . . . . . . . . . . . . . . . . . . . . . . . . . . 11 Карта SD . . . . . . . . . . . . . . . . . . . . . . . . . . . . . . . . . . . 13 Функции MIDI . . . . . . . . . . . . . . . . . . . . . . . . . . . . . . . 15
MIDI2коммутация . . . . . . . . . . . . . . . . . . . . . . . . . . . . . . . . . . . . . . . . . . . . . . . . . . . . . 15 Использование MIDI . . . . . . . . . . . . . . . . . . . . . . . . . . . . . . . . . . . . . . . . . . . . . . . . . . 16
Обмен данными KP3 с компьютером . . . . . . . . . . . . . 17 Установка программного обеспечения. . . . . . . . . . . . 19 Технические характеристики. . . . . . . . . . . . . . . . . . . 21 Таблица MIDI2сообщений . . . . . . . . . . . . . . . . . . . . . . 22 Список программ эффектов . . . . . . . . . . . . . . . . . . . . 23
|
Korg KAOSS PAD KP3. Руководство пользователя |
3 |
Введение
Благодарим за приобретение динамического эффект-процессора/сэмплера KAOSS PAD KP3. Для максимальной реализации потенциала прибора, внимательно прочитайте данное руководство.
Обзор
KP3 построен по технологии Korg KAOSS, позволяющей использовать сенсорную панель X-Y для управления аудиоэффектами. Перемещениями пальца вдоль сенсорной панели в горизонтальном и вертикальном направлениях или нажатиями можно одновременно управлять различными параметрами эффектов в реальном времени. В комплект поставки входит защитный экран.
KP3 обеспечивает 128 программ эффектов, от задержек и фильтров до вокодеров и даже синтезаторов. Расширяют возможности управления панелью функции Pad Motion, Hold и Mute. Восемь программ можно модифицировать и сохранить в назначенные на кнопки Program Memory ячейки памяти для моментального доступа.
Новая функция FX Release может автоматически обеспечивать эффект задержки при убирании пальца с панели, облегчая создание плавных переходов в процессе исполнения.
Кроме этого, KP3 является удобным сэмплером. Доступны микрофонный и линейный входы, обеспечивающие согласование с различными источниками сигналов. Возможно ресэмплирование выходного сигнала самого KP3, а также сэмплирование внешних сигналов через встроенные эффекты. Посредством кнопок Sample Bank можно записывать и воспроизводить цикличные и одиночные сэмплы. К функциям редакции сэмплов относятся автоматическое разбиение и ручная установка стартовой точки цикла, что облегчает синхронное воспроизведение сэмплов.
Благодаря наличию функций Auto-BPM, MIDI Clock и Tap Tempo скорость воспроизведения сэмплов может синхронизироваться с темпом произведения и темпозависимыми эффектами. Сэмплы и установки можно сохранять на карты Secure Digital (SD) или в компьютер посредством интерфейса USB. Добро пожаловать в мир KP3!
Внешний вид прибора
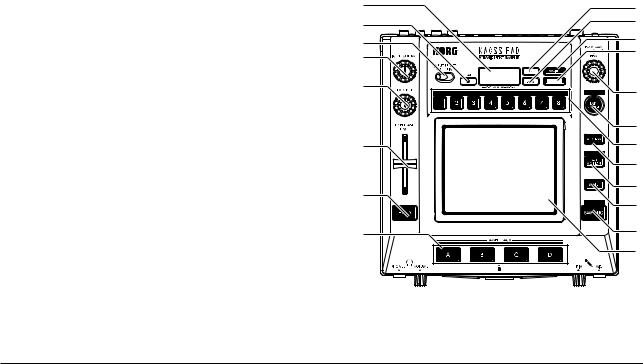
Верхняя панель
1.Дисплей
2.Индикатор [PEAK]
3.Переключатель [INPUT SELECT]
4.Регулятор [INPUT VOLUME]
5.Регулятор [FX DEPTH]
6.Слайдер LEVEL
7.Кнопка [HOLD]
8.Кнопки [SAMPLE BANK]
9.Индикатор [PROG]
10.Индикатор [BPM] (Мигает при выборе программы BPM.)
11.Кнопка [WRITE]
12.Кнопка [SHIFT]
13.Регулятор [PROGRAM/BPM]
14.Кнопка [TAP/RANGE]
15.Кнопки [PROGRAM MEMORY 1-8]
16.Кнопка [AUTO BPM]
17.Кнопка [PAD MOTION]
18.Кнопка [MUTE]
19.Кнопка [SAMPLING]
20.Сенсорная панель
9
10
11
12
13
14
15
16
17
18
19
20
|
4 |
Korg KAOSS PAD KP3. Руководство пользователя |
Уход за сенсорной панелью
Никогда не прилагайте чрезмерных усилий при работе с сенсорной панелью и не размещайте на ней тяжелых предметов. Нарушение этого условия может повредить или поцарапать панель. Не манипулируйте отличными от пальцев предметами. Для очистки панели используйте мягкую сухую ткань. Во избежание деформации панели не применяйте растворители.
|
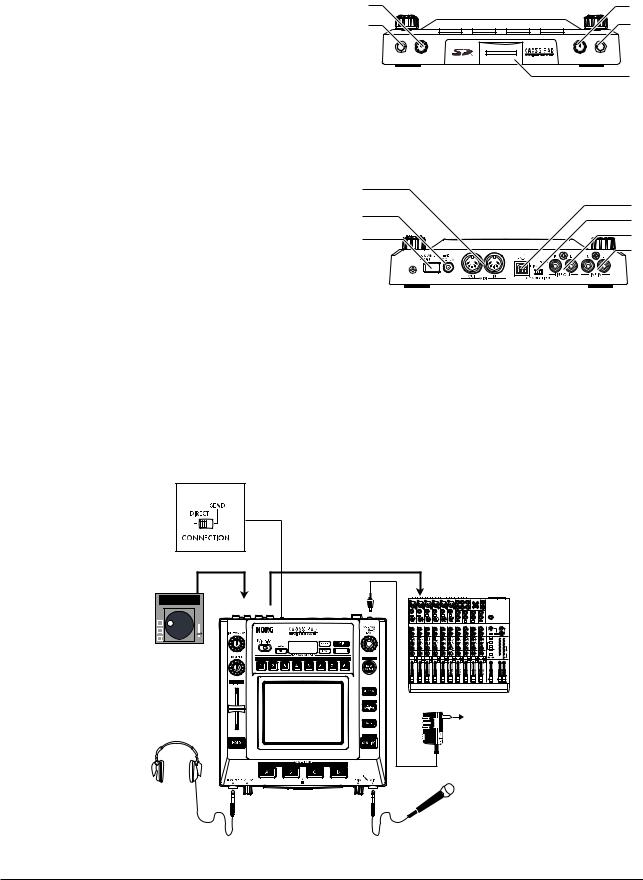
Лицевая панель |
1 |
3 |
|
|
1. |
Регулятор [PHONES VOLUME] |
2 |
4 |
|
2. |
Разъем [PHONES] |
||
|
3. |
Регулятор [MIC TRIM] |
5 |
4.Разъем [MIC]
5.Ñëîò êàðò SD
Ïеред установкой или удалением карты SD необходимо выключить KP3!
Тыльная панель
|
1. |
Разъемы [MIDI IN], [MIDI OUT] |
1 |
4 |
|
|
2. |
Разъем DC 12V |
2 |
||
|
5 |
||||
|
3. |
Переключатель [POWER] |
3 |
6 |
|
|
7 |
||||
|
4. |
Разъем [USB] |
|||
5. Переключатель [CONNECTION]
6.Разъемы [LINE OUT]
7.Разъемы [LINE IN]
Коммутация
Основная коммутация
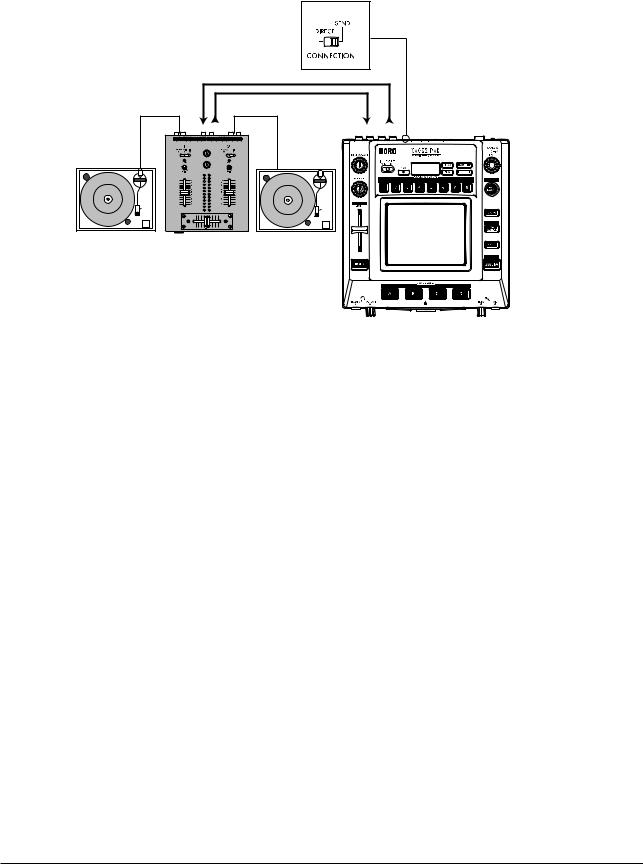
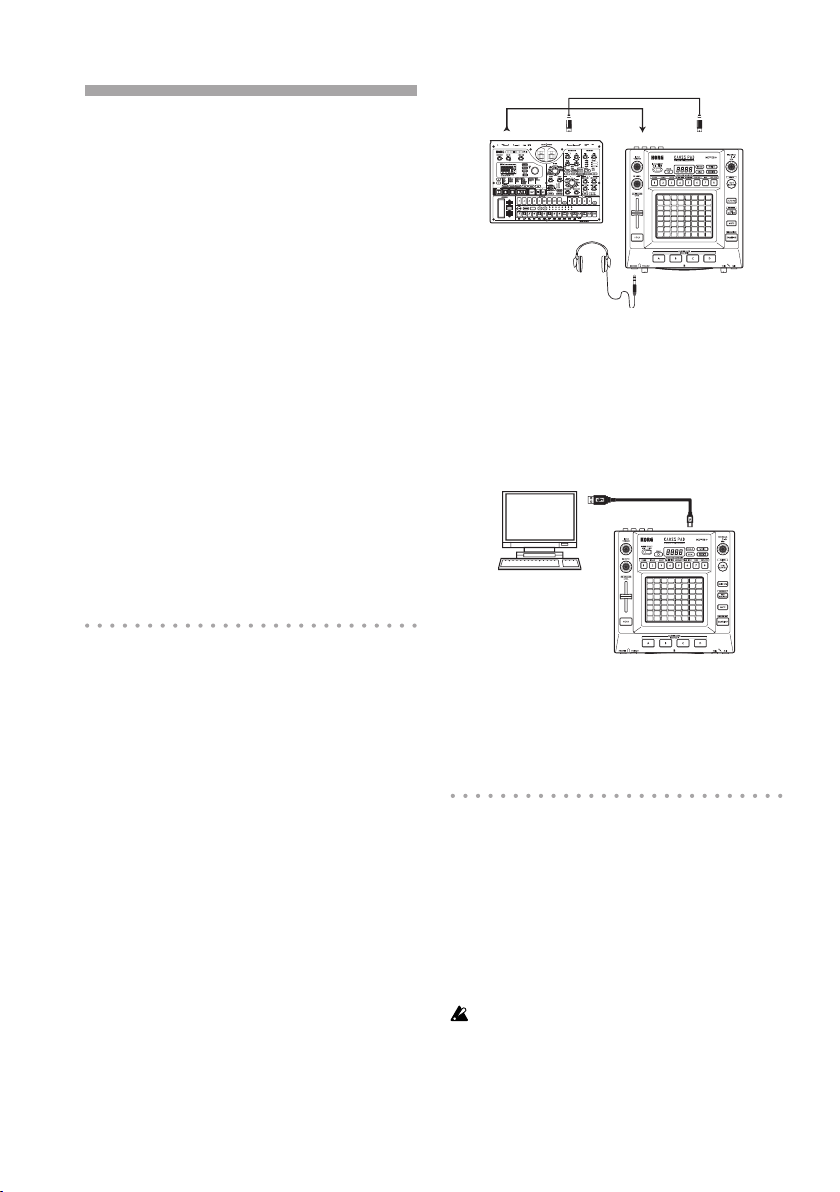
Используйте данную коммутацию для обработки эффектами аудиосигналов со входов KP3 и передачи обработанного звука на входы микшера. В данном случае, обработанный входной сигнал можно сэмплировать. При этом, переключатель CONNECTION тыльной панели должен быть установлен в положение DIRECT. KP3 имеет два типа входных разъемов, используйте их сообразно ситуации.
|
LINE OUT |
DC12V |
|
LINE IN |
|
|
CD-плеер |
|
|
Микшер, DJ-микшер |
|
|
Ñåòü |
|
Korg KAOSS PAD KP3. Руководство пользователя |
5 |
Коммутация DJ2микшера
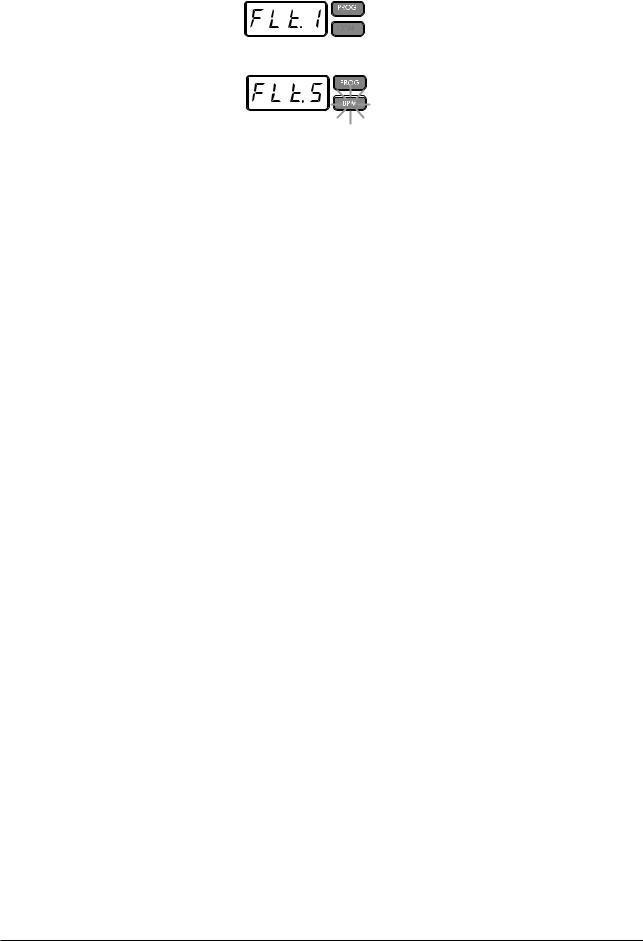
Для использования KP3 в качестве внешнего процессора эффектов, подключите разъемы посыла на эффекты DJ или любого другого микшера к разъемам Line In на KP3, а разъемы Line Out на KP3 подключите к разъемам возврата с эффектов микшера. При этом, переключатель CONNECTION тыльной панели должен быть установлен в положение SEND. На выходе KP3 будет присутствовать только обработанный сигнал, а изначальный прямой входной сигнал KP3 будет отсутствовать. Для установки глубины эффекта используйте регулировки посыла и возврата микшера.
|
RETURN |
LINE OUT |
|
SEND |
LINE IN |
Проигрыватель DJ-микшер Проигрыватель
Работа с прибором
Включение питания
1.Скоммутируйте KP3 с остальным оборудованием, как показано на рисунке, и подключите сетевой адаптер к электрической розетке.
Используйте только прилагаемый сетевой адаптер.
2.Нажмите кнопку Power на KP3. Дисплей засветится.
Для отключения питания KP3 повторно нажмите кнопку Power.
Подача аудиосигналов
1.Переключателем Input Select выберите входные разъемы, к которым подключено аудиоустройство.
MIC: Эффектом будет обрабатываться сигнал микрофонного входа.
LINE: Эффектом будет обрабатываться сигнал линейного входа.
Установка громкости
1.После подачи аудиосигнала со входного устройства, регулятором Input Volume установите входной уровень таким, чтобы избежать загорания индикатора Peak красным цветом. При использовании микрофонного входа, регулятором MIC Trim подстройте уровень без искажений микрофонного сигнала.
2.При использовании микрофонного входа, регулятором MIC Trim добейтесь четкого звукового сигнала без искажений.
3.При использовании наушников, регулятором Phones Volume установите необходимый уровень прослушивания.
Выбор программы
Программы можно выбирать тремя способами.
|
6 |
Korg KAOSS PAD KP3. Руководство пользователя |
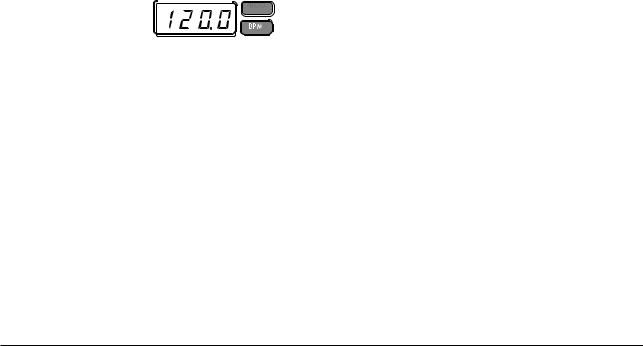
1.Если дисплей отображает номер программы, можно выбрать программу регулятором Program. Если дисплей отображает текущий BPM, нажмите селектор PROGRAM/BPM для переключения дисплея на отображение программы.
При выборе синхронизированной с BPM программы, индикатор BPM будет мигать.
2.Если удерживать кнопку SHIFT при вращении селектора PROGRAM/BPM, вы будете переходить к первой программе каждой группы, чтобы не перелистывать все 128 программ. Выбрав нужную группу, отпустите кнопку SHIFT и селектором PROGRAM/BPM выберите программу в данной группе.
3.Восемь заранее определенных программ можно выбрать нажатиями соответствующих кнопок PROGRAM MEMORY.
Селектор PROGRAM/BPM является регулятором непрерывного типа. По достижении последнего номера программы, вы вернетесь к началу списка.
Установка глубины эффекта
1.Если переключатель CONNECTION установлен в DIRECT, установите глубину эффекта регулятором FX/DEPTH. В крайнем левом положении регулятора эффект будет отсутствовать, а в крайнем правом будет максимален.
2.Если переключатель CONNECTION установлен в SEND, установите глубину эффекта регулировками посыла и возврата микшера.
Hold
Если при работе с сенсорной панелью нажать кнопку HOLD, а затем убрать палец с панели, эффект будет продолжаться как в момент последнего касания сенсорной панели перед нажатием кнопки HOLD. Индикаторы панели продолжат свечение в этой позиции.
Функция Mute
При нажатии кнопки MUTE, входной сигнал отключится. Это позволит получить на выходе только звук эффекта.
Трансформер
Быстрыми переключениями кнопки MUTE можно создать ритмы из задержанного входного звука. Такая диджейская техника называется “трансформер”.
FX RELEASE
Обычно, переход от сильно обработанного эффектом сигнала обратно к необработанному режет слух. Благодаря функции FX RELEASE, в момент снятия пальца с сенсорной панели (т.e., в момент отключения эффекта) возникает эффект задержки, синхронизированной с текущим BPM, который затем постепенно сходит на нет. Это создает плавный музыкальный переход от жесткого эффекта, типа Distortion или Decimator, к звуку прямого сигнала.
Сохранение установки FX RELEASE
В каждой программе можно сохранить свою установку FX RELEASE.
1.Для установки глубины эффекта FX RELEASE для текущей программы, удерживайте кнопку SHIFT и используйте слайдер FX RELEASE.
2.Нажмите кнопку WRITE. Кнопки WRITE и PROGRAM MEMORY замигают. Кнопка SHIFT будет светиться и работать в качестве кнопки EXIT.
3.Нажмите кнопку WRITE еще раз. Программа буде записана, и KP3 вернется в обычное состояние.
Если выбрана программа, уже использующая задержку, функция FX Release действовать не будет, но звук задержки программы эффекта продолжится после снятия пальца с панели, создавая сходный эффект.
|
Korg KAOSS PAD KP3. Руководство пользователя |
7 |
Pad Motion
KP3 позволяет записывать перемещения пальца по сенсорной панели посредством функции Pad Motion. Это позволяет впоследствии из памяти прибора воспроизводить эти перемещения, отображаемые загораниями соответствующих индикаторов. Данную последовательность перемещений можно записать в качестве части Program Memory.
Запись
Нажмите и удерживайте кнопку PAD MOTION. При касании сенсорной панели, кнопка PAD MOTION начнет мигать, индицируя запись последовательности перемещений. Для останова записи отпустите кнопку PAD MOTION, и начнется воспроизведение последовательности перемещений. Последовательность перемещений записывается только несколько секунд, поэтому как только кнопка Pad Motion перестанет мигать и будет светиться красным цветом, запись последовательности перемещений будет остановлена, и начнется ее воспроизведение. Для останова воспроизведения последовательности перемещений повторно нажмите кнопку PAD MOTION, и она погаснет.
При начале записи, ранее записанная последовательность перемещений будет стерта.
Воспроизведение
Нажмите кнопку PAD MOTION; она засветится, и записанные перемещения будут циклично воспроизводиться, отображаясь загораниями соответствующих индикаторов. Для останова воспроизведения последовательности перемещений повторно нажмите кнопку PAD MOTION, и она погаснет.
Реверсивное воспроизведение
Удерживая нажатой кнопку SHIFT, нажмите кнопку PAD MOTION (REVERSE), и последовательность перемещений будет воспроизводиться “задом наперед”. Вы можете повторять эту операцию для последовательного переключения между прямым и обратным воспроизведением.
Сохранение
Для сохранения записанной последовательности перемещений, запишите (сохраните) текущую программу в Program Memory.
Работа с BPM
BPM означает Beats Per Minute и определяет темп произведения в терминах количества ударов (четверти нот) в минуту. Чем выше значение BPM, тем быстрее темп.
Просмотр BPM
При включении KP3, BPM установится в 120.0.
Если дисплей отображает текущую программу, нажмите селектор PROGRAM/BPM для переключения дисплея на отображение BPM.
Если задана внешняя синхронизация, дисплей отображает “Ext”, и значение BPM задать невозможно.
Ручная установка BPM
1.Если дисплей отображает текущую программу, нажмите селектор PROGRAM/BPM для переключения дисплея на отображение BPM.
2.Селектором PROGRAM/BPM установите значение BPM с шагом в 0.1. Вращением селектора PROGRAM/BPM при удержании кнопки SHIFT вы можете менять целочисленные значения с шагом в 1.
Функция Auto BPM автоматически отключается.
Функция Tap Tempo
При неизвестном BPM, три или более раз нажмите кнопку TAP/RANGE в ритме песни. Прибор рассчитает темп, и значение BPM отобразится на дисплее.
Функция Auto BPM
KP3 может установить значение BPM автоматически, путем определения ритма песни. Если ритм песни меняется, значение BPM в KP3 будет меняться синхронно.
|
8 |
Korg KAOSS PAD KP3. Руководство пользователя |

1.Нажмите кнопку AUTO BPM для включения функции Auto BPM.
2.Кнопка AUTO BPM засветится, и BPM входного аудиосигнала определится автоматически.
Если BPM не распознается
Несколько раз нажмите кнопку TAP/RANGE в ритме песни; исходя из темпа нажатий KP3 автоматически определит BPM.
Из-за природы работы функции Auto BPM, возможно ошибочное определение значения 1/2 или 2/3 от реального значения BPM, а также некоторые отклонения. В этом случае, используйте кнопку TAP/RANGE для внесения компенсации. При нажатии кнопки TAP/RANGE при включенной функции Auto BPM, заданное нажатиями значение будет центральной величиной диапазона BPM.
Невозможно определить значение BPM для музыки, не содержащей четкого ритма. Для BPM доступен диапазон 80 — 160.
Задание начала такта
Поскольку Auto BPM точно определяет темп, вы можете вручную задать первую долю такта. Удерживая нажатой кнопку SHIFT, нажмите кнопку TAP/RANGE (ALIGN); этот момент будет воспринят, как начало такта. Кнопка начнет мигать зеленым цветом на первой доле такта. (Для размера 4/4: зеленый красный красный > красный).
Эта установка изменяется в начале каждого сэмпла.
Отключение Auto BPM
Нажмите кнопку AUTO BPM, чтобы она погасла. Функция Auto BPM отключится, и зафиксируется текущее значение BPM.
Функция MIDI Sync
BPM в KP3 может быть определен сообщениями MIDI Timing Clock с внешнего MIDI-устройства. Подключите разъем [MIDI IN] на KP3 к разъему [MIDI OUT] внешнего MIDI-устройства (типа секвенсера), передающего сообщения синхронизации.
Данная функция не синхронизирует данные секвенсера с программами ритмических паттернов KP3. Для такой синхронизации необходимо внедрить сообщение Touch Pad On в начало каждого такта данных секвенсера или прикасаться к сенсорной панели в начале каждой фразы KP3 для запуска паттерна.
Для приема KP3 сообщений Timing Clock и Touch Pad On, перейдите в режим MIDI Edit и разрешите их прием/передачу.
Вы не сможете использовать функции Tap Tempo или Auto BPM в процессе приема KP3 сообщений Timing Clock с внешнего MIDI-устройства.
Сохранение установок на кнопки Program Memory
Текущее состояние KP3 может назначаться на кнопки PROGRAM MEMORY для быстрого доступа.
Сохраняемые данные:
•Программа эффекта
•Состояние и позиция (координаты) кнопки HOLD
•Состояние регулятора FX/DEPTH
•Последовательность перемещений
Сохранение установок
1.Нажмите кнопку WRITE.
Кнопки PROGRAM MEMORY и WRITE начнут мигать.
2.Нажмите выбранную для сохранения кнопку PROGRAM MEMORY. Она начнет мигать, дисплей отобразит “WRT”, и установки сохранятся. Затем KP3 вернется в нормальный режим работы.
Вызов установок
1.Нажмите кнопку PROGRAM MEMORY (1-8), и назначенные на нее сохраненные установки будут загружены.
|
Korg KAOSS PAD KP3. Руководство пользователя |
9 |
Сэмплирование
KP3 может записывать цикличные фразы и одиночные сэмплы с внешнего источника. KP3 также может ресэмплировать результат обработки встроенными эффектами внешнего сигнала, создавая новый сэмпл.
Циклы могут содержать до 4 тактов (16 долей) с текущим при записи BPM (например, при темпе 140, 16 долей звучат около 7 секунд).
Если значение темпа менее 73, максимальное количество долей снижается до 8. Если значение темпа менее 39, максимальное количество долей снижается до 4. Для цикличного сэмпла можно задать количество долей 16, 8, 4, 2 или 1. При создании цикличного сэмпла, он начинает звучать сразу после записи (соответствующая кнопка SAMPLE BANK светится оранжевым цветом.)
Запись сэмпла
1.Нажмите кнопку SAMPLING.
Кнопки SAMPLE BANK начнут мигать красным, индицируя готовность к записи, а дисплей отобразит “[16]” (16 долей по умолчанию). Для отмены записи нажмите кнопку SHIFT.
Функция Auto BPM автоматически отключается.
2.Селектором PROGRAM/BPM задайте количество долей. Дисплей переключается между [16], [8], [4], [2] или [1].
3.Нажмите кнопку SAMPLE BANK A, B, C или для записи. Она начнет мигать зеленым цветом, дисплей отобразит “REC”, и начнется сэмплирование. Кнопки PROGRAM MEMORY будут поочередно вспыхивать, индицируя доли записи.
4.Для записи однократного сэмпла нажмите ту же кнопку SAMPLE BANK в момент окончания сэмпла. Запись остановится, и сэмпл запишется. Выбранная для него кнопка SAMPLE BANK загорится красным цветом.
5.Если заданное время BEAT истекло до нажатия кнопки SAMPLE BANK, запись окончится и будет создан цикличный сэмпл. KP3 автоматически перейдет в режим воспроизведения, и кнопка SAMPLE BANK загорится оранжевым цветом.
Предыдущие данные выбранной кнопки SAMPLE BANK будут переписаны.
Воспроизведение сэмплов
SAMPLE BANK светятся зеленым цветом, если содержат цикличный сэмпл, или красным, если однократный. Кнопки без сэмплов не горят. При нажатии кнопки, содержащей цикличный сэмпл, начинается его воспроизведение. Кнопка при этом светится оранжевым цветом. Для останова воспроизведения нажмите эту кнопку повторно.
При нажатии кнопки, содержащей однократный сэмпл, она гаснет, и данный сэмпл воспроизводится.
Если для программы выбран эффект сэмпла, воспроизведение начнется при касании сенсорной панели после выбора кнопки SAMPLE BANK.
Громкости сэмплов
Громкость всех банков сэмплов устанавливаются слайдером.
Для установки громкости отдельного банка сэмплов:
1.Удерживая нажатой кнопку SHIFT, нажмите нужную кнопку SAMPLE BANK; она будет мигать зеленым цветом.
2.Индикаторы панели, соответствующие выбранному банку (т.e., расположенные над кнопкой) отображают барограф, а индикаторы над оставшимися банками отображают их относительные уровни.
3.Коснитесь панели для настройки громкости сэмпла выбранного банка.
|
10 |
Korg KAOSS PAD KP3. Руководство пользователя |
Соседние файлы в предмете [НЕСОРТИРОВАННОЕ]
- #
- #
- #
- #
- #
- #
- #
- #
- #
- #
- #

2
Precautions
Location
Using the unit in the following locations can result in
a malfunction.
• In direct sunlight
• Locations of extreme temperature or humidity
• Excessively dusty or dir ty locations
• Locations of excessive vibration
• Close to magnetic elds
Power supply
Please connect the designated AC adapter to an AC
outlet of the correct voltage. Do not connect it to an
AC outlet of voltage other than that for which your
unit is intended.
Interference with other electrical devices
Radios and televisions placed nearby may experience reception interference. Operate this unit at a
suitable distance from radios and televisions.
Handling
To avoid breakage, do not apply excessive force to
the switches or controls.
Care
If the exterior becomes dirty, wipe it with a clean, dry
cloth. Do not use liquid cleaners such as benzene
or thinner, or cleaning compounds or ammable polishes.
Keep this manual
After reading this manual, please keep it for later
reference.
Keeping foreign matter out of your equipment
Never set any container with liquid in it near this
equipment. If liquid gets into the equipment, it could
cause a breakdown, re, or electrical shock.
Be careful not to let metal objects get into the equipment. If something does slip into the equipment, unplug the AC adapter from the wall outlet. Then contact your nearest Korg dealer or the store where the
equipment was purchased.
DECLARATION OF CONFORMITY (for USA)
Responsible Party : KORG USA INC.
Address :
Telephone : 1-631-390-6500
Equipment Type :
Model : KP3+
This device complies with Part 15 of FCC Rules. Operation is subject to the following two conditions:
(1) This device may not cause harmful interference,and (2) this device must accept any interference received, including interference
that may cause undesired operation.
316 SOUTH SERVICE ROAD, MELVILLE, NY
DYNAMIC EFFECT/SAMPLER
THE FCC REGULATION WARNING (for USA)
NOTE: This equipment has been tested and found
to comply with the limits for a Class B digital device, pursuant to Part 15 of the FCC Rules. These
limits are designed to provide reasonable protection against harmful interference in a residential
installation. This equipment generates, uses, and
can radiate radio frequency energy and, if not installed and used in accordance with the instructions, may cause harmful inter ference to radio
communications. However, there is no guarantee
that interference will not occur in a particular installation. If this equipment does cause harmful interference to radio or television reception, which can
be determined by turning the equipment off and on,
the user is encouraged to try to correct the interference by one or more of the following measures:
• Reorient or relocate the receiving antenna.
• Increase the separation between the equipment and receiver.
• Connect the equipment into an outlet on a circuit different from that to which the receiver is
connected.
• Consult the dealer or an experienced radio/TV
technician for help.
If items such as cables are included with this
equipment, you must use those included items.
Unauthorized changes or modication to this system can void the user’s authority to operate this
equipment.
Notice regarding disposal (EU only)
When this “crossed-out wheeled bin” symbol is displayed on the product, owner’s
manual, battery, or battery package, it signies that when you wish to dispose of this
product, manual, package or battery you
must do so in an approved manner. Do not
discard this product, manual, package or
battery along with ordinary household waste. Disposing in the correct manner will prevent harm to
human health and potential damage to the environment. Since the correct method of disposal will
depend on the applicable laws and regulations in
your locality, please contact your local administrative body for details. If the battery contains heavy
metals in excess of the regulated amount, a chemical symbol is displayed below the “crossed-out
wheeled bin” symbol on the battery or battery
package.
* All product names and company names are the
trademarks or registered trademarks of their respective owners.
3

Table of Contents
Main features …………………………………… 5
Connections …………………………………….. 6
DJ mixer connections ……………………….. 7
Using the power switch ……………………… 8
Selecting the audio input …………………… 8
Adjusting the volume ………………………… 8
Selecting a program …………………………. 8
Using the touch pad ………………………….. 9
Mute function …………………………………… 9
FX RELEASE …………………………………… 9
Pad Motion …………………………………….. 10
Specifying the BPM ………………………… 10
Storing settings to a PROGRAM MEMO-
RY ………………………………………………… 12
Sampling ……………………………………….. 12
Procedure for Function settings ……….. 15
About each function ………………………… 15
Inserting or removing SD cards ………… 17
Checking the total capacity of the card 17
Checking the remaining capacity of the
card ………………………………………………. 17
Formatting the SD card …………………… 17
Saving to SD card …………………………… 18
Loading from an SD card …………………. 18
Accessing the SD card from your com-
puter ……………………………………………… 18
MIDI connections ……………………………. 20
MIDI settings ………………………………….. 20
Using the KP3+ as a MIDI controller …. 22
Parts of the KP3+ …………………………..114
PROGRAM LIST…………………………….119
4

Introduction
Thank you for purchasing the Korg KP3+ KAOSS PAD dynamic effect/sampler. To enjoy
YOUR KP3+ to the fullest potential, please
read this manual carefully and use the KP3+
only as directed.
Main features
150 built-in programs for DJ mixes and sound
design
In addition to the effect programs that were so
popular on the KP3, such as a lter that’s designed with an analog feel in mind, standard
spatial-type effects such as a highly usable
delay, a grain shifter that lets you freeze an instant of sound, and a decimator, we’ve added
an enhanced looper as well as new effects.
You can connect a mic to the mic input jack
and generate full-edged vocoder sounds in
real time. An «FX RELEASE» feature has been
provided which lets you control the reverberant
tail of the effect to obtain a more natural decay,
ensuring that these powerful effects will blend
naturally into your song or performance.
Use the touch pad to control eects in real
time
Since you can assign different types of effect
parameters to the X-axis and Y-axis of the
touch pad and control them simultaneously,
you can easily and intuitively perform complex
effect operations such as varying the delay
time and feedback at the same time, or simultaneously the lter’s cutoff and resonance. By
rubbing, tapping, or stroking the pad with your
ngertip, you can easily apply complex effects.
Sampling capability with sophisticated functionality
It’s easy to capture either one-shot or loop
samples into the four sample banks. For loop
sampling, the BPM Detection function will detect the tempo down to the rst decimal place,
and capture up to four measures along with
the BPM data. You can also adjust the start
point, instantly create completely new phrases by using the new Slice function to edit the
way that a loop sample is actually played, and
take advantage of the Resampling function to
recapture a sample as it’s processed by an effect.
Use the slider to adjust the volume of the sample data
A volume slider that adjusts the volume of the
sample data makes usage dramatically more
efcient, and gives you even more expressive
possibilities. The Pad Motion function lets you
capture and play back the movements of your
nger on the pad, and even allows reverse
playback. There’s a Hold function that locks
the effect depth at the position of your nger
on the touch pad, and a Mute function that lets
you cut the audio input and leave just the effect sound of the reverb or delay. From simple
effects to complex transformations that combine multiple effects simultaneously, it’s easy
to control the sound the way that you want for
your DJ mixes or sound design work.
SD card slot and USB connector
The SD card slot lets you store sample data
and user data such as the sample save-destination bank, one-shot/loop playback settings,
and program memories. There’s also a USB
connector that lets you back up this data to
your computer, allowing you to manage large
amounts of sample data with ease.
Dedicated software available for download
We’ve provided dedicated KP3+ Editor software that lets you use your computer to edit
sample data, program memories, and other
user settings. The software also includes a
MIDI Assignment Editor function which lets
you use the KP3+ as a powerfully customizable MIDI controller. You can download this
software free of charge from the Korg website
(http://www.korg.com/).
5
Getting ready
Connections
AC ADAPTER
AC
CD PLAYER
MIXER, DJ MIXER
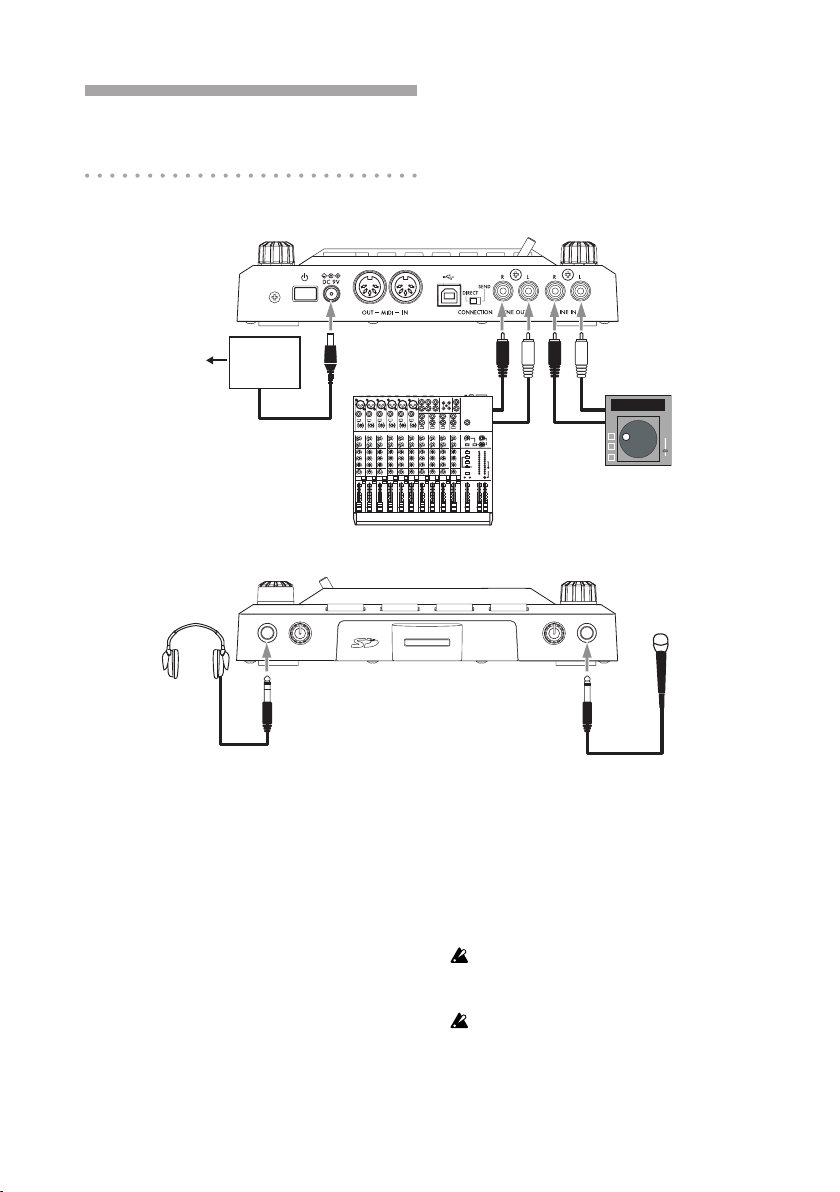
Connecting your monitor amp or mixer to the
output jacks
Connect the KP3+’s LINE OUT jacks to your
mixer or powered monitors (amplied speakers).
If you’re using headphones, connect them to
the PHONES jack.
TIP: The KP3+’s sound will still be output from the
LINE OUT jacks even if headphones are connected.
6
Connecting your mic or audio source to the
input jacks
If you’re using a mic, connect it to the MIC
jack.
If you want to connect a sampler or other audio
source device, connect its output jacks to the
KP3+’s LINE IN jacks.
Always connect gear with the power turned off. Careless usage can damage your speaker system or cause
other malfunctions.
If you are not using a mic, turn the MIC TRIM knob all
the way down.
DJ mixer connections
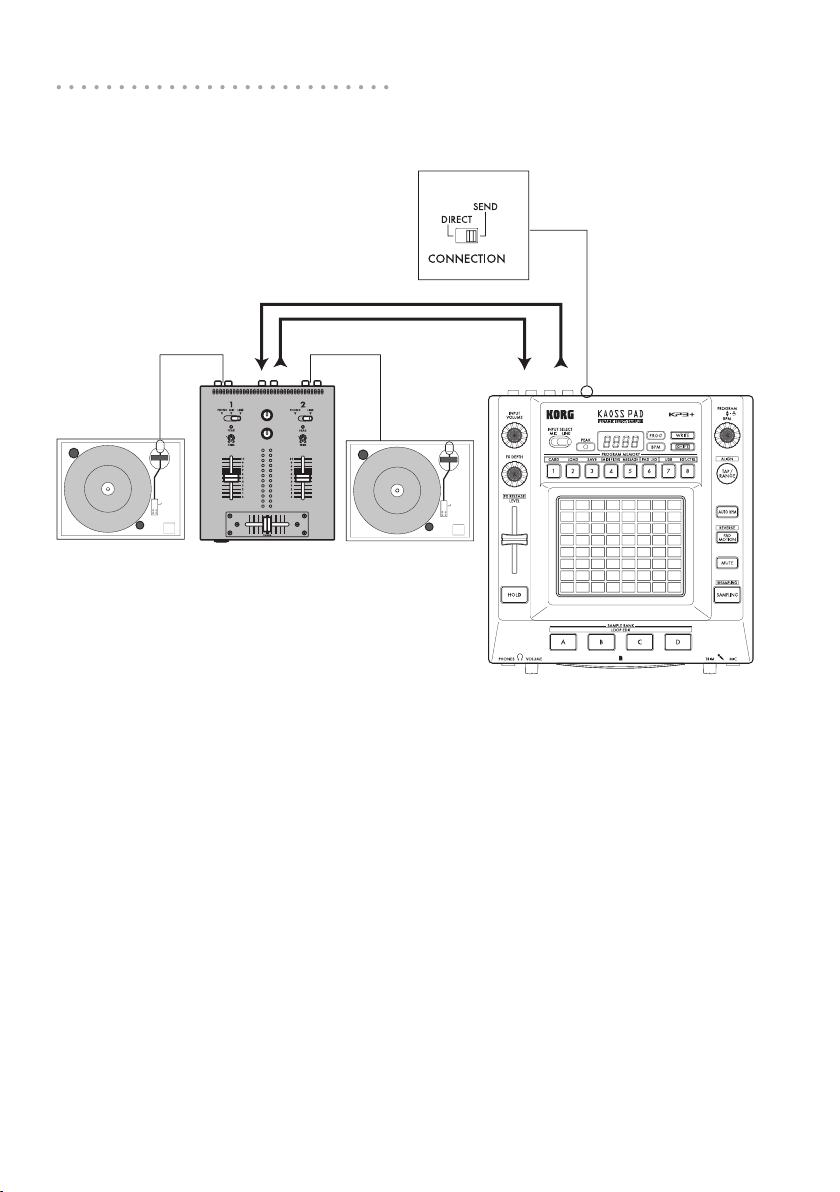
Connecting the KP3+ to AUX send/return jacks
RETURN
SEND
TURNTABLE
TURNTABLEDJ MIXER
You can use the KP3+ as an external effect
unit by connecting it to the Aux send and return
jacks of a mixer. For this type of connection,
set the CONNECTION switch to SEND.
DIRECT: Both the input and effect sounds will
be output from the KP3+. When you are not
touching the touch pad, the input sound will
be output as is. “Controlling the effect depth
(p.9)”
SEND: Only the effect sound (not the input
sound) will be output from the KP3+.
TIP For more information on the send and return
jacks, please refer to the owner’s manual for the device that you are connecting.
LINE OUT
LINE IN
TIP When you are using the KP3+ as an external
effects unit, the return level may be lower than expected. In such cases, adjust the input level on the
KP3+. “Adjusting the volume (p.8)”
7
Operation
Using the power switch
1. Connect the KP3+ to your other equipment
as shown in the diagrams on the preceding
pages, and connect the AC adapter to an electrical outlet.
Never use any AC adapter other than the one that’s in-
cluded.
2. Press the Power button to turn the KP3+
on. The display will light up.
To turn the KP3+ off, press and hold down the
Power button until the display indicators turn
off.
The settings will not be retained after the power is
turned off.
Auto Power O
The KP3+ features an Auto Power Off function, which turns the unit off automatically if
the unit is left unused for approximately four
hours.
TIP If any sound is being input, this function will not
kick in.
Disabling the Auto Power O function
Follow the steps below to disable the Auto
Power Off function.
1. Turn the KP3+ on while pressing and holding down the SHIFT button.
The unit will indicate the current settings on
the display.
2. Rotate the PROGRAM/BPM knob to select
“diS” on the display.
3. Press the WRITE button to store this setting. The unit will automatically restart.
TIP To enable the Auto Power Off function, turn the
KP3+ on while pressing and holding down the SHIFT
button. Rotate the PROGRAM/BPM knob to select
“EnA” on the display, then press the WRITE button.
TIP If you turn the unit off without pressing the WRITE
button in the steps above, the changes to the setting
will not be applied.
TIP The initial factory setting is “EnA” for the Auto
Power Off function.
8
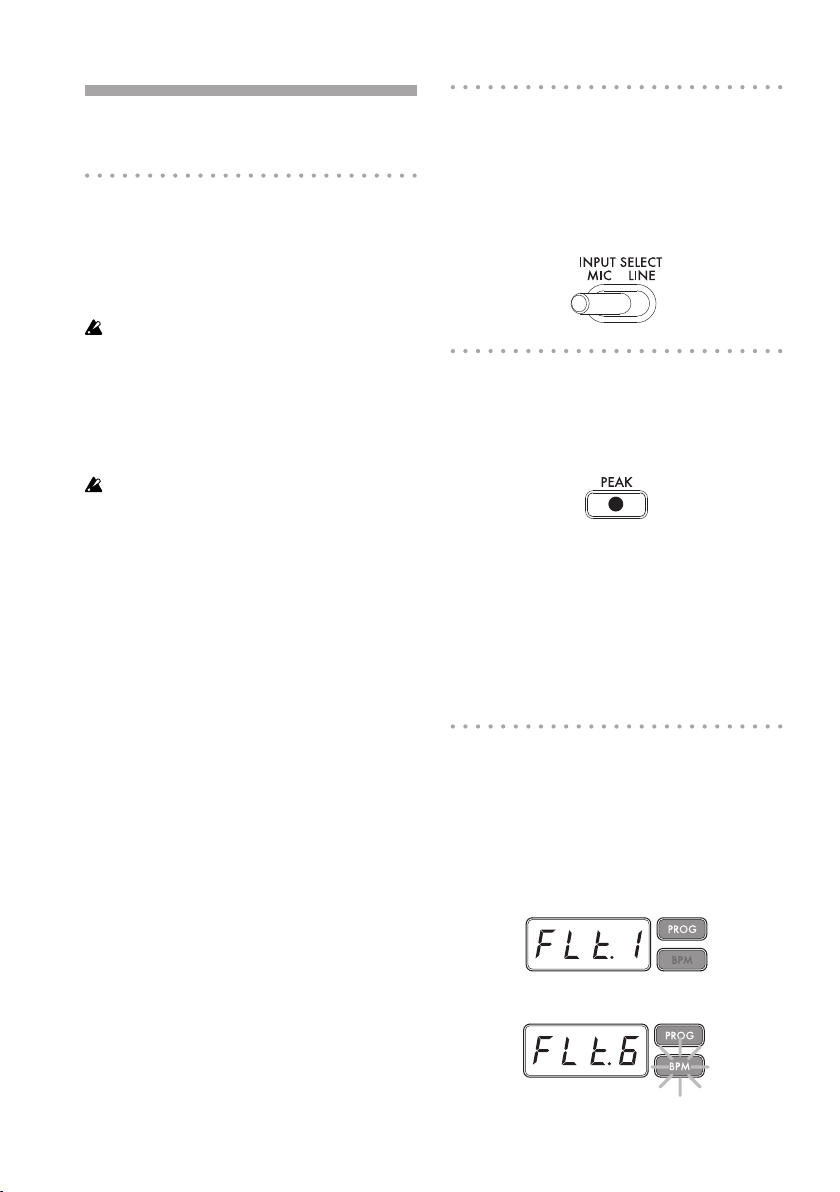
Selecting the audio input
1. Use the INPUT SELECT switch to choose
which of the KP3+’s input jacks will be used.
MIC: The effect will be applied to the mic input.
LINE: The effect will be applied to the line in-
puts.
Adjusting the volume
1. Use the INPUT VOLUME knob to adjust
the input level. Adjust the Input Volume so that
the PEAK indicator does not light-up red.
If you are using the MIC jack, adjust the MIC
TRIM knob as appropriate for the sensitivity of
the mic, so that the sound is not distorted.
2. If you are listening through headphones,
use the PHONES VOLUME knob to adjust the
headphone volume level.
TIP: The PHONES VOLUME knob does not affect the
volume of the LINE OUT jacks.
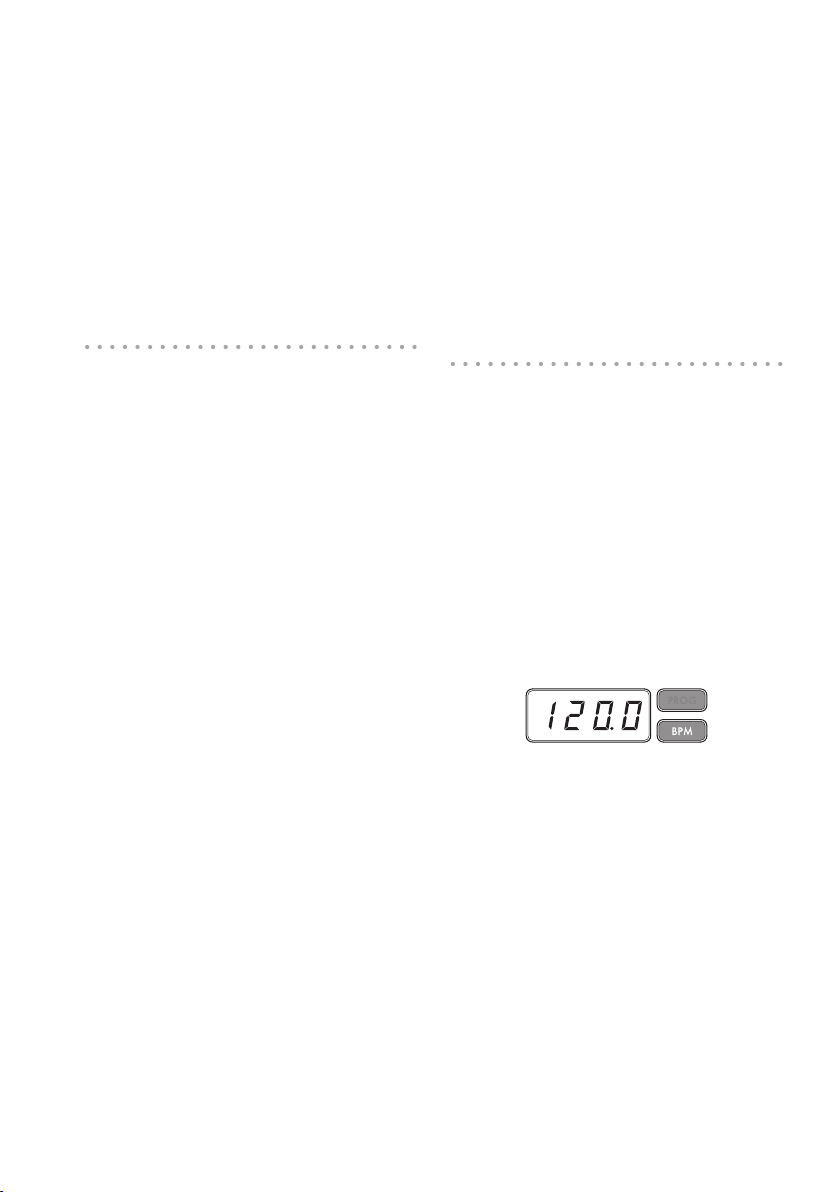
Selecting a program
1. If the display is currently showing a program number, you can select a program by
turning the PROGRAM/BPM knob.
TIP: If the display is showing the current BPM, press
the PROGRAM/BPM knob to switch to the program
display.
The BPM indicator will blink if you select a program that synchronizes to the BPM.

2. If you hold down the SHIFT button as you
rotate the PROGRAM/BPM knob, you will advance to the rst program in each category,
rather than having to scroll through all 150
programs. Once you have selected the correct
category, release the SHIFT button and use
the PROGRAM/BPM knob to select the program from within that category.
3. Finally, your eight favorite programs can be
selected by simply pressing one of the PROGRAM MEMORY buttons. (Refer to page 12).
The PROGRAM/BPM knob is a continuous
knob. When you’ve reached the last program
number, you’ll wrap around to the beginning of
the list.
Controlling the eect depth
1. If the CONNECTION switch on the rear
panel is set to DIRECT, use the FX/DEPTH
knob to adjust the depth of the effect. Turning
the knob to the right will increase the effect
depth.
2. If the CONNECTION switch on the rear
panel is set to SEND, you will need to use the
effect send and return levels on your mixer to
control the effect depth.
Using the touch pad
You can control the sound by using your nger
to rub or tap the touch pad.
TIP: Afx the included protective sheet to the touch
pad before using it.
Touch pad care
Never press the touch pad with excessive
force, or place heavy objects on it. It may
crack or break if handled roughly. Press the
touch pad only with your nger, since rubbing or pressing the touch pad with a sharp
object will scratch it. To clean the touch pad,
wipe it lightly with a soft dry cloth. Do not
use solvents such as thinner, since this may
cause deformation.
Hold
IIf you press the HOLD button as your nger
is on the touch pad, you can take your nger
away and the effect will continue as if your nger was still on the touch pad and at the same
location as when you pressed the HOLD button. The pad LEDs will remain lit at that position.
TIP: The position of the pad LED that lights-up may
shift depending on how or where you press the touch
pad.
TIP: For some programs, the sound will continue
even after you take your nger off the touch pad.
Mute function
Holding down the MUTE button will momentarily cut the input signal, but the effected signal will continue to play.
Transformer eect
By rapidly tapping the MUTE button, you can
create rhythmic effects from a continuous audio input, as in the “transformer” technique
used by DJs.
FX RELEASE
What is FX RELEASE?
Making the transition from a very hard-edge
effect back to the original unaffected signal
can often times be very abrupt or sudden. With
FX RELEASE, the moment you take your hand
off the touch pad (i.e., the moment you turn
off the effect), a delay effect synchronized to
the current BPM will be applied, and will then
gradually diminish. This lets you smoothly and
musically transition from an aggressive effect
such as Distortion or the Decimator back to
the “thru” state.
TIP If you’ve selected an effect program that uses
delay (i.e., a program whose FX RELEASE is OFF
in the EFFECT PROGRAM LIST), the delay sound of
the effect program will remain the moment you take
your hand off the touch pad, and the FX RELEASE
function will not work.
Saving the FX RELEASE setting
You can save a different FX RELEASE setting
for each program.
9
1. To adjust the depth of the FX RELEASE effect for the program that’s currently selected,
hold down the SHIFT button and use the FX
RELEASE slider.
2. Press the WRITE button.
The WRITE button and PROGRAM MEMORY
button will blink. The SHIFT button will be lit,
and will function as an EXIT button.
3. Press the WRITE button once again.
The program will be written, and the KP3+ will
return to normal operation.
Reverse playback
If you hold down the SHIFT button and press
the PAD MOTION (REVERSE) button, the
pad motion will play back in reverse. You can
repeat this operation to alternate between
“reverse playback” › “forward playback” › “reverse playback.”
Saving a pad motion
To save the pad motion you’ve just recorded,
write (or re-write) the current program into Program Memory (p.12)
Pad Motion
Pad Motion allows you to record and playback
the motion of your nger on the touch pad.
This allows you to accurately reproduce the
same complicated movements repeatedly. In
addition, the pad LEDs will provide a visual indication of the movement.
You can even save pad motion recording as
part of the Program Memory. (p.12)
Recording a pad motion
Hold down the PAD MOTION button. As soon
as your nger hits the touch pad, the PAD MOTION button will begin blinking, indicating that
the pad motion is being recorded. To stop recording, release the PAD MOTION button, and
pad motion playback will begin. Pad motion is
only recorded for a few seconds, so if the Pad
Motion button stops blinking and is lit up red,
pad motion recording has stopped, and pad
motion playback will begin immediately.
To stop the pad motion playback, touch the
PAD MOTION button once again. the button
will go dark (unlit).
TIP When you begin recording, the previously-recorded motion will be overwritten.
Playing back a pad motion
Press the PAD MOTION button; the button will
light up, and the pad motion will begin playing
as a loop.
The pad LEDs will show the recorded movement. When you press the PAD MOTION button once again, the button will go dark and
10
playback will stop.
Specifying the BPM
What is BPM?
BPM (Beats Per Minute) is the tempo of the
song expressed as the number of beats (quarter notes) that occur in one minute. A higher
BPM value means a faster tempo.
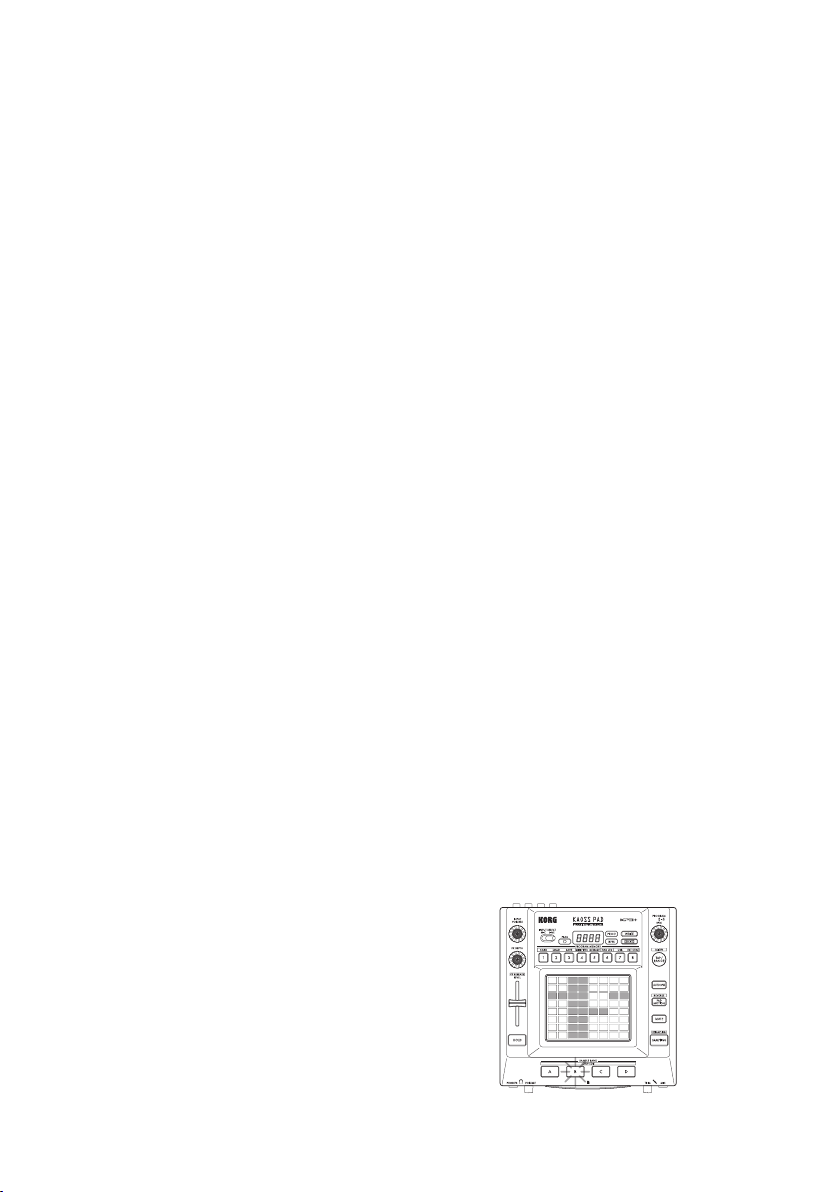
Viewing the BPM
When you turn on the KP3+, the BPM will be
set to 120.0.
If the display shows the current program,
press the PROGRAM/BPM knob to switch to
the BPM display.
TIP: If the clock is set to external synchronization,
“Ext” will be shown in the display, and you won’t be
able to specify the BPM value.
Manually setting the BPM
1. If the display shows the current program,
press the PROGRAM/BPM knob to switch to
the BPM display.
2. Use the PROGRAM/BPM knob to adjust
the BPM value in steps of 0.1. By turning the
PROGRAM/BPM knob while holding down the
SHIFT button, you can adjust the integer portion of the value in steps of 1.
TIP The Auto BPM is automatically turned off.

Using Tap Tempo to set the BPM
If you’re not certain of the BPM value of a
song, you can set the BPM by pressing the
TAP/RANGE button in rhythm with the beat of
the song.
1. Press the TAP/RANGE button three or
more times in rhythm with the beat of the song.
The KP3+ will detect how fast you’re pressing
the button, the corresponding BPM value will
appear in the display, and that BPM value will
be set.
TIP: You can’t use Tap Tempo if the KP3+ is synchronized to MIDI timing clock data that’s received from
an external MIDI device.
Auto BPM detection
The KP3+ can set the BPM value automatically by detecting the beat of the song. If the
song’s BPM changes, the KP3’s BPM value
will change in sync.
1. Press the AUTO BPM button to turn on
Auto BPM detection.
2. The AUTO BPM button will light up, and the
BPM of the incoming audio source will be detected automatically.
If the KP3+ is unable to detect the BPM
Press the TAP/RANGE button several times in
time with the beat of the song; the KP3+ will
automatically detect the BPM using the beat
you manually tapped as a guideline.
Because of the way that the Auto BPM function operates, it may erroneously detect a value that is 1/2 or 2/3 of the correct BPM value,
or small deviations may arise. In such cases,
you can use the TAP/RANGE button to make
compensations. If you press the TAP/RANGE
button while Auto BPM detection is active, the
value you specify by tapping will become the
center value of the BPM range.
TIP It’s not possible to detect the BPM value from
music that does not have a clear sense of beat. The
detectable BPM range is from 80 to 160.
Turning o Auto BPM
Press the AUTO BPM button to make the button go dark. The Auto BPM function will turn
off, and the current BPM value will be xed.
MIDI Sync function
The BPM of the KP3+ can be set to follow
MIDI Time Clock messages from an external
MIDI device. Connect the MIDI OUT connector of an external MIDI device (such as a sequencer set to transmit MIDI time clock messages) to the MIDI IN connector of the KP3+.
TIP: This function will not synchronize sequence
data with the KP3+’s rhythm pattern programs. If you
want to synchronize sequenced data and the KP3+’s
internal rhythm patterns, you will either have to insert
a Touch Pad On message into the beginning of each
measure of your sequence data, or touch the touch
pad at the beginning of each of the KP3+ phrases to
start the pattern.
TIP: If you want the KP3+ to receive Timing Clock
and Touch Pad On messages, go to MIDI Setting
(→p.20), and select “Applying the MIDI message lter”
(→p.21) so that these messages will be received.
TIP: You can not use the Tap Tempo or Auto BPM
functions while the KP3+ is receiving Timing Clock
from an external MIDI device.
11

Storing settings to a PROGRAM
MEMORY
The PROGRAM MEMORY buttons allow you
to save and instantly recall your eight favorite
KP3+ programs and settings.
Stored data
— Effect program
— FX DEPTH knob setting
— Pad motion
— The on/off status of the HOLD button and its
position (coordinates)
Storing
1. Set the KP3+ to the condition you want to
store.
2. Press the WRITE button.
The PROGRAM MEMORY button and the
WRITE button will blink.
3. Press the PROGRAM MEMORY button of
the number that you want to use to store the
settings; the settings will be stored, and then
the KP3+ will return to the program display.
Never turn off the power or perform any other operations while settings are being stored. Doing so may corrupt
the data.
Recalling
1. Press one of the PROGRAM MEMORY
buttons (1–8); the settings stored in that memory location will be recalled.
Sampling
The KP3+ can record both looped phrases and
one shot samples from an external source.
The KP3+ can also resample; allowing you to
sample external audio sources through the internal effects, or capture the entire output of
the KP3+ as a new sample.
Loop samples can be up to four measures (16
beats) long, at the current BPM when you begin recording. (for example, at a tempo of 140,
16 beats would be approximately 7 seconds).
If the tempo value is 73 or lower, the maximum
of beats that can be sampled is 8. If the tempo
value is 39 or lower, the maximum of beats
12
that can be sampled is 4.
For a loop sample you can specify a beat
length of 16, 8, 4, 2, or 1.
When a loop sample is created, it will begin
playing as soon as it is done being recorded
(the corresponding SAMPLE BANK button will
be lit orange.)
Sampling
1. Press the SAMPLING button.
In this sample-ready mode, the SAMPLE
BANK buttons will blink red, and the display
will indicate “[4]” (the default value is 4 beats).
To exit without sampling, press the SHIFT button.
TIP The Auto BPM is automatically turned off.
2. Use the PROGRAM/BPM knob to specify
the length of sampling (in beats).
The display will switch between [16], [8], [4],
[2], or [1] accordingly.
3. When you are ready to record, press one of
the blinking SAMPLE BANK buttons—A, B, C,
or D. The selected SAMPLE BANK button will
blink red, the display will indicate “REC,” and
sampling will begin.
The PROGRAM MEMORY buttons will consecutively blink to indicate the beat you’re recording.
TIP The data that had been in the selected SAMPLE
BANK button will be overwritten.
4. If you want to record a one-shot sample,
press the same SAMPLE BANK button before
reaching the specied BEAT. Sampling will
end, and a one-shot sample will be created.
The SAMPLE BANK button used for recording
will light up red. It will be easier to record a
one-shot sample if you specify a longer setting
such as “16.”
5. If the specied BEAT time elapses before
you press the SAMPLE BANK button, sampling will end, and a loop sample will be created. The KP3+ will automatically switch to
playback, and the SAMPLE BANK button will
light up green.
Resampling
By resampling, you can create a sample that
combines multiple existing samples, or create
a new sample from an existing sample that’s
been processed by an effect. You can resample to create both loop and one-shot samples.
Remember that with resampling, the output of
the KP3+ is being recorded, so all of the effects created using the touch pad will be recorded as part of the sample data.
1. Hold down the SHIFT button and press the
SAMPLING button.
2. The SAMPLE BANK buttons will blink orange, and the KP3+ will be in the record-ready
mode.
3. From here, follow the same instructions for
loop and one shot sampling as described in
the previous section.
TIP When you press a SAMPLE BANK button, the
playback of the data assigned to that BANK button
will stop and will be overwritten.
Playing back samples
The SAMPLE BANK buttons will light up orange if they contain a loop sample or in red if
they contain a one-shot sample. Buttons that
contain no sample data will be dark.
When you press a button that contains a loop
sample, loop playback will start. The button
will be lit up in green during playback. Press
the button once again to stop playback.
When you press a button that contains a oneshot sample, the button will momentarily be
light up in green, and playback of the one-shot
sample will start.
TIP The way that the button illuminates will change
if you change the setting that’s described in «Setting
the Sample Playback Trigger» (page 14).
TIP If a sample effect is selected for the program,
playback will begin when you touch the touch pad
after selecting a SAMPLE BANK button.
Specifying the beginning of the measure
You can manually reset which beat will be considered the start of the measure. Hold down
the SHIFT button and press the TAP/RANGE
(ALIGN) button; that moment will be specied
as the beginning of a measure. The button will
blink red at the beginning of the beat. (This is
xed for 4/4; red→white→white→white)
Sample playback levels
If you want to adjust the sample playback volume for all banks, use the LEVEL slider.
Edit sample settings for each bank
Hold down the SHIFT button and press the
SAMPLE BANK button for the bank you want
to set; you’ll enter the sample edit page.
In the sample edit page you can edit settings
for level and playback.
Adjusting the level of an individual sample
bank
1. Hold down the SHIFT button and press the
SAMPLE BANK button that contains the sample that you want to adjust the playback level
for. The Sample Editing Page will appear in the
display. The SAMPLE BANK buttons containing the sample to be edited will blink and the
pad LED will display a bar graph, indicating the
sample playback level. The LEDs above the
remaining banks will indicate their respective
levels.
2. When you touch the bar graph displayed in
the touch pad, the corresponding sample playback level can be adjusted.
3. When your nger touches the touch pad
above another SAMPLE BANK button,
the sample to be edited will change to the selected bank. You can adjust its playback level
accordingly.
4. When you press the SAMPLE BANK button, the sample playback state will be changed.
When you press another SAMPLE BANK button, the sample to be edited will change.
5. When you press the SHIFT button, the setting will be entered and the KP3+ will return to
its normal state.
13
Start Point setting
1. The SHIFT button will be lit, and the specied SAMPLE BANK button will change to
blinking.
The display will show the loop start point setting.
2. Use the PROGRAM/BPM knob to adjust
the start point in steps of 1/32nd of a beat, over
a range of ± 1 beat.
TIP You can’t select this setting for one-shot samples.
Slice setting
Loop samples can be sliced into equal parts.
You can select whether each sliced part will
play or not play. Sliced parts that do not play
are skipped, so the overall length of the loop
will be made shorter. This allows you to create a variety of new rhythmic gures and loops
from the same original data. For example by
playing only the rst two beats and last two
beats of a four-measure sample to create a
one-measure loop.
1. The SHIFT button will be lit, and the specied SAMPLE BANK button will change to
blinking.
2. All eight PROGRAM MEMORY buttons will
light up (by default).
By pressing the corresponding button you can
turn on or off each sample slice.
TIP You can’t select this setting for one-shot samples.
Setting the Sample Playback Trigger
You can specify how a sample will be triggered
when the SAMPLE BANK button is pressed.
1. Enter the sample edit page.
If the display shows the start point setting,
press the PROGRAM/BPM knob to see the
trigger type specied for the selected sample.
2. Turn the PROGRAM/BPM knob to select
the trigger type.
When you press the SAMPLE BANK button,
the sample playback will start and you can
check the sample.
When you press another SAMPLE BANK but-
14
ton, the sample to be edited will be changed.
3. When you press the SHIFT button, the setting will be entered and the KP3+ will return to
its normal state.
TIP: A one-shot sample cannot be set for TYPE 1
and 2.
TIP: The setting selected here is disabled when the
sample program (from the program SMP.1 to CRS.4)
mode is selected or when the trigger is set to turn on
or off by MIDI message.
TIP: The trigger can be set for each sample.
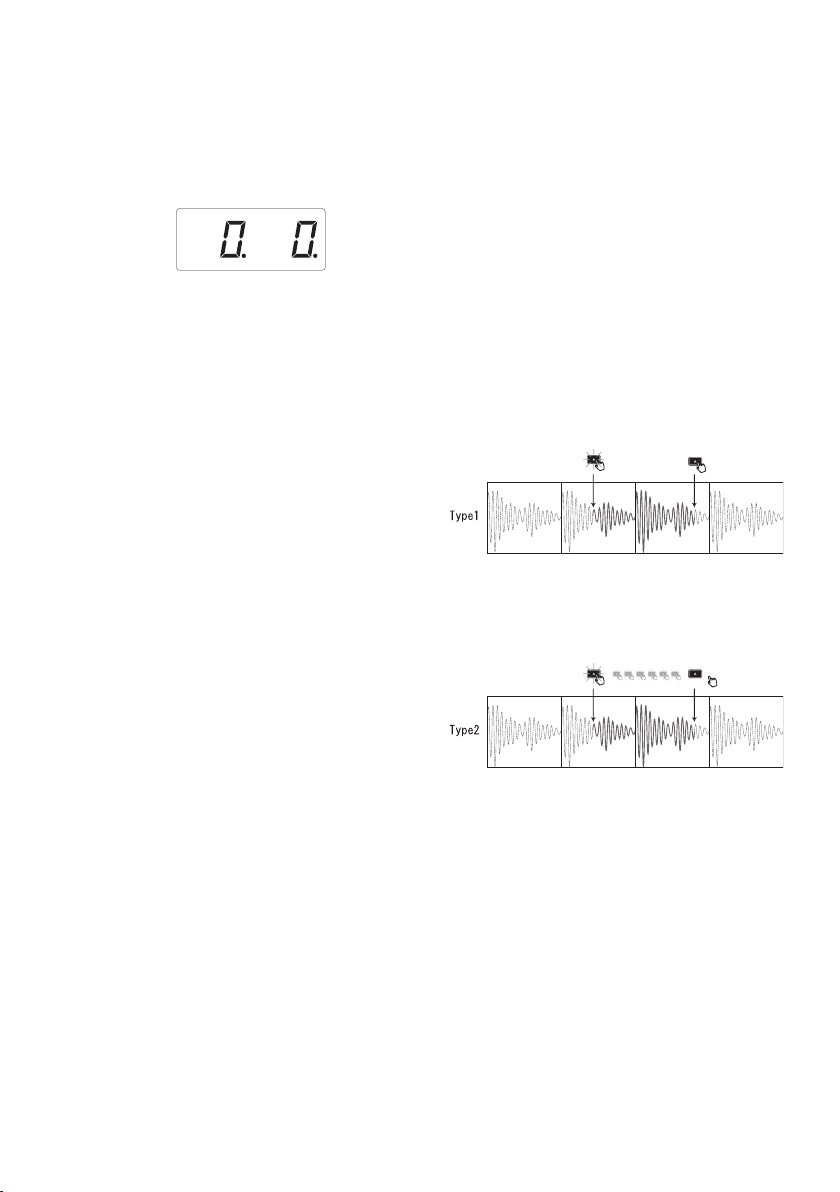
Trigger Type List
Type 1 “1.-.-”: When the sample is not heard,
the loop continues playing and each time the
SAMPLE BANK button is pressed, the volume
control is turned on or off.
Type 2 “2.-.g”: When the sample is not heard,
the loop continues playing. The sample volume is set to on (Gate) only when the SAMPLE
BANK button is held down.
Hold
Type3 “3.r.-”: In this setting, the sample always starts from the beginning (resetting).
Each time the SAMPLE BANK button is
pressed, the volume control is turned on or off.
Type 4 “4.r.g”: The sample always starts from
the beginning (resetting). The sample is set to
on (Gate) only when the SAMPLE BANK button is held down.
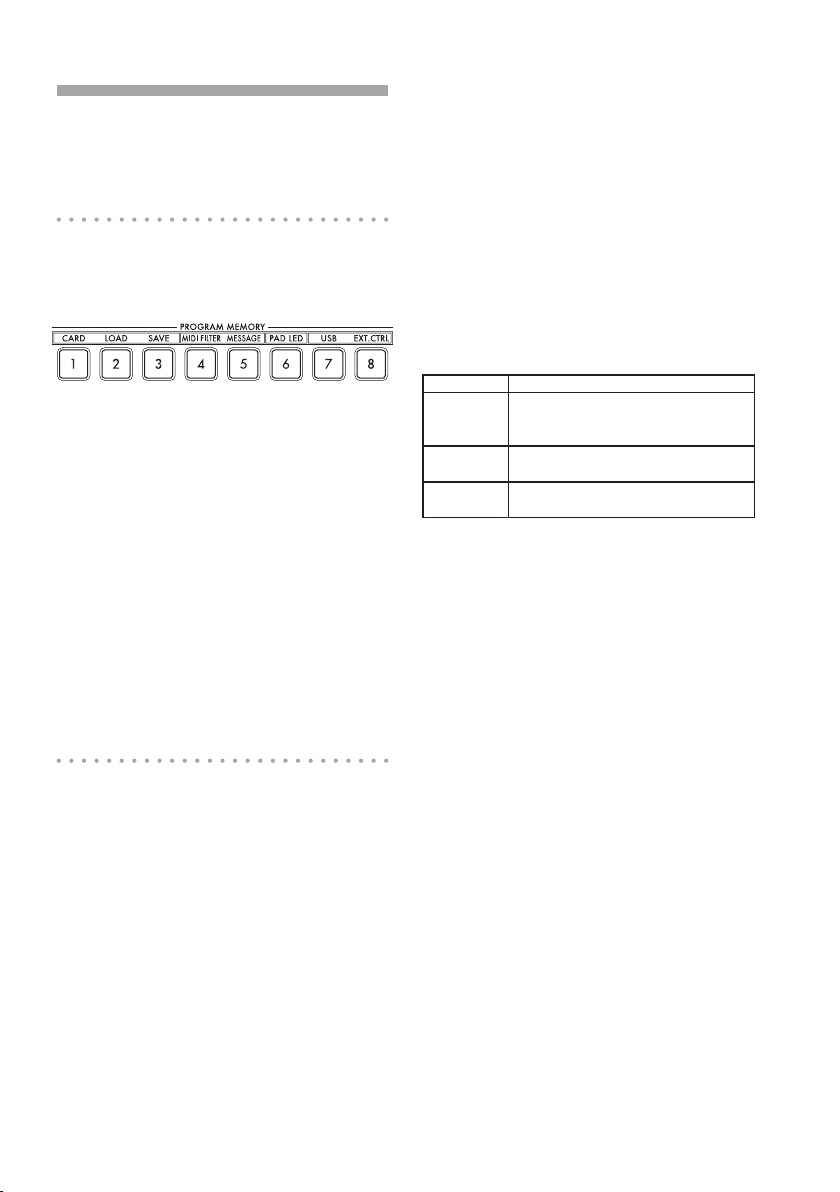
Function settings
These settings let you format an SD card, and
save or load your samples.
Procedure for Function settings
1. Hold down the SHIFT button and press one
of the PROGRAM MEMORY buttons 1–8.
2. Use the PROGRAM/BPM knob to select a
sub-parameter.
3. Press the PROGRAM/BPM knob to view
the value options for that parameter.
4. Use the PROGRAM/BPM knob to select a
value.
5. Press the TAP/RANGE button (lit) to return
to the parameter list. Repeat steps 2–5 to edit
additional parameters.
6. At this point, you can either press the
WRITE button (blinking) to save the changes
you have made, or you can press the SHIFT
button to exit without saving.
TIP: While the TAP/RANGE button is lit, you can
press the TAP/RANGE button to return to the preceding page.
About each function
[1] CARD
Displays information about the SD card, or formats the SD card (→p.16: Using an SD card).
[2] LOAD
Loads data from the SD card into the KP3+
(→p.18: Loading from an SD card).
[3] SAVE
Saves data from the KP3+ to the SD card
(→p.18: Saving to SD card).
[4] MIDI FILTER
Species the MIDI clock setting and MIDI
message ltering. (→p.21: Applying the MIDI
message lter).
[5] MESSAGE
Species the channel on which MIDI messages will be transmitted/received, and assigns
a control change to each controller. You can
specify note numbers for the SAMPLE BANK
buttons. (→p.20: MIDI settings).
[6] PAD LED
Prog: This turns on/off the function that displays the program name in the touch pad LED
when a program change occurs.
ILLU: This species the illumination shown in
the pad LED when a certain time has elapsed
since you took your hand off the touch pad.
“oFF”: Illumination will be off.
“ChAr”: A text string will be scrolled. You can
use the editor software to edit this
text string.
“TYP.1–8”: Illumination in a variety of patterns
will be displayed.
“TYP.C”: Illumination patterns TYP.1 through
TYP.8 will be switched automatically.
TIP: Illumination will not occur if Hold is active, nor
when you’re adjusting function settings.
TIP: You can download the KP3+ Editor from the
Korg website. (http://www.korg.com)
Scrl: Species the speed setting used for
the text to scroll. This setting determines the
speed used for the pad LED to scroll. You can
choose Slow, Mid, or Fast speeds.
TIP: You can’t change the speed of the illumination
display.
[7] USB
You can connect the KP3+ to your computer
and read/write the contents of the inserted
card via USB (→p.18: Accessing the SD card
from your computer).
[8] EXT.CTRL
This lets you use the KP3+ as a MIDI controller.
The MIDI message assigned to each controller using the KP3+ Editor will be transmitted
(→p.22: Using the KP3+ as a MIDI controller).
TIP: You can download the KP3+ Editor from the
Korg website. (http://www.korg.com)
15
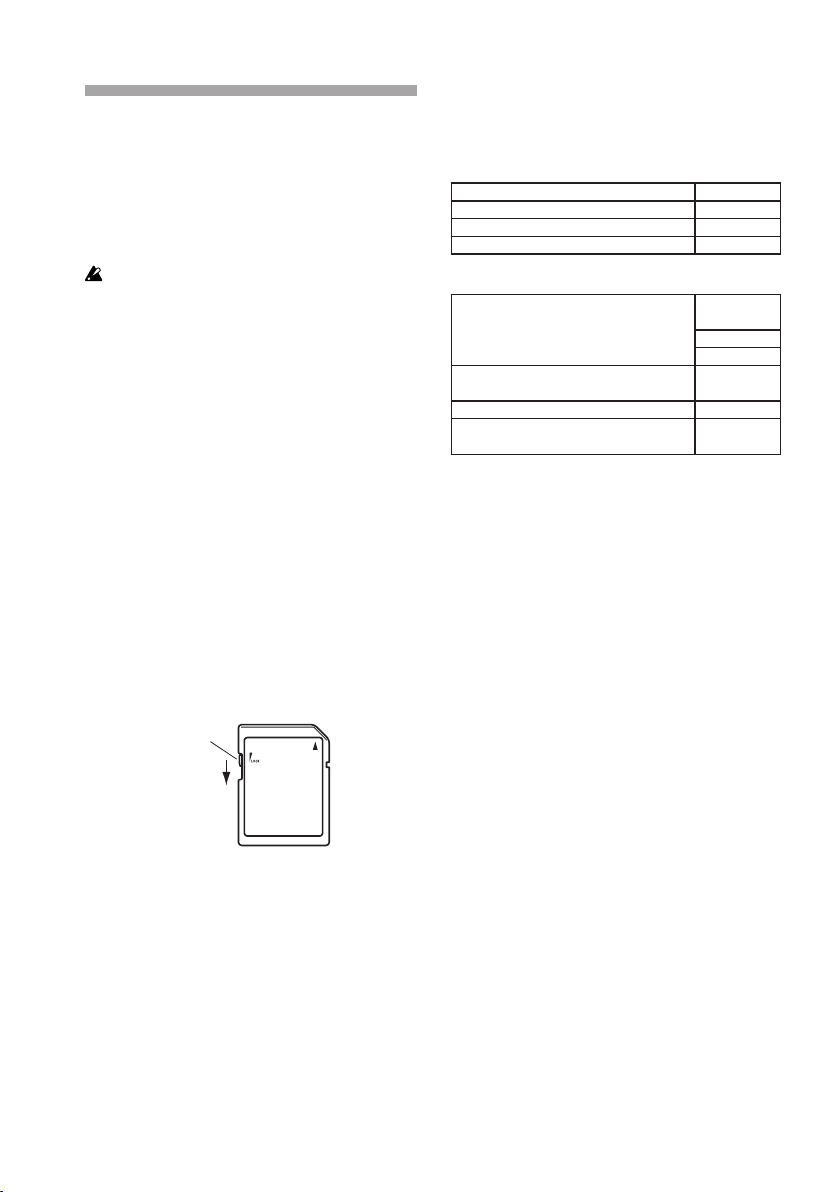
Using an SD card
Write protect
switch
Protected
You can use an SD card to save or load internal data.
Audio les (WAVE format or AIFF format) that
you’ve created on your computer can also be
loaded.
Never turn off the power or remove the SD card while
data is being saved or the card is being formatted. Doing so
may render the SD card unusable.
TIP The SD card is not included. It must be purchased separately.
TIP The KP3+ supports SD cards of up to 2GB capacity and SDHC cards of up to 32GB capacity.
TIP The KP3+ can handle up to 256 les in total.
The unit will not recognize any les that exceed the
256 le limit.
TIP The KP3+ may take time to recognize or write
les on large capacity cards.
About the write protect setting of an SD card
SD cards have a write protect switch that prevents the data from being overwritten accidentally and lost. If you set the card’s switch to the
protected setting, it will be impossible to write
or erase data on the card, or to format it. If you
need to save edited data on the card, move the
switch back to its original unprotected setting.
Handling SD cards
Please carefully read and observe the instructions that came with your SD card.
About the contents of the SD card
The following les and folders will be created
in the root directory of the card.
Files you can save
SAMPLE Data 00–99.p3s
GLOBAL 0–9.p3g
PROGRAM MEMORY Set 0–9.p3p
All Data 0–9.p3a
Files you can load
SAMPLE Data 00–99.p3s
00–99.kps
00–99.wav
00–99.aif
GLOBAL 0–9.p3g
0–9.kpg
PROGRAM MEMORY Set 0–9.p3p
All Data 0–9.p3a
0–9.kpa
TIP: If an All data le named “0.p3a” exists on the
card, this le will automatically be loaded when you
start up the KP3+.
TIP The WAVE or AIFF les that can be loaded must
be 8/16-bit linear PCM mono or stereo les. 8-bit
data will be loaded by lling the lacking bits with
zeros. When loading les created on the computer,
the le name must be changed to a two -digit integer
(00–99), and the le must be placed in the root folder
of the SD card.
TIP When WAVE or AIFF les are loaded as sample
data, the le is loaded with the appropriate settings
for the loop. Therefore, it may be played back at a
different pitch than on your computer. To play back at
the same pitch, adjust the BPM setting on the KP3 +.
In addition, if the data is longer than can be recorded
in one bank, it will be truncated. If the data is shorter
than can be recorded in one bank, the remaining
length will be handled as silence.
TIP This device can use les saved with KP3. However, the PROGRAM MEMORY settings cannot be
loaded since they are incompatible with this device.
16
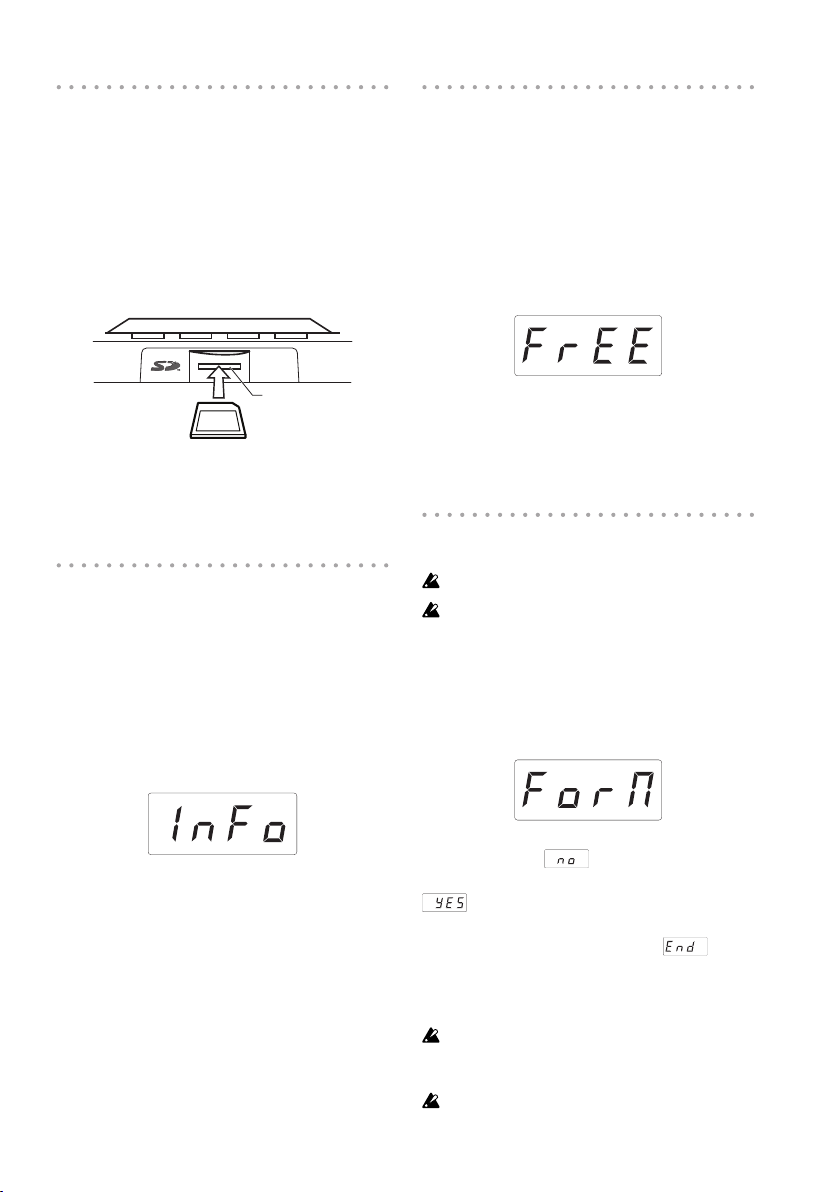
Inserting or removing SD cards
Checking the remaining capacity
Inserting an SD card
Taking care that the SD card is oriented correctly, push into the slot until it locks into place
with a click. Insert the card, making sure that it
is oriented correctly. The gold contacts should
be facing down, and the angled corner to your
right.
SD Card Slot
SD Card
Removing an SD card
Press the SD card inward until it pops outward
with a click; then pull out the card to remove it.
Checking the total capacity of the
card
Here is how you can display the total capacity
of the SD card.
1. Hold down the SHIFT button and press the
PROGRAM MEMORY 1 (CARD) button.
2. Use the PROGRAM/BPM knob to select
“InFo” (card capacity).
of the card
Here is how you can display the remaining capacity of the SD card.
1. Hold down the SHIFT button and press the
PROGRAM MEMORY 1 (CARD) button.
2. Use the PROGRAM/BPM knob to select
“FrEE” (remaining card capacity).
3. Press the PROGRAM/BPM knob to view
the remaining capacity of the card.
Press the TAP/RANGE button (lit) to return
and select another parameter, press the
SHIFT button to return to the normal state.
Formatting the SD card
All data on the card will be lost when you format it.
Before you can use an SD card, you must format it on
the KP3+. The card may not work if it was formatted on another device.
1. Hold down the SHIFT button and press the
PROGRAM MEMORY 1 button.
2. Use the PROGRAM/BPM knob to select
“ForM.”
3. Press the PROGRAM/BPM knob to view
the total capacity of the card.
Press the TAP/RANGE button (lit) to return select another parameter, press the SHIFT button to return to normal operation.
3. Press the PROGRAM/BPM knob; the display will indicate (No.)
4. Use the PROGRAM/BPM knob to select
(Yes) and press the PROGRAM/BPM
knob to format the card. When formatting is
complete, the display will indicate (End.)
Press the TAP/RANGE button (lit in pink) to
return and select another parameter, press the
SHIFT button to return to the normal state.
Never turn off the power or remove the SD card while
data is being formated. Doing so may render the SD card
unusable.
If an SD card operation fails, the display will indicate
“Err” (Error).
17
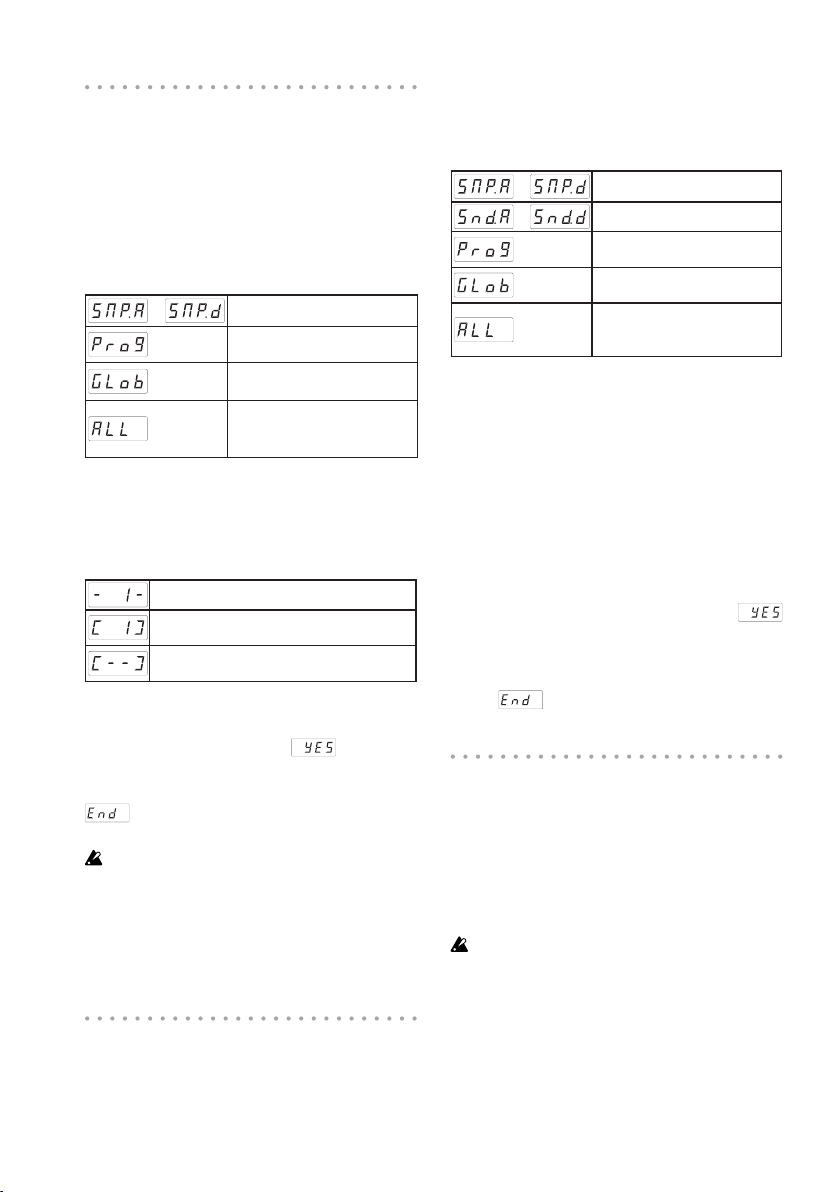
Saving to SD card
Here’s how you can save the sample data, program memories, and all settings onto an SD
card.
1. Hold down the SHIFT button and press the
PROGRAM MEMORY 3 (SAVE) button.
2. Use the PROGRAM/BPM knob to select
the type of data that you want to save.
–
3. Press the PROGRAM/BPM knob; the display will show the le numbers (0–9, or 0–99
for sample data) that can be saved. Use the
PROGRAM/BPM knob to select the le number where you want to save the data.
A new le will be added.
The data will overwrite an existing le (in
this case, le 1).
There is an identically-named le or
folder that cannot be rewritten.
4. To execute the Save process, press the
PROGRAM/BPM knob, then use the PROGRAM/BPM knob to select (Yes), and
nally press the PROGRAM/BPM knob. When
saving is completed, the display will indicate
(End.) Press the SHIFT button to return
to the program indication.
Never turn off the power or remove the SD card while
data is being saved. Doing so may render the SD card unusable.
TIP: If the SD card is protected, the display will indicate “Prct” and it will not be possible to save. Remove the card, turn off write protect, and try the operation again.
Sample data
Contents of program
memory
MIDI FILTER, MESSAGE and
PAD LED setting data le
The contents of “SMP.A”–
“SMP.D”, “Prog,” and “GLob”
combined in a single le
1. Hold down the SHIFT button and press the
PROGRAM MEMORY 2 (LOAD) button.
2. Use the PROGRAM/BPM knob to select
the type of data that you want to load.
–
–
Sample data
A WAVE or AIFF le
Contents of program
memory
MIDI FILTER, MESSAGE and
PAD LED setting data le
The contents of “SMP.A”–
“SMP.D”, “Prog,” and “GLob”
combined in a single le
3. Press the PROGRAM/BPM knob; the display will show the le numbers (0–9 or 0–99)
that can be loaded. Use the PROGRAM/BPM
knob to select the number that you want to
load.
TIP: For WAVE les and AIFF les, the KP3+ will recognize only les whose name consists of a two-digit
number with a le extension, such as “00.wav” or
“99.aif.” If .wav and .aif les with the same two-digit
number exist, the WAVE le will take priority.
4. Press the PROGRAM/BPM knob, then use
the PROGRAM/BPM knob to select
(Yes), and nally press the PROGRAM/BPM
knob again to execute the Load operation.
When loading is complete, the display will indicate (End.) Press the SHIFT button to
return to the program indication.
Accessing the SD card from your
computer
The KP3+ has a USB connector that can be
connected to your computer, allowing you to
copy settings or sample data from the SD card
to your computer for saving (backup).
If you press the SHIFT button while in USB mode, you’ll
return to the program display. Never press the SHIFT button while communication is occurring. Doing so may render the SD card unusable.
Loading from an SD card
Here’s how you can load data from an SD
card.
18
Connecting the USB connector
If you connect the KP3+’s USB connector directly to your computer, you’ll be able to use
your computer to manage the data on the card
that’s in the KP3+’s card slot.
Follow the procedure for the operating system
on your computer.
Windows users
TIP Before you continue, power-on your computer
and start up the operating system.
1. Use a USB cable to connect the KP3+ to
your computer.
Plug in the connector of the USB cable that
is connected to your computer into the KP3+’s
USB connector.
Make sure that the connector is oriented correctly, and insert it as far as it will go.
TIP: When you connect the KP3+ for the rst time,
the standard Windows device driver will be installed
automatically.
2. The drive name of the card in the card slot
will appear on your computer.
3. Hold down the SHIFT button and press the
PROGRAM MEMORY 7 (USB) button. The
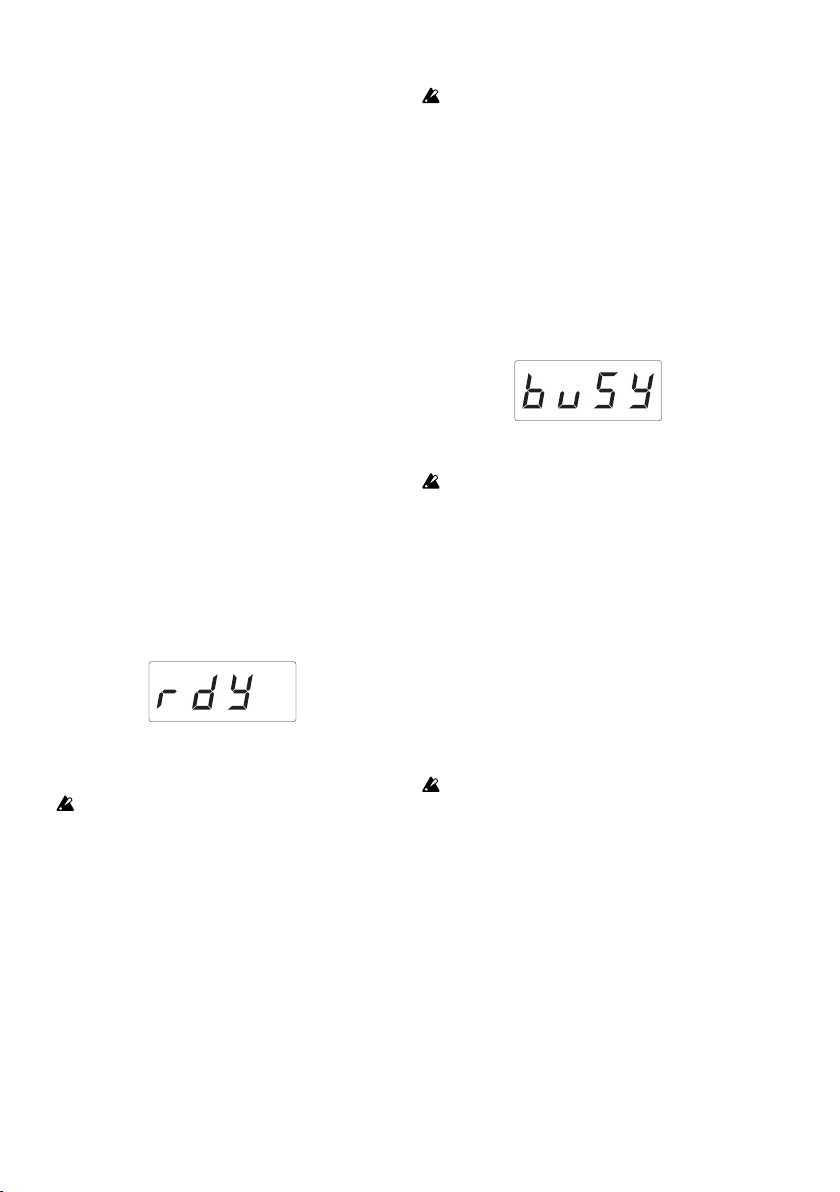
display will indicate “rdy.”
TIP The contents of the KP3+’s card won’t be visible from your computer until you enter “USB Storage
Mode.”
From this point until you’ve completed step 5, you
must not disconnect the USB cable, remove the card from
the slot, or switch the power of your computer on or off.
Doing so may damage the data.
4. To view the contents of the KP3+’s card,
open the drive that was added to your computer in step 2.
Copy the desired data onto your computer.
You can also copy data from your computer
onto the card.
5. Exit USB mode.
In Explorer or My Computer, right-click the
“Removable Disk” icon and choose “Remove.”
Then press the KP3+’s SHIFT button to exit
USB mode.
When you’re ready to disconnect the KP3+ from your
computer, you must rst exit USB mode and then disconnect the USB cable.
MacOSX users (OSX 10.5 or later)
1. Use a USB cable to connect the KP3+ to
your computer.
Plug the USB connector into the KP3+’s USB
connector. Make sure that the connector is oriented correctly, and insert it as far as it will go.
2. Hold down the SHIFT button and press the
PROGRAM MEMORY 7 (USB) button.
The display will indicate “buSy.”
3. The drive name of the card in the card slot
will appear on your computer.
While this screen is shown, you must not disconnect
the USB cable, remove the card from the slot, or switch the
power of your computer on or off. Doing so may damage
the data.
4. To view the contents of the KP3+’s card,
open the drive that was added to your computer in step 2.
Copy the desired data onto your computer.
You can also copy data from your computer
onto the card.
5. When you’re ready to disconnect the KP3+,
drag the drive from the desktop into the Trash.
Then press the KP3+’s SHIFT button to exit
USB mode.
When you’re ready to disconnect the KP3+ from your
computer, you must rst exit USB mode and then disconnect the USB cable.
19
MIDI functions
What is MIDI?
MIDI stands for Musical Instrument Digital
Interface, and is a world-wide standard for
exchanging a variety of performance-related
information between electronic musical instruments and computers.
About the MIDI implementation chart
The MIDI implementation chart is designed
to let you compare the MIDI messages that
can be transmitted and received by a device.
When using two MIDI devices, you can compare their MIDI implementation charts to see
which messages are compatible between
them.
TIP: You can download the KP3+’s MIDI implementation chart from the Korg website.(http://www.korg.
com)
* Details on the MIDI functionality are provided in the separate MIDI implementation. To obtain the MIDI implementation, please contact your local Korg distributor.
MIDI connections
Commercially available MIDI cables are used
to transmit and receive MIDI messages. Connect these cables between the MIDI connectors of the KP3+ and the MIDI connectors of
the external MIDI device where you want to
transfer data.
MIDI IN connector: This connector receives
MIDI messages from another MIDI device.
Connect it to the MIDI OUT connector of the
external device.
MIDI OUT connector: This connector transmits
messages from the KP3+. Connect it to the
MIDI IN connector of the external device.
LINE IN MIDI INMIDI OUTOUTPUT
ELECTRIBE MX-SD
Connecting to your computer
You can use a USB cable to connect the KP3+
directly to a computer equipped with a USB
connector, and transmit or receive the same
MIDI messages as via the MIDI connectors.
In order to use the KP3+ Editor, you must connect the KP3+ to your computer via USB.
USB
Computer
TIP: To use the USB connection, the Korg USB-MIDI
driver must be installed in your computer. Download
the Korg USB-MIDI driver from the Korg website
(http://www.korg.com), and install it as described in
the documentation included with the driver.
MIDI settings
In addition to using the KP3+ as a synthesizer,
you can also use it as a realtime controller for
an external MIDI device.
By connecting the KP3+ to your MIDI sequencer and recording the MIDI messages that are
transmitted when you use the touch pad, you
can play back the touch pad operations.
If you turn of f the power without storing your settings,
the settings will revert to their original state, and will not be
saved.
20
Setting the MIDI channel
Here’s how to set the KP3+’s MIDI channel.
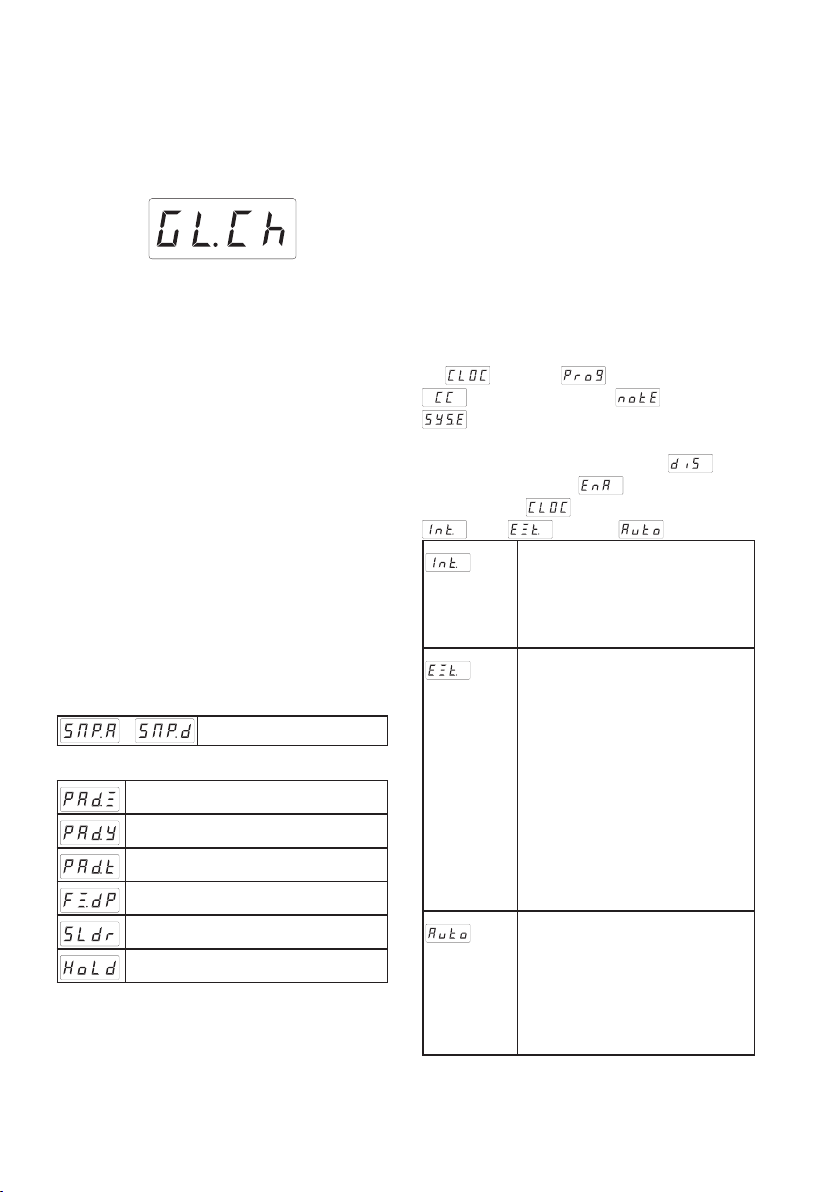
1. Hold down the SHIFT button and press
PROGRAM MEMORY 5 (MESSAGE).
2. Use the PROGRAM/BPM knob to select
“GL.Ch” (Global MIDI channel), and then press
the PROGRAM/BPM knob.
The currently-specied MIDI channel is displayed. Use the PROGRAM/BPM knob to
change the MIDI channel.
3. If you want to store the setting, press the
WRITE button. If you don’t want to store the
setting, press the SHIFT button.
TIP: In order for data to be sent independently to multiple MIDI devices via a single MIDI cable, MIDI has
sixteen channels (1–16). If the transmitting device is
set to MIDI channel “1,” the receiving device must
also be set to channel “1” in order for MIDI messages
to be received.
Changing the control change numbers
or note numbers
1. Hold down the SHIFT button and press
PROGRAM MEMORY 5 (MESSAGE).
2.
Use the PROGRAM/BPM knob to select the
control of the assignment that you want to change,
and then press the PROGRAM/BPM knob.
Transmit/receive note messages
–
Transmit control change messages
Touch pad X-axis
Touch pad Y-axis
Touch pad on/off
FX DEPTH knob
LEVEL slider / Gate Time
HOLD button
3. Use the PROGRAM/BPM knob to specify
a control change number or note number in the
range of 0–127. If you choose a control number that has already been assigned to a different controller, the decimal point will light-up.
If you assign that same number, this control-
SAMPLE BANK buttons
ler will transmit and receive the same control
change message as the other controller.
4. If you want to store the setting, press the
WRITE button. If you don’t want to store the
setting, press the SHIFT button.
Applying the MIDI message lter
1. Hold down the SHIFT button and press
PROGRAM MEMORY 4 (MIDI FILTER).
2. Use the PROGRAM/BPM knob to select
the message that you want to lter, and then
press the PROGRAM/BPM knob.
You can lter the transmission and reception
of (clock), (program change),
(control change), (note), and
(system exclusive) messages.
3. Use the PROGRAM/BPM knob to disable
or enable the message. Choose (Disabled; i.e., ltered) or (Enabled; i.e., not
ltered). For (clock), you can specify
(Int), (Ext), or (Auto).
The KP3+ will use its internal
(Int):
clock. Choose this setting if you’re
using the KP3+ on its own, or as
the master (the controlling device),
where external MIDI devices are
synchronized.
The KP3+ will synchronize to MIDI
(Ext):
clock messages that are received
from an external MIDI device connected to the MIDI IN connector or
to the USB connector.
TIP: If you choose “Ext” as the clock
setting, USB will take priority if clock
messages are received via both
MIDI and USB.
TIP: For more about settings for
synchronizing with an external MIDI
device, please refer to the owner’s
manual of the device that you’re using.
If MIDI clock messages are re-
(Auto):
ceived from an external MIDI device
connected to the MIDI IN connector
or USB connector, the KP3+ will
automatically use the “Ext” setting.
If clock messages are not being
received, the KP3+ will use the “Int”
setting.
4. If you want to store the setting, press the
WRITE button. If you don’t want to store the
setting, press the SHIFT button.
21
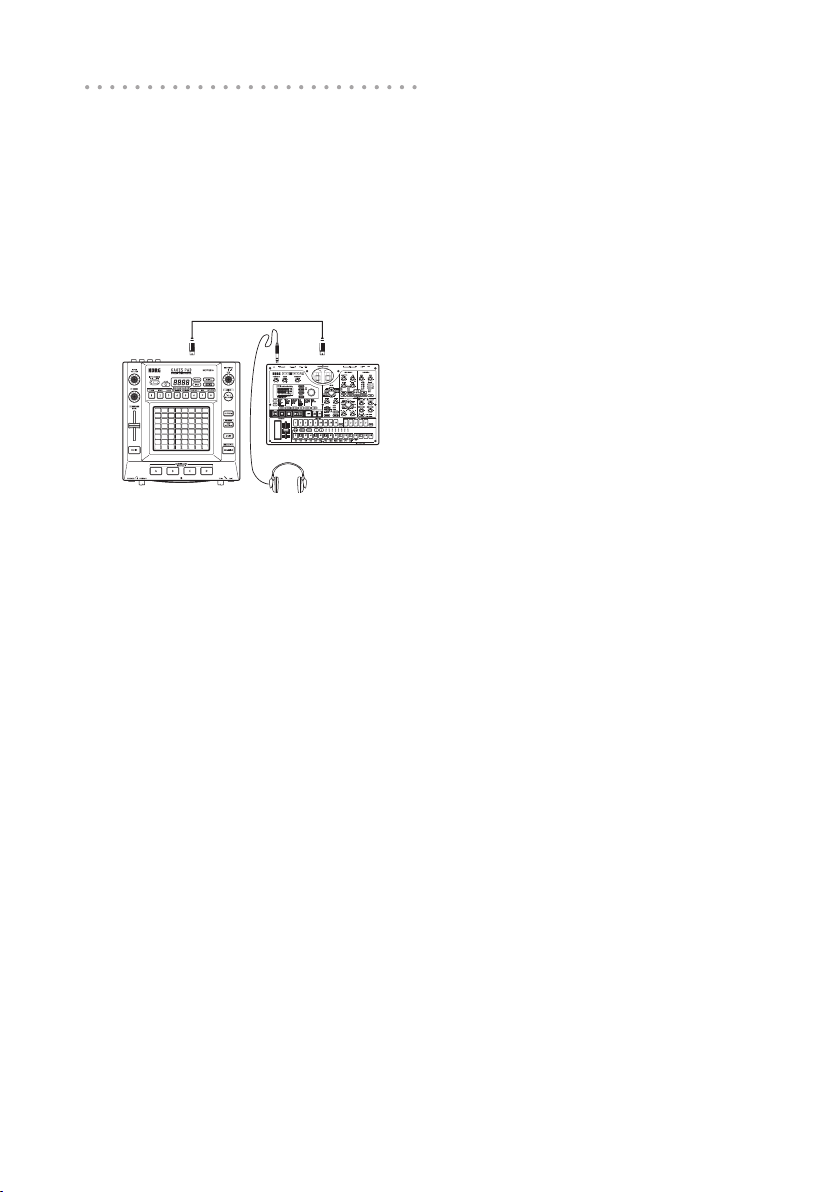
Using the KP3+ as a MIDI controller
In External Control mode you can use the
KP3+ as a MIDI controller to control an external MIDI device such as a synthesizer, or a
software synthesizer on your computer.
Example connections for External Control
mode
MIDI INMIDI OUT
ELECTRIBE MX-SD
TIP: For details on the parameters that can be controlled, please refer to the owner’s manual of the device or software that you’re using.
TIP: Depending on the device or software that you’re
using, there may be cases where parameters cannot
be controlled, or cases where you must adjust settings rst. Please refer to the owner’s manual for the
device or software that you’re using.
Switching to External Control mode
Hold down the SHIFT button and press the
PROGRAM MEMORY 8 (EXT.CTRL) button.
To exit External Control mode, press the
SHIFT button.
MIDI message assignments in External Control mode
Assignments for the MIDI messages transmitted in External Control mode are made using
the KP3+ Editor.
TIP: The KP3+ Editor can be downloaded free of
charge from the Korg website (http://www.korg.com).
For details on how to adjust these settings, please
refer to the documentation included with the KP3+
Editor.
22
Controllers available in External Control mode
You can use the following controllers in External Control mode.
Controller Transmitte d MIDI message (fac tory settings)
Touch pad X-axis (entire range) Control change (#70)
Touch pad Y-axis (entire range) Control change (#71)
Touch pad X-axis (right of center) Control change (#72)
Touch pad X-axis (left of center) Control change (#73)
Touch pad Y-axis (middle to top) Control change (#74)
Touch pad Y-axis (middle to bottom) Control change (#75)
Touch pad XY-axes (lower left to upper right) Control change (#76)
Touch pad on/off Control change (#92)
LEVEL slider Control change (#93)
FX DEPTH knob Control change (#94)
HOLD button Control change (#95)
PROGRAM MEMORY 1 button Control change (#49)
PROGRAM MEMORY 2 button Control change (#50)
PROGRAM MEMORY 3 button Control change (#51)
PROGRAM MEMORY 4 button Control change (#52)
PROGRAM MEMORY 5 button Control change (#53)
PROGRAM MEMORY 6 button Control change (#54)
PROGRAM MEMORY 7 button Control change (#55)
PROGRAM MEMORY 8 button Control change (#56)
SAMPLE BANK A button Note on/off (#36)
SAMPLE BANK B button Note on/off (#37)
SAMPLE BANK C button Note on/off (#38)
SAMPLE BANK D button Note on/off (#39)
PROGRAM/BPM knob Program change (#0–#127), Timing clock
Messages that can be transmitted/received outside of External Control mode
With the factory settings, the following MIDI messages can be transmitted and received.
Controller
Touch pad X-axis Control change (#12)
Touch pad Y-axis Control change (#13)
Touch pad on/off Control change (#92)
LEVEL slider Control change (#93)
FX DEPTH knob Control change (#94)
HOLD button Control change (#95)
SAMPLE BANK A button Note on/off (#36)
SAMPLE BANK B button Note on/off (#37)
SAMPLE BANK C button Note on/off (#38)
SAMPLE BANK D button Note on/off (#39)
PROGRAM/BPM knob Program change, bank select, MIDI timing clock (only if
MIDI messages transmitted and received (factory settings)
the clock setting is Int)
23

Specications
Number of programs 150
Main controllers Touch pad, LEVEL slider
Display 4-digit LED display
Connectors OUTPUT (stereo, RCA jacks), LINE IN (stereo,
RCA jacks), MIC IN (unbalanced 6.3 mm phone
jack), PHONES (6.3 mm stereo phone jack), MIDI
IN/OUT, USB (type B)
Power supply DC9V
Dimensions and weight 210 (W) x 226 (D) x 49 (H) mm, 1.3 kg
8.27” x 8.90” x 1.93″, 2.87 lbs.
Operating temperature 0–+40 ˚C (non-condensing)
Included items AC adapter, protective sheet for touch pad
* Appearance and specications of this product are subject to change without notice.
24
Précautions
Emplacement
L’utilisation de cet instrument dans les endroits suivants peut en entraîner le mauvais fonctionnement.
• En plein soleil
• Endroits très chauds ou très humides
• Endroits sales ou fort poussiéreux
• Endroits soumis à de fortes vibrations
• A proximité de champs magnétiques
Alimentation
Branchez l’adaptateur secteur mentionné à une prise
secteur de tension appropriée. Evitez de brancher
l’adaptateur à une prise de courant dont la tension
ne correspond pas à celle pour laquelle l’appareil est
conçu.
Interférences avec d’autres appareils électriques
Les postes de radio et de télévision situés à proximité peuvent par conséquent souffrir d’interférences
à la réception. Veuillez dès lors faire fonctionner cet
appareil à une distance raisonnable de postes de radio et de télévision.
Maniement
Pour éviter de les endommager, manipulez les commandes et les boutons de cet instrument avec soin.
Entretien
Lorsque l’instrument se salit, nettoyez-le avec un
chiffon propre et sec. Ne vous servez pas d’agents
de nettoyage liquides tels que du benzène ou du diluant, voire des produits inammables.
Conservez ce manuel
Après avoir lu ce manuel, veuillez le conserver soigneusement pour toute référence ultérieure.
Evitez toute intrusion d’objets ou de liquide
Ne placez jamais de récipient contenant du liquide
près de l’instrument. Si le liquide se renverse ou
coule, il risque de provoquer des dommages, un
court-circuit ou une électrocution.
Veillez à ne pas laisser tomber des objets métalliques dans le boîtier (trombones, par ex.). Si cela se
produit, débranchez l’alimentation de la prise de courant et contactez votre revendeur korg le plus proche
ou la surface où vous avez acheté l’instrument.
Note concernant les dispositions (Seulement EU)
Quand un symbole avec une poubelle barrée d’une croix apparait sur le produit, le
mode d’emploi, les piles ou le pack de piles,
cela signie que ce produit, manuel ou
piles doit être déposé chez un représentant
compétent, et non pas dans une poubelle
ou toute autre déchetterie conventionnelle.
Disposer de cette manière, de prévenir les dommages pour la santé humaine et les
dommages potentiels pour l’environnement. La
bonne méthode d’élimination dépendra des lois
et règlements applicables dans votre localité, s’il
vous plaît, contactez votre organisme administratif
pour plus de détails. Si la pile contient des métaux
lourds au-delà du seuil réglementé, un symbole
chimique est afché en dessous du symbole de la
poubelle barrée d’une croix sur la pile ou le pack
de piles.
* Tous les noms de produits et de sociétés sont des
marques commerciales ou déposées de leur détenteur respectif.
25

Sommaire
Caractéristiques principales …………….. 27
Connexions ……………………………………. 28
Liaisons d’un mélangeur DJ ……………. 29
Interrupteur d’alimentation ……………….. 30
Sélection de l’entrée audio ………………. 30
Réglage du volume …………………………. 30
Sélection d’un programme ……………… 30
Pad tactile ……………………………………… 31
Fonction de coupure de son …………….. 31
FX RELEASE …………………………………. 31
Pad Motion …………………………………….. 32
Réglage du BPM …………………………….. 32
Sauvegarde des réglages dans une mé-
moire de programme ……………………… 33
Échantillonnage ……………………………..34
Réglage des fonctions …………………….. 37
Description des fonctions ………………… 37
Vérier la capacité totale de la carte …. 39
Vérier la capacité résiduelle de la carte .
……………………………………………………..39
Formater une carte SD ……………………. 39
Sauvegarde sur carte SD ………………… 40
Chargement d’une carte SD …………….. 40
Accès à la carte SD à partir de
l’ordinateur …………………………………….. 40
Liaisons MIDI ………………………………… 42
Réglages MIDI ……………………………….. 42
Utilisation du KP3+ comme contrôleur
MIDI ……………………………………………… 44
Eléments du KP3 …………………………..114
PROGRAM LIST…………………………….119
26

Introduction
Merci d’avoir fait l’acquisition du contrôleur d’effet
dynamique/échantillonneur KP3+ KAOSS PAD de
Korg. An de pouvoir exploiter au mieux toutes les
fonctions du KP3+ , veuillez lire attentivement ce manuel et utiliser l’instrument de la manière préconisée.
Caractéristiques principales
150 sons intégrés idéaux pour les mix de DJ et les
travaux de création sonore
Outre les programmes d’effet si populaires du KP3,
comme par exemple un ltre conçu pour produire
une impression analogique, les effets standard
d’environnements acoustiques (comme un delay indispensable, un effet “Grain Shifter” qui permet de
geler une tranche temporelle de son, ainsi qu’un effet
“Decimator”), nous avons ajouté un enregistreur en
boucle amélioré ainsi que de nouveaux effets. Vous
pouvez brancher un micro à la prise d’entrée prévue
à cet effet et produire d’authentiques sons de Vocoder en temps réel. La fonction “FX RELEASE” permet de contrôler la queue de réverbération de l’effet
an de produire une chute plus naturelle du son, de
sorte à intégrer de façon naturelle ces puissants effets à vos compositions et performances.
Contrôle des effets en temps réel avec le pad tactile
Vu que vous pouvez assigner divers types de paramètres d’effets à l’axe X et à l’axe Y du pad tactile et
les piloter simultanément, vous pouvez produire des
combinaisons d’effets sophistiquées de façon simple
et intuitive, comme par exemple varier simultané ment le temps de délai et la réinjection, ou encore
contrôler en tandem la fréquence de coupure et la
résonance du ltre. En frottant et tapotant le pavé du
bout des doigts, vous pouvez facilement générer des
effets sophistiqués.
Fonction d’échantillonnage sophistiquée
Vous pouvez facilement capturer une performance
“one shot” (jouée une seule fois) ou des échantillons
en boucle dans une des quatre banques d’échantillons prévues à cet effet. Pour l’échantillonnage en
boucle, la fonction de détection de BPM calcule le
tempo jusqu’au premier chiffre après la virgule et
capture jusqu’à quatre mesures avec les données
de tempo original. Vous pouvez aussi ajuster le point
de départ, créer instantanément des phrases entièrement neuves en utilisant la nouvelle fonction Slice
an de découper les échantillons et de modier la
manière dont un échantillon en boucle est reproduit,
et mettre à prot la fonction Resampling pour recap turer un échantillon (‘rééchantillonner’) pendant qu’il
est traité par un effet.
Utilisation du curseur pour fader le volume des données de l’échantillon
Un curseur de volume qui contrôle le volume des
données de l’échantillon constitue un avantage incroyable en terme d’efcacité, et élargit davantage
vos possibilités d’expression. La fonction Pad Motion
permet de capturer et de reproduire les mouvements
de vos doigts sur le pavé; elle permet même d’inverser la lecture de ces données. La fonction Hold
verrouille l’intensité de l’effet à la position de votre
doigt sur le pad tactile. La fonction Mute permet de
couper le signal d’entrée et de conserver uniquement le son de l’effet de réverbération ou de delay.
Qu’il s’agisse d’effets simples ou de transformations
complexes combinant plusieurs effets, l’instrument
permet de piloter facilement le son et de le façonner
tel que vous le voulez pour vos mix de DJ ou créations sonores.
Fente pour carte SD et prise USB
La fente pour carte SD vous permet d’archiver les
données d’échantillons et les données utilisateur
telles que la banque de destination de sauvegarde
d’échantillons, les réglages de lecture One shot /en
boucle et les mémoires des programmes. Vous disposez aussi d’une prise USB permettant d’archiver
ces données sur un ordinateur et de gérer facilement
des volumes impor tants de données d’échantillons.
Logiciel dédié téléchargeable
Nous proposons aux utilisateurs le logiciel dédié
KP3+ Editor. Ce logiciel permet d’éditer les données
d’échantillons, les mémoires des programmes et
d’autres réglages utilisateur. Le logiciel comprend
aussi une fonction d’éditeur d’assignation MIDI qui
permet d’utiliser le KP3+ comme un contrôleur MIDI
extrêmement customisable. Vous pouvez télécharger gratuitement ce logiciel sur le site web de Korg
(http://www.korg.com/).
27
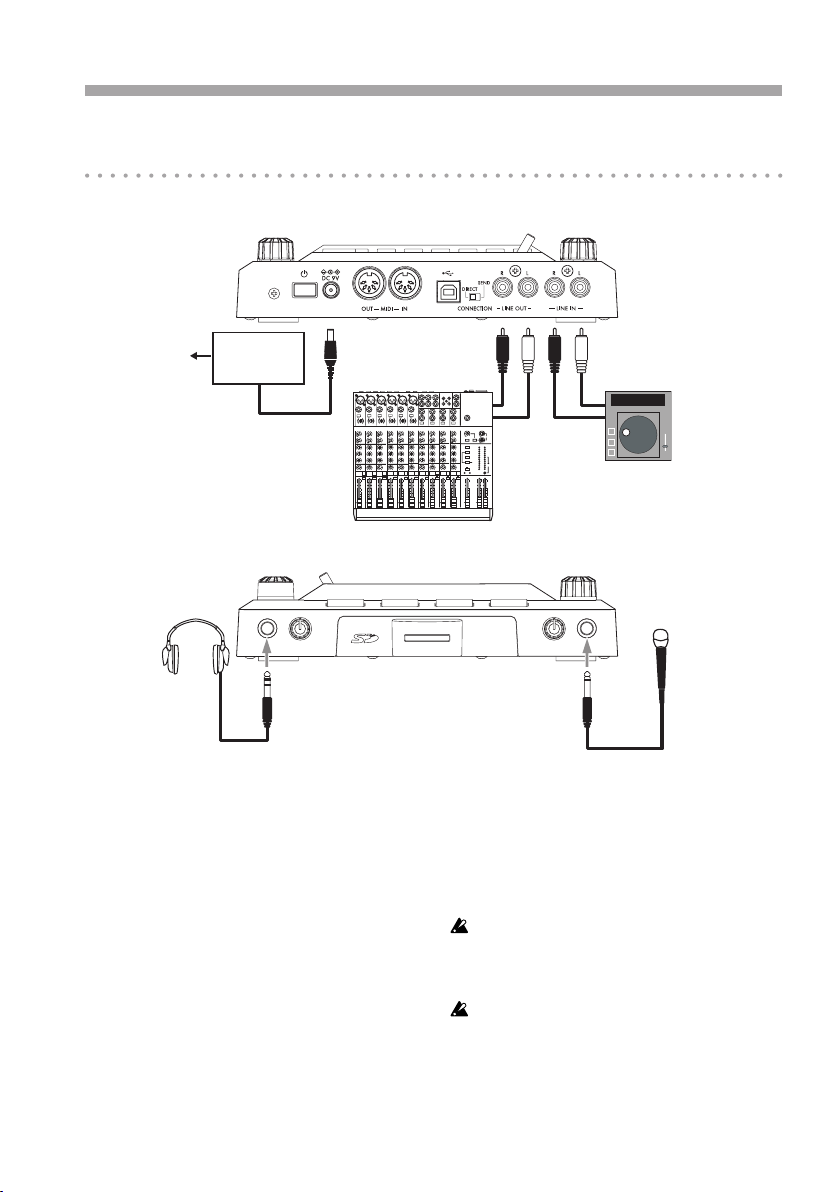
Préparations
Connexions
Secteur
Adaptateur secteur
Lecteur CD
Console de mixage, mixeur DJ
Connexion d’enceintes actives ou d’une console de
mixage aux sorties
Branchez les prises LINE OUT du KP3+ aux entrées
de votre console de mixage ou de vos enceintes ac tives.
Si vous utilisez un casque, branchez-le à la prise
PHONES.
ASTUCE: Le son du KP3+ est toujours envoyé aux
prises LINE OUT même quand vous branchez un
casque.
28
Connexion d’un micro ou d’un dispositif audio aux
entrées
Si vous utilisez un micro, branchez-le à la prise MIC.
Vous pouvez brancher les sorties d’un échantillonneur ou d’une autre source audio aux prises LINE
IN du KP3+.
Pour effectuer les connexions, mettez toujours les appareils concernés hors tension. Une mauvaise utilisation risque
d’endommager vos enceintes ou d’entraîner un fonctionnement erratique.
Si vous n’utilisez pas de micro, réglez la commande MIC
TRIM au minimum.
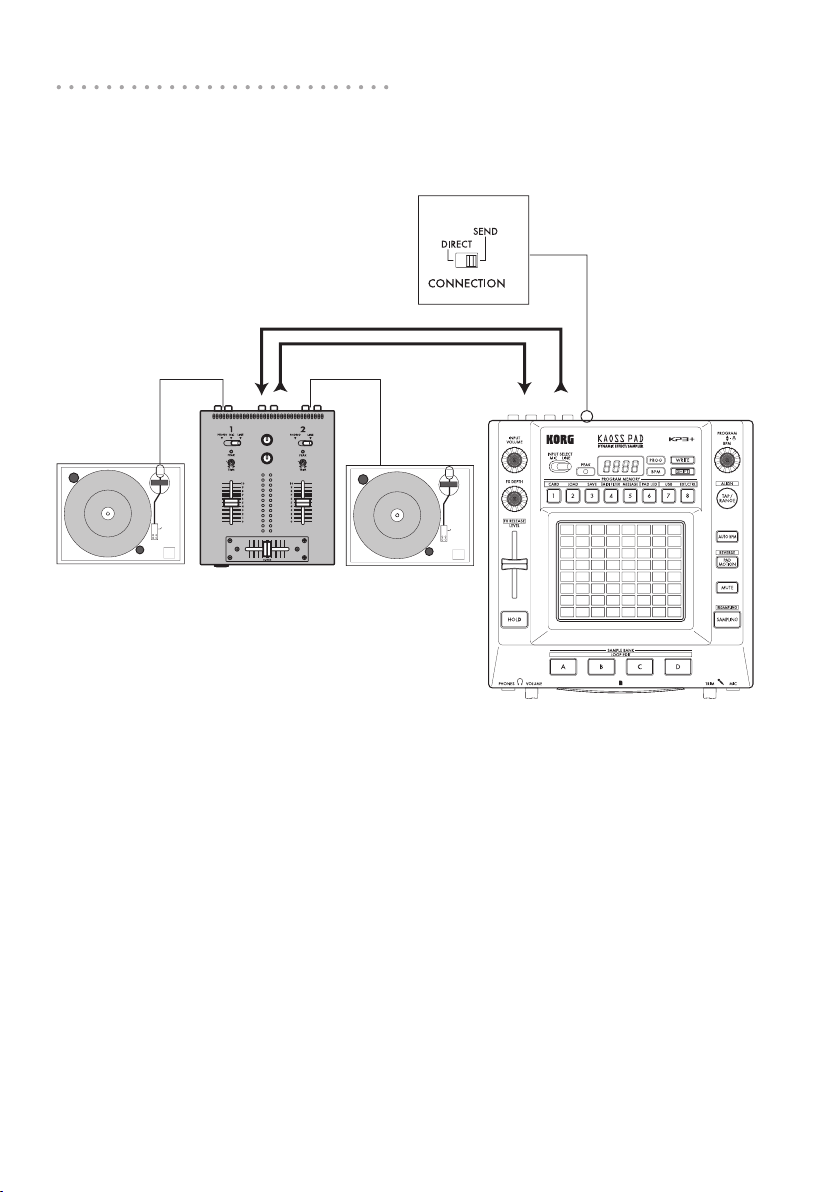
Liaisons d’un mélangeur DJ
Connexion du KP3+ à des départ/retour
RETURN
SEND
TURNTABLE
Vous pouvez utiliser le KP3+ comme processeur
d’effet externe et le brancher aux prises de départ
et de retour d’une console de mixage. Pour cette
connexion, réglez le commutateur CONNECTION
sur “SEND”.
Le signal d’entrée et le signal d’effet sont
transmis par le
tactile, le signal d’entrée est retransmis tel quel. “p.31:
Contrôle de la profondeur de l’effet”
Seul le signal d’effet (et non le signal d’entrée)
est transmis par le
ASTUCE: Pour en savoir plus sur les prises de départ
et de retour, voyez le mode d’emploi du dispositif
branché.
ASTUCE: Quand vous utilisez le KP3+ comme processeur d’effet externe, le niveau de retour peut être
trop faible. Dans ce cas, réglez le niveau d’entrée sur
le KP3+. “p.30: Réglage du volume”
KP3+
. Si vous ne touchez pas le pad
KP3+
.
TURNTABLEDJ MIXER
LINE OUT
LINE IN
29
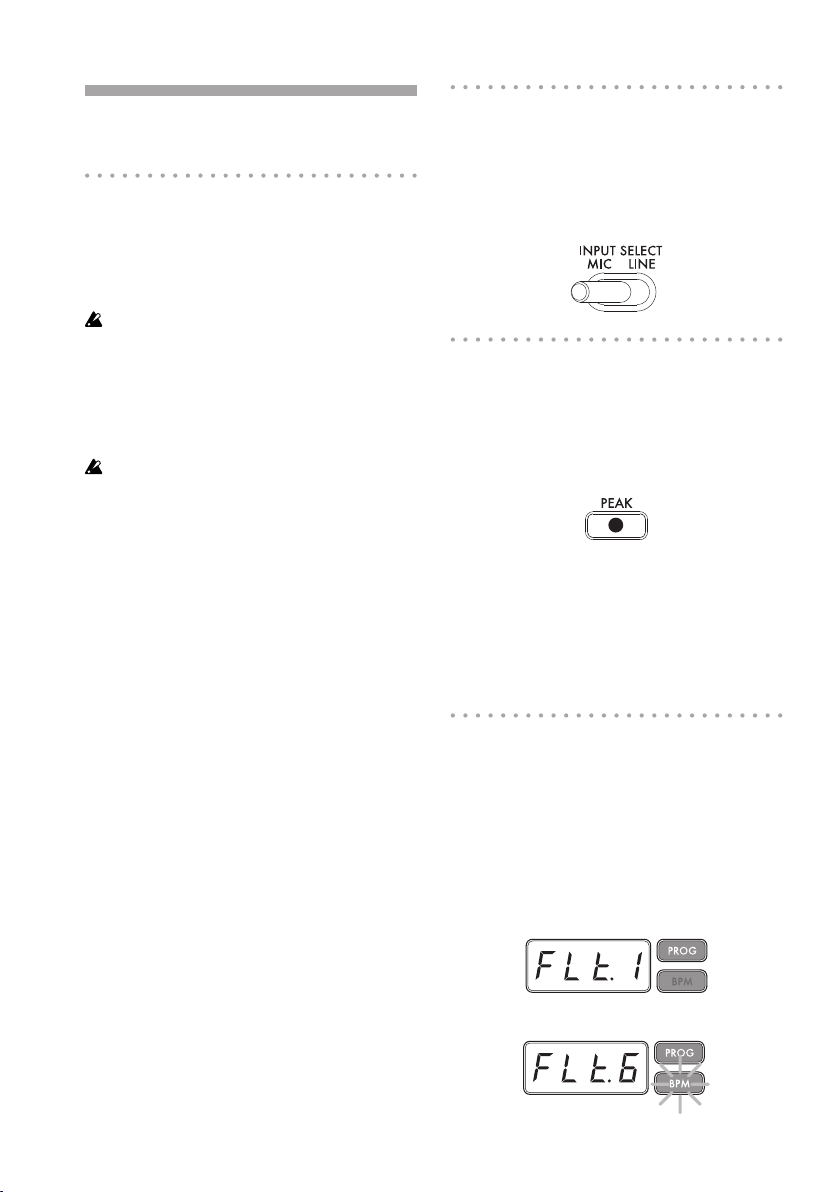
Fonctionnement
Interrupteur d’alimentation
1. Branchez le KP3+ à votre matériel en vous référant aux illustrations des pages précédentes puis
branchez l’adaptateur secteur à une prise de courant.
N’utilisez jamais d’autre adaptateur secteur que l’adapta-
teur fourni.
2. Appuyez sur l’interrupteur d’alimentation pour
mettre le KP3+ sous tension. L’écran s’allume.
Pour mettre le KP3+ hors tension, maintenez l’interrupteur d’alimentation enfoncé jusqu’à ce que l’écran
s’éteigne.
Les réglages ne sont pas conservés après la mise hors
tension.
Mise hors tension automatique
Le KP3+ dispose d’une fonction “Auto Power Off”
qui met automatiquement l’appareil hors tension s’il
reste inutilisé durant environ quatre heures.
ASTUCE: Si un signal d’entrée arrive, l’instrument
n’est pas mis hors tension.
Désactivation de la fonction ‘Auto Power Off’
Effectuez les opérations suivantes pour désactiver la
fonction “Auto Power Off”.
1. Mettez le KP3+ sous tension tout en maintenant
le bouton SHIFT enfoncé.
L’écran afche le réglage en vigueur à l’écran.
2. Tournez la commande PROGRAM/BPM pour
sélectionner “diS” à l’écran.
3. Appuyez sur le bouton WRITE pour sauvegarder
ce réglage. L’instrument redémarre automatiquement.
ASTUCE: Pour activer la fonction “Auto Power Off”,
mettez le KP3+ hors tension tout en maintenant le
bouton SHIFT enfoncé. Tournez la commande PROGRAM/BPM pour sélectionner “EnA” à l’écran puis
appuyez sur le bouton WRITE.
ASTUCE: Si vous coupez l’alimentation sans appuyer
sur le bouton WRITE ci-dessus, le changement de
réglage n’est pas appliqué.
ASTUCE: A la sortie d’usine, la fonction “Auto Power
Off” est réglée sur “EnA”.
Sélection de l’entrée audio
1. Utilisez le commutateur INPUT SELECT pour
sélectionner les entrée du KP3+ que vous souhaitez
utiliser.
L’effet sera appliqué à l’entrée de micro.
L’effet sera appliqué aux entrées de ligne.
Réglage du volume
1. Utilisez la commande INPUT VOLUME pour régler le niveau d’entrée. Choisissez un niveau aussi
élevé que possible tout en évitant que le témoin
PEAK ne s’allume en rouge quand il reçoit des signaux audio.
Si vous utilisez un micro, réglez la commande MIC
TRIM en fonction de la sensibilité du micro an d’éviter
une distorsion du signal audio.
2. Si vous écoutez au casque, réglez le volume du
casque avec la commande PHONES VOLUME.
ASTUCE La commande PHONES VOLUME n’inuence pas le niveau de sortie de la prise LINE OUT.
Sélection d’un programme
Les programmes peuvent être sélectionnés de trois
façons différentes.
1. Si l’afcheur indique un numéro de programme,
vous pouvez sélectionner un autre programme en
tournant le commande PROGRAM/BPM.
ASTUCE Si l’afcheur indique le BPM actuel, appuyez
sur le commande PROGRAM/BPM pour passer à
l’afchage du programme.
Le témoin BPM clignotera si vous sélectionnez un
programme synchronisé avec avec le BPM.
30
Loading…
-
Listens: The Coral — Leaving Today
- Компьютеры
- Музыка
- Финансы
- Cancel
Введение
Данное руководство показывает, насколько просто настроить процессор эффектов/контроллер Korg KaossPAD3 (KP3) для работы с программой Native Instruments Traktor©. После того как все будет корректно сконфигурировано, пользователь сможет выбирать эффекты Traktor и управлять ими с помощью тач-пэда KP3 и других назначаемых MIDI-контроллеров. Такой подход к управлению эффектами является интуитивным, быстрым и открывает широкие возможности для творчества.
Сама процедура исключительно проста и не отнимет много времени. Приведенное ниже описание предполагает, что вы уже инсталлировали драйвер KORG USB MIDI на ваш компьютер. Для проверки корректности коммутации KP3 и компьютера запустите программу KP3editor и убедитесь, что обмен данными доступен в обоих направлениях.
Начало работы
Карта функций в файле .tsi основана на фабричных настройках KP3. Пожалуйста, посмотрите Руководство Пользователя KP3 и рисунок ниже.

Откройте программу Traktor и выберите в меню File команду “Controller Manager”. На экран выведется следующее изображение:

В секции Devie Setup щелкните по кнопке “ADD” и из раскрывшегося списка выберите опцию “Generic MIDI”.

Выберите устройство KP3 с помощью параметров “In-Port” и “Out-Port”. После этого окно будет выглядеть приблизительно так:

Щелкните по расположенной внизу кнопке “IMPORT”, и в ответ на запрос укажите файл .tsi из данного архива. Щелкните по “OK”. Экран будет выглядеть примерно так:

Закройте окно Preferences, инсталляция завершена.
На рисунке ниже показано, как функции KP3 связаны с проигрывателем Traktor DECK A и модулем FX 1. Кнопки банков сэмплов KP3 C и D назначены на функции DECK B Loop IN/SET CUE и Deck B Loop OUT.

Кнопки KP3 SAMPLE BANK не генерируют никаких MIDI-данных нот до тех пор, пока в банк не загружен сэмпл. Подробнее см. Руководство Пользователя KP3.
Привет всем 
В новом номере журнала ELECTRO вышла моя статья про самый любимый прибор — KAOSS PAD 3
Korg Kaoss Pad 3
Своими впечатлениями об использовании Korg Kaoss Pad 3 с нашими читателями поделился Павел Лесневский, электронный музыкант и продюсер проекта CityZen, артист крупнейшего Швейцарского лейбла SirupMusic.
В 2006 году Kaoss Pad 3 попал ко мне из Цюриха, где был куплен на выставке по моей просьбе. Мне очень хотелось быть в числе первых обладателей этого прибора. Основное что двигало мной в тот момент — это желание иметь инновационный прибор с собственным неповторимым звучанием, так как встроенные в микшерные пульты эффекты порядком надоели. Если вы профи, то понимаете, что я имею в виду. Реальность превзошла все мои самые смелые ожидания: компактный размер, небольшой вес, удивительный внешний вид, ну и, конечно же, светодиодный сенсорный экран, который отображает движения яркими красными индикаторами.
Набор эффектов включает в себя как и всем известные эффекты (обрезные фильтры НЧ/ВЧ, полосный фильтр, флэнжер, эквалайзер, кольцевой модулятор с обрезным фильтром, фэйзер, auto-pan, слайсер, дилэй, tape echo, реверберация, гейтированная реверберация, low compressor), так и эффекты, которые в приборах такого класса встречаются крайне редко (grain shifter, вокодер, дециматор, isolator & distortion, broken modulation, talk-filter, mid pitch shifter).
Помимо встроенного сэмплера в память KP3 также прописаны синтезаторные функции: Pad Drum 1/2, Unison Saw Bass, Noise Synthesizer & Looper. Вам трудно представить, как все это многообразие удалось уместить, в небольшой черной коробочке без потерь эргономики и качества звучания? Но факт остается фактом: при цене 13–14 тысяч рублей этот прибор открывает практически безграничные возможности для расширения привычных творческих рамок. Изначально KP3 позиционируется как оборудования для диджеев, что накладывает определенные особенности на его архитектуру и начинку. Но практика показала, что сенсорное управление в сочетании с функцией сэмплирования притягивает не только любителей покрутить пластинки, но и гитаристов, битбоксеров, клавишников, певцов и просто любителей пожужжать, не выходя из дома.
На YouTube, введя в поиск запрос «Kaoss Pad 3», можно найти сотни роликов о том, как различные люди, от супер-известных NIN, до молодых экспериментаторов, используют KP3 в невероятных сочетаниях, извлекая из него космическое многообразие звуков.
В самом начале я использовал KP3 просто как эффектор в режиме direct в разрыве между микшерным пультом и усилителем. Скажу честно, что для меня, как для опытного пользователя различных устройств, поначалу несколько смущала индикация пиков. В KP3 она реализована достаточно просто: один диод мигает несколькими цветами – зеленый, оранжевый и красный. Но все, что на первый взгляд воспринимается как минусы, — это всего лишь лишние 5 минут вашего времени на понимание, так как Kaoss Pad 3 это прибор для тех, кто сначала думает, а потом делает. Трех режимов отображения уровня входящего сигнала оказалось вполне достаточно. Моими любимыми эффектами сразу стали nod3, dly3, lop3, для нашего стиля музыки эти программы оказались как нельзя кстати.
Через день после первого включения я решил проинсталлировать компакт диск внутри коробки и открыл для себя KP3 с совершенно новой для себя стороны – сэмплер с картой SD.
Сначала через очень удобный интерфейс, выполненный в стиле самого прибора, я записал на карту в 128 Мб (прибор поддерживает SD до 2 Гб) несколько сэмплов – ударный луп, акапеллу из трека, глитчи и гитарный луп. Несмотря на то, что изначально все лупы были разного темпа, прибор воспроизводил их синхронно, т. е. сработала функция автоматической подгонки, это оказалось очень удобно. А еще немного позже, после обновления оперционной системы прибора до версии 2.0, семплерная часть стала радовать еще больше. Я даже научился играть треки полностью на KP3, это очень круто выглядит. Это очень важная особенность политики компании Korg: новые операционные системы для продуктов реально расширяют функционал прибора очень полезными нововведениями, а предоставляются они бесплатно. Приятно чувствовать такую заботу о пользователе.
Во время выступления с помощью одного устройства, мне c легкостью удавалось создавать такое количество спецэффектов, что другие артисты, понимая, откуда это звучит, спрашивали, где можно купить такой же! Я подумал, если с одним прибором можно делать такое, то что же будет, если их станет два? К тому времени KP3 уже активно продавался в России, в 2007 году я купил через сайт muztorg.ru свой второй KP3. Менее чем через неделю, мне пришла посылка с долгожданной обновкой!
Итак, сейчас я каждое выступление, будь то диджей-сет или лайв, не выпускаю из рук два прибора KP3. Если я играю диджей-сет, то использую приборы в разрыве с вертушками — один слева, другой справа. Иногда включаю их последовательно. Это позволяет широко использовать сэмплерные возможности — я получаю сразу 8 пэдов для записи входящего сигнала.
Сейчас, в 2008 на лайв-выступлениях мы используем консоль Korg Zero8 (о ней я расскажу в следующий раз). Так вот, в ней как раз очень кстати пришлись две дополнительные стерео aux-линии для подключения внешних эффекторов, в которые я вставляю оба KP3. Во время перфоманса в дело идут почти все возможности обоих приборов.
Для каждого трека из выступления существуют файлы *.kpa, с акапеллами, драм лупами и заранее подготовленными сценами обработки. К примеру, в одном треке мы вставляем микрофон прямо в KP3, обрабатываем встроенным вокодером, сэмплируем на лету и используем кусочки голосовых слайсов синхронно с основной партией трека, играющего с Ableton Live. Вы спросите, что же мешает писать и обрабатывать через консоль непосредственно в Ableton?
Ответ прост — стабильность и эргономика. Кто бы что ни говорил, но намного удобнее и надежнее распределять задачи на выступлении между устройствами. Семплинг и обработка в KP3 реализована на высшем уровне и не виснет (железо вообще имеет такое отличительное от софта свойство в большинстве случаев). В нашем сетапе Ableton воспроизводит партии треков чистым звуком, без обработки. Все эффекты мы вывели наружу в два KP3 и встроенную обработку Zero8.
Мой личный совет: если есть возможность разгрузить процессор, переместив часть задач на железо (синтез, обработка, семплинг), делайте это, даже если вы считаете, что шансы на то, что ваш перфоманс зависнет или затормозит во время звукового экстаза на многотысячном танцполе очень малы, не стоит рисковать.
Итак, подытожим:
Korg Kaoss Pad 3 Вам жизненно необходим если:
Вам надоел стандартный звук популярной диджейской техники.
Вам нужен зубодробительный эффектор с огромным количеством программ и расширенными возможностями сэмплинга.
Вы любите отличаться и удивлять, как музыкой, так и подачей.
Вы уверенно смотрите в будущее — в сторону сенсорных технологий.
Вы бы не хотели тратить на это большую сумму.