

www.krups.com
09
7
04
m
a
q
b
p
c
d
e
f
g
h
o
1 cup
i
j
k
l
n
r
s
1
2 3
4
7
10
5 6
8
11
9
=
x1
x2
=
10
13
04
12
14
14
15
17a 17b
19
20
16
18
21
10
13
04

Espresso XP4050
English 6
Instructions for Use
Warranty
Guarantee of Performance
Français 17
Mode d’emploi
Garantie
Garantie de rendement
Español
Español 28
Instrucciones de uso
Garantía
Garantía de rendimiento
5

English
IMPORTANT SAFEGUARDS
When using electrical appliances, basic safety precautions should
always be followed to reduce the risk of fire, electric shock and/or
injury to persons, including the following:
A. Read all instructions.
B. Do not touch hot surfaces. Use handles or knobs.
C. To protect against fire, electric shock and injury to persons, do
not immerse cord, plugs or appliance in water or other liquid.
D. Close supervision is necessary when any appliance is used by or
near children.
E. Unplug from outlet when not in use and before cleaning.
Allow to cool before putting on or taking off parts, and before
cleaning the appliance.
F. Do not operate any appliance with a damaged cord in order to
avoid a hazard or plug or after the appliance malfunctions, or
has been damaged in any manner. Return appliance to your
nearest authorized KRUPS Service Center for examination,
repair or adjustment (see Limited Warranty).
G. The use of accessory attachment not recommended by KRUPS
may result in fire, electric shock or injury to persons.
H. Do not use outdoors.
I. Do not let cord hang over edge of table or counter or touch hot
surfaces.
J. Do not place on or near a hot gas or electric burner, or in a
heated oven.
K. To disconnect, turn switch to “OFF”, then remove plug from
wall outlet.
L. Do not use appliance for other than intended use.
M. Use extreme caution when dispensing hot steam.
6

SAVE THESE INSTRUCTIONS
CAUTION
A. This appliance is for household use only. Any servicing other
than routine cleaning and user maintenance should be
performed by authorized KRUPS service personnel only (see
Limited Warranty).
B. Do not immerse base in water.
C. To reduce the risk of fire or electric shock, do not remove the
base of the machine. There are no user serviceable parts inside.
Repairs should be performed by authorized KRUPS service
personnel only.
SPECIAL CORD SET
INSTRUCTIONS
Regarding your Cord Set:
A. A short power supply cord is provided to reduce risks resulting
from becoming entangled in or tripping over a longer cord.
B. Longer extension cords are available and may be used if care is
exercised in their use.
C. If a long extension cord is used, (1) the marked electrical rating
of the extension cord should be at least as great as the electrical
rating of the appliance, (2) the longer cord should be arranged
so that it will not drape over the counter top or table top where
it can be pulled on by children or tripped over.
This appliance has a polarized plug (one blade is wider than the
other). To reduce the risk of electric shock, this plug is intended to
fit into a polarized outlet only one way. If the plug does not fit
fully in the outlet, reverse the plug. If it still does not fit, contact a
qualified electrician. Do not attempt to modify the plug in any
way.
7

Espresso Coffee
Your new Krups espresso machine has been
constructed to make café quality espresso,
cappuccino, and latte at home.
Espresso is a style of coffee that comes from a
unique process, not a particular type of coffee
bean. Hot water, under pressure, is passed
through tightly packed, finely ground coffee.
The resulting liquid is rich, dark, and extremely
flavorful: the concentrated essence of the
coffee bean.
Espresso is not served in regular coffee cups,
but in small 1.5-oz «shots». The perfect
espresso shot is topped by beautiful, thick,
golden foam known as crema, a product of
the natural oils in the coffee bean, and the
source of its rich flavour and aroma.
It is important to note that your espresso
coffee must be both well roasted coffee and
correctly ground. If you cannot buy ground
espresso coffee, use a coffee grinder to grind
the beans. The coffee must not be ground
too fine. It must be slightly granulated, with a
consistency somewhat between flour and
sugar. Too fine a grind results in bitter, overextracted espresso and a risk of blocking the
grid of the brewing head and the filter; too
coarse and the espresso will be weak and
under-extracted.
In addition to the coffee you use, the other
three factors that determine perfect espresso
results are water, temperature and pressure.
Your Krups machine ensures all three are
precision-controlled by expertly designed
technology. What you must ensure is that the
water you use is freshly-drawn (so that it has
not had time to stagnate in the air), without
any chlorine odor and at a fairly cold
temperature.
The second myth is that drinking espresso will
keep you awake all night. Actually, despite its
strong flavour, espresso contains less caffeine
than regular coffee; typically 60-80 mg per
shot compared to 80-100 mg per cup of
regular coffee due to espresso’s longer, darker
roasting.
And finally, many people think that espresso
takes too long to prepare. The truth is, as the
name implies, an espresso is intended to be
served quickly, without elaborate preparation.
As you will discover, your Krups espresso
machine has been intuitively designed for easy
use and built for the long term.
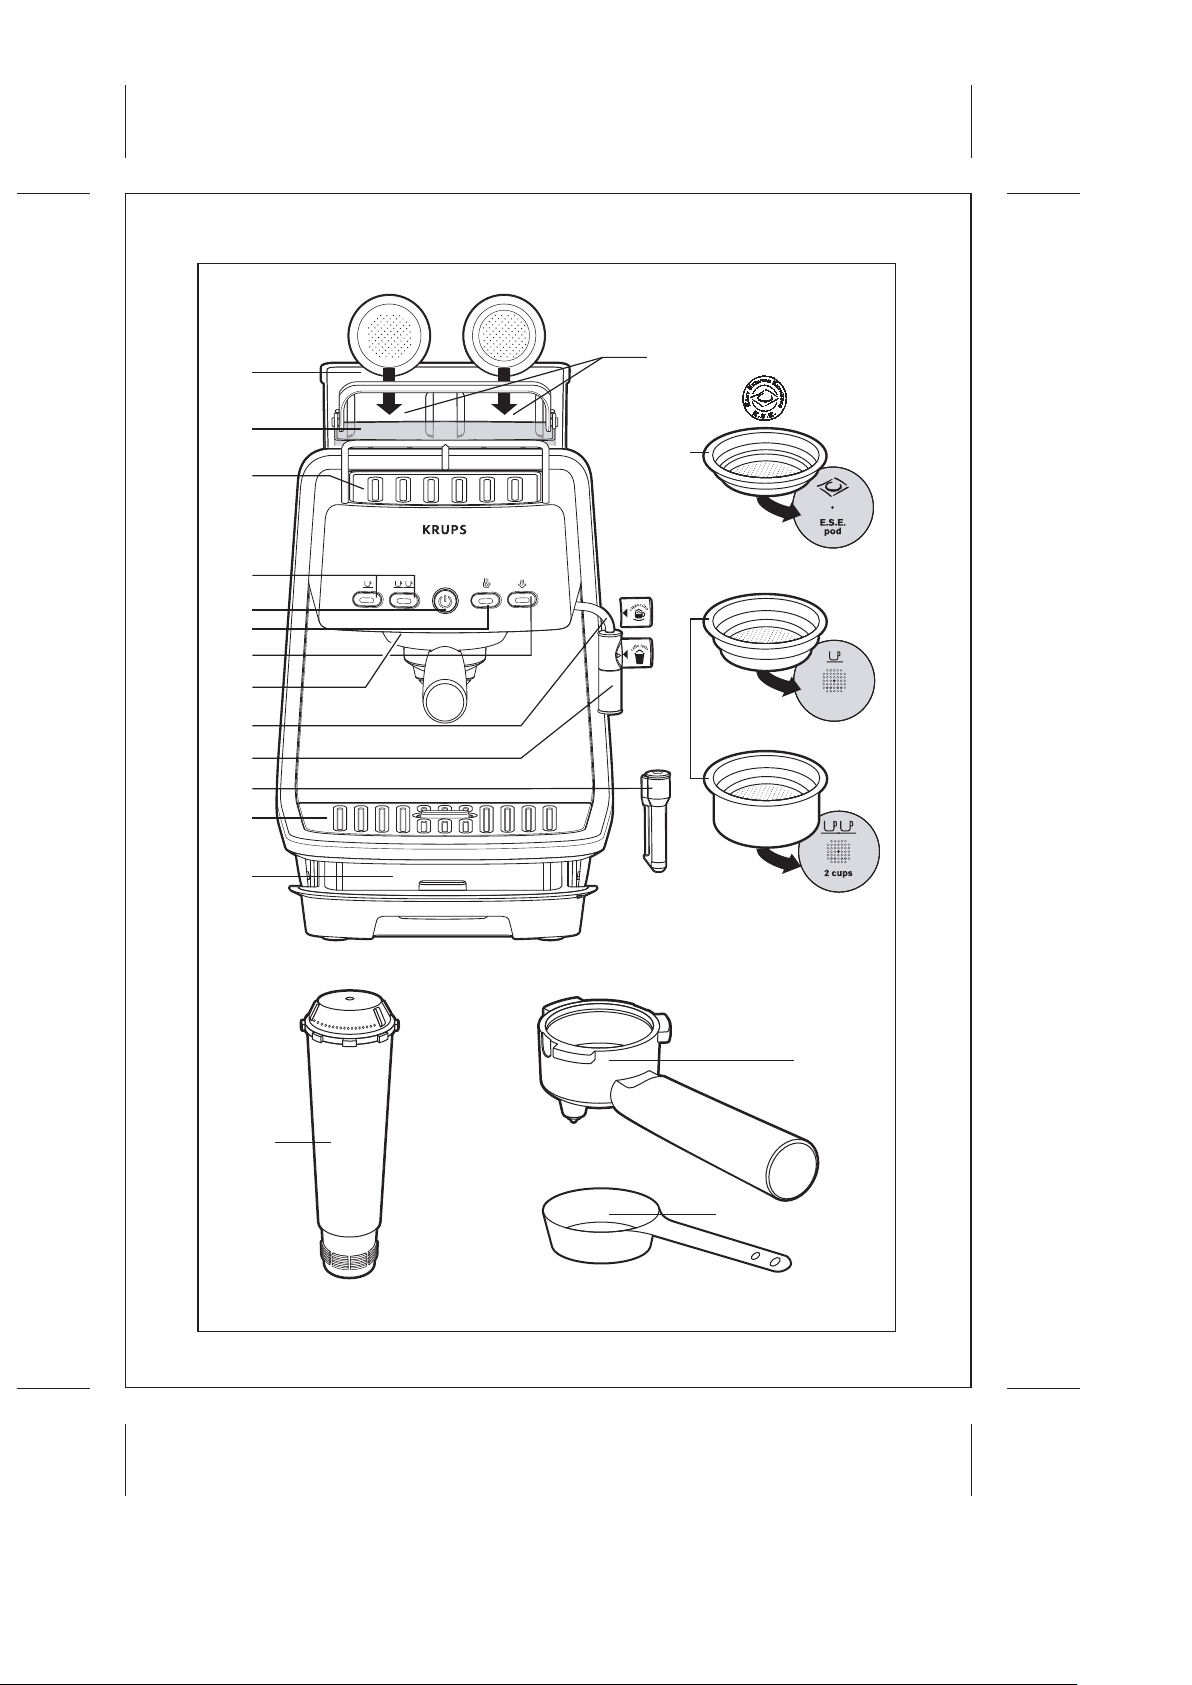
Description
a Tank lid
b Removable water tank
c Warming plate for cups
d Coffee selection buttons
e Start / Stop switch with temperature
control light (blue)
f Hot water button
g Steam button
h Brewing head
I Steam nozzle
J Auto Cappuccino accessory
k Perfect froth accessory
l Grid
m Drip tray
n Filter holder
o Filter for one or two cups (ground
coffee)
p E.S.E. filter
q Storage for filter sieves
r Claris water filter (optional)
s Measuring spoon
There are a number of misconceptions
surrounding espresso. The first is that
espresso should be bitter and burnt tasting.
In fact, the ideal espresso shot should be
aromatic, bittersweet (not bitter) and
assertive, with a lingering aftertaste.
8
Getting Started
To successfully enjoy the full benefits of your
new Krups espresso machine, please carefully
read these instructions in their entirety before
using this product.

• Place your espresso machine on a stable,
heat resistant surface away from, for
example, an electrical heating plate or near a
flame.
• Plug the machine into a grounded electrical
socket. Verify that the voltage indicated on
the technical specifications on the bottom of
the unit corresponds to your electrical
installation.
• Ensure the drip tray and drip tray grid are in
place when using the machine.
Before using your machine for the first time,
clean the system completely as follows:
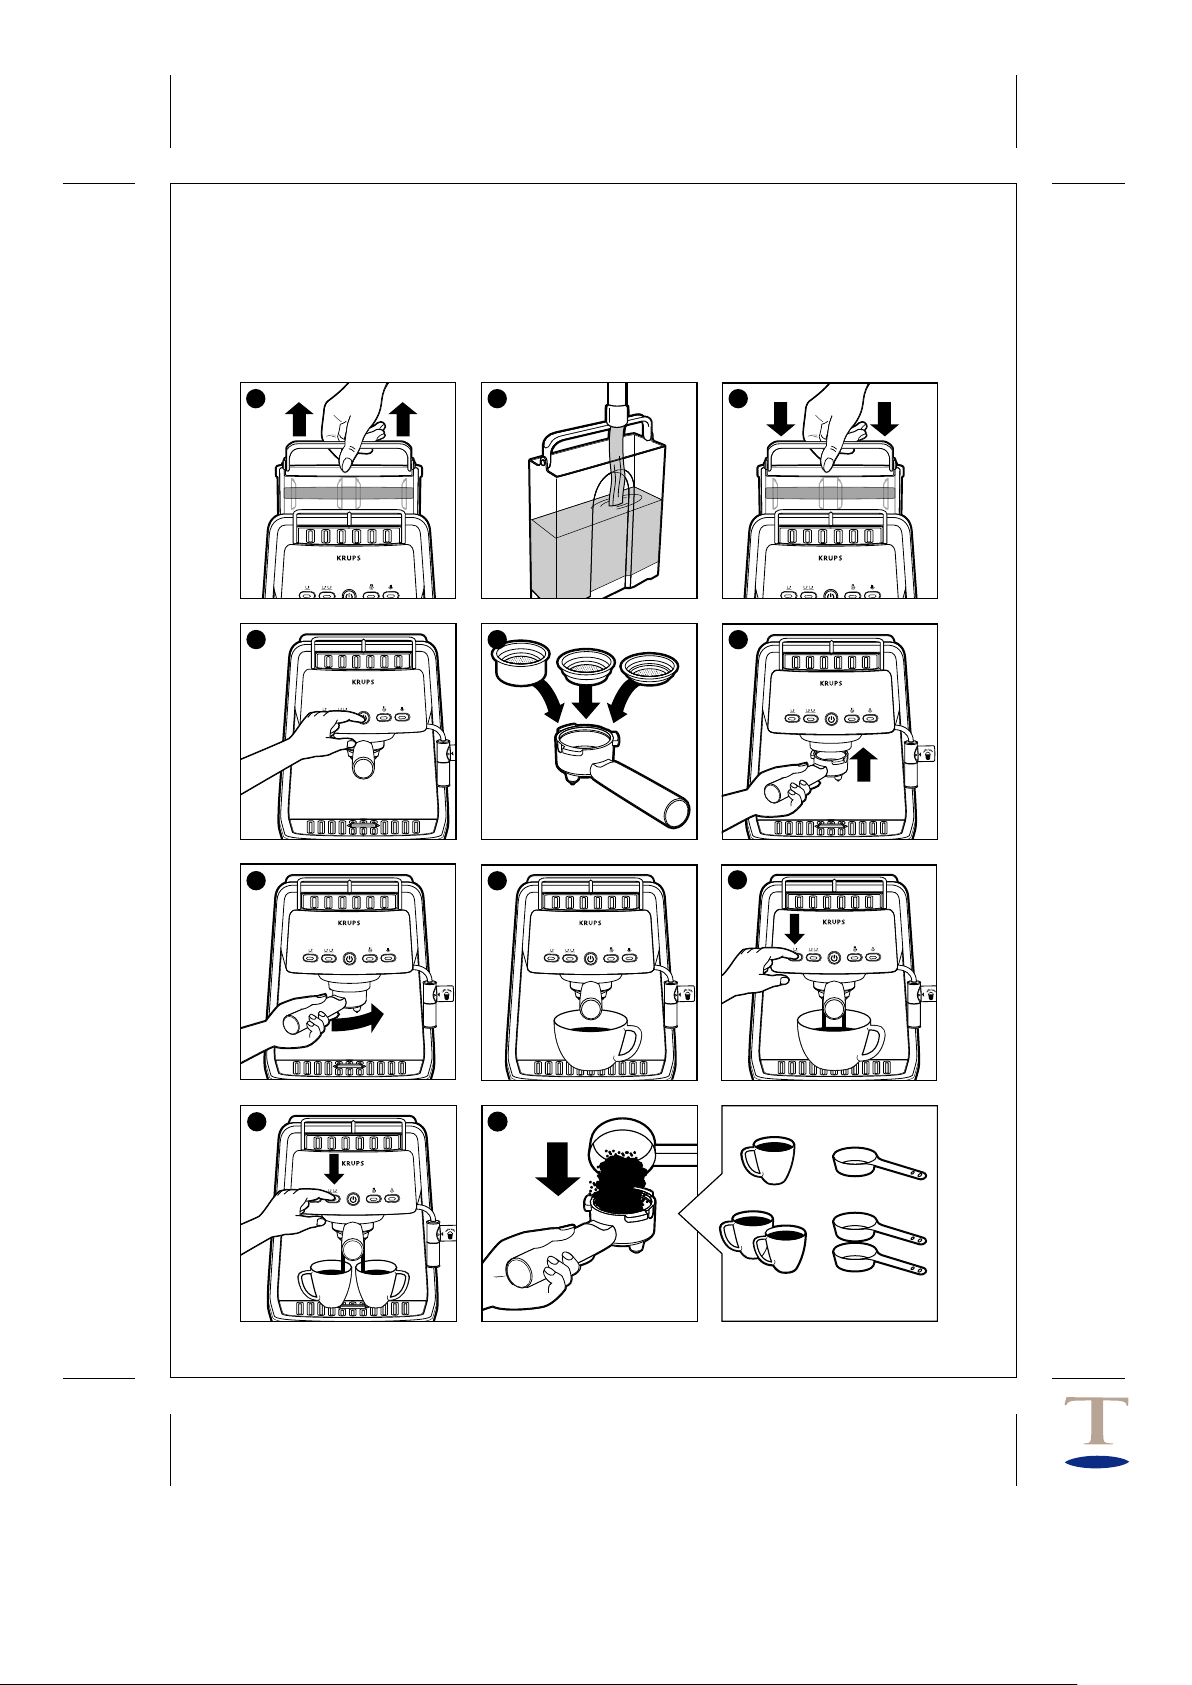
• Open the lid and lift out the water container
using the handle (1). Fill the water container
with fresh, cold water (2).
• Place the water container back into the
machine by positioning it firmly in the water
container compartment (3) and close the lid.
• Turn on the machine (4). The start/stop
switch will blink.
• Two filters are set in the tank lid.
• Place one of the filter baskets in the filter
holder (5). Then put the filter holder up
against the machine’s brewing head.
• To ensure that the filter holder is in the
correct position, turn the handle so it points
to the left at a 45 degree angle (6), place
the filter holder flat against the brewing
head, then turn the handle towards the right
(7) as far as it can go.
• Place a container, as large as possible,
beneath the filter holder (8).
• As soon as the start/stop switch begins to
glow continuously, the coffee selection
buttons will glow continuously.
The machine is ready to operate
• Pressing the button for two coffees
(10) will now cause water to run through
the machines pipes.
Repeat this process five times.
As an accessory, there is a filter cartridge
(N° art. F088) not delivered with the
machine.
Using the various functions of
your espresso machine
1. MAKING ESPRESSO
. WITH GROUND COFFEE
For best results, we recommend that you first
pre-heat the accessories (filter holder, filter
basket and cups) without putting in
ground coffee. To do this :
• Fill the water container with fresh, cold
water (1) (2) (3) and turn on the machine
(4).
• Put the filter holder and an empty filter
basket in place (6) (7), and place the
espresso cups underneath.
• As soon as the coffee selection buttons
begin to glow continuously, the machine is
ready to operate.
• Choose one of the coffee selection button
or
• The cups will fill with hot water. Once filled,
empty them.
After making your first espresso and the
machine is warmed, the espresso cups can
then be pre-heated on the cup warming plate.
. Preparing an espresso :
• Fill the water container (1) (2) (3) and turn
on the machine (4).
• Put the filter basket for one or two cups into
the filter holder (5).
• Place some ground coffee in the filter basket
(1 or 2 measuring scoops), and then tamp it
down firmly; the coffee should reach the lip
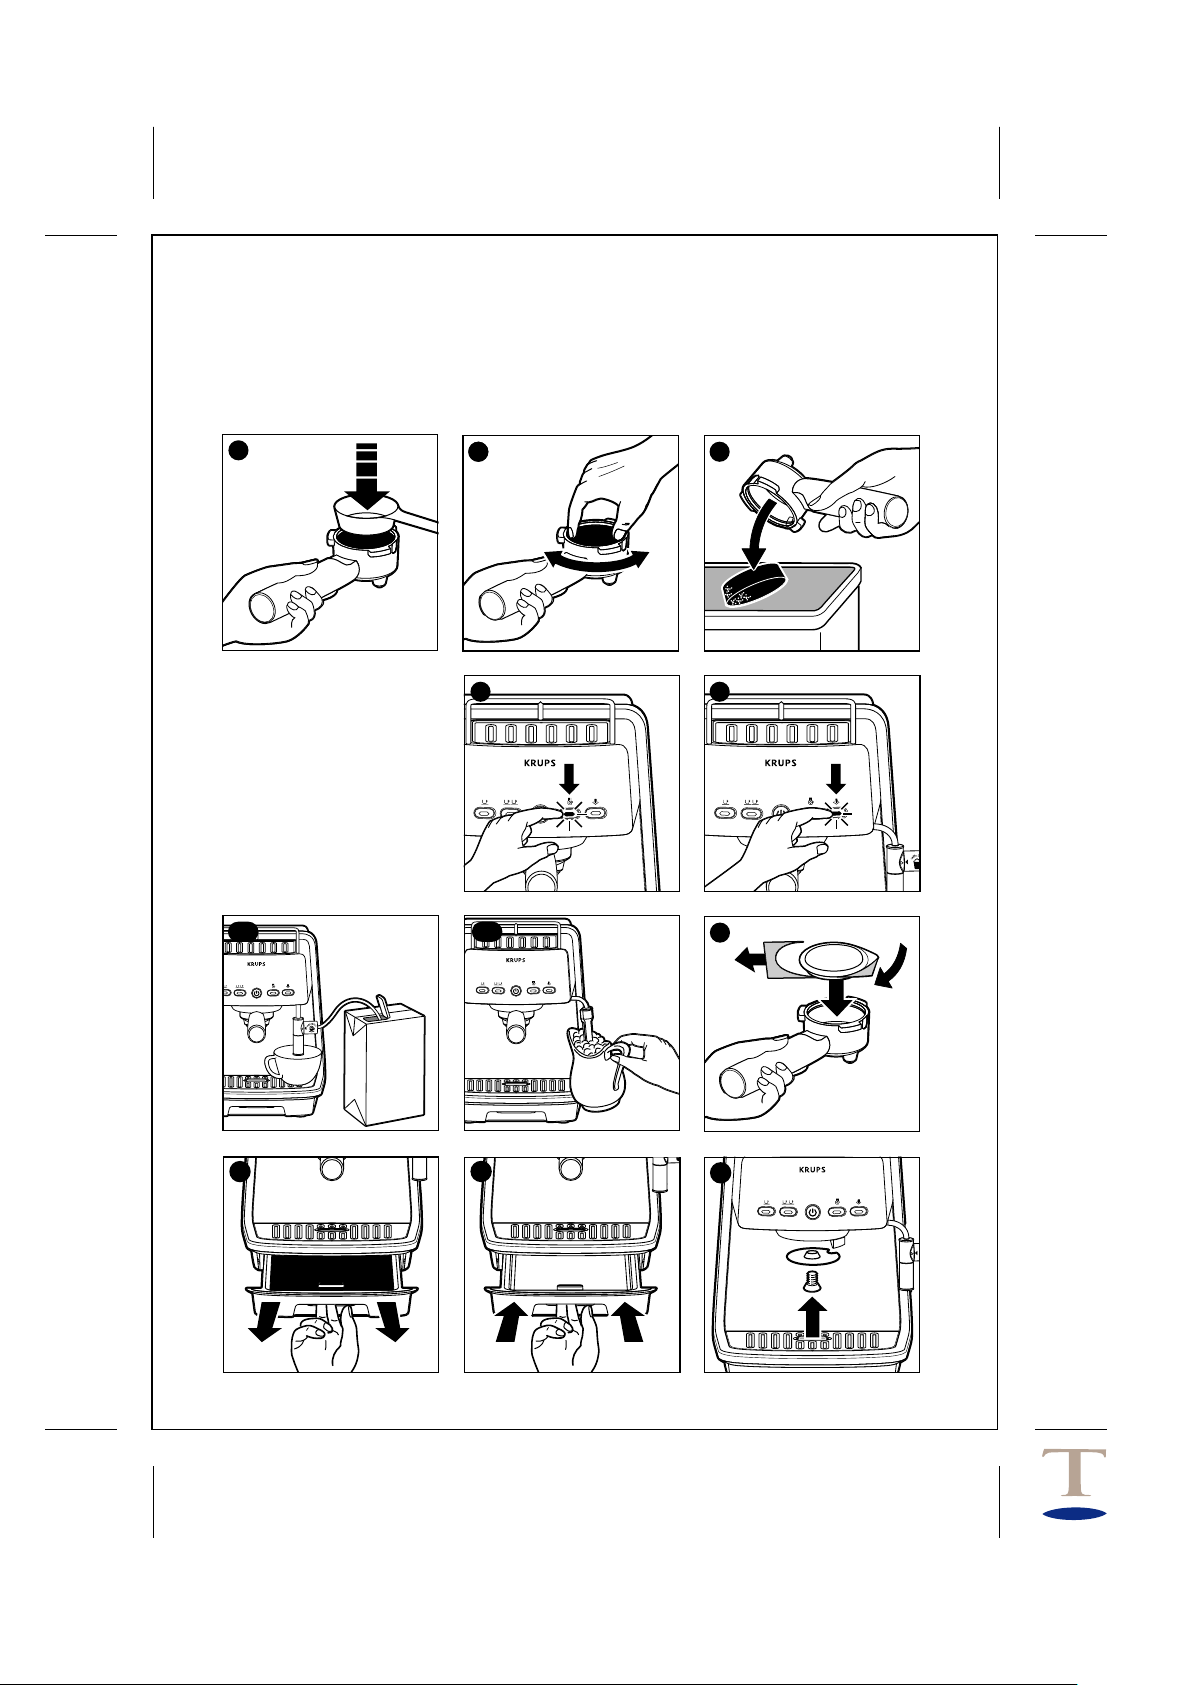
of the filter (11) (12).
• Remove any ground coffee which is lying
around the filter (13).
• Replace the filter holder into the machine.
Turn the filter holder until it is firmly locked
into place (6) (7).
• Place one or two espresso cups beneath the
filter holder.
As soon as the coffee selection buttons begin
to glow continuously, the machine is ready to
operate
Your machine is already preprogrammed for
the preparation of one or two cups of
espresso.
(9) (10).
9

• Press your choice of coffee size by pressing
the respective coffee selection button
(9) (10).
• When the programmed quantity is reached,
espresso stops running automaticly.
• Remove the filter holder and the filter from
the machine and take out the coffee
grounds (14).
The filter basket can be refilled to make more
espressos.
Caution: if the water container is empty
and the pump is running, you will hear a
very distinct noise, which is louder than
the normal operating sound. If this
happens, press the start/stop switch (4).
Check the water container and refill as
needed.
Never let the machine run when the
water container is empty as this can
damage the pump.
USING THE SPECIAL “ E.S.E. “ FILTER
“E.S.E.”, which stands for “Easy Serving
Espresso”, is a selected measure of coffee,
ground and pressed between two filter papers
making a coffee pod which is ready to use (for
example “illy pods). This system makes it
easy for you to prepare your espresso and to
clean the machine.
The E.S.E. system was designed for making
Italian-style “espresso ristretto” or “short
espresso”.
We do not intend, or recommend, that
the E.S.E. servings be used for making
more then one single serving or a “long
espresso”.
We recommend that you take care when
handling and storing the E.S.E. pre-portioned
pods so that they do not become deformed.
For best results, we recommend that you preheat the accessories (filter holder, filter basket
and cups) without any coffee. To do this, see
section entitled “Espresso Making” above.
. Preparing an espresso:
• Fill the water tank (1) (2) (3) and turn on the
machine (4).
Setting the E.S.E. pod (18).
Tear excess paper from pod at perforated
edge. Place the E.S.E. pod with the RED
MARKING FACE DOWN (bend the paper
10
corners down) in the E.S.E. filter holder fitted
with its own filter.
or
• Take care to put all the paper inside the filter
or you may have some drips.
Placing the E.S.E. pod correctly will create a
richer, thicker crema.
Locking the handle tightly and properly will
also help avoid leakage from the filter holder
and ensure a better brewing cycle.
Place the filter holder inside the brewing head
and firmly turn the handle as far right as
possible (6) (7) (8).
As soon as the coffee selection buttons
commence to glow continuously, the machine
is ready to operate.
• Press the single serving coffee button
• When the recommended quantity of coffee
has been reached (35ml), press the coffee
button
(9) again if suitable volume was
not preprogrammed.
• Remove the filter holder from the brewing
head and throw away the used coffee pod.
NOTE: All pods (such as those sold by
Starbucks and Illy ) can be used in your
Krups XP 4050 as long as they are E.S.E.
standard pods.
illy is a registered trademark of illy espresso of the
americas, inc.
Starbucks is a registered trademark of the
Starbucks Coffee Company.
2. PROGRAMMING YOUR MACHINE:
Should you wish to alter the preprogrammed
quantity (50ml per cup, manufacturing
setting) of espresso filled into one or two
cups, proceed as follows:
• Fill the water container (1) (2) (3) and turn
on the machine (4).
• Put the filter basket for one or two cups into
the filter holder (5).
• Place some ground coffee in the filter basket
(1 or 2 measuring scoops), and then tamp it
down firmly; the coffee should reach the lip
of the filter (11) (12) or a E.S.E. pod in the
E.S.E. filter (18).
• Remove any ground coffee which is lying
around the filter (13).
• Replace the filter holder (6) (7).
(9).

• Place one or two cups beneath the filter
holder.
As soon as the coffee selection buttons begin
to glow continuously, the machine is ready to
operate.
• Hold down either the one or two cups
button
coffee button and start/stop switch will
begin to blink.
• When the desired quantity of espresso has
run through, stop the machine by pressing
the coffee button or
The quantity that just ran through into your
cup is now automatically programmed into
the machine.
or
(9) (10) (>3 sec). The
(9) (10).
3 . HOT WATER PREPARATION
You can prepare hot water with this machine.
• Fill the water container (1) (2) (3) and turn
on the machine (4).
• Place the cup beneath the auto cappuccino
accessory.
As soon as hot water button commences to
glow continuously, the machine is ready to
operate.
(15).
(15).
• Press the hot water button
• When the desired quantity of water has run
through, stop the machine by pressing again
the hot water button
4. STEAM FUNCTION FOR PREPARING CAPPUCCINO
LATTE
AND
The thumping noise which occurs while steam
is being produced comes from the intermittent regulation of the pump and has no effect
on the proper working of the machine.
Caution: during and after use of the
machine, the metallic parts of the auto
cappuccino accessory can become
extremly hot.
It is best to use fresh, skim or low-fat, well
chilled milk. The milk container must also be
cold (do not run it under hot water before
frothing the milk).
. Using the Auto Cappuccino accessory
The auto cappuccino accessory makes it easy
to produce steamed frothy milk for making
cappuccino, latte or even hot chocolate.
• Fill the water container with fresh, cold
water (1) (2) (3) and turn on the machine
(4).
• Put the auto cappucino accessory in place on
the steam nozzle.
• Place a cup under the auto cappuccino
accessory.
• Pour about 100 ml of cold milk into a
container.
• Insert the flexible tube into this container or
directly in the milk (17a).
Please note the straight cut end of tube must
fit inside auto cappuccino device and irregular
end dipped in the milk.
• Turn the setting knob on the auto cappuccino accessory to the position ‘cappuccino’
or ‘latte’.
• When the machine is ready (start/stop
switch glows continously), press the steam
button
When the steam button glows continuously
again, the machine is now ready for steam.
• Press the steam button
• Once the desired level of froth has been
produced, press the steam button again to
stop
Follow this cleaning operation in order to
prevent the milk from drying on the auto
cappuccino accessory:
• Place a cup under the auto cappuccino
accessory
• Immerse the flexible tube into a clean
container 1/3 full of water.
• Press the steam button
the water has run through, press the steam
button again
• Next, clean the auto cappuccino accessory
with a damp cloth. We recommend that
you clean the auto cappuccino accessory
immediately.
For more thorough cleaning of the auto
cappuccino accessory, please refer to the
section below entitled «Cleaning the
machine».
If you wish to make an espresso immediately
after steaming milk, the machine must first be
allowed to cool down in order to achieve the
correct temperature required to prepare an
espresso.
(16), and it will begin to blink.
(16).
(16) .
(16) and when all
(16) to stop.
11

• Machine automatically cools down when
pressing the coffee button (one or two cups)
— When cooling down, the start/stop button
blinks and hot water automatically flows
into drip tray . When correct temperature is
reached, the coffee selection buttons will
glow continously and the machine is ready
to make espresso.
. Using the perfect froth accessory as an
alternative to the auto cappuccino
accesssory.
• Replace the auto cappuccino accessory with
the perfect froth accessory.
• Fill the water container with fresh, cold
water (1) (2) (3) and turn on the machine
(4).
• When the machine is ready (start/stop switch
glows continuously), press the steam button
(16), and the start/stop switch will begin
to blink.
When the steam button glows continuously
again, the machine is ready for steam.
• Immerse the perfect froth accessory in the
milk to be heated (we recommend that a
stainless steel container with a capacity of
about 0,5 litres be used).(17b)
• Hold the container under the perfect froth
accessory in such a way that the tip is
immersed in the milk.
• Press the steam button
container steady during this operation. Do
not allow the tip of the perfect froth
accessory to touch the bottom of the
container as this will obstruct the steam
output.
• Once the desired level of froth has been
produced, press the steam button
again to stop.
Follow this cleaning operation in order to
prevent the milk from drying on the auto
cappuccino accessory:
• Submerge the perfect froth accessory in a
container with water.
• Press the steam button
the water has run through, press the steam
button again
• Wipe the perfect froth accessory with a
damp cloth.
(16) to stop.
(16). Keep the
(16)
(16) and when all
Cleaning the Machine
— Never wash your espresso machine
accessories in the dishwasher.
After use, the water tank must be emptied.
. Drip tray
If several espressos are being prepared one
after the other, the drip tray should be
emptied from time to time (about once every
7 — 8 espressos) (19). The presence of water is
normal and does not signify a leak. If
necessary, clean the drip tray and its grid with
water and a little non-abrasive washing-up
liquid, rinse and dry. Replace it correctly (20).
. The brewing head, the filter and the
filter holder
These must be cleaned after each use. All you
need to do is wipe with a damp cloth over the
brewing head of your machine and to wash
the other accessories in water and a little nonabrasive dishwashing liquid, rinse and dry.
If the brewing head is heavily clogged up,
unscrew the grid, clean it and refit it, pressing
down firmly (21).
When your espresso machine is not being
used, do not leave the filter holder on the
machine as it will cause unnecessary wear of
the gasket
. The cup warming plate: remove this to
clean it with water and a little non-abrasive
dishwashing liquid, rinse and dry.
. The auto cappuccino accessory
For more thorough cleaning the auto cappuccino accessory can be dismantled from the
machine.
Clean it with water, a little non-abrasive
dishwashing liquid and a small brush. Rinse
and dry it before refitting it.
Please note the direction of fitting the flexible
tube : engage the straight-cut end in the auto
cappuccino accessory.
Descaling
Descalling is necessary to keep your espresso
machine running efficiently.
• As a result descaling of your espresso
machine should be done fairly regularly.
12
Loading…
-
Инструкции по эксплуатации
1
KRUPS XP4050 инструкция по эксплуатации
(9 страниц)
- Языки:Русский
-
Тип:
PDF -
Размер:
751.1 KB -
Описание:
Кофемашина
Просмотр
На NoDevice можно скачать инструкцию по эксплуатации для KRUPS XP4050. Руководство пользователя необходимо для ознакомления с правилами установки и эксплуатации KRUPS XP4050. Инструкции по использованию помогут правильно настроить KRUPS XP4050, исправить ошибки и выявить неполадки.
Русский
- Bedienungsanleitung Krups XP4050
- Krups XP4050 User Manual
- Manual Usuario Krups XP4050
- Mode d’emploi Krups XP4050
- Istruzioni Krups XP4050
- инструкция Krups XP4050
- Krups XP4050の取扱説明書
- Handleiding Krups XP4050
- Manual de uso Krups XP4050
Вам нужна инструкция? Мы поможем Вам ее найти и сэкономить Ваше время.
- 9 stron
- 1.8 mb
Изделие Krups XP4050, а также другие, которыми Вы пользуетесь ежедневно, наверняка вы получили в комплекте с инструкцией обслуживания. Из опыта наших пользователей мы знаем, что большинство из Вас не уделили этому особого внимания. Большая часть инструкций, сразу же после покупки попадает в корзину для мусора вместе с коробкой — это ошибка. Ознакомьтесь с информацией, касающейся инструкции Krups XP4050, которая поможет Вам в будущем сэкономить нервы и избежать головной боли.
Важная подсказка — не забывайте хотя бы раз прочитать инструкцию Krups XP4050
Если вы не хотите каждый раз читать информационные брошюры, касающиеся, тех или Krups XP4050 иных изделий, достаточно, прочитать их раз — сразу же после покупки устройства. Вы получите основное знания, касающиеся поддержания изделия Krups XP4050 в хорошем эксплуатационном состоянии, так, чтобы без проблем достигнуть его планируемого цикла работы. Затем инструкцию можно отложить на полку и вернуться к ней только в случае, если вы не уверены, правильно ли проводится техобслуживание изделия. Правильный уход является необходимым элементом Вашего удовольствия Krups XP4050.
Раз в году пересмотрите шкафчик, в котором держите инструкции для всех устройств, — выбросите те, которыми вы уже не пользуетесься. Это поможет Вам сохранять порядок в своей домашней базе инструкций обслуживания.
Summary of Contents for Krups XP4050
Что находится в инструкции Krups XP4050? Почему стоит ее прочитать?
- Гарантия и подробности, касающиеся техобслуживания изделия
Хорошей идеей будет прикрепить чек к странице инструкции. Если что-то плохое случится во время использования Krups XP4050, у вас будет комплект документов, необходимый для гарантийного ремонта. В этой части инструкции вы найдете информацию об авторизованных сервисных центрахKrups XP4050 а также, как самостоятельно правильно ухаживать за оборудованием — так, чтобы не потерять гарантийных прав. - Указания по монтажу и Setup
Не терять нервов и времени на самостоятельную попытку установки и первого запуска изделия. Воспользуйтесь рекомендациями производителя Krups XP4050 чтобы правильно запустить изделие, без лишнего риска повреждения оборудования. - Информация, касающаяся дополнительных запчастей (входящих в комплект а также являющихся опцией)
Пересматривая эту часть документа вы сможете проверить, доставлен ли ваш Krups XP4050 с полним комплектом аксессуаров. Вы также сможете узнать, какие дополнительные запчасти или аксессуары для Krups XP4050 Вы сможете найти и докупить к своему устройству. - Troubleshooting
Самые частые проблемы, касающиеся Krups XP4050 и методы их решения. Это очень полезная часть руководства по обслуживанию — она позволит Вам сэкономить много времени на поиск решений. 90% проблем с Krups XP4050 повторяется у многих пользователей. - Требования, касающиеся питания и энергетический класс
Информация, касающаяся количества потребляемой энергии, а также рекомендации, касающиеся установки и питания Krups XP4050. Прочитайте, чтобы оптимально пользоваться Krups XP4050 и не использовать большего количества ресурсов, нежели это необходимо для правильной работы изделия. - Специальные функции Krups XP4050
Здесь вы можешь узнать, как персонализировать изделие Krups XP4050. Вы узнаете, какие дополнительные функции могут помочь Вам удобно использовать продукт Krups XP4050 а также, какие функции Вашего устройства оптимальны для выполнения конкретной деятельности.
Как видите в инструкции вы найдете информацию, которая реально поможет Вам в использовании Вашего изделия. Стоит с ней ознакомиться, чтобы избежать разочарований, возникающих из более короткого, нежели предусматривалось, периода исправности изделия Krups XP4050. Если все же вы не хотите копить инструкции в своем доме, наш сайт поможет Вам в этом — вы должны найти у нас руководство по обслуживанию большинства из своих устройств, а также Krups XP4050.
Комментарии (0)
Хорошее руководство по эксплуатации
Законодательство обязывает продавца передать покупателю, вместе с товаром, руководство по эксплуатации Krups XP 4050. Отсутствие инструкции либо неправильная информация, переданная потребителю, составляют основание для рекламации в связи с несоответствием устройства с договором. В законодательстве допускается предоставлении руководства в другой, чем бумажная форме, что, в последнее время, часто используется, предоставляя графическую или электронную форму инструкции Krups XP 4050 или обучающее видео для пользователей. Условием остается четкая и понятная форма.
Что такое руководство?
Слово происходит от латинского «instructio», тоесть привести в порядок. Следовательно в инструкции Krups XP 4050 можно найти описание этапов поведения. Цель инструкции заключается в облегчении запуска, использования оборудования либо выполнения определенной деятельности. Инструкция является набором информации о предмете/услуге, подсказкой.
К сожалению немного пользователей находит время для чтения инструкций Krups XP 4050, и хорошая инструкция позволяет не только узнать ряд дополнительных функций приобретенного устройства, но и позволяет избежать возникновения большинства поломок.
Из чего должно состоять идеальное руководство по эксплуатации?
Прежде всего в инструкции Krups XP 4050 должна находится:
— информация относительно технических данных устройства Krups XP 4050
— название производителя и год производства оборудования Krups XP 4050
— правила обслуживания, настройки и ухода за оборудованием Krups XP 4050
— знаки безопасности и сертификаты, подтверждающие соответствие стандартам
Почему мы не читаем инструкций?
Как правило из-за нехватки времени и уверенности в отдельных функциональностях приобретенных устройств. К сожалению само подсоединение и запуск Krups XP 4050 это слишком мало. Инструкция заключает ряд отдельных указаний, касающихся функциональности, принципов безопасности, способов ухода (даже то, какие средства стоит использовать), возможных поломок Krups XP 4050 и способов решения проблем, возникающих во время использования. И наконец то, в инструкции можно найти адресные данные сайта Krups, в случае отсутствия эффективности предлагаемых решений. Сейчас очень большой популярностью пользуются инструкции в форме интересных анимаций или видео материалов, которое лучше, чем брошюра воспринимаются пользователем. Такой вид инструкции позволяет пользователю просмотреть весь фильм, не пропуская спецификацию и сложные технические описания Krups XP 4050, как это часто бывает в случае бумажной версии.
Почему стоит читать инструкции?
Прежде всего здесь мы найдем ответы касательно конструкции, возможностей устройства Krups XP 4050, использования отдельных аксессуаров и ряд информации, позволяющей вполне использовать все функции и упрощения.
После удачной покупки оборудования/устройства стоит посвятить несколько минут для ознакомления с каждой частью инструкции Krups XP 4050. Сейчас их старательно готовят или переводят, чтобы они были не только понятными для пользователя, но и чтобы выполняли свою основную информационно-поддерживающую функцию.
Просмотр
Доступно к просмотру 9 страниц. Рекомендуем вам скачать файл инструкции, поскольку онлайн просмотр документа может сильно отличаться от оригинала.
-
Espresso           Art. XP4000/XP4020
Deutsch                        6
Turkce                      14
Polski                        21
Cesky                          28
Slovensky                                34
Slovensko                      40
Hrvatski                        46
Romane?te                       52
Magyar                          58
Русский                      65    500
Україньска                  72
84
5
Sommaire.PM6.5           5                           29/11/04, 18:22
-
Expresso4000_russe.qxd  30/11/04  14:14  Page 65
Русский
• В  случае  ненормальной  работы  и  при
Опис                                    выполнении процедуры чистки следует
отключать прибор от сети.
а   Крышка резервуара                  • При отключении прибора запрещается
b   Съемный резервуар для воды           тянуть за шнур питания. Следите, чтобы
шнур  не  зацеплялся  за  острые  углы  и
с   Мармит для подогрева чашек
края мебели.
d   Переключатель режима кофе/пар
• Старайтесь, чтобы нагревающиеся час-
е   Световой индикатор «пуск/стоп»       ти  прибора  (мармит,  держатель  фильт-
(синий)                              ра, паровое сопло, насадка «Капуччино»)
f   Световой индикатор контроля          не  соприкасались  со  шнуром  питания.
температуры (оранжевый)              Не дотрагивайтесь до них руками.
g   Головка кипятильника               • Запрещается окунать прибор в воду.
• Не оставляйте прибор в доступном для
h   Паровое сопло
детей  месте  и  не  оставляйте  свисать
i   Насадка«Капуччино»                   шнур питания.
j   Решетка поддона для стекания       • Выполняйте процедуру удаления наки-
капель                               пи в соответствии с инструкциями.
k   Поддон для стекания капель         • Запрещается  использовать  неисправ-
l   Держатель фильтра                    ный  прибор  или  прибор  с  поврежден-
ным шнуром питания.
m   Фильтр для приготовления одной
или двух чашек (молотый кофе)      • В  случае  повреждения  шнура  питания
или других специальных частей прибора,
n   Фильтр системы «ESE»
их замена выполняется только в техниче-
o   Отделение для хранения фильтров      ском центре фирмы «Крупс». По сообра-
p   Фильтр для очистки воды              жениям безопасности запрещается раз-
бирать прибор.
q   Ложка-дозатор
• Перед  выполнением  рабочего  цикла
убедитесь,  что  держатель  фильтра  до-
веден до упора. Перед снятием держа-
Меры безопасности                       теля фильтра поставьте переключатель
в положение О.
• Перед включением кофеварки «эспрес-  • Не  оставляйте  работающий  прибор  в
со» внимательно прочтите инструкцию.   местах, доступных для детей. Дети и ин-
Данный прибор должен включаться толь-  валиды  могут  пользоваться  прибором
ко в сетевую розетку с заземлением. Убе-  только  под  контролем  взрослых  и  здо-
дитесь, что рабочее напряжение прибо-  ровых людей.
ра,  указанное  на  заводской  табличке,
соответствует напряжению электросети
• Запрещается устанавливать прибор на   Кофе «эспрессо»
горячие  поверхности  (например,  на
электроплитку)  или  вблизи  открытого  Кофе «эспрессо» - гораздо более аромат-
огня.                                ный и крепкий, чем обычный кофе. Его по-
• Так как работающий прибор находится  дают в маленьких чашках, по возможнос-
под давлением, запрещается снимать   ти, предварительно нагретых. При приго-
держатель  фильтра,  содержащий  мо-  товлении вкусного бодрящего черного ко-
лотый кофе, в процессе прохождения   фе «эспрессо» с пенкой горячая вода про-
воды.                                пускается через молотый кофе.
• При  включении  прибора  следует  убе-  Вы  всегда  отличите  кофе  «эспрессо»  от
диться, что поддон для стекания капель  обычного  по  его  аромату  и  характерной
и решетка установлены на место.      пенке. Но для приготовления такого кофе
65  KRUPS
-
Expresso4000_russe.qxd  30/11/04  14:14  Page 66
требуется высокое давление и правильно  • Как только прибор нагреется до нужной
обжаренный, хорошо смолотый кофе. Ес-    температуры, загорится оранжевый све-
ли  вам  не  удалось  купить  молотый  кофе  товой индикатор. Установите переключа-
«эспрессо», то следует смолоть кофейные  тель в положение   (9). Вода из резер-
зерна в кофемолке. Не рекомендуется до-  вуара начинает постепенно стекать.
биваться слишком «тонкого помола». Ко-  • В случае необходимости вы можете ос-
фе должен остаться слегка гранулирован-  тановить рабочий цикл, поставив пере-
ным. Слишком мелкий кофе может засо-     ключатель  в  положение  О.  Опорожнив
рить  решетки  головки  кипятильника  и  посуду,  вы  можете  вновь  продолжить
фильтр и нарушить процесс пропускания    процесс.
воды через кофе.
Из дополнительных принадлежностей
Для  получения  достаточного  количества  можно  использовать  фильтрующий
пены красивого цвета в начале цикла вода  блок (арт. F088, не входит в поставку
стекает достаточно медленно. Это совер-  прибора).
шенно нормальное явление.
Для того, чтобы сварить настоящий кофе
«эспрессо», следует использовать сырую  Различные режимы
воду (не стоявшую в течение долгого вре-  работы кофеварки
мени на воздухе), без запаха хлора и до-  «Эспрессо»
статочно холодную.
1. РЕЖИМ «ЭСПРЕССО»
Перед первым                          . ИЗ МОЛОТОГО КОФЕ
использованием                        Чтобы получить вкусный кофе, рекоменду-
ется сначала подогреть все принадлеж-
Перед  первым  использованием  следует,  ности (держатель фильтра, фильтр и чаш-
не заправляя прибор молотым кофе, про-  ки)  без  заправки  молотым  кофе.  Для
мыть систему подогрева воды чистой во-  этого:
дой в объеме одного или двух резервуа-  • Заполните резервуар водой (1) (2) (3) и
ров.  Для  этого  выполните  следующую   включите прибор (4).
процедуру:
• Установите держатель фильтра (6) (7),
• Откройте крышку и и извлеките резер-   поместите  под  ним  кофейные  чашки.
вуар для воды, взяв его за ручку (1). За-
Как  только  прибор  нагреется  до  нужной
полните его водой (2).               температуры, оранжевый световой инди-
• Вновь  установите  резервуар  и  убеди-  катор погаснет.
тесь, что он плотно встал на место, от-  • Переведите переключатель в положение
крыв  доступ  для  воды.  Закройте  его   (10).
крышкой (3).
• Когда чашки заполнятся горячей водой,
• Включите прибор (4). Синий и оранже-   переведите  переключатель  в  положе-
вый  световые  индикаторы  загораются.  ние О.
Оба фильтра подаются в крышку резер-
вуара.                               Когда прибор нагреется, кофейные чашки
можно подогревать на мармите.
• Установите один из фильтров в держатель
(5). Затем вставьте держатель в головку  . Приготовление кофе «эспрессо»:
кипятильника.                        • Заполните резервуар водой (1) (2) (3) и
• Чтобы правильно установить держатель   включите прибор (4).
фильтра, его следует держать так, чтобы  • Вставьте  фильтр  для  одной  или  двух
ручка была направлена влево (6). Вставь-  чашек в держатель (5).
те держатель в головку кипятильника и по-
верните ручку вправо (7) до упора.   • Загрузите  в  фильтр  одну  или  две  пор-
ции молотого кофе и хорошо утрамбуй-
• Поставьте  под  держатель  фильтра  по-  те  кофе  с  помощью  ложки-доза-тора
суду как можно большего размера (8).   (11) (12).
KRUPS      66
- 1
- 2
- 3
- 4
- 9