

LEICA D-LUX
Instructions
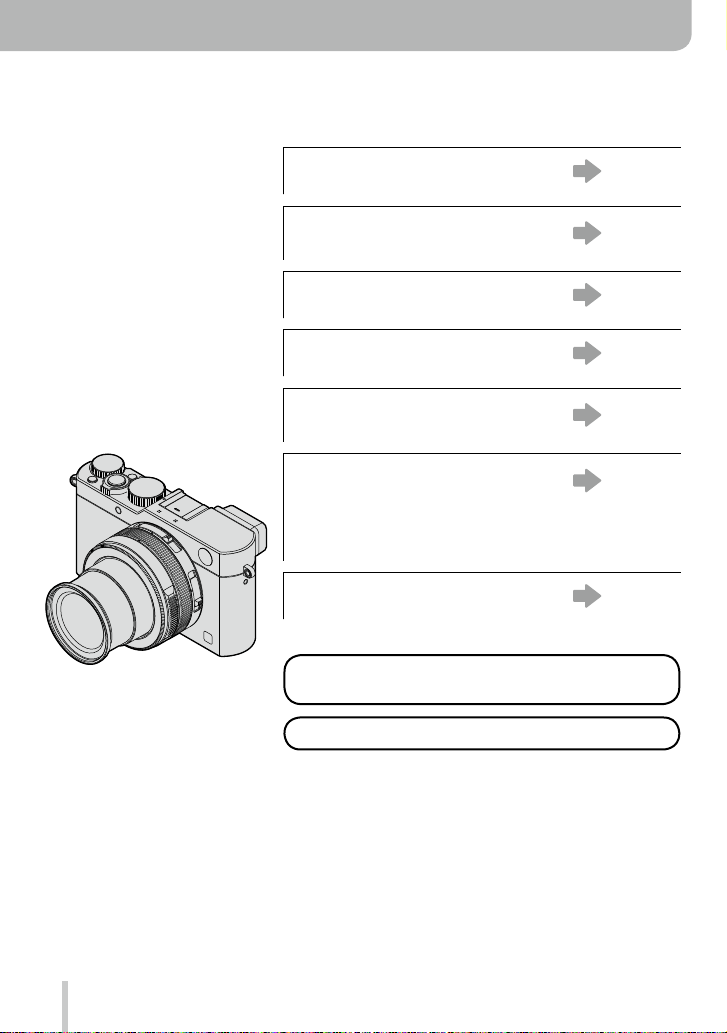
Finding the information you need
In these instructions, you can find the information you need from the following pages.
Table of Contents
Function Name List
“Contents by Function”
The Main Parts
Monitor/Viewfinder Display List
On-Screen Message List
“Message displays”
Menu List
“Menu list”
[Rec] ……………………. P.273
[Motion Picture]……… P.275
[Custom] ………………. P.276
[Setup] ………………… P.278
[Playback] …………….. P.279
Q&A Troubleshooting
For details on how to use these
instructions, see the next page.
Wi-Fi® function →221
P.4 —
P.10 —
P.14 —
P.263 —
P.269 —
P.273 —
P.280 —
2
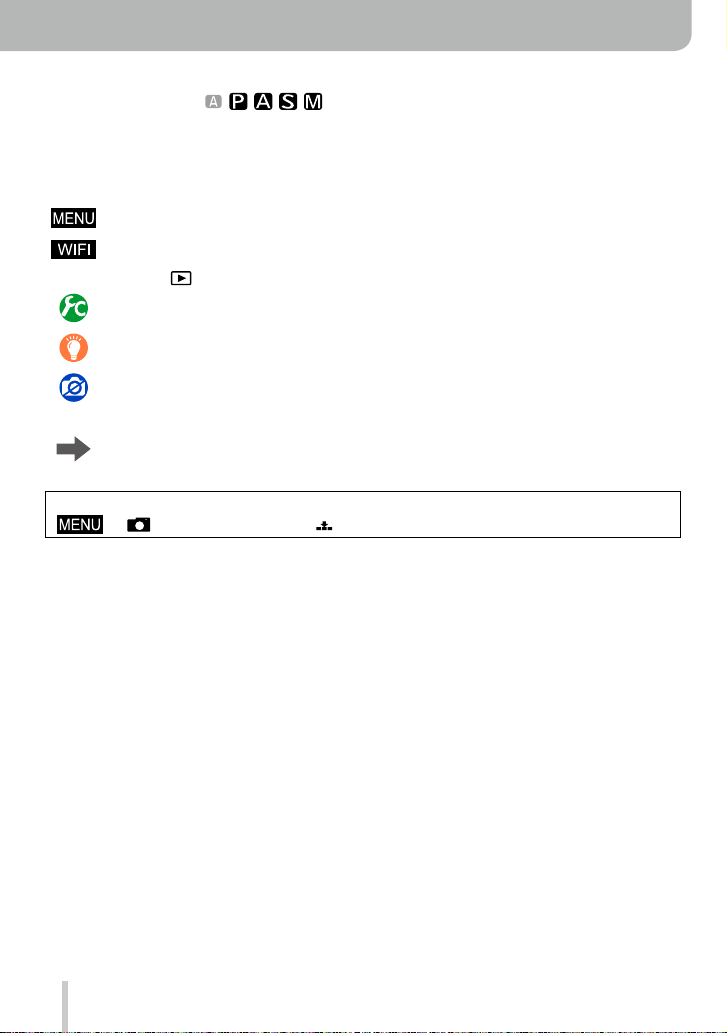
How to use these instructions
Recording mode icons
Recording modes:
In recording modes indicated by black icons, you can select and execute the indicated
menus and functions.
■
About the symbols in the text
Indicates how the menu item can be set after pressing the [MENU/SET] button.
Indicates how the Wi-Fi setting can be made after pressing the [WIFI] button.
[AF/AE], [DISP], [
Settings that can be performed in the [Custom] menu.
Application tips
Conditions in which a particular function cannot be used.
(→00) Indicates the reference page.
Click to view the description on the next page.
In these instructions, steps for setting a menu item are described as follows:
→ [Rec] → [Quality] → [ ]
], etc. Indicate the respectively labeled buttons
3

Table of Contents
■
Finding the information you need ….. 2
■
How to use these instructions ………..3
Before Use
■
Before Use ………………………………….. 12
■
Scope of Delivery ………………………… 13
Preparations
■
Attaching the lens cap and
shoulder strap …………………………….. 19
■
Charging the Battery …………………… 20
Remaining battery capacity …………………..21
Guidelines for the number of recordable
pictures and the operating time ……………..22
■
Inserting and Removing the Battery /
the Card
■
About Cards That can be Used …….. 25
■
Setting Language, Time, and Date
■
Menu Control ………………………………. 31
■
The Quick Menu ………………………….. 34
■
Assigning Frequently Used
Functions to the Function Buttons
■
Changing Settings Using the
Control Ring ……………………………….. 39
………………………………………. 24
Formatting the card (initialization)…………..26
Recording capacity guidelines
(pictures/recording time) ……………………….27
Changing time settings …………………………30
Setting the menu screen background ……..33
Customizing the Quick Menu ………………… 35
Changing the settings assigned to the
control ring ………………………………………….40
… 29
… 37
■
Contents by Function ………………….. 10
■
Accessories ………………………………… 13
■
The Main Parts …………………………….14
[MENU/SET] button / Cursor buttons /
Control dial………………………………………….18
■
The [Setup] Menu ………………………… 41
[Clock Set] ………………………………………….41
[World Time] ………………………………………..41
[Travel Date] ……………………………………….42
[Wi-Fi] ………………………………………………..42
[Beep] ………………………………………………..43
[Live View Mode] …………………………………43
[Monitor Display] / [Viewfinder] ………………44
[Monitor Luminance] …………………………….45
[Sleep Mode]……………………………………….46
[USB Mode] ………………………………………..47
[TV Connection] …………………………………..47
[Menu Resume] …………………………………..49
[Menu Background]………………………………49
[Menu Information] ………………………………. 49
[Language] …………………………………………. 49
[Version Disp.]……………………………………..50
[Self Timer Auto Off] ……………………………..50
[No.Reset] ………………………………………….. 50
[Reset] ……………………………………………….50
[Reset Wi-Fi Settings] …………………………..51
[Format] ……………………………………………..51
■
Entering Text ………………………………. 52
4

Basics
■
How to Hold the Camera ……………… 53
■
Using the Viewfinder …………………… 54
Switching between monitor and
viewfinder……………………………………………54
About Eye Sensor AF …………………………..55
■
Taking Still Pictures …………………….. 56
■
Recording Motion Pictures ………….. 58
■
Selecting the Recording Mode …….. 59
Recording mode
■
Using Snapshot Mode …………………. 75
Taking pictures using the camera
handheld ([iHandheld Night Shot]) …………78
Combining several exposures into a single
picture with rich gradation ([iHDR]) ………… 79
Picture effects (Filter)
Table of Contents
■
Switching Information Displayed
on the Recording Screen …………….. 62
■
Viewing Your Pictures …………………. 67
Viewing motion pictures ……………………….. 70
■
Switching the Display Information
of the Playback Screen ………………… 71
■
Deleting Pictures …………………………. 73
[Delete Single] …………………………………….73
Deleting multiple (up to 100)/all pictures….74
■
Taking Pictures Using the
Exposure Control Modes
, , , and …………………………80
Program Mode …………………………………….81
Aperture-Priority Mode………………………….83
Shutter-Priority Mode …………………………… 84
Manual Exposure Mode ……………………….. 86
Checking the effects of aperture value
and shutter speed ([Preview] Mode) ………. 88
■
Taking Pictures Using Additional
Effects (Filter) …………………………….. 89
5

Picture Quality and Coloring Settings
■
Adjusting the Picture Quality
by Adding an Effect
[Photo Style] ……………………………… 100
■
Adjusting Bright / Dark Sections
[Highlight Shadow] ……………………. 102
■
Setting the White Balance ………….. 103
■
Setting Picture Quality and
Resolution …………………………………107
Changing the aspect ratio of
still pictures ……………………………………….107
Setting the resolution ………………………….108
Setting the compression rate of pictures
([Quality]) ………………………………………….109
Focus and Exposure Settings
■
Using Autofocus ……………………….. 114
Selecting the focus mode
(AFS, AFF, AFC) ………………………………..114
Switching [AF Mode] ………………………….. 115
Changing the position and size
of the AF area ……………………………………121
Setting your preferred focusing
method …………………………………………….. 124
■
Taking Close-Up Pictures ……………126
Focusing range ………………………………….126
■
Manual Focusing ……………………….. 128
MF Assist ………………………………………….131
Table of Contents
■
Using the Picture Correction
Functions Effectively …………………..111
Correcting contrast and exposure
([i.Dynamic])……………………………………… 111
Enhancing the impression of
high resolution ([i.Resolution]) …………….. 111
Combining still pictures with different
exposures ([HDR]) ……………………………..112
Reducing the noise in long exposures
([Long Shtr NR])………………………………… 113
Setting the color space ………………………. 113
■
Focus and Exposure Memory
Lock ………………………………………….. 133
■
Exposure Compensation ……………. 135
■
Setting the ISO Sensitivity …………. 136
Setting the upper ISO sensitivity limit ……137
Setting the ISO sensitivity setting
increments ………………………………………..138
Extending the ISO sensitivity setting …….138
■
Selecting the Exposure Metering
Mode [Metering Mode] ………………. 139
Shutter and Drive Settings
■
Setting the Shutter Type ……………..140
■
Selecting a Drive Mode ………………. 141
■
Using Continuous Mode …………….. 142
■
Using [Auto Bracket] …………………. 145
6
■
Using Aspect Bracketing……………. 147
■
Using the Self-Timer ………………….. 148
■
Creating Panorama Pictures ………. 150

Functions for Specific Subjects and Purposes
■
Taking Pictures Automatically
at Set Intervals
[Time Lapse Shot] ……………………… 153
■
Creating Stop Motion Pictures
[Stop Motion Animation] ……………. 156
■
Making Multiple Exposures
for a Single Picture
[Multi Exp.] ………………………………… 160
■
Disabling Operational Sounds
and the Light Sources at the
Same Time [Silent Mode] ………….. 162
■
Using the Face Recognition
Function [Face Recog.] …………….. 163
■
Recording Profiles of Children
and Pets on Pictures ………………….166
■
Using Screens and Displays for
Specific Recording Conditions …… 167
Stabilizer, Zoom and Flash
■
Compensating Camera Shake ……. 169
■
Using the Lens’ Zoom Function …. 171
Zoom types and use …………………………..172
■
Using the Supplied Flash Unit ……. 177
Attaching the flash unit ……………………….177
Changing the flash control mode ………….180
Changing the flash modes …………………..181
Setting 2nd curtain sync ……………………..183
Flash exposure compensation …………….. 184
Synchronizing the flash output to an
exposure compensation setting for the
ambient light ……………………………………..184
Recording Motion Pictures
Table of Contents
■
Recording Motion Pictures ………… 185
Setting the resolution and the
frame rate …………………………………………185
How to focus when recording a motion
picture ([Continuous AF]) ……………………. 186
Recording motion pictures …………………..187
Recording motion pictures in 4K ………….. 191
Creating a high-resolution still picture
from a 4K motion picture [4K PHOTO] ….192
■
Taking Still Pictures While a Motion
Picture is Being Recorded …………. 195
7
■
Using the [Motion Picture] Menu … 196
[4K PHOTO] ………………………………………196
[Rec Quality] ……………………………………..196
[Picture Mode]……………………………………196
[Continuous AF] …………………………………196
[Mic Level Disp.] ………………………………..197
[Mic Level Adj.]…………………………………..197
[Wind Cut] …………………………………………197

Playing Back and Editing Pictures
Table of Contents
■
Viewing Group Pictures ……………..198
■
Capturing Still Pictures From
Motion Pictures …………………………. 200
■
Using the [Playback] Menu ………… 201
[Slide Show] ……………………………………… 201
[Playback Mode] ………………………………..203
[Location Logging] ……………………………..204
[RAW Processing] ………………………………205
[Title Edit] …………………………………………. 208
[Text Stamp] ………………………………………209
[Video Divide] ……………………………………. 211
Wi-Fi
■
Wi-Fi® and NFC Functions ………….. 221
■
What You Can do With the
Wi-Fi Function …………………………… 224
■
Operating the Camera by
Connecting it to a Smartphone …… 225
Installing the smartphone/tablet app
“Leica Image Shuttle”………………………….225
Connecting to a smartphone………………..226
Connecting to a smartphone using the
NFC function …………………………………….. 230
Taking pictures via remote control with a
smartphone ………………………………………. 231
Playing back pictures in the camera on a
smartphone ………………………………………. 232
Saving pictures from the camera to the
smartphone ………………………………………. 232
Easily transferring pictures from the
camera …………………………………………….. 233
Sending pictures from the camera to
social networking services …………………..234
Adding location information to pictures
in the camera from a smartphone ………… 234
Operating the camera to send pictures
to a smartphone ………………………………… 236
[Time Lapse Video] ……………………………. 212
[Stop Motion Video] ……………………………212
[Resize] ……………………………………………. 213
[Cropping] …………………………………………214
[Rotate] / [Rotate Disp.] ………………………215
[Favorite] ………………………………………….. 216
[Print Set] ………………………………………….217
[Protect] ……………………………………………218
[Face Rec Edit] ………………………………….219
[Picture Sort] ……………………………………..220
[Delete Confirmation] ………………………….220
■
About Connections ……………………. 239
[Via Network]
Connecting via a wireless access point …240
[Direct]
Connecting directly …………………………….243
Connecting quickly with the same settings
as used previously
([Select a destination from History] /
[Select a destination from Favorite]) ……..244
Settings for sending pictures ……………….246
■
[Wi-Fi Setup] ……………………………… 247
8

Connecting with other devices
■
Enjoying 4K Motion Pictures ……… 248
Viewing 4K motion pictures …………………248
Storing 4K motion pictures…………………..248
■
Viewing on a TV Screen ……………..249
HDTV Link (HDMI) …………………………….. 251
■
Copying the Recorded Image
Data to a Computer ……………………. 253
Copying the data………………………………..254
Others
■
Using Optional Flash Units ………… 261
■
Monitor/Viewfinder Displays ………. 263
■
Message Displays ……………………… 269
■
Menu List ………………………………….. 273
Table of Contents
■
Storing Recorded Still and
Motion Pictures on a Recorder …… 256
Copying by inserting the card into the
recorder ……………………………………………256
Dubbing playback pictures via an
AV cable ……………………………………………256
■
Printing pictures ………………………..257
Printing multiple pictures……………………..258
Printing with date and text …………………..259
Making print settings on the camera …….. 260
■
Q&A Troubleshooting ……………….. 280
■
Usage Cautions and Notes ………… 294
■
Leica Service Addresses ……………. 301
9

Contents by Function
Still Picture Recording
Recording
Recording mode …………………………………….59
[Preview] ……………………………………………….88
Picture effects (Filter)………………………………89
Macro recording ……………………………………126
Recording panorama pictures ………………..150
[Time Lapse Shot] …………………………………153
[Stop Motion Animation] …………………………156
[Multi Exp.] …………………………………………..160
[Silent Mode] ………………………………………..162
Focusing (AF/MF)
Focus Mode …………………………………………114
AF Mode …………………………………………….. 115
Adjusting the AF area position ………………..121
Manual Focus ………………………………………128
AF/AE Lock ………………………………………….133
Exposure Control
AF/AE Lock ………………………………………….133
Exposure Compensation ……………………….135
ISO sensitivity ………………………………………136
[Metering Mode] ……………………………………139
[Auto Bracket] ………………………………………145
Motion Picture Recording
Motion Pictures
[Rec Quality] ………………………………………..185
Motion pictures in 4K …………………………….191
[4K PHOTO]…………………………………………192
Taking still pictures while a
motion picture is being recorded …………….195
Drive Modes
Drive Mode ………………………………………….141
[Aspect Bracket] …………………………………..147
[Self Timer] ………………………………………….148
Picture and Color Settings
[Photo Style] ………………………………………..100
[Highlight Shadow] ………………………………..102
White Balance ……………………………………..103
[Picture Size] ……………………………………….108
[Quality] ………………………………………………109
[i.Dynamic] ………………………………………….. 111
[i.Resolution] ……………………………………….. 111
[HDR] ………………………………………………….112
[Long Shtr NR] ……………………………………..113
[Color Space] ……………………………………….113
Flash Operation
[Flash Mode] ………………………………………..181
2nd curtain synchro ………………………………183
[Flash Adjust.] ………………………………………184
Screen settings
[Monochrome Live View] ……………………….168
[Mic Level Disp.] …………………………………..197
Audio Recording
[Mic Level Adj.] …………………………………….197
[Wind Cut] ……………………………………………197
Setup/Customization
Basic settings
[Clock Set] …………………………………………….29
How to set menu items ……………………………31
[Q.MENU] ……………………………………………..34
[Beep] …………………………………………………..43
[Sleep Mode] …………………………………………46
[Reset] (initialization) ………………………………50
Diopter adjustment …………………………………55
Display switching ………………………………62, 71
10
Customization
[CUSTOM] in the Quick Menu ………………….35
Function buttons …………………………………….37
Control ring ……………………………………………40
Custom Set ……………………………………………60
[Custom] menu …………………………………….276
[Cursor Button Lock] ……………………………….38
Motion picture button …………………………….189

Playback
Playback
[Auto Review] ………………………………………..57
Picture playback …………………………………….67
Playback Zoom ………………………………………68
Multi Playback ……………………………………….68
Motion picture playback …………………………..70
Delete …………………………………………………..73
Display/playback settings
[Slide Show] …………………………………………201
[Rotate]/[Rotate Disp.] …………………………..215
Wi-Fi
Connecting
“Image Shuttle” …………………………………….225
NFC ……………………………………………………230
[WPS (Push-Button)] ……………………..240, 243
Direct connection ………………………………….243
Connecting with other Devices
Computer
Software available for download ……………..253
TV
[HDTV Link] …………………………………………251
Contents by Function
Editing
[RAW Processing] …………………………………205
[Resize] ……………………………………………….213
[Cropping] ……………………………………………214
Adding information
[Location Logging] ………………………………..204
[Title Edit] …………………………………………….208
[Text Stamp] ………………………………………… 209
Image settings
[Favorite] ……………………………………………..216
[Print Set] …………………………………………….217
[Protect] ………………………………………………218
Image Shuttle
Remote recording …………………………………231
Saving images ……………………………………..232
Sending images …………………………….233, 236
Sending and adding location information …234
[Touch Sharing] ……………………………………. 247
Recorder
Dubbing ………………………………………………256
Printer
PictBridge ……………………………………………257
11
Before Use
Before Use
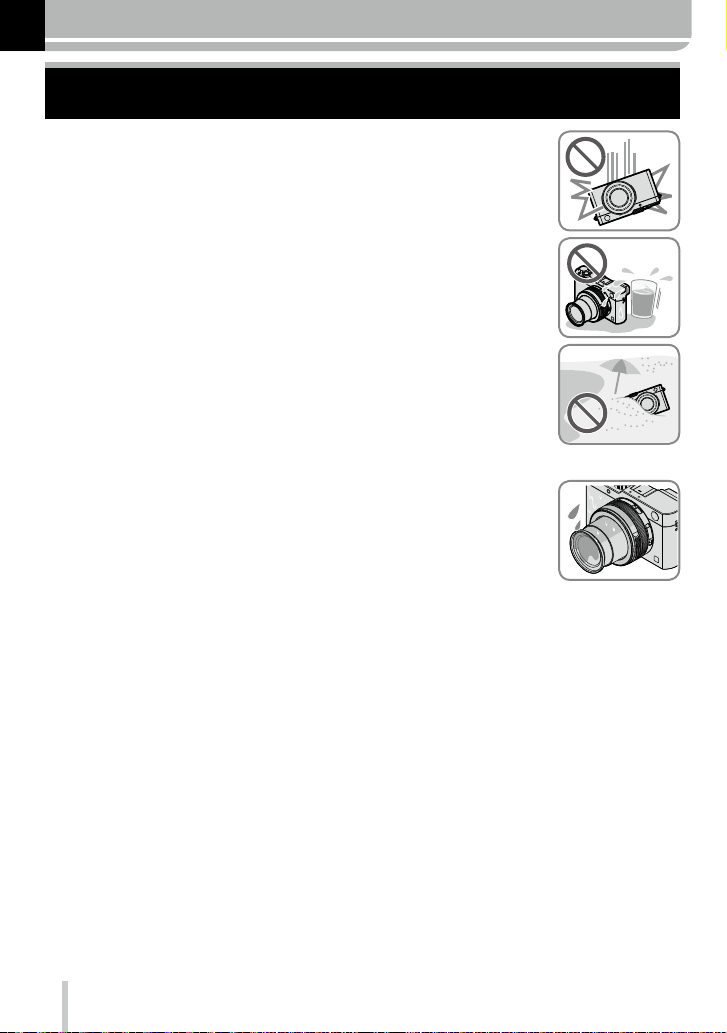
■
Camera handling
Do not subject it to excessive vibration, force, or pressure.
Otherwise, the lens, the monitor, or the external body may be damaged.
●
Besides, the camera may also malfunction or the image may not be
recorded.
The camera is not dust/splash resistant, or waterproof.
Avoid using the camera in places with a lot of dust, water, sand,
etc. such as on a rainy day or at the beach.
Liquids, sand and other foreign material may enter through the gaps around
●
the lens, the buttons, etc. Be particularly careful since it may not just cause
malfunctions, but it may also cause irreparable damage.
■
Condensation (When the lens, the monitor, or the viewfinder, is fogged up)
Condensation may occur when the camera is exposed to sudden changes
●
of temperature or humidity. Avoid these conditions, which may make the
lens, monitor, or viewfinder, dirty, cause mold, or damage the camera.
If condensation does occur, turn off the camera and wait about two hours
●
before using it. Once the camera adjusts to the surrounding temperature,
the fogging will clear naturally.
■
Always take a test shot first
Before important events when you will use the camera (at weddings, for example),
always take a test shot to make sure that pictures and sound record correctly.
■
No compensation for missed shots
Leica Camera AG cannot compensate for missed shots if technical problems with the
camera or card prevent recording.
■
Carefully observe copyright laws
Unauthorized use of recordings that contain works with copyright for purposes other
than personal use is prohibited under copyright law. Recording of certain material may
be restricted even for the purpose of personal use.
■
Also refer to “Usage Cautions and Notes” (→294)
12
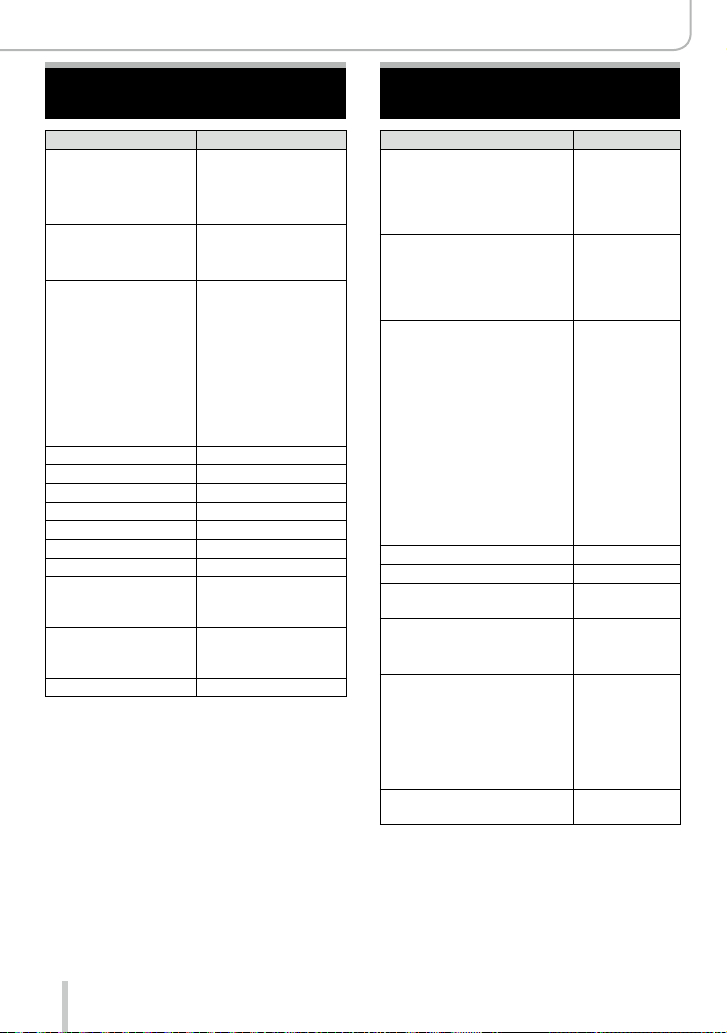
Scope of Delivery Accessories
Before Use
Rechargeable battery
BP-DC15-E 18 544
BP-DC15-U 18 545
BP-DC15-TK 18 546
Battery charger
BC-DC15-E 423-109.001-010
BC-DC15-U 423-109.002-010
Mains cable
Korea 423-114.001-003
Taiwan 423-114.001-004
EU 423-114.001-005
China 423-114.001-006
UK 423-114.001-007
Australia 423-114.001-008
Flash unit CF D 423-109.001-030
USB-Cable 423-114.001-010
Carrying strap 423-109.001-020
Lens cap 423-109.001-018
Lens cap string 423-109.001-019
Hot shoe cover 423-109.001-015
CD with instr.-PDFs 423-109.001-016
Button template for
Canada (French)
Short instructions 93 588-592
Guarantee Card 439-399.100-026
Order-No.
(delivery differs
depending on markets)
423-114.001-009
(only with camera
model 18 471)
(delivery differs
depending on markets)
Carrying straps
Artisan & Artist for Leica,
satin, green
Carrying strap D-Lux (Typ 109),
leather, cognac
Wrist straps
Artisan & Artist for Leica,
satin, green
Wrist strap D-Lux (Typ 109),
leather, cognac
Cases
Protector D-Lux (Typ 109),
leather, cognac
Case for D-Lux 6 (Typ 109),
leather, cognac
Twist D-Lux (Typ 109),
Alcantara, black
System cases
size S, Nylon, black 18 746
size S, Leather, gray 18 761
Artisan & Artist for Leica, size
M, leather-Nylon, black
Handgrip D-Lux (Typ 109) 18 547
Automatic lens cap 18 548
Flash unit
Leica CF 22
Tripods
Mini tripod 14 100
Travel tripod, carbon fiber 14 101
Ball heads
Ball head 18,
short, black/silver 14 108 / 14 109
long, black/silver 14 110 / 14 112
Ball head 24 14 113
Ball head 38 14 114
SD- and credit card
sheath, black / cognac
Order-No.
14 884
18 824
14 885
18 823
18 820
18 821
18 822
14 883
18 694
18 538 / 18 539
Notes:
• Memory cards are optional.
•
Check that all items belonging to the scope of delivery are included before using the camera.
• Depending on the country or area where the camera was purchased, the items and
their shape may differ from the descriptions and illustrations in these instructions.
• Always keep small parts in a safe place out of the reach of children.
• Please dispose of all packaging appropriately.
13
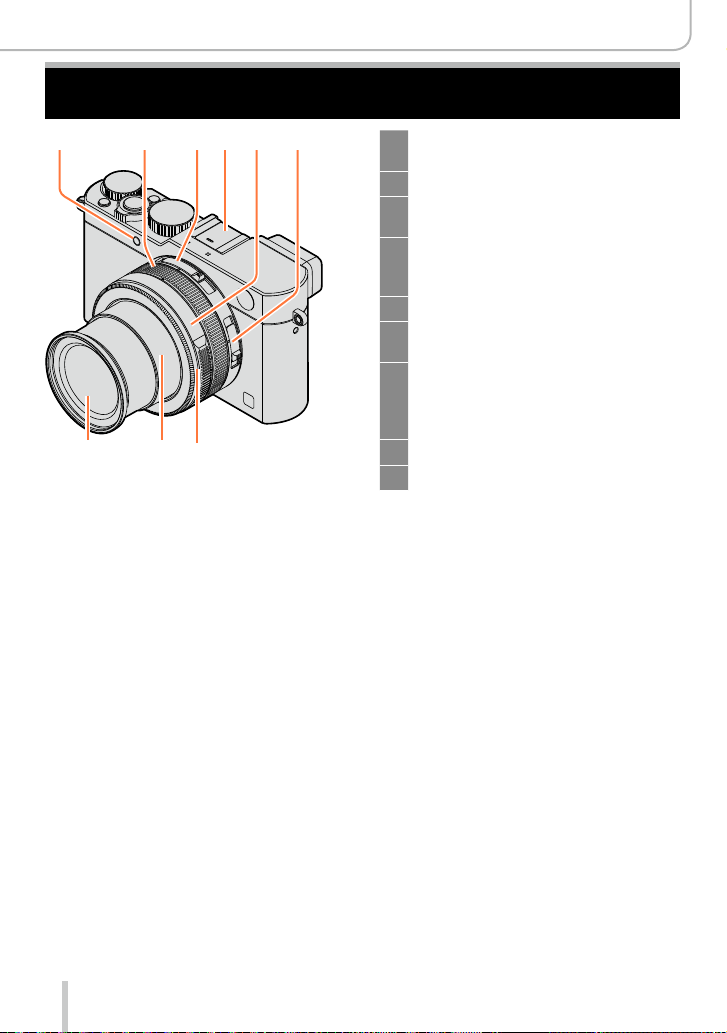
The Main Parts
Before Use
1 2 5 643
9 8 7
1 Self-timer indicator (→148) /
AF Assist Lamp (→53, 125)
2 Control ring (→39)
3 Aspect ratio selector switch
(→107)
4 Hot shoe (Hot shoe cover) (→177)
The hot shoe cover is inserted at
the time of purchase.
5 Aperture ring (→59)
6 Focus selector switch
(→114, 126, 128)
7 Lens front ring
To attach the auto lens cap
(optional), remove the lens front
ring.
8 Lens barrel
9 Lens
14
Before Use
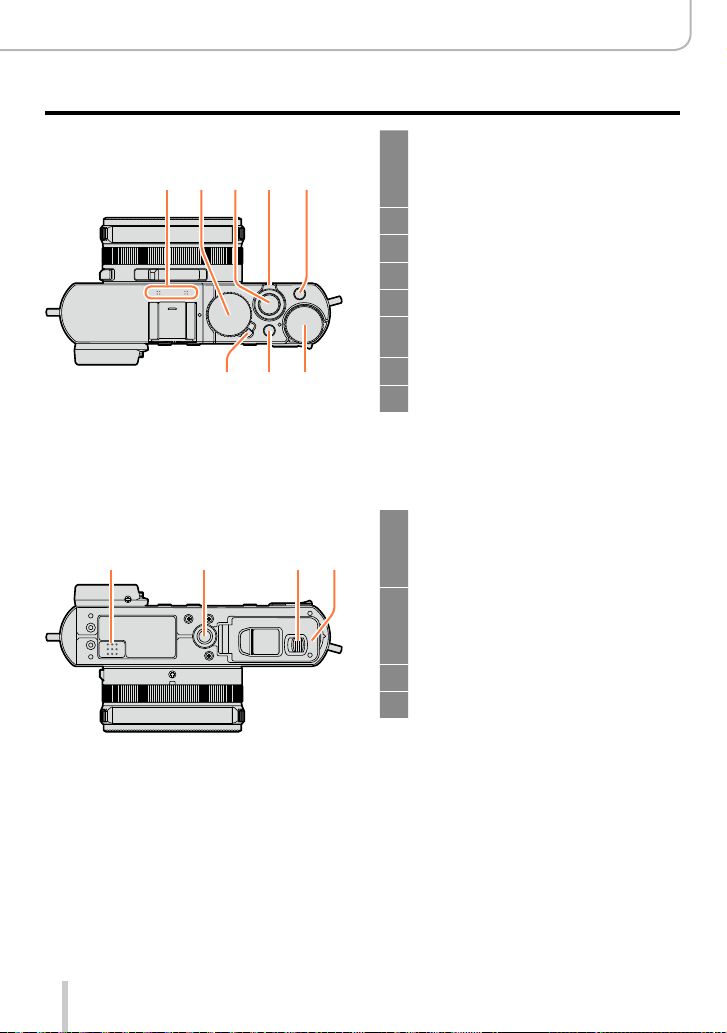
The Main Parts
(Top)
10 11 12 14
(Bottom)
18 20
13
1617 15
19 21
Stereo microphone (→53, 197)
10
Be careful not to cover the
microphone with your finger. Doing
so may impair sound recording.
Shutter speed dial (→59)
11
Shutter button
12
Zoom lever (→171)
13
[F] (Filter) button (→89)
14
Exposure compensation dial
15
(→135)
[A] button (→59)
16
Camera [ON/OFF] switch
17
Speaker
18
Be careful not to cover the speaker,
e.g. with your finger. Doing so may
impair sound audibility.
Tripod thread (→297)
19
Using tripod screws with lengths of
7
5.5mm (
the camera if attached.
Release slider (→24)
20
Card/Battery door (→24)
21
/32″) or more may damage
15
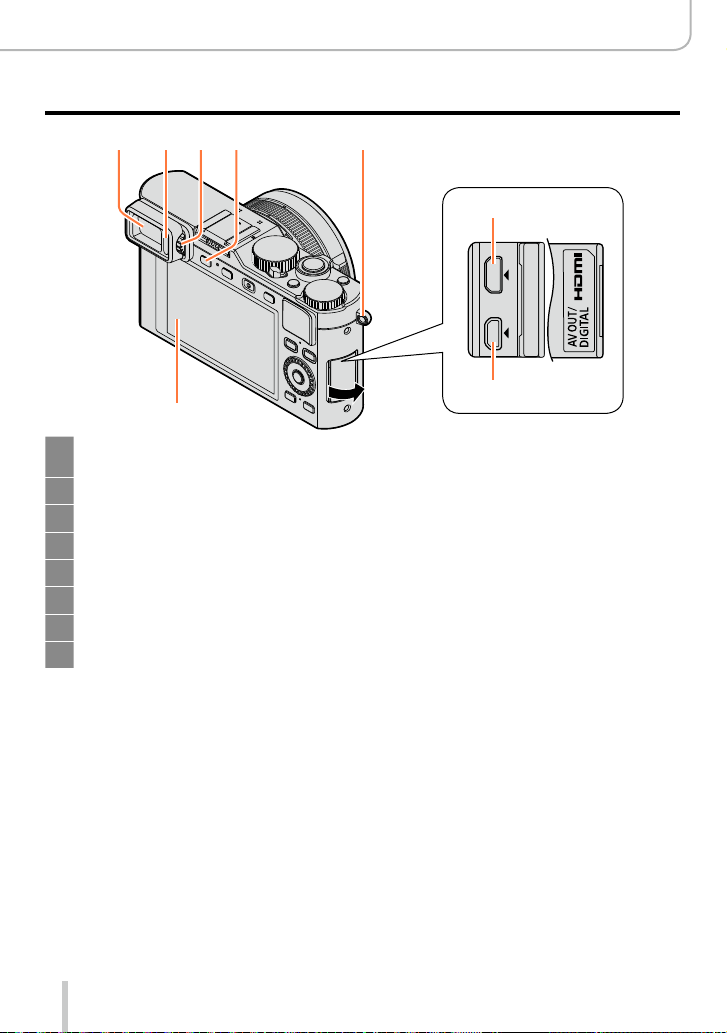
262422 2523
27
Viewfinder (EVF) (→54)
22
In these instructions, “viewfinder” is used to indicate the EVF.
Eye Sensor (→54)
23
Diopter adjustment wheel (→55)
24
[EVF] button (→54) / [Fn3] button (→37)
25
Strap eyelet (→19)
26
Monitor
27
[HDMI] socket (→249)
28
[AV OUT/DIGITAL] socket (→249, 254, 256, 257)
29
Before Use
The Main Parts
28
29
16
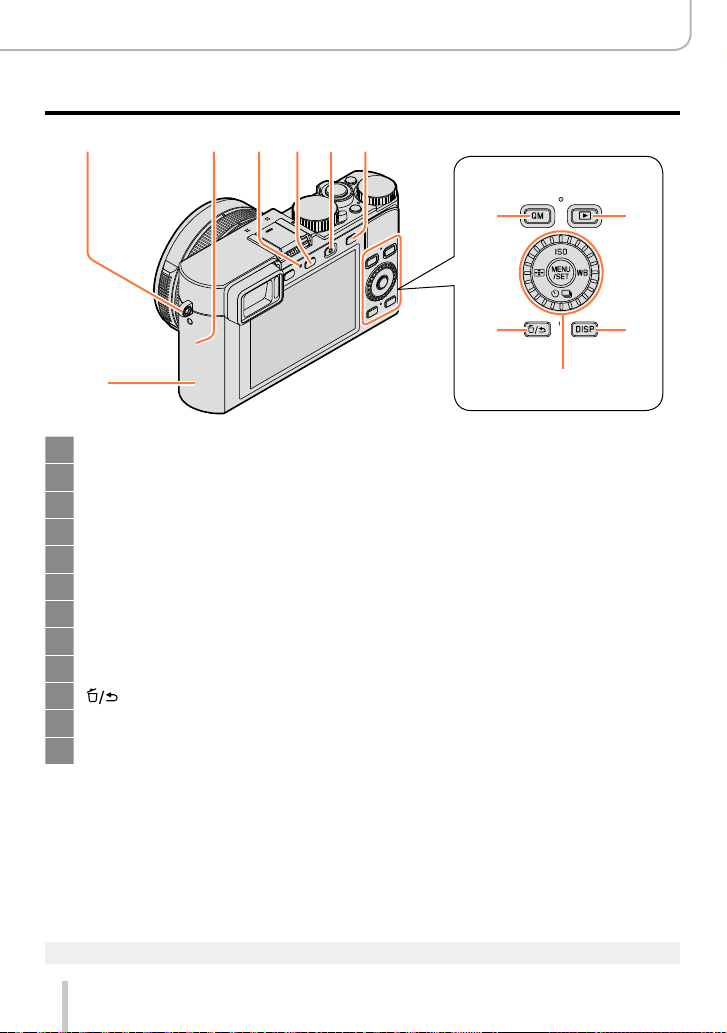
26 34333230 31
Before Use
The Main Parts
35
Strap eyelet (→19)
26
®
antenna
Wi-Fi
30
Wi-Fi connection lamp (→222)
31
[WIFI]/[Fn2] button (→222)
32
Motion picture button (→58)
33
[AF/AE] button (→133)
34
NFC antenna (→230)
35
[QM] button (→34)
36
Playback button (→67)
37
] (Delete/Cancel)/[Fn1] button (→32, 73)
[
38
[DISP] button (→62, 71)
39
[MENU/SET] button / Cursor button / Control dial (→18)
40
36
38
37
39
40
The illustrations and screens in these instructions may differ from the actual product.
●
17
Before Use
The Main Parts
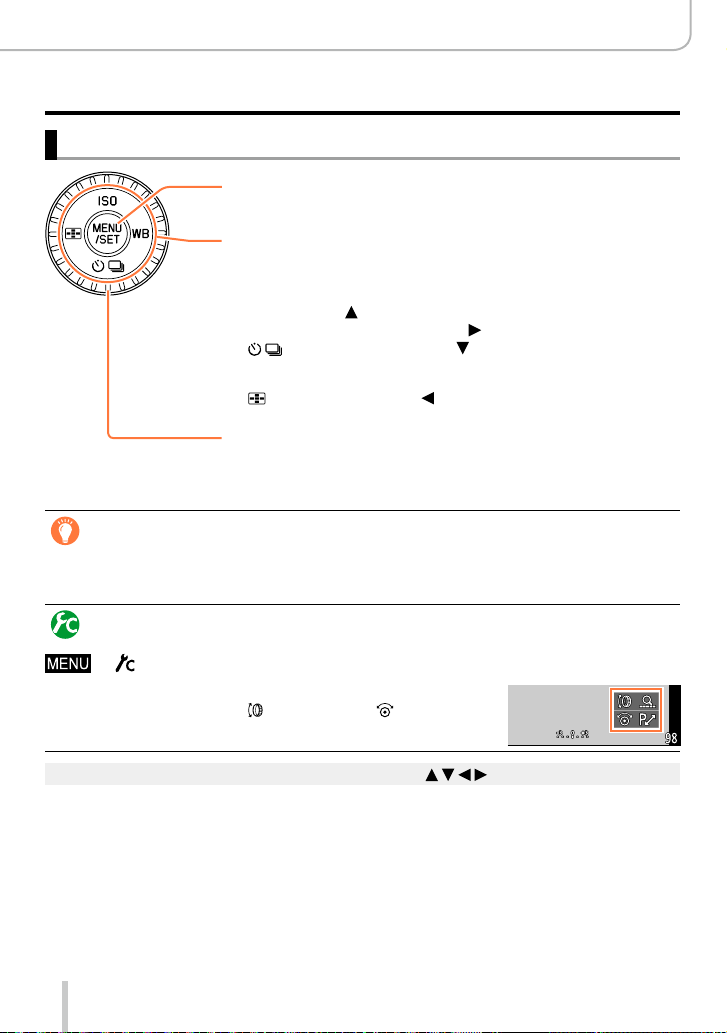
[MENU/SET] button / Cursor buttons / Control dial
[MENU/SET] button
Use this button to call up the menus, enter the settings, etc. (→31)
Cursor button
This button is used to move the cursor on the menu screens and for
other functions. (→32)
You can perform the following operations while recording.
[ISO] button ( ) (→136)
[WB] (White Balance) button ( ) (→103)
[ ] (Drive Mode) button ( )
Single (→141), Continuous (→142), Auto Bracket (→145),
Aspect Bracket (→147), Self-timer (→148), Panorama (→150)
[ ] (AF Mode) button ( ) (→115, 131)
Control dial
Turn the dial to select setting items and change setting values.
(→32, 67)
Disabling the button and dial operation (while recording)
When [Cursor Button Lock] is assigned to a function button, operation of the [MENU/SET]
button, the cursor button, and the control dial is disabled. (→38)
Enabling/disabling the operation guide display
→ [Custom] → [Dial Guide] → [ON] / [OFF]
• When you set the operation guide to [ON], the operation
guide for the control ring ([
parts appear on the recording screen.
In these instructions, the button to be used is indicated by .
●
]), control dial ([ ]), and other
18
Preparations
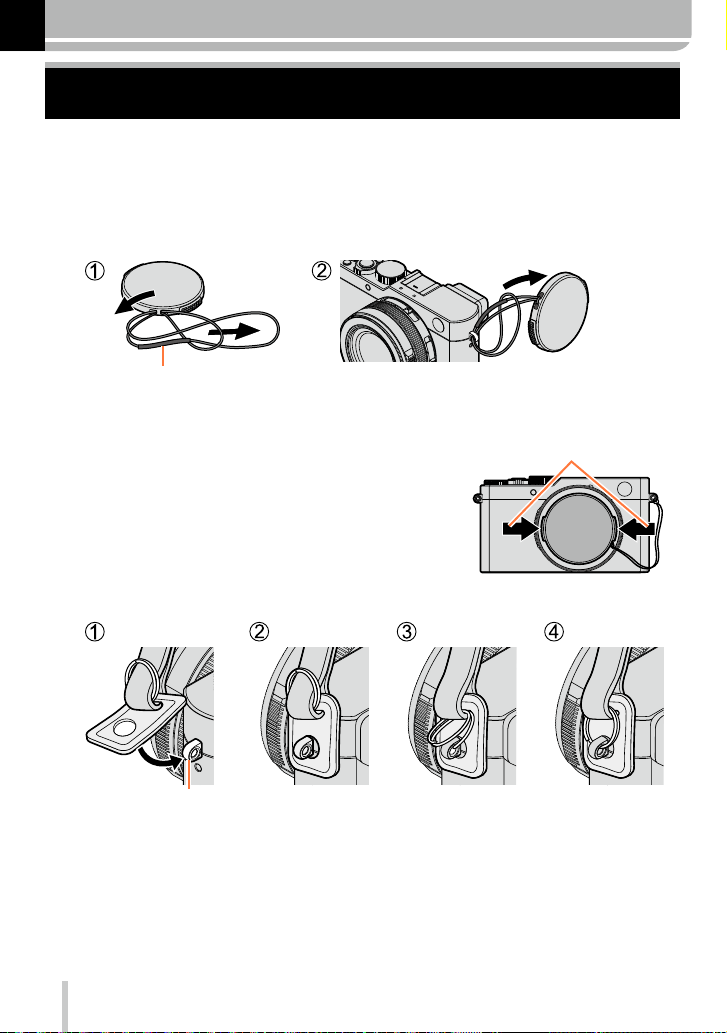
Attaching the lens cap and shoulder strap
Cover the lens with the lens cap to protect it whenever you are not using the camera. We
recommend attaching the lens cap using the lens cap string to prevent its loss. We also
recommend attaching the carrying strap to prevent the camera from being dropped.
Use the lens cap string (supplied) to attach the lens cap to the
1
camera
Make sure that the thicker part of the string is not hanging over the lens cap or the shoulder
strap eyelet.
Attach the lens cap
2
Attach the carrying strap
3
To attach and remove the lens
cap, press the tabs shown by
arrows in the illustration.
Shoulder strap eyelet
19
• Attach the other end the same way.
• Make sure it does not loosen.
• Attach it with the Leica logo on the strap facing out.
• Do not wrap the strap around your neck. It may result in injury or accident.
• Do not leave the carrying strap where a child can reach it.
– This may result in the child accidentally strangling itself.
Preparations
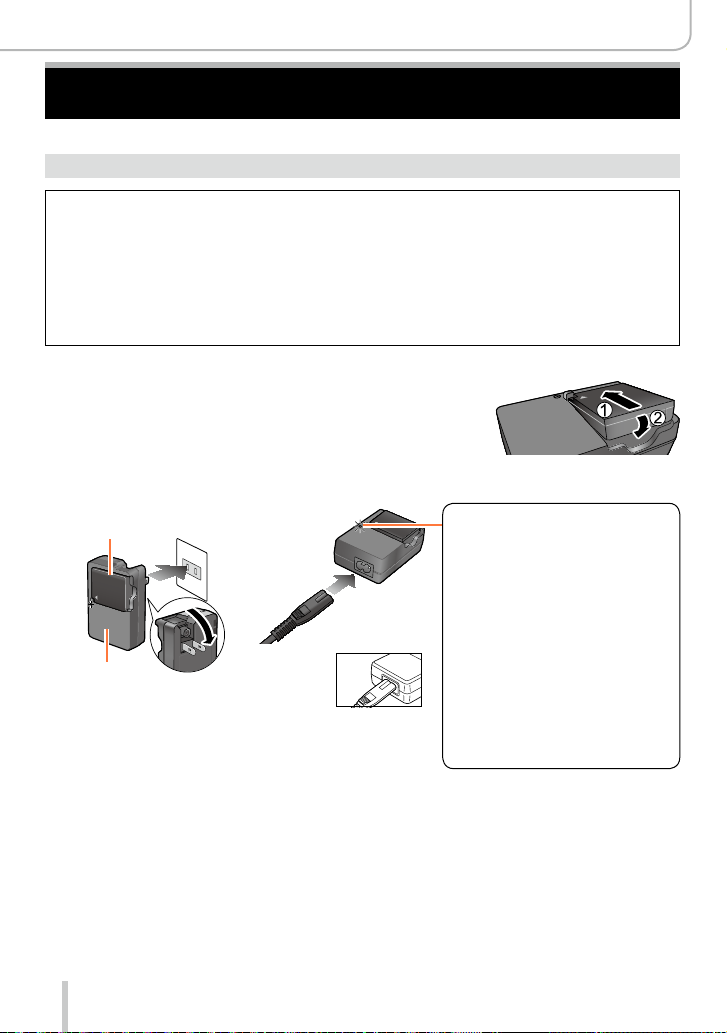
Charging the Battery
Always charge before the first use! (the battery is shipped uncharged)
About batteries that you can use with this camera
It has been found that counterfeit batteries which look very similar to the
genuine product are available in some markets. Some of these batteries are
not adequately equipped with internal protection to meet the requirements
of appropriate safety standards. Using such batteries may lead to fire or
explosion. Please be advised that Leica Camera AG is not liable for any accident
or failure occurring as a result of use of a counterfeit battery. To ensure that
safe products are used we urgently recommend to use only the Leica battery
BP-DC15 (→13).
• Use only the dedicated charger and battery.
Insert the battery into the charger
1
Connect the charger to an electrical outlet
2
Plug-in type
Battery
Charger
(model-specific)
• Charge the battery indoors.
Inlet type
Charging light
([CHARGE])
On: Charging in progress
Off: Charging complete
If the light is flashing:
• Battery temperature is
too high or too low. We
recommend charging in a
location where the ambient
temperature is between 10°C
and 30°C (50°F to 86°F).
• Battery/charger connector is
dirty. Clean with a dry cloth.
Remove the battery after charging is completed
3
• The battery charger is in a standby condition as long as AC power is supplied.
The primary circuit is always “live” as long as the battery charger is connected to
an electrical outlet.
20
Preparations
Charging the Battery
Notes on charging time
Charging time approx. 190min
• The charging time indicated above is the time required when the battery is completely
discharged. The time required for charging differs depending on conditions of battery
usage. Charging takes longer when temperatures are either high or low and when the
battery has not been used for a long period of time.
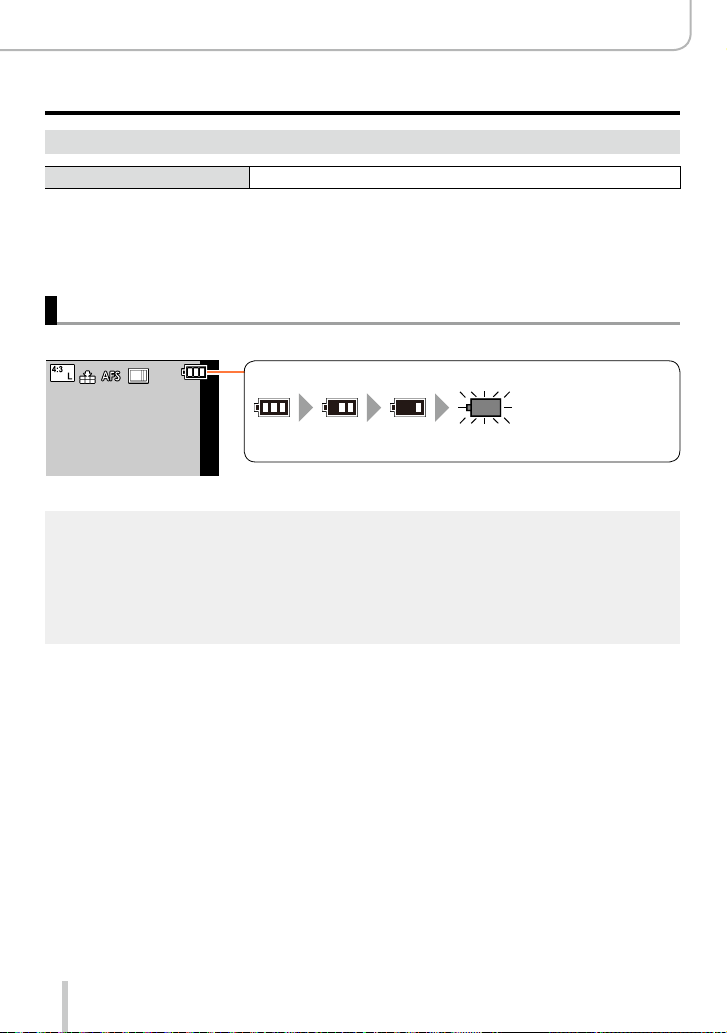
Remaining battery capacity
When using the camera, the remaining battery capacity is displayed.
Remaining capacity
(flashes red)
If the battery icon flashes red, recharge or replace the battery with a
fully charged one.
Use only the Leica battery BP-DC15 (→13).
●
Leica Camera AG cannot guarantee the quality of any other type of battery.
●
Remove the battery from the camera after use.
●
• Keep the battery in a plastic case, making sure that it is kept away from metallic objects (such
as clips) when carrying or storing it.
To remove the battery, turn the camera off and wait until the Leica logo on the monitor goes off.
●
(Failure to wait may cause the camera to malfunction and may damage the card or the recorded
data.)
21

Preparations
Charging the Battery
Guidelines for the number of recordable pictures and the
operating time
Recording still pictures (When using the monitor)
Number of recordable pictures
Recording time
approx. 350/300
approx. 175/150
Recording still pictures (When using the viewfinder)
Number of recordable pictures
Recording time
*
When the supplied flash unit is used.
■
Recording conditions by CIPA standard
CIPA is an abbreviation of “Camera & Imaging Products Association”.
• [Program AE] Mode
• Temperature: 23°C (73.4°F)/Humidity: 50% RH when monitor is on.
• Using an SDHC memory card.
• Using the supplied battery.
• Starting recording 30 seconds after the camera is turned on (when [Stabilizer] is set to [
• Recording once every 30 seconds with full flash output every second recording.
• Zooming through the complete focal length range (from Tele to Wide) or vice versa in every
recording.
• Turning the camera off every 10 recordings and leaving it until the temperature of the battery
decreases.
The number is reduced if intervals are longer (e.g. to approx. one quarter for 2-minute
intervals under the above conditions).
approx. 320/270
approx. 160/135
*
pictures
*
min
*
pictures
*
min
By CIPA standard
By CIPA standard
]).
22

Preparations
Charging the Battery
Recording motion pictures (When using the monitor)
[Rec Quality] Available recording time
[FHD/20M/30p]
[FHD/20M/25p]
[4K/100M/30p]
[4K/100M/25p]
1
*
The time you can actually record when repeatedly turning the camera on and off, starting and
stopping recording and using the lens’ zoom function.
2
*
With camera models 18 471 / 18 472
3
*
With camera models 18 470 / 18 473
■
Recording conditions
• Temperature 23°C (73.4°F), humidity 50% RH
Motion pictures with their file size set to [FHD], [HD] or [VGA] in [Rec Quality]:
●
Recording stops when the continuous recording time exceeds 29 minutes or the file size exceeds
4GB.
• Since the file size becomes larger with [FHD], recording with [FHD] will stop earlier than after
29 minutes.
Motion pictures with their file size set to [4K] in [Rec Quality]:
●
Recording stops when the continuous recording time exceeds 15 minutes. (You can continue
recording without interruption even if the file size exceeds 4GB, but the video will be saved and
played back in separate parts.)
2
*
3
*
2
*
3
*
approx. 135min approx. 65min
approx. 90min approx. 45min
Actual available recording time
Viewing pictures (When using the monitor)
1
*
Playback time approx. 260min
The operating times and number of recordable pictures will differ according to the
●
environment and the operating conditions.
For example, in the following cases, the operating times shorten and the number of recordable
pictures is reduced.
• In low-temperature environments, such as on ski slopes.
• When functions such as flash and zooming are used repeatedly.
If the available battery capacity is significantly reduced, it is reaching the end of its lifespan.
●
Please purchase a new battery.
23
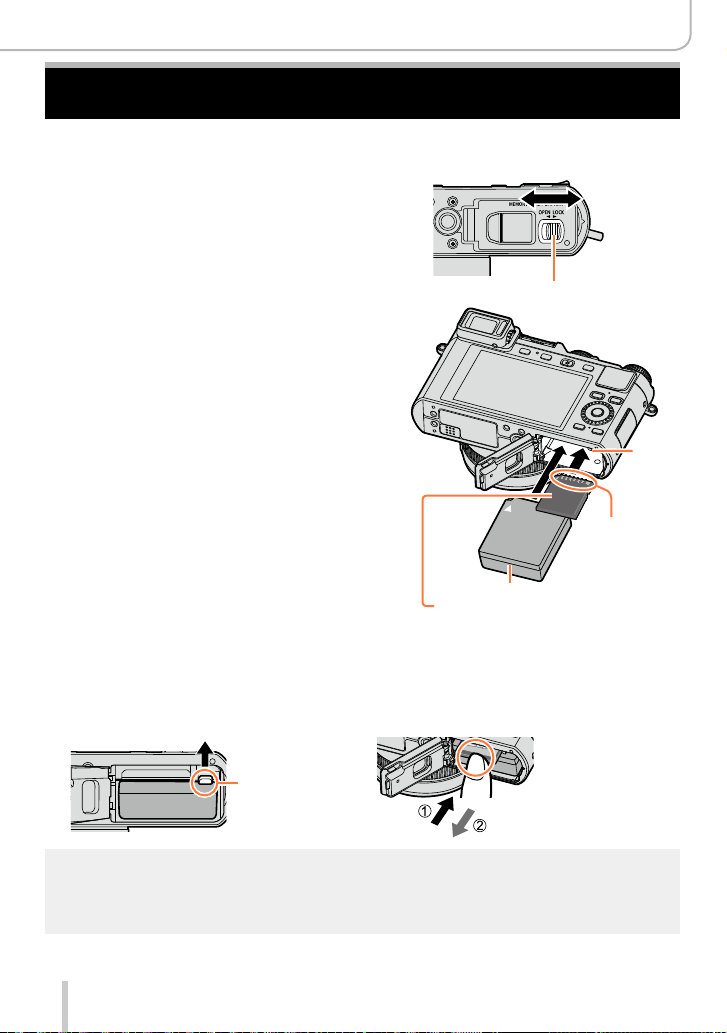
Inserting and Removing the Battery / the Card
• Make sure that the camera is turned off.
Move the release slider to the
1
[OPEN] position and open the
card/battery door
Insert the battery and card,
2
making sure that their
orientation is correct
• Battery:
Push it down until the latch locks the
battery in its correct position.
• Card:
Push it down until it clicks into place.
Close the card/battery door and
3
move the release slider to the
[LOCK] position
■
To remove
• Battery:
Move the latch in the direction of the
arrow.
• Card:
Push it further down until it clicks, then
pull it straight out.
[OPEN]
Release slider
Charged battery (check orientation)
Card
(check orientation:
terminals face monitor)
Preparations
[LOCK]
Latch
Do not touch
the terminals
Latch
Remove the battery from the camera after use.
●
Keep the memory card out of reach of children to prevent swallowing.
●
To remove card or battery, turn the camera off and wait until the Leica logo on the monitor turns
●
off. (Failure to wait may cause the camera to malfunction and may damage the card or the
recorded data.)
24
Preparations
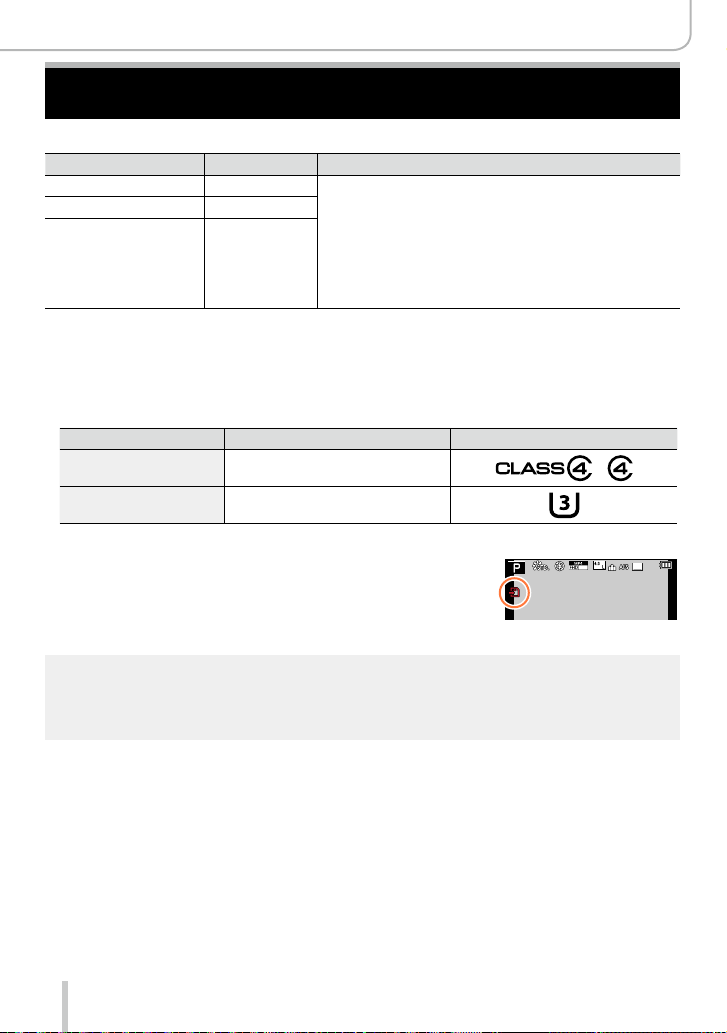
About Cards That can be Used
The following SD standard-based cards can be used.
Type of Card Capacity Notes
SD memory cards 8 MB – 2 GB • Can be used with devices compatible with the
SDHC memory cards 4 GB – 32 GB
SDXC memory cards 48 GB, 64 GB
■
About motion picture recording and speed class
According to the [Rec Quality] (→185) of a motion picture, the required card differs. Use
a card that meets the following ratings of the SD or UHS speed classes.
• SD and UHS speed classes are the speed standards regarding continuous writing.
Confirm the SD speed by checking the card label or other card related materials.
[Rec Quality] Speed class Label example
FHD/HD/VGA Class 4 or higher
4K UHS speed class 3
Access to the card
The access indication is displayed in red when pictures are
being recorded on the card.
respective formats.
• Before using SDXC memory cards, check that your
computer and other devices support this type of card.
• This camera is compatible with UHS-
Class 3 standard SDHC/SDXC memory cards.
• Only the cards listed on the left with the given capacities
are supported.
Ι UHS Speed
p
25
While the camera is accessing the card (for an operation such as picture writing, reading, deletion,
●
or formatting), do not turn it off or remove the battery or the card. Do not subject the camera to
vibrations, impact, or static electricity. The card or the data on the card may be damaged, and
the camera may no longer operate normally. If an operation fails due to vibration, impact or static
electricity, perform it again.
25

Preparations
About Cards That can be Used
If you set the write-protect switch to “LOCK”, you may not be able to write, delete
●
or format the data or display it by recording date. These operations become
available again when you unlock the switch.
It is recommended that you copy important recordings to your computer
●
(as electromagnetic fields, static electricity, or faults may damage the data).
Write-protect
switch
Formatting the card (initialization)
Format the card before recording a picture with the camera. Since data cannot be
recovered after formatting, make sure to back up necessary data in advance.
Set the menu item
1
→ [Setup] → [Format]
• A confirmation screen is displayed. If you select [Yes], the operation is executed.
This requires a sufficiently charged battery.
●
Do not turn off the camera or perform other operations during formatting.
●
Always format cards with this camera. Please reformat the card with this camera if it has already
●
been formatted with a computer or another device.
If the card cannot be formatted, please try another card before contacting a Leica Camera AG
●
service facility.
26
Preparations
About Cards That can be Used
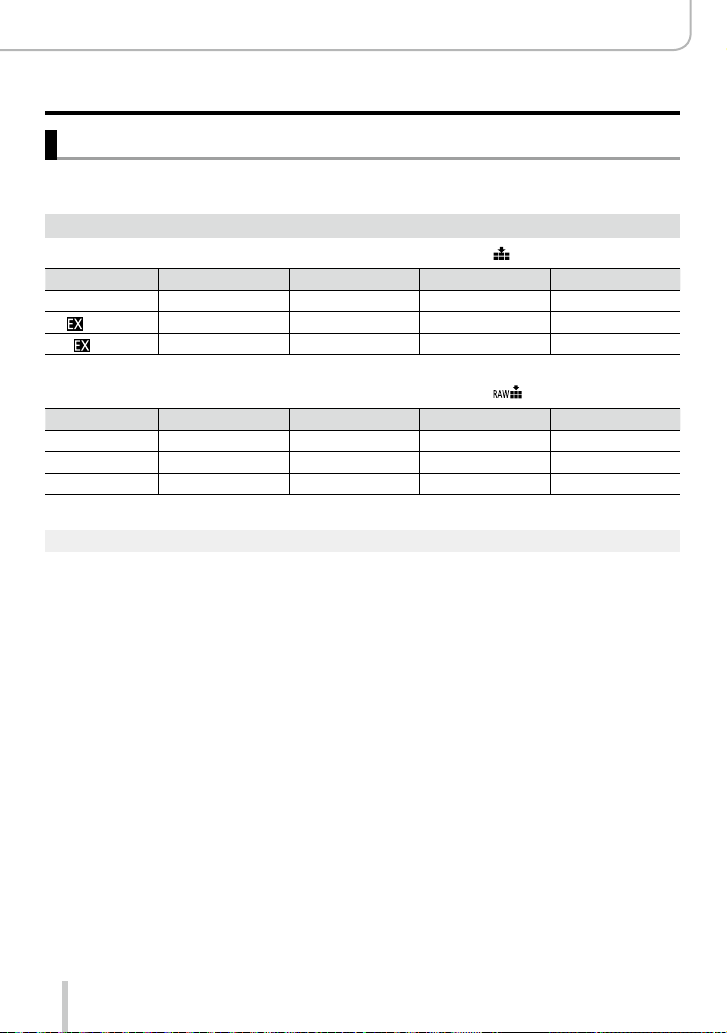
Recording capacity guidelines (pictures/recording time)
The number of pictures you can take and the recording time vary depending on card
capacity (and on recording conditions and the type of card).
Recording picture capacity (still pictures)
When the aspect ratio is set to [4:3] and [Quality] is set to [ ]
[Picture Size] 8GB 16GB 32GB 64GB
L (12.5M) 1090 2200 4420 8820
M (6.5M)
S (3M)
When the aspect ratio is set to [4:3] and [Quality] is set to [ ]
[Picture Size] 8GB 16GB 32GB 64GB
L (12.5M) 340 700 1400 2800
M (6.5M) 400 810 1620 3230
S (3M) 440 890 1780 3530
When the number of recordable pictures exceeds 9,999, “9999+” is displayed.
●
1880 3810 7630 14970
3220 6500 13030 24700
27
Preparations
About Cards That can be Used
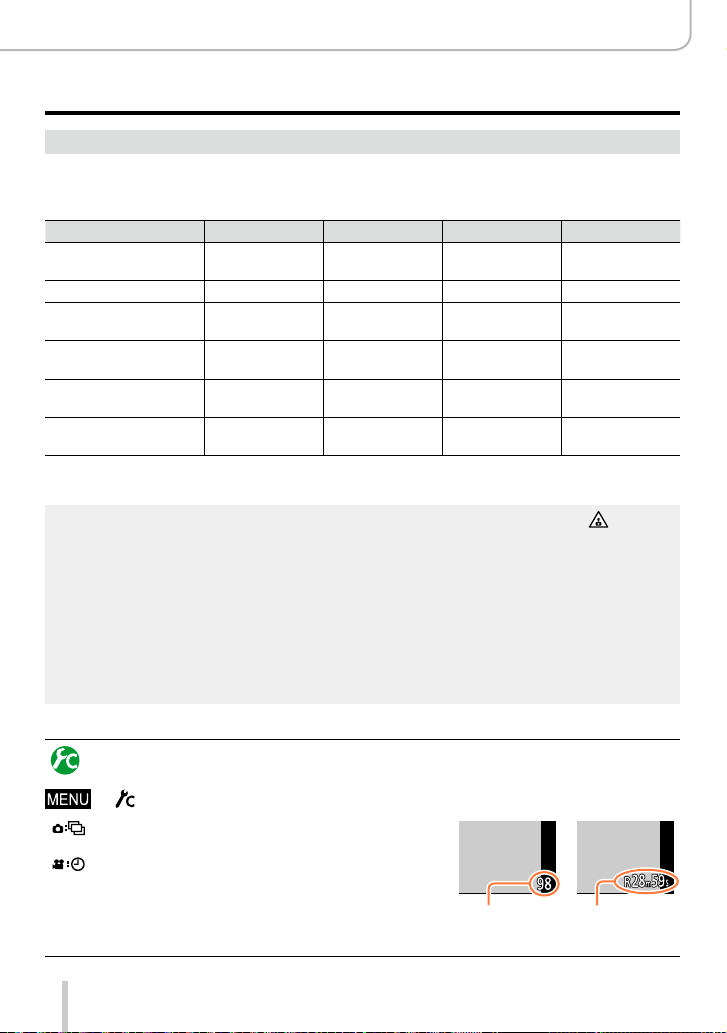
Recording time capacity (motion pictures)
• The recordable time is the total time of all the motion pictures which have been
recorded.
([h], [m] and [s] indicate “hours”, “minutes” and “seconds”.)
[Rec Quality] 8GB 16GB 32GB 64GB
[4K/100M/30p]
[4K/100M/25p]
[4K/100M/24p] 9m 00s 20m 00s 42m 00s 1h 20m 00s
[FHD/28M/60p]
[FHD/28M/50p]
[FHD/20M/30p]
[FHD/20M/25p]
[HD/10M/30p]
[HD/10M/25p]
[VGA/4M/30p]
[VGA/4M/25p]
1
*
With camera models 18 471 / 18 472
2
*
With camera models 18 470 / 18 473
If the surrounding temperature is high, or a motion picture is recorded continuously, [ ] is
●
displayed and recording may be stopped automatically to protect the camera.
Motion pictures with their file size set to [FHD], [HD] or [VGA] in [Rec Quality]:
●
Recording stops when the continuous recording time exceeds 29 minutes or the file size exceeds
4GB.
• Since the file size becomes larger with [FHD], recording with [FHD] will stop earlier than after
29 minutes.
Motion pictures with their file size set to [4K] in [Rec Quality]:
●
Recording stops when the continuous recording time exceeds 15 minutes. (You can continue
recording without interruption even if the file size exceeds 4GB, but the video will be saved and
played back in separate parts.)
The maximum available continuous recording time is displayed on the screen.
●
1
*
2
*
1
*
2
*
1
*
2
*
1
*
2
*
1
*
2
*
9m 00s 20m 00s 42m 00s 1h 20m 00s
37m 00s 1h 15m 00s 2h 30m 00s 5h 00m 00s
49m 00s 1h 40m 00s 3h 20m 00s 6h 40m 00s
1h 30m 00s 3h 10m 00s 6h 25m 00s 12h 50m 00s
3h 25m 00s 7h 00m 00s 14h 10m 00s 28h 15m 00s
Switching the display between the number of recordable pictures
and the available recording time
→ [Custom] →[Remaining Disp.]
[
] (Remaining shots):
Displays the number of pictures that can be recorded.
[ ] (Remaining time):
Displays the remaining recording time.
28
Number of
recordable
pictures
Available
recording time
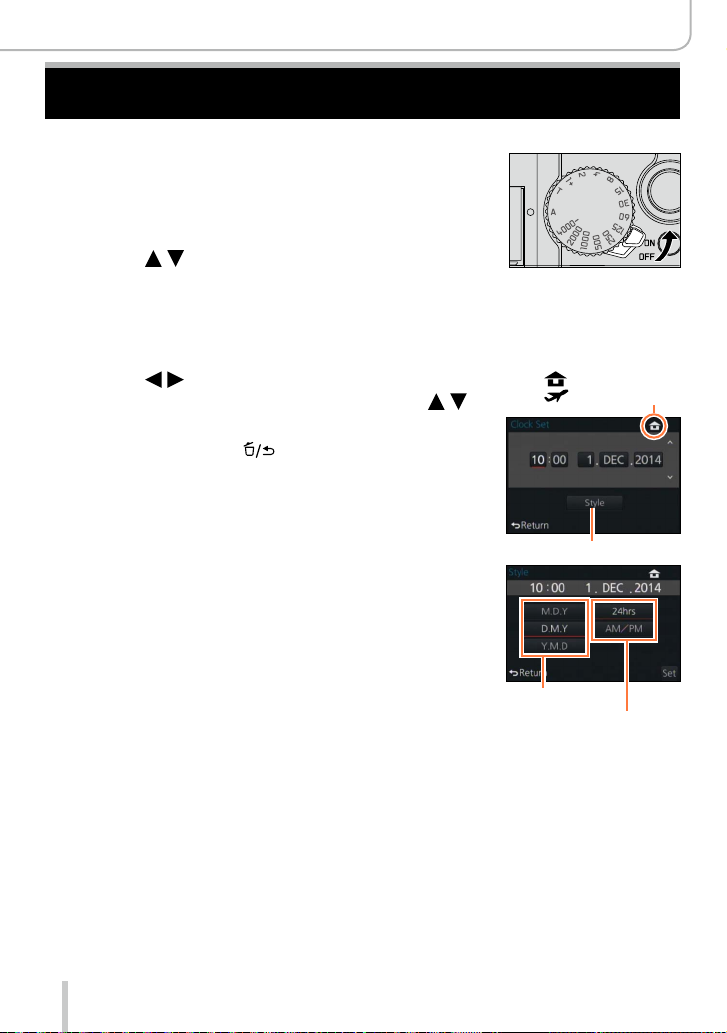
Setting Language, Time, and Date
The clock is not set when the camera is shipped.
Turn the camera on.
1
Press [MENU/SET] while the message is
2
displayed.
Press to select the language, and
3
then [MENU/SET].
• The [Please set the clock] message appears.
Press [MENU/SET].
4
Press to select the items (year,
5
month, day, hour, minute), and then
to set.
• To cancel → Press [ ].
To set the display order or time display format:
• Select [Style], and then press [MENU/SET] to display
the setting screen for display order and time display
format.
Preparations
: Home time
: Destination time
Style
Press [MENU/SET].
6
• A confirmation screen is displayed. Press [MENU/SET].
When [Please set the home area] is displayed, press
7
[MENU/SET].
29
Display order
Time display format

Preparations
Setting Language, Time, and Date
Press to set your home area, and
8
then [MENU/SET].
If the clock is not set, the correct date cannot be printed when you order a photo studio to print the
●
picture, or when you stamp the date on the pictures with [Text Stamp].
City or area name
Current time
Difference from GMT
(Greenwich Mean Time)
Changing time settings
Select [Clock Set] from the [Setup] menu to change the current time settings.
• Clock settings will be saved for approx. 3 months even after the battery is removed,
provided a fully charged battery was installed in the camera for 24 hours beforehand.
Select [Clock Set] from the [Setup] menu.
1
• For details about how to set the menu: (→31)
Set the date and time (Perform steps 5 — 6. (→29))
2
30
Loading…
When you use links on apotelyt.com to buy products,
the site may earn a commission.
PW,
Did you lose or misplace the instruction manual that came with your Leica D-LUX (Typ 109)? It happens all too easily, but fortunately Leica
makes a soft copy available that you can browse through online, print out, or download (see the pdf file below).
It is certainly good practice to carefully familiarize oneself with the many different functionalities and options that the D-LUX Typ 109 offers, and the
official user manual is without doubt an authoritative and comprehensive source of respective information.
That said, the instruction booklet
can be a dry read, so that a dedicated camera
guide book from a professional photographer that illustrates the camera’s core functions in a real life photography context can be a very helpful complement. Yes,
getting one of these camera guides (see here at amazon)
would involve an additional expense, but if that book helps to exploit the camera’s potential to the full,
the (small) additional investment may well be worth it.
Also, you might want to check out the video tutorial on the Leica D-LUX (Typ 109) below.

In any case, the D-LUX Typ 109 is an advanced imaging tool, whose many features merit serious attention. This
fixed lens compact camera was revealed to the public on September 15th, 2014,
which means that, as of today, the camera is 3865 days old (young?). The camera has meanwhile been discontinued and was succeeded by the Leica D-LUX 7 as a replacement in the same line of cameras.
Leica’s instruction manual for the D-LUX Typ 109
The camera’s instruction manual is 302 pages long. The pdf version is embedded below.
As you browse through, you will hopefully find the information you are looking for.
You can also print out a hard copy by right clicking on the manual and then choosing the respective menu option. For convenience,
a summary of the key specs of the D-LUX Typ 109 is included towards the bottom of this webpage.
Don’t forget to bookmark this page for future reference (Ctrl-Shift-D on a Windows PC; Cmd-Shift-D on a Mac). Happy browsing!
Click on the button below to download the pdf version of the Leica D-LUX (Typ 109) manual to your computer. The file will open in a new browser window.
Download the Manual
If you prefer to read the user guide in another language, please check the respective availability on
Leica’s support site.
That site also provides complementary online resources, such as information on the compatibility of various camera accessories or the availability of
firmware updates that are not necessarily comprehensively covered in the instruction manual.
Printed, hardcopy versions of the Leica D-LUX Typ 109 manual can sometimes be found online. You can check the availability on amazon and ebay via the buttons below.
amazon.com
ebay.com
Video tutorial for the Leica D-LUX (Typ 109)
Perhaps instead of reading through a manual or operations guide,
you might prefer to better familiarize yourself with your D-LUX Typ 109 by watching a video tutorial. It can notably help to quickly get to know the
key functions and to set up your camera according to your particular preferences and needs.
Once again, the Leica D-LUX Typ 109 is a sophisticated imaging tool and not exploiting its capabilities to the full would be a pity. Hence, taking the time to
study online information material or to read through a well-written camera guide book is highly recommended to make the most of your purchase.
Find D-LUX Typ 109 guide book at
amazon.com
Leica D-LUX Typ 109 FAQ
Below are some additional questions and answers
concerning some particular features of the D-LUX Typ 109.
What type of imaging sensor is used in the Leica D-LUX Typ 109?
The camera features a CMOS (Complementary Metal–Oxide–Semiconductor) sensor.
What is the ISO sensitivity range of the Leica D-LUX Typ 109?
The camera has a native sensitivity range from ISO 200 to ISO 12500, which can be extended to ISO 100-25600.
How do I find the shutter count on my Leica D-LUX Typ 109?
Leica embeds the number of shutter actuations in hidden menus. You can check the number of shots that your D-LUX Typ 109 has taken up to now by carefully following the steps described on the Leica D-LUX Typ 109 shutter count page.
Is completely silent shooting possible with the Leica D-LUX Typ 109?
The camera has an electronic shutter option, so that it is indeed feasible to capture images without any shutter noise.
Do I need to purchase an external camera trigger to shoot time-lapse sequences with the Leica D-LUX Typ 109?
No, the Leica D-LUX (Typ 109) has an intervalometer built-in, so that low frequency shooting (for example, flower blooming, sunset, moon rise) can be undertaken without the need to purchase a separate external intervalometer and related software.
Is it difficult to use manual focus lenses with the Leica D-LUX Typ 109?
The D-LUX Typ 109 offers focus peaking as a manual focus aid. This feature works by placing a colored highlight on in-focus zones within the image.
Does the Leica D-LUX Typ 109 feature an autofocus assist light?
Yes, the camera has a lamp built-in that can illuminate the subject and improve autofocus in low-light settings.
Does the Leica D-LUX Typ 109 support the Ultra High Speed (UHS) bus interface for SD cards?
Yes, the camera can indeed use UHS-I cards (data transfer speed of up to 104 MB/s).
Which battery does the Leica D-LUX Typ 109 use?
The camera gets its power from the Leica BP-DC15 (here at amazon), which is a rechargeable Lithium-Ion power pack.
Further reading
How does the D-LUX Typ 109 stack up against available alternatives?
In case you would like to check on the differences and similarities with other camera models, just make a corresponding selection in the search boxes below. An an alternative, you can also directly jump to any one of the listed comparisons that were previously generated by the CAM-parator tool.
- Canon 50D vs Sony A9 II
- Canon G12 vs Leica D-LUX Typ 109
- Canon SX540 vs Sony A9 II
- Fujifilm X-A1 vs Sony A9 II
- Leica D-LUX Typ 109 vs Leica SL
- Leica D-LUX Typ 109 vs Leica TL
- Leica D-LUX Typ 109 vs Nikon D1H
- Leica D-LUX Typ 109 vs Nikon D3S
- Leica D-LUX Typ 109 vs Olympus E-600
- Sony A7S II vs Sony A9 II
- Sony A9 II vs Sony RX1R II
- Sony A9 II vs Sony ZV-1F
Core camera specifications
Here is a list of the main features and technical characteristics of the Leica D-LUX (Typ 109).
Specifications Summary
| Camera Model | Leica D-LUX Typ 109 | |
|---|---|---|
| Camera Type | Fixed lens compact camera | |
| Camera Lens | 24-75mm f/1.7-2.8 | |
| Launch Date | September 2014 | |
| Launch Price | USD 1 195 | |
| Sensor Specs | ||
| Sensor Technology | CMOS | |
| Sensor Format | Four Thirds Sensor | |
| Sensor Size | 15.7 x 11.8 mm | |
| Sensor Area | 185 mm2 | |
| Sensor Diagonal | 19.6 mm | |
| Crop Factor | 2.0x | |
| Sensor Resolution | 12.7 Megapixels | |
| Image Resolution | 4 112 x 3 088 pixels | |
| Pixel Pitch | 3.82 μm | |
| Pixel Density | 6.85 MP/cm2 | |
| Moiré control | Anti-Alias filter | |
| Movie Capability | 4K/30p Video | |
| ISO Setting | 200 — 12 500 ISO | |
| ISO Boost | 100 — 25 600 ISO | |
| Screen Specs | ||
| Viewfinder Type | Electronic viewfinder | |
| Viewfinder Field of View | 100% | |
| Viewfinder Magnification | 0.70x | |
| Viewfinder Resolution | 2764k dots | |
| Top-Level Screen | no Top Display | |
| LCD Framing | Live View | |
| LCD Size | 3.0 inch | |
| LCD Resolution | 921k dots | |
| LCD Attachment | Fixed screen | |
| Touch Input | No touchscreen | |
| Shooting Specs | ||
| Focus System | Contrast-detect AF | |
| Manual Focusing Aid | Focus Peaking | |
| Maximum Shutter Speed | 1/4000s | |
| Continuous Shooting | 11 shutter flaps/s | |
| Silent Shooting | Electronic Shutter | |
| Time Lapse Photography | Intervalometer Built-in | |
| Fill Flash | no On-Board Flash | |
| Storage Medium | SDXC cards | |
| Single or Dual Card Slots | Single card slot | |
| UHS card support | UHS-I | |
| Connectivity Specs | ||
| External Flash | Hotshoe | |
| USB Connector | USB 2.0 | |
| HDMI Port | micro HDMI | |
| Wifi Support | Wifi built-in | |
| Near-Field Communication | NFC built-in | |
| Body Specs | ||
| Battery Type | Leica BP-DC15 power pack | |
| Battery Life (CIPA) | 300 shots per charge | |
| Body Dimensions |
118 x 66 x 55 mm (4.6 x 2.6 x 2.2 in) |
|
| Camera Weight | 405 g (14.3 oz) |
Did you notice an error on this page? If so, please get in touch, so that we can correct the information.
You are here:
Home
»
Leica D-LUX Typ 109 Review
»
Leica D-LUX Typ 109 User Manual
Google Ads:
Популярность:
25035 просмотры
Подсчет страниц:
302 страницы
Тип файла:
Размер файла:
5.67 Mb
Google Ads:
Google Ads:
-
Leica MA Мануал
Популярность:
3331 просмотры
Подсчет страниц:
61 страницы
Тип файла:
PDF
Размер файла:
4.89 Mb
-
Leica M6-J Мануал
Популярность:
3450 просмотры
Подсчет страниц:
51 страницы
Тип файла:
PDF
Размер файла:
6.32 Mb
lies LEICAD-LUX4
MHCTpyKUM^
Instruktioner
Návod k pouzití

Русский
Svenska
Cestina
79


в
□
ш
□
Правила безопасности
Перед первым использованием ознакомьтесь со следующими требованиями
техники безопасности и соблюдайте их в процессе эксплуатации.
Личная безопасность
Внимание. Для минимизации риска пожара и поражения электрическим током при
меняйте только рекомендованные аксессуары и не подвертайте устройство воздействию
дождя или влажной атмосферы. Не снимайте крышку или заднюю крышку. При необхо
димости ремонта обращайтесь в службу сервиса компании Leica.
Осторожно. Соблюдайте авторские права. Копирование коммерческих кассет/дисков или иного опубликованного/
выпущенного материала (в том числе частично и для личного пользования) может нарушать авторские права.
Примечание:
• Пункты в меню вашей LEICA D-LUX 4 МОГУТ отличаться от приведенных в настоящей
инструкции.
• Обозначение SD является тортовой маркой
• LEICA является заретистрированной тортовой маркой компании Leica Microsystems IR
GmbH.
• Elmarit является заретистрированной тортовой маркой компании Leica Camera AG.
• Прочие наименования, компании и описания изделий, приведенные в инструкции,
являются тортовыми марками соответствующих компаний.
Предотвращение повреждения устройства
Фотокамера
• Обращайтесь с фотокамерой бережно.
• Не трясите и не ударяйте фотокамеру, так как при этом можно повредить объектив и
LCD-монитор.
• Не прикасайтесь к поверхности линз и к разъемам трязными руками.
• Оберетайте фотокамеру от песка, пыли и воды.
• При попадании соленой воды сначала удалите ее салфеткой, смоченной теплой
водопроводной водой, а затем вытрите насухо чистой сухой тканью.
LCD-монитор
Монитор изтотовлен по оовременной выоокоточной технолотии. Однако, на нем мотут
наблюдатьоя отдельные темные или оветлые пикоели. Это нормально, такие пикоели
не будут появлятьоя на онимках.
• Недавитенаэкран.
• Еоли фотокамера охлаждена, изображение на мониторе кажетоя более
темным.
Объектив
• Не прилатайте усилия к сбъективу.
• Не сставляйте фстсаппарат с сбъектгчвсм, направленным на Сслнцеэтс мсжет вызвать етс
псвреждение.
Конденсация
Конденсация влаги прсисхсдит в определенных условиях. Если конденсация имеет место,
отключите фотокамеру и оставьте ее сохнуть приблизительно на два часа. Вытрите влату с
линз и монитора сухой чистой тканью.
• Конденсация оставляет пятна на линзах, способствует росту трибков и выходу фото
камеры из строя.

Карты памяти
• Не подвергайте карты памятп нагреву, попаданию прямого солнечного света, воздействию
электромагнитного излучения или статического электричества. Не сгибайте и не роняйте
карты. В протпвном случае записанные данные могут быть повреждены или стерты.
• Если карта не используется, храните ее в упаковке.
• Избегайте попадания грязи, песка, жидкостей и иных посторонних предметов на контакты.
Аккумулятор (литий-ионный)
• Заряжайте аккумулятор только при помощи прилагаемого зарядного устройства.
• Используйте только указанный тип аккумулятора.
• Избегайте попадания грязи, песка, жидкостей и иных посторонних предметов на контакты.
• Не подвергайте аккумулятор воздействию прямых солнечных лучей в течение длительного
времени (например, в автомобиле).
• Не прикасайтесь к выводам металлическими предметами.
• Запрещено бросать аккумулятор в огонь, подвергать сильному нагреву и разбирать.
• При попдцании жидкости из аккумулятора на одежду или кожу смойте ее проточной водой. При
попадании в глаза промойте их большим количеством проточной воды, не трите при этом газа.
Затем обратитесь к врачу.
Зарядное устройство
• Обеспечьте необходимую вентиляцию в процессе зарядке во избежание перегрева и возникно
вения угрозы пожара.
• Зарядное устройство работает при напряжении от110до 220В переменного тока. Выберите
кабель питания, подходящий к вашей розетке.
• Розетка должна располагаться в легкодоступном месте поблизости от устройства.
Если устройство не эксплуатируется длительное время
• Храните аккумулятор в прохладном сухом месте при температуре 15-25°С.
• Снимите с фотокамеры аккумулятор и карту памяти.
• Не храните полностью заряженный аккумулятор в фотокамере, поскольку это при
ведет к его саморазряду и потере емкости.
• Заряжайте аккумулятор по крайней мере раз в год.
• Храните фотоаппарат в присутствии поглотителя влаги (силикагеля, продающегося в
специализированных магазинах).
Данные на карте
• Записанные данные могут быть повреждены или стерты в случае выхода фотокамеры из строя по
вине владельца.Компания Leica не несет ответственности за любой ущерб, вызванный потерей
записанныхданных.
Использование штатива
• При монтировании фотокамеры убедитесь, что штатив надежно установлен.
• Когда фотокамера установлена на штативе, из нее нельзя извлечь аккумулятор или карту памяти.
• При установке фотокамеры проверьте, что винт штатива завинчивается прямо, без переко
са. Если винт затянут слишком туго, вы можете повредить резьбу в корпусе, повредить или
поцарапать корпус или табличку с техническими характеристиками.
• Внимательно ознакомьтесь с инструкцией по эксплуатации штатива.
а
j Предотвращение повреждений фотокамеры
Щ
Фотокамера:
Эксплуатация
фотокамеры
Когда вы садитесь, вынимайте фотокамеру из кармана.
Не помещайте фотокамеру в наполненные карманы или бумажные пакеты.
Не роняйте фотокамеру, не ударяйте ее и не прикладывайте к ней усилий.
Не вешайте посторонних предметов на ремешок, так как они могут ударять
ся о фотокамеру, экран или объектив и вызвать их поломку.
Дилеры компании Leica осуществляют продажу чехлов для вашей фото
камеры.
В
Устранение проблем
Если фотокамера функ
ционирует неправильно:
1. Включите фотокамеру
2. Снимите аккумулятор
3. Установите аккумулятор
4. Включите фотокамеру
Очистка фотокамеры
Перед очисткой фото
камеры всегда снимайте
аккумулятор и вынимайте
вилку сетевого адаптера
из розетки!
• Располагайте фотокамеру как можно дальше от электриче
ских приборов, таких, как:
— телевизоры
— микроволновые печи
— видео игры
— радиопередающие устройства
— высоковольтные линии и т.д.
Все эти устройства могут негативно повлиять на качество запи
си изображения и звука. Возможны потеря данных и искажение
снимков.
• Используйте только прилагаемые к изделию кабели.
• Нетянитезакабели.
• Не удлиняйте шнуры и кабели.
• Не опрыскивайте фотокамеру инсектицидами или летучими химикатами.
• Для очистки фотокамеры не используйте бензин, растворители, спирт,
средства для мытья посуды и т.д., так как это может повредить поверх
ность корпуса и вызвать отслоение его облицовки.
• Не оставляйте фотокамеру на длительное время в контакте с резиновыми
или пластиковыми изделиями.
• Не используйте средства бытовой химии или пропитанные различными
химикатами салфетки. Очищайте корпус только влажной тканью, затем
насухо вытрите сухой тканью.
LCD-монитор:
Щ
Карты памяти:
Хранение карт памяти
Повреждение карты может
привести к потере данных!
Не давите на ЮО-монитор.
Это может привести к появлению цветных пятен на экране и выходу
монитора из строя.
Не сгибайте и не роняйте карты.
Защищайте карты от попадания песка, грязи, прямого солнечного света,
воздействия высокихтемператур или электромагнитных излучений.

Аккумулятор/Зарядное устройство;
Литий-ионный аккумулятор.
Генерация электричества
происходитврезультате
химической реакции, про
текающей внутри аккумуля
тора. На ход реакции влияют
температура окружающей
среды и влажность. Слишком
высокая или слишком низкая
температура сокращает срок
службы аккумулятора.
Всегда извлекайте аккумулятор после использования и храните его в при
лагаемом чехле. Не роняйте аккумулятор.
Перед установкой аккумулятора проверьте, не имеет ли он или его контакты
каких-либо повреждений. Не используйте поврежденные аккумуляторы.
Устанавливайте аккумулятор правильным образом. При неверной установке
существует угроза взрыва.
По возможности берите с собой запасные аккумуляторы.
Низкие температуры сокращают срок службы аккумуляторов.
При поездках берите с собой зарядное устройство.
Утилизируйте не подлежащие ремонту аккумуляторы в соответствии с мест
ным законодательством.
Срок службы аккумулятора ограничен.
Не бросайте аккумулятор в огонь — он может взорваться.
Избегайте попадания металлических предметов на контакты аккумулятора.
Это может привести к пожару.
Зарядное устройство, расположенное рядом с радиоприемником, может вы
зывать помехи приему. Располагайте зарядное устройство не менее чемв1м
от радиоприемников.
При работе зарядное устройство может издавать гудение. Это не является
неисправностью.
После зарядки отсоедините сетевой кабель от розетки для полного обесточи
вания устройства.
Поддерживайте чистоту контактов аккумулятора и зарядного устройства.
а
Юридическое уведомление
QuickTime, QuickTime Logo являются торговыми марками или зарегистрированными торговы
ми марками Appiè Computer ine. и используются по лицензии.
QuickTime
Утилизация
Высококачественные материалы, из которых изготовлено данное устройство, пригодны для
повторного использования. Устройство нельзя утилизировать вместе с обычными бытовыми
отходами. Его можно бесплатно сдать в специальных пунктах приема. Для дополнительной
информации по этому вопросу обратитесь в местные органы власти.
Аккумуляторы нельзя утилизировать вместе с обычными бытовыми отходами. Как потреби
тель согласно законодательству вы обязаны утилизировать батареи в специальных местах
их сбора. Заклейте контакты липкой лентой во избежание короткого замыкания.
Следующие символы помещены на аккумуляторах, содержащих опасные вещества:
РВ = аккумулятор содержит свинец
Сб = аккумулятор содержит кадмий
Нд = аккумулятор содержит ртуть
и = аккумулятор содержит литий

Наименования узлов камеры
Джойстик ^
Гнездоштатива LCD-мoнитop
Переключатель режимов
Режим:
В
Блокировка АФ/АЭ
Ушко крепления
__ ^ Режим воспроизве-
[ ►] дения
1
ремешка
V
Ч.
1 Компонентный выход
Р АУ-ои1/иЗВ
1 Разъем внешнего
питания
_______
Дверца отсека карты
памяти/аккумулятора
Динамик
Фокусировка
Выключатель питания
Рычаг трансфокатора
Кнопка затвора
Микрофон
I Разъем внешней
вспышки
Диск выбора
Автоспуск индикатор /
Лампа подсветки АФ
Кнопка вспышки
Вспышка
АФ/Макро/Пере-
ключатель АФ
Объектив
Переключатель формата изо
бражения
Курсор влево /
Автоспуск
Курсор вверх / Выдержка /
Брекетинг
Курсор вправо /
Настройки вспышки
Курсор вниз/
Кнопка Вп
Серийн. съемка /
Удаление
Интеллектуальный авторежим
для автоматической записи
Программный режим
для автоматической уста
новки выдержки
Режим приоритетадиа-
фрагмы
для установки приоритета
диафрагмы
Режим приоритета вы
держки
для установки приоритета
выдержки
Ручная установка вы
держки
для ручной установки
выдержки
Пользовательские на
стройки
1
для ранее записанных
настроек 1
Пользовательские на
стройки
2
для ранее записанных
настроек2
Режим видеосъемки
для записи видео
Режим сцены
для съемки в режиме
сцены

о
1
С
0
-мониторе
а
При показеслайдов
Увеличение
яркости
монитора
Не функционирует в.
— режиме ВОСП.
Нажмите БЫСТР.
МЕНЮ
I
Выберите режим
работы 1С0-монитора
I Ж
Нормальнаяяркость
I—ОРР
Нажмите БЫСТР.
МЕНЮ
т Автоматическая яркость
_
__
Экранбудетлетчевидеть(онстанет
\
_Ж
ярче, например,для использования на
открытом воздухе).
11

05:34
Leica D- Lux 4 Full Review
09:21
Reviewing the Leica D-Lux 4 — A New Camera for Videoing Me Sculpting
04:53
Фотоаппарат Leica | Краткий обзор. Почему так дорого стоит? | Фотограф Алексей Самсонов
04:01
Видеообзор компактного фотоаппарата Leica D-lux 6 Sp. Edition 100
05:42
Panasonic Lumix LX100 / Leica D-LUX (Typ 109). Где подвох? Pro Hi-Tech
02:11
Leica D-LUX 4 camera German / Japan great camera
08:55
What I love about my little Leica D-Lux 4!!
03:28
Leica D Lux 4 Still Images
Нажмите на кнопку для помощи