
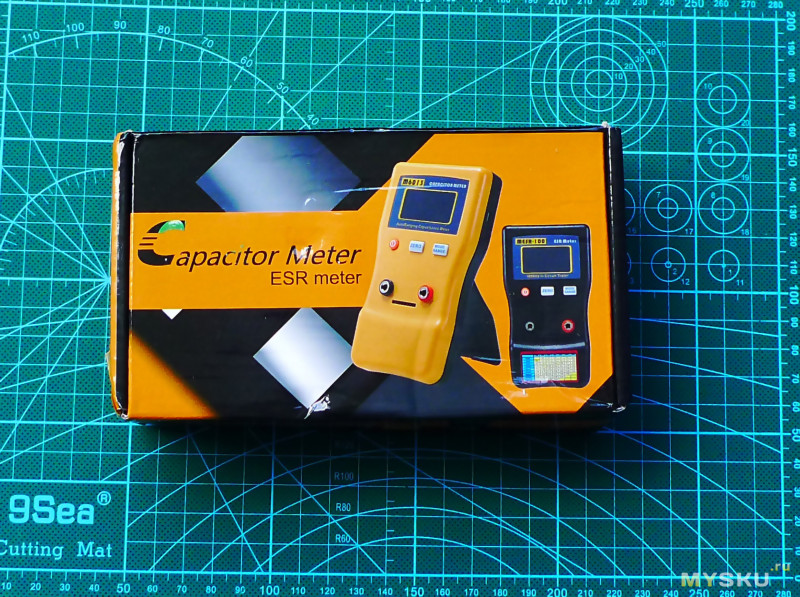
Предлагаю вашему вниманию обзор портативного прибора для проверки ESR(ЭПС) конденсаторов MESR-100 v2 который имеет LCD экран с подсветкой и разъем MicroUSB для подключения внешнего источника питания…
Что такое ESR (ЭПС) и как это устроено, полезная информация для ознакомления
go-radio.ru/esr-kondensatora.html
en.wikipedia.org/wiki/Equivalent_series_resistance
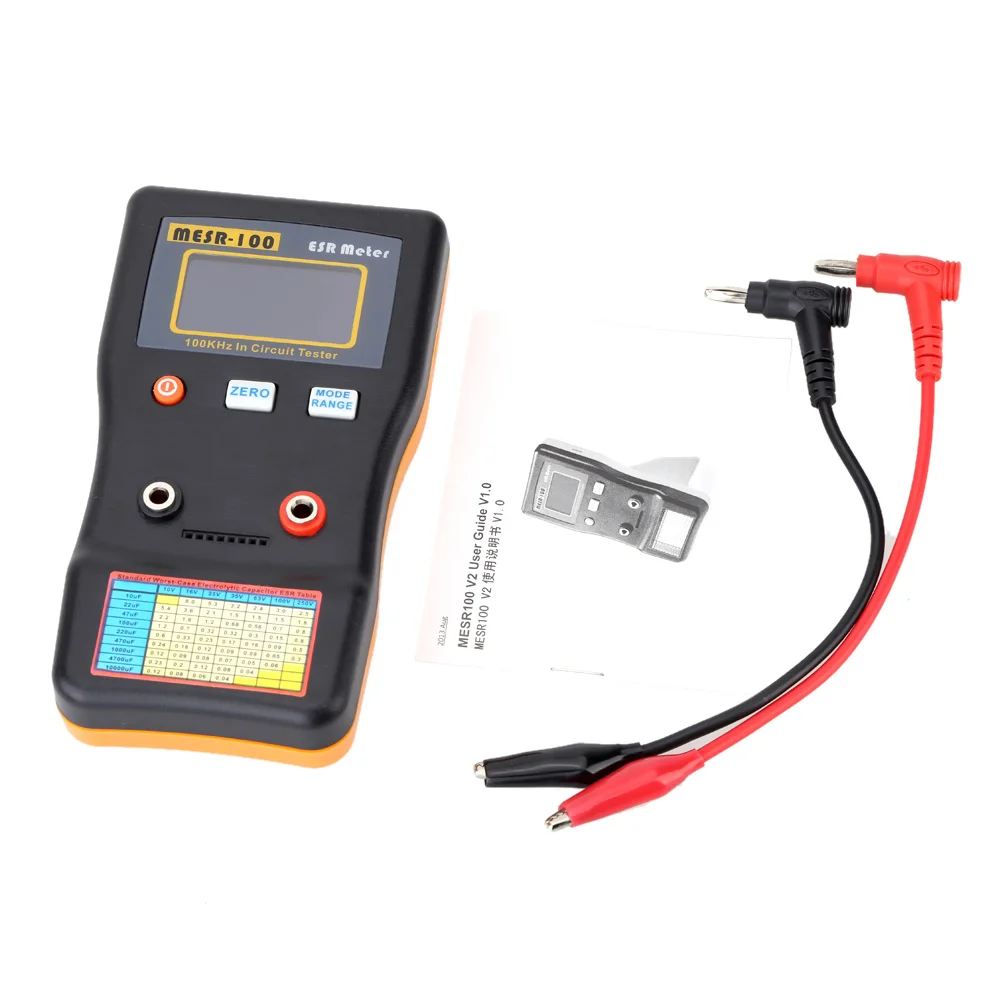
Комплект поставки, коробка, вес прибора с батарейками


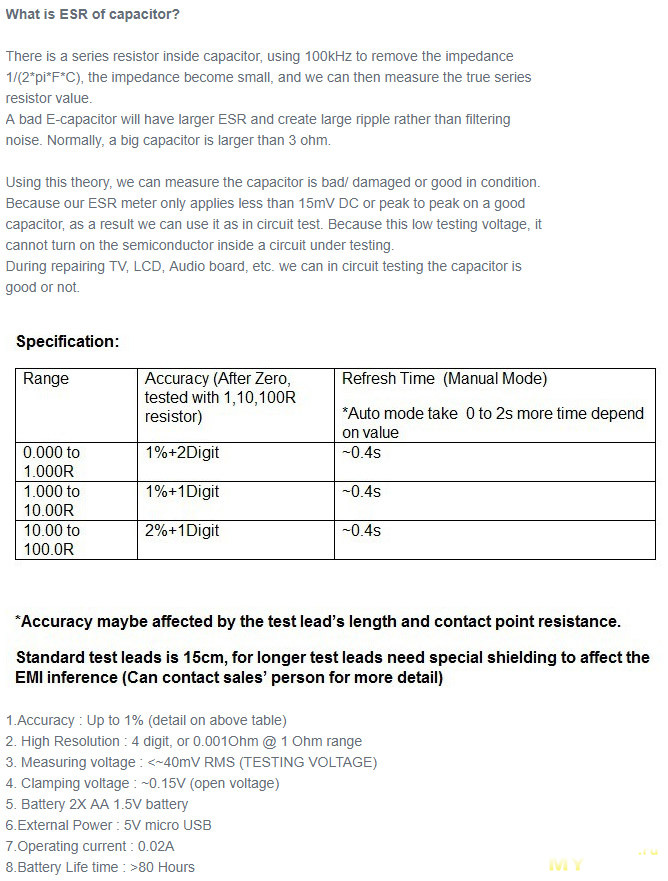
Технические характеристики прибора, сравнение с первой версией
Compare MESR100 old V1 and new V2 Improvement:
1) Change square wave to sine wave 100 KHz, reduce square wave’s high frequency component, and affect the reading passing the test
leads and capacitor.
2) Higher Resolution up to 0.001 ohm.
3) 128X64 dot matrix LCD, with more larger value display and information
4) Embedded 25V capacitor table at LCD, auto display the capacitor is good or bad reference to common 25V electrolytic capacitor.
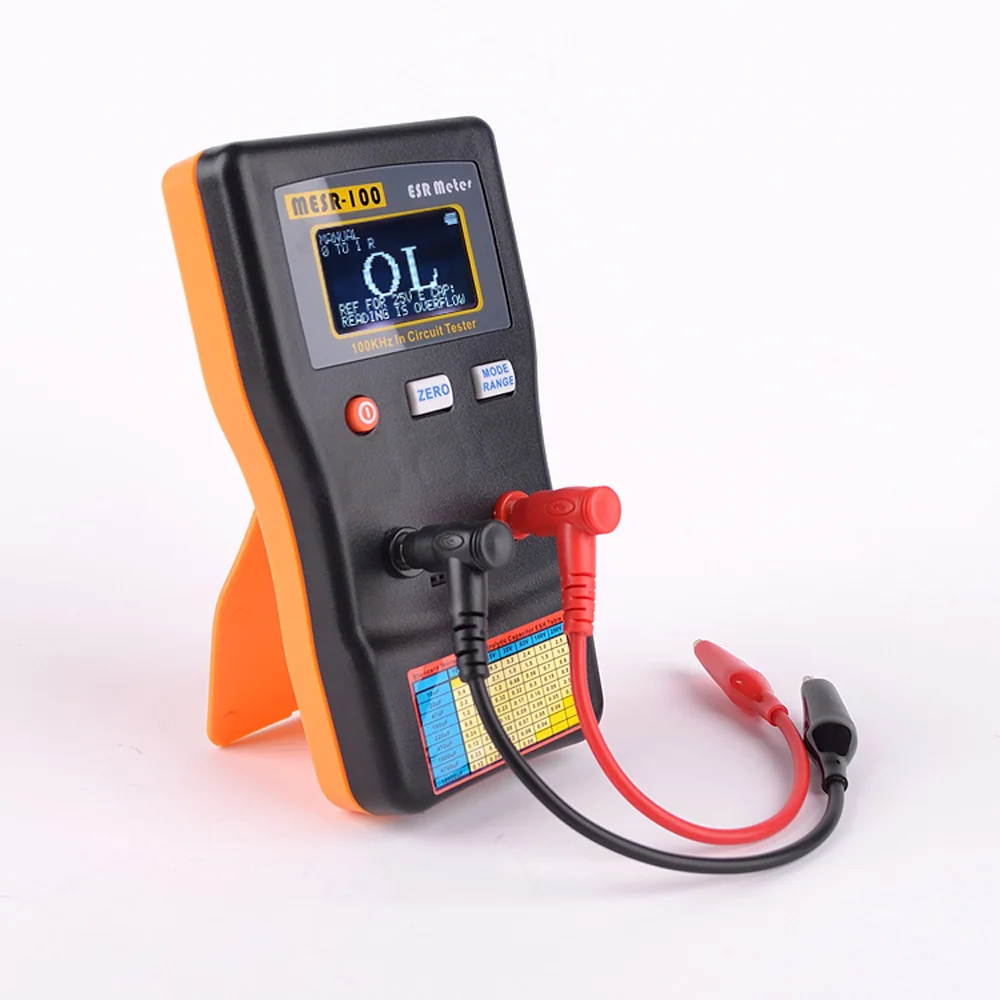
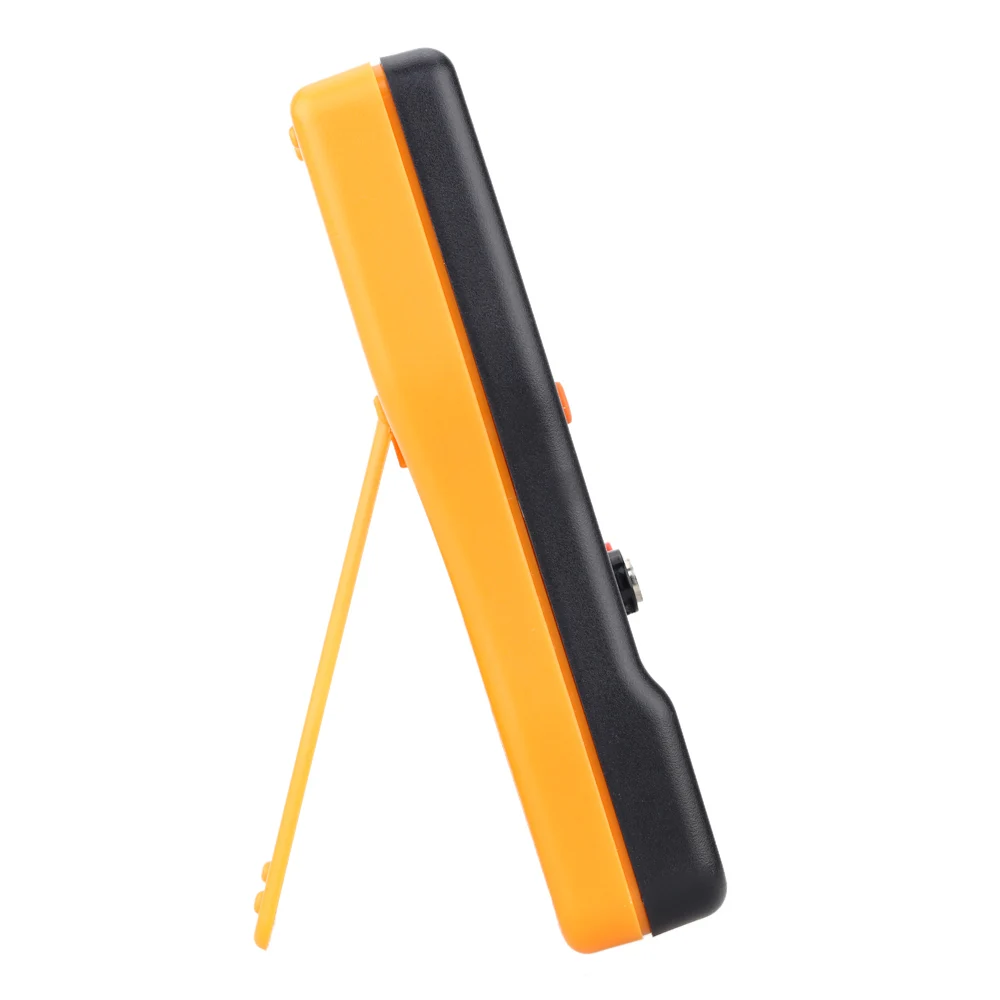
5) New plastic case, curve design for hand carrying. New stand for 60 degree stand on desk.
6) Use 2X AA battery, more convenience and longer battery life than 9V battery.
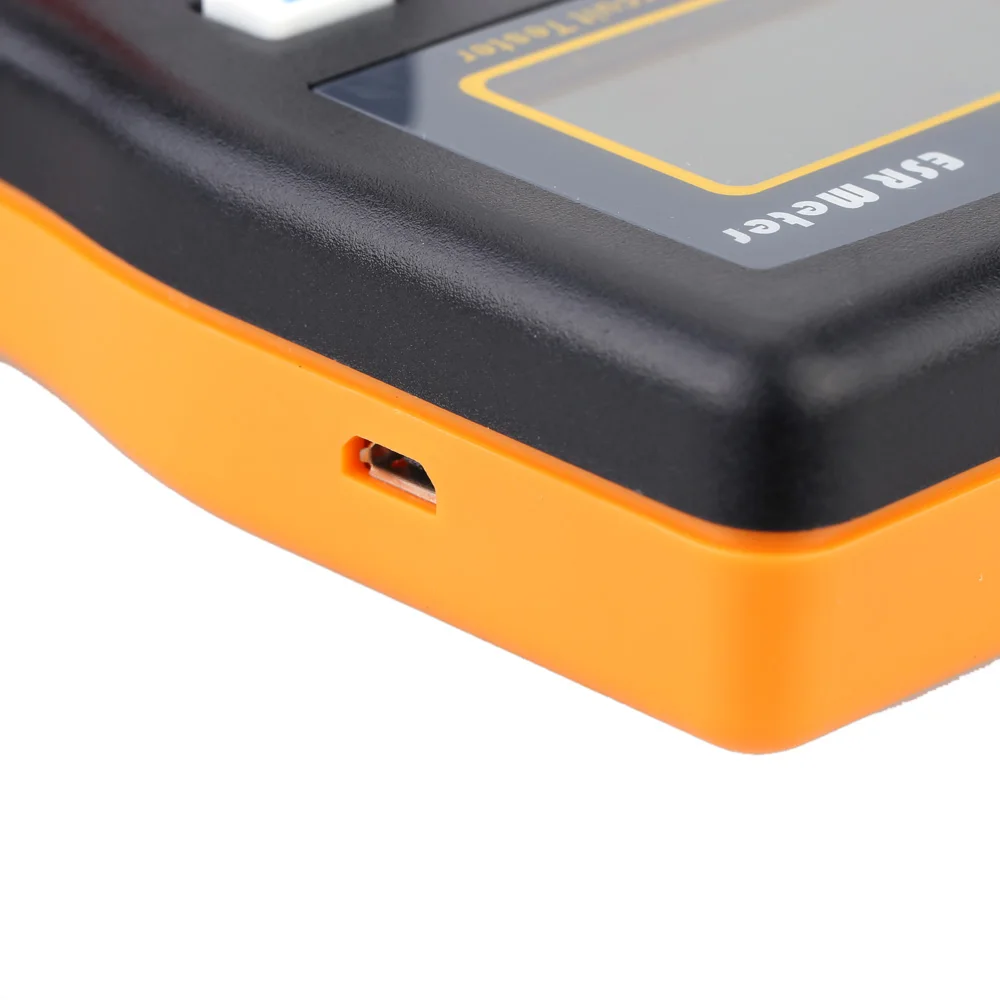
7) Support external USB power, using standard micro-USB port.
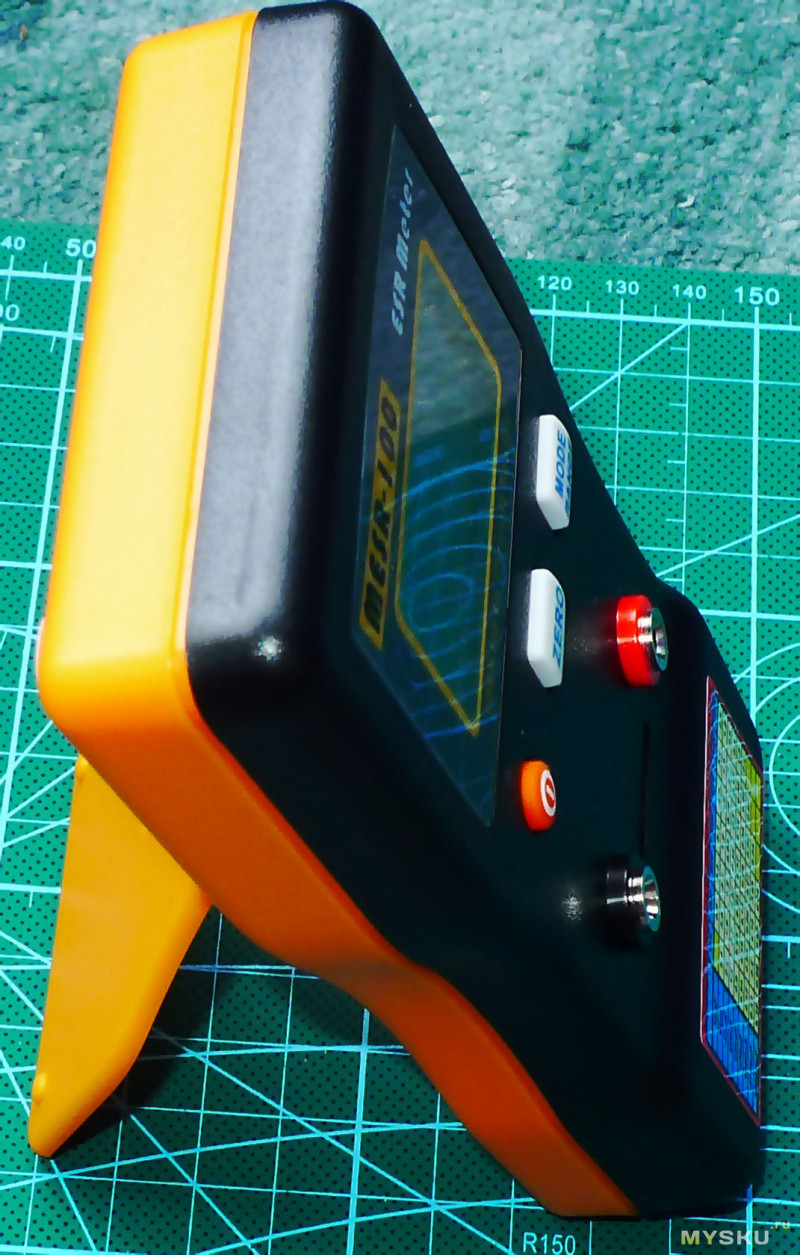
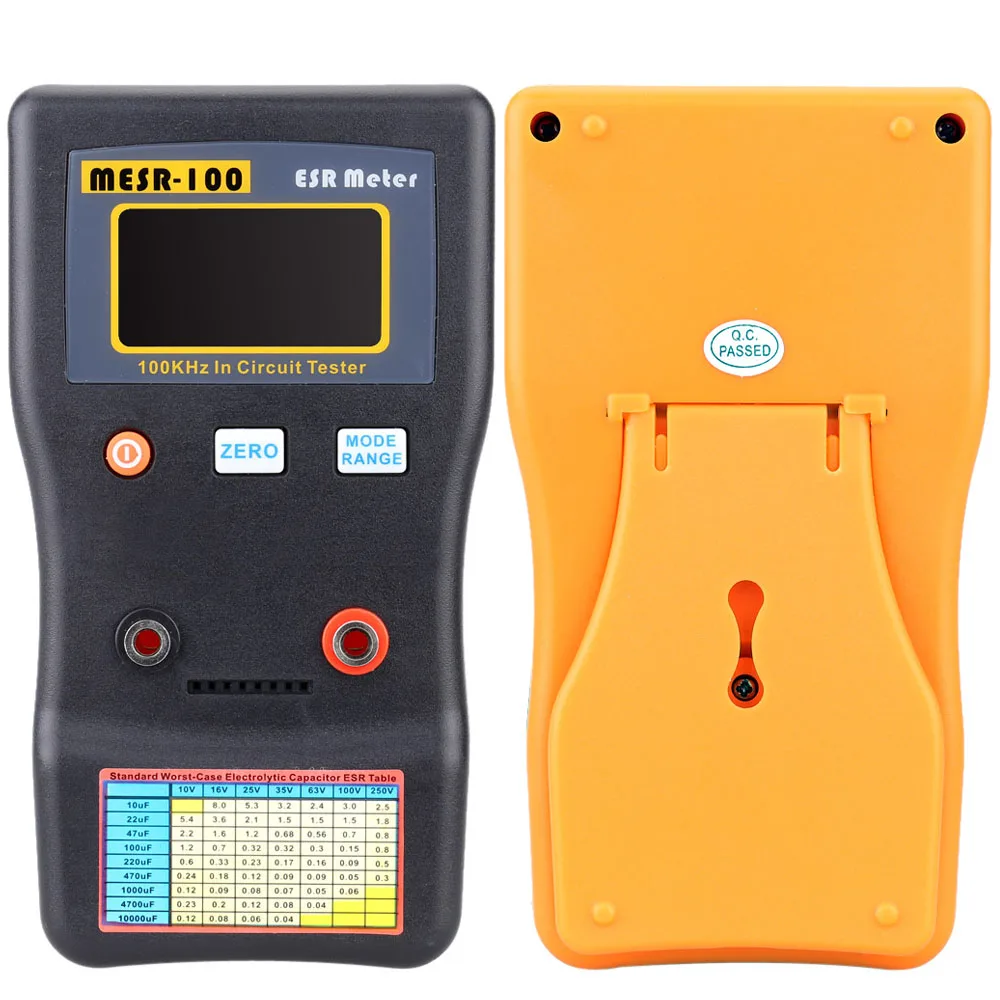
Внешне прибор выглядит вполне прилично
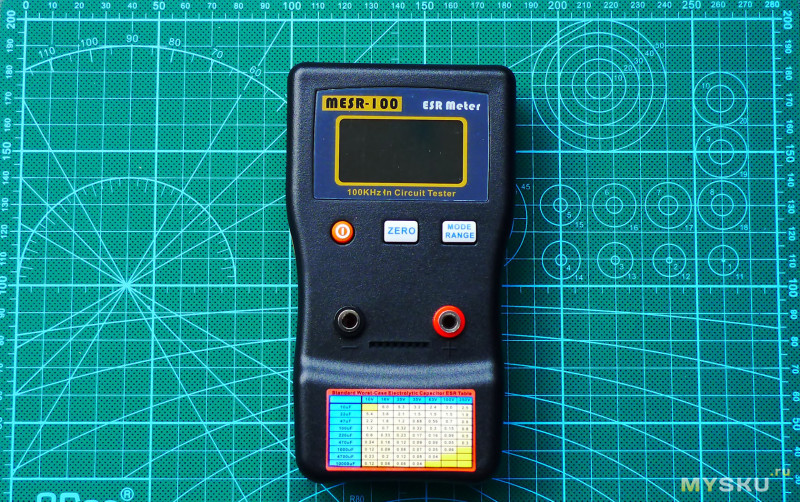
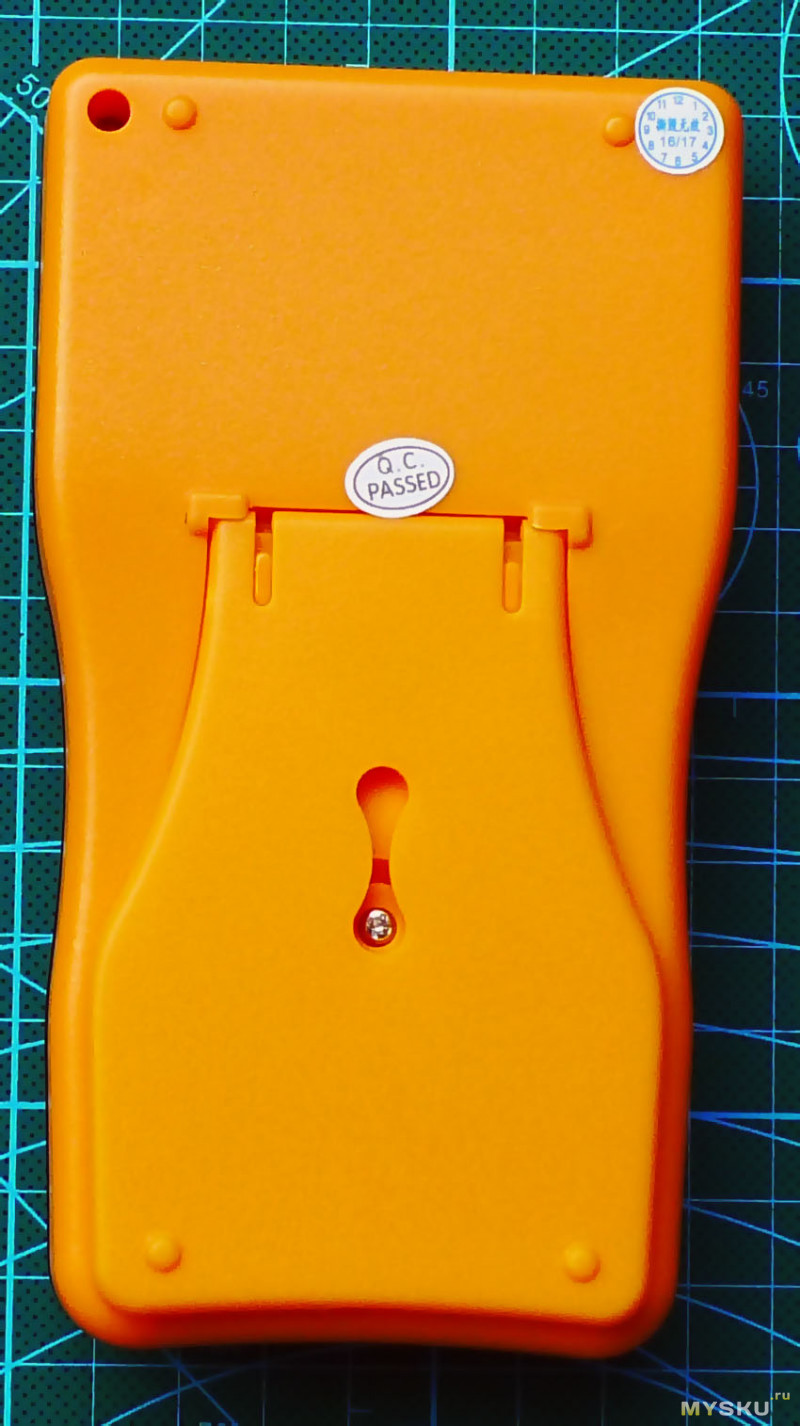
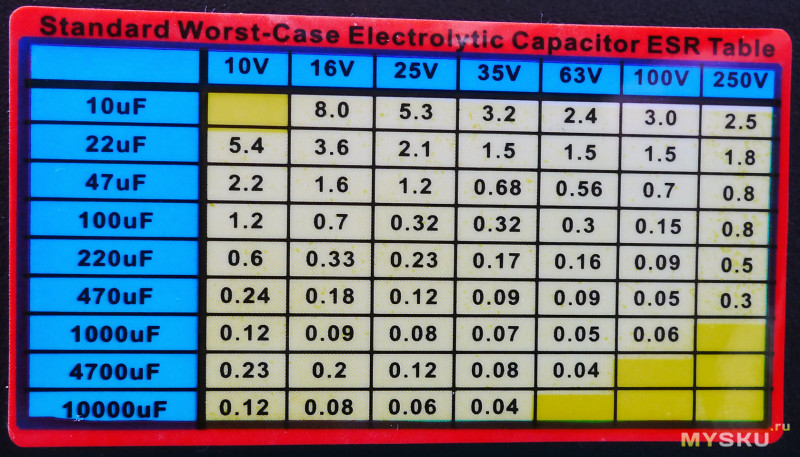
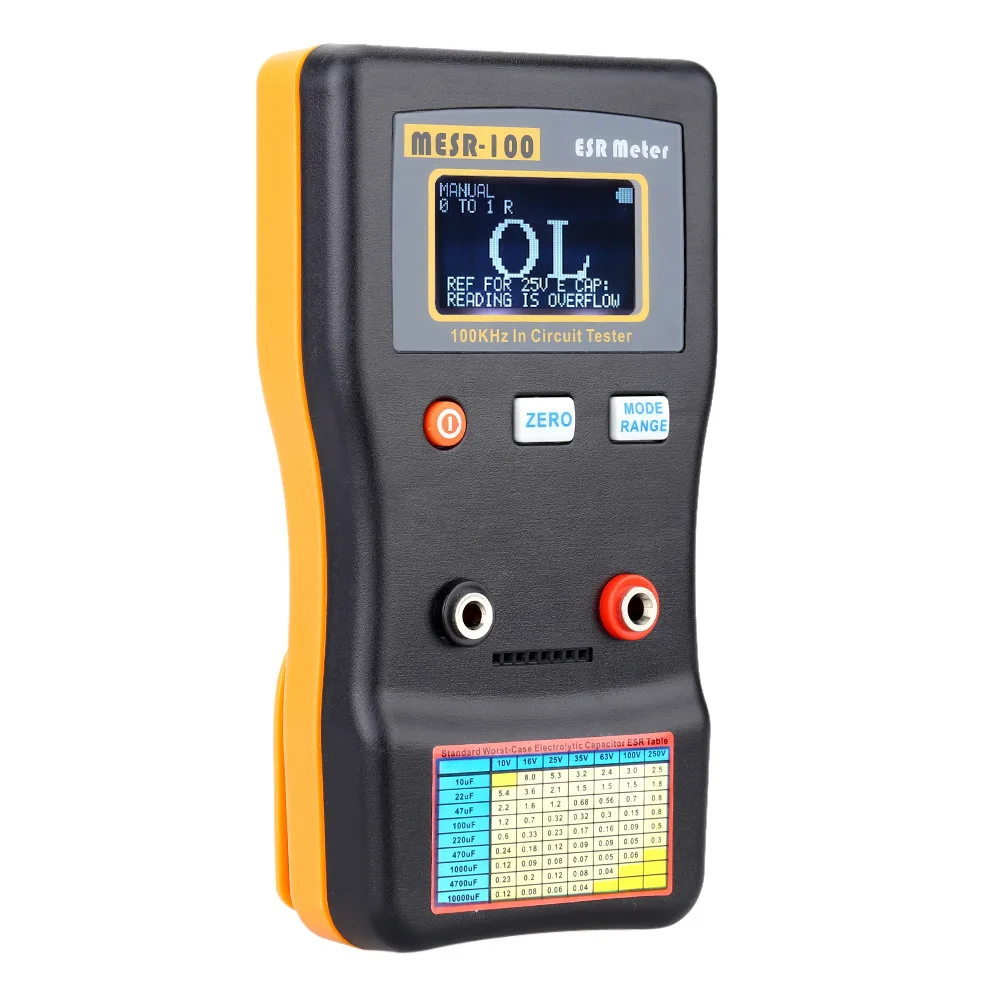
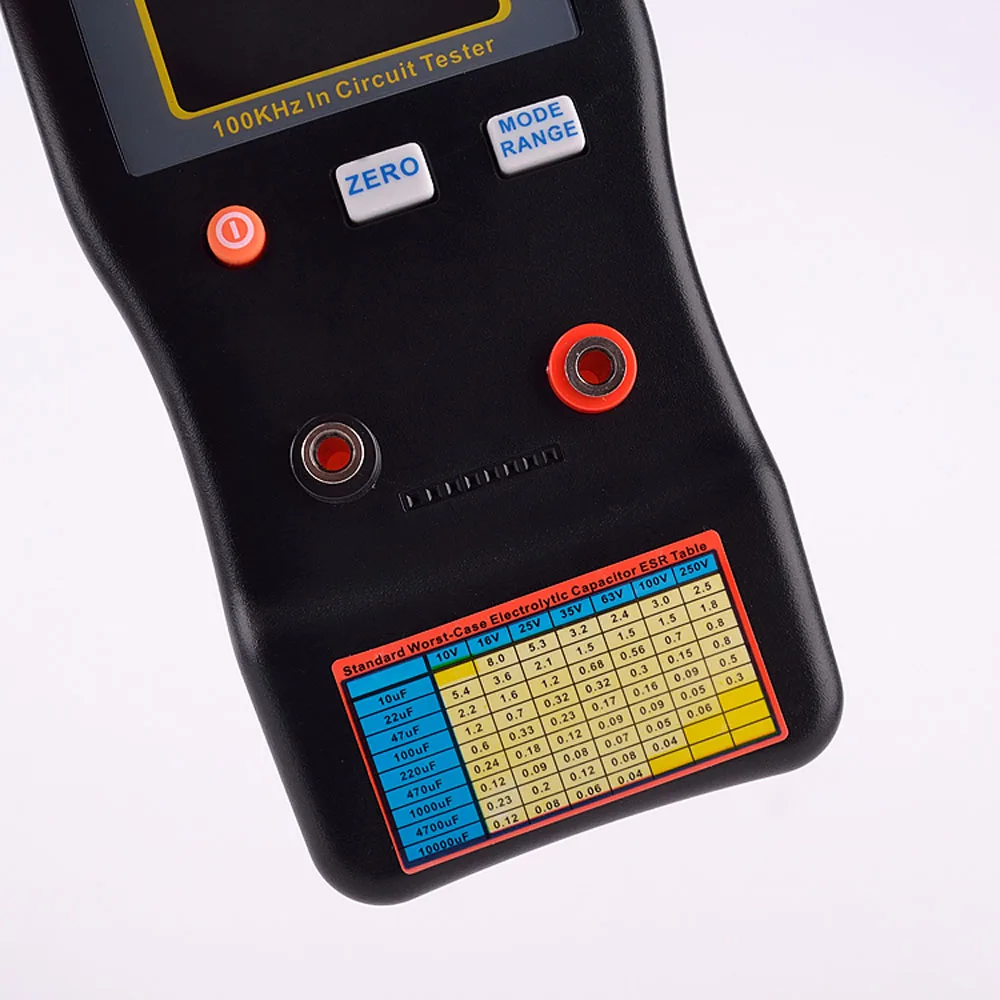
Таблица ESR на лицевой панели
Имеется складная подставка для его вертикального расположения
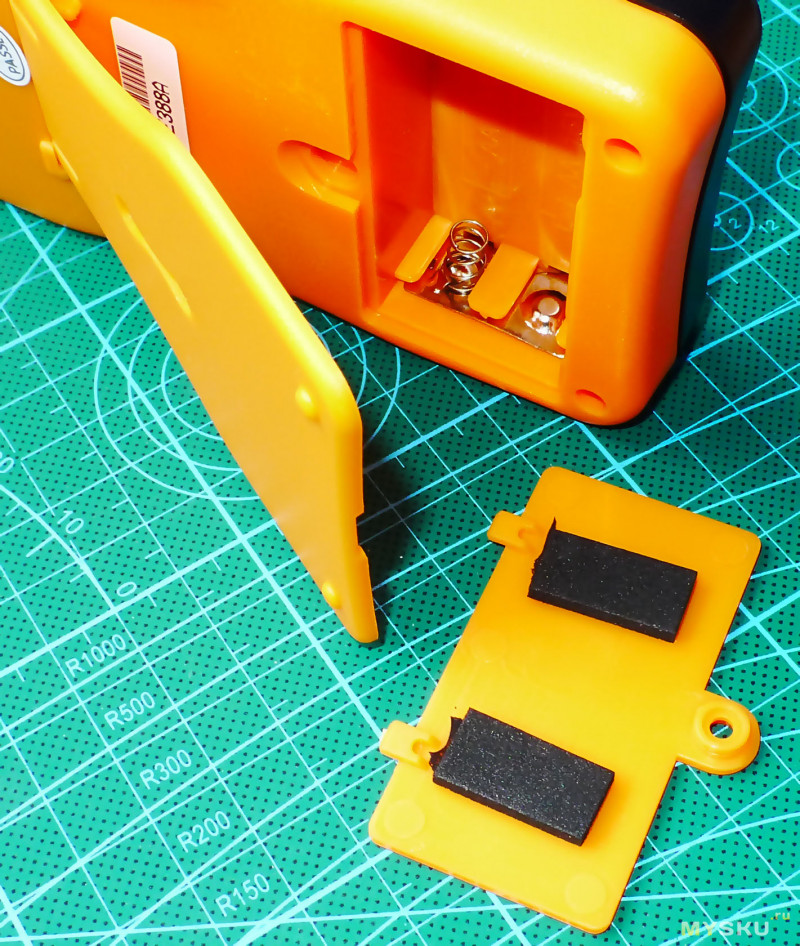
Питание осуществляется от 2X AA батареек
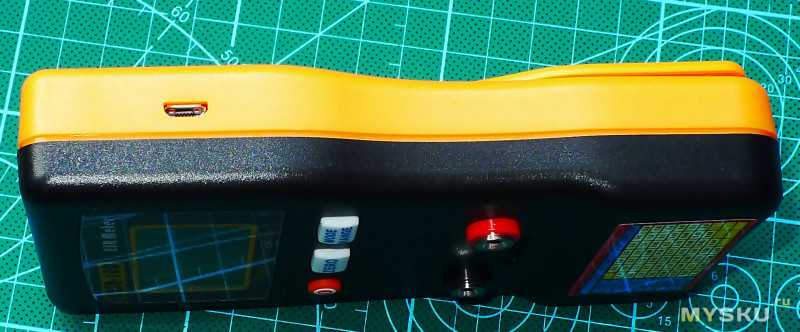
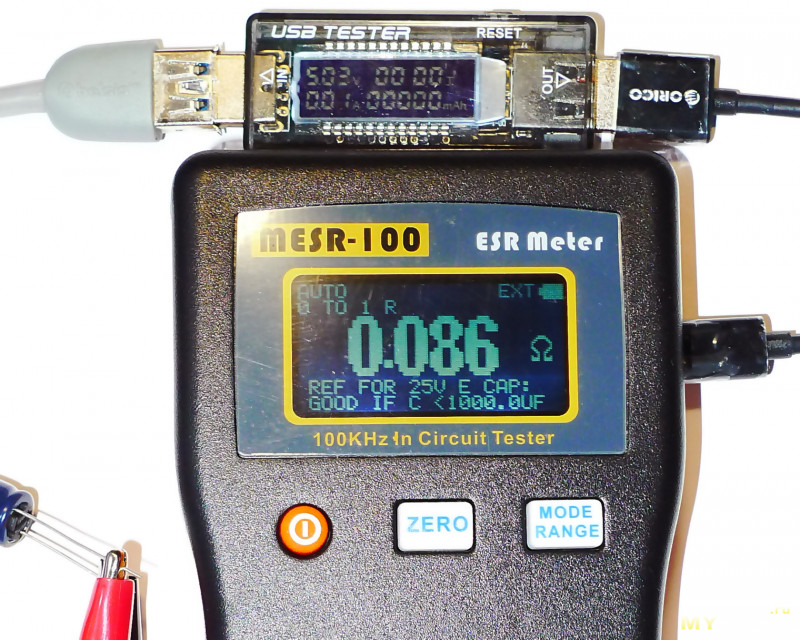
Прибор также может питаться от MicroUSB разъема расположенного на его боковой стенке
Замер тока потребления устройства в режиме измерения ёмкости
Включается и управляется прибор тремя кнопками.
Включение и отключение — нажатие и удержание на 1-2 секунды
Кнопка ZERO — калибровка и кнопка MODE RANGE — ручной выбор диапазона измерений
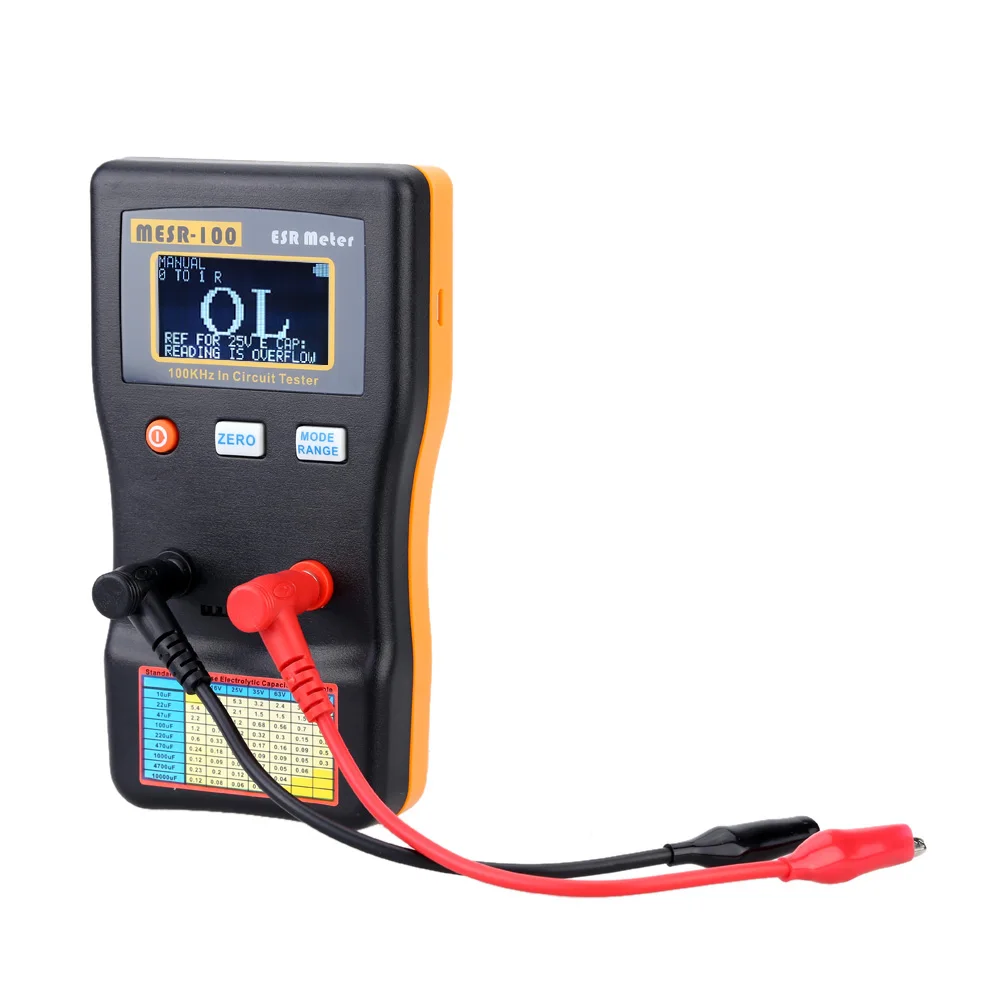
При включении прибора высвечивается сначала название и версия прошивки

Калибровка ESR метра сводится лишь к нажатию и удержанию кнопки ZERO на пару секунд при замкнутых щупах или перемычке на колодке между её + и — т.е. в зависимости от способа измерения

Начинка этого прибора
MESR-100 V2 построен на основе микроконтроллера PIC18F24K20
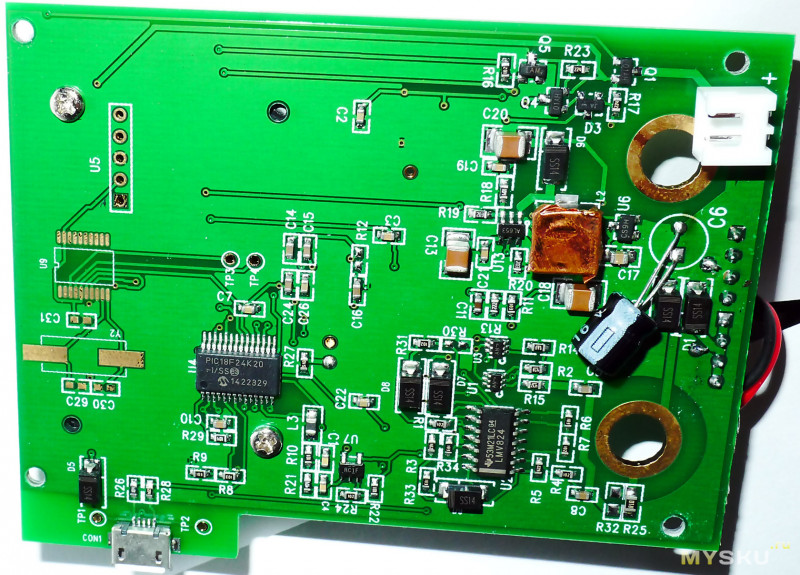
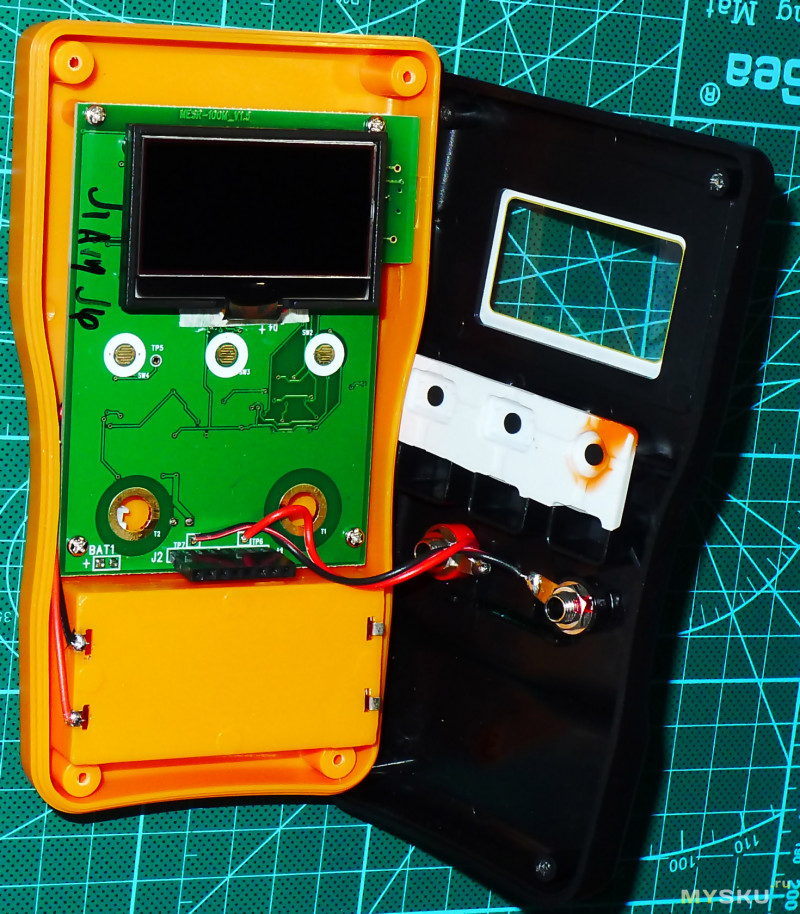
Дисплей — монохромный LCD с подсветкой из двух светодиодов
Для проверки MESR-100 я подобрал несколько радиодеталей

Подручные ESR измерители; показатели разнятся несильно за исключением плёночных конденсаторов, ну и время измерения оказалось худшее у MG328
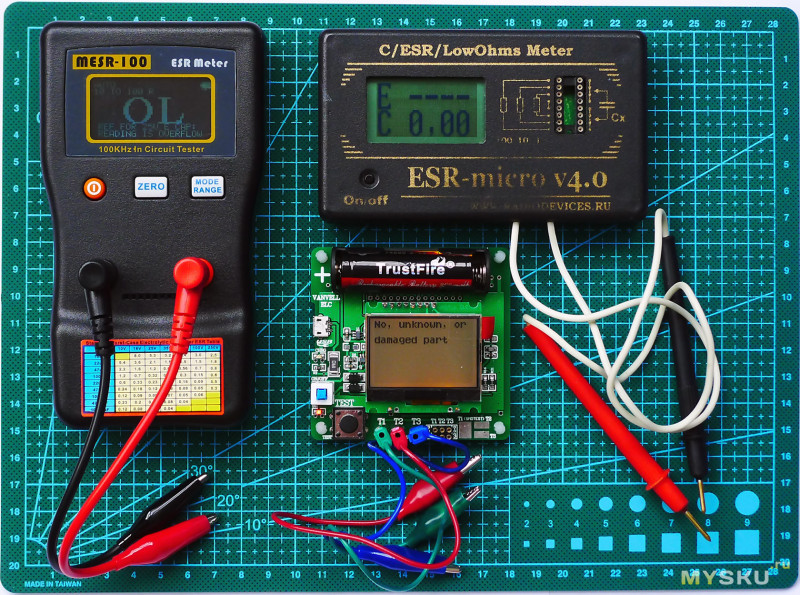
В процессе тестирования посмотрел на входы щупов осциллографом Instrustar ISDS 220A; когда к ним ничего не подключено
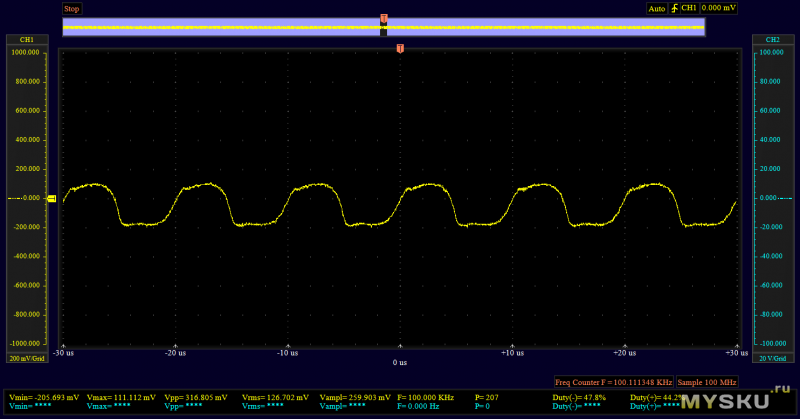
Заявленная частота 100 KHz совпадает
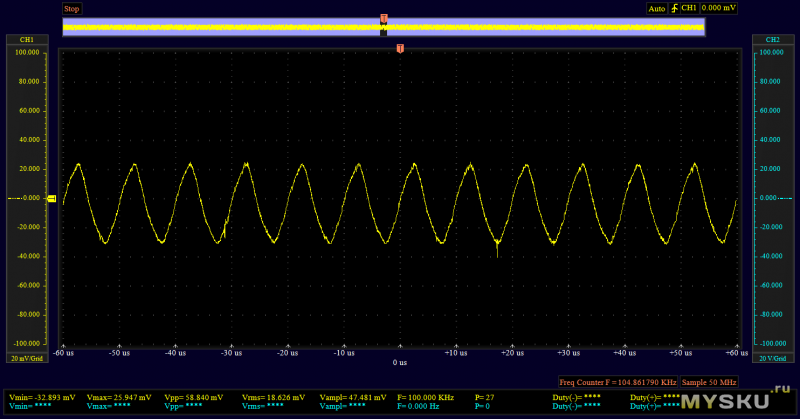
Измерение ёмкости 22uf(плохой, с подсохшим электролитом)
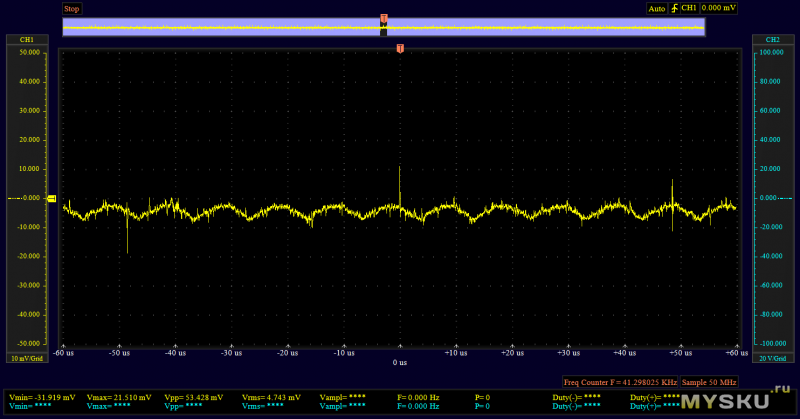
Хороший конденсатор Panasonic Low Esr (FC серии) на 470мкфх25В
Подборка видеоматериала по MESR-100
Резюме
Плюсы
MESR-100 показал довольно неплохую точность (после калибровки «0» перед измерениями).
Универсальное питание.
Экран с подсветкой.
Быстрый результат измерений пределах 1-ой секунды на любой ёмкости конденсатора
Возможность измерить ЭПС конденсаторов без выпайки их из платы, но для этого придётся менять штатные щупы
Минусы
При измерениях <0,1 Ом через щупы, прибор выдаёт иногда плавающие показания, а вставить в его клеммную колодку проводник толщиной более 0,6мм нельзя, как тут не вспомнить про зажим Кельвина.
MESR-100 ESR измеритель емкости ом метр профессиональный измерительный Измеритель сопротивления емкости конденсатор тестер цепи

Этот MESR-100 V2 Автоматический диапазон конденсатора ESR и низкий ом метр Диапазон измерения от 0,001 до 100.0R, поддержка в тестировании цепи. Используя истинную синусоидальную волну 100 кГц для измерения значения ESR, которая равна методу тестирования изготовителя конденсатора.
Особенности:
Это серии резисторов внутри конденсатора, используя 100 кГц для удаления импеданса 1/(2 * pi * F * C).
Сопротивление становится маленьким, и мы можем затем измерить значение резистора истинной серии.
Используя эту теорию, мы можем измерить конденсатор плохой/поврежденный или хороший в состоянии.
Наш измеритель ЭСР применяется только менее 15 мВ постоянного тока или пика к пику на хорошем конденсаторе, в результате мы можем использовать его как в тесте цепи.
Во время ремонта телевизора, ЖК-дисплея, аудиоплаты и т. д. мы можем в цепи тестирования конденсатор хороший или нет.
Двойной терминал, для быстрого и легкого осмотра общего конденсатора или резистора, печатная Таблица ESR для быстрой проверки.
Технические характеристики:
Цвет: черный
Точность диапазона (после нуля, время обновления (ручной режим)
Протестировано с 1,10, 100R автоматический режим занимает от 0 до 2 с, больше времени
Резистор) зависит от емкости.
0,000 к 1.000R 1% + 2 разряда ~ 0,4 s
1,000 к 10.00R 1% + 1 цифра ~ 0,4 s
10,00 к 100.0R 2% + 1 цифра ~ 0,4 s
Точность: до 1% (подробнее о приведенной выше таблице)
Широкий диапазон измерений:> 1 мкФ
Высокое разрешение: 4 цифры, или 0.001Ohm @ 1 Ω диапазон
Измерительное напряжение: <~ 40 мВ RMS (испытательное напряжение)
Внешнее питание: 5 В micro USB
Рабочий ток: 0.02A
Батарея: 2 * AA 1,5 В батарея (не входит в комплект)
Время работы батареи:> 80 часов
Размер изделия: приблизительно 14,5*8*3 см/5,7*3,1*1,2 дюйма
Товар Вес:Ок139,6 гр/4,9 унций
Посылка Размеры:ОкПротивоскользящий коврик для телефона 17*9*5 см/6,7*3,5 * 2.0in
Посылка Вес:Ок218 гр/7,7 унций
Посылка список:
1 * постоянной ёмкости, универсальный конденсатор метр
2 * Тесты зажимы
1 * Руководство пользователя


Доставка:
1. Мы гарантируем отправку товара в течение 24-72 часов после подтверждения оплаты, за исключением праздников.
2. Мы отправляем по Почта Китая, HKpost EMS, DHL, FedEx, в соответствии с вашим выбором при размещении заказов.
3. Если вы не получили товар через 45 дней, пожалуйста, не стесняйтесь связаться с нами. Мы приложим все усилия, чтобы решить проблему.
4. Мы не несем ответственности за задержки, связанные с таможней, ввозными пошлинами, налогами или другими таможенными пошлинами.
Гарантия:
1. Все товары имеют гарантию 1 год. Если ваша покупка не соответствует товарному качеству, пригодности для цели или соответствует описанию, мы можем убедиться, что ваши проблемы решены.
2. Для неправильно отправленных товаров, пожалуйста, свяжитесь с нами в течение 48 часов после доставки. Мы организуем доставку правильных товаров или вернем всю вашу оплату.
3. Для дефектных или неисправных продуктов, пожалуйста, сделайте фотографии или видео, мы повторно отправим или вернем деньги после подтверждения.

The answer to the question, of how to use ESR meter, is really simple and straightforward. Connect the capacitor to the meter, note the reading, and compare it with the given ESR table to tell if you have a bad capacitor or a good one.
The above is a short summary, of course. You can consider this as a general rule of thumb for all the variations of available ESR meters.
ESR value is an important parameter of a capacitor. Using this value we can actually tell if the capacitor is good or bad even without desoldering it from the PCB board, thus saving us a lot of resources.
If this introduction got your attention, then I am pretty positive you will enjoy the rest of this article as well.
Hi, I am Abbas. In the rest of the article, I will explain in detail what is ESR meter is, how to use an ESR meter the correct way, how to find out the bad cap from the good one, and so much more.
I am not perfect, nor is this article going to be. This is just my limited knowledge try to help you somehow.
I hope you will enjoy it.
What is an ESR meter
The word ESR stands for equivalent series resistance. Now the device that measures this value is called an ESR meter, pretty simple right?
An ESR meter is a very special tool when it comes to testing a capacitor. We use a multimeter for testing capacitors as well but an ESR meter help to test a capacitor even when it is in the circuit board.
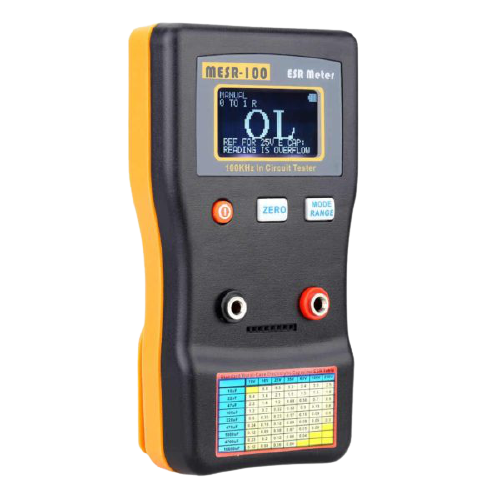
The above is the MESR-100. This is the best ESR meter on the market according to my opinion.
By looking at this device you can say that it is a simple device. It has three operation buttons, two ports for probes, and a wide digital screen for reading.
If you pay close attention to the port there is a dotted line. These dots are the slots where you put your capacitor under test for reading if you don’t want to use the probe cables.
The beauty of this ESR meter is you can power it up using two options. One is a battery and the other is a USB adapter. It is up to you which option you prefer.
The above device is specific to the ESR reading. You will see other devices as well available on the market. You will find multimeters and LCR meters with ESR value measuring capabilities. It doesn’t matter what tool you prefer, just remember the purpose of the ESR meter is to test a bad capacitor in or off the circuit.
How to use ESR meter (taking the example of MESR-100)
This is the question we really need to answer in this article. The above was the background building so that, so you have a clear idea of what is an ESR and why it is important to measure.
Let’s see how to use ESR meters of any shape and variation. As there are many ESR meters available on the market. I will first explain a general method applicable to all meters. Then I will share the exact method for MESR -100 ESR meter. Because this tool is widely used in the field.
General method
In general (how to use ESR meter), you will find the ESR feature in mostly LCR meters and most often in advanced multimeters. The following is the most used LCR meter (DE-500) on the market.
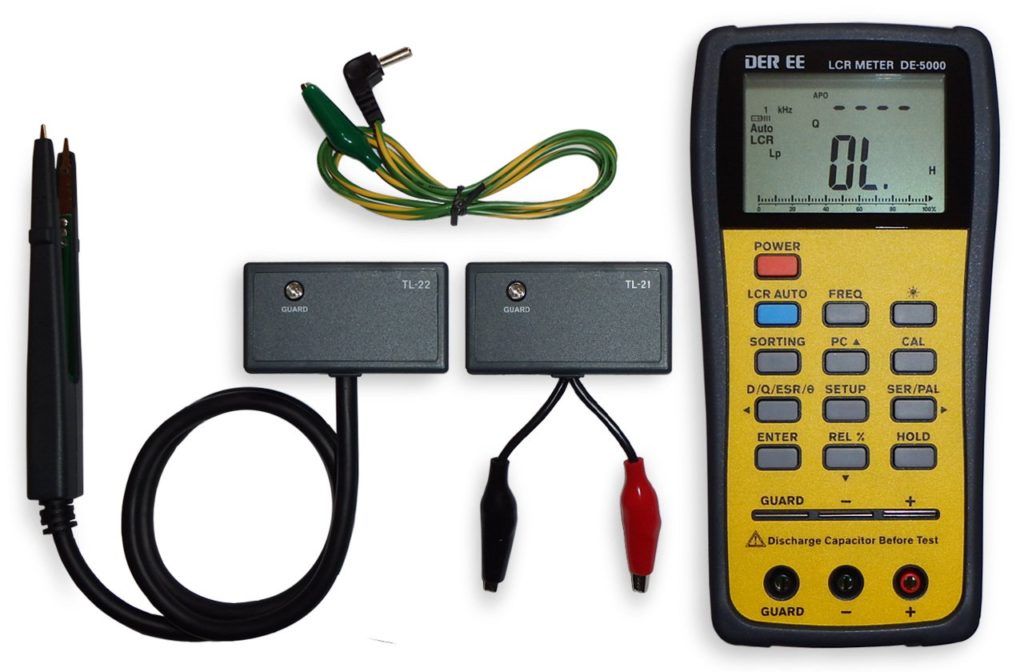
This is the DE-500 ESR meter (Amazon link). If you pay close attention to its operation buttons you will find an ESR button. This will be true for all ESR meters and multimeters. Just search for the ESR button or functions.
After you find the ESR button follow the following steps:
- Press the ESR button so that you get into the ESR mode
- Take the capacitor you want to test and completely discharge it first.
- Connect the probes in the right polarity if the capacitor is electrolytic.
- Note the reading on the screen, it is that simple
Make sure you connected the probes correctly and your capacitor is completely discharged. In case you connect a fully charged capacitor by accident. This may result in damaging your LCR meter.
Measuring ESR with MESR-100
Now the same steps of how to use ESR meter apply to this guy as well. But let’s see them in detail. For this method, you should have MESR-100 (Amazon link) in your lab. If you are into repair I think this meter will save you a lot of time.
Follow the following steps to use MESR-100:
- Turn on the meter and see the value on the screen. This value should be ideally zero, but generally, it should be close to zero.
- Connect the probes first in their right ports
- Now if the value were not zero at the beginning. Then short the probes and see the value decreasing to zero.
- When we confirm that the value on the screen is zero. It is time to go for the next steps.
- Discharge the capacitor completely with a high resistance tool available to you.
- For an electrolytic capacitor connect the negative probe to the negative terminal of the capacitor and the positive to the positive – this is very important.
- Press the test button
- See the results on the screen
The value you see on the screen is the ESR value of the capacitor. Note it down. It is time to see if the capacitor is a good one or a bad one.
The above was the steps of how to use ESR meter. They are simple once you practice them repeatedly.
How to tell if the cap is bad
As I have shared a few times the ESR value is used to test a bad capacitor.
Now the whole point is, that an ideal capacitor has an ESR value equal to zero, but in reality, it is very less; close to the ideal zero value. A high ESR value is the first indicator of a capacitor’s failure.
Every capacitor has its rated ESR value given in its datasheet for reference. We used the above tool to measure that ESR value.
To tell if the capacitor is bad we just need to compare the measured value with the given datasheet value. If the value drifted by 10% then it would mean that we have a bad capacitor.
Checking by MESR-100
Checking a bad capacitor with MESR-100 is very easy. It has given a table of ESR values on its body as you can see it yourself in the above given picture.
All we need to do is take the reading and compare it with the given table. And furthermore. On the screen, you will also get the indication that the capacitor is bad without even comparing and looking for the ESR values of that particular capacitor.
Conclusion
The ESR value is an important value to measure. It helps us find out the bad capacitor even in the circuit boards. To measure this value we need to have a decent ESR meter.
There are so many ESR meters out there on the market. Choose whatever you like. All the meters will help you measure the ESR of any electrolytic or ceramic capacitor of any value and rating.
After picking the meter it is time to learn how to use ESR meter. Every ESR meter is different, but there is a general way to use any ESR meter which I shared in great detail in the above sections.
And well, there you have it. Now, if a reader like me, reads the conclusion first. You read it. It’s time to go to the beginning. But you are the reader, making this far. I hope you enjoyed it.
Thank you and have a grateful life.
Other useful posts
- 11 Best cheap ESR meter (For Easy Bad Caps Testing)
- Reviewing Excelvan M6013 Meter [The Best Capacitance Meter]
- 7 Best Powered Breadboard kit for beginners
Hi. I am very happy to see you. I love electronics since childhood, earned a Bachelor’s degree in Electronics Engineering, Master’s degree in Electrical Engineering (RF & Microwaves).
In this blog, I share my learnings about electronics, and try to help beginner make their first circuits on breadboard. Hopefully, it will be helpful to you and you will enjoy it.
- May 15, 2024
- JINGYAN
Table of Contents
- JINGYAN MESR-100 ESR Capacitor Tester Ohm Meter
- Product Information
- Product Usage Instructions
- FAQ
- Features
- Specification
- Operating Introduction
- Read User Manual Online (PDF format)
- Download This Manual (PDF format)
JINGYAN MESR-100 ESR Capacitor Tester Ohm Meter
Product Information
- The MESR100 V2 is an auto-ranging capacitor ESR and Low Ohm Meter designed for measuring capacitors in a circuit.
- It uses a true 100 KHz sine wave to measure the ESR value, allowing for accurate testing similar to capacitor manufacturers’ methods.
- The device can help identify bad or damaged capacitors based on their ESR values, which indicate larger ripple and potential issues with filtering noise.
Features
- Measuring range from 0.001 to 100.0R
- Supports in-circuit testing
- Dual terminal for inspecting capacitors and resistors
- External USB power support via micro-USB port
Product Usage Instructions
Operating Instructions
- POWER ON: Press and hold the ON/OFF circle orange button for 2 to 3 seconds to power on. Press and release the button to shut down the meter.
- AUTO/MANUAL mode:
- Auto Range: Press and release the RANGE button to enable auto mode.
- Manual Range: Scroll through the manual range options by pressing the RANGE button.
- 1 Key Zero: Short circuit the test leads’ terminal, then press and release the ZERO button to zero out wire resistance.
FAQ
- What is the ESR of a capacitor?
- The ESR (Equivalent Series Resistance) of a capacitor refers to the series resistor inside the capacitor. By using a 100kHz frequency, the device removes impedance and measures the true series resistor value, helping identify if a capacitor is bad or damaged.
- How can I use the MESR100 V2 for in-circuit testing?
- With its low testing voltage of less than 15mV DC, the MESR100 V2 can be used for in-circuit testing without turning on the semiconductor inside a circuit under testing. This feature is particularly useful when repairing electronic devices like TVs, LCDs, and audio boards.
MESR100 V2 User Guide V1.0
Features
- JINGYAN MESR-100 V2 Auto-ranging capacitor ESR and Low Ohm Meter Measuring range from 0.001 to 100.0R, support IN CIRCUIT Testing.
- Using true 100 KHz sine wave to measure the ESR value, which is equal to the testing method of capacitor manufacturer.
- In the market, some techniques use the short pulse method to testing, but the value will vary vs the capacitance and sometimes the reading is different from the manufacturer’s value.
- What is the ESR of a capacitor?
- There is a series resistor inside the capacitor, using 100kHz to remove the impedance 1/(2piF*C), the impedance becomes small, and we can then measure the true series resistor value.
- A bad E-capacitor will have a larger ESR and create a large ripple rather than filtering noise.
- Normally, a big capacitor is larger than 3 ohms.
- Using this theory, we can measure the capacitor is bad/ damaged or good in condition.
- Because our ESR meter only applies less than 15mV DC or peak to peak on a good capacitor, as a result we can use it as in circuit test. Because this low testing voltage, it cannot turn on the semiconductor inside a circuit under testing.
- During repairing TV, LCD, Audio board, etc. we can circuit testing the capacitor is good or not.
- Dual terminal, for fast and easy inspect general capacitor or resistor, a printed ESR table for fast check.
Compare MESR100 old V1 and new V2 Improvement
- Change square wave to sine wave 100 KHz, reduce square wave’s high-frequency component, and affect the reading passing the test leads and capacitor.
- Higher Resolution up to 0.001 ohm.
- 128X64 dot matrix LCD, with more larger value display and information
- Embedded 25V capacitor table at LCD, auto display the capacitor is good or bad reference to common 25V electrolytic capacitor.
- New plastic case, curve design for hand carrying. New stand for 60 degree stand on desk.
- Use 2X AA battery, more convenience and longer battery life than 9V battery.
- Support external USB power, using standard micro-USB port.
MEASURING 220uF 25V Electrolytic Capacitor Vpk to pk is 2.48mV Frequency is
100kHz Sine Wave
Specification
Range| Accuracy (After Zero, tested with 1,10,100R resistor)| Refresh Time
(Manual Mode)
*Auto mode take 0 to 2s more time depend on value
—|—|—
0.000 to 1.000R| 1%+2Digit| ~0.4s
1.000 to 10.00R| 1%+1Digit| ~0.4s
10.00 to
100.0R
| 2%+1Digit| ~0.4s
Accuracy may be affected by the test lead’s length and contact point
resistance.
Standard test leads are 15cm, longer test leads need special shielding to
affect the EMI inference (Can contact sales’ salesperson for more details)
- Accuracy: Up to 1% (detail in above table) Wide Measurement Range: >1uF (for 0.1uF the error will be larger on equation 1/(2piF*C) @ 100Khz )
- High Resolution: 4 digits, or 0.001Ohm @ 1 Ohm range
- Measuring voltage: <~40mV RMS (TESTING VOLTAGE)
- Clamping voltage: ~0.15V (open voltage)
- Battery 2X AA 1.5V battery
- External Power: 5V micro USB
- Operating current 0.02A
- Battery Lifetime: >80 Hours
Operating Introduction
POWER ON
- Press and hold the ON/ OFF circle orange button for 2 to 3 seconds to power on.
- Press and release the ON/ OFF button to shut down the meter.
AUTO/ MANUAL mode
- Auto Range:
- Press and release the RANGE button and at the first line of LCD will show “AUTO:”
- At auto mode meter will automatically select the best range to detect.
- Manual Range:
- Scroll the manual range from 1R, 10R and 100R range by press and release the RANGE button
- In LCD will show MANUAL at first LCD line and show at second line: 0-1R, 1-10R and 10-100R.
Key Zero:
Short circuit the test leads’ terminal, cancelling the wire resistance.
Press and release the “ZERO” button, LCD shows “ZERO” and wait the zero to
disappear.
If you are using the meter array socket, you need to use a short pin to short
circuit to set zero.
Backlight:
LCD backlight will be on during power-on
Auto Sleep:
After around 10 hours of not testing, it will shut down automatically to save
power.
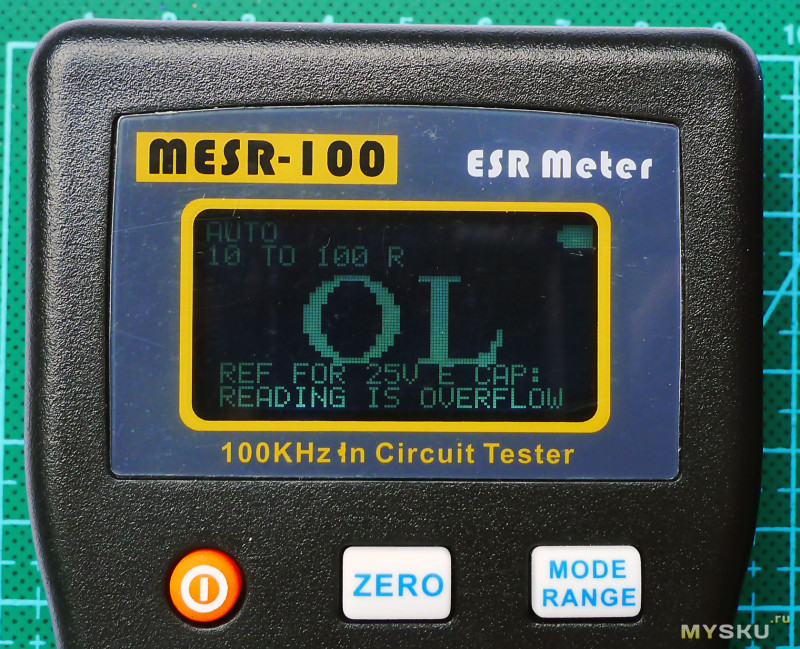
OVERFLOW or OL:
Display overflow when the value is out of range, you can check that you are
zero correctly.
ESR TABLE:
It is for reference only, different manufacturer of capacitors has different
ESR, better to test a good cap ESR and compare with what you are testing,
usually bad cap with higher ESR few times larger than good one.

SOFTWARE ESR:
Put the 25V Electrolytic capacitor value to LCD, and compare,
GOOD if C < XXuF means the capacitor may be in good condition if it is less
than XXuF
PLASTIC STAND:
If you don’t use the stand, press and push the lock position:

- PLEASE DISCHARGE THE CAPACITOR BEFORE TESTING, you can use a screwdriver to short circuit, or series with a resistor around 10 ohm and short for 5 to 10s.
- There is 2 fast diodes inside the meter to prevent high voltage, but it is important to discharge the capacitor firstly, as it is a large surge current and voltage and may damage the meter.
Read User Manual Online (PDF format)
Read User Manual Online (PDF format) >>
Download This Manual (PDF format)
Download this manual >>
Новый, полный комплект.
Ценник 1000р + почта по России
Оплата на Сберпластик
Характеристики
Range
Accuracy (After Zero, tested with 1nF, 1uF, 1000uF)
Refresh Time (Manual Mode)
*Auto mode take 0 to 2s more time depend on value
Larger capacitance take more measuring time
0.01pF to 47.000nF
1%+2Digit
~0.2s to 1s
47.00nF to 47.000uF
1%+1Digit
~0.2s to 2s
47.00uF to 470.00mF
1 to 3%+1Digit (Larger capacitance will have larger error)
~0.2s to 30s
*Accuracy maybe affected by the test lead’s length and distance of test leads. Especially testing pF small capacitance, shortest test lead is recommended, and be careful the surrounding EMI or RF noise may affect the pF reading.
1) Accuracy: Up to 1% (detail on above table)
2) High Resolution: 5 digit
3) Measuring voltage: <0.8V
4) Clamping voltage: ~1.25V (open voltage)
5) Battery 2X AA 1.5V battery
6) External Power: 5V micro USB
7) Operating current 0.02A
 Battery Life time: >80 Hours
Operating Introduction:
1) POWER ON
Press and hold the ON/ OFF circle orange button for 1 to 2 second to power on.
Press and release the ON/ OFF button to shut down meter.
2) AUTO/ MANUAL mode:
i) Auto Range:
Press and release the RANGE button and at the first line of LCD will show “AUTO:»
At auto mode meter will automatically select the best range to detect.
ii) Manual Range:
Scroll the manual range from 47nF, 47uF and 470mF range by press and release the RANGE button
In LCD will show MANUAL at first LCD line and show at second line: 0-47NF, 47NF TO 47UF and 47UF TO 470MF.
3) 1 Key Zero:
OPEN circuit the test leads’ terminal.
Press and release the “ZERO» button, LCD shows “ZERO» and wait the zero disappear.
If you are using the meter array socket, you need to OPEN circuit to set zero too.
4) Socket:
You can use the 8 pin socket to measure the capacitor
5) Running Average:
It will automatically start running average if the capacitance reading become stable and user can get more accuracy reading.
During running average it will show “AVG” at right bottom LCD or it will show raw data icon “RAW”
As a result, if you want to get higher accuracy reading, you can take the reading during AVG display.
This function will automatically on, once the raw data is noise.
6) Backlight:
LCD backlight will on during power on
7) Auto Sleep:
Around 8 to 10 hours for not testing, it will shut down automatically to save power.
OVERFLOW or OL:
Display overflow when the value is out of range, you can check that you are zero correctly.
9) PLASTIC STAND:
If you don’t use the stand, press and push the lock position:
Изменено пользователем Borodach