
Manual
View the manual for the Røde Rode VideoMic Pro here, for free. This user manual comes under the category microphones and has been rated by 1 people with an average of a 8. This manual is available in the following languages: English. Do you have a question about the Røde Rode VideoMic Pro?
Ask your question here
Røde Rode VideoMic Pro specifications
Below you will find the product specifications and the manual specifications of the Røde Rode VideoMic Pro.
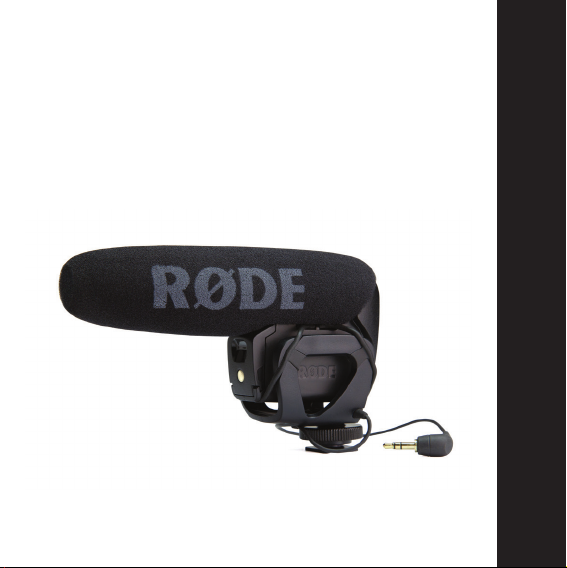
The Rode VideoMic Pro is a microphone designed for videographers and filmmakers. It is a compact and lightweight device that attaches to a camera’s hot shoe mount, allowing for direct audio recording while capturing video footage.
Featuring a supercardioid polar pattern, the Rode VideoMic Pro focuses on capturing sound from the front and reduces background noise from the sides and rear. This ensures clear and accurate audio reproduction, ideal for interviews, dialogue, and narration in various environments.
The microphone boasts a frequency range of 40Hz to 20kHz, capturing a wide spectrum of sounds with precision. It also features a high sensitivity, delivering clear audio even at low recording levels.
Equipped with a robust Rycote Lyre shock mounting system, the VideoMic Pro effectively isolates the microphone from handling noise and vibrations, providing smooth and professional sound quality.
The device is powered by a 9V alkaline battery, which can last for approximately 70 hours of continuous operation. It also includes a power LED indicator to monitor battery status, ensuring that you never miss a moment of important audio capture.
To enhance usability, the Rode VideoMic Pro offers a three-position level control (-10dB, 0dB, +20dB) to optimize recording levels for different scenarios. It also features a high-pass filter switch, reducing low-frequency rumble and background noise.
Overall, the Rode VideoMic Pro is a reliable and versatile microphone, well-suited for professional video production, vlogging, and content creation. It provides clear and accurate audio recording, making it an excellent choice for capturing high-quality sound on the go.
General
| Brand | Røde |
| Model | Rode VideoMic Pro |
| Product | microphone |
| EAN | 698813002092 |
| Language | English |
| Filetype | Manual (PDF) |
Frequently asked questions
Can’t find the answer to your question in the manual? You may find the answer to your question in the FAQs about the Røde Rode VideoMic Pro below.
Is the manual of the Røde Rode VideoMic Pro available in English?
Yes, the manual of the Røde Rode VideoMic Pro is available in English .
Is your question not listed? Ask your question here
…
RODE Microphones User Manual
VideoMic Pro
1
Compact directional
on-camera microphone
www.rodemic.com/videomicpro
ENGLISH
INSTRUCTION MANUAL

2
Compact Shotgun Microphone
• Compact, lightweight body
• Broadcast recording quality
• Condenser microphone
• Integrated shock mount provides isolation from
• Integrated foam windshield
• 3.5mm stereo mini jack output (dual mono)
• Rugged construction
Detailed Control
• Two step high-pass filter (0, 80 Hz)
• Three position level control
• LED on / off power indicator
• Integrated billeted metal camera shoe mount
Features
handling/mechanical noise
(-10dB, 0dB, +20dB)
with 3/8” thread for easy boompole mounting
3
High Quality Performance
• 9V battery powered – over 70 hours use (alkaline)
• Low noise circuitry
• Flexible and lightweight cable to minimise handling noise and
ensure isolation
• Australian designed and manufactured
• 10 Year Warranty when you register your microphone (see
below)
Register your VideoMic Pro now and
validate your free 10 year warranty.
Scan the QR code with a smartphone, or visit
www.rodemic.com/warranty
The VideoMic Pro is covered by a limited warranty for one (1) year from the date
of purchase. This can be extended free of charge to a full ten (10) year warranty
by registering your microphone online by visiting our website as above.

General Operation
Shotgun microphones such as the VideoMic Pro have a narrow
pick-up angle or polar response, and so can be used to great effect
with cameras for news gathering, weddings or sporting events.
The VideoMic Pro can be used in any situation where you want to
listen to what’s in the shot, not what’s at the side or out of view.
Regular use of the VideoMic Pro will provide you with better
results as you become more familiar with its sound and pick-up
characteristics.
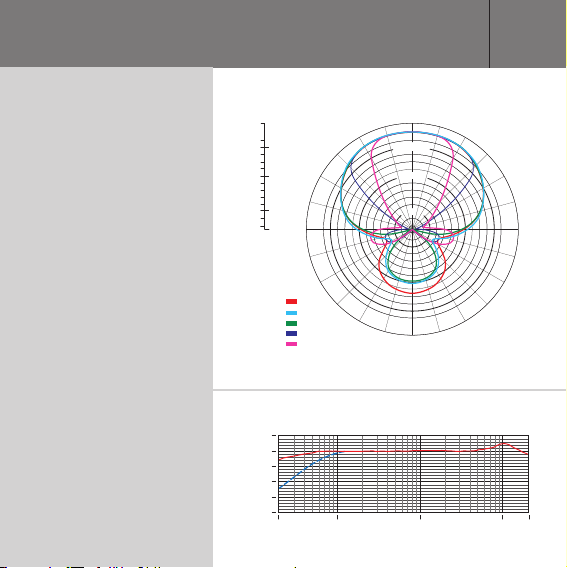
Specifications
Polar Response
Frequency
Response
+5.0
0.0
-2.0
-4.0
-6.0
-8.0
-10.0
-12.0
-14.0
-16.0
-18.0
-20.0
-22.0
-24.0
-25.0
90˚ 270˚
dB rel. 1V/Pa
Frequency:
500 Hz:
1000 Hz:
2000 Hz:
8000 Hz:
14000 Hz:
10
0
-10
-20
-30
dB re 1 V./Pa
-40
20 Hz 100 1000 10 000 20 000
-2.0
-10.0
-20.0
180˚
5

6
Specifications
Acoustic Principle
Directional Pattern
Frequency Range
Frequency Range (High
Pass Filter)
Variable Level
Output Impedence
Signal to Noise Ratio
Equivalent Noise
Maximum SPL
Maximum Output
Line Gradient
Super-Cardioid
40Hz ~ 20 000Hz
Selectable HPF @ 80Hz /
12dB / octave
3 position switch (-10dB, 0dB, +20dB)
200Ω
74dB
20dBA SPL (A-weighted as per IEC651)
134dB
+6.9dBu (@ 1% THD into 1K Ω load)

Sensitivity
-38dB re 1V/Pa (12.6mV @ 94 dB SPL) ±
2dB @ 1kHz
Dynamic Range
Power Requirements
Output Connection
Battery Life
Weight (no battery)
Dimension (WxLxH)
114dB SPL (as per IEC651)
9V alkaline battery (Current 7.8mA)
3.5 Stereo mini jack plug (dual mono)
Tip
— left channel
Ring
— right channel
>70 hours
86g (3oz)
43mm x 150mm x 95mm (1.69”x 6”x 3.74”)
Additional accessories
RØDE has a full line of accessories such as windshields, boom
poles, cable extenders and pistol grips. Please visit our website for
further details.
88
Powering the VMP
+
–
best possible battery life. The VideoMic Pro will run continuously for
over 70 hours with a high quality alkaline or lithium battery.
Battery performance may vary depending on ambient temperature
and battery shelf life, so it is wise to always carry a spare battery.
We suggest always installing a fresh battery when the application is
critical, with no opportunity to re-shoot.
Always remember to switch off the VideoMic Pro when not in use.
9V
The VideoMic Pro runs on a standard 9V
battery. (ANS1:1604A or IEC:6LR61).
We recommend using a high quality
lithium or alkaline battery to achieve the
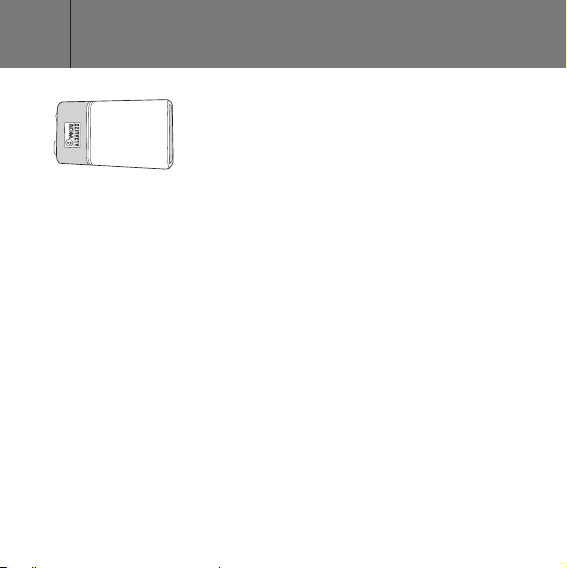
Installing the battery
To install the battery, open the battery cover located on the front of
the VideoMic Pro, just under the windshield foam. To remove the
cover, firmly push upwards on the indentation with your finger. Pull
the base of the cover out to completely remove it, and provide access
to the battery compartment (see Figure 1).
Insert the battery with the negative terminal (-) on top. The battery
will protrude a little until it is pushed in by replacing the battery cover.
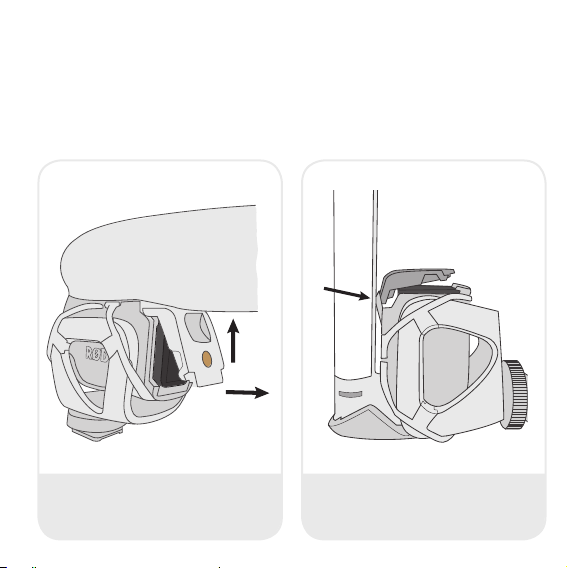
Replacing the battery cover
To replace the battery cover, insert the top at an angle, hooking it
under the lever indicated by the arrow in Figure 2. Then push down
at the base (pushing the battery into the compartment) until the
bottom clips of the battery door click into place.
1
2
Figure 1 — The battery cover opens from
the front of the mic.
Figure 2 — Replace the cover by inserting
the top at an angle then pushing down
on the base.
Loading…
- Rycote® Lyre® антивибрационное крепление
- Вещательное качество
- Новая подобранная пара полудюймовых капсюлей в XY стерео конфигурации
- Улучшенная поролоновая ветрозащита
- Ультра легкий и компактный
- Управление питанием и фильтром на корпусе микрофона
- Двухуровневый НЧ фильтр (плоский, 75Hz)
- Трехпозиционный переключатель уровня (-10dB, 0, +20dB)
- Питание от 9В батареи — свыше 100 часов (alkaline)
- Новый усиленный кабель в Кевларовой оплетке
- Металлическое 3/8 дюймовое крепление для легкой телескопической удочки
Новый микрофон Stereo VideoMic Pro Rycote обеспечивает высокое качество звука. Идеален для видеооператоров и для записи музыки и аудиосцен с ощущением реалистичной окружающей атмосферы.
Stereo VideoMic Pro Rycote использует в конструкции подобранную пару высокочувствительных, полудюймовых, кардиоидных, конденсаторных капсюлей в XY стерео конфигурации. Обладает широкой стерео базой и естественной глубиной звука.
Новшеством Stereo VideoMic Pro Rycote является встроенная антивибрационная система крепления Rycote® Lyre®, которая разделяет микрофонную капсулу и электронику с крепежем, обеспечивая изоляцию от внешних физических факторов, таких как гул и вибрации. Изготовлен из цельного куска износостойкого термопластика. Благодаря своей эластичности, Lyre® обеспечивает превосходную акустическую подвеску, никогда не изнашивается, не провисает и не ломается.
Stereo VideoMic Pro Rycote, благодаря своей эргономике, превосходно подходит для цифровых зеркальных фотоаппаратов, бытовых и профессиональных видеокамер. Новейший, усиленный кевларовый кабель, в совокупности с улучшенной ветрозащитой, обеспечивают отличную акустическую развязку с камерой, значительно пониженный уровень шума и более высокую чувствительность.
Удобно расположенные переключатели на задней части корпуса микрофона позволяют управлять питанием, уровнями сигнала и фильтром на 75Гц, который вырезает шум, производимый работой кондиционеров, транспорта и других нежелательных помех низких частот.
Аттенюатор (PAD) на -10dB позволяет уменьшить чувствительность микрофона в ситуациях, таких как громкая живая музыка или громкий шум на спортивных мероприятиях.
Подобно VideoMic Pro, Stereo VideoMic Pro Rycote имеет переключатель для усиления сигнала на + 20дБ для записи более высокого качества на цифровые зеркальные камеры. Как правило низкокачественное предусиление таких камер можно уменьшить за счет усиления сигнала с микрофона, что приводит к более низкому уровню шума и гораздо чистой записи.
Røde VideoMic Rycote
8
0
H
z
VideoMic
TM
Parts Guide
Mic Controls
quickstart
guide
TM
www.rodemic.com
1. Foam windshield
2. Camera shoe mount
3. Battery cover
4. PAD switch (inside battery compartment)
warranty.rodemic.com/videomicScan the QR code to register now, or visit
Don’t FORGET
to register for your
FREE ten year warranty!
The RØDE VideoMic
TM
features an integrated
shock mount based on Rycote
®
Lyre
®
technology.
Constructed from a single piece of hard-wearing
thermoplastic, the Lyre
®
provides superior acoustic
suspension to traditional elastic solutions,
and will never wear out, sag or snap.
RØDE SOUNDBOOTH
now for Broadcast mics
Hear and compare RØDE microphones
at www.rodemic.com/soundbooth or on your iPad
®
5. LED power indicator
6. Power and HPF switch
7. Integrated Rycote
®
Lyre
®
suspension
8. 3.5mm dual mono output cable
The High Pass Filter (HPF ) is a low frequency cut-off setting, which you can use
to remove rumble, camera noise or other low frequency noise while recording.
Mic ON
using High Pass Filter
Mic ON
Flat setting
Battery OFF
Mic mute
6
7
8
LED power
indicator
028_952_1_Videomic_Quickstart.indd 1028_952_1_Videomic_Quickstart.indd 1 17/12/2012 8:45:19 AM17/12/2012 8:45:19 AM
Manual
View the manual for the Røde VideoMic Rycote here, for free. This manual comes under the category microphones and has been rated by 1 people with an average of a 9.7.
This manual is available in the following languages: English. Do you have a question about the Røde VideoMic Rycote or do you need help?
Ask your question here
Product Images (2)

Røde VideoMic Rycote specifications
Below you will find the product specifications and the manual specifications of the Røde VideoMic Rycote.
General
| Brand | Røde |
| Model | VideoMic Rycote | VIDEOMIC RYCOTE |
| Product | microphone |
| Language | English |
| Filetype | User manual (PDF) |
Frequently Asked Questions
Can’t find the answer to your question in the manual? You may find the answer to your question in the FAQs about the Røde VideoMic Rycote below.
How do I adjust the microphone controls on the Røde VideoMic Rycote?
To adjust the microphone controls on the Røde VideoMic Rycote, follow these steps:
1. Loosen the camera shoe connection by turning the tightening ring counterclockwise before attaching the microphone to the camera. This will help eliminate undesired noise caused by cable movement.
2. Slide the camera shoe into place on the camera mount and gently tighten the ring clockwise to secure the microphone.
3. Connect the VideoMic’s audio lead to the camera’s «Audio In» or «Mic» socket. Use the in-built cable clips to secure the cable in place.
4. Inside the battery compartment, you will find a three-position PAD switch. This switch allows you to select a 10 or 20dB reduction of the input sensitivity, which is useful when recording loud sound sources.
5. To change the battery, gently push and slide the battery cover off. Insert a standard 9V battery with the positive (+) end upwards. The VideoMic can run for up to 100 continuous hours with a good quality alkaline or lithium battery.
6. Finally, push the cable in from the bottom to ensure a secure connection.
By following these steps, you can easily adjust the microphone controls on the Røde VideoMic Rycote.
How can I use the RØDE SOUNDBOOTH for Broadcast mics with the Røde VideoMic Rycote?
To use the RØDE SOUNDBOOTH for Broadcast mics with the Røde VideoMic Rycote, follow these steps:
1. Start by connecting the Røde VideoMic Rycote to your camera. Turn the tightening ring counterclockwise to loosen the camera shoe connection. Slide the camera shoe into place on the camera mount and gently tighten the ring clockwise to secure it.
2. Connect the VideoMic’s audio lead to the camera’s «Audio In» or «Mic» socket. Make sure to secure the cable in place using the in-built cable clips.
3. Inside the battery compartment of the VideoMic, you will find a three-position PAD switch. This switch allows you to select a 10 or 20dB reduction of the input sensitivity. Adjust the PAD switch according to the sound source you are recording to achieve the optimal level.
4. If the battery needs to be replaced, gently push and slide the battery cover off. Insert a standard 9V battery with the positive (+) end upwards. The VideoMic can run for up to 100 continuous hours with a good quality Alkaline or Lithium battery.
By following these steps, you can effectively use the RØDE SOUNDBOOTH for Broadcast mics with the Røde VideoMic Rycote.
How do I activate the High Pass Filter (HPF) on the Røde VideoMic Rycote?
To activate the High Pass Filter (HPF) on the Røde VideoMic Rycote, follow these steps:
1. Locate the power and HPF switch on the microphone. It is labeled with the HPF symbol.
2. Make sure the microphone is turned on by sliding the switch to the «Mic ON» position.
3. To activate the HPF, slide the switch to the «Mic ON» position and then push it further to the right until it clicks into place.
4. The HPF setting is now activated, and it will start filtering out low-frequency noise such as rumble and camera noise while recording.
5. If you want to disable the HPF, simply slide the switch back to the «Flat setting» position.
Remember, the HPF is a useful feature to remove unwanted low-frequency noise from your recordings. By activating it, you can achieve cleaner and clearer audio.
How do I adjust the microphone controls on the Røde VideoMic Rycote?
To adjust the microphone controls on the Røde VideoMic Rycote, follow these steps:
1. Loosen the camera shoe connection by turning the tightening ring counterclockwise before attaching the microphone to the camera. This will help eliminate undesired noise caused by cable movement.
2. Slide the camera shoe into place on the camera mount and gently tighten the ring clockwise to secure the microphone.
3. Connect the VideoMic’s audio lead to the camera’s «Audio In» or «Mic» socket. Use the in-built cable clips to secure the cable in place.
4. Inside the battery compartment, you will find a three-position PAD switch. This switch allows you to select a 10 or 20dB reduction of the input sensitivity, which is useful when recording loud sound sources.
5. To change the battery, gently push and slide the battery cover off. Insert a standard 9V battery with the positive (+) end upwards. The VideoMic can run for up to 100 continuous hours with a good quality alkaline or lithium battery.
6. Finally, push the cable in from the bottom to ensure a secure connection.
By following these steps, you can easily adjust the microphone controls on the Røde VideoMic Rycote.
How can I use the RØDE SOUNDBOOTH for broadcast mics with the Røde VideoMic Rycote?
To use the RØDE SOUNDBOOTH for broadcast mics with the Røde VideoMic Rycote, follow these steps:
1. Start by connecting the Røde VideoMic Rycote to your camera. Turn the tightening ring counterclockwise to loosen the camera shoe connection. Slide the camera shoe into place on the camera mount and gently tighten the ring clockwise to secure it.
2. Connect the VideoMic’s audio lead to the camera’s «Audio In» or «Mic» socket. Make sure to secure the cable in place using the in-built cable clips.
3. Inside the battery compartment of the VideoMic, you will find a three-position PAD switch. This switch allows you to select a 10 or 20dB reduction of the input sensitivity. Use this switch to adjust the output level when recording loud sound sources.
4. If the battery needs to be replaced, gently push and slide the battery cover off. Insert a standard 9V battery with the positive (+) end upwards. The VideoMic can run for up to 100 continuous hours with a good quality alkaline or lithium battery.
By following these steps, you can effectively use the RØDE SOUNDBOOTH for broadcast mics with the Røde VideoMic Rycote.
How do I activate the High Pass Filter (HPF) on the Røde VideoMic Rycote?
To activate the High Pass Filter (HPF) on the Røde VideoMic Rycote, follow these steps:
1. Locate the power and HPF switch on the microphone. It is labeled with the HPF symbol.
2. Make sure the microphone is turned on by sliding the switch to the «Mic ON» position.
3. To activate the High Pass Filter, slide the switch to the «using High Pass Filter» position.
4. The High Pass Filter is a setting that cuts off low-frequency noise, such as rumble or camera noise, while recording.
5. By activating the HPF, you can improve the audio quality by reducing unwanted low-frequency noise.
6. If you want to disable the High Pass Filter and use the microphone in its default setting, slide the switch back to the «Flat setting» position.
7. Remember to turn off the microphone when you’re done using it to conserve battery power.
By following these steps, you can easily activate the High Pass Filter on the Røde VideoMic Rycote and enhance your audio recordings.
Is the manual of the Røde VideoMic Rycote available in English?
Yes, the manual of the Røde VideoMic Rycote is available in English .
Is your question not listed? Ask your question here
2
Pro
quickstart guide
VideoMic Pro Kurzanleitung
VideoMic Pro Guide de démarrage rapide
VideoMic Pro Guía de inicio rápido
VideoMic Pro Guida rapida
VideoMic Pro 快速入门指南
VideoMic Pro クイックスタートガイド
VideoMic Pro 퀵 스타트 가이드
Protect Your VideoMic Pro.
Register Online Now For Your
10 Year Warranty.
Tun Sie Ihrem VideoMic Pro etwas
Gutes. Registrieren Sie es online, um die
10-Jahres-Garantie zu aktivieren.
Protégez votre VideoMic Pro. Enregistrez-
vous maintenant pour bénécier d’une
garantie de 10 ans.
Protege tu VideoMic Pro. Regístrate
online para disfrutar de 10 años de
garantía.
Proteggete il vostro VideoMic Pro.
Registratevi ora online per ottenere la
garanzia di 10 anni.
保护您的 VideoMic Pro。马上在线注册,
获得 10 年保修。
VideoMic Proを保護してください。オンライ
ン登録で直ちに 10 年保証が得られます。
VideoMic Pro를 보호하세요. 온라인 등록을
통해 10년의 보증 기간을 누리십시오.
INSTALLING THE BATTERY
Installieren Der Batterie / Installation De La Pile / Colocar La Pila / Installare La Batteria / 安装电池 / バッテリーを取り付ける
/ 배터리 장착하기
To remove the battery cover, push up on the
indentation, then pivot the bottom of the cover
away.
Zur Entnahme des Batteriefachdeckels müssen Sie
die Kerbe hochschieben und die Deckelunterseite
wegdrehen.
Pour retirer le couvercle, poussez l’encoche vers le
haut puis ouvrez la partie inférieure du couvercle.
Para retirar la tapa, presiona hacia arriba sobre la
ranura y, a continuación, gira la parte inferior de la
tapa para retirarla.
Per togliere il coperchio del vano batteria, tirate
l’incavo, poi sfilate il coperchio dal fondo.
要取下电池盖,请先将卡舌向上推,然后将电池盖
底部撬开。
バッテリーカバーを取り外すときは、凹み部分を押し
上げてからカバーの底を回転させて取り外します。
배터리 커버를 제거하려면 패인 홈 부분을 누른 후, 커버의
아랫부분을 들어 올립니다.
Insert battery negative side up. Replace the cover
– hook the top clips in, then press the bottom into
place.
Schieben Sie die Batterie mit dem Minuspol in das
Fach. Bringen Sie die Blende wieder an, indem
Sie die Clips an der Oberseite einhaken und die
Unterseite andrücken.
Insérez la pile en orientant le côté négatif vers le
haut. Remettez le couvercle en accrochant d’abord
les attaches du haut puis en appuyant sur celles du
bas pour clipser le couvercle.
Inserta la pila con el lado negativo hacia arriba. Para
volver a colocar la tapa, encaja los clips superiores y
presiona la parte inferior para fijarla en su posición.
Inserite la batteria con il polo negativo rivolto verso
l’alto. Rimettete il coperchio – fissate i gancetti in
alto, poi premete il fondo del coperchio.
插入电池时负极朝上。 首选将电池盖顶部的卡舌插
入,然后按住底部的卡舌使盖子卡入到位。
電池のマイナス極を上にして装着してください。カバ
ーを元に戻すときは、上部を引っ掛けるように取り付
けてから下部を押し付けて装着します。
배터리의 음극을 위로 해서 넣습니다. 커버를 다시
씌우십시오 — 위쪽 클립을 채운 후 아랫부분을 제자리에
눌러 넣습니다.
1
1
2
123-969-2-1_vmpr_qsg.indd 1 8/04/2015 1:43 pm