
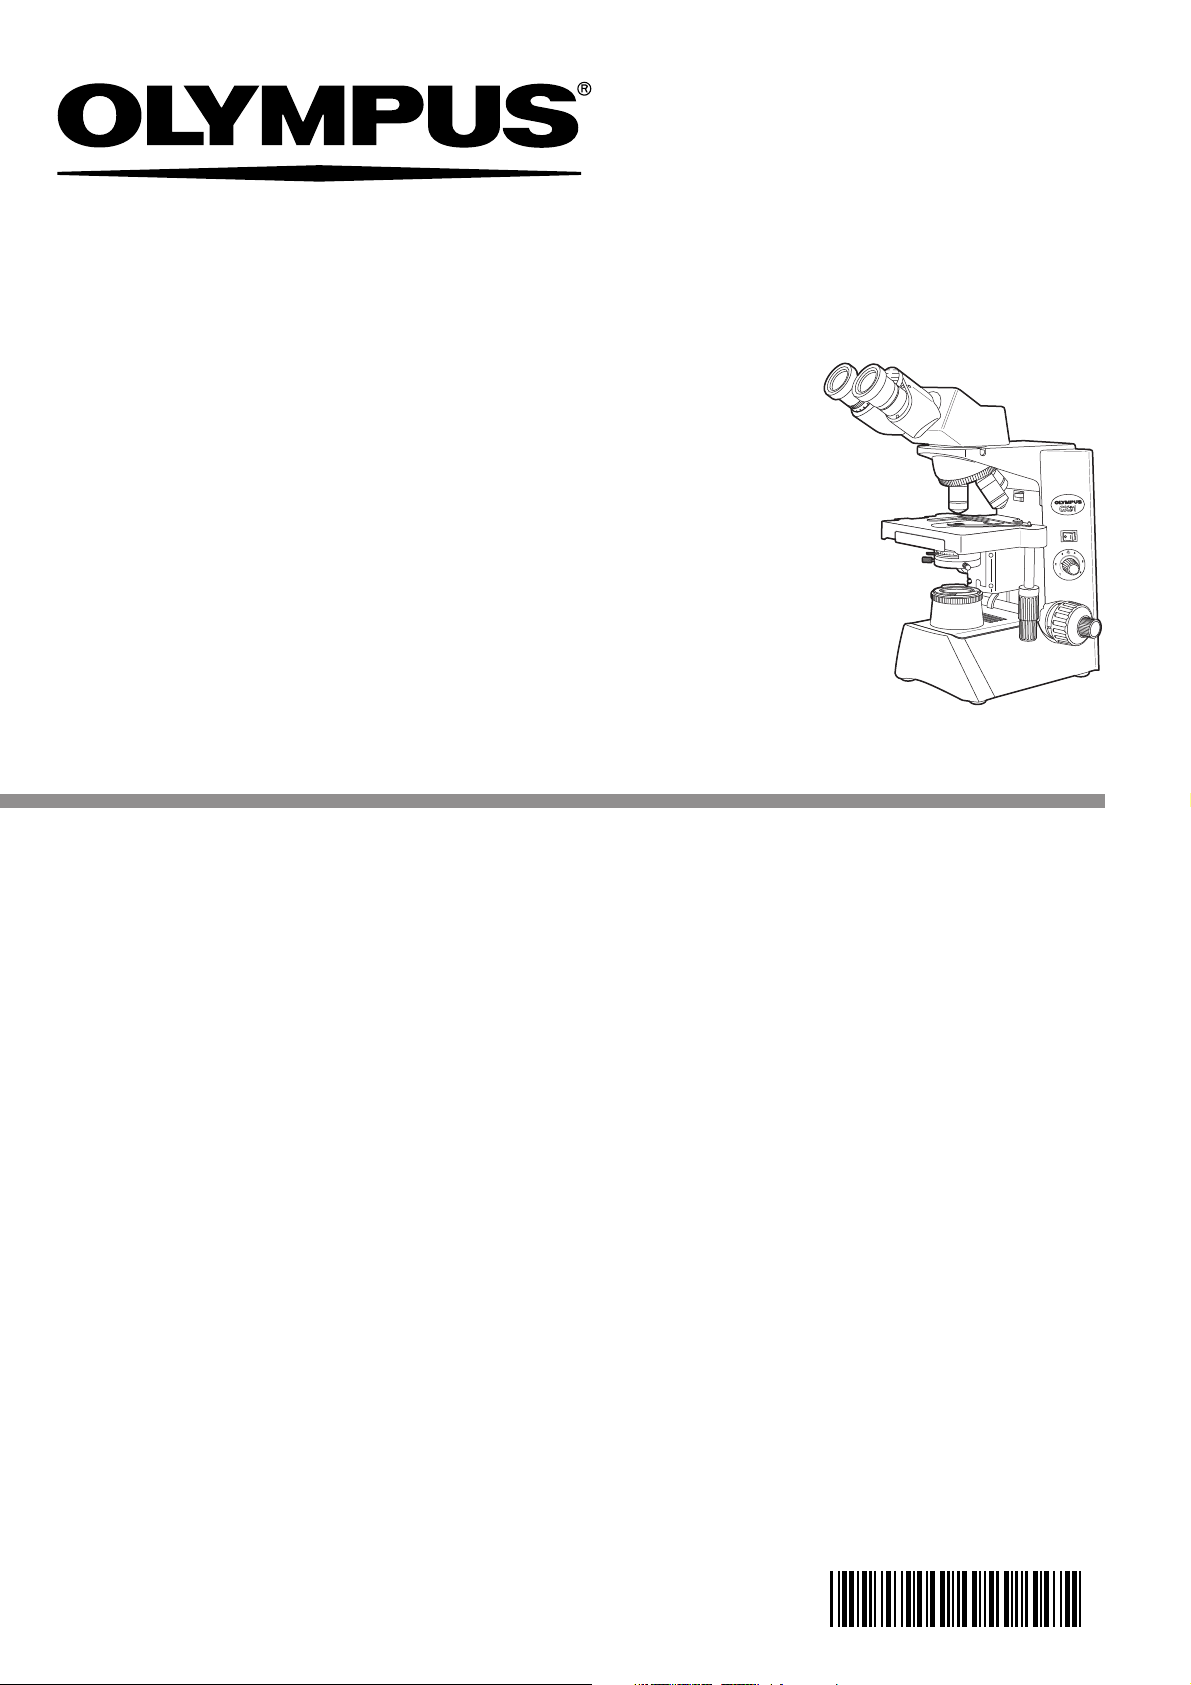
INSTRUCTIONS
CX31
BIOLOGICAL MICROSCOPE
This instruction manual is for the Olympus Biological Microscope Model CX31. To ensure
the safety, obtain optimum performance and to familiarize yourself fully with the use of this
microscope, we recommend that you study this manual thoroughly before operating the
microscope. Retain this instruction manual in an easily accessible place near the work
desk for future reference.
AX6654

CONTENTS
Page
IMPORTANT — Be sure to read this section for safe use of the equipment. — 1-3
1 NOMENCLATURE 4
2
SUMMARY OF BRIGHTFIELD OBSERVATION PROCEDURE
3 ASSEMBLY — See this section for the replacement of the light bulb. — 6-7
4 USING THE CONTROLS 8-14
4-1 Base……………………………………………………………………………………………………………………………………………………………………8
Turning On the Bulb Field Iris Diaphragm
1 2
4-2 Focusing Block……………………………………………………………………………………………………………………………………………9
Adjusting the Coarse Adjustment Knob Tension Simplified Pre-focusing Dial
1 2
4-3 Stage…………………………………………………………………………………………………………………………………………………………10-11
Placing the Specimen Moving the Specimen
1 2
4-4 Observation Tube………………………………………………………………………………………………………………………………11-12
Adjusting the Interpupillar Distance Adjusting the Tilt Adjusting the Diopter
1 2
Using the Eye Shades Using the Eyepiece Micrometer Disk
4 5
4-5 Condenser……………………………………………………………………………………………………………………………………………………13
1
Centering the Field Iris Diaphragm Aperture Iris Diaphragm
4-6 Immersion Objectives…………………………………………………………………………………………………………………………..14
Using the Immersion Objectives
1
2
3
CX31
5
5 TROUBLESHOOTING GUIDE 15- 16
6 SPECIFICATIONS 17
7 OPTICAL CHARACTERISTICS 18
PROPER SELECTION OF THE POWER SUPPLY CORD…………………………………………..19-20
IMPORTANT
SAFETY PRECAUTIONS
Fig.1
1. After the equipment has been used in an observation of a specimen
that is accompanied with a potential of infection, clean the parts
coming in contact with the specimen to prevent infection.
· Moving this product is accompanied with the risk of dropping the
specimen. Be sure to remove the specimen before moving this
product.
· In case the specimen is damaged by erroneous operation, promptly
take the infection prevention measures.
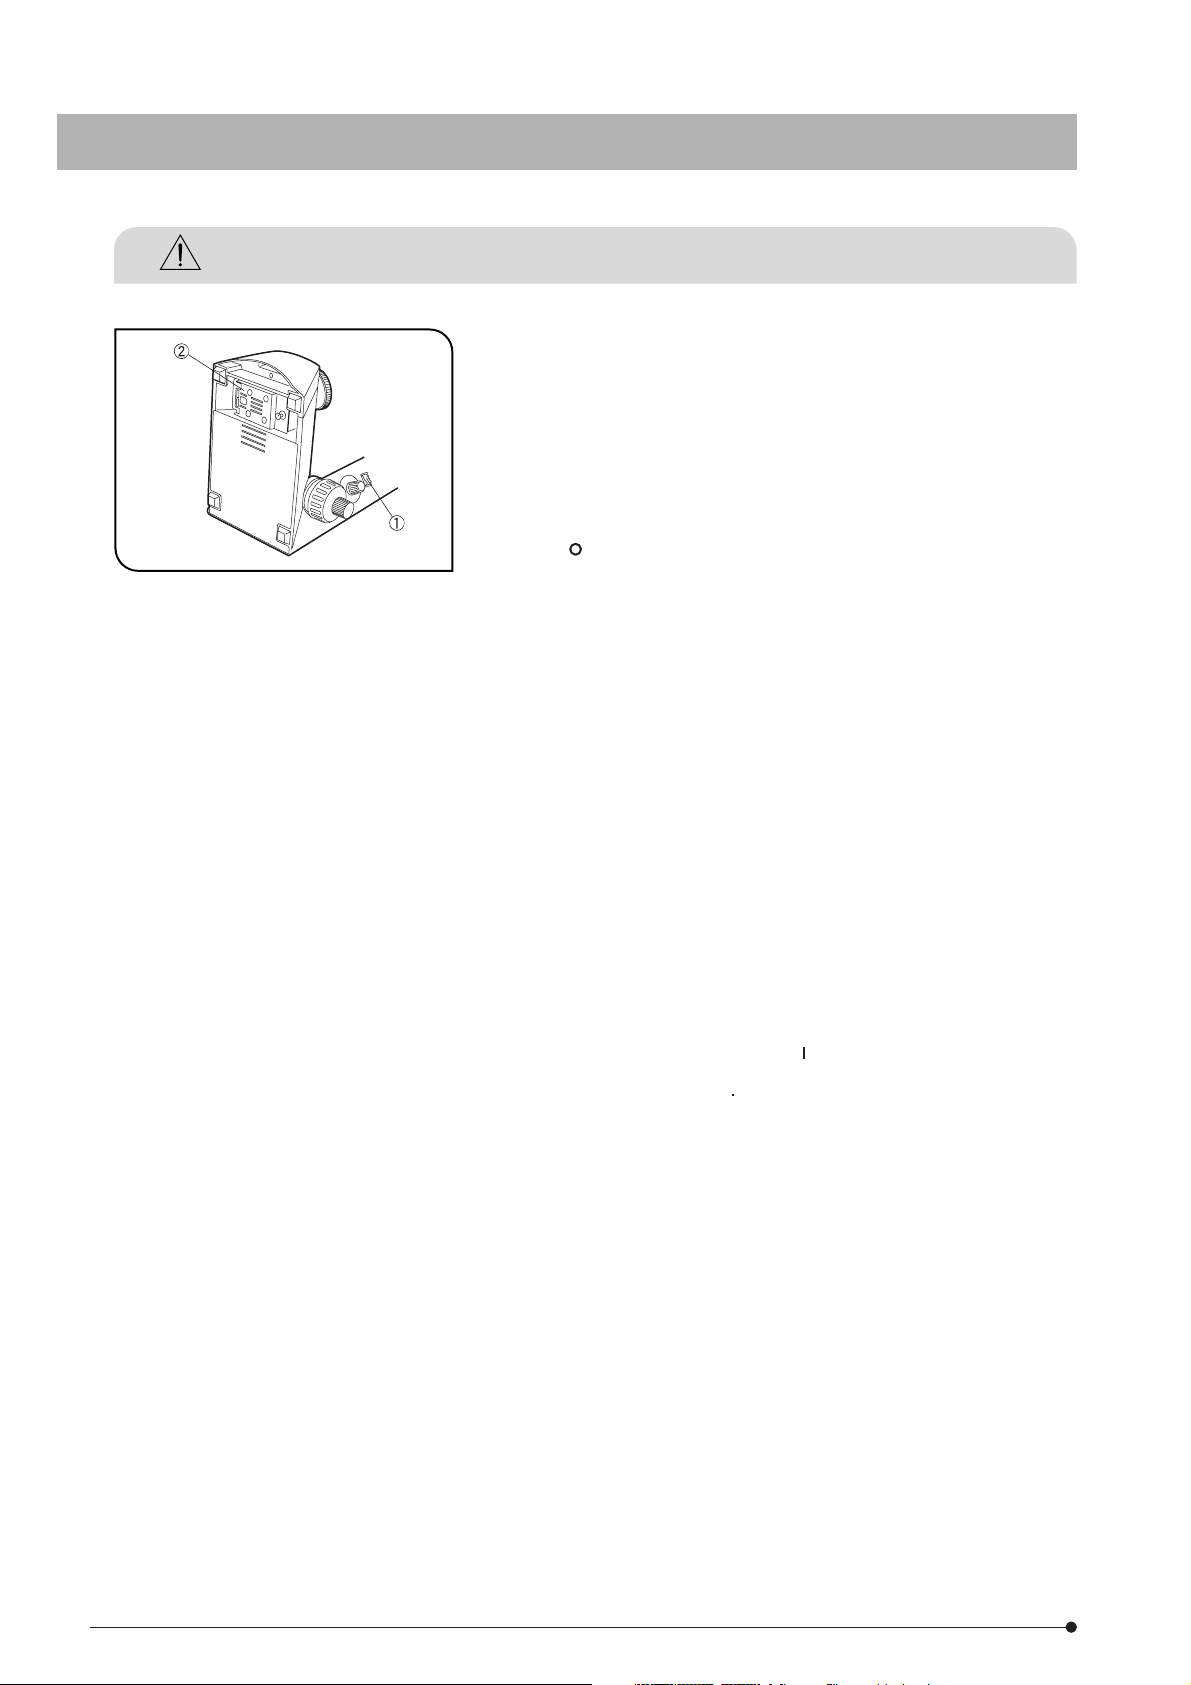
2. To avoid potential shock hazard and fire, always set the main switch @
to “ ” (OFF) and disconnect the power cord from the AC receptacle
at the rear of the microscope and from the wall outlet before replacing
the bulb. Allow the lamp housing cover ² and the bulb to cool before
touching them.
3. Install the microscope on a sturdy, level table.
The air vents on the underside of the base should never be blocked
by placing the microscope on a flexible surface such as a carpet, as
this could result in overheating and cause a fire.
4. Always use the power cord provided by Olympus. If no power cord is
provided, please select the proper power cord by referring to the
section “PROPER SELECTION OF THE POWER SUPPLY CORD” at the
end of this instruction manual. If the proper power cord is not used,
Olympus can no longer warrant the electrical safety and performance
of the equipment.
5. When installing the microscope, route the power cord away from the
microscope base. Should the power cord come in contact with the hot
microscope base, the power cord could melt and cause electric shock.
6. Connect the power cord correctly and ensure that the grounding
terminal of the power supply and that of the wall outlet are properly
connected. If the equipment is not grounded, Olympus can no longer
warrant the electrical safety and performance of the equipment.
7. Never set the main switch @ to “ ” (ON) while any metallic object is
inserted into the air vents of the microscope frame as this will result in
electrical shock, personal injury and equipment damage.
8. When the microscope is not in use or when it is malfunctioning,
disconnect the power cord plug from the AC receptacle or from the
wall outlet.
1
Safety Symbols
The following symbols are found on the microscope. Study the meaning of the symbols and always use the equipment in
the safest possible manner.
ExplanationSymbol
Indicates that the surface becomes hot, and should not be touched with bare hands.
Before use, carefully read the instruction manual. Improper handling could result in personal
injury to the user and/or damage to the equipment.
Indicates that the main switch is ON.
Indicates that the main switch is OFF.
CX31
Warning Label
A warning label is affixed at parts where special precaution is required when handling and using the microscope. Always
heed the warnings.
Warning label
position:
If the warning label becomes soiled, peeled off, etc., contact Olympus to have it replaced.
Getting Ready
1
Fig. 2
Base underside
(Caution for bulb replacement)
1. A microscope is a precision instrument. Handle it with care and avoid
subjecting it to sudden or severe impact.
2. Do not use the microscope where it is subjected to direct sunlight,
high temperature and humidity, dust or vibrations. (For the operating
environment conditions, refer to and adhere to the conditions specified
in Chapter 6, “SPECIFICATIONS” on page 17.)
3. The tension of the coarse focus adjustment knob should only be
adjusted by means of the tension adjustment ring.
4. Heat from the microscope is led away by natural convection.
Consequently, leave an enough space (10 cm or more) on the rear of
the microscope and ensure that the room is well ventilated.
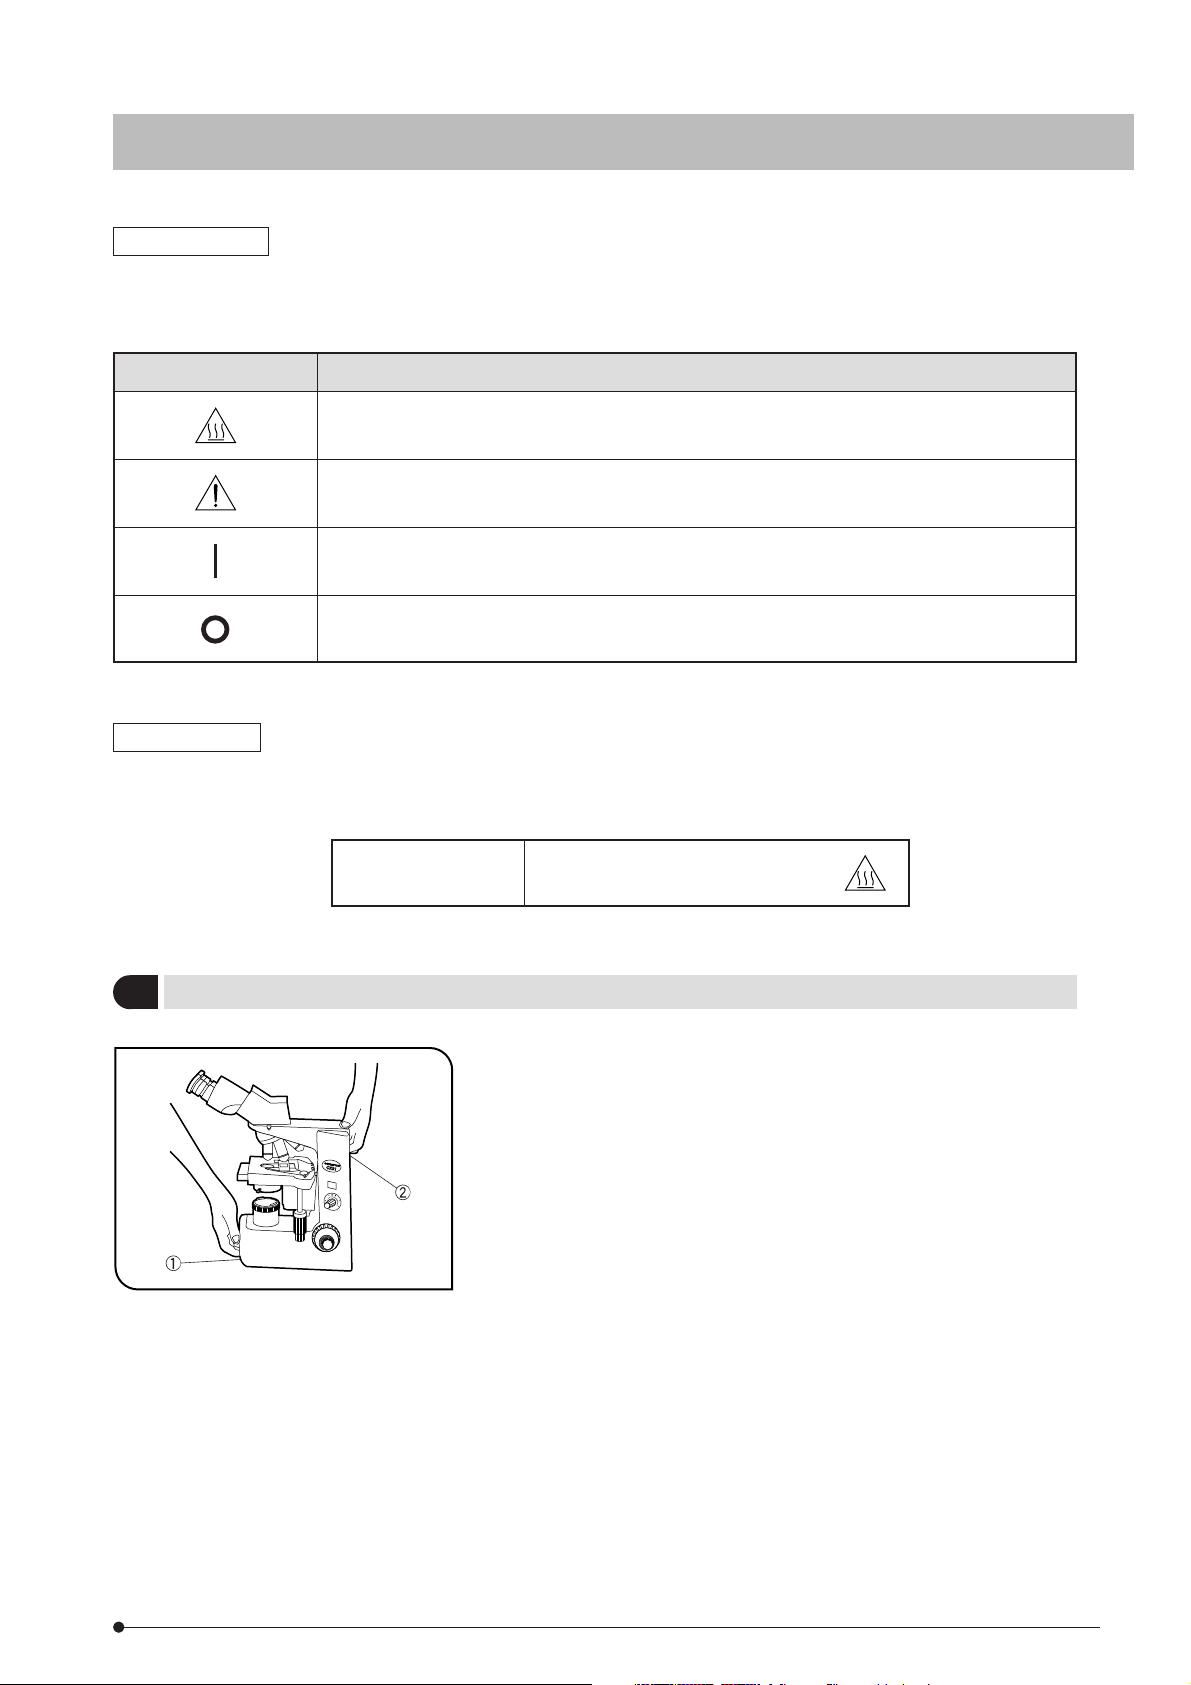
5. When moving the microscope, carefully carry it with one hand under
the base @ and the other hand holding at the recessed handle on the
rear of the arm ² as shown in the illustration on the left.
#Damage to the microscope will occur if you hold it by the stage, X-
axis/Y-axis knob, binocular section of the observation tube, etc.
Also be sure to remove the specimen to prevent it from falling off.
#Sliding the microscope on the surface of the table may damage or
tear off the rubber feet and/or scratch the table top surface.
2
Maintenance and Storage
1
1. Clean all glass components by wiping gently with gauze. To remove fingerprints or oil smudges, wipe with gauze
slightly moistened with a mixture of ether (70%) and alcohol (30%).
Since solvents such as ether and alcohol are highly flammable, they must be handled carefully. Be sure to
keep these chemicals away from open flames or potential sources of electrical sparks — for example,
electrical equipment that is being switched on or off. Also remember to always use these chemicals only in a
well-ventilated room.
2. Do not attempt to use organic solvents to clean the non-optical components of the microscope. To clean them, use a
lint-free, soft cloth lightly moistened with a diluted neutral detergent.
3. Do not disassemble any part of the microscope as malfunction or damage may occur.
4. When not using the microscope, ensure that the frame is cooled down and store it in a locker or cover it with a dust
cover.
5. When disposing of the microscope, check the regulations and rules of your local goverment and be sure to observe
them.
Caution
3
If the microscope is used in a manner not specified by this manual, the safety of the user may be imperiled. In
addition, the equipment may also be damaged. Always use the equipment as outlined in this instruction manual.
The following symbols are used to set off text in this instruction manual.
: Indicates that failure to follow the instructions in the warning could result in bodily harm to the
user and/or damage to equipment (including objects in the vicinity of the equipment).
# : Indicates that failure to follow the instructions could result in damage to equipment.
} : Indicates commentary (for ease of operation and maintenance).
3
This device complies with the requirements of directive 98/79/EC concerning in vitro diagnostic medical devices.
CE marking means the conformity to the directive.
NOTE : This equipment has been tested and found to comply with the limits for a Class A digital device,
pursuant to Part 15 of the FCC Rules. These limits are designed to provide reasonable protection
against harmful interference when the equipment is operated in a commercial environment. This
equipment generates, uses, and can radiate radio frequency energy and, if not installed and used in
accordance with the instruction manual, may cause harmful interference to radio communications.
Operation of this equipment in a residential area is likely to cause harmful interference in which case the
user will be required to correct the interference at his own expense.
FCC WARNING : Changes or modifications not expressly approved by the party responsible for compliance
could void the user’s authority to operate the equipment.
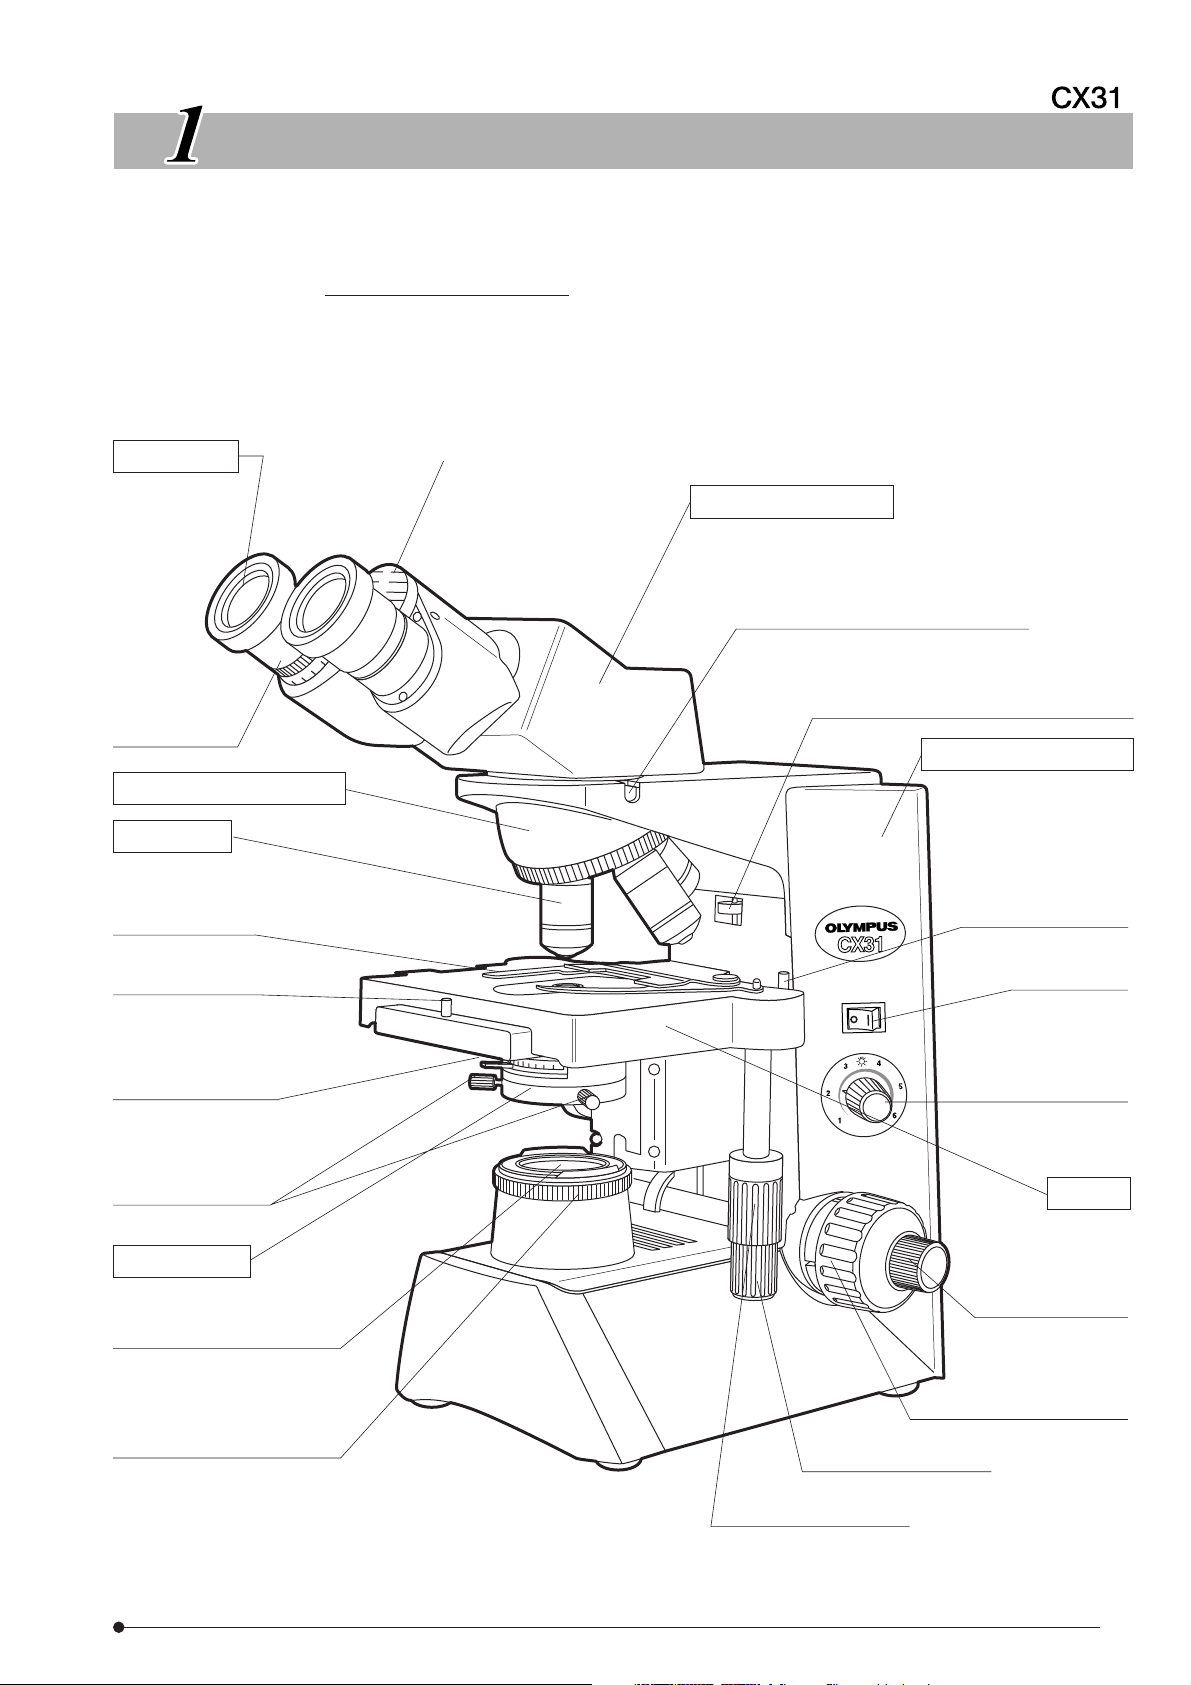
CX31
NOMENCLATURE
}The revolving nosepiece is fastened with a band to prevent it from turning during transportation. Remove the band when
unpacking the microscope. Be sure to store the band for re-transportation of the microscope.
* The stage is shipped with the two transport pins locked. When using the microscope for the first time, remove the transport
lock pins before use.
}If you have not yet attached the lamp bulb and power cord to the microscope, read Chapter 3, “ASSEMBLY” on pages 6 to 7.
Eyepieces
(Fixed at 10X)
Diopter
adjustment ring
(Page 11)
Revolving Nosepiece
Objective
Specimen holder
(Page 10)
Transport lock pin*
Interpupillar distance scale (Page 11)
Observation Tube
Binocular tube: CX31RBSF microscope frame
CX31RBSFA microscope frame
Tilting tube: CX31RTBISF microscope frame
Tube clamping screw
(Use the provided Allen wrench.)
Simplified pre-focusing dial (Page 9)
Microscope Frame
CX31RBSF
CX31RBSFA
CX31RTBISF
Transport lock pin*
Main switch
(Page 
Aperture iris
diaphragm knob
(Page 13)
Condenser
centering screws
(Page 13)
Condenser
Filter holder
Place a 45 mm filter on this.
Field iris diaphragm ring
Light intensity
control knob
(Page
Stage
Fine focus
adjustment knob
(Page 9)
Coarse focus
adjustment knob
(Page 9)
X-axis knob (Page 11)
Y-axis knob (Page 11)
4
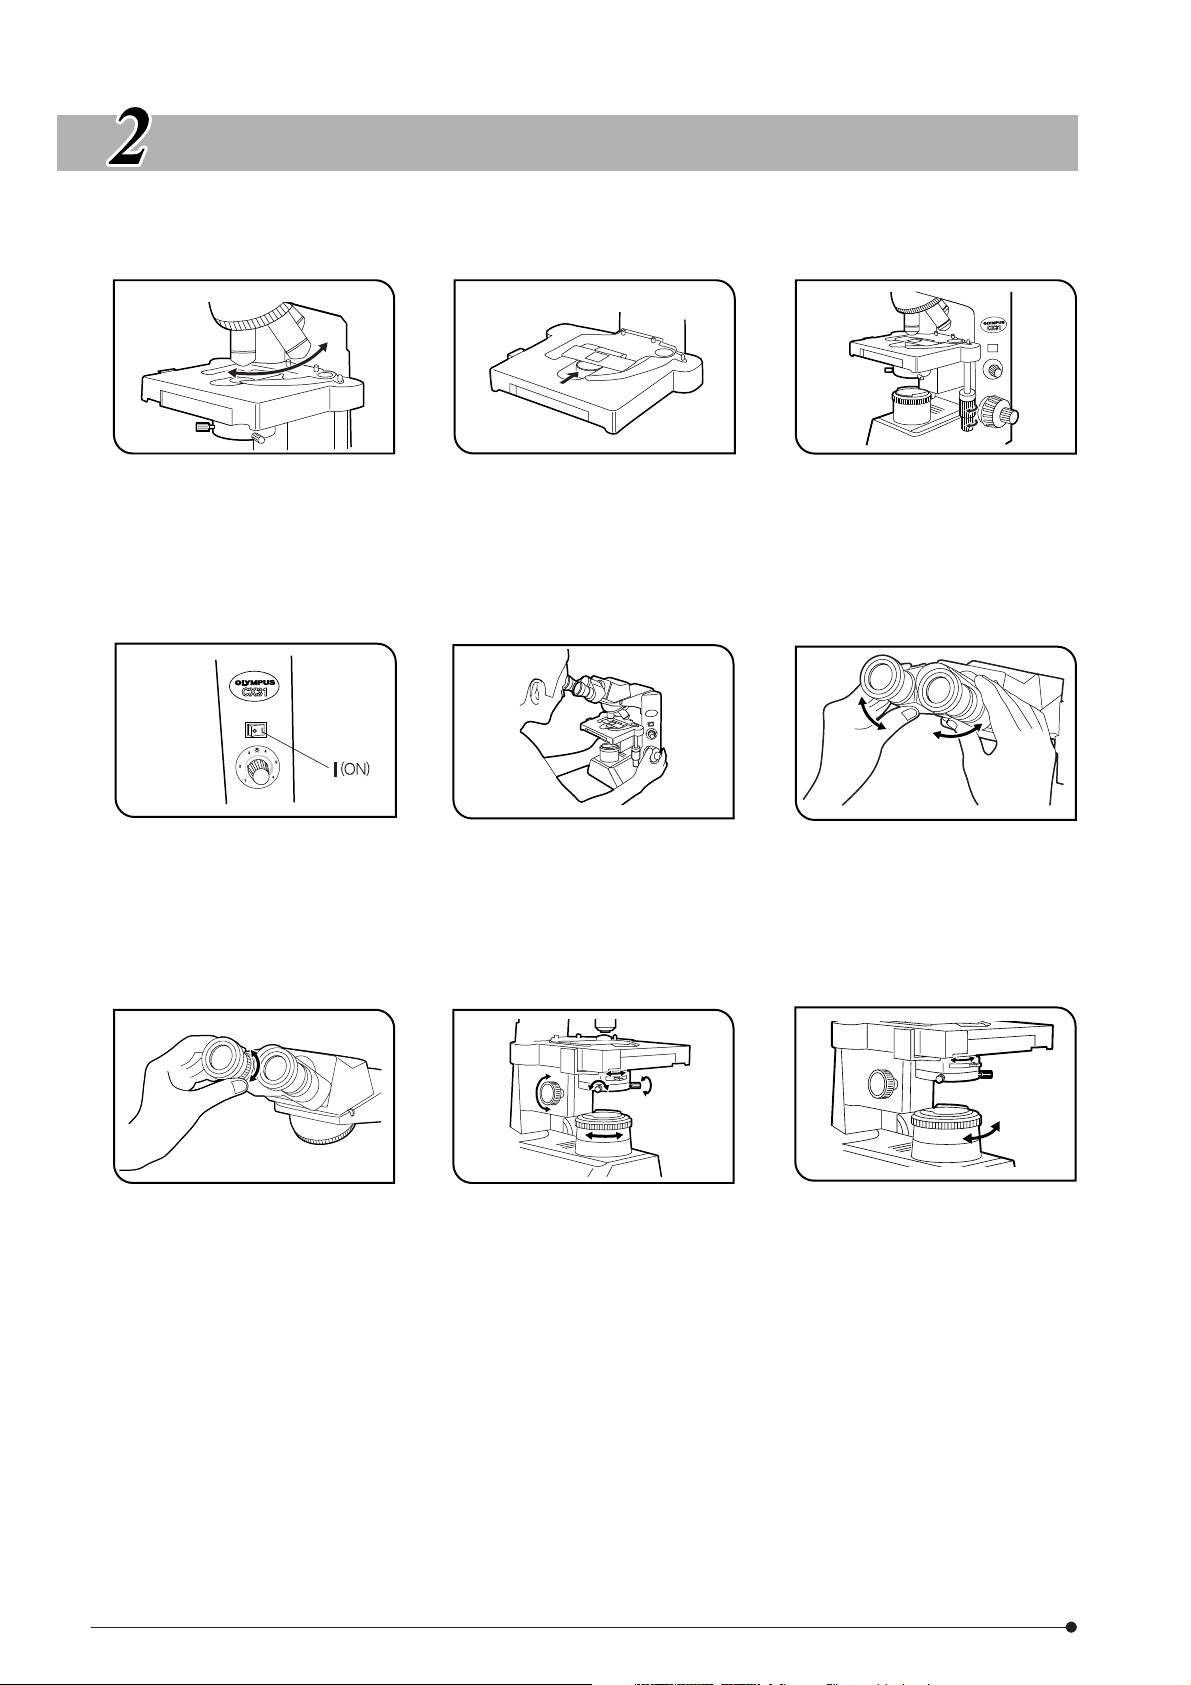
SUMMARY OF BRIGHTFIELD OBSERVATION
PROCEDURE
123
· Turn the revolving nosepiece to
engage the 10X objective.
#Make sure that the revolving
nosepiece stops with an audible
click.
456
· Set the main switch to “ I ” (ON)
and adjust the brightness with the
light intensity knob. (Page
789
· Place a specimen on the stage.
(Page 10)
· Turn the coarse and fine
adjustment knobs to bring the
specimen into focus.
· Turn the X-axis knob and Y-axis
knob to move the specimen into
the light path. (Page 11)
· Adjust the interpupillary distance.
(Page 11)
· When the tilting observation tube is
used, adjust the angle of tilt.
(Page 11)
· Adjust the diopter. (Page 11) · Center the field iris diaphragm.
(Page 13)
10 Engage the objective to be used for observation in the light path, then readjust the focus.
11 Place the required filter on the filter holder.
12 Re-adjust the aperture iris diaphragm, field iris diaphragm and brightness and start observation.
5
· Adjust the aperture iris diaphragm
and field iris diaphragm. (Page
Loading…
INSTRUCTIONS CX31 BIOLOGICAL MICROSCOPE This instruction manual is for the Olympus Biological Microscope Model CX31. To ensure the safety, obtain optimum performance and to familiarize yourself fully with the use of this microscope, we recommend that you study this manual thoroughly before
CX31 CONTENTS Page IMPORTANT — Be sure to read this section for safe use of the equipment. — 1-3 1 NOMENCLATURE 4 2 SUMMARY OF BRIGHTFIELD OBSERVATION PROCEDURE 5 3 ASSEMBLY 4 USING THE CONTROLS — See this section for the replacement of the light bulb. — 6-7 8-14 4-1
IMPORTANT SAFETY PRECAUTIONS Fig.1 1 1. After the equipment has been used in an observation of a specimen that is accompanied with a potential of infection, clean the parts coming in contact with the specimen to prevent infection. · Moving this product is accompanied with the risk of dropping the
CX31 Safety Symbols The following symbols are found on the microscope. Study the meaning of the symbols and always use the equipment in the safest possible manner. Symbol Explanation Indicates that the surface becomes hot, and should not be touched with bare hands. Before use, carefully read the
1 Maintenance and Storage 1. Clean all glass components by wiping gently with gauze. To remove fingerprints or oil smudges, wipe with gauze slightly moistened with a mixture of ether (70%) and alcohol (30%). Since solvents such as ether and alcohol are highly flammable, they must be handled
CX31 NOMENCLATURE }The revolving nosepiece is fastened with a band to prevent it from turning during transportation. Remove the band when unpacking the microscope. Be sure to store the band for re-transportation of the microscope. * The stage is shipped with the two transport pins locked. When
SUMMARY OF BRIGHTFIELD OBSERVATION PROCEDURE 1 · Turn the revolving nosepiece to engage the 10X objective. #Make sure that the revolving nosepiece stops with an audible click. 2 · Place a specimen on the stage. (Page 10) 4 · Set the main switch to “ I ” (ON) and adjust the brightness with the light
CX31 ASSEMBLY 1 Mounting the Bulb (Replacement of Bulb) (Fig. 3) 1. Turn the microscope frame on its side and pull the lamp housing knob @ on the underside of the base to open the lamp housing cover. 2. Holding the halogen bulb ² contained in the polyethylene bag to avoid leaving fingerprints on
3 Fig. 7 Attaching the Optional Cord Hanger (CH3-CH) (Figs. 7 & }By attaching the optional CH3-CH cord hanger on the rear of the microscope frame, the power cord can be accommodated by winding around the hanger. Insert the hook ² of the cord hanger @ into the air vent groove on the rear of the
CX31 USING THE CONTROLS 4-1 Base 1 Turning On the Bulb (Fig. 9) 1. Set the main switch @ to “ ” (ON). 2. Turn the light intensity knob ² clockwise in the direction of the arrow to make the illumination brighter or counterclockwise to make it darker. The numbers around the knob indicates the
4-2 Focusing Block 1 2 DOWN UP 9 (Fig. 11) 1. The coarse adjustment knob tension is preadjusted for easy use. However, if desired, one can change the tension using the tension adjustment ring @. Applying a large flat-bladed screwdriver to any of the grooves ² on the circumference of the ring,
CX31 4-3 Stage 1 Placing the Specimen (Fig. 13) #Releasing the curved finger with great force or suddenly releasing your grip on the curved finger knob @ while releasing the curved finger will crack or damage the slide glass. Always place the specimen with great care. Observation with Specimen
2 Moving the Specimen (Fig. 14) Turn the upper knob which is the Y-axis knob @ to move the specimen in the vertical direction, and turn the lower knob which is the X-axis knob ² to move it in the horizontal direction. #Do not use the specimen holder or stage to move the specimen, for this will
CX31 4 Using the Eye Shades (Fig. 18) When Wearing Eyeglasses Use with the eye shades in the normal, folded-down position. This will prevent the eyeglasses from contacting and scratching the eyepieces. When Not Wearing Eyeglasses Extend the folded eye shades in the direction of the arrow for
4-5 Condenser 1 Centering the Field Iris Diaphragm (Figs. 21 & 22) 1. With the 10X objective engaged and the specimen brought into focus, turn the field iris diaphragm ring @ counterclockwise to stop down the diaphragm to near its minimum size. 2. Turn the condenser height adjustment knob ² to
CX31 4-6 Immersion Objectives 1 Fig. 24 Using the Immersion Objectives (Fig. 24) }The 100X objective is included only in the standard set of the CX31RBSFA combination. #Be sure to use the provided Olympus immersion oil. When the oil of other make is used the surface of the Top lens of Condenser may
TROUBLESHOOTING GUIDE Under certain conditions, performance of the unit may be adversely affected by factors other than defects. If problems occur, please review the following list and take remedial action as needed. If you cannot solve the problem after checking the entire list, please contact
CX31 Problem Cause Remedy Page 2. Coarse/Fine Focus Adjustment a) Coarse adjustment knob is hard to turn. Tension adjustment overtightened. ring b) Stage drifts down by itself or focus is lost during observation. Tension adjustment ring is too loose. Tighten it. c) Coarse adjustment will not go all
SPECIFICATIONS Item Specification 1. Optical system UIS (Universal Infinity System) optical system 2. Illumination Illuminator built in. 6V 30W halogen bulb (PHILIPS 5761) (Average service time: Approximately 100 hr. when used as directed) 100-120 V/220-240 V , 0.85/0.45 A, 50/60 Hz 3. Focusing
CX31 OPTICAL CHARACTERISTICS Magnification The following table shows the optical characteristics of combinations of eyepieces and objectives. The figure on the right shows the performance data engraved on the objectives. Objective designation Mechanical tube length Numerical aperture Cover glass
PROPER SELECTION OF THE POWER SUPPLY CORD If no power supply cord is provided, please select the proper power supply cord for the equipment by referring to “Specifications» and «Certified Cord» below. CAUTION : In case you use a non-approved power supply cord for Olympus products, Olympus can no
CX31 Table 2 HAR Flexible Cord APPROVAL ORGANIZATIONS AND CORDAGE HARMONIZATION MARKING METHODS Approval Organization Printed or Embossed Harmonization Marking (May be located on jacket or insulation of internal wiring) Alternative Marking Utilizing Black-Red-Yellow Thred (Length of color section
Shinjuku Monolith, 3-1, Nishi Shinjuku 2-chome, Shinjuku-ku, Tokyo, Japan EC REP Wendenstraße 14-18, 20097 Hamburg, Germany 3500 Corporate Parkway, P.O. Box 610, Center Valley, PA 18034-0610, U.S.A. One Corporate Drive, Orangeburg, NY 10962, U.S.A. 491B River Valley Road, #12-01/04 Valley Point
Описание
Микроскоп Olympus СХ 31.
Лабораторный микроскоп Olympus CX31 идеально подходит для различных видов биологических и медицинских исследований. Прекрасно подходит для гистологической практики.
Все основные элементы управления микроскопом CX31 (фокусировка, управление светом и столиком) расположены близко друг к другу. Компактный и эргономичный дизайн микроскопа значительно повышает эффективность работы с ним. Поле зрения окуляров — 20. Регулировка межзрачкового расстояния тубуса в диапазоне 48-75 мм. Конструкция предметного столика не имеет элементов, выступающих за габариты столика, что позволяет легко и без помех перемещать исследуемых объект. Ручки грубой и точной фокусировки располагаются симметрично по обе стороны микроскопа. Имеется легко настраиваемый ограничитель перемещения столика вверх для предотвращения повреждения объектива при наблюдении с большим увеличением. На задней панели присутствует специальная ручка для переноски микроскопа. Встроенный конденсор Аббе с числовой апертурой 1,25 значительно повышает резкость и контрастность изображения на различных уровнях увеличения. Объективы серии UIS2 обеспечивают яркое и качественное изображение, а комплектация микроскопа вместо бинокулярного тубуса тринокулярным дает возможность установить цифровую камеру.
Особенности:
- Эргономичный дизайн.
- Контраст.
- Чёткое и точное изображение.
Технические характеристики
|
Оптическая |
UIS2, Cкорректирована на бесконечность. |
|
Револьверная |
Четырехпозиционная, ориентированная |
|
Фокусировка |
Грубый ход 36.8мм |
|
Освещение |
Встроенный осветитель проходящего света. |
|
Визуальная |
Бинокулярная визуальная |
|
Предметный |
Габариты — 188(Ш) х 134(Г) |
|
Конденсор |
Конденсор Аббе с встроенным фильтром дневного света |
|
Объективы |
План Ахромат 4х, 10х, 40х, 100х |
|
Окуляры |
WHB10х/20 с диоптрийной коррекцией |
|
Габариты |
233 x 367.5 x 511 |
|
Вес, кг |
8 |
Транспортные характеристики
Отзывы о товаре
Отзывов на Olympus СХ 31 пока нет. Будьте первым.
Вопросы о товаре
Задайте нам свой вопрос о Olympus СХ 31
Уважаемые покупатели, информируем Вас, что производитель может изменить цвет, внешний вид и характеристики товара без дополнительного уведомления продавца (НВ-Лаб). Поэтому размещенные на нашем сайте характеристики и фотографии являются справочными. Характеристики и внешний вид купленного товара иногда могут отличаться от опубликованных. Мы стараемся поддерживать описания в актуальном состоянии и обновляем информацию по мере получения её от производителей.
Вся размещённая на сайте информация опубликована исключительно для ознакомительных целей и ни при каких условиях не является публичной офертой.
Olympus CX31 Instruction Manual
- Addeddate
- 2020-05-19 20:46:00
- Classification
- Laboratory;Microscope;Olympus Microscope;Olympus CX31
- Identifier
- manual_Olympus_CX31_Instruction_Manual
- Identifier-ark
- ark:/13960/t0tr4pg1c
- Ocr
- ABBYY FineReader 11.0 (Extended OCR)
- Page_number_confidence
- 86.96
- Ppi
- 300
- Scanner
- Internet Archive Python library 1.9.0
comment
Reviews
There are no reviews yet. Be the first one to
write a review.
316
Views
DOWNLOAD OPTIONS
Temporarily Unavailable
DAISY
For users with print-disabilities
Uploaded by
Sketch the Cow
on
Усовершенствованные оптические характеристики и экономичность
Экономичное и в то же время высокопроизводительное решение для клинического и образовательного использования, CX31 предлагает четкое изображение в светлых полях с превосходной плоскостностью и эргономичный дизайн для большей простоты и комфорта при длительном использовании.
Отличные плоские изображения с помощью объективов PLCN
Серия PLCN объективов UIS2 значительно улучшает плоскостность, создавая резкие и четкие изображения вплоть до самых границ поля зрения. Объективы 10x и 40x, наиболее часто используемые при наблюдениях, обеспечивают наилучшую плоскостность среди микроскопов данного класса.
Яркие равномерные изображения при наблюдениях
Апертурная ирисовая диафрагма со встроенным конденсором и стандартная полевая диафрагма обеспечивают яркое и равномерное освещение при любом используемом увеличении. В системе освещения используется высокоэффективная галогенная лампа на 6В/30Вт для получения ярких изображений.
Превосходная оптика
- Отличная UIS2 Оптика. Окуляр UIS2 обеспечивает широкое поле зрения (FN 20) и позволяет легко наблюдать с помощью очков. Серия объективов PLCN Plan Achromat обеспечивает яркое, четкое наблюдение с выдающейся плоскостью.
- Широкий выбор смотровой трубы. Три вида смотровой трубы (бинокулярный, тринокулярный и наклонный бинокль) доступны в соответствии с пользовательскими приложениями.
- Интегрированный конденсатор Abbe. Встроенный конденсатор Abbe с NA 1.25 и оптимизированной апертурной диафрагмой обеспечивает соответствующую настройку диафрагмы для различных образцов и увеличений.
- Противогрибковая обработка. Обработка, которой подвергаются тубусы, окуляры и объективы, защищает оптические элементы даже в регионах с высокой влажностью.
Эргономичные особенности дизайна
- Предметный столик без боковых выступов. Низко расположенная ручка управления обеспечивает плавное и комфортное перемещение образца. Шкала градации белыми буквами на черном фоне.
- На элементах управления X и Y установлены тактильные ручки, что облегчает передвижение предметного столика
- Коаксиальная ручка для грубой/точной фокусировки. Фокусировка плавная и легкая, руки пользователя находятся на столе.
- Ограничение верхнего предела предотвращает контакт между объективом и образцом при наблюдениях с большим увеличением.
- Особо жесткая рама выдерживает частое использование и перемещение.
- Удобные ручки на передней и задней части рамы облегчают переноску микроскопа.
| Метод наблюдения | Светлое поле, темное поле |
| Оптическая система | Оптическая система UIS2 (Универсальная система, с коррекцией на бесконечность) |
| Освещение | Встроенная система освещения по Келлеру, в проходящем свете Галогенная лампа: 6В 30Вт 100–120 В/22O–240 В ~ 0,85/0,45 А, 50/60 Гц |
| Фокусировка | Перемещение столика по высоте, роликовая направляющая (зубчатая рейка и шестерня) Ход за один оборот: 36,8 мм Диапазон полного хода: 25 мм Блокировка по верхнему пределу с помощью упрощенной круговой шкалы предварительной фокусировки Регулировка натяжения на ручке грубой фокусировки |
| Револьвер | Револьвер с фиксацией для четырех объективов, с наклоном вовнутрь |
| Бинокулярный тубус | Линейное поле (мм): 20 Угол наклона тубуса: 30° Диапазон регулировки межзрачкового расстояния: 48–75 мм |
| Столик | Размеры: 188 (Ширина) X 134 (Толщина) мм Диапазон перемещений: 76 мм в направлении X и 50 мм в направлении Y Держатель для образцов: Держатель для двух предметных стекол Резиновая насадка: Входит в комплект поставки как стандартный элемент |
| Конденсор | Тип: Конденсор Аббе, со встроенным фильтром дневного света Числовая апертура: 1,25 с масляной иммерсией Апертурная ирисовая диафрагма: Встроенная |
| Размеры и масса | 233 (Ширина) X 411(Высота) X 367.5 (Толщина) мм; приблизительно 8 кг |