

Primo Star
Operating manual
Bedienungsanleitung
Mode d’emploi
Instrucciones de manejo
Инструкция по применению
操作手册

Carl Zeiss Copyright Primo Star
Knowledge of this manual is required for the operation of the instrument. Would you therefore
please make yourself familiar with the contents of this manual and pay special attention to hints concerning
En
safe operation of the instrument. The specifications are subject to change; the manual is not covered
lish Deutsch
by an update service. Unless expressly authorized, forwarding and duplication of this document,
as well as utilization and communication of its contents are not permitted. Violations will entail an
obligation to pay compensation. All rights reserved in the event of granting of patents or registration of a utility
model.
Die Kenntnis dieser Anleitung ist für die Bedienung des Gerätes erforderlich. Bitte machen Sie sich deshalb
mit dem Inhalt vertraut und befolgen Sie besonders Hinweise, die den sicheren Umgang mit dem Gerät
betreffen. Änderungen im Interesse der technischen Weiterentwicklung bleiben vorbehalten; das Handbuch
unterliegt nicht dem Änderungsdienst. Weitergabe sowie Vervielfältigung dieser Unterlage, Verwertung und
Mitteilung ihres Inhalts sind nicht gestattet, soweit nicht ausdrücklich zugestanden. Zuwiderhandlungen
verpflichten zu Schadenersatz. Alle Rechte für den Fall der Patenterteilung oder Gebrauchsmuster-Eintragung
vorbehalten.
L’utilisation de l’appareil suppose la bonne connaissance du présent mode d’emploi. Nous vous prions par conséquent
Fran
de lire attentivement les informations contenues dans ce document et de respecter notamment les consignes relatives
à la sécurité d’utilisation. Le fabricant se réserve le droit d’apporter des modifications techniques en fonction de
l’évolution des technologies. Ces modifications ne sont pas automatiquement prises en compte dans le mode d’emploi
ais
qui accompagne chaque appareil. Toute divulgation, reproduction ou publication du présent document, même
partielle, est interdite sans notre autorisation écrite. Toute infraction donne droit au versement de dommages et
intérêts. Tous les droits sont réservés en cas de délivrance d’un brevet ou de dépôt d’un modèle d’utilité.
El manejo de este equipo presupone el conocimiento de las presentes instrucciones. Por eso le rogamos
Es
familiarizarse con su contenido y observar en particular las indicaciones que se refieren al manejo seguro del mismo.
Nos reservamos el derecho a modificaciones en interés del desarrollo técnico; el manual no está sujeto al servicio de
añol
actualización. Sin nuestro consentimiento expreso no se autoriza ni la entrega y reproducción de este manual, ni el
aprovechamiento y la comunicación de su contenido. Cualquier contravención implica el pago de una
indemnización. Reservados todos los derechos para el otorgamiento de patentes o el registro de modelos de
utilidad.
Знание данной инструкции необходимо для использования прибора. Поэтому необходимо ознакомиться
Р
с ее содержанием и особенно следовать указаниям, касающихся безопасного обращения с прибором.
сский
Фирма оставляет за собой право на изменения в интересах технического усовершенствования;
руководство не подлежит изменениям. Передача и тиражирование данных документов, использование и
сообщение их содержания не допускаются без особого
возмещение убытков. Фирма оставляет за собой право на выдачу патента или регистрацию
зарегистрированной модели.
版 权
操作本仪器必须先阅读本手册内容。因此请务必熟悉本手册内容,尤其要遵从有关仪器正确操作的注意事项。技
术可能会有更新,此手册不含升级服务。未经授权禁止复制,利用和转载本手册内容。如有违背必须承担相应赔
偿责任。保留所有申请专利或者样品注册权利。
Issued by: Carl Zeiss MicroImaging GmbH
P.O.B. 4041, 37030 Göttingen, Germany
Phone: +49 (0) 551 5060 660
Fax: +49 (0) 551 5060 464
E-Mail: micro@zeiss.de
www.zeiss.de
Number of this manual: B 46-0071 v
Date of issue: Version 7, 03/01/2006
разрешения. В случае нарушений полагается
2 B 46-0071 v 03/06

Primo Star Contents Carl Zeiss
CONTENTS
Page
lish
1 Notes on Instrument Safety…………………………………………………………………………………. 4
1.1 General safety notes………………………………………………………………………………………………. 4
1.2 Instrument safety and EMC …………………………………………………………………………………….. 4
1.3 Unpacking, transportation, storage…………………………………………………………………………… 5
1.4 Disposal……………………………………………………………………………………………………………….. 5
1.5 Use……………………………………………………………………………………………………………………… 5
1.6 Notes on warranty…………………………………………………………………………………………………. 7
2 Description …………………………………………………………………………………………………………. 8
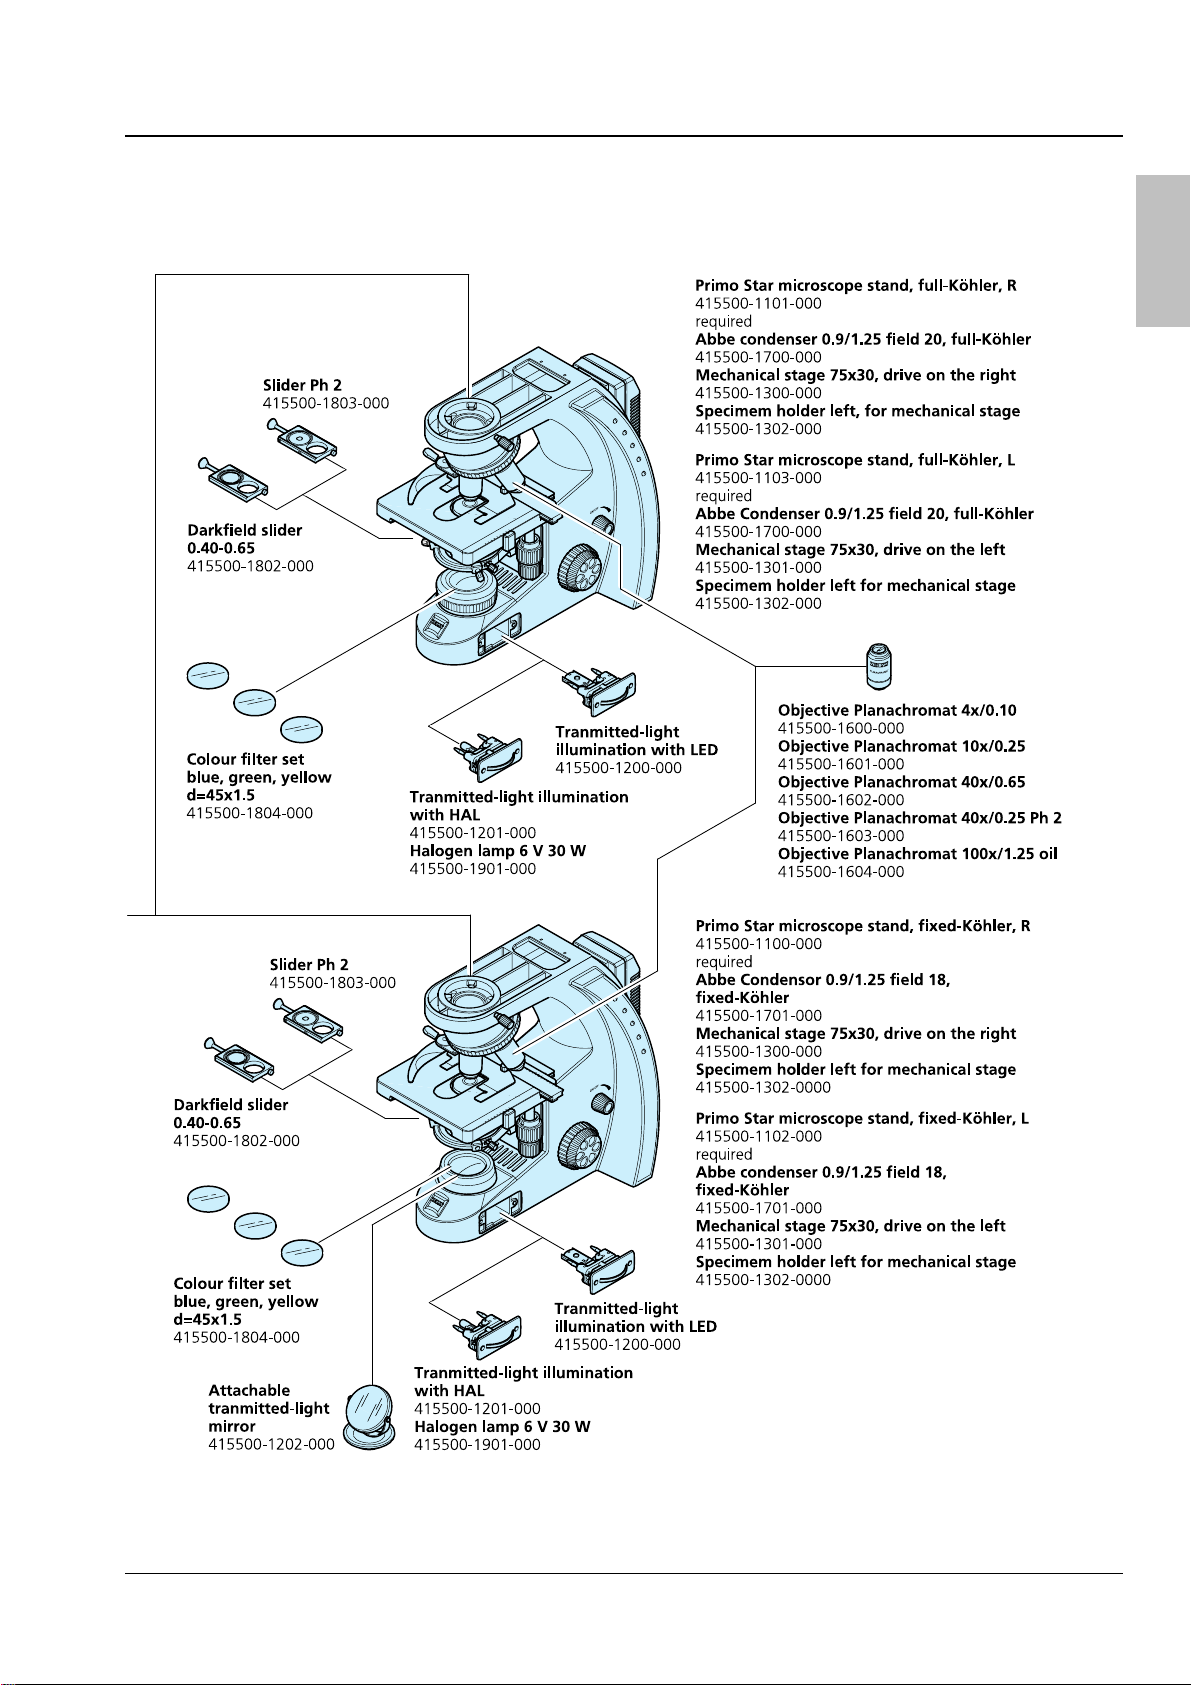
2.1 System overview……………………………………………………………………………………………………. 8
2.2 Total view…………………………………………………………………………………………………………… 10
2.3 Intended use ………………………………………………………………………………………………………. 11
2.4 Instrument description and main features ………………………………………………………………… 11
2.5 Objectives…………………………………………………………………………………………………………… 12
3 Start-Up and Operation …………………………………………………………………………………….. 13
3.1 Starting up the microscope……………………………………………………………………………………. 13
3.2 Controls …………………………………………………………………………………………………………….. 14
3.3 Operating the microscope …………………………………………………………………………………….. 16
3.3.1 Setting interpupillary distance and viewing height …………………………………………………….. 16
3.3.2 Compensating for ametropia and inserting the eyepiece pointer………………………………….. 16
3.3.3 Adjusting transmitted-light brightfield on the Full Köhler microscope……………………………. 17
3.3.4 Adjusting transmitted-light brightfield on the Fixed Köhler microscope …………………………. 18
3.3.5 Adjusting transmitted-light phase contrast or transmitted-light darkfield……………………….. 19
3.4 Converting the microscope……………………………………………………………………………………. 20
3.4.1 Changing the tube ………………………………………………………………………………………………. 20
3.4.2 Inserting color filters…………………………………………………………………………………………….. 20
3.4.3 Replacing the 6V 30W halogen lamp or the LED illumination………………………………………. 21
3.4.4 Changing objectives …………………………………………………………………………………………….. 21
3.4.5 Installing/removing the illuminating mirror……………………………………………………………….. 22
3.4.6 Installing a camera……………………………………………………………………………………………….. 23
En
4 Care and Troubleshooting …………………………………………………………………………………. 25
4.1 Instrument care …………………………………………………………………………………………………… 25
4.2 Troubleshooting ………………………………………………………………………………………………….. 26
5 Appendix………………………………………………………………………………………………………….. 27
5.1 Technical data …………………………………………………………………………………………………….. 27
B 46-0071 v 03/06 3

Carl Zeiss Notes on Instrument Safety Primo Star
1 NOTES ON INSTRUMENT SAFETY
En
1.1 General safety notes
lish
Please read this Operating Manual carefully before starting up the microscope.
If you need supplementary information, contact Carl Zeiss Service or an authorized agency.
To ensure safe operation and troublefree function of the microscope, strictly observe the precautions and
warnings given in this manual.
These are set off herein as follows:
CAUTION
This symbol indicates a possible hazard to the user of the instrument.
CAUTION
This symbol indicates a possible hazard to the instrument or system.
CAUTION
Disconnect the plug-in power unit from line power before opening the microscope!
NOTE
This symbol refers you to advice that you must observe under all circumstances.
1.2 Instrument safety and EMC
The Primo Star microscope has been designed, produced and tested in compliance with the standards
DIN EN 61010-1 (IEC 61010-1) and IEC 61010-2-101 «Safety requirements for electrical equipment for
measurement, control and laboratory use “.
The Primo Star microscope meets the requirements of the EC Directive 98/79/EC Annex 1 and carries the
mark.
Radio-noise suppression in compliance with EN 55011 Class B
Noise immunity in compliance with DIN EN 61326
The instruments are disposed of in compliance with the WEEE Directive 2002/96/EC.
4 B 46-0071 v 03/06

Primo Star Notes on Instrument Safety Carl Zeiss
1.3 Unpacking, transportation, storage
Please observe the following safety notes for unpacking, transportation and storage of the microscope:
− The microscope is supplied packed to commercial standards in a plastic case with cardboard
packaging; use the original packaging only for any transportation.
− Retain the original packaging for longer storage or return to the manufacturer.
− When unpacking the equipment, verify that all parts specified on the delivery note are present.
− Keep transport and storage temperatures as specified in Technical Data.
− Set up the microscope on a stable worktable with solid and smooth tabletop.
− Do not touch optical surfaces.
1.4 Disposal
Please observe the following safety notes for the disposal of the microscope:
Defective microscopes should not be disposed of with household waste; dispose of them in
compliance with the provisions of the law.
lish
En
1.5 Use
The microscope including its original accessories must not be used for microscopic techniques other than
those described in this Operating Manual.
Please observe the following safety notes when using the microscope:
The manufacturer cannot assume any liability for other applications, including those of
individual modules or single components. This also applies to any service or repair work that is
not carried out by authorized service personnel. In case of non-compliance, all warranty claims
shall be forfeited.
The microscope may only be operated by trained personnel who must be aware of the possible
dangers involved with microscopy and the particular application concerned. The microscope
may only be operated if set up on a stable, solid and smooth surface.
The stereomicroscope is a high-precision instrument that can be impaired in its performance or
even be destroyed when handled improperly.
B 46-0071 v 03/06 5

Carl Zeiss Notes on Instrument Safety Primo Star
The microscope is equipped with a plug-in power unit allowing line voltages to be used in the
En
lish
range between 100 and 240 V ± 10%, 50/60 Hz, without the need for changing the voltage
setting on the instrument.
The plug-in power unit meets the requirements of Protection Class II (with protective
insulation). If its casing is damaged, put the plug-in power unit out of operation. The
microscope may be operated only with the supplied plug-in power unit.
If it is determined that protection measures are no longer effective, the instrument must be
switched off and safeguarded against inadvertent operation. Please contact a Zeiss service
agency or the Carl Zeiss Microscopy Service to repair the instrument.
− Always disconnect the power cable, before opening the instrument and changing the lamp
or LED source.
− Wait for the lamp to cool down before replacing it and do not touch the new bulb.
− The instrument may only be opened by qualified specialists or service staff.
− The operation of the instrument in explosion-risk environments is not allowed.
®
Make sure to read the safety notes provided with Immersol 518 N
immersion oil.
Immersion oil irritates the skin. Avoid any contact with skin, eyes and clothing.
After skin contact, wash the oil off with plenty of water and soap.
After eye contact, immediately rinse the eye with plenty of water for at least five minutes.
If the irritation persists, consult a specialist.
Proper disposal of immersion oil: Take care to ensure that immersion oil does not enter surface
water or the sewage system.
The microscope is not equipped with special devices for the protection from substances that
are corrosive, potentially infectious, toxic, radioactive, or other substances that could be
hazardous to health. Make sure to observe all legal regulations, particularly the relevant
national accident prevention regulations when handling such substances.
− Before any transport of the instrument, switch it off and let it cool down (hot surface at the
bottom of the instrument).
− Operate the device only on a hard, non-combustible support.
− The plug-in power unit must not get in contact with moisture.
6 B 46-0071 v 03/06

Primo Star Notes on Instrument Safety Carl Zeiss
1.6 Notes on warranty
The Primo Star Microscope including its original accessories must not be used for microscopic techniques
other than those described in this Operating Manual. The manufacturer cannot assume any liability for
other applications.
Please note the following information on warranty for the Primo Star Microscope:
− The manufacturer guarantees that the microscope is free of material or manufacturing defects when
delivered.
− Possible defects must be notified to us immediately and steps be taken to minimize damage.
− If notified of such a defect, the manufacturer is obligated to rectify it at his discretion, either by
repairing the instrument or delivering an intact replacement.
− No guarantee is provided for defects caused by natural wear (wearing parts in particular) and improper
use.
− The instrument manufacturer shall not be liable for damage caused by faulty operation, negligence or
any other tampering with the microscope, particularly the removal or replacement of microscope
components, or the use of accessories from other manufacturers.
Unauthorized tampering with the instrument shall lead to a forfeit of all warranty claims.
lish
En
B 46-0071 v 03/06 7

Carl Zeiss Description Primo Star
2 DESCRIPTION
En
2.1 System overview
lish
8 B 46-0071 v 03/06
Primo Star Description Carl Zeiss
lish
En
B 46-0071 v 03/06 9

Carl Zeiss Description Primo Star
2.2 Total view
En
lish
1 Eyepiece
2 Binocular head
3 Tube
4 Carrying handle
5 Plug-in power unit
6 Stand
7 ON/OFF switch;
illumination
intensity
8 Illumination
module
9a Luminous-field
diaphragm,
adjustable
9b Luminous-field
diaphragm, fixed
10a Condenser carrier,
Full Köhler
10b Condenser carrier,
Fixed Köhler
11a Abbe condenser,
Full Köhler
11b Abbe condenser,
Fixed Köhler
12 Objective
13 Microscope stage
14 Objective
nosepiece
Fig. 1 Total view
10 B 46-0071 v 03/06

Primo Star Description Carl Zeiss
2.3 Intended use
The Primo Star microscope is a universally applicable light microscope primarily designed for the
examination of cell and tissue cultures as well as sediments in culture flasks, Petri dishes and microplates.
Typical applications:
Examination of blood and tissue samples from the human body, observation of intracellular
processes on living cell cultures, cell-cell interactions, motility, growth, potential measurement,
detection of medical drugs, microinjection and in vitro fertilization.
When handling hazardous substances, observe the instructions on intended operation, correct use and
statutory safety precautions.
2.4 Instrument description and main features
The Primo Star is a transmitted-light microscope of compact design with a small footprint.
Beside the high-resolution, infinity-corrected objectives and the important microscopy techniques, such as
brightfield, darkfield and phase contrast, the microscope is optionally available with a camera port for
photo and video documentation.
The major features of the microscope include:
− Modular illumination through 6V 30W halogen lamp, LED illumination or illuminating mirror.
− Integrated fixture for external power supply and cable (incl. cable with multi-standard plug and
country-specific plug adapters)
lish
En
− Plastic-coated carrying handle integrated in stand for installation, uninstallation and transport
− Blue, light-intensity indicators installed on both sides and well visible from a distance
− Stand in «Full Köhler» or «Fixed Köhler» design
− Convenient coaxial coarse and fine focusing drive, smoothness of coarse focusing drive being
adjustable
− Mechanical stage 75×30 left/right with specimen holder, stage controls optionally on the right or left
− Space-saving, continuously adjustable illumination module optionally with halogen or LED source
− «Full Köhler» or «Fixed Köhler» Abbe condensers for brightfield, darkfield and Ph 2 phase contrast
− Backward inclined quadruple objective nosepiece with W 0.8 lens thread running on ball bearing
− Infinity-corrected «Plan-ACHROMAT» objectives with magnifications of 4x, 10x, 40x and 100x/Oil for
brightfield, darkfield and Ph 2 phase contrast Ph 2 (40x/Ph2) as well as for oil immersion applications
(100x/Oil)
− Binocular tube or binocular phototube (50% vis, 50% doc) with ergonomically favorable tube angle of
30° with adjustable interpupillary distance and viewing height
− 10× focusing eyepieces for field-of-view numbers 18 or 20, suitable for spectacle wearers
B 46-0071 v 03/06 11

Carl Zeiss Description Primo Star
2.5 Objectives
En
The objectives are the optical heart of the microscope. The objectives may be labeled as follows:
lish
Plan-ACHROMAT 10×/0.25 ∞/-.
where:
10× Objective magnification,
With a defined color ring on the
objective being assigned to each
magnification step (Carl Zeiss color code)
0.25 Numerical aperture
∞ Infinite mechanical tube length
− Usable with cover slip thickness D = 0 or
0.17 mm
or
0.17 Usable with cover slip thickness
D = 0.17 mm
Other labels:
Oil Oil immersion objective
Fig. 2 Objective
Ph 2 Phase contrast objective with green
inscription and phase stop Ph 2
Objective magnification multiplied by eyepiece magnification results in overall visual magnification, e.g.
10 x 10 = 100x.
Numerical aperture multiplied by 1000, e.g. 0.25 × 1000 = 250×, presents the maximum useful
magnification; there is no resolution for further details above that limit.
When immersion objectives are used, the air between the cover slip and the objective is replaced by a
liquid, which in most cases is immersion oil. The plastic oiler containing 5 ml of immersion oil is
particularly suitable for this purpose.
Because of their short working distances, the 40×, 40x/Ph 2 and 100x/Oil objectives are equipped with
resilient mounts for specimen protection.
12 B 46-0071 v 03/06

Primo Star Start-Up and Operation Carl Zeiss
3 START-UP AND OPERATION
3.1 Starting up the microscope
Before installing and starting up the microscope, be sure to carefully read and observe the
notes on instrument safety (see Section
1).
Do not touch optical surfaces when unpacking the microscope to avoid fingerprints!
The microscope is supplied completely assembled and inclusive of accessories packed to commercial
standards. Additionally ordered components, such as sliders or transmitted-light equipment with
illuminating mirror, are packed separately.
• Remove the microscope from the transport case and place it onto the worktable.
Retain the original packaging for storage of the instrument in longer periods of non-use or for
return to the manufacturer.
• Remove the plug-in power unit (
Fig. 3/2) from
its storage fixture on the back wall of the
microscope.
• Replace the installed power outlet adapter by
one of the supplied country-specific adapters
Fig. 3/4), if necessary. To this end, pull off the
(
attached adapter and plug on the desired
adapter.
lish
En
• Connect the plug-in power unit to a power
outlet.
• If the plug-in power unit cannot be plugged
into the chosen power outlet because of limited
space, replace the power outlet adapter by the
supplied IEC adapter (
Fig. 3/3). This allows the
plug-in power unit to be put flat onto the
tabletop and connected to the power outlet
through a country-specific appliance cable.
When using the IEC adapter, the plug-in power unit can be fixed to the back wall of the
microscope stand by means of the supplied two self-adhesive hooks and the Velcro
• Turn on the microscope with rotary switch (
Fig. 3/5) and adjust the illumination to the desired
Fig. 3 Starting up the microscope
®
strip.
intensity.
The selected intensity is indicated in five steps by the blue light-emitting diodes (
Fig. 3/1) arranged on
both sides of the stand.
• At the end of the microscopic examinations, turn the microscope off with the rotary switch and cover
it with the dust cover.
• The smoothness of the coarse focusing drive (
Fig. 4/18) is factory-adjusted. However, you can readjust
it when required.
B 46-0071 v 03/06 13

Carl Zeiss Start-Up and Operation Primo Star
3.2 Controls
En
lish
Fig. 4 Controls
14 B 46-0071 v 03/06

Primo Star Start-Up and Operation Carl Zeiss
Legend to Fig. 4:
1 Eyepieces
2 Binocular body of the tube
3 Illumination-intensity indicators
4 Rotary knob for switch ON/OFF and adjustment of illumination intensity
5 Fine focusing drive (right side)
6 Coarse focusing drive (right side)
7 Control knob for X travel of mechanical stage
8 Control knob for Y travel of mechanical stage
9 Condenser clamp screw
10a Knurled ring for adjustment of luminous-field diaphragm (with Full Köhler equipment only)
10b Luminous-field diaphragm (fixed in Fixed Köhler equipment)
11a Condenser entering screws (in Full Köhler equipment: knurled screws)
11b Condenser centering screws (in Fixed Köhler equipment: Allen screws)
12 Spring lever of specimen holder
13 Knurled ring of objective nosepiece
14 Lever for the adjustment of the aperture diaphragm of the condenser
15 Knurled knob for vertical adjustment of condenser
16 Coarse focusing drive (left side)
17 Fine focusing drive (left side)
18 Knurled ring for adjusting the smoothness of the coarse focusing drive
lish
En
B 46-0071 v 03/06 15

Carl Zeiss Start-Up and Operation Primo Star
3.3 Operating the microscope
En
lish
3.3.1 Setting interpupillary distance and
viewing height
• Swing the eyepiece tubes symmetrically slightly
toward or away from one another to adjust the
distance between the tubes to your individual
interpupillary distance (
Fig. 5).
The adjustment of the interpupillary distance is
correct when you see only one round image while
Fig. 5 Setting the interpupillary distance
looking through the two eyepieces!
• Swivel the eyepiece tubes fully up (
down (
Fig. 6/B) to adjust the viewing height to
Fig. 6/A) or
your individual requirements.
Fig. 6 Adjusting the viewing height
3.3.2 Compensating for ametropia and
inserting the eyepiece pointer
The eyepieces (
over rubber eyecups (
Fig. 7/3) are equipped with fold-
Fig. 7/1: pulled out; Fig. 7/2:
folded over).
Both eyepieces are suitable for spectacle wearers.
Additionally, they contain a focusing ring for the
compensation of defective vision. The provided
diopter scale serves to facilitate finding the correct
setting.
The eyepiece pointer can be inserted in one
eyepiece, when required.
To this end, follow this procedure:
• Use Allen key SW 1 mm to loosen grub screw
(
Fig. 7/6) on the binocular body from the
bottom; remove the eyepiece.
• Unscrew the stop (
Fig. 7/5) by hand from the
eyepiece.
• Insert the eyepiece pointer (
Fig. 7/4) into the
eyepiece (with the coated side facing your
eyes). Screw in the eyepiece stop again.
• Put the eyepiece into the tube and fix it with
Fig. 7 Inserting the eyepiece pointer
the grub screw.
16 B 46-0071 v 03/06

Primo Star Start-Up and Operation Carl Zeiss
• Turn the focusing ring of the eyepiece (Fig. 7/3) to focus on the triangular figure of the eyepiece
pointer.
• Put the specimen onto the mechanical stage. Look at the specimen through the eyepiece with the
eyepiece pointer and focus on the microscopic image by turning on the focusing drive.
• When in the above-mentioned eyepiece both microscopic image and eyepiece pointer appear sharply,
focus the image for the second eye by turning the focusing ring of the second eyepiece.
Having done so, both microscopic images inclusive of the eyepiece pointer are focused.
Afterwards, you should focus on the specimen only by adjusting the focusing drive.
3.3.3 Adjusting transmitted-light
brightfield on the Full Köhler
microscope
• First, place a contrasty specimen slide with the
0.17 mm cover slip being on top in the
specimen holder of the mechanical stage. Fix
the slide by means of the spring lever
Fig. 4/12).
(
lish
En
• If the microscope stand is equipped with a
phase or dark-filed slider, pull this slider out to
the left as far as it will go.
• Turn rotary knob (
Fig. 8/1) on microscope stand
to adjust the illumination intensity.
• Move the Abbe condenser up to the top
mechanical stop by turning knurled knob
Fig. 4/15); set the control lever of the aperture
(
diaphragm (
Fig. 4/14) to mid-position.
The knurled knob for vertical
adjustment of the condenser is at the
left of the microscope, if you use the
mechanical stage 75×30 with drive on
the right, it is at the right, if the stage
controls are on the left.
• Turning at the knurled ring (
Fig. 8/6) of the
nosepiece, swing the 10x objective into the
light path.
• On the binocular tube (
Fig. 8/7), first look
through one eyepiece and turn the focusing
Fig. 8/2) to focus on the specimen.
drive (
Fig. 8 Adjusting transmitted-light
brightfield
• Then, readjust the focus for the other eye, if necessary, by turning the eye lens of the focusing
eyepiece.
• Close the luminous-field diaphragm (
of view (
Fig. 8/A).
Fig. 8/3) until it becomes visible (even if not in focus) in the field
B 46-0071 v 03/06 17

Carl Zeiss Start-Up and Operation Primo Star
• Turn the knurled knob for vertical adjustment of the condenser (Fig. 4/15) until the edge of the
En
lish
luminous-field diaphragm appears sufficiently sharp (
• Center the image of the luminous-field diaphragm using both centering screws (
condenser (
Fig. 8/D).
(
Fig. 8/C). Then, open the diaphragm until it just disappears from the field of view
Fig. 8/B).
Fig. 8/5) of the
• To adjust the aperture diaphragm (contrast), remove one eyepiece from the tube and look through the
tube with your naked eye. Swing lever (
2/3 … 4/5 of the diameter of the exit pupil of the objective (
Fig. 8/4) to adjust the aperture diaphragm to approximately
Fig. 8/E). In most applications, this
aperture diaphragm setting provides optimum contrast at almost ideal resolution, and is therefore the
best compromise for the human eye.
• Insert the eyepiece back in the tube.
Specimen field size and objective aperture change after every objective change. Therefore,
repeat the adjustment of luminous-field diaphragm and aperture diaphragm to obtain
optimum results.
3.3.4 Adjusting transmitted-light brightfield on the Fixed Köhler microscope
The Primo Star Fixed Köhler Microscope is supplied factory-adjusted. Operation is restricted to a few
manipulations.
• Place the specimen in the specimen holder of the mechanical stage.
• If the microscope stand is equipped with a phase or dark-filed slider, pull this slider out to the left as
far as it will go.
• Adjust the desired magnification by swinging in the corresponding objective.
• Set the control lever of the aperture diaphragm of the condenser to the value of the selected
magnification (10x, 40x or 100x).
• Turn the rotary knob on the microscope stand to adjust the illumination intensity to a level pleasant
for observation.
If the condenser had been removed (e.g. for installing the illuminating mirror), make sure to
reinstall and center it by means of the two centering screws (for this, refer to Section
3.4.5).
18 B 46-0071 v 03/06

Primo Star Start-Up and Operation Carl Zeiss
3.3.5 Adjusting transmitted-light phase
contrast or transmitted-light
darkfield
lish
• First, adjust the microscope as you do for
brightfield.
• Turn the nosepiece to swing the phase-contrast
objective (40x/Ph 2) into the light path.
• Open the luminous-field diaphragm (
Fig. 9/3, if
adjustable) on the stand and open the aperture
diaphragm by means of control lever (
on Abbe condenser (
• If the phase-contrast slider (
Fig. 9/2).
Fig. 9/6) was not
Fig. 9/1)
factory-installed yet, first unscrew its screw
Fig. 9/7). Then, push the slider from the left
(
into the Abbe condenser and screw the screw
Fig. 9/7) back in again.
(
• Push the slider to the right as far as it will go to
move the phase stop into the light path.
• Move the control lever of the aperture
diaphragm to fully open it on the Full Köhler
model or set it to the PH mark on the Fixed
Köhler model.
• Adjust the illumination intensity as needed.
En
Fig. 9 Inserting the slider
• Check the centering of the phase stop
according to the drawing in
Fig. 10. To this end,
remove one eyepiece and replace it by the
eyepiece telescope.
• Center the phase stop, if necessary, (
Fig. 10/A)
by turning the two adjusting screws of the
slider (
SW 1.5 (
corresponds to that shown in
Fig. 9/5) by means of the two Allen keys
Fig. 9/4) until the phase stop image
Fig. 10/B.
• Afterwards, replace the eyepiece telescope by
the eyepiece again.
For darkfield applications, use the darkfield slider in place of the phase-contrast slider.
Fig. 10 Centering the phase stop
B 46-0071 v 03/06 19
Carl Zeiss Start-Up and Operation Primo Star
3.4 Converting the microscope
En
lish
Unplug the plug-in power unit from
line power before converting the
microscope.
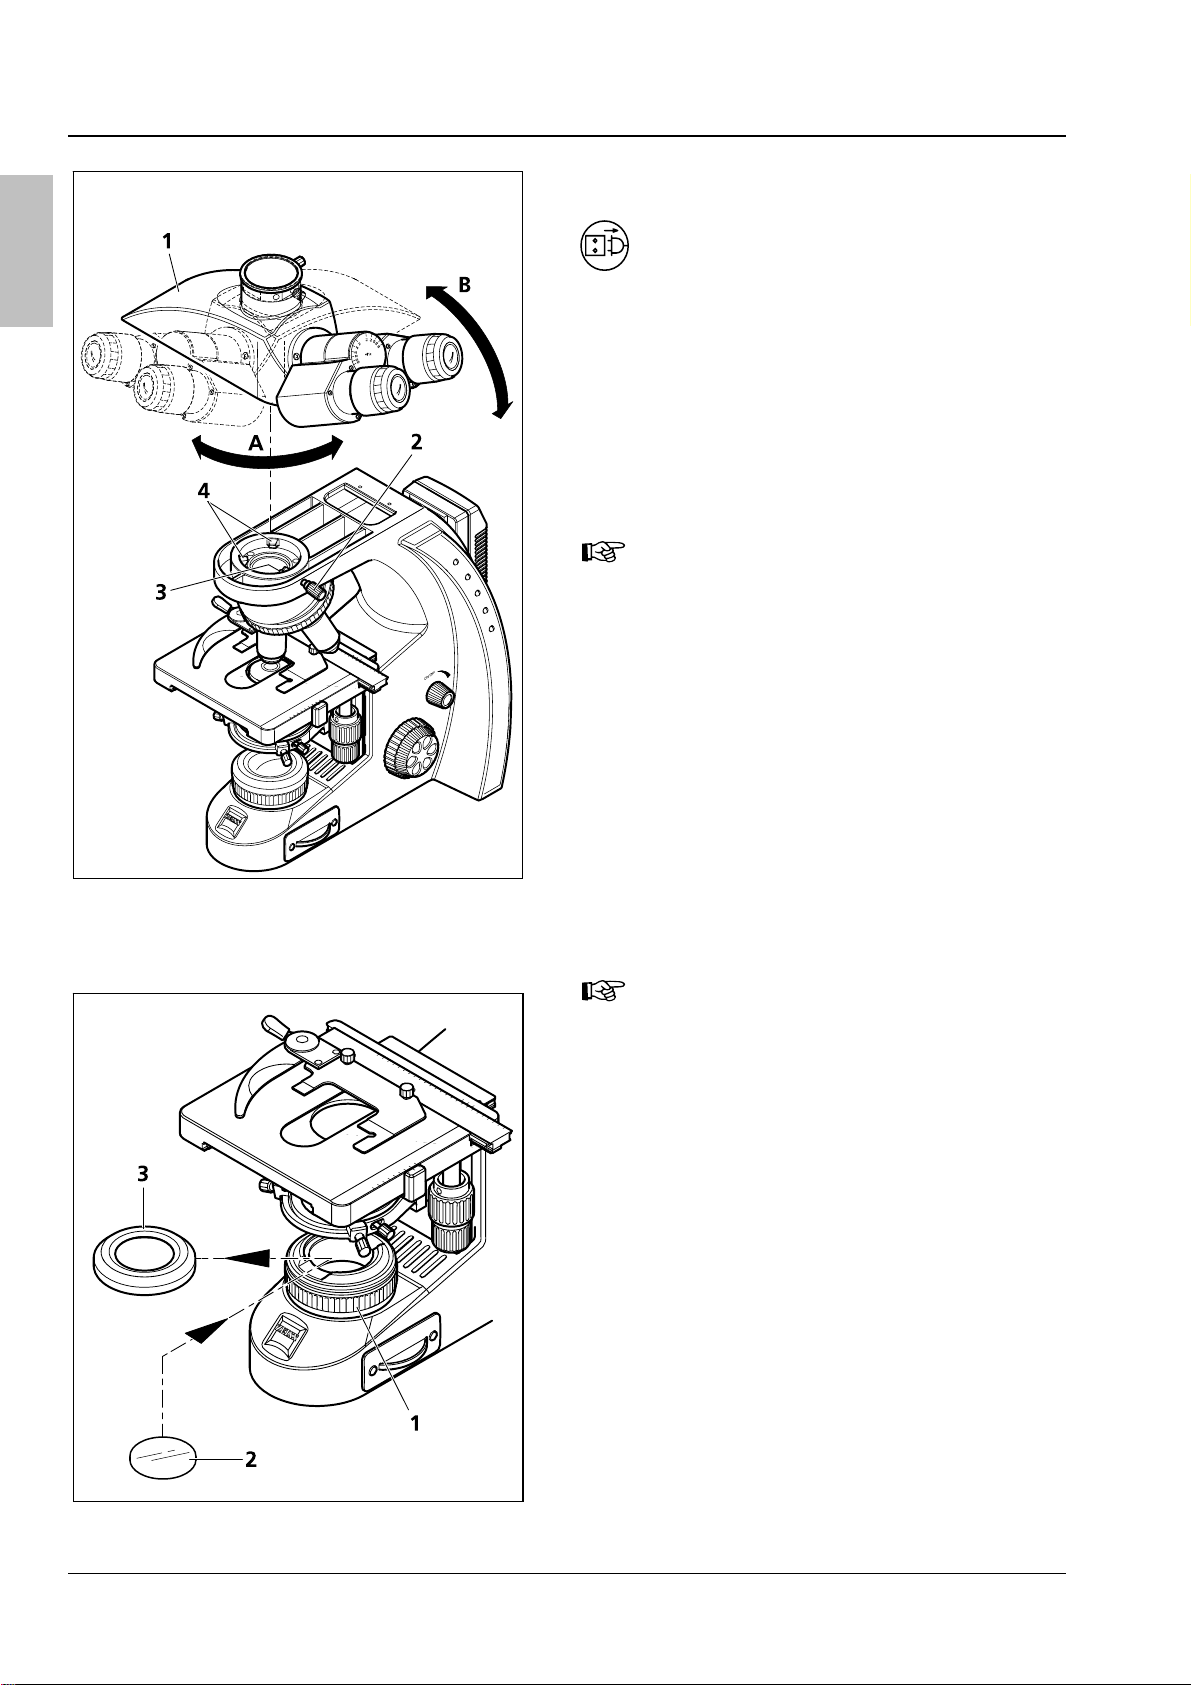
3.4.1 Changing the tube
Fig. 11 Changing the tube
• Loosen clamp screw (
installed tube (
approximately 90° (
side take it of upward (
For reasons of space, the tube may
Fig. 11/2), turn the
Fig. 11/1) clockwise by
Fig. 11/A) and on the right
Fig. 11/B).
also be clamped by the grub screw
with hexagonal socket head supplied
with the tube.
• Insert the tube to be installed, with the
eyepieces pointing to the right and its dovetail
mount slightly inclined, under the two holding
elements (
Fig. 11/4) in the stand.
• Then, place the tube horizontally onto the
stand. In doing so, the groove on the underside
of the tube must be located above the third
holding element (
Fig. 11/3) of the stand.
• Turn the tube counterclockwise by 45°
(eyepieces pointing frontward), align it to the
stand and tighten clamp screw (
For space-saving storage of the
Fig. 11/2).
microscope (e.g. in a cabinet) the tube
may also be rotated by 180° to the
back.
3.4.2 Inserting color filters
• Move the condenser carrier fully up by turning
the knurled screw for vertical adjustment
Fig. 4/15).
(
• Unscrew the cover cap (
luminous-field diaphragm (
Fig. 12/3) from the
Fig. 12/1).
• Put the desired filter – yellow, green or blue –
(
Fig. 12/2) onto the mounting surface of the
luminous-field diaphragm and screw the cover
cap back into place.
Fig. 12 Inserting a color filter
20 B 46-0071 v 03/06

Primo Star Start-Up and Operation Carl Zeiss
3.4.3 Replacing the 6V 30W halogen
lamp or the LED illumination
Unplug the plug-in power unit from
the power outlet and allow for a
sufficient cool-down time of the
6V 30W halogen lamp before you
replace it.
lish
En
• Loosen both fastening screws (
illumination module (
Fig. 13/1 o 2). In doing so,
Fig. 13/3) of the
slightly press the screws against the spring and
turn them by 90°: Turn left screw clockwise and
right screw counterclockwise.
• Pull the illumination module (
Fig. 13/1 or 2) out
of the stand.
• If the stand is equipped with a 6V 30W halogen
lamp (
(
Fig. 13/4) from the lamp carrier and insert the
Fig. 13/2), remove the halogen lamp
new halogen lamp. Do not touch the new lamp
with naked fingers as this will reduce lamp life.
• If the stand is equipped with an LED source,
replace the complete illumination module
including the LED (
• Push the illumination module (
Fig. 13/1).
Fig. 13/1 or 2)
back into the stand and lock it by means of the
two screws (
Fig. 13/3). In doing so, slightly press
the screws against the spring and turn them by
90°: Turn left screw counterclockwise and right
screw clockwise.
Fig. 13 Replacing the 6V 30W halogen lamp
or the LED illumination module
3.4.4 Changing objectives
• Turn the focusing drive to move the mechanical
stage fully down.
• Turn the nosepiece (
objective to be changed (
Fig. 14/3) to move the
Fig. 14/1) into a lateral
position.
• Unscrew the objective and remove it
downward.
• Screw the desired objective (
nosepiece as far as it will go.
• If you intend to insert the objective in a lens
mount not used so far, remove the dust cover
from the corresponding mount of the
nosepiece.
Fig. 14/2) into the
Fig. 14 Changing an objective
B 46-0071 v 03/06 21

Carl Zeiss Start-Up and Operation Primo Star
3.4.5 Installing/removing the
En
illuminating mirror
lish
Fig. 15 Removing/installing the condenser
The mirror serves to illuminate the specimen if no
power outlet is available.
It can be used only in combination with the
Primo Star Fixed Köhler Microscope. For this
purpose, it is necessary to remove the condenser
and the condenser carrier insert.
Installing the illuminating mirror:
• Remove cover cap (
field diaphragm (
Fig. 15/6) from luminous-
Fig. 15/5).
• Using an Allen key, loosen the clamp screw
Fig. 15/2) of the condenser and the centering
(
screws (
Fig. 15/4) so that the condenser (Fig. 15/7) can
(
Fig. 15/3) of the condenser carrier
be removed frontward. Remove the condenser
Fig. 15/7).
(
• Unscrew clamp screw (
from condenser carrier insert (
Fig. 15/2 or Fig. 16/1)
Fig. 15/1 or
Fig. 16/3).
Fig. 16 Installing/removing the illuminating
mirror
• Push the condenser carrier backward against
the spring and inclining it remove it upward
from the condenser carrier (
• Insert the mirror (
Fig. 16/5) from top through
Fig. 15/4).
the aperture of the condenser carrier and place
it onto the mount of the luminous-field
diaphragm (
Fig. 16/2). Take care that the mirror
rests level on the mount.
• Rotate and incline the mirror until the daylight is
reflected homogeneously into the light path.
Removing the illuminating mirror:
• Remove the mirror (
Fig. 16/5) upwards through
the aperture of the condenser carrier.
• Slightly incline the condenser carrier insert
Fig. 15/1 or Fig. 16/3) to insert it in the
(
aperture of the condenser carrier. In doing so,
press the unit backward against the spring and
place it horizontally onto the condenser carrier.
• Screw the condenser clamp screw (
into the condenser carrier insert.
Fig. 16/1)
22 B 46-0071 v 03/06

Primo Star Start-Up and Operation Carl Zeiss
• Taking care that the locating screw on the rear side of the condenser fits in groove (Fig. 16/4) of the
condenser carrier insert, put the condenser into this insert.
• Screw the cover cap back onto the luminous-field diaphragm.
• To center the condenser, connect the microscope to the power outlet and switch it on.
• Turn the nosepiece to swing the 4x objective into the light path.
lish
En
• Turn the two centering screws (
Fig. 15/3) to adjust the illuminated image symmetrically to the edge of
the field of view.
3.4.6 Installing a camera
You can install a digital camera, a video camera or
a compact digital camera to your choice on the
microscope via the available camera adapters (see
Section
• First, install the photo tube (
• Loosen clamp screw (
2.1).
necessary (refer to Section
Fig. 17/8) and remove the
Fig. 17/7), if
3.4.1).
dust cap from the photo tube.
Installing a compact digital camera
• Sliding mount (
M37/52 (
Fig. 17/3) and lens mount (Fig. 17/6)
Fig. 17/4), thread adapter ring
are supplied premounted as Digital Camera
Adapter P95 M37/52×0.75. The opposite
drawing shows this unit dismantled.
Furthermore, you may unscrew the M37/52
thread adapter (
sliding mount (
Fig. 17/3) (not shown) from the
Fig. 17/4) so that you can also
mount cameras with M37 thread.
• Mount the adapter ring (
with the camera) to the camera (
Fig. 17/2) (supplied
Fig. 17/1) (see
the operating instructions of the camera).
Fig. 17 Installing a camera
• Screw the unit consisting of sliding mount (
mount (
Fig. 17/6) into the adapter ring (Fig. 17/2).
Fig. 17/4), thread adapter ring M37/52 (Fig. 17/3) and lens
• Insert the camera with adapter into the photo tube as far as it will go. Align it and fasten it with clamp
screw (
Fig. 17/8).
B 46-0071 v 03/06 23

Carl Zeiss Start-Up and Operation Primo Star
• Depending on the microscope equipment or the camera used, it may be necessary to optimize the
En
lish
distance between camera lens and lens mount (
necessary in particular, if it is impossible to obtain an unvignetted image in any of the zoom positions
Fig. 17/6) (see double-headed arrow). This will be
of the camera lens. To this end, adjust the camera as follows:
− Switch off the autofocus.
− Set the object distance to ∞.
− Set aperture-priority auto exposure mode.
− Choose an aperture as large as possible (i.e. small aperture value!).
Not all the cameras provide these options. Please consult the Operating Manual of the used camera.
• Loosen grub screw (
Fig. 17/5).
• Vary the camera lens/lens mount distance gradually, i.e. displace the sliding mount with camera on
lens mount in defined steps.
• Zoom the camera lens through from wide angle (W) to tele position (T).
• Carry out this test until the image is format filling without masking or vignetting.
• Retighten the grub screw (
With camera/adapter combinations that have not been recommended expressly by Zeiss, it
Fig. 17/5).
may be quite impossible to obtain an unvignetted image.
Installing a digital camera or video camera with C-mount thread
Cameras with C-mount thread are to be connected to the phototube of the microscope by means of the
camera adapter P95-C 2/3” 0.65x or P95-C ½” 0.5x (
• Put the camera (
Fig. 17/10) together with the corresponding camera adapter (Fig. 17/9) into the
phototube as far as it will go, align it and fasten it by means of the clamp screw (
Fig. 17/9).
Fig. 17/8).
24 B 46-0071 v 03/06

Primo Star Care and Troubleshooting Carl Zeiss
4 CARE AND TROUBLESHOOTING
4.1 Instrument care
Care of the microscope is restricted to the following operations:
• Cover the instrument with the dust cover after every use.
• Do not install the microscope in a humid room; maximum humidity < 75%.
• Cover open tubes with the dust caps.
• Remove dust and loose dirt from visible optical surfaces with a brush, blower brush, cotton bud,
optics cleaning tissue, or a cotton cloth.
• Remove water-soluble dirt (coffee, cola, etc.) by blowing on it and subsequent wiping it off with a
cloth moistened with water to which you may also add a mild detergent.
• Wipe off stubborn oily or fatty dirt (immersion oil, fingerprints) with a cotton bud or a lint-free cotton
cloth and the optics cleaning solution L.
The cleaning solution consists of 90 vol% gasoline and 10 vol% isopropanol (IPA). Its individual
constituents are also known as:
Gasoline: Medical alcohol, petrolether
Isopropanol: 2-Propanol,
Dimethylcarbinol,
2-Hydroxypropane
Clean optical surfaces by polishing in circles starting in the middle and moving to the edges using slight
pressure only.
lish
En
For the use in humid climatic zones, all optical components of the microscope are provided with
protection against fungus attack.
B 46-0071 v 03/06 25

Carl Zeiss Care and Troubleshooting Primo Star
4.2 Troubleshooting
En
lish
The field of view is not
completely visible.
Problem Cause Remedy
Nosepiece with objective has not been
switched into click-stop position.
Condenser has not been set correctly. Set condenser correctly.
Switch nosepiece with objective into
click-stop position.
Low resolving power, poor
image contrast
The aperture diaphragm has not been
adjusted correctly.
The luminous-field diaphragm has not
been adjusted correctly.
The filter has not been inserted
correctly in the filter mount.
The aperture diaphragm has not been
opened to the correct size.
Condenser not focused correctly. Focus the condenser.
Wrong cover slip thickness selected
for use of transmitted-light objectives
corrected for 0.17mm cover slips.
Use of no or non-specified immersion
oil with immersion objective
Air bubbles in immersion oil Remove the bubbles by applying new oil
Immersion oil on the front lens of a
dry objective.
Dirt or dust on the optical surfaces of
objectives, eyepieces, condenser, or
filters
Adjust aperture diaphragm correctly.
Adjust luminous-field diaphragm
correctly.
Insert filter correctly into filter mount.
Set opening of aperture diaphragm to
correct size.
Use standard 0.17 mm cover slips.
Use the supplied immersion oil.
or moving the objective to and fro.
Clean the front lens of the dry objective.
Clean the respective optical
components.
Greater focus differences after
changing the objective
the LED source does not light
up although the microscope
has been switched on.
The 6V 30W halogen lamp is
flickering, its light intensity
unstable, the illumination
inhomogeneous
Stage comes down by itself,
image focus is unstable
The focusing eyepieces have not been
set correctly.
Power plug has not been plugged into
power outlet.
6V 30W halogen lamp or LED source is
defective.
End of average service life of 6V 30W
halogen lamp has been reached.
Power cable Incorrectly installed or
broken power cable
The pins of the 6V 30W halogen lamp
have not been inserted correctly in the
lamp holder.
The pins of the 6V 30W halogen lamp
have not been inserted symmetrically
in the lamp holder.
Adjusted torque of coarse focusing
drive is too low.
Set the focusing eyepieces to the
corresponding defective vision.
Connect power plug to power outlet. The 6V 30W halogen lamp or
Replace the defective 6V 30W halogen
lamp or the LED module
Replace the 6V 30W halogen lamp.
Connect the power cable correctly or
replace it.
Insert the pins of the 6V 30W halogen
lamp correctly in the lamp holder.
Insert the pins of the 6V 30W halogen
lamp symmetrically in the lamp holder.
Increase the torque of the coarse
focusing drive to make motion stiffer.
26 B 46-0071 v 03/06

Primo Star Appendix Carl Zeiss
5 APPENDIX
5.1 Technical data
Dimensions (width x depth x height)
Stand with binocular tube
Stand with phototube
With tube / phototube turned by 180°
approx. 190 x 425 x 395 mm
approx. 190 x 425 x 395 mm
approx. 190 x 375 x 395 mm
Weight
Primo Star with phototube 8.2 kg
Ambient conditions
Transport (in packaging):
Permissible ambient temperature
Storage:
Permissible ambient temperature
Permissible humidity
(no condensation)
Operation:
Permissible ambient temperature
Permissible humidity
(no condensation)
Atmospheric pressure
-40 to +70 °C
+10 to +40 °C
max. 75% at 35 °C
+5 to +40 °C
max. 75% at 35 °C
800 hPa to 1060 hPa
Operating data
lish
En
Protection Class
Protection Type
Electrical safety
Pollution degree
Overvoltage category
Radio interference suppression
Line voltage
Line frequency
Power consumption
Output of plug-in power unit
Microscope 12V/6V DC
Light sources
Halogen lamp
Adjustability of light source
Color temperature at 6V
Luminous flux
Average service life
Luminous area
II
IP20
in compliance with DIN EN 61010-1 (IEC 61010-1)
including CSA and UL directives
2
II
in accordance with EN 61326
100 to 240 V (±10 %) wide-range input power supply, i.e. the
voltage setting of the instrument need not be changed!
50 / 60 Hz
70 VA; secondary voltage of external power supply 12V
12 V DC; max. 2.5A
1.5V – 6V adjustable
HAL 6V 30W
continuous, from 1.5 to 6V DC
2800 K
280 lm
1000 h
1.5 x 3 mm
B 46-0071 v 03/06 27

Carl Zeiss Appendix Primo Star
En
lish
Constant, brightness-independent
color temperature of
Homogeneous field illumination
Suitable for objectives with
magnifications of
Analogous brightness adjustment from
LED illumination
Optical/mechanical data
Stand with stage focusing
With coarse focusing drive
With fine focusing drive
Total stage lift
Objective change Manual via quadruple objective nosepiece
Objectives Infinity-corrected objective range with W 0.8 mounting thread
Eyepieces
With field-of-view number 18
With field-of-view number 20
Specimen stage
Dimensions (width x depth)
Stage travel (X x Y)
Coaxial drive
Vernier scales
Specimen holder
7480 K
20 mm diameter
4x to 100x
approx. 15 to 100%
4 mm/revolution
0.5 mm/revolution
15 mm
30 mm tube size
PL 10x/18 Br. foc.
PL 10x/20 Br. foc.
Mechanical stage 75×30 right/left
140 x 135 mm
75 x 30 mm
Optionally right or left
Readable from the right
With spring lever, left
Abbe condenser 0.9/1.25, fixed collector For V
Abbe condenser 0.9/1.25 For V
Binocular tube 30°/20
Maximum field-of-view number
Interpupillary distance
Tube angle
Viewing height
Viewing port
Binocular phototube 30°/20
Maximum field-of-view number
Interpupillary distance
Tube angle
Viewing height
Viewing port
Photo/video port
Light path selection with swing-in prism
. 4x to 100x
obj
. 4x to 100x
obj
20
Adjustable from 48 to 75 mm
30°
380 to 415 mm
Tube factor 1x
20
Adjustable from 48 to 75 mm
30°
380 to 415 mm
Tube factor 1x
Tube factor 1x, 60 mm mount
50% vis / 100% doc
Illuminating mirror With plane surface and spherical surface with f’ = 75 mm
28 B 46-0071 v 03/06

Primo Star Inhaltsübersicht Carl Zeiss
INHALTSÜBERSICHT
Seite
1 Hinweise zur Gerätesicherheit …………………………………………………………………………….. 4
1.1 Allgemeine Sicherheitshinweise ……………………………………………………………………………….. 4
1.2 Gerätesicherheit und EMV………………………………………………………………………………………. 4
1.3 Auspacken, Transportieren, Lagern…………………………………………………………………………… 5
1.4 Entsorgen…………………………………………………………………………………………………………….. 5
1.5 Bedienen……………………………………………………………………………………………………………… 5
1.6 Garantiehinweise…………………………………………………………………………………………………… 7
2 Gerätebeschreibung……………………………………………………………………………………………. 8
2.1 Systemübersicht ……………………………………………………………………………………………………. 8
2.2 Gesamtansicht…………………………………………………………………………………………………….. 10
2.3 Verwendungszweck …………………………………………………………………………………………….. 11
2.4 Gerätebeschreibung und Hauptmerkmale………………………………………………………………… 11
2.5 Objektive……………………………………………………………………………………………………………. 12
Deutsch
3 Inbetriebnahme und Bedienung ………………………………………………………………………… 13
3.1 Mikroskop in Betrieb nehmen………………………………………………………………………………… 13
3.2 Bedienelemente…………………………………………………………………………………………………… 14
3.3 Mikroskop bedienen…………………………………………………………………………………………….. 16
3.3.1 Okularabstand und Einblickhöhe einstellen………………………………………………………………. 16
3.3.2 Augenfehlsichtigkeit am Okular ausgleichen und Okularzeiger einsetzen………………………. 16
3.3.3 Durchlicht-Hellfeld am Mikroskop Full-Köhler einstellen ……………………………………………… 17
3.3.4 Durchlicht-Hellfeld am Mikroskop Fixed-Köhler einstellen …………………………………………… 18
3.3.5 Durchlicht-Phasenkontrast oder Durchlicht-Dunkelfeld einstellen …………………………………. 19
3.4 Mikroskop umrüsten ……………………………………………………………………………………………. 20
3.4.1 Tubus wechseln…………………………………………………………………………………………………… 20
3.4.2 Farbfilter einsetzen ………………………………………………………………………………………………. 20
3.4.3 Halogenlampe 6 V / 30 W bzw. LED-Beleuchtung wechseln………………………………………… 21
3.4.4 Objektiv wechseln ……………………………………………………………………………………………….. 21
3.4.5 Spiegel ein- und ausbauen…………………………………………………………………………………….. 22
3.4.6 Kamera ansetzen…………………………………………………………………………………………………. 23
4 Pflege und Störungsbeseitigung………………………………………………………………………… 25
4.1 Gerät pflegen……………………………………………………………………………………………………… 25
4.2 Störungsbeseitigung…………………………………………………………………………………………….. 26
5 Anhang…………………………………………………………………………………………………………….. 27
5.1 Technische Daten ………………………………………………………………………………………………… 27
B 46-0071 v 03/06 3

Carl Zeiss Hinweise zur Gerätesicherheit Primo Star
1 HINWEISE ZUR GERÄTESICHERHEIT
1.1 Allgemeine Sicherheitshinweise
Bitte machen Sie sich vor Inbetriebnahme des Mikroskops mit dem Inhalt dieser Bedienungsanleitung
gründlich vertraut.
Ergänzende Informationen erhalten Sie von unserem Service oder von autorisierten Vertretungen.
Deutsch
Zur Gewährleistung einer sicheren Arbeitsweise und ungestörten Funktion des Mikroskops sind
unbedingt die in der Bedienungsanleitung angegebenen Vorsichtsmaßnahmen und Warnungen zu
beachten.
Diese sind im laufenden Text durch Symbole gekennzeichnet:
VORSICHT
Bei Nichtbeachtung der Sicherheitshinweise besteht eine Gefahr für den Benutzer.
ACHTUNG
Dieses Symbol kennzeichnet eine Gefahr, die für das Gerät oder Gerätesystem entstehen kann!
ACHTUNG
Vor Eingriff in das Mikroskop Steckernetzteil vom Netz trennen!
HINWEIS
Arbeitshinweise, die beim Umgang mit dem Mikroskop zu beachten sind.
1.2 Gerätesicherheit und EMV
Das Mikroskop Primo Star wurde entsprechend der Norm DIN EN 61010-1 (IEC 61010-1) und
IEC 61010-2-101 «Sicherheitsbestimmungen für elektrische Mess-, Steuer-, Regel- und Laborgeräte“,
konstruiert, gefertigt und geprüft.
Das Mikroskop Primo Star erfüllt die Anforderungen der EG-Richtlinie 98/79/EG Anhang 1 und ist mit
dem
— Zeichen gekennzeichnet.
Funkentstörung nach EN 55011 Klasse B
Störfestigkeit nach DIN EN 61326
Die Geräte werden gemäß der WEEE-Richtlinie 2002/96/EG entsorgt.
4 B 46-0071 v 03/06
Loading…
Zeiss Primo Star User Manual
- Addeddate
- 2020-05-19 21:07:00
- Classification
- Laboratory;Microscope;Zeiss Microscope;Zeiss Primo Star
- Identifier
- manual_Zeiss_Primo_Star_User_Manual
- Identifier-ark
- ark:/13960/t3b07xp10
- Ocr
- ABBYY FineReader 11.0 (Extended OCR)
- Page_number_confidence
- 98.73
- Ppi
- 300
- Scanner
- Internet Archive Python library 1.9.0
comment
Reviews
There are no reviews yet. Be the first one to
write a review.
370
Views
DOWNLOAD OPTIONS
Temporarily Unavailable
DAISY
For users with print-disabilities
Temporarily Unavailable
EPUB
Uploaded by
Sketch the Cow
on
Zeiss Primo Star Microscope PDF User Guides and Manuals for Free Download: Found (1) Manuals for Zeiss Primo Star Device Model (Operating Manual)
Zeiss Primo Star Operating Manual
Details:
- Manufacturer: Zeiss
- Product Name/ID: Zeiss Primo Star / #791202
- Category: Microscope
- File Path: zeiss/primo-star_791202.pdf
- Last Updated: 17 Apr 2025
- Description: The Zeiss Primo Star manual provides essential instructions for setup, operation, and maintenance, helping you get the most out of your device while avoiding common operational issues.
- Document Type: User Manual
- Pages: 28
Download PDF
Read Online
The Zeiss Primo Star is a sophisticated laboratory microscope that perfectly balances quality, affordability, and user-friendly features. Designed primarily for educational purposes and routine laboratory applications, this microscope has garnered positive reviews for its impressive optics, ergonomic design, and robust construction. As users delve into the world of microscopy, the Primo Star serves as an ideal starter microscope while being capable of more advanced techniques.
One of the standout features of the Zeiss Primo Star is its optical performance. The microscope is equipped with high-quality objectives that provide clear, bright, and detailed images. The optical system utilizes modern infinity-corrected optics, ensuring that images remain sharp even at different magnifications. This is incredibly valuable for students and professionals who rely on precise visuals for their research or studies.
Another crucial aspect of the Primo Star is its ergonomic design, which promotes comfortable extended use. The adjustable height and inclination of the microscope body help minimize strain during long sessions of observation. Moreover, the focus knobs are positioned for easy access, enhancing the overall user experience, particularly in educational settings where prolonged use is common.
The construction quality of the Zeiss Primo Star is noteworthy. Built from durable materials, it is designed to withstand the wear and tear of daily laboratory activities. This robustness makes it a cost-effective investment for institutions, ensuring that the equipment remains reliable over time.
In terms of usability, the Zeiss Primo Star features:
- Intuitive Controls: Easy-to-use controls that facilitate smooth adjustments and allow users to focus more on observation rather than operations.
- Variety of Accessories: A range of optional accessories is available, including camera adapters and specialized illumination systems, expanding the functionality of the base model.
- Multiple Illumination Options: The microscope provides choices between LED and halogen illumination, ensuring adequate lighting for various applications.
When considering the Zeiss Primo Star, users can expect not only excellent performance but also a brand known for its reliability. Zeiss has a long-standing reputation in the optics field, making the Primo Star a trustworthy addition to any laboratory. It reassures users that they are investing in quality engineering backed by years of experience.
Furthermore, the education market highly benefits from the Primo Star. Its affordability allows educational institutions to equip classrooms with quality microscopes without exceeding budget constraints. This accessibility encourages hands-on learning, enabling students to explore the microscopic world in a hands-on manner.
In conclusion, the Zeiss Primo Star embodies the ideal combination of performance, durability, and user-friendly design. Whether it is for microscopy education or routine laboratory diagnostics, it proves to be an invaluable tool. With its impressive optical capabilities, ergonomic features, and robust construction, the Primo Star is recommended for anyone looking to step into the world of microscopy. Its adherence to Zeiss quality makes it a reliable choice for both novice users and seasoned professionals alike.
FAQ: Types of Manuals and Their Contents
Zeizz Primo Star Manuals come in various types, each serving a specific purpose to help users effectively operate and maintain their devices. Here are the common types of Zeizz Primo Star User Guides and the information they typically include:
- User Manuals: Provide comprehensive instructions on how to use the device, including setup, features, and operation. They often include troubleshooting tips, safety information, and maintenance guidelines.
- Service Instructions: Designed for technicians and repair professionals, these manuals offer detailed information on diagnosing and repairing issues with the device. They include schematics, parts lists, and step-by-step repair procedures.
- Installation Guides: Focus on the installation process of the device, providing detailed instructions and diagrams for proper setup. They are essential for ensuring the device is installed correctly and safely.
- Maintenance Manuals: Provide guidance on routine maintenance tasks to keep the device in optimal condition. They cover cleaning procedures, part replacements, and regular servicing tips.
- Quick Start Guides: Offer a concise overview of the essential steps needed to get the device up and running quickly. They are ideal for users who need immediate assistance with basic setup and operation.
Each type of Zeizz Primo Star instruction is designed to address specific needs, ensuring users have the necessary information to use, maintain, and repair their devices effectively.
Related Instructions for Zeizz Primo Star:
1
Primo Star
Operating manual Zeizz Microscope Operating manual (File: zeizz-primo-star-operating-manual-306, 08.10.2024)
306
1099
165
Microscope Devices by Other Brands:
|
Olympus FLUOVIEW FVMPE-RS Service Manual FLUOVIEW FVMPE-RS (Microscope ePDF User Guide, #9T4F25) AX8343 22 Mar 2025 | 28 |
|
|
Olympus BH2-CH Substage Assembly Olympus BH2-CH Substage User Manual (Assembly), @C1R8J4 Complete Teardown, Cleaning/Lubrication, and Reassembly of the Olympus BH2-CH Substage Assembly 17 Feb 2025 | 26 |
|
|
Optika SZN Series Operation Manual #5IUF1O: SZN Series Microscope Operation manual m 09 Apr 2025 | 36 |
|
|
BMS BMS C1 series Operation & User’s Manual BMS BMS C1 series Guide (Operation & user’s manual), @KRT7R1 Biological Microscope 04 Oct 2024 | 20 |
Categories:
Microscope
Zeiss Primo Star Operating manual
- Zeiss
- Microscope
- Operating manual for Zeiss Primo Star
- zeiss-primo-star-operating-manual-28_manual.pdf
- 28 |
Pages Preview:
Document Transcription:
See Details
Download