
TP-LINK TD-8816 — Настройка Megaline
Внешний ADSL маршрутизатор с интерфейсом Ethernet 10/100 Base-T

Если вы забыли свой пароль, или не можете подключиться с теми учетными данными, что у вас есть (Логином / Паролем), вы можете воспользоваться гостевым логином “megaline”. Забейте в поле Username слово “megaline”, в поле Password также “megaline” (все буквы латинские в нижнем регистре, при этом значения VPI / VCI могут быть любыми). Под гостевым пользователем, вы не сможете зайти в интернет, но сможете попасть в личный кабинет и изменить пароль на интернет.
Безопасность
TD-8816
ADSL2+ Modem Router
Rev:2.0.0
1910010536

COPYRIGHT & TRADEMARKS
Specifications are subject to change without notice. is a registered trademark
of TP-LINK TECHNOLOGIES CO., LTD. Other brands and product names are trademarks or
registered trademarks of their respective holders.
No part of the specifications may be reproduced in any form or by any means or used to make any
derivative such as translation, transformation, or adaptation without permission from TP-LINK
TECHNOLOGIES CO., LTD. Copyright © 2011 TP-LINK TECHNOLOGIES CO., LTD. All rights
reserved.
http://www.tp-link.com

FCC STATEMENT
This equipment has been tested and found to comply with the limits for a Class B digital device,
pursuant to part 15 of the FCC Rules. These limits are designed to pro-vide reasonable protection
against harmful interference in a residential installation. This equipment generates, uses and can
radiate radio frequency energy and, if not in-stalled and used in accordance with the instructions,
may cause harmful interference to radio communications. However, there is no guarantee that
interference will not occur in a particular installation. If this equipment does cause harmful
interference to radio or television reception, which can be determined by turning the equipment off
and on, the user is encouraged to try to correct the interference by one or more of the following
measures:
• Reorient or relocate the receiving antenna.
• Increase the separation between the equipment and receiver.
• Connect the equipment into an outlet on a circuit different from that to which the
receiver is connected.
• Consult the dealer or an experienced radio/ TV technician for help.
This device complies with part 15 of the FCC Rules. Operation is subject to the following two
conditions:
1) This device may not cause harmful interference.
2) This device must accept any interference received, including interference that may
cause undesired operation.
Any changes or modifications not expressly approved by the party responsible for compliance
could void the user’s authority to operate the equipment.
CE Mark Warning
This is a class B product. In a domestic environment, this product may cause radio interference, in
which case the user may be required to take adequate measures.

CONTENTS
Package Contents ………………………………………………………………………………………. 1
Chapter 1. Introduction ……………………………………………………………………………. 2
1.1 Product Overview ………………………………………………………………………………………… 2
1.2 Main Features …………………………………………………………………………………………….. 2
1.3 Conventions ……………………………………………………………………………………………….. 3
Chapter 2. Hardware Installation ………………………………………………………………. 4
2.1 The Front Panel ………………………………………………………………………………………….. 4
2.2 The Back Panel …………………………………………………………………………………………… 5
2.3 Installation Environment ……………………………………………………………………………….. 5
2.4 Connecting the Router …………………………………………………………………………………. 5
Chapter 3. Quick Installation Guide ………………………………………………………….. 7
3.1 Configure PC………………………………………………………………………………………………. 7
3.2 Login …………………………………………………………………………………………………………. 9
Chapter 4. Software Configuration………………………………………………………….. 12
4.1 Status ………………………………………………………………………………………………………. 12
4.1.1 Device Info ………………………………………………………………………………………………………12
4.1.2 System Log ……………………………………………………………………………………………………..13
4.1.3 Statistics ………………………………………………………………………………………………………….14
4.2 Quick Start ……………………………………………………………………………………………….. 16
4.3 Interface Setup ………………………………………………………………………………………….. 16
4.3.1 Internet ……………………………………………………………………………………………………………16
4.3.2 LAN…………………………………………………………………………………………………………………21
4.4 Advanced Setup ………………………………………………………………………………………… 25
4.4.1 Firewall ……………………………………………………………………………………………………………25
4.4.2 Routing ……………………………………………………………………………………………………………25
4.4.3 NAT ………………………………………………………………………………………………………………..26
4.4.4 QoS ………………………………………………………………………………………………………………..30
4.4.5 VLAN ………………………………………………………………………………………………………………31
4.4.6 ADSL ………………………………………………………………………………………………………………33
4.5 Access Management………………………………………………………………………………….. 34
4.5.1 ACL…………………………………………………………………………………………………………………34
4.5.2 Filter………………………………………………………………………………………………………………..35
4.5.3 SNMP ……………………………………………………………………………………………………………..42
4.5.4 UPnP ………………………………………………………………………………………………………………42
4.5.5 DDNS ……………………………………………………………………………………………………………..43
4.5.6 CWMP …………………………………………………………………………………………………………….44

4.6 Maintenance……………………………………………………………………………………………… 44
4.6.1 Administration………………………………………………………………………………………………….. 45
4.6.2 Time Zone ………………………………………………………………………………………………………. 45
4.6.3 Firmware………………………………………………………………………………………………………….47
4.6.4 SysRestart……………………………………………………………………………………………………….49
4.6.5 Diagnostics………………………………………………………………………………………………………49
4.7 Help …………………………………………………………………………………………………………. 50
Appendix A: Specifications……………………………………………………………………….. 51
Appendix B: Troubleshooting……………………………………………………………………. 52
Appendix C: Technical Support…………………………………………………………………. 62

TD-8816 ADSL2+ Modem Router User Guide
Package Contents
The following items should be found in your package:
¾ One TD-8816 ADSL2+ Modem Router
¾ One Power Adapter for TD-8816 ADSL2+ Modem Router
¾ Quick Installation Guide
¾ One RJ45 cable
¾ Two RJ11 cables
¾ One ADSL splitter
¾ One Resource CD , including:
z This User Guide
z Other Helpful Information
Note:
)
Make sure that the package contains the above items. If any of the listed items are damaged or
missing, please contact your distributor.
1

TD-8816 ADSL2+ Modem Router User Guide
Chapter 1. Introduction
Thank you for choosing the TD-8816 ADSL2+ Modem Router .
1.1 Product Overview
The device is designed to provide a simple and cost-effective ADSL Internet connection for a
private Ethernet network.
The Router is easy to use. The TD-8816 connects to an Ethernet LAN or computers via standard
Ethernet ports. The ADSL connection is made using ordinary telephone line with standard
connectors. Multiple workstations can be networked and connected to the Internet using a single
Wide Area Network (WAN) interface and single global IP address. The advanced security
enhancements, IP/MAC Filter, Application Filter and URL Filter can help to protect your
network from potentially devastating intrusions by malicious agents from the outside of your
network.
The Router is easy to install and manage. Quick Start of the Web-based Utility is supplied and
friendly help messages are provided for the configuration. Network and Router management is
done through the Web-based Utility which can be accessed through local Ethernet using any web
browser.
ADSL
The TD-8816 supports full-rate ADSL2+ connectivity conforming to the ITU and ANSI
specifications. In addition to the basic DMT physical layer functions, the ADSL2+ PHY supports
dual latency ADSL2+ framing (fast and interleaved) and the I.432 ATM Physical Layer.
1.2 Main Features
¾ 1 10/100M RJ-45 LAN ports (Auto MDI/MDIX), 1 RJ11 port
¾ Downstream data rates up to 24Mbps, upstream data rates up to 3.5Mbps(With Annex M
enabled).
¾ Supports long transfers, the max line length can reach to 6.5Km.
¾ Supports remote configuration and management through SNMP
¾ Supports PPPoE, it allows connecting the internet on demand and disconnecting from the
Internet when idle.
and CWMP.
¾ Quick response semi-conductive surge protection circuit, provides reliable ESD and
surge-protect function.
¾ High speed and asymmetrical data transmit mode, provides safe and exclusive bandwidth.
¾ Supports All ADSL industrial standards.
¾ Compatible with all mainstream DSLAM (CO).
¾ Provides integrated access of internet and route function which face to SOHO user.
2

¾ Real-time Configuration and device monitoring.
¾ Supports Multiple PVC (Permanent Virtual Circuit).
¾ Built-in DHCP server.
¾ Built-in firewall, supports IP/MAC filter, Application filter and URL filter.
¾ Supports Virtual Server, DMZ host and IP Address Mapping.
¾ Supports Dynamic DNS, UPnP and Static Routing.
¾ Supports system log and flow Statistics.
¾ Supports firmware upgrade and Web management.
TD-8816 ADSL2+ Modem Router User Guide
1.3 Conventions
The Router or device mentioned in this User Guide stands for TD-8816 without any explanations.
Parameters provided in the pictures are just references for setting up the product, which may
differ from the actual situation.
3
TD-8816 ADSL2+ Modem Router User Guide
Chapter 2. Hardware Installation
2.1 The Front Panel
Figure 2-1
The LEDs locate on the front panel, which indicate the device’s working status. For details, please
refer to LED Explanation.
LED Explanation:
Name Status Indication
On The modem router is powered on.
Power
Off
On There is a device connected to this LAN port.
The modem router is off. Please ensure that the power
adapter is connected correctly.
LAN
ADSL
Internet
Note:
)
1. If the ADSL LED is off, please check your Internet connection first. Refer to 2.4 Connecting
the Router for more information about how to make Internet connection correctly. If you have
already made a right connection, please contact your ISP to make sure if your Internet service
is available now.
2. If the Internet LED is off, please check your ADSL LED first. If your ADSL LED is also off,
please refer to Note 1. If your ADSL LED is GREEN ON, please check your Internet
configuration. You may need to check this part of information with your ISP and make sure
everything have been input correctly. Refer to 4.1.1 Device Info
information.
Flash
Off There is no device connected to this LAN port.
On ADSL line is synchronized and ready to use.
Flash The ADSL negotiation is in progress.
Off
On
Flash
Off
The modem router is sending or receiving data over this
LAN port.
ADSL synchronization fails. Please refer to Note 1 for
troubleshooting.
The network is available with a successful Internet
connection.
There is data being transmitted or received via the
Internet.
There is no successful Internet connection or the modem
router is operating in Bridge mode. Please refer to Note 2
for troubleshooting.
and 4.3.1 Internet for more
4
TD-8816 ADSL2+ Modem Router User Guide
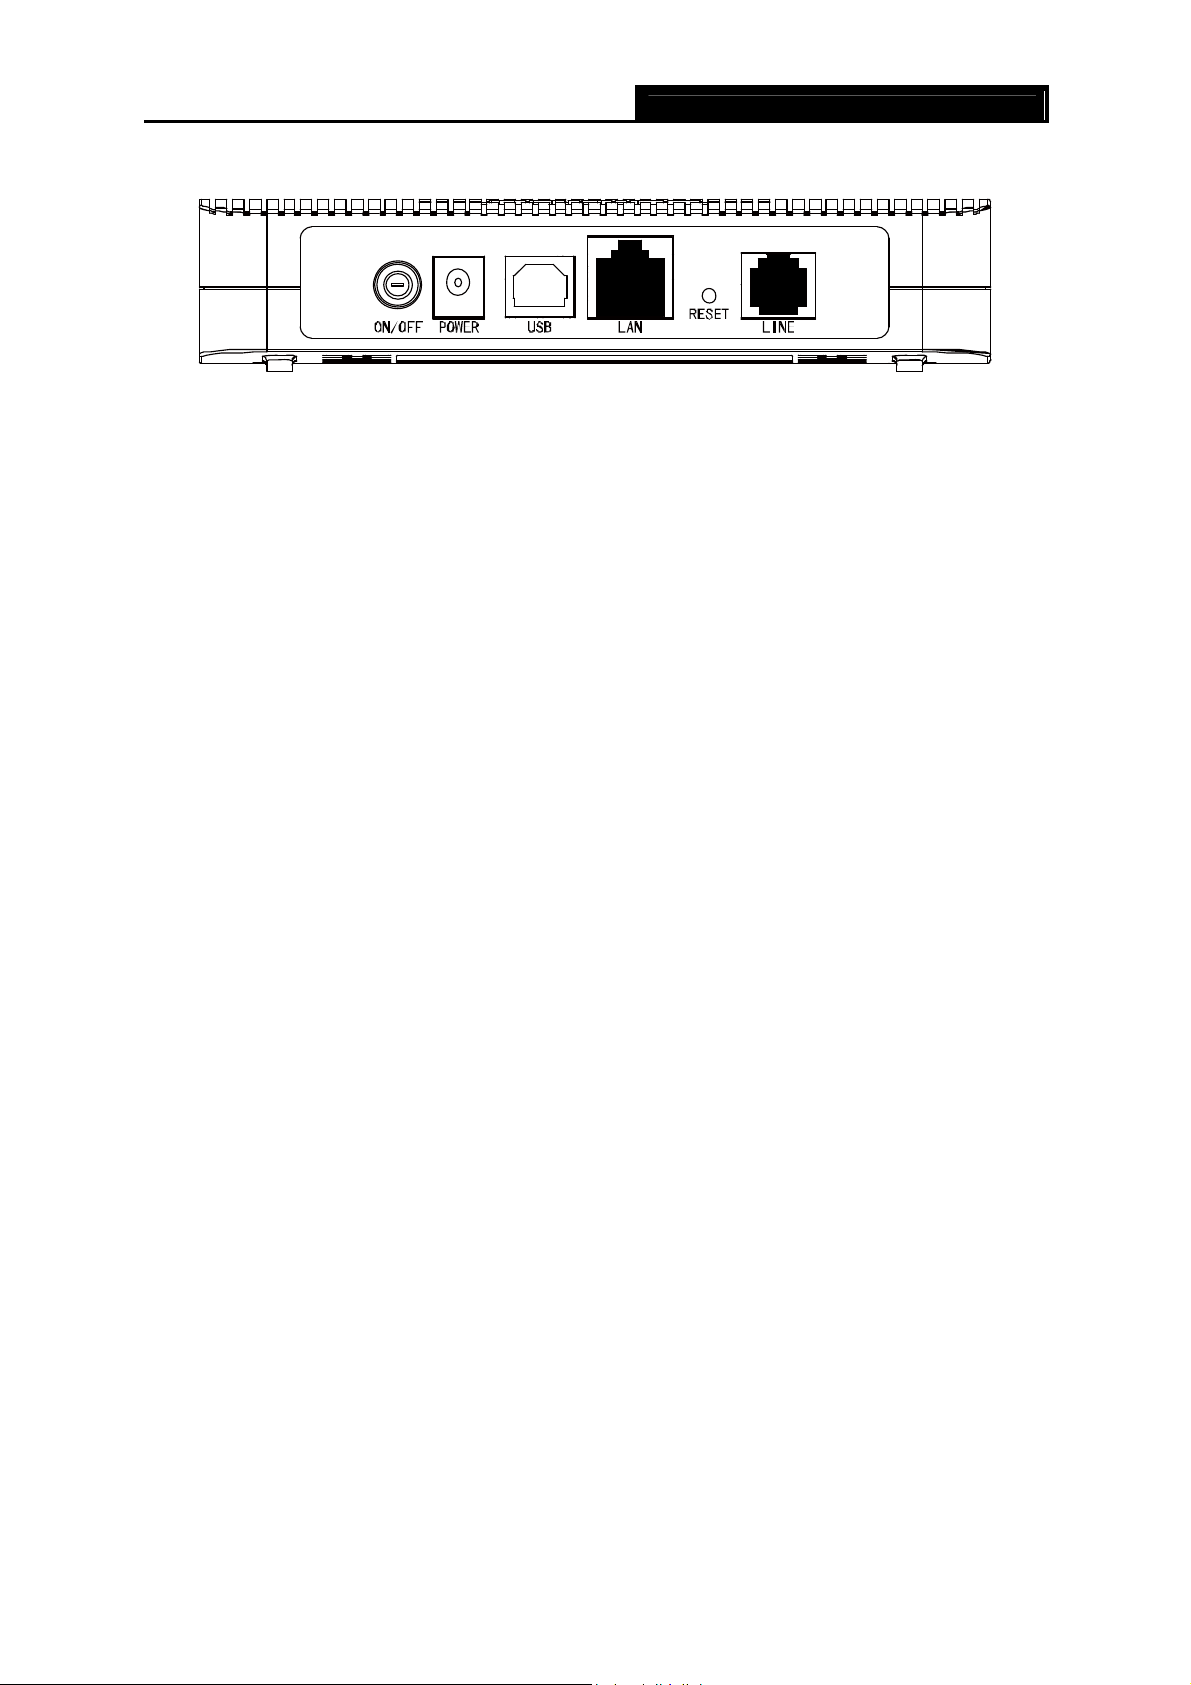
2.2 The Back Panel
Figure 2-2
¾ ON/OFF: The switch for the power.
¾ POWER: The Power plug is where you will connect the power adapter.
¾ LAN: Through the port, you can connect the Router to your PC or the other Ethernet network
devices.
¾ RESET: There are two ways to reset the Router’s factory defaults.
Method one: With the Router powered on, use a pin to press and hold the Reset button
(about 5 seconds) until the SYS LED becomes quick-flash from slow-flash. And then release
the button and wait the router to reboot to its factory default settings.
Method two:Restore the default setting from “Maintenance-SysRestart” of the Router’s
Web-based Utility.
¾ LINE: Through the port, you can connect the Router with the telephone.
2.3 Installation Environment
¾ The Product should not be located where it will be exposed to moisture or excessive heat.
¾ Place the Router in a location where it can be connected to the various devices as well as to
a power source.
¾ Make sure the cables and power cord are placed safely out of the way so they do not create a
tripping hazard.
¾ The Router can be placed on a shelf or desktop.
2.4 Connecting the Router
Before installing the device, please make sure your broadband service provided by your ISP is
available. If there is any problem, please contact your ISP. You need to connect the device to the
phone jack, the power outlet, and your computer or network. Before cable connection, cut off the
power supply and keep your hands dry. You can follow the steps below to install it.
Step 1: Connect the ADSL Line.
Method one: Plug one end of the twisted-pair ADSL cable into the ADSL LINE port on
the rear panel of TD-8816, and insert the other end into the wall socket.
Method two:You can use a separate splitter. External splitter can divide the data and
voice, and then you can access the Internet and make calls at the same time. The
external splitter has three ports:
• LINE: Connect to the wall jack
5
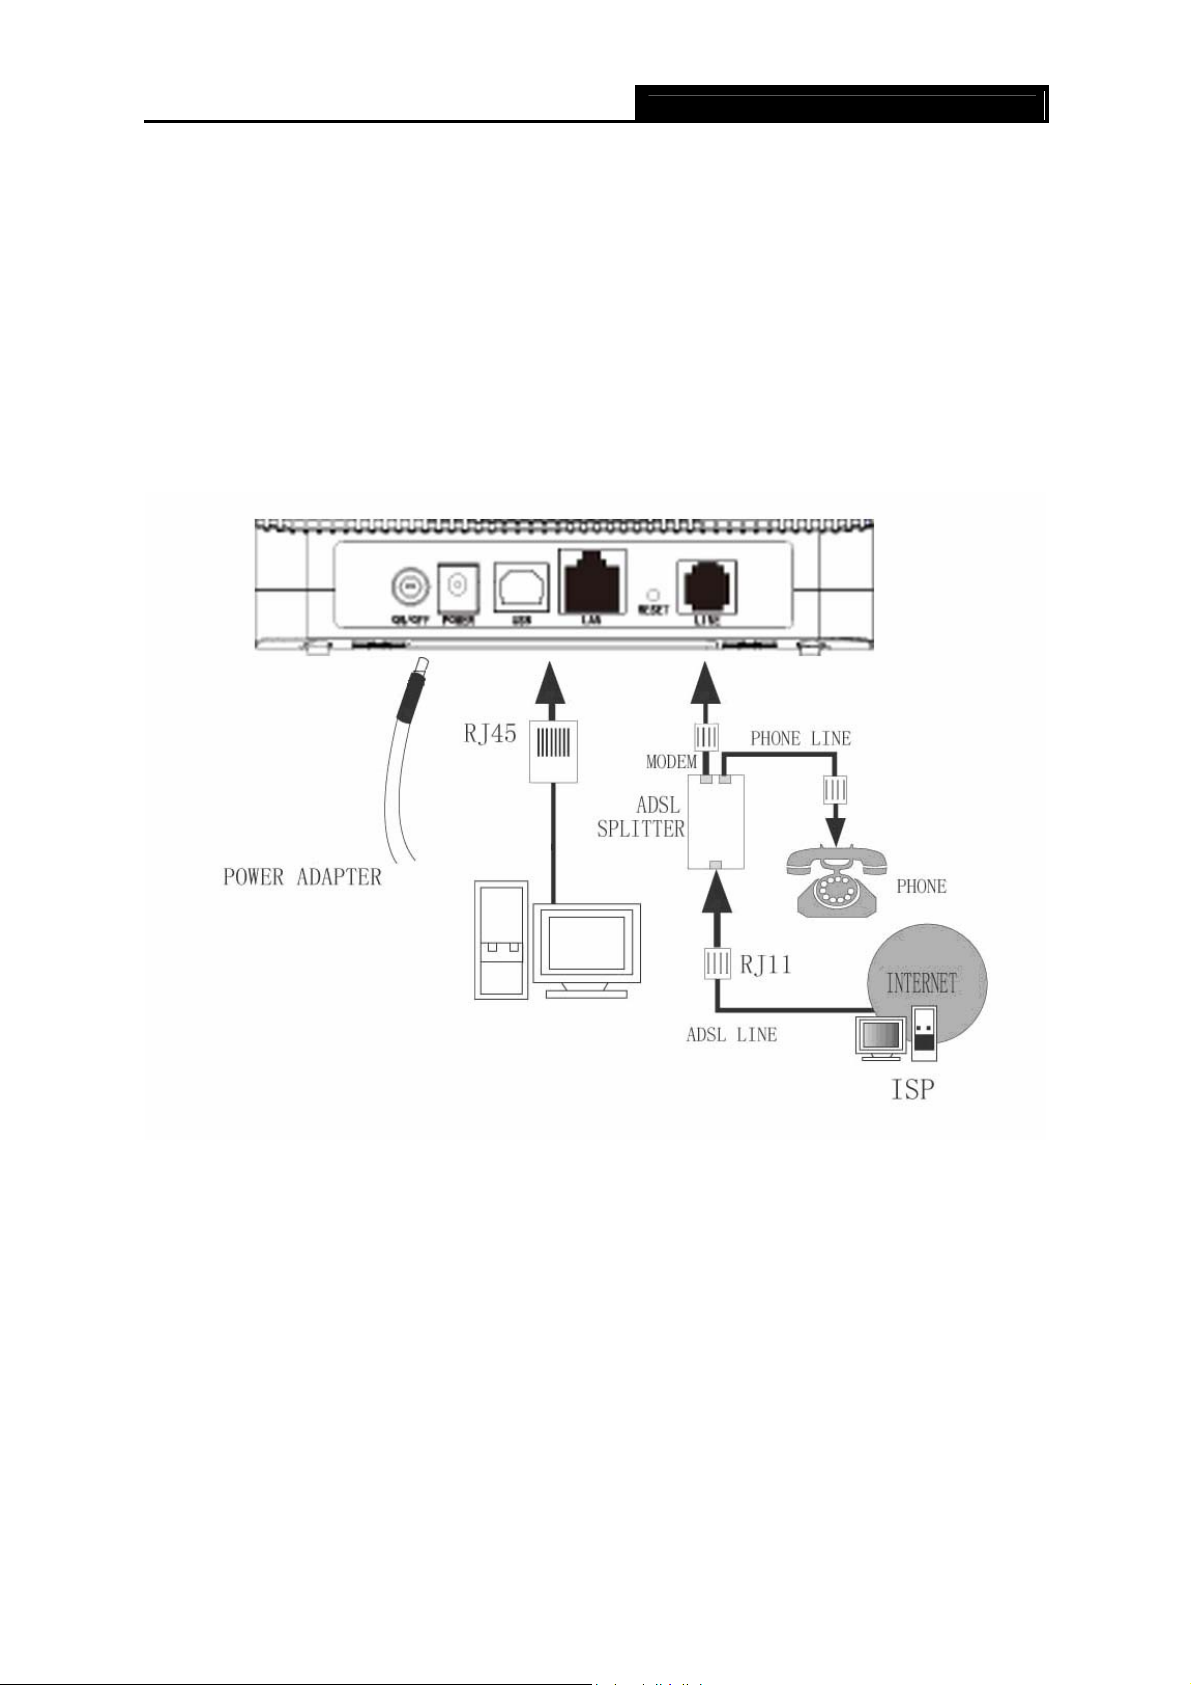
• PHONE: Connect to the phone sets
• MODEM: Connect to the ADSL LINE port of TD-8816
Plug one end of the twisted-pair ADSL cable into the ADSL LINE port on the rear panel
of TD-8816. Connect the other end to the MODEM port of the external splitter.
Step 2: Connect the Ethernet cable. Attach one end of a network cable to your computer’s
Ethernet port or a regular hub/switch port, and the other end to the LAN port on the
TD-8816.
Step 3: Attach the power adapter. Connect the power adapter to the POWER connector on the
rear of the device and plug in the adapter to a wall outlet or power extension.
Step 4: Turn on the TD-8816 and power on the computers and LAN devices.
TD-8816 ADSL2+ Modem Router User Guide
Figure 2-3
6
TD-8816 ADSL2+ Modem Router User Guide
Chapter 3. Quick Installation Guide
3.1 Configure PC
After you directly connect your PC to the TD-8816 or connect your adapter to a Hub/Switch which
has connected to the Router, you need to configure your PC’s IP address. Follow the steps below
to configure it.
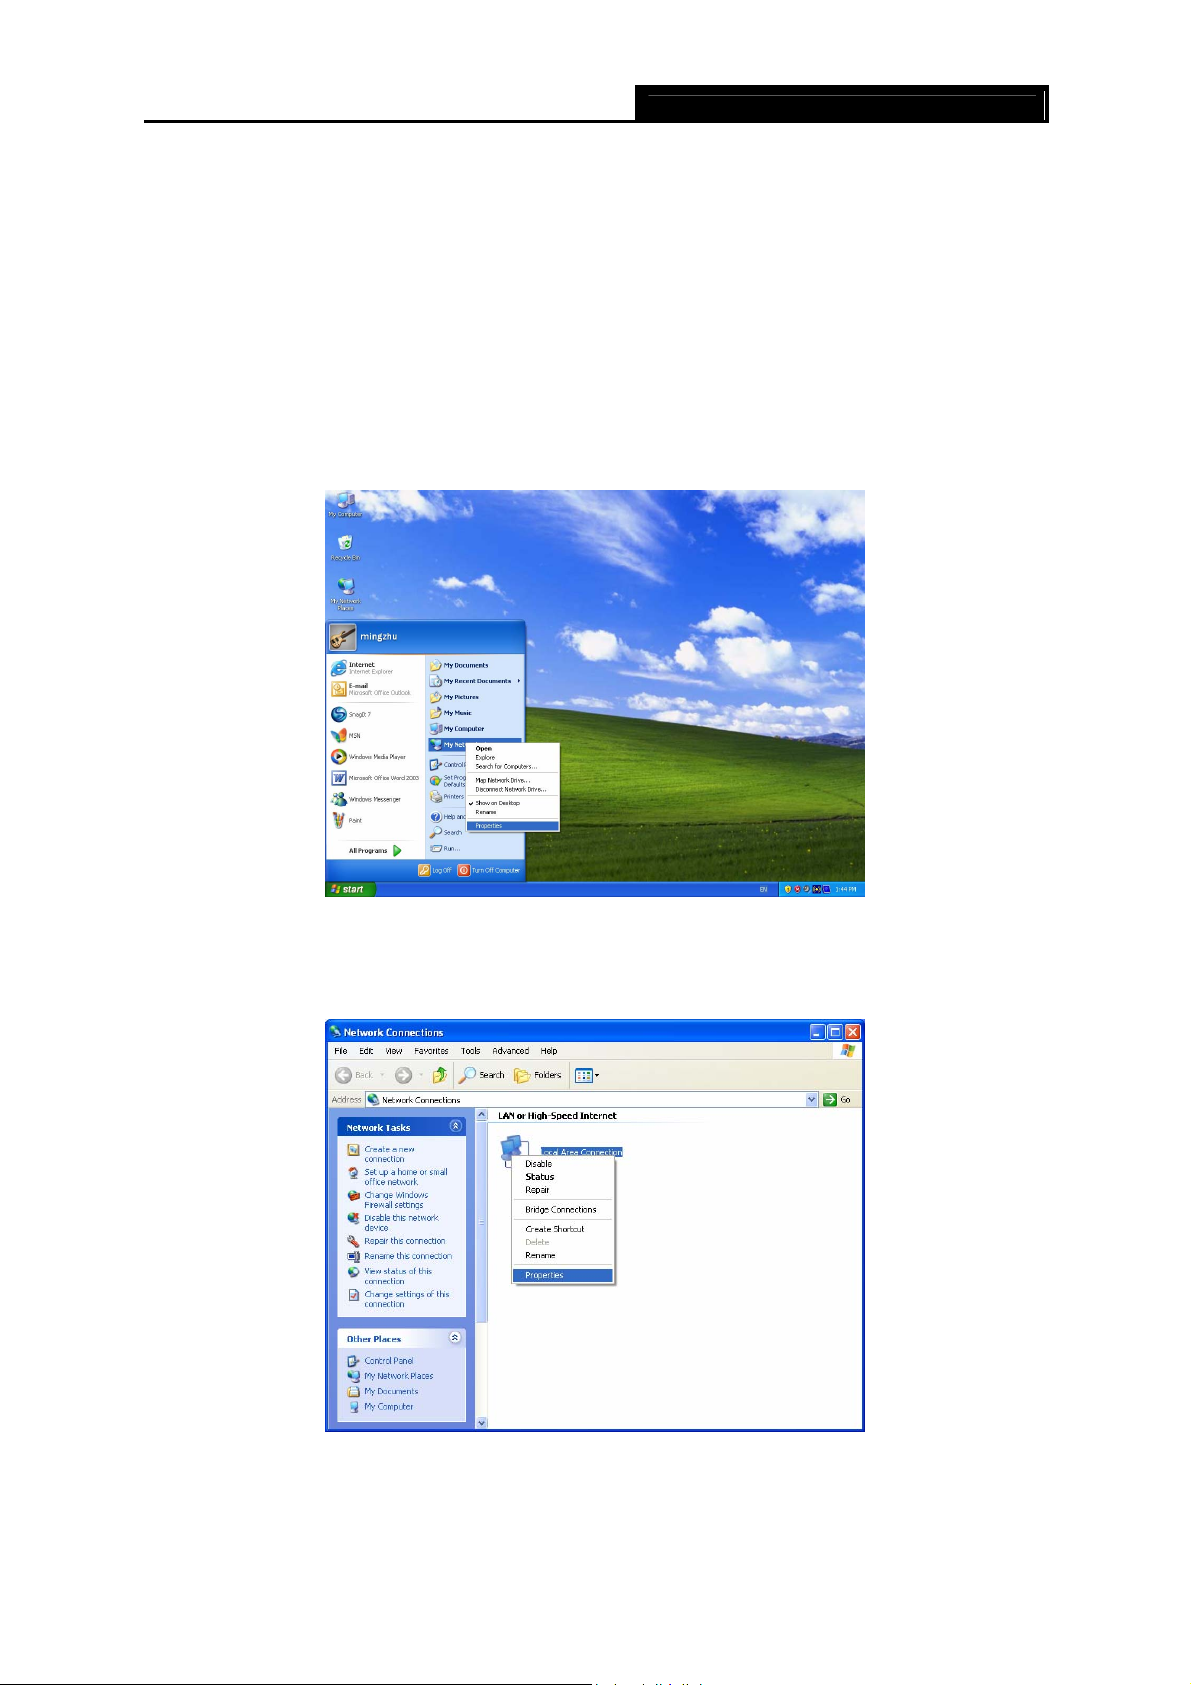
Step 1: Click the Start menu on your desktop, right click My Network Places, and then select
Properties (shown in Figure 3-1).
Figure 3-1
Step 2: Right click Local Area Connection (LAN), and then select Properties.
Figure 3-2
Step 3: Select General tab, highlight Internet Protocol (TCP/IP), and then click the Properties
button.
7
TD-8816 ADSL2+ Modem Router User Guide
Figure 3-3
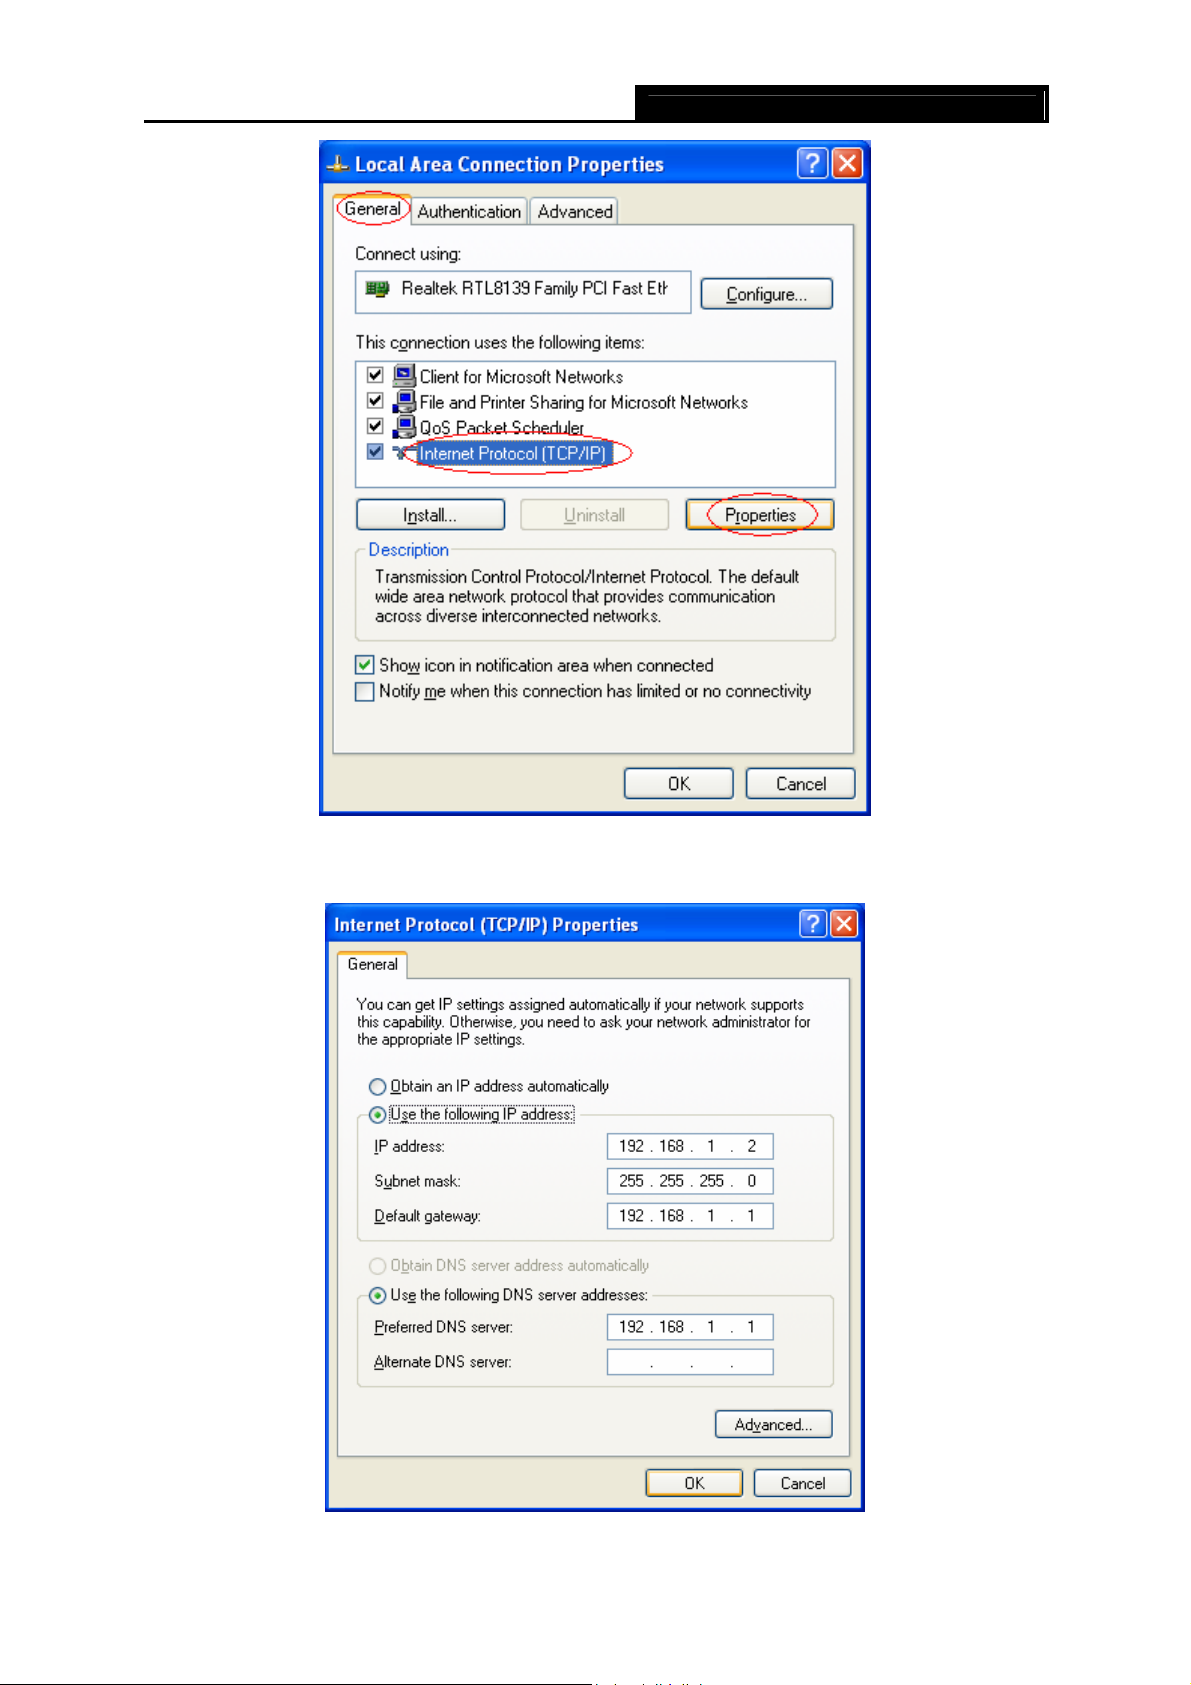
Step 4: Configure the IP address as Figure 3-4 shows. After that, click OK.
Figure 3-4
8

Note:
)
You can configure the PC to get an IP address automatically, select “Obtain an IP address
automatically” and “Obtain DNS server address automatically” in the screen above.
Now, you can run the Ping command in the command prompt to verify the network connection.
Please click the Start menu on your desktop, select run tab, type cmd in the field, and then type
ping 192.168.1.1 on the next screen, and then press Enter.
If the result displayed is similar to the screen below, the connection between your PC and the
Router has been established.
TD-8816 ADSL2+ Modem Router User Guide
Figure 3-5
If the result displayed is similar to the screen shown below, it means that your PC has not
connected to the Router.
Figure 3-6
You can check it follow the steps below:
1) Is the connection between your PC and the Router correct?
The LEDs of LAN port which you link to the device and the LEDs on your PC’s adapter should
be lit.
2) Is the TCP/IP configuration for your PC correct?
If the Router’s IP address is 192.168.1.1, your PC’s IP address must be within the range of
192.168.1.2 ~ 192.168.1.254.
3.2 Login
Once your host PC is properly configured, please proceed as follows to use the Web-based Utility:
Start your web browser and type the private IP address of the Router in the URL field: 192.168.1.1.
9

After that, you will see the screen shown below, enter the default User Name admin and the
default Password admin, and then click OK to access to the Quick Start screen. You can follow
the steps below to complete the Quick Setup.
TD-8816 ADSL2+ Modem Router User Guide
Figure 3-7
Step 1: Select the Quick Start tab, then click RUN WIZARD, and you will see the next screen.
Click the NEXT button.
Figure 3-8
Step 2: Configure the time for the Router, and then click the NEXT button.
Figure 3-9
10
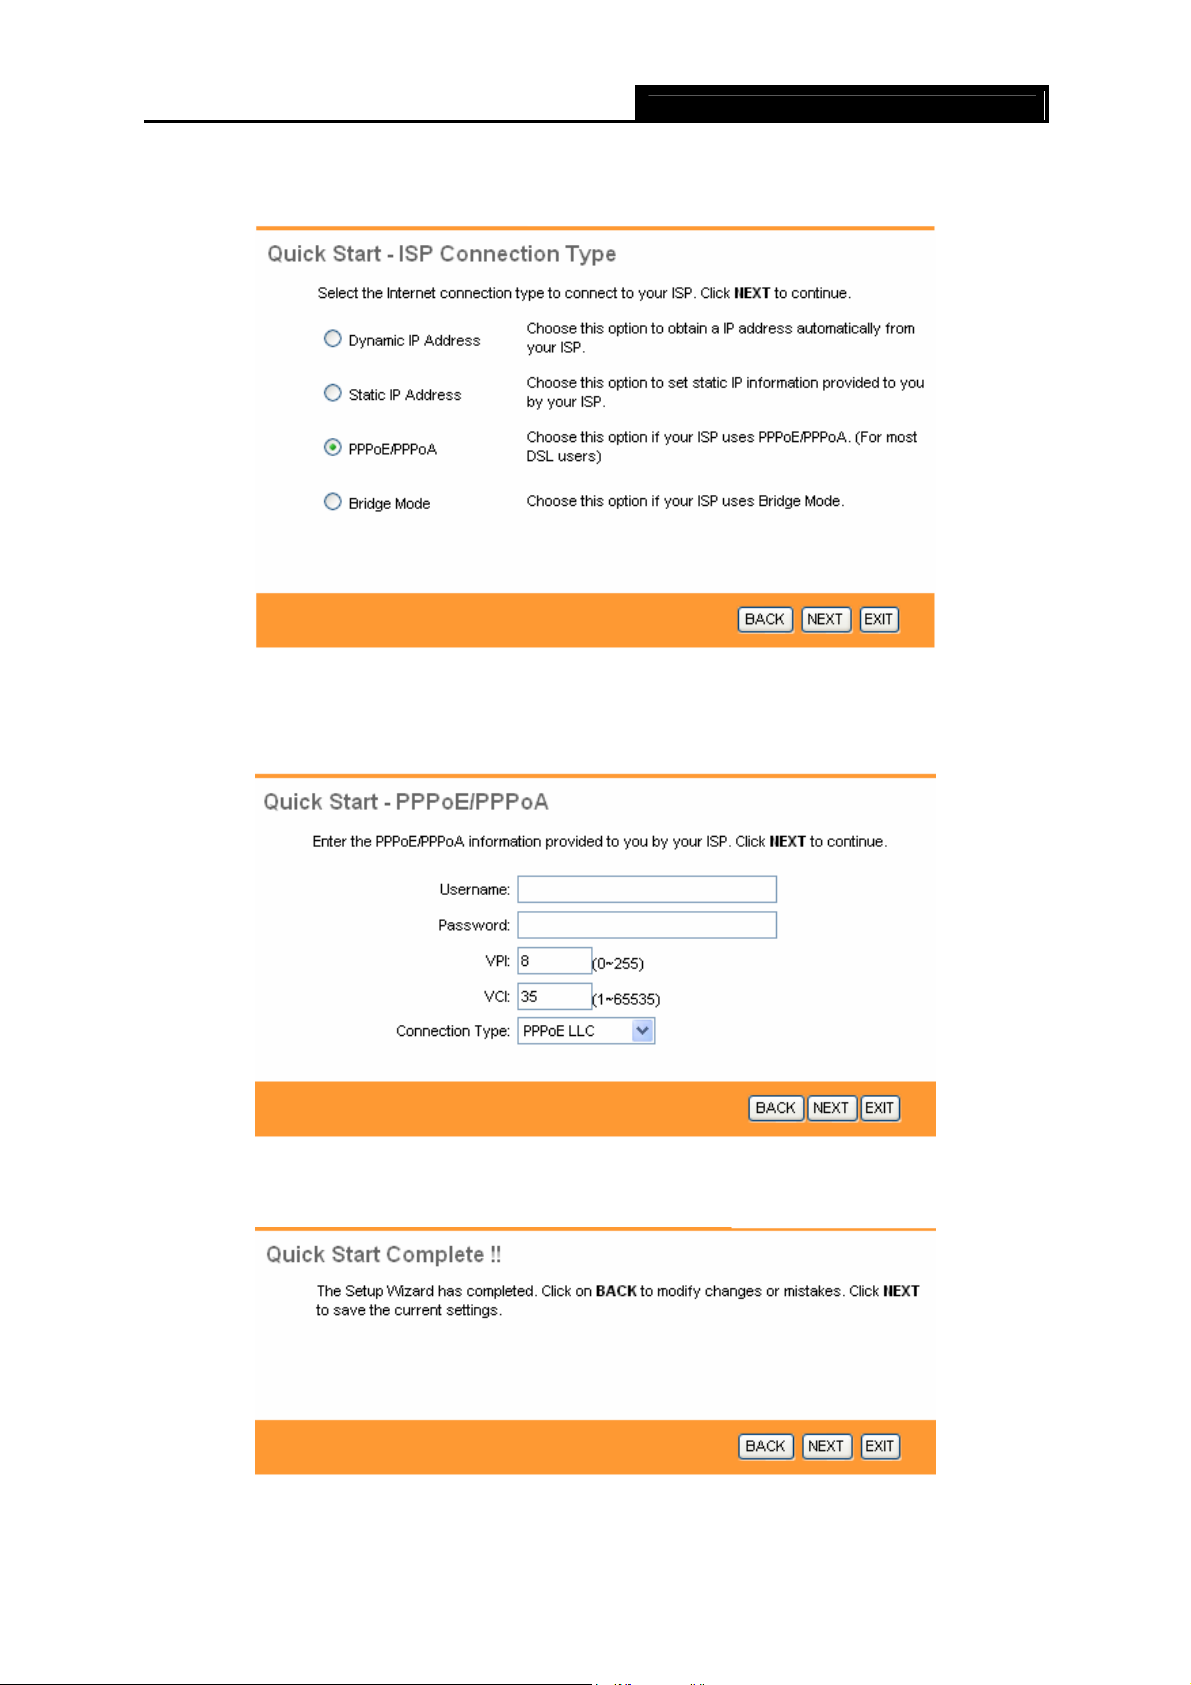
Step 3: Select the connection type to connect to the ISP (We select PPPoE/PPPoA mode for
example here), and then click the NEXT button.
Step 4: Configure the following options provided by your ISP: Username, Password, VPI, VCI
TD-8816 ADSL2+ Modem Router User Guide
Figure 3-10
and Connection Type. Then click NEXT.
Step 5: Click NEXT to finish the Quick Start.
Figure 3-11
Figure 3-12
11
TD-8816 ADSL2+ Modem Router User Guide
Chapter 4. Software Configuration
This User Guide recommends using the “Quick Installation Guide” for first-time installation. For
advanced users, if you want to know more about this device and make use of its functions
adequately, maybe you will get help from this chapter to configure the advanced settings through
the Web-based Utility.
After your successful login, you can configure and manage the device. There are main menus on
the top of the Web-based Utility, submenus will be available after you click one of the main menus.
On the center of the Web-based Utility, there are the detailed configurations or status information.
To apply any settings you have altered on the page, please click the SAVE button.
4.1 Status
Choose “Status”, you can see the next submenus: Device Info, System Log and Statistics.
Click any of them, and you will be able to configure the corresponding function.
Figure 4-1
4.1.1 Device Info
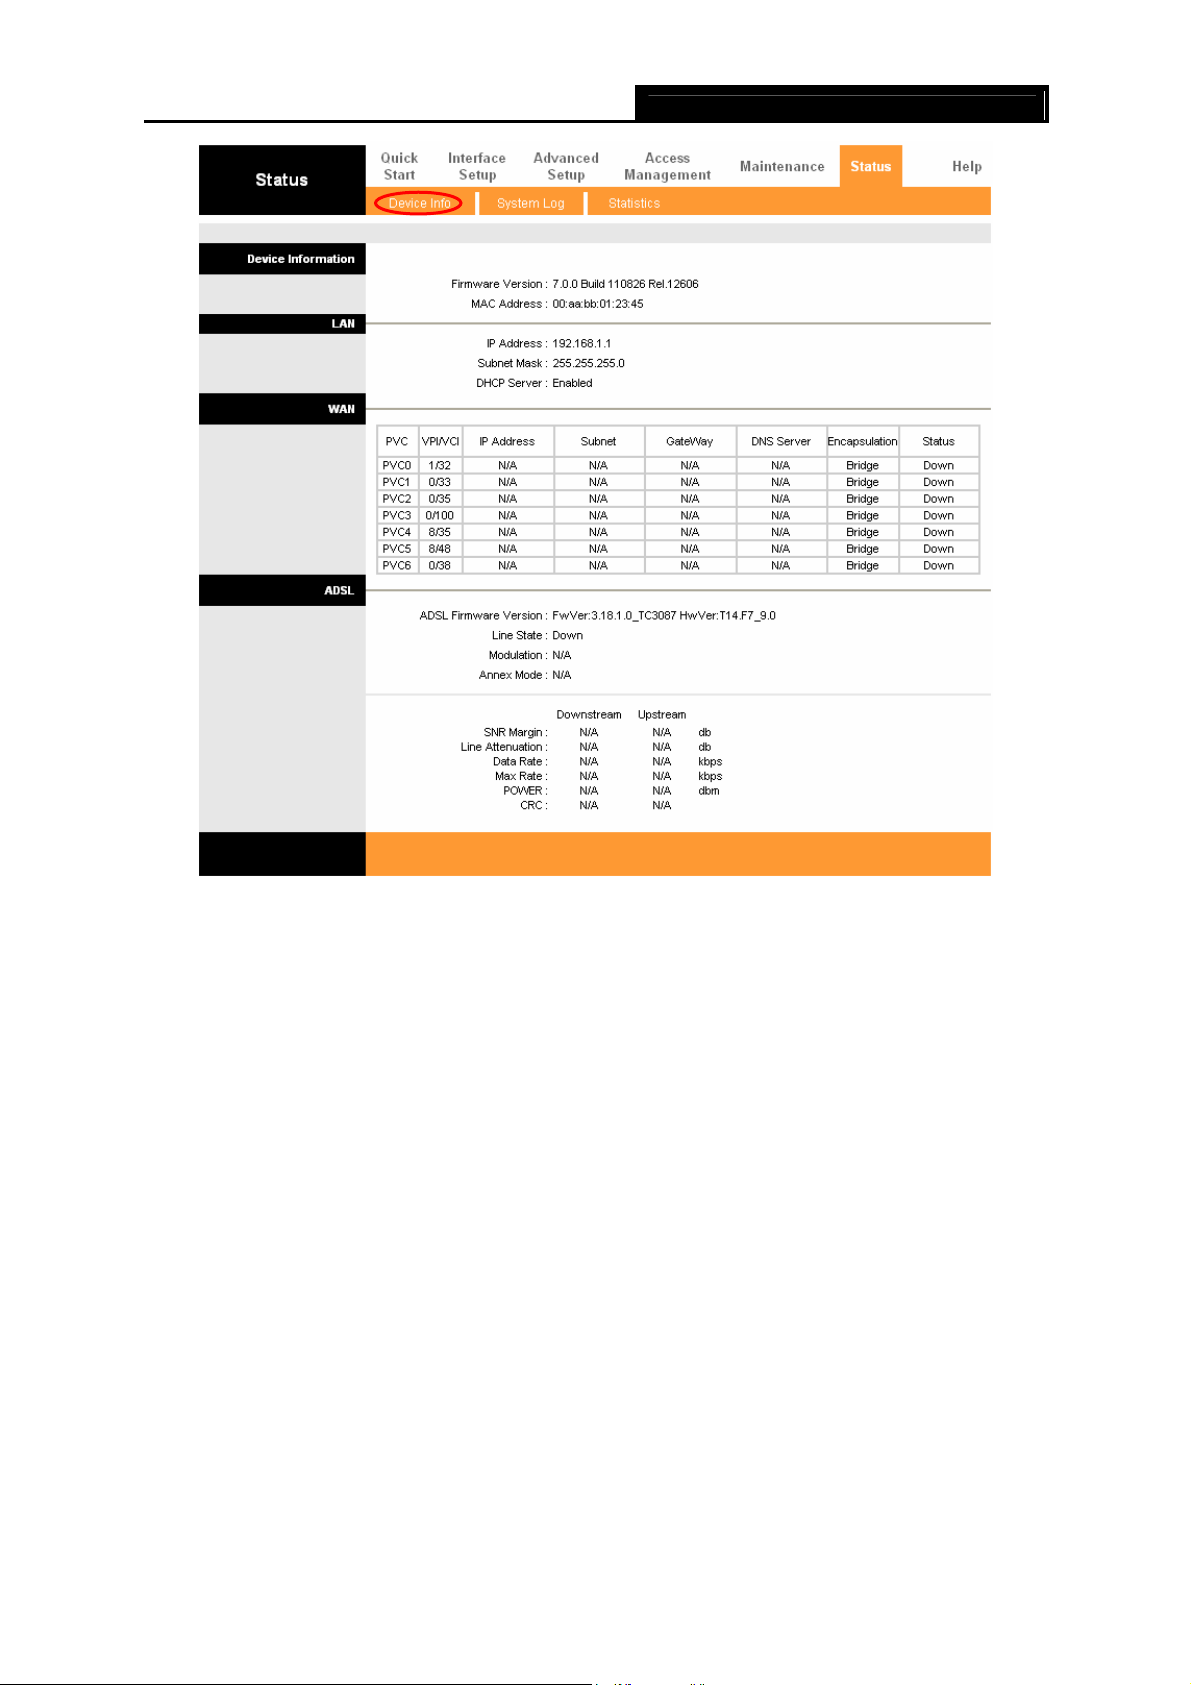
Choose “Status→Device Info” menu, and you will be able to view the device information,
including LAN, WAN and ADSL. The information will vary depending on the settings of the Router
configured on the Interface Setup screen.
12
TD-8816 ADSL2+ Modem Router User Guide
Figure 4-2
4.1.2 System Log
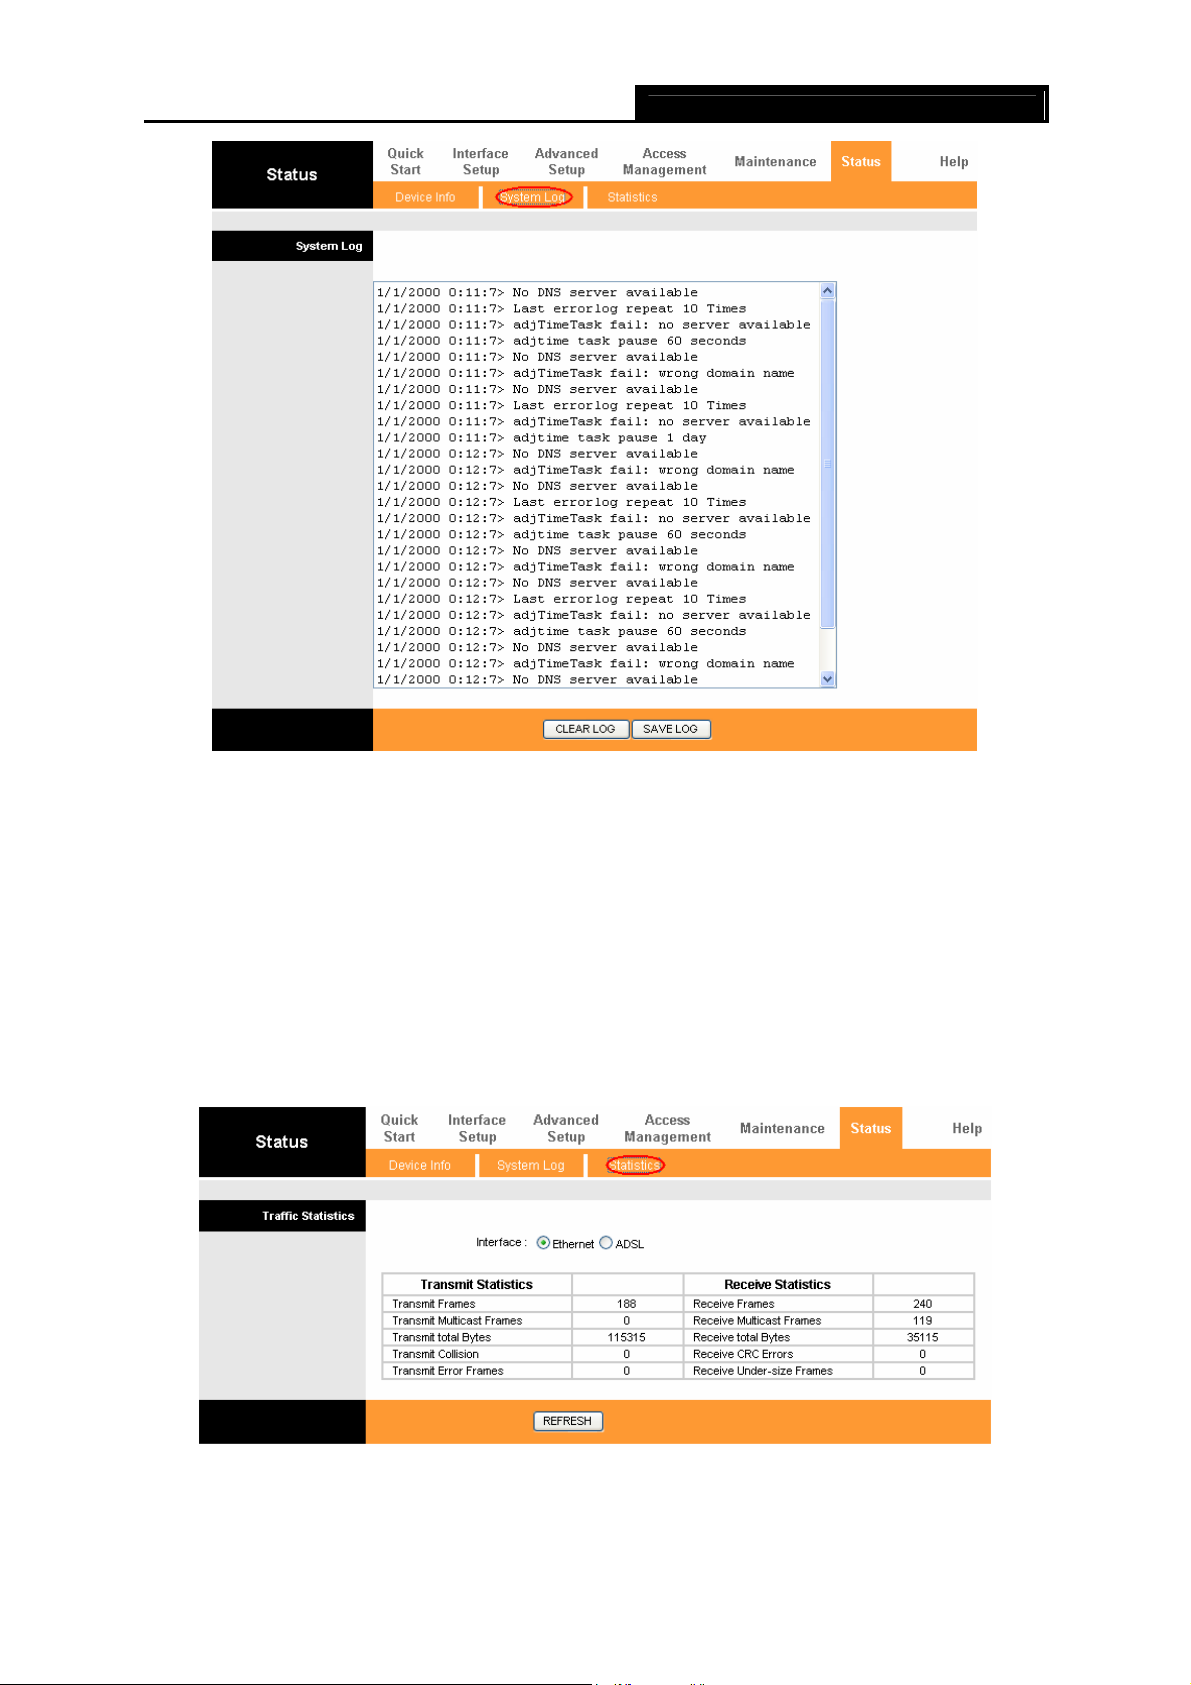
Choose “Status→System Log” menu, and you will be able to query the logs of the Router.
13
TD-8816 ADSL2+ Modem Router User Guide
Figure 4-3
The Router can keep logs of all traffic. You can query the logs to find what happened to the
Router.
Click the CLEAR LOG button to clear the logs.
Click the SAVE LOG button to save the logs.
4.1.3 Statistics
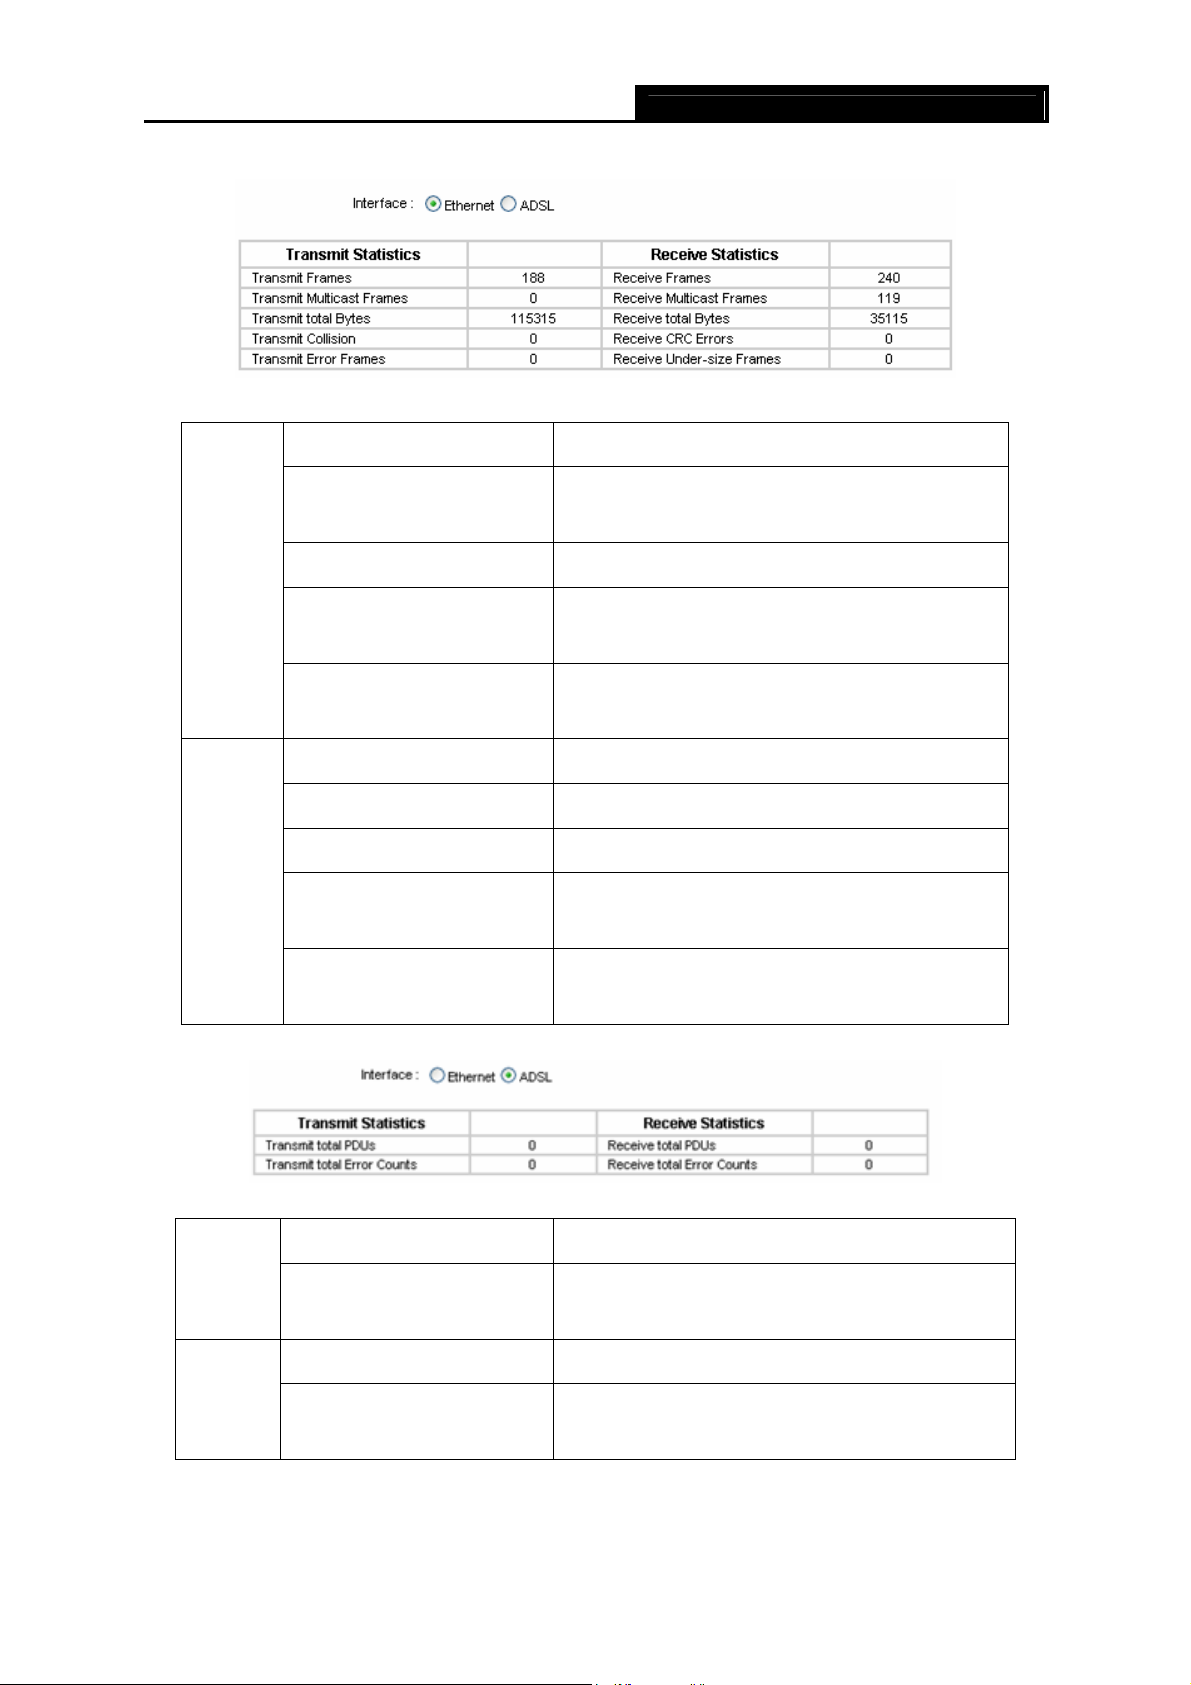
Choose “Status→Statistics” menu, and you will be able to view the network traffic over Ethernet,
and ADSL.
Figure 4-4
¾ Interface: You can select Ethernet and ADSL to view the corresponding network traffic over
different ports.
14
TD-8816 ADSL2+ Modem Router User Guide
¾ Select Ethernet, and you will see the statistics table as below.
Statistics Table:
Transmit
Statistics
Receive
Statistics
Transmit Frames
Transmit Multicast Frames
Transmit total Bytes
Transmit Collision
Transmit Error Frames
Receive Frames
Receive Multicast Frames
Receive total Bytes
Receive CRC Errors
Receive Under-size Frames
The frames transmitted over the Ethernet port.
The multicast frames transmitted over the Ethernet
port.
The total bytes transmitted over the Ethernet port.
The collision occurred over the Ethernet port when
data is being transmitted.
The error frames over the Ethernet port when data is
being transmitted.
The frames received over the Ethernet port.
The multicast frames received over the Ethernet port.
The total bytes received over the Ethernet port.
The CRC errors occurred over the Ethernet port when
data is being received.
The Under-size frames received over the Ethernet
port.
¾ Select ADSL, and you will see the statistics table as below.
Statistics Table:
The total PDUs transmitted over the ADSL port.
The total errors occurred over the ADSL port when data
is being transmitted.
The total PDUs transmitted over the ADSL port.
The total errors occurred over the ADSL port when data
is being received.
Transmit
Statistics
Receive
Statistics
Transmit total PDUs
Transmit total Error Counts
Receive total PDUs
Receive total Error Counts
15

TD-8816 ADSL2+ Modem Router User Guide
4.2 Quick Start
Please refer to » 3.2: Login».
4.3 Interface Setup
Choose “Interface Setup”, you can see the next submenus: Internet and LAN.
Figure 4-5
Click any of them, and you will be able to configure the corresponding function.
4.3.1 Internet
Choose “Interface Setup→Internet” menu, you can configure the parameters for WAN ports in
the next screen (shown in Figure 4-6).
16
Loading…
Инструкция по настройке модема
TP-Link TD-8816
Общая информация
Маршрутизатор со встроенным модемом ADSL2+ TD-8816 представляет собой высокопроизводительный маршрутизатор с модемом,
который поддерживает надежное подключение по полноскоростному стандарту ADSL2+. Это недорогое сетевое решение для дома и
малого бизнеса. Устройство 2-в-1 сочетает в себе функции высокоскоростного модема DSL, маршрутизатора NAT с 1 портом 10/100
Мбит/с. С помощью маршрутизатора TD-8816 вы сможете легко создать защищенную проводную сеть и совместно использовать принтер,
обмениваться файлами, музыкой, фотографиями между различными компьютерами в сети.
Внешний вид
Рис №1
Рис №2
Назначение портов (рис.№2):
1 – кнопка включения/выключения модема (рис. №2-1)
2 – гнездо подключения питания 220В (рис. №2-4)
3 – порт LAN для подключения ПК через проводное соединение (рис. №2-3)
4 – кнопка Reset для сброса сделанных настроек и возвращения к заводским настройкам (рис. №2-4)
5 – порт Line для подключения кабеля от сплиттера (рис. №2-5)
Подключение
1) Подключение сплиттера (Splitter):
-
Телефонный кабель от ГПС «Углетелеком», который заведен в Вашу квартиру, подключите к cплиттеру в гнездо, отмеченное как «Line» (на рисунке №3 обозначено 1). Сплиттер разделяет частоты голосового сигнала (0,3 – 3,4 КГц) от частот, используемых ADSL-модемом (26 КГц – 1,4 МГц). Это исключает взаимное влияние модема и телефонного аппарата (факса).
-
Далее к гнезду, отмеченному как ADSL (на рисунке №3 обозначено 2) подключите модем TP-Link TD-8816. Кабель для этого подключения идет в комплекте с модемом.
-
Далее к гнезду, отмеченному как Phone (на рисунке №3 обозначено 3) подключите телефонный кабель, идущий к Вашему телефонному аппарату.
Рис №3
2) Подключение модема:
-
В гнездо подключения питания подключите адаптер и включите его в розетку 220В.
-
В порт WAN подключите кабель Ehternet от сплиттера.
-
Для подключения ПК на модеме имеется один порт. Подключите ПК к этому порту.
3) Настройки модема TP-Link TD-8816:
-
Извлеките из упаковки модем, подключите питание, подключите к сплиттеру и ПК как указано в пункте 1.
-
Для настройки модема откройте окно браузера, установленного на Вашем ПК (MS Explorer, Opera, другие).
-
В адресной строке введите IP-адрес модема 192.168.1.1 (рис. №4):
Рис №4
-
Вам будет предложено ввести логин и пароль для входа в настройки модема. Они заложены заводом-изготовителем и указаны на обратной
стороне модема:Пользователь: admin;
Пароль: admin;
Введите их в соответствующие строки и кликните Ок (рис. №5,6):
-
Вам открывается основная страница меню настроек (рис. №7) для
осуществления настроек модема кликните Quick Start:Рис №7
-
В открывшемся меню выберите Run wizard (рис. №8):
Рис №8
-
Для выполнения пошаговых настроек модема кликните NEXT (рис. №9):
Рис №9
-
Первый шаг настроек – Вам предлагается выбрать часовой пояс. Вам нужно кликнуть на стрелку справа от окна выбора, выпадет список
часовых поясов, выберите GMT+03.00 и кликните Next (рис.№10)Рис №10
-
Теперь Вам нужно выбрать тип авторизации на сервере Углетелеком,
кликните на
PPPoE / PPPoA и затем Next (рис. №11):Рис №11
-
В открывшемся окне Вам нужно указать (рис. №12):
- User Name: вписать то имя пользователя, которое Вам выдали при
заключении договора; - Password: вписать пароль для авторизации на сервере PPPoE, который
Вам так же выдали при заключении договора; - !Если Вы не знаете или забыли имя пользователя и пароль, Вы можете
позвонить в службу техподдержки по номерам (062) 381-00-00, (062) 385-00-55,
(071) 334-39-71, (095) 053-28-23 , назвать
свой номер договора, и оператор Вам подскажет эти параметры; - Параметр VPI: 35;
- Параметр VСI: 0;
- Параметр Connection Type оставьте без изменений, т.е. «PPPoE LLC»;
- По завершению – нажмите Next.
Рис №12
- User Name: вписать то имя пользователя, которое Вам выдали при
-
Для применения настроек необходимо кликнуть Next (рис. №13):
Рис №13
-
Для завершения настроек необходимо кликнуть Close (рис. №14):
Рис №14
-
Страница 1
TD-8816 ADSL2+ Modem Router Rev:3.1.0 1910010870[…]
-
Страница 2
COPYRIGHT & TRADEMARKS Specifications are subjec t to change without notice. is a registered trademark of TP-LINK TECHNOLOGIES CO., LTD. Other br ands and product names are trademarks or registered trademarks of t heir respective holders. No part of the specificat ions may be reproduced in any form or b y any means or used to make any derivativ[…]
-
Страница 3
FCC STATEMENT This equipment has been tested and found to comply wi th the limits for a Class B digital device, pursuant to part 15 of the FCC Rules. These limit s are designed to pro-vide reasonable protection against harmful interference in a residential installation. This equipment ge nerates, uses and can radiate radio frequency energy and, if […]
-
Страница 4
Safety Information When product has power button, the power butto n is one of the way to shut off the product; when there is no power button, the only way to co mpletely shut off power is to disconnect the product or the power adapter from the power source. Don’t disassemble the product, or make repairs yourself. You run the risk of elect[…]
-
Страница 5
DECLARA TION OF CONFORMITY For the following equipment: Product Description: ADSL2+ Modem Router Model No.: TD-8816 T rademark: TP-LINK We declare under our own respon sibility that the above products satisfy all the technical regulations applicable to the product with in the scope of Council Directives: Directives 2004 / 108 / EC, Directives 2 006[…]
-
Страница 6
CONTENTS Package Contents ………………………………………………………………………………………. 1 Chapter 1. Introduction ……………………………………………………………………………. 2 1.1 Product Overview ………………………………………………………………………….[…]
-
Страница 7
4.5.6 CWMP ……………………………………………………………………………………………………………. 50 4.6 Maintenance ……………………………………………………………………………………………… 51 4.6.1 Administration ……………………………………………………..[…]
-
Страница 8
TD-8816 ADSL2+ Modem Router User Guide 1 Package Contents The following items should be found in your package: One TD-8816 ADSL2+ Modem Router One Power Adapter for TD-8816 ADSL2+ Modem Router Quick Installation Guide One RJ45 cable Two RJ11 cables One ADSL splitter One Resource CD , including: This User Guide Ot[…]
-
Страница 9
TD-8816 ADSL2+ Modem Router User Guide 2 Chapter 1. Introduction Thank you for choosing the TD-8816 ADSL2+ Modem Router . 1.1 Product Overview The device is designed to provide a simple and cost-effective ADSL Internet connection for a private Ethernet network. The Modem Router is easy to use. Connect the TD-8816 to a n Ethernet LAN or computers vi[…]
-
Страница 10
TD-8816 ADSL2+ Modem Router User Guide 3 Supports Multiple PVC (Per manent Virtual Circuit). Built-in DHCP server. Built-in firewall, supports IP/MAC filter, Application filter and URL filter. Supports Virtual Server, DMZ host and IP Address Mapping. Supports Dynamic DNS, UPnP and Static Routing. Supports system log and flow[…]
-
Страница 11
TD-8816 ADSL2+ Modem Router User Guide 4 Chapter 2. Hardware Installation 2.1 The Front Panel Figure 2-1 The LEDs locate on the front panel, which indicate the device’s working status. For details, please refer to LED Explanation . LED Explan ation: Name Status Indication On The modem router is powered on. Power Off The modem router is off. Pl ea[…]
-
Страница 12
TD-8816 ADSL2+ Modem Router User Guide 5 2.2 The Back Panel Figure 2-2 ON/OFF : The switch for the power. POWER : The Power plug is where yo u will connect the power adapter. RESET : There are two ways to reset the modem router’s factory defaults. Method one: With the modem router powered on, us e a pin to press and hold the Reset […]
-
Страница 13
TD-8816 ADSL2+ Modem Router User Guide 6 Figure 2-4 W all-mount Install Note: The diameter of the screw, 4mm<D<7.5mm, and the distance of two sc rews is 111.5mm. The screw that project from the wall need around 4m m based, and t he length of the screw need to be at least 20mm to withstand t he weight of the product. 2.4 Connecting the Rou[…]
-
Страница 14
TD-8816 ADSL2+ Modem Router User Guide 7 TD-8816. Connect the other end to the MO DEM port of the external splitter. Step 2: Conn ect the Ethernet cable. Attach one end of a network cable to your computer’s Ethernet port or a regular hub/switch port, and the other end to the LAN port on the TD-8816. Step 3: Attach the power adapter. Connect the p[…]
-
Страница 15
TD-8816 ADSL2+ Modem Router User Guide 8 Chapter 3. Quick Installation Guide 3.1 TCP/IP Configuration The default IP address of the TD-8816 ADSL2+ Modem Router is 192.16 8.1.1. And the default Subnet Mask is 255.255.255.0. These values can be changed as you des ire. In this guide, we use all the default values for description. Connect the local PC […]
-
Страница 16
TD-8816 ADSL2+ Modem Router User Guide 9 Figure 3-2 You can check it follo wing the steps below: 1) Is the connection between your PC and the modem router correct? The LEDs of LAN port which you link to the dev ice and the LEDs on y our PC’s adapter should be lit. 2) Is the TCP/IP configuration for y our PC correct? If the modem router’s […]
-
Страница 17
TD-8816 ADSL2+ Modem Router User Guide 10 Click the NEXT button. Figure 3-8 Step 2: Configur e the time for the m odem router, and then click the NEXT button. Figure 3-9 Step 3: Select the connection type to c onnect to the ISP (We select PPPoE/PPPoA mode for example here), and then click the NEXT button. Figure 3-10 Step 4: Configur e the followin[…]
-
Страница 18
TD-8816 ADSL2+ Modem Router User Guide 11 Figure 3-1 1 Step 5: Click NEXT to finish the Quick Start. Figure 3-12[…]
-
Страница 19
TD-8816 ADSL2+ Modem Router User Guide 12 Chapter 4. Software Configuration This User Guide recommends using the “Quick Installation Guide” for first-time installation. For advanced users, if you want to know more abo ut this device and make use of its functions adequately, maybe you will get help from this chapter to configur e the advanced se[…]
-
Страница 20
TD-8816 ADSL2+ Modem Router User Guide 13 Figure 4-2 4.1.2 System Log Choose “ Status → System Lo g ” menu, and you will be able to query the logs of the Modem Router.[…]
-
Страница 21
TD-8816 ADSL2+ Modem Router User Guide 14 Figure 4-3 The modem router can keep logs of all traffic. Y ou can query the logs to find what happened to the modem router. Click the CLEAR LOG button to clear the logs. Click the SAVE LOG button to save the logs. 4.1.3 Statistics Choose “ Status → Statistics ” menu, and you will be able to view the […]
-
Страница 22
TD-8816 ADSL2+ Modem Router User Guide 15 Select Ethernet , and you will see the statistics table as below. Statistics Table: Transmit Frames The frames transmitted over the Ethernet port. Transmit Multicast Frames The multicast frames transmitted over the Ethernet port. Transmit total Bytes The total bytes transmitted over the Ethernet port. T[…]
-
Страница 23
TD-8816 ADSL2+ Modem Router User Guide 16 4.2 Quick S t art Please refer to 3.2 Login . 4.3 Interface Setup Choose “ Interface Setup ”, you can see the next submenus: Internet and LAN . Figure 4-5 Click any of them, and you will be able to configure the corre sponding function. 4.3.1 Internet Choose “ Interface Setup → Internet ” menu, yo[…]
-
Страница 24
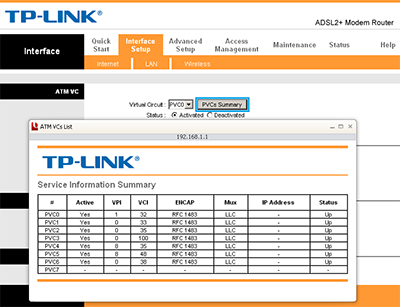
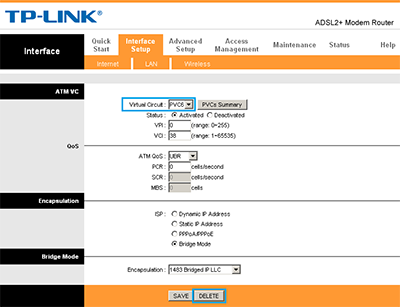
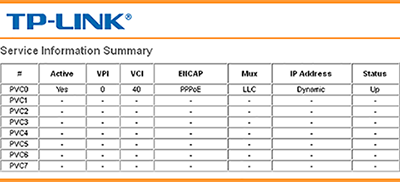
TD-8816 ADSL2+ Modem Router User Guide 17 Figure 4-6 ATM VC: ATM settings are used to connect to your ISP. Your ISP provides VPI (Virtual Path Identifier), VCI (Virtual Channel Identifier) settings to you. In th is Device, you can totally setup 8 VCs on different encapsulations, if you apply 8 di fferent virtual circuits from your ISP. You need[…]
-
Страница 25
TD-8816 ADSL2+ Modem Router User Guide 18 VCI: Identifies the virtual channel endpoints in an ATM network. The valid range is from 32 to 65535 (1 to 31 is reserved for well- known protocols). Pl ease input the value provided by your ISP. QoS: Select the Quality of Service types for th is Virtual Circuit, in cluding CBR (Constant Bit Rate), […]
-
Страница 26
TD-8816 ADSL2+ Modem Router User Guide 19 TCP MTU Option: Enter the TCP MTU as your desire. The default value is 1500. IPv4 Address: If you select IPv4 as IP version, you should configure the following. NAT: Select this option to Enable/ Disable the NAT (Network A ddress Translation) function for this VC. The NAT function can be ac tiva[…]
-
Страница 27
TD-8816 ADSL2+ Modem Router User Guide 20 Figure 4-8 Note: Each IP address entered in the fields must be in t he appropriat e IP form, which is four IP octets separated by a dot (x.x.x.x), su ch as 192.168.1.100. The Modem Router will not accept the IP address if it is not in this format. 3. PPPoA/PPPoE Select this option if your ISP requires y[…]
-
Страница 28
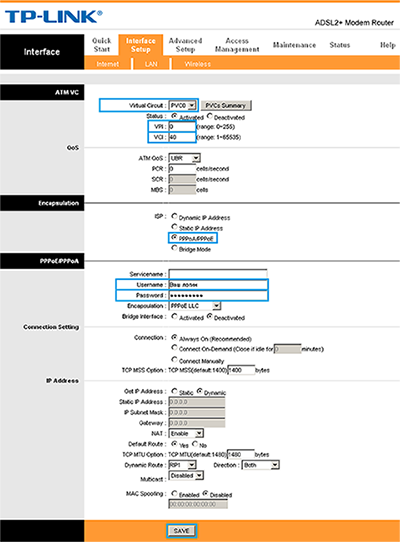
TD-8816 ADSL2+ Modem Router User Guide 21 Figure 4-9 Service name: Specify a name for the PPPoA/PPPoE connection for recognition. Username: Enter your username for your PPPoA/ PPPoE connection to identify and verify your account to the ISP. Password: Enter your password for your PPPoA/PPPoE connection. Encapsulation: For both PPPoA/[…]
-
Страница 29
TD-8816 ADSL2+ Modem Router User Guide 22 or given by your ISP. For Static IP, you need to specify the IP address, Subnet Mask and Gateway IP address. Dual Stack Line: Enable the Dual Stack Lite( D-S Lite ) function if you need. It is disabled by default. 4. Bridge Mode If you select this type of connection, the modem router can be configured t[…]
-
Страница 30
TD-8816 ADSL2+ Modem Router User Guide 23 Figure 4-1 1 IP Common Option: Configure the IP common option here. Encapsulation: Select the encapsulation mode for the Dy namic IP Address, you can leave it default. Bridge Interface: Activate the option, t he modem router can also work in Bridge mode. Default Route: If enable this functio[…]
-
Страница 31
TD-8816 ADSL2+ Modem Router User Guide 24 Figure 4-12 Note: Each IP address entered in the fields must be in the appropriate IPv6 form, which is eight IP octets separated by a colon (x:x:x:x :x:x:x:x). The modem router will not accept the IP address if it is not in this format. 3. PPPoA/PPPoE Select this option if your ISP requires you to use a[…]
-
Страница 32
TD-8816 ADSL2+ Modem Router User Guide 25 Figure 4-13 Service name: Specify a name for the PPPoA/PPPoE connection for recognition. Username: Enter your username for your PPPoA/ PPPoE connection to identify and verify your account to the ISP. Password: Enter your password for your PPPoA/PPPoE connection. Encapsulation: For both PPPoA[…]
-
Страница 33
TD-8816 ADSL2+ Modem Router User Guide 26 enable the function, please click Enable . MLD Proxy: The MLD (Multicast Listener Discovery Prot ocol) Proxy function is disabled by default. If you want to enable the function, please click Enable . Dual Stack Lite: Enable the Dual Stack Lite (D-S Lite) function if you need. It is disabled by defau[…]
-
Страница 34
TD-8816 ADSL2+ Modem Router User Guide 27 Figure 4-15 Router Local IP: These are the IP settings of the LA N interface for the device. These settings may be referred to as Private se ttings. You may change the LAN IP addres s if needed. The LAN IP address is private to y our internal networ k and cannot be seen on the Internet. IP Address: […]
-
Страница 35
TD-8816 ADSL2+ Modem Router User Guide 28 means the ADSL modem router will only accept but will not send RIP packet. OUT only means the ADSL modem router will only send but will not accept RIP packet. Multicast: Select IGMP version, or disable the function. IGMP (Internet Group Multicast Protocol) is a session-layer pr otocol used to establish […]
-
Страница 36
TD-8816 ADSL2+ Modem Router User Guide 29 secondary DNS IP to 0.0.0.0. If you want to use DNS relay, you can setup DNS server IP to 192.168.1.1 on their Computer. If not, t he device will perform as no DNS relay. Primary DNS Server: Type in your preferred DNS server. Secondary DNS Server: Type in your preferred DNS server. Radvd Enable:[…]
-
Страница 37
TD-8816 ADSL2+ Modem Router User Guide 30 4.4 Advanced Setup Choose “ Advanced Setup ”, you can see the next submenus: Figure 4-18 Click any of them, and you will be able to configure the corre sponding function. 4.4.1 Firewall Choose “ Advanced Setup → Firew all ” menu, and you will see the next screen (shown in Figure 4-19 ). Figure 4-1[…]
-
Страница 38
TD-8816 ADSL2+ Modem Router User Guide 31 Figure 4-20 Click ADD ROUTE button to add a new route in the next screen (shown in Figure 4-21 ). Figure 4-21 Destination IP Address: This parameter specifies the IP network address of the final destination. IP Subnet Mask: Enter the subnet mask for this destination. Gateway IP Address: Enter th[…]
-
Страница 39
TD-8816 ADSL2+ Modem Router User Guide 32 Figure 4-22 Virtual Circuit: Select the Virtual Circuit Index that you plan to setup for the NAT function. NAT Status: This field shows the current statu s of the NAT function for the current VC. You can go to the previous screen (shown in Figure 4-6 ) to activate the function. Number of IPs; Th[…]
-
Страница 40
TD-8816 ADSL2+ Modem Router User Guide 33 The Virtual Server is the server or server(s) behind NAT (on the LAN), for example, Web server or FTP server, that you can make visible to t he outside world even though NAT makes your whole inside network appear as a single machine to the outside world. Figure 4-24 Rule Index: The Virtual server rule i[…]
-
Страница 41
TD-8816 ADSL2+ Modem Router User Guide 34 Click the BACK button to return to the previous screen. Click the CANCEL button to cancel the configur ation which is made just now. 4.4.3.3. IP Address Mapping Choose “ Advanced Set up → NAT → IP Address Mapping ” in Figure 4-22 , you can con figure the Address Mapping Rul e in the next screen. The[…]
-
Страница 42
TD-8816 ADSL2+ Modem Router User Guide 35 Public Start & End IP: Enter the public IP Address you want to do NAT. Public Start IP is the starting public IP address and Pub lic End IP is the ending public IP address. If you have a dynamic IP, enter 0.0.0.0 as the Public Start IP. Address Mapping List: This displays the informati on about […]
-
Страница 43
TD-8816 ADSL2+ Modem Router User Guide 36 Figure 4-27 QoS: Select this option to Activa te/Deactivate the QoS. Summary: Click the button to view t he configurations of QoS. Rule: Configure the rules for QoS. If the traffic complies with the rule, then the modem router will take the corresponding action to deal with it. Rule Index: S[…]
-
Страница 44
TD-8816 ADSL2+ Modem Router User Guide 37 Vlans. IPP/DS Field: Select the type of the action to assign the priority. When you select IPP/TOS, you can assign the prio rity via IP informati on. IP QoS function is intended to deliver guaranteed as well as different iated Internet services by giving network resource and usage control to the Network[…]
-
Страница 45
TD-8816 ADSL2+ Modem Router User Guide 38 he rule. the rule. iori t y via DHCP (the header of IP group). It maps ure the action that the modem router takes to deal with the traffic which accord the DSCP priority. Queue #: Select the priority type for the action. ment, ba ndwidth allocation and resource ical switch port is configured with an acc[…]
-
Страница 46
TD-8816 ADSL2+ Modem Router User Guide 39 Figure 4-30 VLAN Index: Select the VLAN index for this VC. You can specify 8 gr oups in maximum. VLAN ID: This indicates the VLAN group. ATM VCs: Select the ATM VCs as members of VLAN , and if you leave the Tagged blank, the tag in frames will be deleted wh en transmitted from the VC. Ethern[…]
-
Страница 47
TD-8816 ADSL2+ Modem Router User Guide 40 4.4.6 ADSL Choose “ Advanced Setup → ADSL ”, you can select the ADSL Type and ADSL Mode in the next screen. The ADSL feature can be selected when you meet the physi cal connection problem. Please check the proper settings with your Internet service provider. Figure 4-32 ADSL Mode: Select the ADSL […]
-
Страница 48
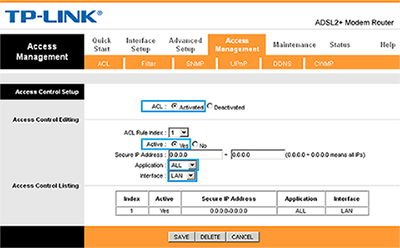
TD-8816 ADSL2+ Modem Router User Guide 41 Figure 4-34 ACL: If Activated , the IP addresses which are contained in the Access Control List can access to the modem router. If Deactivated , all IP addresses can access to the modem router. ACL Rule Index: Select the ACL rule index for the entry. Active: Enable the ACL rule. Secure IP Ad[…]
-
Страница 49
TD-8816 ADSL2+ Modem Router User Guide 42 Figure 4-35 Filter Type Selection: Select the fil ter type fo r the next configuration. IP/MAC Filter Set Index: Select the Set index for the IP Filter entry. This index can match with six IP / MAC Filter Rule Indexes. Interface: Select the interface for the entry. Direction: Select the dire[…]
-
Страница 50
TD-8816 ADSL2+ Modem Router User Guide 43 Note: You should set the IP/MAC Filter Set Index and IP/MAC Filter Rule Inde x together to appoint the address (shown in the Filter List) for the IP Filter rule. For example, (1, 2), it means the rule will be shown in the row 2 for the matching with 1. Rule Type: For IP Filter, please select IP here[…]
-
Страница 51
TD-8816 ADSL2+ Modem Router User Guide 44 Note: If you want to make the rule take ef fect, please select Ye s to active the rule. Step 3: Enter the “Source IP Address”, “Destinat ion IP Address”, “Subnet Mask” and “Port Number” in the corresponding field. Step 4: Select the Protocol as “TCP” and se lect the Unmatched rule as[…]
-
Страница 52
TD-8816 ADSL2+ Modem Router User Guide 45 Figure 4-36 Rule Type: Select MAC for the MAC Filter rule. Active: Select “Yes” to make t he rule to take effect. MAC Address: Enter the MAC address for the rule. Rule Unmatched: If the current rule can not match, and you select For w ard , the modem router will skip the rule and tr ansm[…]
-
Страница 53
TD-8816 ADSL2+ Modem Router User Guide 46 Note: If you want to make the rule take ef fect, please select Ye s to active the rule. Step 3: Enter the “MAC Address” and select the Unmatched rule as “N ext”. Step 4: Finally, click the SAVE to save the entry. Step 5: Go to Step 2 to configure the next rule: Block the PC with MAC address 00-0[…]
-
Страница 54
TD-8816 ADSL2+ Modem Router User Guide 47 Figure 4-37 Filter Type Selection: Select the Application Filter for the next configuration. Application Filter: Activate or deactivate the function. ICQ & MSN & YMSG & Real Audio/Video: Select Allow or Den y for these applications. If you select Allow, the modem router will acc ept […]
-
Страница 55
TD-8816 ADSL2+ Modem Router User Guide 48 Figure 4-38 Filter Type Selection: Select the URL Filter fo r the next configuration. Active: Select “Yes” to make the rule take effect. URL Index: Select the index for the URL Filter entry. URL: Enter the URL for this URL Filter. URL Filter Listing: This displays the informati on ab[…]
-
Страница 56
TD-8816 ADSL2+ Modem Router User Guide 49 Figure 4-39 SNMP: Activate or deactivate the function. Get Community: Select to set the password for the incoming Get requests from the management station. Set Community: Select to set the password fo r incoming Set requests from the management station. Trap Host: Enter the trap host here. 4[…]
-
Страница 57
TD-8816 ADSL2+ Modem Router User Guide 50 4.5.5 DDNS Choose “ Access Management → DDNS ”, you ca n configure the DDNS function in the screen (shown in Figure 4-41 ). The modem router offers a Dy namic Domain Name System ( DDNS ) feature. The feature lets you use a static host name with a dynamic IP address. Users should type the host name, us[…]
-
Страница 58
TD-8816 ADSL2+ Modem Router User Guide 51 Figure 4-42 CWMP: Select to activate the CWMP f unction. URL: Enter the website of ACS which is provided by your ISP. User Name/Passwo rd: Enter the user name and password to login the ACS server. Path: Enter the path that connects to the ACS server. Port: Enter the port that connec ts t[…]
-
Страница 59
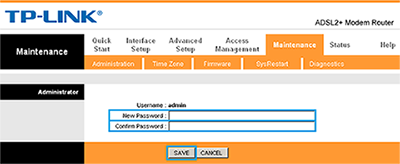
TD-8816 ADSL2+ Modem Router User Guide 52 Figure 4-44 Note: 1) There is only one account that can access Web-Management interface. The default account is «admin», and the default password is «adm in». Admin has read/write access privilege. 2) When you change the password, you should enter the new password twice, and then cli[…]
-
Страница 60
TD-8816 ADSL2+ Modem Router User Guide 53 Note: The ADSL modem router builds in some NTP Se rvers, when the modem router connect s to the Internet, the modem router will get the system ti me automatically from the NTP Server . Y ou can also configure the NTP Server address automatically , and then the modem router will get the time from the spe[…]
-
Страница 61
TD-8816 ADSL2+ Modem Router User Guide 54 hard drive of the computer. Click Brow se to find the local hard drive and locate the firmware or romfile to be used for upgrade. Figure 4-48 To upgrade the modem router’s firmware , follow these instructions below: Step 1: Downl oad a more recent firmware upgr ade file from the TP-LINK website ( www.t[…]
-
Страница 62
TD-8816 ADSL2+ Modem Router User Guide 55 Figure 4-49 Step 2: Save the file as the appointed file (shown in Figure 4-50 ). TD-8816 Figure 4-50 To restore the modem router’s settings: Step 1: Click the Brow se button to locate the update file for the device, or enter the exact path in “New Romfile Location” field. Step 2: Click the UPGRADE but[…]
-
Страница 63
TD-8816 ADSL2+ Modem Router User Guide 56 Figure 4-51 4.6.5 Diagnostics Choose “ Maintenance → Diagnostics ”, you can vi ew the test res ults for the conn ectivity of the physical la yer and protoco l layer for both LA N and WAN sides i n the screen (shown in Figure 4-5 2 ). Figure 4-52 4.7 Help Choose “ Help ”, you can view the help info[…]
-
Страница 64
TD-8816 ADSL2+ Modem Router User Guide 57 Figure 4-53 Note: Click the tab, and you will be able to get the corresponding information.[…]
-
Страница 65
TD-8816 ADSL2+ Modem Router User Guide 58 AppendixA: Specifications General Standards and Protocols ANSI T1.413, ITU G.992.1, ITU G. 992.2, ITU G.992.3, ITU G.992.5 IEEE 802.3, IEEE 802.3u, TCP/IP, PPPoA , PPPoE, SNTP, HTTP, DHCP, ICMP, NAT,CWMP Safety & Emission FCC, CE Ports 1 10/100M Auto-Negotiation RJ45 port ( Auto MDI/MDIX) 1 RJ11 port […]
-
Страница 66
TD-8816 ADSL2+ Modem Router User Guide 59 Appendix B: Configuring the PC In this section, we’ll introduce how to install and configure the TCP/IP corr ectly in Windows XP. First make sure your Ethernet Adapter is worki ng, refer to the adapter’s manual if necessary. 1. Configure TCP/IP component 1) On the Windows taskbar, click the Start button[…]
-
Страница 67
TD-8816 ADSL2+ Modem Router User Guide 60 Figure B-2 5) The following TCP/IP Properties window will display and the IP Address tab is open on this window by default. Now you have two ways to configure the TCP/IP protocol below: Setting IP address automatically Select Obtain an IP address automatically , Choose Obtain DNS server automatically , […]
-
Страница 68
TD-8816 ADSL2+ Modem Router User Guide 61 Figure B-3 Note: For Windows 98 OS or before, the PC and Modem Router may need to be restarted. Setting IP address manually 1 Select Use the following IP address radio button. And the fo llowing items available 2 If the modem router’s LAN IP address is 192.168.1. 1, specify the IP address as 19[…]
-
Страница 69
TD-8816 ADSL2+ Modem Router User Guide 62 Figure B-4 Now: Click OK to keep your settings.[…]
-
Страница 70
TD-8816 ADSL2+ Modem Router User Guide 63 Appendix C: Troubleshooting T1. How do I restore m y modem router’s configuration to its f actory default settings? With the modem router powered on, press and hold the RESET button on the rear pan el for 8 to 10 seconds before releasing it. Note : Once the modem router is reset, the current c onfigur[…]
-
Страница 71
TD-8816 ADSL2+ Modem Router User Guide 64 d) Select Obtain an IP address automatically and Obtain DNS server address automatically . Then click OK . For Windows 8 a) Move your mouse to the lowe r right corner and you will see Search icon in the Popups. Go to “ -> Apps ”. Type Control Panel in the search box and press Enter , then you will go[…]
-
Страница 72
TD-8816 ADSL2+ Modem Router User Guide 65 Now, try to log on to the Web-based configur ation page again after the above settings have been configured. If you still cannot acce ss the configuration page, please restore your modem router’s factory default settings and re configure your modem router follow ing the instructions in 3.2 Login . Please […]
-
Страница 73
TD-8816 ADSL2+ Modem Router User Guide 66 Appendix D: Technical Support Technical Support For more troubleshooting help, go to: www.tp-link .com/support/faq T o download the latest Firmware, Driver , Utility and User Guide, go to: www.tp-link .com/support/download For all other technical support, please c ontact us b y using the followi[…]