
Характеристики
|
Производитель |
|
|
Тип |
электрический |
|
Испытательное давление, бар |
40 |
|
Соединение к трубопроводу |
внешняя G1/2 |
|
Рабочая жидкость |
вода, антифриз |
|
Макс. температура жидкости, град. С |
40 |
|
Производительность, л/мин |
6 |
|
Мощность, Вт |
1300 |
Электрический опрессовочный насос Rothenberger RP Pro III 61185 и другие оригинальные товары в категории электрические опрессовщики доступны на сайте интернет-магазина Бигам в Москве по специальной цене 97220 рублей. Перед покупкой данной модели бренда Rothenberger рекомендуем посмотреть особенности, технические параметры, документацию и сертификаты на продукцию. Также предлагаем сравнить товар электрический опрессовочный насос Rothenberger RP Pro III 61185 с ассортиментом модификаций и аналогов из категории электрические опрессовщики Rothenberger.
-
-
Инструкция Rothenberger RP Pro III
Инструкция.pdf 346.48 КБ
На странице представлена инструкция по эксплуатации и другие материалы производителя о товаре электрический опрессовочный насос Rothenberger RP Pro III 61185, необходимые пользователю. Из руководства пользователя Rothenberger можно узнать устройство изделия, срок службы и комплект поставки. Электрический опрессовочный насос Rothenberger RP Pro III 61185 и все товары серии требуют соблюдения правил использования, обслуживания, ухода и хранения.
-
Похожие товары
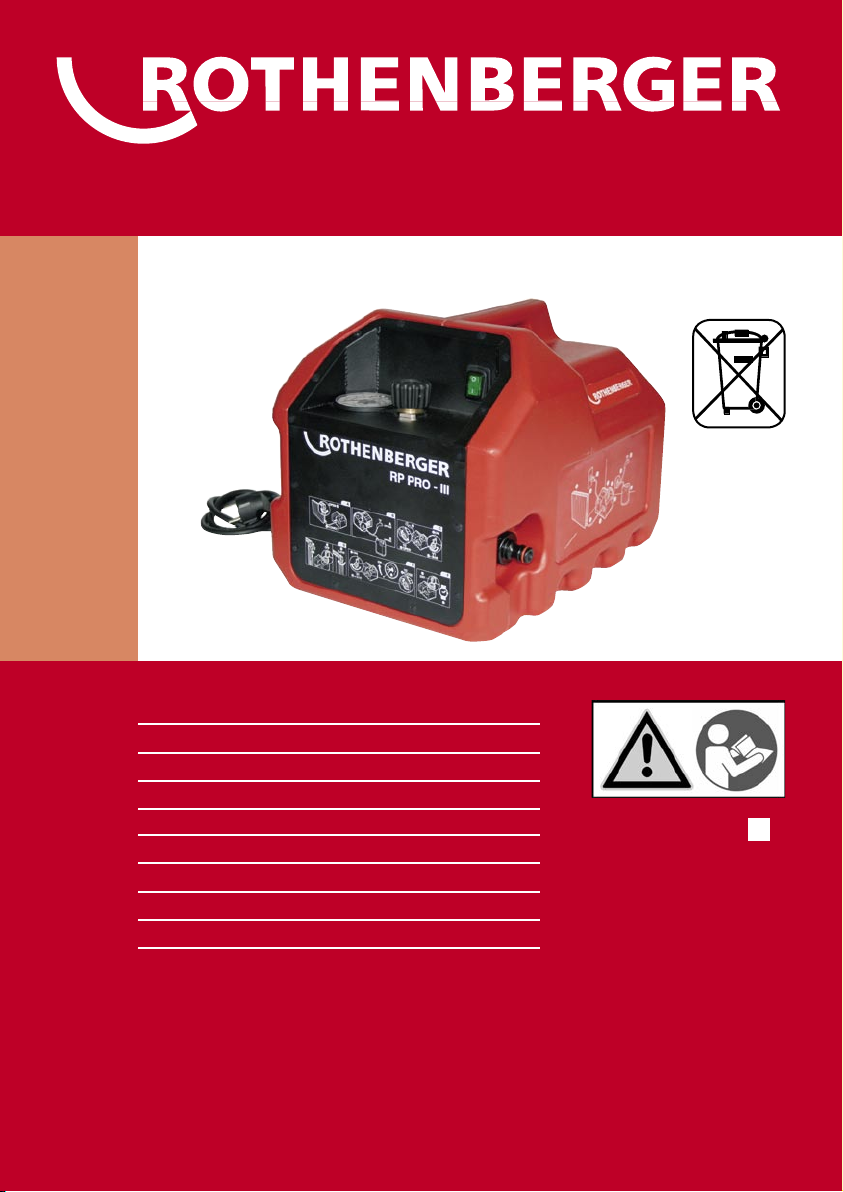
www.rothenberger.com
RP PRO III
RO PRO III
6.1185
Bedienungsanleitung
Instructions for use
Instruction d’utilisation
Instrucciones de uso
Istruzioni d’uso
Gebruiksaanwijzing
Instruções de serviço
Brugsanvisning
Bruksanvisning

2
DEUTSCH Seite 7
Bedienungsanleitung bitte lesen und aufbewaren! Nicht wegwerfen! Bei Schäden durch
Bedienungsfehler erlischt die Garntie! Technische Äanderungen vorbehalten!
ENGLISH Page 10
Please read retain these directions for use. Do not throw them away! The warranty does not cover
damage caused by incorrect use of the equipment! Subject to technical modifications.
FRANÇAIS Page 13
Lire attentivement le mode d’emploi et le ranger à un endroit s{ur! Ne pas le jetter! La garantie est
annulée lors de dommages d{us à une manipulation erronée! Sous rèserve de modificaions techniques.
ESPAÑOL. Pais de origen Página 16
¡Por favor, lea y conserve el manual de instrucciones! ¡No lo tire! ¡En caso de daños por errores de
manejo, la garantía queda sin validez! Modificaciones técnicas reservadas.
ITALIANO Pagina 19
Per favore leggere e conservare le istruzioni per l’uso! Non gettarle via! In caso di danni dovuti ad
errori nell’ uso, la garanzia si estingue! Ci si riservano modifiche tecniche.
NEDERLANDS Bladzijde 22
Lees de handleiding zorgvulding door en bewaar haar goed! Niet weggoien! Bij schade door
bedieningsfouten komt de garantieverlening te vervallen! Technische wijzgingen voorbehouden.
PORTUGUES Pagina 25
Queiram ler e guardar o manual de instruções! Não deitar fora! Em caso de avarias por utilização
incorrecta, extingue-se garantia! Reservado o direito de alterações técnicas.
DANSK Side 28
Læs igenom bruksanvisningen, og gem den til senere brug! Smid den ikke ud! Skader, som mâtte
opstâ som folge af betjeningsfejl, medfØrer, at garantien mister sin gyldighed! Red til tekniske
ændringer forbeholdes.
SVENSKA Side 31
Läs igenom bruksanvisingen och förvara den väl! Kasta inte bort den! Garantin upphör om
apparaten har använts eller betjänats pä ett felaktigt sätt! Med reservation för tekniska ändringar.
Intro
3
OverviewA
V2
V1
A
B
C
I
H
G
F
E
D
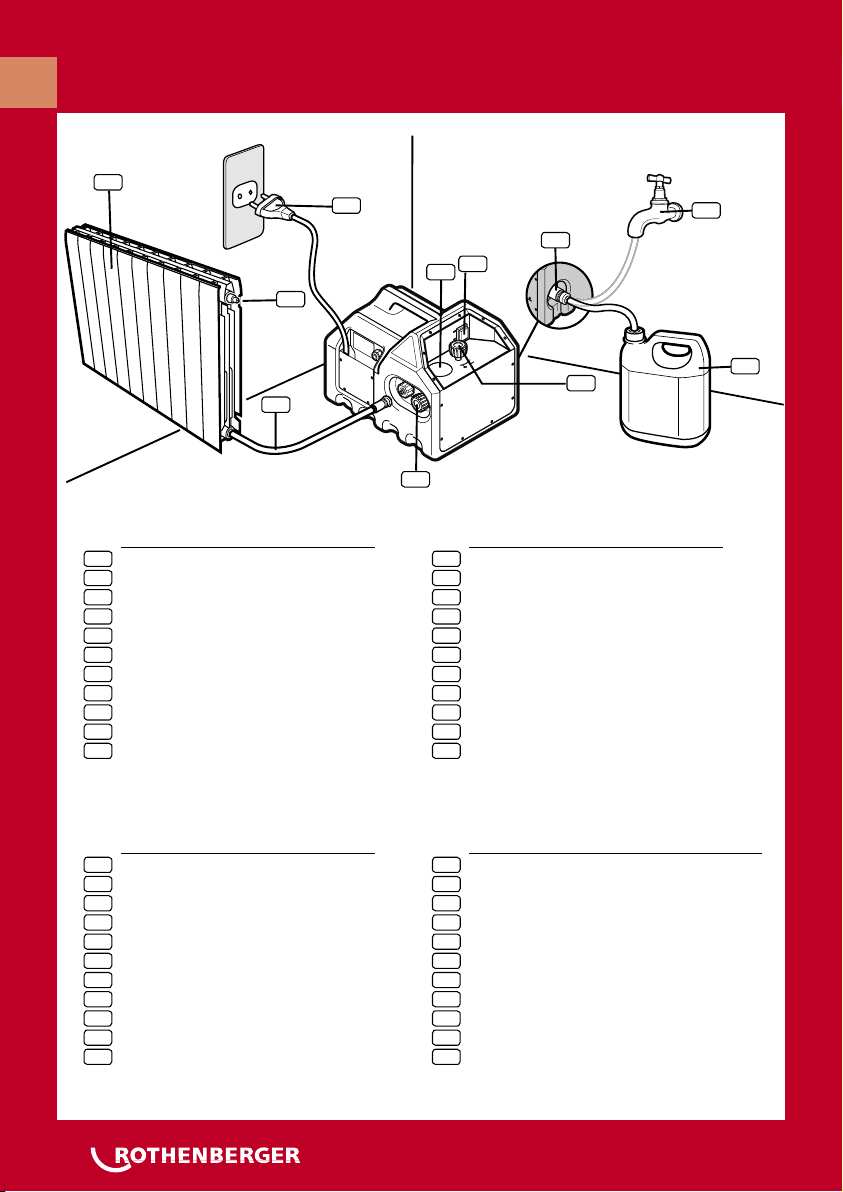
Zu prüfendes Rohrleitungssystem
Hauptablaßhahn
Hochdruckschlauch
Wassertank
Wassernetz
Anschluß der Wasserversorgung
ON/OFF-Schalter der Elektropumpe
Manometer
Kabel mit Steckanschluss
Druckregelventil mit Griff
Absperrventil V2 mit Griff
A
B
C
D
E
F
G
H
I
V1
V2
DEUSTCH
Piping system to be tested
Master bleeder
High pressure hose
Water tank
Water network
Feeding water connector
ON/OFF switch of the power pump
Manometer
Cord with plug
Pressure adjusting valve V1 with knob
Closing valve V2 with knob
A
B
C
D
E
F
G
H
I
V1
V2
ENGLISH
Système de tuyauterie d’essai
Purge principale
Tuyau de haute pression
Bac d’eau
Réseau d’eau
Raccord d’eau d’alimentation
Interrupteur ON/OFF de l’électropompe
Manomètre
Câble avec prise
Vanne de réglage de pression à poignée
Vanne d’arrêt V2 à poignée
A
B
C
D
E
F
G
H
I
V1
V2
FRANÇAIS
A
B
C
D
E
F
G
H
I
V1
V2
Sistema de tubería de prueba.
Purga principal.
Manguera de alta presión.
Tanque de agua.
Red de agua.
Conexión de agua de alimentación.
Interruptor ON/OFF de la electrobomba.
Manómetro.
Cable con enchufe.
Válvula de regulación de presión.
Válvula de cierre V2.
ESPAÑOL

C
D
4
Spurgo principale
Connessione dell’acqua di alimentazione
Tubo di alta pressione
Cavo con presa
Interruttore ON/OFF dell’elettropompa
Manometro
Sistema di tubatura di prova
Rete d’acqua
Bidone d’acqua
Valvola di regolazione della pressione con maniglia
Valvola d’intercettazione V2 con maniglia
A
B
C
D
E
F
G
H
I
V1
V2
ITALIANO
Hoofdkraan
Aansluiting toevoerwater
Hogedrukslang
Kabel met stekker
ON/OFF schakelaar van de elektropomp
Manometer
Te testen leidingensysteem
Waternetwerk
Watercisterne
Ventiel V1 met knop om druk te regelen
Sluitventiel V2 met knop
A
B
C
D
E
F
G
H
I
V1
V2
NEDERLANDS
Sistema de tubagem de prova
Purga principal
Mangueira de alta pressão
Tanque de água
Rede de água
Conexão de água de alimentação
Interruptor ON/OFF da electrobomba
Manômetro
Fio com tomada
Válvula de regulação de pressão com manilha
Válvula de fêcho V2 com manilha
A
B
C
D
E
F
G
H
I
V1
V2
PORTUGUES
Test-rørsystem
Central afluftning
Højtryksslange
Vandtank
Vandnetværk
Vandtilførselsforbindelse
ON/OFF-afbryder til el-pumpen
Manometer
Kabel med stikkontakt
V1 trykjusteringsventil med knop
Lukkeventil V2 med knop
A
B
C
D
E
F
G
H
I
V1
V2
DANSK
Rörledningssystem som ska testas
Huvudinmatare
Högtryckslang
Vattentank
Vattensystem
Vatteninmatningsfäste
ON/OFF knapp för strömpumpen
Manometer
Sladd med anslutning
Ventil som justerar lufttryck V1 med handtag
Tillslutande ventil V2 med handtag
A
B
C
D
E
F
G
H
I
V1
V2
SVENSKA
5
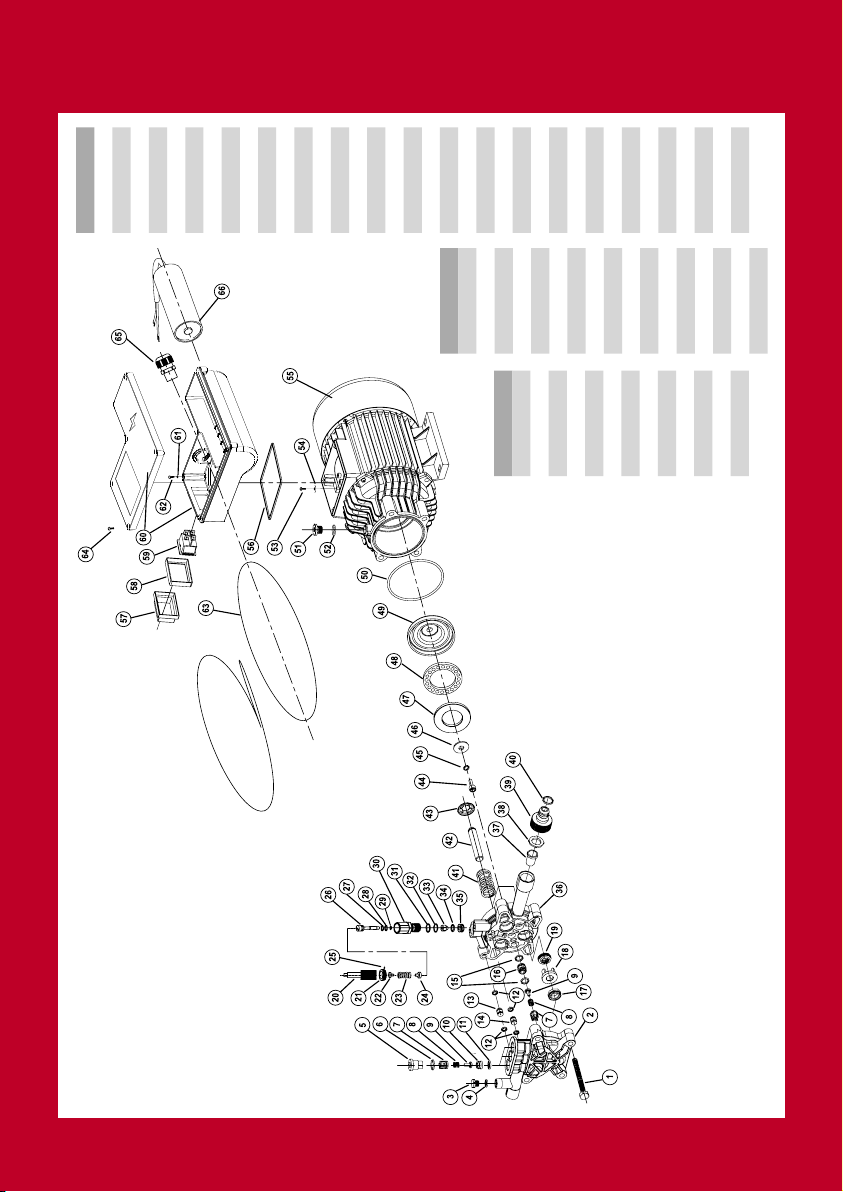
ITEM CODE
1 V121M01
2 V121M02
3 V121M03
4 V121M04
5 V121M05
6 V121M06
7 V121M07
8 V121M08
9 V121M09
10 V121M10
11 V121M11
12 V121M12
13 V121M13
14 V121M14
ITEM CODE
15 V121M15
16 V121M16
17 V121M17
18 V121M18
19 V121M19
20 V121M20
21 V121M21
22 V121M22
23 V121M23
24 V121M24
25 V121M25
26 V121M26
27 V121M27
28 V121M28
29 V121M29
30 V121M30
31 V121M31
ITEM CODE
32 V121M32
33 V121M33
34 V121M34
35 V121M35
36 V121M36
37 V121M37
38 V121M38
39 V121M39
40 V121M40
41 V121M41
42 V121M42
43 V121M43
44 V121M44
45 V121M45
46 V121M46
47 V121M47
48 V121M48
49 V121M49
50 V121M50
51 V121M51
52 V121M52
53 V121M53
54 V121M54
55 V121M55
56 V121M56
57 V121M57
58 V121M58
59 V121M59
60 V121M60
61 V121M61
62 V121M62
63 V121M63
64 V121M64
65 V121M65
66 V121M66
67 V121M67
68 V121M68
Spare partsC
6
CE-KONFORMITÄTSERKLÄRUNG
Wir erklären in alleiniger Verantwortung, dass
dieses Produkt mit den angegebenen Normen
und Richtlinien übereinstimmt.
EC-DECLARATION OF CONFORMITY
We declare on our sole accountability that this
product conforms to the standars and guidelines
stated.
DECLARATION CE DE CONFORMITÉ
Nous déclarons sous notre propre responsabilité
que ce produit est conforme aux normes et
directives indiquées.
DECLARACIÓN DE CONFORMIDAD CE
Declaramos, bajo nuestra responsabilidad
exclusiva, que este producto cumple con las
normas y directivas mencionadas.
DICHARAZIONE DI CONFORMITÀ CE
Dichiriamo su nostra unica responsabilità, che
questo prodotto è conforme alle norme ed alle
direttive indicate.
EC-VERKLARING VAN OVEREENSTEMMING
Wij verklaren in eigen verantwoordelijkheid dat
dit product overeenstemt met de van toepassing
zijnde normen en richtlijnen.
DECLARAÇÃO DE CONFORMIDADE CE
Declaramos, sob responsabilidade exclusiva,
que o presente produto está conforme com as
Normas e Directivas indicadas.
CE-KONFORMITETSERKLÆRING
Vi erklærer som eneansvarring, at dette produkt
er i overensstemmelse med anførte standarder,
retningslinjer og direktver.
CE.FÖRSÄKRAN
Vi försäkar pä eget ansvar att denna produkt
uppfyller de angivna normerna och riktlinjerna.
CE
José Ignacio Pikaza
General Manager
01.06.2009
2006/42/EG
EN50144.1
89392EEC,
91368EEC,
73/23 EEC,
89/336 EEC

7
DEUTSCH
Allgemeine Sicherheitshinweise
ACHTUNG! Sämtliche Anweisungen sind zu lesen.
Fehler bei der Nichteinhaltung der nachstehend aufgeführten Anweisungen können elektrischen Schlag,
Brand und/oder schwere Verletzungen verursachen.
Der nachfolgend verwendete Begriff “Elektrowerkzeug” bezieht sich auf netzbetriebene Elektrowerkzeuge (mit Netzkabel) und auf akkubetriebene Elektrowerkzeuge (ohne Netzkabel).
BEWAHREN SIE DIESE ANWEISUNGEN GUT AUF.
Arbeitsplatz
Halten Sie Ihren Arbeitsbereich sauber und
aufgeräumt. Unordnung und unbeleuchtete
Arbeitsbereiche können zu Unfällen
führen.
Arbeiten Sie mit dem Gerät nicht in
explosionsgefährdeter Umgebung, in
der sich brennbare Flüssigkeiten, Gase
oder Stäube befinden. Elektrowerkzeuge
erzeugen Funken, die den Staub oder die
Dämpfe entzünden können.
Halten Sie Kinder und andere
Personen während der Benutzung des
Elektrowerkzeugs fern. Bei Ablenkung
können Sie die Kontrolle über das Gerät
verlieren.
Elektrische Sicherheit
Der Anschlussstecker des Gerätes muss in
die Steckdose passen. Der Stecker darf in
keiner Weise verändert werden. Verwenden
Sie keine Adapterstecker gemeinsam mit
schutzgeerdeten Geräten. Unveränderte
Stecker und passende Steckdosen verringern
das Risiko eines elektrischen Schlages.
Vermeiden Sie Körperkontakt mit geerdeten
Oberflächen, wie von Rohren, Heizungen,
Herden und Kühlschränken. Es besteht ein
erhöhtes Risiko durch elektrischen Schlag,
wenn Ihr Körper geerdet ist.
Halten Sie das Gerät von Regen oder
Nässe fern. Das Eindringen von Wasser in
ein Elektrogerät erhöht das Risiko eines
elektrischen Schlages.
Zweckentfremden Sie das Kabel nicht, um
das Gerät zu tragen, aufzuhängen oder um
den Stecker aus der Steckdose zu ziehen.
Halten Sie das Kabel fern von Hitze, Öl,
scharfen Kanten oder sich bewegenden
Geräteteilen. Beschädigte oder verwickelte
Kabel erhöhen das Risiko eines elektrischen
Schlages.
Wenn Sie mit einem Elektrowerkzeug
im Freien arbeiten, verwenden Sie nur
Verlängerungskabel, die auch für den
Außenbereich zugelassen sind. Die
1.
a.
b.
c.
2.
a.
b.
c.
d.
e.
Anwendung eines für den Außenbereich
geeigneten Verlängerungskabels verringert
das Risiko eines elektrischen Schlages.
Sicherheit von Personen
Seien Sie aufmerksam, achten Sie darauf,
was Sie tun, und gehen Sie mit Vernunft
an die Arbeit mit einem Elektrowerkzeug.
Benutzen Sie das Gerät nicht, wenn Sie
müde sind oder unter dem Einfluss von
Drogen, Alkohol oder Medikamenten
stehen. Ein Moment der Unachtsamkeit beim
Gebrauch des Gerätes kann zu ernsthaften
Verletzungen führen.
Tragen Sie persönliche Schutzausrüstung
und immer eine Schutzbrille. Das Tragen
persönlicher Schutzausrüstung, wie
Staubmaske, rutschfeste Sicherheitsschuhe,
Schutzhelm oder Gehörschutz, je nach
Art und Einsatz des Elektrowerkzeuges,
verringert das Risiko von Verletzungen.
Vermeiden Sie eine unbeabsichtigte
Inbetriebnahme. Vergewissern Sie sich,
dass der Schalter in der Position “AUS”
ist, bevor Sie den Stecker in die Steckdose
stecken. Wenn Sie beim Tragen des Gerätes
den Finger am Schalter haben oder das
Gerät eingeschaltet an die Stromversorgung
anschließen, kann dies zu Unfällen führen.
Entfernen Sie Einstellwerkzeuge oder
Schraubenschlüssel, bevor Sie das Gerät
einschalten. Ein Werkzeug oder Schlüssel,
der sich in einem drehenden Geräteteil
befindet, kann zu Verletzungen führen.
Überschätzen Sie sich nicht. Sorgen Sie für
einen sicheren Stand und halten Sie jederzeit
das Gleichgewicht. Dadurch können Sie das
Gerät in unerwarteten Situationen besser
kontrollieren.
Tragen Sie geeignete Kleidung. Tragen Sie
keine weite Kleidung oder Schmuck. Halten
Sie Haare, Kleidung und Handschuhe fern
von sich bewegenden Teilen. Lockere
Kleidung, Schmuck oder lange Haare
können von sich bewegenden Teilen erfasst
werden.
Wenn Staubabsaug- und –
Auffangeinrichtungen montiert werden
können, vergewissern Sie sich, dass
diese angeschlossen sind und richtig
verwendetwerden. Das Verwenden dieser
Einrichtungen verringert Gefährdungen
durch Staub.
Sorgfältiger Umgang und Gebrauch von
Elektrowerkzeugen
Überlasten Sie das Gerät nicht. Verwenden
3.
a.
b.
c.
d.
e.
f.
g.
4.
a.

8
DEUTSCH
Techbische Daten
Bestimungsgemäße Verwendung
Druck und Dichtigkeitsprüfung von Rohrleitungssystemen wie z.B. Hydraulik-, Heizungs-, Trinkwasserleitungen, Ölleitungen, Sprinkeler-, Kessel- und Solaranlagen, usw. sowie Druckbehälter.
Wartung und Inspektion
Vor dem Anschluß der Pumpe an das Stromnetz und
den Wassernetzanschluß ist zu beachten:
a) Zustand des Hochdruckschlauches und
Netzkabel überprüfen. Gegebenenfalls
ersetzen.
b) Zustand des Wasserfilters (No.V121M37-
C Spare parts) überprüfen. Reinigen oder
gegebenenfalls austauschen.
Zubehör
Mit der Pumpe wird ein Wartungssatz (061186)
mitgeliefert, so dass verschlissene oder beschädigte
Dichtungen ausgetauscht werden können.
Regelmäßige Wartung erhöht die Lebensdauer.
Spannung: …………………………………………….. 220-240 V, 50 Hz (110 V), einphasig
Nennleistung Motor: …………………………….. 1,3 Kw.
Nennstromstärke: …………………………………. 6 A.
Schutzart: ……………………………………………… IP32
Maximaler Druck: …………………………………. 40 bar
Durchflußmenge: …………………………………. 6 l/min
Gewicht: ………………………………………………… 16 Kg
Abmessung L x B x H(mm): ……………………… 380 x 290 x 300
Prüfmedium: …………………………………………. sauberes Trinkwasser,Glycol, Tyfocor, Max. Temp. 40ºC
Hochdruckschlauch: ……………………………….. R1/2”, 1,2 m Länge
Schmiermittel: ………………………………………. Öl SAE 15-40
Lärmpegel: ……………………………………………. Im Betrieb ohne Druckaufbau 70 dB
Im Betrieb mit Druckaufbau bei 40 bar 90dB
Das Tragen von Gehörschutz wird empfohlen.
Sollte das Gerät eine längere Zeit still stehen, wird
empfohlen, das in den internen Kreisen verbleibende
Restwasser zu entleeren
Vermeiden Sie, das Gerät an sehr kalten Orten mit
Frostgefahr zu lagern
Wasserfilter sauber und in gutem Zustand halten
Falls Sie das Gerät mit Frostschutzmittel vom Typ
Glycol, Tifocor, usw. betreiben, lassen Sie es mit
sauberem Süßwasser laufen, um die Innenkreise zu
reinigen.
Sie für Ihre Arbeit das dafür bestimmte
Elektrowerkzeug. Mit dem passenden
Elektrowerkzeug arbeiten Sie besser und
sicherer im angegebenen Leistungsbereich.
Benutzen Sie kein Elektrowerkzeug, dessen
Schalter defekt ist. Ein Elektrowerkzeug, das
sich nicht mehr ein- oder ausschalten lässt,
ist gefährlich und muss repariert werden.
Ziehen Sie den Stecker aus der Steckdose,
bevor Sie Geräteeinstellungen vornehmen,
Zubehörteile wechseln oder das Gerät
weglegen. Diese Vorsichtsmaßnahme
verhindert den unbeabsichtigten Start des
Gerätes.
Bewahren Sie unbenutzte Elektrowerkzeuge
außerhalb der Reichweite von Kindern
auf. Lassen Sie Personen das Gerät nicht
benutzen, die mit diesem nicht vertraut
sind oder diese Anweisungen nicht gelesen
haben. Elektrowerkzeuge sind gefährlich,
wenn Sie von unerfahrenen Personen
benutzt werden.
Pflegen Sie das Gerät mit Sorgfalt.
b.
c.
d.
e.
Kontrollieren Sie, ob bewegliche
Geräteteile einwandfrei funktionieren
und nicht klemmen, ob Teile gebrochen
oder so beschädigt sind, dass die Funktion
des Gerätes beeinträchtigt ist. Lassen Sie
beschädigte Teile vor dem Einsatz des
Gerätes reparieren. Viele Unfälle haben
ihre Ursache in schlecht gewarteten
Elektrowerkzeugen.
Verwenden Sie Elektrowerkzeug,
Zubehör, Einsatzwerkzeuge usw.
entsprechend diesen Anweisungen und
so, wie es für diesen speziellen Gerätetyp
vorgeschrieben ist. Berücksichtigen Sie
dabei die Arbeitsbedingungen und die
auszuführende Tätigkeit. Der Gebrauch
von Elektrowerkzeugen für andere als
die vorgesehenen Anwendungen kann zu
gefährlichen Situationen führen.
Service
Lassen Sie Ihr Gerät nur von qualifiziertem Fachpersonal und nur mit Original-Ersatzteilen reparieren.
Damit wird sichergestellt, dass die Sicherheit des
Gerätes erhalten bleibt.
f.
5.
9
DEUTSCH
Entsorgung
Teile des Gerätes sind Wertstoffe und können der
Wiederverwertung zugeführt werden. Hierfür stehen
zugelassene und zertifizierte Verwerterbetriebe zur
Verfügung. Zur umweltverträglichen Entsorgung
der nicht verwertbaren Teile (z.B. Elektronikschrott)
befragen Sie bitte Ihre zuständige Abfallbehörde.
Verbrauchte Wechselakkus nicht ins Feuer oder in
den Hausmüll werfen. Ihr Fachhändler bietet eine
umweltgerechte Entsorgung an.
Nur für EU-Länder:
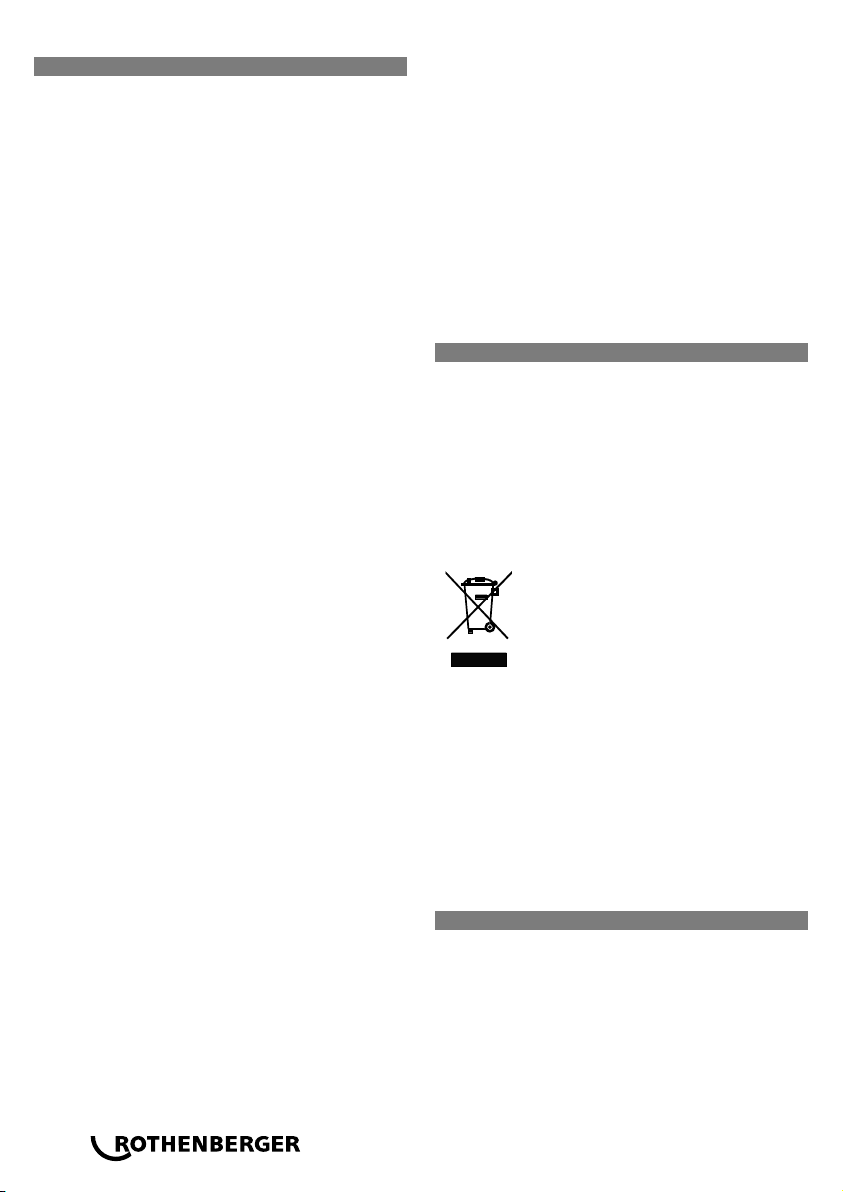
Werfen Sie Elektrowerkzeuge nicht in
den Hausmüll! Gemäß der Europäischen
Richtlinie 2002/96/EG über Elektro- und
Elektronik-Altgeräte
und ihrer Umsetzung in nationales Recht
müssen nicht mehr gebrauchsfähige
Elektrowerkzeuge getrennt gesammelt und einer
umweltgerechten Wiederverwertung zugeführt
werden.
Nur für Deutschland gültig:
Die Entsorgung Ihres erworbenen ROTHENBERGER
Gerätes übernimmt ROTHENBERGER für Sie kostenlos! Bitte geben Sie dies bei Ihrem nächsten
ROTHENBERGER Service Express Händler ab. Wer
Ihr ROTHENBERGER Service Express Händler in Ihrer
Nähe ist, erfahren Sie auf unserer Homepage unter
www.rothenberger.com
Kundendienst
Es stehen Ihnen die Rothenberger- Servicestationen
oder der Hersteller mit seiner Reparaturabteilung
zur Verfügung. Selbstverständlich schicken wir Ihnen
auch umgehend Ersatzteile zu. Wenden Sie sich bitte
an Ihren Händler oder den Hersteller.
Bestellen Sie Ihre Zubehör und Ersatzteile bei Ihrem
Fachhändler oder bei unserer Hot – Line After Sales.
Tel. +49 6195 99 52 14
Fax: +49 6195 99 52 15
ANMERKUNG:
Wird die Pumpe ohne Wasser betrieben, kommt es
zu Beschädigungen.Vergewissern Sie sich vor dem
Betrieb, das die Wasserversorgung sichergestellt ist.
Nachdem der gewünschte Druck erreicht worden ist,
vermeiden Sie dass die Pumpe mehr als 3 Minuten in
Betrieb verbleibt.
Reinigen Sie, wenn nötig das Zulaufwasser mit einem
Wasserfilter. Verunreinigungen könnten die Pumpe
beschädigen.
Bedienung der RP Pro III
Entlüftung (Pos. B der Übersichtszeichnung)
vom zu prüfenden Rohrleitungssystem ( Pos. A)
öffnen.
Wasserversorgungsanschluß (Pos. F der
Übersichtszeichnung) an der elektrischen
Pumpe anschließen.
Im Ansaugbetrieb am Saugschlauch empfiehlt
sich die Verwendung eines Handelsüblichen
Filters.
Es gibt zwei Betriebsarten:
a) Zulaufbetrieb mit Wasseranschluß min
1/2“ (Mindestdruck 1 bar) (Pos. E auf der
Übersichtszeichnung).
b) Ansaugbetrieb (Druckloses Wasserreservoir)
mit Ausgangshöhe von max. 1m (Pos. D auf
der Übersichtszeichnung).
Hochdruckschlauch (Pos. C der
Übersichtszeichnung) an einem Ende an
der Pumpe und am anderen Ende an das zu
prüfende System anschließen.
Ventil V2 in Richtung OPEN drehen (gegen den
Uhrzeigersinn). Ventil V1 in Richtung +bar (im
Uhrzeigersinn) bis zum Anschlag drehen.
Schließen Sie das Gerät an eine vorschriftsmäßig
installierte Schutzkontaktsteckdose 230
V, 50 Hz an. Bevor Sie den Netzstecker in
die Steckdose stecken, prüfen Sie, ob die
Netzspannung, die Sie benutzen, wollen mit
der des Gerätes übereinstimmt. Mittels (Pos. G
der Übersichtszeichnung) elektrische Pumpe
einschalten, bis die zu prüfende Rohrleitung
restlos entlüftet ist.
Mittels Schalter (Pos. G) ausschalten und
Entlüftung vom Rohrleitungssystem schließen.
Um den erforderlichen Prüfdruck zu erreichen
a) Elektrische Prüfpumpe wieder einschalten
mittels (Pos.G).
b) Ventil V1 langsam in Richtung +bar (im
Uhrzeigersinn) drehen, bis auf dem
Manometer der gewünschte Prüfdruck
erreicht ist (Pos. F der Übersichtszeichnung)
c) Ventil V2 in Richtung CLOSE (im
Uhrzeigersinn) ganz schließen.
Zeigt, das Manometer einen höherer Druck
als der gewünschte Prüfdruck, verfahren Sie in
umgekehrter Reihenfolge:
a) Ventil V2 in Richtung OPEN (gegen
Uhrzeigersinn) vollständig öffnen und das
Ventil V1 in Richtung (gegen Uhrzeigersinn)
–bar bis der gewünschte Prüfdruck erreicht
wird.
b) Ventil V2 in Richtung CLOSE (im
Uhrzeigersinn) schließen.
c) Elektrische Prüfpumpe ausschalten.
1.
2.
3.
4.
5.
6.
8.
Nach durchgeführter Prüfung, ist das Ventil V2
in Richtung OPEN (gegen Uhrzeigersinn) ganz
zu öffnen und das Ventil V1 in Richtung (gegen
Uhrzeigersinn) — bar zu drehen.
9.

10
ENGLISH
Technical data
Power: …………………………………………………… 220-240 V., 50/60 Hz (110 V.), single phase.
Rated motor output: ………………………………. 1,3 Kw.
Rated current: ………………………………………… 6 A.
Protection class: ……………………………………… IP32
Max. pressure: ………………………………………. 40 bar
Rated flow: ……………………………………………. max 6 l/min
Unit net weight: …………………………………….. Kg. 16
Unit overall dimensions: …………………………. 380 x 290 x 300 mm.
Feeding water: ………………………………………. clean fresh water, Glycol, Tyfocor, Temp. Max. 40ºC.
High pressure hose: ………………………………… inner diam. 1/4”, 2 m. long
Lubricant: ………………………………………………. four-stroke motor oil SAE 15W/40.
Noise level: …………………………………………….. not higher than 90 dB (A)
Intended use
Check tests for pressure or air tightness of piping
systems and containers used in all types of
installations.
Hydraulic installations, heating facilities, compressed
air, steam, cooling, oil and sprinkler installations,
thermal solar systems, etc.
Manufacturing of boilers (coil air tightness check)
and pressurised recipients or tanks.
Circuit filling.
Routine maintenance
Before connecting the pump to the power and water
supplies:
Check carefully serviceability of h.p. hose and
cord with plug. If necessary, replace them with
new ones.
Check water filter (No. V121M37 — C Spare
Parts). Get it clean or replaced, if required.
If the equipment is going to remain unused for a
long period, we recommend that you empty out any
residual water from the internal circuits.
Avoid storing the equipment in very cold areas where
there may be a risk of freezing.
Maintain the water filter clean and in good
condition.
If you are using the equipment with Glycol or Tifocortype antifreeze products, switch the system on with
clean, fresh water in order to flush out the internal
circuits.
a.
b.
Repair, replacement of parts
For the most accessible sealing gaskets, there is a
maintenance kit (cod. R6.1186) which enables you to
change worn or degraded gaskets, thus extending
the electric pump’s working life.
Operating instructions
Open master bleeder (pos. B of the of outer
view) of the piping system to be tested (pos.
A).
Connect the water inlet hose (pos. F of the of
outer view) to the power pump. It is possible to
feed the testing power pump in two ways:
directly from the water network (min. 1 bar
pressure) – pos. E of the outer view,
from a tank placed max. 1 meter below the
level of the power pump (pos. D of the of
outer view).
Connect the high pressure hose (pos. C of the
of outer view) to both power pump and piping
system (pos. A).
Open the valve V2 towards OPEN. Turn the
valve V1 knob towards — bar till the its stop
point.
Put the plug (pos. I of the of outer view) into
its socket: the power must be 230 V, 50/60 Hz,
single phase. Switch on the power pump (pos.
G of the of outer view) and let it run until all air
has been drained from tested piping.
Switch the power pump (pos. G) off and close
the master bleeder (pos. B).
To submit the piping system to wanted test
pressure:
switch again the power pump on,
turn slowly the valve V1 towards +bar
increasing the pressure till wanted test
pressure is pointed out by the manometer
(pos. F of the of outer view),
close completely the valve V2 towards
CLOSED.
If you notice that the manometer points out a
pressure higher than the wanted one:
open fully the valve V2 towards OPEN and
open the valve V1 towards — bar till reaching
the wanted pressure,
close the valve V2 towards CLOSED,
switch the power pump off.
1.
2.
a.
b.
3.
4.
5.
6.
7.
a.
b.
c.
8.
d.
e.
f.
11
ENGLISH
Once the piping test has been carried out, open
fully the valve V2 towards OPEN and turn the
valve V1 towards — bar.
9.
WARNING:
Use clean fresh water only and/or non-aggressive
liquids.
Once wanted pressure is reached, avoid the power
pump running for more than 1,5 minutes.
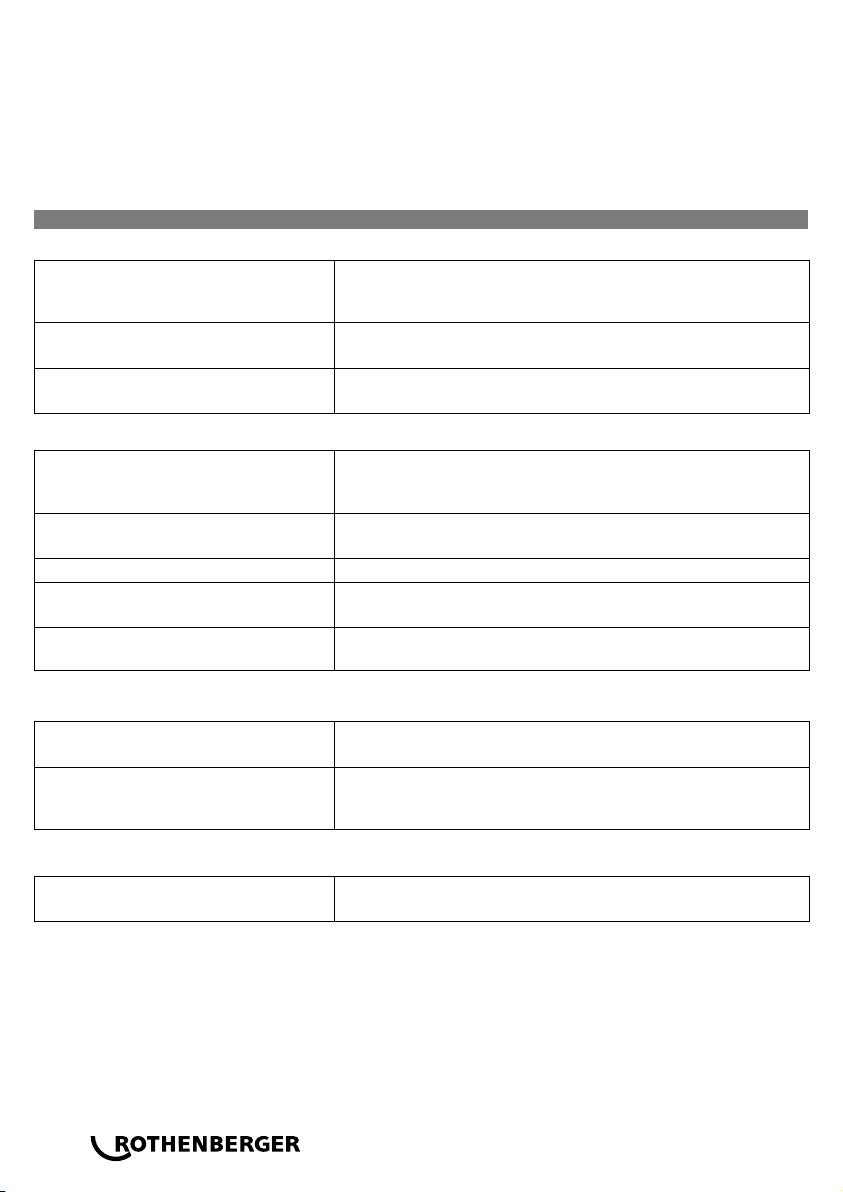
Fault, possible causes, repairs
Though switched on, the motor does not start running
Current does not reach the motor
terminal box
Check plug/socket contact. Check cord wires integrity up to
terminal box. Reset the electrical feeding cut by motor thermal
protection and/or replace blown fuses.
Current reaches the motor terminal box,
however with too low voltage
Arrange for motor to be fed with correct 230V, 50/60 Hz (110 V.)
electric current
Pump jammed up or stuck by ice.
Motor rotor stuck
Apply to an appointed Service Center
La bomba funciona pero no sube presión
Pump is fed with too small quantity of
water
Check the feeding water hose: its inner diameter must be min. 15
mm.. Moreover the feeding water has to flow from cock with min.
pressure of 1 bar
Considerable quantity of air mixed with
inlet water
Put a vented storage tank in the water feeding line between cock
and water inlet with the pump
Water filter clogged Clean the filter
Pump water seals worn out or pump
valves jammed
Use the R6.1186 air tightness kit. Apply to an appointed Service
Center
Valve V1 at the minimum point of
pressure
Turn the valve V1 till reaching the wanted pressure
Irregular pressure output combined to considerable noise
Air mixed with feeding water Check tightness at both ends of feeding water hose
Pump is fed with too small quantity of
water
Check the feeding water hose: its inner diameter must be min. 15
mm. Moreover the feeding water has to flow from cock with min.
pressure of 1 bar
Pump gets the tested piping pressurised but cannot keep wanted pressure
Valve V2 does not perform properly
Check the functioning of the valve V2. Clean it and remove dirt
that water may have carried inside
Loading…
ManualsPro
Rothenberger
ROTHENBERGER RP PRO III Water Pressure Testing Instruction Manual
- June 4, 2024
- Rothenberger
Table of Contents
- Overview
- Safety instructions
- Technical data
- Use
- General maintenance
- Repair and replacement of parts
- Operating instructions
- Faults, possible causes, and repairs
- Documents / Resources
- References
- Read User Manual Online (PDF format)
- Download This Manual (PDF format)

RP PRO III Water Pressure Testing
Instruction Manual

Overview

A. Piping system or vessel to be tested
B. Master bleeder
C. High pressure hose
D. Water tank
E. Water mains
F. Feeding water connector| G. ON/OFF switch of the power pump
H. Pressure gauge
I. Cord with plug
J. Override switch
V1. Pressure adjusting valve
V2. Closing valve V2 with knob
—|—
Please read and retain these directions for use. Do not throw them away! The
warranty does not cover damage caused by incorrect use of the equipment!
Subject to technical modifications!
Symbols in this document:
| Danger!
This symbol warns that the user is in danger of injury.
—|—
| Attention!
This symbol warns that there is a danger of causing material or environmental
damage.
| Action required
| Use of hearing protectors
This symbol warns that hearing protectors should be worn in order to guarantee
the worker’s safety.

| Use of goggles obligatory
This symbol warns that goggles should be worn in order to guarantee the
worker’s safety.
| Consult the manual or instructions book
This symbol warns that the manual should be consulted in order to avoid risks.
Safety instructions
Warning! Read all of the safety precautions, instructions, illustrations,
and specifications supplied with this electrical equipment. Failure to observe
all of the instructions given below may result in electric shock, fire, and/or
serious injury.
Keep all of the precautions and instructions for future reference.
1.1 Safety in the work area
a) Keep the work area clean and well-lit. Untidy and dark areas can cause
accidents.
b) Do not use electrical equipment in explosive atmospheres, such as in the
presence of flammable liquids, gases, or dust. Electrical equipment generates
sparks that could set the dust or fumes alight.
c) Keep children and onlookers at a distance when using electrical equipment.
Distractions can cause a loss of control.
1.2 Electrical safety
a) The electrical equipment’s plug must be suitable for the electrical supply.
Do not modify the plug under any circumstances. Do not use a plug adapter with
earthed electrical
equipment. Unmodified plugs and the use of the corresponding sockets (230V or
110V) will reduce the risk of electric shock.
b) Avoid touching earthed surfaces, such as piping, radiators, chains, or
coolers. The risk of electric shocks increases if the body is connected to the
earth.
c) Do not expose electrical equipment to rain or moist conditions. Water
getting into the equipment will increase the risk of electric shock.
d) Do not use the cord incorrectly. Never use the cord to carry, lift or
unplug the electrical equipment. Keep the cord away from heat, oil, sharp
edges, or moving parts. Damaged or tangled cords increase the risk of electric
shock.
e) When using electrical equipment outside, use an extension cord that is
suitable for outdoor use. Using an extension cord that is suitable for outdoor
use reduces the risk of electric shock.
f) If using electrical equipment in moist conditions is unavoidable, use a
power supply that is protected by a Residual Current Device (RCD). Using an
RCD reduces the risk of electric shock.
g) If the power cord has to be replaced, it must be replaced by the
manufacturer or service agent in order to avoid a safety risk.
1.3 Staff safety
a) Stay alert, check what you are doing and use common sense when handling
electrical equipment. Do not use electrical equipment when you are tired or
under the influence of drugs, alcohol, or medical products. One moment of
distraction while handling electrical equipment can cause serious injury.
b) Use personal protective equipment. Always wear eye protection. Personal
protection equipment such as dust masks, non-slip shoes, helmets or ear
protection used for appropriate conditions reduce personal harm.
c) Avoid accidental start-ups. Ensure that the switch is in the “off” position
before connecting to the power supply and/or battery, picking up or moving the
equipment.
Transporting electrical equipment while switched on and running is very
dangerous and can cause an accident.
d) Remove any keys or tools before turning the electrical equipment on. A key
or a tool connected to a rotating part of electrical equipment may cause harm.
e) Keep feet firmly on the ground and maintain your balance at all times. This
allows greater control of the electrical equipment in unexpected situations.
f) Dress appropriately. Do not wear loose clothing or jewellery. Keep your
hair and clothing away from moving parts. Loose clothing, jewellery or long
hair can get caught in
moving parts.
g) Do not allow confidence gained through frequent use of the equipment to
cause you to ignore the general safety principles. One careless move can cause
serious injury.
1.4 Use and care of the electrical equipment
a) Do not force the electrical equipment. Use the electrical equipment in a
way that is appropriate for your application. Using the electrical equipment
correctly will make work better and safer at the speed for which it was
designed.
b) Do not use the electrical equipment if you are unable to move the switch
from “on” to “off” and vice versa. Any electrical equipment that you are
unable to control with the switch is dangerous and should be repaired.
c) Unplug the power source plug and/or remove the battery, if possible, before
making an adjustment, replacing an accessory, or storing the electrical
equipment. Preventative measures like this reduce the risk of starting the
equipment by accident.
d) Keep inactive electrical equipment out of the reach of children and do not
allow people who are not familiar with the equipment or with these
instructions to handle them. Electrical equipment is dangerous in the hands of
untrained users.
e) Maintain electrical equipment and accessories. Ensure that moving parts are
not misaligned or blocked, and that there are no broken parts and other
conditions that may affect the operation of the electrical equipment.
Electrical equipment should be repaired before use when it is damaged. Many
accidents are caused by poorly maintained electrical equipment.
f) Use the electrical equipment, accessories and equipment tips, etc. in
accordance with these instructions, bearing in mind the work conditions and
the work to be carried out. Using electrical equipment for applications
different from those intended may provoke a hazardous situation.
g) Keep handles and gripping surfaces dry, clean, and free of oil and grease.
Slippery handles and gripping surfaces prevent safe gripping and control of
the equipment in certain situations.
1.5 Maintenance
a) Have your electrical equipment serviced by a qualified service technician
and only use appropriate, genuine Rothenberger spare parts. This guarantees
that the safety of the electrical equipment is maintained.
1.6 Special safety instructions
This document contains important instructions for people’s safety. It is
intended for the user. Keep it in a safe place for future reference.
Read and follow these instructions closely every time that the test power pump
is turned on:
-
Ensure that the electrical system has an appropriate RCD circuit breaker.
-
Always disconnect the power pump after each test and before carrying out the following operations:
a. Moving the power pump from one position to another.
b. For maintenance.
c. For accessory and part replacement. -
Do not pull on the electric cord, on the supply hose, or on the high-pressure hose connected to the piping system to move the power pump.
-
Never pull on the electrical supply cord to unplug it.
-
Never let unqualified people, children, adolescents, etc., or people who are not trained in the use of power pumps use the pump.
-
To guarantee the safety of the power pump, follow the manufacturer’s instructions and only use original replacement parts, components, and accessories or parts that have been authorized by the manufacturer.
-
Water nozzles can be very dangerous if used inappropriately: never point the water jet at people, animals, electrical equipment, or the power pump itself.
-
Never use the water jet on yourself or other people to clean clothing or shoes.
-
ATTENTION: the hoses, accessories, and couplings are very important for the safety of the power pump. Only use hoses, accessories, and couplings which are recommended by the manufacturer.
-
Never use the power pump when the electrical supply cord or other important parts such as safety devices, high-pressure hose, etc. are damaged.
-
If you have to use an extension cord, the plug and connector must be waterproof.
-
Inappropriate extension cords can be dangerous.
-
The user must take all of the safety precautions mentioned in this manual into consideration. Otherwise, misuse of the equipment can cause accidents and the manufacturer assumes no responsibility if this is due to the disregard of the safety precautions mentioned here.
Do not dispose of electrical equipment with domestic waste. In compliance with
the Directive 2012/19/UE of the European Parliament and its transposition to
the state legislation framework in the Royal Decree 208/2005 on electrical and
electronic devices and the management of their waste, the objective is to
prevent the generation of this waste, to reduce its elimination and the level
of danger of its components, to promote the re-use of devices and the
valorization of their waste and determine a suitable way to manage this in an
aim to improve the efficiency of environmental protection.
Technical data
Voltage| 230 V, 50 Hz
(110 V.), single-phase
—|—
Nominal power of the motor| 1.3 kW
Rated current| 6 A
Protection class| IP20
Maximum pressure| 40 bar
Nominal flow: max| 6 l/min
Net weight of device:| 16 Kg
Total dimensions of device:| 380 x 290 x 300 mm
Supply water:| clean freshwater, Glycol, Tyfocor, Maximum temperature: 40ºC
High-pressure hose:| Ø int. 1/4”, 1.2 m. length
Lubricant:| oil for 4-stroke engines SAE 15W/40
Noise level:| no higher than 90 dB (A)
Use
- Pressure testing of seals on piping systems and vessels used in all types of installations.
- Hydraulic, heating, steam, refrigeration, oil, spraying installations, solar thermal systems, etc.
- Production of boilers (verification of tightness of coils) and pressure recipients or tanks, filling of circuits.
General maintenance
Before connecting the pump to electric sockets and water supplies:
a. Carefully check the condition of the high-pressure hose and the cord of the
plug. If necessary, replace them with new ones.
b. Check the water filter (No. V121M37 – C Spare Parts). Clean it and replace
it if necessary.
If the device is to be stored for a long period of time, it is recommendable
to empty the water remaining in the internal circuits
Avoid storing the equipment in very cold places where there is a risk of
freezing
Keep the water filter clean and in good condition
If the equipment is used with antifreeze agents such as Glycol, Tyfocor, etc.
use the device with clean fresh water to clean out the internal circuits
Repair and replacement of parts
There is a maintenance Kit for the most accessible set of sealing gaskets
(cod. R6.1186), which enables the replacement of the most commonly worn or
eroded gaskets and prologues the power pump’s lifespan.
The replacement of parts, servicing of the pump, and electrical inspection
should only be carried out by official Service Centres.
Operating instructions
-
Open the master bleeder of the piping system or vessel to be drained (i.e. Fig B On appliance)
-
Connect the water inlet hose to the hose connection on side of the appliance (Fig F option A or B)
Option A: Direct from water mains (Min pressure 1 BAR)
Option B: Use Clean water from the water storage container which should be
placed no more than 1-meter MAX below the pump level -
Connect the high-pressure hose, threaded ½” male end to ½” female connection beside the control valve V2 on the appliance and ½” female connection on the high-pressure hose to appropriate fitting on the system to be tested
-
Turn control valve V2 Anticlockwise fully to OPEN
Turn control valve V1 Anticlockwise fully to –BAR -
Plug appliance into mains (Fig E On appliance). Power must be 230V 50 Hz * O R on 110V
APPLIANCES USE A 3KVA TRANSFORMER ONLY!
Please note: This appliance is for testing only, NOT for filling a system.
Using your RP PRO III to fill a system will damage or break the appliance! If
the system is empty, use another method to fill it before pressure testing
with your RP PRO III
Switch on the appliance (Fig G On appliance) and allow it to run until
satisfied that the system is free of air via the bleed point. Then switch off
the pump and close the bleed point immediately! -
To achieve the desired test pressure:
• Turn on the pump (Making sure control valve V2 is fully OPEN)
• Slowly turn control valve V1 clockwise to +BAR, increasing pressure till
desired pressure is achieved. Use V1 to increase and decrease pressure as
required!
• Turn control valve V2 clockwise to CLOSE, then turn off the pump
IMMEDIATELY! -
If the reading on the gauge has exceeded desired pressure. Keeping the pump OFF:
• Carefully open V2 and turn V1 toward –BAR till you reach the desired
pressure
• Then close V2 -
When testing is complete:
Turn control valve V2 Anticlockwise fully to OPEN
Turn control valve V1 Anticlockwise fully to –BAR
N.B. When storing appliances between uses and for long periods of time,
open V1 & V2 fully then turn knobs back clockwise half a turn to prevent
valves from sticking!
Faults, possible causes, and repairs
Despite being switched on, the motor doesn’t start
The electrical current isn’t reaching the terminal box| Check the plug/socket
connection. Check the length of the cords leading to the terminal box.
Reassemble the motor’s thermal protection or replace blown fuses. Return to
Service Centre.
—|—
The electrical current is reaching the terminal box, but the voltage is very
low| Connect the motor to a supply of 230V, 50 Hz. For 110V, please use a 3KVA
transformer.
Pump seized with ice. Motor rotor seized up| Return to an official Service
Centre.
The pump is working but the pressure isn’t rising
Insufficient water supply| Check the supply hose: the inner diameter should
not be less than 15 mm. Also, the water pressure at the outlet tap should not
be less than 1 bar.
—|—
A considerable amount of air in the input water| MAIN: Check fittings are
tight and water supply is MIN 1 bar with sufficient flow.
TANK: Check water tank is full and that the hose is correctly submerged
to draw water to the pump.
The water filter is dirty| Clean the filter.
The pump’s gaskets are in bad condition or the pump valves have seized up|
Replace the sealing kit R6.1186.
V1 valve set to a minimum pressure| Open the V1 valve until the desired
pressure is attained.
The discharge pressure is irregular and makes considerable noise
| Air in the supply water | Check the seal at both ends of the supply hose. |
|---|---|
| Insufficient water supply | Check the supply hose: the inner diameter should |
not be less than 15 mm.
Also, the water pressure at the outlet tap should not be less than 1 bar.
The piping reaches the test pressure but doesn’t maintain the desired
pressure
The V2 valve isn’t working correctly| Check the operation of the V2 valve.
Clean it and remove any dirt that the water may have carried inside. Return to
Service Centre.
—|—
ROTHENBERGER Worldwide
ROTHENBERGER UK Limited
2, Kingsthorne Park, Henson Way,
Kettering
GB-Northants NN16 8PX
Tel. + 44 15 36 / 31 03 00
Fax + 44 15 36 / 31 06 00
info@rothenberger.co.uk
ROTHENBERGER USA LLC
7130 Clinton Road
Loves Park, IL 61111, USA
Tel. +1 / 80 05 45 76 98
Fax + 1 / 81 56 33 08 79
pipetools@rothenberger-usa.com
www.rothenberger-usa.com
ROTHENBERGER Werkzeuge GmbH
Industriestraße 7
D- 65779 Kelkheim / Germany
Telefon + 49 (0) 61 95 / 800 – 0
Fax + 49 (0) 6195 / 800 – 3500
info@rothenberger.com
www.rothenberger.com
Item number-index/date/departmet
Documents / Resources
|
ROTHENBERGER RP PRO III Water Pressure
Testing
[pdf] Instruction Manual
RP PRO III Water Pressure Testing, RP PRO III, Water Pressure Testing,
Pressure Testing
—|—
References
- USA Location information — USA.com
- ROTHENBERGER Benelux
- ROTHENBERGER-TOOLS SA
- ROTHENBERGER USA
- ROTHENBERGER S.A.
- ROTHENBERGER France
- ROTHENBERGER
- ROTHENBERGER Italiana
- ROTHENBERGER RUSSIA — официальный сайт представителя в России: продажа всех инструментов РОТЕНБЕРГЕР
Read User Manual Online (PDF format)
Read User Manual Online (PDF format) >>
Download This Manual (PDF format)
Download this manual >>
Описание
Насос электрический для испытаний ROTHENBERGER RP PRO 3 — этот насос применяется для проведения испытаний на герметичность трубопроводных систем и емкостей отопительного оборудования, санитарных технических устройств, охладительных и пневматических устройств, с давлением до 40 бар.
Особенности:
Автоматическое заполнение и испытание на герметичность трубопроводных систем и резервуаров.
Компактный и прочный пластмассовый корпус обеспечивает удобство при работе на стройке.
Свободный выбор способа подачи жидкости: насос может работать как с помощью самовсасывания, так и с помощью нагнетательного устройства.
Подходит для использования с маслом и водой.
Проверочный шланг имеет стальную оплетку для предотвращения ошибок измерений, которые могут возникнуть при расширении шланга во время работы.
Глицериновый манометр компенсирует пневмоудары и позволяет легко считывать показания.
Характеристики:
Самовсасывающий электрический насос RP PRO III.
Диапазон испытаний до 40 бар.
Пластмассовый корпус.
Выбор способа подачи жидкости: самовсасывание или нагнетательное устройство.
Подходит для использования с маслом и водой.
Проверочный шланг со стальной оплеткой.
Глицериновый манометр для легкого считывания показаний.
Документы
Как купить
Оформить заказ на нашем сайте легко. Просто добавьте выбранные товары в корзину, а затем перейдите на страницу Корзина, проверьте правильность заказанных позиций и нажмите кнопку «Оформить заказ» или «Быстрый заказ».
Быстрый заказ
Функция «Быстрый заказ» позволяет покупателю не проходить всю процедуру оформления заказа самостоятельно. Вы заполняете форму, и через короткое время вам перезвонит менеджер магазина. Он уточнит все условия заказа, ответит на вопросы, касающиеся качества товара, его особенностей. А также подскажет о вариантах оплаты и доставки.
По результатам звонка, пользователь либо, получив уточнения, самостоятельно оформляет заказ, укомплектовав его необходимыми позициями, либо соглашается на оформление в том виде, в котором есть сейчас. Получает подтверждение на почту или на мобильный телефон и ждёт доставки.
Оформление заказа в стандартном режиме
Если вы уверены в выборе, то можете самостоятельно оформить заказ, заполнив по этапам всю форму.
Заполнение адреса
Выберите из списка название вашего региона и населённого пункта. Если вы не нашли свой населённый пункт в списке, выберите значение «Другое местоположение» и впишите название своего населённого пункта в графу «Город». Введите правильный индекс.
Доставка
В зависимости от места жительства вам предложат варианты доставки. Выберите любой удобный способ.
Оплата
Выберите оптимальный способ оплаты.
Покупатель
Введите данные о себе: ФИО, адрес доставки, номер телефона. В поле «Комментарии к заказу» введите сведения, которые могут пригодиться курьеру, например: подъезды в доме считаются справа налево.
Оформление заказа
Проверьте правильность ввода информации: позиции заказа, выбор местоположения, данные о покупателе. Нажмите кнопку «Оформить заказ».
Наш сервис запоминает данные о пользователе, информацию о заказе и в следующий раз предложит вам повторить к вводу данные предыдущего заказа. Если условия вам не подходят, выбирайте другие варианты.
Оплата
Оплата на сайте осуществляется следующим образом. Ниже приведен пример описания оплаты на сайте:
1. Название и описание товара: на главной странице сайта отображается название и краткое описание выбранного товара.
2. Форма оплаты: на странице товара размещена форма оплаты, Вам необходимо заполнить форму заказа и дождаться звонка менеджера интернет-магазина, который подтвердит ваш заказ и согласует с вами сроки доставки.
3. Стоимость товара: рядом с формой оплаты отображается стоимость выбранного товара.
4. Способ оплаты: пользователь может выбрать способ оплаты из списка доступных вариантов.
5. Безопасность: сайт обеспечивает безопасность платежей, используя надежные методы шифрования данных, такие как SSL-сертификаты и двухфакторная аутентификация.
6. Информация о доставке: на сайте также указана информация о доставке товара после оплаты.
7. Отзывы и рекомендации: на сайте можно найти отзывы и рекомендации других пользователей, которые уже приобрели товары или услуги на данном сайте.
8. Контактная информация: на сайте указана контактная информация для связи с поддержкой клиентов в случае возникновения вопросов с оплатой.
Доставка
Доставка товара осуществляется после оплаты покупателем и согласования с ним условий доставки.
Наш интернет-магазин работает с транспортными компаниями:
и другими транспортными компаниями, чтобы обеспечить быструю и надежную доставку по России и странам СНГ. При оформлении заказа вы можете выбрать транспортную компанию, указав адрес и способ оплаты. Мы обязательно свяжемся с вами для уточнения деталей доставки, сроков и стоимости.
Самовывоз
Вы можете самостоятельно забрать свой заказ по адресу:
г.Мурманск, ул.Гвардейская 23 А, 1 этаж, офис 2
Для осуществления самовывоза необходимо предварительно согласовать дату и время:
по телефону: 8 (8152) 60-00-80
по электронной почте: info@armln.ru
Отзывы
Оставить отзыв
У данного товара нет отзывов. Станьте первым, кто оставил отзыв об этом товаре!
Задать вопрос
Вы можете задать любой интересующий вас вопрос по товару или работе магазина.
Наши квалифицированные специалисты обязательно вам помогут.
Задать вопрос
- Описание продукта
- Характеристики
- Документы
- Похожие товары
- Доставка и оплата
Особенности Rothenberger RP PRO-3
— Удобство считывания показаний. Глицериновый манометр позволяет легко и удобно считывать показания при динамичной знакопеременной нагрузке.
— Простота регулирования. Вентиль настройки давления имеет точную маркировку на ручке, что позволяет просто и быстро произвести регулировку.
— Надежность. Устройство оснащено предохранительным клапаном для более надежной работы.
— Практичность. Компактный и прочный корпус электрического насоса для опрессовки трубопроводных систем Rothenberger RP PRO III 61185 выполнен из АБС-пластика для удобства работы на стройке.
Преимущества
Насос электрический для опрессовки Rothenberger RP PRO-III 61185 вы можете
приобрести в интернет-магазине smartcomplect.com по доступной цене.
Насос электрический для опрессовки Rothenberger RP PRO-III 61185: описание, технические характеристики, сертификаты,
документация, фото, сопутствующие товары, расход.
Купить Насос электрический для опрессовки Rothenberger RP PRO-III 61185 в интернет-магазине очень просто – Вам достаточно
оформить заказ через корзину нашего сайта или по телефону. Мы доставим товар
по Москве и в любой регион России.
Широкий выбор Насосное оборудование на сайте интернет-магазина smartcomplect.
- Файлы30628009 / 30628010
- Снят с производстваНет
- Торговая маркаRothenberger
- Страна происхождения↓
- Германия
- Исполнениеповерхностный
- Степень защитыIP32
- Мощность1300Вт
- Производительность0,36 м3/ч
- Тип↓
- Электрический опрессовщик
- Вид↓
- Для специализированных работ
- СерияRP PRO III
- Испытатальное давление, бар40
- Соединение к трубопроводу↓
- Внешняя G1/2
- Рабочая жидкостьВода
- Мах температура жидкости, °С40
- Напряжение, В220
- Частота, Гц50
- Производительность, л/мин6
- Для повышения давленияНет
- РоторСухой
- Материал корпуса↓
- Пластик/нержавеющая сталь
- Габариты без упаковки, мм↓
- 375х290х300
- Вес нетто, кг17,66
Доставка
Стоимость доставки любого товара из нашего центра снабжения зависит от нескольких факторов:
- Габариты материала (вес, объем и длина)
- Адрес покупателя
- Тариф доставки (подробнее о тарифах доставки)
Минимальная доставка по Москве : 900 рублей.
Материалы могут приехать к вам даже сегодня, при условии заказа до 14:00.
У водителя будут все необходимые отгрузочные документы на товары из вашего заказа. Сертификаты – по требованию.
Разгрузка
Разгрузка товара обговаривается в каждом отдельном случае и оплачивается отдельно.
Оплата
Заказ может быть оплачен любым удобным способом:
- Наличными при получении (Внимание! Если сумма заказа превышает 50 000 руб., для отгрузки необходим аванс в размере 20% от общей суммы)
- Картой на нашем сайте через надежный сервис Я.Деньги (при заказе через корзину).
- Безналичным переводом